

LG LDT5678SS User Manual

ENGLISH ESPAÑOL
OWNER'S MANUAL
DISHWASHER
Read this owner's manual thoroughly before operating the appliance
and keep it handy for reference at all times.
LDF567***
MFL69261723
Rev.03_061718
LDT567***
Copyright © 2018 LG Electronics Inc. All Rights Reserved.
www.lg.com

2
TABLE OF CONTENTS
3 PRODUCT FEATURES
4 SAFETY INSTRUCTIONS
4 IMPORTANT SAFETY INSTRUCTIONS
9 PRODUCT OVERVIEW
9 Exterior Parts
10 Interior Parts
10 Accessories
11 INSTALLATION
11 Installation Parts and Tools
12 Installation Overview
12 Product Dimensions
12 Product Specifications
13 Preparing Cabinet Opening
14 Preparing Electrical Wiring
14 Preparing Water Supply Connection
15 Preparing Dishwasher
16 Sliding Dishwasher into Cabinet
17 Leveling the Appliance
18 Securing Dishwasher to Countertop
18 Connecting Drain Hose
20 Connecting Water Supply
20 Connecting Power
21 Final Check
36 SMART FUNCTIONS
36 SmartThinQ Application
39 Smart Diagnosis™ Function
40 MAINTENANCE
40 Cleaning the Exterior
40 Cleaning the Interior
40 Seasonal Maintenance and Storage
41 Clogged Drain Air Gap or In-Sink Disposal
42 Cleaning the Filters
43 Cleaning the Spray Arms
44 TROUBLESHOOTING
44 FAQs: Frequently Asked Questions
46 User Support Videos
47 Before Calling for Service
51 LIMITED WARRANTY
51 FOR USA
55 Warranty Exceptions
22 OPERATION
22 Using the Appliance
23 Control Panel
24 Cycles
25 Options
26 Cycle/Option Guide
27 Loading the Dishwasher
27 Loading the Lower Rack
29 Loading the Silverware Basket
30 Loading the Upper Rack
33 Loading the Cutlery Rack
34 Adding Cleaning Agents

ENGLISH
PRODUCT FEATURES
QuadWash™ System
3PRODUCT FEATURES
Multi-Motion lower spray arm shoots water in various directions and at optimized intensities to reach every area
of the tub. This system provides more powerful and complete cleaning coverage.
Inverter Direct Drive Motor
LG's experience in motor technology results in extraordinary functionality, with advanced features like the Dual
Zone option, whisper-quiet operation, energy efciency, and durability.
The simple design and high build quality of the motor make it so reliable that it's covered for 10 years under the
warranty.
EasyRack Plus
This easy-to-use system of adjustable tines and rack height provides more exibility and versatility when
loading dishes of various shapes and sizes.
Hybrid Drying System
This efcient drying system does not use a heating element during the drying process resulting in superior
energy efciency and gentle care for dishes.
SmartThinQ™
Download the new LG smart phone app to set options, self-diagnose and troubleshoot problems with the
appliance, and other useful features. This function uses Wi-Fi.
4 SAFETY INSTRUCTIONS
SAFETY INSTRUCTIONS
READ ALL INSTRUCTIONS BEFORE USE
Your safety and the safety of others are very important.
We have provided many important safety messages in this manual and on your appliance. Always read and
follow all safety messages.
This is the safety alert symbol.
This symbol alerts you to potential hazards that can kill or injure you and others.
All safety messages will follow the safety alert symbol and either the word WARNING or CAUTION.
These words mean:
WARNING
You may be killed or seriously injured if you do not follow instructions.
CAUTION
You may be slightly injured or cause damage to the product if you do not follow instructions.
All safety messages will tell you what the potential hazard is, tell you how to reduce the chance of injury, and
tell you what may happen if the instructions are not followed.
IMPORTANT SAFETY INSTRUCTIONS
WARNING
To reduce the risk of explosion, re, death, electric shock, scalding or injury
to persons when using this product, follow basic precautions, including the
following:
California Proposition 65
• This product contains chemicals known to the State of California to cause cancer and birth defects or other
reproductive harm. Wash hands after handling.
INSTALLATION
• Connect to a properly rated, protected, and sized power circuit to avoid electrical overload.
• To reduce the risk of severe injury or death, follow all installation instructions.
• The appliance must be installed and electrically grounded by qualied service personnel in accordance with
local codes.
• Disconnect the power supply line, house fuse or circuit breaker before installing or servicing the appliance.
• When moving or installing the product in a different location, call qualied service personnel for installation
and service.
• Keep packing materials out of the reach of children. Packaging material can be dangerous for children.
There is a risk of suffocation.
• Moving or installation of the appliance requires two or more people.
• This appliance is not designed for maritime use or for mobile installations such as in RVs, trailers, or aircraft.

ENGLISH
• Store and install the appliance where it will not be exposed to temperatures below freezing or exposed to
outdoor weather conditions.
• This appliance must be positioned near to an electrical power supply.
• Do not, under any circumstances, cut or remove the ground from the power supply line.
• When installing or moving the appliance, be careful not to pinch, crush, or damage the power supply line.
• Do not install the appliance in humid spaces.
• Destroy the carton, plastic bag, and other packing materials after the appliance is unpacked. Children might
use them for play. Cartons covered with rugs, bedspreads, or plastic sheets can become airtight chambers.
• Never attempt to operate this appliance if it is damaged, malfunctioning, partially disassembled, or has
missing or broken parts, including a damaged power supply line.
• Adhere to all industry recommended safety procedures including the use of long sleeved gloves and safety
glasses.
• The installer must ensure that the dishwasher is completely enclosed at the time of installation.
• Use new hoses when connecting the appliance to the water supply. Do not reuse old hoses.
• After installing, check the hose connection for leaks.
• Do not damage or place heavy items on the power supply line of the appliance.
OPERATION
• Repair or immediately replace all power supply lines that have become frayed or otherwise damaged. Do
not use a power supply line that shows cracks or abrasion damage along its length or at either end.
• If you detect a strange sound, a chemical or burning smell, or smoke coming from the appliance, unplug it
immediately, and contact an LG Electronics customer information center.
• Never unplug the appliance by pulling on the power supply line.
• Do not use an extension cable or adapter with this appliance.
• Do not grasp the power supply line or touch the appliance controls with wet hands.
• Do not modify or extend the power cable.
• If the product has been submerged, contact an LG Electronics customer information center for instructions
before resuming use.
• Do not store or use gasoline or other ammable vapors and liquids in the vicinity of this or any other
appliance.
• Keep the area underneath and around your appliances free of combustible materials (lint, paper, rags, etc.),
gasoline, chemicals and other ammable vapors and liquids.
• This appliance is not intended for use by persons (including children) with reduced physical, sensory or
mental capabilities, or lack of experience and knowledge, unless they have been given supervision or
instruction concerning the use of the appliance by a person responsible for their safety.
• If the electrical supply line is damaged, it must only be replaced by the manufacturer or its service agent or
a similar qualied person in order to avoid a hazard.
• Do not abuse, sit on, or stand on the door of the appliance.
• Read all instructions before using the appliance and save these instructions.
• Use this appliance only for its intended purpose.
5SAFETY INSTRUCTIONS

6 SAFETY INSTRUCTIONS
• Do not allow children to play on, in or with the appliance. Close supervision of children is necessary when
the appliance is used near children.
• Do not tamper with controls.
• In the event of a gas leak (propane gas, LP gas, etc.) do not operate this or any other appliance. Open a
window or door to ventilate the area immediately.
• Under certain conditions, hydrogen gas may be produced in a hot-water system that has not been used
for two weeks or more. HYDROGEN GAS IS EXPLOSIVE. If the hot-water system has not been used for
such a period, before using the appliance turn on all hot water faucets and let the water ow from each for
several minutes. This will release any accumulated hydrogen gas. As the gas is ammable, do not smoke or
use an open ame during this time.
• Fix the drain hose securely in place.
• Use only detergents or wetting agents recommended for use in a dishwasher and keep them out of the
reach of children.
• Do not let children eat detergent or dishwasher rinse agent.
• When loading items to be washed:
- Locate sharp items so that they are not likely to damage the door seal.
- Load sharp knives with the handles up to reduce the risk of cut-type injuries.
• Do not wash plastic items unless they are marked "dishwasher safe" or the equivalent. For plastic items not
so marked, check the manufacturer’s recommendations.
• Do not touch the HEATING ELEMENT during or immediately after use.
• Do not operate your dishwasher unless all ENCLOSURE panels are properly in place.
• Do not abuse, sit on, or stand on the door or dish rack of the dishwasher.
• Do not install or store the dishwasher where it will be exposed to weather conditions.
• After cleaning the dishes, turn off the faucet. Turn on the faucet again and check the connection status of
water supply hose before cleaning.
• Do not open the door while operating. For safety reasons, the drain pump operates if the door is opened,
resulting in a longer cycle time.
• Be careful not to catch your hand when closing the door of the product.
• Do not plug the dishwasher into a damaged outlet.
• Do not install or keep the dishwasher near electrical components or exposed ames.
• Do not wash dishes exposed to gasoline, solvents or other ammable materials.
• When cleaning, do not spray water on the product directly.
• Do not press buttons with a sharp object such as an awl or pin.
• Do not use solvent-based detergent.
• Do not come into contact with the steam outlet.
• Small parts, such as rack clips and lter retaining posts can be a choke hazard to small children if removed
from the dishwasher. Keep out of reach of small children.

ENGLISH
MAINTENANCE
• Do not repair or replace any part of the appliance. All repairs and servicing must be performed by qualied
service personnel unless specically recommended in this Owner’s Manual. Use only authorized factory
parts.
• Do not disassemble or repair the appliance by yourself.
• Remove any dust or foreign matter from the power supply line.
• Disconnect this appliance from the power supply before cleaning and attempting any user maintenance.
Turning the controls to the OFF position does not disconnect this appliance from the power supply.
• Remove the door before the appliance is removed from service or discarded to avoid the danger of children
or small animals getting trapped inside.
• Unplug the appliance before cleaning to avoid the risk of electric shock.
• Before discarding the appliance, cut off the power supply line and destroy the appliance's control panel.
GROUNDING INSTRUCTIONS
• For a permanently connected dishwasher: This appliance must be connected to a grounded metal,
permanent wiring system, or an equipment-grounding conductor must be run with the circuit conductors and
connected to the equipment-grounding terminal or lead to the appliance.
• Connect the ground wire to the green ground connector in the terminal box.
TIP OVER HAZARD
• Do not use the dishwasher until completely installed.
• Do not push down on the open dishwasher door.
• Failure to follow these instructions may result in serious injury or cuts.
7SAFETY INSTRUCTIONS
SAVE THESE INSTRUCTIONS

8 SAFETY INSTRUCTIONS
CAUTION
To reduce the risk of minor injury to persons, malfunction, or damage to the
product or property when using this product, follow basic precautions, including
the following:
INSTALLATION
• Install the product on a rm and level oor.
• This dishwasher must be connected to a hot water supply with a temperature range between 120 °F (49 °C)
and 149 °F (65 °C). This temperature range provides the best washing results and shortest cycle time. The
temperature should not exceed 149°F (65 °C) to prevent damage to dishes.
• Do not put the drain hose under the dishwasher during installation.
OPERATION
• Do not place objects on top of the appliance.
• Turn off the water faucets and unplug the appliance if the appliance is to be left for an extended period of
time, such as during vacations.
• Do not store or spill liquid detergents, cleaners, or bleaches (chlorine bleach, oxygen bleach) on the
appliance. Doing so may result in corrosion, discoloration or damage to the surface of the appliance.
• Do not touch draining water which may be hot.
• If the drain hose and the water supply hose are frozen in winter, defrost before using the appliance.
• Do not put hands, feet, or metal objects below or behind the appliance.
• Do not put the drain hose under the dishwasher during installation.
ENGLISH
PRODUCT OVERVIEW
7
3
4
1
6
7
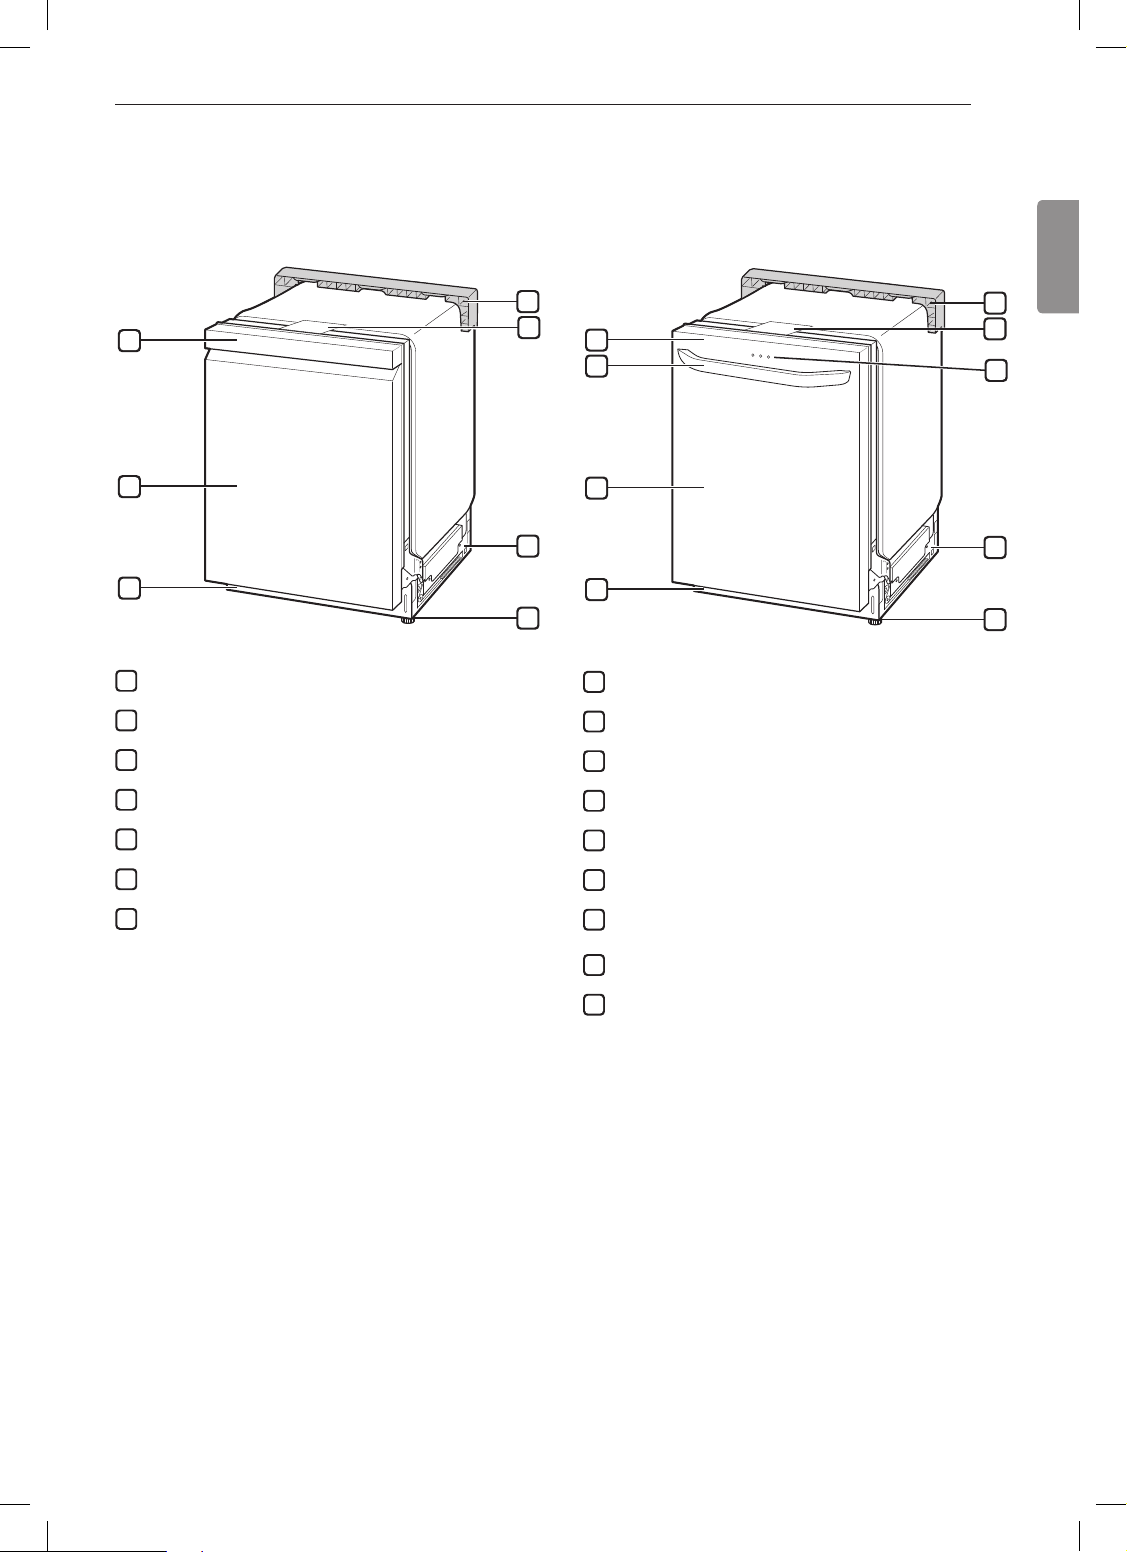
Exterior Parts
9PRODUCT OVERVIEW
1
2
3
1
Control Panel & Door Handle
2
Front Cover
Lower Cover
Shipping Brace
5
Safety Cover
6
Base
4
5
1
2
5
6
7
3
6
8
4
9
Control Panel
2
Door Handle
3
Front Cover
4
Lower Cover
5
Shipping Brace
Safety Cover
7
Leveling Feet
NOTE
• Do not remove the safety cover at any time.
Signal Light (some models)
Base
8
Leveling Feet
9
SignaLight™ (Front Display)
The top-control models have 3 indicator LEDs centered at the top of the front cover.
• Red : Error (See the Error Codes in Troubleshooting section.)
• White (steady): Normal operation.
• White (blinking): Cycle has been paused. (After four minutes in pause mode, the machine turns off.)
• Green: Cycle nished normally.
The green light stays on for 90 seconds.
To keep the green light on until the door is opened, turn the power on, and then press and hold High Temp on
the control panel for 3 seconds until OFF or On appears in the display. The dishwasher remembers this setting
until manually changed.
10 PRODUCT OVERVIEW
6
1
4
6
10
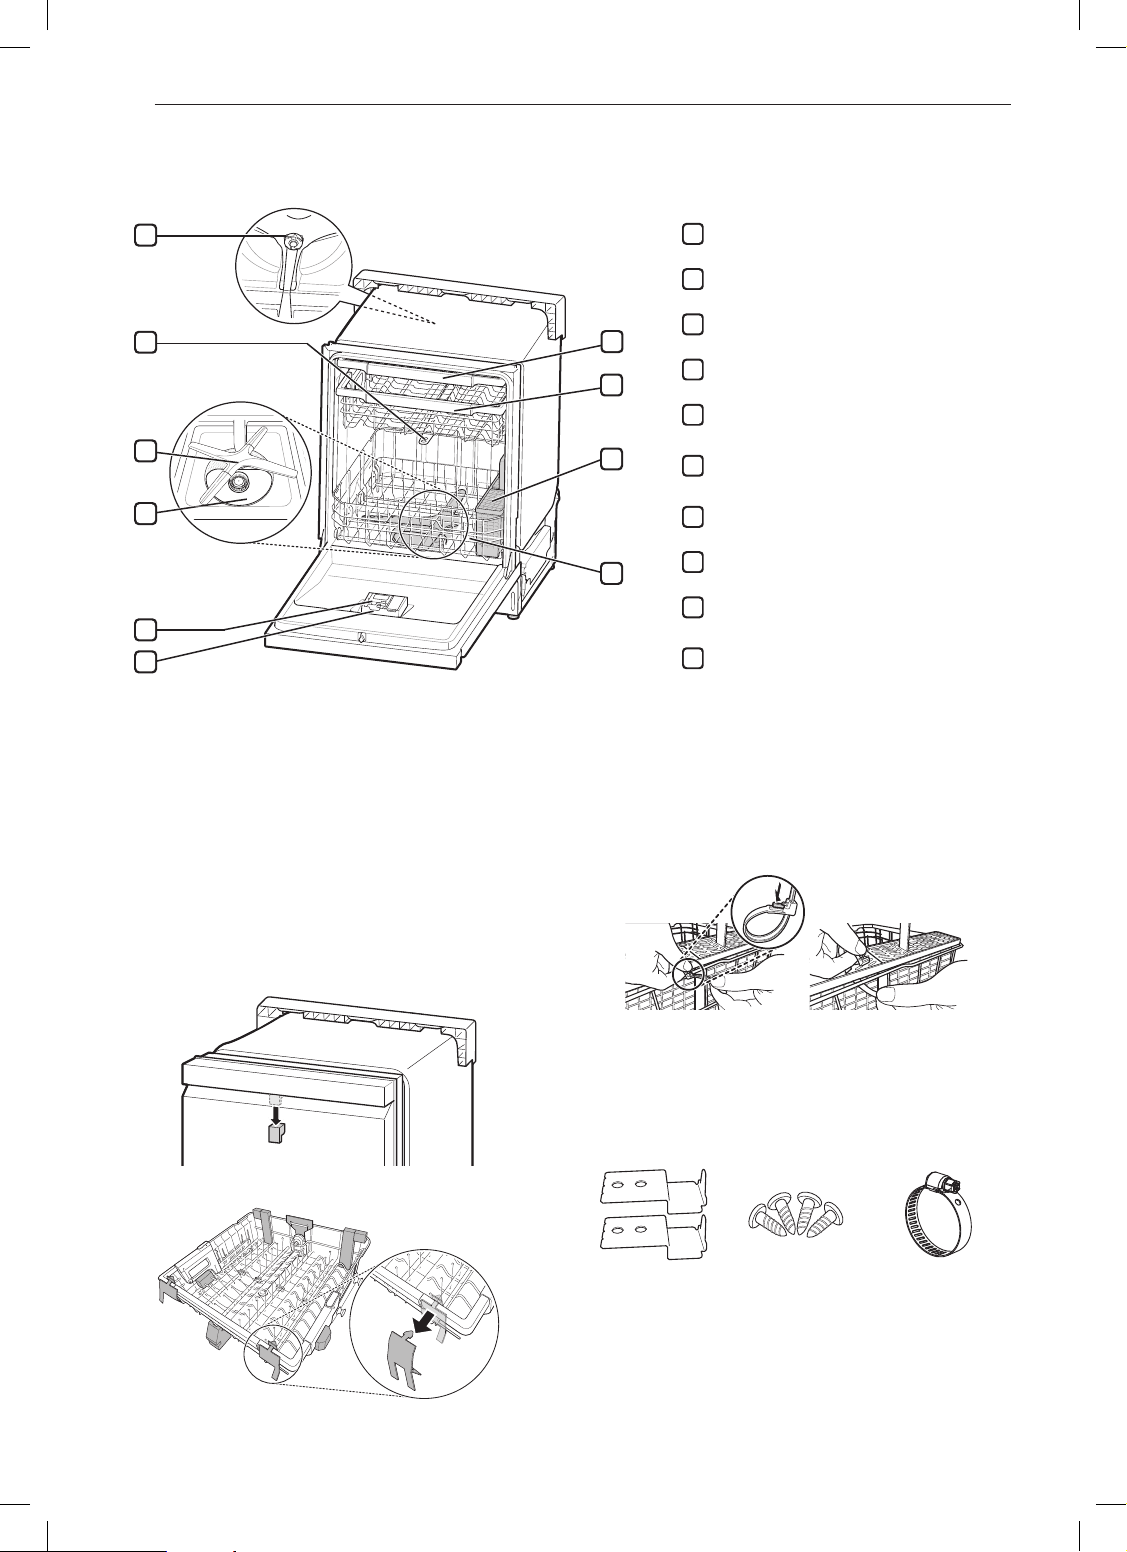
Interior Parts
1
2
3
4
5
NOTE
• The silverware basket ships installed at the back
of the bottom rack. For best performance, install it
along the right side as shown in the Interior Parts
section.
• Remove all packing materials from the exterior
and interior of the dishwasher before installing the
appliance.
Top Wash Impeller
2
Upper Spray Arm
3
7
8
9
10
Lower Spray Arm
Filtration System
5
Detergent and Rinse Aid Dispenser
Drying Vent Cover
7
Cutlery Rack
8
Upper Rack
9
Silverware Basket
Lower Rack (appearance may vary)
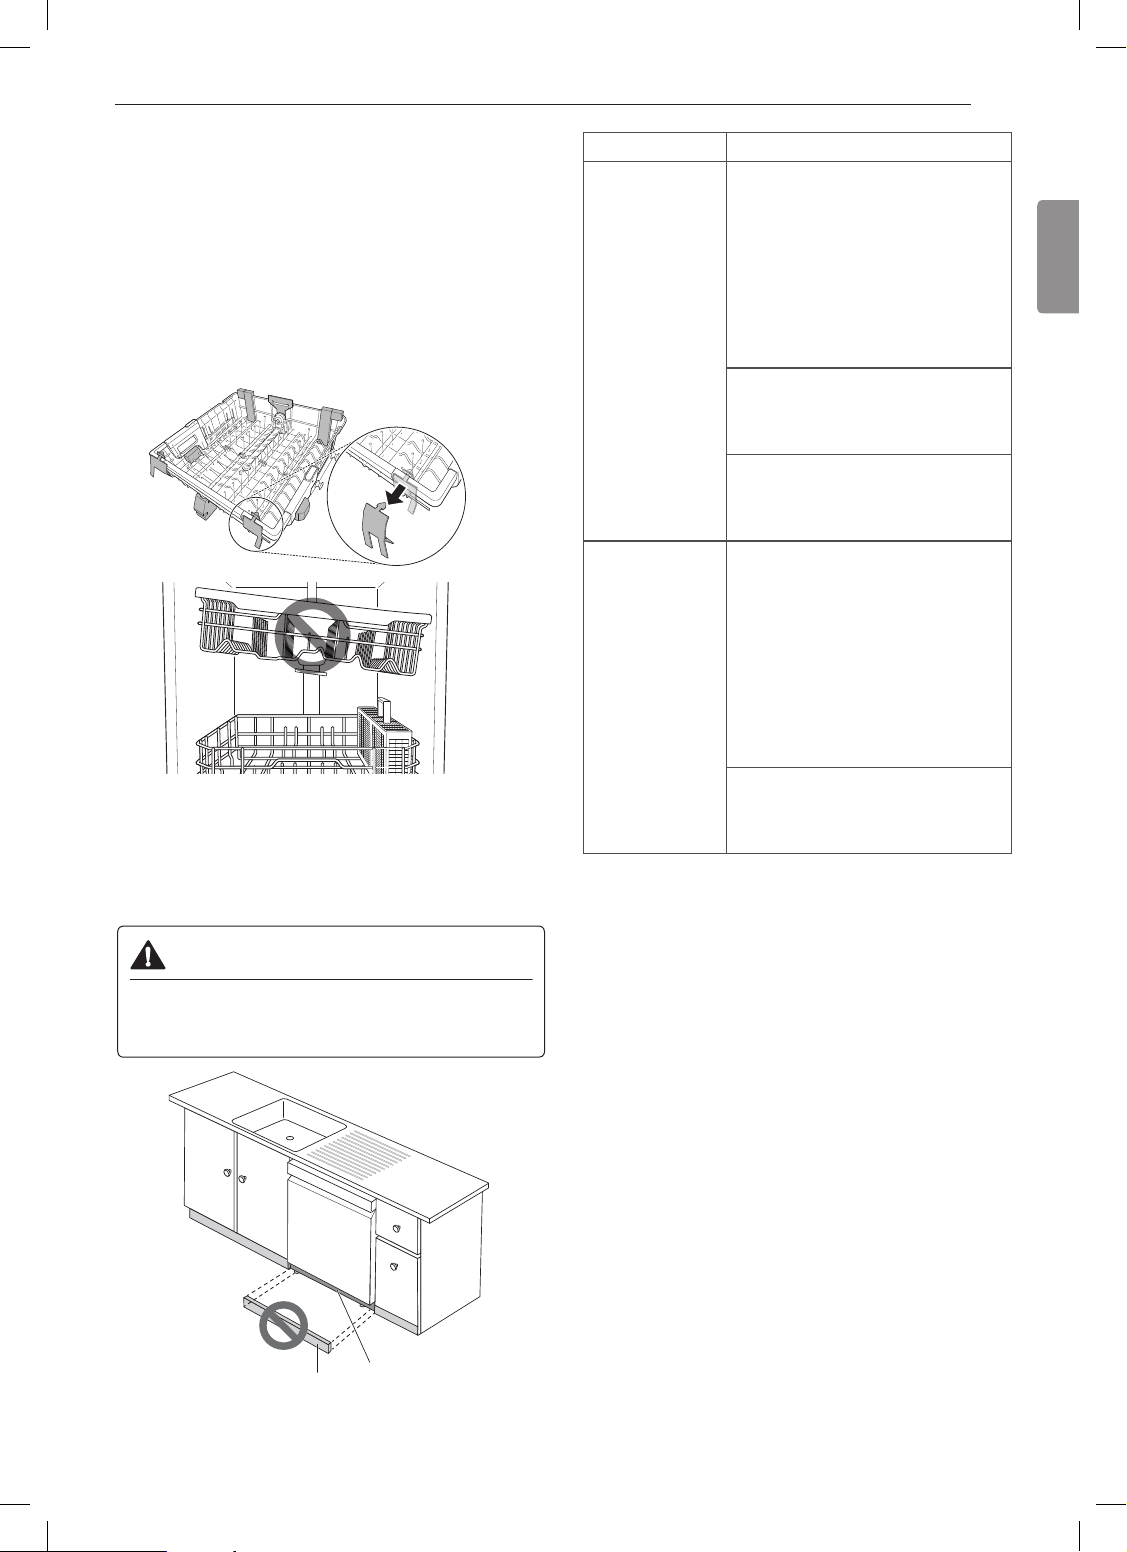
• Press the tab to remove the cable tie by hand.
Cutting the tie with a knife or scissors may damage
the rack or the silverware basket.
Accessories
Included Accessories
3
2
Installation
brackets
(2ea)
Wood screws
(4ea)
Hose clamp
(1ea)
ENGLISH
INSTALLATION
Installation Parts and Tools
11INSTALLATION
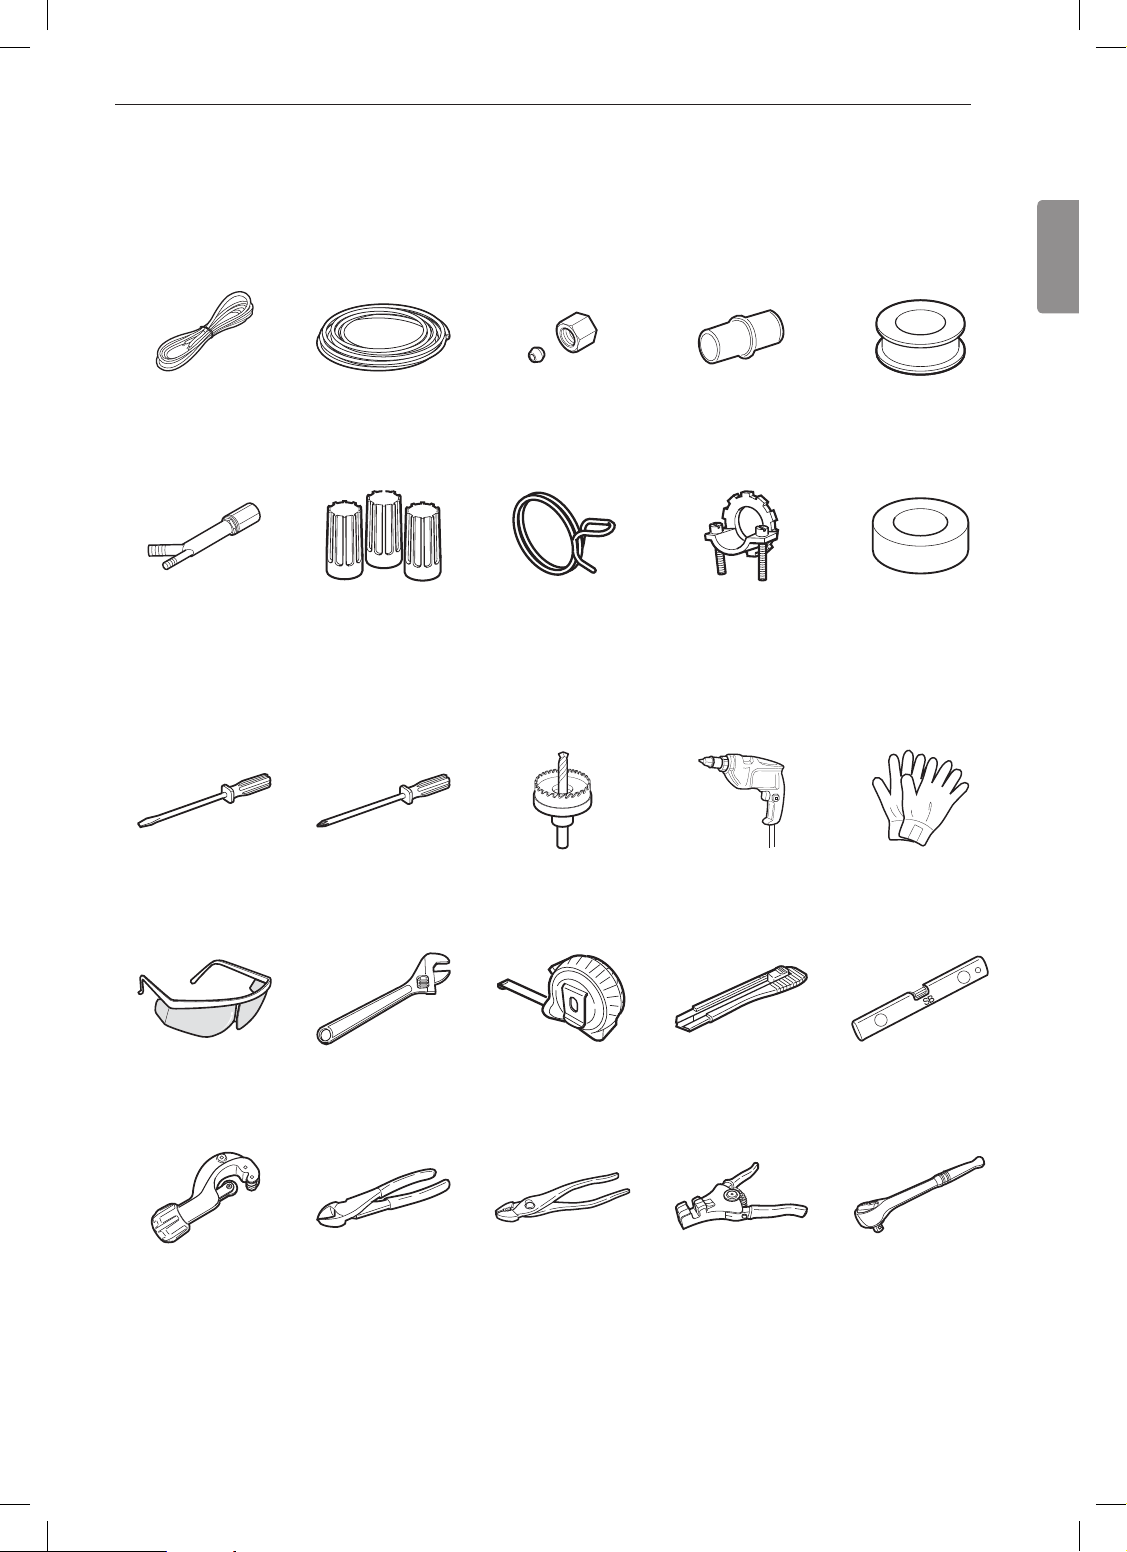
Parts not Provided
Electrical cable Water supply tube Fittings for tube Coupler Teon™ tape
Air gap Wire nuts for
16-gauge wiring
Hose clamp ⅞" UL approved
strain relief
Electrical tape
Tools Needed
Flat-blade
screwdriver
Safety glasses Adjustable wrench Tape measure Utility knife Level
Tubing cutter Nipper Pliers Wire stripper ¼" Square
Phillips
screwdriver
Hole saw
min. 2½" bit
Electrical drill Gloves
drive wrench
12 INSTALLATION
Installation Overview
Preparing Cabinet Opening
Preparing Electrical Wiring
Preparing Water Supply Connection
Preparing the Dishwasher
Removing Lower Cover
Sliding the Dishwasher into Cabinet
Leveling the Dishwasher
Securing the Dishwasher to Countertop
Connecting the Drain Hose
Connecting Water Supply
Connecting Power
Final Check
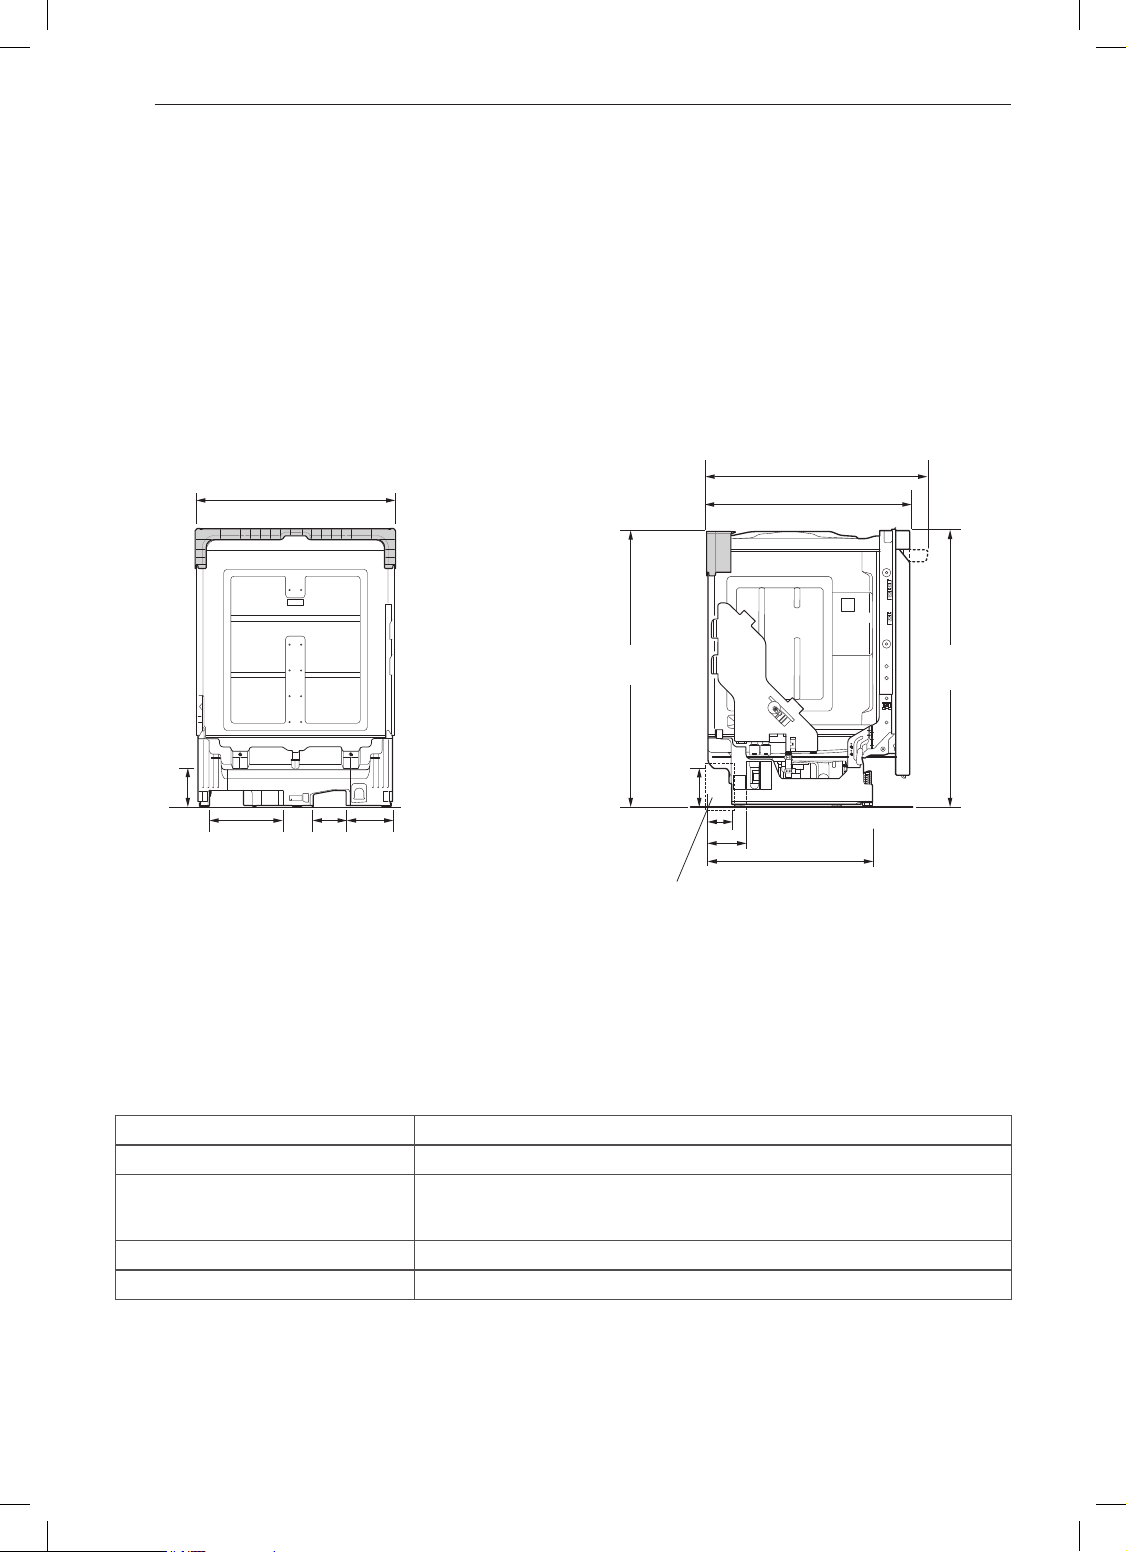
Product Dimensions
Back view Side view
3
23 /4" (603 mm)
5 13
26 /8 - 26 /16" (676 - 681 mm)
5
24 /8" (625 mm)
5
1
4 /2"
(115 mm)
3
9 /8"
(238 mm)
11
4 /16"
(119 mm)
1
/4"
5
(134 mm)
33 /16"
(846 mm)
1
4 /2"
(115 mm)
15
2 /16" (75 mm)
3
4 /4" (120 mm)
3
20 /16" (512 mm)
Water supply hose, drain hose and electric cable should be passed
through this area.
33 /8"
(854 mm)
NOTE
• For easiest installation, see marked areas above for water and electrical clearances in base of dishwasher.
Product Specications
The appearance and specications listed in this manual may vary due to constant product improvements.
Electrical requirement 120 V, 60 Hz AC only, minimum 15 A circuit breaker
Water pressure 20 - 80 psi (140 - 550 kPa)
3
/4"(W) X 24 5/8"(D) X 33 5/8"(H)
Dimensions
Inlet water temperature 120 °F (49 °C) minimum, 149 °F (65 °C) maximum
Net weight 72 - 89 lbs. (33 - 40 kg)
23
603 mm(W) X 625 mm(D) X 854 mm(H)
5
ENGLISH
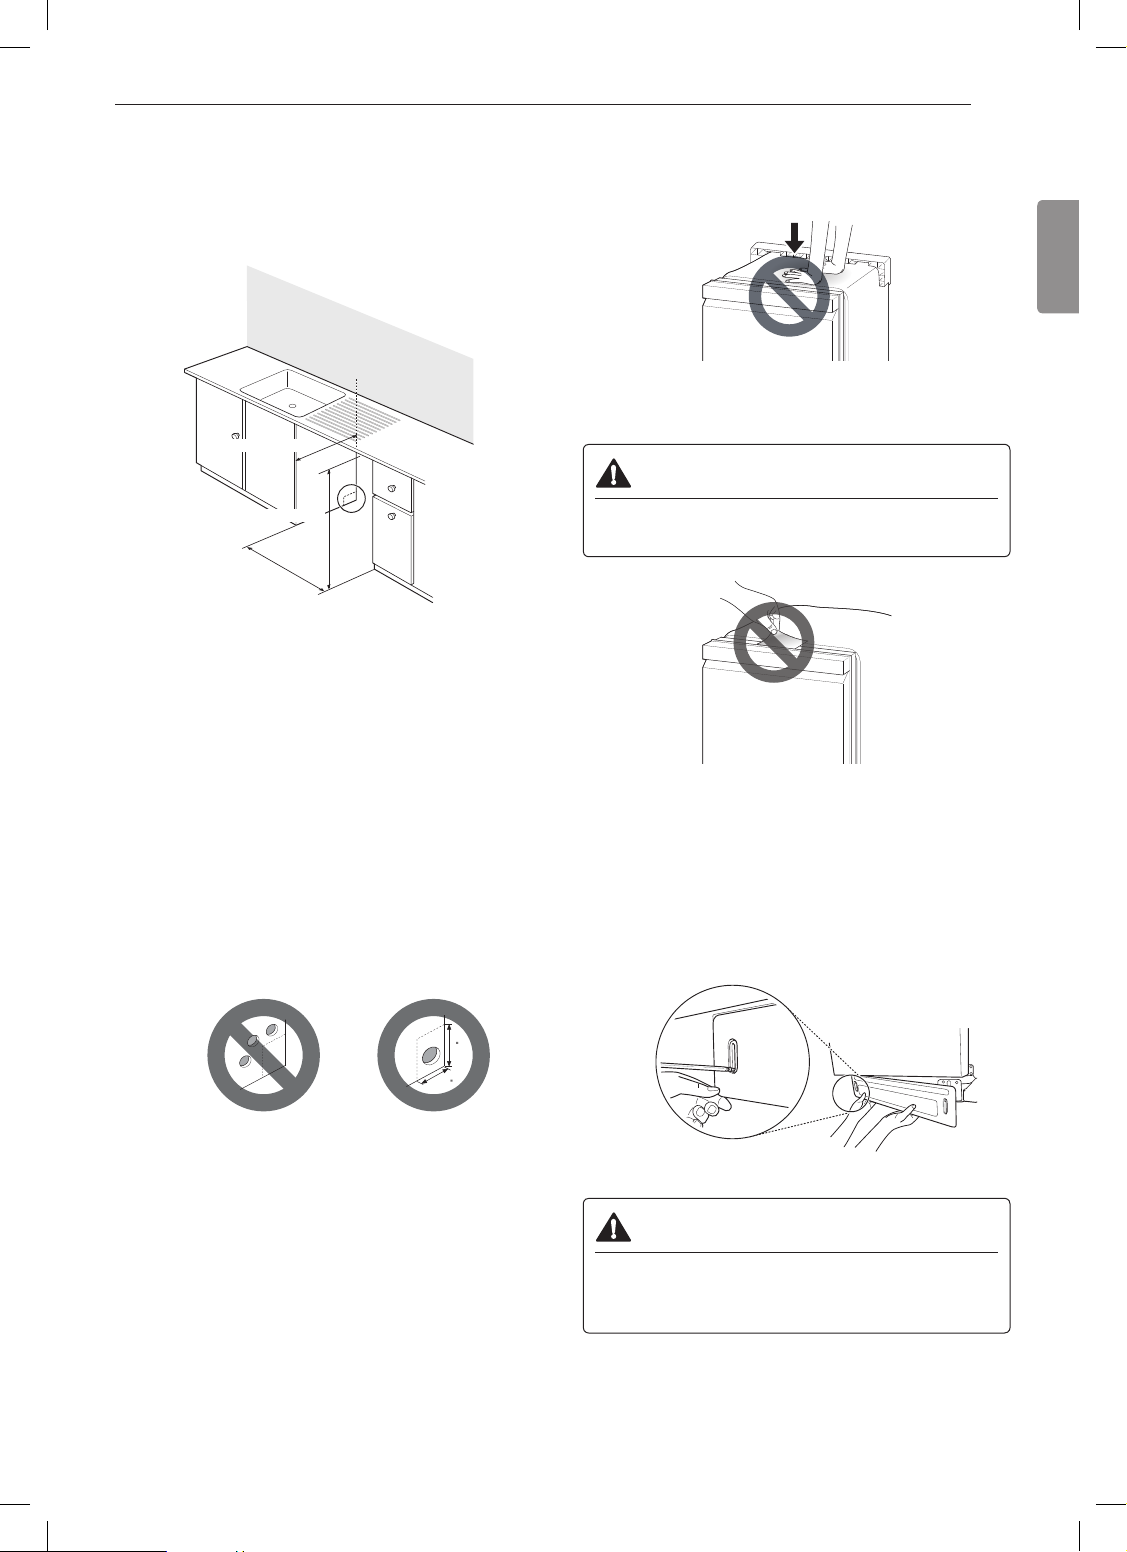
Preparing Cabinet Opening
This dishwasher is designed to t a standard
dishwasher opening. An opening may be needed
on both sides to route plumbing and electrical
connections.
24" (610 mm) min.
5
33 /
8" (854 mm) min.
24" (610 mm) min.
Select a location as close to the sink as possible
1
for easy connections to water and drain lines.
13INSTALLATION
NOTE
• Do not push.
WARNING
• Do not remove safety cover. Removal can result
in re, electric shock or death.
To ensure proper drainage, install the
2
dishwasher no more than 12 ft. (3.65 m) from
the sink.
If installing the dishwasher in a corner, leave a
3
minimum of 2" (50 mm) between the dishwasher
and the adjacent wall.
To allow for proper clearance of plumbing and
4
electrical, use the template included with the
literature to determine the clearance on the side
of the cabinet where the cabinet meets the back
wall. Using a 2
in the target area as shown on the template.
1
/2" diameter hole saw, drill a hole
4
Removing Lower Cover
Remove the two screws attaching the lower
1
cover to the dishwasher.
Remove the lower cover from the base.
2
Remove the insulation pad from behind the
3
access panel.
9
CAUTION
• If you lay the dishwasher on its back, do so
carefully to avoid damaging the drain hose and
the tub.
NOTE
• Remember to replace the lower cover when the
installation is complete.

14 INSTALLATION
Preparing Electrical Wiring
Operate this appliance with the correct voltage
1
as shown in this manual and on the rating plate.
Connect it to a dedicated, properly grounded
branch circuit which is protected by a time delay
fuse. Connect the appliance using 3-wires,
including a ground wire.
If an outlet and other power connector are used,
2
it should be in an accessible location adjacent
to and not behind the dishwasher and within 4 ft
(1.2 m) of the dishwasher's side.
The wiring must be grounded properly. If in
3
doubt, have it checked by a qualied electrician.
Do not connect any other appliance to the same
outlet.
Route the wiring.
4
Preparing Water Supply
Connection
Make sure the house water supply is turned off
before connecting the dishwasher water lines.
Connect the dishwasher to a hot water supply
1
with a temperature range between 120 °F (49
°C) and 149 °F (65 °C). This temperature range
provides the best washing results and shortest
cycle time. To prevent damage to dishes, the
temperature should not exceed 149 °F (65 °C).
When connecting the dishwasher water line,
2
sealing tape or compound should be used on
pipe threads to avoid leaks. Tape or compound
should not be used on compression ttings.
The water supply tube must be located in the left
3
side channel.
Electrical cable
Make sure the electrical cable is oriented in the
5
right side channel.
1
4 /2" - 6”
(115 mm - 152 mm)
WARNING
• For personal safety, remove house fuse or open
circuit breaker before installation.
• Do not use an extension cable or adapter with
this dishwasher.
NOTE
• If you nd any damage to the dishwasher, contact
your retailer or contractor.
• The included wire nut in 16AWG should be used.
1 3
6 /2" - 7 /4"
(165 mm - 197 mm)
Water supply line
NOTE
• Use new hoses when connecting to the water
supply. Do not reuse old hoses.
ENGLISH
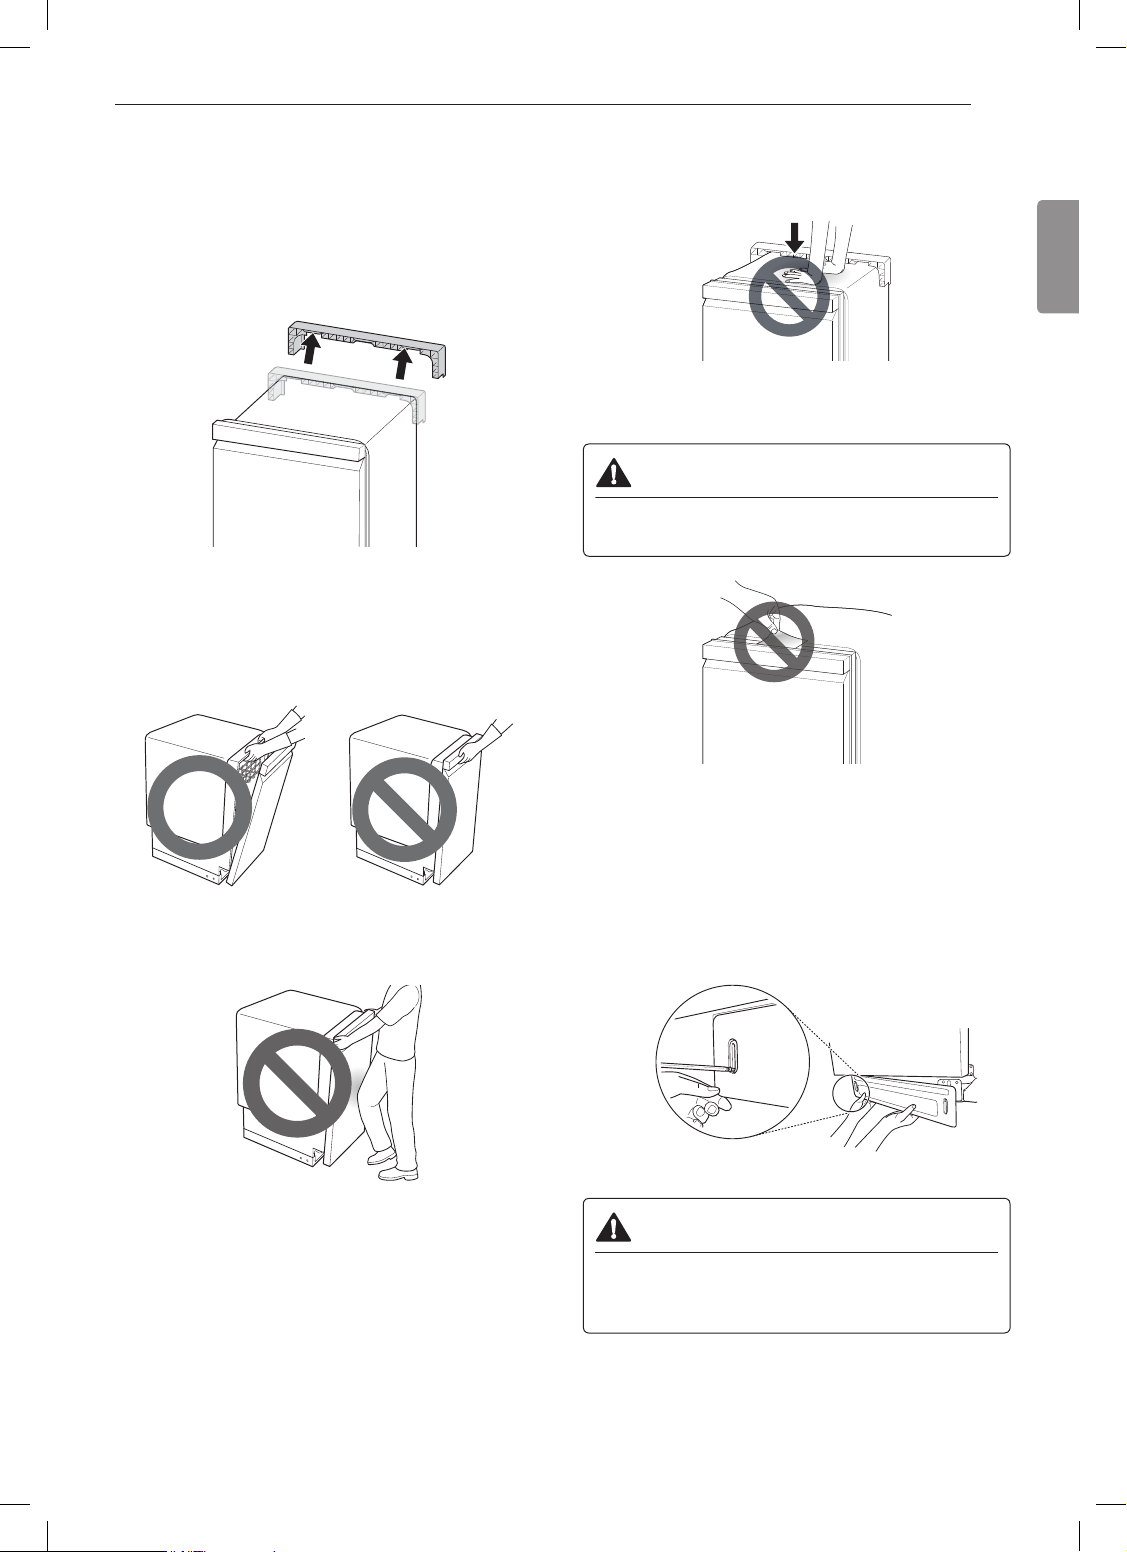
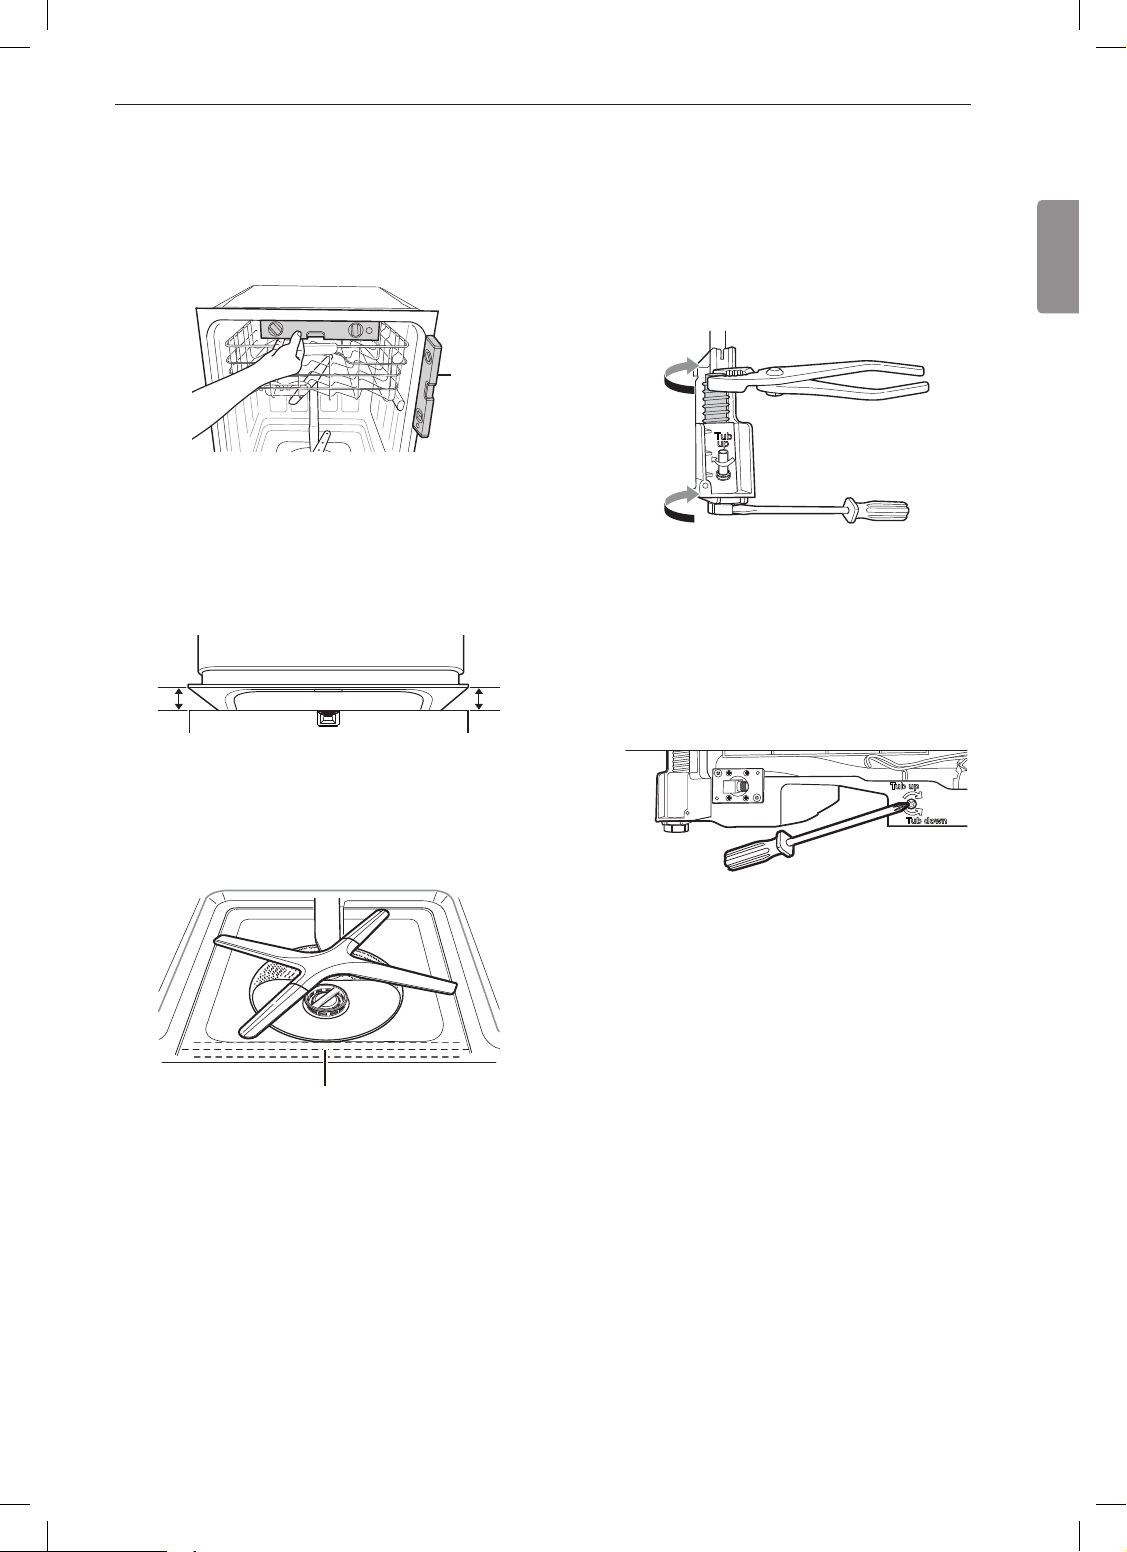
Preparing Dishwasher
15INSTALLATION
Removable Rear Plastic Shipping
Brace
The rear shipping brace can be removed if additional
clearance is needed when installing the dishwasher
under a low countertop.
NOTE
• Do not pull or lift the dishwasher using the handle;
doing so can damage the door and hinges. Open
the door and grab the body frame and the top front
opening of the tub to move or lift the dishwasher.
NOTE
• Do not push.
WARNING
• Do not remove safety cover. Removal can result
in re, electric shock or death.
NOTE
• Do not push the door of the dishwasher with knees.
Removing Lower Cover
Remove the two screws attaching the lower
1
cover to the dishwasher.
Remove the lower cover from the base.
2
Remove the insulation pad from behind the
3
access panel.
CAUTION
• If you lay the dishwasher on its back, do so
carefully to avoid damaging the drain hose and
the tub.
NOTE
• Remember to replace the lower cover when the
installation is complete.
16 INSTALLATION
Attaching Mounting Hardware
For countertops made of wood or other material
that will not be damaged by drilling, use the metal
installation brackets.
Insert the installation brackets into the slots in
1
the upper frame.
2
Installation bracket
Bend the brackets to secure them to the
2
dishwasher tub.
1
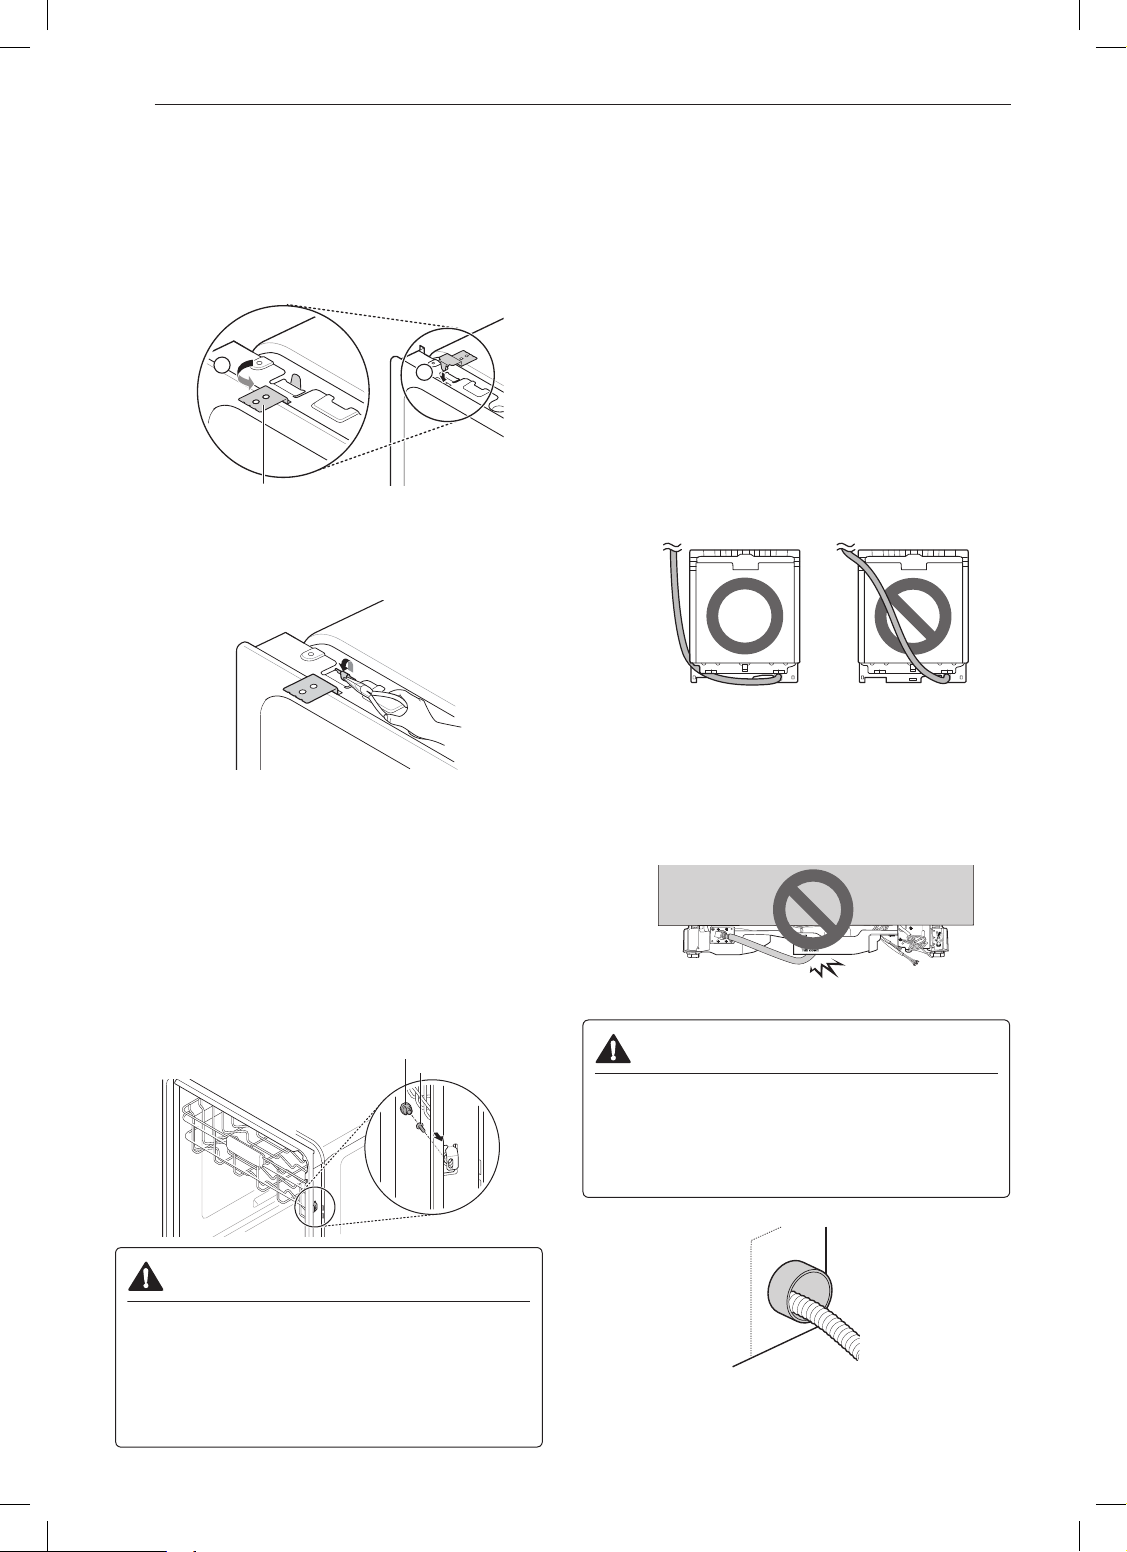
Sliding Dishwasher into
Cabinet
Slide the dishwasher carefully into the cabinet
1
opening.
Make sure the drain hose inside the cabinet is
2
not kinked or pinched.
Make sure the water supply line and electrical
3
supply are routed through the channels under
the dishwasher.
To avoid a kinked or pinched drain hose, be
4
sure to pull on the drain hose while sliding the
dishwasher into place. Do not allow any slack
behind the dishwasher.
NOTE
• Installation brackets and screws can be found in the
silverware basket.
For countertops made of granite, marble, or other
materials that could be damaged by drilling, use the
wood screws to attach the dishwasher to the cabinet.
See installation instructions in Securing Dishwasher
to Countertop.
Cap
Screw
CAUTION
• Ensure the dishwasher is level and all legs are
in rm contact with the oor before attaching the
dishwasher to the countertop or cabinet. If the
product is not leveled properly, the door may not
close or water may leak.
After leveling the dishwasher, do not leave the
5
water supply line or power supply line under the
base. This is a potential cause of water leaks.
Place the water line and power supply line in the
channel.
CAUTION
• The opening in the side of the cabinet may have
sharp edges. To avoid damaging the drain hose,
smooth out or pad the edges of the opening. Pull
the drain hose through the opening slowly and
carefully.
17INSTALLATION
ENGLISH
Leveling the Appliance
Check that dishwasher is level.
• Attach level on top front opening of tub from side to
side.
• Attach level on front side of tub.
Level
NOTE
• If you don’t have a level, try using a smartphone
level application instead.
Make sure that the gap between the door and the tub
is equal on both the left and right sides.
Adjusting the Legs
Adjusting the Front Legs
• Use a at-blade screwdriver or a pliers to turn the
front legs and adjust the front of the tub.
• Turn the front legs clockwise to raise the front of the
tub and counter-clockwise to lower it.
• The adjustments work identically for both front legs.
Adjusting the Rear Legs
• Use a Phillips screwdriver to adjust the back legs
and the rear of the tub using the center screw at the
base of the appliance in the front.
• Turn the center screw clockwise to raise the rear of
the tub and counter-clockwise to lower it.
The water level should be checked after the initial ll
on the Normal cycle. If the water level is not near the
center of both tub lower indentations, the dishwasher
may not be correctly leveled. The dishwasher may
leak during operation if it is not correctly leveled.
Water level should be near the center
of both tub lower indentations.
NOTE
• To avoid damaging the screw, do not use an electric
screwdriver.

18 INSTALLATION
Securing Dishwasher to
Countertop
For countertops made of wood or other material that
will not be damaged by drilling, use Method 1.
For countertops made of granite, marble, or other
materials that could be damaged by drilling, use
Method 2.
NOTE
• Cover the lter hole with towels to prevent screws
from falling down into the pump.
• Use a magnetic screwdriver.
Method 1
Using the provided screws, secure the dishwasher to
the countertop through the holes in the bracket.
Screw
Installation bracket
NOTE
• Installation brackets and screws can be found in
the silverware basket. See Attaching Mounting
Hardware section for more information on attaching
installation brackets to dishwasher.
Method 2
Remove the plastic caps from the mounting
1
bracket access holes.
Drive a wood screw through the mounting
2
bracket and into the cabinet frame.
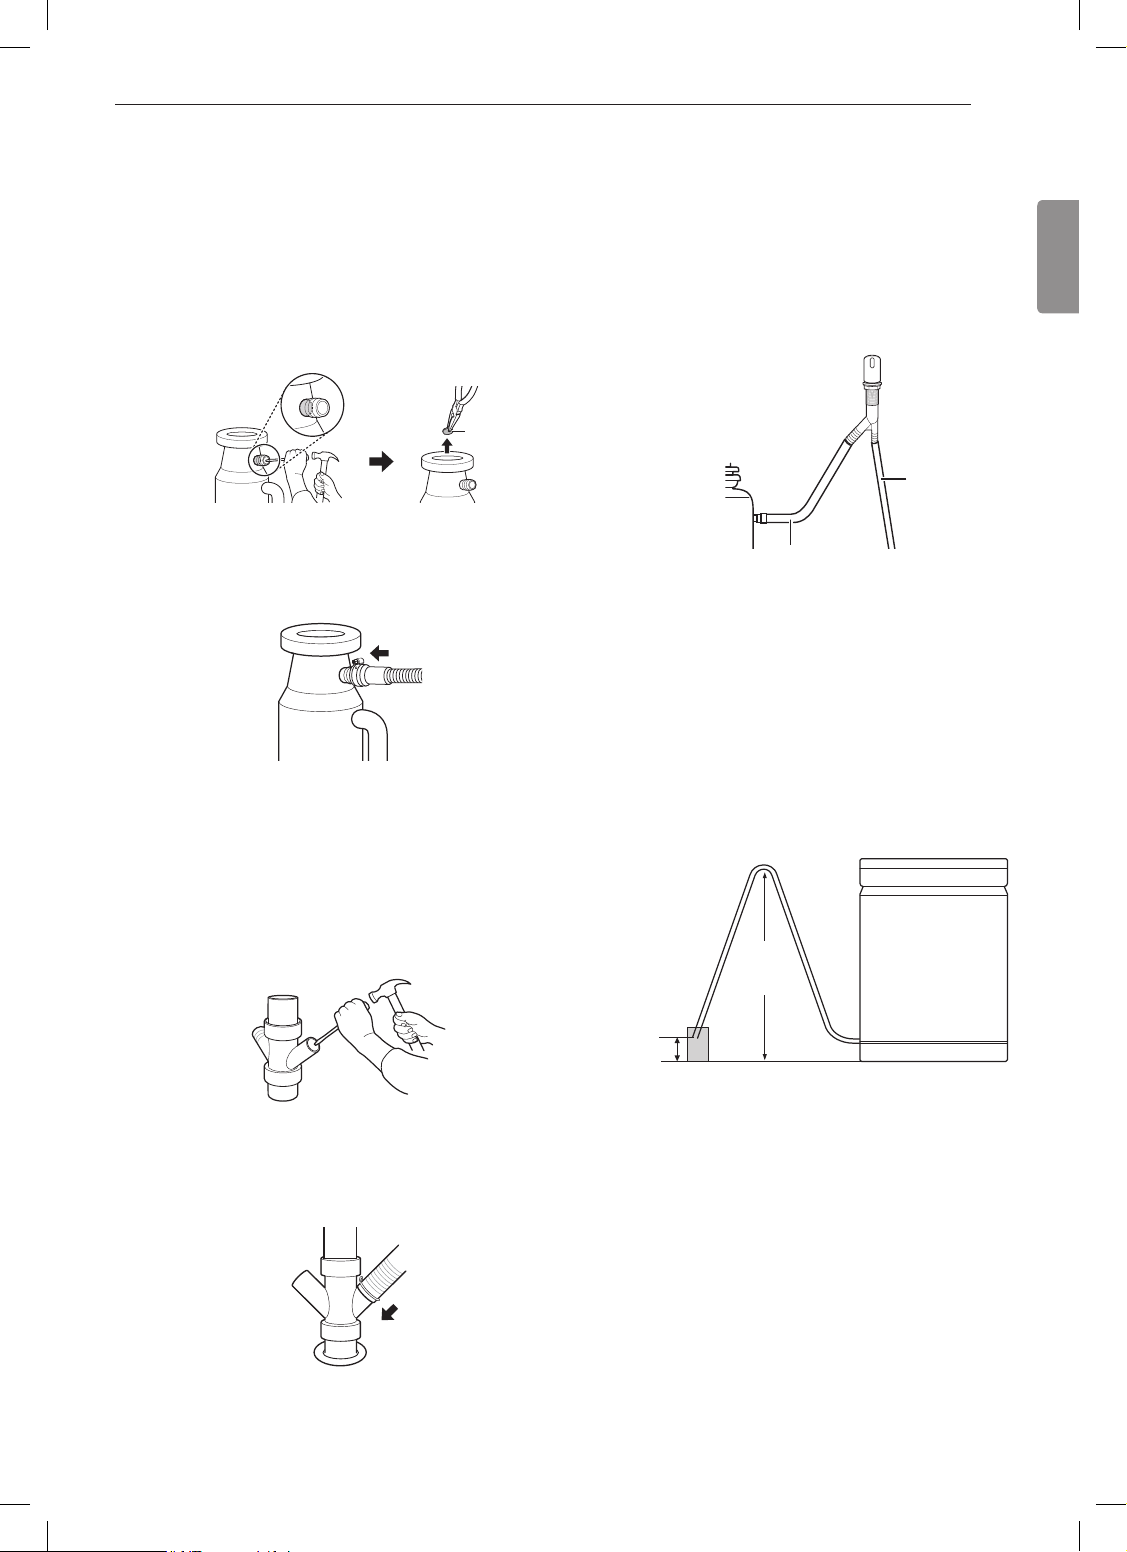
Connecting Drain Hose
40"
(1016 mm)
max.
12"
(305 mm)
min.
If the end of the drain hose does not t the drain
line, use a heat and detergent resistant adapter
(not supplied). These may be obtained from a local
plumbing supply store.
The two typical connections are shown. To prevent
siphoning, one of the following connections should be
used.
5
/8"
(16 mm)
For air gap connections,
cut off drain hose at dotted
line
Drain Requirements
• Follow local codes and ordinances.
• Do not exceed 12 ft. (3.65 m) distance to drain.
• Do not connect drain lines from other devices to the
dishwasher drain hose.
• If an extension drain hose is required, use
inside diameter, 2-3 ft. length hose and a coupler for
connecting the two hose ends.
3
/4"
(19 mm)
For disposal or waste tee
connections
1"
(25 mm)
5
/8" or 7/8"
Reinstall the plastic caps.
3
Cap
Screw
Hose clamp
NOTE
• For drain hose installation, use the screw style
clamp provided with this dishwasher in the
silverware basket.
Coupler
Hose clamp
19INSTALLATION
ENGLISH
NOTE
• If the knockout plug has not been removed, the
dishwasher will not be able to drain properly.
Connecting to Disposal with No Air
Gap
Remove the knockout plug with a hammer and
1
screwdriver.
Knockout plug
Attach the drain hose to disposal with the hose
2
clamp provided. Move into position and tighten
the hose clamp.
Connecting to Disposal or Waste Tee
with Air Gap
Remove the knockout plug with a hammer and
1
screwdriver.
Connect end of the drain hose to the air gap with
2
hose clamp provided. This avoids water being
siphoned from the tub.
Drain hose
Attach the rubber connector to disposal or waste
3
tee with the hose clamp provided. Move into
position and tighten the hose clamp.
Air gap
Rubber hose
connector
Connecting Waste Tee with No Air
Gap
Remove the knockout plug with a hammer and
1
screwdriver.
Attach the drain hose to waste tee with the hose
2
clamp provided. Move into position and tighten
the hose clamp.
Connecting without Air Gap
The height of the drain hose end must be at least 12"
(305 mm) and within 40" (1016 mm) from the base of
the appliance to avoid water being siphoned from the
tub.
40"
(1016 mm)
max.
12"
(305 mm)
min.
Drain pipe
20 INSTALLATION
1 2
1 2 3
4
Connecting Water Supply
Before connecting, turn off the water supply.
1
Slide the exible stainless-steel water line or
2
copper tube into the elbow.
Tighten the compression nut and make sure that
3
the line is not kinked or pinched.
Valve Water supply
NOTE
• During the nal installation check of the dishwasher,
an IE error code may appear on the display. Make
sure the water line is not kinked and the water
supply for the dishwasher has been turned on
before calling for service.
line
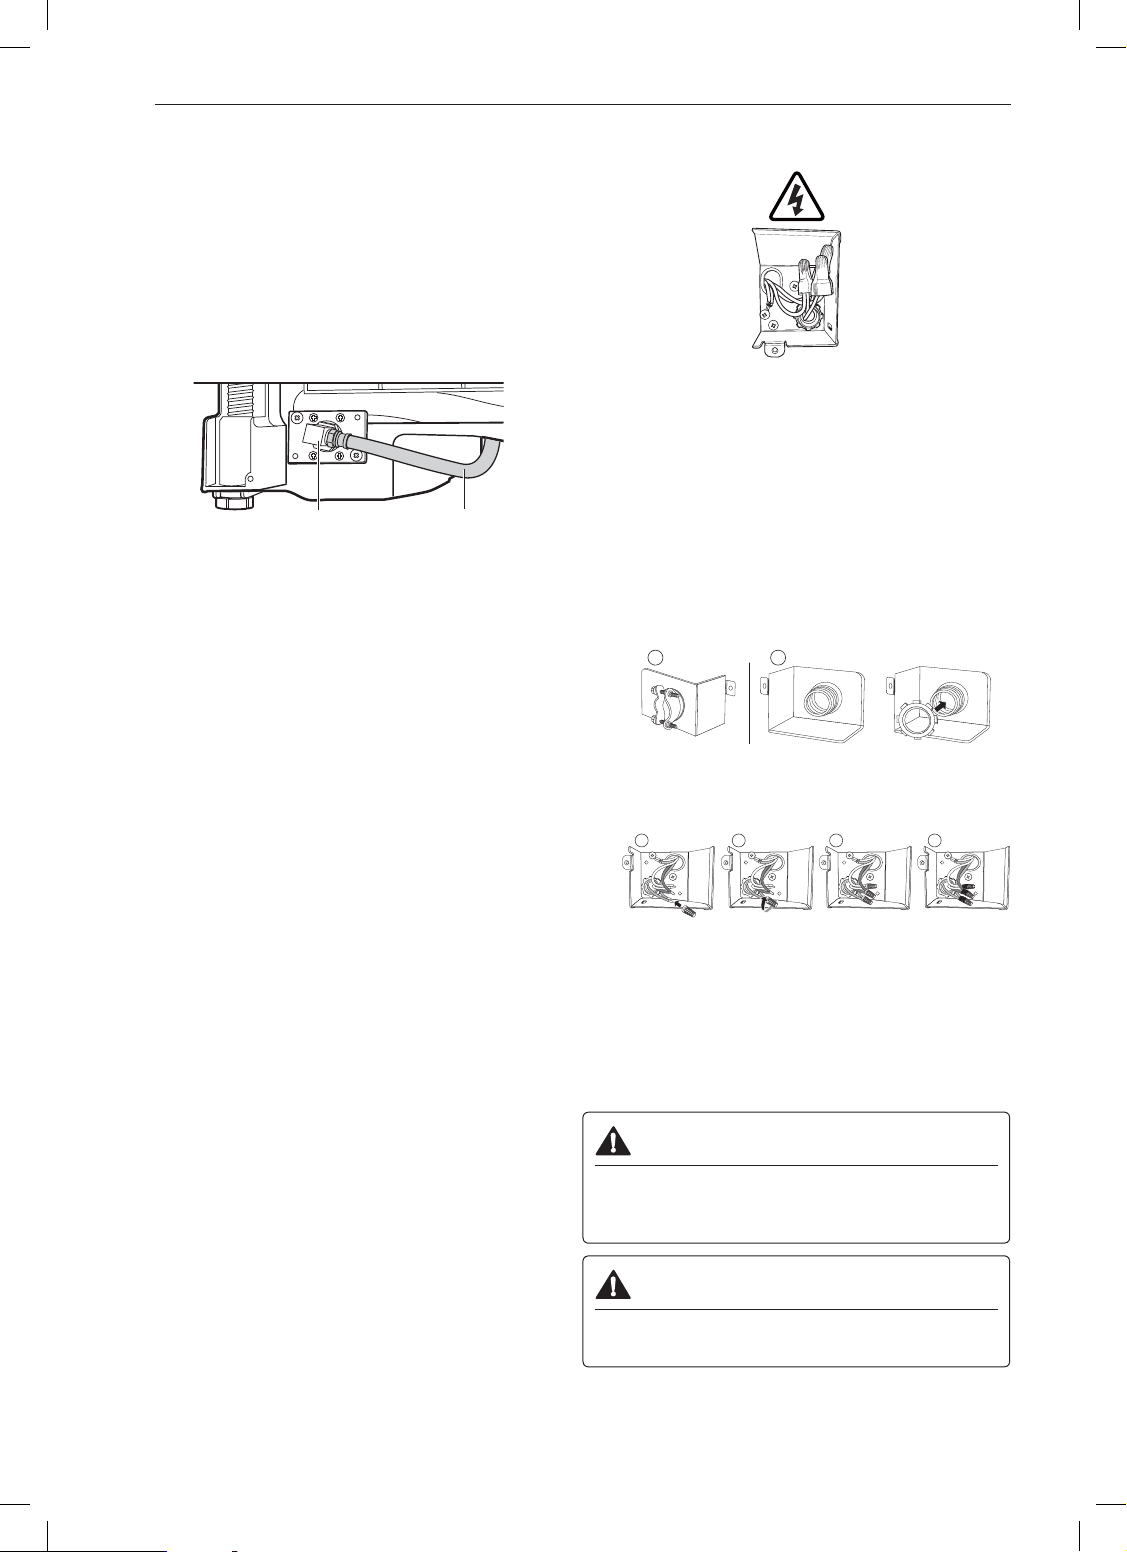
Connecting Power
NOTE
• The best location for the electrical conduit is on the
right side of the back wall. Re-route the power cable
before installation if the electrical conduit pipe is
longer than 3" (76 mm) and is centered on the back
wall.
Before beginning, turn off electrical power to the
1
unit at the circuit breaker.
Remove the junction box cover and then install
2
the strain relief.
Twist the wire nuts tightly onto the wires; then
3
wrap each connection with electrical tape.
Check again and make sure that all wires are
4
connected correctly: black to black, white to
white, green ground wire to green ground wire.
Replace the junction box cover.
5
WARNING
• Verify that the black wire is hot (120 V). If not,
or if you are unsure of the power supply, have it
checked by a licensed electrician.
CAUTION
• Do not leave stripped wire exposed. Trim
stripped wire to t completely inside wire nuts.
21INSTALLATION
ENGLISH
Final Check
Turn on electrical power.
1
Turn on house water supply.
2
Make sure the door opens and closes smoothly.
3
If necessary, level the dishwasher again.
If the door will not close, make sure the rack
is level and all packaging materials have been
removed.
3
2
Error Code Possible Cause and Solution
Drain hose kinked or pinched.
Feed the drainage and supply
hoses through the hole under
the sink. Then gradually slide the
dishwasher into the cabinet while
pulling on the hoses under the sink
to take up any slack. This helps
OE Error
IE Error
avoid kinking the hoses or trapping
them beneath the dishwasher.
Drain hose connected to
disposal.
Remove knockout plug on disposal.
Waste tee is clogged.
Remove knockout plug on waste
tee.
Water supply line kinked under
dishwasher.
Feed the drainage and supply
hoses through the hole under
the sink. Then gradually slide the
dishwasher into the cabinet while
pulling on the hoses under the sink
to take up any slack. This helps
avoid kinking the hoses or trapping
them beneath the dishwasher.
House water supply not turned
on.
Run the dishwasher on a Turbo cycle to verify
4
proper operation and check for leaks.
CAUTION
• Only install the lower cover provided with the
machine. Do not install cabinet baseboard as it
may cause noise and leakage.
Cabinet baseboard
Lower cover
Turn water on.

22 OPERATION
OPERATION
Using the Appliance
Before Using the Appliance
• Read the Important Safety Instructions.
• Connect to the hot water supply only. The water
supply temperature should be a minimum of 120°F
(49°C) for better washing performance and shorter
cycle time.
• Follow the instructions for loading the dishwasher to
ensure effective cleaning.
• Remove insoluble items such as bones, toothpicks,
and pieces of paper while loading the dishwasher.
When loading the dishwasher
Only load items that are dishwasher-safe.
1
Remove solid, burned-on scraps from dishes
2
prior to loading in the dishwasher.
Select the Cycle and Options
6
Select the cycle and options that best t the
load by referring to the Cycle guide. The display
will show the estimated time for the cycle and
options selected.
Operate the Dishwasher
7
Method 1
• Press the Start button and then close the
door in less than four seconds to operate the
dishwasher. If the door is not closed within four
seconds, the white LED with time ashes, an
audible tone is heard, and the cycle does not
start.
Method 2
• Close the door rst and then press the Start
button to operate the dishwasher.
If the door is opened during the cycle, the
dishwasher will stop. To resume the cycle, see
methods 1 and 2 above.
Place items with deep dish bottoms at an angle
3
to help water run off and speed the drying
process.
NOTE
• Do not load utensils that are not heat-resistant or
have decorative metal trim.
Quick Start
Load the Dishes
1
Scrape the dishes free of excess food, bones,
and any other hard, non-soluble residue. Pull
each rack out and load the dishes as described
in this manual.
Measure the Detergent
2
Using the guidelines in this manual, ll the
detergent cup with the recommended amount
of detergent and close the lid. If a prewash is
desired, the recess on top of the lid should also
be lled with detergent.
Close the Door
3
Turn on the Dishwasher
4
To turn on the display panel, press the Power
button.
Check the Rinse Aid
5
The Rinse Aid
rinse aid in the dishwasher is low. Add rinse aid
if the level is low to maintain the effectiveness of
the dry cycle.
icon will ash if the level of
NOTE
• If the door is opened during the cycle and is
not closed within four seconds after selecting
the Start button, or if the door is closed without
pressing the Start button, the white LED with
time ashes, an audible tone is heard, and the
cycle does not start.
End of Cycle
8
When the cycle is complete, a chime will sound
and the display will show End until the door is
opened or Power is pressed. To save energy,
press and hold High Temp for three seconds
to set the End display to automatically turn off a
few minutes after the cycle ends.
CAUTION
• Do not open the door during operation or
immediately after it has completed the wash
cycle as the steam build up may cause scalding
as the door is opened.
NOTE
• Empty the lower rack rst and then the upper rack.
This will avoid water dripping from the upper rack
onto dishes in the lower rack.
Auto-Off
The dishwasher automatically turns off after four
minutes of inactivity if paused or if no cycle is started.
ENGLISH
Control Panel
2
23OPERATION
1
1
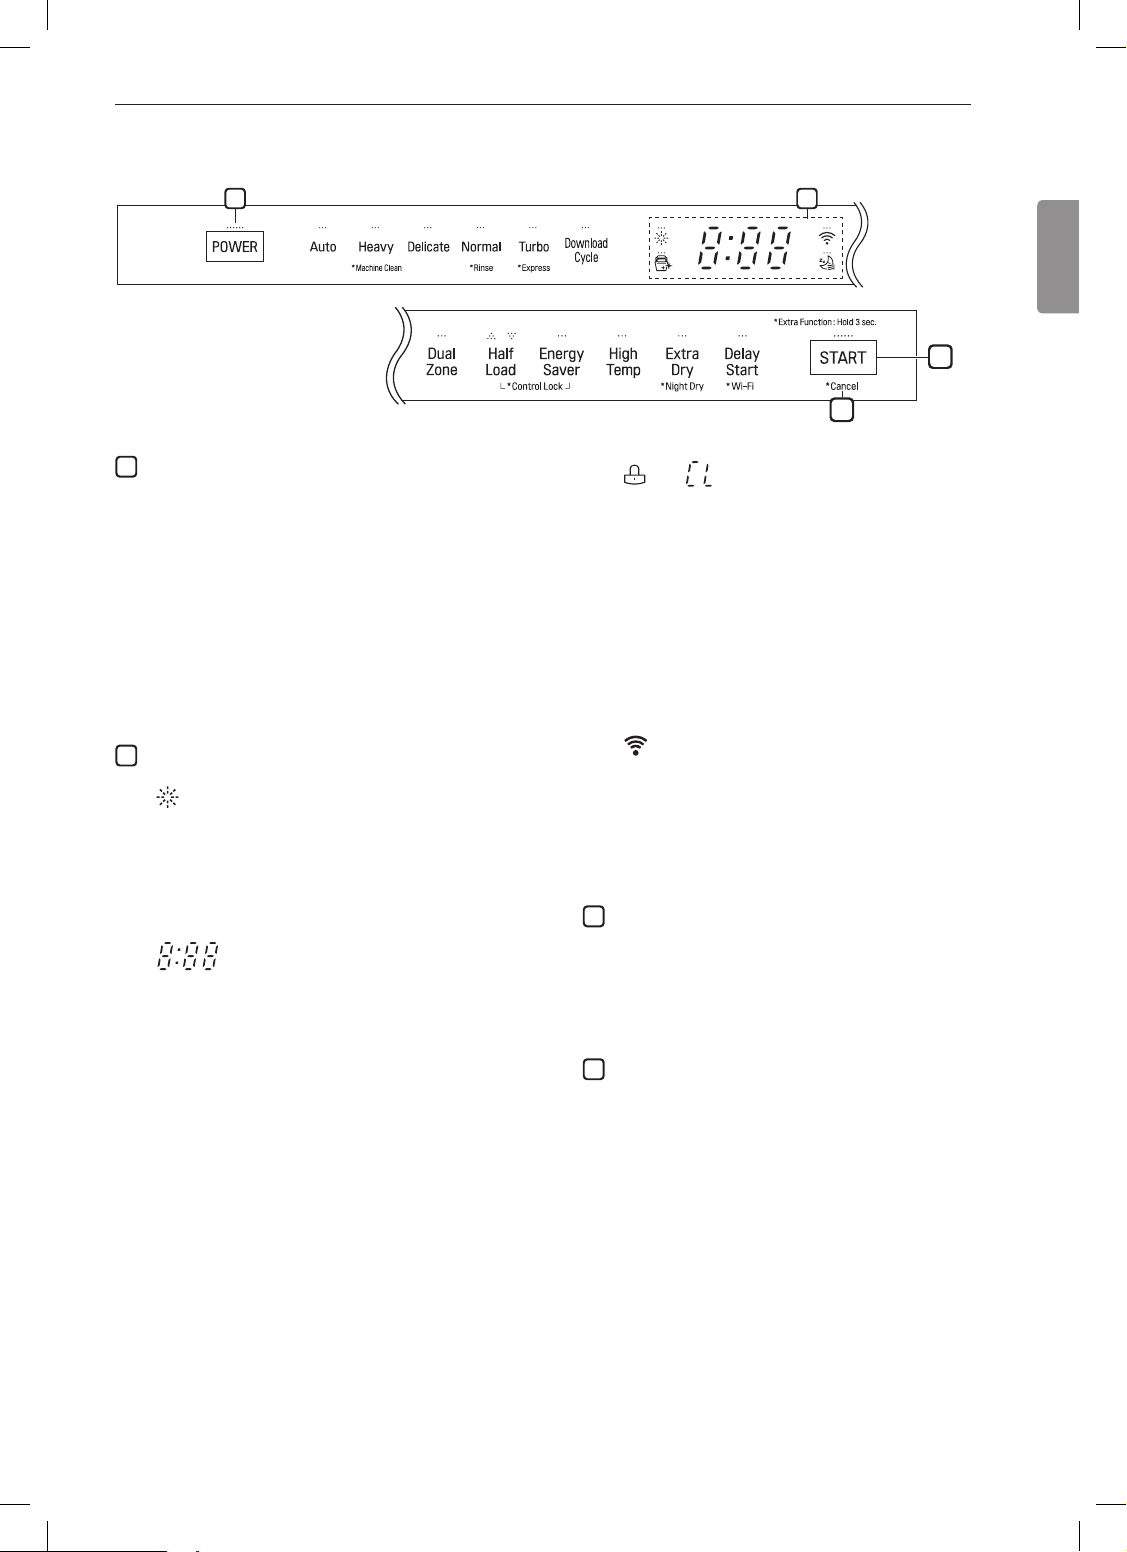
Power
• Press the Power button to turn power on and
off.
• After the cycle is complete, the power
automatically turns off for purposes of safety and
economy.
• If there is a power surge, power outage, or
disruption of any kind, power is automatically
turned off for safety.
• When power is connected again, it will turn on
automatically and resume the cycle.
Display
: Rinse Aid Icon
•
- This icon illuminates when the rinse aid level is
low. The LED automatically shuts off when the
rinse aid is relled or the level is set to 0.
- Refer to the Rinse Aid Dispenser Adjustment
section.
•
- The digital display on the control panel shows
NOTE
• The estimated time shown on the display does
not include delay times for heating water, etc.
• If Delay Start is selected, the display shows the
delay time in hours.
• Cycle time may vary depending on the soil level
of your load.
: Digital Display
the ESTIMATED cycle time. When the cycle
and options are selected, the display shows
the total estimated time to complete those
selections. During operation, the display shows
the remaining estimated operating time.
2
3
, : Control Lock
•
- The Control Lock feature helps prevent
settings from being changed during a cycle.
Selecting this feature locks all of the buttons,
except for the Power button, on the control
panel. This feature does not lock the door.
- While a cycle is running, press and hold Half
Load and Energy Saver simultaneously for
three seconds to activate or deactivate Control
Lock.
- To start a new cycle, deactivate Control Lock.
: Wi-Fi
•
- When the appliance is connected to the
internet through a home Wi-Fi network, this
icon illuminates.
- Press and hold Delay Start for approximately
three seconds to connect to the network.
3
Cancel
• The drain pump activates and the cycle cancels.
Once the dishwasher nishes draining, the
power turns off.
• Press and hold Start for three seconds to
activate.
4
Start
• To operate the machine, either press Start and
close the door within four seconds or close the
door and press Start.
• If Start button is not pressed to start the cycle,
an alert will sound.
Chime On/Off
• To activate or deactivate the button sounds,
press and hold Dual Zone and Energy Saver
simultaneously for three seconds. The error alert
sound cannot be turned off.
4

24 OPERATION
Cycles
Select your desired cycle.
Auto
This cycle senses the soil amount and soil toughness
and is optimized to achieve the best cleaning.
Heavy
This cycle is for heavily soiled dishes and dishes with
hardened on soil. The Heavy cycle defaults to the
strongest spray intensity and uses it to wash heavily
soiled dishes.
Delicate
Use this cycle to clean delicate items such as ne
china and stemware.
Normal
This cycle is for moderately soiled, everyday loads.
Select the Night Dry option if leaving dishes
overnight. Press and hold Extra Dry for three
seconds to activate Night Dry.
• After the cycle ends, the fan runs for an hour to help
vent the warm, moist air in the tub. You can stop the
fan by opening the door after the cycle ends.
Turbo
This cycle will clean heavily soiled dishes in an hour
using slightly more energy and water.
• This cycle does not have drying. Select the Extra
Dry and Night Dry option or another cycle for better
drying.
Download Cycle
Use a dedicated cycle downloadable via Wi-Fi or
NFC.
NOTE
• Only the cycle code for the current Download cycle
appears on the appliance. See the smartphone app
for cycle codes, names, and more information about
the available cycles.
- Default Cycle : P1. Pots & Pans
Machine Clean
This cycle is for cleaning the inside of the dishwasher.
Use the cycle without dishes in the machine. It
eliminates residual soils, odor, white spots, and other
dirt. Add citric acid or another cleaning agent for more
effective results.
• Press and hold Heavy for three seconds to activate.
NOTE
• The Machine Clean
cycles. To activate or deactivate the icon, press the
Delicate button for three seconds.
icon ashes every 30
Rinse
This cycle is a quick rinse for dishes that will not be
washed immediately. The cycle rinses dishes that
have excess soil to soften dried on residue. Rinsing
the dishes helps prevent odors in the dishwasher. No
detergent should be used.
• This cycle does not have drying.
• Press and hold Normal for three seconds to
activate.
Express
This cycle will quickly clean lightly soiled dishes.
(Time : 33 minutes)
• This cycle does not have drying. Select the Extra
Dry and Night Dry option or another cycle for better
drying.
• Press and hold Turbo for three seconds to activate.

25OPERATION
ENGLISH
Options
Select the desired cycle button and then select the
options for that cycle.
Dual Zone
This option automatically sets the spray intensity to
soft for the upper spray arm and strong for the lower
spray arm. Place heavily soiled dishes like plates and
bowls in the lower rack and lightly soiled dishes like
cups and small plates in the upper rack to get the
best results.
Half Load
This option washes intensively by selecting the upper
or lower racks. For small loads, use just the upper
or lower rack to save energy and time. By pressing
the Half Load button, the settings
cancellation of the Half Load option are available.
Energy Saver
This option saves energy by reducing the wash
and rinse temperatures. Wash time is increased to
maintain wash performance. Do not use this cycle
with heavily soiled dishes.
, and the
High Temp
Raises the main wash temperature to improve
cleaning.
Extra Dry
Select the Extra Dry option for better drying
performance. This option adds extra drying time to
the cycle and raises the heated rinse temperature.
• When the rinse aid is empty, the Extra Dry option is
selected automatically.
Night Dry
Dishes are often left in the dishwasher overnight after
the cycle ends. This can result in the steam inside
the tub condensing on dishes, leaving them wet. The
Night Dry option runs the ventilation fan periodically
to help vent the steam from the tub.
• Press and hold Extra Dry for three seconds to
activate.
• The Night Dry option is selected by default for all
cycles for which it is available, except the Normal
cycle.
• To add the Night Dry option to the Normal cycle,
press and hold Extra Dry for 3 seconds.
Delay Start
The Delay Start feature delays the start of a selected
cycle. Each time the Delay Start button is pressed,
the delay time increases by an hour. The delay
time can be set from 1 to 12 hours, in one-hour
increments.

26 OPERATION
Cycle/Option Guide
The cycle guide below shows the available options for each cycle.
Cycle Auto Heavy Delicate Normal Turbo Express Rinse
Soil Level all levels heavy light all levels heavy light light
*Water Usage
**Wash Time with
Options (Mins.)
Dual
Zone
Half
Load
***Energy
Saver
Available
Options
High
Temp
Extra
Dry
Night
Dry
Delay
Start
13.8-
25.0L
3.6-
6.6 gal
89 - 192 140 - 214 95 - 153 98 - 190 59 - 121 33 - 103 12 82
26.9 L
7.1 gal
19.7 L
5.2 gal
9.2-
19.5 L
2.4-
5.2 gal
27.5 L
7.3 gal
20.4 L
5.4 gal
6.8 L
1.8 gal
Machine
Clean
12.3 L
3.2 gal
* Actual water consumption will vary depending on soil level and hardness of water.
** The actual running time and cycle time displayed may change depending on options chosen, soil level, water
temperature, and hardness of water. Therefore, display time and actual running time can be different.
*** Energy Saver cannot be used at the same time as Extra Dry or High Temp.
: Extra drying time only, no added high-temperature rinse.
: ON by default.
NOTE
• Options are not available for Download Cycle.
27OPERATION
ENGLISH
Loading the Dishwasher
The extra tall tub allows loading of dishes, pans, or
other utensils up to 14" high.
For effective washing performance, always follow the
following instructions.
• Remove large particles of food debris from plates
including bones etc. before loading.
• Items with burnt on food should be soaked prior to
loading in the dishwasher.
• Deep pots or dishes should be placed upside down.
• Make sure that all items do not touch each other.
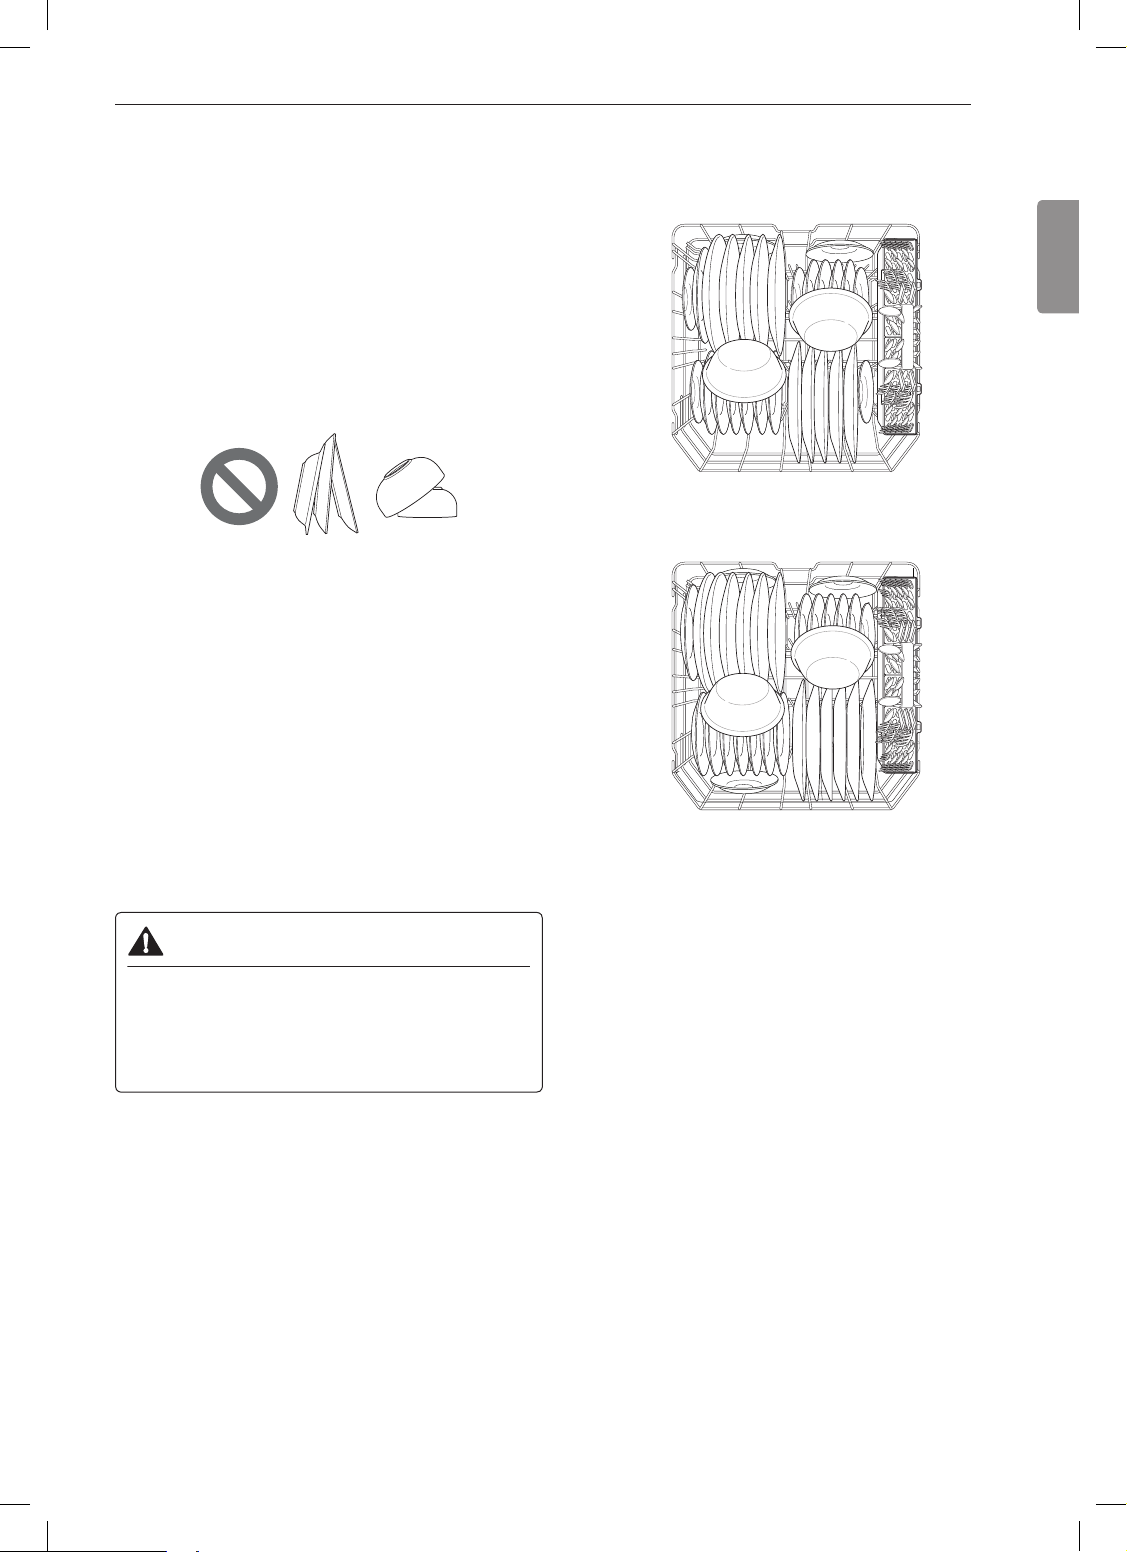
Non-Dishwasher Safe Items
The combination of high water temperature and
dishwasher detergents may damage certain items.
Do not wash the following items in the dishwasher.
• Copper or anodised aluminium
• Hand painted silver or gold leaf crockery
• Wood or bone handled utensils
• Iron or non rust proof utensils
• Plastic items which are not dishwasher safe
• Expensive ware such as silver and dishes with
golden rings
• Fragile item such as crystal glasses
CAUTION
• Do not place pots or pans with plastic handles
in the appliance as the handles may deteriorate
due to the heat and detergent.
• Water proof or long lasting lipstick smudges on
glasses may not be removed during the wash.
Loading the Lower Rack
Loading 10 Place Settings
Loading 12 Place Settings
Lower Rack Loading Tips:
• Plates should be positioned upright and facing the
center of the rack and pots, pans and large dishes
must be turned upside down.
• Load dinner plates, dishes, soup bowls etc.
between the tines.
• Load cookie sheets, cake pans and other large
items on the sides or back of the rack. Loading
these items in the front of the dishwasher can
prevent the water spray from reaching the detergent
dispenser.
• Make sure that pot handles and other large items do
not stop the rotation of the spray arms.
• The lower rack should not be used for small items
such as cups, wine glasses, or small plates. These
items should be loaded in the upper rack.
• Make sure that large items do not interfere with the
rotation of the spray arms, and do not prevent the
detergent dispenser from opening.
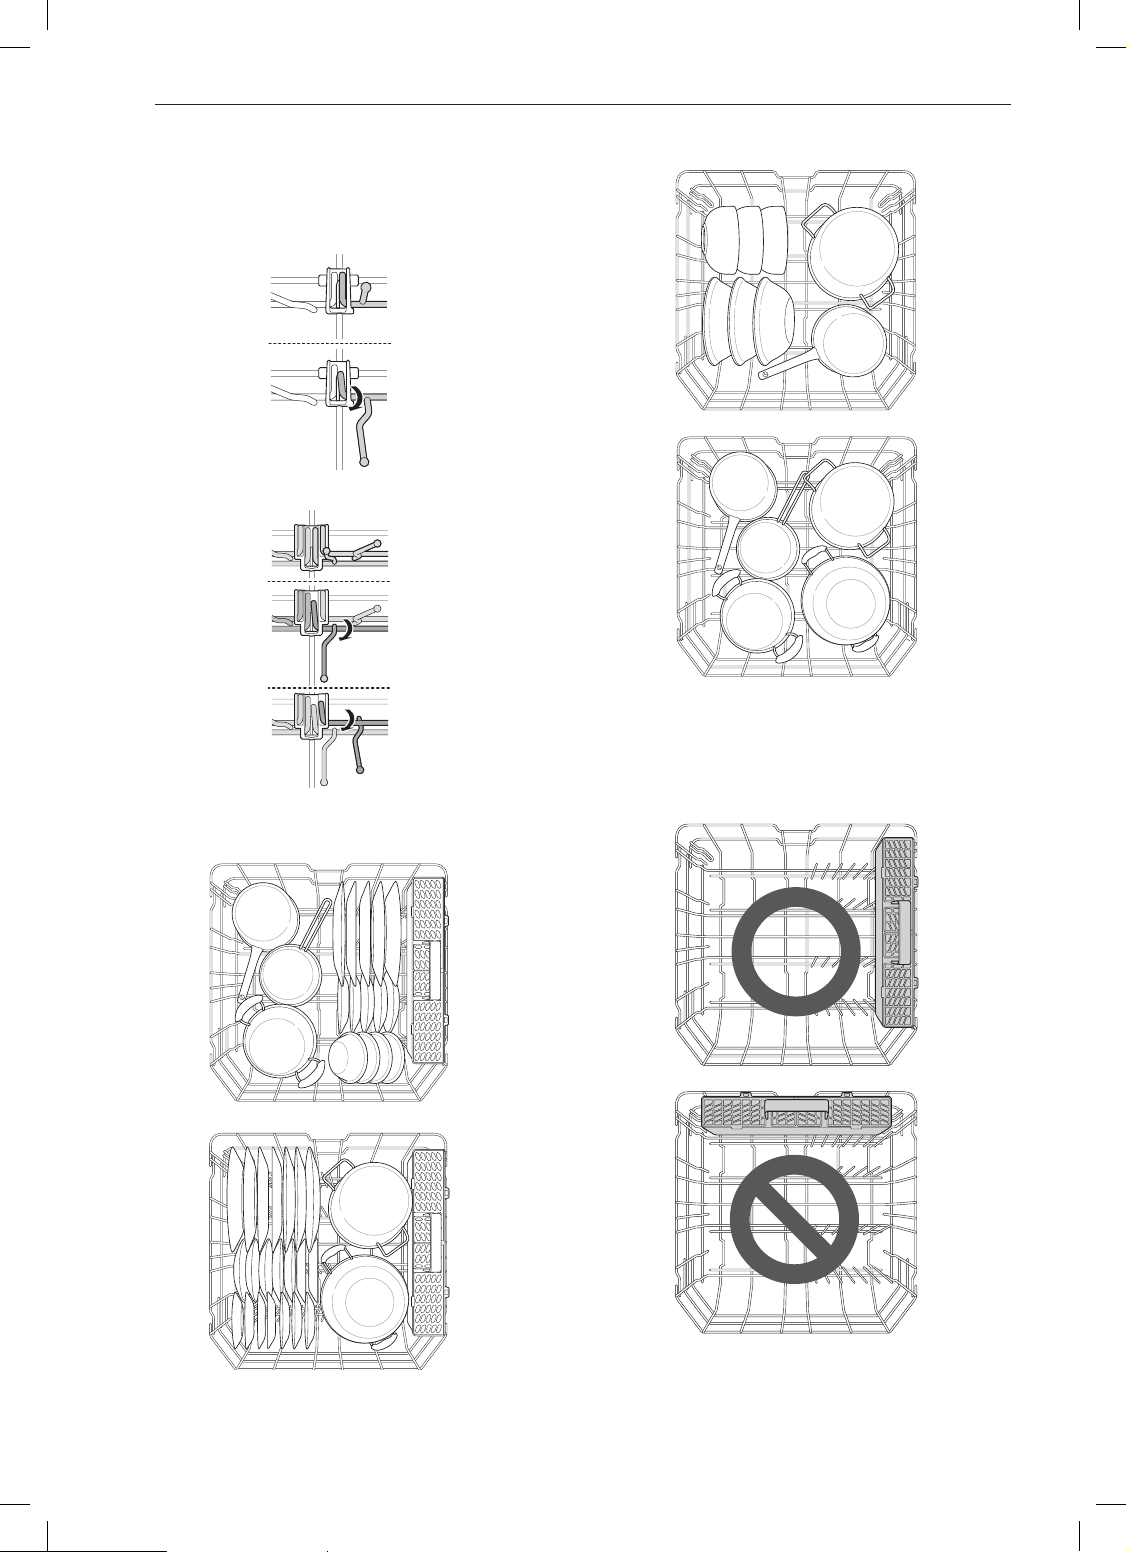
28 OPERATION
Folding Down the Lower Tines
Fold tines down to t larger dishes; pull tines back up
to t smaller dishes.
Case 1
Case 2
Loading Pots & Bowls
Loading Dishes & Pots
NOTE
• The silverware basket ships installed at the back
of the bottom rack. For best performance, install it
along the right side as shown.
29OPERATION
ENGLISH
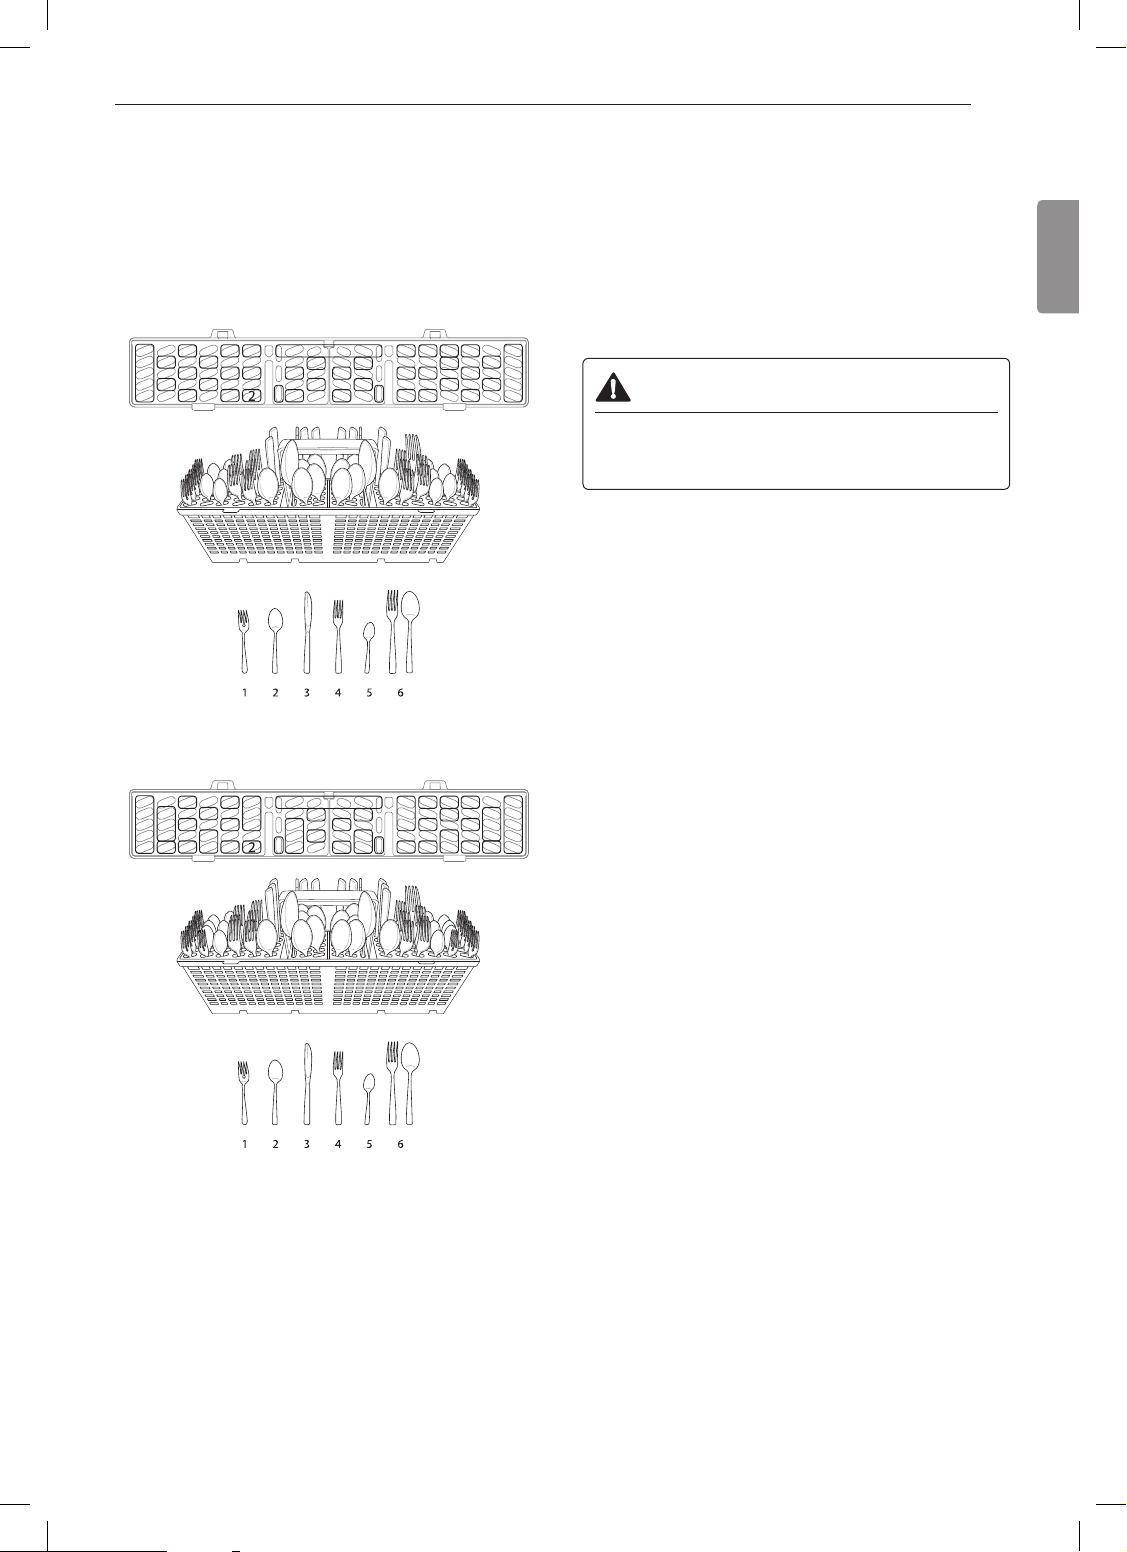
Loading the Silverware
Basket
The silverware basket has separators to avoid
scratching and tarnishing of delicate silverware.
Loading 10 Place Settings
544
5
5
1
5
5
3
3
4
4
4
3
2
2
2
2
6
2
2
2
2
3 4 6 5
6
2
4
443
5 1
4
5
Silverware Loading Tips:
• For best cleaning results, use the top separators in
the basket when loading silverware. The separators
will prevent nesting of silverware.
• Load sharp items, such as knives, pointing down.
• When unloading the dishwasher, it is best to start
with the silverware basket. Doing so will prevent
water droplets from falling on your silverware from
the upper rack.
5
5
WARNING
• Be careful when loading and unloading sharp
items. Load sharp knives with the handles up to
reduce the risk of personal injury.
Loading 12 Place Settings
544
5
5
1
5
1
3
4
4
4
3
2
2
2
2
2
2
6
6
2
3
4 6 5
4
4
4
42
515 1
5
30 OPERATION
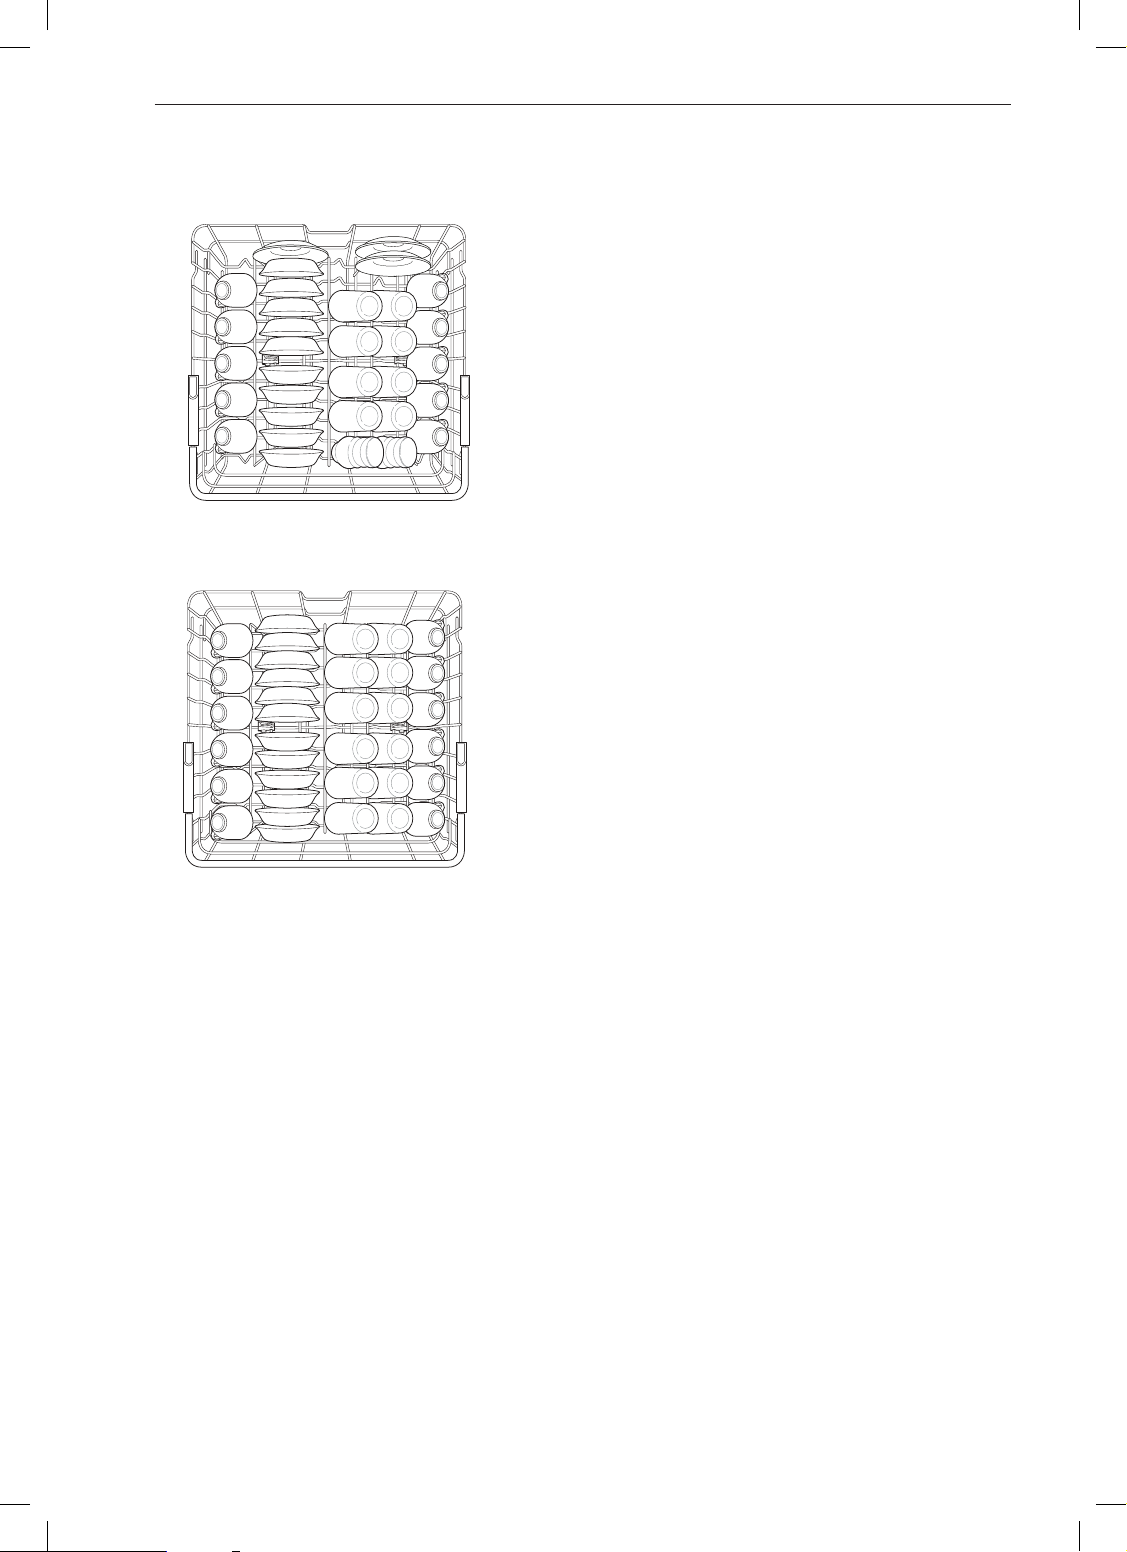
Loading the Upper Rack
Loading 10 Place Settings
Loading 12 Place Settings
Upper Rack Loading Tips:
• Place cups and glasses in the rows between the
rack tines. Placing them over the rack tines can lead
to breakage and water spots.
• To avoid chipping, do not let stemware touch other
items.
• Place items so that the open end faces down for
cleaning and drying.
• Do not stack items on top of each other.
• Use the upper rack for small or delicate items
such as small plates, cups, saucers, glasses, and
dishwasher-safe plastic items.
• Cups, glasses, and bowls must be positioned
upside down.
• Make sure items do not interfere with the rotation of
the spray arms above and below the upper rack.
• When loading larger items in the upper rack, such
as wine glasses or taller cups, it may be necessary
to remove the cutlery rack if one is present.
 Loading...