

Page 1
Model/Modelo/Modèle
LDF9932ST
EnglishEspañolFrançais
DISHWASHER
USER’S GUIDE
Please retain this owner’s manual for
future reference.
Read and follow all safety rules and
instructions before using this product.
GUIA DE USUARIO
Guarde este manual de usuario para
referencia futura. Lea y siga todas
las reglas e instrucciones de seguridad
antes de utilizar este producto.
LAVAPLATOS
GUIDE DE L'UTILISATEUR
Veuillez conserver ce manuel de
l'utilisateur pour référence future.
Lisez et suivez toutes les règles et les
instructions relatives à la sécurité avant
d'utiliser ce produit.
LAVE-VAISSELLE
To contact LG Electronics:
1-800-243-0000 (US)
Or visit us on the Web at: us.lge.com
Para comunicarse con LG Electronics:
1-800-243-0000 (US)
O visítenos en la Web en: us.lge.com
To contact LG Electronics:
1-888-542-2623 (Canada)
Or visit us on the Web at: ca.lge.com
Pour contacter LG Electronics, appelez le
1-888-542-2623 (Canada)
Ou visitez-nous sur le Web à l'adresse :
ca.lge.com
Page 2

2
INTRODUCTION
IMPORTANT SAFETY INSTRUCTIONS
Basic Safety Precautions 3, 4
Electrical Safety 4
Before Using the Dishwasher 5
PARTS AND FEATURES
Features 6
Parts 7
Control Panel 8, 9
TROUBLESHOOTING
Before Calling for Service 21, 22
WARRANTY
Product Registration Information 24, 25
Congratulations on your purchase
and welcome to the LG family.
Your new LG Dishwasher combines
quiet, efficient operation with
advanced cleaning technology.
By following the operating and care
instructions in this manual, your
dishwasher will provide you with
many years of reliable service.
THANK YOU!
OPERATING INSTRUCTIONS
Quick Start 10
Selecting a Cycle 11
Loading the Lower Rack 13
Loading for Steam 13
Loading the Upper Rack 14
Loading the Silverware Basket 14
Height-Adjustable Upper Rack 15
Removing the Upper Rack 15
Loading the Cutlery Rack 16
Height Adjustable Tray 16
Adding Detergent to the Dispenser 17
Adding Rinse Aid to the Dispenser 18
CARE AND CLEANING
Cleaning Metallic Parts 19
Cleaning the Lower Spray Arm 19
Cleaning the Upper Spray Arm 19
Cleaning the Top Spray Arm 20
Seasonal Maintenance and Storage 20
SPECIFICATIONS
Specifications 23
Page 3

3
English
IMPORTANT SAFETY INSTRUCTIONS
READ ALL INSTRUCTIONS BEFORE USE
Your safety and the safety of others is very important.
We have provided many important safety messages in this manual and on your appliance. Always read and
follow all safety messages.
This is the safety alert symbol.
This symbol alerts you to potential hazards that could eventually result in property damage or serious
bodily harm, even death.
The safety alert symbol will be followed by either the word “WARNING” or “CAUTION,” then an important safety
message. These words mean:
WARNING To reduce the risk of fire, electric shock, or injury to persons when using
this appliance, follow basic precautions, including the following:
• This manual contains very important information
regarding the installation, use, and maintenance
of your dishwasher.
• The manufacturer cannot be responsible for
injuries or damage caused by failure to follow
these safety and caution instructions.
• Read all instructions carefully before using the
dishwasher.
• Use the dishwasher only for its intended function.
• Use only detergents or rinse agents
recommended for use in a dishwasher. Keep all
dishwasher detergents and additives out of the
reach of children.
• This appliance is not intended for use by young
children or unqualified persons.
• When loading items to be washed:
1) Load sharp items so that they are not likely to
damage the door seal; and
2) Load sharp knives with the handles up to
reduce the risk of injury when reaching into the
dishwasher.
• Do not wash plastic items in the dishwasher
unless they are labeled dishwasher-safe or the
equivalent. For plastic items not so labeled, check
the manufacturer’s recommendations.
• Do not operate the dishwasher unless all
enclosure panels are properly in place.
• Do not tamper with controls.
• Do not abuse, sit on, or stand on the door or dish
racks of the dishwasher.
• To reduce the risk of injury, do not allow children
to play in or around a dishwasher.
• Under certain conditions, hydrogen gas may be
produced in a hot water system that has not been
used for two weeks or more. HYDROGEN GAS
IS EXPLOSIVE. If the hot water system has not
been used for such a period of time, turn on all
hot water faucets and let the water flow for
several minutes. This will release any
accumulated hydrogen gas. Since hydrogen
gas is flammable, do not smoke or use an
open flame during this time.
• Remove the door to the wash compartment when
disposing of an old dishwasher.
BASIC SAFETY PRECAUTIONS
WARNING
This symbol indicates the possibility of serious bodily harm, even death.
CAUTION
This symbol indicates the possibility of injury or damage to property.
Page 4

4
IMPORTANT SAFETY INSTRUCTIONS
READ ALL INSTRUCTIONS BEFORE USE
For a permanently connected dishwasher:
This appliance must be connected to a grounded
metal, permanent wiring system or an equipmentgrounding conductor must be run with the circuit
conductors and connected to the equipmentgrounding terminal or lead on the appliance.
Consult with a qualified electrician.
Tip Hazard
Do not put excessive downward force on the open
dishwasher door prior to installation, as this could
cause damage to the unit or cause it to tip over. Do
not use the dishwasher before installation has been
completed in accordance with the Installation
Instructions.
BASIC SAFETY PRECAUTIONS
WARNING To reduce the risk of fire, electric shock, or injury to persons when using
this appliance, follow basic precautions, including the following:
ELECTRICAL SAFETY
WARNING
Electrical Shock Hazard
Failure to follow these instructions can result
in death, fire, or electrical shock.
• The dishwasher MUST be grounded. Connect
the ground wire to the green ground connector in
the terminal box.
• Do not use an extension cord with this appliance.
• The dishwasher is designed to be used with
standard household current (120 Volts AC, 60
Hz.). Before connecting the dishwasher, ensure
that the outlet or cable is properly grounded and
polarized by circuit breakers or fuses. Failure to
provide adequate grounding of this appliance
may cause electrical shock or malfunction of the
appliance. Consult with a qualified electrician.
• Do not install or store the dishwasher where it will
be exposed to weather conditions. Failure to
observe this precaution may result in electrical
shock, fire, malfunction, and/or deformation of the
dishwasher.
• Do not damage or place heavy items on the
power cord of the appliance. Do not use the
dishwasher if it has a damaged power cord.
Power cord damage may cause fire and electrical
shock. Consult with a qualified electrician.
• Do not grasp the power cord or touch the
dishwasher controls with wet hands. Do not use
the dishwasher if it has a damaged power cord or
plug, and do not plug the dishwasher into a
damaged outlet. Failure to observe these
instructions may result in electrical shock.
• Disassembly or repair must be performed by
experienced service persons. Improper
disassembly or repair could lead to product failure
or electrical shock.
Page 5

5
IMPORTANT SAFETY INSTRUCTIONS
READ ALL INSTRUCTIONS BEFORE USE
SAVE THESE INSTRUCTIONS
Before using the dishwasher, please read the
Important Safety Instructions.
Water supply temperature should be a minimum
of 120°F (49°C) for better washing and
reasonable cycle time.
For this reason, use the hot water supply only. It
is also important that the dishwasher is loaded
according to instructions for effective cleaning.
When loading the dishwasher, make sure that
insoluble items such as bones, toothpicks, and
pieces of paper have been removed.
BEFORE USING THE DISHWASHER
When loading the dishwasher, observe the
following general guidelines:
1. Place items with deep dish bottoms at an
angle to help water run off and speed the
drying process.
2. Remove solid, burned-on scraps from dishes
prior to loading in the dishwasher.
3. Only load items that are dishwasher-safe.
NOTE: Do not load utensils that are not
heat-resistant, have decorative metal trim, etc.
English
Page 6

6
PARTS AND FEATURES
FEATURES
LARGE CAPACITY
LG dishwashers allow you to load very large
items in both the upper
and lower racks. The
tall tub provides extra
overall capacity and
the clearance to
accommodate large
dishes. Extra large items
(max. 14 in.) may be
loaded in the lower rack
by raising the upper rack.
SLIM DIRECT MOTOR™
The new Slim Direct Motor™ is inverter-
controlled. Wash
power is controlled
based on cycle
selection. It also
offers high energy
efficiency to minimize
energy use.
HYBRID DRYING SYSTEM
This system effectively dries dishes without the
use of a heating
element that would
increase energy
consumption.
VARIO SPRAY SYSTEM
Because the water spray alternates between the
upper and lower racks,
all of the power from
the motor is directed
to one rack at a time.
This concentrates all
the cleaning power of
the motor on each rack
in turn.
SOFT FOOD GRINDER AND
SELF-CLEANING FILTER
For best wash results, your LG dishwasher has
a built-in soft food
grinder and a selfcleaning filter. The
grinder grinds up soft
food and residue into
small particles that can
be caught in the filter
and washed down the
drain. The self-cleaning
filter system continuously cleans the wash water
as it circulates to separate any residue from the
wash water. All dirt and residue is easily washed
down the drain.
LIGHT TOUCH BUTTONS AND BLUE LCD
The light touch buttons on the control panel make
selections easy and
convenient, while the
blue LCD display
clearly displays the
selected cycle and
options.
STEAM WASHING
Steam technology provides better cleaning
performance than
regular wash systems.
Steam is the most
energy efficient gentle
care for your finest
china and stemware.
Page 7

7
PARTS AND FEATURES
PARTS
CONTROL PANEL
DOOR HANDLE
FRONT COVER
LOWER COVER
LEVELING FEET
FRONT DISPLAY
(SignaLight™)
BASE
1
2
4
5
3
6
9
7
8
11
14
15
12
10
TOP SPRAY ARM
UPPER SPRAY ARM
STEAM NOZZLE
LOWER SPRAY ARM
DETERGENT AND RINSE AID
DISPENSER
DRYING VENT COVER
TUB LAMP
(Illumitub™)
CUTLERY RACK
UPPER RACK
SILVERWARE BASKET
LOWER RACK
TOP DISPLAY
POWER BUTTON
1
2
5
6
3
4
7
8
9
10
11
12
15
16
13
14
17
18
19
20
English
16
17
18
19
20
13
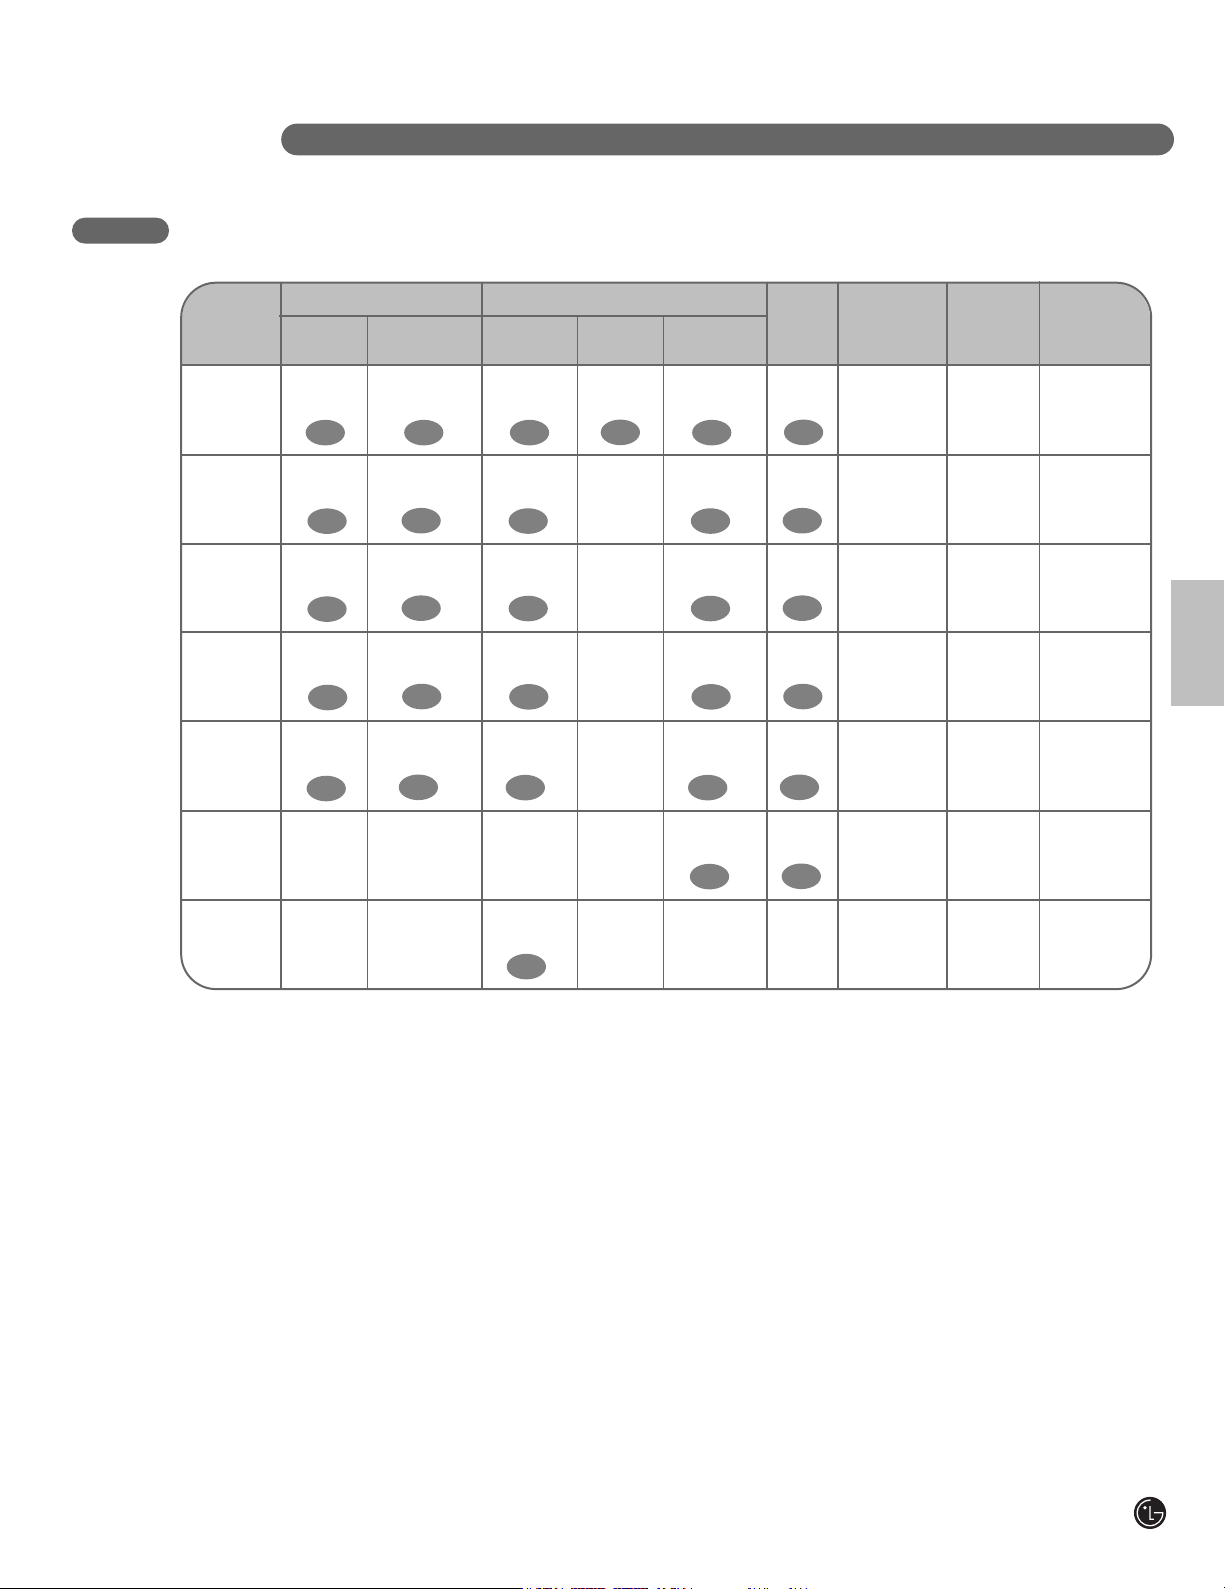
The WASH, RINSE and DRY lamps
twinkle while each phase of washing
process. The CLEAN lamp turns on
after all procedure is ended for 4
minutes.
Page 8

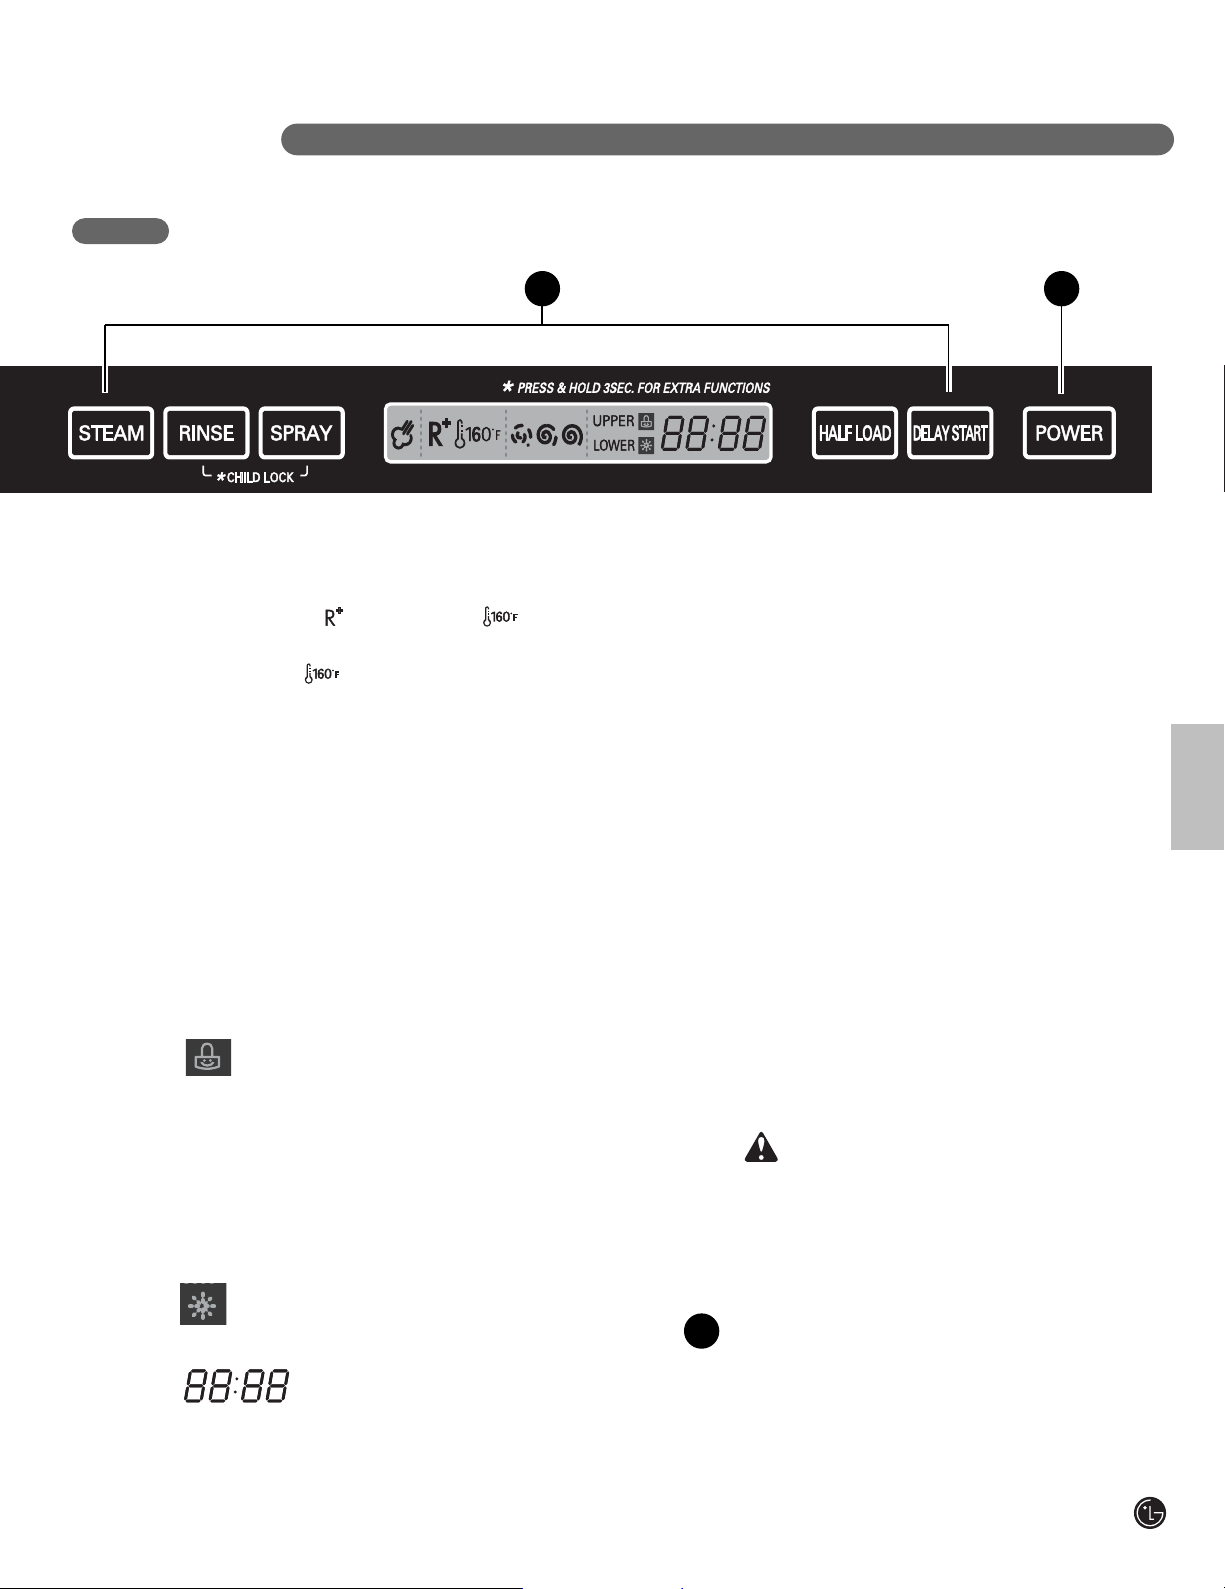
EXTRA RINSE( ), SANITARY( )
8
PARTS AND FEATURES
CONTROL PANEL
1
2
1
2
CYCLES
Press the cycle that corresponds to your desired wash
cycle.
POWER SCRUB
This cycle is for very heavily soiled dishes.
NORMAL
This cycle is for normally soiled, everyday loads.
DUAL INTENSITY
This cycle washes the upper and lower racks at different
spray intensities. The default setting for this cycle washes
the lower rack with strong spray intensity and the upper
rack with soft spray intensity. This provides optimum
cleaning performance for mixed loads, including fine
china and stemware. If other combinations are desired,
use the steps listed below to change the intensities or to
use the HALF LOAD feature.
How To Use Dual Intensity
1. Press and hold the SPRAY button for three seconds until
the UPPER light begins to blink.
2. While the UPPER light is blinking, press the SPRAY
button until the desired intensity for the upper rack is
selected.
3. Press the HALF LOAD button to switch to the lower rack
and use the SPRAY button to adjust to the desired
intensity.
4. Selections can be cancelled by selecting any cycle except
QUICK WASH
This is a shortened cycle that is perfect for recently used
or lightly soiled loads.
STEAM DELICATE
This cycle adds the gentle power of steam to boost the
cleaning power of the delicate cycle. The cycle is perfect
for effectively cleaning delicate items like fine china or
stemware.
STEAM FRESH
This cycle can be used to freshen up dishes that may
have been stored or not used for a long time.
CHIME ON/OFF
To enable or disable the chime, press and hold the
Quick Wash and Steam Delicate buttons for 2
seconds.
RINSE ONLY
This cycle is a quick rinse for dishes that will not be
washed immediately. No detergent should be used.
To select the Rinse Only cycle, press the Power
button; then press the Rinse button once without
pressing any other cycle buttons.
NOTE: If a main cycle has been selected, the Rinse
Only cycle will not be available without first shutting
the power off.
CANCEL
To cancel a running cycle, open the door and then
press and hold the Dual Intensity and Quick Wash
buttons together for 3 seconds. The drain pump
will be activated and the cycle will be cancelled.
CYCLE OPTIONS AND DISPLAY
Press the desired cycle option buttons to select
and set any of the dishwasher’s options described
below. The display will show the selected cycle
times and cycle options.
SPRAY (INTENSITY)
Repeated pressing of the Spray button will select
the desired spray. The strong, medium, or soft light
will show in the top left portion of the display.
RINSE
Repeated pressing of the Rinse button will select the
desired Rinse option. The Sanitary, Extra Rinse, or
Sanitary and Extra Rinse lights will show in the
bottom left portion of the display.
3
Soft ( ), Medium ( ), Strong ( )
Page 9

9
PARTS AND FEATURES
• The ( ) symbol indicates that sanitary rinse has
been selected.
The symbol blinks during the cycle if the sanitary
temperature has been achieved. Once the cycle has
ended, the symbol will be steady if the sanitary
temperature has been achieved.
*NOTE: This high-temperature rinse sanitizes
dishware and glassware in accordance with
NSF/ANSI Standard 184 for residential
dishwashers. Certified dishwashers are not
intended for licensed food establishments.
• When you select Extra Rinse, an additional
rinse cycle is added.
• Rinse Only is a wash cycle described on
the previous page.
CHILD LOCK
Lamp will turn on when Child Lock
setting is on.
• To lock/unlock the buttons, press and hold the Rinse
and Spray Buttons simultaneously for 3 seconds with
the door open.
• Lock the control buttons during cycle operation to
prevent settings from being changed.
RINSE AID
Refill with rinse aid when the lamp
turns on.
DIGITAL DISPLAY
The Digital Display on the control panel
shows the estimated cycle and option
times.
When the dishwasher is powered up, the display will be
blank. When the cycle and options are selected, the
display will show the total estimated time to complete
those selections. During operation, the display shows
the remaining estimated operating time.
NOTES:
• The estimated time shown in the display does not
include delay times for heating water, etc.
• If Delay Wash is selected, the display shows the
delay time in hours.
HALF LOAD
• For small loads, you may use just the upper or
lower rack to save energy.
• Each press of the Half Load button cycles
between upper rack only and lower rack only.
• If Half Load is not pressed, the dishwasher will
run normally, with upper and lower spray arms
operating alternately.
DELAY START
• To delay the start of a selected cycle, press
the Delay Start button.
• Each time Delay Start is pressed will delay
the start of the cycle by one additional hour.
• The delay start time can be set from 1 to 24
hours in one-hour increments.
STEAM
• Press the Steam button to add steam to a
selected cycle.
• The Steam symbol will be lighted when the
STEAM option has been selected.
• The steam symbol will blink while steam is
being injected into the dishwasher.
POWER
• Pressing the Power button turns on power
to the controls.
• After the cycle is complete, the power
automatically turns off for safety and economy.
• If there is a power surge, power outage,
or disruption of any kind, the power will be
automatically turned off for safety, and the
cycle will need to be restarted.
CONTROL PANEL (continued)
3
English
4
WARNING
Steam can cause burns. Use caution in the
area of the steam nozzle on the left side of
the dishwasher if the door is opened
during the steam portion of a cycle.
Contact with the steam or the steam
nozzle can cause burns.
4
Page 10

10
OPERATING INSTRUCTIONS
QUICK START
CAUTION
Empty the lower rack first and then the upper
rack. This will avoid water dripping from the
upper rack onto dishes in the lower rack.
WARNING
In general, it is not advisable to open the door
while the dishwasher is in operation. If the door
is opened, a safety device stops the dishwasher.
Care should be taken when opening the door
immediately following the cycle, as steam may
escape.
AUTO-OFF
The dishwasher will automatically turn off if a cycle
is not selected or if the door is not closed within 10
minutes.
NOTE :
If small hard items such as bones, nut shells or plastic or glass pieces get into the pump, they can
cause a grinding noise as the soft food disposer in the dishwasher attempts to grind up these hard
objects. Some objects that might get into the pump could eventually be ground up and drained away.
However, if a grinding noise is heard and it does not go away, call for service to have the objects
removed from the pump. Some objects such as pieces of glass could cause damage to the pump if not
removed promptly.
LOAD THE DISHES
Scrape the dishes free of excess food, bones,
and any other hard, non-soluble residue. Pull
each rack out and load the dishes as
described on pages 13 and 14.
MEASURE THE DETERGENT
Using the guidelines on page 17, fill the
detergent cup with the recommended amount
of detergent and close the lid. If a prewash is
desired, the recess on top of the lid should
also be filled with detergent.
TURN ON THE DISHWASHER
To start the cycle, open the door and press
the Power button.
CHECK THE RINSE AID
The Rinse Aid indicator light will illuminate if
the level of rinse aid in the dishwasher is low.
Add rinse aid if the level is low to maintain the
effectiveness of the dry cycle.
SELECT THE CYCLE AND OPTIONS
Select the cycle and options that best fit the
load by referring to the chart on page 11. The
display will show the estimated time for the
cycle and options selected.
CLOSE THE DOOR
The dishwasher will start automatically, after a
slight delay, when the door is closed and
latched. During the cycle, the display will
indicate the estimated time remaining for the
cycle and options selected. If the door is
opened during the cycle, the dishwasher will
stop. When the door is closed, the cycle will
resume from the point where it was stopped.
END OF CYCLE
When the cycle is completed, a chime will
sound and the display will show “END.” After a
short time, the display and controls will shut
off for safety and energy conservation.
1
2
3
6
4
5
7
Page 11
11
SELECTING A CYCLE
Power Scrub
This cycle is for very heavily soiled loads such
as cookware.
Normal
Select this cycle for normally soiled, everyday
loads.
Dual Intensity
This cycle allows the upper and lower racks to
be washed at different spray intensities in the
same cycle for a precise balance of cleaning
performance and care of the dishes. See
page 8.
Quick Wash
This is a shortened cycle that is perfect for
recently used or lightly soiled loads.
Steam Delicate
This cycle adds the gentle power of steam to
boost the cleaning power of the delicate cycle.
The cycle is perfect for effectively cleaning
delicate items like fine china or stemware.
Steam Fresh
This cycle can be used to freshen up dishes that
may have been stored or not used for a long
time.
Rinse Only
If you don’t plan to wash a load of dishes
immediately, use this cycle to remove excess
soil and soften dried-on residue. To select
Rinse Only, press Rinse button without selecting
a main cycle. See page 8.
OPERATING INSTRUCTIONS
English
*Actual water consumption will vary depending on soil level.
**Actual cycle times may vary depending on soil levels and water temperature.
Steam
Delicate
113°F
45°C
140°F
60°C
5.5–6.9 gal.
21–26 L
107
Min.
CYCLE
Spray
Itensity
Power
Scrub
Normal
Dual
Intensity
Rinse
Only
Wash
Rinse
Dry
*Water
Usage
**Cycle
Time
Prewash Main Wash Rinse 1 Rinse 2
Heated
Rinse
131°–145°F
55°–63°C
154°F
68°C
5.5–9.2 gal.
21–35 L
122–176
Min.
95°–140°F
35°–60°C
149°-153°F
65°-67°C
Strong
Medium
Medium
Medium
Medium
Medium
Soft
5.5–6.9 gal.
21–26 L
138
Min.
154°F
68°C
149°F
65°C
5.5 gal.
21 L
78
Min.
2.6–6.9 gal.
10–26 L
97–124
Min.
Quick
Wash
Steam
Fresh
1.2–1.5 gal.
4.5-5.5 L
49
Min.
1.3 gal.
5 L
15
Min.
154°F
68°C
131°F
55°C
115°F
46°C
Page 12

12
OPERATING INSTRUCTIONS
CAUTION
NON-DISHWASHER-SAFE ITEMS
The combination of high water temperature and
dishwasher detergents may damage certain items.
LG does not recommend washing the following
items in the dishwasher:
• Hand-painted silver or gold-leaf dishes
• Wood- or bone-handled utensils
• Iron or other rust-prone utensils
• Plastic items that are not dishwasher-safe
When in doubt, check manufacturers’
recommendations.
Page 13
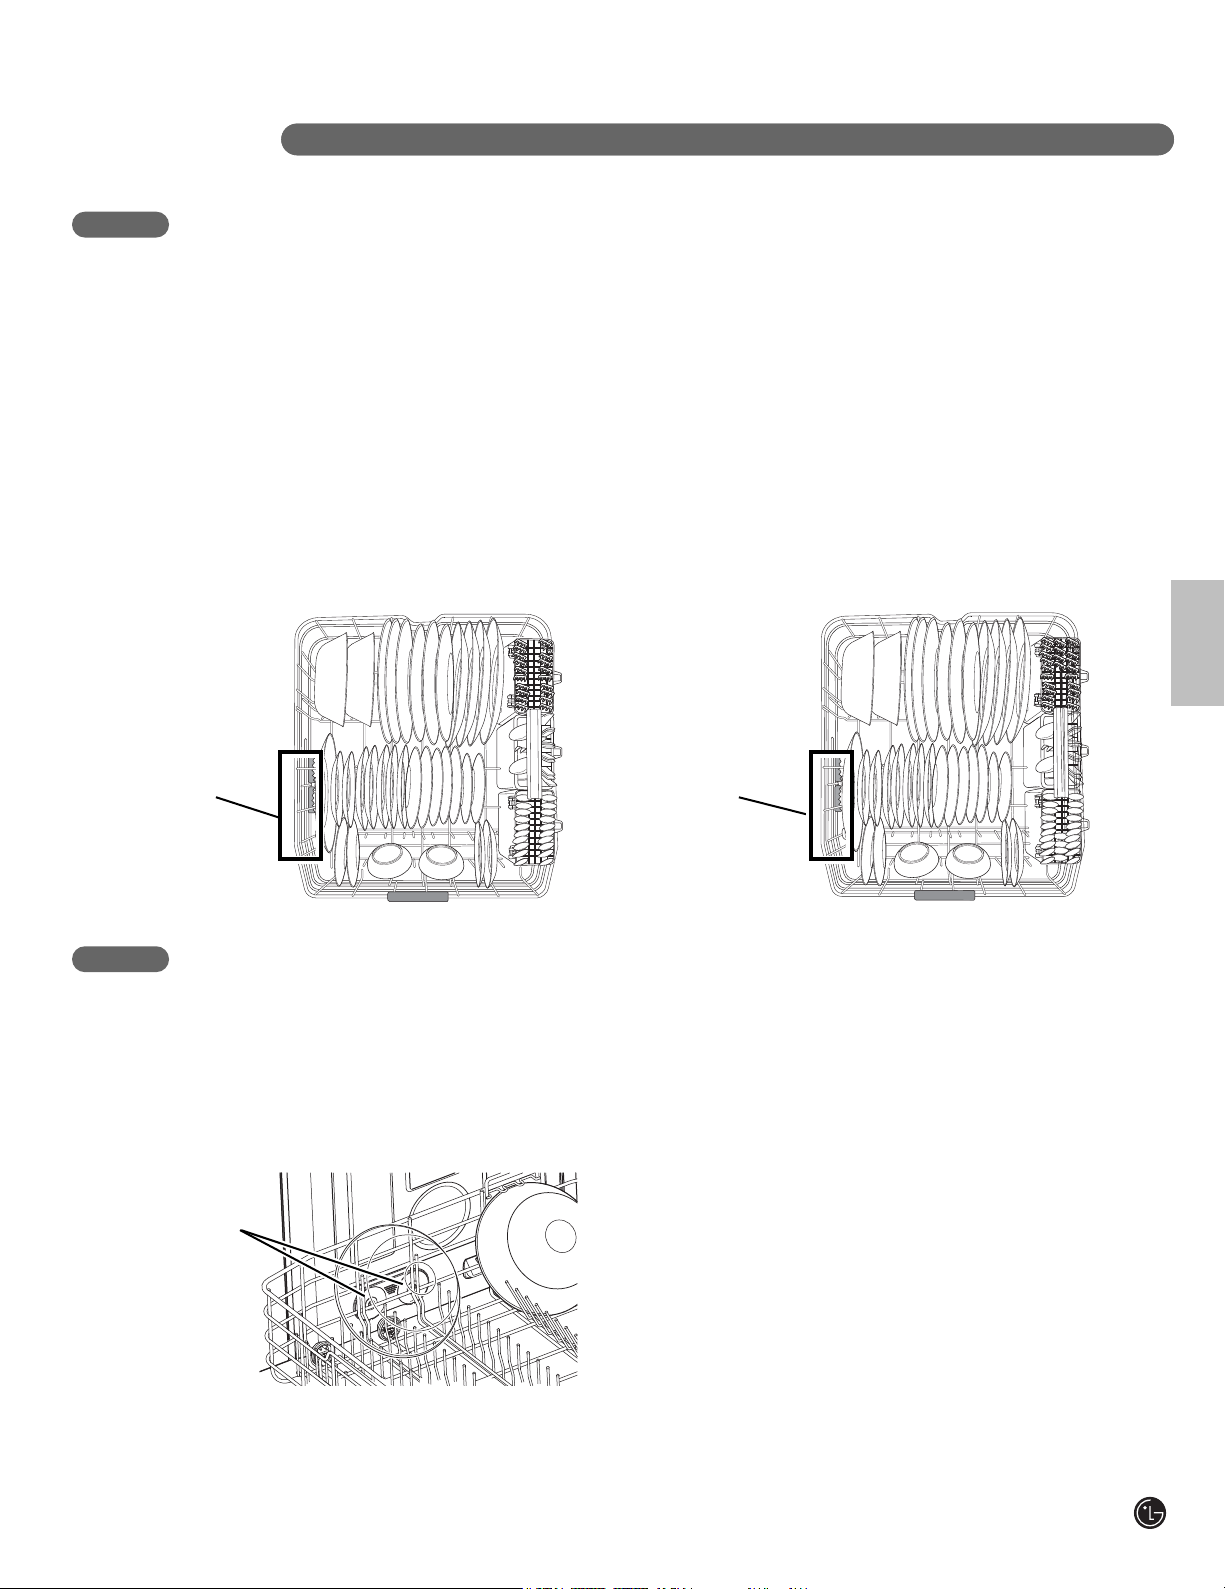
13
The extra tall tub allows loading of dishes, pans,
or other utensils up to 14 inches high.
NOTE: Make sure large items do not interfere
with the rotation of the spray arms, and do not
prevent the detergent dispenser from opening.
The lower rack is recommended for dinner
plates, soup bowls, dishes, pots, pans, lids, and
grill trays. Plates should be positioned vertically
and facing the center of the rack. Pots, pans,
and large bowls must be turned so that the
inside faces downward. The silverware basket
may be used in either the lower or upper rack.
The lower rack should not be used for small
items like cups, wine glasses, or small plates.
These items should be loaded in the upper rack.
Load heavily soiled or stained dishes in the front
left side of the lower rack with the dirty side
facing out and down. This is the area the stream
enters the dishwasher. The use of hot steam
maximizes the dishwasher’s cleaning
performance.
LOADING THE LOWER RACK
OPERATING INSTRUCTIONS
LOADING 10 PLACE SETTINGS, LOWER RACK
LOADING 12 PLACE SETTINGS, LOWER RACK
English
Steam
Nozzle
Area
Steam
Nozzle
Area
To maximize the benefits of steam for removing
difficult or baked-on soils, load the target dishes
on the lower rack to the left side. For best effect,
load the dishes so they are facing down and to
the left to benefit from both the direct steam
spray and the lower spray arm wash action.
LOADING FOR STEAM
Steam
Nozzles
Page 14

14
OPERATING INSTRUCTIONS
LOADING THE SILVERWARE BASKET
The silverware basket has separators to avoid
scratching and tarnishing of delicate silverware.
The basket can be separated into three modules
that can be used individually in both the upper
and lower racks. For small loads of silverware,
modules can be removed, allowing extra space
for other dishes.
WARNING
Be careful when loading and unloading sharp
items. Load sharp knives with the handles
up to reduce the risk of personal injury.
1
2
3
4
5
LOADING THE UPPER RACK
Use the upper rack for small or delicate items
such as small plates, cups, saucers, glasses,
and dishwasher-safe plastic items. Cups,
glasses, and bowls must be positioned upside
down. Extra cups or cooking utensils can be laid
on the fold down cup racks, which may also
provide support for long stemmed glasses. Make
sure items do not interfere with the rotation of the
spray arms above and below
the upper rack.
LOADING 10 PLACE SETTINGS, UPPER RACK
LOADING 12 PLACE SETTINGS, UPPER RACK
Page 15
15
OPERATING INSTRUCTIONS
The upper rack adjusts up to allow you to place
tall and oversized items up to 14 inches high in
the lower rack. Or, you can adjust the upper rack
down to allow placement of large dishes up to
12 inches high in the upper rack.
NOTE: After adjusting, make sure that dishes in
the upper and lower racks do not interfere with
the rotation of the spray arm. Do not adjust the
rack while it is loaded with dishes.
HEIGHT-ADJUSTABLE UPPER RACK
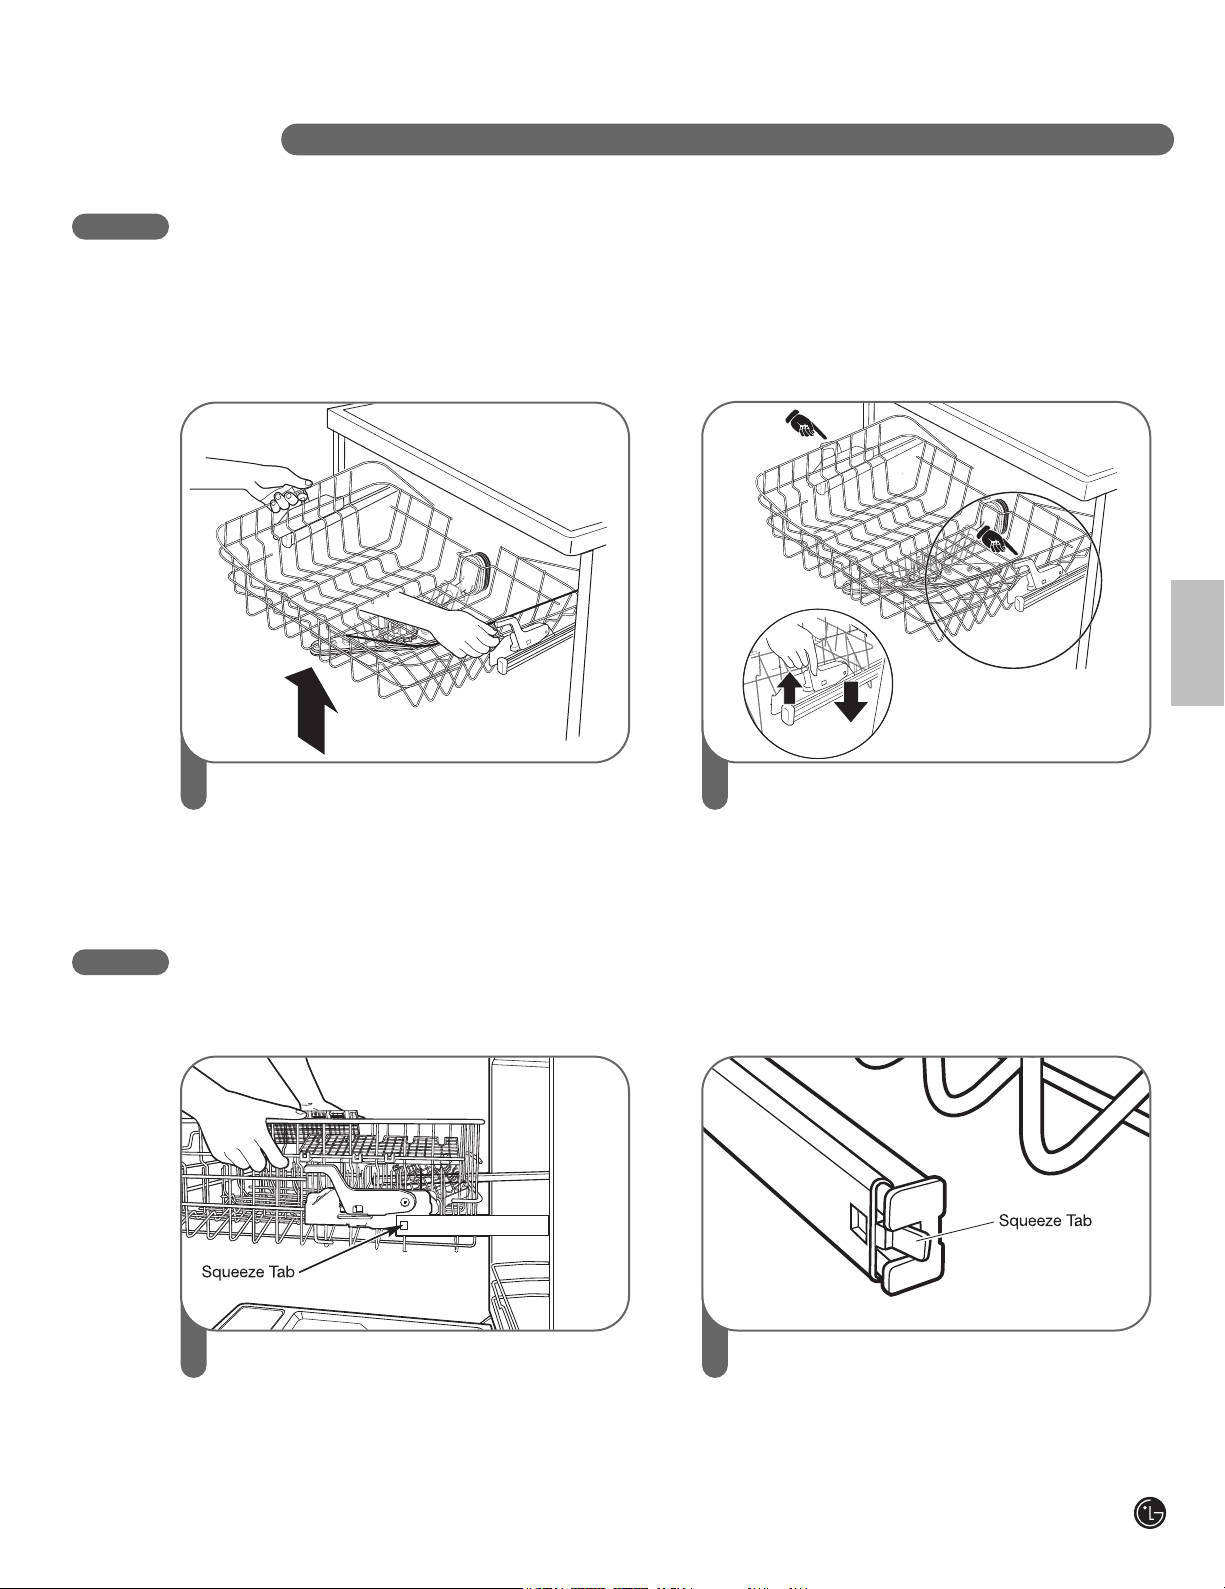
The upper rack can be removed to make more room for items in the lower rack.
NOTE: Always remove dishes from the upper rack before removing it.
REMOVING THE UPPER RACK
English
1
To raise the rack:
Simply lift the rack at the center of each
side (see illustration) until the rack locks
into place in the upper position. It is not
necessary to lift the lock levers to raise
the rack.
2
To lower the rack:
Hold the rack at the center of each side
to support its weight; then lift the lever on
each side to release the rack and lower it to
the lower position.
1
Pull the upper rack out until it stops. Locate
the squeeze tab.
2
Squeeze the tab of the retainer at the end of
each side rail and remove it. Be careful not
to allow the upper rack to fall off the rails
after the retainers are removed. Pull the
upper rack out of the slides.
Page 16

16
The cutlery rack is best suited for flatware and
most cooking or serving utensils.
The separators on the cutlery racks help keep
flatware separated to avoid damage and improve
cleaning.
Knife, fork, and spoon handles should be
positioned between the tines.
If the handles of your
flatware are too thick,
then reverse the pieces
so the handles face the
other direction as
shown in the bottom
figure.
Each side tray can be adjusted independently to a
high or low position to accommodate different sizes
of utensils or cutlery.
Each tray is adjusted by lifting it out and rotating it
front to back.
Removable Cutlery Rack
The entire cutlery rack can be removed if more
space is needed on the upper rack for larger items.
NOTE :
Always remove cutlery from the rack before
removing the rack.
WARNING
Be careful when loading and unloading sharpedged items. Load sharp knives with the blade
down in order to reduce the risk of injury.
Pull the rack out to the end of the rails, then lift
the front of the rack so the rollers clear the stop
on the end of the rail. The rack can now be slid
forward and removed from the rails.
Right Wrong
Alternate
Sample 10-place setting.
OPERATING INSTRUCTIONS
LOADING THE CUTLERY RACK HEIGHT ADJUSTABLE TRAY
Page 17

17
English
OPERATING INSTRUCTIONS
ADDING DETERGENT TO THE DISPENSER
• Detergent must be put into the detergent
compartment before starting any cycle except
Rinse Only.
• If dishes are only lightly soiled, use less
detergent.
• The total capacity of the main detergent
compartment is 1.4 oz (40 ml). The recommended usage marks in the dispenser are
0.5 oz (15 ml) and 0.9 oz (25 ml). Using excess
detergent can leave a film on dishes and in the
dishwasher resulting in poor wash performance.
• The amount of detergent needed depends on
the cycle, load size, and soil level of dishes.
1
If the lid is closed, press the lever on the
bottom side of the lid to open the dispenser.
2
Add dishwashing detergent to the main wash
compartment until the level is between the 15
and 25 lines. Fill to 25 line for hard water or
heavily soiled loads or to 15 line for soft
water or lightly soiled loads. Adjust amount of
detergent to best meet your cleaning needs
and conditions.
Close the lid firmly until a click is heard.
NOTE: DO NOT add detergent when the
Rinse Only cycle is selected.
Dispenser Latch
3
If a prewash is desired, fill the recessed
prewash compartment area in the lid with
detergent.
NOTE: Too much detergent can leave
a film on dishes and in the dishwasher
resulting in poor wash performance.
Main Wash Compartment
CAUTION
DETERGENT INFORMATION
Use only detergent intended for automatic
dishwashers. Incorrect detergent may cause the
dishwasher to fill with suds during operation.
Excess sudsing may reduce wash performance
and may cause the unit to leak. DO NOT use
hand dishwashing detergent in this dishwasher.
Prewash
Compartment
NOTE :
Remove the label on the dispenser prior to
running the dishwasher.
Page 18

18
OPERATING INSTRUCTIONS
ADDING RINSE AID TO THE DISPENSER
The use of rinse aid products is recommended to
prevent spots on dishes from water droplets
remaining after the completion of the wash cycle,
and to enhance the performance of the dry cycle.
NOTE: Only use liquid rinse aid in this
dishwasher.
1
Rotate the round cap counterclockwise to
remove it.
2
Add a liquid rinse aid to the maximum fill
level (max. 4.8 oz [145 ml]).
3
Replace the cap and turn clockwise to lock.
Rinse aid will be dispensed automatically
during the final rinse cycle.
RINSE AID DISPENSER ADJUSTMENT
The rinse aid dispenser is factory-set to level 3,
which should provide
the best performance
under most conditions.
Setting the rinse aid
control too low will
contribute to spotting
and streaking of dishes
and poor
drying performance.
Setting the control too high can cause foaming,
which will cause poor wash performance.
To adjust the rinse aid dispenser setting, remove
the cap and adjust the rinse aid lever to the
desired setting.
REFILLING THE RINSE AID
The capacity of the rinse aid dispenser is 4.8 oz
(145 ml). How often the dispenser will need to be
refilled depends on how often dishes are washed
and the rinse aid setting used.
If the rinse aid level is low, the Rinse Aid light on
the control panel will illuminate.
NOTE :
The dispenser also has a round Rinse Aid
Indicator Eye that is dark when the dispenser
is full and light when it is empty.
Rinse Aid Indicator Eye
Adjustment Lever
Page 19

19
English
CLEANING METALLIC PARTS
CARE & CLEANING
For best results, it is important to periodically check and care for the spray arms.
WARNING To prevent injury during care and maintenance/cleaning, wear
gloves and/or protective clothing.
Some exterior and interior parts can be cleaned
with a damp cloth or sponge. A cloudy film may
form on the surface of the stainless steel tub,
especially with hard water.
CLEANING THE LOWER SPRAY ARM
• Make sure that the water jet holes are not
blocked by food particles.
• When cleaning is necessary, remove the lower
spray arm by pulling up.
• After cleaning the lower spray arm, replace it
by pushing down until it clips into place. Be
sure the spray arm turns freely.
CLEANING THE UPPER SPRAY ARM
1
Pull the upper rack forward. Make sure that
the water jet holes are not blocked by food
particles.
When cleaning is necessary, remove the
upper spray arm by turning the nut on
the bottom of the spray arm 1/8 turn
counterclockwise and pulling down
(see illustrations).
2
After cleaning the upper spray arm, press
it up into place. Turn the nut 1/8 turn
clockwise to make sure the nut locks
back into place.
Page 20
20
CARE & CLEANING
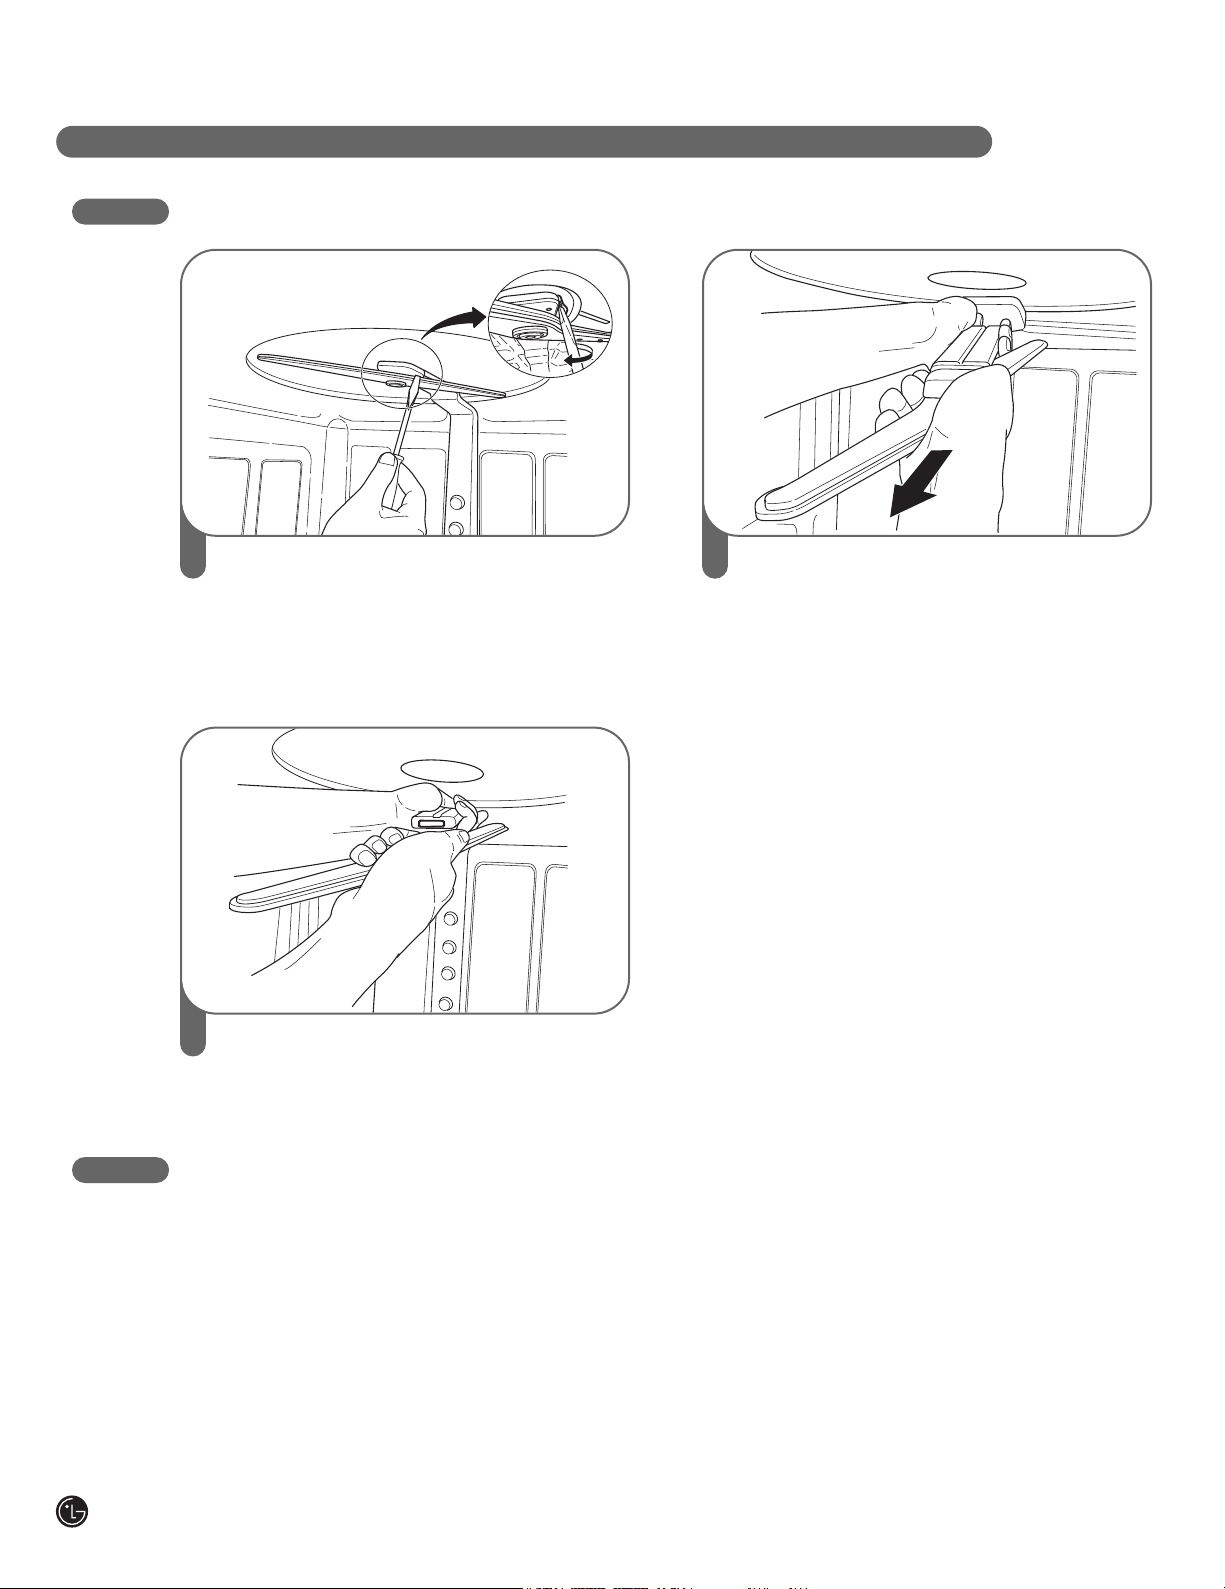
CLEANING THE TOP SPRAY ARM
SEASONAL MAINTENANCE AND STORAGE
• During the summer, if you will be absent for
extended periods of time, it is recommended
that you close the water valve and unplug the
power cord, or turn off the circuit breaker.
• During winter, if you will be absent for extended
periods of time and there is a possibility of
freezing temperatures, it is recommended that
you winterize the water supply lines and the
dishwasher itself. Winterization must be
performed by experienced service personnel.
1
Make sure that the water jet holes are not
blocked by food particles.
When cleaning is necessary, use a screwdriver
to release the retainer clip from the bracket
that holds the top spray arm assembly to
the tub.
2
Then pull the spray arm out.
3
After cleaning the top spray arm, replace it.
Slide it back into place and make sure the
retainer clip engages.
Page 21

21
English
BEFORE CALLING FOR SERVICE
TROUBLESHOOTING
Problem Possible Causes Solutions
If you have followed this troubleshooting guide and the problem persists, or if the problem you are
experiencing is not listed here,
please call LGE Customer Service at 1-800-243-0000(US), 1-888-542-2623(Canada).
Dishwasher does not
operate
Dishwasher operates
too long
Odor
Water remains in tub
after completion of cycle
Spots and filming on
dishes
Door is not completely closed.
Power supply or power cord is
not connected.
Fuse is blown or circuit breaker tripped.
Unit is connected to cold water.
Previous cycle was stopped before
completion.
Drain hose is kinked or clogged.
Low water temperature.
Wrong amount of detergent used.
Overloading.
Improper loading.
Insufficient water pressure.
Insufficient detergent.
Rinse aid dispenser empty.
Extremely hard water.
To remove hard water build up in tub
Make sure the door is completely closed and latched.
Connect the power supply or cord properly.
Replace fuse or reset circuit breaker.
Check the water supply connection or water heater
setting.(Heating cold water takes longer.)
Operate the Quick Wash cycle with detergent without
loading any dishes.
Adjust hose or clear blockage.
Water supply should be at least 120°F for best wash
performance.
Use the recommended amount of detergent.
Load the proper amount of dishes.
See the Using Your Dishwasher section.
Adjust water pressure to between 20 and 120 psi.
Add the recommended amount of detergent.See Using
Your Dishwasher section.
Refill rinse aid dispenser.
The best way to eliminate spots on your dishes is to install a whole house water softener in your home.
If a water softener is already installed or you do not plan on installing one,
try adding an “Extra Rinse”option as part of the wash cycle to help minimize this condition.
T o add an Extra Rinse to the cycle,select the wash cycle then press extra rinse.
Note: When selecting the “Extra Rinse”cycle times and water usage will be increased from normal use.
Remove all dishes,silverware and silverware holder from the dishwasher .Only the racks should remain
in the tub.
Fill a measuring cup with white vinegar approximately 14~17ounces(400~500mL),place the measuring
cup in the lower rack.
Run a “Normal”cycle and select “Extra Rinse”and “Sanitary”,then close the door.
DO NOT USE ANY DETERGENT
Note: Make sure to let the dishwasher complete the entire cycle.The cleaning method should only be
done as needed.
Page 22

22
TROUBLESHOOTING
BEFORE CALLING FOR SERVICE (continued)
Problem Possible Causes Solutions
If you have followed this troubleshooting guide and the problem persists, or if the problem you are
experiencing is not listed here,
please call LGE Customer Service at 1-800-243-0000(US), 1-888-542-2623(Canada).
Cloudiness on glassware
Black or gray marks on
dishes
Yellow or brown film on
inside surfaces of
dishwasher
Dishes don’t dry
Lamps don’t illuminate
Sprays arms do not
rotate smoothly
Upper rack crooked
IE Error
OE Error
FE Error
E1 Error
HE Error
TE Error
The display shows PF
Combination of excessive detergent and
soft water.
Aluminum items rubbing dishes
during cycle.
Coffee or tea stains.
Rinse agent dispenser empty.
Power is not connected.
Fuse is blown or circuit breaker tripped.
Holes of spray arms are blocked by food
particles.
Rack is poorly adjusted.
Water inlet problem.
Drainage problem.
Excessive water supplied.
Water leakage problem.
Heater circuit failure.
Thermistor failure or very high inlet
water temperature (over 194°F).
The dishwasher experienced a power
failure.
Use less detergent and use a rinse aid to minimize
the problem.
Reposition the dishes.
Eliminate the stain by using a stain removal product.
Check and refill the rinse agent dispenser if empty.
Connect power supply.
Replace fuse or reset circuit breaker.
Clean the holes of spray arms.
See Using Your Dishwasher section.
Check for clogged,kinked or frozen water inlet hose.
Check water supply.
Check for clogged,kinked or frozen drain hose.
Please call your Authorized Service Center or LGE
Customer Service at
1-800-243-0000(US),1-888-542-2623(Canada).
This is not an error.The dishwasher will restart
automatically after 10 seconds.
Food soil remains on
dishes
Improper cycle selection.
Water temperature is too low.
Dishwashing detergent was not used.
Low inlet water pressure.
Water jet holes on spray arms blocked.
Improper loading of dishes.
Select correct cycle based on soil level and type of
dishware being washed.
Check water supply connection or water heater setting.
Use recommended detergent.
Water pressure should be between 20 and 120 psi.
Clean the spray arms.
Make sure dishes do not block spray arm rotation or
interfere with detergent dispenser.
Noise Some level of noise is normal during
operation.
The dishwasher is not level.
Nozzle arm knocking against dishes.
Detergent cover opening.
Drain pump at the beginning of drain cycle.
Adjust the leveling feet.
Reposition the dishes.
Page 23

23
English
SPECIFICATIONS
SPECIFICATIONS
• Power Supply: 120V, 60 Hz AC only, minimum 15A circuit breaker
• Water Pressure: 20–120 psi (140–830 kPa)
• Size (WxDxH): 23 3/4″ x 24 5/8″ x 33 5/8″ (603 mm x 625 mm x 854 mm)
• Inlet Water Temperature: 120°F (49°C) minimum
• Product Weight : 114 lbs.(51.7kg)
The appearance and specifications are subject to change without notice.
Page 24
LG ELECTRONICS, INC.
DISHWASHER LIMITED WARRANTY — USA
Should your LG Dishwasher prove to be defective in material or workmanship under normal use during the warranty period listed below,effective from the
date of original consumer purchase of the product, LG Electronics will replace the defective part(s). Replacement parts will meet intended fit and function of
the original part. Replacement parts are warranted for the unexpired portion of the original warranty period.This limited warranty is good only to the original
purchaser of the product and effective only when used in the United States of America.
No other warranty is applicable to this product. THIS WARRANTY IS IN LIEU OF ANY OTHER WARRANTY, EXPRESS OR IMPLIED, INCLUDING
WITHOUT LIMITATION, ANY WARRANTY OF MERCHANTABILITY OR FITNESS FOR A PARTICULAR PURPOSE. TO THE EXTENT ANY IMPLIED WARRANTY
IS REQUIRED BY LAW, IT IS LIMITED IN DURATION TO THE EXPRESS WARRANTY PERIOD ABOVE. NEITHER THE MANUFACTURER NOR ITS U.S.
DISTRIBUTOR SHALL BE LIABLE FOR ANY INCIDENTAL, CONSEQUENTIAL, INDIRECT, SPECIAL, OR PUNITIVE DAMAGES OF ANY NATURE, INCLUDING
WITHOUT LIMITATION, LOST REVENUES OR PROFITS, OR ANY OTHER DAMAGE WHETHER BASED IN CONTRACT, TORT, OR OTHERWISE. Some states
and/or territories do not allow the exclusion or limitation of incidental or consequential damages or limitations on how long an implied warranty lasts, so the
above exclusion or limitation may not apply to you.This warranty gives you,the original purchaser,specific legal rights and you may also have other rights
that vary from state to state or territory to territor y.
WARRANTY PERIOD:
For the Period of: LG Will Replace:
One year from date Any part of the Dishwasher which fails due to a defect in materials or workmanship. During this full one-year
of original purchase warranty, LGE will also provide, free of charge, all labor and on-site service to replace the defective part.
Two years from date Any part of the dishwasher (except as listed below) which fails due to a defect in materials or workmanship.
of original purchase During this two-year parts warranty, you will be responsible for any labor or on-site service costs.
Five years from date Electronic control board and dishwasher rack which fails due to a defect in materials or workmanship.
of original purchase During this five-year parts warranty, you will be responsible for any labor or on-site service costs.
Ten years from date Direct Drive motor which fails due to a defect in materials or workmanship.
of original purchase During this ten-year warranty, you will be responsible for any labor or on-site service costs.
Limited Lifetime Stainless steel door liner and tub (as long as owned by the original purchaser) which fails due to a defect in
materials or workmanship. During this limited lifetime parts warranty, you will be responsible for any labor
or on-site service costs.
Replacement units and repair parts may be new or factory remanufactured. Replacement units and repair parts are warranted for the remaining
portion of the original unit’s warranty period.
THIS LIMITED WARRANTY DOES NOT APPLY TO:
1. Service calls to your home for delivery or pick-up, installation,
instruction, replacement of house fuses, connection of house wiring
or plumbing, or to correct unauthorized repairs.
2. Failure of product to perform during power failures and interruptions
or inadequate electrical service.
3. Damage caused by transportation or handling.
4. Damage caused to the product by accident, vermin, lightning, winds,
fire, floods, or acts of God.
5. Damages caused by leaky or broken water pipes, frozen water pipes,
restricted drain lines, or inadequate or interrupted water supply.
6. Damages caused by inadequate supply of air.
7. Damages caused by operating the product in a corrosive
atmosphere.
8. Repairs when your LG product is used in other than normal, singlefamily household use or contrary to the instructions described in the
product User’s Guide.
9. Damage resulting from accident, alteration, misuse, abuse, or
improper installation, repair,or maintenance. Improper repair includes
the use of parts not approved or specified by LG.
10.Normal maintenance as described in the User’s Guide,such as
cleaning or replacing filters,cleaning coils,etc.
11.Use of accessories or components that are not compatible with this
product.
12.Products with altered or removed serial numbers.
13.Changes in the appearance of the product that do not affect product
performance.
14.Increases in utility costs and additional utility expenses.
The cost of repair or replacement under these excluded
circumstances shall be borne by the consumer.
TO CONTACT LG ELECTRONICS BY MAIL:
LG Customer Interactive Center
P. O. Box 240007
201 James Record Road
Huntsville, Alabama 35813
ATTN: CIC
Product Registration Information
Model Number: ________________________________
Serial Number: ________________________________
You can find these numbers on a label on the side of the air
conditioner.
Date of Purchase: ______________________________
Dealer’s Name: ________________________________
Page 25
English
WARRANTY : Should your LG Dishwasher (“Product”) fail due to a defect in material or workmanship under normal home use during
the warranty period set forth below, LG Canada will at its option repair or replace the Product upon receipt of proof of original retail
purchase. This warranty is valid only to the original retail purchaser of the product and applies only to a Product distributed in Canada by
LG Canada or an authorized Canadian distributor thereof. The warranty only applies to Products located and used within Canada.
Replacement products and parts are warranted for the remaining portion of the original warranty period or ninety (90) days, whichever is
greater.
Replacement products and parts may be new or remanufactured.
LG Authorized Service Center warranties their repair work for thirty (30) days.
For complete warranty details and customer assistance,
please call or visit our website:
Call 1-888-542-2623 (24 hours a day, 365 days a year) and
select the appropriate option from the menu, or visit our website
at http://www.lg.ca
Write your warranty information below:
Product Registration Information:
Model:
Serial Number:
Date of Purchase:
1.Service trips to deliver, pick up, or install the product; instructing a customer on operation of the product; repair or replacement of fuses or correction of wiring,
or correction of unauthorized repairs/installation.
2.Failure of the product to perform during power failures and interruptions or inadequate electrical service.
3.Damage caused by leaky or broken water pipes, frozen water pipes, restricted drain lines, inadequate or interrupted water supply or inadequate supply of air.
4.Damage resulting from operating the Product in a corrosive atmosphere or contrary to the instructions outlined in the Product owner’s manual.
5.Damage to the Product caused by accidents, pests and vermin, lightning, wind, fire, floods, or acts of God.
6.Damage resulting from the misuse, abuse, improper installation, repair, or maintenance of the Product. Improper repair includes use of parts not approved or
specified by LG Canada.
7.Damage or product failure caused by unauthorized modification or alteration, or use for other than its intended purpose, or resulting from any water leakage
due to improper installation.
8.Damage or Product failure caused by incorrect electrical current, voltage, commercial or industrial use, or use of accessories, components, or cleaning
products that are not approved by LG Canada.
9.Damage caused by transportation and handling, including scratches, dents, chips, and/or other damage to the finish of your product, unless such damage
results from defects in materials or workmanship and is reported within one (1) week of delivery.
10.Damage or missing items to any display, open box, discounted, or refurbished Product.
11.Products with original serial numbers that have been removed, altered, or cannot be readily determined. Model and Serial numbers, along with original retail
sales receipt, are required for warranty validation.
12.Increases in utility costs and additional utility expenses.
13.Replacement of light bulbs, filters, or any consumable parts.
14.Repairs when your Product is used in other than normal and usual household use (including, without limitation, commercial use, in offices or recreational
facilities) or contrary to the instructions outlined in the Product owner’s manual.
15.Costs associated with removal of the Product from your home for repairs.
16.The removal and reinstallation of the Product if it is installed in an inaccessible location or is not installed in accordance with published installation
instructions, including the Product owner’s and installation manuals.
17.Accessories to the Product such as door bins, drawers, handles, shelves, etc.. Also excluded are parts besides those that were originally included with the
Product.
All costs associated with the above excluded circumstances shall be borne by the consumer.
LG CANADA’S SOLE LIABILITY IS LIMITED TO THE WARRANTY SET OUT ABOVE. EXCEPT AS EXPRESSLY PROVIDED ABOVE, LG CANADA MAKES NO
AND HEREBY DISCLAIMS ALL OTHER WARRANTIES AND CONDITIONS RESPECTING THE PRODUCT, WHETHER EXPRESS OR IMPLIED, INCLUDING,
BUT NOT LIMITED TO, ANY IMPLIED WARRANTY OR CONDITION OF MERCHANTABILITY OR FITNESS FOR A PARTICULAR PURPOSE, AND NO
REPRESENTATIONS SHALL BE BINDING ON LG CANADA. LG CANADA DOES NOT AUTHORIZE ANY PERSON TO CREATE OR ASSUME FOR IT ANY
OTHER WARRANTY OBLIGATION OR LIABILITY IN CONNECTION WITH THE PRODUCT. TO THE EXTENT THAT ANY WARRANTY OR CONDITION IS
IMPLIED BY LAW, IT IS LIMITED TO THE EXPRESS WARRANTY PERIOD ABOVE. LG CANADA, THE MANUFACTURER OR DISTRIBUTOR SHALL NOT BE
LIABLE FOR ANY INCIDENTAL, CONSEQUENTIAL, SPECIAL, DIRECT OR INDIRECT DAMAGES, LOSS OF GOODWILL, LOST PROFITS, PUNITIVE OR
EXEMPLARY DAMAGES OR ANY OTHER DAMAGE, WHETHER ARISING DIRECTLY OR INDIRECTLY FROM ANY CONTRACTUAL BREACH,
FUNDAMENTAL OR OTHERWISE, OR FROM ANY ACTS OR OMISSIONS, TORT, OR OTHERWISE.
This warranty gives you specific legal rights. You may have other rights which may vary from province to province depending on applicable provincial
laws. Any term of this warranty that negates or varies any implied condition or warranty under provincial law is severable where it conflicts with
provincial law without affecting the remainder of this warranty’s terms.
WARRANTY PERIOD: (Note: If the original date of purchase can not be verified, the warranty will begin sixty
(60) days from the date of manufacture.)
Dishwasher
Extended Component Warranty (Parts Only)
(Consumer will be charged for Labor after One (1) year from the date of purchase)
Two (2) year from the date
of original retail purchase
Parts Labor
Five(5) years from the date
of original retail purchase
PCB, Rack, Stainless Steel
Door Liner, Tub
Ten (10) years from the date
of original retail purchase
DD motor
(internal/functional parts only)
One (1) year from the date
of original retail purchase
THIS LIMITED WARRANTY DOES NOT COVER:
LG ELECTRONICS CANADA, INC.
LG DISHWASHER LIMITED WARRANTY - Canada
Page 26

26
INTRODUCCIÓN
INSTRUCCIONES DE SEGURIDAD
IMPORTANTES
Precauciones básicas de seguridad 27, 28
Seguridad sobre electricidad 28
Antes de utilizar el lavaplatos 29
PIEZAS Y CARACTERÍSTICAS
Características 30
Piezas 31
Panel de control 32, 33
DETECCIÓN DE PROBLEMAS
Antes de solicitar servicio técnico 45, 46
GARANTÍA
Información sobre registro de producto 48, 49
Felicitaciones por su compra
y bienvenido a la familia de LG.
Su nuevo lavaplatos LG combina
un funcionamiento silencioso y
eficiente con una tecnología de
limpieza avanzada. Siguiendo
las instrucciones de operación
y cuidado de este manual, su
lavaplatos le brindará muchos
años de servicio confiable.
¡GRACIAS!
INSTRUCCIONES DE OPERACIÓN
Inicio rápido 34
Seleccione un ciclo 35
Carga de la bandeja inferior 37
Carga para vapor 37
Carga de la bandeja superior 38
Carga de la canasta de cubiertos 38
Bandeja superior de altura ajustable 39
Desmontaje de la bandeja superior 39
Carga de la bandeja para cubiertos 40
Bandeja de altura ajustable 40
Cómo agregar detergente al dispensador 41
Cómo agregar agente
de enjuague al dispensador 42
CUIDADO Y LIMPIEZA
Limpieza de las piezas metálicas 43
Limpieza del brazo de pulverización inferior 43
Limpieza del brazo de pulverización superior 43
Limpieza del brazo
de pulverización más elevado 44
Mantenimiento estacional y almacenamiento 44
ESPECIFICACIONES
Especificaciones 47
Page 27

27
Español
INSTRUCCIONES DE SEGURIDAD IMPORTANTES
LEA TODAS LAS INSTRUCCIONES ANTES DE USAR
Su seguridad y la seguridad de otros es muy importante.
Hemos incluido muchos mensajes de seguridad importantes en este manual y en su electrodoméstico.
Siempre lea y siga todos los mensajes de seguridad.
Este es el símbolo de alerta de seguridad.
Este símbolo lo alerta sobre peligros potenciales que podrían provocar daños a la propiedad o lesiones
personales graves o incluso la muerte.
El símbolo de alerta de seguridad será seguido por la palabra “ADVERTENCIA” O “PRECAUCIÓN”, y luego
un mensaje importante de seguridad. Estas palabras significan:
ADVERTENCIA Para reducir el riesgo de incendio, descarga eléctrica
o lesiones a personas cuando utilice este artefacto, deben seguirse precauciones
básicas de seguridad, incluyendo las siguientes:
• Este manual contiene información muy importante
relacionada con la instalación,
el uso y el mantenimiento de su lavaplatos.
• El fabricante no se hace responsable de lesiones
o daños provocados por no seguir estas
instrucciones de seguridad y de precaución.
• Lea todas las instrucciones con detenimiento
antes de utilizar el lavaplatos.
• Use el lavaplatos sólo para su función prevista.
• Utilice sólo detergentes o agentes de enjuague
recomendados para el lavaplatos. Mantenga
todos los detergentes y aditivos del lavaplatos
fuera del alcance de los niños.
• Este electrodoméstico no está concebido para ser
usado por niños pequeños o personas
no calificadas.
• Cuando cargue elementos para lavar:
1) Cargue los elementos filosos de modo que
no dañen el sellado de la puerta; y
2) Cargue los cuchillos filosos con los mangos
hacia arriba para reducir el riesgo de lesiones
cuando quite los elementos del lavaplatos.
• No lave elementos plásticos en el lavaplatos
a menos que estén clasificados como aptos
para lavaplatos o equivalente. En el caso de
elementos plásticos que no estén clasificados así,
verifique las recomendaciones del fabricante.
• No haga funcionar el lavaplatos a menos que
todos los paneles del recinto se encuentren
en su lugar.
• No altere o modifique los controles.
• No maltrate, ni se siente o se pare sobre
la puerta o bandejas del lavaplatos.
• Para reducir el riesgo de lesión, no permita que
los niños jueguen dentro o alrededor de un
lavaplatos.
• Bajo ciertas condiciones, puede producirse gas
de hidrógeno en un sistema de agua caliente que
no se ha usado durante dos semanas o más. EL
GAS DE HIDRÓGENO ES EXPLOSIVO. Si el
sistema de agua caliente no se ha usado durante
dicho período de tiempo, abra todos
los grifos de agua caliente y deje fluir el agua
durante varios minutos. Esto liberará el gas
de hidrógeno acumulado. Ya que el gas de
hidrógeno es inflamable, no fume o utilice
una llama abierta en ese momento.
• Quite la puerta del compartimento de lavado
cuando deseche un lavaplatos viejo.
PRECAUCIONES BÁSICAS DE SEGURIDAD
ADVERTENCIA Este símbolo indica la posibilidad de muerte o lesiones
personales graves.
PRECAUCIÓN
Este símbolo indica la posibilidad de lesiones o daños a la propiedad.
Page 28

28
INSTRUCCIONES DE SEGURIDAD IMPORTANTES
LEA TODAS LAS INSTRUCCIONES ANTES DE USAR
Para un lavaplatos conectado en forma
permanente:
Este electrodoméstico debe conectarse a
un sistema de cableado permanente con conexión
a tierra o debe utilizarse un conductor de conexión
a tierra del equipamiento con los conductores
de circuito y conectarse a la terminal de conexión a
tierra o conductor del artefacto. Consulte a un
electricista calificado.
Peligro de volcaduras
No ejerza una fuerza excesiva hacia abajo sobre
la puerta abierta del lavaplatos antes de la
instalación, ya que esto puede dañar la unidad
o hacer que vuelque. No utilice el lavaplatos
antes de haber finalizado la instalación según
las Instrucciones de instalación.
PRECAUCIONES BÁSICAS DE SEGURIDAD
ADVERTENCIA Para reducir el riesgo de incendio, descarga eléctrica
o lesiones a personas cuando utilice este artefacto, deben seguirse precauciones
básicas de seguridad, incluyendo las siguientes:
SEGURIDAD SOBRE ELECTRICIDAD
ADVERTENCIA
Peligro de descarga eléctrica
No seguir estas instrucciones puede provocar
la muerte, un incendio o una descarga
eléctrica.
• El lavaplatos DEBE tener una conexión a tierra.
Conecte el cable a tierra al conector verde a
tierra en la caja terminal.
• No utilice un cable de extensión con este
electrodoméstico.
• El lavaplatos se halla diseñado para utilizarse con
corriente doméstica normal (120 voltios CA, 60
Hz). Antes de conectar el lavaplatos, asegúrese
de que el tomacorriente o cable esté conectado a
tierra adecuadamente y polarizado por
interruptores de circuito o fusibles. No contar con
una conexión a tierra adecuada en este
electrodoméstico puede provocar una descarga
eléctrica o el mal funcionamiento del aparato.
Consulte a un electricista calificado.
• No instale o almacene el lavaplatos en lugares
donde se verá expuesto a las inclemencias del
clima. No cumplir con esta precaución puede
provocar una descarga eléctrica, un incendio,
el mal funcionamiento y/o deformación del
lavaplatos.
• No coloque elementos pesados sobre el cable de
energía del aparato, ni lo dañe. No utilice el
lavaplatos si su cable de energía se encuentra
dañado. Un daño en el cable de energía puede
provocar un incendio o una descarga eléctrica.
Consulte a un electricista calificado.
• No tome el cable de energía o toque los controles
del lavaplatos con manos mojadas. No utilice el
lavaplatos si tiene el cable de energía o enchufe
dañados, y no enchufe el lavaplatos en un
tomacorriente dañado. No cumplir con estas
instrucciones puede provocar una descarga
eléctrica.
• Sólo personas de reparación experimentadas
deben efectuar su desmontaje o reparación. Un
desmontaje o reparación inapropiados pueden
provocar una falla del producto o una descarga
eléctrica.
Page 29

29
Español
INSTRUCCIONES DE SEGURIDAD IMPORTANTES
LEA TODAS LAS INSTRUCCIONES ANTES DE USAR
GUARDE ESTAS INSTRUCCIONES
Antes de utilizar el lavaplatos, tenga a bien leer
las Instrucciones importantes de seguridad. La
temperatura de suministro de agua debe ser
de un mínimo de 120°F (49°C) para un mejor
lavado y tiempo de ciclo razonable.
Por esta razón, sólo utilice un suministro de
agua caliente. También resulta importante que
el lavaplatos se cargue de acuerdo con las
instrucciones para lograr una limpieza efectiva.
Cuando cargue el lavaplatos, asegúrese de
haber retirado elementos insolubles tales como
huesos, escarbadientes y pedazos de papel.
ANTES DE UTILIZAR EL LAVAPLATOS
Cuando cargue el lavaplatos, cumpla con las
siguientes reglas generales:
1. Coloque los elementos con fondos de platos
profundos en un ángulo para ayudar al
escurrimiento del agua y acelerar el proceso
de secado.
2. Quite los restos sólidos y quemados de los
platos antes de cargarlos al lavaplatos.
3. Sólo cargue elementos que sean aptos para
lavaplatos.
NOTA: No cargue utensilios que no sean
resistentes al calor, tienes ribetes de metal
decorativo, etc.
Page 30
30
PIEZAS Y CARACTERÍSTICAS
CARACTERÍSTICAS
CAPACIDAD GRANDE
Los lavaplatos LG le permiten cargar elementos
muy grandes en las
bandejas superior e
inferior. El tambor alto
ofrece una capacidad
global extra y el espacio
para colocar platos
grandes. Los elementos
extra grandes (máx.
14 pulg.) pueden
cargarse en la bandeja
inferior elevando la
bandeja superior.
MOTOR SLIM DIRECT™
El nuevo Motor Slim Direct™ se encuentra
controlado por un
inversor. La energía
de lavado se controla
en base a la selección
del ciclo. También
ofrece una elevada
eficiencia de energía
para minimizar el uso
de la misma.
SISTEMA DE SECADO HÍBRIDO
Este sistema seca la vajilla de manera efectiva
sin el uso de un
elemento calentador
que incremente el
consumo de energía.
SISTEMA DE PULVERIZACIÓN VARIO
Dado que la pulverización de agua alterna entre
las bandejas superior e
inferior, toda la energía
del motor se dirige
a una bandeja por
vez. Esto concentra
toda la energía de
limpieza del motor en
cada estante por vez.
TRITURADOR DE ALIMENTOS BLANDOS
Y FILTRO DE AUTO LIMPIEZA
Para mejores resultados, su lavaplatos LG
cuenta con un
triturador incorporado
de alimentos blandos
y un filtro de auto
limpieza. El triturador
muele los alimentos
blandos y los residuos
en pequeñas partículas
que pueden retenerse
en el filtro y eliminarse por el desagüe. El
sistema de filtro de auto limpieza limpia en forma
continua el agua de lavado mientras circula para
separar cualquier clase de residuo del agua.
Toda la suciedad y los residuos pueden
eliminarse por el desagüe fácilmente.
PANTALLA TÁCTIL Y LCD AZUL
Los botones táctiles del panel de control facilitan
las selecciones y son
muy cómodos,
mientras que la
pantalla LCD azul
muestra claramente el
ciclo y las opciones
seleccionadas.
LAVADO CON VAPOR
La tecnología de vapor ofrece un mejor
desempeño de limpieza
que los sistemas de
lavado regulares. El
vapor es el método de
cuidado más delicado y
con mejor rendimiento
de energía para su
porcelana y cristalería
más fina.
Page 31

31
Español
PIEZAS Y CARACTERÍSTICAS
18
19
20
PIEZAS
PANEL DE CONTROL
MANIJA DE LA PUERTA
TAPA FRONTAL
TAPA INFERIOR
PATAS DE NIVELACIÓN
PANTALLA FRONTAL
(SignaLight™)
BASE
BRAZO DE PULVERIZACIÓN
MÁS ELEVADO
BRAZO DE PULVERIZACIÓN
SUPERIORBOQUILLA DE VAPOR
BOQUILLA DE VAPOR
BRAZO DE PULVERIZACIÓN INFERIOR
DISPENSADOR DE DETERGENTE
Y AGENTE DE ENJUAGUE
TAPA DE LA VENTILACIÓN
DE SECADO
LÁMPARA DE LA TINA
(IllumiTubTM)
BANDEJA PARA CUBIERTOS
BANDEJA SUPERIOR
CANASTA PARA UBIERTOS
BANDEJA INFERIOR
PANTALLA SUPERIOR
BOTÓN DE ENCENDIDO
1
2
5
6
7
8
3
4
10
9
11
12
13
16
17
14
15
1
2
4
5
3
6
9
7
8
11
14
15
12
10
16
17
18
19
20
13
Los indicadores luminosos de
LAVADO, ENJUAGUE y SECADO
parpadean durante cada etapa del
proceso de lavado. El indicador
luminoso LIMPIO se ilumina durante
4 minutos una vez acabado cualquier
proceso.
Page 32

32
3
PIEZAS Y CARACTERÍSTICAS
PANEL DE CONTROL
1
CICLOS
Presione el ciclo que corresponda a su ciclo de lavado
deseado.
POWER SCRUB (Fregado fuerte)
Este ciclo es para platos muy sucios.
NORMAL
Este ciclo es para cargas de todos los días con suciedad
normal.
DUAL INTENSITY (Intensided doble)
Este ciclo lava las bandejas superior e inferior
empleando diferentes intensidades de pulverización. El
ajuste predeterminado de este ciclo lava la bandeja
inferior empleando una intensidad de pulverización fuerte
y una intensidad suave en la bandeja superior. Esto
proporciona un rendimiento óptimo de limpieza para
cargas mixtas, incluyendo porcelana china y copas de
cristal. Si desea realizar otras combinaciones, use la
siguiente lista de pasos para cambiar la intensidad o usar
la función de MEDIA CARGA.
Uso de la función de intensidad dual
1. Mantenga pulsado el botón SPRAY (Pulverización)
durante tres segundos hasta que la luz SUPERIOR
empiece a parpadear.
2. Mientras la luz SUPERIOR está parpadeando, pulse el
botón SPRAY (Pulverización) hasta escoger la
intensidad deseada para la bandeja superior.
3. Pulse el botón HALF LOAD (Media carga) para
cambiar a la bandeja inferior y use el botón SPRAY
(Pulverización) para ajustar la intensidad deseada.
4. Las selecciones pueden cancelarse escogiendo
cualquier ciclo excepto
QUICK WASH (Lavado rápido)
Un ciclo más corto que resulta perfecto para cargas
usadas recientemente o poco sucias.
STEAM DELICATE (Vapor delicado)
Este ciclo agrega la energía suave del vapor para
potenciar el poder de limpieza del ciclo delicado.
El ciclo es perfecto para la limpieza efectiva de
elementos delicados como porcelana o cristalería fina.
STEAM FRESH (Vapor fresco)
Este ciclo puede utilizarse para refrescar platos que han
estado guardados o no se han utilizado por un período
prolongado.
TIMBRE ENCENDIDO/APAGADO
Para activar o desactivar el timbre, presione y
sostenga los botones Quick Wash y Steam Delicate
durante 2 segundos.
RINSE ONLY (Sólo enjuague)
Este ciclo es un enjuague rápido para platos que
no se lavarán de inmediato. No debe utilizarse
detergente.
Para seleccionar el ciclo Rinse Only (sólo enjuague),
presione el botón Power (encendido), luego el botón
Rinse (enjuague) una vez sin presionar otros botones
de ciclo.
NOTA: Si se ha seleccionado un ciclo principal, el
ciclo Rinse Only (sólo enjuague) no se encontrará
disponible sin antes apagar el encendido.
CANCEL (Cancelación)
Para cancelar un ciclo en funcionamiento, abra
la puerta y luego presione y sostenga los botones
Dual Intensity (intensidad doble) y Quick Wash
(lavado rápido) en conjunto durante 3 segundos.
La bomba de drenaje se activará y se cancelará
el ciclo.
OPCIONES DE CICLO Y PANTALLA
Presione los botones de opción de ciclo deseados
para seleccionar y configurar cualquiera de las
opciones del lavaplatos descriptas abajo. La
pantalla mostrará los tiempos del ciclo seleccionado y
las opciones de ciclo.
SPRAY (INTENSITY)
(Pulverización) (intensidad)
Al presionar repetidamente el botón Spray
(pulverización) se seleccionará la pulverización
deseada. Las luces strong (fuerte), medium
(media), o soft (suave) aparecerán en la parte
superior izquierda de la pantalla.
RINSE (Enjuague)
Al presionar repetidamente el botón Rinse (enjuague)
se seleccionará la opción de enjuague deseada. Las
luces Sanitary (sanitaria), Extra Rinse (extra
enjuague), o Sanitary (sanitaria) y Extra Rinse
2
1
2
Soft ( ), Medium ( ), Strong ( )
(suave) (media) (fuerte)
Page 33
33
Español
PIEZAS Y CARACTERÍSTICAS
PANEL DE CONTROL
(continuación)
(extra enjuague) aparecerán en la porción superior
izquierda de la pantalla.
• El símbolo ( ) indica que se ha seleccionado la
aclaración por esterilización.
El símbolo parpadea durante el ciclo si se ha
alcanzado la temperatura de esterilización. Acabado
el ciclo, el símbolo permanecerá fijo si se ha
alcanzado la temperatura de esterilización.
*NOTA: El enjuague de alta temperatura desinfecta la
vajilla y la cristalería en cumplimiento con NSF/ANSI
Norma 184 para lavaplatos residenciales. Los
lavaplatos certificados no se encuentran concebidos
para establecimientos alimenticios con licencia.
• Cuando seleccione Extra Rinse (extra enjuague),
se agregará un ciclo adicional de enjuague.
• Rinse Only (Sólo aclarado) es un ciclo de lavado
descrito en la página anterior.
CHILD LOCK (Bloqueo para niños)
La luz se encenderá cuando la configuración de
Bloqueo para niños se encuentre accionada.
• Para bloquear/desbloquear los botones, mantenga
pulsados simultáneamente, y durante 3 segundos,
los botones Rinse y Spray (Enjuague y Pulverización)
con la puerta abierta.
• Bloquea los botones de control durante la
operación de ciclo para evitar que se cambien las
configuraciones.
AGENTE DE ENJUAGUE
Rellene con agente de enjuague cuando la luz
se encienda.
PANTALLA DIGITAL
La pantalla digital del panel de control
muestra los tiempos estimados de ciclo y
de opción en una pantalla de dos dígitos. Cuando el
lavaplatos se enciende, la pantalla
estará en blanco. Cuando se seleccionan los ciclos
y las opciones, la pantalla mostrará el tiempo
estimado total para completar esas selecciones.
Durante la operación, la pantalla muestra el tiempo
de operación restante estimado.
NOTAS:
• El tiempo estimado de la pantalla no incluye
tiempos de retardo para calentar agua, etc.
• Si el tiempo supera los 99 minutos, la pantalla
muestra los tiempos en horas enteras. (2H, 3H,
etc.)
• Si se selecciona Delay Wash (lavado retardado),
la pantalla muestra el tiempo de retardo en
horas.
DELAY START (Inicio retardado)
• Para retardar el inicio de un ciclo seleccionado,
presione el botón Delay Start.
• Cada vez que se presiona Delay Start se retarda
el inicio del ciclo en una hora adicional.
• El tiempo de inicio retardado puede configurarse
desde 1 a 24 horas en incrementos de una hora.
STEAM (Vapor)
• El símbolo Steam (Vapor) se iluminará cuando
esté escogida la opción STEAM (Vapor).
• El símbolo Steam (Vapor) parpadeará mientras
el vapor esté siendo inyectado dentro del
lavavajillas.
POWER (Encendido)
• Al presionar el botón Power se acciona la energía
hacia los controles.
• Al finalizar el ciclo, el aparato se apaga
automáticamente para seguridad y economía.
• Si hay una subida de tensión o un corte de
energía, o una interrupción de cualquier clase,
el aparato se apagará automáticamente para
seguridad y el ciclo tendrá que reiniciarse.
4
3 4
EXTRA RINSE( ), SANITARY( )
ADVERTENCIA
El vapor puede provocar quemaduras. Tenga cuidado
con la zona de la boquilla de vapor situada en el lado
izquierdo del lavavajillas si abre la puerta durante la
fase de vaporización de un ciclo.
El contacto con el vapor o con la boquilla de vapor
puede provocar quemaduras.
(extra enjuague) (sanitaria)
Page 34

34
INSTRUCCIONES DE OPERACIÓN
INICIO RÁPIDO
CARGUE LOS PLATOS
Elimine el exceso de alimentos, huesos
y otros residuos duros e insolubles de los
platos. Extienda las bandejas hacia afuera
y cargue los platos como se indica en las
páginas 37 y 38.
MIDA EL DETERGENTE
Utilizando las indicaciones de la página 41,
llene el recipiente de detergente con la
cantidad recomendada y cierre la tapa. Si
desea realizar un prelavado, también debe
llenarse con detergente el espacio ubicado
sobre la tapa.
ENCIENDA EL LAVAPLATOS
Para iniciar el ciclo, abra la puerta y presione
el botón Power (encendido).
VERIFIQUE EL AGENTE DE
ENJUAGUE
La luz indicadora del agente de enjuague se
iluminará si el nivel de agente de enjuague del
lavaplatos es bajo. Agregue agente de
enjuague si el nivel es bajo para mantener
la efectividad del ciclo de secado.
SELECCIONE EL CICLO Y LAS
OPCIONES
Seleccione el ciclo y las opciones que mejor
se ajustan a la carga consultando la tabla de
la página 35. La pantalla mostrará el tiempo
estimado del ciclo y de las opciones
seleccionadas.
CIERRE LA PUERTA
El lavaplatos arrancará automáticamente,
después de una pequeña demora, cuando la
puerta se cierre y trabe. Durante el ciclo, la
pantalla indicará el tiempo restante estimado
del ciclo y de las opciones seleccionadas.
Si la puerta se abre durante el ciclo, el
lavaplatos se detiene. Cuando la puerta se
cierra, el ciclo se reiniciará desde el punto
en donde se detuvo.
FIN DEL CICLO
Cuando el ciclo se ha completado, sonará una
campana y en la pantalla podrá verse “END”
(Fin). Después de un período corto,
la pantalla y los controles se apagarán por
cuestiones de seguridad y de conservación de
energía.
1
2
3
6
4
5
PRECAUCIÓN
Vacíe la bandeja inferior primero y luego la
superior. Esto evitará que caiga agua desde la
bandeja superior en los platos de la bandeja
inferior.
ADVERTENCIA
En general, no se recomienda abrir la puerta
mientras el lavaplatos se encuentra en
funcionamiento. Si la puerta se abre, un
dispositivo de seguridad detiene el lavaplatos.
Debe tenerse cuidado al abrir la puerta
inmediatamente después de finalizado el ciclo,
ya que puede salir vapor.
7
APAGADO AUTOMÁTICO
El lavaplatos se apagará automáticamente si no
se selecciona un ciclo o si la puerta no se cierra
dentro de 10 minutos.
NOTE :
Si entrasen en la bomba objetos pequeños y duros como huesos, cáscaras de nuez opedazos de
plástico o cristal, estos podrían ocasionar ruidos chirriantes cuando el triturador de alimentos blandos
del lavavajillas intente triturar dichos objetos. Algunos objetos que pudieran acceder a la bomba podrían
ser triturados y desaguados eventualmente. Si embargo, si escuchara un ruido chirriante y este no
cesara, solicite asistencia técnica para extraer los objetos de la bomba. Algunos objetos como pedazos
de cristal, podrían provocar daños en la bomba si no son extraídos rápidamente.
Page 35
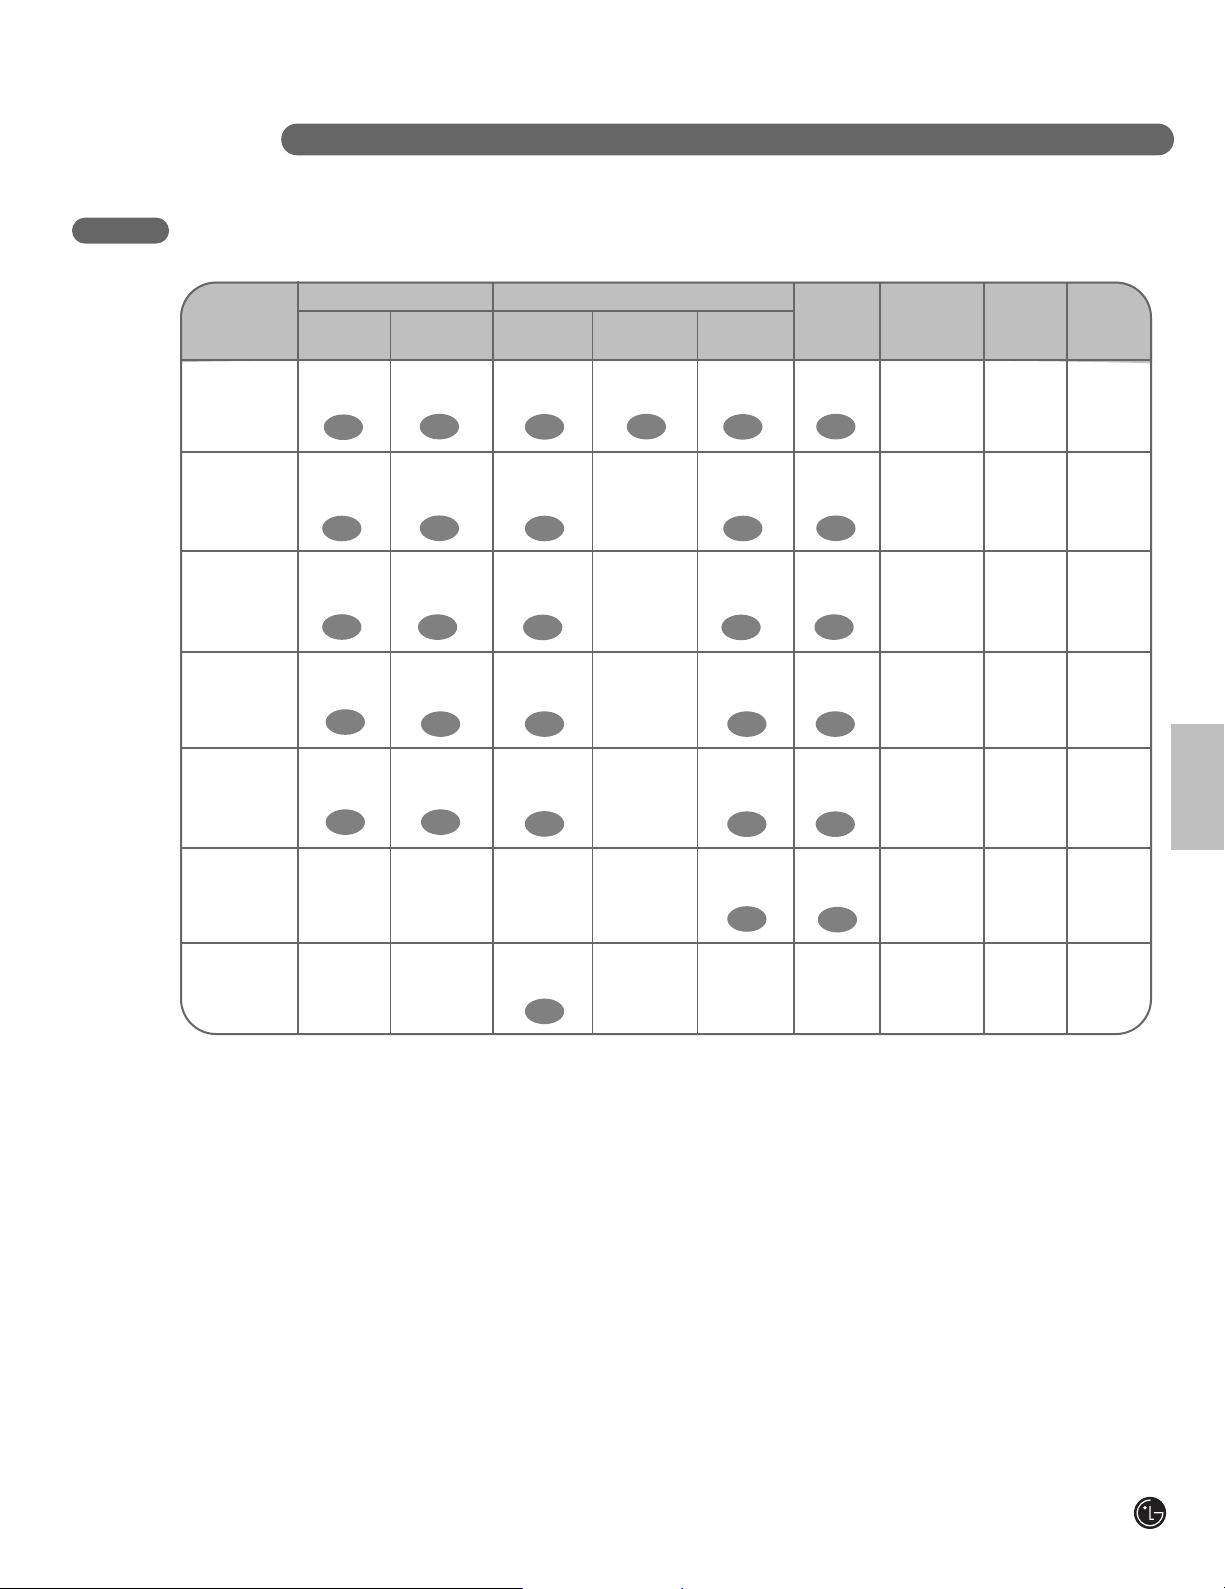
35
Español
SELECCIONE UN CICLO
Power Scrub (Fregado fuerte)
Este ciclo es para cargas muy sucias tales como
elementos de cocción.
Normal
Seleccione este ciclo para cargas de todos los
días con suciedad normal.
Dual Intensity (Intensidad doble)
Este ciclo permite que las bandejas superior e
inferior se laven con diferentes intensidades de
pulverización durante el mismo ciclo para un
equilibrio preciso de limpieza y cuidado de los
platos. Ver página 32.
Quick Wash (Lavado rápido)
Un ciclo más corto que resulta perfecto para
cargas usadas recientemente o poco sucias.
Steam Delicate (Vapor delicado)
Este ciclo agrega la energía suave del vapor
para potenciar el poder de limpieza del ciclo
delicado. El ciclo es perfecto para la limpieza
efectiva de elementos delicados como porcelana
o cristalería fina.
Steam Fresh (Vapor fresco)
Este ciclo puede utilizarse para refrescar platos
que han estado guardados o no se han utilizado
por un período prolongado.
Rinse Only (Sólo enjuague)
Si no piensa lavar inmediatamente una carga, use
este ciclo para eliminar el exceso de suciedad y
ablandar residuos secos adheridos. Para escoger
la función Rinse Only (Sólo aclarado), pulse el
botón Rinse (Aclarado) sin escoger ningún ciclo
principal. Examine la página 32.
INSTRUCCIONES DE OPERACIÓN
CICLO
Power
Scrub
Normal
Quick Wash
Lavado
Enjuague
Pre-lavado
Steam
Delicate
Steam Fresh
Dual
Intensity
Rinse
Only
*El consumo real de agua variará de acuerdo con el nivel de suciedad.
**La duración del ciclo en curso podría variar dependiendo del nivel de suciedad y la temperatura del agua.
Lavado
principal
131°–145°F
55°–63°C
95°–140°F
35°–60°C
154°F
68°C
115°F
46°C
113°F
45°C
Enjuague 1 Enjuague 2
Enjuague
caliente
154°F
68°C
149°-153°F
65°-67°C
149°F
65°C
140°F
60°C
154°F
68°C
131°F
55°C
Secado
*Uso de
agua
5.5–9.2 gal.
21–35 L
2.6–6.9 gal.
10–26 L
5.5–6.9 gal.
21–26 L
5.5 gal.
21 L
5.5–6.9 gal.
21–26 L
1.2–1.5 gal.
4.5–5.5 L
1.3 gal.
5 L
**Tiempo
del ciclo
Pulveriz
-ación
122–176
min.
Strong
(fuerte)
Medium
(media)
Medium
(media)
Medium
(media)
Medium
(media)
Medium
(media)
Soft
(suave)
97–124
min.
138 min.
78 min.
107 min.
49 min.
15 min.
Page 36

36
INSTRUCCIONES DE OPERACIÓN
PRECAUCIÓN
ELEMENTOS NO APTOS PARA
LAVAPLATOS
La combinación de una elevada temperatura del
agua y los detergentes para lavaplatos puede
dañar ciertos elementos. LG no recomendáis
lavar los siguientes elementos en el lavaplatos:
• Vajilla de loza pintada a mano con plata u oro
• Utensilios de madera o hueso
• Utensilios de hierro o propensos a oxidarse
• Elementos plásticos no aptos para lavaplatos
Si tiene alguna duda, consulte las
recomendaciones del fabricante.
Page 37
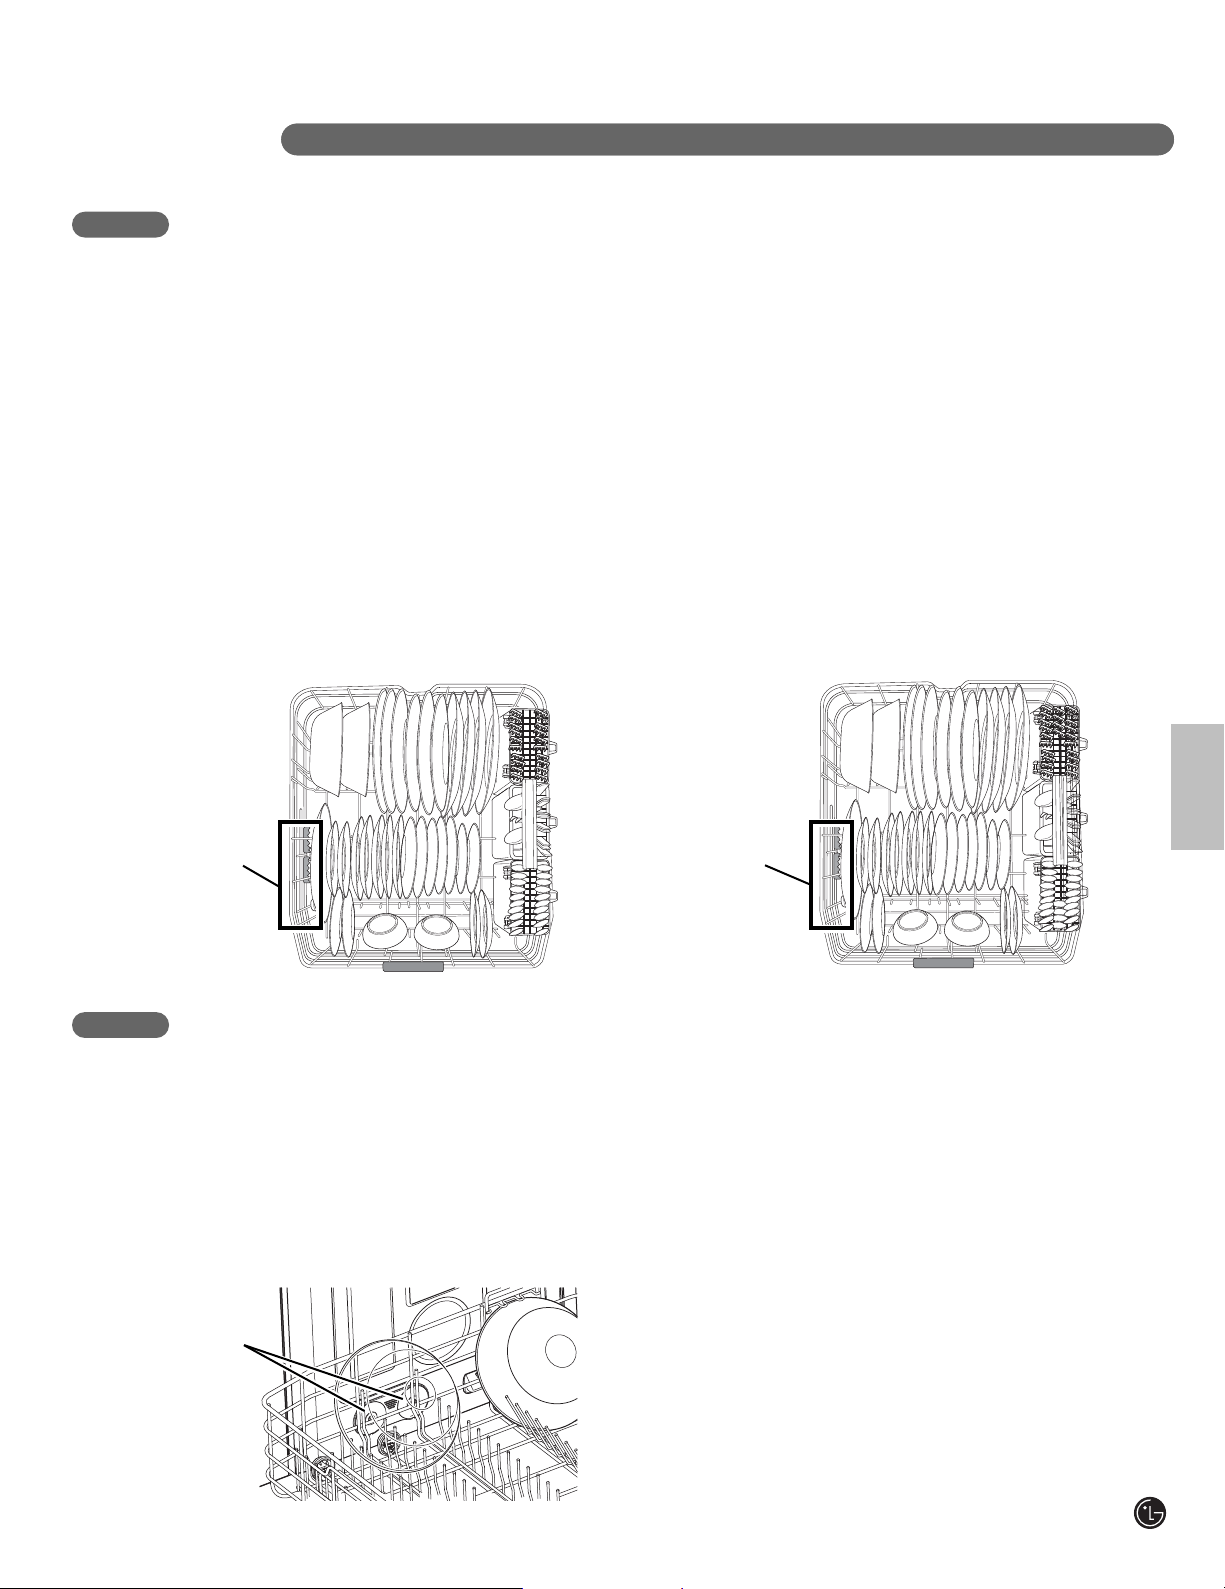
37
Español
El tambor extra alto permite la carga de platos,
ollas u otros utensilios de una altura de hasta
14 pulgadas.
NOTA: Verifique que los elementos grandes no
interfieran con la rotación de los brazos de
pulverización, y que dejen abrir el dispensador
de detergente.
Se recomienda la bandeja inferior para platos
de cena y de sopa, ollas, sartenes, tapas y
bandejas de parrillas. Los platos deben
colocarse en forma vertical mirando el centro
de la bandeja. Las ollas, sartenes y tazones
grandes deben darse vuelta para que la parte
interna mire hacia abajo. La canasta de
cubiertos puede utilizarse tanto en la bandeja
superior como en la inferior.
La bandeja inferior no debe usarse para
elementos pequeños como tazas, copas de
vino o platos pequeños. Estos elementos
deben cargarse en la bandeja superior.
Cargue los platos muy sucios o manchados en
el lado frontal izquierdo de la bandeja inferior
con el lado sucio hacia afuera y abajo. Esta es el
área por donde ingresa el vapor al lavaplatos. La
utilización de vapor caliente maximiza la limpieza
del lavaplatos.
CARGA DE LA BANDEJA INFERIOR
INSTRUCCIONES DE OPERACIÓN
CARGA DE CONFIGURACIONES DE 10 LUGARES,
BANDEJA INFERIOR
CARGA DE CONFIGURACIONES DE 12 LUGARES,
BANDEJA INFERIOR
Área de
boquilla
de vapor
Área de
boquilla
de vapor
Para optimizar los beneficios del vapor en la
eliminación de suciedad difícil o adherida,
cargue los platos que desea tratar
específicamente. Para obtener el mejor
resultado, cargue los platos con la cara hacia
abajo y hacia la izquierda para aprovechar la
pulverización de vapor directa y la acción de
lavado del brazo de pulverización inferior.
CARGA PARA VAPOR
Boquillas
de vapor
Page 38

38
INSTRUCCIONES DE OPERACIÓN
CARGA DE LA CANASTA DE CUBIERTOS
La canasta para cubiertos cuenta con
separadores para que los cubiertos delicados no
se rayen u oscurezcan. La canasta puede
dividirse en tres módulos separados que pueden
utilizarse en forma individual tanto en
la bandeja inferior como en la superior. Para
pequeñas cargas de cubiertos, los módulos
pueden quitarse, dejando espacio extra para
otra vajilla.
ADVERTENCIA
Tenga cuidado cuando cargue y descargue
elementos filosos. Cargue cuchillos filosos con
los mangos hacia arriba para reducir el riesgo de
una lesión personal.
1
2
3
4
5
CARGA DE LA BANDEJA SUPERIOR
Utilice la bandeja superior para elementos
pequeños o delicados tales como platos, tazas,
vasos y elementos de plástico aptos para
lavaplatos. Las tazas, vasos y tazones deben
colocarse dados vuelta. Las tazas o utensilios de
cocina extras pueden colocarse en las bandejas
para tazas plegables, las que también pueden
brindar soporte a copas de tallos largos.
Verifique que los elementos no interfieran con la
rotación de los brazos de pulverización sobre y
debajo de la bandeja superior.
CARGA DE CONFIGURACIONES DE 10 LUGARES,
BANDEJA SUPERIOR
CARGA DE CONFIGURACIONES DE 12 LUGARES,
BANDEJA SUPERIOR
Page 39

39
Español
INSTRUCCIONES DE OPERACIÓN
BANDEJA SUPERIOR DE ALTURA AJUSTABLE
La bandeja superior se ajusta hacia arriba para
permitirle colocar elementos altos y de grandes
dimensiones hasta una altura de 14 pulgadas en
la bandeja inferior. O, puede ajustarse la
bandeja superior hacia abajo para permitir la
colocación de platos de hasta 12 pulgadas de
altura en la bandeja superior.
NOTA: Después del ajuste, asegúrese de que
los platos de las bandejas superior e inferior
no interfieren con la rotación del brazo de
pulverización. No ajuste la bandeja mientras
se encuentre cargada con platos.
DESMONTAJE DE LA BANDEJA SUPERIOR
La bandeja superior puede desmontarse para dejar más espacio a los objetos situados en la bandeja
inferior. NOTA: Retire siempre los platos de la bandeja superior antes de desmontarla.
1
Para elevar la bandeja:
Simplemente levante la bandeja desde el
centro de cada lado (ver ilustración) hasta
que la bandeja se trabe en su lugar en la
posición superior. No es necesario elevar las
palancas de bloqueo para levantar la
bandeja.
2
Para bajar la bandeja:
Sostenga la bandeja desde el centro de
cada lado para soportar el peso; luego
levante la palanca de cada lado para liberar
la bandeja y bajarla.
1
Extraiga la bandeja superior hasta su tope.
Localice la lengüeta de presión.
2
Pulse la lengüeta del dispositivo de retención
situada en el extremo de cada riel lateral y
desmóntelos.
Tenga cuidado de no permitir la salida de la
bandeja superior de los rieles una vez
desmontados los dispositivos de retención.
Extraiga la bandeja superior de los rieles.
Page 40
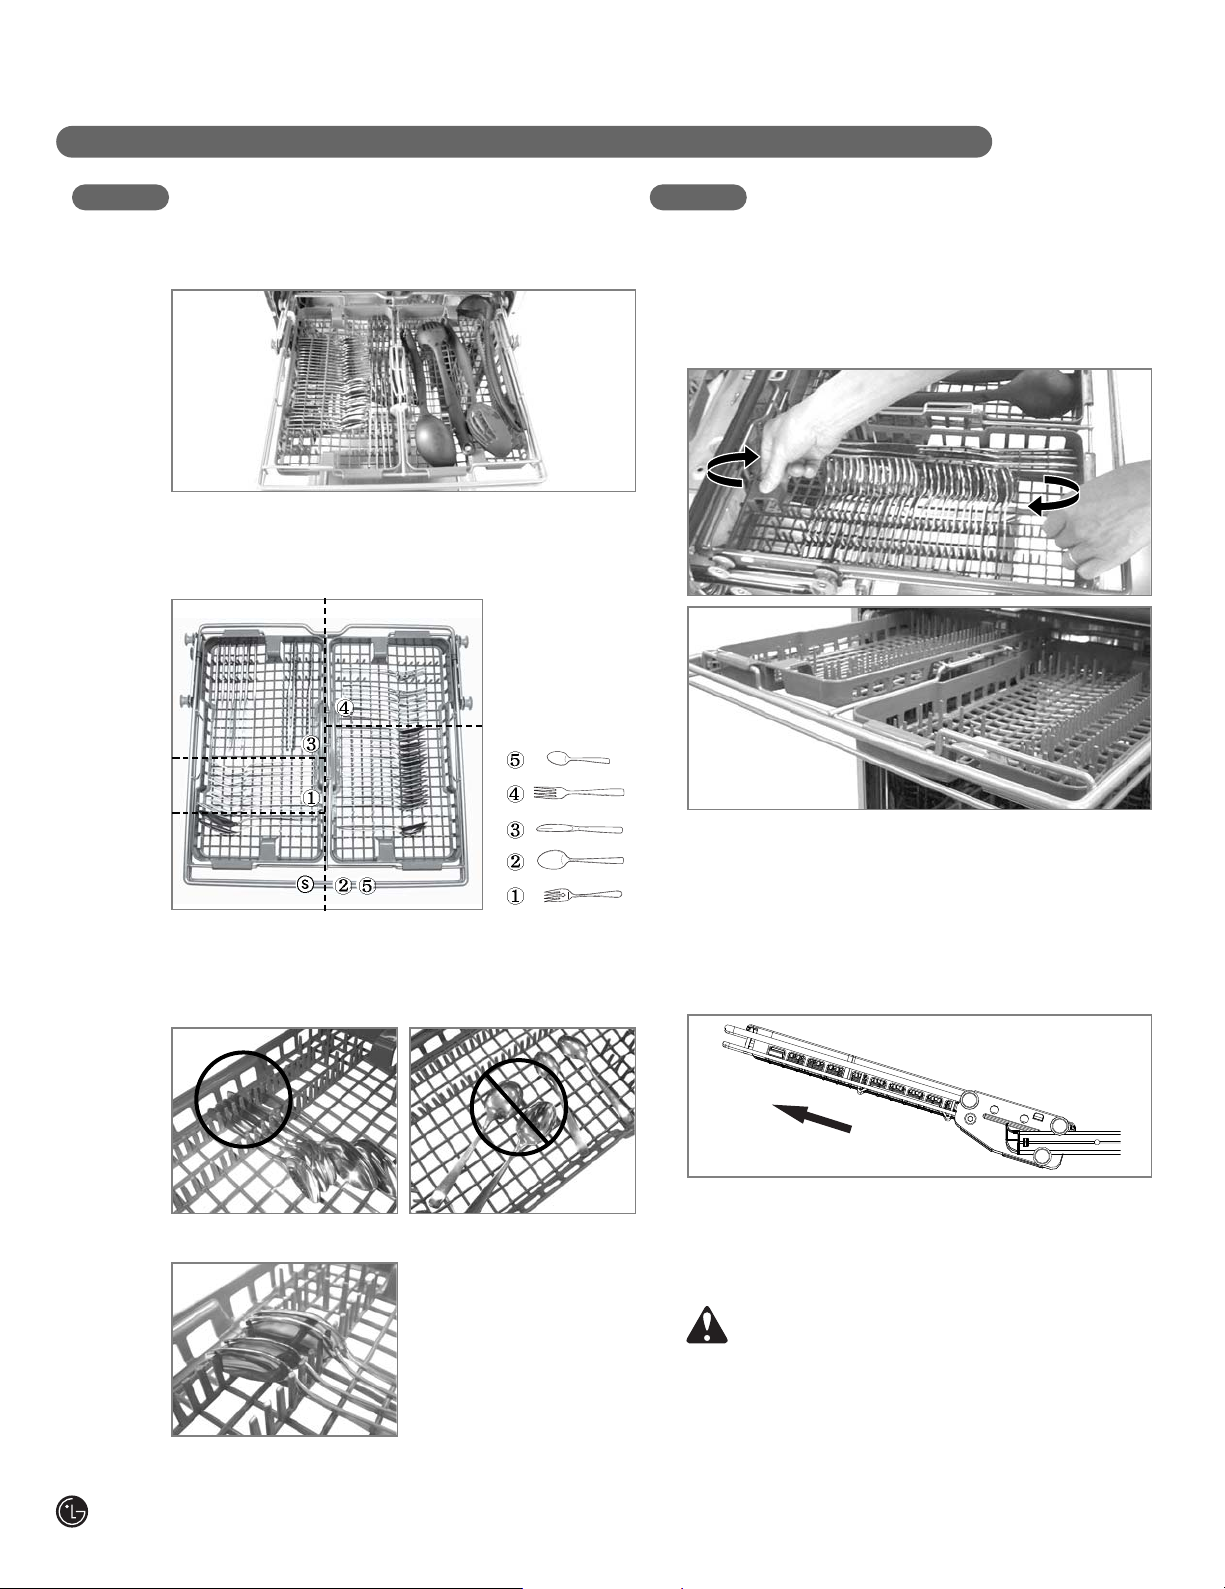
40
La bandeja para cubiertos es perfecta para muchos
utensilios de cocina y de servicio.
Los separadores de las bandejas para cubiertos
ayudan a mantener los utensilios de cocina
separados para evitar daños y mejorar la limpieza.
Knife, fork, and spoon handles should be positioned
between the tines.
Si los mangos de sus
ollas o sartenes son
demasiado gruesos,
invierta las piezas para
que éstos miren en otra
dirección, como indica la
figura inferior.
Cada rejilla lateral puede ajustarse
independientemente a una posición superior o inferior
para acomodarse a objetos de diferentes tamaños.
Puede ajustar las rejillas levantándolas y girando la
parte frontal hacia atrás.
Rejilla para cubiertos extraíble
Si desea colocar utensilios grandes, deberá sacar la
bandeja de cubiertos para dejar espacio extra.
NOTE :
Siempre saque los cubiertos de la bandeja antes
de sacarla.
ADVERTENCIA
Tenga cuidado durante la carga y descarga de
objetos afilados. Cargue los cuchillos con la hoja
hacia abajo, para reducir el riesgo de lesiones.
Extraiga la rejilla hasta el extremo de los rieles,
después levante la parte frontal para que las ruedas
eviten el tope final del riel. Ahora ya puede deslizar
la rejilla hacia fuera y sacarla de los rieles.
Correcto Incorrecto
Invertir
10 servicios colocados en la bandeja superior
OPERATING INSTRUCTIONS
CARGA DE LA BANDEJA PARA CUBIERTOS
BANDEJA DE ALTURA AJUSTABLE
Page 41

41
Español
INSTRUCCIONES DE OPERACIÓN
CÓMO AGREGAR DETERGENTE AL DISPENSADOR
• Debe colocarse detergente en el
compartimento de detergente antes de
comenzar cualquier ciclo con excepción
de Rinse Only (sólo enjuague).
• Si los platos sólo estuvieran ligeramente
sucios, use menos detergente.
• La capacidad total del compartimento de
detergente principal es de 1.4 oz (40 ml). Las
marcas recomendadas del dispensador son 0.5
oz (15 ml) y 0.9 oz (25 ml). Utilizar un exceso
de detergente puede dejar una película sobre
los platos y en el lavaplatos, lo que provoca un
desempeño pobre de lavado.
• La cantidad de detergente necesario depende
del ciclo, el tamaño de la carga y el nivel de
suciedad de los platos.
PRECAUCIÓN
INFORMACIÓN SOBRE EL DETERGENTE
Sólo utilice detergente creado para lavaplatos
automáticos. El detergente incorrecto puede
hacer que el lavaplatos se llene de espuma
durante el funcionamiento. La espuma excesiva
puede reducir el desempeño de lavado y puede
generar pérdidas en la unidad. NO USE
detergente para lavar a mano en el lavaplatos.
1
Si la tapa se encuentra cerrada, presione la
palanca sobre el lado inferior de la tapa para
abrir el dispensador.
2
Añada detergente para lavavajillas al
compartimento de lavado principal hasta que
el nivel esté entre las líneas 15 y 25. Rellene
hasta la línea 25 para aguas duras o para
cargas muy sucias o hasta la línea 15 para
aguas blandas o cargas ligeramente sucias.
Ajuste la cantidad de detergente para
alcanzar mejor sus necesidades y
condiciones de limpieza.
Cierre firmemente la tapa hasta oír un “clic”.
NOTA: NO agregue detergente cuando se
selecciona el ciclo Rinse Only (Sólo
enjuague).
Traba del dispensador
3
Si se desea prelavado, llene con detergente
el espacio del compartimento de prelavado
sobre la tapa.
NOTA: Demasiado detergente puede dejar
una película sobre los platos y en el
lavaplatos, lo que provoca un desempeño
pobre de lavado.
Compartimento
de lavado principal
Compartimento
de pre-lavado
NOTA : Retire la etiqueta del dispensador antes de
poner en funcionamiento el lavavajillas.
Page 42
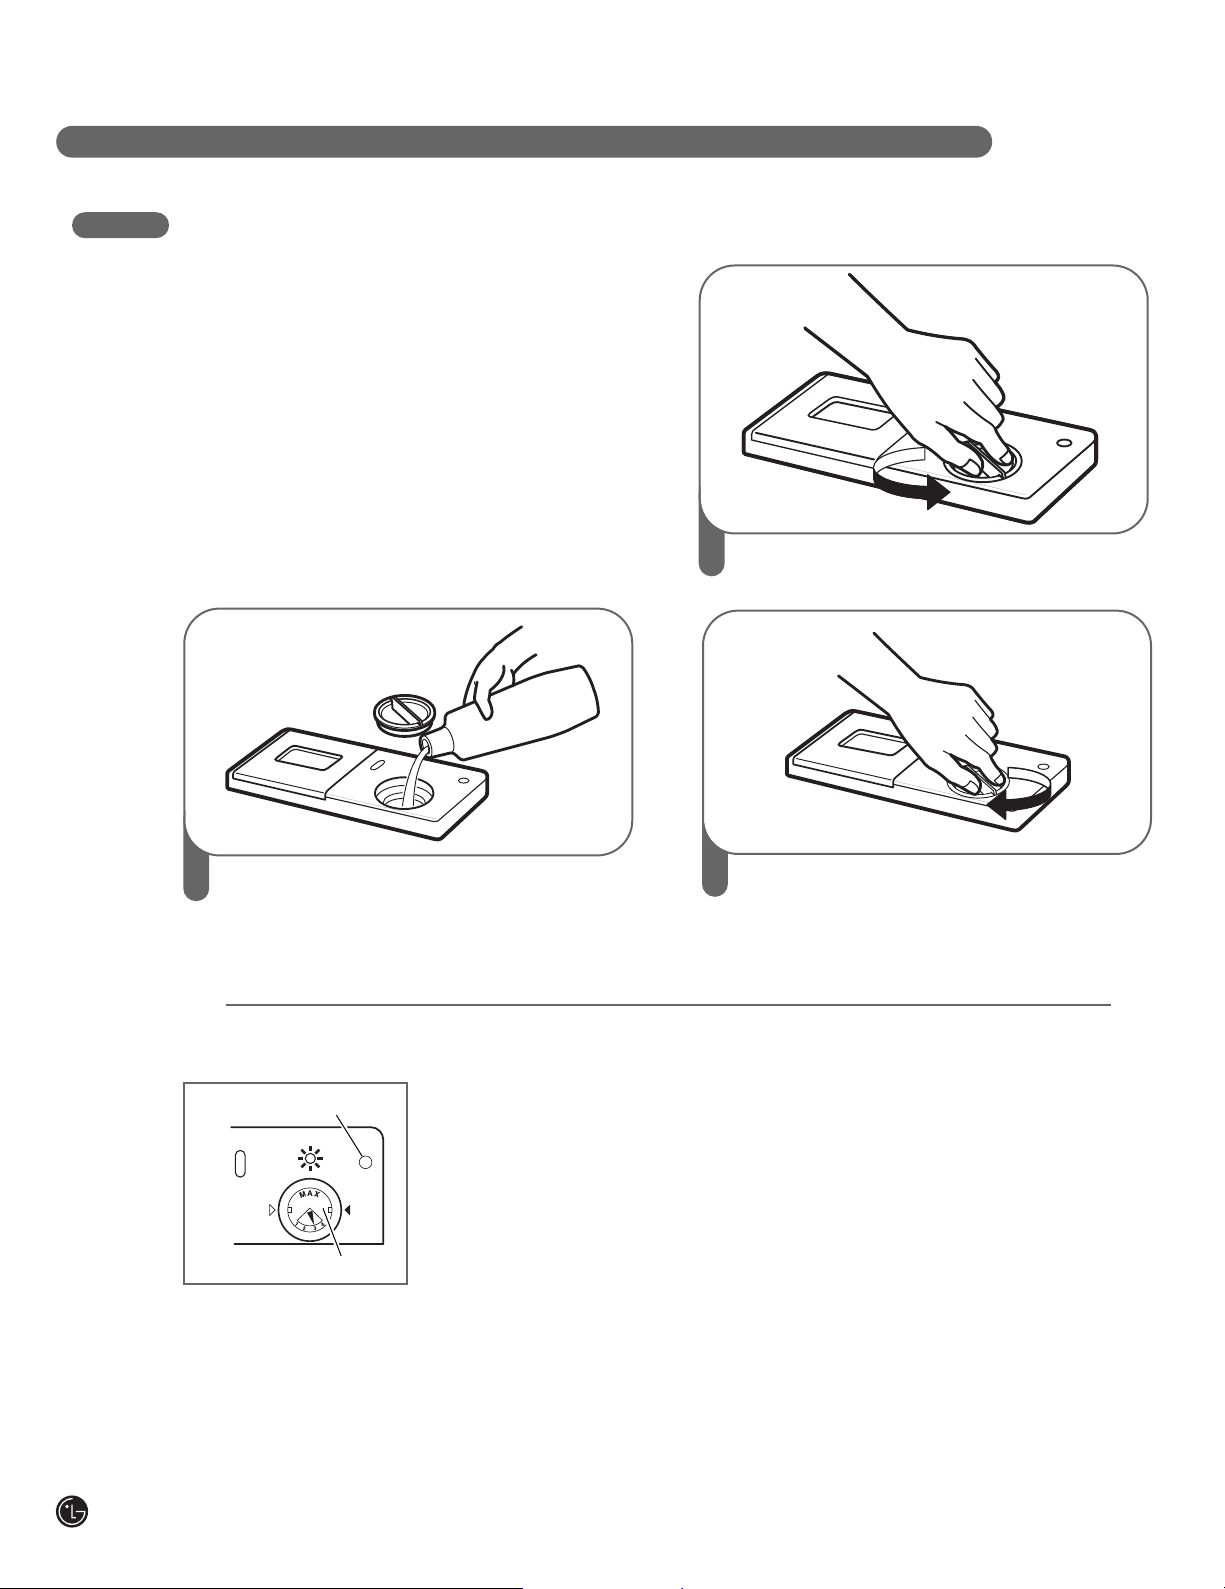
42
INSTRUCCIONES DE OPERACIÓN
CÓMO AGREGAR AGENTE DE ENJUAGUE AL DISPENSADOR
Se recomienda el uso de agentes de enjuague
para evitar la presencia de manchas en los
platos debido a las gotas de agua que quedan
después de finalizado el ciclo de lavado, y para
mejorar el desempeño del ciclo de secado.
NOTA: Sólo use agente de enjuague líquido en
este lavaplatos.
1
Gire la tapa redonda en sentido contrario a
las agujas del reloj para quitarla.
2
Agregue un agente de enjuague líquido
hasta el nivel de llenado máximo (máx.
4,8 oz [145 ml]).
3
Vuelva a colocar la tapa y gire en sentido
de las agujas del reloj para trabarla.
El agente de enjuague se dispensará
automáticamente durante el ciclo de
enjuague final.
AJUSTE DEL DISPENSADOR DE AGENTE
DE ENJUAGUE
El dispensador de
agente de enjuague
tiene una configuración
de fábrica de nivel 3,
que debería ofrecer
el mejor desempeño
en la mayoría de las
condiciones. Configurar
el control de agente
de enjuague en un nivel muy bajo contribuirá a la
formación de manchas y vetas en los platos y a un
pobre desempeño de secado. Configurar el control
a un nivel demasiado alto puede provocar espuma,
lo que generará un pobre desempeño de lavado.
Para ajustar la configuración del dispensador
de agente de enjuague, quite la tapa y ajuste la
palanca de agente de enjuague en la configuración
deseada.
CÓMO RELLENAR EL AGENTE
DE ENJUAGUE
La capacidad del dispensador de agente de
enjuague es de 4,8 oz (145 ml). La regularidad
con la que se debe rellenar depende de la
regularidad con que se lavan los platos y de la
configuración de agente de enjuague utilizada.
Si el nivel de agente de enjuague es bajo, se
iluminará la luz de agente de enjuague del panel
de control.
NOTA:
El dispensador también cuenta con un
indicador de agente de enjuague que se
encuentra oscuro cuando el dispensador
está lleno y claro cuando esté vacío.
Indicador de agente
de enjuague
Palanca de ajuste
Page 43

43
Español
LIMPIEZA DE LAS PIEZAS METÁLICAS
CUIDADO Y LIMPIEZA
Para mejores resultados, resulta importante controlar y cuidar los filtros y brazos de pulverización
en forma periódica.
ADVERTENCIA Para evitar lesiones durante el cuidado
y mantenimiento/limpieza, use guantes y/o vestimenta de protección.
Algunas piezas exteriores e interiores pueden
limpiarse con un paño o esponja húmedos.
Puede formarse una película oscura sobre la
superficie del tambor de acero inoxidable,
especialmente con agua dura.
LIMPIEZA DEL BRAZO DE PULVERIZACIÓN INFERIOR
• Asegúrese de que los orificios de chorros de
agua no se encuentren bloqueados con
partículas de alimentos.
• Cuando la limpieza sea necesaria, quite el
brazo de pulverización inferior tirando de él
hacia arriba.
• Después de limpiar el brazo de pulverización
inferior, vuelva a colocarlo presionándolo hacia
abajo hasta que se trabe en su lugar.
Asegúrese de que el brazo de pulverización
gire libremente.
LIMPIEZA DEL BRAZO DE PULVERIZACIÓN SUPERIOR
1
Tire de la bandeja superior hacia delante.
Asegúrese de que los orificios de chorros
de agua no se encuentren bloqueados con
partículas de alimentos.
Cuando la limpieza sea necesaria, quite el
brazo de pulverización superior girando la
tuerca de la parte inferior del brazo de
pulverización en un giro de 1/8 en sentido
contrario a las agujas del reloj y tirando hacia
abajo (ver ilustraciones).
2
Después de limpiar el brazo de pulverización
superior, presiónelo hacia arriba en su lugar.
Gire la tuerca en 1/8 de giro en sentido de
las agujas del reloj para verificar que la
tuerca se trabe en su lugar.
Page 44

44
CUIDADO Y LIMPIEZA
MANTENIMIENTO ESTACIONAL Y ALMACENAMIENTO
• Durante el verano, si va a ausentarse por
períodos de tiempo prolongados, se
recomienda que cierre la válvula de agua y
desenchufe el cable de energía, o desconecte
el interruptor de circuitos.
• Durante el invierno, si va a ausentarse por
períodos de tiempo prolongados y si existe
la posibilidad de temperaturas bajo cero, se
recomienda que coloque aislación térmica
en las líneas de suministro de agua y en
el lavaplatos mismo. Sólo personas de
reparación experimentadas deben efectuar
su adaptación para el invierno.
1
Asegúrese de que los orificios de chorros
de agua no se encuentren bloqueados con
partículas de alimentos.
Cuando la limpieza sea necesaria, utilice
un destornillador para liberar el gancho
de retención del soporte que sostiene el
montaje del brazo de pulverización más
elevado al tambor.
2
Luego tire del brazo de pulverización hacia
afuera.
3
Luego de limpiar el brazo de pulverización
más elevado, vuelva a colocarlo. Deslícelo
en su lugar y asegúrese de que se trabe el
gancho de retención.
LIMPIEZA DEL BRAZO DE PULVERIZACIÓN MÁS ELEVADO
Page 45

45
Español
ANTES DE SOLICITAR SERVICIO TÉCNICO
DETECCIÓN DE PROBLEMAS
Problema Causas posibles Soluciones
Si usted ha seguido esta guía de detección de problemas y aún así el problema persiste, o si el problema
que está experimentado no se encuentra listado aquí, llame al Servicio de Atención al Cliente de LGE al
1-800-243-0000(US), 1-888-542-2623(Canada).
El lavaplatos
no funciona
El lavaplatos funciona
durante mucho tiempo
Olor
Queda agua en
el tambor después de
finalizar el ciclo
Manchas y película
grasosa en los platos
La puerta no está bien cerrada.
El suministro de energía o el cable de
energía no se encuentran conectados.
Fusible quemado o interruptor
de circuitos accionado.
La unidad está conectada al agua fría.
El ciclo previo se detuvo antes
de finalizar.
La manguera de desagüe está torcida
o tapada.
Baja temperatura de agua.
Cantidad equivocada de detergente.
Carga excesiva.
Carga inadecuada.
Presión de agua insuficiente.
Cantidad insuficiente de detergente.
El dispensador de agente de enjuague
está vacío.
Agua extremadamente dura.
Para eliminar de la tina las incrustaciones producidas por el agua dura.
La mejor forma de eliminar las machas de la vajilla consiste en instalar un filtro que reduzca la dureza del agua en su domicilio.
(ablandar el agua).
Si ya cuenta con un filtro de agua o no piensa instalar uno,
pruebe seleccionar una opción de enjuague adicional “Extra Rinse”como parte del ciclo de lavado, con el fin de minimizar este
problema.
Para incorporar un enjuague adicional al ciclo,seleccione el ciclo de lavado y en seguida pulse el botón del enjuague adicional.
Nota: Al seleccionar “Extra Rinse”,se incrementarán el tiempo del ciclo de lavado y el consumo de agua
aumentan con respecto al modo de uso normal.
Extraiga del lavavajillas todos los platos, los cubiertos y el cesto de los cubiertos.En la tina solo deberán quedar las cestas.
Llene una taza medidora con aproximadamente 400~500 ml de vinagre blanco, y coloque la taza medidora en la cesta inferior .
Elija un ciclo “Normal”,seleccione las funciones “Extra Rinse”(Enjuague adicional) y “Sanitary”(Sanitario) y cierre la puerta.
NO UTILICE DETERGENTES
Nota: Asegúrese de que el lavavajillas realiza el ciclo completo de lavado.
El método de limpieza solo debe realizarse cuando se considere necesario.
Asegúrese de que la puerta esté bien cerrada y trabada.
Conecte el suministro de energía o el cable
correctamente.
Cambie los fusibles o reconfigure los interruptores.
Verifique la conexión de suministro de agua o la
configuración del calentador de agua. (Calentar agua
fría lleva más tiempo.)
Utilice el ciclo de lavado rápido con detergente sin
cargar platos.
Ajuste la manguera o destape la obstrucción.
El suministro de agua debe ser por lo menos 120°F para
un mejor desempeño de lavado.
Utilice la cantidad recomendada de detergente.
Cargue la cantidad adecuada de platos.
Ver la sección Cómo usar su lavaplatos.
Ajuste la presión de agua entre 20 y 120 psi.
Agregue la cantidad recomendada de detergente.Ver
la sección Cómo usar su lavaplatos.
Rellene el dispensador de agente de enjuague.
Quedan residuos en los
platos
Selección inadecuada de ciclo.
La temperatura del agua es muy baja.
No se usó detergente para lavaplatos.
Presión de agua baja en la entrada.
Seleccione el ciclo correcto en base al nivel de suciedad
y al tipo de vajilla.
Verifique la conexión de suministro de agua o la
configuración del calentador de agua.
Use el detergente recomendado.
La presión de agua debe hallarse entre 20 y 120 psi.
Page 46

46
DETECCIÓN DE PROBLEMAS
ANTES DE SOLICITAR SERVICIO TÉCNICO (cont.)
Problema Causas posibles Soluciones
Si usted ha seguido esta guía de detección de problemas y aún así el problema persiste, o si el problema
que está experimentado no se encuentra listado aquí, llame al Servicio de Atención al Cliente de LGE al
1-800-243-0000(US), 1-888-542-2623(Canada).
Ruido
Turbidez en los
elementos de vidrio
Marcas negras o grises
en los platos
Una película amarilla
o marrón en las
superficies internas
del lavaplatos
Los platos no se secan
Las lámparas no
iluminan
Los brazos de
pulverización no giran
bien
La bandeja superior
está torcida
Error IE
Error OE
Error FE
Error E1
Error HE
Error TE
En la pantalla puede
verse PF
Un nivel de ruido es normal durante
el funcionamiento.
El lavaplatos no está nivelado.
El brazo de la boquilla se golpea contra
los platos.
Combinación de excesivo detergente
y agua blanda.
Elementos de aluminio rozan los platos
durante el ciclo.
Manchas de café o té.
El dispensador de agente de enjuague
está vacío.
El aparato no está conectado
al tomacorriente.
Fusible quemado o interruptor
de circuitos accionado.
Los orificios de los brazos de
pulverización se encuentran bloqueados
con partículas de alimentos.
La bandeja está mal ajustada.
Problema en la entrada de agua.
Problema de drenaje.
Suministro excesivo de agua.
Problema de pérdida de agua.
Falla en el circuito calentador.
Falla del termistor o temperatura de
agua de entrada muy elevada (más
de 194°F).
El lavaplatos sufrió un corte de energía.
Apertura de la tapa de detergente.
Drene la bomba al comienzo del ciclo de drenaje.
Ajuste las patas de nivelación.
Cambie la posición de los platos.
Use menos detergente y un agente de enjuague para
minimizar el problema.
Cambie la posición de los platos.
Elimine la mancha mediante un producto removedor
de manchas.
Verifique y rellene el dispensador de agente
de enjuague.
Conecte el suministro de energía.
Cambie los fusibles o reconfigure los interruptores.
Limpie los orificios de los brazos de pulverización.
Ver la sección Cómo usar su lavaplatos.
Verifique que la manguera de entrada de agua no esté
bloqueada,torcida o congelada.
Controle el suministro de agua.
Verifique que la manguera de drenaje no esté
bloqueada,torcida o congelada.
Tenga a bien llamar al Centro de Servicio Autorizado
o al Centro de Atención al Cliente de LGE al
1-800-243-0000(US),1-888-542-2623(Canada).
Esto no es un error.El lavaplatos se reiniciará
automáticamente después de 10 segundos.
Quedan residuos en los
platos
Los orificios de chorros de agua de los
brazos de pulverización se encuentran
bloqueados.
Carga inadecuada de los platos.
Limpie los brazos de pulverización.
Verifique que los platos no bloqueen la rotación del
brazo de pulverización ni interfieran con el dispensador
de detergente.
Page 47

47
Español
ESPECIFICACIONES
ESPECIFICACIONES
• Suministro de energía: 120V, 60 Hz AC solamente, interruptor de circuitos mínimo 15A
• Presión de agua: 20–120 psi (140–830 kPa)
• Tamaño (AxPxA): 23 3/4
x 24 5/8
x 33 5/8 (603 mm x 625 mm x 854 mm)
• Temperatura de entrada de agua: 120°F (49°C) mínimo
• Peso: 114 lbs.(51.7kg)
La apariencia y especificaciones pueden sufrir cambios sin previo aviso.
Page 48

LG ELECTRONICS, INC.
GARANTÍA LIMITADA DEL LAVAPLATOS – EE.UU.
Si su lavaplatos LG llegara a tener defectos en los materiales o mano de obra bajo un uso normal durante el período de garantía establecido a continuación,
vigente desde la fecha original de compra del producto, LG Electronics reemplazará las piezas defectuosas. Las piezas de reemplazo tendrán las mismas
características y funciones de la pieza original. Las piezas de reemplazo tienen garantía durante el tiempo restante del período de garantía original. Esta
garantía limitada solamente cubre al comprador original del producto y tiene vigencia sólo cuando se lo utilice en los EE.UU.
Ninguna otra garantía es aplicable a este producto. ESTA GARANTÍA REEMPLAZA CUALQUIER OTRA GARANTÍA, EXPRESA O IMPLÍCITA,
INCLUYENDO, SIN LIMITACIÓN, CUALQUIER GARANTÍA DE COMERCIABILIDAD O APTITUD PARA UN OBJETIVO PARTICULAR. EN LA MEDIDA EN QUE
CUALQUIER GARANTÍA IMPLICITA SEA REQUERIDA POR LA LEY, SE LIMITA EN DURACIÓN AL PERÍODO DE GARANTÍA EXPRESO ANTERIOR. NI EL
FABRICANTE NI SU DISTRIBUIDOR EN LOS EE.UU. SERÁN RESPONSABLES DE DAÑOS INCIDENTALES, RESULTANTES, INDIRECTOS, ESPECIALES
O PUNITIVOS DE CUALQUIER NATURALEZA, INCLUYENDO, SIN LIMITACIÓN, GANANCIAS O INGRESOS PERDIDOS, O CUALQUIER OTRO DAÑO
EXPRESADO MEDIANTE CONTRATO, EXTRACONTRACTUALMENTE O DE CUALQUIER OTRA FORMA. Algunos estados y/o territorios no permiten la
exclusión o limitación de daños o limitaciones incidentales o resultantes sobre el tiempo de duración de una garantía implícita,por lo tanto las exclusiones o
limitaciones anteriores pueden no aplicarse en su caso. Este garantía otorga al comprador original derechos legales específicos y usted puede contar con
otros derechos, que pueden variar de estado a estado o de territorio a territorio.
PERÍODO DE GARANTÍA:
Por el período de: LG reemplazará:
Un año desde la fecha Cualquier pieza del lavaplatos que falle debido a un defecto de los materiales o mano de obra. Durante esta
de compra original garantía de un año, LGE también ofrece, en forma gratuita, la mano de obra y trabajos en el lugar para reemplazar
la pieza defectuosa.
Dos años desde la fecha Cualquier pieza del lavaplatos (con excepción de las listadas abajo) que falle debido a un defecto de los materiales
de compra original o mano de obra. Durante esta garantía de piezas de dos años, usted será responsable de cualquier clase de costos
de mano de obra o trabajos en el lugar.
Cinco años desde la fecha El tablero de control electrónico y las bandejas del lavaplatos que fallen debido a un defecto de los materiales
de compra original o mano de obra. Durante esta garantía de piezas de cinco años, usted será responsable de cualquier clase de
costos de mano de obra o trabajos en el lugar.
Diez años desde la fecha Direct Drive motor que falla debido a un defecto en material o mano de obra.
de compra original Durante estos diez años de garantía, usted será responsable de cualquier trabajo o costo de servicio.
Limitada de por vida El revestimiento de la puerta y el tambor de acero inoxidable (siempre y cuando sea propiedad del comprador
original) que fallen debido a un defecto de los materiales o mano de obra. Durante esta garantía de piezas limitada
de por vida, usted será responsable de cualquier clase de costos de mano de obra o trabajos en el lugar.
Las unidades de reemplazo y las piezas de reparación pueden ser nuevas o refabricadas. Las unidades de reemplazo y las piezas de repuesto están
cubiertas por la garantía durante el tiempo restante del período de garantía de la unidad original.
ESTA GARANTÍA LIMITADA NO SE APLICA A:
1. Visitas a su domicilio para entregar o retirar piezas,instalar,instruir,
reemplazar fusibles domésticos, conexión de cableados o cañerías
o para corregir reparaciones no autorizadas.
2. Averías del producto durante fallas e interrupciones de energía
o servicios eléctricos inadecuados.
3. Daños provocados por transporte o manipulación.
4. Daños al producto provocados por accidentes,alimañas, rayos,
viento, incendio, inundaciones o fuerza mayor.
5. Daños provocados por tuberías de agua rotas o con pérdidas,
tuberías congeladas, líneas de drenaje restringidas o suministro
de agua inadecuada o interrumpida.
6. Daños provocados por suministro de aire inadecuado.
7. Daños provocados por utilizar el producto en una atmósfera
corrosiva.
8. Reparaciones cuando su producto LG no se utiliza de una manera
normal en una vivienda familiar única o cuando se utiliza sin respetar
las instrucciones descriptas en la Guía del Usuario del producto.
9. Daños provocados por accidentes,modificaciones, uso indebido,
maltrato, o instalación inadecuada, reparación o mantenimiento. Las
reparaciones inadecuadas incluyen el uso de piezas no aprobadas o
especificadas por LG.
10.Mantenimiento normal como se describe el la Guía de Usuario,como
limpieza o reemplazo de filtros, limpieza de serpentinas, etc.
11.Uso de accesorios o componentes no compatibles con este producto.
12.Productos con números de serie modificados o borrados.
13.Cambios en la apariencia del producto que no afecten el desempeño
del mismo.
14.Incrementos en los costos de los servicios públicos y gastos
adicionales de servicios públicos.
El costo de la reparación o reemplazo bajo estas circunstancias
excluidas quedará a cargo del consumidor.
PARA CONTACTAR A LG ELECTRONICS
POR CORREO:
LG Customer Interactive Center
P. O. Box 240007
201 James Record Road
Huntsville, Alabama 35813
ATTN: CIC
Información sobre registro de producto
Número de modelo: ______________________________
Número de serie: ______________________________
Usted puede encontrar estos números en una etiqueta
ubicada en el costado del lavaplatos.
Fecha de compra: ______________________________
Nombre del vendedor: ____________________________
Page 49

Español
Los productos y piezas de reemplazo están garantizados durante el tiempo restante del periodo de garantía original o bien, durante noventa
(90) días, cualquiera que sea mayor.
Los productos y piezas de reemplazo pueden ser nuevos o refabricados.
El Centro de Servicio Autorizado de LG garantiza sus trabajos de reparación durante treinta (30) días.
LA RESPONSABILIDAD ÚNICA DE LG CANADÁ SE LIMITA A LA GARANTÍA ESTABLECIDA CON ANTERIORIDAD. CON LA EXCEPCIÓN DE LO YA
ESTABLECIDO EXPRESAMENTE, LG CANADÁ NO PROPORCIONA Y EN ESTE ACTO NIEGA CUALQUIER OTRA GARANTÍA Y CONDICIÓN EN RELACIÓN
CON EL PRODUCTO, YA SEA EXPRESA O IMPLÍCITA, INCLUYENDO, DE MANERA ENUNCIATIVA MAS NO LIMITATIVA, CUALQUIER GARANTÍA O
CONDICIÓN DE COMERCIABILIDAD O IDONEIDAD PARA UN PROPÓSITO ESPECÍFICO, Y NINGUNA CLÁUSULA OBLIGARÁ A LG CANADÁ. LG CANADÁ
NO AUTORIZA A NINGUNA PERSONA A CREAR O ASUMIR DE SU PARTE CUALQUIER OTRA OBLIGACIÓN DE GARANTÍA O RESPONSABILIDAD EN
RELACIÓN CON EL PRODUCTO. EN CASO DE QUE CUALQUIER GARANTÍA O CONDICIÓN RESULTARA IMPLÍCITA POR LEY, ESTARÁ LIMITADAAL
PERIODO DE GARANTÍA EXPRESO ESTABLECIDO CON ANTERIORIDAD. LG CANADÁ, EL FABRICANTE O EL DISTRIBUIDOR NO TENDRÁN
RESPONSABILIDAD ALGUNA POR CUALQUIER DAÑO INCIDENTAL, EMERGENTE, ESPECIAL, DIRECTO O INDIRECTO, POR CUALQUIER PERDIDA DE
CRÉDITO MERCANTIL, GANANCIAS PERDIDAS, DAÑOS PUNITIVOS O EJEMPLARES O CUALQUIER OTRO DAÑO, COMO RESULTADO DIRECTO O
INDIRECTO DE CUALQUIER INCUMPLIMIENTO DE CONTRATO, FUNDAMENTAL O NO, O DE CUALQUIER ACTO O OMISIÓN, AGRAVIO O ALGÚN OTRO.
Esta garantía le proporciona derechos legales específicos. Usted puede tener otros derechos que varíen entre las provincias según las leyes
provinciales aplicables. Cualquier término de esta garantía que niegue o cambie cualquier disposición o garantía bajo la ley provincial podrá ser
retirada en cuanto entre en conflicto con la ley provincial, sin afectar el resto de las condiciones de esta garantía.
Lavaplatos
Garantía Extendida para Componentes (Únicamente Piezas)
(Se cobrará mano de obra al consumidor después de un (1) año a partir de la fecha de compra)
Dos (2) años después de la
fecha de compra original.
Piezas Mano de obra
Cinco (5) años después de la
fecha de compra original.
PCI, cesto, contrapuerta de
acero inoxidable, cuba
Diez (10) años después de la
fecha de compra original
DD motor
(únicamente piezas internas y funcionales)
Un (1) año después de la
fecha de compra original.
GARANTÍA : En caso de que su lavaplatos de LG (en lo sucesivo, el "Producto”) falle debido a un defecto en el material o en la mano
de obra bajo condiciones de uso normal en su casa y durante el periodo de garantía establecido a continuación, LG Canadá, a su
discreción, reparará o reemplazará el Producto contra entrega de la prueba de compra original. Esta garantía es válida únicamente para
el comprador original del producto y aplica únicamente a un Producto distribuido en Canadá por LG o por un distribuidor autorizado del
mismo, en Canadá. La garantía únicamente aplica para Productos que se encuentran y que se usan dentro de Canadá.
Para mayores detalles sobre la garantía y servicio al cliente,
favor de llamar o visitar nuestro sitio Web:
Llame al 1-888-542-2623 (las 24 horas al día, los 365 días del año) y
seleccione la opción apropiada del menú o visite nuestro sitio Web:
http://www.lg.ca
Escriba la información sobre su garantía a continuación:
Información de Registro de Producto:
Modelo:
Número de serie:
Fecha de compra:
1. Viajes de servicio para entregar, recoger, o instalar el producto; enseñarle a un cliente cómo operar el producto; la reparación o reemplazo de fusibles, la
corrección del cableado, o la corrección de reparaciones / instalaciones realizadas sin autorización.
2. La falta de funcionamiento del producto durante fallas e interrupciones de electricidad o debido a un servicio de electricidad inadecuado.
3. Daño ocasionado por tuberías de agua rotas o con fugas, tuberías de agua congeladas, líneas de drenaje restringidas, suministro de agua inadecuado o
suspendido, o el suministro de aire inadecuado.
4. Daño ocasionado por la operación del Producto en un ambiente corrosivo o contrario a las instrucciones establecidas en el manual de usuario del Producto.
5. Daño al Producto ocasionado por accidentes, plagas y animales dañinos, rayos, viento, fuego, inundaciones o casos fortuitos.
6. Daño ocasionado por el mal uso, abuso, instalación, reparación o mantenimiento incorrectos del Producto. La reparación incorrecta incluye el uso de piezas
no aprobadas o no especificadas por LG Canadá.
7. Daño o falla del producto ocasionados por una modificación o alteración realizada sin autorización, o su uso para propósitos distintos a los pretendidos, o
bien como resultado de cualquier fuga de agua debido a su instalación incorrecta.
8. Daño o falla del producto ocasionados por una corriente eléctrica o voltaje incorrecto, su uso comercial o industrial, o el uso de accesorios, componentes o
productos de limpieza que no estén aprobados por LG Canadá.
9. Daño ocasionado por su transportación y manejo, incluyendo rayones, abolladuras, desportilladuras y/u otro daño al acabado del producto, a menos que tal
daño esté ocasionado por defectos en los materiales o por la mano de obra y que haya sido denunciado en un periodo de una (1) semana después de su
entrega.
10. Daño o artículos que falten en cualquier Producto de exhibición, en caja abierta, en descuento o reacondicionado.
11. Productos con números de serie originales que se hayan quitado, alterado o que no se puedan establecer fácilmente. Se requieren los números de
modelo y de serie, junto con el recibo de venta original, para validar la garantía.
12. Aumentos en costos de servicios públicos y otros gastos para servicios públicos.
13. Reemplazo de focos, filtros u otros consumibles.
14. Reparaciones cuando su Producto se use en condiciones que no sean de uso normal en su casa (incluyendo, de manera enunciativa, su uso comercial,
en oficinas o en instalaciones recreativas) o de manera contraria a las instrucciones establecidas en el manual de usuario del Producto.
15. Costos asociados con la extracción del Producto de su casa para reparaciones.
16. La extracción y reinstalación del Producto en el caso de estar instalado en un lugar inaccesible, o de no estar instalado de acuerdo con las instrucciones
de instalación publicadas, incluyendo los manuales de usuario y de instalación del Producto.
17. Accesorios del Producto tales como canastillas para puertas, cajones, manijas, repisas, etc. También excluye las piezas que no sean las que se incluyeron
originalmente con el Producto.
Todos los costos asociados con las condiciones de exclusión arriba mencionadas se pagarán por parte del consumidor.
PERIODO DE GARANTÍA: (Nota: si no se puede verificar la fecha original de compra, la vigencia de la
garantía iniciará a partir de los sesenta (60) días de su fecha de fabricación.)
ESTA GARANTÍA LIMITADA NO CUBRE:
LG ELECTRONICS CANADA, INC.
GARANTÍA LIMITADA PARA LAVAPLATOS DE LG - Canadá
Page 50

50
INTRODUCTION
CONSIGNES DE SÉCURITÉ IMPORTANTES
Précautions élémentaires de sécurité 51, 52
Sécurité électrique 52
Avant d'utiliser le lave-vaisselle 53
PIÈCES ET CARACTÉRISTIQUES
Caractéristiques 54
Pièces 55
Panneau de commande 56, 57
GUIDE DE DÉPANNAGE
Avant d'appeler le service après-vente 69, 70
GARANTIE
Informations relatives
à l'enregistrement du produit 72
Nous vous félicitons pour votre
acquisition et vous souhaitons la.
bienvenue au sein de la famille LG.
Votre nouveau lave-vaisselle LG
combine silence, facilité
d'utilisation ainsi qu'une nouvelle
technologie de lavage. En suivant les
instructions d'utilisation et de
maintenance décrites dans ce guide,
votre lave-vaisselle vous fournira un
service fiable pendant de nombreuses
années.
MERCI !
INSTRUCTIONS D'UTILISATION
Démarrage rapide 58
Sélectionner le programme 59
Charger le panier inférieur 61
Chargement pour lavage à la vapeur 61
Charger le panier à couverts 62
Charger le panier supérieur 62
Ajuster la hauteur de panier supérieur 63
Enlévement de panier supérieur 63
Chargement du panier à couverts 64
Plateau à hauteur réglable 64
Ajouter du détergent 65
Ajouter du liquide de rinçage 66
ENTRETIEN ET NÉTTOYAGE
Nettoyer les parties métalliques 67
Nettoyer le bras d'aspersion inférieur 67
Nettoyer le bras d'aspersion supérieur 67
Nettoyer le bras d'aspersion du plafond 68
Maintenance périodique
et non-utilisation prolongée 68
SPÉCIFICATIONS
Spécifications 71
Page 51

51
Français
Nous fournissons dans ce manuel de nombreuses mises en garde de sécurité qui sont également présentes
sur votre appareil. Lisez et suivez toujours toutes les mises en garde de sécurité.
Voici le symbole d'alerte de sécurité.
Ce symbole vous met en garde sur de possibles dangers qui pourraient provoquer des dommages
matériels ou des blessures corporelles, parfois mortelles.
Le symbole d'alerte de sécurité sera suivi du mot « AVERTISSEMENT » ou « MISE EN GARDE », puis d'un
important message concernant la sécurité. Ces mentions signifient :
Ce manuel contient des remarques très
importantes concernant l'installation, l'utilisation
et l'entretien de votre lave-vaisselle.
Le fabricant ne pourra être tenu responsable de
tout problème résultant du non-respect des
consignes de précaution et de sécurité.
Veuillez lire ce manuel avec attention avant
d'utiliser ce lave-vaisselle pour la première fois.
Ce lave-vaisselle est conçu pour un usage
domestique.
Utilisez seulement des détergents ou des
liquides de rinçage spécifiquement adaptés
à l'utilisation d'un lavevaisselle. Conservez
le détergent et le liquide de rinçage hors de
portée des enfants.
N'autorisez pas les enfants ou des personnes
non qualifiées à faire fonctionner le lave-vaisselle.
Lors du chargement d'objets à laver :
1) Disposez les objets pointus de façon qu'ils
n'endommagent pas les parties qui garantissent
l’étanchéité de la porte et
2) Disposez les couteaux tranchants en
positionnant leur manche vers le haut afin de
réduire tout risque de blessure lorsque vous
manipulez l’intérieur du lave-vaisselle.
Ne lavez pas d'objets en plastique à moins qu'ils
aient été conçus pour un lavage en lave-vaisselle
ou équivalent. Pour les objets en plastique
n'ayant aucune mention particulière, veuillez
consulter les recommandations du fabricant.
Ne mettez pas en marche le lave-vaisselle à
moins que tous les panneaux intérieurs soient
correctement mis en place.
Ne pas modifier pas les commandes.
Ne pas malmener ou s'asseoir sur la porte ou
encore sur les paniers du lave-vaisselle.
Afin d’éviter tout risque de blessure, ne laissez
jamais d'enfant sans surveillance à l’intérieur ou
autour du lave-vaisselle et ne les laissez pas non
plus jouer avec celui ci.
Dans certaines conditions, du gaz hydrogène
peut être produit à l’intérieur d'un circuit d'eau
chaude n'ayant pas été utilisé depuis deux
semaines ou plus. L’HYDROGÈNE EST UN GAZ
EXPLOSIF. Si le circuit d'eau chaude n'a pas été
utilisé pendant un longue période de temps,
ouvrez tous les robinets d'eau chaude puis laisser
l'eau couler pendant plusieurs minutes. Cela aura
pour effet de purger tout gaz hydrogène
accumulé. L’hydrogène est également un gaz
inflammable, ne fumez pas ou n'utilisez pas
d'appareils produisant des flammes pendant
toute la durée de la purge.
Retirez la porte du compartiment de lavage
lorsque vous vous débarrassez d'un vieux
lave-vaisselle.
AVERTISSEMENT Afin de réduire tout risque d’incendie, d’électrocution ou
de blessures causées aux utilisateurs de cet appareil, veillez à respecter les précautions
élémentaires d'utilisation et les instructions suivantes :
PRÉCAUTIONS ÉLÉMENTAIRES DE SÉCURITÉ
AVERTISSEMENT
MISE EN GARDE
CONSIGNES DE SÉCURITÉ IMPORTANTES
LISEZ TOUS DES INSTRUCTIONS AVANT
L'UTILISATION
Votre sécurité ainsi que celle des autres est très importante.
Ce symbole indique la possibilité de blessures corporelles,
parfois mortelles.
Ce symbole indique la possibilité de blessures ou
de dommage matériel.
Page 52

52
CONSIGNES DE SÉCURITÉ IMPORTANTES
LISEZ TOUS DES INSTRUCTIONS AVANT
L'UTILISATION
Pour un lave-vaisselle branché en permanence :
Cet appareil doit être connecté à une prise
pourvue d'une tige métallique reliée à la terre,
à un système de câblage permanent ou un
équiment pourvu d'un dispositif relié à la terre
doit être installé et branché à l'appareil. Demandez
conseil auprès d'un électricien qualifié.
Consignes de sécurité
Ne pas ouvrir la porte du lave-vaisselle avec une
force excessive avant son installation, cela pourrait
endommager l'appareil ou le faire basculer en
avant. Ne pas utiliser le lave-vaisselle avant qu'une
complète installation conforme aux instructions ne
soit réalisée.
PRÉCAUTIONS ÉLÉMENTAIRES DE SÉCURITÉ
AVERTISSEMENT Afin de réduire tout risque d'incendie, d’électrocution ou
de blessures infligées aux utilisateurs de cet appareil, veillez à respecter les précautions
élémentaires d'utilisation et les instructions suivantes :
SÉCURITÉ ÉLECTRIQUE
AVERTISSEMENT
Risque d’électrocution
Le non-respect de ces consignes peut
entraîner la mort, l'incendie et l’électrocution.
• Le lave-vaisselle DOIT être connecté à la terre.
Branchez le cable terre à la prise de terre verte
située à l’intérieur de la boîte d'alimentation.
• N'utilisez pas de ralonge pour bracher cet
appareil sur secteur.
• Le lave-vaisselle est conçu pour une utilisation
domestique standard (120 Volts AC, 60 Hz).
Avant de raccorder le lave-vaisselle, assurezvous
que la prise ou le câble soit correctement
connecté à la terre et soit polarizé par le
disjoncteur ou les fusibles. Le non-respect du
branchement à la terre peut entraîner des
risques d’électrocution ou de dysfonctionnement
de l'appareil. Demandez conseil auprès d'un
électricien qualifié.
• Ne pas installer ou exposer le lave-vaisselle
sera exposé aux conditions météorologiques.
Le non-respect de cette consigne peut entraîner
des risques d’électrocution, d'incendie, de
dysfonctionnement ou/et de déformation du
lave-vaisselle.
• Ne pas endommager ou placer des objets lours
sur le cable d'alimentation de l'appareil. Ne pas
utiliser le lave-vaisselle si le cable d'alimentation
est endommagé. Cela peut entraîner des risques
d’électrocution. Demandez conseil auprès d'un
électricien qualifié.
• Ne pas manipuler le cable d'alimentation ou
toucher les commandes du lave-vaisselle avec
les mains mouillées. Ne pas utiliser le lavevaisselle sur une prise endommagée. Le nonrespect de ces consignes peut entraîner des
risques d’électrocution.
• Le démontage ou la réparation de l'appareil doit
être éffectué par un technicien qualifié. Un
démontage ou réparation non-conforme peut
entraîner des risques de dysfonctionnement de
l'appareil ou d’électrocution.
Page 53

53
Français
LISEZ TOUS DES INSTRUCTIONS AVANT
L'UTILISATION
CONSIGNES DE SÉCURITÉ IMPORTANTES
CONSERVEZ CES INSTRUCTIONS
Avant d'utiliser le lave-vaisselle, veuillez lire les
Consignes importantes de sécurité.
La température de l’arrivée d'eau doit être au
moins de 120°F (49°C) pour un lavage correct et
un temps de programme raisonable.
Pour cette raison, utilisez uniquement l’arrivée
d'eau chaude. Il également important de charger
le lave-vaisselle selon les recommandations
données pour que le lavage soit effectif. Lorsque
vous chargez le lave-vaisselle, veillez à éliminer
les denrées insolubles telles que les os, les curedents et les bouts de papier.
AVANT D'UTILISER LE LAVE-VAISSELLE
Lorsque vous chargez le lave-vaisselle, veillez à
suivre les recommandations générales suivantes :
1. Placez les éléments avec fonds de plats
profonds dans un angle incliné afin que l'eau
s’écoule facilement et que le processus de
séchage soit plus rapide.
2. Retirez les éléments solides et les restes
d'aliments brûlés présents sur la vaisselle
avant de les introduire dans le lave-vaisselle.
3. N'introduisez que les objets conçus pour un
lavage en lave-vaisselle.
REMARQUE : N'introduisez pas d'ustensiles
non résistants à la chaleur, avons garniture de
métal décoratif, etc.
Page 54

54
PIÈCES ET CARACTÉRISTQUES
CARACTÉRISTIQUES
UNE GRANDE CAPACITÉ
Les lave-vaisselle LG permettent le chargement
d'objets très volumineux
que ce soit sur le pannier
supérieur ou inférieur. La
hauteur du bac permet
une capacité de charge
supplémentaire ainsi que
la disposition de vaisselle
volumineuse. Les objets
très volumineux (max.
14 p.) peuvent être
disposés sur le pannier
inférieur en soulevant le
pannier supérieur.
SLIM DIRECT MOTOR™
Le nouveau Slim Direct Motor™ est contrôlé par
onduleur. La puissance
de lavage diffère
selon le programme
sélectionné. Cela
permet une utilisation
plus éfficace de
l’énergie et diminue
la consomation en
électricité de l'appareil.
SYSTÈME DE SÉCHAGE HYBRIDE
Ce système permet de sécher efficacement la
vaisselle sans utiliser
d’élément chauffant
qui augmenterait la
consommation
d'énergie.
SYSTÈME VARIO SPRAY
Puisque l'aspersion d'eau alterne entre le pannier
supérieur et le pannier
inférieur, toute la
puissance du moteur
est utilisée pour un
seul pannier à la fois.
Ceci concentre toute la
puissance de
nettoyage du moteur
sur chaque panier en
alternance.
BROYEUR D’ALIMENTS MOUS ET
FILTRE AUTONETTOYANT
Pour un lavage optimal, votre lave-vaisselle LG
est équipé d’un broyeur
d’aliments mous et
d’un filtre
autonettoyant. Le
broyeur réduit les
aliments et les restes
mous en particules
fines qui sont
récupérées par le filtre
et évacuées par le tuyau de vidange.
Le système de filtre autonettoyant permet de
séparer les restes de l’eau de lavage alors que
celle-ci circule. Tous les restes et les déchets
sont facilement évacués par le tuyau de vidange.
TOUCHES ULTRA SENSIBLES
ET ACL BLEU
Les touches ultra
sensibles du panneau
de commande facilitent
les sélections, tandis
que l'affichage ACL
bleu indique clairement
le cycle sélectionné et
les options.
LAVAGE À LA VAPEUR
La technologie vapeur offre de meilleures
performances de lavage
que les systèmes de
lavage classiques. La
vapeur permet
d’effectuer un entretien
doux, économique et
optimal de vos
porcelaines les plus
fines, ainsi que de vos
verres.
Page 55

55
Français
PIÈCES ET CARACTÉRISTQUES
PlÉCES
PANNEAU DE COMMANDES
POIGNÉE DE PORTE
COUVERCLE FRONTAL
COUVERCLE INFÉRIEUR
PIEDS DE MISE DE NIVEAU
ÉCRAN D'AFFICHAGE FRONTAL
BASE
1
2
4
5
3
6
9
7
8
11
14
15
12
10
BRAS D'ASPERSION DE PLAFOND
BRAS D'ASPERSION SUPÉRIEUR
BUSE À VAPEUR
BRAS D'ASPERSION INFÉRIEUR
BAC À DÉTERGENT ET À LIQUIDE DE
RINÇAGE
COUVERCLE DU CONDUIT DE
SÉCHAGE
ÉCLAIRAGE DE LA CUVE
(ILLUMITUBMC)
PANIER À COUVERTS
PANIER SUPÉRIEUR
PANNIER À COUVERTS
PANIER INFÉRIEUR
AFFICHAGE SUPÉRIEUR
TOUCHE DE MISE EN MARCHE
1
2
5
6
3
4
7
8
9
10
11
12
15
16
13
14
17
18
19
20
16
17
18
19
20
13
Les témoins WASH(lavage),
RINSE(rinçage) et DRY(séchage)
s'allument chacune leur tour selon la
phase en cours du cycle de lavage.
Le voyant CLEAN(propre) s'allume
pendant 4 minutes une fois que le
cycle de lavage est complétement
terminé.
Page 56
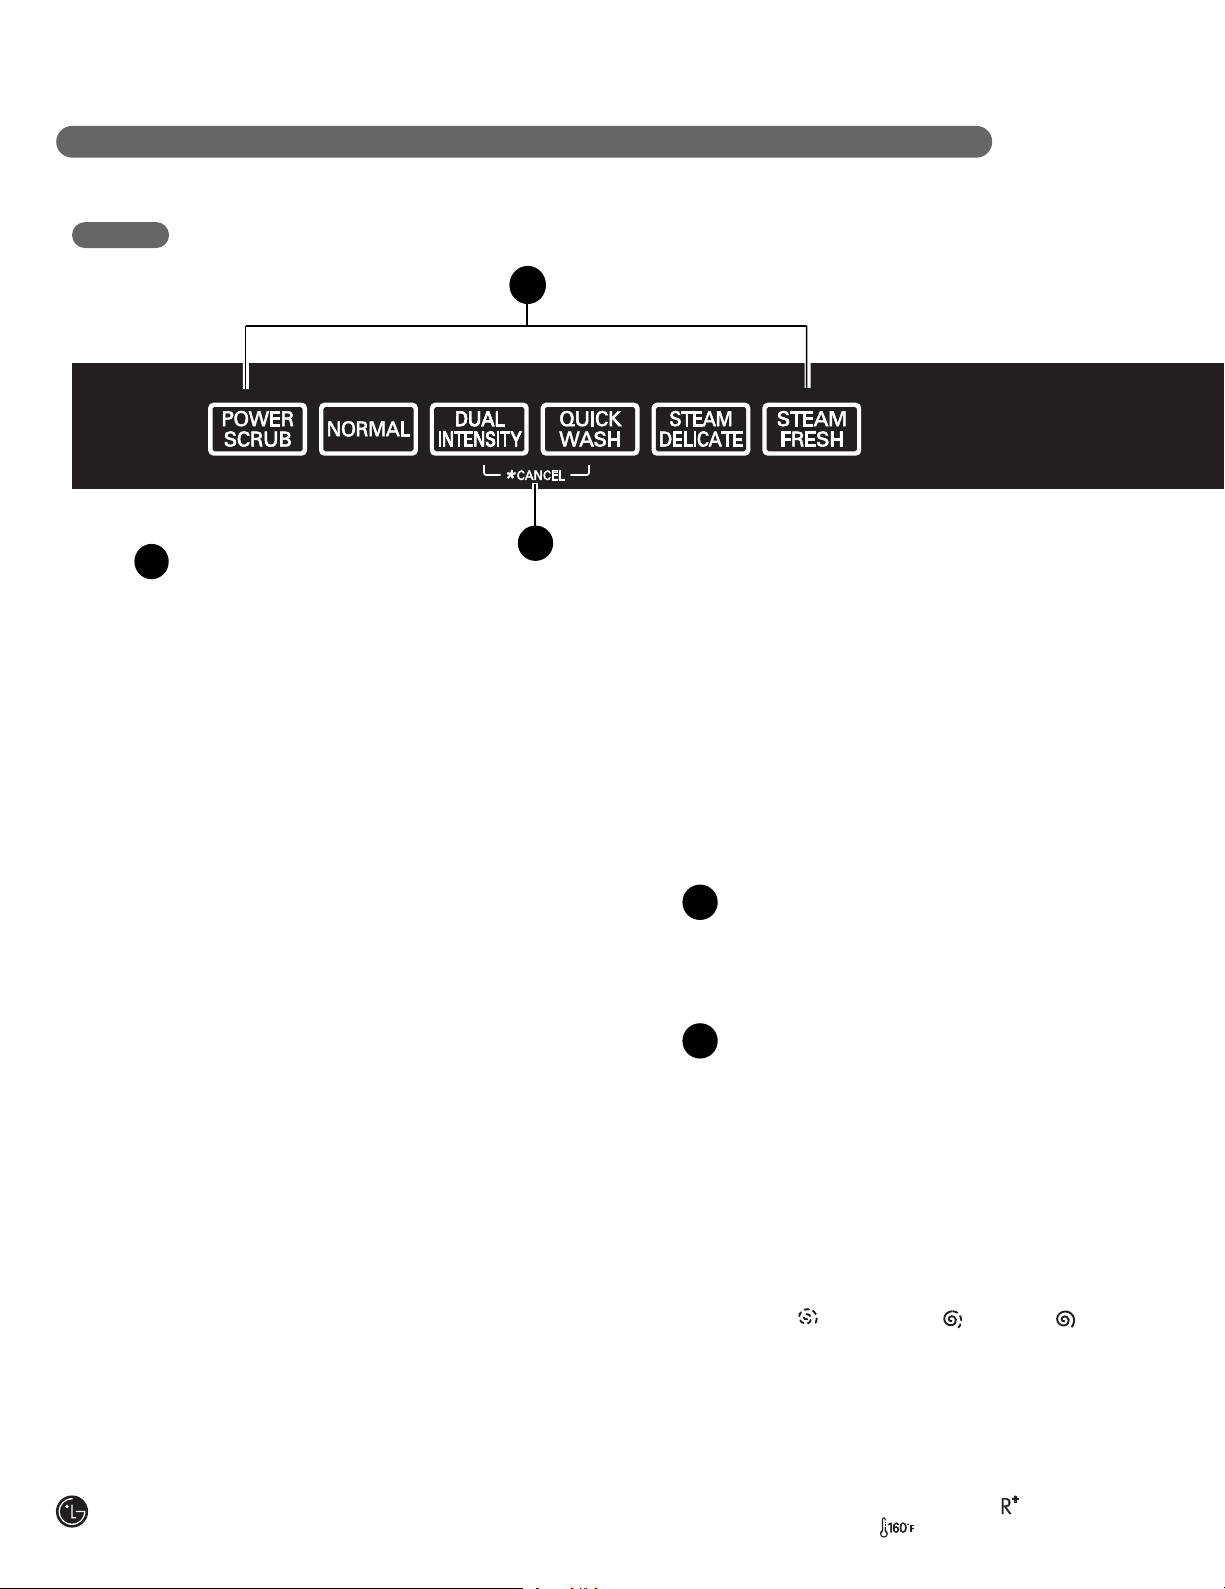
56
RINÇAGE SUPPLÉMENTAIRE( ),
STÉRILISATION( )
PIÈCES ET CARACTÉRISTQUES
PANNEAU DE COMMANDE
1
2
1
2
CYCLES
Appuyez sur le cycle de lavage souhaité.
POWER SCRUB
(Lavage-récurage)
Ce cycle est destiné au lavage de la vaisselle très
encrassée.
NORMAL
Ce cycle est destiné au lavage des chargements quotidiens,
normalement encrassés.
DUAL INTENSITY
(Double intensité)
Ce cycle soumet les paniers supérieur et inférieur à des
intensités de pulvérisation différentes. L’option par défaut de
ce cycle soumet le panier inférieur à une forte pulvérisation
et le panier supérieur à une pulvérisation douce. Il permet
d’obtenir des performances de lavage optimales pour les
chargements mixtes, y compris la porcelaine fine et les
verres. Si vous souhaitez des combinaisons
supplémentaires, utilisez les étapes décrites ci-dessous
pour modifier l’intensité ou utilisez la fonction HALF LOAD
(Demi-charge).
Utilisation de la double intensité
1. Maintenez enfoncé le bouton SPRAY (Pulvérisation)
pendant trois secondes jusqu’à ce que le témoin UPPER
(Supérieur) clignote.
2. Alors que le témoin UPPER (Supérieur) clignote, appuyez
sur le bouton SPRAY (Pulvérisation) jusqu’à ce que
l’intensité souhaitée de lavage du panier supérieur soit
sélectionnée.
3. Appuyez sur le bouton HALF LOAD (Demi-charge) pour
basculer vers le panier inférieur et utilisez le bouton SPRAY
(Pulvérisation) pour régler l’intensité souhaitée.
4. Il est possible d’annuler vos sélections en choisissant un
autre cycle.
QUICK WASH
(Lavage rapide)
Il s’agit d’un cycle court convenant parfaitement au lavage
de la vaisselle récemment utilisée ou peu encrassée.
STEAM DELICATE
(Vapeur Douce)
Ce cycle propose une vapeur douce pour augmenter la
puissance du cycle doux. Il convient parfaitement au lavage
des articles délicats comme la porcelaine fine ou les verres.
STEAM FRESH
(Rafraîchissement à la vapeur)
Ce cycle permet de rafraîchir la vaisselle ayant été stockée
ou non utilisée depuis une longue durée.
CARILLON MARCHE/ARRÊT
Pour activer ou désactiver la sonnerie, maintenez
enfoncés les boutons Quick Wash (Lavage rapide) et
Steam Delicate (Vapeur douce) pendant 2 secondes.
RINSE ONLY
(Rinçage seulement)
Ce cycle permet de rincer rapidement la vaisselle qui ne
va pas être lavée immédiatement. Il n’est pas
nécessaire d’utiliser de lessive.
Pour sélectionner le cycle Rinse Only (Rinçage
seulement), appuyez sur le bouton Power (Marche) ;
puis appuyez une fois sur le bouton Rinse (Rinçage)
sans appuyer sur aucun autre bouton.
REMARQUE: si un cycle principal a été sélectionné, le
cycle Rinse Only (Rinçage seulement) sera indisponible
jusqu’à ce que vous arrêtiez le lave-vaisselle.
CANCEL
(Annuler)
Pour annuler un cycle en cours, ouvrez la porte puis
maintenez enfoncés simultanément les boutons Dual
Intensité (Double intensité) et Quick Wash (Lavage
rapide) pendant 3 secondes. La pompe du tuyau de
vidange sera activée et le cycle sera annulé.
OPTIONS ET AFFICHAGE DES CYCLES
Appuyez sur les boutons d’option de cycle souhaités
pour sélectionner l’une des options du lave-vaisselle
décrites ci-dessous. L’écran indiquera la durée et les
options du cycle sélectionné.
SPRAY
(INTENSITY)
Pulvérisation (intensité)
Il est possible de sélectionner la pulvérisation souhaitée
en appuyant de manière répétée sur le bouton Spray
(Pulvérisation). Le témoin Strong (Forte), Medium
(Moyenne) ou Soft (Doux) apparaîtra dans la partie
supérieure gauche de l’écran.
RINSE
(Rinçage)
Il est possible de sélectionner l’option de rinçage
souhaitée en appuyant de manière répétée sur le bouton
Rinse (Rinçage). Les témoins Sanitary (Stérilisation),
Extra Rinse (Rinçage supplémentaire) ou Sanitary
(Stérilisation) et Extra Rinse (Rinçage supplémentaire)
apparaîtront dans la partie inférieure gauche de l’écran.
3
Doux ( ), Moyenne ( ), Forte ( )
Page 57

57
Français
PIÈCES ET CARACTÉRISTQUES
• Le symbole ( ) indique que le rinçage
hygiénique a été sélectionné. Ce symbole clignote au
cours du cycle et reste fixe une fois le cycle terminé si
la température hygiénique a été atteinte.
*REMARQUE: Ce rinçage à haute
températurestérilise la vaisselle ainsi que les objets
en verre selonla norme standard 184 NSF/ANSI
Standard 184élaborée pour les lave-vaisselle
domestiques. Leslave-vaisselle certifiés ne sont pas
conçus pour êtreutilisés dans les établissements de
restauration.
• Lorsque vous sélectionnez Extra Rinse (Rinçage
supplémentaire), un cycle de rinçage supplémentaire
est ajouté.
• Le cycle Rinse Only (Rinçage seulement) est un cycle
de lavage décrit à la page précédente.
CHILD LOCK
(SÉCURITÉ ENFANT)
Le témoin s’allume lorsque l’option Child Lock
(Sécurité enfant) est activée.
• Pour verrouiller ou déverrouiller ces boutons,
maintenez enfoncés simultanément les boutons Rinse
(Rinçage) et Spray (Pulvérisation) pendant 3
secondes avec la porte ouverte.
• Verrouillez les boutons de commande au cours du
cycle pour éviter la modification des options.
PRODUIT DE RINÇAGE
Ajoutez du produit de rinçage lorsque le témoin
s’allume.
ÉCRAN NUMÉRIQUE
L’écran numérique du tableau de
commande indique les durées estimées
du cycle et des options.
Lorsque le lave-vaisselle est mis sous tension, l’écran
est vierge. Lorsque le cycle et les options sont
sélectionnés, l’écran indique la durée totale estimée
des sélections. Au cours du fonctionnement, l’écran
indique la durée restante estimée.
REMARQUES:
• La durée estimée indiquée à l’écran n’inclut pas les
délais de chauffage de l’eau, etc.
• Si l’option Delay Wash (Lavage différé) est
sélectionnée, l’écran indique le délai en heures.
HALF LOAD
(Demi-charge)
• En présence de chargements réduits, il est possible
d’utiliser uniquement le panier supérieur ou inférieur
pour économiser de l’énergie.
• Chaque fois que vous appuyez sur le bouton Half Load
(Demi-charge), vous sélectionnez uniquement le panier
supérieur ou le panier inférieur .
• Si vous n’appuyez pas sur le bouton Half Load (Demicharge), le lave-vaisselle fonctionnera normalement, les
bras gicleurs supérieur et inférieur fonctionnant
alternativement.
DELAY START
(Lavage différé)
• Pour différer le lancement d’un cycle sélectionné,
appuyez sur le bouton Delay Start (Lavage différé).
• Chaque fois que vous appuyez sur le bouton Delay
Start (Lavage différé), le lancement du cycle est différé
d’une heure supplémentaire.
• La durée de lancement peut être différée d’une à 24 heures, grâce à des intervalles allant de une à quatre
heures.
STEAM
(Vapeur)
• Appuyez sur le bouton Steam (Vapeur) pour ajouter de
la vapeur à un cycle sélectionné.
• Le symbole de la vapeur s’éclairera lors de la sélection
de l’option STEAM (Vapeur).
• Le symbole de la vapeur clignotera lors de l’injection de
la vapeur à l’intérieur du lave-vaisselle.
POWER
(Marche)
• Le fait d’appuyer sur le bouton Power (Marche) permet
d’activer les commandes
• À la fin du cycle, le lave-vaisselle s’arrête
automatiquement pour des raisons de sécurité et
d’économie.
• En cas de montée de puissance, de coupure de courant
ou d’interruption de toute sorte, le lave-vaisselle
s’arrêtera automatiquement pour des raisons de sécurité.
Le cycle devra être relancé.
PANNEAU DE COMMANDE (suite)
3 4
MISES EN GARDES
La vapeur peut provoquer des brûlures. Au cours
de la partie vapeur d’un cycle, si la porte du lavevaisselle est ouverte, prenez garde à la zone des
buses à vapeur située du côté gauche du lavevaisselle. Le contact avec la vapeur ou les buses
à vapeur peut provoquer des brûlures.
4
Page 58

58
INSTRUCTIONS D'UTILISATION
DÉMARRAGE RAPIDE
MISE EN GARDE
Videz d'abord le panier inférieur et ensuite le panier supérieur. Cela évitera que l'eau présente sur le
panier supérieur ne s'écoule sur le panier inférieur.
AVERTISSEMENT
Il est généralement déconseill. d'ouvrir la porte lorsque le lave-vaisselle est en marche. Si la porte s'ouvre,
un dispositif de sécurité arrête le lave-vaisselle. Il est souhaitable d'ouvrir la porte avec précaution lorsque
le programme vient de se terminer car de la vapeur d'eau pourrait s'échapper de l'appareil.
ARRÊT AUTOMATIQUE
Le lave-vaisselle s'éteint automatiquement si un cycle n'est pas sélectionné ou si la porte n'est pas fermée
dans les 10 minutes.
REMARQUE : Si des petits morceaux durs tels que des os, des coquilles de noix, des morceaux de
plastique ou du verre entrent dans la pompe, ils peuvent être à l’origine d’un bruit de broyage lorsque le
broyeur d’aliments mous du lave-vaisselle tente de les broyer. Certains morceaux ayant pénétré dans la
pompe finissent par être broyés et évacués. Cependant, si vous entendez un bruit de broyage
persistant, faites réviser le lave-vaisselle pour retirer les morceaux de la pompe. Certains morceaux
comme du verre peuvent endommager la pompe s’ils ne sont pas rapidement retirés.
CHARGEMENT DE LA VAISSELLE
Débarrassez la vaisselle des restes de
nourriture, des os et de tous les déchets,
c’est-à-dire des restes indissolubles. Tirez
chaque panier et chargez la vaisselle comme
décrit aux pages 61 et 62.
QUANTITÉ DE LESSIVE
En suivant les directives de la page 65,
remplissez le compartiment à lessive avec la
quantité recommandée et fermez le couvercle.
Si vous souhaitez effectuer un prélavage, le
renfoncement situé sur la partie supérieure du
couvercle doit également être rempli de
lessive.
MISE EN MARCHE DU LAVEVAISSELLE
Pour lancer le cycle, ouvrez la porte et
appuyez sur le bouton Power (Marche).
VÉRIFICATION DU NIVEAU DE
PRODUIT DE RINÇAGE
Le témoin indicateur du niveau de produit de
rinçage s’allumera si le niveau de produit de
rinçage dans le lave-vaisselle est bas. Ajoutez
du produit de rinçage si le niveau est trop bas
pour garantir l’efficacité du cycle de séchage.
SÉLECTION DU CYCLE ET DES
OPTIONS
Sélectionnez le cycle et les options
correspondant au mieux au chargement, en
consultant le tableau de la page 59. L’écran
affichera la durée estimée du cycle et des
options sélectionnées.
FERMETURE DE LA PORTE
Le lave-vaisselle se mettra en marche
automatiquement, peu après la fermeture de
la porte. Au cours du cycle, l’écran affichera la
durée restante estimée pour le cycle et les
options sélectionnées. En cas d’ouverture de
la porte au cours du cycle, le lave-vaisselle
s’arrêtera. Lorsque la porte sera fermée, le
cycle reprendra au stade où il s’est arrêté.
FIN DU CYCLE
À la fin du cycle, une sonnerie retentira et
l’écran affichera « END » (FIN). Peu après,
l’écran et les commandes s’éteindront pour
des raisons de sécurité et d’économie
d’énergie.
1
2
3
6
4
5
7
Page 59

59
Français
SÉLECTIONNER LE PROGRAMME
Power Scrub (Lavage-récurage)
Ce programme est destiné à de la vaisselle très
sale. Ex : Les moules à gâteaux.
Normal
Sélectionnez ce programme pour de la vaisselle
normalement sale, pour toutes charges.
Dual Intensity (Double intensité)
Ce cycle soumet les paniers supérieur et
inférieur à différentes intensités de pulvérisation
au cours du même cycle, pour un équilibre
précis entre les performances de lavage et
l’entretien de la vaisselle. Consultez la page 56.
Quick Wash (Lavage rapide)
Il s’agit d’un cycle court convenant parfaitement
au lavage de la vaisselle récemment utilisée ou
peu encrassée.
Steam Delicate (Vapeur – articles fragiles)
Ce cycle propose la puissance douce de la vapeur
pour augmenter la puissance du cycle délicat. Il
convient parfaitement au lavage des articles délicats
comme la porcelaine fine ou les verres.
Steam Fresh (Rafraîchissement à la vapeur)
Ce cycle permet de rafraîchir la vaisselle ayant été
stockée ou non utilisée depuis une longue durée.
Rinse Only (Rinçage seulement)
Si vous n’envisagez pas de laver un chargement de
vaisselle dans l’immédiat, ce cycle permet de retirer
les restes de déchets et de ramollir les restes secs.
Pour sélectionner Rinse Only (Rinçage seulement),
appuyez sur le bouton Rinse (Rinçage) sans
sélectionner de cycle principal. Consultez la page 56.
INSTRUCTIONS D'UTILISATION
*La consommation réelle d'eau va varier en fonction du niveau de saleté.
**La durée du cycle va varier en fonction du niveau de saleté et de la température de l'eau.
Steam
Delicate
Steam
Fresh
113°F
45°C
140°F
60°C
5.5–6.9 gal.
21–26 L
107
Min.
PROGRAMME
Pulvéri-
sation
intensité
Power
Scrub
Normal
Dual
Intensity
Rinse
Only
Lavage
Rinçage
Séc-
hage
*Eau
utilisée
**Durée
duprog-
ramme
Pré-
lavage
Lavage
principal
Rinçage1Rinçage
2
Température
du rinçage
131°–145°F
55°–63°C
154°F
68°C
5.5–9.2 gal.
21–35 L
122–176
Min.
95°–140°F
35°–60°C
149°-153°F
65°-67°C
Forte
Moyenne
Moyenne
Moyenne
Moyenne
Moyenne
Doux
5.5–6.9 gal.
21–26 L
138
Min.
154°F
68°C
149°F
65°C
5.5 gal.
21 L
78
Min.
2.6–6.9 gal.
10–26 L
97–124
Min.
Quick
Wash
1.2–1.5 gal.
4.5-5.5 L
49
Min.
1.3 gal.
5 L
15
Min.
154°F
68°C
131°F
55°C
115°F
46°C
Page 60

60
INSTRUCTIONS D'UTILISATION
MISE EN GARDE
DES OBJETS NON LAVABLES
AU LAVE-VAISSELLE
La combinaison d'une eau à haute température et
de liquides vaiselle risquent d'endommager certains
objets. LG vous recommand de ne pas laver les
objets suivants dans le lave-vaisselle :
• de la vaisselle peinte à la main en feuille d'argent
ou d'or
• des ustensiles au manche en bois ou en os
• des ustensiles en fer ou sensibles à la rouille
• Des objets en plastique qui ne sont pas lavables
au lave-vaisselle
Dans le doute, reportez-vous aux
recommandations du fabricant.
Page 61
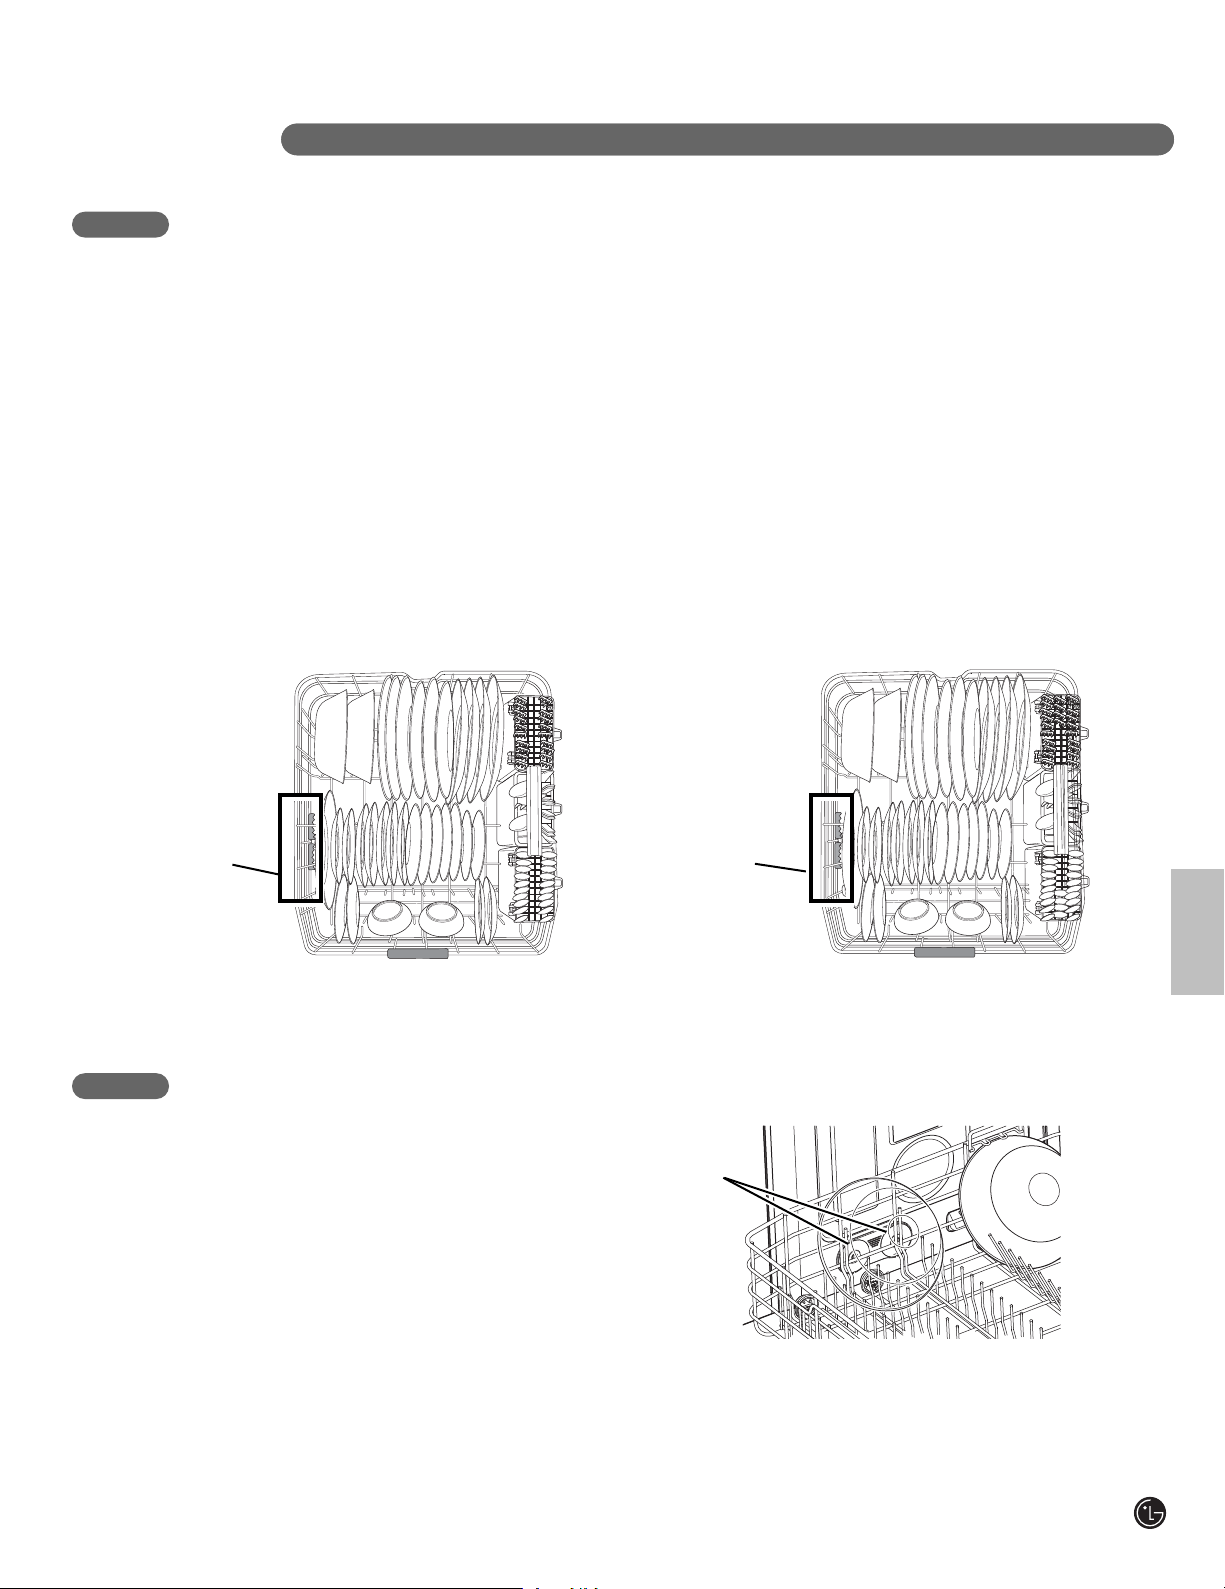
61
Français
La cuve haute supplémentaire permet de ranger
la vaisselle, des casserolesou d'autres ustensiles
d'une hauteur pouvant atteindre jusqu’à 14
pouces.
REMARQUE : Assurez-vous que la vaisselle de
grande taille n'entrave pasla rotation des bras
d'aspersion, et n’empêche le distributeur de
détergent de s'ouvrir.
Le panier inférieur est recommandé pour les
assiettes, les bols, les chaudrons, les
casseroles, les couvercles et même les plateaux
grill. Les assiettes doivent être placées à la
verticale et faire face au centre du panier. Les
pots, les poêles à frire et les casseroles doivent
être placées à l'envers. Le panier à couverts doit
être utilisé dans le panier inférieur ou supérieur.
Le panier inférieur ne doit pas être utilisé. pour la
petite vaisselle telle que les tasses, les verres à
vin ou les petites assiettes. Ces objets doivent
être charges dans le panier supérieur.
Chargez la vaisselle très encrassée dans la
partie avant gauche du panier inférieur, le côté
encrassé vers l’extérieur et le bas. Il s’agit de la
zone par laquelle la vapeur entre dans le lavevaisselle. L’utilisation de la vapeur chaude
optimise les performances de lavage du lavevaisselle.
CHARGER LE PANIER INFÉRIEUR
INSTRUCTIONS D'UTILISATION
CAPACITÉ 10 COUVERTS, PANIER INFÉRIEUR
CAPACITÉ 12 COUVERTS, PANIER INFÉRIEUR
Zone
des
buses à
vapeur
Zone
des
buses à
vapeur
Pour optimiser l’élimination des déchets
incrustés ou ayant cuit, chargez la vaisselle dans
le panier inférieur, du côté gauche. Pour obtenir
un meilleur résultat, chargez la vaisselle vers le
bas et la gauche pour qu’elle soit directement
soumise à la pulvérisation de vapeur et qu’elle
bénéficie de l’action du bras gicleur inférieur.
CHARGEMENT POUR LAVAGE À LA VAPEUR
Buses à
vapeur
Page 62

62
INSTRUCTIONS D'UTILISATION
CHARGER LE PANIER À COUVERTS
Le panier à couverts comporte des diviseurs qui
permettent d’éviter les rayures et le ternissement
des couverts délicats. Le panier peut se diviser en
trios paniers qui peuvent être utilisés dans le
panier inférieur et dans la panier supérieur. S'il y a
peu de couverts à laver, vous pouvez retirer les
paniers, pour libérer de la place pour d'autres
plats.
AVERTISSEMENT
Faites attention lorsque vous placez ou retirez
des objets coupants.
Placez le manche des couteaux vers le haut afin
de réduire le risque de coupure.
1
2
3
4
5
CHARGER LE PANIER SUPÉRIEUR
Utilisez le panier supérieur pour les objets
fragiles ou de petite taille tels que les tasses, les
verres, les soucoupes, ou les petites assiettes et
les objets non lavables au lave-vaisselle. Les
tasses, les verres et les bols doivent être placés
à l'envers. Les tasses supplémentaires ou les
ustensils de cuisine peuvent être placés sur des
tiges rabattables, lesquelles peuvent également
soutenir les verres à pieds. Assurez-vous que la
vaisselle de grande taille n'entrave pas la
rotation des bras d'aspersion au-dessus et sous
le panier supérieur.
CAPACITÉ 10 COUVERTS, PANIER SUPÉRIEUR
CAPACITÉ 12 COUVERTS, PANIER SUPÉRIEUR
Page 63

63
Français
INSTRUCTIONS D'UTILISATION
Le panier supérieur se règle vers le haut afin de
vois permettre de placer les objets encombrants
de 14 pouces de hauteur dans la panier inférieur.
Ou vous pouvez abaisser le panierpour pouvoir
placer des objets d'une hauteur de 12 pouces
dans le panier supérieur.
REMARQUE: Une fois le réglage terminé,
assurez-vous que les plats placés dans les
panniers inférieur et supérieur n'entravent pas la
rotation du bras d'aspersion. Ne réglez pas la
hauteur des paniers si le lave-vaisselle est plein.
AJUSTER LA HAUTEUR DU PANIER SUPÉRIEUR
Vous pouvez enlever le panier supérieur pouraccroître la capacité du panier inférieur.
REMARQUE: Prendre la précaution d'enlever les assiettes contenues dans le casier supérieur avent de le
retirer.
ENLÉVEMENT DU PANIER SUPÉRIEUR
1
Pour régler la hauteur du panier :
Levez le panier au niveau du centre de
chaque côté (voir l’illustration) jusqu’à ce qu’il
se bloque en position haute. Il n’est pas
nécessaire de lever le levier de verrouillage
pour lever le panier.
2
Pour abaisser le panier :
Maintenez le panier au niveau du centre de
chaque côté pour supporter son poids, puis
levez le levier situé de chaque côté pour le
libérer et l’abaisser en position basse.
1
Tirez le panier supérieur jusqu’à ce qu’il se
bloque. Localisez la patte de pression
2
Appuyez sur la patte du dispositif de retenue
située à l’extrémité de chaque rail latéral et
retirez le dispositif de retenue. Ne laissez pas
le panier supérieur tomber sur les rails après
le retrait des dispositifs de retenue. Tirez le
panier supérieur hors des rails.
Pressez la
languette
Pressez la
languette
Page 64

64
Le panier à couverts convient mieux pour les
couverts et la plupart des ustensiles de cuisine et
de service.
Les diviseurs des paniers à couverts aident à
séparer les ustensiles, ce qui permet d’éviter les
dommages et d’améliorer le nettoyage.
Il faut placer les manches des couteaux, des
fourchettes et des cuillères entre les tiges.
Si les manches de vos
couverts sont trop
épais, mettre ceux-ci à
l'envers de manière à
ce que les manches
soient dans l'autre
sens, comme indiqué
dans le schéma
cidessous.
Il est possible de régler séparément chaque côté du
plateau, le mettant plus haut ou plus bas de manière
à pouvoir y placer des ustensiles ou des couverts de
différentes tailles.
Pour ajuster les plateaux il faut les soulever et les
faire tourner sur eux-mêmes de l'avant vers l’arrière.
Casier amovible pour les couverts
Vous pouvez enlever le panier à couverts au
complet si vous avez besoin de plus d'espace dans
le panier supérieur pour de gros articles.
REMARQUE : Retirez toujours la coutellerie dans
le panier avant d'enlever le panier.
ATTENTION
Soyez prudent lorsque vous chargez ou
déchargez des éléments pointus. Les lames de
couteaux doivent être dirigées vers le bas pour
réduire les risques de vous blesser.
Tirer le casier vers l’extérieur en le faisant glisser
sur ses guides puis soulever la partie avant de
celui-ci de manière à ce que les roulettes
s’arrêtent au bout des guides. Il est alors possible
de faire coulisser le casier en le faisant sortir de
ses guides.
Correct Incorrect
Alternatif
Exemple de 10 couverts.
INSTRUCTIONS D'UTILISATION
CHARGEMENT DU PANIER À
COUVERTS
PLATEAU À HAUTEUR
RÉGLABLE
Page 65

65
Français
INSTRUCTIONS D'UTILISATION
AJOUTER DE D
ÉTERGENT
• Vous devez remplir le compartiment à lessive
avant le lancement de tout cycle, sauf le cycle
Rinse Only (Rinçage seulement).
• Si la vaisselle est légèrement encrassée, utilisez
une quantité moindre de lessive.
• La capacité totale du compartiment à lessive
principal est de 40 ml. Les marques de niveau
recommandé du distributeur sont 15 ml et 25 ml.
Une utilisation excessive de lessive peut
entraîner le dépôt d’un film sur la vaisselle et
dans le lave-vaisselle, ce qui risque d’amoindrir
les performances de lavage.
• La quantité nécessaire de lessive dépend du
cycle, de la taille du chargement et du niveau
d’encrassement de la vaisselle.
1
Si le couvercle est fermé, appuyez sur le
levier situé sur son côté inférieur pour ouvrir
le distributeur.
2
Ajoutez de la lessive dans le compartiment
principal jusqu’à ce que le niveau soit
compris entre 15 et 25 ml. Remplissez
jusqu’à 25 ml en présence d’eau calcaire ou
de chargements très encrassés ou jusqu’à
15 ml en présence d’eau douce ou de
chargements peu encrassés. Dosez la
quantité de lessive pour répondre au mieux à
vos besoins et aux conditions de lavage.
Fermez bien le couvercle jusqu’à ce que
vous entendiez un « clic ».
REMARQUE : N’AJOUTEZ PAS de lessive
lorsque le cycle Rinse Only (Rinçage
seulement) est sélectionné.
Loquet du distributeur
3
Si vous souhaitez effectuer un prélavage,
remplissez de lessive le renfoncement situé
dans le couvercle.
REMARQUE: une quantité trop importante
de lessive peut entraîner le dépôt d’un film
sur la vaisselle et dans le lave-vaisselle, ce
qui risque d’amoindrir les performances de
lavage.
MISE EN GARDE
INFORMATIONS RELATIVES
AUDÉTERGENT
N'utilisez que du détergent prévu pour des lavevaisselle automatiques. Le lave-vaisselle
pourraitsinon se remplir de mousse pendant le
lavage. La mousse de savon risquerait d'altérer
les performances de l'appareil et de provoquer
des fuites. N'utilisez PAS de détergent pour plats
d.licats dans ce lave-vaisselle.
Pré-lavage
Compartiment
REMARQUE :
Retirez l'étiquette placée sur le
tiroir à produits avant d'utiliser le lave-vaisselle
pour la première fois.
Compartiment lavage normal
Page 66
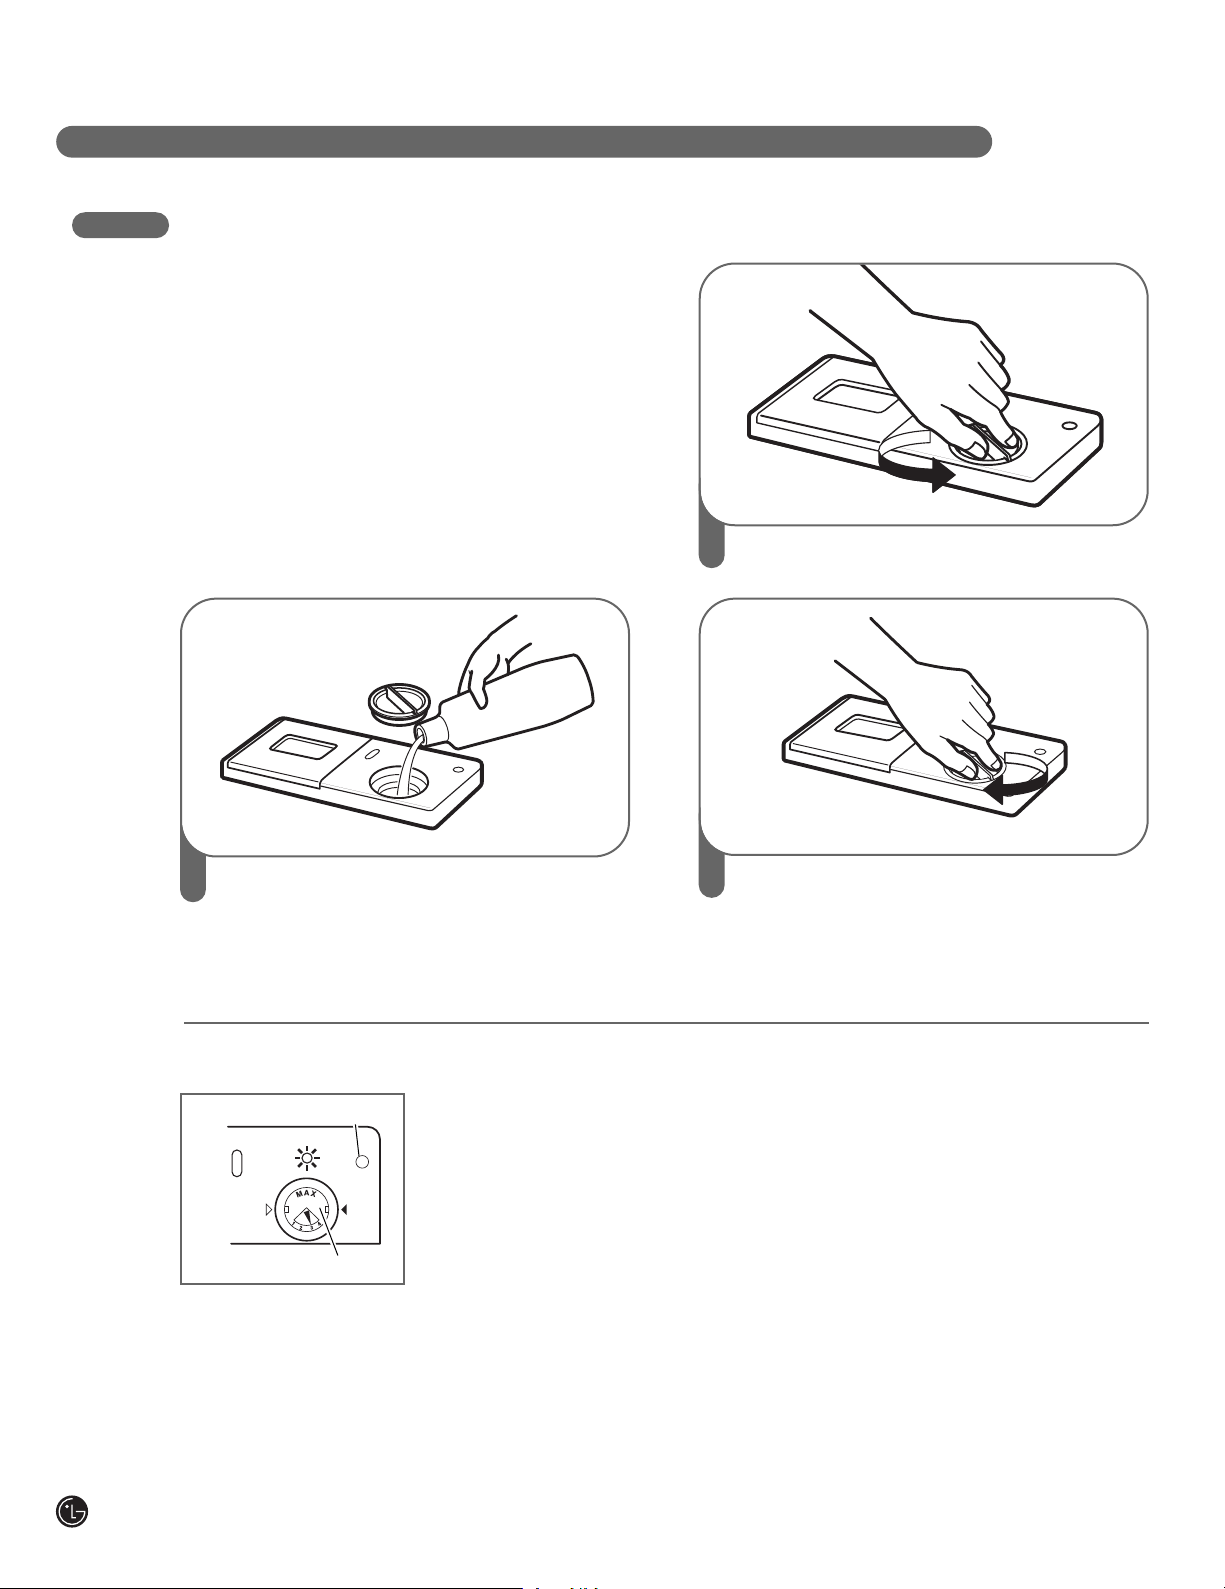
66
INSTRUCTIONS D'UTILISATION
AJOUTER DU LIQUIDE DE RINÇAGE
L'utilisation de produits de rinçage est
recommandée afin d’éviter les taches d'eau sur
la vaisselle une fois le programme de lavage
terminé et afin d’améliorer les performances du
programme de séchage.
REMARQUE : Seuls les liquides de rinçage
liquids peuvent être utilisés dans ce
lavevaisselle.
1
Tournez le bouchon dans le sens contraire
des aiguilles d'une montre et enlevez-le.
2
Ajoutez du liquide de rinçage jusqu'au niveau
maximum. (max. de 145 ml [4,8 oz])
3
Replacez le bouchon et verrouillez-le en le
vissant dans le sens des aiguilles d'une
montre.
Le liquide de rinçage sera distribué
automatiquement durant le dernier cycle de
rinçage.
RÉGLAGE DU DISTRIBUTEUR DE LIQUIDE
DE RINÇAGE
Le distributeur de liquide
de rinçage est réglé en
usine sur le niveau 3,
ceci garantissant des
performances optima les
dans toutes les
conditions. Si la
commande le liquide de
rinçage est réglée sur un
niveau trop faible, des taches, des traînées se
produiront et le programme de séchage sera
altéré. Si la commande du liquide de rinçage est
réglée sur un niveau trop élevé, ceci risque de
produire de la mousse et d'altérer les
performances du programme de lavage.
Pour régler le distributeur de liquide de rinçage,
retirez le couvercle et ajustez le levier sur le
niveau souhaité.
AJOUT DE PRODUIT DE RINÇAGE
La capacité du distributeur de produit de rinçage
est de 145 ml. La fréquence de remplissage du
distributeur dépend de la fréquence de lavage de
la vaisselle et de l’option de produit de rinçage
utilisée. Si le niveau de produit de rinçage est
bas, le témoin de produit de rinçage du tableau
de commandes s’allumera.
REMARQUE :
le distributeur dispose également d’un
témoin rond de produit de rinçage qui est
éteint lorsque le distributeur est plein et qui
est allumé lorsqu’il est vide.
Indicador de agente de enjuague
Palanca de ajuste
Page 67

67
Français
NETTOYER LES PARTIES MÉTALLIQUES
ENTRETIEN ET NÉTTOYAGE
Pour de meilleurs résultats, il est important de vérifier régulièrement et de procéder à un entretien
régulier des bras d'aspersion.
AVERTISSEMENT Afin d’éviter les blessures pendant l'entretien et le
nettoyage, munissez-vous de gants et/ou de vêtements de protection.
Certains composants extérieurs ou intérieurs
peuvent être nettoyés avec un chiffon doux ou une
éponge. Une pellicule trouble peut s'accumuler sur
la surface de la cuve en acier inoxydable,
particulièrement lorsqu'on utilise de l'eau dure.
NETTOYER LE BRAS D'ASPERSION INFÉRIEUR
• Assurez-vous que les orifices des jets d'eau ne
sont pas bloqués par des particules d'aliments.
• Si nécessaire, enlevez-le en tirant dessus.
• Nettoyez le bras d'aspersion et replacez-le en
l’enfonçant. Assure—vous qu'il tourne sans
difficulté.
NETTOYER LE BRAS D'ASPERSION SUPÉRIEUR
1
Tirez le panier supérieur vers l'avant.
Assurez-vous que les orifices des jets d'eau
ne sont pas bloqués par des particules
d'aliments.
Si nécessaire de nettoyer le bras
d'aspersion, enlevez-le en dévissant l’écrou
au bas du bras d'aspersion d'un 1/8
ème
de
tour dans le sens inverse des aiguilles d'une
montre et en tirant (voir les illustrations).
2
Après avoir nettoyé le bras d'aspersion
supérieur, insérez-le. Vissez l’écrou d'un
huitième de tour dans le sens des aiguilles
d'une montre afin de vous assurer que
l’écrou s'encastre.
Page 68

68
ENTRETIEN ET NÉTTOYAGE
NETTOYER LE BRAS D'ASPERSION DU PLAFOND
MAINTENANCE PÉRIODIQUE ET NON-UTILISATION
PROLONGÉE
• Si vous vous absentez pendant une longue
période au cours de l’été, il est recommandé de
fermer le robinet automatique de débit d'eau et
de débrancher le cordon électrique.
• Si vous vous absentez pendant une longue
période au cours de l'hiver, si la pièce dans
laquelle le lave-vaisselle a été installée est
exposée au gel, il est recommandé d’hivériser
les tuyaux d'alimentation en eau et l'appareil.
La préparation pour l'hiver de l'appareil doit être
éffectué par un technicien qualifié.
1
Assurez-vous que les orifices des jets d'eau
ne sont pas bloqués par des particules
d'aliments. Lorsque le nettoyage s’avère
nécessaire, utilisez un tournevis pour
dévisser le collier de fixation du support qui
maintient le bras d'aspersion supérieur en
place sur la cuve.
2
Puis retirez le bras d'aspersion.
3
Après avoir nettoyé le bras d'aspersion de
dessus, remettez-le en place. Faites-le
coulisser en place et assurez-vous que le
collier de fixation s'engage.
Page 69

69
Français
GUIDE DE DÉPANNAGE
Eau extrmement dure
La meilleure manière d'éliminer les taches sur vos plats est d'installer un adoucisseur d'eau dans votre maison.
Si vous en avez déjà un ou si vous ne prévoyez pas d'en installer un,
essayez d'ajouter un cycle "Rinçage+" au cycle de lavage afin de réduire les taches et la pellicule.
Pour ajouter un rinçage supplémentaire au cycle, sélectionnez le cycle de lavage, puis appuyez sur Rinçage+.
Remarque :
à celles d'une utilisation normale.
Pour enlever le calcaire accumule dans la cuve
Sortez tous les plats, les couverts et le panier à ustensiles du lave-vaisselle. Seuls les paniers peuvent rester
dans la cuve.
Remplissez une tasse à mesurer d'environ 400 à 500 ml de vinaigre blanc et placez-le dans le panier inférieur.
Lancez un cycle "Normal" et sélectionnez "Rinçage+" et "UV", puis fermez la porte.
N'UTILISEZ PAS DE DÉTERGENT
Remarque :
que lorsque c'est nécessaire.
lors de la sélection du "Rinçage+", la durée du cycle et la consommation d'eau seront supérieures
laissez le lave-vaisselle effectuer le cycle complet. Cette méthode de nettoyage ne doit être utilisée
Page 70
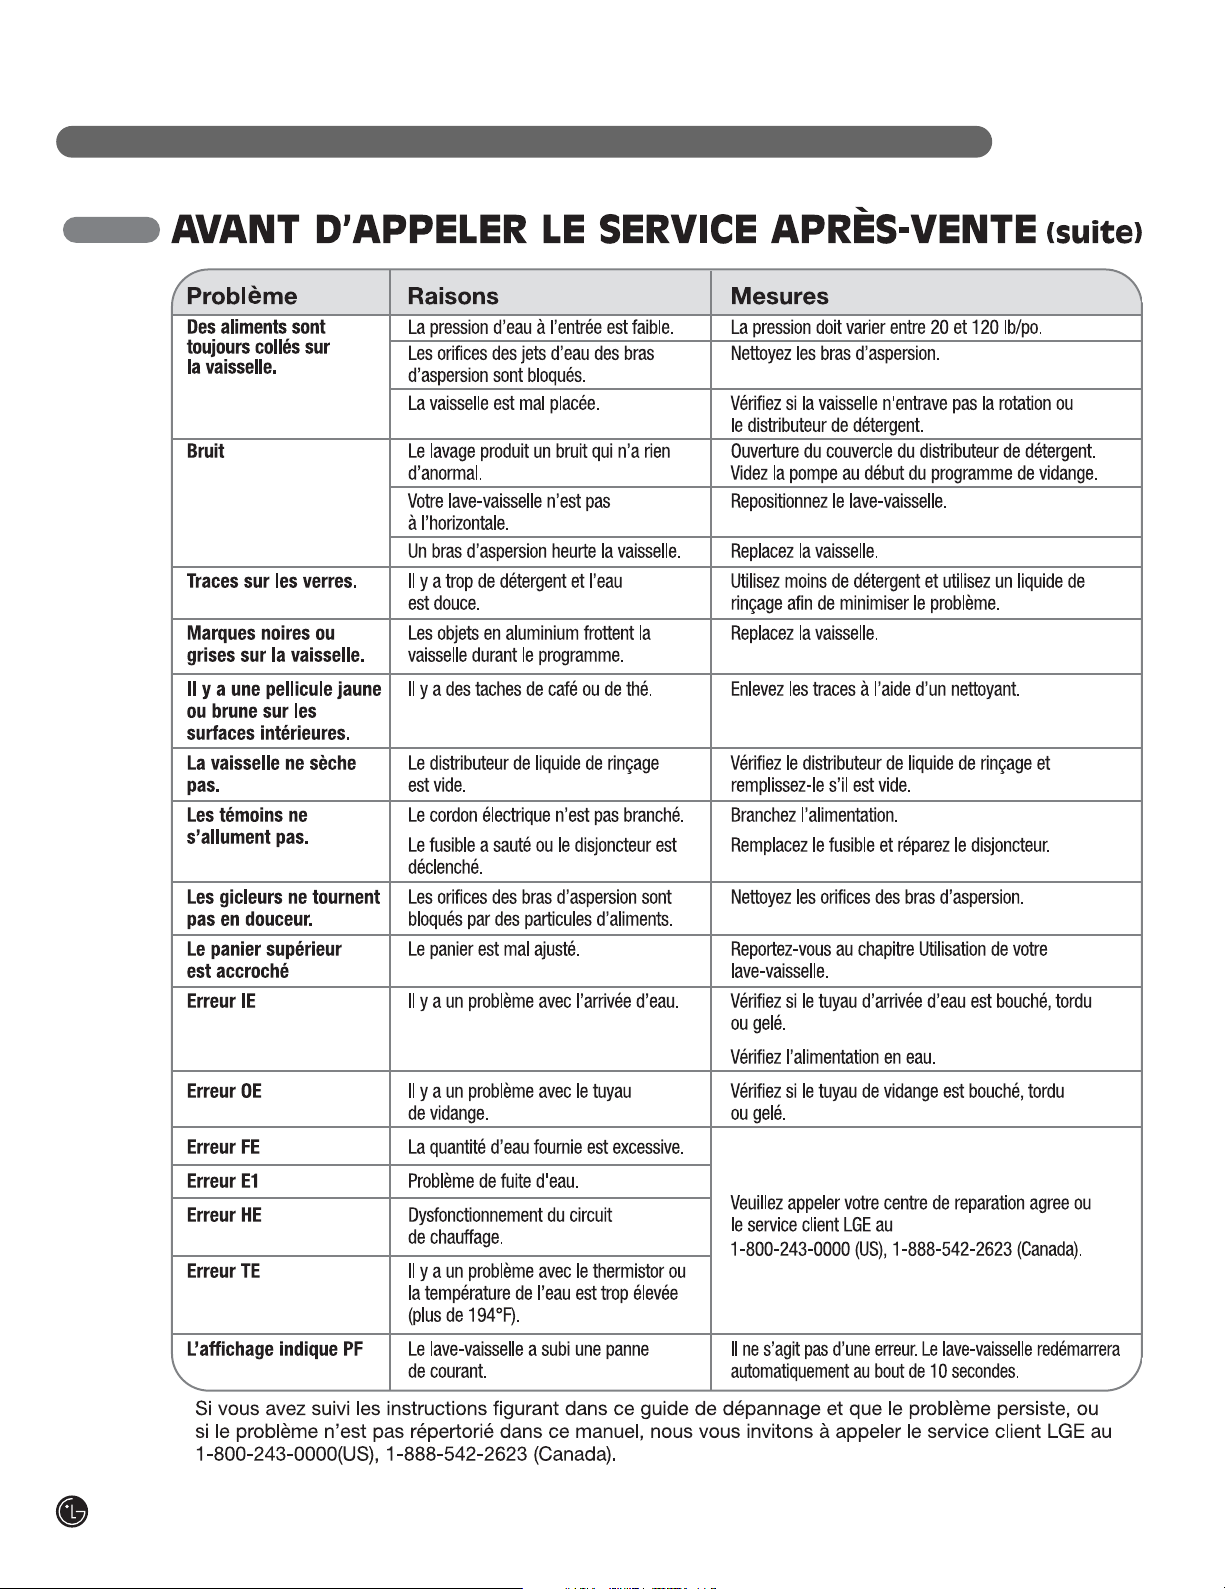
70
GUIDE DE DÉPANNAGE
Page 71

71
Français
SPÉCIFICATIONS
SPÉCIFICATIONS
• Alimentation : 120V, 60 Hz AC uniquement, protégé par un disjoncteur ou par un fusible de 15A minimum
• Pression de l'eau : 20-120 psi (soit 1.379-8.2737 bar) (140-830 kPa soit 1.4-8.3 bar)
• Dimensions (WxDxH) : 23 3/4″ x 24 5/8″ x 33 5/8″ (603 mm x 625 mm x 854 mm)
• Température d’arrivée d'eau : 120°F (49°C) minimum
• Poids : 114 lbs.(51.7kg)
L'apparence ainsi que les spécifications peuvent changer sans avis préalable.
Page 72
GARANTIE : Si votre lave-vaisselle LG (le « produit ») s'avère défectueux en raison d'un défaut de matériau ou de fabrication lors d'une
utilisation normale à domicile, pendant la période de garantie spécifiée ci-après, LG Canada réparera ou remplacera à sa discrétion le
produit sur réception de la preuve d'achat originale fournie par le détaillant. Cette garantie n'est offerte qu'à l'acheteur original du produit
chez un détaillant et ne s'applique qu'à un produit distribué au Canada par LG Canada ou par un distributeur canadien autorisé. La
garantie ne s'applique qu'aux produits situés et utilisés au Canada.
Pour obtenir tous les détails sur la garantie et accéder au
service à la clientèle, téléphonez-nous ou visitez notre site Web :
Composez le 1-888-542-2623 (24 h sur 24, 365 jours par année) et
sélectionnez l'option de menu appropriée, ou visitez notre site Web
au http://www.lg.ca
Écrivez vos renseignements de garantie ci-dessous :
Renseignements sur l'enregistrement du produit :
Modèle :
Numéro de série :
Date d'achat :
1. Un appel de service pour livrer, ramasser ou installer le produit; renseigner un client sur le fonctionnement du produit; réparer ou remplacer des fusibles ou rectifier
le câblage; ou corriger une réparation ou installation non autorisée.
2. La défaillance du produit durant une panne ou interruption de courant ou en raison d'un service électrique inadéquat.
3. Des dommages occasionnés par la fuite ou le bris de conduites d'eau, le gel de conduites d'eau, des tuyaux de drainage restreints, une alimentation en eau
inadéquate ou interrompue ou une alimentation en air inadéquate.
4. Des dommages attribuables à l'utilisation du produit dans une atmosphère corrosive ou contraire aux instructions spécifiées dans le manuel d'utilisation du produit.
5. Des dommages au produit causés par un accident, des animaux nuisibles ou des vermines, la foudre, le vent, un incendie, une inondation ou une catastrophe
naturelle.
6. Les dommages attribuables à une mauvaise utilisation, une utilisation abusive ou à une installation, une réparation ou un entretien inapproprié du produit. Les
réparations inappropriées incluent l'utilisation de pièces ni approuvées ni recommandées par LG Canada.
7. La détérioration ou la défaillance du produit causée par une modification ou un changement non autorisé ou une utilisation autre que celle prévue, ou résultant
d'une fuite d'eau occasionnée par une mauvaise installation.
8. La détérioration ou la défaillance du produit causée par un courant ou un voltage électrique incorrect, une utilisation commerciale ou industrielle, ou l'utilisation
d'accessoires, d'éléments ou de produits nettoyants non approuvés par LG Canada.
9. Les dommages causés par le transport et la manipulation, notamment les égratignures, les bosses, les écaillures et/ou tout autre dommage à la finition du produit,
à moins que ces dommages ne soient attribuables à des défauts de matériaux ou de fabrication et qu'ils ne soient signalés dans un délai d'une (1) semaine de la
livraison.
10. Des dommages ou des pièces manquantes à tout produit exposé, déballé, soldé ou remis à neuf.
11. Des produits dont le numéro de série original a été retiré, modifié ou ne peut être facilement déterminé. Le modèle et le numéro de série, ainsi que le reçu de
vente original du détaillant, sont requis pour valider la garantie.
12. L'augmentation des coûts et de la consommation des services publics.
13. Le remplacement des ampoules électriques, des filtres et de toute pièce non durable.
14. Les réparations requises si le produit ne sert pas à une utilisation domestique normale et habituelle (y compris, sans toutefois s'y limiter, une utilisation
commerciale, dans un bureau ou un centre récréatif) ou est utilisé contrairement aux instructions spécifiées dans le manuel d'utilisation du produit.
15. Les coûts associés à l'enlèvement du produit de votre résidence aux fins de réparation.
16. L'enlèvement et la réinstallation du produit, s'il est installé à un endroit inaccessible ou contrairement aux instructions d'installation publiées, y compris dans le
manuel d'utilisation et le manuel d'installation du produit.
17. Les accessoires du produit, tels que les balconnets, les tiroirs, les poignées, les tablettes, etc. Sont également exclues les pièces non incluses initialement avec le
produit.
Tous les coûts associés aux circonstances exclues ci-dessus seront assumés par le consommateur.
PÉRIODE DE GARANTIE : (Remarque : Si la date d'achat originale ne peut être vérifiée, la garantie débutera
soixante (60) jours suivant la date de fabrication.)
LA PRÉSENTE GARANTIE LIMITÉE NE COUVRE PAS CE QUI SUIT :
LG ELECTRONICS CANADA, INC.
GARANTIE LIMITÉE DU LAVE-VAISSELLE LG - Canada
Les produits et pièces de remplacement sont garantis pour la portion restante de la période de garantie originale ou quatre-vingt-dix (90) jours,
selon la période la plus longue.
Les produits et pièces de remplacement peuvent être neufs ou remanufacturés.
Le centre de service autorisé LG garantit les réparations pendant trente (30) jours.
LA RESPONSABILITÉ DE LG CANADA SE LIMITE À LA GARANTIE CI-DESSUS. SAUF TEL QU'IL EST EXPLICITEMENT INDIQUÉ CI-DESSUS, LG CANADA
NE FOURNIT AUCUNE AUTRE GARANTIE ET REJETTE TOUTES LES AUTRES GARANTIES ET CONDITIONS EXPLICITES OU IMPLICITES À L'ÉGARD DU
PRODUIT, CE QUI INCLUT, SANS TOUTEFOIS S'Y LIMITER, TOUTE GARANTIE ET CONDITION IMPLICITE DE QUALITÉ MARCHANDE OU DE
CONVENANCE À UN USAGE PARTICULIER ET AUCUNE DÉCLARATION NE LIERA LG CANADA. LG CANADA N'AUTORISE PERSONNE À CRÉER NI À
ASSUMER AUCUNE AUTRE PROVISION POUR GARANTIES EN RELATION AVEC CE PRODUIT. SI UNE GARANTIE OU CONDITION IMPLICITE EST
REQUISE PAR LA LOI, SA PÉRIODE SE LIMITE À CELLE DE LA GARANTIE EXPLICITE SUSMENTIONNÉE. LG CANADA, LE FABRICANT ET LE
DISTRIBUTEUR NE POURRONT ÊTRE TENUS RESPONSABLES D'AUCUN DOMMAGE ACCESSOIRE, CONSÉCUTIF, SPÉCIAL, DIRECT OU INDIRECT,
D'AUCUNE PERTE D'ACHALANDAGE OU DE PROFITS, D'AUCUN DOMMAGE PUNITIF, EXEMPLAIRE OU AUTRE, DIRECTEMENT OU INDIRECTEMENT
ATTRIBUABLE À TOUTE VIOLATION CONTRACTUELLE, FONDAMENTALE OU AUTRE, OU À UNE ACTION, UNE OMISSION, UN DÉLIT OU TOUTE AUTRE
CHOSE.
La présente garantie vous confère des droits légaux spécifiques. Vous pourriez disposer d'autres droits, suivant les lois provinciales applicables.
Toute clause de la présente garantie qui invalide ou modifie une condition ou garantie implicite aux termes d'une loi provinciale est dissociable si elle
entre en conflit avec la loi provinciale, et ce, sans affecter les autres clauses de la garantie.
Lave-vaisselle
Garantie prolongée sur les pièces seulement
(Les consommateurs devront payer pour la main-d'œuvre un (1) an après la date d'achat)
Deux (2) ans à compter de
la date d'achat initiale
Pièces Main-d'œuvre
Cinq (5) ans à compter de la
date d'achat initiale
PCI, panier, contre-porte en
acier inoxydable, cuve
Dix (10) ans à compter de la
date d'achat initiale
DD moteur
(pièces internes fonctionnelles seulement)
Un (1) an à compter de la
date d'achat initiale
Page 73

73
Français
NOTAS
Page 74

74
NOTAS
Page 75

75
Français
NOTAS
Page 76

P/No. MFL62077126
 Loading...