

Page 1
User’s Guide Specification
User’s Guide Specification
Model Description
1.
담 당 관리자
Park SY
09.12.28
KANG
KWANG SUK
09.12.28
MODEL
SUFFIX
2.
LD/LE series
USA
Printing Specification
BRAND
Product Name
LG
LD/LE series
Part No.
MFL62882705
(1004-REV05)
1. Trim Size (Format) : 182mm x 257 mm
2. Printing Colors
• Cover : 1 COLOR (BLACK)
• Inside : 1 COLOR (BLACK)
3. Stock (Paper)
• Cover : Coated paper , S/White 150 g/㎡
• Inside : Uncoated paper , 백상지 60 g/㎡
4. Printing Method : Off set
5. Bindery : Saddle stitch
6. Language : English/Korean (2)
7. Number of pages : 40
“This part contain Eco-hazardous substances (Pb, Cd, Hg, Cr6+, PBB, PBDE, etc.) within LG standard level,
N
O
T
E
S
Details should be followed Eco-SCM management standard[LG(56)-A-2524].
Especially, Part should be followed and controlled the following specification.
(1)Eco-hazardous substances test report should be submitted
when Part certification test and First Mass Production.
(2) Especially, Don’t use or contain lead(Pb) and cadmium(Cd) in ink.
Special Instructions3.
(1) Origin Notification
* LGEMX : Printed in Mexico
* LGERS : Printed in Mexico
* LGEAZ : Printed in Brazil
* LGESP : Printed in Brazil
* LGESY : Printed in China
4.
Changes
9
8
7
6
5
Apr./22/10 Park sun young S0-86634
Apr./12/10 Park sun young S0-85071
4
Feb./28/10 Park sun young S0-79084
3
Jan./28/10 Park sun young S0-75392
2
* LGENT : Printed in China
* LGENP : Printed in China
* LGEIL : Printed in India
* LGEDI : Printed in Indonesia
* LGEIN : Printed in Indonesia
* LGEMA : Printed in Poland
* LGEWA : Printed in U.K.
* LGEEG : Printed in Egypt
* LGERA : Printed in Russia
* LGEAK : Printed in Kazakhstan
* LGETH : Printed in Thailand
* LGEVN : Printed in Vietnam
Deleted 3D glasses for LX6500 and deleted Korean manual.
1.Added RS-232C function, 2.Deleted EPA logo for 32LE54,
3.Added LX6500-U.
Added some sentence related S/W notice.
Applied PQ test results of PK750-U.
Jan./15/10 Park sun young S0-73516
1
REV.
MM/DD/YY
NO.
Downloaded From TV-Manual.com Manuals
SIGNATURE
CHANGE NO.
Applied PQ test results.
CHANGE CONTENTS
Page 2

Front cover
Pagination sheet
Pagination sheet
P/NO.MFL62882705
Total pages : 40 pages
LG(EN)
P/NO.
Blank
page
2….
Rear cover
Blank
page
…. ….
(KO) (KO)
36
37
Downloaded From TV-Manual.com Manuals
Page 3

OWNER’S MANUAL
The model and serial number of the TV is located
on the back and one side of the TV.
Record it below should you ever need service.
MODEL
SERIAL
The extended owner’s manuals that contain information on the advanced features of this LG TV are
located on the CD-ROM provided in an electronic
version.
To read these files, you will need to use the personal
computer (PC) equipped with a CD-ROM drive.
Downloaded From TV-Manual.com Manuals
LG Customer Information Center
For inquires or comments, visit www.lg.com or call;
1-800-243-0000
1-888-865-3026
1-888-542-2623
USA, Consumer
USA, Commercial
CANADA
Register your product Online!
www.lg.com
(For 42/47/55LE5400, 42/47/55LE5500, 42/47/55LE7500,
47/55LE8500, 42/47/55LX6500)
This product qualifies for ENERGY STAR in the
“factory default (Home Use)” setting.
Changing the factory default settings or enabling other
features may increase power consumption that could
exceed the limits necessary to quality for ENERGY STAR.
LED LCD TV / LCD TV
PLASMA TV
Please read this manual carefully before operating
your set and retain it for future reference.
LCD TV MODELS
32LD550
42LD550
46LD550
52LD550
60LD550
P/NO : MFL62882705 (1004-REV05)
47LD650
55LD650
LED LCD TV MODELS
32LE5400
42LE5400
47LE5400
55LE5400
42LE5500
47LE5500
55LE5500
42LE7500
47LE7500
55LE7500
47LE8500
55LE8500
42LX6500
47LX6500
55LX6500
PLASMA TV MODELS
50PK750
60PK750
www.lg.com
Page 4
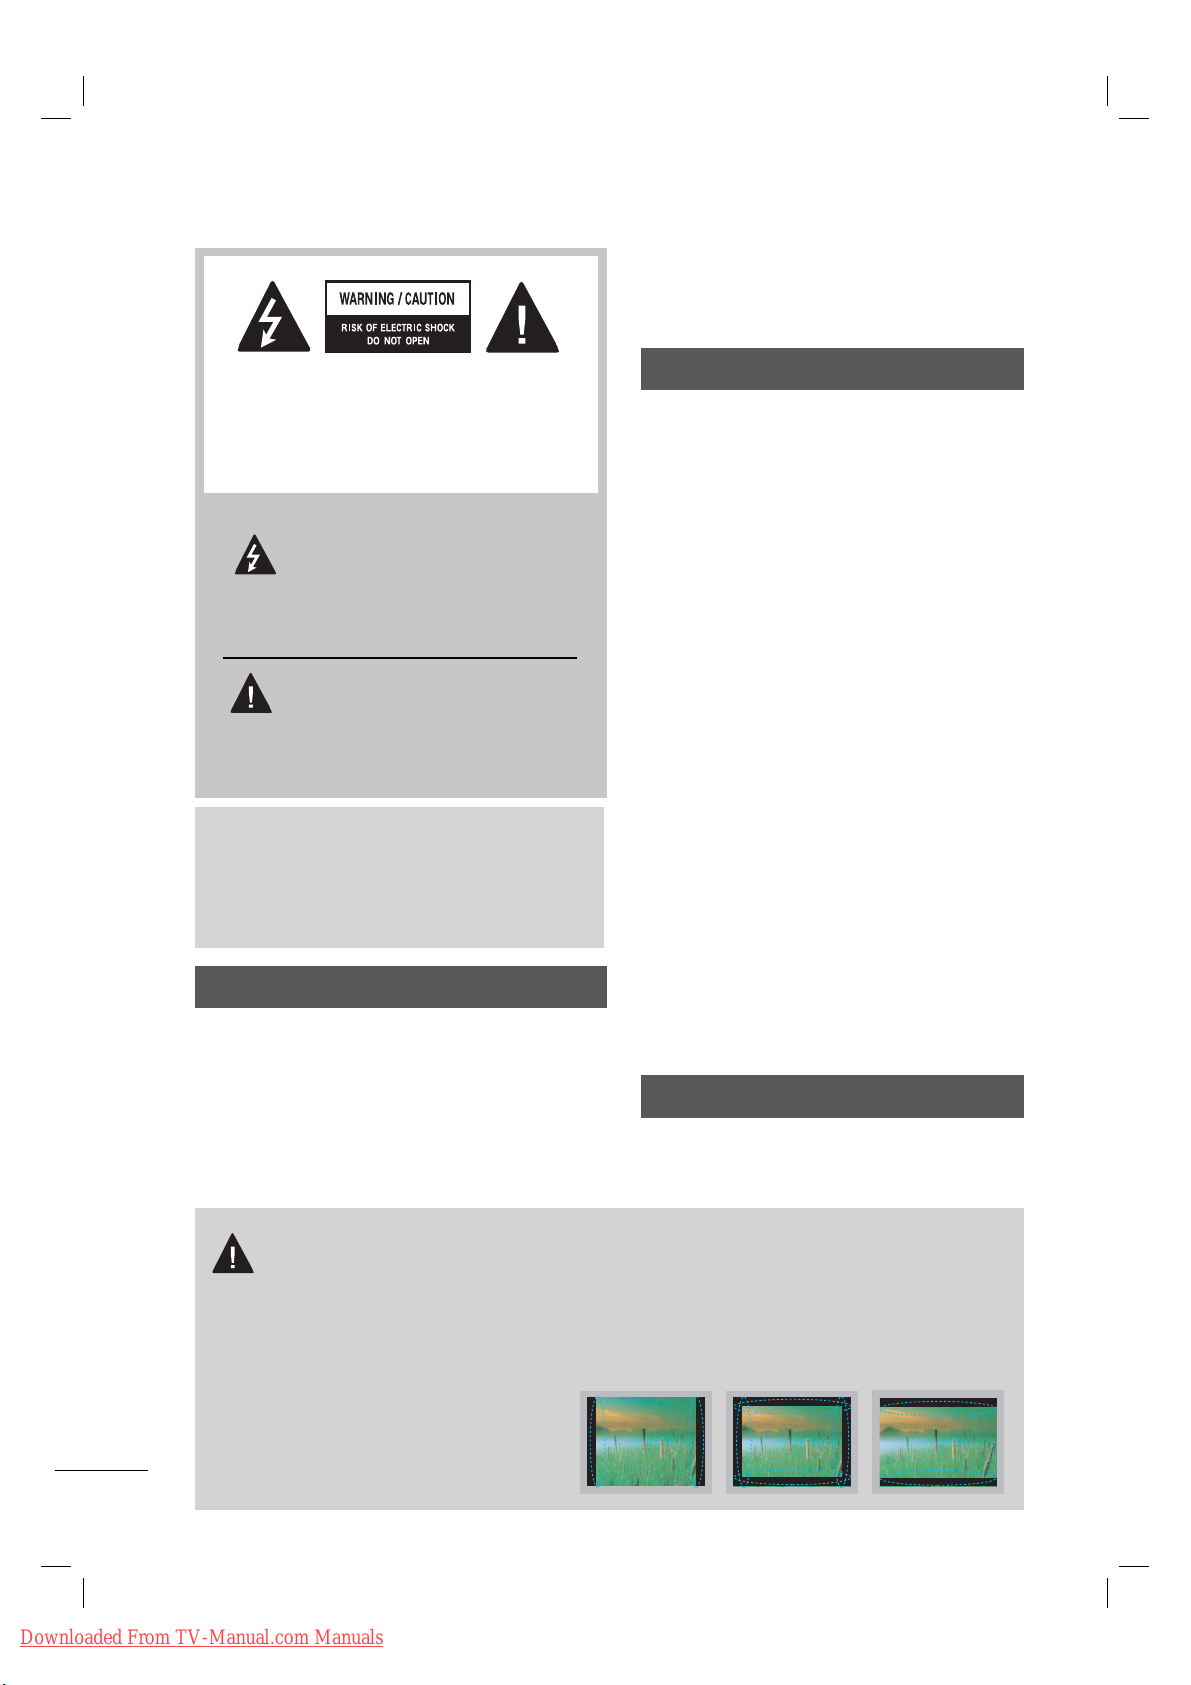
WARNING / CAUTION
TO REDUCE THE RISK OF ELECTRIC
SHOCK DO NOT REMOVE COVER (OR
BACK). NO USER SERVICEABLE PARTS
INSIDE. REFER TO QUALIFIED SERVICE
PERSONNEL.
The lightning flash with arrowhead
symbol, within an equilateral triangle, is intended to alert the user to
the presence of uninsulated “dangerous voltage” within the product’s enclosure that may be of sufficient magnitude to
constitute a risk of electric shock to persons.
The exclamation point within an equi-
lateral triangle is intended to alert
the user to the presence of impor-
tant operating and maintenance
(servicing) instructions in the literature
accompanying the appliance.
WARNING/CAUTION
TO REDUCE THE RISK OF FIRE AND
ELECTRIC SHOCK, DO NOT EXPOSE THIS
PRODUCT TO RAIN OR MOISTURE.
NOTE TO CABLE/TV INSTALLER
This reminder is provided to call the CATV system
installer’s attention to Article 820-40 of the National
Electric Code (U.S.A.). The code provides guidelines for proper grounding and, in particular, specifies that the cable ground shall be connected to the
grounding system of the building, as close to the
point of the cable entry as practical.
WARNING / CAUTION
To prevent fire or shock hazards, do not expose
this product to rain or moisture.
FCC Notice
Class B digital device
This equipment has been tested and found to
comply with the limits for a Class B digital device,
pursuant to Part 15 of the FCC Rules. These
limits are designed to provide reasonable protection against harmful interference in a residential installation. This equipment generates, uses
and can radiate radio frequency energy and, if not
installed and used in accordance with the
instructions, may cause harmful interference to
radio communications. However, there is no
guarantee that interference will not occur in a
particular installation. If this equipment does
cause harmful interference to radio or television
reception, which can be determined by turning
the equipment off and on, the user is encouraged to try to correct the interference by one or
more of the following measures:
- Reorient or relocate the receiving antenna.
- Increase the separation between the equipment and receiver.
- Connect the equipment to an outlet on a circuit
different from that to which the receiver is connected.
- Consult the dealer or an experienced radio/TV
technician for help.
This device complies with part 15 of the FCC Rules.
Operation is subject to the following two condi-
tions: (1) This device may not cause (harmful)
interference, and (2) this device must accept
any interference received, including interference
that may cause undesired operation (of the
device).
Any changes or modifications in construction of
this device which are not expressly approved by
the party responsible for compliance could void
the user’s authority to operate the equipment.
CAUTION
Do not attempt to modify this product in any
way without written authorization from LG
Electronics. Unauthorized modification could
void the user’s authority to operate this product.
IMPORTANT INFORMATION TO PREVENT “IMAGE
BURN / BURN-IN” ON YOUR TV SCREEN
ꔛ
When a fixed image (e.g. logos, screen menus, video game, and computer display) is displayed on
the TV for an extended period, it can become permanently imprinted on the screen. This phenomenon is known as “image burn” or “burn-in.” Image burn is not covered under the manufacturer’s
warranty.
ꔛ
In order to prevent image burn, avoid displaying a fixed image on your TV screen for a prolonged
period (2 or more hours for LCD, 1 or more
hours for Plasma).
ꔛ
Image burn can also occur on the letterboxed areas of your TV if you use the 4:3
aspect ratio setting for an extended period.
2
Downloaded From TV-Manual.com Manuals
Page 5

SAFETY INSTRUCTIONS
IMPORTANT SAFETY INSTRUCTIONS
Read these instructions.
Keep these instructions.
Heed all warnings.
Follow all instructions.
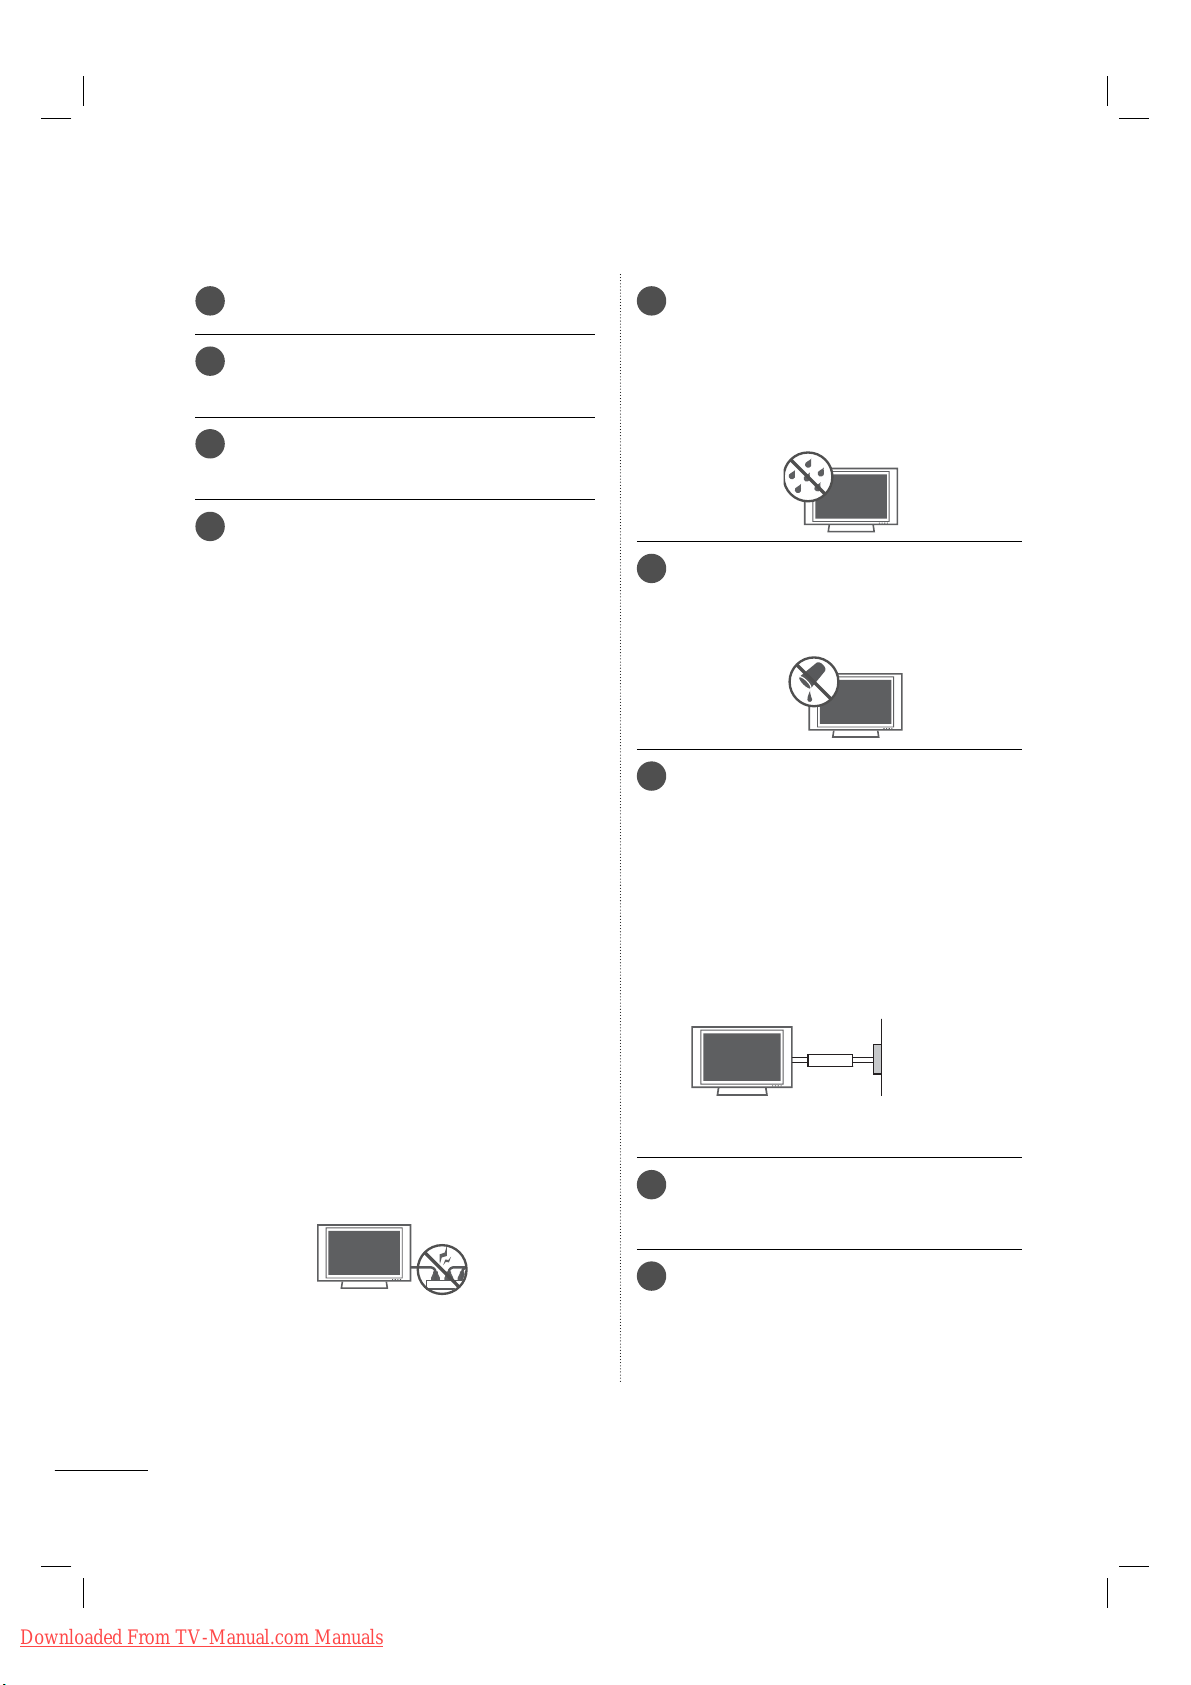
Do not use this apparatus near water.
1
Clean only with dry cloth.
2
Do not block any ventilation openings. Install in
3
accordance with the ma nufacturer’s instructions.
Protect the power cord from being walked
6
on or pinched particularly at plugs, convenience receptacles, and the point where
they exit from the apparatus.
Only use attachments/accessories speci-
7
fied by the manufacturer.
Use only with the cart, stand, tripod, bracket,
8
or table specified by the manufacturer, or
sold with the apparatus. When a cart is
used, use caution when moving the cart/
apparatus combination to avoid injury from
tip-over.
Do not install near any heat sources such as
4
radiators, heat registers, stoves, or other apparatus (including amplifiers) that produce heat.
Do not defeat the safety purpose of the polarized
5
or grounding-type plug. A polarized plug has
two blades with one wider than the other. A
grounding type plug has two blades and a third
grounding prong, The wide blade or the third
prong are provided for your safety. If the provided
plug does not fit into your outlet, consult an electrician for replacement of the obsolete outlet.
Unplug this apparatus during lighting
9
storms or when unused for long periods
of time.
Refer all servicing to qualified service per-
10
sonnel. Servicing is required when the
apparatus has been damaged in any way,
such as power-supply cord or plug is damaged, liquid has been spilled or objects
have fallen into the apparatus, the apparatus has been exposed to rain or moisture,
does not operate normally, or has been
dropped.
3
Downloaded From TV-Manual.com Manuals
Page 6
SAFETY INSTRUCTIONS
Never touch this apparatus or antenna during
11
a thunder or lighting storm.
When mounting a TV on the wall, make sure
12
not to install the TV by the hanging power
and signal cables on the back of the TV.
Do not allow an impact shock or any objects
13
to fall into the product, and do not drop onto
the screen with something.
CAUTION concerning the Power Cord:
14
It is recommend that appliances be placed
upon a dedicated circuit; that is, a single
outlet circuit which powers only that appliance and has no additional outlets or
branch circuits. Check the specification page
of this owner's manual to be certain.
Do not connect too many appliances to the
same AC power outlet as this could result in
fire or electric shock.
Do not overload wall outlets. Overloaded wall
outlets, loose or damaged wall outlets, extension cords, frayed power cords, or damaged
or cracked wire insulation are dangerous . Any
of these conditions could result in electric
shock or fire. Periodically examine the cord of
your appliance, and if its appearance indicates
damage or deterioration, unplug it, discontinue use of the appliance, and have the cord
replaced with an exact replacement part by
an authorized servicer. Protect the power cord
from physical or mechanical abuse, such as
being twisted, kinked, pinched, closed in a
door, or walked upon. Pay particular attention
to plugs, wall outlets, and the point where the
cord exits the appliance.
Do not use a damaged or loose power cord.
Do not pull on the power cord to unplug the
TV. Grasp the plug when unplugging the
power cord.
WARNING - To reduce the risk of fire or elec-
15
trical shock, do not expose this product to
rain, moisture or other liquids. Do not touch
the TV with wet hands. Do not install this
product near flammable objects such as
gasoline or candles or expose the TV to
direct air conditioning.
Do not expose to dripping or splashing and
16
do not place objects filled with liquids, such
as vases, cups, etc. on or over the apparatus (e.g. on shelves above the unit).
GROUNDING
17
Ensure that you connect the earth ground
wire to prevent possible electric shock (i.e. a
TV with a three-prong grounded AC plug
must be connected to a three-prong grounded AC outlet). If grounding methods are not
possible, have a qualified electrician install a
separate circuit breaker.
Do not try to ground the unit by connecting it
to telephone wires, lightening rods, or gas
pipes.
Power
Supply
Short-circuit
Breaker
DISCONNECTING DEVICE FROM MAINS
18
Mains plug is the disconnecting device. The
plug must remain readily operable.
4
Downloaded From TV-Manual.com Manuals
As long as this unit is connected to the AC
19
wall outlet, it is not disconnected from AC
power even if you turn off the power switch
on the unit.
Page 7

ANTENNAS
Antenna Lead in Wire
Antenna Discharge Unit
(NEC Section 810-20)
Grounding Conductor
(NEC Section 810-21)
Ground Clamps
Power Service Grounding
Electrode System (NEC
Art 250, Part H)
Ground Clamp
Electric Service
Equipment
20
Outdoor antenna grounding
If an outdoor antenna is installed, follow the
precautions below. An outdoor antenna system should not be located in the vicinity of
overhead power lines or other electric light or
power circuits, or where it can come in contact
with such power lines or circuits as death or
serious injury can occur.
Be sure the antenna system is grounded so as
to provide some protection against voltage
surges and built-up static charges.
Section 810 of the National Electrical Code
(NEC) in the U.S.A. provides information with
respect to proper grounding of the mast and
supporting structure, grounding of the lead-in
wire to an antenna discharge unit, size of
grounding conductors, location of antenna
discharge unit, connection to grounding electrodes and requirements for the grounding
electrode.
Antenna grounding according to the National
Electrical Code, ANSI/NFPA 70
Ventilation
23
Install your TV where there is proper ventilation. Do not install in a confined space such
as a bookcase. Do not cover the product
with cloth or other materials (e.g.) plastic
while plugged in. Do not install in excessively dusty places.
Take care not to touch the ventilation open-
24
ings. When watching the TV for a long
period, the ventilation openings may
become hot.
If you smell smoke or other odors coming
25
from the TV or hear strange sounds, unplug
the power cord contact an authorized service
center.
Do not press strongly upon the panel with
26
hand or sharp object such as nail, pencil or
pen, or make a scratch on it.
NEC: National Electrical Code
Cleaning
21
When cleaning, unplug the power cord and
rub gently with a soft cloth to prevent
scratching. Do not spray water or other liquids
directly on the TV as electric shock may occur.
Do not clean with chemicals such as alcohol,
thinners or benzene.
Moving
22
Make sure the product is turned off, unplugged
and all cables have been removed. It may take
2 or more people to carry larger TVs. Do not
press against or put stress on the front panel
of the TV.
27
Keep the product away from direct sunlight.
For LED LCD TV/LCD TV
28
If the TV feels cold to the touch, there may be
a small “flicker” when it is turned on. This is
normal, there is nothing wrong with TV.
Some minute dot defects may be visible on
the screen, appearing as tiny red, green, or
blue spots. However, they have no adverse
effect on the monitor's performance.
Avoid touching the LCD screen or holding
your finger(s) against it for long periods of
time. Doing so may produce some temporary distortion effects on the screen.
ON DISPOSAL
(Only Hg lamp used LCD TV)
The fluorescent lamp used in this product
contains a small amount of mercury. Do not
dispose of this product with general household waste. Disposal of this product must be
carried out in accordance to the regulations of
your local authority.
Downloaded From TV-Manual.com Manuals
5
Page 8
CONTENTS
!
MENU
CONTENTS
WARNING / CAUTION
SAFETY INSTRUCTIONS
PREPARATION
Accessories . . . . . . . . . . . . . . . . . . . . . . . . . . . . . . . . . . . . . . . . . . . . . . . . 7
Stand Instruction
VESA Wall Mounting
Desktop Pedestal Installation
Cable Management
Swivel Stand
Attaching the TV to a Desk
Kensington Security System
. . . . . . . . . . . . . . . . . . . . . . . . . . . . . . . . . . . . . . . . 9
. . . . . . . . . . . . . . . . . . . . . . . . . . . . . . . . . . 14
. . . . . . . . . . . . . . . . . . . . . . . . . . . . . . . . . . . . . . . . . . . . . 15
. . . . . . . . . . . . . . . . . . . . . . . 2
. . . . . . . . . . . . . . . . . . . . . 3
. . . . . . . . . . . . . . . . . . . . . . . . . . . . . . . . . 12
. . . . . . . . . . . . . . . . . . . . . 13
. . . . . . . . . . . . . . . . . . . . . . . 15
. . . . . . . . . . . . . . . . . . . . . . 15
NETCAST
Netcast Menu. . . . . . . . . . . . . . . . . . . . . . . . . . . . . . . . . . . . . . . . . . . 24
WATCHING TV
Turning On TV . . . . . . . . . . . . . . . . . . . . . . . . . . . . . . . . . . . . . . . . . . 25
Initial Setting
On-Screen Menus Selection
. . . . . . . . . . . . . . . . . . . . . . . . . . . . . . . . . . . . . . . . . . . . 25
. . . . . . . . . . . . . . . . . . . . . 26
APPENDIX
Troubleshooting . . . . . . . . . . . . . . . . . . . . . . . . . . . . . . . . . . . . . . . . 27
Maintenance
Open Source Software Notice
Product Specifications
. . . . . . . . . . . . . . . . . . . . . . . . . . . . . . . . . . . . . . . . . . . . 30
. . . . . . . . . . . . . . . . . . . 31
. . . . . . . . . . . . . . . . . . . . . . . . . . . . . . 33
EXTERNAL EQUIPMENT SETUP
Connecting your TV . . . . . . . . . . . . . . . . . . . . . . . . . . . . . . . . . . 16
NETWORK
Network Setup. . . . . . . . . . . . . . . . . . . . . . . . . . . . . . . . . . . . . . . . . . . 17
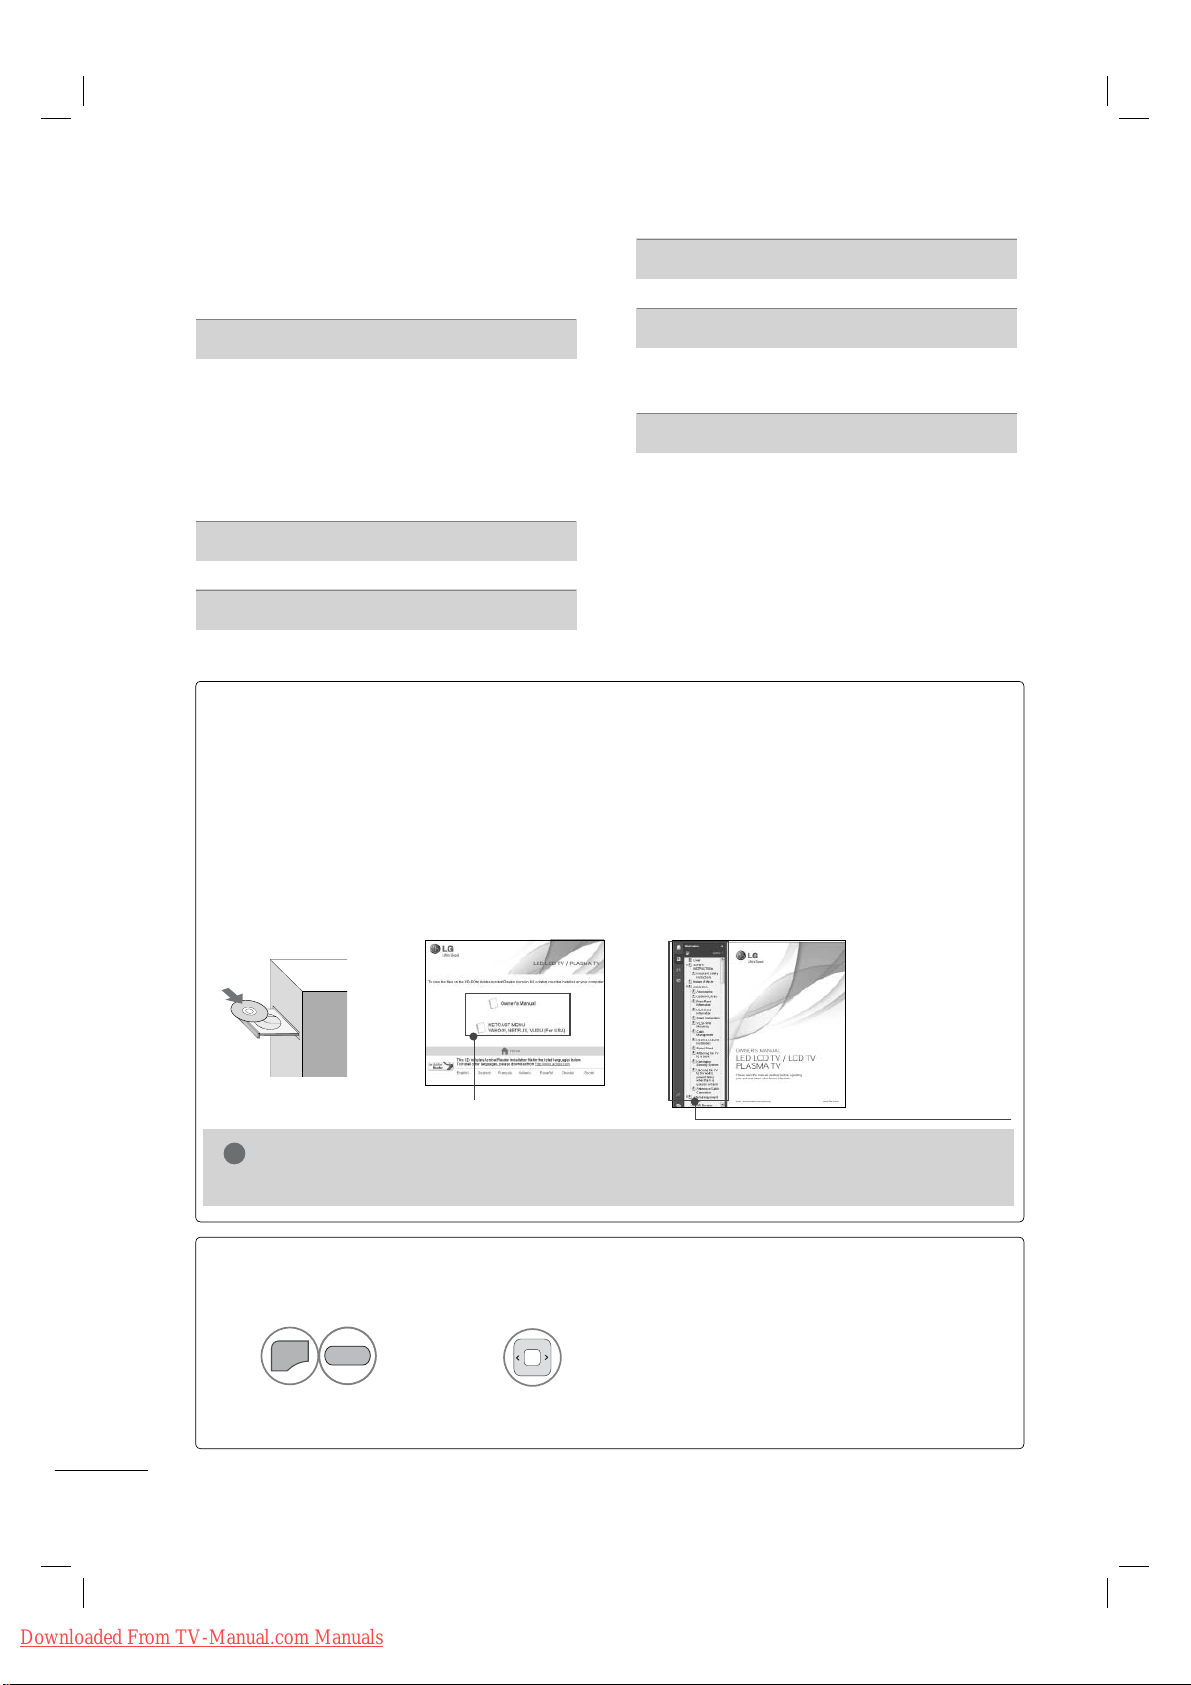
HOW TO USE THE OWNER'S MANUAL ON THE CD-ROM
To view the Owner's Manual on the CD-ROM, Adobe Acrobat Reader must be installed on your PC.
The “ACRORD" folder on the CD-ROM contains the installation programs for them.
If you want to install those programs, Open the “My Computer”
“ACRORD”
➜ double-click your language.
➜ Open the “LG”➜ Open the
TO VIEW THE OWNER'S MANUAL ON THE CD-ROM
The Owner's Manual files are included in the supplied CD-ROM.
Load the supplied CD-ROM into the CD-ROM drive of your PC.
After a while, the web page of the CD-ROM will open automatically. (for Window only)
➜
When you click, display the PDF file.
NOTE
►If the web page does not appear automatically, open the Owner's Manual file
directly.
Open the “My computer”
➜
You can find the
desired contents
easily using the
bookmark.
➜ Open the “LG”➜ Open the “index.htm” file.
TO VIEW THE SIMPLE MANUAL
You can easily and effectively access the TV information by viewing a simple manual on the TV.
1
GREEN
Select
Simple Manual.
➜
2
Select the part of the manual you
want to see.
6
Downloaded From TV-Manual.com Manuals
Page 9
PREPARATION
1.5V 1.5V
ACCESSORIES
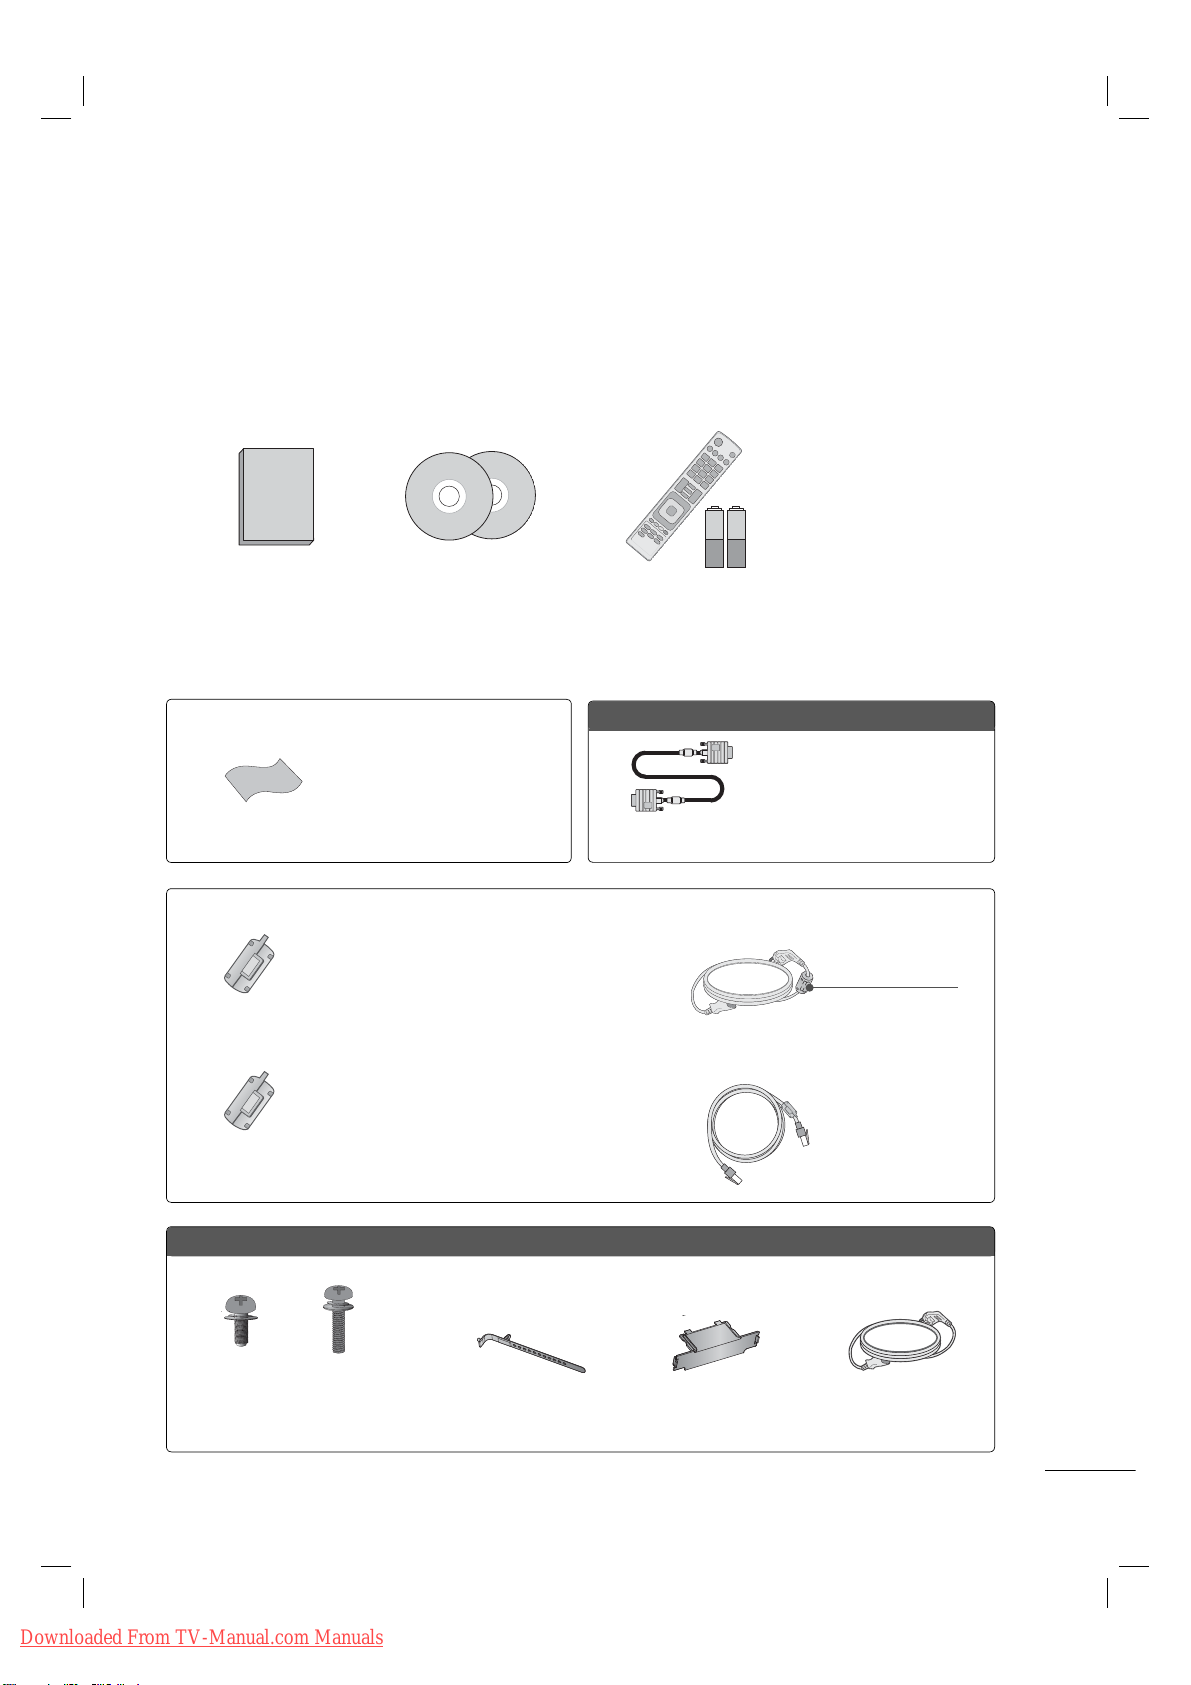
Ensure that the following accessories are included with your TV. If an accessory is missing, please contact the dealer where you purchased the TV.
The accessories included may differ from the images below.
Owner’s Manual CD Manual,
Nero MediaHome 4
Essentials CD
Not included with all models
* Wipe spots on the exterior only
with the polishing cloth.
* Do not wipe roughly when remov-
Polishing Cloth
ing stains. Excessive pressure may
cause scratches or discoloration.
Not included with all models
Ferrite core can be used to reduce the electromagnetic
waves that may interfere with the TV. Install the Ferrite
core on the power cable close to the wall plug.
Ferrite Core
(Black)
Ferrite core can be used to reduce the electromagnetic
wave when connecting the LAN cable. Place the ferrite
Ferrite Core
core far from TV and wind the LAN cable in the ferrite
core once.
(White)
Remote Control,
Batteries (AAA)
Option Extras
D-sub 15 pin Cable
When using the VGA (D-sub 15
pin cable) PC connection, the
user must use shielded signal
interface cables with ferrite cores
to maintain standards compliance.
Close to the wall plug.
50/60PK750
(For 50PK750)
x 3 x 4
(M5 x 14) (M4 x 28)
Screws for stand assembly
(Refer to P.9)
Downloaded From TV-Manual.com Manuals
x 2
Cable Holder
(Refer to p.14)
Protection Cover
(Refer to p.9)
Power Cord
7
Page 10
32/42/46/52/60LD550, 47/55LD650
1.5V 1.5V
CH
FLASHBK
VOL
POWER TV/INPUT
x 8
(M4 x 20)
(For 32/42LD550)
Screws for stand assembly
(Refer to P.10)
Screw for stand fixing
(Refer to P.15)
Protection Cover
(Refer to P.10)
Power Cord
32/42/47/55LE5400, 42/47/55LE5500, 42/47/55LE7500, 47/55LE8500, 42/47/55LX6500
(47/55LE8500) (Other models)(55LE5400/5500/7500,
55LX6500)
x 8 x 8x 4x 4
(M4 x 20) (M4 x 16)(M4 x 16)(M4 x 24)
Screws for stand assembly
(For 42/47/55LE7500,
47/55LE8500)
(Refer to P.11)
(For 32LE5400)
Cable Holder
(Refer to p.14)
(For 42/47/55LE7500)
Component gender cable,
AV gender cable
Cleansing Cloths
(mitt)
* Wipe spots on the exterior only with the cleasing cloths.
Simple Remote
Control,
Batteries (AAA)
Screw for stand
fixing
(Refer to P.15)
* Do not wipe roughly when removing stains. Excessive pres-
sure may cause scratches or discoloration.
* For cleaning front frame, please slowly wipe in one direction
after spraying water 1-2 times on cleansing cloths. Please
remove excessive moisture after cleaning. Excessive moisture may cause water stains on the frame.
x 2
OPTIONAL EXTRAS
Optional extras can be changed or modified for quality improvement without any notification.
Contact your dealer for buying these items.
This device only works with compatible LG LED LCD TV, LCD TV, or Plasma TV.
Wireless Media Box
(AN-WL100W)
8
Downloaded From TV-Manual.com Manuals
Wireless LAN for Broadband/
DLNA Adaptor
(AN-WF100)
(For 42/47/55LX6500)
3D Glasses
(AG-S100)
Page 11

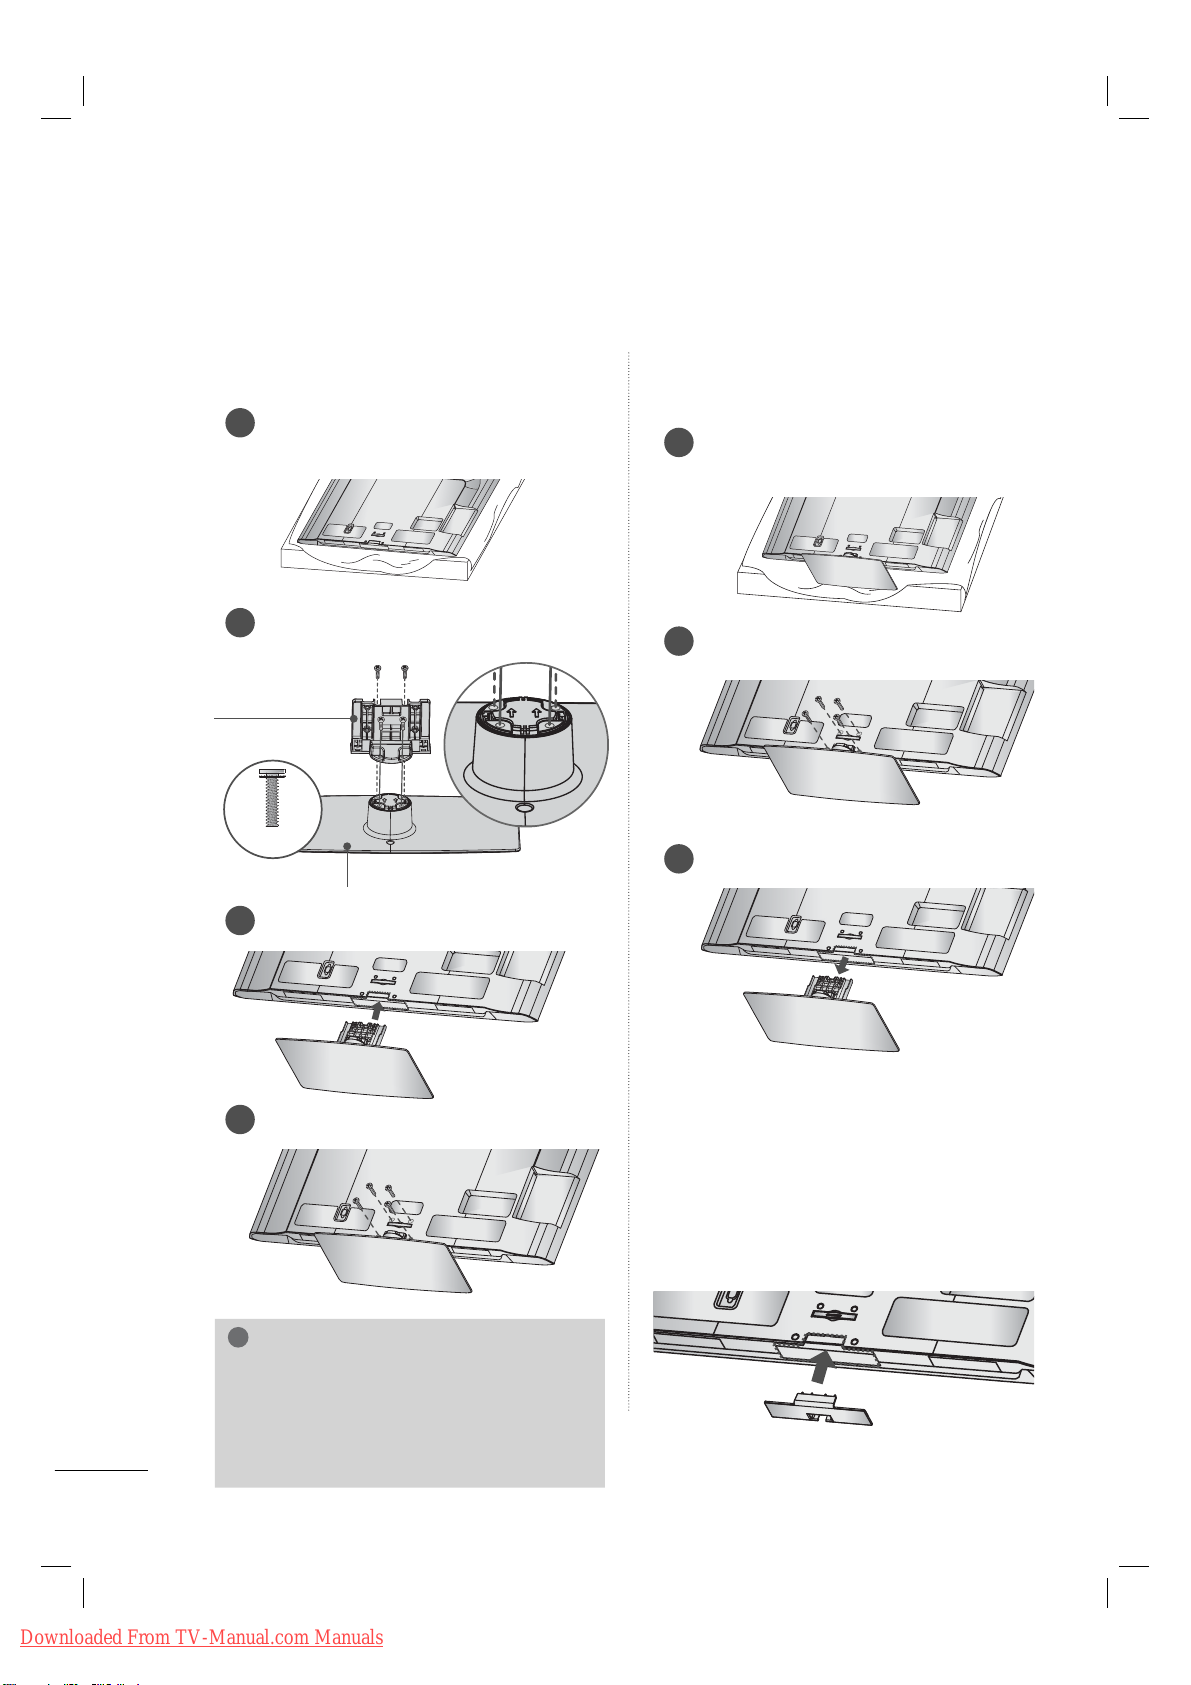
STAND INSTRUCTIONS
!
ꔛ
Image shown may differ from your TV.
(For 50/60PK750)
INSTALLATION (For 50PK750)
Carefully place the TV screen side down on
1
a cushioned surface to protect the screen
from damage.
Assemble the parts of the STAND BODY
2
with the STAND BASE of the TV.
STAND BODY
M5 x 14
Assemble the TV as shown.
3
STAND BASE
DETACHMENT
Carefully place the TV screen side down on
1
a cushioned surface to protect the screen
from damage.
Remove the screws that hold the stand on.
2
50PK750 60PK750
M4 x 28
Detach the stand from TV.
3
M4 x 30
4
Install the 4 screws into the holes shown.
M4 x 28
NOTE
► When assembling the desk type stand,
make sure the screws are fully tightened (If
not tightened fully, the TV can tilt forward
after the product installation). Do not over
tighten.
Downloaded From TV-Manual.com Manuals
PROTECTION COVER
After removing the stand, install the included
PROTECTION COVER over the hole for the
stand.
Press the PROTECTION COVER into the TV until
you hear it click.
When installing the wall mounting bracket, use
the PROTECTION COVER.
PROTECTION COVER
Fix a guide to the outside.
9
Page 12
PREPARATION
!
AC
IN
C
A
BLE M
A
NA
GE
ME
NT
AC IN
CABLE MANAGEMENT
AC IN
CABLE MANAGEMENT
AC IN
CABLE MANAGEMENT
AC IN
CABLE MANAGEMENT
AC
IN
C
AB
L
E
MA
N
AGE
M
ENT
STAND INSTRUCTIONS
ꔛ
Image shown may differ from your TV.
(For 32/42/46/52/60LD550, 47/55LD650)
INSTALLATION
Carefully place the TV screen side down on
1
a cushioned surface to protect the screen
from damage.
Assemble the parts of the STAND BODY
2
with the STAND BASE of the TV.
STAND BODY
M4 x 20
STAND BASE
DETACHMENT
Carefully place the TV screen side down on
1
a cushioned surface to protect the screen
from damage.
Remove the screws that hold the stand on.
2
Detach the stand from TV.
3
Assemble the TV as shown.
3
4
Install the 4 screws into the holes shown.
NOTE
► When assembling the desk type stand,
make sure the screws are fully tightened (If
not tightened fully, the TV can tilt forward
after the product installation). Do not over
tighten.
PROTECTION COVER
After removing the stand, install the included
PROTECTION COVER over the hole for the
stand.
Press the PROTECTION COVER into the TV until
you hear it click.
When installing the wall mounting bracket, use
the PROTECTION COVER.
10
Downloaded From TV-Manual.com Manuals
Page 13
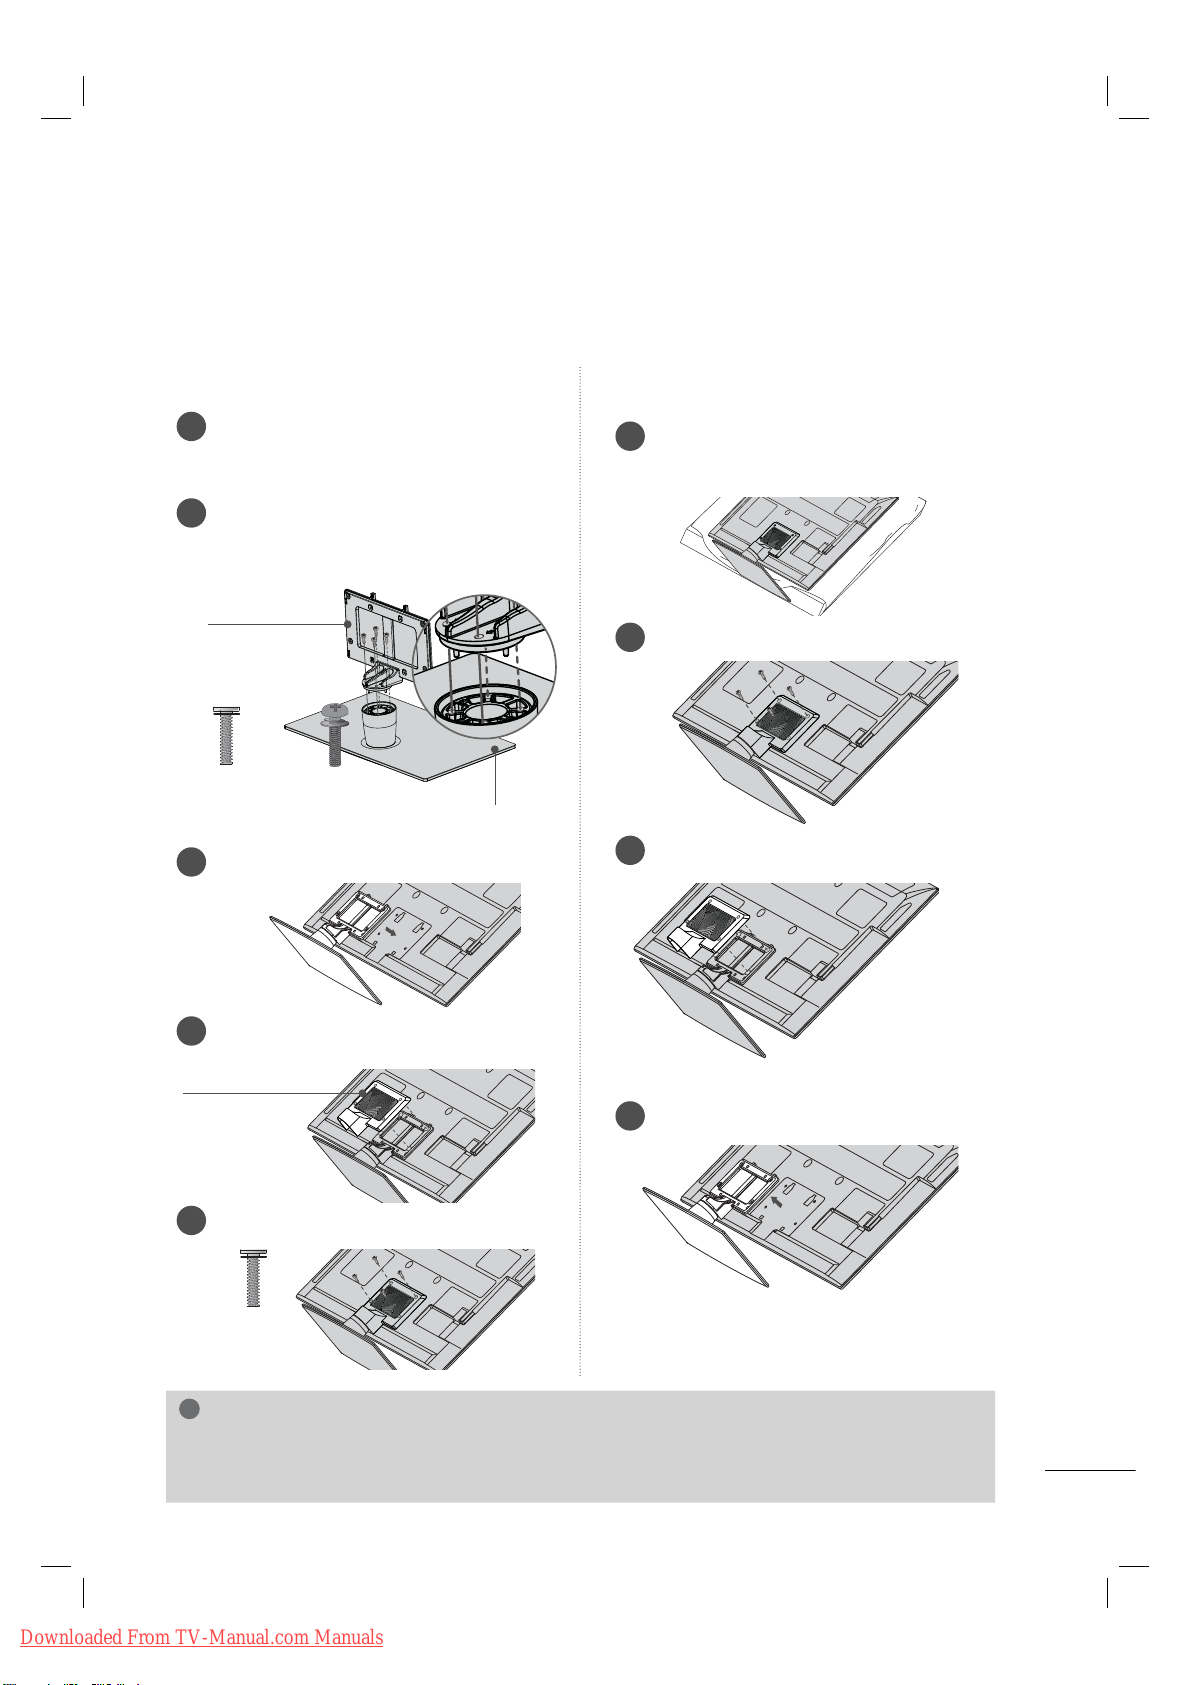
!
STAND INSTRUCTIONS
(For 32/42/47/55LE5400, 42/47/55LE5500, 42/47/55LE7500, 47/55LE8500, 42/47/55LX6500)
ꔛ
Image shown may differ from your TV.
INSTALLATION
DETACHMENT
Carefully place the TV screen side down on
1
a cushioned surface to protect the screen
from damage.
Assemble the parts of the STAND BODY
2
with the STAND BASE of the TV. At this
time, tighten the screws that hold the
STAND BODY on.
STAND BODY
M4 x 20
(47/55LE8500)
M4 x 16
(Other models)
Assemble the TV as shown.
3
M4 x 24
(55LE5400/5500/7500,
55LX6500)
STAND BASE
Carefully place the TV screen side down on
1
a cushioned surface to protect the screen
from damage.
Remove the screws that hold the stand on.
2
Detach the STAND REAR COVER from TV.
3
Assemble the part of the STAND REAR
4
COVER with the TV.
STAND REAR
COVER
5
Install the 4 screws into the holes shown.
M4 x 20
(47/55LE8500)
M4 x 16
(Other models)
Detach the stand from TV.
4
NOTE
► When assembling the desk type stand, make sure the screws are fully tightened (If not tightened
fully, the TV can tilt forward after the product installation). Do not over tighten.
11
Downloaded From TV-Manual.com Manuals
Page 14

PREPARATION
VESA WALL MOUNTING
Install your wall mount on a solid wall perpendicular to the floor. When attaching to other building materials, please contact your nearest installer.
If installed on a ceiling or slanted wall, it may fall and result in severe personal injury.
We recommend that you use an LG brand wall mount when mounting the TV to a wall.
LG recommends that wall mounting be performed by a qualified professional installer.
Model
32LD550,
32LE5400
42/46LD550,
47LD650,
42/47LE5400,
42/47LE5500,
42/47LE7500,
47LE8500,
42/47LX6500
52LD550, 55LD650,
55LE5400,
55LE5500,
55LE7500,
55LE8500,
60LD550,
55LX6500
50PK750 400
VESA (A * B)
A
B
200
100 M4 4
*
200
200 M6 4
*
400
400 M6 4
*
400 M6 4
*
Standard
Screw
Quantity
Wall Mounting Bracket
(sold separately)
LSW100B, LSW100BG
LSW200B, LSW200BG
LSW400B, LSW400BG
AW-50PG60M AW-50PG60MS
60PK750 600
12
Downloaded From TV-Manual.com Manuals
400 M8 4
*
AW-60PG60M AW-60PG60MS
Page 15

!
NOTE
► Screw length needed depends on the wall
mount used. For further information, refer to
the instructions included with the mount.
► Standard dimensions for wall mount kits are
shown in the table.
► When purchasing our wall mount kit, a detailed
installation manual and all parts necessary for
assembly are provided.
► Do not use screws longer than the standard
dimension, as they may cause damage to the
inside to the TV.
► For wall mounts that do not comply with the
VESA standard screw specifications, the length
of the screws may differ depending on their
specifications.
► Do not use screws that do not comply with the
VESA standard screw specifications.
Do not use fasten the screws too strongly, this
may damage the TV or cause the TV to a fall,
leading to personal injury. LG is not liable for
these kinds of accidents.
► LG is not liable for TV damage or personal
injury when a non-VESA or non specified wall
mount is used or the consumer fails to follow
the TV installation instructions.
CAUTION
► Do not install your wall mount kit while your TV is turned on. It may result in personal injury due to
electric shock.
DESKTOP PEDESTAL INSTALLATION
ꔛ
Image shown may differ from your TV.
For proper ventilation, allow a clearance of 10.1 cm (4 inch) on all four sides from the wall.
10.1 cm (4 inch)
10.1 cm (4 inch)
10.1 cm (4 inch)
CAUTION
► Ensure adequate ventilation by following the clearance recommendations.
► Do not mount near or above any type of heat source.
10.1 cm (4 inch)
13
Downloaded From TV-Manual.com Manuals
Page 16

PREPARATION
AC IN
AC IN
AC IN
CABLE MANAGEMENT
ꔛ
Image shown may differ from your TV.
32/42/46/52/60LD550, 47/55LD650
Connect the cables as necessary.
1
To connect additional equipment, see the
EXTERNAL EQUIPMENT SETUP section.
Open the CABLE MANAGEMENT CLIP as
2
shown.
Plasma TV
After connecting the cables as necessary,
install the CABLE HOLDER as shown and
1
bundle the cables.
In case of the LAN cable, install as shown
to reduce the electromagnetic wave.
CABLE HOLDER
32/42/47/55LE5400, 42/47/55LE5500,
42/47/55LE7500, 47/55LE8500,
42/47/55LX6500
Secure the power cord with the CABLE
HOLDER on the TV back cover.
1
It will help prevent the power cable from
being removed by accident.
14
CABLE MANAGEMENT CLIP
Put the cables inside the CABLE
3
MANAGEMENT CLIP and snap it closed.
CABLE HOLDER
After connecting the cables as necessary,
2
install the CABLE HOLDER as shown and
bundle the cables.
CABLE HOLDER
Downloaded From TV-Manual.com Manuals
Page 17

SWIVEL STAND
After installing the TV, you can adjust the TV set manually to the left or right direction by 20 º to suit
your viewing position.
ATTACHING THE TV TO A DESK
ꔛ
Image shown may differ from your TV.
The TV must be attached to a desk so it cannot be pulled in a forward/backward direction, poten-
tially causing injury or damaging the product.
1-Screw
( provided as parts of the product)
(For
32/42LD550, 32LE5400
Stand
Desk
)
WARNING
► To prevent TV from falling over, the TV should be securely attached to the floor/wall per installa-
tion instructions. Tipping, shaking, or rocking the machine may cause injury.
KENSINGTON SECURITY SYSTEM
ꔛ
This feature is not available for all models.
- The TV is equipped with a Kensington Security System connector on the back panel. Connect the Kensington Security
System cable as shown below.
- For the detailed installation and use of the Kensington Security
System, refer to the user’s guide provided with the Kensington
Security System.
For further information, contact http://www.kensington.com,
the internet homepage of the Kensington company. Kensington
sells security systems for expensive electronic equipment such
as notebook PCs and LCD projectors.
NOTE: The Kensington Security System is an optional accessory.
Downloaded From TV-Manual.com Manuals
15
Page 18

RGB IN (PC)
LAN
WIRELESS
CONTROL
(RGB/DVI)
RS-232C IN
(
SERVICE ONLY)
OPTICAL
DIGITAL
/DVI IN
2
3
1
VIDEO
AUDIO
L(MONO)
R
AV IN 1
AUDIO IN
AUDIO OUT
VIDEO
AUDIO
COMPONENT IN
YPB PR
L R
2
1
Y L RPB PR
ꔡ
S-VIDEO
OUTPUT
SWITCH
ANT IN
ANT OUT
RGB IN (PC)
LAN
(RGB/DVI)
/DVI IN
2
3
1
VIDEO
AUDIO
COMPONENT IN
AUDIO IN
AUDIO OUT
2
1
VIDEO
AUDIO
L(MONO)
R
AV IN 1
YPBP
R
L R
OPTICAL DIGITAL
(
SERVICE ONLY)
L R
VIDEO
AUDIO
HDMI OUTPUT
RGB IN (PC)
LAN
WIRELESS
CONTROL
(RGB/DVI)
VIDEO
L(MO
VIDEO
AUDIO IN
AUDIO OUT
2
1
/DVI IN
2
3
1
YPBP
R
OPTICAL DIGITAL
(
SERVIC
L R
DVI OUTPUT
AUDIO
RGB IN (PC)
LAN
WIRELESS
CONTROL
RS-232C IN
(
SERVICE ONLY)
VIDEO
AUDIO
L(MONO)
R
VIDEO
AUDIO
COMPONENT INAV IN 1
YPBP
R
L R
AUDIO OUT
2
1
/DVI IN
2
3
1
(RGB/DVI)
AUDIO IN
OPTICAL DIGITAL
ꔡ
EXTERNAL EQUIPMENT SETUP
ANTENNA/
CABLE IN
RGB IN (PC)
LAN
WIRELESS
CONTROL
(RGB/DVI)
OPTICAL DIGITAL
/DVI IN
2
3
1
VIDEO
AUDIO
L(MONO)
R
VIDEO
AUDIO
COMPONENT INAV IN 1
YPB PR
L R
AUDIO IN
AUDIO OUT
2
1
RS-232C IN
(
SERVICE ONLY)
ꔡ
PREPARATION
CONNECTING YOUR TV
To connect an additional equipment, see the External Equipment Setup section in CD Manual.
* Typical Layout
Connection Order
HDMI is the best way to connect a
device. If it's not available, move down
the list in order until you find a connection that's available on each device.
1
2
HDMI
DVI
3
Component
4
Composite
1
HDMI
Use HDMI to connect
external devices when
available. If not available, use DVI or
Component.
2
DVI
You can use a adapter to connect
DVI to HDMI, but you will only
have 2 channel stereo for sound.
The adapter is not needed when
connecting a PC.
Sorry, A phone
Jack to stereo
0.32 cm (1/8")
headphone plug
adapter is not
included. It is
available from
most stores that
carry electronics.
3
4
Component
Composite
Use Composite
for the video
connection if
available.
Match the jack
colors.
Antenna/Cable
Use this connection when you need to
connect directly to an antenna or cable
system instead of using a cable box.
Antenna
Cable TV
OR
Make sure
you don't
mix up the
colors.
16
Downloaded From TV-Manual.com Manuals
RF Coaxial
Wire (75 Ω)
Be careful not
to bend the
copper wire.
ANTENNA/
CABLE IN
Page 19

NETWORK
NETWORK SETUP
Wired Network Connection
This TV can be connected to a local area network (LAN) via the LAN port. After making the physical
connection, the TV needs to be set up for network communication.
Broadband modem
1. How to connect
Connect the LAN port of the Modem or Router to the LAN port on the TV.
1
LAN
ꔡ
WIRELESS
CONTROL
1
/DVI IN
3
2
1
Broadband Service
RGB IN (PC)
(RGB/DVI)
AUDIO IN
2
YPBP
1
OPTICAL DIGITAL
AUDIO OUT
VIDEO
RS-232C IN
(
SERVICE ONLY)
VIDEO
R
L(MONO)
L R
AUDIO
AUDIO
R
COMPONENT INAV IN 1
Router
Broadband modem
Broadband Service
2. How to use
ꔛ
Select “Network Setting” in the NETWORK menu.
ꔛ
After connecting the LAN port, use the NETCAST menu.
ꔛ
For more information about NETCAST setup and troubleshooting, visit our Knowledgebase at
LGknowledgebase.com. Search for NetCast.
CAUTION
► Do not connect a modular phone cable to the LAN port.
► Since there are various connection methods, please follow the specifications of your telecommu-
nication carrier or internet service provider.
17
Downloaded From TV-Manual.com Manuals
Page 20

NETWORK
MENU
ENTER
ENTER
ENTER
ENTER
12
ABC3 DEF
4
GHI5 JKL6
MNO
7
PQRS8 TUV
0
9
WXYZ
ENTER
Wired Network Setup
If wired and wireless networks are both available, wired is the preferred method.
After making a physical connection, a small number of home networks may require the TV network
settings to be adjusted.
For detail information, contact your internet provider or router manual.
If you already set
NETWORK
• Network Setting : Wired
• Network Status : Internet is connected
• Legal Notice
• ESN
ꔂ Move ꔉ Enter
Network Type
Wired network is recommended
Wired
Wireless
Appeared when wired and
wireless are simultaneously
connected.
the Network Setting
Previous setting value exists. Do
you want to connect with the
previous setting?
Enter
Resetting
ꔉ Next
ꕯ Exit
2
3
4
5
6
IP Auto Setting
Network Status
TV
Network connecting
Setting Test Close
1
Select NETWORK.
Network Setting
Select the IP setting mode.
IP Mode
ꔈIP Address 255 . 255 . 0 . 0
ꔈSubnet Mask 255 . 255 . 0 . 0
ꔈGateway 255 . 255 . 0 . 0
ꔈDNS Server 255 . 255 . 0 . 0
ꕉ Previous
◀ IP Auto Setting ▶
Enter
ꔛ
This feature requires an always-on
broadband internet connection.
ꔛ
You do not need to connect to a PC
ꕯ Exit
IP Manual Setting
Network Setting
Insert the IP address.
IP Mode
ꔈIP Address 255 . 255 . 0 . 0
ꔈSubnet Mask 255 . 255 . 0 . 0
ꔈGateway 255 . 255 . 0 . 0
ꔈDNS Server 255 . 255 . 0 . 0
◀ IP Manual Setting ▶
Enter
ꕉ Previous
ꕯ Exit
to use this function.
Select Network Setting.
ꔛ
If Network Setting is not working,
check your network conditions. Check
the LAN cable and make sure your
Select Wired.
If you already set Network Setting:
Select Resetting. The new connection
settings resets the current network
settings.
Select IP Auto Setting or IP Manual
Setting.
When Selecting IP Manual Setting:
IP addresses will need to be input
manually.
router has DHCP turned on if you
wish to use the Auto Setting.
ꔛ
If the Network Setting is not completed, network may not operate normally.
ꔛ
IP Auto Setting: Select it if there is a
DHCP server on the local area network (LAN) via wired connection, the
TV will automatically be allocated an
IP address. If you’re using a broadband router or broadband modem
that has a DHCP (Dynamic Host
Configuration Protocol) server function. The IP address will automatically
be determined.
ꔛ
IP Manual Setting: Select it if there is
no DHCP server on the network and
you want to set the IP address manu-
Select Enter.
ally.
18
Downloaded From TV-Manual.com Manuals
Page 21

!
NOTE
► For more information about NETCAST setup
and troubleshooting, visit http://lgknowledgebase.com. Search for NETCAST.
► Use a standard LAN cable with this TV. Cat5
or better with a RJ45 connector.
► Many network connection problems during set
up can often be fixed by re-setting the router
or modem. After connecting the player to the
home network, quickly power off and/or disconnect the power cable of the home network
router or cable modem. Then power on and/or
connect the power cable again.
► Depending on the internet service provider
(ISP), the number of devices that can receive
internet service may be limited by the applicable terms of service. For details, contact your
ISP.
► LG is not responsible for any malfunction of
the TV and/or the internet connection feature
due to communication errors/malfunctions
associated with your broadband internet connection, or other connected equipment.
► LG is not responsible for problems within your
internet connection.
► Some content available through the network
connection may not be compatible with the TV.
If you have questions about such content,
please contact the producer of the content.
► You may experience undesired results if the
network connection speed does not meet the
requirements of the content being accessed.
► Some internet connection operations may not
be possible due to certain restrictions set by
the Internet service provider (ISP) supplying
your broadband Internet connection.
► Any fees charged by an ISP including, without
limitation, connection charges are your responsibility.
► A 10 Base-T or 100 Base-TX LAN port is
required for connection to this TV. If your internet service does not allow for such a connection, you will not be able to connect the TV.
► A DSL modem is required to use DSL service
and a cable modem is required to use cable
modem service. Depending on the access
method of and subscriber agreement with your
ISP, you may not be able to use the internet
connection feature contained in this TV or you
may be limited to the number of devices you
can connect at the same time. (If your ISP
limits subscription to one device, this TV may
not be allowed to connect when a PC is already
connected.)
► The use of a “Router” may not be allowed or
its usage may be limited depending on the
policies and restrictions of your ISP. For details,
contact your ISP directly.
► The wireless network operates at 2.4 GHz radio
frequencies that are also used by other household devices such as cordless telephone,
Bluetooth® devices, microwave oven, and can
be affected by interference from them. It can
be interrupted by the device using 5Ghz radio
frequencies. It is same device with LG wireless
media box, cordless telephone, other Wi-Fi
device.
► It may decrease the service speed using
Wireless network by surrounding wireless condition.
► Turn off all unused network equipment in your
local home network. Some devices may generate network traffic.
► In some instances, placing the access point or
wireless router higher up away from the floor
may improve the reception.
► The reception quality over wireless depends on
many factors such as type of the access point,
distance between the TV and access point,
and the location of the TV.
► When connecting internet through the wired/
wireless sharing machine, it may interrupt the
connection because of the use limitation and
confirmation of service company.
► To connect wireless AP, an AP that supports
the wireless connection is necessary, and the
wireless connection function of the AP needs
to be activated. Please enquire to the AP supplier for the possibility of AP wireless connections.
► Please verify the security settings of AP SSID
for wireless AP connection, and enquire to the
AP supplier for the AP SSID security settings.
► The TV can become slower or malfunction with
wrong settings of network equipments (wired/
wireless router, hub, etc). Please install correctly by referring to the manual of the equipment, and set the network.
►
When AP is set to include 802.11 n, and if
Encryption is designated as WEP(64/128bit)
or WPA(TKIP/AES), the connection may not
be possible. There may be different connection methods according to the AP manufacturers.
Downloaded From TV-Manual.com Manuals
19
Page 22

NETWORK
IN 4
AV IN 2
VIDEO
AUDIO
L(MONO)
R
H/P
USB IN 1 USB IN 2
!
Wireless Network
The LG Wireless LAN for Broadband/DLNA Adaptor, which is sold separately, allows the TV to connect
to a wireless lan network.
The network configuration and connection method may vary depending on the equipment in use and
the network environment. Refer to the setup instructions supplied with your access point or wireless
router for detailed connection steps and network settings.
1. How to connect
Connect the “LG Wireless LAN for Broadband/DLNA Adaptor (sold separately)” to the USB
1
IN 1 or 2 port on the TV.
2. How to use
ꔛ
Select “Network Setting” in the NETWORK menu.
ꔛ
After connecting, you can use the NETCAST menu.
NOTE
►For enjoying pictures, music, or video stored in the PC using the router, the use of wired port in the
router is recommended.
►When the wireless port of the router is used, there may be restrictions for some functions.
20
Downloaded From TV-Manual.com Manuals
Page 23

Wireless Network Setup
ENTER
ENTER
12
ABC3 DEF
4
GHI5 JKL6
MNO
7
PQRS8 TUV
0
9
WXYZ
ENTER
MENU
ENTER
ENTER
ENTER
ENTER
Setting up the AP (Access Point) or the wireless router is required before connecting the TV to the
network.
If you already set the
NETWORK
• Network Setting : Wired
• Network Status : Internet is connected
• Legal Notice
• ESN
ꔂ Move ꔉ Enter
Network Type
Wired network is recommended
Wired
Wireless
Appeared when wired and wireless
are simultaneously connected.
Network Setting
Previous setting value exists. Do
you want to connect with the
previous setting?
Enter
Resetting
ꔉ Next
ꕯ Exit
Selecting the wireless network setting type
Select the wireless network setting type.
Setting from the AP list
Simple setting (WPS-button mode)
Setting Ad-hoc network
ꔉ Next
ꕉ Previous ꕯ Exit
Network Setting
Select the IP setting mode.
IP Mode
ꔈIP Address 255 . 255 . 0 . 0
ꔈSubnet Mask 255 . 255 . 0 . 0
ꔈGateway 255 . 255 . 0 . 0
ꔈDNS Server 255 . 255 . 0 . 0
ꕉ Previous
◀ IP Auto Setting ▶
Enter
1
2
3
4
5
If your AP is locked
Inserting the security key
Insert the security key of AP.
Insert 8~63 ASCII characters
Enter Cancel
ꕯ Exit
ꕉ Prev.
Select NETWORK.
Select Network Setting.
Select Wireless.
If you already set Network
Setting: Select Resetting.
The new connection settings
resets the current network settings.
Select Setting from the AP list.
Selecting AP
Select AP you want to connect.
◀▶
ꕯ Exit
6
Scan the all available AP (Access
Point) or wireless routers within range
and display them as a list.
7
Select an AP (Access Point) or
wireless router on the list.
(If your AP is locked, insert the
security key of AP).
8
Repeat step 4-5 on P.18.
9
Input the security key of AP.
Page 1/1
Input the new SSID
iptime
ASW
Network1
ꔅ Connecting with PIN mode
ꕉ Previous ꕯ Exit
Access Point
Search
ꔉ Next
Downloaded From TV-Manual.com Manuals
21
Page 24

NETWORK
ENTER
ENTER
ENTER
When a security code is already set
PIN (Personal Identification Number)
If you want to connect the AP (Access Point) or router with PIN, use this feature.
Selecting AP
Select AP you want to connect.
Input the new SSID
iptime
ASW
Network1
ꔅ Connecting with PIN mode
ꕉ Previous ꕯ Exit
Repeat step 1-6 on P.21.
1
2
3
Connect the acccess point with PIN
RED
mode.
You can see the Network ID and Security Key
Page 1/1
Access Point
Search
ꔉ Next
on your TV screen.
Enter the PIN number to your device.
Connecting with PIN mode
Insert PIN number at the AP webpage and
press ‘Connect’ button.
PIN NUBMER : 12345670
Connect
For more information, check the AP manual.
ꕉ Previous
4
5
ꔛ
Select Connect.
Repeat step 4-5 on P.18.
PIN number is the unique 8 digit number
of the dongle.
ꔉ Next
ꕯ Exit
22
Simple setting (WPS-button mode)
If your access point or wireless router that supports PIN or WPS (Wi-Fi Protected Setup), it’s available
to use your access point or wireless router within 120 counts. You do not need to know the access
point name (SSID: Service Set Identifier) and security code of your access point or wireless router.
Select the wireless network setting type.
Select the wireless network setting type.
Setting from the AP list
Simple setting (WPS-button mode)
Setting Ad-hoc network
ꕉ Previous ꕯ Exit
Repeat step 1-4 on P.21.
1
2
Select Simple setting (PBC
mode).
ꔉ Next
Simple setting (WPS-button mode)
Press PBC Mode button of AP and press ‘Connect’ button.
Connect
Caution: Check if PBC mode button is available for your AP.
ꕉ Previous
ꔉ Next
ꕯ Exit
3
4
Select Connect.
Repeat step 4-5 on P.18.
Downloaded From TV-Manual.com Manuals
Page 25

ENTER
ENTER
ENTER
ENTER
AD-hoc Mode
ENTER
ENTER
This is the method of communicating directly with the machine to communicate without AP.
This is the same as connecting two PCs with a cross cable.
Selecting the wireless network setting type
Select the wireless network setting type.
Setting from the AP list
Simple setting (WPS-button mode)
Setting Ad-hoc network
ꔉ Next
ꕉ Previous ꕯ Exit
Setting Ad-hoc network
Features using exiting network can be unavailable. Do you
want to change network connection?
Enter Cancel
ꔉ Next
ꕉ Previous ꕯ Exit
Setting Ad-hoc network
Insert the setting information into the device.
Network ID(SSID) : LGTV10
Security Key : 1111111111
ꔅ Changing the setting information.
Connect
ꕉ Previous ꕯ Exit
ꔉ Next
Network Status
Adhoc network is connected.
TV
(LGTV10)
Signal Strength
Mac Address : 00:00:13:64:23:01
IP Address : 10.19.152.115
Gateway
Subnet Mask : 255.255.254.0
Gateway : 10.19.152.1
Setting Test Close
Repeat step 1-3 on P.21.
1
2
Select Setting AD-hoc network.
3
Select Enter.
Network Setting
Insert the IP address.
IP Mode
ꔈIP Address 192 . 168 . 0 . 10
ꔈSubnet Mask 255 . 255 . 255 . 0
ꔈ
Gateway 192 . 168 . 0 . 1
ꔈ
DNS Server 255 . 255 . 0 . 0
ꕉ Previous
ꔛ
PC Setting
Internet Protocol(TCP/IP) of PC needs to be set
manually.
IP address, Subnet Mask, and default Gateway
can be set with your own discretion.
i.e) IP address: 192.168.0.1 / Subnet Mask:
255.255.255.0 / default Gateway: 192.168.0.10
ꔛ
TV Setting
Verify IP address and gateway of PC.
Input Gateway address of PC to IP Address, and
IP Address of PC to Gateway, and select Enter.
i.e) IP address: 192.168.0.10 / Subnet Mask:
255.255.255.0 / default Gateway: 192.168.0.1
IP Manual Setting
Enter
ꕯ Exit
5
6
Setting Ad-hoc network
Insert the setting information into the device.
Network ID(SSID) : LGTV10
Security Key : 1111111111
Connecting the Ad-hoc network
Cancel
ꔛ
Example of the PC setting that
supports a wireless network
1. Find a wireless network device in
your PC.
2. Select LGTV10 that appears in
the list. (Select the same name
as the network ID that appears
on your TV screen.)
3. Type 1111111111 in the Inserting
the security key dialog.
(Type the security key that
appears on your TV screen.)
Insert the IP address.
Network setting is completed.
Select Close.
4
Select Connect to connect Ad-hoc network.
You can see the Network ID and Security Key
on your TV screen.
Enter this Network ID and Security Key to
your device.
If a network may not operate, change the
setting information using the RED button.
Downloaded From TV-Manual.com Manuals
23
Page 26

NETCAST
ENTER
!
NETCAST
NETCAST MENU
These services are provided by separate Content Provider.
NETCAST menu source can differ by country.
What is a NETCAST?
Stream movies, TV shows and video, and get up to the minute news, stock information and weather
updates directly to your TV.
ꔛ
To view the owner’s manual that provided by
the Content Provider, visit our website at
http://www.lg.com.
ꔛ
To see the activation method of Yahoo!,
Netflix, or Vudu, click the Yahoo!, Netflix,
Vudu in the CD manual (For USA).
1
ꔛ
Yahoo! (For USA)
Yahoo! TV Widgets give you the best of the
Internet in perfect harmony with the simplicity and
reliability of your TV. TV Widgets deliver a Cinematic
internet
web services for viewing on the TV.
ꔛ
You can instantly watch movies (quite a few new
releases) & TV episodes from Netflix streamed
over the internet to your TV.
To become a Netflix member visit: www.netflix.
com/LG
Note that this service is provided by the Content
Provider, Netflix. It is dependent on Netflix to provide the data.
ꔛ
In order to make rental/purchase transactions on
the Vudu service, a user must create an account
on vudu.com.
That account is linked to a specific device, via a
process called “activation”. It is possible to have
multiple devices associated with a single Vudu
account.
Note that this service is provided by the Content
Provider, Vudu. It is dependent on Vudu to provide the data.
TM
Netflix (For USA)
Vudu (For USA)
Select NETCAST menu option.
experience by converting your favorite
2
Enjoy the online service.
ꔛ
YouTube
YouTube is a video sharing website where users
can upload, view, and share video clips.
ꔛ
Picasa
Picasa is a photo organizing, editing or sharing
website where users can upload, view, and share
photos.
NOTE
► The videos list searched from the TV may
different with the list searched from a web
browser on PC.
► The settings of this TV do not affect the
YouTube’s playback quality.
► The playback of videos may be paused,
stopped or buffering occurring often
depending on your broadband speed.
► For service that requires log in, join the
applicable service on the website using the
PC and log in through the TV to enjoy various additional functionalities.
► When you set the city you want with Setup
by pressing the red button, the background
of NetCast will be set to the weather of the
selected city.
► For Plasma TV: If there is no user action 2
minutes following freezing image or video
on screen, the screensaver will activate itself
preventing fixed image remaining on screen.
24
Downloaded From TV-Manual.com Manuals
Page 27

ENTER
ENTER
ENTER
ENTER
ENTER
WATCHING TV
TURNING ON THE TV
First, connect power cord correctly.
1
At this moment, the TV switches to
standby mode.
ꔛ
In standby mode to turn TV on, press
the
/ I, INPUT, CH (ꕌ or ꕍ) button
on the TV or press the
POWER, INPUT,
CH (ꕌ or ꕍ), Number (0~9) button on
the remote control.
Select the viewing source by using the
2
INPUT button on the remote control.
When finished using the TV, press the
3
POWER button on the remote control.
The TV reverts to standby mode.
INITIAL SETTING
This Function guides the user to easily set the
essential items for viewing the TV for the first
time when purchasing the TV. It will be displayed
on the screen when turning the TV on for the first
time. It can also be activated from the user
menus.
ꔛ
Default selection is “Home Use”. We recommend setting the TV to “Home Use” mode
for the best picture in your home environment.
ꔛ
“Store Demo” Mode is only intended for use
in retail environments. Customers can adjust
the “Picture menu - Picture mode” manually while inspecting the TV, but the TV will
automatically return to preset in-store mode
after 5 minutes.
ꔛ
“Store Demo” Mode is an optimal setting for
displaying at stores. “Store Demo” mode
initializes the TV to set the image quality.
Step2. Mode setting
Step 2. Mode Setting
i
Selecting the environment.
Choose the setting mode you want.
Select [Home Use] when setting TV up
in-home. You can adjust picture quality
accordingly through Picture Mode menu
option.
Home Use Store Demo
• Demo Mode Off
ꕉ Previous ꔉ Next
For 42/47/55LE5400, 42/47/55LE5500,
42/47/55LE7500, 47/55LE8500, 42/47/55LX6500
1
Select Home Use.
Step3. Power Indicator
(For LED LCD TV)
Step 3. Power Indicator
Standby Light ◀ Off ▶
ꕉ Previous ꔉ Next
1
ꔛ
This function is disable in “Step2. Mode
Select On or Off.
Setting - Store Demo”.
Step4. Time Zone
Step 3. Time Zone
Time Zone ◀ Eastern ▶
Daylight Saving Auto
ꕉ Previous ꔉ Next
1
Select Time Zone option.
Step1. Selecting Language
WELCOME!
Thank you for choosing LG
Step 1. Language
English
Español
Français
한국어
1
Downloaded From TV-Manual.com Manuals
Select Menu Language.
ꔉ Next
2
Step5. Auto Tuning
Step 5. Auto Tuning
Before starting,
be sure that the
TV antenna is connected.
ꕉ Previous ꔉ Next
1
Check your antenna connection and
start Auto Tuning.
Select Daylight Saving
option.
25
Page 28

WATCHING TV
ON SCREEN MENUS SELECTION
Your TV's OSD (On Screen Display) may differ slightly from that shown in this manual.
Some of these features are not available on all models. For further information, refer to the CD Manual.
CHANNEL
ꔛ
Auto Tuning:
All available TV channels are
searched and stored automatically.
ꔛ
Manual Tuning:
selection and add or delete individual channels.
ꔛ
Channel Edit:
nel list.
User can do manual channel
You can add or delete in the chan-
PICTURE
ꔛ
Aspect Ratio: Selects the desired picture format
ꔛ
Picture Wizard: This feature lets you adjust the
picture quality of the original image.
ꔛ
Energy Saving: It reduces the TV’s power consumption by lowering the backlight level.
ꔛ
Picture Mode: Selects a picture mode that is best
suited for the program you are currently watching.
ꔛ
TruMotion: It provides clears, smoother images, even
during fast action scenes creating a more stable
structure for a crisper picture.
ꔛ
Screen (RGB-PC): Adjust the screen Resolution,
Auto config, Position, Size, Phase, Reset.
ꔛ
LED Local Dimming: After analyzing the signal of
the input video by areas of the screen, it adjusts
the backlight to improve the contrast ratio.
AUDIO
ꔛ
Auto Volume: Auto Volume makes sure that the
volume level remains consistent whether you are
watching a commercial or a regular TV program.
ꔛ
Clear Voice II: By differentiating the human sound
range from others, it helps users listen to human
voices better.
ꔛ
Balance: Adjust the left/right sound of speaker.
ꔛ
Sound Mode: Select the sound mode to Standard,
Music, Cinema, Sport, and Game.
ꔛ
TV Speaker: Turn the TV speakers off if using
external audio equipment.
TIME
ꔛ
Clock: Set the current time Auto or Manual.
ꔛ
Off Time: Set the time the TV will automatically
be turned off.
ꔛ
On Time: Set the time the TV will automatically be
turned on.
ꔛ
Sleep Timer: Select the amount of time before
your TV turns off automatically.
LOCK
ꔛ
Set Password: Change the password.
ꔛ
Lock System: Select On or Off to use Lock
System menu option.
ꔛ
Downloadable Rating: This function is available
only for digital channel signal.
ꔛ
Input Block: Enables you to select a source to
block from the external source devices you have
hooked up.
ꔛ
Key Lock: This feature can be used to prevent
unauthorized viewing by locking out the front
panel controls.
OPTION
ꔛ
Language
- Menu Language: The menus can be shown on
the screen in the selected language.
Audio Language: Selects your desired language
-
in the digital broadcasting.
ꔛ
Caption: Selects and displays a caption. Captions
are provided to help people with hearing loss
.
watch TV.
ꔛ
Power Indicator: Adjust the power/standby indicator light of TV front.
ꔛ
ISM Method: Use it to minimize any fixed image
on the screen.
ꔛ
Set ID: Choose the desired TV ID number.
ꔛ
Initial Setting: Reset the TV to factory default and
erase all stored channels.
ꔛ
Mode Setting: Select either Store Demo or Home
Use.
NETWORK
ꔛ
Network Setting: After making wired or wireless
network connection, complete the network setting.
ꔛ
Network Status: Check the network status.
ꔛ
Legal Notice: Check the important notice relating
to network services.
ꔛ
ESN: We provide you the Netflix ESN (Electronic
Serial Number) that allows you to watch videos
using the Netflix website.
INPUT
ꔛ
Select desired input sources.
MY MEDIA
ꔛ
Movie List: Play movies.
ꔛ
Photo List: View photos.
ꔛ
Music List: Play songs.
GAME
ꔛ
Allows you to enjoy the games installed on the TV.
3D VIDEO (For 42/47/55LX6500)
ꔛ
This TV can display 3D video when received from
a compatible device. 3D video contains two pictures for each video frame formatted for each eye.
Therefore, special 3D glasses are required to view
3D video.
26
Downloaded From TV-Manual.com Manuals
Page 29

APPENDIX
TROUBLESHOOTING
Abnormal Operation
The remote control
doesn’t work
TV turns off suddenly
Video Problems
No picture &No sound
ꔛ
Check to see if there is any object between the product and the remote
control causing obstruction. Ensure you are pointing the remote control
directly at the TV.
ꔛ
Ensure that the batteries are installed with correct polarity (+ to +, - to -).
ꔛ
Ensure that the correct remote operating mode is set: TV, VCR etc.
ꔛ
Install new batteries.
ꔛ
Is the sleep timer set?
ꔛ
Check the power control settings. Power interrupted.
ꔛ
If there is no signal, the TV turns off automatically in 15 minutes.
ꔛ
Check whether the product is turned on.
ꔛ
Try another channel. The problem may be with the broadcast.
ꔛ
Is the power cord inserted into wall power outlet?
ꔛ
Check your antenna direction and/or location.
ꔛ
Test the wall power outlet, plug another product’s power cord into the
*This feature is not available for all models.
outlet where the product’s power cord was plugged in.
Picture appears slowly
after switching on
No or poor color or
poor picture
Horizontal/vertical bars
or picture shaking
Poor reception on
some channels
Lines or streaks in pic-
tures
No picture when con-
necting HDMI
ꔛ
This is normal, the image is muted during the product startup process.
Please contact your service center, if the picture has not appeared after
five minutes.
ꔛ
Adjust Color in menu option.
ꔛ
Keep a sufficient distance between the product and the VCR.
ꔛ
Try another channel. The problem may be with the broadcast.
ꔛ
Are the video cables installed properly?
ꔛ
Activate any function to restore the brightness of the picture.
ꔛ
Check for local interference such as an electrical appliance or power
tool.
ꔛ
Station or cable product experiencing problems, tune to another station.
ꔛ
Station signal is weak, reorient antenna to receive weaker station.
ꔛ
Check for sources of possible interference.
ꔛ
Check antenna (Change the direction of the antenna).
ꔛ
If an HDMI cable doesn’t support High Speed HDMI, it can cause flickers
or no screen display. In this case use the latest cables that support High
Speed HDMI.
Downloaded From TV-Manual.com Manuals
27
Page 30

APPENDIX
Audio Problems
No output from one
of the speakers
Unusual sound from
inside the product
No sound
when connecting
HDMI/USB
PC Mode Problems
The signal is out of
range
Vertical bar or stripe
on
background &
Horizontal Noise &
Incorrect position
Screen color is unsta-
ble or single color
ꔛ
Adjust Balance in menu option.
ꔛ
A change in ambient humidity or temperature may result in an unusual
noise when the product is turned on or off and does not indicate a fault
with the product.
ꔛ
Check High Speed HDMI cable.
ꔛ
Check USB cable over version 2.0.
ꔛ
Use normal MP3 file.
ꔛ
Adjust resolution, horizontal frequency, or vertical frequency on the PC.
ꔛ
Check the input source.
ꔛ
Activate the Auto configure feature or adjust size, phase, or H/V position.
*This feature is not available for all models.
(Option)
ꔛ
Check the signal cable.
ꔛ
Reinstall the PC video card.
28
When connecting the
HDMI cable to the PC,
there is no audio.
ꔛ
Check the manual for the video card in the PC to see if it supports
HDMI audio and how to set it up properly.
Downloaded From TV-Manual.com Manuals
Page 31

Movie List Problems
The file does not
appear on the Movie
List.
Message is displayed
saying “This file is
invalid” or the audio is
working normally but
the video is not work-
ing normally.
Message is displayed
saying “Unsupported
Audio” or the video is
working normally but
the audio is not work-
ing normally.
Subtitle is not working.
ꔛ
Check whether the file extension is supported.
ꔛ
Check whether the file is playing normally on a PC. (Check whether the
file is damaged.)
ꔛ
Check whether the resolution is supported.
ꔛ
Check whether the video/audio codec is supported.
ꔛ
Check whether the frame rate is supported.
ꔛ
Check whether the file is playing normally on a PC. (Check whether the
file is damaged.)
ꔛ
Check whether the audio codec is supported.
ꔛ
Check whether the bit rate is supported.
ꔛ
Check whether the sample rate is supported.
ꔛ
Check whether the file is playing normally on a PC. (Check whether the
file is damaged.)
ꔛ
Check whether the video file and subtitle file name are the same.
ꔛ
Check whether the video file and subtitle file are located in the same
folder.
ꔛ
Check whether the subtitle file is supported.
ꔛ
Check whether the language is supported. (When you open the subtitle
file on a PC, you can check the language of the subtitle file.)
Downloaded From TV-Manual.com Manuals
29
Page 32

APPENDIX
MAINTENANCE
Early malfunctions can be prevented. Careful and regular cleaning can extend the amount of time you
can enjoy your new TV.
Caution: Be sure to turn the power off and unplug the power cord before you begin any cleaning.
Cleaning the Screen
Here’s a great way to keep the dust off your screen for a while. Wet a soft cloth in a mixture of
lukewarm water and a little fabric softener or dish washing detergent. Wring the cloth until it’s
1
almost dry, and then use it to wipe the screen.
Make sure the excess water is off the screen, and then let it air-dry before you turn on your TV.
2
Cleaning the Cabinet
ꔛ
To remove dirt or dust, wipe the cabinet with a soft, dry, lint-free cloth.
ꔛ
Please be sure not to use a wet cloth.
Extended Absence
CAUTION
► If you expect to leave your TV dormant for a long time (such as a vacation), it’s a good idea to
unplug the power cord to protect against possible damage from lightning or power surges.
30
Downloaded From TV-Manual.com Manuals
Page 33

OPEN SOURCE SOFTWARE NOTICE
The following GPL executables and LGPL, MPL libraries used in this product are subject to the GPL2.0/
LGPL2.1/MPL1.1 License Agreements:
GPL EXECUTABLES:
Linux kernel 2.6, busybox, e2fsprogs, jfsutils, lzo, msdl-1.1, mtd-utils, ntpclient, procps, udhcpc
LGPL LIBRARIES:
Atk, cairo, directFB, ffmpeg, glib, GnuTLS, gtk+, iconv, libintl, libgcrypt, libgpg-error, libsoup, libusb, pango,
uClibc, webkit
MPL LIBRARIES:
Nanox, spidermonkey
LG Electronics offers to provide source code to you on CD-ROM for a charge covering the cost of performing
such distribution, such as the cost of media, shipping and handling upon e-mail request to LG Electronics :
opensource@lge.com
This offer is valid for a period of three (3) years from the date of the distribution of this product by LG
Electronics
You can obtain a copy of the GPL, LGPL, MPL licenses on the CD-ROM provided with this product.
Also you can obtain the translation of GPL, LGPL licenses from
http://www.gnu.org/licenses/old-licenses/gpl-2.0-translations.html,
http://www.gnu.org/licenses/old-licenses/lgpl-2.1-translations.html.
This product includes other open source software.
► boost C++: software developed by http://www.boost.org distributed under the Boost Software License,
Version 1.0
► c-ares : copyright © 1998 by the Massachusetts Institute of Technology
► expat:
- copyright © 1998, 1999, 2000 Thai Open Source Software Center Ltd and Clark Cooper
- copyright © 2001-2007 Expat maintainers.
► fontconfig: copyright © 2001, 2003 Keith Packard
► freetype: copyright © 2003 The FreeType Project (www.freetype.org).
► ICU: copyright © 1995-2008 International Business Machines Corporation and others.
► libcurl: copyright © 1996 - 2008, Daniel Stenberg.
► libjpeg: This software is based in part on the work of the Independent JPEG Group copyright © 1991 –
1998, Thomas G. Lane.
► libmng: copyright © 2000-2007 Gerard Juyn, Glenn Randers-Pehrson
► libpng: copyright © 1998-2008 Glenn Randers-Pehrson
► libupnp: copyright © 2000-2003 Intel Corporation
► libxml2 : copyright © 1998-2003 Daniel Veillard
► libxslt: copyright © 2001-2002 Daniel Veillard
► lua interpreter: copyright © 1994–2008 Lua.org, PUC-Rio
► md5: copyright © 1991-2, RSA Data Security, Inc
► openSSL:
- cryptographic software written by Eric Young.
- software written by Tim Hudson.
- software developed by the OpenSSL Project for use in the OpenSSL Toolkit. (http://www.openssl.org)
Downloaded From TV-Manual.com Manuals
31
Page 34

APPENDIX
► pixman:
- copyright © 1987, 1988, 1989, 1998 The Open Group
- copyright © 1987, 1988, 1989 Digital Equipment Corporation
- copyright © 1999, 2004, 2008 Keith Packard
- copyright © 2000 SuSE, Inc.
- copyright © 2000 Keith Packard, member of The XFree86 Project, Inc.
- copyright © 2004, 2005, 2007, 2008 Red Hat, Inc.
- copyright © 2004 Nicholas Miell
- copyright © 2005 Lars Knoll & Zack Rusin, Trolltech
- copyright © 2005 Trolltech AS
- copyright © 2007 Luca Barbato
- copyright © 2008 Aaron Plattner, NVIDIA Corporation
- copyright © 2008 Rodrigo Kumpera
- copyright © 2008 André Tupinambá
- copyright © 2008 Mozilla Corporation
- copyright © 2008 Frederic Plourde
► portmap: copyright © 1983,1991 The Regents of the University of California.
► tiff: copyright © 1987, 1993, 1994 The Regents of the University of California.
► tinyxml: copyright © 2000-2006 Lee Thomason
► xyssl:
- Copyright © 2006-2008 Christophe Devine
- Copyright © 2009 Paul Bakker
► zlib: copyright © 1995-2005 Jean-loup Gailly and Mark Adler
All rights reserved.
Permission is hereby granted, free of charge, to any person obtaining a copy of this software and associated
documentation files (the "Software"), to deal in the Software without restriction, including without limitation
the rights to use, copy, modify, merge, publish, distribute, sublicense, and/or sell copies of the Software, and
to permit persons to whom the Software is furnished to do so, subject to the following conditions:
THE SOFTWARE IS PROVIDED "AS IS", WITHOUT WARRANTY OF ANY KIND, EXPRESS OR IMPLIED,
INCLUDING BUT NOT LIMITED TO THE WARRANTIES OF MERCHANTABILITY, FITNESS FOR A
PARTICULAR PURPOSE AND NONINFRINGEMENT. IN NO EVENT SHALL THE AUTHORS OR COPYRIGHT
HOLDERS BE LIABLE FOR ANY CLAIM, DAMAGES OR OTHER LIABILITY, WHETHER IN AN ACTION OF
CONTRACT, TORT OR OTHERWISE, ARISING FROM, OUT OF OR IN CONNECTION WITH THE SOFTWARE
OR THE USE OR OTHER DEALINGS IN THE SOFTWARE.
32
Downloaded From TV-Manual.com Manuals
Page 35

PRODUCT SPECIFICATIONS
MODELS
Dimensions
(Width x
Height
x Depth)
Weight With stand
With stand
Without stand
Without stand
MODELS
Dimensions
(Width x
Height
x Depth)
Weight With stand
With stand
Without stand
Without stand
MODELS
Dimensions
(Width x
Height
x Depth)
Weight With stand
With stand
Without stand
Without stand
32LD550
(32LD550-UB)
800.0 mm x 563.0 mm x 207.0 mm
(31.5 inch x 22.1 inch x 8.1 inch)
800.0 mm x 503.0 mm x 74.7 mm
(31.5 inch x 19.8 inch x 2.9 inch)
10.2 kg (22.4 lbs) 15.4 kg (33.9 lbs)
9.2 kg (20.2 lbs) 13.8 kg (30.4 lbs)
46LD550
(46LD550-UB)
1115.0 mm x 752.0 mm x 270.0 mm
(43.8 inch x 29.6 inch x 10.6 inch)
1115.0 mm x 680.0 mm x 77.0 mm
(43.8 inch x 26.7 inch x 3.0 inch)
18.6 kg (41.0 lbs) 26.9 kg (59.3 lbs)
16.6 kg (36.5 lbs) 23.6 kg (52.0 lbs)
60LD550
(60LD550-UB)
1441.0 mm x 963.0 mm x 345.0 mm
(
56.7 inch x 37.9 inch x 13.5 inch)
1441.0 mm x 877.0 mm x 109.0 mm
(
56.7 inch x 34.5 inch x 4.2 inch
40.0 kg (88.1 lbs)
35.7 kg (78.7 lbs)
42LD550
(42LD550-UB)
1024.0 mm x 695.0 mm x 261.0 mm
(40.3 inch x 27.3 inch x 10.2 inch)
1024.0 mm x 632.0 mm x 78.7 mm
(40.3 inch x 24.8 inch x 3.0 inch)
52LD550
(52LD550-UB)
1266.0 mm x 851.0 mm x 330.0 mm
(49.8 inch x 33.5 inch x 12.9 inch)
1266.0 mm x 775.0 mm x 96.4 mm
(
49.8 inch x 30.5 inch x 3.7 inch)
)
Power requirement AC 100-240 V ~ 50 / 60 Hz
Television System NTSC-M, ATSC, 64 & 256 QAM
Program Coverage VHF 2-13, UHF 14-69, CATV 1-135, DTV 2-69, CADTV 1-135
External Antenna Impedance 75 Ω
Environment
condition
ꔛ
The specifications shown above may be changed without prior notice for quality improvement.
Operating Temperature 0 °C to 40 °C (32 °F to 104 °F)
Operating Humidity Less than 80 %
Storage Temperature -20 °C to 60 °C (-4 °F to 140 °F)
Storage Humidity Less than 85 %
33
Downloaded From TV-Manual.com Manuals
Page 36

APPENDIX
MODELS
Dimensions
(Width x
Height
x Depth)
Weight With stand
Power requirement AC 100-240 V ~ 50 / 60 Hz
Television System NTSC-M, ATSC, 64 & 256 QAM
Program Coverage VHF 2-13, UHF 14-69, CATV 1-135, DTV 2-69, CADTV 1-135
External Antenna Impedance 75 Ω
Environment
condition
ꔛ
The specifications shown above may be changed without prior notice for quality improvement.
With stand
Without stand
Without stand
Operating Temperature 0 °C to 40 °C (32 °F to 104 °F)
Operating Humidity Less than 80 %
Storage Temperature -20 °C to 60 °C (-4 °F to 140 °F)
Storage Humidity Less than 85 %
1137.0 mm x 758.0 x 270.0 mm
(44.7 inch x 29.8 inch x 10.6 inch)
1137.0 mm x 685.0 mm x 76.8 mm
(44.7 inch x 26.9 inch x 3.0 inch)
47LD650
(47LD650-UA)
1329.0 mm x 872.0 mm x 330.0 mm
(52.3 inch x 34.3 inch x 12.9 inch)
1329.0 mm x 796.0 mm x 96.5 mm
(52.3 inch x 31.3 inch x 3.7 inch)
20.3 kg (44.7 lbs) 33.0 kg (72.7 lbs)
18.3 kg (40.3 lbs) 28.8 kg (63.4 lbs)
55LD650
(55LD650-UA)
34
Downloaded From TV-Manual.com Manuals
Page 37

MODELS
Dimensions
(Width x
Height
x Depth)
Weight With stand
With stand
Without stand
(50PK750-UA, 50PK750-UF)
50PK750
1184.0 mm X 801.0 mm X 309.7 mm
(46.6 inch x 31.5 inch x 12.1 inch)
1184.0 mm X 738.5 mm X 52.4 mm
(46.6 inch x 29.0 inch x 2.0 inch)
32.3 kg (71.2 lbs) 47.2 kg (104.0 lbs)
(60PK750-UA, 60PK750-UF)
60PK750
1402.8 mm X 935.3 mm X 383.9mm
(55.2 inch x 36.8 inch x 15.1 inch)
1402.8 mm X 866.8 mm X 52.4mm
(55.2 inch x 34.1 inch x 2.0 inch)
Without stand
Power requirement AC 100-240 V ~ 50 / 60 Hz
Television System NTSC-M, ATSC, 64 & 256 QAM
Program Coverage VHF 2-13, UHF 14-69, CATV 1-135, DTV 2-69, CADTV 1-135
External Antenna Impedance 75 Ω
Environment
condition
ꔛ
The specifications shown above may be changed without prior notice for quality improvement.
Operating Temperature 0 °C to 40 °C (32 °F to 104 °F)
Operating Humidity Less than 80 %
Storage Temperature -20 °C to 60 °C (-4 °F to 140 °F)
Storage Humidity Less than 85 %
29.9 kg (65.9 lbs) 42.7 kg (94.1 lbs)
Downloaded From TV-Manual.com Manuals
35
Page 38

APPENDIX
MODELS
Dimensions
(Width x
Height
x Depth)
Weight With stand
Dimensions
(Width x
Height
x Depth)
Weight With stand
Power requirement AC 120 V ~ 50 / 60 Hz
Television System NTSC-M, ATSC, 64 & 256 QAM
Program Coverage VHF 2-13, UHF 14-69, CATV 1-135, DTV 2-69, CADTV 1-135
External Antenna Impedance 75 Ω
Environment
condition
With stand
Without stand
Without stand
MODELS
With stand
Without stand
Without stand
Operating Temperature 0 °C to 40 °C (32 °F to 104 °F)
Operating Humidity Less than 80 %
Storage Temperature -20 °C to 60 °C (-4 °F to 140 °F)
Storage Humidity Less than 85 %
784.6 mm x 558.1 mm x 221.0 mm
(30.8 inch x 21.9 inch x 8.7 inch)
784.6 mm x 499.5 mm x 39.9 mm
(30.8 inch x 19.6 inch x 1.5 inch)
1126.6 mm x 757.9 mm x 284.4 mm
(44.3 inch x 29.8 inch x 11.1 inch)
1126.6 mm x 692.0 mm x 29.3 mm
(44.3 inch x 27.2 inch x 1.1 inch)
32LE5400
(32LE5400-UC)
12.6 kg (27.7 lbs) 19.5 kg (42.9 lbs)
10.5 kg (23.1 lbs) 16.7 kg (36.8 lbs)
47LE5400 (47LE5400-UC)
47LE5500 (47LE5500-UA)
47LX6500 (47LX6500-UB)
22.9 kg (50.4 lbs) 34.5 kg (76.0 lbs)
19.6 kg (43.2 lbs) 28.8 kg (63.4 lbs)
42LE5400 (42LE5400-UC)
42LE5500 (42LE5500-UA)
42LX6500 (42LX6500-UB)
1016.0 mm x 692.0 mm x 270.0 mm
(40.0 inch x 27.2 inch x 10.6 inch)
1016.0 mm x 630.0 mm x 29.3 mm
(40.0 inch x 24.8 inch x 1.1 inch)
55LE5400 (55LE5400-UC)
55LE5500 (55LE5500-UA)
55LX6500 (55LX6500-UB)
1306.0 mm x 867.0 mm x 345.0 mm
(51.4 inch x 34.1 inch x 13.5 inch)
1306.0 mm x 797.0 mm x 29.3 mm
(51.4 inch x 31.3 inch x 1.1 inch)
ꔛ
The specifications shown above may be changed without prior notice for quality improvement.
36
Downloaded From TV-Manual.com Manuals
Page 39

MODELS
Dimensions
(Width x
Height
x Depth)
Weight With stand
With stand
Without stand
42LE7500
(42LE7500-UC)
1018.2 mm x 693.5 mm x 269.8 mm
(40.0 inch x 27.3 inch x 10.6 inch)
1018.2 mm x 630.7 mm x 29.3 mm
(40.0 inch x 24.8 inch x 1.1 inch)
21.9 kg (48.2 lbs) 26.2 kg (57.7 lbs)
47LE7500
(47LE7500-UC)
1128.6 mm x 758.9 mm x 284.4 mm
(44.4 inch x 29.8 inch x 11.1 inch)
1128.6 mm x 693.3 mm x 29.8 mm
(44.4 inch x 27.2 inch x 1.1 inch)
Without stand
MODELS
Dimensions
(Width x
Height
x Depth)
Weight With stand
Dimensions
(Width x
Height
x Depth)
Weight With stand 31.6 kg (69.6 lbs) 43.8 kg (96.5 lbs)
Power requirement AC 120 V ~ 50 / 60 Hz
Television System NTSC-M, ATSC, 64 & 256 QAM
Program Coverage VHF 2-13, UHF 14-69, CATV 1-135, DTV 2-69, CADTV 1-135
External Antenna Impedance 75 Ω
Environment
condition
ꔛ
The specifications shown above may be changed without prior notice for quality improvement.
With stand
Without stand
Without stand
MODELS
With stand
Without stand 1122.6 mm x 707.3 mm x 34.5 mm
Without stand 26.9 kg (59.3 lbs) 35.8 kg (78.9 lbs)
Operating Temperature 0 °C to 40 °C (32 °F to 104 °F)
Operating Humidity Less than 80 %
Storage Temperature -20 °C to 60 °C (-4 °F to 140 °F)
Storage Humidity Less than 85 %
1122.6 mm x 769.3 mm x 275.0 mm
19.1 kg (42.1 lbs) 23.0 kg (50.7 lbs)
55LE7500
(55LE7500-UC)
1306.0 mm x 869.0 mm x 328.0 mm
(51.4 inch x 34.2 inch x 12.9 inch)
1306.0 mm x 797.4 mm x 31.2 mm
(51.4 inch x 31.3 inch x 1.2 inch)
39.1 kg (86.2 lbs)
33.5 kg (73.8 lbs)
47LE8500
(47LE8500-UA)
1292.6 mm x 875.4 mm x 311.9 mm
(44.1 inch x 30.2 inch x 10.8 inch)
(44.1 inch x 27.8 inch x 1.3 inch)
(50.8 inch x 34.4 inch x 12.2 inch)
1292.6 mm x 802.9 mm x 34.5 mm
(50.8 inch x 31.6 inch x 1.3 inch)
55LE8500
(55LE8500-UA)
Downloaded From TV-Manual.com Manuals
37
Page 40

APPENDIX
38
Downloaded From TV-Manual.com Manuals
Page 41

Downloaded From TV-Manual.com Manuals
39
 Loading...