

Page 1

ENGLISH
ESPAÑOL FRANÇAIS
OWNER’S MANUAL
VACUUM CLEANER
Please read this manual carefully before operating
your vacuum and retain it for future reference.
LcV900B
P/No.: MFL66982301
www.lg.com
Page 2

2
CONTENTS
LG VACUUM CLEANER WARRANTY
3
LG VACUUM CLEANER WARRANTY
IMPORTANT SAFETY INFORMATION
4-5
IMPORTANT SAFETY INFORMATION
PARTS AND FEATURES
6
PARTS AND FEATURES
ASSEMBLY
Unpacking the Vacuum Cleaner
7
Assembly Parts
7
The Vacuum Cleaner Assembly
8
Canister
8
Telescopic Wand
8
Hose
8
Power Nozzle
8
Accessory Storage
9
Cord Storage
9
CARE & CLEANING
14
Storing the Vacuum Cleaner
14
Dust Tank and Dust Separator Component
15
Emptying the Dust Tank
15
Cleaning the Dust Tank
16
Cleaning the Foam Pre Filter
17
Cleaning the HEPA Filter
18
Agitator Maintenance
18
Replacing the Agitator Belt
19
Removing Clogs
20
Cleaning the Exterior of the Vacuum Cleaner
TROUBLESHOOTING
Troubleshooting 21-22
OPERATION
10
Control Operation
10
Adjusting for Carpet Pile Height
11
Accessories
11
Accessory Use Chart
12
Installing Attachments
12
Tips and Tricks
12
Using the Bare Floor Nozzle
13
Stairways and Landings
13
Agitator Motor Overload Protection
13
Thermal Overload Protection
Page 3

3
ENGLISH
LG VACUUM CLEANER WARRANTY
LG Electronics Inc. will repair or replace your product, at LG’s option, if it proves to be defective in material or workmanship
under personal household use, during the warranty period set forth below, effective from the date of original consumer
purchase of the product. This limited warranty is good only to the original purchaser of the product and effective only when
used in U.S.A. and Canada.
WARRANTY PERIOD:
Five Year
From the date of the
original purchase
THIS WARRANTY IS IN LIEU OF ANY OTHER WARRANTIES, EXPRESS OR IMPLIED, INCLUDING
WITHOUT LIMITATION, ANY WARRANTY OF MERCHANTABILITY OR FITNESS FOR A PARTICULAR
PURPOSE. TO THE EXTENT ANY IMPLIED WARRANTY IS REQUIRED BY LAW, IT IS LIMITED IN
DURATION TO THE EXPRESS WARRANTY PERIOD ABOVE. LG WILL NOT BE LIABLE FOR ANY
CONSEQUENTIAL, INDIRECT, OR INCIDENTAL DAMAGES OF ANY KIND, INCLUDING LOST REVENUES
OR PROFITS, IN CONNECTION WITH THE PRODUCT. SOME STATES DO NOT ALLOW LIMITATION ON
HOW LONG AN IMPLIED WARRANTY LASTS OR THE EXCLUSION OF INCIDENTAL OR CONSEQUENTIAL
DAMAGES, SO THE ABOVE LIMITATIONS OR EXCLUSIONS MAY NOT APPLY TO YOU.
This warranty covers only defects in material and workmanship.
LGE will NOT pay for:
1. Expendable items that can wear out, including, but not limited to, filters and belts.
2. A service technician to instruct the user in correct product assembly, operation or maintenance.
3. A service technician to clean or maintain this product.
4. Damage to or failure of this product if it is not assembled, operated or maintained according to all instructions
supplied with this product.
5. Damage to or failure of this product resulting from accident, abuse, misuse or use for other than its intended
purpose.
6. Damage to or failure of this product caused by the use of detergents, cleaners, chemicals or utensils other than
those recommended in all instructions supplied with this product.
7. Damage to or failure of parts or systems resulting from unauthorized modifications made to this product.
This warranty is extended to the original purchaser for products purchased for home use within the U.S.A. In Alaska, the
warranty excludes the cost of shipping or service calls to your home.
Some states do not allow the exclusion or limitation of incidental or consequential damages, so this exclusion or limitation
may not apply to you. This warranty gives you specific legal rights, and you may also have other rights which vary from states
to states. To know what your legal rights are, consult your local or state consumer affairs or your state’s Attorney General.
HOW SERVICE IS HANDLED:
Any part of the vacuum cleaner which fails due to a defect in materials or workmanship.
During this full five-year warranty, LG will also provide, free of charge, all labor and shop
service to replace the defective part.
(Except-Suction motor 3 years warranty)
CUSTOMER ASSISTANCE INFORMATION:
To Prove Warranty Coverage
To Obtain Nearest Authorized
Service Center or Sales Dealer, or
to Obtain Product, Customer, or
Service Assistance
Retain your Sales Receipt to prove date of purchase.
A copy of your Sales Receipt must be submitted at the time warranty service is
provided.
Call 1-800-243-0000 (Phone answered 24 hours - 365 days a year) and choose
the appropriate prompt from the menu; or visit our website at: http://us.
lgservice.com. (In Canada- Call 1-888-542-2623, website http://ca.lgservice.com)
Page 4

4
IMPORTANT SAFETY INFORMATION
READ ALL INSTRUCTIONS BEFORE USE
IMPORTANT SAFETY INSTRUCTIONS
Read and follow all instructions before using your vacuum cleaner to prevent the risk of fire, electric shock, personal injury, or
damage when using the vacuum cleaner. This guide does not cover all possible conditions
service agent or manufacturer about problems that you do not understand.
This is the safety alert symbol. This symbol alerts you to potential hazards that can kill or
hurt you and others. All safety messages will follow the safety alert symbol and either the
word “WARNING” or “CAUTION”.
that may occur. Always contact your
WARNING
CAUTION
Indicates a hazardous situation which, if not avoided, could result in death
or serious injury.
Indicates a hazardous situation which, if not avoided, could result in minor
or moderate injury.
WARNING
• Disconnect electrical supply before servicing or cleaning
the unit or when cleaner is not in use.
Failure to do so could result in electrical shock or personal injury.
•
Do not use vacuum cleaner to pick up anything that is burning
or smoking such as cigarettes, matches, or hot ashes.
Failure to follow this instruction could result in death, fire or electrical shock.
• Do not vacuum flammable or explosive substances such as
gasoline, benzene, thinners, propane (liquids or gases).
The fumes from these substances can create a fire hazard or
explosion. Doing so could result in death or personal injury.
• Do not handle plug or vacuum cleaner with wet hands.
Failure to follow this instruction could result in death or
electrical shock.
• Do not unplug by pulling the cord.
Failure to follow this instruction could result in product damage
or electrical shock. To unplug, grasp the plug, not the cord.
• Keep hair, loose clothing, fingers, and all parts of the
body away from openings and moving parts.
Failure to do so could result in electrical shock or personal injury.
• Do not pull or carry by cord, use cord as a handle, close
a door on cord, or pull cord around sharp edges or
corners. Do not run vacuum cleaner over cord. Keep
cord away from heated surfaces.
Failure to follow this instruction could result in electrical
shock or personal injury, fire, or product damage.
• Do not use as a toy. Close attention is necessary when
used by or near children.
Personal injury or product damage could result.
•
Do not use with damaged cord or plug. If appliance is not
working as it should, has been dropped, damaged, left
outdoors, or dropped into water, return it to a service center.
Personal injury or product damage could result. If the power
cord or plug is damaged or faulty, contact LG Electronics
Service Agent to avoid hazard.
• Do not use vacuum cleaner if it has been under water.
Personal injury or product damage could result. If the
vacuum has water damage, contact LG Electronics Service
Agent to avoid hazard.
• Always turn off this appliance before connecting or
disconnecting either hose or motorized nozzle.
• Do not leave appliance when plugged in. Unplug from
outlet when not in use and before servicing.
• Hold plug when rewinding onto cord reel. Do not allow
plug to whip when rewinding.
• Do not continue to vacuum if any parts appear missing
or damaged.
Personal injury or product damage could result. If parts are
missing or damaged, contact LG Electronics Service Agent to
avoid hazard.
• Do not use an extension cord with this vacuum cleaner.
Fire hazard or product damage could result.
• Use proper voltage.
Using improper voltage may result in damage to the motor
and possible injury to the user. Proper voltage is listed on the
bottom of vacuum cleaner.
• Turn off all controls before unplugging.
Failure to do so could result in electrical shock or personal injury.
• Do not modify the plug in any way.
Failure to follow this instruction could result in electrical shock,
product damage, personal injury or death. If plug does not fit,
contact a qualified electrician to install the proper outlet.
• Repairs to electrical appliances may only be performed
by qualified service technicians.
Improper repairs may lead to serious hazards for the user.
• Do not use out doors or on wet surfaces.
Failure to follow this instruction could result in electrical shock or
personal injury.
• Do not put anything between vacuum cleaner body and
agitator head space.
Personal injury or product damage could result.
• This product contains chemicals known to the State of
California to cause cancer and birth defects or other
reproductive harm. Wash hands after handling.
• Use extra care when cleaning on stairs.
• The hose contains electrical wires. Do not use the hose
if it is damaged, cut or punctured.
Failure to follow this instruction could result in death, or electrical shock.
• Do not put fingers near the gear.
Failure to follow this instruction could result in personal injury.
gear
Page 5

5
ENGLISH
CAUTION
IMPORTANT SAFETY INFORMATION
• Do not insert objects into vacuum openings.
Failure to follow this instruction could result in product
damage.
• Do not use the vacuum if any of the openings are
blocked. Keep vacuum openings free of dust, lint, hair
and anything that may reduce air flow.
Failure to follow this instruction could result in product
damage.
• Do not use the vacuum cleaner without the tank and/or
filters properly installed.
Failure to follow this instruction could result in product
damage.
• Always clean the dust tank and filters after vacuuming
carpet cleaners or fresheners, powders and fine dust.
These products can clog the filters, reduce airflow and/'or
cause damage to the vacuum. Failure to clean the dust tank
and filters could cause permanent damage to the cleaner.
• Do not use the vacuum cleaner to pick up sharp or hard
objects such as small toys, pins, paper clips, etc.
They may damage the cleaner or dust tank.
• Store the vacuum cleaner indoors.
Put the vacuum cleaner away after use to prevent tripping
over it.
• The vacuum cleaner should not be operated by young
children.
Failure to follow this instruction could result in personal injury
or product damage.
• Only use parts produced or recommended by qualified
service technicians.
Failure to do so could result in product damage.
• Follow all instructions in the owner's manual.
Only use LG recommended or approved attachments
and accessories.
Failure to do so could result in personal injury or product
damage.
• When cleaning stairs, always place the vacuum cleaner
at the bottom on the stairs.
Failure to do so could result in personal injury or product
damage.
• Make sure the filters (exhaust filter and motor safety
filter) are completely dry before replacing in the
machine.
Failure to do so could result in product damage.
• Do not dry the filters in an oven or microwave.
Failure to follow this instruction could result in fire hazard.
• Do not dry the filters in a clothes dryer.
Failure to follow this instruction could result in fire hazard.
• Do not dry near an open flame.
Failure to follow this instruction could result in fire hazard.
• Always turn the vacuum cleaner off before connecting or
disconnecting the hose.
Personal injury or product damage could result.
• The vacuum cleaner is only intended for household use.
• You are responsible for proper assembly and use of your
vacuum cleaner.
Thermal protector :
This vacuum cleaner has a special thermostat that protects the vacuum cleaner in case of motor overheating. If the vacuum
cleaner suddenly shuts off, turn off and unplug the vacuum cleaner.
Check the vacuum cleaner for possible source of overheating such as full dust tank, blocked hose or clogged filter. If these
conditions are found, fix them and wait at least 30 minutes before attempting to use the vacuum cleaner. After 30 minutes, plug
the vacuum cleaner back in and turn it on. If the vacuum cleaner still does not run, contact a qualified service technician.
SAVE THESE INSTRUCTIONS
Page 6
6
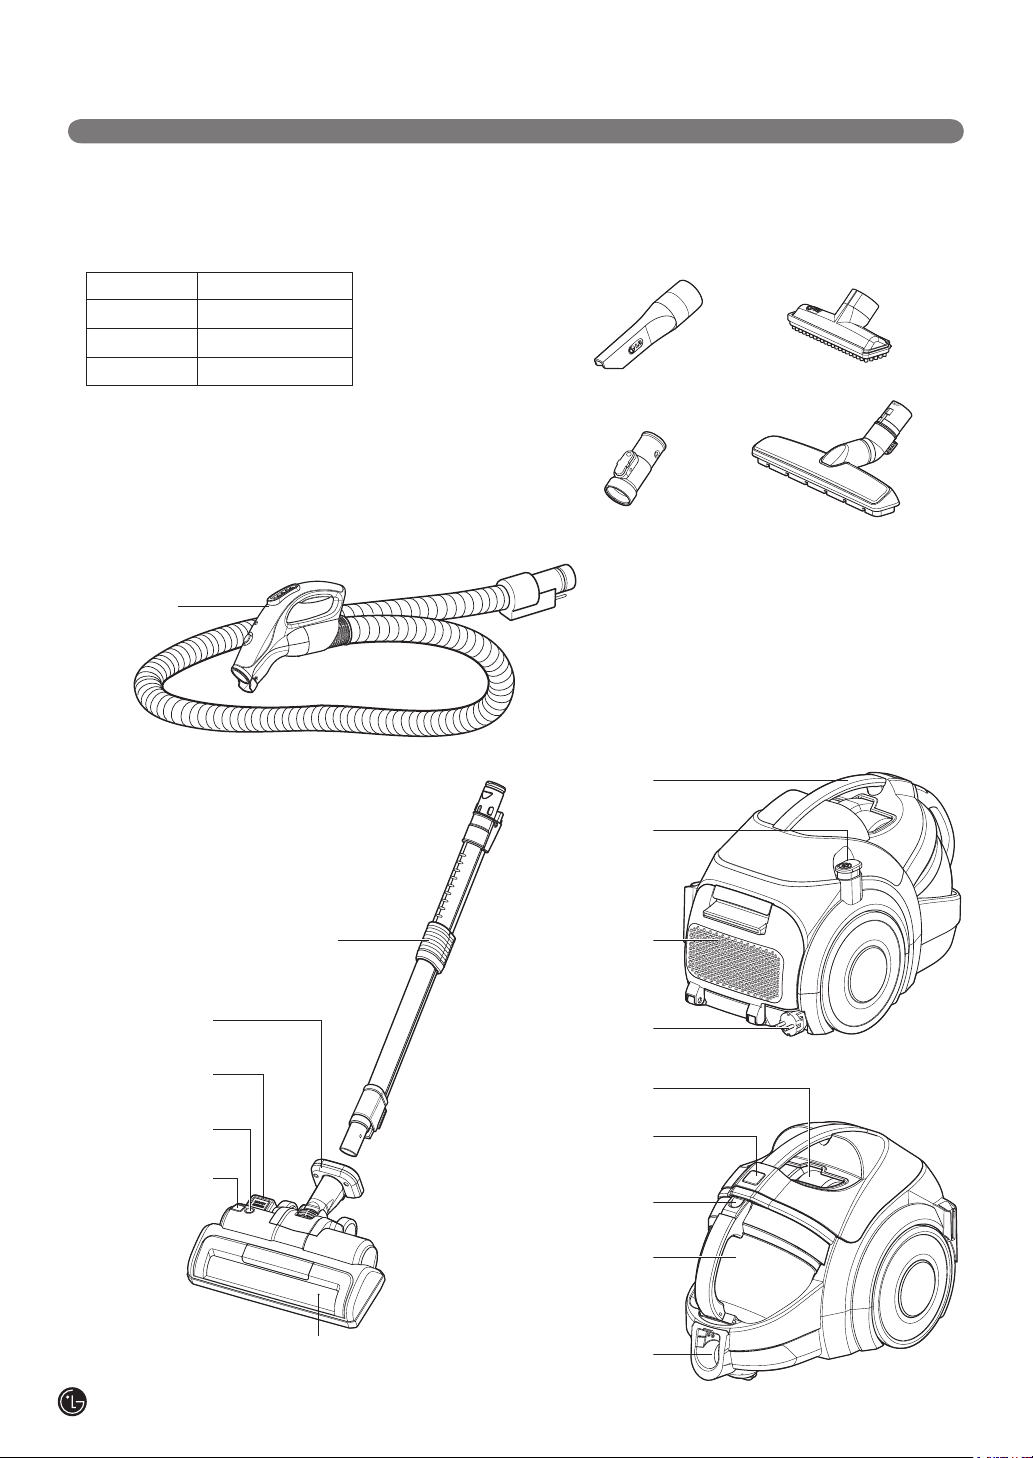
PARTS AND FEATURES
It is important to know your vacuum cleaner’s parts and features to assure its proper and safe use.
Review these before using your vacuum cleaner.
Common Replacement Parts
HEPA Filter ADQ73133301
Filter Frame MEA62331601
Foam Filter MDJ54988501
Agitator Belt MAS62023801
To order these parts call
1-800-243-0000 (U.S.A.)
1-888-542-2623 (Canada)
Hose Handle
Accessory Tools
Crevice Tool
Adaptor
Carry Handle
Power Cord
Reel Button
Dusting Brush
Bare Floor Nozzle
Release Pedal
Height Adjustment
Pedal (on rear)
Reset Button
Carpet Height
Indicator
Telescopic Wand
Power Nozzle
HEPA Filter
Power Cord
Dust Separator
Dust Separator
Release
Dust Tank Release
Dust Tank
Canister Hose Port
Page 7
7
ENGLISH
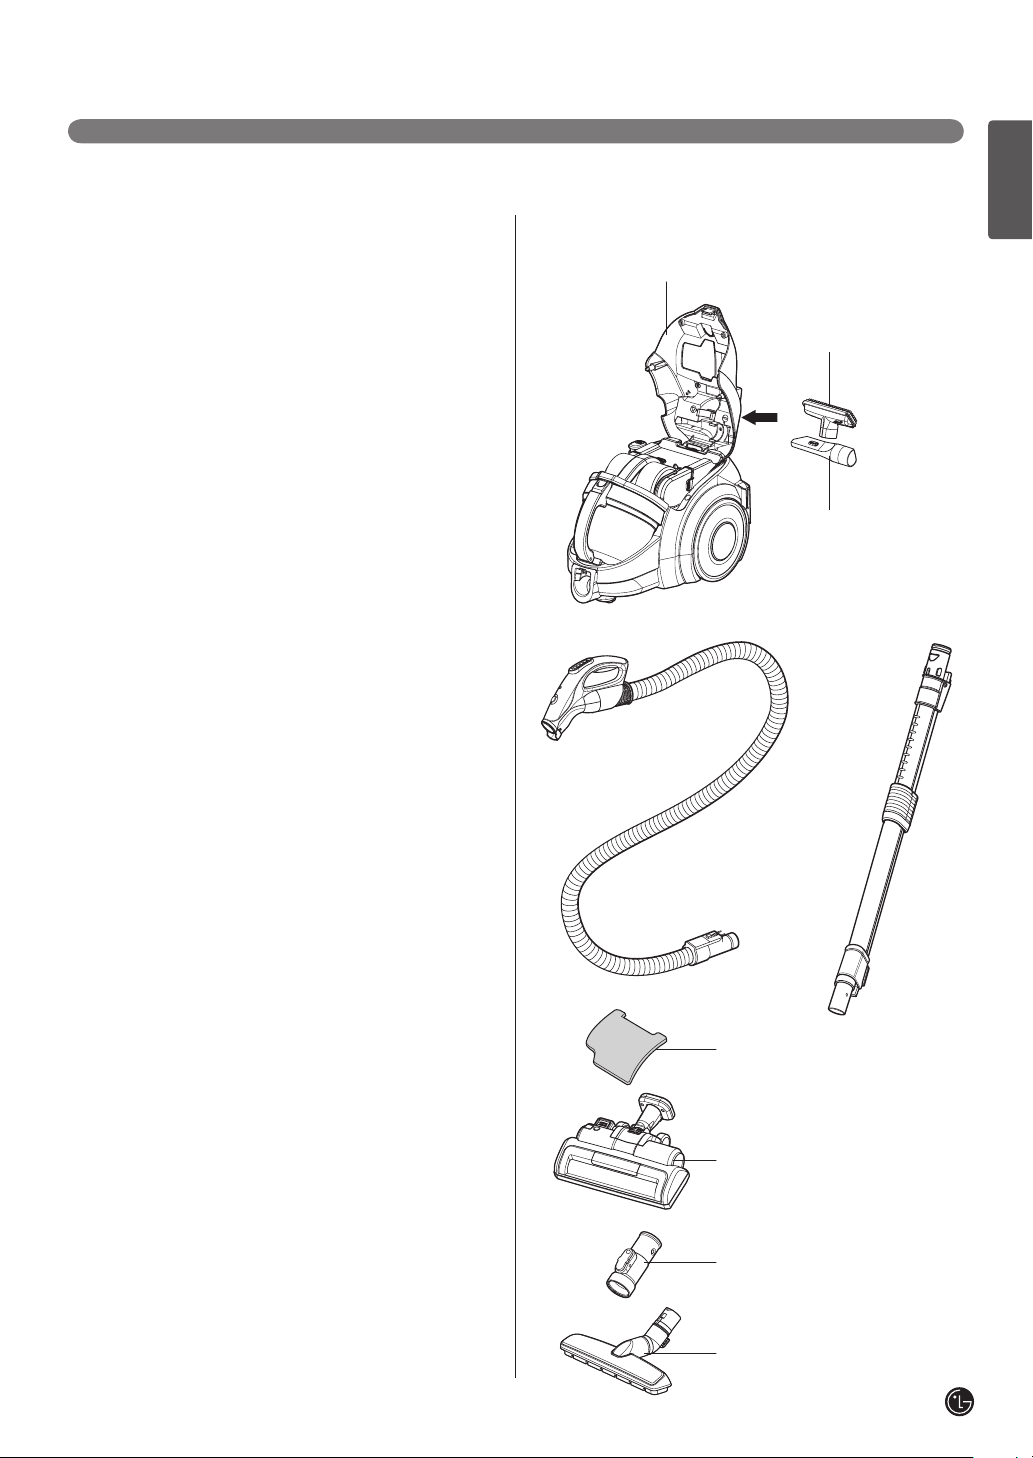
ASSEMBLY
To reduce the risk of shipping damage, your vacuum cleaner is shipped partially unassembled.
Unpacking the Vacuum Cleaner
Carefully unpack the vacuum cleaner and make
sure that you have all parts before discarding of any
packaging.
Remove any tape and protective film before
assembly.
Items that are packed in the box:
1. Canister
2. Dusting Brush (already installed)
3. Crevice Tool (already installed)
4. Hose
5. Telescopic Wand
6. Additional Foam Filter
7. Power Nozzle
8. Adaptor
9. Bare Floor Nozzle
Assembly Parts
1. Canister
2. Dusting Brush
3. Crevice Tool
4. Hose 5. Telescopic Wand
6. Additional Foam Filter
7. Power Nozzle
8. Adaptor
9. Bare Floor Nozzle
Page 8
8
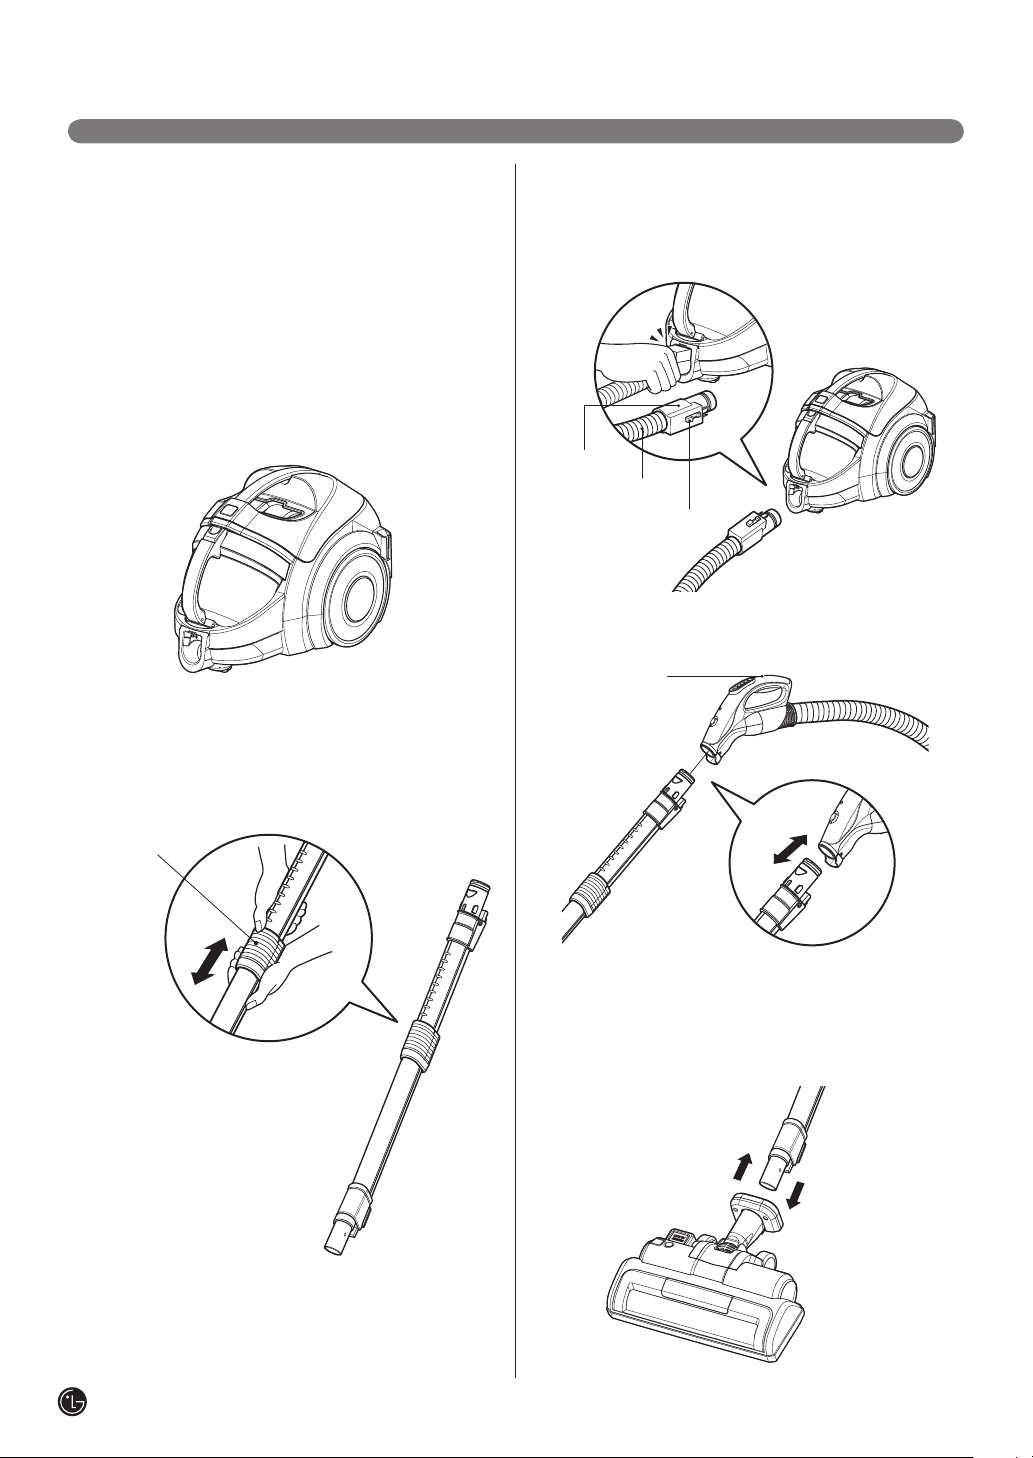
ASSEMBLY
The Vacuum Cleaner Assembly
Canister
1. Inspect Canister
2. Check to see that Dust Tank is properly installed.
See the "Emptying the Dust Tank" section for
instructions.
3. Check to see that the dust separator and exhaust
filters are properly installed.
See the "Cleaning the Foam Pre Filter" section
for instructions.
Telescopic Wand
1. Grasp and hold the latch to adjust reach.
2. Pull out the wand to the desired length.
Hose
1. Insert the hose into the canister until it locks into
place. To remove the hose from the canister,
press the release button and pull the hose out.
Fitting pipe
Flexible Hose
Release button
2. Line up the electrical connectors and insert the
telescopic wand firmly into hose handle.
Hose Handle
latch
Power Nozzle
Line up the electrical connectors and push the Power
Nozzle into the telescopic wand until it clicks into place.
Page 9
9
ENGLISH
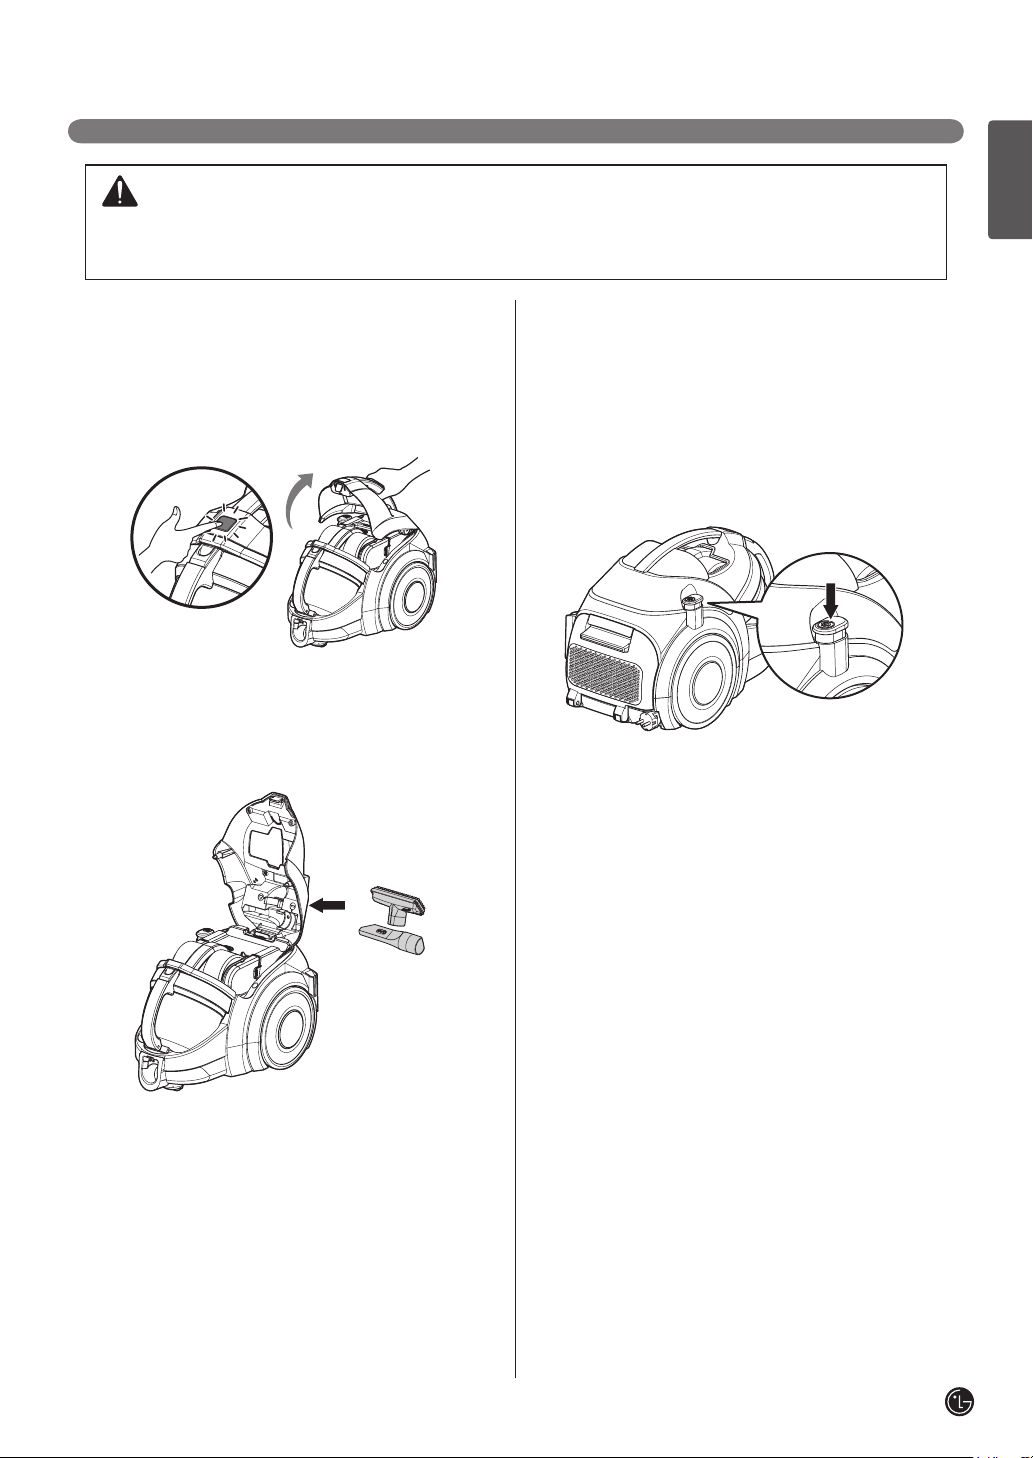
ASSEMBLY
WARNING
Personal Injury and Product Damage Hazard!
DO NOT use outlets above counters. Damage to items in the surrounding area could occur.
Accessory Storage
Your vacuum cleaner features convenient on-board
storage of accessories.
• Push the Dust Separator Release Button and
open the main cover.
• Clip the dusting brush onto the bottom of the cover
with the brush side facing the cover.
With the angled edge facing the cover, clip the
crevice tool onto the cover.
Cord Storage
To release the cord:
Grasp the plug and pull cord to desired cord length.
To store the cord:
Hold plug and press on the cord rewind button on
the rear side of handle.
To prevent cord from whipping, hold plug until cord
is rewound.
NOTE: To reduce the risk of electric shock, this
appliance has a polarized plug (one blade is wider
than the other).
This plug will fit in a polarized outlet only one way. If
the plug does not fit fully in the outlet, reverse the
plug. If it still does not fit, contact a qualified
electrician to install the proper outlet. DO NOT
modify the plug in any way.
Page 10

10
OPERATION
WARNING
Personal Injury Hazard
Do not set the vacuum on the stairs, always keep the unit on the floor.
Control Operation
1
2
3
4
1. MAX : For maximum suction of the vacuum
cleaner.
2. MIN : For minimum suction of the vacuum
cleaner.
3. FLOOR/CARPET : To turn the agitator on or off.
4. OFF: To turn the canister off.
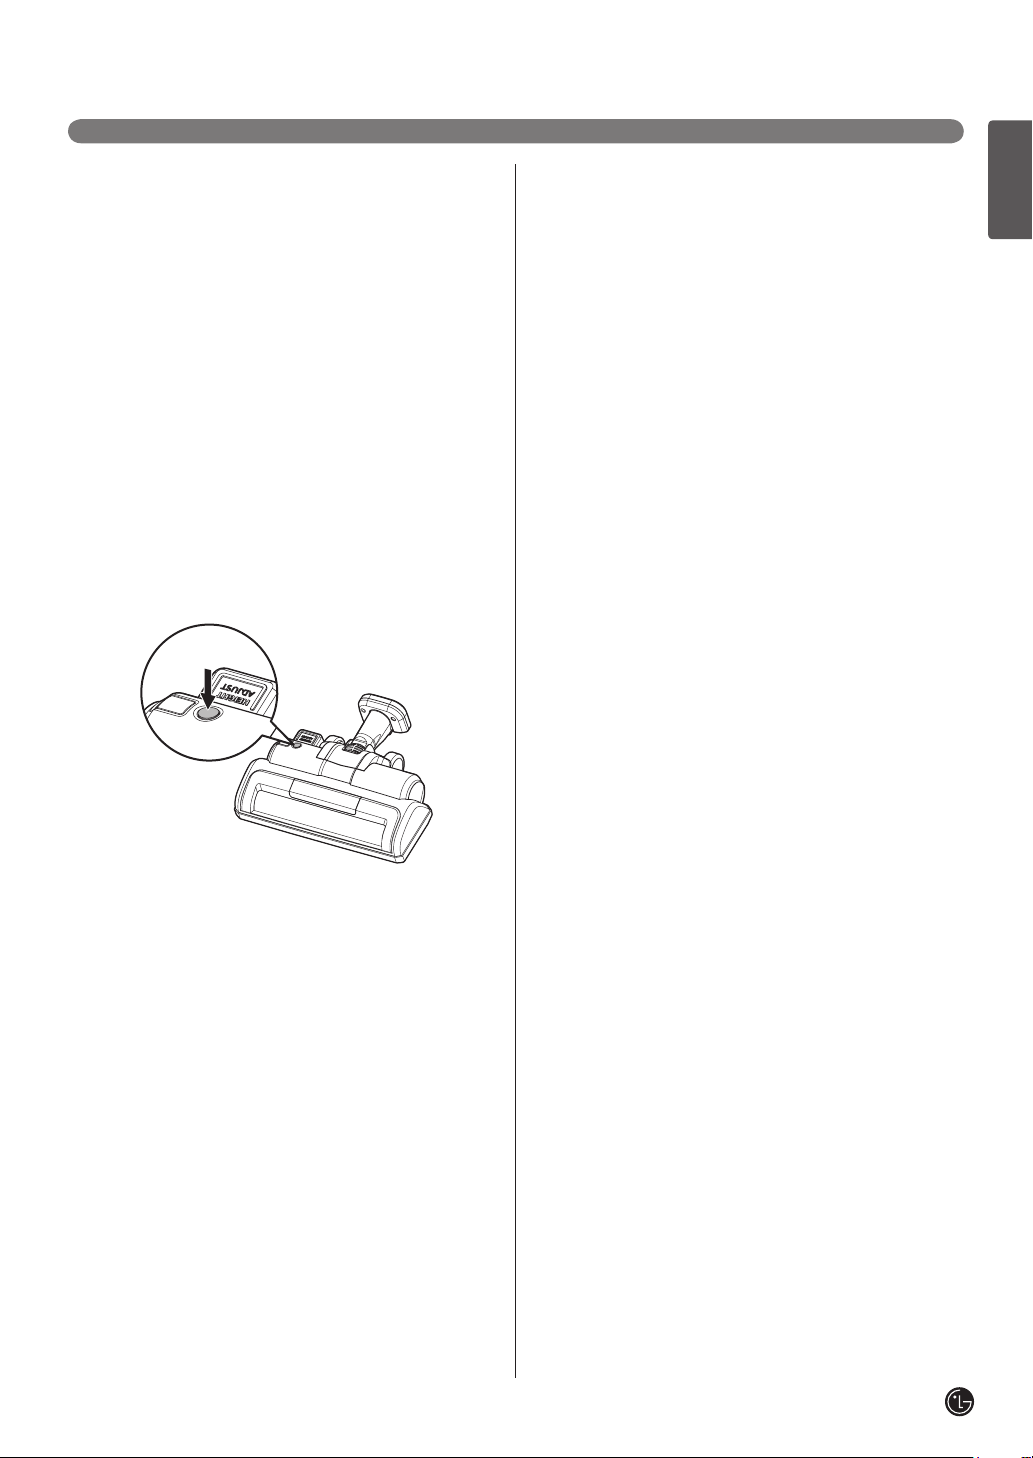
Adjusting for Carpet Pile Height
To adjust for pile height:
It may be necessary to raise and lower the power
head for various carpet pile heights.
Press the right foot pedal to adjust height of the
agitator. Each press will raise the agitator one notch.
Suggested pile height settings:
You may need to raise the head of the vacuum
cleaner to make vacuuming area rugs and longer
pile rugs easier.
For maximum cleaning performance, the following
carpet height settings are recommended:
• L – for bare floors
• ML – for standard carpet
• Higher settings – for very deep pile carpet where
easier pushing effort is desired, while maintaining
good cleaning performance.
There are 4 settings:
H = High
M = Medium
ML = Medium Low
L = Low
NOTE: If the vacuum is difficult to push, change the
height adjustment to the next highest setting.
Attention:
certain types of carpet or flooring. Always check the
carpet or floor covering manufacturer’s recommended
cleaning instructions before vacuuming.
Special care is required when vacuuming
Page 11
11
ENGLISH
OPERATION
Accessories
Dusting Brush
Functions as a dusting brush and an upholstery
nozzle which is useful when cleaning furniture.
Attach as shown.
Crevice Tool
The crevice tool can be used for tight corners
between cushions and other hard to reach places.
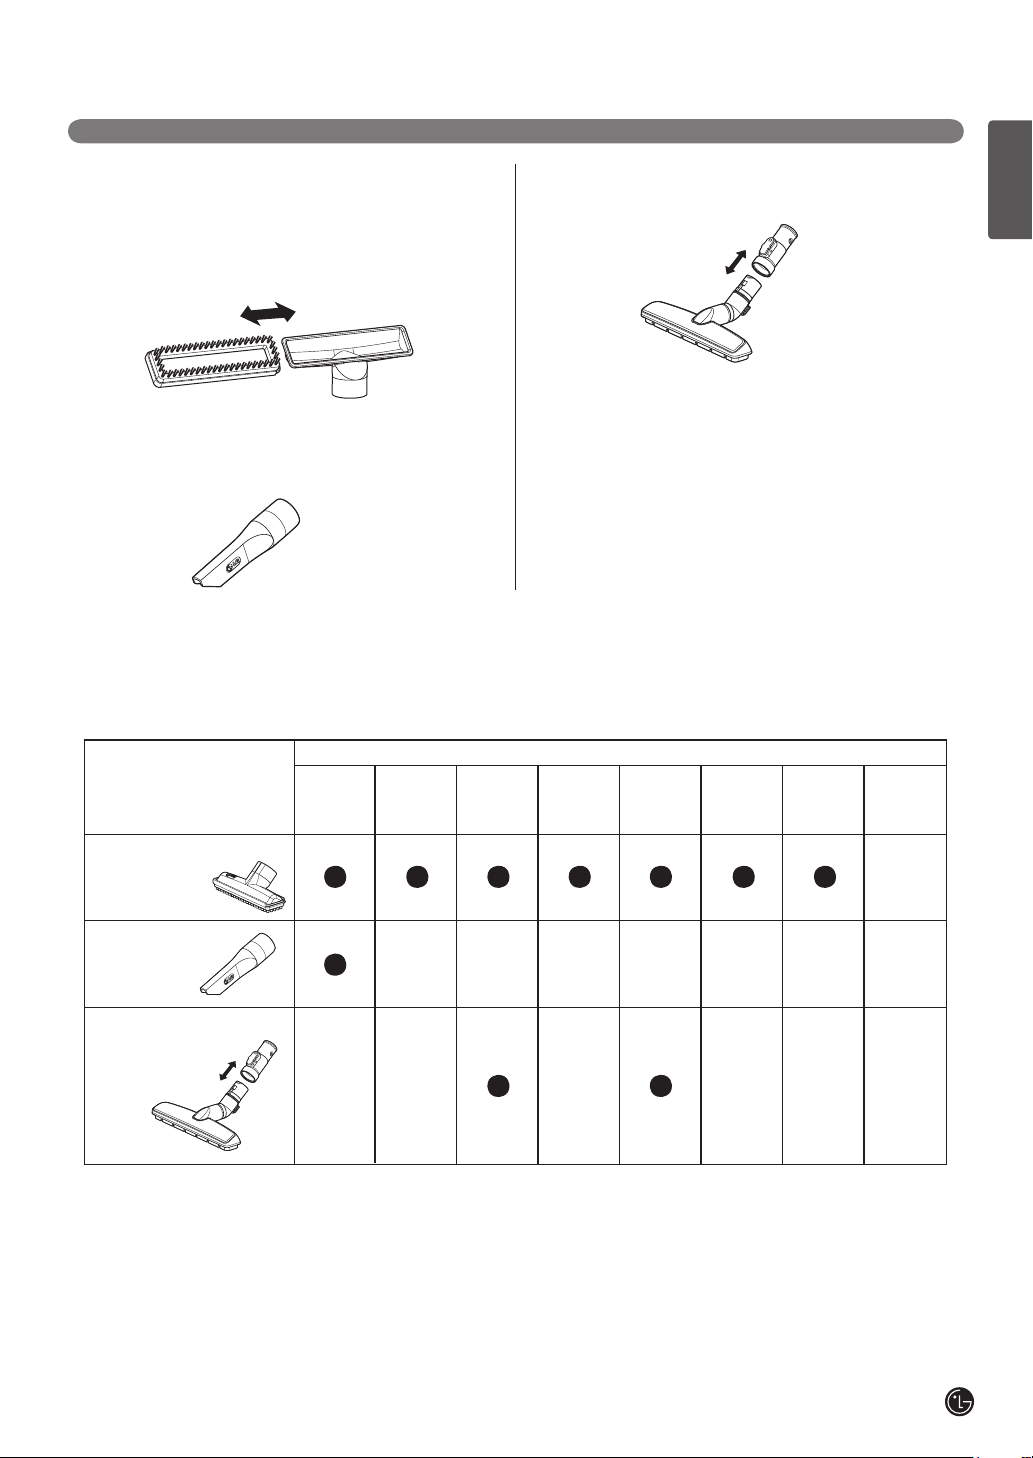
Accessory Use Chart
Accessory
Between
Cushions
Upholstered
Surfaces*
Furniture
and Hard
Surfaces*
Bare Floor Nozzle
This tool can be used on hardwood and tiled floors.
CLEANING AREA
Drapes*
(lower
power level)
Stairs Carpeted
Floors/
Rugs
Walls Mattress/
Bedding
Dusting Brush
Crevice Tool
Bare Floor Nozzle
* Always make sure attachments are clean before using on fabrics.
Page 12
12
OPERATION
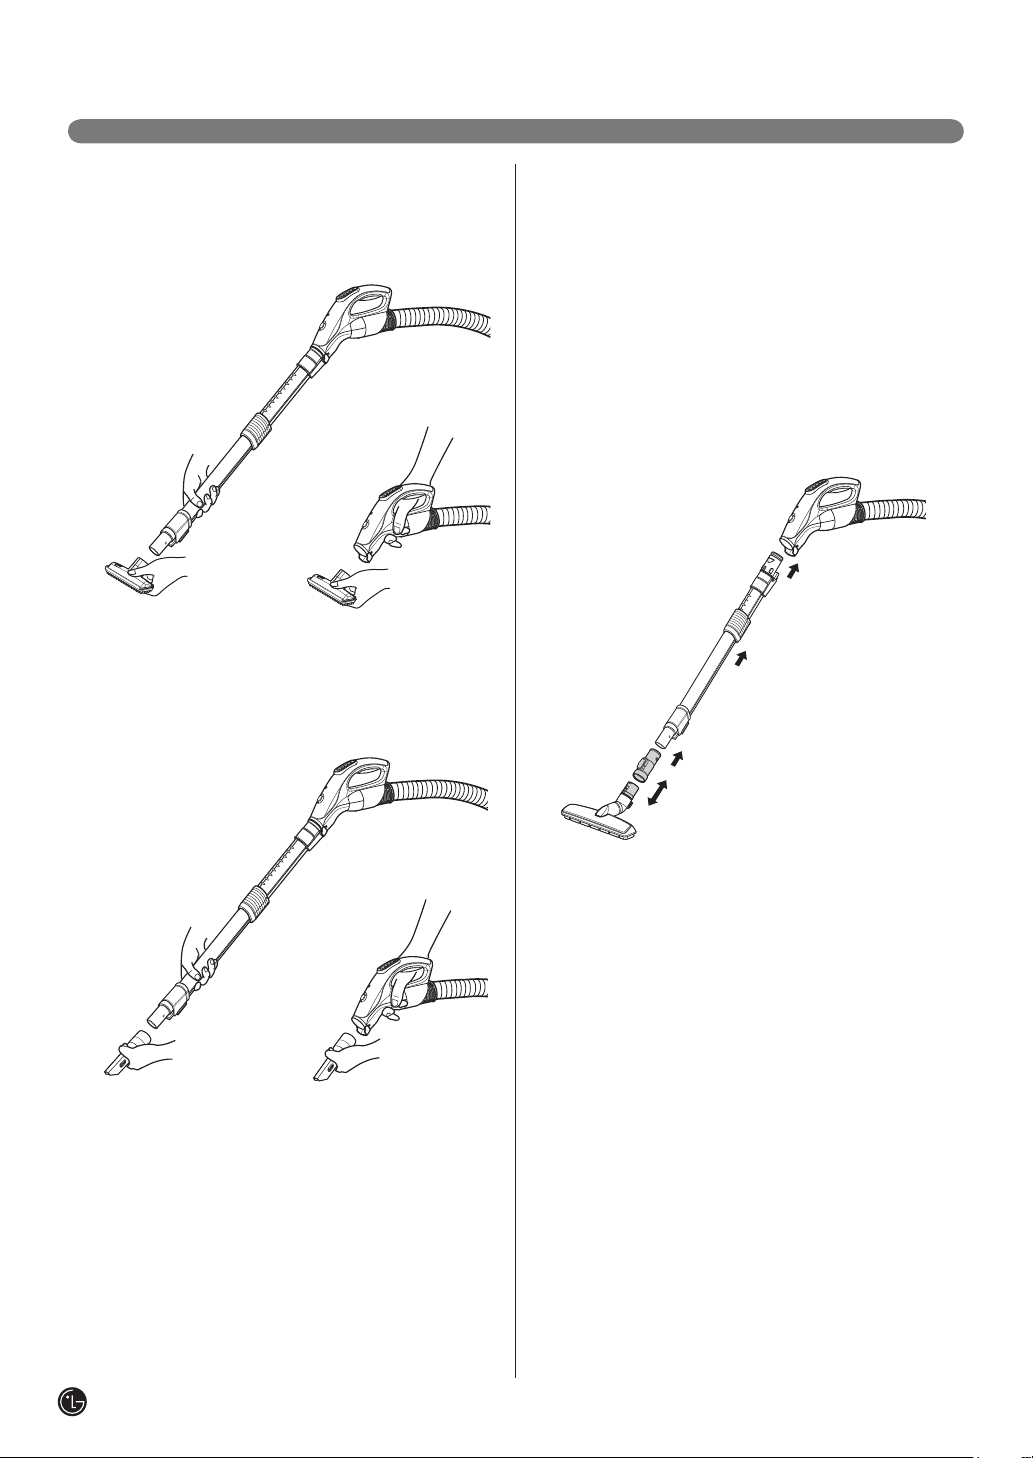
Installing Attachments
Using the Dusting Brush
Slide the Dusting Brush over the end of the wand or
fit it into the hose handle.
Using the Crevice Tool
Slide the crevice tool over the end of the wand or fit
it into the handle.
Tips and Tricks
Carpet Edges and Corners:
For tight corners, carpet edges and along base
boards, use the dusting brush.
Use the crevice tool for especially hard to reach
areas.
Using the Bare Floor Nozzle
The bare floor nozzle is attached to the wand with
the adaptor and should be used on hardwood and
tiled floors.
Page 13
13
ENGLISH
OPERATION
Stairways and Landings
Use the Dusting Brush or Upholstery Nozzle on
stairs and landings. Make sure the vacuum cleaner
is placed so that it cannot tip or fall. See page 12 for
instructions on selecting and using attachments.
Agitator Motor Overload
Protection
The agitator has a built-in protection against motor
damage should the agitator jam. If the agitator
slows down or stops, the agitator overload protector
shuts off the agitator motor. The suction motor will
remain on at this time.
To correct problem: Turn off and unplug vacuum
cleaner, remove obstruction and press the reset
button.
Thermal Overload Protection
This vacuum cleaner has a thermal overload
protector which automatically activates to protect
the vacuum cleaner from overheating. If a clog
disturbs the normal flow of air to the motor, the
thermal protector turns the motor off automatically
to allow the motor to cool in order to prevent
possible damage to the vacuum cleaner.
To correct the problem: Turn the vacuum cleaner
off and unplug the power cord. Check for and
remove clogs, if necessary. Also check and clean
any dirty filters.
Wait approximately 30 minutes and plug the
vacuum cleaner in and turn back on to see if the
motor protector has reset. The thermal protector
system will not reset until the vacuum cleaner has
completely cooled down.
Page 14

14
CARE & CLEANING
Always follow all safety precautions when cleaning and servicing the vacuum cleaner.
Storing the Vacuum Cleaner
When not in use, store the vacuum cleaner upright
or on its wheels. Insert the nozzle clip into its slot on
canister bottom and on side of the body.
Dust tank and Dust Separator
Component
The dust tank and dust separator consist of several
key components.
Always make sure that all parts are properly
reinstalled after emptying the dust tank.
Never operate the canister without all filters in
place!
Never operate the canister with wet filters or
components!
Key components:
1. Dust tank lid : Open to empty the dust tank.
2. Dust tank : Where dirt is collected.
3. Dust separator lid : Open to remove debris from
dust separator.
4~5. Foam pre filter : Captures medium to fine
particles. It consists of washable filter frame
and foam filter.
1. Dust Tank Lid
5. Filter Frame
2. Dust Tank
3. Dust Separator Lid
4. Foam Filter
Page 15

15
ENGLISH
CARE & CLEANING
Emptying the Dust Tank
WARNING
Electrical shock and personal injury hazard.
Always unplug the power cord from the
electrical outlet before servicing or
performing maintenance on the vacuum
cleaner. Failure to do so could result in
electrical shock or personal injury.
For maximum performance, always empty the dust
tank when the indicator on the hose handle is lit, or
when the dust tank level reaches the MAX line.
Indicator
MAX line
Cleaning the Dust Tank
For optimal performance, clean the dust tank
regularly.
To Clean the Dust Tank:
Remove the dust tank from the vacuum cleaner.
1.
2. Wash the dust tank and cover of dust tank.
3. Dry completely away from direct sunlight.
TO REMOVE DUST TANK, Grasp the handle of
dust tank and then press the dust tank release. Pull
out the dust tank.
Pull out
Tank handle
TO EMPTY DUST TANK, lift the dust tank cover off
and empty the tank as shown.
Tank separation lever
NEVER operate the canister with wet
components!
Page 16
16
CARE & CLEANING
Cleaning the Foam Pre Filter
CAUTION
A wet filter can cause permanent damage to
the vacuum cleaner. Be sure filters are
completely dry before reinstalling.
For optimal performance, check the filters every
2 months and clean when necessary.
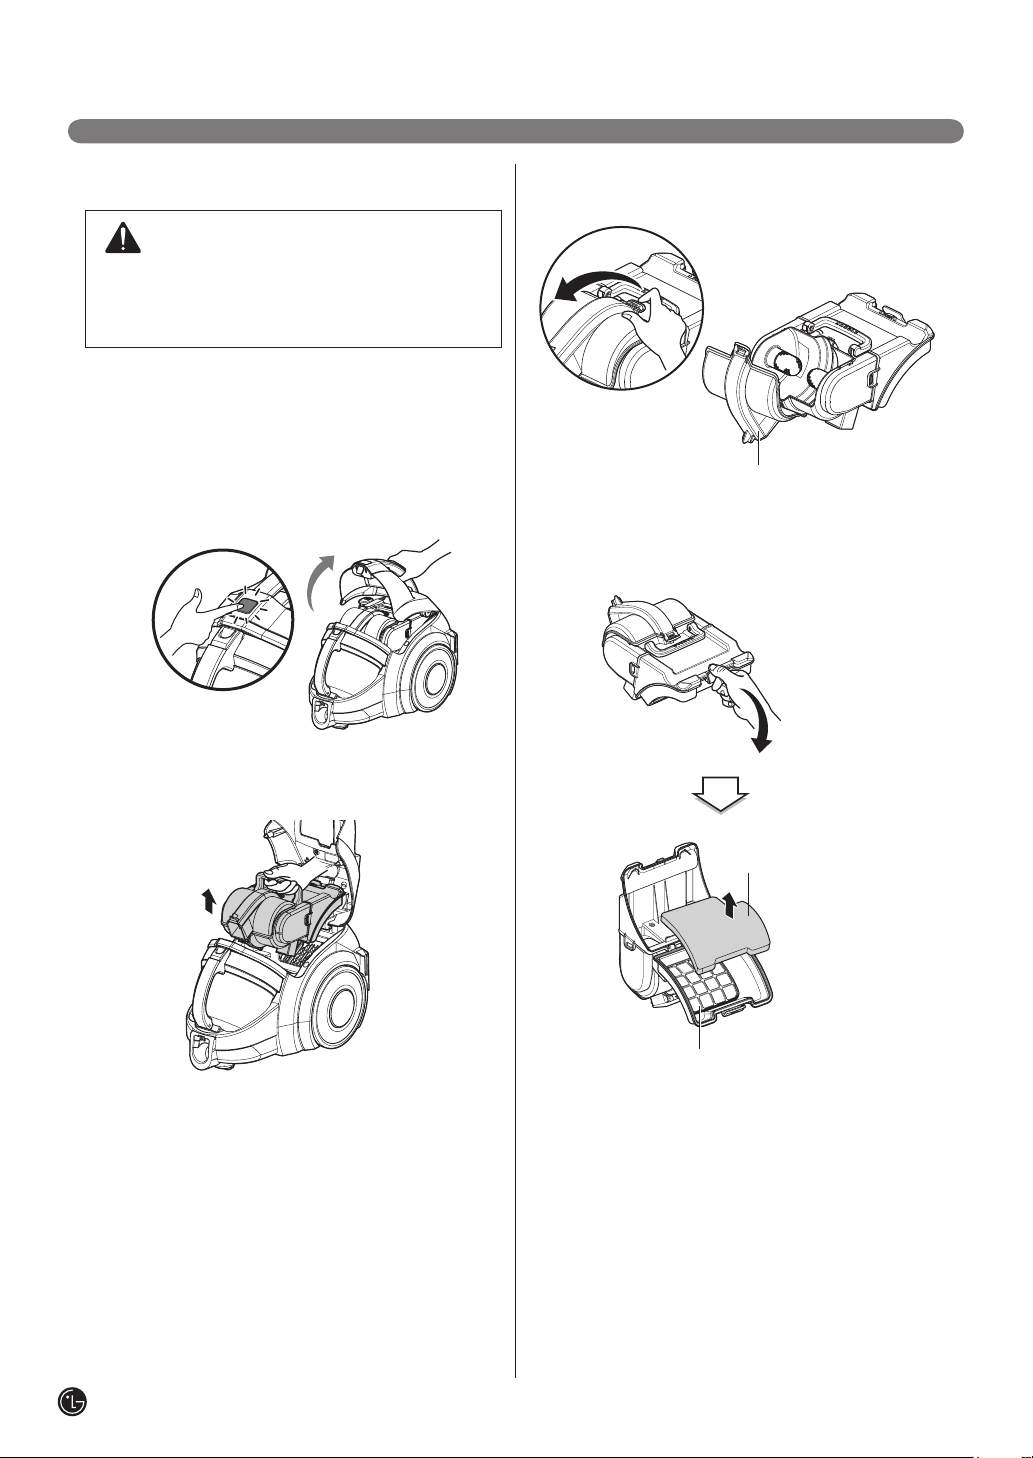
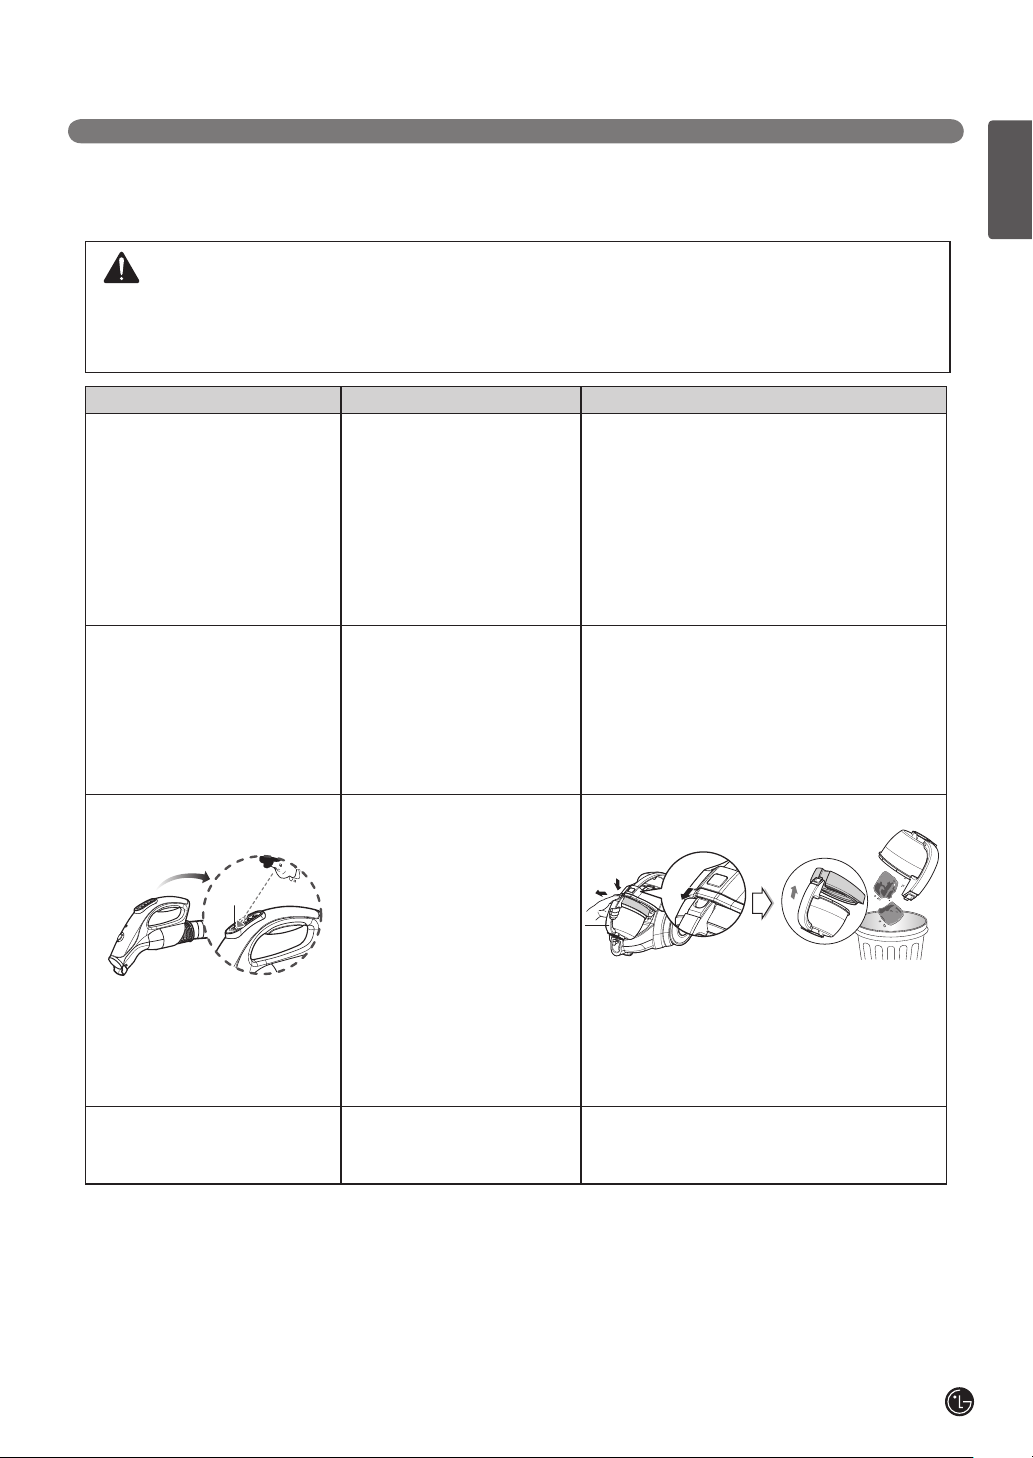
To Clean the foam pre filter:
1. Grasp the handle of canister and then push the
dust separator release button. Open the cover of
canister.
3. Open the dust separator lid by pulling the lid
cover lever and remove dirt.
Dust Separator Lid
4. Open the pre filter cover by pulling the pre filter
cover lever. Take out the foam filter and remove
the filter frame from the dust separator.
2. Grasp the handle of the dust separator and take
it out.
Foam Filter
Filter frame
Page 17
17
ENGLISH
CARE & CLEANING
5. Shake out any excess dust or debris and rinse
the foam filter & filter frame with clean water.
6. Dry completely away from sunlight.
NEVER operate the vacuum cleaner with wet
filters or components!
If you notice a loss of suction and cleaning the foam
filter does not help, you need to replace the foam
filter. You can purchase additional foam filters from
LG by calling
1-800-243-0000(U.S.A), 1-888-542-2623
(Canada) and asking for parts on page 6.
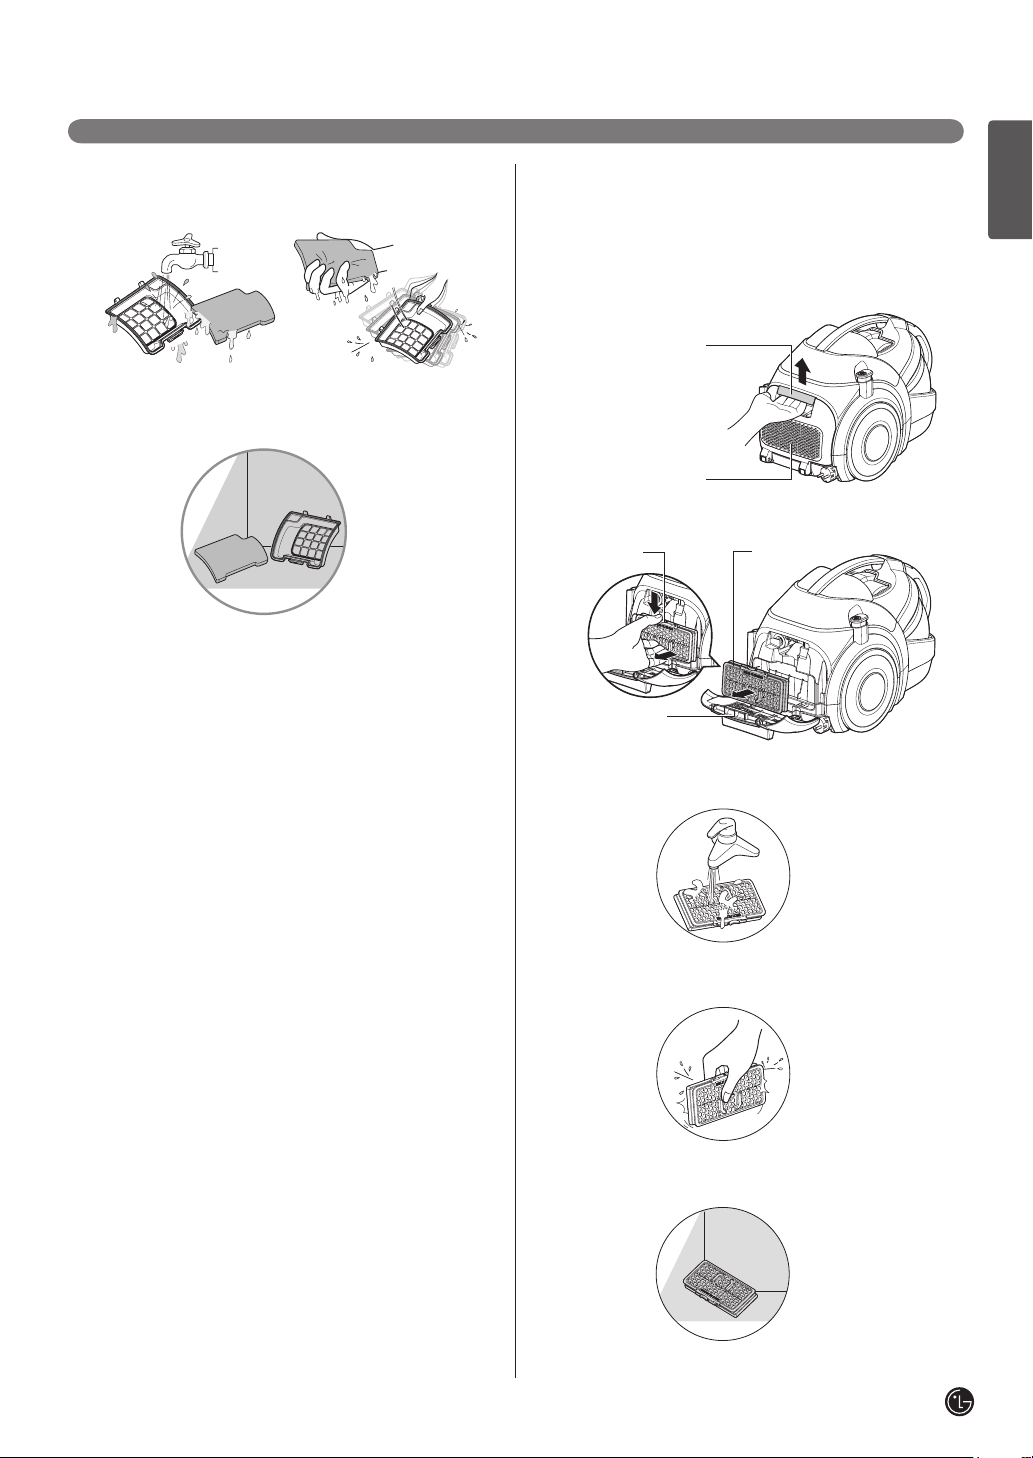
Cleaning the HEPA Filter
For optimal performance, check the filter every
6 months and clean when necessary.
To Clean the HEPA Filter:
1. Remove the HEPA filter cover.
Lever
HEPA filter cover
2. Separate the HEPA filter by pushing the button.
Button
HEPA filter
cover
3. Wash the filter thoroughly in flowing water.
HEPA filter
4. Remove moisture.
5. Dry completely away from sunlight.
Page 18
18
CARE & CLEANING
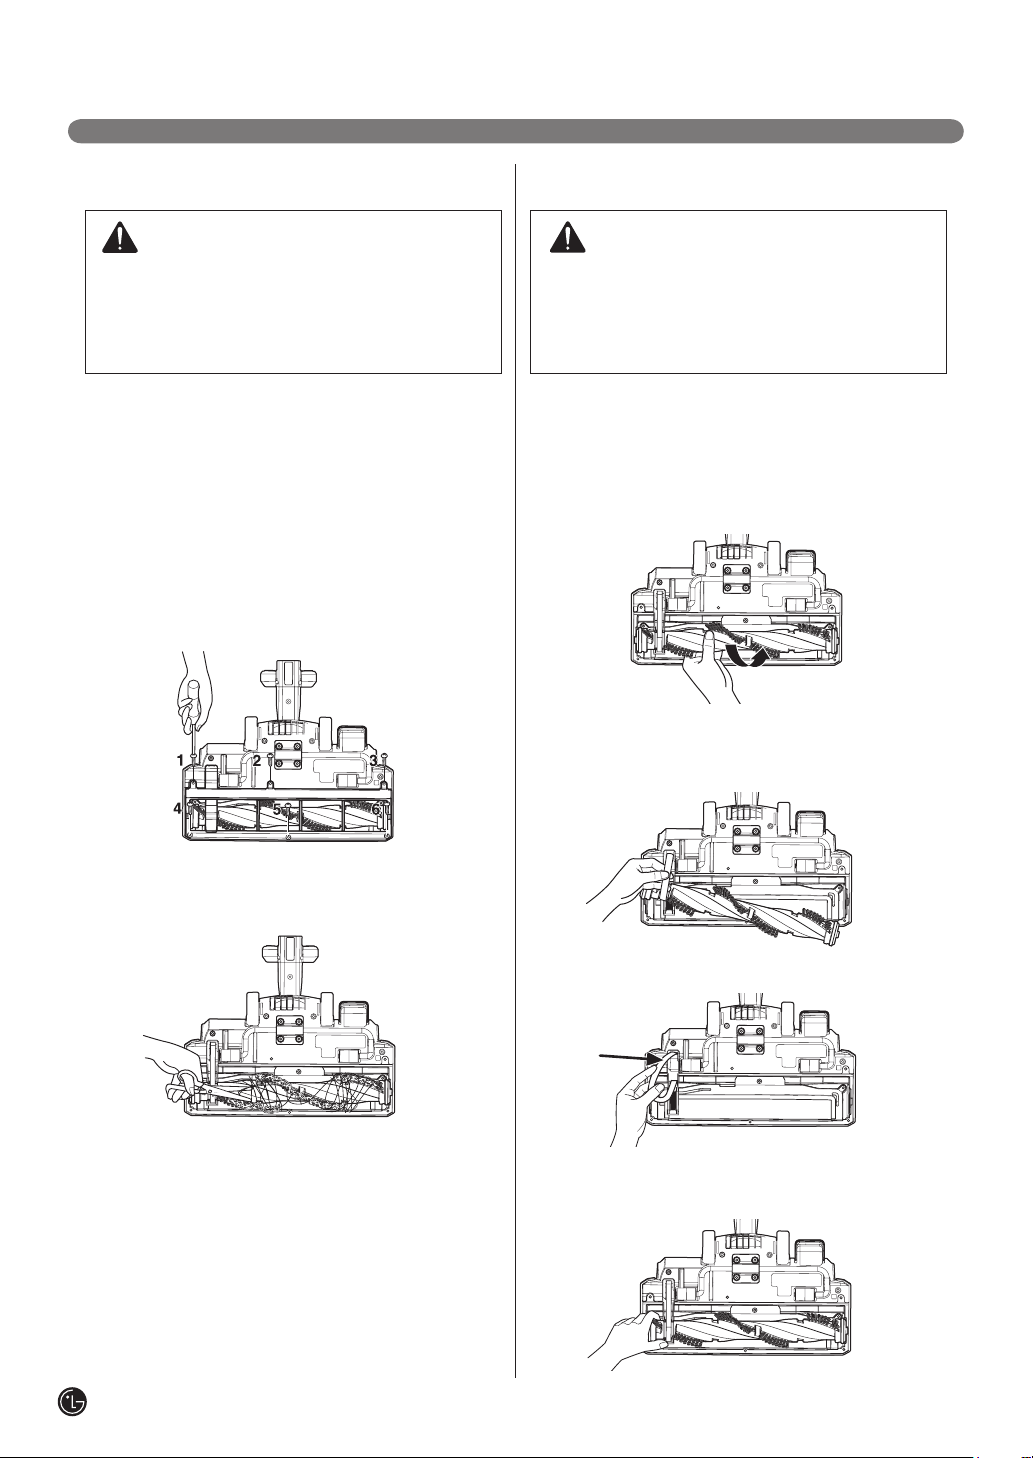
Agitator Maintenance
WARNING
Electrical shock and personal injury hazard.
Always unplug the vacuum cleaner before
servicing. Failure to do so could result in
electrical shock or personal injury.
Frequently check the agitator brush area for hair,
string and lint buildup.
Remove the Agitator Brush Cover:
1. Unplug the canister. Disconnect power nozzle
from the wand.
2. Turn the power nozzle over, so that the agitator is
facing up.
3. Set the power nozzle on a cloth or a smooth
surface.Remove the six screws on the bottom of
the head and remove the cover.
Replacing the Agitator Belt
WARNING
Electrical shock and personal injury hazard.
Always unplug the vacuum cleaner before
servicing. Failure to do so could result in
electrical shock or personal injury.
If the belt breaks, follow the steps below to replace
the agitator belt.
To Replace the Belt:
1. Remove the agitator brush cover.
2. Lift the agitator straight out.
3. Unhook the old belt from the drive pulley. Make
sure no pieces of the broken belt are trapped in
the agitator or drive pulley area.
4. Carefully remove any accumulated string, hair,
etc. from the agitator and the agitator area.
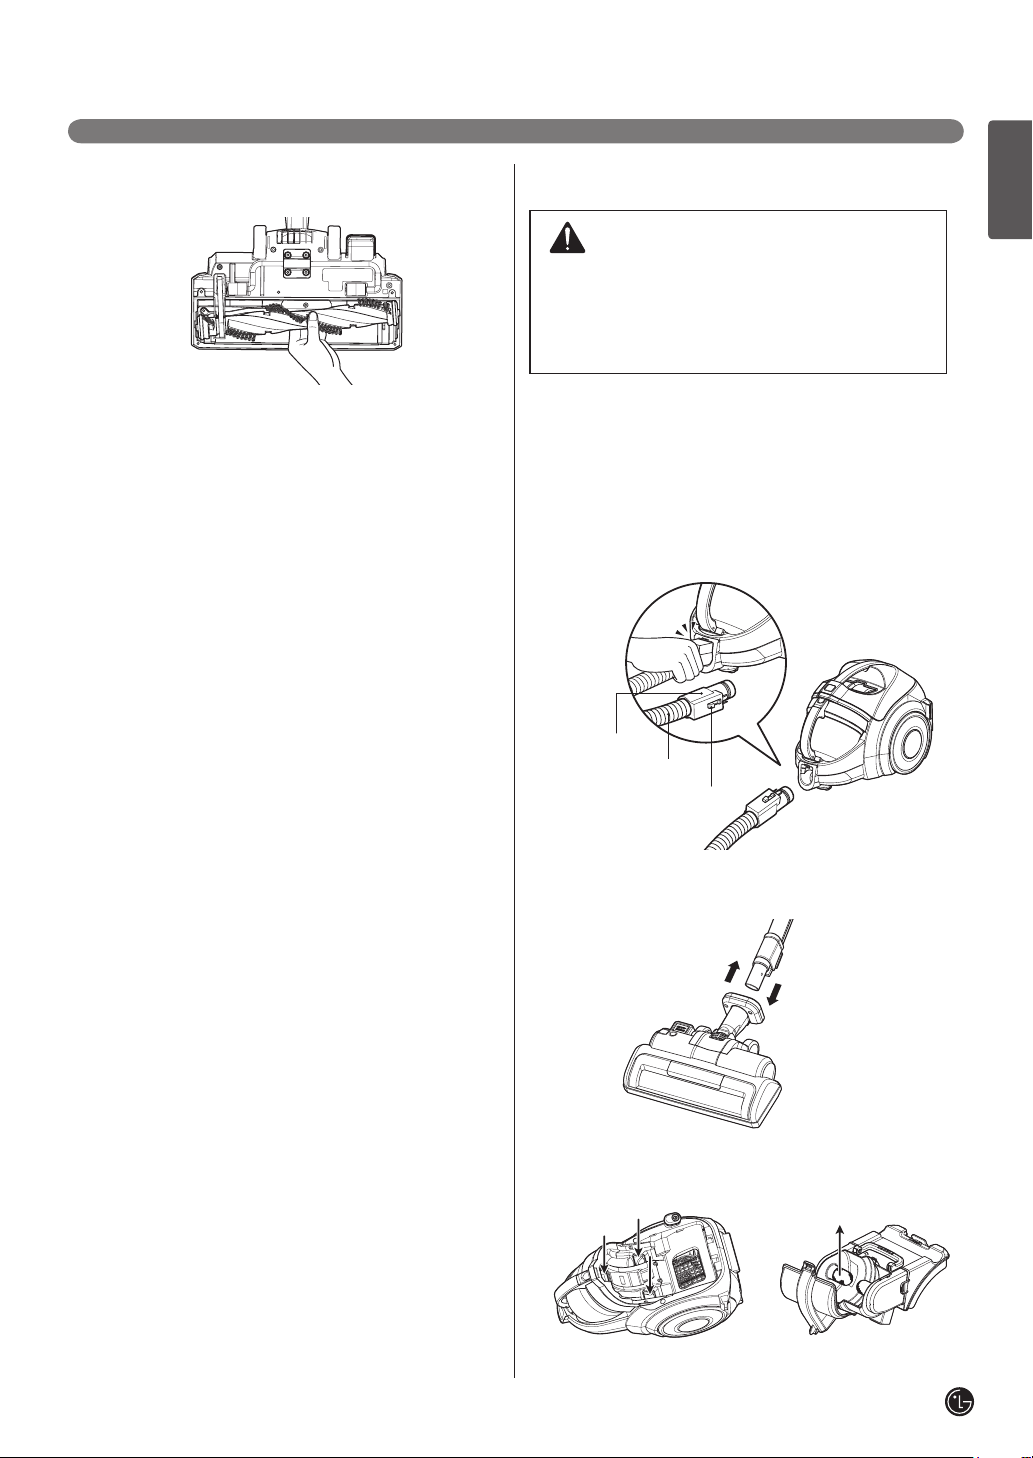
To reinstall the cover,
reverse the steps above.
4.
Hook the new belt over drive pulley of agitator motor.
5. Fit the agitator through the belt, making sure the
belt is aligned with the pulley section of the
agitator.
Page 19
19
ENGLISH
CARE & CLEANING
6. Lower the agitator into place, making sure the
oval shaped tabs fit into the indents on the head.
7. Reinstall the agitator brush cover.
Removing Clogs
WARNING
Electrical shock and personal injury hazard.
Always unplug the vacuum cleaner before
servicing. Failure to do so could result in
electrical shock or personal injury.
If you notice a loss in suction, first check the filters
as described on page 16. If the filters are clean,
there may be a clog. The arrows show areas where
clogs are most likely to occur.
To check for clogs:
1. Check the hose where it connects to the canister
by pressing the release button on the top end of
the hose.
Fitting pipe
Flexible Hose
Release Button
2. Check the power nozzle where it connects to the
wand by pressing the power nozzle release
pedal.
3. Remove the dust separator and check the dust
separator inlet where it connects to the canister.
Page 20
20
CARE & CLEANING
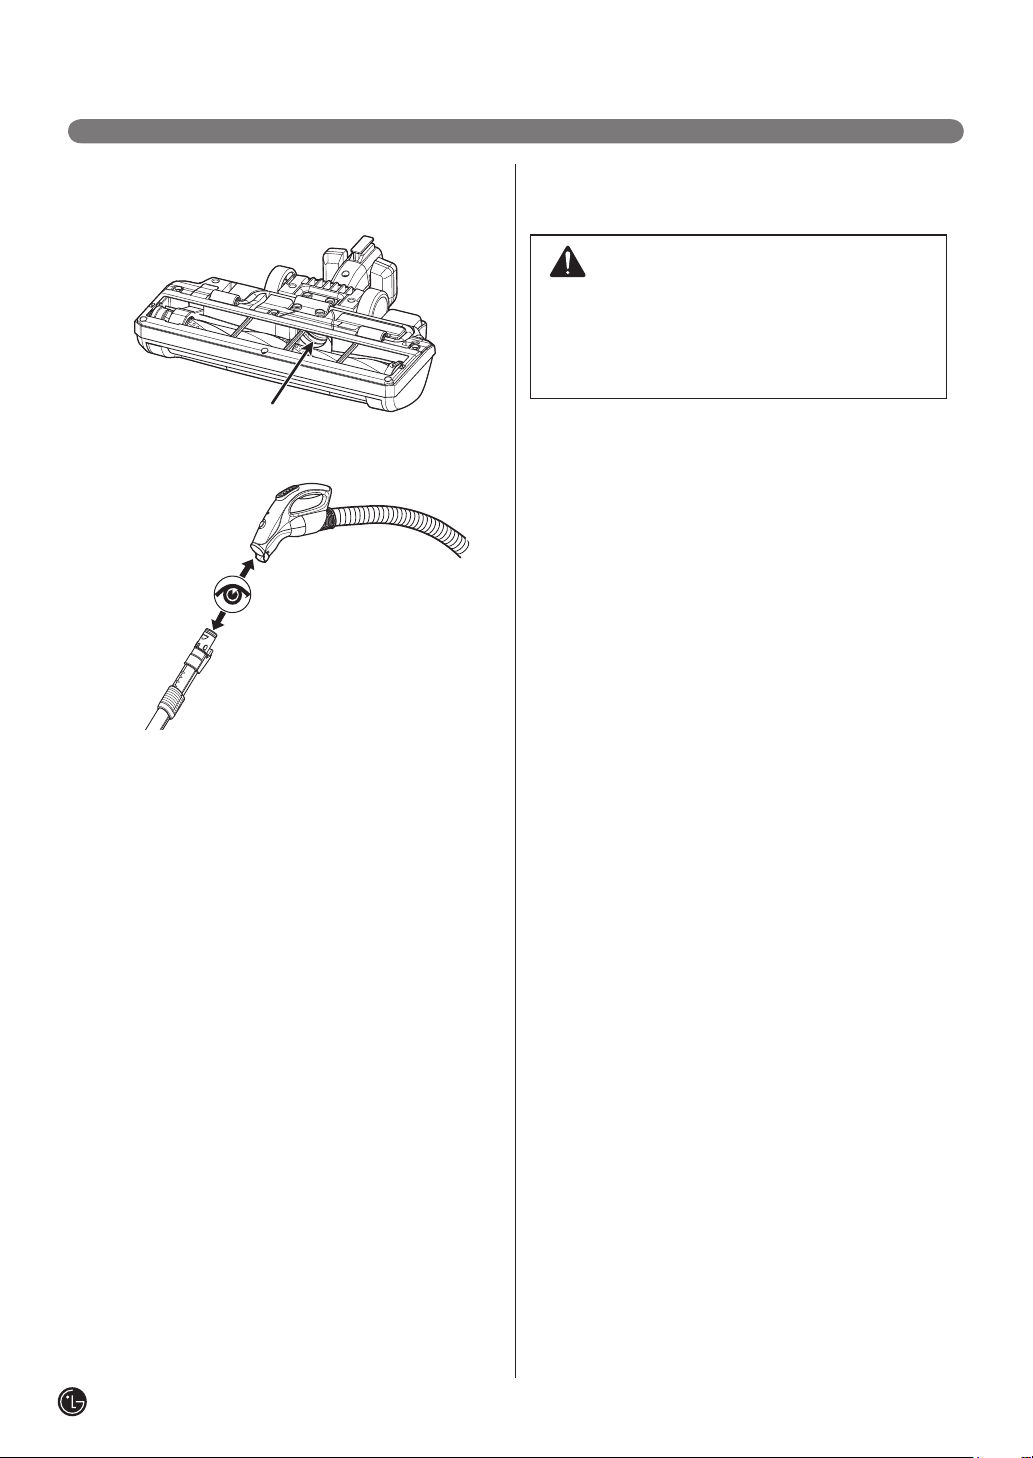
4. Turn the power nozzle over and check the
agitator inlet.
5. Separate the wand and hose and check for
clogging.
Cleaning the Exterior of the
Vacuum Cleaner
WARNING
Electrical shock and personal injury hazard.
Always unplug the vacuum cleaner before
servicing. Failure to do so could result in
electrical shock or personal injury.
Wipe the exterior of the vacuum cleaner with a
clean, soft cloth that has been dipped in water and
wrung dry.
DO NOT allow water to enter any openings in the
vacuum cleaner.
DO NOT clean tools in a dishwasher or clothes
washer. Wash tools in warm soapy water, rinse and
allow to air dry completely.
DO NOT use tools if they are wet.
Page 21
21
ENGLISH
TROUBLESHOOTING
Indicator
Review this chart to find do-it-yourself solutions for minor performance problems.
Any service or repair needed, other than as described in this Owner's Manual, should be performed through
your local LGE service center.
WARNING
Electrical shock and personal injury hazard.
Always unplug the vacuum cleaner before servicing. Failure to do so could result in electrical
shock or personal injury.
PROBLEM
Vacuum cleaner will
not run
Poor suction
LED on the hose is lit
POSSIBLE CAUSE POSSIBLE SOLUTION
• Unplugged at wall outlet
• Hose is not connected to
the body properly
• Dust tank improperly
installed
• Clogged hose, wand,
nozzle
• Full or clogged dust tank
and filters
• Dust tank improperly
installed
• Clogged hose, wand,
nozzle
• Dust tank is full
• Make sure cord is plugged into a
functioning outlet.
• Remove the hose from the body and
reconnect it properly.
• Make sure all dust tank components and
filters are installed correctly.
• Check for clogs.
• Empty dust tank and clean filters.
• Make sure all dust tank components and
filters are installed correctly.
• Check for clogs.
• Empty dust tank
Unit runs louder than usual
• Power is on without dust
tank
• Rotating plate in the dust
tank is restricted because
of obstruction
• Clogged hose, wand,
nozzle
• Reattach dust tank
• Remove obstruction.
• Check for clogs.
Page 22

22
TROUBLESHOOTING
PROBLEM
Musty or unusual smell
Agitator does not turn
POSSIBLE CAUSE POSSIBLE SOLUTION
• Smell of new motor
• Old and dirty filters
• The foam filter or exhaust
filter is wet.
• Switch is off (unit is in
bare floor mode)
• The power nozzle is
disconnected with the
wand.
• Agitator motor overload
protection is tripped
(brush is jammed)
• Belt broken
• The wand is disconnected
with the hose.
• New vacuum cleaner smell should
disappear in 1-2 months.
• Empty dust tank and clean filters.
• Dry the foam filter or exhaust filter
completely away from sunlight.
• Turn on agitator power switch.
• Properly connect the power nozzle to the
wand.
• Unplug the vacuum cleaner and check the
agitator for obstructions and reset the unit.
• Replace belt.
• Properly connect the wand to the hose.
Page 23

ESPAÑOL
MANUAL DEL PROPIETARIO
ASPIRADOR
Lea este manual detenidamente antes de utilizar el
aspirador y guárdelo para futuras consultas.
LcV900B
P/No.: MFL66982301
www.lg.com
Page 24

2
CONTENIDO
GARANTÍA DE ASPIRADOR LG
3
GARANTÍA DE ASPIRADOR LG
INFORMACIÓN IMPORTANTE SOBRE
SEGURIDAD
4-5
INFORMACIÓN IMPORTANTE SOBRE
SEGURIDAD
PIEZAS Y CARACTERÍSTICAS
6
PIEZAS Y CARACTERÍSTICAS
MONTAJE
Desembalaje del aspirador
7
Piezas:
7
El conjunto del aspirador
8
Depósito
8
Varilla telescópica
8
Manguera
8
Boquilla de aspiración
8
Almacenaje de accesorios
9
Recogecable
9
CUIDADO Y LIMPIEZA
14
Guardar el aspirador
14
Depósito colector de polvo y componente
separador de polvo
15
Vaciado del depósito colector de polvo
15
Limpieza del depósito colector de polvo
16
Limpieza del prefiltro de espuma
17
Limpieza del filtro HEPA
18
Mantenimiento del agitador
18
Sustitución de la correa del aspirador
19
Eliminación de obstrucciones
20
Limpieza del exterior del aspirador
SOLUCIÓN DE PROBLEMAS
Solución de problemas21-22
FUNCIONAMIENTO
10
Control de funcionamiento
10
Ajuste de la altura del pelo de moquetas
11
Accesorios
11
Cuadro de utilización de accesorios
12
Colocación de accesorios
12
Consejos y trucos
12
Uso de la herramienta de boquilla para
suelo desnudo
13
Peldaños y descansillos
13
Protección contra sobrecargas del motor agitador
13
Protección contra sobrecarga térmica
Page 25

3
ESPAÑOL
GARANTÍA DE ASPIRADOR LG
LG Electronics Inc. reparará o sustituirá su producto, a discreción de LG, en caso de defectos en materiales o mano de obra
bajo uso doméstico, durante el periodo de garantía que se indica más adelante, y en vigor desde la fecha de compra original del
producto. Esta garantía limitada sólo tiene validez para el comprador original del producto y cuando se utilice en EE.UU. y
Canadá.
PERÍODO DE GARANTÍA:
Cinco años
Desde la fecha de
compra original
ESTA GARANTÍA EXCLUYE CUALQUIER OTRA GARANTÃA, EXPRESA O IMPLÃCITA, INCLUIDA SIN
LIMITACIÓN CUALQUIER GARANTÍA DE COMERCIABILIDAD O ADECUACIÓN A UN FIN PARTICULAR.
EN EL GRADO EN QUE CUALQUIER GARANTÍA IMPLÍCITA SEA REQUERIDA POR LEY, SE LIMITARÃ EN
SU DURACIÓN AL PERIODO INDICADO ANTERIORMENTE PARA LA GARANTÍA EXPLÍCITA.
LG NO SERÁ RESPONSABLE DE NINGÚN DAÑO CONSECUENCIAL, INDIRECTO O INCIDENTAL DE
NINGÚN TIPO, INCLUIDAS PÉRDIDAS DE INGRESOS O BENEFICIOS EN RELACIÓN CON EL PRODUCTO.
ALGUNOS ESTADOS NO PERMITEN LA LIMITACIÓN EN EL TIEMPO DE LA DURACIÓN DE GARANTÍAS
IMPLÍCITAS O LA EXCLUSIÓN DE DAÑOS INCIDENTALES O CONSECUENCIALES, POR LO QUE NO LE
SERÁN APLICABLES LAS LIMITACIONES O EXCLUSIONES.
Esta garantía cubre sólo los defectos de material y mano de obra.
LGE no pagará:
1. Elementos sometidos a desgaste incluidos, pero no limitados a ellos, filtros y correas.
2. Un técnico de servicio para enseñar al usuario el correcto montaje, utilización y mantenimiento del producto.
3. Un técnico de servicio para la limpieza o mantenimiento de este producto.
4. Los daños o fallos de este producto si no se ha montado, no se ha utilizado y no se ha realizado el mantenimiento
según las instrucciones facilitadas con este producto.
5. Daños o fallos de este producto resultantes de accidentes, abusos, usos incorrectos o para fines diferentes de los
previstos para este producto.
6. Daños o fallos de este producto causados por el uso de detergentes, limpiadores, productos químicos o utensilios
diferentes a los recomendados en las instrucciones facilitadas con el producto.
7. Daños o fallos de las piezas o sistemas resultantes de modificaciones no autorizadas realizadas a este producto.
CÓMO SE PRESTA EL SERVICIO:
Cualquier parte del aspirador que falle debido a defectos de materiales o mano de obra.
Durante este periodo de garantía completa de cinco años, LG prestará, de forma gratuita,
todos los servicios de mano de obra y taller para sustituir la pieza defectuosa.
(Excepción - el motor de succión tiene 3 años de garantía.)
Esta garantía se aplica al comprador original para productos adquiridos para uso doméstico en EE.UU. En Alaska, la garantía
excluye los costes de envío o llamadas de servicio a su domicilio.
Algunos estados no permiten la exclusión o limitación de daños incidentales o consecuenciales, por lo que quizás no le sea
aplicable esta exclusión. Esta garantía le proporciona derechos legales específicos, y usted puede tener otros derechos que
varían de unos estados a otros. Para conocer sus derechos legales, consulte al departamento de comercio y consumo local o
estatal.
INFORMACION DE ASISTENCIA AL CLIENTE:
Para probar la cobertura en
garantía
Para ponerse en contacto con el
servicio técnico
o distribuidor más cercano, o
para obtener asistencia en
relación con el producto o
solicitar servicio
Guarde el comprobante de compra para demostrar la fecha de compra.
Deberá enviar una copia del justificante de compra para cualquier servicio en garantía.
Llame al número 1-800-243-0000 (Teléfono de 24 horas - 365 días al año) y elija
entre las opciones del menú; o visite nuestra página web en: http://us.lgservice.
com. (En Canadá llame al 1-888-542-2623, página web http://ca.lgservice.com)
Page 26

4
INFORMACIÓN IMPORTANTE SOBRE SEGURIDAD
LEA TODAS LAS INSTRUCCIONES ANTES DEL USO
INSTRUCCIONES DE SEGURIDAD IMPORTANTES
Lea y cumpla con todas las instrucciones antes de utilizar el aspirador para evitar el riesgo de incendio, descargas eléctricas,
lesiones o daños durante el uso del aspirador. Esta guía no cubre todas las condiciones posibles que puedan ocurrir.
Póngase en contacto con el servicio técnico o el fabricante para cualquier problema que no pueda entender.
Se trata de un símbolo de alerta de seguridad. Este símbolo le alerta de peligros potenciales que pueden
causar lesiones graves o mortales a otras personas. Todos los mensajes de seguridad estarán
acompañados del símbolo de alerta de seguridad y la palabra "ADVERTENCIA" o "PREACUCIÓN".
ADVERTENCIA
PRECAUCIÓN
Indica una situación peligrosa que, si no se evita, podría dar lugar
a lesiones graves o mortales.
Indica una situación peligrosa que, si no se evita, podría dar lugar
a lesiones leves.
ADVERTENCIA
•
Desconecte la alimentación eléctrica antes de cualquier trabajo de
servicio o limpieza de la unidad o cuando no la esté utilizando.
En caso contrario, podría causar descargas eléctricas o lesiones.
• No utilice el aspirador para recoger nada que esté ardiendo o
con humo, como cigarrillos, cerillas o cenizas caliente.
En caso contrario, podría causar lesiones mortales, un incendio o
descargas eléctricas.
• No aspire sustancias inflamables o explosivas, como
gasolina, benceno, disolventes, propano (líquidos o gases).
Los gases de estas sustancias pueden crear peligro de incendio o
explosión. Puede causar peligro de lesiones graves o mortales.
No toque el enchufe o el aspirador de vapor con las manos mojadas.
•
En caso contrario, podría causar lesiones mortales o descargas
eléctricas.
• No desconecte el aparato tirando del enchufe.
En caso contrario, podría causar descargas eléctricas o dañar el
producto. Para desenchufar, hágalo tirando del enchufe, no del cable.
• Mantenga el cabello, las prendas amplias, los dedos etc,
alejados de los orificios y piezas en movimiento.
En caso contrario, podría causar descargas eléctricas o lesiones.
• No transporte el aparato tirando del cable, ni utilice el cable
como asa, no enganche el cable con una puerta ni lo pase
alrededor de bordes o esquinas cortantes. No pase el
aspirador por encima del cable. Mantenga el cable alejado de
superficies calientes.
En caso contrario, podría causar descargas eléctricas, sufrir
lesiones o dañar el producto.
• No lo utilice como juguete. Preste especial atención cuando
utilice el aspirador en presencia de niños.
Podría sufrir lesiones o causar daños.
•
No utilice el aspirador si el cable o el enchufe están dañados. Si el
aparato funciona correctamente, si se ha caído o dañado, si se ha
dejado al aire libre o se caído en agua, envíelo al servicio técnico.
Podría sufrir lesiones o causar daños. Si el cable de alimentación
está dañado o es defectuoso, póngase en contacto con el servicio
técnico de LG Electronics para evitar peligros.
• No utilice el aspirador si se ha estado bajo el agua.
Podría sufrir lesiones o causar daños. Si el aspirador se ha
dañado a causa del agua, póngase en contacto con el servicio
técnico de LG Electronics para evitar peligros.
• Apague siempre el aparato antes de conectar o desconectar
la manguera o la boquilla motorizada.
• No deje el aparato desatendido mientras esté enchufado.
Desconéctelo de la red cuando no vaya a usarlo antes del
mantenimiento.
• Sujete el enchufe para recoger el cable en el recogecable. No
• Deje de utilizar el aparato si observa que falta alguna pieza o
• No utilice cables de extensión con este aspirador.
• Utilice el voltaje adecuado.
• Apague todos los controles antes de desenchufar.
• No modifique el enchufe.
• Las reparaciones de aparatos eléctricos sólo serán
• No utilice este aparato al aire libre o sobre superficies mojadas.
• No coloque ningún objeto entre el cuerpo del aspirador y el
• Este producto contiene productos químicos que, según
• Tenga especial cuidado cuando esté limpiando escaleras.
• La manguera contiene cables eléctricos. No utilice la
• No ponga los dedos cerca del engranaje.
deje el enchufe impacte para recoger el cable.
hay alguna pieza dañada.
Podría sufrir lesiones o causar daños. Si faltan piezas o alguna
está dañada, pongase en contacto con el servicio técnico de LG
Electronics para evitar peligros.
Podría causar un incendio o dañar el producto.
En caso contrario, podría dañarse el motor y el usuario podría
sufrir lesiones. El voltaje adecuado se indica en la parte inferior
del aspirador.
En caso contrario, podría causar descargas eléctricas o lesiones.
En caso contrario, podría causar descargar eléctricas, daños en el
aparato o sufrir lesiones graves o mortales. Si el enchufe no es
compatible con la toma eléctrica, pongase en contacto con un
electricista cualificado para la instalación de una toma adecuada.
realizadas por técnicos cualificados.
Las reparaciones incorrectas pueden causar peligros graves para
el usuario.
En caso contrario, podría causar descargas eléctricas o sufrir lesiones.
espacio de la cabeza del aspirador.
Podría sufrir lesiones o causar daños.
declara el Estado de California, pueden causar cáncer y
toxicidad reproductiva. Lave sus manos tras utilizarlo.
manguera si está dañada, cortada o perforada.
En caso contrario, podría causar lesiones mortales o descargas
eléctricas.
En caso contrario, podría sufrir lesiones.
engranaje
Page 27

5
ESPAÑOL
INFORMACIÓN IMPORTANTE SOBRE SEGURIDAD
PRECAUCIÓN
• No introduzca objetos en los orificios del aspirador.
En caso contrario, podría dañar el producto.
• No utilice el aspirador si alguno de los orificios está
bloqueado. Mantenga los orificios sin polvo, pelusa, pelo
o cualquier otro elemento que pueda reducir el flujo de
aire.
En caso contrario, podría dañar el producto.
• No utilice el aspirador sin el depósito y/o filtros
correctamente instalados.
En caso contrario, podría dañar el producto.
• Limpie el depósito de polvo y los filtros tras aspirar
limpiadores de moquetas, polvos o polvo fino.
Estos productos pueden atascar los filtros, reducir el flujo de
aire y/o causar daños en el aspirador. Si no se limpian el
depósito de polvo y los filtros, el aspirador podría sufrir
daños permanentes.
• No utilizará el aspirador para recoger objetos cortantes o
duros, como juguetes, pines, clips de papel, etc.
Pueden causar daños en el aspirador o el depósito de polvo.
• Guarde el aspirador en un interior, no lo deje al aire libre.
Coloque el aspirador de modo que no pueda volcar.
• No permita a los niños utilizar el aspirador.
En caso contrario, podría sufrir lesiones o dañar el producto.
• Utilice sólo piezas fabricadas o recomendadas por
técnicos de servicio cualificados.
En caso contrario, podría dañar el producto.
• Siga todas las instrucciones del manual del propietario.
Utilice sólo accesorios aprobados o recomendados por
LG.
En caso contrario, podría sufrir lesiones o dañar el producto.
• Cuando limpie escaleras, coloque el aspirador en la
parte inferior de las escaleras.
En caso contrario, podría sufrir lesiones o dañar el producto.
• Asegúrese de que los filtros estén completamente secos
(filtro de salida y filtro de seguridad del motor) antes de
colocarlos en la máquina.
En caso contrario, podría dañar el producto.
• No seque los filtros en un horno u horno microondas.
En caso contrario, podría dañar el producto.
• No seque los filtros en una secadora para ropa.
En caso contrario, podría causar peligro de incendio.
• No los seque cerca de llamas abiertas.
En caso contrario, podría causar peligro de incendio.
• Apague el aspirador antes de conectar o desconectar la
manguera.
Podría sufrir lesiones o causar daños.
• Este aspirador se ha diseñado sólo para uso doméstico.
• Usted es responsable del correcto montaje y uso del
aspirador.
Protector térmico:
Este aspirador tiene un termostato especial que protege el aspirador en caso de sobrecalentamiento del motor. Si el aspirador
se apaga de forma repentina, apáguelo y desenchúfelo.
Compruebe las posibles causas del sobrecalentamiento del aspirador, como el depósito de polvo lleno, manguera bloqueada o
filtro obstruido. Si se observan estas condiciones, soluciónelas y espere un mínimo de 30 minutos antes de intentar utilizar el
aspirador. Después de 30 minutos, vuelva a enchufar el aspirador y enciéndalo. Si el aspirador sigue sin funcionar, póngase en
contacto con un servicio técnico cualificado.
GUARDE ESTAS INSTRUCCIONES
Page 28

6
PIEZAS Y CARACTERÍSTICAS
Es importante conocer las piezas y características del aspirador para garantizar un uso correcto y
seguro. Léalas antes de utilizar el aspirador.
Piezas de repuesto comunes
Filtro HEPA ADQ73133301
Marco del ltro MEA62331601
Filtro de espuma MDJ54988501
Correa del aspirador MAS62023801
Para solicitar estas piezas, llame a
1-800-243-0000 (EE.UU.)
1-888-542-2623 (Canadá)
Asa de manguera
Herramientas
Accesorio
para grietas
Adaptador
Asa de transporte
Botón de
recogecable
Cepillo para polvo
Boquilla para suelo
desnudo
Varilla telescópica
Pedal de
desenganche
Ajuste de altura Pedal
(en parte trasera)
Botón de puesta
a cero
Altura de alfombra
Indicador
Boquilla de aspiración
Filtro HEPA
Cable de alimentación
Separador de polvo
Cierre de separador
de polvo
Cierre de depósito de polvo
Depósito de polvo
Orificio de manguera
de depósito
Page 29

7
ESPAÑOL
MONTAJE
Para reducir el riesgo de daños durante el transporte, el aspirador se entrega parcialmente desmontado.
Desembalaje del aspirador
Desembale el aspirador cuidadosamente y
asegúrese de que se incluyen todas las piezas
antes de desechar el embalaje.
Retire la cinta y el film de protección antes del
montaje.
Elementos que se incluyen en la caja:
1. Depósito
2. Cepillo de polvo (ya instalado)
3. Herramienta para grietas (ya instalada)
4. Manguera
5. Varilla telescópica
6. Filtro de espuma adicional
7. Boquilla de aspiración
8. Adaptador
9. Boquilla para suelo desnudo
Piezas:
1. Depósito
2. Cepillo para polvo
3. Accesorio para
grietas
4. Manguera 5. Varilla telescópica
6. Filtro de espuma adicional
7. Boquilla de aspiración
8. Adaptador
9. Boquilla para suelo desnudo
Page 30

8
MONTAJE
El conjunto del aspirador
Depósito
1. Inspeccione el depósito
2. Compruebe la correcta instalación del depósito
de polvo. Consulte las instrucciones en la
sección "Vaciado del depósito de polvo".
3. Consulte la correcta instalación del separador de
polvo y los filtros de salida. Para más
instrucciones, consulte "Limpieza del prefiltro de
espuma".
Varilla telescópica
1. Sujete el seguro para ajustar el alcance.
2. Extraiga la varilla hasta la longitud deseada.
Manguera
1. Inserte la manguera en el depósito hasta que
quede fija en su posición. Para quitar la
manguera del seguro, presione el botón de cierre
y tire de la manguera.
Colocación
del tubo
Manguera flexible
Botón de cierre
2. Alinee los conectores eléctricos e inserte la
varilla telescópica con fuerza en el asa de la
manguera.
Asa de
manguera
seguro
Boquilla de aspiración
Alinee los conectores eléctricos y empuje la
boquilla de aspiración en la varilla telescópica hasta
oír un clic.
Page 31

9
ESPAÑOL
ADVERTENCIA
MONTAJE
Peligros de lesiones y daños al producto
NO utilice las salidas por encima de encimeras. Podría dañar los elementos de la zona
adyacente.
Almacenaje de accesorios
El aspirador incorpora un cómodo espacio del
almacenaje para los accesorios.
• Presione el botón de fijación del separador de
polvo y abra la tapa principal.
• Fije el cepillo del polvo en la parte inferior de la
tapa con el lado del cepillo orientado hacia la
tapa.
Con el borde en ángulo orientado hacia la tapa,
fije la herramienta para grietas en la tapa.
Recogecable
Para soltar el cable:
Sujete el enchufe y tire del cable a la longitud
deseada.
Para guardar el cable:
Sujete el enchufe y presione el botón de recogida
del cable del lado trasero del asa.
Para evitar que el cable se recoja con violencia,
sujete el enchufe hasta que se haya guardado el
cable.
NOTA: Para reducir el riesgo de descargas
eléctricas, este aparato tiene un enchufe polarizado
(una clavija es más ancha que la otra).
El enchufe puede conectar en la toma en una sola
dirección. Si no puede introducir el enchufe
completamente en la toma, invierta su posición. Si
todavía no puede introducirlo, póngase en contacto
con un electricista cualificado para instalar una
toma adecuada. NO modifique el enchufe.
Page 32

10
FUNCIONAMIENTO
ADVERTENCIA
Peligro de lesiones
No coloque el aspirador sobre los peldaños de una escalera, mantenga la unidad siempre sobre el suelo.
Control de funcionamienton
1
2
3
4
1. MAX : Para la máxima succión del aspirador.
2. MIN : Para la mínima succión del aspirador.
3. FLOOR/CARPET (SUELO/ALFOMBRA) : Para
activar y desactivar el agitador.
4. OFF: Para apagar el depósito.
Ajuste de la altura del pelo de
moquetas
Para ajustar la altura:
Puede ser necesario bajar o subir la cabeza
motorizada para las diferentes alturas del pelo de
las moquetas.
Presione el pedal derecho para ajustar la altura del
agitador. Cada vez que pise, el agitador subirá una
muesca.
Sugerencias de ajuste para la altura del pelo:
Puede ser necesario elevar el cabezal del aspirador
para limpiar alfombras y alfombras de pelo más
largo.
Para la máxima eficacia en la limpieza, se
recomiendan las siguientes alturas para las
distintas moquetas:
• L – para los pisos pelados
• ML – para la alfombra estándar
• Ajustes más altos – para moquetas de pelo muy
profundo cuando se desea un empuje más suave
del aspirador, al tiempo que se logra una limpieza
eficaz.
Hay 4 ajustes:
H = Alto
M = Medio
ML = Medio bajo
L = Bajo
NOTA: Si resulta difícil empujar el aspirador,
cambia el ajuste de altura al siguiente más alto.
Atención:
se limpian determinados tipos de moquetas y suelos.
Antes aspirar, compruebe las instrucciones de
limpieza del fabricante de la moqueta o alfombra.
Debe prestarse especial atención cuando
Page 33

11
ESPAÑOL
FUNCIONAMIENTO
Accesorios
Cepillo para polvo
Funciona como cepillo para polvo y boquilla para
tapicería, de utilidad cuando se limpia el mobiliario.
Colóquelo como se muestra.
Accesorio para grietas
El accesorio para grietas se puede utilizar para
esquinas entre cojines y otros espacios de difícil
acceso.
Cuadro de utilización de accesorios
Accesorios
Entre
cojines
Superficies
tapizadas*
Mobiliario y
superficies
duras*
Boquilla para suelo desnudo
Se puede usar esta herramienta sobre madera dura
y en suelos teselados.
ÁREA DE LIMPIEZA
Cortinas*
(nivel de
potencia bajo)
Escaleras
Suelos con
moqueta/
alfombras
Paredes
Colchones/
Ropa de
cama
Cepillo para polvo
Accesorio
para grietas
Boquilla para suelo
desnudo
* Asegúrese de que los accesorios estén limpios antes de utilizarlos sobre los tejidos.
Page 34

12
FUNCIONAMIENTO
Colocación de accesorios
Uso del cepillo para polvo
Deslice el cepillo para polvo en el extremo de la
varilla o colóquelo en el asa de la manguera.
Uso del accesorio para grietas
Deslice el accesorio para polvo en el extremo de la
varilla o colóquelo en el asa de la manguera.
Consejos y trucos
Bordes de moqueta y esquinas:
Para esquinas cerradas y bordes de moqueta,
utilice el cepillo para polvo.
Utilice el accesorio para grietas para áreas de difícil
acceso.
Uso de la herramienta de boquilla
para suelo desnudo
La boquilla para suelo blando se une al vástago de
forma similar a resto de conexiones, y debe usarse
sobre madera dura y suelos teselados.
Page 35

13
ESPAÑOL
FUNCIONAMIENTO
Peldaños y descansillos
Utilice el cepillo para polvo y la boquilla de tapicería
en peldaños y descansillos. Asegúrese de colocar
el aspirador de modo que no pueda volcar o
caerse. Consulte en la página 12 las instrucciones
de selección y uso de los accesorios.
Protección contra sobrecargas del
motor agitador
El agitador tiene integrada una protección para no
dañar el motor si el agitador se atasca. Si el
agitador se ralentiza o se para, la protección contra
sobrecargas apaga el motor del agitador. El motor
de succión seguirá funcionando.
Para corregir el problema: Apague el aspirador,
elimine la obstrucción y el botón de puesta a cero.
Protección contra sobrecarga
térmica
Este aspirador tiene un protector contra descargas
térmicas que se activa automáticamente para
proteger el aspirador contra sobrecalentamientos.
Si una obstrucción afecta al flujo normal de aire del
motor, el protector térmico apaga el motor
automáticamente para que se enfríe y evitar
posibles daños en el aspirador.
Para corregir el problema: Apague el aspirador y
desconéctelo de la red. Compruebe si hay alguna
obstrucción y, si es necesario, elimínela. Asimismo,
compruebe y limpie la suciedad de los filtros.
Espere aproximadamente 30 minutos y vuela a
poner en funcionamiento el aspirador para
comprobar si se ha puesto a cero el protector del
motor. El sistema del protector térmico no se
pondrá a cero hasta que el aspirador se haya
enfriado completamente.
Page 36

14
CUIDADO Y LIMPIEZA
Siga todas las precauciones de seguridad para el mantenimiento y limpieza del aspirador.
Guardar el aspirador
Cuando no lo vaya a utilizar, guarde el aspirador en
posición vertical o sobre las ruedas. Inserte el clip
de la boquilla su ranura de la parte inferior del
depósito y el lateral del cuerpo.
Depósito colector de polvo y
componente separador de polvo
El depósito colector de polvo y el separador de
polvo tiene varios componentes clave.
Asegúrese de volver a instalar todas las piezas
correctamente tras el vaciado del depósito colector
de polvo.
No utilice el aspirador si no se han colocado
todos los filtros.
No utilice el aspirador con los filtros o
componentes mojados.
Componentes clave:
1. Tapa del depósito colector de polvo : Ábrala
para vaciar el depósito.
2. Depósito de polvo : Aquí se recoge el polvo.
3. Tapa del separador de polvo : Ábrala para
eliminar la suciedad del recogedor de polvo.
4~5. Prefiltro de espuma : Captura las partículas
de tamaño medio a pequeño. Está compuesto
de un marco de filtro y un filtro de espuma
lavables.
1. Tapa del depósito
colector de polvo
2. Depósito de polvo
3. Tapa del separador de
polvo
4. Filtro de
espuma
5. Marco del filtro
Page 37

15
ESPAÑOL
CUIDADO Y LIMPIEZA
Vaciado del depósito colector de polvo
ADVERTENCIA
Peligro de descargas eléctricas y lesiones.
Desconecte el enchufe de la toma eléctrica
antes de realizar trabajos de mantenimiento
en el aspirador. En caso contrario, podría
causar descargas eléctricas o lesiones.
Para lograr el máximo rendimiento, vacíe el
depósito colector de polvo cuando se ilumine el
indicador del asa de la manguera, o cuando el nivel
del depósito de polvo llegue a la línea MAX.
Indicador
Línea MAX
Limpieza del depósito colector de
polvo
Para lograr un rendimiento óptimo, limpie el
depósito colector de polvo con regularidad.
Para limpiar el depósito colector de polvo:
1. Retire el depósito de polvo del aspirador.
2. Lave el depósito y la tapa.
3. Séquelos sin exponerlos a la luz solar directa.
PARA RETIRAR EL DEPÓSITO COLECTOR DE
POLVO, sujete el asa del depósito y presione el
dispositivo de cierre. Extraiga el depósito colector
de polvo.
Tirar
Asa del
depósito
PARA VACIAR EL DEPÓSITO, levante la tapa y
vacíe el depósito como se muestra.
Palanca de separación del depósito
NO utilice el aspirador con los filtros o
componentes mojados.
Page 38

16
CUIDADO Y LIMPIEZA
Limpieza del prefiltro de espuma
PRECAUCIÓN
Un filtro sucio puede causar daños
permanentes en el aspirador. Asegúrese de
que los filtros estén completamente libres
antes de volver a instalarlos.
Para un rendimiento óptimo, compruebe los
filtros cada 2 meses y límpielos cuando sea
necesario.
Para limpiar el prefiltro de espuma:
1. Sujete el asa del depósito y presione el botón de
apertura del separador de polvo. Abra la tapa del
depósito.
3. Abra la tapa del separador de polvo tirando de la
palanca y elimine la suciedad.
Tapa del separador de polvo
4. Abra la tapa del filtro tirando de la palanca de la
tapa del prefiltro. Extraiga el prefiltro y retire el
marco del filtro del separador de polvo.
2. Sujete el asa del separador de polvo y extráigalo.
Prefiltro de espuma
Marco del filtro
Page 39

17
ESPAÑOL
CUIDADO Y LIMPIEZA
5. Limpie el polvo o la suciedad y lave el prefiltro y
el marco del filtro con agua limpia.
6. Séquelos sin exponerlos a la luz solar directa.
No utilice el aspirador con los filtros o
componentes mojados.
Si observa pérdida de succión y la limpieza del
prefiltro no ayuda, deberá sustituir los prefiltros
de espuma. Puede solicitar filtros de espuma
adicionales a LG llamando a
1-800-243-0000(EE.UU.), 1-888-542-2623
(Canadá) y solicite las piezas de la página 6.
Limpieza del filtro HEPA
Para un rendimiento óptimo, compruebe el filtro
cada 6 meses y límpielo cuando sea necesario.
Para limpiar el filtro HEPA:
1. Retire la tapa del filtro HEPA.
Levantar
Tapa del filtro HEPA
2. Separe el filtro HEPA presionando el botón.
Botón
Tapa del
filtro HEPA
3. Lave el filtro en agua.
Filtro HEPA
4. Elimine la humedad.
5. Séquelo sin exponerlo a la luz solar directa.
Page 40

18
CUIDADO Y LIMPIEZA
Mantenimiento del agitador
ADVERTENCIA
Peligro de descargas eléctricas y lesiones.
Desenchufe el aspirador antes de proceder
con el mantenimiento. En caso contrario,
podría causar descargas eléctricas o
lesiones.
Compruebe con frecuencia el área del cepillo
agitador para si se hubieran acumulado cabello,
hilos o pelusa.
Retire la tapa del cepillo agitador:
1. Desenchufe el depósito. Desconecte la boquilla
de aspiración de la varilla.
2. De la vuelta a la boquilla, de modo que el
agitador quede hacia arriba.
3. Coloque la boquilla sobre un trapo o una
superficie suave. Quite los seis tornillos de la
parte inferior del cabezal y retire la tapa.
Sustitución de la correa del aspirador
ADVERTENCIA
Peligro de descargas eléctricas y lesiones.
Desenchufe el aspirador antes de proceder
con el mantenimiento. En caso contrario,
podría causar descargas eléctricas o
lesiones.
Si la correa se rompe, siga estos pasos para
sustituirla.
Para cambiar la correa:
1. Retire la tapa del cepillo agitador:
2. Levante el agitador.
3. Desenganche la correa vieja de la polea de
transmisión. Asegúrese de que no quede ningún
fragmento de la correa rota en el área del
agitador o de la polea.
4. Retire cuidadosamente el pelo, pelusa, etc.
acumulado del agitador y el área del agitador.
Para volver a colocar la tapa,
realice los pasos anteriores en
orden inverso.
4. Enganche la nueva correa en la polea de
transmisión del motor del agitador.
5. Coloque el agitador en la correa, asegurándose
de que la sección de la polea quede alineada
con la sección de la polea del activador.
Page 41

19
ESPAÑOL
CUIDADO Y LIMPIEZA
6. Baje el agitador a su posición, asegurándose de
que las pestañas de forma ovalada ajusten en su
posición en el cabezal.
7. Vuelva a colocar la tapa del cepillo agitador.
Eliminación de obstrucciones
ADVERTENCIA
Peligro de descargas eléctricas y lesiones.
Desenchufe el aspirador antes de proceder
con el mantenimiento. En caso contrario,
podría causar descargas eléctricas o
lesiones.
Si observa alguna pérdida de succión, compruebe en
primer lugar los filtros, según se describe en la página
16. Si los filtros están limpios, puede haber alguna
obstrucción. Las flechas muestran áreas en las que
existe más probabilidad de que se produzcan atascos.
Para comprobar las obstrucciones:
1. Compruebe la manguera donde se conecta al
depósito presionando el botón de apertura del
extremo superior de la manguera.
Colocación
del tubo
Manguera flexible
Botón de cierre
2. Compruebe la boquilla de aspiración donde se
conecta con la varilla presionando el pedal de
desconexión de la boquilla.
3. Retire el separador de polvo y compruébelo
donde se conecta con el depósito.
Page 42

20
CUIDADO Y LIMPIEZA
4. De la vuelva a la boquilla y compruebe la entrada
del agitador.
5. Separe la varilla y la manguera y compruebe si
están obstruidas.
Limpieza del exterior del aspirador
ADVERTENCIA
Peligro de descargas eléctricas y lesiones.
Desenchufe el aspirador antes de proceder
con el mantenimiento. En caso contrario,
podría causar descargas eléctricas o
lesiones.
Limpie el exterior del aspirador con un trapo limpio
humedecido con agua.
NO permita la entrada de agua por los orificios del
aspirador.
NO limpie los accesorios en una lavadora o un
lavavajillas. Lave los accesorios en agua tibia
jabonosa, enjuáguelos y séquelos al aire libre.
NO utilice los accesorios si están mojados.
Page 43

21
ESPAÑOL
SOLUCIÓN DE PROBLEMAS
Consulte el cuadro para encontrar soluciones a problemas menores. Cualquier servicio o reparación
necesarios, además de los descritos en el Manual del Propietario, serán realizados por el servicio técnico
local de LG.
ADVERTENCIA
Peligro de descargas eléctricas y lesiones.
Desenchufe el aspirador antes de proceder con el mantenimiento. En caso contrario, podría
causar descargas eléctricas o lesiones.
PROBLEMA CAUSA POSIBLE POSIBLE SOLUCIÓN
El aspirador no funciona
Baja succión
Se ilumina el LED de la
manguera
Indicador
Desconectado de la red •
La manguera no se ha •
conectado correctamente
al cuerpo
No se ha instalado •
correctamente el depósito
colector de polvo
Manguera, varilla o •
boquilla atascadas
Depósito de polvo y ltros •
llenos o atascados
No se ha instalado •
correctamente el depósito
colector de polvo
Manguera, varilla o •
boquilla atascadas
El depósito colector de •
polvo está lleno
El aspirador se ha •
encendido sin el depósito
colector de polvo
La placa giratoria del •
depósito de polvo está
obstruida
Asegúrese de que el cable esté enchufado •
en una toma con corriente.
Quite la manguera del cuerpo y vuelva a •
conectarla correctamente.
Asegúrese de que todos los componentes •
del depósito de polvo se hayan instalado
correctamente
Compruebe posible obstrucciones.•
Vacíe el depósito de polvo y limpie los •
ltros.
Asegúrese de que todos los componentes •
del depósito de polvo se hayan instalado
correctamente
Compruebe posible obstrucciones.•
Vacíe el depósito de polvo •
Vuelva a colocar el depósito de polvo •
Elimine la obstrucción.•
La unidad hace más ruido
del habitual
Manguera, varilla o •
boquilla atascadas
Compruebe posible obstrucciones.•
Page 44

22
SOLUCIÓN DE PROBLEMAS
PROBLEMA CAUSA POSIBLE POSIBLE SOLUCIÓN
Olor a humedad o raro
El agitador no gira
Olor del motor nuevo •
Filtros viejos y sucios •
El ltro de espuma o •
el ltro de salida están
mojados.
El interruptor está •
apagado (la unidad está
en modo de suelo sin
alfombras)
La boquilla de aspiración •
está desconectada de la
varilla.
Se ha disparado la •
protección contra
sobrecargas del motor del
agitador (el cepillo está
atascado)
Correa rota•
La varilla está •
desconectada de la
manguera.
El olor del aspirador nuevo desaparecerá •
en 1-2 meses.
Vacíe el depósito de polvo y limpie los •
ltros.
Seque el ltro de espuma o el ltro de •
salida sin exponerlos a la luz solar directa.
Encienda el agitador. •
Conecte correctamente la boquilla •
aspiradora en la varilla.
Desenchufe el aspirador y compruebe si •
hay obstrucciones en el agitador antes
ponerlo a cero.
Cambie la correa.•
Conecte correctamente la varilla a la •
manguera.
Page 45

MANUEL D’UTILISATION
FRANÇAIS
ASPIRATEUR
Veuillez lire attentivement ce manuel avant d’utiliser l’aspirateur
et conservez-le pour vous y référer ultérieurement
LcV900B
P/No.: MFL66982301
www.lg.com
Page 46

2
SOMMAIRE
GARANTIE ASPIRATEUR LG VACUUM
3
GARANTIE ASPIRATEUR LG VACUUM
CONSIGNES DE SECURITE IMPORTANTES
4-5
CONSIGNES DE SECURITE IMPORTANTES
PARTIES ET CARACTERISTIQUES
6
PARTIES ET CARACTERISTIQUES
ASSEMBLAGE
Déballage de l‘aspirateur
7
Pièces assemblées
7
Assemblage de l’aspirateur
8
Boîtier
8
Tube télescopique
8
Tuyau d’aspiration
8
Brosse
8
Rangement des accessoires
9
Rangement du câble
9
ENTRETIEN & NETTOYAGE
14
Rangement de l’aspirateur
14
Eléments Bac à poussière et système
turbo-cyclone
15
Vider le sac à poussière
15
Nettoyer le bac à poussière
16
Nettoyer le filtre mousse
17
Nettoyage du filtre HEPA
18
Entretien de l’Agitateur
18
Remplacer la courroie de l’Agitateur
19
Retirer les engorgements
20
Nettoyer la partie extérieure de l’aspirateur
RESOLUTION DES PROBLEMES
Résolution des problèmes21-22
UTILISATION
10
Contrôle Fonctionnement
10
Réglage de la hauteur des pointes
11
Accessoires
11
Tableau d’utilisation des accessoires
12
Installation des pièces
12
Astuces
12
Utilisation du suceur parquet
13
Escaliers et paliers
13
Protection de surcharge du moteur de
l’agitateur
13
Protection de surcharge thermale
Page 47

3
FRANÇAIS
GARANTIE ASPIRATEUR LG VACUUM
En cas de défaut de matériel ou de fabrication pendant utilisation personnelle, LG Electronics Inc. s’engage à réparer ou
remplacer le produit, à sa discrétion, pendant la période de garantie stipulée ci-dessous, à partir de la date d’achat d’origine du
produit. Cette garantie limitée est uniquement valable à l’acheteur d’origine du produit et est exclusivement effective aux
Etats-Unis et au Canada.
PERIODE DE GARANTIE :
Cinq ans
À compter de la date
d’achat d’origine
LA PRESENTE GARANTIE REMPLACE TOUTE AUTRE GARANTIE, DIRECTE OU INDIRECTE, SANS
RESTRICTION, TOUTE GARANTIE COMMERCIALE OU DE FORME A DES FINS SPECIFIQUES.
DANS LA MESURE OU TOUTE GARANTIE INDIRECTE EST EXIGEE PAR LA LOI, ELLE EST LIMITEE EN
DUREE A LA PERIODE DE GARANTIE DIRECTE CI-DESSUS.
LG NE PAUT ETRE TENU POUR RESPONSIBLE DES DOMMAGES DIRECTS, INDIRECTS OU ACCIDENTELS,
Y COMPRIS LA PERTE DE REVENUS OU DE PROFITS RELATIVE AU PRODUIT.
CERTAINS ETATS N’APPLIQUENT PAS DE LIMITATION SUR LA DUREE DE LA GARANTIE INDIRECTE OU
SUR L’EXCLUSION DE DOMMAGES RIRECTS OU ACCIDENTELS, PAR CONSEQUENT, IL EST POSSIBLE
QUE LES LIMITATIONS OU EXCLUSIONS STIPULEES CI-DESSUS NE VOUS CONCERNENT PAS.
La présente garantie couvre uniquement les defaults de matériaux et de fabrication.
LGE n’indemnisera pas :
1. Les articles non durables qui peuvent s’user, y compris, mais non restrictifs aux filtres et courroies.
2. Les services d’un technicien pour indiquer à l’utilisateur l’assemblage, l’utilisation ou l’entretien corrects du produit.
3. Les services d’un technicien pour nettoyer et entretenir ce produit.
4. Les dommages ou défaillances de ce produit dont l’assemblage, l’utilisation ou l’entretien n’ont pas été réalisés
conformément aux instructions fournies avec ce produit.
5. Les dommages ou défaillances matériels causes par accident, mauvaise utilisation ou utilisation à d’autres fins.
6. Les dommages ou défaillances de ce produit causes par l’utilisation de détergents, de produits d’entretien, de
produits chimiques ou d’ustensiles autres que les produits recommandés dans les instructions fournies avec ce
produit.
7. Les dommages ou défaillances de pièces ou de systèmes causes par des modifications non autorisées réalisées dur
ce produit.
SERVICE APRES-VENTE :
Toute pièce de l’aspirateur défaillante du fait d’un défaut de matériaux ou de fabrication. Au
cours de la garantie d’une durée de cinq ans, LG s’engage à fournir, gratuitement, toute
forme d’assistance pour remplacer la pièce défaillante.
(Exception : garantie de 3 ans pour Le moteur d’aspiration)
Cette garantie s’applique à l’acheteur d’origine des produits pour utilisation domestique aux Etats-Unis. En Alaska, la garantie
exclut les frais d’expédition ou de service à domicile.
Certains états n’appliquent pas d’exclusion de limitation de dommages indirects ou accidentels, par conséquent il est possible
que cette exclusion ou limitation ne vous concerne pas. La présente garantie vous accorde des droits légaux spécifiques, vous
pouvez également bénéficier d’autres droits qui variant selon les états. Pour connaître vos droits légaux, veuillez consulter les
services de consommateur locaux ou de votre état ou le ministre de la justice de votre état.
INFORMATION ASSISTANCE CLIENTELE:
Pour prouver la couverture de la
garantie
Pour obtenir la liste des centres de
maintenance ou des revendeurs
agréés les plus proches, ou pour
obtenir un service après-vente ou
une assistance clientèle,
Conservez le ticket de caisse comme preuve de la date d’achat.
Une copie du ticket de caisse doit être fournie lors du service après-vente sous
garantie.
Veuillez appeler le 1-800-243-0000 (Permanence téléphonique 24 h sur 24 - 365
jours par an) et choisissez le service approprié dans le menu ; ou consultez notre
site web à l’adresse : http://us.lgservice.com. (Au Canada- Appelez le 1-888-5422623, site web http://ca.lgservice.com)
Page 48

4
CONSIGNES DE SECURITE IMPORTANTES
VEUILLEZ LIRE L’ENSEMBLE DES CONSIGNES AVANT UTILISATION
CONSIGNES DE SECURITE IMPORTANTES
Veuillez lire et suivre l’ensemble des consignes avant d’utiliser l’aspirateur afin d’éviter tout risqué d’incendie, de choc électrique, de
blessure corporelle, ou quelconque dommage lors de l’utilisation de l’aspirateur. Le présent guide ne détaille pas l’ensemble des situations
pouvant se présenter. Toujours contacter un réparateur qualifié ou bien le fabricant pour les problèmes que vous ne comprenez pas.
Il s’agit du symbole de sécurité. Ce symbole vous avertit des dangers potentiels qui
pourraient tuer ou blesser vous-même ou des tiers. Tous les messages de sécurité seront
précédés des messages de sécurité ainsi que du mot “AVERTISSEMENT” ou “ATTENTION”.
AVERTISSEMENT
ATTENTION
Ce symbole vous prévient des risques ou des pratiques risquées
pouvant provoquer des blessures graves ou la mort.
Ce symbole vous prévient des risques ou des pratiques risquées
pouvant provoquer des blessures corporelles mineures.
AVERTISSEMENT
• Débranchez le câble électrique avant de réparer ou de nettoyer
l’appareil, ou bien lorsque vous ne l’utilisez pas.
Dans le cas contraire, cela pourrait provoquer un chic électrique ou des
blessures corporelles.
• Ne pas utiliser l’aspirateur pour aspirer des matières incandescentes
telles que des cigarettes, des allumettes ou des cendres.
Dans le cas contraire, cela pourrait provoquer la mort; un incendie ou
un choc électrique.
Ne pas aspirer de substances inflammables ou explosives telles que de
•
l’essence, du benzène, des diluants ou du propane (liquide ou gazeux).
Les vapeurs de ces substances peuvent créer un incendie ou une explosion.
Cela pourrait provoquer la mort ou des blessures corporelles.
•
Ne pas manipuler la prise ou l’aspirateur avec les mains mouillées.
Dans le cas contraire, cela pourrait provoquer la mort ou un choc électrique.
• Ne pas débrancher en tirant sur le câble.
Dans le cas contraire, cela pourrait provoquer des dommages de
l’appareil ou un choc électrique. Pour débrancher, utilisez la prise
comme poignée et non le câble.
• Eloignez les cheveux, les vêtements amples, les doigts, et toute
autre partie du corps des ouvertures et des parties mobiles.
Dans le cas contraire, cela pourrait provoquer un choc électrique ou
des blessures corporelles.
• Ne pas tirer ou soulever par le câble, ne pas utiliser le câble
comme poignée, ou bien le tirer contre des coins ou des angles
pointus. Ne pas faire passer l’appareil sur le câble. Eloignez le
câble de surfaces chaudes.
Dans le cas contraire, cela pourrait provoquer un choc électrique, des
blessures corporelles, un incendie ou des dommages matériels.
• Ne pas utiliser comme un jouet. Surveillez les enfants lorsque
ceux-ci utilisent l’appareil ou en sont proches.
Dans le cas contraire, cela pourrait provoquer des blessures
corporelles ou des dommages matériels.
• Ne pas utiliser l’appareil si le câble ou la prise ont été endommagés.
Si l’appareil ne fonctionne pas correctement, s’il est tombé, s’il a été
endommagé, laissé à l’extérieur ou s’il a été immerge dans l’eau,
veuillez contacter le service après-vente.
Dans le cas contraire, cela pourrait provoquer des blessures corporelles
ou des dommages matériels. Si le câble ou la prise ont été endommagés
ou sont défaillants, veuillez contacter LG Electronics Veuillez contacter le
service après-vente pour éviter tout risqué.
• Ne pas utiliser l’aspirateur s’il a été immergé dans l’eau.
Dans le cas contraire, cela pourrait provoquer des blessures
corporelles ou des dommages matériels. Dans le cas où l’aspirateur a
été immerge dans l’eau, beuillez contacter le service après-vente LG
Electronics pour éviter tout risque.
• Vérifiez que l’appareil est éteint avant de brancher ou de
débrancher le flexible ou la brosse motorisée.
• Ne laissez pas l’appareil branché. Débranchez de la prise murale
lorsque vous ne l’utilisez et avant toute réparation.
• Maintenez la prise lors du rembobinage du cordon. Veillez à ne
pas tirer sur la prise lors du rembobinage.
• Ne pas continuer d’aspirer si un défaut ou un dommage apparaît
ou si une pièce manque ou est endommagée.
Dans le cas contraire, cela pourrait provoquer des blessures
corporelles ou des dommages matériels. Si des pièces manquent,
veillez contacter le service après-vente LG Electronics pour éviter tout
risque de danger.
• Ne pas utiliser de rallonges électriques avec cet aspirateur.
Cela pourrait provoquer un incendie ou des dommages matériels.
• Utiliser la bonne tension électrique.
Utiliser une mauvaise tension électrique peut endommager le moteur et
blesser l’utilisateur. La tension à utiliser est indiquée sous l’aspirateur.
• Vérifier que l’appareil est éteint avant de la débrancher.
Le non respect de cette consigne peut provoquer un choc électrique ou
des blessures corporelles.
• Ne jamais changer la prise.
Le non respect de cette consigne peut provoquer un choc électrique,
des dommages matériels, des blessures corporelles ou la mort. Si la
prise ne correspond pas, contactez un électricien qualifié pour installer
une prise murale adéquate.
• Les réparations doivent toujours être réalisées par des
techniciens qualifiés.
De mauvaises réparations peuvent faire encourir de graves risqué à
l’utilisateur.
• Ne pas utiliser à l’extérieur ou sur des surfaces mouillées.
Le non respect de cette consigne peut provoquer un choc électrique ou
des blessures corporelles.
• Ne pas insérer d’objets entre le corps de l’aspirateur et la tête de
l’agitateur.
Le non respect de cette consigne peut provoquer des blessures
corporelles ou des dommages matériels.
• Ce produit contient des produits chimiques reconnus par l’état
de Californie pour être toxiques et provoquer des cancers. Lavezvous les mains après chaque utilisation.
• Faites très attention lorsque vous aspirez des escaliers.
• Le flexible contient des câbles électriques. Ne pas l’utiliser s’il a
été endommagé, coupé ou percé.
Le non respect de cette consigne peut provoquer la mort ou un choc
électrique.
• Ne pas mettre les doigts près de la roulette.
Le non respect de cette consigne peut provoquer des blessures
corporelles.
Roulette
Page 49

5
FRANÇAIS
ATTENTION
CONSIGNES DE SECURITE IMPORTANTES
• Ne pas insérer d’objets dans les ouvertures.
Le non respect de cette consigne peut provoquer des
dommages matériels.
• Ne pas utiliser l’appareil si certaines ouvertures sont
bloquées. Retirez la poussière, la suie, les cheveux et
tout ce qui pourrait réduire le flux d’air.
Le non respect de cette consigne peut provoquer des
dommages matériels.
• Ne pas utiliser l’appareil sans le bac à poussière et/ou
les filtres en place.
Le non respect de cette consigne peut provoquer des
dommages matériels.
• Toujours nettoyer le bac à poussière et les filtres après
l’utilisation de produits nettoyeurs de tapis ou de
moquettes ou après avoir aspire de la poussière fine.
Ces matières peuvent obstruer les filtres, réduire le flux d’air
et endommager l’appareil. Ne pas nettoyer le bac à
poussière peut provoquer des dommages irréversibles à
l’appareil.
• Ne pas utiliser l’aspirateur pour ramasser des objets
pointus, des petits jouets, des punaises, des trombones
etc.
Cela pourrait endommager l’aspirateur ou le bac à poussière.
• Conservez l’aspirateur en intérieur.
Rangez l’appareil après usage pour éviter toute chute.
• L’aspirateur n’a pas été conçu pour être utilisé sans
surveillance par des enfants.
Le non respect de cette consigne peut provoquer des
blessures corporelles.
• Utilisez uniquement des pièces produites ou
recommandées par des techniciens qualifiés.
Le non respect de cette consigne peut provoquer des
dommages matériels.
• Utilisez uniquement l’appareil comme indiqué dans le
manuel de l’utilisateur. Utilisez uniquement avec des
accessoires et brosses recommandés pu approuvés par
LG.
Le non respect de cette consigne peut provoquer des
blessures corporelles ou des dommages matériels.
• Lorsque vous nettoyez les escaliers, placez toujours
l’aspirateur en bas de l’escalier.
Le non respect de cette consigne peut provoquer des
blessures corporelles ou des dommages matériels.
• Assurez-vous que les filtres (filtre entrée moteur et filtre
sortie moteur) soient entièrement sec savant de le
replacer dans l’appareil.
Le non respect de cette consigne peut provoquer des
dommages matériels.
• Ne pas essayer de sécher les filtres dans un four ou un
micro-ondes.
Le non respect de cette consigne peut provoquer un
incendie.
• Ne pas sécher le filtre dans un sèche-linge.
Le non respect de cette consigne peut provoquer un
incendie.
• Ne pas sécher à proximité d’un feu.
Le non respect de cette consigne peut provoquer un
incendie.
• Assurez-vous que l’appareil soit éteint avant de brancher
ou de débrancher le flexible.
Le non respect de cette consigne peut provoquer des
blessures corporelles ou des dommages matériels.
• L’aspirateur est uniquement conçu pour utilisation
domestique.
• Vous êtes responsables de l’assemblage et de
l’utilisation corrects de l’appareil.
Protecteur thermal :
Cet aspirateur est muni d’un thermostat spécial qui le protégé en cas de surchauffe du moteur. Si l’appareil s’éteint
soudainement, éteignez l’interrupteur et débranchez l’appareil.
Vérifiez une éventuelle raison de surchauffe sur l’aspirateur, comme un bac à poussière plein, un tube bouché ou bien un filtre
obstrué. Si vous trouvez une des conditions ci-dessus, réparez-les et attendez environ 30 minutes avant de réutiliser l’appareil.
Après 30 minutes, branches et rallumez l’appareil. Si l’aspirateur ne fonctionne toujours pas, contactez un électricien qualifié.
CONSERVEZ CES INSTRUCTIONS
Page 50

6
PARTIES ET CARACTERISTIQUES
Il est important que vous connaissiez les parties et caractéristiques de l’aspirateur pour garantir
une utilisation correcte sécurisée. Prenez-en connaissance avant d’utiliser l’appareil.
Pièces de replacement courantes
Filtre HEPA ADQ73133301
Cadre ltre MEA62331601
Filtre mousse MDJ54988501
Courroie de l’Agitateur MAS62023801
Pour commander ces pièces, veuillez appeler
1-800-243-0000 (Etats-Unis)
1-888-542-2623 (Canada)
Variateur poignée
Outils Accessoires
Suceur plat
Adaptateur
Pognée
Bouton de
rembobinage du
câble
Brosse meubles
Suceur parquet
Tube télescopique
Pédale
Réglage de hauteur
Pédale (à l’arrière)
Bouton de réglage
Hauteur de tapis
Indicateur
Brosse
Filtre HEPA
Câble
Système turbo-
cyclone
Sortie système
turbo-cyclone
Sortie bac à
poussière
Bac à poussière
Entrée boîtier tuyau
d’aspiration
Page 51

7
FRANÇAIS
ASSEMBLAGE
Afin de réduire le risqué de dommages au cours de l’expédition, l’aspirateur est expédié
partiellement assemble.
Déballage de l’aspirateur
Déballez soigneusement l’aspirateur et assurezvous qu’aucune pièce ne manqué avant de vous
débarrasser de tout emballage.
Retirez le scotch et film protecteur avant
assemblage.
Pièces contenues dans la boîte :
1. Boîtier
2. Brosse meubles (déjà installée)
3. Suceur plat (déjà installé)
4. Tuyau d’aspiration
5. Tube télescopique
6. Filtre en mousse supplémentaire
7. brosse
8. Adaptateur
9. Suceur parquet
Pièces assemblées
1. Boîtier
2. Brosse meubles
3. Suceur plat
4. Tuyau d’aspiration 5. Tube télescopique
6. Filtre en mousse
supplémentaire
7. Brosse
8. Adaptateur
9. Suceur parquet
Page 52

8
ASSEMBLAGE
Assemblage de l’aspirateur
Boîtier
1. Inspecter le boîtier
2. Assurez-vous que le bac à poussière soit
correctement installé. Voir la section “Vider le bac
à poussière” pour instructions.
3. Vérifiez que le système turbo-cyclone et les
filtres sortie moteur soient bien installés. Voir la
section “Nettoyer le filtre Mousse” pour
instructions.
Tube télescopique
1. Saisissez la bague de réglage et maintenez-la
pour régler la portée.
2. Etendez le tube à la longueur désirée.
Tuyau d’aspiration
1. Insérez le tuyau d’aspiration dans le boîtier
jusqu’à ce qu’au verrouillage. Pour retirer le
tuyau d’aspiration, appuyez sur le bouton de
déclenchement et retirez le tuyau.
Embout du
flexible
Flexible
Bouton de
déclenchement
2. Alignez les connecteurs électriques et insérez le
tube télescopique fermement dans le variateur
poignée.
Variateur
poignée
Bague de
réglage
Brosse
Alignez les connecteurs électriques et poussez la
brosse dans le tube télescopique jusqu’au clic.
Page 53

9
FRANÇAIS
ASSEMBLAGE
AVERTISSEMENT
Risque de blessures corporelles et de dommages matériels !
NE PAS utiliser sur des plans de travail. Cela peut endommager les objets situés aux alentours.
Rangement des accessoires
L’aspirateur est muni d’un compartiment de
rangement des accessoires.
• Appuyez sur le bouton du système turbo-cyclone
et ouvrez le couvercle principal.
• Accrochez la brosse à meubles sous le couvercle
avec le côté de la brosse face au couvercle. Avec
la partie en biais face au couvercle, accrochez le
suceur plat au couvercle.
Rangement du câble
Pour étirer le câble :
Saisissez la prise et tirez le câble à la longueur
souhaitée.
Pour ranger le câble :
Saisissez la prise et appuyez sur le bouton de
rembobinage du câble sur le côté arrière de la
poignée.
Pour empêcher le câble de s’arracher, maintenez la
prise jusqu’à ce que le câble soit rembobiné.
REMARQUE : Pour éviter le risqué de choc
électrique, l’appareil est dote d’une prise polarisée
(une des lames est plus large que les autres).
Cette prise s’insère dans le tuyau d’une seul côté.
Si la prise ne rentre pas complètement dans le
tuyau, insérez-la à l’envers. Si elle ne rentre
toujours pas, contacter un électricien qualifié pour
installer le tuyau correctement. NE PAS modifier la
prise.
Page 54

10
UTILISATION
AVERTISSEMENT
Risque de blessures corporelles
Ne placez pas l’aspirateur dans les escaliers, maintenez toujours l’unité au sol.
Contrôle Fonctionnement
1
2
3
4
1. MAX : Pour une aspiration maximum de
l’aspirateur.
2. MIN : Pour une aspiration minimum de
l’aspirateur.
3. FLOOR/CARPET (MOQUETTE/TAPIS ) : Pour
allumer ou éteindre l’agitateur.
4. OFF: Pour étendre le boîtier.
Réglage de la hauteur des pointes
Pour régler la hauteur des pointes :
Il peut être nécessaire d’augmenter ou de diminuer
la puissance pour plusieurs hauteurs de pointes de
moquette.
Appuyez sur la pédale de droite pour régler la
hauteur de l’agitateur. Chaque pression fera monter
l’agitateur d’un cran.
Exemples de réglages de la hauteur des pointes:
Vous devez soulever la tête de l’aspirateur pour
faciliter l’accès des zones d’aspiration des tapis et
des pointes de moquette.
Pour une performance de nettoyage maximum,
les réglages de hauteur de moquette suivants sont
recommandés :
• L – pour les planchers nus
• ML – pour le tapis standard
• Réglages plus élevés – Pour les moquettes de
haute laine, lorsqu’un effort de pression plus
élevé est nécessaire, en conservant une bonne
performance de nettoyage.
Il y a 4 modes de réglage :
H = Elevé
M = Moyen
ML = Moyen Faible
L = Faible
REMARQUE: Si l’aspirateur est difficile à pousser,
changez le réglage de la hauteur sur le mode
suivant le plus élevé.
Attention : Une attention spécifique est nécessaire
pour l’aspiration de certains types de moquettes
ou de sols. Vérifiez toujours les instructions de
nettoyages recommandées par le fabricant de la
moquette ou du revêtement du sol avant d’aspirer.
Page 55

11
FRANÇAIS
UTILISATION
Accessoires
Brosse à meubles
Est utilisée comme brosse à meubles et embout
pour tissus utile pour nettoyer les meubles. Fixez
comme indiqué.
Suceur plat
Le suceur plat peut être utilisé pour les coins étroits
entre les cousins et les endroits difficiles d’accès.
Tableau d’utilisation des accessoires
Accessoire
Entre les
cousins
Revêtements
de Surfaces*
Meubles et
surfaces
dures*
Suceur parquet
Cet accessoire s'utilise sur des planchers et sols
carrelés.
ZONE DE NETTOYAGE
Rideaux* (niveau
de puissance
plus faible)
Escaliers
Sols
tapissés/
Tapis
Murs Matelas/
Literie
Brosse meubles
Suceur plat
Suceur parquet
* Assurez-vous toujours que les pièces soient propres avant de les utiliser sur des tissus.
Page 56

12
UTILISATION
Installation des pièces
Utilisation de la brosse à meubles
Faites glisser la brosse à meubles sur l’embout du
tube ou fixez-la sur le variateur poignée.
Utilisation du suceur plat
Faites glisser le suceur plat sur l’embout du tube ou
fixez-la sur le variateur poignée.
Astuces
Bords et coins de moquettes :
Pour les coins étroits, les bords de moquette et le
long des planchers, utilisez la brosse à meubles.
Utilisez le suceur plat pour les zones
particulièrement difficiles d’accès.
Utilisation du suceur parquet
Le suceur parquet se fixe sur le tube rallonge
comme d'autres accessoires et s'utilise sur des
planchers ou sols carrelés.
Page 57

13
FRANÇAIS
UTILISATION
Escaliers et paliers
Utilisez la brosse à meubles ou l’embout pour tissus
sur les escaliers et paliers. Assurez-vous que
l’aspirateur soit place de manière à ne pas chuter.
Voir page 12 pour les instructions relatives à la
sélection et à l’utilisation des pièces.
Protection de surcharge du moteur
de l’agitateur
L’agitateur est dote d’une protection intégrée contre
les dommages du moteur en cas de panne de
l’agitateur. Si l’agitateur ralentit ou s’arrête, le
protecteur de surcharge de l’agitateur éteint le
moteur de l’agitateur. Le moteur d’aspiration restera
en marche.
Pour corriger le problème : Eteignez et
débranchez l’aspirateur, retirez les engorgements et
appuyez sur le bouton réinitialiser.
Protection de surcharge thermale
L’aspirateur est dote d’un protecteur de surcharge
thermal qui est automatiquement active pour
protéger l’aspirateur de la surchauffe. Dans le cas
où un engorgement perturbe le flux d’air normal au
moteur, le protecteur thermal éteint
automatiquement le moteur pour permettre au
moteur de se refroidir afin d’empêcher un éventuel
endommagement de l’aspirateur.
Pour corriger le problème : Eteignez l’aspirateur
et débranchez le câble d’alimentation. Contrôlez et
retirez les engorgements, si nécessaire. Contrôlez
et nettoyez également les filtres sales.
Attendez environ 30 et branches l’aspirateur.
Vérifiez que la protection du moteur soit
réinitialisée. Le système de protection thermale ne
sera pas réinitialisé tant que l’aspirateur aura
complètement refroidi.
Page 58

14
ENTRETIEN & NETTOYAGE
Respectez toujours l’ensemble des consignes de sécurité lors de l’entretien et du nettoyage de
l’aspirateur.
Rangement de l’aspirateur
Lorsque vous ne l’utilisez pas, rangez l’aspirateur
en position debout ou sur ses roulettes. Insérez le
clip de la brosse dans la fente située sous le boîtier
et sur le côté du corps de l’appareil.
Eléments Bac à poussière et
système turbo-cyclone
Le bac à poussière et le système turbo-cyclone
sont composés de plusieurs éléments principaux.
Assurez-vous toujours que toutes les pièces soient
correctement réinstallées après avoir vidé le bac à
poussière.
N’actionnez jamais le boîtier sans que l’ensemble
des filtres ne soient e place !
N’actionnez jamais le boîtier avec des filtres ou
des éléments mouillés !
Eléments principaux :
1. Couvercle bac à poussière : Ouvrez pour vider
le bac à poussière.
2. Bac à poussière : emplacement où la crasse est
collectée.
3. Couvercle du système turbo-cyclone : Ouvrez
pour retirer les déchets du système turbocyclone.
4~5. Filtre mousse : Saisit les particules fines.
Il est composé d’un cadre de filtre et d’un filtre
mousse lavables.
1. Couvercle bac
à poussière
2. Bac à poussière
3. Couvercle système
turbo-cyclone
4. Filtre mousse
5. Cadre filtre
Page 59

15
FRANÇAIS
ENTRETIEN & NETTOYAGE
Vider le bac à poussière
AVERTISSEMENT
Risque de choc électrique et de blessures
corporelles.
Débranchez toujours le câble d’alimentation
de la prise électrique avant de nettoyer ou de
réparer l’aspirateur. Le non respect de cette
consigne peut provoquer un choc électrique
ou des blessures corporelles.
Pour une performance maximum, videz toujours le
bac à poussière lorsque l’indicateur situé sur le
variateur poignée est allumé, ou lorsque le niveau
du bac à poussière a atteint la ligne MAX.
Indicateur
Ligne MAX
Nettoyer le bac à poussière
Pour une performance optimale, nettoyez
régulièrement le bac à poussière
Pour nettoyer le bac à poussière :
1. Retirez le bac à poussière de l’aspirateur
2. Nettoyez le bac à poussière et le couvercle du
bac à poussière
3. Séchez entièrement à l’abri de la lumière du
soleil.
POUR RETIRER LE BAC A POUSSIERE,
Saisissez la poignée du bac à poussière et appuyez
sur le bouton de séparation du bac. Retirez le bac à
poussière.
Retirez
Poignée du
bac à
poussière
POUR VIDER LE BAC A POUSSIERE, soulevez le
couvercle du bac à poussière et videz le bac
comme indiqué.
Bouton de séparation du bac
N’actionnez JAMAIS le boîtier avec des
éléments mouillés !
Page 60

16
ENTRETIEN & NETTOYAGE
Nettoyer le filtre mousse
ATTENTION
Un filtre mouillé peut provoquer endommager
l’aspirateur de façon permanente. Assurezvous que les filtres soient entièrement secs
avant de les réinstaller.
Pour une performance optimale, vérifiez
les filtres tous les 2 mois et nettoyez-les si
nécessaire.
Pour nettoyer le filtre mousse :
1. Saisissez la poignée du boîtier et appuyez
sur le bouton de séparation du bac. Ouvrez le
couvercle du boîtier.
3. Ouvrez la Couvercle du système turbo-cyclone
en tirant la poignée du couvercle du guide et
retirez la crasse.
Couvercle du système turbo-cyclone
4. Ouvrez le couvercle du filtre en tirant la poignée
de couverture du filtre. Retirez le filtre mousse
et retirez le cadre du filtre du système turbocyclone.
2. Saisissez la poignée du système turbo-cyclone et
retirez-la.
Filtre mousse
Cadre filtre
Page 61

17
FRANÇAIS
ENTRETIEN & NETTOYAGE
5. Retirez l’excès de poussière ou de déchets et
rincez le filtre mousse & le cadre du filtre à l’eau.
6. Séchez entièrement à l’abri de la lumière du
soleil.
Ne JAMAIS actionner l’aspirateur avec des
filtres ou des éléments mouillés !
Si vous remarquez une perte d’aspiration et que le
nettoyage du filtre mousse ne change rien, vous
devez remplacer le filtre mousse. Vous pouvez
acheter des filtres mousses supplémentaires
auprès de LG en appelant
1-800-243-0000(Etats-Unis), 1-888-542-2623
(Canada) et en demandant les pièces indiquées à
la page 6.
Nettoyage du filtre HEPA
Pour une performance optimale, vérifiez le filtre
tous les 6 mois et nettoyez-le si nécessaire.
Pour nettoyer le filtre HEPA :
1. Retirez le couvercle du filtre HEPA.
Poignée
Couvercle du
filtre HEPA
2. Retirez le filtre HEPA en appuyant sur le bouton.
Bouton
Couvercle du
filtre HEPA
3. Nettoyez entièrement le filtre à l’eau.
Filtre HEPA
4. Retirez l’humidité.
5. Séchez entièrement à l’abri de la lumière du
soleil.
Page 62

18
ENTRETIEN & NETTOYAGE
Entretien de l’agitateur
AVERTISSEMENT
Risque de choc électrique et de blessures
corporelles.
Débranchez toujours le câble d’alimentation
de la prise électrique avant de nettoyer ou de
réparer l’aspirateur. Le non respect de cette
consigne peut provoquer un choc électrique
ou des blessures corporelles.
Vérifiez régulièrement la brosse de l’agitateur et
retirez l’accumulation de cheveux, de fils et de
peluches.
Retirez le couvercle de la brosse de l’agitateur :
1. Débranchez le boîtier. Déconnectez la brosse du
tube.
2. Retournez la brosse pour que l’agitateur soit
tourné vers le haut.
3. Placez la brosse sur un chiffon ou une surface
lisse. Retirez les six vis situés sous la tête et
retirez le couvercle.
Remplacer la courroie de l’agitateur
AVERTISSEMENT
Risque de choc électrique et de blessures
corporelles.
Débranchez toujours le câble d’alimentation
de la prise électrique avant de nettoyer ou de
réparer l’aspirateur. Le non respect de cette
consigne peut provoquer un choc électrique
ou des blessures corporelles.
Si la courroie se casse, suivez les étapes décrites
ci-dessous pour remplacer la courroie de l’agitateur.
Pour remplacer la courroie :
1. Retirez le couvercle de la brosse de l’agitateur.
2. Retirez l’agitateur.
3. Décrochez l’ancienne courroie de la poulie.
Assurez-vous qu’aucune partie de la courroie
cassée ne soit coincée dans la zone de
l’agitateur ou de la poulie.
4. Retirez soigneusement les chevaux, peluches
etc. de l’agitateur et de la zone de l’agitateur.
Pour remettre le couvercle,
inversez les étapes décrites
ci-dessus.
4. Accrochez la nouvelle courroie sur la poulie du
moteur de l’agitateur.
5. Fixez l’agitateur sur la courroie, en vous Assurant
que la courroie soit bien alignée sur la section de
la poulie de l’agitateur.
Page 63

19
FRANÇAIS
ENTRETIEN & NETTOYAGE
6. Baissez l’agitateur en vous Assurant que les
languettes ovales soient insérées dans les fentes
de la tête.
7. Remettez le couvercle de la brosse de l’agitateur.
Retirer les engorgements
AVERTISSEMENT
Risque de choc électrique et de blessures
corporelles.
Débranchez toujours le câble d’alimentation
de la prise électrique avant de nettoyer ou de
réparer l’aspirateur. Le non respect de cette
consigne peut provoquer un choc électrique
ou des blessures corporelles.
Si vous remarquez une perte d’aspiration, vérifiez
d’abord les filtres comme indiqué à la page 16. Si
les filtres sont propres, il se peut qu’il y ait un
engorgement. Les flèches indiquent les zones dans
lesquelles un engorgement est susceptible d’être
provoqué
Pour vérifier les engorgements :
1. Vérifier le tuyau à l’endroit de connexion avec le
boîtier en appuyant sur le bouton de
déclenchement au bout du tuyau en haut.
Embout du
flexible
Flexible
Bouton de déclenchement
2. Vérifiez la zone de connexion de la brosse au
tuyau en appuyant sur le bouton de
déclenchement de la pédale de la brosse.
3. Retirez le système turbo-cyclone et vérifiez
l’arrivée du système turbo-cyclone dans la zone
de connexion avec le boîtier.
Page 64

20
ENTRETIEN & NETTOYAGE
4. Retournez la brosse et vérifiez l’arrivée de
l’agitateur.
5. Séparez le tuyau du tube et vérifiez les
engorgements.
Nettoyer la partie extérieure de
l’aspirateur
AVERTISSEMENT
Risque de choc électrique et de blessures
corporelles.
Débranchez toujours le câble d’alimentation
de la prise électrique avant de nettoyer ou de
réparer l’aspirateur. Le non respect de cette
consigne peut provoquer un choc électrique
ou des blessures corporelles.
Essuyez la partie extérieure de l’aspirateur avec un
chiffon mou et propre trempé dans l’eau et essoré.
NE PAS laisser d’eau pénétrer dans les ouvertures
de l’aspirateur.
NE PAS nettoyer les outils dans un lave-vaisselle
ou un lave-linge.
Lavez les outils à l’eau chaude et savonneuse,
rincez et laissez entièrement sécher à l’air.
NE PAS utiliser les outils s’ils sont mouillés.
Page 65

21
FRANÇAIS
RESOLUTION DES PROBLEMES
Consultez ce tableau pour les solutions aux problèmes mineurs.
Toute réparation ou entretien autres que ceux décrits dans le manuel de l’utilisateur doivent être réalisés par
le service après-vente LGE local.
AVERTISSEMENT
Risque de choc électrique et de blessures corporelles.
Débranchez toujours l’aspirateur avant d’effectuer une réparation. Le non respect de cette
consigne peut provoquer un choc électrique ou des blessures corporelles.
PROBLEME CAUSE EVENTUELLE SOLUTION EVENTUELLE
L’aspirateur ne fonctionne
pas
Faible aspiration
L’indicateur LED sur le
tuyau est allumé
Indicateur
Débranché de la prise •
murale
Le tuyau n’est pas •
correctement connecté au
corps de l’appareil
Le bac à poussière n’est •
pas installé correctement
Tuyau, tube, brosse •
engorgés
Bac à poussière et ltres •
pleins ou engorgés
Bac à poussière pas •
correctement installé
Tuyau, tube, brosse •
engorgés
Le bac à poussière est •
plein
L’appareil est allumé sans •
le bac à poussière
La plaque tournante dans •
le bac à poussière est
restreinte car engorgée
Assurez-vous que le câble soit branché à •
la prise murale.
Retirez le tuyau du corps de l’appareil et •
reconnectez-le correctement.
Assurez-vous que tous les éléments et •
ltres du bac à poussière soit correctement
installés.
Vériez les engorgements•
Videz le bac à poussière et nettoyez les •
ltres.
Assurez-vous que tous les éléments •
et ltres du bac à poussière soient
correctement installés.
Vériez les engorgements•
Videz le bac à poussière •
Replacez le bac à poussière •
Retirez les engorgements•
Le bruit émis par l’unité est
plus fort que d’habitude
Tuyau, tube, brosse •
engorgés
Vériez les engorgements•
Page 66

22
RESOLUTION DES PROBLEMES
PROBLEME CAUSE EVENTUELLE SOLUTION EVENTUELLE
Odeur de moisi ou
inhabituelle
L’agitateur ne tourne pas
Odeur du nouveau moteur •
Filtres vieux et sales •
Le ltre mousse ou le ltre •
d’entrée du moteur est
mouillé
L’interrupteur est éteint •
(unité en mode sol brut)
La brosse est •
déconnectée du tuyau
La protection de •
surcharge de l’agitateur
est déclenchée
(la brosse est en panne)
Courroie cassée•
Le tube est déconnecté du •
tuyau
L’odeur du nouvel aspirateur devrait •
disparaître dans 1-2 mois.
Videz le bac à poussière et nettoyez les •
ltres.
Séchez entièrement le ltre mousse et •
le ltre d’entrée du moteur à l’abri de la
lumière du soleil.
Allumez l’interrupteur de l’agitateur. •
Connectez correctement le tuyau au tube. •
Débranchez l’aspirateur et vériez les •
éventuels engorgements de l’agitateur et
réinitialisez l’unité.
Remplacez la courroie.•
Connectez correctement le tube au tuyau.•
Page 67

LG Customer Information Center
1-800-243-0000
1-888-865-3026
1-888-542-2623
USA, Consumer User
USA, Commercial User
CANADA
Register your product Online!
www.lg.com
Made in Korea
 Loading...