

LG LBUR0552QC, LBNR0552QC Owner’s Manual
AIR
CONDITIONER
Please read this manual carefully before operating
your set and retain it for future reference.
TYPE : Ceiling Duct-type Air Conditioner
For Single Ceiling Ducted models
P/No : MFL37347405_v3
CUSTOMER CARE
1800-180-3575 (Toll Free)
CALL
Regd. Office : LG Electronics India Pvt. Ltd., A Wing (3rd Floor), D-3, District Center, Saket, New Delhi - 110017
12 x 7
(9:00 AM – 9:00 PM)
www.lg.com/in/support
CLICK
cac.service@lgepartner.com
MFL37347405
To know more about LG, visit www.lg.com
For Corporate/Instutional enquiries,
please write to enquiries@lgindia.com


Ceiling Duct-Type Air Conditioner Owner’s Manual
TABLE OF CONTENTS
F or Your Records
Write the model and serial numbers here:
Model #
1. Safety Precautions ..............3
2. Operating Instructions .........9
3. Care and Maintenance.......26
4. Before you call for service...29
Serial #
You can find them on a label on the side of each unit.
Dealer's Name
Date Purchased
R
ead This Manual
Inside you will find many helpful hints on how to use
and maintain your air conditioner properly. Just a little
preventive care on your part can save you a great
deal of time and money over the life of your air
conditioner.
You'll find many answers to common problems in the
chart of troubleshooting tips. If you review our chart of
Troubleshooting Tips first, you may not need to call
for service at all.
CAUTION
• Contact the authorized service technician for repair
or maintenance of this unit.
• Contact the installer for installation of this unit.
• The air conditioner is not intended for use by young
children or invalids without supervision.
• Young children should be supervised to ensure that
they do not play with the air conditioner.
• When the power cord is to be replaced, replacement
work shall be performed by authorized personnel
only.
• Installation work must be performed in accordance
with the national wiring standards by authorized
personnel only.
2
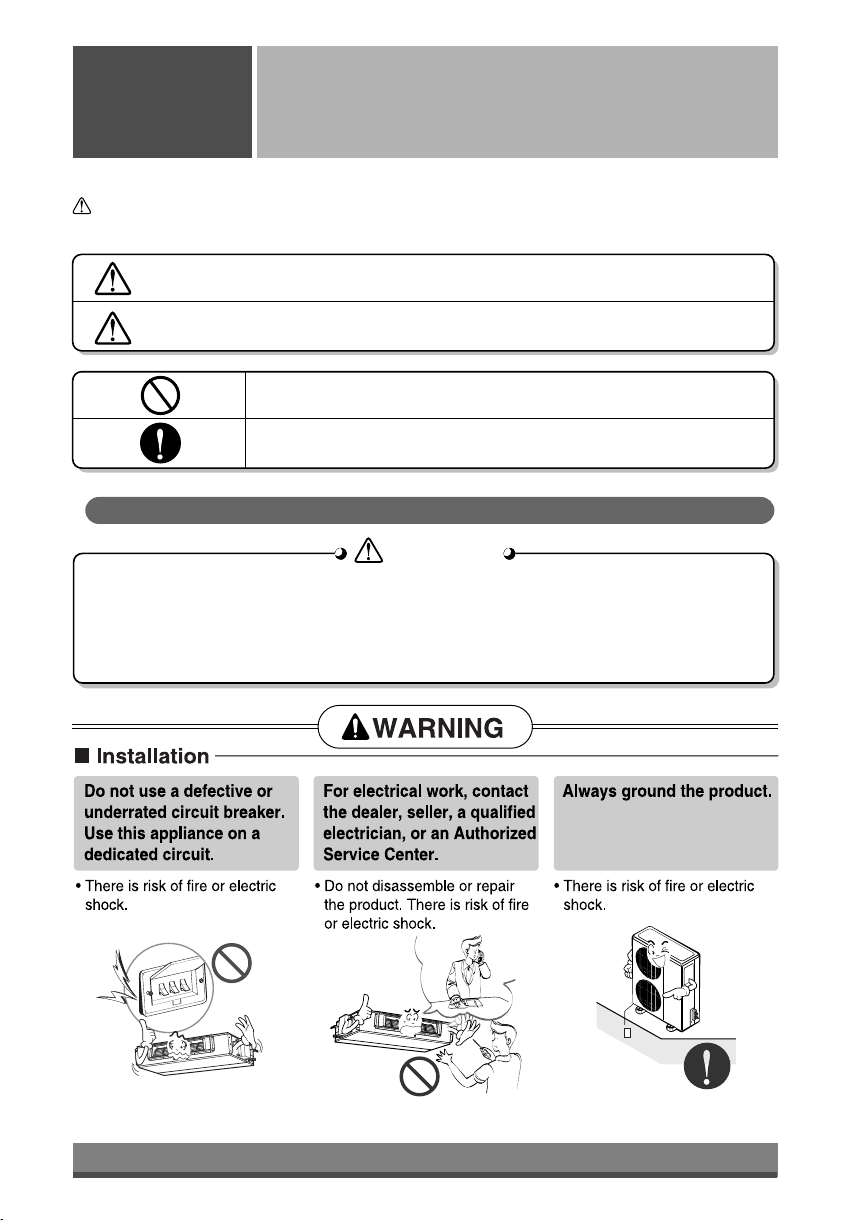
Safety
Precautions
To prevent injury and property damage, follow these instructions.
Incorrect operation due to ignoring instructions will cause harm or damage, the seriousness of which is
indicated by the following symbols.
Precautions
WARNING
CAUTION
This symbol shows the possibility of death or serious injury.
This symbol indicates the possibility of injury or damage to property.
Never Do This
Always Do This
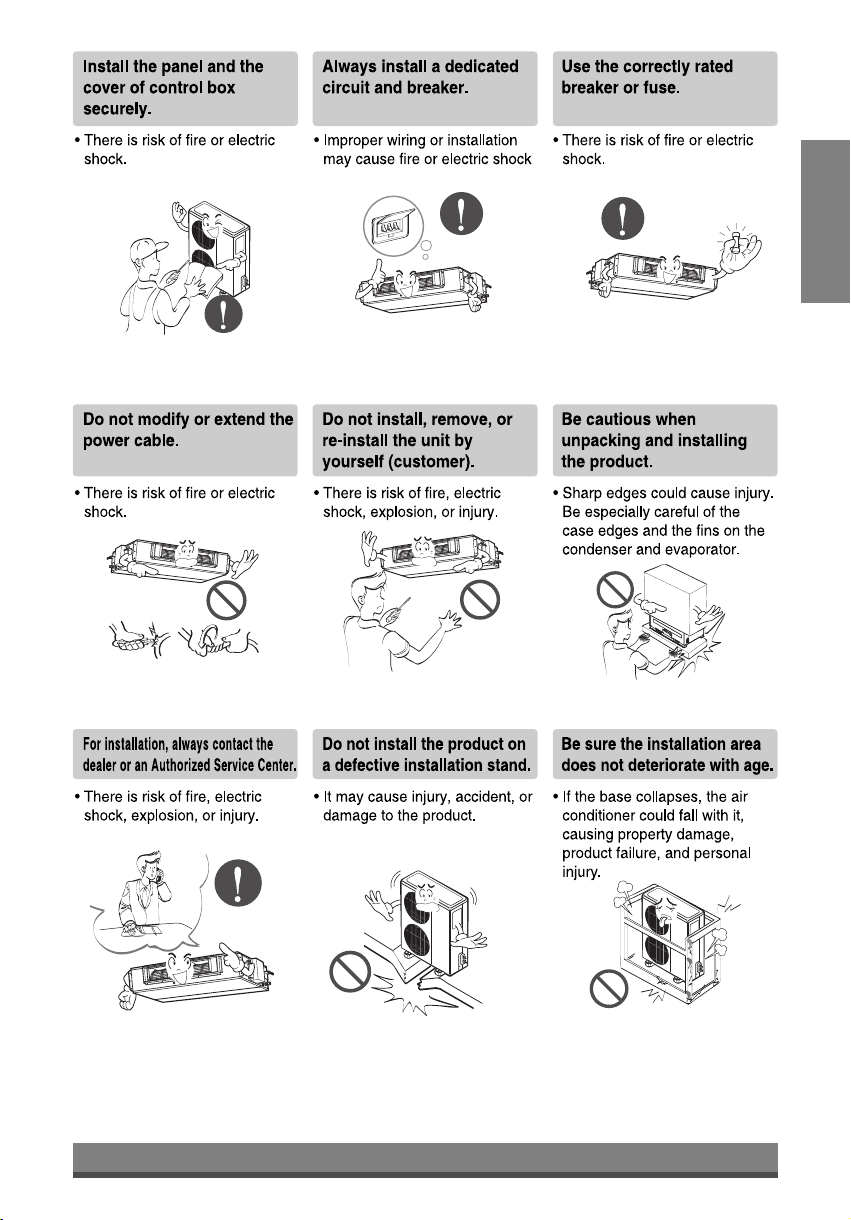
Installation precautions
WARNING
WARNING
n
Do not install, remove and reinstall the unit by yourself.
• Improper installation will cause water leakage, electrical shock, or fire. Please consult
authorized dealer or specialist for the installation work. Please note fault caused by improper
installation is not covered by warranty.
• Unit must be installed in an easily accessible area. Any additional cost required to hire a
special equipment to service the unit will be the responsibility of the customer.
3
ENGLISH
4
5
ENGLISH
6
7
ENGLISH
8
Operating
Instructions
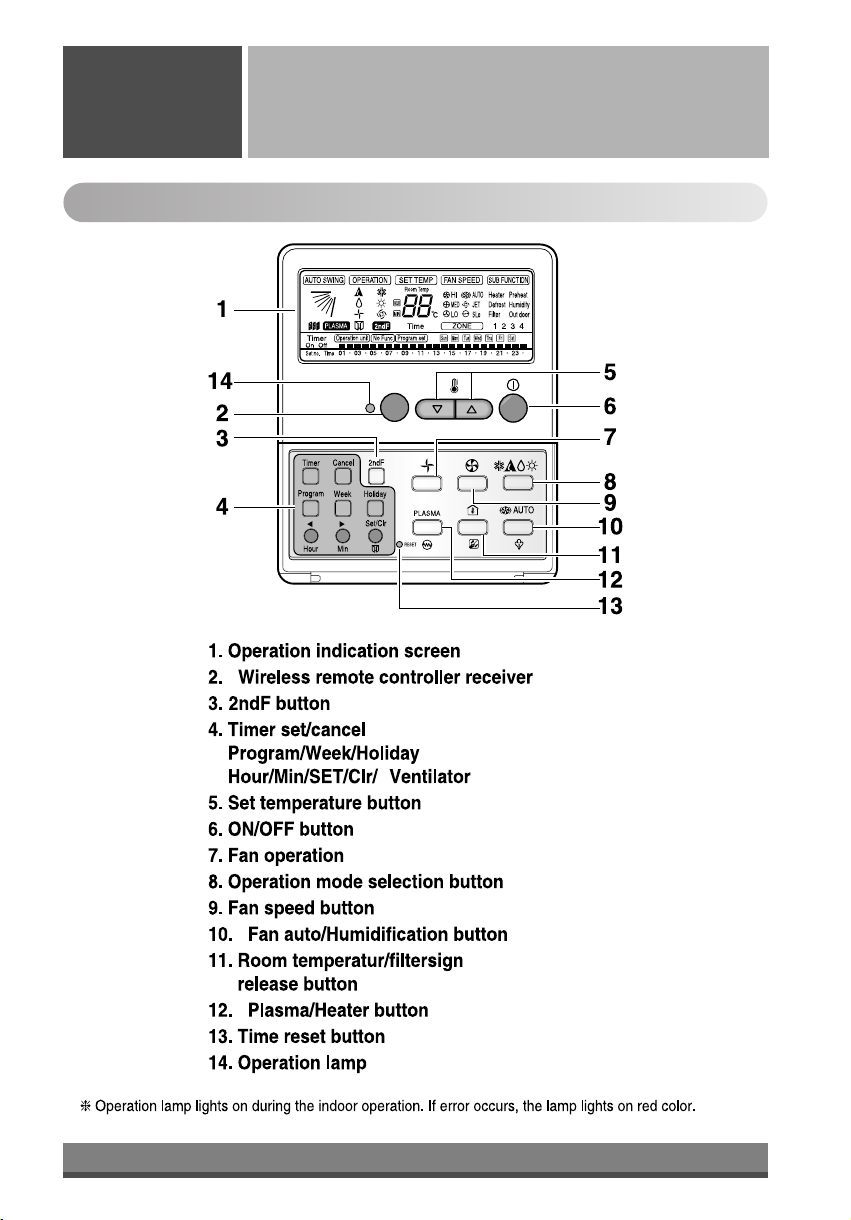
Operating Instructions
Name and Function of Remote Controller
Optional feature.
•
•
(For number of COMP selection)
*
•
•
(optional)
9
(optional)
(optional)
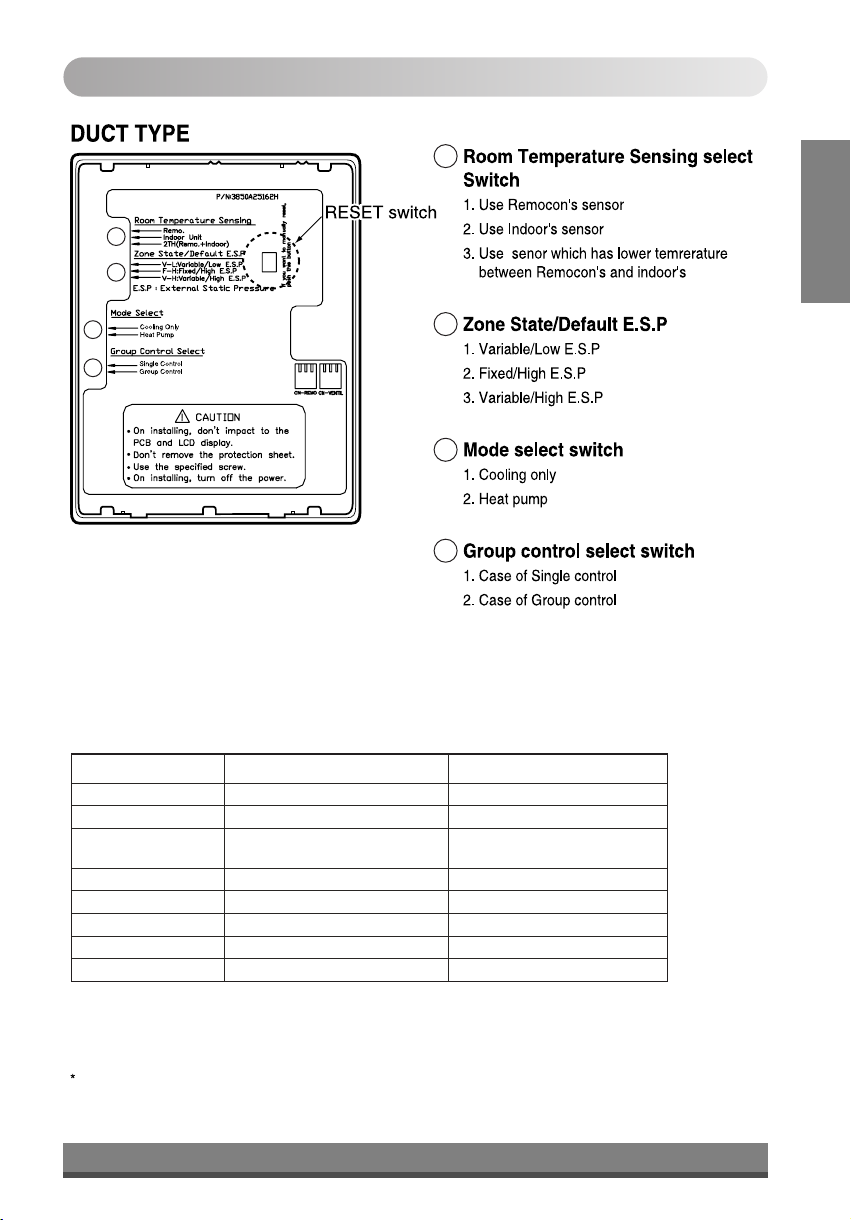
Information of Slide Switch
1
2
3
4
IDU Fan Speed Provision
1
ENGLISH
2
3
(optional)
4
(optional)
Model IDU Fan Speed
LB-G0308QC 3 Speed (Hi, Low and Medium)33K BTU/h
LB-G0307QC 3 Speed (Hi, Low and Medium)36K BTU/h
LB-R0551QC /
LB-R0552QC
LB-80851QC 3 Speed (Hi, Low and Medium)102K BTU/h
LB-80852QC
LB-81100QC 3 Speed (Hi, Low and Medium)132K BTU/h
LB-81101QC 3 Speed (Hi, Low and Medium)132K BTU/h
LB-K1700QC 3 Speed (Hi, Low and Medium)204K BTU/h
When changing the product selection switch and group control switch, you must press the reset switch to use
the changed selection.
Capacity
66K BTU/h
102K BTU/h
3 Speed (Hi, Low and Medium)
3 Speed (Hi, Low and Medium)
10
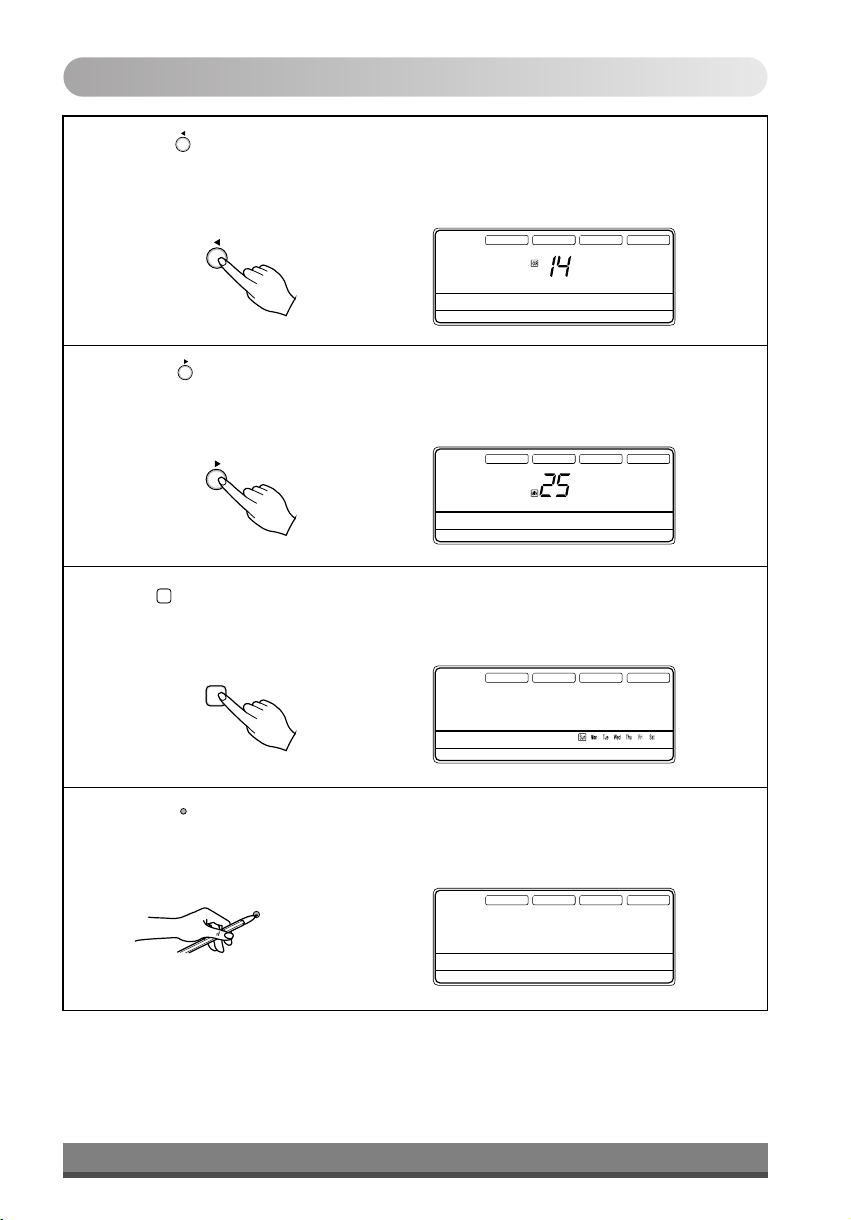
Set the Current Time and a day of the Week
Press the ' ' button.
1
Hour
Each time the button is pressed, the number is changed from 00 to 23.
You can set the number of the current hour.
AUTO SWING
OPERATION
SET TEMP
Room Temp
Press the ' ' button.
2
Hour
Operation unit Program set
Timer
On
Off
01 03 05 07 09 11 13 15 17 19 21 23
Set no. Time
Min
Time
Each time the button is pressed, the number is increased from 00 to 59.
You can set the number of the current minute.
AUTO SWING
OPERATION
SET TEMP
Room Temp
Min
Week
Press ' ' button.
Operation unit Program set
Timer
On
Off
01 03 05 07 09 11 13 15 17 19 21 23
Set no. Time
Time
3
Each time the button is pressed, a day of the week is shifted from sunday to saturday.
You can set the day of the week.
Week
AUTO SWING
OPERATION
SET TEMP
Room Temp
Operation unit Program set
Timer
On
Off
01 03 05 07 09 11 13 15 17 19 21 23
Set no. Time
Time
FAN SPEED
HI
MED
LO
ZONE
FAN SPEED
HI
MED
LO
ZONE
FAN SPEED
HI
MED
LO
ZONE
SUB FUNCTION
AUTO
Heater
JET
Defrost
Filter
1 2 3 4
SUB FUNCTION
AUTO
Heater
JET
Defrost
Filter
1 2 3 4
SUB FUNCTION
AUTO
Heater
JET
Defrost
Filter
1 2 3 4
Preheat
Humidify
Out door
Preheat
Humidify
Out door
Preheat
Humidify
Out door
Press the ' ' button.
RESET
4
If you want to reset the current time and a day of the week, click the Reset button.
AUTO SWING
OPERATION
SET TEMP
RESET
11
Operation unit Program set
Timer
On
Off
01 03 05 07 09 11 13 15 17 19 21 23
Set no. Time
Room Temp
Time
FAN SPEED
HI
MED
LO
ZONE
SUB FUNCTION
AUTO
Heater
Defrost
JET
Filter
1 2 3 4
Preheat
Humidify
Out door
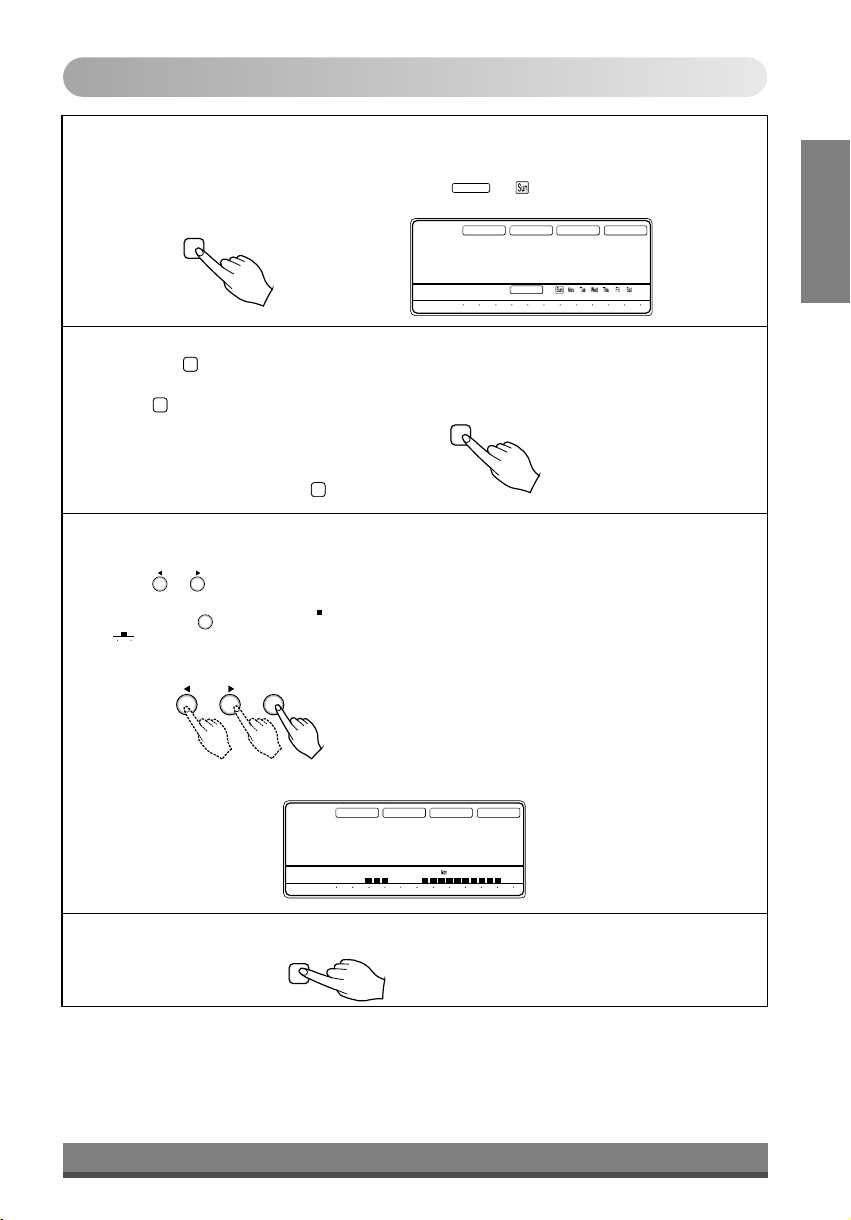
Weekly Programming
Press the Program button.
1
The remote controller is displayed like a picture. Then ' ', ' ' and '01' is blinked.
Program
Program set
AUTO SWING
OPERATION
SET TEMP
Room Temp
Operation unit
Timer
On
Off
01 03 05 07 09 11 13 15 17 19 21 23
Set no.
Time
Time
Program set
FAN SPEED
HI
MED
LO
ZONE
SUB FUNCTION
AUTO
Heater
JET
Defrost
Filter
1 2 3 4
Preheat
Humidify
Out door
ENGLISH
Press the ' ' button.
Week
2
Week
Press button repeatedly until desired mode appears.
For example, if you want Thu, press button 4 times.
Week
Week
Select the time you want.
3
Press or button, then blinking letter is shown.
If you press button, then ' ' shape appears.
unit
05
' ' shape means that five o'clock is reserved.
Using below buttons, you can reserve time.
* For example, the air-conditioner is on 6,7,8 and 13~22 o'clock.
MinHour
SET/CLR
MinHour
SET/CLR
AUTO SWING
OPERATION
SET TEMP
Room Temp
Time
Operation unit
Timer
On
Off
01 03 05 07 09 11 13 15 17 19 21 23
Set no.
Time
Program set
FAN SPEED
HI
MED
LO
ZONE
SUB FUNCTION
AUTO
Heater
JET
Defrost
Filter
1 2 3 4
Preheat
Humidify
Out door
Press the Program button again to finish weekly programmining.
4
Program
12
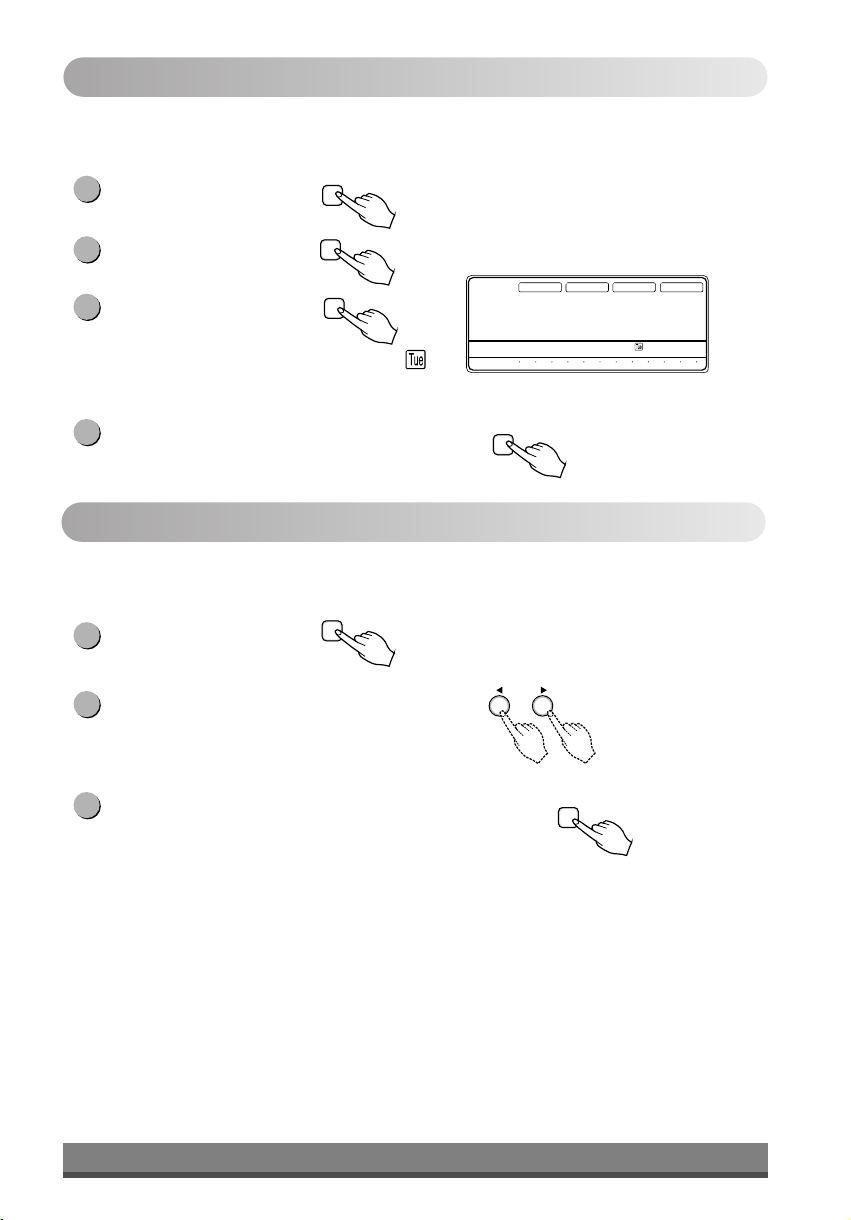
Holiday Setting
If Tuesday is a holiday in this week, you may set a holiday.
Press the Program button.
1
Press the Week button.
2
Select the Tuesday.
Press the Holiday button.
3
Program
Week
Holiday
Then the remote controller will be displayed ' '.
The outside rectangular means holiday.
Press the Program button again to finish holiday setting.
4
Timer Setting (Delay start/Pre-set stop)
This function is used to turn on or turn off in several hours.
Press the Timer button
1
to turn Timer on or off.
2
Change the timer setting until the desired time is set.
Timer
AUTO SWING
OPERATION
SET TEMP
Room Temp
Time
Timer
On
Off
Set no.
Program
Operation unit
Time
Program set
01 03 05 07 09 11 13 15 17 19 21 23
MinHour
FAN SPEED
HI
MED
LO
ZONE
SUB FUNCTION
AUTO
Heater
Defrost
JET
Filter
1 2 3 4
Preheat
Humidify
Out door
If you want to cancel the timer setting, press the Cancel button.
3
Note :- •
ON Timer is available when unit is OFF.
•
OFF Timer is available when unit is ON.
It starts counting time after Timer was set.
•
Timer can be set upto 24 hours.
•
13
Cancel
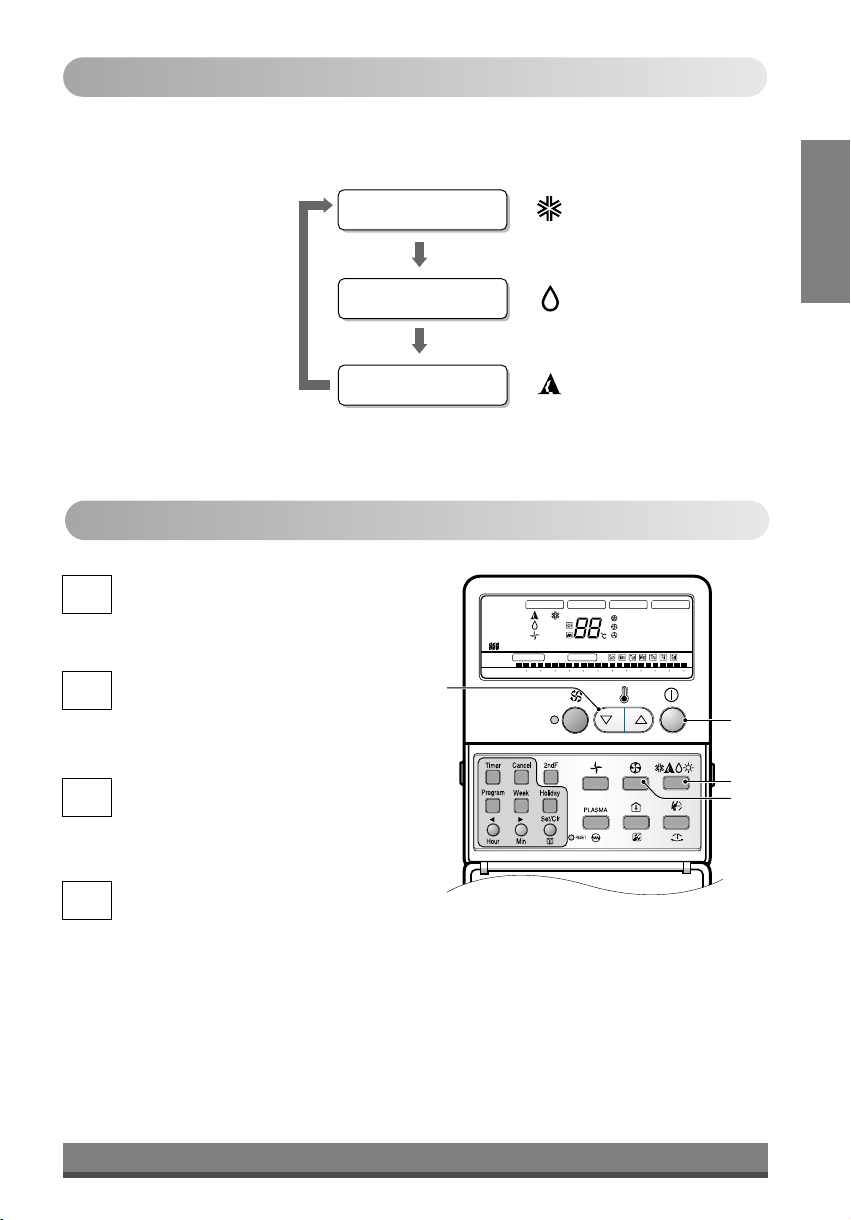
Operation Mode
Operation Procedure
On/Off Button
1st
Operation Mode Selection Button
2nd
Cooling Mode
Soft Dry Mode
Auto Mode
3
AUTO SWING OPERATION
Timer
On
Off
Set no. Time
SET TEMP
Room Temp
Time
Program set
Operation unit
01 03 05 07 09 11 13 15 17 19 21 23
FAN SPEED
HI
MED
LO
SUB FUNCTION
Filter Out door
1 2 3 4
ENGLISH
1
Room Temperature Setting Button
3rd
Indoor Fan Speed Selection Button
th
4
2
4
14
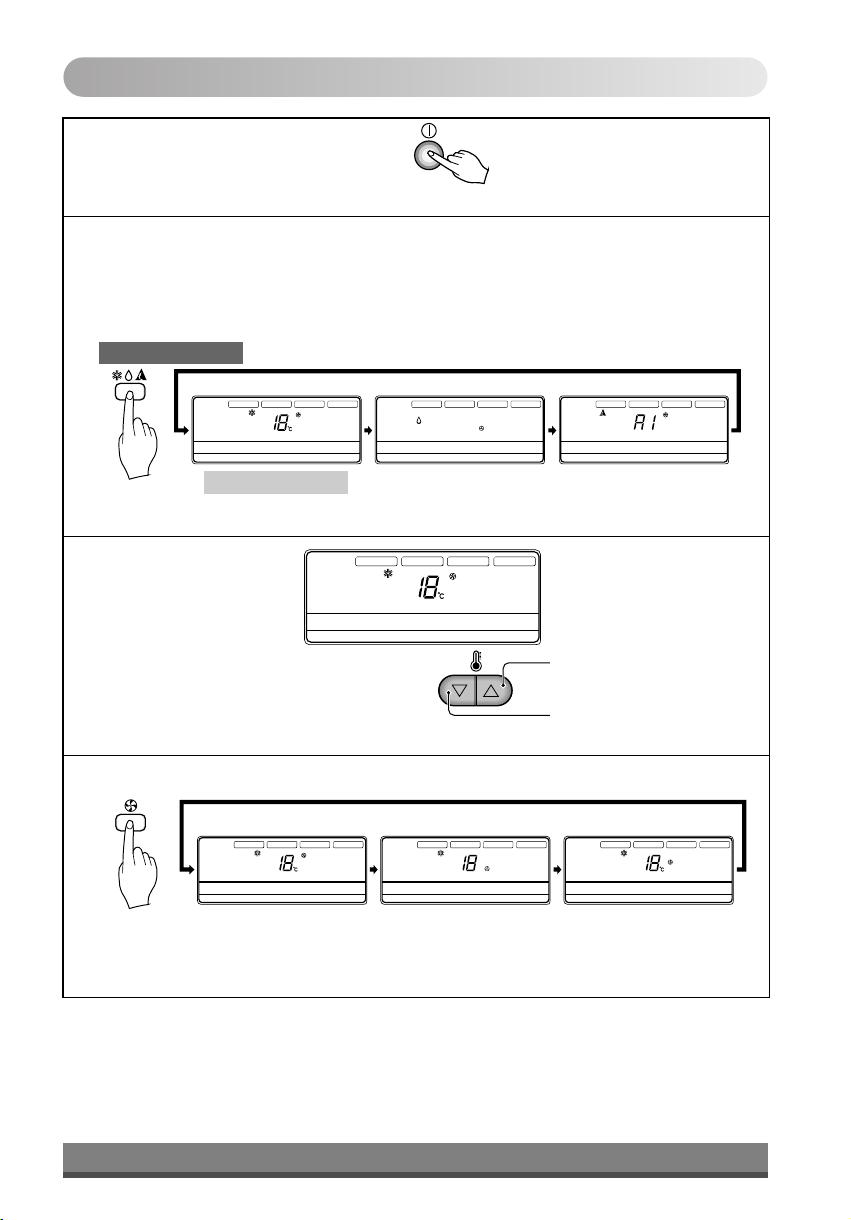
Cooling Operation Mode
Press the On/Off Button.
1
Select Cooling Operation.
2
Press the Operation Mode Selection Button.
Each time the button is pressed, the operation mode is shifted in the arrow direction.
COOLING MODEL
Operation Display
AUTO SWING
Set the temperature
3
lower than the room
temperature.
OPERATION
Operation unit Program set
Timer
On
Off
01 03 05 07 09 11 13 15 17 19 21 23
Set no. Time
Cooling Operation Soft Dry Operation
SET TEMP
Room Temp
FAN SPEED
SUB FUNCTION
HI
MED
LO
ZONE
Time
AUTO SWING
AUTO
JET
Timer
On
Set no. Time
AUTO SWING
Heater
Preheat
Defrost
Humidify
Filter
Out door
1 2 3 4
Off
Operation unit Program set
Timer
On
Off
01 03 05 07 09 11 13 15 17 19 21 23
Set no. Time
OPERATION
SET TEMP
Operation unit Program set
01 03 05 07 09 11 13 15 17 19 21 23
OPERATION
Room Temp
Time
SET TEMP
Room Temp
FAN SPEED
HI
MED
LO
ZONE
FAN SPEED
HI
AUTO
MED
JET
LO
ZONE
Time
SUB FUNCTION
AUTO
Heater
JET
Defrost
Filter
1 2 3 4
SUB FUNCTION
Heater
Preheat
Defrost
Humidify
Filter
Out door
1 2 3 4
• The temperature can be set
Preheat
Humidify
Out door
To raise the Temperature.
AUTO SWING
OPERATION
Operation unit Program set
Timer
On
Off
01 03 05 07 09 11 13 15 17 19 21 23
Set no. Time
SET TEMP
Room Temp
FAN SPEED
HI
MED
LO
ZONE
Time
SUB FUNCTION
AUTO
Heater
Defrost
JET
Filter
1 2 3 4
Preheat
Humidify
Out door
Auto Operation
within a range of 18°C ~ 30°C
by 1°C .
Set the fan speed.
4
Operation Display
AUTO SWING
OPERATION
Operation unit Program set
Timer
On
Off
01 03 05 07 09 11 13 15 17 19 21 23
Set no. Time
• Select the fan speed in three steps- high, low, medium.
• The display shows high fan speed.
• Each time the button is pressed, the fan speed mode is shifted.
SET TEMP
Room Temp
FAN SPEED
HI
MED
LO
ZONE
Time
SUB FUNCTION
AUTO
Heater
JET
Defrost
Filter
1 2 3 4
Preheat
Humidify
Out door
AUTO SWING
OPERATION
SET TEMP
Room Temp
Operation unit Program set
Timer
On
Off
01 03 05 07 09 11 13 15 17 19 21 23
Set no. Time
15
FAN SPEED
HI
MED
LO
ZONE
Time
To lower the Temperature.
SUB FUNCTION
AUTO SWING
AUTO
Heater
Preheat
JET
Defrost
Humidify
Filter
Out door
1 2 3 4
OPERATION
Operation unit Program set
Timer
On
Off
01 03 05 07 09 11 13 15 17 19 21 23
Set no. Time
SET TEMP
Room Temp
FAN SPEED
HI
MED
LO
ZONE
Time
SUB FUNCTION
AUTO
Heater
JET
Defrost
Filter
1 2 3 4
Preheat
Humidify
Out door
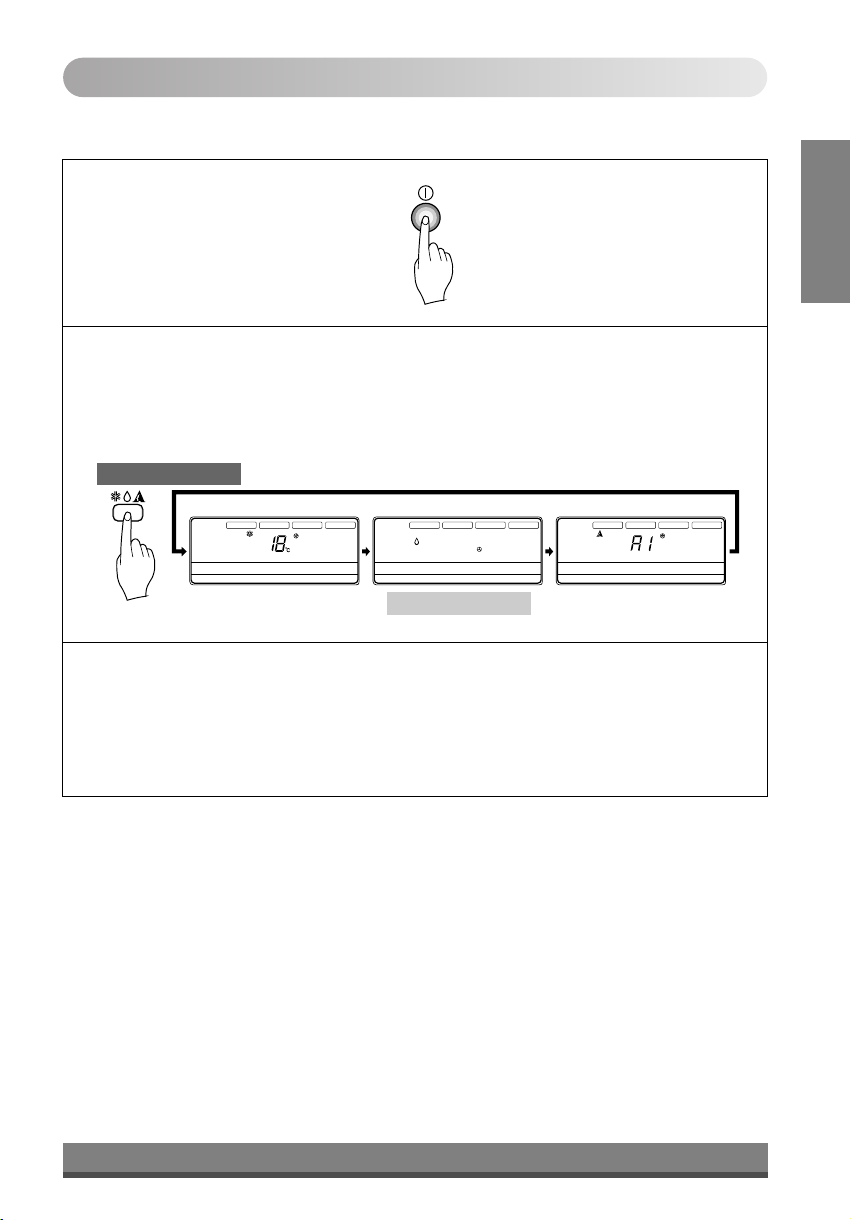
Soft Dry Operation Mode
This mode dehumidifies without overcooling.
Press the On/Off Button.
1
Select Soft Dry Operation.
2
Press the operation Mode Selection Button.
Each time the button is pressed, the operation mode is shifted in the arrow direction.
COOLING MODEL
Operation Display
AUTO SWING
OPERATION
Operation unit Program set
Timer
On
Off
01 03 05 07 09 11 13 15 17 19 21 23
Set no. Time
Cooling Operation
SET TEMP
Room Temp
FAN SPEED
HI
MED
LO
ZONE
Time
SUB FUNCTION
AUTO
Heater
JET
Defrost
Filter
1 2 3 4
AUTO SWING
Preheat
Humidify
Out door
OPERATION
Operation unit Program set
Timer
On
Off
01 03 05 07 09 11 13 15 17 19 21 23
Set no. Time
SET TEMP
Room Temp
FAN SPEED
HI
MED
LO
ZONE
Time
SUB FUNCTION
AUTO
Heater
JET
Defrost
Filter
1 2 3 4
Preheat
Humidify
Out door
AUTO SWING
Timer
On
Set no. Time
Soft Dry Operation Auto Operation
OPERATION
SET TEMP
Room Temp
Operation unit Program set
Off
01 03 05 07 09 11 13 15 17 19 21 23
During Soft Dry Operation.
3
• The indoor fan speed is automatically set to the low, so the shift of the indoor fan speed is
impossible because it's already being set to the best speed for Dry Operation by Micom
Control.
FAN SPEED
HI
MED
LO
ZONE
Time
SUB FUNCTION
AUTO
Heater
JET
Defrost
Filter
1 2 3 4
Preheat
Humidify
Out door
ENGLISH
16
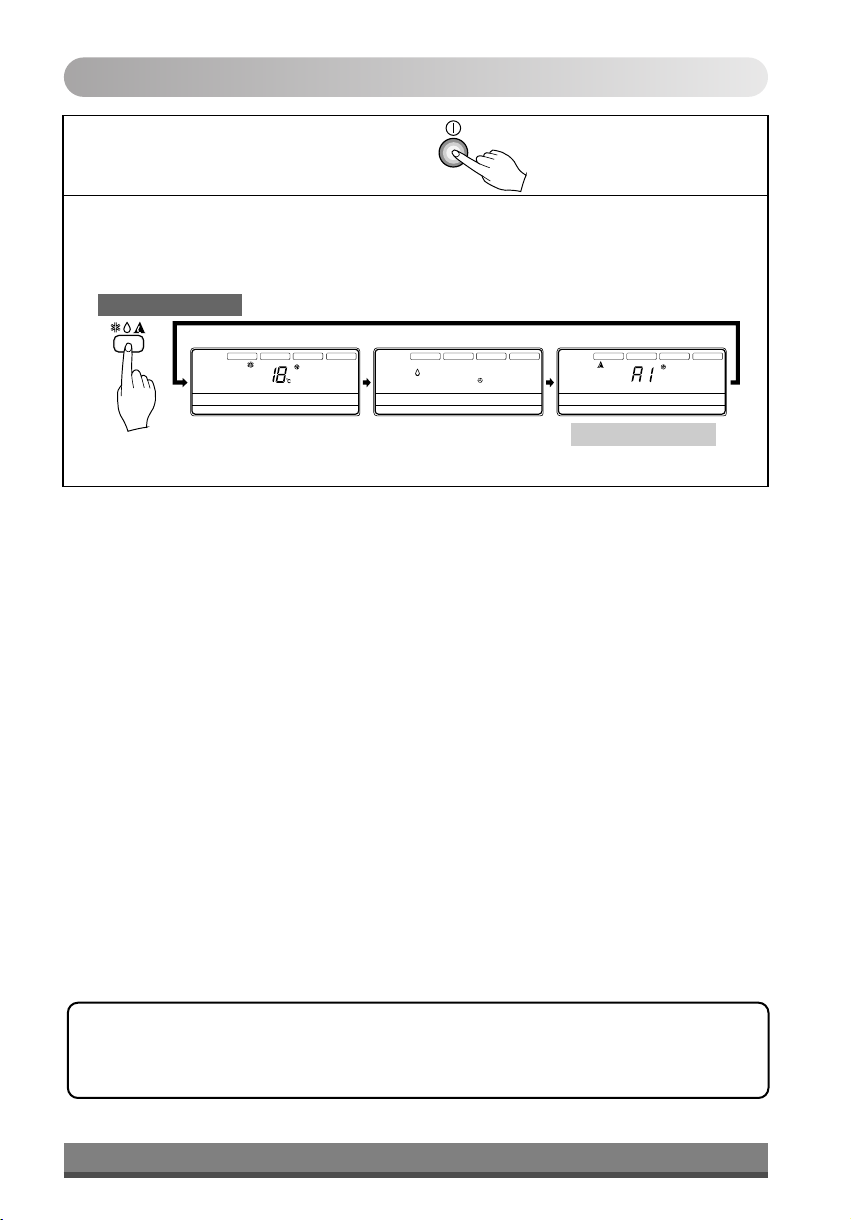
Auto Operation Mode
Press the On/Off Button.
1
To select Auto Operation , press the Operation Mode Selection button.
2
Each time the button is pressed, the operation mode is shifted in the direction of the arrow.
COOLING MODEL
Operation Display
AUTO SWING
OPERATION
Operation unit Program set
Timer
On
Off
01 03 05 07 09 11 13 15 17 19 21 23
Set no. Time
Cooling Operation
SET TEMP
Room Temp
FAN SPEED
HI
MED
LO
ZONE
Time
SUB FUNCTION
AUTO
Heater
JET
Defrost
Filter
1 2 3 4
Preheat
Humidify
Out door
AUTO SWING
OPERATION
Operation unit Program set
Timer
On
Off
01 03 05 07 09 11 13 15 17 19 21 23
Set no. Time
SET TEMP
Room Temp
FAN SPEED
HI
MED
LO
ZONE
Time
SUB FUNCTION
AUTO
Heater
JET
Defrost
Filter
1 2 3 4
Preheat
Humidify
Out door
AUTO SWING
Operation unit Program set
Timer
On
Off
01 03 05 07 09 11 13 15 17 19 21 23
Set no. Time
Soft Dry Operation Auto Operation
OPERATION
SET TEMP
Room Temp
FAN SPEED
HI
MED
LO
ZONE
Time
SUB FUNCTION
AUTO
Heater
JET
Defrost
Filter
1 2 3 4
Preheat
Humidify
Out door
During Auto Operation:
q You can switch the indoor fan speed.
q The system will automatically switch from the cooling mode to the heating mode as the room temperature
and set temperature.(Heat pump model only)
17
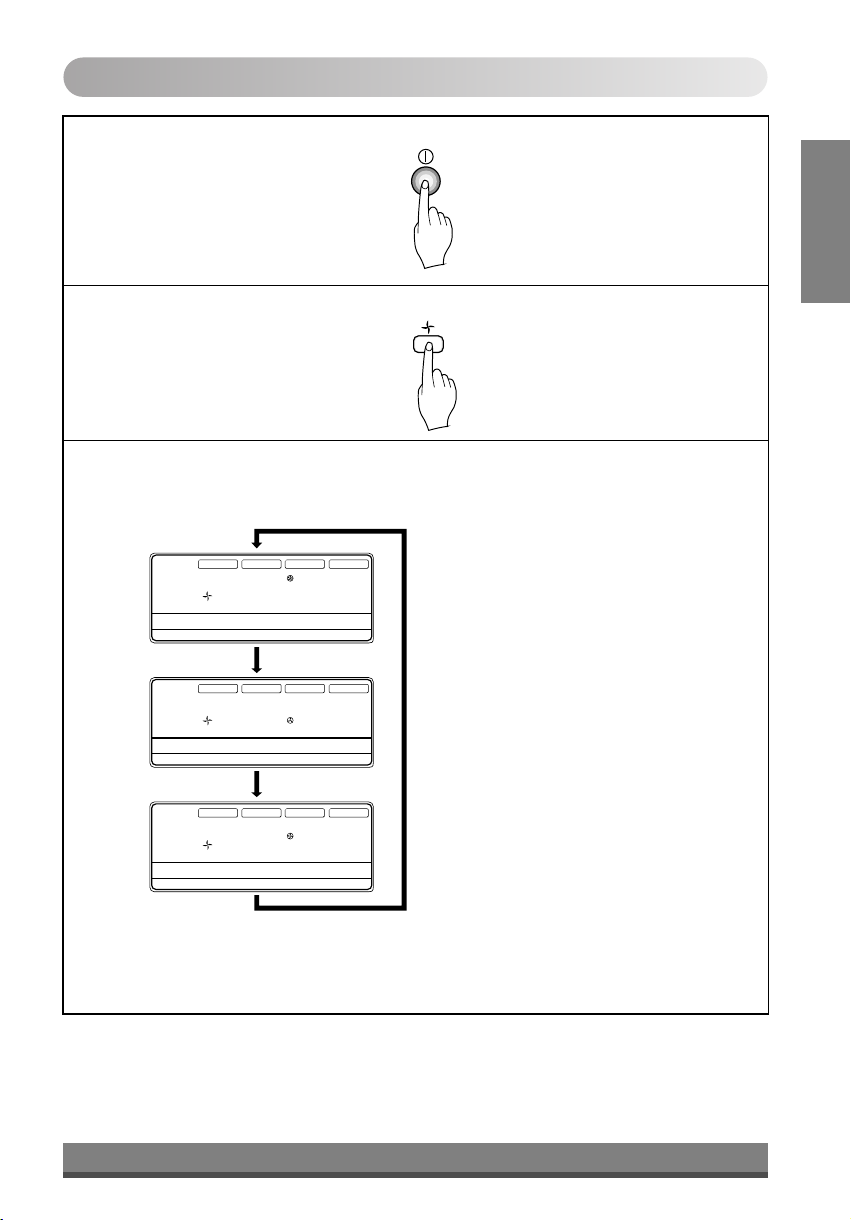
FAN Operation
Press the On/Off Button.
1
Press FAN Operation Button.
2
Each time Indoor Fan Speed button is pressed, the fan speed mode is shifted in the
3
arrow direction.
AUTO SWING
OPERATION
Operation unit Program set
Timer
On
Off
01 03 05 07 09 11 13 15 17 19 21 23
Set no. Time
SET TEMP
Room Temp
FAN SPEED
HI
MED
LO
ZONE
Time
SUB FUNCTION
AUTO
Heater
JET
Defrost
Filter
1 2 3 4
Preheat
Humidify
Out door
• Fan speed is high.
ENGLISH
AUTO SWING
OPERATION
Operation unit Program set
Timer
On
Off
01 03 05 07 09 11 13 15 17 19 21 23
Set no. Time
AUTO SWING
OPERATION
Operation unit Program set
Timer
On
Off
01 03 05 07 09 11 13 15 17 19 21 23
Set no. Time
SET TEMP
Room Temp
SET TEMP
Room Temp
FAN SPEED
HI
MED
LO
ZONE
Time
FAN SPEED
HI
MED
LO
ZONE
Time
SUB FUNCTION
AUTO
Heater
JET
Defrost
Filter
1 2 3 4
SUB FUNCTION
AUTO
Heater
JET
Defrost
Filter
1 2 3 4
Preheat
Humidify
Out door
Preheat
Humidify
Out door
• Fan speed is low.
• Fan speed is medium.
* You can't set the temperature in Fan Operation mode. To exit this mode, press 'Operation Mode' button.
18
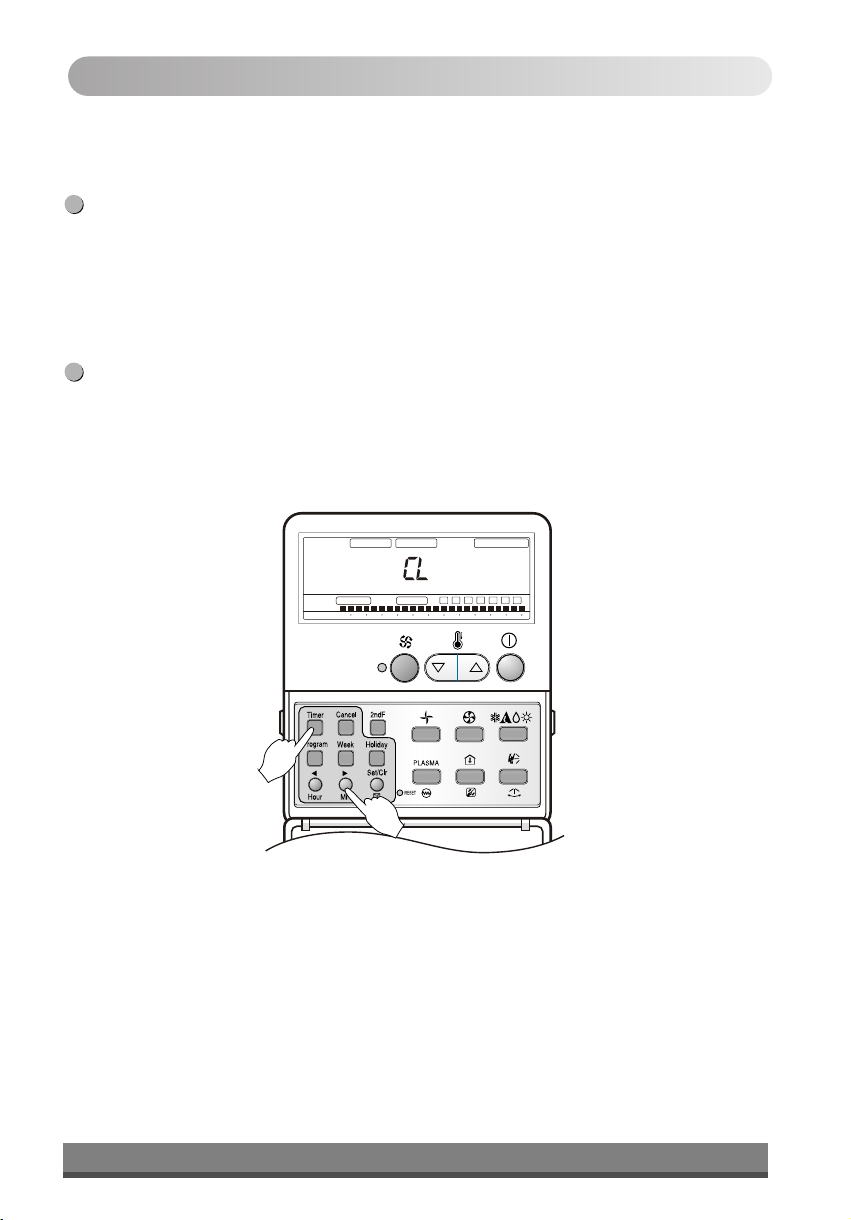
Child Lock Function
This is the Function that any children cannot used to the air-conditioner.
Operation procedure
To set the Child-Lock Function
1
Press the Timer button and Minute Set button for three seconds. Then the
operation mode shift to child lock mode and it is displayed ‘CL’ in the operation
display.
When you press any button in this time, the remote controller is not converted to
any selected mode and the ‘CL’ is displayed in the remote controller for about
three seconds. But the Room Temperature function is operated in spite of child
lock mode.
2
To cancel the Child-Lock Function
Press the Timer button and Minute Set button for three seconds. Then the
child-lock mode is cancelled and the preselected mode is displayed in the
remote controller.
OPE RATI ON
SE T T EMP
Ti mer
On Of f
Se t no. Tim e
Operation unit
Program s et
01 03 05 0 7 09 11 1 3 15 1 7 19 21 2 3
Sun Mon Tu e
SU B F UN CT IO N
Wed
Thu
Fri Sa t
19
 Loading...