

Page 1

LG Customer Information Center
For inquires or comments, visit www.lge.com or call;
1-800-243-0000 USA, Consumer User
1-888-865-3026 USA, Commercial User
1-888-542-2623 CANADA
Register your product Online!
www.lge.com
Page 2

ENGLISH
Please read this manual carefully before operating
your set and retain it for future reference.
P/NO.: MFL67783510
www.lg.com
Page 3

3
4
4
4
5
............................................................................................
Connection
Control Panel
Temperature Control
Quick Freezer
ECO Model
Loose-Fitting Door Alarm
Self Test
Removal And Installation Of Detachable Glass Shelf
Removal And Installation Of Drawer In Refrigeration Compartment........
Removal And Installation Of Drawer In Freezing Compartment..............
Ice Preparation.........................................................................................
CARE AND MAINTENANCE.....................................................................
Foodstuff Storage ....................................................................................
During Move ...........................................................................................
Refrigeration Operation Features ............................................................
Anti-Condensation Tube .........................................................................
...................................................
........................
......................................
5
6
7
7
8
8
8
9
9
10
10
10
11
11
12
12
13
13
13
14
15
.......................................................
............................................................................
SMART DIAGNOSIS(Option)....................................................................
17
18
20
2
Page 4

CAUTION
Failure to do so can result in death or brain
damage.
Indicates an imminently hazardous
situation which, if not avoided, may
result in minor or moderate injury, or
product damage only.
3
Page 5

Failure to do so can result in back or other
injury.
Failure to do so can result in death,
explosion, or fire.
WARNING
known to the State of California to cause cancer
and birth defects or other reproductive harm.
Wash hands after handling.
to cause cancer and birth defects or other reproductive harm. Wash hands after handling.
: This product contains chemicals
This product contains chemicals known to the State of California
4
Page 6

Failure to follow these instructions can result
in death, fire, or electrical shock.
Supply Cord Replacement
If the supply cord is damaged, it must be
replaced by the manufacturer or its service
agent or a similarly qualified person in order
to avoid a hazard.
5
Page 7

Universal section
(not in all models)
(not in all models)
Removable glass shelf
refrigeration system
Vitamin Plus system
(not in all models)
vegetables and fruits
Separator for foodstuffs
(not in all models)
freezing compartment
Display
LED lamp
Multi-flow
Drawer for
Ice tray
Drawers of
Section for dairy products
(not in all models)
Egg tray
Door baskets
Separator for bottles
(not in all models)
Door basket for 2L bottles
Height-adjustable foot
Note
If you find some parts missing from your unit, they
may be parts only used in other models.
6
Page 8

CONNECTION
• Install the limit stops to the upper corners
on the rear wall of the refrigerator as shown
in Fig.1. The stops are supplied in the door
basket inside the refrigeration compartment;
• Choose the suitable place. Locate the
refrigerator in a place convenient for its
use;
• The refrigerator is not a built-in appliance.
Free space not less than 5 cm should be
provided from above, from its rear and side
faces for air circulation and reduction of
power consumption. Fig.2;
• Do not install the refrigerator near heat
sources and in a zone exposed to direct
sunlight or high humidity;
• Make sure that electrical voltage indicated
in the manual meets the parameters of
your mains;
• Do not remove the round stickers on the
rear side of the refrigerator.
They have a decorative function closing
the fabrication holes;
• To exclude vibration, check the refrigerator
installation using a level. If necessary, turn
the adjustable feet to compensate irregularity
of the floor.
To ensure better closing of the door, the
refrigerator should be slightly inclined
backwards. To turn the adjustable feet,
slightly incline the refrigerator.
• Before use, carefully wash the refrigerator;
• Install the removable parts, such as ice tray,
etc. to the appropriate places.
It is necessary to prevent possible damages
during transportation;
• Insert the power cord plug to the power
outlet. Do not power other electric appliance
from the same outlet.
forward backward
Figure 1. Installation of limit stops
Figure 2. Installation of refrigerator to wall
NOTE
The limit stops are located in the door basket of
the refrigeration compartment.
They should be installed to get higher operational
efficiency of the refrigerator.
After first installation of the refrigerator, let it
work for 2-3 hours for stabilization of the
operating temperature inside and only then
fill the refrigerator with fresh or frozen
foodstuffs. After disconnection of the
refrigerator from the mains, wait at least 5
minutes to switch on it again. Now, the
refrigerator is ready for service.
7
Page 9

CONTROL PANEL
External light-emitting-diode (LED) display
Temperature control in
freezing compartment
Quick freeze/
Economy mode
Temperature control in
refrigeration compartment
LED display lock button
Loose-fitting door alarm
Internal display
Eco Friendly
Quick freeze Temperature control in
freezing compartment
Temperature control
in refrigeration compartment
Economy mode
TEMPERATURE CONTROL
The initial temperature in the refrigeration and freezing compartments is 3 °C and -20 °C,
respectively.
If you wish, you can change it pushing the temperature control button of the appropriate compartment.
External LED display
The actual inner temperature varies depending on the food status, as the indicated
NOTE
Internal LED display
setting temperature is a target temperature, not actual temperature within refrigerator.
Refrigeration function is weak in the initial time.
Please adjust temperature as above after using refrigerator for minimum 2~3 days.
QUICK FREEZE
It is used, if it is necessary to quickly freeze foodstuffs. Push once the "Quick freeze/Economy mode"
button (on the external display) or "Quick freeze" button (on the internal display).
The "QUICK FREEZE" lamp will light up and quick freezing will be started. Quick freeze takes about
24 hours.
8
Page 10

Upon completion of this operation, the state (earlier set temperature mode).
If you wish to stop the quick freeze operation,push again twice the "Quick freeze/Economy
mode" button (on the external display) or once the "Quick freeze" button
(on the internal display).The lamp will extinguish, the quick freeze operation will be stopped,
and the refrigerator will return to the previous state (previous temperature mode).
External LED display Internal LED display
ECO MODE
It activates the power saving mode, which is convenient in the event of your long departure.
It allows you to reduce power consumption. Push twice the "Quick freeze/Economy mode"
button (on the external display) or once the "Economy mode" button (on the internal display).
The lamp will light up (ECO MODE).Repeated pushing of the button deactivates this function.
External LED display Internal LED display
To activate the "ECO MODE", push the "Quick freeze/Economy mode" button.
Third pushing of the button deactivates both modes and the refrigerator returns to the previous
temperature mode.
NOTE
When the "ECO MODE" is activated,other buttons are inoperative.
Push the "ECO MODE" button to return thea ppliance to the previous temperature mode.
For power saving, the external display is switched to the energy conservation
mode – backlighting of all indicators except for "LOCK" extinguishes.
LOOSE-FITTING DOOR ALARM
• If the refrigerator door is opened for some time (30 sec), the alarm is activated;
• You can enable and disable the loose-fitting door alarm shortly pushing the "ALARM"
button (not in all models);
• If the alarm continues to sound even after closure of the door, contact the service center.
External LED display
on off on
"LOCK" (for models with LED display)
• When the "LOCK" button is activated, other buttons are inoperative;
• To lock/unlock the refrigerator display, push the "LOCK" button and hold it for 3 seconds.
Lock Unlock Unlock
NOTE
In the event of power cutoff, the mode settings are kept.
9
Page 11

SELF-TEST
The display has a self-test function.
If the refrigerator has a failure, the buttons
become inoperative and the indicator shows
the error code. In this case, do not switch
off power and immediately contact the local
service center.
If you switch off the refrigerator, a service
engineer may need much time to find the
faulty element.
REMOVAL AND INSTALLATION OF
DETACHABLE GLASS SHELF
To remove a shelf from the refrigerator, first
slightly raise it (1) and then pull (2). Improper
removal may result in damage of internal
parts in the refrigerator.
REMOVAL AND INSTALLATION OF
DRAWER IN REFRIGERATION
COMPARTMENT
To remove the lower drawer from the
refrigeration compartment, proceed as follows:
• Remove the lower basket from the door
raising the basket;
• Pull the drawer all the way out raising it by
the front part and pulling;
• Raise the drawer cover by the front part
and pull to remove it;
To install a shelf to the refrigerator, proceed
in the same way: first raise the front edge of
the shelf (3) and then push it to the
refrigerator (4). Improper installation may
result in damage of internal parts in the
refrigerator.
1
• To install the drawer back, proceed in the
reverse sequence.
At that, you should take care to exclude slant.
Improper removal and installation may result
in damage of internal parts in the refrigerator.
10
Page 12

NOTE
The guarantee does not cover mechanical
damages (cracks, shears, dents, traces of
enclosure opening, etc.) caused by
violation of the refrigerator storage,
transportation, operation, and
maintenance rules, application of
excessive force.
REMOVAL AND INSTALLATION OF
DRAWERS IN FREEZING
COMPARTMENT
When a large quantity of foodstuffs is stored
in the freezing compartment, you can remove
the middle drawer from the appliance and
store foodstuffs immediately on foodstuffs
placed to the lower drawer.
To remove any drawer of the freezing
compartment, proceed as follows:
1. Pull the drawer all the way out;
2. Raise it by the front part and pull.
2
1
2
1
3
Do not apply excessive force to remove the
drawers and shelves – this may result in
damage of the refrigerator.
ICE PREPARATION
Fill the ice tray with water and place it to
the freezing compartment.
If ice cubes are required as soon as possible,
activate the "QUICK FREEZE" function.
To remove ice cubes, hold the tray on ends
and slightly bend it.
To install any drawer back to the freezing
compartment, proceed in the reverse
sequence:
1. Place the drawer onto the guides at
an angle 45°;
2. Lower the front part of the drawer in
parallel to the guides;
3. Push the drawer all the way in.
At that, you should take care to exclude
slant.
CAUTION!
Connect to potable water supply only.
To easily remove cubes, water the tray in
advance.
11
Page 13
CARE AND MAINTENANCE
FOODSTUFF STORAGE
• Do not store food which goes bad easily at
low temperature, such as banana, and melon.
• Allow hot food to cool prior to storing.
Placing hot food in the fridge-freezer could
spoil other food, and lead to higher electric bills.
• When storing the food, use a container
with a lid. This prevents moisture from
evaporating, and helps food to keep its
taste and nutrients.
• Do not block air vents with food.
Smooth circulation of cold air keeps
fridge-freezer temperature even.
• Do not open the door frequently. Opening
the door lets warm air enter the fridge-freezer,
and cause temperature to rise.
• To adjust the temperature control easily,
do not store food near the temperature
control dial.
• Never keep too many foods in door rack,
as this may stop the door from fully closing.
• Do not store bottles in the freezer
compartment - they may break when frozen.
• Do not refreeze food that has been thawed.
This causes loss of taste and nutrition.
• If it is necessary to quickly freeze fresh
foodstuffs, place them to the lower drawer
of the freezing compartment and push
the "QUICK FREEZE" button;
• Frozen foodstuffs should be stored packed
(in polyethylene film, aluminum foil, etc.) in
the freezing compartment;
• Volume of the upper drawer in the freezing
compartment is the "two stars" section.
Temperature inside this section does not
rise above -12°C. This should be taken into
account for storage of foodstuffs.
CLEANING
1. Before cleaning, make sure that power
supply is switched off;
2. Outside and inside, the refrigerator should
be washed with a clean napkin wetted in
warm water with a liquid detergent.
Then wipe dry with a dry napkin;
3. After cleaning, make sure that the power
cord is not damaged.
Then tightly insert the plug to the power
outlet.
1.
It is prohibited to use abrasive materials,
gasoline, benzene, solvents, hydrochloride,
hot water, hard brushes, etc., which may
damage the refrigerator surface.
2. For products with a stainless steel exterior,
use a clean sponge or soft cloth and a
mildDetergent in warm water.
Do not use abrasive or harsh cleaners.
Dry thoroughly with a Soft cloth.
Do not use appliance wax, bleach, or other
products containing chlorine on stainless
steel.
VITAMIN PLUS (OPTIONAL)
It contains anti-oxydant that is able to avoid
oxidation process in order to make the fruits
and vegetables fresh for longer time.
This part contains anti-oxydant substance that
should not be eaten.Opening and closing the
door too much often can reduce its lifetime.
12
Page 14

CARE AND MAINTENANCE
GENERAL
Electric power failure.
• An interruption in electric power supply for
1-2 hours will not harm the stored foodstuffs.
Try to less frequently open and close the
refrigerator door during this period.
DURING MOVE:
• Remove all foodstuffs and other objects
from the refrigerator. Firmly secure the
internal detachable parts
(shelves, drawers, door baskets);
• To avoid damage of the floor and adjustable
feet of the refrigerator, turn them
counter-clockwise before transportation;
• The refrigerator should be firmly secured in
the truck to prevent its hits and falling
inside the truck during transportation;
• The refrigerator should be transported in
vertical position in a covered vehicle.
The original package should not be
damaged during transportation;
• During loading and unloading, the
refrigerator should be protected against hits.
BEFORE SWITCHING ON:
• If the refrigerator is transported in cold
season, unpack the refrigerator in a warm
room and do not switch on it for at least
12 hours.
NOTE
If you keep the fridge-freezer in a hot, and
humid place, frequently opening
the door or putting a lot of vegetables in it may
cause condensation to form.
This has no effect on its performance.
Remove the condensation with a dry, dust-free
cloth.
If droplets form beneath the cover of the
vegetable drawer,keep vegetables or fruits
wrapped with plastic wrap.
REFRIGERATOR OPERATION FEATURES
Cracking noise may be heard due to thermal
deformations of the refrigerator components.
Typical sounds from activation of the
thermostatic controller and compressor are
normal sounds occurring during operation of
electric equipment in the appliance.
The refrigerant circulating inside the
refrigeration system may calmly gurgle,
even if the compressor is idle.
Do not worry, this is absolutely normal.
The following sounds may be heard during
operation of the refrigerator:
- Clicks from actuation of the temperature
sensor/switch;
- Murmur of the refrigerant circulating in tubes
of the refrigeration system;
- Slight cracking noise from thermal
deformations of materials.
These sounds are not associated with any
defect and they have a functional aspect.
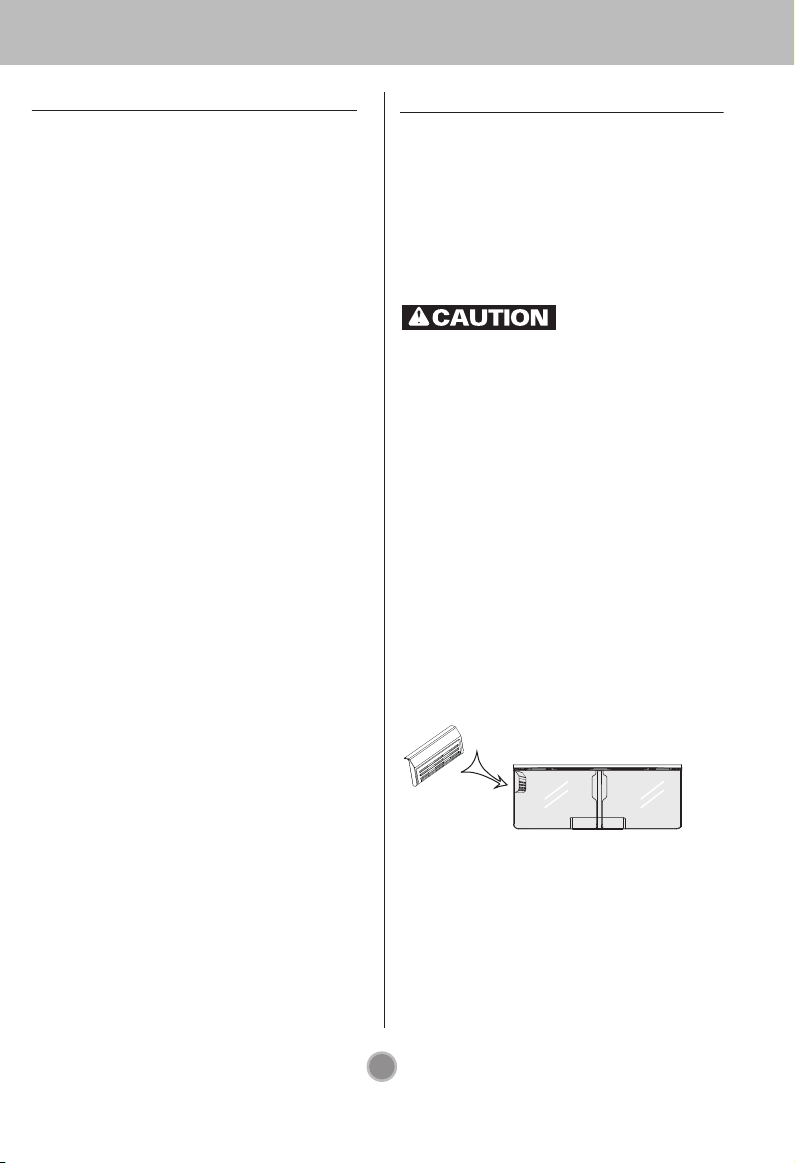
ANTI-CONDENSATION TUBE:
• The anti-condensation tube is laid inside
the enclosure around the front face of the
refrigerator to exclude moisture
condensation;
• The refrigerator may greatly heat up in
these places, especially immediately after
switching on for the first time or at high
ambient temperature.
Anti-condensation tube
Do not move or incline the refrigerator during
its operation.
Noise may occur in the compressor.
This feature does not affect operability of
the compressor.
Dry ice is very cold! Do not allow it to touch
bare skin. It is well below °F and will cause
immediate frostbite and damage to the skin
and other tissue.
Dty ice frozen carbon dioxide. Use only in a
well ventilated area.As the ice releases carbon
dioxode vapor,it could cause light-headedness,
fainting,suffocation, or death.
13
Page 15

Failure to do so can result in death, explosion,
or fire.
14
Page 16

REHINGING OF DOORS
The refrigerator is designed so that the doors
can be opened right or left depending on the
layout of your kitchen.
CAUTION!
1. Prior to hinging the door to the opposite
side, first of all unload the refrigerator from
foodstuffs and remove all unsecured
accessories (shelves and drawers) from it.
2. To tighten and loose bolts, use a socket
wrench or a box wrench for 10 mm.
3. Do not lay the refrigerator onto the floor.
4. Take care to exclude dropping of the door
in the process of disassembly or assembly.
Remove the plastic bushing from the
door of the refrigeration compartment .
Unscrew the screw located above the
10
6
А
door of the refrigerator and move the door
9
stop to the opposite side. Tighten the
10
screw . Move the plastic bushings
14
and (only for models with an internal
6
display) to the opposite side.
14
7
A
5
1.
Unscrew the screw of the upper hinge
2
cover to remove the hinge cover and
disconnect the connection cable
5
(only for models with an external display).
Unscrew the bolts fixing the upper
4
hinge and carefully remove the door
from the middle hinge .
Remove the blank .
8
Remove the upper door cover
2.
3
18
8
For external
2
1
3
4
A
display
5
7
(only for models with an external display),
pull out the cable and install it to the
5
hole on the opposite side of the door.
Install the upper door cover into place.
7
11
(Only for models with an external display).
3.
9
10
6
Using a flat screwdriver, push and separate
the caps from the front panel
12
and unscrew the screws , remove the
11
panel , move the cable to the
11
13
15
opposite side. After installation of the
11
panel into place, tighten the screws
and close their heads with the caps .
15
8
11
12
13
4.
Unscrew the bolts of the middle hinge,
17
13
12
remove the middle hinge and raise the door
of the freezing compartment to remove
the door. Remove the blank and install
it instead of the removed middle hinge .
B
19
18
15
Page 17

Unscrew the dowel of the lower hinge
22
23
turning it counter-clockwise and screw the
dowel into the opposite hole. Unscrew the
24
bolts fixing the lower hinge and
25
bolt on the refrigerator enclosure.
Unscrew the screw on the lower part of
10
the door fixing the door closer of the
freezing compartment . Unscrew the
10
screw on the lower part of the door fixing
the door stop of the freezing
compartment , move the stop to the
9
В
23
29
В
9
opposite side into the dedicated place and
fix it. Rehinge the closer to the opposite
29
side into the dedicated place and fix it.
Move the upper cap to the opposite side.
19
25
5. Attach the removed lower hinge to the
26
16
18
17
26
B
9
10
29
23
22
24
23
holes located on the opposite side of the
enclosure and fix the hinge with the bolts .
Tighten the screw in the enclosure on the
25
24
opposite side. Install the door of the freezing
compartment onto the lower hinge
dowel . Unfold the removed middle
hinge with its axis out and fix the hinge
with the bolts (tighten the bolts carefully
В
23
18
17
to exclude scratching of the door). Install the
washer onto the middle hinge .
16
18
18
20
B
22
23
9
6. Install the door of the refrigeration
compartment aligning the hole in the
A
lower part of the door and middle
hinge dowel . Then install the upper
hinge supplied in the refrigerator
18
27
package placing the dowel into the
appropriate upper hole in the door of the
refrigeration compartment . Connect the
cable connectors (only for models with an
5
external display). Fix the upper hinge
using the bolts . Install the left cover of
the upper hinge and fix it with the
screw . Install the blank supplied in
2
3
29
A
27
28
the refrigerator package.
2
29
3
27 5
28
For external display
10
After Completing the job
Make sure that the four corners of the door gasket are not folded.It is recommended to
apply a small amount of sillicon grease on them.
Adjust the leveling screw on the bottom to the highest level so that the front side of the
refrigrator is higher than the rear side.
If you need assistance after switching the direction of the door opening as shown above,
call a service center.
Note
Reversing the doors is not covered by the warranty.
16
Page 18

17
Page 19

TROUBLE SHOOTING
18
Page 20

TROUBLE SHOOTING
19
Page 21

SMART DIAGNOSIS(Option)
SMART DIAGNOSIS
Should you experience any problems with
your refrigerator, it has the capability of
transmitting data via your telephone to the LG
service center. This gives you the capability of
speaking directly to our trained specialists. The
specialist records the data transmitted from
your machine and uses it to analyze the issue,
providing a fast and effective diagnosis.
If you experience problems with your
refrigerator, call the phone No. of LG
Customer Information Center. Only use
the Smart Diagnosis feature when instructed
to do so by the LG call center agent. The
transmission sounds that you will hear are
normal and sound similar to a fax machine.
Smart Diagnosis cannot be activated unless
your refrigerator is connected to power. If
your refrigerator is unable to turn on, then
troubleshooting must be done without using
Smart Diagnosis.
Using Smart Diagnosis
First, call the phone No. of LG Customer
Information Center. Only use the Smart
Diagnosis feature when instructed to do so
by the LG call center agent.
Lock the display. (Option)
1
To lock the display, press and hold the
Lock button for three seconds. (If the
display has been locked for over five
minutes, you must deactivate the lock
and then reactivate it.)
Hold the mouthpiece of your phone in
3
front of the speaker that is located on the
right hinge of the refrigerator door, when
instructed to do so by the call center.
Press and hold the Freezer Temperature
4
button for three seconds while continuing
to hold your phone to the speaker.
After you hear three beeps, release the
5
Freezer Temperature button.
Keep the phone in place until the tone
6
transmission has finished. This takes about
15 seconds, and the display will count
down the time. Once the countdown is
over and the tones have stopped, resume
your conversation with the specialist, who
will then be able to assist you in using the
information transmitted for analysis.
NOTE
For best results, do not move the phone
while the tones are being transmitted.
If the call center agent is not able to get
an accurate recording of the data, you
may be asked to try again.
Open the refrigerator door.
2
Lock Unlock Unlock
20
NOTE
Call quality differences by region may
affect the function.
Use the home telephone for better
communication performance, resulting
in better service.
Bad call quality may result in poor data
transmission from your phone to the
machine, which could cause Smart
Diagnosis to not work properly.
 Loading...