

LG Laser Display Owner`s Manual

OWNER'S MANUAL
Laser Display
Please read the safety information carefully before using the product.
HECTO
www.lg.com
2
LICENSE
LICENSE
Manufactured under license from Dolby Laboratories.
"Dolby" and the double-D symbol are trademarks of Dolby
Laboratories.
ABOUT DIVX VIDEO: DivX® is a digital video format created
by DivX, LLC, a subsidiary of Rovi Corporation. This is an
official DivX Certified® device that plays DivX video. Visit divx.
com for more information and software tools to convert your
files into DivX videos.
ABOUT DIVX VIDEO-ON-DEMAND: This DivX
Certified® device must be registered in order to play purchased
DivX Video-on-Demand (VOD) movies. To obtain your
registration code, locate the DivX VOD section in your device
setup menu. Go to vod.divx.com for more information on how
to complete your registration.
DivX Certified® to play DivX® video up to HD 1080p, including
premium content.
DivX®, DivX Certified® and associated logos are trademarks
of Rovi Corporation or its subsidiaries and are used under
license.Covered by one or more of the following U.S. patents:
7,295,673; 7,460,668; 7,515,710; 7,519,274
The terms HDMI and HDMI High-Definition Multimedia
Interface, and the HDMI logo are trademarks or registered
trademarks of HDMI Licensing LLC in the United States and
other countries.
Manufactured under license under U.S. Patent Nos: 5,956,674;
5,974,380; 6,487,535 & other U.S. and worldwide patents
issued & pending. DTS, the Symbol, & DTS and the Symbol
together are registered trademarks & DTS 2.0 Channel is a
trademark of DTS, Inc. Product includes software. © DTS, Inc.
All Rights Reserved.
This device meets the EMC requirements for home appliances (Class B) and is
intended for home usage. This device can be used in all regions.
NOTE
• The product images and On-Screen Display (OSD) in this manual are examples to
help you understand how to operate the product, so they may be different from the
actual Laser Display.
SAFETY INSTRUCTIONS
WARNING/CAUTION
RISK OF ELECTRIC SHOCK
DO NOT OPEN
SAFETY INSTRUCTIONS
Please take note of the safety instructions to prevent any potential accident or misuse
of the Laser Display.
Safety precautions are given in two forms, i.e. Warning and Caution as detailed below.
WARNING: Failure to follow the instructions may cause serious injury and even
death.
CAUTION: Failure to follow the instructions may cause injury to persons or
damage to the product.
Read the owner's manual carefully and keep it to hand.
WARNING/CAUTION
WARNING/CAUTION
RISK OF ELECTRIC SHOCK
DO NOT OPEN
TO REDUCE THE RISK OF
ELECTRIC SHOCK DO NOT
REMOVE COVER (OR BACK).
NO USER SERVICEABLE PARTS
INSIDE. REFER TO QUALIFIED
SERVICE PERSONNEL.
- TO REDUCE THE RISK OF FIRE
AND ELECTRIC SHOCK, DO NOT
EXPOSE THIS PRODUCT TO RAIN
OR MOISTURE.
3
The lightning flash with
arrowhead symbol, within an
equilateral triangle, is
intended to alert the user to the
presence of uninsulated “dangerous
voltage” within the product’s
enclosure that may be of sufficient
magnitude to constitute a risk of
electric shock to persons.
The exclamation point within
an equilateral triangle is
intended to alert the user to
the presence of important operating
and maintenance (servicing)
instructions in the literature
accompanying the appliance.

4
SAFETY INSTRUCTIONS
Read these instructions.
Keep these instructions.
Heed all warnings.
Follow all instructions.
Indoor Installation
WARNING
• Do not place the product in direct
sunlight or near heat sources such as
radiators, fires, stoves, etc.
- This may cause fire.
• Do not place inflammables such as
flammable spray near the product.
- This may cause fire.
• Do not allow children to cling to or
climb up to the product.
- This may cause the product to fall,
causing injury or death.
• Do not place the product directly on a
carpet, rug or place where ventilation
is restricted such as a book shelf or
closet.
- This may cause the product's
internal temperature to rise and
cause fire.
• Do not place the product close to
sources of steam or oil such as a
humidifier or kitchen counter.
- This may cause fire or electric
shock.
• Do not place the product where it
might be exposed to dust.
- This may cause fire.
• Do not use the product in a damp
place, such as a bathroom or a place
exposed to the wind and rain, where
it is likely to get wet.
- This may cause fire or electric
shock.
• Do not allow a tablecloth or curtain to
block the vents.
- This may cause the internal
temperature of the product to rise
and cause fire.
• The distance between the air vent
of the product and the wall should
be more than 30 cm for ventilation
purposes.
- Otherwise, this may cause the
internal temperature of the product
to rise and cause fire.
• When installing the product on a
ceiling, a professional technician
should install it using the authorized
tools. If installed improperly, the
product may fall.
- This may cause personal injury or
property damage. For installation
of the product, please contact the
customer support center.
• If you use a ceiling mounting device,
use adhesive to prevent loosening of
screws, or apply oil or lubricant to the
product, this may cause the case to
crack and the product to fall.
• This may also cause serious personal
injury to the person below the device
(if any) and damage to the product
as well.

SAFETY INSTRUCTIONS
5
CAUTION
• When installing the product on a table
or shelf, be careful not to place it near
the edge.
- This may fall causing injury to
persons or the product malfunction.
Make sure that you use the cabinet
or stand that fits the product.
• Turn off the product, disconnect
it from the power supply and all
connected apparatus before moving
it.
- Otherwise, the power cord may be
damaged causing fire or electric
shock.
• Do not place the product on an
unstable or vibrating surface such as
a wobbly shelf or a slope.
- It may fall or flip and cause injury.
• Be careful not to tip or drop the
product over when connecting
external devices to the product.
- This may cause injury to persons or
damage to the product.
Power
WARNING
• The grounding wire should be
connected.
- Be sure to connect the grounding
wire to avoid damage to the product
or an electric shock when there is a
short circuit.
• If it is not possible to ground the
unit, purchase a circuit breaker and
connect the product to its wall outlet.
• Do not try to ground the product to
the gas pipe, water pipe, lightning
rod, or telephone line, etc.
• The power plug should be inserted
fully into the power outlet.
- An unstable connection may cause
fire.
• Do not place heavy objects on the
power cord.
- This may cause fire or electric
shock.
• Never touch the power plug with a
wet hand.
- This may cause electric shock.
• Do not plug too many devices into
one multi-power outlet.
- This may cause fire due to the
power outlet overheating.
• Remove dust or contaminants around
power plug pins or wall outlets.
- Failure to do so may cause fire.
• To turn off the main power, remove
the power plug, which should be
positioned so it is easy to access for
operation.

6
SAFETY INSTRUCTIONS
CAUTION
• Hold the plug firmly when unplugging.
- A broken wire in the cord may
cause fire.
• Ensure the power cord and plug are
not damaged, modified, severely
bent, twisted, pulled, sandwiched
or hot. Do not use the product if the
power outlet is loose.
- This may cause fire or electric
shock.
• Keep the power cord away from any
heating devices.
- The cord coating may melt and
cause fire or electric shock.
• Place the product where people will
not trip over or tread on the power
cord to protect the power cord and
plug from any damage.
- This may cause fire or electric
shock.
• Do not turn the product on or off
by plugging in the power plug or
unplugging it from the wall outlet.
(Do not use the power plug as a
switch.)
- This may cause electric shock or
product malfunction.
• Do not insert a conductor into the
other side of the wall outlet while the
power plug is inserted into the wall
outlet.
• In addition, do not touch the
power plug immediately after it is
disconnected from the wall outlet.
- This may cause electric shock.
• Only use the official power cord
provided by LG Electronics. Do not
use other power cords.
- This may cause fire or electric
shock.
When in Use
WARNING
• Do not place anything containing
liquid on top of the product, such as
a vase, flower pot, cup, cosmetics, or
medicine; or ornaments, candles, etc.
- This may cause fire or electric
shock, or injury due to falling.
• In the event that there is a heavy
impact on the product or the cabinet
is damaged, switch it off, unplug it
from the power outlet and contact an
authorized service center.
- Failure to do so may cause fire or
electric shock.
• Do not insert pieces of metal, such
as coins, hairpins or metal debris, or
flammable materials, such as paper
or matches, into the product.
- This may cause fire or electric
shock.
• In the event that liquid or a foreign
object falls into the product, switch it
off and unplug it from the power outlet
and contact our service center.
- Failure to do so may cause fire or
electric shock.
• Make sure that a child does not
swallow the batteries when you
replace the old remote control
batteries with new ones. Keep
batteries out of reach of children.
- If a child swallows a battery, consult
a doctor immediately.
• Do not look directly into the lens
when the product is in use. The
strong light may damage your eyes.
• When the product is on or has just
been turned off, avoid touching the
air vent because it will be very hot.
• If there is a gas leak, do not touch
the wall outlet. Open the window for
ventilation.
- A spark may cause a fire or burn.

SAFETY INSTRUCTIONS
7
• Never touch the product or power
cord during thunder or lightning.
- This may cause electric shock.
• Do not use the product near
electronic devices that generate a
strong magnetic field.
• Do not wear the plastic package
used to pack the product around your
head.
- This may cause suffocation.
• Do not touch the product with your
hand for a long time when it is
running.
• When you play a game by connecting
a game console to a product, it is
recommended that you maintain a
distance of more than 1.5 times the
diagonal length of the screen.
• Make sure that the length of
connecting cable is long enough.
- Otherwise, the product may fall
causing personal injury or damage
to the product.
CAUTION
• Do not place a heavy object on the
product.
- It may fall down and cause physical
injury.
• Be careful to protect the lens from
heavy impact during transportation.
• Do not touch the cover glass of the
product.
• Otherwise, the cover glass may be
damaged.
• Do not use any sharp tools on the
product, such as a knife or hammer,
because this may damage the
casing.
• In the event that no image appears
on the screen or no sound is heard,
stop using the product. Switch off
the product, unplug it from the power
outlet and contact our service center.
Failure to do so may cause fire or
electric shock.
• Do not drop anything onto the
product or apply heavy pressure to it.
- This may cause injury to persons or
the product malfunction.
• It is recommended that you maintain
a distance of more than 1.5 - 3 times
the diagonal length of the screen
between your eyes and the screen.
- If you watch the screen at a close
distance for a long time, your
eyesight may become worse.
• When closing the door of the product,
be careful not to jam your finger.
- This may cause injury to persons or
the product malfunction.

8
SAFETY INSTRUCTIONS
• Do not block the light emitted from
the product's lens with a book or a
cover. Long exposure to the light
may melt or burn the object, possibly
causing fire. In addition, the lens may
be overheated and the product may
be damaged by the reflected light.
Stop projecting temporarily or turn off
the power.
• Do not start the product with volume
high.
- High volume may damage hearing.
Be sure to lower the volume before
turning off the product. Raise the
volume gradually after turning on
the product.
• When you go out, place the product
out of reach of pets or other animals,
and unplug it from the wall outlet.
- Otherwise, it may cause short circuit
and fire.
Cleaning
WARNING
• Do not spray water directly to the
product when cleaning. Do not allow
water to get into the product or do not
allow it to get wet.
- This may cause fire or electric
shock.
• In the event that smoke or a strange
smell comes out from the product or
a foreign object falls into the product,
stop using it. Switch off the product,
unplug it from the power outlet and
contact our service center.
- Otherwise, this may cause fire or
electric shock.
• To remove dust or stains on the cover
glass, use an air spray or use a swab
or soft cloth to wipe the glass gently.
CAUTION
• Contact your seller or our service
center once a year to clean the
internal parts of the product.
- If you do not clean the Laser
Display for a long period of time,
dust will accumulate, which may
cause fire or damage to the product.
• When cleaning plastic parts, such as
the product case, unplug the power
first and wipe with a soft cloth. Do
not spray with water or wipe with a
wet cloth. When cleaning the plastic
parts, such as the product case,
do not use cleanser, automobile or
industrial shiner, abrasive or wax,
benzene, alcohol, etc., which can
damage the product.
- This can cause fire, electric shock
or product damage (deformation,
corrosion and damage).
SAFETY INSTRUCTIONS
9
Others
WARNING
• Only a qualified technician can
disassemble or modify the product.
For inspection, adjustment, or repair,
contact your seller or our service
center.
- Otherwise, this may cause fire or
electric shock.
CAUTION
• Make sure you use the same type of
new battery for replacement.
• Do not mix new batteries with old
ones.
- Burst or leaking batteries may
cause fire or electric shock.
• Unplug the power cord if the product
is not used for a long period.
- Accumulated dust may cause
electric shock due to overheating,
ignition, or poor insulation, or fire
due to a short circuit.
• Do not charge the battery using any
devices other than the one provided
with the product.
- This may cause damage to the
battery or fire.
• Dispose of the used battery properly.
- Failure to do so may cause
explosion or fire. The correct
method of disposal may vary
depending on your country or
region. Dispose of the battery
pack according to the appropriate
instructions.
• Do not throw or disassemble the
battery.
- This may cause fire or explosion
due to damage to the battery.
• Always use batteries approved and
certified by LG Electronics.Failure to
do so may cause fire or explosion.
• Store the battery away from metallic
objects, such as keys and paper
clips.
- Excess current may cause a rapid
increase in temperature, resulting in
damage to battery, fire or burns.
• Do not store the battery near any
heat source, such as a heater.
This may cause fire or product
malfunction.
• Do not store it at temperatures higher
than 60°C or in high humidity.
- This may cause explosion or fire.
• Keep the battery out of reach of
children.
- Failure to do so may cause personal
injury or product malfunction.
• Make sure that the battery is installed
correctly.Failure to do so may cause
explosion or fire.
• The battery contains lithium-ion, so it
must be handled with care.
- Failure to do so may cause
explosion or fire.

10
SAFETY INSTRUCTIONS
Eye Care Sensor
WARNING
• Do not poke the sensor with a sharp
object.
- This can damage the sensor and
cause it to malfunction.
Laser
WARNING
• This product contains a laser module.
Do not disassemble or modify the
product as this could be dangerous.
• You risk being exposed to laser
radiation if you manipulate or alter the
product in a way not specified in the
user manual.
• To protect your eyes avoid looking
directly into the bright light from the
unit.
• Please kindly take a 5W 440 - 460nm
Laser protective goggles when you
need direct access the Light, and
do not use sun glasses for the eye
protection.
CAUTION
• Use of controls or adjustments or
performance of procedures other than
those specified herein may result in
hazardous radiation exposure.
• This product is a class 2 laser device
that meets IEC 60825-1.
Laser Display standard: class 2 laser
product
Wavelength: 446 nm
Wave source : Approximately 0.2 mW
Light output: < 24.5 mW
Radiation angle: 66 °
Built-in laser standard:
Class 4 laser module
Wavelength: 435 nm - 455 nm
Light output: approx. 1.6 W x 36
SAFETY INSTRUCTIONS
LASER RADIATION
DO NOT STARE INTO BEAM
CLASS 2 LASER PRODUCT
11
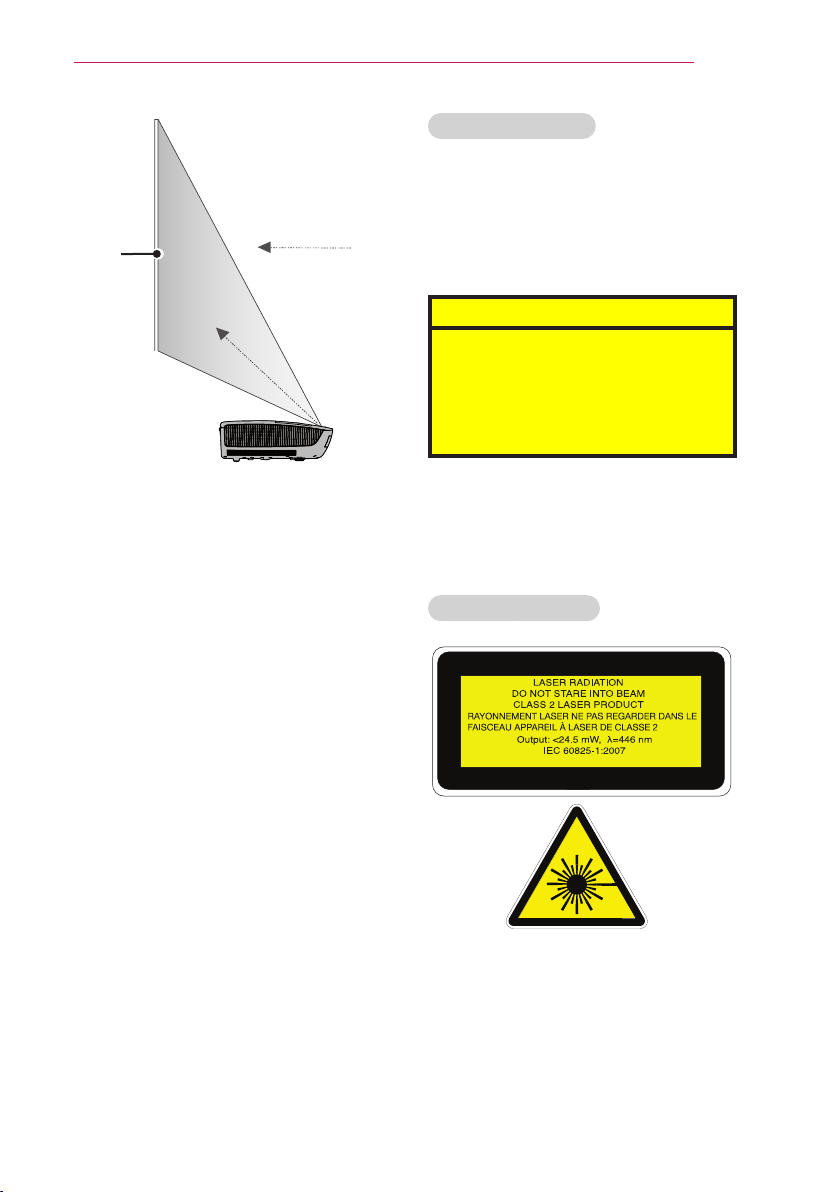
Screen
Viewing direction
Laser beam
direction
- This Laser Display is a Risk Group 2
device that meets safety standard IEC
62471 standard.
Risk Group 2
CAUTION. Possibly hazardous optical
radiation emitted from this product. Do
not
stare at operating lamp. May be
harmful to
The label of Laser Display is attached to
the top of the product.
Laser Display Label
the eye.
Laser warning symbol and danger symbol

12
SAFETY INSTRUCTIONS
FCC NOTICE
Federal Communications
Commission (FCC) Statement
You are cautioned that changes or
modifications not expressly approved
by the part responsible for compliance
could void the user’s authority to operate
the equipment.
This equipment has been tested and
found to comply with the limits for a
Class B digital device, pursuant to
part 15 of the FCC rules. These limits
are designed to provide reasonable
protection against harmful interference
in a residential installation. This
equipment generates, uses and can
radiate radio frequency energy and, if
not installed and used in accordance
with the instructions, may cause harmful
interference to radio communications.
However, there is no guarantee that
interference will not occur in a particular
installation. If this equipment does
cause harmful interference to radio
or television reception, which can be
determined by turning the equipment off
and on, the user is encouraged to try to
correct the interference by one or more
of the following measures:
- Reorient or relocate the receiving
antenna.
- Increase the separation between the
equipment and receiver.
- Connect the equipment into an outlet
on a circuit different from that to which
the receiver is connected.
- Consult the dealer or an experienced
radio/TV technician for help.
1) this device may not cause harmful
interference, and 2) this device must
accept any interference received,
including interference that may cause
undesired operation of the device of the
device.
FCC Caution
Any changes or modifications not
expressly approved by the party
responsible for compliance could void
the user’s authority to operate this
equipment and For indoor use only, use
outdoors or in other modes not covered
by this manual may violate the FCC
regulation and violate the user authority
to use the product. Specially, within the
5.15-5.25 GHz band, U-NII device is
restricted to indoor operations to reduce
any potential for harmful interference to
co-channel MSS operations.
FCC RF Radiation Exposure
Statement:
This equipment complies with FCC
radiation exposure limits set forth for
an uncontrolled environment. End
users must follow the specific operating
instructions for satisfying RF exposure
compliance.

SAFETY INSTRUCTIONS
13
Disposal of your old appliance
1. When this crossed-out wheeled bin
symbol is attached to a product it
means the product is covered by the
European Directive 2002/96/EC.
2. All electrical and electronic products
should be disposed of separately
from the municipal waste stream
through designated collection
facilities appointed by your
government or your local authorities.
3. The correct disposal of your old
appliance will help prevent potential
negative consequences for the
environment and human health.
4. For more detailed information about
disposal of your old appliance,
please contact your city office, waste
disposal service or the shop where
you purchased the product.
Disposal of waste
batteries/accumulators
1. When this crossed-out wheeled
bin symbol is attached to batteries/
accumulators of Your product
it means they are covered by
European Directive 2006/66/EC.
2. This symbol may be combined with
chemical symbols for mercury(Hg),
cadmium(Cd) or lead(Pb) if the
battery Contains more that 0.0005 %
of mercury, 0.002 % of cadmium or
0.004 % of lead.
3. All batteries/accumulators should
be disposed separately from
the municipal waste stream via
designated collection facilities
appointed by the government or the
local authorities.
4. The correct disposal of Your old
batteries/accumulators will help
to prevent potential negative
consequences for the environment,
animal and human health.
5. For more detailed information about
disposal of Your old batteries/
accumulators, please contact Your
city office, waste disposal service or
the shop where You purchased the
product.

14
Table of contents
Table of contents
LICENSE 2
SAFETY INSTRUCTIONS 3
- Indoor Installation 4
- Power 5
- When in Use 6
- Cleaning 8
- Others 9
- Eye Care Sensor 10
- Laser 10
PREPARATION 16
Accessories 16
Optional Accessories 17
Accessories Shipped with Product 17
Parts and Components 18
- Front 18
- Back 19
Status Indicator 20
Installation 21
- Installation Precautions 21
- Projection Distance per Screen Size
22
- Kensington Security System 23
REMOTE CONTROL 24
SETTING UP THE LASER DISPLAY 28
Setting Up the Laser Display 28
- Initial Setup 28
- Watching Laser Display 30
Additional Options 31
- Adjusting the Aspect Ratio 31
- Using the Edge Adj Function 32
- Using the Input List 32
To use SIMPLINK 33
Explanation on SIMPLINK features 34
Using the Quick Menu 34
NETWORK FEATURES 35
NETWORK Settings 35
- One-Click Network Connection 35
- Expert Settings for Network
Connection 35
- Wireless Network Connection 36
- Wireless Network Setup 36
- Tips for Network Setup 37
Using the Wi-Fi Screen Share
Function 38
- Connecting the Wi-Fi Direct 38
Using WiDi 38
- WiDi Setup (Wireless Display) 38
MAGIC REMOTE CONTROL 26
- Pairing the Magic Remote Control 27
- Re-pairing the Magic Remote Control
27
- Using the Magic Remote Control 27
SMARTSHARE™ 39
Before Using 39
- Connecting a USB Device 39
- Removing a USB Device 39
- Connecting DLNA 41
Using SmartShare™ 43
- Watching the Videos 44
- Viewing the Photos 47
- Listening to Music 48
Using the Magical Mirroring Function
49
Running Magical Mirroring 49
- MirrorOp Sender 52

Table of contents
15
CUSTOMIZING SETTINGS 55
Settings 55
PICTURE Settings 56
SOUND Settings 60
TIME Settings 62
OPTION Settings 63
NETWORK Settings 66
CONNECTING EXTERNAL DEVICES 68
Connecting an HD Receiver, DVD
Player, or VCR 69
- HDMI connection 69
- HDMI to DVI Connection 70
Connecting a PC 70
- RGB Connection 70
- HDMI to DVI Connection 71
- RGB to DVI Connection 71
Connecting External Devices 72
- AV Connection 72
Component Connection 72
Connecting Headphones 73
- Headphone Connection 73
Connecting a Laptop 73
- RGB Connection 73
- HDMI connection 74
Using the TRIGGER Port 75
- Motor screen connection 75
MAINTENANCE 85
Cleaning 85
- Cleaning Cover Glass 85
- Cleaning the Laser Display Case 85
Updating the Software 86
SPECIFICATIONS 87
SERIAL COMMUNICATION
FUNCTION 76
Using Serial Communication 76
Establishing Serial Communication 76
Communication Protocol 77
16
HQHUJ\
VHWWLQJV
HGJH#DGM
KHOS LQSXW
VDYLQJ
VWLOO
YRO
SDJH
EODQN
PXWH
T1PHQX
RN
EDFN
DY#PRGH
H[LW
XVE
VOHHS
UDWLR
DXWR
PREPARATION
PREPARATION
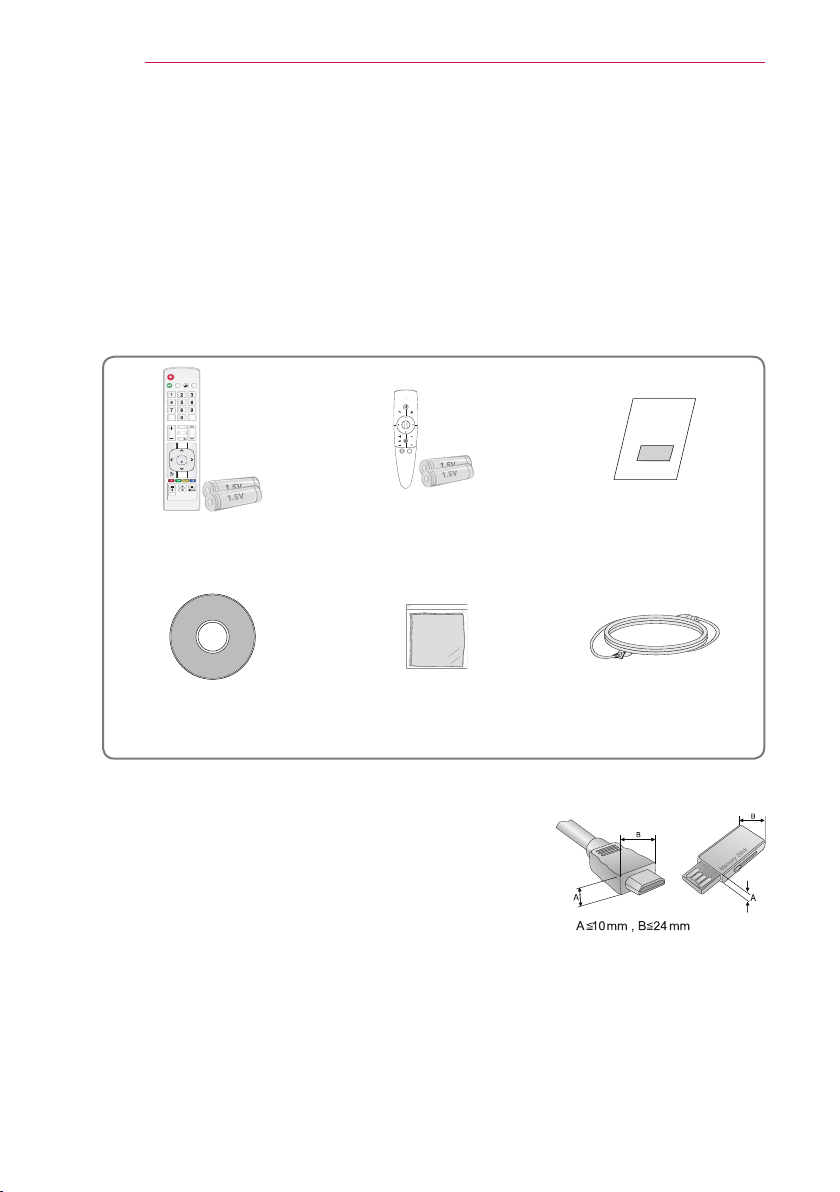
Accessories
Check the accessories provided with the product.
The picture may be different from the actual product.
Accessories are subject to change without prior notice in order to improve the
performance of the product. New accessories may be added or old ones may be
removed.
VHWWLQJV
EDFN
P
?
T
T1PHQX
Remote Control
Two AAA Batteries
Magic Remote Control
Two AA Batteries
User Guide
Owner's Manual CD Polishing Cloth Power Cord
• When connecting a cable to the HDMI or USB port, make sure the bezel of the cable
is not too large and will not block other ports.
PREPARATION
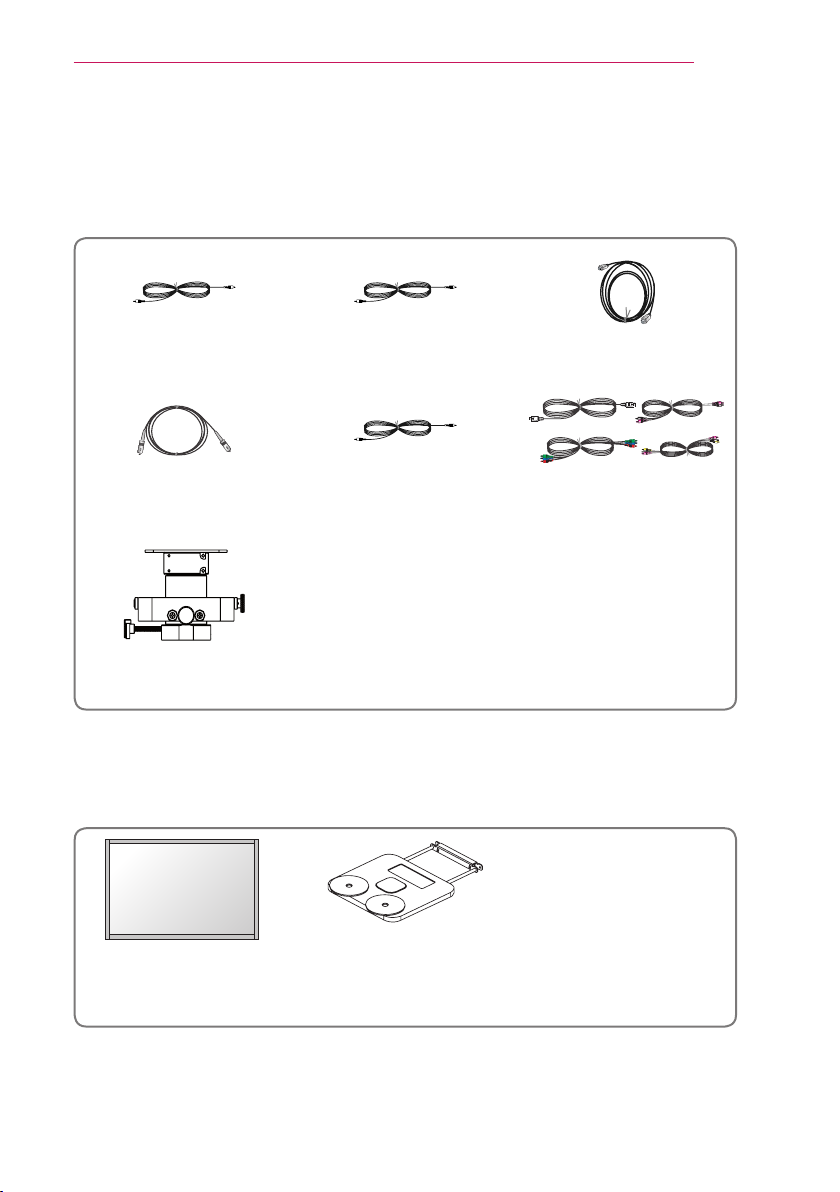
Optional Accessories
To purchase optional accessories, visit an electronics store or an online shopping site.
Optional extras are subject to change without prior notice in order to improve the
product quality, and new optional accessories may be added.
Video Cable Audio Cable HDMI Cable
17
Optical Cable
Ceiling Bracket
(AJ-CB100)
PC Audio Port
Connection Cable
Cables for Connecting
External Devices
Accessories Shipped with Product
These accessories are shipped with the product when you purchase it.
Hecto Laser Display
Projection Screen
(SC100)
Ez Bracket
(AJ-BB100)
18
PREPARATION
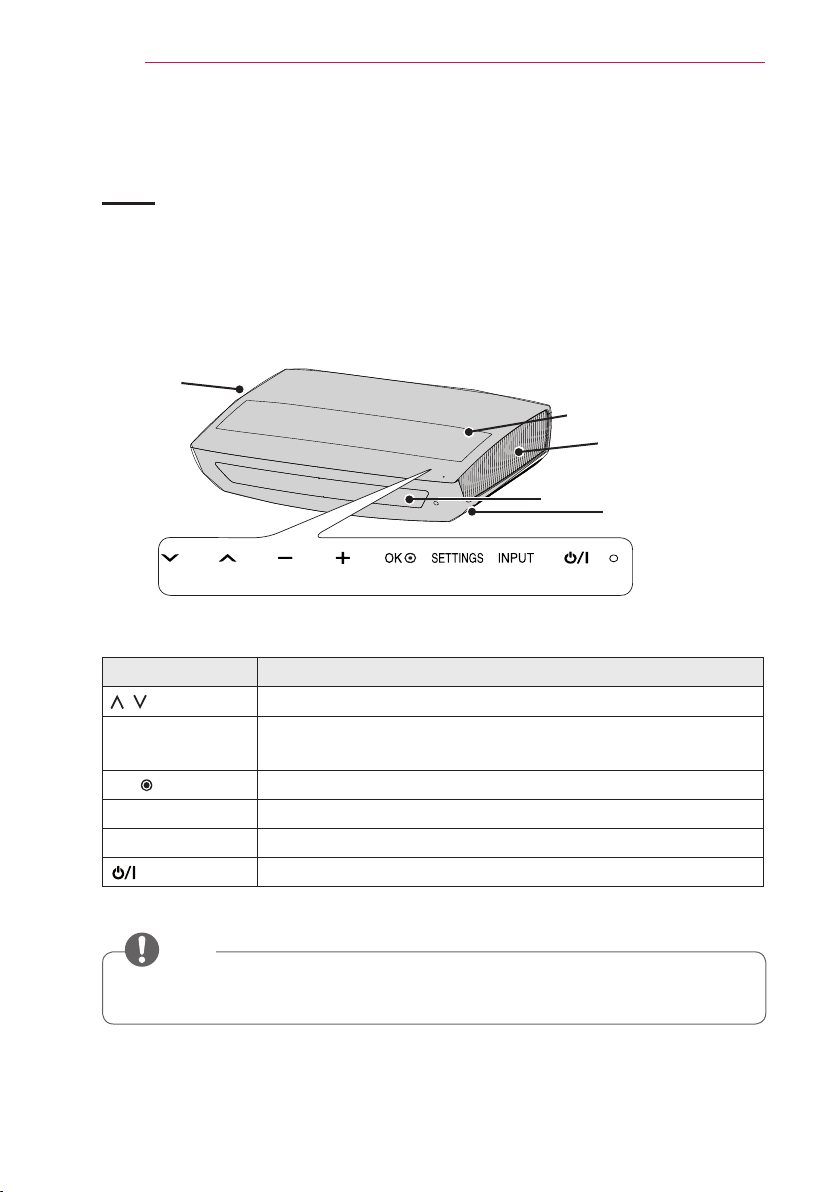
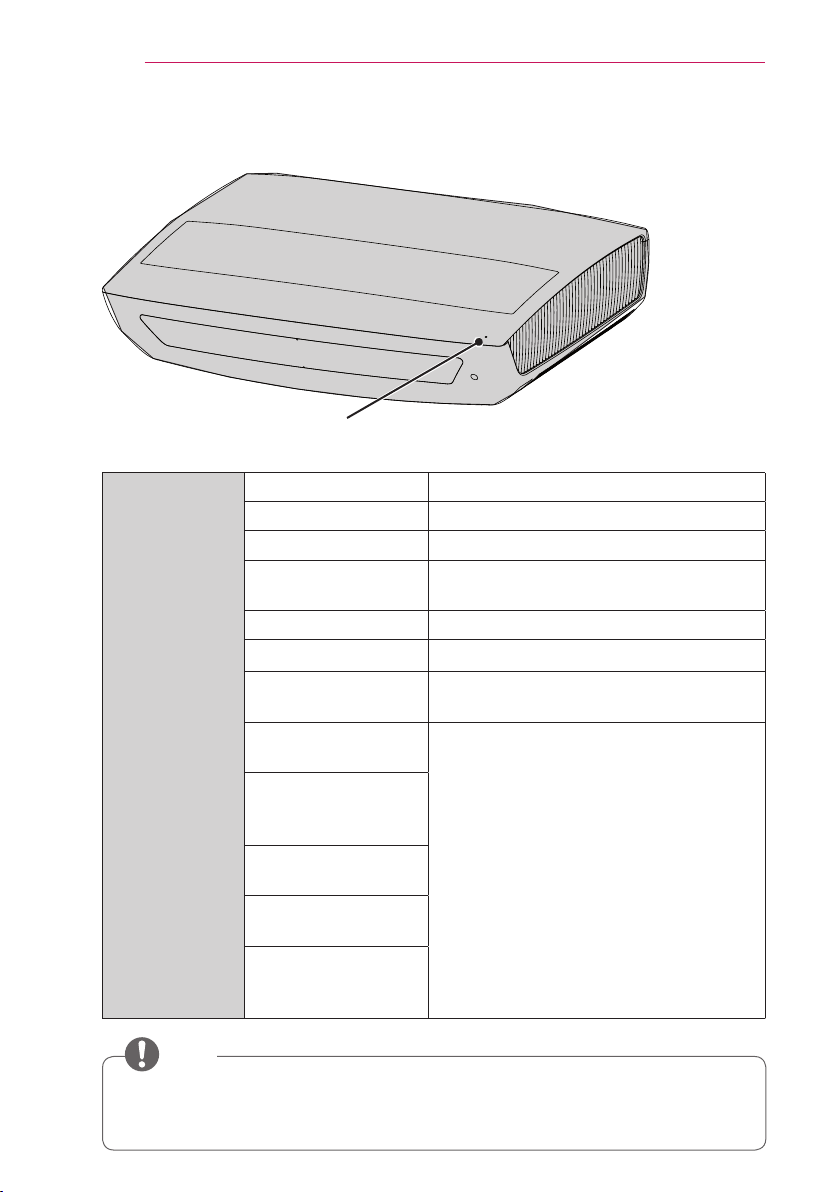
Parts and Components
Front
* This Laser Display is manufactured using high-precision technology. You may,
however, see tiny black dots and/or bright spots that continuously appear on the
screen. This is a normal result of the manufacturing process and does not indicate a
malfunction.
* Ceiling light glare depends on the light levels in a room and the distance between the
product and the ceiling. It is not a product defect.
1
Vent
Electric Door
1
Vent
Speaker
USB IN 2 Port
Control Panel
Button Description
,
-, +
Moves between menus and changes the settings.
Adjusts the volume level, or enters a sub menu and changes
the
settings.
OK Shows the current mode and saves changes to the settings.
SETTINGS Displays or closes the Settings menu.
INPUT Changes the input source.
(Power) Turns the the Laser Display on or off.
1 Due to the high temperature of the vent area, do not get close to the vent area.
NOTE
• Press the "USB IN 2" label shown in the figure above to make the USB IN 2 port
visible.
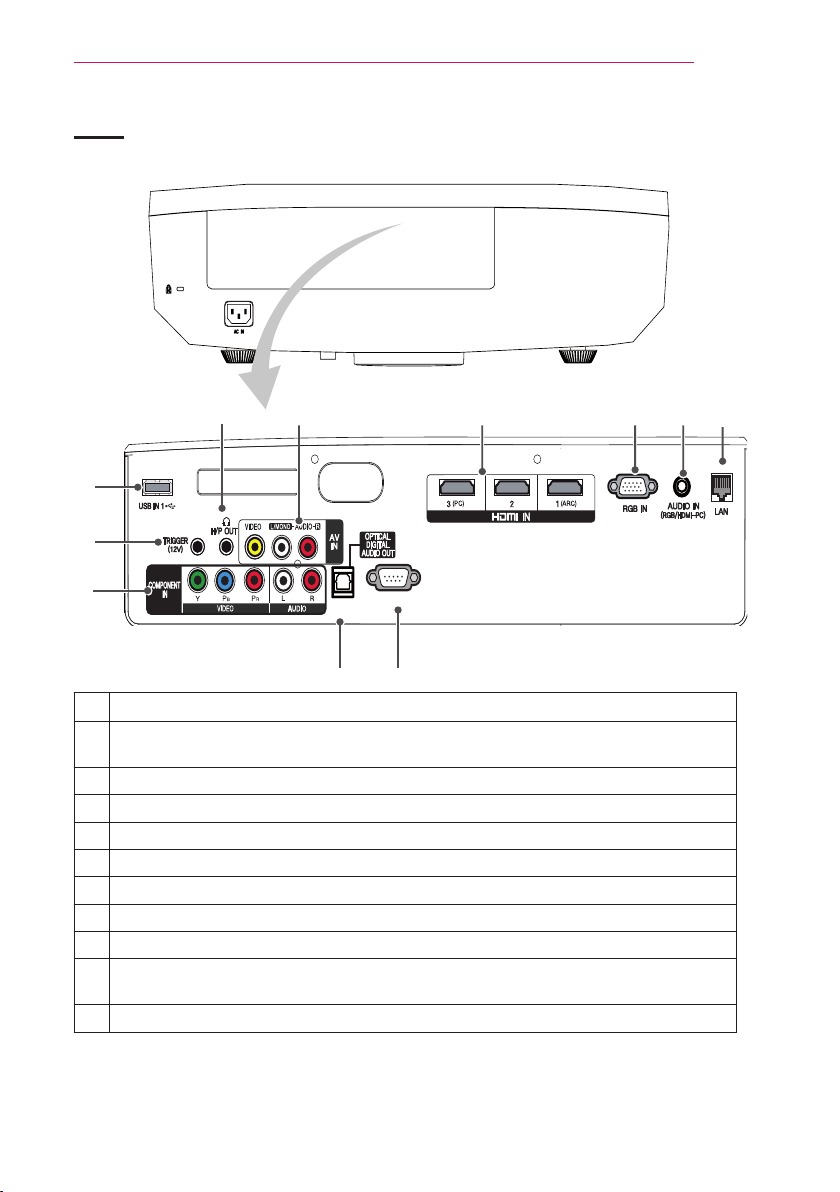
RS-232C IN
Back
PREPARATION
19
❹ ❺
❻
❸
❷
❶
❿ ⓫
Component IN Port
❶
TRIGGER(12 V) Port
❷
Connect an external device (e.g., roll screen) to this port.
USB IN1 Port
❸
H/P OUT Port
❹
AV IN Port
❺
HDMI IN 1(ARC), 2, 3(PC) Port
❻
RGB IN Port
❼
AUDIO IN (RGB/HDMI-PC) Port
❽
LAN Port
❾
OPTICAL DIGITAL AUDIO OUT Port
❿
In standby mode, digital audio is not output.
RS-232C IN Port
⓫
❼ ❽
❾
20
PREPARATION
Status Indicator
Operation/Status Indicator
Operation/
Status Indicator
Off Power standby state (Power is off.)
Red Power standby state
White Warm stand-by (Power standby state)
White (Brightness
changes slowly.)
Off In operation
Red (blinking) High temperature warning
Red (blinking) +
Purple once (blinking)
Red (blinking) +
Purple twice (blinking)
Red (blinking) +
Purple three times
(blinking)
White (blinking) +
Purple once (blinking)
White (blinking) +
Purple twice (blinking)
White (blinking) +
Purple three times
(blinking)
The Laser Display is in the process of
turning on or off.
The Laser Display has turned off due to
the high temperature.
There may be a problem inside the
product, so contact a local service center.
NOTE
• If you turn off the power, the Laser Display may not complete the operation in
progress depending on conditions and the operation/status indicator may turn red
(standby mode).

Installation
PREPARATION
21
Installation Precautions
• Place the product in a well-ventilated
environment.
- To prevent the internal heat from
building up, install the Laser Display
in a well-ventilated place.
Do not place anything near the
Laser Display. That may block
its air vents. If the air vents are
blocked, the internal temperature
will increase.
- Do not place the Laser Display on
a carpet or rug. If a product has its
inlet vent on its bottom, do not block
the vent and use the product on a
leveled solid surface.
- Be sure to prevent foreign objects,
such as scraps of paper, from
entering the inlet vent.
• Do not place the product in a hot or
humid environment.
- Do not place the product in a hot,
cold, or humid environment.
(See the details about the operating
temperature and humidity.)
• Do not place the product in a dusty
place.
- This may cause fire.
• Never open any cover on the product.
There is a high risk of electric shock.
• The Laser Display is manufactured
using high-precision technology. You
may, however, see tiny black dots
and/or bright spots that continuously
appear on the screen. This is a
normal result of the manufacturing
process and does not indicate a
malfunction.
• The remote control may not work
in an environment where a lamp
equipped with electronic ballasts or
a three-wavelength fluorescent lamp
is installed. Replace the lamp with an
international standard lamp for the
remote control to work normally.
• Do not open or press the electric door
or by force.
- This may cause product
malfunction.
- Leave enough distance (30 cm or
more) around the vent of the Laser
Display.
22
A
B
D
C
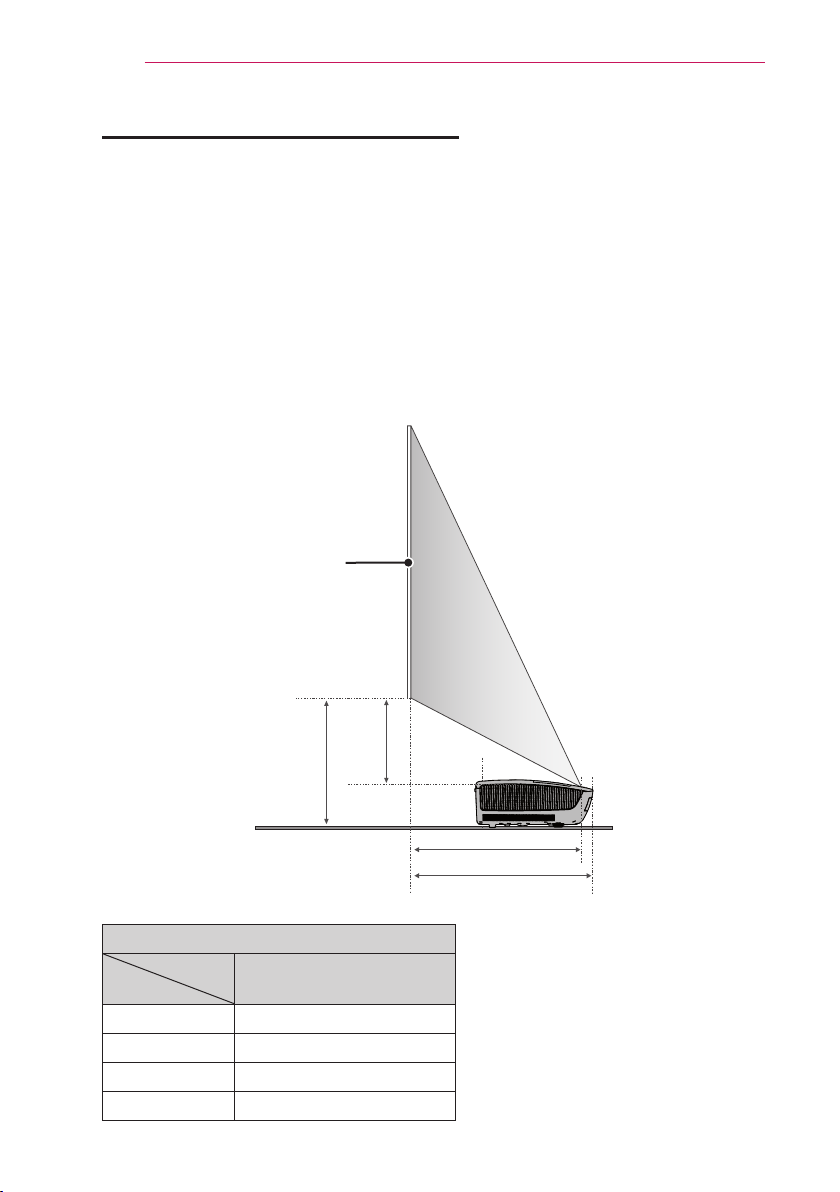
PREPARATION
Projection Distance per Screen Size
1 Place the Laser Display on a sturdy level surface, together with the computer or
audio/video source.
2 Place the Laser Display at an appropriate distance away from the screen. The
distance between the Laser Display and the screen determines the actual size of
the image.
3 Position the Laser Display so that the lens is perpendicular to the screen. If the
lens is not perpendicular to the screen, the image displayed on the screen may be
distorted. To correct the distortion, use the Edge Adj function.
4 Connect the power cords of the Laser Display and the connected devices to the
wall outlet.
Screen
16:9 Aspect Ratio (Unit: mm)
ARC 2540
(2213 x 1245)
A 550
B 530
C 262.5
D 370
PREPARATION
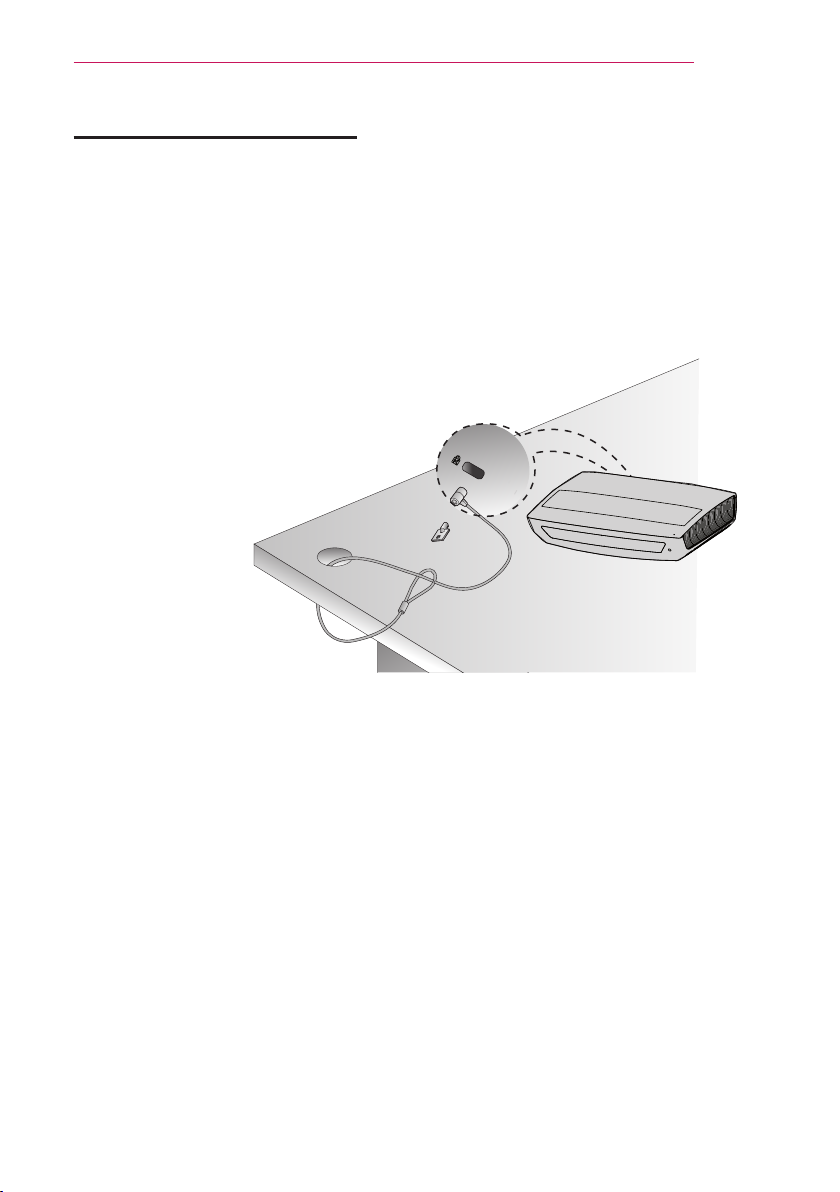
Kensington Security System
• This the Laser Display has a Kensington Security Standard connector to prevent
theft. Connect a Kensington Security System cable as shown below.
• For more information on installation and use of the Kensington Security System,
refer to the user guide provided with the Kensington Security System.
• The Kensington Security System is an optional accessory.
• What is Kensington?
Kensington is a company that provides safety systems for laptops and other
electronic devices.
Website: http://www.kensington.com
23
HQHUJ\
KHOS LQSXW
VDYLQJ
VWLOO
YRO
SDJH
EODQN
PXWH
XVE
VOHHS
UDWLR
24
REMOTE CONTROL
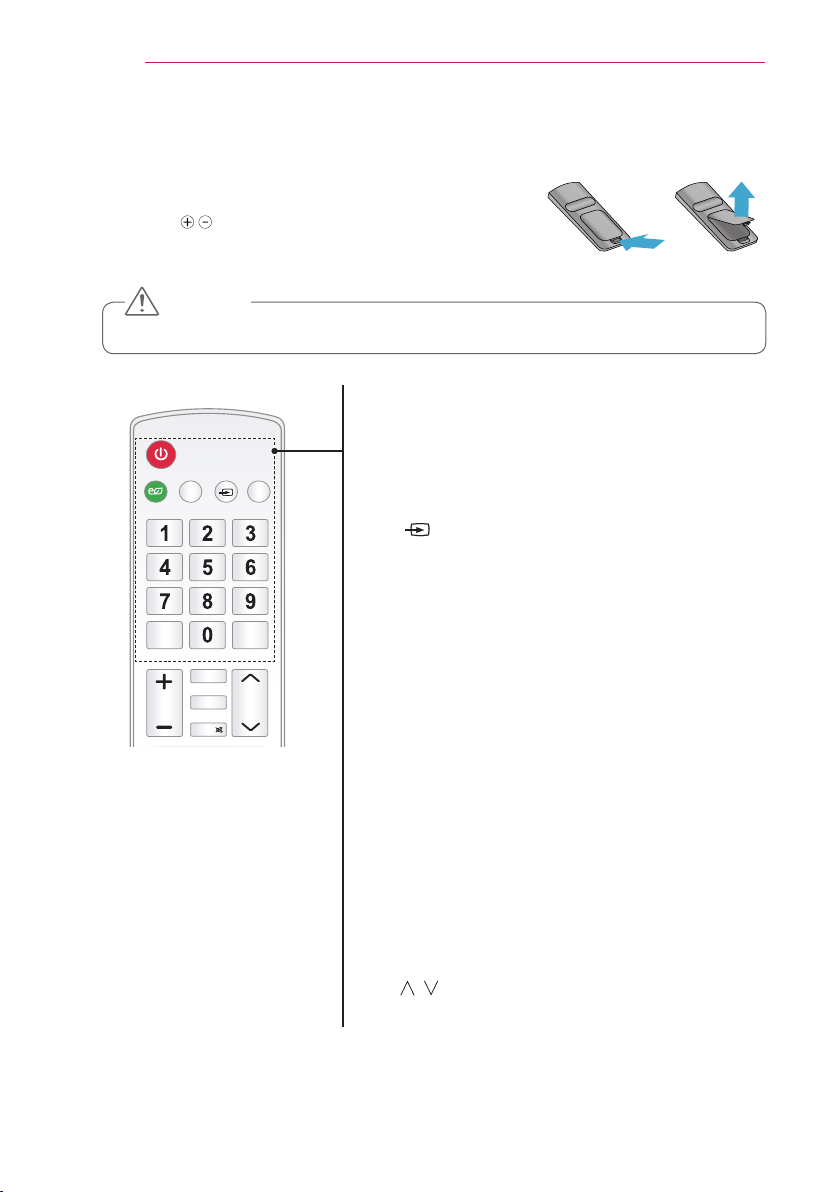
REMOTE CONTROL
Open the battery cover on the back of the remote control
and insert the batteries which is specified in the battery
room with poles pointing in the correct direction.
The new and same type of batteries (1.5 V AAA) must
be used.
CAUTION
• Do not mix new batteries with old ones.
POWER
Turns the Laser Display on or off.
ENERGY SAVING ꕊ
Changes the energy saving mode.
HELP
Enables the self-diagnosis.
INPUT
Changes the input source.
USB
Accesses USB mode.
Number buttons
Enters a number.
SLEEP
Sets the length of time until the Laser Display turns
off.
STILL
Freezes the moving image.
(Available in any mode other than DivX)
VOL +, -
Adjusts the volume level.
BLANK
Displays the empty screen for a while.
RATIO
Resizes the picture.
MUTE
Mutes the sound of the Laser Display.
PAGE ,
Moves to the previous/next page.
HQHUJ\
VHWWLQJV
HGJH#DGM
KHOS LQSXW
VDYLQJ
VWLOO
YRO
SDJH
EODQN
PXWH
T1PHQX
RN
EDFN
DY#PRGH
H[LW
XVE
VOHHS
UDWLR
DXWR
VWLOO
SDJH
H[LW
XVE
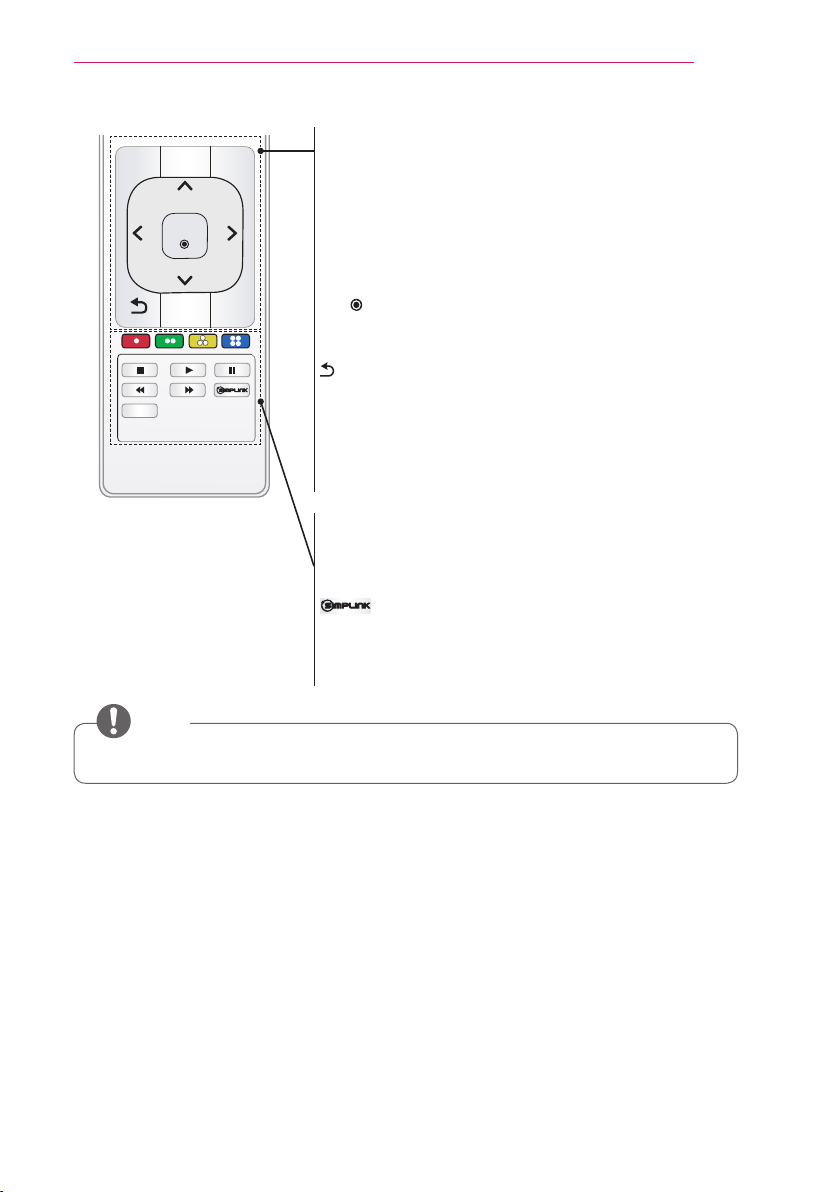
REMOTE CONTROL
SETTINGS
Displays or closes the Settings menu.
AUTO
Automatically adjusts the PC input image.
Q.MENU
Changes the settings easily.
Up/Down/Left/Right buttons
Switches between menu functions.
OK
Shows the current mode and saves changes to the
settings.
BACK
Returns to the previous screen.
AV MODE
Sets the genre for the Laser Display program.
EXIT
Closes a menu.
Color buttons
Sets detailed settings or gesture for each menu.
Playback control buttons
Controls the playback of SmartShare.
Allows you to use the SimpLink function.
EDGE ADJ
Adjusts the image to fit the screen.
25
NOTE
• For seamless operation, do not block the IR receiver.
26
HOME
HOME
HOME
MAGIC REMOTE CONTROL
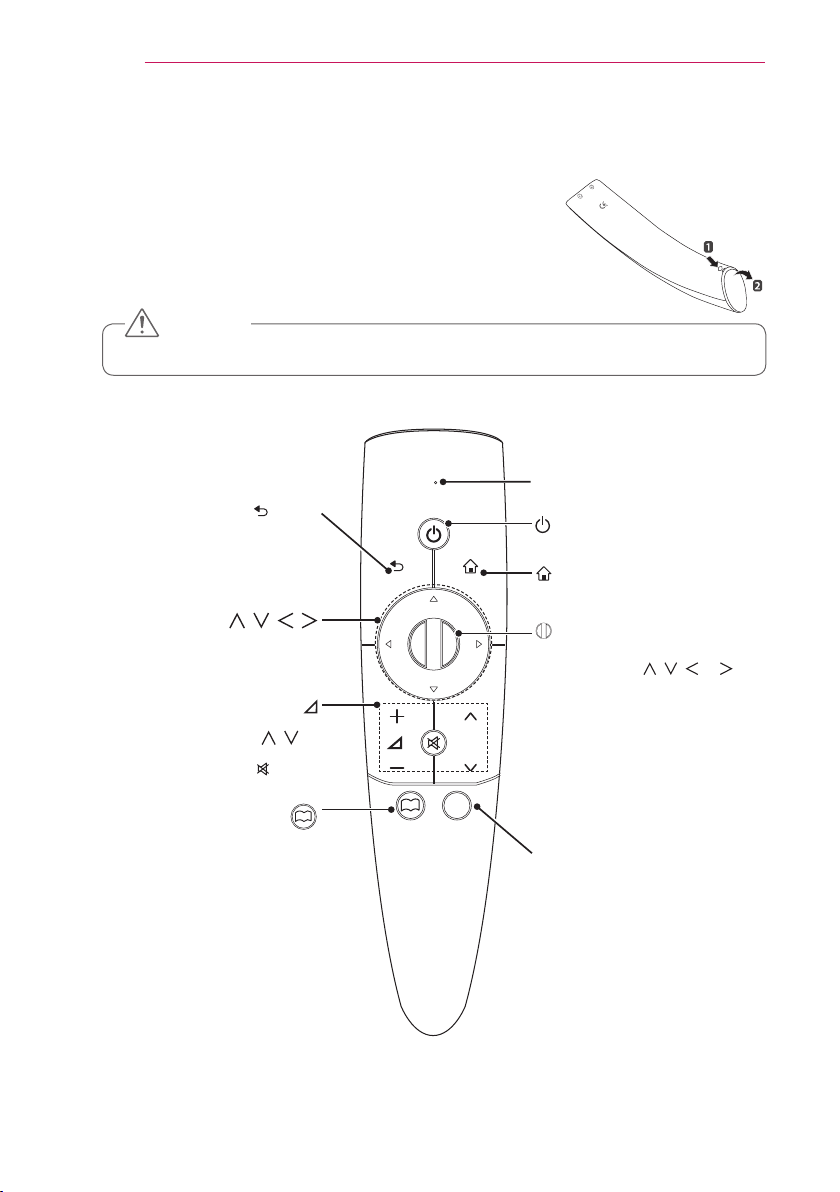
MAGIC REMOTE CONTROL
If the battery low message appears while using the Laser
Display, replace the batteries.
As shown in the figure, press the top of the battery cover
and slide it down the cover. Insert two new and identical
alkaline batteries (1.5V, AA type) with + and - poles
pointing in the correct direction in the remote control.
CAUTION
• Do not mix new batteries with old ones.
Pointer Signal Transmitter
Press this button during menu
BACK
selection to return to the
previous step.
, , ,
(top, bottom, left, right)
(+, -)
Adjusts the volume level.
( , ) P
Moves to the previous/next page.
MUTE
Mutes the sound of the Laser Display.
?
Opens the self-diagnosis
window.
EDFN
VHWWLQJV
P
?
T
T1PHQX
POWER
Turns Laser Display on or off.
SETTINGS
Displays or closes the Settings
menu.
Wheel (OK)
Select a menu or option.
If you press the , , or
button while the pointer is moving,
the pointer disappears and the
Magic remote control operates as
a normal remote control.
To display the pointer on the
screen, shake the Magic remote
control to the left/right.
Q.MENU: Shows the Q.MENU.
PUSH
MAGIC REMOTE CONTROL
27
Pairing the Magic Remote Control
You must pair the Magic remote control with the Laser Display to use it.
Pair the Magic remote control prior to use as follows:
1 Turn on the Laser Display and press the Wheel (OK) button towards the Laser
Display. When the pairing is complete, the pairing completion message is displayed
on the Laser Display screen.
2 If the remote failed to pair, turn the Laser Display off and on and try pairing again by
pressing the Wheel (OK) button.
Re-pairing the Magic Remote Control
1 Press the
5 seconds.
The Magic remote control will pair again when you press the wheel (OK) button.
SETTINGS button and BACK button at the same time for about
2 Press the BACK button while pointing the remote control at the Laser Display for
about 5 seconds to reset and pair the remote control. When the pairing is complete,
the pairing completion message is displayed on the Laser Display screen.
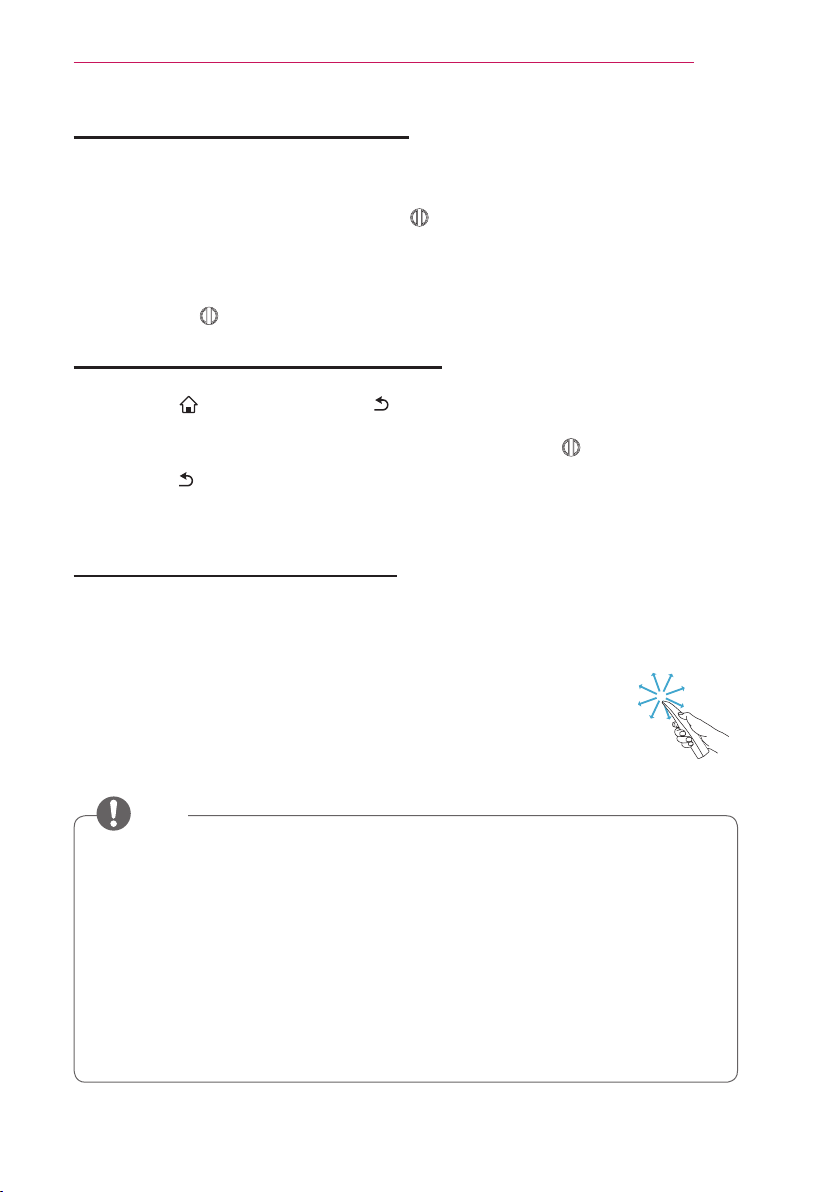
Using the Magic Remote Control
1 Shake the Magic remote control lightly when there is no pointer displayed on the
screen. A pointer will be displayed on the screen.
→ The pointer disappears if the remote control is not used for a
certain period of time.
2 When you move the pointer signal transmitter up/down/left/right
while pointing it toward the Laser Display, the pointer moves.
→ If the pointer is not working properly, do not move the Magic
remote control for about 10 seconds, and then try again.
NOTE
• Use the remote control within the specified range (10 meters). You may
experience communication failures when using the device outside the coverage
area or if there are obstacles within the coverage area.
• You may experience communication failures depending on nearby devices.
Devices, such as a microwave oven and wireless LAN, operate in the same
frequency band (2.4 GHz) as the Magic remote control. This may cause
communication failures.
• The Magic remote control may become damaged or may malfunction if it is
dropped or receives a heavy impact.
• Take care not to bump into nearby furniture, electronics or other people when
using the Magic remote control.
 Loading...