

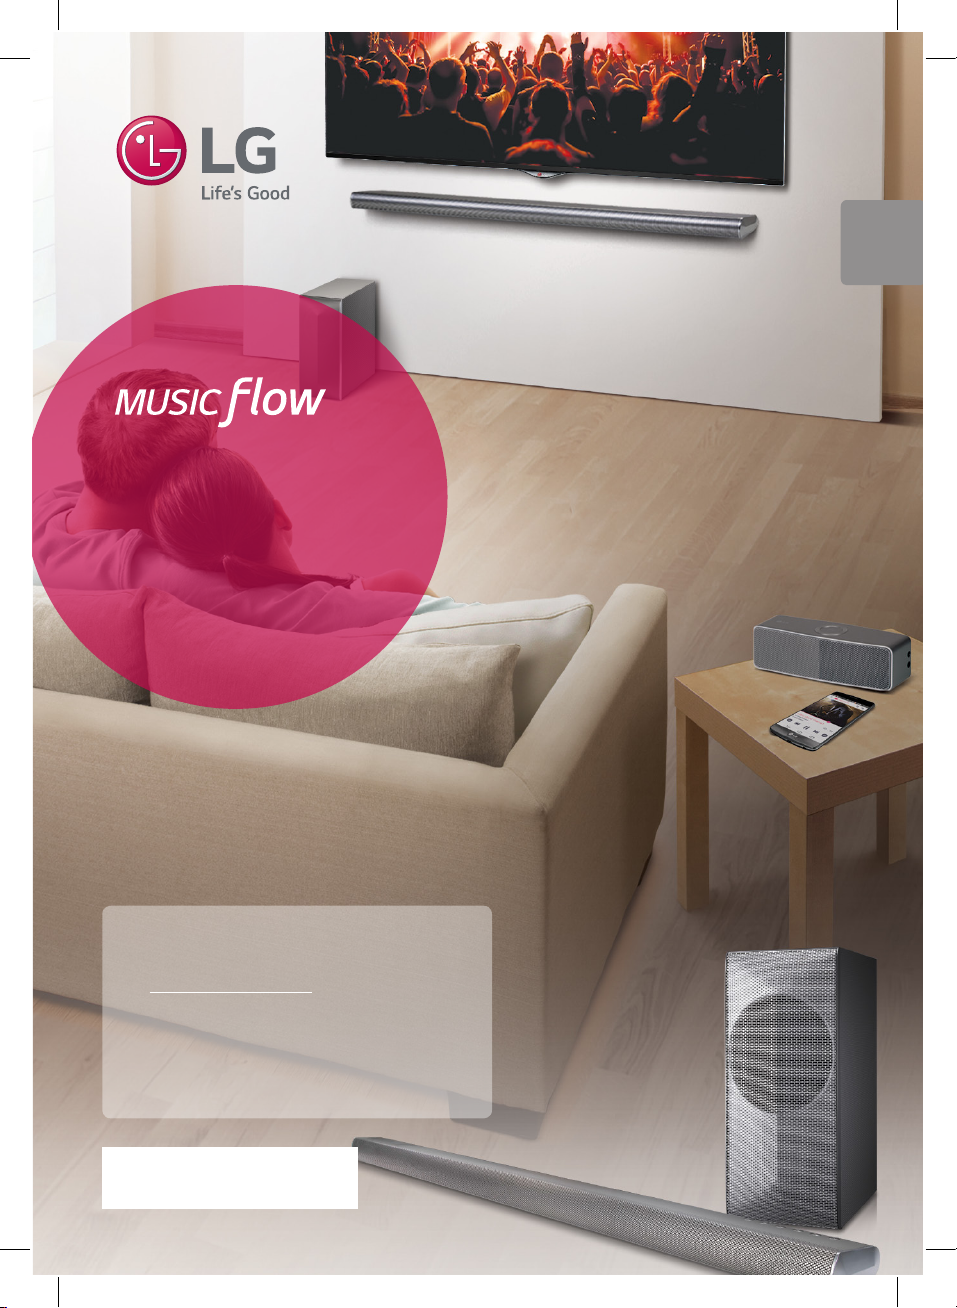
HS7
SMART Hi-Fi AUDIO
Wireless Multi-room Sound Bar
Model : MUSICFLOW HS7
ENGLISH
ENGLISH | SIMPLE MANUAL
To view the instructions of advanced features,
visit http://www.lg.com and then download
Owner’s Manual.
Some of the content in this manual may dier
from your unit.
The actual product may dier from the image.
*MFL68864987*
www.lg.com
1 Getting Started
Getting Started2
Safety Information
1
Getting Started
CAUTION: TO REDUCE THE RISK OF ELECTRIC
SHOCK DO NOT REMOVE COVER (OR BACK) NO
USER-SERVICEABLE PARTS INSIDE REFER SERVICING
TO QUALIFIED SERVICE PERSONNEL.
product’s enclosure that may be of sucient
magnitude to constitute a risk of electric shock to
persons.
instructions in the literature accompanying the
product.
WARNING: TO PREVENT FIRE OR ELECTRIC SHOCK
HAZARD, DO NOT EXPOSE THIS PRODUCT TO RAIN
OR MOISTURE.
WARNING: Do not install this equipment in a
conned space such as a book case or similar unit.
CAUTION: Do not use high voltage products
around this product. (ex. Electrical swatter) This
product may malfunction due to electrical shock.
CAUTION: The apparatus shall not be exposed to
water (dripping or splashing) and no objects lled
with liquids, such as vases, shall be placed on the
apparatus.
CAUTION: Do not block any ventilation openings.
Install in accordance with the manufacturer’s
instructions.
Slots and openings in the cabinet are provided for
ventilation and to ensure reliable operation of the
product and to protect it from over heating. The
openings shall be never be blocked by placing
the product on a bed, sofa, rug or other similar
surface. This product shall not be placed in a builtin installation such as a bookcase or rack unless
proper ventilation is provided or the manufacturer’s
instruction has been adhered to.
CAUTION
RISK OF ELECTRIC SHOCK
DO NOT OPEN
This lightning ash with arrowhead
symbol within an equilateral
triangle is intended to alert the
user to the presence of uninsulated
dangerous voltage within the
The exclamation point within an
equilateral triangle is intended
to alert the user to the presence
of important operating and
maintenance (servicing)
NOTICE: For safety marking information including
product identication and supply ratings, please
refer to the main label on the bottom or the other
surface of the product.
For models using an adapter
Only use the AC adapter supplied with this device.
Do not use a power supply from another device or
another manufacturer. Using any other power cable
or power supply may cause damage to the device
and void your warranty.
CAUTION concerning the Power Cord
Most appliances recommend they be placed upon
a dedicated circuit;
That is, a single outlet circuit which powers only
that appliance and has no additional outlets or
branch circuits. Check the specication page of this
owner’s manual to be certain. Do not overload wall
outlets. Overloaded wall outlets, loose or damaged
wall outlets, extension cords, frayed power cords, or
damaged or cracked wire insulation are dangerous.
Any of these conditions could result in electric
shock or re. Periodically examine the cord of your
appliance, and if its appearance indicates damage
or deterioration, unplug it, discontinue use of the
appliance, and have the cord replaced with an
exact replacement part by an authorized service
center. Protect the power cord from physical or
mechanical abuse, such as being twisted, kinked,
pinched, closed in a door, or walked upon. Pay
particular attention to plugs, wall outlets, and
the point where the cord exits the appliance. The
Power Plug is the disconnecting device. In case of
an emergency, the Power Plug must remain readily
accessible.

Getting Started 3
This device is equipped with a portable battery or
accumulator.
Safety way to remove the battery from the
equipment: Remove the old battery or battery
pack, follow the steps in reverse order than
the assembly. To prevent contamination of the
environment and bring on possible threat to
human and animal health, the old battery or
the battery put it in the appropriate container
at designated collection points. Do not dispose
of batteries or battery together with other
waste. It is recommended that you use local,
free reimbursement systems batteries and
accumulators. The battery should not be exposed
to excessive heat such as sunshine, re or the like.
Disposal of your old appliance
1. All electrical and electronic
products should be disposed of
separately from the municipal
waste stream via designated
collection facilities appointed
by the government or the local
authorities.
2. The correct disposal of
your old appliance will help
prevent potential negative
consequences for the
environment and human
health.
3. For more detailed information
about disposal of your old
appliance, please contact
your city office, waste disposal
service or the shop where you
purchased the product.
Disposal of waste batteries/accumulators
1
Getting Started
Pb
1. This symbol may be combined with chemical
symbols for mercury(Hg), cadmium(Cd) or
lead(Pb) if the battery Contains more that
0.0005% of mercury,0.002% of cadmium or
0.004% of lead.
2. All batteries/accumulators should be
disposed separately from the municipal
waste stream via designated collection
facilities appointed by the government or the
local authorities.
3. The correct disposal of Your old batteries/
accumulators will help to prevent potential
negative consequences for the environment,
animal and human health.
4. For more detailed information about disposal
of Your old batteries/accumulators, please
contact Your city office, waste disposal
service or the shop where You purchased the
product.

Getting Started4
Declaration of Conformity
Hereby, LG Electronics European Shared Service
1
Center B.V., declares that this Wireless Multi-
Getting Started
room Sound Bar is compliant with the essential
requirements and other relevant provisions of
Directive 1999/5/EC. The complete Declaration of
Conformity may be requested through the following
postal address:
LG Electronics European Shared Service Center B.V.
or can be requested at our dedicated DoC website:
http://www.lg.com/global/support/cedoc/cedoc#
This device is a 2.4 GHz and 5 GHz wideband
transmission system, intended for use in all EU
member states and EFTA countries, with indoor use
restriction for 5 GHz band. (5150 – 5250 MHz)
This device should be installed and operated with
minimum distance 20 cm between the device
and your body. And this phrase is for the general
statement for consideration of user environment.
European Standard Team
Krijgsman 1
1186 DM Amstelveen
The Netherlands
POWER: This unit operates on a mains supply of
100 - 240 V ~ 50 / 60 Hz.
Wiring: This unit is supplied with a BS 1363
approved main plug. When replacing the fuse,
always use of the same rating approved to BS 1362.
Never use this plug with the fuse cover omitted. To
obtain a replacement fuse cover
contact your dealer. If the type of plug supplied is
not suitable for the mains sockets in your home,
then the plug should be removed and a suitable
type tted. Please refer to the wiring instructions
below:
Warning: A mains plug removed from the mains
lead of this unit must be destroyed. A mains plug
with bared wires is hazardous if inserted in a mains
socket. Do not connect either wire to the earth pin,
marked with the letter E or with the earth symbol 6
or coloured green or green and yellow. If any other
plug is tted, use same rating of fuse in the plug.
Important: The wires in this mains lead are coloured
in accordance with the following codes:
- BLUE: NEUTRAL, BROWN: LIVE - As the colours of
the wires in the mains lead of this unit may not
correspond with the coloured marking identifying
the terminals in your plug, proceed as follows: The
wire which is coloured blue must be connected to
the terminal which is marked with the letter N or
coloured black. The wire which is coloured brown
must be connected to the terminal which is marked
with the letter L or coloured red.
Table of Contents
Table of Contents 5
1 Getting Started
2 Safety Information
6 Unpacking
6 – Additional Information for some
accessories
7 Front panel
7 Rear panel
8 Remote control
2 Connecting to your TV
9 Connecting to your TV
9 – 1. Optical connection
9 – 2. HDMI (ARC) connection
9 – 3. Wireless LG Sound Sync
connection
3 Using Multi-Room
10 Multi-Room Network Setup
10 – Step 1. Home Network Requirement
11 – Step 2. Installing “Music Flow Player”
App and Media Server
12 – Step 3. Initial Multi-Room Setup
14 – Step 4. Add Speakers (Optional)
15 – Using the Bridge
16 Enjoying Multiple MUSICflow Product
16 – 1. Home Cinema Mode (Surround
Sound Mode)
16 – 2. Grouping Mode
16 – 3. L/R Stereo Mode
5 Troubleshooting
18 Troubleshooting
6 Appendix
22 Mounting the main unit on a wall
23 About Status LED’s Condition
23 Specification
23 OPEN SOURCE SOFTWARE
NOTICE
1
2
3
4
5
6
4 Using External device
17 Using External device
17 – 1. HDMI Input connection
17 – 2. PORTABLE IN connection
17 – 3. BLUETOOTH® connection
Some of the content in this manual may dier from Music Flow Player app depending on the
application’s version.
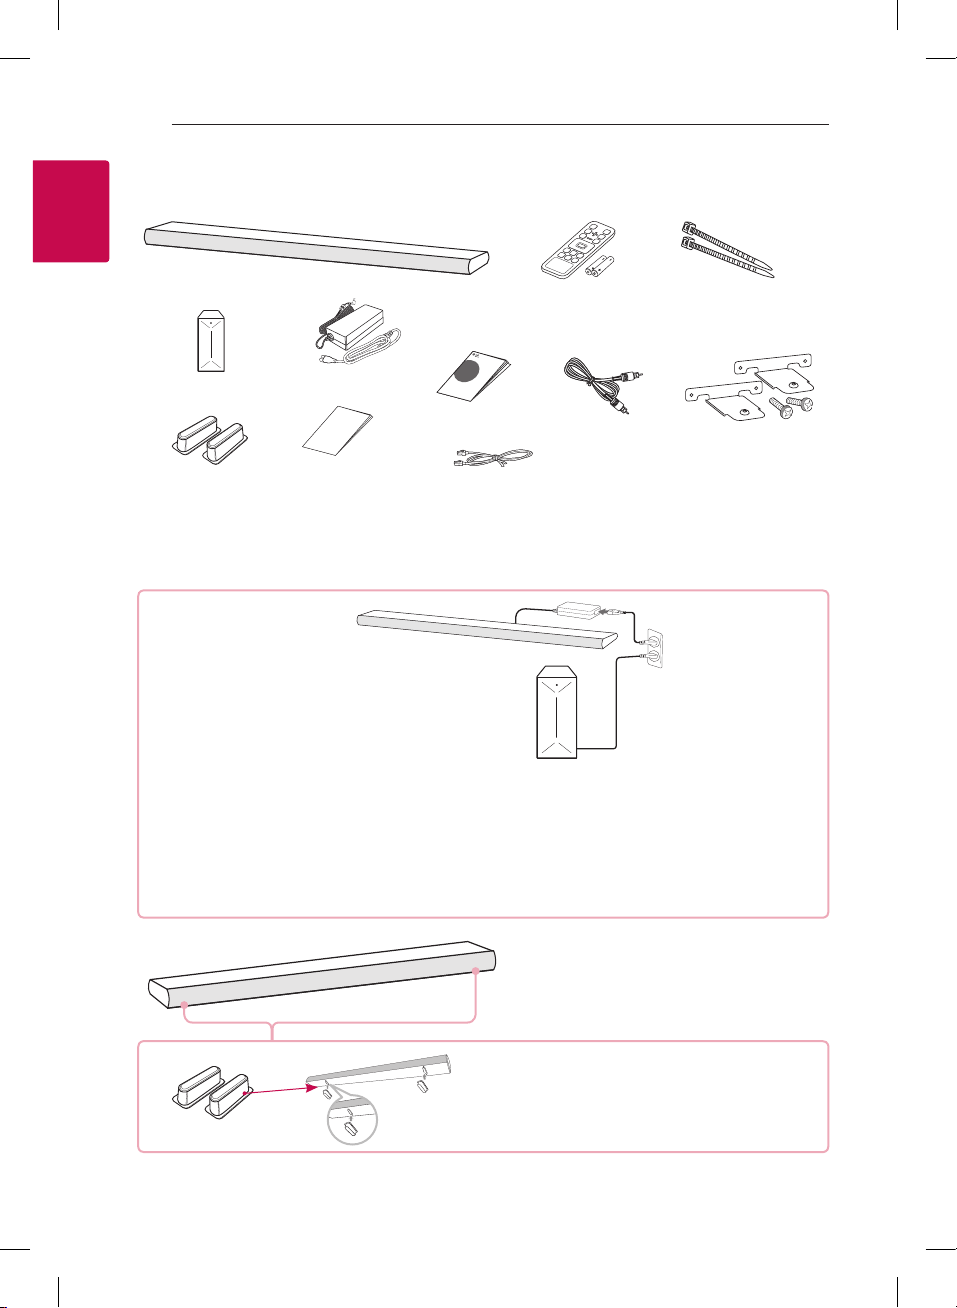
Unpacking
1
Getting Started
Getting Started6
Unit
Remote Control and
Batteries
Cable ties
Subwoofer
Foot
yWhen mounting this unit on a wall, refer to page 22.
Adapter and
power cord
Wall bracket
install guide
Simple Manual
LAN cable
Optical cable
Wall brackets and
screws
Additional Information for some accessories
Subwoofer
Wireless subwoofer connection
1. Connect the power cord of the main unit and the wireless subwoofer to the outlet.
2. Turn them on and the wireless subwoofer will be automatically connected. When the connection is
completed, you can see the green LED on the subwoofer.
If you have trouble to connect the wireless subwoofer, refer to page 18.
yRaises the height by attaching them.
yIf it has already a foot under the sound bar, detach
the foot. Then, replace to adjustable foot.
Foot
yDepending on the region, the supplied accessories may dier.
yWhen installing the unit on the metal furniture of
material, mount the supplied foot.

Front panel
Getting Started 7
1
Getting Started
Display window
A
LED indicator: Shows connection status.
B
(Page 23)
yWhite (blinking): waiting for network
connection
yWhite (staying on): network connection is
completed.
yWhite (Dimmed): standby mode with
network connection.
yGreen (staying on): the rst group was set.
yRed (staying on): standby mode without
network connection
Remote sensor
C
Rear panel
(Standby/On)
D 1/!
F (Function): Selects the function and input
E
source. (OPTICAL / HDMI IN / WI-FI / Bluetooth /
PORTABLE)
+ (Volume)
F -/
(Wi-Fi): Connects initial MUSICflow
G
product to your network wirelessly.
(Add): Adds the additional MUSICflow
H
product to your network.
(In case that one or more MUSICflow product is
connected.)
S/W download connector (For service only)
A
DC IN (AC adapter input)
B
HDMI IN / OUT (TV ARC) connector : Connect
C
to HDMI IN (ARC) on TV.
ETHERNET (LAN) port
D
PORTABLE IN connector
E
OPT. IN connectors
F
Getting Started8
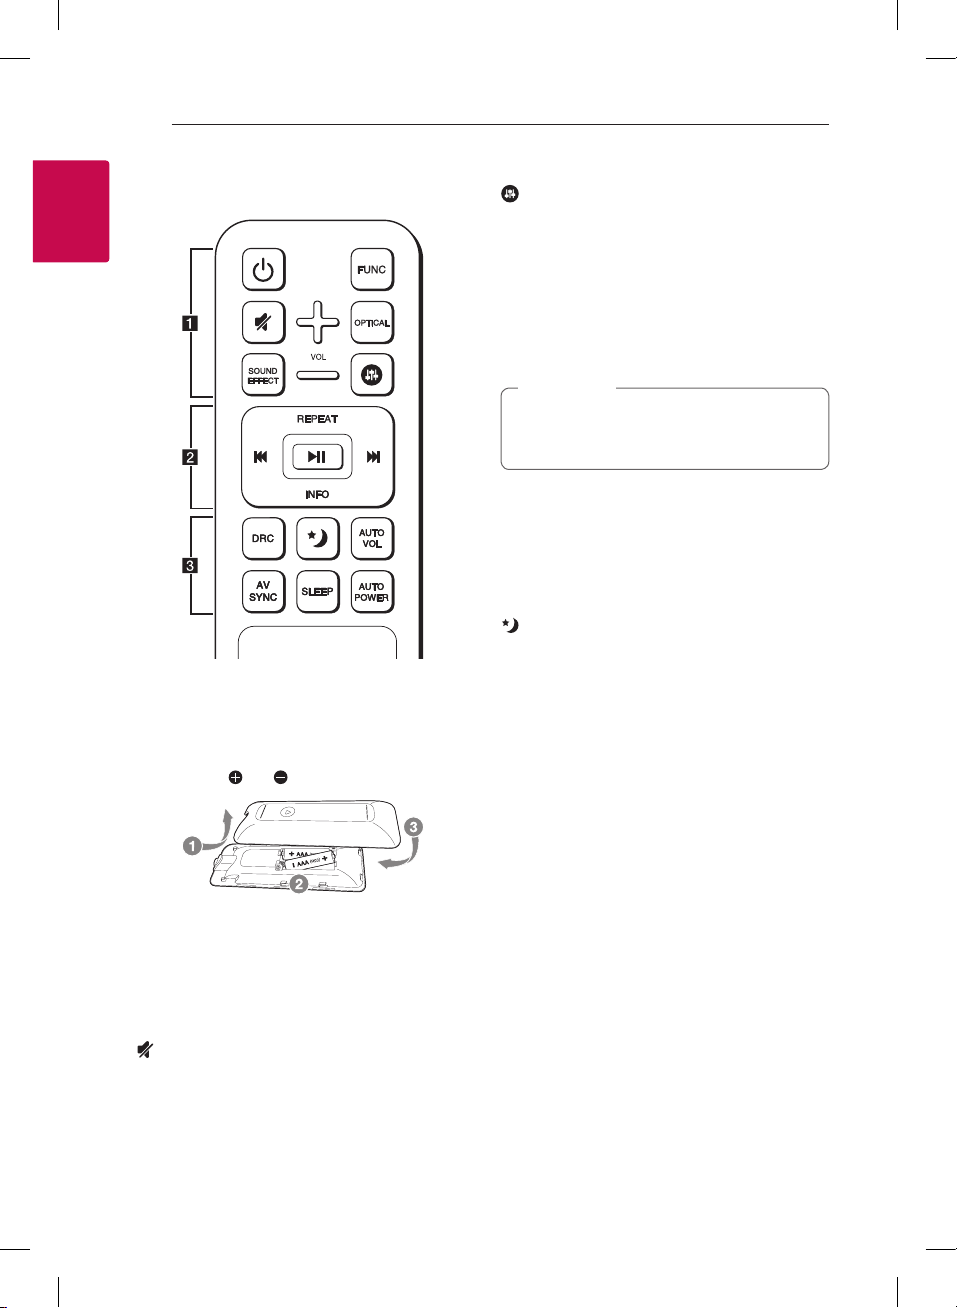
Remote control
1
Getting Started
Battery Installation
Remove the battery cover on the rear of the
Remote Control, and insert two R03 (size AAA)
batteries with and matched correctly.
• • • • • • • • • • a • • • • • • • • •
(Power) : Switches the unit ON or OFF (standby
1
mode).
FUNC (Function): Selects the function and the
input source. (OPTICAL / HDMI IN / WI-FI / Bluetooth
/ PORTABLE)
(Mute) : Mutes the sound.
OPTICAL : Changes input source to OPTICAL
directly.
SOUND EFFECT : Selects a sound eect mode.
: Adjusts sound level of Treble, Bass and Sub-
woofer.
+/- (VOL): Adjusts speaker volume.
• • • • • • • • • • b • • • • • • • • •
REPEAT : Listen to your music repeatedly.
C/V
dM
playback.
INFO : Displays the input source information.
• • • • • • • • • • c • • • • • • • • •
DRC : Turns on or o DRC function.
yDRC (Dynamic Range Control) : Make the sound
the sound intensity and improve neness and
softness.
AUTO VOL : Turns on or o the AUTO VOLUME
mode.
yWhen the output sound is too loud or too low,
AV SYNC : Synchronizes the audio and video.
yWhen receiving audio signals from TV, sound
y Press AV SYNC then Use
SLEEP : Sets the system to turn o automatically at
a specied time.
AUTO POWER : Turns on or o AUTO POWER
function.
yIf your TV or an external device is connected to
(Skip) : Skips Fast backward or Forward.
(Play/Pause) : Starts playback or pauses
Note
,
You can use these playback buttons after
play music by “Music Flow Player” App or PC
software.
clear when the volume is turned down (Dolby
Digital only).
(Night mode) : Set Night mode to On to reduce
press this button on the remote control. So you
can enjoy the sound with appropriate levels.
and images may not be matched. In the case,
this function can adjust the delay time.
C/V
the time which you can set at between 0 and
300 ms.
Optical Input connector(s) on the unit and when
you turn on your TV or an external device, this
unit recognizes the input signal and selects the
optical function. You can hear the sound from
your device.
to control
2 Connecting to your TV
Connecting to your TV 9
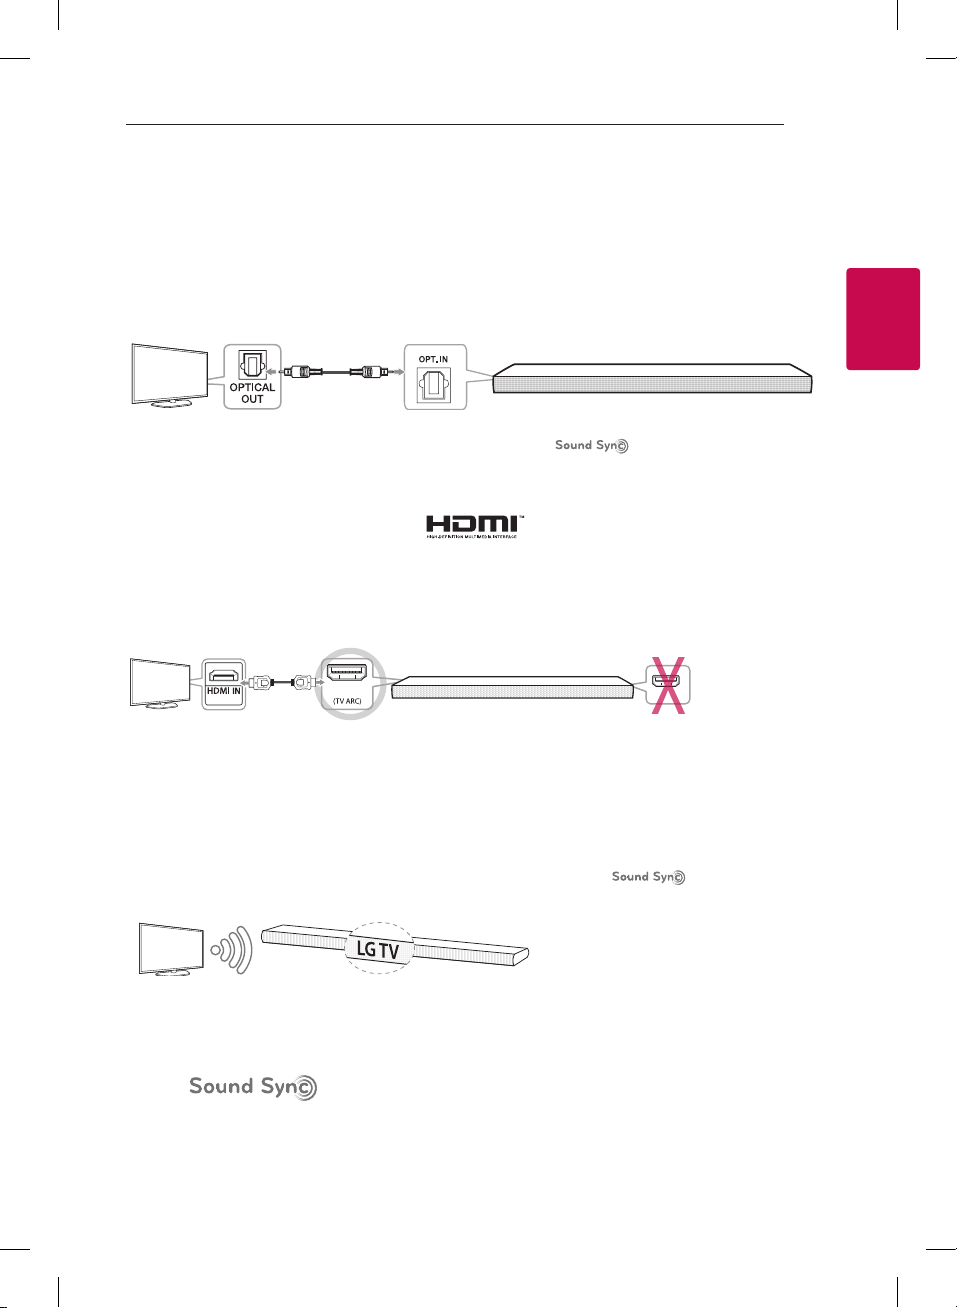
Connecting to your TV
Make one of the following connections, depending on the capabilities of your TV among Optical, HDMI or
Wireless connection.
1. Optical connection
1. Connect the OPT. IN jack on the unit to OPTICAL OUT jack on the TV using an OPTICAL cable.
2. Set up the sound output of TV to OPTICAL output. (For details, reference your TV user manual.)
Note: If your LG TV is supported LG Sound Sync (LG TV with the logo). Set up the sound
output of TV to LG Sound Sync (Optical). (For details, reference your TV user manual.)
3. Set the input source of this unit to OPTICAL using OPTICAL or FUNC button.
2. HDMI (ARC) connection
If you connect this unit to a TV that supports HDMI CEC and ARC (Audio Return Channel), you can enjoy the
TV audio through the speakers of this unit without connecting the optical cable.
1. Connect the HDMI OUT (TV ARC) jack on the unit to HDMI IN (ARC) jack on the TV using an HDMI cable
(Type A, High speed HDMI™ Cable with Ethernet).
2
Connecting to your TV
(ARC)
TV : HDMI IN (ARC) Sound Bar : HDMI OUT (TV ARC)
2. Set up the sound output of TV to HDMI (ARC). (For details, reference your TV user manual.)
3. ARC function is automatically selected when ARC signal comes in from TV, no matter what kind of the
function you are using.
OUT
IN
3. Wireless LG Sound Sync connection
If you connect this unit to a TV that supports LG Sound Sync (LG TV with the logo), you can enjoy
the TV sound with wireless connection.
1. Turn on the unit and set the input source of this unit to LG TV function using FUNC button.
2. Set up the sound output of TV to LG Sound Sync (Wireless). (For details, reference your LG TV user
manual.) “PAIRED” appears on the display window for about 3 seconds and then you can see “LG TV” on
the display window if connecting normally between this unit and your TV.
About
You can control some functions of this unit by your TV’s remote control with LG Sound Sync. It is compatible
with the LG TV that is supported LG Sound Sync. Make sure of the LG Sound Sync logo on your TV.
3 Using Multi-Room
Using Multi-Room10
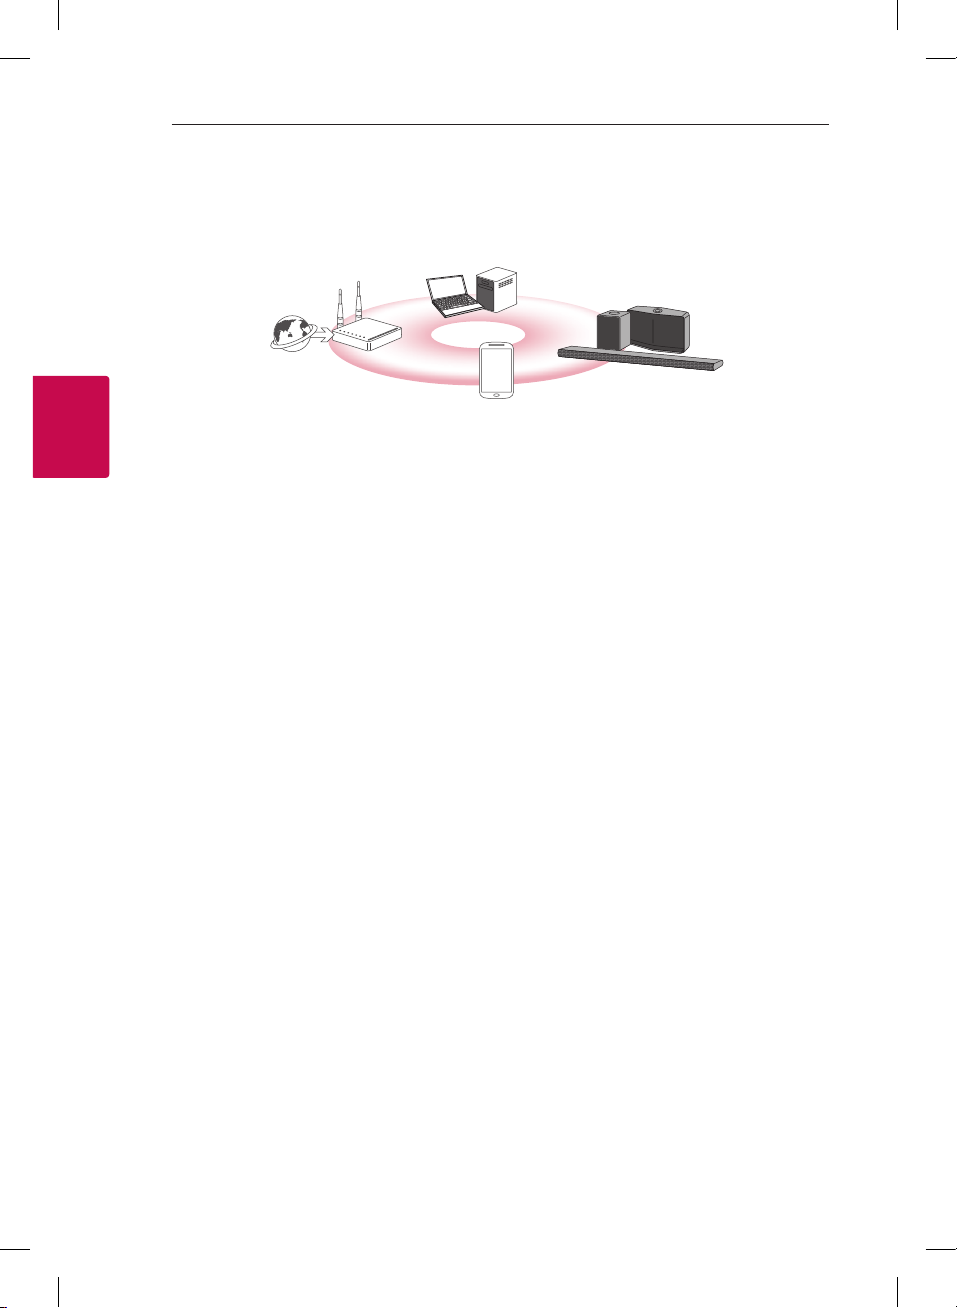
Multi-Room Network Setup
Step 1. Home Network Requirement
d
c
a
b
Make sure that wireless network environment using a router is installed at your home. The home router
a
should be connected to the internet.
Connect your smart device to your home network.
b
3
Using Multi-Room
Connect the speaker to the power supply.
c
If you want to enjoy the music on media server (PC, Mac or Network Storage), connect the media server
d
to your home network.
Caution for Home Network Requirement
.
yMUSICow system communicates over both 2.4 GHz and 5 GHz home network supporting 802.11b/g/n
wireless technology.
yWireless signal interference may lead to disconnection of network or stopping playback.
yDepending on the speed of your network, playback of online contents may not work well.
yNetwork connection may not be made with some routers (or modem) from certain internet
communication service providers. In such case, purchase a router from general market and use.
yBecause of a rewall on your PC, Music Flow PC Software may not work well. In this case, disable all your
rewalls and try to connect again. Refer to your rewall’s instruction or website.

Using Multi-Room 11
Step 2. Installing “Music Flow Player” App and Media Server
Installing “Music Flow Player” App
Download “Music Flow Player” on the Apps Store or Google Play Store.
A B
OR
A
Type “Music Flow Player” in the search bar and tap “Search”.
B
Scan the QR code using the scanning application.
Note for “Music Flow Player” App
,
yDepending on the device, “Music Flow Player” app may not work.
yMusic Flow Player app will be available in version of the software as follow;
Android O/S : Ver 4.0 (ICS) (or later)
iOS O/S : Ver 6.0 (or later)
3
Using Multi-Room
Installing Media Server software on your PC or Mac
Media server software allows you to access audio les stored in media server (PC, Mac or Network storage)
and enjoy them on your speaker via home networking. On www.lg.com website, type model name in the
search bar and nd media server software on support tab.
yWindows : Music Flow PC Software
yMac OS : Nero MediaHome 4 Essentials
Note for using Media Server
,
yOn your PC or Mac, you must share the folder contained Audio content to play them on MUSICow
system.
yOn your NAS Device, you must also need to change the settings of your NAS device to ensure that DLNA
server is enabled.
yOn your Firewall software, you may also need to change the settings of your rewall software to ensure
that Windows le sharing is not blocked.

Using Multi-Room12
Step 3. Initial Multi-Room Setup
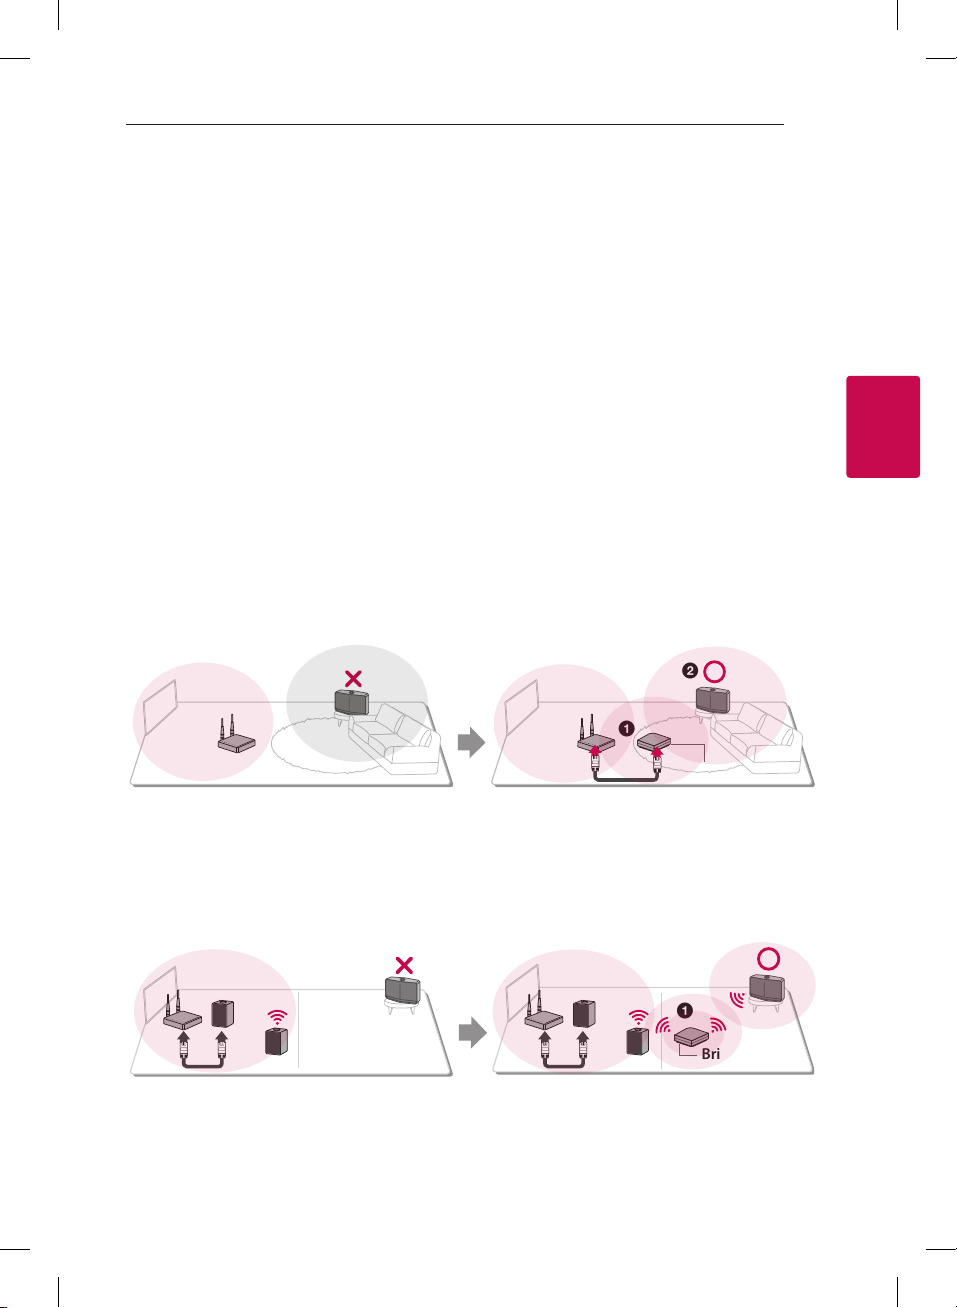
When installing the MUSICow product for the rst time, you can choose two types of connection as below.
Option 1. Wired connection (MUSICflow Mesh Network Connection)
Connect the one of MUSICow products (sound bar, speaker or bridge) to the home router using LAN cable.
Then you can connect the additional MUSICow products (Optional) to your home network wirelessly
(MUSICow Mesh Network). Refer to “Step 4. Add Speakers (Optional)” on page 14.
If you have a bridge
Bridge ( Wired Connection) à Sound bar (Add speaker) à Other speakers (Add speaker)
If you do not have a bridge
Sound bar ( Wired Connection) à Other speakers (Add speaker)
3
Using Multi-Room
LAN Cable
Simple Setup Guide (Wired Connection)
1. Ensure that your smart device is connected to your Wi-Fi network.
2. Select the product you want to connect.
3. Launch Music Flow Player App and follow “Wired Connection” instructions on set-up wizard.
4. Connect LAN cable from router to any one of MUSICflow product (sound bar, speaker or bridge).
5. Power on the MUSICflow product and wait until you see a white LED become solid.
6. If you install successfully, update speaker software to the latest:
[Home à Settings à Version Info.]
m Tip
Separated from the router’s Wi-Fi environment, composes wireless network among MUSICow products.
Using MUSICow mesh network, Wireless coverage is expanded, which oers stable music streaming service.
In the below case, MUSICow Mesh Network connection is recommended.
1. When the Wi-Fi coverage cannot reach whole house because home router performance is unstable.
(In case that your home router supports only 802.11 b/g 2.4 GHz.)
2. When you want to enjoy MUSICflow system in stable wireless network environment.
3. When you want to use in below mode.
1) Multi-Room & Group-play Mode
2) Home Cinema Mode
3) Hi-Fi (24 bit/192 kHz) Mode : When you enjoying the high-quality audio source (ex: flac)

Using Multi-Room 13
Option 2. Wireless connection (Standard Wireless Connection)
When the wired connection is unavailable between MUSICow products and home router, MUSICow
product oers music streaming service within home router’s Wi-Fi coverage.
Connect the one of MUSICow products(sound bar or speaker) to the home router wirelessly.
(Option)
Then you can connect the additional MUSICow products to your home Wi-Fi network wirelessly.
Refer to “Step 4. Add Speakers (Optional)” on page 14.
Wireless signal
Simple Setup Guide (Wireless Connection)
1. Ensure your smart device is connected to your Wi-Fi network.
2. Select the product you want to connect.
3. Launch Music Flow Player App and follow “Wireless Connection” instructions on set-up wizard.
4. Press (Wi-Fi Setup icon) button at the back or top of the MUSICflow product (sound bar, speaker or
bridge).
5. Check if the network indicator LED is blinking in a white and red color.
6. Please input the password of Home Router for connecting MUSICflow product to home router.
If you have iOS device, you must take the three steps below
6-1. Press home button of iOS device and go to [Settings].
If you can select “MusicFlow_Setup” in Wi-Fi settings. The App and MUSICflow product will be
connected.
6-2. Move to Music Flow Player App and input the password of home router for connecting MUSICflow
product to home router.
6-3. Press home button of iOS device and go to [Settings].
Reconnect to your Home Wi-Fi network. And move to Music Flow Player App again.
7. If you install successfully, update speaker software to the latest:
[Home à Settings à Version Info.]
Note
,
yIf you failed for “Wireless connection” conguration. It seems that location is too far from the router, it may
not be connected. Place and use it at a location that is close enough to router.
yMusic Flow PC Software installed on desktop is not supports wireless connection procedure. In this case,
use the Music Flow Player on smart device.
yIf the router’s performance is not good enough (ex. 802.11g 2.4GHz), sound may be broken in group play
or surround playback mode. In this case, connect the speaker in MUSICflow Mesh Network.
3
Using Multi-Room

Using Multi-Room14
m Tip
Oers music streaming service in MUSICow system within home router’s Wi-Fi coverage.
In the below case, Standard wireless connection is recommended.
1. When all speakers are within the home router’s Wi-Fi coverage.
(If case that your home router supports 802.11n 2.4/5 GHz )
2. When the wired connection is unavailable between MUSICow products and home router.
3. When you want to use in below mode.
1) when you use single speaker MUSICflow system.
2) Group-play in the Wi-Fi coverage of the home router
3) L/R stereo Mode
Step 4. Add Speakers (Optional)
If you connect the initial MUSICow product to your home network, you can connect the additional
3
MUSICow products (sound bar, speaker or bridge) to your home network.
Using Multi-Room
Simple Setup Guide (Add Speakers)
1. If you have additional speakers, power on the speaker.
2. Launch smart device or PC application and follow instructions on set-up wizard.
[Home à Add Speakers]
3. Press (ADD icon) button at the back or at the top of the MUSICflow product (sound bar, speaker or
bridge) which is you want to connect.
4. Check if network indicator LED is blinking in a red color.
5. If you install successfully, update speaker software to the latest:
[Home à Settings à Version Info.]
Note
,
If you failed for “Add Speaker” conguration. It seems that location is too far from between speakers, it may
not be connected. Place and use it at a location that is close enough to router and each speakers.
Using Multi-Room 15
Note for Multi-Room Setup
,
yYou can make all wireless/wired connection according to the location of the router. But we recommend
that you connect the rst speaker or bridge to the router using LAN cable and connect additional
speakers for network stability.
yWhen the “Firmware update”pop-up appears on Music Flow Player App, touch to start updating.
yIf you connected a speaker with a LAN cable and installed other speakers additionally: If the speaker with
frequent sound breaking is not close enough with the cable connected speaker, additionally install Bridge
or other speaker in the middle location between the speaker connected with LAN cable and the speaker
with sound breaking, and try again.
yEven if you connected speakers with MUSICow mesh network, music sound breaks by ambient signal
interference causing Wi-Fi network defect. In this case, you can try to change Mesh network channel of
MUSICow system at the [Settings à Advanced settings à Mesh Network Channel]
yWhen making connection, “Mesh network composition” may appear and it takes about 30 seconds. This
message appears once in rst installation but appear again when you change network environment.
Using the Bridge
1. Use as a root device (wired to the home router)
When your home router is located far from speaker location to be connected in wired mode:
According to “Simple Setup Guide (Wired Connection)”, connect the Bridge to your home router with
a
LAN cable.
According to “Simple Setup Guide (Add Speakers)“, add MUSICflow products to your home network.
b
b
3
Using Multi-Room
a
Bridge
2. Use as a wireless extender
When you want to expand MUSICow mesh network coverage:
Preparation: Initial MUSICow product is connected to your home router with LAN cable.
According to “Simple Setup Guide (Add Speakers)“, add the Bridge to your home network.
a
According to “Simple Setup Guide (Add Speakers)“, add MUSICflow products to your home network.
b
b
a
Bridge

Using Multi-Room16
Enjoying Multiple MUSICflow Product
1. Home Cinema Mode (Surround Sound Mode)
Simply add a LG MUSICow sound bar to your network and synchronize it with your LG MUSICow speakers
to enjoy a home cinema system experience.
If you have a bridge
Bridge ( Wired Connection) à Sound bar (Add speaker) à Other speakers (Add speaker)
If you do not have a bridge
Sound bar ( Wired Connection) à Other speakers (Add speaker)
Note
,
If you connect the MUSICow Speakers to your Home Cinema, those speakers must be same model.
3
Using Multi-Room
2. Grouping Mode
Speakers placed in separate rooms can play the same music or dierent music based on your needs.
Synchronize your multi-room speakers together to play the same song in every room.
Requirement
yMUSICow Sound Bar x 1
yMUSICow Speaker x 2 (Same model)
yNetwork Bridge (optional)
Requirement
yMore than 2 MUSICow
yNetwork Bridge (optional)
3. L/R Stereo Mode
Set your speakers to stereo sound with Music Flow Player Apps to enjoy movies and your favourite tracks.
Requirement
yMUSICow Speaker x 2
yNetwork Bridge (optional)

4 Using External device
Using External device 17
Using External device
1. HDMI Input connection
To the Blu-ray disc player,
DVD player, game console,
etc.
1. Connect HDMI IN jack on the unit to HDMI OUT jack on the audio & video device such as Blu-ray disc
player, DVD player, game console, etc.
2. Select the input source of this unit to HDMI IN using FUNC button.
2. PORTABLE IN connection
4
Using External device
1. Connect any device which has portable out( ) to the PORTABLE IN connector of the unit by using a 3.5
mm stereo cable.
2. Select the input source of this unit to PORTABLE using FUNC button.
3. BLUETOOTH® connection
LG HS7 (XX:XX) /
LG LAS750M (XX:XX)
1. Select the input source of this unit to Bluetooth function using FUNC button.
“BT READY” appears on the display window.
2. Select “LG HS7 (XX:XX) or LG LAS750M (XX:XX)” on your Bluetooth device for pairing.
3. When this unit is successfully connected with your Bluetooth device, “PAIRED” will appear on the display
window and change to Bluetooth device name soon.
If it is unavailble to display device name on the unit, ”_” will be display.
4. Play music on your Bluetooth device.

5 Troubleshooting
YRO#PLQ
VOL
Troubleshooting18
Troubleshooting
No woofer sound
You can set up wireless connection manually, when
your connection is not completed.
1. Adjust volume level of the main unit to
minimum.
-”VOL MIN” appears on the display window.
YRO#PLQ
2. Press and hold (MUTE) on the remote control
for about 3 seconds.
-“W RESET” / “WL RESET” appears on the display
window briey.
5
Troubleshooting
3. If the LED of the wireless subwoofer already
blinks in green continually, you can skip this
step. Press and hold PAIRING on the back of the
wireless subwoofer for more than 5 seconds.
-The LED of the wireless subwoofer lights up
alternately in red and green.
Z#UHVHW
or
ZO#UHVHW
Red Green
4. Disconnect the power cord of the main unit
and the wireless subwoofer.
5. Connect them again after the LED of the main
unit and the wireless subwoofer is fully turned
off. The main unit and the wireless subwoofer
will be paired automatically when you turn on
the main unit.
-When the connection is completed, you can
see the green LED on the subwoofer.
Green
VOL
In case that sounds are cut off
during playback
yFor best performance of wireless connection
such as Bluetooth or wireless subwoofer, do not
install the unit on Metallic furniture and raises
the height by attaching accessory foot because
wireless connection communicates through a
module positioned on the bottom of the unit.
yBe careful not to make scratches on the surface
of the Unit /Sub-Woofer when installing or
moving them.
yIt takes a few seconds (and may take longer)
for the main unit and the subwoofer to
communicate with each other and make sounds.
yThe closer the main unit and the subwoofer,
the better sound quality. It is recommended to
install the main unit and the subwoofer as close
as possible and avoid the cases below.
-There is a obstacle between the main unit and
the subwoofer.
-There is a device using same frequency with
this wireless connection such as a medical
equipment, a microwave or a wireless LAN
device.

Troubleshooting 19
Software Update
When the MUSICow product is connected to
your home network, rst of all, check whether the
rmware version is the latest on all speakers and
the Music Flow Player application.
MUSICow product might require recent rmware
to be installed for optimal operation.
[Settings à Version Info.]: you can check if your
speaker has the latest rmware.
How can I initialize speaker?
If you press down “ (Add)” button until Beep
sounds once, the network related settings are
initialized. (For sound bar, “DISABLED” is displayed in
the display window.)
If you press down “ (Add)” button until Beep
sounds twice, factory initialization is performed.
(For sound bar “RESET” is displayed in the display
window.)
Speaker is not connected.
1. For speaker that is already connected, check if
the phone is connected to the same router as
the speaker, then connect to the same router,
and check the followings.
1-1. Set Power off / on, and check the
connection.
1-2. If it is not solved by 1-1, close the
application and run again.
1-3. If it is not solved by 1-2, reset the Speaker
and reconnect.
1-4. If it is not solved by 1-3, delete the App,
reinstall, and try again. To reset, press and
hold the “ADD” button for 8 seconds until
you hear one beep.
2. If you change the location of the speaker that is
in use,
2-1. If the changed location is too far from the
home router, it may not be connected.
Place and use it at a location that is close
enough to router.
2-2. Connect the speaker with a LAN cable,
and for additionally installed speakers, if
they are not close enough to the speaker
connected with a LAN cable, additionally
install Bridge or another speaker in the
middle location between the speaker
connected with LAN cable and the
speaker with sound being disconnected.
There are times that speaker
disappears from the application
1. If the speaker blinking lamp is not blinking, and
stays as white: Even after the speaker power off
and on, if the problem continues, in this case
you have to reset the speaker (To reset, press
and hold the “ADD” button for 8 seconds until
you hear one beep. ) and need to register again.
Carry out speaker installation or additional
procedures.
2. If the speaker blinking lamp blinks white network signal is unstable. Wait for a while, or
move the speaker to another location closer to
other speaker or router.
3. Press menu key or menu at the top right side of
Home screen to end Music Flow Player app and
run again.
5
Troubleshooting

Troubleshooting20
Music sound breaks and unstable
MUSICflow system
1. If speaker with breaking sound is connected
through wireless connection mode,
yIf the distance between speaker and home
router is not close enough, the corresponding
condition may occur. Move speaker closer to
home router and try again.
y If the device with sound source to play (Ex.
phone or laptop) is at a place without uent
home router signal, move the corresponding
device closer to the home router and try
again.
2. If you connected a speaker with a cable and
installed other speakers additionally:
If the speaker with frequent sound breaking is
not close enough with the cable connected
speaker, additionally install Bridge or other
speaker in the middle location between the
cable connected speaker and the speaker with
sound breaking speaker, and try again.
3. Even if you connected speakers with MUSICflow
mesh network, musperformance of wireless
connection such as Bluetoothic sound breaks
5
Troubleshooting
by ambient signal interference causing WiFi network defect. In this case, you can try to
change Mesh network channel of MUSICflow
system at the [Settings à Advanced settings à
Mesh Network Channel]
How can I compose Music Library?
/ Song is not added even though
library is updated.
Just by adding a song to DLNA server, Music Library
is not automatically updated. When you add a song
to the server, in [Settings à Music Library à Sync],
run Music Library synchronization again. Even after
Music Library synchronization, if song is not added,
check the followings.
1. Check if DLNA server or PC SW shared folder is
designated.
2. Check if DLNA server contents list is renewed.
yEven if you copy the le into the server,
server contents list may not be immediately
renewed, so check the server setting.
yIf you copy a song into the phone with
a method other than MTP, it may not be
reected to the server contents list. In such
case, rescan the contents in the phone, or
turn o and start the phone again.
3. The sharing may be blocked, so check DLNA
server program setting or firewall setting.
y If you are using LG Musicow PC software,
when you designate shared folder, the
corresponding folder will be automatically
added to Music Library in a minute.

Troubleshooting 21
No TV sound in HDMI (ARC)
connection
The ARC function enables an HDMI capable TV to
send the audio streaming to HDMI OUT of the unit.
To use this function :
yYour TV must support the HDMI-CEC and ARC
function and the HDMI-CEC and ARC must be
set to On.
yThe setting method of HDMI-CEC and ARC may
dier depending on the TV. For details about
ARC function, refer to your TV manual.
yYou must use the HDMI cable (Type A, High
Speed HDMI™ cable with Ethernet).
yYou must connect the HDMI OUT (TV ARC) on
the unit with HDMI IN of the TV that supports
ARC function using an HDMI cable.
yYou can connect only one Sound bar to TV
compatible with ARC.
LG MUSICflow product is turned off
automatically.
There are some cases that power o will occur if
not receiving sound signal:
yOptical, HDMI ARC, Bluetooth, Wi-Fi (DLNA)
mode: if there is no sound signal during 20
minutes.
yPortable-In : no sound signal during 6 hours.
-In case of Network connected, it will go to
Network standby mode (White LED).
-In case of Network disconnected, it will go to
Standby mode (Red LED).
What is the type of music file that
can be played?
yYou can play the les with extension mp3, wma,
ac, m4a, aac, ogg, and wav.
yFor mp3 and wma, sampling frequency is 32- 48
kHz, and for ac, it supports up to 192 kHz, 24 bit.
yEven if the above conditions are satised, it may
not be played according to the characteristics of
the le or media server.
yDRM applied le cannot be played.
How can I use Spotify?
LG MUSICow product supports Spotify connect
method provided by Spotify. Through this, you
can use the function supported by Spotify by
connecting to the speaker through Spotify
application. If Music Flow speaker is in the network
composed of the same router, Spotify application
Speaker shape Icon is changed, and when you press
this Icon, you can check and select the speakers in
the same network. (When the speaker is selected,
the icon changes to green.)
How can I use HomeChat?
After HomeChat device registration, you can use
Home Chat.
Each of the family members can register and use
one speaker in HomeChat, and one person can
register several speakers.
For details, refer to http://www.lghomechat.com.
Note
,
Depending on the region, some services (ex.
Spotify, Homechat, etc.) are unavailable.
5
Troubleshooting

6 Appendix
Appendix22
Mounting the main
unit on a wall
Preparation materials
Unit
Wall bracket install guide
Wall bracket
Screws
Screws (A)
Wall plug
Screws (A) and Wall Plugs are not supplied for
mounting the unit. We recommend the Hilti
(HUD-1 6 x 30) for the mounting.
1. Match the TV’s BOTTOM EDGE of Wall bracket
install guide with the bottom of TV and attach
to the position.
6
Appendix
2. When you mount it on a wall (concrete), use the
wall plugs. You should drill some holes. A guide
sheet (Wall bracket install guide) is supplied to
drill. Use the sheet to check the point to drill.
3. Remove the Wall bracket install guide.
4. Fix the brackets with screws (A) as shown in the
illustration below.
TV
5. Put the unit on the brackets to match screw
holes on the bottom of the unit.
6. Fix the unit with the screws firmly.

About Status LED’s Condition
Color Status
Appendix 23
(O) (White)
(White) (Red)
(White)
(O) (Red)
(Dimmed White)
(Red)
Note for Status LED’s Condition
,
yWhen you set the group at rst, Network status LED turns green.
yThe additional groups are set, the Network status LED color is changed in group order.
(Green)
(
yIf the grouped speakers switch to the network standby mode, the brightness of Network status LED gets
dark.
>
Specification
The unit is waiting for network connection
The initial unit is being connected to the network
( button is pressed)
The unit is connected to the network
The additional unit is being connected to the network
( button is pressed)
Network standby mode
Standby mode
(Magenta)
(Cyan)
>
(Blue)
>
(Yellow)
>
OPEN SOURCE
Network Status
Standby Mode Status
)
6
Appendix
Power Supply: 25 V 0 2 A (AC adapter)
AC adapter
yModel : DA-50F25
Manufacturer: Asian Power Devices Inc.
Input: 100 - 240 V ~ 50/60 Hz
Output: 25 V 0 2 A
Power consumption: 45 W
yNetworked standby : 5.8 W
(If all network ports are activated.)
Amplier Total output: 360 W
Bluetooth: Codec SBC
Dimensions (W x H x D): (1060 x 45 x 82) mm
(without Foot)
Net Weight (Approx.): 2.5 kg
yDesign and specications are subject to change
without notice.
SOFTWARE NOTICE
To obtain the source code under GPL, LGPL, MPL
and other open source licenses, that is contained in
this product, please visit
http://opensource.lge.com.
In addition to the source code, all referred license
terms, warranty disclaimers and copyright notices
are available for download.
LG Electronics will also provide open source code
to you on CD-ROM for a charge covering the cost
of performing such distribution (such as the cost of
media, shipping and handling) upon email request
to opensource@lge.com. This oer is valid for three
(3) years from the date on which you purchased the
product.

Technology with the human touch
GUARANTEE
• LG Electronics U.K. Ltd. will provide the following services in order to expedite this Guarantee.
1. All faulty components which fail due to defective manufacture will be replaced free of charge for a period of 12 months
from the original date of purchase.
2. The dealer (or his service agent) who sold the product will be reimbursed for any labour provided in the repair of this LG
equipment, for a period of 12 months from the original date of purchase. These claims must be made in accordance with
the published scale of service charges and relevant claims procedure.
PLEASE NOTE:
A. The dealer may restrict the guarantee to the original purchaser.
B. The dealer is not obliged to carry out service under guarantee if unauthorized modifications are made to the apparatus,
or if non standard components are used or if the serial number of the apparatus is removed, defaced, misused, or altered.
C. Any claims made under guarantee must be directed to the dealer from whom the equipment was originally purchased.
The dealer may, before carrying out service under guarantee, require a receipted account as evidence of the date of
purchase.
D. We respectfully point out that your dealer is not obligated to replace batteries if they become exhausted or worn in use.
E. Aerial alignment and consumer control adjustments are not covered by this guarantee.
This guarantee does not affect your statutory rights.
• REQUIREMENTS TO MAINTAIN WARRANTY COVERAGE:
RETAIN YOUR RECEIPT TO PROVE DATE OF PURCHASE. A COPY OF YOUR RECEIPT MUST BE SURRENDERED AT THE TIME
GUARANTEE SERVICE IS PROVED.
• Product Registration Card :
It is helpful to complete at least your name, address, phone, model & serial numbers and return it. This will enable LG to
assist you in the future should you lose your receipt, your units be stolen, or should modifications be necessary.
• To obtain information or assistance:
Call UK: 0344 847 5454 IE: 01 686 9454
MODEL NO.* SERIAL NO.* DATE OF PURCHASE.*
In all cases of diculty - consult your LG dealer from whom the product was purchased
LGEUK Website : www.lg.com/uk
(Service website : www.lg.com/uk/support)


LG Customer Information Center
Country Telephone
Austria / Österreich
Slovenia / Slovenija 080-543543
Benelux
Schweiz / Suisse / Svizzera /
Switzerland
České republiky nebo Slovenské
republiky / Českej republiky alebo
Slovenskej republiky
Deutschland 01806 11 54 11
España 963 05 05 00
France 3220
Ελλάδα
Italia 199600099
Polska 801 54 54 54
Portugal 808 785 454
România 031 228 3542
United Kingdom
0810-144131
0900 543 5454 (NL)
015 200 255 (BE)
0848-543543
CZ: 810 555 810
SK: 0850 111 154
801 11 200 900
210 4800 564
UK : 0344 847 5454
IE : 01 686 9454
United Kingdom www.lg.com/uk/musicow
 Loading...