

LG LAN-S360U15 Owner's Manual
Portable Navigation
OWNER’S MANUAL
550/555 Series
ENGLISH
Please read this manual carefully before operating
your Navigation device.
Keep it for future reference.
Designs and specifications are subject to change
without prior notice for improvement.

Table of contents
2
Safety note 5-11
Supplied parts 12
Part names 13-14
Front panel . . . . . . . . . . . . . . . . . . . . . . . . . . . . . . . . . . .13
Rear / Side panel . . . . . . . . . . . . . . . . . . . . . . . . . . . . . .14
Connecting devices 15-22
Installation sequence for the suction-cup mount . . . . .15-16
Detaching the suction-cup mount . . . . . . . . . . . . . . . . . .17
Installing the external GPS antenna (Optional) . . . . . .17-18
Installing Microsoft ActiveSync . . . . . . . . . . . . . . . . . . . .19
Connecting the USB cable . . . . . . . . . . . . . . . . . . . . .19-20
Downloading files: ActiveSync . . . . . . . . . . . . . . . . . . . .20
Data exchange via card reader . . . . . . . . . . . . . . . . . . . .21
Downloading files: Removable disk . . . . . . . . . . . . . . . . .21
Disconnecting the USB device . . . . . . . . . . . . . . . . . . . .22
Before operation 23
Starting up . . . . . . . . . . . . . . . . . . . . . . . . . . . . . . . . . . .23
Navi Menus . . . . . . . . . . . . . . . . . . . . . . . . . . . . . . . . . .32
Guide to . . . . . . . . . . . . . . . . . . . . . . . . . . . . . . . . . . . . .32
Go Home . . . . . . . . . . . . . . . . . . . . . . . . . . . . . . . . . . . .32
Cancel Route . . . . . . . . . . . . . . . . . . . . . . . . . . . . . . . .32
Recalculate . . . . . . . . . . . . . . . . . . . . . . . . . . . . . . . . . .33
Route Manager . . . . . . . . . . . . . . . . . . . . . . . . . . . . . .33
Setup . . . . . . . . . . . . . . . . . . . . . . . . . . . . . . . . . . . . . . .33
Find an Address, Street, Intersection or City . . . . . . . . . .34
Selecting the city, state and country to search in . . . . . . .34
Selecting a new settlement to search in . . . . . . . . . . .35-36
Changing the state (Australia, USA, etc.) . . . . . . . . . . . .37
Search for a location 32-44
Screen with Map 24-31
Map screen . . . . . . . . . . . . . . . . . . . . . . . . . . . . . . . .24-28
Cursor menu . . . . . . . . . . . . . . . . . . . . . . . . . . . . . . .29-31

3
Table of contents
Changing the country . . . . . . . . . . . . . . . . . . . . . . . . . . .37
Selecting a street or the centre of the settlement . . . . . .37
Selecting the centre of the settlement . . . . . . . . . . . . . .38
Select a street . . . . . . . . . . . . . . . . . . . . . . . . . . . . . .38-39
Select a house number or the midpoint of the street . . . .39
How to select an intersection instead of a
house number . . . . . . . . . . . . . . . . . . . . . . . . . . . . . . . .39
Find in History . . . . . . . . . . . . . . . . . . . . . . . . . . . . . . . .40
Find Coordinates . . . . . . . . . . . . . . . . . . . . . . . . . . . .40-41
Find a POI . . . . . . . . . . . . . . . . . . . . . . . . . . . . . . . . .42-43
Find My POI . . . . . . . . . . . . . . . . . . . . . . . . . . . . . . . . . .44
Find one of the Favourites (Home/Work) . . . . . . . . . . . . .44
Route manager 45-54
TBT Summary . . . . . . . . . . . . . . . . . . . . . . . . . . . . . .45-46
Simulation . . . . . . . . . . . . . . . . . . . . . . . . . . . . . . . . . . .47
Manage POI (Points of Interest) . . . . . . . . . . . . . . . . .47-48
Manage My POI . . . . . . . . . . . . . . . . . . . . . . . . . . . .48-49
Edit Way Point . . . . . . . . . . . . . . . . . . . . . . . . . . . . . .49-50
Route Information . . . . . . . . . . . . . . . . . . . . . . . . . . .50-53
Detour . . . . . . . . . . . . . . . . . . . . . . . . . . . . . . . . . . . . . .54
Setup 55-66
General Setup . . . . . . . . . . . . . . . . . . . . . . . . . . . . . .55-56
Map Setup . . . . . . . . . . . . . . . . . . . . . . . . . . . . . . . . . . .57
Sound Setup . . . . . . . . . . . . . . . . . . . . . . . . . . . . . . .58-59
Route parameter . . . . . . . . . . . . . . . . . . . . . . . . . . .59-61
Language & Units . . . . . . . . . . . . . . . . . . . . . . . . . . .61-62
Advanced Setup . . . . . . . . . . . . . . . . . . . . . . . . . . . . . . .62
Display Setup . . . . . . . . . . . . . . . . . . . . . . . . . . . . . . . . .62
Backlight Setup . . . . . . . . . . . . . . . . . . . . . . . . . . . . . . .63
Smart Zoom . . . . . . . . . . . . . . . . . . . . . . . . . . . . . . . . . .63
User Data Management . . . . . . . . . . . . . . . . . . . . . . . . .64
About . . . . . . . . . . . . . . . . . . . . . . . . . . . . . . . . . . . . . . .65
GPS Data screen . . . . . . . . . . . . . . . . . . . . . . . . . . . . . .65
Time Sychronization . . . . . . . . . . . . . . . . . . . . . . . . . . . .66

Table of contents
4
Troubleshooting 70-72
Specifications 73
Support-Hotline 74
Symbol used in this manual
Indicates special notes and operating features.
Using software 67-69
LGE MapLoader . . . . . . . . . . . . . . . . . . . . . . . . . . . .67-69
5
Safety note
CAUTION : TO REDUCE THE RISK OF ELECTRIC SHOCK DO NOT
SPLIT COVER(OR BACK) NO USER SERVICEABLE PARTS
INSIDE. REFER SERVICING TO QUALIFIED SERVICE
PERSONNEL.
CAUTION
RISK OF ELECTRIC SHOCK
DO NOT OPEN
The lightning flash with arrowhead symbol, within an equilateral
triangle is intended to alert the user about the presence of
uninsulated dangerous voltage within the product’s enclosure that
may be of sufficient magnitude to constitute a risk of electric shock.
The exclamation point within an equilateral triangle is intended to
alert the user to the presence of important operating and
maintenance (servicing) instructions in the literature accompanying
the appliance.
Disposal of your old appliance
1. When this crossed-out wheeled bin symbol is attached to a
product, it means the product is covered by the European
Directive 2002/96/EC.
2. All electrical and electronic products should be disposed of
separately from the municipal waste stream via designated
collection facilities appointed by the government or the local
authorities.
3. The correct disposal of your old appliance will help prevent
potential negative consequences for the environment and human
health.
4. For more detailed information about disposal of your old
appliance, please contact your city office, waste disposal service
or the shop where you purchased the product.
This product is manufactured to comply with Directive 2005/83/EEC
(ANNEX I , 3.2.9), 72/245/EEC 99/5/EC and 2006/95/EEC.
Safety note
6
Always operate the vehicle in a safe manner. Do not become
distracted by the navigation while driving, and always be fully aware
of all driving conditions.
Minimize the amount of time spent viewing the navigation screen
while driving and use voice prompts when possible.
Do not enter destinations, change settings, or access any functions
requiring prolonged use of the unit’s controls while driving.
Pull over in a safe and legal manner before attempting such
operations.
Do not kink or crease the power cable or place heavy objects on the
power cable.
Fire can result from damaged power cables.
Unplug the AC adapter during electrical storms. This may result in
electrical shock.
Do not handle the power plug nor the adapter with wet hands.
This may result in electrical shock.
Immediately power off the unit and unplug the AC adapter if you
notice smoke or odors coming from the player or adapter.
Fire can result from improper use.
Make sure to insert the power plug tightly.
Fire can result from improper use.
Use only the specified power adapter.
Using a different type of adapter may damage the product.
(DC 5 - 5.4V)
The appliance is not intended for use by children or infirm persons
without supervision.
7
Safety note
Note that malfunctions may occur if you use the product in places
where static electricity occurs frequently.
Do not use the unit near water.
Do not touch the unit with wet hands.
Do not attempt to disassemble or repair the product yourself.
Do not use the product for other purposes than those described in
this guide.
Do not use for many hours at extremely low or high temperatures.
(-10°C~60°C)
Avoid leaving the product in hot or humid places.
Take special attention when touching the product box, owner's
manual and accessories to avoid cuts.
While driving, keep the sound volume at a proper level.
Do not drop it and avoid heavy impacts at anytime.
Safety note
8
If you notice unusual odors, excessive heat coming from the
product, anything else that seems unusual, do not use the product
and contact our Customer Service Center.
Always use soft and dry cotton cloth when cleaning the product.
Do not use strong solvents such as alcohol, benzine, or thinner, as
these might damage the surface of the unit.
When attaching a navigation holder, remove impurities in the area to
attach before attaching, and press the suction lever to avoid falling.
Do not pull out the SD Memory Card while the navigator is
operating. It may cause mechanical problems.
Do not use the navigator for extended periods of time.
This may result in battery discharge.
Please obey all traffic regulations.
To aid safe driving, information on safe driving routes and routes
where accidents occur frequently is included.
Voice guidance and map route may differ from the actual traffic
conditions.
When moving the product, separate the power plug from cigarette
lighter socket and separate the main body from holder or separate
the holder from the window before moving.

9
Safety note
• If you attach the vacuum disk on the glass for a long period of
time, the pressure in the disk slowly reduces and the vacuum disk
may fall off.
• The Navigator holder may fall off at a sudden stop, thus causing a
dangerous situation. We recommend it should be installed close to
the dashboard so it can be supported properly.
• Applying too much force to adjust while the connecting arm is
tightly fixed, may deform the rubber disk connecting all the
components.
• If the holder falls off, please follow the instructions again to
reinstall and use it.
• Please note that if the product is damaged due to user negligence,
it cannot be returned or refunded.
Winter precaution
• The vacuum disk can easily come off the glass due to
differences in temperature between inside and outside the
windscreen.
Caution : Danger of explosion if battery is incorrectly replaced.
Replace only with the same or equivalent type.
Summer precautions
• When the vacuum disk can easily come off the glass due to
difference in temperature between inside and outside of the
windscreen.
• Remove the vacuum disk and store it separately when parking for
a long period of time.
• The built-in battery may be damaged when kept under direct
sunlight in the car for a long period of time due to internal
temperature rise.
Separate the unit and store it in a cool place.
A temperature rise can reduce the battery life span or cause an
explosion.

Safety note
10
• Never leave your unit/accessories (including windshield mount, car
charger etc) visible in an unattended vehicle, since it’s an easy
target for thieves.
• Back up your data using our provided software in the CD.
• In order to protect the screen and the unit, always store it in the
carry case.
• Do not use the memory card (SD card) with any other devices
since the memory card could be damaged.
• The unit has to be outdoors to locate the current position from
satellite. It could take few minutes to locate your position when you
start it for the first time.
If it takes longer than 5 minutes, make sure there aren’t any tall
trees or buildings around you.
• When installing the unit, make sure that it does not block the view
on the windscreen.
Make sure that unit does not interfere with the safety operations of
the vehicle when installed. Eg. Deployment of air bags or other
safety equipments.
• The unit could require the external antenna kit if the vehicle has
the heat reflective shield embedded in the windshield which may
prevent the unit from locating the current position.
The external antenna kit is available as an optional accessory.
• The instructions are not 100% correct, so only use it to aid you
finding the destination.
Map data is updated annually, so it can be different to the actual
road if there are changes during that period.
• The unit is designed to provide you with route suggestions, so it
does not reflect road conditions, traffic congestion, weather
conditions or other factors that may affect safety or timing while
driving.

11
Safety note
• LG is not responsible for any injury, property damage or accidents
resulting from reliance on the navigation system.
• LG is not responsible for the accuracy of traffic-related information
and data supplied by other parties.
• LG disclaims all liability for use of the navigation that causes or
contributes to death, injury or property damage or that violates any
law including traffic laws. All the stated instructions should be
followed, because if not, it may lead to death, serious injury or
property damage.
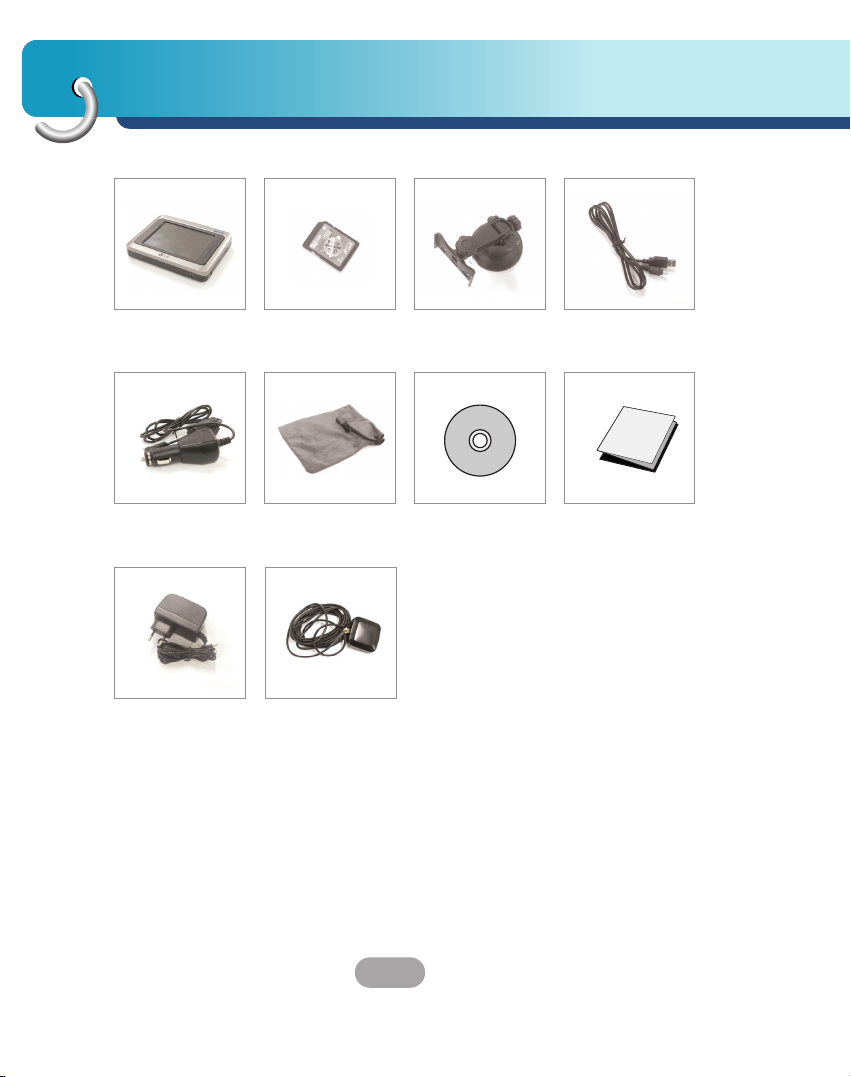
Supplied parts
12
SD memory card (Optional)
The supplied SD Memory Card space may not be insufficient after upgrade.
In this case, another SD Memory Card that has bigger space has to be
purchased.
Main Set SD Memory
Card (Optional)
Suction-Cup
Mount
USB Cable
Cigarette Lighter
Adapter
Carrying Case Installation
CD
Quick Start
Guide
GPS Antenna
(Optional)
AC Adapter
(Optional)
Contents may vary without notice.
13
Part names
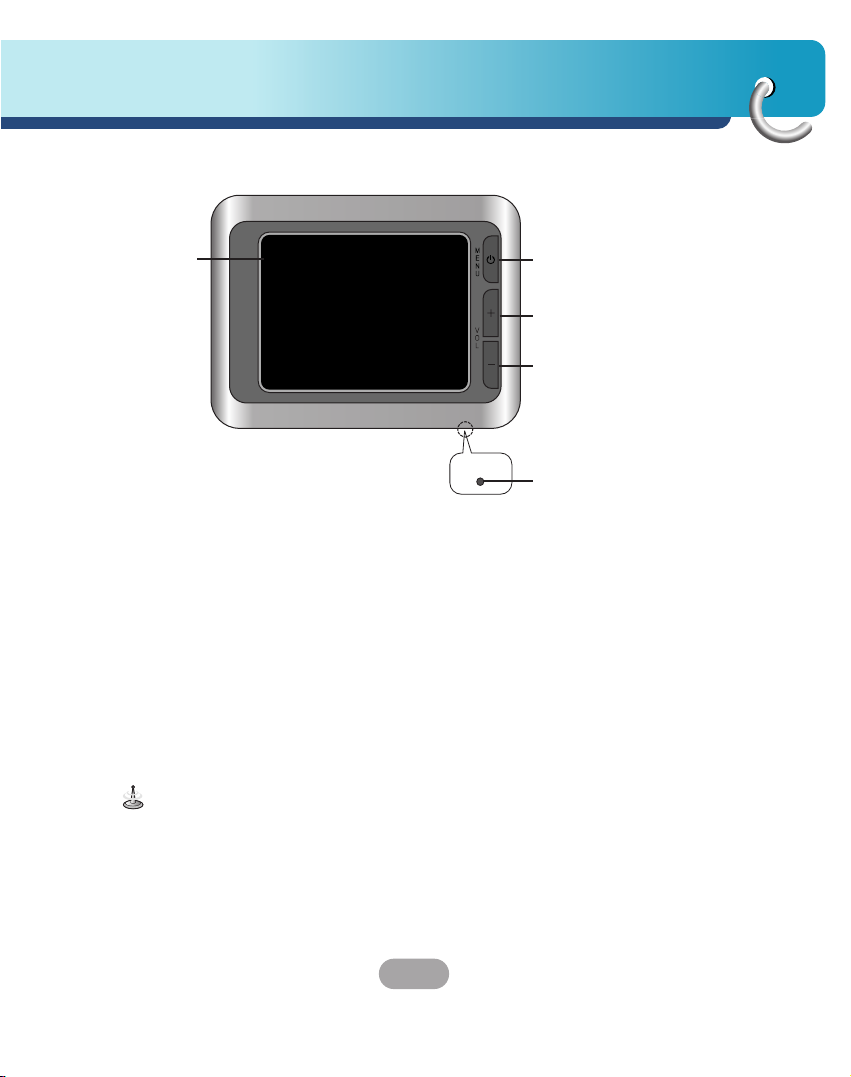
Front panel
2
3
4
To activate the menu function through the LCD screen, touch the LCD
screen with a finger.
1. LCD
2. MENU button
Move to the main menu screen or
the previous screen.
Power sleep
Entering power sleep mode.
ON: Press and hold.
OFF: Press and hold again.
3. Volume Up
Increases the volume level.
4. Volume Down
Decrease the volume level.
5. RESET hole
If the unit fails to operate
properly, press the reset button
using a ball point pen or a similar
tool.
1
RESET
5
Part names
14
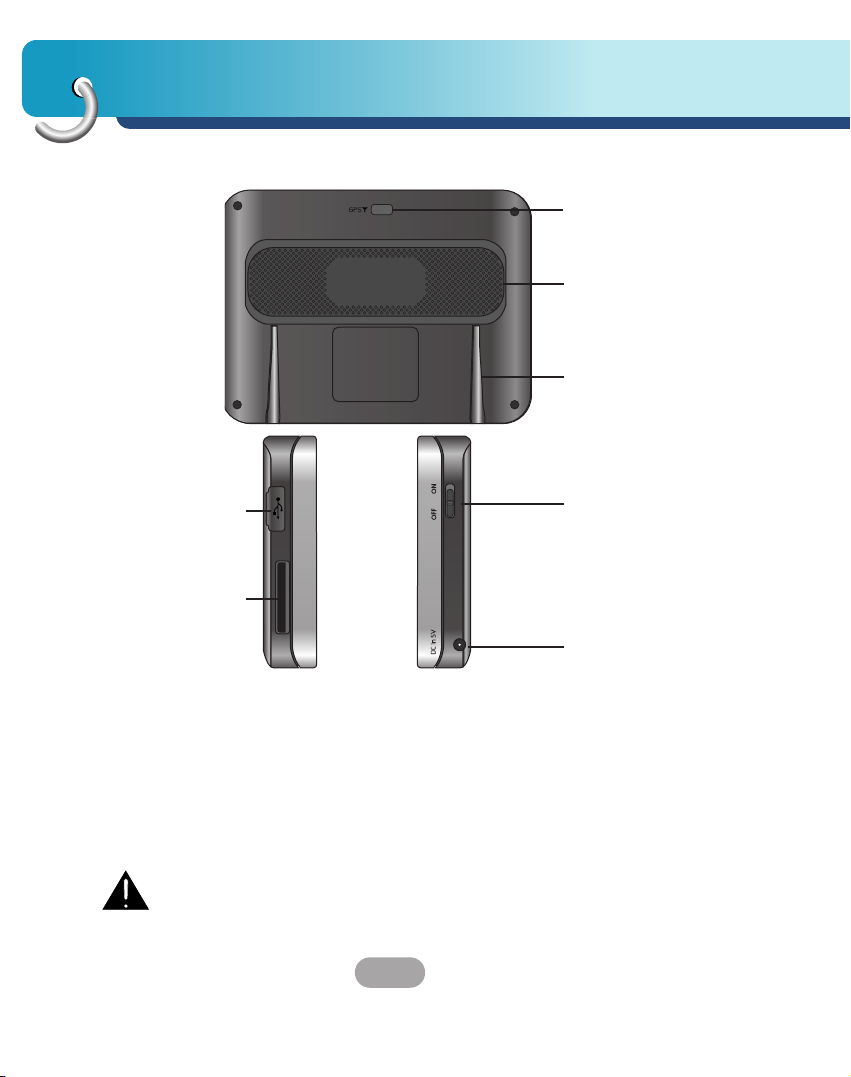
Rear / Side panel
2
3
6
7
1. External GPS Antenna Slot
2. Speaker
Gives a voice guidance service.
3. Docking connector
4. USB port
5. Memory Card Slot
Insert a SD Memory Card.
6. Power ON / OFF button
ON: Slide switch up.
OFF: Slide switch down.
7. Power supply connector
DC 5V
Deleting or altering the map data in the built-in memory or the SD
memory card randomly, may cause problems in the navigation
function.
4
5
1

15
Connecting devices
Installation sequence for the suction-cup mount
1. Select the most suitable position on the
windscreen.
2. Clean the surface of the windscreen, to remove
any dust and grease.
3. Place the suction-cup mount on a suitable
position on the windscreen.
4. Push back the lever to the left until you hear a
click, fixing the suction-cup mount in position.
5. Align the docking connector at the suction-cup
mount to mount then push the unit down until
you here a click.
Connecting devices
16
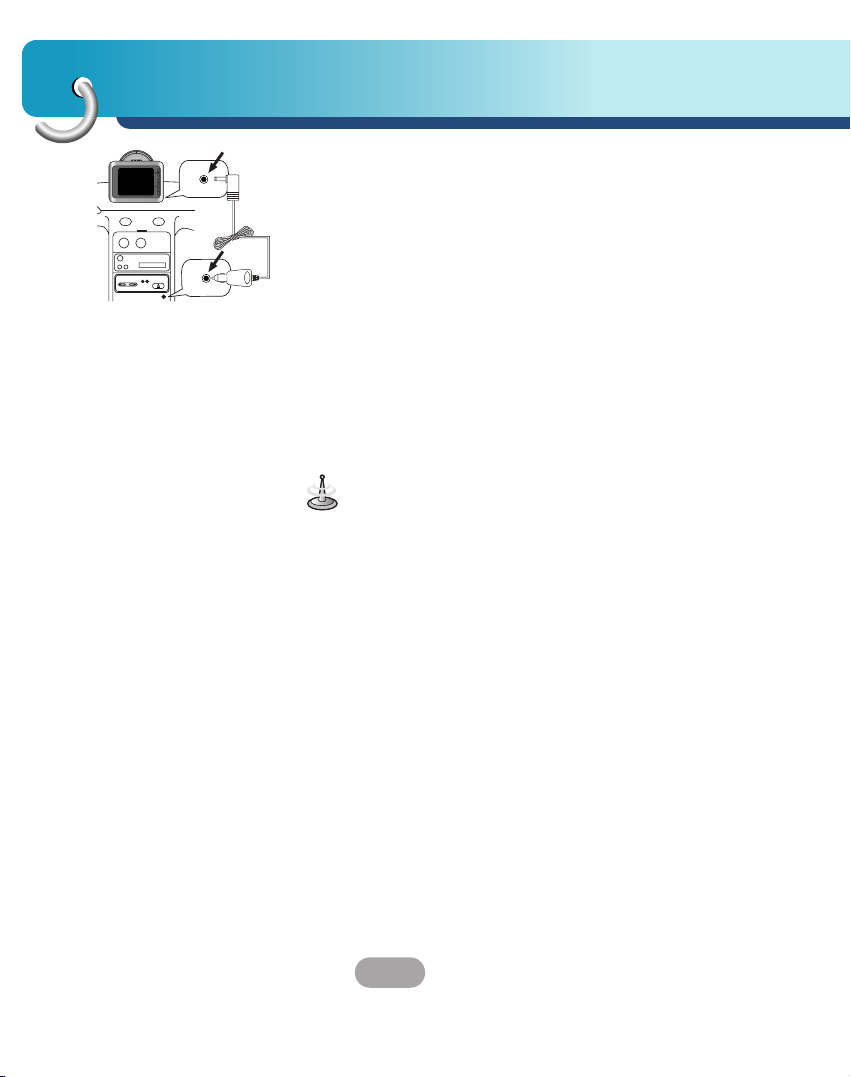
6. Plug the small plug end of the cigarette lighter
adapter into the power supply connector at the
side of the unit.
7. Plug the other end into your vehicle’s 12V
(cigarette lighter) socket.
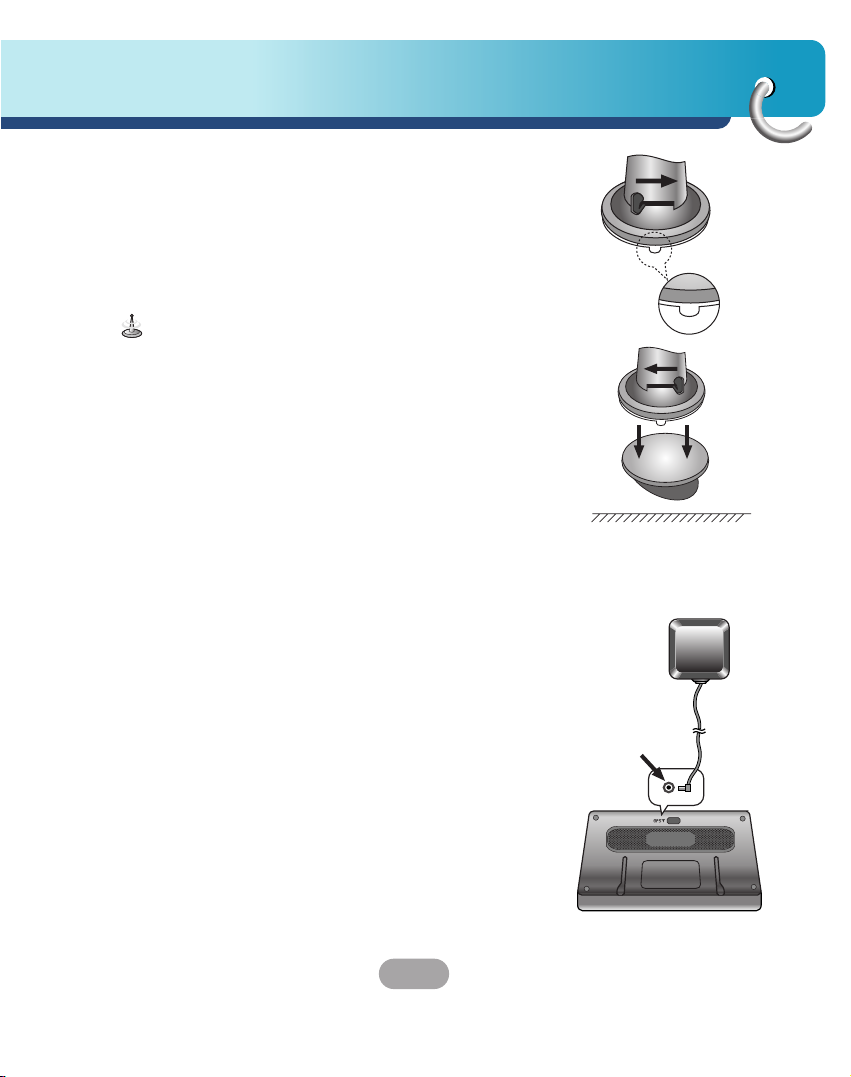
8.
To adjust the angle of the mount, slacken the
adjustable knobs at the
suction-cup
and then turn
it gently. In addition to tilting the mount up and
down and from side to side, you can also rotate
the mount, from the left, -45-45°.
9. When you finish, tighten up the knobs again.
• This unit and its cigarette lighter adapter are
designed for use in vehicles that have 5 -5.4V,
negative ground electrical systems.
(This is a standard for most vehicles.)
If your vehicle has a different type of electrical
system, the DC power system cannot be used.
• When attaching the mount, remove impurities from
the surface before attaching, and press the lever to
avoid falling.
• Adjust the direction of the mount to prevent it from
disturbing the driving.
• Adjust it to an angle you can see well.
• Be careful of falling the unit from the windscreen
when you drive.
• The arm of the mount may vibrate. Attach the mount
close to the dashboard as much as you can.
17
Connecting devices
Detaching the suction-cup mount
1. To remove the mount, pull the lever to the right.
2. If the mount still doesn’t detach from the
windscreen, Pull up handle of suction cup to move
the suction rubber.
Drivers in California and Minnesota prohibit from
placing anything on the windshild of a vehicle.
The
suction-cup mount is fastened with double-sided
tape.
Installing the external GPS antenna (Optional)
This unit has a built-in GPS antenna to receive the
satellite signals.
The external GPS antenna needs to be purchased
separately and may improve the receiving condition of
satellite signals when the signals are poor.
1. Select the place to attach the external GPS
antenna.
2. Plug the jack end of the GPS antenna into the
socket on the backside of the unit.
Dash board
Double-sided tape

Connecting devices
18
When Installing the antenna inside the vehicle
(on the dashboard or shelf)
Affix the external GPS antenna on as level a surface
as possible where the external GPS antenna faces
outside the window. (The GPS antenna is fastened
with a double-sided tape.)
• Make sure the surface is free of moisture, dust,
grime, oil, etc., before affixing the sheet.
• The double-sided tape contains a strong adhesive
and may leave a mark on the dashboard if
removed.
• Some vehicles use window glass that does not
allow signals from GPS satellites to pass through.
On such vehicles, install the GPS antenna on the
outside of the vehicle.
When installing the antenna outside the
vehicle (on the body)
Place the external GPS antenna in a position as level
as possible, such as on the roof or trunk lid.
(The GPS antenna is fastened with a magnet.)
When routing the lead in from the top of the door
Make a U-shaped loop in the lead on the outside to
prevent rainwater from flowing along the lead into the
interior of the vehicle.
(The GPS antenna is fastened with a magnet.)
19
Connecting devices
Installing Microsoft ActiveSync
In order to synchronize your data between your PC
and the unit, you need the Microsoft ActiveSync
program.
1. Click ActiveSync “setup.exe”.
2. Click “Next” to install Microsoft ActiveSync on
your PC.
3. Read the following license agreement carefully
and select “I accept the terms in the license
agreement”.
4. Click “Next”.
5. Enter your information.
6. Click “Next”.
7. Click “Next” to install to this folder, or click
“Change” to install to a different folder.
8. Setup is ready to begin installing Microsoft
ActiveSync.
9. The installation is in progress.
10. The Setup Wizard has successfully installed,
click “Finish”.
11. When prompted, connect your unit to your PC.
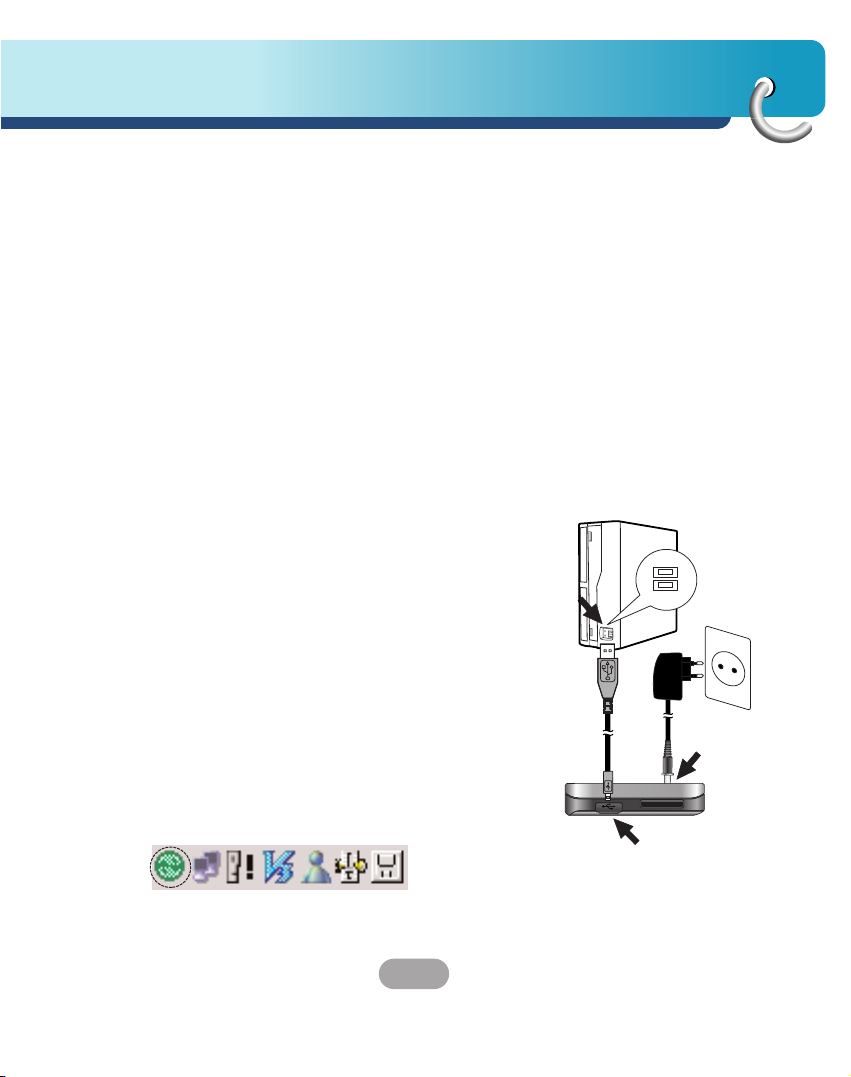
Connecting the USB cable
1. Connect the unit's power supply connector and
wall outlet using AC adapter.
2. Switch the unit on.
3. Connect one end to the USB port on your PC
and then plug the other end into your unit's USB
port.
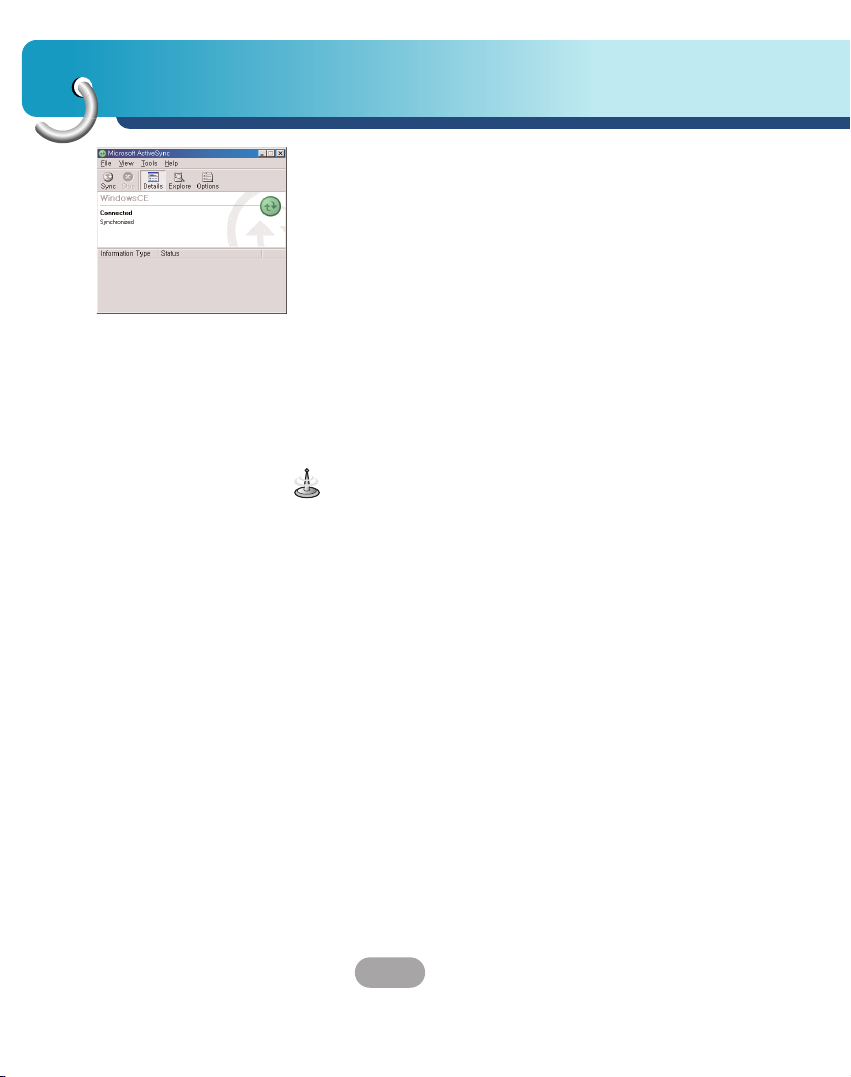
4. The icon is displayed in the system tray if
successfully connected.
Connecting devices
20
• ActiveSync installation is required for USB operation.
Download the latest version of Microsoft ActiveSync
for your unit. ActiveSync is a very convenient
Microsoft program for synchronizing data between
your unit and your PC. It loads itself automatically,
syncs your unit with your PC and then sits there,
patiently waiting to synchronize any piece of data
that you change.
• The tray icon may be hidden in some Windows XP
systems according to your settings.
• 50M Byte of the available memory capacity is used
for the working software. Be careuful not to use the
50M Byte of the memory card space at any time.
5. The “Add New Hardware Wizard” should
automatically install the USB drivers.
6. Follow the on screen instructions to establish a
partnership and synchronize your unit with your
PC.
Downloading files: ActiveSync
1. Open Windows Explorer on your PC.
The Mobile Device is displayed in Window
explorer.
2. Create the folder you want to use.
3. Select the file you want to save, then drag and
drop it to the removable disk.
21
Connecting devices
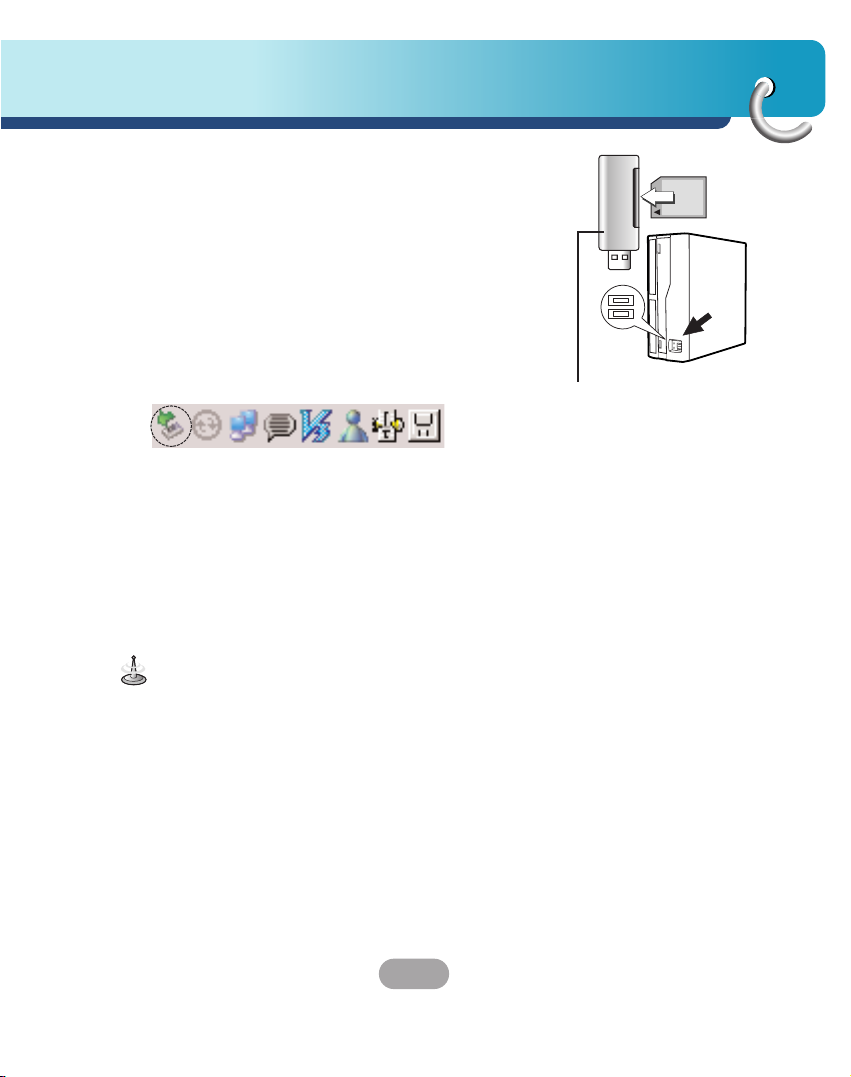
Data exchange via card reader.
You can transfer data via ActiveSync.
Howerer, if you wish to copy large quantities of data
(Navigation maps and Photo files) to the memory
card these can also be stored directly to the memory
card.
1. Insert the SD card into your card reader.
2. Insert the card reader into of your computer's
USB port.
3. An icon is displayed in the system tray if
successfully connected.
Downloading files: Removable disk
1. Open Windows Explorer on your PC.
The removable disk is displayed in Window
explorer.
2. Create the folder you want to use.
3. Select the file you want to save, then drag and
drop it to the removable disk.
Not supplied.
Don’t remove the USB cable while uploading or
downloading files.
Connecting devices
22
Disconnecting the USB device
Wait until you get a message that you can safely
unplug the device before disconnecting the USB
device.
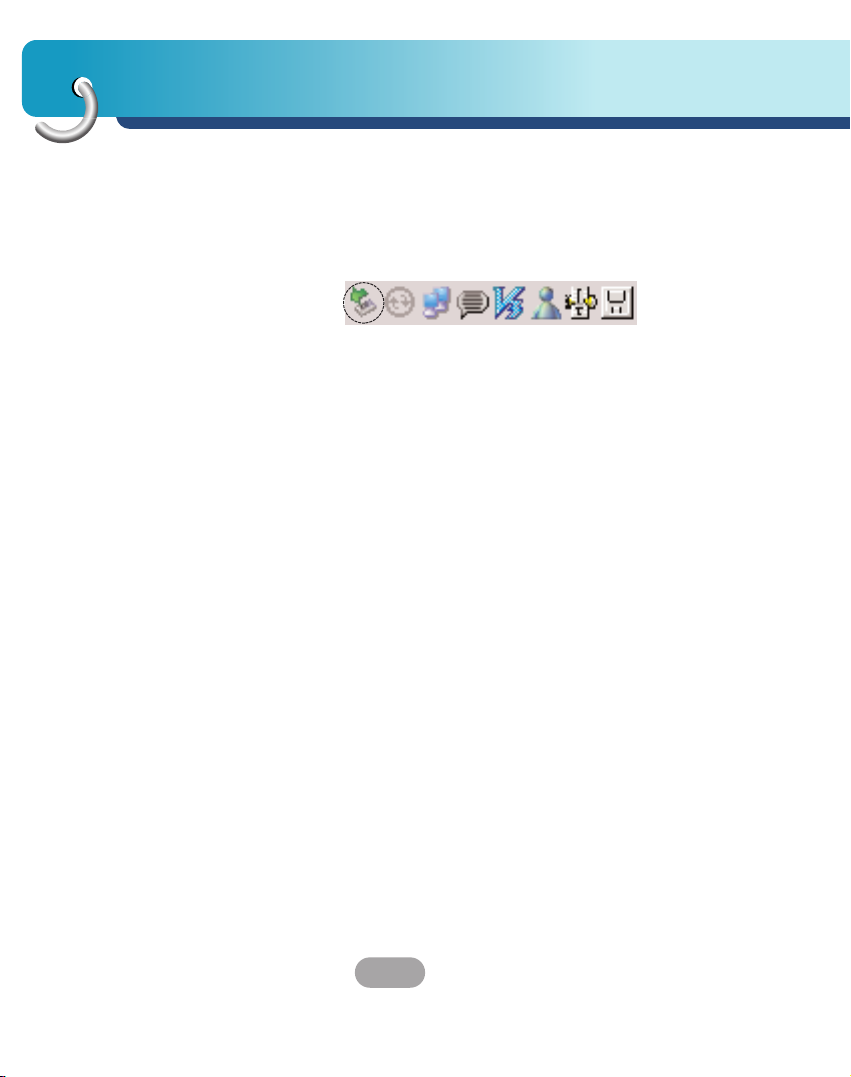
1. The safe remove icon is in the system tray.
2. Click on the icon to eject the unit from the
PC and select the ‘Safely remove’ message.
3. A message will appear indicating that it is now
safe to disconnect the unit.
4. You can now go ahead and unplug the memory
card reader from the PC.
23
Before operation
Starting up
The navigation software and the digital map material
are supplied in the built-in memory or the SD
memory card. Installation is fairly automatic.
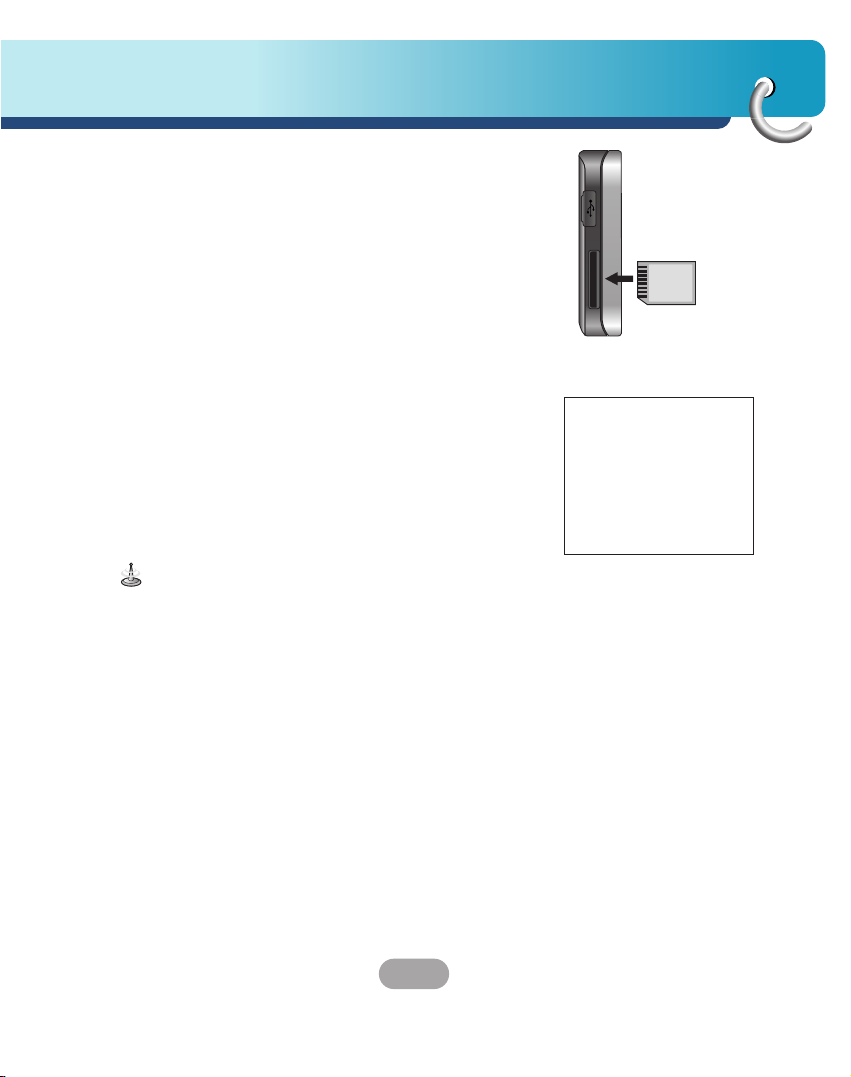
SD memory card:
The application and maps are stored in the SD
memory card. Insert the SD memory card into the
navigation device.
Built-in memory:
The application and maps are stored in the built-in
memory.
Push the Power button up to turn on the device.
The Map screen is displayed
It may take some time until the GPS receiver initially
acquires enough satellites' data during the first use of
the GPS navigation equipment.
SD memory card
compatibility list
LG
SanDisk
TOSHIBA
Transcend
Billionton
Panasonic
Apacer
MCDiAFO
ZIBEN
 Loading...