

Page 1

CAR CD/MP3/WMA Receiver
OWNER’S MANUAL
MODEL : LAC-M8600R
Please read this instruction booklet carefully and completely
before connecting, operating or adjusting this product.
ENGLISH
LAC-M8600R_ENG
Page 2
Safety note
2
TO REDUCE THE RISK OF ELECTRIC SHOCK DO NOT SPLIT
COVER(OR BACK) NO USER SERVICEABLE PARTS INSIDE.
REFER SERVICING TO QUALIFIED SERVICE PERSONNEL.
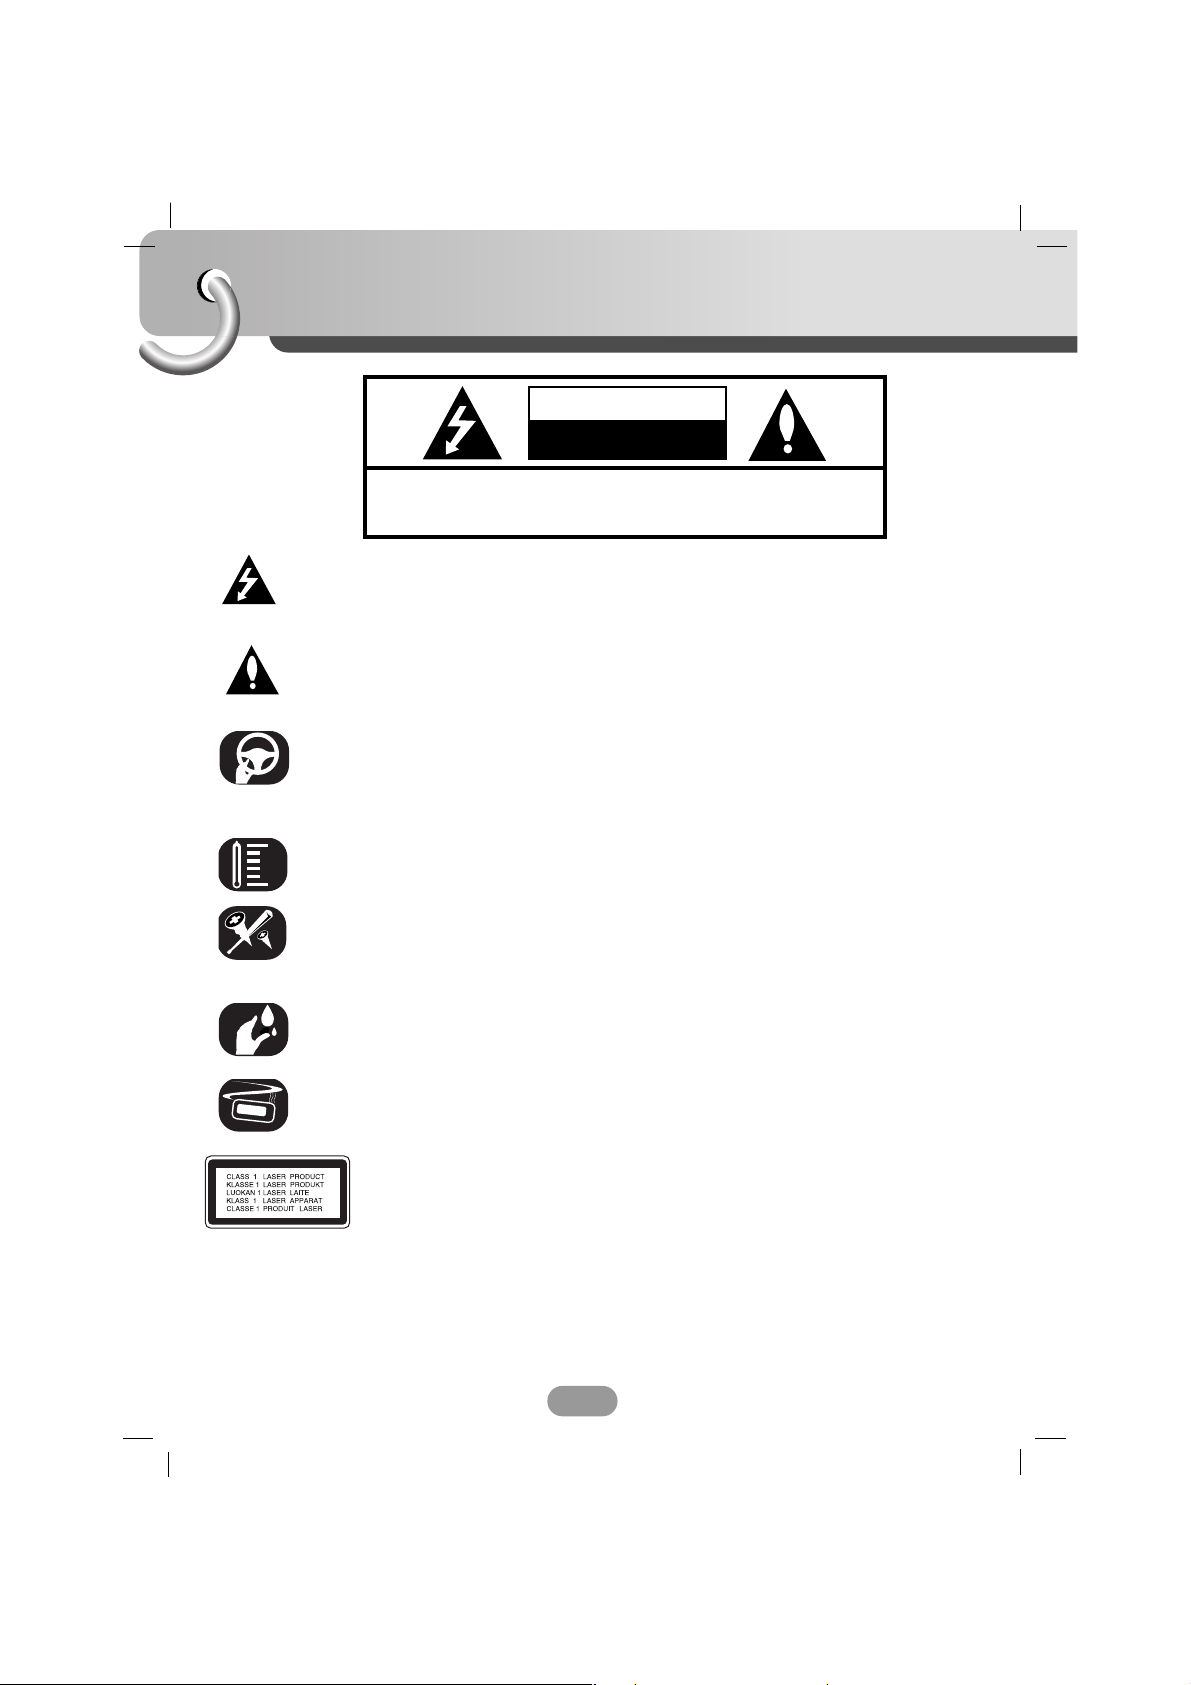
CAUTION
RISK OF ELECTRIC SHOCK
DO NOT OPEN
The lightning flash with arrowhead symbol, within an equilateral triangle is
intended to alert the user about the presence of uninsulated dangerous
voltage within the product’s enclosure that may be of sufficient magnitude
to constitute a risk of electric shock to persons.
The exclamation point within an equilateral triangle is intended to alert the
user to the presence of important operating and maintenance (servicing)
instructions in the literature accompanying the appliance.
Always operate the vehicle in a safe manner.
Do not become distracted by the vehicle while driving, and always be fully
aware of all driving condition. Do not change settings, or any functions.
Pull over in a safe and legal manner before attempting such operations.
Do not use for many hours at extremely low or high temperature.
(-10~60°C)
To reduce the risk of electric shock, do not remove the cover or back of
this product. There are no user-serviceable parts inside.
Refer servicing to qualified service personnel.
To reduce the risk of fire or electric shock, do not expose this product to
dripping or splashing water, rain, or moisture.
Due to high temperature outside of the unit, please use the unit only
installed in a car.
CAUTION : VISIBLE AND INVISIBLE LASER RADIATION WHEN OPEN AND
INTERLOCKS DEFEATED.
CAUTION : This product uses a Laser System.
To ensure proper use of this product, please read this owner’s manual carefully
and retain it for future reference. Should the unit require maintenance, contact an
authorized service center.
Performing controls, adjustments, or carrying out procedures other than those
specified herein may result in hazardous radiation exposure.
To prevent direct exposure to laser beam, do not try to open the enclosure.
Visible laser radiation when open. DO NOT STARE INTO BEAM.
Page 3
Safety note
3
8 cm
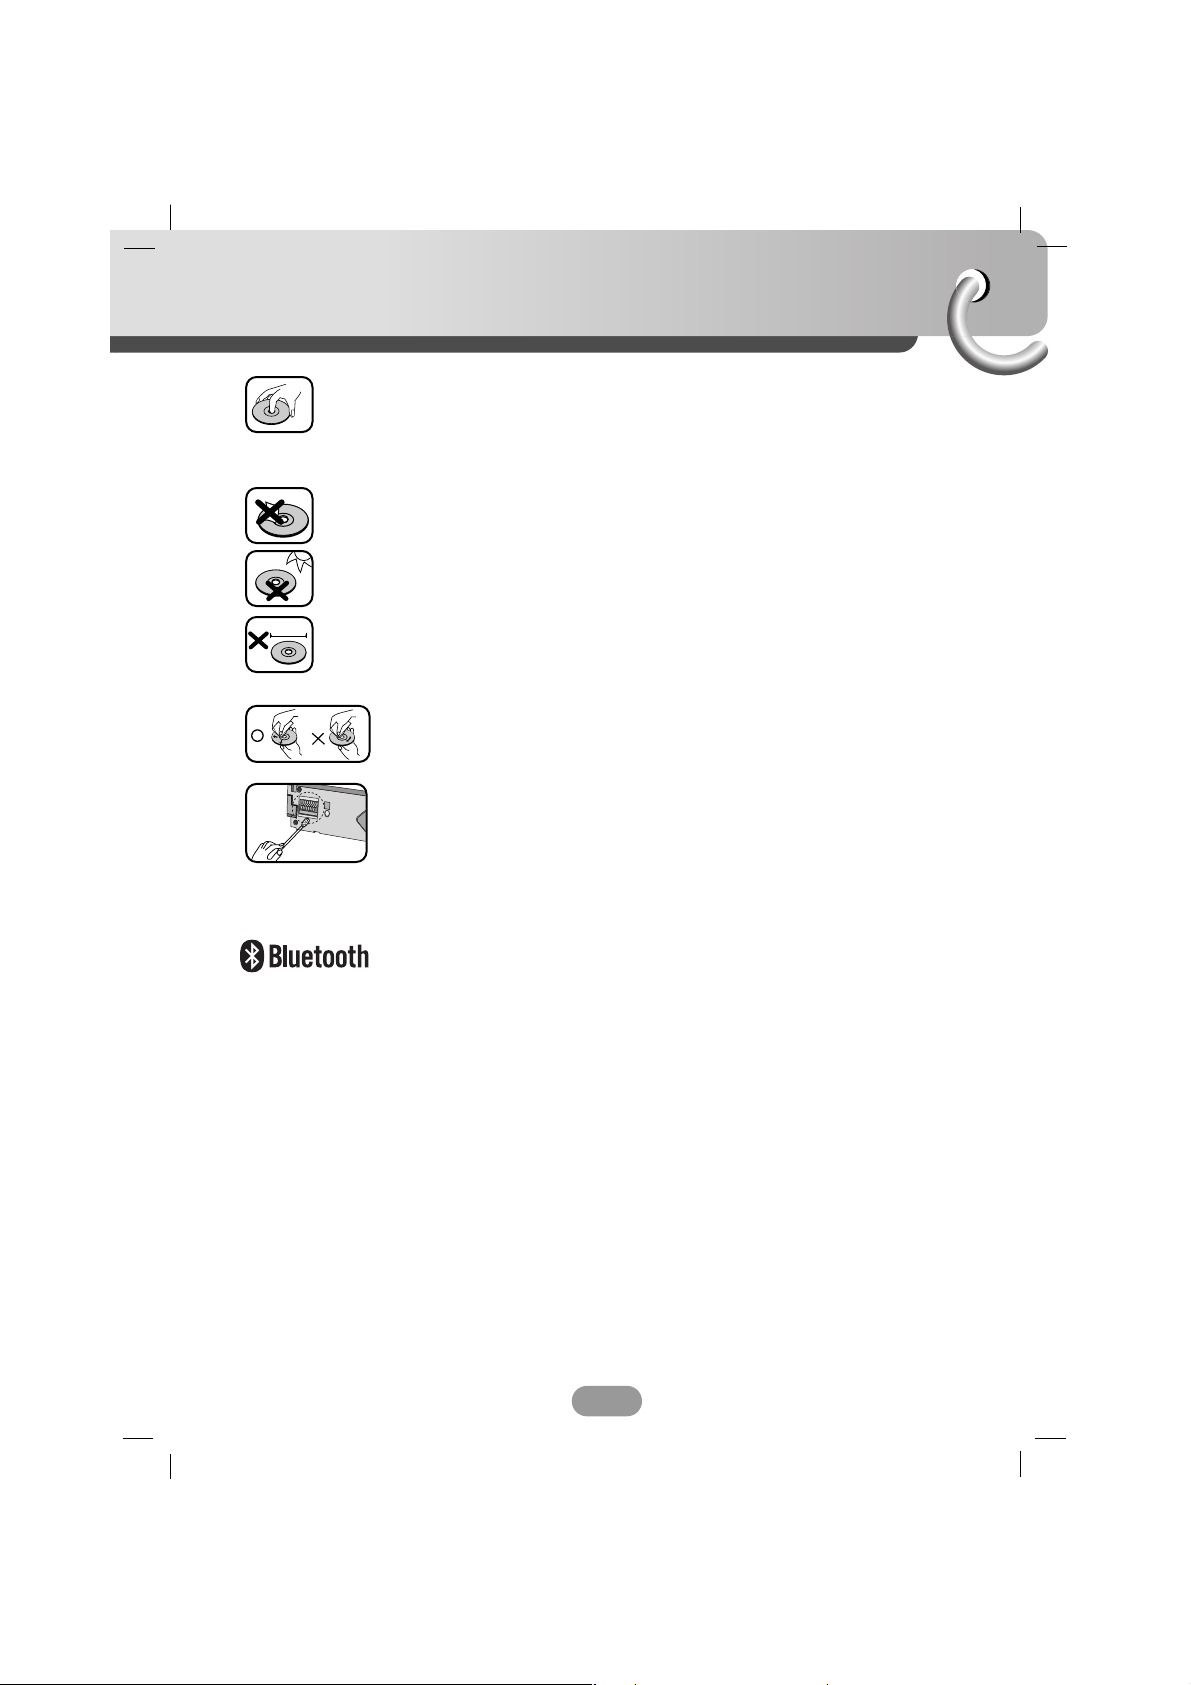
• A defective or soiled disc inserted into unit can cause sound to drop out
during playback.
• Handle the disc by holding its inner and outer edges.
• Do not touch the surface of the unlabeled side of the disc.
Do not stick paper or tape etc. on the surface.
Do not expose the disc to direct sunlight or excessive heat.
This unit cannot be operated by 8cm disc (using 12cm disc only).
In case of inserting 8cm disc by mistake of user, press the EJECT button
for a long time with the front panel opened.
• Clean the disc before playback. Wipe the disc from the center outward
with a cleaning cloth.
• Never use solvents such as benzine or alcohol to clean the disc.
Periodically wipe the contacts on the back of the front panel with a cotton
swap moistened with alcohol.
Bluetooth® wireless technology is a system which allows radio contact
between electronic devices within a max. range of 10 meters.
Connecting individual devices under Bluetooth® wireless technology does
not incur any charges. A mobile phone with Bluetooth® wireless
technology can be operated via the Cascade if the connection was made
via Bluetooth® wireless technology.
Page 4
Table of contents
4
Safety notes . . . . . . . . . . . . . . . . . . . . . . . . . . . . . . . . . . . . . . . . . . .2-3
Table of contents . . . . . . . . . . . . . . . . . . . . . . . . . . . . . . . . . . . . . . . . .4
Before use . . . . . . . . . . . . . . . . . . . . . . . . . . . . . . . . . . . . . . . . . . . . .5
Front panel . . . . . . . . . . . . . . . . . . . . . . . . . . . . . . . . . . . . . . . . . . . . .6
Remote control . . . . . . . . . . . . . . . . . . . . . . . . . . . . . . . . . . . . . . . . . .7
Installation . . . . . . . . . . . . . . . . . . . . . . . . . . . . . . . . . . . . . . . . . . . . . .8
Connection diagram . . . . . . . . . . . . . . . . . . . . . . . . . . . . . . . . . . . . . . .9
Connection . . . . . . . . . . . . . . . . . . . . . . . . . . . . . . . . . . . . . . . . . . . . .10
Basic operation . . . . . . . . . . . . . . . . . . . . . . . . . . . . . . . . . . . . . . . 11-14
Bluetooth operation . . . . . . . . . . . . . . . . . . . . . . . . . . . . . . . . . . . . 15-19
Radio operation . . . . . . . . . . . . . . . . . . . . . . . . . . . . . . . . . . . . . . . . . 20
RDS operation . . . . . . . . . . . . . . . . . . . . . . . . . . . . . . . . . . . . . . . 21-22
CD/MP3/WMA operation . . . . . . . . . . . . . . . . . . . . . . . . . . . . . . . . 23-24
Troubleshooting . . . . . . . . . . . . . . . . . . . . . . . . . . . . . . . . . . . . . . . . 25
Specifications . . . . . . . . . . . . . . . . . . . . . . . . . . . . . . . . . . . . . . . . . . 26
Disposal of your old appliance
1. When this crossed-out wheeled bin symbol is attached to a product, it means the
product is covered by the European Directive 2002/96/EC.
2. All electrical and electronic products should be disposed of separately from the
municipal waste stream via designated collection facilities appointed by the
government or the local authorities.
3. The correct disposal of your old appliance will help prevent potential negative
consequences for the environment and human health.
4. For more detailed information about disposal of your old appliance, please
contact your city office, waste disposal service or the shop where you purchased
the product.
This product is manufactured to comply with the radio interference requirements of
EEC DIRECTIVE 89/336/EEC, 93/68/EEC and 73/23/EEC.
Page 5

Before use
5
Detachable front panel
The front panel of this unit can be detached to prevent theft.
1 Press the (RELEASE) to open the front panel.
2 Hold the left part the front panel.
3 Pull the front panel.
4 Place the front panel in the supplied protective case.
Attachable front panel
The front panel of this unit can be detached to prevent theft.
1 Align the right side of the panel with stopper.
2 push the left side or panel into the unit until clicks.
Notes
• When detaching or attaching the front panel, do not press
the display or control buttons.
• The control buttons may not work properly if the front panel
is not attached properly. If this occurs, gently press the front
panel.
• Do not leave the front panel in any area exposed to high
temperatures or direct sunlight.
• Do not drop the front panel or otherwise subject it to strong
impact.
• Do not allow such volatile agents as benzine, thinner, or
insecticides to come into contact with the surface of the front
panel.
• Do not try to disassemble the front panel.
2
3
4
1
2
Protective Case
Front panel
Page 6
Front Panel
6
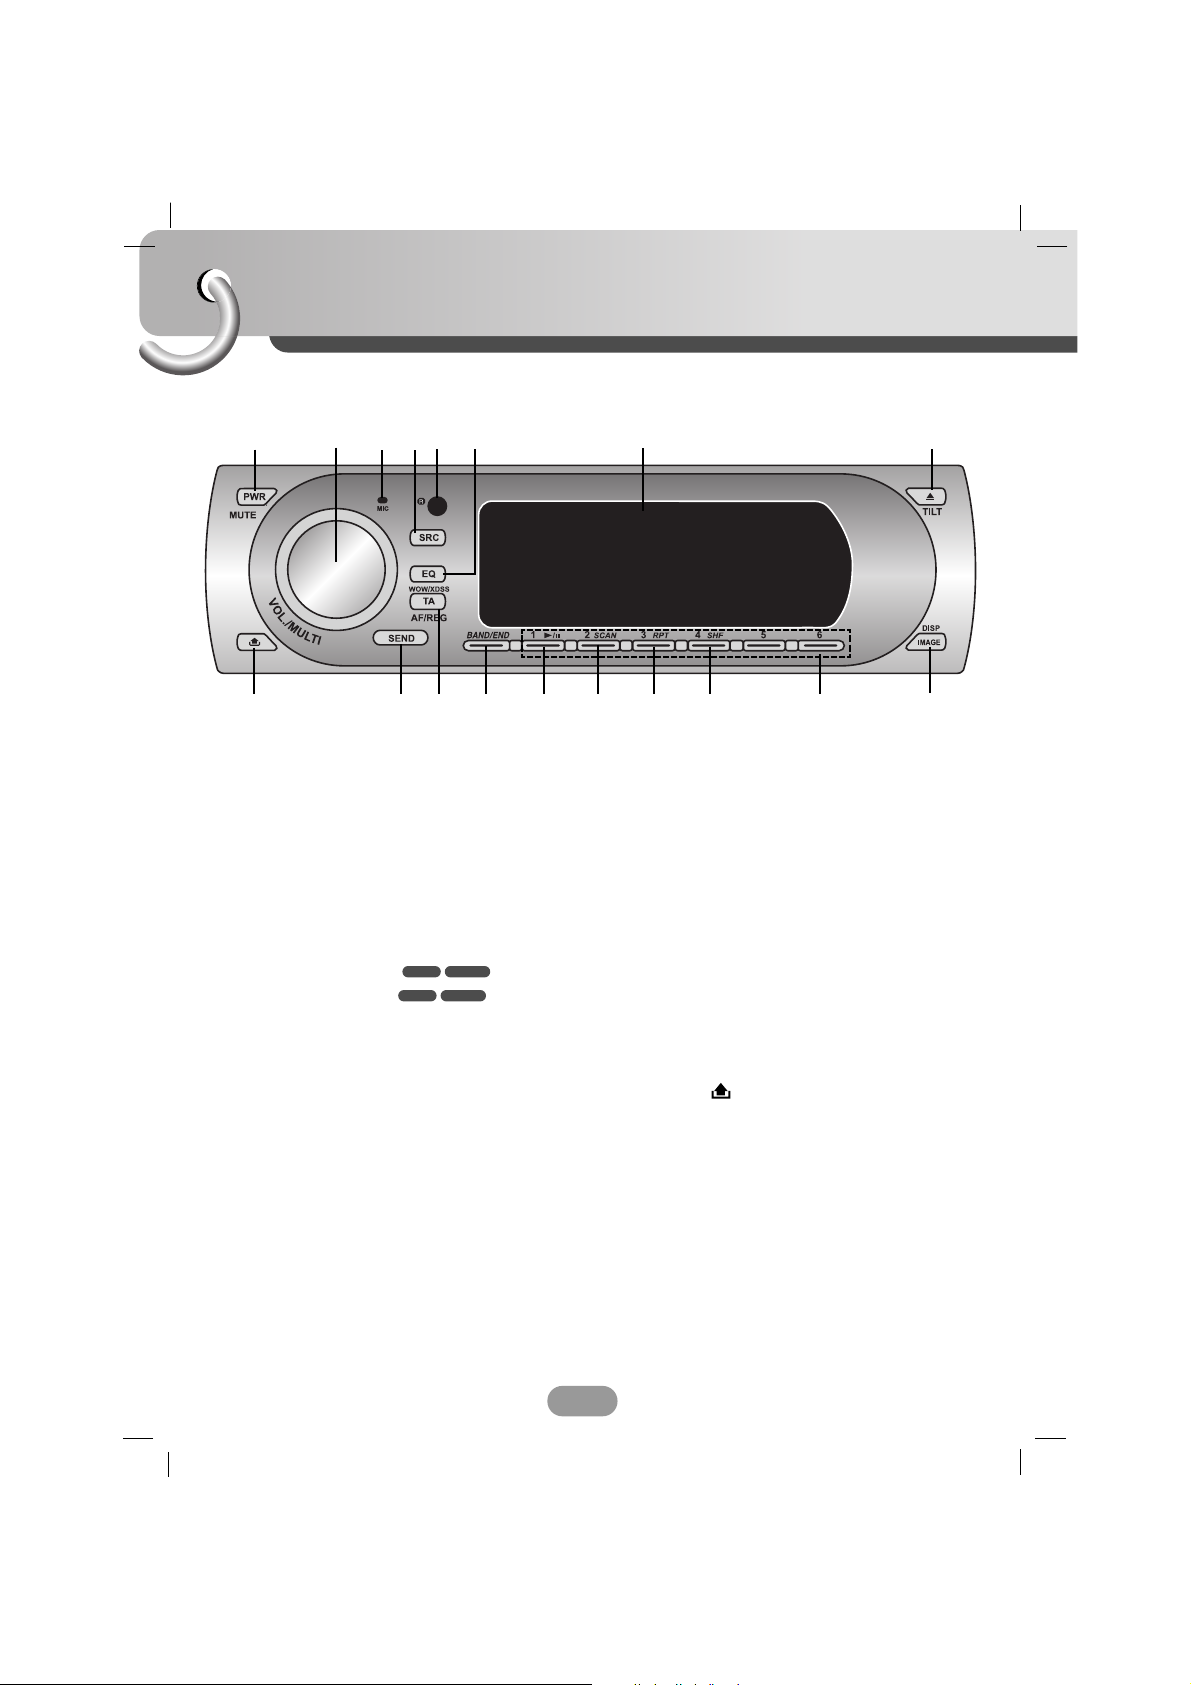
1 POWER [PWR / MUTE]
2 • VOLUME [VOL./MULTI]
• SELECT
• MENU
• SKIP ?m M? / SEARCH mM
• SEEK/ TUNE
• PROGRAM TYPE [PTY]
• MP3 TRACK +10/-10
• FOLDER UP/DOWN
• AUTO STORE [AS]
• PRESET SCAN [PS]
3 MICROPHONE [MIC]
4 SOURCE [SRC]
5
REMOTE SENSOR
6 EQUALIZER [EQ / WOW / XDSS]
7 DISPLAY WINDOW
8 • EJECT Z
• [TILT]
9 • [IMAGE]
• DISPLAY [DISP]
10 PRESET STATION [1~6]
11
SHUFFLE [SHF]
12
REPEAT [RPT]
13 INTRO SCAN [SCAN]
14 PLAY/PAUSE B/X
15
[BAND/END]
16 • TRAFFIC ANNOUNCEMENT [TA]
• ALTERNATIVE FREQUENCIES [AF]
• REGIONAL [REG]
17 [SEND]
18 RELEASE
WMAMP3
WMAMP3
12356 8
915
18 14 13 12 11 10
7
17 16
4
Page 7
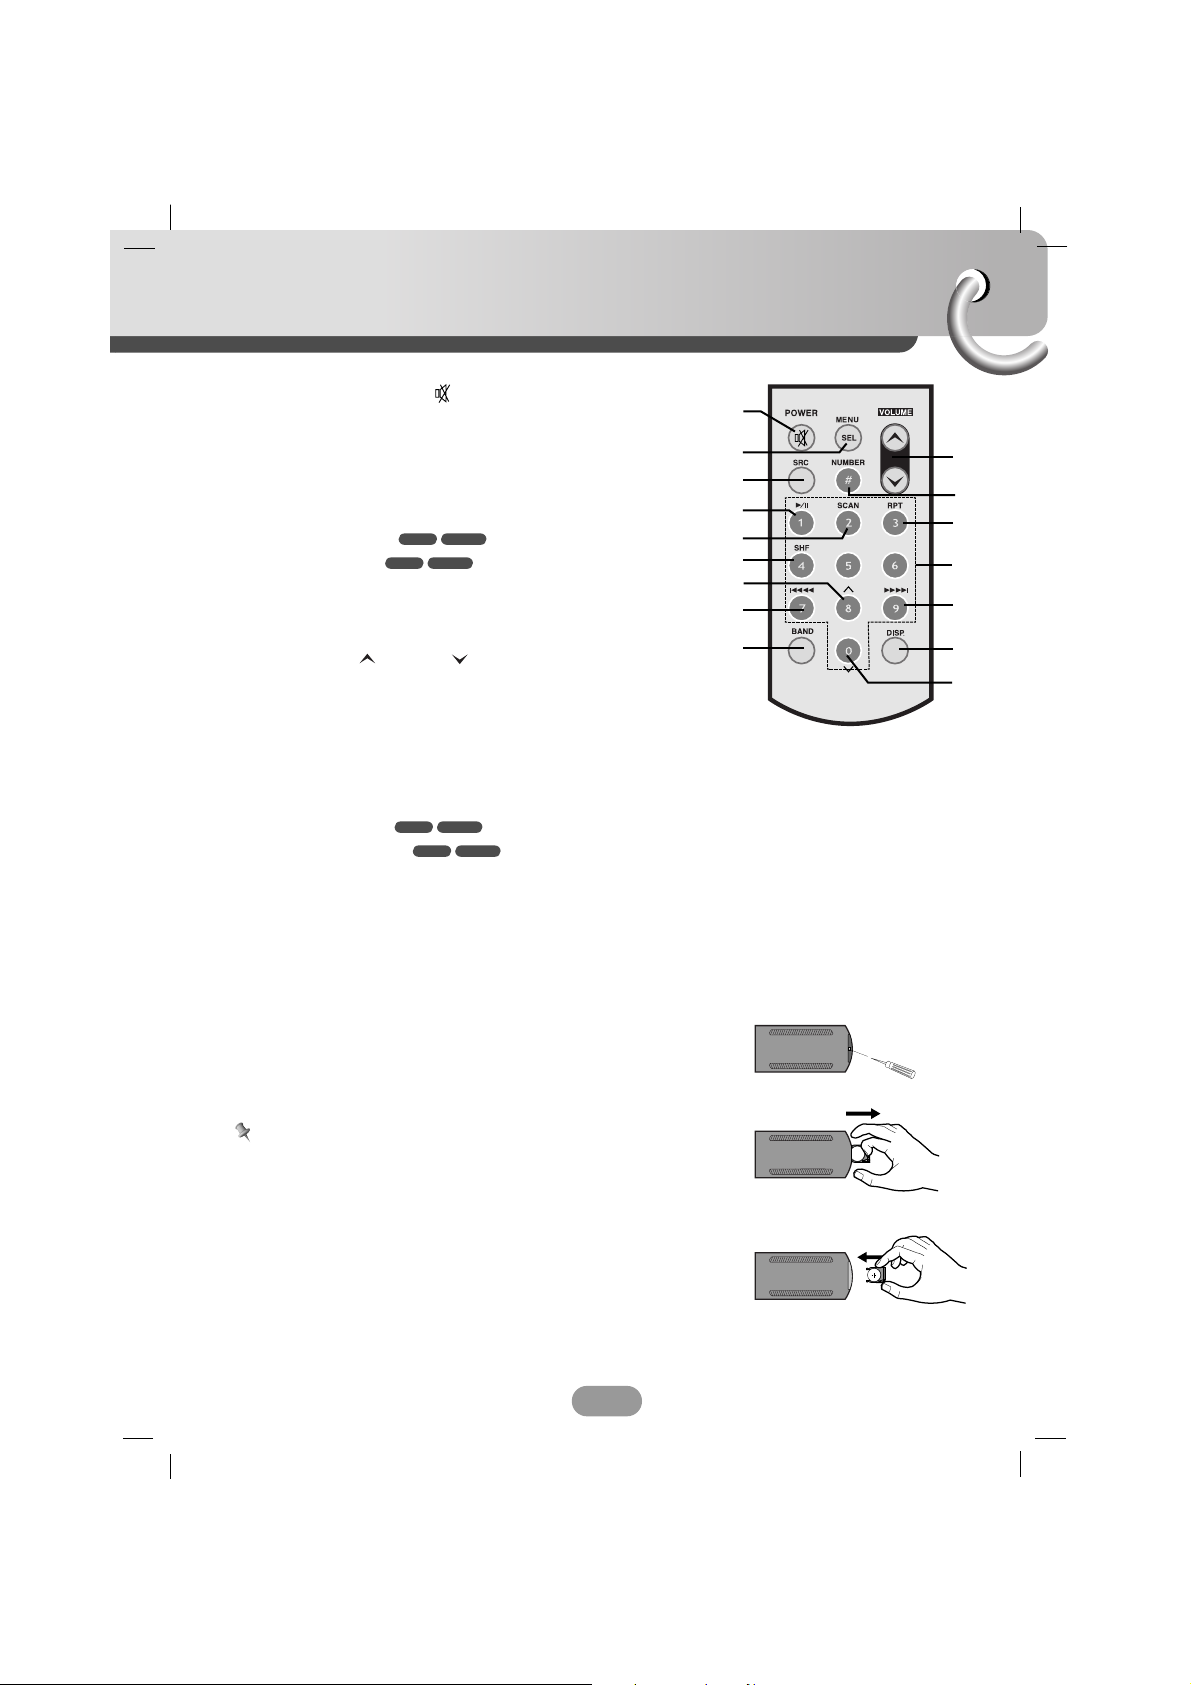
Remote control
7
Battery installation
1 Remove the battery holder with a pencil or ball point pen.
2 Install the battery on the battery holder.
3 Install the battery holder back into its original position.
Notes
• Use only one CR2025 (3V) lithium battery.
• Remove the battery if the remote control is not used for a
long period of time.
• Do not leave the product in a hot or humid place.
• Do not handle the battery with metallic tools.
• Do not store the battery with metallic materials.
• In the event of battery leakage, wipe the remote control
completely clean and install a new battery.
1 POWER [PWR] / MUTE
2 SELECTION [MENU/SEL]
3 SOURCE [SRC]
4 PLAY / PAUSE B/X
5 INTRO SCAN [SCAN]
6 SHUFFLE [SHF]
7 • MP3 TRACK +10
• FOLDER UP
UU
8
• CD SKIP / SEARCH ?m m
• SEEK / TUNE ?m m
9 [BAND]
10 VOLUME UP / DOWN
11 NUMBER [#]
12
REPEAT [RPT]
13 NUMBER [0 -9]
14 • CD SKIP / SEARCH M M?
• SEEK / TUNE M M?
15 DISPLAY [DISP.]
16 • MP3 TRACK -10
• FOLDER DOWN
uu
WMAMP3
WMAMP3
WMAMP3
WMAMP3
10
12
14
15
16
1
3
8
9
4
5
2
6
7
11
13
Page 8
A
A
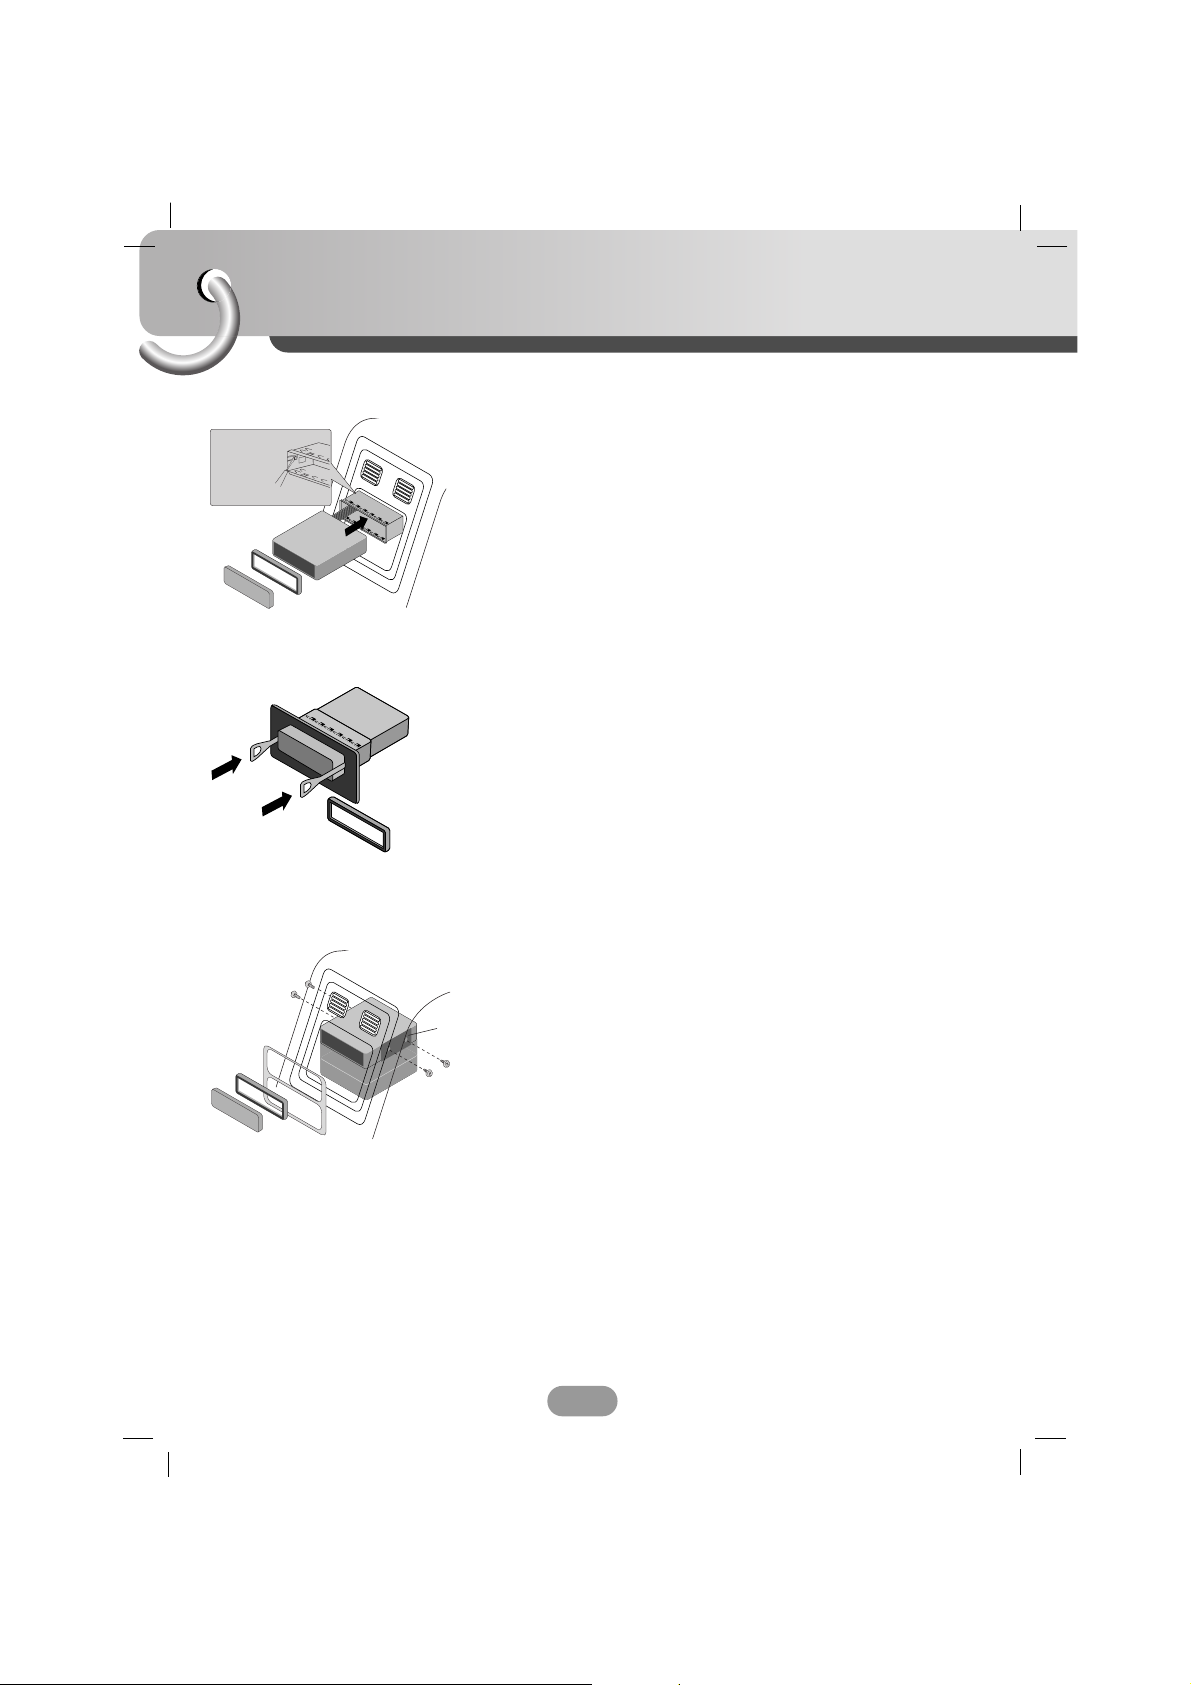
Installation
8
5
4
3
1
2
6
Bend the claws
according to
the thickness
of the
dashboard
Front panel
Front panel
Basic Installation
Before installing, make sure that the ignition-switch is set to
OFF and remove the terminal of the car battery to avoid
short-circuiting.
1 Remove the existing receiver unit.
2 Make the necessary connections.
3 Install the installation sleeve.
4 Install the unit into the installation sleeve.
Removing the existing receiver unit.
If there is already an installation sleeve for the receiver unit in
the dashboard, it must be removed.
1 Remove the rear support from the unit.
2 Remove the front panel and trim ring from the unit.
3 Insert the lever A into the hole on one side of the unit.
Perform the same operation on the other side and pull the
unit out from the mounting sleeve.
ISO-DIN Installation
1 Slide the unit into the ISO-DIN frame.
2 Install screws removed from the old unit.
3 Slide the unit and frame into dash opening.
4 Install the dash panel or adapter plate.
5 Install the trim ring to unit.
6 Install the faceplate by fitting right edge into position then
pushing left edge closed.
Page 9
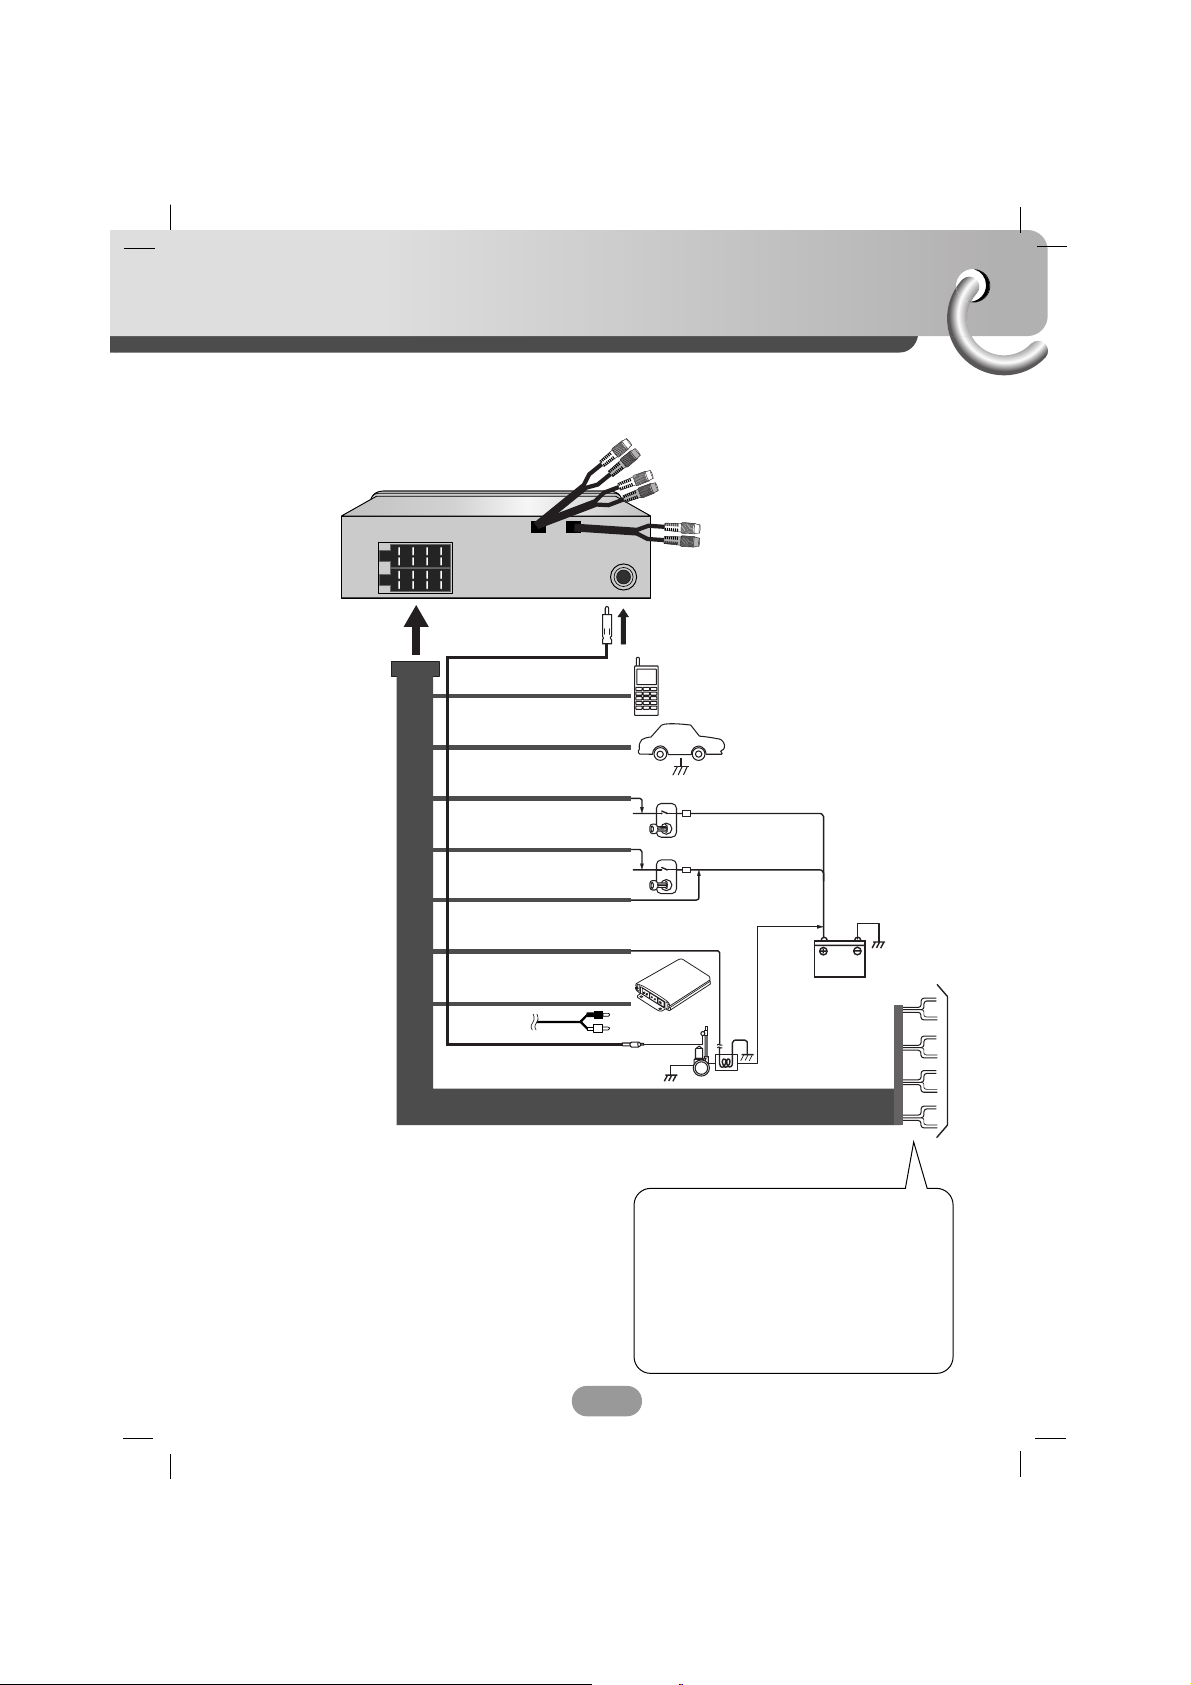
Connection diagram
9
Before connecting, make sure that the ignition switch is set to OFF, and remove the battery #
terminal to avoid short circuits.
1. WHITE FL+
2. WHITE/BLACK STRIPE FL-
3. GRAY FR+
4. GRAY/ BLACK STRIPE FR-
5. GREEN RL+
6. GREEN/ BLACK STRIPE RL-
7. VIOLET RR+
8. VIOLET/ BLACK STRIPE RR-
AA
BB
CC
PHONE MUTE (ORANGE)
GROUND(-) (BLACK)
DIMMER (PINK)
TO IGNITION (RED)
TO BATTERY(+) (YELLOW)
POWER ANTENNA (BLUE)
AMPLIFIER
REMOTE ON (BLUE/WHITE)
(Optional)
DIMMER SWITCH
IGNITION SWITCH
POWER
ANT
BATTERY
CONTROL RELAY
1
2
3
4
5
6
7
8
Page 10

Connection
10
AA
From antenna
BB
To the wiring of the vehicle colors of leads.
• BLACK : This lead is for the ground connection.
• ORANGE : This lead is for the phone line connection.
• PINK : This lead is for the dimmer line
connection.
• RED : This lead is for connection to the power
supply terminal when the ignition switch is
set to ACC.
• YELLOW : This lead is for connection to the battery
(back-up) terminal from which power is
always supplied.
• BLUE : This lead is for the power antenna
connection.
• BLUE/WHITE : This lead is for the remote amplifier on
connection.
CC
Speaker Connections
Connecting to Auxiliary Equipment (Optional)
• Connect the AUDIO INPUT connector of this unit to the
AUDIO OUTPUT connector of the Amplifier.
• Connect the AUX INPUT connector of this unit to the
AUX OUTPUT connector of the Auxiliary Equipment.
AUDIO IN AUX
RLRR FLFR R L
Auxiliary Device
Amplifier
2345678
1
L
FRONT
R
REAR
L
R
Page 11

Basic operation
11
Turning the unit on
Press the PWR/MUTE (POWER/MUTE on the remote control) or any other button.
Note
When you insert the CD in the CD slot, the unit turns on.
Turning the unit off
Press and hold the PWR/MUTE (POWER/MUTE on the remote control) for more than 1.2
seconds.
Insert a disc
1 Press the Z/TILT to open the front panel.
2 Draws the disc, and starts playback automatically.
Eject a disc
Press the Z/TILT to open the front panel. The disc automatically ejects from the loading slot.
When the disc is ejected by pressing Z/TILT during playback, it will be loaded automatically
after 10 seconds unless you pull out disc from the unit.
Selecting a source
Press the SRC repeatedly to select a source.
The indicator lights up in the following order. TUNER → CD → AUX → TUNER...
Adjusting the volume
Rotate the VOL./MULTI (Press VOLUME on the remote control) to adjust the sound
level.
Note
When you turn the unit off, the current volume level is automatically memorized. Whenever
you turn the unit back on, it will operate at the memorized volume level.
Mute
1 Press the PWR/MUTE (POWER/MUTE on the remote control) to cut the sound.
2To cancel it, press again.
Checking the clock
You can see the clock pressing the IMAGE/DISP (DISP. on the remote control).
Page 12
Basic operation
12
Changing the monitor angle
Press and hold the Z/TILT to adjust the front panel to an easily viewable angle.
• The angle of front panel can be adjusted up to 3 steps.
• The adjusted the LCD panel angle will be memorized and the monitor panel will
automatically return to this angle the next time the monitor panel is opened.
Setting the menu
1 Press and hold the VOL./MULTI (MENU/SEL on remote control) for about 1 second.
The menu screen appears.
Beep y EON TA y DPI y TA y ECM y SRS focus
2 Push the VOL./MULTI toward up or down to scroll between menus.
(Press the
UU uu
on the remote control.)
3 Push the VOL./MULTI toward left or right to select the settings of your choose.
(Press the
?m m/M M? on the remote control.)
4 Press the VOL./MULTI shortly to exit main screen.
SRS focus
Set the SRS focus quality.
( HIGH / LOW )
Beep
Set the beep sound every time a button is pressed.
• 2ND mode : The beep is only generated when a key is
long pressed (1 sec)
• ALL mode : The beep is generated when any key is pressed.
EON TA
• DISTANCE : EON TA switching is try to implemented by the
information of current station.
• LOCAL : When the filed strength level of EON linked is less
than threshold level, the radio does not switch that
station, and customer can hardly listen to any
disturbances.
DPI
• SOUND : If the sound of a station with different PI is heard
intermittently, the receiver mutes the sound after
1 second.
• MUTE : If the situation described above is repeated, the receiver
instantly mutes the sound.
TA
ECM
(Echo Cancellation
Mode)
• ALARM : When a newly tuned station has no TP information for 5
seconds, a double beep sound is output.
• SEEK : When the newly tuned station does not receive TP
information for 5 seconds, the receiver retunes to the
next station which has the same PI as the last
station, but has the TP information.
It is to decrease any echo phenomenon of voice coming from the
Bluetooth phone of the other party when working Bluetooth.
Control the mode(1-3) to the appropriate condition when talking over
the phone.
Page 13

Basic operation
13
Push the VOL./MULTI toward left or right to move the next stage.
(Press ?m m/M M? on the remote control) : EQ setting
Note
Normally the function work as sound level control, So you can not select EQ to adjust the EQ
level when is using the EQ (POP, Classic, ROCK JAZZ, VOCAL, SALSA, SAMBA) mode.
Turn right Turn left
VOL
Increase the volume level.
Increase the microphone level.
Decrease the volume level.
Decrease the microphone level.
EQ
Increase the equalizer level.
Decrease the equalizer level.
BAL
Decrease the level of the right speaker(s). Decrease the level of the left speaker(s).
FAD
MIC
Decrease the level of the rear speaker(s). Decrease the level of the front speaker(s).
Using the EQ (Equalizer)
The equalizer lets you adjust the equalization to match the acoustic characteristics of
the car’s interiors desired.
Press the EQ/WOW/XDSS repeatedly. The indicator lights up in the following order.
POP t Classic t ROCK t JAZZ t VOCAL t SALSA t SAMBA t USER1 t USER2
t OFF
• POP : Optimized for R&B, Soul and Country music.
• Classic : Optimized for orchestral music.
• ROCK : Optimized for Hard Rock and Heavy Metal music.
• JAZZ : Sweet sound with soft feeling.
• VOCAL : Powerful realism with strong sound quality.
• SALSA : Reproduces salsa music acoustics.
• SAMBA : Reproduces samba music acoustics.
• USER1 : Use the menu to set the sound level you want.
• USER2 : Use the menu to set the sound level you want.
You can adjust each sound level to your preference. Once you select a USER mode and then
make an adjustment, it automatically stored for the currently selected USER mode.
See “Adjusting the sound level” on page 13.
Adjusting the sound level
1 Press the VOL./MULTI (MENU/SEL on the remote control) repeatedly to select the mode
you want to adjust from volume, equalizer, balance and fader.
The indicator lights up in the following order.
VOL t EQ t BAL t FAD t MIC
2 Rotate the VOL./MULTI (Press VOLUME on the remote control) to adjust the sound
quality.
Page 14

Basic operation
14
XDSS/XDSS+ (Extreme Dynamic Sound System)
Press and hold the EQ/WOW/XDSS to select XDSS or XDSS+
XDSS t XDSS+ t SRS (FOCUS t TRU BASS t 3D-STEREO t WOW) t By pass
XDSS/XDSS+ : Improve the treble, bass sound.
SRS (Sound Retrieval System)
1 Press and hold the EQ/WOW/XDSS to select SRS.
2 Press the EQ/WOW/XDSS repeatedly to select sub SRS.
• FOCUS : Improve the resolution sound.
• TRUBASS : Improve the bass sound to make spectacular.
• 3D-STEREO : Enjoy the 3D surround effect.
• WOW : Enjoy the SRS and TruBass simultaneously.
Notes
• is a trademark of the SRS Labs, Inc.
• WOW technology is incorporated under license of the SRS Labs, Inc.
•You can not use EQ function when is using the SRS function.
Using the IMAGE
Press the IMAGE/DISP repeatedly to select the background you want in the display window.
You can select one of 10 modes. It visualizes and displays the change of sound output during
play.
Page 15

Bluetooth operation
15
Your unit supports Bluetooth wireless connections. You can set up
a wireless link with Bluetooth phone.
Starting Bluetooth on your phone
Your phone’s Bluetooth feature may be set to off by default.
To use your car Bluetooth feature, Bluetooth must be turned on in
your phone.
Note
Refer to your phone’s user guide.
Using a Bluetooth wireless connection
Pairing your unit and Bluetooth phone
Pairing links your unit and Bluetooth phone, and is required only once for the initial setup.
Before you start the pairing procedure, make sure the Bluetooth feature is turned on in to
your Bluetooth phone. Refer to your Bluetooth phone’s user guide.
1 Press and hold the SEND to connect your Bluetooth phone.
If connecting through a Bluetooth phone, the hands-free connection or headset
connection may operate depending on the type of the phone.
Handsfree t Headset t OFF (No display)
2 If your Bluetooth phone does not support the handsfree connection, then initiate the
headset connection.
The indicator flashes.
3 Set the Bluetooth phone to look for your unit.
4 When the Bluetooth phone displays the device name, select the device.
5 The Bluetooth phone displays the PIN code enter screen, enter the PIN code.
LG CAR AUDIO PIN CODE : 1234
6 When your unit successfully paired with your Bluetooth phone, the flashing of indicator
stops.
Notes
•Your unit keeps lists of pairing you recently connected. A maximum of 4 pairing numbers
can be saved.
• The Bluetooth phone which has a previous record showing that it has successfully connect-
ed will automatically start the connecting process when starting a car.
• Unlike the hands-free functionality, Headset connection will allow only two functions
“answering calls” and “making a call from the latest call”.
Also the caller’s number is not displayed when answering calls.
Bluetooth phone not yet connected
If the Bluetooth phone has not been connected when you try to call up telephone mode, the
“Connecting” displays on the screen.
Page 16

Bluetooth operation
16
Answering and Ending a call
Your unit, Bluetooth phone, or both may ring when you receive a call, press the SEND to
answer a call.
To end a call, press the BAND/END.
Rejecting a call
When your unit rings, press the BAND/END.
If “Rejecting” function unusable, then the phone connected to the device does not support the
rejecting calls functionality.
Missed call notification
When an incoming call is not answered, the missed call message is displayed on the your
screen.
1 The “Missing Call” displays on the screen.
2 Press the SEND button to answer the call.
3To end the call and hang up the phone, press the BAND/END button.
Setting the menu
Once your unit and Bluetooth phone are paired, your phone automatically connects to the unit
when you turn it on the next time. To confirm your unit and Bluetooth phone are successfully
paired and operating property, make call.
1 If your Bluetooth phone is already connected to a unit, press the SEND.
The menu screen appears.
Dial preset t Dial last answered? t Dial last call?
2 Push the VOL./MULTI toward up or down to select the menu.
3 Press the SEND to enter the your choose.
Making a call from the latest call : Dial last call?
Your phone keeps a lists of your recently received and dialed even if the calls did not
connected. The lists are sorted from newest to oldest entries.
Your unit keeps recorded of your recently received and dialed on phone.
Press the SEND to place a call to entered phone number.
There is case that sending is done by pressing the SEND button for a long time depending on
type of hand-phone. (For basic setting, press the SEND button shortly.)
The “Calling Last Call” displays on the screen.
Note
When you want to make an international call, push the VOL./MULTI toward up to add +.
Push the VOL./MULTI toward down to deletes +.
+ can only be added when the detail list of Missed call, Dialled call or Received call is
selected.
Page 17

Bluetooth operation
17
Dial using a number from the list : Dial last answered?
Your unit keeps a record of your recently received and display.
1 Press the SEND.
2 Push the VOL./MULTI toward up or down to select the “Dial last answered?” menu.
3 Press the SEND.
The “Last answered” and number displays on the screen.
4 Push the VOL./MULTI toward up or down to scroll between numbers.
(Or press one of the number 1 ~ 6.)
5 Press the SEND to place a call to entered phone number.
Note
When you want to make an international call, push the VOL./MULTI toward up to add +.
Push the VOL./MULTI toward down to delete +.
Storing a call number :
Dial Preset?
You can easily store up to 6 internal entries for later recall at the touch of a button.
1 Press the SEND.
2 Push the VOL./MULTI toward up or down to select the “Dial last answered?” menu.
3 Press the SEND.
The “Last answered” and number displays on the screen.
When you want to save an international call, push the VOL./MULTI toward up to add +.
Push the VOL./MULTI toward down to deletes +.
4 Press and hold the SEND.
5 Push the VOL./MULTI toward up or down to scroll between numbers or press one of the
number 1 ~ 6.
6 Press the SEND.
The selected number has been stored in memory.
(Or press and hold one of the number 1 ~ 6.)
7 Repeat steps 1 and 4 to save other calls.
The next time, you press the same number 1 ~ 6, the number is recalled from the
memory.
Echo canceling and noise reduction
When you are doing hands-free phoning in the vehicle, you may hear undesired echo.
This function reduces the undesired echo and noise while you are doing hands-free phoning,
and maintain a certain sound quality.
Please see page 12 for detail.
Note
After setting ECM function, ensure to separate Car Audio Front Panel and mount it again.
Page 18

Bluetooth operation
18
Pairing your unit and Bluetooth device (MP3 Player, MP3 Phone...)
When you activate your Bluetooth device’s linked the unit, you can listen to MP3 with wireless
connections.
1 Press and hold the SEND to connect your Bluetooth device.
If connecting through a Bluetooth device, the hands-free connection or headset
connection may operate depending on the type of the phone.
Handsfree t Headset t OFF (No display)
2 If your Bluetooth device does not support the handsfree connection, then initiate the
headset connection.
The indicator flashes.
3 Set the Bluetooth device to look for your unit.
4 When the Bluetooth device displays the device name, select the device.
5 The Bluetooth device displays the PIN code enter screen, enter the PIN code.
LG CAR AUDIO PIN CODE : 1234
6 When your unit successfully paired with your Bluetooth device, the flashing of indicator
stops.
Playing MP3 files
When you turn Bluetooth on, your Bluetooth device display “Bluetooth” in the home screen.
The Bluetooth remains on until you press turn the device off.
Press the SRC repeatedly to select a Bluetooth.
The indicator lights up in the following order.
TUNER → CD → AUX → BLUETOOTH → TUNER...
To play MP3 file stored on your Bluetooth device, refer to your Bluetooth device’s user guide.
Notes
• This function, which cannot be used in device that it is no MP3 function.
• In order to use Bluetooth technology, devices must be able to interpret certain profiles.
This unit is compatible with following profiles.
- GAP (Generic Access Profile)
- HSP (Hands Set Profile)
- HFP (Hands Free Profile)
- GAVDP (Generic Audio/Video Distribution Profile)
A2DP (Advanced Audio Distribution Profile)
AVDTP (Audio/Video Distribution Transport Profile)
AVRCP (Audio/Video Distribution Remote Control Profile)
• When recording the keywords and magic word, park your vehicle in a quiet place with the
windows closed and the heater/air conditioner off.
This is necessary to obtain a higher recognition rate.
Page 19

Bluetooth operation
19
GAP
GAP is short for Generic Access Profile. This is a basic profile of Bluetooth wireless
technology.
HFP
HFP is short for Hands-Free Profile. This profile is used for hands-free phoning with the
devices featuring Bluetooth wireless technology.
HSP
HSP is short for Head Set Profile. This profile is used for connecting headset and
communication terminal wireless technology.
GAVDP
This profile uses an Initiator (INT)a device (such as a portable player) that initiates a
signalling procedure to send a request to an Acceptor (ACP), - such as headphones etc.
Although this profile specifies signalling transaction procedures between two devices to set
up, terminate and reconfigure streaming channels, using to use the GAVDP alone; it is
required to use GAVDP in combination with profiles that depend on this profile - the AVRCP
and the VDP.
A2DP
Mobile phones and devices with A2DP high quality stereo bluetooth profile.
This profile is based on the GAVDP, and allows advanced audio to be transmitted (audio
streaming) from a Source (SRK) - such as a CD player, to a Sink (SNK), such as headphones.
AVRCP
Based on the GAP Profile, it uses a Controller (CT) - PDA, computer mobile phone etc., that
sends a command to a Target (TG) - TV, discman, headphone etc. The command can be to
Play, record, colour control, volume control etc., depending on the nature of the devices
involved and the scenario. The commands are transported by a new additional protocol,
called the Audio/Video Control Transport Protocol (AVCTP). Some scenarios defined are
Remote Control from a Separate Controller, Remote Control and Audio Stream Between Two
Devices, Remote Controller with LCD.
Page 20

Radio operation
20
Listening to radio stations
1 Press the SRC to select the radio.
2 Press the BAND/END repeatedly to select a band.
The indicator lights up in the following order. FM1 t FM2 t FM3 t MW(AM)
3 Seek tuning : Push the VOL./MULTI toward left or right. (Press the
?m m M M? on
the remote control.) The tuner will scan the frequencies until a broadcast with strong
enough reception is found.
Manual tuning : Push and hold the VOL./MULTI toward left or right until MANUAL starts
flashing on the display, and then push it repeatedly.
(Press and hlod the
?m m/M M? on the remote control, and then press it repeatedly.)
The frequencies move up or down step by step.
Auto search memory
This function lets you automatically store the 6 strongest broadcast frequencies.
1 Press the SRC to select the tuner.
2 Push and hold the VOL./MULTI for more than 1 second.
Scanning starts from the currently displayed frequency to higher frequencies and stops
when 6 stations have been preset or the receivable frequencies have been scanned once.
Storing and recalling broadcast frequencies
You can easily store up to 6 broadcast frequencies for later recall at the touch of a button.
1 Select the desired frequency.
2 Press one of the preset station 1 ~ 6 for more than 1 second.
The number you have pressed will flash in the preset number indicator and then remain
lit. The selected radio station frequency has been stored in memory.
3 Repeat steps 1 and 2 to preset other stations.
The next time, you press the same preset station 1 ~ 6, the radio station frequency is
recalled from the memory.
Notes
• As FM1, FM2, FM3 have the same frequency range, up to 18 stations can be preset for
FM.
• When a station is preset on the preset station button on which another station of the same
band has already been preset, the previously preset station is automatically erased.
To scan the preset stations
Push the VOL./MULTI. To stop the scanning, Push the VOL./MULTI.
To tune in the preset stations
Press BAND/END to select the desired band and press the desired number (1-6).
The number of the preset station 1 ~ 6 is displayed and the preset station is received.
Page 21

RDS operation
21
RDS Display options
In normal RDS operation the display will indicate the station name. Pressing the IMAGE/DISP
enables you to cycle through the various data types in the following sequence:
(CT t FREQUENCY t PTY t RT t PS)
• CT (Time controlled by the channel)
• PTY (Program type recognition)
• RT (Radio text recognition)
• PS (Program Service name)
• PI (Program Identification)
• AF (Alternative Frequencies for the actual program)
• TP (Traffic Program Identification)
• TA (Traffic Announcement Identification)
PROGRAM TYPE
function
To select a certain program type out of the reception band, the following procedure
can be used.
1 Press the BAND/END to select FM mode.
2 After, Push the VOL./MULTI knob repeatedly in down direction for selecting each mode.
music group t speech group t search off
3 Short press one of the preset station 1 ~ 6.
Each time this button is pressed, the display mode changes as follows.
Note
RDS is only available for FM reception.
No Music group
1.
2.
3.
4.
5.
6.
Pop M, Rock M
Easy M, Light M.
Classics, Other M
Jazz, Country
Nation M, Oldies
Folk M
No Speech group
1.
2.
3.
4.
5.
6.
News, Affairs, Info
Sport, Educate, Drama
Culture, Science, Varied
Weather, Finance, Children
Social, Religion, Phone In
Travel, Leisure, Document
Page 22

RDS operation
22
RDS TA function
To switch on or off the TA (Traffic Announcement) function, press the TA/AF/REG repeatedly.
• TA ON
Traffic programs and announcements can be automatically received using TP/TA features.
• TA OFF
Traffic programs and announcements can not be received using TP/TA features.
RDS AF/REG function
To switch on or off the AF function (Alternative Frequencies) or the REG (Regional Network
Tracking) function, long press repeatedly the TA/AF/REG more than 2 seconds.
• AF: ON / REG: ON
Network-Tracking is activated. Regional mode is engaged (AF function changes between
stations broadcasting the same program at all times). Regional mode shall be selected only
in case of driving in certain local areas.
• AF: ON / REG: OFF
Network-Tracking is activated. AF function changes between stations belonging to the
broadcast network being received.
• AF: OFF / REG: OFF
Network-Tracking is deactivated. Only station name will be displayed. In case of poor
reception no alternative station can be used.
Page 23

CD/MP3/WMA operation
23
Playing an Audio CD and MP3/WMA Disc
The unit can play MP3/WMA formatted recordings on CD-ROM, CD-R or CD-RW discs.
Before playing MP3/WMA recordings, read the notes on MP3/WMA Recordings on page 26.
If you change the source, CD play also stops (without ejecting the CD). Next time you select
“CD” as the source, CD play starts from where playback has been stopped previously.
To directly play a file, press NUMBER (#) on remote control and then press the track
number with 0-9 number.
Pause
1 Press BB/X during playback.
2To return to playback, press BB/X again.
Moving to another track
Push the VOL./MULTI toward left or right during playback to select the next track or to
return the beginning of the current track. (Press the
?m m/M M? on the remote
control.)
Push the VOL./MULTI toward left to select the previous track. (Press the ?m m on the
remote control.) (If playing times is less then 4 seconds, there is no operation.)
Search
Push the VOL./MULTI knob (?m m/M M? on remote control) in left or right direction for
about 1 second during playback and then release at the point you want.
Intro scan
1 Press the SCAN.
The FOLDER SCAN appears in the display window.
(The first 10 seconds of each files in the current selected folder on the disc are played.)
The SCAN ALL appears in the display window.
(The first 10 seconds of each files on the disc are played.)
Press and hold SCAN for about 1 seconds during playback.
The SCAN ALL appears in the display window.
(The first 10 seconds of each files on the disc are played.)
2 Press the SCAN again.
The SCAN OFF appears in the display window. (The intro scan is cancelled.)
Repeat
1 Press the RPT during playback.
The 1 RPT appears in the display window.
(The current selected music on the disc is played repeatedly.)
Press and hold RPT for about 1 seconds during playback.
The FOLDER RPT appears in the display window.
(The current selected folder on the disc is played repeatedly.)
2 Press the RPT again.
The RPT OFF appears in the display window. (The repeat mode is cancelled.)
WMAMP3
WMAMP3CD
WMA
MP3CD
WMAMP3
CD
WMAMP3
WMA
MP3CD
WMA
MP3CD
WMA
MP3CD
WMA
MP3CD
Page 24

CD/MP3/WMA operation
24
Random
1 Press the SHF during playback.
The FOLDER SHF appears in the display window.
(The current selected folder on the disc is played randomly.)
The SHF ALL appears in the display window.
(All of the music on the disc is played randomly.)
Press and hold the SHF for about 1 seconds during playback.
The SHF ALL appears in the display window.
(All of the music on the disc is played randomly.)
2 Press the SHF again.
The SHF OFF appears in the display window.
(The random playback is cancelled.)
Note
During random playback, if you push the VOL./MULTI (press the ?m m on remote control)
toward the left, you won’t go back to the previous track.
CD TEXT / ID3 TAG
When playing a disc containing information, you can see the information CD TEXT/ID3 TAG
information.
In a CD TEXT, some information about the disc (disc title, performer and track title) is
recored.
In a ID3 TAG, some information about the file (album title, Performer name, song title,
recording year, music genre and a brief comment )is recored.
If there is no information, “NO TEXT” will be shown in the display window.
Press the IMAGE/DISP repeatedly during MP3/WMA/CD TEXT file playback.
MP3/WMA TRACK -10/+10 (If there is no folder or one folder.)
During playback, push the VOL./MULTI (press the uuon remote control) toward the down to
skip to the previous 10 track, and push the VOL./MULTI (press the UUon remote control)
toward the up to skip to the next 10 track.
MP3/WMA FOLDER UP/DOWN (If there are more than two folders.)
During playback, push the VOL./MULTI (press the uuon remote control) toward the down to
go to the previous folder, and push the VOL./MULTI (press the UUon remote control) toward
the up to go to the next folder.
Note
Time display appearing on the display part when playing VBR file may vary and there may be
some difference from actual time (both progress time and VBR are displayed at the same
time when playing file).
WMA
MP3
WMA
MP3
WMA
MP3CD
WMAMP3
CD
WMAMP3
WMA
MP3CD
Page 25

Troubleshooting
25
Symptom Cause Correction
Power doesn’t
turn on.
The unit doesn’t
operate.
Playback is not
possible.
The disc is dirty.
The loaded disc is of a type this
unit cannot play.
Clean disc.
Check what type the disc.
There’s no
sound.
There’s audio
skipping.
The unit does
not operate
correctly even
when the
appropriate
remote control
buttons are
pressed.
The volume level is low.
This unit is not firmly secured.
Adjust the volume.
Secure this unit firmly.
No sound is
heard.
The volume
level will not
rise.
Cables are not connected
correctly.
Connect the cables correctly.
Leads and connectors are not
properly connected.
The fuse is blown.
Noise and other factors are
causing the built-in
microprocessor to operate
incorrectly.
Confirm once more that all
connections are correct.
Rectify the problem that caused
the fuse to blow, and then replace
it. Be very sure to install the
correct fuse with the same rate.
Turn the unit off and then on.
Battery power is low.
Some operations are prohibited
with certain discs.
Load new battery.
Check using another disc.
Page 26

26
Specfications
MP3/WMA Disc compatibility with this unit is limited as follows:
1. Sampling Frequency / 8 - 48kHz (MP3), 22.05 - 48kHz (WMA)
2. Bit rate / within 8 - 320kbps (include VBR) (MP3), 32 -320kbps (WMA)
3. CD-R/CD-RW file system should be “ISO 9660”
4. If you record MP3/WMA files using software which cannot create a FILE SYSTEM, for example
“Direct-CD” etc., it will not be possible to playback MP3/WMA files. We recommend that you use
“Easy-CD Creator” which creates an ISO9660 file system.
Customers should also note that permission is required in order to download MP3/WMA files and
music from the Internet.
Our company has no right to grant such permission.
Permission should always be sought from the copyright owner.
GENERAL
Output Power . . . . . . . . . . . . . . . . . . . . . . . . . . . . . . . . . . . . . . . . . . . . . .50W x 4CH (Max.)
Power Source . . . . . . . . . . . . . . . . . . . . . . . . . . . . . . . . . . . . . . . . . . . . . . . . . . . . . .DC 12V
Speaker impedance . . . . . . . . . . . . . . . . . . . . . . . . . . . . . . . . . . . . . . . . . . . . . . . . . . . . .4Ω
Ground System . . . . . . . . . . . . . . . . . . . . . . . . . . . . . . . . . . . . . . . . . . . . . . . . . . . . Negative
Dimensions (W x H x D) . . . . . . . . . . . . . . . . . . . . . . . .180 x 51 x 171 mm (Without Front Panel)
Net Weight . . . . . . . . . . . . . . . . . . . . . . . . . . . . . . . . . . . . . . . . . . . . . . . . . . . . . . . . . .2.0 kg
CD SELECTION
Frequency Response . . . . . . . . . . . . . . . . . . . . . . . . . . . . . . . . . . . . . . . . . . . .20 Hz-20 kHz
S/N Ratio . . . . . . . . . . . . . . . . . . . . . . . . . . . . . . . . . . . . . . . . . . . . . . . . . . . . . . . . . . .95 dB
Distortion . . . . . . . . . . . . . . . . . . . . . . . . . . . . . . . . . . . . . . . . . . . . . . . . . . . . . . . . . . . .0.1%
Channel Separation (1kHz) . . . . . . . . . . . . . . . . . . . . . . . . . . . . . . . . . . . . . . . . . . . . .70 dB
RADIO SELECTION
FM
Frequency Range . . . . . . . . . . . . . . . . . . . . . . . . . . . . . . . . . . . .87.5-107.9 or 87.5-108 MHz
S/N Ratio . . . . . . . . . . . . . . . . . . . . . . . . . . . . . . . . . . . . . . . . . . . . . . . . . . . . . . . . . . .55 dB
Distortion . . . . . . . . . . . . . . . . . . . . . . . . . . . . . . . . . . . . . . . . . . . . . . . . . . . . . . . . . . .0.7%
Usable Sensitivity . . . . . . . . . . . . . . . . . . . . . . . . . . . . . . . . . . . . . . . . . . . . . . . . . .12 dBµV
AM (MW)
Frequency Range . . . . . . . . . . . . . . . . . . . . . . . . . . . . . . . . . . . . .520-1720 or 522-1620 kHz
S/N Ratio . . . . . . . . . . . . . . . . . . . . . . . . . . . . . . . . . . . . . . . . . . . . . . . . . . . . . . . . . . .45 dB
Distortion . . . . . . . . . . . . . . . . . . . . . . . . . . . . . . . . . . . . . . . . . . . . . . . . . . . . . . . . . . . .1.0%
Usable Sensitivity . . . . . . . . . . . . . . . . . . . . . . . . . . . . . . . . . . . . . . . . . . . . . . . . . .28 dBµV
Page 27

27
Mobile phone list and manufacturing company applicable
Company
Nokia
Nokia
Nokia
Nokia
Nokia
Nokia
Nokia
Nokia
Nokia
Nokia
Nokia
Nokia
Nokia
Nokia
Nokia
Nokia
Nokia
Samsung
Samsung
Samsung
Samsung
Samsung
Samsung
Samsung
Samsung
Samsung
Samsung
Samsung
Samsung
Samsung
Samsung
Samsung
Samsung
LG
LG
LG
LG
LG
list
8910i
6021
3230
3650
6210i
6310i
6230
6230i
6260
6600
9500
6630
6680
6681
N70-1
8800
8801
SGH-D500
SGH-D508
SGH-D600
SGH-Z500
SGH-Z500V
SGH-E770
SCH-V720
SPH-E3700
SCH-A900
SPH-V6900
SPH-V7450
SPH-V7400
SPH-X7700
SPH-M600
SGH-E730
SGH-E720
KF-1000
LP-3900
P7200
S5200
U8290
Company
LG
LG
LG
LG
Motorola
Motorola
Motorola
Motorola
Motorola
Motorola
Sony-Ericsson
Sony-Ericsson
Sony-Ericsson
Sony-Ericsson
Sony-Ericsson
Sony-Ericsson
Sony-Ericsson
Sony-Ericsson
Sony-Ericsson
Sony-Ericsson
QteK
QteK
QteK imate
imate
QteK imate
QteK imate
HP
Siemens
Siemens
Siemens
Panasonic
O2
O2
Palmone
Blackberry
Toshiba
SAZEM
list
LG KG800
LG KU730
U8210
KP-4000
E1000
V600
V3 razor
L6
E1
A1000
T68i
T610
K600i
K700i
S700i
V600
K750i
W550i
W800i
P910i
9090
9100
8100
K2
8020
JASJAR
6515
S55
SL75
M75
X70
XDA2 Mini
XDA2 I
Treo 650
7290
A5504T
myX6-2
Page 28

P/NO : 3834RR0050G
 Loading...