

LG L704I Users manual

Part 15.21 statement
" Change or Modifications that are not expressly approved by the manufacturer could void
the user's authority to operate the equipment. "
Part 15.105 statement
This equipment has been tested and found to comply with the limits for a class B digital device,
pursuant to Part 15 of the FCC Rules.
These limits are designed to provide reasonable protection against harmful interference in a
residential installation.
This equipment generates uses and can radiate radio frequency energy and, if not installed and used
in accordance with the instructions, may cause harmful interference to radio communications.
However, there is no guarantee that interference will not occur in a particular installation. if this
equipment does cause harmful interference or television reception, which can be determined by
turning the equipment off and on, the user is encouraged to try to correct the interference by one or
more of the following measures:
- Reorient or relocate the receiving antenna.
- Increase the separation between the equipment and receiver.
- Connect the equipment into an outlet on a circuit different from that to
which the receiver is connected
- Consult the dealer or an experienced radio/TV technician for help.

LIMITED WARRANTY STATEMENT
1. WHAT THIS WARRANTY COVERS:
LG offers you a limited warranty that the enclosed subscriber unit and its enclosed accessories will be
free from defects in material and workmanship, according to the following terms and conditions:
(1) The limited warranty for the product extends for ONE (1) year beginning on the data of purchase
of the product.
(2) The limited warranty extends on to the original purchaser of the product and is not assignable or
transferable to any subsequent purchaser/end user.
(3) This warranty is good only to the original purchaser of the product during the warranty period as
long as it is in the U.S., including Alaska, Hawaii, U.S. Territories and Canada.
(4) The external housing and cosmetic parts shall not be covered under these limited warranty terms.
(5) Upon request from LG, the consumer must provide information to reasonably prove the date of
purchase.
(6) The customer shall bear the cost of shipping the product to the Customer Service Department of
LG. LG shall bear the cost of shipping the product back to the consumer after the completion of
service under this limited warranty.
2. WHAT THIS WARRANTY DOES NOT COVER:
(1) Defects or damages resulting from use of the product i n other than its normal and customary
manner.
(2) Defects or damages from abnormal use, abnormal conditions, improper storage, exposure to
moisture or dampness, unauthorized modifications, unauthorized connections, unauthorized repair,
misuse, neglect, abuse, accident, alteration, improper installation, or other acts which are not the
fault of LG, including damage caused by shipping blown fuses spills of food or liquid.
(3) Breakage or damage to antennas unless caused directly by defects in material or workmanship.
(4) That the Customer Service Department at LG was net notified by consumer of the alleged defect
or malfunction of the product during the applicable limited warranty period.
(5) Products which have had the serial number removed or made illegible.
(6) The limited warranty is in lieu of all other warranties, express or implied either in fact or by
operations law, statutory or otherwise, including, but limited to any implied warranty of
marketability or fitness for a particular use.
(7) Damage resulting from use of non-LG approved accessories.
(8) All plastic surfaces and all other externally exposed parts that are scratched or damaged due to
normal customer use.
(9) Products operated outside published maximum ratings.
3
(10) Products used or obtained in a rental prog ram.
(11) Consumables (such as fuses).
3. STATE LAW RIGHTS:
No other express warranty is applicable to this product. THE DURATION OF ANY IMPLIED
WARRANTIES, INCLUDING THE IMPLIED WARRANTY OF MARKETABILITY, IS LIMITED
TO THE DURATION OF THE EXPRESS WARRANTY HEREIN. LG INFOCOMM INC. SHALL
NOT BE LIABLE FOR THE LOSS OF THE USE OF THE PRODUCT, INCONVENIENCE, LOSS
OR ANY OTHER DAMAGES, DIRECT OR CONSEQUENTIAL, RISING OUT OF THE USE OF,
OR INABILITY TO USE, THIS PRODUCT OR FOR ANY BREACH OF ANY EXPRESS OR
IMPLIED WARRANTY, INCLUDING THE IMPLIED W ARRA NTY OF MAR KETABILITY
APPLICABLE TO THIS PRODUCT. Some states do not allow the exclusive of imitation of incidental
or consequential damages or limitations on how long an implied warranty lasts; so these limitations or
exclusions may not apply to you. This warranty gives you specific legal rights and you may also have
other rights which vary from state to state.
4. HOW TO GET WARRANTY SERVICE:
To obtain warranty service, please call the following web address:
www.lgeservice.com

8
For Your Safety
Important Information
This user guide contains important information on the use and
operation of this phone. Please read all the information
carefully for optimal performance and to prevent any damage
to or misuse of the phone. Any changes or modifications not
expressly approved in this user guide could void your warranty
for this equipment.
Before You Start
Safety Instructions
WARNING! To reduce the possibility of electric shock, do not
expose your phone to high humidity areas, such as the
bathroom, swimming pool, etc.
Always store your phone away from heat. Never store your
phone in settings that may expose it to temperatures less than
32°F or greater than 104°F, such as outside during extreme
weather conditions or in your car on a hot day. Exposure to
excessive cold or heat will result in malfunction, damage
and/or catastrophic failure.
Be careful when using your phone near other electronic
devices. RF emissions from your mobile phone may affect
nearby in adequately shielded electronic equipment. You
should consult with manufacturers of any personal medical
devices such as pacemakers and hearing aides to determine if
they are susceptible to interference from your mobile phone.
Turn off your phone in a medical facility or at a gas station.
Never place your phone in a microwave oven as this will
cause the battery to explode.
IMPORTANT! Please read the TIA SAFETY INFORMATION on
page 78 before using your phone.
Safety Information
Read these simple guidelines. Breaking the rules may be
dangerous or illegal. Further detailed information is given in this
user guide.
] Never use an unapproved battery since this could damage
the phone and/or battery and could cause the battery to
explode.
] Never place your phone in a microwave oven as it will
cause the battery to explode.
] Do not dispose of your battery by fire or with hazardous or
flammable materials.
] Make sure that no sharp-edged items come into contact
with the battery. There is a risk of this causing a fire.
] Store the battery in a place out of reach of children.
] Be careful that children do not swallow any parts such as
rubber plugs (earphone, connection parts of the phone,
etc.). This could cause asphyxiation or suffocation.

9
For Your Safety
] Unplug the power cord and charger during lightning storms
to avoid electric shock or fire.
] When riding in a car, do not leave your phone or set up the
hands-free kit near to the air bag. If wireless equipment is
improperly installed and the air bag is activated, you may be
seriously injured.
] Do not use a hand-held phone while driving.
] Do not use the phone in areas where its use is prohibited.
(For example: aircraft).
] Do not expose the battery charger or adapter to direct
sunlight or use it in places with high humidity, such as a
bathroom.
] Never store your phone in temperatures less than- 4°F or
greater than 122°F.
] Do not use harsh chemicals (such as alcohol, benzene,
thinners, etc.) or detergents to clean your phone. There is a
risk of this causing a fire.
] Do not drop, strike, or shake your phone severely. Such
actions may harm the internal circuit boards of the phone.
] Do not use your phone in high explosive areas as the phone
may generate sparks.
] Do not damage the power cord by bending, twisting, pulling,
or heating. Do not use the plug if it is loose as it may cause
a fire or electric shock.
] Do not place any heavy items on the power cord. Do not
allow the power cord to be crimped as it may cause fire or
electric shock.
] Do not handle the phone with wet hands while it is being
charged. It may cause an electric shock or seriously
damage your phone.
] Do not disassemble the phone.
] Do not place or answer calls while charging the phone as it
may short-circuit the phone and/or cause electric shock or
fire.
] Only use the batteries, antennas, and chargers provided by
LG. The warranty will not be applied to products provided by
other suppliers.
] Only authorized personnel should service the phone and its
accessories. Faulty installation or service may result in
accidents and consequently invalidate the warranty.
] Do not hold or let the antenna come in contact with your
body during a call.
] An emergency call can be made only within a service area.
For an emergency call, make sure that you are within a
service area and that the phone is turned on.

10
For Your Safety
FCC RF Exposure Information
WARNING! Read this information before operating the phone.
In August 1996, the Federal Communications (FCC) of he United
States, with its action in Report and Order FCC 96-326, adopted
an updated safety standard for human exposure to radio
frequency (RF) electromagnetic energy emitted by FCC
regulated transmitters. Those guidelines are consistent with
the safety standard previously set by both U.S. and
international standards bodies.
The design of this phone complies with the FCC guidelines and
these international standards.
CAUTION
Use only the supplied and approved antenna. Use of
unauthorized antennas or modifications could impair call
quality, damage the phone, void your warranty and/or result in
violation of FCC regulations. Do not use the phone with a
damaged antenna. If a damaged antenna comes into contact
with skin, a minor burn may result. Contact your local dealer
for a replacement antenna.
Body-worn Operation
This device was tested for typical body-worn operations with
the back of the phone kept 0.79 inches (2cm) between the
user’s body and the back of the phone. To comply with FCC RF
exposure requirements, a minimum separation distance of 0.79
inches(2cm) must be maintained between the user's body
and the back of the phone. Third-party belt-clips, holsters, and
similar accessories containing metallic components should not
be used. Body-worn accessories that cannot maintain 0.79
inches(2cm) separation distance between the user's body
and the back of the phone, and have not been tested for typical
body-worn operations may not comply with FCC RF exposure
limits and should be avoided.

11
For Your Safety
Vehicle Mounted External Antenna
(optional, if available)
A minimum separation distance of 8 inches (20cm) must be
maintained between the user/bystander and the vehicle
mounted external antenna to satisfy FCC RF exposure
requirements. For more information about RF exposure, visit
the FCC website at www.fcc.gov
FCC Part 15 Class B Compliance
This device and its accessories comply with part 15 of FCC
rules. Operation is subject to the following two conditions:
(1) This device and its accessories may not cause harmful
interference, and (2) this device and its accessories must
accept any interference received, including interference that
may cause undesired operation.
Cautions for Battery
] Do not disassemble.
] Do not short-circuit.
] Do not expose to high temperature: 60°C (140°F).]
] Do not incinerate.
Battery Disposal
] Please dispose of your battery properly or bring to your
local wireless carrier for recycling.
] Do not dispose in fire or with hazardous or flammable
materials.
Adapter (Charger) Cautions
] Using the wrong battery charger could damage your phone
and void your warranty.
] The adapter or battery charger is intended for indoor use
only.
Do not expose the adapter or battery charger to direct sunlight
or use it in places with high humidity, such as the bathroom.

Phone Parts and Functions ...................28
Display ....................................................32
Menu Operations....................................34
Soft Key Operations...............................34
Side Button Main Operations ................35
Using the UIM ..................36
Attaching/Removing the Battery Pack..38
Charging the Phone....................40
Turning Power ON..................................44
Turning Power OFF ................................44
Date/Time ...............................................45
Using Caller ID Notification Service ......45
Own Number...........................................45
Confirming before use
27

28
Confirming before use
Ç≤égópëOÇÃämîF
Confirming before use
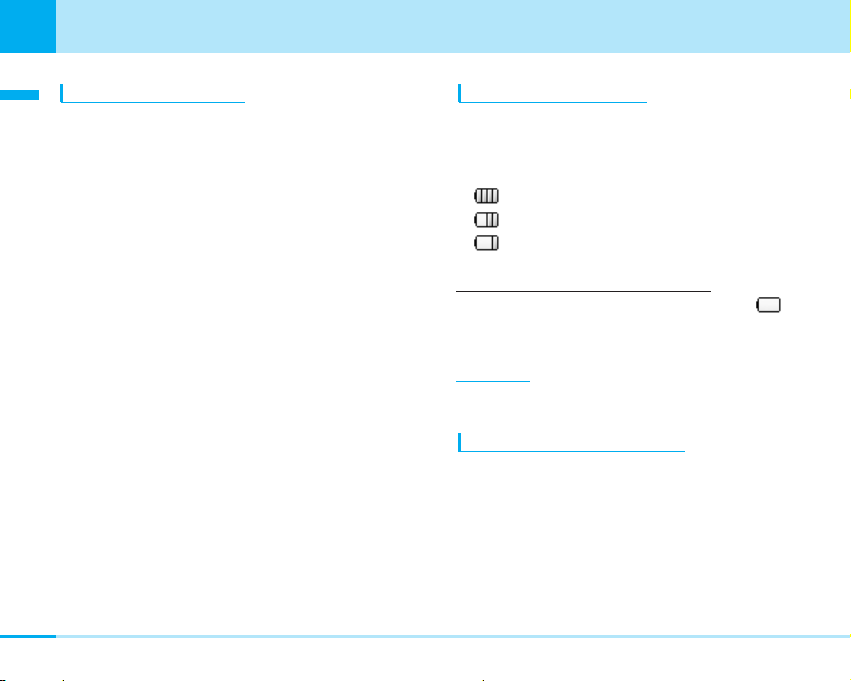
The Name and function of each part of the phone are as follows.
• This manual describes operation of each button using an illustration of the button.
Phone Parts and Functions

29
Confirming before use
Confirming before use
Next Page
1 Earpiece
While talking over a call, the other party’s voice is
heard from here.
2 LED display
Lights up and flashes during incoming call or battery
charging. You cannot change the light up/flash method.
3 In camera
You can use this camera for shooting yourself or
sending movie by Video-phone call.
4 Display > P32
5 Earphone/Microphone terminal
For connecting a Flat-plug Earphone/Microphone Set
with Switch (option), etc. Do not forcibly pull the
earphone/microphone cover
※
.
※: You can rotate it forward or backward when it is open.
6 MMail button
Press from the Stand-by display to bring up the Mail
menu. > P140
Press from the Stand-by display for 2 or more seconds
to check new message. > P129, P156
Press this key during auto key lock to cancel the auto
lock. > P101
You can execute the items shown on the soft key area.
> P34
7 KNavigation button
For selecting an item and scrolling the display.
The following operations can be performed from the
Stand-by display:
UUp button : The phonebook list screen appears.
> P67
DDown button : The custom menu screen appears.
> P186
LLeft button : Received call screen appears.
> P86
Press for 1 or more seconds to
display the received mail list. > P88
RRight button : Redialed call screen appears.
> P87
Press for 1 or more seconds to
display the sent mail list. > P88
8 CMenu/Select button
Press on the Stand-by display to bring up the Main menu.
>
P34
An operation displayed in the soft key area can be
performed.
>
P34

30
Confirming before use
Ç≤égópëOÇÃämîF
9 TVideo-phone button
Confirming before use
Press to make/receive video-phone calls. > P58, P60
Press on the Stand-by display to view the other party that
you made the latest call.
Press to switch modes, etc. in entering mode
(Pictograph/Symbol/Emoticon). > P223
Press to switch in camera and out camera when
camera is started.
! AStart button
Press to make/receive voice calls. > P48, P50
Press on the Stand-by display to view the other party
that you made the latest call. Press for 1 or more
seconds to display all received/sent mail history.
Press while characters are entered to switch between
full-pitch and half-pitch. > P222
" FEVolume buttons
Press to adjust the volume, etc. > P35
Press these buttons on the Stand-by display for 1 or
more seconds to turn on the photo light. > P192
# Dial button
$ * * (asterisk) button/Public mode (drive mode)
button
Press to enter “*” and to switch between upper case
and lower case while characters are entered. > P224
On the stand-by display, press this key for 1 or more
seconds to set or cancel Public mode (drive mode).
> P52
% Microphone
For speaking to the other party.
For recording sound when shooting moving images by
the camera.
& Ii-mode button
Press from the Stand-by display to bring up the
i-mode menu. > P122
Press for 2 or more seconds from the Stand-by display
to bring up software list screen of i-appli. > P163
Press from the entering character mode to switch the
mode (Hiragana/Katakana/English/ Number)
An operation displayed in the soft key area can be
performed. > P34
( NMultitask button
Press to bring up the Task Manager.
Press for 1 or more seconds to bring up the New Task
> P284
screen.
) PPower/End button
Press for 2 or more seconds to turn the power on.
Press for 2 or more seconds to turn the power off.
> P44
Press to end calls and end functions.
~ QClear button
Press to return to the previous operation.
Press this button on the Stand-by display (when the
phone is closed) for 1 or more seconds to enable
the auto key lock
Press to cancel the operation depending on the function
such as sending mails or downloading data.
> P100
※

Confirming before use
Confirming before use
Also, press to delete entered text.
:
Note that the operation may not be canceled
※
depending on the timing of canceling
※
.
+ #(Sharp)/ Manner Mode button
Press for 1 or more seconds from the Stand-by display
to activate/deactivate the Manner Mode.
> P78
Also, press to enter “#” and to start a new line while
characters are entered.
, Connector terminal
For connecting adapters and cables.
- Infrared data port
Point this port to the other device for infrared
communication. > P186
. Strap hole
/ Speaker
Ring tone and alarm can be heard from here.
The voice of the other partner can be heard from here
when you are calling using the speaker phone.
: Rear cover
; GCamera button
Press this button on the Stand-by display to activate
the photo mode and press this for 1 or more seconds
to activate the movie mode. > P111, > P117
< Out camera
You can use this camera for shooting still image or
moving images or sending movie by Video-phone call.
= Photo light
You can turn on this light when the out camera is used.
This lights up/flashes in red during shooting still image
or moving images. > P111, > P117
You can also use this light as a flashlight. > P192
Opening/closing phone
Slide the body front portion where the Stand-by display
exists upward to open the phone. Slide it downward to
close the phone.
Information
• Note that sliding it roughly results in a failure.
Next Page
31
32
Confirming before use
Ç≤égópëOÇÃämîF
Confirming before use
Display
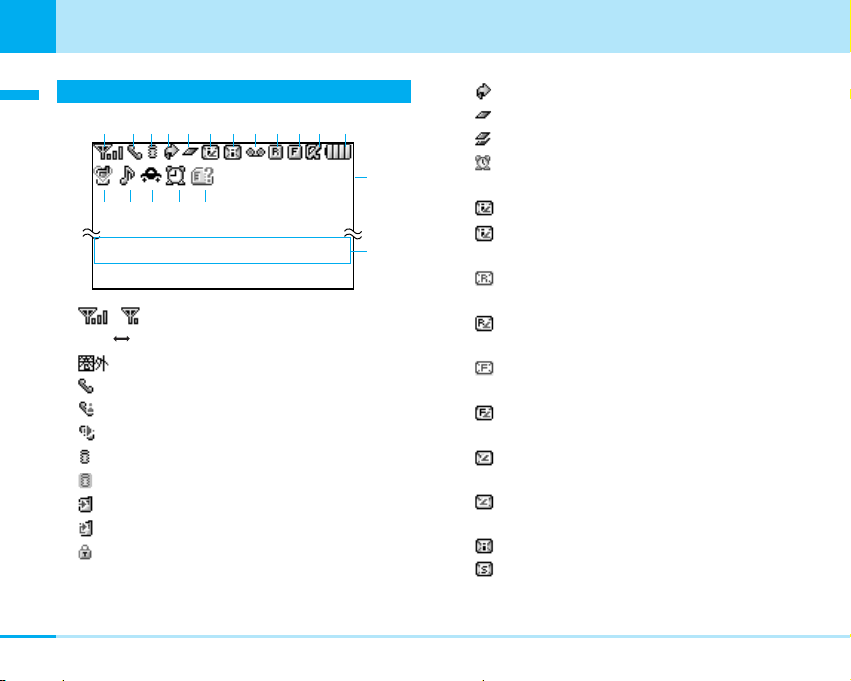
1 ~ : Shows the level of the received radio waves.
Strong Weak
: Out of the service area.
2 : Displayed during a voice call.
: Displayed during a video-phone call.
: Displayed during a voice call using the speaker phone.
3 (Blinks): while i-mode is activated.
(Blinks): during i-mode communication.
: Displayed during trying dialup connection.
: Displayed during dialup connection.
: Displayed while an SSL-enabled page is displayed or
obtained.
4 : Displayed while “All Call Rejection” is activated.
5 : Displayed while a function (Task) is activated.
: Performing multiple functions (Task).
(Blinking): Alarm starts while talking, activating camera
or setting public mode (drive mode).
6 (White): Displayed when the i-mode Center holds a mail.
(Pink): Displayed when the box for i-mode mail at the
i-mode Center is full.
(White): Displayed when the i-mode Center holds a
MessageR.
(Pink): Displayed when the box for MessageR at the
i-mode Center is full.
(White): Displayed when the i-mode center holds a
MessageF.
(Pink): Displayed when the box for MessageF at the
i-mode Center is full.
(White): Displayed when the i-mode Center holds mail,
a messageR and a messageF.
(Pink): Displayed when the boxes for i-mode mail,
MessageR and MessageF at the i-mode Center are full.
7 (White): Displayed when an unread mail exists.
(White): Displayed when an unread SMS message exists.
Mail Menu i-mode
1 23456 789!" #
$%&()
~
+
Remain 8
TV viewing

33
Confirming before use
Confirming before use
(White): Displayed when an unread mail and SMS
message exist.
(Pink): Displayed when the inbox is full.
: Displayed when the area for SMS messages in the
UIM is full.
: The inbox and the SMS in card are full.
8 (Yellowish green): Displayed when a Voice Mail
message exists.
(Orange): Displayed when the box for Voice Mail
messages is full.
9 (White): Displayed when an unread MessageR exists.
(Pink): Displayed when the box for MessageR is full.
! (White): Displayed when an unread MessageF exists.
(Pink): Displayed when the box for MessageF is full.
" : Displayed when i-appli is being started.
: Displayed when i-appli auto start failed.
# ~ : Shows the battery level.
$ (Pink): Displayed during Manner mode.
(Blue): Displayed during Original manner mode.
% : Displayed when the ringtone for incoming voice
call or video-phone call sounds, not operating a
vibration.
: Displayed when the vibration for incoming call is
activated to “Pattern 1” or “Pattern 2” when the
alarm for incoming voice call or video-call is muted,
and the vibration operate linked with a melody.
: Displayed when a vibration and a ringtone for
incoming voice call and video-phone call sounds
at the same time and the vibration is set to
operate linked with a melody.
: Displayed when a vibration and a ringtone from
incoming voice call or video-phone call do not
operate.
& : Public mode (Drive mode) active.
( : Displayed while an alarm is set.
: Displayed when today’s schedule exists.
: Displayed when an alarm is set and today’s
schedule exists.
) :Displayed when UIM is not inserted or an error
occurs on the UIM.
~ Date counter > P200
Displays the number of days till the registered event.
+ Stand-by memo > P198
Displays the stand-by memo you create.
34
Confirming before use
Ç≤égópëOÇÃämîF
Confirming before use
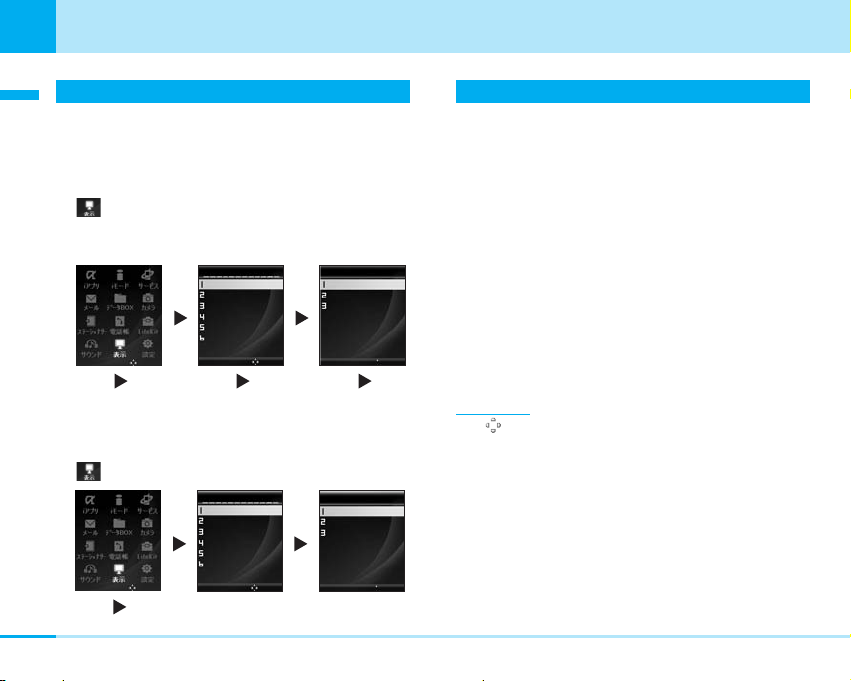
Menu Operations
This section describes the operation using an example for
setting a wall paper on the Stand-by display.
a Selecting a function by a K
1. On the Stand-by display, C [Menu] ] Highlight
using K ] C ] H Move the cursor to the
Stand-by display ] C ] H Move the cursor to the
Wallpaper ] C
a Selecting a function by pressing the key
corresponding to the menu number
1. On the Stand-by display, C [Menu] ] Highlight
using K ] C ]1]
1
Soft Key Operations
To perform an operation displayed in the soft key area on
the 待受画面, press the corresponding button as below.
Information
• (Navigation icon) that indicates the directions in which you
can scroll and select items using K is also displayed in the
soft key area.
• Items displayed in the soft key area vary depending on the
display.
Display
Stand-by display
Call display
Font
Menu style
Backlight
Color scheme
Select
Select
K CH CH C
Select
Display
Stand-by display
Call display
Font
Menu style
Backlight
Color scheme
Select
Wallpaper
Clock/Calender
Wallpaper memo
K C1 1
Stand-by display
Wallpaper
Clock/Calender
Wallpaper memo
Select
Stand-by display
Select
35
Confirming before use
Confirming before use
Side Button Main Operations
• If auto key lock (P100) is enabled with phone
closed, the operations are as follows:
FE : the auto lock can be cancelled temporarily. Refer to
the table below.
G : Cannot be operated.
FE
]
Operation of
phone
Open/
Close
Close
Open/
Close
Open/
Close
phone
operation
When the display is
turned on
Cancel temporarily
the auto key lock
Adjust the button
check volume
Adjust ring tone
volume
How to operate
When the display is turned
G
]FE/
off
During the auto key lock
]FE]
C
During stand-by
]
During incoming call
FE
phone
operation
Adjust phone
volume
Call rejection
Stopping alarm
Scrolling the listing
display or site
display by page
※
Switch the one
moth schedule
display by month
Starting camera
Zoom
Photo light on/off
How to operate
During voice phone/
Video-phone call
Press ] G for 1 or more
seconds during incoming call
During the alarm/ schedule
alarm is ringing ] E
During displaying each
]
screen
1
FE
During displaying the one
month display in the
Scheduler
]
FE
During stand-by
(Photo mode)
G
for 1 or more
]
Press
seconds during stand-by
(Movie mode)
During the still image/moving
images shooting display is
displayed ] FE
※
2
During stand-by, press
or Efor 1 or more
F
seconds (light up)
When the photo light
lights up, press
(light off)
]
Operation of
phone
FE
Open/
Close
]
Close
Open/
Close
Open/
Close
Open/
Close
G
]
Open/
Close
Open/
Close
]
Open/
Close
or
F
E
36
Confirming before use
Inserting
1. Insert the UIM with its IC-side facing downwards in
the direction of the arrow underneath the guide
Removing
1. Slide the UIM in the direction of the arrow to
remove it
Ç≤égópëOÇÃämîF
phone
Confirming before use
operation
Adjusting the volume
when moving images/
melodies are replayed
Playing and pausing
moving images/
melodies
※1 : Depending on the display type, you can move the cursor up
and down.
※2 : “Flashlight” (P192 ) is set to “Not use”, this does not function.
How to operate
When playing moving
images/melodies
When moving images/
melodies are stopped, ]
G (play)
When the moving
images/ melodies are
played, ] G (pause)
]
FE
Using the UIM ( Card)
Your phone number and contracted contents for the
service, etc. are recorded in the UIM. You need to insert it
into the phone to make/receive calls or perform
communication.
Refer to the UIM manual for details of how to use it.
Inserting/Removing UIM ( Card)
Insert/remove the UIM after you turn off the power of the
phone and remove the rear cover and battery pack
beforehand (P39).
• Remove the AC adapter and options beforehand.
Operation of
phone
Open/
Close
Open/
Close
37
Confirming before use
Confirming before use
Information
• When inserting / removing the UIM, close the flip, and then put
it on your hand. Take care not to accidentally torch or scratch
the IC.
About Password of UIM
You can set 2 passwords, PIN1 and PIN2, for a UIM.
> P107
UIM Restriction Functions
The UIM has a restriction function to protect your data and
files.
If you obtain the following types of data and files with a
UIM inserted, restrictions are automatically imposed to
disable them when the UIM is not inserted or when
another UIM is inserted.
• Images/melodies/i-motion/i-appli obtained from sites
and Internet web pages
• Files attached to i-mode mail messages and
MessagesR/F
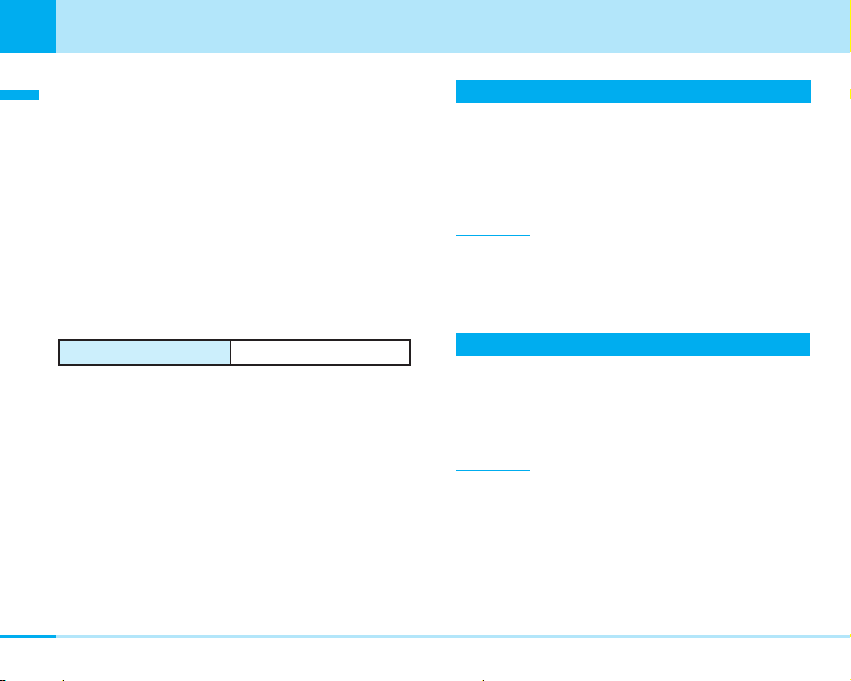
Differences of UIM
The card (blue) differs from the card
(Green/White) as follows:
a About WORLD WING
Function
Number of digits of the phone
number that can be stored in
the UIM phonebook
WORLD WING AvailableNot available
Service dialing
WORLD WING is international roaming
service that allows you to use the same mobile pone
number for making and receiving calls after inserting
your UIM (Green/White) in a phone applicable to
the service or mobile phone available for overseas use
(WCDMA or GSM).
• Application is not required for the user who signed a
service contract after September 1, 2005.
However, those who notified that the service is not
required during signing the service contract or
canceled in the middle of the contract need to apply
for the service again.
UIM (Blue)
(Green/White)
Up to 26 digitsUp to 20 digits
AvailableNot available
UIM

38
Confirming before use
Attaching
1. Press the rear cover in the direction of the arrow 1
to slide it in the direction of the arrow 2, then lift it
up in the direction of the arrow 3 to remove
2. Insert the battery in the direction of the arrow 1
with the label facing downwards, then push it in
the direction of the arrow 2
Ç≤égópëOÇÃämîF
• Those who did not apply for WORLD WING before
Confirming before use
August 31, 2005 need to apply for the service.
• Some billing plans may not be applied to WORLD
WING.
• For loss or theft of the phone, account settlement of
total charges, or phone failure while overseas, see
"Failure while overseas" the back side of the
operation manual. Note that the customer shall also
pay the fees for call and communication after the
phone is lost or stolen.
Attaching/Removing the Battery Pack
Make sure that you attach the dedicated battery pack L02
for L704i to use it.

Confirming before use
Confirming before use
3. Adjust the rear cover to the ditch of the
phone holding the cover approx. 3mm off, then
press it in the direction of the arrow 1 to slide it in
the direction of the arrow 2, then push it until it
clicks
Removing
1. Press the rear cover in the direction of the arrow 1
to slide it in the direction of the arrow 2, then lift it
up in the direction of the arrow 3 to remove
2. Take the projection of the battery pack to lift it up
in the direction of the arrow
Next Page
39

40
Confirming before use
Ç≤égópëOÇÃämîF
Information
Confirming before use
• Attach/remove the battery pack with the phone closed
and held in your hand after you turn off the power. In addition,
If you attach/remove the battery pack forcibly, it may damage
the charging connector of battery.
• Take care not to attach/remove the rear cover. Note that if the
rear cover is forcibly depressed, the slot of the rear cover may
be damaged.
• For details about the battery, see the manual for Battery Pack L02.
Charging the Phone
Charging
Connect specified AC Adapter (option) to charge the
battery after attaching the battery pack to the
phone (P38). You need AC Adapter 01 for both
overseas and domestic usage (option) separately when
using the phone overseas.
1. Open the cover
of the phone
※: You can rotate it forward or backward when it is open.
※
of the external connector terminal
2. Place the arrow side of the AC adaptor connector
up and keep the connector level with head
set to connect in the arrow direction
3. Insert the AC adapter’s plug into a power socket

Confirming before use
Confirming before use
• If you start to charge the battery, the charging start
tone will sound.
The battery level icon ( ) flashes on and off in turn
and it is red. After charging, the alarm tone for ending
the charging will ring and then the flashing disappears
and the LED turns off.
• If you charge the phone with the power off, the
animation for the battery level is displayed as follows,
depending on the battery level.
- In case the battery level is low: “Please wait” >
“Charging” > “Battery charged”
- In case the battery is empty: “Please wait” > “Low
battery Please wait” > “Charging” > “Battery
charged”
Information
• When you use the phone for the first time, the battery
pack is not fully charged. Fully charge the battery before using
it.
• When you attach the AC adapter to the phone, do not
use unnecessary force. The phone and the connector
may be damaged.
• Do not remove the battery pack and the UIM during charging.
• If the battery cannot be charged correctly, turn off the power
once, remove the battery pack, and then reattach it to charge
the battery again.
• If the battery level becomes very low during a video-phone call,
connecting the AC adapter may not charge the battery fully,
and the power may go off.
• When charging the battery pack overseas, confirm the voltage
used in the country or the area of stay, and use
Overseas/Domestic AC Adapter 01 (option) (A conversion plug
adapter for overseas travel applying to the country or area of
stay is required). Also, do not charge the battery pack using an
electric transformer for overseas travel.
• Refer to the instruction manuals for AC Adapter 01
(option) and AC Adapter 01 for both overseas and
domestic usage (option) for details.
Next Page
41
42
Confirming before use
Checking the Battery Level
When turning the power on, the battery level (estimate)
icon appears.
• The Battery Level display indicates just an estimate of
the battery level.
: Almost full
: Getting low
: Almost empty. Charge the battery immediately.
When You Need to Charge the Battery
If the battery is completely flat, a message appears,
flickers, and the battery alarm sounds. If you press
C
, the
message disappears and the battery alarm stops.
Information
• If you set “Manner mode” or “Original manner mode” and set
battery alarm to OFF, the alert tone does not ring.
Ç≤égópëOÇÃämîF
Removing the AC Adapter
Confirming before use
After charging completes, disconnect the AC adapter from
the phone.
1. Disconnect the connector of the AC adapter from
the power socket
2. While pressing the release buttons on both sides
of the connector, remove it horizontally from the
phone in the direction of the arrow
• Do not pull the connector forcibly. Malfunction may
result.
3. Close the cover of the external connector terminal
of the phone
Precautions on the Battery Pack
Be sure to use the battery pack dedicated to the
phone.

43
Confirming before use
a Battery life
• The battery pack is a consumable. With repeating the
charging, the operating time at a time is gradually
reduced.
• It is recommended to change the battery pack early
when the operating time at a time is reduced to
approximately half compared to the time when the
is purchased since the useful life of the battery
pack is reaching to the end. The battery pack may
expand when it is reaching to the end of useful life
depending on its usage condition, this is not a problem.
The useful life of the battery pack is one year as a guide
line. However, repeated charging/discharging for short
time, usage in high temperature environment, or
continuous long time charging condition may shorten
the useful life of the battery.
For environmental protection, bring the exhausted
battery to an , dealer, or recycle shop.
a Do not charge for long periods of time (several days)
with the phone turned on.
• Do not leave the phone power on for long
periods of time while charging. Otherwise, when
charging finishes, the phone will attempt to
receive power from the battery so that when you
actually use the phone, you will be able to do
so for just a short amount of time before the battery
alarm sounds. If this happens, charge the battery
correctly. When charging the battery again, first
disconnect the phone from the AC adapter
and then set it again.
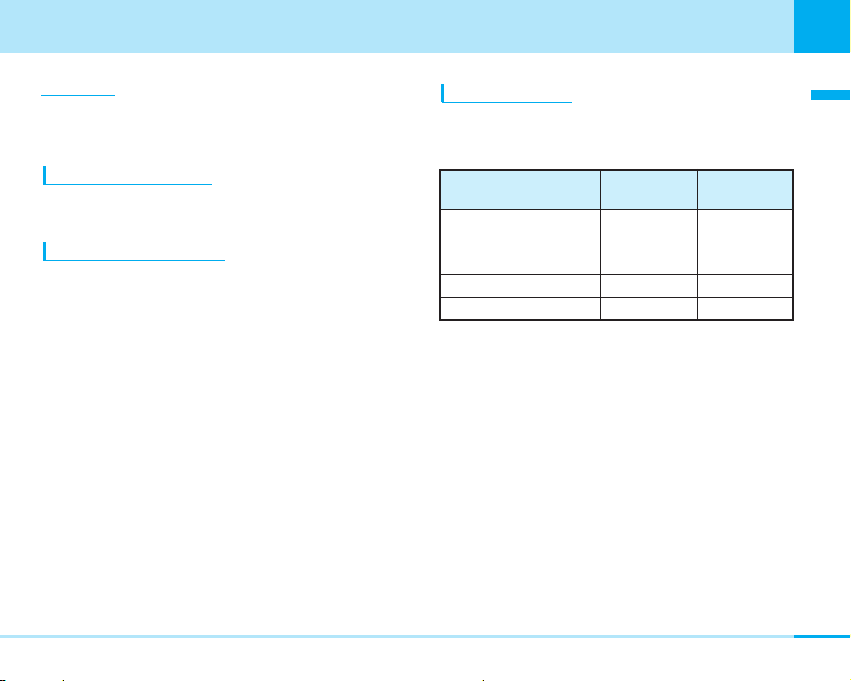
a Estimated usage time for battery
The usable time of the battery varies depending on the
usage environment or its remaining life.
Network
/ 3G
GSM/GPRS Static : about ••• hrs Voice call: about ••• minutes
• Continuous talk time is the estimated time when radio
waves can be sent and received normally.
• Continuous stand-by time is the estimated time you
can use thephone in motion when it is closed
and can receive radio waves normally. The standby
time could be about half of this estimate depending
on the battery level, function settings, other ambient
conditions such as temperature, the status of radio
waves in the area (weak or no radio waves, for
instance) and the status of the network of the country
in which you stay. The continuous standby time will
be shorter if you don't insert the UIM. When you use
i-mode communications, the talk/transmission time
and standby time will be shorter. Further, even if you
do not make calls or perform i-mode communication,
the talk/communication time and standby time will be
shorter if you compose i-mode mail, start up a
downloaded i-appli.
Stand-by time
Static : about ••• hrs
Dynamic : about ••• hrs
Continuous talk time
Voice call : about ••• min
Video call : about •• min
Confirming before use
44
Confirming before use
Ç=égópëOÇÃämîF
• The continuous standby time for standstill is the
Confirming before use
average number of hours you can use the
phone in standstill status when it is closed and can
receive radio waves normally.
• The continuous standby time for in motion is the
average number of hours you can use the
phone in the combined status of ”standstill”, “moving”
and “out of the service area” when it is closed, in an
area where it can receive radio waves normally.
• The talk/communication time and standby time will
also be shorter than the above-mentioned estimates
when you perform data transmission or multi-access
or when you use the camera.
a Estimated time for charging battery
AC Adapter 01 Approx. ••• minutes
• The estimated charging time is for when the
phone is off and the battery is being charged from
empty. The charging time will be longer if you charge
the battery with the power turned on.
a Other precautions
• Do not use any other adapter than the specified one.
It may shorten the life of the battery pack.
Turning Power ON
• Before you turn on the power, make sure that the UIM is
inserted and that the battery is fully charged.
1. Press P for 2 or more seconds
• After the Wake-up display is displayed, the Stand-by
display appears.
Information
• If “PIN code request” (P101) is set to “ON”, you need to enter
the PIN1 code.
• If “All lock” (P99) is set to “Power on”, you need to enter the
terminal security code.
Turning Power OFF
1. Press P for 2 or more seconds
• Select "Yes" on the Confirm display when the
phone is closed.
• The Exit display appears and the power is turned off.
Information
• The time to turn off the phone may be long. Depending
on the status of network, the lead time may differ. During
switching off the power, do not repeat to power on/off.

45
Confirming before use
Confirming before use
Date/Time
You can set the date and time. See “Setting Date & Time”
(P96) for details of how to set them up.
Using Caller ID Notification Service
The Caller ID Notification Service enables you to notify the
other party of your phone number when you make a call.
See “Using Caller ID Notification Service” (P208) for details
of how to set it up.
Own Number
You can display your phone number recorded in the UIM.
1. On the Stand-by display, C ] 0
• See “Displaying Own Number” (P72) for details of
how to change the settings on the Own Number
display.

47
Making calls............................................48
Receiving calls .......................................51
Using Public mode (drive mode) ...........52
Using Public mode (power off) ..............54
Making calls/
Receiving calls

48
Making calls/Receiving calls
Making calls/Receiving calls
Making calls
1. Enter the other party’s phone number
• Q: The last digit is cleared. To clear all digits,
press it for 1 or more seconds.
• C
[Save]:
You can register / add the entered phone
number to phonebook. Go to step 2 on page 64 of
“Adding to Phonebook”.
• I
[Search]: You can search for the phone number in
phonebook. See the contents after step 3 on page 67.
2. A
]
Start talking when the other party answers
• Press Q for 1 or more seconds: You can switch
ON/OFF the speaker phone.
3. P to end the call after talking
• When the call is disconnected, the alert sound
sounds from a receiver.
Information
• If you press A after entering the number from 0 to 9 in the
Enter Phone Number screen, you can make a call directly
matching the the number saved in memory.
• You can enter a phone number of up to 42 digits.
• If you enter a phone number exceeding 16 digits, dialing will be
made displaying the first 16 digits digits of the phone number.
• You can make a call after entering “184” (Not notify) or “186”
(Notify) in front of phone number.
• When the Flat-plug Earphone/Microphone Set with Switch
(option) is attached, you can only talk on the Earphone /
Microphone regardless that the speaker phone is ON/OFF.
• When dialing/receiving overseas, some name of the other party
may not be displayed even that name is registered in the
phonebook.
Using the Submenus of the Enter Phone
Number Display
1. From the Enter Phone Number screen (See left),
M[Menu]
]
Select from the following submenu
items
Notify caller ID
Set whether to notify your phone number per call.

49
Making calls/Receiving calls
Making calls/Receiving calls
Next page
– Not notify : “#31#” is added in front of the phone
number entered, but the phone number is not notified.
– Notify : “*31#” is added in front of the phone
number entered, and the phone number is notified.
– Cancel : The added “#31#” or “*31#” is deleted.
Select prefix
The number saved in “Setting Prefix Dial” (P93) is
added before the phone number is entered.
International call
The international access code saved in “International dial
setting” (P92) is added before the phone number is
entered.
Save
You can save the entered phone number entered into
the Phonebook. Go to step 2 on page 64 of “Adding
to Phonebook”.
Search phonebook
You can search for the phone number in phonebook. For
operations after searching, see 3 on page 66 of
“Searching for Phonebook Entries”.
Using the Submenus of the Talking screen
1. From the Talking screen (P48), M[Menu] ]Select
from the following submenu items
New call
※
1
You can put the current call on make and hold a call
to another party.
End active call
You can disconnect the call.
Hold
※
1
/Cancel held call
※
1
You can put/release the call on hold.
Mute
※
2
/Unmute
※
2
You can mute/unmute the voice transmitted to the other
party.
※1: Available only for Call Waiting Service subscribers.
To use this service, go to “Using Call Waiting Service” (P206).
※2: Not displayed during call is held.
Making a Call From the Dialed/Received Call Record
1. From the Stand-by display, L/R/A/T
] Select
a record ]
A
Information
• See “Using the Submenu of the Received Calls display” (P86)
for submenus.
Making a Call from the Phonebook
1. U in the Stand-by display, or search the
phonebook
]
Select the party you want to call
]
A
• When there are multiple registered phone numbers,
press A on the phonebook list display. Then, the
outgoing call phone number selection display is
displayed, select the phone number and press C
[Call].

50
Making calls/Receiving calls
Making calls/Receiving calls
Information
• To switch the phonebook list to display between the
phone and UIM, select M [Menu] > “View handset” / “View
UIM” on the phonebook list screen.
Using Pause Dial
You can use services such as sending messages to a
pocket bell, reserving tickets or checking the balance of
your bank account by sending push signal from the
handset. When the pause "P" has been entered, you can
send while dividing the dial data at the position where the
pause is entered.
1. Enter the phone number
2. Enter the dial data
• Press *3 times to enter pause “P”.
• Only 0to 9, #, *and pause “P” can be
entered.
• Up to 42 digit can be entered.
• If you enter pause “P” before the phone number, you
can not dial.
3. A
• A call is made to the other party, and the dial data
from the beginning to the first pause “P” is displayed
while being connected.
4. Confirm that the other party accepted ] A or C
[Select]
• The dial data from the beginning to the first “P” is
sent, and the dial data to the next pause “P” is
displayed. Each time you press Aor C, the dial
data to the next “P” is sent. When you send the last
number, the calling screen appears.
Information
• Depending on the target device, the dial data may not be
received.
• When using video-phone call, you can not use pause dial.
International Calls
You can make an inteÎrnational call easily using the
international call service “WORLD CALL”.
When you have signed up for service, you have
contracted to use “WORLD CALL” (except those who
have applied not to use it).
• You can make calls to 240 countries and areas
worldwide.
a How to make calls
009130 > 010 > Country code > Area code >
Destination phone number ] A
• This service is not available with some billing plans.
• Application/monthly fee for WORLD CALL is free of
charge.
• The WORLD CALL charges are added to your monthly
bill.

Making calls/Receiving calls
Making calls/Receiving calls
• Contact “ Information Center” on the back of
this manual for inquiries about WORLD CALL.
• If the other party uses a specific 3G mobile phone
overseas, you can make an “International Video-phone
Call” by dialing out using T after following the dialing
method described above.
– See the International Service web page of for
the information about connectable countries and
telecommunications carriers.
– Images sent from the other party may blur on your
phone or you may not be able to connect,
depending on the other party’s phone used for the
international video-phone.
• When the area code begins with “0”, leave this out when
dialing. However, include “0” when making a call to
some countries or regions such as Italy.
Making an International Call Easily
• Confirm that the “Setting Prefix Dial” (P93) is set to
“AUTO” and “009130010” (WORLD CALL) is set for
“IDD prefix code” in “IDD prefix setting”.
1. On the Stand-by display, press 0 for 1 or more
seconds to enter “+”
2. Enter Country code > Area code > Destination
phone number
3. “Yes”
4. Pto end the call after talking
]
A(T)
Adjusting the Volume
1. Press FE Hduring a call or press H for 1 or more
seconds
Information
• The changed volume is held even after ending the call.
Receiving calls
1. When you receive a call,
• I[Silent]: You can set to no sound for incoming call.
If you subsequently press I [Reject], incoming call
will be rejected.
• P: Reject the call.
2. P to end the call after talking
• A confirmation tone is emitted from the phone when
the incoming call is disconnected.
A
Next Page
51
 Loading...