

Page 1
ENGLISH
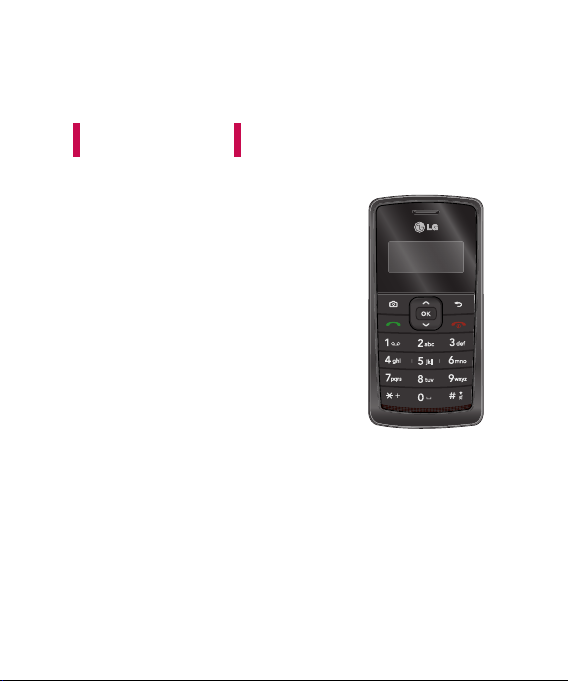
KT610
Please read this manual carefully
before operating your mobile phone.
Retain it for future reference.
USER GUIDE
Page 2

Table of Contents
Introduction 4
Table of Contents
For Your Safety 5
Guidelines for safe and efficient
use 6
KT610 Features 12
Parts of the phone
Getting started 16
General functions 21
Menu tree 31
Google 32
Search
Maps
Mail
YouTube
Multimedia 33
RealPlayer
Music player
Recorder 34
Camera 35
Flash Player 37
2
Profiles 38
Browser 39
Browsing the web
Saved pages
Auto. Bookmarks 40
Browser feeds
Log 41
Recent calls
Call duration
Packet data
Messaging 42
New message
Inbox 45
My folders
Mailbox
Drafts 46
Sent
Outbox
Reports
Contacts 47
New contact
Contacts list
Groups
Page 3

Connectivity 48
Conn.mgr.
Bluetooth
USB 49
Sync 50
Organiser 51
Calendar
Clock
Notes 52
Quickoffice
Calculator 53
Converter
File mgr.
Memory 54
My stuff 55
Images
Video clips 56
Tracks
Sound clips
Streaming links
Presentations 57
All files
Tools 58
Installations
Call mailbox
Speed dial
Themes 59
Actv. keys 60
App. mgr. 61
GPS data 62
Landmarks 63
Device mgr.
Help
About
Settings 64
General
Phone 65
Connection 67
Applications 70
Accessories 71
Technical data 72
Table of Contents
3
Page 4
Introduction
Congratulations on your purchase of
Introduction
the advanced and compact KT610
3G video mobile phone, designed
to operate with the latest digital
mobile communication technology.
This user’s guide contains
important information on the
use and operation of this phone.
Please read all the information
carefully for optimal performance
and to prevent any damage to
or misuse of the phone. Any
changes or modifications not
expressly approved in this user’s
guide could void your warranty
for this equipment.
4
Page 5

For Your Safety
Please read these simple guidelines.
Not following these guidelines may
be dangerous or illegal. Further
detailed information is given in this
manual.
Warning
►
Mobile Phones must be switched
off at all times in aircrafts.
►
Do not hold the phone in your
hand while driving.
►
Do not use your phone near petrol
stations, fuel depots, chemical
plants or blasting operations.
►
For your safety, use ONLY specified
ORIGINAL batteries and chargers.
►
Do not handle the phone with wet
hands while it is being charged.
It may cause an electric shock or
seriously damage your phone.
►
Keep the phone in a safe place out
of small children's reach. It includes
small parts which, if detached, may
cause a choking hazard.
Caution
►
Switch off the phone in any
area where required by special
regulations. For example, do not
use your phone in hospitals or
it may affect sensitive medical
equipment.
►
Emergency calls may not be
available under all mobile
networks. Therefore, you should
never depend solely on your
mobile phone for emergency calls.
►
Only use ORIGINAL accessories to
avoid damage to your phone.
►
All radio transmitters carry risks
of interference with electronics in
close proximity. Minor interference
may affect TVs, radios, PCs, etc.
►
Batteries should be disposed
of in accordance with relevant
legislation.
►
Do not dismantle the phone or
battery.
For Your Safety
5
Page 6

Guidelines for safe and efficient use
Please read these simple guidelines.
Guidelines for safe and efficient use
Not following these guidelines may
be dangerous or illegal. Further
detailed information is given in this
manual.
Certification
information (SAR)
THIS DEVICE MEETS
INTERNATIONAL GUIDELINES FOR
EXPOSURE TO RADIO WAVES
Your mobile device is a radio
transmitter and receiver. It is
designed and manufactured not to
exceed the limits for exposure to
radio frequency (RF) recommended
by international guidelines
(ICNIRP). These limits are part of
comprehensive guidelines and
establish permitted levels of RF
energy for the general population.
The guidelines were developed by
independent scientific organisations
through periodic and thorough
evaluation of scientific studies. The
guidelines include a substantial
6
safety margin designed to assure the
safety of all persons, regardless of
age and health.
The exposure standard for
mobile devices employs a unit of
measurement known as the Specific
Absorption Rate, or SAR. The SAR
limit stated in the international
guidelines is 2.0 W/kg*. Tests for
SAR are conducted using standard
operating positions with the
device transmitting at its highest
certified power level in all tested
frequency bands. Although the SAR
is determined at the highest certified
power level, the actual SAR of the
device while operating can be well
below the maximum value. This is
because the device is designed to
operate at multiple power levels so
as to use only the power required
to reach the network. In general,
the closer you are to a base station,
the lower the power output of
the device. Before a phone model
is available for sale to the public,
compliance with the European
Page 7

R&TTE directive must be shown. This
directive includes as one essential
requirement the protection of the
health and the safety for the user and
any other person. The highest SAR
value for this device when tested for
use at the ear is 0,537 W/kg.
This device meets RF exposure
guidelines when used either in the
normal use position against the ear
or when positioned at least 1.5 cm
away from the body. When a carry
case, belt clip or holder is used for
body-worn operation, it should not
contain metal and should position
the product at least 1.5 cm away from
your body. In order to transmit data
files or messages, this device requires
a quality connection to the network.
In some cases, transmission of data
files or messages may be delayed
until such a connection is available.
Ensure the above separation distance
instructions are followed until the
transmission is completed. The
highest SAR value for this device
when tested for use at the body is
1,32 W/kg.
* The SAR limit for mobile devices
used by the public is 2.0 watts/
kilogram (W/kg) averaged over ten
grams of body tissue. The guidelines
incorporate a substantial margin of
safety to give additional protection
for the public and to account for
any variations in measurements.
SAR values may vary depending on
national reporting requirements
and the network band. For SAR
information in other regions please
look under product information at
www.lgmobile.com.
Guidelines for safe and efficient use
7
Page 8

Guidelines for safe and efficient use
►
Product care and
Guidelines for safe and efficient use
maintenance
WARNING!
chargers and accessories approved
for use with this particular phone
model. The use of any other types
may invalidate any approval or
warranty applying to the phone,
and may be dangerous.
►
Do not disassemble this unit. Take
it to a qualified service technician
when repair work is required.
►
Keep away from electrical
appliances such as a TV's, radios or
personal computers.
►
The unit should be kept away from
heat sources such as radiators or
cookers.
►
Never place your phone in a
microwave oven as it will cause the
battery to explode.
►
Do not drop.
►
Do not subject this unit to
mechanical vibration or shock.
8
Only use batteries,
The coating of the phone may be
damaged if covered with wrap or
vinyl wrapper.
►
Do not use harsh chemicals (such
as alcohol, benzene, thinners, etc.)
or detergents to clean your phone.
There is a risk of this causing a fire.
►
Do not subject this unit to
excessive smoke or dust.
►
Do not keep the phone next to
credit cards or transport tickets; it
can affect the information on the
magnetic strips.
►
Do not tap the screen with a
sharp object as it may damage
the phone.
►
Do not expose the phone to liquid
or moisture.
►
Use accessories, such as earphones
and headsets, with caution. Ensure
that cables are tucked away safely
and do not touch the antenna
unnecessarily.
►
Please remove the data cable
before powering on the handset.
Page 9

Efficient phone
operation
To enjoy optimum performance
with minimum power consumption
please.
►
Do not hold the antenna when the
phone is in use. If you hold it, it can
affect call quality, it may also cause
the phone to operate at a higher
power level than needed and
shorten talk and standby times.
Electronic devices
All mobile phones may get
interference, which could affect
performance.
►
Do not use your mobile phone
near medical equipment
without requesting permission.
Avoid placing the phone over
pacemakers (i.e. in your breast
pocket.)
►
Some hearing aids might be
disturbed by mobile phones.
►
Minor interference may affect TVs,
radios, PCs, etc.
Road safety
Check the laws and regulations on
the use of mobile phones in the
areas when you drive.
►
Do not use a hand-held phone
while driving.
►
Give full attention to driving.
►
Use a hands-free kit, if available.
►
Pull off the road and park before
making or answering a call if
driving conditions so require.
►
RF energy may affect some
electronic systems in your motor
vehicle such as a car stereo or
safety equipment.
►
If your vehicle is equipped with
an air bag, do not obstruct
it with installed or portable
wireless equipment. It can cause
serious injury due to improper
performance.
Guidelines for safe and efficient use
9
Page 10

Guidelines for safe and efficient use
If you are listening to music whilst
Guidelines for safe and efficient use
outside and about, please ensure
that the volume is at a reasonable
level so that you are aware of your
surroundings. This is particularly
imperative when attempting to cross
the street.
Avoid damage to
your hearing
Damage to your hearing can occur
if you are exposed to loud sound for
long periods of time. We therefore
recommend that you do not turn on
or off the handset close to your ear.
We also recommend that music and
call volumes are set to a reasonable
level.
Blasting area
Do not use the phone where blasting
is in progress. Observe restrictions,
and follow any regulations or rules.
10
Potentially explosive
atmospheres
►
Do not use the phone at a
refueling point. Don't use near fuel
or chemicals.
►
Do not transport or store
flammable gas, liquid, or
explosives in the compartment of
your vehicle, which contains your
mobile phone and accessories.
In aircraft
Wireless devices can cause
interference in aircraft.
►
Turn off your mobile phone before
boarding any aircraft.
►
Do not use it on the ground
without crew permission.
Children
Keep the phone in a safe place out
of small children's reach. It includes
small parts which if detached may
cause a choking hazard.
Page 11

Emergency calls
Emergency calls may not be available
under all mobile networks. Therefore,
you should never depend solely on
your mobile phone for emergency
calls. Check with your local service
provider.
Battery information
and care
►
You do not need to completely
discharge the battery before
recharging. Unlike other battery
systems, there is no memory
effect that could compromise the
battery's performance.
►
Use only LG batteries and chargers.
LG chargers are designed to
maximize the battery life.
►
Do not disassemble or short-circuit
the battery pack.
►
Keep the metal contacts of the
battery pack clean.
►
Replace the battery when it
no longer provides acceptable
performance. The battery pack
may be recharged hundreds of
times until it needs replacing.
►
Recharge the battery if it has
not been used for a long time to
maximize usability.
►
Do not expose the battery charger
to direct sunlight or use it in high
humidity, such as the bathroom.
►
Do not leave the battery in hot or
cold places, this may deteriorate
the battery performance.
►
Risk of explosion if battery is
replaced by an incorrect type.
►
Dispose of used batteries
according to the manufacturer's
instructions.
►
If you need to replace the battery,
take it to the nearest authorized LG
Electronics service point or dealer
for assistance.
►
Always unplug the charger from
the wall socket after the phone is
fully charged to save unnecessary
power consumption of the
charger.
Guidelines for safe and efficient use
11
Page 12
KT610 Features
Parts of the phone
KT610 Features
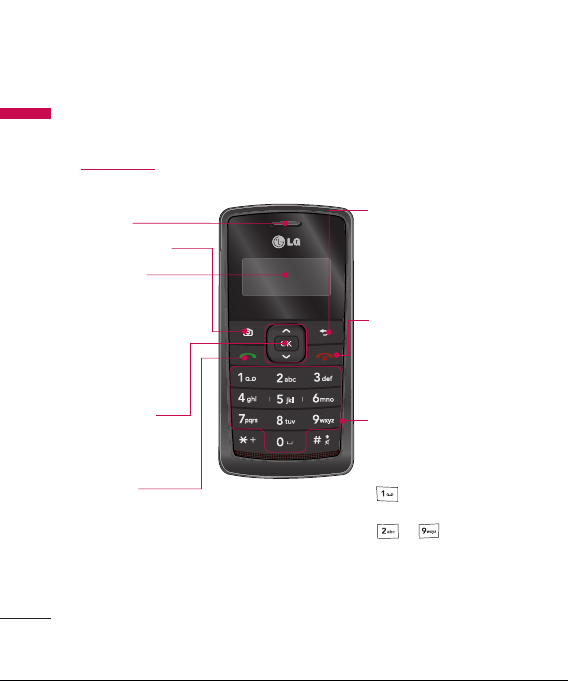
Open view
12
Earpiece
Camera hot key
LCD screen
Icons showing signal
strength, battery
level and various
other functions.
Soft key indications.
Confirm key
Selects menu options
and confirms actions
Send key
►
Dials a phone
number and answers
a call.
►
In standby mode:
Shows a history of
calls made, received,
and missed.
Clear key
Clears a character with each
press. Hold the key
down to clear all input.
Use this key to go back to a
previous screen.
End/Power key
End or reject a call.
Closes the task window and
goes back to
standby mode.
Alpha numeric keys
►
In standby mode: Input
numbers to dial.
Hold down
- to dial voice mail
centre.
to -
for speed
►
In editing mode: Enter
numbers & characters.
dials.
Page 13
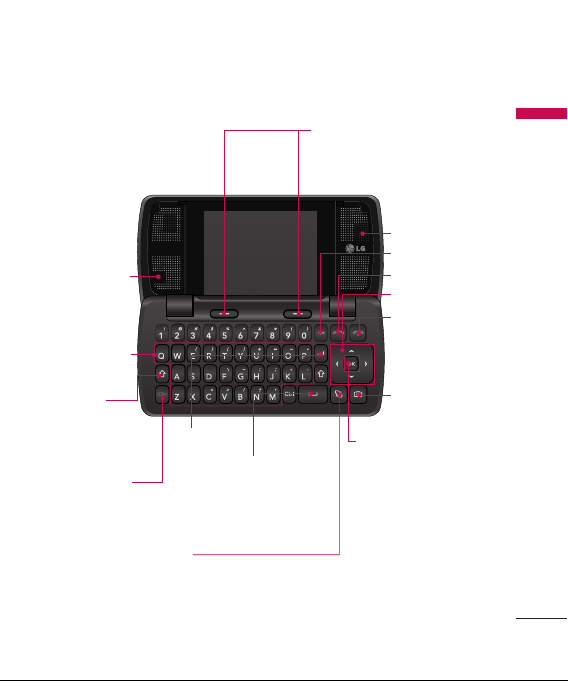
Internal
camera lens
Alpha
numeric
keys
Shift Key
►
Use to change
letter case
when typing.
Character Key
►
Use to insert
symbols into
text.
Enter Key
Space Key
►
Use to enter
space while
editing.
Menu key
►
Opens the main menu.
►
Opens the task manager
Left soft key/ Right soft key
►
Performs the function
indicated at the bottom of
the display.
Speaker
Clear Key
Send key
Navigation keys
End key
Camera Key
Confirm key
►
Selects menu
options and
confirms actions.
Clear key
►
Clears a character
with each press.
Hold the key down
to clear all input.
►
Use this key to go
back to a previous
screen.
KT610 Features
13
Page 14
KT610 Features
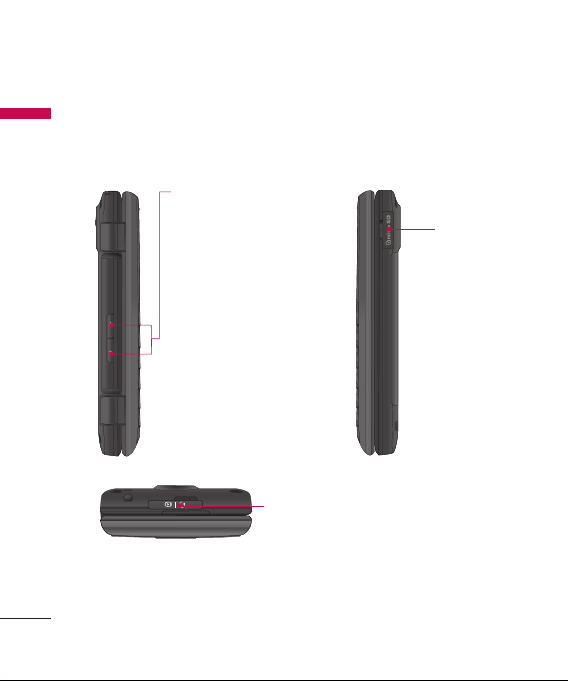
Left side view Right side view
KT610 Features
Side keys
Note
►
To protect your hearing,
maximum volume level
is 10.
Headset/Charger/Cable connector
Note
►
Please ensure phone is powered on and in
standby mode before connecting the USB cable.
Micro SD
memory
card slot
14
Page 15
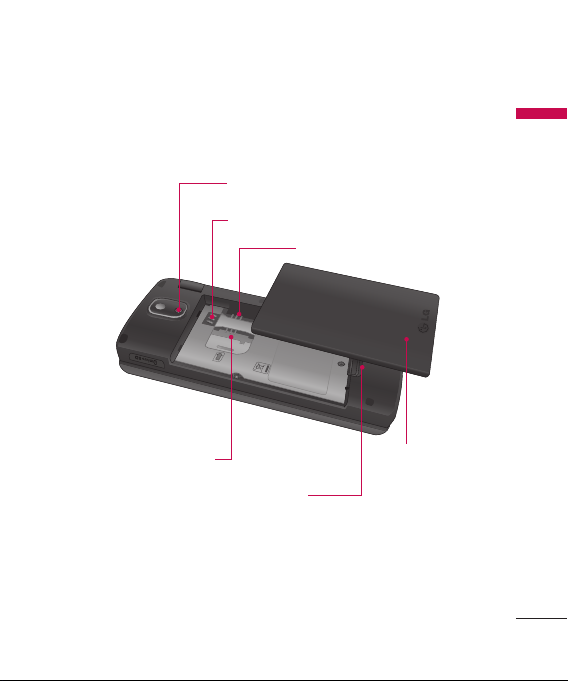
Rear view
KT610 Features
External camera lens
Battery terminals
SIM card socket
SIM card terminals
Battery release latch
Press this button to
remove the battery.
Battery
15
Page 16
Getting started
Installing the SIM
Getting started
card and battery
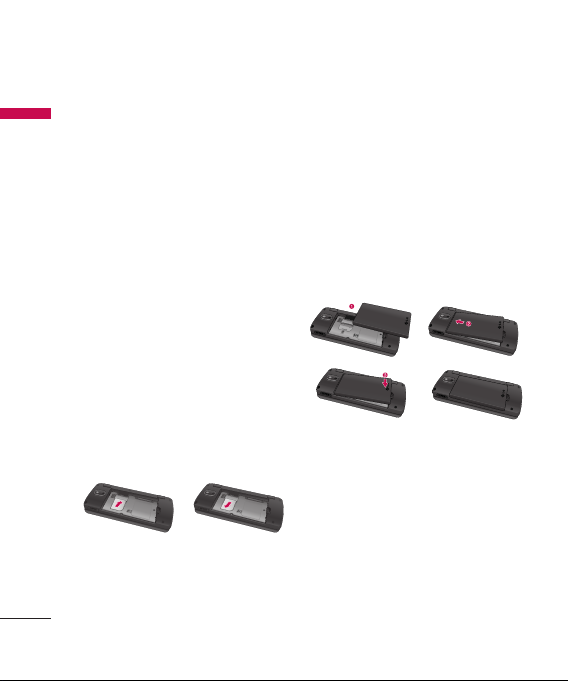
1. Installing the SIM card.
Your SIM card contains your
phone number, service details and
contacts and must be inserted into
your handset. Always disconnect
the charger and other accessories
from your handset before inserting
and removing your SIM card. Slide
the SIM card into the SIM card
holder. Make sure that the SIM card
is properly inserted and the gold
contact area on the card is facing
downwards. To remove the SIM
card, press down lightly and pull it
in the reverse direction.
To insert the SIM
16
card
To remove the SIM
card
Note
►
The metal contact of the SIM card can
easily be damaged by scratches. Pay
special attention to the SIM card while
handling. Follow the instructions
supplied with the SIM card.
2. Install the battery.
Slide the battery upwards until it
snaps back into place.
Page 17
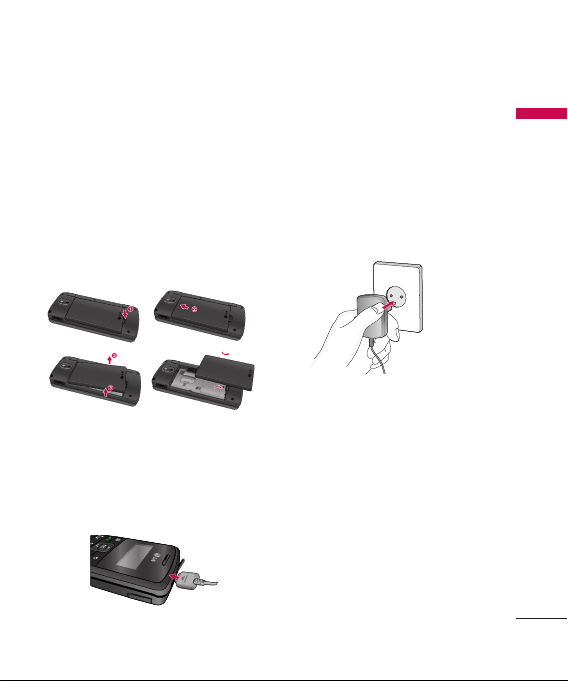
3. To remove the battery.
Turn the power off. (If the power is
left on, there is a chance you could
lose the stored telephone numbers
and messages.)
Press and hold down the battery
release button and slide the
battery down.
Charging the battery
Before connecting the travel adapter
to the phone you must first install
the battery.
1. With the arrow facing you as
shown in the diagram push the
plug on the battery adapter into
the socket on the left side of the
phone until it clicks into place.
2. Connect the other end of the travel
adapter to the mains socket.
Note
►
Only use the charger included in
the box.
3. The moving bars on the battery
icon will stop after charging is
complete.
4. Ensure the battery is fully charged
before using the phone for the
first time.
Getting started
17
Page 18
Getting started
Caution
Getting started
►
Do not force the connector as this may
damage the phone and/or the travel
adapter.
►
If you use the battery pack charger
when abroad, use an attachment plug
adaptor for the proper configuration.
►
Do not remove your battery or the SIM
card while charging.
Warning
►
Unplug the power cord and charger
during lightning storms to avoid
electric shock or fire.
►
Make sure that no sharp-edged items
such as animal teeth or nails, come
into contact with the battery. This may
cause a fire.
Disconnecting the
charger
Disconnect the charger from the
phone as shown in the diagram
below.
18
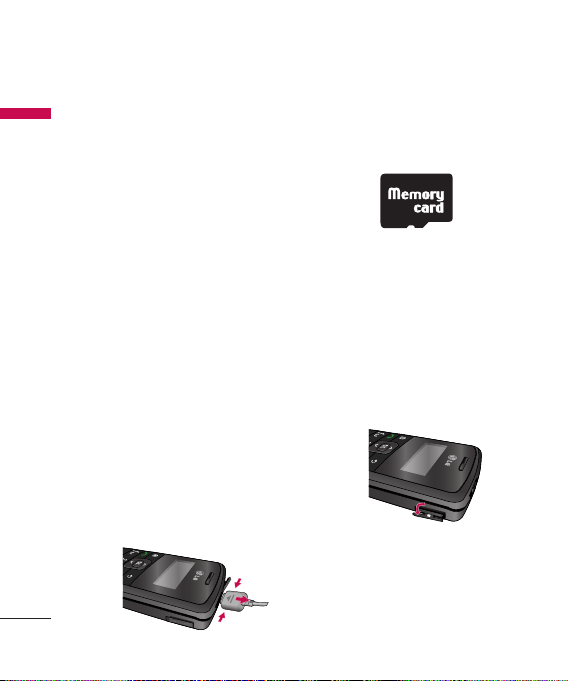
How to use a memory
card
<Memory card>
<How to insert memory card>
1 Turn the phone off. Inserting or
removing the memory card when
the phone is on may damage the
files stored in the memory card.
2 Lift the plastic cover which
protects the slot.
3 Insert the memory card into the
slot. The gold contacts behind
memory card must be facing
down while inseting into the
Page 19
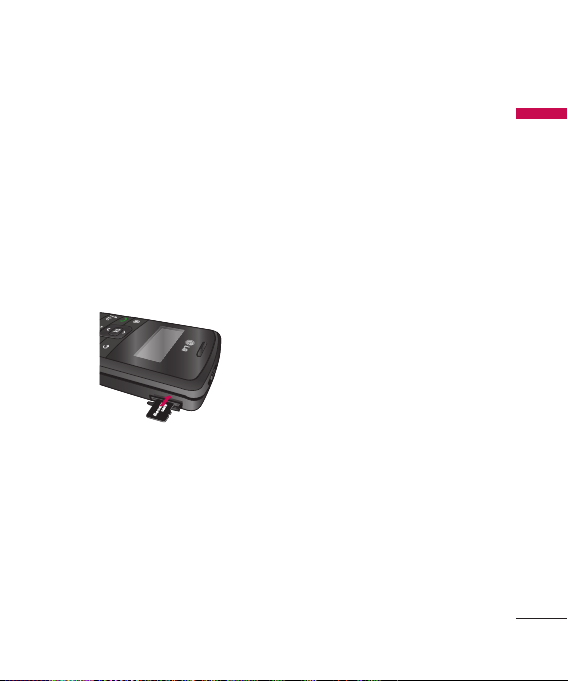
phone. Don’t push the memory
card too much. If it doesn’t go into
the slot easily, you may be trying
to insert it in the wrong way or
there could be a foreign object
in the slot.
4 Once inserted, push the memory
card until you hear a ‘Click’,
meaning that the memory card
has been correctly engaged.
5 Close the plastic slot protection.
6 To remove the memory card,
open the slot protection and push
the memory card to unlock it.
Carefully extract the memory card.
Attention:
►
Avoid using the memory card
when the battery is low.
►
When writing to the card, wait for
the operation to complete before
removing the card.
►
The card is designed to fit easily
into the system one way only.
►
Do not bend the card or force it
into the slot.
►
Do not insert any memory
cards other than those made by
memory card.
►
If the memory card has been
formatted using FAT32, format the
memory card using FAT16 again.
For more information on the
memory card, please refer to the
memory card instruction manual.
Getting started
19
Page 20

Getting started
Memory card
Getting started
formatting
Before you start to use the memory
card you have to format it. After
you insert the memory card, select
→ Organiser → Memory, then
press
.
This operation should only be done
when you insert the memory card
for the first time. During formatting
various folders will be created for
different data types.
Turning the handset
on/off
Turning your handset on
Ensure that your SIM card is in your
handset and the battery is charged.
Press and hold
comes on. Enter the SIM PIN code
that was supplied with your SIM
card if the PIN code request is set to
On. After a few seconds you will be
registered on the network.
20
until the power
Turning your handset off
Press and hold
goes off. Or press
Switch off!. There may be a few
seconds delay while the handset
powers down. Do not turn the
handset on again during this time.
until the power
and select
Page 21

Making and
answering calls
Making a voice call
1. Enter the number including the full
area code.
►
To delete a digit press .
To delete all digits press and
hold
.
2. Press
3. When you have a call in progress,
to make the call.
you can access the followings by
pressing the left soft key [Options].
►
Activate loudspeaker/
You can switch on/off
handset:
the loudspeaker to allow
others nearby to participate in
the conversation, for example.
►
End active call: Select this if
you want to nish active call.
►
Hold: Select this to put
a caller on hold. Select
Unhold to continue your
conversation.
General functions
►
Call Mute: Select this to switch
the microphone off. To switch
it back on, press Unmute.
►
New call: Select this to make
a new call. Activating call is
automatically held.
►
Open active standby: select
this to open active standby
screen.
►
Conference: Select this to
create a conference call to
converse with multiple people
at the same time.
Tip
►
To add a participant to a conference
call, call the new participant, press
the left soft key [Options] and select
Conference > Add to conference.
►
Switch to video call: Ends the
active call and automatically
make a video call to the same
number.
►
Send MMS: You can send a
media file to the other party as
a multimedia message.
General functions
21
Page 22

General functions
►
General functions
Send DTMF: To send touch
tones.
Tip
►
While a call is in progress, you can
press the number keys to send DTMF
tones. You can use DTMF tones to
communicate with voice mailboxes
and computerised telephony systems.
►
Help: Use this option to get to
know the phone feature.
4. Press
to finish the call, or
close the handset.
Making a call from the call
logs
1. In standby mode, press
the latest incoming, outgoing and
missed phone numbers will be
displayed.
2. Select the desired number by using
the up/down navigation keys.
3. Press
to call the number.
Making a Video call
You can make a video call in a 3G
covered service area. If the called
user has a 3G video phone in a 3G
covered service area, the call will be
established. You can also answer a
video call for video incoming call.
1. Input the phone number using
the keypad, or select the phone
number from the calls made/
received lists.
►
To correct mistakes, press
briefly to delete the last
number, or press and hold
and
to delete all numbers.
2. If you do not want to use the
speakerphone, ensure you have
the headset plugged in.
3. To start the video function, press
the left soft key [Options] and
select Call
→
Video call.
►
You will be notified that you will
need to close other applications
to make the video call.
22
Page 23

Note
►
The video call may take some time to
connect.
4. Adjust the camera position if
necessary.
5. When you have a video call in
progress, you can access the
followings by pressing the left soft
key [Options].
►
Enable
- Sending video: Select this to
send your own video image.
- Sending audio: Select this to
unmute the microphone so as
to allow audio sending.
- Sending aud. & video: Select
this to send your video and
audio.
Note
►
You can zoom your video image in or
out using up /down navigation keys.
►
Disable
- Sending video: Select this not
to send your video image.
- Sending audio: Select this to
mute the microphone so as
not to allow audio sending.
- Sending aud. & video: Select
this not to send your video
and audio.
►
Activate loudspeaker/
You can switch on/off
handset:
the loudspeaker to allow
others nearby to participate in
the conversation, for example.
►
Video preference: Select
Clearer detail to set received
video quality preference
with a lower frame rate but
a good image quality. Select
Smoother video to use a
higher frame rate but a lower
image quality.
►
Send snapshot: You can take
a picture and send it to the
other party. Press
take the picture and
Capture to
Use video
to return to the regular video
call after sending it.
General functions
23
Page 24

General functions
24
General functions
►
Share image: You can send an
image in the
My stuff.
►
End active call: Select this to
answer a video call while you
already have another video or
voice call in progress.
►
Open active standby: To open
the standby mode image on
the display.
►
Use secondary camera: Select
this to use the secondary
camera.
►
Change image order: To
switch the location of the
other party's and your own
video or still image on the
display.
►
Zoom in/out: You can zoom
your video image in or out.
►
Switch to voice call: Ends the
video call and automatically
redial the same number for a
regular voice call.
Image folder in
►
Help: Use this option to get to
know the phone feature.
6. Press
to finish the call, or close
the handset.
Making a voice/video call
from Contacts
It is easy to call anyone whose
number you have stored in your
Contacts.
1. Move the joystick to the down to
access the contacts list.
2. Scroll to the contact to make a call.
3. Press
4. Press
to make a voice call. Press
the left soft key and select Make
video call to make a video call.
to finish the call.
Making international calls
1. Press
international prefix. The '+'
character prefixes the international
access code.
2. Enter the country code, area code,
and the phone number.
twice for the
Page 25

3. Press
.
Adjusting the volume
During a call, if you want to adjust
the earpiece volume, use (
left side of the phone.
) on the
Answering a call
When you receive a call, the phone
rings and the flashing phone icon
appears on the screen. If the caller
can be identified, the caller’s phone
number (or name if stored in your
Contacts) is displayed.
Press
1.
Note
►
To reject an incoming call, press
►
If A nykey answer is set to On (Menu
2. End the call by pressing
to answer an incoming
call.
or the right soft key twice.
→
Settings → Phone → Call →
Anykey answer), any key will answer a
call except
.
.
Note
►
You can answer a call while using the
Contacts or other menu features.
►
When the compatible headset is
connected, you can also answer a call
using the headset key, as well as using
the phone. To reject an incoming call,
.
press
►
You can mute the ringtone when a
call comes in by pressing the right soft
key [Silence].
Shortcut to activate
silent mode
You can activate the silent mode
by pressing and holding down
when Flip of the phone is closed.
Or press and select Silent.
Entering text
You can enter alphanumeric
characters using the keypad.
For example, storing names in
Contacts, writing a message, creating
a personal greeting or scheduling
events in the calendar all require
General functions
25
Page 26
General functions
entering text. The following text
General functions
input methods are available with the
handset.
T9 Mode
Abc abc
This mode lets you enter words
with only one keystroke per
letter. Each key on the keypad
has more than one letter. The T9
mode automatically compares
your keystrokes with an internal
dictionary to determine the
correct word, thus requiring
far fewer keystrokes than the
traditional ABC mode. This is
sometimes known as predictive
text.
Mode
This mode lets you enter letters
by pressing the key labeled with
the required letter once, twice,
three or four times until the letter
is displayed.
26
Abc abc
123 Mode
Type numbers using one
keystroke per number. To change
to 123 mode in a text entry field,
press the
is displayed.
(Numbers Mode)
123
key until 123 mode
Changing the text input mode
When you are in a field that allows
characters to be entered, you will
notice the text input mode indicator
in the upper right corner of the LCD
screen.
►
Press
►
Press and hold
between text entry mode and
number entry mode.
to cycle between
Abc, abc, Abc,
abc.
to switch
Using the T9 Mode
The T9 predictive text input mode
allows you to enter words easily with
a minimum number of key presses.
Page 27
As you press each key, the handset
begins to display the characters that
it thinks you are typing based on a
built-in dictionary. As new letters are
added, the word changes to reflect
the most likely candidate from the
dictionary.
1. When you are in the T9 predictive
text input mode, start entering a
to
word by pressing
one key per letter.
►
The word changes as letters
. Press
are typed. Ignore what's on the
screen until the word is typed
completely.
►
If the word is still incorrect after
typing completely, press
once or more to scroll through
the other word options.
Example
Press
Good.
to get Home.
Press
►
If the desired word is missing
to type
from the word choices list, add
it by using the ABC mode.
2. Enter the whole word before
editing or deleting any keystrokes.
3. Complete each word with a space
by pressing
.
To delete letters, press
press and hold down
entire words are deleted.
Using the ABC Mode
to to enter your text.
Use
1. Press the key labelled with the
required letter:
►
Once for the first letter.
►
Twice for the second letter.
►
And so on.
2. To insert a space, press
To delete letters, press . Press
and hold down
display.
. You can
until the
once.
to clear the
General functions
27
Page 28

General functions
Using the 123 (Number) mode
General functions
The 123 mode enables you to enter
numbers in a message(a telephone
number, for example). Press the keys
corresponding to the required digits
before manually switching back to
the appropriate text entry mode.
In the text entry mode, you can
enter numbers by long press on the
corresponding keys.
Using the symbol mode
The symbol mode enables you to
enter various symbols or special
characters.
1. To enter a symbol, press Edit key
] and select More symbols.
[
The symbol list window is shown
up.
2. After selecting the desired one
using navigation keys, press
.
28
Page 29
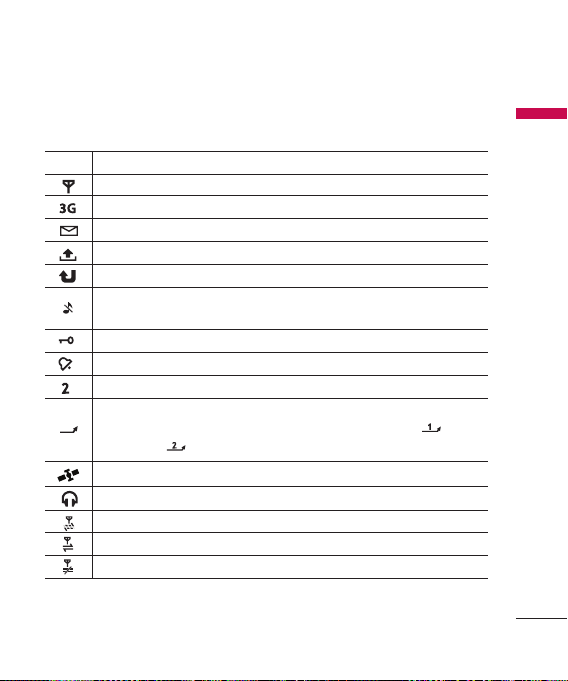
On-screen icons
Icon Description
The device is being used in a GSM network.
The device is being used in a UMTS network (network service).
You have one or more unread messages in the Inbox folder in Messag.
There are messages waiting to be sent in the Outbox folder.
You have missed calls.
Shown if Ringing type is set to Silent and Message alert tone, IM alert
tone, and E-mail alert tone are set to Off.
The device keypad is locked.
A clock alarm is active.
The second phone line is being used (network service).
All calls to the device are diverted to another number. lf you have two
phone lines(network service), the indicator for the first line is
the second
GPS application is in use.
A compatible headset is connected to the device.
A GPRS packet data connection is available.
A GPRS packet data connection is active.
A GPRS packet data connection is on hold.
.
General functions
and for
29
Page 30
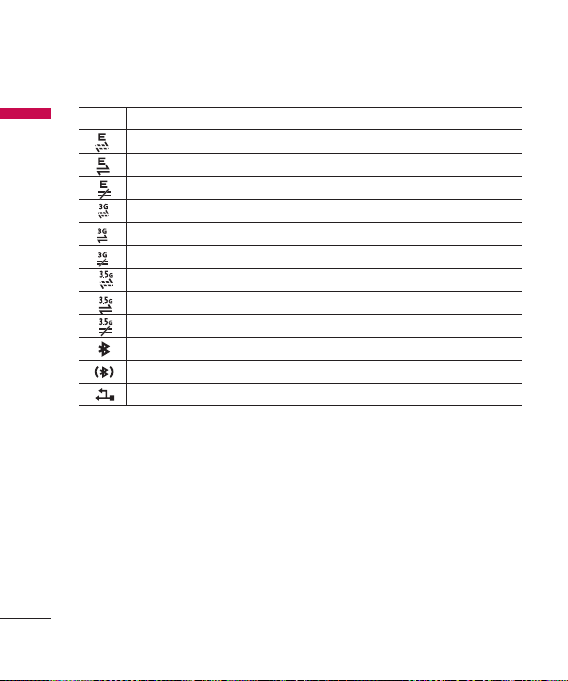
General functions
Icon Description
General functions
A EDGE packet data connection is available.
A EDGE packet data connection is active.
A EDGE packet data connection is on hold.
A UMTS packet data connection is available.
A UMTS packet data connection is avtive.
A UMTS packet data connection is on hold.
A HSDPA packet data connection is available.
A HSDPA packet data connection is avtive.
A HSDPA packet data connection is on hold.
Bluetooth connectivity is on.
Data is being transmitted using Bluetooth connectivity.
A USB connection is active.
30
Page 31

Menu tree
1. Google
1.1 Search
1.2 Maps
1.3 Mail
1.4 YouTube
2. Multimedia
2.1 RealPlayer
2.2 Music player
2.3 Recorder
2.4 Camera
2.5 Flash Player
3. Profiles
3.1 General
3.2 Silent
3.3 Meeting
3.4 Outdoor
3.5 Pager
3.6 Offline
4. Browser
5. Log
5.1 Recent calls
5.2 Call duration
5.3 Packet data
6. Message
6.1 New message
6.2 Inbox
6.3 My folders
6.4 Mailbox
6.5 Drafts
6.6 Sent
6.7 Outbox
6.8 Reports
7. Contacts
8. Connectivity
8.1 IM
8.2 Conn. Mgr.
8.3 Bluetooth
8.4 USB
8.5 Sync
9. Organiser
9.1 Calendar
9.2 Clock
9.3 Notes
9.4 Quickoffice
9.5 Calculator
9.6 Converter
9.7 File mgr.
9.8 Memory
0. My stuff
Images
Video clips
Tracks
Sound clips
Streaming links
Presentations
All files
. Tools
.1 Installations
.2 Call mailbox
.3 Speed dial
.4 Themes
.5 Actv. keys
.6 App. mgr.
.7 GPS data
.8 Landmarks
.9 Device mgr.
0
.
Help
. About
#. Settings
#.1 General
#.2 Phone
#.3 Connection
#.4 Applications
Menu tree
31
Page 32

Google
You can access Google and use the
Google
followings; Search, Maps, Blogger
and YouTube.
Search
You can search the web-pages in
this menu.
Maps
You can access maps from your
mobile devices with this option.
Mail
You can receive or send e-mail. For
details, please contact your service
provider.
YouTube
You can view your friends’ Youtube
pages or log into your own and
manage your postings.
32
Page 33

Multimedia
RealPlayer
You can play sound or video clips
saved in the phone or stream music
and video clips.
►
Open
-
Most recent clips: Select this to
play one of the up to 6 music
or video clips you most recently
played.
-
Saved clip: Select this to play
a saved video clip or to open a
stream link to a media clip.
►
Download videos: You can
download video clips from the
web.
►
Settings: You can change video or
connection settings.
►
About application: You can view
info about the application.
Music player
You can play music tracks.
<Key operations>
Key Description
Rewinds the track.
Stops playback
Fast fwds the track.
►
►
►
►
►
Starts playing music.
/
Decreases the volume.
Increases the volume.
/
/
Music library: You can view, play
and manage all music tracks saved
on your device or memory card.
Open 'Now playing': You can view
the currently playing set of tracks.
Download tracks: You can
download music from the web.
Random play: You can play music
tracks in a random order.
Loop: You can repeatedly play
music, either a specific track or
all tracks.
on
Multimedia
33
Page 34

Multimedia
►
Equaliser: You can enhance or
Multimedia
diminish frequencies during music
playback.
►
Add to track list: You can add the
playing music track to a new or
saved track list.
►
Use tone
- Set as ringing tone: You can set
the music track as the ringing
tone for the current profile.
Assign to contact: You can set
-
the music track as ringing tone
for a contact.
►
Play in background: You can leave
Music player on in the background
when using other applications.
►
View details
Recorder
You can record speech or sound.
You can record a phone call by
selecting Recorder during the call.
Note
►
Obey all local laws governing the
recording of phone calls. Both parties
of the call hear a tone every 5 seconds
during recording.
1. Press the left soft key [Options]
and select Settings to select the
recording quality and default
memory for your sound clips.
2. Press the left soft key [Options] and
select Record sound clip to start
recording. When a recording is
started, the recording time appears
on the LCD.
3. When you finish the recording,
press the right soft key [Stop]. The
recorded file is automatically saved
in Sound clips folder in My stuff.
4. To play the sound clip after
recording, press
5. You can listen to previously
recorded sound clips by selecting
Go to My stuff.
.
34
Page 35

Camera
In this application, you can take
photos or record videos.
You can switch between camera and
video recorder using the right/left
navigation keys.
To take photos:
1. The viewfinder shows you the
image to be captured.
2. To zoom in/out, press the up/down
navigation key.
3. Using the left soft key [Options],
the followings are available.
►
Capture: Select this to take
a photo.
►
Show toolbar: After selecting
this, you can switch between
Image and Video modes,
activate night or sequence
mode, or switch between main
and secondary camera using
.
the
►
Video mode: Switches to
Video mode.
►
Use secondary camera: Select
this to use the secondary
camera.
►
Night mode: You can activate/
deactivate the night mode.
►
Sequence mode: You can take
multiple photos in one go by
selecting On.
►
Self-timer: To take a photo
automatically after a short
time delay.
►
Go to My stuff: To view images
and videos saved on the
phone or memory card.
►
Adjust: You can adjust the
brightness, contrast, white
balance and colour tone.
►
Settings
Image
• Image quality: You can adjust
the image quality.
Note
►
The better the image quality, the more
memory the photo uses and the fewer
photos you can save on your phone or
memory card.
Multimedia
35
Page 36

Multimedia
Multimedia
<Short-cut keys>
36
- Show captured image:
Select No to take one photo
immediately after another.
This way, your photos do
not remain on the display
after you take them, and the
camera is ready for use again.
- Resolution (Camera 1): Select
the desired resolution for the
external camera by pressing
.
- Resolution (Camera 2): Select
the desired resolution for the
internal camera by pressing
.
- Default image name: To key
in the default name for your
new photos.
- Memory in use: where to save
your photos.
►
Help: Use this option to get to
know the phone feature.
►
Exit
: To activate night mode and take
photos when lighting is dim
and the camera needs a long
exposure time.
: To edit brightness settings.
: To activate sequence mode and
take 6 photos in one go.
: To edit contrast settings.
4. To take a photo, press
are automatically saved in Images
folder in My stuff.
To record videos:
1. Press right navigation keyto switch
to video camera.
2. To zoom in/out press up/down
navigation key.
3. Using the left soft key [Options],
the followings are available:
Record, Show toolbar,
Image mode, Use secondary
camera, Night mode, Mute,
Go to My stuff, Adjust or Settings.
Video
- Length: Select between
Maximum and Short.
. Photos
Page 37

Tip
►
To send the video clip in a multimedia
message, select
size of the video.
-
Resolution (Camera 1): Select
Short
to reduce the
the desired resolution for the
external camera by pressing
.
- Resolution (Camera 2): Select
the desired resolution for the
internal camera by pressing
.
-
Default video name: To key in
the default name for your new
videos.
- Memory in use: Select where to
save your videos.
►
Help: Use this option to get to
know the phone feature.
►
Exit: Exits the application.
4. To record a video, press .
5. To stop recording, press the
right soft key [Stop]. Videos are
automatically saved in Video clips
folder in My stuff. if you do not
want to save the video press
To play the video, press the left soft
key [Options] and select Play.
Flash Player
You can view and play Flash files
made for mobile devices.
1. To open a folder or play Flash
file, scroll to the folder of file and
press .
2. Scroll to a Flash file and press the
left soft key [Options].
Note
►
Available options may vary.
►
Send: You can send the Flash
file to compatible devices.
►
Organise
- Copy to folder: To save a copy
of the file in another folder.
-
Move to folder: To move the
file to a different folder.
-
New folder: To create a folder
to organize your Flash files.
3. To delete a Flash file, scroll to it and
press .
.
Multimedia
37
Page 38

Profiles
You can manage the call, message,
Profiles
and other alert settings of your
phone.
1. To change the profile, scroll to the
desired profile, press the left soft
key [Options] and select Activate.
Note
►
To change profiles in any view, briefly
press the Power key on the right side
of the phone.
►
To quickly activate the Silent profile in
standby mode, press and hold
. To return to General profile,
again press and hold
►
In Offline profile, you cannot make or
receive calls or use other features that
require network coverage.
2. To modify a profile, scroll to it,
press the left soft key [Options],
and select Personalise.
38
Scroll to the following settings
to edit: Ring tone, Video
and
call tone, Ring type, Ring volume,
Message alert tone, E-mail alert
tone, Vibrating alert, Keypad tones,
Warning tones, Alert for.
Tip
►
When you select Ascending, the
ringing volume starts from level one
and increases level by level to the
maximum volume you set in the next
setting.
To save your settings, press Back.
.
3. To create a new profile with your
own sound settings, press the
left soft key [Options] and select
Create new.
Page 39

Browser
Browsing the web
You can browse web pages in this
menu. Key in the page address and
press the left soft key [Go to].
Keyboard shortcuts:
To Open your Bookmark
/
To search for speci c text
/
on the page(Find)
To return to the Previous
/
page
To switch between your
/
open Windows
To toggle page Overview
/
on and o
To Go to a di erent web
/
page.
To goto your Homepage
/
You can access the followings by
pressing the left soft key [Options]:
Open link, Go to web address,
Bookmarks, Save as bookmark,
Rotate screen, Navigation options,
Zooming options, Window, Clear
privacy data, Tools, Find, Settings.
Tip
►
Cookies are necessary if you shop
on the web to retain the items you
buy until you reach the cashier page,
for example. However, the info may
be misused, and you may receive
unwanted advertisements in your
phone, for example.
Saved pages
You can view a saved web page. After
scrolling to it, press
Scroll to a saved page and press
the left soft key [Options] to access
the followings: Saved pages, Clear
privacy data.
To remove a saved page, scroll to it
and press
.
.
Browser
39
Page 40

Browser
Auto. Bookmarks
Browser
You can returns to a web page you
have recently visited. After scrolling
to the desired page address, press
.
Scroll to a bookmark and press the
left soft key [Options] to access the
followings: Back to page, Bookmark
manager, Mark/Unmark, Navigation
options, Clear privacy data, Tools,
Details, Settings.
To delete a bookmark, scroll to it and
.
press
Note
►
The NDTV midlet shortcut is present
under Browser -> options.
40
Browser feeds
You can download and manage feeds
and blogs.
Blog is short for weblog, which is
a continuously updated web diary
meant to be viewed by any web user.
To download a feed or blog, scroll to
it and press
You can access the following by press
the left soft key [Options]: Refresh,
Refresh all, Manage feed, Mark/
Unmark, Back to page, Clear privacy
data, Settings.
.
Page 41

Log
Recent calls
You can view the recently missed,
received and dialed calls.
Missed calls
Allows you to view the last 20 phone
numbers from which someone
unsuccessfully tried to reach you.
Received calls
Allows you to view the last 20 phone
numbers that you have answered.
Dialled numbers
Allows you to view the last 20 phone
numbers that you have called or
tried to call.
Note
►
You can also view Dialled numbers in
standby mode by pressing
You can make a call, send a message
and save the number in Contacts.
You can edit the phone number or
copy the number using Use number
option. You can delete your missed,
received, or dialled calls.
.
You can reset the recent calls register
in Recent calls, press the left soft key
[Options] and select Clear recent
calls. To set the time period to keep
log events in the phone memory,
select Settings option.
Call duration
You can view the duration of calls to
and from your phone.
Using the left soft key [Options], the
followings are available: Clear timers,
Settings, Help, Exit.
Packet data
You can check the amount of data
transferred during packet data
connections.
Note
►
You may be charged for your packet
data connections according to the
amount of transferred data.
Using the left soft key [Options],
the followings are available: Clear
counters, Settings, Help, Exit.
Log
41
Page 42

Messaging
New message
Messaging
You can create a text message,
multimedia message, audio message
or E-mail. Press the left soft key
[Options]. You can access the
followings.
Create message
You can create Text message/
Multimedia message/ Audio
message/ E-mail.
Text message
1. In the To field, press to select
recipients from Contacts or key in a
recipient mobile phone number.
2. Move to the message field by
pressing the down navigation key.
3. Enter your message in the message
field.
Option menus in message field:
Add recipient, Insert, Sending
options, Message details,
Writing language.
4. Press
42
to send the message.
The messages will automatically be
saved in the Sent message folder.
If the message has not been sent,
it will remain in the Outbox with a
failed status.
Note
►
To save the message without sending
it, press the right soft key [Close] and
select Save to Drafts.
Multimedia message
Multimedia messages may contain
text, images and sound and video
clips. To send and receive multimedia
messages, you need to register with
a multimedia messaging service and
define multimedia settings in your
phone.
1. In the To field, press
recipients from Contacts or key in a
recipient mobile phone number or
an e-mail address.
Tip
►
If you key in more than one number,
separate the numbers with a semicolon.
To insert a semicolon, press
select ; using the navigation keys.
to select
and
Page 43

►
To add @ in letter mode,
hold
and press .
press and
2. Enter a subject in the Subject field.
3. Enter your message in the message
field.
Option menus in message field
(Note: Available options may
: Send, Add recipient,
vary.)
Create presentation, Insert
object, Insert new, Place text
first/ Place text last, Remove,
Address fields, Preview, Objects,
Check contacts, Sending
options, Message details,
Writing language, Help, Exit.
4. Press
to send the message.
Audio message
1. Press to record your message.
2. When you hear a sound, please
start recording.
(You can record up to 2 minutes
and 30 seconds.)
3. To save the sound clip, press the
left soft key [Options] and select
Save sound clip.
Note
►
You can check what you recorded
using Play sound clip option.
►
To replace the sound clip, select Replace
sound clip → New sound clip.
►
To send a sound clip in your phone or
memory card, select Replace sound
clip → From My stuff. Scroll to the
desired music track or sound clip and
press
.
►
To delete the audio clip, press .
4. Scroll to the To field. Press to
select recipients from Contacts or
key in a recipient mobile phone
number.
Tip
►
If you key in more than one number,
separate the numbers with a
semicolon. To insert a semicolon, press
and select ; using the navigation
keys.
5. Press to send the message.
Audio messages are transferred in
the multimedia messaging service.
Messaging
43
Page 44

Messaging
E-mail
Messaging
To send/receive an email, you should
set up the email account.
1. In the To field, press
recipients from Contacts or key in
an e-mail address.
Tip
►
If you key in several addresses, separate
them with a semicolon. To insert a
semicolon, press
the navigation keys.
►
Insert the primary recipients in the To
field and those who only need the email for reference in the Cc field.
2. Enter a subject in the Subject field.
3. Enter your message in the message
field.
Option menus in message field
(Note: Available options may
: Add recipient, Insert,
vary.)
Address fields, Attachments,
Sending options,
Writing language, Help, Exit.
4. Press
to send the message.
44
to select
and select ; using
Note
►
To save the message without sending
it, press the right soft key [Close] and
select Save to Drafts.
SIM messages
You can browse messages on your
SIM card.
Cell broadcast
With the cell broadcast service
(CBS), you can receive informative
messages from your service provider
on various topics, such as weather
or traffic conditions in a particular
region.
To receive cell broadcast messages,
you need to turn on cell broadcast
reception.
Press the left soft key [Options] and
select Settings. Set the Reception
On.
In the Cell broadcast topic list, the
followings are available by pressing
the left soft key [Options]: Open,
Subscribe, Hotmark, Topic, Settings.
Page 45

Service commands
You can send service commands
such as activation requests for
network services, to your service
provider. After keying in a command
and press
.
To call the sender of the message,
.
press
Note
►
You can view other folders in
Messages by using the left/right
navigation keys.
Messaging
Settings
You can define or edit settings for
different message types. For further
information, please refer to the Help
menu on the phone.
Inbox
You can browse, open and manage
received text, multimedia and other
messages.
1. Scroll to a new message and press
.
2. Using the left soft key [Options],
the followings are available. (Note:
Available options may vary): Create
message, Reply, Sort by, Move to
folder or Mark/Unmark.
To delete a message, press
.
My folders
You can view messages or message
templates saved in your own folders.
Mailbox
You must register for an e-mail
service and set up a mailbox to
receive/send emails.
Contact your service provider for
correct settings.
In the e-mail list, the followings are
available by pressing the left soft key
[Options].
(Note: Available options may vary):
Create message, Connect, Retrieve
e-mail, Delete, Sort by or E-mail
settings.
45
Page 46

Messaging
Drafts
Messaging
You can view, edit and send
messages you have created but not
yet sent.
1. Press
2. To send a message, press
3. To delete a message, scroll to it and
to view or edit a
message.
. You can delete multiple
press
messages. [Options] and select
Mark/Unmark to put a tick next
to it. Once you have marked the
desired messages, press
Sent
Your last 20 sent messages are
automatically saved in the Sent
folder. The following options are
available using the left soft key.
(Note: Available options may vary)
Sort by or Move to folder.
Outbox
You can view and manage messages
waiting to be sent.
46
1. To cancel sending a message,
use the following options after
pressing the left soft key [Options]:
Defer sending, Delete, Move to
Drafts.
2. To send a message that is
.
suspended, failed or scheduled for
later delivery, press the left soft key
[Options] and select Send.
Reports
You can keep track of your text and
.
multimedia messages after sending.
You can call a message recipient by
pressing the
Note
►
You can receive or reject delivery
reports in text and multimedia
message settings. (Open Messages
and press the left soft key [Options]
and select Settings → Text messages
or Multimedia message. Set Receive
report to Yes/No.)
►
No delivery reports can be received
from messages sent to e-mail
addresses.
.
Page 47

Contacts
New contact
You can create a contact address. You
can enter the first name, last name,
mobile number, telephone number,
E-mail address, a number for video
call, pager number, company name
and job title of a new contact. You
can add, rename or delete contact
card fields, using Add detail, Edit
label or Delete detail options. After
filling in the fields, press the right soft
key [Done].
Contacts list
You can view a contact card by
pressing the
To make a voice or video call to a
contact, press
Using the left soft key [Options],
the followings are available: Open,
Call, Create message, Edit, Delete,
Duplicate, Mark/Unmark,
to SIM directory
Send business card, Contacts
info, Synchronisation → Start,
.
.
Copy
, SIM contacts,
Synchronisation → Settings,
Settings, Help, Exit
To remove a contact from the
directory, press the
.
Groups
Press the right navigation key in
Contact list.
You can create contact groups to
send messages to a number of
people at the same time, for example.
Using the left soft key [Options],
the followings are available: Open,
Create message, New group, Delete,
Rename, Ringtone, Contacts info,
Settings, Help, Exit.
To delete a contact group, press the
. The individual contacts cards
of group members remain in the
Contacts directory.
Contacts
47
Page 48

Connectivity
Conn.mgr.
Connectivity
You can manage active data
connections.
To view detailed connection info,
such as the duration, speed of data
transfer, and the amount of data sent
or received, scroll to the connection
and press
To end a connection, scroll to it and
press
To end all connections, press the
left soft key [Options] and select
Disconnect all.
Bluetooth
You can make a wireless connection
to other compatible devices such as
computers.
Bluetooth provides you with wireless
connections to other Bluetooth
devices such as computers or other
phones.
►
Bluetooth: To enable wireless
connections to other Bluetooth
devices, select On.
.
.
►
My phone's visibility: Set the
visibility of your phone to other
Bluetooth devices.
Note
►
Yo ur Paired devices can still connect
to your phone even if you select
Hidden.
►
My phone's name: You can change
the name of your phone, which is
visible to other devices that search
for Bluetooth devices. Key in the
new name and press OK.
To send data via Bluetooth:
1. Open the application that contains
the item you want to send.
2. Scroll to the item, press the left soft
key [Options] and select Send →
Via Bluetooth.
3. The phone searches for Bluetooth
devices within range and lists
them.
Scroll to the desired device and press
to set up the connection.
48
Page 49

To pair with a device:
1. Press the right navigation key
to move to the Paired devices
window.
2. Press the left soft key [Options]
and select New paired device.
The phone starts to search for
Bluetooth devices within range.
3. Scroll to the device with which you
want to pair and press
4. Agree on a common passcode with
the owner of the other device and
key it in. Press OK.
Note
►
Some devices have fixed passcodes.
If you trust a paired device, you can
allow it to connect automatically
to your phone. Scroll to the device,
press the left soft key [Options] and
select Set as authorised. This way,
you do not have to accept a device
manually every time you connect
to it.
.
To give a nickname to a paired device
that is displayed only in your phone,
scroll to the device, press the left
soft key [Options], and select Assign
short name.
To delete pairing with a device, scroll
to the device and press
.
USB
You can transfer data to and from
another device using the USB wire
provided in the sales pack.
You can change the device type to
which you normally connect your
phone with the USB cable.
USB mode
►
PC Suite: To connect PC Suite to
your phone via the USB cable.
►
Data transfer: To access and
transfer data, such as text or music
files, between your memory card
and a compatible device, such as a
computer, using USB.
Connectivity
49
Page 50

Connectivity
Ask on connection
Connectivity
Select Ye s to select the USB mode
every time you use the USB cable
to connect your phone to another
device.
Sync
You can synchronise data in your
phone's contacts, calendar, notes
and text message applications
with corresponding applications
on a computer or Internet server.
Synchronisation settings are saved in
sync profiles.
Note
►
The available applications you can
synchronise may vary. Contact your
service provider for more information.
50
Scroll to a sync profile and press
the left soft key [Options]. You can
access the followings. Synchronise,
Edit sync profile, New sync profile,
View log.
To delete a synchronization profile,
scroll to it and press
.
Page 51

Organiser
Calendar
You can edit and keep track of your
schedule.
Using the left soft key [Options],
the followings are available. Open,
New entry, Week view, To-do view,
Delete entry, Go to date, Settings.
Tip
►
You can also add appointments by
starting to write with the number
keys. The Meeting editor opens
automatically.
Clock
Time
You can view the time, day of the
week and date, or set and edit alarms
or modify date and time settings.
1. To set date and time, press the
left soft key [Options] and select
Settings.
2. Scroll to the following settings and
: Time, Time zone, Date,
press
Date format, Date separator, Time
format, Time separator, Clock
type, Alarm clock tone, Workd ays
, Network operator time.
Note
►
This service may not be available in
all networks.
3. Press the right soft key [Back] to
save your settings.
To quickly set a one -time alarm,
press any number key and key in
the alarm time. To change the time
of a set alarm, press the left soft key
[Options] and select Reset alarm.
Alarm
1. In the Clock window, press the
right navigation key.
2. Press the left soft key [Options] and
select New alarm.
3. Fill in the following fields. Alarm
time, Description, Repeat.
4. Press the left soft key [Done].
Organiser
51
Page 52

Organiser
Tip
Organiser
►
To quickly set a one-time alarm, you
can also press any number key and
key in the alarm time.
To deactivate or delete an alarm,
scroll to it and press
World
1. In the Clock window, press the
right navigation key twice.
2. Press the left soft key [Options]:
Add city, Set as the current city,
Settings.
3. To delete a city, scroll to it and
press
.
Notes
You can view or write notes.
1. To write a note, press any number
key. The note editor opens
automatically.
Tip
►
To add a space between words,
press .
52
►
To insert special characters, press
.
2. To save your note, press the right
soft key [Done].
.
3. Using the left soft key [Options],
the followings are available: Open,
Send, New note, Delete, Mark/
Unmark, Synchronisation.
Quickoffice
Shows compatible files in the
Documents folder in phone memory
and/or the memory card.
The application tabs determine
which types of documents are
displayed.
►
Quickword: Microsoft Word and
text documents.
►
Quicksheet: Microsoft Excel
spreadsheets.
►
Quickpoint: Microsoft PowerPoint
presentations.
►
Quickmanager: To update and
upgrade your Quickoffice software
and download other userful
applications.
Page 53

Using the left soft key [Options], the
followings are available. New file,
Sort by, Details, Send.
Velocity and Volume from one unit
(for example, gallons) to another
(litres).
Organiser
Calculator
To use the calculator:
1. Key in the first number of the
calculation.
2. To select a function on the right-
hand side of the display, scroll to it
and press the
3. Key in the next number of the
calculation.
4. Select any remaining operations
and key in numbers.
5. To execute the calculation, scroll to
"=" and press
6. The result of the calculation
remains in the editor field and can
be used as the first number of a
new calculation.
.
.
Converter
You can convert Currency, Area,
Energy, Length, Mass, Power,
Pressure, Temperature, Time,
File mgr.
You can browse and manage folders
and files.
1. To view the contents of a folder or
file, scroll to it and press
2. To send a file to compatible
devices, scroll to it and press
3. Using the left soft key [Options],
the followings are available: Move
to folder, Copy to folder, New
folder, Mark/Unmark, Rename,
Find, View details, Memory
details.
Note
►
Default folders such as Sound clips in
My stuff cannot be moved or deleted.
4. To delete a folder or file, scroll to it
and press
Note
►
To browse and manage folders and
files on your memory card, press the
right navigation key.
.
.
.
53
Page 54

Organiser
Memory
Organiser
You can view the status of the
memory card. Using the left soft
key [Options], the followings are
available: Remove memory card,
Back up phone memory, Restore
from card, Format memory card,
Memory card name, Set password,
Memory details.
Note
►
Do not format a memory card that
contains important software or data
as formatting destroys all that is saved
on the card.
Tip
►
You can select Remove password
later. This means the memory card
is unlocked and no password is
requested when it is inserted into
another device. In this case, the data
saved on the card is not protected
against unauthorised use.
54
Page 55

My stuff
You can browse media files in each
folder.
Images
Images contains a folder of default
images and default flash files preloaded onto your phone, images
downloaded by you and images
taken on your phone’s camera.
►
Download: You can download
images from the web.
►
Send: You can send the image via
MMS, Bluetooth or Email.
►
Find: To find a particular image,
key in the first letters of the image
name. You can send an image to
compatible devices by pressing
.
the
►
Sort by: You can arrange your
images according to their date,
title, size, format.
►
Use image
- Set as wallpaper: You can set
the image as the background
image for the display while the
phone is in standby mode.
Add to contact: You can add a
thumbnail image to a contact
card.
►
Delete: Delete a file
►
Organise
- New folder: You can create a
folder to store images.
Move to folder: You can move
-
the image to a different folder.
Copy to memory card/ Copy
-
to phone mem.:
image or folder to your memory
card or phone memory.
Move to memory card/ Move
-
to phone mem.:
the image or folder from one
memory to another.
►
Mark/Unmark: You can select
multiple images for sending or
deleting at the same time, for
example.
►
Rename: Change the file name.
►
View details: You can view
detailed information on the image.
To copy the
To m ove
My stuff
55
Page 56

My stuff
Video clips
My stuff
The Videos folder shows the
list of downloaded videos and
videos you have recorded on
your phone: Download, Send,
Find, Sort by, Delete, Organise,
Mark/Unmark, Rename, View
details.
Tracks
Music albums are automatically
created based on the ID3 tags
attached to the music files.
You can allow or prevent the display
of these albums using Show albums/
Hide albums option: Download,
Send, Find, Sort by, New track list,
Use tone, Edit, Organise, Show
albums/ Hide albums, View details,
Mark/Unmark, Delete.
Note
►
If you delete M3U files by using New
track list option, the contained tracks
are not deleted. If you delete an item
shown using the Show album option,
56
every track the album includes will
be deleted.
Sound clips
The Sounds folder contains
the Default sounds, your voice
recordings and sound files
downloaded by you. From here you
can manage, send or set sounds as
ringtones: Download, Send, Find,
Sort by, Use tone, Organise, View
details, Mark/Unmark.
Streaming links
To use a link to play the media file,
scroll to the link and press
Find, New link, Edit, Organise, Mark/
Unmark
Note
►
Streaming means playing music,
video, or sound clip files directly from
the web, without first downloading it
to your phone.
: Send,
Page 57

Presentations
Presentations may contain SVG -T
and Flash file presentations, which
combine multiple media files,
such as images and sound clips.
Presentations may also be interactive.
To play a presentation scroll to it
and press
volume using
the phone. To delete a presentation,
scroll to it and press
by, Organise, Mark/Unmark.
. You can adjust the
on the left side of
: Find, Sort
All files
You can view or play a media file
or streaming link to a media file by
pressing
Mark/Unmark, Rename.
Note
►
: Find, Sort by, Organise,
Not available for links. You can rename
links using Edit option.
My stuff
57
Page 58

Tools
Installations
Tools
Applications are installed
automatically with your phone start.
Call mailbox
You can use the network service
of voice mail that works as an
answering machine for your phone.
A call mailbox is a network service
that works as an answering machine
where people who are unable to
reach you can leave messages.
Tip
►
With the call diverting network
service, you can direct incoming
calls to your call mailbox. [Menu →
Settings → Phone → Call divert →
Voice calls]
If your phone prompts you for the
call mailbox number that you cannot
recall, press the left soft key [Find] to
search for it in Contacts.
Tip
►
To quickly call your call mailbox in
standby mode, press
58
and .
Using the left soft key [Options], you
can access the followings. Define
number, Call voice mailbox, Change
number.
Speed dial
You can assign speed dialling keys
to
(from
in your contacts directory.
Some number keys may be assigned
as speed dials to special phone
numbers. For example, number
is reserved for your call mailbox.
To assign speed dialling keys:
1. Scroll to an available speed dialling
number and press
2. Select Assign.
3. Select the contact to whom you
want to assign the speed dial.
Select the phone number.
You can call a phone number linked
to a speed dialling key in standby
mode by pressing the speed dial and
then
) to phone numbers
.
.
Page 59

Note
►
To call a number linked to a speed
dialling key just by pressing and
holding the speed dial in standby
mode, open Settings
→
Speed dialing and select On.
To assign a speed dialling key to a
different phone number:
1. Scroll to the speed dialling
number and press the left soft key
[Options].
2. Select Change.
3. Select the new contact and
number.
You can remove a number linked to
a speed dial by pressing the left soft
key [Options] and selecting Remove.
The contact and phone number you
remove will remain in your Contacts.
→
Phone → Call
Some themes may also include
ringtones or message alert tones.
General
You can preview or change the
theme used for all applications that
do not have their own themes or
download more themes to your
phone.
Menu view
You can change the display
appearance of applications in Menu
between Grid and List formation.
Wallpaper
You can change the background
image on the display in standby
mode. To change the background
image on the display in standby
mode, scroll to Image and press
Tools
.
Themes
You can change the look of your
phone's display. In Themes, you can
select different themes, which consist
of various settings that affect the
appearance of your phone's display.
Power saver
You can change the option that
appears as power saver when your
device has been idle and no keys
have been passed for some time:
Date and time, Text or Animation.
59
Page 60

Tools
Tip
Tools
►
You can key in the Power saver timeout after which the power saver
is turned on, in Menu → Settings
→ General → Personalisation →
Display.
Note
►
You can also choose any other power
saver you may have installed on your
phone.
Using the left soft key [Options], you
can access the followings: Preview,
Settings.
Actv. keys
You can view and manage usage
rights for media files in your phone.
Some media files, such as images,
music or video clips are protected by
digital usage rights.
The activation keys for such files
may allow or restrict their usage. For
example, with some activation keys
you may listen to a music track only a
limited number of times. During one
60
playback session you may rewind,
fast-forward or pause the track, but
once your stop it, you have used one
of the instances allowed.
Valid keys
To view detailed info about your
usage rights for a media file, such
as their validity status and whether
you can send the media file to other
devices, scroll to the corresponding
activation key and press
Tip
►
In the activation key details view, you
can see the validity status of the key,
details about your usage rights and
restrictions for the corresponding
media file and where the media file is
currently saved on your device.
Using the left soft key [Options], you
can access the followings. Get new
key, Reload
To delete the activation key for a
media file and the media file itself,
scroll t o the key and press
.
.
Page 61

Invalid keys
To view detailed info about your
expired or missing usage rights for a
media file, scroll to the corresponding
activation key and press
Tip
►
Activation keys expire when you
run out of instances when you are
allowed to use a media file or the time
period for using the file ends.
►
In the activation key details view, you
can see the validity status of the key,
details about your usage rights and
restrictions for the corresponding
media file and where the media file is
saved on your device.
Using the left soft key [Options], you
can access the followings. Get new
key, Reload.
Note
►
You may not be able to buy more
instances or extend the usage period
for all media files.
.
Not in use
Unused activation keys are usually
for media files that have been
deleted from the device or saved on
a removed memory card. To view
detailed info about an activation key
not in use, scroll to it and press
.
Using the left soft key [Options], you
can access the followings.
Reload, Restore activation keys.
App. mgr.
You can install and update Java and
other applications or components
compatible with the Symbian
operating system.
You can receive software installation
packages via e-mail or multimedia
messaging, transfer them from a
computer or download them from
the Web.
To download and install software
from the Web, select Download
apps.
Tools
61
Page 62

Tools
Scroll to an application and press
Tools
the left soft key [Options] to access
the followings: Install, Open, View
details, Send, Remove, View log,
Settings
GPS data
Note
►
For the GPS data application to
function correctly, a satellite-based
positioning method must be in use.
To select the positioning method used
to detect the location of your device,
press Option → Positioning settings.
Navigation
You can view navigating info to
your trip destination. Duration
provides you with an estimate of the
remaining time before you reach
your destination at your current
travelling speed.
Tip
►
The top of the display must point in
the direction you are moving for the
direction to your destination to remain
valid.
62
Using the left soft key [Options],
you can access the followings: Set
destination, Stop navigation, Save
position, Satellite status.
Position
You can view positioning info,
such as the latitude and longitude
coordinates and the altitude of your
current location. You can also see the
accuracy of this info.
Using the left soft key [Options],
you can access the followings: Save
position, Satellite status.
Trip distance
You can view your travelling info,
such as the distance, duration you
have travelled, your average speed
and maximum speed.
Using the left soft key [Options],
you can access the followings: Start,
Stop, Resume, Reset, Restart, Clear,
Satellite status.
Page 63

Note
►
The GPS data application must
receive positioning info from at least 3
satellites to function as a travelling aid.
If the satellite signal is lost during the
tip, the trip distance values you can see
are not current, but based on the latest
positioning info available.
Landmarks
You can map particular locations
in your device and make it easy to
find them.
Using the left soft key [Options], you
can access the followings: Edit, New
land mark, Delete, Add to category,
Send, Call, Go to web address,
Mark/Unmark, Edit categories,
Landmark icon.
Device mgr.
To view or update the current
software version of your device.
Using the left soft key [Options],
you can access the followings:
Install update, Check for updates,
Settings.
Note
►
Before the installation, make a backup
of the data in your device, and check
that the device battery has enough
power or connect the charger.
Help
You can read instructions about
using the applications and functions
of your phone.
About
You can see the copyright
information of this product.
Tools
63
Page 64

Settings
General
Settings
You can edit the general settings of
your device or restore the original
default device settings.
Personalisation
To edit settings related to the
display, standby mode and general
functionality of your device.
►
Display: You can edit brightness,
list font size and other display
settings. After setting each value,
press the right soft key [Back]:
Brightness, List font size, Power
saver time-out, Welcome note /
logo or Light time-out.
►
Standby mode: To select the
general theme for your device, edit
the theme settings and display or
hide the operator logo.
standby, Shortcuts or Active
standby apps.
►
Tones: To edit settings for the
various sounds produced by your
phone.
Active
►
Themes: To change the look of
your device's display.
Note
►
Language: To select the languages
for the phone texts and for you to
write messages, notes and other
texts.
Date and time
To edit time and date settings.
Enhancement
You can edit settings related to
the various enhancements such as
Headset and Wireless car kit you can
use with your device.
►
Headset:
Default profile,
Automatic answer.
►
Wireless car kit:
Automatic answer.
Default profile,
Security
You can edit settings related to the
security of your personal information
on your phone or SIM card and data
64
Page 65

connections between your device
and the network.
►
Phone and SIM card: To change
the PIN and other security codes
and edit other security settings
for your phone and SIM card:
code request, PIN code, PIN2
code, Keypad autolock period,
Phone autolock period, Lock
code, Lock if SIM card changed
Confirm SIM services.
►
Certificate management
To view and manage the digital
certificates in your phone.
►
Security module
To view or edit security modules.
PIN
Factory settings
To restore the default settings of
your device or remove any operator
settings, press the left soft key [Yes]
and key in the lock code.
Note
►
Default lock code is 12345.
Positioning
The location of your device can be
detected and the info can be used by
other applications in your device.
Phone
You can edit the general settings
related to making and receiving calls.
,
Call settings
►
Send my caller ID: Scroll to Ye s to
display your caller identity to the
people you call, No to hide it or Set
by network to follow the default
setting of your home network.
►
Call waiting: To be notified of
incoming calls while you have a call
in progress, select Activate.
►
Reject call with SMS: To send
an explanatory text message to
callers when you reject their call,
select Ye s .
►
Message text: Key in the text for
the message to send to rejected
callers.
Settings
65
Page 66

Settings
Settings
66
►
Image in video call: To send a
still image to video callers if you
disable sending your video during
the calls.
►
Automatic redial: To have your
phone redial when numbers are
busy or calls are not answered,
select On.
►
Show call duration: To have the
length of a call displayed during
the call, select Ye s.
►
Summary after call: To have the
duration of a call briefly displayed
after the call, select On.
►
Speed dialling: To call the phone
numbers to which you have
assigned speed dialling keys by
pressing and holding the speed
dial key, select On.
►
Anykey answer: To answer
incoming calls by pressing any key
except the End and Power keys,
select On.
►
Line in use (shown if ALS is
supported by SIM): Select either
of your phone lines as the primary
line for making calls and sending
messages.
►
Line change (shown if ALS is
supported by SIM): To prevent the
primary line from being changed,
select Disable. You need your PIN2
code to change this setting.
Note
►
The accessibility of some Call settings
depends on the availability and your
subscription to the network services.
Contact your service provider for more
information.
Call divert
You can divert incoming calls to your
voice mailbox or to another phone
number.
►
Voice calls: You can divert
incoming voice calls to your
voice mailbox or to another
phone number. Select Activate
→ To voice mailbox or To other
number.
To cancel the diverting of calls, scroll
to the active divert options, press
the left soft key [Options] and select
Cancel.
Page 67

To check your current diverts, scroll
to the call divert options, press the
left soft key [Options] and select
Check status.
►
Data and video calls: You can
divert incoming data and video
calls to another phone number.
Call barring
You can restrict the receiving of calls:
Outgoing calls/ International calls/
International calls except to home
country/ Incoming calls/ Incoming
calls when abroad.
To edit mobile call barring settings,
you need a password. You obtain
the barring password from your
service provider upon subscription
to this network service. Call barring
affects all voice and data calls, except
emergency calls. Scroll to barring
options, press
►
Activate to restrict calls.
►
Cancel to undo call restriction.
►
Check status to see if calls are
restricted or not.
and select:
Network
You can select the network type, the
manner of selecting networks and
indicate when your phone is used in
a Micro Cellular Network: Network
mode, Operator selection, Cell info
display
Connection
You can edit access point and other
connection settings.
Bluetooth
You can edit settings for Bluetooth
connectivity. For further information.
Bluetooth provides you with wireless
connections to other Bluetooth
devices such as computers or other
phones: Bluetooth, My phone's
visibility, My phone's name.
Tip
►
Give a unique name to your phone
to make sure it is easy to recognise
when there are several Bluetooth
devices in the vicinity.
Settings
67
Page 68

Settings
USB
Settings
You can change the device type to
which you normally connect your
phone with the USB cable. USB
, Ask on connection.
mode
Access points
You can view, create, and manage
access points. An access point is
where your phone connects to
the network by way of a data call
or packet data. To use e-mail and
multimedia services or to browse
web pages, you must first define
internet access points for these
services.
1. To create a new access point, press
the left soft key [Options] and
select New access point.
2. Scroll to the following
settings and press
Connection name, Data bearer,
Dial-up number, User name,
Prompt password, Password,
Authentication, Homepage, Data
call type, Maximum data speed.
68
to edit:
3. To save your settings, press the
right soft key [Back].
The icons on the left-hand side of
the access points indicate their data
bearers.
To edit an access point, scroll to it
and press
To delete an access point, scroll to it
and press
Note
►
For further information, please refer to
the Help option on the handset.
.
.
Packet data
You can set when to use packet data
connections and key in the access
point to be used if you use your
phone as a modem for a computer.
►
Packet data connection:
Define when to use packet data
connections.
►
Access point: If you use the phone
as a modem to enable packet data
connectivity from a computer,
scroll to this and press
the access point name and press
. Key in
Page 69

OK. Contact your service provider
for the access point name for
modem connections.
To save your settings, press the right
soft key [Back].
SIP settings
You can create or edit session
initiation protocol (SIP) profiles,
which are necessary for making
Internet calls.
To create a SIP profile, press the left
soft key [Options] and select New
SIP profile → Default profile or Use
default profile to select a profile as
the basis for the new profile.
To edit a SIP profile, scroll to it and
.
press
To select the SIP profile you want to
use by default for communications
sessions, scroll to the profile, press
the left soft key [Options] and select
Default profile.
To delete a SIP profile, scroll to it and
.
press
Note
►
SIP profiles may be preset in your
device or you may receive them from
your service provider. You may not be
able to edit or manage SIP profiles.
Configurations
You can view or delete trusted
servers from which your phone may
receive configuration settings. You
can receive messages from your
network operator, service provider, or
company information management
department. These messages
contain configuration settings for
trusted servers and are automatically
saved in Configurations. From
trusted servers you may receive
configuration settings for access
points, multimedia or e-mail services,
and synchronisation settings.
To delete configurations for a trusted
server, scroll to the server and press
. The configuration settings for
other applications provided by this
server are also deleted.
Settings
69
Page 70

Settings
Note
Settings
►
For example, you may need to delete
trusted server configurations and
the configuration settings provided
by it when you change your service
provider.
Applications
You can edit the settings of different
applications.
RealPlayer
You can change RealPlayer
video or connection settings:
Video, Streaming.
Camera
You can edit image or video settings.
For further information, please refer
to p.35-37.
Voice recorder
You can select the recording quality
and default memory for your sound
clips: Recording quality, Memory
in use.
70
App. manager
You can edit the Application
manager settings.
Some software packages that you
install in your device may contain
certificates for additional security:
Software installation, Online
certificate check, Default web
address.
Log
You can set the time period to
keep log events and to display call
duration during calls.
Note
►
If you select No log, all log contents
are permanently deleted.
Tip
►
You may also edit the settings of
other applications installed in your
device by your service provider that
appear on the list.
Page 71

Accessories
There are various accessories for your mobile phone. You can select these
options according to your personal communication requirements.
Charger
Hands free ear-microphone
and controller combo
Standard Battery
Data cable/CD
You can connect your phone to
PC to exchange the data between
them.
Note
►
Always use genuine LG accessories.
►
Failure to do so may invalidate your
warranty.
►
Accessories may vary in different
regions: please check with our regional
service company or agent for further
information.
Accessories
71
Page 72

Technical data
General
Technical data
Product name : KT610
System : GSM 900 / DCS 1800 / PCS 1900 / W-CDMA
Ambient temperatures
Max : +55°C (discharging), +45°C (charging)
Min : -10°C
72
Page 73

Page 74

Page 75

Page 76

Page 77

SERVICE CENTER LIST
State City ASC Name ASC Address Phone No.
Andhra Pradesh Adhoni RS CDMA 21/490,Arts & Science College Road, Near Devi Nursing home, Adhoni 9346490905 Mr.Mohan
Andhra Pradesh Adilabad KIRAN MOBILE WORLD 7-14-78/A, Near Nethaji Chouk, Cinema Road, Adilabad 9346358181 kiran kumar
Andhra Pradesh Amalapuram SANDESH CELLULAR Shop no 5 R.K. TOWERS COLLEGE ROAD AMALAPURAM 9346398838 Mr.RAVI KUMAR
Andhra Pradesh Anantpur RK LG CDMA Shop No 3, Cellular,Pallavi Towers, Opp to Canara Bank,Subash
Andhra Pradesh Armoor SAI SRI Electronics Shop.no:2, mahalakshmi road, Armoor 9392622038 Mr.srinivas
Andhra Pradesh Bapatla Vijaya Communications G.B.C.Road, Bapatla 9346206305 Mr.B.Siva
Andhra Pradesh Bhimavaram Gopi Krishna
Andhra Pradesh Chirala Lakshmi Infocomm Munthavari street, sangam thestre Road, Chirala 9347052181 Ms.Shakeena
Andhra Pradesh Chittor CMT Computer Services
Andhra Pradesh Cuddapah Srinivasa Communication Shop No.4, Siddapriya Complex, Opp. HP Petrol Pumping Point,
Andhra Pradesh Dharmavaram Siddharta Communications Opp to Sathya Lodge, PRC Circle, Dharmavaram 9347064101 Mr.Naresh
Andhra Pradesh Eluru S.S.COMPUTERS Door.No:23B-4-8/3, Ayyapa Complex, Beside Kanuri Madhavi Hospital,
Andhra Pradesh
Andhra Pradesh Gudur Srinivasa Electronics Ist floor, Airtel Building, Kummari Veedhi,Gudur 9390829440 S. Naga Suman
Andhra Pradesh
Andhra Pradesh
Andhra Pradesh Hindupuram S.V.A Cellular Shop.no:3,Vinayaka Lodge, Railway Road, Hindupur 9390000135 Mr. D.B.Ravindra
Andhra Pradesh Huzurabad BHARGAVI
Andhra Pradesh Hyderabad SUNBEAM TECHNOLOGIES 120,Chenoy Trade Centre, Parklane, Near Paradise,Secunderabad 40200193 /
Andhra Pradesh Hyderabad Bhagya Communications
Communications
Gudivada
KANAKADURGACOMMUNACTIONS
Guntur
Vasavi Associates
Hazurnagar/Kodad
Sri Pavan Electronics Mallika Towers, Besides Reliance Web World, Kodad 9346901519
COMMUNICATIONS
Road, Ananthpur
JP Road Near Mohan Service Center Bhimavaram 9346700202 Mr.Siva
20-439, A.S.M.STREET, MITTOOR, CHITTOOR
Cuddapah
Subbama Devi School Road, R.R.Pet, Eluru
SHOP NO:4,C/O SURYA RESDENCY, OPP:VIJAYA GAS COMPANY,ELURU
ROAD,GUDIVADA
Shop No:21,Central Plaza,Naaz Center,Guntur
DCMS Complex, Near bus Stand, main road, Huzurabad 9391755619
Shop no:109, Upper Ground Floor,#12-2-825, S.G.M. Mall, Mehdipatnam,
Hyderabad
Contact Person
9393722777 Sridhar
9347361979 Mr.Gopi
9346350224 Mr.Sahadeva
Reddy
329294 Mr.DIWAKER
9394220688
Mr.KUMAR
3257789
MR.Satyam
Mr Narasimha Rao
Nath
T.VISHNU
VARDHAN
Mr.Suresh
66383193
32972308,
Mr.Bipin
32001406
Page 78

State City ASC Name ASC Address Phone No.
a
P
P
P
P
P
P
P
P
P
P
P
P
P
P
P
P
P
P
P
P
P
P
P
P
P
Andhra Pradesh Hyderabad JVR Infotech Pvt Ltd Shop No 8 ,Vanijya Vihar, Nalanda Building, Dilsukh Nagar Main
Andhra Pradesh Hyderabad PRIMUS INFOMATIC &
Andhra Pradesh Hyderabad Reliable Communication
Andhra Pradesh Hyderabad S V Electronics Shop No. 41, Nilagiri Block, Aditya Enclave, Ameerpet Main Road,
Andhra Pradesh Hyderabad Shweta Communications
Andhra Pradesh Hyderabad Shweta Computers # 1-7-69/1 & 2, OPP Aditya Delux Hotel, Near Paradaise circel, Sarojini
Andhra Pradesh Hyderabad Sreenivasa Technologies SAI VIKRAM TOWERS, SHOP NO :4,RELIANCE WEB WORLD BUILDING,
Andhra Pradesh Hyderabad Sri Surya Communications #Madhu Enclave,Street no 06,Shyamlal Buildings, Begumpet ,
Andhra Pradesh Hyderabad Sri Varun Electronics D.No 5-8-344/1, “ DHAN BHAGYA ESTATE “, Chirag Ali Lane, Abids,
Andhra Pradesh Hyderabad VICTORY ELECTRONICS Shop No. B-1, Quli Qutub Shah Stadium, Opp. City College, Hyderabad 32408999,
Andhra Pradesh Jagityal SS Communications
Andhra Pradesh Jangaon
Andhra Pradesh Jangareddygudem SRI DEVI COMMUNICATION
Andhra Pradesh Kakinada Delta Infotech
Andhra Pradesh Kamareddy Pager King Communication Sircilla Road, Kamareddy, Dist. Nizamabad 9397366633 Mr. Moizuddin
Andhra Pradesh Karimnagar SS Marketers 2-8-40, Mukarampura, Near Circus Grounds, Karimnagar 9391552223 Sujan
Andhra Pradesh Kavali Sree Balaji Infotech Trunk Road,Near Ongole Bus stand, Kavali, Nellore District, Andhra
Andhra Pradesh Khammam Sriven Technologies D.No:11-2-37,Shop No.3, D.V.Krishna Complex, Beside Baburao Petrol
Andhra Pradesh Kothagudam S.Swathi CDMA Service
Andhra Pradesh Kuppam SAGAR COMPUTER
Andhra Pradesh Kurnool R K LG CDMA Shop no:13, First floor, UCON Plaza, Kurnool 220201
Andhra Pradesh Machillipatnam
Andhra Pradesh Madanapalle Sri Balaji Computers
SOFTWARE PVT LTD
SKY WIN COMMUNICATIONS
Center
SERVICES
Om Sree Sai Communications
Road, Hydrabad
#18/A,Methodist Complex, 5-9-190, Lane Opp to Chermas,
Abids, Hyderabad
G-8, 3-6-561, AALTO’S A & M Trade Centre, HIMAYATNAGAR, HYDERABAD
Hydrabad
Shop No.9, Ground Floor, Pavani Ansuya Complex, Opp. Huda Complex,
Tarnaka, Hyderabad
Devi Road, Secunderabad
Balagi Nagar Kukatpally
Hyderabad
Next to Raghava Ratna Towers, Hyderabad
Opp to L.G.RAM. Lodge Street, Park Line, Jagityal 9391533535
#2-7-134, Beside Bharat Gas, Bus stand Road,Jangoan. 9390102839 VARUN
Near Mavullama Temple, Opp.Andhra Bank,Jangareddygudem
Door No. 6-1-29, Opp. Swami Vivekananda Park, Jawahar Street, Surya Rao
Pet, Kakinada
Pradesh
Bunk, Balaji Nagar, Wyra Road, Khammam
9-3-3,Above Sindhura Electronics, Near RTC BUS Stand,Kothagudem 9391552228 Mr.niaz Ahmed
14-124, PALACE ROAD, KUPPAM 9391862436
25/276, Kota Vari Tulla Center, Jaganadhapuram, Machillipatnam
Shop No:2, 1st floor, Sri sai Complex, CTM Road, Madanapally
Contact Person
24161848,
EV Ramakanth
55109604
66755111 Mr.Govind Kabra
32913251
Mr.Sandeep.soni
55754477
Mr.Pradeep
32977389
32968162 Mr. Sandeep
Heda
27721076,
Mr.Jagdish
-32977548
32961479 Mr.Praveen
32961127 Mr.Nageswara
Rao
32900909
Mr.Alokh Mohan
55781999
MR. B.L.VARMA
24502339
Mr.Hari
227297 Prasanna Lakshmi
5593533 Mr. Shivanand
6329567 Mr. G. Sri Sai
Charan
325567 Mr.Bhaskar Reddy
Mr.Sagar
Mr.G Rama
Krishna
9347741777 Mr.Rafee
9390025204 Ravi Kumar
Andhra
Andhra
Medak
Andhra
Andhra
Andhra
Andhra
Andhra
Andhra
Andhra
Andhra
Andhra
Andhra
Andhra
Andhra
Andhra
Andhra
Andhra
Andhra
Andhra
Andhra
Andhra
Andhra
Andhra
Andhra
Andhra
St
Page 79

Person
anth
d Kabra
.soni
ep
eep
h
n
wara
Mohan
RMA
Lakshmi
nand
ddin
i Sai
ar Reddy
hmed
a
ar
State City ASC Name ASC Address Phone No.
Andhra Pradesh Mahabubnagar SRI Chakra mobile
Andhra Pradesh Manchiryal SS CDMA Service Centre Shop no.7,Mounika Complex,BPL Chourasta,Manchiryal 9394552223 Mr.T. Nagaraju
Medak Kavali Balaji Communications Door.no:1-3-77/j, Opp to State bank of Hyderabad, Main Branch,
Andhra Pradesh Medchal Khan Electronics Sanjeeva Reddy Complex, Besides RTC Bus Depot, Medchal 9347222088 Mr. Jaleel Khan
Andhra Pradesh Miryalguda Needs Electronics Jagannath Complex, Opp Bus Stand, Miryalguda 9394645696
Andhra Pradesh Nalgonda Quintessence Electronics
Andhra Pradesh Nandyal Dhanush Systems, Dno:25/165 B,Sanjeev Nagar, Near Ramalayam, Nandyal 9392236699
Andhra Pradesh Narasaraopet Rajendra Infotech
Andhra Pradesh Nellore Siri Enterprises Co-Operative Bank Complex, 1st Floor, Shop No: 26,Near Gandhi
Andhra Pradesh
Andhra Pradesh Nirmal OM SAI Electronics Shop.no:1, Kala Nagar road, Beside 2 town Police station, Nirmal 9390000024 Mr. Mahendar
Andhra Pradesh Nizamabad Satya Electronics # 7-10-65,Shop no 1 ,1 st Floor,H.M.H.V Complex,Beside Bus
Andhra Pradesh Ongole TejaSri Communications 37-1-107,Near Mastan Darga Center,Trunk Road,Ongole 9393026115 Mr.SASI
Andhra Pradesh Peddapalli
Andhra Pradesh Peddapuram Devi Infotech Opp.Veternary Hospital, Shop No-1, Santa Market Road,Peddapuram 9394864400 Mr.Siva Kumar
Andhra Pradesh
Andhra Pradesh Putturu Siva Sai Computer World 8-104/C, VIJAYA LAKSHMI COMPLEX TIRUPATI-CHENNAI
Andhra Pradesh Rajamundhary Siri Infotech Police Welfare Complex, City Hospitals Junction, Danvai Pet Main
Andhra Pradesh Raychoti Raju Computer World Room No 3 Up Stairs Syeedia complex, bustand road, Rayachoty 9346209881 Mr.Raju
Andhra Pradesh Repalle Sri Satya Solutions
Andhra Pradesh Sangareddy Sri Technologies Srimaan Complex, Beside Inspection Bunglow, Main Road, Sangareddy 9391216573 Mr.AJAZ AHMED
Andhra Pradesh Sattenapalli S.S. Communications Opp.Telephone Exchange, Sattenapalli 9397610550 Mr.Sai
Andhra Pradesh Shad Nagar Sri Gana Electronics, Shop No : 2, Khajja Veeresam Complex, College Road, Shadnagar 9392633111 Mr. Vigneswar
Andhra Pradesh Siddipet Gopala Krishana
Andhra Pradesh Srikakulam SRI SAI COMPUTER
Andhra Pradesh Srikalahasti KSV Computer Services NNR Buildings, d.no: 16-582, Panagal road, Srikalahasti 9390044399
care centre
NELLORE
Balaji Watch & Electronics
Abhi Marketers Shop No:19/8/291, MRK Plaza, Lakshmi Nagar, Godhavari Khani 9347077009 Srinivas
(Ramagundam)
Prodattur
SV Techonoligies 4-625-3,Gandhi Road, Opp Karur Vysya Bank, Produttur 9347251806
Communications
SHOPPE
Shop.no:15,Shareef Complex, Near Bus stand, Mahbubnagar 9396348999 Mr.Anil
Main road, Medak
Shop No :5,Srinivasa complex, Opp to market office,HYD road, Nalgonda
C/o Hari priya Electronics, Arundelpet, Narsaraopet 224136
Statue, G.N.T.Road, NELLORE. Andhra Pradesh.
16/249,Trunk Road,Nellore
Stand,Nizamabad
ROAD, PUTTUR
Road, Rajhamundry
10/14-126,Municipal Office Road,Railpet,Repalle
SHOP NO:13, FIRST FLOOR, MACCA COMPLEX, OPP:CITIZEN’S CLUB,
M.G ROAD, SIDDIPET
OPP TEJA TIFFIN CORNER,G. T. ROAD, SRIKAKULAM 9390611779
Contact Person
9346439961 Mr. Rajkumar
Mr Ravi Kumar
9396610220
Mr Venkateshwar Rao
Mr.Ramesh
Mr.Sasi Bhushan
3290339,
Mr.Pratap
9398309571
2339999 Mr.Rajesh
326000 Mr.Satyam
BHUSAN
Mr.Ravi Kumar
9393028024
C.Janardhna Reddy
2421567
Mr Raghvendra
9396222993 Mr.Sridhar
9392511064 Mr. Kura Giridhar
MR SESHAGIRI
SAHADEVA REDDY
Page 80

State City ASC Name ASC Address Phone No.
a
g
g
g
g
g
g
g
g
Andhra Pradesh Sullurpet Sai Baba Electronics, D.No. 10/47, Bapuji Steet, Sullurupet 9346920527
Andhra Pradesh Tadepalligudem SRI HARIPRIYA INFOTECH
Andhra Pradesh Tanuku SHIVANAND ENTERPRISES D/NO-34-3-3, MAIN ROAD GAMINI COMPUND TANUKU. 220489 Mr. SRINIVAS
Andhra Pradesh Tenali Vaishnavi Infotech
Andhra Pradesh Tirupathi CMT Computer Services 18-1-624 VV Mahal Road,OPP HDFC BANK, Tirupathi 3296979 Mr.K Vasu Naidu
Andhra Pradesh Vijayawada K L Computer House 39-9-46 SVS Temple Street,Labbipet,Vijaywada 5520461,
Andhra Pradesh Vijayawada V V Communications 28-23-31/32,OPP.SWARUGHA FOODS,VIJAY TALKIES
Andhra Pradesh VIJAYAWADA Balaji Watch & Mobiles
Andhra Pradesh Vishakapatnam Sri Sai Ganesh Infotech G5,Ground Floor, Backside of Sangam-Sarat Theatre,1st Lane,Dwarka
Andhra Pradesh Vishakapatnam Jai Bharani Communications Door No:52-11-7/7, Sapthagiri Plaza, Old Resuvanipallem,
Andhra Pradesh Vizayanagaram S R TECHNOLOGIES DRNO 17-2-29, RAJABAZAR, VIZAINAGARAM 9346418791 Mr.Balakrishna
Andhra Pradesh Vuyyuru Sugreeva Communications Behind Datta Automobiles, Katturu Road, Vuyyuru
Andhra Pradesh Wanaparthy Sri Ganesh Electronics Shop No : 16-63, Opp R R Compex, Wanaparthy 9396800275 Mr Deva Raj
Andhra Pradesh Warrangal S S Marketers 6-1-73/1, Sai Bhavan, Sridevi Theatre Road, Hanamkonda, Warrangal 2552223 Mr. L.Srinivas Rao
Assam Guwhati A B PERIPHERALS &
Bihar Arrah Surya Services Sushila Bhawan, Suryapuri colony, By pass road, Arrah 9334538845 Sanjay Kumar
Bihar Aurangabad Computer Sansar L.P.Complex,old G.T.Road, Aurangabad, Bihar, PIN:824101 9334926768 Shreeniwas
Bihar Begusarai Krishna Communication Eashwari Complex,Dak Bangla Chowk, Bishnupur, Begusarai,
Bihar Bhagalpur
Bihar Bhagalpur Printronix Infosolutions Ganpati Complex,1st floor, Patel babu road 9934629247 Himansu Shekhar
Bihar Biharsharif Shanya Infotech Magdha Commecrcial Complex, 1st.Floor, Shop.No.5, MG Road,
Bihar Chapra Ambey Associates
Bihar Darbanga Prime Computer Hanuman Nagar, Doner Road, Darbanga. 2220560 Abhinav Kumar
Bihar Gaya Agrawal Distributors
Bihar Muzafarpur Krish Enterprises Nr.Kanhoulinaka.no.2, Kachisarai Road, Muzafarpur. 9304410745 Sanjeev Kumar
Pvt.Ltd
SERVICES
S.K. Communication
THOTA GOPI COMPLEX PLOICE QUARTERS LANE, BESIDES ZP HIGH
SCHOOL, TADEPALLIGUDAM.
D.No:22/11/114, Opp.Kanikacharla Kalyanamandapam, Bose Road, Tenali.
CENTER,VIJAYAWADA
29-37-79, Eluru Road, Opp. Vijaya Talkies, Vijayawada 6648888 Mr.Prasad
Nagar, Visakhapatnam
Vishakapatnam-13
Wahed house, 2nd Floor,Opp ASTC Volvo point, Ulubari, Kamrup,
Guwahati
Bihar-851101.
NEAR RAILWAY STATION,Super market complex, Patel Babu road,
BHAGALPUR -812001
Bharaopar,Bihar Sharif, Nalanda Dist. Bihar,Pin:803101
D-23, Hathwa Market, Chapra,Dist: Saran, Bihar, Pin:841301 9334295605
Swarajpuri Road (Opp. Nagbatia Road), Waves Building,Gaya, Pin:
Contact Person
S. Venkata Krishna
9346408640
Mr.Suresh
9347651330 Mr.Murali
Mr.Kartik
5671461
9396467789 Mr.Rahul
Mr.Chandra Shekar
3258777
3242111
Mr. P.Venkatapathi
Raju
9393033355
Mr.Phani
2732417 Wassi Ahmed
9334341700 Dinkar Kumar
9334255275 Kundan Kumar
9334048037 Amit Kanchan
Jayant Kumar
Verma
9334218122 Lalit Agrawal
Bihar
Bihar
Bihar
Bihar
Bihar
Bihar
Chhattis
Chhattis
Chhattis
Chhattis
Chhattis
Chhattis
Chhattis
Chhattis
Delhi
Delhi
Delhi
Delhi
Delhi
Delhi
Delhi
Delhi
St
Page 81

Person
Krishna
h
IVAS
i
u Naidu
a Shekar
katapathi
ishna
Raj
ivas Rao
med
mar
as
mar
umar
Shekhar
chan
mar
umar
wal
umar
State City ASC Name ASC Address Phone No.
Bihar Patna INFOTEK TRADING
Bihar Patna Synerzy Trading Company G-01,Chanakya Plaza Complex,Main Road, Kankarabagh, Patna.8000020 2356900 Vikas Chandra
Bihar Patna COMPETENT MOBILE
Bihar Patna Micro Zone-Patna 17/C,S.K Puri, Near Basawan Park 3294696
Bihar Purnea Micro Zone-Purnea Narottam Hata,NH-31, Purnea 9304166633 Amit Kumar
Bihar Sasaram Nandika Enterprises Hari Complex, Panjab National Bank, Sasaram, Rohtas (Bihar) 4222008 Abhinav Gupta
Chhattisgarh AMBIKAPUR NEHA COMMUNICATION
Chhattisgarh Bhilai A B Automation Shop No 117 , Ground Floor , Chouhan Estate, Supela Bhilai
Chhattisgarh Bhilai Sai Ram Electronics
Chhattisgarh Bilaspur Mahamaya Infotech Shop No 203, Jain Plaza, Ground floor, Link Road, Bilaspur 2413865 Mr. Pawan Kumar
Chhattisgarh KORBA STAR MOBILE SERVICES SS Plaza FD-13 PH Road Korba Chhattisgarh 9300401485 Mr. Anish Menon
Chhattisgarh Raigarh BLUE CHIP COMPUTER Purana Sadar Bazaar, Raigarh, Chhatisgarh. 329888 Mr. Ashok
Chhattisgarh Raipur Cybernet Systems B-2,1st Floor, Garchaz Complex, Jail Road, Raipur - 492001 077-14069971 Mr Anand Singh
Chhattisgarh Rajnandgaon BHAVYE SERVICES SHOP NO 5 , BELOW SBI , KAMPTEE LINE , RAJNANDGAON 395200 MANISH
Delhi Delhi Aegiss Infotech UG-25 , Ansal Chamber -2, 6, Bhikaji Cama Place, New Delhi-110066 65477740 ,
Delhi Delhi Arham Infotech Services 1/1, Regal Building, Near Malik Sweets, Connaught Place New Delhi
Delhi Delhi Comhard Systems
Delhi Delhi Comhard Systems B-120, Hardev Puri, 100 Feet Main Road, Near MTNL Office, Nathu
Delhi Delhi Connexions and
Delhi Delhi Cube Engineers and
Delhi Delhi Innovative Telecom 304 , GDITL Northex Towers, A-09 ,3rd Floor , Northex Tower, Netaji
Delhi Delhi Nice Telecom 15/19 & 15/21, DDA Complex, Nangal raya, Near D Block, Janakpuri,
COMPANY
SERVICE
Communications
Consultants Pvt Ltd
1st floor, City Palace, New Dak Bunglow Road, Patna-800001 2227166 Sanjay Choubey
Shop 1, Hotel Lalitha Complex, East Bowring Canal Road, Patna 9334027706 Mohit Ahluwalia
Ramanuj Ganj road, Opp. Kosa Form , Ambikapur , Sarguja, Pin-497001 440414
SHOP-NO-52/90, HIMALAY COMPLEX, AKASH GANGA, SUPELA, BHILAI
- 110 001.
D-30,31, First floor, Near Hotel Shipra, Main Vikas Marg, Lakshmi Nagar 011-32955887,
Colony Chowk, Shahdra, New Delhi - 110 093.
183, Avtar Enclave, Opposite Nirula’s , Pashchim vihar ,New Delhi-110063
A-65, Naraina Industrial Area, Phase-1, New Delhi
Subhash Place, Pitampura, New Delhi-110 088.
Delhi - 110046
Contact Person
Mithlesh Kumar
Mr.Rishi Dubey
09329750711/
Mr. Satish Singh
0788-2295989
4038917 Mr. Balan
Agrawal
GOLCHA
Mr. Atul Gupta
9312294105,
9313796774
011-41501124,
Mr. Anil Surana
011-32584421
Mr Ravi Kant
9818867678,
Gupta
011-32979819
011-32575507 ,
Mr. Ravi Kant
011-32572427
Gupta
011-32451431,
Mr. Bhupinder
011-65237374
Agrawal
09312224103,
Mr. Arvinder
011-65450272,
41411623
011-32925753,
Mr Manoj Garg
011-65154343,
9811682453
011-32607072,
Ripul Garg
0-9213264403
Page 82

State City ASC Name ASC Address Phone No.
a
Delhi Delhi R K Communications 2516 Hudson Lines, Kingsway Camp-Nr. Kamla Nagar, New Delhi
Delhi Delhi Sagar Technologies J-39,Central Mkt, Lajpat Nagar-II, New Delhi-110024
Delhi Delhi Sukriti Communication 101 Patparganj- Mayur Vihar phase -1 - New Delhi -110091
Delhi Delhi Touch Tone Telecom B-52, First Floor, Kalkaji, New Delhi
Delhi Delhi Ucom Technologies Pvt Ltd. 45, 1st Flr, Corner Mrkt, Malviya Nagar, New Delhi - 110017
Delhi Delhi Telecom systems 67/4, harshvihar chowk, pitampura, new delhi 9910089333 mr. Satbir
Delhi Delhi Shine telecom N-18, SOUTH EX-1, NEW DELHI 9811143204
Delhi Delhi Elcom Trading Company
Delhi Delhi Teletalk C-21,First Floor, Near Bus Stand, Bhajan pura, Delhi-11053
Goa Panjim Mandovi Mobiles Mohidin Towers Do. No. AS3 Opp to Hotel Manashanti Dadavaidya
Gujarat Ahmedabad Vision Communication 33, 1st Floor, Sukh Sagar Complex, Opp. Dinesh Chamber, Bapunagar,
Gujarat Ahmedabad M Age Cellnet A-176, Popular Plaza, Near Someshwar Part -1, 132 Ft. Ring Road,
Gujarat Ahmedabad A Com Technologies Shop No-37, 1st Floor, Shubh Complex, Near Rajasthan Hospital, Camp
Gujarat Ahmedabad Mishree Communication
Gujarat Ahmedabad Silicon Valley 9, Gokul Palace, Maninagar Cross Road, Maninagar Ahmedabad 30225430 Mr. Rajesh Patel
Gujarat Ahmedabad Shiv Sai Communications 21,Muncipal Market, C.G.Road, Ahmedabad
Gujarat Amreli Precision Telecom 32,33 Opera House, Station Road, Amreli. 230940 Mr. Kamlesh Tank
Gujarat Anand Desktop Infosystems B/10, Vaibhav Tower, V V Nagar Road, Anand 246885
Gujarat Ankaleshwar Akshar Telecom C 1 Keval Shopping Center,old National Highway No.8,GIDC
Gujarat Bharuch Akshar Telecom Pramukh Swami Complex, Panch Batti, Bharuch
Gujarat
Gujarat Bhuj Infotech Computer 2nd Floor, NarNarayan Chambers, Opp Indian Airlines Office,
Gujarat Gandhidham Vansh Electronics Shop No. 35, Swami Vivekanand Complex, Near Oslo Circle, Gandhidham
Gujarat Gandhinagar Creative Communications
Pvt. Ltd.
Bhavnagar
Shivshruti Services 98/B, Makvana Building, Down Chowk, Bhavnagar
G-1, Goverdhan Building, 53-54. Nehru Place, New Delhi -110019.
rd Panjim-403001
Ahmedabad
Satellite, Ahmedabad
Road, Shahibaug, Ahmedabad
FF-17, RUDRA SQUARE, OPP. JUDGES BUNGALOW, POLICE STATION,
BODAKDEV, AHMEDABAD
,Ankaleshwar
Station Road,Bhuj
Shop No 102,Suman City,Sector 11,Gandhinagar 23226241
Contact Person
011-32508861,
Mr. Pradeep
9312606463
Aggarwal
011- 65425644,
Mr.Manoj Kumar
9350224692
011-32498011,
Mr.Dipendra kumar
011-65238011
chaturvedi
011 32939031,
Ashish Dey
011-65672800
011-41745469,
Mr. Neeraj
09212131300
Mr. Naveen Goyal
9310577009,
Mr. Somesh
011-64582709
Narang
9818400551
Mr.B.c. Vashist
6452949
Prakash
65122322
Mr Ajay
Kachhadiya
30122838
Mr K Jairaj
32940560
Mr. Vijay.S.Gohel
32508491
Mr. Mitesh Patel
66057999
Mr. K.Jayraj
Mr. Dipesh Patel
02646-250860 Mrs. Anita Amin
26422241027
Mr. Hanif Patel
3296222
Mr.P D Jala
324295
Mr. Vasant
Mepani
232739
Mr. Siddarth
Gajjar
Mr. K.J.Barot
Gujarat
Gujarat
Gujarat
Gujarat
Gujarat
Gujarat
Gujarat
Gujarat
Gujarat
Gujarat
Gujarat
Gujarat
Gujarat
Gujarat
Gujarat
Gujarat
Gujarat
Gujarat
Gujarat
Gujarat
Gujarat
Gujarat
Gujarat
Haryana
St
Page 83

Person
j
a
e
ep
Kumar
a kumar
y
j
r
n Goyal
sh
ashist
ya
j
S.Gohel
h Patel
h Patel
raj
sh Tank
h Patel
a Amin
Patel
la
t
rth
rot
State City ASC Name ASC Address Phone No.
Gujarat Godhra Binary Computers 34, Lokhandwala Complex, LIC Road, Nr. Chitra Cinema, Godhra. 9376589019 MR. A. Raja
Gujarat Himmatnagar Jay Telecommunications B-F 105, 1st floor, Durga Complex, Near Railway Station, Himmathnagar
Gujarat Idar Maruti Communication 3, Sarvoday Market, Near Bus Stand, Behind Sarvoday Guest House, Idar Mr. Niraj Patel
Jamnagar
Gujarat
Gujarat
Gujarat Kalol Maitree Communication B/93,Yogi Complex, near Mahendra Mill Road,Kalol
Gujarat
Gujarat Morvi Pulse Sales and Services Madhav Market, 1st Floor, Near New ST Stand, Sanala Road Morbi.
Gujarat Nadiad D.C. Infosystems 105, Municipal Shopping Centre, Opp.Paras Cinema, Santram
Gujarat Navsari Deep Enterprise
Gujarat Palanpur Shree Manibhadra Mobile 16, 1st Floor, Aroma Arcad, Opp. Joravar Palace, Palanpur 320321 Mr. Panchal
Gujarat Patan Able infotech F/9, palika bazar complex, rajmahal road,near sanktoba hall, Patan
Gujarat
Gujarat Rajkot Joshi Telecom Shop No.8, Kuber Complex, Opp Chandubhai Bhelwala, Dr Yagnik
Gujarat Rajkot Roopang infocare Vinod Nivas, 4, Sardarnagar(West), Nr Astron Cinema, Rajkot 6950111 Mr. Kishore Patel
Gujarat Sanand Ravi Communication 37,Sagar Complex, Opp.Hotel Khiabar, Sarkhej Bavla Cross Road, Sanand
Gujarat Surat Om Sai Services
Gujarat Surat Yash Telecom
Gujarat Surat Excel Solutions H-3, Ruchi Flats, Near Iqara Building, Adajan Hazira Road. Surat-
Gujarat Surendranagar Nihaal Computer Services
Gujarat
Gujarat Valasad Klassik Stationo Products 10, Jethalal Mulji Market, Halar Road,Valsad -
Gujarat Vapi Klassik Stationo Products 116, Bhanudarshan Co-Op Society, Koparli Road, Near Gunjan
Haryana Ambala Bee Ess Aar Communication 92-93, Gandhi market, Ambala Cantt-133001 2641234,
Sudarshan Infosys “Shraddha”, Park Colony, Motor House, Near UTI Bank, P.N.Marg, Jamnagar 2552696 Mr. Amit Unadkat
Junagadh
K.J.Traders 29/30, Danapith, Junagadh 2627320 Mr. Paresh
Mehsana
Prime Computer
Consumables
Porbandar
Varun Infotech 1ST Floor,Garden Cafe Building, Opp.New Fountain, Nr.R.T.O Office,
Vadodara
Shreeji Telecom GF 13, Sterling Shopping Center,R.C.Dutt Road,Alkapuri, Vadodara - 0265-3059363 Mr. Jignesh Gohel
83-B, Vimal Super Market, B K Road, S.T.Workshop Road, Mehsana
Road, Nadiad.
10, Upper Level, Diamond Palace, Sattabir, Sayagi Road, Navsari- 02637 324095
Porbandar
Road, Rajkot
39,Golden Point,Near Science Laboratory,Ring Road, Surat -
M-20, Centre point, Near Kadiwala High School, Civil Cross Road, Ring
Road,Surat-395002
94, old housing board, opp school no 13, Surendranagar 320375
Cinema, GIDC, Vapi
Contact Person
329532
Mr. Manibhai
Patel
Rughani
325288
Mr. Jignesh Shah
2325123
Mr. Suketu Patel
300433
Mr. Natubhai
Patel
Mr. Dipesh Patel
Mr. Vinod
Kasundra
Sunil D
226400
Mr. Rakesh Bhai
3290285 Mr. Mitesh
Changela
6530707
Mr Jiten Dave
32401211
Mr. Ravi N
2613231233
Mr. Dharmesh
Patel
0261 2477903
Mr. Rehan Saikh
0261-6544500
Mr. Virender Jain
Mr. Sikandar
02632-329363
Mr. Darshan
Panchal
0260-3292363 Mr. Avishek
Suhasaria
Rajiv Gupta
Page 84

State City ASC Name ASC Address Phone No.
a
l
l
l
l
l
A
d
d
d
d
d
d
d
d
d
d
k
k
k
k
k
k
Haryana Bahadurgarh Unique Telecom 5,Rajaram Market, Main Najafgarh Road, Bahadurgarh, Near Bajaj
Haryana Bhiwani Sandeep Electronics 10 th Plot, First Floor, Circular road, Mahem Gate Chowk, Near Dr.
Haryana
Faridabad
Comsoft Computers
Haryana Faridabad VR Infocomm Shop No.44, Neelam Fly Over, Neelam Chowk, NIT Faridabad.
Haryana Faridabad Sky lark mobile point
Haryana
Gurgaon
Signature Communications B-100 A , South City -1, Opposite - Huda Gymkhana Club - Gurgaon
Haryana
Gurgaon
Lalji Communication SCO-31, - First Floor, Above MTNL Sanchar Haat, Main Market, Opp.
Haryana HISAR M K ELECTRONICS SHOP NO-4A,FIRST FLOOR, NEELKANTH COMPLEX, CAMP CHOWK,
Haryana Hissar Parnami Communication 32,Neel Kamal Complex, Red sqaure Market,Near Elite Cinema Hall,
Haryana Jind Gaurav Telecom Main Bazar, Near rani Talab, Near Bharat Electronics, Jind 325400 Deepak Garg
Haryana Kaithal Mahesh Communication Shop no.22, Bajrang Bali Market, Near Randhir cinema- Kaithal
Haryana Karnal Mass Communication Shop No.69, Main Market, Ground Floor, Moughal Canal, Karnal
Haryana Kurukshetra Bharti Communication 3,Krishna Market, Opp.Abhay Palace, Pipli Road,Kurukshetra,Haryana-
Haryana NARNAUL
Haryana Palwal Shree Ganesh
Haryana Panipat INS Telecom 2, Bishan Sarup Colony, Opp Bus Stand, Near Hotel Deep, Panipat
Haryana Rewari Mahak tele services 53-A, Model Town, Near Shreeji restaurent, Rewari 01274-329222 Gaurave yadve
Haryana Rohtak Telecentre Shakti Market, Civil Hospital Road, Near Chhotu Ram Chowk,
Haryana Sirsa Sirsa Communication 168,Huda Complex, Old Bus Stand, Sirsa 0166-329591 Rajindera
Haryana Sonipat Teleworld Shop No 20, 1st Floor, M.C.Market, Subhash Chowk, Sonipat,
Haryana
Haryana YAMUNAGAR
PRIME COMMUNICATION
Communications
SONIPAT
RELIABLE TELLY SHOPPE OPP. OLD CIVIL HOSPITAL RLY ROAD SONIPAT NEAR S.B.I.
KRISHNA COMMUNICATION
Showroom
Kajal’s Nursing Home, Adjacent to Rameshwar’s Sweet House, Bhiwani,
Haryana - 127021
601/1 Gopi Colony Chowk- Sector-19 , Near Prem Prakash Ashram, OLD
Faridabad-121002
4, G.T.Road, Near Bus Stand, Marla Colony, Fatehabad 0989655244
122001
BSNL Exchange, Sector-12A, OLD Gurgaon -122001.
MAIN DELHI RD.
Hissar, Haryana-125001
- 132001
Shop no.8 , 1st Floor Taneja complex, near Nirula Hotel , main Road Narnaul 9355375351
Basant Apts, Shop No.5, Kithwari Chowk, Mathura Road, Near Saraswathi
School, Palwal
Rohtak-124001
Haryana-138001
BANK, SONEPAT
SHOP NO.19, 20-A 1ST FLOOR, WORKSHOP ROAD, YAMUNAGAR
Contact Person
9315873676,
Mr. Harinder
9350941877
252000
Mr. Sukhveer
Saini
0129-3293512,
Mr. Ashwani
0129-4104252,
Jindal
9310977888
0129-4031959,
Mr. Vinod Kumar
0129-3208737
Gupta.
Pankaj
0124-3256565,
Raj Kumar Garg
0124-4102709
95124-
Mr.Bharat
3200900
Bhushan
9991090260 MANMOHAN
KRISHAN
Mr. Pradeep Garg
09354332000
9315146000
Mr. Mahesh
3290717
Mr.Harish
01744-327717
Mr. Ramesh
MR. Naveen
01275-321028,
Harish Chandra
09315403328
3291860
Jagdeep
Sachdeva
247242 Mr.Madaan
3290889
Vipin Dua
9991090252
UMESH
CHAUDHARY
9354784019
MR. SURESH/
Mr.Sandeep
Haryana
Himacha
Himacha
Himacha
Himacha
Himacha
Jammu
Jammu
Jammu
JHARKH
Jharkhan
Jharkhan
Jharkhan
Jharkhan
Jharkhan
Jharkhan
Jharkhan
Jharkhan
Jharkhan
Jharkhan
Karnata
Karnata
Karnata
Karnata
Karnata
Karnata
St
Page 85

Person
der
veer
ani
Kumar
r Garg
t
HAN
ep Garg
arg
sh
sh
en
yadve
an
ARY
ESH/
ep
State City ASC Name ASC Address Phone No.
Haryana Yamunanagar Manish Communications Shop No.3, Sharma Colony, Near Mahindra Petrol Pump, Yamunanagar
Himachal Pradesh MANDI
Himachal Pradesh Palampur Electronic Home Kallu Di Hatti,PO Maranda Thasil, Palampur, Distt-Kangra-176102 01894238463 Mr. Ravi Kumar
Himachal Pradesh Poanta Sahib SINGAL MARKETING Badri Nagar,Near LIC Office, Poanta Sahib
Himachal Pradesh Shimla Hanu Computers 76/ 9, 2nd floor LoweR Bazar Shimla 9418068421 Sandeep Patial
Himachal Pradesh Solan Vikas Mobile Repair Center MOHAN COMPLEX, First Floor Upper Bazar, Solan-173212 9816271183
Jammu Jammu MOBILE CARE 608-A Gandhi Nagar Behind Laxmi Narayan Mandir 0191-2436814 Mr Dixit Gupta
Jammu Srinagar THE NET SURFER 2nd Floor Mohi-ud-Din Building, Poloview, srinagar
Jammu
JHARKHAND
Jharkhand
Jharkhand
Jharkhand
Jharkhand Godda Karan Mobilink Maa Kalyani, Katra, Main Market, Godda-814133 9334525200 Mr.Saroj
Jharkhand Hazaribagh Digital Services Plaza Mkt, pugmill road, Nr.Kallu Chowk, Hazaribagh.
Jharkhand Jamshedpur Tirupati Teletech Chakravarti Compound, Near Hotel Castel, Contractors area, Bistupur,
Jharkhand Jamshedpur Prasad Electronics Nr.Bus stand,Community Center, Kagal Nagar, Jamshedpur. 0657-2226077 Mr.Raju/ Saritha
Jharkhand Ramgarh Shreyas Empaire Bus Stand Complex, Ramgarh-829122 9334085642 Mr.Piyush
Jharkhand Ranchi Balaji Infotech Near Dr.Kashyap Eyeclinic, Purulia Road,Ranchi.
Jharkhand Ranchi Satya Systems & Solutions 158, Opp Hotel Palace, Kadru, Ranchi-834002
Karnataka Anekal Sri Venkateshwara
Karnataka Bagalkote Turning Point Computers Opp. VRL Booking point, near Engg college BEC road, Vidyagiri,
Karnataka Bailhongal 3G Communication Shop No 459\2 Near Inchal Cross Belgaum Road Bailhongal-591102
Karnataka Bangalore Ascent Communication No:113, St Johns Church road, Bangalore - 560005 32914856 Kumaresan
Karnataka Bangalore Insta Service Point NO:64,Mission road, SATHI COMPLEX, BANGALORE-27
Karnataka Bangalore Optima Mobile Services 24/2,Dr.Rajkumar Road, Near Subramanyanagar Police Station, 2nd Block,
V.M. COMMUNICATION
Udhampur
SERVICE SOLUTIONS Ward No. 15 Shakti Nagar Opp. Old ITI Udhampur
BOKARO
Digital Equipment Centre GB-11, City Palace, Opp.Indian Bank, Bokaro.
Daltonganj
MAA MOBILES Jail Road, Jail Hata, Dalton Ganj-822101
Deogarh
Kanan Electronics Hotel Relax Complex, BLC Road, Deogarh-814112
Dhanbad
Nirmala Entreprises
Communications
- 135005
NEAR PNB MOTI BAZAAR, MANDI-175001 9816024978
Ground Floor, Muskan Complex, Nr.Subhash Chowk, Dhanbad. 9334027583
Jamshedpur-831001
# 37, KSRTC COLONY, HOSUR MAIN ROAD,ANEKAL TALUK,
BANGALORE - 562106
Bagalkote
Rajajinagar, Bangalore - 560 010
Contact Person
233277
Vinod Kumar
Mittal
M Mahender
Singh Thakur
9318715848
Mr. Rajesh singal
Vikas
0194-2459549
Mr Wasim
01992-276724
Mr Rakesh
9334072270
Dewashish Ojha
9304285663
Mr.Navin Kr.
Kashyap
9304059528
Mr. Mahesh
Sharma
Mr.Niraj Sinha
Kumar Jha
9334599570
Mr.Shish Alam
0657 3293331 Abhijeet
Mukherjee
0651-3205400,
Mr. Sanjeev,
9304412277
Mr. Sunil Kedia
0651 3291019
Amit Rastogi
320078
R.Jaganath
329310
B.M. Hiremath/
Veeresh
9343815097
Vishwanath
22107560
Venkatesh
23131953 Unni Krishnan
Page 86

State City ASC Name ASC Address Phone No.
a
k
k
k
k
k
k
k
k
k
k
k
k
k
k
k
Karnataka Bangalore Optima Mobile Services P-3, Mallikarjuna Complex, Opp R T Nagar Police Station, 80 Feet Road, R
Karnataka Bangalore Pranav infocom No 102, Surya Mansion, 7th Main, 4th Block, JAYANAGAR, BANGALORE
Karnataka Belgaum Hello India Telecom G-4,Maratha Mandir Complex, Khanapur Road, Near Railway Flyover,
Karnataka Bellary Shri Vinayak Electronics # C1, R K Complex, KC Road Bellary-583103
Karnataka Bhadravati Digital communication SR Complex 4th cross B H Road Bhadravathi-577301
Karnataka Bhatkal Vijay Communication
Karnataka Bidar Mayuri Infotech Ravi complex,shop no: 4,Udgir road,Bidar-585401 225544 Ravi Halhalli
Karnataka Bijapur Turning point computers Khed building,opp Vijaya college, Sholapur road, Bijapur-586103
Karnataka Channapatna C&C Technology “Ramanujam Nilaya” No.2104, 11th Cross, Kuvempunagar B M Road,
Karnataka Chikaballpur Sri Ram Prasad Enterprises Post office road Chikaballapur-562101 329579
Karnataka Chikmaglaur Cell Tec Electronics ragavendra complex, NMC circle,Neharu road, Chikmanglur - 577101 9341013183 Prem kumar
Karnataka Chintamani Amrutha Mobiles Gajanna Circle Chintamani - 563125
Karnataka Davangere Kruthika Communication Shop No: 6, Park View Plaza, (Income Tax Office’s Ground Floor) ,
Karnataka Doddaballpur Santosh Communication VITOBHA TEMPLE ROAD, OPP ASHWINI HOSPITAL, DODDABALLAPUR
Karnataka Gadag Tranqil Telecom Service
Karnataka Gokak Cell World Basaweshwara circle opp-court Gokak - 591307 93438-73777 Shivanand /
Karnataka
Karnataka Hassan Sree Digital Solutions 1380 Mission Hospital road opp Hindibed college - 573201 329481 Vidya Shankar
Karnataka
Karnataka Hubli Shruti Services shop no : B6, Laxmi complex, Court circle , Hubli- 580020 3290671 Mahendar
Karnataka Hunsur Sriram Infocom No.6, Municpal complex, H.D.Kote road circle - 571105
Karnataka Kadur Ashwa Tele Mobiles TB Road Kadur -577548
Karnataka
Karnataka Karwar Mithun Tele Solution Prema complex Civil court road opp SBM Karwar -581301
Karnataka KGF Global Net Communcations
Pvt Ltd
Gulbarga
Aishwaraya Communication C-9, Asian Plaza S.V.P.Chowk Main road Gulbarga-585102
Hosakote
Emposys Communication Shop no 1, Mahalatha Devi Complex M V Badavane, College Road
Kankapura
Sumukh Communications Harshitha Complex, Budikere, Bangalore main rd, Near KSTC Bus stand
T Nagar, Bangalore-560032
-560011
Belgaum - 590 001.
Hussian Complex Bunder road Bhatkal - 581320 329327
Channapatna - 571501
4th Main, Near Vishweshwaraiah Park, P.J. Extension, Davangere-577002
–561203.
Shop No12, Siddalingeshwar Complex Below SBM, Station Road,Gadag
District Gadag-528101
Hoskote-562114
Kanakapura-562117
Opp. King George Hall, Geetha road Robetson pet, KGF - 563122 329559
Contact Person
32710202
Madan
9343023209 S.V.Sirish
2420533
Mohan
655043
Devandra /
Richard
9341081291
Nagabushan
Vittal H.Naik
329318
S.M.Hiremath
324222 Charan
Vardharaj / Ram
prasad
9342262811
Sudarshan Reddy
395444
Sujay
9341736645
Santosh
576998
Raju / Zakir
Chougala
329447
Mallikarjun
652532 Raghunandan
253699
H.H.Pradeep
9341033310
R.Ananda Murthy
9342743344
R.C.Harish
9341199222
Mithun palyunker
Shiva Kumar
Karnata
Karnata
Karnata
Karnata
Karnata
Karnata
Karnata
Karnata
Karnata
Karnata
Karnata
Karnata
Karnata
Karnata
Karnata
Kerala
Kerala
Kerala
Kerala
Kerala
Kerala
Kerala
Kerala
Kerala
Kerala
St
Page 87

Person
a
/
han
aik
alli
ath
/ Ram
ar
n Reddy
kir
d /
n
nkar
dan
r
p
Murthy
h
alyunker
ar
State City ASC Name ASC Address Phone No.
Karnataka Kolar Seanmatrix No:384,Suguna comples, Near KSRTC bus stand, Anthargange road,
Karnataka Kumta Krishna Mobiles 938, College road, NH 17, opp RWW, Kumta - 581343
Karnataka Kundapur Reya Mobiles Vaishali complex I flr Shastri circle, Kundapur - 576201 320866 Anantha / Ramya
Karnataka Madikeri C.M. Communications Shop no. 8, M A Complex Ist flr Kohinoor rd Madikeri 9343837555 Mohamad Sharief
Karnataka Mandya C & C Technology 2068, First Cross, Krishna Krupa Nilaya Subhash Nagar, Mandya-
Karnataka Mangalore Innovative Infocom 15-10-537/11, Jayavarma Centre, Mallikatte Circle, Kadri, Mangalore
Karnataka Moodabidri Media Guard Technologies Rajeev Gandhi complex main road Moodabidri
Karnataka Mysore K.K.Marketing 1432/9, Tribhuvan Towers, opp Veterinary Hospital, Dewan’s Road,
Karnataka Nipani Manusoft Computers Dumale Complex Chikodi road Nipani - 591237
Karnataka Raichur Akshay Electronics 1st floor, hotel UMA complex, station road, Raichur - 584101
Karnataka Ranibenur Kruthika Communication LIC Building Opp to Gupta Petrol bunk PB road Ranebennur-581115 231444
Karnataka Shimoga Chetan Electronics C-5, Kenchappa complex, Durgigudi main road, Shimoga-577201
Karnataka Tiptur Shree Digital Solutions Nanjappa complex, opp city union bank, BH road, Tiptur - 572201 9343813731 Vidyashankar
Karnataka Tumkur Durga Communication No.14 CMI Complex, opp Jayadeva Hostel, B.H.Road - 572101 2256184 Naveen Kumar
Karnataka Udupi Sanman Mobile Services Shop No: 15, Simaz complex, Diana circule, Court road, Udupi- 576101. 3955770 Prakash
Kerala Alappuzha GETRONICS FIRST FLOOR, KARTHIKA BUILDING, OPP SDV BOYS HIGH SCHOOL,
Kerala Alathur MARSTEK 12/950, Ground Floor, AR Complex, Opp. Munsiff’s Court, Alathur,
Kerala Aluva SED INFOSYS BUILDING NO 12/57 DOOR NO 8, FIRST FLOOR, POOTHULLIL
Kerala Attingal AM Technologies Mamam, Near Dreams Theater, Attingal
Kerala Badagara Amarkish Communications 1st Floor, Sarala Complex, Near KVR Motors, N.H. Bypass Road, Nut
Kerala Cherthala Cherukattu Phones Krishna Building, Opp govt boys high school, AC road, Cherthala
Kerala Ernakulam TELETECH SYSTEMS 20, First Floor, Penta Estate, above Airtel office, Janatha Junction,
Kerala Ernakulam Zenicon Infocom(P) limited Above Syndicate Bank, Opp Cochin Shipyard, M.G.Road, Cochin-15 2359511 Jaimon Joseph
Kerala Ernakulam Guidelines Ground Floor, Mundukottackal Estates, Kadavanthara, S A Road, Cochin 4000113 Manoj G
Kerala IRINJALAKKUDA NICE MOBILES NICE BUILDING, ST. JOSEPH’S COLLEGE JUNCTION, IRINJALAKKUDA
Kolar 560101
571401
- 575002.
Dhanwantri Road Cross, Mysore -570001
COURT ROAD, ALLEPPY.
Palakkad Dt.- 678 541
BUILDING, ALUVA - 683 101.
Street, Vadakara-673101.
Palarivattom, Cochin-25
- 680121
Contact Person
2228714
Shetty
329607
D.V.Prabhu
320777 Charan
6563244
Sebastian
Fernandes
325909
Vishwas Kumar
4258613
Karunakaran.
9448148005
Mahesh Dumale
329673
Narasimhlu
Sujay
9343370193
Panduranga rao
/ Binoy
3290446
OMPRAKASH
04922-321311
Mr. Rajesh. V.
3235599
Sudheesh
3290301
Saji
0496 - 3255756
Mr.Jeeju /
Mr. Baiju
9388441434
Mahesh C D
3207554 SONY THOMAS
0480-3291515 MR. SEBASTIAN
Page 88

State City ASC Name ASC Address Phone No.
a
Kerala Kalpetta Mobi Care Apasara Building, Near Municipality Office, Main Road, Kalpetta
Kerala Kanhangad Xn COMPUTERS &
Kerala
Kerala Karunagapally Supreme Enterprises Valiyath Plaza, Opp to KSRTC Bus stand,Karunagapally
Kerala Kasargode Xn COMPUTERS &
Kerala Kollam Digital Infosystems MC-3087, New Block, Bishop Jeromi Nagar, Chinnakada, Kollem-691001
Kerala Kottarakkara Sivashakthi Communications KP II/1574, Valiyavila bldg, Near Marthoma Girls high school, Pulamon
Kerala Kottayam SVM Technologies M.P.M COMPLEX, Near Popular Maruti Show Room, M.C ROAD, S.H
Kerala
Kerala KUNNAMKULAM V STAR MOBILES
Kerala Manjeri Integrated Computer
Kerala Mavelikara Ettutharayil Agencies GROUND FLOOR, KOIPPALLIL ROYAL ARCADE, PUTHIYAKAVU,
Kerala Palai Cyriac Tv Plaza Vypana Building,Petta Road, Palai. 329746 Tom Cyriac
Kerala Palakkad Benraws International 12/310/6, Ground Floor, Mero Complex, H.P.O.Road, Palakkad
Kerala Pallakad ORION TECHNO
Kerala Pathanamthitta Melamparambil Agencies 10/264, Main Road, Town,Pathanamthita 2223132 M.V. Francis
Kerala THALASSERY SAHAR COMMUNICATION 44-1929, MACKSON MONOR, OPP. PARIS RESIDENCY, LOGANS
Kerala Thiruvalla Sangeetha Electronics 524/17, Central Tower, Cross Junction, Thiruvalla
Kerala
Kerala
Kerala Thodopuzha National Electronics Shop No 5, Aswathy Shopping Complex, Temple Junction, Thodupuzha
Kerala Thriprayar Nice Mobiles 382J, 1st Floor, Century Plaza, N.H.17, Near Bus Stand, Thriprayar-
Kerala Tirur Telit Telecom Shop GROUND FLOOR, AL AMAL COMPLEX, PAN BAZAR, TIRUR
DATACARE
KANNUR
SAHAR COMMUNICATIONS
DATACARE
Kozhikode
Domain Infosystems Ist Floor, Al Fahad Complex, Saba School Cross Road, Near Corporation
Systems
SOLUTIONS
Thiruvananthapuram
Appolo Systems Thelungu Chetty Complex, Shop No 23-24, Kalpalayam JN Karamana,
Thiruvananthapuram
Smart Mobile TC 2/3554(5), First Floor, Opp. Petrol Pump, Kesavadasapuram,
BENGACHERY COMPLEX, OPP.VYAPARA BHAVAN, T B ROAD JN,
KANHANGAD.
SB-666-C & D, PRESTIGE CENTRE, GROUND FLOOR, SUB REGISTER
OFFICE ROAD, KANNUR.
BENDICHAL COMMERCIAL COMPLEX, PRESS CLUB JN, MG ROAD,
KASARGOD.
PO, Kottarakkara
MOUNT,KOTTAYAM, KERALA- 686 006
Stadium, Puthiyara, Kozhikkode-673004
ROOM NO 4/ VIII/1039, CITY COMPLEX,OPP TEMPO PARK, TOWN HALL
ROAD, KUNNAMKULLAM.
Royal Tower, TB Road, Manjeri - 676121
MAVELIKARA
- 678 001.
12/310/15 FIRST FLOOR, METRO COMPLEX, HEAD POST OFFICE
ROAD, PALAKAD-678001
ROAD, THALASSERY
Thiruvananthapuram 695 002.
Trivandrum-695004
680567
Contact Person
04936-329366
Thanseer
0467-3259755
Mr.SANDEEP
0497-3258585
AJAI ABHIRAM
2620282
Mr. Ratish/Prem
04994-324755 Mr. SANDEEP
2760647
Johnson Lawrence
3298191 Suresh
2565303 Rajesh K S
0495-2722222,
Mukundan
0495-3243745
04885-320009
VIJUMON.K.V.
0483-3299686
Mr. Thomason
Chacko
3293340
Biji
0491-3052002
Mathews
0491 -
KHAJA HUSSAIN
3200255
Oommen
0490 - 3208585
AJAI
3203000
Ranjeev Kumar
2340523
Santosh
3200105
Krishnakumar P B
220320
Aneesh M A
0487 - 3240400
T.P. Sebastian
0494 -
Vasan.K.Nair
3295623
Kerala
Kerala
Madhya
Madhya
Madhya
Madhya
Madhya
Madhya
Madhya
Madhya
Madhya
Madhya
Madhya
Madhya
Madhya
Madhya
Madhya
Madhya
Madhya
Madhya
Madhya
Madhya
Madhya
Madhya
Madhya
St
Page 89

Person
EEP
IRAM
h/Prem
EEP
awrence
S
n
.K.V.
ason
ac
USSAIN
cis
umar
mar P B
A
stian
air
State City ASC Name ASC Address Phone No.
Kerala
TRICHUR
CELL TECH SHOP NUMBER 5B,TC23/326, N.P. TOWER, GURUVAYOOR ROAD,
Kerala Vaikom VAIKUNDAM ELECTRONICS II/ 214C , Mannamkeriel Complex, Bus stand Road, Valiyakavala, Vaikom 326616 Sreekumar.G
Madhya Pradesh Balaghat Shri Computers Keshar Plaza Complex, Hanuman Chowk, Balaghat
Madhya Pradesh Betul Shivam Electronics
Madhya Pradesh Bhopal Akansha Enterprises
Madhya Pradesh Bhopal Neha Sales Corporation F-104, Anmol Tower, E-5/14, Commercial Zone, Arera Colony,
Madhya Pradesh Bhopal MUSIC MAHAL BHOPAL SHOPNO.1 NEW MARKET NEAR HANUMAN MANDIR, BHOPAL
Madhya Pradesh Bhopal GSM SOLUTION-BHO M-2 CHETAK COMPLEX, ZONE -2 M.P NAGAR, Bhopal
Madhya Pradesh Biaora MOBILECARE-BIAORA KR Complex Rajkand Road, Biaora. M.P.
Madhya Pradesh Chindwara Bunty Photoelectronics Shop No.33, Jiji Bai Complex, Parasia Road, Chindwara 07162-230358 Mr.Ritesh Shukla
Madhya Pradesh Dewas New Taj Electronics New Taj Electronics, 4, New Market, Moti Bunglow Main Road, Dewas
Madhya Pradesh
Guna
Madhya Pradesh Gwalior Galav Computers
Madhya Pradesh Gwalior VERSHA SALES &
Madhya Pradesh Indore Apurva Electronics
Madhya Pradesh Indore Ayushi Electronics
Madhya Pradesh Indore PIONEER MARKETING
Madhya Pradesh Indore IT CUSTOMER CARE-IND LG-13, TRADE CENTRE,18,SOUTH TUKOGANJ, INDORE
Madhya Pradesh Itarsi
Madhya Pradesh Jabalpur Sri Sai Communication C/O MUSKAN CARD GALLERY, 766, SHAHID SMARK MARG, NEAR
Madhya Pradesh Jabalpur I T SOLUTION
Madhya Pradesh Katni Excellent Infosys 20/306, Gurunanak Ward, Katni
Madhya Pradesh Khandwa NAMAN REFRIGERATION-
Madhya Pradesh Mandsaur Sky Link Mobile Services
Madhya Pradesh MORENA MOBILE PLAZA M S ROAD , JIWAJI GUNJ , OPP BANK OF INDIA, MORENA
Mobile Junction Jai Stambh Chauraha,Nr.Central Bank, Guna-473001
SERVICE-ASP
S.S. Telecommunications
KHANDWA
WEST FORT, Thrissur
Jiaprakash Chowk,Kothi Bazar, Auto Stand, Betul - 460001 9329099071
25-26 , CENTRAL MARKET, ROSHANPURA SQUARE, BHOPAL MP 7553201626
Bhopal-462016
Ground floor ,Ganpati Plaza , City Centre , Gwalior 0751-4013311
GROUND FLOOR SARAFA BAZAR LASHKAR,GWALIOR 0751-4060444
UG 11 , B M Tower , Sapna Sangeeta Road , Opp. Lotus, Indore 7313207283
UG-10,Ratnamani Complex, 7/1,New Palasia, Indore-452001 0731 - 3251284
224, Prem Trade Center, Maharani Road, Indore.
Vijayshree Complex 5, Line Sarafa Bazar,
Itarsi - 461111
RANITAL SQUARE, JABALPUR-482001
GROUND FLOOR,ASTHA APPARTMENTS.WRIGHT TOWN, Jabalpur
TAPAL CHALL,KHANDWA
Payas Ice Cream Parlour, 16, Opium Godown Road, Nai Abadi, Mandsaur
458001 (M.P.)
Contact Person
0487-2387386 SANTOM
KALLOOR
9300632132
Mr. Deepak Bajaj
Mr.Vikram
Motwani
Mr. Dinesh Asija
7553015088
Mr.Ashok Hirwani
0755-5220725/
Mr.SHINU
2579178
07373-316816
Mr.NEERAJ
07373-316816
Mr.Atul Sharma
07272-220005,
Mr.Shabbir Shaikh
406006
07542-329277
Mr.Deepak Arya
Mr.Pradeep Dixit
Mr.AJIT KUMAR
Mr.Nitin Kulkarni
Mr.Santosh Dwivedi
0731-4006503 Mr.Ritesh
0731-4207487
Mr. Sanjay
Dhankar
9300272505, Mr.Akilesh
Saxsena
0761-4046831
Mr.MOHIT
SAREEN
0761-
Mr.SANJEEV
4014064/
CHOUBEY
4064370
07622 406047
Mr.Prafful Agrawal
0733-2230089
MR.YASHWANT
MALI
07422-243978
Mr.Gaurav B.
Mittal
07532 400886 Mr.T C SHIVHARE
Page 90

State City ASC Name ASC Address Phone No.
a
h
h
h
h
h
h
h
h
h
h
h
h
h
h
h
h
h
h
h
Madhya Pradesh
Neemuch
Madhya Pradesh Ratlam Kirti Telecom 124 Station road Opp.Raj Tower, Ratlam - 457001 239346 Mr.Kirti Jain
Madhya Pradesh Sagar Neeta Computers
Madhya Pradesh Satna Maa Shaarda Communication
Madhya Pradesh SATNA
Madhya Pradesh Shivpuri Ocean Computer
Madhya Pradesh Ujjain Galaxy Computers &
Maharashtra AHMEDNAGAR T V SPOT
Maharashtra Akola Supra Computers
Maharashtra Amravati Scorpio Services
Maharashtra Aurangabad Unique Telematics
Maharashtra Aurangabad Electronics World
Maharashtra Beed Shree Enterprises
Maharashtra BHIWANDI VARAD ELECTRONICS SHOP NO2, PRABHU CHAYA BLGD, PRABHU ALI, NEAR OLD GOVT.
Maharashtra Chalisgaon Mobile Point Shop-22, Momaya Complex, Near Bus Stand, Chalisgaon
Maharashtra Chandrapur Crystal Services Behind Hotel Simran, Jatpura Gate Chandrapur
Maharashtra Chandrapur Shiv Communications Ramnagar, Near Durga Mata Mandir, Sindhi Colony, Chandrapur
Maharashtra Chinchwad
Maharashtra Dhule Pearl Communications Below Reliance WebWorld Express, CKB Arcade, Nr Deopur Bus
Maharashtra Gondia M/s V2 Care Opp. Cofee house, Railtoli, Gondia 441614
Maharashtra Hatkangale
Maharashtra Islampur Solar Shoppy opp Sai Motor Driving School, Nr Stand Road, Islampur, Distt Sangli,
Maharashtra Jalgaon Global Enterprises E-81, 1st floor, Golani Market, Jalgaon -425001
Maharashtra
Shree Balaji Mobiles Jain Bhavan Road, Near Ganganagar Off., NEEMUCH (M.P.)
Jama Complex, Teen Batti, Sagar - 470002.
AKASHWANI AGENCIES-SATNA
Corporation
Communication
Ritz Communication Shop No 10,"A" wing,Jai Ganesh Vision,Next to Hotel Neelkanth,Near
(Pimpri)
Sai Vision Services
(Ichalkaranji)
KALYAN
SKY LARK ASSOCIATES Shop:1, 'A' Wing, Suresh Tower Co-op. Hsg. Soc, Opp. Municipal
Gali No1, C/o Shri Gopal Sharan Singh, Pushp Raj Colony, Satna
OPP.CMA SCHOOL,SHOP NO.2,ANNAM CHHAYA, REWA ROAD, Satna
!st Floor, Vishnu Mandir Market, Near Panipat Handloom, Shivpuri
43/2, Varruchi Marg,Opp Madhav Nagar Police Staion, Freeganj, Ujjain
B-3, ADARSH SAMRUDHI, NR. CHOUPATI KARANJA 414001 0241-2326267
Ushakiran Complex, Shastri Nagar, Opp. Hotel Surya, Akola.
Shop No. 84, Ground Floor, GulshanTowers, Nr. Panchasheel Cinema,
Amrawati, Pin-444601
Shop no.108/B, Behind Sajawat Handloom, Tapdiya Super Market, Nirala Bazar,
Aurangabad-431001
Sahyadri Building,opp. To Shivaji School,Khokadpura, Aurangabad-431001. 0240-3296998
Behind Raj Hotel, A H Wadia Vachnalay Road, Beed-431122.
HOSPITAL, MANDAI, BHIWANDI, DIST THANE
Fam Multiplex,Akurdi, Pune-411033
Stand, Dhule.
11/236 MOHAN ARCADE SHOP NO B14, STATION ROAD, TALHATKANGALE, CITY-ICHALKARANJI-416115
ISLAMPUR-415409
Vegetable Market, Santoshi Mata Road, Kalyan (W)
Contact Person
07423-320033
Mr.Savesh Goyal
07582-329951
Mr.Ramesh Gupta
7672320797
Mr.Prashant Singh
07672-416455
Mr.Ajay
Sukhramani
07492-225505
Mr.Sameer
Saxena
0734-2515995,
Mr.Anurag
2530777
Chhajhlani
MR ANIL APTE
9326866469
Mr.Prashant
0721-2567302
Mr. Pramod
0240-2356447
Mr.Mazhar
Ahmed Shaikh
Mr. Rauf
02442 231831,
Mr. Rahul Joshi/
02442-228855
Mr. Rajiv Joshi
02522- 222653
Mr. Hitendra
Zope
02554-309996 Mohd. Israfil Ansari
9370273776
Mr. Mahmood
329546
Mr.Mahesh
020-27485613,
Ms Nikita
020 32661900,
09371029777
02562-324666
Mrs. Sonu Atul
Bang
329322
Mr. Krishna
Sargam
0230-2439989
Sameer Bhonsale
9326777603
Mr. D.H.Patil
0257-2236899
Mr. Pramod
0251-3209899
MR. NASEER
Maharas
Maharas
Maharas
Maharas
Maharas
Maharas
Maharas
Maharas
Maharas
Maharas
Maharas
Maharas
Maharas
Maharas
Maharas
Maharas
Maharas
Maharas
Maharas
St
Page 91

Person
h Goyal
ain
h Gupta
nt Singh
ni
er
g
ni
APTE
ant
d
ar
haikh
l Joshi/
Joshi
dra
afil Ansari
mood
sh
u Atul
a
onsale
atil
od
EER
State City ASC Name ASC Address Phone No.
Maharashtra Kohlapur SMS Services S5, Diwan Tower, Opp. Nutan Marathi School, Near Mirajkar Tikkty,
Maharashtra Kolhapur KOMAL ELECTRONICS 517/10 ''SAWALI" SHIVAJI PARK,NEAR VIKRAM HIGHSCHOOL,SHIVAJI
Maharashtra Kopergaon Om Sai Mobile Opp. ST Bus Stand, Daharngaon Road, Kopergaon, Dist Ahmednagar.
Maharashtra Latur HINDUSTAN MOBILES
Maharashtra Malegaon Cell Care Shop No.14, Beside Sana Travels, Bunkar Bazar, Qidwai Road, Malegaon
Maharashtra Mumbai Absolute Networks A007, Vishal Shopping Centre, Next to Vishal Hall, Near Station,
Maharashtra Mumbai Creative Solutions SHOP NO 6 AMBIKA COOPERATIVE HOUSING SOCIETY, JAWAHAR
Maharashtra Mumbai
Maharashtra Mumbai
Maharashtra Mumbai Grace Tele Services Shop no 3, C/1, Manik Nagar Soc, Punjabi lane, Borivali (W ), Mumbai
Maharashtra Mumbai Komplex Telecom
Maharashtra Mumbai LG Service Centre Shop No.1,2,3 Ground Floor, Rajakamal Bldg,Opp.Ram Mandir, Subhash
Maharashtra Mumbai PARAS TELECOM 2nd floor, Rear Side Capital Cinema Building, Wauddy Road, Opp.
Maharashtra Mumbai Sai Tele Services
Maharashtra Mumbai
Maharashtra Mumbai
Maharashtra Mumbai Trident Communications 8-A,Vasant Smruti, Dadasaheb Phalke Road, Beside "BharatKhsetra
Maharashtra Mumbai Sierra Mobiles Opp Prabhu Darshan, L.J.Road, Shivaji Park, Near Shiv Sena Bhavan,
Maharashtra Nagpur Epoch Services
SERVICES
CYBER-GYAN CONVERGENCE
& SERVICES (INDIA)
PVT. LTD.
G.P.ELECTRONIC
Corporation
Yash Telecom
TERABYTE
Kolhapur, Pin -416005.
PARK KOLHAPUR-416001
Shop No.47/59,Site 110, Gandhi Market, Nr Bhalchandra Blood Bank,
Main Road, Latur-413512
- 423203.
M.V.Road, Andheri (E), Mumbai - 400 069
NAGAR ROAD NO 2 NEAR RAILWAY CROSSING,GOREGAON WEST,
MUMBAI 400062
43/44, Gold Filled Plaza, Sion Bandra Link Road, Sion, Mumbai-400017
A/27, Gr. floor, Sagar Tech Plaza, Andheri-Kurla Road, Saki-Naka, Andheri
(E), Mumbai 400072
400092
Shop no.A/19, Nootan Nagar Premises Co. Op. Hsg. Society,
Near Bandra Rly. Stn., Towards Bandra Talav, Turner Road, Bandra
(West) Mumbai
Road, Vile Parle(E) Mumbai 400 057
Mumbai CST Railway Station, Mumbai
A-110, Satyam Commercial Complex, M.G.Road, Ghatkoper (E),
Mumbai - 400 077.
Dadarkar Tower, Shop no.1, Opp.Film Centre, Near Crossroads, Tardeo,
Mumbai - 400 034
Shop 27, Vikas Paradise, Bhakti Marg, Off L.B.S. Road, Near R Mall,
Mulund (W), Mumbai 400080
Building", Near Dadar station(E), Dadar -East, Mumbai - 400 014.
Mumbai 400016
"Shope No. UG-9, Bhakati Vihar Complex, Chapru Nagar Square, Lakadganj,
Nagpur -440008"
Contact Person
0231-2541120,
Prakash Patil
9326226120
0231-2521424,
MR. VASANT P.
09823317055
BODAKE
02423-226463
Mr. Mahendra
Devkar
02382-641111,
Mr. Sandeep
982345500
Parande
937020819 Mr Ansari Mohd
Israfil
022 32544800
Mr. Arun
022-28769003
Mr. Anand
022-24075939
Mr. Jatin Parekh
2232633960 Mr. MAYUR
022-32455033
Mr. Daniel
022 64147153 Mr. Haque
022-26134917
MR. RAKESH /
OMKAR
022 32022228
Mr. Ganesh
022-40111264
Ms. ISHA
9324049698
Mr.Girish
022-32640045 Mr. Chirag
9323960027
Mr. Kalpesh
022 24382200 Mr. Anurag
0712 3246777
Mr. Girish
Page 92

State City ASC Name ASC Address Phone No.
a
h
h
h
h
h
h
h
Maharashtra Nagpur Spectrum Marketing Shop No.2, Dharampeth Towers, West High Court (WHC) Road,
Maharashtra Nagpur Shivatronics B-31 Sai Regency Complex Ravi Nagar Square Nagpur Maharashtra
Maharashtra
NANDED
DEVANSH MICROTRONICS ,opp forest office, nr Ranbhidkar's residence -Nanded-431602
Maharashtra Nanded ROYAL UNIQUE SERVICES-
Maharashtra Nasik Mobs Associates Shop No. 8a, First Floor,'Kapote-Meher' Market, Renuka Nagar, Wadala
Maharashtra PANVEL Oceanic Tele System Shop No. 3, Sai Arcade, Sector 15, New Panvel (E),Dist. Raigad. 9322217221 Ms. Swapnaja
Maharashtra PEN SKYPHONE ENTERPRISES
Maharashtra Pune MICROCHIP SOLUTIONS Akshay Chambers 216 Naryan Peth,Near Bhide Bridge, N C Kelkar
Maharashtra Pune Horizon 32A, Lotus Court, Near Hotel Panchami, Pune Satara Road, Pune. 02032501222,
Maharashtra Pune Mobile World G-25, AKSHAY COMPLEX, DHOLE PATIL ROAD, PUNE-411 001 30942268,
Maharashtra Pune Viki Info Technologies Shop No4, Amit Complex,474, Sadashiv Peth,Opp New English School,
Maharashtra
Maharashtra Sangamneer Rajpal Telecom
Maharashtra Sangli Ramesh Electronics Opp. Kanya Purohit prashala, Rajwada, Sangli-416416
Maharashtra Satara Shivkal Mobilink 173/6/7 Raviwarpeth shop no-11, Vithal Lila Complex, Powai Naka, opp
Maharashtra
Maharashtra Solapur ATHARVA ELECTRONICS
Maharashtra Solapur Jawaharlal Radio Service 184, Gold Finch Peth, nr Hotel Ritesh, Solapur - 413007. 0217-2725030 Prasanna J
Maharashtra Thane Urmi Enterprises G. F. Abhiman II , Opp. Forest Office, Teen Hath Naka, Thane ( W ) 022 65928384 Mr. Rinkesh
Maharashtra VASAI E-Link Solutions Shop No.5, Type C, Bldg no.5/6, Shanti Vihar, Mira Road -E, Pin
NANDED
Ratnagiri
S P ELECTRONICS-PUNE shop no-19, Parasmani Complex, K C Jain Nagar, Nr Maruthi Mandir,
Shirrampur
Siddharth Infocom
PUN
Dharampeth , Nagpur - 440010
440044
Plot No-48,Krishna Kamal , Opp. Sunil Furniture, Bhagya Nagar road,
Ashok Nagar Nanded-431605
Naka, Dawrka, Nasik - 422 001.
SHOP NO 3, SHREE COMPLEX, OPP UNIQUE BAZAR, PEN KHOPOLI
ROAD, PEN, DIST RAIGAD-402107
Rd, Pune-411030
Tilak Road Pune Maharshtra
Ratnagiri-415612
Yashodhan complex,New Nagar Rd, Near hotel Chaitali, Sangamner
Janta Bank, Satara-415002
Shop No 1, Hotel Sidhartha Building, Sidhartha Stop, Sagamaner Road,
Shrirampur-413709
940/2 NORTH SADAR BAZAR, GARUD BUNGLOW, SOLAPUR-413003
Code : 401107.
Contact Person
712-22527823 Ms. Sonali
9300892579
Mr. Ravi Gupta
02462-249789
Mr. Prashant
Palnate
2,462,262,419
Mrs. Sunita
Ashish Naik
0253-6523613 Mr. Mahesh
9373435000 MR KULDEEP
020-24471155,
Mr Mahyesh
9823905949
Bhosale
Mr. Nilesh
9325002399
Pundye
Pawan Mantri
9325088055
020 24434134,
MR.VIVEK SURVE
9322206664,09
371829891
02352-329556,
MR. SANTOSH
221982,
PRABHU
9823317158
02425320888 Mr Harish Rajpal
0233-2327601,
Suresh Shegane
9823085176,
09372107601
02162-325212 Mr. Mahesh
Shinde
02422-222117,
Mr. Kedar
02422-329530
Fargade
0217-2317595,
MR. UMESH
9823317081
KAMALAPURKAR
Chavan
Panchal
9322839386
Mr. OMKAR
Maharas
Maharas
Maharas
Maharas
Maharas
Maharas
Maharas
Orissa
Orissa
Orissa
Orissa
Orissa
Orissa
Orissa
Orissa
Orissa
Orissa
Orissa
Orissa
Punjab
Punjab
Punjab
Punjab
Punjab
St
Page 93

Person
e
li
upta
ant
ta
ik
sh
naja
EEP
sh
ntri
SURVE
OSH
Rajpal
egane
sh
r
SH
URKAR
J
sh
AR
State City ASC Name ASC Address Phone No.
Maharashtra VASHI BEEKEYEN ENTERPRISES Block No 1, Shop No. 17, Mahaveer Milan, Sector 28, Near Blue Diamond,
Maharashtra VASHI LG Service Centre- DAKC
Maharashtra VIRAR Siddhivinayak Tele Services Shop no 5&6, Vishnu Prasad Complex, Opp Utkarsha School, Near S.T.
Maharashtra Wardha Libra Electronics
Maharashtra
Yavatmal
Star Electronics
Yavatmal
Maharashtra
Maharashtra Yeotmal I T Services Nr datey college,C/o Yahoo cyber cafe, Yawatmal 445001 9372610121 Mr. Umeh Gadwe
Orissa Anugul Creative Solution Hanuman Bazar, Near gundicha mandir,
Orissa Balasore Raghunath IT Solutions Azimabad, Proof Road, Balasore.-756001
Orissa
Orissa
Orissa BHADRAK A B Associates Nr.Reliance Web World Express, Bypass Road, BHADRAK-756001
Orissa Bhubaneswar Miracle Services IT Extn. Plot No. 136, Fr. Lane of Vigilance Office, Beh. Passport Office, Surya
Orissa Bhubneshwar S.A.INFOSYS 291.Bomikhal, Opp.Akamra cinema hall, Bhubaneswar-751010
Orissa Cuttack O.A.INFOTECH Behind Govt Bus Stand, Badambadi, Cuttack -753012
Orissa Jajpurroad Smruti Infotech Dala Chhak, Jajpur Road, Jajpur 06726-324529 Mr Sumit Ranjan
Orissa PURI Baijnath Infocomm At Muncipal Mkt, Grand Road, Puri-752001 9337032005
Orissa Rourkela Infosys 13,Bisra Road,subhadra complex Opp.Choudhary Petrol Pump, Rourkela 9337403999 Arun Ghosh
Orissa Sambalpur A.N.Communication Inf. Of Zilla School, Pensionpara,
Punjab
Punjab Barnala Unique Infotech Mittal Street, Near M C Office, Barnala-148101
Punjab Batala New Krishna Entrepriese
Punjab
Punjab Chandigarh Vignesh Services S.C.O- 189-90, Sec- 34, Chandigarh 0172-3018028 Mukesh Arya
Combine Electronics
& Services
Berhampur
Global Electronics Gandhi Nagar, 1st Lane, Berhampur.
Berhampur (Orissa)
RASHMI ELECTRONICS &
COMPUTERS
Amritsar
Bajaj Telecommunication 87, G Floor, Nehru Complex, Lawrence Road, Amritsar-143001
Bathinda
Lalli's Electronic Gallery
Hotel, Vashi, New Mumbai
H Block, Ground Floor, Dhirubhai Ambani Knowledge City, Navi
Mumbai-400709
Bus stand, P.P. Marg., Virar ( West) Pin 401305.
Opposite to LIC office,Arvi Stand Main Road, Wardha : - 442001
Near Shyam Talkies Ram Mandir Road Yavatmal Maharashtra 445001
Shop No 13, 1st floor, Old Indira Gandhi Market, Azad Maidan Road,
Yavatmal-445001
Angul-759122
Shop No.19, Sai Complex, Main Road, Gandhi Nagar, Berhampur, Orissa 0680-3290409 RASHMI RANJAN
Nagar, BBSR.
Sambalpur-768001
Circular Road, Near Shekhari di Kothi, Batala
1139-A, First Floor, Amrik Singh Road, Nr Gole Diggi, Bhatinda
Contact Person
022-65114304
Mr. Shailesh
022-30386032 Mr. Rajnish
0250-3258111
Mrs. Yogita
Kadam
245286 Ms. Manjusha
2324106
Mr.Snajay
Chabda
9822200166
Mr. Ajay Shukla
06764-329207 Mr Tapas Sahu
06782-329267,
Mr. Sujit Kr Sen
9337669107
0680-2223124
Mr. D.B.Nepak
SHARMA
9337040450
Kartik Chandra
Rout
0674-2390461,
Mr. Chaco/
2391533
Suprava
0674-2573114
Ashwini k sahoo
9338912613
Arabind Rout Ray
Nayak
Mr.Ajay/ Sandeep
Agrawal
9337660919 Mr. Md.
Abdul Aziz
9814650314
Suman Bajaj
01679- 238007
Pankaj Goyal
1871-396612 Navin Handa
0164-2239500,
Ashok Kakria
2236337
Page 94

State City ASC Name ASC Address Phone No.
a
n
n
n
n
n
n
n
n
n
n
n
n
n
n
n
n
n
n
n
n
n
n
n
n
n
n
n
Punjab Chandigarh New Tech SCO 495/496 SEC 35C First floor
Punjab Gurdaspur S K Electronics Ajit Singh Market, Batala Road, Nr. Petrol Pump, Gurdaspur
Punjab Hoshiarpur Kuldip's Mobile Care Dhobian Wali Gali,Phagwara Road, Hoshiarpur- 01882-226906 Kuldip
Punjab Jallandhar Mobile Center 233/1, Saheed Udham Singh Nagar,Backside Hotel Preet, Nakodar
Punjab Kapurthala Arun Electronics 217,C Block,Jama Masjid, Shoping Complex-144601 01822 329254 Arun Khosla
Punjab Kotkapura OM MOBILE SERVICE
Punjab Ludhiana Shahi Communication Shop No.5, 4X International, 583 L, Model Town, Ludhiana 0161-3244190 Amit Shahi
Punjab Ludhiana Anant Shree Comp 19K Opp PAU Gate no 1 Ferozpur Road
Punjab Malaut KHURANA MOBILE
Punjab
Punjab
Punjab Mansa Sharma Telecom OPP.PARKASH BOOK DEPOT,NAGINA MARKET, MANSA 9316173009
Punjab Moga Rashpal Telecom 6, Red Cross Road, Court Road, Near Old Court, Moga-142001 01636-222468 Mr. Rashpal
Punjab Nabha Echo Telecom Opp. Milan Palace Circualr Road. NABHA 147201 01765-329244 Girish Garg
Punjab Nawasher Kapoor Electronics Kothi Road, Opp Kumar Hotel, Nawashahr-144514 01823-509739 Narender Pal
Punjab Pathankot Touch InfoSys 189 Opp. Guru Nanak Park, Model Town, Pathankot. 0186-3290300 Mr.Navdeep
Punjab Pathankot Leo Comp Near Tourist hotel, millitary ground, Pathankot 9814586406 Mr Kamal
Punjab Patiala Image Services 84, First Floor, Leela Bhawan, Patiala-147001
Punjab Phagwara Bansal telecom G T Road,Railway Road Chowk, Phagwara-144401
Punjab Rajpura M K Enterprises Shop no.6,Gurudwara Singh Sabha Market, Rajpura Town-140401 9316432866 Johny
Punjab Ropar Arora Communication Shop No.1,Lehari Shah Mandir Road,Ropar 9872363032 Amit Arora
Punjab Samana Sangam Mobile care Tehsile Road,Near Garg Laboutry 9316868292 Vaneet Kumar
Punjab Sangrur NATIONAL COMPUTERS SUNAMI GATE, SANGRUR PIN NO = 148001 1672233335,
Punjab Sarhind A.S. Infocom Grain Market,Cinema Road Sirhind City-140406 01763-324777 Jaspreet Singh
Rajasthan Ajmer Nehal Infotech S1, 2nd Floor, Inderlok Complex, Near Agra gate, Ajmer 3291404 Suresh sharma/
Rajasthan Ajmer Prangan 112/10,Civil lines,Ajmer Pareek
CENTRE
SOLUTION
Malerkotla
Prime Infocomm Opp. Main gate,Govt College, MalerKotla-148023 9317731979 Rohit Bansal/Raj
Mandi Gobindgarh
Aditya Infocom
Road, Jalandhar-144001.
1ST FLOOR DHANU RAM PANSARI , Railway Road-151204 1635-223069,
SHOP NO 7 OPP, NEW TELEPHONE EXCHANGE G T ROAD MALUAT
PIN NO = 152107
Main Iron Market, Mandi Gobindgarh
Contact Person
9814244862
Mr Pawan
01874-329906
Mr. S.Sukhvinder
0181-3292666 Vikas Sangar
ROHIT MITTAL
9815759239
0161- 3245386
Ms Monia
RAMESH
9316940003
KHURANA
Verma
9316320490 Naresh Aggarwal
Udesh Kumar
Sharma
Singh
Singh Bedi
0175-2222796,
Rohit Bansal
9872281524
01824-461321,
Mangalesh
9888005339
SARABJIT SINGH
9814586196
Shatrugan
Rajastha
Rajastha
Rajastha
Rajastha
Rajastha
Rajastha
Rajastha
Rajastha
Rajastha
Rajastha
Rajastha
Rajastha
Rajastha
Rajastha
Rajastha
Rajastha
Rajastha
Rajastha
Rajastha
Rajastha
Rajastha
Rajastha
Rajastha
Rajastha
Rajastha
Rajastha
Rajastha
St
Page 95

Person
hvinder
gar
sla
ITTAL
hi
a
A
ggarwal
ar
pal
rg
Pal
ep
di
l
h
ra
umar
SINGH
Singh
arma/
n
State City ASC Name ASC Address Phone No.
Rajasthan Alwar R.K.Telecom SHOP NO.112, FIRST FLOOR, GANPATI TOWER NEAR NANGLI
Rajasthan alwar Pareek electronics Opp. To Tehsil,Alwar Pareek
Rajasthan Beawar Srikrishna Infocom Chaoni Road, Bhagat Chauraha, Near Roadways Bus Terminus,Beawar 329675 Shravan
Rajasthan Bhilwara Ajanta Communications No3,Bapna Complex,Pur Road,Bhilwara 9351610212 Shravan
Rajasthan Bikaner Tech Solutions 1st floor,222&223, Ganpati plaza, KEM Road, Bikaner 3292423 Aziz/Vika
Rajasthan
chittorgarh
Rajasthan chomu Tambi Telelink Kotwali chabutra, dhan ji ki gali, Sadar Bazar Chomu 9314090400 Anup tambi/DP
Rajasthan Dholpur Tirupati Telecom 14,Bhagwati Market, Near Jagan Cinema hall, Jagan Tiraha,Dhoulpur Moshin/
Rajasthan Jaipur Alpha Infotech Systems F-1, First Floor, Krishna Mall, Lakshmi Mandir Crossing, Tonk Road,
Rajasthan Jaipur Vishwas Infoteck 13-14,Indira Switch, Opp Chambal Power House, Hawa Sarak,Civil
Rajasthan Jaipur Alliance Communication G6,City plaza,Space Cinema Hall, Jhotwara Road, Jaipur-16 Amit/Bhushan
Rajasthan Jaipur Solution Computers Plot no4,Krishna nagar II, Janpath, Lalkothi, Near Hotel Paradise, Jaipur. Dhreej mathur
Rajasthan
Rajasthan
Rajasthan
Rajasthan
Rajasthan Kishangarh Capital Enterprises 5,Radha Krishan market, Opp. Sardul school, Kishangarg 326550
Rajasthan Kota Cyber Infosystems 26, Ground floor, Kalawati Paliwal market, Gumanpura, Kota-324007 232153 Rais khan
Rajasthan kota Rajesh electronics 355,Shopping centre,Near Jain Mandir,Kota Rajesh
Rajasthan Kota Saya electronics 1-TA-16,Vigyan Nagar,Kota Lalit
Rajasthan Kotputli Isha Communications 11, ground floor, Govardhan plaza, Nehru Bazar, Kotputli Vijender
Rajasthan Nagaur Jam Appex Shop num.7, Opp. Old power house, Station road, Nagaur 329595 Amit
Rajasthan Nathdwara Geniune Infotech Shop num.10,Suriya apartments, Opp.Vandana talkies, Bus stand,
Rajasthan Pali Mansi Mobile 9,Vasant Vihar,Opp. Bangur college,Pali Abhishek
Rajasthan ShrigangaNagar Telecare Servecies 33,J Block, Near Birbal Circle, SriGanga nagar 3207687 Abhishek
Rajasthan ShrigangaNagar Electro device care 10 H Block, Sri Ganga nagar. Raman
Rajasthan Sikar Rita Computers ShopNo4, Kabra Market, Shramdan Marg, Sikar Saurav
Arihant Infotech A46,Meera Market, Near Rajasthan Patrika Office, Chittorgarg 325933 Abhishek
Jhunjunu
M S Mobile Point Shop num.5,Kaswan Complex,Opp Roadways Bus Stand,Jhunjunu Abhshek/Sunil
Jodhpur
Omega Electronics UG/4, Adeshwar Tower, Main Chopasani Road, Opp.Gehlot Watch
Jodhpur
Space Electronics Shop no4, Manidhari Hospital, Residency road, Jodhpur 3291214 Hemanbt
Jodhpur
Digital electrocare 3/4B, 1st Polo Pawta,Jodhpur Johender
CIRCLE , Alwar
Jaipur-302015
Lines, Jaipur-302016
Co, Jodhpur-342003
Nathdwara.
Contact Person
Umesh sharma
Saini
Devender
3299724 Shatrugan
mangal
3242050 Madan
3291214 Pratap singh
Sharrugan
329208 Gajender
choudhary
chakravarthy
Page 96

State City ASC Name ASC Address Phone No.
a
d
d
d
d
d
d
d
d
d
d
d
d
d
d
d
d
d
d
d
Rajasthan Udaipur Ficusa Enterprises 13,Darshanpura,Opp.M.B.Commerce College Gate, Nr Computer
Tamilnadu Ambasamudram THE MOST TECH 63D , k.n.v.complex, Opp to Marichamman Temple , Ambasamudram 04634-251143 mr.stany
Arkonam
Tamilnadu
Tamilnadu Arni Digitech Computers Shop No. 201/82- B1, SM Road, Arani - 623101 04173-223929 d.mohan ram
Tamilnadu Aruppaukottai THE MERCURY
Tamilnadu Attur VRNET V.R.Net,Dr.Arumugam complex,salem main road ,ATTUR 04282-243585 Mr.Senthil kumar
Tamilnadu Batlagundu Karthik Communications No 221, Main Road , Batlagundu- 624202 9360019090 Mr Lakshmanan
Tamilnadu Bhavani Sri Abirami Electronics 2E , Pavadi Street, Anthiyur Corner, Bhavani-638301 04256-230919 Mr Balamurugan
Tamilnadu Chegalapatu SKB Electronics No-42 Devarajanar pillai Street, Vedachalam Nagar, Chengalpet 044-37406080 Mr.Balaji
Tamilnadu Chennai Genesis Communication 63/3, First main road, Gandhi Nagar, Adyar, Chennai-600020 044-24401188 Mr Suresh
Tamilnadu
Tamilnadu
Tamilnadu
Tamilnadu
Tamilnadu Chidambaram Future Tech Hasan Towers, 1st Floor, No. 14, V.G.P.Street, Near Hotel Ritz,
Tamilnadu Coimbatore Fast track 138-C, TV Swamy Road ( West ) , RS Puram , Coimbatore - 641002 2551155 , Mr Anand
Tamilnadu Coimbatore Nucom Services 3/61, Master Building, Kattoor Road, Pappa Naicken, Palayam,
Tamilnadu Coimbatore Classic Electronics - Coi, No 1/1 , Alagappa Road , 6th St, Tatabad, Coimbatore - 640012 4374875 Mr Arivazhagan
Tamilnadu Cuddlore Kasturi Cellular Service NO: 37 (2C) BHARATHI ROAD, CUDDALORE. 607 001, CUDDALORE
Tamilnadu Cumbum LG MOBILE SERVICE
Tamilnadu Dharapuram IT Zone 40-A-1, Bye Pass Corner, Dharapuram-624202
Tamilnadu Dharmapuri CALRITY DIGITAL
Tamilnadu Dindigul padma electronics 15,Dudley high School, Dindigul 0451-2427080 murali chandra
Tamilnadu Erode Jans Electronics 29, Sathy Road, Near Hotel Oasis, Erode - 638004 3258526 Mr Kannan
Tamilnadu
G.M. MARKETING NO.3/4, SUBURAYAN STREET, ARAKKONAM-631001 04177-231395
COMPUTERS
Chennai
GS Systems 547/352, F M Towers, Mount Road, Nandanam, Chennai-600035 044-24330889 Mr.Nicholus
Chennai
Sabisu B2, Golden Enclave, New 275, Old 184, Poonamallee High Road,
Chennai
Unicare Infocomm Services No.293, Arcot Road, Next to Indian Overseas Bank, Kodambakkam
Chennai
GARAGE DE TELECOM OLD No:30: NEW No: 10, KMBF BUILDING,1ST FLOOR, DURAISAMY
GALLERY
PHOTO&AUDIO
Gobichettipalayam
BEST ELECTRONICS 47a/1, kms complex kacherry medu, gobichettipalam 04285-225598 Mr. g.a.jayakumar
Zone,Udaipur-313002
607, MADURAI ROAD, NEAR NEW BUS STAND, ARUPPUKOTTAI626101
Kilpauk, CHENNAI 600 010.
Chennai - 24
ROAD, NEAR POTHYS,T.NAGAR, CHENNAI 600017
Chidambaram
Coimbatore - 641037.
DISTRICT,TAMIL NADU.
No 52, Gandhiji Street, CUMBUM-625516 9360211100 Mr.Senthil kumar
98/29C KANDASAMY VADIYAR STREET, DHARMAPURI, 636701 04342-265835 MR. RAJ
Contact Person
2410002 Mahak/Virendra
Mr. p.gajapathi
04566-222552
Mr.
R.BOOMINATHAN
044-26612347 Mr.palani
044 24724666,
Kartik
044 52047059,
09382306857
044-28143454
04144-222150 Mr.Shaker
4351569 Mr.Uthaman
04142
Mr Raghupati
- 220183
9360360779,
Mr Ramakrishnan
04258-329293
MURUGHESAN
Tamilna
Tamilna
Tamilna
Tamilna
Tamilna
Tamilna
Tamilna
Tamilna
Tamilna
Tamilna
Tamilna
Tamilna
Tamilna
Tamilna
Tamilna
Tamilna
Tamilna
Tamilna
Tamilna
St
Page 97

Person
irendra
pathi
ram
NATHAN
il kumar
manan
urugan
h
lus
i
r
an
hagan
pati
il kumar
krishnan
ESAN
andra
n
yakumar
State City ASC Name ASC Address Phone No.
Tamilnadu Hosur Suryas will of people R S Towers, Opp Traffic Police Station, Bangalore By Pass Road,
Tamilnadu Kallkuruchi NEW MAGESTIC CELL
Tamilnadu Kancheepuram Classic Mobile Care Centre Door No.67-A, (Shop No.5), P.S.K. Street, Kancheepuram-631 501 9345636900
Tamilnadu Karaikal SHREE HARINI CELLULOR
Tamilnadu Karaikudi SITIYES ELECTRONICS 10 A / 3 , Muthulakshmi Complex, Opp to Income Tax Office, Sekkalai,
Tamilnadu Karur Aswathi Electronics 108 ,Old Bye-pass Road , Near KG Hospital , Karur 9360244555 ,
Tamilnadu Kovilpatti ST.MARYS CELLPHONES No.6, Rajakumari Towers, AKS Theater Road, Kovilpatti 9360533649 /
Tamilnadu Krishnagiri Madura Care Centre No 361, Crown Complex, Bangalore Main Road, Krishnagiri-635001 9364258223 Mr Suresh Kumar
Tamilnadu Kumbakonam FARGAN ELECTRONICS NO.5 VRS COMPLEX, HAJIAR STREET, KUMBAKONAM- 612001, 0435-
Tamilnadu Kuzhithurai Mobile Care Shop no 211, SM Arcade, Main Road, Marthandam , Kuzhithurai
Tamilnadu
Tamilnadu Mayiladuthurai NRS MOBILE CITY NO-28 - C/14, R.R.COMPLEX, MAILADUTHURAI 04364-223277 ABDUL RAHIM
Tamilnadu Nagercoil Redeemer Electronics Shop no 2, Pillars Gate, Balamore Road, Nagercoil-629001 04652-
Tamilnadu Namakkal V.R CARE 77/2, Veera Vilas, Trichy Main Road, Namakkal - 637001 04286-329304 Mr.
Tamilnadu Ooty MOUNTAIN CELL COM NO:302,Band lane, Commercial road,Near Liberty Theatre, Ooty-
Tamilnadu Palani HI-TECH ELECTRONICS No.76, New Dharapuram Road, Opp. ICICI Bank, Palani - 624601 04545-240244
Tamilnadu Paramathy Velur Vishwak Mobiles No 5, KK High School Building, 98, High school Road, Paramathy
Tamilnadu Pattukottai MOBILE CARE 127, BIG STREET, PATTUKOTTAI 04373-252150 MR.ARUL
Tamilnadu Perambalur THE BEST Vivkanand st., M.P. office opp., Perambalur 04328-275717 Mr.P.Kumar
SALES&SERVICE
SERVICE
Madurai
Devaa Electronics No.4, Thirumakulam North Street,Near Ayyappan koil, Thhallakulam,
Hosur-635109
OPP TO TELEPHONE EXCHANGE, GANDHI ROAD KALLAKURICHI 04151-228270 MURUGESAN
OPP. TO NEW BUS STAND , BHARATHI MAIN ROAD,KARAIKAL609602
Karaikudi - 630002
- 629165
Madurai-625002
643001.
Velur - 638182
Contact Person
04344-246687 Shanmugam
Mr. Damodaran
320544
K.SELVAGANAPATHY
9362611455
Mr.S.VEERAPANDIYAN
Mr Satish Kumar
9367123748
Mr. Iyyappan
9894133839
SURBUDEEN
2401123,
3290303
270587 Mr Surendra
Kumar
4360995 Guna
Mr.Dinkar
327788,
9443453490
R.Vijayalakshmi
0423-2443787 Mr.Sujith & Miss
. Geetha
Mr. r.ramachandran
04268-
Mr Mohan
224348,
9360110755
ALAGAN
Page 98

State City ASC Name ASC Address Phone No.
a
d
d
d
d
d
d
d
d
d
s
s
s
s
s
s
s
s
s
s
s
Tamilnadu Perundurai SREE BABY ELECTRONIC 483, mainroad, perundurai 04294-221800 Mr.shiva balan
Pollachi
Tamilnadu
Tamilnadu Pondicherry Digital Logistics 126/2, Perumal Koil Street (Bharathi Street Cutting), Pondicherry-
Tamilnadu Pondicherry BALAJI ELECTRONICS
Tamilnadu
Tamilnadu Port Blair UNIVERSAL SERVICE CARE R.G.T. ROAD, PORT BLAIR, ANDAMAN-744101 03192-329588
Tamilnadu Pudukottai YEM KAY ELECTRONICS 2, Subabharathi complex, 5378, 79, Alangudi Road, Pudukottai-
Tamilnadu Rajapalayam SRI VIGNESH MOBILES 292\1, TENKASI ROAD, OPP BOMBAY LADGE, RAJAPALAYAM-626117 04563-220398 Mr.
Tamilnadu Ramanathpuram ZEENATH TELECOM 13-B/23, PAL LUCKY PLAZA, Madurai Road , RAMANATHAPURAM-
Tamilnadu Ranipet Unicare Infocom Services No.36, opp.Gangadhara Muddaliar Middle School, MBT Road,
Tamilnadu Rasipuram SMS CARE SERVICE No 179 / 1, Anna Salai, Ground Floor, Rasipuram-637208 9345052553
Tamilnadu Salem Vishwesh Mobiles Sixer Complex, 121/19A, Sarada College Road, Next to Abi Medical
Tamilnadu
Tamilnadu Tambaram SARAVANAS INFOCOM
Tamilnadu
Tamilnadu Thanjavur Z M Electronics 1006/1007, South East Rampart, Opp to Municipal Higher Sec School
Tamilnadu Tindivanam REVA COMMUNICATIONS Old No. 117/1, New No. 205/1, Nehru Street, Tindivanam - 604001 225250 LAKSHMI
Tamilnadu Tiruchendur ARK MOBILE SOLUTIONS ARK DTP centre, No. 1 a 7 North car street, Rayan Complex,
Tamilnadu Tiruchengode BALAJI ELECTRONICS 108 s s d road,near lorry stand thiruchengode 04288-255157 Mr.sekar
Tamilnadu Tirunevelli Classic Electronic 39, Trivendrum Road, Opposite Kalimark, Welcome Complex,
Tamilnadu
Tamilnadu
STAR MOBILES SHOP NO. 5 Ground Floor, Vasanth Complex, Immamkan Street,
(ASC)PON-CHE
Ponneri
SRI BALAJI MOBILE CARE
CENTER
Sivakasi
TELE WORLD 78, PARSN PLAZA, Chariman Shanmuga Nadar Road , OPP.TO.WATER
SERVICES PVT LTD
Tenkasi
AIRTONE 1/ 17, KMSS complex, west masi street, Tenkasi. 627811 04633-227980 Mr. M.Nagaraja
Tirupattur
Acal Computer Systems 52/1, kkc complex, krishnagiri road, tirupattur 325385 sunder
Tirupur
Shri Vasavi Electronics "# 155-303, Mangalam Road, Karuvam palayam,
POLLACHI.
605001
No:21, 3rd CROSS STREET, Annanager, PONDICHERRY 3090414
NO, 26, THALUKKA OFFICE ROAD, PONNERI, THIRUVALLUR
DIST-601204
622001.
623501
Novelpur,ranipet, Vellore Dist.
Centre, Salem - 636007
TANK, SIVAKASI-626123
New No-43 ,Old No:3A,Mudichur road,Tambaram west,chennai
600045
Tanjore - 613001
Tiruchendur. 628215
Palayamkottai, Tirunilveli-627002
Tirupur -641604"
Contact Person
04259-222230 Mr.Senthil Kumar
9843093348 G Singaravelu
27973381 Mr.BALAJI
Mr.Naveen
9344038441 Mr.Rajesh
Kannan
KU.G.MUTTHIAH
04567-226750 Mr.M.S.JAHIR
HUSSAIN
270806 Mr.Basker/
Mr.karthik
Mr Manikavasagam
3290535 Vasudev Nayak
04562-325730 B.MATHAN
KUMAR
044-32915599 Mr.Palani/
Mr.ranjith
sankar
272595,
Ziauddin
329554
NARAYANAN
04639-243339 Mr.Mahesh
2575801,
Erkins
3290339
4244009 MR.U.B. Bala
Murali
Tamilna
Tamilna
Tamilna
Tamilna
Tamilna
Tamilna
Tamilna
Tamilna
Tamilna
U.P. (Ea
U.P. (Ea
U.P. (Ea
U.P. (Ea
U.P. (Ea
U.P. (Ea
U.P. (Ea
U.P. (Ea
U.P. (Ea
U.P. (Ea
U.P. (Ea
St
Page 99

Person
balan
il Kumar
velu
I
n
TTHIAH
HIR
r/
k
avasagam
Nayak
N
/
garaja
I
NAN
sh
Bala
State City ASC Name ASC Address Phone No.
Tamilnadu Tiruvarur Softel Teleservices No 21, Municipal Complex , Ground Floor , Panagal Road ,
Tamilnadu Tiruvellore Yamkarna Computer 38/186 JAWAHARLAL NEHRU ROAD, OPP TO SBI MAIN BRANCH,
Tamilnadu Trichy S K Electronics Raj Complex, 9/A EVR Road, Puthur, Trichy- 620017 277,194 Krishnan
Tamilnadu Tuticorin Snows Cell Care Kala Complex, No 20,B-1,W G C Road, Tuticorin-628002 0461-2334043 Kennedy
Tamilnadu Udumalpet ALLWA ELECTRONICS 5 Thuluva vellar shopping complex, V.O.C. street,.UDUMALPET.642126 04252-223047 Mr. Sentamarai
Tamilnadu Vaniambadi
Tamilnadu Vellore Matha Communication 4, S.L.N Plaza, Opposite Odai Pilliar Koil, Gandhinagar,Vellor - 632006 0416-2240800 Gunaa Shekhar
Tamilnadu Villupuram BROAD BAND no 642, nehruji road, VILLUPURAM 222936 Mr. Pragasam
Tamilnadu Virudhunagar RBG Electronics 76/9, Lakshmi Complex, Pullalakkottai Road, (Opposite Uzhavar
U.P. (East)
U.P. (East)
U.P. (East)
U.P. (East) Gonda DIGITECH SERVICES Suraj Complex Malviya Nagar, Ground Floor,In front of Distt. Mahila
U.P. (East)
U.P. (East) JHANSI Krishna Enterprises 372/A CIVIL LINES,GWALIAR ROAD, JHANSI-284001 9335090997 SUJEET
U.P. (East)
U.P. (East)
U.P. (East)
U.P. (East) LAKHIMPUR S S ELECTRONICS GURDARSHAN BUILDING, KACHEHRI ROAD, LAKIMPUR KHERI,
U.P. (East) Lucknow ALFA ELECTRONICS Shop No.GF20 ABC Complex, Kanpur Road, Lucknow 0522-3948730 Harjinder Singh
REVA COMMUNICATIONS
Barabanki
Yash Enterprises Rashid Enclave, Mugal Darbar, First Floor,nagar palika rd, Barabanki 9336323714 Mr. Ajay
FAIZABAD
Microworld Computer
Hardware Lab
Fatehpur
TRIMURTI TELECOM
SERVICES
HARDOI
Shipra Electricals &
Appliances
Kanpur
AAKARSH ELECTRONICS 63/2 C(9)BALAJI COMPLEX, THE MALL, KANPUR 9335360303 Mr.Raman
Kanpur
AR Infotech 111/402 Ashok Nagar, Kanpur Pin 208012 Amit Trivedi
Kanpur
LB Infotech 124/122A GOVIND NAGAR, KANPUR 0512-3207303 Deepak Bhatia
Tiruvarur-610001
THIRUVALLUR - 602 001
No.848/3, CL Road, Vaniyambadi - 635 751 395023 LAKSHMI
sandhai), Virudhunagar-626001.
1st floor, Baldev Plaza, Rekhabganj, Faizabad 9335098244 Kapil/Sunil
230, SHADIPUR CHAURAHA, NASEPEER ROAD,FATEHPUR-212601 9336223093 Sanjay Sachan
Hospital, Gonda
553 STATION ROAD, RAILWAY GANJ, HARDOI-241001 9335348407 Gaurav
LAKHIMPUR -262701
Contact Person
04366- 22110,
Mr Ravi
9362721444
37600329 Mr. Saravana
kannan
NARAYANAN
04562-420160,
Mr Karrupuswamy
9344869593
Srivastava
9336695719 Atul Singh
Chauhan
9335038258 SAURABH SINHA
Page 100

State City ASC Name ASC Address Phone No.
a
a
a
a
a
a
a
a
a
a
a
a
a
a
a
a
a
a
a
a
a
a
a
a
a
a
U.P. (East) Lucknow Hitech Communication SS 205, Road Cross Plaza, Badshah Nagar Crossing, Lucknow. 9335088061
U.P. (East) Lucknow NET COM 3 way road, City Point, Opp Krishi Bhawan, Lucknow-226024 0522-3094222 Vinod Sharma
U.P. (East) Lucknow RR ENTERPRISES Shop No.3,first floor, Deewan Chand Complex, 292/11 Chowk, Lucknow 0522-3262263 MR.YOGESH
U.P. (East) Lucknow MOBILE DOT COM G2 Shri Ram Towers Ashok Marg ,Lucknow 9335819202 Mr Anand Jhouri
U.P. (East) Raebarilly Karuna Enterprises Shop No.3, Bajpai Market, Beliganj, Mailk Main Road, Raeberilly 9336005741 Vikas
U.P. (East)
Sitapur
U.P. (East) SULTANPUR S S INFOCOM SHOP NO. 14&15 NANDINI COMPLEX NEAR SUPER MARKET
U.P. (East) Unnao Avijit Infocom 251 opp Collector Ganj, Unnao 0512-6820020 VISHNU PANDEY
Uttar Pradesh Agra NSC Computers Shop No G-124, Block No- 29, Sanjay Place, Agra – 9319111350 Rajeev Singhal
Uttar Pradesh Agra Ankur Care Centre 6/1, M.G.Road, Agra. 9412254152 Ankur Goyal
Uttar Pradesh Agra Space Consultancy &
Uttar Pradesh Aligarh Infocare 17, Vikram Arcade, Railway Road, Aligarh - 9359588880 Kamal Jain /
Uttar Pradesh Aligarh A.V.Computer Services City Enclave opp.Kumar Nursing Home Ramghat Road 9412274391 Vaivhav Gupta
Uttar Pradesh Allahabad RADIO CENTRE SHOP NO-3 1ST FLOOR MEENA BAZAR, Allahabad 3292488 MR. MANISH
Uttar Pradesh Allahabad B.P.Electronics 28, M.G.Marg, opp Rama Jewlers Civil lines, Allahabad-211001 3290315 Mr. Umesh
Uttar Pradesh Allahabad MICRONET SOLUTION B 38/1 ,SHOP NO. FF3 VASHITSTHA VINAYAK TOWER, TASHKAND
Uttar Pradesh AMROHA SHREE JEE TRADERS KAILSA ROAD NEAR MODABADI GATE, AMROHA 9319075289
Uttar Pradesh AZAMGARH RAJASTHALI ASIF GANJ, CHOWK, AZAMGARH-276001 223644 MR.TRILOKI
Uttar Pradesh Badyun Customer Care Services. Plaza Market 1st Floor Near Ghantaghar sixroad Badyun. 9319086944 Mr. Nazim
Uttar Pradesh BAILA Sankatha Communications Mall Godam Road Dr.S. N.Pandey Clinic Chowk Balia-277001. UP 9336635533 Mr. Manish
Uttar Pradesh Bareilly JAI INFOTECH SA-96 DEENDAYAL PURAM BAREILLY 0581-3208484 Mr Rohit Tandon
Uttar Pradesh Bareilly Sapan Infotech G - 64 A Kunwar Complex, Near Gupta Watch Co,116 Civil
Uttar Pradesh Basti Royal Enterprises Shop No.12 Nagar Palika Market, Company Bagh, Basti 9336784054 Sunil Kumar
Uttar Pradesh
Uttar Pradesh Bijnor Konark Service Centre Shop No.7,1st Floor, Near Ajaz Ali Hall, Nagar Palika Complex, Bijnor. 9358364067
Uttar Pradesh Bullandshar MN Telecom Shop No-1 BHARAMAPUTRA COMPLEX,KALA AAM, BULANDSHAR 9,358,011,688 Mr Taukir Khan
Higrade Computers 7, Muncipal Market, Sitapur 05862-351808 Sanjeev Goel
SULTANPUR-228001
Services
BHADOI
Kislay Communication VINDA MARKET NEAR TEHSIL, BHADOI-224101 9235506029 KISLAY
UG 1 & 2, Opp. Jaihind Hotel, Merchant Chamber, Sadar Bazar, Agra 9358504140 Kapil Sharma /
MARG, CIVIL LINES, ALLAHABAD
Lines, Bareilly
Contact Person
MR.RAVI PRAKASH/
MR.RAJENDRA
RAMAN
9335055217 SACHIN
DWIVEDI
Rihan Pervej
Prabal bansal
KHANNA
Aggarwal
9335395183 Mr. Hashmi
SIDHARTH
AGARWAL
NATH JALAAN
9359102467 Mr. Dhirendra
Negi
Mr.Pratyush Gupta
Uttar Pr
Uttar Pr
Uttar Pr
Uttar Pr
Uttar Pr
Uttar Pr
Uttar Pr
Uttar Pr
Uttar Pr
Uttar Pr
Uttar Pr
Uttar Pr
Uttar Pr
Uttar Pr
Uttar Pr
Uttar Pr
Uttar Pr
Uttar Pr
Uttar Pr
Uttar Pr
Uttar Pr
Uttar Pr
Uttar Pr
Uttar Pr
Uttar Pr
St
 Loading...