

Page 1
本手册中描述的某些功能可能
与手机实际功能稍有出入,具
体取决于手机软件及您的服务
提供商。
KS500 用户手册
Page 2

恭喜您购买此款功能先进、外观小巧
的 LG KS500 手机,它采用了最新的
数字移动通信技术,专注于为您提供便
利的操作。
Page 3
设置
待机屏幕
基本功能
高级功能
管理功能
网络
设置
配件
准则
01
02
03
04
05
06
07
08
09
Page 4
LG KS500 |
用户手册
4
内容
设置
开始了解您的手机...............8
安装 SIM 卡和电池.............10
存储卡........................12
菜单地图......................13
待机屏幕
迷你键盘 ....................14
主菜单 ......................15
状态栏 ......................16
呼叫..........................17
拨打电话 ...................17
从电话本拨打电话 ............17
接听或拒绝电话 ..............17
快速拨号 ....................17
查看通话记录 ................18
使用呼叫转接 ................18
使用呼叫限制 ................19
更改常用设置 ................19
搜索联系人 ..................20
添加新联系人 ................20
联系人选项 ..................20
将联系人添加到群组 ..........21
为联系人添加图片 ............21
将电话本复制到 SIM 卡 .......21
删除所有联系人 ..............22
查看信息 ....................22
信息..........................23
信息 ........................23
发送信息 ....................23
输入文本 ....................23
设置电子邮件 ................24
检索电子邮件 ................25
更改电子邮件设置 ............25
信息文件夹 ..................26
管理信息 ....................26
使用模板 ....................27
更改文本信息设置 ............27
更改多媒体信息设置 ..........28
更改其它设置 ................28
Page 5
高级功能
照相机........................29
快速拍照 ....................29
拍照后 ......................29
使用工具栏 ..................30
更改图像大小 ................30
查看保存的照片 ..............30
选择拍摄模式 ................31
使用连拍模式 ................31
使用选景拍摄模式 ............31
摄像机........................32
快速摄像 ....................32
拍摄视频后 ..................32
使用工具栏 ..................32
观看保存的视频 ..............33
观看视频时调节音量 ..........33
我的文档......................34
我的图像 ...................34
选项菜单 ....................34
发送照片 ....................35
管理图像 ....................35
删除图像 ....................35
创建幻灯片显示 ..............35
我的声音 ....................36
使用声音 ....................36
我的视频 ....................36
观看视频 ....................36
暂停视频时使用选项 ..........36
发送视频剪辑 ................37
将视频剪辑用作铃声 ..........37
使用视频选项菜单 ............37
游戏和应用程序 ..............37
玩游戏 ......................37
Flash 内容 ..................38
查看 Flash 文件 .............38
查看 Flash 文件时使用选项 ...38
其它 ........................38
我的存储卡 ..................38
将手机用作 Mass Storage
设备 ........................38
5
Page 6
LG KS500 |
用户手册
6
内容
多媒体........................40
音乐 ........................40
将音乐传输到手机 ............40
播放歌曲 ....................40
创建播放列表 ................41
播放播放列表 ................41
编辑播放列表 ................41
删除播放列表 ................42
语音备忘录 ..................42
发送录音 ...................42
将文件传输到手机 ............42
管理功能
管理器........................43
将事件添加到日历中 ..........43
编辑日历事件 ................43
共享日历事件 ................43
添加备忘录 ..................44
工具..........................45
设置闹钟 ....................45
使用计算器 ..................45
世界时间 ....................45
换算器 ......................46
使用秒表 ....................46
网络
浏览器........................47
访问网页 ....................47
添加并访问书签 ..............47
访问保存的页面 ..............47
查看浏览器历史记录 ..........47
更改网络浏览器设置 ..........47
Yahoo!........................48
Page 7
设置
设置..........................49
更改显示设置 ................49
激活情景模式 ................49
个性化情景模式 ..............49
其它手机设置 ................50
更改安全性 ..................50
使用内存管理器 .............50
蓝牙 ........................51
更改蓝牙设置 ................51
与其它蓝牙设备配对 ..........52
更改安全性 ..................52
配件
配件..........................53
网络服务......................54
技术参数......................54
准则
关于安全有效使用手机的准则....56
7
Page 8
LG KS500 |
用户手册
8
设置
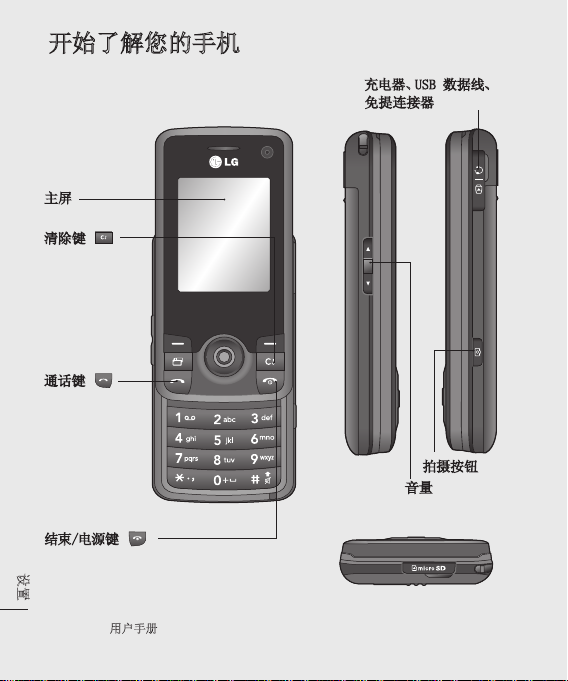
开始了解您的手机
主屏
清除键
每按一下删除
一个字符。
通话键
拨号或接听来
电。
结束/电源键
挂断或拒接来电。
开机/关机。
按一次返回待机屏幕。
充电器、USB 数据线、
免提连接器
拍摄按钮
音量
Page 9
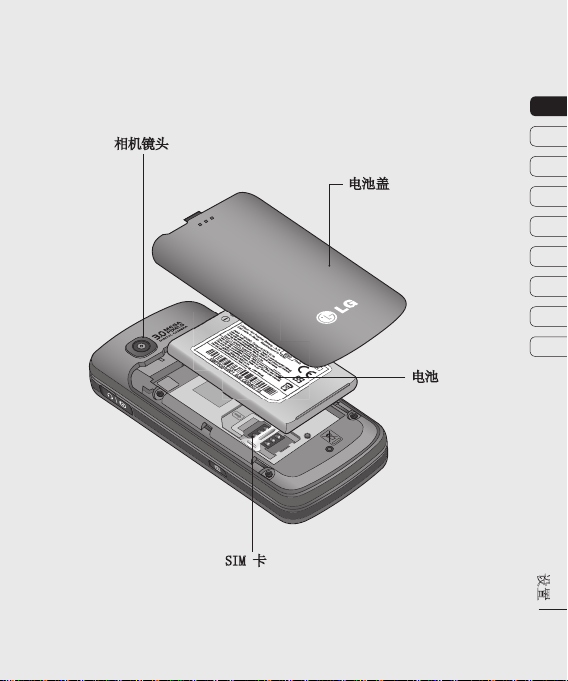
相机镜头
电池盖
01
02
03
04
05
06
07
08
09
电池
SIM 卡
设置
9
Page 10
LG KS500 |
用户手册
10
设置
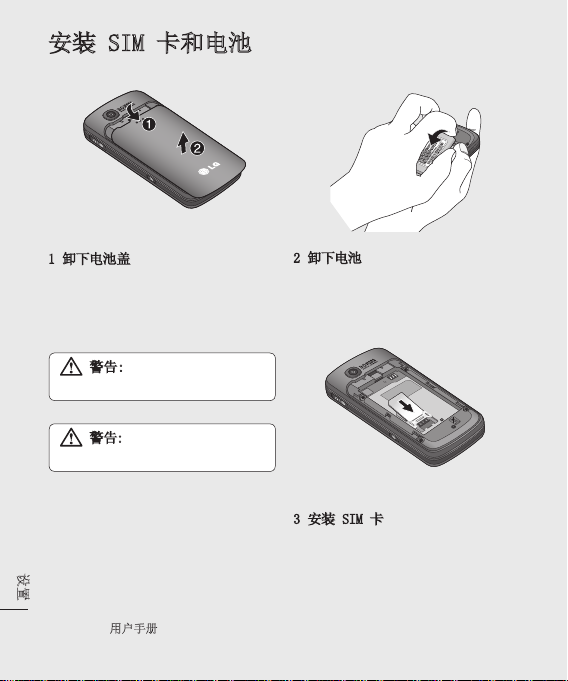
安装 SIM 卡和电池
1 卸下电池盖
将电池盖沿手机底部滑动,卸下电
池盖。
警告: 不要使用指甲取出
电池。
警告: 手机开机时,不要取出
电池,这可能会损坏手机。
2 卸下电池
抬起电池底边,小心将电池从电池
室取出。
3 安装 SIM 卡
将 SIM 卡滑进 SIM 卡弹夹中。确
保卡的金色接触区域面朝下。要取出
SIM 卡,沿相反的方向轻推。
Page 11

4 安装电池
先将电池顶端插入电池室顶部。请确
保电池触点与手机端子对齐。向下推
电池底端,直至电池卡入到位。
5 更换电池盖
将电池盖沿手机顶部滑动,直到卡
入到位。
6 充电
推开 KS500 侧面的充电器插槽
盖。将接头插入充电器,然后将充
电器插入电流插座。只有屏幕上显
示“已完全充电”信息,KS500 充电
才完成。
01
02
03
04
05
06
07
08
09
设置
11
Page 12
LG KS500 |
用户手册
12
设置
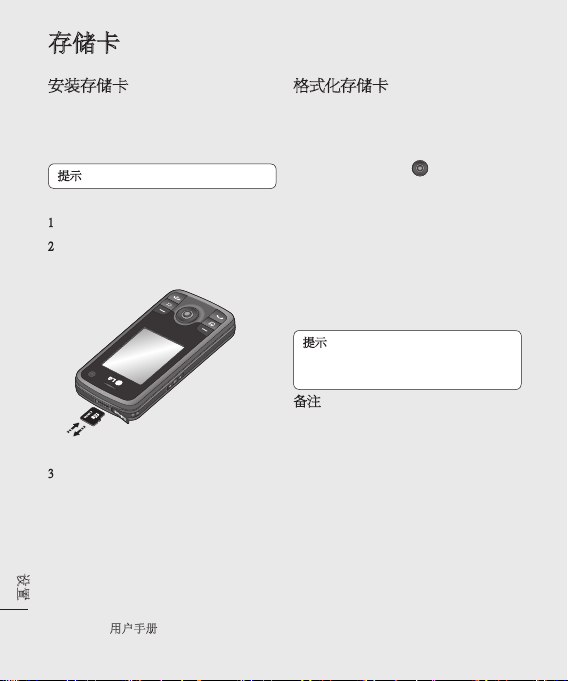
存储卡
安装存储卡
使用存储卡,可以扩展手机的可用
存储空间。 KS500 最大支持 8GB 存
储卡。
提示:存储卡是可选配件。
1 像前面一样卸下电池盖。
2 将存储卡滑入插槽顶部,直到卡入
到位。 确保金色接触区域面朝下。
3 像前面一样替换电池盖。
格式化存储卡
如果已格式化存储卡,您可以开始使
用。 如果未格式化存储卡,您需要先
进行格式化。
1 从待机屏幕中按 ,选择“设
置”。
2 选择“内存管理器”,然后选择“外
部存储器”。
3 选择"格式化",然后确认选择。
4 输入密码(如果已设置)以格式化
存储卡,现在,您可以使用该存储
卡了。
提示! 要更改默认存储位置,请从“手
机设定”菜单选择“主存储器设置”,
以打开“内存管理器”。
备注: 如果存储卡中已有内容,它将
自动保存在正确的文件夹中,例如,
视频将自动保存到“我的视频”文件
夹中。
Page 13
传输电话本
将电话本从 USIM 卡传输到手机:
1 从待机屏幕选择 然后选择“电
话本”。
2 选择“设置”,然后选择“复制”。
3 选择“从手机到USIM卡”,然后按右
选择"完成"。
4 选择“全部”或“逐个”,然后按右
选择"完成"。
01
02
03
04
05
06
07
08
09
设置
13
Page 14
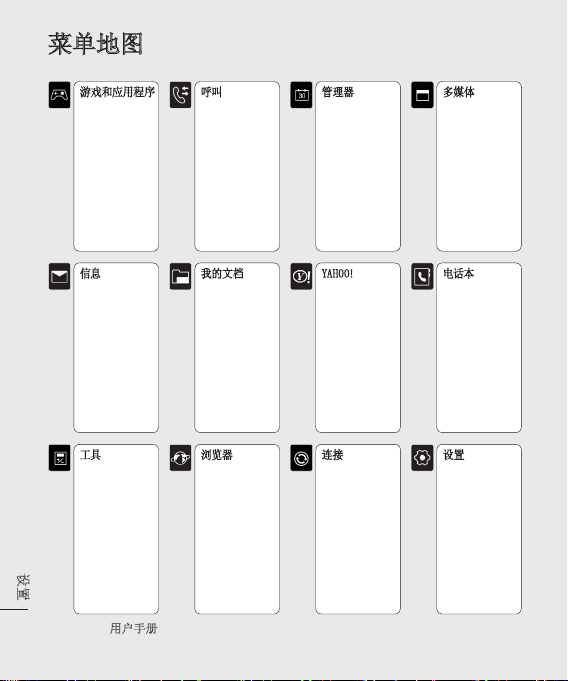
菜单地图
设置
14
游戏和应用程序
1 我的应用程序
2 设置
信息
1 创建新信息
2 收件箱
3 电子邮箱
4 草稿箱
5 发件箱
6 已发送
7 我的文件夹
8 模板
9 图释
0 设置
工具
1 快速菜单
2 闹钟
3 计算器
4 秒表
5 换算器
6 世界时间
7
SIM 卡服务
LG KS500 |
用户手册
呼叫
1 拨打视频电话
2 通话记录
3 通话时间
4 数据音量
5 通话费用
6 呼叫转接
7 呼叫限制
8 固定拔号
9 呼叫等待
0 常用设置
* 视频通话设置
我的文档
1 我的图像
2 我的声音
3 我的视频
4 我的应用程序
5 Flash 内容
6 其它
7 外部存储器
浏览器
1 主页
2 输入地址
3 书签
4 RSS 读卡器
5 保存的网页
6 历史记录
7 设置
管理器
1 日历
2 任务
3 备忘录
4 私人备忘录
5 日期计算器
6 设置
YAHOO!
1 Yahoo! Go
连接
1 蓝牙
2 同步服务
3 USB 连接模式
4
GPS 类型
多媒体
1 照相机
2 摄像机
3 音乐
4 录音机
电话本
1 新增
2 搜索
3 快速拨号
4 群组
5 服务号码
6 本机号码
7 我的名片
8 设置
设置
1 情景模式
2 手机
3 显示
4 日期和时间
5 网络
6 互联网配置文件
7 存取点
8 分组数据连接
9 安全性
0 内存管理器
* 流媒体设置
# 恢复初始设定
Page 15
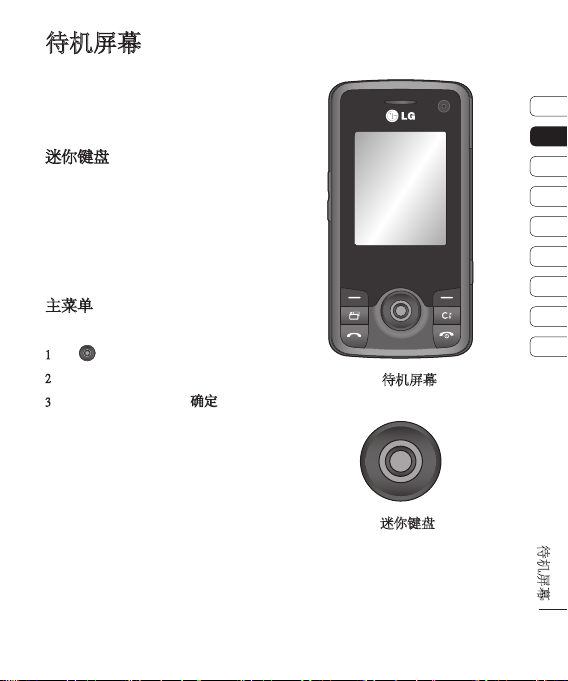
待机屏幕
在此,您可以访问菜单选项、快速拨
打电话和更改情景模式,以及其它一
些操作。
迷你键盘
你的KS500有一个独特的功能;迷你
键盘。你可用它来导航 菜单和网络服
务.利用迷你键盘移动和做选择。迷你
键盘能让你上,下,左,右移动在主菜单
或在不同的应用程序。按迷你键盘能
打开主菜单。
主菜单
主菜单提供 12 个菜单选项。
1 按 能打开主菜单。
2 使用箭头键选择所需菜单选项。
3 选定需要的选项时,按确定打开
01
02
03
04
05
06
07
08
09
s 待机屏幕
s 迷你键盘
待机屏幕
15
Page 16
待机屏幕
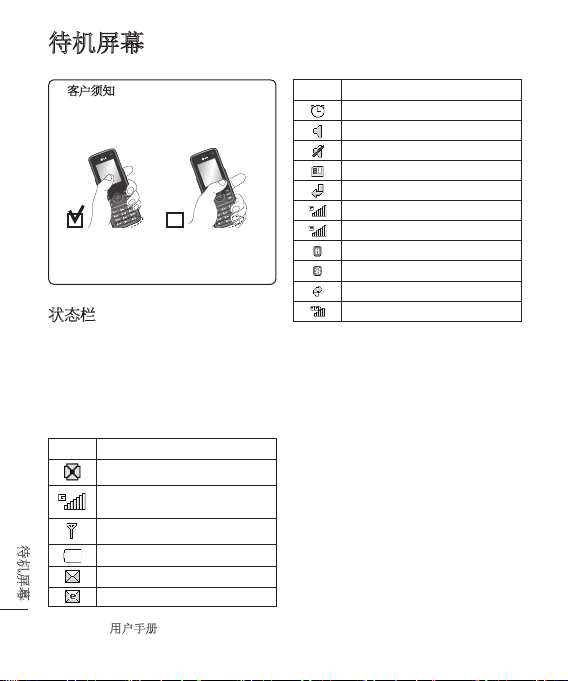
客户须知
为了使天线保持最佳的灵敏度,
LG 建议您按照下图所示的方式持
握手机。
X
通话和使用蓝牙连接期间,请不要
用手遮挡天线区域。 这可能降低
信号质量。
状态栏
状态栏使用不同图标指示诸如信号强
度、新信息和电池使用寿命等信息,以
及告知您是否启动了蓝牙或 GPRS。
下表说明了您可能在状态栏中看到的
不同图标的涵义。
图标 描述
多任务
网络信号强度(指示栏数
不同)
LG KS500 |
无网络信号
电池电量空
新文本信息
新电子邮件
用户手册
待机屏幕
16
图标 描述
闹钟已设置
正在使用“标准”情景模式
正在使用“静音”情景模式
外部存储器
呼叫被转接
GPRS 可用
正在使用 EDGE
正在漫游
蓝牙已启动
来电被拒绝
3G 可用
Page 17
呼叫
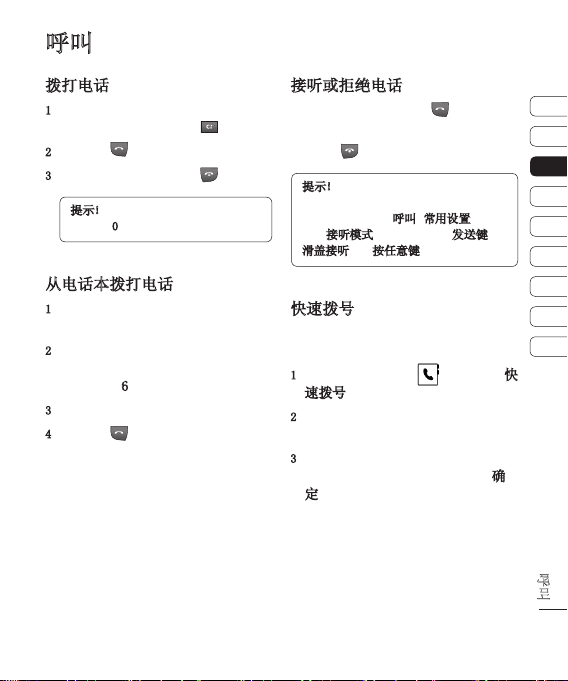
拨打电话
1 使用键盘输入号码。
要删除一个数字,请按 。
2 按绿色 键拨打输入的号码。
3 要结束通话,请按红色 键。
提示!要输入 + 以拨打国际电话,
请按住 0。
从电话本拨打电话
1 从主菜单中,按向下箭头打开电话
本。
2 使用键盘输入您要呼叫的联系人的
第一个字母。因此,对于“Office”,
请按三次 6 (MNO)。
3 使用箭头键在电话本间滚动。
4 按绿色 键呼叫选定的联系
人。
接听或拒绝电话
电话铃响起时,按绿色 键接听
电话。
按红色 键拒接来电。
提示!您可以更改手机上的设置以更改
接听来电的方式。
从主菜单中,选择呼叫、常用设置,然后
选择接听模式。您可以选择: 发送键、
滑盖接听以及按任意键。
快速拨号
您可以为常用联系人指定快速拨号
号码。
1 从主菜单中,选择 ,然后选择快
速拨号。
2 语音邮件设为快速拨号 1。
选择其它号码以分配至联系人。
3 此时将打开您的电话本。选择您要
分配到该号码的联系人,然后按确
定。
要呼叫快速拨号号码,按住指定的数
字,直到屏幕上显示该联系人。通话将
自动启动。
01
02
03
04
05
06
07
08
09
呼叫
17
Page 18
LG KS500 |
用户手册
18
呼叫
呼叫
查看通话记录
从主菜单中,选择 ,然后选择通
话记录。
所有通话 - 查看所有拨出电话、已接
来电和未接来电的完整列表。
拨出电话 - 查看所有已拨打的电话
的列表。
已接来电 - 查看打给您的所有电话
的列表。
未接来电 - 查看您没接到的所有电
话的列表。
要查看其它通话信息,请在 菜单
中选择:
通话时间 - 查看通话时长的详细信
息。
通话费用 - 查看您拨打电话所产生的
费用(此服务取决于网络,某些运营商
不支持此服务)、所有电话的通话时间
(已接听和已拨打)。
数据音量 - 查看所有已接收和发送数
据的字节数(KB)。
提示!从任意通话记录中选择“选项”,
删除选定的或所有记录的项。
使用呼叫转接
1 从主菜单中,选择 。
2 选择呼叫转接。
3 选择转接电话的情况: 转接所有通
话、线路忙时转接、无人接听时转
接,或无网络或关机时转接。
4 选择是否要转接至语音邮箱或其它
号码。
5 输入转接号码或选择搜索浏览转接
号码。
备注: 转接来电可能会产生一定费
用。有关详细信息,请联系您的网络
提供商。
提示!要关闭所有通话转接,请从呼叫转
接菜单中选择全部关闭。
Page 19
使用呼叫限制
1 从主菜单中,选择 。
2 选择呼叫限制。
3 针对语音来电或可视电话选择以下
选项中的一项或所有项:
所有拨出电话
拨出的国际电话
国际漫游时拨出的电话
所有来电
国际漫游时来电
4 选择激活,然后输入呼叫限制密码。
请与您的网络运营商联系,了解有关
此服务的信息。
提示!如果要仅允许从手机拨打特定号
码,您可以打开固定拨号功能。要打开此
功能,请从呼叫菜单中选择固定号码,然
后选择打开。请注意,您需要从运营商处
获取 PIN2 码。
更改常用设置
1 从主菜单中,选择 ,然后选择常
用设置。
2 在此,您可以修改以下设置:
拒接来电 - 您可以设置是否拒接来
电。
发送我的号码 - 选择当您呼叫对方
时是否显示您的号码。
自动重拨 - 选择开或关。
接听模式 - 选择是使用接受键、任
意键接听电话还是滑开手机时接听
电话。
分钟提示音 - 选择打开,在通话过
程中每一分钟将听到一次提示音。
蓝牙接听模式 - 您可以选择是通过
手机还是蓝牙耳机(如果连接)接听
来电。
保存新号码 - 选择在结束通话时是
否要保存电话号码(如果该号码尚未
保存在电话本中)。
通话关闭设置 - 选择关闭滑盖时是
否结束当前通话。
01
02
03
04
05
06
07
08
09
呼叫
19
Page 20
LG KS500 |
用户手册
20
呼叫
呼叫
搜索联系人
1 从主菜单中,选择 ,然后选择搜
索。
2 使用键盘输入您要呼叫的联系人的
第一个字母。因此,对于“Office”,
请按三次 6 (MNO)。
3 使用箭头键在电话本及其不同号码
间滚动。
添加新联系人
1 从主菜单中,选择 ,然后选择新
增。
2 选择是将新联系人保存到手机还是
USIM 卡。
3 输入您要保存的有关联系人的信息,
然后,选择完成。
或者,使用以下快捷键:
1 输入要保存的号码,然后选择选
项。
2 选择保存号码,然后选择添加新名称
或更新电话本以选择是创建新联系
人还是更新现有联系人。
3 输入以上相关信息,然后选择完
成。
备注: 保存联系人的电子邮件地址
时,按键盘上的 键选择符号,
如“@”。
联系人选项
查看联系人时,您可以执行多项操作。
以下介绍如何访问及使用这些功能:
1 打开您要使用的联系人。
请参阅上面的搜索联系人。
2 选择选项以打开选项列表。在此,您
可以:
发送信息 - 向联系人发送信息。如
果联系人有电子邮件地址,您也可以
在此向其发送电子邮件。
发送名片 - 以名片方式发送联系人
的详细信息。
回复电话 - 向联系人拨打语音电
话。
拨打视频电话 - 向联系人拨打视频
电话。
新增 - 添加新联系人。
编辑 - 更改联系人的详细信息。
标记/去除标记 - 对选定联系人执
行标记/去除标记操作。
Page 21
查找方式 - 按名称或群组搜索联系
人。
保存到 USIM 卡 - 选择是移动还是
复制到 SIM 卡或手机(取决于联系
人的初始保存位置)。
删除 - 删除联系人。选择是确认。
文本输入 - 插入符号、输入法、编
写语言和添加至自订字库的选项。
将联系人添加到群组
您可以将联系人集合到群组,例如,将
工作同事和家人分开。手机中已设置多
个群组,包括: 家人、朋友、同事、同
学、重要人士。
1 从主菜单中,选择 ,然后选择群
组。
2 滚动到您要添加联系人的群组,选
择它,然后选择新增。
3 此时将打开联系人列表。滚动到您
要添加至群组的联系人,选择标记,
然后选择完成。
提示!您可以为群组指定来电铃声。选
择您要为其指定来电铃声的群组,然后
选择选项。
为联系人添加图片
您可以为联系人添加图片,更改联系人
在地址簿中的显示方式。
1 从主菜单中,选择 ,然后选择设
置。
2 选择联系人列表设置,然后从显示
图片选项卡中选择关或开。
3 返回到电话本,选择您要为其添加图
片的联系人。
4 选择选项,然后选择编辑。
5 向下滚动到图像部分。
选择编辑,然后选择选项。
如果选择拍照,将打开相机取景器,
以便您为联系人拍照。
将电话本复制到 SIM 卡
您可以将联系人从 SIM 卡复制到手
机,或从手机复制到 SIM 卡。
1 从主菜单中,选择 ,然后依次选
择设置和复制。
2 在从手机到 USIM 卡或从 USIM 卡
到手机间选择。
3 选择是要一次性复制所有联系人还
是每次复制一个。
01
02
03
04
05
06
07
08
09
呼叫
21
Page 22
呼叫
删除所有联系人
1 从主菜单中,选择 ,然后依次选
择设置和清空电话本。
2 选择是从 USIM 卡还是手机删除联
系人。
3 选择是确认选择。
查看信息
1 从主菜单中,选择 ,然后选择以
下选项之一以查看服务号码、本机号
码或您自己的名片。
提示!如果您尚未创建名片,我的名片屏
幕将为您提供创建名片的选项。选择添
加,输入任何其他联系人的详细信息。
结束后,请选择完成。
呼叫
22
LG KS500 |
用户手册
Page 23
信息
信息
KS500 将短信、多媒体信息和电子邮件
结合到一个直观易使用的菜单中。
发送信息
1 从主菜单中,选择 和创建新信
息。
2 选择以发送信息或电子邮件。
3 此时将打开一条新的空白信息。
4 使用 T9 预测、Abc 手动输入信
息。
请参阅下面的输入法,查看如何在不
同的文本输入模式间切换。
5 从选项菜单中,选择插入以添加图
像、视频、声音或符号。
6 选择发送。
7 输入电话号码,或选择电话本以打开
联系人列表。
您可以添加多个联系人。
8 选择发送。
输入文本
有两种方式可输入文本:
“T9 预测”和“Abc 手动”。
要打开 T9 预测文本以开始写新信
息,请依次选择选项、输入法和 T9
模式。
打开 T9 后,您可以按 在 T9 预
测、Abc 手动和数字之间切换。
T9 预测
T9 模式根据您的按键顺序,使用内置
词典识别您输入的字。只需点触与您要
输入的字母关联的数字键即可,输入所
有字母后,字典将识别您输入的内容。
例如,依次按 8、3、5、3、7、4、6、6、3
输入“telephone”。
如果未显示您需要的单词,请选择“选
项”,然后选择添加至自订字库。使用
Abc 手动模式输入单词,您输入的单词
或名称将被添加到词典中。
01
02
03
04
05
06
07
08
09
信息
23
Page 24
LG KS500 |
用户手册
24
信息
信息
Abc 手动
在 Abc 模式中,要输入字母,您必须
重复按键。例如,要写入“hello”,需
要按两次 4、两次 3、三次 5,再按三
次 5,最后按三次 6。
设置电子邮件
使用 KS500 中的电子邮件,您可以
在旅途中随时与他人保持联系。设
置 POP3 或 IMAP4 电子邮件账户非
常快捷。
1 从主菜单中,选择 ,然后选择
设置。
2 选择电子邮件,然后选择电子邮件账
户。
3 选择选项,然后选择编辑。
4 现在,您可以选择帐户工作方式:
我的名称 - 输入您的名称。
用户名 - 输入账户的用户名。
密码 - 输入账户密码。
电子邮件地址 - 输入账户的电子邮
件地址。
邮件回复地址 - 输入“回复”电子
邮件地址。
发送邮件服务器 - 输入帐户的邮件
服务器地址。
接收邮件服务器 - 输入账户的详细
信息。
最大接收字节数 - 选择电子邮件的
大小限制,最大为 1MB。
邮箱类型 - 输入邮箱类型:
POP3 或 IMAP4。
保存到服务器 - 选择是否将电子
邮件保存到服务器。对于 IMAP4 账
户,始终保存副本。
保存已发送邮件至 - 选择是否保存
IMAP4 电子邮件。对于 POP3 账户,
副本始终保存在手机中。
接入点 - 选择 Internet 接入
点。
自动读取 - 选择是否要检索邮件。
高级设置 - 选择是否使用高级设
置。
SMTP 端口号 - 通常为 25。
Page 25
接收服务器端口 - 通常,对于
POP3 账户为 110; 对于 IMAP4 账
户为 143。
SMTP 认证 - 选择发送邮件服务器
的安全设置。
SMTP 用户名 - 输入 SMTP 用户
名。
SMTP 密码 - 输入 SMTP 密码。
APOP 安全登录 - 选择可为 POP3
账户激活 APOP 安全登录。 IMAP4
账户通常设置为“关闭”。
检索电子邮件
您可以自动或手动查看新电子邮件。有
关如何自动查看新电子邮件的详细信
息,请参阅更改电子邮件设置。
手动查看:
1 从主菜单中,选择信息,然后按电子
邮箱
2 选择您要查看其电子邮件的账户,然
后选择检索。
3 KS500 将连接到您的电子邮件账户
并检索新邮件。
更改电子邮件设置
您可以使用以下设置配置电子邮件首
选项。
1 从主菜单中,选择信息,然后选择设
置。
2 选择电子邮件 - 在此,您可以更改
以下设置:
允许回复电子邮件 - 选择是否允许
发送“读取确认”邮件。
请求回复电子邮件 - 选择是否要请
求“读取确认”邮件。
检索间隔 - 选择 KS500 检查新电
子邮件信息的频率。
消息包括在转送和回复 - 选择在回
复时是否要包括原始邮件。
包含附件 - 选择是否要包含原始附
件。
漫游时自动检索 - 选择漫游时是自
动检索邮件或停止自动检索。
新电子邮件通知 - 选择在收到新电
子邮件时是否需要提示。
01
02
03
04
05
06
07
08
09
信息
25
Page 26
LG KS500 |
用户手册
26
信息
信息
签名 - 创建电子邮件签名并打开此
功能。
优先级 - 选择电子邮件信息的优先
级级别。
信息文件夹
从主菜单中,选择 。
收件箱 - 您接收到的所有信息将放置
在收件箱中。在此,您可以执行回复、
转发及其它操作,有关详细信息,请参
阅第 26 页。
电子邮箱 - 电子邮箱文件夹包含手
机上配置的每个电子邮件帐户的文
件夹。
草稿箱 - 如果您来不及写完一条信
息,您可以将已写信息保存在此。
发件箱 - 这是发送信息时的临时存
储文件夹。
已发送 - 您发送的所有信息将放置在
已发送文件夹中。
我的文件夹 - 允许您根据需要对信息
进行分组。
模板 - 一个有用的信息列表,可用于
快速回复。
图释 - 有用的图释列表。
您也可以通过选择设置来访问信息
设置。
管理信息
您可以使用收件箱管理信息。
1 从主菜单中,选择信息,然后选择收
件箱。
2 选择选项,然后选择:
回复 - 回复选定的信息。
转发 - 将选定信息发送给其他人。
通话 - 向发件人拨打电话。
删除 - 删除选定的信息。
创建新信息 - 创建新的信息或电子
邮件。
标记/去除标记 - 对选定信息执行
标记/去除标记操作。
Page 27

移至我的文件夹 - 将选定信息移至
您创建的文件夹之一。
过滤器 - 根据信息是短信还是彩
信,对其进行排序。
提示!如果看到信息无空间接收信息,
您可以删除信息或保存的文件以腾出
空间。
使用模板
为您最常使用的短信和多媒体信息创
建模板。手机中已有一些模板,您可以
根据需要进行编辑。
1 从主菜单中,选择信息,然后选择模
板。
2 选择文本模板或多媒体模板。选定
信息后,依次选择选项和编辑以更改
现有模板。您也可以选择新增创建
新模板或删除删除现有模板。
3 在创建新信息时,您可以通过选择
选项,然后依次选择插入和模板使
用模板。
更改文本信息设置
KS500 已预定义信息设置,因此,您可
以立即发送信息。
如果您要更改设置,请参阅以下内容获
取详细信息。
从主菜单中,选择信息,然后依次选择
设置和文本信息。您可以更改:
文本信息中心 - 输入信息中心的详
细信息。
发送报告 - 选择可接收信息已发送
确认信息。
有效期 - 选择信息在信息中心中的最
常保存时间。
信息类型 - 将文本转换为文本、语
音、传真、X.400 或电子邮件。
字符编码 - 选择字符编码方式,请注
意,这将影响信息大小并因此产生数
据费用。
将长文本另发送为 - 选择发送长信息
的方式(通过多条短信或一条彩信)。
01
02
03
04
05
06
07
08
09
信息
27
Page 28
信息
更改多媒体信息设置
从主菜单中,选择信息,然后依次选择
设置和多媒体信息。
您可以更改:
检索模式 - 选择是自动还是手动下
载多媒体信息,取决于您是在当地还
是漫游。
状态报告 - 选择是否允许请求状态
报告。
已读回执 - 选择是否允许发送已读
回执。
优先级 - 选择多媒体信息的优先级
级别。
有效期 - 选择信息在信息中心中的最
常保存时间。
幻灯片持续时间 - 选择幻灯片在屏幕
上显示多长时间。
创建模式 - 从受限、警告和未使用
中选择。
发送时间 - 从立即、1 小时之后、
1 天之后和 1 周之后选择。
多媒体信息中心 - 选择特定于网络设
定的运营商以发送多媒体信息。
信息
28
LG KS500 |
用户手册
更改其它设置
从主菜单中,依次选择信息和设置,然
后从以下选项中选择:
视频信箱中心或语音邮件 - 在此将保
存您的视频邮件和/或语音邮件号码。
有关其提供的服务的详细信息,请联系
您的网络运营商。
服务信息 - 您可以在此关
闭“Push”信息,这意味着您的信息在
到达时将不再被直接推入设备,只有在
您检查新信息时才会。
小区服务 - 选择小区服务的接收状
态、信息提示和语言。
Page 29
照相机
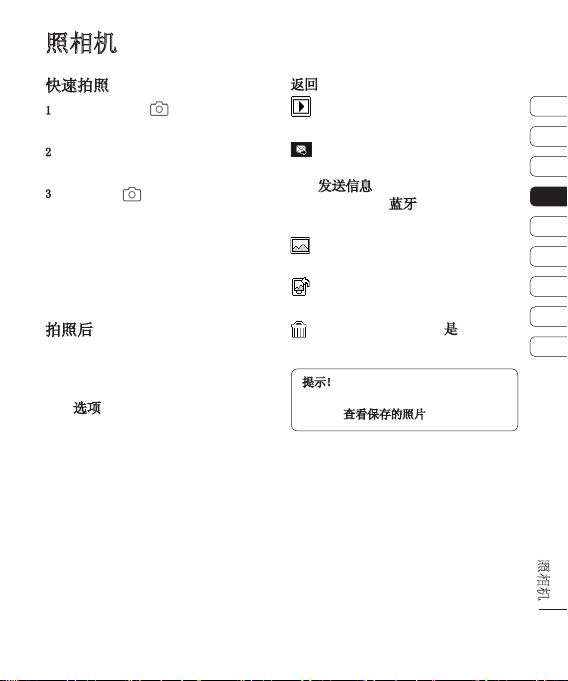
快速拍照
1 按手机右侧的 键,此时屏幕上
将出现相机取景器。
2 水平放置相机,将镜头对准要拍摄的
物体。
3 按中键或 键拍照。
拍好的照片的文件名指明当前日期和
时间。
(示例) PDD-MM-YY_hh.mm
( P:前缀 / D:日 / M:月 /
Y:年 / h:小时 / m:分钟)
拍照后
拍好的照片将显示在屏幕上。图像名称
在屏幕底部滚动显示,屏幕右侧将显示
多个选项。
选择选项重命名或编辑图像。
返回 - 返回上一个菜单。
查看“相册”中保存的您拍摄的
照片。
以彩信、电子邮件、通过蓝牙或作
为明信片发送照片。
有关发送信息的信息,请参阅第
23 页,有关使用蓝牙发送和接收文件
的信息,请参阅第 50 页。
立即拍摄其它照片。
将保存您的当前照片。
将图像用作墙纸、联系人图像或开
机或关机屏幕。
删除拍摄的照片,点触是确认。此
时将出现取景器。
提示!在相机模式下,选择“播放”图
标打开相册。有关详细信息,请参阅第
30 页的
查看保存的照片。
01
02
03
04
05
06
07
08
09
照相机
29
Page 30
LG KS500 |
用户手册
30
照相机
照相机
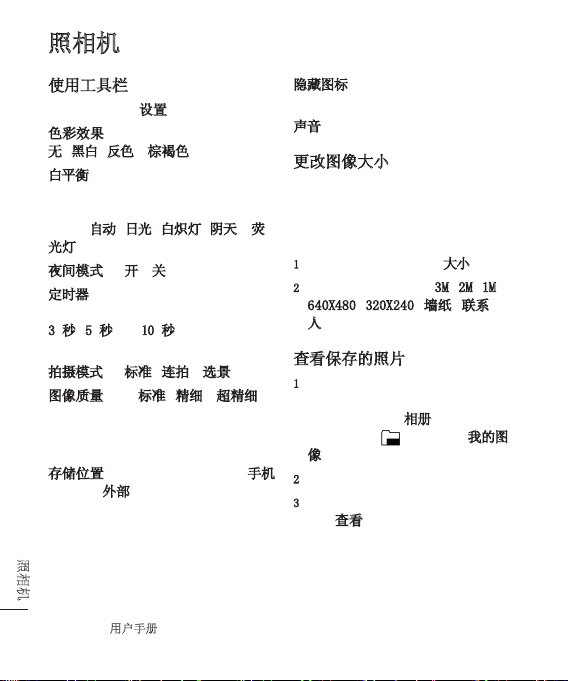
使用工具栏
拍照前,请选择设置以配置各种选项。
色彩效果 - 从四个色调选项中选择:
无、黑白、反色和棕褐色。
白平衡 - 白平衡确保照片中的白色
显示真实。要正确调整相机的白平衡,
您需要确定光照条件。从以下选项中
选择: 自动、日光、白炽灯、阴天或荧
光灯。
夜间模式 - 开或关
定时器 - 自拍器允许您设置按下拍
摄按钮后的延迟。从以下选项中选择:
3 秒、5 秒 或 10 秒。如果照片中要
包括您自己,自拍器非常有用。
拍摄模式 - 标准、连拍和选景
图像质量 - 在标准、精细和超精细之
间选择。质量越精细,照片将越清晰,
同时,文件更大,这意味着内存中可存
储的照片越少。
存储位置 - 选择是将照片保存到手机
内存还是外部存储器。
隐藏图标 - 设置是否自动隐藏取景器
边缘的图标。
声音 - 从三种快门声音中选择一种。
更改图像大小
图像越大,文件越大。保存的照片越
大,占用的手机内存则越多。如果要在
手机中保存更多图片,请更改图像大
小,使文件更小。
1 从右侧的工具栏中选择大小。
2 从以下选项中选择: (3M、2M、1M、
640X480、320X240、墙纸、联系
人)。
查看保存的照片
1 您可以通过相机模式或从待机屏幕
访问保存的照片。在取景器中,从
右侧工具栏选择相册即可。从主菜
单中,选择 ,然后选择我的图
像。
2 屏幕上将显示您的图片库。
3 使用箭头选择您要查看的照片,然后
选择查看放大。
Page 31

选择拍摄模式
1 选择设置打开可用拍摄模式。
2 从四个选项中进行选择:
标准拍摄 - 此为默认拍摄模式,照
片将以标准方式拍摄,如第 29 页
的快速拍照中所述。
连拍 - 这允许您快速地连续拍摄
九张照片。有关详细信息,请参阅第
31 页的使用连拍模式。
选景 - 从趣味相框中选择一个,将
您的朋友化身为海盗或为其点缀环
境。
使用连拍模式
连拍模式对于拍摄移动中的物体或运
动中的物体非常有用。
1 选择连拍。
2 将物体定位在取景器中,请像拍摄普
通照片一样按下拍摄按钮。
3 相机将快速地连续拍摄八张照片,
并在屏幕左侧显示第一张照片的缩
略图。
4 通过选择缩略图选择您要保留的照
片: 第一次是查看,然后选择保存以
保存。
5 在图像缩略图旁边将显示一个勾
号。选择保存以退出。
使用选景拍摄模式
选景拍摄可将您的朋友化身为海盗或
为其点缀环境。
1 选择选景菜单。
2 将物体定位在趣味相框中,按拍摄
按钮。
3 通过选择保存来保存图像。
01
02
03
04
05
06
07
08
09
照相机
31
Page 32

LG KS500 |
用户手册
32
摄像机
摄像机
快速摄像
1 按手机右侧的 键,此时屏幕上
将出现相机取景器。
2 从右侧工具栏中选择视频,屏幕上将
显示摄像机的取景器。
3 将相机镜头对准要拍摄的物体。
4 按中键或按 键开始录制。
5 REC 出现在取景器下底部,计时器将
显示视频长度。
6 要暂停视频,请选择暂停,要恢复录
制,请选择恢复。
7 选择停止可以停止录制。
备注: 您也可以从主菜单访问摄像机:
选择 ,向下滚动并选择摄像机以
打开取景器。
拍摄视频后
屏幕上将显示所拍摄视频的静态图像。
视频名称滚动显示在屏幕底部。按设
置,您可以访问用作和重命名。
使用工具栏
拍摄视频前,请选择设置以配置各种
选项。
色彩效果 - 选择适用于您所拍摄的
视频的色调。从四个色调选项中选择:
无、黑白、反色或棕褐色。
白平衡 - 白平衡确保视频中的白色
显示真实。要正确调整相机的白平衡,
您需要确定光照条件。从以下选项中
选择: 自动、日光、白炽灯、阴天或荧
光灯。
夜间模式 - 开或关
视频质量 - 在超精细、精细和标准之
间选择。质量越精细,视频将越清晰,
同时,文件更大,这意味着内存中可存
储的视频越少。
时长 - 正常和彩色录音。
提示!设置菜单层叠在取景器之上,因
此,当您更改图像颜色或质量时,您将在
设置菜单下预览到图像更改效果。
Page 33

使用箭头键导航其它中的选项。
存储位置 - 选择是将视频保存到手机
内存还是外部存储器。
隐藏图标 - 设置相机是否自动隐藏取
景器侧面的图标。
语音 - 选择“静音”,录制视频而不
录制声音。
观看保存的视频
1 选择摄像册图标。屏幕上将显示您的
摄像册。
2 突出显示您要查看的视频,将其调
到摄像册前方。
3 选择视频以完全打开。
观看视频时调节音量
要在播放视频时调整音频音量,请使
用手机侧键。
01
02
03
04
05
06
07
08
09
摄像机
33
Page 34

LG KS500 |
用户手册
34
我的文档
我的文档
您可以将多媒体文件储存到手机内存
的我的文档中,这样,您可以轻松访问
所有图片、声音、视频和游戏。您也可
以将文件保存到存储卡中。使用存储
卡的优点是: 您可以释放手机内存的
存储空间。
我的图像
我的图像包含一个文件夹,其中包括预
先加载到手机中的默认图像、您下载的
图像以及手机相机拍摄的图像。
选项菜单
可用选项取决于您选择的图像类型。以
下列出的所有选项对于您使用手机相
机拍摄的照片均可用,但对于默认图
像,仅可使用新建文件夹、排序方式、
网格视图、文件信息和内存管理器。
在图像文件夹中,选择“选项”以显示
选项列表。
发送 - 通过信息、电子邮件或蓝牙向
朋友发送选定的图像。
备注: 在通过多媒体信息发送图像
前,可能需要调整其大小。
用作 - 选择是用作墙纸、联系人图
像、开机图像还是关机图像。
移动 - 将图像从手机内存移到存储
卡,或从存储卡移到手机内存。
复制 - 将图像从手机内存复制到存储
卡,或从存储卡复制到手机内存。
删除 - 删除选定的图像。
标记/去除标记 - 选择多个文件。
打印方式 - 通过 Bluetooth® 打印
图像文件。
文件 - 旋转、重命名或查看选定图像
的信息(名称、大小、日期、分辨率、类
型和版权所有)。
新建文件夹 - 在“图片”文件夹中创
建一个新的文件夹。
幻灯片显示 - 请参阅第 35 页的创建
幻灯片显示。
排序方式 - 按日期、类型或名称排
列图像。
列表视图/网格视图 - 更改您查看照
片的方式。
内存信息 - 查看内存状态。
Page 35

发送照片
1 从主菜单中,选择 。
2 选择我的图像。
3 选择照片,然后选择选项。
4 选择发送并从信息、电子邮件或蓝牙
中选择。
5 如果选择信息或电子邮件,照片将被
附加到信息中,您可以照常撰写和发
送信息。如果选择蓝牙,手机将提示
您打开蓝牙; 如果选择是,手机将
搜索要将图片发送至的设备。
管理图像
1 从主菜单中,选择 。
2 选择我的图像。
3 选择选项,然后选择排序方式。
4 从日期、类型或名称中选择。
删除图像
1 从主菜单中,选择 。
2 选择我的图像。
3 选择图像,然后选择选项。
4 选择删除。
创建幻灯片显示
如果要在手机上查看图像,您可以创建
一个幻灯片显示,这样,您无需对每张
图像都执行打开和关闭操作。
1 从主菜单中,选择 。
2 选择我的图像。
3 选择您要开始幻灯片放映的照片,然
后选择选项。
4 选择幻灯片显示,放映即开始。
5 选择停止暂停幻灯片显示,选择返回
结束幻灯片显示或返回我的图像文
件夹。
在幻灯片显示过程中选择选项允许您
更改为全屏或风景视图。
01
02
03
04
05
06
07
08
09
我的文档
35
Page 36

LG KS500 |
用户手册
36
我的文档
我的文档
我的声音
我的声音文件夹包含默认声音以及录
音。在此,您可以将声音设为铃声或将
其发送给其他人。
使用声音
1 从主菜单中,选择 。
2 选择我的声音。
3 选择默认声音或录音。
4 找到一个声音,选择播放试听。
5 选择选项,然后选择用作将声音设
为来电铃声、视频铃声、信息提示
音、开机铃声或关机铃声。
我的视频
我的视频文件夹包括下载的视频和您
在手机上录制的视频。
观看视频
1 从主菜单中,选择 。
2 选择我的视频。
3 选择视频,然后选择播放。
暂停视频时使用选项
在暂停模式下选择选项并从以下选项
中选择:
风景视图 - 以完整拍摄模式观看视
频文件。
静音/取消静音 - 打开或关闭声音。
抓取 - 将定帧捕获为图片。
重复 - 重复视频文件。
文件信息 - 查看名称、大小、日期、
时间、类型、长度、尺寸、保护和版权
等详情。
发送 - 以信息、电子邮件形式、通过
蓝牙或作为媒体相册发送视频。
删除 - 删除视频。
用作 - 用作视频铃声。
Page 37

发送视频剪辑
1 选择视频,然后选择选项。
2 选择发送并从信息、电子邮件或蓝牙
中选择。
3 如果选择信息或电子邮件,视频剪
辑将被附加到信息中,您可以照常撰
写和发送信息。如果选择蓝牙,手机
将提示您打开蓝牙并搜索要将视频
发送至的设备。
将视频剪辑用作铃声
1 选择视频,然后选择选项。
2 选择用作,然后选择视频铃声。
使用视频选项菜单
从视频文件夹,您可以选择以下选项:
发送 - 向朋友发送视频。
移动 - 将视频剪辑从手机内存移至存
储卡,或从存储卡移至手机内存。
复制 - 将视频剪辑从手机内存复制到
存储卡,或从存储卡复制到手机内存。
删除 - 删除视频。
标记/去除标记 - 选择多个文件。
文件 - 编辑文件名称并查看其信息。
新建文件夹 - 在“我的视频”文件夹
中创建一个新的文件夹。
排序方式 - 按特定顺序排列视频。
网格视图/列表视图 - 以网络或列表
类型查看选项菜单。
内存管理器 - 查看内存状态。
游戏和应用程序
KS500 中预安装了多款游戏,供您在
闲暇时娱乐。如果选择要下载其它游
戏或应用程序,它们将保存到此文件
夹中。
玩游戏
1 从主菜单中,选择 。
2 选择我的应用程序。
3 选择所选游戏,然后选择启动。
01
02
03
04
05
06
07
08
09
我的文档
37
Page 38

LG KS500 |
用户手册
38
我的文档
我的文档
Flash 内容
“Flash 内容”文件夹包含所有默认
和下载的 Flash 文件。
查看 Flash 文件
1 选择我的文档,然后选择 Flash 内
容。
2 选择文件,然后按播放。
查看 Flash 文件时使用选项
在暂停模式下选择选项并从以下选项
中选择:
播放/暂停 - 暂停或恢复播放。
全屏/风景视图 - 以全屏或风景视图
模式查看您的 Flash 文件。
(仅在您未暂停而选择选项时出现。)
静音/取消静音 - 打开或关闭声音。
用作墙纸 - 将 Flash 文件用作墙
纸。
文件信息 - 查看有关文件的详细信
息。
其它
其它文件夹用于存储非图片、声音、视
频、游戏或应用程序文件。
我的存储卡
如果您已插入存储卡,它将显示为我
的文档中的一个文件夹。该文件夹将
分为四个文件夹: 图像、声音、视频
和其它。
将手机用作 Mass Storage 设备
KS500 可以用作 Mass Storage 设
备,和 USB 记忆棒一样。要将文件
从计算机移到手机时,这是一个好方
法。如果您已插入存储卡并作为 Mass
Storage 连接,计算机上将显示两个
驱动器。
1 从主菜单中,选择连接。
2 选择 USB 连接。
3 滚动到 Mass Storage,然后选择选
择。
Page 39

4 将 USB 数据线的较小端插入 KS500
一端的接口。将较大端插入计算机
的 USB 端口。
5 此时将自动打开一个可移动磁盘(如
果已插入存储卡,则为两个),其中显
示手机或存储卡上的所有文件夹。
6 将您的图像、视频、音乐或文档拖放
至所需文件夹。
7 通过单击桌面工具栏上的安全移除
硬件图标,安全移除您的手机。
01
02
03
04
05
06
07
08
09
我的文档
39
Page 40

LG KS500 |
用户手册
40
多媒体
多媒体
音乐
LG KS500 拥有内置的 MP3 播放器,
因此,您可以播放所有喜爱的音乐。
要进入 MP3 播放器,请从主菜单选
择 ,然后选择音乐。在此,您可
以访问:
最近播放 - 此菜单显示最近播放的
20 首曲目。
所有曲目 - 包含手机中的所有歌曲。
艺术家 - 您可以按艺术家查看并播
放音乐。
专辑 - 您可以按专辑查看并播放音
乐。
流派 - 您可以按流派查看并播放音
乐。
播放列表 - 包含您创建的任何播放
列表。
随机曲目 - 如果要以随机方式播放,
请选择此选项。
将音乐传输到手机
将音乐传输到手机的最轻松的方法是
通过蓝牙或同步数据线。
使用蓝牙传输:
1 请确保双方设备都已打开蓝牙,对对
方可见。
2 选择设备上的音乐文件,选择“通过
蓝牙”发送。
3 选择手机上的是接受该文件。
4 文件应显示在音乐 > 所有曲目中。
播放歌曲
1 从主菜单中,选择 。
2 选择音乐。
3 选择所有曲目,然后选择要播放的歌
曲。选择播放开始播放。
4 从选项菜单中,选择最小化以隐藏
音乐播放器屏幕,这样,在音乐播放
时,您可以像往常一样使用手机。
Page 41

5 选择“返回”以停止音乐并返回音乐
菜单。
提示!要在聆听音乐时更改音量,请使用
手机侧面的音量键。
创建播放列表
您可以从所有曲目文件夹中进行选择,
以创建自己的播放列表。
1 从主菜单中,选择 。
2 选择音乐,然后选择播放列表。
3 选择新增,输入播放列表名称,然后
按选择保存。
4 此时将显示所有曲目文件夹。选择要
包含在文件夹中的曲目: 移至所需曲
目,按标记 ,在其名称旁会出现
一个勾号。
5 选择完成以保存播放列表。
播放播放列表
1 从主菜单中,选择 。
2 选择音乐,然后选择播放列表。
3 移至您要播放的播放列表,选择选
择,然后选择播放。
编辑播放列表
您可能随时想要向播放列表添加新歌
曲或从中删除歌曲。
您也可能希望管理播放列表。
1 从主菜单中,选择 。
2 选择音乐,然后选择播放列表。
3 滚动到您要编辑的播放列表,选择
选择,然后选择选项。
从以下选项选择:
新增歌曲 - 使用此选项,您可以向
播放列表添加歌曲,也可以从中删除
歌曲。
从列表中删除 - 将歌曲从播放列表
中删除。点触是确认。
上移/下移 – 在列表中上移或下移
歌曲,以更改播放顺序。
01
02
03
04
05
06
07
08
09
多媒体
41
Page 42

多媒体
删除播放列表
1 从主菜单中,选择 。
2 选择音乐,然后选择播放列表。
3 滚动到您要删除的播放列表,然后
选择选项。
4 选择删除,然后选择是确认。
语音备忘录
使用录音机录制语音备忘录或其它
声音。
1 从主菜单中,选择 。
2 选择录音机。
3 选择 Rec. 开始录音。
4 选择暂停暂停录音。
5 选择静音结束录音
6 从“选项”菜单中,选择播放以试听
录音,或选择删除以删除录音。
备注: 选择选项,然后选择转至录音以
收听保存的所有语音备忘录。
多媒体
42
LG KS500 |
用户手册
发送录音
1 完成录音后,请选择选项。
2 选择发送,然后从信息、蓝牙或电子
邮件中选择。如果选择信息或电子邮
件,录音将被添加到信息中,您可以
照常撰写或发送信息。
将文件传输到手机
您也可以使用蓝牙将文件从计算机传
送到手机。
1 请确保手机和计算机都已打开蓝
牙,彼此可见。
2 通过蓝牙,使用计算机发送文件。
3 通过选择是接受文件。
4 文件将根据其类型保存到相应文件
夹。因此,例如,照片将保存在我的
图像文件夹,音乐将保存在我的声音
文件夹。如果手机无法识别文件类
型,它将保存在其它文件夹。
备注: 使用蓝牙发送的文件仅可保存
在手机内存中。
Page 43

管理器
将事件添加到日历中
1 从主菜单中,选择 ,然后选择日
历。
2 选择您要添加事件的日期。您可以
通过以下方式选择日期: 使用箭头
键滚动到日期; 或依次选择选项、新
增,然后手动输入日期。
3 选择新增,然后输入事件开始时间。
使用箭头键向下滚动,输入事件的结
束时间。
4 向下滚动,输入电子邮件主题。
5 选择是否要为事件设置闹钟。向左
或向右滚动,查看可用选项。您可以
选择将闹钟设为在事件开始时停止,
或在事件开始前的特定时间期内停
止。
6 选择事件是一次性事件,还是重复
事件。您可以从每天、每周、每月、每
年或用户设置选项中选择。如果事件
为重复事件,您还可以向下滚动以输
入过期日期,事件将在该日期停止重
复。
7 选择完成,您的事件将保存在日历
中。将使用图标标记包含事件的日
期。
编辑日历事件
1 从主菜单中,选择 ,然后选择日
历。
2 选择“选项”,然后选择每周以查看
所有事件列表。滚动到您要编辑的
事件,然后选择查看。或者,在日历
中选择事件发生的日期,然后选择查
看。
3 选择选项,然后选择编辑,然后滚动
到您要更改的事件详细资料。进行修
改,然后选择完成以存储编辑过的
事件。
备注: 您可以从日历中删除事件: 查
看事件,然后选择删除。
共享日历事件
1 从主菜单中,选择 ,然后选择日
程表。
2 选择查看以选择要共享的事件,然
后选择选项。
3 选择发送,然后从文本信息、多媒体
信息、电子邮件或蓝牙中选择。
01
02
03
04
05
06
07
08
09
管理器
43
Page 44

管理器
添加备忘录
1 从主菜单中,选择 ,然后选择备
忘录。
2 选择新增,然后键入您的备忘录。
3 选择保存。
4 在您下一次打开备忘录应用程序时,
将打开备忘录应用程序。
提示!您可以编辑现有备忘录。
选择要编辑的备忘录,选择选项,然后
选择编辑。
管理器
44
LG KS500 |
用户手册
Page 45

工具
设置闹钟
1 从主菜单中,选择 ,然后选择闹
钟。
2 从选项菜单中选择新增。
3 输入所需闹钟时间。
4 选择您希望闹钟响起的方式: 一次、
每天、星期一至星期五、星期一至星
期六、星期六至星期天或节假日除
外。
5 向下滚动,选择闹钟声音。选择编辑
选择新声音。
6 向下滚动,为闹钟输入名称或保留建
议的名称。
7 选择完成。
备注: 您最多可以设置 5 个闹钟。
使用计算器
1 从主菜单中,选择 ,然后选择计
算器。
2 按数字键输入数字。
3 使用箭头键进行加、减、乘、除操
作。
4 您可以进入选项菜单,执行更复杂
的计算。
5 按 清空屏幕以开始新计算。
世界时间
1 从主菜单中,选择 ,然后选择世
界时间。
2 要向列表添加新城市,请依次选择选
项、添加城市,然后从列表中选择城
市。
3 要设置当前时区,请选择选项,然后
选择更改当前城市。
01
02
03
04
05
06
07
08
09
工具
45
Page 46

工具
换算器
1 从主菜单中,选择 ,然后选择换
算器。
2 您可以选择换算币种、面积、长度、
重量、温度、容量或速度。
3 选择初始和目标换算测量单位。
4 下面将显示换算结果。
使用秒表
1 从主菜单中,选择 ,然后选择秒
表。
2 按开始启动计时器。
3 如果要记录时间,请按记录。
4 按静音停止计时器。
5 按恢复继续计时,或选择重置重新
开始。
工具
46
LG KS500 |
用户手册
Page 47

浏览器
浏览器将为您提供最新新闻、体育、天
气和交通信息等。您还可以使用它下载
最新铃声、音乐、墙纸和游戏。
访问网页
1 从主菜单中,选择 。
2 要直接进入浏览器主页,请选择主页
进入互联网主页,或输入地址键入
您要访问的网页的 URL。
备注: 连接此服务并下载内容时,可能
会产生额外费用。查看网络提供商要求
的数据付费。
添加并访问书签
为了轻松快速地访问收藏的网站,您可
以添加书签并保存网页。
1 要查看保存为书签的页面,请选择选
项,然后选择书签。
2 选择添加至书签。
3 确认标题,然后按完成。
4 选择文件夹以将书签保存在其中。
提示!在浏览器中打开网页后,您可以选
择保存页面页面以保存当前网页。
访问保存的页面
1 从主菜单中,选择 。
2 选择保存的网页。
3 选择网页,然后选择打开。
查看浏览器历史记录
1 从主菜单中,选择 。
2 选择历史记录。
3 此时将显示一个您最近访问过网页
列表。您可以打开其中一个网页。
更改网络浏览器设置
1 从主菜单中,选择 。
然后,选择设置。
2 您可以选择浏览互联网时手机的处
理方式、显示方式以及信息使用方
式。选择选项,然后选择设置,您可
以修改多个设置。
01
02
03
04
05
06
07
08
09
浏览器
47
Page 48

Yahoo!
Yahoo!
要访问 Yahoo! 服务,请点触菜单,选
择 Yahoo!。
提示!在某些国家/地区,您无法访问
Yahoo!。具体取决于网络服务。
RSS 阅卡器
RSS 阅卡器提供来自手机中注册网址
的新闻更新并以简易方式提供。
雅虎!
48
LG KS500 |
用户手册
Page 49

设置
在此文件夹内,您可以更改手机设置以
个性化 KS500。
更改显示设置
1 从主菜单中,选择 。
2 选择显示,然后选择:
屏幕主题 - 修改手机显示,包括墙
纸。
菜单样式 - 选择用于显示菜单的样
式。
拨号 - 调整输入电话号码时使用的
字体样式。
字体 - 调整字体类型。
背景灯 - 选择背景灯持续时间。
手机方案 - 更改屏幕整体外观。
问候语信息 - 选择待机屏幕上的显
示信息。
备注: 背景灯打开时间越长,电池耗
电量就越大,您可能需要更频繁的对
手机进行充电。
激活情景模式
从主菜单中,选择设置,然后选择情景
模式。选择您要激活的情景模式。
从以下选项选择:
标准
静音
户外
飞行模式
用户定义 1
用户定义 2
用户定义 3
个性化情景模式
1 选择您要编辑的情景模式,选择选
项,然后选择编辑。
2 从静音情景模式中,您可以打开或关
闭振动。有关其他情景模式,您可以
更改声音和提示音。
01
02
03
04
05
06
07
08
09
设置
49
Page 50

LG KS500 |
用户手册
50
设置
设置
其它手机设置
从主菜单中,选择设置。
随后,您可以调整以下内容的设置。
手机 - 更改手机设置: 键盘锁、鼠
标指针、语言和省电模式。您还可以
查看手机信息。
显示 -更改您的显示设置。
日期和时间 - 调整日期和时间设
置,或者,选择在旅行时自动更新时
间。
网络 - KS500 将自动连接到首选
网络。要更改这些设置,请使用此菜
单。您也可以使用此菜单添加新的接
入点。
存取点 - 网络运营商已保存此信
息。
分组数据连接 - 设置分组数据连
接。
恢复初始设定 - 将所有设置重置到
其出厂设置。
更改安全性
PIN 码请求 - 将手机设置为开机时需
要请求 SIM 卡的 PIN 码。
手机锁 - 设置手机锁以避免未经授权
的使用。您需要一个安全码。
更改密码 - 更改密码: PIN/PIN2/安
全码。
使用内存管理器
KS500 有三种可用存储器: 手机、SIM
卡和外部存储卡(您可能需要单独购买
存储卡)。
您可以使用内存管理器确定每种存储
器的使用方式以及查看可用空间。
从主菜单中,选择设置,然后选择内存
管理器。选项包括:
手机公用内存 - 查看 KS500 上的可
用内存: 图像、声音、视频、多媒体信
息、电子邮件、Java 和其它。
手机剩余内存 - 查看手机针对不同项
目的可用内存。
USIM 卡内存 - 查看 USIM 卡的可
用内存。
Page 51

外部存储器 - 查看外部存储卡的可用
内存(您可能需要单独购买存储卡)。
主存储器设置 - 选择是将手机内存还
是外部存储器作为主要存储。
蓝牙
蓝牙适用于在无线条件下发送和接收
文件,连接快速且方便。您也可以连接
蓝牙耳机拨打和接听电话。
开始使用蓝牙共享文件之前,您需要将
您的设备与其它蓝牙设备配对。有关配
对设备的详细信息,请参阅下一页的与
其它蓝牙设备配对。
打开蓝牙:
1 从主菜单中,选择连接,然后选择蓝
牙。
2 选择打开。
发送文件:
1 打开您要保存的文件。
2 依次选择选项、发送,然后选择蓝
牙。
3 KS500 将自动搜索范围内其它启用
了蓝牙的设备。
4 选择您要向其发送文件的设备,然后
选择发送。
提示!注意进度栏,确保文件已发送。
接收文件:
1 要接收文件,您的蓝牙必须为开且可
见。有关详细信息,请参阅下一页的
更改蓝牙设置。
2 手机会提示您一条信息,是否接收来
自其他发件人的文件。选择是以接收
文件。
更改蓝牙设置
1 从主菜单中,选择连接,然后选择蓝
牙。
2 选择设置。
您可以更改以下内容:
我的设备可见性 - 从可见、隐藏或
可见 1 分钟中选择。
我的设备名称 - 输入一个个性化名
称以识别您的 KS500。
01
02
03
04
05
06
07
08
09
设置
51
Page 52

设置
支持的服务 - 搜索 KS500 支持的
配置文件。
我的地址 - 查看您的蓝牙地址。
与其它蓝牙设备配对
要将您的 KS500 与其它设备配对,您
可以设置受通行码保护的连接。这将
确保您的通信更安全。
1 查看蓝牙是否为开且可见。
2 从“蓝牙”菜单中选择搜索新设备。
3 KS500 将搜索设备。
搜索完成时,屏幕上将显示添加和
刷新。
4 选择您要与之配对的设备,选择添
加,输入通行码,然后选择选择。
5 随后,您的手机将连接到其它设备,
您可以在该设备上输入相同的通行
码。
6 现在,受通行码保护的蓝牙连接已
经准备就绪了。
设置
52
LG KS500 |
用户手册
更改安全性
更改安全性以保护 KS500 及重要
信息。
从主菜单中,选择设置,然后选择安
全性。
需要 PIN 码 - 开机时要需要 PIN
码。
手机锁 - 选择时需要提供安全码。
更改密码 - 更改您的保密密码、PIN
码或 PIN2 码。
Page 53

配件
这些配件随 KS500 提供。
充电器
电池
数据线和 CD
连接并同
步 KS500 和
PC。
用户手册
了解更多关于
KS500 的信息。
01
02
03
04
05
06
07
08
09
立体声耳机和免提连接器
KS500
注意:
• 确保使用正规的 LG 配件。
• 仿冒品或替代品及非原厂配件可能会让您
丧失保修权益。
• 各个地区的配件可能不同; 如有任何疑
问、请与我们的地区服务公司或代理查
证核实。
配件
53
Page 54

网络服务 技术参数
本指南中描述的无线手机适用于 GSM
900、DCS 1800、PCS 1900 和 W-CDMA
网络。
本指南中包含的一系列功能称为网络
服务。这些服务是由您的无线服务提
供商提供的特殊服务。在利用这些网络
服务之前,必须先向您的服务提供商预
订,并获取使用说明。
网络服务
54
LG KS500 |
用户手册
常规
产品名称 : KS500
系 统 : GSM 900 / DCS 1800 /
PCS 1900 / W-CDMA
外部环境
最高温度 : +55℃(放电)、
+45℃(充电)
最低温度 : -10℃
Page 55

Declaration of Conformity
Declaration of Conformity
Suppliers Details
Name
LG Electronics Inc
Address
LG Electronics Inc. LG Twin Towers 20,
Yeouido-dong, Yeongdeungpo-gu, Seoul, Korea 150-721
Product Details
Product Name
GSM / W-CDMA Terminal Equipment
Model Name
KS500
Trade Name
LG
Applicable Standards Details
R&TTE Directive 1999/5/EC
EN 301 489-01 V1.6.1, EN 301 489-07 V1.3.1
EN 301 489-17 V1.2.1, EN 301 489-24 V1.3.1
EN 301 511 V9.0.2
EN 301 908-1 V2.2.1 EN 301 908-2 V3.2.1,
EN 300 328 V1.6.1
EN 50360/EN 50361:2001
EN 60950-1 : 2001
Supplementary Information
The conformity to above standards is veried by the following Notied Body(BABT)
BABT, Balfour House, Churcheld Road, Walton-on-Thames, Surrey, KT12 2TD, United Kingdom
Notied Body Identication Number : 0168
Declaration
I hereby declare under our sole responsibility that the
product mentioned above to which this declaration
relates complies with the above mentioned standards
and Directives
LG Electronics Inc. Amsterdam Oce
Veluwezoom 15, 1327 AE Almere, The Netherlands
Tel : +31 - 36- 547 - 8940, e-mail : seokim@lge.com
Name Issued Date
Seung Hyoun, Ji / Director 18. Aug. 2008
Signature of representative
Page 56

LG KS500 |
用户手册
56
关于安全有效使用手机的准则
关于安全有效使用手机的准则
请阅读以下简单的准则。违反这些准则
可能造成危险或者触犯法律。
暴露在射频能量之下
无线电波暴露和“特定吸收率”(SAR)
信息
此款 KS500 型手机已设计为遵守有关
适用的无线电波暴露安全要求。此要求
基于相关的科学准则,其中包括为确保
所有人员(无论年龄和健康状况)安全
而设计的安全裕量。
• 无线电波暴露准则采用一种称
为“特定吸收率”或 SAR 的测量单
位。 SAR 测试是在所有用到的频带
中以手机的最高认可功率电平进行
发射时使用标准化方法执行的。
• 不同的 LG 手机型号可能有不同的
SAR 能级,但它们均符合相关的无
线电波暴露准则。
• 国际非游离辐射防护委员会
(ICNIRP) 建议的 SAR 上限值为:
每 10 克重的人体组织吸收的能量
平均值不超过 2W/kg。
• 由 DASY4 对该型号手机进行的测
试,人耳和身体能够承受的 SAR 最
大值分别为 0.874 W/kg 和 1.36
W/kg(10 克)。
• 电气电子工程师协会 (IEEE) 建议
的 SAR 上限值为 0.631 W/kg,平均
值超过 1 克薄纸,此 SAR 数据适
用于各个国家/地区的居民。
产品保养和维护
警告: 仅使用经核准为用于
此特定手机型号的电池、充电器和
配件。使用任何其它类型可能导致
适用于此手机的许可或保修失效,
并可能造成危险。
• 不要拆解本机。当需要维修时,请将
手机送往合格的服务技术人员处。
• 远离诸如电视、收音机或个人计算机
之类的电器。
• 远离诸如暖气片或厨灶之类的热
源。
Page 57

• 小心不要让手机摔落。
• 不要让手机受到机械振动或撞击。
• 在任何有特殊条例要求的区域关闭
手机。
例如,请勿在医院使用手机,因为它
可能影响敏感的医疗设备。
• 手机充电时,请勿用湿手操作手机。
这可能会导致电击或手机严重受
损。
• 请勿在靠近易燃物体的位置充电,
因为手机可能因加热而引发火灾。
• 使用干布清洁手机外壳(不要使用如
苯、稀释剂或酒精之类的溶剂)。
• 如果手机置于柔软物体之上,请不
要充电。
• 应在通风条件好的位置对手机进行
充电。
• 不要在烟雾或灰尘过多的环境中使
用或存放手机。
• 不要将手机放在信用卡或卡式车票
旁边,它可能会影响磁条上的信息。
• 不要用尖锐物体敲击屏幕,这可能会
损坏手机。
• 不要将手机暴露在液体或潮气中。
• 谨慎使用如耳机之类的配件。在不必
要的情况下,不要触摸天线。
有效的手机操作
电子设备
所有手机都可能受到干扰,这种干扰
会对性能造成影响。
• 在未经允许的情况下,不得在医疗
设备附近使用手机。不要将手机放
在心脏起搏点上,例如,胸前的口袋
内。
• 手机可能会对某些助听器造成干
扰。
• 微弱的干扰可能会影响电视、收音
机、个人计算机等。
01
02
03
04
05
06
07
08
09
关于安全有效使用手机的准则
57
Page 58

LG KS500 |
用户手册
58
关于安全有效使用手机的准则
关于安全有效使用手机的准则
行车安全
查阅有关在驾驶时使用手机的本地法
律法规。
• 不要在驾驶时使用手持式手机。
• 将注意力完全集中在驾驶上。
• 如果有免提装置,请使用免提装
置。
• 如果行驶条件需要,请在拨打或接
听电话之前将车辆驶离道路并停
车。
• 射频能量可能影响车辆内的电子系
统,例如立体声音响、安全设备等。
• 当车辆配备气囊时,不要让安装的
或便携式的无线设备阻挡气囊。否
则,可能导致安全气囊失效,或由于
不适当的个人行为造成严重伤害。
• 如果您在外出时使用耳机收听音乐,
请确保将音量设置为合理的音量级
别,以便注意周围的情况。在过马路
时,尤其要注意这一点。
避免对您的听力造成伤害
如果您长时间置于高音环境中,那么您
的听力可能会遭到伤害。因此,我们建
议您在开机或关机时不要将手机置于
耳边。同时,我们还建议您将音乐和通
话音量设置为合理的音量级别。
爆破区域
不要在正进行爆破的地区使用手机。
请依照有关限制,并遵守任何规章或
规定。
易爆环境
• 不要在加油站内使用手机。
• 请勿在加油点或化工厂附近使用手
机。
• 不要在放有手机和配件的车厢内运
输或存放可燃气体、液体或爆炸品。
在飞机上
无线设备可能对飞机造成干扰。
• 登机前,请关机。
• 未经机务人员允许,不得在地面上使
用手机。
Page 59

儿童
将手机放在儿童接触不到的安全地
方。手机中包含细小零件,如果脱落可
能导致窒息危险。
紧急电话
并非在所有手机网络中均可使用紧急
电话。因此,您不应仅依赖于手机的
紧急呼叫功能。请向本地的服务提供
商核准。
电池信息及保养
• 您无需在再次充电前对电池进行完
全放电。与其它电池系统不同,本机
电池不具有可能影响电池性能的记
忆效应。
• 只能使用 LG 电池和充电器。 LG
充电器设计为最大程度地延长电池
使用寿命。
• 不要拆解电池组或将其短路。
• 保持电池组的金属触点清洁。
• 当电池不再提供合乎要求的性能时,
请更换电池。在需要更换之前,电池
组可以反复充电数百次。
• 如果电池已经使用很长一段时间,请
对电池再次进行充电以保持最佳使
用状态。
• 不要将电池充电器暴露在直射阳光
下,也不要在诸如浴室之类的高湿环
境中使用。
• 不要将电池存放在过热或过冷的地
方,这可能损害电池的性能。
• 如果用不适当的电池进行替换,可能
会有爆炸危险。
• 请按制造商的说明处置用过的电池。
如果可能,请循环使用电池。不要象
处理家用废物一样处理电池。
• 如果要更换电池,请将其携带至 LG
Electronics 授权服务点或经销商
处以寻求帮助。
• 手機充完電後務必將充電器自插座
移除,以節省充電器不必要的電力損
耗。
01
02
03
04
05
06
07
08
09
关于安全有效使用手机的准则
59
Page 60

Page 61

Some of the contents in this manual may
differ from your phone depending on
the software of the phone or your service
provider.
KS500 User Guide
Page 62

Congratulations on your purchase of the
advanced and compact KS500 phone by LG,
designed to operate with the latest digital mobile
communication technology.
Disposal of your old appliance
1 When this crossed-out wheeled bin symbol is attached to
a product it means the product is covered by the European
Directive 2002/96/EC.
2 All electrical and electronic products should be disposed of
separately from the municipal waste stream via designated
collection facilities appointed by the government or the local
authorities.
3 The correct disposal of your old appliance will help prevent
potential negative consequences for the environment and
human health.
4 For more detailed information about disposal of your old
appliance, please contact your city office, waste disposal service
or the shop where you purchased the product.
Page 63

Set up
Your standby screen
The basics
Get creative
Get organised
The web
Settings
Accessories
01
02
03
04
05
06
07
08
Page 64

Contents
SETUP
Getting to know your phone ............................7
Inserting the SIM and Battery ........................... 9
Memory card .........................................................11
Transferring Contacts.........................................12
Menu map ..............................................................13
YOUR STANDBY SCREEN
Thumbpad .........................................................14
The main menu ................................................14
The status bar ...................................................15
THE BASICS
Calls ...........................................................................16
Making a call ....................................................16
Making a call from your contacts .............16
Answering or rejecting a call ......................16
Speed dialling...................................................17
Viewing your call logs ...................................17
Using call divert ...............................................18
Using call barring ............................................18
Changing the common settings ...............19
Searching for a contact .................................19
Adding a new contact ...................................20
Contact options ...............................................20
Adding a contact to a group ......................21
Adding a picture to a contact ....................21
Copying your contacts to your SIM .........21
Deleting all of your contacts ......................22
4
LG KS500 | User Guide
Viewing information ......................................22
Messaging ..............................................................23
Messaging ..........................................................23
Sending a message ........................................23
Entering text .....................................................23
Setting up your email ....................................24
Retrieving your email ....................................25
Changing your email settings....................25
Message folders ...............................................26
Managing your messages ...........................26
Using templates ..............................................27
Changing your text message settings....27
Changing your multimedia message
settings ................................................................27
Changing your other settings ....................28
GET CREATIVE
Camera .....................................................................29
Taking a quick photo .....................................29
After you’ve taken your photo...................29
Using the toolbar ...........................................29
Changing the image size .............................30
Viewing your saved photos ........................30
Choosing a shot mode .................................31
Using burst shot mode .................................31
Using a frame shot mode ............................31
Video camera ........................................................32
Shooting a quick video .................................32
After you’ve shot your video ......................32
Page 65

Using the toolbar ............................................32
Watching your saved videos ......................33
Adjusting the volume when viewing
a video .................................................................33
My stu ....................................................................34
My images .........................................................34
Option menus ..................................................34
Sending a photo ..............................................35
Organising your images ...............................35
Deleting an image ..........................................35
Creating a slide show ....................................35
My sounds ..........................................................35
Using a sound ...................................................35
My videos ...........................................................36
Watching a video ............................................36
Using options while video is paused ....36
Sending a video clip ....................................36
Using a video clip as a ringtone ..............36
Using the video options menu .............. 37
Games and applications ........................... 37
Playing a game ............................................. 37
Flash contents .............................................. 37
Viewing an SWF/Flash le ........................ 37
Using options viewing the SWF/Flash
le .....................................................................37
Others .............................................................. 38
My memory card .........................................38
Using your phone as a mass storage
device .............................................................. 38
Multimedia......................................................... 39
Music ............................................................... 39
Transferring music onto your phone ... 39
Playing a song .............................................. 39
Creating a playlist ....................................... 40
Playing a playlist .......................................... 40
Editing a playlist ..........................................40
Deleting a playlist ....................................... 40
Voice recorder .............................................. 40
Sending the voice recording .................. 41
Transferring a le to your phone ........... 41
GET ORGANISED
Organiser ............................................................ 42
Adding an event to your calendar ........ 42
Editing a calendar event ........................... 42
Sharing a calendar event .......................... 42
Adding a memo ........................................... 43
Tools ..................................................................... 44
Setting an alarm ..........................................44
Using the calculator ...................................44
World time ..................................................... 44
Converter .......................................................44
Using the stopwatch .................................. 45
5
Page 66

Contents
THE WEB
Browser ...............................................................46
Accessing the web ...................................... 46
Adding and accessing bookmarks ........ 46
Accessing a saved page ............................ 46
Viewing your browser history................. 46
Changing the web browser settings .... 46
SETTINGS
Settings ...............................................................47
Changing your screen settings ..............47
Activating your proles............................. 47
Personalising your proles ......................47
Other phone settings ................................ 47
Changing your security settings ............ 48
Using Memory manager .......................... 48
Bluetooth .......................................................49
Changing your Bluetooth settings ....... 49
Pairing with another
Bluetooth device ......................................... 50
ACCESSORIES
Accessories ........................................................ 51
Network service ............................................... 52
Technical data ................................................... 52
GUIDELINES
6
LG KS500 | User Guide
Guidelines for safe and ecient use ........ 54
Page 67

Getting to know your phone
Main screen
Clear key
Deletes a
character with
each press.
Call key
Dials a number
or answers an
incoming call.
End/Power key
Ends or rejects a call. Turns the
phone on/off. Press once to
return to the standby screen.
Charger, USB Cable,
Handsfree connector
Volume
Micro SD Card
01
02
03
04
05
06
07
08
09
Capture button
Setup
7
Page 68

Getting to know your phone
Setup
8
LG KS500 | User Guide
External camera lens
Battery cover
Battery
SIM card
Page 69

Inserting the SIM and Battery
1 Remove the battery cover
Slide the battery cover towards the
bottom of the phone and away from it.
WARNING: Do not use your
ngernail when removing the battery.
WARNING: Do not remove the
battery when the phone is switched
on, as this may damage the phone.
2 Remove the battery
3 Insert the SIM card
Lever the bottom edge of the battery
and remove it carefully from the
battery compartment.
Slide the SIM card into the SIM card
holder. Make sure that the gold contact
area on the card is facing downwards.
To remove the SIM card, pull it gently in
the reverse direction.
01
02
03
04
05
06
07
08
09
Setup
9
Page 70

Inserting the SIM and Battery
4 Install the battery
Insert the top of the battery into the
top edge of the battery compartment.
Ensure the battery contacts align with
the terminals on the phone. Press
down the bottom of the battery until it
clips into place.
5 Replace the battery cover
Setup
Slide the battery cover towards the top
of the phone until it clicks into place.
10
LG KS500 | User Guide
6 Charging your phone
Pull open the cover of the charger
socket on the side of your KS500. Insert
the connector on your charger, and
plug into a mains electricity socket.
Your KS500 will need to be charged
until the message “Battery full” appears
on the screen.
Page 71

Memory card
Installing a memory card
You can expand the memory space
available on your phone using a memory
card. The KS500 will support up to a 4GB
memory card.
TIP!! A memory card is an optional
accessory.
1 Insert the memory card into the slot at
the top, until it clicks into place. Make
sure that the gold contact area is facing
downwards.
Formatting the memory card
If your memory card is already formatted,
you can begin using it. If your card isn’t
formatted you will need to do so.
1 From the standby screen press ,
select Settings.
2 Select Memory manager then choose
External memory.
3 Select Format and then confirm your
choice.
4 Enter the password, if one is set, and
your card will be formatted and ready
to use.
TIP! To change your default
storage destination, open Memory
manager from the Phone settings
menu and select Primary storage
settings.
NOTE: If your memory card has existing
content it will automatically be filed in the
correct folder. For example, videos will be
stored in the My videos folder.
01
02
03
04
05
06
07
08
09
Setup
11
Page 72

Transferring Contacts
Transferring your contacts
To transfer your contacts from your USIM
to your phone:
1 From the standby screen select
and choose Contacts.
2 Select settings then Copy.
3 Choose Handset to USIM and press
to select Done.
4 Choose All together or One by one and
press to select Done.
Setup
12
LG KS500 | User Guide
Page 73

Menu map
GAMES & APPS
1
My games & apps
2 Settings
MESSAGING
1
Create new
message
2 Inbox
3 Mailbox
4 Drafts
5 Outbox
6 Sent items
7 My folders
8 Templates
9 Emoticons
0 Settings
TOOLS
1 Quick menu
2 Alarms
3 Calculator
4 Stopwatch
5 Converter
6 World time
7 SIM Service
CALLING
1 Make video call
2 Call logs
3 Call durations
4 Data volume
5 Call costs
6 Call divert
7 Call barring
8 Fixed dial
numbers
9 Call waiting
0
Common settings
*
Video call settings
MY STUFF
1 My images
2 My sounds
3 My videos
4
My games & apps
5 Flash contents
6 Others
7
My memory card
Browser
1 Home
2 Enter address
3 Bookmarks
4 RSS reader
5 Saved pages
6 History
7 Settings
ORGANISER
1 Calendar
2 To do
3 Memo
4 Secret memo
5 Date nder
6 Settings
YAHOO!
1
Yahoo! Go
CONNECTIVITY
1 Bluetooth
2 Synch service
3 USB Connection
Mode
4 GPS type
MULTIMEDIA
1 Camera
2 Video camera
3 Music
4 Voice recorder
CONTACTS
1 Add new
2 Search
3 Speed dials
4 Groups
5
Service dial
numbers
6 Own number
7
My business card
8 Settings
SETTINGS
1 Proles
2 Phone
3 Screen
4 Date & Time
5 Network
6 Internet proles
7 Access points
8
Packet data conn.
9 Security
0
Memory manager
*
Streaming settings
# Reset settings
01
02
03
04
05
06
07
08
09
Setup
13
Page 74

Your standby screen
From here you can access menu options,
make a quick call or change your profile
- as well as many other things.
Thumbpad
Your KS500 has a special feature; an
Thumbpad. You can use this to navigate
menus as well as your web browser.
Use the Thumbpad to move and make
selections. With the Thumbpad, you can
move up, down, left and right in the Menu
or in different applications or lists. You can
press the Thumbpad to open Menu.
The main menu
The main menu provides twelve menu
options.
1 PressPress to open the main menu.
2 Use the Thumbpad to move and make
selections
3 When the option you require isWhen the option you require is
selected, press to open.
Your standby screen
14
LG KS500 | User Guide
▲
Standby screen
▲
Thumbpad
Page 75

Advice to the customer
In order to allow better antenna sensitivity
LG suggest that you hold the handset as
shown below.
X
Please do not cover the antenna area with
your hand during a call or when using
a Bluetooth connection. It may reduce
signal quality.
The status bar
The status bar indicates, using various
icons, things like signal strength, new
messages and battery life as well as telling
you whether your Bluetooth or GPRS is
active.
Below is a table which explains the
meaning of icons you’re likely to see in
the status bar.
Icon Description
Multitasking
Network signal strength
(number of bars will vary)
No network signal
Battery empty
Icon Description
New text message
New email
An alarm is set
Normal profile in use
Silent profile in use
External memory
Calls are diverted
GPRS available
EDGE in use
Roaming
Bluetooth is active
Calls are rejected
3G available
01
02
03
04
05
06
07
08
09
Your standby screen
15
Page 76

Calls
Making a call
1 Enter the number using the keypad.
To delete a digit press .
2 Press the green key to dial the
entered number.
3 To end the call, press the red key.
TIP! To enter + for making an international
call, press and hold
0.
Making a call from your contacts
1 From the main menu, press the down-
arrow to open your contacts.
2 Using the keypad, enter the rst letter
of the contact you want to call. So, for
'Oce', press 6 (MNO) three times.
3 Use the arrow keys to scroll through your
contacts.
4 Press the green key to call the
selected contact.
Calls
16
LG KS500 | User Guide
Answering or rejecting a call
When your phone rings, press the green
key to answer the call.
Press the red key to reject the incoming
call.
TIP! You can change the settings on your
phone to change how you answer a call.
From the main menu, select Calling, then
Common settings, and select Answer mode.
You can choose from Press send key, Slide
up and Press any key.
Page 77

Speed dialling
You can assign a frequently-called contact to
a speed dial number.
1 From the main menu, select , then
Speed dials.
2 Your voicemail is set to speed dial 1.
Choose any other number to assign to
a contact.
3 Your address book will open. Select the
contact you’d like to assign that number
to and press OK.
To call a speed dial number, press and hold
the assigned number until the contact
appears on screen. The call will initiate
automatically.
Viewing your call logs
From the main menu, select and choose
Call logs.
All calls - View the complete list of all of your
dialled, received and missed calls.
Dialled calls - View the list of all the
numbers you have called.
Received calls - View the list of all the
numbers that have called you.
Missed calls - View the list of any calls you
have missed.
To view other information on your calls,
select the following in the menu:
Call duration - View details of how long you
have spent on your calls.
Call costs - View the charges applied to your
dialled numbers (this service is networkdependent, some operators are unable to
support it) and the duration of all your calls;
received and dialled.
Data volume - View the amount in kilobytes
of all your received and sent data.
TIP! From any call log, select Options to
delete selected or all logged items.
01
02
03
04
05
06
07
08
09
Calls
17
Page 78

Calls
Using call divert
1 From the main menu, select .
2 Select Call divert.
3 Choose whether you would like to divert
all calls when the line is busy, when
there is no answer or when you are not
reachable.
4 Choose whether to divert to your
voicemail or to another number.
5 Enter your divert number or select Search
to browse for your divert number.
Note: Charges may be incurred for diverting
calls. Please contact your network provider
for details.
TIP! To turn o all call diverts, choose
Deactivate all from the Call divert
menu.
Calls
18
LG KS500 | User Guide
Using call barring
1 From the main menu, select .
2 Select Call barring.
3 Choose any or all of the following options
for Voice calls or Video calls:
All outgoing
Outgoing international
Outgoing international calls except
home country
All incoming
Incoming when abroad
4 Select Activate and enter the call barring
password. Please check with your
network operator for this service.
TIP! If you only want to allow calls to
specic numbers from your phone, you
can turn on the Fixed dial numbers
feature. To do so, select Fixed dial
numbers from the Calling menu and
then choose Turn on. Please note, you'll
need your PIN2 code from your operator.
Page 79

Changing the common settings
1 From the main menu, select and then
choose Common settings.
2 From here you can amend the settings
for:
Call reject - You can set which incoming
calls to reject.
Send my number - Choose whether your
number will be displayed when you call
someone.
Auto redial - Choose On or O.
Answer mode - Choose whether to
answer the phone using the accept key,
any key or by sliding your handset open.
Minute minder - Select On to hear a tone
every minute during a call.
BT answer mode - You can choose
whether calls should be answered by the
handset or by a Bluetooth headset, if one
is connected.
Save new number -Choose whether to
save the phone number when ending a
call, if the phone number is not already
saved in your phonebook.
Slide close setting - Choose whether or
not to end the active call when the slide is
closed.
Searching for a contact
1 From the main menu, select and
choose Search.
2 Using the keypad enter the rst letter
of the contact you want to call. So, for
'Oce', press 6 (MNO) three times.
3 Scroll through the contacts and their
dierent numbers using the arrow keys.
01
02
03
04
05
06
07
08
09
Calls
19
Page 80

Calls
Adding a new contact
1 From the main menu, select and
choose Add new.
2 Choose whether to store your new
contact on your Handset or USIM.
3 Enter the information you would like to
store about the contact and select Done.
Or, use the following shortcut:
1 Enter the number you wish to store and
select Options.
2 Choose Save number and then select
whether you would like to create a
new contact or update an existing one
by choosing New contact or Update
contact.
3 Enter the relevant information as above
and select Done.
Note: When it comes to storing a Contact
email address, press the key on the
keypad to get access to symbols such as '@'.
Calls
20
LG KS500 | User Guide
Contact options
There are many things you can do when
viewing a contact. Here's how to access and
use those features:
1 Open the contact you’d like to use.
See Searching for a contact above.
2 Select Options to open the list of options.
From here you can:
Send message - Send a message to
the contact. If the contact has an email
address, you can send them an email
from here, too.
Send business card - Send the contact's
details as a business card.
Make voice call - Make a voice call to the
contact.
Make video call - Make a video call to the
contact.
Add new contact - Add a new contact.
Edit - Change the contact’s details.
Add to Group - Add the selected contact
to Group
Mark/unmark - Mark/unmark the
selected contact.
Search by - Search a contact by number
or group.
Page 81

Save to USIM - Choose to move or copy
to the SIM card or phone (depending on
where you originally saved the contact).
Delete - Delete the contact. Select Yes to
conrm.
Text input - Options for Insert symbol,
Input method, Writing language and
Add to dictionary.
Adding a contact to a group
You can collect your contacts into groups,
keeping your work colleagues and family
members separate, for example. There
are a number of groups including Family;
Friends;Colleagues;School; and VIP already
set up on the phone.
1 From the main menu, select and
choose Groups.
2 Scroll to the group you wish to add a
contact to, select it and choose Add.
3 Your contact list will open. Scroll to the
contacts you would like to add to the
group and select Mark, then Done.
TIP! You can assign a ringtone to a group.
Select the group you wish to assign the
ringtone to and select Options.
Adding a picture to a contact
You can change the appearance of your
contacts in your address by including a
picture
1 From the main menu, select and
choose Settings.
2 Select Contact list settings and select O
or On from the Show picture tab.
3 Return to the address book and select
the contact to which you want to add a
picture.
4 Choose Options and select Edit.
5 Scroll down to the Image section.
Choose Edit and select an option.
If you select Take a picture, your camera
viewnder will open, so you can take a
picture of your contact.
Copying your contacts to your SIM
You can copy your contacts from your SIM
to your handset or from your handset to
your SIM.
1 From the main menu, select and
choose Settings and then Copy.
2 Choose between Handset to USIM or
USIM to handset.
01
02
03
04
05
06
07
08
09
Calls
21
Page 82

Calls
3 Choose whether to copy all the contacts
together or one at a time.
Deleting all of your contacts
1 From the main menu, select and
choose Settings and then Clear contacts.
2 Select to delete contacts from USIM or
Handset.
3 Select Yes to conrm your selection.
Viewing information
1 From the main menu, select and
choose one of the options to view your
Service dial numbers, your Own number
or your own business card.
TIP! If you haven’t yet created a business
card, the My business card screen will give
you the option to create one. Select Add and
enter your details as you would for any other
contact. Select Done when you are nished.
Calls
22
LG KS500 | User Guide
Page 83

Messaging
Messaging
Your KS500 combines SMS, MMS and email
into one intuitive and easy-to-use feature.
Sending a message
1 From the main menu, select and
then Create new message.
2 Choose to send a Message or Email.
3 A new, blank message will open.
4 Enter your message using T9 predictive
or Abc manual.
See Entering text below to see how to
switch between the dierent text entry
modes.
5 From the Options menu, select Insert to
add an image, video, sound or symbol.
6 Select Send.
7 Enter the phone number or select
Contacts to open your contacts list.
You can add multiple contacts.
8 Select Send.
Entering text
There are two ways to enter text:
T9 predictive and Abc manual.
To turn on T9 predictive text, begin a new
message, choose Options, select Input
method and choose T9 mode.
With T9 on, you can switch between
T9 predictive, Abc manual and numbers by
pressing .
T9 predictive
T9 mode uses a built-in dictionary to
recognise the words you are writing
based on the key sequences you enter.
Simply touch the number key associated
with the letter you want to enter, and the
dictionary will recognise the word once all
the letters are entered. For example, press
8, 3, 5, 3, 7, 4, 6, 6, 3 to write ‘telephone’.
If the word you want doesn’t appear,
choose Options and select Add to
dictionary. Enter the word using Abc
manual mode and your word or name will
be added to the dictionary.
Abc manual
In Abc mode you must press the key
repeatedly to enter a letter. For example, to
write ‘hello’, press 4 twice, 3 twice, 5 three
times, 5 three times again, then 6 three
times.
01
02
03
04
05
06
07
08
09
Messaging
23
Page 84

Messaging
Setting up your email
You can stay in touch on the move by using
the email facility on your KS500. It’s quick
and simple to set up a POP3 or IMAP4 email
account.
1 From the main menu, select and
then Settings.
2 Select Email then Email accounts.
3 Select Add.
4 You can now choose how your account
works:
Title - Enter a name for this account.
My name - Enter your name.
Username - Enter the account
username.
Password - Enter the account password.
Email address - Enter the account email
address.
Reply email address - Enter the ‘reply to’
email address.
Outgoing mail server - Enter the
account's mail sever address.
Messaging
Incoming mail server - Enter the
account details.
24
LG KS500 | User Guide
Maximum receive size - Choose the size
limit of your emails, the maximum is
1MB.
Mailbox type - Enter the mailbox type,
POP3 or IMAP4.
Save to server - Choose whether to save
your emails to the server. For IMAP4
accounts copies are always saved.
Save sent mail into - Choose where
to save your IMAP4 emails. For POP3
accounts copies are always saved on the
phone.
Access point - Choose your Internet
access point.
Auto retrieve - Choose whether to
retrieve your mail.
Advanced settings - Choose whether to
use the advanced settings.
SMTP port number - Normally, this will
be 25.
Incoming server port - Normally, this
is 110 for POP3 accounts and 143 for
IMAP4 accounts.
SMTP authentication - Choose the
security settings for the outgoing mail
server.
SMTP username - Enter the SMTP
username.
Page 85

SMTP password - Enter the SMTP
password.
APOP secure login - Choose to activate
APOP secure login for a POP3 account.
IMAP4 accounts are always set to o.
Retrieving your email
You can check for new email automatically
or manually. See Changing your email
settings for details on how to check for
new email automatically.
To check manually:
1 From the main menu, select Messaging
and then Mailbox.
2 Select the account for which you would
like to check your email and then select
Retrieve.
3 Your KS500 will connect to your
email account and retrieve your new
messages.
Changing your email settings
You can use the following settings to
congure your email preferences.
1 From the main menu, select Messaging
and then Settings.
2 Select Email - from there you change the
following settings:
Allow reply email - Choose to allow the
sending of ‘read conrmation’ messages.
Request reply email - Choose whether
to request ‘read conrmation’ messages.
Retrieve interval - Choose how often
your KS500 checks for new email
messages.
Include message in Fwd & Reply -
Choose whether or not to include the
original message in your replies.
Include attachment - Choose
whether or not to include the original
attachment.
Auto retrieval in roaming - Choose
to auto retrieve your messages when
abroad, or stop auto retrieval.
New email notication - Choose
whether to be alerted to new emails.
Signature - Create an email signature
and switch this feature on.
Priority - Choose the priority level of
your email messages.
01
02
03
04
05
06
07
08
09
Messaging
25
Page 86

Messaging
Message folders
From the main menu, select .
Inbox - All received messages are placed in
your inbox. From here you can send replies,
forward and perform other actions.
Mailbox - The mailbox folder contains
folders for each email account congured
on the phone.
Drafts - If you don’t have time to nish
writing a message, you can save what
you’ve done so far.
Outbox - This is a temporary storage folder
and contains messages that are being sent.
Sent items - All sent messages are placed
into your Sent items folder.
My folders - Allows you to group messages
as you prefer.
Templates - A list of useful messages, to be
used for quick replies.
Emoticons - A list of useful emoticons.
You can also access your messaging
settings by selecting Settings.
Messaging
26
LG KS500 | User Guide
Managing your messages
You can use your Inbox to manage your
messages.
1 From the main menu, select Messaging
and then Inbox.
2 Select Options and then choose to:
Reply - Send a reply to the selected
message.
Forward - Send the selected message on
to another person.
Call - Voice / Video Call the person who
sent you the message.
Delete - Delete selected messages.
Create new message - Create a new
message or Email.
Mark/unmark - Mark/unmark the
selected messages.
Copy & Move - Move the selected
message to one of the folders you have
created or USIM.
Filter - Sort messages depending on
whether they are SMS or MMS.
Save Number - Save the selected
number.
TIP! If you see the message No space for
messages you can delete either messages or
saved les to create space.
Page 87

Using templates
You can create templates for the SMS and
MMS messages you send most frequently.
You’ll nd some templates already on your
phone, and you can edit these if you wish.
1 From the main menu, select Messaging
and then Templates.
2 Choose Text templates or Multimedia
templates. Once you've selected a
message, choose Options and then Edit
to change an existing template. You
can also choose Add new to create a
new template or Delete to delete and
existing template.
3 You can use a template when you create
a new message by selecting Options,
followed by Insert and then Templates.
Changing your text message
settings
Your KS500 message settings are predened so that you can send messages
immediately.
If you’d like to change the settings, see
below for more information.
From the main menu, select Messaging,
then choose Settings and then Text
message. You can make changes to:
Text message centre - Enter the details for
your message centre.
Delivery report - Choose to receive
conrmation that your message was
delivered.
Validity period - Choose how long your
message is stored at the message centre.
Message types - Convert your text into
Voice, Fax, Paging, X.400 Email.
Character encoding - Choose how your
characters are encoded; note that this
impacts the size of your message and may
therefore aect data charges.
Send long text as - Choose how to send
long messages (by multiple SMS or by
single MMS).
Changing your multimedia message
settings
From the main menu, select Messaging,
then choose Settings, followed by
Multimedia message.
You can make changes to:
Retrieval mode - Choose whether to
automatically or manually download
multimedia messages depending on
whether you are at home or roaming.
01
02
03
04
05
06
07
08
09
Messaging
27
Page 88

Messaging
Delivery report - Choose to allow /request
a delivery report.
Read reply - Choose to allow / send a read
report
Priority - Choose the priority level of your
MMS.
Validity period - Choose how long your
message is stored at the message centre.
Slide duration - Choose how long your
slides appear on screen.
Creation mode - Choose from Restricted,
Warning and Free.
Delivery time - Choose from Immediately,
After 1 hour, After 1 day and After 1 week.
Multi msg centre - Select an operator-
specic network prole for the sending of
multimedia messages.
Changing your other settings
From the main menu, select Messaging,
choose Settings and then choose from the
following:
Videomail or Voicemail - Your Videomail
Messaging
and/or Voicemail numbers are stored here.
Contact your network operator for more
information on the service they provide.
28
LG KS500 | User Guide
Service message - Here you can switch o
'push' messaging; your messages will no
longer be pushed directly to your device as
they are received, only when you check for
new messages.
Info. service - Choose the reception status,
alerts and language of your info messages.
Page 89

Camera
Taking a quick photo
1 Press the key on the right-hand
side of the handset and the camera’s
viewnder will appear on screen.
2 Holding the phone horizontally, point
the lens towards the desired subject of
the photo.
3 Press the centre key or the key to
take a photo.
The le name of captured picture indicates
the current date and time.
e.g. PDD-MM-YY_hh.mm
( P : Prex / D : Day / M : Month /
Y : Year / h : Hour / m : Minute)
After you’ve taken your photo
Your captured photo will appear on screen.
The name of the image runs along the
bottom of the screen and you’ll see options
displayed at the right of the screen.
Select Options to rename or edit the
image.
Go back to previous menu.
View the pictures you have taken in
your Album.
Send the photo as an MMS, Email, via
Bluetooth.
See page 24 for Sending a message, and
page 34 about sending and receiving your
les using Bluetooth.
Take another photo straight away.
Your current photo will be saved.
Use the image as wallpaper, as a
Contact image, or in your Start-up or Shut
down screen.
Delete the photo you have just
taken and conrm by touching Yes. The
viewnder will reappear.
TIP! In camera mode select Play icon to open
the photo album. See page 33,
saved photos, for details.
Viewing your
Using the toolbar
Before taking a photo, select Settings to
congure various options.
Colour eect - Choose from four colour
tone options: None, Black & White,
Negative and Sepia.
White balance - The white balance ensures
that any white in your photos appears
realistic. In order for your camera to
correctly adjust the white balance you may
need to determine the light conditions.
01
02
03
04
05
06
07
08
09
Camera
29
Page 90

Camera
Choose from Auto, Sunny, Incandescent,
Cloudy or Fluorescent.
Night mode - On or O
Timer - The self-timer allows you to set a
delay after the capture button is pressed.
Choose from o, 3 secs., 5 secs. or 10 secs..
Great for that group photo you want to be
a part of.
Shot mode - Normal, Burst shot and
Frame shot
Image quality - Choose between Normal,
Fine and Super ne. The ner the quality,
the sharper the photo will be but the le
size will increase as a result, which means
you’ll be able to store fewer photos in your
phone's memory.
Memory in use - Choose whether to save
your photos to the Handset memory or to
the External memory.
Hide icons - Set whether to automatically
hide the icons on the side of the viewnder.
Sound - Select one of the three dierent
shutter sounds.
Camera
30
LG KS500 | User Guide
Changing the image size
The larger the image size, the larger the
le. Storing larger sized images will take up
more of your phone's memory. If you want
to t more pictures on to your phone you
can alter the image size to make the le
size smaller.
1 Select Size from the right toolbar.
2 Select an option from those presented
(3M, 2M, 1M, 640X480, 320X240,
Contact).
Viewing your saved photos
1 You can access your saved photos from
within the camera mode and from the
standby screen. From the viewnder,
simply select Album from the right
toolbar. From the main menu, select
and then My images.
2 Your gallery will appear on screen.
3 Use the arrows to select the photo
you want to view and choose View to
enlarge it.
Page 91

Choosing a shot mode
1 Select Settings to open the available
shot modes.
2 Choose from the four options:
Normal shot -This is the default shot
type, the photo will be taken in the
normal way, as outlined in Taking a
quick photo on page 31.
Burst shot - This enables you to take
nine shots automatically in very quick
succession. See Using burst shot mode
on page 34 for details.
Frame shot - Choose from one of the
fun frames to transform your friend
into a pirate or just decorate their
surroundings.
Using burst shot mode
Burst shot mode is great for taking photos
of moving objects or at sporting events.
1 Select Burst shot.
2 Position the subject in the viewnder
and press the capture button as you
would to take a normal photo.
3 The camera will take nine shots in quick
succession and display the rst with
eight thumbnails on the left side of the
screen.
4 Select the shot you want to keep by
selecting the thumbnail once to view
and select Save to save.
5 A tick will appear next to the image
thumbnail. Select Save to exit.
Using a frame shot mode
Frame shot can be used to transform your
friend into a pirate, or just to decorate their
surroundings with a frame.
1 Select Frame shot menu.
2 Position the subject in the fun frame and
press the capture button.
3 Save the image by selecting Save.
01
02
03
04
05
06
07
08
09
Camera
31
Page 92

Video camera
Shooting a quick video
1 Press the key on the right hand
side of the handset and the camera’s
viewnder will appear on screen.
2 Select Video from the right toolbar
and the video camera's viewnder will
appear on screen.
3 Point the camera lens towards the
desired subject of the video.
4 Press the centre key or the key to
start recording.
5 REC will appear in the bottom of the
viewnder and a timer will show the
length of your video.
6 To pause the video select Pause and
resume by selecting Resume.
7 Select Stop to stop recording.
Note: You can also access the video camera
from the main menu by selecting ,
scrolling down and selecting Video camera
to open the viewnder.
After you’ve shot your video
Video camera
A still image representing your captured
video will appear on screen. The name of
the video runs along the bottom of the
screen. You can access the Use as and
Rename options by pressing Settings.
32
LG KS500 | User Guide
Using the toolbar
Before shooting a video, select Settings to
congure various options.
Colour eect - Choose a colour tone to
apply to the video you’re taking. Choose
from four colour tone options: O, Black &
White, Negative or Sepia.
White balance - The white balance ensures
that any white in your videos appears
realistic. In order for your camera to
correctly adjust the white balance you may
need to determine the light conditions.
Choose from Auto, Sunny, Incandescent,
Cloudy or Fluorescent.
Night mode - On or O
Video quality - Choose between Super
ne, Fine and Normal. The ner the quality
the sharper a video will be, but the le size
will increase as a result, which means you’ll
be able to store fewer videos in the phone’s
memory.
Duration - Message or Normal.
TIP! The settings menu is superimposed
over the viewnder, so when you change
elements of the image colour or quality
you’ll be able to see the image change in
preview behind the settings menu.
Page 93

Use the arrow keys to navigate the options
in Others.
Memory in use - Choose whether to save
your videos to the Handset memory or to
the External memory.
Hide icons - Set the camera to
automatically hide the icons to the side of
the viewnder.
Voice - Choose Mute to record a video
without sound.
Watching your saved videos
1 Select the album icon. Your album will
appear on screen.
2 Highlight the video you want to view to
bring it to the front of the album.
3 Select the video to open it fully.
Adjusting the volume when viewing
a video
To adjust the volume of the audio on a
video whilst it is playing, use the keys on
the side of the handset.
01
02
03
04
05
06
07
08
09
Video camera
33
Page 94

My stu
You can store multimedia les in your
phone’s memory in My stu so that you
have easy access to all of your pictures,
sounds, videos and games. You can also
save your les to a memory card. The
advantage of using a memory card is that
you can free up space on your phone’s
memory.
My images
My images contains a folder of default
images pre-loaded onto your phone,
images downloaded by you and images
taken with your phone’s camera.
Option menus
The options available to you depend on
what type of image you have selected. All
of the options listed below will be available
for pictures you have taken on the phone’s
camera, but only the Use as, Sort by, Grid
view, File info. and Memory manager
options are available for default images.
In the images folder, select Options to
display your list of options.
My stu
Send - Send the selected image to a friend
via message, email or Bluetooth.
34
LG KS500 | User Guide
Note: The image may need to be resized
before it can be sent by MMS.
Use as - Select as Wallpaper, Contacts
image, Start up image or Shut down image.
Move - Move an image from the phone
memory to a memory card or vice versa.
Copy - Copy an image from the phone
memory to a memory card or vice versa.
Delete - Delete the selected image.
Mark/Unmark - Select multiple les.
Print via - Print an image le via Bluetooth®.
File - Rotate, rename or view the
information (name, size, date, resolution,
type and copyright) of the selected image.
Create new folder - Create a new folder
within the Pictures folder.
Slide show - See Creating a slide show on
page 38.
Sort by - Arrange your images by date,
type or name.
List view/Grid view - Change the way you
view your photos.
Memory manger - View the memory
status.
Page 95

Sending a photo
1 From the main menu, select .
2 Select My images.
3 Select a photo and choose Options.
4 Select Send and choose from Message,
Email or Bluetooth.
5 If you choose Message or Email, your
photo will be attached to the message
and you can write and send the message
as normal. If you choose Bluetooth, you
will be prompted to turn Bluetooth on
and if you choose Yes, your phone will
search for a device to send the picture
to.
Organising your images
1 From the main menu, select .
2 Select My images.
3 Select Options and then Sort by.
4 Choose from Date, Type or Name.
Deleting an image
1 From the main menu, select .
2 Select My images.
3 Select an image and choose Options.
4 Select Delete.
Creating a slide show
If you want to look at the images on your
phone, you can create a slide show to save
you from having to open and close each
individual image.
1 From the main menu, select .
2 Select My images.
3 Select the photo with which you would
like to begin the slideshow and choose
Options.
4 Select Slide show and it will begin.
5 Select Stop to pause the slide show or
Back to end the slide show and return to
the My images folder.
Selecting Options during the slide show
allows you to change to full or landscape
view.
My sounds
The My sounds folder contains Default
sounds as well as your Voice recordings.
From here you can set sounds as ringtones
or send them to other people.
Using a sound
1 From the main menu, select .
2 Select My sounds.
01
02
03
04
05
06
07
08
09
My stu
35
Page 96

My stu
3 Select Default sounds or Voice
recordings.
4 Find a sound and choose Play to listen
to it.
5 Select Options and choose Use as to
set the sounds as your Voice ringtone,
Video ringtone, Message tone, Start-up
sound or Shut down sound, contact
ringtone.
My videos
The My videos folder contains downloaded
videos and videos that you have recorded
with your phone.
Watching a video
1 From the main menu, select .
2 Select My videos.
3 Select a video and choose Play.
Using options while video is paused
Select Options while in pause mode and
choose from:
Landscape view - View the video le in
My stu
full shot.
Mute/Unmute - Switch the sound on/o.
36
LG KS500 | User Guide
Capture - Capture the frozen frame as a
picture.
Repeat - Repeat the video le.
File info. - View the name, size, date, time,
type, duration, dimension, protection and
copyright details.
Send - Send the video in a message, Email,
via Bluetooth or as a Media Album.
Delete - Delete the video.
Use as - use as voice ringtone and video
ringtone.
Sending a video clip
1 Select a video and select Options.
2 Select Send and choose from Message,
Email or Bluetooth.
3 If you choose Message or Email, your
video clip will be attached to the
message and you can write and send
the message as normal. If you choose
Bluetooth, you will be prompted to turn
Bluetooth on and your phone will search
for a device to send the video to.
Using a video clip as a ringtone
1 Select a video and choose Options.
2 Select Use as and choose Video
ringtone.
Page 97

Using the video options menu
From the Videos folder, you can choose
from the following options:
Send - Send a video to a friend.
Use as - Select a video clip for Voice
ringtone or Video ringtone.
Move - Move a video clip from the phone
memory to a memory card or vice versa.
Copy - Copy a video clip from the phone
memory to a memory card or vice versa.
Delete - Delete a video.
Mark/Unmark - Select multiple les.
File - Edit the le name and view its
information.
Create new folder - Create a new folder
within the My videos folder.
Sort by - Sort videos into a specic order.
Grid view/List view - View the options
menu by Grid or List type.
Memory manager - View the memory
status.
Games and applications
Your KS500 comes with pre-loaded games
to keep you amused when you have time
to spare. If you choose to download any
additional games or applications they
should be saved in this folder.
Playing a game
1 From the main menu, select .
2 Select My games & apps.
3 Select the game of your choice and
choose Launch.
Flash contents
The Flash contents folder contains all
of your default and downloaded ash
contents.
Viewing an SWF/Flash le
1 Select My stu then Flash contents.
2 Select the le and press Play.
Using options viewing the SWF/
Flash le
Select Options while in pause mode and
choose from:
01
02
03
04
05
06
07
08
09
My stu
37
Page 98

My stu
Play/Pause - Pause or resume playback.
Full screen/Landscape view - View your
SWF/Flash in full screen or landscape view
mode. (this only appears if you select
Options without pausing).
Send - Send the selected le to a friend via
message, email or Bluetooth.
Delete - Delete the selected le.
Mute/Unmute - Switch the sound on/o.
Use as wallpaper - Set the SWF/Flash le as
a wallpaper.
File info. - View the details about the le.
Others
The Others folder is used to store les
which are not pictures, sounds, videos,
games or applications.
My memory card
If you’ve inserted a memory card it will
be displayed as a folder within My stu.
That folder will be divided into four further
folders: Images, Sounds, Videos and
Others.
My stu
38
LG KS500 | User Guide
Using your phone as a mass storage
device
Your KS500 can be used as a mass storage
device, just like a USB stick. This is a great
way of moving les from your computer to
your phone. If you’ve inserted a memory
card and are connecting as mass storage,
two drives will appear on your computer.
1 From the main menu, select
Connectivity.
2 Select USB Connection.
3 Scroll to Mass storage and choose
Select.
4 Insert the smaller end of the USB cable
into the USB cable connector on the
edge of the KS500. Plug the larger end
into the USB port of your computer.
5 A removable disk folder will open
automatically (two if you have a memory
card inserted) showing all the folders on
your phone.
6 Drag and drop your images, videos,
music or documents into the desired
folders.
7 Safely remove your phone by clicking
on the Safely remove hardware icon in
your desktop toolbar.
Page 99

Multimedia
Music
Your LG KS500 has a built-in MP3 player so
you can play all your favourite music.
To access the MP3 player, choose from
the main menu and then select Music.
From here you have access to:
Recently played - This menu shows the last
20 tracks that were played.
All tracks - Contains all of the songs you
have on your phone.
Artists - You can view and play music
sorted by artist.
Albums - You can view and play music
sorted by album.
Genres - You can view and play music
sorted by genre.
Playlists - Contains any playlists you have
created.
Shue tracks - If you want to play a
continuous random selection, choose this
option.
Transferring music onto your phone
The easiest way to transfer music onto your
phone is via Bluetooth or your sync cable.
To transfer using Bluetooth:
1 Make sure both devices have Bluetooth
switched on and are visible to one
another.
2 Select the music le on the device and
choose to send it via Bluetooth.
3 Choose Yes on your phone to accept the
le.
4 The le should appear in Music >
All tracks.
Playing a song
1 From the main menu, select .
2 Choose Music.
3 Select All tracks and then the song you
want to play. Select Play to begin.
4 From the Options menu, choose
Minimize to hide the music player
screen so that you can continue using
your phone as normal while music is
playing.
5 Select Back to stop the music and return
to the music menu.
TIP! To change the volume while
listening to music, use the volume keys
on the side of your phone.
01
02
03
04
05
06
07
08
09
Multimedia
39
Page 100

Multimedia
Creating a playlist
You can create your own playlists by
choosing a selection of songs from the All
tracks folder.
1 From the main menu, select .
2 Choose Music, then Playlist.
3 Select Add, enter the playlist name and
choose Save.
4 The All tracks folder will be shown.
Select the songs that you would like to
include by moving to them and pressing
Mark ;
a tick will show next to their name.
5 Select Done to store the playlist.
Playing a playlist
1 From the main menu, select .
2 Choose Music, then Playlists.
3 Move to the playlist you would like to
play and choose Select and then Play.
Editing a playlist
Multimedia
From time to time, you may want to add
new songs or delete songs from a playlist.
You may also want to organise your
playlists.
1 From the main menu, select .
40
LG KS500 | User Guide
2 Choose Music, then Playlists.
3 Scroll to the playlist you want to edit and
choose Select, then Options.
Choose from:
Add new songs - You can add or delete
songs from the playlist using this option.
Remove from list - Remove a song from
the playlist. Touch Yes to conrm.
Move up/Move down - Move the song
up or down the list to change the
playing order.
Deleting a playlist
1 From the main menu, select .
2 Choose Music, then Playlists.
3 Scroll to the playlist you want to delete
and select Options.
4 Select Delete and choose Yes to conrm.
Voice recorder
Use your Voice recorder to record voice
memos or other sounds.
1 From the main menu, select .
2 Choose Voice recorder.
3 Select Rec. to begin recording.
4 Select Pause to pause the recording.
 Loading...