

Page 1
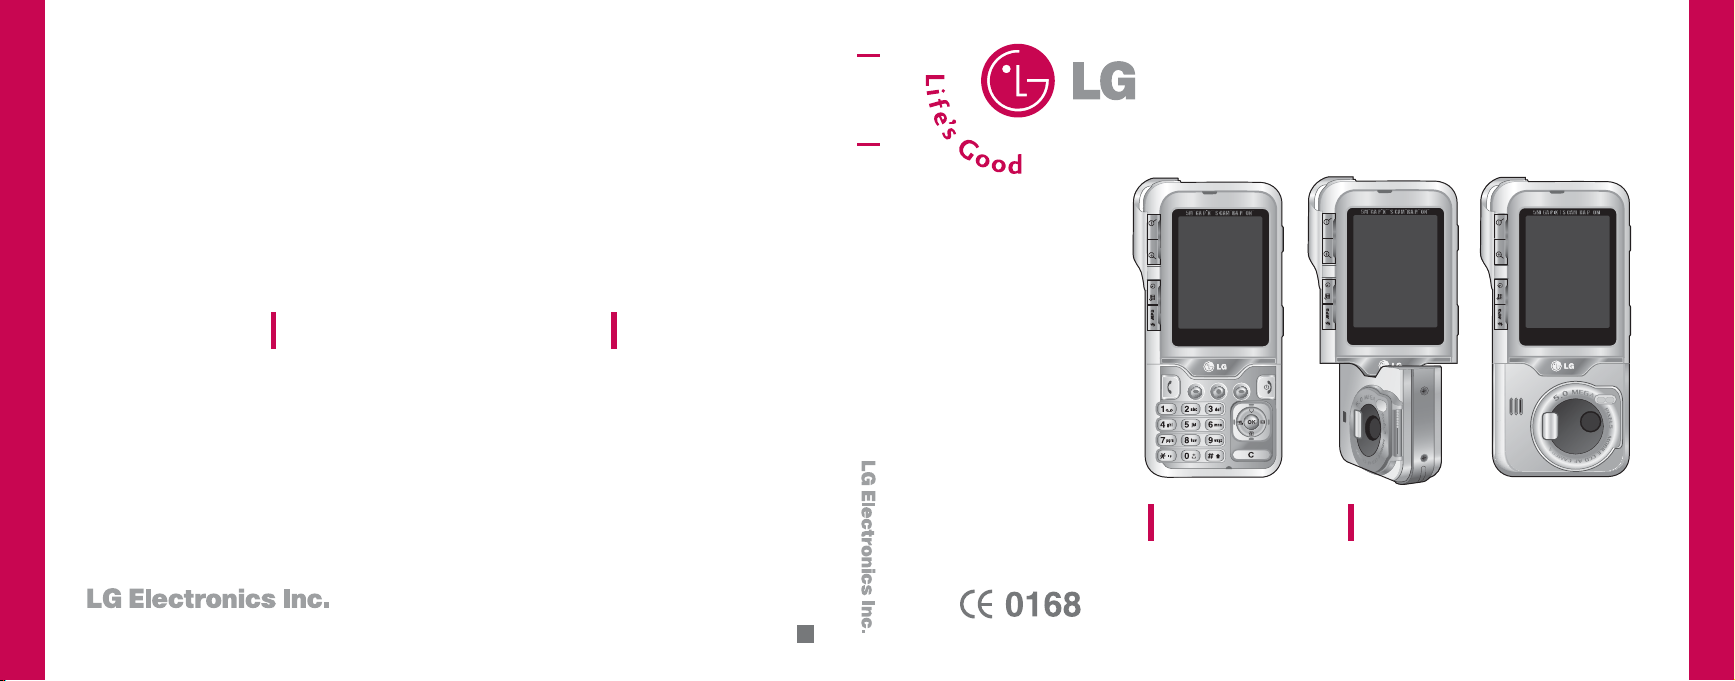
KG920
P/N : MMBB0204421(1.0
)
http://www.lgmobile.com
G
Some of contents in this manual may differ from your phone depending on the
software of the phone or your service provider.
USER GUIDE
ENGLISH
KG920
USER GUIDE
KG920
USER GUIDE
Page 2

KG920 User Guide
- English
Disposal of your old appliance
1. When this crossed-out wheeled bin symbol is attached to a product it means the product is
covered by the European Directive 2002/96/CE.
2. All electrical and electronic products should be disposed of separately from the municipal waste
stream via designated collection facilities appointed by the government or the local authorities.
3. The correct disposal of your old appliance will help prevent potential negative consequences for
the environment and human health.
4. For more detailed information about disposal of your old appliance, please contact your city office,
waste disposal service or the shop where you purchased the product.
Page 3

Table of contents
2
Introduction 5
For Your Safety 6
Guidelines for safe and
efficient use 7
KG920 features 12
Parts of the phone
Display information 16
On-Screen Icons
Installation 18
Installing the SIM card and
the handset battery
Charging the battery 19
Disconnecting the charger 20
Memory card
Inserting the memory card 21
Removing the memory card
Memory card formatting 22
Memory card adapter 23
To connect an external memory
card to your PC: 24
General functions 25
Making a calls
Adjusting the Volume 26
Answering a Call
Entering Text 27
Selecting Functions
and Options 31
In-Call Menu 32
During a Call
Conference Calls 33
Menu Tree 35
Games & Apps 38
Games & Apps
Profiles
Contacts 40
Search
Add new
Caller groups 41
Speed dial
Own number 42
My business card
Settings
Organiser 44
Calendar
Add new
View daily schedules
Delete past
Delete all
Go to date
Set alarm tone 45
Memo
Multimedia 46
Camera 47
Video camera 49
Frame shot 50
Voice recorder 51
Table of contents
Page 4

Table of contents
3
Record 5
1
View list 52
MP3
MP3 player 54
Playlist 55
Settings
Photo album
Video album 56
Settings 57
Camera
Video camera
Messages 58
New message
Write text message
Write multimedia message 59
Write email message 60
Inbox 61
Mailbox 63
Drafts
Outbox
Listen to voice mail 64
Info message
Read
Topics
Templates 65
Text templates
Multimedia templates
Settings
Text message
Multimedia message 66
Email
Voice mailbox number 68
Info message
Push messages
My Stuff 69
Images
Sounds
Games & Apps 70
External memory
Display 73
Wallpaper
Standby text
Backlight time
Brightness
Network name
Profiles 74
Activate
Personalise
Rename 75
Tools 76
Favourites
Alarm clock
Bluetooth
Paired devices/Handsfree devices 77
Settings 78
Supported services
Connectivity
Page 5

Table of contents
4
Calculator 79
Unit converter
World time
Browser 80
Home
Bookmarks 81
Go to URL
Settings
Profiles
Cache 82
Cookie
Clear cache
Clear cookie
Security
Call register 84
Missed calls
Received calls
Dialled calls
All calls 85
Delete recent calls
Call charges
Call duration
Call costs
Settings
GPRS information 86
Call duration
Data volumes
Settings 87
Date & Time
Date
Time
Language
Call
Call divert
Answer mode 88
Send my number 89
Call waiting
Minute minder 89
Auto redial
Security
90
PIN code request
Handset lock
Auto key lock timeout
Call barring
Fixed dial number 91
Change codes 92
Network
Network selection
Band selection
GPRS Attach 93
Switch on
When needed
Memory status
Reset settings
Accessories 94
Technical Data 95
Table of contents
Page 6
Introduction
5
Congratulations on your purchase of the advanced
and compact KG920 mobile phone, designed to
operate with the latest digital mobile communication
technology.
Introduction
This user’s guide contains important information
on the use and operation of this phone. Please
read all the information carefully for optimal
performance and to prevent any damage to or
misuse of the phone. Any changes or
modifications not expressly approved in this
user’s guide could void your warranty for this
equipment.
Use of phone cases with magnetic locks with
slide type phones has caused problems such as
loss of network signal and phones powering off.
Page 7

Please read these simple guidelines. Not following
these guidelines may be dangerous or illegal. Further
detailed information is given in this manual.
CAUTION!
•
Switch off the phone in any area where required by
special regulations. For example, do not use your phone
in hospitals or it may affect sensitive medical equipment.
•
Emergency calls may not be available under all mobile
networks. Therefore, you should never depend solely on
your mobile phone for emergency calls.
•
Only use ORIGINAL accessories to avoid damage to your
phone.
•
All radio transmitters carry risks of interference with
electronics in close proximity. Minor interference may
affect TVs, radios, PCs, etc.
•
Batteries should be disposed of in accordance with
relevant legislation.
•
Do not dismantle the phone or battery.
WARNING!
•
Mobile Phones must be switched off at all times in
aircrafts.
•
Do not hold the phone in your hand while driving.
•
Do not use your phone near petrol stations, fuel depots,
chemical plants or blasting operations.
•
For your safety, use ONLY specified ORIGINAL batteries
and chargers.
•
Do not handle the phone with wet hands while it is being
charged. It may cause an electric shock or seriously
damage your phone.
•
Keep the phone in a safe place out of small children’s
reach. It includes small parts which, if detached, may
cause a choking hazard.
For Your Safety
For Your Safety
6
Page 8

Exposure to radio frequency energy
Radio wave exposure and Specific Absorption
Rate (SAR) information
The KG920 has been designed to comply with
applicable safety requirements for exposure to radio
waves. This requirement is based on scientific
guidelines that include safety margins designed to
assure the safety of all persons, regardless of age and
health.
• The radio wave exposure guidelines employ a unit of
measurement known as the Specific Absorption Rate,
or SAR. Tests for SAR are conducted using
standardised methods with the phone transmitting
at its highest certified power level in all used
frequency bands.
• While there may be differences between the SAR
levels of various LG phone models, they are all
designed to meet the relevant guidelines for
exposure to radio waves.
• The SAR limit recommended by the International
Commission on Non-Ionizing Radiation Protection
(ICNIRP) is 2W/kg averaged over ten (10) gram of
tissue.
• The highest SAR value for this model phone tested
by DASY4 for use at the ear is 0.636 W/kg (10g).
• SAR data information for residents in
countries/regions that have adopted the SAR limit
recommended by the Institute of Electrical and
Electronics Engineers (IEEE) is 1.6 W/kg averaged
over one (1) gram of tissue (for example USA,
Canada, Australia and Taiwan).
Product care and maintenance
•
Do not disassemble this unit. Take it to a qualified
service technician when repair work is required.
•
Keep away from electrical appliances such as a TV's,
radios or personal computers.
•
The unit should be kept away from heat sources such
as radiators or cookers.
WARNING!
Only use batteries, chargers and accessories approved for
use with this particular phone model. The use of any other
types may invalidate any approval or warranty applying to
the phone, and may be dangerous.
Guidelines for safe and efficient use
Guidelines for safe and efficient use
7
Page 9

8
Guidelines for safe and efficient use
•
Never place your phone in a microwave oven as it will
cause the battery to explode.
•
Do not drop.
•
Do not subject this unit to mechanical vibration or
shock.
•
The coating of the phone may be damaged if
covered with wrap or vinyl wrapper.
•
Do not use harsh chemicals (such as alcohol,
benzene, thinners, etc.) or detergents to clean your
phone. There is a risk of this causing a fire.
•
Do not subject this unit to excessive smoke or dust.
•
Do not keep the phone next to credit cards or
transport tickets; it can affect the information on the
magnetic strips.
•
Do not tap the screen with a sharp object as it may
damage the phone.
•
Do not expose the phone to liquid or moisture.
•
Use accessories, such as earphones and headsets,
with caution. Ensure that cables are tucked away
safely and do not touch the antenna unnecessarily.
•
Please remove the data cable before powering on
the handset.
Efficient phone operation
To enjoy optimum performance with minimum power
consumption please:
•
Do not hold the antenna when the phone is in use. If
you hold it, it can affect call quality, it may also cause
the phone to operate at a higher power level than
needed and shorten talk and standby times.
8
Guidelines for safe and efficient use
Page 10

Guidelines for safe and efficient use
9
Electronic devices
All mobile phones may get interference, which
could affect performance.
•
Do not use your mobile phone near medical
equipment without requesting permission. Avoid
placing the phone over pacemakers (i.e. in your
breast pocket.)
•
Some hearing aids might be disturbed by mobile
phones.
•
Minor interference may affect TVs, radios, PCs, etc.
Road safety
Check the laws and regulations on the use of
mobile phones in the areas when you drive.
•
Do not use a hand-held phone while driving.
•
Give full attention to driving.
•
Use a hands-free kit, if available.
•
Pull off the road and park before making or answering
a call if driving conditions so require.
•
RF energy may affect some electronic systems in
your motor vehicle such as a car stereo or safety
equipment.
•
If your vehicle is equipped with an air bag, do not
obstruct it with installed or portable wireless
equipment. It can cause serious injury due to
improper performance.
If you are listening to music whilst out and about,
please ensure that the volume is at a reasonable level
so that you are aware of your surroundings. This is
particularly imperative when attempting to cross the
street.
Avoid damage to your hearing
Damage to your hearing can occur if you are exposed
to loud sound for long periods of time. We therefore
recommend that you do not turn on or off the handset
close to your ear. We also recommend that music and
call volumes are set to a reasonable level.
Page 11

10
Guidelines for safe and efficient use
Blasting area
Do not use the phone where blasting is in progress.
Observe restrictions, and follow any regulations or
rules.
Potentially explosive
atmospheres
•
Do not use the phone at a refueIling point. Don't use
near fuel or chemicals.
•
Do not transport or store flammable gas, liquid, or
explosives in the compartment of your vehicle, which
contains your mobile phone and accessories.
In aircraft
Wireless devices can cause interference in aircraft.
•
Turn off your mobile phone before boarding any
aircraft.
•
Do not use it on the ground without crew
permission.
Children
Keep the phone in a safe place out of small children's
reach. It includes small parts which if detached may
cause a choking hazard.
Emergency calls
Emergency calls may not be available under all mobile
networks. Therefore, you should never depend solely
on your mobile phone for emergency calls. Check with
your local service provider.
Guidelines for safe and efficient use
Page 12

11
Battery information and care
•
You do not need to completely discharge the
battery before recharging. Unlike other battery
systems, there is no memory effect that could
compromise the battery's performance.
•
Use only LG batteries and chargers. LG chargers are
designed to maximize the battery life.
•
Do not disassemble or short-circuit the battery pack.
•
Keep the metal contacts of the battery pack clean.
•
Replace the battery when it no longer provides
acceptable performance. The battery pack may be
recharged hundreds of times until it needs replacing.
•
Recharge the battery if it has not been used for a
long time to maximize usability.
•
Do not expose the battery charger to direct sunlight
or use it in high humidity, such as the bathroom.
•
Do not leave the battery in hot or cold places, this
may deteriorate the battery performance.
Memory card information and
care
• Always insert/remove the memory card while the
handset is switched off. When writing to the card,
wait for the operation to complete before removing
the card.
• The memory card is designed to fit easily into the
phone one way only. Do not bend or force it into
the slot.
• If the memory card becomes corrupt, then please
format the card. Please note this may not resolve
the problem.
• Please do not use excessive force when writing on
the memory card label.
• Carry and store the memory card in its case.
• Do not allow the memory card to get wet.
• Do not leave the memory card in extremely hot
locations.
• Do not disassemble or modify the memory card.
Guidelines for safe and efficient use
Page 13
KG920 features
12
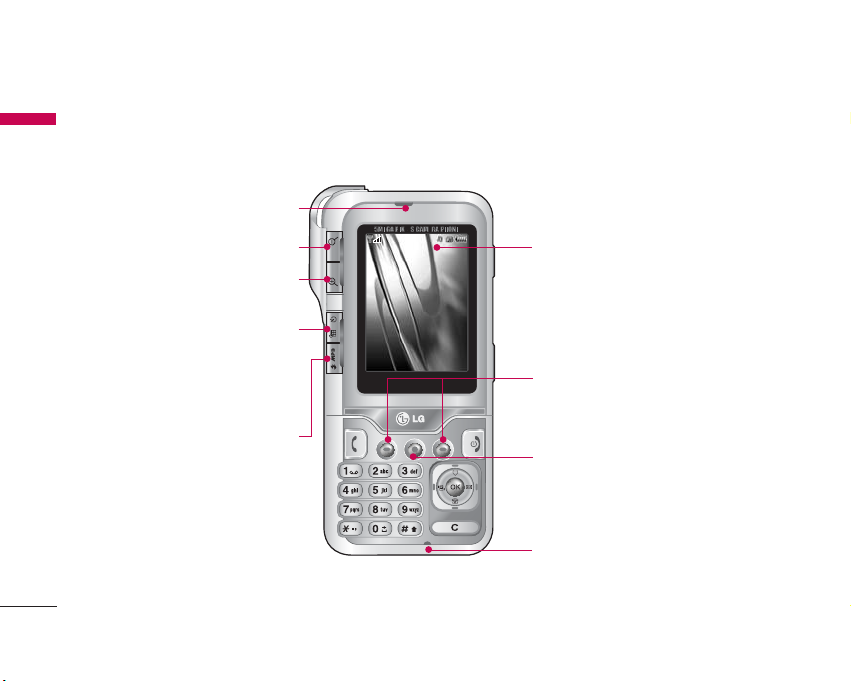
Parts of the phone
Front view
KG920 features
Earpiece
Zoom out
Left soft key/ Right soft key
These keys perform the function
Indicated in the bottom of the display.
LCD
• Top: Icons showing signal strength,
battery level and various other
functions.
• Bottom: Soft key indications
'SRXEGXW
'SRXEGXW
'SRXEGXW
'SRXEGXW
'SRXEGXW
'SRXEGXW
'SRXEGXW
'SRXEGXW
'SRXEGXW
'SRXEGXW
'SRXEGXW
'SRXEGXW1IRY
1IRY
1IRY
1IRY
1IRY
1IRY
1IRY
1IRY
1IRY
1IRY
1IRY
1IRY
Zoom in
Scheduler key
A shortcut key to the
Scheduler menu.
MP3 hot key
Activate the MP3
menu directly.
Microphone
Album key
Page 14
KG920 features
13
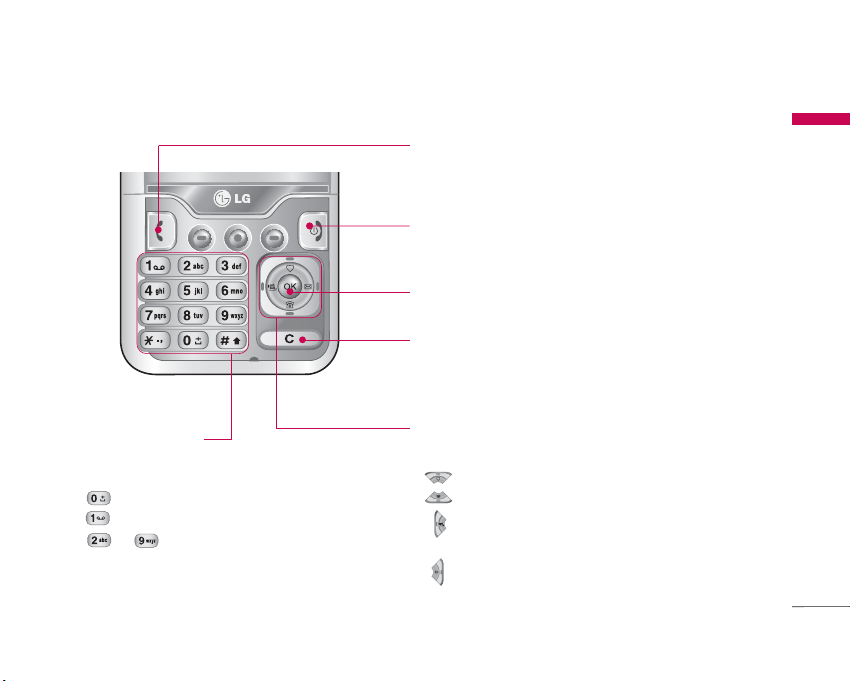
Navigation keys
• In standby mode:
Briefly: List of Favourites
Briefly: List of Contacts
Briefly: List of Profiles
(Hold down: Activate/Deactivate Vibrate mode)
Briefly: List of Messages
• In menu: scroll up & down
Confirm key
Selects menu options and confirms actions.
Send key
• Dial a phone number and answer a call.
• In standby mode: shows a history of calls made,
received, and missed.
End/Power key
• Switch on/off (hold down)
• End or reject a call.
Clear key
Deletes a character with each press. Hold the key down
to clear all input. Use this key to go back to a previous
screen.
Alpha numeric keys
• In standby mode: Input numbers to
dial. Hold down
- International calls
- Dial Voice mail centre.
to - Speed dials
• In editing mode: Enter numbers &
characters
Page 15
14
KG920 features
KG920 features
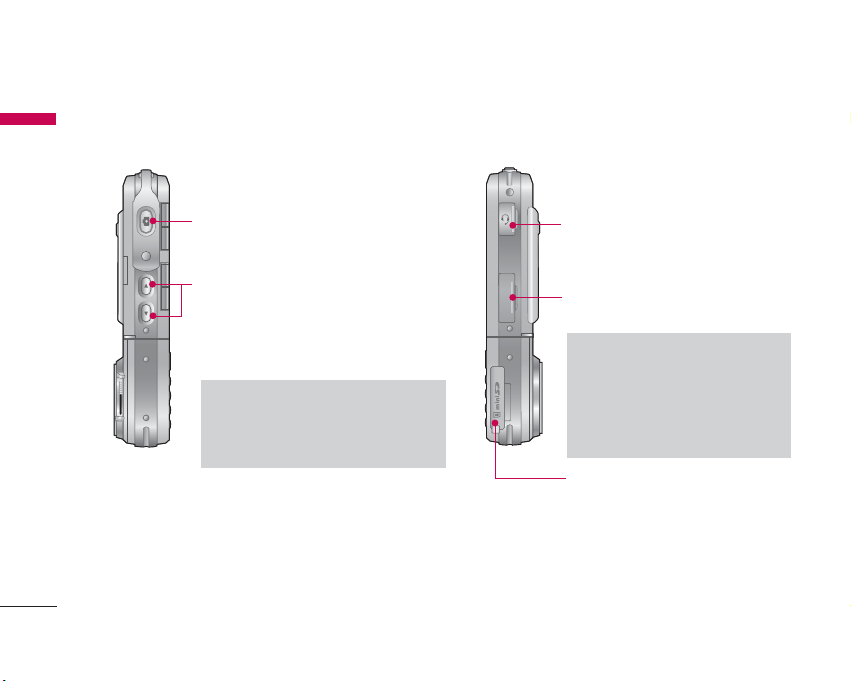
Left side view Right side view
Note
]
To protect the sense of hearing ,
maximum volume level is 3.
Note
]
Please ensure phone is
powered on and in idle mode
before connecting the USB
cable.
Side keys
]
In standby mode: Keytone volume
• In menu: Scroll up & down
• During a call: Earpiece volume
Handsfree slot
Cable Connector/
Battery Charging Connector
Memory card slot
Side Camera key
Page 16
15
KG920 features
Rear view
Camera lens
Camera cover adjuster
Camera cover
Battery latch
Press this button to
remove the battery cover.
Flash
Holes for a
carrying strap
SIM card socket
Battery
Battery Terminals
Page 17
KG920 features
16
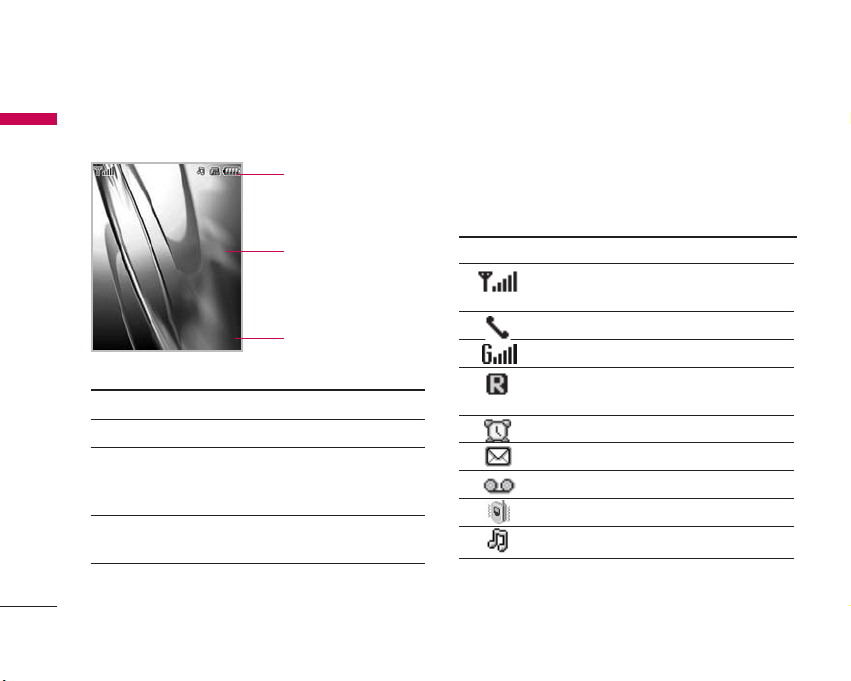
Display Information
Icon area
Text and graphic area
Soft key indications
Area Description
First line Displays various icons.
Middle lines Display messages, instructions and
any information that you enter, such
as number to be dialled.
Last line Shows the functions currently
assigned to the two soft keys.
The screen displays several icons. These are described
below.
On-Screen Icons
Icon/Indicator
Description
Tells you the strength of the network
signal.
Call is connected.
You can use GPRS service.
Shows that you are using a roaming
service.
The alarm has been set and is on.
You have received a text message.
You have received a voice message.
Vibrate only menu in profile.
General menu in profile.
KG920 features
'SRXEGXW
'SRXEGXW
'SRXEGXW
'SRXEGXW
'SRXEGXW
'SRXEGXW
'SRXEGXW
'SRXEGXW
'SRXEGXW
'SRXEGXW
'SRXEGXW
'SRXEGXW1IRY
1IRY
1IRY
1IRY
1IRY
1IRY
1IRY
1IRY
1IRY
1IRY
1IRY
1IRY
Page 18
KG920 features
17
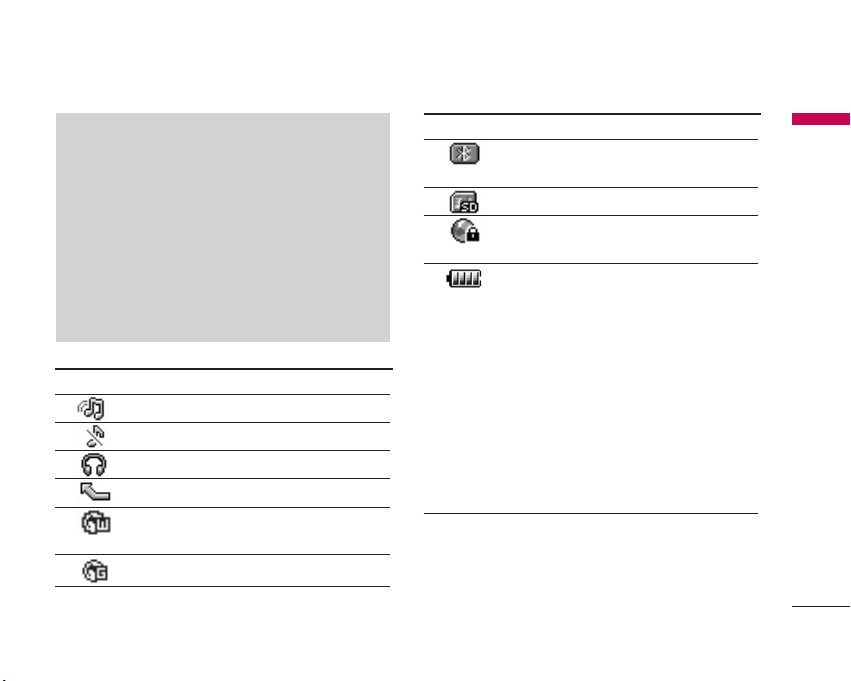
Icon/Indicator
Description
Loud menu in profile.
Silent menu in profile.
Headset menu in profile.
You can divert a call.
Indicates that the phone is accessing
WAP.
Indicates that you are using GPRS.
Icon/Indicator
Description
You have activated the Bluetooth
menu.
Indicates the SD card is inserted.
Indicates that you are using a security
connection.
Indicates the battery level, divided in
bars. The Battery indicator may
fluctuate depending on the kind of
phone usage. Using multimedia
functions like MP3, camera, video, etc
will increase battery consumption, so
the battery charge expires sooner than
when using common features of the
phone. This difference in battery
consumption may cause a fluctuation
of 2 or 3 bars depending on the
application used.
Note
The quality of the conversation may change
depending on network coverage. When the signal
strength is below 2 bars, you may experience
muting, call drop and poor audio. Please refer to
this signal as an indicator for your calls. When
there are no bars, that means that there is no
network coverage: in this case, you won’t be able
to access the network for any service (call,
messages and so on).
Page 19
Installation
18
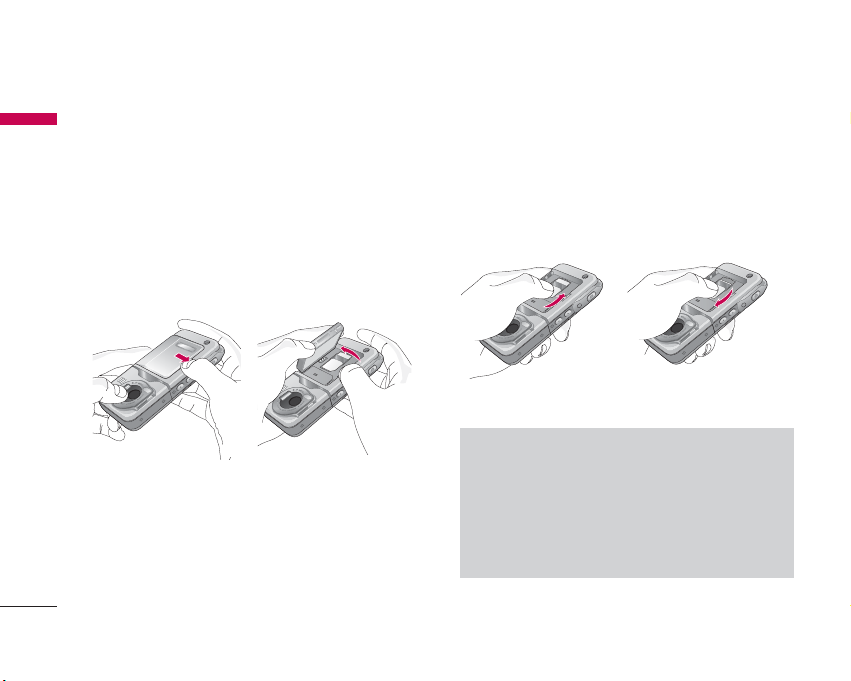
Installing the SIM card and the
handset battery
Make sure the phone is powered off before you
remove the battery.
1. Remove the battery.
Slide the battery latch to release the battery from
its compartment.
2. Install the SIM card.
Insert and slide the SIM card into the SIM card
holder. Make sure that the SIM card is inserted
properly and that the gold contact area on the card
is facing downwards. To remove the SIM card, press
down lightly and pull it in the reverse direction.
To insert the SIM card To remove the SIM card
Note
]
The metal contact of the SIM card can be
easily damaged by scratches. Pay special
attention to the SIM card while handling.
Follow the instructions supplied with the SIM
card.
Installation
Page 20
Installation
19
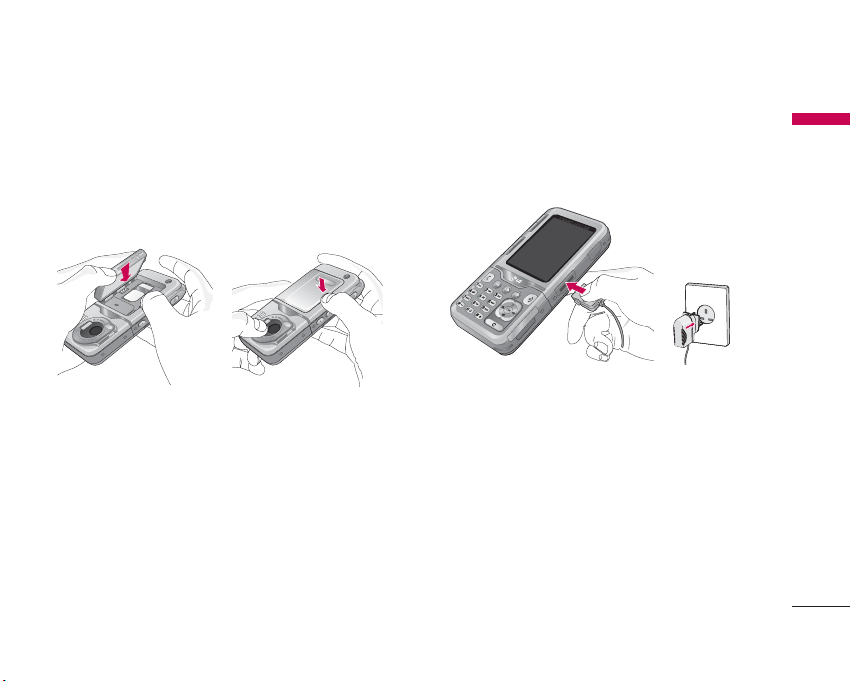
3. Install the battery.
Insert the bottom of the battery first into the
bottom edge of the battery compartment. Push
down the top of the battery until it snaps into
place.
Charging the Battery
Before connecting the travel adapter to the phone
you must first install the battery.
1. Ensure the battery is fully charged before using the
phone for the first time.
2. With the arrow facing you as shown in the diagram
push the plug on the battery adapter into the
socket on the side of the phone until it clicks into
place.
3. Connect the other end of the travel adapter to the
mains socket. Use only the charger included in the
box.
4. The moving bars of battery icon will stop after
charging is complete.
Page 21
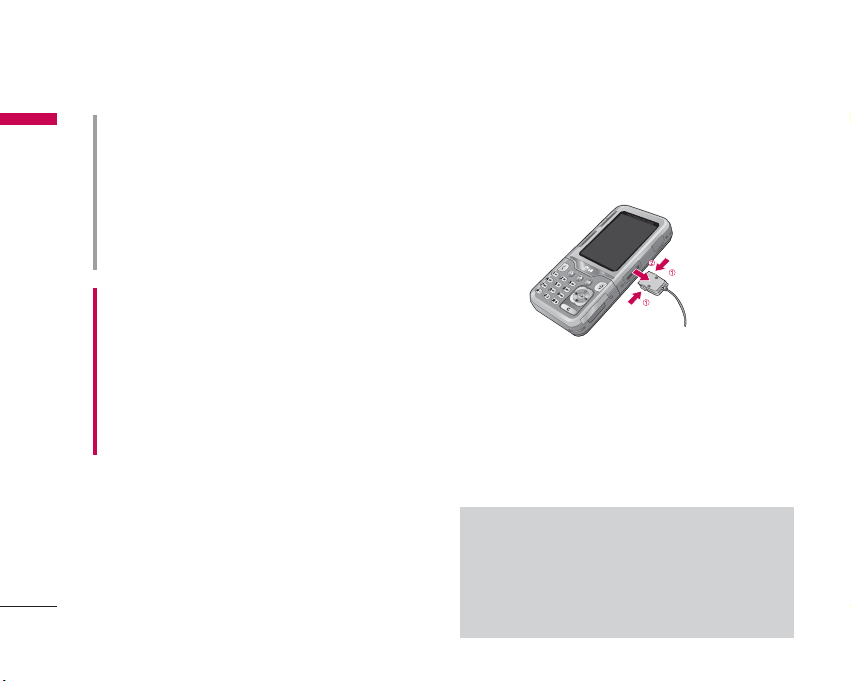
Disconnecting the charger
Disconnect the travel adapter from the phone by
pressing its side buttons as shown in the diagram.
Memory card
The KG920 is equipped with a slot on the side for a
memory card. You can use this card to save data files
such as photos and videos. You can play the audio files
in the memory card. Also, you can use the memory
card as a mass storage.
Note
]
Always insert/remove the memory card with
the handset power off.
]
If the memory card is removed, you can not
take pictures and videos or receive files by
bluetooth.
WARNING!
•
Unplug the power cord and charger during lightning
storms to avoid electric shock or fire.
•
Make sure that no sharp-edged items such as animal
teeth or nails, come into contact with the battery. There
is a risk of this causing a fire.
•
Do not place or answer calls while charging the phone as
it may short-circuit the phone and/or cause electric shock
or fire.
CAUTION!
•
Do not force the connector as this may damage the
phone and/or the travel adapter.
•
If you use the battery pack charger out of your own
country, use an attachment plug adaptor for the proper
configuration.
•
Do not remove your battery or the SIM card while
charging.
Installation
Installation
20
Page 22
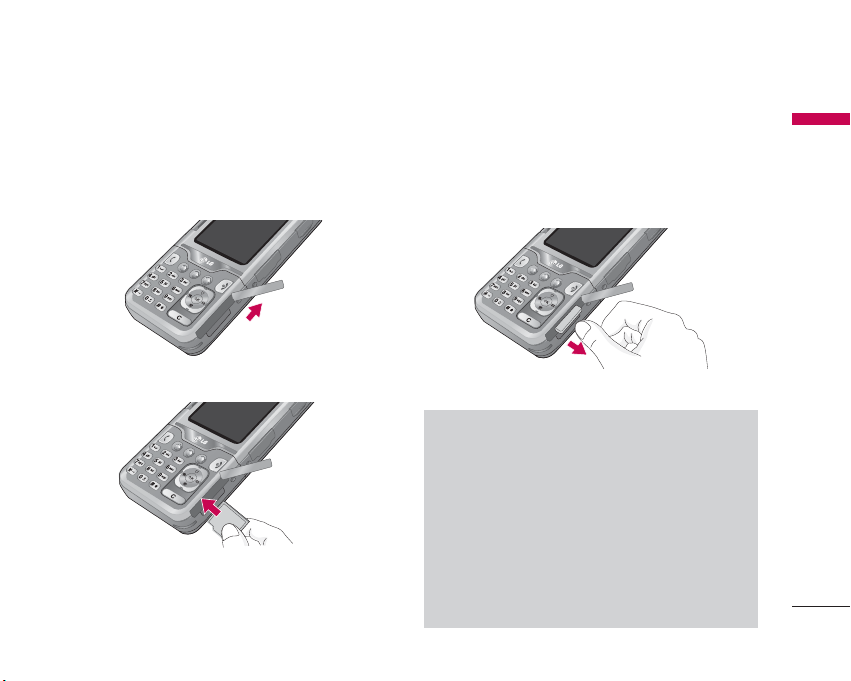
Inserting the memory card
Insert the memory card into the slot until the memory
card is fully inserted into the slot, as shown in the
figure below:
Open the memory card slot
Insert the memory card
Removing the memory card
1. Push in memory card with the tip of your finger into
the slot which will activate the eject mechanism.
2. Carefully pull the memory card out of slot.
Remove the memory card
Note
]
The memory card must be removed or inserted
only when necessary as its removal/insertion
may lead to failure.
]
When inserting an external memory card,
remove and insert it again if its icon appears
red. (If the icon remains red after re-insertion,
the memory card may likely be damaged, so
replace it with another one.)
Installation
21
Page 23

Installation
22
Memory card formatting
Before you start using the memory card it is necessary
to format it. After you insert the memory card, select
Menu-Settings-Reset settings-Clear external memory
(Menu #.8), then press OK. This operation should be
done only when you insert memory card for the first
time. During formatting, various folders will be created
for different data types.
Note
]
Please note formatting the memory card will
erase all data on the card.
Note
]
Removal of an external memory card or turning
the mobile phone off while using the card
(Store, Copy, Remove, Initialise, Play, etc.) may
clear or initialise any stored file, which in turn
may lead to severe damage on the card or
malfunction of the phone.
]
It is recommended the card be initialised within
the mobile phone. The memory card includes
some system space for any external memory
file so some capacity may survive the
initialisation of the memory card.
]
It is always advised to make a backup of any
data stored on your memory card.
Installation
Page 24

If you do not wish for this to happen, to create the
folders
on the card you need to do the following;
1. Insert the memory card into the slot.
2. Access the external memory by pressing the
following keys. Menu, My stuff (6), External
Memory (6.4).
3. 6 Folders are displayed.
1) Videos
2) Photos
3) Images
4) Musics
5) Sounds
6) Others
4. To create the above folders onto the memory card,
you must open each folder individually. A "List
empty" message will be displayed as you access
each folder, and at the same time this folder will be
created on the card.
5. If you now place your memory card into your pc,
those 6 folders which you have just created will be
displayed.
6. Alternately you can create the folders yourself, if
you insert the new memory card into your pc.
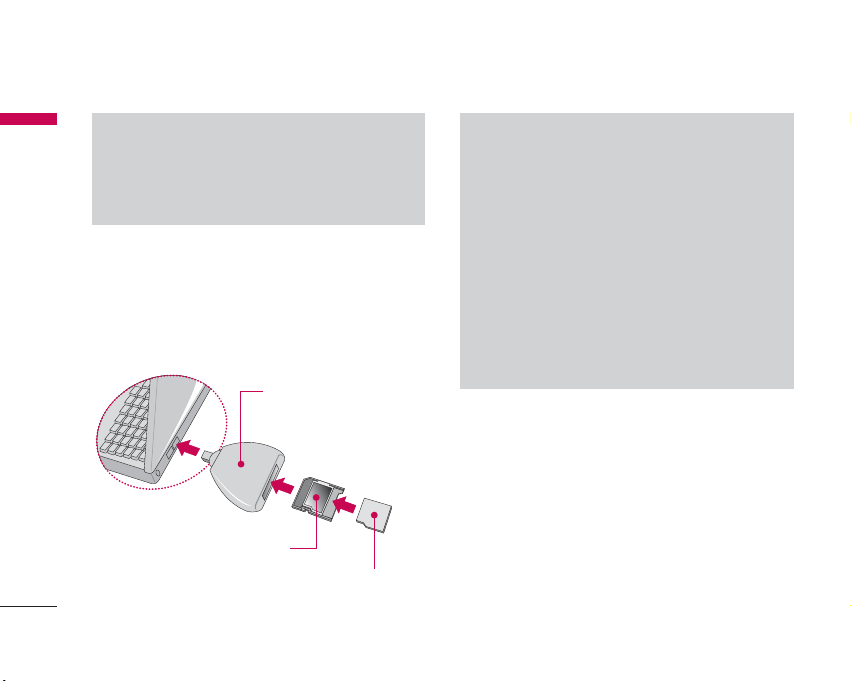
Memory card adapter
When you insert the memory card into its adapter, it
can be used with other memory sticks which are
compatible with devices such as PC's to exchange and
save data to without a data cable.
1. Insert the memory card into adapter.
2. Insert the adapter into the SD slot of the PC.
3. Check the status of the external memory on the PC.
Note
]
Please note that any extra folders/sub folders
you create will not be visible on the phone via
External memory.
]
If the file name on the memory card is too long
(recommended length: less than 115
characters including extension), it may not be
visible on the phone.
Installation
23
Page 25
To connect an external memory
card to your PC:
]
A removable external memory card can be
reused to store photos, videos and/or MP3s. (It
is compatible with 64MB,128MB, 256MB, or
512MB and supports FAT/FAT32. The
compatibility varies between manufacturers, so
please check the instructions before you use
your memory card.)
Note
]
Do not insert the External Memory Adapter
into the Memory Card R/W without the
memory card inserted into the adapter. Or the
R/W may fail.
]
Do not place any stickers on the memory card
or the adapter. Stickers may come off inside,
leading to damage.
]
Please ensure the adapter is kept dust free.
]
Some external memory cards have not been
tested for compatibility with this product.
Note
]
Before connecting this memory card adapter to
your PC, check whether your PC has a built in
SD slot or not.
Installation
Installation
24
Memory Card Read/Write
(Purchase separately)
External Memory Card
External Memory Card
Adapter
Page 26

Making a Call
1. Make sure your phone is powered on.
2. Enter a phone number including the area code. To
edit a number on the display screen, simply press
the key to erase one digit at a time.
]
Press and hold the key to erase the entire
number.
3. Press the key to call.
4. When you want to finish, press the key.
Making a call from the call history list.
1. Press the key, and the most recent incoming,
outgoing and missed phone numbers will be
displayed.
2. Select the desired number by using the navigation
keys.
3. Press the key.
Making International Calls
1. Press and hold the key for the international
prefix. The ‘+’ character can be replaced with the
international access code.
2. Enter the country code, area code, and the phone
number.
3. Press the key.
Ending a Call
When you have finished a call, press the key.
Making a Call From the Contact list
You can store names and phone numbers dialled
frequently in the SIM card as well as the phone
memory known as the Contact list.
You can dial a number by simply looking up a name in
the contact list.
General Functions
General Functions
25
Page 27

Adjusting the Volume
During a call, if you want to adjust the earpiece
volume, use the side keys of the phone.
In idle mode, you can adjust the key tone volume using
the side keys.
Answering a Call
When you receive a call, the phone rings and the
flashing phone icon appears on the screen. If the caller
can be identified, the caller’s phone number (or
name/photo, if stored in your Address Book) is
displayed.
1. The left soft key to answer an incoming call. If the
Any Key menu option (Menu #.3.2), has been set,
any key press will answer a call except for the
key or the right soft key.
2. Pressing the key.
Vibrate Mode (Quick)
Vibrate Mode can be activated by pressing and
holding the left navigation key.
Signal Strength
If you are inside a building, being near a window may
give you better reception. You can see the strength of
your signal by the signal indicator ( ) on your
phone’s display screen.
Note
]
You can answer a call while using the Address
Book or other menu features. In the case the
phone is connected to a PC via USB cable, any
incoming calls will be rejected, but after
disconnecting the phone from the PC you will
see the Missed call window.
General Functions
General Functions
26
Page 28

General Functions
27
Entering Text
You can enter alphanumeric characters by using the
phone’s keypad. For example, storing names in the
Address Book, writing a message, creating scheduling
events in the calendar all require entering text. The
following text input methods are available in the
phone.
T9 Mode
This mode allows you to enter words with only one
keystroke per letter. Each key on the keypad has more
than one letter. The T9 mode automatically compares
your keystrokes with an internal linguistic dictionary
to determine the correct word, thus requiring far fewer
keystrokes than the traditional ABC mode.
ABC Mode
This mode allows you to enter letters by pressing the
key labeled with the required letter once, twice, three
or four times until the letter is displayed.
123 Mode (Numbers Mode)
Type numbers using one keystroke per number. To
change to 123 mode in a text entry field, press
key until 123 mode is displayed.
Symbolic Mode
This mode allows you to enter special characters.
Changing the Text Input Mode
1. When you are in a field that allows characters to be
entered, you will notice the text input mode
indicator in the upper right corner of the display.
2. If you want to change modes, press .
The available modes are changed.
Note
]
Some fields may allow only one text input mode
(e.g. telephone number in address book fields).
Page 29
Using the T9 Mode
The T9 predictive text input mode allows you to enter
words easily with a minimum number of key presses. As
you press each key, the phone begins to display the
characters that it thinks you are typing based on a
built-in dictionary. As new letters are added, the word
changes to reflect the most likely candidate from the
dictionary.
1. When you are in the T9 predictive text input mode,
start entering a word by pressing keys to
Press one key per letter.
]
The word changes as letters are typed-ignore
what’s on the screen until the word is typed
completely.
]
If the word is still incorrect after typing
completely, press the down navigation key once
or more to cycle through the other word options.
Example: Press to type
Good.
]
If the desired word is missing from the word
choices list, add it by using the ABC mode.
2. Enter the whole word before editing or deleting any
keystrokes.
3. Complete each word with a space by pressing the
key or key.
To delete letters, press . Press and hold
down to erase the letters continuously.
28
General Functions
General Functions
Note
]
You can select a different T9 language from the
menu option by holding down the key.
The default setting on the phone is T9 enabled.
Note
]
To exit the text input mode without saving your
input, press . The phone returns to the idle
screen.
Page 30
Using the ABC Mode
Use the to keys to enter your text.
1. Press the key labeled with the required letter:
]
Once for the first letter.
]
Twice for the second letter.
]
And so on.
2. To insert a space, press the key once. To
delete letters, press the key. Press and
holddown the key to erase the letters
continuously.
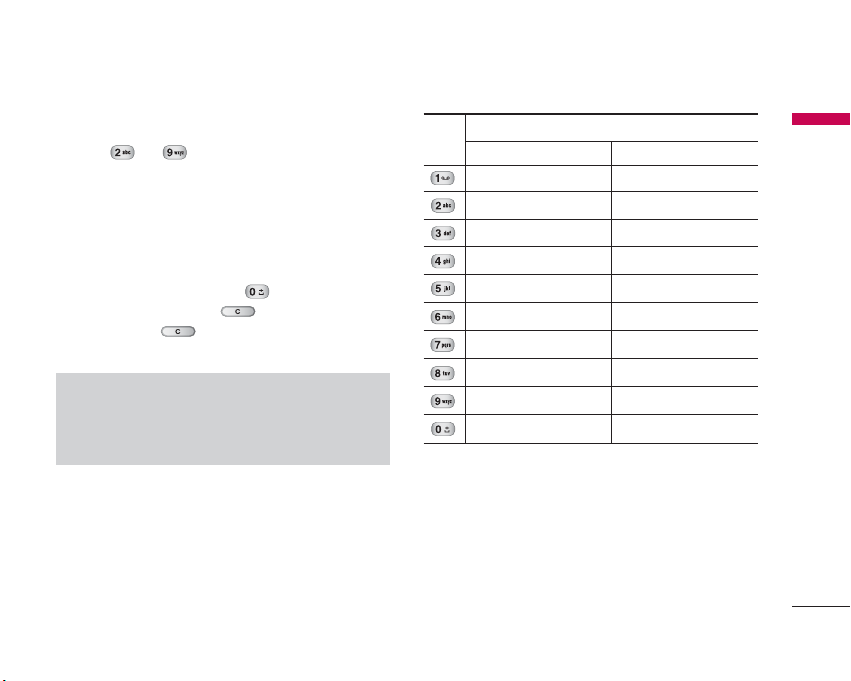
Key
Characters in the order display
Upper Case Lower Case
. , / ? - : ' " 1 . , / ? - : ' " 1
A B C 2 a b c 2
D E F 3 d e f 3
G H I 4 g h i 4
J K L 5 j k l 5
M N O 6 m n o 6
P Q R S 7 p q r s 7
T U V 8 t u v 8
W X Z Y 9 w x y z 9
Space 0 Space 0
Note
]
Refer to the table below for more information
on the characters available using the keys.
29
General Functions
Page 31

Using the 123 (Numbers) Mode
The 123 Mode enables you to enter numbers in a text
message (a telephone number, for example).
Press the keys corresponding to the required digits
before manually switching back to the appropriate
text entry mode.
Using the Symbol Mode
The Symbol Mode enables you to enter various
symbols or special characters.
To enter a symbol, press the key. Use the
navigation keys to select the desired symbol and press
the [OK] key.
General Functions
General Functions
30
Page 32

Your phone offers a set of functions that allow you to
customise the phone. These functions are arranged in
menus and sub-menus, accessed via the two soft keys
marked and . Each menu and sub-menu allows
you to view and alter the settings of a particular
function. The roles of the soft keys vary according to
the current context; the label on the bottom line of
the display just above each key indicates its current
role.
Selecting Functions and Options
Selecting Functions and Options
31
Press the right soft
key to access the
available Contacts.
Press the left soft
key to access the
available Menu.
1IRY
1IRY
1IRY
1IRY
1IRY
1IRY
1IRY
1IRY
1IRY
1IRY
'SRXEGXW
'SRXEGXW
'SRXEGXW
'SRXEGXW
'SRXEGXW
'SRXEGXW
'SRXEGXW
'SRXEGXW
'SRXEGXW
'SRXEGXW
Page 33

32
Your phone provides a number of control functions
that you can use during a call. To access these
functions during a call, press the left soft key
[Options].
During a Call
The menu displayed on the handset screen during a
call is different than the default main menu displayed
when in idle screen, and the options are described
below.
Speaker phone
During a call you can activate the speaker phone by
selecting Options/Speaker phone on, or by pressing
the OK button. To mute the speaker phone select
Options/Speaker phone off, or press the OK button
one more time.
Making a Second Call
(Network Dependent)
You can make a second call while currently on a call.
Enter the second number and press the . When
the second call is connected, the first call is
automatically placed on hold. You can swap between
calls, by pressing the key.
You can also get a number you wish to dial from the
Address Book to make a second call. Press the Right
soft key then select Contacts.
Swapping Between Two Calls
To switch between two calls, press key or the left
soft key, and then select Swap.
Answering an Incoming Call
To answer an incoming call when the handset is
ringing, simply press the key. The handset is also
able to warn you of an incoming call while you are
already on a call. A tone sounds in the earpiece, and
the display will show that a second call is waiting.
In-Call Menu
In-Call Menu
Page 34

33
In-Call Menu
33
This feature, known as Call Waiting, is only available if
your network supports it. For details of how to
activate and deactivate it see Call Waiting (Menu
#.3.4)
If Call Waiting is on, you can place the first call on hold
and answer the second, by pressing .
Rejecting an Incoming Call
You can reject an incoming call without answering by
simply pressing the key.
During a call, you can reject an incoming call by
pressing the key.
Muting the Microphone
You can mute the microphone during a call by pressing
the [Options] key then selecting [Mute]. The handset
can be unmuted by pressing the [Unmute]. When the
handset is muted, the caller cannot hear you, but you
can still hear them.
DTMF tones while calling
To switch on DTMF tones while calling (e.g. to use the
phone with an automatic switchboard) press the key
[Options] followed by Send DTMF _DTMF on. Select
DTMF off to disable DTMF tones. DTMF tones are
normally on.
Conference Calls
The conference service provides you with the ability
to have a simultaneous conversation with more than
one caller, if your network service provider supports
this feature. A conference call can only be set up when
you have one active call and one call on hold, both
calls having been answered. Once a conference call is
set up, calls may be added, disconnected or separated
(that is, removed from the conference call but still
connected to you) by the person who set up the
conference call. These options are all available from
the In-Call menu. The maximum callers in a conference
call are five. Once started, you are in control of the
conference call, and only you can add calls to the
conference call.
Page 35

34
Setting Up a Conference Call
To set up a conference call, place one call on hold and
while the active call is on, press the left soft key and
then select the Join menu of Conference call.
Activate the Conference Call on Hold
To activate a conference call on hold, press the
key. Alternatively press the left soft key
[Options] and select Conference/Hold all calls. Other
users on hold will stay connected. To return to
conference call mode, press the left soft key
[Options] followed by Conference call.
Adding Calls to the Conference Call
To add a call to an existing conference call, press the
left soft key, and then select the Join menu of
Conference call.
Private Call in a Conference Call
To have a private call with one caller from a conference
call, display the number of the caller you wish to talk
to on the screen, then press the left soft key. Select
the Private menu of Conference call to put all the
other callers on hold.
Ending a Conference Call
Currently displayed caller from a conference call can
be disconnected by pressing the key.
In-Call Menu
In-Call Menu
Page 36

35
Menu Tree
Menu Tree
The following illustration shows the available menu structure and indicates the:
]
Number assigned to each menu option.
5.1 New message
5.2 Inbox
5.3 Mailbox
5.4 Drafts
5.5 Outbox
5.6 Listen to voice mail
5.7 Info message
5.8 Templates
5.9 Settings
3.1 Calendar
3.2 Memo
4.1 Camera
4.2 Video camera
4.3 Frame shot
4.4 Voice recorder
4.5 MP3
4.6 Photo album
4.7 Video album
4.8 Settings
1.1 Games & Apps
1.2 Profiles
2.
1 Search
2.
2 Add new
2.
3 Caller groups
2.
4 Speed dial
2.
5 Own number
2.
6 My business card
2.
7 Settings
1.
Games & Apps
3. Organiser 5. Messages
4. Multimedia2. Contacts
Page 37

7.1 Wallpaper
7.2 Standby text
7.3 Backlight time
7.4 Brightness
7.5 Network name
8.x.1
Activate
8.x.2
Personalise
8.x.3
Rename
7. Display
8. Profiles
Menu Tree
36
Menu Tree
6.1 Images
6.2 Sounds
6.3 Games & Apps
6.4 External memory
6. My stuff
9.1 Favourites
9.2 Alarm clock
9.3 Bluetooth
9.4 Connectivity
9.5 Calculator
9.6 Unit converter
9.7 World time
9. Tools
Page 38

Menu Tree
37
0.1 Missed calls
0.2 Received calls
0.3 Dialled calls
0.4 All calls
0.5 Delete recent calls
0.6 Call charges
0.7 GPRS information
0. Call register
#.1 Date & Time
#.2 Language
#.3 Call
#.4 Security
#.5 Network
#.6 GPRS Attach
#.7 Memory status
#.8 Reset settings
*.1 Home
*.2 Bookmarks
*.3 Go to URL
*.4 Settings
*. Browser #. Settings
Page 39

Games & Apps
Games & Apps
38
Games & Apps
Menu 1.1
• Default Games: In this menu, you can manage the
Java applications installed on your phone. You can
play or delete downloaded applications, or set the
connect option. The downloaded applications are
organised in folders.
Press the left soft key [Options] to open the
selected folder or launch the selected midlet.
After selecting a folder, press [Options] and then sub
menus available to several options are displayed.
]
Open: You can see the stored games.
]
New Folder: Create a new folder.
Profiles
Menu 1.2
A profiles is the network information used to connect
to the Internet.
If you want to see the details of a profile, please refer
to Menu *.4.1.
JavaTM, is a technology developed by Sun
Microsystems. Similar to the way you would
download the Java Applet using the standard MS
Internet Explorer browsers, Java MIDlet can be
downloaded using a WAP enabled phone.
Depending on the service provider, all Java based
programs such as Java games can be downloaded
and run on a phone. Once downloaded, the Java
program can be viewed in the Games & Apps
menu where you can select, execute, or delete.
The Java program files saved in the phone are in
.JAD or .JAR format.
Page 40

CAUTION!
Only J2ME(Java 2 Micro Edition) based
programs will run in a phone environment. The J2SE(Java 2
Standard Edition) based programs will only run in a PC
environment.
Note
]
The JAR file is a compressed format of the Java
program and the JAD file is a description file
that includes all detailed information. From the
network, prior to download, you can view all
detailed file descriptions from the JAD file.
]
While being based on a standard language
(J2ME), not all Java applications are compatible
with all handsets on sale insofar as specific
libraries may be used for a telephone model.
The software may be blocked or switch itself on
when Java applications not specifically
developed for the phone this manual refers to
are downloaded, making it necessary to
“restart” the handset. We would like to point
out that these problems are caused by
incompatible applications and are not a
product fault.
Games & Apps
39
Page 41

Search
Menu 2.1
1. Select Search by pressing the right soft key
[Contacts] or [OK].
2. Enter the name that you want to search.
3. If you want to edit, delete or copy an entry, select
the left soft key [Options]. The following menu
will be displayed.
]
Edit: You can edit the name, number, group,
character and picture by using the navigation key.
]
Write messages: After you have found the number
you want, you can send a text/multimedia message
to the selected number.
]
Send via Bluetooth: You can send the data from
the phone book to devices which are compatible
with Bluetooth through Bluetooth.
]
Copy to phone: You can copy an entry from SIM
to phone or from phone to SIM.
]
Main number: If a contact has more than one
number stored, select the one that you use most
often. This main number will be displayed first.
]
Assign speed dial: You can assign the entry as a
speed dial.
]
View caller groups: For further details see (Menu
2.3).
]
Delete: You can delete an entry.
Add new
Menu 2.2
You can add a phonebook entry by using this function.
Phone memory capacity is 1000 entries. SIM card
memory capacity depends on the service provider.
You can also save upto 20 characters of name in The
Phone memory, and save characters in the SIM card.
The number of characters is a SIM dependent feature.
Note
]
Instant searching is available by inputting the
initial letter of the name you want to search.
Contacts
40
Contacts
Page 42

1. Select Add new by pressing the left soft key
[Select] or [OK].
2. Select the memory you want to save to: SIM or
Phone. If you set to Phone, you need to select
which number you want as a main number.
a. Press [OK] to input a name.
b. Press [Save], then you can input a number.
c. You can set a group for the entry by pressing
, .
d. You can set a character and a picture for the
entry by pressing the right soft key
[
New pic.
] , .
Caller groups
Menu 2.3
You can add up to 20 members per group, with up to
a maximum of 7 groups in total.
]
Member list: Shows the group members you have
selected.
]
Group ring tone: Allows you to specify ring tone
for the group members’ call.
]
Group icon: Allows you to select the icon
dependent on Group.
]
Add member: You can add group members. Each
group should not exceed 20 members.
]
Delete member: You can remove the member from
the Group member list. But the name and the
number will be remained in phonebook.
]
Rename: You can change a group name.
]
Delete all: Allows you to delete all the members in
the group.
Speed dial
Menu 2.4
Assign contacts to any of the keys to .
You can then call that contact by pressing the
corresponding number key.
1. Open the phonebook first by pressing the right soft
key [Contacts] in standby mode.
Note
]
Maximum stored name and number length
depends on SIM-card type.
41
Contacts
Page 43

2. Scroll to Speed dial, then press the left soft key
[OK].
3. If you want to add speed dial, select (empty). Then,
you can search the name in the phonebook.
4. After assigning the number as speed dial, you can
change and delete the entry. You can also make a
call or send a message to this number.
Own number
Menu 2.5
(Sim dependent)
You can save and check your own number in SIM card.
My business card
Menu 2.6
This option allows you to create your own business
card featuring Name and a mobile phone number. To
create a new business card, press the left soft key
[Edit] and enter the information into the fields.
Settings
Menu 2.7
1. Press the right soft [Contacts] in standby
mode.
2. Scroll to Settings, then press the left soft key
[OK].
]
Default memory
Scroll to highlight Default memory, and then press
the left soft key [OK].
- If you select Always ask, when adding entry, the
phone will ask where to store.
- If you select SIM or Phone, the phone will store an
entry to SIM or phone.
]
View options
Scroll to highlight View options, and then press the
left soft key [OK].
- Name only: Set the phonebook list by displaying
the name only.
- Name & number: Set the phonebook list by
displaying the name and number.
- With picture: Set the phonebook list with the
information and picture of contact.
Contacts
Contacts
42
Page 44

43
]
Copy/Move all
You can copy/move entries from SIM card memory
to Phone memory and vice versa.
1. Open the Phonebook first by pressing the right soft
key [Contacts] in standby mode.
2. Scroll to Copy/Move all, and then press the left
soft key [OK] to enter this menu.
• SIM to Phone: You can copy/move the entries
from SIM Card to Phone memory.
• Phone to SIM: You can copy/move the entries
from Phone memory to SIM Card.
]
Memory in use: This feature allows you to see how
many entries are in use, or free in your phonebook.
]
Clear contacts
You can delete all the entries in the SIM and Phone.
This function requires the Security code.
1. Scroll to highlight Clear contacts, and then press
the left soft key [OK].
2. Highlight the memory you wish to erase, and then
press the left soft key [OK].
3. Enter the security code and press the left soft key
[OK] or the right soft key [Back].
]
Service dial number
Use this function to access a particular list of
services provided by your network operator (if
supported by the SIM card).
Contacts
Page 45

Organiser
Organiser
44
Calendar
Menu 3.1
When you enter this menu a calendar will be displayed.
The month and year are shown at the top of the
screen. Whenever you the change the date under the
Settings menu, the calender will update automatically.
The current date will be highlighted in blue and any
schedule will be at the top left hand corner of the
corresponding square. An audible alarm can be set for
memo’s and reminders.
To change the day, month and year.
Key Description Key Description
Yearly Weekly
Monthly Daily
In the scheduler mode, press left soft key
[Options] as follows;
Add new
(Menu 3.1.1)
Allows you to add new a schedule and memo for the
chosen day. You can store up to 20 notes. Input the
subject and then press left soft key [OK]. You
enter the appropriate information in the following
section; Time, Repeat and Alarm.
View daily schedules
(Menu 3.1.2)
View all schedules and memo for the chosen day. Use
, to browse through the note lists. If you
set the alarm for a note, the alarm icon is displayed.
If you want to view the note in detail, press the left
soft key [Select]. Press the left soft key
[Options] Edit, Delete, Set alarm tone the note you
selected.
Delete past
(Menu 3.1.3)
You can delete the past schedule that you have
already been notified of.
Delete all
(Menu 3.1.4)
You can delete all the notes.
Go to date
(Menu 3.1.5)
You can go to the chosen date directly.
Page 46

45
Set alarm tone
(Menu 3.1.6)
You can set the alarm tone for each chosen date.
Memo
Menu 3.2
1. Select the Memo by pressing the left soft key
[OK].
2. If the entry is empty, press the left soft key
[New].
3. Input the memo and then press the left soft key
[OK].
Organiser
Note
]
If you want to change the text input mode,
press the in order.
Page 47

Multimedia
46
Using the camera module built in your phone, you can
take pictures of people or record videos. Additionally,
you can send photos to other people and select
photos as wallpaper.
1
Select flash() 2Timer()
3/4
Adjust zoom(+/-)
Shutter sound or video recording sound is omitted
even when setting mode, including manner mode .
• To take a picture
Hold down the camera button. The camera will be
ready to use after you remove the camera lens cover
and you may want to rotate the screen into a
horizontal position.
- To take clear pictures, press the camera button
while holding the camera without any movement.
- Appropriately adjust distance to the object that you
want take a picture of (more than 50 cm).
- Handle carefully since the camera is vunerable to
shock and use a soft cloth when cleaning the camera
lens.
- Do not disassemble or modify the camera as this may
lead to fire or malfunctioning.
- Auto Focus function is enabled when taking a picture
or sticker shot. Press the camera button half way
to adjust focus.
Multimedia
Flash
Camera lens
Camera cover
adjuster
Auto Focus
sub light
12 34
Note
]
When using the camera, power consumption
increases. If this icon appears on the
wallpaper, indicating low battery, recharge the
battery before use.
Rotation supported (180 )
Camera in rotated position
(when taking picture of oneself)
Page 48

Camera
Menu 4.1
Hold down the camera button on the wallpaper,
then the camera becomes ready to take a picture
immediately. If Auto Save is selected in the Camera
Settings, pictures are saved automatically after being
taken.
]
Press the camera button.
1
Mode switching function - Camera( )/Video
camera( )/Frame shot( )
2
Photo album selection
3
Settings selection - Settings 1/Settings 2
(press to clear Settings screen)
4
Move to Sending Mail function. (However,
when using continuous shot and external
memory Sending Mail function is not supported.)
5
Saves photo.
6
You can edit the name of the photo.
Option 1( )
]
Press the right key to access the settings menu
and use the navigation keys to go through and
amend the settings.
Note
]
If the Auto save function is set to on, the above
options 4,5 and 6 are not displayed.
Note
]
Turning the camera off whilst in use may clear
or initialise any stored file and the shooting
time varies depending on the environment
including resolution and image quality.
Multimedia
47
1
2
3
4
5
6
Page 49

48
Multimedia
Multimedia
• Mode [ ]: Auto/Close Up/Portrait/Landscape/
Sports/Dusk/Program AE
• Flash[ ]: Off/On/Auto/Red eye
• Filter[ ]: Off/Black and white/Sepia/Negative
• Sequence shot[ ]: Sequence shot1/Sequence
shot3/Sequence shot6
• Timer[ ]: Off/3 secs/5 secs/10 secs/15 secs
• Resolution[ ]: 2592l1944, 2048l1536,
1600l1200, 1280l960, 640l480, MMS
• Quality[ ]: Normal/Fine/Super fine
Option 2 ( )
]
Press the right key twice.
• Whitebalance [ ]: Auto/
Incandescent/Fluorescent/Sunny/Cloudy/Shade
• Light metering [ ]: All, Centre
• ISO [ ]: Auto, ISO 100, ISO 200, ISO 400
• Auto Focus [ ]: Centre/Multi
• Date Stamp [ ]: Off/On
Note
]
Resolution: This sets the size (resolution) of
the photo, expressed in pixels: The greater the
resolution, the greater the size of the photo
and, consequently, the size of the file created
on the memory card. The resolutions available
are 2592x1944 pixels, 2048x1536,
1600x1200, 1280x960, 640x480 and
MMS (320x240). The MMS format is the only
one that can be used to send photos as an
attachment in multimedia messages. In any
case, if the photo size is less than 100 KB, you
can also send photos taken with a resolution of
640x480 pixels.
If you wish to print a photo using digital print
services, selecting the highest resolution is
recommended.
Note
]
These options are dependant on the resolution
set.
Page 50

Video Camera
Menu 4.2
Time duration which you can record a video may vary
according to the specific conditions used, including
resolution, image quality, etc.
1
Mode switching function - Video camera( )
/Frame shot( )/Camera( )
2
Video album
3
Settings selection - Settings 1/Settings 2
(press to clear Settings screen)
Press the camera key to start recording. To stop
recording, press the camera key again. After the
recording has stopped,
4
You can cancel the recorded video.
(or use )
5
Save the recorded video.
6
You can edit the name of the video.
Note
]
It should be noted that when power goes off
during operation, files in the memory could be
deleted or reset.
Note
]
Max length of a video clip that can be recorded
is 1 hour (60 minutes.)
Multimedia
49
4
5
6
1
2
3
Page 51

Option 1 ( )
]
Press the right key to access the settings menu
and use the navigation keys to go through and
amend the settings.
• Filter[ ]: Off/Black and white/Sepia/Negative
• Resolution[ ]: 320l240/176l144
• Quality[ ]: Normal/Fine/Super fine
• Whitebalance [ ]: Auto/Incandescent/
Fluorescent/Sunny/Cloudy/Shade
• Light metering [ ]: All/Centre
• Sound [ ]: Off/On
Frame Shot
Menu 4.3
Whilst in Frame Shot Mode you can use one of the
various frame templates to decorate your photos.
1
Mode switching function - Frame shot( )/
Camera( )/Video camera( )
2
Select background()
3
Select settings - cancel (or use )
Select background using and then press or
.
Multimedia
Multimedia
50
1
2
3
Page 52

Multimedia
51
4
Mode switching function - Camera( )/Video
camera( )/Frame shot( )
5
Select photo album
6
Settings selection - Settings (press to clear
Settings screen)
]
Press camera button
7
Moves to Sending Mail function.
8
Saves photo.
9
You can edit name of the photo.
Option 1 ( )
]
Press the right key to access the settings menu
and use the navigation keys to go through and
amend the settings.
• Flash[ ]: Off/On/Auto/Red eye
• Filter[ ]: Off/Black and white/Sepia/Negative
• Quality[ ]: Normal/Fine/Super fine
• Whitebalance [ ]: Auto/Incandescent/
Fluorescent/Sunny/Cloudy/Shade
Voice recorder
Menu 4.4
With the voice memo feature you can record up to 20
voice messages and each memo can be up to 20
seconds long.
Record
(Menu 4.4.1)
You can record a voice memo in the Voice recorder
menu.
1. Once recording has started, the message Recording
and the remaining time is displayed.
2. If you want to finish recording, press the left soft
key [Save].
3. Key in Voice memo title, press the left soft key
[OK].
7
8
9
4
5
6
Page 53

Multimedia
52
View list
(Menu 4.4.2)
The list of voice memos are displayed. You can
playback and delete the recorded voice memo.
The following [Options] menus are available.
]
Play: Allows you to listen to the recorded voice
memo.
]
Send: Allows you to send via multimedia message
and e-mail.
]
Delete: Allows you to delete the voice memo.
]
Delete all: Allows you to delete all voice memos.
MP3
Menu 4.5
The KG920 has an integrated MP3 player. You can
enjoy listening to MP3 music files on your phone
memory using a compatible headset or via the internal
loudspeaker.
The music player supports:
• MPEG-1 Layer III, MPEG-2 Layer III, MPEG-2.5
Layer III: Sampling frequency up from 8KHz to
48KHz. Bit rate up to 320Kbps, stereo.
• AAC: ADIF, ADTS formats (Sampling frequency from
8KHz to 48KHz)
Note
]
Because of the small dimension of the speaker,
in some cases the audio could be distorted,
especially at maximum volume and when there
are lots of bass sounds. Therefore, we
recommend you to use the stereo headset in
order to appreciate the high quality of your music.
Multimedia
Page 54

53
• AAC+: V1 : (Bit rate 16`128Kbps)
V2 : (Bit rate 16`48Kbps)
(Sampling frequency from 8KHz to
48KHz)
• MP4, M4A: Sampling frequency up from 8KHz to
48KHz, Bit rate up to 320Kbps, stereo.
• WMA: Sampling frequency up from 8KHz to 48KHz,
Bit rate up to 320Kbps, stereo.
You can transfer MP3 files from a compatible PC to
the memory in your phone using the Mass Storage
function.
When you connect the phone to a PC using the USB
cable (supplied in the same package), windows
explorer will display <<removable disk>>.
After you copy songs to the removable disk, you
should execute safe removal from your system.
Note
]
You should copy MP3 files to my media\Music
folder. If you copy the file(s) to another folder,
you will not be able to view them.
]
The PC should run Windows 98 SE, Windows
ME, Windows 2000, Windows XP operating
system.
Note
]
KG920 does not support the variable bit rate
of all mentioned file types. Therefore, you can
not change the file from MP3 format to AAC.
Multimedia
Page 55

Multimedia
54
MP3 player
(Menu 4.5.1)
The following screen is displayed.
1. Press the MP3 menu key, and then select MP3
player.
2. Press the left soft key [Options] to access the
following menus.
]
View playlist: You can select another MP3 file you
wish to play.
]
Area repeat: The special area part of the current
music is repeated when you select ON of the menu.
]
Set as ringtone: You can set an MP3 file as a ringtone.
]
Settings: There are 3 settings under this menu,
which are explained in more detail on the next page.
Note
]
In the case an invalid file is included in the
playlist, an error message will pop up and go
back to the prior screen.
Multimedia
Repeat Loop
Play all
Repeat all A
>
B
Repeat one
Player skin
Progressive
bar
Running time
Volume level
6 volume levels
including mute
File name with
the file
extension
Status of the
music controller
Shuffle
Playmode
Equalizer
setting value
Stereo
Page 56

55
Playlist
(Menu 4.5.2)
This menu allows you to view the whole play list. You
can move through the tracks by pressing the
navigation key. In addition, once you have selected the
track, you can delete the file or view its information via
the options menu.
Settings
(Menu 4.5.3)
]
Playmode
This menu allows you to set the play mode: Play all,
Repeat all, Repeat one.
]
Set shuffle
If you select the On option, then your saved tracks
will be played in a random order.
]
Visual effect
This menu allows you to change the visual background of LCD on the phone whilst an MP3 is
playing.
Photo album
Menu 4.6
You can view and send a picture. In addition, you can
set the picture as a wallpaper.
]
View/Multi view: You can view the maximum of 9
thumbnails in a screen.
]
Slide show: You can view the pictures in a slide
show.
]
Set as wallpaper: You can set a picture as a
wallpaper.
Note
]
Music is copyright protected in international
treaties and national copyright laws. It may be
necessary to obtain permission or a license to
reproduce or copy music. In some countries
national law prohibits private copying of
copyrighted material. Please check the national
legislation of the applicable country concerning
the use of such material.
Multimedia
Page 57

Multimedia
56
]
Send via multimedia message: You can write and
edit multimedia messages, checking message size.
]
Send via email: Send the selected file to another
device via email if the file size is less than
300Kbytes.
]
Send via Bluetooth: You can send a picture via
Bluetooth.
]
Rename: Change the name of the selected file.
]
Delete: You can delete a picture.
]
Delete all: Delete all files in the list.
]
Information: Displays information about the saved
picture.
Video album
Menu 4.7
You can view videos which have been saved in the
memory.
]
Play: You can play the video file when pressing the
OK key or selecting Play menu of the Options menu.
]
Send via Bluetooth: Send the selected file to
another device via Bluetooth.
]
Rename: Change the name of the selected file. The
maximum length of characters is 90. In the filename
it is impossible to use symbols such as / : * ?' < > |
and etc. And you can not change the extension of
file.
]
Delete: Delete a file.
]
Delete all: Delete all files in the list.
]
Information: Displays information about the saved
picture.
Note
]
The Photo Album will only display pictures
taken by the handsets camera.
]
Photo View is only available for JPG files no
larger than 5 M Pixel and 2.5 MB in its size (5
M Pixel 2592x1944).
Multimedia
Page 58

Settings
Menu 4.8
Camera
(Menu 4.8.1)
]
Auto save: If you set this feature to On, the images
will be saved automatically without displaying the
menu bar to save.
]
Delete all photos: You can delete all the photos
which have been saved in the memory.
]
Shutter sound: You can select the camera shutter
sound by selecting either Off or sound 1`4.
Video camera
(Menu 4.8.2)
]
Auto save: Pictures are saved automatically after
being taken.
]
Delete all videos: Allows you to delete all the
videos which have been saved in the memory.
Note
]
For Video Play, please ensure that the external
memory card has enough room to create cache
files. If not, Video Play may not be available.
(The size of cache files needed depends on the
size of the video files to play).
57
Multimedia
Page 59

New message
Menu 5.1
This menu includes functions related to SMS (Short
Message Service), MMS (Multimedia Message
Service), Email, voice mail, as well as the network’s
service messages.
Write text message
(Menu 5.1.1)
You can write and edit text messages up to 10 pages.
1. Enter the New messages menu by pressing the left
soft key [OK].
2. If you want to write a new message, select Write
text message.
3. To make text input easier, use T9.
4. Press [Insert] to attach the following;
Insert
]
Images: You can insert Default graphics or graphics
in My folder that are available for short messages.
]
Sounds: You can insert sounds that are available for
short messages.
]
Text templates: You can use Text templates
already set in the phone.
]
Contacts: You can add phone numbers or e-mail
addresses from the address book.
]
Symbol: You can add special characters.
]
My business card: You can add your Business card
to the message.
5. After you have completed the message, press the
left soft key [Options] to select the required
option.
Options
]
Send: Sends text messages.
1. Enter recipients phone number(s).
2. Press key to add more recipients.
3. You can add phone numbers from the address
book.
4. Once the numbers have been entered, press the left
soft key to send the message. All messages will
automatically be saved in the outbox, even after a
sending failure.
]
Save to drafts: Stores messages in the Drafts
folder.
Messages
Messages
58
Page 60

Messages
59
]
Font & Alignment: You can select the Size and
Style of font, and the alignment of text.
]
Colour: You can also set the Colour of the text
(foreground) and the background.
]
Add T9 dictionary: You can add your own words.
This menu will only be shown when the edit mode
has been set to T9ABC/T9Abc/T9abc.
]
T9 languages: Select the desired language for T9
input mode. You can also deactivate the T9 input
mode by selecting ‘T9 off ’.
]
Exit: If you press Exit whilst writing a message, you
will be taken back to the message menu. Also the
written message will not have been saved.
Write multimedia message
(Menu 5.1.2)
A multimedia message can contain text, images,
and/or sound clips. This feature can be used only if it
is supported by your network operator or service
provider. Only devices that offer compatible
multimedia message or e-mail features can receive and
send multimedia messages.
1. Enter the New message menu by pressing the left
soft key [OK].
2. If you want to write a new message, select Write
multimedia message.
3. You can create a new message or choose one of the
multimedia message templates already made.
4. Press Insert to add Images, Sounds, External
memory, Contacts, Symbol, New photo, New
sound, Text templates, My business card.
Maximum available file size, that can be inserted into
an MMS-message, is 100 kb.
Options
]
Send: You can send a multimedia message to
multiple recipients, as well as save it, to send at a
later time.
Note
]
This phone supports EMS release 5, so is
available to send colour pictures, sounds, text
styles, etc.. If the other parties handsets do not
support such options, the pictures, sounds or
texts sent may not be displayed correctly on
their phones.
Page 61

Messages
60
]
Preview: You can preview a multimedia message
you have created.
]
Save: You can save the multimedia message to the
following folders; To drafts or As template.
]
Edit subject: Allows you to modify the multimedia
message you have chosen.
]
Add slide: You can add a slide before or after the
current slide.
]
Move to slide: You can move to the previous or
next slide.
]
Delete slide: You can delete current folders.
]
Set slide format
- Set timer: You can set a timer for slide, text,
picture and sound.
]
Remove media: You can remove a picture or sound
in the slide. This option can be shown only when any
media file has been added.
]
Add T9 dictionary: You can add your own words.
This menu will only be shown when the edit mode
has been set to T9ABC/T9Abc/T9abc.
]
T9 languages: Select the desired language for T9
input mode. You can also deactivate T9 input mode
by selecting ‘T9 off ’.
]
Exit: If you press Exit whilst writing a message, you
will be taken back to the message menu. Also the
written message will not have been saved.
Write email message
(Menu 5.1.3)
To send/receive an email, you should set up the email
account.
1. You can input up to 12 email addresses in the To
and Cc field.
Note
]
When creating a multimedia message, if you
upload a picture (50K) you may find that whilst
the picture is loading you will not be able to
carry out any other actions until the picture has
competed loading.
Note
]
All messages will be automatically saved in the
outbox folder, even after a sending failure.
Messages
Page 62

61
Tip: To input “ @”, press the and select “ @”.
2. Key in the subject of the mail and press OK.
3. After writing an email message, press the left soft
key [Options]. You can access the following
option menus.
]
Send: Sends the email message.
]
Edit recipients: You can edit recipients.
]
Edit subject: You can edit the subject.
]
Save to drafts: Select this to save the message in
Drafts.
]
T9 languages: Select the language for T9 input
mode. You can also deactivate the T9 input mode
by selecting ‘T9 off ’.
]
Exit: If you select Exit whilst writing a message, you
will be taken back to the message menu. Also the
written message will not have been saved.
4. You can attach files by pressing the right soft key
[Insert].
Note
]
For each e-mail account you may save up to 30
messages (totally 110 for three accounts). In
Inbox slide you may save not more than 30
messages, in Drafts and Outbox folders - 5
messages, and in Sent slide up to 10 messages.
In case Drafts Outbox or Sent slide is full, and
you try to save new message to one of this
folders, first saved message will be
automatically deleted.
]
Maximum size for one sent message is 300 kb
with attachments, and maximum size for one
received message is 100 kb. In case you have
received message with more than 5
attachments, only 5 of them will be received.
Some attachment may display incorrectly.
Messages
Page 63
62
Inbox
Menu 5.2
You will be alerted when you receive a new message.
They will be stored in the Inbox. In the Inbox, you can
identify each message by icons. For detail, see the icon
directive.
If the phone shows ‘No space for SIM message’, you
only have to delete the SIM messages from the Inbox.
If the phone displays ‘No space for message’, you will
then need to delete messages, media or applications
to free up space.
* SIM message
SIM message means that the message is
exceptionally stored in the SIM card.
When you are notified that you have received a
multimedia message, you have to wait for the message
to be downloaded before you can view it.
To read a message, select one of the messages by
pressing the left soft key .
]
View: You can view the received messages.
]
Delete: You can delete the current message.
]
Reply: You can reply to the sender.
]
Forward: You can forward the selected message to
another party.
]
Return call: You can call back the sender.
]
Information: You can view information about
received messages; Sender’s address, Subject (only
for Multimedia message), Message date & time,
Message type, Message size.
]
Delete all: You can delete all messages.
Messages
Messages
Icon Icon directive
Multimedia message
Short message
SIM message
Read multimedia message
Read text message
Push message
Notified multimedia message
Page 64

63
Mailbox
Menu 5.3
When you access this menu, you can either connect to
your remote mailbox to retrieve your new email
messages, or you can view the previously retrieved
email messages without logging in to the email server.
You can check the saved emails, drafts, outbox, and
sent emails. In the Inbox, up to 30 emails are stored.
Drafts
Menu 5.4
Using this menu, you can preset up to five multimedia
messages that you use most frequently. This menu
shows the preset multimedia message list.
The following options are available.
]
View: You can see the multimedia messages.
]
Edit: Allows you to modify the chosen message.
]
Delete: Deletes the message you choose.
]
Information: To view the information of the
message.
]
Delete all: Deletes all of the messages in the folder.
Outbox
Menu 5.5
This menu allows you to view the messages which you
have sent, those that are currently sending or
messages that have failed sending previously.
]
View: You can view the message.
]
Forward: You can forward the selected message to
another party.
]
Delete: You can delete the message.
]
Information: You can check the information of each
message.
]
Delete all: You can delete all the messages in the
outbox.
Messages
Icon Icon directive
MMS Unsent
MMS delivery confirmed
SMS unsent
SMS delivery confirmed
Page 65

64
Listen to voice mail
Menu 5.6
Once this menu has been selected, simply press the
left soft key [OK] to listen to voice mail. You can
also hold down the key in standby mode to listen
to voice mail.
Info message
Menu 5.7
(Dependent to network and subscription)
Info service messages are text messages delivered by
the network to your handset. They provide general
information such as weather reports, traffic news,
taxis, pharmacies, and stock prices. When you receive
an info service message, you will see a popup message
show you that or the info service message is directly
displayed. To view the message again follow the
sequence shown below;
Read
(Menu 5.7.1)
1. When you have received an info service message
and select Read to view the message, it will be
displayed on the screen.
2. The message will be shown until another message is
selected.
Topics
(Menu 5.7.2)
(Dependent to network and subscription)
]
Add new: You can add Info service message
numbers in the Phone memory with its nickname.
]
View list: You can see Info service message numbers
which you have added. If you press [Options],
you can edit and delete info message categories
which you have added.
]
Active list: You can select info service message
numbers in the active list. if you activate an info
service number, you can receive messages sent from
the number.
Note
]
When you receive a voice mail, your phone will
display an icon and you will hear an alert. Please
check with your network provider for details of
their service in order to configure the handset
correctly.
Messages
Messages
Page 66

65
Templates
Menu 5.8
Text templates
(Menu 5.8.1)
You have 6 text templates as below;
• Please call me back.
• I’m late. I will be there at
• Where are you now?
• I am on the way.
• Top urgent. Please contact.
• I love you.
Multimedia templates
(Menu 5.8.2)
After you have saved a new template, you can use the
following options.
]
View: You can see multimedia templates.
]
Delete: You can delete multimedia templates.
]
Add new: Allows you to add new multimedia
templates.
]
Write messages: You can write and send
multimedia messages.
]
Edit: You can edit multimedia templates.
]
Delete all: Allows you to delete all multimedia
messages.
Settings
Menu 5.9
Text message
(Menu 5.9.1)
]
Message types:
Text, Voice, Fax, Natl. paging, X.400, Email,
ERMES
Usually, the type of message is set to Text. You can
convert your text into alternative formats. Contact
your service provider for the availability of this
function.
]
Validity period: This network service allows you to
set how long your text messages will be stored at
the message centre.
]
Delivery report: If you set to Yes, you can check
whether your message is sent successfully.
Messages
Page 67

]
Reply charging: When a message is sent, it allows
the recipients to reply and charge the cost of the
reply to your telephone bill.
]
SMS centre: This is where the Networks SMS
Service Centre address is stored.
Multimedia message
(Menu 5.9.2)
]
Priority: You can set the priority of the message
you choose.
]
Validity period: This network service allows you to
set how long your text messages will be stored at
the message centre.
]
Subject: You can enter multimedia messages
subject when this menu is on.
]
Delivery report: If it is set to Yes in this menu, you
can check whether your message is sent
successfully.
]
Auto retrieve: If you select On, you receive
multimedia messages automatically. If you select
Off, you receive only notification message in the
inbox and then you can check this notification. If
you select Home network only, you receive
multimedia messages depends on Homenetwork.
]
Network settings: If you select multimedia message
server, you can set URL for multimedia message
server.
]
Permitted message types
Personal: Personal message.
Advertisements: Commercial message.
Information: Necessary information.
Email
(Menu 5.9.3)
This menu allows you to edit, delete or add an email
account.
]
Account
You can set up to 3 email accounts by selecting Add
new. Using the Edit menu, you can set the following
values.
Messages
66
Messages
Page 68

Set as default
Edit
- Title: Account name.
- User ID: Enter your email ID.
- Password: Enter your email password.
- Email address: Enter the email address given to
you by your service provider.
- Outgoing server: Enter the SMTP address and
Port number of computer that sends your email.
- Incoming server: Enter the POP3 address and
Port number of the that receives your email.
- Maximum receive size: Allows you to select the
email size you received.
- Leave msg on server: Select Yes to leave the
messages on the server.
- Insert signature: Select Yes to attach your
signature to your email messages.
- Access point: Allow you to select the access
point from the list.
- SMTP port number: Allow you to edit SMTP port
number.
- POP3 port number: Allow you to edit POP3 port
number.
- Outgoing server ID/PW: Enter the ID and
password for sending your email.
Delete: Deletes the selected account from the list.
]
Add new: Add the new email account.
]
Access point
You can edit the access points.
There are default access points for some opera tors,
stored in phone memory.
Title: Access point name.
APN: Input the APN of Access point.
User ID: Enter the User ID of your access point.
Password: Enter the Password of your access point.
]
DNS address: Set DNS address.
]
Signature
You can make your signature.
67
Messages
Page 69

Voice mailbox number
(Menu 5.9.4)
You can receive a voicemail if your network service
provider supports this feature. When a new voicemail
has arrived, the symbol will be displayed on the screen.
Please check with your network service provider for
details of their service in order to configure the phone
accordingly.
]
Home: You can listen to voice mails by selecting
Home.
]
Roaming: Even when you are abroad, you can listen
to voice mails if a roaming service is supported.
Info message
(Menu 5.9.5)
]
Receive
Yes: If you select this menu, your phone will receive
Info service messages.
No: If you select this menu, your phone will not
receive Info service messages any more.
]
Alert
Yes: Your phone will beep when you have received
Info service message numbers.
No: Your phone will not beep even though you have
received info service messages.
]
Languages
You can select the language you want by pressing
[On/Off]. Then, the info service message will be
shown in the language that you selected.
Push messages
(Menu 5.9.6)
You can set the option whether you will receive the
message or not.
Messages
68
Messages
Page 70

Images
Menu 6.1
After selecting an image, press the left key
[Options] and then you can select any of the following
options:
]
Set as wallpaper: The selected image can be set as
wallpaper.
]
Write messages: The image can be sent via
Multimedia or Email service. Maximum message size
is 100 kb for MMS message and 300 kb for E-mail
message.
]
Send via Bluetooth: The Image can be sent via
Bluetooth.
]
Copy to External memory: Copy the selected file
to the same folder in the External memory.
Sounds
Menu 6.2
After selecting a sound, press the left key [Options].
You can select any of the following options:
]
Set as ringtone: The selected sound can be set as a
ringtone.
]
Write messages: The sound can be sent by SMS or
MMS, Email service. Maximum MMS message is 100
kb, and for e-mail is 300 kb.
]
Send via Bluetooth: The sound downloaded from
network can be sent via Bluetooth.
]
Copy to External memory: Copy the selected file
to the same folder in the External memory.
Note
]
When you send .MMF or .MIDI sound file from
another phone via Bluetooth, it will be saved to
Sounds.
Note
]
Maximum .GIF supporting size is 100 Kb.
My stuff
69
My stuff
Page 71

Games & Apps
Menu 6.3
In this menu, you can manage the Java applications
installed on your phone. You can play or delete
downloaded applications, or set the connect option.
This menu will connect to the Menu 1.1.
External Memory
Menu 6.4
This menu allows you to view Videos, Photos, Images,
Music, Sounds and Others in your memory card. If
the external memory is not available, a pop up
message “Please insert external memory” is displayed.
Note
]
Removable disk won't be accessible, if Sim card
is absent.
My stuff
70
My stuff
New Fantastic LG There is Mass Storage function
in the KG920. if you connect the USB cable, you
can use the phone as a Removable Disk.
You can download MP3 files, and photos, video,
txt files etc. this gives you fast access from PC to
Phone, by just connecting the USB cable.
This function does not require the installation of
additional software.
1. Whilst the phone is displaying the standby
screen, connect the phone to the PC using the
supplied USB cable. The PC should recognise
the handset within a few seconds.
2. The phone will display « USB » on the screen.
3. The phone will be identified as « Removable
disk » in My Computer. The PC should then
treat the KG920 as a standard drive allowing
you to place files to and from the handset's
memory. You can either use Window's drag
and drop or copy and paste methods to
transfer content.
Page 72

My stuff
71
4. Double click on « Removable disk » and open. A
folder called My media will be displayed. Within
that folder there are a further 5 folders. Do not
disconnect the phone whilst a file transfer is in
progress, doing so may damage the memory
and corrupt the file.
5. When you want to disconnect the phone from
your PC, use Windows to safely remove the
handware and then disconnect the USB cable
from the handset.
]
If you receive a call whilst in mass storage
mode, the call will be rejected. Once the
handset is disconnected, the KG920 will
display information about any calls missed.
MMyy mmeeddiiaa
In the My media folder you will find the following
5 folders; Music, Others, Photos, Text and
Videos.
Do not change the names of these folders, doing
so will cause content stored in them to not be
seen by the handset.
MMuussiicc
]
You can store music files in this folder.
]
The supported formats are:
MP3,AAC,AAC+,AAC++, MA,MP4(audio),Wav.
]
The files in this folder can be played using the
MP3 player and Playlist features of the phone.
]
If you download an MP3 file to a different
folder, it will be not be possible for the phone
to locate and play the file.
]
Do not create subfolders here because the
MP3 files contained in that folder will not be
found and, therefore, will unable to be played
by the music player.
]
To set an MP3 file as a ringtone then please do
the following on the handset: options>Go to
MP3 player>options>set as ringtone.
Page 73

My stuff
My stuff
72
OOtthh ee rrss
]
Any type of file can be stored here. This folder
is mainly used for transporting files from one PC
to another.
]
The handset can preview JPG (Max 460K), GIF
(Max 100K).
]
You can set an image file as wallpaper as long as
it does not exceed 30k in size, for other
formats please use the PC Suite.
PPhh oott ooss
]
This folder is reserved for pictures taken using
the phone's digital camera.
]
Even though photos can be uploaded to this
folder from your PC, they will not be available
on the phone's photo album or My photos
folder. Therefore, we recommend that no
photos are uploaded to this folder.
TTeexxtt
]
This folder supports .txt files. If you place non
.txt files here then the handset will not display
them.
VViiddee ooss
]
You can download videos taken with the
phone's digital camera onto the PC and upload
new videos onto the phone.
]
This folder supports the 3GP file format.
]
You can upload files of any size until the
memory is full.
]
Files stored in this folder can be accessed by
doing the following on the handset:
Menu>Multimedia>Video album.
Page 74

You can set functions relating to the phone.
Wallpaper
Menu 7.1
You can select the background pictures in standby
mode.
]
Default
You can select a picture or an animation of
wallpaper by pressing , , or .
]
My folder
You can select a picture or an animation as
wallpaper.
Standby text
Menu 7.2
If you select On, you can edit the text which is
displayed in standby mode.
Backlight time
Menu 7.3
You can set the light-up duration of the display.
Brightness
Menu 7.4
The screen brightness can be adjusted from 40% to
100%.
Network name
Menu 7.5
If this function is activated, network name will be
displayed on LCD.
Display
Display
73
Page 75

74
In Profiles, you can adjust and customise the phone
tones for different events, environments, or caller
groups.
There are five preset profiles: Vibrate only, Silent,
General, Loud and Headset. Each profile can be
personalised. Press the left soft key [Menu] and select
Profiles using up/down navigation keys.
Activate
(Menu 8.X.1)
1. A list of profiles is displayed.
2. In the Profiles list, scroll to the profile you want to
activate and press the left soft key [OK] or OK
key.
3. Then, select Activate.
Personalise
(Menu 8.X.2)
Scroll to the desired profile in the Profile list. After
pressing the left soft key or the OK key, select
Personalise. The profile setting option opens. Set the
option as required.
]
Call alert type: Set the alert type for incoming calls.
]
Ring tone: Select the desired ring tone from the list.
]
Ring volume: Set the volume of the ringing tone.
]
Message alert type: Set the alert type for
messages.
]
Message tone: Select the alert tone for messages.
]
Keypad tone: Select the desired keypad tone.
]
Keypad volume: Set the volume of keypad tone.
]
Effect sound volume: Set the volume of effect
sound.
]
Power on/off volume: Set the volume of the
ringing tone when switching the phone on/off.
]
Auto answer: This function will be activated only
when your phone is connected to the handsfree kit.
• Off: The phone will not answer automatically.
• After 5 secs: After 5 seconds, the phone will
answer automatically.
• After 10 secs: After 10 seconds, the phone will
answer automatically.
Profiles
Profiles
Page 76

75
Rename
(Menu 8.X.3)
You can rename a profile and give it any name you
choose to.
1. To change the name of a profile, scroll to the profile
in the profile list and after pressing the left soft key
or the OK key, select Rename.
2. Key in the desired name and press the OK key or
the left soft key [OK].
Note
]
Vibrate only, Silent and Headset profiles
cannot be renamed.
Profiles
Page 77

Tools
76
Favourites
Menu 9.1
This option allows you to add your own favourites to
the list already provided. Once you create your own
menu, you can access the desired function quickly in
the idle screen by pressing the up navigation key.
Alarm clock
Menu 9.2
You can set up to 5 alarm clocks to go off at a
specified time.
1. Select On and enter the alarm time you want.
2. Select the repeat period: Once, Mon
Fri,
Mon
Sat, Everyday.
3. Select the alarm tone you want and press [OK].
4. Edit the alarm name and press [OK].
Bluetooth
Menu 9.3
Bluetooth enables compatible mobile devices,
peripherals and computers that are in close proximity
to communicate directly with each other without
wires. This handset supports built-in Bluetooth
connectivity, which makes it possible to connect them
with compatible Bluetooth headsets, computer
applications and so on.
Note
]
If you use LG PC Sync via Bluetooth, you can
only exchange the data within the phonebook.
]
When you receive data from another Bluetooth
device, the phone requests for a confirmation.
After confirming the transfer, the file will be
copied in your phone.
]
Depending on the file type, it will be stored in
the following folders:
Note
]
The menu of SMS, MMS and MP3 is already
provided in your own favourites.
Tools
Page 78

77
Paired devices/Handsfree devices
(Menu 9.3.1/Menu 9.3.2)
You can view all devices which your KG920 is already
paired to.
If you have entered Paired devices or Handsfree devices,
you will see the following options in both those menus.
]
Connect/Disconnect: Allows you to connect to your
paired Bluetooth devices.
]
Add new: Allows you to search for new Bluetooth
devices and add them to your phone's list of paired
devices. When you select Add new your handset will
start to search for Bluetooth devices within range. Once
the device you wish to pair appears on the list press the
right soft key [Stop].
Scroll to the desired device and press the left soft key
[Pair]. You will then be asked to enter a passcode. The
passcode can be any code you wish to use (the same
passcode must be used by both devices) or is one that is
pre-determined by the manufacturer of the device you
are trying to pair with. Please check the User Manual of
the device you are initiating the pair with to see if it
already has a predetermined passcode in place.
]
Assign name: Allows you to change the name of the
paired Bluetooth device and how it is displayed on the
handset.
]
Set as authorised/Set as unauthorised: Allows you to
set an authorised connection between each Bluetooth
device. For example if you regularly use a Bluetooth
headset with your phone then setting the connection as
authorised will mean the headset will automatically
connect to the handset each time the headset is
powered on.
- MP3 (.mp3, mp4, aac, m4a, wma): Music
folder.
- Video (.3GP): Video folder.
- Phonebook contacts (.VCF): Phonebook.
- Photos(.jpg): Photos folder.
- Other files (.*.*): File storage folder.
]
Supported Bluetooth software (Bluetooth
stacks) for DUN: WIDCOMM Bluetooth for
Windows 1.4 and 3.0
Tools
Page 79

78
]
All services: Allows you to view all services which are
supported by a Bluetooth device.
]
Delete: Allows you to delete a paired Bluetooth device.
]
Delete all: Allows you to delete all paired Bluetooth
devices.
Settings
(Menu 9.3.3)
]
Set Bluetooth
You can activate or cancel Bluetooth function.
]
My handset’s visibility
This indicates whether or not your handset will be
visible to other Bluetooth devices.
]
My handset’s name
You can set the name of Bluetooth device. The
default name is LG KG920.
Supported services
(Menu 9.3.4)
You can see the Bluetooth service (PC Sync).
Connectivity
Menu 9.4
You can access network services through the
Connectivity menu. If you want to use PC Sync,
Contents banks or the Internet Cube, you should
activate PC Sync. & Internet kit in the menu and then
plug in the USB cable When you wish to use the Mass
Storage functionality, just activate the removable disk
option in the menu.
Note
]
Due to a compatibility problem, some devices
may not support this function.
Tools
Tools
Page 80

79
Calculator
Menu 9.5
This contains the standard functions such as +, _, x, ÷ :
Addition, Subtraction, Multiplication, and Division.
Furthermore, you can use the various function of
calculator such as +/_, sin, cos, tan, log, In, exp, sqrt.
1. Input the numbers by pressing numeric keys.
2. Use a navigation key to select a sign for calculation.
3. Then input the numbers.
4. Press key to view the result.
5. To input the decimal number, press key. If you
press key, you can enter ( ).
6. To end Calculator, press the right soft key
[Back].
Unit converter
Menu 9.6
This converts any measurement into a unit you want.
There are 9 types that can be converted into units:
Currency, Surface, Length, Weight, Temperature,
Volume, Velocity, Shoes and Clothes.
1. You can select one of nine unit types by pressing
[OK] key.
2. Select the unit you want to convert by pressing
and . It’s impossible to input “-”
symbol inunit converter.
3. Select the standard value by using , .
World time
Menu 9.7
You can check the current time of Greenwich Mean
Time (GMT) and major cities around the world, using
the left/right navigation keys. The screen shows the
city name, current date and time. To select the time
zone in which you are located, proceed as follows:
1. Select the city corresponding to your time zone by
pressing the left/right navigation , ,
, keys one or more times.
The local date and time are displayed.
2. If you want to change the time display in standby
mode to the selected time, press the left soft key
[Set].
Tools
Page 81
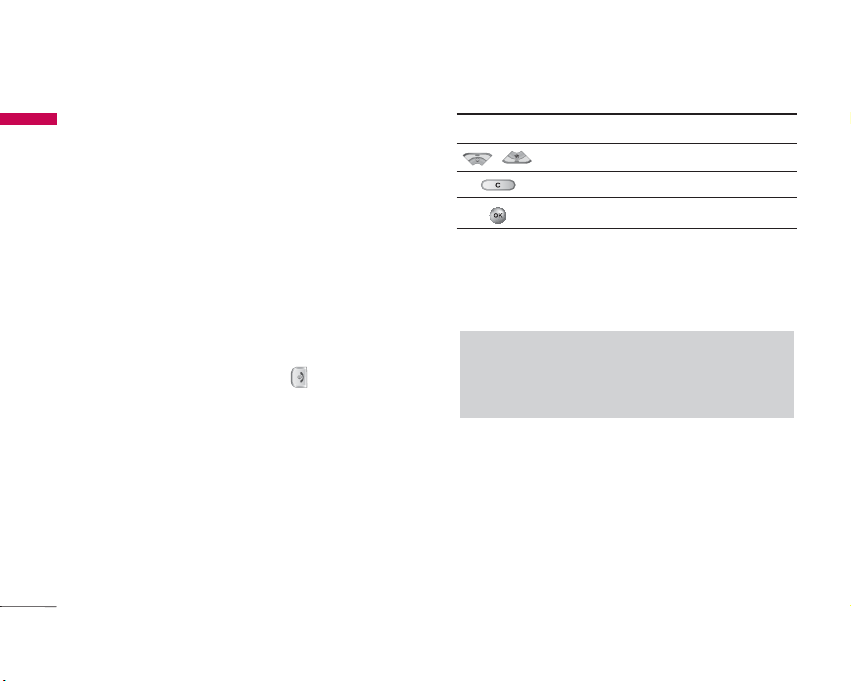
You can access various WAP (Wireless Application
Protocol) services such as banking, news, weather
reports and flight information. These services are
specially designed for mobile phones and they are
maintained by WAP service providers.
Check the availability of WAP services, pricing and
tariffs with your network operator and/or the service
provider whose service you wish to use. Service
providers will also give you instructions on how to use
their services.
Once connected, the homepage is displayed. The
content depends on the service provider. To exit the
browser at any time, press the ( ) key. The phone
will return to the idle menu.
Navigating with the WAP browser
You can surf the Internet using either the phone keys
or the WAP browser menu.
Using the phone keys
When surfing the Internet, the phone keys function
differently to phone mode.
Key Description
Scrolls each line of the content area
Returns to the previous page
Selects options and confirms actions
Using the WAP browser menu
There are various menu options available when surfing
the Mobile Web.
Home
Menu *.1
Connects to a homepage. The homepage will be the
site which is defined in the activated profile. It will be
defined by the service provider if you have not defined
it in the activated profile.
Note
]
The WAP browser menus may vary, depending
on your browser version.
80
Browser
Browser
Page 82

81
Bookmarks
Menu *.2
This menu allows you to store the URL of favourite
web pages for easy access at a later time.
To create a bookmark
1. Press the left soft key [Options].
2. Select Add new and press the OK key.
3. After entering the desired URL and title, press the
OK key.
After selecting a desired bookmark, the following
options are available.
]
Connect: Connects to the selected bookmark.
]
Add new: Select this to create a new bookmark.
]
Edit: You can edit the URL and/or the title of the
selected bookmark.
]
Delete: Deletes the selected bookmark.
]
Delete all: Deletes all the bookmarks.
Go to URL
Menu *.3
You can connect directly to the site you want. After
entering a specific URL, press the OK key.
Settings
Menu *.4
You can set the profile, cache, cookie and security
related to internet service.
Profiles
(Menu *.4.1)
A profile is the network information used to connect
to the Internet.
There are default profiles for some operators, stored
in phone memory. It’s impossible to rename default
profiles.
Each profile has submenus as follows:
]
Activate: Activates the selected profile.
]
Settings: Use this to edit and change WAP settings
for the selected profile.
Browser
Page 83

- Homepage: This setting allows you to enter the
address (URL) of a site you want to use as
homepage. You do not need to type http:// at the
front of each URL as the WAP Browser will
automatically add it.
- Bearer: You can set the bearer data service.
1 Data/2 GPRS
- Data settings: Appears only if you select Data
Settings as a Bearer/service.
Dial number: Enter the telephone number to dial to
access your WAP gateway.
User ID: The users identity for your dial-up server
(and NOT the WAP gateway).
Password: The password required by your dial-up
server (and NOT the WAP gateway) to identify you.
Call type: Select the type of data call : Analogue of
Digital (ISDN).
Linger time: You need to enter timeout period. After
entering that, the WAP navigation service will be
unavailable if any data is not input or transferred.
- GPRS settings: The service settings are only
available when GPRS is chosen as a bearer service.
APN: Input the APN of the GPRS.
User ID: The users identify for your APN server.
Password: The password required by your APN
server.
- Proxy settings
Proxy: Activates or cancels proxy.
IP address: Input the IP address of the Proxy server
you access.
Port: Input the Proxy Port.
- DNS settings
Primary server: Input the IP address of the primary
DNS server you access.
Secondary server: Input the IP address of the
secondary DNS server you access.
]
Rename: You can change the profile name.
]
Add new: You can add a new profile.
]
Delete: Deletes the selected profile from the list.
Browser
Browser
82
Page 84

Cache
(Menu *.4.2)
The information or services you have accessed are
saved in the cache memory of the phone.
Cookie
(Menu *.4.3)
Check whether a cookie is used or not.
Clear cache
(Menu *.4.4)
Removes all context saved in cache.
Clear cookie
(Menu *.4.5)
Removes all context saved in cookie.
Security
(Menu *.4.6)
A list of the available certification is shown.
]
Authority: You can see the list of authority
certificates that have been stored in your phone.
]
Personal: You can see the list of personal
certificates that have been stored in your phone.
Note
]
A cache is a buffer memory, which is used to
save data temporarily.
Browser
83
Page 85

You can check the record of missed, received, and
dialled calls only if the network supports the Calling
Line Identification (CLI) within the service area.
The number and name (if available) are displayed
together with the date and time at which the call was
made. You can also view call times.
Missed calls
Menu 0.1
This option lets you view the last 10 unanswered calls.
You can also:
]
View the number if available and call it, or save it in
the Address Book
]
Enter a new name for the number and save both in
the Address Book
]
Send a message to this number
]
Delete the call from the list
Received calls
Menu 0.2
This option lets you view the last 10 incoming calls.
You can also:
]
View the number if available and call it or save it in
the Address Book
]
Enter new name for the number and save both in the
Address Book
]
Send a message to this number
]
Delete the call from the list
Dialled calls
Menu 0.3
This option lets you view the last 20 outgoing calls
(called or attempted).
You can also:
]
View the number if available and call it or save it in
the Address Book
]
Enter new name for the number and save both in the
Address Book
]
Send a message to this number
]
Delete the call from the list
Call register
Call register
84
Page 86

All calls
Menu 0.4
You can view all lists of outgoing or incoming calls.
Delete recent calls
Menu 0.5
Allows you to delete Missed calls and Received calls
lists. You can delete Dialled calls and All calls lists at
one time.
Call charges
Menu 0.6
Call duration
(Menu 0.6.1)
Allows you to view the duration of your incoming and
outgoing calls. You can also reset the call times.
The following timers are available:
]
Last call: Length of the last call.
]
All calls: Total length of all calls made and incoming
calls since the timer was last reset.
]
Received calls: Length of the incoming calls.
]
Dialled calls: Length of the outgoing calls.
]
Reset all: Allows you to reset the timers of all calls
by pressing the left soft key [Yes].
Call costs
(Menu 0.6.2)
Allows you to check the cost of your Last call, All
calls, remaining and Reset all the cost. To reset the
cost, you need to know your PIN2 code.
Settings
(Menu 0.6.3)
(SIM Dependent)
]
Set tariff: You can set the currency type and the
unit price. Contact your service providers to obtain
charging unit prices. To select the currency or unit
in this menu, you need the PIN2 code.
]
Set credit: This network allows you to limit the cost
of your calls by selected charging units. If you select
Read, the number of remaining unit is shown. If you
select Change, you can change your change limit.
]
Auto display: This network service allows you to
see automatically the cost of your last calls. If set to
On, you can see the last cost when the call is
released.
Call register
85
Page 87

GPRS information
Menu 0.7
You can check the amount of data transferred over the
network through the GPRS information option. In
addition, you can also view how much time you are
online.
Call duration
(Menu 0.7.1)
You can check the duration of Last call, Reset all and
All calls. You can also reset the call timers.
Data volumes
(Menu 0.7.2)
You can check The Sent, Received or All data
volumes and Reset all.
Call register
Call register
86
Page 88

Date &Time
Menu #.1
You can set functions relating to the date and time.
Date
(Menu #.1.1)
]
Set Date
You can enter the current date.
]
Date format
You can set the Date format such as
DD/MM/YYYY, MM/DD/YYYY, YYYY/MM/DD.
(D: Day / M: Month / Y: Year)
Time
(Menu #.1.2)
]
Set Time
You can enter the current time.
]
Time format
Your can set the time format between 24-hour and
12-hour.
Language
Menu #.2
You can change the language for the display texts in
your phone. This change will also affect the Language
Input mode.
Call
Menu #.3
You can set the menu relevant to a call by pressing
[Select] in the Setting menu.
Call divert
(Menu #.3.1)
The Call divert service allows you to divert incoming
voice calls, fax calls, and data calls to another number.
For details, contact your service provider.
]
All voice calls
Diverts voice calls unconditionally.
]
If busy
Diverts voice calls when the phone is in use.
]
If no reply
Diverts voice calls which you do not answer.
Settings
Settings
87
Page 89

]
If out of reach
Diverts voice calls when the phone is switched off or
out of coverage.
]
All data calls
Diverts to a number with a PC connection
unconditionally.
]
All fax calls
Diverts to a number with a fax connection
unconditionally.
]
Cancel all
Cancels all call divert service.
The submenus
Call divert menus have the submenus shown below.
• Activate
Activate the corresponding service.
To voice mail centre
Forwards to message centre. This function is not
shown at All data calls and All fax calls menus.
To other number
Inputs the number for diverting.
To favourite number
You can check recent 5 diverted numbers.
• Cancel
Deactivate the corresponding service.
• View status
View the status of the corresponding service.
Answer mode
(Menu #.3.2)
]
Any key
If you select this menu, you can receive a call by
pressing any key except [End] key.
]
Send key only
If you select this menu, you can receive a call by only
pressing [Send] key.
Settings
Settings
88
Page 90

Send my number
(Menu #.3.3)
(network and subscription dependent)
]
Set by network
If you select this, you can send your phone number
depending on two line service such as line 1 or line
2.
]
On
You can send your phone number to another party.
Your phone number will be shown on the receiver’s
phone.
]
Off
Your phone number will not be shown.
Call waiting
(Menu #.3.4)
(network dependent)
]
Activate
If you select Activate, you can accept a waiting
(receiving) call.
]
Cancel
If you select Cancel, you cannot recognize the
waiting (receiving) call.
]
View status
Shows the status of Call waiting.
Minute minder
(Menu #.3.5)
If you select On, you can check the call duration by a
beep sound given every minute during a call.
Auto redial
(Menu #.3.6)
]
On
When this function is activated, the phone will
automatically try to redial in the case of failure to
connect a call.
]
Off
Your phone will not make any attempts to redial
when the original call has not connected.
Settings
89
Page 91

Security
Menu #.4
PIN code request
(Menu #.4.1)
In this menu, you can set the phone to ask for the PIN
code of your SIM card when the phone is switched on.
If this function is activated, you’ll be requested to
enter the PIN code.
1. Select PIN code request in the security settings
menu, and then press [Select].
2. Set Enable/Disable
3. If you want to change the setting, you need to enter
the PIN code when you switch on the phone.
4. If you enter the wrong PIN code more than 3 times,
the phone will lock out. If the PIN is blocked, you will
need to key in the PUK code.
5. You can enter your PUK code up to 10 times. If you
key in the wrong PUK code more than 10 times,
you can not unlock your phone. You will need to
contact your service provider.
Handset lock
(Menu #.4.2)
You can use a security code to avoid unauthorised use
of the phone. Whenever you switch on the phone, the
phone will request a security code if you set the phone
lock to When switch on.
If you set the phone lock to When SIM changed, your
phone will request security code only when you
change your SIM card.
Auto key lock timeout
(Menu #.4.3)
This menu allows to set the time of Auto key lock.
Call barring
(Menu #.4.4)
The Call barring service prevents your phone from
making or receiving certain category of calls. This
function requires the call barring password. You can
view the following submenus.
]
All outgoing calls
The barring service for all outgoing calls.
]
Outgoing international
The barring service for all outgoing international
calls.
Settings
Settings
90
Page 92

]
Outgoing international when roaming
The barring service for all international outgoing
calls except home network.
]
All incoming
The barring service for all incoming calls.
]
Incoming when roaming
The barring service for all incoming calls when
roaming.
]
Cancel all
You can cancel all barring services.
]
Change password
You can change the password for Call Barring
Service.
The submenus:
• Activate
Allows to request the network to set call restriction
on.
• Cancel
Set the selected call restriction off.
• View status
View the status whether the calls are barred or not.
Fixed dial number
(Menu #.4.5)
(SIM dependent)
You can restrict your outgoing calls to selected phone
numbers. The numbers are protected by your PIN2
code. The numbers you wish to allow access to once
this service has been enabled, must be added to the
contacts after enabling Fixed dial number.
]
Enable
You can restrict your outgoing calls to selected
phone numbers.
]
Disable
You can cancel fixed dialling function.
]
Number list
You can view the number list saved as Fixed dial
number.
Settings
91
Page 93

Change codes
(Menu #.4.6)
PIN is an abbreviation of Personal Identification
Number to prevent use by unauthorised person. You
can change the access codes: Security code, PIN
code, PIN2 code.
1. If you want to change the Security code/PIN1/
PIN2 code input your original code, and then press
[OK].
2. Input new Security code/PIN1/PIN2 code and
verify them.
Network
Menu #.5
You can select a network which will be registered
either automatically or manually. Usually, the network
selection is set to Automatic.
Network selection
(Menu #.5.1)
You can select a network type.
Automatic
If you select Automatic mode, the phone will
automatically search for and select a network for you.
Once you have selected “Automatic”, the phone will
be set to “Automatic” even though the power is off
and on.
Manual
The phone will find the list of available networks and
show you them. Then you can select the network
which you want to use if this network has a roaming
agreement with your home network operator. The
phone let you select another network if the phone fails
to access the selected network.
Preferred
You can set a list of preferred networks and the phone
attempts to register with first, before attempting to
register to any other networks. This list is set from the
phone’s predefined list of known networks.
Band selection
(Menu #.5.2)
EGSM/DCS
Depending on Network situation, you can select
EGSM/DCS.
PCS only
Depending on Network situation, you can select PCS
only.
Settings
Settings
92
Page 94

GPRS Attach
Menu #.6
You can set GPRS service depending on various
situations.
Switch on
(Menu #.6.1)
If you select this menu, the phone is automatically
registered to a GPRS network when you switch the
phone on. Starting a WAP or PC dial-up application
created the connection between phone and network
and data transfer is possible. When you end the
application, GPRS connection is ended but the
registration to the GPRS network remains.
When needed
(MENU #.6.2)
If you select this menu, the GPRS connection is
established when you connect a WAP service and
closed when you end the WAP connection.
Memory status
Menu #.7
You can check free space and memory usage of each
repository, Internal memory, Multimedia memory and
External memory. You can go to each repository
menu.
Reset settings
Menu #.8
You can initialise all factory defaults. You will need the
Security code to activate this function.
]
Restore default settings: Allows you to restore the
phone back to its default settings.
]
Clear external memory: Allows you to format the
external memory and create a default directory.
Settings
93
Page 95
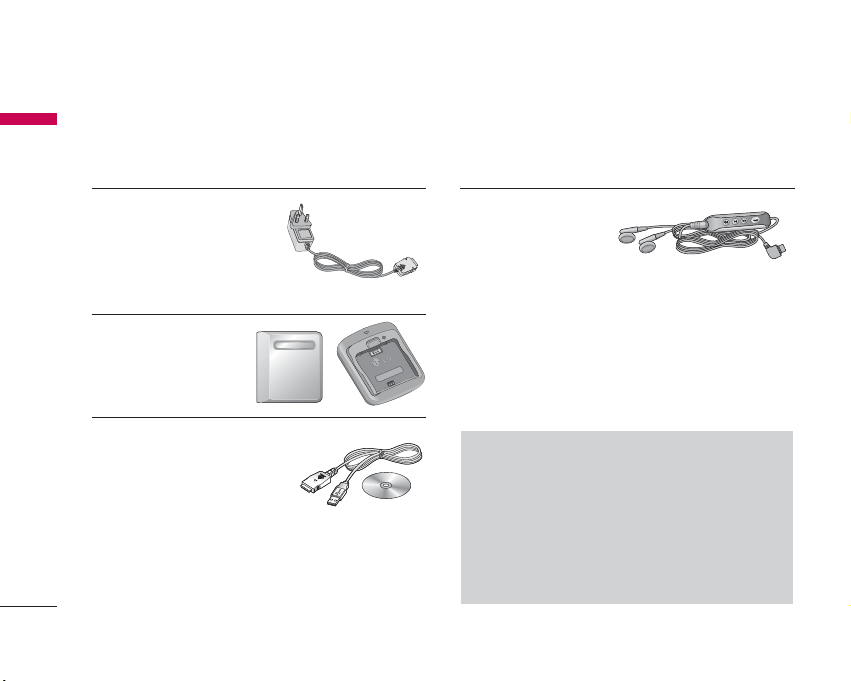
Accessories
Accessories
94
Travel Adapter
This charger allows you to
charge the battery while away
from home or your office.
Standard Battery
Data cable/CD
You can connect your phone to
PC to exchange the data
between them.
Hands free earmicrophone and
music player
controller combo
Stereo headset
Controller: Answer & End button, music player
control, volume control, Hold button and microphone.
After connecting the headset and the controller, plug
the end of controller into the headset jack on the left
side of the phone.
Note
]
Always use genuine LG accessories.
]
Failure to do so may invalidate your warranty.
]
Accessories may vary in different regions;
please check with our regional service
company or agent for further inquires.
There are various accessories for your mobile phone. You can select these options according to your
personal communication requirements.
Page 96

Technical Data
Technical Data
95
General
Product name: KG920
System : GSM 900 / DCS 1800 / PCS 1900
Ambient Temperatures
Max: +55°C
Min: -10°C
Page 97

 Loading...