

Page 1
IP8540
IP Phone for Microsoft OCS 2007
User Guide
This document provides information about IP8540 IP Phone.
You can download all required documents at www.lg-nortel.com.
* IP8540 needs Microsoft OCS (Office Communications Server) 2007 for proper operation.
Page 2

IP8540 User Guide
Regulatory and Compliance statements
This section provides required regulator, safety and disclaimer statements.
1. Radio Frequency Emissions:
FCC Compliance statement:
This device complies with Part 15 rules. Operation is subject to the following two conditions;
1. This device may not cause harmful interference, and
2. This device must accept any interference received, including interference that may cause undesired operation.
This Equipment has been tested and found to comply with the limits for a Class B digital device, pursuant to Part 15
of the FCC rules. These limits are designed to provide reasonable protection against harmful interference in a
residential installation. This equipment generates, uses and can radiate radio frequency energy and, if not installed
and used in accordance with the instructions, may cause harmful interference to radio communications. However,
there is no guarantee that interference will not occur in a particular installation. If this equipment does cause harmful
interference to radio or television reception, which can be determined by turning the equipment off and on, the user is
encouraged to try to correct the interference by one of the following measures:
• Reorient or relocate the receiving antenna.
• Increase the separation between the equipment and the receiver.
• Connect the equipment into an outlet on a different circuit from that to which the receiver is connected
If problems persist, consult the dealer or an experienced radio/TV technician for help.
Canada Compliance statement:
This Class B digital apparatus complies with Canadian ICES-003.
Cet appareil numérique de la classe B est conforme à la norme NMB-003 du Canada.
This device complies with Class B Limits of Industry Canada. Operation is subject to the following two conditions;
1. This device may not cause harmful interference, and
2. This device must accept any interference received, including interference that may cause undesired operation.
European Union Declarations of Conformity:
LG-Nortel Co. Ltd. declares that the equipment specified in this document, which bears the “CE” mark, conforms to
the European Union Radio and Telecommunications Terminal Equipment Directive (R&TTE 1999/5/EC) including,
Electromagnetic Compatibility Directive (89/336/EEC) and
Low Voltage Directive (73/23/EEC)
Copies of these Declarations of Conformity (DoCs) can be obtained by contacting your local sales representative.
The product fulfills the essential requirements of the harmonized standards shown above. This product also complies
with the following standards:
• EN 55022 Class B
• AS/NZ 3548 Class B
• EN 55024
• EN 50082-1
• EN 61000-3-2
• EN 61000-3-3
2. Product Safety Instructions
This product complies with and conforms to the following international Product Safety standards as applicable:
Safety of Information Technology Equipment, IEC 6095-1, including
Relevant national deviations as listed in Compliance with IEC for Electrical Equipment (IECEE)
Safety of Information Technology Equipment, CAN/CSA-C22.2 No. 60950-1/UL 60950-1
3. E-911 and use of the IP8540 with Multi-Line Telephone Systems:
Please note the use and operation of this phone as part of a multi-line telephone system (MLTS) may be subject to
state and/or federal E-911 MLTS laws that require the MLTS to provide a caller’s telephone number, extension, and
physical location to applicable state and/or local emergency services when a caller initiates a 911 call. This phone
does not provide a caller’s telephone number, extension, or physical location information to emergency services
when a caller dials 911, and compliance with state and/or federal E-911 MLTS laws is the sole responsibility of the
purchaser of this phone.
Page 3

IP8540 User Guide
4. Privacy:
IP8540 implements several security and encryption technologies however, privacy of communications may not be
ensured when using this telephone.
The specifications and information regarding the products in this manual are subject to change
without notice. All statements, information, and recommendations in this manual are believed to
be accurate but are presented without warranty of any kind, expressed or implied. Users must
take full responsibility for their application of any products.
The software license and limited warranty for the accompanying product are set forth in the
information packet that shipped with the product and are incorporated herein by this reference.
If you are unable to locate the software license or limited warranty, contact your LG-Nortel
representative for a copy.
Notwithstanding any other warranty herein, all document files and software of these suppliers
are provided "as is" with all faults. LG-Nortel and the related suppliers disclaim all warranties,
expressed or implied, including, without limitation, those of merchantability, fitness for a
particular purpose and non-infringement or arising from a course of dealing, usage, or trade
practice.
In no event shall LG-Nortel or its suppliers be liable for any indirect, special, consequential, or
incidental damages, including, without limitation, lost profits or loss or damage to data arising
out of the use or inability to use this manual, even if LG-Nortel or its suppliers have been
advised of the possibility of such damages.
Copyright © 2009 LG-Nortel Co. Ltd. All Rights Reserved
This material is copyrighted by LG-Nortel Co. Ltd.
Any unauthorized reproductions, use or disclosure of this material, or any part thereof, is strictly
prohibited and is a violation of Copyright Laws.
LG-Nortel is a trademark of LG-Nortel Co. Ltd.
All other brand and product names are trademarks or registered trademarks of their respective
companies.
Microsoft UC Logo mark owned by Microsoft and LG-Nortel is using under license agreement
Page 4

Revision History
IP8540 User Guide
REVISION DATE OF ISSUE
1.00 2007-11-02
2.00 2009-02-09
REMARKS
Initial Release
Format change
Added information about new features released
with Office Communication Server 2007 R2
Page 5

IP8540 User Guide
Important Safety Instructions
When using this product, basic safety precautions should always be followed to reduce the risk of fire,
electric shock and injury to persons, including the following;
1. Read and understand all instructions.
2. Follow all warnings and instructions marked on the product.
3. Unplug this product from the wall outlet before cleaning. Do not use liquid cleaners or aerosol
cleaners. Use a damp cloth for cleaning.
4. Do not use this product near water, for example, near a bathtub, wash bowl, kitchen sink, or
laundry tub, in a wet basement, or near a swimming pool.
5. Do not place this product on an unstable stand, or table. The product may fall, causing serious
damage to the product.
6. This product should be operated only from the type of power source indicated on the product
label. If you are not sure of the type of power supply to your home, consult your dealer or local
power company.
7. Do not allow anything to rest on the power cord. Do not locate this product where the cord might
be damaged by people walking on it.
8. Do not overload wall outlets and extension cords as this can result in the risk of fire or electric
shock.
9. Never spill liquid of any kind on the product.
10. To reduce the risk of electric shock, do not disassemble this product, but take it to a qualified
person when some service or repair work is required. Opening or removing covers may expose
you to dangerous voltages or other risk. Incorrect reassemble can cause electric shock when the
appliance is subsequently used.
11. Unplug this product from the wall outlet and refer servicing to qualified service personnel under
the following conditions:
a. When the power supply cord or plug is damaged.
b. If liquid has been spilled into the product.
c. If the product has been exposed to rain or water.
d. If the product does not operate normally by following the operating instructions. Adjust
only those controls that are covered by the operating instructions because improper
adjustment of other controls may result in damage and will often require extensive work
by a qualified technician to restore the product to normal operation.
e. If the product has been dropped or damaged.
f. If the product exhibits a distinct change in performance.
12. Avoid using your device during an electrical storm. There may be a remote risk of electric shock
from lightning.
13. Do not use your device to report a gas leak in vicinity of the leak.
14. Severe damage to your device will occur if this set is plugged into an ISDN connection.
15. Consult your system administrator to ensure that you are plugging your set into a 10/100 BaseT
Ethernet jack.
Precaution
• Keep this product away from heating appliances and electrical noise generating device such as
fluorescent lamps, motors and television. These noise sources can interfere with the performance.
• This product should be kept free of dust, moisture, high temperature (more than 40°C) and vibration,
and should not be exposed to direct sunlight.
• Never attempt to insert wires, pins, etc. into the product. If the product does not operate properly, it
should be repaired by an authorized service center.
• Do not use benzene, thinner, or the like, or any abrasive powder to clean the product. Wipe it with a
soft cloth.
Page 6

IP8540 User Guide
Table of contents
1. Introducing LG-Nortel IP8540 IP Phone..................................................................................3
1.1 Overview........................................................................................................................................3
1.2 Device Layout................................................................................................................................4
2. Getting your IP8540 up and running........................................................................................6
2.1 What’s in the box..........................................................................................................................6
2.2 AC/DC power adaptor..................................................................................................................7
2.3 Optional accessory for wall-mount installation..........................................................................7
2.4 Set-up.............................................................................................................................................7
2.5 Wall Mounting...............................................................................................................................8
2.6 Adjusting the Viewing Angle........................................................................................................9
2.7 Connections to IP8540..............................................................................................................10
2.8 Initial Power up and Sign In ................................ .......................................................................11
2.8.1 Calibrating the touch screen..............................................................................................11
2.8.2 Sign In with IP8540.............................................................................................................11
2.8.3 Sign In with Office Communicator 2007 R2 on your PC .................................................12
2.8.4 Setting your unlock parameters.........................................................................................13
2.8.5 Set Time Zone ......................................................................................................................15
3. Using your IP8540.....................................................................................................................16
3.1 Understanding the touch screen...............................................................................................16
3.2 Controlling Presence (Phone Status)........................................................................................17
3.3 Contact List................................ .................................................................................................19
3.3.1 Viewing a Contact Card.......................................................................................................19
3.3.2 Searching the Contact list ..................................................................................................20
3.3.3 Selecting a Contact Group..................................................................................................21
3.4 Message Waiting........................................................................................................................ 22
3.5 Call Logs ......................................................................................................................................23
3.6 Settings........................................................................................................................................24
3.6.1 Locking your phone.............................................................................................................25
3.6.2 Adjusting volume levels......................................................................................................26
3.6.3 Ring tones............................................................................................................................27
3.6.4 Changing your PIN...............................................................................................................28
3.6.5 Changing fingerprint ...........................................................................................................29
3.6.6 Update your password ........................................................................................................30
3.6.7 Adjusting the screen brightness.........................................................................................31
3.6.8 Changing the Time Zone.....................................................................................................32
3.6.9 Changing the date and time display format.....................................................................33
3.6.10 Switching Users................................................................................................................34
3.6.11 Calibrating the touch screen...........................................................................................35
3.6.12 To set logging...................................................................................................................36
3.6.13 Viewing the device information......................................................................................37
i
Page 7

IP8540 User Guide
3.6.14 Changing the language...................................................................................................38
3.7 Connecting the USB Cable and Signing In................................................................................39
3.7.1 Why Use the USB Cable ......................................................................................................39
4. Making Calls with IP8540........................................................................................................40
4.1 Adjusting the handset and speakerphone volume..................................................................40
4.2 The Call Basics................................ ............................................................................................41
4.2.1 Make a call, while idle ........................................................................................................41
4.2.2 Make a call, while busy....................................................................................................... 41
4.2.3 Redial the most recent call ................................................................................................41
4.2.4 Receive a call....................................................................................................................... 42
4.2.5 Hold a call ............................................................................................................................ 42
4.2.6 Resume a held call..............................................................................................................42
4.2.7 Transfer................................................................................................................................42
4.2.8 Conference...........................................................................................................................44
4.3 Forwarding Calls .........................................................................................................................45
4.4 Make a Phone Call Using Office Communicator 2007 R2...................................................... 47
4.4.1 What is a Communicator Call? ..........................................................................................47
5. Troubleshooting Problems.......................................................................................................48
5.1 Log-in...........................................................................................................................................48
5.2 Placing Calls................................................................................................................................ 49
5.3 Conference Call...........................................................................................................................50
5.4 Unexpected Behavior.................................................................................................................50
6. IP8540 Product Specification.................................................................................................51
ii
Page 8

IP8540 User Guide
1. Introducing LG-Nortel IP8540 IP Phone
1.1 Overview
IP8540 is a powerful communications tool for enterprises with Microsoft Office Communications Server
2007. IP8540 links the power of Office Communications Server 2007 to the high reliability of a dedicated
desk phone. IP8540 employs an embedded version of Office Communicator 2007 (“Office
Communication 2007 Phone Edition”) as the client with access to contacts stored locally and in Office
Communications Server 2007. The large full color touch screen graphically presents context sensitive call
controls, contact lists and status. A simple tap of the screen yields fingertip control of communications,
place calls from contact lists, transfer calls to others and conference multiple calls.
• Wideband real-time codec technology delivers high fidelity audio from the handset and full duplex
speakerphone.
• For higher security installations, IP8540 supports both PIN (Personal Identification Number) and
advanced biometric fingerprint reader.
• Keep a record of all phone conversations in Outlook.
With Microsoft Office Communications Server 2007 R2 upgrade (S/W version 3.5.6907.0), following new
features are also available:
• Improved user experience. The user interface has been enhanced to provide a better look-and-
feel. The soft input panel (SIP) has been enlarged to enable easier entry of credentials on the
Sign-in page.
• Voice Mail indicator. A "Message Waiting" indicator is now shown when a voicemail has been
recorded. The list of voicemails is also displayed in the Messages view, showing who left the
message, their presence status, and the date and time that the message was recorded. (This
feature requires Exchange 2007.)
• Call Log view. The Call Log view has also been implemented, showing the list placed, received,
and missed calls (This feature requires Exchange 2007).
• Configure Finger Print to unlock. Users can choose to configure a PIN or a fingerprint to
unlock the phone.
• Wideband audio quality. Audio quality has been improved significantly by the addition of
wideband RTAudio for peer-to-peer VoIP calls. Multiparty and PSTN calls now use the SIREN
codec to the A/V MCU or Mediation server. In addition, significant work has been done to
improve echo cancellation.
• External access. External access is now supported. Users can now take the device home and
make calls from and receive calls to their SIP URI or work phone number.
• Search Outlook contacts on the device. The Search feature on the phone now displays not
only your corporate address book contacts but also personal contacts that you have stored in
Outlook. Users can call Outlook contacts from phone with a single touch.
• Improved login scenarios. Login resiliency and auto sign-in during failures have been improved
in this version.
3
Page 9

IP8540 User Guide
• Improved scrolling experience. Users can quickly scan and find a contact to call by using the
improved and accelerated scroll wheel on the device. The new scroll wheel and improved driver
provide a richer experience and reduce the time required to search for a particular contact.
• Reset to factory defaults. Users can now reset the device like any other Mobile device to
factory defaults by using small pin on back of device, between the headset and USB interfaces.
• Volume settings. The device displays the existing volume level as a user increases or
decreases the volume. Users can change the volume of handset or speaker during the call.
• Change/forgot PIN. Users can change the PIN that they use to unlock the phone. The Forgot
PIN functionality has been introduced to enable users who have forgotten their PIN to unlock the
device using their password.
• Update password. Users can update their password on the device after they have changed it on
the PC. Note that server will only authenticate the new password when its current security
association (SA) has expired, so use of this setting is not recommended in this release.
1.2 Device Layout
The IP8540 uses a touch screen to select contacts and configure settings, a scroll-wheel to navigate the
user interface, and a standard keypad for entering phone numbers.
Figure 1 below describes the key elements of the IP8540.
Figure 1: Key elements of the IP8540
• Liquid crystal display (LCD) touch screen: Touch screen for entering commands
and selecting contacts
• Keypad: Standard phone keypad for entering phone numbers
4
Page 10

IP8540 User Guide
• Light-emitting diode (LED) status lights : Indicates user presence information
(Green indicates “Available”, Amber indicates “Away”, Green & Amber indicates
“Inactive”, and Red indicates “Busy” or “Active Call”)
• Scroll-wheel : Navigates up and down the contact list and other elements of the
user interface.
• Volume up/down button : Increases and decreases the volume for the
ringer, handset, and loudspeaker.
• Mute microphone : Disable or enable audio input
• Speakerphone button : Activate or deactivate speakerphone
• Headset button : Activate or deactivate headset audio
• Finger reader : Allows you to log on to your IP8540 with the touch of your finger
• Help : Displays context sensitive help
5
Page 11
IP8540 User Guide
2. Getting your IP8540 up and running
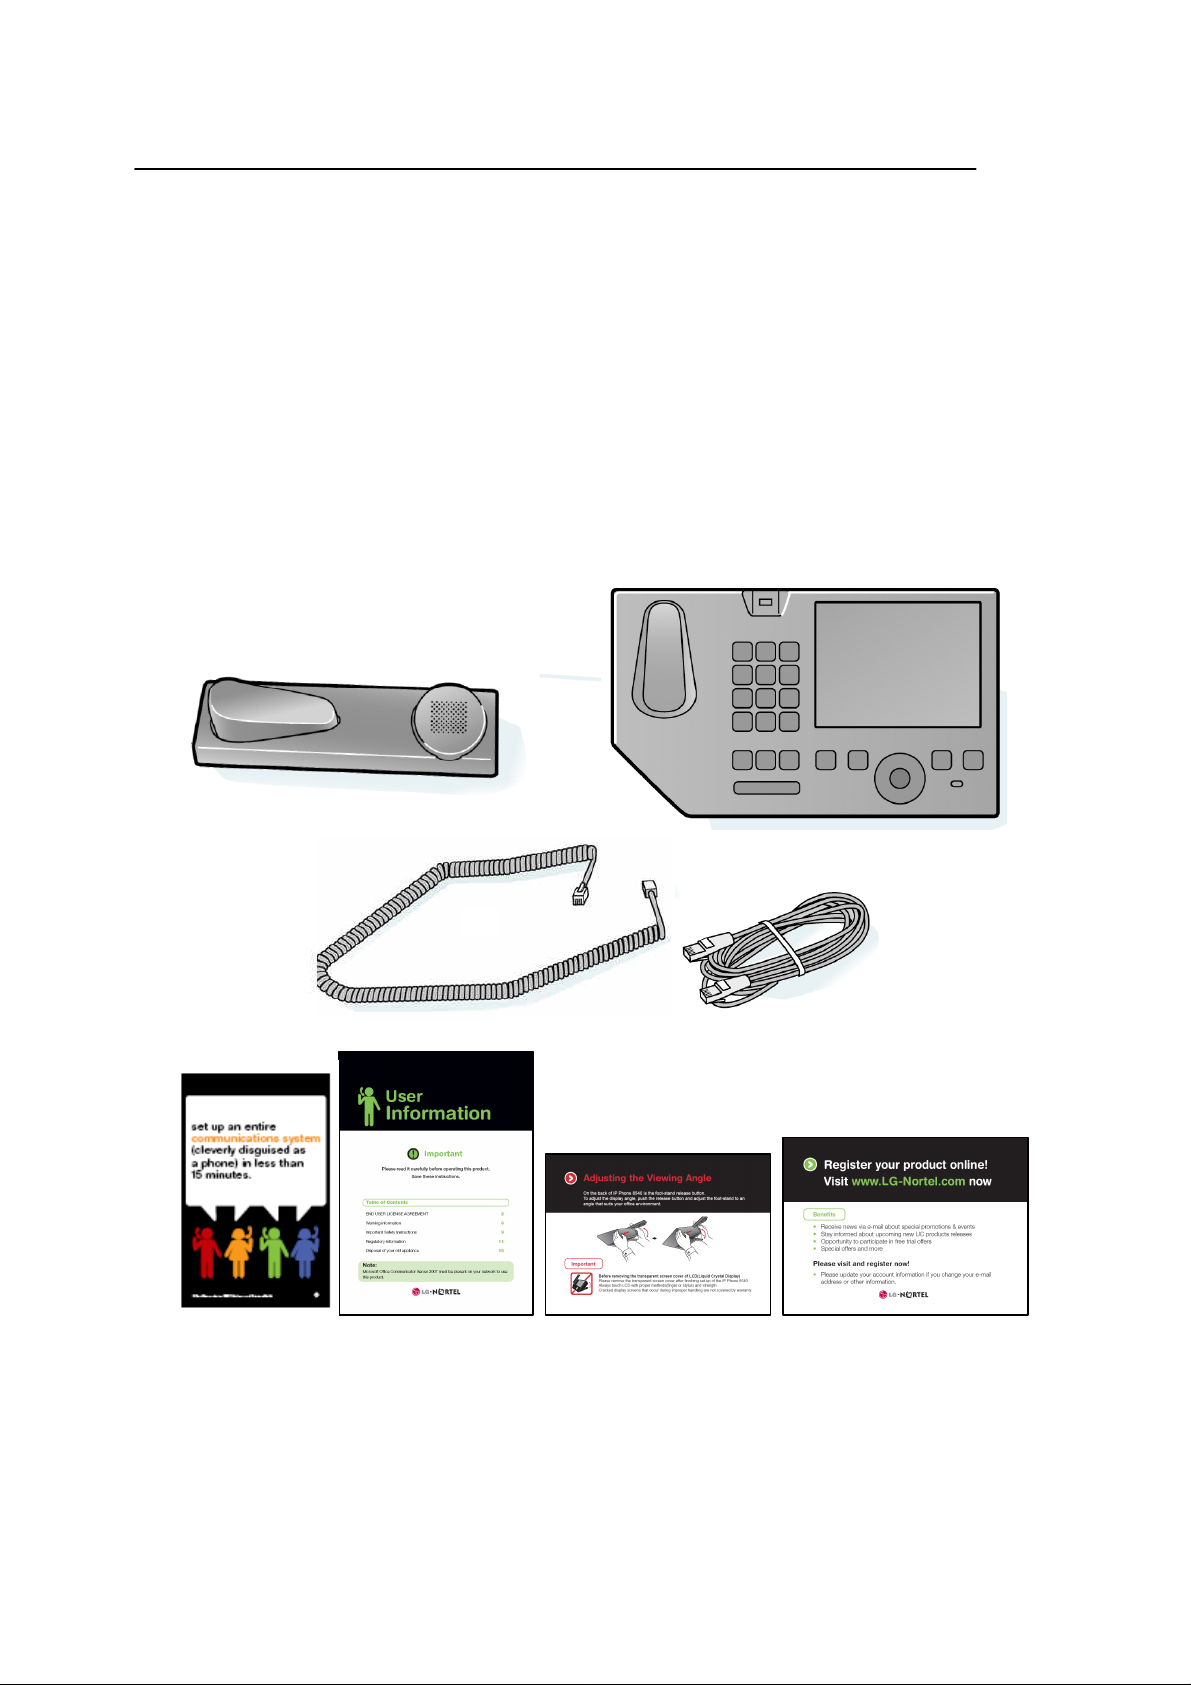
2.1 What’s in the box
The IP8540 product package contains the items as shown in Figure 2.
• IP8540
• Phone handset
• Handset Coiled-cord
• 1.8 m (6-foot) RJ-45 Ethernet cable
• Quick Guide / User information booklet / Tilting leaflet / Registration card
Figure 2: Contents of IP8540 product package
6
Page 12

IP8540 User Guide
2.2 AC/DC power adaptor
The IP8540 ships without an AC/DC power adaptor . The IP8540 LAN Ethernet port supports IEEE802.3af
PoE (Power-over-Ethernet), so an external power supply is not needed if your Ethernet switch supports
PoE class 3. If the installation requires an AC/DC power adaptor, select the adaptor for your region from
the table below.
Order Part Number Model Number Applicable Region
TKTN9010201 PLA12R-120(ASK)-R USA USA, Canada, Mexico
TKTN9010601 PLA12R-120(ASK-E)-R EUA Europe
TKTN9010701 PLA12R-120(ASK-K)-R GBR United Kingdom
TKTN9010801 PLA12R-120(ASK-S)-R AUS Australia
TKTN9010901 PLA12R-120(ASK-C)-R CHN China
TKTN9011001 PLA12R-120(ASK-H)-R KDX South Korea
2.3 Optional accessory for wall-mount installation
The IP8540 optionally can be wall mounted; you may wish to order the following part number to ensure
secure placement of the handset when phone is wall mounted:
Order Part Number Part Name
TKTN9013701 Handset Holder for Wall Mount
2.4 Set-up
Before connecting your new phone, take a moment to consider safety and reliability. Use common sense
when locating, connecting and using your IP8540.
• Locate the phone on a dry level surface. Keep the phone away from the edges of the surface to
avoid the phone falling off the edge.
• Locate cables to avoid damage. For example, do not locate under rugs or carpet. Also, do not
locate cables between the desktop and walls where they may be crushed, damaging the insulation.
• Check the cables regularly and, if damage is noted, disconnect the phone. Contact your local
representative for a replacement.
• Should liquid spill on the Phone, disconnect the unit from power and the network.
• Do not use during lightning storms. Lightning presents a rare but potential lethal shock hazard.
• Clean IP8540 with a soft dry cloth; do not use liquid cleaners or sprays.
• Only attach peripherals specified by LG-Nortel.
• Always use caution when connecting to AC power. Use only with a properly grounded standard
AC power outlet and the AC/DC adaptor for the unit.
7
Page 13
IP8540 User Guide
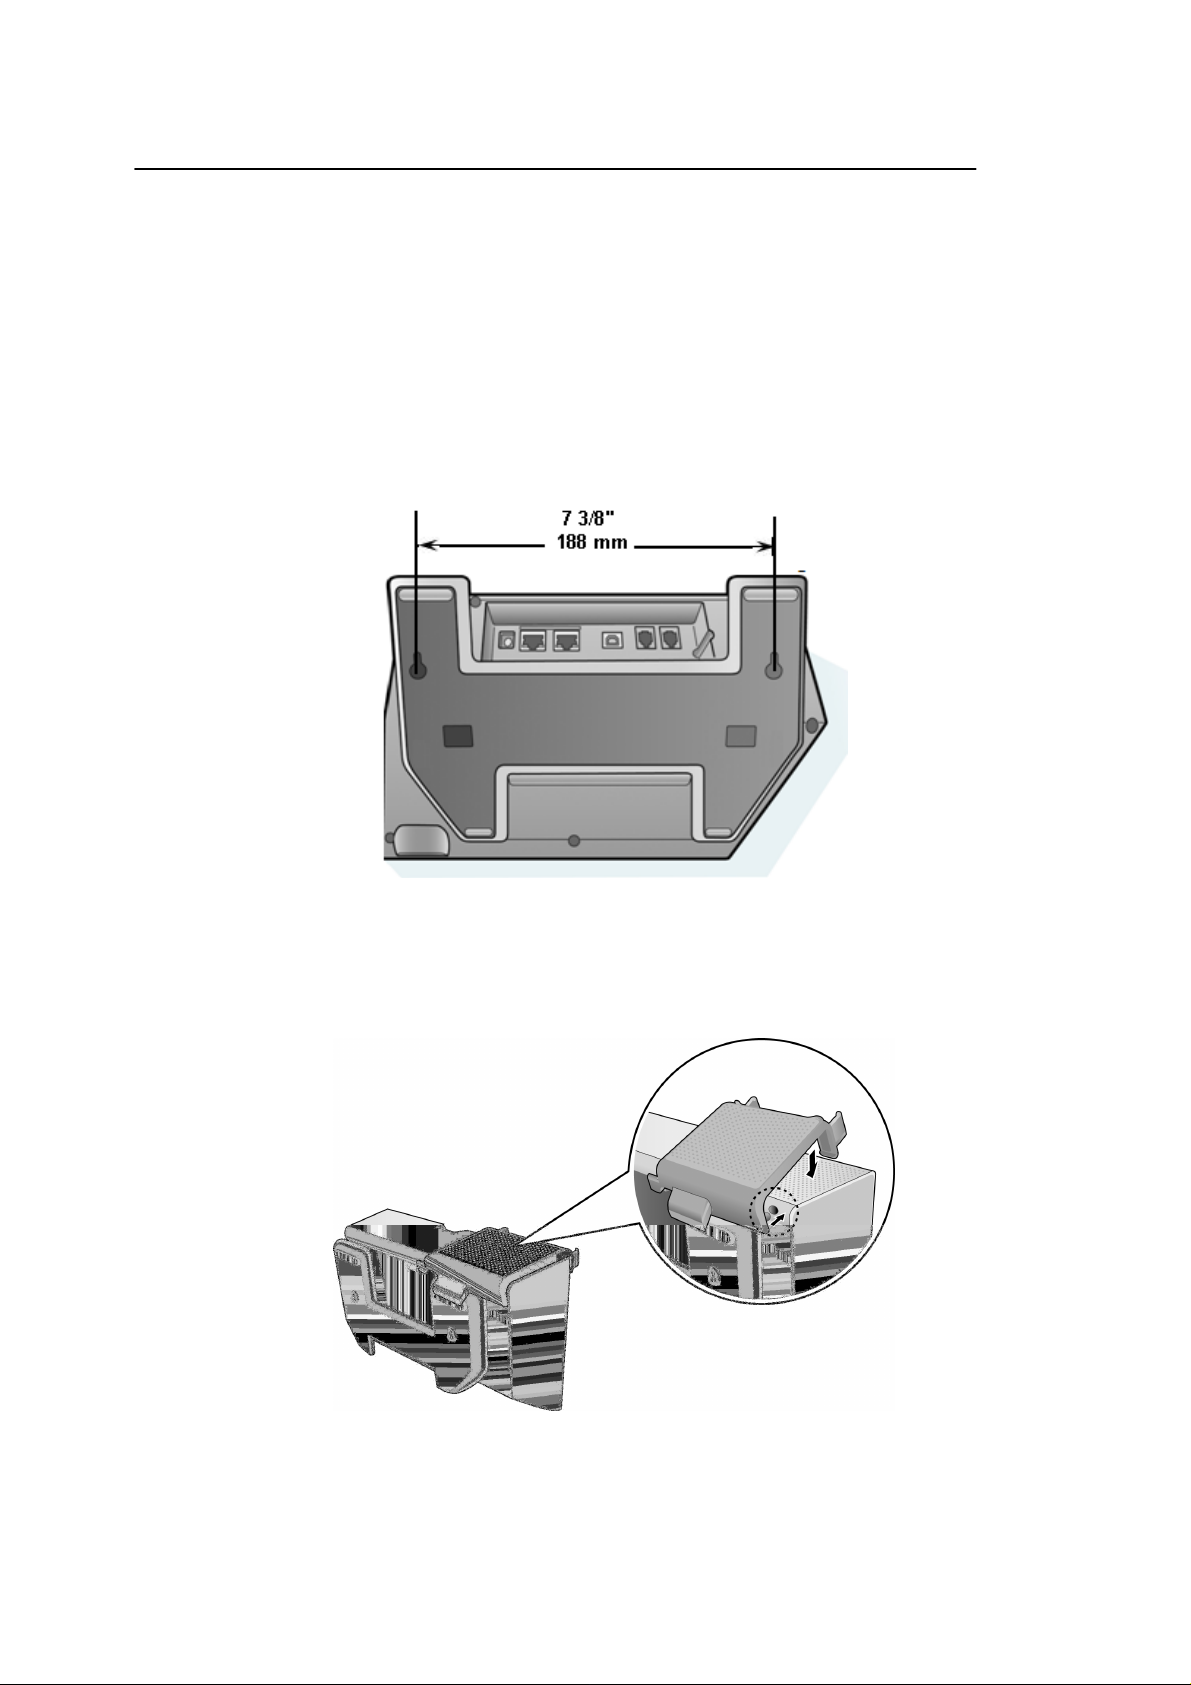
2.5 Wall Mounting
The foot of IP8540 incorporates slotted wall mount holes. To wall mount IP8540 you will need to install
two mounting screws arranged to fit in the mounting slots. #6 pan head screws are recommended and
should be anchored firmly into a wall stud or wall anchor. Tighten the screw leaving about 1.5 mm (1/16th
inch) of exposed screw to allow for the plastic thickness. Slide the hole in the foot over the head of the
screws then slide the unit down the wall. If the unit does not slide down over the screws, loosen the
screws slightly. If the unit is loose on the wall, remove the unit and slightly tighten the screws. The
adjacent figure gives center-to-center mounting dimensions.
Figure 3: Wall mount dimensions
There also is a handset holder that clips onto the phone (as shown below) to secure the handset when
phone is mounted to a wall (refer to previous section for part number to order).
Figure 4: Handset-holder for wall mount installation
8
Page 14

IP8540 User Guide
2.6 Adjusting the Viewing Angle
On the back of IP8540 is the foot-stand release button. To adjust the display angle, push the release
button and adjust the foot-stand to provide the best view of the touch screen.
Figure 5: Viewing angle control
9
Page 15
IP8540 User Guide
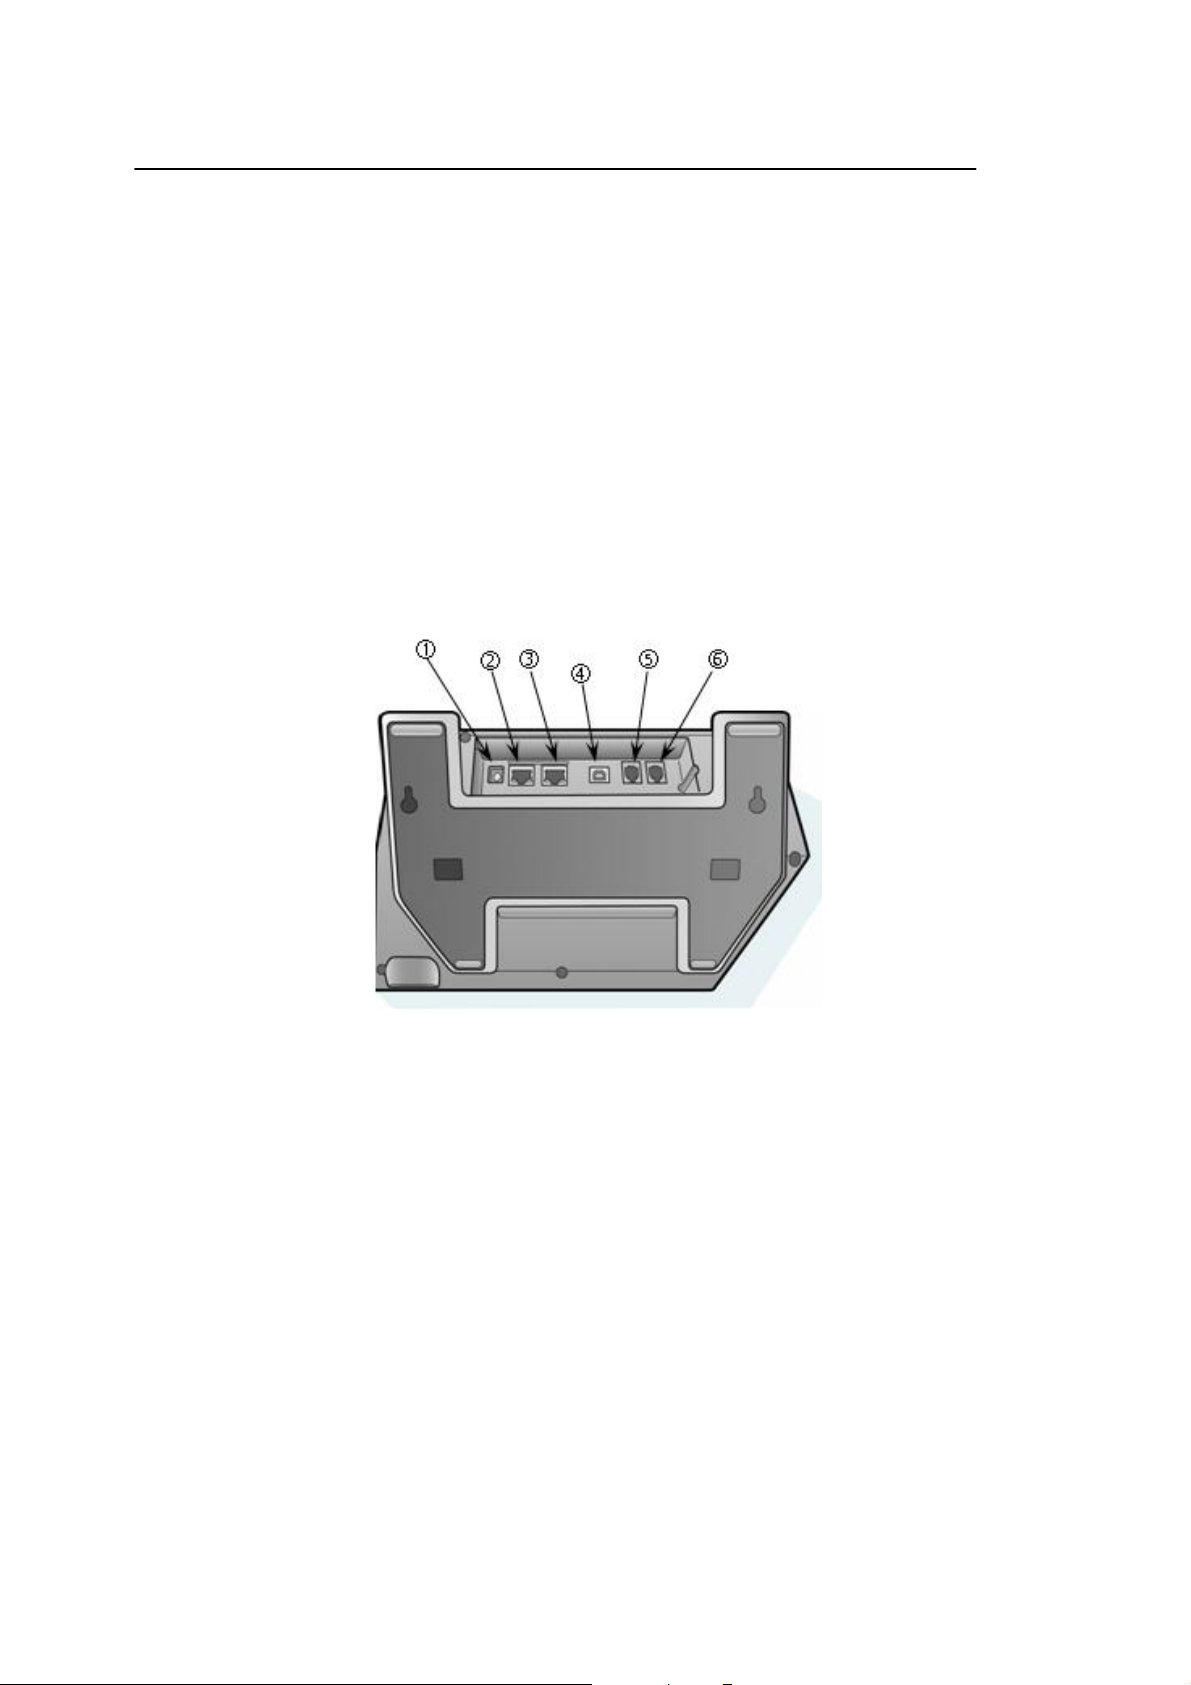
2.7 Connections to IP8540
The IP8540 incorporates several standard connectors to interface to your LAN, power, and peripherals.
Note the LAN must have a local DHCP (Dynamic Host Control Protocol) server to provide an IP address
and other information to the phone. The connectors are grouped in the wiring cavity as shown in the
Figure.
To install the IP8540: €
• Connect the coiled cord to the handset and RJ-9 connector †.
• Connect the Ethernet cable to RJ-45 connector ‚ and your Ethernet switch.
• Connect the AC/DC power adaptor to DC input connector • and a standard AC power outlet. If
your LAN equipment is compliant with the Power-over-Ethernet (PoE) standard, then use of the
AC/DC adapter is optional.
Figure 6: IP8540 rear view
Optional connections and their intended uses are:
• RJ-9 connector … (Connection to a headset with RJ-9 plug)
• Type-B USB connector „ (Connection to a USB host connector on PC)
• RJ-45 connector ƒ (Connection to Ethernet port on local PC; This allows IP8540 and PC to share
a single LAN termination.)
*** There is a Type-A USB port on the side of the wiring cavity. This USB port is reserved for future use.
10
Page 16
IP8540 User Guide
2.8 Initial Power up and Sign In
The first time you power up IP8540, you will need to do the following:
• Calibrate the touch screen
• Sign In (with IP8540 or with Office Communicator 2007 R2 on your PC)
• Set the phone unlock parameters
• Set the time zone
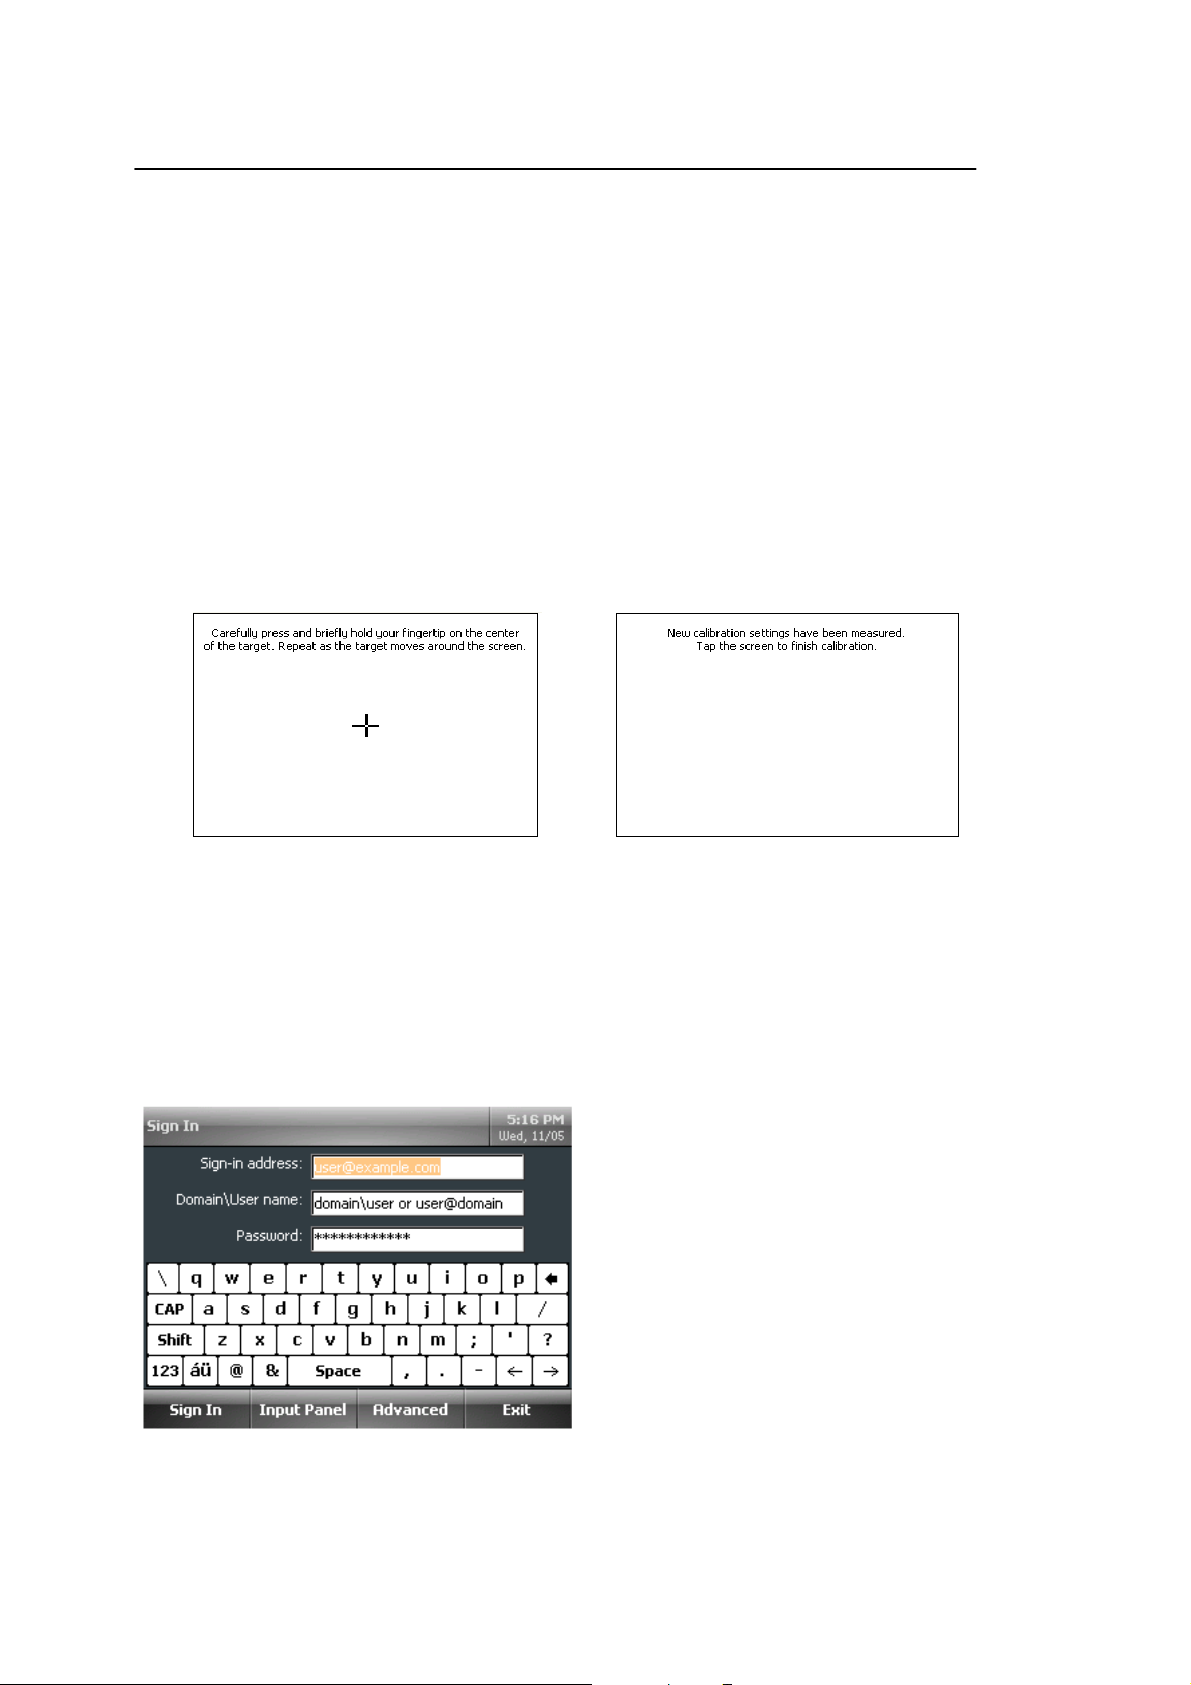
2.8.1 Calibrating the touch screen
You must calibrate the touch screen during the initial power up. After initializing, the IP Phone displays
calibration instructions. Follow the on-screen instructions to calibrate the touch screen.
2.8.2 Sign In with IP8540
After completing calibration, the Sign In screen appears. Once entered, your sign-in details are stored for
subsequent sign-in. To sign-in you must enter the following:
• Sign in address
• Domain\user name
• Password
11
Page 17

IP8540 User Guide
This information is available from your Windows Office Communications Server 2007 administrator.
1. Use the virtual keyboard to enter each of the items in the respective text box.
2. Tap Sign In, in the lower-left of screen.
*** For numeric entries, tap the numeric button, , in the lower left of the virtual keyboard.
2.8.3 Sign In with Office Communicator 2007 R2 on your PC
After completing calibration, the Sign In screen appears. You can connect IP8540 (with S/W version
3.5.6907.0) to your computer using an USB cable for automatic single-sign in using Office Communicator
2007 R2.
To sign in to your IP8540 using Office Communicator 2007 R2, do the following:
• Sign into Office Communicator 2007 R2 from your computer.
• Using the USB cable, connect the Type-B USB connector (smaller cable end connector) to the backside
of your IP8540.
• Connect the Type -A connector (larger cable end connector) to your computer.
• When both ends of the cable are secured, the connection between Office Communicator 2007 R2 and
your IP8540 is detected and you are prompted to enter your Account, User name, and Password from
Office Communicator 2007 R2.
• Enter account information using Office Communicator 2007 R2.
After you have entered your credentials, IP8540 is ready for signing in.
12
Page 18

IP8540 User Guide
To sign in using Office Communicator 2007 R2, do the following:
• Tap Advanced.
• Tap Sign in via PC.
• Sign on using Office Communicator 2007 R2.
2.8.4 Setting your unlock parameters
For security, you can lock the IP8540 when leaving your desk. When locked, the display shows the blank
screen with “Unlock” soft key on lower left corner. (IP8540 can place and receive calls while locked using
keypad, but contact list access and other controls are disabled.)
IP8540 unlocks by entering a PIN (Personal identification Number) or using the biometric fingerprint
reader.
After you complete sign-in, the PIN creation screen appears. You can select and set the unlock method
(PIN or fingerprint) and create a PIN or fingerprint scan.
13
Page 19

IP8540 User Guide
To select and set the unlock method, do one of the following:
• Create a PIN by typing and retyping a 6-digit PIN.
Or,
• Enter a fingerprint scan by tapping Use Fingerprint Instead.
• Swipe you fingertip until four readings are measured.
14
Page 20

IP8540 User Guide
2.8.5 Set Time Zone
You set your time zone upon first sign-in. To change the time zone settings, do the following:
• Tap and as needed to adjust the time zone.
• Tap OK.
IP8540 displays the main screen and is ready for use.
15
Page 21

IP8540 User Guide
3. Using your IP8540
3.1 Understanding the touch screen
Before you begin use of your IP8540, take a moment to familiarize yourself with the overall screen layout.
As shown in the Figure 7, the screen is divided into four (4) major sections:
• Presence & Info bar – The Presence & Info bar at the top of the screen displays your presence,
name, Call forward control icon, and the date and time.
• Window controls – The Window control section on the left side of the screen includes icons to
select the active window (Contacts, Messages, Call Logs, Settings, or Help).
• Main Window – The Main Window displays the selected window and active call information.
• Control bar – The Control bar at the bottom of the screen displays context sensitive controls for the
IP8540 and call control buttons (Transfer, conference, etc.).
Presence & Info bar
Window controls Main window
Control bar
Figure 7: IP8540 screen layout
16
Page 22

IP8540 User Guide
3.2 Controlling Presence (Phone Status)
Your IP8540 sends updated status information to Office Communications Server at regular intervals or
when the status changes. There may be times when you want to change your presence status. For
example, if you need to concentrate on a report, you may change your status to Do Not Disturb to avoid
interruptions.
• At the top of the screen, tap the presence color to the left to your name.
• Tap your presence status.
17
Page 23

IP8540 User Guide
The following table describes each presence indicator and the accompanying status text.
Icon Status Text Description
Available The contact is online and can participate in
conversations. The user can set this presence level
manually.
Busy The contact is online but engaged in another call. The
user can set this presence level manually.
Be Right Back This contact is engaged in another activity and will
return shortly.
Away The contact is probably not available. This status is
displayed for the following reasons:
• The IP8540 has been idle for more than the inactive
period - 15 minutes by default.
• The Office Outlook calendar or Out of Office
Assistant for the contact indicates an out of office.
state
• The contact has manually set the presence status
to Away.
Do Not Disturb The contact is online but does not want to be
interrupted. This status displays when set manually by
the user.
Reset Status Resets status to the default based on Communicator
status.
18
Page 24

IP8540 User Guide
3.3 Contact List
From the contact list you can view contact information, search for a contact in a group and call a contact.
The status information in the contact list displays the availability of the contact. Icons indicate presence
to the left of the contact’s name, and by text to the right. You can adjust the status of your IP8540. Refer
to
In the contact list, you can view the following information for each contact:
• Contact's presence,
• Contact's name, and
• Contact card, which contains additional details about the contact.
3.3.1 Viewing a Contact Card
A contact card provides details about the contact’s availability, activity and alternate phone numbers.
Depending on the level of access granted you by a contact, the card displays the contact’s schedule,
phone numbers, as well any note the contact has written.
To view a contact card:
• From the Contacts screen, tap the name of the contact.
19
Page 25

IP8540 User Guide
• View the contact information.
• To place a call from the contact card, tap the phone number you would like to call, or tap the Call
button.
(Note: The default phone number for all contacts is their work phone. For user’s that are UC enabled,
when their work phone number is dialed, their IP phone will ring as well.)
• When you are done viewing the Contact card, tap Close Card.
3.3.2 Searching the Contact list
You can search for a contact from the list using the dial pad. Each dial pad digit represents the three
alphabet characters on the button, 2 for ABC, 3 for DEF, etc. As you input digits, the display shows
contacts that match all three (3) characters of the digit.
To search the records
• With the dial pad, enter digits in the text box representing the letters in the contacts name.
Matching contact names are displayed.
To dial a contact
• Tap the contact name or, use the scroll wheel to highlight the contact and tap Call.
20
Page 26

IP8540 User Guide
3.3.3 Selecting a Contact Group
You can setup multiple contact lists or Contact Groups. You can select the Contact Group or all groups
to display in the Contact window.
To view a Contact Group
• To the right of the Contacts box, tap the Contact Groups icon .
• Do one of the following:
a) To view a Contact Group, tap the group name.
b) To create a Contact Group, tap New Group and follow the on screen instructions.
c) To view all of your contacts, tap All Contacts.
21
Page 27

IP8540 User Guide
3.4 Message Waiting
In conjunction with Office Communications Server 2007, Exchange 2007 provides voice mail services.
The Message window control icon indicates how many new voice mails are waiting. The Message
window displays a list of voice mails, showing who left the message, their presence status, and the date
and time of the recording. This feature requires Exchange 2007.
To access voice mail, do the following:
• On the right margin, tap the Voice Mail button .
• In the list of voice mails, tap the desired voice mail.
Or,
• Tap the Call Voice Mail button.
22
Page 28

IP8540 User Guide
3.5 Call Logs
A log of your calls (missed, received, and placed) is available in the IP8540. Using IP8540, you may view
and return calls from the Call Logs. IP8540 stores a maximum of 60 records in the log. You can manage
the Call Logs from your desktop PC using Outlook.
To view the call log
• Tap the Call Log icon.
• Select one of the following Call Log views:
o To view all calls that you have missed, received, or placed, tap the All calls icon .
o To view calls that you have missed, tap the Missed calls icon .
o To view calls that you have received, tap the Received calls icon .
o To view calls that you have placed, tap the Placed calls icon .
To view the contact card for a contact in the Call Log
• Tap the contact card icon next to the contact name.
• When done viewing the contact card, tap Close Card.
To place a call from the call logs
• Tap Call Log.
• Select the log view (missed, received, or placed).
• Using the Scroll Wheel, locate the log item.
Tap the contact to place the call.
23
Page 29

IP8540 User Guide
3.6 Settings
The Settings window allows you to configure settings for and view information about your IP8540. The
Settings window has the following selections:
• Lock phone
• Volume
• Ring Tones (with S/W version 3.5.6907.0)
• Change PIN
• Change Fingerprint
• Update password
• Brightness
• Location/Time Zone
• Date and Time Format
• Switch User
• Calibrate Touch Screen
• Logging
• About (device information)
• Change Language (with S/W version 3.5.6907.0)
24
Page 30

IP8540 User Guide
3.6.1 Locking your phone
For security, IP8540 has a lock feature. When locked, the display shows the unlock screen shown below.
To lock the phone
• Tap the Settings icon, .
• Tap Lock Phone
IP8540 Unlock screen displays and the phone locks.
To unlock IP8540
• Tap Unlock and follow the on-screen instructions.
25
Page 31

IP8540 User Guide
3.6.2 Adjusting volume levels
To set volume levels
• Tap the Settings icon, .
• Tap Volume.
• Tap and to adjust volume levels for the ringer, handset, and speaker.
• Tap OK.
26
Page 32

IP8540 User Guide
3.6.3 Ring tones
You can set one of four ring tones for you IP8540 (with S/W version 3.5.6907.0).
To configure ring tones, do the following:
• Tap Settings. .
• Tap Ring Tones .
• Tap and as needed to select a ring tone.
• Tap Play to hear the tone.
• When you have chosen a ring tone, tap OK.
27
Page 33

IP8540 User Guide
3.6.4 Changing your PIN
To change your PIN,
• Tap the Settings icon, .
• Tap Change PIN.
• In the Current PIN box, use the keypad to enter your current PIN.
• In the New PIN and Confirm PIN boxes, enter your new PIN.
28
Page 34

IP8540 User Guide
3.6.5 Changing fingerprint
You can change the fingerprint ID you use to unlock the device by resetting the Change Fingerprint ID
setting. For example, it may be more convenient to use a finger from you left hand if your phone is to the
left of your work area.
To change your Fingerprint ID, do the following:
• Tap the Settings icon, .
• Tap Change Fingerprint.
• Swipe the fingerprint read er with the finger you currently use unlock the phone.
• Swipe a finger across the fingerprint reader until you have entered four successful readings.
29
Page 35

IP8540 User Guide
3.6.6 Update your password
To change your password
• Tap the Settings icon, .
• Tap Update Password.
• Use the virtual keyboard to enter the old and new password information.
• Tap OK.
30
Page 36

IP8540 User Guide
3.6.7 Adjusting the screen brightness
To set the brightness
• Tap the Settings icon, .
• Tap Brightness.
• Tap and to adjust the brightness
• Tap OK.
31
Page 37

IP8540 User Guide
3.6.8 Changing the Time Zone
To change location and time zone
• Tap the Settings icon, .
• Tap Set Time Zone.
• Tap and to set the location and time zone.
• Tap OK.
32
Page 38

IP8540 User Guide
3.6.9 Changing the date and time display format
To change the format of the date and time display
• Tap the Settings icon, .
• Tap Date/Time Format.
• Tap and to adjust the time and date formats.
• Tap OK.
33
Page 39

IP8540 User Guide
3.6.10 Switching Users
Multiple users can use IP8540, but not concurrently. A user must sign out of the device before another
user can sign in. In doing so, each user individually signs into the Microsoft Office Communications
Server 2007. To switch users, the current user must sign out using the Switch User feature to allow
another user to sign into the device. No past user information, such as sign-in addresses or passwords,
are retained on the device.
To switch from one user to another:
• Tap the Settings icon, .
• Tap Switch User.
• Use the virtual keyboard to enter the new user information.
• Tap Sign In.
34
Page 40

3.6.11 Calibrating the touch screen
To calibrate the touch screen
• Tap the Settings icon, .
• Tap Calibrate Touch Screen.
IP8540 User Guide
• Use your fingertip to touch the on-screen target until the new calibration is established.
• When the calibration is set, tap the screen a final time to finish the calibration.
35
Page 41

IP8540 User Guide
3.6.12 To set logging
For tracking purposes, IP8540 can upload its activity logs to the Office Communications Server 2007
Update Service. This is helpful for problem evaluation.
To enable logging, do the following:
• Tap Settings.
• Tap Set Logging.
• To enable logging tap the left arrow, to disable logging tap the right arrow.
To send a log, do the following:
• Tap Settings.
• Tap Set Logging.
• Tap Send Logs.
36
Page 42

IP8540 User Guide
3.6.13 Viewing the device information
The following information can be viewed from the System Information screen:
• Firmware version number
• MAC address
• IP Address
• Subnet Mask
• Gateway IP Address
• DNS Server IP Address
• VLAN ID number
To view the device information, do the following:
• Tap the Settings icon, .
• Tap System Information.
• To return to the previous screen, tap OK.
37
Page 43

IP8540 User Guide
3.6.14 Changing the language
IP8540 (with S/W version 3.5.6907.0) supports multiple languages. Your administrator can configure one
or more languages for your phone depending on the needs for your organization.
To change the language for all text displayed on your phone, do the following:
• Tap Settings.
• Tap Change Language.
• Tap the arrow buttons to choose a language.
• Tap OK to request a language.
•
The language will be requested from the server and downloaded to your device within minutes.
38
Page 44

IP8540 User Guide
3.7 Connecting the USB Cable and Signing In
3.7.1 Why Use the USB Cable
You can connect IP8540 (with S/W version 3.5.6907.0) to your computer using the USB cable for simplified
deskphone sign in using Office Communicator 2007 R2. Below is a list of advantages to using the USB cable.
• Computer sign in You can connect Office IP8540 to your computer using the USB cable for
quick desk phone sign in using Office Communicator 2007 R2.
• Make a one-click audio call Each contact in your Office Communicator 2007 R2 Contact List
has a default number that you can call by clicking the Call button to the right of the contact.
• USB audio using IP8540 When your IP8540 is attached to your computer with a USB cable, you
can receive audio through the phone’s loudspeaker for Office Live Meeting 2007 and Office
Communicator 2007 R2 calls.
39
Page 45

IP8540 User Guide
4. Making Calls with IP8540
4.1 Adjusting the handset and speakerphone volume
The Volume Up/Down button controls ringer, handset and speaker volume. What the buttons
control depends on the state of the device. The volume levels that you set are retained from one meeting
to the next until you change them. Table below summarizes the modes for volume settings.
State of device Volume mode Description
Phone is on or off hook and
speakerphone button is on.
Adjusts
the speaker volume
during a call
Press the volume button
and
adjust the volume of the dial-tone
prior to using the phone.
Phone is off hook and
speakerphone button is off.
Not in a call and
phone is on or off hook
Additionally, you can adjust volume by tapping the Settings and Volume buttons available on the screen.
Adjusts
the handset volume
during a call
Adjusts
ringer volume
Press the volume button
and
adjust the volume of the dial-tone
prior to using the phone.
Press the volume button
and
adjust the volume of the ringer.
40
Page 46

4.2 The Call Basics
4.2.1 Make a call, while idle
• Tap a contact in the displayed list.
or
• Dial the number using the keypad.
To make an outgoing phone call while the device is on the hook
a) With the handset on the hook, enter the phone number using the 10-digit keypad. The
numbers appear in the phone number field. Use the backspace key to correct an entry.
b) After the final digit is entered, remove the phone from the hook and the phone will begin
dialing. Additionally, you can press speaker button or select the Call button.
To make an outgoing phone call while the device is off the hook
a) With the handset off the hook, enter the phone number using the 10-digit keypad. The
numbers appear in the phone number field. Use the backspace key to correct an entry.
IP8540 User Guide
b) After the final digit is entered, press the Call button on the LCD screen. Additionally, the
numbers will automatically dial if a matching dial string has been found.
• Tap Call.
You may lift the handset for privacy.
4.2.2 Make a call, while busy
• Tap New Call and
• Tap contact in the displayed list.
or
• Dial the number using the keypad.
• Tap Call.
You may lift the handset for privacy.
4.2.3 Redial the most recent call
You can redial the most recent call you have dialed (with S/W version 3.5.6907.0).
• From the Contacts screen, tap Redial.
The most recent call you have placed will begin connecting.
41
Page 47

IP8540 User Guide
4.2.4 Receive a call
• Lift the handset or press Answer, which activates the Speakerphone or headset.
-Or,
• Press Redirect to send the call to another destination.
-Or,
• Press To Voice Mail to send the call to Voice Mail. Voice mail service requires Exchange Sever
2007.
4.2.5 Hold a call
• Tap Hold in the active call window.
4.2.6 Resume a held call
• Tap the call in the call list.
4.2.7 Transfer
You can transfer a call using the following methods:
• Consult with the intended contact for transferring the call and then transfer the call.
• Directly transfer the call to a contact.
• If your mobile phone number is configured to appear in Office Communicator 2007 on your PC,
then you can transfer a call to your mobile phone.
To transfer a call, do the following:
• With a call in progress, tap Transfer.
• Tap Consult then Transfer To… to contact the intended contact for transferring the call.
-orTap Transfer Directly To… to transfer the call immediately to a contact.
-orWhen your mobile phone is published in Office Communicator you will have the option of
transferring calls to your mobile phone. Tap Transfer to Mobile Phone… to forward the call
to your mobile phone.
42
Page 48

IP8540 User Guide
• Tap a contact to transfer the call to.
• Either consult with the contact and transfer, or in the case of a direct transfer, the call will be
immediately transferred.
43
Page 49

4.2.8 Conference
In the Contact List, do the following:
• Select a contact to call.
• After the caller answers tap Conference and then Add Someone.
IP8540 User Guide
• Tap another contact to call.
44
Page 50

IP8540 User Guide
4.3 Forwarding Calls
IP8540 has the ability to send incoming calls to an alternate destination, i.e. forward your calls. You
define where to send calls, voice mail, a contact or a phone number. Exchange 2007 is required for
forwarding to voice mail.
Call-forwarding parameters can be set using IP8540 or from Office Communicator 2007 R2. Configuring
call-forwarding options on one results in updating the configuration on the other. For example, setting callforwarding to go directly to voice mail from Office Communicator 2007 R2 will update for IP8540 as well.
To configure call-forwarding rules using IP8540, do the following:
• At the top of the screen, tap the forwarding icon to the right of your name.
• On the Forwarding screen, tap the forwarding rule that you want to apply.
45
Page 51

IP8540 User Guide
• If you are forwarding to another contact or phone number, select Forward to contact or phone
number… , and tap the contact name that you want to forward your calls, and then tap OK.
• On the Forwarding screen, tap OK.
To configure call-forwarding rules using Office Communicator 2007 R2, do the following:
• In the Office Communicator window, click the Call Forwarding button .
• Click Forward Calls To , and then select one of the following:
• Voice mail to automatically forward all incoming calls to your voice mail.
• A phone number to automatically forward calls to that number.
• New Number to enter a new number to which to forward the call. You can refer to the Online
Help for examples of how to enter phone numbers.
• Contact, and then select a contact to forward calls to that contact.
To ring another number at the same time your device rings
• In the Office Communicator window, click the Call Forwarding button , point to
Simultaneously Ring, and then do one of the following:
• Click a phone number to simultaneously ring your primary phone and the additional number.
• Click New Number to enter a new number to which to ring at the same time as your primary
number. You can refer to the Online Help for examples of how to enter phone numbers.
46
Page 52

IP8540 User Guide
4.4 Make a Phone Call Using Office Communicator 2007 R2
Each contact in your Contact List has a number that you can call by clicking the Call button associated
with the contact. The number is the contact’s work number by default, but can change based on the
number most recently used to call the contact. If you have the USB cable connected between your
IP8540 (with S/W version 3.5.6907.0) and your computer, you can place calls directly from Office
Communicator 2007 R2.
4.4.1 What is a Communicator Call?
Office Communicator 2007 R2 provides a Communicator Call option, as a way of placing a call to a
contact. When you place a Communicator Call, the call is a VoIP call that is directed to all of the
contact’s devices that are configured for Office Communicator 2007. Depending upon the devices on
which the contact has Office Communicator configured, the call can ring either the contact’s computer or
her telephony devices that are configured for Office Communicator, or both.
To view call options for a contact:
• In the Contact List, click the arrow to the right of the Call button associated with the
contact.
• In the Call options menu, click the name or number you want to call or click New Number
and then enter the number you want to call.
To make a one-click audio call
• In the Contact List, click the Call button to the right of the contact you want to call.
47
Page 53

IP8540 User Guide
5. Troubleshooting Problems
5.1 Log-in
I cannot sign-in to IP8540. I see error "Cannot connect to server or server name is incorrect".
Validate your domain name is correct.
•
• See Unexpected Behavior later in this section.
Contact your IT help to:
•
ü Ensure DHCP is configured to provide DNS address as part of DHCP response.
ü Ensure DNS has SRV records for SIP service.
ü Ensure SIP server is reachable from LAN.
I cannot sign-in to my IP8540. I see error "Cannot validate server certificate".
• See Unexpected Behavior later in this section.
Contact your IT help to:
•
ü Ensure either time.windows.com is accessible or NTP is configured with appropriate SRV
records created in DNS.
ü Ensure PKIenrollment objects have been created on AD to point to CA or CA delegate
ü If PKI enrollment is not enabled, then ensure caAttribute for Certificate Authority container
has appropriate root certificates.
I cannot sign-in to IP8540. I see error "User name or password is invalid".
Make sure you user name and password is correct.
•
If you change your password on the device before the server attempts to re-authenticate, the
•
device will not be able to sign in to the server and will be left on the sign in screen. Enter your
old password in the Password field and press Sign in.
If your domain password has changed and the server attempts to re-authenticate, the device
•
will return to the sign in screen. Enter your new password in the Password field and press Sign
in.
• See Unexpected Behavior later in this section.
Contact your IT help to:
•
ü Make sure time on your phone is correct if Kerberos is enabled in your system.
ü Make sure either WINS server is enabled or DHCP option 119 provides DNS suffix search
list if Kerberos authentication is being used on the server.
I cannot sign-in to IP8540; I continue to see the error message "Device does not have a valid IP address".
Ensure the IP8540 is properly connected to switch or router.
•
Make sure LAN outlet has proper connectivity to your network.
•
• See Unexpected Behavior later in this section.
Contact your IT Help and check:
•
ü Make sure DHCP is enabled in your system.
I mistyped my PIN during first configuration, how do I correct it?
Double tap on the edit text box for pin and start typing new digits.
•
Use the Settings Menu to edit your PIN.
•
I had configured my device and left for the day. This morning it is showing the login prompt.
A software upgrade or password expiration has probably occurred. Enter your login
•
information.
• See Unexpected Behavior later in this section.
I came this morning and my phone display shows “My Device” and “Recycle Bin”.
48
Page 54

IP8540 User Guide
The phone software has restarted in an unusable state. Power cycle the phone.
•
I am trying to login for the first time and I do not see the PIN option.
Contact your IT Help and check:
•
ü Ensure PIN is enabled on OCS (pool level->FrontEnd Properties->VoIP tab).
I am trying to configure fingerprint, but the phone does not seems to recognize my swipes.
Click “Use Pin Configuration” on menu bar and click “Use finger print Configuration” on menu
•
bar. Now, try finger swipe again.
If on repeated tries it still does not work, see Unexpected behavior section below.
•
I used my fingerprint as the unlock mechanism, but on every attempt my finger swipe is not being
recognized. My phone is locked and I am stuck.
Try to do a full-length clean finger print swipe – slow and easy.
•
Repeat above step few times and if it still does not recognize your finger swipe, then use small
•
recessed button in the wiring cavity. The recess button is located between USB and headset
connectors. Use a small (non-metallic) point to press the button. This will take you back to the
factory defaults.
How can I restore my device to factory defaults?
A small recessed button is located in the wiring cavity between USB and headset connectors.
•
Use a small (non-metallic) point to press the button. This will take you back to the factory
default
On device boot-up, calibration screen shows “press enter to accept”. I do not see enter on the phone.
Use “Select” button in the center of the Scroll wheel in lieu of Enter.
•
My screen calibration seems off and I cannot click anything on the screen.
Recalibrate the touch screen. Tap Calibrate Touch Screen in the Settings menu to recalibrate
•
the screen.
5.2 Placing Calls
When I press the Help button or the Setting button there is no response.
Contact your IT Help and check:
•
ü Ensure you are signed into OCS service.
As soon as I call <xyz>, it shows call as active and hold.
In the active call display, Hold is a softkey. Tapping the Hold softkey places the connected
•
party on hold.
Before I complete my dialing, the call is initiated with invalid number.
• See Unexpected Behavior later in this section.
Contact your IT Help and check
•
ü Most probably dialing plan has overlapping rules causing one rule to override other.
Remove overlap rules or reconfigure dial plan to remove any conflicts.
I called someone but there is no speech path.
Tap Hold and then tap the call in the active call list and see if speech path is recreated.
•
• See Unexpected Behavior later in this section.
Contact your IT Help and check:
•
ü Are you traversing firewall? If so, make sure MRAS has been configured correctly.
49
Page 55

IP8540 User Guide
ü Do you have any internal firewall? If so, make sure UDP ports on internal firewall are open
for communication.
5.3 Conference Call
I am trying to add someone to a conference, but I keep seeing "Connecting" on display.
• See Unexpected Behavior later in this section.
Contact your IT Help and check:
•
ü Make sure AV MCU's are configured in the network.
ü Make sure VoIP is enabled on AV MCU's.
ü Make sure IP8540 user is UC enabled.
5.4 Unexpected Behavior
IP8540 locked up while I was doing <xyz…>.
Restart your device by power cycling. Notify your IT Help should this reoccur.
•
IP8540 is behaving inconsistently
• Power-cycle the device to restart your phone. Notify your IT Help should this reoccur.
50
Page 56

IP8540 User Guide
6. IP8540 Product Specification
Item Specification
Network interface IEEE 802.1 10/100 Base-T Fast Ethernet, RJ-45
Desktop PC Interface IEEE 802.1 10/100 Base-T Fast Ethernet, RJ-45
Peripheral interface
Indicators
VoIP protocol Session Initiation Protocol (SIP)
Audio processing
User Interface elements
(1) USB type A port (reserved)
(1) USB type B port
Mute LED
Speakerphone LED
Headset LED
Presence LED
Codec: G.722.1, G.723.1, G.726, G.711, MSRT Audio,
SIREN
Voice Activity Detection (VAD)
Comfort Noise Generation (CNG)
5.7” TFT color LCD with touch-screen
Navigation wheel
Functional buttons
• Microphone mute
• Speakerphone
• Headset
• Volume Control
• Help
Alphanumeric 12-button dial pad
Microphone
Speaker
Handset
Headset jack (RJ-11)
Physical Size (H x W x D)
Weight 6.6 Kg (3 lbs.) approx.
Power
Noise level 15 dB @ 1 meter
Operation Temperature 0~40 (ºC) , 32~104 (ºF)
Storage Temperature -20 ~ 60 (ºC) , -68~140 (ºF)
Operation Humidity 10-85% RH (non-condensing)
51
180 x 270 x 195 mm
(including handset, with 45 degree angle position)
IEEE 802.3af Power-over-Ethernet support (class 3)
or
External AC/DC adaptor:
Input 100~240VAC, 0.5 A (Max.), 50/60 Hz
Output 12VDC, 1.0 A (Max.) 12W Max.
Page 57

IP8540 User Guide
LG-Nortel Co.Ltd.
GS Gangnam Tower, 679-1, Yeoksam-1-dong, Gangnam-Gu
Seoul, 135-985
Korea
www.lg-nortel.com
52
 Loading...