

Page 1

OWNER’S MANUAL
DLP PROJECTOR
Please read this manual carefully before operating
your set and retain it for future reference.
HW300T
P/NO : MFL66679803 (1110-REV04)
www.lg.com
Page 2
LICENSES
2
LICENSES
Supported licenses may differ by model. For more information about licenses, visit
www.lg.com.
Manufactured under license from Dolby Laboratories.
“Dolby “and the double-D symbol are trademarks of Dolby
Laboratories.
ABOUT DIVX VIDEO: DivX® is a digital video format
created by DivX, LLC, a subsidiary of Rovi Corporation. .
This is an official DivX Certified® device that plays DivX
video. Visit www.divx.com for more information and
software tools to convert your files into DivX video.
ABOUT DIVX VIDEO-ON-DEMAND: This DivX Certified®
device must be registered in order to play purchased
DivX Video-on-Demand (VOD) movies. To obtain your
registration code, locate the DivX VOD section in your
device setup menu. Go to vod.divx.com for more
information on how to complete your registration.
“DivX Certified® to play DivX® video up to HD 1080p,
including premium content.”
“DivX®, DivX Certified® and associated logos are
trademarks of Rovi Corporation or its subsidiaries and are
used under license.”
“Covered by one or more of the following U.S. patents :
7,295,673; 7,460,668; 7,515,710; 7,519,274”
HDMI, the HDMI logo and High-Definition Multimedia
Interface are trademarks or registered trademarks of HDMI
Licensing LLC.
NOTE
Image shown may differ from your projector.
Your projector’s OSD (On Screen Display) may differ slightly from that shown
in this manual.
Page 3
SAFETY INSTRUCTIONS
3
SAFETY INSTRUCTIONS
Please take note of the safety instructions to prevent any potential accident
or misuse of the projector.
Read these instructions.
Keep these instructions.
Heed all warnings.
Follow all instructions.
The lightning flash with
arrowhead symbol, within
an equilateral triangle,
is intended to alert the user to
the presence of uninsulated
“dangerous voltage” within the
product’s enclosure that may
be of sufficient magnitude to
constitute a risk of electric shock
to persons.
The exclamation point
within an equilateral
triangle is intended to
alert the user to the presence
of important operating and
maintenance (servicing)
instructions in the literature
accompanying the appliance.
WARNING/CAUTION
- TO REDUCE THE RISK OF FIRE
AND ELECTRIC SHOCK, DO NOT
EXPOSE THIS PRODUCT TO
RAIN OR MOISTURE.
Indoor Installation
WARNING
Do not place the Projector in direct
sunlight or near heat sources such as
radiators, fires, stove etc.
- This may cause a fire hazard.
Do not place flammable materials in,
on or near the projector.
- This may cause a fire hazard.
Do not hang on the installed projector.
- It may cause the projector to fall,
causing injury or death.
Do not block the vents of the projector
or restrict air-flow in any way.
- This would cause the internal
temperature to increase and could
cause a fire hazard or damage to the
unit.
Do not place the projector close to
sources of steam or oil such as a
humidifier.
- This may create a fire hazard or an
electric shock hazard.
Do not place the projector where it
might be exposed to excessive dust.
- This may cause a fire hazard or
damage to the unit.
Do not use the projector in a damp
place such as a bathroom where it is
likely to get wet.
- This may cause a fire or an electric
shock hazard.
Page 4

SAFETY INSTRUCTIONS
4
Do not place the projector directly on a
carpet, rug or place where ventilation
is restricted.
- This would cause its internal
temperature to increase and might
create a fire hazard or damage the
unit.
Ensure good ventilation around the
projector. The distance between the
projector and the wall should be more
than 30 cm.
- An excessive increase in its internal
temperature may cause a fire hazard
or damage to the unit.
NOTES
When installing the projector on a
table, be careful not to place it near
the edge.
- The projector could fall causing injury
and damage to the projector.
use a suitable stand.
Disconnect from the power supply
and remove all connections before
moving, or cleaning.
Only use the projector on a level and
stable surface.
- It may fall and cause injury and/or
damage to the unit.
Do not drop the projector when
connecting to a external devices.
- This may cause injury and/or damage
to the unit.
Only
Power
WARNING
Earth wire should be connected.
- Ensure that you connect the earth
ground wire to prevent possible
electric shock (That is a Projector
with a three-prong grounded AC plug
must be connected to a three-prong
grounded AC outlet).
If grounding methods are not
possible, have a qualified electrician
install a separate circuit breaker.
Do not try to ground the unit by
connecting it to telephone wires,
lightening rods, or gas pipes.
The power cord should be inserted
fully into the power outlet to avoid a
fire hazard.
- This may cause a fire hazard or
damage the unit.
Do not place heavy objects on the
power cord.
- This may cause a fire or an electric
shock hazard.
Never touch the power plug with a
wet hand.
- This may cause an electric shock
hazard.
Do not plug-in too many items into
one power outlet.
- It may result in overheating of the
outlet and create a fire hazard.
Prevent dust from collecting on the
power plug pins or outlet.
- This may cause a fire hazard.
Page 5

SAFETY INSTRUCTIONS
5
NOTES
Hold the plug firmly when unplugging.
If you pull the cord, it may be
damaged.
- This may cause a fire hazard.
Do not use if the power cord or the
plug is damaged or any part of the
power outlet is loose.
- This may cause a fire or an electric
shock hazard or damage to the unit.
Ensure the power cord does not come
into contact with sharp or hot objects.
- This may cause a fire or an electric
shock hazard or damage to the unit.
Place the projector where people will
not trip or tread on the power cord.
- This may cause a fire or an electric
shock hazard or damage to the unit.
Do not turn the projector On/Off by
plugging-in or unplugging the power
plug to the wall outlet. (Allow the unit
to cool before removing power.)
- It may cause mechanical failure or
could cause an electric shock.
Using
WARNING
Do not place anything containing
liquid on top of the projector such as
flowerpot, cup, cosmetics or candle.
- This may cause a fire hazard or
damage to the unit.
In case of impact shock or damage to
the projector switch it off and unplug it
from the power outlet and contact an
authorized service center.
- This may cause a fire or an electric
shock hazard or damage to the unit!
Do not allow any objects to fall into
the projector.
- This may cause an electric shock
hazard or damage to the unit!
If water is spilt into the projector
unplug it from the power supply
immediately and consult your Service
Agent.
- This may cause an electric shock
hazard or damage to the unit!
Dispose of used batteries carefully
and safely.
- In the case of a battery being
swallowed by a child please consult a
doctor immediately.
Do not remove any covers. High risk
of Electric Shock.
Don’t look directly into the lens when
the projector is in use. Eye damage
may occur.
Do not touch metal parts during or
soon after operation since the vents
will remain very hot.
If the projector is in a room that
experiences a gas leak, do not touch
the projector.
- It can cause a fire or a burn by a
spark.
Always open the lens door or remove
the lens cap when the projector is on.
Never touch this apparatus or power
cord during a thunder or lightning
storm.
- This may cause an electric shock
hazard.
Page 6

SAFETY INSTRUCTIONS
6
CAUTION
It is recommend that most appliances
be placed on a dedicated circuit;
that is, a single outlet circuit which
powers only that appliance and has no
additional outlets or branch circuits.
Check the specification page of this
owner’s manual to be certain.
Do not overload wall outlets.
Overloaded wall outlets, loose or
damaged wall outlets, extension cords,
frayed power cords, or damaged or
cracked wire insulation are dangerous.
Any of these conditions could result
in electric shock or fire. Periodically
examine the cord of your appliance,
and if its appearance indicates
damage or deterioration, unplug it,
discontinue use of the appliance, and
have the cord replaced with an exact
replacement part by authorized service
personnel.
Protect the power cord from physical
or mechanical abuse, such as being
twisted, kinked, pinched, closed in a
door, or walked upon. Pay particular
attention to plugs, wall outlets, and
the point where the cord exits the
appliance.
concerning the Power Cord
NOTES
Do not place heavy objects on top of
projector.
- This may cause mechanical failure or
personal injury.
Take care not to impact the lens
particularly when moving the projector.
Do not touch the lens of the projector.
It is delicate and easily damaged.
Do not use any sharp tools on the
projector as this will damage the
casing.
In the event that an image does not
appear on the screen please switch it
off and unplug it from the power outlet
and contact your Service Agent.
- This may cause a fire or an electric
shock hazard or damage to the unit!
Do not drop the projector or allow
impact shock.
- This may cause mechanical failure or
personal injury.
Keep the proper distance from the
product.
- Your vision may be impaired if you
look at the product too closely.
Page 7

SAFETY INSTRUCTIONS
7
Cleaning
WARNING
Do not use water while cleaning the
projector.
- This may cause damage to the
projector or an electric shock hazard.
In the unlikely event of smoke or a
strange smell from the projector,
switch it off, unplug it from the wall
outlet and contact your dealer or
service center.
- This may cause a fire or an electric
shock hazard or damage to the unit!
Use an air spray or soft cloth that is
moist with a neutral detergent and
water for removing dust or stains on
the projection lens.
NOTES
Contact the Service Center once a
year to clean the internal parts of the
projector.
- Accumulated dust can cause
mechanical failure.
When cleaning the plastic parts such
as projector case, unplug the power
and wipe it with a soft cloth. Do not
use cleanser, spray water or wipe
with a wet cloth. Especially, never use
cleanser (glass cleaner), automobile
or industrial shiner, abrasive or
wax, benzene, alcohol etc., which
can damage the product. Use an
air spray or soft cloth that is moist
with a neutral detergent and water
for removing dust or stains on the
projection lens.
- It can cause fire, electric shock
or product damage (deformation,
corrosion and damage).
Others
WARNING
Do not attempt to service the
projector yourself. Contact your dealer
or service center.
- This may cause damage to the
projector and could give an electric
Shock as well as invalidating the
warranty.
NOTES
Do not mix new batteries with old
batteries.
- This may cause the batteries to
overheat and leak.
Be sure to unplug if the projector is
not to be used for a long period.
- Accumulated dust may cause a fire
hazard or damage to the unit!
Only use the specified type of battery.
- This could cause damage to the
remote control.
Page 8

SAFETY INSTRUCTIONS
8
ANTENNA
Outdoor Antenna Grounding
If an outdoor antenna is installed,
follow the precautions below. An
outdoor antenna system should not
be located in the vicinity of overhead
power lines or other electric light
or power circuits, or where it can
come in contact with such power
lines or circuits as death or serious
injury can occur. Be sure the antenna
system is grounded so as to provide
some protection against voltage
surges and built-up static charges.
Section 810 of the National Electrical
Code (NEC) in the U.S.A. provides
information with respect to proper
grounding of the mast and supporting
structure, grounding of the leadin wire to an antenna discharge
unit, size of grounding conductors,
location of antenna discharge unit,
connection to grounding electrodes
and requirements for the grounding
electrode.
Antenna grounding according to the
National Electrical Code, ANSI/NFPA
70
Antenna Lead in Wire
Ground Clamp
Electric Service
Equipment
Ground Clamp
NEC: National Electrical Code
Antenna Discharge Unit
(NEC Section 810-20)
Grounding Conductor
(NEC Section 810-21)
Power Service
GroundingElectrode
System (NEC Art 250,
Part H)
FCC NOTICE
Warning - Class B
(b) For a Class B Digital device or
peripheral, the instructions furnished the
user shall include the following or similar
statement, placed in a prominent location
in the text of the manual:
NOTE: This equipment has been tested
and found to comply with the limits for
a Class B digital device, pursuant to
part 15 of the FCC Rules. These limits
are designed to provide reasonable
protection against harmful interference in
a residential installation. This equipment
generates, uses and can radiate radio
frequency energy and, if not installed and
used in accordance with the instructions,
may cause harmful interference to radio
communications. However, there is no
guarantee that interference will not occur
in a particular installation. If this equipment
does cause harmful interference to radio
or television reception, which can be
determined by turning the equipment off
and on, the user is encouraged to try to
correct the interference by one or more of
the following measures:
- Reorient or relocate the receiving
antenna.
- Increase the separation between the
equipment and receiver.
- Connect the equipment into an outlet on
a circuit different from that to which the
receiver is connected.
- Consult the dealer or an experienced
radio/TV technician for help.
Page 9

SAFETY INSTRUCTIONS
9
Disposal of your old appliance
1. When this crossed-out wheeled bin
symbol is attached to a product it means
the product is covered by the European
Directive 2002/96/EC.
2. All electrical and electronic products
should be disposed of separately from
the municipal waste stream through
designated collection facilities appointed
by your government or your local
authorities.
3. The correct disposal of your old appliance
will help prevent potential negative
consequences for the environment and
human health.
4. For more detailed information about
disposal of your old appliance, please
contact your city office, waste disposal
service or the shop where you purchased
the product.
Disposal of waste
batteries/accumulators
1. When this crossed-out wheeled
bin symbol is attached to batteries/
accumulators of Your product it means
they are covered by European Directive
2006/66/EC.
2. This symbol may be combined with
chemical symbols for mercury(Hg),
cadmium(Cd) or lead(Pb) if the battery
Contains more that 0.0005% of mercury,
0.002% of cadmium or 0.004% of lead.
3. All batteries/accumulators should be
disposed separately from the municipal
waste stream via designated collection
facilities appointed by the government or
the local authorities.
4. The correct disposal of Your old
batteries/accumulators will help to
prevent potential negative consequences
for the environment, animal and human
health.
5. For more detailed information about
disposal of Your old batteries/
accumulators, please contact Your city
office, waste disposal service or the shop
where You purchased the product.
For USA
NOTE TO CABLE/TV INSTALLER
This reminder is provided to call the CATV
system installer’s attention to Article 82040 of the National Electric Code (U.S.A.).
The code provides guidelines for proper
grounding and, in particular, specifies that
the cable ground shall be connected to the
grounding system of the building, as close
to the point of the cable entry as practical.
Page 10

TABLE OF CONTENTS
10
TABLE OF CONTENTS
LICENSES 2
SAFETY INSTRUCTIONS 3
ASSEMBLING AND PREPAR-
ING 12
Unpacking 12
Optional Extras 13
Parts and Buttons 14
Installation 15
- Installation Precautions 15
- Basic Operation of the Projector 16
- How to Install the Projector Using
a Tripod 17
- Kensington Security System 17
REMOTE CONTROL 18
WATCHING PROJECTOR 20
Connecting to an Antenna or Cable 20
- Connecting an Antenna or Basic
Cable 20
- Connecting a Cable Box 20
Watching Projector 21
- Turning on for the First Time 21
- Focus and Position of the Screen
Image 21
- Watching Projector 21
Managing Channels 22
- Setting Up Channels 22
Using Additional Options 24
- Adjusting Aspect Ratio 24
- Using Keystone Function 25
- Using the Input List 25
- Blank Function 26
Using the Quick Menu 26
ENTERTAINMENT 27
Network Connection 27
- Connecting to
a Wireless Network 27
- Setting to a Wireless Network 28
- Tips for Network Setting 30
- Network Status 32
NETCAST 32
- Using the NETCAST 32
MY MEDIA 36
- Connecting USB Storage
Devices 36
- Connecting DLNA DMP (Digital
Living Network Alliance, Digital
Media Player) 38
- Connecting DLNA DMR (Digital
Living Network Alliance, Digital
Media Render) 42
- MOVIE LIST 43
- PHOTO LIST 49
- MUSIC LIST 51
- FILE VIEWER 53
PLAY GAME 54
CUSTOMIZING SETTINGS 55
The SETUP Menu 55
CHANNEL Settings 56
PICTURE Settings 56
SCREEN Settings 60
AUDIO Settings 61
TIME Settings 62
LOCK Settings 63
OPTION Settings 65
NETWORK Settings 66
Page 11

MAKING CONNECTIONS 67
Connecting to a HD receiver, DVD, or
VCR player 68
- HDMI Connection 68
- Component Connection 68
- Composite Connection 69
Connecting to a PC 69
- RGB Connection 69
Connecting to a Headphone 70
MAINTENANCE 71
Updating the Projector Firmware 71
Cleaning the Projector 72
- Cleaning the lens 72
- Cleaning the Projector Case 72
How to Fix the Lens Cap 73
SPECIFICATIONS 74
TABLE OF CONTENTS
11
Page 12

ASSEMBLING AND PREPARING
12
ASSEMBLING AND PREPARING
Unpacking
Check your product box for the following items. If there are any missing
accessories, contact the local dealer where you purchased your product.
The illustrations in this manual may differ from the actual product and item.
Remote Control
and Batteries (AAA)
Computer Cable
Composite/
Component Gender
cable
Note that clearance is limited between the USB and
HDMI inputs. Using devices of a non-standard size
may block other ports.
Owner’s manual Power Cord AC-DC Adapter
Nero MediaHome4
Essentials CD
Wireless LAN for Broadband/DLNA
Adaptor (AN-WF100)
Polishing Cloth Portable bag
Lens Cap and
Strap
Page 13
ASSEMBLING AND PREPARING
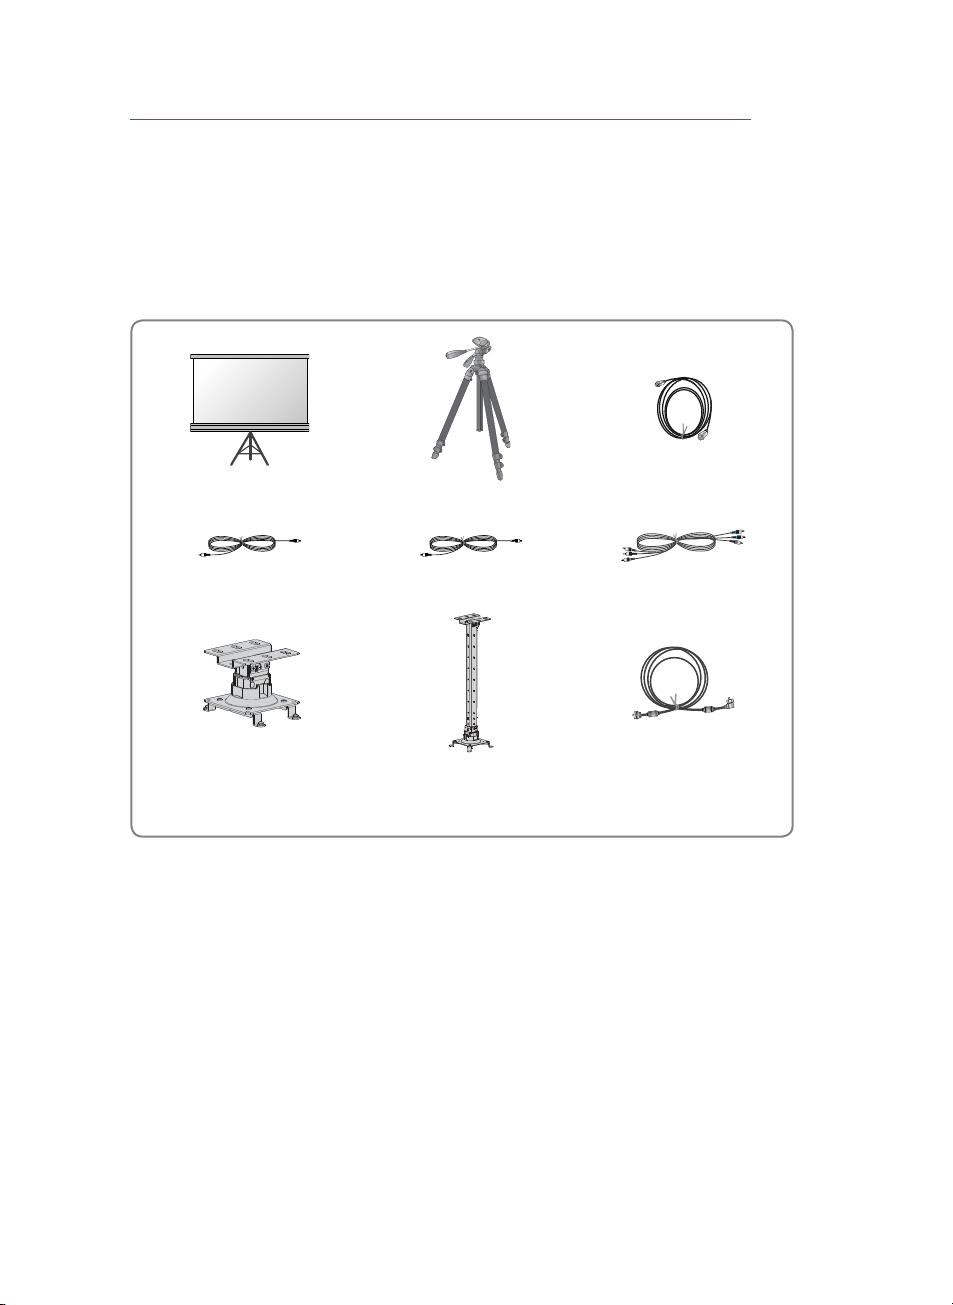
Optional Extras
Optional extras can be changed or modified for quality improvement without any
notification.
Contact your dealer for buying these items.
Projection Screen Tripod HDMI Cable
Video Cable Audio Cable Component Cable
13
AJ-CB2 AJ-CB2+AJ-CS60
Ceiling Mounting Bracket
1 Use screw size: M4x6-M4x8
1
RF cable
Page 14

ASSEMBLING AND PREPARING
DC IN
RGB IN
A/V INCOMPONENT IN
ANTENNA IN
CH
+ VOL-
14
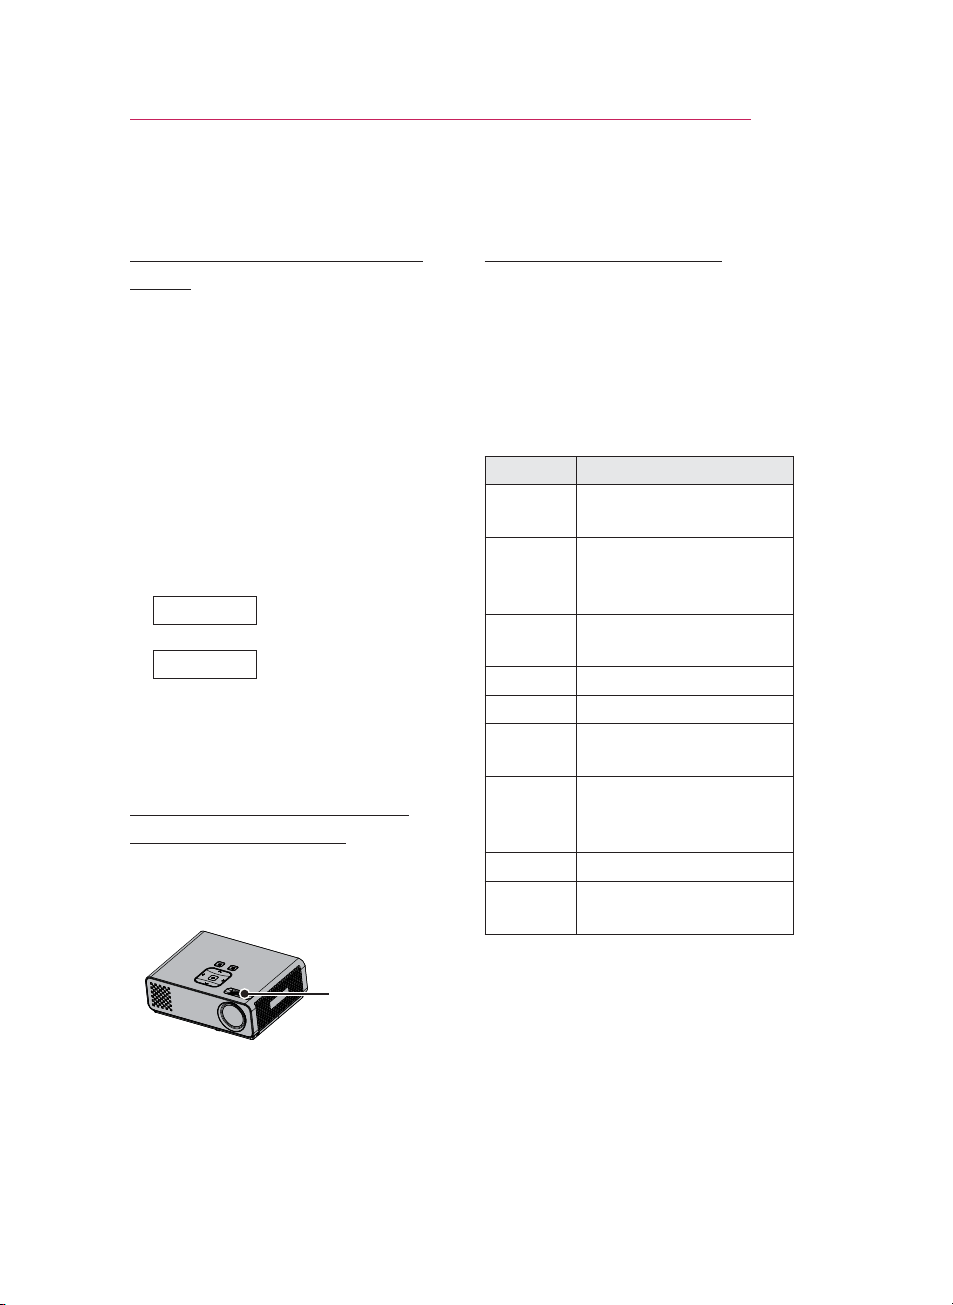
Parts and Buttons
* The projector is manufactured using high-precision technology. You may,
however, see on the Projector screen tiny black points and/or bright points (red,
blue, or green). This can be a normal result of the manufacturing process and
does not always indicate a malfunction.
Control panel
Rear Connection panel
Speaker
Exhaustion
Direction
Focus ring
2
lens
Button Description
(POWER) Turns the projector ON/OFF.
(MENU) Displays or closes menus.
CH∧,∨ Scrolls through saved channels.
VOL -, + Adjusts the volume level.
∧,∨,<,>
ꔉ(OK)
Adjusts functions of menus.
Checks present mode and saves the change of functions.
1 High heat, keep the area near the exhaust clear.
2 Do not touch the lens when using the projector or opening the lens cap.
1
Page 15
Installation
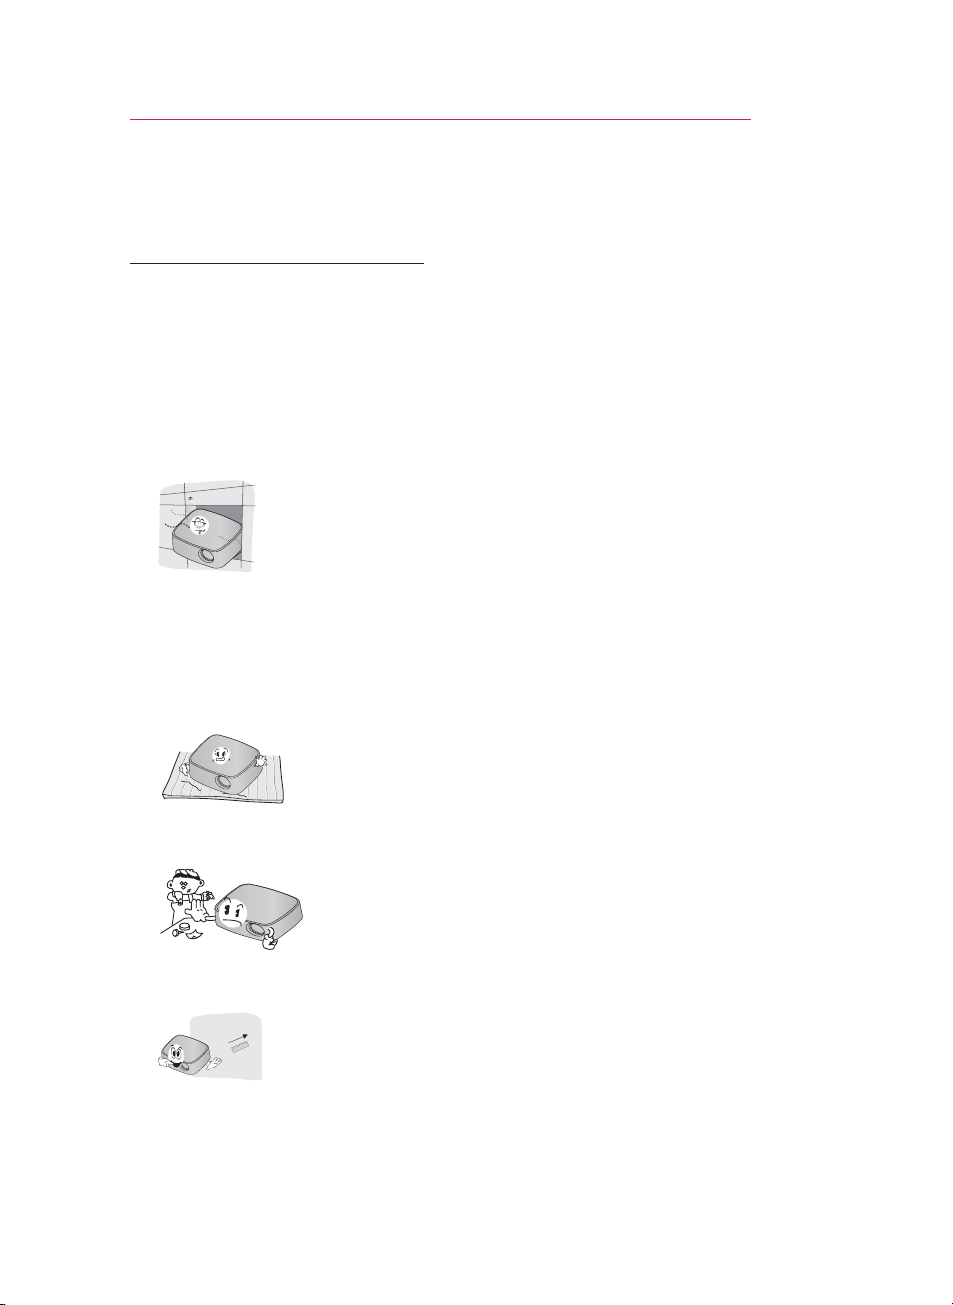
Installation Precautions
Provide proper ventilation for this
projector.
- The projector is equipped with
ventilation holes. Do not block or
place anything near these holes.
Internal heat build-up may occur,
causing picture degradation or
damage to the projector.
- Do not place the projector on
a carpet, rug or other similar
surface. It may prevent a adequate
ventilation of the projector bottom.
This product should be mounted to
a wall or ceiling only.
- Never push the projector or spill
any kind of liquid into the projector.
- Leave an adequate distance (30
cm or more) around the projector.
ASSEMBLING AND PREPARING
Place this projector in adequate
temperature and humidity
conditions.
- Install this projector only in
a location where adequate
temperature and humidity is
available. (See p.74)
Don’t place the projector where it
can be covered with excessive dust.
- This may cause overheating of the
projector.
Do not obstruct the slots and
openings of the projector. This may
cause overheating and cause a fire
hazard.
This projector is manufactured using
high-precision technology. You may,
however, see tiny black points and/
or bright points (red, blue or green)
that continuously appear on the
projector Screen. This is a normal
result of the manufacturing process
and does not indicate a malfunction.
The remote control may not
work when a lamp equipped
with electronic ballast or a threewavelength lamp is installed.
Replace those lamps with
international standard products to
use the remote control normally.
15
Page 16
ASSEMBLING AND PREPARING
508
635
762
889
1016
1143
1270
1397
1524
1651
1778
1905
2032
2159
2286
2413
2540
431
538
646
754
861
969
1077
1185
1292
1400
1508
1615
1723
1831
1938
2046
2154
269
337
404
471
539
606
673
741
808
875
943
1010
1077
1145
1212
1279
1347
586
737
887
1038
1200
1342
1492
1643
1794
1947
2097
2248
2399
2552
2702
2853
3004
16
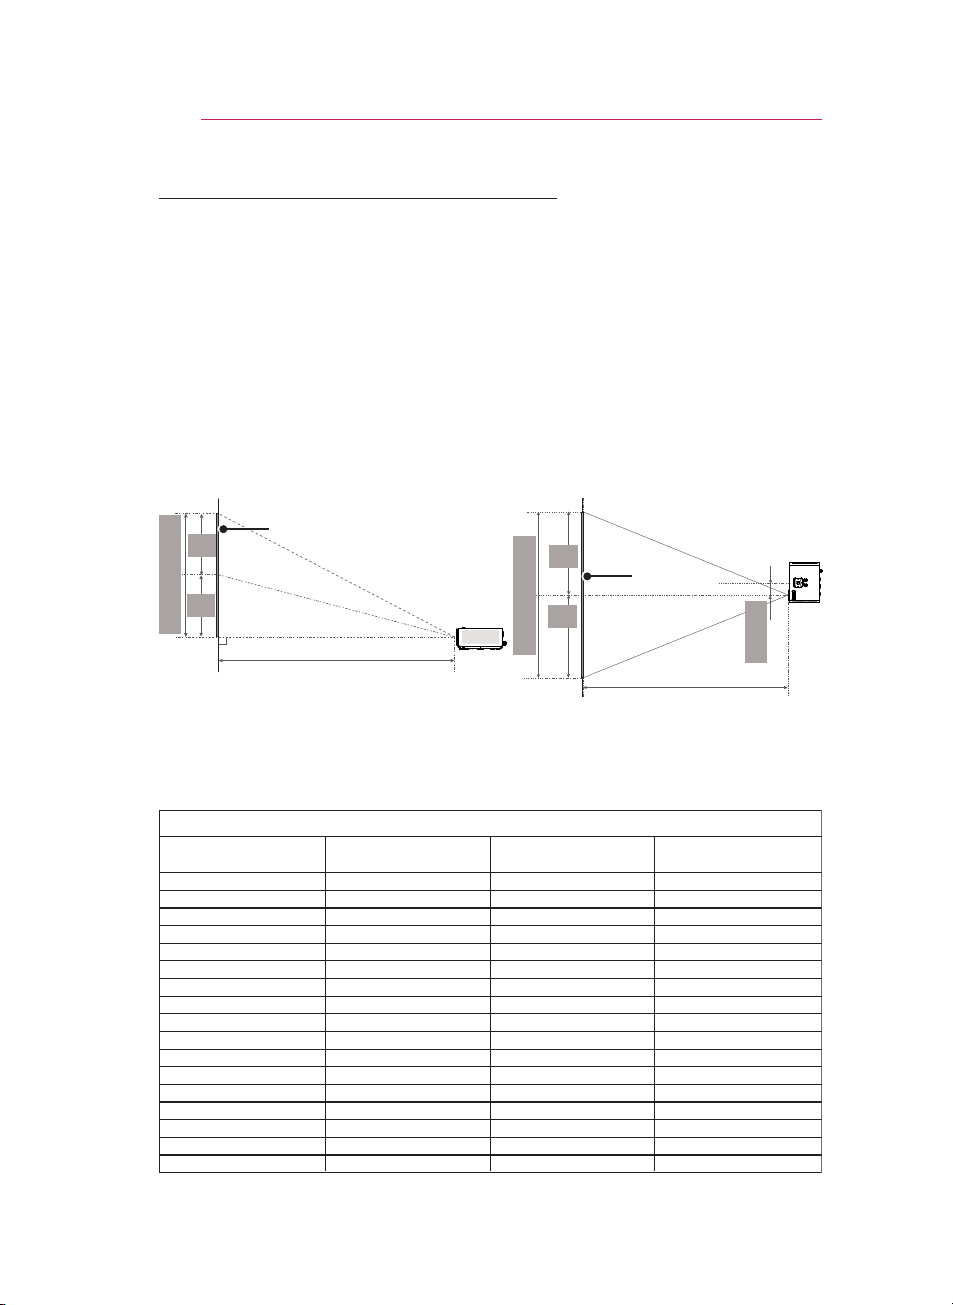
Basic Operation of the Projector
1 Place the projector on a sturdy and horizontal surface.
2 Place the projector with the desired distance from the screen. The distance
between the projector and the screen determines the actual size of the image.
3 Position the projector so that the lens is set at a right angle to the screen. If the
projector is not set at a right angle, the screen image will be crooked. Although,
slight angles can be counteracted using the Keystone adjustement. (See p.25).
4 After placing the projector in its desired location, connect the video input(s).
Then connect the power cable to the projector and the wall outlet.
Projection offset ratio: 100%
Vertical Size (X)
X/2
X/2
Screen
Horizontal Size (Y)
Y/2
Y/2
Projection distance (D)
16 : 9 Scale
Diagonal Size (mm) Horizontal Size (Y) (mm) Vertical Size (X) (mm)
Screen
51 mm
Projection distance (D)
Projection Distance (D)
(mm)
Page 17
ASSEMBLING AND PREPARING
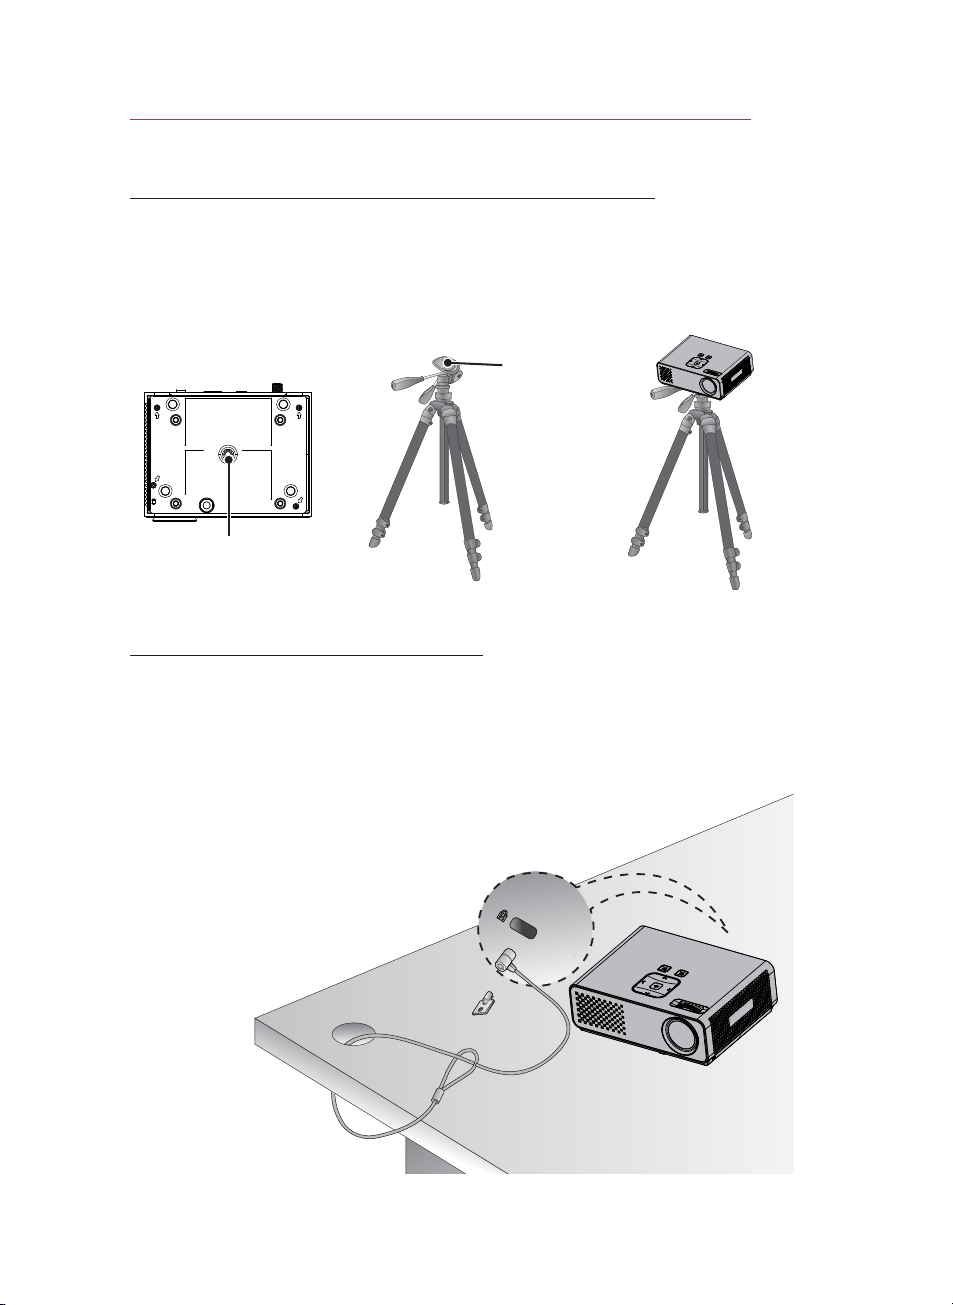
How to Install the Projector Using a Tripod
* You can install this projector using a camera tripod.
* When stabilizing the tripod, we recommend using the locking bolt of standard
size 4.5 mm or less.The maximum size allowed for the locking bolt is 5.5 mm.(If
it is longer than the maximum allowed size, it may damage the projector.)
17
Bottom side of Projector
Part connected to
the tripod
+
Tripod
Projector is
connected to
this part.
⇒
Kensington Security System
This projector has a Kensington Security System Connector on the panel.
Connect a Kensington Security System cable as below.
For detailed installation and use of the Kensington Security System, refer to the
user’s guide included with the Kensington Security System set. And for further
information, contact
Kensington company that deals with expensive electronic equipment such as
notebook PCs or projectors.
The Kensington Security System is an optional item.
http://www.kensington.com
, the internet homepage of the
Page 18
REMOTE CONTROL
18
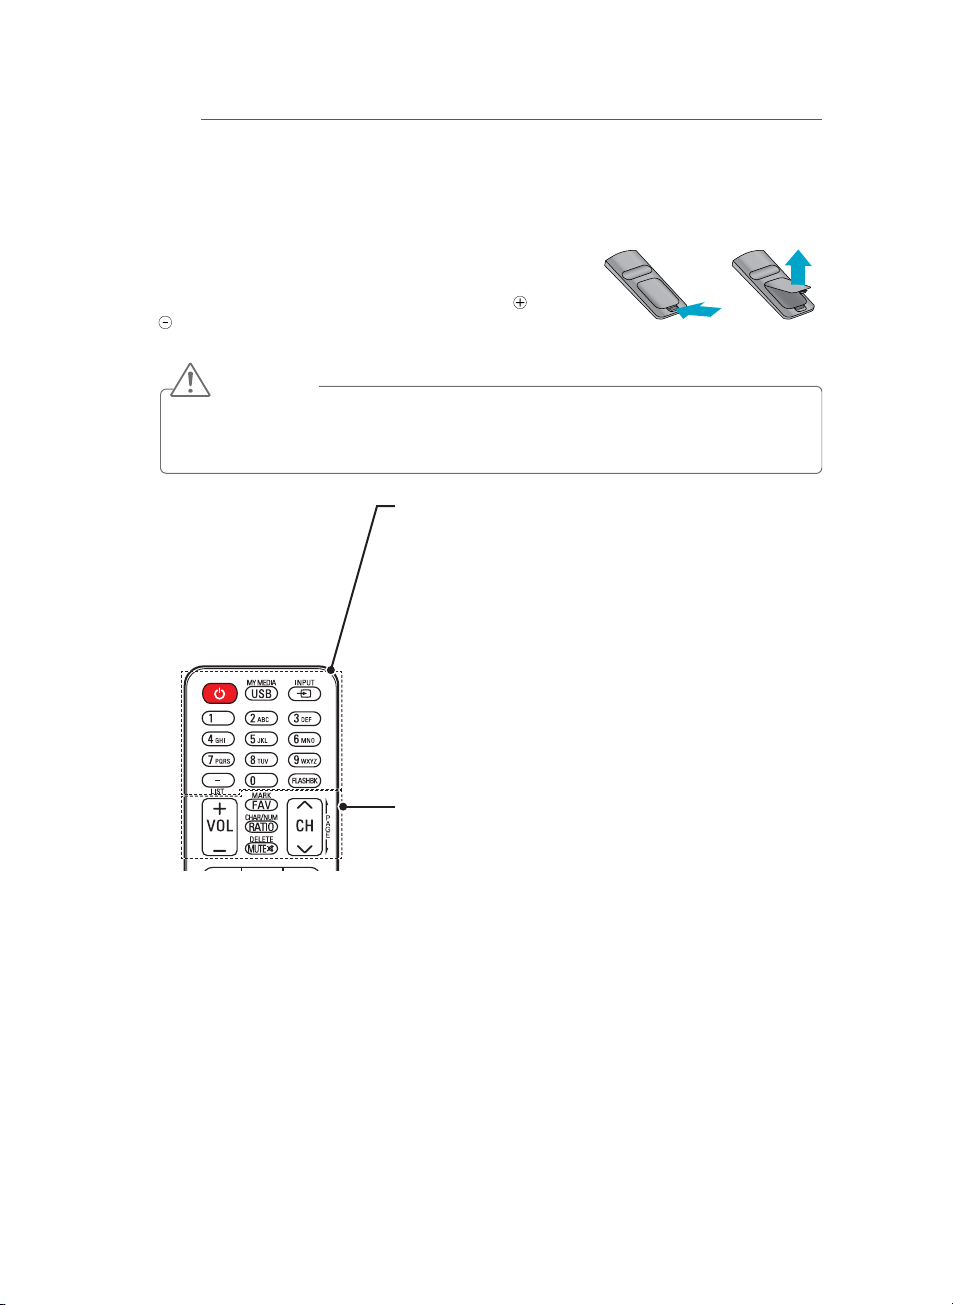
REMOTE CONTROL
The descriptions in this manual are based on the buttons on
the remote control. Please read this manual carefully and use
the projector correctly. To replace batteries, open the battery
cover, replace batteries (1.5 V AAA) matching the
ends to the label inside the compartment, and close the
battery cover. To remove the batteries, perform the installation actions in reverse.
CAUTION
RISK OF EXPLOSION IF BATTERY IS REPLACED WITH AN INCORRECT TYPE.
DISPOSE OF USED BATTERIES AT A RECYCLING DROP-OFF LOCATION.
Do not mix old and new batteries, as this may damage the remote control.
POWER
Turns the projector on or off.
USB/MY MEDIA
Access MY MEDIA.
INPUT
Changes the input source.
Alphanumeric buttons
Enters letters and numbers.
- (Dash)
Inserts a dash between numbers such as 2-1 and 2-2.
LIST
Accesses the saved channel list.
FLASHBK
Tunes to the last channel viewed.
VOL
Adjusts the volume level.
FAV
Accesses your favorite channel list.
MARK
Selects a menu or option.
RATIO
Resizes an image.
CHAR/NUM
Switches between Letter and Number input modes.
MUTE
Mutes all sounds
DELETE
Deletes letters and numbers.
CH
Scrolls through the saved channels.
PAGE
Moves to the previous or next screen.
and
Page 19

REMOTE CONTROL
MENU
Accesses the menu.
NETCAST
Select the desired NETCAST menu source.
Q.MENU
Accesses the quick menu.
Navigation buttons (up/down/left/right)
Scrolls through menus or options.
OK
Selects menus or options and confirms your input.
BACK
Returns to the previous level.
AUTO
Automatically adjusting of the PC input image.
EXIT
Clears all on-screen displays and returns to projector
viewing.
Control buttons
Controls the NETCAST or MY MEDIA.
BLANK
Turns the projector screen on or off.
STILL
Freeze the moving image.
Functions as the STILL button in any mode other than
DivX.
INFO
Views the information of the current program and screen.
SLEEP
Sets the length of time until the projector turns off.
Key's
Adjusts Keystone.
PICTURE
Change the image mode.
Color buttons
These access special functions in some menus.
19
NOTE
Optimal remote range is less than 6 meters and within a 60 degree
arc of the IR receiver.
The remote range may be less when cables are connected to the
projector.
When you carry the remote control in the portable bag, make sure
that the buttons on the remote control are not pressed by the
projector, cables, documents or any other accessories in the bag.
Otherwise, it may reduce the battery life significantly.
DC IN
RGB IN
30° 30°
A/V INCOMPONENT IN
ANTENNA IN
Page 20
WATCHING PROJECTOR
20
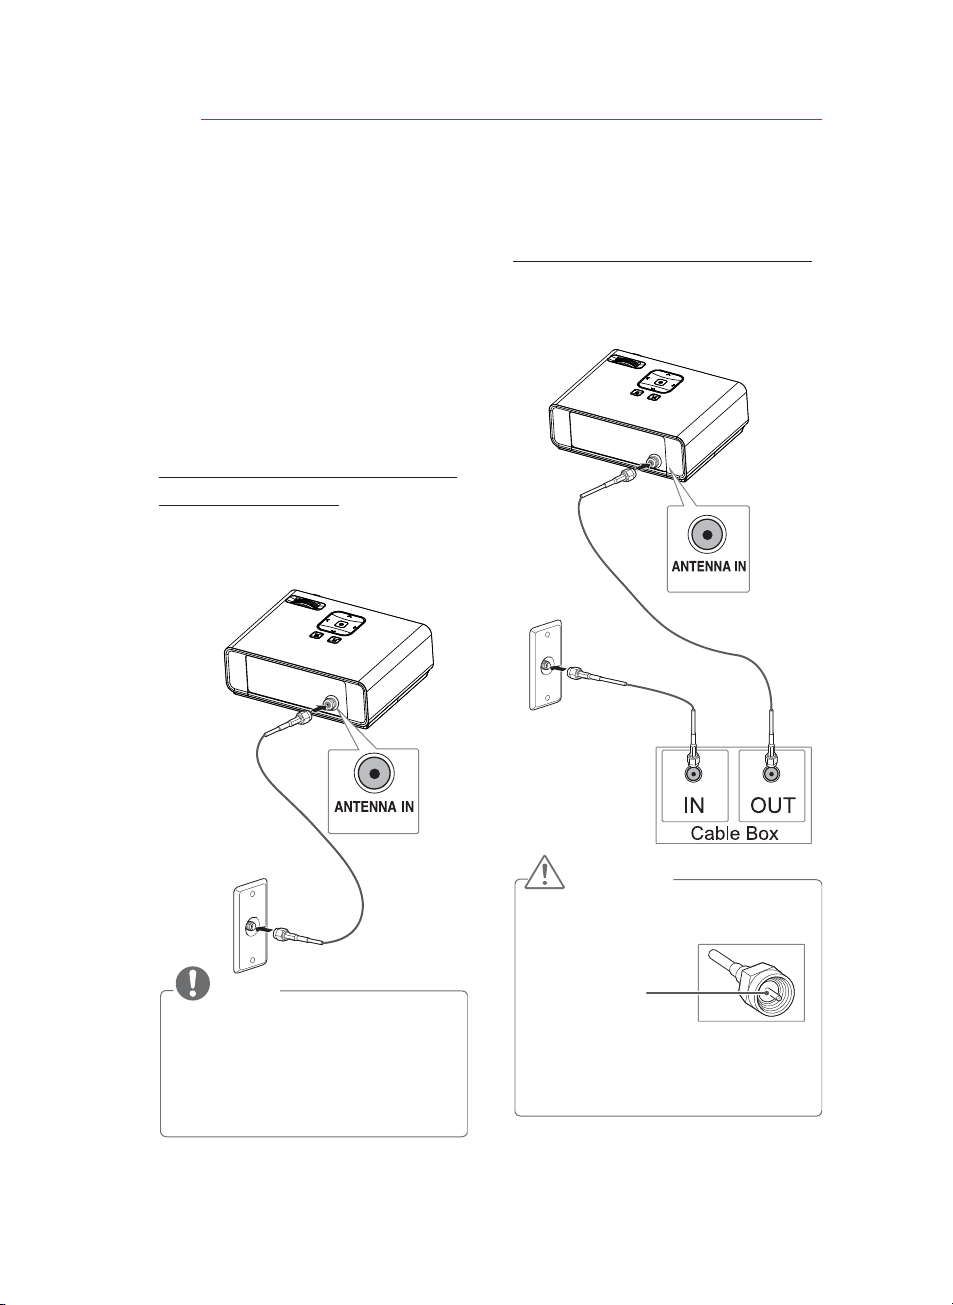
WATCHING PROJECTOR
Connecting to an
Antenna or Cable
Connect an antenna, cable, or cable
box to watch TV while referring to the
following. The illustrations may differ
from the actual items and a RF cable
is optional.
Connecting an Antenna
or Basic Cable
Connect the projector to a wall
antenna socket with an RF cable
(75 Ω).
Connecting a Cable Box
Connect the projector to a cable box
and the cable box to a wall antenna
socket with 2 RF cables (75 Ω).
NOTE
Use a signal splitter to use more
than 2 projectors.
Visit http://lgknowledgebase.com
for more information about the
antenna and cable connection.
Search for antenna.
CAUTION
Make sure not to bend the copper
wire of the RF cable.
Copper wire
Complete all connections between
devices, and then connect the
power cord to the power outlet to
prevent damage to your projector.
Page 21
Watching Projector
WATCHING PROJECTOR
21
Turning on for the First
Time
1 Make sure the power cord is
connected correctly.
2 After wait for a moment, press
the POWER button on the remote
control or control panel. (The light
on the control panel will be turned
on.)
Check if the lens cap is removed
before turning on the power.
3 Follow the on-screen instructions to
customize your projector settings
according to your preferences.
Language
⬇
Time Zone
Selects a language to
display.
Selects the time zone
and daylight saving.
4 Press the INPUT button on the
remote control to select the input
signal you want.
Focus and Position of
the Screen Image
When an image appears on the
screen, check if it is in focus and fits
the screen properly.
Watching Projector
1 In Standby mode, press the
POWER to turn the projector on.
2 Press INPUT and select desired
input.
3 Control the projector using the
following buttons while you are
watching projector.
Button Description
CH∧,∨ Scrolls through saved
channels.
LIST Selects a channel on the
saved or recent watched
channel list.
0 - 9 Selects a channel by
entering numbers.
VOL -, + Adjusts the volume level.
MUTE Mutes all sounds.
Q.MENU Accesses the quick
menus. (See p.26)
FLASHBK Alternates between
the last two channels
selected.
RATIO Resizes an image.
Key's Adjusts Keystone. (See
p.25)
Focus ring
To adjust the focus of the image,
rotate the focus ring.
4 To turn the projector off, press the
POWER.
Page 22

WATCHING PROJECTOR
22
Managing Channels
Setting Up Channels
Storing Channels
To store channels automatically,
1 Press MENU to access the menu.
2 Press the Navigation buttons to
scroll to CHANNEL and press OK.
3 Press the Navigation buttons to
scroll to Auto Tuning and press OK.
4 Select Start to start automatic
tuning. The projector scans
and saves available channels
automatically.
5 When you are finished, press EXIT.
To store channels manually,
1 Press MENU to access the menu.
2 Press the Navigation buttons to
scroll to CHANNEL and press OK.
3 Press the Navigation buttons to
scroll to Manual Tuning and press
OK.
4 Scroll through the channel types,
and then add or delete channels.
5 When you are finished, press EXIT.
NOTE
If the projector scans a blocked
channel, you will be prompted to
enter your password to keep the
channel scanned.
You can store up to 1000 channels.
The number of channels that you
can store differs depending on the
broadcasting signal environment.
The channels are stored in the
order of DTV, TV, Cable DTV and
Cable TV.
Page 23

WATCHING PROJECTOR
23
Editing Your Channel List
1 Press MENU to access the menu.
2 Press the Navigation buttons to
scroll to CHANNEL and press OK.
3 Press the Navigation buttons to
scroll to Channel Edit and press
OK.
4 Edit channels using the following
buttons.
Channel Edit Favorite Group :
ꔉ Ch. Change
ꔂ Navigation
DTV TV Cable DTV Cable TV
3-1 5-1 7-1
ꘂ Favorite Ch.
ꘃ Page Change
A
꘩ Favorite Ch. Group
ꔅ Block/Unblock
Page 1/1
ꕉ Provious
ꔅ Add/Delete
Button Description
OK Selects the highlighted
channel to view.
∧,∨,
<,>
Scrolls through channel
types or channels.
FAV Adds a favorite channel
list.
CH Moves to the previous or
next page.
Q.MENU Changes the favorite
group.
Yellow Block or unblock a
channel.
Blue Adds or deletes a channel.
The deleted channel
displays in blue.
5 When you are finished, press EXIT.
Favorite Channel Setup
1 Press CH or Number buttons to
access to select your desired
channel.
2 Press FAV. to access the Favorite
List.
3 Press the , buttons to scrolls
through channel group.
4 Press the Yellow button.
Favorite Channel List
1 Press FAV. to access the Favorite
List.
2 Press the Navigation buttons to
scroll to a channel.and press OK.
Favorite List
◀
Group
ꔖ 3-1
ꔖ 4-1
ꔅ Ch.Reg. ꔅ Ch.Edit
Button Description
∧,∨
<,>
Scrolls through channels.
Scrolls through channel
group.
CH Moves to the previous or
next page
Yellow Register or cancel the
current channel in favorite
channel list.
Blue Go to the “CHANNEL menu
- Channel Edit”.
ꕉ Exit
ꔁ Favorite Ch. Group
A
▶
ꔉ
ꔡ
Page 24

WATCHING PROJECTOR
24
Using Additional
Options
Adjusting Aspect Ratio
Resize an image to view at its optimal
size by pressing RATIO while you are
watching projector.
NOTE
Some options may not be
available depending on input
signals.
You can also change the image
size by pressing
.
MENU
Q.MENU
or
- FULL: Changes to the full screen
regardless of the aspect ratio.
- 16:9: Resizes images to fit the
screen width.
- Just Scan: Displays video images in
the original size without cutting off
the edges.
- Set By Program: Displays images
in the same aspect ratio as the
original image.
- 4:3: Resizes images to the previous
standard.
- Zoom: Enlarges an image to fit the
screen width. The top and bottom
of the image may not appear.
Adjust proportion of Zoom, press
or .
Move the image on the screen,
press or .
- Cinema Zoom: Formats an image
to the cinemascope ratio, 2.35:1.
To change the ratio of the cinema
zoom, press or and its range
is from 1 to 16.
To move the zoom focus up or
down, press or .
NOTE
If you select
see image noises at the edge or
edges of the screen.
Just Scan
, you may
NOTE
If you enlarge or reduce an image,
the image may be distorted.
Page 25

WATCHING PROJECTOR
25
Using Keystone
Function
Use this function when the screen is
not at a right angle to the projector
and the image is a trapezoid shape.
Only use the Keystone function
when you can’t get the best angle by
moving the projector.
- +
•Keystone 0
◀
▶
ꔉ OK
1 Press Key'sꔌ, Key'sꔍ to adjust the
screen condition as you want.
2 When you are finished, press EXIT.
Keystone
-40
Using the Input List
Using the Input List
can be adjusted from
to 40.
1 Press INPUT to access the input
sources.
- The connected device displays on
each input sources, only TV and
AV input are always active.
Input List
ꔂ Move ꔉ OK
Adding an Input Label
Add a label to an input source so
that you can easily identify a device
connected to each input source.
Input Label
AV
Component
RGB-PC
HDMI
◀▶
◀▶
◀▶
◀▶
Close
1 Press INPUT to access the input
sources.
2 Press the Blue.
3 Press the Navigation buttons to
scroll to one of the input sources.
4 Press the Navigation buttons to
scroll to one of the input labels.
5 When you are finished, press EXIT.
TV AV RGB-PC USB Component HDMI
Input Label
ꕉ Exit
2 Selecting an input signal with the
INPUT button will only change the
projector only to connected inputs.
Press the Navigation buttons to
scroll to any inputs.
Page 26

WATCHING PROJECTOR
26
Blank Function
Using Blank Function
This function may be effective if
you need to get the attention of
the audience during presentations,
meetings or briefings.
1 Press the BLANK to turn off the
screen.
You can choose the background
color. (Refer to "Selecting Blank
Image")
2 Press any button to cancel the
blank function.
To temporarily turn off the image
on the screen, press BLANK. Do
not block the projection lens with
any objects when the projector is
under operation as this could cause
the objects to become heated and
deformed or even cause a fire.
Selecting Blank Image
1 Press MENU to access the menu.
2 Press the Navigation buttons to
scroll to OPTION and press OK.
3 Press the Navigation buttons to
scroll to Blank Image and press OK.
3 Press the Navigation buttons to
scroll to the setting or option you
want and press OK.
4 When you are finished, press EXIT.
Using the Quick
Menu
Customize frequently used menus.
1 Press Q.MENU to access the quick
menus.
2 Press the Navigation buttons to
scroll through the following menus
and press OK.
Menu Description
Aspect Ratio Changes the image
size. (See p.24)
Picture Mode Changes the image
mode. (See p.57)
LED Mode To adjust the
brightness of the
image. (See p.66)
Multi Audio Changes the audio
language (Digital
signal)
SAP Changes the MTS
sound (Analog signal)
Sleep Timer The sleep timer turns
the projector off at
the preset time.
Del/Add Edits the channels
to add or delete the
channel.
PJT Mode Turns the projected
image upside down or
flips horizontal.
USB Device Eject a USB device.
The menu is
displayed only when
the USB device is
connected.
3 Press the Navigation buttons to
scroll to the option you want.
4 When you are finished, press
Q.MENU.
Page 27

ENTERTAINMENT
DC IN
RGB IN
A/V INCOMPONENT IN
ANTENNA IN
27
ENTERTAINMENT
Network Connection
Connecting to a Wireless Network
The LG Wireless LAN for Broadband/DLNA Adaptor, allows the projector to connect to a
wireless LAN network.
The network configuration and connection method may vary depending on the equipment in
use and the network environment. Refer to the setup instructions supplied with your access
point or wireless router for detailed connection steps and network settings.
Setting up the AP (Access Point) or the wireless router is required before connecting the
projector to the network. The easiest method is the WPS button method (Third method in
this section).
Cable modem
LAN WAN
Ethernet
Router
@
Internet
NOTE
When the wireless port of the router is used, there may be restrictions on some
functions.
Page 28

ENTERTAINMENT
28
Setting to a Wireless
Network
To set up the network settings,
1 Press MENU to access the menu.
2 Press the Navigation buttons to
scroll to NETWORK and press OK.
3 Press the Navigation buttons to
select Network Setting and press
OK.
4 Press the Navigation buttons to
select Setting from the AP list and
press OK.
- Scan the all available AP (Access
Point) or wireless routers within
range and display them as a list.
Selecting the wireless network setting type
Select the wireless network setting type.
Setting from the AP list
Simple setting (WPS-button mode)
Setting Ad-hoc network
ꔉ Next
ꕉ Previous
ꕯ Exit
5 Press the Navigation buttons
to select an AP (Access Point)
or wireless router on the list. (If
your AP is secured, you will be
prompted for the key. and press
OK.
Selecting AP
Select AP you want to connect.
Input the new SSID
iptime
ASW
Network1
ꔅ Connecting with PIN mode
ꕉ Previous ꕯ Exit
Page 1/1
Access Point
Search
ꔉ Next
6 Press the Number buttons of the
remote controller or select the
proper buttons on the image to
Input the security key of AP and
press OK.
PIN
(Personal Identification Number)
If your router is set to use a PIN , use
the following instructions.
1 Repeat step 1-4 on "Setting to a
Wireless Network".
2 Press the Red to connect the
access point with PIN mode.
3 You can see the PIN number on
your screen. Enter the PIN number
to your device. PIN number is
the unique 8 digit number of the
dongle.
4 Press OK to select Connect.
Connecting with PIN mode
Insert PIN number at the AP webpage and
press ‘Connect’ button.
PIN NUBMER : 12345670
Connect
For more information, check the AP manual.
ꔉ Next
ꕉ Previous
ꕯ Exit
5 If you have already set the Network
Setting, select Resetting. The new
connection settings will reset the
current network settings.
Page 29

ENTERTAINMENT
29
6 Select IP Auto Setting or IP Manual
Setting.
- If selecting IP Manual Setting,
press the Navigation and Number
buttons. IP addresses will need to
be input manually.
- IP Auto Setting: Select this if
there is a DHCP server (Router)
on the local area network
(LAN) via wired connection,
the projector will automatically
be allocated an IP address.
If you’re using a broadband
router or broadband modem
that has a DHCP (Dynamic Host
Configuration Protocol) server
function, the IP address will
automatically be determined.
- IP Manual Setting: Select if there
is no DHCP server on the network
or you want to set the IP address
manually.
7 When you are finished, press EXIT.
WPS (Wi-Fi Protected Setup)
If your router or AP has a WPS button,
there is the easiest connection
method. You simply press the button
on the router and then select the WPS
on the projector within 120 seconds.
1 Repeat step 1-3 on "Setting to a
Wireless Network".
2 Press the Navigation buttons to
select the Simple setting (WPSbutton mode).
3 Press the WPS button on your
router.
4 Go back to the projector and select
Connect.
5 Repeat step 5-6 on "PIN(Personal
Identification Number)".
Ad-hoc Mode
Ad-hoc mode allows the projector
to use a wireless to connect to a
computer without using a router or
access point.
1 Repeat step 1-3 on "Setting to a
Wireless Network".
2 Press the Navigation buttons to
select Setting Ad-hoc network and
press OK.
3 Press the Navigation buttons to
select Enter and press OK.
4 Press OK to select Connect to
connect Ad-hoc network.
- You can see the Network ID and
Security Key on your screen.
- Enter this Network ID and
Security Key to your device.
- When needed, you can change
the setting information using the
Red.
NOTE
When searching for wireless
networks on your PC using ad-hoc,
the projector is named LGPJT0.
LGPJT0 that appears in the list.
(Select the same name as the
network ID that appears on your
screen.)
Page 30

ENTERTAINMENT
30
5 Press the Navigation buttons to
type in an IP address and press OK.
- PC Setting: Internet Protocol(TCP/
IP) of PC needs to be set
manually. IP address, Subnet
Mask, and default Gateway can
be set with your own discretion.
e.g.) IP address: 192.168.0.1 /
Subnet Mask: 255.255.255.0
/ default Gateway:
192.168.0.10
- Projector Setting: Verify IP
address and gateway of PC. Input
Gateway address of PC to IP
Address, and IP Address of PC to
Gateway, and select Enter.
e.g.) IP address: 192.168.0.10 /
Subnet Mask: 255.255.255.0
/ default Gateway:
192.168.0.1
6 Press the Navigation buttons to
select Close after Network setting
is completed.
7 Press the OK.
Tips for Network Setting
Many network connection problems
during set up can often be fixed
by re-setting the router or modem.
After connecting the player to the
home network, quickly power off
and/or disconnect the power cable
of the home network router or cable
modem. Then power on and/or
connect the power cable again.
Depending on the internet service
provider (ISP), the number of
devices that can receive internet
service may be limited by the
applicable terms of service. For
details, contact your ISP.
LG is not responsible for any
malfunction of the projector and/
or the internet connection failure
due to communication errors/
malfunctions associated with your
broadband internet connection, or
other connected equipment.
LG is not responsible for problems
within your internet connection.
Some content available through the
network connection may not be
compatible with the projector. If you
have questions about such content,
please contact the producer of the
content.
You may experience undesired
results if the network connection
speed does not meet the
requirements of the content being
accessed.
Page 31

ENTERTAINMENT
31
Some internet connection operations
may not be possible due to certain
restrictions set by the Internet
service provider (ISP) supplying your
broadband Internet connection.
Any fees charged by an ISP
including, without limitation,
connection charges are your
responsibility.
A DSL modem is required to use
DSL service and a cable modem
is required to use cable modem
service. Depending on the
access method of and subscriber
agreement with your ISP, you may
not be able to use the internet
connection feature contained in
this projector or you may be limited
to the number of devices you can
connect at the same time. (If your
ISP limits sub-scription to one
device, this projector may not be
allowed to connect when a PC is
already connected.)
The use of a “Router” may not be
allowed or its usage may be limited
depending on the policies and
restrictions of your ISP. For details,
contact your ISP directly.
The wireless network operates
at 2.4 GHz radio frequencies that
are also used by other household
devices such as cordless telephone,
Bluetooth® devices, microwave
oven, and can be affected by
interference from them.It can be
interrupted by the device using 5
Ghz radio frequencies. It is same
device as LG wireless media box,
cordless telephone, other Wi-Fi
device.
It may decrease the service
speed using Wireless network by
surrounding wireless condition.
Turn off all unused network
equipment in your local home
network. Some devices may
generate network traffic.
In some instances, placing the
access point or wireless router
higher up away from the floor may
improve the reception.
The reception quality over wireless
depends on many factors such as
type of the access point, distance
between the projector and access
point, and the location of the
projector.
When connecting internet through
the wireless sharing machine, it may
interrupt the connection because of
the use limitation and confirmation
of service company.
To connect wireless AP, an AP that
supports the wireless connection
is necessary, and the wireless
connection function of the AP needs
to be activated. Please enquire to
the AP supplier for the possibility of
AP wireless connections.
Please verify the security settings of
AP SSID for wireless AP connection,
and enquire to the AP supplier for
the AP SSID security settings.
The Projector can become slower
or malfunction with wrong settings
of network equipments (wired/
wireless router, hub, etc). Please
install correctly by referring to the
manual of the equipment, and set
the network.
Page 32

ENTERTAINMENT
32
When AP is set to include 802.11 n,
and if Encryption is designated as
WEP(64/128bit) or WPA(TKIP/AES),
the connection may not be possible.
There may be different connection
methods according to the AP
manufacturers.
Network Status
To set up the network settings,
1 Press MENU to access the menu.
2 Press the Navigation buttons to
scroll to NETWORK and press OK.
3 Press the Navigation buttons to
scroll to Network Status. and press
OK.
4 Press OK to check the network
status.
Option Description
Setting Return to the network
setting menu or wireless
network setting type menu.
Test Test the current network
status after setting the
network.
Close Return to the previous
menu.
NETCAST
Stream movies, Game, SNS, Internet
Radio or weather updates directly to
your projector.
Using the NETCAST
1 Press NETCAST to access the
menu option.
2 Press the Navigation buttons to
scroll to the content you want and
press OK.
UCC Movie Weather Photo
News Sports Video Map
Setup Exit
❶❷❸
No. Description
❶
Selects your desired online
service.
If a service requires you to log
in, you must first sign up for the
service on your computer and
then log into the service on the
projector.
❷
Set the option menu.
❸
Exit NETCAST.
3 Enjoy the NETCAST features.
Page 33

ENTERTAINMENT
33
NOTE
The videos list searched from the
projector may different with the
list searched from a web browser
on PC.
The playback of videos may
pause, stop, or buffer depending
on your broadband speed.
For service that requires log in,
join the applicable service on the
website using the PC and log in
through the projector to enjoy
various additional functionalities.
When you set the city you want
with Setup by pressing the red
button, the background of NetCast
will be set to the weather of the
selected city.
Notice
These services are provided by
separate content providers.
Please visit the content providers
web site for specific information on
their service.
Premium menu can differ by
country.
Note that content may be updated
automatically depending on the
service provider, so the content
layout or operation method may
change without notice. Please refer
to the help menu on the screen.
All information, data, documents,
communications, downloads, files,
text, images, photographs, graphics,
videos, webcasts, publications,
tools, resources, software, code,
programs, applets, widgets,
applications, products and other
content (“Content”) and all services
and offerings (“Services”) provided
or made available by or through
any third party (each a “Service
Provider”) is the sole responsibility
of the Service Provider from whom
it originated.
The availability of and access to
Content and Services furnished by
the Service Provider through the LGE
Device are subject to change at any
time, without prior notice, including,
but not limited to the suspension,
removal or cessation of all or any
part of the Content or Services.
Page 34

ENTERTAINMENT
34
Should you have any inquiry or
problem related to the Content
or Services, you may refer to the
Service Provider’s website for the
most up-to-date information. LGE
is neither responsible nor liable for
customer service related to the
Content and Services. Any question
or request for service relating to the
Content or Services should be made
directly to the respective Content
and Service Providers.
Please note that LGE is not
responsible for any Content or
Services provided by the Service
Provider or any changes to, removal
of, or cessation of such Content or
Services and does not warrant or
guaranty the availability of or access
to such Content or Services.
Some content may be harmful to
minors depending on the service
provider. Parental guidance is
necessary.
The service may be interrupted if
the Internet connection is unstable.
Please check the connection status
if you experience this problem.
The videos list searched from the
projector may different with the list
searched from a web browser on
PC.
The playback of videos may pause,
stop, or buffer depending on your
broadband speed.
For service that requires log in,
join the applicable service on
the website using a PC and log
in through the projector to enjoy
various additional functions.
Legal Notice
IMPORTANT NOTICE RELATING TO
NETWORK SERVICE
All content and services accessible
through this device belong to
third parties and are protected by
copyright, patent, trademark and/
or other intellectual property laws.
Such content and services are
provided solely for your personal
noncommercial use. You may not use
any content or services in a manner
that has not been authorized by the
content owner or service provider.
Without limiting the foregoing, unless
expressly authorized by the applicable
content owner or service provider,
you may not copy, upload, post,
transmit, translate, sell, modify, create
derivative works, or distribute in any
manner or medium any content or
services displayed through this device.
YOU EXPRESSLY ACKNOWLEDGE
AND AGREE THAT THE DEVICE
AND ALL THIRD PARTY CONTENT
AND SERVICES ARE PROVIDED
“AS IS” WITHOUT WARRANTY
OF ANY KIND, EITHER EXPRESS
OR IMPLIED. LG ELECTRONICS
EXPRESSLY DISCLAIMS ALL
WARRANTIES AND CONDITIONS
WITH RESPECT TO ANY CONTENT
AND SERVICES, EITHER EXPRESS
OR, IMPLIED, INCLUDING BUT
NOT LIMITED TO, WARRANTIES
OF MERCHANTABILITY, OF
SATISFACTORY QUALITY, FITNESS
FOR A PARTICULAR PURPOSE,
AND NON-INFRINGEMENT OF
THIRD PARTY RIGHTS. LG DOES
NOT GUARANTEE THE ACCURACY,
Page 35

ENTERTAINMENT
35
VALIDITY, TIMELINESS, LEGALITY,
OR COMPLETENESS OF ANY
CONTENT OR SERVICE MADE
AVAILABLE THROUGH THIS DEVICE
AND DOES NOT WARRANT THAT
THE DEVICE OR SERVICES WILL
MEET YOUR REQUIREMENTS,
OR THAT OPERATION OF THE
DEVICE OR SERVICES WILL BE
UNINTERRUPTED OR ERROR-FREE.
UNDER NO CIRCUMSTANCES,
INCLUDING NEGLIGENCE, SHALL LG
BE LIABLE, WHETHER IN CONTRACT
OR TORT, FOR ANY DIRECT,
INDIRECT, INCIDENTAL, SPECIAL
OR CONSEQUENTIAL DAMAGES,
OR ANY OTHER DAMAGES ARISING
OUT OF, ANY INFORMATION
CONTAINED IN, OR ANY CONTENT
OR SERVICE ACCESSED BY YOU
OR ANY THIRD PARTY, EVEN IF
ADVISED OF THE POSSIBILITY OF
SUCH DAMAGES.
Third party services may be changed,
suspended, removed, terminated
or interrupted, or access may be
disabled at any time, without notice,
and LG makes no representation or
warranty that any content or service
will remain available for any period
of time. Content and services are
transmitted by third parties by means
of networks and transmission facilities
over which LG has no control. LG may
impose limits on the use of or access
to certain services or content, in any
case and without notice or liability. LG
expressly disclaims any responsibility
or liability for any change, interruption,
disabling, removal of or suspension of
any content or service made available
through this device.
LG is neither responsible nor liable
for customer service related to the
content and services. Any question
or request for service relating to the
content or services should be made
directly to the respective content and
service providers.
Page 36

ENTERTAINMENT
36
MY MEDIA
Connecting USB Storage
Devices
Connect USB storage devices such
as a USB flash drive or external
hard drive to the projector and use
multimedia features.
Connect a USB flash drive or USB
memory card reader to the projector
as shown in the following illustration.
USB memory
stick
To disconnect a USB storage device,
make sure to end the connection
properly to prevent damages to the
projector or files.
1 Press Q.MENU to access the quick
menus.
2 Press the Navigation buttons to
scroll to USB Device and press OK.
3 Disconnect the USB storage device
only when the message says that it
is safe to remove.
NOTE
After Eject USB, USB memory
cannot be read. Remove USB
memory, and connect again.
Page 37

ENTERTAINMENT
37
Tips for Using
USB Storage Devices
Only a USB storage device is
recognizable.
USB hubs are not supported.
A USB storage device which uses its
own driver may not be recognized.
The recognition speed of a USB
storage device will depend on each
device.
Please do not turn off the projector
or unplug the USB device when the
connected USB storage device is
operating. When such a device is
suddenly separated or unplugged,
the stored files or the USB storage
device may be damaged.
Please do not connect the USB
storage device which was artificially
maneuvered on the PC. The
device may cause the product to
malfunction or fail to be played.
Never forget to use only a USB
storage device which has normal
music files, image files, movie files
or text files.
Please use only a USB storage
device which was formatted as
a FAT16, FAT32 and NTFS file
system provided with the Windows
operating system. In case of a
storage device formatted as a
different utility programmed which
is not supported by Windows, it
may not be recognized.
Please connect power to a USB
storage device which requires an
external power supply. If not, the
device may not be recognized.
Please connect a USB storage
device with cable is offered by USB
maker. If connected with cable is
not offered by USB maker or an
excessively long cable, the device
may not be recognized.
Some USB storage devices may not
be supported or operate smoothly.
If the name of a folder or file is
too long, it will not be displayed or
recognized.
File alignment method of USB
storage device is similar to
Window XP and filename with up
to 100 english characters can be
recognized.
Please backup important files
because a data of USB device may
be damaged. Data management
is consumer’s responsibility and
in consequence the manufactures
does not cover data damage.
The recommended capacity is 1TB
or less for a USB external hard disk
and 32GB or less for USB memory.
Any device with more than the
recommended capacity may not
work properly.
If the USB memory device does
not work properly, disconnect and
reconnect it.
If a USB external hard disk with a
“Energy Saving” function does not
work, turn the hard disk off and on
again to make it work properly.
USB storage devices below USB 2.0
are supported as well. But they may
not work properly in the movie list.
Page 38

ENTERTAINMENT
38
Connecting DLNA DMP
(Digital Living Network
Alliance, Digital Media
Player)
This projector can display and play
many types of movie, photo and
music files from your DLNA server.
The Digital Living Network
Alliance (DLNA) is a cross-industry
organization of consumer electronics,
computing industry and mobile
device companies. DLNA provides
consumers with easy sharing
of digital media through a wired or
wireless network in the home.
The DLNA certification logo makes it
easy to find products that comply with
the DLNA Interoperability Guidelines.
This unit complies with DLNA
Interoperability Guidelines v1.5. When
a PC running DLNA server software
or other DLNA compatible device is
connected to this projector, some
setting changes of software or other
devices may be required. Please refer
to the operating instructions
for the software or device for more
information.
Please refer to "MY MEDIA" for
additional information on supported
file types and other instructions.
The supplied Nero MediaHome 4
Essentials CD-ROM is a customized
software edition only for sharing
files and folders to this projector.
The supplied Nero MediaHome
4 Essentials software does not
support following functions:
Transcoding, Remote UI, projector
control, Internet services and Apple
iTunes
This manual explains operations
with the English version of Nero
MediaHome 4 Essentials as
examples. Follow the explanation
referring to the actual operations of
your language version.
Check your network settings when
the DLNA option does not work
properly.
If there is an abnormal operation
or an error occurs in Nero Media
Home, the DLNA option may not
work properly. In this case, exit
Nero Media Home and restart the
programme. You can download the
latest version of Nero Media Home
by clicking the question mark at the
bottom-left of the program.
When the network is unstable, the
device may be slower or may need
to load during playback.
When playing a video in DLNA
mode, the Multi Audio and Closed
Caption features are not supported.
When selecting Full Screen in DLNA
mode, the ratio of the outputted
screen may differ from the original.
When more than one projector
is connected to a single server in
DLNA mode, a file may not play
properly, depending on the server
performance.
If the play time information is
not provided by the server, it is
displayed as “--:--:--.”
DLNA operation may not work
properly according to the AP
manufacturers.
Page 39

Installing Nero MediaHome 4
Essentials
ENTERTAINMENT
39
Nero MediaHome 4 Essentials is
easy to use DLNA server software for
Windows.
Computer requirements for Nero
MediaHome 4 Essentials
Windows® XP (Service Pack 2
or higher), Windows Vista® (no
Service Pack required), Windows®
XP Media Center Edition 2005
(Service Pack 2 or higher),
Windows Server® 2003
Windows Vista® 64-bit edition
(application runs in 32-bit mode)
Hard drive space: 200 MB hard
drive space for a typical installation
of Nero MediaHome stand-alone
1.2 GHz Intel® Pentium® III
or AMD Sempron™ 2200+
processors
Memory: 256 MB RAM
Graphics card with at least 32
MB video memory, minimum
resolution of 800 x 600 pixels, and
16-bit color settings
Windows® Internet Explorer® 6.0
or higher
DirectX® 9.0c revision 30 (August
2006) or higher
Network environment: 100 Mb
Ethernet, WLAN (IEEE 802.11a/b/
g/n)
1 Close all Microsoft Windows
programs and exit any anti-virus
software that may be running.
2 Insert the Nero MediaHome 4
Essentials CD-ROM into your
computer’s CD-ROM drive.
3 Click Nero MediaHome 4
Essentials. The installation is
prepared and the installation wizard
appears.
4 Click the Next button to display the
serial number input screen. Click
Next to go to the next step.
5 If you accept all conditions, click
I accept the License Conditions
check box and click Next.
Installation is not possible without
this agreement.
6 Click Typical and click Next. The
installation process is started.
7 If you want to take part in the
anonymous collection of data,
select the check box and click the
Next button.
8 Click the Exit button to complete
the installation.
Page 40

ENTERTAINMENT
40
Sharing Files and Folders
After installing Nero MediaHome, you
must add folders you wish to share.
1 Double-click the Nero MediaHome
4 Essentials icon on the desktop.
2 Click Network icon on the left and
define your network name in the
Network name field. The Network
name you enter will be recognized
by your projector.
3 Click Shares icon on the left.
4 Click Local Folders tab on the
Shared screen.
5 Click Add icon to open the Browse
Folder window.
6 Select the folder containing the
files you want to share. The
selected folder is added to the list
of shared folders.
7 Click Start Server icon to start the
server.
Playing Shared contents
You can display and play movie,
photo and music content stored on
your computer or other DLNA media
servers.
1 Press the USB button. Then,
move to MOVIE/PHOTO/MUSIC
LIST with the Navigation buttons
and press the OK button. Press
the Blue buttons to search other
network device.
2. Press the Navigation buttons move
to a desired file and press the OK
button.
NOTE
If the shared folders or files are
not displayed on the projector,
click the folder on the
Folders
Folder
Visit
information and software tools.
tab and click
at the
More
www.nero.com
Local
Rescan
button.
for more
Page 41

Tips for using DLNA DMP
To play the file on the media server,
the projector and the media server
must be connected to the same
access point.
Because the compatibility and
available playback functions on
the
MY MEDIA
on the bundle DLNA server
(Nero MediaHome 4 Essentials)
environment, file requirements
and playback functions on the
may differ depending on
MEDIA
media servers.
Even the files that are not supported
can be displayed in photo thumbnail
or music thumbnail.
Movie thumbnail is not supported in
DLNA Movie.
If there is an unplayable music file in
the
MY MEDIA
will skip the file and play next file.
The file information indicated on the
screen may not always correct for
music and movie files in
menu
This projector only supports movie
subtitle files supplied by Nero
MediaHome 4.
The subtitle file name and movie
file name have to be the same and
located at the same folder.
If subtitle files have been added
after a directory has been indexed
already, the user has to remove
and re-add the folder to the list of
shares.
menu are tested
MY
menu, the projector
MY MEDIA
ENTERTAINMENT
The playback and operating quality
of the
MY MEDIA
function may be
41
affected by your home network
condition.
The files from removable media
such as USB drive, DVD-drive etc.
on your media server may not share
properly.
When playing the Media through
DLNA connection, it does not
support the DivX file play which is
protected by DRM.
Up to 200 folders in one folder and
999 including folders and files can
be recognized.
If there are too many folders and
files in one folder, it may not operate
properly.
Page 42

ENTERTAINMENT
42
Connecting DLNA DMR
(Digital Living Network
Alliance, Digital Media
Render)
This supports remote playing of media
files. Media from a compatible device
(Windows 7, Mobile Phone with
PlayTo, or other compatible DLNADMC device) can be “pushed” to the
projector.
The DMR function only works properly
when the projector and PC are on the
same local network.
1 To play a file, select the file by
using the “Remote Play” feature in
Windows 7.
To do this, right-click on the file you
want to play.
2 You can play a file only on a single
projector set or device even though
multiple devices are connected.
The playback speed depends on
the network status.
NOTE
Subtitle is supported only on
some DMC devices.
The DMR function may not work
properly in a wireless network.
The seek function of the DMC
only works on video files.
The DMR is not available when
another function is operating (MY
MEDIA work etc.).
Refer to the owner’s manual of
the mobile phone or other device
to find out how to use it to play a
file.
You can change the name of a
connected projector by doubleclicking the item you want
to change in Control Panel >
Network and Internet > View
network computers and devices
(For Windows 7).
You cannot change the name of
a projector while DMR media is
playing. Change it when playback
is stopped.
Page 43

ENTERTAINMENT
MOVIE LIST
* The movie list is activated once USB is detected. It is used when playing movie
files on projector.
Tips for playing video files
43
Some user-created subtitles may
not work properly.
Some special characters are not
supported in subtitles.
HTML tags are not supported in
subtitles.
Time information in an external
subtitle file should be arranged in
ascending order to be played.
Changing font and color in subtitles
is not supported.
Subtitles in languages other than
one specified are not supported.
Subtitle files of 1 MB or larger may
not be played properly.
The screen may suffer temporary
interruptions (image stoppage,
faster playback, etc.) when the audio
language is changed.
A damaged video file may not be
played correctly, or some functions
may not be usable.
Video files produced with some
encoders may not be played
correctly.
If the video and audio structure of
recorded file is not interleaved, the
file not playback properly.
Video with resolution higher than
maximum resolution supported for
each frame, cannot be guaranteed
for smooth playback.
Video files other than the specified
types and formats may not work
properly.
The movie file encoded by the GMC
(Global Motion Compensation) and
Qpel (Quarterpel Motion Estimation)
is not supported.
Only 10000 sync blocks are
supported within the subtitle file.
We do not guarantee smooth
playback of profiles encoded level
4.1 or higher in H.264/AVC.
DTS Audio codec is not supported.
A video file more than 30GB in file
size is not supported for playback.
Playing a video via a USB connection
that doesn’t support high speed
may not work properly.
The video file and its subtitle file
must be located in the same folder.
At this time, a video file name
and its subtitle file name must be
identical for it to be displayed.
When you are watching a movie
via the Movie List function, user
setup for each picture mode is not
supported.
Trick Mode does not support other
functions than ꕙ if video files do not
have index information.
When playing video file using
network, the Trick mode is limited
to 2-times speed.
Video file names that contain special
characters may not be playable.
Page 44

ENTERTAINMENT
44
DivX supported mode
File
Extensions
.asf
.wmv
.divx
.avi
.mp4
.m4v
.mkv
.ts
.trp
.tp
.vob
.mpg
.mpeg
.mpe
Bit rate range : within 32 kbps - 320 kbps (MP3)
Subtitle format : *.smi/*.srt/*.sub(MicroDVD, SubViewer1.0/2.0)/*.ass/*.ssa/*.txt(TMPlayer)/*.psb(PowerDivX)
Audio/
Codec Profile/Level Support
Video
VC-1 Advanced
Profile
Video
VC-1 Simple
and Main Profiles
WMA Standard
Audio
WMA 9 Professional
DivX3.11
DivX4
DivX5
DivX6
Video
XViD
H.264 / AVC
MPEG-1 Layer I, II
MPEG-1 Layer III
Audio
(MP3)
Dolby Digital
H.264 /AVC
Video
MPEG-4 Part 2 Advanced Simple Profile(e.g. 720p/1080i)
Audio AAC AAC-LC and HE-AAC
Video H.264 /AVC
HE-AAC HE-AAC-LC and HE-AAC
Audio
Dolby Digital
H.264 /AVC
MPEG-2 Main Profile @High Level (e.g. 720p 60, 1080i 60)
Video
VC-1
MPEG-1 Layer I, II
MPEG-1 Layer III
(MP3)
Audio
Dolby Digital
AAC AAC-LC and HE-AAC
MPEG-1
Video
MPEG-2 Main Profile @High Level (e.g. 720p 60, 1080i 60)
Dolby Digital
Audio
MPEG-1 Layer I, II
DVD-LPCM
Video MPEG-1 Main Profile@High Level (e.g. 720p60, 1080i60) Only streams
Audio MPEG-1 Layer I, II
Advanced Profile @ Level 3 (e.g. 720p 60, 1080i 60,
1080p 30)
Simple Profile @ Medium Level (e.g. CIF, QVGA)
Main Profile @ High Level (e.g. 1080p 30)
Advanced Simple Profile(720p/1080i)
Main Profile@ Level 4.1
High Profile@ Level 4.1 (e.g. 720p60, 1080i60,
1080p30)
Main Profile @Level 4.1
High Profile @Level 4.1 (e.g. 720p 60, 1080i 60,
1080p 30)
Main Profile @Level 4.1
High Profile @Level 4.1
(e.g.720p 60, 1080i 60, 1080p 30)
Main Profile @Level 4.1
High Profile @Level 4.1 (e.g. 720p 60, 1080i 60,
1080p 30)
Simple Profile@Medium Level (e.g. CIF, QVGA)
Main Profile@High Level (e.g. 1080p30)
Advanced Profile@Level3 (e.g. 720p60, 1080i60,
1080p30)
Explanation
Only streams
compliant to SMPTE
421M VC-1 standard
are supported.
Global motion
compensation or
quarterpel motion
estimation does not
supported. Streams
using this syntax are
not supported.
Global motion
compensation or
quarterpel motion
estimation does not
supported. Streams
using this syntax are
not supported.
Most of the MKV
content
available is encoded by
the open source x264
codec.
Only streams
compliant to SMPTE
421M VC-1 standard
are supported.
compliant configured
properly for TS, PS
or ES
Page 45

Browsing Movie List
ENTERTAINMENT
45
Play video files on the screen. Your
screen can display video files from a
USB storage device.
1 Connect a USB storage device.
2 Press USB to access the Home
menu.
3 Press the Navigation buttons to
scroll to Movie List and press OK.
4 Press the Navigation buttons to
scroll to the device you want and
press OK.
5 Press Navigation buttons to select
a folder or file you want and press
OK.
❷
Movie List
M1 M2 M3 M4
Butterfly_...
d
01:34:33
ꔅ To Photo List ꔅ Change Numbers ꔅ Mark Mode ꕯ Exit
Drive1
ꔂ Move ꔉ Play ꘃ Page Change ꘁ Mark
❻❼❽❾
❹❸❶
Page 1/1
❺
Page 1/1USB 1 XTICK
No. Description
❶
Thumbnail
Abnormal files
Non-supported files
❷
Contents List
❸
Moves to upper level folder
❹
Current page/Total pages of
folders
❺
Current page/Total pages of
contents
❻
Move to Photo List.
❼
Changes the number or
thumbnails displayed
at a time.
❽
Allows you to mark certain files.
Select files you want and press
Color buttons.
Play
Marked
Mark All
Unmark
All
Exit Mark
Mode
❾
Exit.
Press Red. Play the first
selected file.
Press Green. Mark all
files in the folder.
Press Yellow. Deselect
all marked files.
Press Blue. Enter or exit
the Mark Mode.
Page 46

ENTERTAINMENT
46
6 Play a movie by using the following
menus/buttons.
ꔊꔋ
ꕖ
ꕗ ꕖ ꕘ ꕚ ꕙ ꘩ Option ꕉ Hide ꕯ Exit
Button Description
<,>
꘩
Option
ꕉ Hide
Move to a specific frame
forward or backward while
playing a video. A cursor
indicating the position can
be viewed on the screen. It
may not work properly for
some movie files.
Stop the media player. Back
ꕗ
to the Movie List
Return to normal playback.
ꕖ
Pauses the media player.
ꕘ
If no buttons are pressed
on the remote control for
10 minutes after pausing,
the projector returns to the
playback state.
ꕘ
and
Select the required speed:
ꕎ
x2, x4, x8, x16, x32
(backward/forward).
Popup Option menu. See
"Options for Movie List".
Hide the menu on screen.
To see the menu again,
press OK.
Return to Movie List.
Exit
Displays slow
ꕙ
motion.
01:02:30 / 02:30:25
Options for Movie List
1 Press Q.MENU.
A pop-up window will appears.
2 Press the Navigation buttons to
scroll to the option and press OK.
3 Press the Navigation buttons
to scroll to one of the following
options and press OK.
Set Video Play.
Option Description
Picture
Size
Audio
Language
Selects your desired
picture format for videos.
: Files are played
Full
according to the aspect
ratio of video.
: Displays the video
16:9
with the aspect ratio of
16:9.
Original
video in original aspect
ratio.
Changes the Language
Group of the audio for
video files. Files with a
single audio track cannot
be selected.
: Displays the
Page 47

Option Description
Subtitle
Language
The subtitles can be
turned on or off.
Language
: Activated
for SMI subtitles and
can select the language
within the subtitle.
Code Page
: Subtitle
font selection. When
set to default, contents
are displayed in the
language set in OPTION
- Menu Language.
: When the video
Sync
is not synchronized
with the captions, it
can be adjusted by 0.5
second.
Position
: Move the
location of the subtitles.
: Changes the
Size
subtitle font size.
Repeat Turn on/off repeat
function of movie
playback.
When turned off, if the
next file name is similar
to the previous file, it can
be played sequentially.
47
Language
ENTERTAINMENT
Subtitle
Language
Supported Language
Group
Latin1 French, Spanish, Catalan
Basque, Portuguese,
Italian, Albanian, RhaetoRomanic, Dutch, German,
Danish, Swedish,
Norwegian, Finnish,
Faeroese, Icelandic, Irish,
Scottish, English
Korean English, Korean
Set Video.
Allows you to change Video presets
(Refer to "PICTURE Settings" on page
56).
Set Audio.
Allows you to change Audio presets
(Refer to "AUDIO Settings" on page 61).
Page 48

ENTERTAINMENT
48
Registering the DivX code
- The DivX registration code allows
you to rent or purchase the latest
movies at www.divx.com/vod. To
play a rented or purchased DivX file,
the file’s registration code should
be same as your projector’s DivX
registration code.
1 Press USB to access the Home
menu and press Blue.
DivX(R) VOD Registration
DivX(R) Deregistration
ꕉ Previous
2 Press the Navigation buttons to
scroll to DivX(R) VOD Registration
and press OK.
i
You must register your device to
play DivX protected videos.
Registration code : xxxxxxxxxx
Register at http://vod.divx.com
OK
3 View the registration code of your
projector.
NOTE
While you are checking the
registration code, some buttons
may not work.
If you use the DivX registration
code of another device, you cannot
play the rented or purchased DivX
file. Make sure to use the DivX
registration code assigned to your
projector.
The video or audio files that are
not converted by the standard
DivX codec may be corrupted or
not be played.
The DivX VOD code allows you to
activate up to 6 devices under one
account.
Deactivating the DivX feature
- You can deactivate all of the devices
through the web server and block
devices from activating.
Delete the existing authentication
information to receive a new DivX
user authentication for the projector.
Once this function is executed, a
DivX user authentication is required
again to see DivX DRM files.
1 Press USB to access the Home
menu and press Blue.
2 Press the Navigation buttons to
scroll to DivX(R) Deregistration and
press OK.
3 Select Yes to confirm.
i
Your device is already
Are you sure you wish to deregister?
⬇
NOTE
DRM (Digital Rights Management)
function: These are the technology
and the service that prevents the
illegal use of digital contents to
protect the copyrights owners’
benefits and rights. File can be
played after the license is cleared
through the methods of online,
etc.
registered
Yes Cancel
Deregistration code:
i
Deregister at http://vod.divx.com
********
Continue with registration?
Yes Cancel
Page 49

PHOTO LIST
* The projector can display JPEG files.
ENTERTAINMENT
49
Photo Supported File Formats
PHOTO(*.JPEG) supporting file
Baseline: 64 pixel (width) x 64 pixel
(height) to 15360 pixel (width) x 8640
pixel (height)
Progressive: 64 pixel (width) x 64 pixel
(height) to 1920 pixel (width) x 1440
pixel (height)
You can play JPEG files only.
Non-supported files are displayed in
the form of predefined icon.
An error message occurs for
corrupted files or file formats that
cannot be played.
Corrupted image files may not be
displayed properly.
It may take some time to view high-
resolution images in full screen.
Browsing Photo List
1 Connect a USB storage device.
2 Press USB to access the Home
menu.
3 Press the Navigation buttons to
scroll to Photo List and press OK.
4 Press the Navigation buttons to
scroll to the device you want and
press OK.
5 Press Navigation buttons to select
a folder or file you want and press
OK.
❷
Photo List
USB 1 XTICK
P1 P2 P3 P4 P5 P6 P7 P8 P9
ꔅ To Music List ꔅ Change Numbers ꔅ Mark Mode ꕯ Exit
Drive1
❹❸❶
Page 1/1
ꔂ Move ꔉ View ꘃ Page Change ꘁ Mark
❻❼❽❾
No. Description
❶
Thumbnail
Abnormal files
Non-supported files
❷
Contents List
❸
Moves to upper level folder
❹
Current page/Total pages of
folders
❺
Current page/Total pages of
contents
❻
Move to Music List.
❼
Changes the number or
thumbnails displayed
at a time.
❺
Page 1/1
Page 50

ENTERTAINMENT
50
No. Description
❽
Allows you to mark certain files.
Select files you want and press
Color buttons.
View
Marked
Mark All Press Green. Mark all
Unmark All Press Yellow. Deselect
Exit Mark
Mode
❾
Exit.
Press Red. Display the
selected photo.
files in the folder.
all marked files.
Press Blue. Enter or
exit the Mark Mode.
6 The following options are available
while viewing photos.
01_a.jpg
2008/12/10
1920 x 1080
479 KB
◀
2/13
Slideshow ꘡ BGM ꘡ ꘤
◀
Option Description
2/13
◀
▶
Select the previous or next
photo.
Slideshow
Selected photos are
꘡
displayed during the
slide show. If no photo is
selected, all photos in the
current folder are displayed
during slide show.
Set the time interval
of the slide show in
Option-Set Photo View.
menu.
BGM ꘡
Listen to music while
viewing photos in full size.
Set the
and album in
Set Photo View.
▶
꘩ Option ꕉ Hide ꕯ Exit
ꕲ
device
BGM
Option
-
menu.
Option Description
Rotate photos.
꘤
Rotates the photo
90°, 180°, 270°, 360°
clockwise.
Photos cannot be
rotated if its width
is greater than the
available supported
resolution height.
View the photo in full mode
ꕲ
or original mode.
꘩
Option
ꕉ Hide
Popup Option menu. See
"Options for Photo List".
Hide the menu on the fullsized screen.
To see the menu
▶
again on the full-sized
screen, press OK
button to display.
Return to Photo List.
Exit
Page 51

ENTERTAINMENT
51
Options for Photo List
1 Press Q.MENU.
A pop-up window will appears.
2 Press the Navigation buttons to
scroll to the option and press OK.
3 Press the Navigation buttons
to scroll to one of the following
options and press OK.
Set Photo View.
Option Description
Slide
Speed
BGM Selects a music folder for
Set Video Play.
Allows you to change Video presets
(Refer to "PICTURE Settings" on page
56).
Set Audio.
Allows you to change Audio presets
(Refer to "AUDIO Settings" on page 61)
Selects a slideshow
speed (Fast, Medium,
Slow).
the background music.
Select Repeat or Random
option.
You cannot change
the music folder
while the background
music is playing.
MUSIC LIST
* You can use the Music List menu to
play MP3 files from a USB storage
device.
Music Supported File Formats
MUSIC (*.MP3) supporting file
Bit rate range 32 Kbps - 320 Kbps
Sampling rate MPEG1 Layer3 :
32kHz, 44.1kHz, 48kHz
Sampling rate MPEG2 Layer3 :
16kHz, 22.05kHz, 24kHz
Browsing Music List
1 Connect a USB storage device.
2 Press USB to access the Home
menu.
3 Press the Navigation buttons to
scroll to Music List and press OK.
4 Press the Navigation buttons to
scroll to the device you want and
press OK.
5 Press Navigation buttons to select
a folder or file you want and press
OK.
003. - B03.mp3
00:00
❹❸❶
Page 1/1
004. - B04.mp3
00:00
❺
Page 1/1
USB 1 XTICK
Music List
001. - B01.mp3
00:00
005. - B05.mp3
00:00
❷
002. - B02.mp3
00:00
Drive1
ꔅ To File Viewer ꔅ Change Numbers ꔅ Mark Mode ꕯ Exit
ꔂ Move ꔉ Play ꘃ Page Change ꘁ Mark
❻❼❽❾
Page 52

ENTERTAINMENT
52
No. Description
❶
Thumbnail
Abnormal files
Non-supported files
❷
Contents List
❸
Moves to upper level folder
❹
Current page/Total pages of
folders
❺
Current page/Total pages of
contents
❻
Move to File Viewer.
❼
Changes the number or
thumbnails displayed
at a time.
❽
Allows you to mark certain files.
Select files you want and press
Color buttons.
Play
Marked
Mark All Press Green. Mark all
Unmark All Press Yellow. Deselect
Exit Mark
Mode
❾
Exit.
Press Red.Play the
selected songs..
files in the folder.
all marked files.
Press Blue. Enter or exit
the Mark Mode.
6 Control playback by using the
following buttons.
Music List
USB 1 XTICK
001. - B01.mp3
ꕖ
00:00
005. - B05.mp3
00:00
002. - B02.mp3
00:00
Drive1
003. - B03.mp3
00:00
Page 1/1
Page 1/1
004. - B04.mp3
00:00
Option Description
<,>
A cursor indicating the
position can be played.
Stop playback.
ꕗ
Return to normal playback.
ꕖ
Paused playback.
ꕘ
Select the previous or next
ꕎ
song.
Play with
Photo
Start playing the selected
songs and then move to
the Photo List.
꘩
Popup Option menu.
Option
ꕉ Hide
Hide the menu on screen.
To see the menu
again on the full-sized
screen, press OK
button to display.
Return to Music List.
Exit
Options for Music List
1 Press Q.MENU.
A pop-up window will appears.
2 Press the Navigation buttons to
scroll to the option and press OK.
3 Press the Navigation buttons
to scroll to one of the following
options and press OK.
Set Audio Play.
Select Repeat or Random option.
Set Audio.
Allows you to change Audio presets
(Refer to "AUDIO Settings" on page 61)
ꔊꔋ
ꕗ ꕖ ꕘ ꕚ ꕙ ꔅ Play with Photo ꘩ Option ꕉ Hide ꕯ Exit
ꕖ
02:30 / 03:25002. - B02.mp3
Page 53

FILE VIEWER
DOC
HWP
PDF
PPT
TXT
XLS
ENTERTAINMENT
53
Supported File Formats
Supported File : XLS, DOC, PPT, TXT,
XLSX, PPTX, DOCX, PDF
Microsoft Office Version 97 / 2000 /
2002 / 2003 / 2007
Adobe PDF Version 1.0 / 1.1 / 1.2 / 1.3
/ 1.4
File Viewer realigns the document,
so it may look different than when
viewed on a PC.
For the documents that include
images, the resolution may look
lower during the realigning process.
If the document volume is big or it
has many pages, loading may take
long time.
Unsupported fonts may be replaced
with other fonts.
Browsing File Viewer
1 Connect a USB storage device.
2 Press USB to access the Home
menu.
3 Press the Navigation buttons to
scroll to File Viewer and press OK.
4 Press the Navigation buttons to
scroll to the device you want and
press OK.
5 Press Navigation buttons to select
a folder or file you want and press
OK.
❶
File Viewer
USB 1 XTICK
test1.doc
42KB
test5.txt
7KB
ꔅ To Movie List ꔅ Change Numbers ꔅ Single Page Mode ꕯ Exit
test2.hwp
512KB
test6.xls
19KB
Drive1
❸❷
Page 1/1
test3.pdf
595KB
test4.ppt
489KB
ꔂ Move ꔉ Open ꘃ Page Change
❺❻❼❽
No. Description
❶
Contents List
❷
Moves to upper level folder
❸
Current page/Total pages of
folders
❹
Current page/Total pages of
contents
❺
Move to Movie List.
❻
Changes the number or
thumbnails displayed
at a time.
Single
❼
Page
Mode
Full
Document
Mode
❽
Exit.
Loads and displays pages
one by one. The initial
loading time is short but
a content-heavy page
may be displayed slowly.
Loads all pages of a file
to memory before it
starts to display them.
The initial loading time is
long but you can navigate
pages quickly after
loading is complete. If a
file is too large, it may fail
to load all the pages.
❹
Page 1/1
Page 54

ENTERTAINMENT
54
6 Control playback by using the
following buttons.
ꔈPress CH to move the previous or
next page.
ꔈPress VOL to Zoom in or zoom out.
ꔈ1. Press MENU.
2.
Press the Navigation buttons to
scroll to Go Page or Zoom press ∧.
MENU Go Page ꔦ Zoom ꕉ Hide
Option Description
Go Page
ꔦ Zoom
ꕉ Hide
Move to a desired page.
Press the Navigation or
Number buttons select a
desired page and press
OK.
Zoom in or zoom out.
Press the Navigation
buttons select a desired
page and press OK.
Close the menu.
To see the menu
again on the fullsized screen, press
to display.
MENU
PLAY GAME
Allows you to enjoy the games
installed on the projector.
1 Press MENU to access the menu.
2 Press the Navigation buttons to
scroll to OPTION and press OK.
3 Press the Navigation buttons to
scroll to GAME and press OK.
GAME
JUMP HOLE IN ONE SUDOKU SAVING CRYSTAL INVADER
ꕯ Exit
4 When you are finished, press EXIT.
Page 55

CUSTOMIZING SETTINGS
CUSTOMIZING SETTINGS
The SETUP Menu
1 Press MENU to access the menu.
2 Press the Navigation buttons to scroll to one of the following menus and press
OK.
3 Press the Navigation buttons to scroll to the setting or option you want and
press OK.
4 When you are finished, press OK.
Menu Description
CHANNEL Sets up and edit channels.
PICTURE Adjusts the image quality or effect.
SCREEN Adjusts the screen size, or keystone.
55
AUDIO Adjusts the sound quality, effect, or volume level.
TIME Sets the time, date, or Timer feature.
LOCK Locks or unlocks channels and programs.
OPTION Customizes the general settings.
NETWORK Sets up the network setting.
INPUT Select the desired input source.
MY MEDIA
Access the photo, music, movie, or file lists and browse
files.
Page 56

CUSTOMIZING SETTINGS
56
CHANNEL Settings
1 Press MENU to access the menu.
2 Press the Navigation buttons to scroll to
CHANNEL and press OK.
3 Press the Navigation buttons to scroll to the
CHANNEL ꔂ Move ꔉ OK
• Auto Tuning
• Manual Tuning
• Channel Edit
setting or option you want and press OK.
- To return to the previous level, press BACK.
4 When you are finished, press EXIT.
The available channel settings are described in the following.
Setting Description
Auto Tuning Tunes and stores all available channels through antennas or
cable inputs. (See p.22)
Manual Tuning Tunes and stores the channels you want manually.
Channel Edit Adds or deletes channels. (See p.23)
PICTURE Settings
1 Press MENU to access the menu.
2 Press the Navigation buttons to scroll to
PICTURE and press OK.
3 Press the Navigation buttons to scroll to the
setting or option you want and press OK.
- To return to the previous level, press BACK.
4 When you are finished, press EXIT.
PICTURE ꔂ Move ꔉ OK
• Picture Mode : Standard
• Contrast 50
• Brightness 50
• Sharpness 5
• Color 70
• Tint 0
• Advanced Control
• Picture Reset
R G
The available picture settings are described in the following.
Page 57

CUSTOMIZING SETTINGS
Setting Description
Picture Mode Selects one of the preset image or customizes options in
each mode for the best screen performance. You are also
able to customize advanced options of each mode.
You can also use this function through the PICTURE button.
Mode
Vivid Adjusts the video image for the retail environment
by enhancing the contrast, brightness, color, and
sharpness.
Standard Adjusts the image for the normal environment.
Cinema Optimizes video image for a cinematic look to
enjoy movies as if you are in a movie theater.
Sport Optimizes the video image for high and dynamic
actions by emphasizing primary colors such as
white, grass, or sky blue.
Game Optimizes the video image for a fast gaming
screen for PCs or games.
Expert Adjusts the detailed video image settings for video
experts as well as general viewers.
Contrast Increases or decreases the gradient of the video signal.
You may use Contrast when the bright part of the picture is
saturated.
Brightness Adjusts the base level of the signal in the picture.
Sharpness Adjusts the level of sharpness in the edges between the light
and dark areas of the picture. The lower the level, the softer
the image.
Color Adjusts intensity of all colors.
Tint Adjusts the balance between red and green levels.
Advanced
Customizes the advanced options.
Control or Expert
Control
Picture Reset Restores the options of each mode to the factory default.
57
Page 58

CUSTOMIZING SETTINGS
58
Advanced / Expert Control Options
Setting Description
Dynamic
Contrast
Dynamic Color Adjusts screen colors so that they look livelier, richer and
Clear White Make the white area of screen brighter and more white.
Skin Color It detects the skin area of video and adjusts it to express a
Noise Reduction Reduces screen noise without compromising video quality.
Digital Noise
Reduction
Gamma
Black Level Sets black level of the screen to proper level.
Real Cinema Makes video clips recorded in film look more natural by
Color Gamut
Edge Enhancer Show clearer and distinctive yet natural corners of the video.
xvYCC This feature represents rich color as much as conventional
Expert Pattern This is a pattern used for expert adjustment.
Color Filter This function filters specific colors in the video.
Adjusts the contrast to keep it at the best level according
to the brightness of the screen. The picture is improved by
making bright parts brighter and dark parts darker.
clearer. This feature enhances hue, saturation and luminance
so that red, blue, green and white look more vivid.
natural skin color.
Removes noise caused by compressing video.
: Make dark and middle gray level area of the picture
Low
brighter.
Medium
High:
: Express original picture levels.
Make dark and middle gray level area of the picture
darker.
You can adjust brightness of dark area and middle gray level
area of the picture.
This option is disabled in RGB-PC mode.
eliminating judder effect.
Standard:
Wide:
Displays standard color area.
Mode to use and set the rich color area of the display.
Maximize the utilization of color to increase color quality.
video signal.
This function is enabled in "Picture mode - Cinema, Expert"
when a xvYCC signal is inputted through HDMI.
You can use the RGB filter to set color saturation and hue
accurately.
Page 59

Setting Description
Color
Temperature
This is the function to adjust the overall color of the screen to
the feeling you want.
Select Cool, Medium, Warm. When Expert mode, customizes
the options of each mode.
Gamma: Select 1.9, 2.2, 2.4
a. Method: 2 Points
- Pattern: Inner, Outer
- Red/Green/Blue Contrast, Red/Green/Blue Brightness: The
adjustment range is -50 - +50.
b. Method: 10 Points IRE
- Pattern: Inner, Outer
- IRE (Institute of Radio Engineers) is the unit to display the
size of the video signal and can be set among 10, 20, 30
- 90, 100. You can adjust Red, Green or Blue according to
each setting.
- Luminance: This function displays calculated luminance
value for 2.2 gamma. You can input luminance value you
want at 100 IRE, than the target luminance value for 2.2
gamma is displayed at every 10 steps from 10 IRE to 90
IRE.
- Red/Green/Blue: The adjustment range is -50 - +50.
Color
Management
System
As the tool used by the experts to make adjustments by using
the test patterns, this does not affect other colors but can be
used to selectively adjust the 6 color areas (Red/Green/Blue/
Cyan/Mgt/Yellow).
Color difference may not be distinctive even when you make
the adjustments for the general video.
Adjusts Red/Green/Blue/Yellow/Cyan, Magenta.
- Red/Green/Blue/Yellow/Cyan, Magenta Color
The adjustment range is -30 - +30.
- Red/Green/Blue/Yellow/Cyan, Magenta Tint:
The adjustment range is -30 - +30.
CUSTOMIZING SETTINGS
:
59
Page 60

CUSTOMIZING SETTINGS
60
SCREEN Settings
1 Press MENU to access the menu.
2 Press the Navigation buttons to scroll to
SCREEN and press OK.
3 Press the Navigation buttons to scroll to the
setting or option you want and press OK.
- To return to the previous level, press BACK.
SCREEN ꔂ Move ꔉ OK
• PJT Mode : Front
• Aspect Ratio : 16:9
• Keystone 0
• RGB Config.
4 When you are finished, press EXIT.
The available screen settings are described in the following.
Setting Description
PJT
Mode
Aspect
Ratio
Keystone Use this function when the screen is not at a right angle to the
RGB
Config.
This function turns the projected image upside down or flips
horizontal.
Select Rear when projecting from the back of the transparent screen
purchased separately.
Select Ceiling when installing the product on the ceiling.
When PJT Mode is Rear/Front Ceiling, the left/right of the speaker
changes automatically.
Changes the image size to view images at its optimal size. (See p.24)
projector and the image is a trapezoid shape. (See p.25)
Customizes the PC display options.
Option
Resolution Selects a proper resolution when your PC uses 768
resolution (1024x768/1280x768/1360x768, 60Hz) and
1050 resolution (1400x1050/ 1680x1050, 60Hz).
Auto
Config.
Position Locates the image at the proper position.
Size Adjusts the image size.
Phase Eliminates horizontal streaking.
Reset Restores the options to the default setting.
Sets the projector to optimize the options automatically
for the projector display.
You can also use this function through the AUTO button.
L R
Page 61

AUDIO Settings
CUSTOMIZING SETTINGS
61
1 Press MENU to access the menu.
2 Press the Navigation buttons to scroll to
AUDIO and press OK.
3 Press the Navigation buttons to scroll to the
setting or option you want and press OK.
- To return to the previous level, press BACK.
AUDIO ꔂ Move ꔉ OK
• Volume 40
• Balance 0
• Treble 50
• Volume Booster(DTV) : Off
R G
4 When you are finished, press EXIT.
The available audio settings are described in the following.
Setting Description
Volume Adjusts the volume level.
You can also use this function through the VOL button.
Balance Adjust the left/right sound of speaker to suit your taste
and room situations.
Treble Adjust the treble to suit your taste and room situations.
Volume Booster(DTV) Amplify the Volume Level.
You can adjust this function in the DTV and Cable DTV.
Page 62

CUSTOMIZING SETTINGS
62
TIME Settings
1 Press MENU to access the menu.
2 Press the Navigation buttons to scroll to TIME
and press OK.
3 Press the Navigation buttons to scroll to the
setting or option you want and press OK.
- To return to the previous level, press BACK.
TIME ꔂ Move ꔉ OK
• Clock
• Off Time : Off
• On Time : Off
• Sleep Timer : Off
• Auto Off : 60 min.
4 When you are finished, press EXIT.
The available time settings are described in the following.
Setting Description
Clock Sets the time, date, time zone, and daylight-saving time feature.
The time will be set automatically according to a digital channel signal
which includes time information provided by the broadcasting station.
If not, set the time and date manually.
Off Time
/On Time
Sets the time to turn on or off the projector automatically. To use this
function, you should set the current time and date in advance.
NOTE
If you do not press any button within 2 hours after the projector
turns on by the On Time feature, the projector enters the Standby
mode automatically.
If you set both Off time and On time features to the same time,
the Off time feature overrides the On time feature.
Sleep
Timer
Auto Off This function turns the projector off automatically after the preset time
Sets the length of time until the projector turns off. When you turn the
projector off and turn it on again, the Sleep timer feature will be set to
off.
is passed when there is no signal.
Page 63

LOCK Settings
CUSTOMIZING SETTINGS
63
1 Press MENU to access the menu.
2 Press the Navigation buttons to scroll to LOCK
and press OK.
3 Press the Navigation buttons to scroll to the
setting or option you want and press OK.
- To return to the previous level, press BACK.
4 When you are finished, press EXIT.
LOCK ꔂ Move ꔉ OK
• Set Password
• Lock System : Off
• Block Channel
• Movie rating
• TV Rating-Children
• TV Rating-General
• Downloadable Rating
• Input Block
• Key Lock : Off
The available lock settings are described in the following.
Setting Description
Set Password Changes the 4-digit password. The default PIN is “0 0 0 0”.
If you forget your password, press “0-3-2-5” on the remote
control.
Lock System Activates or deactivates the lock system.
Block Channel Blocks the channels that contain inappropriate contents for
children. The channels can be selected but the screen blank and
the audio is muted.
To watch a locked channel, enter the password.
Movie rating Blocks the movies that are only broadcasted on the projector
and contain inappropriate contents, based on the Motion Picture
Association of America (MPAA) rating.
Rating
G General audiences – All ages admitted
PG Parental guidance suggested – Some material
may not be suitable for children
PG-13 Patents strongly cautioned – Some material
may be inappropriate for children under 13
R Restricted – Under 17 requires accompanying
parent or adult guardian
NC-17 No one 17 and under admitted.
X Adults only
Blocking Off Permits all programs
Page 64

CUSTOMIZING SETTINGS
64
Setting Description
TV RatingChildren
TV RatingGeneral
Blocks the children’s TV programs that parents do not want their
children to watch. To block other TV programs, you should set
the TV Rating-General feature.
Rating
Age Applies to TV-Y, TV-Y7
Fantasy Violence Applies to TV-Y7
Blocks the TV programs that you want based on the ratings by
using the Parental Control Function (V-Chip).
NOTE
The V-Chip electronically reads TV program ratings and allows
parents to block program that are unsuitable for children.
Rating
Age applies to TV-G, TV-PG, TV-14, TV-MA
Dialogue (sexual dialogue) applies to TV-PG, TV-14
Language (adult language) applies to TV-PG, TV-14, TV-MA
Sex (sexual situations) applies to TV-PG, TV-14, TV-MA
Violence applies to TV-PG, TV-14, TV-MA
Downloadable
Rating
This function operates only when projector has received Region5
Rating data. The name of the rating option may differ.
NOTE
This feature is available only for digital channels.
Input Block Block the input sources.
Key Lock This feature can be used to prevent unauthorized viewing by
locking out the panel controls, so that it can only be used with
the remote control.
In Key Lock 'On', if the projector is turned off, press the Power
button.
With the Key Lock 'On', the display 'Key Lock' appears on the
screen if any button on the panel is pressed while viewing the
projector.
Page 65

OPTION Settings
CUSTOMIZING SETTINGS
65
1 Press MENU to access the menu.
2 Press the Navigation buttons to scroll to
OPTION and press OK.
3 Press the Navigation buttons to scroll to the
setting or option you want and press OK.
- To return to the previous level, press BACK.
OPTION ꔂ Move ꔉ OK
• Language : English
• Caption : Service1
• Blank Image : Blue
• LED Mode : Normal
• Auto Power : Off
• GAME
4 When you are finished, press EXIT.
The available option settings are described in the following.
Setting Description
Language Selects a desired Menu Language.
Caption Sets whether to display captions and customize your option in each
mode.
Mode
CC 1-4
(Closed
Captioning)
Text 1-4
Service 1-6 This is only available for the digital broadcasting
Option (For Digital Broadcasting)
Size Selects the wordsize.
Font Selects a typeface for the text.
Text Color Selects a color for the text.
Text
Opacity
Bg Color Adjusts the opacity for the text color.
Bg Opacity Adjusts the opacity for the background color.
Edge Type Selects an edge type.
Edge Color Selects a color for the edges.
Blank Image You can choose the background color to the selected Blank
function.(See p.26)
Displays the audio portion of a TV program as text on
the screen. CC1 is the most common mode in use.
- Field 1 data channels: two Captions (CC1, CC2) and
two Text (T1, T2).
- Field 2 data channels: two Captions (CC3, CC4) and
two Text (T3, T4).
system.
Adjusts the opacity for the text color.
Page 66

CUSTOMIZING SETTINGS
66
Setting Description
LED Mode To adjust the brightness of the screen.
LED Mode changes into Dimming mode automatically if use a
portable battery.
LED Mode changeds into Dimming mode automatically if there is
no input signal.
You can also use this function through the Q.MENU button.
Auto Power To make projector turned on automatically when the plug of
adapter is inserted.
Option
On When connect DC plug to the projector, projector
turns on automatically.
Off When connect DC plug to the projector, projector
enters standby state.
GAME Allows you to enjoy the games installed on the projector.
NETWORK Settings
1 Press MENU to access the menu.
2 Press the Navigation buttons to scroll to
NETWORK and press OK.
3 Press the Navigation buttons to scroll to the
setting or option you want and press OK.
- To return to the previous level, press BACK.
NETWORK ꔂ Move ꔉ OK
• Network Setting : None
• Network Status : Not connected
• Legal Notice
4 When you are finished, press EXIT.
The available network settings are described in the following.
Setting Description
Network Setting Configure the network settings. (See p.28)
Network Status Display the network status. (See p.32)
Legal Notice Display the Legal notice. (See p.34)
Page 67

MAKING CONNECTIONS
MAKING CONNECTIONS
Connect various external devices to the ports on the projector.
Computer/Notebook VCRDVD
Digital Device
67
USB
Headphone
HDMI – See p.68
Component – See p.68
Composite – See p.69
RGB – See p.69
Memory storage – See p.36
Audio - See p.70
Gaming Device
Page 68

MAKING CONNECTIONS
COMPONENT IN
ANTENNA IN
A/V INCOMPONENT IN
68
Connecting to a HD
receiver, DVD, or
VCR player
Connect a HD receiver, DVD, or VCR
player to the projector and select an
appropriate input mode.
HDMI Connection
Transmits the digital video and audio
signals from an external device to the
projector. Connect the external device
and the projector with the HDMI cable
as shown in the following illustration.
Component Connection
Transmits the analog video and audio
signals from an external device to the
projector. Connect the external device
and the projector with the component
cable as shown in the following
illustration.
HDMI OUT
B PR (R)
VIDEO OUT
(L)YP
AUDIO OUT
Page 69

MAKING CONNECTIONS
RGB IN
A/V INC
RGB IN
A/V IN
COMPONENT IN
ANTENNA IN
A/V INCO
69
Composite Connection
Transmits the analog video and audio
signals from an external device to the
projector. Connect the external device
and the projector with the composite
cable as shown in the following
illustration.
Connecting to a PC
This projector supports the Plug &
Play. A PC will automatically recognize
the projector and requires no driver to
be installed.
RGB Connection
Transmits the analog video signal from
your PC to the projector. Connect the
PC and the projector with the D-sub
15 pin signal cable as shown in the
following illustrations. To transmit an
audio signal, connect a 3-pole audio
cable from PC to the projector.
VIDEO OUT
(L) (R)
AUDIO OUT
AUDIO OUTRGB OUT (PC)
Page 70

MAKING CONNECTIONS
N
A
70
Connecting to a
Headphone
Listen to the sound through a
headphone.
Page 71

MAINTENANCE
MAINTENANCE
71
Update and clean your projector
regularly to keep the best
performance and to extend the
product lifespan.
Updating the
Projector Firmware
Download and install the latest
firmware by connecting to the
firmware update server to enhance or
change the product function, or add
new features.
The firmware update may not work
properly depending on the Internet
environment. If so, you may obtain
the latest firmware update from the
authorized LG Electronics service
center.
To check the current firmware version
or update the firmware,
1 Press MENU to access the menu.
2 Press the Red buttons to access
Customer Support.
3 Press the Navigation buttons to
scroll to Software Update and
press OK.
The current firmware version
displays.
4 Select Check Update Version to
check a new firmware version
manually.
When selecting “Software UpdateOn”
- If the projector is connected to
the internet and it finds a software
update on the LG server, the
update popup menu will appear
automatically.
- If the updated digital software
information is transmitted, the
update popup menu will appear
automatically.
NSU (Network Software Update):
When software update is on, the
projector will automatically check for
software updates. A pop-up window
will appear on the screen when an
update is available.
Software Update
ꔈ Current Version
Check Update Version
00.00.06
Close
On
◀
▶
Page 72

MAINTENANCE
72
NOTE
The software downloading
time will vary depending on
the software size and network
conditions.
During the software update
procedure, do not turn off the
projector or disconnect AC power,
or disconnect the network.
After software update, you can
confirm the update software
version at software Update menu.
When update is completed, the
projector will restart automatically
in 5 seconds.
The projector functions may be
improved or changed by software
update.
The available time or functionality
of NetCast menu may be depends
on your ISP network conditions.
When an update is completed,
some CHANNEL, PICTURE, and
AUDIO menu settings may need
resetting.
This projector cannot be updated
to previous software version.
Use the “
button to update the latest
software on the Network server
manually.
You cannot open NetCast while
the software is being updated.
Check Update Version
Cleaning the
Projector
Cleaning the lens
Use an air spray or cleaning cloth for
product exterior, provided with the
product, to lightly clean the product.
Please use a recommended air spray
or lens cleaning product.To clean
lens, small amount of cleaning agent
on a swab or a soft cloth and rub on
the lens. Please be aware that liquid
may flow pass through the lens if the
product is sprayed on lens directly.
Cleaning the Projector
Case
To clean the projector case, first
unplug the power cable. To remove
dirt or dust, wipe the casing with
polish cloth provided. When you
want to remove the dust or stain on
the lens, use the cloth for product
exterior, provided with the product.
Do not use alcohol, benzene, thinners
”
or other chemical detergents as these
can cause the casing to be warped or
discolored.
Page 73

How to Fix the Lens
Cap
1 Prepare the lens cap and the strap
supplied as accessories.
2 Insert the end of the strap into
the hole at the bottom of the lens
section of the projector.
3 Fix the strap at the hole of the
projector into the hole of the lens
cap, and then pass the lens cap
through the strp lasso.
MAINTENANCE
73
Page 74

SPECIFICATIONS
74
SPECIFICATIONS
MODEL HW300T (HW300T-JE)
Resolution (Pixel) 1280 (Horizontal) × 800 (Vertical)
Ratio 16:10 (Horizontal:Vertical)
Panel size (mm) 11.623
Projection distance
(Screen size)
Projection Offset 100 %
Remote control distance 6 m
Video compatibility NTSC
AC-DC Adapter 19.5 V
Audio Output 1 W + 1 W
Television System NTSC-M, ATSC, 64 & 256 QAM
Program Coverage
External Antenna
Impedance
Height (mm) 54.0 (without foot), 57.0 (with foot)
Width (mm) 160.0
Length (mm) 119.5
Weight (g) 780
USB Device 5 V, 0.5 A (max)
Temperature
In operation 0°C - 40°C
Operating Condition
In storage and transit -20°C - 60°C
Humidity (relative humidity)
In operation 0 % - 80%
Not in operation 0 % - 85%
VHF 2 - 13, UHF 14 - 69, CATV 1 - 135,
0.59 m - 3.00 m
(50.8 cm - 254.0 cm)
, 5.64 A
DTV 2 - 69, CADTV 1 - 135
75 Ω
Page 75

SPECIFICATIONS
75
RGB-PC supported mode
Format
640X350
720X400
640X480
800X600
1024X768
1152X864
1280X768
1280X800
1360X768
1280X1024
1400X1050
1680X1050
If the projector does not support
Vertical Freq.
(Hz)
70.090
70.080
59.940
60.310
60.000
60.053
59.870
60.000
60.015
60.020
59.979
60.000
the input signal, “Invalid Format”
message appears on the screen.
The projector supports DDC1/2B
type as Plug & Play. (Auto
recognition of PC monitor)
PC synchronization signal
types supported: Separate type
synchronization.
To get the the best picture quality,
adjust the PC graphics card to
1280x800.
Horizontal
Freq.(kHz)
31.468
31.469
31.469
37.879
48.363
54.348
47.776
49.680
47.712
63.981
65.317
65.300
OPEN SOURCE LICENSE
To obtain the source code under
GPL, LGPL, MPL and other open
source licenses, that is contained
in this product, please visit http://
opensource.lge.com.
In addition to the source code, all
referred license terms, warranty
disclaimers and copyright notices are
available for download.
Page 76

The model and serial number of the
projector is located on the back or one side
of the projector. Record it below should you
ever need service.
MODEL
SERIAL
LG Customer Information Center
USA, Consumer User
1-800-243-
USA, Commercial User
1-888-865-3026
CANADA
1-888-542-2623
0000
 Loading...