

Page 1

OWNER'S MANUAL
LG CineBeam AI ThinQ
DLP Projector
Please read the safety information carefully before using this product.
HU85LA
P/NO : SAC37813542 (1907-REV00)
Copyright © 2019 LG Electronics Inc. All Rights Reserved.
www.lg.com
Page 2

ENGLISH
2
CONTENTS
LICENSES 3
Open Source Software Notice Information 4
SAFETY PRECAUTIONS 5
PREPARATION 19
INSTALLATION 26
MAGIC LIGHTING REMOTE 32
CONNECTING DEVICES 38
SPECIFICATIONS 43
SYMBOLS 48
TROUBLESHOOTING 49
Page 3

LICENSES
Supported licenses may differ by model. For more information about licenses, visit
www.lg.com.
The terms HDMI and HDMI High-Denition
Multimedia Interface, and the HDMI Logo are
trademarks or registered trademarks of HDMI
Licensing Administrator, Inc. in the United
States and other countries.
Manufactured under license from Dolby Laboratories. Dolby, Dolby Vision,
Dolby Audio, Dolby Atmos, and the double-D symbol are trademarks of Dolby
Laboratories.
For DTS patents, see http://patents.dts.com. Manufactured under license from
DTS Licensing Limited. DTS, the Symbol, & DTS and the Symbol together, DTS
2.0 Channel, DTS 2.0+Digital Out, DTS-HD, and DTS Virtual:X are registered
trademarks or trademarks of DTS, Inc. in the United States and/or other countries.
© DTS, Inc. All Rights Reserved.
USB Type-C™ and USB-C™ are trademarks of USB Implementers Forum.
NOTE
• Images shown in this manual may differ from your projector.
• Your projector’s OSD (On Screen Display) may differ slightly from that shown in
this manual.
3
ENGLISH
Page 4

ENGLISH
4
Open Source Software Notice Information
To obtain the source code under GPL, LGPL, MPL, and other open source licenses,
that is contained in this product, please visit http://opensource.lge.com.
In addition to the source code, all referred license terms, warranty disclaimers and
copyright notices are available for download.
LG Electronics will also provide open source code to you on CD-ROM for a charge
covering the cost of performing such distribution (such as the cost of media,
shipping, and handling) upon email request to opensource@lge.com.
This offer is valid for a period of three years after our last shipment of this product.
This offer is valid to anyone in receipt of this information.
Page 5
SAFETY PRECAUTIONS
Please take note of the safety instructions to prevent any potential accident or
misuse of the projector.
Child injuries can be prevented by following these simple safety precautions.
The precautions should be followed in the same manner when you store or move
your existing projector.
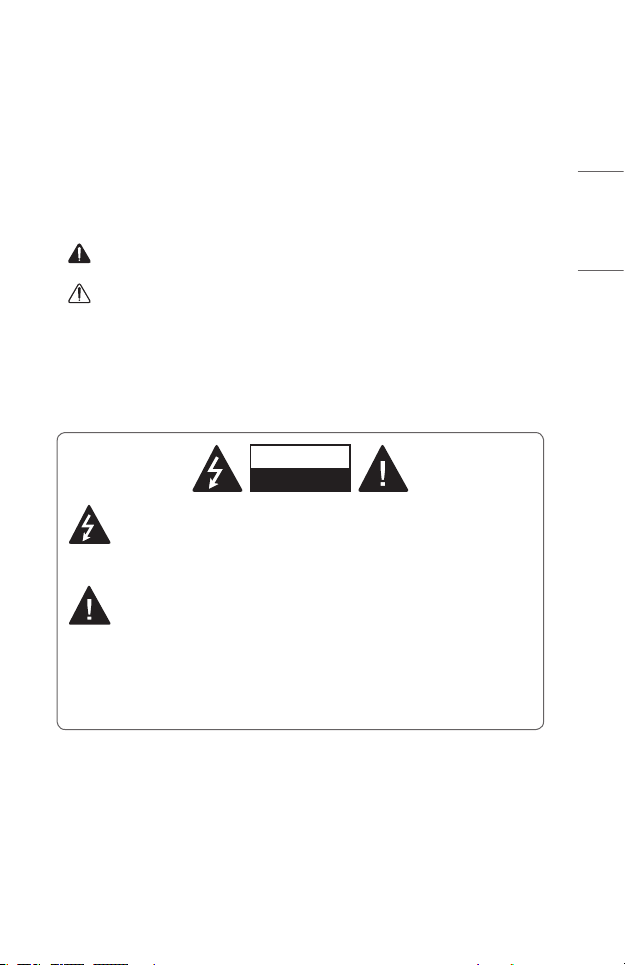
• Safety precautions are given in two forms, i.e., WARNING and CAUTION as
detailed below.
WARNING: Failure to follow the instructions may cause serious injury and
even death.
CAUTION: Failure to follow the instructions may cause personal injury or
product damage.
• Read the owner’s manual carefully and keep it on hand.
WARNING/CAUTION
RISK OF ELECTRIC SHOCK
DO NOT OPEN
The lightning ash with arrowhead symbol, within an equilateral
triangle, is intended to alert the user to the presence of uninsulated
dangerous voltage within the product’s enclosure that may be of
sufcient magnitude to constitute a risk of electric shock to persons.
The exclamation point within an equilateral triangle is intended to alert
the user to the presence of important operating and maintenance
(servicing) instructions in the literature accompanying the appliance.
5
ENGLISH
WARNING/CAUTION
− TO REDUCE THE RISK OF FIRE AND ELECTRIC SHOCK, DO NOT EXPOSE
THIS PRODUCT TO RAIN OR MOISTURE.
Page 6

ENGLISH
6
Read these instructions. Keep these instructions.
Heed all warnings. Follow all instructions.
Indoor Installation
WARNING
Do not install products including projectors and remote controls in the
following places:
− Any place exposed to direct sunlight;
− Any humid place such as bathroom;
− Any place near hot objects such as ammables and stoves;
− Any place where oil, oil mist, and steam can reach such as a worktop or places
near a humidier;
− Any place where water can splash like a vase or the aquarium;
− Any place that is dusty or exposed to wind and rain;
− Any place that is under the air conditioner or is directly exposed to the wind
from the air conditioner;
− Any place near ammable materials such as ammable sprays, etc.; or
− Any cupboard, bookcase shelf or cabinet without a xture installed and any
place where a pet can access.
• It may cause an electric shock, fire, malfunction, deformation or falling.
Be careful not to fall or drop the projector when connecting an external
device.
• It may cause injury or damage to the product.
Page 7

Keep the following precautions in mind to prevent the temperature rise inside
the projector:
− Install the air vents at least 30 cm (11.8 inches) away from the wall.
− Do not install the product in a place where it cannot be ventilated, such as on a
bookcase or in a closet.
− Do not install the product on carpet or cushion.
− Make sure that the air vents are not blocked with tablecloths, curtains, etc.
• It may cause a fire.
For places where oil or oil mist can reach, do not install the product on a wall
or ceiling.
• The product may be damaged and fall.
Do not allow a child to hang or climb on the installed projector.
• The projector may fall and cause injury or death.
When installing the product on the ceiling, observe the following precautions
to prevent the projector from falling:
− Contact the Customer Support Center for installation.
− Tighten the product by using the mounting equipment and M4 x 8 mm (M6
x 10mm, 1/4-20UNC x 5.5mm) screws that are approved by a professional
technician.
− Do not use adhesive, lubricant, oil, etc. when using the mounting equipment.
− Do not tighten the screws with an excessive force since the projector may fall
due to breakage of the screw connection part. (the recommended torque: 5-8
kgf.cm (4.34-6.94 ibf-in))
• A failure to follow the precautions may result in injury or death and product
damage due to the fall of the product.
7
ENGLISH
Page 8

ENGLISH
8
CAUTION
When moving the projector, be sure to turn off the power switch and
disconnect the power plug, antenna cable and the connection cord between
the devices.
• A failure to do so may cause damage to the projector or the cord, resulting in a
fire or electric shock.
Do not install the projector on a shaky shelf, a slanted place, a place subject
to vibrations, a place where the projector is not fully supported or on a fabric
such as tablecloths.
• It may cause injury as the projector falls or tips over, or it may cause a
malfunction of the projector.
To prevent damage to the power cord or plug, do not install the projector
where the cord can be walked on.
• It may cause a fire or electric shock.
When installing the projector, do not install it too close to the wall.
• The cable connection may be deteriorated or the projector and its cables may be
damaged.
When installing the projector on a cabinet or a shelf, make sure that the front
end of the bottom of the projector does not come out.
• The projector may fall due to the unbalance of the center of gravity and cause
injury to people or a malfunction.
Page 9

When in Use
WARNING
When thunder or lightning strikes, unplug the power cord and do not touch
the antenna wire.
• It may cause an electric shock.
If there is a gas leak from the gas lines, do not touch the outlet and be sure to
vent by opening the window.
• Sparks may be caused and lead to a fire or burns.
When using the product with an external device such as a game console
connected, keep the length of the connection line enough.
• The product may fall over and cause injury or product damage.
Do not scratch or give an impact on the projector with metallic materials or
objects.
• It may cause injury to people or damage to the product.
Do not insert metallic objects including coins, hairpins or a piece of iron or
ammableobjectssuchaspaperormatchesintotheprojector.
• It may cause a fire or electric shock.
When replacing the batteries used for the remote control, be careful not to let
children eat them and keep the batteries out of reach of children.
• If a child swallows the battery, consult a doctor immediately.
9
ENGLISH
Page 10

ENGLISH
10
Keep the plastic wrapping of the product out of the reach of children.
• If a child misuses it, it may suffocate the child.
Do not touch near the vents during the operation or immediately after the
power is turned off as they generate intense heat.
• The heat does not indicate a defect or a problem of the projector when it is
operating so use it with confidence.
Do not look into the front of the lens when the projector is operating. Strong
light is projected from the product which can cause injury to your eyes.
Never try to disassemble or modify the projector yourself. Always seek a
qualiedservicetechnicianorconsultyourdealerorlocalServiceCenterfor
inspection, adjustment or repairs.
• It may cause a fire or electric shock.
Page 11

CAUTION
Do not use any product that uses high voltage electricity near the projector.
(e.g.Anelectricyswatter)
• It may cause a malfunction.
Do not place any liquid containers such as a vase, pot, cup, cosmetics or
medicine, decorations such as candles or any heavy objects on top of the
projector.
• Doing so may cause a fire, electric shock and injury due to failing.
The surface of the AC adapter is hot, so be careful not to put the surface
against your skin or let the children touch the surface during use. (Except for
themodelsthatdonotuseanadapter)
Do not hold or move the projector upside down by grabbing only the power
cord, signal cable, or projection mirror.
• Doing so may damage the product or cause an electric shock or fire.
Even if the projector is turned off with the remote control or the button, the
power is not completely cut off if the power cord is plugged in.
If you use headphones or earphones, do not use them at high volume or for a
long period of time. (It applies only to the models that support headphones
(earphones).)
• Doing so may damage your hearing.
Do not start the projector when the volume is high.
• A loud volume can cause hearing loss.
Do not use or store the projector outdoors for an extended period of time.
Do not touch the projector’s lens or give an impact on it.
• It may cause damage to the product.
11
ENGLISH
Page 12

ENGLISH
12
Do not block the light from the projector lens with a person, book or other
objects.
• If the light from the projector shines on an object for a long time, it can cause fire
due to the heat of such light. Also, the reflected light can heat the lens and cause
damage to the projector.
Do not mix old and new batteries together.
• It may cause battery rupture or fire due to liquid leakage or may cause electrical
shock.
When replacing the batteries, make sure that they are properly installed
accordingtothepolarities(+,-).
• Battery rupture or leakage may lead to fire, explosion, injury or contamination
(damage) of the surrounding area.
Donotexposethebatteriestodirectsunlight,replace,electricheater,high
temperatureabove60°C(140°F),excessivelyhumidplacesorexcessiveheat.
• It can cause an explosion or fire.
Do not throw or disassemble the battery.
• It can cause a fire and explosion due to battery damage.
Do not carelessly throw away old batteries.
• It can cause an explosion or fire. The disposal method may vary by country and
region. Dispose of it in an appropriate manner.
Page 13

13
Power
WARNING
Make sure the power plug is securely plugged in to prevent it from shaking.
• If the connection is unstable, it may cause a fire.
Do not plug too many devices into one multi-power outlet.
• This may result in fire due to the power outlet overheating.
Do not insert a metal object such as chopsticks into the other end of the
power plug while it is plugged into a wall outlet. Also, do not touch the power
plug immediately after unplugging it from the outlet.
• It can cause an electric shock.
Connect the power plug to a grounded outlet or multi-tap. (Except for any
devicewithoutgroundconnection)
• A failure to do so may cause an electric shock due to a malfunction or electrical
short.
Never touch the power plug with wet hands.
• It may cause an electric shock.
Disconnect the power plug from the outlet when you are not using the
projector for a long time or absent.
• Dust collects and may cause an electric shock and fire caused by a short circuit
due to heat, ignition and insulation/degradation.
The Power Plug is the disconnecting device. In case of an emergency, the
Power Plug must remain readily accessible.
ENGLISH
Page 14

ENGLISH
14
If any of the following occurs, it could be a malfunction of the product, so
you must immediately turn the projector off, unplug the power cord from the
outlet, and contact the service center:
− When the product is damaged;
− When the product fails;
− When there is a foreign substance inside the product; or
− When the product smokes or smells.
• It may cause a fire or electric shock.
CAUTION
Do not unplug or plug the power plug from/in the outlet while the power
switchison.(Donotusethepowerplugasaswitch.)
• It may cause a fire or malfunction.
When removing the AC adapter or power cord, be sure to hold the plug part.
• A failure to do so may cause a fire or damage to the product.
Do not damage the AC adapter, power cord or power plug, place heavy objects
on them or give an impact on them.
• It may cause a fire, electric shock or damage to the product.
Attach the power cord and AC adapter connected to the projector in a way
that they are fully seated.
• Poor contact can cause a malfunction of the product and fire.
If there is dust on the pin part of the power plug or the outlet, clean it
thoroughly.
• It may cause a fire.
Keep the power cord away from heat sources.
• The coating of the cord may melt and cause a fire or electric shock.
Use only the authorized power cord or AC adapter supplied by LG Electronics.
Do not use any other products.
• It may cause a malfunction of the product, fire or electric shock.
Page 15

15
Cleaning
WARNING
Do not spray water directly onto the projector when cleaning it.
• It may cause a fire or electric shock.
CAUTION
How to clean the projector
− Disconnect the plug from the outlet before cleaning.
− Do not wipe the optical system (the lens and mirror) immediately after the
power is turned off.
− Do not spray the water with a sprayer on the product or wipe the product with
a damp cloth.
− Wipe the product gently with a soft cloth.
− Do not use any detergents, automotive or industrial polishes, abrasives, waxes,
benzenes or alcohols.
• It may cause a fire, electric shock or damage to the projector (deformation,
corrosion, and breakage).
How to clean the lens
− Clean the lens if any dust or smudge appears on the surface of the lens.
− Clean the surface of the lens with an air sprayer or a soft, dry cloth.
− To remove dust or stains on the lens, use a compressed air duster, cotton swab,
or soft cloth to gently wipe the lens.
− Never clean the lens when the projector is operating or immediately after the
projector is turned off.
− Do not use any detergents, automotive or industrial polishes, abrasives, waxes,
benzenes, alcohols, water, etc. on the lens, as they will damage the projector.
Consult your dealer or the service center for cleaning the interior of the
product once a year.
• If you do not clean the interior of the projector for a long time while dust collects,
it may cause a fire or malfunction.
ENGLISH
Page 16

ENGLISH
16
Antenna
WARNING
Bend down the part where the outdoor antenna line goes into the inside so
thatrainwatercannotowintoit.
• Rainwater going into the product may cause a fire or electric shock.
CAUTION
If you are using an outdoor antenna, please install it away from electrical wires
to make sure it does not touch any nearby wires even when it falls down due
to heavy wind.
• Failure to do so may cause electric shock or physical injury.
Outdoor Antenna Grounding
• If an outdoor antenna is installed, follow the precautions below. An outdoor
antenna system should not be located in the vicinity of overhead power lines or
other electric light or power circuits, or where it can come in contact with such
power lines or circuits as death or serious injury can occur. Be sure the antenna
system is grounded to provide some protection against voltage surges and
built-up static charges. Section 810 of the National Electrical Code (NEC) in the
U.S.A. provides information with respect to proper grounding of the mast and
supporting structure, grounding of the lead-in wire to an antenna discharge unit,
size of grounding conductors, location of antenna discharge unit, connection to
grounding electrodes and requirements for the grounding electrode.
Page 17
17
Antenna grounding according to the National Electrical Code, ANSI/NFPA 70
Antenna Lead in Wire
Ground Clamp
Electric Service Equipment
Ground Clamp
NEC: National Electrical Code
Antenna Discharge Unit
(NEC Section 810-20)
Grounding Conductor
(NEC Section 810-21)
Power Service Grounding
Electrode System (NEC Art
250, Part H)
For USA
NOTE TO CABLE/TV INSTALLER
This reminder is provided to call the CATV system installer’s attention to Article
820 - 40 of the National Electric Code (U.S.A.). The code provides guidelines
for proper grounding and, in particular, species that the cable ground shall be
connected to the grounding system of the building, as close to the point of the
cable entry as practical.
ENGLISH
Page 18

ENGLISH
18
Laser
WARNING
• You risk being exposed to laser radiation if you manipulate or alter the product in
a way not specified in the user manual.
• Be sure not to let infants or people with diseases directly watch the light source.
CAUTION
• This product is a class 1 laser device that meets IEC 60825-1.
Built-inlaserstandard(class4lasermodule)
• Blue
– Wavelength: 448 nm - 462 nm
– Light output: approx. 95 W x 2
• Red
– Wavelength: 636 nm - 642 nm
– Light output: approx. 2.5 W x 12
Product Laser Class Label
CLASS 1 LASER PRODUCT
1
The laser class label of product is attached to the bottom of the product.
Page 19
PREPARATION
The pictures may differ slightly from the actual product.
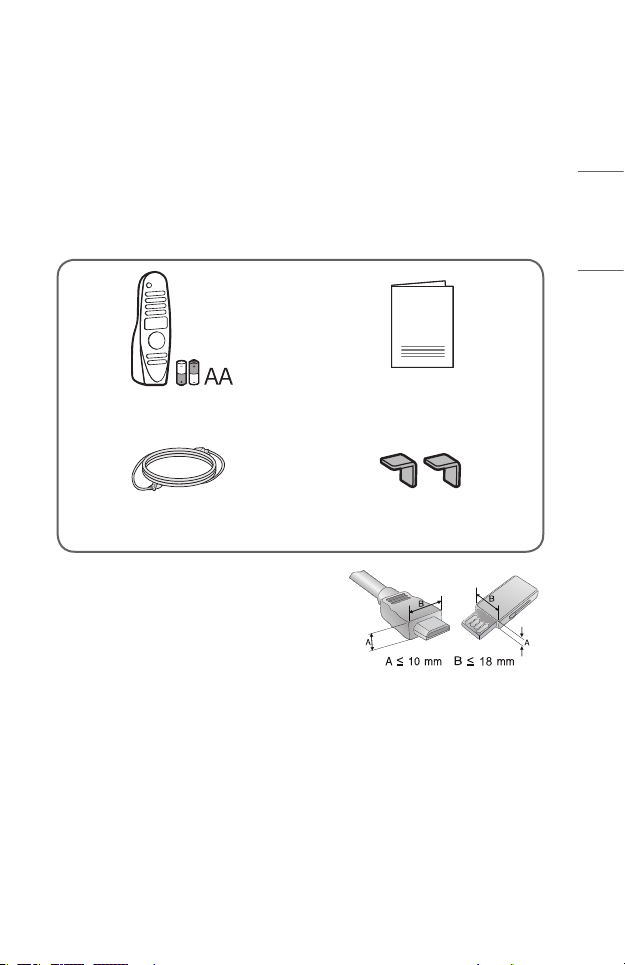
Accessories
Accessories included with the projector are show below.
Accessories are subject to change without prior notice.
New accessories may be added or old ones removed.
Magic Lighting Remote
Two AA Batteries
Power cord Edge guards
• When connecting an HDMI or USB cable, or
connecting a USB flash drive to the HDMI or
USB port, use a product that has a width of
18 mm (0.7 inches) or less and a height of
10 mm (0.3 inches) or less. If the USB cable
or USB flash drive does not fit the USB ports
of the projector, use an extension cable that
supports USB 2.0.
• When connecting two USB devices at the same time, each one should have
bezels less than 8.5 mm (0.3 inches) thick.
• Use a certified cable with the HDMI logo attached.
• If you do not use a certified HDMI cable, the screen may not display or a
connection error may occur. (Recommended HDMI cable types)
– Ultra High-Speed HDMI®/TM Cable (3 m (9.8 feet) or less)
Owner’s Manual
19
ENGLISH
Page 20
ENGLISH
20
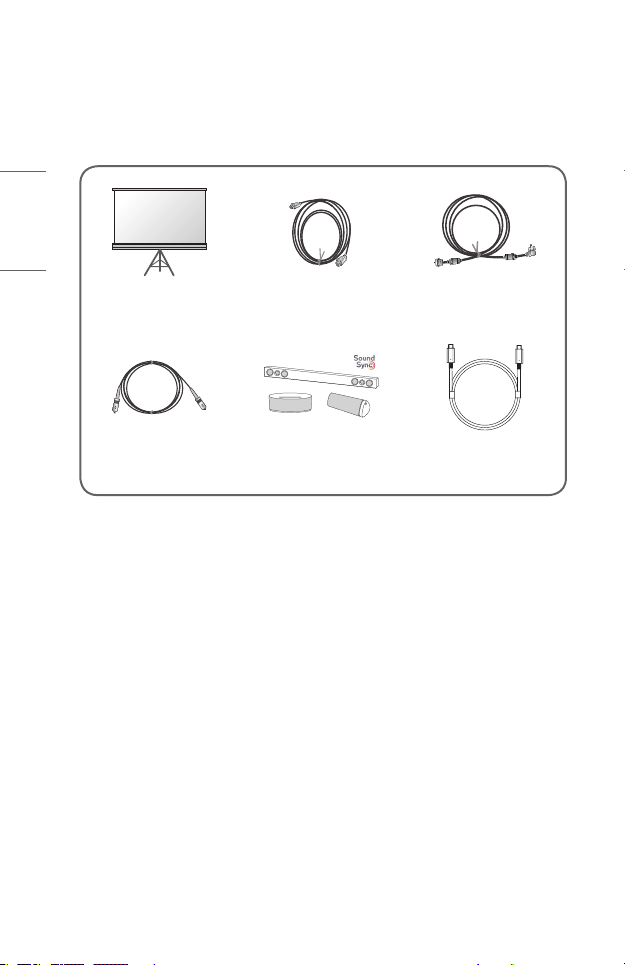
Optional Extras
To purchase optional accessories, visit an electronics store or online shopping site
or contact the retail store where you purchased the product. Optional accessories
are subject to change without prior notice.
Projection Screen HDMI Cable RF Cable
Optical Cable LG Audio Device USB-C Cable
Page 21
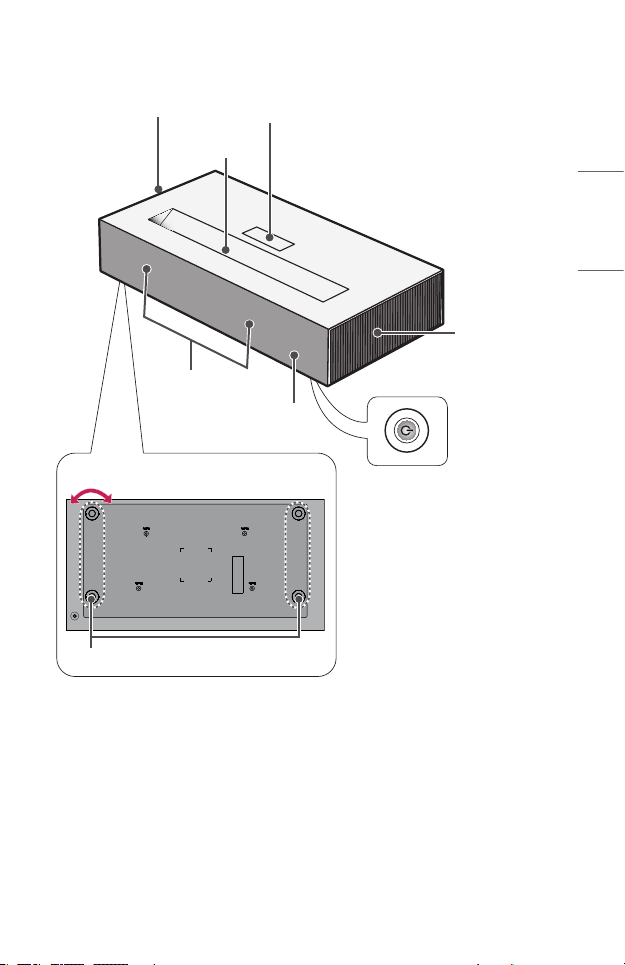
Parts and Components
Inlet Vent
Focus Ring Cover
2)
Lens
21
4)
ENGLISH
Outlet Vent
Speaker
Joystick Button
IR Receiver
Bottom of the Projector
Adjustable leg
3)
1) Due to the high temperature of vent area, do not get close to the vent area.
2) Do not touch the lens when using the projector. The lens may be damaged.
(Keep lens away from sharp objects.)
3) Turn the adjustable leg left or right to adjust the angle.
4) Be careful not to get your ngers caught when closing the projector’s door.
(This may cause injury to people or a malfunction of the product.)
1)
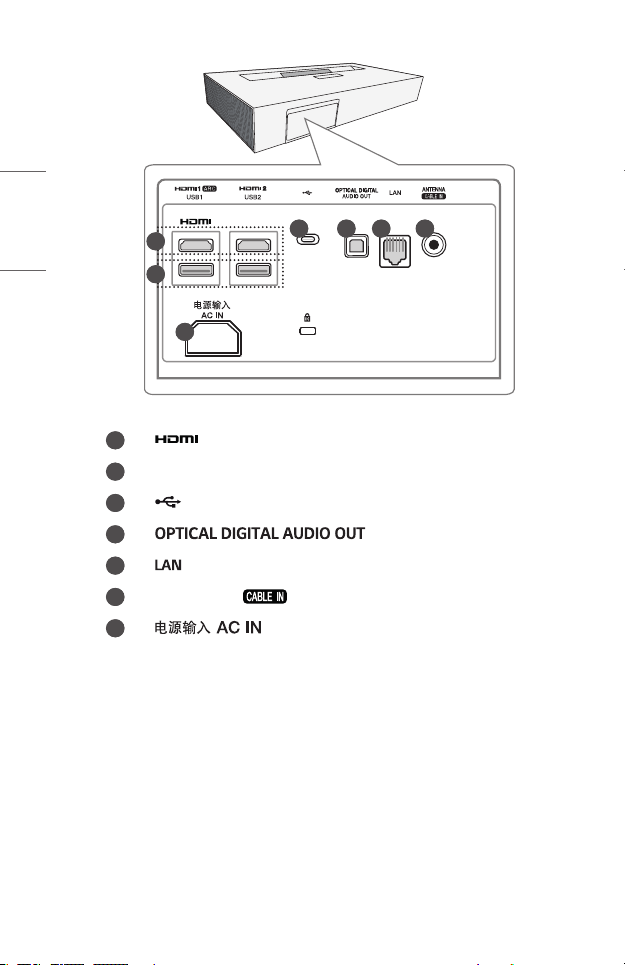
Page 22
ENGLISH
22
1
2
1
USB 2.0 Port
2
3
4
5
Antenna Port ( )
6
7
3 4 5 6
7
Port
(USB-C Port)
Port
Port
(AC IN Port)
Page 23
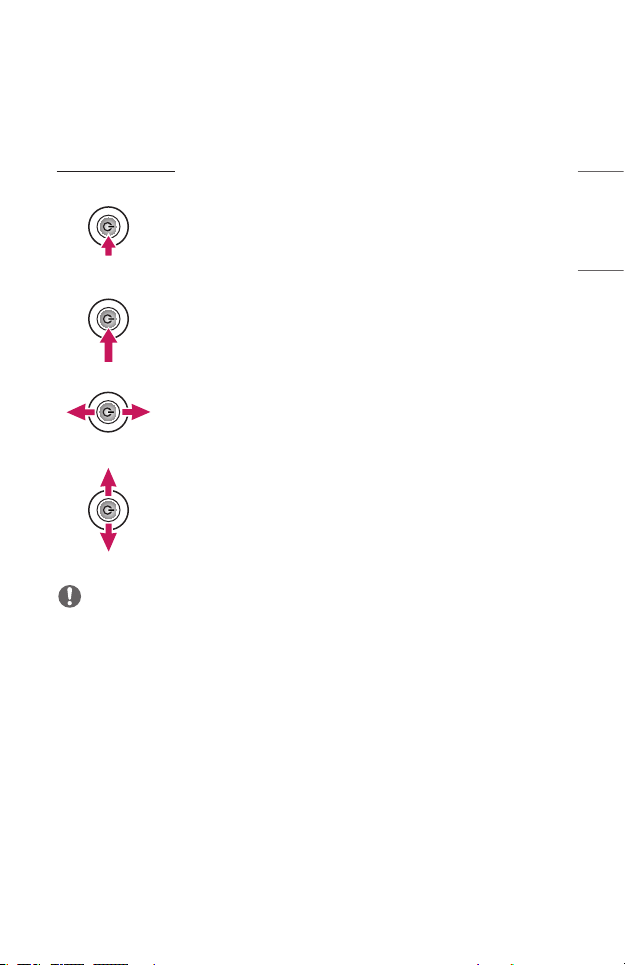
Using the Joystick Button
You can operate the projector by pressing the button or moving the joystick left,
right, up, or down.
Basic functions
When the projector is turned off, place your
Power On
nger on the joystick button, press it once,
and release it.
23
ENGLISH
Power Off
(Press and
Hold)
Volume
Control
Channels
Control
NOTE
• When moving the joystick button up, down, left or right, be careful not to move
the button while it is being pressed. The volume and channel may not be adjusted
when the joystick button is pressed and moved.
Press and hold the joystick button for more
than 3 seconds while the projector is on.
Place your nger over the joystick button
and move it left or right, you can adjust the
volume level.
Place your nger over the joystick button and
move it up or down, you can scroll through
the saved channels.
Page 24

ENGLISH
24
Adjusting the menu
When the projector is turned on, press the joystick button one time.
You can adjust the menu items ( , , , ) moving the joystick button left,
right, up, or down. Move to the desired menu item, and then press the joystick
button once to select it.
Turns the power off.
Changes the input source.
Clears on-screen displays and returns to projector viewing.
Displays the Settings menu.
Page 25
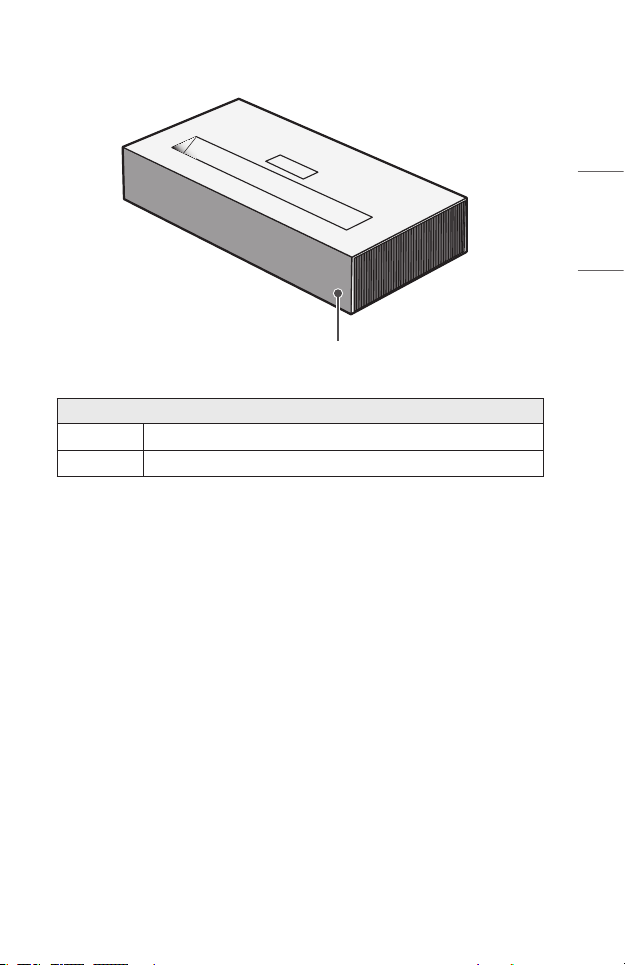
Projector Status Indicators
LED Power Indicator
LED Power Indicator
Red
Off
Power standby state
The projector is operating with the power on.
25
ENGLISH
Page 26
ENGLISH
26
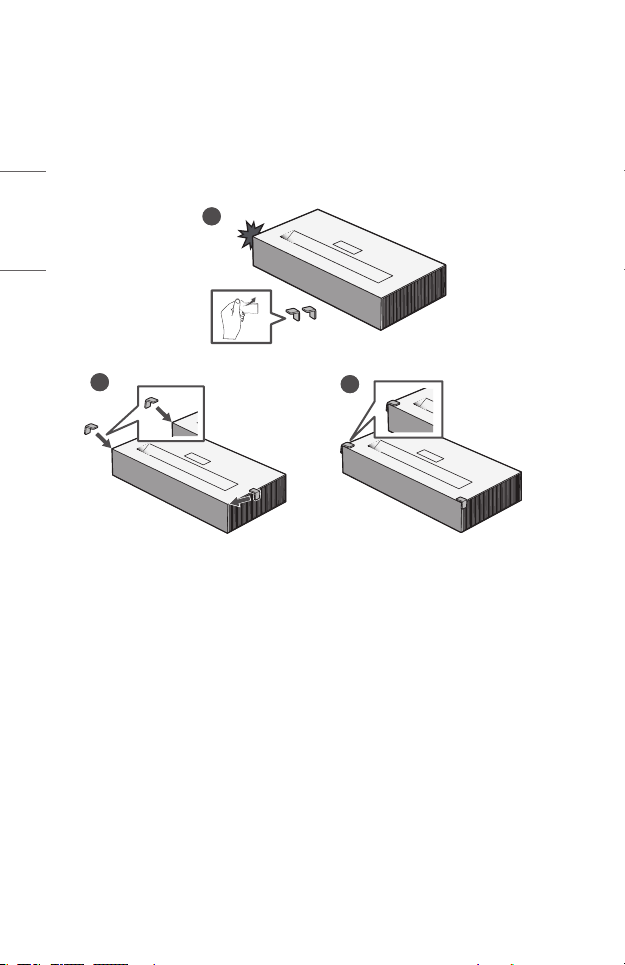
INSTALLATION
How to use the edge guards
It prevents any damage to the product and injury when being attached to sharp
edges of the product.
1
2
3
Page 27

27
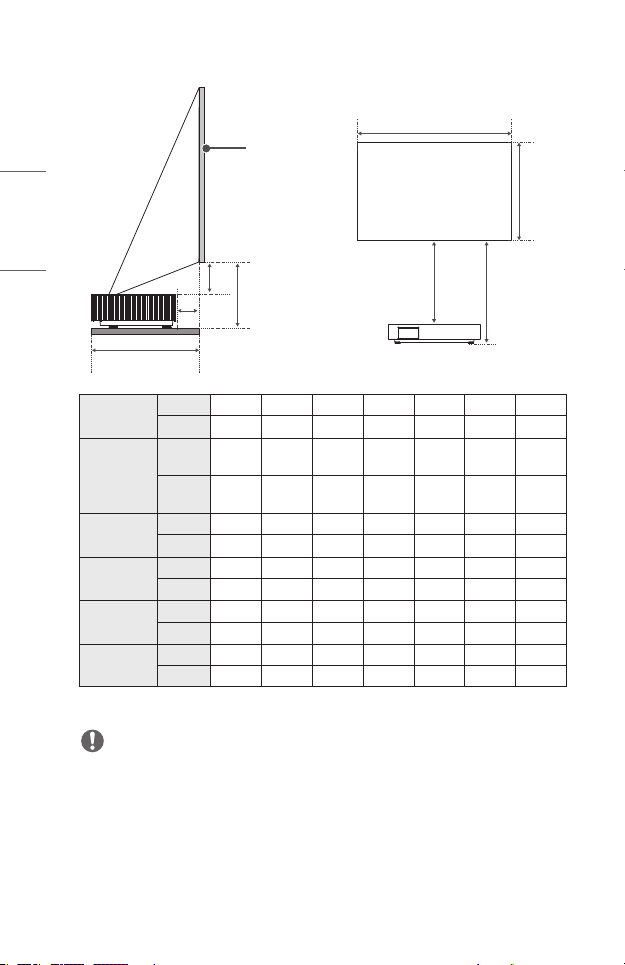
Projection Distance per Screen Size
1 Place the projector on a sturdy, level surface, together with the PC or audio/
video source.
2 Place the projector an appropriate distance away from the screen. The distance
between the projector and the screen determines the actual size of the image.
3 Position the projector so that the lens is at a right angle to the screen. If the
projector is not at a right angle, the projected image will look distorted. To
correct the distortion, use the Edge Adjustment function.
4 Connect the power cord of the projector and the connected device to the wall
outlet.
ENGLISH
Page 28
28
Ratio of upward projection: 120 %
X
Screen
ENGLISH
C
D
C
D
B
A
Screen Size
Horizontal
Size(X)x
Vertical Size
(Y)
A
B
C
D
The projection distance may vary depending on the installation conditions.
inches 90 95 100 105 110 115 120
mm 2286 2413 2540 2667 2794 2921 3048
inches 78.4
mm 1992
inches 15.8 16.6 17.5 18.3 19.2 20.0 20.8
mm 403 424 445 466 488 509 530
inches 2.2 3.0 3.8 4.6 5.5 6.3 7.2
mm 56 77 98 119 141 162 183
inches 7.1 7.6 8.1 8.6 9.1 9.6 10.1
mm 182 195 207 220 232 245 257
inches 12.6 13.1 13.6 14.0 14.6 15.0 15.5
mm 321 334 346 358 371 383 396
x44.1
x1121
82.7
x46.5
2103
x1183
87.1
x49.0
2214
x1245
91.4
x51.4
2324
x1308
95.8
x53.9
2435
x1370
100.2
x56.3
2546
x1432
NOTE
• If the projected image looks distorted or bent, check to see if the screen is
installed properly.
Y
104.6
x58.8
2657
x1494
Page 29
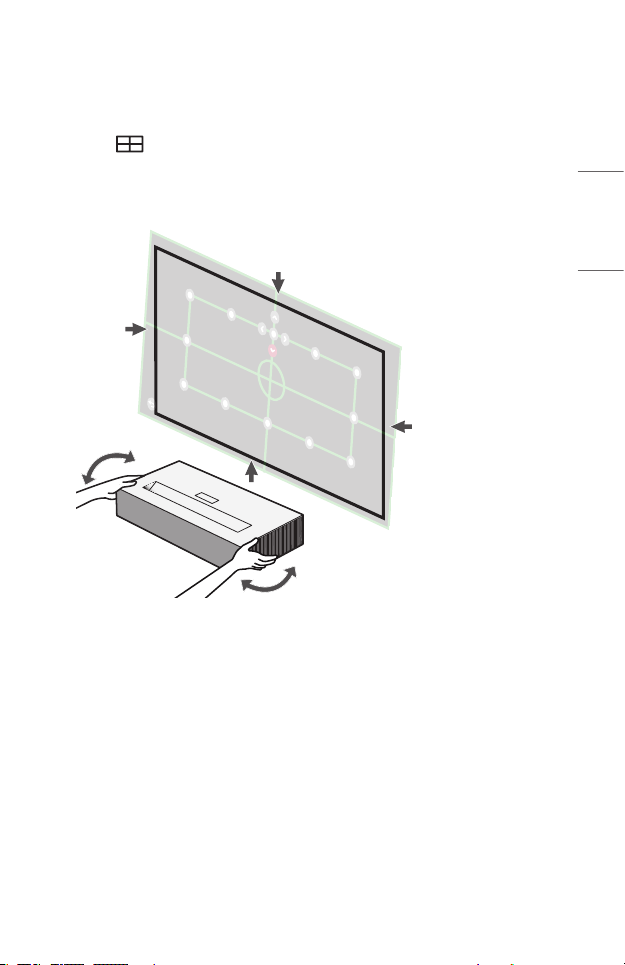
Focus of the Screen Image
When an image appears on the screen, check if it is in focus and ts the screen
properly.
1 Press (EdgeAdjustment) button on the remote control to execute the
[Edge Adjustment] function.
2 Move the projector to the left or right to check that the projection ts on the
screen.
29
ENGLISH
Page 30
ENGLISH
30
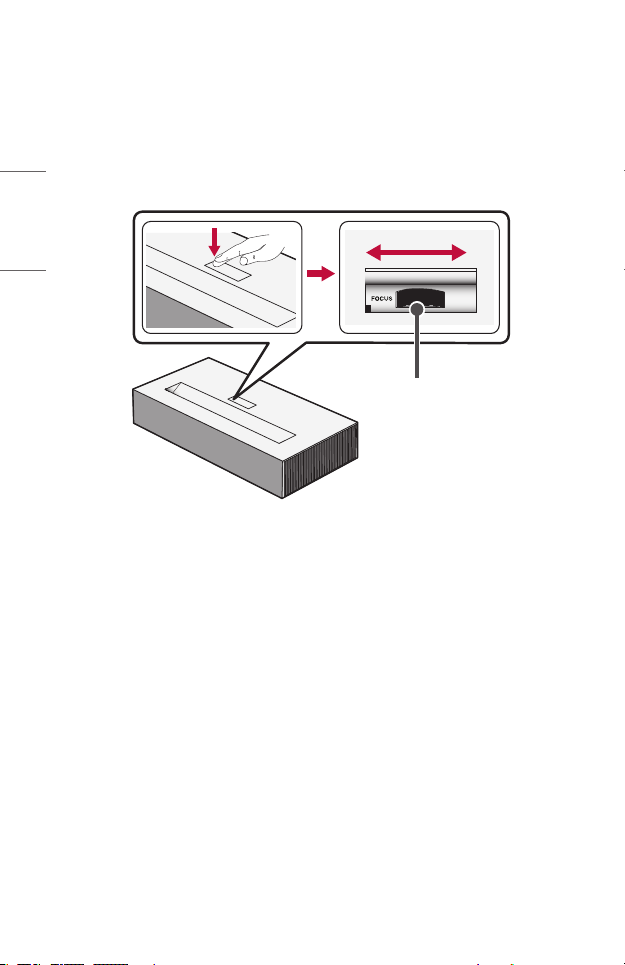
3 To adjust the focus of the image, slowly adjust the focus ring to the left or
right while looking at the top center of the screen. You can adjust the focus
most effectively when the left and right screen are balanced. When adjusting
the focus on the screen, do not let the product shake.
– Before using the focus ring, press the lower left corner of the focus ring
cover once to open the cover. Please open the focus ring cover before
using the focus ring.
Focus Ring
4 If the angle of the projection is not perpendicular, use the [Edge Adjustment]
function. (Use the Up/Down/Left/Right buttons on the remote control to
adjust the top/bottom/left/right of each angular point.)
Page 31

Kensington Security System
• This projector has a Kensington Security Standard connector as an anti-theft
mechanism. Connect a Kensington Security System cable as shown below.
• For more information on installation and use of the Kensington Security System,
refer to the user’s guide provided with the Kensington Security System.
• The Kensington Security System is an optional accessory.
• What is Kensington?
Kensington is a company that provides safety systems for laptops and other
electronic devices. Website: http://www.kensington.com
31
ENGLISH
Page 32

ENGLISH
32
MAGIC LIGHTING REMOTE
• Depending on country
If the battery low message appears while using the
Projector, replace the batteries.
As shown in the gure, press the top of the battery
cover and slide it down the cover. Insert two new and
identical batteries (1.5 V, AA type) with + and - poles
pointing in the correct direction in the remote control.
* : To use the button, press and hold for more than 3 seconds.
CAUTION
• Do not mix new batteries with old ones.
(POWER)
Turns the Projector on or off.
You can turn your set-top box on or off by adding the settop box to the universal remote control for your Projector.
Number buttons
Enters numbers.
*
Accesses the [QUICK HELP].
(Dash)
Inserts a dash between numbers such as 2-1 and 2-2.
1
2
Accesses the saved channel list.
Edits QUICK ACCESS.
(QUICK ACCESS is a feature that allows you to enter a
specied app or Live TV directly by pressing and holding the
number buttons.)
(MOREACTIONS)
Displays more remote control functions.
Enables SAP (Secondary Audio Program) Feature.
*
*
Page 33

Adjusts the volume level.
(MUTE)
Mutes all sounds.
(MUTE)*
Accesses the [Accessibility] menu.
(Voicerecognition)
Network connection is required to use the voice recognition
function.
Once the voice display bar is activated on the projector
screen, press and hold the button and speak your command
out loud.
(Search)
Search for content such as movies and other videos, or
perform a web search by entering your search terms in the
search box.
Scrolls through the saved channels.
Accesses the Home menu.
*
Displays the list used previously.
(Q.Settings)
Accesses the Quick Settings.
(Q.Settings)*
Displays the [All Settings] menu.
Press the up, down, left or right button to scroll the menu.
If you press
in use, the pointer will disappear from the screen and the
Magic Lighting Remote will operate like a general remote
control. To display the pointer on the screen again, shake
the Magic Lighting Remote to the left and right.
Wheel(OK)
Press the center of the Wheel button to select a menu. You
can change channels by using the Wheel button.
(Up/Down/Left/Right)
buttons while the pointer is
33
ENGLISH
Page 34

34
(Back)
Returns to the previous screen.
(Back)*
Clears on-screen displays and returns to last input viewing.
ENGLISH
Shows channels guide.
Streaming Service buttons
Connects to the Video Streaming Service.
(INPUT)
Changes the input source.
(INPUT)*
Accesses the [Home Dashboard].
These access special functions in some menus.
The remote control buttons light up so that you can use the
remote control in the dark.
If the remote control does not move, the pointer disappears
and the remote control light turns off in about 5 seconds.
The lighting function is applied when the product is shipped,
and if you press and hold the
seconds, the
can turn the lighting function on or off.
Execute [Edge Adjustment].
Control buttons (
Controls media contents.
(POWER) button ashes twice and you
(EdgeAdjustment)
button for more than 5
, )
Page 35

To Register the Magic Lighting Remote
You must pair the Magic Lighting Remote with the projector to use it.
Pair the Magic Lighting Remote prior to use as follows.
1 Put batteries into the Magic Lighting Remote and turn the Projector on.
2 Point the Magic Lighting Remote at your projector and press the Wheel
(OK) on the remote control.
• If the projector fails to register the Magic Lighting Remote, try again after
turning the projector off and back on.
To Re-register the Magic Lighting Remote
1 Press the and buttons at the same time, for ve seconds, to unpair
the Magic Lighting Remote with your projector.
2 Press the Wheel(OK) button towards the projector to re-register the
Magic Lighting Remote.
• Pressing and holding the button will let you cancel and re-register Magic
Lighting Remote at once.
35
ENGLISH
Page 36

ENGLISH
36
Using the Magic Lighting Remote
• If you shake the Magic Lighting Remote left and right
or turn its wheel while pointing it at the projector,
a pointer will appear on the projector screen. If you
move the remote control in the direction you want,
the pointer follows the movement.
Move the pointer to the location you want and press
the Wheel(OK) button to execute the function.
Page 37

Setting the Pointer of Magic Lighting Remote
[Accessibility] [Pointer Options]
• You can set the pointer speed and size you want while it is on the screen.
– [Tracking Speed]: Sets the pointer speed.
– [Pointer Size]: Selects the pointer size.
• If the pointer has not been used for a certain period of time, it will disappear.
When the pointer disappears from the screen, shake the Magic Lighting Remote
right and left.
The pointer will disappear if you press the up, down, left, right buttons, and the
remote will work as a conventional remote.
• If the pointer is not responding smoothly, you can reset the pointer by moving it
to the edge of the screen.
• Use the remote control within the specified range (within 10 m (32.8 feet)).
You may experience communication failures when using the device outside the
coverage area or if there are obstacles within the coverage area.
• You may experience communication failures depending on the accessories.
Devices such as a microwave oven and wireless LAN operate in the same
frequency band (2.4 GHz) as the Magic Lighting Remote. This may cause
communication failures.
• Impacts can cause the Magic Lighting Remote to malfunction.
• Take care not to bump into nearby furniture, electronic equipment, or other
people when using the Magic Lighting Remote.
37
ENGLISH
Page 38

ENGLISH
38
CONNECTING DEVICES
You can connect various external devices to the projector.
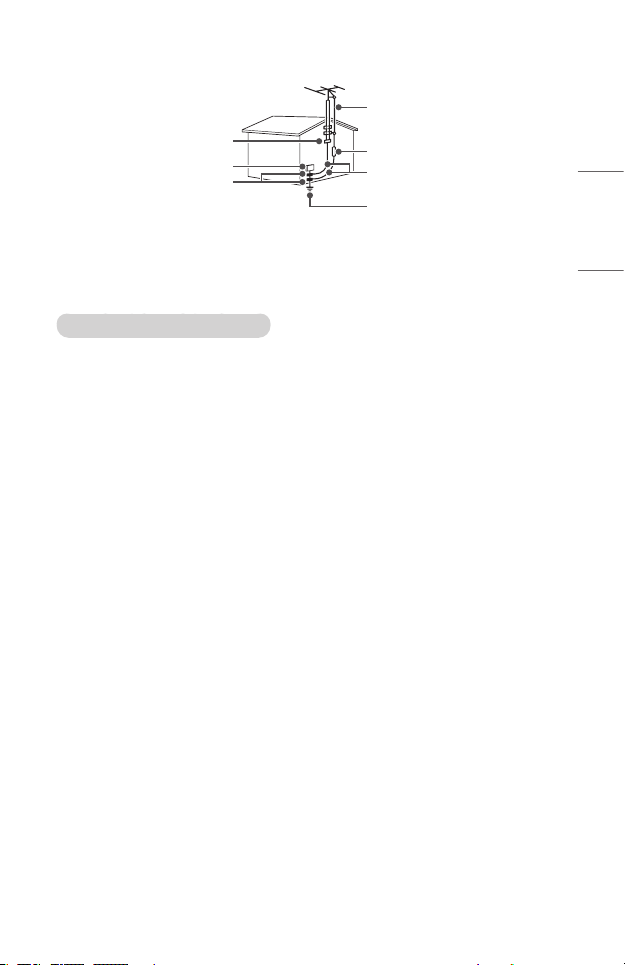
Connecting the Antenna or Cable
To watch TV using an indoor/outdoor antenna, connect a wall terminal and the
antenna port of the projector using an RF cable (75Ω).
You can watch terrestrial or cable (analog, digital) TV.
Optional Extras
NOTE
• Make sure not to bend the copper wire of the RF
cable (75 Ω). Turn the input jack to the right to
fasten it.
• Ensure you use a standard coaxial cable (75 Ω,
sold separately) when connecting to the projector
input.
• For better image quality in locations where signal
strength is low, purchase and install a signal
amplifier (booster).
• A signal splitter is required if you want to use two
or more projectors through one antenna.
• If you have any problems when installing the
antenna, please consult a suitable retailer or the
store where you purchased the antenna.
Copper wire
Page 39

39
Connecting with a HDMI Cable
Various functions are available after connecting a digital broadcasting receiver,
DVD, PC, laptop, etc. with an HDMI cable.
With an HDMI cable, you can enjoy high quality picture and sound.
Using a HDMI cable, connect the port of the projector to the HDMI output
port of the device to connect. Both video and audio are output at the same time.
• (INPUT) [Home Dashboard] [INPUTS] [HDMI1]/[HDMI2]
Optional Extras
NOTE
ARC(AudioReturnChannel)
• External audio devices that support SIMPLINK and ARC must be connected using
port. ( )
• When connected with a high-speed HDMI® cable, external audio devices that
support ARC output or SPDIF work with the SIMPLINK function without the
need for an additional optical audio cable.
When connecting PC/laptop
• The projector supports Plug and Play. Your PC will automatically detect the
projector and requires no driver installation.
ENGLISH
Page 40

ENGLISH
40
Connecting with a USB-C Cable
Connect the USB-C terminal of the projector to the USB-C output terminal of a
PC/laptop or smartphone using a USB-C cable.
Contact the manufacturer of your device to see if this feature is supported. Only
the smartphones that support USB-C will work.
• (INPUT) [Home Dashboard] [INPUTS] [USB-C]
Optional Extras
NOTE
• PD (Power Delivery) and DP Alternate Mode are supported.
– A USB-C gender changer may be necessary depending on the cable used if
using PD (Power Delivery).
• The function may not operate properly depending on the connected device’s
specifications, USB-C cable status, or surroundings.
• The USB PD (for power supply) function may not operate according to the
specifications of the connected equipment.
• Check the resolution of the connected devices before using the DP Alternate
Mode function.
Page 41

41
Connecting a Digital Amp
Using an optical cable, connect the digital audio input port of a digital amp to the
OPTICAL DIGITAL AUDIO OUT port of the projector. The output of an amp with
a digital converter must be set to the desired audio format. When using a HDMI
cable to connect a home theater or when connecting an optical output to an
external audio device, set [Sound Out] to [Optical]. If a projector, home theater, or
the speaker of an external audio device is operating at the same time, there will be
an echo.
Optional Extras
NOTE
• Refer to the user manual of the audio device to connect.
• When connecting this product to other devices, make sure to turn off and unplug
all the devices.
• The audio output of this product has wide-ranging audio bandwidth, so the
receiver volume must be adjusted properly. Speakers can be damaged by
unexpected high frequencies.
• Connecting the OPTICAL DIGITAL AUDIO OUT port of the projector to the
digital audio input port of a digital amp and the audio input port of the projector
to the analog audio output port of the digital amp can cause sound oscillation
due to the closed loop. Remove one of the two connections to prevent this. (This
also applies to home theater devices.)
ENGLISH
Page 42

ENGLISH
42
Connecting a smart device (smartphone, tablet,
etc.)
• (INPUT) [Home Dashboard] [INPUTS] [HDMI1]/[HDMI2]
• The picture may look different from the actual product.
Connect a smart device to the projector using a cable1) and set the external input
of the projector to HDMI. The smart device screen will then be displayed through
the projector. You can connect with any HDMI input port.
For model-specic instructions regarding use of the wired connection, please check
with the smart device manufacturer.
Supported smart devices may change depending on the circumstances of each
manufacturer.
1) Examples of how to connect a cable to different smart devices (cable purchased
separately).
Slimport supported devices
Charging port of a
Charging
cable of
a smart
device
smart device
Charger
HDMI cable
Projector HDMI port
Slimport adapter
Projector USB port
Apple Lightning Digital AV adapter supported devices
HDMI cable
Projector HDMI port
Lightning Digital AV
adapter
Charging port of a
smart device
Apple 30-pin Digital AV adapter supported devices
HDMI cable
Projector HDMI port
Apple 30-pin Digital
AV adapter
Charging port of a
smart device
Page 43

SPECIFICATIONS
MODEL HU85LA(HU85LA-NA)
Resolution(Pixel) 3840 (Horizontal) × 2160 (Vertical)
Aspect ratio 16:9 (Horizontal:Vertical)
Projection distance
− Screen size
Ratio of upward
projection
Power consumption 350 W
Power AC 100 - 240 V, 50/60 Hz, 3.5 A
Audio Output 5 W + 5 W
Television System ATSC / NTSC-M / 64 & 256 QAM
Program Coverage
External Antenna
Impedance
Height
Width 680 mm (26.7 inches)
Depth 347 mm (13.6 inches)
Weight 12.2 kg (26.8 lbs)
USB Device
Environment
Condition
• Contents in this manual may be changed without prior notice due to upgrade of
product functions.
1) 4K UHD resolution with 8.3 million discrete pixels projected by XPR (Expanded
Pixel Resolution) video processing.
403 mm to 530 mm (15.8 inches to 20.8 inches)
− 2286 mm to 3048 mm (90 inches to 120 inches)
120 %
VHF 02 to 13, UHF 14 to 69, CATV 01 to 135,
DTV 02 to 69, CADTV 01 to 135
75 Ω
128 mm (5.0 inches) (without foot),
139 mm (5.4 inches) (with foot)
USB 2.0
Standard-A
USB Type-C Output: 5 V, 1 A (Max.)
Temperature
Operation 0 °C to 40 °C (32 °F to 104 °F)
Storage -20 °C to 60 °C (-4 °F to 140 °F)
Relative Humidity
Operation 0 % to 80 %
Storage 0 % to 85 %
Output: 5 V, 0.5 A (Max.)
1)
43
ENGLISH
Page 44

44
HDMI(DTV)/USB-C(DTV)SupportedMode
ENGLISH
Resolution
640 x 480 31.46 59.94
640 x 480 31.5 60.00
720 x 480 31.47 59.94
720 x 480 31.5 60.00
720 x 576 31.25 50.00
1280 x 720 44.96 59.94
1280 x 720 45 60.00
1280 x 720 37.5 50.00
1920 x 1080i 28.12 50.00
1920 x 1080i 33.72 59.94
1920 x 1080i 33.75 60.00
1920 x 1080p 26.97 23.97
1920 x 1080p 27.00 24.00
1920 x 1080p 33.71 29.97
1920 x 1080p 33.75 30.00
1920 x 1080p 56.25 50.00
1920 x 1080p 67.43 59.94
1920 x 1080p 67.5 60.00
1920 x 1080p 112.5 100
1920 x 1080p 134.86 119.88
1920 x 1080p 135.00 120
Horizontal Frequency
(kHz)
VerticalFrequency(Hz)
Page 45

45
Resolution
3840 x 2160p 53.95 23.98
3840 x 2160p 54 24.00
3840 x 2160p 56.25 25.00
3840 x 2160p 61.43 29.97
3840 x 2160p 67.5 30.00
3840 x 2160p 112.5 50.00
3840 x 2160p 134.86 59.94
3840 x 2160p 135 60.00
4096 x 2160p 53.95 23.98
4096 x 2160p 54 24.00
4096 x 2160 56.25 25.00
4096 x 2160 61.43 29.97
4096 x 2160 67.5 30.00
4096 x 2160 112.5 50.00
4096 x 2160 134.86 59.94
4096 x 2160 135 60.00
Horizontal Frequency
(kHz)
VerticalFrequency(Hz)
ENGLISH
Page 46

46
HDMI(PC)/USB-C(PC)SupportedMode
ENGLISH
Resolution
640 x 350 31.46 70.09
720 x 400 31.46 70.08
640 x 480 31.46 59.94
800 x 600 37.87 60.31
1024 x 768 48.36 60.00
1360 x 768 47.71 60.01
1152 x 864 54.34 60.05
1280 x 1024 63.98 60.02
1920 x 1080 67.5 60
1920 x 1080 135 120
3840 x 2160 54 24.00
3840 x 2160 56.25 25.00
3840 x 2160
4096 x 2160 53.95 23.97
4096 x 2160 54 24
• If an invalid signal is input into the projector, it will not be displayed properly on
the screen or a message such as [No Signal] or [Invalid Format] will be displayed.
• The projector supports the DDC1/2B type as the Plug and Play function (Auto-
recognition of PC monitor).
• 3840 x 2160 is recommended as the best picture quality in the PC mode.
Horizontal Frequency
(kHz)
67.5 30.00
VerticalFrequency(Hz)
Page 47

Otherspecications
Risk Group 2
CAUTION Possibly hazardous optical radiation
emitted from this product. Do not stare at
operating lamp. May be harmful to the eye.
This label is attached to the bottom of the product and language may differ.
47
ENGLISH
Page 48

ENGLISH
48
SYMBOLS
Refers to alternating current (AC).
Refers to direct current (DC).
Refers to class II equipment.
Refers to stand-by.
Refers to “ON” (power).
Refers to dangerous voltage.
Page 49

TROUBLESHOOTING
Please check the list below when you experience the following symptoms during
use of the product. It may not be a failure.
Checklist for Safety (please check a long-used projector for safety
issues.)
Does your device have any of the following issues?
• The projector does not display anything on the screen or output sound when
it is turned on.
• The product emits smoke or a burning smell.
• Water or foreign substances are present inside the product.
• Part of the projected image is cut out.
• A strange noise (crackling or sparking sound) regularly occurs from inside the
projector.
• The projector still displays the screen or outputs sound when it is turned off.
• There are other errors or failures.
In this case, stop using the product.
• For safety, turn off the power switch and remove the plug from the socket.
• Contact the place of purchase or authorized service center for product
inspection.
• Do not attempt to repair the product yourself.
Abnormal behavior
• There is a colored dot (bright dots, dark dots, stationary dots, and/or flickering
dots) on the screen.
– This projector was produced with high precision technology. However, a tiny
dark or bright dot may appear on the screen. This is a common occurrence
due to the production process, and it does not indicate a functional failure.
• The remote control may not work properly where a lamp with electronic
stabilizer or a three-wavelength lamp is installed.
– In this case, replace the lamp with electronic stabilizer or the three-
wavelength lamp with international standard products to ensure the
remote control works properly.
49
ENGLISH
Page 50

Page 51

ABOUT LG PROJECTOR
Image shown may differ from your projector.
Your projector’s OSD (On Screen Display) may differ slightly from that shown in this
manual.
[ ] : the buttons and the text to be displayed on the projector screen.
Copyright © 2019 LG Electronics Inc. All Rights Reserved.
Page 52

2
CONTENTS
ABOUT LG PROJECTOR 3
ENGLISH
HOW TO OPERATE THE PROJECTOR 10
ENJOY LIVE TV 21
HOW TO USE VARIETY OF CONTENTS 30
CONNECT OTHER DEVICES 36
BENEFITS OF SMART PROJECTOR 65
TOUR LIST OF SETTINGS 69
TO UPDATE SOFTWARE 107
TROUBLESHOOTING 108
Page 53

ABOUT LG PROJECTOR
Home Tutorial
3
Using the Home feature of the LG Projector
You can open the Home screen by pressing the button on your remote control.
You can combine frequently used apps on a single screen and use whichever you want
at any time.
6
4
2 3
1
Launch [Search].
1
Move to the [Home Dashboard].
2
You can select or control a device (mobile, external device, etc.) connected
to the projector.
Move to the TV input you used recently.
3
5
ENGLISH
Page 54

ENGLISH
4
Move to the recently used app.
4
Long-press the button on the remote control or focus the [Recents].
You can run or close a recently used app in the list provided in the preview
area at the top.
You can run, move, and delete all the apps installed on your projector.
5
Focus on each App area. It provides the preview at the top.
6
You can check or run useful features of each app and recommended
content on the preview without entering into the app.
• Some apps may not provide the preview.
• The availability of and access to contents and services in LGE device are subject
to change at any time without prior notice.
Page 55

Manage LG Projector Home
You can view a list of all apps installed on your projector, change their positions, or
delete them.
1 Select the app you want to edit, and press and hold the Wheel (OK) or
OK button on the Remote Control. This will activate the app edit mode.
Or you can select the edit mode button at the far right corner of the Home list
to enter the app edit mode.
2 To move the app to your desired position, go to the position and press the
Wheel (OK) or OK button. To delete an app, select the above the app.
• You can move and delete as many apps as you wish before exiting the edit
mode.
• You can also move apps with the buttons on your remote control.
3 After the editing is done, press the at the top right to exit the app edit
mode.
• The default projector app cannot be edited.
5
ENGLISH
Page 56

ENGLISH
6
1 2
You can automatically arrange the app list in the order of most frequently
1
used based on your accumulated app usage pattern.
You can add your favorite video service channel to the list.
2
• This feature is available only when the network is connected.
• Some models may not be supported.
Page 57

Prepare Live TV
Watching TV broadcasting
1 Connect the broadcast antenna/cable to the projector. You may also connect
a piece of equipment that can receive broadcasting such as a set-top box
instead of the antenna/cable.
Run the (Q. Settings) [Connection] [Device Connector] and
select the [Set-Top Box/OTT] that appears in the device list, and you can see
it.
2 Start the (Q. Settings) [Channels] [Channel Tuning] [Auto
Tuning]. Finds and adds only channels being broadcast.
7
ENGLISH
Page 58

ENGLISH
8
Network Setting
Network Setting
If you congure settings for the network, you can use various services such as online
contents and applications.
Setting a Wired Network
1 Connect the LAN port of the projector and the router using a LAN cable. The
router should be connected to the Internet beforehand.
2 Press the (Q. Settings) button on the remote control and select
[Connection] [Wired Connection (Ethernet)].
• If the router supports DHCP, the projector is automatically connected to the
network when you connect the projector to the network with a LAN cable.
Setting a Wireless Network
1 Turn on the power of the router connected to the Internet.
2 Press the (Q. Settings) button on the remote control and select
[Connection] [Wi-Fi Connection].
3 When the network search is complete, the list of networks available for
connection is shown.
4 Select a network to connect. If your Wireless Router is password protected,
enter the password congured for the router.
Page 59

Network Setting Warnings
• Use standard LAN cable (connect to Cat7 or higher with RJ45 connector, 10
Base-T, or 100 Base TX LAN port).
• Resetting the modem may fix some network connection problems. Turn the
power OFF, disconnect and reconnect it, and then turn the power on to solve
the problem.
• LG Electronics is not responsible for any network connection problems or any
faults, malfunctions, or errors caused by network connection.
• The network connection may not work properly because of network settings or
the Internet service provider.
• DSL service must use a DSL modem; and cable service must use a cable modem.
Since only a limited number of network connections may be available, projector
network setting may not be used depending on the contract with Internet
service provider. (If the contract does not allow more than one device per line,
only the already-connected PC may be used.)
• A wireless network can experience interference from other devices that use
the 2.4 GHz frequency (wireless phone, Bluetooth device, or microwave oven).
Although interference can also happen when using the 5 GHz frequency, it is
less likely to occur.
• The wireless environment can make wireless network service run slowly.
• Failure to turn off all local home networks may cause excessive traffic on some
devices.
• The access point device must support wireless connections and wireless
connection feature must be enabled on the device to have AP (access point)
connection. Contact the service provider for availability of wireless connections
on the access point.
• Check SSID and security settings of the AP. Refer to the appropriate
documentation for SSID and security settings of the AP.
• Invalid settings of network devices (wired/wireless line sharer, hub) can cause
the projector to operate slowly or not operate properly. Install the devices
correctly according to the appropriate manual and network.
• The connection method may differ depending on the AP manufacturer.
9
ENGLISH
Page 60

ENGLISH
10
HOW TO OPERATE THE PROJECTOR
Using Projector Functions through Speech
You can easily and quickly access the projector’s various functions through speech
recognition.
1 Press and hold the button on the remote control and speak out the
function you want to launch or the keyword you want to use for your search.
2 Once you release the button after your speech input, the corresponding
function is launched.
Page 61

11
• This feature is available in certain countries only.
• Your [Location] must correspond to the language for exact search results. Some
function may not be available if your location settings and language settings are
different.
• You can change the language in (Q. Settings) [General]
[Language] [Menu Language].
• The languages available for voice recognition features may be changed in
accordance with service operation policy.
• Details of service may vary by model.
• Please note that AI service may be changed, removed or terminated, without
notice, by LGE or its third party providers.
• Press the button on the remote control to view examples of the functions
you can use with voice command.
ENGLISH
Page 62

ENGLISH
12
Cautions for Speech Recognition
• Voice recognition requires a Magic Lighting Remote, which may not be
supported by certain models.
• To use all speech recognition features, you need to set your channels, regions,
etc. Otherwise, you cannot use some features.
• You must have a network connection to use the speech recognition feature.
• If you have a network connection, you need to accept the terms and conditions
to use speech recognition.
• To control the set top box connected to the projector with the voice recognition
feature, go to (Q. Settings) [Connection] [Device Connector]
to set up a universal remote control.
• It is recommended to point the Magic Lighting Remote toward the set top box
after the voice input.
• The rate of speech recognition may vary depending on the characteristics
of the user (voice volume, pronunciation, accent, and talking speed) and the
surroundings (noise and projector volume).
• To achieve accurate recognition of your speech, you must pronounce words in a
slow and accurate manner at an appropriate voice volume at a distance of about
10 cm (3.9 inches) away from the Magic Lighting Remote’s microphone.
• If you speech is not recognized properly, speech recognition may operate
differently than you originally intended.
Page 63

13
To View More Features of the Remote Control
You can control more features or external devices connected to your projector by using
the buttons displayed on your projector screen.
1 Press the button on the remote control.
2 Using the remote control, select your desired button on [More Actions]
displayed on your projector screen.
1
2
3
4
5
6
When you select a device, the [More Actions] turns into the remote control
1
for the device.
If a sound bar is connected, the [More Actions] can be used as a remote
control for the sound bar.
• You need Magic Lighting Remote to use universal remote control
function.
Various kinds of information related to the program you are watching will
2
appear at the bottom of the screen.
ENGLISH
Page 64

ENGLISH
14
You can capture your projector screen.
3
• Some models may not be supported.
• You can view/delete screen-captured images in the [Photo & Video]
app.
• You can copy screen-captured images to USB storage device in the
[Photo & Video] app. (Some models may not be supported.)
It displays the information for the program you are watching, external input,
4
photographs, music, video, etc. on the screen.
You can set the video/sound mode for watching sports games.
5
You can set features related to the program you are watching.
6
• Available features may vary depending on the broadcast signal.
• The types of buttons appearing on the [More Actions] vary, depending on the
region and the type of connected device.
• Some models may not be supported.
Page 65

15
Universal Remote Control
With the Magic Lighting Remote, you can control Set-Top Boxes, Blu-ray Players, Home
Theater systems, etc.
Automatically Setting the Universal Remote Control
Connect the devices to be set to the projector’s HDMI input, and turn the power of the
device on.
The projector will scan the connected device to automatically set the universal remote
control without manual setting.
• After setting the universal remote control, you may need to do some additional
user settings.
• It may take several seconds to complete the settings for the universal remote
control.
• In some models, you can set the universal remote control only after converting
to an input of a connected device.
• Depending on the connected device, the automatic setting feature for universal
remote control (automatic device connection) may not be supported.
ENGLISH
Page 66

ENGLISH
16
Manually Setting the Universal Remote Control
If the universal remote control is not automatically set or it is connected to the AV
input/Component input, you can manually set it.
1 Select the (Q. Settings) [Connection] [Device Connector].
2 Select the type of the device you want to set.
3 Complete the settings for the universal remote control according to the
guidance on the screen.
You can change or cancel the universal remote control settings.
• This feature can only be used with the Magic Lighting Remote. (The provided
remote control differ depending upon model.)
• Some models may not be supported.
• AV input/Component input ports are available in certain models only.
• When changing the settings, check that the device to be changed is turned on.
• You can set up the universal remote control with the latest updated information.
• The manual setting feature for universal remote control is not supported for a
game console.
• Some buttons may not work depending upon the model of the external device.
• Place the device near the projector for seamless operation.
• If there is an obstacle in front of the device, it may not be able to receive the
signal properly. If the device is in a drawer, open the drawer.
Page 67

17
Launching Apps through [QUICK ACCESS]
Using apps quickly and easily with [QUICK ACCESS]
Press and hold a number button on the remote control to open an app or to activate an
external input registered to the button.
Setting the [QUICK ACCESS]
1 Launch the app or select the channel or input you wish to assign.
2 Press and hold the number button (1~8) you want to register.
No. 9 is xed to [QUICK HELP].
3 When the registration pop-up window appears, select [Yes].
• If you press and hold a number button that has already been registered, the
registered function will be performed.
• To see the items that can be registered, select a number that has not been
registered in the [EDIT QUICK ACCESS] mode.
• If you are in a mode where [QUICK ACCESS] cannot run, no action will be
performed.
• If you delete a registered app, [QUICK ACCESS] will be deregistered as well.
ENGLISH
Page 68

18
Checking and editing [QUICK ACCESS]
Press and hold the number 0 button on the remote control.
The [QUICK ACCESS] edit screen appears.
4
ENGLISH
1
2
3
Selecting a number that has already been registered allows deregistering
1
it.
When you select a number that has not been registered, items that can
2
be registered will be shown.
An item that has been registered to a different number is indicated with
3
a check mark.
You can view a brief instruction for this function.
4
Page 69

19
Using SIMPLINK
You can conveniently control and use various multimedia devices connected through
HDMI with the projector’s remote control.
1 Connect the SIMPLINK HDMI Output port to the projector’s HDMI IN port with
an HDMI® cable.
2 Press the (Q. Settings) button on the remote control and select
[Connection] [HDMI Device Settings].
3 Set [SIMPLINK (HDMI-CEC)] to [On].
4 Congure the [Auto Power Sync] settings to [On] or [Off]. (If [Auto Power
Sync] is set to [On], turning on a SIMPLINK-linked device will turn the
projector on. When you turn off the projector, the device will also be turned
off.)
5 Turn on the connected device. When the projector automatically connects to
the device, the input will switch. If the device is not automatically connected to
the projector, click the button.
• This feature works only with devices with the logo. Check for the
SIMPLINK logo on the external device. There may be a problem using the device
if the device does not meet the required specifications.
• A high-speed HDMI® cable with CEC (Consumer Electronics Control) function
is required to use SIMPLINK. Pin 13 of the high-speed HDMI® cable is used for
data transfer between devices.
• If you want to output sound to the external audio equipment connected through
the HDMI® cable, set [SIMPLINK (HDMI-CEC)] to [On].
ENGLISH
Page 70

ENGLISH
20
Supported SIMPLINK Functions
• Instant Play
When you start a multimedia device, you can immediately watch content from
the device on the projector without having to control anything.
• Controlling devices with the projector remote control
Enables the user to control multimedia devices with the projector remote
control to watch content.
— The pointer function of the Magic Lighting Remote can be limited.
• Main Power Off
If [Auto Power Sync] is set to [On] in the [HDMI Device Settings] settings and
the projector is turned off, the devices connected to your projector via SIMPLINK
will also be turned off.
— This feature is only available in certain devices.
• Main Power On
If [Auto Power Sync] is set to [On] in the [HDMI Device Settings] settings,
turning on a SIMPLINK-linked device will turn the projector on.
— If [SIMPLINK (HDMI-CEC)] is set to [Off], [Auto Power Sync] cannot be set
to [On].
— Some models may not be supported.
Page 71

ENJOY LIVE TV
Live Menu
21
Using Live Menu
You can use the relevant features with ease when watching TV broadcasts.
1 Run [TV] by pressing .
2 Move the Magic Lighting Remote’s pointer to the left side of the projector
screen.
You can bring it up by pressing the button on the remote control even
when you are not watching any broadcasts.
1
2
3
4
[RECOMMENDED]: Get channel and program recommendations based on
1
your viewing history.
[CHANNELS]: View a list of broadcast content that is currently being
2
broadcast.
[GUIDE]: You can view programs and the schedule of each program.
3
[TV SCHEDULER]: You can enter the time and date of program to
4
schedule watching it at the set time.
ENGLISH
Page 72

ENGLISH
22
• The channels displayed in Channel List are a configuration of channels provided
by the broadcast service provider. Therefore, if the broadcast service provider
has changed its channel configuration without notice, the channels displayed in
Channel List may differ from the actual TV channels.
• Because channel information displayed in Channel List includes information
provided by external Electronic Program Guide (EPG) providers, it may differ
from the actual TV channels.
• To receive proper recommendation services, you need to set up your network,
region and auto tuning.
• The configurable items differ depending upon model.
Page 73

Guide
Viewing Guide
You can view programs and the schedule of each program.
Press the remote control’s button, and select the [GUIDE] tab on the left side of
the screen.
6 7 8 9
3
1
2
Click on each area, and you can move to the app.
1
You can view information about the channel and broadcast.
2
You can view information about the program you are currently watching
3
as well as the focused program information.
Select the button or the title of the desired program. You can view
4
more information on the program and perform [WATCH] or [Reminder],
etc.
You will be taken to the program list for the current date and time.
5
4
5
23
ENGLISH
Page 74

ENGLISH
24
Launch [CHANNEL MANAGER].
6
You can change the size for the program list to adjust the number of
7
channels displayed on the screen.
Sets the lter.
8
You can turn on / off Mini TV.
9
• Program information is not displayed for channels with no provided broadcast
information.
Viewing Set-Top Box Guide
After connecting the Set-Top Box, you can view programs and the schedule of the SetTop Box and use the Magic Lighting Remote.
• Some models may not be supported.
Page 75

25
Checking Program Info
Viewing Program Information
While watching a live broadcast press the Wheel (OK) button. The Channel Banner
appears.
ENGLISH
1
2
3
Move to the [CHANNELS].
1
It display the information about the program you are watching. Select
2
a channel banner to enter the detailed information pop-up to see the
detailed program information or run additional features related to the
banner. You can view broadcast information about other channels using
the buttons.
• You can view broadcast information about the channel you are
currently watching using the buttons.
• Press the button on the remote control move the banner’s
position.
• The features can be controlled only within the detailed information
pop-up.
Page 76

ENGLISH
26
If the program you are watching includes information such as [Closed
3
Caption] or [Audio Language], you can set these features.
• Available features may vary depending on the broadcast signal.
You can set [Closed Caption].
You can set [Audio Language].
• Only available with digital broadcasts.
You can set [Multi Audio].
• Only available with analog broadcasts.
Page 77

27
Using [MAGIC LINK]
It offers various videos and information related to the program you are currently
watching.
If you are watching a program via a set-top box, you should complete the universal
remote control settings to use the [MAGIC LINK] function properly.
1 Press the Wheel (OK) button on your remote control. The Channel Banner
appears.
2 Press the [MAGIC LINK] button in the Channel Banner.
3 Various kinds of information related to the program you are watching will
appear at the bottom of the screen. Select the desired information.
• The search range may vary depending on the country.
• While [MAGIC LINK] is in use, the content provided may not always match the
program that you are watching at the time. Change the channel with the Magic
Lighting Remote before using [MAGIC LINK].
• Some adult-only channels or locked channels do not support this function.
• The search results may vary depending on the information on the program you
are watching.
• The [MAGIC LINK] feature via set-top box is supported in some countries or
models only.
• Some set-top boxes may not support the [MAGIC LINK] function.
• Only set-top boxes connected via HDMI input are supported.
ENGLISH
Page 78

ENGLISH
28
Using [TV SCHEDULER]
This function is used to set the time and date for watching a specic program.
1 Press the remote control’s button, and select the [TV SCHEDULER] tab on
the left side of the screen.
2 Select the at the top right.
1 2 3 4
You can sort the list.
1
You can set the Delete Mode.
2
You can set the New Reminder.
3
Launch [GUIDE].
4
Page 79

29
Schedule by program
You can select a show to Schedule it for watching.
1 Press the remote control’s button, and select the [GUIDE] tab on the left
side of the screen.
2 Select the program you want.
If you want to watch a live broadcast, click the [WATCH] button.
In case of an upcoming program, click the [Reminder] button.
• Applies to digital broadcasting.
Manual Scheduling
You can select the date, time, and channel to watch the channels.
1 Press the remote control’s button, and select the [TV SCHEDULER] tab on
the left side of the screen.
2 Select the at the top right.
3 Select the at the top right.
4 Select [CREATE MANUALLY].
5 Set the date, time, and channel to watch.
• Some models may not be supported.
ENGLISH
Page 80

ENGLISH
30
HOW TO USE VARIETY OF CONTENTS
LG Content Store
You can quickly and conveniently browse for TV Shows, Movies, and more to watch
immediately.
You can also download and use apps from various categories such as education,
entertainment, lifestyle, news, and games.
1 Press the button on the remote control.
2 Launch the [LG Content Store] application.
• Depending on the model, the provided contents may differ or some features
may be limited.
• Exercise caution when in used by children. Children may have access to
inappropriate online content through this product.
You can block inappropriate online content by restricting access to some apps.
— Restrictions can be set in (Q. Settings) [Safety] [Application
Locks].
Recommended Content on the Main Screen
You can view recommendations for the most popular content and apps in each
category on the [LG Content Store] main screen. Choose a piece of content to watch it,
or choose an app to download it.
• Some models may not be supported.
• This feature is available only when the network is connected.
Page 81

31
Creating LG Account
In [Account Management], you can use your email address to create a new LG account.
1 Press the (Q. Settings) button on the remote control and select
[General] [Account Management].
2 Select [CREATE ACCOUNT]. Read and accept the Terms of Service.
3 Enter an ID and a password. Your ID must be your email address.
4 Enter your birthday.
5 Select [OK]. Go to your email to verify your email address. Please verify your
email before the time expires.
6 Log in with your new account to start using the service.
• Some models may not be supported.
• Internet connection is required to create an account.
• Required information may vary depending upon the country.
• You may be restricted from the service depending upon your age.
ENGLISH
Page 82

32
Managing your LG Account
You can manage the information of your LG account.
1 Press the (Q. Settings) button on the remote control.
2 Go to [General] [Account Management] to log in.
ENGLISH
Personal Information
You can view or edit your information of the account currently logged in.
You can change the password or press [EDIT] to edit your personal information.
• Some models may not be supported.
Page 83

Search Content
[Search]
[Search] allows you to nd and use a variety of content and information. You can
search for les, including image, video, and audio les.
Searching for Content
1 Press the button on the remote control.
2 Launch .
3 Search for a variety of content and information by typing in your desired
search terms.
2 3
1
33
ENGLISH
Enter your desired search term.
1
Change the settings of the features provided by [Search].
2
Exit the search.
3
• Some apps provide a feature that lets you search within your projector. If you
run a search in such apps, the search will be carried out in [Search].
• Search results may vary depending on the channel, region, network settings, and
whether you have agreed to the terms and conditions.
Page 84

ENGLISH
34
Use App & Contents
Installing Apps
You can install various apps on your projector from the [LG Content Store].
1 Press the button on the remote control.
2 Launch the [LG Content Store] application.
3 Select your desired category from the categories shown at the top of the
screen. The list of available apps in the selected category will be shown.
4 Select an app to set up from the list.
5 Read the details of the app and then press [Install].
6 When the installation is complete, you can run the app immediately.
• Available categories may vary depending on the country or service status.
• If the storage on your projector is insufficient, you can install the apps by
connecting an external memory device.
• Some USB storage devices may not be supported or may not work properly.
• USB drivers containing apps from other LG TVs or LG Projectors may not be
used.
• You can delete apps you have downloaded in the [APPS] item’s [My Apps].
Page 85

35
Watching VOD Content
You can immediately enjoy dramas, movies, and more with real-time streaming.
1 Press the button on the remote control.
2 Launch the [LG Content Store] application.
3 Select your desired category from the categories shown at the top of the
screen, such as TV Shows and Movies. The list of available content in the
selected category will be shown.
4 Select an item from the list.
5 You can play your desired content.
An app may be required to play the content. If not installed, install the app to
play the content.
• Some models may not be supported.
• Available categories may vary depending on the country or service status.
• To see detailed information about the content, select the title in the bottom and
the area.
ENGLISH
Page 86

ENGLISH
36
CONNECT OTHER DEVICES
Using [Home Dashboard]
You can select or control a device (mobile, external device, Home IoT Devices, etc.)
connected to the projector.
• Press and hold the button on your remote control.
4 5 6 7
1 2
You can check and select the connected smart device with the LG TV Plus.
1
You can play sound from a smart device connected via Bluetooth.
You can check and select the external device connected through the
2
external input port or network.
You can check and control the device connected via the Home IoT.
3
3
Page 87

You can edit the name or change the icon of a device connected to the
4
Inputs.
You can edit the name of a device connected to the [HOME IoT DEVICES]
or [SHOW]/[HIDE] the device.
• Some devices cannot be edited.
[OCF Connection]: If you set it to be [On], any device that supports OCF will
5
be linked too.
[Notice]: If you turn it [On], you can receive notications about the status
of the Home IoT Devices.
[Device Connector]: You can start the [Device Connector] app.
It refreshes the device list.
6
Exit the [Home Dashboard].
7
• The configurable items differ depending upon model.
37
ENGLISH
Page 88

ENGLISH
38
Mobile Connection
You can use a variety of features by connecting the projector to a smart device.
Connecting Your Smart Device to a Projector Using the LG TV
Plus App
1 Download the LG TV Plus app from the app store of your smart device.
2 Connect your projector and smart device to the same Wi-Fi network.
3 Run the LG TV Plus app installed on your smart device.
4 Follow the instructions from LG TV Plus app to connect your smart device
to the projector. You can check the connected smart device at [Home
Dashboard] of the projector.
Page 89

39
Controlling Your Projector with the LG TV Plus App
You can tap the buttons on your smart device’s screen to control the projector.
1 2
3
You can use the same functions as the Magic Lighting Remote’s pointer
1
and arrow keys.
You can change the channel, adjust the volume, or make other adjustments
2
without using the remote control while watching a broadcast.
You can open an app installed on your projector or congure settings for
3
functions such as switching input or adding favorite channels.
• Some controls may be limited in external input mode.
• The app’s screen and functionality are subject to change without prior notice.
• Available features may differ depending on your country and OS.
ENGLISH
Page 90

ENGLISH
40
Share Content with the LG TV Plus App
You can share and enjoy the content stored on your smart device through your
projector.
1 Run the LG TV Plus app installed on your smart device.
2 Set up your desired content on your projector.
Matters That Require Special Attention during Content Share
• Check your network settings if the Content Share option does not work
properly.
• May not work properly on a wireless network. It is recommended that you
connect to a wired network.
• May not work properly depending upon the network environment.
• If multiple display devices are connected to one device, the content may not be
played properly depending upon server performance.
• Supported features may vary depending on the version and manufacturer of
your smart device’s operating system.
• To watch the 1080p video through Content Share function, a router that uses 5
GHz frequency is required.
If a 2.4 GHz router is used, the video may not play properly.
• Captions are only supported on some connected devices.
• When a subtitle file is added later, disable the shared folder and then enable it
again.
• The DRM files in the connected device will not play.
• Even for the file format supported by the projector, the supported file format
may differ depending upon the connected device environment.
• If there are too many folders or files in a folder, it may not work properly.
• The information on the file imported from the connected device may not be
displayed correctly.
• Depending upon the encoding, some streams may not play in Content Sharing
mode.
Page 91

41
Share Smartphone Screen
To see the Mobile Device's screen on the projector
1 Enable Screen Share mode on the mobile device.
2 Your projector will be displayed in the list of available devices.
3 Select your projector and request connection.
4 After the connection is established, the projector will display the screen of the
connected device.
• For a reliable connection always keep the connected device to your projector
updated to the latest OS version.
• A non-LGE device might not connect even when it is detected.
• Connect the device to a 5 GHz router because the performance may be affected
by your wireless environment.
• The response rate may vary, depending upon the user’s environment.
• It differs among devices. For more information on the device you want to
connect to, refer to its user guide.
• If connection fails repeatedly, turn off the projector and the device you want to
connect to, then turn them back on and try again.
ENGLISH
Page 92

ENGLISH
42
Playing Sound from a Smart Device through the
projector’s Speakers
Connect a smart device to the projector via Bluetooth to play sound from the smart
device through the projector’s speakers.
1 Press the button on the remote control and select [Home Dashboard].
2 In the [MOBILE] area, run the [Bluetooth Audio Playback].
3 Turn the smart device’s Bluetooth on, then select the projector from the list
of devices.
4 The projector will be connected to the smart device.
Page 93

43
Connecting USB
Connect a USB storage device (USB HDD, USB Flash Drive) to the USB port on the
projector to enjoy the content les stored on the USB storage device on your projector.
ENGLISH
USB Flash Drive
Models with USB-C support only.
• Please check whether USB 2.0 is supported before using USB-C storage devices.
• Certain functions may not work properly depending on USB-C to USB-A cable
or gender used.
USB-C Flash Drive
Page 94

ENGLISH
44
Tips for Using a USB storage device
• A USB storage device that has a built-in automatic recognition program or uses
its own driver might not be recognizable.
• Some USB storage devices may not be supported or may not work properly.
• If you use a USB extension cable, the USB storage device may not be recognized
or may not work properly.
• Please use only USB storage devices formatted with the FAT32 or NTFS file
system provided by Windows OS.
• It is recommended that you use an external USB HDD with a rated voltage of 5
V or less and a rated current of 500 mA or less.
• It is recommended that you use a USB hub or hard disk drive with a power
supply. (If the power supplied is not sufficient, the USB storage device may not
be detected properly.)
• It is recommended that you use a USB stick of 32 GB or less or a USB HDD of 2
TB or less.
• If a USB HDD with power-saving function does not work, turn the hard drive off
and on again to make it work properly. See the owner’s manual for the USB HDD
for more information.
• Data on a USB storage device may be damaged, so it is recommended that you
back up any important files. Users are responsible for data management. The
manufacturer bears no responsibility.
• Press the button on the remote control. To remove the USB storage
device, press the Eject ( ) button, which appears at the top when you focus on
the USB storage device you want to remove. If you disconnect the USB storage
device without selecting [EJECT], an error may occur in your projector or storage
device.
• For more information on other connection methods, go to (Q.Settings)
[Connection] [Device Connector].
• Press and hold the button on your remote control. Select the connected
USB from [Home Dashboard] [INPUTS] and select the [FORMAT] button to
format the USB storage device. After format, all the data of USB storage device
will be deleted and formatted as NTFS or FAT32 file system.
• When connecting a USB storage device, a random file/folder can be created to
provide Smart projector services such as the saving and retrieving of thumbnail
images.
Page 95

[Photo & Video]
Viewing Photos and Videos
You can view photos and videos using the [Photo & Video] app.
1 Press the button on your remote control.
2 Launch the [Photo & Video] application.
3 Select your desired storage device.
4 Select and view your desired photo or video.
1 2 3 4
Select your desired type of content and viewing method.
1
Select and delete your desired content.
2
(You cannot delete les that are shared from other devices.)
Select the content you want to play. You can only select the same type of
3
content as you rst selected.
Launch [Search].
4
• Certain content may not be displayed on the list if the number of all content
exceeds 40,000.
45
ENGLISH
Page 96

ENGLISH
46
Photo Player
Selecting a photo in the [Photo & Video] app runs the photo player. You can view your
saved photos.
1 2 3 4 5 6 7
Returns to the entire content list.
1
You can play background music by running the music player.
2
You can zoom the photos in/out.
3
Starts the slide show.
4
Rotates photos.
5
360-degree photos can be viewed in 360 degrees.
6
• Using the 360° VR Play on a normal photo may distort the image.
• Some models may not be supported.
You can set the size of a photo or change the speed and effect of a slide
7
show.
Page 97

Supported Photo Files
File type Format Resolution
.jpeg
.jpg
.jpe
.png PNG
.bmp BMP
JPEG
Minimum: 64 x 64
Maximum
Normal Type: 15360 (W) x 8640 (H)
Progressive Type: 1920 (W) x 1440 (H)
Minimum: 64 x 64
Maximum: 5760 (W) x 5760 (H)
Minimum: 64 x 64
Maximum: 1920 (W) x 1080 (H)
47
ENGLISH
Page 98

ENGLISH
48
Video Player
Selecting a video in the [Photo & Video] app runs the video player. You can view your
saved videos.
1 2
Returns to the entire content list.
1
You can select other content by displaying the playlist while watching a
2
video.
You can control basic video playback functions.
3
Rotates videos.
4
• Some models may not be supported.
360-degree videos can be viewed in 360 degrees.
5
• Using the 360° VR Play on a normal video may distort the videos.
• Some models may not be supported.
You can do the settings related to play on repeat of the video.
6
You can set additional options.
7
3
4 5 6 7
Page 99

Setting Additional Options
1 2 3 4
You can change subtitle settings.
1
You can set audio tracks.
2
You can set continue watching to resume playing from the last viewed
3
scene.
Returns to the basic operation screen.
4
49
ENGLISH
Page 100

ENGLISH
50
Supported Video Files
Maximum data transfer rate:
• Full HD video
H.264 1920 x 1080@60P BP/MP/HP@L4.2 Maximum 40 Mbps
HEVC 1920 x 1080@60P Main/Main10@L4.1 Maximum 40 Mbps
• ULTRA HD video (ULTRA HD model only)
H.264 3840 × 2160@30P BP/MP/HP@L5.1 Maximum 50 Mbps
HEVC 3840 × 2160@60P Main/Main10@L5.1 Maximum 60 Mbps
Supported external subtitles:
*.smi, *.srt, *.sub (MicroDVD, SubViewer 1.0/2.0), *.ass, *.ssa, *.txt (TMPlayer), *.psb
(PowerDivX), *.dcs (DLP Cinema)
Supported embedded subtitles format:
• Matroska (mkv): Sub Station Alpha (SSA), Advanced Sub Station Alpha (ASS),
SRT
• MP4 (mp4): Timed Text
 Loading...