

LG HU70LS-EU User manual

OWNER'S MANUAL
LG CineBeam 4K
DLP Projector
Please read the safety information carefully before using this product.
HU70LS
P/NO : SAC37813554 (1910-REV00)
Copyright © 2019 LG Electronics Inc. All Rights Reserved.
www.lg.com

ENGLISH
2
CONTENTS
LICENSES 3
Open Source Software Notice Information 4
SAFETY PRECAUTIONS 5
PREPARATION 16
INSTALLATION 23
MAGIC LIGHTING REMOTE 30
CONNECTING DEVICES 36
SPECIFICATIONS 41
SYMBOLS 46
TROUBLESHOOTING 47

LICENSES
Supported licenses may differ by model. For more information about licenses, visit
www.lg.com.
The terms HDMI, HDMI High-Denition
Multimedia Interface, and the HDMI Logo are
trademarks or registered trademarks of HDMI
Licensing Administrator, Inc.
Manufactured under license from Dolby Laboratories. Dolby, Dolby Vision,
Dolby Audio, Dolby Atmos, and the double-D symbol are trademarks of Dolby
Laboratories.
For DTS patents, see http://patents.dts.com. Manufactured under license from
DTS Licensing Limited. DTS, the Symbol, & DTS and the Symbol together, DTS
2.0 Channel, DTS 2.0+Digital Out, DTS-HD, and DTS Virtual:X are registered
trademarks or trademarks of DTS, Inc. in the United States and/or other countries.
© DTS, Inc. All Rights Reserved.
USB Type-C™ and USB-C™ are trademarks of USB Implementers Forum.
3
ENGLISH
NOTE
• Images shown in this manual may differ from your projector.
• Your projector’s OSD (On Screen Display) may differ slightly from that shown in
this manual.

ENGLISH
4
Open Source Software Notice
Information
To obtain the source code under GPL, LGPL, MPL, and other open source licenses,
that is contained in this product, please visit http://opensource.lge.com.
In addition to the source code, all referred license terms, warranty disclaimers and
copyright notices are available for download.
LG Electronics will also provide open source code to you on CD-ROM for a charge
covering the cost of performing such distribution (such as the cost of media,
shipping, and handling) upon email request to opensource@lge.com.
This offer is valid for a period of three years after our last shipment of this product.
This offer is valid to anyone in receipt of this information.
SAFETY PRECAUTIONS
Please take note of the safety instructions to prevent any potential accident or
misuse of the projector.
Child injuries can be prevented by following these simple safety precautions.
The precautions should be followed in the same manner when you store or move
your existing projector.
• Safety precautions are given in two forms, i.e., WARNING and CAUTION as
detailed below.
WARNING: Failure to follow the instructions may cause serious injury and
even death.
CAUTION: Failure to follow the instructions may cause personal injury or
product damage.
• Read the owner’s manual carefully and keep it on hand.
WARNING/CAUTION
RISK OF ELECTRIC SHOCK
DO NOT OPEN
The lightning ash with arrowhead symbol, within an equilateral
triangle, is intended to alert the user to the presence of uninsulated
dangerous voltage within the product’s enclosure that may be of
sufcient magnitude to constitute a risk of electric shock to persons.
The exclamation point within an equilateral triangle is intended to alert
the user to the presence of important operating and maintenance
(servicing) instructions in the literature accompanying this device.
5
ENGLISH
WARNING/CAUTION
− TO REDUCE THE RISK OF FIRE AND ELECTRIC SHOCK, DO NOT EXPOSE
THIS PRODUCT TO RAIN OR MOISTURE.

ENGLISH
6
Read these instructions. Keep these instructions.
Heed all warnings. Follow all instructions.
Indoor Installation
WARNING
Do not install products including projectors and remote controls in the
following places:
− Any place exposed to direct sunlight;
− Any humid place such as bathroom;
− Any place near hot objects such as ammables and stoves;
− Any place where oil, oil mist, and steam can reach such as a worktop or places
near a humidier;
− Any place where water can splash like a vase or the aquarium;
− Any place that is dusty or exposed to wind and rain;
− Any place that is under the air conditioner or is directly exposed to the wind
from the air conditioner;
− Any place near ammable materials such as ammable sprays, etc.; or
− Any cupboard, bookcase shelf or cabinet without a xture installed and any
place where a pet can access.
• It may cause an electric shock, fire, malfunction, deformation or falling.
Be careful not to drop the projector when connecting an external device.
• It may cause injury or damage to the product.

Keep the following precautions in mind to prevent the temperature rise inside
the projector:
− Install the air vents at least 30 cm away from the wall.
− Do not install the product in a place where it cannot be ventilated, such as on a
bookcase or in a closet.
− Do not install the product on carpet or cushion.
− Make sure that the air vents are not blocked with tablecloths, curtains, etc.
• It may cause a fire.
For places where oil or oil mist can reach, do not install the product on a wall
or ceiling.
• The product may be damaged and fall.
Do not allow a child to hang or climb on the installed projector.
• The projector may fall and cause injury or death.
When installing the product on the ceiling, observe the following precautions
to prevent the projector from falling:
− Contact the Customer Support Center for installation.
− Tighten the product by using the mounting equipment and M4 x 8 mm (M6
x 10 mm, 1/4-20UNC x 5.5 mm) screws that are approved by a professional
technician.
− Do not use adhesive, lubricant, oil, etc. when using the mounting equipment.
− Do not tighten the screws with an excessive force since the projector may fall
due to breakage of the screw connection part. (the recommended torque: 5-8
kgf.cm)
• A failure to follow the precautions may result in injury or death and product
damage due to the fall of the product.
7
ENGLISH

ENGLISH
8
CAUTION
When moving the projector, be sure to turn off the power switch and
disconnect the power plug, antenna cable and the connection cord between
the devices.
• A failure to do so may cause damage to the projector or the cord, resulting in a
fire or electric shock.
Do not install the projector on a shaky shelf, a slanted place, a place subject
to vibrations, a place where the projector is not fully supported or on a fabric
such as tablecloths.
• It may cause injury as the projector falls or tips over, or it may cause a
malfunction of the projector.
To prevent damage to the power cord or plug, do not install the projector
where the cord can be walked on.
• It may cause a fire or electric shock.
When installing the projector, do not install it too close to the wall.
• The cable connection may be deteriorated or the projector and its cables may be
damaged.
When installing the projector on a cabinet or a shelf, make sure that the front
end of the bottom of the projector does not come out.
• The projector may fall due to the unbalance of the center of gravity and cause
injury to people or a malfunction.

When in Use
WARNING
When thunder or lightning strikes, unplug the power cord and do not touch
the antenna wire.
• It may cause an electric shock.
If there is a gas leak from the gas lines, do not touch the outlet and be sure to
vent by opening the window.
• Sparks may be caused and lead to a fire or burns.
When using the product with an external device connected such as a games
console, make sure the connection cable is long enough.
• The product may fall over and cause injury or product damage.
Do not scratch or give an impact on the projector with metallic materials or
objects.
• It may cause injury to people or damage to the product.
Do not insert metallic objects including coins, hairpins or a piece of iron or
ammableobjectssuchaspaperormatchesintotheprojector.
• It may cause a fire or electric shock.
When replacing the batteries used for the remote control, be careful not to let
children eat them and keep the batteries out of reach of children.
• If a child swallows the battery, consult a doctor immediately.
9
ENGLISH

ENGLISH
10
Keep the plastic wrapping of the product out of the reach of children.
• If a child misuses it, it may suffocate the child.
Do not touch near the vents during the operation or immediately after the
power is turned off as they generate intense heat.
• The heat does not indicate a defect or a problem of the projector when it is
operating so use it with confidence.
Do not look into the front of the lens when the projector is operating. Strong
light is projected from the product which can cause injury to your eyes.
Never try to disassemble or modify the projector yourself. Always seek a
qualiedservicetechnicianorconsultyourdealerorlocalServiceCenterfor
inspection, adjustment or repairs.
• It may cause a fire or electric shock.

CAUTION
Do not use any product that uses high voltage electricity near the projector.
(e.g.Anelectricyswatter)
• It may cause a malfunction.
Do not place any liquid containers such as a vase, pot, cup, cosmetics or
medicine, decorations such as candles or any heavy objects on top of the
projector.
• Doing so may cause a fire, electric shock and injury due to failing.
The surface of the AC adapter is hot, so be careful not to put the surface
against your skin or let the children touch the surface during use. (Except for
themodelsthatdonotuseanadapter)
Do not hold or move the projector upside down by grabbing only the power
cord, signal cable, or projection mirror.
• Doing so may damage the product or cause an electric shock or fire.
Even if the projector is turned off with the remote control or the button, the
power is not completely cut off if the power cord is plugged in.
If you use headphones or earphones, do not use them at high volume or for a
long period of time. (It applies only to the models that support headphones
(earphones).)
• Doing so may damage your hearing.
Do not start the projector when the volume is high.
• A loud volume can cause hearing loss.
Do not use or store the projector outdoors for an extended period of time.
Do not touch the projector’s lens or give an impact on it.
• It may cause damage to the product.
11
ENGLISH

ENGLISH
12
Do not block the light from the projector lens with a person, book or other
objects.
• If the light from the projector shines on an object for a long time, it can cause fire
due to the heat of such light. Also, the reflected light can heat the lens and cause
damage to the projector.
Do not mix old and new batteries together.
• It may cause battery rupture or fire due to liquid leakage or may cause electrical
shock.
When replacing the batteries, make sure that they are properly installed
accordingtothepolarities(+,-).
• Battery rupture or leakage may lead to fire, explosion, injury or contamination
(damage) of the surrounding area.
Donotexposethebatteriestodirectsunlight,replace,electricheater,high
temperature above 60 °C, excessively humid places or excessive heat.
• It can cause an explosion or fire.
Do not throw or disassemble the battery.
• It can cause a fire and explosion due to battery damage.
Do not carelessly throw away old batteries.
• It can cause an explosion or fire. The disposal method may vary by country and
region. Dispose of it in an appropriate manner.

13
Power
WARNING
Make sure the power plug is securely plugged in to prevent it from shaking.
• If the connection is unstable, it may cause a fire.
Do not plug too many devices into one multi-power outlet.
• This may result in fire due to the power outlet overheating.
Do not insert a metal object such as chopsticks into the other end of the
power plug while it is plugged into a wall outlet. Also, do not touch the power
plug immediately after unplugging it from the outlet.
• It can cause an electric shock.
Connect the power plug to a grounded outlet or multi-tap. (Except for any
devicewithoutgroundconnection)
• A failure to do so may cause an electric shock due to a malfunction or electrical
short.
Never touch the power plug with wet hands.
• It may cause an electric shock.
Disconnect the power plug from the outlet when you are not using the
projector for a long time or absent.
• Dust collects and may cause an electric shock and fire caused by a short circuit
due to heat, ignition and insulation/degradation.
The Power Plug is the disconnecting device. In case of an emergency, the
Power Plug must remain readily accessible.
ENGLISH

ENGLISH
14
If any of the following occurs, it could be a malfunction of the product, so
you must immediately turn the projector off, unplug the power cord from the
outlet, and contact the service center:
− When the product is damaged;
− When the product fails;
− When there is a foreign substance inside the product; or
− When the product smokes or smells.
• It may cause a fire or electric shock.
CAUTION
Do not unplug or plug the power plug from/in the outlet while the power
switchison.(Donotusethepowerplugasaswitch.)
• It may cause a fire or malfunction.
When removing the AC adapter or power cord, be sure to hold the plug part.
• A failure to do so may cause a fire or damage to the product.
Do not damage the AC adapter, power cord or power plug, place heavy objects
on them or give an impact on them.
• It may cause a fire, electric shock or damage to the product.
Attach the power cord and AC adapter connected to the projector in a way
that they are fully seated.
• Poor contact can cause a malfunction of the product and fire.
If there is dust on the pin part of the power plug or the outlet, clean it
thoroughly.
• It may cause a fire.
Keep the power cord away from heat sources.
• The coating of the cord may melt and cause a fire or electric shock.
Use only the authorized power cord or AC adapter supplied by LG Electronics.
Do not use any other products.
• It may cause a malfunction of the product, fire or electric shock.

15
Cleaning
WARNING
Do not spray water directly onto the projector when cleaning it.
• It may cause a fire or electric shock.
CAUTION
How to clean the projector
− Disconnect the plug from the outlet before cleaning.
− Do not wipe the optical system (the lens and mirror) immediately after the
power is turned off.
− Do not spray the water with a sprayer on the product or wipe the product with
a damp cloth.
− Wipe the product gently with a soft cloth.
− Do not use any detergents, automotive or industrial polishes, abrasives, waxes,
benzenes or alcohols.
• It may cause a fire, electric shock or damage to the projector (deformation,
corrosion, and breakage).
How to clean the lens
− Clean the lens if any dust or smudge appears on the surface of the lens.
− Clean the surface of the lens with an air sprayer or a soft, dry cloth.
− To remove dust or stains on the lens, use a compressed air duster, cotton swab,
or soft cloth to gently wipe the lens.
− Never clean the lens when the projector is operating or immediately after the
projector is turned off.
− Do not use any detergents, automotive or industrial polishes, abrasives, waxes,
benzenes, alcohols, water, etc. on the lens, as they will damage the projector.
Consult your dealer or the service center for cleaning the interior of the
product once a year.
• If you do not clean the interior of the projector for a long time while dust collects,
it may cause a fire or malfunction.
ENGLISH
ENGLISH
16
PREPARATION
The pictures may differ slightly from the actual product.
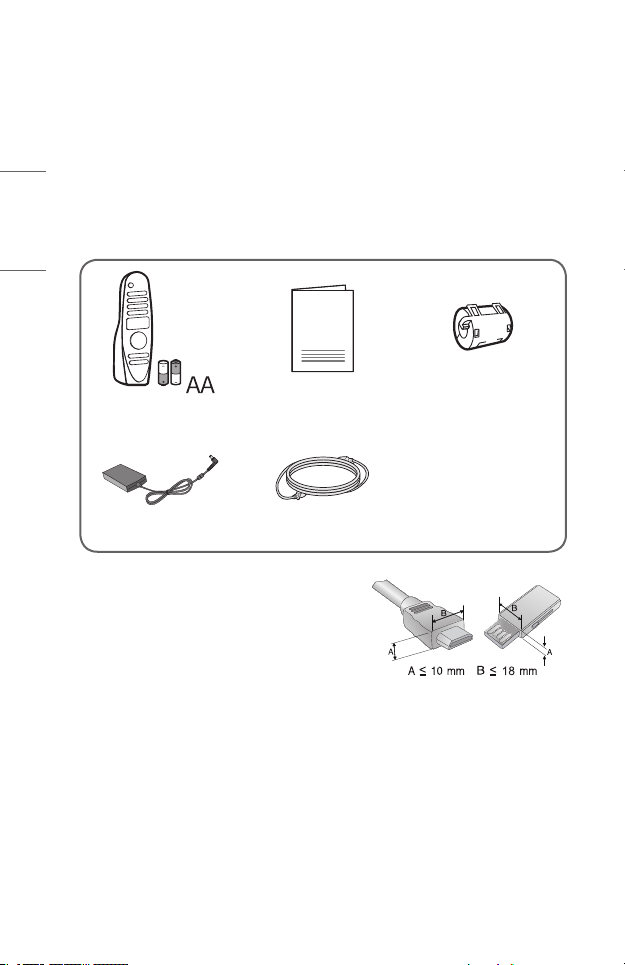
Accessories
Accessories included with the projector are show below.
Accessories are subject to change without prior notice.
New accessories may be added or old ones removed.
Magic Lighting Remote
Two AA Batteries
AC-DC Adaptor Power cord
• When connecting an HDMI or USB cable, or
connecting a USB flash drive to the HDMI
or USB port, use a product that has a width
of 18 mm or less and a height of 10 mm or
less. If the USB cable or USB flash drive does
not fit the USB ports of the projector, use an
extension cable that supports USB 2.0.
• When connecting two USB devices at the same time, each one should have
bezels less than 8.5 mm thick.
• Use a certified cable with the HDMI logo attached.
• If you do not use a certified HDMI cable, the screen may not display or a
connection error may occur. (Recommended HDMI cable types)
– Ultra High-Speed HDMI®/TM Cable (3 m or less)
Owner’s Manual Ferrite core
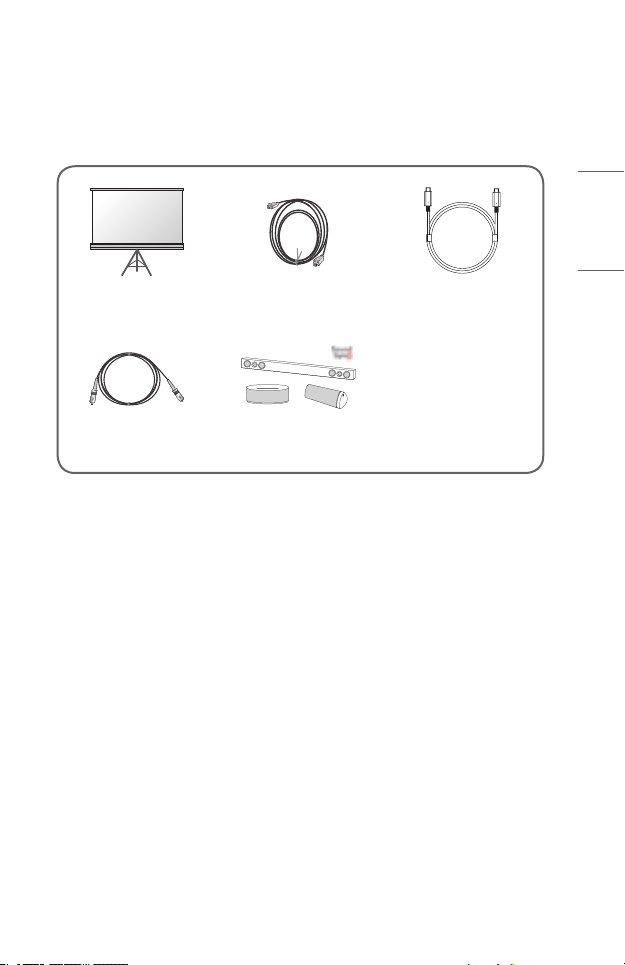
Optional Extras
To purchase optional accessories, visit an electronics store or online shopping site
or contact the retail store where you purchased the product. Optional accessories
are subject to change without prior notice.
Projection Screen HDMI Cable USB-C Cable
Optical Cable LG Audio Device
17
ENGLISH
ENGLISH
18
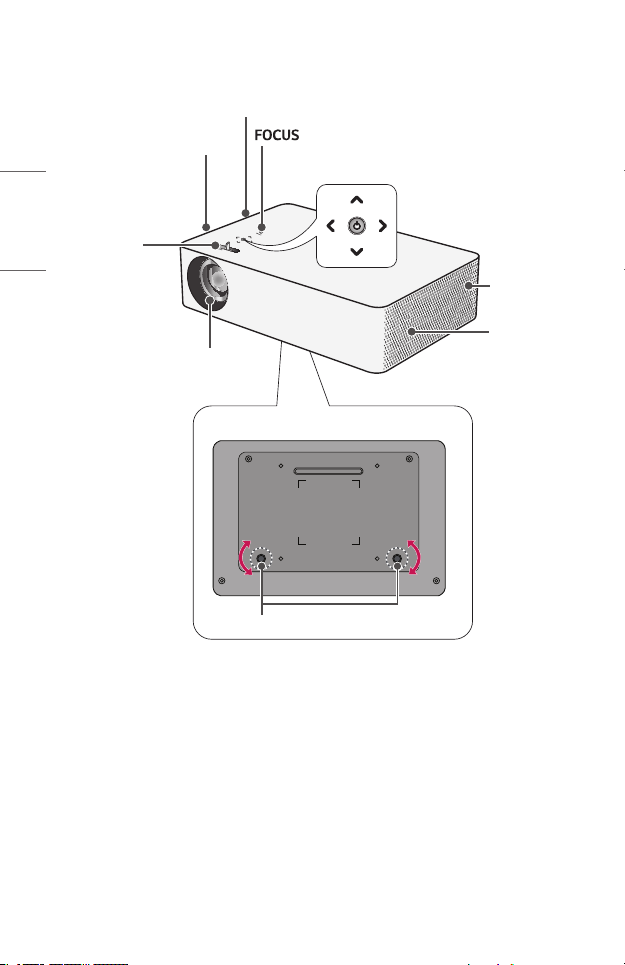
Parts and Components
Speaker
Inlet Vent
Zoom Ring
button
Buttons
Speaker
Outlet Vent
2)
Lens
Bottom of the Projector
Adjustable leg
3)
1) Due to the high temperature of vent area, do not get close to the vent area.
2) Do not touch the lens when using the projector. The lens may be damaged.
(Keep lens away from sharp objects.)
3) Turn the adjustable leg left or right to adjust the angle.
1)
19
ENGLISH
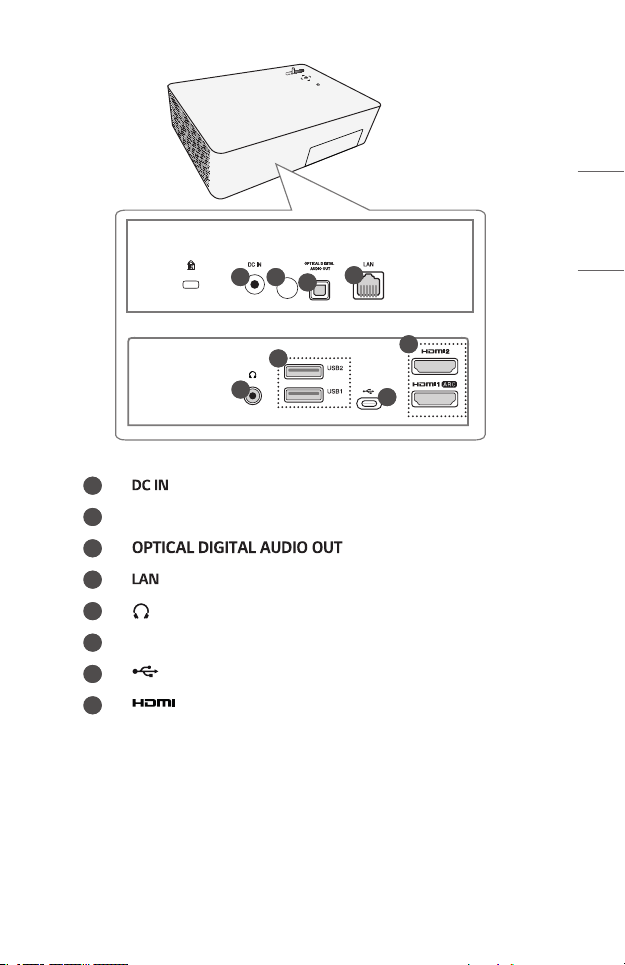
1
2
3
4
5
6
7
8
Port
IR Receiver
Port
(Headphone Port)
USB 2.0 Port
(USB-C Port)
Port
1 2
5
6
3
4
8
7
Port

20
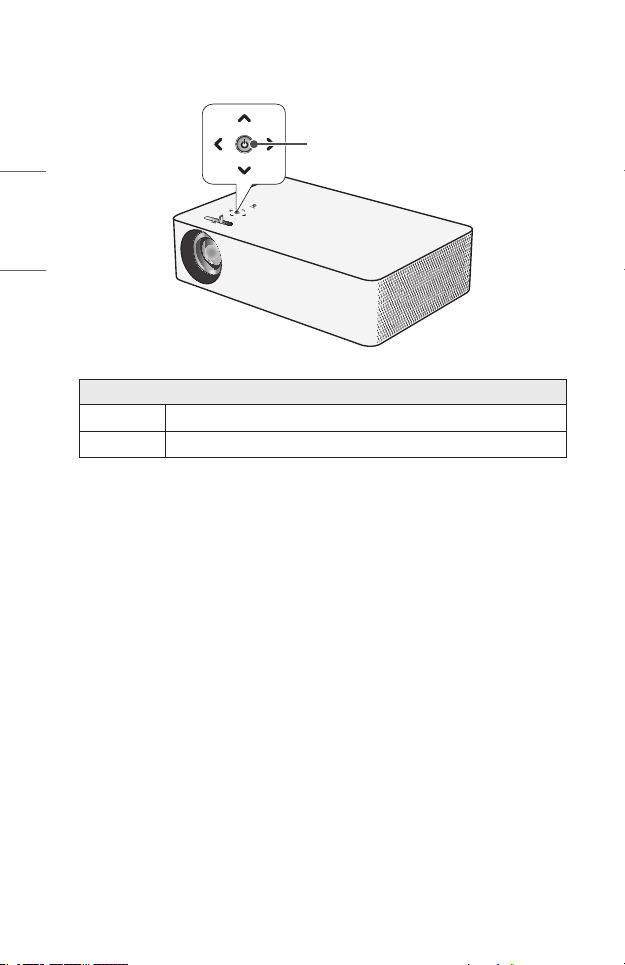
Using the Buttons
You can operate the projector by pressing the button.
Basic functions
ENGLISH
,
, , ,
Power On
Power Off
(Press and
Hold)
Volume
Control
Up/Down/
Left/Right
Press the power button once while
the projector is off.
Press and hold the Power button
for more than 3 seconds while the
projector is on.
Adjust the volume by pressing the
left/right button.
Sets functions or moves the cursor.
Adjusting the menu
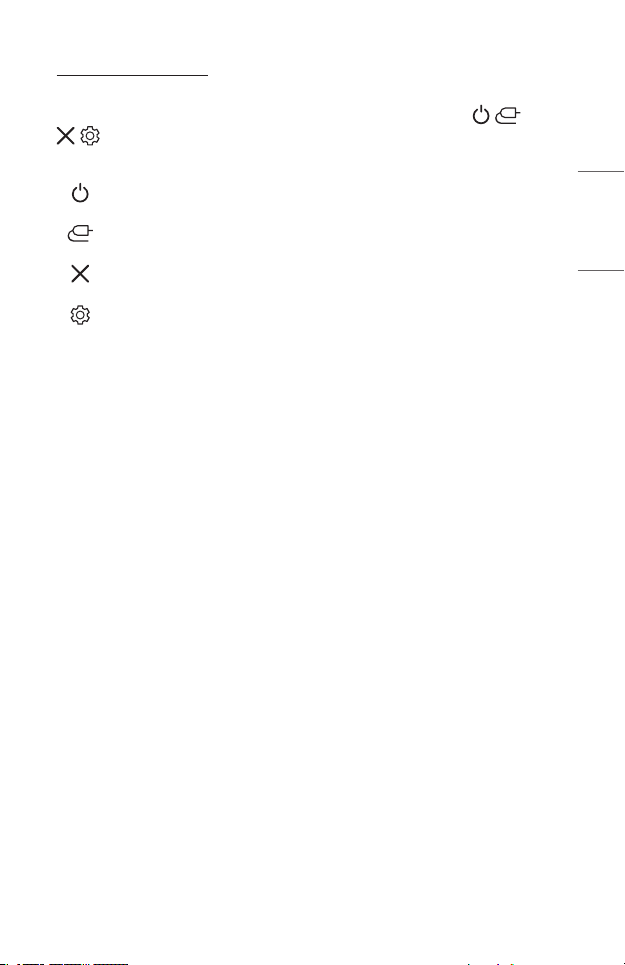
Press the power button once while the projector is on.
Press the top, bottom, left, and right buttons to move to a menu item (
, ). After moving to the desired menu item, press the Power button once to
select it.
Turns the power off.
Changes the input source.
Clears on-screen displays and returns to projector viewing.
Displays the Settings menu.
21
, ,
ENGLISH
ENGLISH
22
Projector Status Indicators
LED Power Indicator
LED Power Indicator
Red
Off
Power standby state
The projector is operating with the power on.
23
INSTALLATION
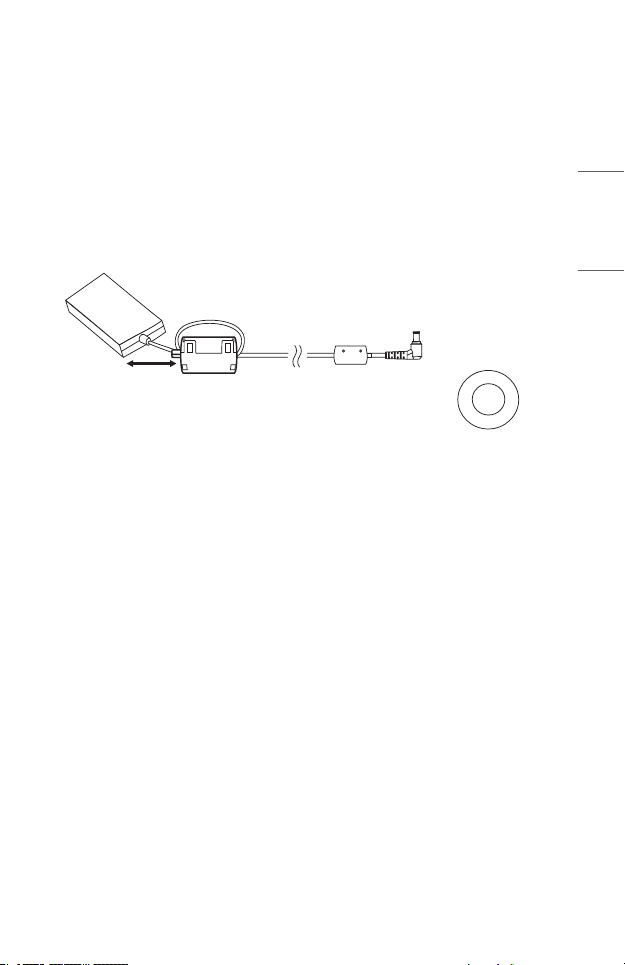
How to use the ferrite core
• Use the ferrite core as illustrated below to reduce electromagnetic radiation.
• The pictures may differ slightly from the actual product.
Put the ferrite core around the AC-DC Adaptor cable as illustrated below. Place
the ferrite core as close to the AC-DC Adaptor body as possible for best results.
Cross Section
of Ferrite Core
(Gray)
10 mm (+/-5 mm)
Power Cord Projector
ENGLISH
ENGLISH
Y/2 Y/2
24
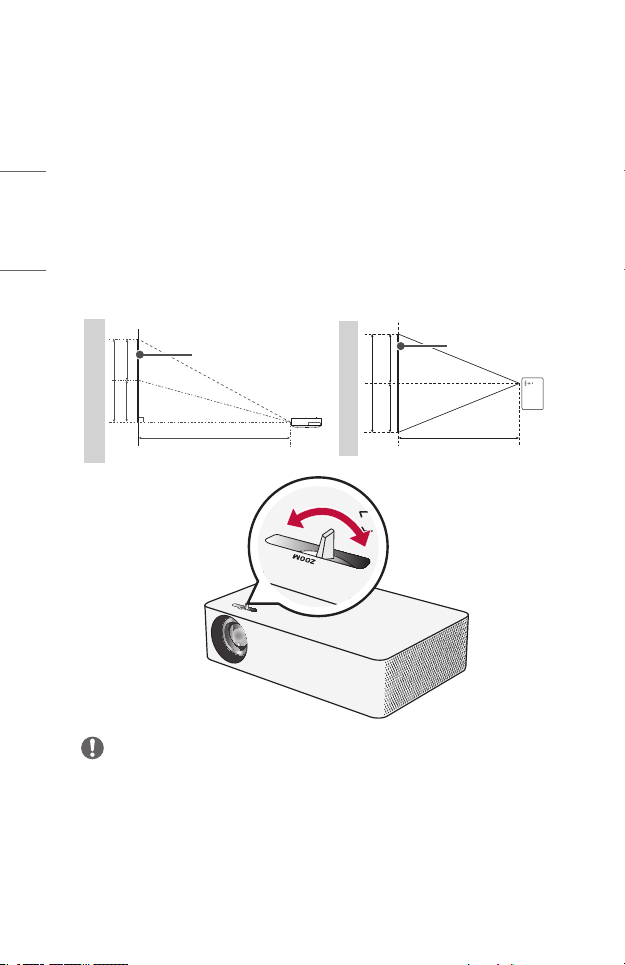
Projection Distance per Screen Size
1 Place the projector on a sturdy, level surface, together with the PC or audio/
video source.
2 Place the projector an appropriate distance away from the screen. The distance
between the projector and the screen determines the actual size of the image.
3 Position the projector so that the lens is at a right angle to the screen. If the
projector is not at a right angle, the projected image will look distorted. To
correct the distortion, use the Keystone function.
4 Connect the power cord of the projector and the connected device to the wall
outlet.
Ratio of upward projection: 100 %
Screen Height (X)
X/2 X/2
Screen
Screen Width (Y)
Screen
Projection Distance (D)
1.0 x Zoom 1.25 x Zoom
NOTE
If the projected image looks distorted or bent, check to see if the screen is
•
installed properly.
Projection Distance (D)
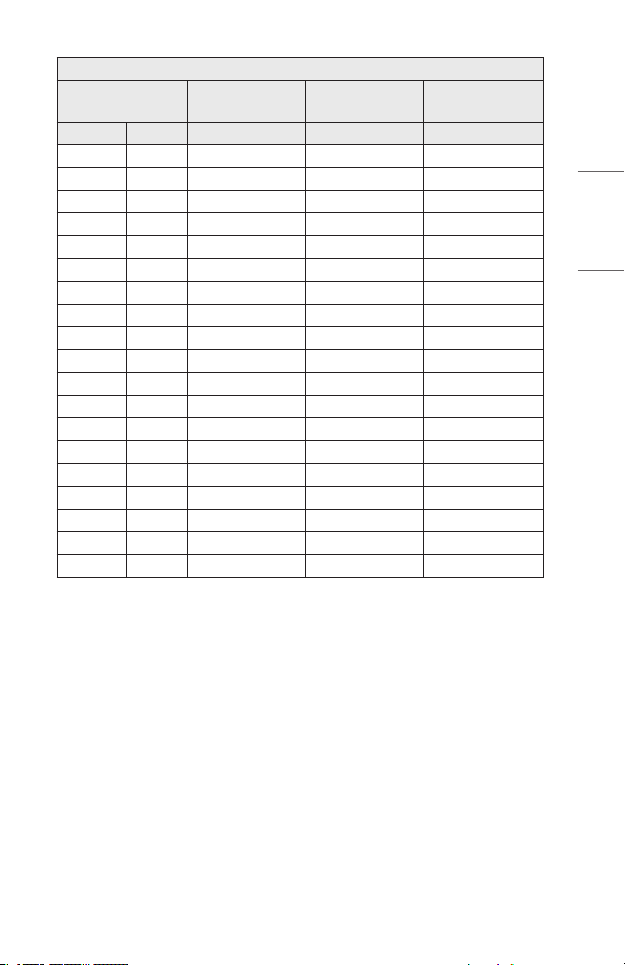
16:9AspectRatio(1.0xZoom)
Screen Size ScreenWidth(Y) ScreenHeight(X)
inches mm mm mm mm
Projection
Distance(D)
50 1270 1107 623 1660
55 1397 1218 685 1830
60 1524 1328 747 2000
65 1651 1439 809 2170
70 1778 1550 872 2350
75 1905 1660 934 2520
80 2032 1771 996 2681
85 2159 1882 1058 2850
90 2286 1992 1121 3020
95 2413 2103 1183 3190
100 2540 2214 1245 3360
105 2667 2324 1308 3529
110 2794 2435 1370 3700
115 2921 2546 1432 3869
120 3048 2657 1494 4042
125 3175 2767 1557 4210
130 3302 2878 1619 4378
135 3429 2989 1681 4547
140 3556 3099 1743 4718
The projection distance may vary depending on the installation conditions.
25
ENGLISH

ENGLISH
26
16:9AspectRatio(1.25xZoom)
Screen Size ScreenWidth(Y) ScreenHeight(X)
inches mm mm mm mm
Projection
Distance(D)
60 1524 1328 747 1600
65 1651 1439 809 1730
70 1778 1550 872 1867
75 1905 1660 934 2004
80 2032 1771 996 2144
85 2159 1882 1058 2276
90 2286 1992 1121 2410
95 2413 2103 1183 2550
100 2540 2214 1245 2681
105 2667 2324 1308 2820
110 2794 2435 1370 2955
115 2921 2546 1432 3090
120 3048 2657 1494 3230
125 3175 2767 1557 3360
130 3302 2878 1619 3500
135 3429 2989 1681 3630
140 3556 3099 1743 3760
The projection distance may vary depending on the installation conditions.
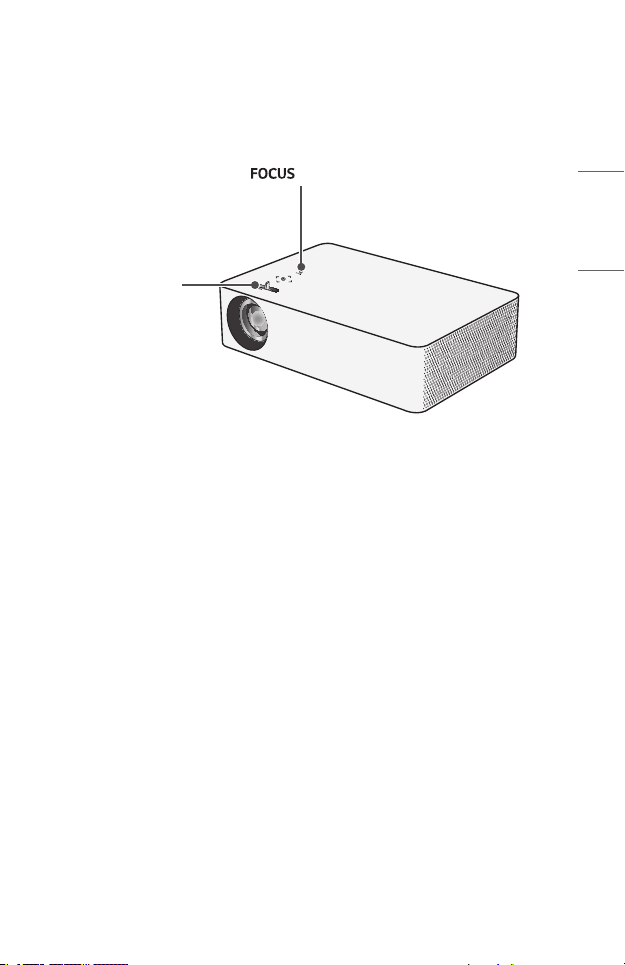
Focus of the Screen Image
When an image appears on the screen, check if it is in focus and ts the screen
properly.
27
Zoom Ring
button
ENGLISH
ENGLISH
28
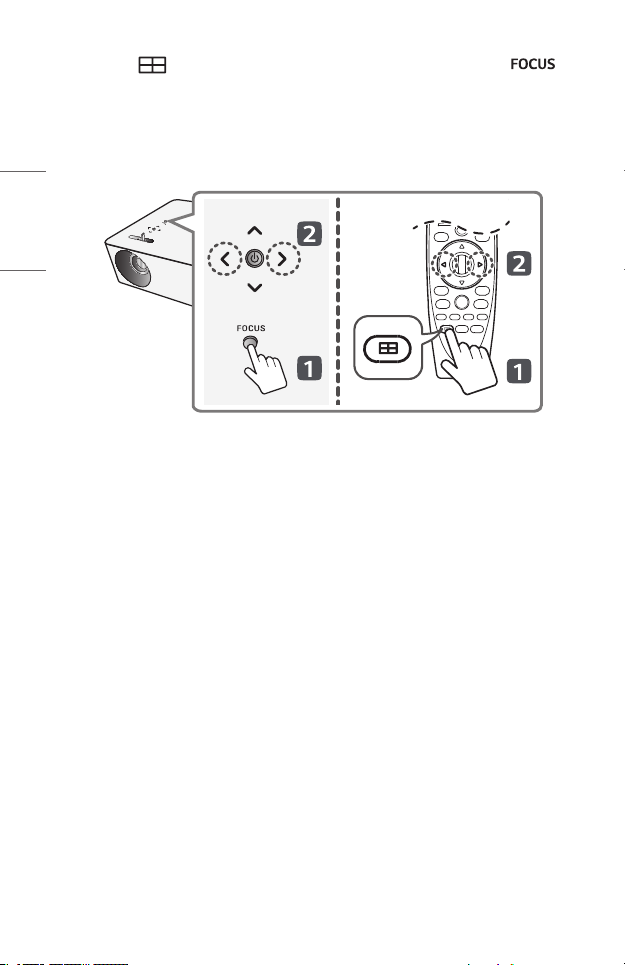
1 Press (FocusAdjustment) button on the remote control or the
button on the projector to execute the [Focus Adjustment] function.
2 You can adjust the focus using the left and right buttons on the projector or
the left and right buttons on the remote control. You can adjust the focus
most effectively when the left and right screen are balanced. When adjusting
the focus on the screen, do not let the product shake.
3 If the angle of the projection is not perpendicular, use the [Keystone] function.
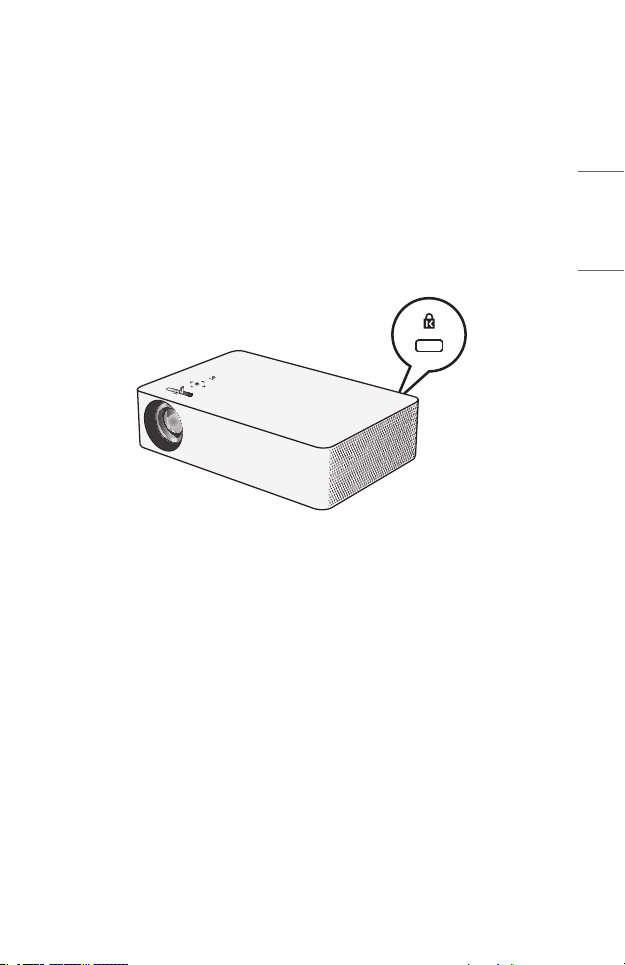
Kensington Security System
• This projector has a Kensington Security Standard connector as an anti-theft
mechanism. Connect a Kensington Security System cable as shown below.
• For more information on installation and use of the Kensington Security System,
refer to the user’s guide provided with the Kensington Security System.
• The Kensington Security System is an optional accessory.
• What is Kensington?
Kensington is a company that provides safety systems for laptops and other
electronic devices. Website: http://www.kensington.com
29
ENGLISH
ENGLISH
30
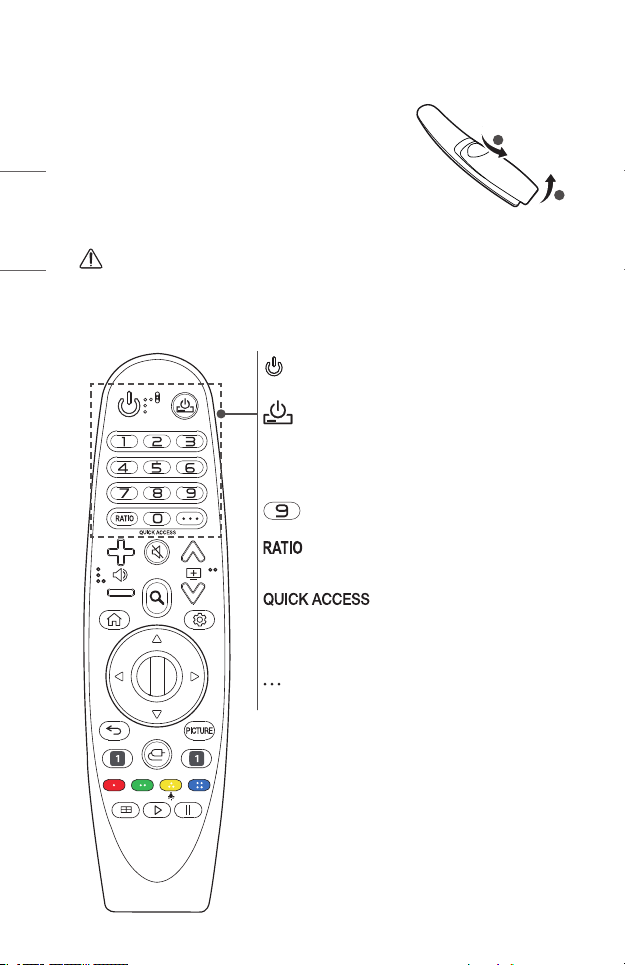
MAGIC LIGHTING REMOTE
If the battery low message appears while using the
Projector, replace the batteries.
As shown in the gure, press the top of the battery
cover and slide it down the cover. Insert two new and
identical batteries (1.5 V, AA type) with + and - poles
pointing in the correct direction in the remote control.
* : To use the button, press and hold for more than 3 seconds.
CAUTION
• Do not mix new batteries with old ones.
(POWER)
Turns the Projector on or off.
You can turn your set-top box on or off by adding the settop box to the universal remote control for your Projector.
Number buttons
Enters numbers.
*
Accesses the [QUICK HELP].
Changes the aspect ratio of the screen per pressing of the
button.
*
Edits QUICK ACCESS.
(QUICK ACCESS is a feature that allows you to enter a
specied app directly by pressing and holding the number
buttons.)
(MOREACTIONS)
Displays more remote control functions.
1
2
 Loading...