

LG HT305SU-F2 Owner’s Manual

OWNER'S MANUAL
DVD Receiver System
Please read this manual carefully before operating
your set and retain it for future reference.
MODEL
HT305SU (HT305SU, SH35SU-S/W)
P/NO : MFL63284731
HT305SU-F2_BBGDLL_ENG_4731.indd 1HT305SU-F2_BBGDLL_ENG_4731.indd 1 2010-02-25 ¿ÀÈÄ 5:25:212010-02-25 ¿ÀÈÄ 5:25:21
2
CAUTION : TO REDUCE THE RISK OF ELECTRIC SHOCK DO NOT REMOVE
COVER (OR BACK) NO USER-SERVICEABLE PARTS INSIDE REFER SERVICING
TO QUALIFIED SERVICE PERSONNEL.
This lightning flash with arrowhead symbol within an equilateral triangle is
intended to alert the user to the presence of uninsulated dangerous voltage
within the product’s enclosure that may be of sufficient magnitude to
constitute a risk of electric shock to persons.
The exclamation point within an equilateral triangle is intended to alert the
user to the presence of important operating and maintenance (servicing)
instructions in the literature accompanying the product.
WARNING : TO PREVENT FIRE OR ELECTRIC SHOCK HAZARD, DO NOT
EXPOSE THIS PRODUCT TO RAIN OR MOISTURE.
WARNING : Do not install this equipment in a confined space such as a book case or
similar unit.
CAUTION : This product employs a Laser System.
To ensure proper use of this product, please read this owner’s
manual carefully and retain it for future reference. Shall the unit
require maintenance, contact an authorized service center.
Use of controls, adjustments or the performance of procedures
other than those specified herein may result in hazardous radiation exposure.
To prevent direct exposure to laser beam, do not try to open the enclosure. Visible
laser radiation when open. DO NOT STARE INTO BEAM.
CAUTION : The apparatus shall not be exposed to water (dripping or splashing) and
no objects filled with liquids, such as vases, shall be placed on the apparatus.
CAUTION concerning the Power Cord
Most appliances recommend they be placed upon a dedicated circuit ;
That is, a single outlet circuit which powers only that appliance and has no additional
outlets or branch circuits. Check the specification page of this owner's manual to be
certain.
Do not overload wall outlets. Overloaded wall outlets, loose or damaged wall outlets,
extension cords, frayed power cords, or damaged or cracked wire insulation are
dangerous. Any of these conditions could result in electric shock or fire. Periodically
examine the cord of your appliance, and if its appearance indicates damage or
deterioration, unplug it, discontinue use of the appliance, and have the cord replaced
with an exact replacement part by an authorized service center.
Protect the power cord from physical or mechanical abuse, such as being twisted,
kinked, pinched, closed in a door, or walked upon. Pay particular attention to plugs,
wall outlets, and the point where the cord exits the appliance.
To disconnect power from the mains, pull out the mains cord plug. When installing the
product, ensure that the plug is easily accessible.
This device is equipped with a portable battery or accumulator.
Safe way to remove the battery or the battery from the equipment:
Remove the old battery or battery pack, follow the steps in reverse order than the
assembly. To prevent contamination of the environment and bring on possible threat
to human and animal health, the old battery or the battery put it in the appropriate
container at designated collection points. Do not dispose of batteries or battery
together with other waste. It is recommended that you use local, free reimbursement
systems batteries and accumulators. The battery shall not be exposed to excessive
heat such as sunshine, fire or the like.
Safety Precaution
CAUTION
RISK OF ELECTRIC SHOCK
DO NOT OPEN
HT305SU-F2_BBGDLL_ENG_4731 3/8/10 7:38 PM Page 2

3
Welcome to your new DVD Receiver
Contents
Setting up . . . . . . . . . . . . . . . . . . . . . . . . . . . . . . . . . . . . . . .4
Main Unit . . . . . . . . . . . . . . . . . . . . . . . . . . . . . . . . . . . . . . .4
Hooking up the unit . . . . . . . . . . . . . . . . . . . . . . . . . . . . . .5-6
Remote control . . . . . . . . . . . . . . . . . . . . . . . . . . . . . . . . . . .7
OSD Initial language settings - Optional . . . . . . . . . . . . . . . .8
Initial Setting the Area Code - Optional . . . . . . . . . . . . . . . . .8
Adjusting the general settings . . . . . . . . . . . . . . . . . . . . .8-10
5.1 Speaker Setup . . . . . . . . . . . . . . . . . . . . . . . . . . . . . . . .9
Enjoying a pre-programmed sound field . . . . . . . . . . . . . . .10
Displaying Disc Information . . . . . . . . . . . . . . . . . . . . . . . . .11
Playing a disc or file . . . . . . . . . . . . . . . . . . . . . . . . . . . .11-13
Viewing photo files . . . . . . . . . . . . . . . . . . . . . . . . . . . . . . .13
Listening to the radio . . . . . . . . . . . . . . . . . . . . . . . . . . . . . .14
Using an USB device . . . . . . . . . . . . . . . . . . . . . . . . . . . . .15
Listening to music from your portable player or external
device . . . . . . . . . . . . . . . . . . . . . . . . . . . . . . . . . . . . . . . . .15
Recording to USB . . . . . . . . . . . . . . . . . . . . . . . . . . . . . . . .16
Language Codes . . . . . . . . . . . . . . . . . . . . . . . . . . . . . . . .17
Area Codes . . . . . . . . . . . . . . . . . . . . . . . . . . . . . . . . . . . .17
Troubleshooting . . . . . . . . . . . . . . . . . . . . . . . . . . . . . . . . .18
Types of Playable Discs . . . . . . . . . . . . . . . . . . . . . . . . . . .19
Specifications . . . . . . . . . . . . . . . . . . . . . . . . . . . . . . . . . . .20
HT305SU-F2_BBGDLL_ENG_4731 3/8/10 7:38 PM Page 3
4
Setting up
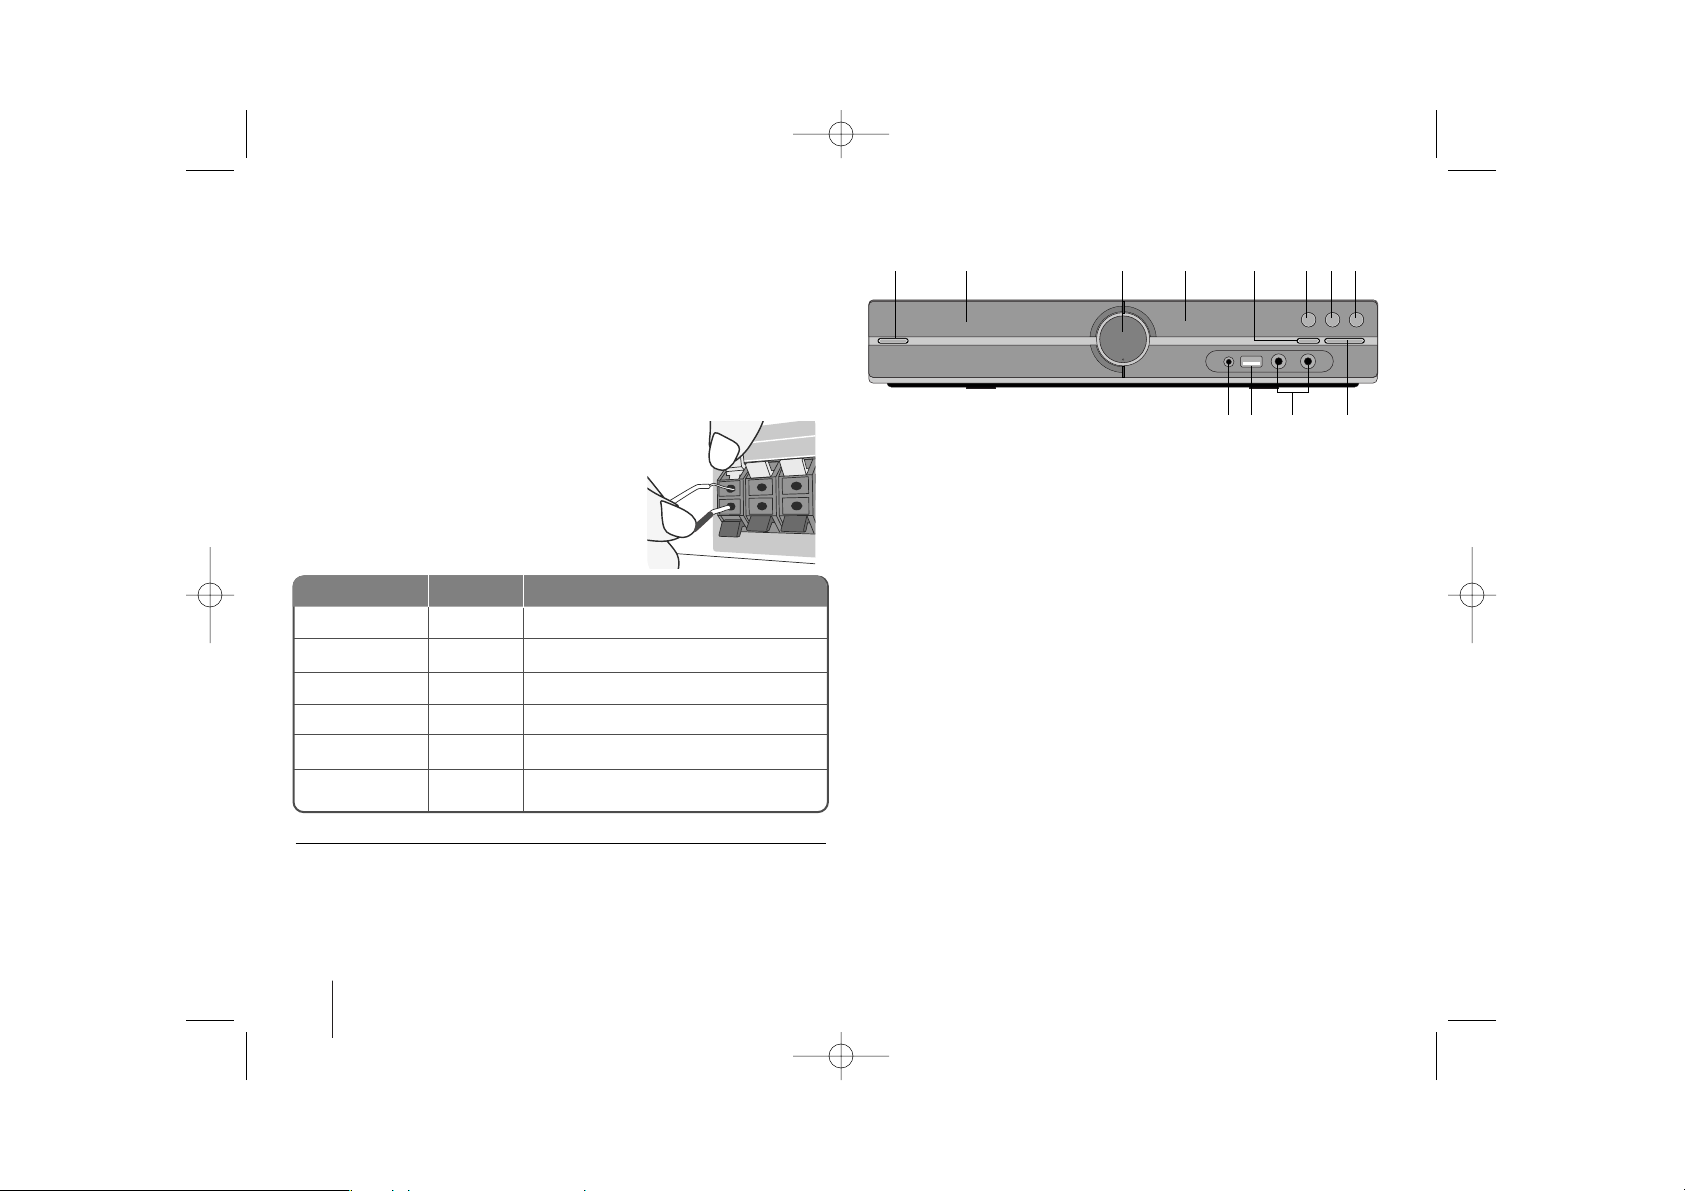
Connect the black end of each wire to
the terminals marked -(minus) and the
other end to the terminals marked +
(plus).
Attaching the speakers to the DVD receiver
aa
You will have received six speaker cables.
Each one is colour-coded by a band near each end and connects one of
the six speakers to the DVD receiver.
bb
Connect the wires to the DVD receiver.
To connect the cable to the DVD receiver, press each plastic finger pad to
open the connection terminal. Insert the wire and release the finger pad.
REAR R
REAR L
CENTER
SUB WOOFER
FRONT R
FRONT L
R.R
R.L
C
W
F. R
F. L
Behind you and to your right.
Behind you and to your left.
Above screen, directly in front of you.
This can be placed in any front position.
In front of yo u, to the right of the
screen.
In front of you, to the left of the
screen.
POSITION
SPEAKER
Main Unit
Be careful of the following
• Be careful to make sure children do not put their hands or any objects into
the *speaker duct.
*Speaker duct : A hole for plentiful bass sound on speaker
cabinet(enclosure).
• The speakers contain magnet parts, so color irregularity may occur on the
TV screen or PC monitor screen. Please use the speakers far away from
either TV screen or PC monitor.
Main Unit
12 345678
12 11 10 9
1 Power (11/``)
Turns the unit on and off.
2 DVD/CD Disc Drawer
3 Volume (VOL.)
Controls the volume when using any function.
4
Display window
5 Open/Close (ZZ)
6 Play/Pause(BB/XX)
7 Stop (xx)
8 Function (F)
Selects the function and input source.
(DVD/CD
, USB, AUX, PORTABLE, FM)
9 TUNING (-/+) (
..>>
), Skip/Search (press and hold)
10 MIC 1/ MIC 2
Connect a microphone to MIC 1 or MIC 2 to both sockets.
You cannot use the microphone when DivX files playback.
11 USB port
You can play video, image and sound files by connecting the USB
device.
12 PORT.(Portable) IN port
You can enjoy music from portable device on your unit.
HT305SU-F2_BBGDLL_ENG_4731 3/8/10 7:38 PM Page 4
5
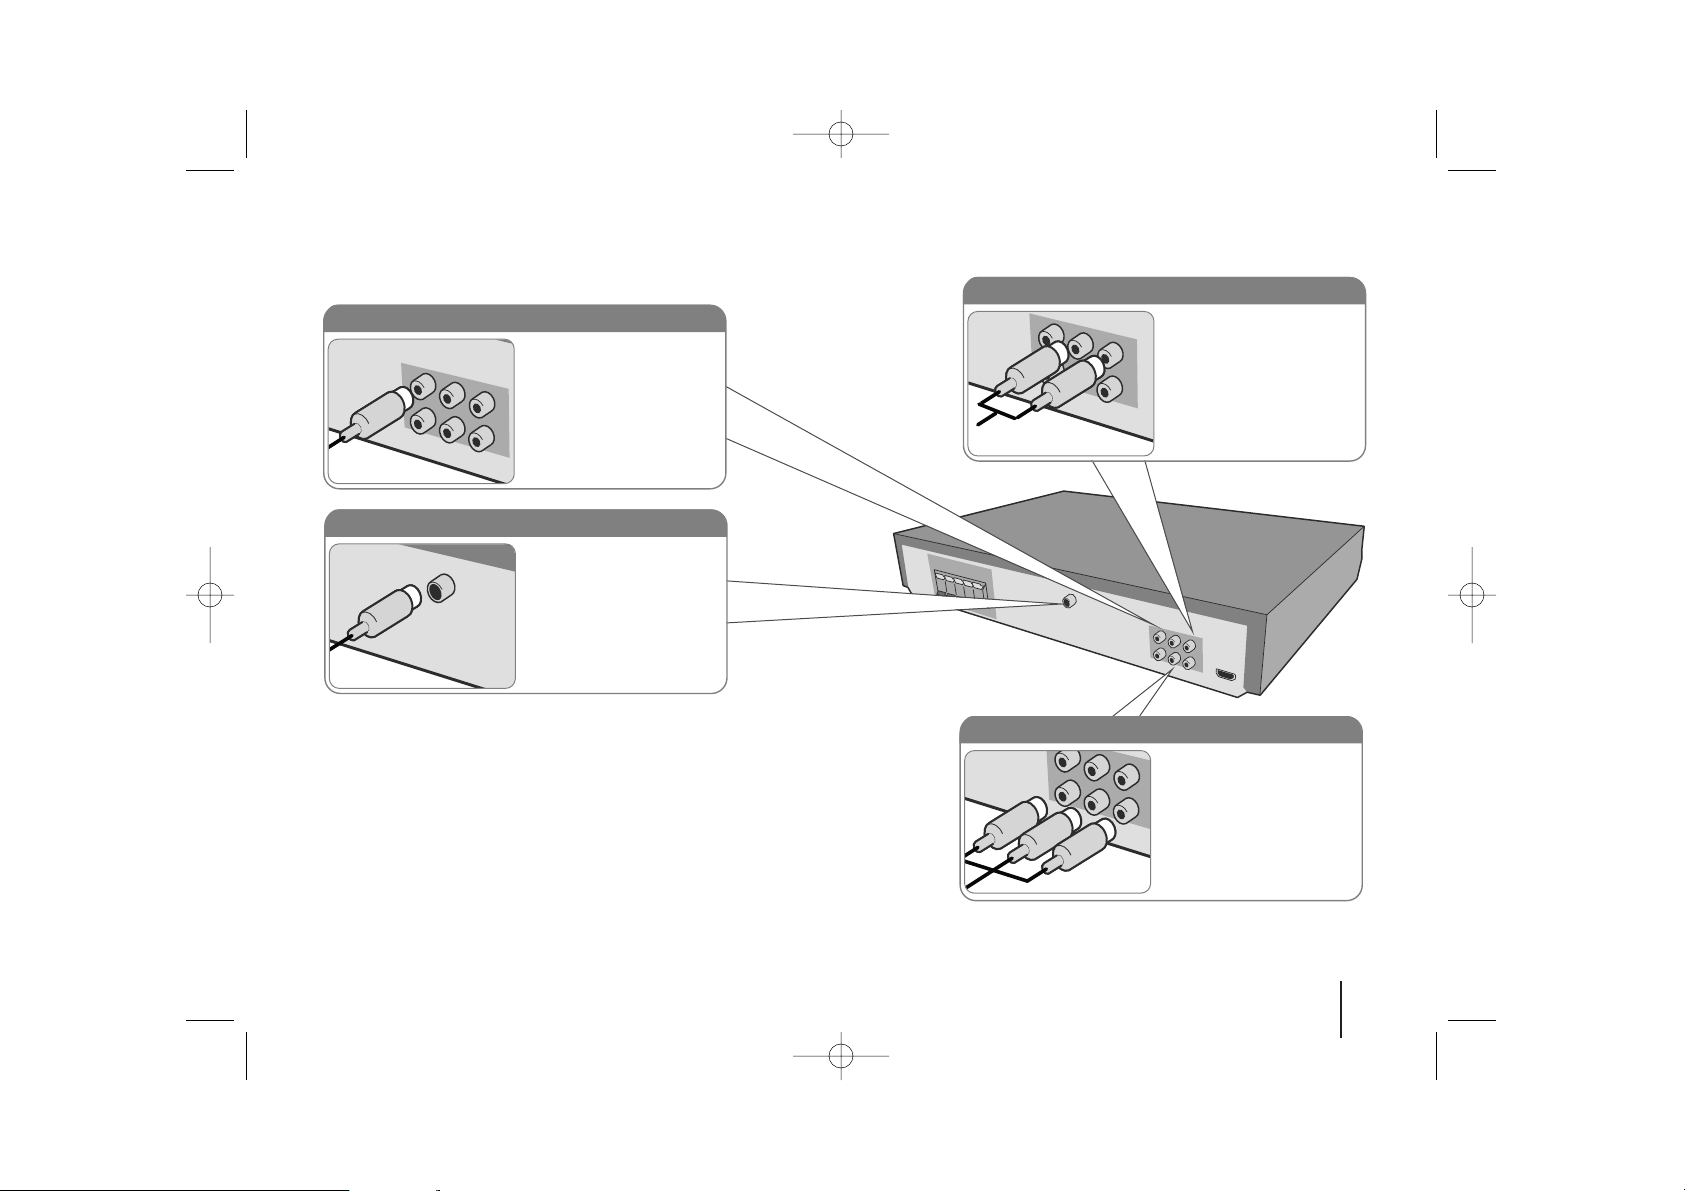
Hooking up the unit
a Connect jacks on the unit and your TV (DVD player or Digital Device etc.) using the cables.
Check the jacks of your TV and choose the A, B or C connection. Picture quality improves in order from A to C.
b Plug the power cord into the power source.
Audio In connection
The unit’s Audio jacks are
colour coded (red for right
audio and white for left
audio). If your TV has only
one output for audio (mono),
connect it to the left (white)
audio jack on the unit.
FM connection
FM - Connect the FM aerial.
The reception will be its best
when the two loose ends of
the aerial are in a straight and
horizontal line.
Video Out connection (A)
Connect the VIDEO
OUTPUT(MONITOR) jack on
the unit to the corresponding
input jack on your TV using a
Video cable.
Component Video connection (B)
Connect the COMPONENT
VIDEO (PROGRESSIVE
SCAN) OUTPUT jacks on
the unit to the corresponding
input jacks on your TV using
a Y PB PR cable.
HT305SU-F2_BBGDLL_ENG_4731 3/8/10 7:38 PM Page 5
6
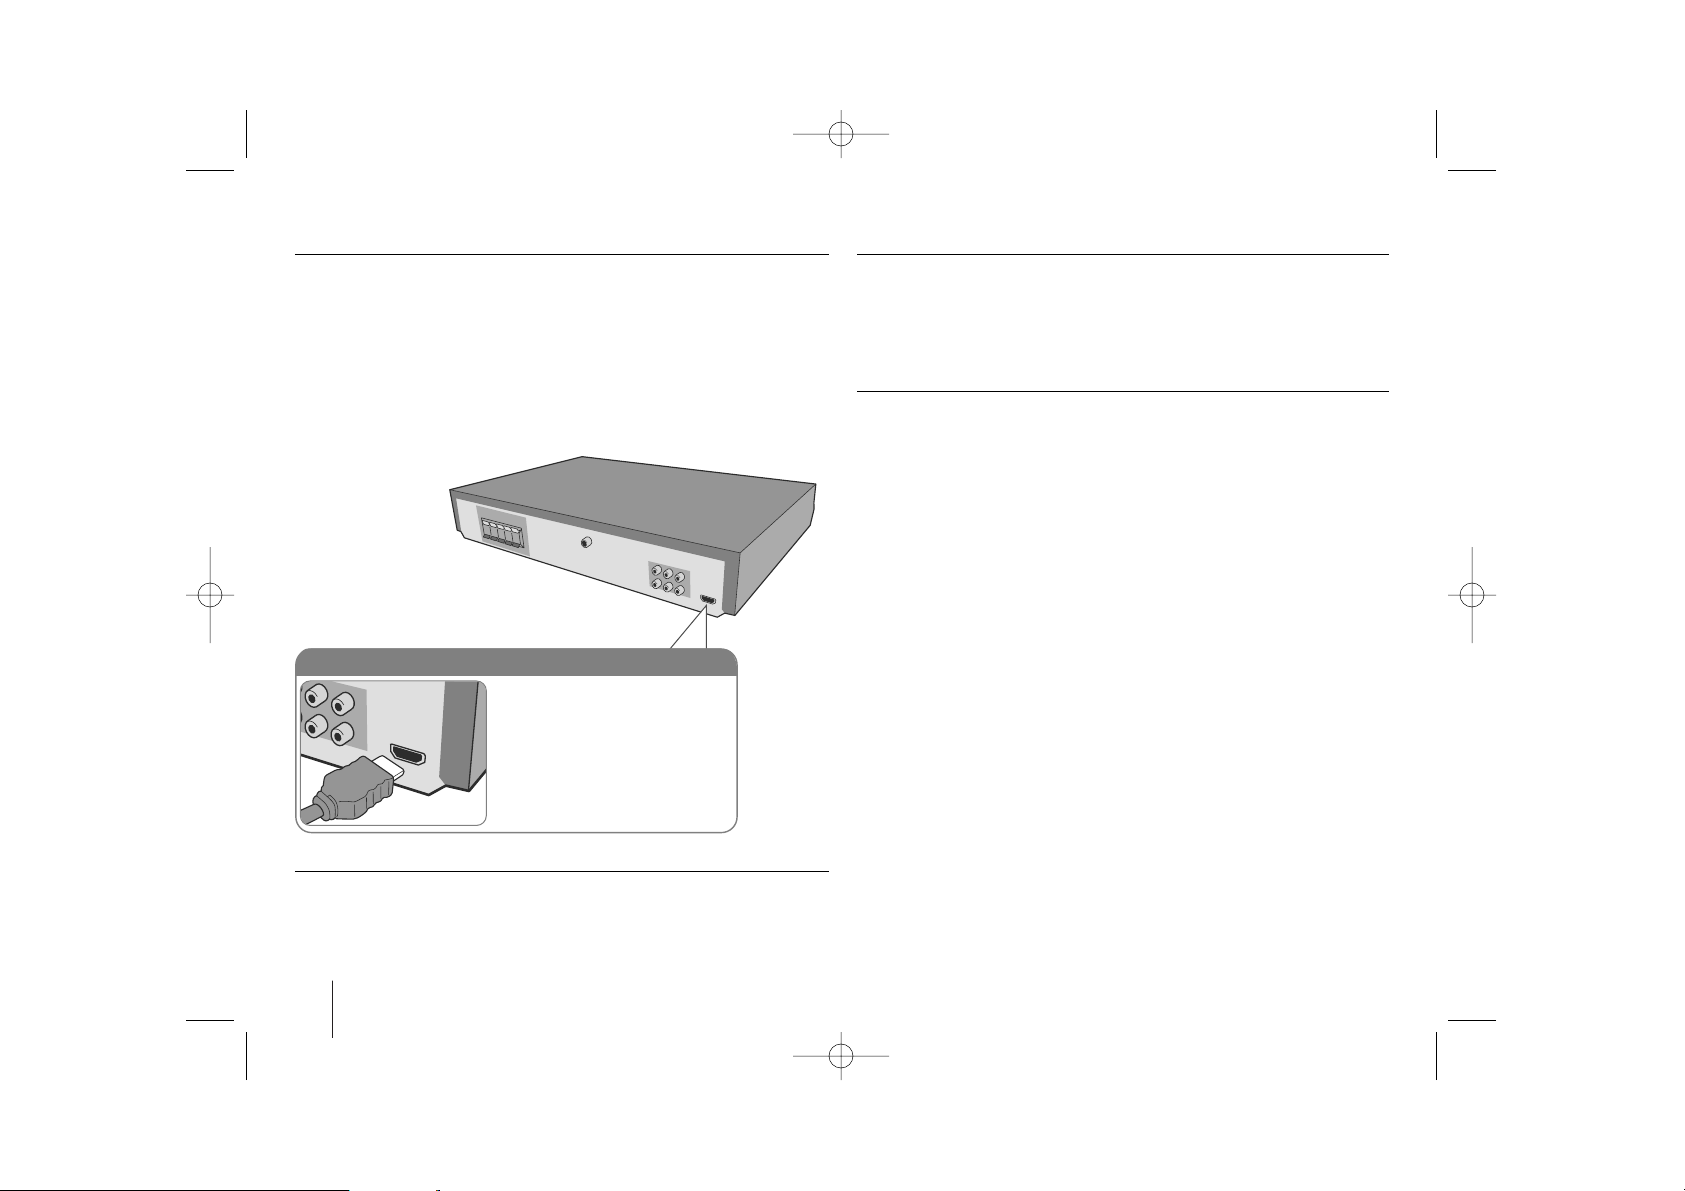
Hooking up the unit
Available resolution according to connection
Displayed resolution in display window and outputted resolution may different
according to connection type.
[HDMI OUT] : 1080p, 1080i, 720p and 480p (or 576p), 480i(or 576i)
[COMPONENT VIDEO OUT] : 480p (or 576p) and 480i (or 576i)
[VIDEO OUT] : 480i (or 576i)
Notes on HDMI Out connection
• If your TV does not accept your resolution setting, abnormal picture appears
on the screen.(“TV do not support” will appears in screen)
Please read owner’s manual for TV, and then set the resolution that your TV
can accept.
• Changing the resolution when the unit is connected with HDMI connector
may result in malfunctions. To solve the problem, turn off the unit and then
turn it on again.
• When you connect a HDMI or DVI compatible device make sure of the
following :
-Try switching off the HDMI/ DVI device and this unit. Next, switch on the
HDMI/ DVI device and leave it for around 30 seconds, then switch on this
unit.
- The connected device’s video input is set correctly for this unit.
- The connected device is compatible with 720X576i(480i), 720X576p(480p),
1280X720p, 1920X1080i or 1920X1080p video input.
- The 1080p, 720p and 576p(480p) resolutions are the progressive scan
applied resolution.
• Not all HDCP-compatible DVI devices will work with this unit.
- The picture will not be displayed properly with non-HDCP device.
Resolution Setting
You can change the resolution for component video and HDMI output.
Press RESOLUTION repeatedly to select the desired resolution - 480i (or 576i),
480p (or 576p), 720p, 1080i, 1080p
The resolution may not be selected depending on the connection or TV.
• Depending on your TV, some of the resolution settings may result in the
picture disappearing or an abnormal picture appearing. In this case, press
RESOLUTION repeatedly until the picture re-appears.
You can set 1080p video resolution to enjoy Full HD picture quality. (Full
HD up-scaling)
Enjoying audio from an external source and selecting the function
You can enjoy audio from an external source through your unit. And You can
select the function.
Press FUNCTION repeatedly to select the desired input source and the function
(DVD/CD, USB, AUX, PORTABLE, FM).
HDMI Out connection (C)
Connect the HDMI OUTPUT jack
on the unit to the HDMI input jack
on a HDMI compatible TV using a
HDMI cable.
HT305SU-F2_BBGDLL_ENG_4731 3/8/10 7:38 PM Page 6
7
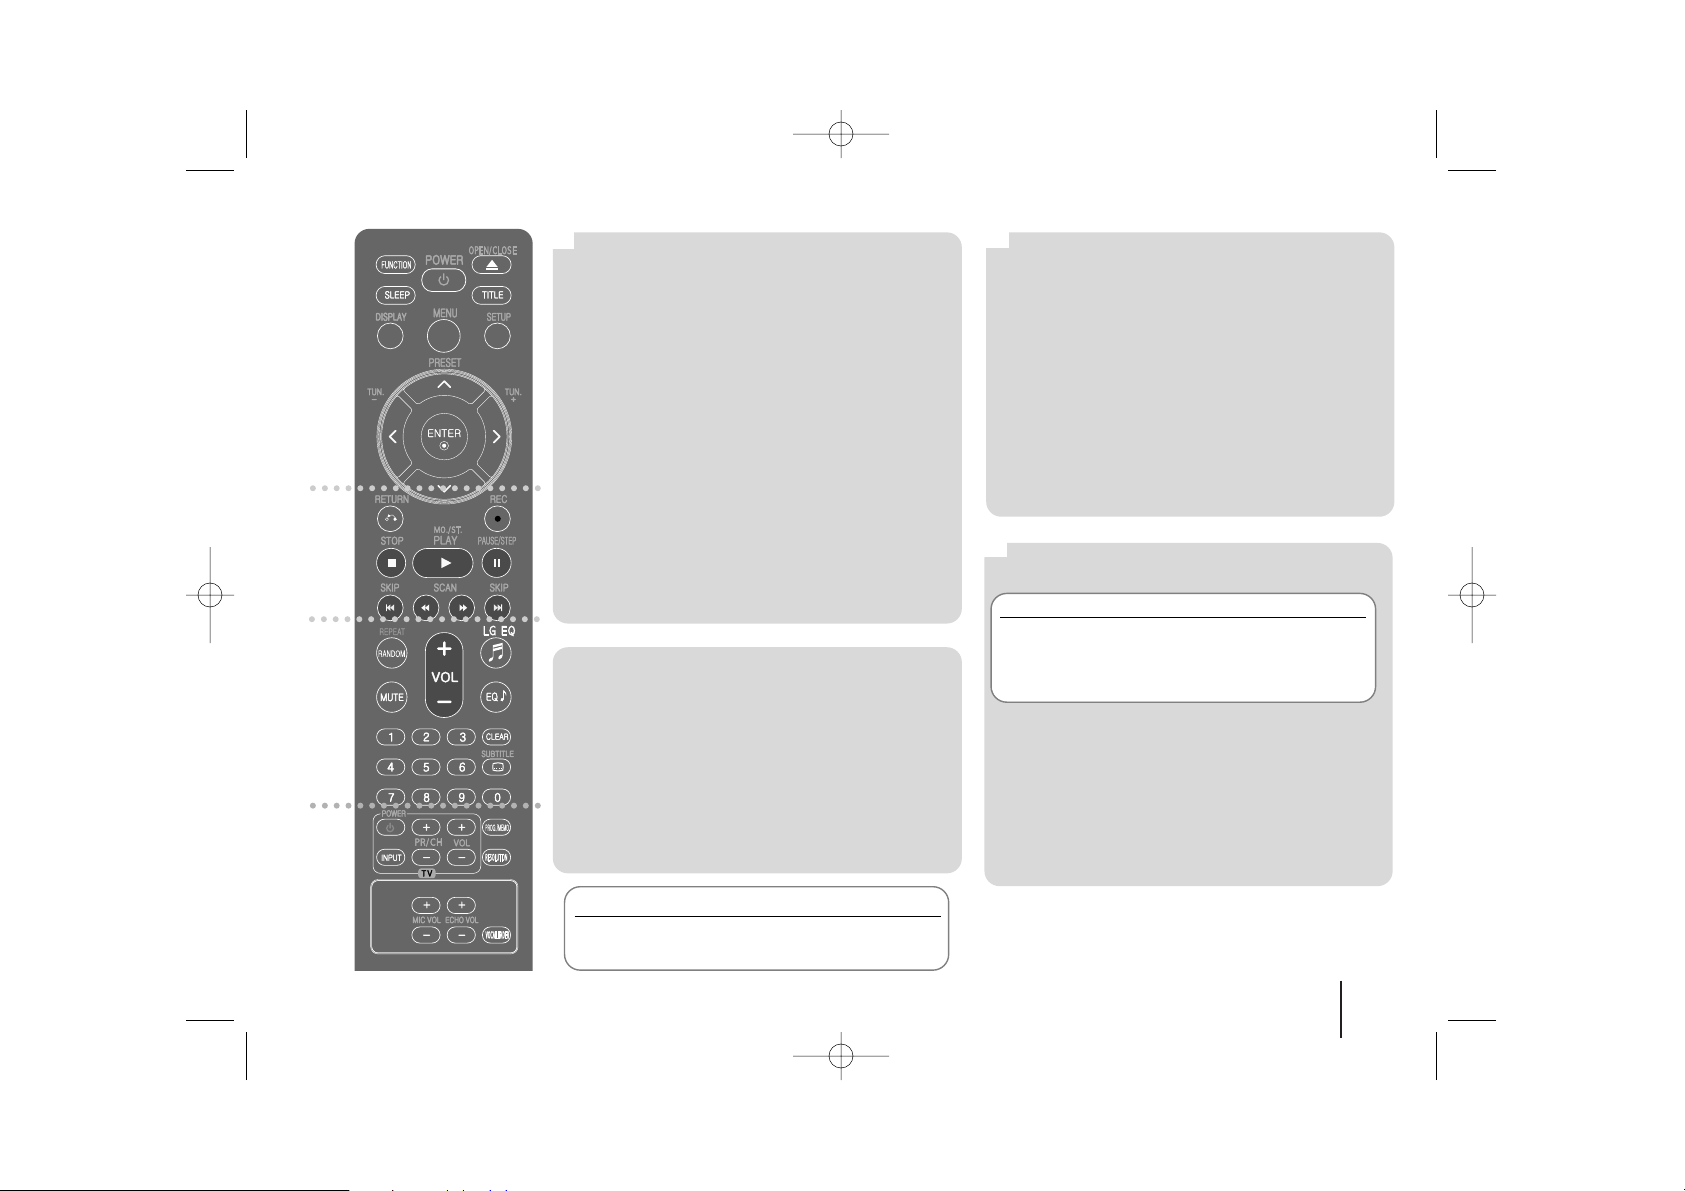
Remote control
a
b
c
d
FUNCTION : Selects the function and input source.
(DVD/CD
, USB, AUX, PORTABLE, FM)
SLEEP : Sets the System to turn off automatically at a
specified time. (Dimmer : Dims the LED (Light-emitting
diode) of front panel by half in power-on status.)
POWER : Switches the unit ON or OFF.
OPEN/CLOSE : Opens and closes the disc Drawer.
TITLE : If the current DVD title has a menu, the title
menu appears on the screen. Otherwise, the disc menu
may not appear.
DISPLAY : Accesses On-Screen Display.
MENU : Accesses the menu on a DVD disc.
SETUP : Accesses or removes setup menu
PRESET (
UU uu
) : Selects programme of Radio.
TUN. (-/+) : Tunes in the desired radio station.
UU uu II ii
(up/ down/ left/ right): Used to navigate on-
screen displays.
ENTER : Acknowledges menu selection.
RETURN (O) : moves backwards in the menu or exits
the setup menu.
REC (z) : USB Direct Recording.
STOP (x) : Stops playback or recording.
PLAY (B), MO./ST. : Starts playback. Selects Mono/
Stereo
PAUSE/STEP (X) : Pause playback
SKIP (../ >>) : Go to next or previous chapter/
track/ file.
SCAN (bb/BB) : Search backward or forward.
REPEAT/RANDOM : To select a play mode.(Random,
repeat)
MUTE : To mute the sound.
VOL (Volume) (+/-) :
Adjusts speaker volume.
LGEQ : You can select a Natural or Local Specialization
equalizer effect by using LG EQ.
EQ (EQUALIZER effect) : You can choose sound
impressions.
CLEAR : Removes a track number on the Program List.
SUBTITLE : During playback, press SUBTITLE
repeatedly to select a desired subtitle language .
0-9 numerical buttons : Selects numbered options in a
menu.
TV Control buttons : Controls the TV. (LG TV only)
PROG./MEMO. : Accesses or removes Program menu.
RESOLUTION : Sets the output resolution for HDMI
and COMPONENT VIDEO OUT jacks.
ECHO VOL. : Adjusts echo volume.
MIC VOL. : Adjusts microphone volume.
VOCAL FADER : You can enjoy the function as
karaoke, by reducing singer vocal of music in the
various source.
Controlling the TV.
You can control the sound level, input source, and
power switching of LG TVs as well. Hold POWER (TV)
and press PR/CH (+/–) button repeatedly until the TV
turns on or off.
a
b
c
d
Put the battery into the remote control
Make sure for the + (plus) and – (minus) on the
battery to be matched on the remote control.
HT305SU-F2_BBGDLL_ENG_4731 3/8/10 7:38 PM Page 7
 Loading...