

Page 1
GR-P2073TTS
Page 2
2
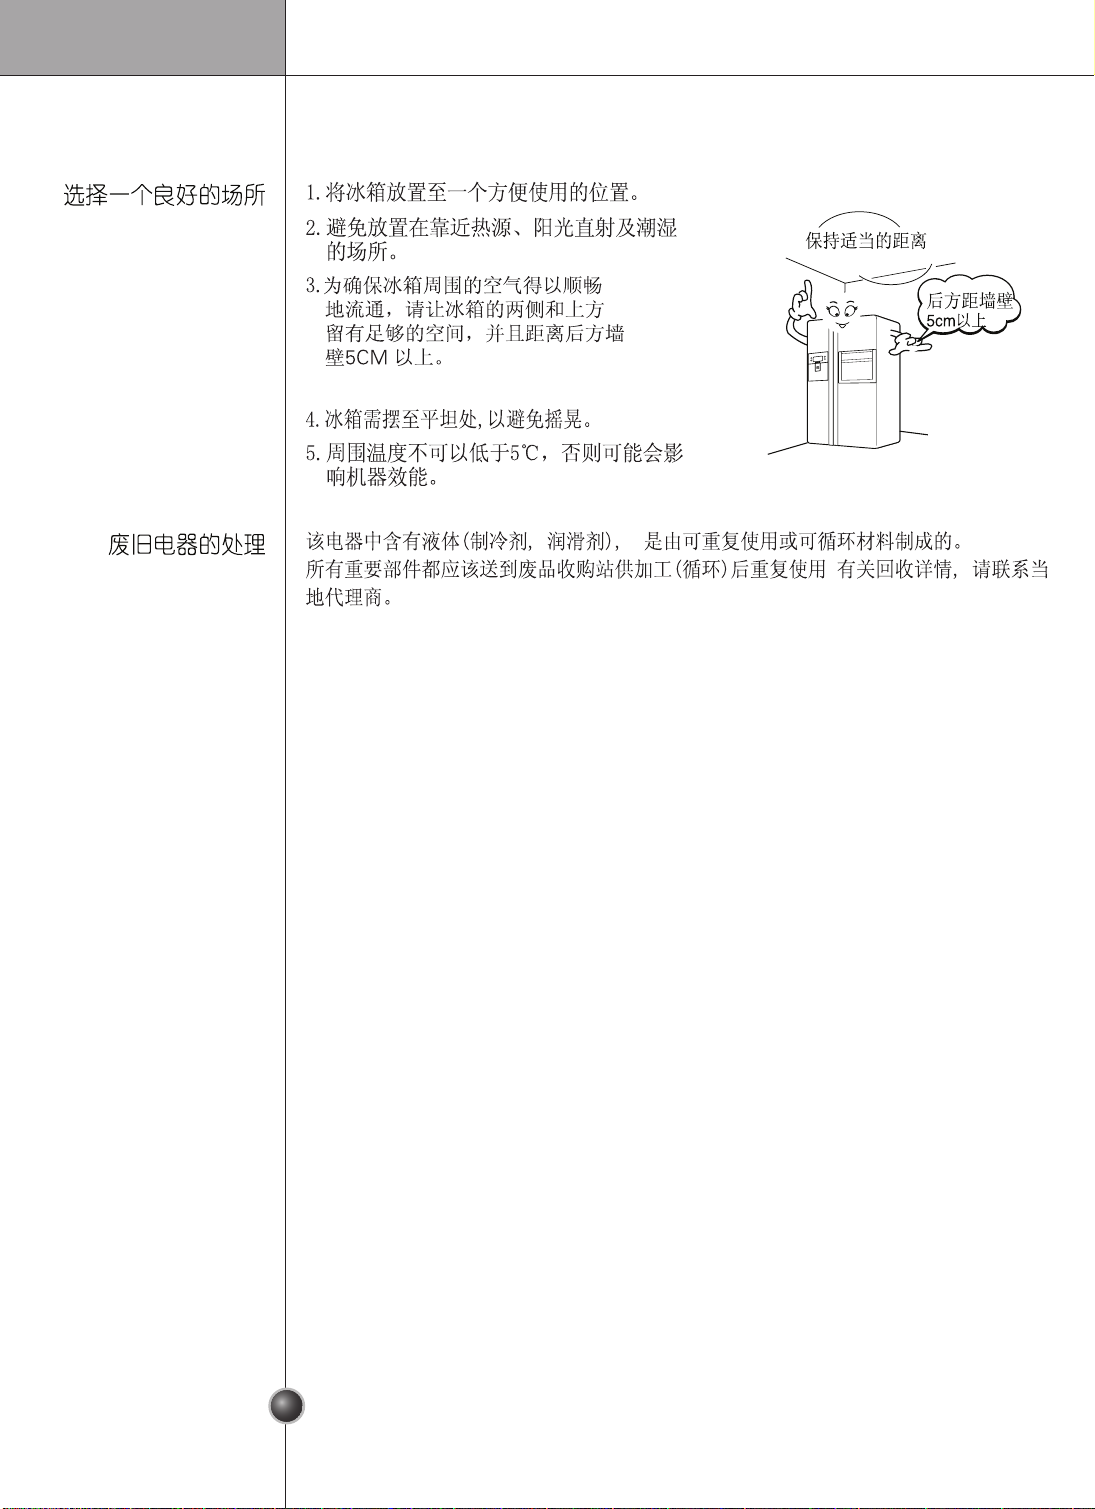
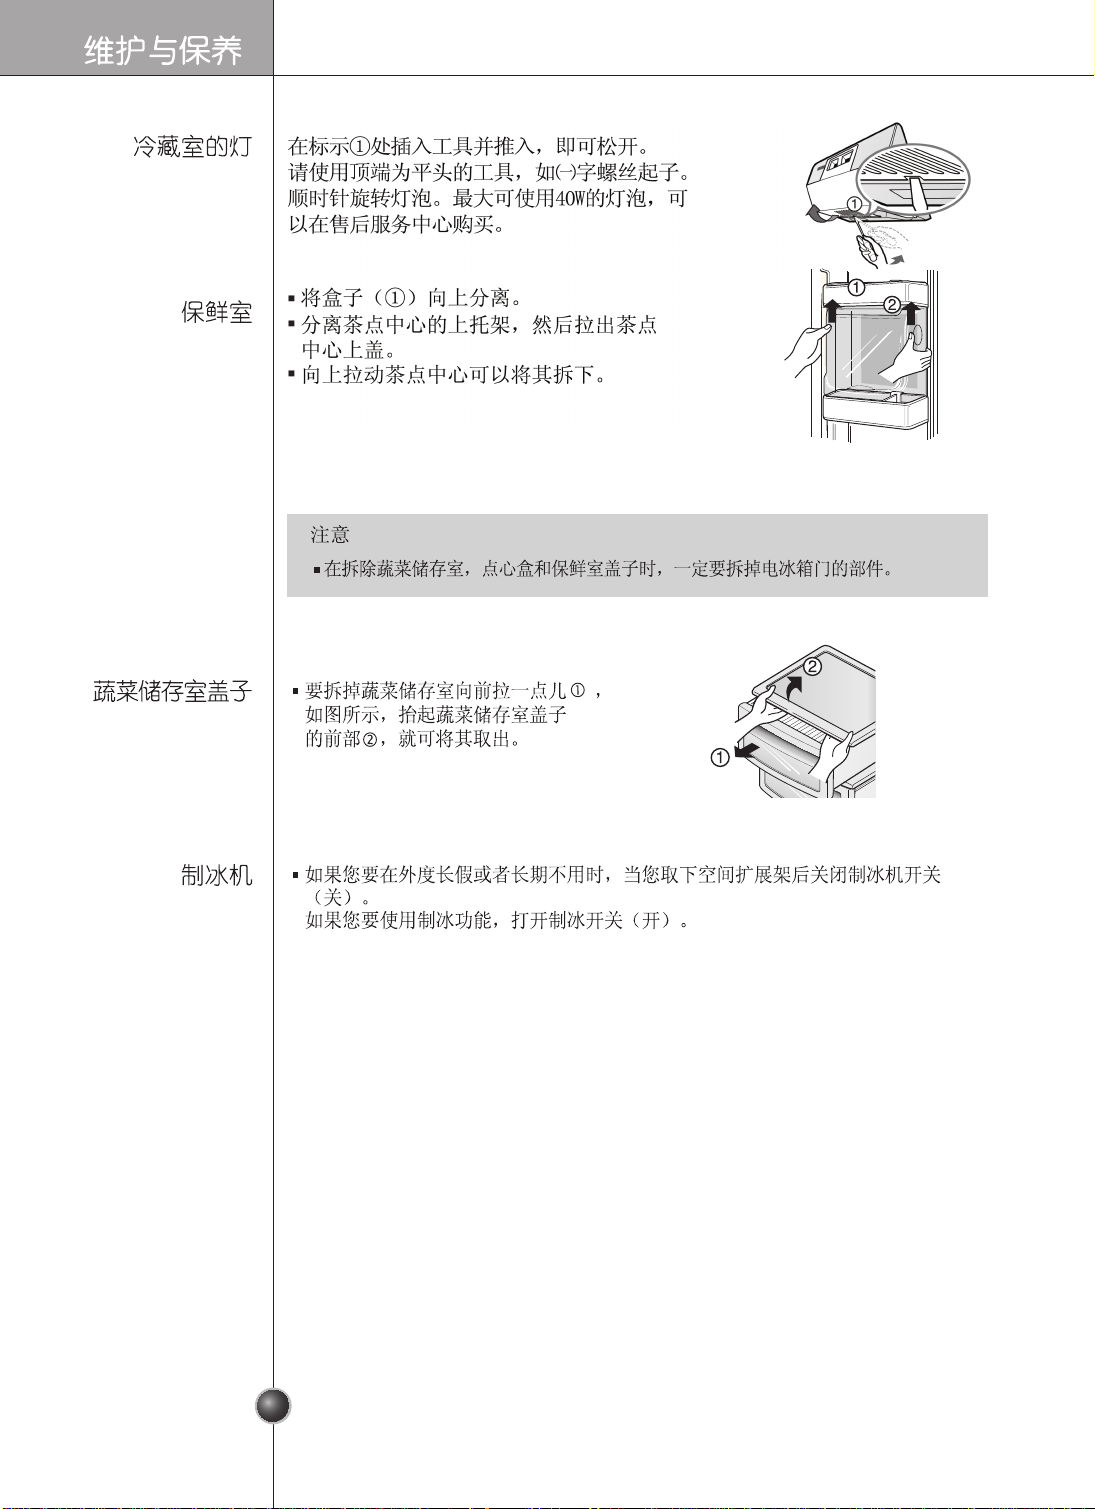
安装于
18
19
22
22
22
20
当冷冻室门未与冷藏室门高度对齐
8
重要安全指南
(仅适用于某些型号)
特效温度转换器(仅适用于某些型号)
温度在特效区发生改变(仅适用于某些型号)
特效区(仅适用于某些型号)
17
17
17
Page 3
进入
本产品的型号及序号可在外壳或冷藏室后面找到,这些号码不会和其它
的冰箱相同。当您购买本产品后,您必须记录以下所需的资料在手册上,
将您购买时的收据订于此处。
购买日期 :
经销店 :
经销店地址 :
经销店电话 :
型号 :
序号 :
执行标准
请勿使用延长线
易接触电源插头
更换电源线
警告
GB4706.1-2005 家用和类似用途电器的安全 第一部分:通用要求
GB4706.13-2004 家用和类似用途电器的安全 制冷器具冰淇淋机和制冰机的特殊要求
GB4343.1-2003 电磁兼容 家用电器 电动工具和类似器具的要求 第一部分:发射
GB17625.1-2003 电磁兼容 限制 谐波电流发射限制(设备每相输入电流<=16A)
重要安全指南
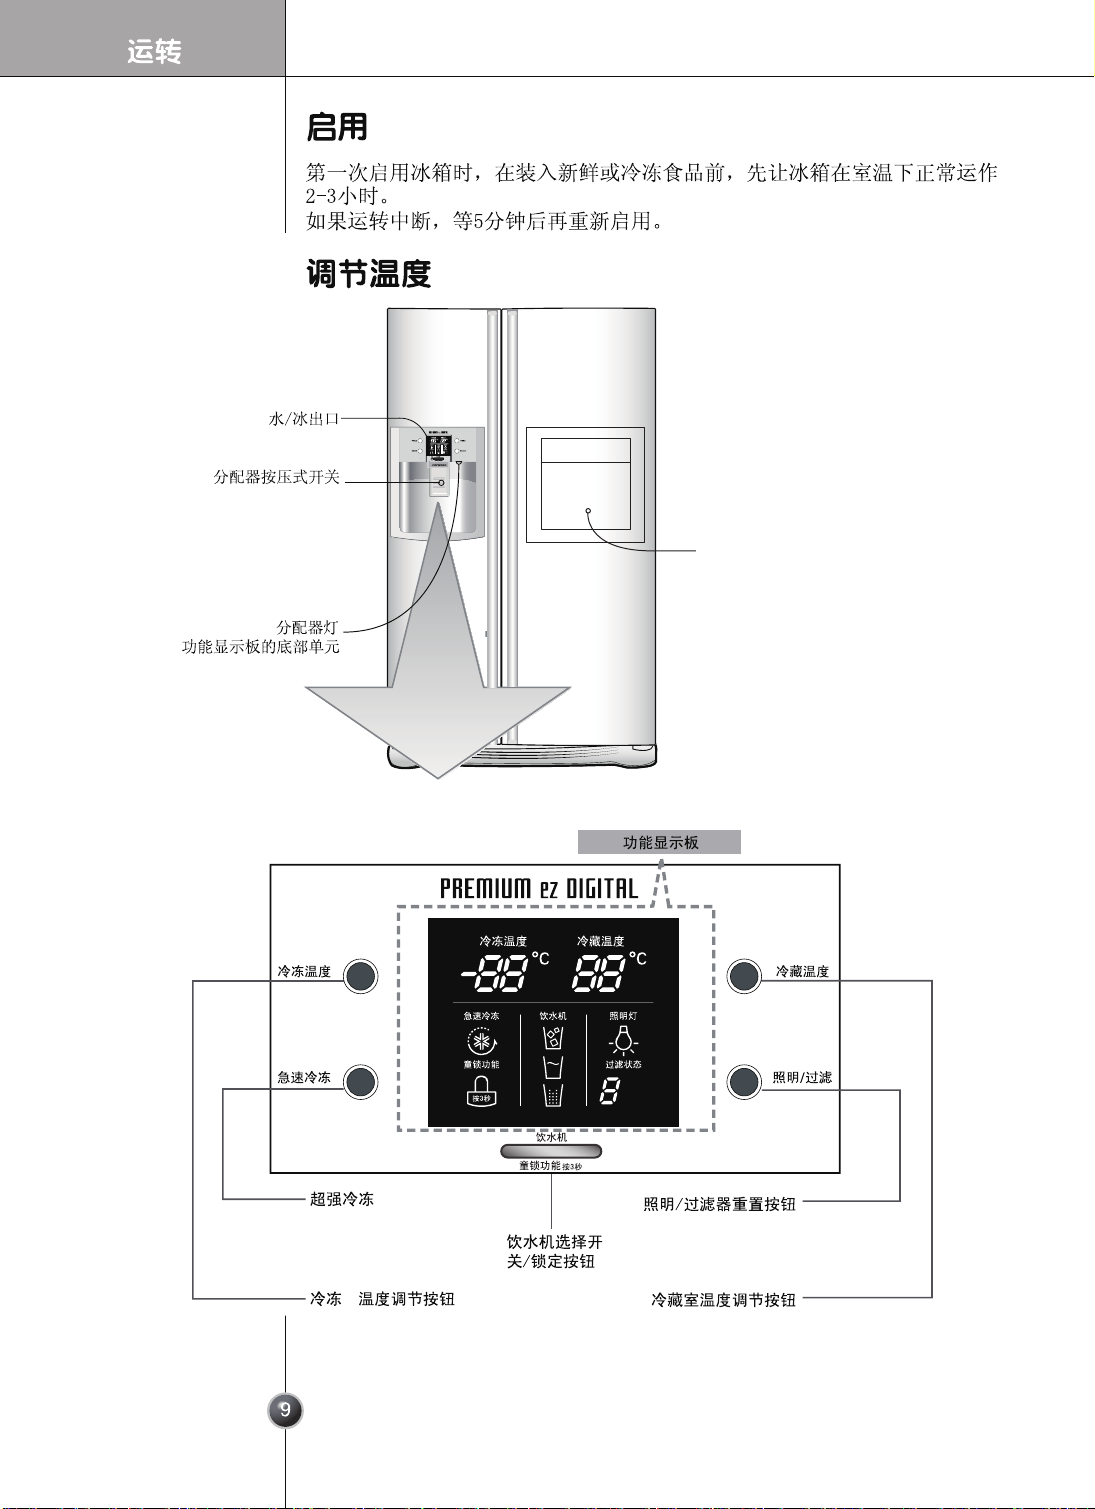
冰箱在使用前,必须正确地安装及放置在符合使用手册“安装”章节所建议的场所。
切勿用力拉扯电源线,需先握紧插头,然后将其从插座中垂直拔出。
移动冰箱时,请留意勿压损电源线。
在冰箱插电启动后,切忌触摸冷冻室内层表面,特别是手湿的时候,皮肤可能会被极
冷的内层黏住。
当冰箱要进行清洁或移动时,先从插座上拔去插头,且绝对不可以用湿的手触摸,否
则可能会导致触电或受到伤害。
不可将电源线做任何的破坏,扭曲或拔起,因为电源线损坏可能会导致触电或火灾。
不要对着冰箱用水冲洗,会降低冰箱的绝缘效果,引起漏电。
请不要使用松的插座和损伤的电源插头,冰箱背面不要挤压到电源插头。
严禁私自拆装、改造冰箱,禁止破坏制冷管路,维修冰箱必须由专职人员进行。
请不要把化妆品、药品,花瓶、杯子等盛水的容器或较重的物品放在冰箱上面。
请不要把药品醚、苯、酒精、液化器等易燃物品或学术资料放入冰箱保存。
煤气泄漏时,请不要碰冰箱和电源插座,要打开门窗通风换气。
勿将包装底托放在冰箱下面,以免发生火灾。
不要将手或脚伸到冰箱底部,也不要机械性撞击冰箱(如脚踢)。不要用手指或金属
物直接接触机械室电器部位,以防触电。
不要使用220V以外的电源。
不可放置玻璃制品在冷冻室内,因为当里面的液体凝固时,可能导致玻璃制品破裂。
当孩童或年长者使用冰箱时,一定要有人在旁指导或协助。
注意不让孩童任意玩耍冰箱,以防意外。
不允许任何人去爬,坐,站或吊在冰箱门上,因为这些动作会造成冰箱损坏,甚至翻
倒,造成严重的人身伤害。
请不要使用冰箱内里点蜡烛的方法去除异味。
如可能,冰箱仅使用一个单独的电源插座,以避免因与其他电器或电灯使用同一排电
源插座,造成超载,而使电源跳电。
冰箱电源插头应放在容易接触的地方,发生事故时可以快速切断电源。
假如电源线损坏,只能交由制造商用特制的线材更换或代理商做售后服务。
请不要随意改装或延长电源线。
否则会导致电击或火灾。
3
Page 4
4
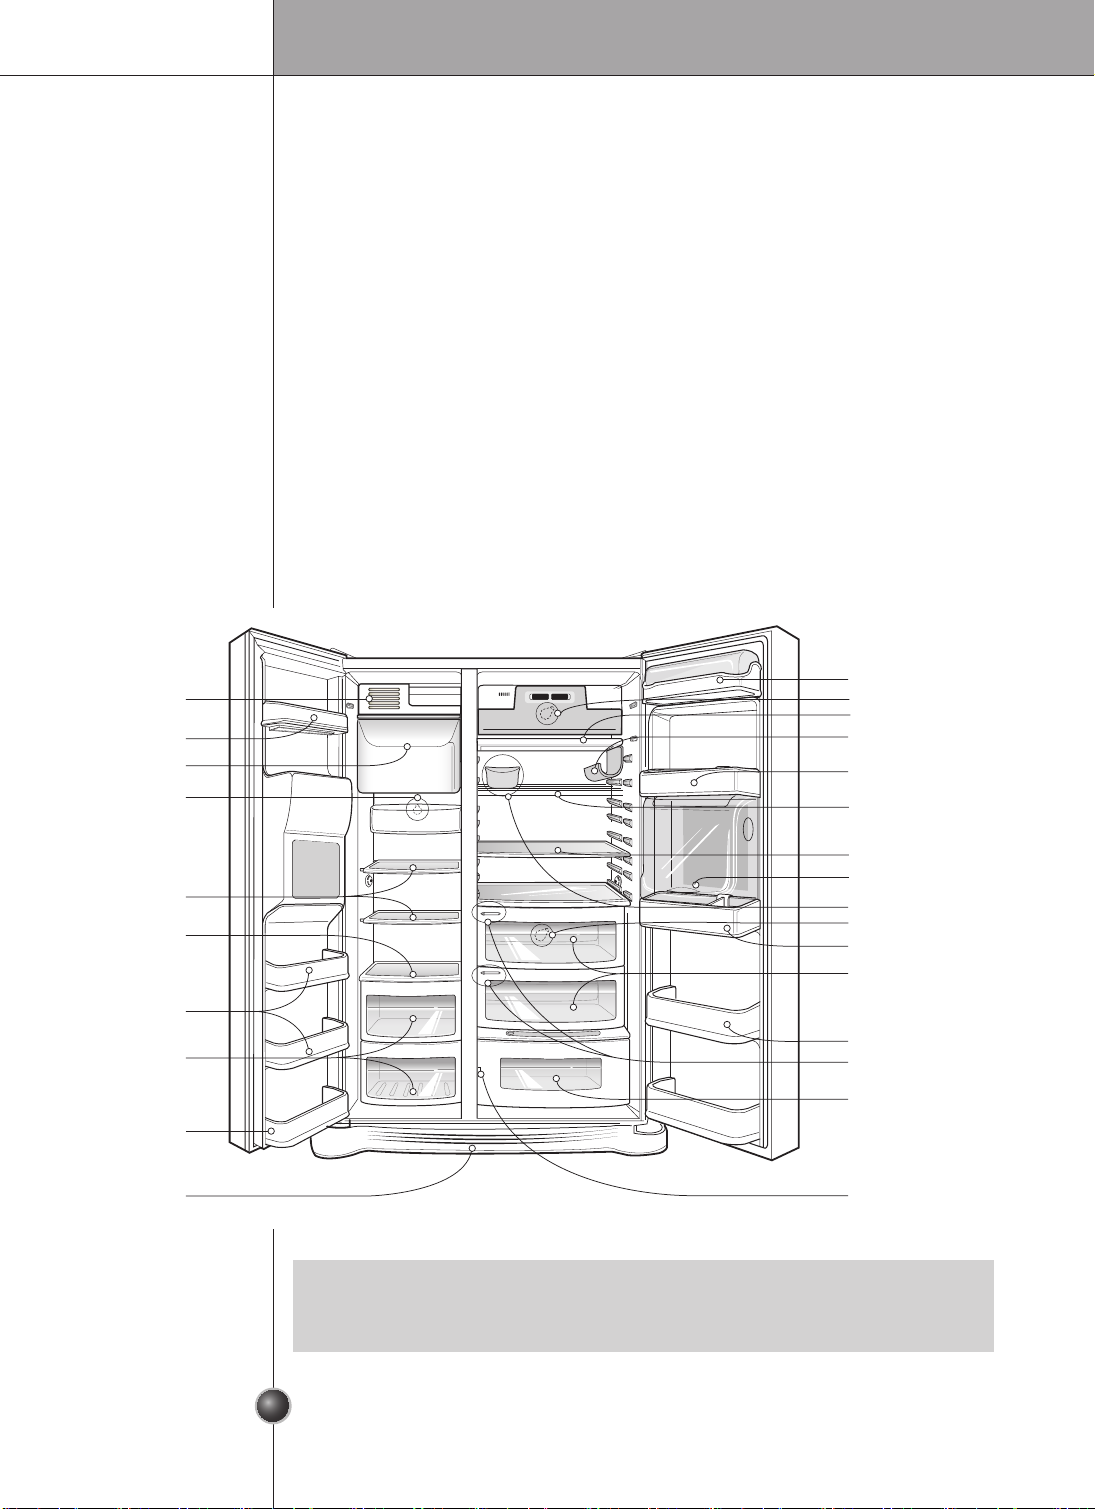
冷冻室 冷藏室
切换开关(蔬菜/肉类)
(选装项)
湿度控制
Page 5
安装
。
安装于何处
。
安装于何处
安装于何处
5 6
Page 6
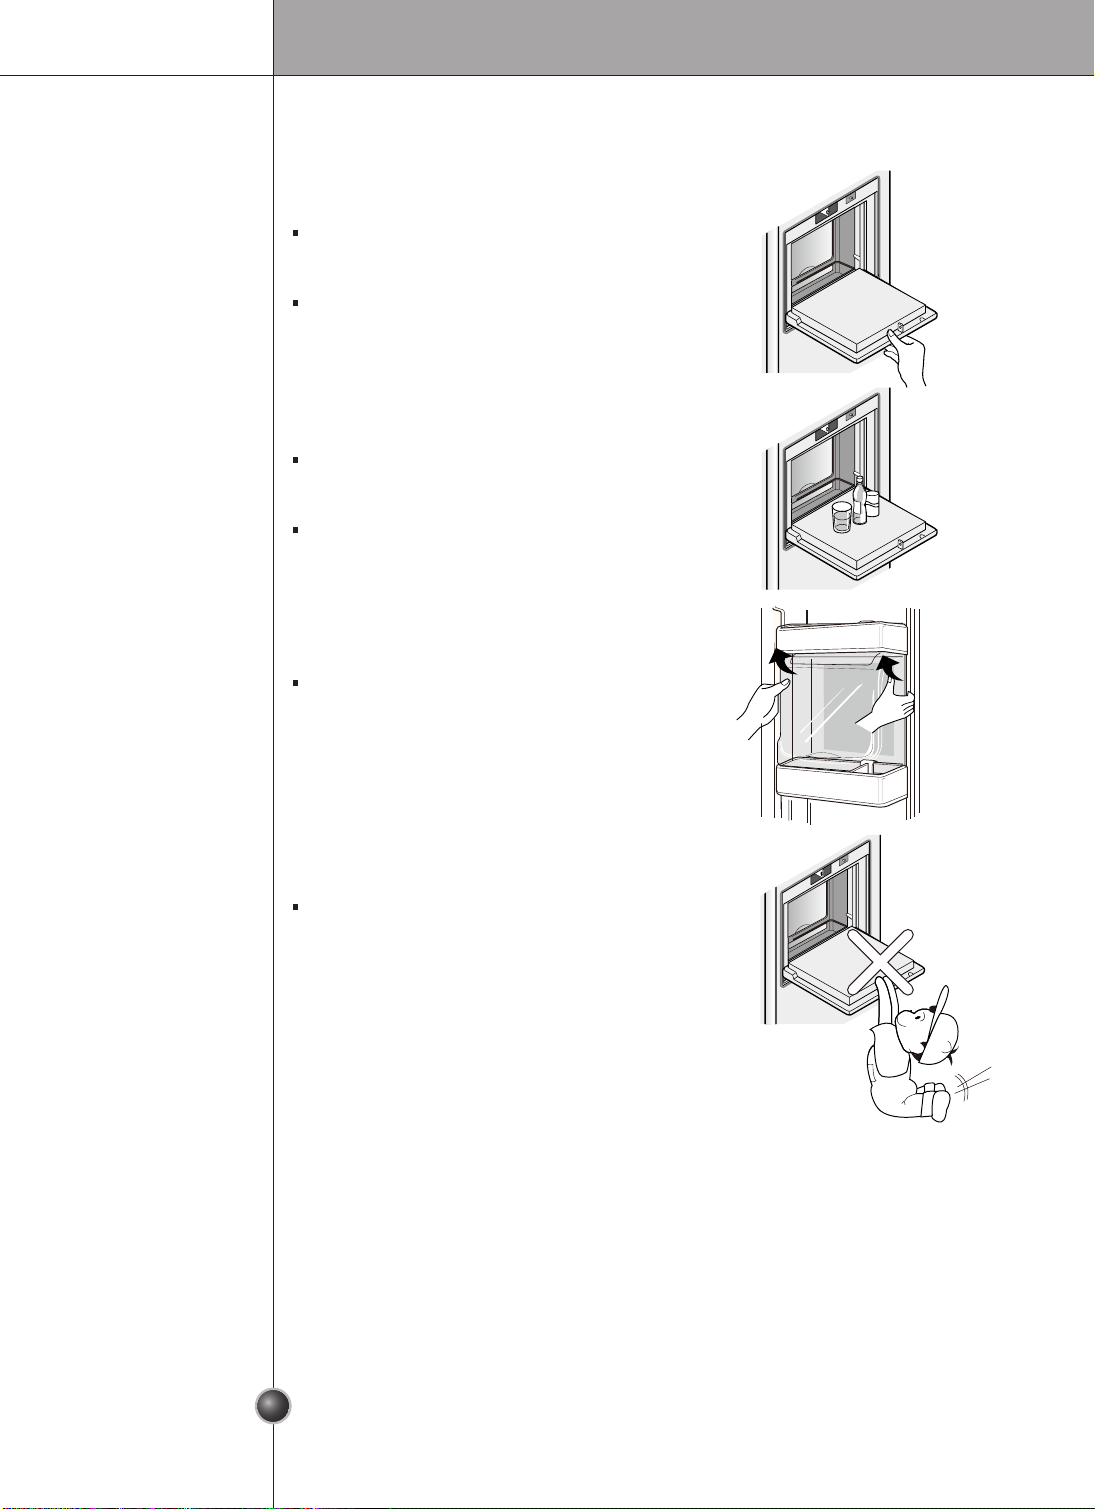
安装
安装
底盖
将门拆下
拆下底盖
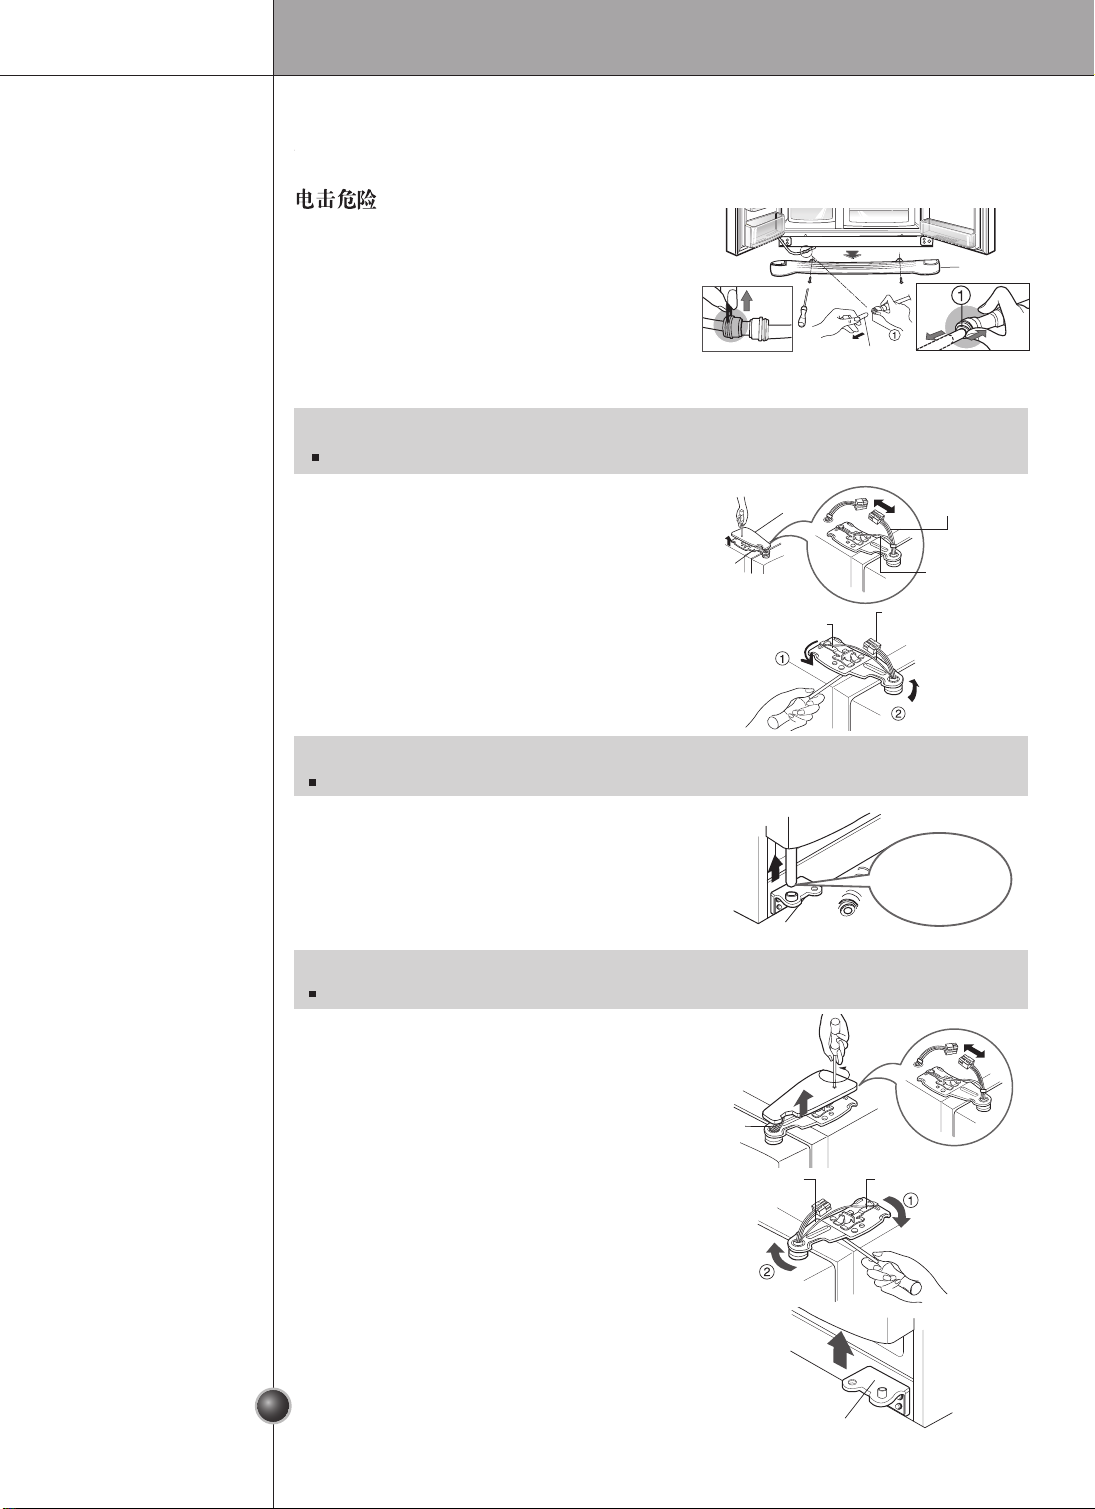
警告
拆下外门前先将电源线拔除,错误的操
拆下冷冻室门
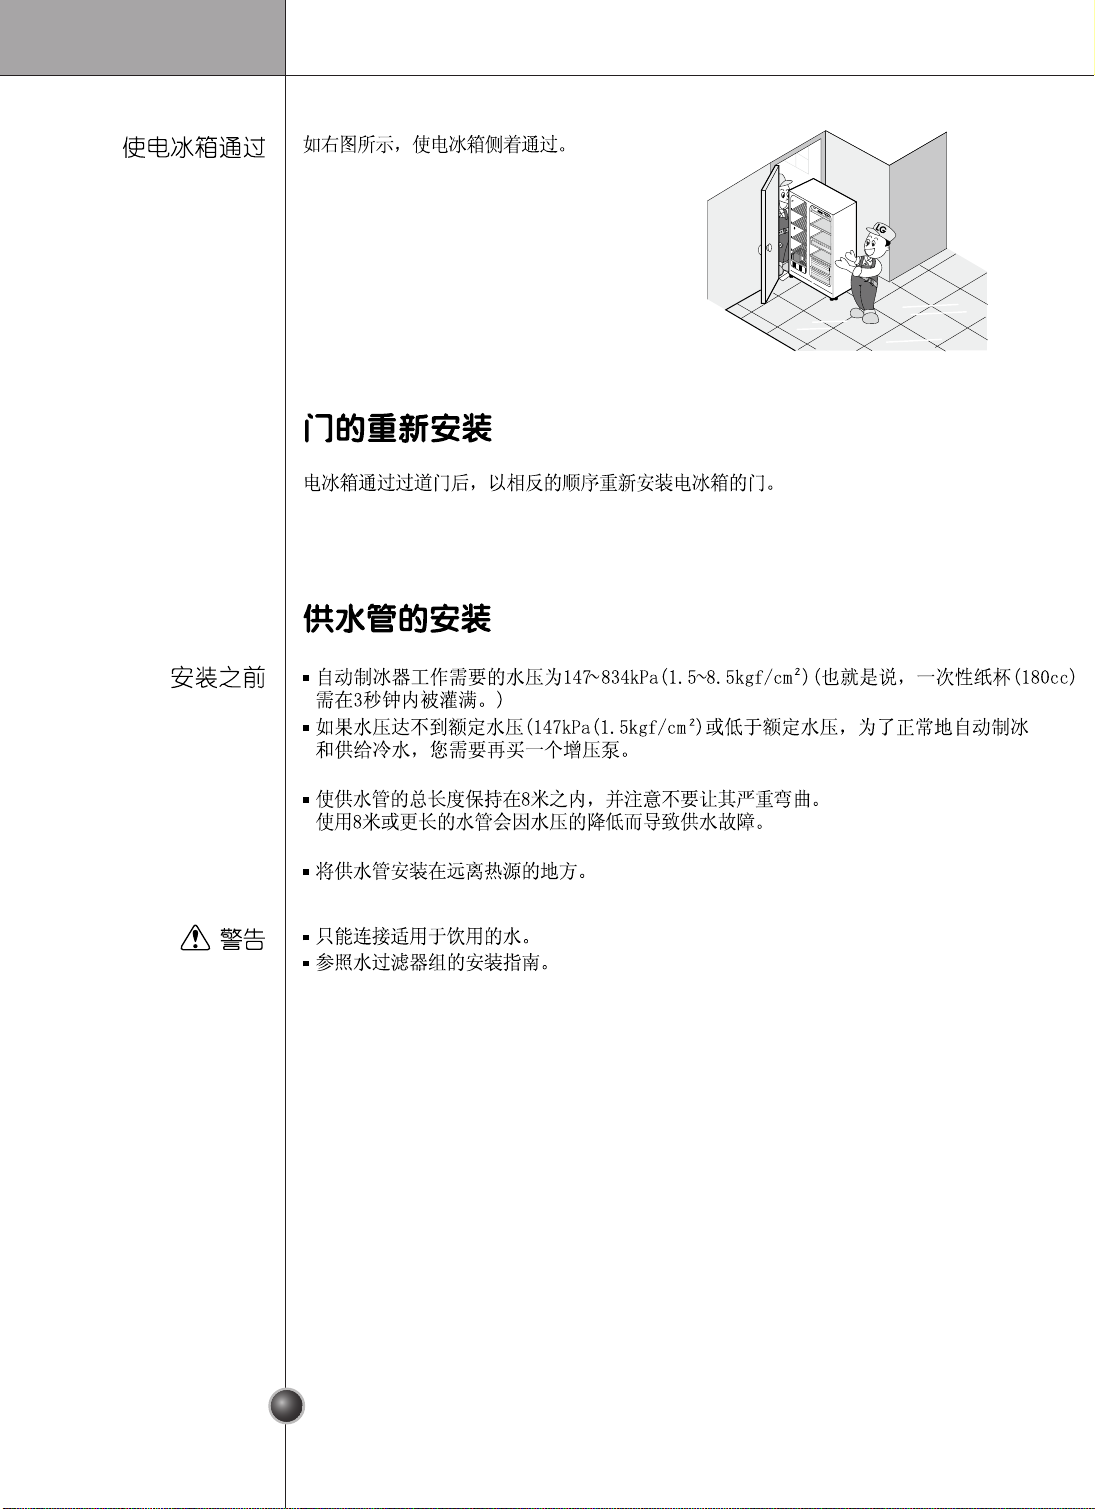
向前方搬运。
供水管
铰链盖
连接线
地线
上铰链
注:
上铰链
固定器
注:
拆掉上铰链时,要小心的用手扶着不要让门向前倒下,以免发生人身伤害。
注:
当冷藏室的门移至过道门里面放下,小心不要损伤供水管。
拆下冷藏室门
1 ) 松开铰链盖螺丝, 移开盖子,
向上抬起将底盖拆下来,取下卡子,然后照
右图所示,压住位置 的同时向上拔出给水管。
1 ) 松开螺丝, 将盖子移开。然后拆开除连接
线外的所有电线。
2 ) 以逆时针方向(①)旋转,拆掉固定器,
然后向上(②)抬起,取出上铰链。
作可能会导致严重的伤害,甚至死亡。
如果您室内门的入口对于冰箱来说太小,先
将冰箱的外门拆下, 然后将冰箱转向侧面再
①
如果水管的端部变形或磨损,予以切除。
3 ) 向上抬起拆掉冷冻室的门。这时,门应该
被抬至足已将供水管完全拉出的高度。
下铰链
足以将供水管
完全拉出来
注:
安装
底盖
将门拆下
拆下外门前先将电源线拔除,错误的操
向前方搬运。
供水管
铰链盖
连接线
地线
上铰链
注:
上铰链
固定器
注:
拆掉上铰链时,要小心的用手扶着不要让门向前倒下,以免发生人身伤害。
注:
当冷藏室的门移至过道门里面放下,小心不要损伤供水管。
下铰链
上铰链
固定器
连接线
1 ) 松开铰链盖螺丝, 移开盖子,
并将电线接头拔开(接地线除外)。
2) 按顺时针方向 旋转,拆掉固定器,
(①)
然后向上 抬起,取出上铰链。(②)
向上抬起将底盖拆下来,取下卡子,然后照
右图所示,压住位置 的同时向上拔出给水管。
1 ) 松开螺丝, 将盖子移开。然后拆开除连接
线外的所有电线。
2 ) 以逆时针方向(①)旋转,拆掉固定器,
然后向上(②)抬起,取出上铰链。
作可能会导致严重的伤害,甚至死亡。
如果您室内门的入口对于冰箱来说太小,先
将冰箱的外门拆下, 然后将冰箱转向侧面再
①
如果水管的端部变形或磨损,予以切除。
3 ) 向上抬起拆掉冷冻室的门。这时,门应该
被抬至足已将供水管完全拉出的高度。
3 ) 向上抬起拆掉冷藏室的门。
下铰链
足以将供水管
完全拉出来
注:
将门拆下
Page 7
安装
7 8
Page 8
安装
安 装
假如冷冻室与冷
藏室高度不同
调整成相同
高度后
高度调节
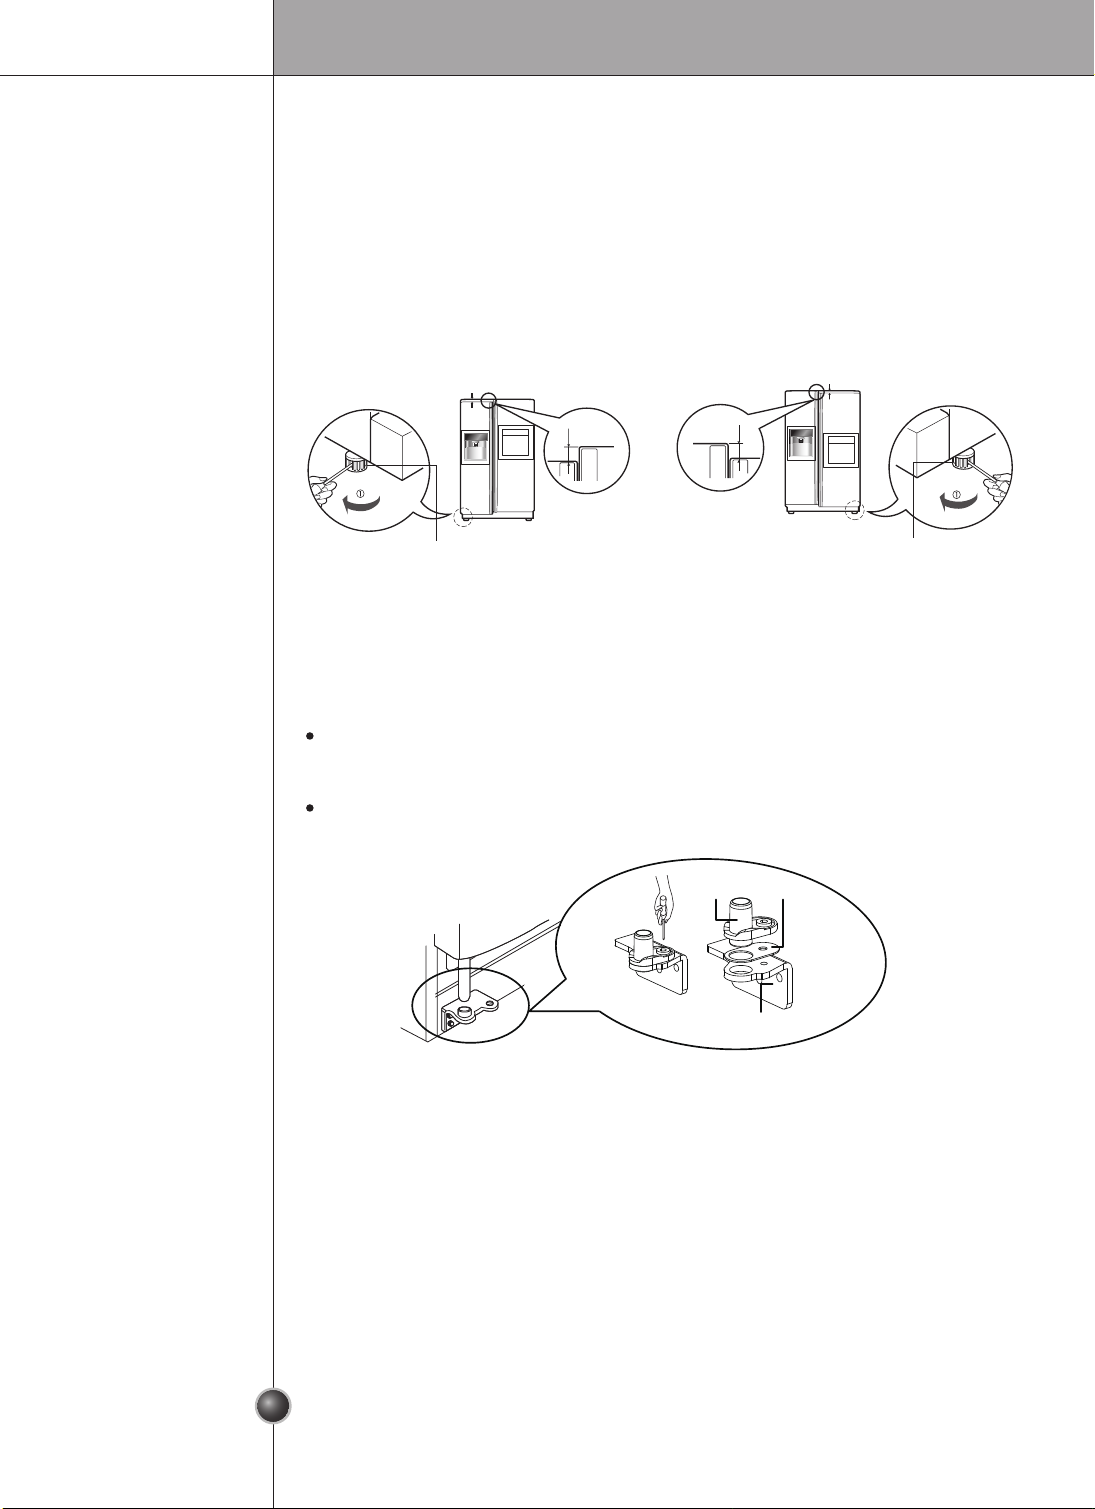
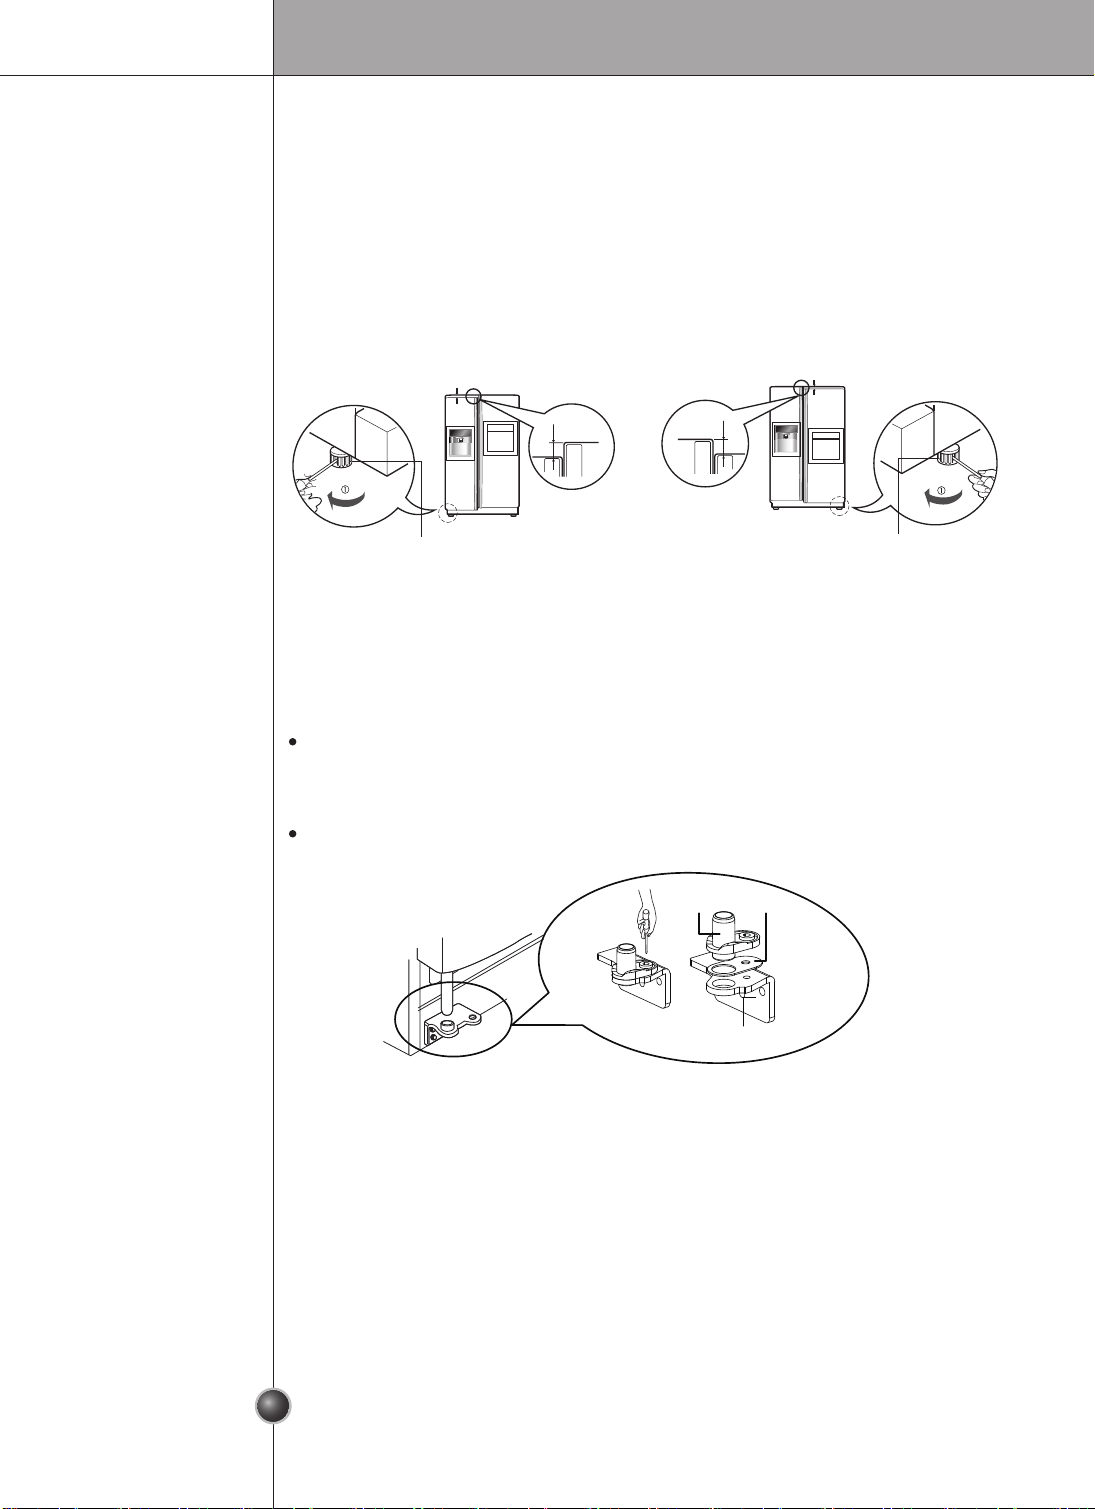
假如冷藏室门比冷冻室门低假如冷冻室门比冷藏室门低
要将门调成同样高度,必须将螺
丝刀(平台)插入右侧高度调整
螺栓的凹槽,依顺时针方向(①)旋
转。
要将门调成同样高度,必须将螺
丝刀(平台)插入左侧高度调整
螺栓的凹槽,依顺时针方向(①)旋
转。
高度不同
高度不同
高度不同
高度不同
右侧高度调整螺栓左侧高度调整螺栓
适度调整冰箱门的高度后,冰箱门关起来会较为紧密。
当冰箱门在不一样高度下关闭时,会因密封度不佳,效果可能受到影响。
下一步
1、将运送过程中所积累的灰尘彻底的清理干净。
2、在冰箱内适当的位置安装配件,如置酒架,防漏保护玻璃搁架(置物搁架)等。
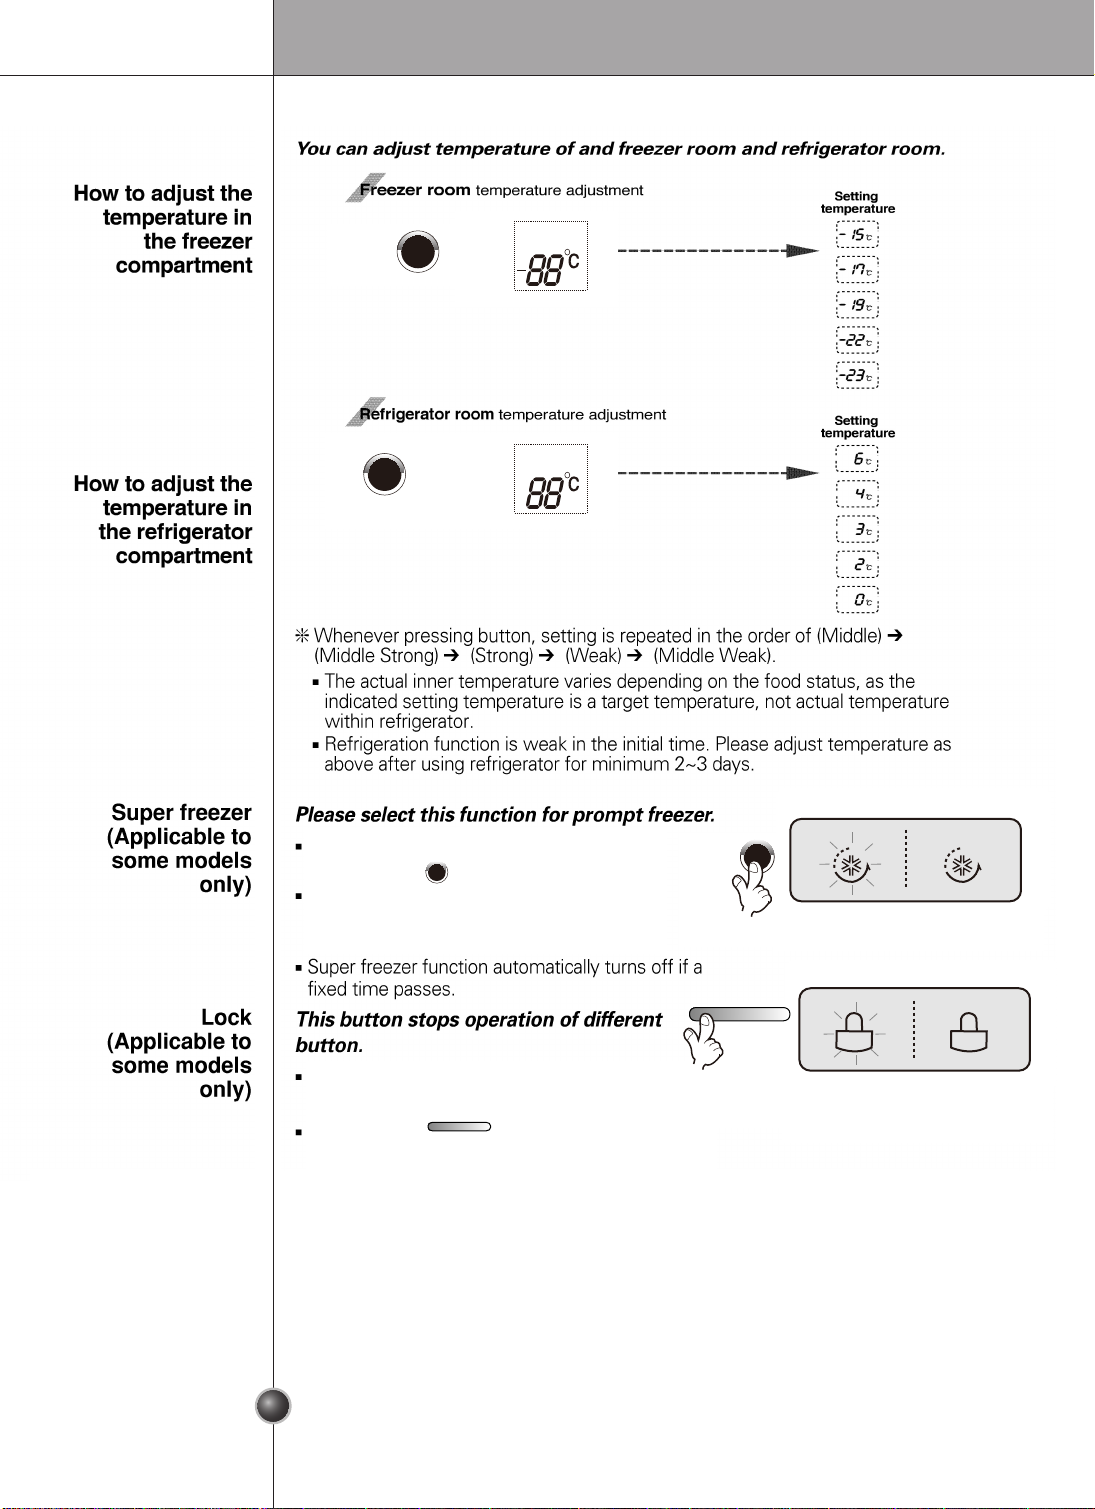
当冷冻室门未与冷藏室门高度对齐
插入足够多的透明板以对齐高度。(一共提供 4 张透明板。)
将门与底部顶点分开,如图 ① 所示使用 (+) 型螺丝刀松开底部铰链上的螺钉,在底部
铰链和底部支架之间插入透明板,然后如图 ② 所示使用螺钉将其固定。
①
②
底部支架
透明板
底部铰链
如果不能使用高度调整螺钉来将门对齐,也可以插入随产品附带的透明板。
安 装
高度调节
假如冷藏室门比冷冻室门低假如冷冻室门比冷藏室门低
要将门调成同样高度,必须将螺
丝刀(平台)插入右侧高度调整
螺栓的凹槽,依顺时针方向(①)旋
转。
要将门调成同样高度,必须将螺
丝刀(平台)插入左侧高度调整
螺栓的凹槽,依顺时针方向(①)旋
转。
高度不同
高度不同
高度不同
高度不同
右侧高度调整螺栓左侧高度调整螺栓
适度调整冰箱门的高度后,冰箱门关起来会较为紧密。
当冰箱门在不一样高度下关闭时,会因密封度不佳,效果可能受到影响。
1、将运送过程中所积累的灰尘彻底的清理干净。
2、在冰箱内适当的位置安装配件,如置酒架,防漏保护玻璃搁架(置物搁架)等。
为了防止运送过程中发生损坏,有些配件是包在一起的。
3、将电源线(或插头)插入插座,不要和其他的设备共用一排插座。
4、使用前,先让冰箱运转2-3小时,等到确认冰箱内的温度已经可以使用后,
才开始使用冰箱。
当冷冻室门未与冷藏室门高度对齐
插入足够多的透明板以对齐高度。(一共提供 4 张透明板。)
将门与底部顶点分开,如图 ① 所示使用 (+) 型螺丝刀松开底部铰链上的螺钉,在底部
铰链和底部支架之间插入透明板,然后如图 ② 所示使用螺钉将其固定。
①
②
底部支架
透明板
底部铰链
如果不能使用高度调整螺钉来将门对齐,也可以插入随产品附带的透明板。
Page 9
长按3秒
时效(月)
长按3秒
时效(月)
室
室
和功能
保鲜室
(只适用于某些型号)
Page 10
锁定
(仅仅用于某些型号)
急速冷冻
(仅仅用于某些型号)
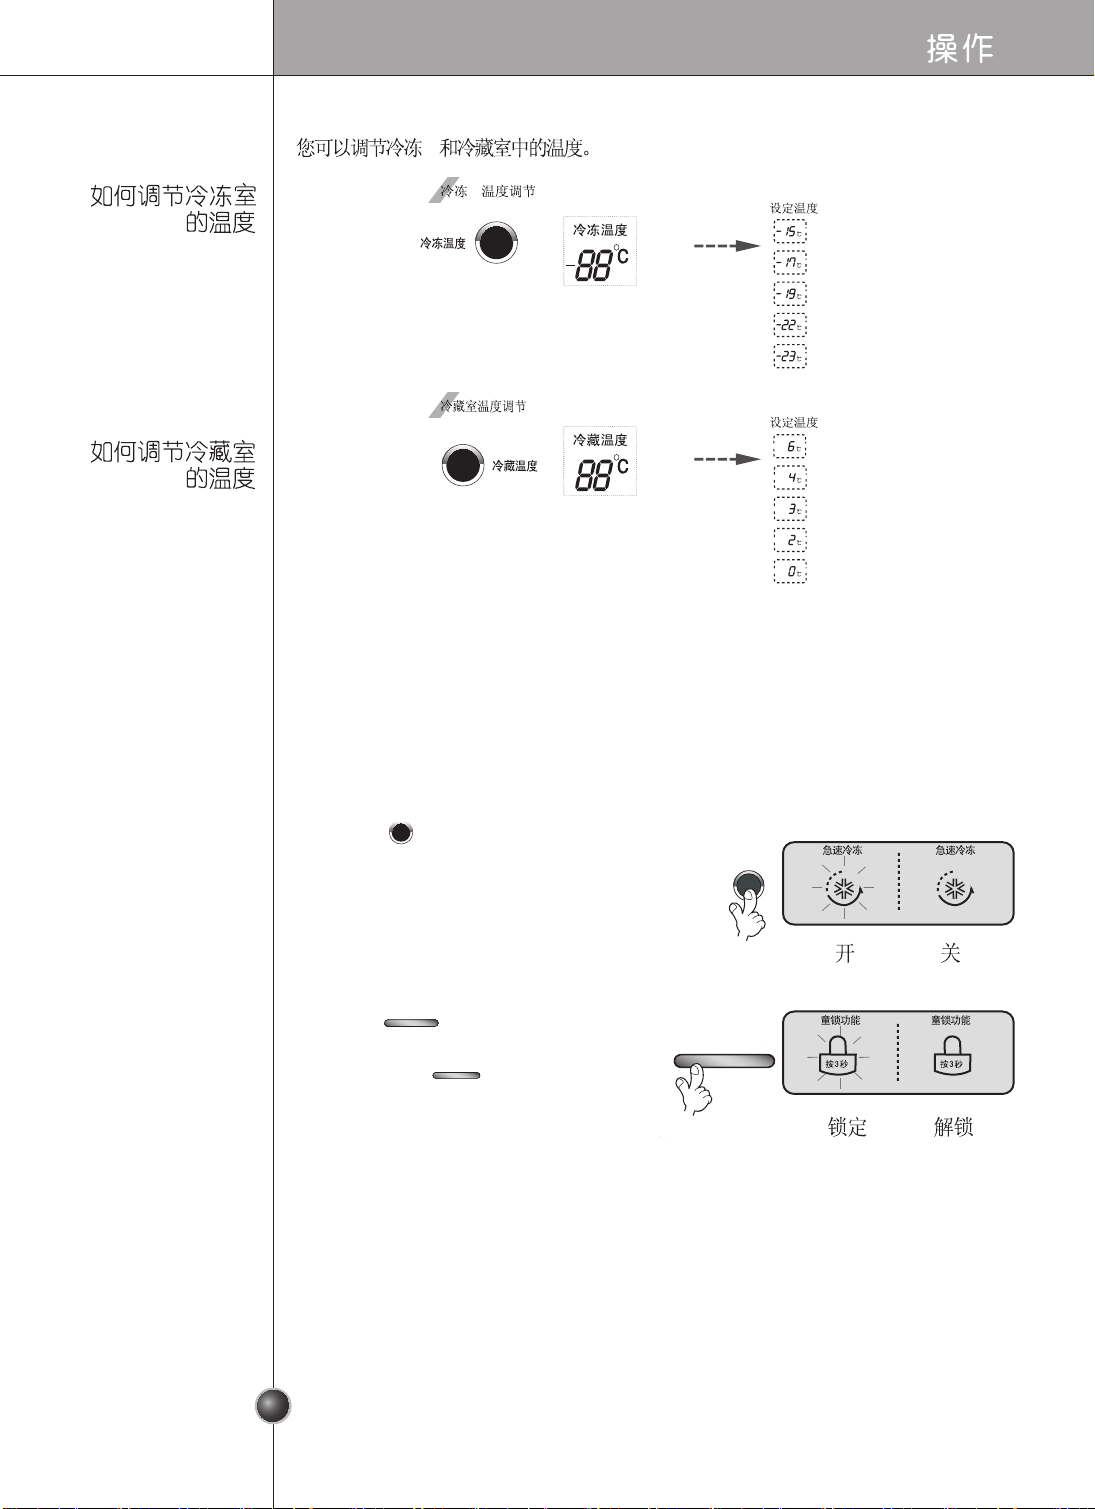
*只要触摸此按钮,温度选择就会以(中)-(较弱)-(强)-(弱)-(较弱)
的次序重复。
■
由于显示的设置温度并不是实际温度而是目标温度,因此根据储藏食物的不同,其内
部温度也会有所不同。
■
制冷功能在开始时较弱。在冰箱使用2-3天后使用以上方法调节温度。
■
连续按 按钮超过3秒将在锁定和解锁
■
如果您使用了 (锁定/解锁)按钮,
则在您将其它按钮解锁之前,这些按钮
都不会工作。
请选择快速制冷功能。
■
当按 按钮时“开”和“关”不断重复
■
当选择急速冷冻为“开”时,箭头标记图形
将停留在“开”状态。
■
超级冷冻功能在设定的时间过后自动关闭。
锁定状态时,其它按钮的操作无效。
急速冷冻
急速冷冻
饮水机
童锁功能
按3秒
饮水机
童锁功能
按3秒
饮水机
童锁功能
按3秒
室
室
之间切换。
10
Page 11
操作 操作
饮水机使用选择
饮水机
童锁功能
按3秒
可能会
室
室
冷冻温度
照明/过滤
冷藏温度
急速冷冻
饮水机
童锁功能按3秒
冷藏温度冷冻温度
童锁功能
急速冷冻
照明灯
过滤状态
饮水机
长按3秒
时效(月)
饮水机
童锁功能
按3秒
按压式开关
秒
饮水机
童锁功能
按3秒
可能会
室
室
冷冻温度
照明/过滤
冷藏温度
急速冷冻
饮水机
童锁功能按3秒
冷藏温度冷冻温度
童锁功能
急速冷冻
照明灯
过滤状态
饮水机
长按3秒
时效(月)
饮水机
童锁功能
按3秒
按压式开关
秒
11 12
Page 12
1
30
3
冷冻温度
照明/过滤
冷藏温度
急速冷冻
饮水机
童锁功能按3秒
冷藏温度冷冻温度
童锁功能
急速冷冻
照明灯
过滤状态
饮水机
长按3秒
时效(月)
冷冻温度
照明/过滤
冷藏温度
急速冷冻
饮水机
童锁功能按3秒
冷藏温度冷冻温度
童锁功能
急速冷冻
照明灯
过滤状态
饮水机
长按3秒
时效(月)
冷冻温度
照明/过滤
冷藏温度
急速冷冻
饮水机
童锁功能按3秒
冷藏温度冷冻温度
童锁功能
急速冷冻
照明灯
过滤状态
饮水机
长按3秒
时效(月)
饮水机
饮水机饮水机
童锁功能
按3秒
童锁功能
按3秒
童锁功能
按3秒
1
30
3
冷冻温度
照明/过滤
冷藏温度
急速冷冻
饮水机
童锁功能按3秒
冷藏温度冷冻温度
童锁功能
急速冷冻
照明灯
过滤状态
饮水机
长按3秒
时效(月)
冷冻温度
照明/过滤
冷藏温度
急速冷冻
饮水机
童锁功能按3秒
冷藏温度冷冻温度
童锁功能
急速冷冻
照明灯
过滤状态
饮水机
长按3秒
时效(月)
冷冻温度
照明/过滤
冷藏温度
急速冷冻
饮水机
童锁功能按3秒
冷藏温度冷冻温度
童锁功能
急速冷冻
照明灯
过滤状态
饮水机
长按3秒
时效(月)
饮水机
饮水机饮水机
童锁功能
按3秒
童锁功能
按3秒
童锁功能
按3秒
Page 13
操作 操作
饮水机显示屏上会显示更换过滤网的图标。
过滤器使用6个月后,需要更换。
显示屏会显示过滤器剩余使用时间。
更换过滤器后,连续3秒按住过滤器更换按钮以复位指示灯。
此按钮调节饮水机灯开和关状态
当按“照明/过滤”时,饮水机灯
在开和关之间切换。
饮水机灯
过滤状态
长按3秒
时效(月)
过滤状态
长按3秒
时效(月)
照明/过滤
照明/过滤
开 关
照明灯
照明灯
饮水机显示屏上会显示更换过滤网的图标。
过滤器使用6个月后,需要更换。
显示屏会显示过滤器剩余使用时间。
更换过滤器后,连续3秒按住过滤器更换按钮以复位指示灯。
此按钮调节饮水机灯开和关状态
当按“照明/过滤”时,饮水机灯
在开和关之间切换。
过滤状态
长按3秒
时效(月)
过滤状态
长按3秒
时效(月)
照明/过滤
照明/过滤
开 关
照明灯
照明灯
13 14
Page 14
地
地
Page 15
15 16
操作 操作
室
Page 16
16
Page 17
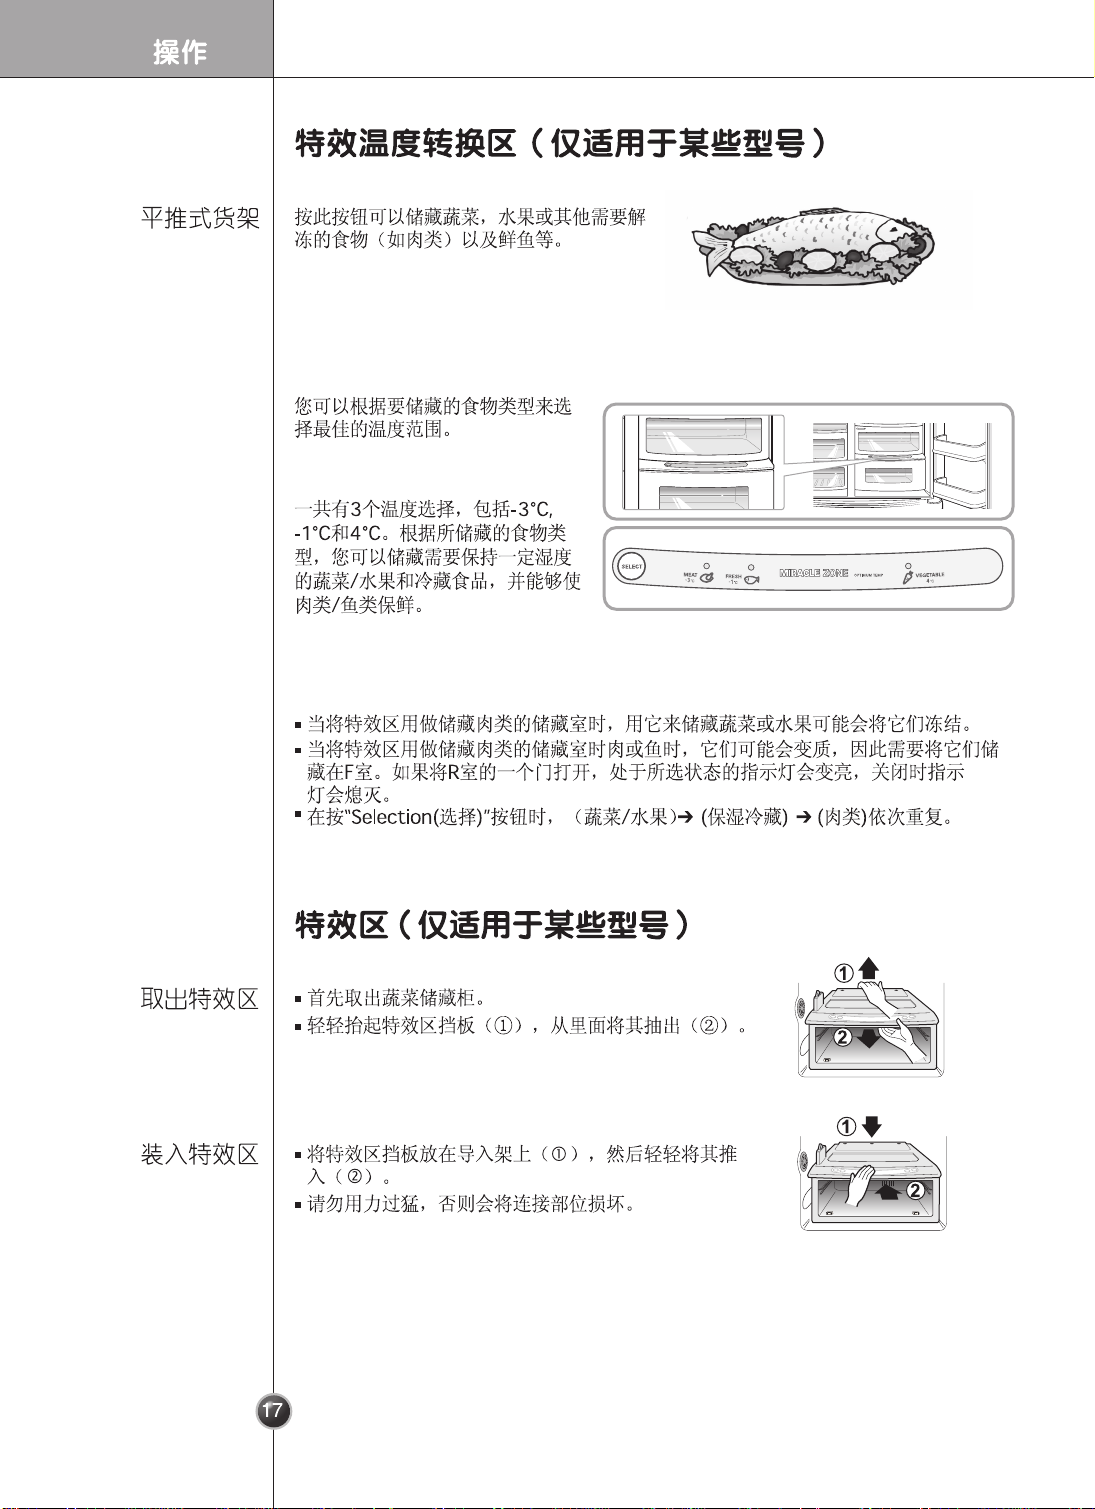
温度在特效区发生改变(仅适用于某些型号)
Page 18
室
室
室
18
Page 19
室
-您的手可能会冻伤,或者由于容器本身材料冻结而碎裂导致人身伤害。
室
室
19
Page 20
室
室
先取出集水器盖。
集水器向外拉出(Pull)① 一半,然后从后面 ②
用力抬起(lift up)就可以取出 ③(参照集水
器上印刷Pull,lift up标志)
要将灯泡取出(③),轻轻敲下(①)部位,然后取
下灯罩(②)。
灯泡以逆时针方向转下来,冰箱使用的灯泡规
格为最大40W的灯泡,可以向服务中心购买。
饮水机
童锁功能按3秒
冷藏温度冷冻温度
童锁功能
急速冷冻
照明灯
过滤状态
饮水机
长按3秒
时效(月)
饮水机
童锁功能
按3秒
冷藏温度冷冻温度
童锁功能
急速冷冻
照明灯
过滤状态
饮水机
长按3秒
时效(月)
饮水机
童锁功能按3秒
冷藏温度冷冻温度
童锁功能
急速冷冻
照明灯
过滤状态
饮水机
长按3秒
时效(月)
冷冻温度
照明/过滤
冷藏温度
急速冷冻
冷冻温度
照明/过滤
冷藏温度
急速冷冻
20321
Page 21
Page 22

-
扭
22
清洁
Page 23
室
室
温度设定太低
室
运行一段时间后,会停机除霜。
23
Page 24
室
室控制温度设定太高。
室控制温度设定太高。
室控制温度设定太高。
控制温度设定太低。
温度设定太低。
温度设定太低。
室
把冷藏室控制温度设定高一点。
将冷藏室控制温度设定低一点。
把冷藏室控制温度设定低一点。
室
室
室
室
室
低
室
室
24
Page 25

25
Page 26

移动冰箱。
室
室
室
26
Page 27

室
41dB(A)
27
Page 28

28
28
Introduction
Installation
Operation
Suggestion on
food storage
Care and
maintenance
Entry
Important safety instruction
Identification of parts
Where to install
Door removal
Door replacement
F
Height adjustment
eed water pipe installation
when the freezer door does not align with the height of the refrigerator door
Starting
Adjusting the temperatures and functions
Refreshment center (Applicable to some models only)
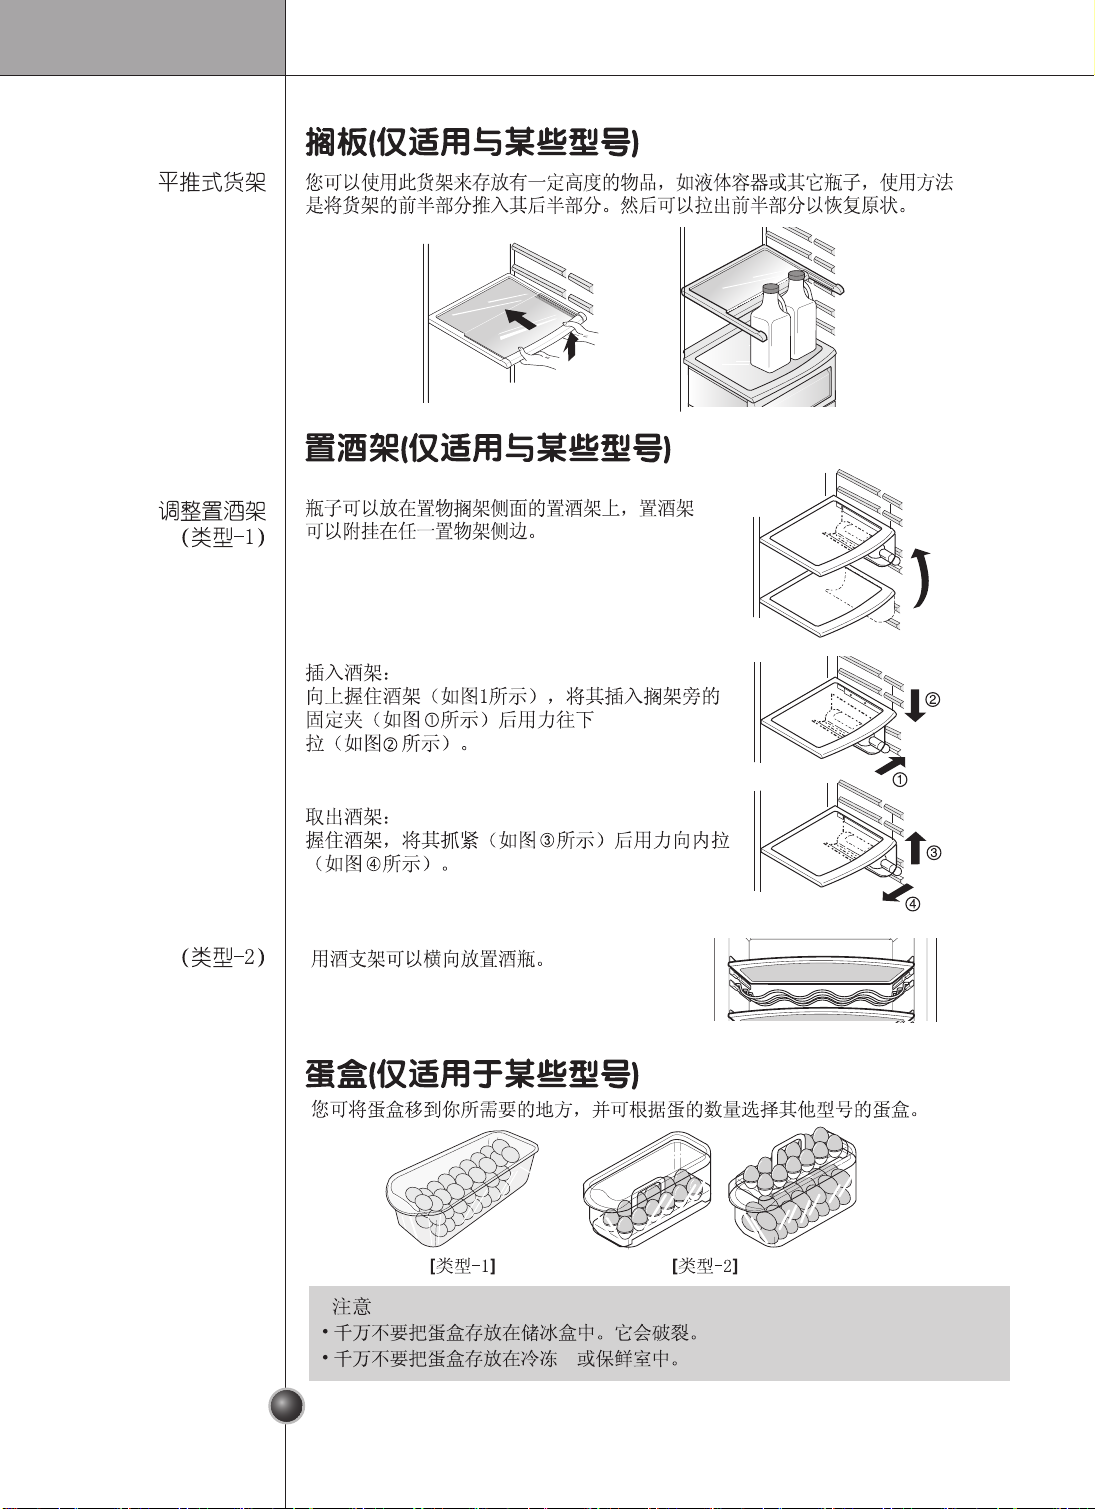
Shelf (Applicable to some models only)
Wine holder (Applicable to some models only)
Egg box (Applicable to some models only)
Humidity control in the vegetable compartment
Convert into a vegetable or meat compartment (Applicable to some models only)
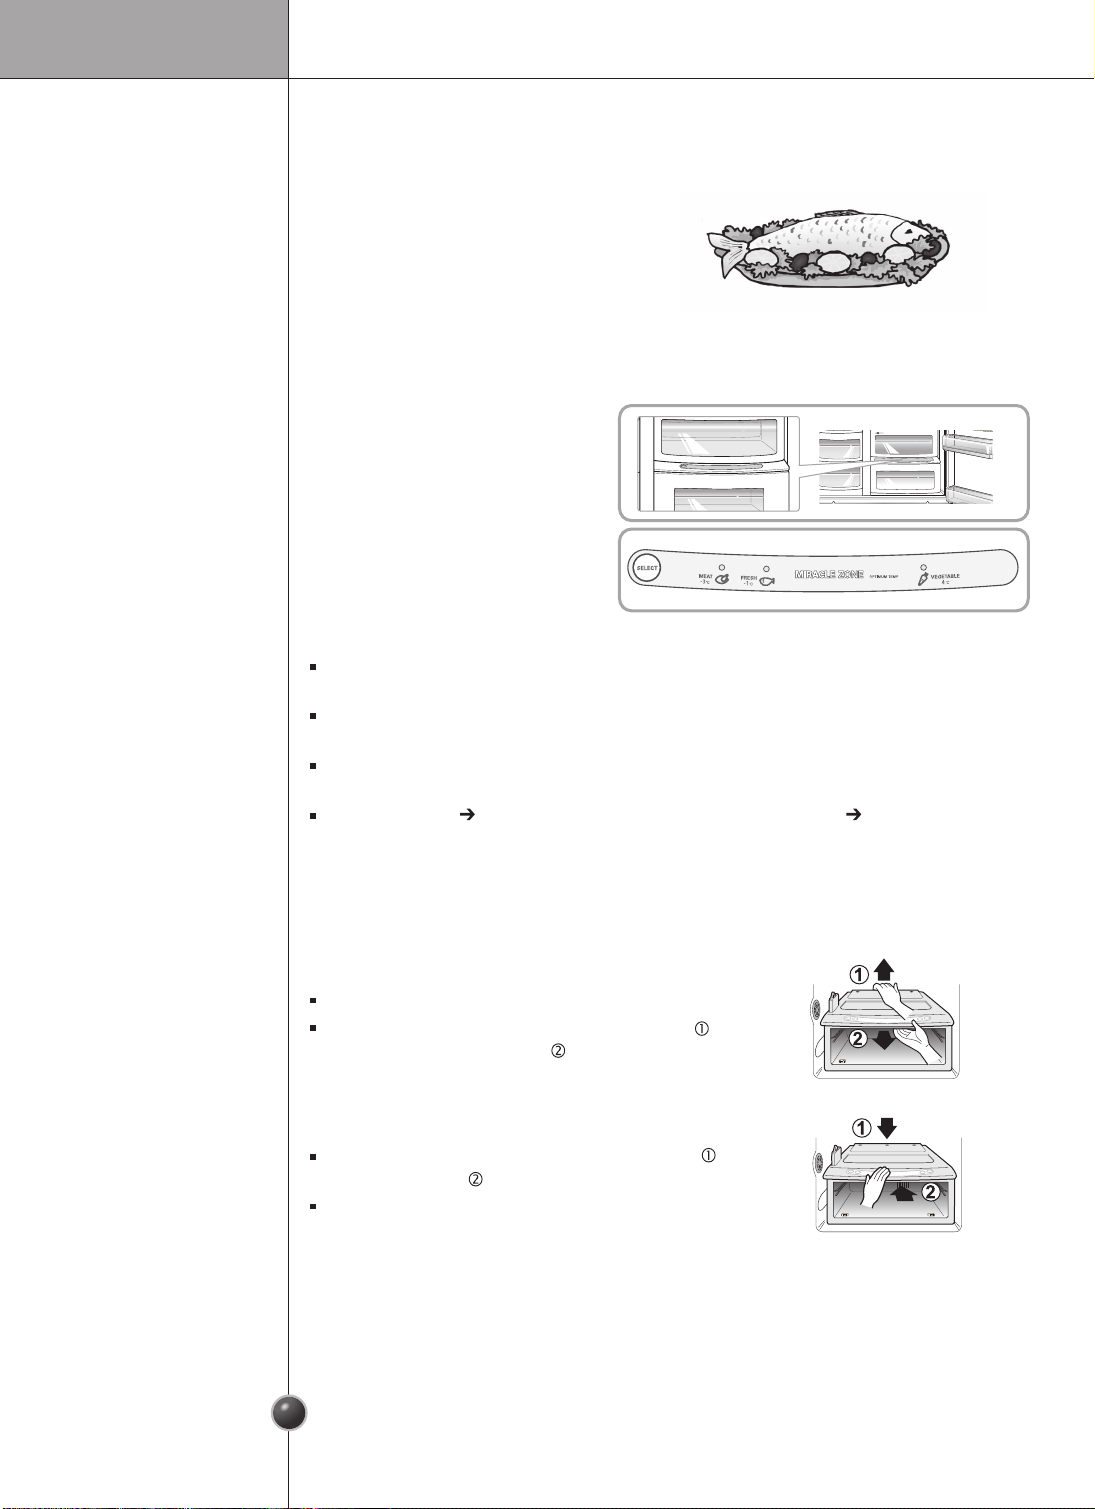
Miracle Zone(Applicable to some models only)
43
Temerature Change at Miracle Zone (Applicable to some models only)
43
Miracle Zone Temperature Transition Corner(Applicable to some models only)
43
Deodorizer(Applicable to some models only)
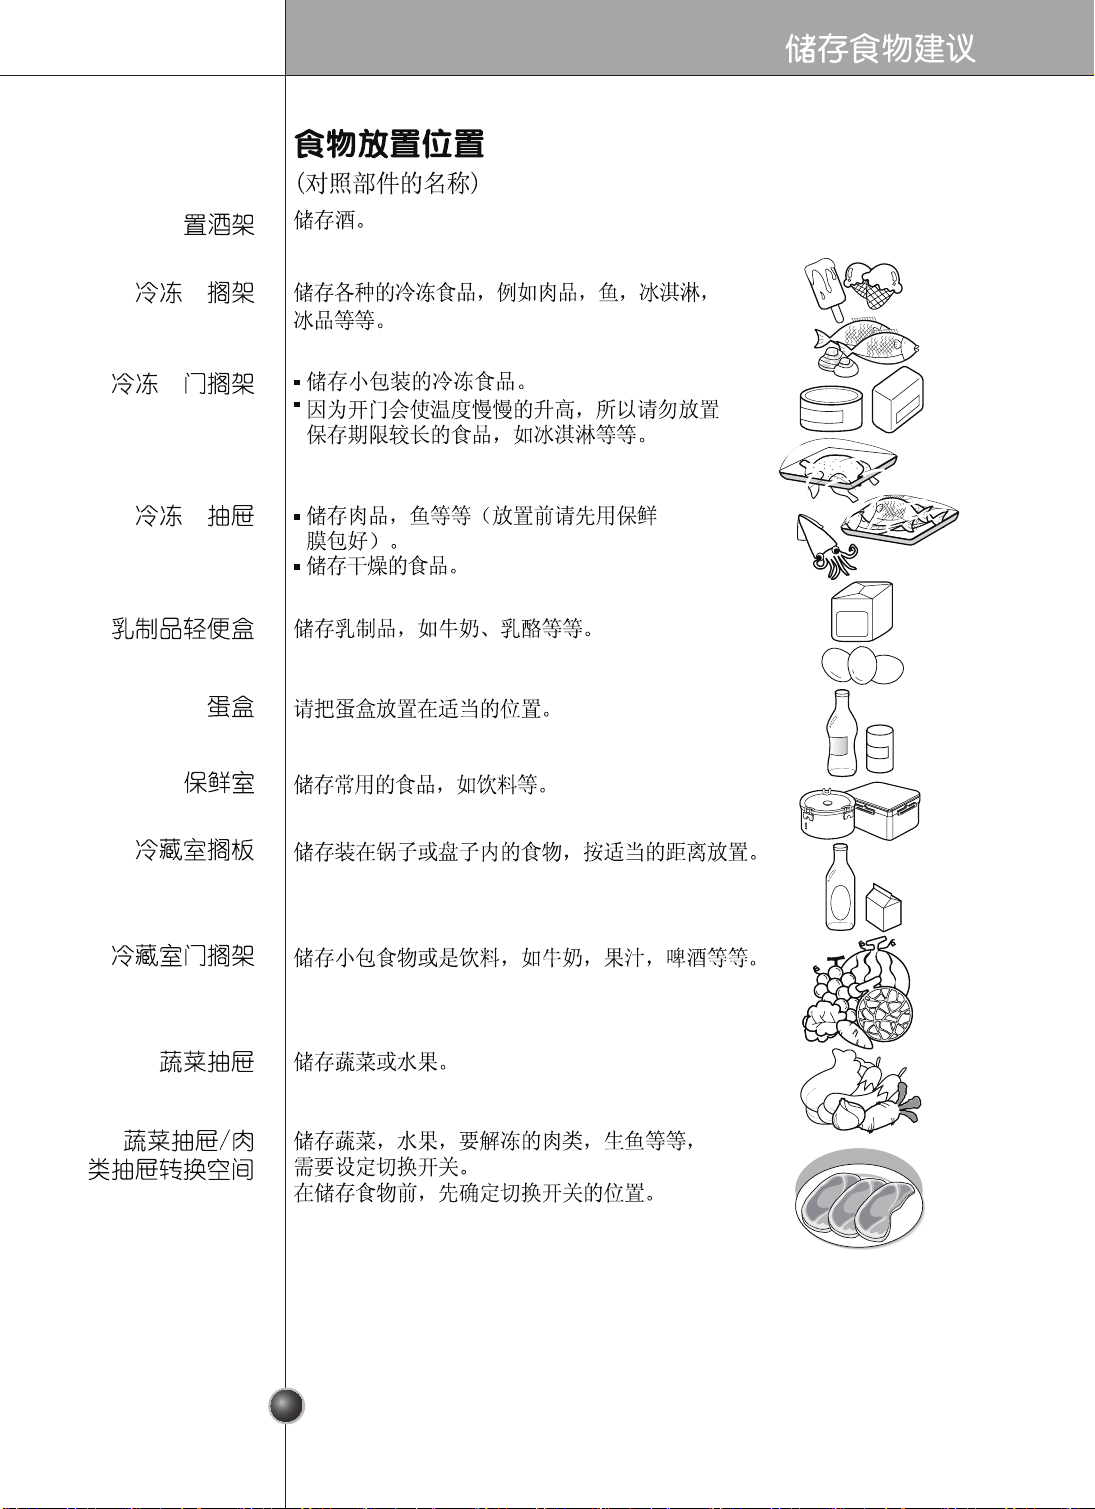
Location of foods
Storing foods
How to dismantle parts
General information
Cleaning
Trouble shooting
Table of contents
29
29
30
31
32
33
33
34
35
35
40
41
41
41
42
42
42
44
45
46
48
48
49
34
Table of contents
Page 29
Introduction Introduction
29 30
Page 30
Introduction
30
Child entrapment
warning
Don’t store
Grounding (Earthing)
Identification of parts
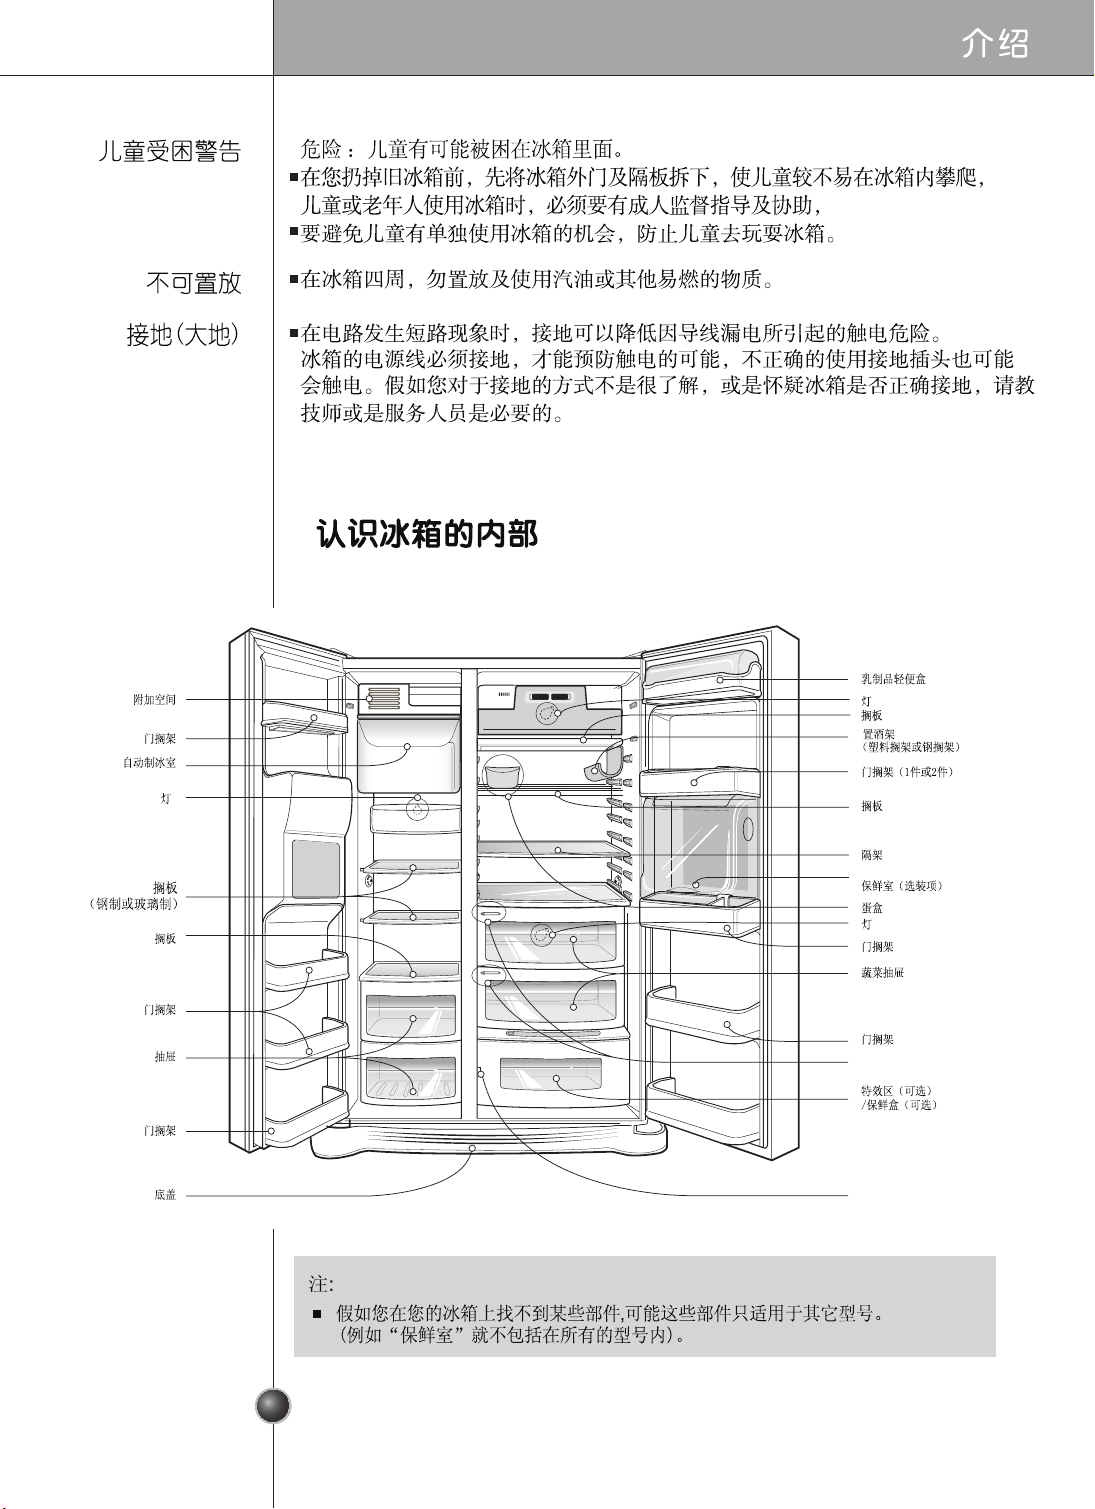
DANGER: Risk of child entrapment.
Before you throw away your old refrigerator or freezer:
Take off the doors but leave the shelves in place so that children may not easily climb
inside.
The appliance is not intended for use by young children or infirm persons without
supervision.
Young children should be supervised to ensure that they do not play with the appliance.
Don’t store or use gasoline or other flammable vapor and liquids in the vicinity of this or
any other appliance.
In the event of an electric short circuit, grounding (earthing) reduces the risk of electric
shock by providing an escape wire for the electric current.
In order to prevent possible electric shock, this appliance must be grounded
improper use of the grounding plug can result in an electric shock. Consult a qualified
electrician or service person if the grounding instructions are not completely
understood, or if you have doubts on whether the appliance is properly grounded.
Freezer
compartment
Refrigerator
compartment
Milk product corner
Door rack
Space plus
Lamp
Automatic
ice maker
Shelf
(steel or glass)
Shelf
Door rack
Drawer
Door rack
Lower cover
Lamp
Lamp
Shelf
Door rack
(1piece or 2pieces)
Door rack
(1piece or 2pieces)
Door rack
Shelf
Shelf (Folding or Normal)
Refreshment center
(Optional)
Egg box
Vegetable drawer (1 or 2)
Miracle Zone (Optional)
Fresh compartment
(Optional)
Conversion switch
(Meats/Vegetables)
(Optional)
Humidity switch
Wine holder
(Plastic or wire
)
•
If you found some parts missing from your unit, they may be parts only used in other
models. (i.c. the “Refreshment center” is not included in all models)
NOTE
Page 31
Select a good
location
Disposal of the
old appliance
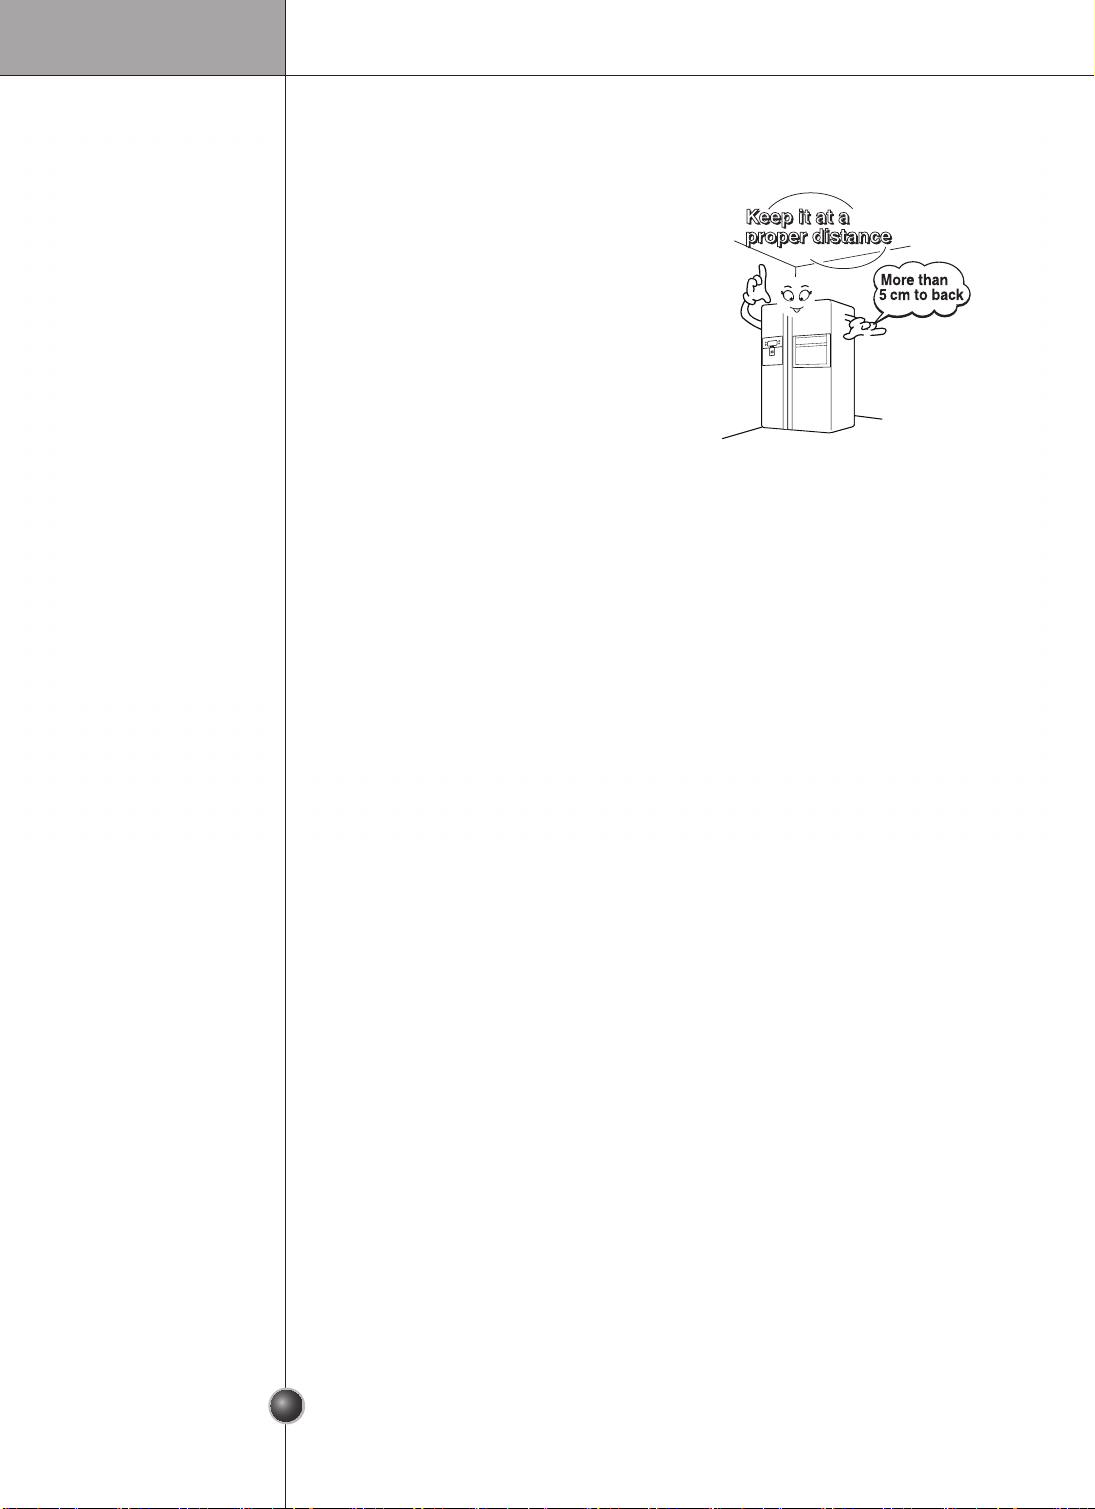
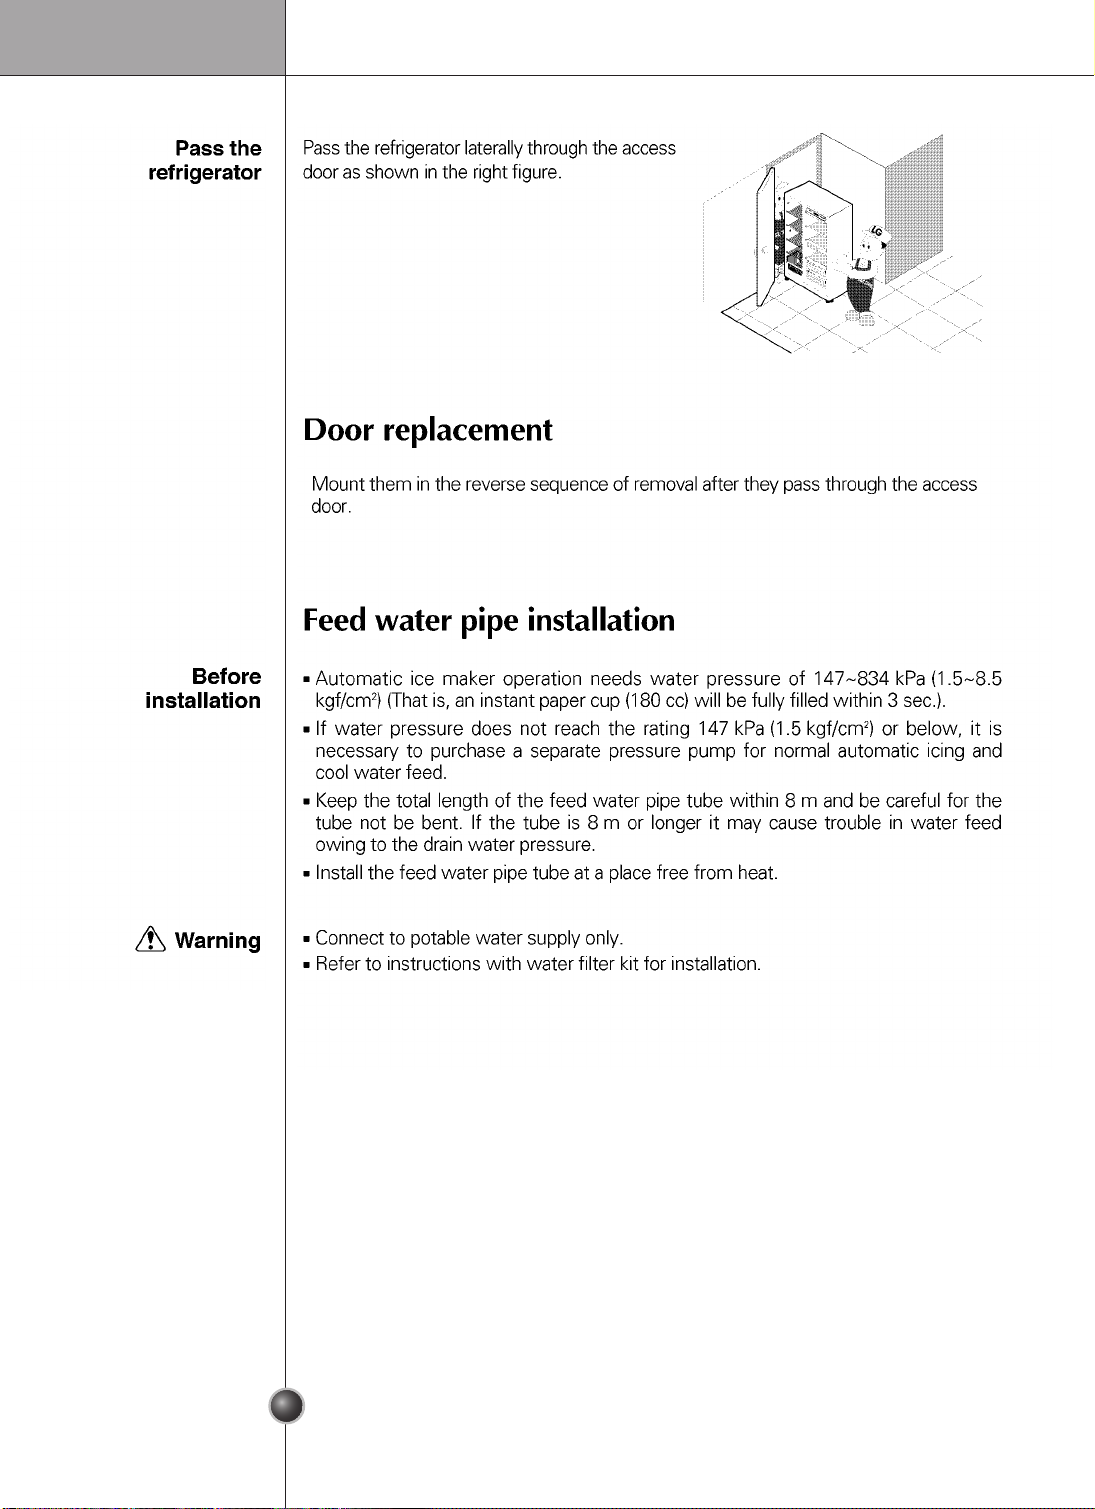
1. Place your appliance where it is easy to
use.
2. Avoid placing the unit near heat sources,
direct sunlight or moisture.
3. To ensure proper air circulation around the
fridge -freezer, please maintain sufficient
space on both the sides as well as top and
maintain at least 2 inches (5 cm) from the
rear wall.
4. To avoid vibrations, the appliance must
be leveled.
5. Don't install the appliance below 5?C. It may cause affect the performance.
Where to Install
This appliance contains fluid (refrigerant, lubricant)and is made of parts and materials
which are reusable and/or recyclable.
All the important materials should be sent to the collection center of waste material
and can be reused after rework (recycling). For take back, please contact with the
local agency.
Introduction
31
Page 32
Introduction
32
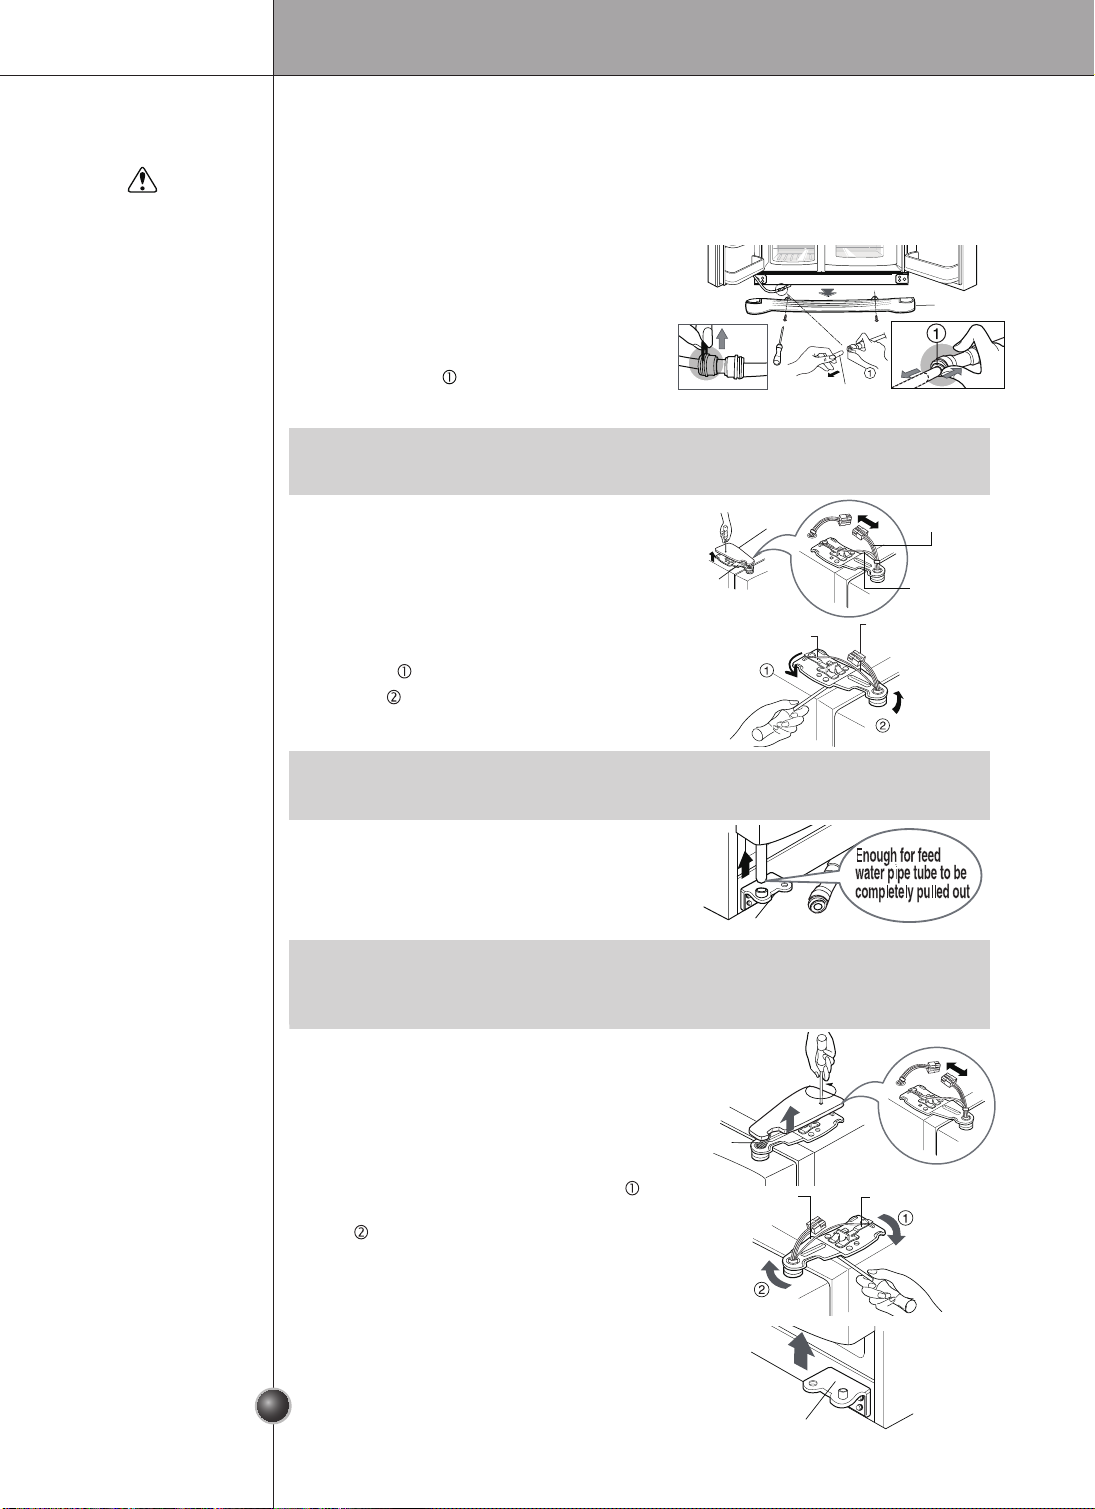
Remove lower
cover and
then feed water
tube
Warning
Remove the
freezer
compartment
door
Remove the
refrigerator
door
Door removal
Failure to do so could result in death or serious injury.
If your access door is too narrow for the
refrigerator to pass through, remove the
refrigerator door and pass the refrigerator laterally.
Electric Shock Hazard
Disconnect electrical supply to refrigerator before installing.
Remove the lower cover by lifting upward, and
remove clip, and then pull up the feed water tube
while pressing area shown in the figure to the
right.
1) Removing the hinge cover by loosening the
screws. Separate all connection wires except
for the earth line after.
2) Remove the keeper by rotating it counter
clockwise ()and then lifting the upper
hinge up (
).
3) Remove the freezer compartment door by
lifting it upward. This time, the door should
be lifted enough for the feed water pipe tube
to be completely pulled out.
1) Loosen the hinge cover screws and remove
the cover. Remove connection wire, if any,
except for the earth line.
2) Remove keeper by rotating it clockwise ( )
and then remove the upper hinge by lifting
it up ( ).
3) Remove the refrigerator compartment door
by lifting it up.
If a tube end is deformed or abraded, cut the part away.
NOTE
When removing the upper hinge, be careful that the door does not fall forwards .
NOTE
Move the refrigerator compartment door passing through the access door and lay
it down, but be careful not to damage the feed water pipe tube.
NOTE
Lower cover
Lower hinge
Lower hinge
Keeper
Feed water tube
Connection
wires
Connection
wires
Hinge
cover
Upper hinge
Upper hinge
Keeper
Upper hinge
Earth line
Page 33
Introduction Introduction
33 34
Page 34
Installation
室
After leveling the
door height
Next
Height adjustment
If the freezer compartment
door is lower than the refrig-
erator compartment door
If the freezer compartment
door is higher than the refrig-
erator compartment door
Level the door by inserting flat (-type)
driver into the groove of the right
height adjusting screw and rotate it
clockwise (①).
Level the door by inserting flat (-type)
driver into the groove of the left
height adjusting screw and rotate it
clockwise (①).
Height difference
Right height
adjustment screw
Height
difference
Height difference
Left height
adjustment screw
Height
difference
The refrigerator doors will close smoothly by heightening the front side by adjusting
the height adjusting screw. If the doors do not close correctly, performance may be
1. Wipe off all dust accumulated during shipping and clean your appliance thoroughly.
2. Install accessories such as the ice cube box, cover evaporating tray, etc., in their
proper places. They are packed together to prevent possible damage during shipping.
3. Connect the power supply cord (or plug) to the outlet. Don't double up with other
appliances on the same outlet.
When the freezer door does not align with
the height of the refrigerator door
Even if the height can not be aligned by using the height adjustment
screw, insert the transparent sheet supplied with the product.
Insert more transparent sheets enough to align the height. (4 sheets are supplied in total.)
Separate the door with the lower height, use the (+) type screwdriver to unscrew the
screw at the bottom hinge as shown at Figure ①, insert the transparent sheet between
the bottom hinge and the bottom bracket, and then fix it with the screw as shown at
Figure ②.
①
②
Bottom bracket
Transparent sheet
Bottom hinge
If the height of
freezer compart-
ment door is
different from the
height of Refrig-
erator compart-
ment door
Installation
Height adjustment
If the freezer compartment
door is lower than the refrigerator compartment door
If the freezer compartment
door is higher than the refrigerator compartment door
Level the door by inserting flat (-type)
driver into the groove of the right
height adjusting screw and rotate it
clockwise (①).
Level the door by inserting flat (-type)
driver into the groove of the left
height adjusting screw and rotate it
clockwise (①).
Height difference
Right height
adjustment screw
Height
difference
Height difference
Left height
adjustment screw
Height
difference
The refrigerator doors will close smoothly by heightening the front side by adjusting
the height adjusting screw. If the doors do not close correctly, performance may be
1. Wipe off all dust accumulated during shipping and clean your appliance thoroughly.
2. Install accessories such as the ice cube box, cover evaporating tray, etc., in their
proper places. They are packed together to prevent possible damage during shipping.
3. Connect the power supply cord (or plug) to the outlet. Don't double up with other
appliances on the same outlet.
When the freezer door does not align with
the height of the refrigerator door
Even if the height can not be aligned by using the height adjustment
screw, insert the transparent sheet supplied with the product.
Insert more transparent sheets enough to align the height. (4 sheets are supplied in total.)
Separate the door with the lower height, use the (+) type screwdriver to unscrew the
screw at the bottom hinge as shown at Figure ①, insert the transparent sheet between
the bottom hinge and the bottom bracket, and then fix it with the screw as shown at
Figure ②.
①
②
Bottom bracket
Transparent sheet
Bottom hinge
Page 35

Operation Operation
35 36
Startin
Adjusting the temperatures and functions
g
When your refrigerator is first installed, allow it to stabilize at normal operating
temperatures for 2-3 hours prior to filling it with fresh or frozen foods.
If operation is interrupted, wait 5 minutes before restarting.
冷冻
温度
冷藏
温度
急速冷冻
童锁功能 童锁功能
急速冷冻
按3秒 按3秒
on off
lock unlock
Locking or Release is repeated whenever the is
pressed more than 3seconds.
If you use the button ,none of the other
buttons will work until you unlock them.
“on” and “off” is repeated whenever
pressing button.
The arrow mark graphic remains at the “on”
status when selecting Special Refrigeration
”on”
冷冻温度
冷藏温度
童锁功能
按3秒
急速冷冻
急速冷冻
饮水机
童锁功能
按3秒
饮水机
童锁功能
按3秒
长按3秒
时效(月)
Startin
Adjusting the temperatures and functions
g
When your refrigerator is first installed, allow it to stabilize at normal operating
temperatures for 2-3 hours prior to filling it with fresh or frozen foods.
If operation is interrupted, wait 5 minutes before restarting.
Operation
Dispenser lamp
Refreshment center
(Applicable to some
models only)
(Bottom celling of
function display board)
Express freezer
Lamp/Filter reset button.
Dispenser selection
button/Lock button
Temperature adjusment button
for freezer compartment
Temperature adjusment button
for freezer compartment
长按3秒
时效(月)
Function display board
Page 36
冷冻
温度
冷藏
温度
急速冷冻
童锁功能 童锁功能
急速冷冻
按3秒 按3秒
on off
lock unlock
Locking or Release is repeated whenever the is
pressed more than 3seconds.
If you use the button ,none of the other
buttons will work until you unlock them.
“on” and “off” is repeated whenever
pressing button.
The arrow mark graphic remains at the “on”
status when selecting Special Refrigeration
”on”
冷冻温度
冷藏温度
童锁功能
按3秒
急速冷冻
急速冷冻
饮水机
童锁功能
按3秒
饮水机
童锁功能
按3秒
Page 37
Operation
37
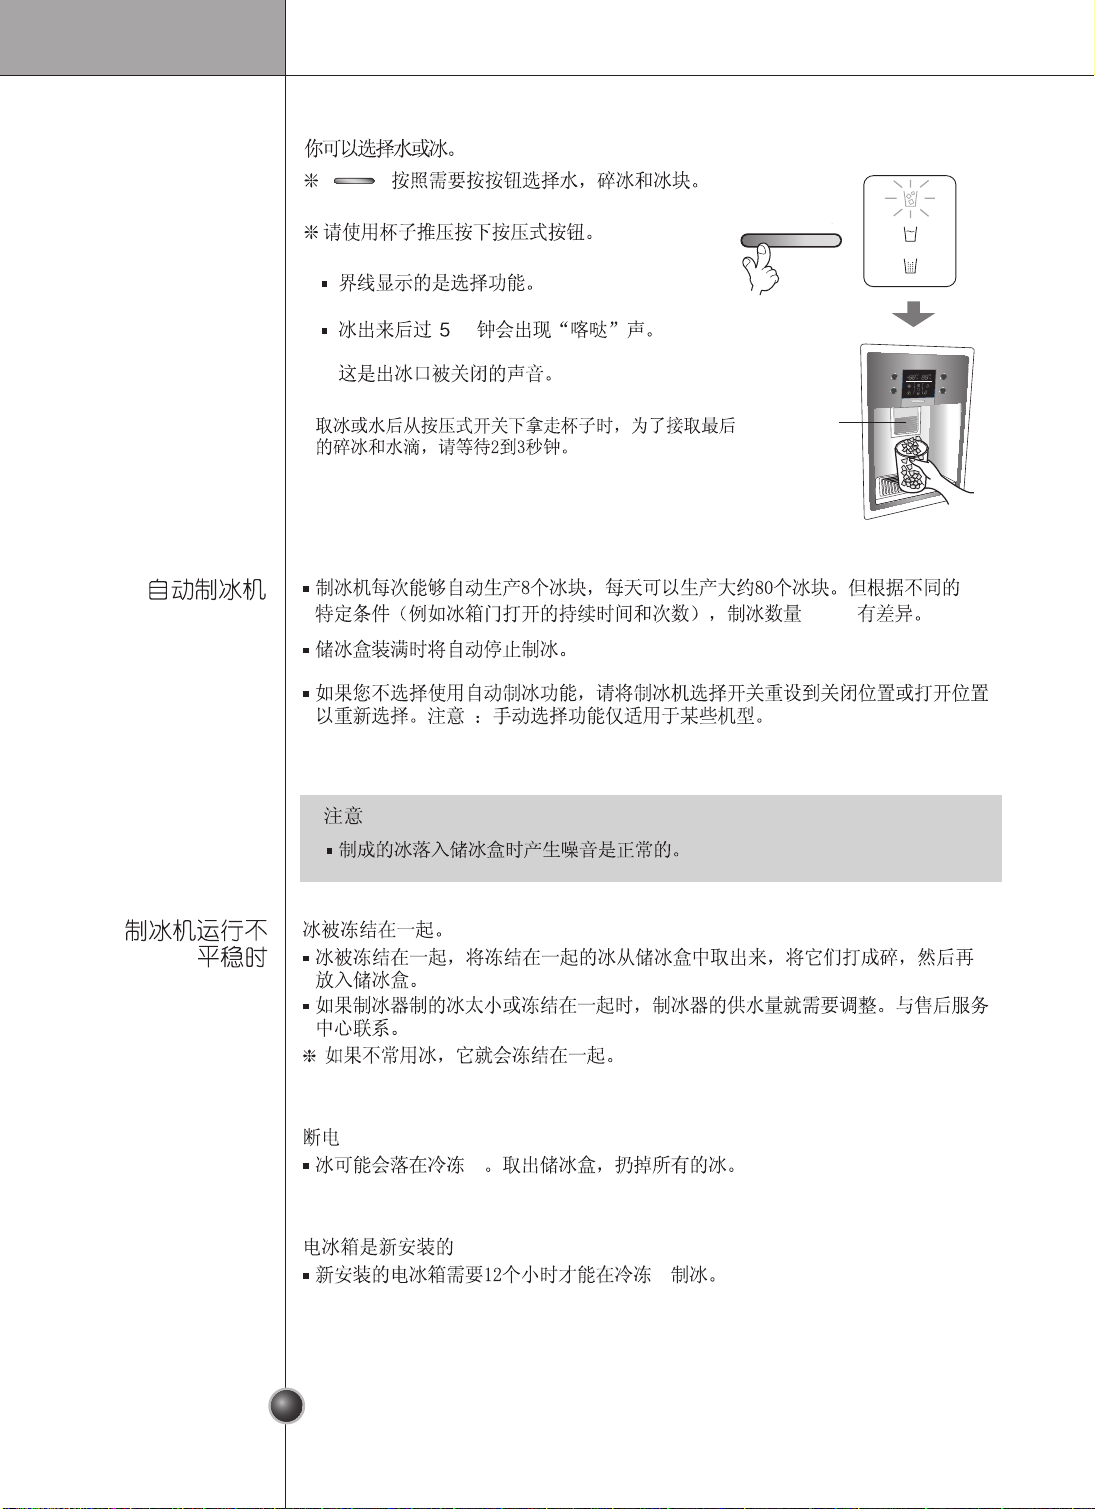
The icemaker can automatically make 8 pieces of ice cubes at anyone time,
approximately 80 pieces per day. However these quantities may vary according to
certain conditions. E.g. the duration and amount of times the refrigerator door is
opened.
The Ice making proceeds ceases automatically when the ice storage bin is full.
If you choose not to use the automatic ice making function, repositioned the
icemaker selection switch to the off position or the on position for reselection. Note:
The manual selection function is only applicable to some models only.
Ice is lumpedtogether
When ice is lumped together, take the ice lumps out of the ice storage bin, break
them into small pieces, and then place them into the ice storage bin again.
When the ice maker produces too small or lumped together ice, the amount of
water supplied to the ice maker need to adjusted. Contact the service center.
If ice is not used frequently, it may lump together.
Power failure
Ice may drop into the freezer compartment. Take the ice storage bin out and discard
all the ice then dry it and place it back. After the machine is powered again, crushed
ice will be automatically selected.
The unit is newly installed
It takes about 12 hours for a newly installed refrigerator to make ice in the freezer
compartment.
Automatic ice
maker
When ice maker
does not operate
smoothly
It is normal that a noise is produced when ice made is dropped into the ice storage
bin.
NOTE
You can select water or ice.
Please select water, slice ice and square ice
by pressing button as you desire.
Please press the push button lightly by
catching and pushing in cup.
The border line is indicated for the selected
function,
"Tak!" sounds if 5 seconds pass after ice
comes out.
It is sound that the outlet of ice is closed.
Dispenser use
selection
Reference : Please wait for 2-3 seconds in order to take
final ice slices or drops of water when taking
out cup from the pressing switches after taking
ice or water.
饮水机
童锁功能
按3秒
冷冻温度
照明/过滤
冷藏温度
急速冷冻
饮水机
童锁功能
按3秒
冷藏温度冷冻温度
童锁功能
急速冷冻
照明灯
过滤状态
饮水机
长按3秒
时效(月)
饮水机
童锁功能
按3秒
Pressing
Switch
Page 38

Operation
38
How to use
dispenser
The other
functions
How ice/cold
water is supplied
Select one among crushed ice, water, and cubed ice and slightly press the push
switch with a glass or other container.
Door open warning
■
■
■
■
■
3 times of warning sounds at the interval of 30 seconds if a minute passes with the
door of refrigerator and the hombar door opened or completely closed.
Please contact with the local service center if warning continue to sound even after
closing the door.
Diagnosis (failure detection) function
Diagnosis function automatically detects failure when failure is found in product during
the use of refrigerator.
If failure occurs at product, it does not operate though pressing any button and normal
indication is not done. In this case, do not turn power off but immediately contact with
the local service center. A lot of time are need for service engineer to detect the failed
part if turning it off.
Crushed ice
Light the crushed ice
in dicating la mp by
pressing the selection
button.
C
rushed
ice will be
dispensed by pressing the
push switch with a glass.
Water
Light the water
indicating lamp by
pressing the selection
button.
Water will be dispensed
by pressing the push
switch with a glass.
Cubed ice
Light the cubed ice
indicating lamp by
pressing the
selection button.
Cubed ice will be dispensed
by pressing the push
switch with a glass.
Water is cooled while stored in the water tank in the refrigerator compartment, and
then sent to the dispenser.
Ice is made in the automatic ice maker and sent to the dispenser divided into crushed
or cubed form ice.
It is normal that the water is not very cold at first. If you want colder water, add
ice into the glass.
NOTE
冷冻温度
照明/过滤
冷藏温度
急速冷冻
饮水机
童锁功能按3秒
冷藏温度冷冻温度
童锁功能
急速冷冻
照明灯
过滤状态
饮水机
长按3秒
时效(月)
冷冻温度
照明/过滤
冷藏温度
急速冷冻
饮水机
童锁功能按3秒
冷藏温度冷冻温度
童锁功能
急速冷冻
照明灯
过滤状态
饮水机
长按3秒
时效(月)
冷冻温度
照明/过滤
冷藏温度
急速冷冻
饮水机
童锁功能按3秒
冷藏温度冷冻温度
童锁功能
急速冷冻
照明灯
过滤状态
饮水机
长按3秒
时效(月)
饮水机
饮水机饮水机
童锁功能
按3秒
童锁功能
按3秒
童锁功能
按3秒
Page 39
Operation Operation
There is a replacement indicator light
for the water filter cartridge on the
dispenser.
The water filter should be replaced
every six months.
The filter light comes on to let you
know when to replace filter.
After replacing the filter, press and hold the filter button more than 3 seconds to reset
the indicator.
Filter condition
(filter replacement
cycle) display
function
Dispenser light
过滤状态
长按3秒
时效(月)
过滤状态
长按3秒
时效(月)
照明/过滤
照明灯
照明灯
This button turn the dispenser light
There is a replacement indicator light
for the water filter cartridge on the
dispenser.
The water filter should be replaced
every six months.
The filter light comes on to let you
know when to replace filter.
After replacing the filter, press and hold the filter button more than 3 seconds to reset
the indicator.
过滤状态
长按3秒
时效(月)
过滤状态
长按3秒
时效(月)
照明/过滤
照明/过滤
ON OFF
照明灯
照明灯
This button turn the dispenser light
in the dispenser on an off.
The dispenser light function is turned
ON or OFF by pressing “照明/过滤”
button.
39 40
There is a replacement indicator light
for the water filter cartridge on the
dispenser.
The water filter should be replaced
every six months.
The filter light comes on to let you
know when to replace filter.
After replacing the filter, press and hold the filter button more than 3 seconds to reset
the indicator.
过滤状态
长按3秒
时效(月)
过滤状态
长按3秒
时效(月)
照明/过滤
照明/过滤
ON OFF
照明灯
照明灯
This button turn the dispenser light
in the dispenser on an off.
The dispenser light function is turned
ON or OFF by pressing “照明/过滤”
button.
There is a replacement indicator light
for the water filter cartridge on the
dispenser.
The water filter should be replaced
every six months.
The filter light comes on to let you
know when to replace filter.
After replacing the filter, press and hold the filter button more than 3 seconds to reset
the indicator.
Filter condition
(filter replacement
cycle) display
function
Dispenser light
过滤状态
长按3秒
时效(月)
过滤状态
长按3秒
时效(月)
照明/过滤
照明/过滤
ON OFF
照明灯
照明灯
This button turn the dispenser light
in the dispenser on an off.
The dispenser light function is turned
ON or OFF by pressing “照明/过滤”
button.
Page 40
Operation
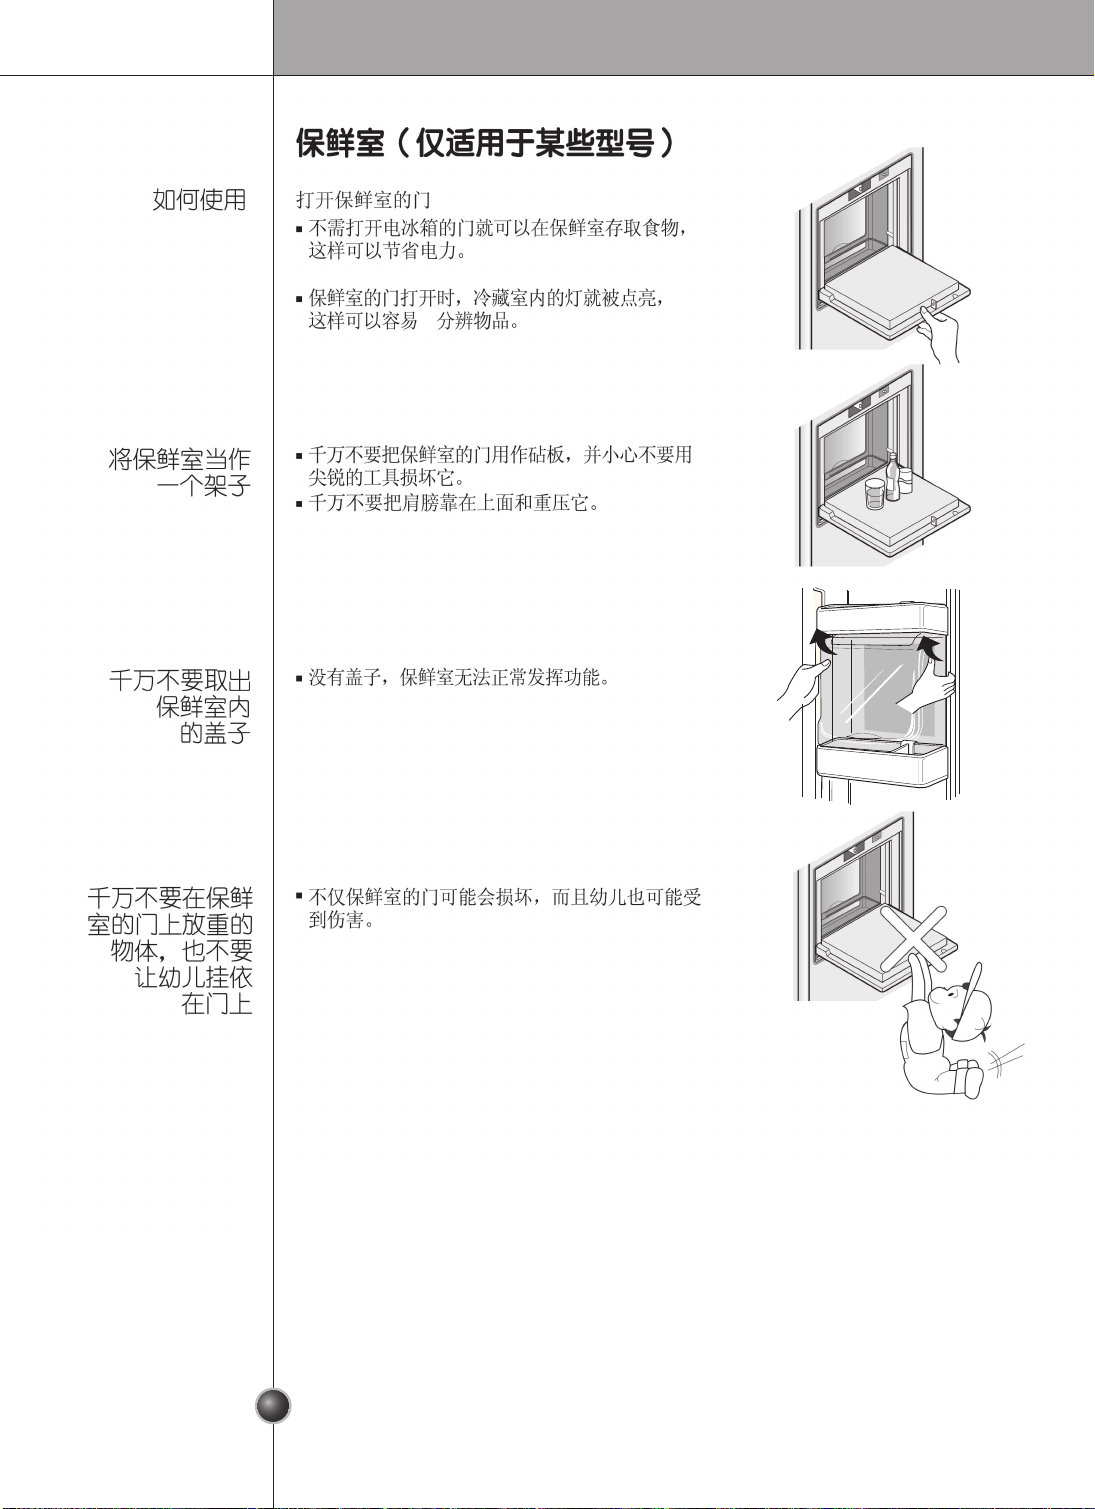
Refreshment center (Applicable to some models only)
Open the refreshment center door.
You can access the refreshment center
without opening refrigerator door and thus
saving electricity.
Inner lamp is lit in refrigerator compartment
when the refreshment center door opens.
Thus it is easy to identify the contents.
Never use the refreshment center door as a
chopping board and take care not to damage it
with sharp tools.
Never rest your arms or severely press on it.
The
refreshment center
can not function
normally without the cover.
Not only can the refreshment center door may
be damaged, but also children may be hurt.
How to use
Never place
heavy items on
the refreshment
center door or
allow children to
hang it on.
Never take out
the inner
refreshment
center cover
Use the
refreshment
center door as a
stand
Operation
Refreshment center (Applicable to some models only)
Open the refreshment center door.
You can access the refreshment center
without opening refrigerator door and thus
saving electricity.
Inner lamp is lit in refrigerator compartment
when the refreshment center door opens.
Thus it is easy to identify the contents.
Never use the refreshment center door as a
chopping board and take care not to damage it
with sharp tools.
Never rest your arms or severely press on it.
The
refreshment center
can not function
normally without the cover.
Not only can the refreshment center door may
be damaged, but also children may be hurt.
Page 41

41 42
Operation Operation
Page 42

42
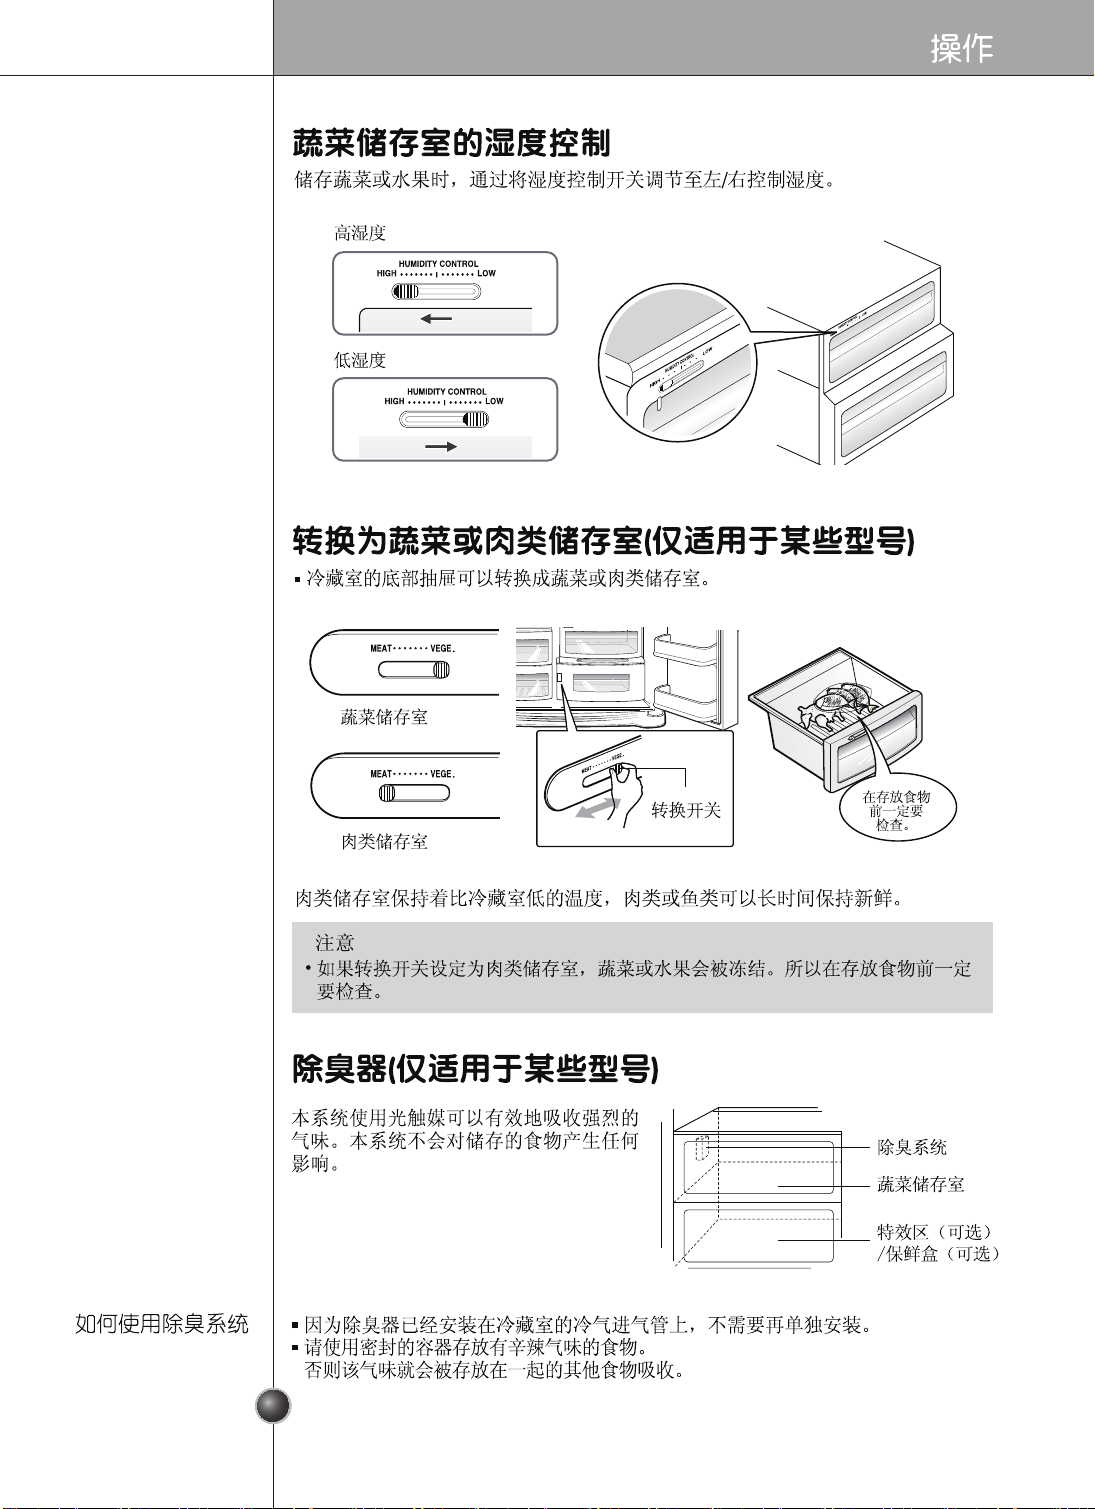
Humidity control in the vegetable compartment
The humidity can be controlled by adjusting the humidity control switch to the
left/right when storing vegetables or fruits.
HIGH LOW
HUMIDITY CONTROL
HIGH LOW
HUMIDITY CONTROL
High humidity
Low humidity
Convert into a vegetable or meat compartment
(Applicable to some models only)
The
meat
compartment maintains the temperature at a lower point than the
refrigerator compartment so that meat or fish can be stored fresh longer.
The bottom drawer in the refrigerator can be converted into a vegetable or meat
compartment
•
Vegetables or fruits are frozen if the conversion switch is set to meats
compartment. So, be sure to check it before storing foods.
NOTE
Deodorizer (Applicable to some models only)
This system efficiently absorbs strong
odors by using the optical catalyst. This
system does hot have any affect on
stored food.
Since it is installed already installed onto the cool air intake duct from the from
the refrigerator compartment, you need no separate installation.
Please use closed containers to store food with pungent odors.
Otherwise, this oder can be absorbed by other food in the compartment.
How to use the
deodorizing
system
Operation
Page 43
Operation
Miracle Zone Temperature Transition Corner
(Applicable to some models only)
By pressing the button, store vegetables,
fruits or other types of food such as meat to
be defrosted, raw fish, etc.
Temperature Change at Miracle Zone
(Applicable to some models only)
Method to Use
You can select optimum
temperature range depending on
types of foods stored.
- 3-step of temperature selection
including -3°C, -1°C and 4°C is
available. Vegetables/fruits and cold
storage foods requiring humidity
maintenance and meats/fishes can
be more freshly stored depending on type of foods stored.
When using the Miracle Zone as storage room of meats, storing vegetables or fruits
may be frozen
When using the Miracle Zone as storage room of meats, keeping meats or fishes
may be spoiled and thus meats or fishes must be kept at the F-room.
If opening a door of the R-room, lamp turns on in the selected status and lamp turns
off if closing it.
(Vegetable/Fruit) (Cold storage while maintaining humidity) (Meat) is
sequentially repeated whenever pressing the "Selection" button.
Miracle Zone (Applicable to some models only)
When removing
Miracle Zone
When installing
Miracle Zone
First, remove the vegetable bin.
After lifting the Miracle Zone case slightly , reach
inside and pull it outward .
Fit the Miracle Zone case on to the ledge and
gently slide it in .
When forced, the connecting parts can be damaged.
43
Page 44

Suggestion on food storage
44
Page 45

45
Suggestion on food storage
Page 46

46
Care and maintenance
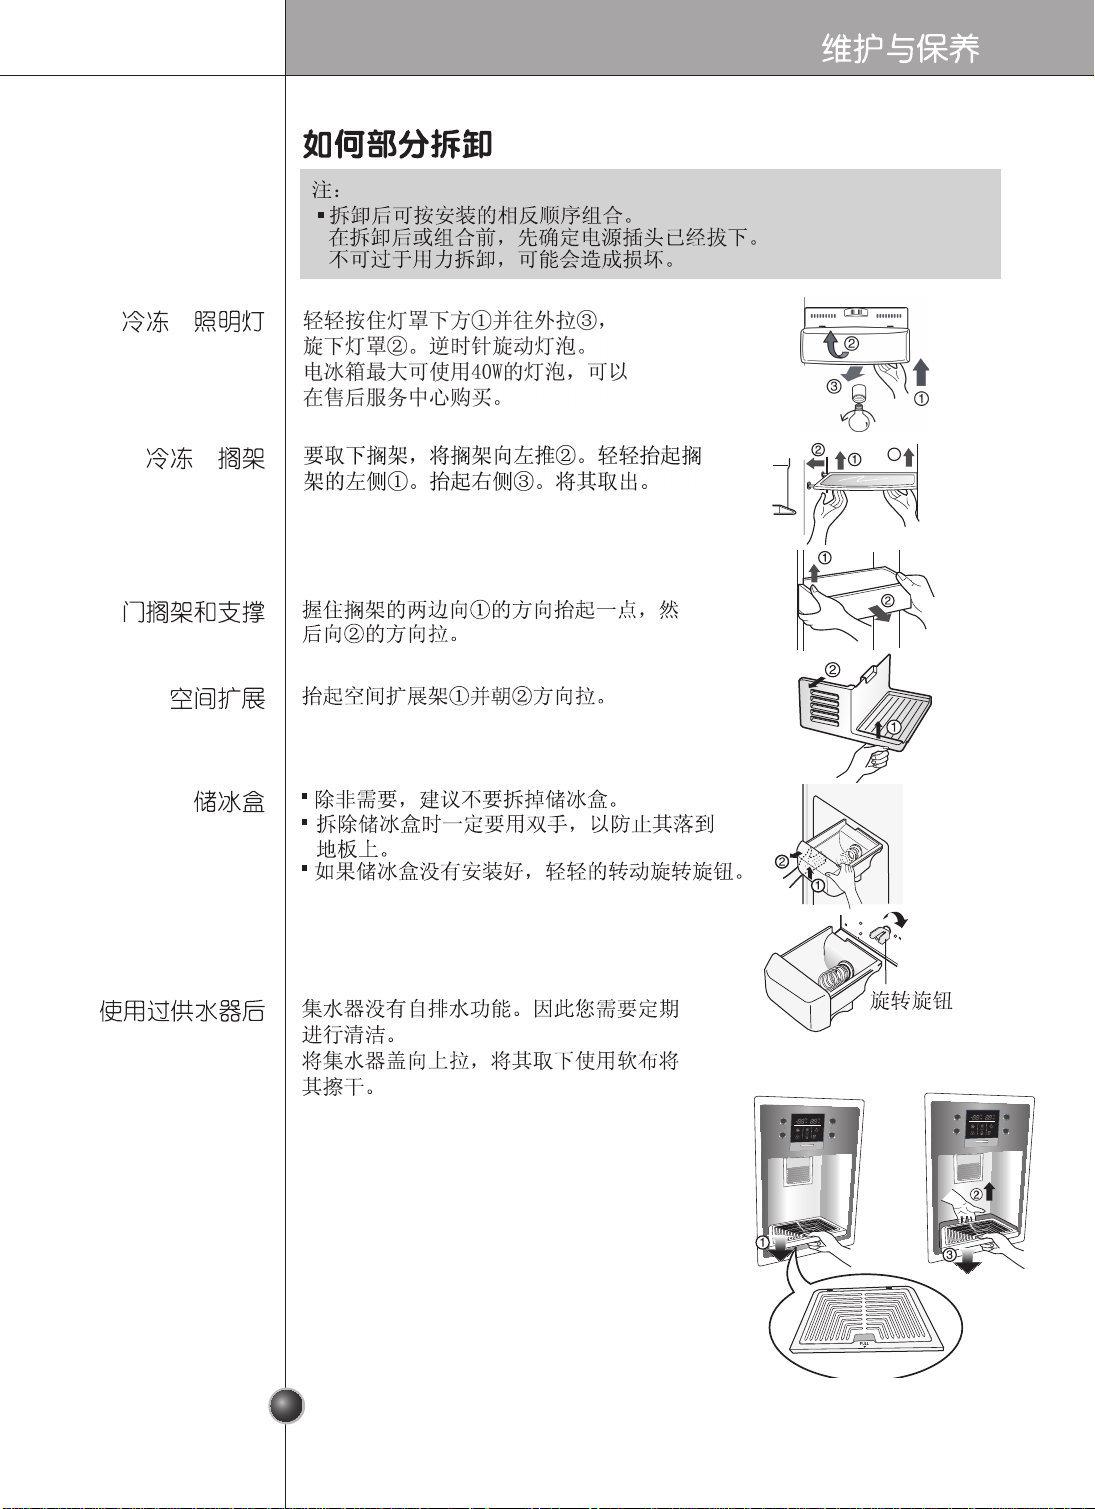
After dispenser
is used
Ice storage bin
direction.
Hold the ice storage bin as shown in the right
figure and pull it out
( )
while slightly lifting it
( ).
It is recommended not to dismantle the ice
storage bin unless it is necessary.
Be sure to use both hands when removing
the ice storage bin, so as not to drop it on the
floor.
If the ice storage bin does not fit well, slightly
rotate the rotating device.
Door rack and
support
Space plus
Lift the door rack holding both sides ( ) and
pull it out to
( )
direction.
Lift the space plus ( ) and pull it out to
( )
direction.
Freezer
compartment
lamp
Freezer
compartment
shelf
Separate the lamp by pulling it out
while slightly
pressing
and rotating
the lamp cover.
Turn the bulb counterclockwise. Use a 40-watt bulb
(max.) which
can be purchased at a service
center.
To remove a shelf, push the shelf to the left ,
lift the left part of the shelf a bit , lift the right
part up , and take it out.
The water collector has no self-draining
function. It should be cleaned regularly.
Remove the cover by pulling the front side of
water collector cover and dry it with a cloth.
Pull the cover fully to the front and pull up
the rear end of the cover slightly to pull it out.
Clean the floor and cover with a dry cloth.
饮水机
童锁功能
按3秒
冷藏温度冷冻温度
童锁功能
急速冷冻
照明灯
过滤状态
饮水机
长按3秒
时效(月)
饮水机
童锁功能按3秒
冷藏温度冷冻温度
童锁功能
急速冷冻
照明灯
过滤状态
饮水机
长按3秒
时效(月)
冷冻温度
照明/过滤
冷藏温度
急速冷冻
冷冻温度
照明/过滤
冷藏温度
急速冷冻
3
Page 47

47
Care and maintenance
Separate the bin (①)to upward.
Separate the upper rack of the refreshment
center and then pull out the refreshment
center cover(
②).
The refreshment center can be removed
by pulling it upwards.
NOTE
Be sure to remove parts from the refrigerator door when removing the vegetable
compartment,snack drawer and refreshment center cover.
To remove the vegetable compartment
cover,pull out the vegetable compartment
a bit to the front
① ,lift the front part of the
vegetable compartment cover as shown by
②,and take it out.
Turn off the lce maker switch(off)after remove the Space plus,if you are
on a long term vacation or don’t use a ice.
You want to use a ice,turn on the lce make switch(on).
Refreshment
center
Vegetable
compartment
cover
Ice Maker
2
1
1
2
Page 48

Care and maintenance
48
Page 49

49
Care and maintenance
Page 50

50
Care and maintenance
Page 51

51
Care and maintenance
Page 52

52
Care and maintenance
Page 53

53
41dB(A)
Care and maintenance
41dB(A)
Page 54
28
54
70
75
74
74
72
71
냉동실과 냉장실문의 높이가 다를 경우
60
60
부품을 분해하는 방법
Miracle Zone 온도전환코너 (일부모델에만 적용)
Miracle Zone 온도 변화 (일부모델에만 적용)
Miracle Zone (일부모델에만 적용)
69
69
69
Page 55

55 56
머리말
Page 56

머리말
냉동실 냉장실
냉동실 냉장실
Page 57

설치
57 58
냉장냉동고의 주위에 적절한 공기의
흐름을 위해 양 측면 및 상단 부분에
충분한 공간을마련하시고 또한 뒤쪽
벽으로부터 최소 2인치(5cm)의 공간을
유지하십시오.
적절한 간격을 유지해
주십시오.
뒤쪽으로
5센티
냉장냉동고의 주위에 적절한 공기의
흐름을 위해 양 측면 및 상단 부분에
충분한 공간을마련하시고 또한 뒤쪽
벽으로부터 최소 2인치(5cm)의 공간을
유지하십시오.
적절한 간격을 유지해
주십시오.
뒤쪽으로
5센티
Page 58

설치
Page 59

설치
59 60
Page 60

설치
①
②
하단 경첩
투명시트
하단 힌지
나사를 조정하여 오른쪽 높이의 홈
에 편평한(- 유형)
드라이버를 삽입하여 도어
의 수평을 조정한 다음 그것을 시
계 방향(①)으로 회전한다.
냉동실 문이 냉장실문보다 낮은 경우
냉동실문이 냉장실문보다 높은경우
나사를 조정하여 왼쪽 높이의 홈
에 편평한(- 유형)
드라이버를 삽입하여 도어의
수평을 조정한 다음 그것을 시계
방향(①) 으로 회전한다.
높이 조절
왼쪽 높이 조절 나사
간격(높이)
간격(높이)
간격(높이)
간격(높이)
오른쪽 높이 조절 나사
만약
냉동실도어와
냉장실도어의
높이가 다르면
냉동실과 냉장실문의 높이가 다를 경우
높이 조절 나사를 이용해도 높낮이가 조절이 되지 않을 경우 제품에 동봉된 투명시트를 삽입 하시기 바랍니다.
높이가 낮은 문쪽의 문을 분리 하고 (그림①)과 같이 (+)형 드라이버를 이용하여
하단 한지의 나사를 푼 다음 (그림②) 하단 한지와 하단 경첩 사이에 투명시트를
삽입한 후 나사로 고정시킨다.
높낮이가 맞춰질 때까지 투명시트를 추가 하십시오.(총4개 동봉되어 있음.)
높이조절나사를 조정하여 앞쪽의 높이를 높이면 문을 부드럽게 닫을 수 있습니
다. 문이 적절하게 닫히지 않으면, 냉장고 성능에 영향을 줄 수 있습니다.
문 높이를
조절한 후에
다음 순서
1. 냉장고를 설치하는 동안 쌓인 쓰레기를 치우고, 냉장고를 깨끗이 닦아줍니다.
2. 와인코너, 달걀 보관통 등과 같은 부속품을 제 위치에 설치합니다. 하역/설치
도중 발생할 수 있는 손상을 막기위해 함께 포장되어 있습니다.
①
②
하단 경첩
투명시트
하단 힌지
나사를 조정하여 오른쪽 높이의 홈
에 편평한(- 유형)
드라이버를 삽입하여 도어
의 수평을 조정한 다음 그것을 시
계 방향(①)으로 회전한다.
냉동실 문이 냉장실문보다 낮은 경우
냉동실문이 냉장실문보다 높은경우
나사를 조정하여 왼쪽 높이의 홈
에 편평한(- 유형)
드라이버를 삽입하여 도어의
수평을 조정한 다음 그것을 시계
방향(①) 으로 회전한다.
높이 조절
왼쪽 높이 조절 나사
간격(높이)
간격(높이)
간격(높이)
간격(높이)
오른쪽 높이 조절 나사
냉동실과 냉장실문의 높이가 다를 경우
높이 조절 나사를 이용해도 높낮이가 조절이 되지 않을 경우 제품에 동봉된 투명시트를 삽입 하시기 바랍니다.
높이가 낮은 문쪽의 문을 분리 하고 (그림①)과 같이 (+)형 드라이버를 이용하여
하단 한지의 나사를 푼 다음 (그림②) 하단 한지와 하단 경첩 사이에 투명시트를
삽입한 후 나사로 고정시킨다.
높낮이가 맞춰질 때까지 투명시트를 추가 하십시오.(총4개 동봉되어 있음.)
높이조절나사를 조정하여 앞쪽의 높이를 높이면 문을 부드럽게 닫을 수 있습니
다. 문이 적절하게 닫히지 않으면, 냉장고 성능에 영향을 줄 수 있습니다.
1. 냉장고를 설치하는 동안 쌓인 쓰레기를 치우고, 냉장고를 깨끗이 닦아줍니다.
2. 와인코너, 달걀 보관통 등과 같은 부속품을 제 위치에 설치합니다. 하역/설치
도중 발생할 수 있는 손상을 막기위해 함께 포장되어 있습니다.
3. 전원 코드(또는 플러그)를 콘센트에 꽂습니다. 다른 전기제품을 같은 콘센트
에 꽂지 마십시오.
Page 61

61
작동
시작
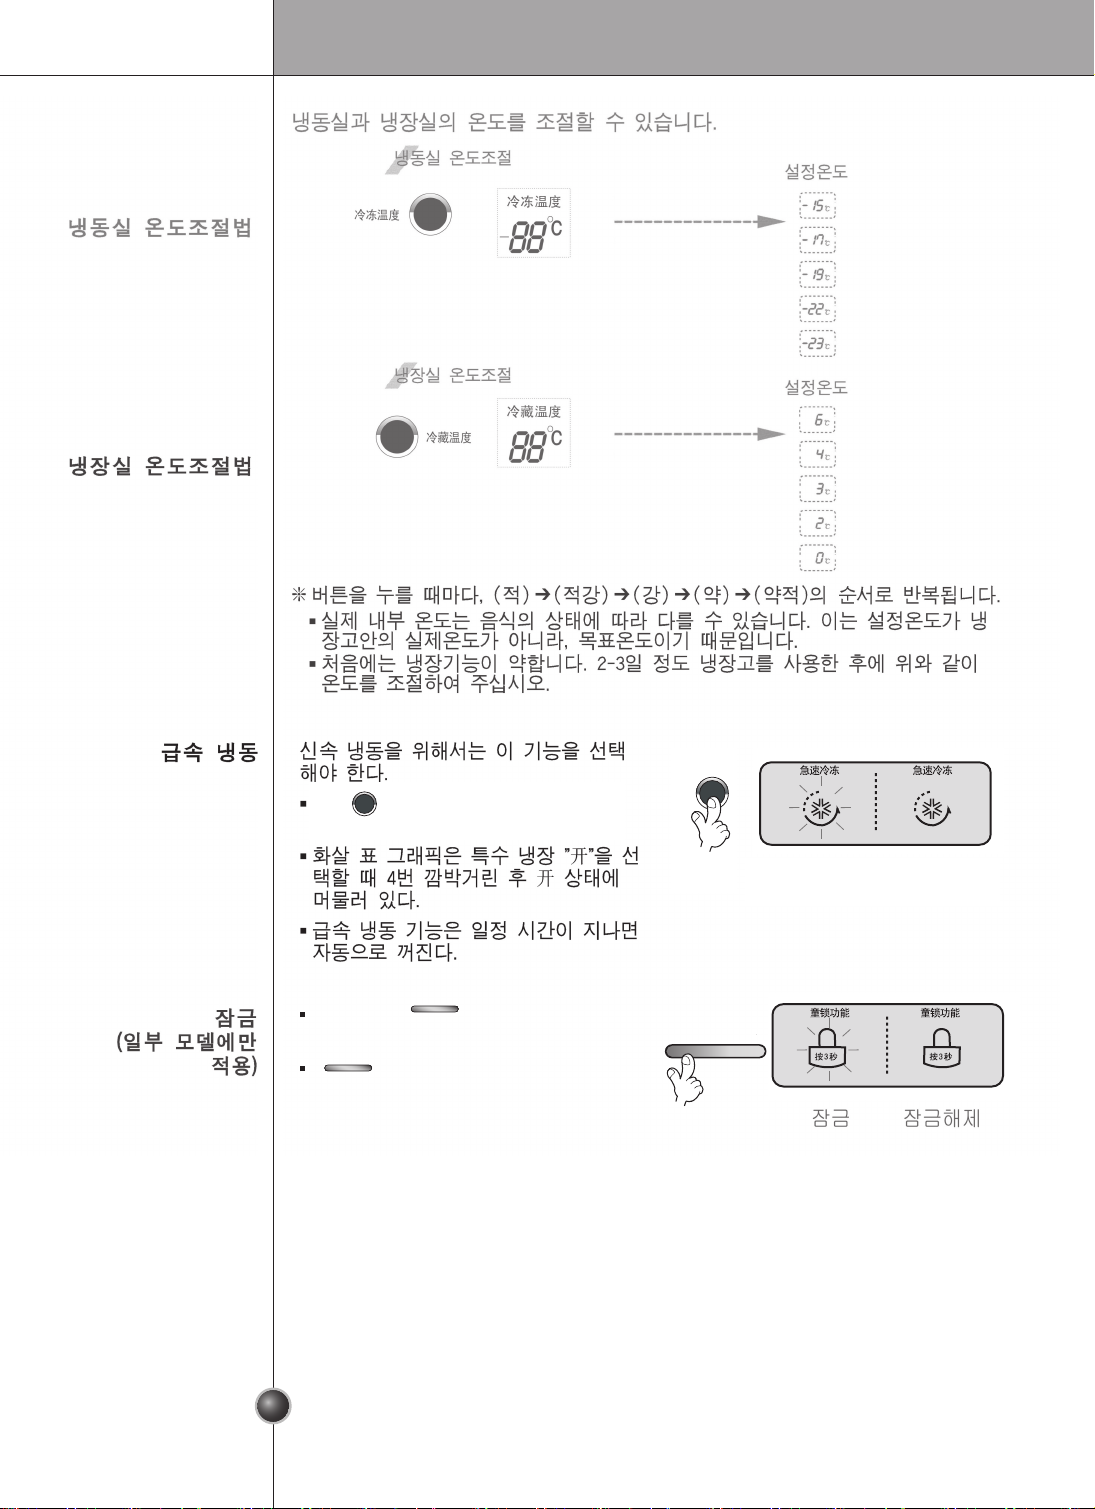
온도 및 기능 조정
냉장고를 먼저 설치했을 때는 신선하거나 냉각된 식품으로 채우기 전에 정상 동
작 온도를 2-3시간동안 안정시킨다. 동작이 중단되면 다시 시작하기 전에 몇 분
을 기다린다.
长按3秒
时效(月)
홈바
(일부 모델의 경우에만
적용)
물/얼음 출력
디스펜서 푸시 스위치
디스펜서 램프
(기능 표시 기판의 천정 바닥)
급속 냉동 버튼
냉동실온도조절버튼
냉장실온도조절버튼
필터재설정버튼
/
램프
기능 화면
디스펜서 버튼
잠금/해제 버튼
长按3秒
时效(月)
Page 62
작동
3초 이상 버튼을 누를 때마다,
잠금이나 해제가 반복됩니다.
버튼을 사용하면, 해제할 때가
지는 다른 버튼을 사용할 수 없습니다.
饮水机
童锁功能
按3秒
饮水机
童锁功能
按3秒
饮水机
童锁功能
按3秒
열림 닫힘
急速冷冻
을 누를 때마다, “켜짐”과
“꺼짐”이 반복됩니다.
急速冷冻
3초 이상 버튼을 누를 때마다,
잠금이나 해제가 반복됩니다.
버튼을 사용하면, 해제할 때가
지는 다른 버튼을 사용할 수 없습니다.
饮水机
童锁功能
按3秒
饮水机
童锁功能
按3秒
饮水机
童锁功能
按3秒
열림 닫힘
急速冷冻
을 누를 때마다, “켜짐”과
“꺼짐”이 반복됩니다.
急速冷冻
Page 63

작동
물 또는 얼음을 선택할 수 있다.
원하는 바에 따라 디스펜서 버튼을 눌
러 물, 조각 얼음 및 각 얼음을 선택한다.
컵을 찾아서 가볍게 눌러 푸시(PUSH) 버
튼을 누른다.
경계선 라인은 선택한 기능에 맞게 표시
된다.
얼음을 꺼낸 후 5초가 지나면 "탁!" 소리
가 난다. 얼음 출구가 닫히는 듯한 소리
가 난다.
참조: 얼음이나 물을 꺼낸 후 누름 스위치를 활용해
서 컵을 꺼낼 때 최종 얼음 조직 또는 물 방
울을 제거하려면 2-3초 기다려야 한다.
누름 스위치
饮水机
童锁功能
按3秒
冷冻温度
照明/过滤
冷藏温度
急速冷冻
饮水机
童锁功能
按3秒
冷藏温度冷冻温度
童锁功能
急速冷冻
照明灯
过滤状态
饮水机
长按3秒
时效(月)
디스펜서
사용 선택
본 얼음제조기는 언제든지 자동적으로 8개의 얼음조각을 제조할 수 있으며 하루
에 대략 80개 가량을 제조할 수 있습니다. 그러나 이러한 제조량은 특정 상황, 예
를 들면, 냉장고 문이 열려있는 시간의 경과 정도에 따라 변할 수 있습니다.
얼음 저장통이 꽉찼을 때에는 얼음제조가 자동적으로 중단됩니다.
자동 얼음제조 기능 사용을 선택하지 않았다면, 얼음제조 선택 스위치를 다시 Off
위치로 놓고, 자동얼음제조기능 재사용 선택시에는 이 스위치를 On 위치로 놓아
주세요. 수동 선택 기능은 일부 모델에만 적용됩니다.
자동 제빙기
얼음이 서로 뭉쳐 있다.
얼음이 서로 뭉쳐 있을 때 얼음 덩어리를 얼음 저장 통에서 꺼낸 다음 그것들을
작은 조각으로 부순 다음 얼음 저장 톤에 다시 집어 넣는다.
얼음 제빙기가 너무 작은 얼음을 만들거나 서로 뭉칠 경우에는 제빙기에 공급되
는 물의 양을 조정해야 한다. 서비스 센터에 문의한다.
얼음을 자주 사용하지 않을 경우 서로 뭉칠 수도 있다.
정전
얼음은 냉동실에 떨어질 수도 있다. 얼음 저장 통을 꺼낸 다음 모든 얼음을 버린
다음 그것을 건조한 다음 다시 집어 넣는다. 기계 전원을 다시 켠 후 부서진 얼
음은 자동으로 선택된다.
기기가 새로 설치될 때
새로 설치된 냉동기가 냉동실에서 얼음을 만드는 데 약 12 시간이 걸린다.
제빙기가 부드
럽게 작동하지
않을 때
만들어진 얼음이 얼음 저장통으로 떨어질 때 보통 소음이 난다.
주의
물 또는 얼음을 선택할 수 있다.
원하는 바에 따라 디스펜서 버튼을 눌
러 물, 조각 얼음 및 각 얼음을 선택한다.
컵을 찾아서 가볍게 눌러 푸시(PUSH) 버
튼을 누른다.
경계선 라인은 선택한 기능에 맞게 표시
된다.
얼음을 꺼낸 후 5초가 지나면 "탁!" 소리
가 난다. 얼음 출구가 닫히는 듯한 소리
가 난다.
참조: 얼음이나 물을 꺼낸 후 누름 스위치를 활용해
서 컵을 꺼낼 때 최종 얼음 조직 또는 물 방
울을 제거하려면 2-3초 기다려야 한다.
누름 스위치
饮水机
童锁功能
按3秒
冷冻温度
照明/过滤
冷藏温度
急速冷冻
饮水机
童锁功能
按3秒
冷藏温度冷冻温度
童锁功能
急速冷冻
照明灯
过滤状态
饮水机
长按3秒
时效(月)
본 얼음제조기는 언제든지 자동적으로 8개의 얼음조각을 제조할 수 있으며 하루
에 대략 80개 가량을 제조할 수 있습니다. 그러나 이러한 제조량은 특정 상황, 예
를 들면, 냉장고 문이 열려있는 시간의 경과 정도에 따라 변할 수 있습니다.
얼음 저장통이 꽉찼을 때에는 얼음제조가 자동적으로 중단됩니다.
자동 얼음제조 기능 사용을 선택하지 않았다면, 얼음제조 선택 스위치를 다시 Off
위치로 놓고, 자동얼음제조기능 재사용 선택시에는 이 스위치를 On 위치로 놓아
주세요. 수동 선택 기능은 일부 모델에만 적용됩니다.
얼음이 서로 뭉쳐 있다.
얼음이 서로 뭉쳐 있을 때 얼음 덩어리를 얼음 저장 통에서 꺼낸 다음 그것들을
작은 조각으로 부순 다음 얼음 저장 톤에 다시 집어 넣는다.
얼음 제빙기가 너무 작은 얼음을 만들거나 서로 뭉칠 경우에는 제빙기에 공급되
는 물의 양을 조정해야 한다. 서비스 센터에 문의한다.
얼음을 자주 사용하지 않을 경우 서로 뭉칠 수도 있다.
정전
얼음은 냉동실에 떨어질 수도 있다. 얼음 저장 통을 꺼낸 다음 모든 얼음을 버린
다음 그것을 건조한 다음 다시 집어 넣는다. 기계 전원을 다시 켠 후 부서진 얼
음은 자동으로 선택된다.
기기가 새로 설치될 때
새로 설치된 냉동기가 냉동실에서 얼음을 만드는 데 약 12 시간이 걸린다.
만들어진 얼음이 얼음 저장통으로 떨어질 때 보통 소음이 난다.
주의
63 64
饮水机
童锁功能
按3秒
Page 64

작동
冷冻温度
照明/过滤
冷藏温度
急速冷冻
饮水机
童锁功能按3秒
冷藏温度冷冻温度
童锁功能
急速冷冻
照明灯
过滤状态
饮水机
长按3秒
时效(月)
冷冻温度
照明/过滤
冷藏温度
急速冷冻
饮水机
童锁功能按3秒
冷藏温度冷冻温度
童锁功能
急速冷冻
照明灯
过滤状态
饮水机
长按3秒
时效(月)
冷冻温度
照明/过滤
冷藏温度
急速冷冻
饮水机
童锁功能按3秒
冷藏温度冷冻温度
童锁功能
急速冷冻
照明灯
过滤状态
饮水机
长按3秒
时效(月)
饮水机
饮水机饮水机
童锁功能
按3秒
童锁功能
按3秒
童锁功能
按3秒
Page 65
65
필터 조건
(필터 교체주기)
디스플레이
기능
주의
重置??器
按住3秒?
냉동실 도어
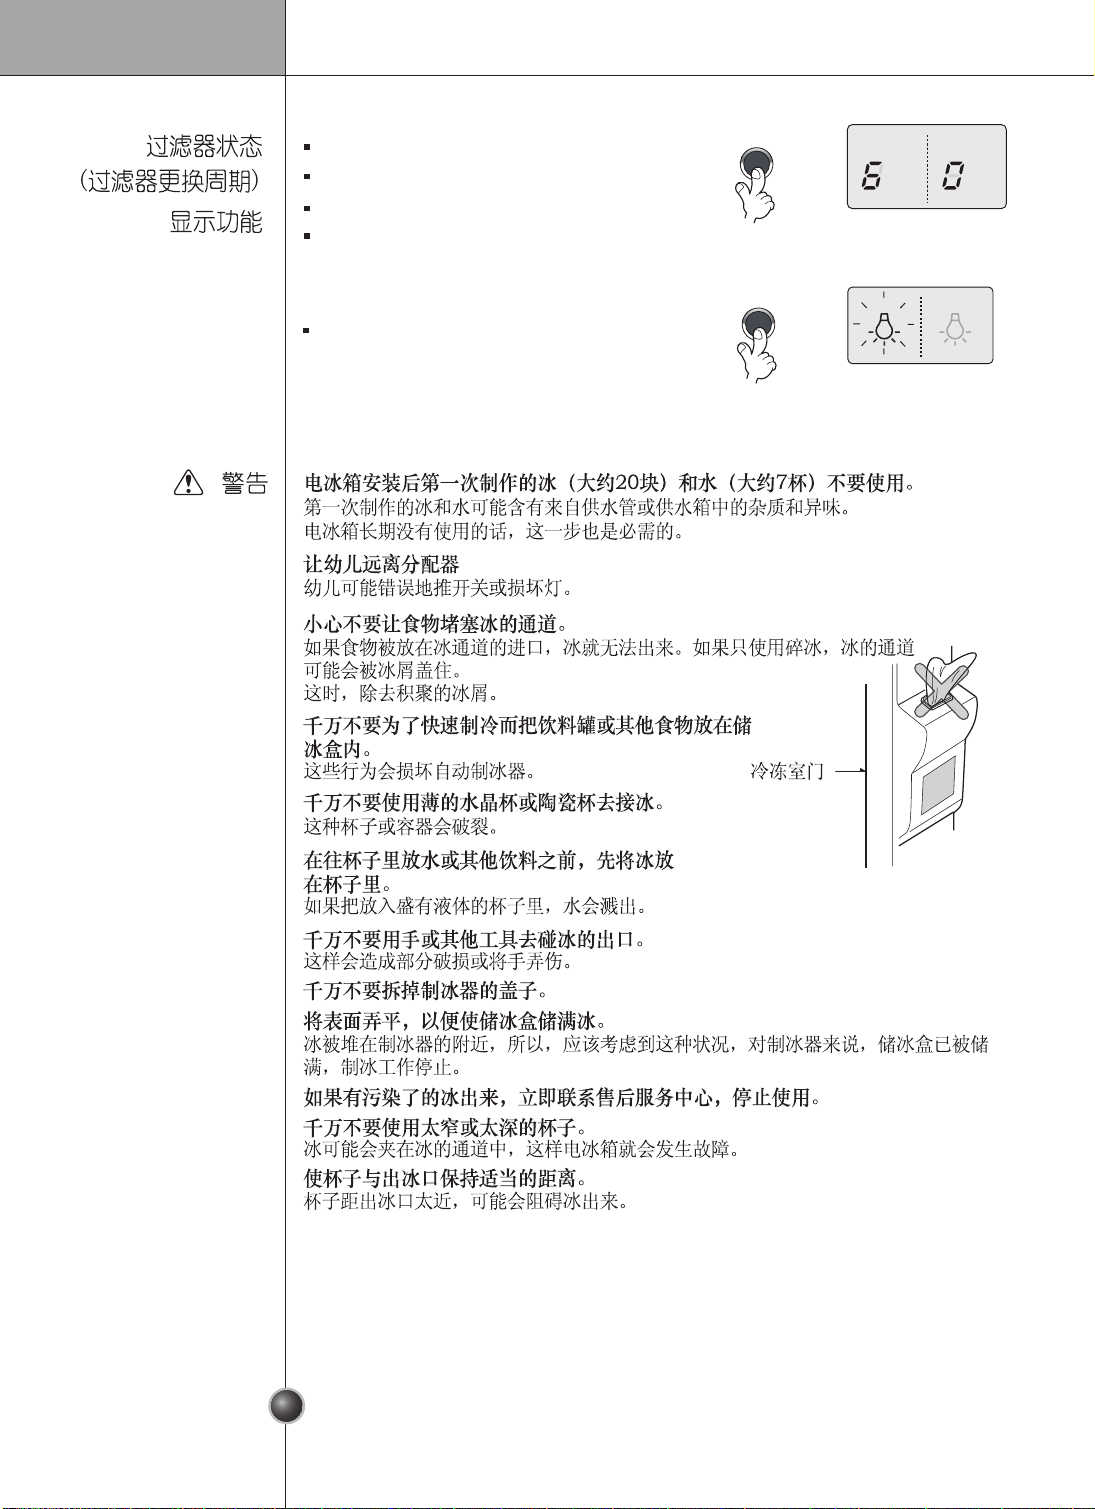
냉장고 설치 후 처음 만들어진 얼음(약 20개)과 물(약 7잔)을 쏟아 버린다.
처음 얼음과 물은 급수관 또는 급수 박스로부터의 입자 또는 냄새를 포함하는 수
가 있다.
어린이들을 디스펜서에서 멀리 떨어지게 한다.
어린이들은 상태가 좋지 못하거나 손상된 램프를 부정확하게 누를 수도 있다.
식품이 얼음 통과를 막지 않도록 주의해야 한
다.
식품이 얼음 통과 입구에 놓이면 얼음이 공급
되지 않을 수도 있다. 또한 얼음 통과는 스프
린터 얼음만 사용될 경우 얼음 분말로 덮힐
수도 있다. 이 경우 쌓여 있는 얼음 분말을 치
워야 한다.
급속 냉각을 위해서는 음료수 통 또는 기타
식품을 얼음 저장 통에 저장해서는 안 된다.
이러한 행동은 자동 제빙기를 손상시킬 수도
있다.
얼음을 모으기 위해 얇은 크리스탈 유리 또는 크로커리를 사용해서는 안 된다.
이러한 유리잔 또는 용기가 부숴질 수도 있다.
물 또는 기타 음료수를 채우기 전에 얼음을 먼저 유리잔에 집어 넣는다.
유리잔에 있는 액체에 얼음에 추가될 경우 물이 뿌려질 수도 있다.
얼음 배출구에 손이나 기타 도구를 대서는 안 된다.
손을 대면 부품 파손 또는 손 부상이 발생할 수 있다.
제빙기 덮개를 제거해서는 안 된다.
얼음 저장 통이 얼음으로 가득차도록 가끔씩 표면의 수평을 유지한다.
얼음이 제빙기 근처에만 쌓인다. 그러므로 얼음 저장 통이 가득 채워지고 제빙 동
작이 중단되므로 제빙기를 사용하여 이러한 상태를 고려해야 한다.
변색된 얼음이 공급되면 사용을 중단하고 즉시 서비스 센터에 연락해야 한다.
너무 좁거나 깊은 유리잔을 사용해서는 안 된다.
얼음이 얼음 통로에 걸리므로 냉장고가 고장이 날 수 있다.
유리잔을 얼음 배출구에서 적당한 거리에 둔다.
유리잔을 배출구에 너무 가깝게 두면 얼음이 빠져 나오는 것을 방해할 수 있다.
디스펜서의 정수필터카트리지를 교체를 알려
주는 지시기가 있습니다.
정수필터는 6개월 마다 교체되어야 합니다.
필터등이 들어와 필터교체시기임을 알려줍니
다.
필터를 교체한후, 필터버튼을 3초이상 눌러서
지시기를 재설정합니다.
过滤状态
长按3秒
时效(月)
过滤状态
长按3秒
时效(月)
照明/过滤
照明/过滤
照明灯
照明灯
열림 닫힘
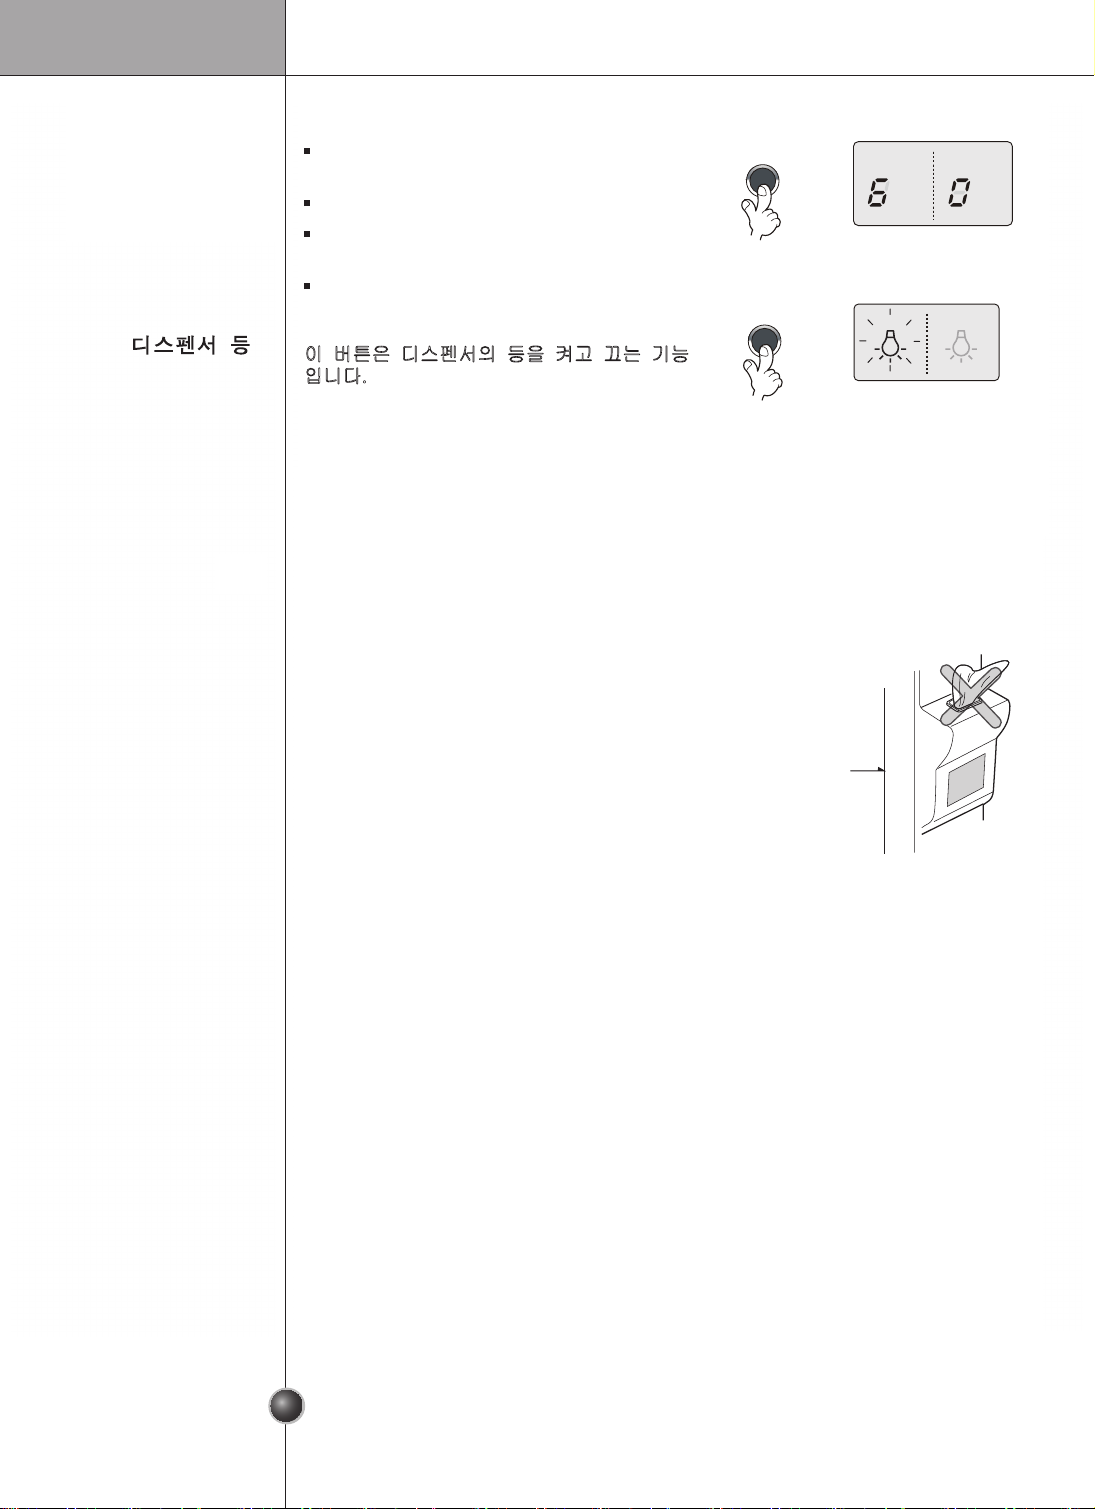
이 버튼은 디스펜서의 등을 켜고 끄는 기능
입니다.
작동
Page 66

작동
Page 67

67 68
작동
Page 68

68
HIGH LOW
HUMIDITY CONTROL
HIGH LOW
HUMIDITY CONTROL
•
작동
Page 69

Page 70

음식보관을 위한 제안
70
Page 71

71
음식보관을 위한 제안
Page 72

Page 73

73
유지보수
2
1
Page 74

유지보수
74
Page 75

75
유지보수
Page 76

유지보수
76
Page 77

77
유지보수
Page 78

유지보수
78
Page 79

(A)
유지보수
79
41dB(A)
Page 80

Page 81
P/NO : MFL30134910
泰州乐金电子冷机有限公司
TAIZHOU LG ELECTRONICS REFRIGERATION CO.,LTD
江苏省泰州市迎宾路2号
http://www.lge.com.cn
 Loading...