

Page 1
Installation
Hardware Installation
NOTES
• Please pay attention to handling Electrostatic
Sensitive Devices, you may use anti-static
products such as wrist straps, heel straps,
mats to protect your body from electrostatic.
• Make sure you have a personal computer with
one or two open USB ports before connecting
the drive to your computer.
• Power for all other devices should be turn off
before attaching the cables.
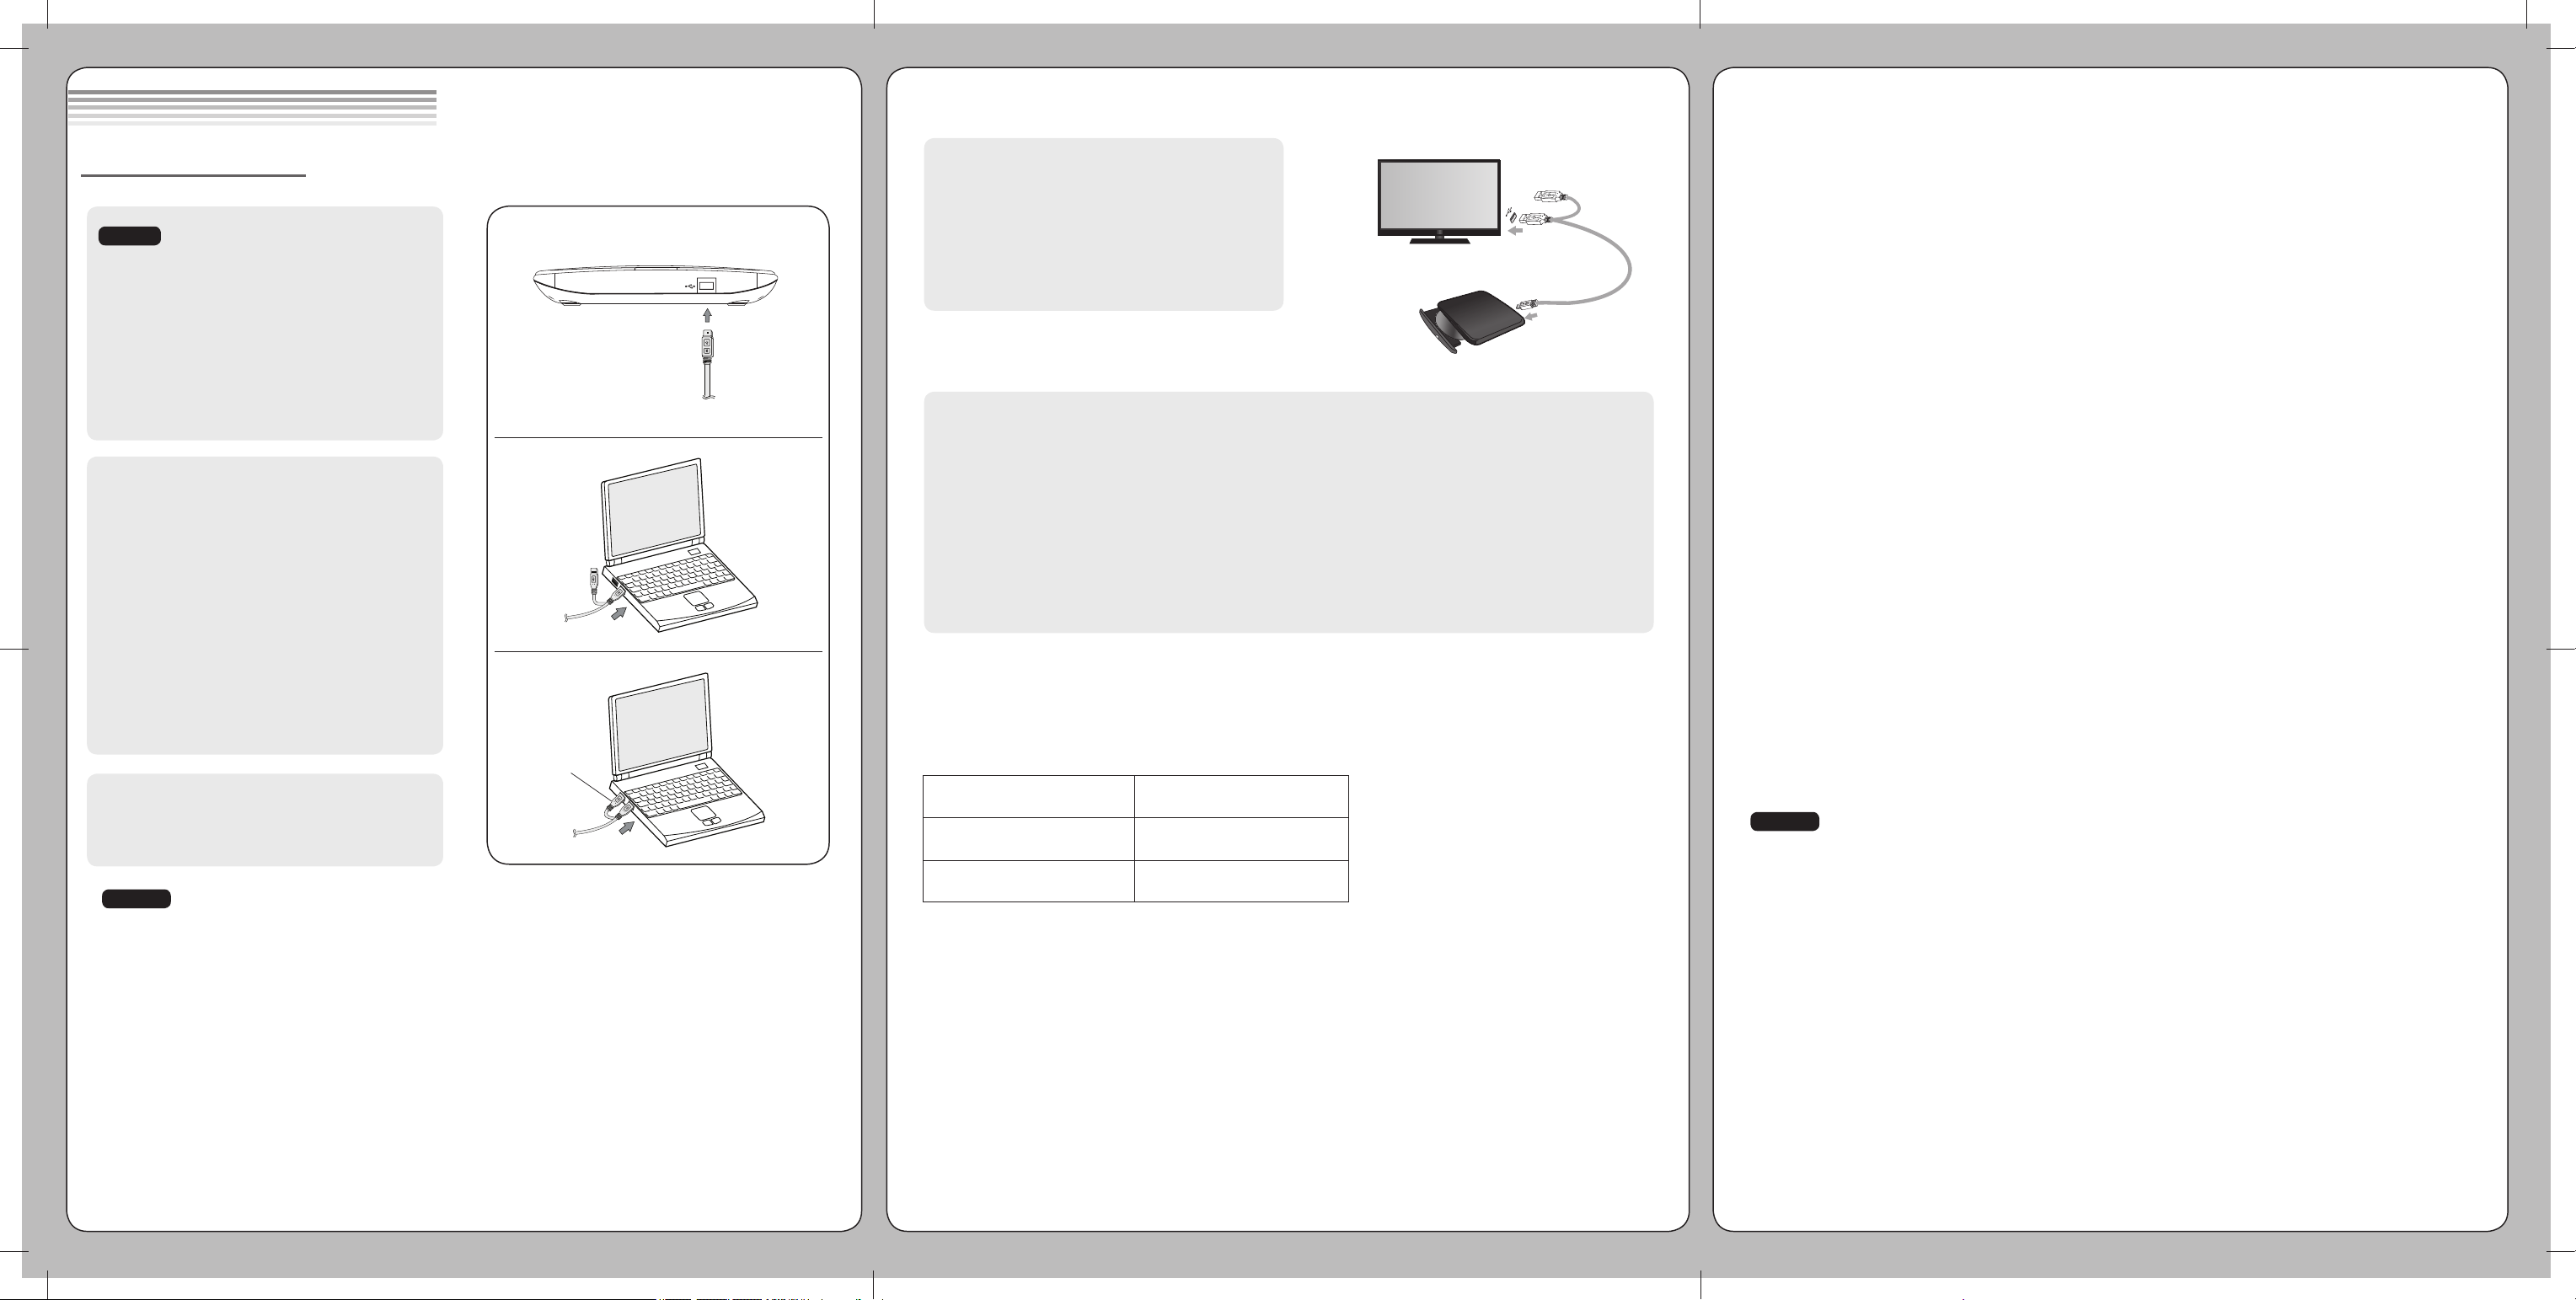
Connecting to computer
Connect the drive to the computer as shown in
figure.
1 Connect the USB 2.0 (Y type) cable to
the drive.
2 Connect the other end of the USB 2.0
cable to your computer.
3 The drive may get its power from the
PC USB power. All systems may not
meet USB power requirements and full
performance may not be achieved.
In this case, connect to the USB power
cable.
When the computer is ready, confirm that the
drive is detected. And then, insert the supplied
software CD into the drive and install the
software.
NOTES
• Please do not connect the USB cables by any means other than specified above.
Using the wrong type of cable with this drive can cause it to malfunction.
• The appliance is not intended for use by young children or infirm persons without supervision.
Young Children should be supervised to ensure that they do not play with appliance.
• If the appliance is supplied from a cord extension set or an electrical portable outlet device, the cord
extension set on electrical portable outlet device must be positioned so that it is not subject to splashing
or ingress of moisture.
1
2
3
USB Power cable
What is TV Connectivity?
TV Connectivity is a function that allows you to
enjoy videos, pictures and music by connecting
this product to a compatible A/V device (e.g.
DIGITAL TV, DIGITAL PHOTO FRAME, PC)
that supports USB connectivity.
How to Use TV Connectivity
* This product is defaulted to ODD mode when it is powered on.
A With the tray open, press and hold the ‘Open/Close’ button for 2 seconds.
(The LED indicator will turn on, switching to TV mode. Press and hold the button again
for 2 seconds with the tray open to return to ODD mode).
B Insert your supported media into the drive.
The disc file system will be converted to FAT32 and will be recognized as USB flash memory.
C Select and play the files from your A/V device to enjoy videos, pictures and music.
Refer to your owner’s manual for more information.
TV Connectivity Specifications
# of files that can be used
(Short Filenames)
Time for Converting to FAT32
on TV Mode(per 1G byte)
Supported File System
About 500 files/13 Characters
Standard.
15 Sec/1GB
ISO,
UDF(1.02/1.5/2.0/2.01/2.5)
Troubleshooting
• I cannot find the files in my disc’s directory.
1. In TV mode, this product supports only about 500 files with filenames fewer than 13 characters.
2. Files larger than 4GB will not be recognized.
The maximum numbers of files and directories that can be displayed may be limited by the file
name’s length, the numbers of files and directories.
• It takes too long to recognize my files when I insert a disc in TV mode.
1. This function requires converting the ISO/UDF file system typical for disc media to FAT32 which is
widely used in PCs. Therefore, it could take extra time to recognize your disc (it takes approximately
15 seconds per 1GB after inserting disc).
• If I insert a disc while in TV mode, the disc is not recognized.
1. This product is powered via USB from an A/V device. If the power of the A/V device is not sufficient
(less than 1.4A), it may not operate properly.
• After connecting to a TV, my videos/pictures/music cannot be played on their own.
1. This product is not designed to play media files on its own. The TV Connectivity function simply
allows you to connect an external Optical Disc Drive to a TV via a USB cable. Please refer to your
television’s owner’s manual to check whether video/pictures/music can be played on your TV.
You will also need to check whether your TV supports the files’ codec.
2. Televisions generally do not have a decoder to play DVD titles, so you cannot play DVD titles using
the TV connectivity function. Please use your PC or DVD player to play DVD titles.
3. Video/Audio CDs cannot be played through this function, as their media structure is different.
Use your PC or other players to play video CD and audio CD.
4. Damaged files may not be played, and there may be some restrictions in some functions during
playback.
5. Videos with a resolution higher than that of your TV may not be displayed properly.
Refer to your owner’s manual or the manufacturer’s website for a list of supported resolutions.
• Does this function allow me to write onto a writeable disc?
1. Our TV Connectivity function is Read-Only and therefore you cannot write.
NOTES
• Normal operation is not guaranteed if you use a USB hub or unspecified USB extension cables.
• Due to compatibility issue of some AV devices and disc, may not work.
Page 2
Quick Set-up Guide
Slim Portable DVD Writer
To install of your product, please read this guide manual carefully and completely.
Features
• Universal Serial Bus (USB) 2.0 interface for high-speed data transfer.
• Buffer Under Run error protection technology
• Emergency eject support
• Combination of CD-R/RW, DVD-R/RW, DVD+R/RW, DVD+R DL,
DVD-R DL, M-Disc (DVD+R SL) and DVD-RAM drive functions into one
drive.
• Supports region playback control Phase II.
• PC USB powered, no AC adapter needed.
Package Items
Item Quantity
- Slim Portable DVD Writer 1
- USB 2.0 cable (Y type) 1
- Software Installation disc 1
- Quick Guide for Drive 1
Cautions
System meeting the following requirements is needed in order to use
USB 2.0 operation with this drive.
• Computer that is equipped with a USB 2.0 – compliant USB
connector or PCI adapter card, and on which the USB 2.0 EHCI
(Enhanced Host Controller Interface) driver software 1) has been
installed.
1)
The USB 2.0 EHCI driver software is supplied with currently available PCI adapter cards that conform to USB 2.0. Further, Microsoft
has released the USB 2.0 EHCI driver software for Windows XP,
therefore it is also possible to use this driver
software with Windows XP SP2.
If you want to know in detail, please contact your USB 2.0
adapter dealer or consult your PC manufacturer, or consult the
Microsoft Corporation Web site.
System Environment
Computer
This unit can be operated in the system environment explained here.
System
requirements
Hard disk
Video Memory
Interface
CD-ROM drive
Software Required
OS
CD-R, CD-RW,
DVD-R, DVD-RW,
DVD+R, DVD+RW,
DVD-RAM,
DVD±R DL discs
* For Windows 7/ Windows Vista, 1 GB of RAM or large is recommended.
* Compatibility problem in write/read function may occur with some media
depending on the media manufacturing quality.
* To achieve maximum Record & Write speed your system may require
data to be copied first to the computer’s hard drive rather than directly
from another source disc or drive.
*
Please visit http://www.m-disc.com to learn more about the M-DISCTM.
Pentium IV 2.4 GHz or Higher(with USB 2.0) for
CPU
basic performance (Recommended for optimal
performance:
Pentium IV 3.2 GHz or Higher).
Memory
256 MB or larger (Recommended: 512 MB).
20 GB or more free space. (The free space needed
for writing depends on the quantity of data.)
64 MB (Recommended: 128 MB).
USB 2.0 port
For Software installation
Windows 7/Windows Vista (32 bit, 64 bit)/
Windows XP SP2, Mac OS X v.10.5.4 or Higher,
Direct X 9.0 or Higher
CD-R : LG, Mitsubishi Kagaku Media, Verbatim,
That’s, TDK, Ritek or HP discs are recommended.
CD-RW : LG, Mitsubishi Kagaku Media, Verbatim
are recommended.
DVD-R : Mitsubishi Kagaku Media, Maxell, That’s
are recommended.
DVD-RW : Victor. JVC, Mitsubishi Kagaku Media,
TDK are recommended.
DVD+R : Mitsubishi Kagaku Media, That’s, Maxell
are recommended.
DVD+RW : TDK, Mitsubishi Kagaku Media, Ricoh
are recommended.
DVD-RAM :
recommended.
M-Disc (DVD+R SL): Millenniata
DVD±R DL : Mitsubishi Kagaku Media, Verbatim
are recommended.
GP40
Maxell, Mitsubishi Kagaku Media are
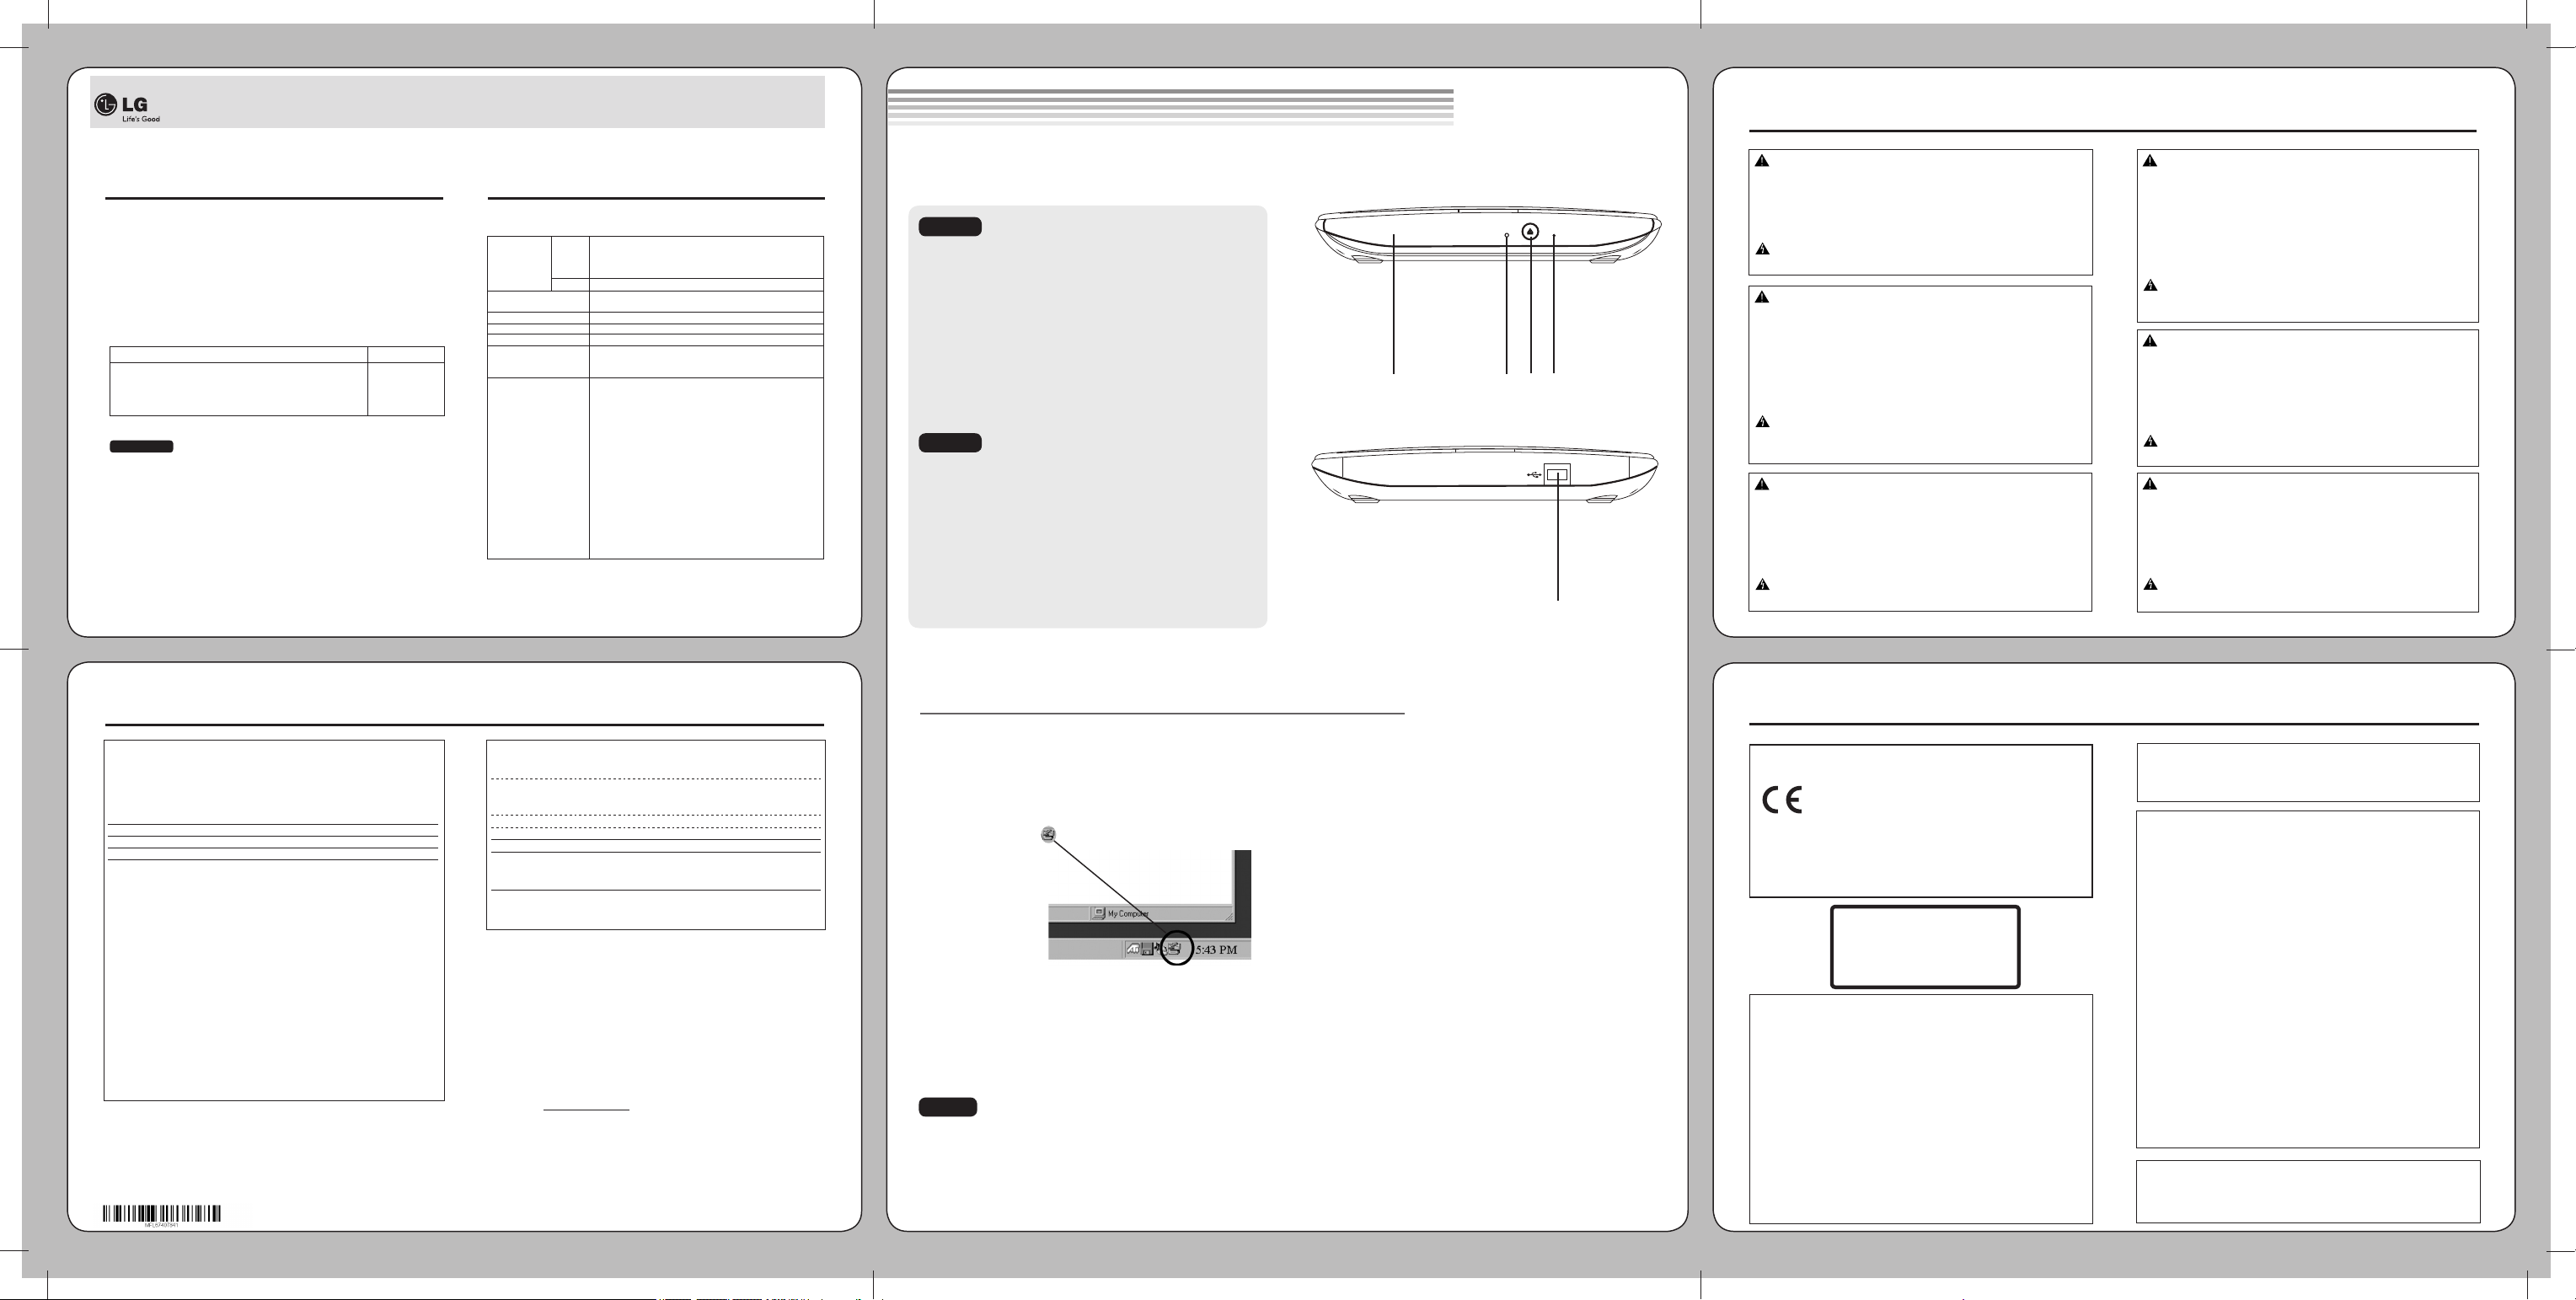
Location and function of controls
This following is the general figure of the design of the drive.
The drive’s appearance and specifications may change without prior notice.
Front
1. Disc Tray
2. Drive activity indicator
The LED is used to indicate the operation of
drive.
3. Eject Button
4. Emergency Eject Hole
1
Rear
1. USB Connector (mini)
This connector is used to connect to the USB
2.0 cable.
2 3 4
Safety Instructions
CAUTION: The laser used in the Writer can damage your eyes.
Do not attempt to open the cover. To reduce the risk of electric shock,
do not remove the cover (or back).
There are no user-serviceable parts inside. Refer servicing to qualified
service personnel. Use of controls or performance of procedures other
than those specified herein may result in hazardous radiation
exposure.
WARNING: To reduce the risk of fire or electric shock, do not expose
this appliance to rain or moisture.
VORSICHT : Der in diesem Laufwerk benutzte Laser kann Ihre Augen
schädigen. Versuchen Sie keinesfalls, die Abdeckung zu öffnen.
Um die Gefahr eines elektrischen Schocks zu reduzieren, sollten Sie
die Abdeckung (oder Rückseite) keinesfalls
entfernen. Im Inneren des Geräts befinden sich keine Teile, die vom
Benutzer selbst gewartet werden können. Überlassen Sie die Wartung
qualifizierten Kundendiensttechnikern. Beachten Sie bei der
Benutzung von Bedienelementen und der Durchführung von
Prozeduren unbedingt die Anweisungen dieses Handbuchs, da
andernfalls gefährliche Strahlung freigesetzt werden kann.
WARNUNG : Setzen Sie das Laufwerk keinesfalls Regen oder
Feuchtigkeit aus, um die Gefahr eines Brandes oder elektrischen
Schocks zu reduzieren.
ATTENTION: l'exposition au laser utilisé dans le graveur présente un
danger pour les yeux. N'essayez pas d'ouvrir le capot.
Afin de réduire les risques de chocs électriques, ne retirez pas le capot
(ni l'arrière du dispositif). Aucune pièce interne ne peut être remplacée
par l'utilisateur. Pour la maintenance de l'appareil, adressez-vous au
personnel qualifié du service de maintenance. L'utilisation de
commandes ou de procédures différentes de celles spécifiées ci-après
peut entraîner une exposition à des rayons dangereux.
AVERTISSEMENT :Ne pas exposer ce matériel à la pluie ou à
l’humidité (risques d’incendie et d’électrocution).
1
PERICOLO : Il dispositivo di lettura e scrittura utilizzato in questo
masterizzatore utilizza un raggio laser che, se osservato da vicino,
può danneggiare la vista. Evitare di smontare il coperchio
dell’apparecchio. Al fine di prevenire eventuali folgorazioni, evitare di
smontare l’apparecchio. All’interno dell’apparecchio non sono presenti
parti che richiedono manutenzione da parte dell’utente. In caso di
difetti o guasti, rivolgersi ad un Centro di Assistenza Tecnica.
L’esecuzione di procedure diverse da quella espressamente indicate
in questo manuale può provocare pericolose esposizioni alle
radiazioni laser.
ATTENZIONE: Al fine di evitare cortocircuiti o principi di incendio,
evitare di esporre questo apparecchio alla pioggia o ad una
eccessiva umidità ambientale.
PRECAUCION: El láser utilizado en la unidad puede dañar sus ojos.
No intente abrir la tapa. Para reducir el riesgo de descarga eléctrica,
no quite la tapa (ni la parte posterior).
No hay piezas internas que deba mantener el usuario.
El servicio de mantenimiento debe efectuarlo personal técnico cualificado. El uso de controles o la ejecución de procedimientos distintos de
los especificados en este manual pueden ser causa de exposición a
radiación peligrosa.
ADVERTENCIA: Para reducir el riesgo de fuego o descarga
eléctrica, no exponga este aparato a la lluvia ni a la humedad.
CUIDADO:
Não tente abrir a tampa. Para reduzir o risco de choques eléctricos,
não retire a tampa (quer frontal quer superior ).
A unidade não contém peças que possam ser reparadas pelo utilizador.
Deixe a manutenção para um técnico da assistência qualificado.
A utilização de controlos ou a execução de procedimentos que não
sejam os especificados neste manual podem causar a exposição a
radiações perigosas.
AVISO: Para reduzir o risco de incêndio ou choque elétrico não
exponha este aparelho á chuva ou humidade.
O laser utilizado na unidade pode causar lesões oculares.
Specifications
Supported Discs
Dimensions (WxHxD) 157 x 25 x 146 (mm)
Weight About 265 g
Interface USB 2.0
Read/Write Speed
Write : (DVD-R): 2x, 4x, 8x
Read : (DVD-R/RW/ROM): 8x/8x/8x max.
❋
The drive’s appearance and specifications may change without prior notice.
- The maximum data transfer rate varies according to the performance
capabilities of the PC.
- For the sake of periodic improvements, specifications and appearance
are subject to change without notice.
-
We have taken all possible measures to assure the quality of our products,
but we cannot be responsible for the consequences if defect occurs.
DVD-ROM(Single/Dual), DVD-RW, DVD-R,
DVD+RW, DVD+R, DVD+R Double layer, DVD-R
Dual layer, DVD- RAM, M-Disc (DVD+R SL),
CD-Digital Audio & CD-Extra, CD-Plus, CD-ROM,
CD-ROM XA-Ready, CD-I FMV, CD-TEXT,
CD-Bridge, CD-R, CD-RW, Photo-CD (Single &
Multi-Session), Video CD, DVD-VIDEO
(DVD-R DL): 2x, 4x, 6x
(DVD-RW): 2x, 4x, 6x
(DVD-RAM): 2x, 3x, 5x (Ver. 2.2 & higher)
M-Disc (DVD+R SL): 4x
(DVD+R): 2.4x, 4x, 8x
(DVD+R DL): 2.4x, 4x, 6x
(DVD+RW): 2.4x, 3.3x, 4x, 8x
(CD-R): 10x, 16x, 24x
(CD-RW): 4x, 10x, 16x, 24x
(DVD-R DL): 8x max.
(DVD-RAM) (Ver.2.2 & Higher): 5x max.
M-Disc (DVD+R SL): 8x max.
(DVD-Video) (CSS Compliant Disc): 4x max.
(DVD+R/+RW): 8x/8x max.
(DVD+R DL): 8x max.
(CD-R/RW/ROM): 24x/24x/24x max.
(CD-DA (DAE)): 24x max.
Data transfer rate
Sustained CD-ROM : 3,600 kB/s (24x max)
DVD-ROM : 11.08 MB/s (8x max)
Average Access CD-ROM : 139 ms (Typical)
Time (1/3 Stroke) DVD-ROM : 167 ms (Typical)
DVD-RAM : 203 ms (Typical)
Buffer capacity 1.0 MB
MTBF 60,000 Power On Hours (Duty Cycle 10 %)
Power Requirement 5 V DC
Operating Environment
Temperature 5 °C to 40 °C
Humidity 15 % to 85 %
Storage Environment
Temperature -30 °C to 60 °C
Humidity 10 % to 90 % RH
Software
Install the appropriate CD Recording Authoring Software before using this
unit.
* Please uninstall any previous CD burning software you may have loaded
on your PC in order to prevent possible compatibility issues.
Once you have installed the application software, you may (if you wish)
begin to reinstall previous software, taking note for errors. We recommend
using the drive with the latest software as some problems encountered
when using the drive can be solved by updating the software.
Please visit www.lgservice.com and install the program,
“LG ODD Online F/W update.” By using the program,
you can automatically check the latest information about FirmWares and
update the FirmWare.
Worldwide support ; http://www.LGservice.com
Worldwide corporate site : http://www.LG.com
Removing the USB converter cable (For Windows)
The drive supports the plug and play(not swap) function of Windows, and can be removed and inserted by
performing the following operation.
1. Stop the application software being currently used.
2. Click the icon “ ” of the taskbar located on your screen’s bottom right side.
3. Click “Safely Remove USB Mass Storage Device-Drive[x:]”.
4. Click “Ok” and then remove the USB converter cable.
NOTE
Don’t remove the USB 2.0 cable when the busy indicator on the drive blinks, or during computer startup.
The removing procedure varies depending on your OS.
EU Conformity Notice
LG Electronics hereby declares that this/these
product(s) is/are in compliance with the essential
requirements and other relevant
provisions of Directive 2004/108/EC, 2006/95/EC, and
2009/125/EC.
European representative :
LG Electronics Inc. - EU Representative
Krijgsman 1, 1186 DM Amstelveen
The Netherlands
CLASS 1 LASER PRODUCT
KLASSE 1 LASER PRODUKT
LUOKAN 1 LASER LAITE
KLASS 1 LASER APPARAT
CLASE 1 PRODUCTO LÁSER
CLASSE 1 PRODOTTO LASER
CAUTION : CLASS 3B VISIBLE AND INVISIBLE LASER RADIATION WHEN OPEN
AND INTERLOCKS DEFEATED.AVOID EXPOSURE TO THE BEAM.
ADVARSEL : KLASSE 3B SYNLIG OG USYNLIG LASERSTRÅLING I ÅBEN
TILSTAND OG VED AFBRUDT LÅSEFUNKTION. UNDGÅ AT BLIVE RAMT AF
LASERSTRÅLEN.
VARO! : LUOKKA 3B AVATTAESSA JA KUMOTTAESSA LUKITUS NÄKYVÄÄ JA
NÄKYMÄTÖNTÄ LASERSÄTEILYÄ. VÄLTÄ LASERSÄTEILLE ALTISTUMISTA.
ATTENTION : CLASSE 3B RAYONNEMENT LASER VISIBLE ET INVISIBLE EN CAS
D’OUVERTURE ET ENCLENCHEMENTS DEFECTUEUX, EVITER L'EXPOSITION
AU FAISCEAU.
VORSICHT : SICHTBARE UND UNSICHTBARE LASERSTRAHLUNG DER KLASSE
3B WENN ABDECKUNG GEÖFFNET UND SICHERHEITSVERRIEGELUNG
ÜBERBRÜCKT VERMEIDEN SIE ES, SICH DEM STRAHL AUSZUSETZEN.
ADVARSEL : KLASSE 3B SYNLIG OG USYNLIG LASERSTRÅLING NÅR ÅPNES
OG LÅS BRYTES. UNNGÅ EKSPONERING FOR STRÅLEN.
VARNING : KLASS 3B SYNLIG OCH OSYNLIG LASERSTRÅLNING FÖREKOMMER
NÄR OCH MELLANLÅSET FÖRSTÖRS. UNDVIK EXPONERING UNDER STRÅLEN.
Industry Canada requirement
This class B digital apparatus complies with Canadian ICES-003.
Cet appareil numérique de la classe B est conforme à la norme NMB-003
du Canada.
FCC COMPLIANCE STATEMENT
Note : This equipment has been tested and found to comply with the
limits for a Class B digital device, pursuant to Part 15 of the FCC
Rules.
These limits are designed to provide reasonable protection
against harmful interference in a residential installation. This
equipment generates, uses, and can radiate radio frequency
energy and, if not installed and used in accordance with the
instructions, may cause harmful interference to radio
communications. However, there is no guarantee that interference
will not occur in a particular installation.
If this equipment does cause harmful interference to radio or
television reception, which can be determined by turning the
equipment off and on, the user is encouraged to try to correct the
interference by one or more of the following measures:
- Reorient or relocate the receiving antenna.
- Increase the separation between the equipment and receiver.
- Connect the equipment into an outlet on a circuit different from that
to which the receiver is connected.
- Consult the dealer or an Authorized Service Center for help.
• FCC WARNING
Changes or modifications not expressly approved by the party
responsible for compliance could void the user’s authority to operate
the equipment.
• This product is for use only with UL listed personal computers that
have installation instructions detailing user-installation of card cage
accessory.
■ Microsoft® and Windows® are trademarks registered in the United
States and other countries by the Microsoft Corporation.
■ The company names and product names written in this manual are
trademarks or registered trademarks of the respective companies.
 Loading...