

Page 1
General Inquiries
<LG Customer Information Center>
0844-847-5847
* Make sure the number is correct before making a call.
GD91 0 User Guid e
www.lgmobile.com
MMBB0348702 (1.2) W
GD910 User Guide
E N G L I S H
Page 2

Bluetooth QD ID B015581
Page 3

GD910
User Guide - ENGLISH
Congratulations on your purchase of the advanced
and compact GD910 phone by LG, designed to
operate with the latest digital mobile communication
technology.
Some of the contents in this manual may differ from
your phone depending on your phone’s software or
your service provider.
Disposal of your old appliance
1 When this crossed-out wheeled bin symbol is attached
to a product, the product is subject to European Directive
2002/96/EC.
2 All electrical and electronic products should be disposed of
separately from the municipal waste stream at collection
facilities designated by the government or local authorities.
3 The correct disposal of your old appliances will help prevent
potential negative impacts on the environment and human
health.
4 For more detailed information about disposal of your old
appliances, please contact your city office, waste disposal
service or the shop where you purchased the product.
Page 4

2 LG GD910 | User Guide
Contents
Guidelines for safe and efficient use .............. 5
Getting to know your phone ......................... 15
Parts of the phone .............................................15
Adjusting your watch to fit your wrist ...................17
Installing the SIM card
Charging & Connecting your phone with the cradle
Connecting your phone and PC ...........................21
Your main screen ...............................................22
Get in touch with your GD910 .............................
Menu map ..................................................... 27
Calls ............................................................... 28
Making a voice or video call ...............................28
Calling your contacts ..........................................28
Answering and rejecting a call ............................29
Adjusting call volume .........................................29
In-call options ....................................................
Speed dialling ....................................................
Viewing your call logs.........................................31
Changing call settings ........................................32
Contacts ........................................................ 34
Searching for a contact ......................................34
Adding a new contact ........................................34
Creating a group ................................................35
Changing your contacts settings .........................36
Viewing information ...........................................37
........................................18
.20
23
29
31
Page 5

3
Contents
Messaging ..................................................... 38
Sending a message ...........................................38
Message folders ................................................40
Managing your messages ..................................41
Changing your text message settings ..................42
Changing your voicemail setting .........................42
Voice command ................................................43
Voice command ............................................ 44
Access ..............................................................44
Using a Voice command feature ..........................44
Voice command settings ....................................45
Utilities ........................................................... 46
My folders .........................................................46
Music ...............................................................46
Transferring music to your phone ........................47
Playing a song ...................................................47
Creating a playlist ..............................................48
Using the camera ..............................................49
Adding an event to your calendar ........................50
Adding an item to your To-Do list ........................50
Adding a memo .................................................51
Using date finder ...............................................51
Setting your alarm .............................................
Voice recorder ...................................................52
Using your calculator .........................................53
Converting a unit ...............................................53
Adding a city to your world clock ........................54
51
Page 6

4 LG GD910 | User Guide
Contents
Using the stopwatch ..........................................54
STK ..................................................................
Settings .......................................................... 55
Personalising your profiles ..................................55
Changing your screen settings ............................56
Changing your phone settings ............................56
Changing your Connectivity settings ....................58
Changing your Bluetooth settings ........................59
Pairing with another Bluetooth device..................60
Using a Bluetooth headset ..................................61
Sending and receiving files using Bluetooth .........
PC Suite ......................................................... 63
Installing the LG PC Suite on your computer ........63
Connecting your phone and PC ...........................64
Backing up and restoring your phone’s data ........64
Viewing phone files on your PC ...........................64
Synchronising your contacts ...............................
Synchronising your messages ............................
Using your phone as a mass storage device ........66
Software Update ............................................ 67
LG Mobile Phone Software .................................67
Troubleshooting ............................................. 68
Accessories ................................................... 70
Network service / Technical data ................. 71
54
61
65
65
Page 7

5
Guidelines for safe and efficient use
Please read these simple guidelines. Not following these
guidelines may be dangerous or illegal.
Exposure to radio frequency energy
This section is related to the Radio wave exposure and
Specific Absorption Rate (SAR) information: The mobile
phone model GD910 has been designed to comply with
applicable safety requirements regarding exposure to
radio waves. These requirements are based on scientific
guidelines that include safety margins designed to ensure
the safety of all persons, regardless of age and health.
• While there may be differences between the SAR levels of
various LG phone models, all LG phones are designed to
meet the relevant guidelines for exposure to radio waves.
• The SAR limit recommended by the International
Commission on Non-Ionizing Radiation Protection (ICNIRP)
is 2 W/kg, averaged over 10 g of tissue.
•
The highest SAR value for this phone model, tested by
DASY4, for use when worn on the body is 0.486 W/kg (10 g).
• SAR data for residents in countries/regions that have
adopted the SAR limit recommended by the Institute of
Electrical and Electronics Engineers (IEEE), which is 1.6
W/kg, averaged over 1 g of tissue.
Page 8
6 LG GD910 | User Guide
Guidelines for safe and efficient use
How to handle your GD910
Water resistance of the GD910
The GD910 is protected against splashing water (IPX4).
• You can wash your face while wearing the device, as it
resists incidental contact with water during normal use.
But it will not be waterproof on swimming.
• When you wash your hands, be careful not to wet the
leather strap as its lifespan can be shorten.
• Do not operate the keys if the GD910 or your hands are
wet. If the phone was exposed by water and it contains
moisture inside the screen, visit an authorized service
center for inspection and repair.
• If liquid has entered the GD910, or if the inside of the
glass is fogged and remains so for an extended period,
immediately take the GD910 to a service centre for
inspection and repair.
• If you assemble missing SIM cap cover’s water proof
gasket or with damaged part, we can not garantee
waterproof.
• If your water proof gasket has been damaged by frequent
uses of SIM cap cover, please visit an authorized service
center.
Page 9

7
Guidelines for safe and efficient use
When wearing the GD910
• Do not expose the device to high temperatures and large
amounts of moisture or dust. Device failure, deformation
and discolouration as well as burn injuries may result.
• Do not damage the cord. Electric shock, overheating or
fire may result.
• Do not touch the recharging devices or plugs with wet
hands. Electric shock may result.
• Do not spill water on the device while recharging. If water
spills on the device, immediately unplug the charger.
Electric shock, overheating, fire due to a short circuit or
product failure may result.
• The battery charger and the adapter are not waterproof.
• People with sensitive skin or in weakened physical
condition may experience rash or skin irritation when
wearing the watch. If you notice that your skin is affected,
immediately stop using it and consult a physician.
• Be careful not to injure yourself and others around you
when you are engaged in heavy physical exercise or work
with wearing the device.
Page 10
8 LG GD910 | User Guide
Guidelines for safe and efficient use
Product care and maintenance
WARNING: Only use batteries, chargers, and accessories
approved for use with this particular phone model. The use
of any other type may invalidate any certification or warranty
applying to the phone and may pose a hazard.
• Do not disassemble this unit. Take it to a qualified service
technician when repair work is required.
• Keep this unit at a distance from electrical appliances,
such as TVs, radios and computers.
• The unit should be kept at a distance from heat sources,
such as radiators and cookers.
• Do not drop the unit.
• Do not subject this unit to mechanical vibrations or
shocks.
• Turn off the phone in any area where you are required by
special regulations. For example, do not use your phone
in hospitals, as it may affect sensitive medical equipment.
• Do not handle the phone with wet hands while it is being
charged. Doing so may cause an electric shock and can
seriously damage your phone.
• Do not to charge your handset near flammable materials,
as the handset can become hot and create a fire hazard.
• Use a dry cloth to clean the exterior of the unit (do not
use solvents such as benzene, thinner, or alcohol).
• Do not charge the phone when it is on soft furnishings.
• Charge the phone in a well ventilated area.
• Do not subject the phone to excessive smoke or dust.
Page 11

9
Guidelines for safe and efficient use
• Do not keep the phone next to credit cards or transport
tickets; it can affect the information on magnetic strips.
• Do not tap the screen with sharp objects, as this may
damage the phone.
• Do not expose the phone to liquid, moisture or humidity.
• Use accessories like headsets cautiously. Do not touch
the antenna unnecessarily.
• Do not use the phone or accessories in places with
high humidity, such as pools, greenhouses, solariums or
tropical environments. This may damage the phone and
invalidate the warranty.
• Leather is an elegant and natural material. It is normal if
there is natural wear and tear after passage of time. In
order to protect the product with better durability, please
observe the following instructions.
- Do not exposing the leather parts to humidity, water, and
direct sources of heat.
- Do not contact the leather surface with alcohol, perfumes,
solvents and greasy substances.
- Do not contact the leather surface with rough, sharp, or
abrasive objects.
- Do not rough exposure to metallic parts, and clean with a
soft dry cloth.
- Do not bend the product with acutely.
In case of problems
- In case of stains occur, wipe the leather surface with
a dry clean, soft cloth, or using a professional leather
cleaning agent.
Page 12

10 LG GD910 | User Guide
Guidelines for safe and efficient use
- In case of contact with water, do not rub the leather
hardly, use a dry clean soft cloth and apply a gentle
dabbing motion to absorb.
• If you need to replace the leather, visit an authorized
service center and replace it with leather approved for
use with this particular phone model.(The leather is
excluded from the warranty.)
Efficient phone operation
Electronic devices
All LG mobile phones may experience or cause
interference, which could affect performance.
• Do not use your mobile phone near medical equipment
without requesting permission. Avoid placing the phone
over pacemakers (e.g. in your breast pocket).
• Some hearing aids might be disrupted by mobile phones.
• Minor interference may affect TVs, radios, computers and
other devices.
Road safety
Check the laws and regulations on the use of mobile
phones in the area you drive in.
• Do not use a hand-held phone while driving.
• Give your full attention to driving. Use a hands-free kit, if
available.
Page 13

11
Guidelines for safe and efficient use
• Pull off the vehicle to the road and park before making or
answering a call, if driving conditions so require.
• RF energy may affect some electronic systems in your
vehicle, including car stereos and safety equipment.
• If your vehicle is equipped with airbags do not obstruct
them with installed or portable wireless equipment. This
can cause airbags to fail or cause serious injury if airbags
operate improperly.
• If you are listening to music while out and about, make
sure the volume is at a moderate level so that you are
aware of your surroundings. This is particularly important
when you are near roads.
Avoid damaging your hearing
Damage to your hearing can occur if you are exposed
to loud sound for long periods of time. We therefore
recommend that you do not turn the handset on or off
while close to your ear.
We also recommend that music and call volumes are set to
moderate levels.
Glass Parts
Some parts of your mobile device are made of glass.
This glass could break if your mobile device is dropped
on a hard surface or receives a substantial impact. If the
glass breaks, do not touch or attempt to remove it. Stop
using your mobile device until the glass is replaced by an
authorised service provider.
Page 14

12 LG GD910 | User Guide
Guidelines for safe and efficient use
Blasting area
Do not use the phone where blasting is in progress.
Observe restrictions, and follow any rules or regulations.
Potentially explosive atmospheres
• Do not use the phone at a refuelling point.
• Do not use the phone near fuel or chemicals.
• Do not transport or store flammable gas, liquid or
explosives in the same compartment of your vehicle as
your mobile phone and accessories.
In aircraft
Wireless devices can cause interference in aircraft.
• Turn your mobile phone off, or activate flight mode before
boarding any aircraft.
• Do not use your mobile phone on the ground without
permission from the crew.
Children
Keep the phone in a safe place, out of the reach of small
children. The phone includes small parts that, if detached,
may represent a choking hazard.
Page 15

13
Guidelines for safe and efficient use
Emergency calls
Emergency calls may not be available in all mobile
networks.
Therefore, you should never depend solely on the phone for
emergency calls. Consult your local service provider.
Battery information and care
• You do not need to completely discharge the battery
before recharging. Unlike other battery systems, there is
no memory effect that could compromise the battery’s
performance.
• Use only LG batteries and chargers. LG chargers are
designed to maximise battery life.
• Do not disassemble or short-circuit the battery pack.
• Keep the metal contacts of the battery pack clean.
• If you need to replace the battery, take it to the nearest
authorised LG Electronics service point or dealer for
assistance.
• Replace the battery when it no longer provides
acceptable performance. The battery pack may be
recharged hundreds of times before it needs replacing.
• To maximise usability, recharge the battery if it has not
been used for a long time.
• Do not expose the battery charger to direct sunlight or
use it in high humidity, such as in the bathroom.
• Do not leave the battery in hot or cold places. This may
deteriorate battery performance.
Page 16

14 LG GD910 | User Guide
Guidelines for safe and efficient use
• There is a risk of explosion if the battery is replaced by
an incorrect type.
• Dispose of used batteries according to the manufacturer’s
instructions. Please recycle whenever possible. Do not
dispose of in household waste.
• Always unplug the charger from the mains after the
phone is fully charged to prevent unnecessary power
consumption by the charger.
• Actual battery life will depend on network configuration,
product settings, usage patterns and battery and
environmental conditions.
Page 17
15
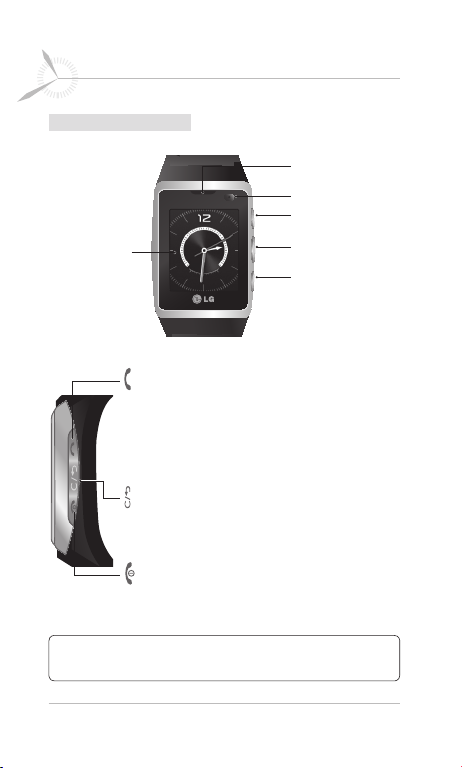
Getting to know your phone
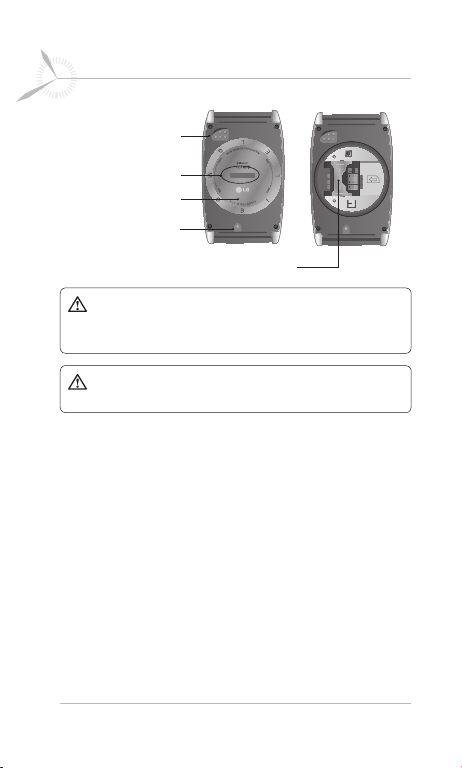
Parts of the phone
Main screen
Send key
- Dials a phone number and answers incoming calls.
-
Opens the call history menu on your clock screen.
Call the most recent number by pressing for 2 seconds.
- Opens the option list when using the menu if
available.
Back/Clear key
- Takes you to the previous menu.
- Gives you quick access on your clock screen to
Voice command when you press for 2 seconds.
End/Power key
-
Closes menu and returns you to the main clock screen.
- Turns the phone on/off when pressed for 2 seconds.
Speaker
Camera lens
Send key
Back/Clear key
End/Power key
TIP! To turn off the device quickly, press and hold the Send key &
Clear key for 3 seconds.
Page 18
16 LG GD910 | User Guide
Getting to know your phone
Charging Pin
SIM cap release
SIM cap cover
Microphone
SIM card socket
WARNING: Do not remove the SIM cap cover when the
phone is on, as this may damage the phone. Removing the SIM
cap cover turns the phone off.
WARNING: Do not use your fingernail to remove the SIM
cap cover.
Page 19
17
Getting to know your phone
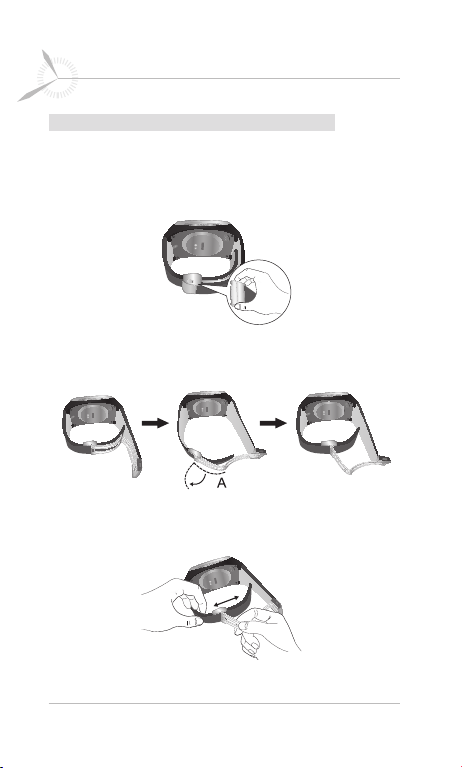
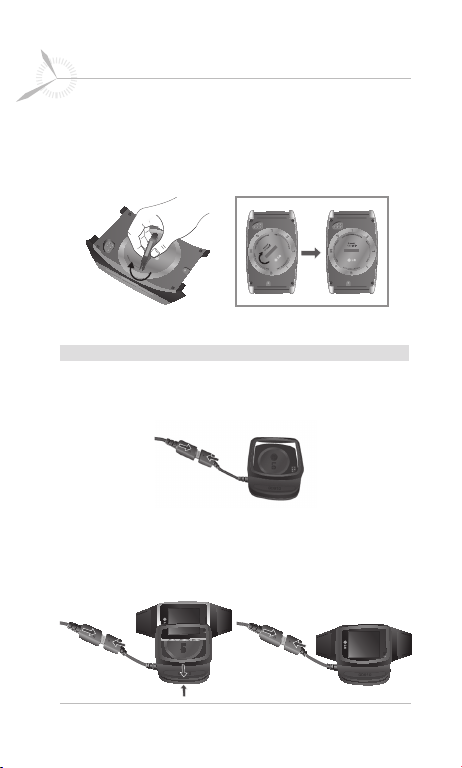
Adjusting your watch to fit your wrist
You can adjust the strap length to your wrist size.
1 Remove watch from wrist and place on a soft surface
with its buckle open.
2 Hold the watch strap and pull the “A” part of the buckle
vertically.
3 Hold the watch strap and adjust the strap length by
moving the “A” part of the buckle from side to side.
Page 20
18 LG GD910 | User Guide
Getting to know your phone
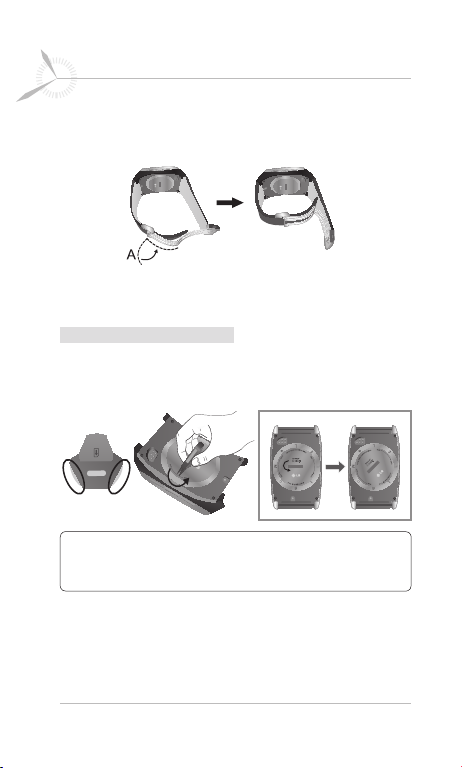
4 To fix the strap length of watch, push the “A” part of the
buckle back to the original location.
5 Press the buckle until a ‘click’ is heard.
Installing the SIM card
1 Remove the SIM cap cover.
- Use the SIM cap tool to open the SIM cap cover.
NOTE: Insert SIM Tool fully in SIM cap release not
to damage the SIM cap cover. Use enclosured SIM Tool not to
damage SIM cap cover.
Page 21
19
Getting to know your phone
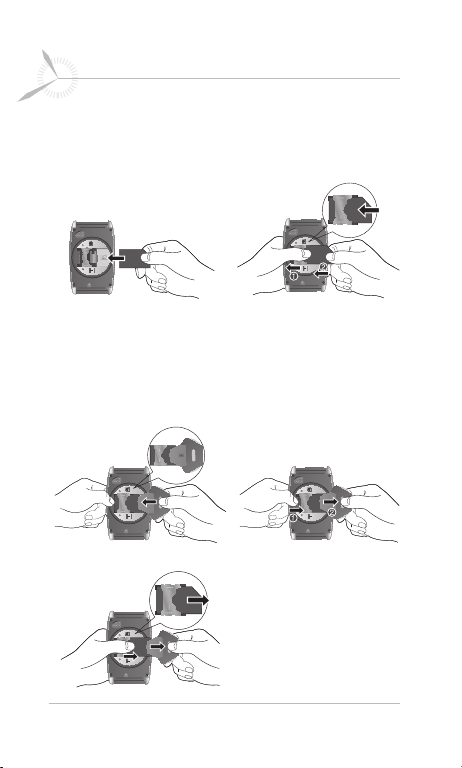
2 Install the SIM card.
Make sure the gold contact area of the SIM card is facing
downwards. Slide the SIM card into the SIM card holder.
A B
* Remove the SIM card.
- To remove the SIM card, gently push the edge of the SIM
card, and then lift it away from the SIM card holder.
- When you remove SIM Card, insert SIM Tool fully and
remove it.
A B
C
Page 22
20 LG GD910 | User Guide
Getting to know your phone
3 Replace the SIM cap cover.
Place the SIM cap cover into the SIM card holder, and
secure it by turning the cover to the right until it clicks
into place.
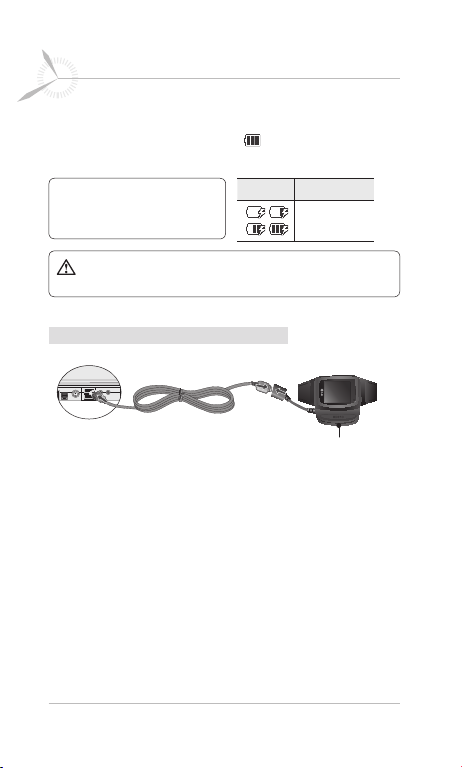
Charging & Connecting your phone with the cradle
1 Plug the power adapter into the mains.
2 Connect the power adapter to the charging cradle.
3 Connect the charging cradle to the phone. Make sure
that the charging pins are properly aligned with the pins
on the charging cradle.
A B
Page 23
21
Getting to know your phone
4 Once you connect the charger, the battery will begin to
charge. If the battery full icon
screen, battery charging is complete.
NOTE: To improve battery
lifetime, the battery must be
fully charged before first use.
WARNING:
securely inserted onto your phone.
Before charging, make sure the SIM cap cover is
appears on the lock
Icon Description
Charging the
battery
Connecting your phone and PC
Charging cradle
Page 24
22 LG GD910 | User Guide
Getting to know your phone
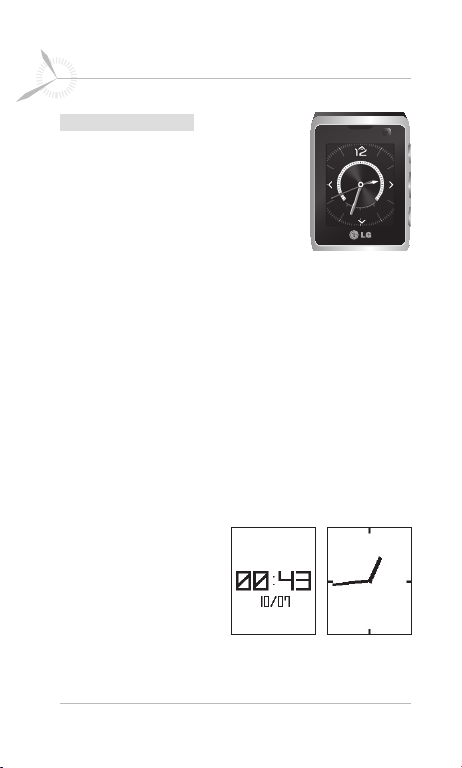
Your main screen
Your GD910 has a touchscreen.
From here, you can access menu
options, make a quick call and change
your profile, among many other functions.
Touchscreen tips
• There’s no need to press hard; the
touchscreen is sensitive enough to detect light touches.
• Use the tip of your finger to touch the option you want.
Be careful not to touch any surrounding keys.
• Don’t cover the phone with a case or cover, as the
touchscreen will not work if any material is covering it.
• When the screen light is off, the touch protection function
is automatically enabled to prevent indiscreet action of the
touch keys. This prevents the touchscreen from responding
when touched unintentionally. To disable touch protection,
press any key on the right side of the phone twice.
• Whenever
your GD910
is not in use, it will return to the
lock screen.
* Lock screen
< Digital > < Analog >
Touchscreen
Page 25
23
Getting to know your phone
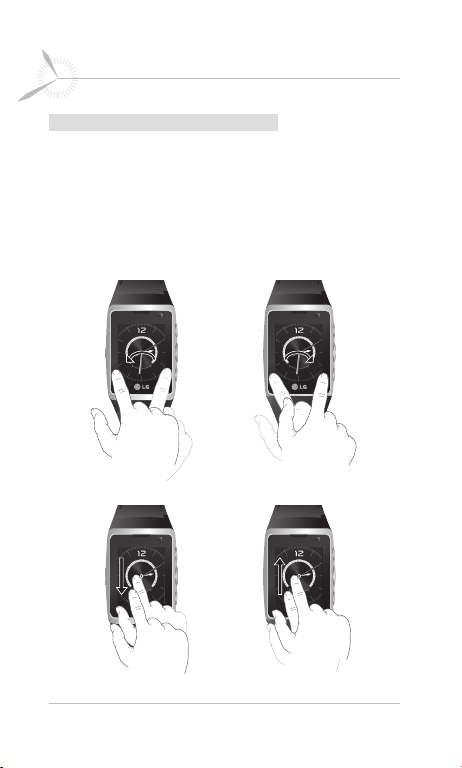
Get in touch with your GD910
The controls on the GD910 touchscreen change
dynamically, depending on the task you are carrying out.
Clock screen: To switch between the screens, just flick the
display from left to right or from right to left. You can also
choose one of the 8 Clock displays by flicking the screen
from top to bottom or from bottom to top on the main clock.
Page 26

24 LG GD910 | User Guide
Getting to know your phone
Scrolling: Drag your finger from side to side to scroll. On
some screens, you can also scroll up and down.
Opening Applications: To open any application, drag
the screen to the desired application, and then touch the
application icon or menu.
Page 27

25
Getting to know your phone
Touch interaction legend
Touch Down
Touch
Down & up
Touch
Down & Hold
Touch
Hold & Up
Touch Down & Drag
(Up o Down )
Touch Down &
Hold & Drag
(Up o Down )
Touch Down & Drag
(Down o Up )
Touch Down &
Hold & Drag
(Down o Up )
Flicking interaction legend
Flicking
(Up o Down )
Flicking
(Down o Up )
Touch Down & Drag
(Left o Right )
Touch Down &
Hold & Drag
(Left o Right )
Flicking
(Left o Right )
Touch Down & Drag
(Right o Left )
Touch Down &
Hold & Drag
(Right o Left )
Flicking
(Right o Left )
Page 28

26 LG GD910 | User Guide
Getting to know your phone
On-Screen Icons
The table below describes
various display indicators
or icons that appear on
the phone’s indicator
The status bar
The quick keys
Information area
screen. To open the
indicator screen, drag
your finger across from left to right on the clock screen.
* The status bar
Icon Description Icon Description
Network signal strength
(number of bars will vary)
No network signal
Flight mode is selected
An alarm is set
Bluetooth is active
Bluetooth Mono
headset
Remaining battery life
Battery empty
* The quick keys
Icon Description Icon Description
Normal profile in use Missed calls
Silent profile in use
Outdoor profile in use
No event
New message
Flight mode is on.
Flight mode is off.
Page 29

27
Menu map
When the screen light is off, press any key on the right side
of the phone twice to disable touch protection and enter
the screen.
The clock screen will display a 4-way arrow
pad. To open the top menu, slide your finger
across from right to left on the main clock
screen twice.
Contacts
1. New contact
2. Search
3. Speed dials
4. Groups
5. Settings
6. Information
Utilities
1. Multimedia
2. Organiser
3. Alarms
4. Voice recorder
5. Tools
Messaging
1. Create message
2. Inbox
3. Drafts
4. Outbox
5. Sent items
6. Templates
7. Emoticons
8. Settings
Settings
1. Bluetooth
2. Profiles
3. Screen
4. Phone
5. Call
6. Connectivity
x2
Page 30

28 LG GD910 | User Guide
Calls
Making a voice or video call
1 To open a Call menu, drag your finger across from right
to left on the clock screen.
2 Select Video call or Voice call.
3 Enter the number on the keypad screen.
To delete a digit, press the Clear key
on the right side of the phone or the
Clear touch key on the screen.
4 Press the Send key on the right side
of the phone or the Send touch key on
the screen to make the call.
5 To end the call, press the End key on the right side
of the phone.
NOTE: Your phone has a Voice command feature that lets you
make calls by name.
TIP! To enter “+” for international calls, touch and
hold the 0 key on the keypad screen.
TIP!
You can enter the asterisk * or # symbol, turn Silent
on/off, Send a message, Save a number
touching on the keypad screen.
Calling your contacts
It’s easy to call anyone whose number is in your Contacts.
1 Open the keypad screen. You can search your contacts
by choosing or .
or
Search contacts by
Page 31

29
Calls
2 Scroll through the contact list or tab the Name field,
enter the first letter(s) of the contact you want to call in
the Name field, and then press the Enter
3 In the list, touch the contact you want to call, and then
select the number to use if there is more than one for
that contact.
4 Press the Send key or the Send touch key. You
can also make a Video call from the options menu.
Answering and rejecting a call
When your phone rings, press the Send key to answer.
Press the End key to reject the incoming call.
TIP! You can send a message to explain why you
cannot receive an incoming call by selecting and using
Excuse message before you reject an incoming call.
Adjusting call volume
To adjust the volume during a call, press the Clear key
and scroll up or down.
In-call options
You can hold a call by pressing the number displayed on
your screen.
Mute - Turns the microphone off so the person you are
talking to cannot hear you.
touch key.
Page 32

30 LG GD910 | User Guide
Calls
Keypad - Opens the keypad screen. You can search
your contacts by choosing or . You can also send
a new message by choosing or save the phone
number by choosing .
To open the options menu during a call, press the Send key
. You can choose from the following:
Speaker on/off - Turns the speakerphone on or off.
Dialpad - Opens a numerical keypad for entering numbers
(e.g., when dialling call centres or other automated
telephone services).
Add call - Allows you to make a second call. Dial the
number or search your contacts, then touch to connect
the call. Both calls will be displayed on the call screen. Your
initial call will be locked and put on hold. To end one or
both calls press the End key .
NOTE: You will be charged for each call you make.
Record - Allows you to record the call.
Go to messages - Allows you to check your messages.
DTMF off - Turns off DTMF during a call. DTMF lets you
use numerical commands to navigate within automated
calls. By default, DTMF is set to on.
End call - Terminates the call.
Page 33

31
Calls
Speed dialling
You can assign a frequently-called contact to a speed dial
number.
1 On the clock screen, drag your finger twice across from
right to left to the top menu. Touch Contacts, and then
select Speed dials.
2 Your voicemail is already set to speed dial 1. You cannot
change this. Touch any other number to assign it to a
speed dial contact.
3 Your address book will open. Select the contact you
want to assign to that number by touching the contact’s
name once. To find a contact, tap the Name box, and
then enter the first letter(s) of the name of the contact.
To call a speed dial number, using the numerical keypad,
press and hold the assigned number until the contact
appears on the screen.
Viewing your call logs
On the clock screen, press the Send key , then scroll left
and right. Choose to view:
All calls - View a complete list of all your dialled,
received and missed calls.
Dialled calls - View a list of all the numbers you have
called.
Received calls - View a list of all the numbers that
have called you.
Missed calls - View a list of any calls you have missed.
Page 34

32 LG GD910 | User Guide
Calls
TIP! In any call log, select the Send key to open the options
menu, and then select Delete to delete items. You can select
more than one item to delete at the same time.
TIP! Touch any call log entry to view the date, time and
duration of the call.
Changing call settings
1 On the clock screen, drag your finger twice across from
right to left to the top menu. Touch Settings, and then
select Call.
2 From here, you can adjust the settings for:
Call divert - Choose whether to divert your calls.
Call waiting - If call waiting is activated, the handset will
notify you of an incoming call while you are on a call.
Call barring - Select which calls you want to barring.
Fixed dial numbers - Select Fixed dial number to
turn on and compile a list of numbers that can be called
from your phone. You’ll need your PIN2 code, which is
available from your operator. Only numbers in the fixed
dial list can be called from your phone.
Excuse message - You can send a message to explain
why you cannot receive an incoming call by touching
and using “Excuse message” before you reject an
incoming call.
Page 35

33
Calls
Call costs - View the charges applied to your dialled
calls. This service is network dependent; some operators
do not support this function.
Call durations - View the duration of all calls including
All, dialed, received calls and the last call.
Common settings
• Call reject - Touch to switch On to highlight the Reject
list. You can touch the text box to choose from all calls,
specific contacts or groups, calls from unregistered
numbers (those not in your contacts), or calls with no
caller ID. Touch
• Send my number - Choose whether to display your
number on an outgoing call.
• Auto redial - Choose on ( ) or off (
• Minute minder - Select on ( ) to hear a tone every
minute during a call.
• BT answer mode - Select Hands-free to answer
calls using a Bluetooth headset, or select Handset to
press a handset key to answer calls.
• Save new number - Select Yes to save a new
number.
TIP! To scroll through a list of options, touch the
last item visible, and then drag your finger up the screen. The
list will move up to display more items.
Video call setting - Touch Video call setting to select
the settings for your video calls. Decide whether to use a
private image, then select one and/or turn on the mirror
to see yourself on the screen when making a video call.
Save to change this setting.
).
Page 36

34 LG GD910 | User Guide
Contacts
Searching for a contact
1 On the clock screen, drag your finger twice across from
right to left to the top menu. Touch Contacts, and then
select Search.
TIP! On the numerical keypad screen, touch to open and
search for contacts.
2 Scroll through the contact list or enter the first letter(s) of
the contact you want to call in the Name field and press
the Enter touch key. You will then see a list of contacts
corresponding to the letters you entered.
3 In the list, touch the contact you want to call, and then
select the number to use if there is more than one for
that contact.
4 Press the Send key or the Send touch key. You can
also make a Video call from the options menu.
Adding a new contact
1 On the clock screen, drag your finger twice across from
right to left to the top menu. Touch Contacts, and then
select New contact.
2 Choose whether to save the contact to your Handset
or USIM.
3 Enter the first and last name of your new contact. You do
not have to enter both, but you must enter at least one.
4 If you want to add a picture to the new contact, touch
, and then Edit image menu appears.
Page 37

35
Contacts
5 You can enter up to five different numbers per contact.
Each entry is assigned a preset type: Mobile, Home,
Office, Pager or Fax.
6 Add an email address in the Email field.
7 Assign the contact to one or more groups, choosing
between No group, Family, Friends, Colleagues,
School, or VIP or one of other groups you created.
TIP! You can create customised groups for your contacts.
8 You can also add a Ringtone, Birthday, Anniversary,
Home page, Home address, Company name, Job
title, Company address or Memo.
9 Touch Save to save the contact.
TIP! When viewing a contact, you can access the options menu
by pressing the Send key
Creating a group
1 On the clock screen, drag your finger twice across from
right to left to the top menu. Touch Contacts, select
Groups, and then touch New group.
2 Enter a name for your new group in the Name field. You
can also assign a ringtone to the group.
3 Touch Save to save the new group.
NOTE: Even if you delete a group, the contacts that were
assigned to that group will not be lost. They will remain in your
contacts.
.
Page 38

36 LG GD910 | User Guide
Contacts
Changing your contacts settings
You can adapt your contacts settings to suits your
preferences.
1 On the clock screen, drag your finger twice across from
right to left to the top menu. Touch Contacts and then
Settings.
2 From here, you can adjust the following settings:
Contact list settings - Choose whether to view contacts
saved to Handset & USIM, Handset only or USIM
only. You can also choose to show the first name or last
name of a contact first and whether to display a quick
command key next to the contact.
Copy - Copy your contacts from your handset to your
USIM or from your USIM to your handset.
You can choose all contacts by using the Send key on
the right side of the phone and touching Select all, or
select each contact one by one.
Move - This works in the same way as Copy, but the
contact will only be saved to the location you’ve moved
it to. So if you move a contact from the USIM to the
handset, it will be deleted from USIM memory.
Send all contacts via Bluetooth - Send all your
contacts to another device using Bluetooth. Bluetooth will
be automatically turned on if you select this option.
Clear contacts - Delete all the contacts on your handset
or USIM. Touch
your contacts.
Yes if you are sure you want to delete all
Page 39

37
Contacts
Viewing information
1 On the clock screen, drag your finger twice across from
right to left to the top menu. Touch Contacts and then
Information.
2 From here, you can view Service dial numbers, your
Own number, Memory info (how much memory space
you have left) and My business card.
TIP! To add your own business card, select My business
card, and then enter your details as you would for any contact.
Touch Save to finish.
Page 40

38 LG GD910 | User Guide
Messaging
Sending a message
1 On the clock screen, drag your finger twice across from
right to left to the top menu. Touch Messaging, and
then select Create message.
2 When you touch a message field, the keypad screen
will appear. Touch the To field to enter the recipient’s
number, or touch the search icon to open your contacts.
You can add multiple contacts.
3 Enter the text message using the keypad screen.
o
4 On the keypad screen, press the Send key to open
the options menu. Choose Writing language, Add to
dictionary, Insert, Save to drafts or Writing font size.
Touch Insert to add a Template, Emoticons or Name
& Number.
5 Touch Send when ready.
Page 41

39
Messaging
Entering text
- Touch to turn T9 predictive text on or off.
- Touch to change between the number, symbol and
text keypads.
- Touch to move the cursor.
- Touch to return to the message field.
- Touch to add a space.
- Touch to delete a character or remove the sentence.
/ - Touch to open or close the pop-up screen.
* T9 predictive mode
In T9 mode, you will see . T9 uses a built-in dictionary
to recognise words based on the key number sequences
you touch. Simply touch the number key associated with
the letter you want to enter, and the dictionary will predict
the word you want to use.
* Abc manual mode
In Abc mode, you will see . In this mode, you must
touch the key repeatedly to enter a letter if T9 mode is
turned off ( ).
Page 42

40 LG GD910 | User Guide
Messaging
Message folders
You’ll recognise the folder structure used on your GD910; it
is user-friendly and self-explanatory.
Inbox - All the messages you receive are placed into
your inbox. Here, you can view, delete and manage your
messages in a number of ways.
Drafts - If you do not finish writing a message, you can
save what you have done in this folder.
Outbox - This is a temporary storage folder while
messages are being sent.
Sent items - All the messages you sent are placed in this
folder.
Templates - A list of pre-written, useful messages, for
quick replies. The phone includes a number of templates
you can edit.
Emoticons - You can add, edit and delete emoticons.
When you write messages, insert your preferred emoticons.
There are some commonly used emoticons already on your
phone.
Settings - This is where you configure your Text message/
Voicemail options.
Page 43

41
Messaging
Managing your messages
1 On the clock screen, drag your finger twice across from
right to left to the top menu. Touch Messaging, and
then select Inbox.
2 Select a message, and then press the Send key
to open the options menu, and then choose from the
following:
Reply - Send a reply to the selected message.
Delete - Delete the selected message.
Forward - Send the selected message on to another
person.
Save number - Save the phone number in the
message.
Extract - Extract information, such as phone number or
email address, from the selected message.
New message - Write a new message regardless of
who sent you the message.
Voice call - Make a voice call to the contact.
Video call - Make a video call to the contact.
Copy&Move - Copy or move the selected message to
your USIM card or handset.
Message info. - Check the message info for type,
subject, where it is from and date.
If you see the message
delete some messages from your inbox to free up space.
If you see the message
delete either messages or saved files to free up space.
No space for USIM, you should
No space for messages, you can
Page 44

42 LG GD910 | User Guide
Messaging
Changing your text message settings
On the clock screen, drag your finger twice across from
right to left to the top menu. Touch Messaging, select
Settings, and then choose Text message.
You can make changes to:
Text message centre - Enter the details of your message
centre.
Delivery report - Choose to receive confirmation that your
message has been delivered.
Validity period - Choose how long your messages are
stored in the message centre.
Changing your voicemail setting
On the clock screen, drag your finger twice across from
right to left to the top menu. Touch Messaging, select
Settings and then choose Voicemail. You can view and
edit the voicemail name and number.
Page 45

43
Messaging
Voice command
Your GD910 supports
enhanced voice
commands. Using
advanced voice
recognition technology,
this feature allows you
to do things by verbal
command (e.g. make
calls, confirm new
messages or voicemail,
check your schedule,
get the time and listen to music).
NOTE:
• Using a Voice command may be difficult in a noisy
environment or during an emergency.
• When you use a voice command feature, the loudspeaker is
in use. Hold the GD910 a short distance away when speak.
• Before using a voice command, please check this feature is
enable. (Settings>Phone>Voice command)
• If you use the phone inside the car, make sure you closed
the car windows. Otherwise, it can be interrupted by the
wind noise and traffic noise.
• Voice command dose not support all of the languages; it
may be not supported some features according to particular
languages.
• Voice command feature is language-dependent. Before
using voice command, please check the voice recognition
language.
* Voice recognition language: US English, UK English,
Spanish, French, Portuguese, German, Italian, and Russian.
Voice command
icon
Clear key
Page 46

44 LG GD910 | User Guide
Voice command
Access
To use a Voice command feature, press and hold the Clear
key on the clock screen, and then follow the prompts.
Using a Voice command feature
Call - Say “Call”, then call someone simply by saying the
name. Speak clearly and exactly as the contact details
appear in your Contacts list. When you have more than
one contact number, you can state the name of the contact
(e.g., “Call John Work”). Your GD910 will be make a call to
the default number of the contacts.
New messages - When you have a new message, TTS
(Text to Speech) function is automatically active then let you
know the information for the number of the new messages
you received for a day. It will also automatically read a new
message you recently received.
Voicemail - You can access the voice mail centre directly
by saying “Voicemail”.
Today schedule - The “Today schedule” command allows
you to access and review your schedule.
Time - The “Time” command gives you the time of day.
Music - The “Music” command allows you to play songs.
Help - Provides general guidelines for using Voice
commands.
Page 47

45
Voice command
Voice command settings
1 On the clock screen, press and hold the Clear key .
2 After enter the voice command feature then press the
Send key
3 Change the settings, as necessary.
Sensitivity - The “Sensitivity” setting controls how
the system filters for matches. Selecting ‘Reject more’
increases the sensitivity to filtering out more potential
matches. Selecting ‘Reject less’ decreases the sensitivity
and displays more potential matches. If you are
frequently asked to repeat or no matches are found,
lower the sensitivity setting.
Train words - If the phone often asks you to repeat a
voice command, train the phone to recognise your voice
patterns.
Timeout - Set to 5 seconds or 10 seconds.
to open the settings.
Page 48

46 LG GD910 | User Guide
Utilities
My folders
You can store any multimedia file in your phone’s memory
so you have easy access to all of your pictures, sounds,
and so on. On the clock screen, drag your finger twice
across from right to left to the top menu. Touch Utilities,
and Multimedia, and then select My folders.
My images - Contains a list of images, including default
images preloaded onto your phone and images taken
by your phone’s camera. You can assign an image to a
particular person in your contacts list so that the image
appears when the person calls you.
My sounds - Contains default sounds and Voice
recordings.
Others - This folder is used to store files that are not
pictures or sounds.
Music
Your GD910 has a built-in music player so you can play all
your favourite music. To access the music player, drag your
finger twice across from right to left on the clock screen to
the top menu. Touch Utilities, and Multimedia, and then
select Music.
From here, you can access a number of folders:
Recently played - View all the songs you have played
recently.
All tracks - Contains all the songs you have on your
phone.
Artists - Browse your music collection by artist.
Page 49

47
Utilities
Albums - Browse your music collection by album.
Genres - Browse your music collection by genre.
Playlists - Contains all your playlists.
Shuffle tracks - Play your tracks in random order.
Transferring music to your phone
The easiest way to transfer music to your phone is using
Bluetooth or your sync cable.
To transfer using Bluetooth:
1 Make sure both devices have Bluetooth turned on and
can see each other.
2 Select the music file on the other device, and then select
send via Bluetooth.
3 When the file is ready to be sent, you must accept it on
your phone by touching Yes.
4 The file will appear in All tracks.
Playing a song
1 On the clock screen, drag your finger twice across from
right to left to the top menu. Touch Utilities, and then
select Multimedia, and then touch Music.
2 Touch All tracks.
3 Select the song you want to play.
4 Touch to pause the song.
5 Touch to go to the previous song.
Page 50

48 LG GD910 | User Guide
Utilities
6 Touch to go to the next song.
7 Touch to return to the Music list.
TIP! To adjust the volume when you’re
listening to music, press the Speaker icon on
the screen, and then scroll up or down.
TIP! Even though the Bluetooth headset is connected with
your handset, you may be able to hear MP3 sound through
handset only. MP3 sound could not come out via Bluetooth
mono headset.
Creating a playlist
You can create playlists by choosing a selection of songs
from the All tracks folder.
1 On the clock screen, drag your finger twice across
from right to left to the top menu. Touch Utilities,
Multimedia, and then select Music.
2 Touch Playlists.
3 Touch Add new playlist, enter the playlist name, and
then touch Save.
4 The All tracks folder will show all the songs on your
phone. Touch all the songs you want to include in your
playlist. A tick will appear on the left side of the track
names.
5 Press the Send key on the right side of the phone
and touch Done.
Page 51

49
Utilities
NOTE: Music is copyright protected in international treaties
and national copyright laws. It may be necessary to obtain
permission or a licence to reproduce or copy music. In some
countries national law prohibits private copying of copyrighted
material. Please check the national legislation of the
applicable country concerning the use of such material.
Using the camera
1 On the clock screen, drag your finger twice across
from right to left to the top menu. Touch Utilities,
Multimedia, and then select Camera.
2 The viewfinder will appear on the screen. Touch to
take a photo.
* In your viewfinder, you can select the following options
before taking a photo. Touch the icons to adapt your
photo:
Gallery - Touch to move to your gallery.
Brightness - Set the brightness of the image in
the viewfinder of the camera. Slide the contrast
indicator along the bar—left for a lower exposure
and hazier image, or right for a higher exposure
and sharper image.
3 Your captured photo will appear on the screen for a few
seconds and disappear. The name of the image runs
along the bottom of the screen.
Page 52

50 LG GD910 | User Guide
Utilities
Adding an event to your calendar
1 On the clock screen, drag your finger twice across from
right to left to the top menu. Touch Utilities, select
Organiser, and then choose Calendar.
2 Select the date to which you want to add an event.
3 Press the Send key , then Add event.
TIP! You can set holiday dates in your calendar. Touch each
day you are on holiday one at time, press the Send key
and then select Set holiday.
Adding an item to your To-Do list
1 On the clock screen, drag your finger twice across from
right to left to the top menu. Touch Utilities, select
Organiser, and then choose To do.
2 Touch Add to do.
3 Set the date for the task, add notes, and select a priority
level: High, Medium or Low.
4 Save your task by selecting Save.
TIP! You can edit an item by selecting it, touching the tab, and
then entering the changes. Confirm the changes by selecting
Save.
,
Page 53

51
Utilities
Adding a memo
1 On the clock screen, drag your finger twice across from
right to left to the top menu. Touch Utilities, select
Organiser, and then choose Memo.
2 Touch New memo.
3
Type your memo, then press the Send key and select
Save to memo.
4 Your memo will appear on the screen.
Using date finder
Date finder is a handy tool that helps you calculate what
the date will be, in a given number of days. It helps you
keep track of deadlines.
1 On the clock screen, drag your finger twice across from
right to left to the top menu. Touch Utilities, select
Organiser, and then choose Date finder.
2 Set the current date in the From tab.
3 Set the number of days in the After tab.
4 The Target date will be shown below.
Setting your alarm
1
On the clock screen, drag your finger twice across from
right to left to the top menu. Touch Utilities, and then select
Alarms.
2 Touch New alarm.
Page 54

52 LG GD910 | User Guide
Utilities
3 Set the time you want the alarm to sound, and then
touch Save. The screen then automatically returns to
the alarm list.
4 Select the item in the list, and then choose one you want
the alarm to repeat: from Not repeated, Daily, Mon -
Fri, Mon - Sat, Sat - Sun or Except holiday.
5 Select Alarm type to select the type of alarm you want.
6 Touch Alarm bell. Choose a sound from the media
album list. To listen to sounds, touch the icon on the
right of the sound.
7 Add a memo to the alarm.
8 Finally, you can set the snooze interval to 5, 10, 20, 30
minutes, 1 hour. Or you can turn snooze off.
9 After setting the alarm, touch Save.
NOTE: You can set up to 5 alarms.
Voice recorder
Use your voice recorder to record voice memos or other
audio files.
To record a sound or voice memo:
1 On the clock screen, drag your finger twice across from
right to left to the top menu. Touch Utilities, and then
select Voice recorder.
2 Touch to begin recording.
3 Touch to end recording.
4 Touch to listen to the recording.
Page 55

53
Utilities
Using your calculator
1 On the clock screen, drag your finger twice across from
right to left to the top menu. Touch Utilities, select
Tools, and then choose Calculator.
2 Touch the box to open up the number keys.
3 Touch the screen and enter numbers using number
keys.
4 For simple calculations, touch the function you need (+,
–, x or ÷), followed by =.
5 For more complex calculations, touch , and then
choose sin, cos, tan, sec, csc, cot, deg, rad, log, ln, exp
and so on.
Converting a unit
1 On the clock screen, drag your finger twice across from
right to left to the top menu. Touch Utilities, select
Tools, and then choose Converter.
2 Choose one you want to convert from Currency,
Surface, Length, Weight, Temperature, Volume and
Velocity.
3 Then select the unit, and enter the value you want to
convert from, followed by the unit you want to convert to.
4 The corresponding value will appear on the screen.
Page 56

54 LG GD910 | User Guide
Utilities
Adding a city to your world clock
1 On the clock screen, drag your finger twice across from
right to left to the top menu. Touch Utilities, and select
Tools, and then choose World clock.
2 Press the Send key , and then select New city.
Choose the continent, and then select the city on the
map. Alternatively, touch Select City. and choose from
the list or touch Search, and select the first word of the
city. The city will display on the screen.
3 Touch the city to add it to your World time list.
Using the stopwatch
1 On the clock screen, drag your finger twice across from
right to left to the top menu. Touch Utilities, select
Tools, and then choose Stopwatch.
2 Touch Start to begin timing.
3 Touch Lap if you want to record lap time.
4 Touch Stop to end the timer.
5 Touch Resume to restart the stopwatch from the
time you stopped it, or touch Reset to start from the
beginning.
STK
This menu may be inactive if your SIM card doesn’t include
STK support services (i.e. SIM Application Toolkit).
Page 57

55
Settings
Personalising your profiles
You can quickly change your profile on
the indicator screen. On the clock screen,
drag your finger across from left to right,
and then touch the profile icon.
TIP! To use Flight mode, select . Flight mode prevents
you from making calls, sending messages or using Bluetooth.
Icon Description Icon Description
Normal profile in use Flight mode is on
Silent profile in use Flight mode is off
Outdoor profile in use
You can personalise each profile setting in the settings
menu.
1 On the clock screen, drag your finger twice across from
right to left to the top menu. Touch Settings, and then
select Profiles.
2 Choose the profile you want to edit.
3 You can then change all of the sounds and alert options
available in the list, including ringtone, volume, message
alerts and more.
Page 58

56 LG GD910 | User Guide
Settings
Changing your screen settings
1 On the clock screen, drag your finger twice across from
right to left to the top menu. Touch Settings, and then
select Screen.
2 Choose from:
Top Menu - Choose the style of the top menu.
Font - Adjust the font size.
Backlight - Choose how long the backlight stays on.
NOTE:
The longer the backlight stays on, the more battery power
it uses and the more often you need to recharge your phone.
Brightness - Adjust the screen brightness.
Lock screen - Choose the clock type on the locked
screen (Digital or Analog).
Action guide - Turn the action guide on or off.
Changing your phone settings
Enjoy the freedom of adapting the GD910 to your
preferences.
1 On the clock screen, drag your finger twice across from
right to left to the top menu. Touch Settings, and then
select Phone.
2 Choose in the list below.
Date & Time - Adjust your date, time, and daylight
saving settings, or choose to automatically update the
time and date when travelling or for daylight saving
settings.
Page 59

57
Settings
Power save - Change the factory-set power saving
settings: Off, Night only or Always on.
Languages - Change the language on your GD910
display.
Security - Adjust your security settings, including PIN
codes and handset lock.
NOTE: Security code
The default security code is set to ‘0000’ and the security
code is required to delete all phone entries and to activate the
Reset settings menu. The security code default setting can be
modified from the Security > Change codes.
Voice command - Select the voice command feature
enable or disable.
Memory manager - Use the memory manager to
determine how each memory is used and how much
space is available.
- Handset common memory - View the memory
available on your GD910 for Pictures, Sounds and
other items.
- Handset reserved memory - View the memory
available on your handset for SMS, Contacts, Calendar,
the To-do lists, Memos, Alarms and Call history.
- USIM memory - View the memory available on your
USIM Card.
Reset settings - Restores all settings to the factory
defaults.
Information - View the Handset information and the
Phone guide for your GD910.
Page 60

58 LG GD910 | User Guide
Settings
Changing your Connectivity settings
Your connectivity settings have already been set up by
your network operator, so you can enjoy your new phone
immediately. To change any setting, use this menu:
On the clock screen, drag your finger twice across from
right to left to the top menu. Touch Settings, and then
select Connectivity. Choose from:
1 Network settings
Select network
automatically searches for a network and registers the
handset to the chosen network. This is recommended
for the best service and quality.
NOTE: When your handset loses a network in manual mode, a
message appears on the Idle screen instructing you to select
an available network.
Network mode - Set the type of network to search
for when searching for networks in the Select network
menu.
Preferred lists - If you are using automatic network
search, you can add a preferred network to connect to.
2 Packet data conn.
Set the packet data connection. (When needed/When
available)
3 USB connection mode
You can use your phone with a variety of PC connectivity
and data communications applications though USB.
(Mass storage/PC suite)
- If you select Automatic, the GD910
Page 61

59
Settings
Changing your Bluetooth settings
1 On the clock screen, drag your finger twice across from
right to left to the top menu. Touch Settings, and then
select Bluetooth.
2 Choose Bluetooth on ( ), press the Send key , and
then select Settings. Make your changes to:
My device visibility - Set Visible or Visible for 1 min so
other devices can detect your phone when searching for
Bluetooth devices. If you select Hidden, other devices
will not be able to detect your phone when searching for
Bluetooth devices.
My device name - You can name or rename your
phone as it will appear on other devices. Your phone’s
name will be shown on other devices only when My
device visibility is set to Visible.
Supported services - You can view the list of devices,
such as headsets and handsfree devices, supported by
your Bluetooth-enabled phone.
Remote SIM Mode - Activate remote SIM mode.
My address - Check your Bluetooth address here.
NOTE: To improve security, we recommend that once you have
configured or paired with a device, set Visibility to Hidden. For
incoming connections, regardless of whether the other device
has been paired with your phone, you can choose to accept or
reject the connection.
Page 62

60 LG GD910 | User Guide
Settings
Pairing with another Bluetooth device
When you pair your GD910 with another device, you can
set up a passcode-protected connection. This means your
pairing is more secure.
1 Check that your Bluetooth is on and Visible. You can
change your visibility in the Settings menu, by selecting
My device visibility and then Visible.
2 Touch Search.
* To turn Bluetooth on:
1 In the Bluetooth menu, touch Bluetooth to turn it on as
shown in the figure below.
2 To turn Bluetooth off, touch Bluetooth again.
If Bluetooth is off, you will see the icon on your
screen.
If Bluetooth is on, you will see the
screen.
3 Your GD910 will search for devices. When the search
has completed, you can see the list of devices found and
Refresh will appear on screen.
4 Choose the device you want to pair with, then enter a
passcode, and then choose OK.
icon on your
Page 63

61
Settings
5 Your phone will then connect to the other device, for
which you must enter the same passcode.
6 Your passcode protected Bluetooth connection is now
ready.
Using a Bluetooth headset
1 Check that Bluetooth is turned on and Visible.
2 Follow the instructions that came with your headset to
pair the two devices.
3 Touch Ask always or Allow without asking, and then
touch Yes to connect. Your GD910 will automatically
switch to Headset profile.
Sending and receiving files using Bluetooth
Bluetooth is a great way to send and receive files, as no
wires are needed and connection is quick and easy.
You can also connect to a Bluetooth headset to make and
receive calls.
Before you can start sharing files using Bluetooth, you will
need to pair your phone with the other Bluetooth device.
For information on pairing devices, see Pairing with
another Bluetooth device.
TIP! The connection may be improved if there are no solid
objects in between your phone and the other Bluetooth device.
NOTE: Read the user guide of each Bluetooth accessory you
are trying to pair with because the instructions may vary.
Page 64

62 LG GD910 | User Guide
Settings
To send a file:
1 Open the file you want to send, typically a photo.
2 Press the Send key, and then select Send.
Choose Bluetooth.
3 If you have already paired the Bluetooth device, your
GD910 will not automatically search for other Bluetooth
devices. If not, your GD910 will search for other
Bluetooth-enabled devices within range.
4 Choose the device you want to send the file to, and then
touch Select.
5 Your file will be sent.
TIP! Check the progress bar to make sure your file is sent.
To receive a file:
1 To receive files, your Bluetooth must be On and Visible.
See Changing your Bluetooth settings on the right for
more information.
2 A message will prompt you to accept the file from the
sender. Touch Yes to receive the file.
NOTE: The Bluetooth® word mark and logos are owned by
the Bluetooth SIG, Inc, and any use of such marks by LG
Electronics is under licence. Other trademarks and trade
names are those of their respective owners.
Page 65

63
PC Suite
You can synchronise your PC with your phone. This will
ensure all your important details and dates match and also
act as a backup to give you peace of mind.
TIP! To do this, you must install the PC Suite
application provided on the CD-ROM or available in a
download from http://update.lgmobile. com. (From www.
lgmobile.com, PRODUCTS > Manual & Software > Go to
Manual & S/W Download Section)
Installing the LG PC Suite on your computer
1 On the clock screen, drag your finger twice across from
right to left to the top menu. Touch Settings, and then
select Connectivity.
2 Touch USB connection mode.
3 Connect the handset and PC using the USB cable, and
then wait a moment.
4 The installation guide message will appear.
Caution! If the installation guide message is not displayed on
your PC, check your CD-ROM settings in Windows.
5 Insert the supplied CD, or click the download button to
directly download the LG PC Suite program from the
website.
6 Click on the LG PC Suite Installer that appears on your
screen.
Page 66

64 LG GD910 | User Guide
PC Suite
Connecting your phone and PC
1 Select PC Suite mode from the Connectivity > USB
connection mode menu and then connect the USB
cable to your phone and PC.
2 LG PC Suite will automatically activate on your PC.
Caution!
If LG PC Suite is not activated automatically
on your PC, please check your CD-ROM settings on the PC.
3 Your phone and PC are now connected.
Backing up and restoring your phone’s data
1 Connect your phone to your PC as outlined above.
2 Click on the Backup icon, and then select Backup or
Restore.
3 Choose whether to back up Contents Data and/or
Phonebook/Schedule/To do/Memo Data. Select the
location where you want to back up the data to, or
restore it from. Click Save.
4 Your data will be backed up.
Viewing phone files on your PC
1 Connect your phone to your PC as outlined above.
2 Click on the Manage Files icon.
3 Images and audio files you have saved on your phone
will be displayed on the screen in the LG Phone files.
Page 67

65
PC Suite
TIP! Viewing the contents of your phone on your PC helps you
manage files, organise documents and remove content you no
longer need.
Synchronising your contacts
1 Connect the phone to your PC.
2 Click on the Contacts icon.
3 Your PC will now import and display all the contacts
saved on your SIM card and handset.
4 Click on File, and then select Save. You can now select
where you want to save your contacts to.
NOTE: To back up contacts saved to your SIM card, click on
the SIM card folder on the left side of the PC screen. Rightclick on one of your contacts, choose Select all, and then
choose Copy or Move to phone memory.
Right-click on your contacts, and then select Copy to phone
memory. Now click on the Handset folder on the left side of
the screen, and all your numbers will be displayed.
Synchronising your messages
1 Connect the phone to your PC.
2 Click on the Messages icon.
3 All your PC and phone messages will be displayed in
folders on the screen.
4 Use the toolbar at the top of your screen to rearrange
messages.
Page 68

66 LG GD910 | User Guide
PC Suite
Using your phone as a mass storage device
Your phone can be used as a mass storage device.
1 Disconnect your phone from your PC.
2 On the clock screen, drag your finger twice across from
right to left to the top menu. Touch Settings, and then
select Connectivity.
3 Touch USB connection mode.
4 Touch Mass storage. This mode will be saved.
5 Connect the phone to your PC. Your phone will display
Connected.
NOTE: Your phone must be unplugged from your PC to initiate
mass storage.
Page 69

67
Software Update
LG Mobile Phone Software
This section discusses how to update LG mobile phone
software. For more information on installing and using this
software, please visit http://update.lgmobile.com.
The update feature allows you to update your software to
the latest version quickly and conveniently over the Internet,
eliminating the need to visit our service centre.
Since the mobile phone software update program requires
the your full attention for the duration of the update
process, please make sure to read the instructions and
notes that appear at each step before proceeding.
Note that removing the USB cable or batteries during the
update process may seriously damage your mobile phone.
LG assumes no liability for the loss of data during the
update process. It is highly recommended to back up any
important information before updating.
Page 70

68 LG GD910 | User Guide
Troubleshooting
This chapter lists a number of problems you might
encounter while using your phone. Some problems require
you to call your service provider, but most are easy to
correct yourself.
Message Possible causes Possible Corrective
SIM error There is no SIM
No
connection
to the
network
Codes do
not match
Function
cannot be
set
Calls not
available
card in the phone,
or you may
have inserted it
incorrectly.
Signal weak
outside network
When you want to
change a security
code, you must
confirm the new
code, by entering it
again. The two codes
you have entered do
not match.
Not supported by
service provider
or registration
required.
Dialling error,
New SIM card
inserted, Charge limit
reached.
measures
Make sure that the SIM
card is correctly inserted.
Move to a higher location,
a window or open space.
Check the service provider
coverage map.
Contact your service
provider.
Contact your service
provider.
New network not
authorised. Check for new
restrictions. Contact a
service provider, or reset
limit with PIN2.
Page 71

69
Troubleshooting
Message Possible causes Possible Corrective
Phone
cannot be
switched
on
Charging
error
Phone
loses
network
Number
not
permitted
On/Off key pressed
too briefly
Battery empty
Battery contacts
dirty
Battery completely
empty
Temperature out of
operating range
Contact problem
No mains voltage
Charger defective
Wrong charger
Defective battery
Signal too weak Reconnection to another
The fixed dial
number function
is on.
measures
Press On/Off key for at
least 2 seconds.
Charge battery. Check
battery indicator on the
screen.
Clean the contacts.
Charge battery.
Make sure the
surrounding temperature
is within the operating
range, wait, and then
charge again.
Check the power supply
and connection to the
phone. Check the battery
contacts, and clean them
if necessary.
Plug in to a different
socket, or check the
voltage.
If the charger does not
warm up, replace it.
Only use original LG
accessories.
Replace the battery.
service provider is
automatic.
Check settings.
Page 72

70 LG GD910 | User Guide
Accessories
There is a variety of accessories, some sold separately, for
your mobile phone. Choose the accessories that meet your
personal needs. Consult your local dealer for availability.
(Items described below may be optional).
Charger
Data cable and CD
Charging cradle
Watch cushion
SIM cap
tool (2)
NOTE:
• Bluetooth Headset is not included, LG recommend
to use a high performance Bluetooth headset for
enhanced communication.
NOTE:
• Always use genuine LG accessories.
• Failure to use genuine LG accessories may invalidate
your warranty.
• Accessories may vary in different regions.
Page 73

71
Network service / Technical data
Network service
The wireless phone described in this guide is approved for
use on E-GSM 900, DCS 1800, PCS 1900 and
WCDMA 2100 networks.
A number of features included in this guide are called
Network Services. These are special services that you
arrange through your wireless service provider. Before
you can take advantage of Network Services, you must
subscribe to them through your service provider and obtain
instructions for their use from your service provider.
Technical data
General
Product name: GD910
System: E-GSM 900 / DCS 1800 /
PCS 1900 / WCDMA 2100
Operating Temperature
Max: +37°C (discharging)
+36°C (charging)
Min: -10°C
Page 74

29. Jun. 2009
GD910
Page 75

LIMITED WARRANTY STATEMENT
1. WHAT THIS WARRANTY COVERS :
LG oers you a limited warranty that the enclosed phone and its enclosed
accessories will be free
from defects in material and workmanship according to the following terms and
conditions:
(1) The limited warranty for the product extends the warranty period beginning on
the date of purchase of the product.
(2) The limited warranty applies for 1 year from the original date of purchase and
extends only to the original purchaser of the product and is not assignable or
transferable to any subsequent purchaser/end user. It shall neither exclude nor
limit any mandatory statutory rights of the customer or any of the customer
rights against the seller/dealer of the product.
(3) This warranty is good only to the original purchaser during the warranty period,
but limited to certain country if specied.
(4) The external housing and cosmetics parts shall be free of defects at the time
of shipment and, therefore, shall not be covered under these limited warranty
terms.
(5) Upon request from LG. or their designated service agent the consumer must
provide information to reasonably prove the date of purchase.
(6) Unless other service arrangements have been specied the customer shall
bear the cost of shipping a defective product back to the Customer Service
Department of LG. LG shall bear the cost of shipping the product back to the
consumer after the completion of service under this limited warranty.
(7) During the warranty period LG or its authorised service agent will repair or
replace at LG’s sole discretion a defective product. A repaired or replaced
product will not be given a prolonged or renewed warranty period.
2.WHAT THIS WARRANTY DOES NOT COVER :
(1) Defects OR Damages resulting from use of the product in other than its normal
and customary manner.
(2) Defects or damages from abnormal use, abnormal conditions, improper
storage.
exposure to moisture or dampness, unauthorised modications, unauthorised
connections, unauthorised repair, neglect, abuse, accident, alteration, improper
installation, or other acts which are not the fault of LG, including damage
caused by shipping, blown fuses, spills of food or liquid.
Page 76

(3) Breakage or damage to antennas unless caused directly by defects in material
or workmanship.
(4) A warranty repair if the Customer Service Department at LG or other agreed
service agent was not notied by the consumer of the alleged defect or
malfunction of the product during the applicable limited warranty period.
(5) Products which have had the serial number or IMEI number removed or made
illegible.
(6) This limited warranty is in lieu of all other warranties, express or implied either
in fact or by operations of law, statutory or otherwise, including, but not limited
to any implied warranty of marketability or tness for a particular use.
(7) Damage resulting from use of non-LG approved accessories.
(8) All plastic surfaces and all other externally exposed parts that are scratched or
damaged due to normal customer use.
(9) Products operated outside published maximum ratings.
(10) Products used or obtained n a rental program.
(11) Consumables (such as fuses).
(12) Suspected defects cau
sed by a failure of the cellular network.
3. CONDITIONS :
No other express warranty is applicable to this product.
The DURATION OF ANY IMPLIED WARRANTIES, INCLUDING THE IMPLIED WARRANTY
OF MARKETABILITY, IL LIMITED TO THE DURATION OF THE EXPRESS WARRANTY
HERIN. LG ELECTRONCS INC. SHALL NOT BE LIABLE FOR THE LOSS OF THE USE
OF THE PRODUCT, INCOVINIENCE, LOO OR ANY OTHER DAMAGES, DIRECT OR
CONSEQUENTIAL, ARISING OUT OF THE USE OF, OR INABILITY TO USE, THIS
PRODUCT OR FOR ANY EXPRESS OR IMPLIED WARRANTY, INCLUDING THE IMPLIED
MARKETABLITY APPLICABLE TO THIS PRODUC T.
Some do not allow the exclusive of limitation of incidental or consequential
damages or limitations on how long an implied warranty lasts; so these limitations
or exclusions may not apply to you. This warranty gives you specic legal rights and
you may also have other rights which vary from country to country.
Page 77

Memo
Page 78

Memo
Page 79

Memo
Page 80

Memo
Page 81

Memo
Page 82

Memo
 Loading...