

Page 1
使用手冊
GD550
繁 體 中 文
简 体 中 文
E N G L I S H
P/N : MMBB0379405 (1.0) G
www.lg.com
Page 2

Bluetooth QD ID B016313
Page 3
-
GD550
此手冊中的部份內容可能會因手機程式之改良或不同網絡商提供
的服務而令實際情況有所不同,這並不會另行通知。
恭喜您購買了 LG 先進輕巧的 GD550 手機,本手機設計採用最
新的數碼流動通訊科技。
使用手冊
繁體中文
Page 4
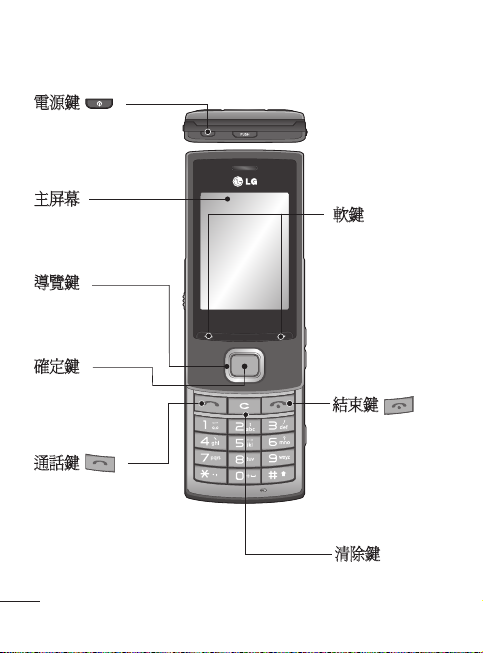
了解您的手機
電源鍵
開啟/關閉手
機。
主屏幕
導覽鍵
確定鍵
選擇功能表選項
並確認操作。
通話鍵
撥打電話號碼及接聽
來電。
2
軟鍵
這些軟鍵會執行
其正上方顯示
的文字所指示的
功能
結束鍵
結束或拒接通
話。 使用此功
能表時將返回至
桌面。
清除鍵
Page 5
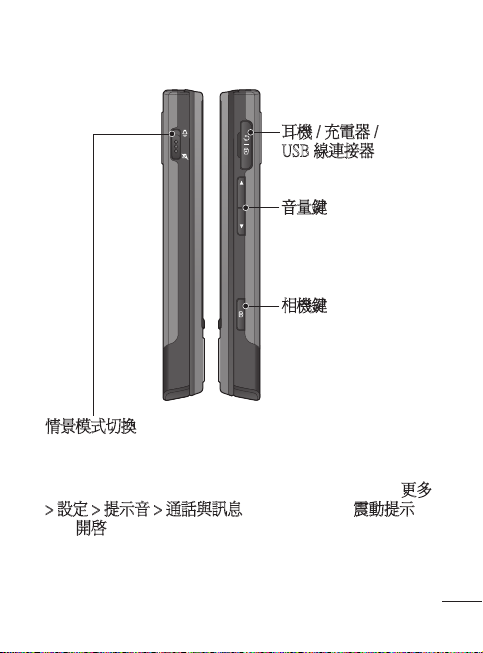
耳機 / 充電器 /
USB 線連接器
音量鍵
控制耳機的音量。
相機鍵
直接從桌面轉至相機
功能表。
情景模式切換
可以向上和向下滑動該開關來開啟或關閉任何屏幕的聲音,
包括鎖定畫面中的來電、音樂、鬧鐘鈴聲等。
此開關僅適用於聲音。 如果想要更改震動設定,轉至更多
> 設定 > 提示音 > 通話與訊息。 預設情況下,震動提示設
定為開啟。
3
Page 6
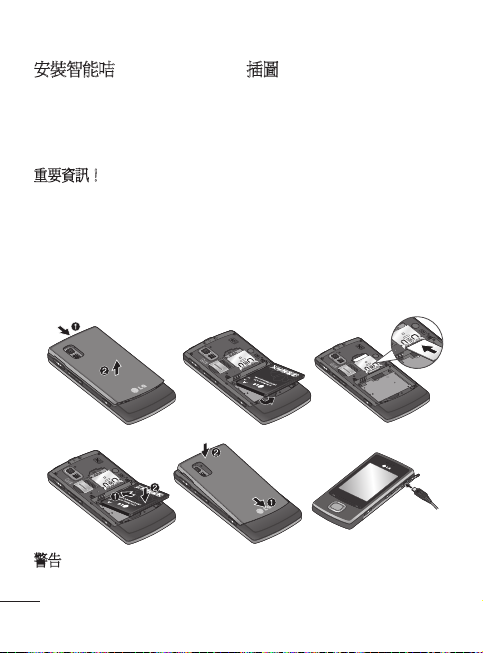
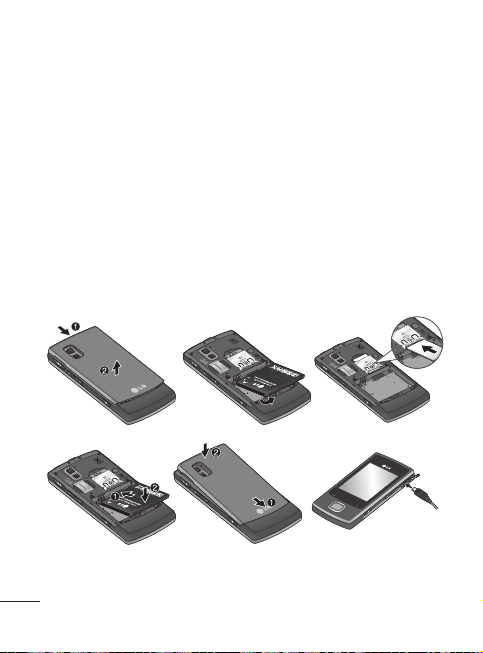
安裝智能咭和為電池充電
安裝智能咭
申請手機網絡後,您將獲得
一張智能咭,當中有申請的
詳細資料,如 PIN 碼、各種
可選服務和其他內容。
重要資訊!
› 由於智能咭容易因刮痕或彎曲
而損壞,因此在使用、插入或
取出智能咭時要加倍小心。 將
所有智能咭放置在兒童無法觸
及的地方。
插圖
1 取下電池蓋
2 取下電池
3 插入智能咭
4 插入電池
5 裝回電池蓋
6 為電池充電
1
4
警告:手機開機時,不要取下電池,因為這樣可能會損壞手機。
4
2
5 6
3
Page 7
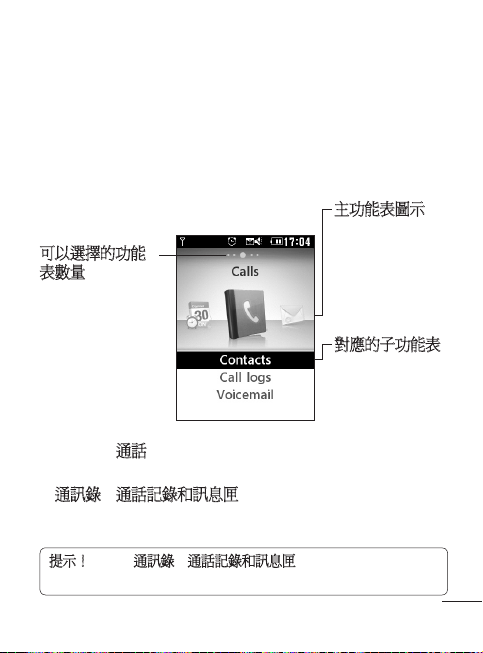
桌面
GD550 手機有一個帶旋轉檢視的簡單易用的桌面,能夠讓您
將功能表從一側移動至另一側。
在桌面的上側有五個點。 每個點均表示一個不同的功能表,
您可以透過按左右導覽鍵在它們中間移動。
主功能表圖示
使用左導覽鍵或
可以選擇的功能
表數量
凸顯的點表示當
前的位置。
桌面總是以通話功能表為開始,您可以從此處向右或向左進
行移動。
在通訊錄、通話記錄和訊息匣功能表中,您可以使用此旋轉
檢視。
提示! 如果在通訊錄、通話記錄和訊息匣功能表中輸入字母或數
字,將會搜尋相應的結果。
右導覽鍵在主功
能表之間移動。
對應的子功能表
使用上導覽鍵或
下導覽鍵來搜尋
子功能表。
5
Page 8
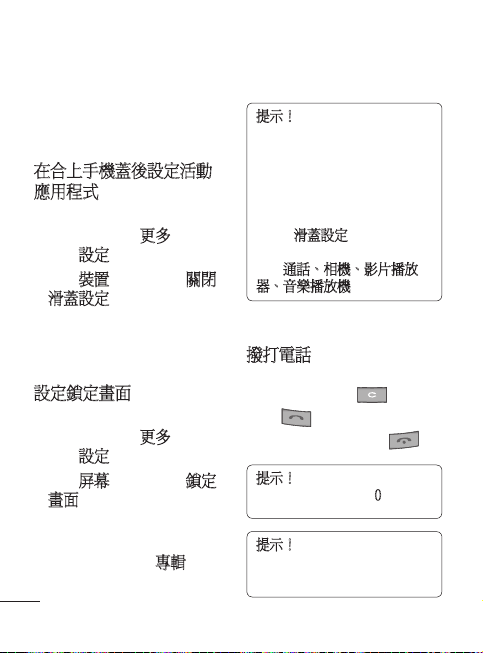
鎖定畫面
合上手機蓋時,通常都將會
終止活動應用程式並顯示鎖
定畫面。
在合上手機蓋後設定活動
應用程式
1 在桌面上使用左導覽鍵或
右導覽鍵選擇更多,然後
選擇設定。
2 選擇裝置,然後選擇關閉
滑蓋設定。
3 按「確定」鍵以標記您不
想在合上手機蓋時終止的
應用程式。
設定鎖定畫面
1 在桌面上使用左導覽鍵或
右導覽鍵選擇更多,然後
選擇設定。
2 選擇屏幕,然後選擇鎖定
畫面。
3 您可以透過按左導覽鍵或
右導覽鍵從預設圖像,或
按屏幕左下部的專輯,從
相片專輯中選擇牆紙圖
6
像。 此外,也可以更改鎖
定畫面的時鐘式樣。
提示! 合上手機蓋時,將會
終止正在使用的功能表並顯
示鎖定畫面。 但是,如果您
正在聆聽音樂或收聽 FM 收音
機或檢視影片,即使合上手
機蓋,也不會終止這些應用
程式。 您可以在設定 > 裝置
> 關閉滑蓋設定中,更改此功
能的設定。 可供選擇的選項
有:通話、相機、影片播放
器、音樂播放機。
通話
撥打電話
1 使用鍵盤輸入號碼。 要刪
除數字,請按 。
2 按 開始通話。
3 要結束通話,請按 。
提示! 要在撥打國際電話時
輸入「+」,請按住 0。
提示! 您可以透過在桌面上
從任何功能表輸入數字轉至撥
號屏幕。
Page 9
使用聯絡人清單撥打電話
1 從桌面選擇通訊錄。
2 使用鍵盤輸入想要通話的
聯絡人姓名或聯絡人所屬
群組名稱的首字母。 例
如,要撥打名為 Office 的
電話,請連接按三次「
6」,選擇首字母「O」。
您可以按鍵盤上的 按
鈕,將輸入模式從字母數
字模式更改為數字模式,
或從數字模式更改為字母
數字模式。
3 從選項中選擇通話,或按
開始通話。
接聽來電和拒接來電
手機響鈴後,按 鍵接聽
來電。
要使響鈴中的手機靜音,只
需將情景模式切換向下滑動
至關閉位置。 如果在開會時
忘記將情景模式更改為靜
音,此功能將派上用場。
按 或使用右導覽鍵選擇
拒絕以拒接來電。
提示! 您可以在轉至更多 >
設定 > 提示音 > 通話與訊息
> 震動提示後,將震動提示設
定為開啟。
使用喇叭
在通話中或撥打電話時,可
以選擇啟用喇叭來啟用喇
叭,啟用喇叭後可以在免提
模式中輕鬆使用手機。 (當
有來電時,您可以選擇接聽
至喇叭來接聽來電。)
如果已啟動喇叭,可以選擇
停用喇叭以恢復正常的手機
通話模式。
快速撥號
您可以為常撥聯絡人指定一
個快速撥號號碼。 要指定快
速撥號,請轉至通訊錄 > 選
項 > 設定 > 快速撥號。
您可以在屏幕上使用旋轉檢
視,為儲存在手機上的所有
聯絡人指定一個號碼。 快速
撥號 1 已設定為留言訊息,
無法更改。
7
Page 10
您可以最多指定 8(編號從 2
至 9)個快速撥號。
一旦指定快速撥號,您可以
透過按住快速撥號號碼開始
通話。
提示! 按住 至
鍵時,如果指定的快速撥號號
碼為空,則您可以直接指定快
速撥號號碼。
檢視通話記錄
從桌面轉至通話,然後選擇
通話記錄。
您可以使用旋轉檢視來檢查
未接來電、已接來電和已撥
電話的通話記錄。 也可以使
用右導覽鍵來檢視先前的通
話記錄。
如果手機未儲存該號碼,也
可以透過輸入聯絡人姓名的
首字母或電話號碼直接轉至
所需聯絡人的通話記錄。
相同聯絡人的持續通話記錄
將會顯示為一個記錄,且該
聯絡人的未接來電、已接來
電或已撥電話的數量將會顯
8
示在聯絡人圖像的下方。 如
果輸入聯絡人的首字母,則
該聯絡人的所有通話記錄都
將會合併為一項。
您可以使用下導覽鍵檢視每
位聯絡人的所有詳細記錄,
包括時間和通話時間。
Page 11
通訊錄
搜尋通訊錄
1 從桌面轉至通話。
2 選擇通訊錄。
3 按右導覽鍵以字母順序搜
尋聯絡人,或輸入聯絡人
姓名的首字母可直接找
到。
如果聯絡人擁有的詳細資訊
(如電話號碼、電子郵件
地址等)條目超過 3 項,則
可以按下導覽鍵來檢視下
一項。
提示! 如果想要將聯絡人清
單作為列表(而非旋轉檢視)
進行檢視,轉至選項 > 設定 >
顯示設定,然後在聯絡人屏幕
將通訊錄圖像設定為關閉。
建立本機號碼咭
此選項將會顯示您的所有相
關資訊。 您可以在此處更改
名稱和提示資訊,如電子郵
件、職位和備忘錄等。
1 從桌面轉至通話。
2 選擇通訊錄。
3 按左導覽鍵至功能表名
稱。 這是預設的名稱。
如果您按新增並提供新名
稱,則將會顯示該名稱(
而不是功能表)。
4 按「儲存」儲存本機號
碼。
新增聯絡人
1 從桌面轉至通話。
2 選擇通訊錄。
3 按左導覽鍵至「新增通訊
錄」並按「選擇」來新加
通訊錄。您也可在選項選
擇「新增通訊錄」。
4 選擇智能咭或內部記憶體
儲存通訊錄,以及是否新
增名字和姓氏。您可以透
過按鍵盤上的 按鈕來
更改輸入模式(如大/小寫
或數字)。
9
Page 12
5 聯絡人圖像預設為隨機指
定,您可以更改聯絡人的
圖片。 如果想要從指定列
表中選擇圖片,按右導覽
鍵。 按左導覽鍵一次可從
相片專輯中選擇,按左導
覽鍵多次可拍攝圖片並直
接使用圖片。 如果選擇了
特大尺寸的聯絡人圖像,
可以進入剪裁屏幕,根據
需要剪裁圖像,然後將圖
像設定為聯絡人圖像。
提示! 當您從桌面拍照並在
「設定」功能表中將圖像大小
設定為通訊錄時,能夠獲得最
大尺寸的聯絡人圖片。
6 儲存電話號碼。
當您新增聯絡人或新群組
時,屏幕上的點將會逐個
增加。
7 選擇 + 更多,如果您需要
其他資訊(如電子郵件、
鈴聲或主頁等)的話。
10
提示! 如果想要儲存聯絡人
的電子郵件地址,可以透過選
擇更多功能表中的電子郵件,
以及按屏幕左下部的選項並
從列表中選擇一個來輕鬆新
增電子郵件地址結尾。 提供
的選項有:@hotmail.com、@
msn.com、@yahoo.com、@
gmail.com。
新增聯絡人至群組
您可以按群組來儲存和管理
通訊錄(如同事和家人)。
要新增群組,按通訊錄功能
表中的左軟鍵轉至選項並選
擇新群組。 您可以選擇是否
將群組新增至內部記憶體或
智能咭,以及是否命名群組
並設定群組的鈴聲。
選擇屏幕右下部的儲存後,
屏幕上將會彈出提示訊息要
求您新增成員。 您可以按此
訊息中的「確定」鍵,直接
將成員新增至群組。 也可以
使用右導覽鍵或左導覽鍵來
搜尋聯絡人清單。
Page 13
訊息
GD550 手機具備與 SMS(文
字訊息服務)、MMS(多媒
體訊息服務)、電子郵件及
網絡服務訊息相關的功能。
檢視訊息
1 從桌面轉至訊息。
2 選擇訊息匣。
3 訊息將會顯示為旋轉檢
視。 首先將會在下方顯
示最近收到或已發送的訊
息。 要檢視右側的訊息,
可以按聯絡人姓名查看訊
息記錄。 開始將會顯示
最近收到訊息的聯絡人姓
名。 您也可以透過輸入聯
絡人姓名的首字母,直接
檢視某些聯絡人的訊息。
在最左側,您可以查看儲
存未發送訊息的草稿資料
夾。
提示! 如果有未讀訊息,將
會在草稿資料夾的後面顯示「
新訊息」資料夾。
4 透過按下導覽鍵,可查看
聯絡人收發的所有訊息的
詳細記錄。
黃色訊息表示新訊息。 綠
色表示已收到的訊息,
而灰色則表示已發送的
訊息。
提示! 您可以透過按
來展開和折疊訊息顯示。 也
可以在更多 > 設定 > 訊息 >
訊息顯示中,選擇展開檢視或
摺疊檢視作為預設顯示。
11
Page 14
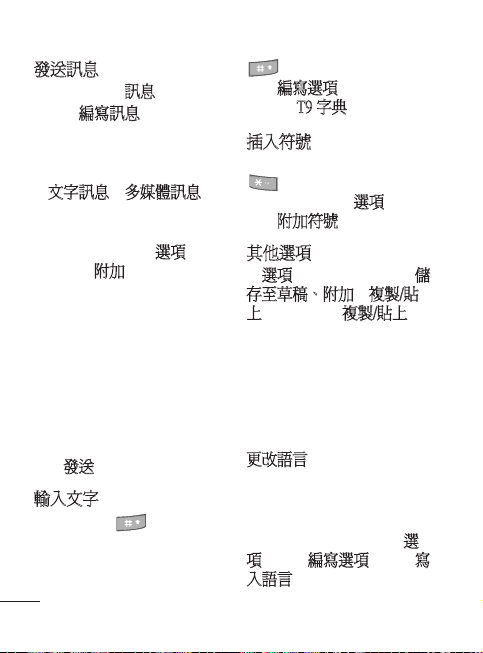
發送訊息
1 從桌面轉至訊息。
2 選擇編寫訊息以發送文字
訊息或多媒體訊息。
3 新的訊息編輯器將會開
啟。 訊息編輯器可以合併
文字訊息和多媒體訊息。
訊息編輯器的預設設定為
文字訊息。
4 選擇屏幕底部的選項,然
後選擇附加以新增圖像、
影片、聲音、文字範本、
多媒體範本、名稱及號碼
等。
5 按「確定」鍵後選擇發送
到以新增收件者。 您可
以輸入聯絡人姓名包括的
任何字母或按「確定」鍵
從聯絡人清單中選擇聯絡
人。
6 按發送。
輸入文字
可以透過按 來更改文字
輸入方法,可供選擇的輸入
方法有 ABC/Abc/abc/123等。
如果想要使用 T9 模式,按住
12
鍵。 或者,按左軟鍵並
選擇編寫選項,也可以開啟
或關閉 T9 字典。
插入符號
如果想要插入符號,首先按
,然後才可選擇符號。
或者,也可以按選項,然後
選擇附加符號。
其他選項
在選項中,您也可以使用儲
存至草稿、附加和複製/貼
上。 如果使用複製/貼上,可
以在編寫屏幕中選擇所輸入
的部分或全部文字,並按照
需要可進行多次複製和貼上
的操作。 在編寫電子郵件或
建立備忘錄時,也可以使用
此功能。
更改語言
GD550 手機可支援多種語
言。
有兩種方法可以從編寫屏幕
更改寫入語言。 可以按選
項,轉至編寫選項並選擇寫
入語言,然後設定所需的語
Page 15
言。 或者,只需按住
鍵。 編寫選項可能會依所選
語言而有所差異。
例如,如果選擇 作為
寫入語言,可以按選項 > 編
寫選項 > 來使用
韓語鍵盤。
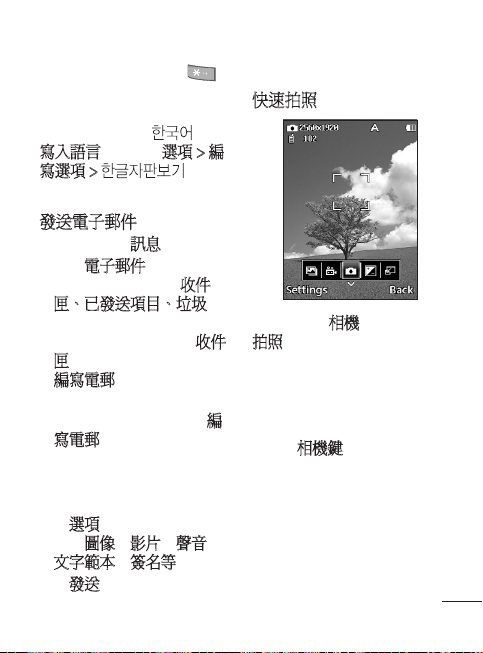
發送電子郵件
1 從桌面轉至訊息。
2 選擇電子郵件,然後選擇
帳戶。 資料夾(如收件
匣、已發送項目、垃圾
等)的顯示方式就像桌面
顯示旋轉檢視一樣。 收件
匣資料夾顯示於第一位,
編寫電郵功能表顯示於最
靠左側。
3 連續按左導覽鍵以選擇編
寫電郵。
4 輸入收件者地址并撰寫標
題。
5 輸入您的訊息。
6 按選項,然後選擇附加以
新增圖像、影片、聲音、
文字範本及簽名等。
7 按發送可發送您的電子郵
件。
相機
快速拍照
從桌面轉至相機,然後選擇
拍照。
或者,只需按手機右側的相
機鍵。
1 水平握住手機,將鏡頭對
準拍攝對象。
2 輕按相機鍵,對焦方塊將
會顯示在取景器屏幕的中
央。
3 定位手機,以便您看到對
焦方塊中的對象。
4 當對焦方塊變綠,則表示
相機對焦完成。
13
Page 16
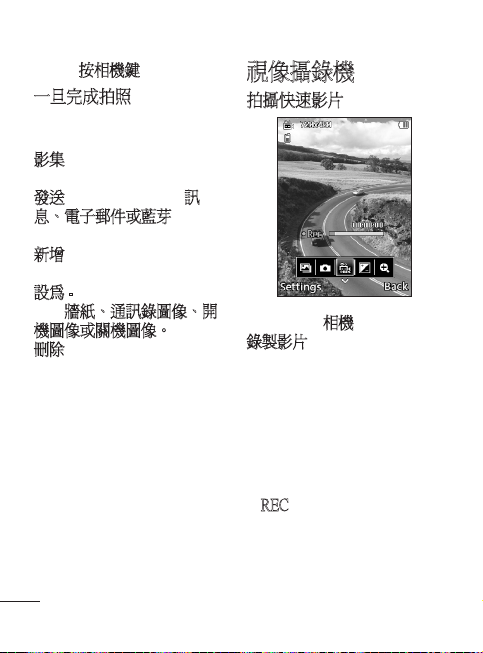
5 再次按相機鍵。
一旦完成拍照
拍攝的相片將會顯示在屏
幕上。
影集 - 選擇該選項可檢視影
集。
發送 - 選擇該選項可經訊
息、電子郵件或藍芽發送
相片。
新增 - 選擇該選項可拍攝新
的相片。
設為 - 選擇該選項可將圖像
用作牆紙、通訊錄圖像、開
機圖像或關機圖像。
刪除 - 選擇該選項可刪除圖
像。
14
視像攝錄機
拍攝快速影片
從桌面轉至相機,然後選擇
錄製影片。 或者,您可以按
住手機右側的相機鍵。
1 將會在屏幕上顯示視像攝
錄機的取景器。
2 水平握住手機,將鏡頭對
準拍攝對象。
3 按相機鍵或「確定」鍵一
次開始錄製。
4 REC 將會顯示在取景器底
部,還有一個計時器顯示
影片長度。
5 重複按相機鍵或「確定」
鍵停止錄製。
Page 17
拍攝影片之後
將在屏幕上顯示一張靜態影
片圖像。
影集 - 選擇該選項可檢視影
集。
播放 - 選擇該選項可播放影
片。
新增 - 選擇該選項可拍攝新
的影片。
發送 - 選擇該選項可經訊
息、電子郵件或藍芽發送
影片。
刪除 - 選擇該選項可刪除影
片。
記事簿
鬧鐘
從桌面轉至記事簿,然後選
擇鬧鐘。
從鬧鐘屏幕中,按左軟鍵可
開啟或關閉鬧鐘,並設定鬧
鐘開始響鈴的時間。 設定
時間後,GD550 手機將會通
知您距離鬧鐘響鈴還有多少
時間。
日曆
從桌面轉至記事簿,然後選
擇日曆。 在當前日期上將會
標有一個方形游標。 您可以
使用導覽鍵將游標移動至其
他日期。 按「確定」鍵可檢
視當日的日程表。
如果沒有任何日程表,可以
按新增日程表來新增日程表
並可輸入有關資訊。 手機將
會在您設定特定的日程表項
目時發出鬧鐘提示音。
15
Page 18
備忘錄
從桌面轉至記事簿,然後選
擇備忘錄。
1 選擇屏幕上的新增備忘錄
以建立新的備忘錄。
2 輸入備忘錄,並按「確
定」鍵以儲存。 將會新增
備忘錄,並且屏幕會顯示
所新增的備忘錄。
可以使用導覽鍵搜尋備忘
錄。
在鎖定屏幕顯示備忘錄
1 使用左導覽鍵或右導覽鍵
選擇備忘錄,然後按左軟
鍵開啟選項。
2 選擇在鎖定屏幕顯示,然
後會將紅色大頭針附加到
備忘錄。
3 您可以在合上手機蓋後查
看備忘錄。 如果想要從屏
幕移除備忘錄,按選項並
選擇從鎖定屏幕移除。
16
更多
新聞
進入此功能表後,將會顯示
天氣預測屏幕。 如果選擇
「連接」鍵,則可以查看更
多詳細的天氣資訊。 或者,
可以按右導覽鍵查看新聞。
如果在我的新聞中按「新
增」鍵,可新增所需要的
RSS「簡易內容匯集」讀取器
搜集更多新聞摘要,或在上
網時將它儲存為我的摘要。
也可以按左軟鍵使用選項來
設定更新行程表。
應用程式
• 音樂
您可以按演出者、專輯和類
型來播放歌曲,並對其進
行分類,或建立我的播放
列表。
正在播放 - 在播放 BGM 的同
時才會顯示此功能表。 您可
以使用多種選項(如新增至
播放列表、等級等),並按
屏幕左下部的選項選擇設定
Page 19
來更改重複、隨機播放和均
衡器設定。
注意:音樂檔案可能受版權和知
識產權法的保護。 請確保您在下
載或複製檔案之前,遵守有關實
質性法律的適用使用條款。
• FM 收音機
LG GD550 手機配備內置 FM
收音機功能,您在外出途中
可以調諧至最愛的電台進行
收聽。 如果按左軟鍵,您可
以使用編輯頻道、新增頻道
和編輯電台名稱選項。 如果
按「確定」鍵,可以查看頻
道列表。 在頻道列表中,您
也可以設定頻道並重新調整
設定。
注意:您必須偑戴耳機才能收聽
電台。 將耳機插入手機右側的耳
機插孔。
• 互聯網
您可以存取互聯網。 互聯網
可讓您在手機上快速、盡情
享受遊戲、音樂、新聞、體
育和娛樂等。 無論您在何
地,無論您在做什麼。
注意:連線至這些服務並下載內
容時,會產生其他費用。 請向網
絡供應商諮詢收費詳情。
• Google 地圖
檢查目前的位置和交通,並
接收到目的地的指示。
• 我的檔案
您可以在此功能表中存取
數據。
將會在全部標籤中顯示所有
數據,如果按右導覽鍵,僅
可檢查內部記憶體數據。
17
Page 20

工具
• 計算機
計算機功能能讓您進行加、
減、乘和除運算。 您可以使
用鍵盤輸入數字和運算符。
使用 鍵可刪除數字。
對於更複雜的計算,按選
項並在 +/-、sin、cos、tan、
log、ln、exp、sqrt、deg、
rad、x^y 或 X^2 之間進行
選擇。
• 語音備忘錄
使用語音備忘錄錄製語音備
忘錄或其他聲音。
按「選擇」鍵開始錄製。
按左軟鍵可暫停錄製。 要繼
續錄製,再次按該按鈕。
要停止錄製,按「確定」
鍵。 將會自動儲存錄製的備
忘錄。
選項 - 如果按選項,可使用
播放、刪除、設為鈴聲或訊
息提示音、經由訊息、電子
郵件或藍芽發送選項。
18
• 秒錶
此功能表可記錄某個活動已
進行的時間。 將會顯示單個
來回(單圈)時間(最多 99
次)的時間,並且也會顯示
總時間。
• 單位轉換器
此功能可將任何測量數據轉
換至所需的單位。
可以轉換 7 種類型的單位:
匯率、面積、重量、長度、
溫度、體積和速度。
• 世界時鐘
世界時鐘功能可提供世界主
要城市的時間資訊。 您可
以按左軟鍵新增城市,也可
使用設為次要城市、編輯目
前日期及時間、夏令時間、
時鐘類型、刪除和刪除全部
選項。
Page 21
設定
• 裝置
(更多 > 設定 > 裝置)
您可以個人化裝置設定。 選
擇想要更改的功能表並設
定值。
日期和時間
您可以設定與日期和時間相
關的功能。
語言
您可以將用於顯示的語言設
定更改為主要語言,並將用
於寫入文字的語言更改為寫
入語言。
安全
更改安全設定,以安全保護
GD550 手機和重要資訊。
鎖定裝置 - 選擇鎖定手機的
時間。
鎖定應用程式 - 選擇要從列
表中鎖定的功能表。
PIN 碼要求 - 選擇開啟手機時
需要輸入的 PIN 碼。
更改密碼 - 更改 PIN 碼、
PIN2 碼、安全密碼。
記憶體資訊
您可以使用記憶體資訊來確
定每個記憶體的使用情況,
並查看可用的空間:內置共
用記憶體、內置預留記憶
體、智能咭記憶體和主要儲
存裝置設定。
電源節省
選擇可切換電源節省模式:
開啟或關閉。 如果設定為開
啟,即可節省電池電力。
19
Page 22
飛航模式
使用此功能可開啟飛航模
式。 開啟飛航模式後,您將
無法撥打電話、連接至互聯
網或發送訊息。
關閉滑蓋設定
您可以在合上手機蓋時設定
活動應用程式。
重設設定
使用重設設定可將所有設定
都重設定為原廠預設值。 您
需要安全密碼,才能啟用此
功能。 預設的安全密碼為「
0000」。
20
• 提示音
(更多 > 設定 > 提示音)
您可以選擇提示音並調節裝
置的音量。
您可以從下列選項中進行
選擇:
通話與訊息
其他鈴聲
• 屏幕
(更多 > 設定 > 屏幕)
您可以更改手機畫面的設
定。
鎖定畫面
您可以設定鎖定畫面上的牆
紙和時鐘。
字體
您可以設定字體式樣和字型
大小。
背光燈
您可以設定屏幕背光燈保持
亮起的時間。
開機圖像
您可以設定開機的圖像。
Page 23
關閉圖像
您可以設定關機的圖像。
• 通話
(更多 > 設定 > 通話)
您可以更改通話設定。
通用設定
您可以設定與一般通話設定
相關的功能:顯示來電者
ID、來電拒接清單、自動重
撥、藍芽接聽模式等。
通話時間
您可以檢查通話的時間。 也
可以在進入安全模式後,
透過按左軟鍵來重設通話
時間。
數據用量
您可以檢視數據用量。 也可
以在進入安全模式後,透過
按左軟鍵來重設數據用量。
通話費用
您可以檢查最後通話
單位或所有通話單位。 或
者,設定通話費用和設定限
制。 也可以在進入 PIN2 碼
後,透過按左軟鍵來重設最
後通話和所有通話。
來電轉駁
您可以選擇將通話重新路由
至另一個號碼:所有通話,
線路繁忙時等。如果按左軟
鍵,可以選擇停用、停用全
部等。
通話限制
您可以限制撥出電話和來
電。
固定撥號號碼
您可以選擇固定撥號號碼,
以開啟並編譯可從此手機撥
出的號碼列表。 將需要輸入
從網絡商處獲得的 PIN2 碼。
僅可從手機撥出固定撥號列
表包含的號碼。
來電等候
您可以將此選項設定為在通
話過程中通知來電。
21
Page 24

• 訊息
(更多 > 設定 > 訊息)
訊息顯示
您可以選擇不同的顯示選項
以便查看訊息。
文字訊息
您可以設定與文字訊息相關
的功能。
多媒體訊息
您可以設定與多媒體訊息相
關的功能。
電子郵件
您可以設定與電子郵件相關
的功能。
簽名
您可以建立文字簽名
可將符號和文字作為簽名的
一部分。
服務訊息
您可以設定與服務訊息相關
的功能,包括服務安全。
22
訊息計數器
您可以設定在某特定時段獲
知有關已發送訊息的資訊。
如果選擇重新設定,將會初
始化數據。
資訊廣播
您可以設定與資訊廣播相關
的功能。
- 區域廣播開啟/關閉
- 頻道:建立、檢視或編輯頻
道以接收資訊訊息。
- 語言:選擇資訊訊息使用
的語言。
Page 25
• 互聯網
(更多 > 設定 > 互聯網)
網絡設定
您可以檢視互聯網設定。 也
可以使用左軟鍵來新增、刪
除和編輯互聯網設定。 但
是,無法刪除或編輯預設
設定。
外觀設定
您可以選擇瀏覽器的外觀
設定。
(如字元編碼、捲動控制、
字型大小、顯示圖像和 Java
指令碼。)
快取記憶
存取過的網頁都將會儲存在
手機的記憶體中。
- 清除快取記憶:全部清除
記憶體中的所有快取記憶
數據。
Cookies
存取過的有關服務的資訊都
將會儲存在 Cookies 中。
- 清除 Cookies:移除全部記
憶體中的全部 Cookies。
安全
- 認證:您可以查看認證列表
並檢視其詳細資料。
- 清除工作階段:清除安全工
作階段。
• 藍芽
(更多 > 設定 > 藍芽)
為 GD550 手機設定藍芽功
能。 您可調整是否向其他裝
置顯示您的手機,或搜尋已
與手機配對的裝置。
藍芽開啟/關閉
您可以開啟或關閉藍芽。
搜尋新裝置
GD550 手機將會搜尋裝置。
完成搜尋後,將會在屏幕上
顯示新增和重新整理。 選擇
想要配對的裝置,在預設狀
態下,手機將會在每次連接
時建立一個密碼。
然後,手機將會連接至其他
裝置。
密碼保護藍芽連接已準備
就緒。
23
Page 26
• 連接
(更多 > 設定 > 連接)
網絡商已經設定連接設定,
因此您可以立即開啟新手
機。 如果要更改任何設定,
請使用此功能表。 您可在此
功能表設定網絡設定與資料
存取網絡設定。
USB 連接
您可以在手機上選擇 USB 連
接模式以用於不同場合。
- 電腦互聯網:可以使用 USB
線將手機用作電腦的數據
機。
- 大容量儲存:選擇此選項,
然後將手機連接至電腦,將
檔案拖放至 GD550 手機可
移除裝置資料夾。
- PC Suite:選擇此選項,然
後在電腦同步模式中將手機
連接至電腦。
- 每次詢問:選擇此選項,每
當手機連接至電腦時系統均
將會提供選項,以讓您選擇
連接模式。
24
• 說明
(更多 > 設定 > 說明)
您可以檢視更多有關 GD550
手機的詳細資訊。
軟件升級
LG
行動手機軟件升級程式
有關安裝和使用本程式的更
多資訊,請瀏覽 http://www.
lgmobile.com
此功能可讓您在網上快捷方
便地將軟件升級到最新版
本,而無需到訪我們的服務
中心。 由於行動手機軟件升
級程式在升級過程中需要用
戶格外留意,因此,在繼續
升級之前,請務必要仔細閱
讀各步驟中顯示的任何說明
和注意事項。 請注意,在升
級過程中移除 USB 數據傳輸
線或電池可能會對行動電話
造成嚴重損壞。 由於製造商
不會為升級過程中的數據損
失承擔任何責任,因此建議
您事先備份好任何重要資料
以策安全。
Page 27
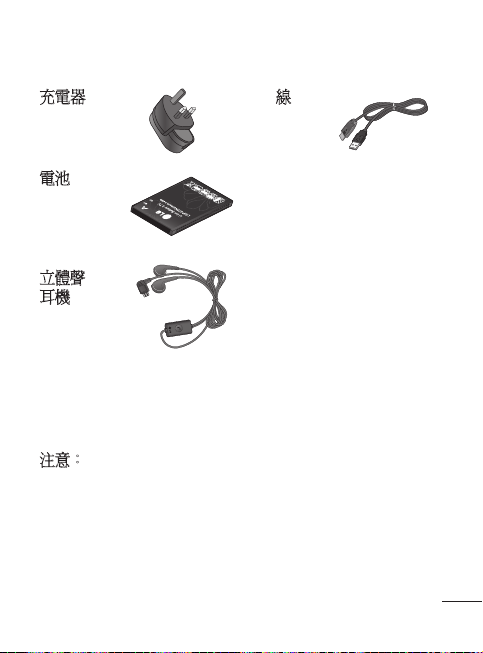
配件
以下配件隨 GD550 手機一起提供。
充電器
電池
立體聲
耳機
注意:
• 只可用原裝LG 配件。
• 不使用原裝LG 配件,保養可能失效。
• 配件在不同地區可能會有所不同,請向我們的地區服務公司或
代理商瞭解更多詳情。
USB 線
25
Page 28
環境溫度
Declaration of Conformity
Declaration of Conformity
GD550
The conformity to above standards is veried by the following Notied Body(BABT)
BABT, Forsyth House, Churcheld Road, Walton-on-Thames, Surrey, KT12 2TD, United Kingdom
Notied Body Identication Number : 0168
I hereby declare under our sole responsibility
that the product mentioned above to which this
declaration relates complies with the above mentioned
standards and Directives
Name Issued Date
Seung Hyoun, Ji / Director
Signature of representative
Declaration
Supplementary Information
Applicable Standards Details
Product Details
Supplier’s Details
Trade Name
Model Name
Product Name
Address
Name
LG Electronics Inc
: LG Electronics Inc. LG Twin Towers 20,
Yeouido-dong, Yeongdeungpo-gu, Seoul, Korea 150-721
LG Electronics Logistics and Services B.V.
Veluwezoom 15, 1327 AE Almere, The Netherlands
GSM 850 / E-GSM 900 / DCS 1800 / PCS 1900 Quad Band and WCDMA Terminal Equipment
LG
R&TTE Directive 1999/5/EC
最高: +55°C(放電)
+45°C(充電)
最低:-10°C
Page 29
安全及有效使用準則
請讀取以下簡易的使用規
則。 違反這些準則可能會發
生危險或觸犯法律。
射頻能量暴露準則
無線電波暴露及比吸收率
(SAR) 資訊。本手機型號
GD550 已為遵守無線電波暴
露的應用安全要求而設計。
此要求包括可確保市民安全
的設計準則,範圍涵蓋各年
齡階層與所有的健康狀況。
• 無線電波暴露指引的量
度單位叫作比吸收率或
SAR。 SAR 測試使用標準
方法進行,用手機以在所
有使用的頻帶最高的合格
電源水平傳輸。
• 雖然不同型號的 LG 電話
的 SAR 水平有所差異,
但所有這些電話都為達到
無線電波暴露的相關指引
而設。
• 國際非離子化輻射保護委
員會 (ICNIRP) 建議的 SAR
限制,即平均 10 克組織
2W/kg。
• 經 DASY4 測試,本型號
• 採用了電氣與電子工程師
產品護理及維修
• 請勿拆開此裝置。 需要
• 根據 LG 的政策,保固期
手機在耳邊使用的最高
SAR 值為 1.45 W/kg(10
克),攜帶於身上時則為
1.31 W/kg(10 克)。
學會 (IEEE) 建議的 SAR
限制,即平均 1 克組織 1.6
W/kg 的國家/地區居民的
SAR 數據資訊。
警告
請僅使用經認可適用於此特定型號
手機的電池、充電器及配件。 使
用其他種類的配件可能會導致手
機的認可或保養失效,並可能引
致危險。
對手機進行維修時,請將
其帶到合資格的維修技
師處。
內的維修可能會包括更換
部件或主板,這些用於更
換的部件或主板可能是新
亦可能是返修的,但其功
能與被更換的部件相同。
27
Page 30

安全及有效使用準則
• 請遠離如電視、收音機或
個人電腦等電器產品而使
用手機。
• 裝置需遠離發熱來源,如
散熱器或烹調器具。
• 請勿摔落手機。
• 請勿讓此裝置遭機械震動
或電擊。
• 請於任何有特殊限制的地
方關閉手機。 例如,請
勿在醫院內使用手機,否
則,它可能會對敏感的醫
療設備造成影響。
• 請勿以潮濕的雙手對充電
中的手機進行操作。 這可
能會引致觸電和造成手機
嚴重損壞。
• 請不要在易燃材料附近為
手機充電,因為充電期間
手機會發熱並導致火災。
• 使用乾布清潔裝置表面(
請勿使用如苯、稀釋劑或
酒精等溶劑)。
• 切勿在柔軟家具上為手機
充電。
28
• 手機應在通風良好的環境
中充電。
• 請勿讓此裝置接觸過多煙
或塵埃。
• 請勿將手機置於信用卡或
車票附近,這可能會影響
磁帶上的資料。
• 請勿以尖銳物件敲打熒
幕,否則可能會對手機造
成損毀。
• 請勿將手機暴露於液體、
濕氣或潮濕環境中
• 請小心使用配件,如耳
機。 如非必要,請勿觸及
天線。
• 切勿在高濕度(如泳池、
溫室、日光浴室)或熱帶
環境中使用手機或配件,
這可能會對手機造成損壞
和使保用失效。
有效手機操作
電子裝置
所有手機都可能會因為受到
干擾而影響效能。
Page 31

• 請勿在未得到批准下在醫
療儀器附近使用您的手
機。 避免將手機放置在
起搏點上,例如您的胸部
口袋。
• 手機可能影響到某些助
聽器。
• 輕微干擾可影響電視、收
音機、個人電腦等。
道路安全
檢查您駕駛時地區使用手機
的法例及規則。
• 駕駛時請勿使用手提手
機。
• 請專心一致駕駛。
• 如有免提耳機,請使用免
提耳機。
• 若有駕駛條例要求,請駛
離馬路並停泊好汽車後才
撥打或接聽電話。
• RF 能量可能會影響車內某
些電子系統,例如車載立
體聲音響及安全設備等。
• 如果您的汽車配有氣囊,
切勿讓已安裝的無線設備
或手提無線設備阻擋氣
囊。 它有可能因使用不當
而失靈或造成嚴重損傷。
• 如果在外出時聆聽音樂,
請確保將音量設定至合適
水平,以便可以對周圍環
境產生警覺。 這在馬路旁
邊時尤為必要。
避免損害您的聽覺
如果長時間以較大音量收
聽,可能會對聽覺造成損
害。 所以我們建議開啟或
關閉手機時,不要將它放於
太近耳朵。 我們亦建議將
音樂及通話音量設定至合適
水平。
爆破地區
請勿在進行爆破時使用手
機。 請嚴格遵守相關限制、
規定或條例。
潛在爆炸氣壓
• 請勿在燃料補給點使用
手機。
• 請勿在燃料或化學物質旁
使用。
29
Page 32

安全及有效使用準則
• 請勿使用放置了手機及配
件的汽車傳輸或放置易燃
氣體、液體或爆炸物。
在飛機上
無線裝置可引致飛機干擾。
• 登機前,請先關掉手機。
• 未經地勤人員批准,請勿
在陸上使用手機。
兒童
請將手機放在兒童接觸不到
的安全地方。 手機包含微細
零件,如果拆開,可能造成
哽咽危險。
緊急呼叫
緊急電話可能在某些流動網
絡中不能發出。 因此,您不
應僅倚賴手機作為緊急電話
方式。 請向您本地的服務供
應商查詢。
電池資料及保護
• 充電前,您無須完全放
電。 跟其他電池系統不
同,沒有記憶影響可緩和
電池的效能。
30
• 只使用 LG 電池及充電
器。 LG 充電器是為將電
池壽命擴至最大而設。
• 請勿拆解電池組或造成電
池組短路。
• 請保持電池組的金屬接點
清潔。
• 當電池不再提供可接受的
效能,請更換電池。 電池
組可重充數百次直至需要
更換為止。
• 如果電池很久沒有使用
來擴展其用量,需重充
電池。
• 請勿直接將充電器暴露於
日光下或高濕度環境(如
浴室)中。
• 請勿把電池放置在熱或冷
的地方,這可損害電池
效能。
• 若使用類型不當的電池,
則有發生爆炸的危險。
• 請根據製造商的指示來處
理廢棄電池。 請盡量回收
利用。 請勿作為家庭廢棄
物處理。
Page 33

• 如果需要更換電池,請帶
同手機前往最近的授權
LG 電子產品服務點或經
銷商以尋求協助。
• 請謹記在手機完全充電後
從牆壁插座拔出充電器,
避免充電器造成不必要的
電力損耗。
• 電池的實際壽命將取決於
網絡設定、產品設定、
使用模式、電池及環境
條件。
31
Page 34

Page 35

-
GD550
此手册中的部份内容可能会因手机程序之改良或不同网络商
提供的服务而令实际情况有所不同,这并不会另行通知。
恭喜您购买此款功能先进、外观小巧的 LG GD550 手机,它
采用了最新的数字移动通信技术,专注于为您提供便利的操
作。
用户手册
简体中文
Page 36

开始了解您的手机
电源键
开机/关机。
主屏
导航键
确定键
选择菜单选项并
确认操作。
通话键
拨打电话号码并接听
来电。
2
软键
这两个按键分别
执行它们上方的
屏幕文字所指示
的功能。
结束键
挂断或拒接来
电。 使用菜单
时返回主屏。
清除键
Page 37

耳机 / 充电器 /
USB 数据线接口
音量键
控制听筒音量。
相机键
直接从主屏转到相机
菜单。
情景模式切换
通过向上或向下滑动任何屏幕(包括锁定屏幕)打开或关闭
声音。 (来电、聆听音乐、闹铃等等)
这仅适用于声音。 如果要更改振动的设置,转到更多 > 设
置 > 按键音 > 通话和信息。 默认情况下,振动提示设为
开。
3
Page 38

安装 SIM 卡和充电
安装 SIM 卡
当您预定了手机网络后,您
将得到一个 SIM 卡,该卡上
载入了您的预定详细信息,
如您的 PIN 码、任何可用的
可选服务以及其他服务。
重要!
› SIM 卡很容易因刮擦或弯折而
损坏,因此,在处理、插入或
取出卡时,请小心谨慎。 请将
所有 SIM 卡置于儿童无法接触
的地方。
1
2
说明
1 打开电池盖
2 取出电池
3 插入 SIM 卡
4 插入电池
5 关闭电池盖
6 充电
3
4
警告:手机开机时,不要取出电池,这可能会损坏您的手机。
4
5 6
Page 39

主屏
GD550 提供简单易用的主屏和旋转视图,允许您来回移动菜
单。
主屏上方有五个圆点。 每个圆点表示一个不同的菜单,通过
按向右和向左导航键您可以在菜单之间移动。
主菜单图标
使用左或右导航
您可以选择的菜单数
突出显示的点显示您
当前的位置。
主屏始终以通话菜单为第一界面,您可以从此处向右或向左
移动。
在电话簿、通话记录和信息框菜单中,您可以使用此旋转视
图。
提示! 如果在电话簿、通话记录和信息框菜单中输入字母或数
字,将搜索到相应的结果。
键在主菜单之间
移动。
相应的子菜单
使用向上或向下
导航键搜索子菜
单。
5
Page 40

锁定屏幕
当滑盖关闭时,通常处于活
动状态的应用程序将终止,
出现锁定屏幕。
滑下手机滑盖时,设置处于
活动状态的应用程序
1 通过使用主屏上的向左或
向右导航键,然后选择设
置来选择更多。
2 选择设备,然后选择滑盖
下滑设置。
3 按“确定”键标记滑盖关
闭时您不想终止的应用程
序。
设置您的锁定屏幕
1 通过使用主屏上的向左或
向右导航键,然后选择设
置来选择更多。
2 选择屏幕,然后选择锁定
屏幕。
3 按向右或向左导航键,您
可以从默认图像中选择墙
纸图像,或者按屏幕左下
角的相册从相册中选择图
6
纸图像。 您还可以更改锁
定屏幕的时钟样式。
提示! 滑下手机滑盖时,您
正使用的菜单将终止,出现锁
定屏幕。 但是,如果您正在
聆听音乐或 FM 收音机,或者
正在观看视频,即便滑下手机
滑盖,这些应用程序也将不
会终止。 您可以在设置 > 设
备 > 滑盖下滑设置中更改此
功能的设置。 选项包括:通
话、相机、视频播放器、音乐
播放器。
通话
拨打电话
1 使用键盘键入号码。 要删
除一个数字,请按 。
2 按 开始通话。
3 要结束通话,请按 。
提示! 要输入 + 以拨打国际
电话,请按住 0。
提示! 您可通过在主屏的任
何菜单中输入号码转到拨号
屏幕。
Page 41

使用联系人列表拨打电话
1 从您的主屏中选择电话
簿。
2 使用键盘输入您要呼叫的
联系人姓名的第一个字母
或者联系人所属群组的名
称。 例如,要输入
Office,请按三次 6 选择第
一个字符“O”。 按键盘
上的按钮,您可以将输入
模式从字母模式更改为数
字模式 ,反之亦然。
3 从选项中选择通话,或按
开始通话。
接听和拒接来电
当手机响铃时,请按 接
听来电。
要在手机响铃时静音,关闭
情景模式切换即可。 如果您
在开会时忘记将情景模式更
改为静音,这非常有帮助。
按 或使用向右导航键选
择拒绝拒接来电。
提示! 转到更多 > 设置 > 按
键音 > 通话和信息 > 振动提
示时,您可以将振动提示设
为开。
使用扬声器
在通话过程中或拨打电话
时,您可以通过选择激活扬
声器来激活扬声器,并且您
可以在免提模式下使用手
机。 (当您收到来电时,您
可以通过选择扬声器接听实
现此操作。)
如果扬声器处于活动状态,
选择停用扬声器将恢复标准
手机会话模式。
快速拨号
您可以为常用联系人指定快
速拨号号码。 要指定快速拨
号,请转到电话簿 > 选项 >
设置 > 快速拨号。
您可以使用旋转视图,该功
能允许您在屏幕上为保存在
手机中的任何联系人指定号
码。 快速拨号 1 设置为您的
语音邮件,不能更改。
7
Page 42

您最多可以指定 8 个快速拨
号(编号从 2 到 9)。
一旦指定了快速拨号,您按
住快速拨号号码便可开始
通话。
提示! 按住键 至
时,如果指定的快速拨号号码
为空,您可以直接指定快速拨
号号码。
查看通话记录
从主屏转到通话并选择通话
记录。
使用旋转视图,您可检查未
接来电、已接来电和已拨电
话的通话记录。 使用向右导
航键查看之前的通话记录。
如果输入联系人姓名的第一
个字母或者电话号码(如
果号码未保存在您的手机
中),您还可以直接转到所
需的电话簿通话记录。
同一联系人的连续通话记录
将显示为一条记录。联系人
的未接电话、已接电话或已
拨电话数量显示在联系人图
8
像下方。 如果您键入联系
人的第一个字母,联系人的
所有通话记录显示为一个
项目。
您可以使用向下导航键查看
每位联系人的所有详细记录
(包括时间和通话时间)。
Page 43

联系人
正在搜索联系人
1 从主屏转到通话。
2 选择“电话簿”。
3 按向右导航键按字母顺序
搜索联系人,或输入联系
人姓名的第一个字母直接
查找。
如果联系人有 3 条以上的详
细信息(如电话号码、地址
邮件地址等),您可以按向
下导航键查看下一条信息。
提示! 如果要以列表而不是
旋转视图的形式查看联系人列
表,请转到联系人屏幕上的选
项 > 设置 > 显示设置并将联
系人图像设为关。
创建我的联系人卡
此选项显示您的信息。 在
此,您可以更改姓名以及修
改信息,如电子邮件、职务、
备忘录等等。
1 从主屏转到通话。
2 选择电话簿。
3 按左导航键两次选择 Me。
这是默认名称。 如果您按
添加并提供新的姓名,将
显示该姓名,而不是 Me。
4 按“确定”键或选择“选
项”并从 SIM 中选择“添
加”,然后您可以从 SIM
中添加您的号码。
添加新联系人
1 从主屏转到通话。
2 选择电话簿。
3 按左导航键一次并按“确
定”键以添加联系人。
您还可以通过选择选项和
选择新联系人来添加新联
系人。
4 选择是将联系人保存到内
存还是 SIM 卡并且添加姓
和名。
按键盘上的按钮,您可以
更改输入模式 (例如
大小写字母或数字)。
9
Page 44

5 默认情况下,联系人图像
是随机指定的。您可以更
换联系人的图片。 如果
要从指定的列表中选择图
片,请按向右导航键。 按
左导航键一次从相册中选
择图片,再次按左导航键
可以拍照以及直接使用图
片。 如果您选择尺寸过大
的联系人图像,您转到裁
切屏幕,因此您可以以根
据需要裁切图像并且将其
设为联系人图像。
提示! 从主屏拍照并且在设
置菜单中将图像大小设置为联
系人,您可以获得最大尺寸的
联系人图片。
6 保存电话号码。
当您添加新联系人或新群
组时,将逐一添加屏幕顶
部的圆点。
7 如果需要添加其他信息,
如电子邮件、铃声或主页
等,请选择+更多。
10
提示! 要保存联系人的电子
邮件地址,通过选择更多菜单
中的电子邮件然后按屏幕左下
方的选项并从列表中选择一
个选项,您可以轻松添加电
子邮件后缀。 选项包括:@
hotmail.com、@msn.com、@
yahoo.com、@gmail.com。
将联系人添加到群组
您可以按“群组”(例如工
作同事和家人)保存并管理
您的联系人。
要添加群组,请通过从“电
话簿”菜单按左软键并选择
新群组转到“选项”。 您可
以选择是将群组添加到内存
还是 SIM卡、为群组命名以
及设置铃声。
选择屏幕右下方的保存时,
屏幕上将弹出要求您添加成
员的提示信息。 您可以从此
信息中按确定键,直接向群
组添加成员。 使用向右或向
左导航键搜索联系人列表。
Page 45

信息
GD550 包含与短信(短信服
务)、彩信(多媒体信息服
务)、电子邮件,以及网络
服务消息相关的功能。
查看信息
1 从主屏转到信息。
2 选择“信息”框。
3 信息将显示为旋转视图。
最近接收或发送的信息将
先显示在下方。 在右手
边,您可以按联系人姓名
查看信息历史记录。 最近
信息的联系人姓名将先显
示。 您还可以通过输入联
系人姓名的第一个字母,
直接从某个电话簿中查看
信息。 在最左边,您可看
到草稿箱文件夹,其中存
储了未发送的信息。
提示! 如果您有未读信息,
草稿箱文件夹后面将显示“新
信息”文件夹。
4 按向下导航键,您可以查
看指定联系人发送或接收
的所有信息的详细历史记
录。
黄色信息为新信息。 绿色
信息为收到的信息,灰色
信息为已发送的信息。
提示! 按 ,您可以展开
和折叠信息显示。 您可以在
更多 > 设置 > 信息 > 信息显
示中选择展开视图和折叠视图
之间的默认显示。
11
Page 46

发送信息
1 从主屏转到信息。
2 选择写信息以发送短信或
多媒体信息。
3 此时将打开新信息编辑
器。 信息编辑器组合了文
本信息和多媒体信息。 信
息编辑器的默认设置为文
本信息。
4 选择屏幕左下角的“选项”,
然后选择“插入”以添加
图像、视频、声音、文本
模板、多媒体模板、姓名
和号码等等。
5 按“确定”键选择发送至
以添加收件人。 您可以输
入联系人姓名中包含的任
何字母或按“确定”键选
择电话簿从联系人列表中
进行选择。
6 按发送。
12
输入文本
文本输入方法可以通过按
:ABC/Abc/abc/123 进
行更改。
如果要使用 T9 模式,请按住
键。 或者在按左软键并
选择编写选项时,您可以打
开或关闭 T9 字典。
插入符号
如果您要插入符号,请按
,然后您可以选择符
号。 或者您可以按选项,然
后选择插入符号。
其它选项
在选项中,您还可以使用保
存到草稿箱、插入和复制/粘
贴。 如果您使用复制/粘贴,
您可以选择您已输入到书写
屏的部分或全部文本,并且
可根据需要多次复制和粘贴
此文本。 写电子邮件或创建
备忘录时,您也可以使用此
功能。
Page 47

更改语言
GD550 支持多种语言。
有两种方式可以从书写屏上
更改编写语言。 您可以按选
项,转到编写选项,选择编
写语言,然后设置您需要的
语言。 或者,您只需按住
键。 编写选项可能会因
您选择的语言而有所不同。
例如,当您选择 作为
编写语言时,您可以按选项 >
编写选项 > 使用
韩语键盘。
发送电子邮件
1 从主屏转到信息。
2 选择电子邮件,然后选择
账户。 文件夹(例如收件
箱、已发送信息、垃圾箱
等)将显示为旋转视图,
和主屏一样。 收件箱文件
夹将先显示,写电子邮件
菜单是最左侧的菜单。
3 连续按向左导航键,选择
写电子邮件。
4 输入收件人的地址和主
题。
5 输入您的信息。
6 按选项,选择插入以添加
图像、视频、声音、文本
模板、签名等等。
7 按发送,您的电子邮件将
被发送。
13
Page 48

相机
快速拍照
从主屏转到相机并选择拍
照。
或者,您可以短按手机右侧
的相机键。
1 水平拿稳手机,将镜头对
准您要拍摄的物体。
2 轻按相机键,取景器屏幕
的中间会出现一个对焦
框。
3 调整手机位置,以便您能
看到物体处于对焦框中。
4 对焦框变绿时,表示相机
已对好焦。
5 再次按相机键。
14
拍摄照片后
拍好的照片将显示在屏幕
上。
相册 - 选择此选项可查看相
册。
发送 - 选择此选项可通过信
息、电子邮件或蓝牙发送
照片。
新建 - 选择此选项可拍摄一
张新照片。
设为 - 选择此选项可将图像
用作墙纸、联系人图像、开
机图像或关机图像。
删除 - 选择此选项可删除图
像。
Page 49

摄像机
快速摄像
从主屏转到相机并选择录制
视频。 或者,您可以按住手
机右侧的相机键。
1 屏幕上将显示摄像机的取
景器。
2 水平放置相机,将镜头对
准要拍摄的物体。
3 按相机键或“确定”键一
次以开始录制。
4 REC 将显示在取景器底
部,计时器将显示视频长
度。
5 再次按相机键或“确
定”键以停止录制。
拍摄视频后
屏幕上将显示所拍摄视频的
静态图像。
相册 - 选择此选项可查看相
册。
播放 - 选择此选项可播放视
频。
新建 - 选择此选项可拍摄新
视频。
发送 - 选择此选项可通过信
息、电子邮件或蓝牙发送
视频。
删除 - 选择此选项可删除视
频。
15
Page 50

管理器
闹钟
从主屏转到管理器并选择
闹钟。
从“闹钟”屏幕,按左软键
打开或关闭闹钟,并且设置
您想让闹钟停止的时间。 在
设置时间后,GD550 将通
知您闹钟关闭之前的剩余
时间。
日历
从主屏转到管理器并选择日
历。 当前日期上有一方形光
标。 您可以使用导航键将光
标移到另一日期。 按“确
定”键可查看该日期的日
程表。
如果没有日程表,您可以按
新建日程表添加和自定义新
日程表。 如果您已为特定日
程表项目设置了闹钟,手机
将会播放闹钟铃声。
16
备忘录
从主屏转到管理器并选择备
忘录。
1 在屏幕上选择新备忘录可
创建新的备忘录。
2 输入备忘录并按“确
定”键保存。 您的备忘
录将添加到并显示在屏幕
上。
使用导航键搜索您的备忘
录。
在锁定屏幕上显示备
忘录
1 使用向左或向右导航键选
择备忘录,然后按左软键
打开选项。
2 选择显示在锁定屏幕上,
随后红色的回形针将附加
至备忘录。
3 滑盖关闭时,您可以查看
备忘录。 如果要从屏幕中
将其删除,请按选项并选
择从锁定屏幕中删除。
Page 51

更多
新闻
进入此菜单后,天气预报屏
幕将会显示。 如果选择“确
定”键,您可看到更详细的
天气信息。 或者,您可通过
按右导航键查看新闻。
如果按“我的新闻”菜单下
的确定键,网上冲浪时,你
可以根据所需添加更多源或
将其作为“我的源”进行存
储。 您还可以按左软键使用
选项设置更新日程表。
使用多
• 音乐
您可以播放歌曲、按艺术
家、专辑和流派对歌曲进行
分类或创建播放列表。
当前播放 - 此菜单仅在 BGM
正在播放时出现。 您可以
使用多个选项(例如添加到
播放列表、评级等)并且可
以通过按屏幕左下角的选项
更改设置重复、随机和均
衡器。
备注:音乐文件可能受版权法和
知识产权法的保护。 请确保在下
载或复制文件之前,遵守适用的
物质法律使用条款。
• FM 收音机
LG GD550 内置了 FM 收音
机,因此您在路上也能转到
喜爱的电台并收听无线广
播。 如果按左软键,您可
以使用编辑频道、新建频道
和编辑电台名称选项。 如
果按“确定”键,您可以查
看频道列表。 在频道列表
中,您也可以设置频道和重
置设置。
备注:您必须连接耳机才能收听
无线广播。 将耳机插入手机右侧
的耳机插孔。
17
Page 52

• 互联网
您可以访问互联网。 互联网
为您提供了一个涵盖游戏、
音乐、新闻、体育、娱乐等
更多内容的缤纷世界,您可
以快速通过手机访问。 畅行
无阻、精彩无限。
备注:连接这些服务并下载内容
时,可能会产生额外费用。 查看
网络提供商要求的数据付费。
• Google 地图
检查您当前的位置和交通并
接收目的地的方向指引。
• 我的文档
您可以访问您在此菜单中的
数据。
所有数据都显示在全部选
项卡,并且如果按向右导
航键,您仅可以检查内存
数据。
18
工具
• 计算器
计算器功能允许您执行加、
减、乘、除操作。 您可以使
用键盘输入数字和运算符。
使用 键可删除数字。
对于较复杂的计算,请按选
项,然后在 +/-、sin、cos、
tan、log、ln、exp、sqrt、
deg、rad、x^y 或 X^2 之间
选择。
• 语音备忘录
使用语音备忘录可录制语音
备忘录或其他声音。
按“确定”键开始录制。
按左软键可暂停录制。 要继
续录制,请再按一次。
要停止录制,请按“确
定”键。 手机将自动保存录
制内容。
选项 - 如果按选项,您可以
使用播放、删除、设为铃声
或信息提示音或者通过信
息、电子邮件、或蓝牙发送
选项。
Page 53

• 秒表
可用此菜单记录事件所用时
间。 还可以显示单圈时间长
度(最多 99 次)和总时间。
• 单位换算器
此功能可将任何测量转换为
您需要的单位。
可以转换的单位有 7 种:货
币、面积、重量、长度、温
度、体积/容积和速度。
• 世界时钟
世界时钟功能提供有关世
界各地主要城市的时间信
息。 您可以按左软键添加城
市,也可以使用设为第二个
城市、编辑当前的日期和时
间、夏令时、时钟类型、删
除和全部删除选项。
设置
• 设备
(更多 > 设置 > 设备)
您可以个性化您的设备设
置。 选择要更改的菜单并设
置值。
日期和时间
您可以设置与日期和时间相
关的功能。
语言
您可以更改设为显示屏主语
言和编写文本编写语言的
语言。
安全性
更改安全设置以保护 GD550
及重要信息。
锁定设备 - 选择锁定手机的
情况。
锁定应用程序 - 从列表中选
择要锁定的菜单。
PIN 码要求 - 选择开机时要请
求的 PIN 码。
19
Page 54

更改密码 - 更改 PIN 码
(如果将 IPN 码请求设
为“开”,将显示此菜单
项)、PIN2 码、安全码。
内存信息
您可以使用内存信息确定已
用内存以及查看可用空间:
内部共用内存、内部预留内
存、USIM 卡内存和主存储
器设置。
省电
选择该选项可将省电设置
切换为:打开或关闭。 如
果设为打开,可以节省电池
电量。
飞行模式
使用此功能,将飞行模式设
为打开。 飞行模式被设为开
时,您将无法拨打电话、连
接互联网或发送信息。
滑盖下滑设置
您可以设置在滑下滑盖时处
于活动状态的应用程序。
20
恢复初始设定
使用重设设置可将所有设置
重置为其出厂默认设置。
要启动此功能,您需要安
全密码。 默认安全密码设
为“0000”。
• 按键音
(更多 > 设置 > 按键音)
您可以选择按键音并调整设
备的音量。
选项包括:
通话和信息
其它铃声
• 显示
(更多 > 设置 > 屏幕)
您可以更改手机显示的设
置。
锁定屏幕
您可以设置在锁定屏幕时显
示的图像和时钟。
字体
您可以设置字体样式和大
小。
Page 55

背景灯
您可以设置屏幕背景灯的时
长以保持其亮着。
开机图像
您可以设置开机时显示的
图像。
关机图像
您可以设置关机时显示的
图像。
• 通话
(更多 > 设置 > 通话)
您可以更改通话设置。
常用设置
您可以设置与常用通话设置
相关的功能:显示我的本机
号码、拒接来电列表、自动
重拨、蓝牙接听模式等。
通话时间
您可以检查通话的时长。 输
入安全码之后再按左软键,
您可以重置时长。
数据量
您可以查看数据量。 输入安
全码之后再按左软键,您可
以重置音量。
通话费用
您可以检查上次通话
单位或所有通话单元。 或者
设置通话费用和设置限制。
输入 PIN2 码后再按左软键,
您可以重置上次通话和所有
通话。
呼叫转接
您可以选择将来电转移到另
一号码:所有通话、正在通
话时的来电等。如果按左软
键,您可以选择停用、全部
停用等。
呼叫限制
您可以限制拨出和呼入的
通话。
固定拔号
您可以选择要打开的固定拨
号号码并编辑一个可从您的
手机拨打的号码列表。 您需
要由运营商提供的 PIN2 码。
仅可以使用手机拨打此号码
列表中的号码。
21
Page 56

呼叫等待
您可以设置此选项以在通
话期间有电话呼入时发出
通知。
• 信息
(更多 > 设置 > 信息)
信息显示
您可以选择用于查看信息的
不同显示选项。
文本信息
您可以设置与文本信息相关
的功能。
多媒体信息
您可以设置与多媒体信息相
关的功能。
电子邮件
您可以设置与电子邮件相关
的功能。
签名
您可以创建文本
签名 您可以在签名中使用符
号和文本。
22
服务信息
您可以设置与服务信息(
包括服务安全性)相关的
功能。
信息中心
您可以设置通知已发送信息
所需的特定期限。 如果选择
重设,数据将被初始化。
小区广播
您可以设置与小区广播相关
的功能。
- 小区广播开/关
- 频道:创建、查看或编辑用
于接收小区广播的频道。
- 语言:选择小区广播的语
言。
Page 57

• 互联网
(更多 > 设置 > 互联网)
情景模式
您可以查看互联网网络设
定。 您可以使用左软键添
加、删除和编辑互联网网络
设定。 但是,您不能删除或
编辑默认配置。
外观设置
您可以选择浏览器外观的
设置。
(字符编码、滚动控制、字
体大小、显示图像和 Java 脚
本。)
缓存
您访问过的网页存储在手机
的内存中。
- 清除缓存:删除内存中缓存
的所有数据。
Cookie
有关您已访问的服务信息存
储在所谓的 Cookies 之中。
- 清除 Cookie:删除内存中的
所有 Cookie。
安全性
- 证书:您可以看到证书的列
表并查看其详细信息。
- 清除会话:删除安全会话。
• 蓝牙
(更多 > 设置 > 蓝牙)
设置 GD550 以使用蓝牙。 您
可以调整对其它设备的可见
性,或搜索您可以与之配对
的设备。
打开/关闭蓝牙
您可以打开或关闭蓝牙。
搜索新设备
GD550 将搜索设备。 搜索完
成时,屏幕上将显示添加和
刷新。 选择您要与之配对的
设备,手机将在您每次连接
时默认创建一个密码。
随后,手机将连接到其它
设备。
现在,受通行码保护的蓝牙
连接已经准备就绪了。
23
Page 58

• 连接
(更多 > 设置 > 连接)
网络运营商已为您设置连接
设置,因此,您开机即可使
用手机。 如果要更改设置,
请使用此菜单。 在此菜单
中,您可以配置网络设置和
数据访问配置文件。
USB 连接
您可以在手机上选择用于多
种用途的 USB 连接模式。
- PC internet:通过使用 USB
数据线,您可以将手机用作
电脑的调制解调器。
- 批量存储:选择此选项并将
手机连接到电脑,将文件
拖放到 GD550 可移动设备
文件夹。
- PC 套件:选择此模式并以
PC Sync 模式将手机连接到
电脑。
- 始终询问:选择此模式,每
次手机连接到电脑时会提供
一个选项,以供选择模式。
24
• 帮助
(更多 > 设置 > 帮助)
您可以查看有关 GD550 的更
多详细资料。
软件升级
LG 手机软件升级计划
有关安装和使用此计划的详
细信息,请访问 http://WWW.
lgmobile.com
使用此功能,无需访问服务
中心,您即可快速方便地将
软件升级到 Internet 上的最新
版本。 由于手机软件升级计
划要求用户注意升级过程的
持续时间,因此,在继续执
行操作之前,请留意每一个
步骤中出现的任何说明和提
示。 请注意,在升级过程中
移除 USB 数据线或取出电池
将严重损坏您的手机。 对于
升级过程中造成的任何数据
丢失,制造商不承担任何责
任,为了安全起见,建议您
事先记录下任何重要信息。
Page 59

配件
这些配件随 GD550 提供。
充电器
电池
立体声
耳机
备注:
• 务必使用原装 LG 配件。
• 否则可能导致保修失效。
• 在不同地区提供的配件可能不同;如需要进一步查询有关情
况,请与我们的地区服务公司或代理联系。
数据线
25
Page 60

外部环境
Declaration of Conformity
Declaration of Conformity
GD550
The conformity to above standards is veried by the following Notied Body(BABT)
BABT, Forsyth House, Churcheld Road, Walton-on-Thames, Surrey, KT12 2TD, United Kingdom
Notied Body Identication Number : 0168
I hereby declare under our sole responsibility
that the product mentioned above to which this
declaration relates complies with the above mentioned
standards and Directives
Name Issued Date
Seung Hyoun, Ji / Director
Signature of representative
Declaration
Supplementary Information
Applicable Standards Details
Product Details
Supplier’s Details
Trade Name
Model Name
Product Name
Address
Name
LG Electronics Inc
: LG Electronics Inc. LG Twin Towers 20,
Yeouido-dong, Yeongdeungpo-gu, Seoul, Korea 150-721
LG Electronics Logistics and Services B.V.
Veluwezoom 15, 1327 AE Almere, The Netherlands
GSM 850 / E-GSM 900 / DCS 1800 / PCS 1900 Quad Band and WCDMA Terminal Equipment
LG
R&TTE Directive 1999/5/EC
最高温度: +55°C(放电)
+45°C(充电)
最低温度:-10°C
Page 61

关于安全有效使用手机的准则
请阅读以下简单的准则。 违
反这些准则可能造成危险或
者触犯法律。
暴露在射频能量之下
无线电波暴露和“特定吸
收率”(SAR) 信息。此款
GD550 型手机已设计为遵守
有关适用的无线电波暴露安
全要求。 此要求基于相关
的科学准则,其中包括为确
保所有人员(无论年龄和健
康状况)安全而设计的安全
裕量。
不同的 LG 手机型号可能有
•
不同的 SAR 能级,但它们
均符合相关的无线电波暴
露准则。
国际非游离辐射防护委员
•
会 (ICNIRP) 建议的 SAR 上
限值为:每 10g 重的人体组
织吸收的能量平均值不超过
2W/kg。
由 DASY4 对该型号手机
•
进行的测试,人耳能够承
受的 SAR 最大值为 1.45
W/kg(10 克),戴在身体
上时,其值为 1.31 W/kg(
10 克)。
电气电子工程师协会 (IEEE)
•
建议的 SAR 上限值为 1.6
W/kg,平均值超过 1 克薄
纸,此 SAR 数据适用于各
个国家/地区的居民。
产品保养和维护
警告
仅使用经核准为用于此特定手机型
号的电池、充电器和配件。 使用
任何其它类型可能导致适用于此手
机的许可或保修失效,并可能造
成危险。
不要拆解本机。 当需要维
•
修时,请将手机送往合格的
服务技术人员处。
保修(由 LG 决定)可能包
•
括使用新的或返修的更换部
件或板,只要其功能与更换
的部件等效。
远离诸如电视、收音机或个
•
人计算机之类的电器。
远离诸如暖气片或厨灶之类
•
的热源。
27
Page 62

关于安全有效使用手机的准则
小心不要让手机摔落。
•
不要让手机受到机械振动
•
或撞击。
在任何有特殊条例要求的区
•
域关闭手机。 例如,请勿
在医院使用手机,因为它可
能影响敏感的医疗装置。
手机充电时,请勿用湿手操
•
作手机。 这可能会导致电
击或手机严重受损。
请勿在靠近易燃物体的位置
•
充电,因为手机可能变热并
引发火灾。
用包装材料或乙烯基包装
•
纸包裹手机可能会损坏手
机涂层。
如果手机置于柔软物体之
•
上,请不要充电。
应将手机放在完全通风的位
•
置充电。
不要在烟雾或灰尘过多的环
•
境中使用或存放手机。
不要将手机放在信用卡或卡
•
式车票旁边,它可能会影响
磁条上的信息。
28
不要用尖锐物体敲击屏幕,
•
这可能会损坏手机。
不要将手机暴露在液体或
•
潮气中。
谨慎使用诸如耳机之类的配
•
件。 在不必要的情况下,
不要触摸天线。
有效的手机操作
电子设备
所有手机都可能受到干扰,
这种干扰会对性能造成影
响。
在未经允许的情况下,不得
•
在医疗装置附近使用手机。
不要将手机放在心脏起搏点
上,即胸前的口袋内。
手机可能会对某些助听器造
•
成干扰。
微弱的干扰可能会影响电
•
视、收音机、个人计算机
等。
Page 63

行车安全
查阅有关在驾驶时使用手机
的本地法律法规。
不要在驾驶时使用手持式
•
手机。
将备注力完全集中在驾驶
•
上。
如果有免提装置,请使用免
•
提装置。
如果行驶条件需要,请在拨
•
打或接听电话之前将车辆驶
离道路并停车。
射频能量可能影响车辆内的
•
电子系统,例如立体声音
响、安全设备等。
当车辆配备气囊时,不要
•
让安装的便携式的无线设
备阻挡气囊。 由于不适当
的个人行为,可能造成严
重伤害。
如果您在外出时使用耳机收
•
听音乐,请确保将音量设置
为合理的音量级别,以便注
意周围的情况。 在过马路
时,尤其要注意这一点。
防止损伤您的听力
如果您长时间置于高音环境
中,那么您的听力可能会遭
到伤害。 因此,我们建议您
在开机或关机时不要将手机
置于耳边。 同时,我们还建
议您将音乐和通话音量设置
为合理的音量级别。
爆破区域
不要在正进行爆破的地区使
用手机。 请依照有关限制,
并遵守任何规章或规定。
易爆环境
不要在加油站内使用手机。
•
不要在靠近燃料或化学制品
•
处使用手机。
不要在放有手机和配件的车
•
厢内运输或存放可燃气体、
液体或爆炸品。
29
Page 64

关于安全有效使用手机的准则
在飞机上
无线设备可能对飞机造成
干扰。
飞机飞行过程中,请关闭手
•
机或激活飞行模式。
未经机务人员允许,不得在
•
地面上使用手机。
儿童
将手机放在儿童接触不到的
安全地方。 手机中包含细小
零件,如果脱落可能导致窒
息危险。
紧急电话
并非在所有手机网络中均可
使用紧急电话。 因此,您不
应仅依赖于手机的紧急呼叫
功能。 请向本地的服务提供
商核准。
电池信息及保养
您无需在再次充电前对电池
•
进行完全放电。 与其它电
池系统不同,本机电池不具
有可能影响电池性能的记
忆效应。
30
只能使用 LG 电池和充电
•
器。 LG 充电器设计为最大
程度地延长电池使用寿命。
不要拆解电池组或将其短
•
路。
保持电池组的金属触点清
•
洁。
当电池不再提供合乎要求的
•
性能时,请更换电池。 在
需要更换之前,电池组可以
反复充电数百次。
如果电池已经使用很长一段
•
时间,请对电池再次进行充
电以保持最佳使用状态。
不要将电池充电器暴露在直
•
射阳光下,也不要在诸如浴
室之类的高湿环境中使用。
不要将电池存放在过热或过
•
冷的地方,这可能损害电池
的性能。
如果用不适当的电池进行替
•
换,可能会有爆炸危险。
请按制造商的说明处置用过
•
的电池。 如果可能,请循
环使用电池。 不要象处理
家用废物一样处理电池。
Page 65

如果要更换电池,请将其
•
携带至 LG Electronics 授权
服务点或经销商处以寻求
帮助。
手机充好电后,请务必将充
•
电器从墙上插座拔下,以避
免不必要的耗电。
实际的电池寿命将取决于网
•
络配置、产品设置、使用方
式、电池和环境条件。
31
Page 66

Page 67

-
GD550 User Guide
English
This guide will help you understand your new mobile phone.
It will provide you with useful explanations of features on your
phone.
Some of the contents in this manual may differ from your
phone depending on the software of the phone or your service
provider.
Disposal of your old appliance
When this crossed-out wheeled bin
1
symbol is attached to a product it
means the product is covered by the
European Directive 2002/96/EC.
All electrical and electronic products
2
should be disposed of separately
from the municipal waste stream
via designated collection facilities
appointed by the government or the
local authorities.
The correct disposal of your old
3
appliance will help prevent potential
negative consequences for the
environment and human health.
For more detailed information about
4
disposal of your old appliance,
please contact your city office, waste
disposal service or the shop where you
purchased the product.
Page 68

Getting to know your phone
Power key
Turns the phone
on/off.
Main screen
Navigation keys
OK key
Selects menu
options and
confirms actions.
Call key
Dials a phone
number and answers
incoming calls.
2
Soft keys
Each of these
keys performs
the functions
indicated by
the text on
the display
immediately
above them.
End key
Ends or rejects a
call. Returns to
the home screen
when you use
the menu.
Clear key
Page 69

Headset / Charger /
USB Cable connector
Volume key
Controls the volume
of the earpiece.
Camera key
Goes to camera menu
directly from the
homescreen.
Profile switch
Turns the sound on or off from any screen including the lock
screen by sliding it up and down. (Incoming call, listening to
music, alarm rings, and etc.)
This is only for the sound. If you want to change the settings for
vibration, go to More > Settings > Tones > Call and message.
Vibrating alert is set to On as default.
3
Page 70
Installing the SIM Card and Charging the Battery
Installing the SIM Card
When you subscribe to a
cellular network, you are
provided with a SIM card
loaded with your subscription
details, such as your PIN, any
optional services available and
many others.
Important!
› The SIM card can be easily
damaged by scratches or
bending it, so be careful when
handling, inserting or removing
the card. Keep all SIM cards out
of reach of small children.
Illustrations
1 Open battery cover
2 Remove the battery
3 Insert your SIM
4 Insert your battery
5 Close the battery cover
6 Charge your battery
1
4
WARNING: Do not remove the battery when the phone is switched on,
as this may damage your phone.
4
2
5 6
3
Page 71

Installing a memory card
Lift the battery cover and
insert a micro SD card into
the card socket with the
gold contact area facing
downwards.
Note: A memory card is an
optional accessory.
Formatting the memory
card
Tap More and choose Settings
> Device > Memory info.
Select External memory and
press Clear using the left soft
key, select Yes and enter the
security code and select OK.
WARNING: When you format your
memory card, the entire contents
will be wiped. If you do not want
to lose the data on your memory
card, back it up rst.
5
Page 72

Your home screen
GD550 provides a simple,easy home screen with the carousel
view which allows you to move to menus from side to side.
There are five dots on the upper side of the home screen. Each
dot indicates a different menu and you can move among them
by pressing the right and left navigation keys.
Main menu icons
Use left or right
Number of menus
you can choose
The focused dot
shows your current
position.
Your home screen always starts with the Calls menu and you
can move right or left from here.
In Contacts, Call logs and Message box menus, you can use this
carousel view.
TIP! If you enter the alphabet or numbers in Contacts, Call logs and
Message box menus, the corresponding results are searched.
6
navigation keys
to move among
the main menus.
Corresponding
sub-menu
Use the up or
down navigation
keys to search
the sub-menu.
Page 73

Your lock screen
When the slide is closed,
typically the active
applications are terminated
and the lock screen appears.
Setting the active
applications when the
phone slide is down
1 Select More by using the
left or right navigation key
on your home screen and
choose Settings.
2 Choose Device, then select
Slide down settings.
3 Press the OK key to mark the
applications you don’t want
to terminate when slide is
closed.
Setting your lock screen
1 Select More by using the
left or right navigation key
on your home screen and
choose Settings.
2 Choose Screen, then select
Lock screen.
3 You can choose the
wallpaper image from the
default images by pressing
the right or left navigation
key or from the photo
album by pressing Album
at the bottom left of the
screen. You can also change
the clock style for your lock
screen.
TIP! When you slide your
phone down, the menu you
are using is terminated and the
lock screen appears. However,
if you are listening to Music
or FM radio, or viewing the
Video, these applications will
not be terminated even when
you slide your phone down.
You can change the settings
for this function in Settings >
Device > Slide down settings.
The options are: Call, Camera,
Video player, Music Player.
7
Page 74

Calls
Making a call
1 Key in the number using the
keypad. To delete a digit
press .
2 Press to initiate the
call.
3 To end the call, press .
TIP! To enter + when making
an international call, press and
hold 0.
TIP! You can go to the dialling
screen by entering numbers
from any menu on your home
screen.
Making a call using your
contacts list
1 Select Contacts from your
home screen.
2 Using the keypad, enter the
first letter of the contact
name you want to call or the
group name to which the
contact belongs. For
8
example, for Office, Press 6
three times to select the first
character, “O”. You can
change the input mode
from alphabet mode to
number mode or vice versa
by pressing button on
the keypad.
3 Select Call from Options or
press to initiate the
call.
Answering and rejecting
a call
When your phone rings, press
to answer the call.
To mute your phone while it is
ringing, simply slide the
Profile switch down to off.
This is useful if you have
forgotten to change your
profile to Silent for a meeting.
Press or select Reject
(right soft key) to reject the
incoming call.
Page 75

TIP! You can set the vibrating
alert to On when you go to
More > Settings > Tones >
Call and message > Vibrating
alert.
Using the speakerphone
During a call or when you are
making a call, you can activate
the speakerphone by selecting
Activate speaker
and you can
use the handset in hands-free
mode.
If the speakerphone is active,
select
Deactivate speaker
to resume normal handset
conversation mode.
Speed dialing
You can assign a speed dial
number to a contact you call
frequently. To assign speed
dial go to Contacts > Options
> Settings > Speed dials.
You can use the carousel view
which allows you to assign a
number to any contact saved
in your phone on a screen.
Speed dial 1 is set to your
voice mail and you cannot
change it.
You can assign up to 8 speed
dials numbered from 2 to 9.
Once you have assigned a
speed dial, you can initiate a
call by pressing and holding
the speed dial number.
TIP! When you press and hold
keys to , if the
assigned speed dial number
is empty, you can assign the
speed dial number directly.
Viewing your call logs
Go to Calls from the home
screen and select Call logs.
You can check the call record
of missed, received, and
dialled calls using the carousel
view. Use the right navigation
key to view older call logs.
You can also go directly to the
desired contact’s call logs if
you enter the first letter of the
9
Page 76

contact name or the phone
number if the number is not
saved in your phone.
Continuous call logs for the
same contact will be shown
as one log and the number of
missing, received, or dialled
calls for the contact is shown
below the contact image. If
you type the first letter of the
contact, all call logs for the
contact are combined as one
item.
You can use the down
navigation key to view all
detailed logs for each contact
including time and call
duration.
10
Contacts
Searching for a contact
1 Go to Calls from the home
screen.
2 Select Contacts.
3 Press the right navigation
key to search for a contact in
alphabetical order, or enter
the first letter of the contact
name to find it directly.
If a contact has more than 3
items of detailed information
such as phone number, e-mail
address and so on, you can
view the next item by pressing
the down navigation key.
TIP! If you want to view the
contact list as a list, not a
carousel view, go to Options
> Settings > Display settings
and set Contacts image to Off
on the contact screen.
Page 77

Creating Me Card
This option shows your
information. Here you can
change the name and alter
information such as E-mail, Job
title, Memo and etc.
1 Go to Calls from the home
screen.
2 Select Contacts.
3 Press the left navigation key
twice to select Me. This is a
default name. If you press
Add and provide a new
name, this will be shown
instead of Me.
4 Select Options and choose
Add from my number,so
that you can add your
number from sim.
Note: This option will be available
only if you set my number(to set
my number go to options and
choose sim contacts then select
my number then select options
and select my new number and
enter the details and press save).
Adding a new contact
1 Go to Calls from the home
screen.
2 Select Contacts.
3 Press the left navigation key
once and press the OK key
to add a contact.
You can also add a new
contact by selecting
Options and choosing New
contact.
4 Choose whether to save a
contact to Internal memory
or SIM and add the first
name, and the last name.
You can change the entry
mode (e.g. upper/lower
case letter, or number) by
pressing the button
on the keypad.
5 The contact image is
assigned randomly as
default and you can change
the picture for that contact.
If you want to choose a
picture from a given list,
press the right navigation
11
Page 78

key. Press the left navigation
key once to select from the
photo album and press
left navigation key once
more to take a picture and
use the picture directly. If
you choose the oversized
picture for the contact
image, you are directed to
the Crop screen so that you
can crop the image as you
wish and set the image as
the contact image.
TIP! When you take a photo
from the home screen and set
the image size in the Settings
menu to Contact, you can
acquire a maximum sized
contact picture.
6 Select + More if additional
information is required
such as E-mail, Ringtone or
Homepage etc.
7 Save the phone number.
Dots on the top of the
screen will be added one by
one when you add a new
12
contact or a new group.
TIP! When you want to store
the e-mail address of a contact,
you can easily add the E-mail
endings by selecting E-mail in
the More menu and pressing
Options on the bottom lefthand side of the screen and
choosing one from the list. The
options are: @hotmail.com,
@msn.com, @yahoo.com, @
gmail.com.
Adding a contact to a group
You can save and manage
your contacts by groups, such
as work colleagues and family.
To add a group go to the
option by pressing the left soft
key from the contact menu
and select New group. You
can choose whether to add
the group to Internal memory
or SIM, name the group and
set the ringtone for the group.
When you select Save at the
bottom right of the screen,
Page 79

the prompt message asking
you to add members pops up
on the screen. You can add a
member to the group directly
by pressing the OK key from
this message. Use the right or
left navigation key to search
the contact list.
Messaging
Your GD550 includes functions
related to SMS (Short Message
Service), MMS (Multimedia
Message Service), and e-mail
as well as service messages for
the network.
Viewing your messages
1 Go to Messages from the
home screen.
2 Select Message box.
3 Messages will be displayed
as a carousel view. The
most recent received or
sent message will be shown
first below. To the righthand side, you can see the
message history by contact
name. The contact name for
the most recent message
is shown first. You can
also view messages from
certain contacts directly by
entering the first letter of
the contact name. To the
leftmost you can see the
draft folder which stores
unsent messages.
TIP! If you have unread
messages, then the `New
message´ folder will appear
after the draft folder.
4 By pressing the down
navigation key, you can see
the detailed history of all
messages received from and
sent to that contact.
Yellow messages are new
messages. Green messages
have been received and
grey messages are sent
messages.
13
Page 80

TIP! You can expand and
collapse the message display
by pressing . You can
choose the default display
between Expanded view
and Collapsed view in More
> Settings > Messages >
Message display.
Sending a message
1 Go to Messages from the
home screen.
2 Choose Write message to
send an SMS or MMS.
3 A new message editor will
open. The message editor
combines text messages
and multimedia messages.
The default setting for the
message editor is the text
message.
4 Select Options at the
bottom left of the screen
and choose Insert to add
an Image, Video, Sound,
Text templates, Multimedia
templates, Name & Number,
etc.
14
5 Select Send to to add
recipients by pressing the
OK key. You can enter any
letters included the contact
name or select Contacts
by pressing the OK key to
choose from contact list.
6 Press Send.
TIP! You can select your
message type as Multiple SMS
or MMS when you enter a
text longer than 1 page in the
message field. If you want to
change the type of message to
send, press More > Settings >
Messages > Text message, and
choose Send long text as.
WARNING: If you add an image,
video, sound or multimedia
templates, etc. to the message, it
will be converted automatically
to MMS mode and you will be
charged accordingly.
Page 81

Features of MMS
When you receive an MMS,
you will only see the first
slide of the MMS. This MMS
message status will not be
changed to ‘read’ unless you
select the message and press
the OK key to select View,
then select the play button in
the centre of the bottom of
the screen.
For a received SMS message,
you can reply to it simply by
pressing the OK key.
Entering text
The text input methods can
be changed by pressing :
ABC/Abc/abc/123.
If you want to use T9 mode,
press and hold the
key. Or when you press Left
soft key and select Writing
options, you can turn the T9
Dictionary on or off.
T9 mode
T9 mode uses a built-in
dictionary to recognise the
words you are writing based
on the sequence of the
keys you press. Simply press
the number key associated
with the letter you want to
enter, and the dictionary will
recognise the word once all
the letters are entered.
Abc mode
This mode allows you to enter
letters by pressing the key
labelled with the required
letter once, twice, three or
four times until the letter is
displayed.
123 mode
Type numbers by using one
keystroke per number. You
can also add numbers while
remaining in letter modes
by pressing and holding the
desired key.
15
Page 82

Changing the language
GD550 supports various
languages.
There are two ways to change
the writing language from
the writing screen. You can
press Options, go to Writing
options, choose Writing
language and then set the
language you want. Or, you
can simply press and hold
the key. The writing
options may differ depending
on the language you choose.
For example, when you
choose as Writing
language you can use the
Korean keypad by pressing
Options > Writing options >
.
Inserting symbols
If you want to insert symbols,
press , then you can
choose a symbol. Or you
can press Options and then
choose Insert symbol.
16
Other Options
In Options, you can also
use Save to drafts, Insert,
and Copy/Paste. If you use
Copy/Paste, you can choose
part of or the entire text you
have entered in the writing
screen and copy and paste this
as many times as you wish.
You can also use this function
when you write an e-mail or
create a memo.
Setting up your e-mail
You can stay in touch on the
move using e-mail on your
GD550. It’s quick and simple
to set up a POP3, IMAP4 or MS
Exchange e-mail account.
1 Go to Messages from the
home screen.
2 Select E-mail.
3 Select Yes when the
setup message appears
and follow the setting up
procedure for each account.
Page 83

Sending an e-mail
1 Go to Messages from the
home screen.
2 Select E-mail, then choose
an account. The folders
such as Inbox, Sent items,
Trash, etc. are shown as the
carousel view just like the
home screen. The Inbox
folder is shown first and the
Write e-mail menu is the
menu furthest to the left.
3 Choose Write e-mail by
pressing the left navigation
key continuously.
4 Enter the recipient’s address
and a subject.
5 Enter your message.
6 Press Options, select Insert
to add an Image, Video,
Sound, Text templates,
Signature, etc..
7 Press Send and your e-mail
will be sent.
Camera
Taking A Quick Photo
Go to Camera from the home
screen and select Take photo.
Or you can press the camera
key on the right-hand side of
the phone briefly.
1 Holding the phone
horizontal, point the lens
towards the subject you
want to photograph.
2 Press the camera key
lightly, and a focus box will
appear in the centre of the
viewfinder screen.
17
Page 84

3 Position the phone so you
can see the subject in the
focus box.
4 When the focus box turns
green, the camera has
focused on your subject.
5 Press the camera key again.
TIP! You can zoom in or out
by pressing the volume keys
on the right-hand side of the
phone or by pressing the
up and down keys on the
navigation keys.
Once you have taken the
photo
Your captured image will
appear on the screen.
Album - Select to view the
album.
Send - Select to send the
photo by Message, E-mail or
Bluetooth.
New - Select to take a new
photo.
18
Set as - Select to use the
image as Wallpaper, Contacts
image, Startup image, or
Shutdown image.
Delete - Select to delete the
image.
Page 85

Video Camera
Shooting a quick video
Go to Camera from the home
screen and select Record
video. Or you can press the
camera key on the right-hand
side of the phone.
1 The viewfinder for the video
camera will appear on the
screen.
2 Holding the phone
horizontal, point the lens
towards the subject of the
video.
3 Press the camera key or
the OK key once to start
recording.
4 REC will appear at the
bottom of the viewfinder
with a timer showing the
length of the video.
5 Press the camera key or the
OK key once more to stop
recording.
After taking a video
A still image representing
your video will appear on the
screen.
Album - Select to view the
album.
Play - Select to play the video.
New - Select to take a new
video.
Send - Select to send the
video by Message, E-mail or
Bluetooth.
Delete - Select to delete the
video.
19
Page 86

Organiser
Alarm clock
Go to Organiser from the
home screen and select Alarm
clock.
From the alarm clock screen,
press the left soft key to turn
the alarm on or off, and set the
time at which you want the
alarm to go off. After you set
the time, the GD550 will notify
you how much time is left
before the alarm goes off.
Calendar
Go to Organiser from the
home screen and select
Calendar. A square cursor is
located on the current date.
You can move the cursor to
another date by using the
navigation keys. Press the OK
key to view schedules for that
day. If there is no schedule,
you can add a new one and
customise it by pressing New
schedule. The phone will
20
sound an alarm tone which
you have set for the specific
schedule item.
The following [Options] are
available:
New schedule - Allows
you to set your personal
schedule on the selected
date.
Go to Date - Allows you to
jump to a specific date.
Key functions - Allows you
to see the key functions for
the calendar.
Settings
Memo
Go to Organiser from the
home screen and select
Memo.
1 Select New Memo on the
screen to create a new
memo.
2 Enter the memo and press
the OK key to save. Your
memo will be added and
displayed on the screen.
Page 87

Use the navigation keys to
search your memo.
Showing a memo on the
lock screen
1 Select the memo using the
left or right navigation keys
and press the left soft key to
open Options.
2 Select Show on lockscreen,
then the red pin will be
attached to the memo.
3 You can see the memo
when the slide is closed. If
you want to remove it from
the screen, press Options
and select Remove from
lockscreen.
More
News
When you enter this menu,
the weather forecast screen
will be displayed. If you select
the OK key you can see more
detailed weather information.
Or you can see the news by
pressing the right navigation
key.
If you press the OK key at
My news, you can Add more
feeds as you wish or store it as
My feed while surfing. You can
also press the left soft key to
use Options to set the Update
schedule.
Applications
• Music
You can play songs, categorise
songs by Artists, Albums, and
Genres, or create My playlists.
Now playing - This menu only
appears while BGM is playing.
21
Page 88

You can use several options
such as Add to playlist,
Rating, etc. and change the
Settings for Repeat, Shuffle
and Equalizer by pressing
Options on bottom left of the
screen.
Last played song - This menu
appears while BGM is not
playing. When you choose this
menu, you can listen to the
song which was played last.
You can use the same options
as Now playing.
All Songs - You can view
all the songs in the internal
and external memory. If
you press Options, you can
use several options such as
Set as Ringtone, Send via
Bluetooth, Search and etc.
My playlists - You can make
and view your playlists.
Artists - Shows the list of
artists for all the songs in your
music library, and shows all
the songs by a chosen artist.
22
Albums - Shows the list of
albums for all the songs in
your music library, and shows
all the songs on a chosen
album.
Genres - Shows the list of
genres for all the songs in your
music library, and shows all
songs for a specific genre.
Shuffle all songs - You can
view all the songs in your
music library with shuffle.
Note: Music files may be protected
by copyright and intellectual
property laws. Please ensure that
you adhere to the applicable
Terms of Use relating to material
laws prior to downloading or
copying files.
Page 89

• FM radio
Your LG GD550 has a built-in
FM radio so you can tune in
to your favourite stations and
listen on the move. If you
press the left soft key, you
can use Edit channel, New
channel, and Edit station
name options. If you press
the OK key, you can see the
Channel list. In Channel list,
you can also set your channels
and readjust your settings.
Note: You must attach your
headphones to listen to the radio.
Insert them into the headphone
jack on the right-hand side of the
phone.
• Internet
You can access the internet.
Internet gives you a fast,
colourful world of games,
music, news, sports,
entertainment, and much
more, on your mobile phone.
Wherever you are and
whatever you’re doing.
Note: Additional charges apply
when connecting to these services
and downloading content. Check
data charges with your network
provider.
• Google Maps
Check your current location
and traffic and receive
directions to your destination.
23
Page 90

• My stuff
You can access your data in
this menu.
All data is shown in the All
tab and if you press the right
navigation key, you can check
only the internal memory
data.
Images - You can view all images
in the phone and use Options: Set
as Wallpaper and etc, Rename,
Edit, Send via, Print via, Sort by
and etc.
Videos - You can play all videos
in the phone and use Options as
for Images.
Sounds - You can play all sound
files in the phone and use Options
as for Images.
Games & apps. - You can see all
games and applications in the
phone and use Options: Send le
info, File info, Permission, etc.
Documents - You can see all
documents in the phone.
Other content - You can check
other content besides the above.
24
Tools
• Calculator
The calculator function allows
you to add, subtract, multiply
and divide. You can enter
numbers and operators by
using the keypad.
Use the key to delete
numbers.
For more complex
calculations, press Options
and choose between +/-, sin,
cos, tan, log, ln, exp, sqrt,
deg, rad, x^y or X^2.
• Voice recorder
Use the Voice recorder to
record voice memos or other
sounds.
Press the OK key to start
recording.
Press the Left soft key to
pause recording. To continue
recording, press again.
To stop recording, press the
OK key. The recording will be
saved automatically
Page 91

Options - If you press Options,
you can use Play, Delete, Set
as Ringtone or Message tone,
or Send via Message, E-mail
or Bluetooth options.
Album - You can choose audio
files to record.
Storage - When the Memory
card exists, you can assign the
default storage to External
memory or Internal memory.
Recording mode - MMS
record mode shortens the
time so that the recording can
fit in a MMS.
Normal mode provides a
longer recording time.
• Stopwatch
This menu allows you to
record the elapsed time of
an event. The duration of an
individual lap time (up to 99
times) and the total time can
also be displayed.
• Unit converter
This function converts any
measurement into a unit you
want.
There are 7 types of units that
can be converted: Currency,
Area, Weight, Length,
Temperature, Volume, and
Velocity.
• World clock
The World clock function
provides time information in
major cities worldwide. You
can add cities by pressing the
left soft key and also use Set
as second city, Edit current
date & time, Daylight saving,
Clock type, Delete and Delete
all options.
25
Page 92

Settings
• Device
(More > Settings > Device)
You can personalise your
device setting. Select the
menu you want to change and
set the value.
Date and time
You can set functions relating
to the date and time.
Language
You can change the language
set as Main language for
display and Writing language
for writing texts.
Security
Change your security settings
to keep your GD550 and the
important information safe.
Lock device - Choose when to
lock your handset.
Lock application - Choose the
menu to lock from the list.
26
PIN code request - Choose
a PIN code to be requested
when you turn your phone on.
Change codes - Change your
PIN code (This menu item will
appear if PIN code request is
set to On), PIN2 code, Security
code.
Memory info
You can use Memory info to
determine how each memory
is used and to see how much
space is available: Internal
common memory, Internal
reserved memory, USIM
memory and Primary storage
settings.
Power save
Choose to switch the power
save settings : On or Off. If you
set On, you can save battery
power.
Page 93

Flight mode
Use this function to switch the
flight mode on. You will not be
able to make calls, connect to
the Internet, or send messages
when flight mode is switched
on.
Slide down settings
You can set the active
applications when the slide
is down.
Reset settings
Use Reset settings to reset all
the settings to their factory
defaults. You need the security
code to activate this function.
The default security code is set
to “0000”.
• Tones
(More > Settings > Tones)
You can select the tones and
adjust the volumes for the
device.
Your options are:
Call and message
Other tones
• Screen
(More > Settings > Screen)
You can change the settings
for the phone display.
Lock screen
You can set images and clocks
on the lock screen.
Font
You can set font style and size.
Backlight
You can set the duration for
the screen backlight to remain
lit.
Startup image
You can set images for startup.
27
Page 94

Shutdown image
You can set images for
shutdown.
• Calls
(More > Settings > Calls)
You can change the call
settings.
Common settings
You can set functions relating
to the common call settings:
Show my caller ID, Call reject
list, Auto redial, Bluetooth
answer mode, etc.
Call durations
You can check the duration
of your call. You can reset the
duration by pressing the left
soft key after entering security
code.
Data volume
You can view your data
volume. You can reset the
volume by pressing the left
soft key after entering security
code.
28
Call costs
You can check the Last call
units or All calls units. Or Set
call cost and Set limit. You can
reset Last call and All calls by
pressing the left soft key after
entering the PIN2 code.
Call divert
You can choose to reroute
calls to another number:
All calls, If busy and etc. If
you press the left soft key,
you can choose Deactivate,
Deactivate all, etc.
Call barring
You can restrict outgoing and
incoming calls.
Fixed dial numbers
You can select Fixed dial
numbers to turn on and
compile a list of numbers
that can be called from your
phone. You will need your
PIN2 code, which is available
from your operator. Only
Page 95

numbers within the fixed dial
list can be called from your
phone.
Call waiting
You can set this to be notified
of incoming calls during a call.
• Messages
(More > Settings > Messages)
Message display
You can select different
display options for viewing a
message.
Text message
You can set functions relating
to the Text message.
Multimedia message
You can set functions relating
to the Multimedia message.
E-mail
You can set functions relating
to E-mail.
Signature
You can create your text
signature You can use symbols
and text as part of the
signature.
Service message
You can set functions relating
to the Service message
including Service security.
29
Page 96

Message counter
You can set the specific period
in which to be informed of the
sent message information. If
you choose Reset, data will be
initialised.
Info message
You can set functions relating
to the Info message.
- Cell broadcast on/off
- Channels : create, view or
edit channels to receive
information messages.
- Languages : choose the
languages for information
messages.
30
• Internet
(More > Settings > Internet)
Profiles
You can view the internet
profiles. You can add, delete
and edit internet profiles
by using the left soft key.
However, you cannot delete or
edit default configurations.
Appearance settings
You can choose the settings
for the browser appearance.
(Character encoding,
Scrolling control, Font size,
Show image, and Java script.)
Cache
The web pages you have
accessed are stored in the
memory of the phone.
- Clear cache: Remove all
cached data in the memory.
Page 97

Cookies
The information about
services you have accessed
is stored in what are called
Cookies.
- Clear cookies: Remove all
cookies in the memory.
Security
- Certificates: You can see the
list of certificates and view
them in detail.
- Clear session: Removes the
secure session.
• Bluetooth
(More > Settings > Bluetooth)
Set up your GD550 for
Bluetooth use. You can adapt
your visibility to other devices
or search through devices with
which your phone is paired.
Bluetooth on/off
You can turn the Bluetooth
on or off.
Search new device
Your GD550 will search for
devices. When the search is
completed Add and Refresh
will appear on screen. Choose
the device you want to
pair with, then the handset
will create a passcode by
defaulting every time you
connect.
Your phone will then connect
to the other device.
Your passcode protecting the
Bluetooth connection is now
ready.
31
Page 98

Paired devices
You can check the paired
devices.
If you press the left soft key
and select New Device, then
you can search for devices to
connect to.
Settings
Make your changes to:
- My device visibility: Choose
whether to be Visible,
Hidden, or Visible for 1 min
from your device to others.
- My device name: Enter a
name for your LG GD550.
- Supported services: Shows
what the phone supports.
- Remote SIM Mode On/Off
- My address: View your
Bluetooth address.
32
• Connectivity
(More > Settings >
Connectivity)
Your connectivity settings
have already been set up by
your network operator, so you
can enjoy your new phone
from switch on. If you want
to change any settings, use
this menu. You can configure
the network setting and data
access profiles in this menu:
USB connection
You can select the USB
connection mode on your
phone for several uses.
- PC internet: You can use the
phone as a modem for your
computer by using a USB
cable.
- Mass storage: Select this
option and connect the
handset to your computer
and drag and drop files to
the removable device folder
of the GD550.
Page 99

- PC Suite: Select this mode
and connect the handset to
your computer in PC Sync
mode.
- Always Ask: Selecting this
mode will give an option to
select the mode, whenever
the handset is connected to
the computer.
• Help
(More > Settings > Help)
You can view more detail
information for your GD550.
Software Upgrade
LG Mobile Phone Software
Upgrade Program
For more information on
installing and using this
program, please visit http://
www.lgmobile.com
This feature allows you to
upgrade your software to
the latest version quickly
and conveniently on the
Internet without needing
to visit our service centre.
The mobile phone software
upgrade program requires
the user’s full attention for
the duration of the upgrade
process, so please be sure to
check any instructions and
notes that appear at each
step before proceeding.
Please note that removing
the USB data communication
cable or batteries during
the upgrade may seriously
damage your mobile phone.
The manufacturer takes no
responsibility for loss of data
during the upgrade process, so
you are advised to note down
any important information in
advance for safekeeping.
33
Page 100

Accessories
These accessories are supplied with the GD550.
Charger
Battery
Stereo
headset
NOTE:
• Always use genuine LG accessories.
• Failure to do this may invalidate your warranty.
• Accessories may be different in different regions; please check with
our regional service company or agent for further inquiries.
34
Data cable
 Loading...