

Page 1

OWNER'S MANUAL
FRIDGE&
FREEZER
Read this owner's manual thoroughly before operating the appliance and keep it handy for
reference at all times.
EN ENGLISH RU РУССКИЙ UZ OʻZBEKCHA
MFL69668857
Rev.04_090219
www.lg.com
Copyright © 2017 - 2019 LG Electronics Inc. All Rights Reserved
Page 2
TABLE OF CONTENTS
SAFETY INSTRUCTIONS ..............................................................3
IMPORTANT SAFETY INSTRUCTIONS ..........................................................3
INSTALLATION .............................................................................10
Compartments.................................................................................................10
Dimensions and Clearances ........................................................................... 11
Ambient Temperature ...................................................................................... 11
Removing the Door .........................................................................................12
Refitting the Door ............................................................................................12
Adjusting the Height of the Door .....................................................................13
Connecting the Appliance ...............................................................................14
Moving the Appliance ...................................................................................... 14
OPERATION ................................................................................. 15
Parts and Functions ........................................................................................15
Notes for Operation .........................................................................................19
Using Control Panel ........................................................................................21
Icemaker ( * ) ...................................................................................................23
Door in Door ( * ) .............................................................................................25
Fresh Vegetable Drawer( * )............................................................................26
InstaView Function ( * ) ..................................................................................26
Other Functions...............................................................................................26
This manual may contain images or content
different from the model you purchased.
This manual is subject to revision by the
manufacturer.
SMART FUNCTIONS .................................................................... 27
Using LG SmartThinQ Application ..................................................................27
Using Smart Diagnosis™ ................................................................................29
MAINTENANCE ............................................................................ 30
Notes for Cleaning ..........................................................................................30
Cleaning the Condenser Cover .......................................................................30
Cleaning the Door Basket ...............................................................................31
Cleaning the Shelf ...........................................................................................31
Cleaning the Vegetable Drawer ......................................................................31
TROUBLESHOOTING .................................................................. 33
Page 3
EN
SAFETY INSTRUCTIONS
The following safety guidelines are intended to prevent unforeseen
risks or damage from unsafe or incorrect operation of the
appliance.
The guidelines are separated into ‘WARNING’ and ‘CAUTION’ as
described below.
This symbol is displayed to indicate matters and
operations that can cause risk. Read the part with this
symbol carefully and follow the instructions in order to
avoid risk.
WARNING
This indicates that the failure to follow the instructions can
cause serious injury or death.
CAUTION
This indicates that the failure to follow the instructions can
cause the minor injury or damage to the product.
IMPORTANT SAFETY INSTRUCTIONS
WARNING
To reduce the risk of explosion, fire, death, electric shock,
injury or scalding to persons when using this product, follow
basic precautions, including the following:
Children in the Household
• This appliance is not intended for use by persons (including children)
with reduced physical, sensory or mental capabilities, or lack of
experience and knowledge, unless they have been given supervision
or instruction concerning use of the appliance by a person
responsible for their safety. Children should be supervised to ensure
that they do not play with the appliance.
• If the appliance is equipped with a lock (some models only), keep the
key out of reach of children.
3
Page 4

EN
Installation
• This appliance should only be transported by two or more people
holding the appliance securely.
• Ensure that the socket outlet is properly grounded, and that the earth
pin on the power cord is not damaged or removed from the power
plug. For more details on grounding, inquire at an LG Electronics
customer information centre.
• This appliance is equipped with a power cord having an equipment-
grounding conductor and a grounding power plug. The power plug
must be plugged into an appropriate socket outlet that is installed and
grounded in accordance with all local codes and ordinances.
• If the power cord is damaged or the hole of the socket outlet is loose,
do not use the power cord and contact an authorized service centre.
• Do not plug the appliance into a multi socket adapter which does not
have a power cable (mounted).
• Do not modify or extend the power cable.
• The appliance should be connected to a dedicated power line which
is separately fused.
• Do not use a multi socket outlet which is not properly grounded
(portable). In case of using a properly-grounded multi socket outlet
(portable), use the multi socket outlet with the current capacity of the
power code rating or higher and use the multi socket outlet only for
the appliance.
• Install the appliance in a place where is easy to unplug the power
plug of the appliance.
• Be careful not to point the power plug up or let the appliance lean
against the power plug.
• Install the appliance on a firm and level floor.
• Do not install the appliance in a damp and dusty place. Do not
install or store the appliance in any outdoor area, or any area that is
subject to weathering conditions such as direct sunlight, wind, rain, or
temperatures below freezing.
• Do not place the appliance in direct sunlight or expose it to the heat
from heating appliances such as stoves or heaters.
• Be careful not to expose the rear of the appliance when installing.
4
Page 5

EN
• Be careful not to let the appliance door fall during assembly or
disassembly.
• Be careful not to pinch, crush, or damage the power cable during
assembly or disassembly of the appliance door.
• Do not connect a plug adapter or other accessories to the power
plug.
Operation
• Do not use the appliance for any purpose (storage of medical
or experimental materials or shipping) other than any domestic
household food storage use.
• Unplug the power plug during a severe thunderstorm or lightening or
when not in use for a long period of time.
• Do not bend the power cable excessively or place a heavy object on
it.
• Do not touch the power plug or the appliance controls with wet hands.
• Do not bend the power cable excessively or place a heavy object on
it.
• If water penetrates electrical parts of the appliance, disconnect power
plug and contact an LG Electronics customer information centre.
• Do not place hands or metallic objects inside the area emitting the
cold air, cover or heat releasing grille on the back.
• Do not apply excessive force or impact to the back cover of the
appliance.
• Do not put animals, such as pets into the appliance.
• Be careful of nearby children when you open or close the appliance
door. The door may bump the child and cause injury.
• Avoid the danger of children getting trapped inside the appliance. A
child trapped inside the appliance can cause suffocation.
• Do not place heavy or fragile objects, containers filled with liquid,
combustible substances, flammable objects (such candles, lamps,
etc.), or heating devices (such as stoves, heaters, etc.) on the
appliance.
5
Page 6

EN
• If there is a gas leakage (isobutane, propane, natural gas,
etc.), do not touch the appliance or power plug and ventilate
the area immediately. This appliance uses a refrigerant gas
(isobutane,R600a). Although it uses a small amount of the gas, it
is still combustible gas. Gas leakage during appliance transport,
installation or operation can cause fire, explosion or injury if sparks
are caused.
• Do not use or store flammable or combustible substances (ether,
benzene, alcohol, chemical, LPG, combustible spray, insecticide, air
freshener, cosmetics, etc.) near the appliance.
• Immediately unplug the power plug and contact an LG Electronics
customer information centre if you detect a strange sound, odour, or
smoke coming from the appliance.
• Fill with potable water only into icemaker or dispenser water tank.
• Do not damage the refrigerant circuit.
• Do not place any electronic appliance (such as heater and mobile
phone) inside the appliance.
Maintenance
• Disconnect the power cord before cleaning the appliance or replacing
the inside lamp (where fitted).
• Securely plug the power plug in the socket outlet after completely
removing any moisture and dust.
• Never unplug the appliance by pulling on the power cable. Always
grip the power plug firmly and pull straight out from the socket outlet.
• Do not spray water or inflammable substances (toothpaste, alcohol,
thinner, benzene, flammable liquid, abrasive, etc.) over the interior or
exterior of the appliance to clean it.
• Do not clean the appliance with brushes, cloths or sponges with
rough surfaces or which are made of metallic material.
• Only qualified service personnel from LG Electronics service centre
should disassemble, repair, or modify the appliance. Contact an LG
Electronics customer information centre if you move and install the
appliance in a different location.
6
Page 7

EN
• Do not use a hair drier to dry the inside of the appliance or place a
candle inside to remove the odours.
• Do not use mechanical devices or other means to accelerate the
defrosting process.
• Connect the water supply line (for plumbed models only) to a potable
water source only. Otherwise, impurities in the water may cause
illness.
Disposal
• When discarding the appliance, remove the door gasket while leaving
the shelves and baskets in place and keep children away from the
appliance.
• Dispose of all packaging materials (such as plastic bags and
styrofoam) away from children. The packaging materials can cause
suffocation.
Technical Safety
• Keep ventilation openings, in the appliance enclosure or in the built-in
structure, clear of obstruction.
• Do not use electrical appliances inside the refrigerator.
• The refrigerant and insulation blowing gas used in the appliance
require special disposal procedures. Consult with service agent or a
similarly qualified person before disposing of them.
• Refrigerant leaking out of the pipes could ignite or cause an
explosion.
• The amount of refrigerant in your particular appliance is shown on the
identification plate inside the appliance.
• Never start up an appliance showing any signs of damage. If in
doubt, consult your dealer.
• This appliance is intended to be used in household and similar
applications only. It should not be used for commercial, or catering
purposes, or in any mobile application such as a caravan or boat.
• Do not store explosive substances such as aerosol cans with a
flammable propellant in this appliance.
7
Page 8
EN
Risk of Fire and Flammable Materials
This symbol alerts you to flammable materials that can
ignite and cause a fire if you do not take care.
• This appliance contains a small amount of isobutane refrigerant
(R600a), but it is also combustible. When transporting and installing
the appliance, care should be taken to ensure that no parts of the
refrigerating circuit are damaged.
• If a leak is detected, avoid any naked flames or potential sources
of ignition and air the room in which the appliance is standing for
several minutes. In order to avoid the creation of a flammable gas
air mixture if a leak in the refrigerating circuit occurs, the size of the
room in which the appliance is used should correspond to the amount
of refrigerant used. The room must be 1 m² in size for every 8 g of
R600a refrigerant inside the appliance.
• When positioning the appliance, ensure the supply cord is not
trapped or damaged.
• Do not locate multiple portable socket-outlets or portable power
supplies at the rear of the appliance.
CAUTION
To reduce the risk of minor injury to persons, malfunction, or damage
to the product or property when using this product, follow basic
precautions, including the following:
Installation
• Do not tilt the appliance to pull or push it when transporting.
• Make sure not to get a body part such as a hand or foot stuck while
moving the appliance.
Operation
• Do not touch frozen food or the metal parts in the freezer
compartment with wet or damp hands. It may cause frostbite.
8
Page 9

EN
• Do not place glass containers, bottles or cans (especially those
containing carbonated drinks) in the freezer compartment, shelves or
ice bin that will be exposed to temperatures below freezing.
• The tempered glass on the front side of the appliance door or the
shelves can be damaged by an impact. If it is broken, do not touch it
with hands.
• Do not place heavy objects on top of the door in door.
• Do not use the door in door as a chopping board and ensure it is not
scratched by a sharp tool, as this may cause appliance damage.
• Do not hang from the appliance door, storage room, shelf or fridge
door in door or climb up into it.
• Do not store an excessive amount of water bottles or containers for
side dishes on the door baskets.
• Prevent animals from nibbling on the power cable or water hose.
• Do not open or close the appliance door with excessive force.
• If the hinge of the appliance door is damaged or operates improperly,
stop using the appliance and contact an authorized service centre.
• Do not clean glass shelves or covers with warm water when they are
cold.
• Never eat frozen foods immediately after they have been taken out in
the freezer compartment.
• Make sure not to get a hand or foot stuck upon opening or closing the
appliance door or door in door.
• Do not open the door of the appliance with the door in door open, or
do not open the door in door while the door of the appliance is open.
The door in door may be struck by the edge of the appliance and
damaged.
Maintenance
• Do not insert the shelves upside down. The shelves may fall.
• To remove frost from the appliance, contact an LG Electronics
customer information centre.
9
Page 10
EN
INSTALLATION
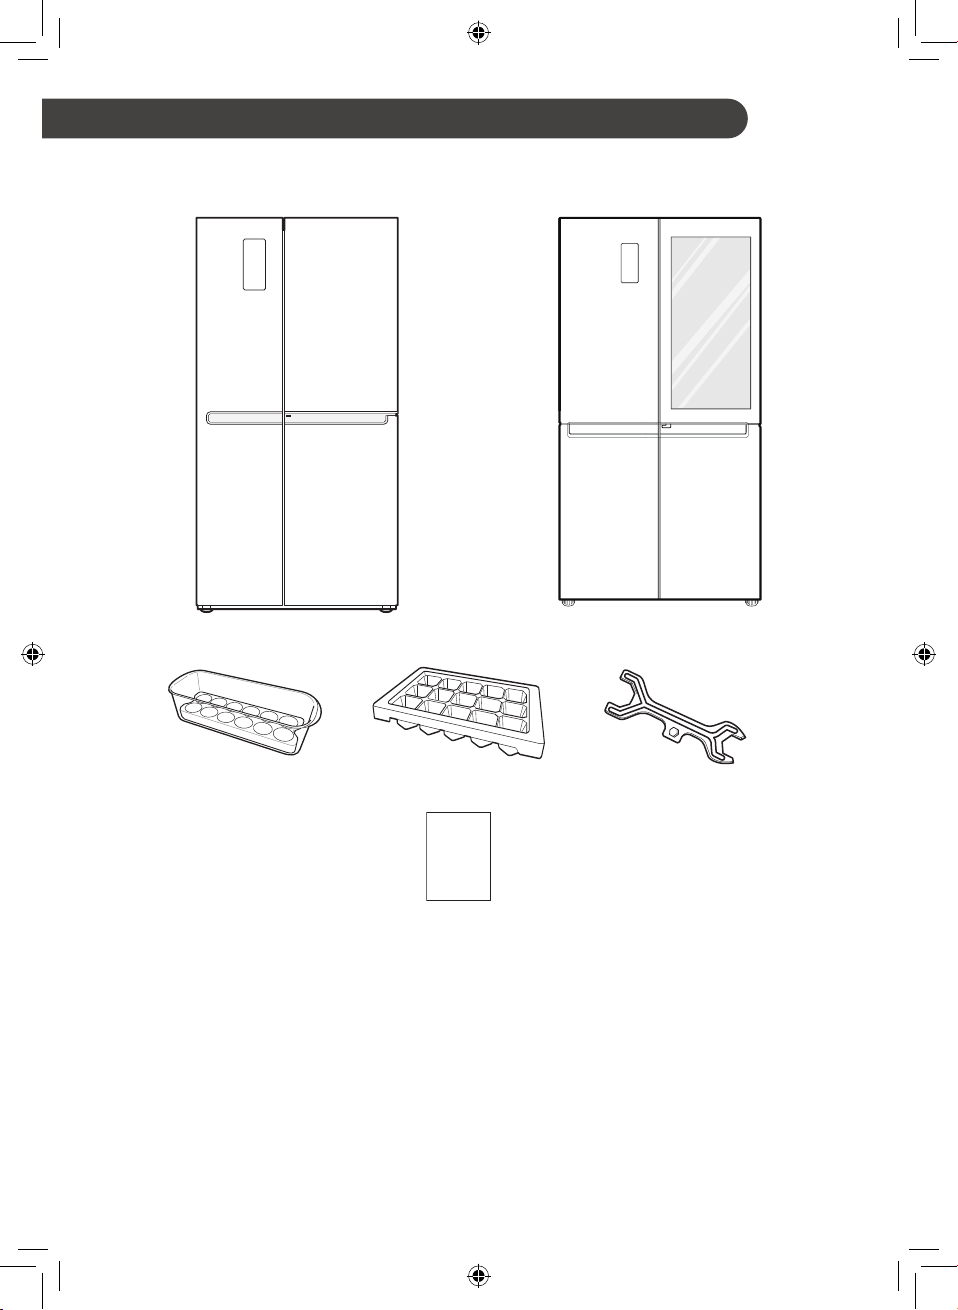
Compartments
Movable Egg Box ( * ) Ice Tray ( * ) Spanner
Owner’s Manual
• The appearance or components of the appliance may differ from model to model.
10
Page 11
EN
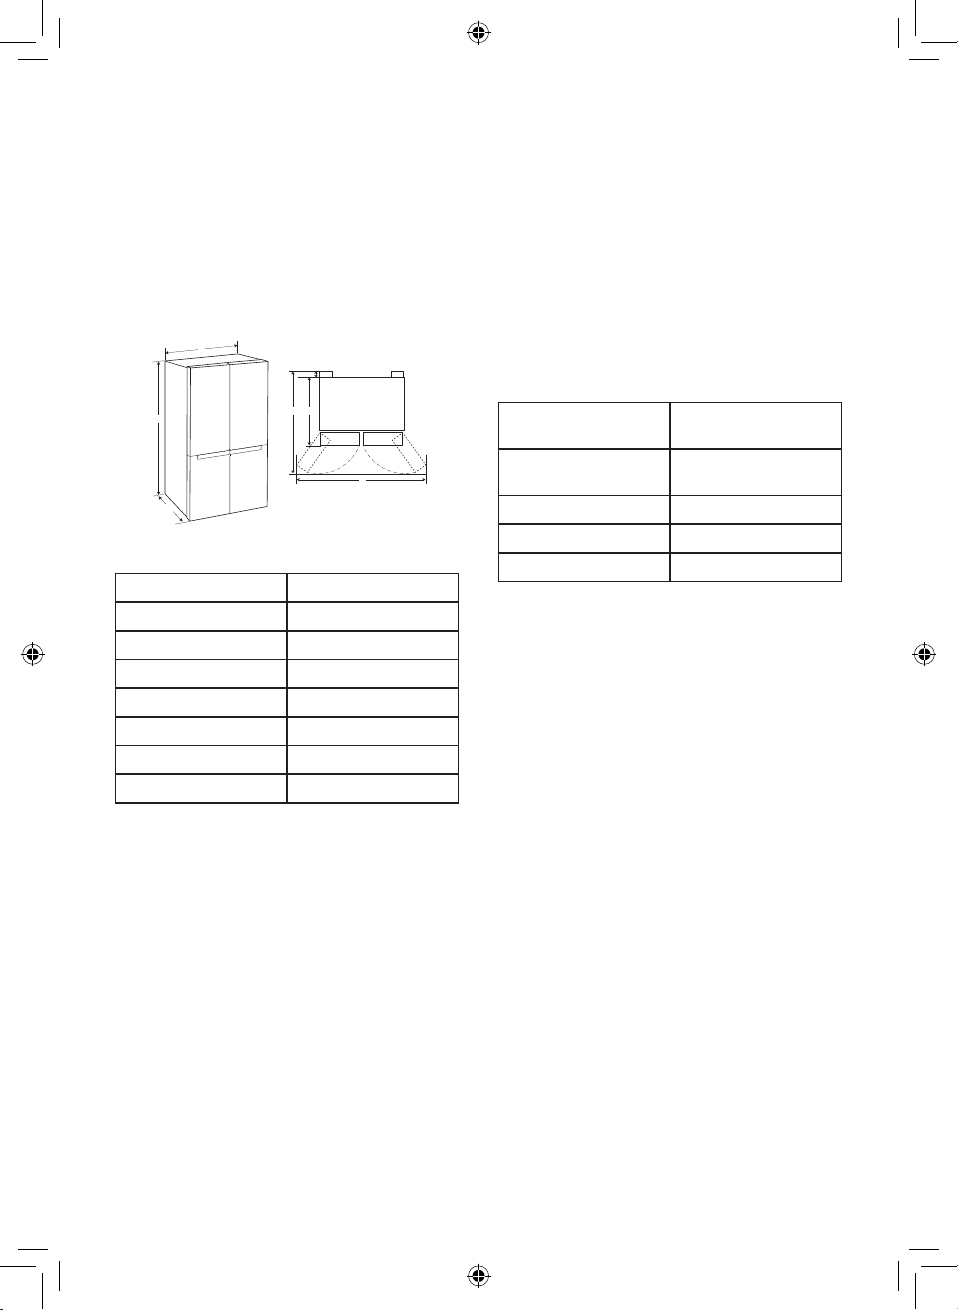
Dimensions and
Clearances
Too small of a distance from adjacent items may
result in the degradation of freezing capability and
increased electricity costs. Allow over 50 mm of
clearance from each adjacent wall when installing
the appliance.
A
D
Ambient Temperature
• The appliance is designed to operate within
a limited range of ambient temperatures,
depending on the climate zone.
• The internal temperature could be affected
by the location of the appliance, the ambient
temperature, the frequency of door opening and
so on.
• The climate class can be found on the rating
label.
B
C
EF
- Size
A 912 mm
B 1790 mm
C 738 mm
D 10 mm
E 728 mm
F 1180 mm
G 1750 mm
Climate Class
G
SN (Extended
Temperate)
Ambient Temperature
Range ºC
+10 - +32
N (Temperate) +16 - +32
ST (Subtropical) +16 - +38
T (Tropical) +16 - +43 / +10 - +43*
*Australia, India, Kenya
NOTE
• The appliances rated from SN to T are intended
to be used at an ambient temperature between
10 ºC and 43 ºC.
11
Page 12
EN
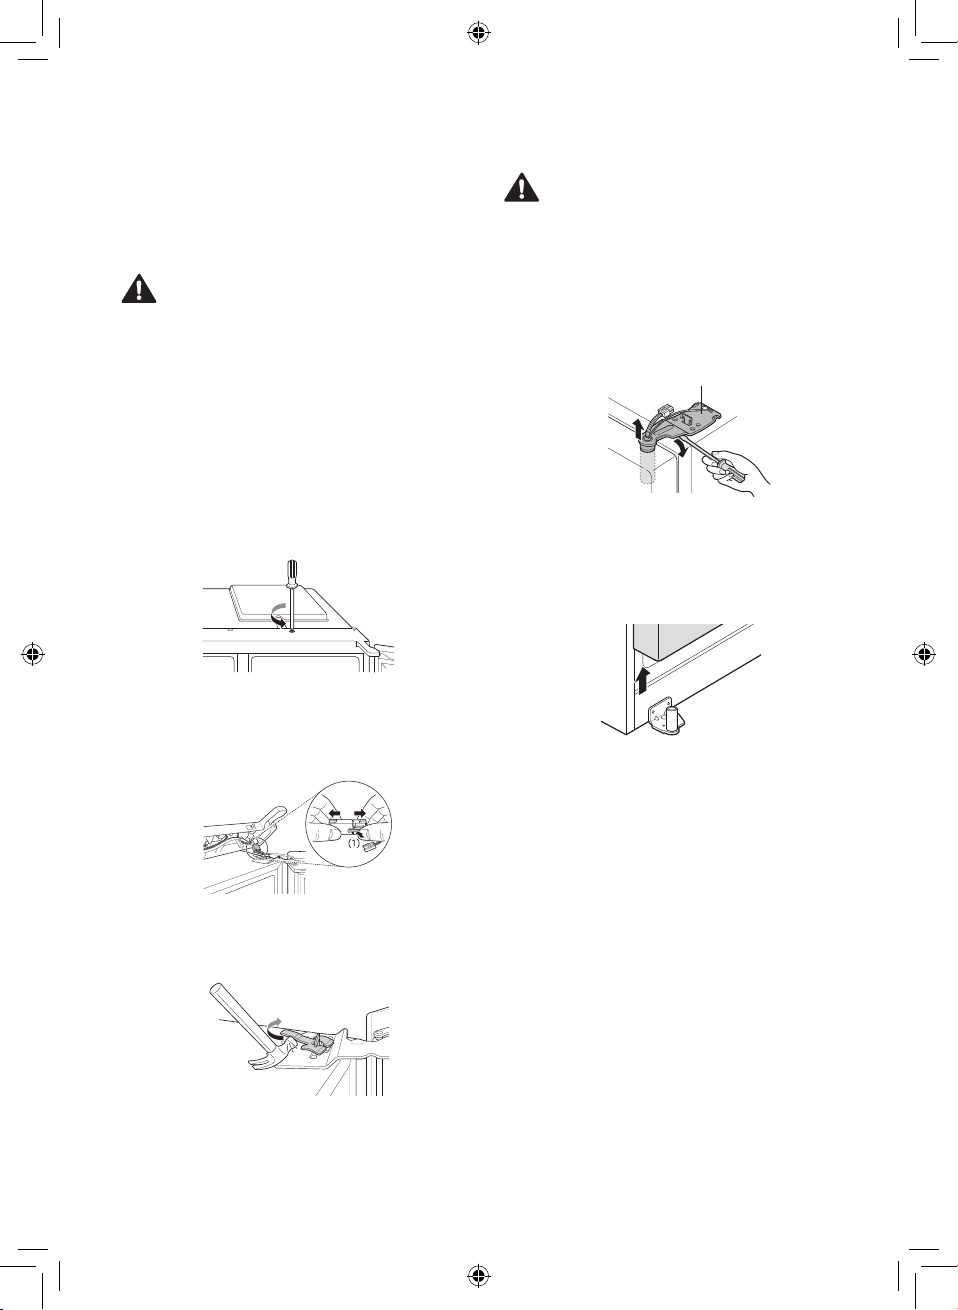
Removing the Door
When it is necessary to move the appliance
through a narrow opening, removing the doors is
the recommended procedure.
WARNING
• Disconnect the power cord, house fuse or
circuit breaker before installing or servicing the
appliance. Failure to follow these instructions
may result in death, fire or electric shock.
If your entrance door is too narrow for the
appliance to pass through, remove the appliance
doors and pass the appliance laterally.
CAUTION
• When removing the upper hinge, be sure to
support the door as it will fall forwards. It is
recommended that two or more people carry out
the door removal and refitting.
Lift the upper hinge fixed between the
4
appliance and the appliance door and then
remove it.
Upper hinge
[For both freezer and fridge]
Remove the screw of the hinge cover on top of
1
the appliance by rotating it counterclockwise.
While pressing (1) hook of the link of the
2
electrical connectors, remove the link by
pulling it in both directions.
Remove the hinge lever by tapping the end of
3
it toward the outside edge of the cabinet.
Door
Remove the freezer and fridge compartment
5
door by lifting it upward. At this time, the door
should be lifted enough for the steel pipe to be
completely pulled out.
Refitting the Door
Mount the doors in the reverse sequence of their
removal once the appliance has been passed
through all access doors.
12
Page 13
EN
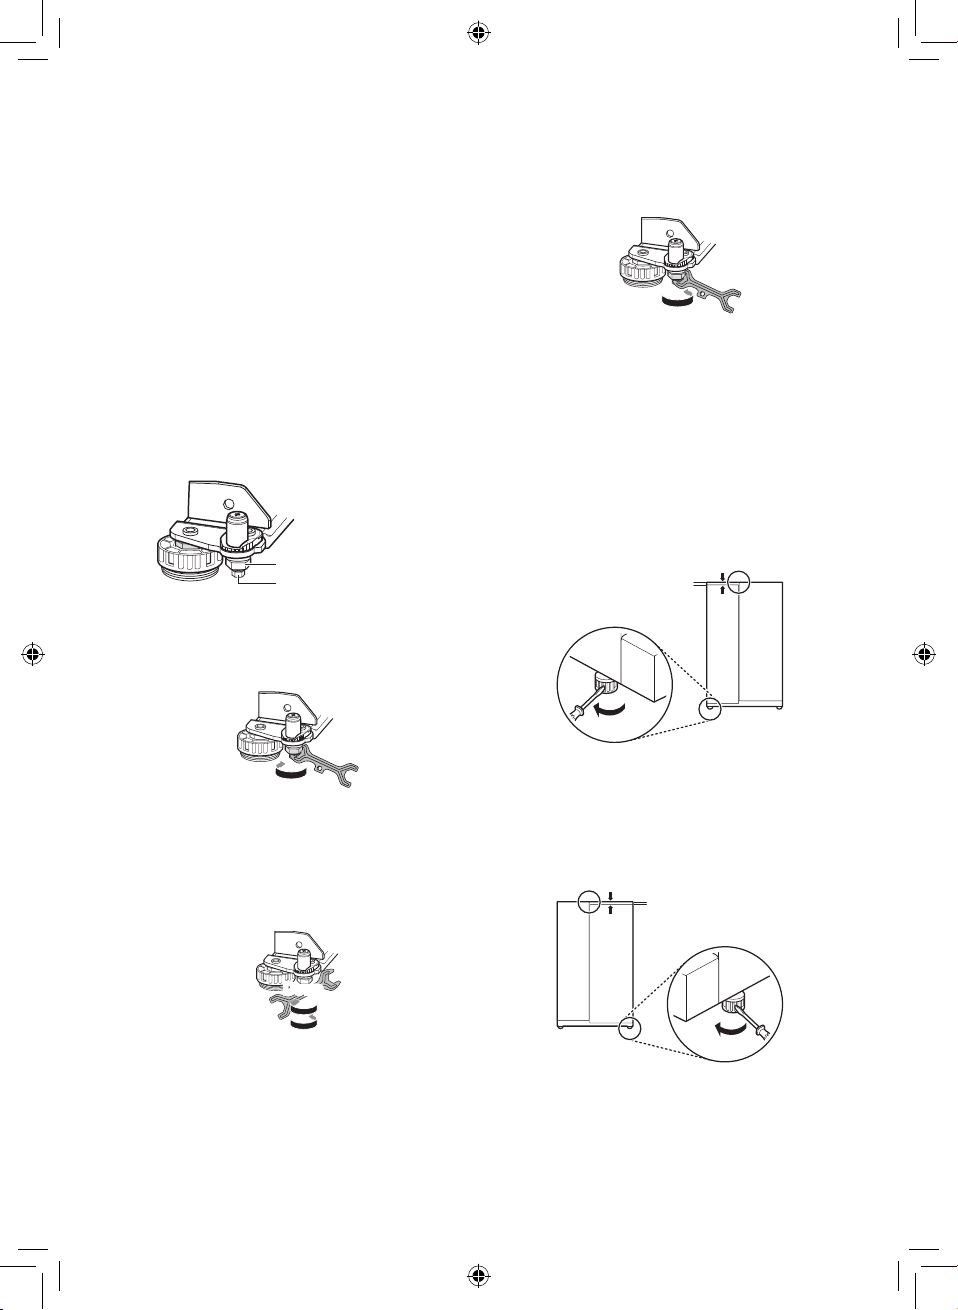
Adjusting the Height of the
Door
If the door of the appliance is not level, adjust the
difference in the height of appliance door using the
following method.
Fasten the keeper nut by turning it
3
counterclockwise.
NOTE
• Because the hinge pin may fall out, do not
adjust the height of the appliance door more
than 5 mm.
[Method1]
*Reference
Keeper nut
Adjustment hinge pin
Turn the keeper nut clockwise using the
1
spanner.
To loosen the nut
Adjust the difference in the height of the
2
appliance door by rotating the adjustment
hinge pin clockwise or counterclockwise with
an 8 mm spanner.
To tighten the nut
If it is impossible to adjust the height of the
appliance door through the above method, level
the door according to the following guide.
[Method2]
If the freezer compartment door is lower than
the fridge compartment door
Level the door by inserting flat(-type) driver into
groove of the left height adjusting screw and rotate
it clockwise.
If the freezer compartment door is higher than
the fridge compartment door
Level the door by inserting flat(-type) driver into
groove of the right height adjusting screw and
rotate it clockwise.
Down
Up
13
Page 14
EN
Connecting the Appliance
After installing the appliance, connect the power
plug into a socket outlet.
NOTE
• After connecting the power supply cord (or plug)
to the outlet, wait 2 or 3 hours before you put
food into the appliance. If you add food before
the appliance has cooled completely, your food
may spoil.
Moving the Appliance
Remove all food from inside the appliance.
1
Pull the power plug out, insert and fix it into
2
the power plug hook at the rear or on top of
the appliance.
Tape parts such as shelves and the door
3
handle to prevent from falling off while moving
the appliance.
Move the appliance with more than two people
4
carefully. When transporting the appliance
over a long distance, keep the appliance
upright.
After installing the appliance, connect the
5
power plug into a socket out to switch on the
appliance.
14
Page 15
EN
OPERATION
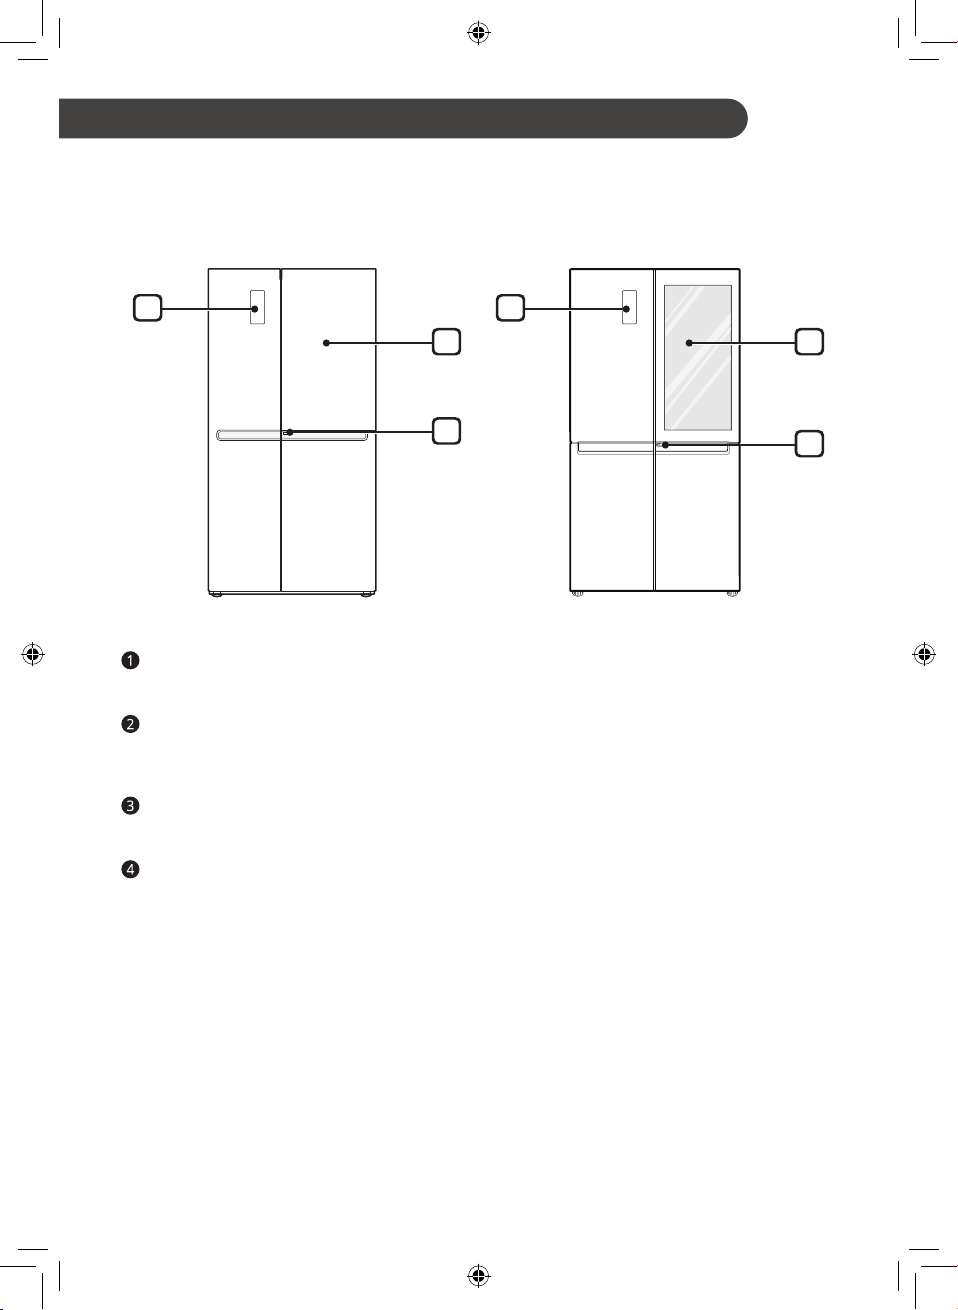
Parts and Functions
Exterior
1
2
3
Control Panel
To set the freezer and fridge temperatures.
Door-in-Door ( * )
The Door in Door is a double layered door system. It can be opened individually or together with the
main door. You can conveniently locate and access your favourite snacks or food items.
Door-in-Door Lever ( * )
This lever opens Door in Door.
InstaView Door in Door ( * )
The InstaView Door in Door compartment allows for easy access to commonly used food items.
1
4
3
NOTE
• (*) means that this feature varies depending on the model purchased.
• The appearance or components of the appliance may differ from model to model.
15
Page 16
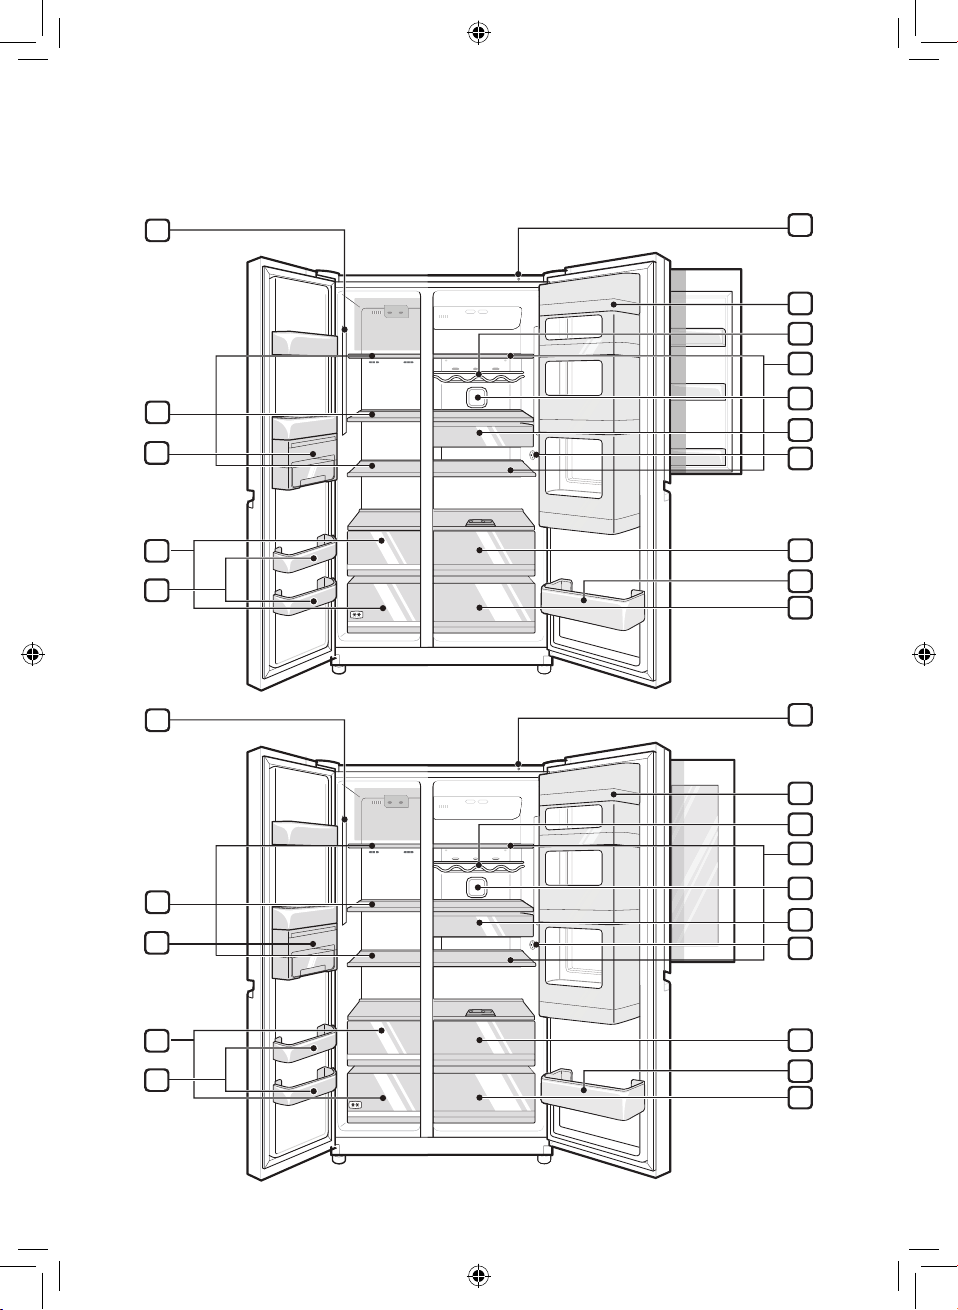
Interior
6
6
1
(1)
EN
7
8
9
2
3
4
5
1
(1)
2
3
10
11
12
13
14
15
7
8
9
10
11
12
16
4
5
13
14
15
Page 17
EN
LED Lamp
The LED lamps inside the appliance light up when you open the door.
Freezer Shelf ( * )
This is where frozen foods such as meat, fish, and ice cream can be stored.
Icemaker ( * )
This is where ice is manually produced and stored.
Freezer Drawer ( * )
This is for long-term storage of frozen items.
Freezer Door Basket
This is where small packages of frozen food can be stored.
• Do not store ice cream or food which will be stored for a long period of time within these baskets.
Smart Diagnosis Unit
Use this function when contacting LG Electronics customer information centre to help make an
accurate diagnosis when the appliance operates abnormally or a failure occurs.
Door in Door ( * )
This is where foods which are taken out frequently such as beverages and snacks are stored.
Bottle Rack ( * )
This is where drinks tall bottles or containers are stored.
CAUTION
• Do not store short bottles or containers. The items may fall and cause an injury or appliance
damage.
Fridge Shelf
This is where refrigerated foods and other items are stored.
• The shelf height can be adjusted by inserting the shelf in another groove of different height.
• Store the foods with higher moisture content at the front of the shelf.
• The actual number of shelves will differ from model to model.
Hygiene Fresh ( * )
• This function reduces and removes odors inside the fridge compartment.
17
Page 18
EN
Snack Drawer ( * )
This is where small packages of refrigerated foods are stored.
Temperature Sensor
This sensor senses the temperature of the fridge compartment.
• Maintain the distance between the sensor and food to accurately sense the temperature.
Fresh Vegetable Drawer ( * )
This is where fruits and vegetables are stored to help maintain freshness by adjusting the humidity
controller.
Fridge Door Basket
This is where small packages of refrigerated foods, drinks and sauce containers are stored.
Vegetable Drawer
This is where fruits and vegetables are stored to remain fresh for as long as possible.
• The actual number of drawers will differ from model to model.
NOTE
• (*) means that this feature varies depending on the model purchased.
• The 2-star section ( a ) basket or drawer can be used to store ice and food from -12 °C to -18 °C for
short periods.
• The top shelf of the freezer(1) will reach the set temperature the most quickly.
18
Page 19

EN
Notes for Operation
• Users should keep in mind that frost can form. If
the door is not closed completely, if the humidity
is high during the summer, or if the freezer door
is opened frequently.
• Ensure there is sufficient space between food
stored on the shelf or door basket to allow the
door to close completely.
• Opening the door lets warm air enter the
appliance, and may cause the internal
temperature to rise.
• If you are leaving the appliance turned off for an
extended period of time, remove all food and
unplug the power cord. Clean the interior, and
leave the doors slightly ajar to prevent mold
from growing in the appliance.
Suggestion for Energy Saving
• Ensure there is sufficient space between stored
foods. This allows cold air to be circulated
evenly and lowers electricity bills.
• Store hot food only after it has cooled in order to
prevent dew or frost.
• When storing food in the freezer compartment,
set the freezer temperature lower than the
temperature indicated on the food.
• Do not put food near the temperature sensor of
the fridge compartment. Keep a distance of at
least 3 cm from the sensor.
• Note that a temperature rise after defrosting
has a permissible range in the appliance
specifications. If you wish to minimise the
impact this may have on the food storage due to
a temperature rise, seal or wrap the stored food
in several layers.
• The automatic defrosting system in the
appliance ensures that the compartment
remains free of ice buildup under normal
operating conditions.
19
Page 20

EN
Storing Foods Effectively
• Store frozen food or refrigerated food inside
sealed containers.
• Check the expiration date and label (storage
instructions) before storing food in the
appliance.
• Do not store food for a long period of time
(more than four weeks) if it spoils easily at a low
temperature.
• Place the refrigerated food or frozen food in
each fridge or freezer compartment immediately
after purchasing.
• Avoid refreezing any food which has been
completely thawed. Freezing any food which
has been completely thawed again will lower its
taste and nutrition.
• Do not wrap and store vegetables with
newspaper. Printing material of newspaper
or other foreign substances may smear and
contaminate food.
• Do not overfill the appliance. Cold air can not
circulate properly if the appliance is overfilled.
• If you set an excessively low temperature
for food, it may become frozen. Do not
set a temperature lower than the required
temperature for the food to be stored correctly.
• If there are chill compartments in the appliance,
do not store vegetables and fruits with higher
moisture content in the chill compartments as
they may freeze due to the lower temperature.
Max Freezing Capacity
• The Express Freeze function will set the freezer
to its maximum freezing capacity.
• This generally takes up to 24 hours and
automatically switches off.
• If the maximum freezing capacity is to be used,
Express Freeze must be switched on for seven
hours before fresh produce is placed in the
freezer compartment.
Maximum Storage
• To get better air circulation, insert all drawers.
• If large quantities of food are to be stored, all
the freezer drawers shall be taken out of the
appliance except the bottom one and the food
shall be stacked directly on the freezer shelves
in the freezer compartment.
NOTE
• To remove the drawers, first pick the food out of
drawers. Then use the handle of drawers, pull
out the drawers carefully. It may cause injury.
• The shape of each drawer may be different,
insert in the right position.
20
Page 21

EN
Using Control Panel
Units and Functions
<Type 1> <Type 2>
Hygiene
Fresh
Power
Fridge Temperature
a
• This sets the fridge target temperature.
Freezer Temperature
b
• This sets the freezer target temperature.
Hygiene Fresh ( * )
c
• This sets the Hygiene Fresh function.
Express Freeze
d
• This sets Express Freeze functions.
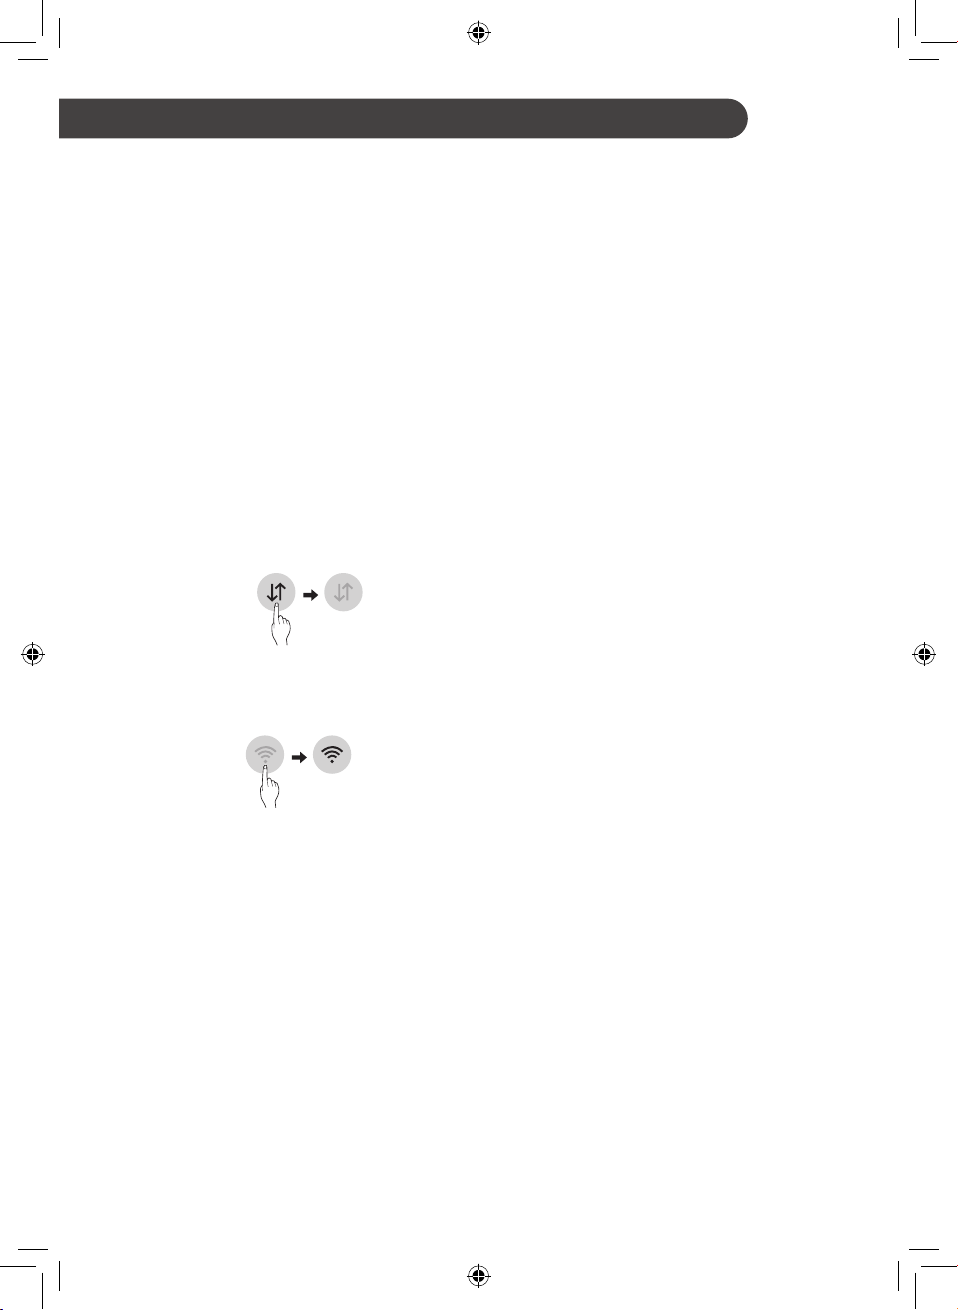
* Wi-Fi
e
• This sets the appliance to connect to your
home’s Wi-Fi network.
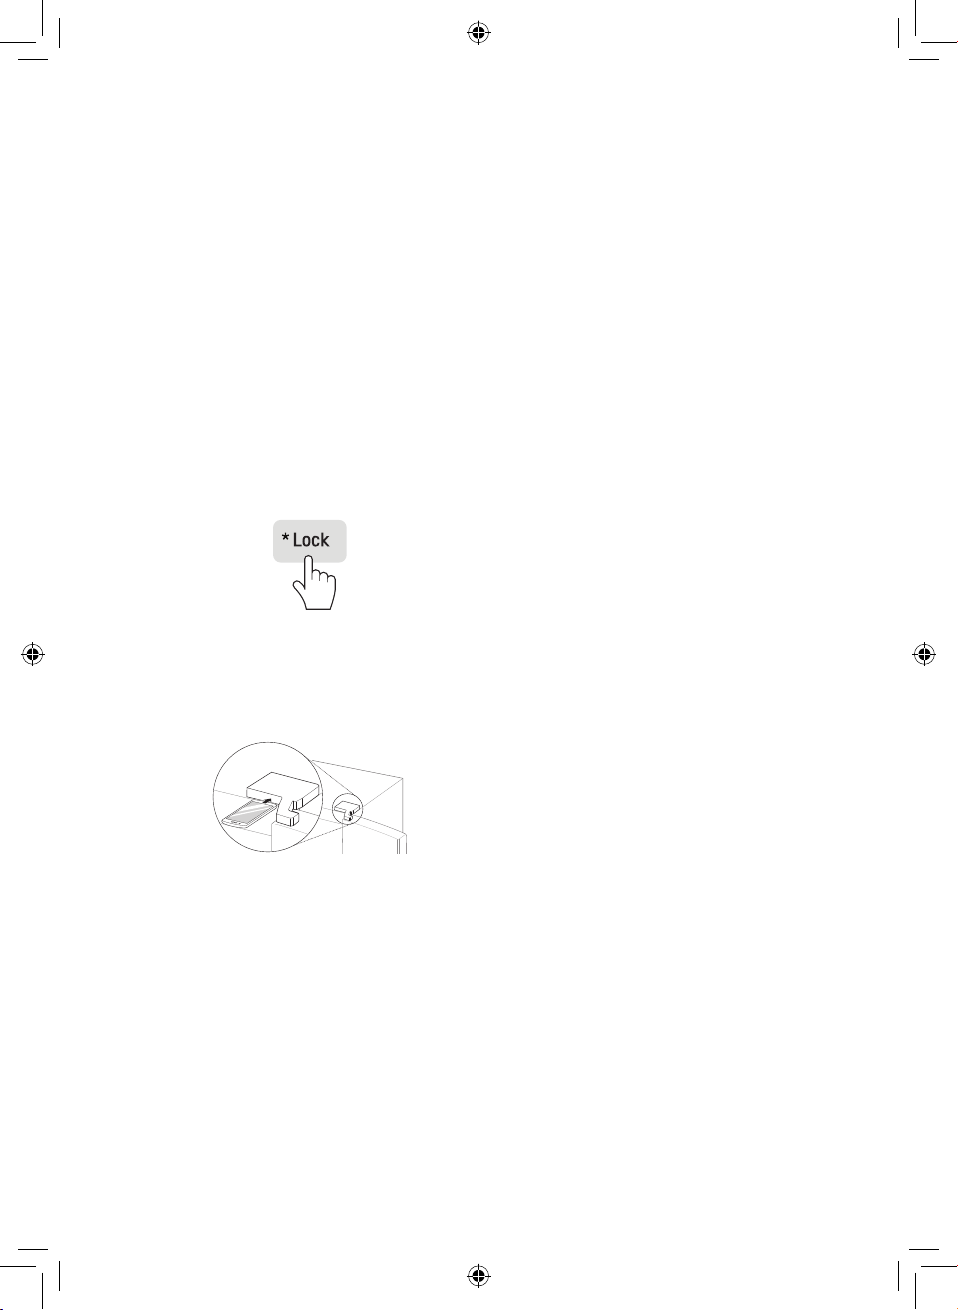
* Lock
f
• This locks the buttons on the control
panel.
NOTE
• (*) means that this feature varies depending on the model purchased.
• The actual control panel may differ from model to model.
• The control panel will turn off automatically for energy saving.
• If there is any finger or skin contacts to the control panel while cleaning it, the button function may
operate.
21
Page 22
EN
Setting the Temperature
This sets the fridge temperature or freezer
temperature.
• Press the Fridge button or Freezer button to
adjust the temperature.
• The temperature can be adjusted.
− Fridge : from 1 °C to 7 °C
− Freezer : from -14 °C to -24 °C
• The actual inner temperature varies depending
on the food status, as the indicated setting
temperature is a target temperature, not actual
temperature within the appliance.
NOTE
• The default temperature setting may vary
depending on the appliance.
• Wait until two or three hours have passed after
connecting the appliance to the outlet before
storing food in the appliance.
• For ice making in normal climates, the freezer
temperature should be set to -19 °C or colder.
Setting Hygiene Fresh
Bacteria and odor inside the appliance can be
minimized with the Hygiene Fresh function.
However, the function is only effective for bacteria
floating in the appliance, not bacteria adsorbed
onto food.
• Each time you press the Hygiene Fresh button,
the Hygiene Fresh function mode will change to
Auto → Power → Off → Auto alternatively.
Setting Express Freeze
The function can quickly freeze a large amount of
ice or frozen foods.
• When you press the Express Freeze button,
the Express Freeze icon lights on the control
panel.
• The function is enabled and disabled in turn
each time you press the button.
• The Express Freeze function automatically
terminates after a specific period has passed.
Setting and Resetting Lock
This locks the buttons on the control panel.
• Press and hold the Lock button for 3 seconds
. When the Lock function is set, all buttons are
locked.
• When you press the Lock button for 3 seconds,
the Lock/Unlock icon on the control panel
lights. The function is enabled and disabled in
turn each time you press the button.
• If you press a button other than lock when the
lock is set, the button will not function.
• When you press a button other than lock when
the lock is set, the Lock/Unlock icon on the
control panel will flash 3 times.
• To change a setting, first press the Lock button
for three seconds to disable the function.
22
Page 23
EN
Icemaker ( * )
This is where ice is manually produced and stored.
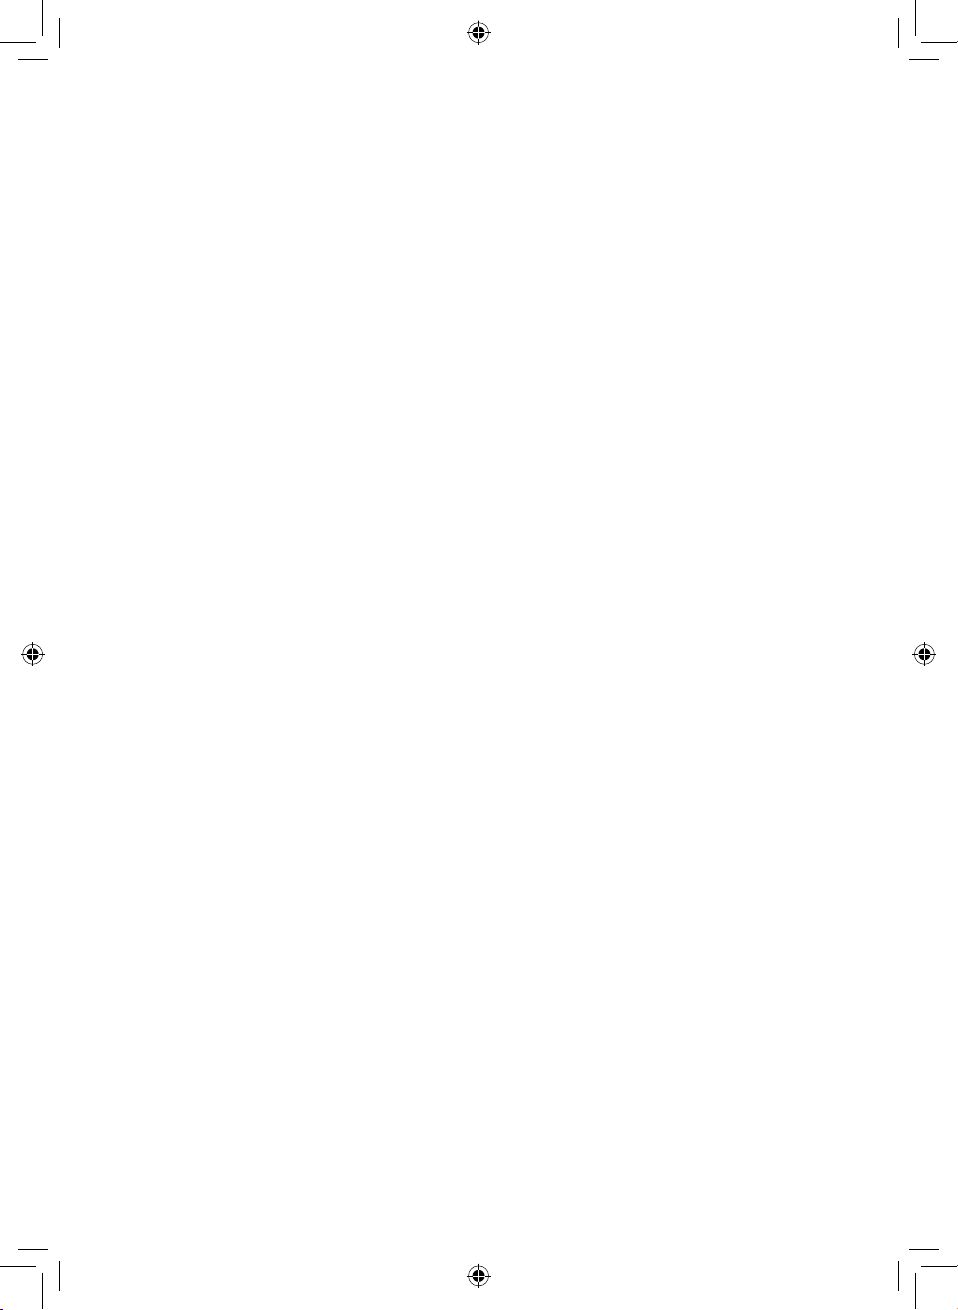
Making Ice
<Type 1>
Hold the handle of ice tray and pull it out.
1
Fill the ice tray with water so that all the cubes
2
are equally full.
Place the ice tray back to its position carefully
3
not to spill water on the floor.
Taking Out Ice
<Type 1>
Rotate the ice separation handle on the
1
icemaker clockwise.
Lift the ice storage bin slightly and remove.
2
<Type 2>
Hold the icetray at its ends and twist gently.
CAUTION
• Be careful not to spill water when inserting the
ice tray after filling with water.
<Type 2>
Fill the icetray with water so that all the cubes
are equally full. And place it in the freezer
compartment.
CAUTION
• If you open and close the freezer door
frequently, it may take longer for water to be
frozen.
• The time for water to be frozen may vary
according to the season. Until 24 hours after
initial installation, the temperature inside the
appliance may not be stabilized so that it may
take longer for water to be frozen.
• Make sure to be careful as the edges of the
ejected ice may be sharp.
23
Page 24
EN
NOTE
• (*) means that this feature varies depending on
the model purchased.
• If ice cannot be detached easily, rotate the ice
separation handle of the icemaker once again.
• Please note that ice may stick together if you
rotate the ice separation handle of the icemaker
before the water has completely frozen.
• It takes approximately three hours for water
at the temperature of -20 °C to be frozen
completely.
• When placing the ice storage bin back to its
original position after using, make sure to check
if it is inserted all the way in.
• The proper storage amount of the ice storage
bin is the amount of ice made three times. If
more than the amount of ice made for three
times is stored, the ice storage bin may not
come out and will become stuck. Do not store
more than three ejected ice trays of ice in the
ice storage bin.
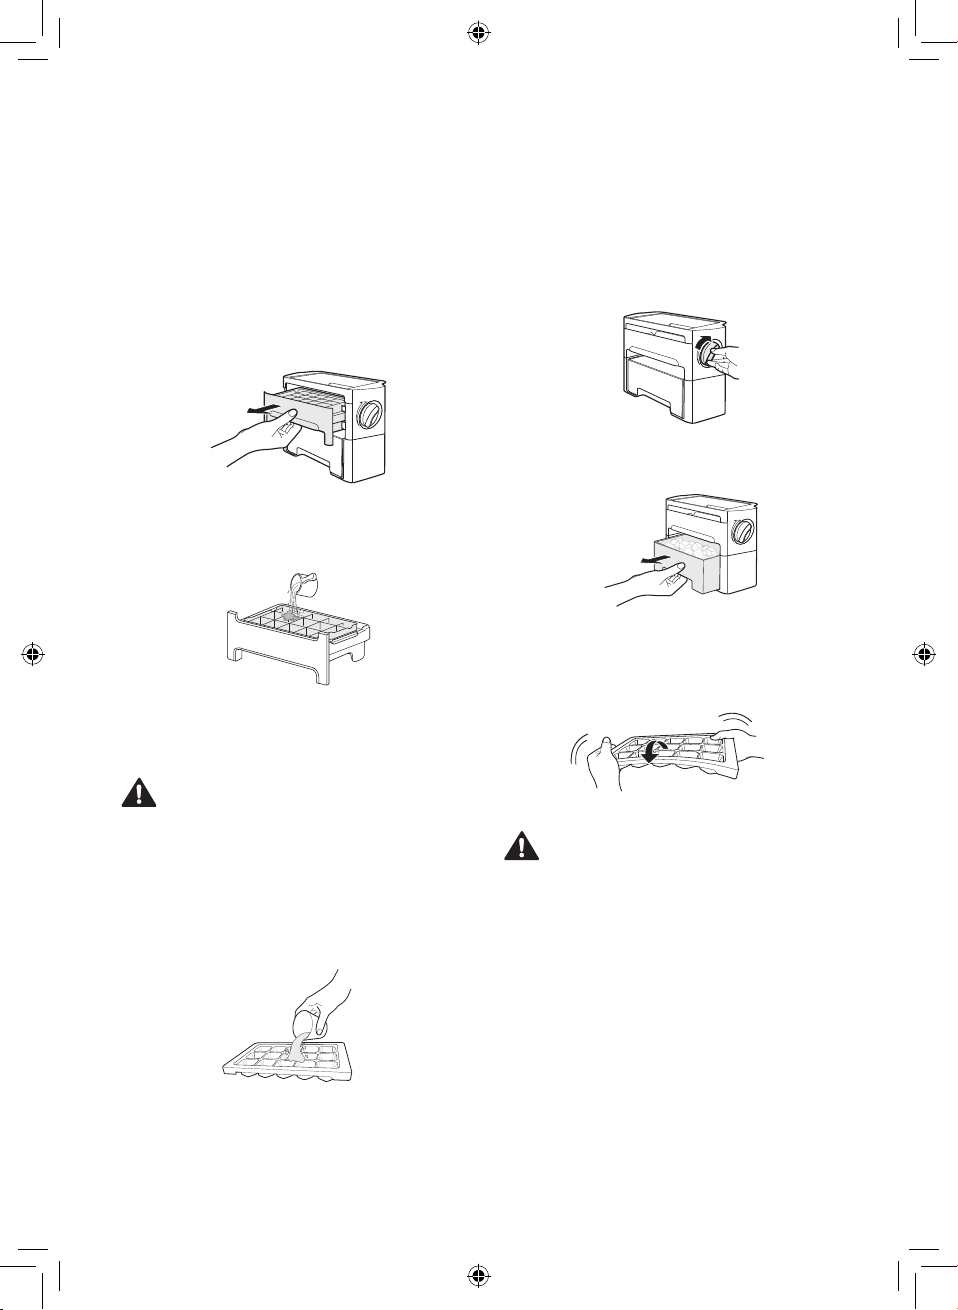
Removing the Icemaker ( * )
Hold both edges of the freezer door basket on
1
top of the icemaker and remove it by pulling
it up.
CAUTION
• Remove in this order. Removing the ice tray first
may cause damage.
• When separating the icemaker, hold and
remove it properly to prevent the ice tray from
falling off.
NOTE
• (*) means that this feature varies depending on
the model purchased.
Cleaning the Ice Tray
Hold the handle of ice tray and pull it out to
1
remove.
After cleaning, remove it back to its original
2
position.
CAUTION
• When cleaning, wipe all components with a wet
towel except for the ice tray and dry them off
completely before using. Failure to do so may
cause malfunctions.
Hold both edges of ice tray compartment and
2
remove it by pulling it up.
24
Page 25

EN
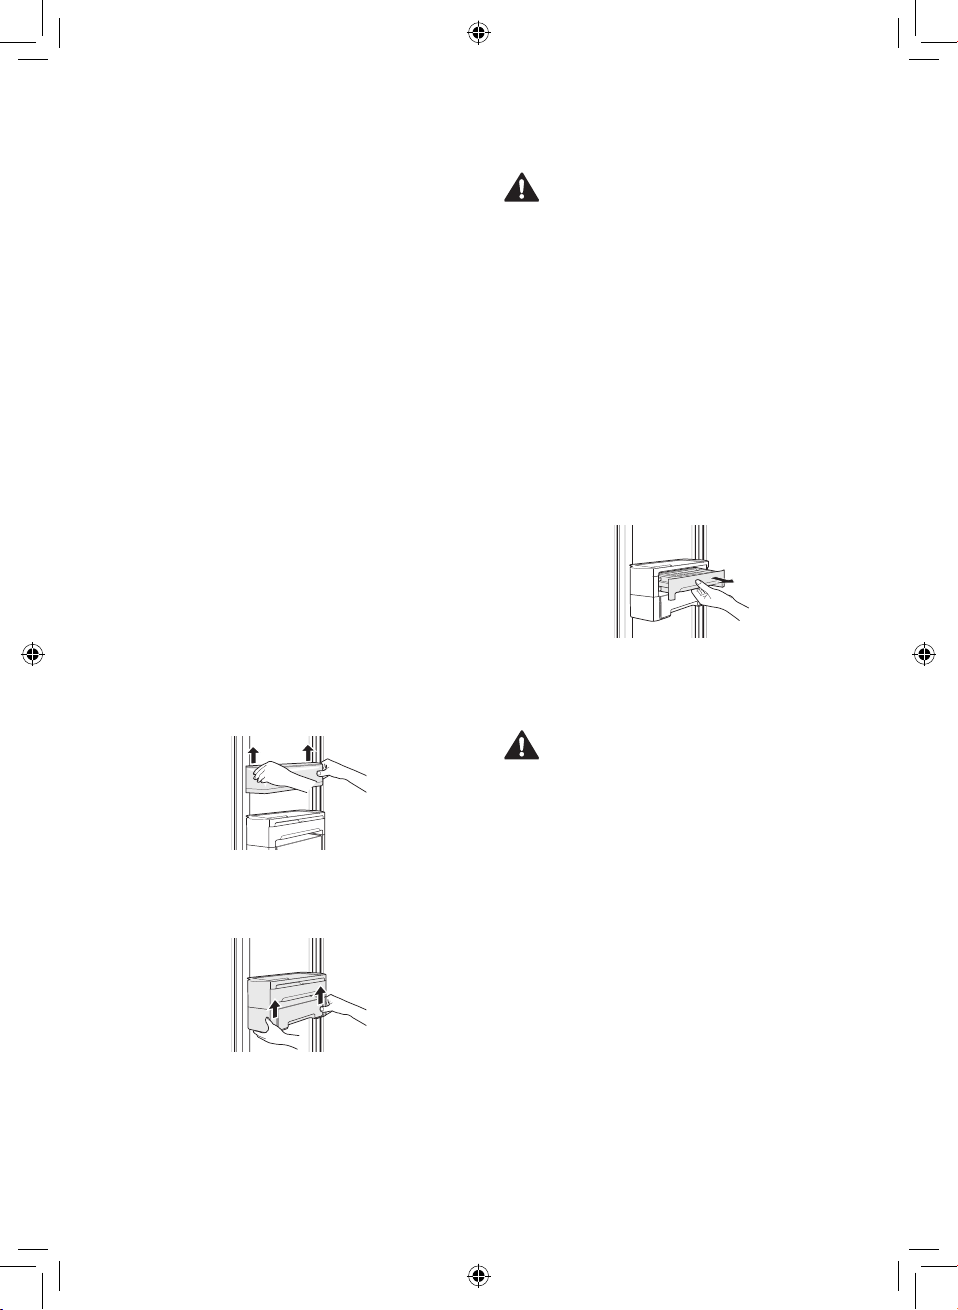
Door in Door ( * )
Pull the lever at the bottom of the door upwards
until the door in door opens.
There is plenty of storage space inside the door in
door and its surrounding baskets, allowing you to
store food in an organized manner.
Removing the Case from the
Door in Door
Hold the case from inside the door in door with
both hands and remove it by lifting it upward.
Removing the Baskets from the
Door in Door
Hold both edges of the basket and remove it
1
by lifting it upward.
Lift the fixed basket up as shown in (1) and
2
remove it by pulling it out as shown in (2).
Refitting the Door in Door Case
Mount them in the reverse order of the removal
process.
Refitting the Baskets to the Door
in Door
Mount them in the reverse order of the removal
process.
NOTE
• (*) means that this feature varies depending on
the model purchased.
25
Page 26
EN
Fresh Vegetable Drawer( * )
The Humidity in the vegetable crisper drawer can
be controlled by sliding the lever in either direction.
If moved to the left side, the air guide will be open
and allow air to circulate through the drawer for
reduced humidity. And if moved to the right side,
the air guide will be closed and will maintain any
humidity that is currently in the crisper drawer.
The closed state is recommended for storing
vegetables, and open state is recommended for
storing fruit.
• The InstaView Door-in-Door function is disabled
when the right refrigerator door and the left
freezer door are open, for two seconds after
closing the door, and when the ice dispenser is
in use.
• Knock near the centre of the glass. Knocking
near the edges of the glass may not activate the
InstaView Door-in-Door function properly.
• Knock hard enough that the knocking sound is
audible.
• The InstaView Door-in-Door function may
activate if a loud noise occurs near the
refrigerator.
NOTE
• (*) means that this feature varies depending on
the model purchased.
Other Functions
NOTE
• (*) means that this feature varies depending on
the model purchased.
InstaView Function ( * )
The InstaView function on the Door-in-Door lets
you see if you’re running low on frequently used
items like beverages and snacks, without opening
the refrigerator door.
Knock twice on the glass to turn the LED light
1
inside the Door-in-Door on or off.
The LED light turns off automatically after ten
2
seconds.
Door Open Alarm
The alarm sounds 3 times in 30 second
intervals if the door (fridge compartment, freezer
compartment, door in door) is left open or not
completely closed for one minute.
• Contact the LG Electronics customer
information centre if the alarm sound continues
even after closing the door.
Failure Detection
The appliance can automatically detect problems
during the operation.
• If a problem is detected, the appliance may not
operate and an error code is displayed even
when any button is pressed.
• When this occurs, do not turn off the power
and immediately contact the LG Electronics
customer information centre. If you turn off
the power, the repair technician from the LG
Electronics customer information centre may
have difficulty finding the problem.
26
Page 27
EN
SMART FUNCTIONS
Using LG SmartThinQ
Application
• For appliances with the a or b logo
Things to check before using LG
SmartThinQ
Check the distance between the appliance
1
and the wireless router (Wi-Fi network).
• If the distance between the appliance and
the wireless router is too far, the signal
strength becomes weak. It may take a long
time to register or installation may fail.
Turn off the Mobile data or Cellular Data on
2
your smartphone.
• For iPhones, turn data off by going to
Settings → Cellular → Cellular Data.
Connect your smartphone to the wireless
3
router.
• If the appliance is having trouble connecting
to the Wi-Fi network, it may be too far from
the router. Purchase a Wi-Fi repeater (range
extender) to improve the Wi-Fi signal strength.
• The Wi-Fi connection may not connect or may
be interrupted because of the home network
environment.
• The network connection may not work properly
depending on the Internet service provider.
• The surrounding wireless environment can
make the wireless network service run slowly.
• The appliance cannot be registered due to
problems with the wireless signal transmission.
Unplug the appliance and wait about a minute
before trying again.
• If the firewall on your wireless router is enabled,
disable the firewall or add an exception to it.
• The wireless network name (SSID) should be a
combination of English letters and numbers. (Do
not use special characters.)
• Smartphone user interface (UI) may vary
depending on the mobile operating system (OS)
and the manufacturer.
• If the security protocol of the router is set to
WEP, you may fail to set up the network. Please
change it to other security protocols (WPA2 is
recommended) and register the product again.
NOTE
• To verify the Wi-Fi connection, check that Wi-Fi
f icon on the control panel is lit.
• The appliance supports 2.4 GHz Wi-Fi networks
only. To check your network frequency, contact
your Internet service provider or refer to your
wireless router manual.
• LG SmartThinQ is not responsible for any
network connection problems or any faults,
malfunctions, or errors caused by network
connection.
Installing LG SmartThinQ
Search for the LG SmartThinQ application from the
Google Play Store or Apple App Store on a smart
phone. Follow instructions to download and install
the application.
27
Page 28

EN
Wi-Fi Function
Communicate with the appliance from a smart
phone using the convenient smart features.
Firmware Update
Keep the appliance performance updated.
Smart Diagnosis™
If you use the Smart Diagnosis function, you will
be provided with the useful information such as a
correct way of using the appliance based on the
pattern of use.
Settings
Allows you to set various options on the
refrigerator and in the application.
NOTE
• If you change your wireless router, Internet
service provider, or password, delete the
registered appliance from the LG SmartThinQ
application and register it again.
• The application is subject to change for
appliance improvement purposes without notice
to users.
• Functions may vary by model.
Re-registering the Appliance or
Registering Another User
Press and hold the Wi-Fi button for 3 seconds to
temporarily turn it off. Run the LG SmartThinQ
application and follow the instructions in the
application to register the appliance.
NOTE
• To disable the Wi-Fi function, press and hold the
Wi-Fi button for 3 seconds. Wi-Fi icon will be
turned off.
Open Source Software Notice
Information
To obtain the source code under GPL, LGPL, MPL,
and other open source licenses, that is contained
in this product, please visit http://opensource.lge.
com.
In addition to the source code, all referred license
terms, warranty disclaimers and copyright notices
are available for download.
LG Electronics will also provide open source code
to you on CD-ROM for a charge covering the cost
of performing such distribution (such as the cost of
media, shipping, and handling) upon email request
to opensource@lge.com. This offer is valid for a
period of three years after our last shipment of this
product. This offer is valid to anyone in receipt of
this information.
Connecting to Wi-Fi
The Wi-Fi button, when used with the LG
SmartThinQ application, allows the appliance
to connect to a home Wi-Fi network. The Wi-Fi
icon shows the status of the appliance’s network
connection. The icon illuminates when the
appliance is connected to the Wi-Fi network.
Initial Appliance Registration
Run the LG SmartThinQ application and follow
the instructions in the application to register the
appliance.
28
Page 29
EN
Using Smart Diagnosis™
• For appliances with the
Smart Diagnosis™ Through the
Customer Information Centre
Use this function if you need an accurate diagnosis
by an LG Electronics customer information centre
when the appliance malfunctions or fails. Use this
function only to contact the service representative,
not during normal operation.
Press the Lock button to activate the lock
1
function.
• If the display has been locked for over 5
minutes, you must deactivate the lock and
then reactivate it.
Open the fridge door and then hold the phone
2
on the upper right speaker hole.
• Position the phone so that its microphone is
aligned with the speaker hole.
c or d logo
NOTE
• Position the phone so that its microphone is
aligned with the speaker hole.
• The Smart Diagnosis™ sound is generated after
around three seconds.
• Hold the phone to the upper right speaker hole
and wait while the data is transmitted.
• Do not take the phone off the speaker hole while
the data is transmitted.
• The data transfer sound may be harsh to the
ear while the Smart Diagnosis™ data is being
transmitted, but do not take the phone off the
speaker hole for accurate diagnosis until the
data transfer sound has stopped.
• When the data transfer is complete, the transfer
completion message is displayed and the
control panel is automatically turned off and
then on again after a few seconds. Afterwards
the customer information centre explains the
diagnosis result.
• The Smart Diagnosis™ function depends on the
local call quality.
• The communication performance will improve
and you can transmit a better signal if you use a
land line home phone.
• If the Smart Diagnosis™ data transfer is poor
due to poor call quality, you may not receive the
best Smart Diagnosis™ service.
Press and hold the Freezer button for three
3
seconds or longer while continuing to hold
your phone to the speaker.
After the data transfer is complete, the service
4
agent will explain the result of the Smart
Diagnosis™.
29
Page 30
EN
MAINTENANCE
Notes for Cleaning
• When removing a shelf or drawer from inside
the appliance, remove all stored foods from the
shelf or drawer to prevent injury or damage to
the appliance.
− Otherwise, injury may occur due to the
weight of stored foods.
• If cleaning the outside air vents of the appliance
by means of vacuuming, then the power cord
should be unplugged from the outlet to avoid
any static discharge that can damage the
electronics or cause an electric shock.
• Detach the shelves and drawers and clean them
with water, and then dry them sufficiently, before
replacing them.
• Regularly wipe the door gaskets with a wet soft
towel.
• Door basket spills and stains should be cleaned
as they can compromise storage ability of the
basket and could even be damaged.
• After cleaning, check if the power cable is
damaged, warm or improperly plugged.
• Keep the air vents on the exterior of the
appliance clean.
− Blocked air vents can cause fire or appliance
damage.
• Waxing external painted metal surfaces helps
provide rust protection. Do not wax plastic parts.
Wax painted metal surfaces at least twice a year
using appliance wax (or auto paste wax). Apply
wax with a clean, soft cloth.
• When cleaning the inside or outside of the
appliance, do not wipe it with a rough brush,
toothpaste, or flammable materials. Do not
use cleaning agents containing flammable
substances.
− This may cause discoloration or damage to
the appliance.
− Flammable substances: alcohol (ethanol,
methanol, isopropyl alcohol, isobutyl alcohol,
etc.), thinner, bleach, benzene, flammable
liquid, abrasive, etc.
• For the appliance exterior, use a clean sponge
or soft cloth and a mild detergent in warm water.
Do not use abrasive or harsh cleaners. Dry
thoroughly with a soft cloth.
• Never clean the shelves or containers in the
dishwasher.
− The parts may become deformed due to the
heat.
• If the appliance is equipped with an LED lamp,
do not remove lamp cover and LED lamp in any
attempt to repair or service it. Please, contact an
LG Electronics customer information centre.
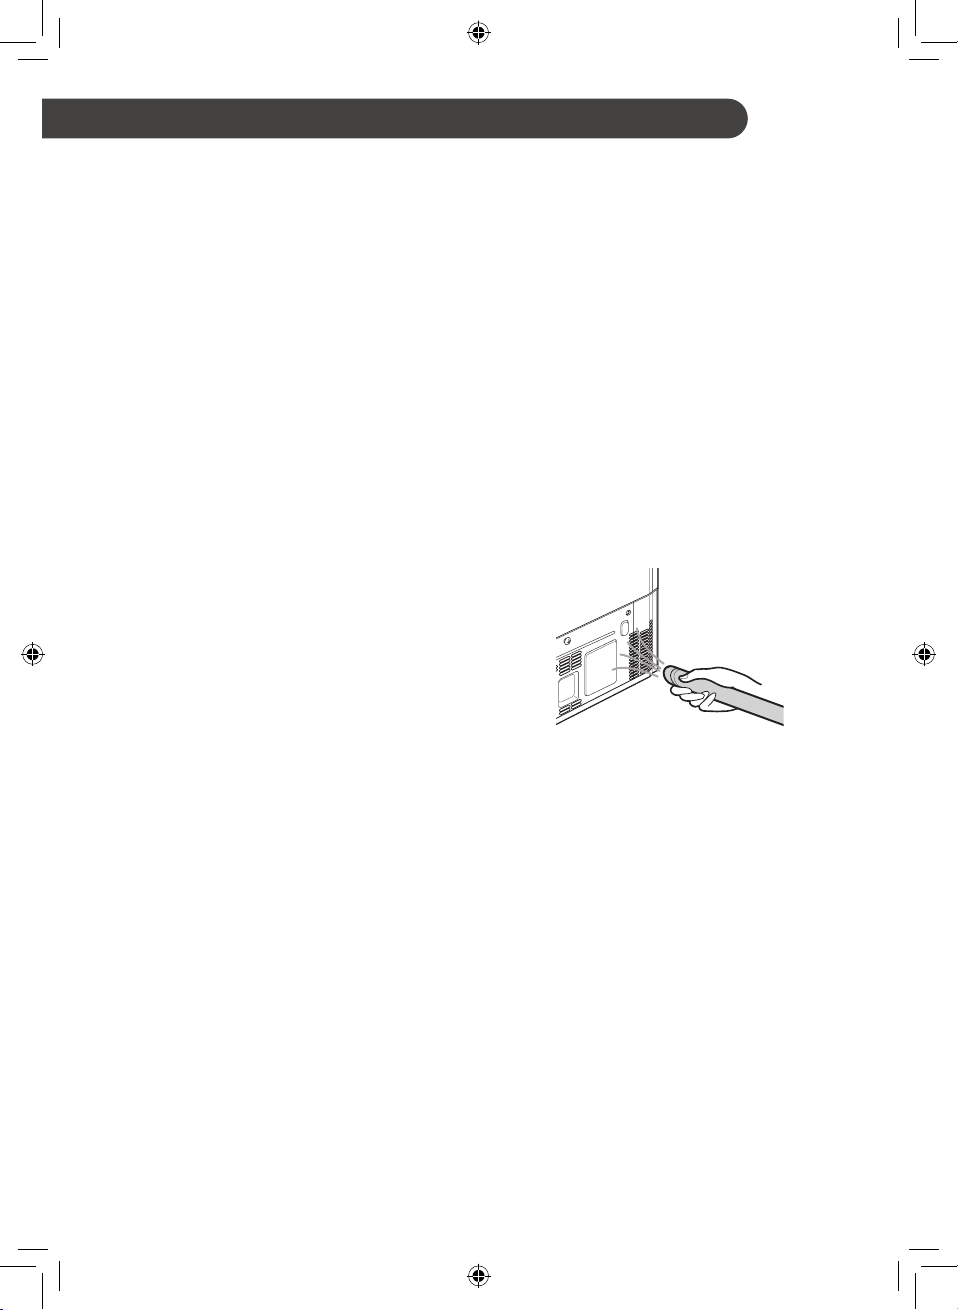
Cleaning the Condenser
Cover
Use a vacuum cleaner with a brush to clean the
condenser cover and vents. Do not remove the
panel covering the condenser coil area.
30
Page 31

EN
Cleaning the Door Basket
Cleaning the Shelf
Removing the Fridge/Freezer
Door Basket
Hold both edges of the basket and remove it by
lifting it upward.
Refitting the Fridge/Freezer Door
Basket
Hold both edges of the door basket, gently
1
push one edge to assemble, and then in the
same manner assemble the other edge.
After assembling, tap the door basket gently to
2
fix it horizontally.
Removing the Fridge/Freezer Shelf
Remove the shelf by pulling it out.
Refitting the Fridge/Freezer Shelf
Remove the shelf by pulling it out while slightly
lifting the rear edge of the fridge shelf.
Cleaning the Vegetable
Drawer
Removing the Vegetable Drawer
Remove the contents of the drawer. Hold the
1
handle of the vegetable drawer and pull it out
completely until it outward gently until it stops.
31
Page 32

EN
Lift the vegetable drawer up and remove it by
2
pulling it out.
Refitting the Vegetable Drawer
If the vegetable drawer has a cover, lift it.
1
Insert the bottom of the vegetable drawer into
2
its original position and gently push it back in
while lowering it.
CAUTION
• Please note that injuries can be caused by
the weight of stored foods when removing the
vegetable drawer.
32
Page 33

EN
TROUBLESHOOTING
Symptoms Reason Solution
There is no
refrigeration or
freezing.
There is poor
refrigeration or
freezing.
The appliance contains
a bad smell.
The inside lamp in the
appliance does not
turn on.
Is there a power
interruption?
If the power plug
unplugged from the
outlet?
Is the fridge or freezer
temperature set to its
warmest setting?
Is the appliance in
direct sunlight, or is it
near a heat generating
object such as cooking
oven or heater?
Did you store hot food
without cooling it first?
Did you put in too
much food?
Are the appliance
doors completely
closed?
Is there enough space
around the appliance?
Is the fridge or freezer
temperature set to
'Warm'?
Did you put in food
with a strong smell?
Vegetables or fruit may
have spoiled in the
drawer?
Does the inside lamp in
the appliance turn off?
• Check the power of other appliances.
• Plug the power plug in the outlet properly.
• Set the fridge or freezer temperature to 'Medium'.
• Check the installation area and reinstall it away
from heat generating objects.
• Cool the hot food first before putting it in the
fridge or freezer compartment.
• Maintain an appropriate space between food.
• Completely close the door and make sure that
stored food is not obstructing in the door.
• Adjust the installation position to make enough
space around the appliance.
• Set the fridge or freezer temperature to 'Medium'.
• Store foods with strong smells in a sealed
containers.
• Throw away rotten vegetables and clean the
vegetable drawer. Do not store vegetables too
long in the vegetable drawer.
• It is not possible for customers to replace the
inside lamp in the appliance as they are not
serviceable. If the inside lamp does not turn
on, please contact the LG Electronics customer
information centre.
33
Page 34

EN
Symptoms Reason Solution
The appliance door is
not closed tightly.
It is difficult to open
the appliance door.
There is condensation
inside the appliance
or on the bottom of
the vegetable drawer
cover.
Frost has formed in the
freezer compartment.
Is the appliance
leaning forward?
Were the shelves
properly assembled?
Did you close the door
with excessive force?
Did you open the door
right after you closed
it?
Did you store hot food
without cooling it first?
Did you leave the
appliance door open?
Do you open and close
the appliance door too
frequently?
Did you put warm
or moist food inside
without sealing it in a
container?
Doors may not be
closed properly?
Did you store hot food
without cooling it first?
• Adjust the front feet to raise the front side slightly.
• Refit the shelves if needed.
• If you apply too much force or speed when
closing the door, it may remain briefly open
before closing. Make sure that you do not slam
the door closed. Close without force.
• If you try to open the appliance door within
one minute after you closed it, you may have
difficulties because of the pressure inside the
appliance. Try to open the appliance door again
in a few minutes so that the internal pressure
stabilizes.
• Cool the hot food first before putting it in the
fridge or freezer compartment.
• Although the condensation will disappear soon
after you close the appliance door, you can wipe
it with a dry cloth.
• Condensation can form due to the temperature
difference from the outside. Wipe out the
dampness with a dry cloth.
• Store food in a covered or sealed container.
• Check if the food item inside the appliance is
blocking the door and make sure that the door is
tightly closed.
• Cool the hot food first before putting it in the
fridge or freezer compartment.
34
Page 35

EN
Symptoms Reason Solution
Frost has formed in the
freezer compartment.
Frost or condensation
has formed inside or
outside the appliance.
The appliance is
noisy and generates
abnormal sounds.
The side or front of the
appliance is warm.
There is water inside
or outside of the
appliance.
Is the air entry or
exit of the freezer
compartment blocked?
Is the freezer
compartment
overfilled?
Did you open and
close the appliance
door frequently or is
the appliance door
improperly closed?
Is the installation
environment humid?
Is the appliance
installed on a weak
floor or improperly
levelled?
Does the rear of the
appliance touch the
wall?
Are objects scattered
behind the appliance?
Is there an object on
top of the appliance?
There are anti
condensation pipes
fitted to these areas of
the appliance to reduce
condensation forming
from around the door
area.
Is there water leakage
around the appliance?
Is there water on
the bottom of the
appliance?
• Make sure that air entry or exit is not blocked so
that the air can circulate inside.
• Maintain an appropriate space between items.
• Frost or condensation can form if the outside air
penetrates inside the appliance.
• Condensation can appear on the exterior of the
appliance if the installation area is too humid or
on a humid day such as a rainy day. Wipe off any
moisture with a dry cloth.
• Install the appliance on a solid and flat area.
• Adjust the installation position to allow enough
clearance around the appliance.
• Remove the scattered objects from behind the
appliance.
• Remove the object on top of the appliance.
• The heat releasing pipe to prevent condensation
is installed on the front and side of the appliance.
You may feel it particularly hot right after the
appliance is installed or during the summer. You
can be assured that this is not a problem and is
quite normal.
• Check if the water has leaked from a sink or
another place.
• Check if the water is from the thawed frozen food
or a broken or dropped container.
35
Page 36

EN
Symptoms Reason Solution
• The ice maker produces ice normally when
approximately 48 hours have passed after the
appliance is installed.
• Connect the water supply pipe to the appliance
and open the supply valve completely.
• If the water supply hose is bent, the water flow
could be compromised.
• It takes approximately 24 hours to produce more
ice in the automatic icemaker. Please wait.
• Press I on the automatic icemaker switch or set
ON for the automatic icemaker button on the
control panel. (For more details on how to use,
visit LG electronics website or use your smart
device.)
• If the set temperature is too warm, ice will be
produced slowly or not at all. Set the Freezer
temperature to -18 °C for normal operation of the
automatic icemaker.
• If you open the appliance door frequently, cold air
will escape, lowering the speed of ice production.
Do not open and close the appliance door
frequently.
• If the appliance door is not completely closed,
the temperature of the freezer compartment will
increase, slowing down the ice production speed.
Close the appliance door completely.
• Check whether there is ice in the ice bin.
• Separate the ice bin and shake it. Discard the
remaining clumped ice after shaking the ice bin.
The automatic
icemaker does
not produce ice or
produces a small
amount of ice.
Ice is not dispensed.
Did you install the
appliance recently?
Did you connect the
water supply pipe to
the appliance and open
the supply valve?
Is the water supply
hose bent?
Have you dispensed
a large amount of ice
recently?
Did you set the ice
maker switch or the
automatic icemaker
button on the control
panel to ON?
Is the temperature
of the freezer
compartment set too
high?
Have you been
opening the appliance
door frequently?
Is the appliance door
completely closed?
Is there ice in the ice
bin?
Is the ice clumped in
the ice bin?
36
Page 37

EN
Symptoms Reason Solution
Ice is not dispensed.
Water does not come
out.
Water tastes strange.
Unable to hear the
sound of ice coming
out?
Is the water supply
valve closed? (For
plumbed models only)
Is the taste of water
different when
comparing it with the
taste of water from
the previous water
purifier?
Has it been a long time
since you installed and
replaced the filter?
Have you flushed out
the filter properly in
the initial stage after
installing it?
Has the purified water
or cold water not been
used for an extended
period of time?
• In the control panel, select the modes for cubed
ice and crushed ice alternately to dispense the
ice.
• Open the water supply valve.
• Has the purified water or cold water not been
used for an extended period of time?
• If an expired filter is used, the purification
performance may decline. It is recommended
to replace the filter according to the filter
replacement period.
• When you install or replace the filter for the
first time, you need to remove air and activated
carbon residue from inside the filter. Use the
appliance after dispensing and discharging
approximately 5 litres of purified water from the
dispenser by pressing the water dispensing lever.
(Activated carbon is harmless to humans.)
• The taste of old water may change due
to bacterial growth. Use the product after
dispensing and discharging approximately 5 litres
(approximately three minutes) from the water
dispenser.
37
Page 38

EN
Symptoms Reason Solution
The defrost control
will click when the
automatic defrost cycle
Clicking noises
Rattling noises
Whooshing noises
Gurgling noises
Popping noises
Vibrating
begins and ends. The
thermostat control (or
appliance control on
some models) will also
click when cycling on
and off.
Rattling noises may
come from the flow of
appliance, the water
line on the back of
the unit (for plumbed
models only), or items
stored on top of or
around the appliance.
Appliance is not
resting evenly on the
floor.
Appliance with linear
compressor was
moved while operating.
Evaporator fan motor
is circulating air
through the fridge and
freezer compartments.
Air is being forced over
the condenser by the
condenser fan.
Appliance flowing
through the cooling
system
Contraction and
expansion of the inside
walls due to changes
in temperature.
If the side or back
of the appliance is
touching a cabinet
or wall, some of the
normal vibrations
may make an audible
sound.
• Normal Operation
• Normal Operation
• Floor is weak or uneven or levelling legs need to
be adjusted. See the Door Alignment section.
• Normal operation. If the compressor does not
stop rattling after three minutes, turn the power to
the appliance off and then on again.
• Normal Operation
• Normal Operation
• Normal Operation
• Normal Operation
• To eliminate the noise, make sure that the sides
and back do not make any contact with any wall
or cabinet.
38
Page 39

EN
Symptoms Reason Solution
Your home appliance
and smartphone is not
connected to the Wi-Fi
network.
The password for the
Wi-Fi that you are
trying to connect to is
incorrect.
Mobile data for your
smartphone is turned
on.
The wireless network
name (SSID) is set
incorrectly.
The router frequency is
not 2.4 GHz.
The distance between
the appliance and the
router is too far.
• Find the Wi-Fi network connected to your
smartphone and remove it, then register your
appliance on LG SmartThinQ.
• Turn off the Mobile data of your smartphone and
register the appliance using the Wi-Fi network.
• The wireless network name (SSID) should be a
combination of English letters and numbers. (Do
not use special characters.)
• Only a 2.4 GHz router frequency is supported.
Set the wireless router to 2.4 GHz and connect
the appliance to the wireless router. To check the
router frequency, check with your Internet service
provider or the router manufacturer.
• If the distance between the appliance and the
router is too far, the signal may be weak and
the connection may not be configured correctly.
Move the location of the router so that it is closer
to the appliance.
39
Page 40

Memo
Page 41

www.lg.com
РУКОВОДСТВО
ПОЛЬЗОВАТЕЛЯ
ХОЛОДИЛЬНИК С
МОРОЗИЛЬНЫМ
ОТДЕЛЕНИЕМ
Перед началом работы с прибором внимательно прочитайте данное руководство и держите
его постоянно под рукой.
Copyright © 2017 - 2019 LG Electronics Inc. Все права защищены.
Page 42

СОДЕРЖАНИЕ
В данном руководстве могут встречаться
изображения или материалы, не
относящиеся к купленной вами модели.
Производитель может вносить изменения
в содержание руководства.
ТЕХНИКА БЕЗОПАСНОСТИ ........................................................3
Важные указания по технике безопасности ..................................................3
УСТАНОВКА ................................................................................12
Комплектация ................................................................................................12
Размеры и зазоры .........................................................................................13
Температура окружающей среды.................................................................13
Снятие двери .................................................................................................14
Установка двери ............................................................................................14
Регулировка высоты двери ...........................................................................15
Подключение устройства ..............................................................................16
Транспортировка устройства ........................................................................16
ЭКСПЛУАТАЦИЯ .........................................................................17
Детали и функции ..........................................................................................17
Примечания по эксплуатации .......................................................................21
Использование панели управления .............................................................23
Ледогенератор ( * ) ........................................................................................25
Дверца в дверце ( * ) .....................................................................................27
Овощной контейнер ( * )................................................................................28
Функция InstaView ( * ) ..................................................................................28
Прочие функции ............................................................................................28
ИНТЕЛЛЕКТУАЛЬНЫЕ ФУНКЦИИ ............................................29
Использование приложения LG SmartThinQ ...............................................29
Использование функции Smart Diagnosis™ ................................................31
ТЕХНИЧЕСКОЕ ОБСЛУЖИВАНИЕ ...........................................32
Примечания по очистке устройства ............................................................. 32
Очистка крышки конденсатора .....................................................................32
Очистка лотка на дверце устройства ..........................................................33
Очистка полок ................................................................................................33
Очистка овощного контейнера .....................................................................33
ПОИСК И УСТРАНЕНИЕ НЕИСПРАВНОСТЕЙ ......................... 35
Page 43

RU
ТЕХНИКА БЕЗОПАСНОСТИ
Следующие рекомендации по технике безопасности призваны
предотвратить непредвиденные риски и ущерб, вызванные
небезопасной либо неверной эксплуатацией изделия.
Рекомендации делятся на две категории: ОСТОРОЖНО
и ВНИМАНИЕ (см. ниже).
Этим символом помечены действия, связанные
с повышенной опасностью. Внимательно прочтите
соответствующий текст и следуйте инструкциям,
чтобы избежать риска.
ВНИМАНИЕ!
Означает, что несоблюдение инструкций может привести
к серьезной травме или смерти.
ОСТОРОЖНО!
Означает, что несоблюдение инструкций может привести
к легкой травме или к поломке изделия.
Важные указания по технике безопасности
ВНИМАНИЕ!
Чтобы снизить опасность пожара, удара током или
получения травм при использовании изделия, необходимо
принять следующие основные меры предосторожности.
Дети в доме
• Прибор не предназначен для использования лицами
(включая детей) с пониженными физическими, сенсорными
или умственными способностями или при отсутствии у них
жизненного опыта или знаний, если они не находятся под
присмотром или не проинструктированы об использовании
прибора лицом, ответственным за их безопасность. Дети должны
находиться под присмотром для недопущения игр с прибором.
3
Page 44

RU
• Если изделие оснащено замком (только для некоторых моделей),
держите ключ в недоступном для детей месте.
Установка
• Для безопасной транспортировки данного устройства требуются
два человека или более.
• Убедитесь в том, что розетка была должным образом заземлена,
а контакт заземления на кабеле питания имеется в наличии и не
поврежден. Более подробные сведения можно получить в центре
поддержки клиентов компании LG Electronics.
• Изделие снабжено шнуром электропитания с жилой заземления
оборудования и вилкой с заземляющим контактом. Вилку следует
подключать к правильно установленной и заземленной согласно
местным нормам и правилам розетке.
• При повреждении шнура питания его замену во избежание
опасности должны производить изготовитель, сервисная служба
или подобный квалифицированный персонал.
• Не подключайте устройство к многорозеточному переходнику,
который не имеет силового кабеля питания (установленного).
• Не вносите изменения и не удлиняйте кабель питания.
• Устройство должно быть подсоединено к отдельной линии
питания с отдельным предохранителем.
• Не используйте неправильно заземленные портативные
розетки-разветвители. Правильно заземленная портативная
розетка-разветвитель должна иметь допустимую нагрузку
по току, соответствующую номинальной или превышающую
ее. Используйте розетку-разветвитель только для данного
устройства.
• Установите устройство в месте со свободным доступом к розетке
электропитания.
• Соблюдайте осторожность и не допускайте, чтобы вилка
электропитания была направлена вертикально или чтобы
холодильник касался вилки питания.
• Установите устройство на ровный прочный пол.
4
Page 45

RU
• Не устанавливайте устройство в местах с высокой влажностью
или большим количеством пыли. Не устанавливайте и не храните
устройство вне помещений или в местах, подверженных прямому
воздействию погодных условий (прямой солнечный свет, ветер,
дождь или температура ниже нуля градусов).
• Не устанавливайте устройство в местах с прямым воздействием
на него солнечных лучей или теплого воздуха от нагревательных
приборов (газовых плит, обогревателей).
• Не подвергайте заднюю часть устройства указанным выше типам
воздействия во время установки.
• Соблюдайте осторожность, чтобы не уронить дверцу устройства
при сборке или разборке.
• Соблюдайте осторожность, чтобы не пережать, передавить
или повредить кабель питания во время установки или снятия
дверцы устройства.
• Не подключайте адаптер-штекер или другие принадлежности к
разъему электропитания.
Эксплуатация
• Не используйте устройство в каких-либо целях (хранение или
перевозка медикаментов, экспериментальных материалов),
отличающихся от хранения продуктов в домашних условиях.
• Отсоединяйте вилку питания от розетки во время сильной грозы,
а также в том случае, если планируете прекратить эксплуатацию
холодильника на длительное время.
• Не перегибайте шнур питания слишком сильно и не помещайте
на него тяжелые предметы.
• Не прикасайтесь к вилке электропитания или кнопкам
управления устройством мокрыми руками.
• Не перегибайте шнур питания слишком сильно и не помещайте
на него тяжелые предметы.
• Если вода попадает на электрические компоненты устройства,
вытащите вилку питания из розетки и свяжитесь с центром
поддержки клиентов компании LG Electronics.
5
Page 46

RU
• Не суйте руки или металлические предметы в зону, откуда идет
холодный воздух, под крышку или к решетке сзади, откуда
выходит тепло.
• Не допускайте чрезмерных усилий или ударов по задней крышке
устройства.
• Не помещайте животных внутрь изделия.
• Если поблизости находятся дети, будьте осторожны при открытии
или закрытии дверцы устройства. Случайный удар дверцей
может привести к травме ребенка.
• Следите за тем, чтобы дети не оказались запертыми внутри
устройства. Ребенок, оказавшийся запертым внутри устройства,
может задохнуться.
• Не ставьте тяжелые или хрупкие предметы, контейнеры,
заполненные жидкостью, горючими веществами,
воспламеняемые предметы (такие как свечи, лампы и т. д.) или
нагревательные приборы (такие как печи, обогреватели и т. д.) на
прибор.
• Если выявлена утечка газа (изобутан, пропан, природный газ
и т. п.), не касайтесь устройства или вилки электропитания
и немедленно проветрите помещение. В этом устройстве
используется хладагент изобутан (R600a). Также используется
небольшое количество легковоспламеняющегося газа. Утечка
газа во время транспортировки, установки или эксплуатации
прибора может привести к пожару, взрыву или травме, если
возникнут искры.
• Не используйте и не храните воспламеняющиеся или горючие
вещества (эфир, бензол, спирт, химические реагенты, сжиженную
пропан-бутановую смесь, горючие спреи, средства от насекомых,
освежитель воздуха, косметические средства и т. д.) вблизи
устройства.
• В случае обнаружения необычных звуков, неприятного запаха
или дыма немедленно отключите питание и свяжитесь с центром
поддержки клиентов компании LG Electronics.
• В льдогенератор или водяной бачок диспенсера можно заливать
только питьевую воду.
6
Page 47

RU
• Не допускайте повреждения контура хладагента.
• Не помещайте внутрь устройства электронные приборы (такие
как нагреватели или мобильные телефоны).
Обслуживание
• Отсоедините кабель питания перед очисткой устройства или
заменой лампы внутреннего освещения (при ее наличии).
• После полного удаления влаги и пыли аккуратно вставьте вилку
электропитания в розетку.
• Никогда не отключайте вилку электропитания из розетки, потянув
за кабель питания. Обязательно надежно удерживайте вилку
в руках и извлекайте ее из розетки, не допуская перекосов.
• Не распыляйте воду или легковоспламеняющиеся
вещества (зубная паста, спирт, растворитель, бензол,
легковоспламеняющиеся жидкости, абразивы и т. д.) внутри или
снаружи прибора для его чистки.
• Не проводите очистку устройства с использованием щеток, ткани
или губок с грубой или металлической поверхностью.
• К разборке, ремонту и модификации изделия допускаются только
уполномоченные специалисты центра поддержки клиентов
компании LG Electronics. Свяжитесь с центром поддержки
клиентов компании LG Electronics, если вы планируете
переместить или установить устройство в новое место.
• Не используйте фен для сушки волос для испарения влаги
внутри устройства, а также не используйте ароматические свечи
для избавления от неприятного запаха внутри устройства.
• Не используйте механические устройства или другие средства
для ускорения процесса оттаивания, кроме рекомендуемых
производителем.
• Подключите линию подачи воды (только подключаемые модели)
только к источнику питьевой воды. В противном случае примеси
в воде могут вызвать недомогание.
7
Page 48

RU
Утилизация
• При утилизации устройства снимите уплотнитель двери,
оставьте полки и лотки на своих местах и не допускайте детей
к устройству.
• Утилизируйте упаковочные материалы (например, пластиковые
пакеты и пенопласт) в местах, недоступных для детей.
Упаковочные материалы могут стать причиной удушения.
Техническая безопасность
• Не загораживайте вентилляционные отверстия, расположенные
в корпусе прибора или во встраиваемой конструкции.
• Не используйте электроприборы внутри холодильника.
• Хладагент и изолирующий газ, используемые в устройстве,
должны утилизироваться в соответствии со специальными
процедурами. Перед их утилизацией проконсультируйтесь
со специалистом по техническому обслуживанию или другим
специалистом с достаточной квалификацией.
• Утечки хладагента из патрубков могут привести к возгоранию или
взрыву.
• Количество хладагента в вашем конкретном устройстве указано
на табличке с паспортными данными внутри устройства.
• Никогда не включайте устройство с признаками повреждений.
При наличии сомнений в исправности устройства обратитесь в
службу поддержки клиентов LG Electronics.
• Данное устройство предназначено только для домашнего
использования или аналогичных областей применения.
Устройство не должно использоваться в коммерческих целях,
на предприятиях общественного питания или на средствах
передвижения, таких как трейлеры или яхты.
• Не храните взрывоопасные вещества, например баллоны
с аэрозолем, содержащим воспламеняющиеся компоненты,
внутри устройства.
8
Page 49

RU
Легковоспламеняемые материалы и риск возникновения
пожара
Данный символ предупреждает о наличии
легковоспламеняемых материалов, которые при
ненадлежащем обращении могут стать причиной
возникновения пожара.
• Данное устройство содержит небольшое количество
изобутанового хладагента (R600a), который является горючим
газом. При транспортировке и установке устройства соблюдайте
осторожность, чтобы не повредить элементы охлаждающего
контура устройства.
• При обнаружении утечки не допускайте использования открытого
пламени или потенциальных источников воспламенения,
в течение нескольких минут проветрите комнату, в которой
установлено устройство. В целях предотвращения образования
огнеопасной смеси газа и воздуха при утечке в охлаждающем
контуре, размер комнаты, в которой установлено устройство,
должен соответствовать количеству используемого хладагента.
Площадь комнаты должна составлять 1 кв. м на каждые 8 грамм
хладагента R600а внутри устройства.
• Устанавливая устройство убедитесь, что кабель питания не
пережат и не поврежден.
• Запрещается размещать переносные розетки или переносные
источники питания вблизи данного устройства.
ОСТОРОЖНО!
Чтобы уменьшить риск незначительной травмы, неисправности или
повреждения продукта или имущества при использовании этого
продукта, соблюдайте основные меры предосторожности, включая
следующие.
9
Page 50

RU
Установка
• Не наклоняйте и не кантуйте устройство при транспортировке.
• Следите за тем, чтобы никакие части тела, например руки или
ноги, не застряли при перемещении прибора.
Эксплуатация
• Не касайтесь замороженных продуктов или металлических
деталей в морозильной камере мокрыми или влажными руками.
Это может вызвать обморожение.
• Не ставьте стеклянные контейнеры, бутылки или банки (особенно
содержащие газированные напитки) в морозильную камеру,
на полки или в лоток для льда, где они будут подвергаться
воздействию отрицательных температур.
• Закаленное стекло на передней стороне дверцы прибора или на
полках может быть повреждено ударом. Если стекло треснуло,
не прикасайтесь к нему руками.
• Не кладите тяжелые предметы на дверцу системы Дверь-в-
двери.
• Не используйте дверцу в качестве разделочной доски,
старайтесь не поцарапать ее острым инструментом, поскольку
это приведет к поломке устройства.
• Запрещается висеть на двери устройства, камере хранения,
полках и дверце системы Дверь-в-двери, а также забираться на
них.
• Запрещается хранить избыточное количество бутылок с водой
или контейнеров с готовыми гарнирами в лотках на дверце
устройства.
• Следите за тем, чтобы животные не грызли кабель питания или
шланг подачи воды.
• Не прилагайте чрезмерных усилий при открывании/закрытии
дверцы устройства.
10
Page 51

RU
• Если петля дверцы прибора повреждена или работает
ненадлежащим образом, прекратите использование прибора и
обратитесь в авторизованный сервисный центр.
• Запрещается использовать теплую воду для очистки стеклянных
полок или крышек, если они холодные.
• Никогда не употребляйте в пищу замороженные продукты сразу
после того, как они были извлечены из морозильной камеры.
• При открывании или закрывании дверцы устройства или дверцы
в дверце старайтесь не прищемить руку или ногу.
• Не открывайте двери прибора при открытой дверце системы
Дверь-в-двери, а также не открывайте дверцу системы Дверь-вдвери, когда открыта основная дверь прибора. Дверца системы
Дверь-в-двери может удариться о край прибора и повредиться.
Обслуживание
• Не устанавливайте полки в перевернутом положении: они могут
упасть.
• Для удаления наледи из устройства свяжитесь с центром
поддержки клиентов компании LG Electronics.
11
Page 52

RU
УСТАНОВКА
Комплектация
Съемный лоток для яиц
( * )
• Внешний вид или состав компонентов устройства могут отличаться в разных моделях.
12
Лоток для льда ( * ) Ключ
Руководство
пользователя
Page 53

RU
Размеры и зазоры
Слишком малое расстояние между
прибором и расположенными рядом
предметами может привести к ухудшению
охлаждающих возможностей и повышению
энергопотребления. Обеспечьте расстояние
не менее 50 мм до ближайших стен и иных
предметов при установке изделия.
A
B
D
EF
Температура окружающей
среды
• Устройство предназначено для работы
в ограниченном диапазоне температур
окружающей среды в зависимости от
климатической зоны.
• Температура внутри прибора может меняться
в зависимости от расположения прибора,
температуры окружающей среды, частоты
открывания двери и так далее.
• Климатический класс можно найти на
этикетке.
G
C
- Габаритные размеры
A 912 мм
B 1790 мм
C 738 мм
D 10 мм
E 728 мм
F 1180 мм
G 1750 мм
Климатический класс
окружающей среды,
°С
SN (Субнормальный) +10–+32
N (Нормальный) +16–+32
ST (Субтропический) +16–+38
T (Тропический) 16–43/10–43*
*Австралия, Индия, Кения
ПРИМЕЧАНИЕ
• Приборы с классификацией от SN до T
предназначены для эксплуатации при
температуре от 10 до 43 ºC.
Диапазон температур
13
Page 54

RU
Снятие двери
Если потребуется переместить устройство
через узкий проем, рекомендуется снять дверь.
ВНИМАНИЕ!
• Перед установкой или обслуживанием
устройства отсоедините кабель питания,
предохранитель или размыкатель.
Несоблюдение данных указаний может
привести к смерти, пожару или удару током.
Если входная дверь слишком узкая и
устройство в нее не проходит, снимите двери и
пронесите боком.
ОСТОРОЖНО!
• При снятии верхней петли обязательно
поддерживайте дверцу, чтобы она не упала.
Рекомендуется снимать и устанавливать
дверцу как минимум вдвоем.
Поднимите верхнюю петлю, закрепленную
4
между устройством и дверью, затем
снимите ее.
Верхняя петля
[Для холодильной и
морозильной камеры]
Выкрутите винт крышки петли в верхней
1
части устройства против часовой стрелки.
Нажмите на фиксатор (1) соединения
2
электрических разъемов и разъедините его,
потянув в противоположные стороны.
Снимите рычаг петли, постучав по его концу
3
в направлении наружного края корпуса.
Дверца
Приподнимите и снимите дверь отсека
5
холодильника и морозильника. При этом
дверь должна быть достаточно приподнята,
чтобы можно было полностью вынуть
стальную трубу.
Установка двери
После перемещения устройства через дверной
проем установите дверь на место, выполнив
процедуру в обратном порядке.
14
Page 55

RU
Регулировка высоты
двери
Если дверь установлена неровно,
отрегулируйте неравномерную высоту
следующим способом.
Закрепите фиксирующую гайку, повернув ее
3
против часовой стрелки.
ПРИМЕЧАНИЕ
• Не изменяйте высоту двери более чем на
5 мм, иначе стержень петли может выпасть.
[Метод 1]
* Ссылка
Фиксирующая гайка
Регулировочный
стержень петли
Поверните фиксирующую гайку по часовой
1
стрелке с помощью гаечного ключа.
Чтобы отпустить гайку
Отрегулируйте разницу высоты двери
2
устройства, поворачивая регулировочный
стержень петли против или по часовой
стрелке ключом на 8 мм.
Чтобы затянуть гайку
Если вышеописанным способом не удается
отрегулировать высоту, сделайте это
следующим образом.
[Метод 2]
Если дверца морозильной камеры ниже
дверцы холодильной камеры
Отрегулируйте высоту дверцы, повернув левый
винт регулировки высоты по часовой стрелке с
помощью плоской отвертки.
Если дверца морозильной камеры выше
дверцы холодильной камеры
Отрегулируйте высоту дверцы, повернув
правый винт регулировки высоты по часовой
стрелке с помощью плоской отвертки.
Вниз
Вверх
15
Page 56

RU
Подключение устройства
После завершения установки устройства
вставьте штекер шнура питания в розетку
электросети.
ПРИМЕЧАНИЕ
• После подключения кабеля питания (или
вилки) к розетке подождите 2–3 часа перед
загрузкой продуктов внутрь устройства.
Если положить их до того, как устройство
полностью охладится, продукты могут
испортиться.
Транспортировка
устройства
Освободите устройство от продуктов.
1
Извлеките вилку из розетки и повесьте
2
на крючок в задней или верхней части
устройства.
Закрепите такие детали, как полки и
3
ручка дверцы, с помощью клейкой ленты,
чтобы предотвратить их падение при
перемещении устройства.
Для безопасного перемещения устройства
4
необходимо не менее двух людей. При
транспортировке на большие расстояния
устройство должно находиться в
вертикальном положении.
После завершения установки вставьте
5
штекер шнура питания в розетку
электросети, чтобы включить устройство.
16
Page 57

RU
ЭКСПЛУАТАЦИЯ
Детали и функции
Наружная часть
1
1
2
3
Панель управления
Настройка температуры в холодильнике и морозильнике.
Дверца в дверце ( * )
Дверца в двери является двухслойной. Ее можно открыть отдельно или вместе с основной
дверью. Это позволяет легко находить и доставать любимые закуски и продукты.
Рычаг дверцы в дверце ( * )
Рычаг открывает Дверь-в-двери.
Отсек InstaView с системой Дверь-в-двери ( * )
Отсек InstaView с системой Дверь-в-двери обеспечивает легкий доступ к часто используемым
продуктам питания.
4
3
ПРИМЕЧАНИЕ
• Символ ( * ) означает, что эта функция зависит от приобретенной модели.
• Внешний вид или состав компонентов устройства могут отличаться в разных моделях.
17
Page 58

Внутренняя часть
6
6
1
(1)
RU
7
8
9
2
3
4
5
1
(1)
2
3
10
11
12
13
14
15
7
8
9
10
11
12
18
4
5
13
14
15
Page 59

RU
Светодиодная лампа
Светодиодные лампы внутри устройства включаются при открытии двери.
Полка морозильника ( * )
Здесь можно хранить замороженные продукты, например мясо, рыбу и мороженое.
Ледогенератор ( * )
Здесь вручную производится и хранится лед.
Ящик морозильной камеры ( * )
Данный контейнер предназначен для длительного хранения замороженных продуктов.
Дверной отсек для замороженных продуктов
Здесь можно хранить небольшие пакеты с замороженными продуктами.
• Не храните в этих отсеках мороженое или продукты длительного хранения.
Блок системы диагностики Smart Diagnosis
Функция используется при обращении в пользовательский информационный центр LG
Electronics. Она помогает точно диагностировать отклонения в работе устройства или поломки.
Дверца в дверце ( * )
Здесь хранятся продукты, к которым требуется быстрый доступ, например напитки и закуски.
Полка для бутылок ( * )
Используется для хранения высоких бутылок или контейнеров.
ОСТОРОЖНО!
• Не храните короткие бутылки или контейнеры здесь. Они могут упасть и стать причиной
травмы или повреждения прибора.
Полки холодильника
На них хранятся охлажденные продукты и прочие предметы.
• Высоту полки можно отрегулировать, вставив ее в другой паз.
• Храните продукты с высоким содержанием влаги в передней части полки.
• Фактическое количество полок может отличаться на разных моделях.
Hygiene Fresh (Функция Hygiene Fresh) ( * )
• Эта функция уменьшает и удаляет запах внутри отсека морозильной камеры.
19
Page 60

RU
Ящик для закусок ( * )
Здесь можно хранить небольшие упаковки с замороженными продуктами.
Датчик температуры
Датчик определяет температуру в холодильной камере.
• Сохраняйте между датчиком и продуктами расстояние, позволяющее точно определять
температуру.
Овощной контейнер ( * )
Используется для хранения свежих фруктов и овощей, которые остаются свежими благодаря
устройству регулировки влажности воздуха.
Лоток в дверце холодильника
В этом отделе необходимо хранить охлажденные продукты в небольших пакетах, напитки или
контейнеры с соусами.
Овощной контейнер
Этот отдел предназначен для длительного хранения свежих фруктов и овощей.
• Фактическое количество контейнеров может отличаться в разных моделях.
ПРИМЕЧАНИЕ
• Символ ( * ) означает, что эта функция зависит от приобретенной модели.
• 2-звездная секция ( a ): в отсеке или ящике можно непродолжительное время хранить мороженое
и продукты при температуре от –12 до –18 °C.
• Верхняя полка морозильной камеры (1) достигает заданной температуры быстрее всего.
20
Page 61

RU
Примечания по
эксплуатации
• Пользователи должны помнить о том, что
наледь может образовываться в случае
неполного закрытия дверцы, при избыточной
влажности в летние месяцы или в случае
частого открытия дверцы морозильной
камеры.
• Следите за тем, чтобы между продуктами на
полке и внутри лотка в дверце оставалось
достаточное пространство, чтобы обеспечить
полное закрытие дверцы.
• Открытая дверца способствует поступлению
теплого воздуха в устройство и может
стать причиной повышения внутренней
температуры.
• Если вы оставляете прибор выключенным
в течение длительного периода времени,
извлеките все продукты питания и
отсоедините кабель питания. Очистите
внутреннюю поверхность и оставьте
двери слегка приоткрытыми во избежание
появления плесени.
Рекомендации по
энергосбережению
• Следите за тем, чтобы между хранящимися
продуктами оставалось достаточно
свободного места. Это позволит холодному
воздуху циркулировать равномерно
и сократит уровень энергопотребления.
• Помещайте горячие продукты на хранение
только после их предварительного
охлаждения для предотвращения
отпотевания и образования наледи.
• При хранении продуктов питания в
морозильной камере установите температуру
ниже указанной на их упаковке.
• Не кладите продукты рядом с установленным
в холодильной камере датчиком
температуры. Сохраняйте расстояние не
менее 3 см от датчика.
• Обратите внимание на то, что допустимый
диапазон повышения температуры после
разморозки приведен в технических
характеристиках устройства. Если вы хотите
уменьшить влияние повышения температуры
на сохранность продуктов, упакуйте их
герметично или оберните в несколько слоев
упаковочного материала.
• Автоматическая система размораживания
в приборе предотвращает обледенение в
нормальных условиях эксплуатации.
21
Page 62

RU
Эффективное хранение
продуктов
• Храните замороженные или охлажденные
продукты в герметичных контейнерах.
• Проверьте срок годности и этикетку
(инструкции по хранению) перед
помещением продуктов в устройство.
• Не следует долго (более четырех недель)
хранить продукты, если они легко портятся
при низкой температуре.
• Сразу же после покупки кладите
охлажденные или замороженные продукты в
холодильный или морозильный отсек.
• Не допускайте замораживания продуктов,
которые были полностью разморожены.
Повторная заморозка любых ранее
полностью размороженных продуктов
негативно скажется на вкусовых качествах
и количестве питательных веществ.
• Не оборачивайте овощи газетой для
хранения. Типографская краска и другие
материалы, используемые при выпуске газет,
могут испортить продукты.
• Не переполняйте устройство. Холодный
воздух не может циркулировать должным
образом, если устройство переполнено.
• Установка очень низкой температуры для
хранения продуктов может привести к их
заморозке. Не устанавливайте температуру
ниже необходимой для правильного
хранения продукта.
• Если в приборе есть отсеки для охлаждения,
не храните в них овощи и фрукты с
высоким содержанием влаги, так как они
могут заморозиться из-за более низкой
температуры.
Максимальная мощность
замораживания
• Режим быстрой заморозки установит
максимальную мощность заморозки.
• Режим быстрой заморозки работает
до 24 часов, после чего автоматически
отключается.
• При необходимости быстрой заморозки
продуктов питания функцию Express Freeze
необходимо включить за семь часов до
загрузки свежих продуктов в морозильную
камеру.
Заморозка большого
количества продуктов
• Для того чтобы улучшить циркуляцию
воздуха, вставьте все ящики.
• Если необходимо заморозить большое
количество продуктов, выньте все ящики из
морозильной камеры за исключением самого
нижнего ящика и разместите продукты
непосредственно на полках.
ПРИМЕЧАНИЕ
• Перед тем как вытаскивать ящики, извлеките
из них все продукты. Вытаскивайте ящики на
себя, держась за их ручку. Иначе вы можете
получить травму.
• Ящики могут отличаться по форме, поэтому
их следует устанавливать каждый на свое
место.
22
Page 63

RU
Использование панели управления
Типы панелей и функции
<Тип 1> <Тип 2>
Hygiene
Fresh
Power
Fridge Temperature (Температура
a
холодильника)
• С ее помощью задается нужный
уровень температуры в холодильнике.
Freezer Temperature (Температура
b
морозильной камеры)
• С ее помощью задается нужный
уровень температуры в морозильной
камере.
Hygiene Fresh ( * )
c
• Данная кнопка задает функцию Hygiene
Fresh.
Express Freeze (Режим быстрой
d
заморозки)
• Данная кнопка задает параметры
функции «Режим быстрой заморозки».
* Wi-Fi
e
• Позволяет подключить прибор к
домашней сети Wi-Fi.
* Lock (Блокировка)
f
• Блокировка кнопок на панели
управления.
ПРИМЕЧАНИЕ
• Символ ( * ) означает, что эта функция зависит от приобретенной модели.
• Фактически панель управления у разных моделей может отличаться.
• Для экономии энергии панель управления выключается автоматически.
• Случайное прикосновение к панели управления в процессе ее очистки может привести к
срабатыванию одной из кнопок.
23
Page 64

RU
Установка параметров
температуры
С помощью данной кнопки задается нужный
уровень температуры в холодильнике или
в морозильной камере.
• Нажмите на кнопку Fridge или Freezer для
регулировки температуры.
• Температуру можно регулировать.
− Холодильная камера: от 1 °C до 7 °C
− Морозильная камера: от -14 °C до -24 °C
• Фактическая температура внутри
устройства может отличаться в зависимости
от состояния продуктов, поскольку
отображаемая заданная температура
является целевой, а не фактической
температурой внутри устройства.
ПРИМЕЧАНИЕ
• Температура по умолчанию зависит от
модели устройства.
• После включения устройства в розетку
подождите два-три часа, затем закладывайте
ед у.
• Для приготовления льда в обычных
климатических условиях температуру
морозильной камеры необходимо настроить
на -19 °C или ниже.
Настройка функции Hygiene
Fresh
Количество бактерий и неприятный запах
внутри устройства можно свести к минимуму
при помощи функции «Гигиена и свежесть».
Тем не менее она позволяет эффективно
справиться с бактериями в воздухе внутри
устройства, а не с бактериями внутри
продуктов.
• При каждом нажатии кнопки Hygiene Fresh
статус функции «Гигиена и свежесть» будет
изменяться в последовательности Авто→
Мощный → Выкл → Авто.
Установка параметров режима
быстрой заморозки
Данная функция обеспечивает быструю
заморозку большого количества льда или
продуктов.
• При нажатии кнопки Express Freeze на
панели управления включится подсветка
значка Express Freeze.
• Данная функция включается и отключается
после каждого нажатия кнопки.
• Функция «Режим быстрой заморозки»
автоматически отключается по истечении
определенного количества времени.
Установка и сброс блокировки
Блокировка кнопок на панели управления.
• Нажмите и удерживайте кнопку Lock в
течение 3 секунд. При активации функции
блокировки все кнопки блокируются.
• При нажатии кнопки Lock (Блокировать)
в течение 3 секунд на панели управления
появится значок Lock/Unlock (Блокировать/
Разблокировать). Функция включается
и выключается каждый раз при нажатии
кнопки.
• При включенной блокировке кнопки (кроме
блокировки) не работают.
• Если на заблокированном устройстве нажать
любую кнопку, кроме блокировки, значок
Lock/Unlock на панели управления мигнет
3 раза.
• Чтобы изменить настройку, сначала зажмите
кнопку Lock на три секунды, чтобы отключить
функцию.
24
Page 65

RU
Ледогенератор ( * )
Здесь вручную производится и хранится лед.
Приготовление льда
<Тип 1>
Возьмитесь за ручку лотка для льда и
1
потяните его на себя.
Наполните лоток водой так, чтобы все
2
ячейки были равномерно заполнены.
Извлечение льда
<Тип 1>
Поверните ручку на ледогенераторе по
1
часовой стрелке.
Приподнимите и выньте коробок со льдом.
2
<Тип 2>
Возьмитесь за край лотка для льда и слегка
поверните.
Верните лоток в исходное положение,
3
стараясь не пролить воду на пол.
ОСТОРОЖНО!
• Будьте осторожны: постарайтесь не пролить
воду из лотка для льда во время его
установки.
<Тип 2>
Наполните лоток водой так, чтобы все ячейки
были равномерно заполнены. Верните его в
морозильную камеру.
ОСТОРОЖНО!
• Если часто открывать и закрывать
морозильную камеру, вода будет замерзать
дольше.
• Время образования льда зависит от сезона.
Также после первого включения температура
в морозильной камере стабилизируется в
течение 24 часов, поэтому образование льда
может занять больше времени.
• Будьте осторожны — края льдинок могут
быть острыми.
ПРИМЕЧАНИЕ
• Символ ( * ) означает, что эта функция
зависит от приобретенной модели.
25
Page 66

RU
• Если лед не вынимается, поверните ручку на
ледогенераторе еще раз.
• Если повернуть ручку на ледогенераторе до
того, как вода полностью замерзнет, кубики в
коробке для льда могу слипнуться.
• Для полного замерзания воды при
температуре -20 °C требуется примерно 3
часа.
• При установке коробка для льда обратно
в морозильную камеру вставляйте его до
конца.
• В коробке достаточно место для трех порций
льда из лотка. Если засыпать в него больше
льда, он может переполнится, что помешает
его извлечению. Не засыпайте в коробок
больше трех порций льда.
Снятие генератора льда ( * )
Возьмитесь за оба края корзинки
1
морозильного отделения над
ледогенератором и выньте ее, потянув на
себя.
Возьмитесь за оба края отделения лотка
2
для льда и выньте его, потянув на себя.
ОСТОРОЖНО!
• Извлекайте в этом порядке. Если попытаться
извлечь лоток для льда первым, вы можете
повредить его.
• Когда извлекаете ледогенератор, держите
его крепко, чтобы не уронить лоток для льда.
ПРИМЕЧАНИЕ
• Символ ( * ) означает, что эта функция
зависит от приобретенной модели.
Очистка лотка для льда
Возьмитесь за ручку лотка для льда и
1
потяните его на себя, чтобы извлечь.
После чистки верните его на место.
2
ОСТОРОЖНО!
• Во время чистки протрите все компоненты
кроме лотка для льда мокрым полотенцем и
тщательно просушите перед последующим
использованием. В противном случае может
возникнуть поломка.
26
Page 67

RU
Дверца в дверце ( * )
Потяните вверх рычаг в нижней части дверцы,
пока дверца в дверце не откроется.
За дверцей системы Дверь-в-двери и в
окружающих ее лотках много места, где можно
хранить продукты надлежащим образом.
Извлечение ящика системы
Дверь-в-двери
Возьмите ящик за Door в Door обеими руками,
поднимите и извлеките.
Извлечение лотков из Door in
Door
Удерживая лоток за боковые стенки,
1
приподнимите его и извлеките из дверцы
холодильника.
Поднимите закрепленную подставку (1) и
2
вытяните (2).
Установка ящика в Door в Door
Выполните установку в порядке, обратном
порядку снятия.
Установка лотков в Door in Door
Выполните установку в порядке, обратном
порядку снятия.
ПРИМЕЧАНИЕ
• Символ ( * ) означает, что эта функция
зависит от приобретенной модели.
27
Page 68

RU
Овощной контейнер ( * )
Влажность в контейнере для овощей можно
контролировать, сдвигая рычаг в нужном
направлении.
Если перевести его влево, воздушная заслонка
откроется и воздух будет циркулировать внутри
ящика, снижая влажность. Если перевести его
вправо, заслонка закроется и текущий уровень
влажности будет сохраняться.
Закрытое положение рекомендуется для
хранения овощей, открытое — для хранения
фруктов.
ПРИМЕЧАНИЕ
• Символ ( * ) означает, что эта функция
зависит от приобретенной модели.
Функция InstaView ( * )
Функция InstaView системы Дверь-в-двери
позволяет увидеть, что заканчиваются часто
используемые продукты питания, например
напитки и закуски, не открывая при этом дверцу
холодильника.
Постучите по стеклу два раза, чтобы
1
включить или выключить светодиодную
подсветку в дверце.
Светодиодная подсветка автоматически
2
выключается через 10 секунд.
• Функция InstaView системы Дверь-в-
двери недоступна, когда правая дверца
холодильной камеры и левая дверца
морозильной камеры открыты, а также в
течение двух секунд после закрытия дверцы
и во время использования дозатора льда.
• Стучите рядом с центральной частью
стекла. Стук рядом с краями стекла
может не активировать функцию InstaView
надлежащим образом.
• Стучите достаточно сильно, чтобы звук стука
был слышен.
• Функция InstaView также активируется от
громкого шума рядом с холодильником.
ПРИМЕЧАНИЕ
• Символ ( * ) означает, что эта функция
зависит от приобретенной модели.
Прочие функции
Сигнал открытой дверцы
Если дверь (холодильника, морозильного
отсека, дверь-в-двери) открыта или неплотно
закрыта в течение одной минуты, звуковой
сигнал подается 3 раза с интервалом 30 секунд.
• Если звук не прекращается даже после
закрытия двери, обратитесь в центр
поддержки клиентов компании LG Electronics.
Выявление неисправностей
Устройство может автоматически выявлять
неисправности во время работы.
• Если выявлена неисправность, устройство не
работает, и отображается код ошибки даже
при нажатии любой из кнопок.
• При возникновении такой ситуации не
отключайте устройство от электросети
и немедленно обратитесь в центр поддержки
клиентов компании LG Electronics. Если вы
отключите устройство, то у специалиста
центра поддержки клиентов компании LG
Electronics могут возникнуть сложности
с определением неисправности.
28
Page 69

RU
ИНТЕЛЛЕКТУАЛЬНЫЕ ФУНКЦИИ
Использование
приложения LG
SmartThinQ
• Для приборов с логотипом a или b.
Проверьте перед
использованием LG SmartThinQ
Проверьте расстояние между прибором
1
и беспроводным маршрутизатором (сеть
Wi-Fi).
• Если расстояние между прибором
и беспроводным маршрутизатором
слишком большое, сила сигнала
ослабляется. Регистрация может занять
много времени или возможен сбой
установки.
Выключите на своем смартфоне функции
2
Мобильные данные или Сотовые
данные.
• Для iPhone выключите данные, перейдя
в Настройки → Сотовая связь →
Сотовые данные.
Подключите свой смартфон к
3
беспроводному маршрутизатору.
ПРИМЕЧАНИЕ
• Чтобы проверить Wi-Fi соединение,
убедитесь, что значок Wi-Fi f на панели
управления светится.
• Прибор поддерживает только сети Wi-Fi 2,4
ГГц. Чтобы проверить частоту вашей сети,
обратитесь к поставщику услуг Интернет
или см. инструкции к беспроводному
маршрутизатору.
• Приложение LG SmartThinQ не
предназначено для решения проблем с
подключением к сети, а также неполадками
и ошибками, вызванными сетевым
подключением.
• Если возникли какие-либо проблемы
при подключении устройства к сети WiFi, это может быть вызвано тем, что
устройство находится слишком далеко от
маршрутизатора. Приобретите ретранслятор
(усилитель сигнала) Wi-Fi, чтобы улучшить
сигнал Wi-Fi.
• Подключение Wi-Fi может быть не
установлено или прервано из-за
особенностей домашней сети.
• В зависимости от Интернет-провайдера с
сетевым соединением могут возникать те или
иные проблемы.
• Окружающая беспроводная среда может
замедлить работу беспроводной сети.
• Устройство может не пройти регистрацию
в связи с проблемами с беспроводной
передачей сигнала. Отключите устройство
от сети и подождите примерно минуту перед
тем, как повторить попытку.
• Если на вашем беспроводном
маршрутизаторе включен брандмауэр,
отключите брандмауэр или добавьте к нему
исключение.
• Имя беспроводной сети (SSID) должно
содержать английские буквы и цифры. (Не
используйте специальные символы)
• Пользовательский интерфейс смартфона
(ПИ) может отличаться в зависимости
от операционной системы (ОС) и
производителя.
• Если протокол безопасности маршрутизатора
настроен на WEP, возможен сбой настройки
сети. Измените его на другой протокол
безопасности (рекомендуется WPA2) и снова
зарегистрируйте изделие.
Установка приложения LG
SmartThinQ
Найдите приложение LG SmartThinQ в Google
Play Store & Apple App Store с помощью
смартфона. Следуйте инструкциям по загрузке
и установке приложения.
29
Page 70

RU
Функция Wi-Fi
Подключайтесь к устройству со смартфона при
помощи удобных интеллектуальных функций.
Обновление микропрограммы
Обновляйте микропрограммное обеспечение
для поддержания производительности
устройства.
Smart Diagnosis™
Интеллектуальная функция диагностики Smart
Diagnosis позволяет получать такую полезную
информацию, как способы правильного
использования устройства на основании
шаблонов.
Настройки
Позволяет задавать различные параметры на
самом холодильнике и с помощью приложения.
ПРИМЕЧАНИЕ
• При изменении маршрутизатора
беспроводной сети, поставщика
услуг Интернета или пароля удалите
зарегистрированное устройство
из приложения LG SmartThinQ и
зарегистрируйте его снова.
• В целях улучшения продукта в
приложение могут вноситься изменения
без предварительного уведомления
пользователя.
• Характеристики могут меняться в
зависимости от модели.
Повторная регистрация устройства
или регистрация другого
пользователя
Нажмите и удерживайте кнопку Wi-Fi в течение
3 секунд, чтобы временно отключить функцию.
Запустите приложение LG SmartThinQ и
следуйте инструкциям в приложении для
регистрации устройства.
ПРИМЕЧАНИЕ
• Для отключения функции Wi-Fi нажмите и
удерживайте кнопку Wi-Fi в течение 3 секунд.
Значок Wi-Fi отключится.
Уведомление о программном
обеспечении с открытым исходным
кодом
Для получения исходного кода по условиям
лицензий GPL, LGPL, MPL и других лицензий
с открытым исходным кодом, который
содержится в данном продукте, посетите вебсайт: http://opensource.lge.com.
Кроме исходного кода для загрузки доступны
все соответствующие условия лицензии,
отказ от гарантий и уведомления об авторских
правах.
Компания LG Electronics также может
предоставить открытый исходный код на
компакт-диске за плату, покрывающую
связанные с этим расходы (стоимость
носителя, пересылки и обработки), по
запросу, который следует отправить по адресу
электронной почты opensource@lge.com. Это
предложение действительно в течение трех лет
с момента последней поставки нами данного
продукта. Это предложение актуально для
любого получателя данной информации.
Подключение к Wi-Fi
При использовании приложения LG Smart
ThinQ кнопка Wi-Fi позволяет подключить
холодильник к домашней сети Wi-Fi. Значок
Wi-Fi показывает состояние подключения
холодильника к сети. Значок светится, когда
холодильник подключен к сети Wi-Fi.
Начальная регистрация устройства
Запустите приложение LG SmartThinQ и
следуйте инструкциям в приложении для
регистрации устройства.
30
Page 71

RU
Использование функции
Smart Diagnosis™
• Для приборов с логотипом c или d.
Система диагностики Smart
Diagnosis™ через центр
поддержки клиентов компании
LG Electronics
С помощью этой функции в случае
возникновения неполадок или сбоев в работе
устройства служба поддержки компании LG
Electronics способна провести дистанционную
диагностику. Используйте данную функцию
только при обращении в службу поддержки,
а не во время нормальной работы.
Нажмите кнопку Lock, чтобы включить
1
блокировку.
• Если экран был заблокирован более 5
минут, его необходимо разблокировать, а
затем заблокировать снова.
Откройте дверцу холодильника и поднесите
2
телефон к динамику в верхнем правом углу.
• Расположите телефон таким образом,
чтобы микрофон располагался напротив
отверстия динамика.
ПРИМЕЧАНИЕ
• Расположите телефон таким образом, чтобы
микрофон располагался напротив отверстия
динамика.
• Система Smart Diagnosis™ издает звук
примерно через три секунды.
• Удерживайте телефон напротив верхнего
правого отверстия динамика и дождитесь
завершения передачи данных.
• Не отводите телефон от отверстия при
передаче данных.
• Звук передачи данных при использовании
функции Smart Diagnosis™ может быть
резким для уха, но в целях обеспечения
точности диагностики не отводите телефон
от отверстия динамика до прекращения звука
передачи данных.
• По завершении передачи данных на
дисплей будет выведено соответствующее
сообщение, а панель управления
автоматически выключится и затем
включится через несколько секунд. Затем
центр поддержки клиентов проинформирует
о результатах диагностики.
• Работоспособность функции Smart
Diagnosis™ зависит от качества местной
телефонной связи.
• Домашний проводной телефон обеспечивает
более высокое качество связи и сигнала.
• Если передача данных с помощью функции
Smart Diagnosis™ затруднена вследствие
низкого качества телефонной связи, вы не
сможете получить максимальный эффект от
ее применения.
Удерживая телефон у динамика, нажмите
3
кнопку Freezer и удерживайте не менее
трех секунд.
После завершения передачи данных
4
специалист по техническому обслуживанию
сообщит вам результаты диагностики
в системе Smart Diagnosis™.
31
Page 72

RU
ТЕХНИЧЕСКОЕ ОБСЛУЖИВАНИЕ
Примечания по очистке
устройства
• Перед снятием полки или контейнера из
внутренней части устройства извлеките все
хранившиеся там продукты во избежание
получения травм или повреждения
устройства.
− В противном случае вес хранящихся
продуктов может стать причиной травм.
• При очистке наружных вентиляционных
отверстий устройства при помощи
пылесоса необходимо отсоединить
кабель электропитания от розетки во
избежание статического разряда, который
может вывести из строя электронное
оборудование или стать причиной поражения
электрическим током.
• Снимите полки и контейнеры, промойте
их водой, а затем дайте им полностью
высохнуть перед обратной установкой.
• Регулярно очищайте уплотнитель дверцы
влажной мягкой тканью.
• Необходимо удалять пролитые продукты
и пятна с лотков в дверце, поскольку их
наличие может негативно сказаться на
качестве хранения продуктов или даже
привести к повреждению лотков.
• После проведения очистки проверьте, не
поврежден ли кабель питания, не происходит
ли его нагрева и правильно ли он вставлен
в розетку.
• Вентиляционные отверстия на внешней
стенке устройства должны поддерживаться
в чистоте.
− Засорение вентиляционных каналов
может стать причиной пожара или
повреждения устройства.
• Покрытие внешних металлических
поверхностей воском помогает защитить
их от ржавчины. Нельзя покрывать воском
пластиковые детали. Как минимум два раза в
год покрывайте окрашенные металлические
поверхности воском. Используйте восковые
составы для бытовой техники (или восковую
пасту для автомобилей). Для нанесения
воска используйте чистую мягкую ткань.
• При чистке внутри или снаружи прибора не
протирайте грубой щеткой, зубной пастой
или горючими материалами. Не используйте
чистящие средства, содержащие горючие
вещества.
− Они могут вызвать обесцвечивание или
повреждение прибора.
− Горючие вещества: спирт (этанол,
метанол, изопропиловый спирт,
изобутиловый спирт и т. д.), растворитель,
отбеливатель, бензол, воспламеняемые
жидкости, абразив и т. д.
• Для мойки наружной части используйте
чистую губку или мягкую тряпку со слабым
моющим средством и теплой водой.
Не используйте абразивы или сильные
очистители. Тщательно протрите поверхность
мягкой тканью.
• Запрещается мыть полки или контейнеры
в посудомоечной машине.
− Эти детали могут деформироваться под
воздействием высокой температуры.
• Если устройство оснащено светодиодными
индикаторами, не снимайте крышку
индикатора и сам индикатор для ремонта
или технического обслуживания. Обратитесь
в центр поддержки клиентов компании LG
Electronics.
Очистка крышки
конденсатора
Для очистки крышки конденсатора и
вентиляционных отверстий используйте
пылесос с щеткой. Не снимайте панель,
закрывающую змеевик конденсатора.
32
Page 73

RU
Очистка лотка на дверце
устройства
Снятие лотка в дверце
холодильника/морозильной
камеры
Удерживая лоток за боковые стенки,
приподнимите его и извлеките из дверцы
холодильника.
Повторная установка лотка
в дверце холодильника/
морозильной камеры
Удерживая лоток за боковые стенки,
1
установите один его край в дверцу
холодильника, осторожно надавив на
него. Затем установите второй край лотка
аналогичным образом.
Очистка полок
Снятие полки холодильника/
морозильной камеры
Снимите полку, вытянув ее наружу.
Установка полки холодильника/
морозильной камеры
Снимите полку холодильника, потянув ее
наружу и слегка приподнимая ее задний край.
Очистка овощного
контейнера
Извлечение овощного
контейнера
Извлеките содержимое ящика. Возьмитесь
1
за ручку ящика для овощей и выдвините
его до конца.
После установки слегка постучите по лотку,
2
чтобы зафиксировать его в горизонтальном
положении.
33
Page 74

RU
Поднимите ящик для овощей и вытяните
2
его наружу.
Установка овощного контейнера
Если ящик для овощей снабжен крышкой,
1
поднимите ее.
Установите нижнюю часть ящика в
2
исходное положение и осторожно вставьте
его, одновременно опуская.
ОСТОРОЖНО!
• Учитывайте, что из-за веса продуктов при
извлечении ящика для овощей можно
получить травму.
34
Page 75

RU
ПОИСК И УСТРАНЕНИЕ НЕИСПРАВНОСТЕЙ
Признаки Возможная причина Способ устранения
Охлаждение или
заморозка продуктов
не происходит.
Плохой уровень
охлаждения или
заморозки продуктов.
Имели ли
место перебои
электропитания?
Вилка вынута из
розетки?
Установлена ли
температура
холодильника
или морозильной
камеры в режим
минимального
охлаждения?
Подвергается
ли устройство
воздействию прямых
солнечных лучей или
находится ли оно
вблизи объектов,
излучающих
тепло, таких как,
например, плита для
приготовления пищи
или обогреватель?
Помещали ли
вы горячие
продукты питания
в холодильник без
предварительного
охлаждения?
Не перегружен
ли холодильник
продуктами?
Полностью ли
закрыты дверцы
устройства?
Достаточно ли
свободного
пространства вокруг
устройства?
• Проверьте, подается ли электропитание на
другие устройства.
• Правильно вставьте вилку в розетку.
• Установите режим температуры холодильника
или морозильной камеры Medium (Средний
уровень охлаждения).
• Проверьте место установки устройства
и установите устройство в другое место вдали
от излучающих тепло объектов.
• Охлаждайте горячую пищу перед тем, как
поместить в холодильный или морозильный
отсек.
• Обеспечьте наличие достаточного свободного
пространства между продуктами.
• Полностью закройте дверцу и убедитесь
в том, что хранящиеся продукты питания не
мешают закрытию двери.
• Измените место установки таким образом,
чтобы обеспечить достаточное пространство
вокруг устройства.
35
Page 76

RU
Признаки Возможная причина Способ устранения
Установлен ли
Внутри устройства
присутствует
неприятный запах.
Лампа внутреннего
освещения
устройства не
работает.
Дверца холодильника
неплотно закрыта.
Дверца устройства
открывается со
значительным
усилием.
режим Warm (Слабое
охлаждение)
холодильника
или морозильной
камеры?
Хранили ли вы
продукты с резким
запахом?
Испортились ли
фрукты и овощи
в контейнере?
Лампа внутреннего
освещения
устройства
выключена?
Наклонено ли
устройство вперед?
Были ли полки
установлены
должным образом?
Закрывали
ли вы дверцу
с приложением
излишнего усилия?
Вы открывали дверь
сразу же после ее
закрытия?
• Установите режим температуры холодильника
или морозильной камеры Medium (Средний
уровень охлаждения).
• Храните продукты с резким запахом
в герметичных контейнерах.
• Избавьтесь от испорченных овощей и очистите
овощной контейнер. Не храните овощи
в овощном контейнере слишком долго.
• Внутренняя лампа устройства не может быть
заменена пользователем. Если внутренняя
лампа не включается, обратитесь в центр
поддержки клиентов LG Electronics.
• Отрегулируйте переднюю ножку, чтобы слегка
поднять лицевую сторону устройства.
• Измените положение полок при
необходимости.
• Если закрывать дверцу слишком быстро
или прикладывать для ее закрытия слишком
большое усилие, дверца может оставаться
открытой в течение короткого промежутка
времени перед закрытием. Старайтесь не
хлопать дверцей при закрытии. Закрывайте
дверцу, не прикладывая большого усилия.
• Если попытаться открыть дверцу устройства
в течение одной минуты после закрывания,
возможны трудности в связи с давлением
внутри устройства. Попробуйте открыть
дверцу устройства через несколько минут,
после стабилизации уровня давления внутри
устройства.
36
Page 77

RU
Признаки Возможная причина Способ устранения
Помещали ли
Конденсат внутри
устройства или на
дне крышки овощного
контейнера.
В морозильном
отсеке образовался
иней.
В морозильном
отсеке образовался
иней.
Образование инея
или конденсата
внутри или снаружи
устройства.
вы горячие
продукты питания
в холодильник без
предварительного
охлаждения?
Дверца устройства
была оставлена
открытой?
Открывали ли вы
дверцу устройства
слишком часто?
Клали ли вы теплые
или влажные
продукты внутрь
устройства без
упаковки их
в герметичные
контейнеры?
Возможно, дверца
неплотно закрыта?
Помещали ли
вы горячие
продукты питания
в холодильник без
предварительного
охлаждения?
Подача или
выпуск воздуха из
морозильного отсека
затруднены?
Морозильный отсек
переполнен?
Часто ли вы
открывали
и закрывали дверцу
устройства? Дверца
устройства закрыта
не полностью?
Высокая ли
влажность в месте
установки?
• Охлаждайте горячую пищу перед тем, как
поместить в холодильный или морозильный
отсек.
• Несмотря на то что конденсат испарится
вскоре после закрытия дверцы устройства,
можно удалить его куском сухой ткани.
• Конденсат может образовываться вследствие
разницы температуры внутри устройства
и снаружи. Удалите влагу куском сухой ткани.
• Храните продукты в закрытых или
герметичных контейнерах.
• Следите за тем, чтобы продукты питания
внутри холодильника не препятствовали
закрытию дверцы, обязательно проверяйте,
плотно ли закрыта дверца.
• Охлаждайте горячую пищу перед тем, как
поместить в холодильный или морозильный
отсек.
• Следите за тем, чтобы отверстия для забора
и выпуска воздуха не были засорены, чтобы
обеспечивать циркуляцию воздуха внутри
устройства.
• Обеспечьте наличие свободного пространства
между продуктами.
• Иней или конденсат могут формироваться
при проникновении в устройство наружного
воздуха.
• Конденсат может появляться на наружных
деталях устройства, если в месте установки
слишком высокая влажность или при большом
количестве осадков. Удалите влагу куском
сухой ткани.
37
Page 78

RU
Признаки Возможная причина Способ устранения
Устройство
установлено
Устройство работает
шумно и издает
странные звуки.
Боковая или
передняя стенки
устройства теплые.
Вода внутри или
снаружи устройства.
на непрочной
поверхности или не
было выровнено
должным образом?
Касается ли задняя
стенка устройства
стены?
Находятся ли за
устройством какиелибо предметы?
Расположен ли какойлибо предмет на
устройстве?
Эти участки
устройства оснащены
противоконденсатными
трубками для
уменьшения
количества конденсата
вокруг дверцы.
Не происходит ли
утечка воды вблизи
устройства?
Имеется ли на дне
устройства вода?
• Установите устройство на ровный прочный
пол.
• Выберите место установки так, чтобы
обеспечить достаточное свободное
пространство вокруг устройства.
• Удалите предметы, лежащие за устройством.
• Снимите все предметы, расположенные на
устройстве.
• Трубка отвода тепла для предотвращения
возникновения конденсата установлена
в передней и боковой частях устройства.
Сразу после установки или в течение
летних месяцев она может довольно сильно
нагреваться. Можете быть уверены, это не
является признаком неисправности.
• Проверьте, не происходит ли утечки воды из-
под раковины или из другого места.
• Проверьте, появляется ли вода из-за
оттаивания продуктов, повреждения или
поломки контейнера в результате падения.
38
Page 79

RU
Признаки Возможная причина Способ устранения
Автоматический
льдогенератор не
производит лед или
производит мало.
Лед не выгружается.
Лед не выгружается.
Вода не выходит.
Устройство
установлено
недавно?
Труба подачи воды
подключена к
устройству, клапан
подачи открыт?
Шланг подачи воды
изогнут?
Вы недавно взяли
много льда?
Вы включили
переключатель
льдогенератора
или нажали кнопку
автоматического
льдогенератора на
панели управления?
Температура в
отсеке морозильника
слишком высокая?
Вы часто открывали
дверь устройства?
Дверь устройства
полностью закрыта?
В емкости для льда
остался лед?
В емкости для льда
лед спрессован?
Не слышен звук
выгрузки льда?
Клапан подачи воды
закрыт? (Только
для моделей с
подключением к
водопроводу.)
• Обычно льдогенератор изготавливает лед
примерно через 48 часов после установки
устройства.
• Подключите трубу подачи воды к устройству и
откройте клапан подачи.
• Изгиб на шланге может помешать току воды.
• На изготовление льда в льдогенераторе уйдет
примерно 24 часа. Просьба подождать.
• Нажмите I на переключателе или
выберите на панели управления кнопку
ON автоматического льдогенератора
(дополнительные сведения об использовании
см. на веб-сайте LG Electronics или своем
мобильном устройстве).
• Если задана слишком высокая температура,
лед не делается или его мало. Настройте
температуру морозильника –18 °C для
нормальной работы автоматического
льдогенератора.
• Если часто открывать дверь устройства,
холодный воздух выйдет и скорость
изготовления льда уменьшится. Не
следует часто открывать и закрывать дверь
устройства.
• Если дверь устройства не полностью
закрыта, температура в морозильном отсеке
поднимется и скорость приготовления льда
снизится. Закройте дверцу устройства до
конца.
• Убедитесь, что в емкости для льда есть лед.
• Демонтируйте емкость для льда и встряхните
ее. Встряхните емкость для льда и удалите
оставшийся спрессованный лед.
• На панели управления вместо режима
выгрузки льда выберите попеременно режимы
для заморозки кубиков льда и колки льда.
• Откройте клапан подачи воды.
39
Page 80

RU
Признаки Возможная причина Способ устранения
Вкус воды
У воды странный
вкус.
Щелкающие звуки
отличается от воды
из предыдущего
очистителя?
После установки
и замены фильтра
прошло много
времени?
Вы правильно
промыли фильтр на
начальном этапе,
после установки?
Очищенная или
холодная вода
не используется
длительное время?
Процесс управления
оттаиванием может
сопровождаться
щелчками при
автоматическом
запуске и завершении
процесса
оттаивания. Работа
терморегулятора
(или устройства
управления
холодильником
на некоторых
моделях) также
сопровождается
щелчками при
включении
и отключении.
• Очищенная или холодная вода не
используется длительное время?
• Если используется фильтр с истекшим сроком
службы, эффективность очистки может
снизиться. Рекомендуется заменять фильтр с
правильными интервалами.
• При первой установке или замене фильтра
нужно удалить из него воздух и налет
активированного угля. Перед использованием
устройства слейте нажатием рычага и
утилизируйте примерно 5 литров очищенной
воды из диспенсера (активированный уголь
безопасен для людей).
• Вкус отстоявшейся воды может измениться
из-за размножения бактерий. Перед
использованием устройства слейте нажатием
рычага и утилизируйте примерно 5 литров
очищенной воды из диспенсера (примерно за
три минуты).
• Устройство исправно.
40
Page 81

RU
Признаки Возможная причина Способ устранения
Источником
дребезжащих
звуков может быть
поток хладагента,
трубопровод воды
в задней части
Дребезжание
Свистящие звуки
Журчащие звуки
Хлопающие звуки
холодильника
(только для моделей
с устройством
очистки) или
предметы,
хранящиеся на
холодильнике или
рядом с ним.
Устройство не
установлено на полу
ровно.
Устройство
с линейным
компрессором было
перемещено во время
эксплуатации.
Электродвигатель
вентилятора
испарителя
обеспечивает
циркуляцию воздуха
в холодильнике
и морозильной
камере.
Воздух отводится
из конденсатора при
помощи вентилятора
конденсатора.
Поток хладагента
через систему
охлаждения
Сжатие и расширение
внутренних
стенок вследствие
изменения
температуры.
• Устройство исправно.
• Пол слабый или неровный или необходимо
выровнять регулируемые ножки. См. раздел
Выравнивание двери.
• Нормальная работа. Если компрессор не
перестанет дребезжать через три минуты,
отключите и снова включите питание
устройства.
• Устройство исправно.
• Устройство исправно.
• Устройство исправно.
• Устройство исправно.
41
Page 82

RU
Признаки Возможная причина Способ устранения
Если боковые
или задняя стенка
Вибрация
Ваш домашний
прибор и смартфон
не подключены к сети
Wi-Fi.
устройства касаются
стены помещения или
стенок шкафа, это
может стать причиной
шумов даже при
нормальном уровне
вибрации.
Пароль для сети
Wi-Fi, к которой
вы пытаетесь
подключиться,
неправильный.
Передача мобильных
данных для вашего
смартфона включена.
Имя беспроводной
сети (SSID) настроено
неправильно.
Частота
маршрутизатора не
2,4 ГГц.
Расстояние между
прибором и
маршрутизатором
слишком большое.
• Для предотвращения шума убедитесь
в том, что боковые стороны и задняя стенка
устройства не соприкасаются со стеной
помещения или стенками шкафа.
• Найдите сеть Wi-Fi, подключенную к
вашему смартфону, и удалите ее, потом
зарегистрируйте свой прибор в LG
SmartThinQ.
• Выключите функцию Мобильные данные
своего смартфона и зарегистрируйте
устройство, используя сеть Wi-Fi.
• Имя беспроводной сети (SSID) должно
содержать английские буквы и цифры. (Не
используйте специальные символы)
• Поддерживается только частота
маршрутизатора 2,4 ГГц. Настройте
беспроводной маршрутизатор на 2,4 ГГц
и подключите прибор к беспроводному
маршрутизатору. Чтобы проверить
частоту маршрутизатора, обратитесь к
своему поставщику Интернет-услуг или
производителю маршрутизатора.
• Если расстояние между прибором и
маршрутизатором слишком большое, сигнал
может быть слабым и подключение может не
настраиваться правильно. Измените место
нахождения маршрутизатора, чтобы он
находился ближе к прибору.
42
Page 83

Для заметок
Page 84

Для заметок
Page 85

www.lg.com
FOYDALANUVCHI QO'LLANMASI
SOVUTKICH&
MUZLATKICH
Ushbu foydalanuvchi qo'llanmani yaxshilab o'qib chiqing va kеlgusida foydalanish uchun saqlab
qo'ying.
Copyright © 2017 - 2019 LG Electronics Inc. All Rights Reserved
Page 86

MUNDARIJA
Ushbu qo'llanmada siz xarid qilgan rusumga
taalluqli bo'lmagan tasvirlar yoki tarkib bo'lishi
mumkin.
Ushbu qo'llanma ishlab chiqaruvchi
tomonidan qayta ko'rib chiqilishi mumkin.
XAVFSIZLIK KO'RSATMALARI .................................................. 3
Muhim xavfsizlik ko'rsatmalari ...........................................................................3
O‘RNATISH .................................................................................. 10
Bo‘lmalar .........................................................................................................10
O‘lchamlar va oraliqlar .................................................................................... 11
Atrof-muhit harorati ......................................................................................... 11
Eshikni olib qo‘yish ..........................................................................................12
Eshikni qayta joylash.......................................................................................12
Eshik balandligini sozlash ...............................................................................13
Jihozni ulash ...................................................................................................14
Jihozni ko‘chirish .............................................................................................14
ISHLATISH ................................................................................... 15
Qismlar va funksiyalar .....................................................................................15
Ishlatish bo‘yicha izohlar .................................................................................19
Using Control Panel (boshqaruv panelidan foydalanish) ................................21
Muz Tayyorlagich ( * ) ......................................................................................23
Door in Door ( * ) .............................................................................................25
Yangi sabzavotlar tortma qutisi ( * ) ................................................................26
InstaView funksiyasi ( * ) ................................................................................26
Boshqa funksiyalari .........................................................................................26
AQLLI FUNKSIYALAR ...............................................................27
LG SmartThinQ ilovasidan foydalanish ...........................................................27
Smart Diagnosis™ (Aqlli tashxis) funksiyasini ishlatish ..................................29
TEXNIK XIZMAT KO‘RSATISH .................................................. 30
Notes for Cleaning (tozalash uchun eslatmalar) .............................................30
Konteyner qopqog‘ini tozalash ........................................................................30
Cleaning the Door Basket (eshik savatchasini tozalash) ................................31
Tokchani tozalash............................................................................................31
Cleaning the Vegetable Drawer (sabzavotlar tortmasini tozalash)..................31
NOSOZLIKLARNI BARTARAF ETISH .....................................33
Page 87

UZ
XAVFSIZLIK KO'RSATMALARI
Quyidagi xavfsizlik ko'rsatmalari kutilmagan xavflar hamda
jihozdan ehtiyotsizlik bilan yoki noto'g'ri foydalanish oqibatida
kеlib chiqadigan zararlarning oldini olishga mo'ljallangan.
Ushbu ko'rsatmalar quyida ko'rsatilganidеk “OGOHLANTIRISH” va
“DIQQAT” belgilari bilan qismlarga ajratilgan.
Ushbu bеlgi xavf tug'dirishi mumkin bo'lgan holat va
amallarni bildiradi. Mazkur bеlgi bilan ajratilgan qismni
ehtiyotkorlik bilan o'qing va xavfning oldini olish uchun
ko'rsatmalarga amal qiling.
OGOHLANTIRISH
Bu bеlgi ko'rsatmalarga amal qilmaslik jiddiy jarohat yoki
o'limga sabab bo'lishi mumkinligini bildiradi.
DIQQAT
Bu bеlgi ko'rsatmalarga amal qilmaslik yengil jarohat yoki
mahsulotga zarar yеtishiga sabab bo'lishi mumkinligini
bildiradi.
Muhim xavfsizlik ko'rsatmalari
OGOHLANTIRISH
Mahsulotdan foydalanish asnosida portlash, yong'in chiqish,
o'lim, elеktr zarbasi yoki jarohatning oldini olish uchun asosiy
ehtiyotkorlik choralariga amal qiling:
Uydagi bolalar
• Ushbu jihoz jismoniy, sеzgi yoki aqliy qobiliyati chеklangan,
foydalanish tajribasi va bilimi kam shaxslar (jumladan, bolalar)
tomonidan foydalanish uchun mo'ljallanmagan. Agar ularning
xavfsizligi uchun javobgar biror shaxs jihozdan foydalanishda ularni
nazorat qilib tursa yoki ko'rsatma bеrib tursa, bunday shaxslar
jihozdan foydalanishlari mumkin. Bolalarni jihoz yonida nazoratsiz
qoldirmang.
• Agar jihoz qulf bilan jihozlangan bo‘lsa (faqat ayrim modellar), kalitni
bolalar olaolmaydigan joyda saqlang.
3
Page 88

UZ
O'rnatish
• Bu jihozni ikki yoki undan ortiq kishi mahkam ushlagan holda joyidan
ko‘chirishi lozim.
• Rozetka yerga to‘g‘ri uzatilganligiga, elektr kabelidagi yerga ulash
mixchasi shikastlanmaganligiga va uning elektr tarmog‘idan uzib
qo‘yilmaganligiga ishonch hosil qiling. Yerga ulash bo‘yicha batafsil
ma’lumot uchun LG Electronics mijozlarni qo'llab quvvatlash
markaziga murojaat qiling.
• Bu jihozning elektr shnuri uskunani yerga ulash simi va vilkasi bilan
jihozlangan. Barcha mahalliy qonun-qoidalarga muvofiq tarzda
o‘rnatilgan va yerga ulangan rozetkadan foydalanish shart.
• Agar elektr shnuri shikastlangan yoki rozetkaning teshigi bo‘shab
qolgan bo‘lsa, shnurni ishlatmang hamda vakolatli xizmat ko‘rsatish
markaziga murojaat qiling.
• Jihozni quvvat kabeliga (o‘rnatilgan) ega bo‘lmagan ko‘p rozetkali
adapterga ulamang.
• Elektr kabelini almashtirmang yoki uzaytirmang.
• Bu jihoz alohida saqlagichga ega boo‘lgan maxsus ajratilgan elektr
liniyasiga ulanishi kerak.
• Mos tarzda yerga ulanmagan ko‘p teshikli rozetkaga (ko‘chma)
ulamang. Mos tarzda yerga ulangan ko‘p teshikli rozetkadan
(ko‘chma) foydalanilganda ko‘rsatilgan nominal tok kuchiga yoki
undan balandroq tok kuchiga mo‘ljallangan ko‘p teshikli rozetkadan
foydalaning va bu rozetkadan faqat jihozning o‘zi uchun foydalaning.
• Jihozni uning elektr kabeli tarmoqdan oson uziladigan joyga o‘rnating.
• Elektr kabeli sanchqisi yuqoriga yo‘nalib qolishi yoki jihozning elektr
kabeli sanchqisiga tiralib qolishidan saqlaning.
• Jihozni qattiq va tekis polga o‘rnating.
• Jihozni nam va changli joyga o‘rnatmang. Jihozni tashqariga yoki
to‘g‘ridan-to‘g‘ri quyosh nuri, shamol yoki yomg‘ir tegadigan, harorat
muzlashgacha boradigan joylarga o‘rnatmang yoki saqlamang.
• Jihozni quyosh nuri to‘g‘ridan-to‘g‘ri tushadigan joyga qo‘ymang
va plita yoki isitkich kabi qizdiruvchi jihozlardan chiqadigan issiqlik
ta’sirida qoldirmang.
• Jihozni o‘rnatishda orqa tomonini ochilib qolishidan ehtiyot bo‘ling.
4
Page 89

UZ
• Jihoz eshigini o‘rnatishda yoki yechishda uning qulab ketishiga yo‘l
qo‘ymang.
• Jihoz eshigini o‘rnatishda yoki yechishda elektr kabelining qisilib
qolishi, ezilishi yoki shikastlanishidan ehtiyot bo‘ling.
• Elektr kabeli sanchqisiga sanchqi adapteri yoki boshqa qurilmalarni
ulamang.
Ishlatish
• Jihozda oziq-ovqat mahsulotlarini saqlashdan boshqa maqsadlarda
(tibbiy yoki tajriba materiallari saqlash yoxud yetkazib berishda)
foydalanmang.
• Qattiq momaqaldiroq yoki chaqmoq paytida yo uzoq muddat
foydalanishi ko‘zda tutilmagan holatlarda jihozning elektr kabeli
sanchqisini tarmoqdan uzib qo‘ying.
• Elektr kabelini haddan ortiq bukmang yoki ustiga og‘ir buyum
qo‘ymang.
• Ho‘l qo‘lingiz bilan elektr vilkasiga yoki jihozning tugmalariga
tegmang.
• Elektr kabelini haddan ortiq bukmang yoki ustiga og‘ir buyum
qo‘ymang.
• Agar jihozning elekt qurilmalari ichiga suv kirib ketadigan bo‘lsa,
elektr kabeli sanchqisini tarmoqdan uzing va LG Electronics mijozlar
uchun axborot markaziga murojaat qiling.
• Jihozning sovuq chiqaradigan joyiga, orqa paneliga yoxud issiqlik
chiquvchi panjarasiga qo‘lingizni yoki metal buyumlarni qo‘ymang.
• Jihozning orqa paneliga ortiqcha kuch yoki zarba ishlatmang.
• Jihoz ichiga uy hayvonlari yoki boshqa jonzotlarni solmang.
• Jihoz eshigini ochish yoki yopishda atrofda yurgan bolalarga ehtiyot
bo‘ling. Eshik bolaga jarohat yetkazishi yoki shikastlashi mumkin.
• Bolalarning jihoz ichiga qamalib qolish xavfidan ehtiyot bo‘ling. Jihoz
ichiga qamalib qolgan bola dimiqib qolishi mumkin.
• Jihoz ichiga og‘ir yoki mo‘rt buyumlarni, ichida suyuqlik bor idishlarni,
yonuvchan moddalarni, oson alangalanuvchan buyumlarni (masalan,
sham, shamchiroq va h.k.) va qizdiruvchi uskunalarni (masalan, plita,
isitkich va h.k.) qo‘ymang.
5
Page 90

UZ
• Agar gaz (izobutan, propan, tabiiy gaz va h.k.) chiqayotgan bo‘lsa,
jihozga yoki elektr kabeli sanchqisiga tegmang va darhol xonani
shamollating. Bu jihoz sovutuvchi gazdan (izobutan, R600a)
foydalanadi. Garchi undagi gaz miqdori juda oz bo‘lsa-da, u baribir
yonuvchandir. Jihozni tashish, o‘rnatish yoki undan foydalanish
paytida undan gaz chiqsa va uchqun chiqishi kuzatilsa, bu yong‘in,
portlash yoki tan jarohatlariga olib kelishi mumkin.
• Jihoz yaqinida tez alangalanuvchan yoki yonuvchan moddalardan
(efir, benzol, spirt, boshqa kimyoviy moddalar, siqilgan suyuq
gaz, yonuvchan aerozol, hasharotlarga qarshi purkaluvchi vosita,
havo tozalagich, pardoz vositasi va h.k.) foydalanmang yoki ularni
saqlamang.
• Agar jihozdan g‘alati ovoz, hid yoki tutun chiqayotganini sezsangiz,
darhol elektr kabeli sanchqisini tarmoqdan uzing va LG Electronics
mijozlarni qo'llab quvvatlash markaziga murojaat qiling.
• Faqat muz idish yoki suv chiqarish uskunasinigina ichimlik suvi bilan
to‘ldiring.
• Jihozning sovitish sxemasiga zarar yetkazmang.
• Jihoz ichiga hech qanday elektr uskunasi (isitkich yoki mobil telefoni
kabilar) solmang.
Tеxnik xizmat ko'rsatish
• Jihozni tozalash yoki ichki chirog‘ini (agar o‘rnatilgan bo‘lsa)
almashtirishdan oldin elektr kabelini tarmoqdan uzing.
• Namlik yoki changni yaxshilab tozalab tashlagandan so‘nggina elektr
vilkasini rozetkaga ulang.
• Jihozni tokdan uzishda elektr kabelidan tortmang. Doim vilkani
mahkam ushlang va rozetkadan to‘g‘ri yo‘nalishda tortib chiqaring.
• Jihozni tozalash uchun uning ichiga yoki tashqarisiga hech qachon
suv yoki yonuvchan moddalarni (tish pastasi, spirt, eritgich, benzin,
oson alangalanuvchi modda, abraziv material va h.k.) purkamang.
• Jihozni hech qachon dag‘al yuzali yoki metall materialdan qilingan
cho‘tka, latta yoki mochalka bilan tozalamang.
• Faqat LG Electronics servis markazining malakali mutaxassisigina
jihozni qismlarga ajratishi, ta’mirlashi yoki o‘zgartirishi zarur. Agar
jihozni boshqa joyga ko‘chirib o‘rnatadigan bo‘lsangiz, LG Electronics
mijozlarni qo'llab quvvatlash markaziga murojaat qiling.
6
Page 91

UZ
• Jihozning ichki tomonini quritish uchun soch qurituvchi uskunadan
foydalanmang va badbo‘y islarni ketkazish uchun jihoz ichiga sham
tiqmang.
• Muzdan tushish jarayonini tezlatish uchun mexanik qurilma yoki
boshqa vositalardan foydalanmang.
• Faqat ichimlik suvi manbasini suv tarmog‘iga ulang (faqat tik
joylashuvchi modellar uchun). Aks holda suvdagi aralashmalar
kasallik keltirib chiqarishi mumkin.
Chiqitga chiqarish
• Jihozni tashlab yuborayotganda uning tokchalarini va savatchalarini
joyida qoldirgan holda, eshik qistirmasini olib tashlang va bolalarni
jihozdan uzoq tuting.
• Qadoq materiallari (plastik paketlar va penoplast)ni bolalardan
uzoqroqda chiqitga chiqaring. Qadoq materiallari bo‘g‘ilib qolishga
sabab bo‘lishi mumkin.
Tеxnik xavfsizlik
• Jihozning korpusida yoki ichki tuzilmasida o‘rnatilgan shamollatish
teshiklarining tiqilib qolishiga yo‘l qo‘ymang.
• Elektr jihozlaridan muzlatgichning ichida foydalanmang.
• Jihozda qo‘llanilgan sovituvchi modda yoki izolyatsion gazni chiqitga
chiqarishda maxsus tartib amal qiladi. Ularni chiqitga chiqarishdan
avval servis markazi agenti yoki sohaning malakali ustasi bilan
maslahatlashing.
• Jihoz naychalaridan sovituvchi moddaning oqishi yong‘in yoki
portlashni keltirib chiqarishi mumkin.
• Aynan sizning jihozingizdagi sovituvchi modda miqdori jihoz ichidagi
identifikatsiya yorlig‘ida ko‘rsatilgan.
• Biror shikastlanish belgisi bo‘lgan jihozni ishga tushirmang. Agar
bunga shubha qilsangiz, dileringizga murojaat qiling.
• Ushbu jihoz faqat uy sharoitida qo‘llash va shunday maqsadlarda
foydalanish uchun mo‘ljallangan. Undan tijorat maqsadida yoki
umumiy ovqatlanish joylarida, g‘ildirakli uy yoxud kema kabi
harakatlanuvchi transport vositalarida foydalanmaslik zarur.
• Jihoz ichida yonuvchan suyuqlikli aerozol idishlari kabi portlovchi
moddalarni saqlamang.
7
Page 92

UZ
Yong‘in va yonuvchan materiallar xavfi
Bu belgi e’tiborsiz qoldirilgan hollarda uchqunlashi va
yong‘inga sabab bo‘lishi mumkin bo‘lgan yonuvchan
materiallar haqida ogohlantiradi.
• Bu jihoz tarkinida oz miqdordagi izobutan sovutish vositasi (R600a)
mavjud, biroq u yonuvchan hamdir. Jihozni tashishda yoki o‘rnatishda
uning sovitish sxemasiga shikast yetkazmaslik uchun ehtiyotkorlikka
rioya qilish talab etiladi.
• Agar shunday oqish holati yuzaga kelgan bo‘lsa, jihoz atrofida ochiq
alanga yoki ehtimoliy isitish manbalari bo‘lishiga yo‘l qo‘ymang
va jihoz turgan xonani bir necha daqiqa davomida shamollating.
Agar sovituvchi modda oqishi kuzatilsa, yonuvchan gazlarning
havodagi aralashmasi yuzaga kelishining oldini olish uchun, jihoz
foydalanilayotgan xona o‘lchamlari undagi sovituvchi modda
miqdoriga mos bo‘lishi zarur. Jihoz ichidagi R600a sovituvchi
moddasining har 8 grammiga xonada 1 m² joy bo‘lishi zarur.
• Jihozni joylashtirganda elektr shnurining tiqilib qolmaganligi yoki
shikastlanmaganligiga ishonch hosil qiling.
• Jihozning orqa korpusiga ko‘chma ko‘p tirqishli rozetkalar yoki
ko‘chma elektr ta’minot jihozlarini joylashtirmang.
DIQQAT
Kichik shaxsiy jarohatlarning xavfini kamaytirish, mahsulotning noto'g'ri
ishlashi yoki mulkka shikast еtishining xavfini kamaytirish uchun asosiy
dastlabki ehtiyot choralari ko'rilishi kеrak, jumladan, quyidagilar:
O'rnatish
• Jihozi tashish chog‘ida uni tortib yoki itarib engashtirmang.
• Jihozni siljitayotganda qo‘l yoki oyoq kabi tana a’zolarining qisilib
qolmasligiga ishonch hosil qiling.
Ishlatish
• Muzlatkich bo‘lmasidagi muzlagan oziq-ovqat mahsulotlari yoki
uning metal qismlariga nam yoki xo‘l qo‘l bilan teginmang. Bu sovuq
urishiga sabab bo‘lishi mumkin.
8
Page 93

UZ
• Harorati muzlash nuqtasidan pastroq haroratga tushadigan muzxona,
tokchalar yoki muz idishiga shisha idishlar, butilka yoki banka
solmang (ayniqsa ichida gazli ichimlik bo‘lsa).
• Jihoz eshigining old tomonidagi toblangan shisha yoki polkalar ta’sir
natijasida shikastlanishi mumkin. Agar u sinsa, unga qo‘llaringiz bilan
tegmang.
• Eshikdagi eshik ustiga og‘ir buyumlarni qo‘ymang.
• Eshikdagi eshikdan taxtakach sifatida foydalanmang va uni tig‘li
asbob bilan tirnamang, chunki bu jihozning buzilishiga olib kelishi
mumkin.
• Jihoz eshigiga, saqlash bo‘lmasiga, tokchasiga yoki muzlatkich
eshigidagi eshikka osilmang yoki ustiga chiqmang.
• Eshik savatchalarida ortiqcha miqdordagi suv idishlari yoki likopchalar
uchun idishlarni saqlamang.
• Uy hayvonlari elektr kabeli yoki suv chiqadigan rezina quvurni
kemirishiga yo'l qo'ymang.
• Jihoz eshigini ortiqcha kuch ishlatib ochib yopmang.
• Agar jihoz eshigining oshiq-moshig'i shikastlangan yoki noto'g'ri
ishlayotgan bo'lsa, uni ishlatishdan to'xtating va vakolatli xizmat
ko'rsatish markaziga murojaat qiling.
• Shisha polkalar yoki qopqoqlarni ular sovuq bo‘lganida iliq suv bilan
tozalamang.
• Muzlagan oziq-ovqat mahsulotlarini muzlatkich bo‘lmasidan olinishi
bilanoq iste’mol qilmang.
• Jihoz eshigini yoki eshikdagi eshikni ochib yopganda qo‘l yoki
oyog‘ingiz qisilib qolmasligiga ishonch hosil qiling.
• Jihoz eshigidagi eshik ochiq turganda uning eshigini ochmang yoki
jihoz eshigi ochiq turganda uning eshigidagi eshigini ochmang.
Eshikdagi eshik jihoz qirrasiga qisilib qolishi va buzlishi mumkin.
Tеxnik xizmat ko'rsatish
• Polkalarni to‘ntarilgan holda solmang. Polkalar yiqilib ketishi mumkin.
• Jihoz muzini tushirish uchun LG Electronics mijozlarni qo'llab
quvvatlash markaziga murojaat qiling.
9
Page 94

UZ
O‘RNATISH
Bo‘lmalar
Olinadigan tuxum qutichasi
( * )
• Jihozning ko‘rinishi va uning qismlari uning modeliga qarab farqlanishi mumkin.
10
Muz lotogi ( * ) Gayka klyuchi
Foydalanuvchi qo’
llanmasi
Page 95

UZ
O‘lchamlar va oraliqlar
Tegishli buyumlar bilan oralig‘i juda kichkina bo‘lsa,
muzlatish samarasi pasayishi va elektr xarajati
ortishi mumkin. Jihozni o‘rnatishda har tomondagi
devordan kamida 50 mm oraliq qoldiring.
A
B
C
- O‘lchami
A 912 mm
B 1790 mm
C 738 mm
D 10 mm
E 728 mm
F 1180 mm
G 1750 mm
D
EF
G
Atrof-muhit harorati
• Jihoz iqlim zonasiga bog‘liq ravishda atrofdagi
haroratlarning cheklangan diapazonida
ishlashga mo‘ljallangan.
• Ichki haroratga jihoz o‘rnatilgan joyi, atrof-
muhitdagi harorat, eshikning qancha ochilibyopilishi va boshqalar ta’sir ko‘rsatadi.
• Iqlim sinfini pasport taxtachasida ko‘rish
mumkin.
Iqlim sinfi
SN (Me’yordan past
iqlim)
Atrof-muhit harorati
diapazoni ºC
+10 - +32
N (O‘rtacha iqlim) +16 - +32
ST (Subtropikal) +16 - +38
T (Tropik) +16 - +43 / +10 - +43*
*Avstraliya, Hindiston, Kenya
Izoh
• SN dan T gacha ko‘rsatilgan moslamalar
10 ºC - 43 ºC atrof haroratida foydalanishga
mo‘ljallangan.
11
Page 96

UZ
Eshikni olib qo‘yish
Jihozni tor joydan olib kirilayotganda uning eshigini
olib qo‘yish tavsiya qilinadi.
OGOHLANTIRISH
• Jihozni o‘rnatish yoki uni ta’mirlashdan avval
elektr kabelini, uydagi elektr saqlagichi yoki
avtomatik o‘chirgichni tarmoqdan uzng. Ushbu
ko‘rsatmalarga amal qilmaslik o‘lim, yong‘in yoki
tok urishiga sabab bo‘lishi mumkin.
Agar kirish eshigingiz jihozni olib kirish uchun juda
tor bo‘lsa, jihozning eshiklarini yechib oling va
jihozni yon tomonlama qilib u yerdan o‘tkazing.
DIQQAT
• Yuqoridagi oshiq-moshiqni olib tashlashda jihoz
eshigini ushlab turing, chunki u oldinga qulashi
mumkin. Eshikni olish yoki o‘rnatishda ikki yoki
undan ortiq odam uni ushlab turishi tavsiya
etiladi.
Jihoz va uning eshigi orasidagi yuqorigi
4
oshiq-moshiqni tepaga ko‘taring va eshikni
yechib oling.
Yuqorigi oshiq-moshiq
[Muzlatkich va sovutkichning har
ikkalasi uchun]
Jihoz yuqori qismidagi oshiq-moshiq qopqog‘i
1
boltini soat strelkasi yo‘nalishiga qaramaqarshi tomonga burab yechib oling.
Elektr konnektorlar ulagichi ilmog‘ini (1)
2
bosib turgan holda har ikki tomonga tortib, u
ulagichlarni chiqarib oling.
Uning uchini jihoz korpusi qirrasi tomon
3
bosgan holda oshiq-moshiq dastagini olib
tashlang.
Eshik
Muzlatgich va sovitkich xonasining eshigini
5
yuqoriga ko'tarib olib tashlang. Ayni paytda
po'lat quvurni to'liq chiqarib olish uchun eshik
etarli darajada ko'tarilishi kerak.
Eshikni qayta joylash
Jihoz kirish eshigidan olib kirilganidan so‘ng eshik
olinishidagi tartibni teskari tarzda amalga oshirib,
uning eshigini o‘rnating.
12
Page 97

UZ
Eshik balandligini sozlash
Agar jihoz eshigi tekis ochilmayotgan bo‘lsa,
quyidagi uslubdan foydalangan holda uning
balandligini sozlang.
Izoh
• Oshiq-moshiq o‘qi chiqib ketmasligi uchun jihoz
eshigini 5 mm dan ortiq balandlikka ko‘tarmang.
Uni soat strelkasiga qarama-qarshi
3
yo‘nalishda burash orqali zulfin gaykasini
qotiring.
Gaykani qotirish uchun
[1-uslub]
*Havola
Zulfin gaykasi
Oshiq-moshiq
o‘qini sozlash
Ushlab turish gaykasini gayka klyuchi dan
1
foydalanib soat strelkasi yo‘nalishida burang.
Gaykani bo‘shatish uchun
Jihoz eshigi balandligidagi farqni sozlash
2
uchun oshiq-moshiqning sozlash o‘qini 8
mm kalit yordamida soat strelkasi yo‘nalishi
bo‘ylab yoki unga teskari tarzda burang.
Pastga
Agar jihoz eshigi balandligini yuqorida ko‘rsatilgan
uslubda sozlashning iloji bo‘lmasa, eshikni
quyidagi uslubga ko‘ra sozlang.
[2-uslub]
Agar muzlatkich bo‘lmasi eshigi sovutkich
bo‘lmasi eshigidan pastroq bo‘lsa
Jihoz eshigining chap pastki qismi tagidagi
murvatga buragichni qo‘yib, soat strelkasi
yo‘nalishi bo‘yicha buragan holda eshik
balandligini rostlang.
Agar muzlatkich bo‘lmasi eshigi sovutkich
bo‘lmasi eshigidan yuqoriroq bo‘lsa
Jihoz eshigining o‘ng pastki qismi tagidagi
murvatga buragichni qo‘yib, soat strelkasi
yo‘nalishi bo‘yicha buragan holda eshik
balandligini rostlang.
Tepaga
13
Page 98

UZ
Jihozni ulash
Jihozni o‘rnatgandan keyin elektr shnurini
devordagi rozetkaga ulang.
Izoh
• Rozetkaga elektr kabelini (yoki sanchqini)
ulagandan so‘ng, jihoz ichiga oziq-ovqat
mahsulotlarini qo‘yish uchun 2 yoki 3 soat
kuting. Agar jihoz to‘liq sovib olgunga qadar
uning ichiga oziq-ovqat mahsulotlari solinsa,
ular aynib qolishi mumkin.
Jihozni ko‘chirish
Jihoz ichidagi barcha oziq-ovqat
1
mahsulotlarini chiqarib oling.
Elektr shnuri vilkasini rozetkadan uzing, elekt
2
shnurini jihozning orqa yoki ust tarafidagi
elekrt shnuri ilgagiga kirgazing va qotirib
qo‘ying.
Jihozni ko‘chirish vaqtida ularning yiqilib
3
ketmasligi uchun polkalar va eshik dastasi
kabi qismlarni tasma bilan mahkamlang.
Jihozni ikki yoki undan ko‘proq kishi
4
yordamida ehtiyotlik bilan siljiting. Jihozni
uzoq masofaga tashiganda jihozni tik holda
ushlang.
Jihozni o‘rnatgandan keyin uni yoqish uchun
5
elektr shnuri vilkasini devordagi rozatkaga
tiqing.
14
Page 99

UZ
Ishlatish
Qismlar va funksiyalar
Korpus
1
2
3
Boshqaruv paneli
Muzlatkich va sovutkich haroratini o‘rnatish
Door-in-Door (Eshikdagi eshik) ( * )
Eshikdagi eshik bu ikki qatlamli eshik tizimidir. Uni alohida holda yoki asosiy eshik bilan birgalikda
ochish mumkin. Sevimli gazaklaringiz yoki tomlaringizni qulay tarzda joylashtirishingiz va olishingiz
mumkin.
1
4
3
Door-in-Door (Eshikdagi eshik) richagi ( * )
Bu dastak Door in Door (eshikdagi eshikni) ochadi.
InstaView Door-in-Door (Eshikdagi eshik) ( * )
The InstaView Door-in-Door (Eshikdagi eshik) bo‘lmasi odatiy ishlatiladigan oziq-ovqat mahsulotlarini
oson olish imkoniyatini beradi.
Izoh
• (*) Xarid qilingan modelga bog‘liq ravishda bu funksiya farq qiladi.
• Jihozning ko‘rinishi va uning qismlari uning modeliga qarab farqlanishi mumkin.
15
Page 100

Ichki qism
6
6
1
(1)
UZ
7
8
9
2
3
4
5
1
(1)
2
3
10
11
12
13
14
15
7
8
9
10
11
12
16
4
5
13
14
15
 Loading...