

global_main.book.book Page 1 Wednesday, May 20, 2020 3:38 PM
OWNER'S MANUAL
FRIDGE & FREEZER
Before beginning installation, read these instructions
carefully. This will simplify installation and ensure that the
product is installed correctly and safely. Leave these
instructions near the product after installation for future
reference.
EN ENGLISH AR ﺔﻴﺑﺮﻌﻟا
MFL71401509
Rev.02_052020
www.lg.com
Copyright © 2019-2020 LG Electronics Inc. All Rights Reserved.
global_main.book.book Page 2 Wednesday, May 20, 2020 3:38 PM
TABLE OF CONTENTS
This manual may contain images or
content that may be different from the
model you purchased.
This manual is subject to revision by the
manufacturer.
SAFETY INSTRUCTIONS
READ ALL INSTRUCTIONS BEFORE USE........................................................... 4
WARNING............................................................................................................4
CAUTION .............................................................................................................9
INSTALLATION
Before Installation ...........................................................................................11
Removing the Fridge and Freezer Door........................................................12
Connecting the Water Line .............................................................................14
Levelling and Door Alignment........................................................................15
Turning on the Power......................................................................................16
Moving the Appliance for Relocation ............................................................16
OPERATION
Before Use ........................................................................................................17
Product Features..............................................................................................19
Control Panel ....................................................................................................22
Ice and Water Dispenser.................................................................................23
Automatic Icemaker ........................................................................................25
InstaView...........................................................................................................27
Door in Door.....................................................................................................28
Drawer...............................................................................................................28
Shelf ...................................................................................................................29
Door Basket ......................................................................................................30
SMART FUNCTIONS
LG ThinQ Application.......................................................................................31
Smart Diagnosis ...............................................................................................32
MAINTENANCE
Cleaning ............................................................................................................34
Water Filter .......................................................................................................35
global_main.book.book Page 3 Wednesday, May 20, 2020 3:38 PM
TROUBLESHOOTING
Before Calling for Service................................................................................37
WARNING
global_main.book.book Page 4 Wednesday, May 20, 2020 3:38 PM
4
EN
SAFETY INSTRUCTIONS
SAFETY INSTRUCTIONS
READ ALL INSTRUCTIONS BEFORE USE
The following safety guidelines are intended to prevent unforeseen
risks or damage from unsafe or incorrect operation of the appliance.
The guidelines are separated into
described below.
Safety Messages
This symbol is displayed to indicate matters and operations
that can cause risk. Read the part with this symbol carefully
and follow the instructions in order to avoid risk.
WARNING
This indicates that the failure to follow the instructions can
cause serious injury or death.
‘WARNING’
and
‘CAUTION’
as
CAUTION
This indicates that the failure to follow the instructions can
cause the minor injury or damage to the product.
WARNING
To reduce the risk of explosion, fire, death, electric shock, injury or
scalding to persons when using this product, follow basic precautions,
including the following:
Technical Safety
• This appliance is not intended for use by persons (including children)
with reduced physical, sensory or mental capabilities, or lack of
experience and knowledge, unless they have been given supervision
or instruction concerning use of the appliance by a person
global_main.book.book Page 5 Wednesday, May 20, 2020 3:38 PM
SAFETY INSTRUCTIONS
5
responsible for their safety. Children should be supervised to ensure
that they do not play with the appliance.
• This appliance is intended to be used in household and similar
applications such as:
- staff kitchen areas in shops, offices and other working
environments;
- farm houses and by clients in hotels, motels and other residential
type environments;
- bed and breakfast type environments;
- catering and similar non-retail applications.
•
This symbol alerts you to flammable materials that can
ignite and cause a fire if you do not take care.
• This appliance contains a small amount of isobutane refrigerant
(R600a), but it is also combustible. When transporting and installing
the appliance, care should be taken to ensure that no parts of the
refrigerating circuit are damaged.
EN
• The refrigerant and insulation blowing gas used in the appliance
require special disposal procedures. Consult with service agent or a
similarly qualified person before disposing of them.
• Do not damage the refrigerant circuit.
• If the power cord is damaged or the hole of the outlet socket is loose,
do not use the power cord and contact an authorized service centre.
• Do not locate multiple portable outlet sockets or portable power
supplies at the rear of the appliance.
• Securely plug the power plug in the outlet socket after completely
removing any moisture and dust.
• Never unplug the appliance by pulling on the power cable. Always
grip the power plug firmly and pull straight out from the outlet
socket.
• Keep ventilation openings, in the appliance enclosure or in the builtin structure, clear of obstruction.

global_main.book.book Page 6 Wednesday, May 20, 2020 3:38 PM
6
EN
SAFETY INSTRUCTIONS
• Do not store explosive substances such as aerosol cans with a
flammable propellant in this appliance.
• Do not tilt the appliance to pull or push it when transporting.
• When positioning the appliance, ensure the supply cord is not
trapped or damaged.
• Do not use mechanical devices or other means to accelerate the
defrosting process.
• Do not use a hair drier to dry the inside of the appliance or place a
candle inside to remove the odours.
• Do not use electrical appliances inside the refrigerator.
• Make sure not to get a body part such as a hand or foot stuck while
moving the appliance.
• Disconnect the power cord before cleaning the appliance or
replacing the inside lamp (where fitted).
• Do not spray water or inflammable substances (toothpaste, alcohol,
thinner, benzene, flammable liquid, abrasive, etc.) over the interior or
exterior of the appliance to clean it.
• Do not clean the appliance with brushes, cloths or sponges with
rough surfaces or which are made of metallic material.
• Only qualified service personnel from LG Electronics service centre
should disassemble, repair, or modify the appliance. Contact an LG
Electronics customer information centre if you move and install the
appliance in a different location.
Risk of Fire and Flammable Materials
• If a leak is detected, avoid any naked flames or potential sources of
ignition and air the room in which the appliance is standing for
several minutes. In order to avoid the creation of a flammable gas air
mixture if a leak in the refrigerating circuit occurs, the size of the
room in which the appliance is used should correspond to the
amount of refrigerant used. The room must be 1 m² in size for every
8 g of R600a refrigerant inside the appliance.
• Refrigerant leaking out of the pipes could ignite or cause an
explosion.

global_main.book.book Page 7 Wednesday, May 20, 2020 3:38 PM
SAFETY INSTRUCTIONS
7
EN
• The amount of refrigerant in your particular appliance is shown on
the identification plate inside the appliance.
Installation
• This appliance should only be transported by two or more people
holding the appliance securely.
• Install the appliance on a firm and level floor.
• Do not install the appliance in a damp and dusty place. Do not install
or store the appliance in any outdoor area, or any area that is subject
to weathering conditions such as direct sunlight, wind, rain, or
temperatures below freezing.
• Do not place the appliance in direct sunlight or expose it to the heat
from heating appliances such as stoves or heaters.
• Be careful not to expose the rear of the appliance when installing.
• Install the appliance in a place where it is easy to unplug the power
plug of the appliance.
• Be careful not to let the appliance door fall during assembly or
disassembly.
• Be careful not to pinch, crush, or damage the power cable during
assembly or disassembly of the appliance door.
• Be careful not to point the power plug up or let the appliance lean
against the power plug.
• Do not connect a plug adapter or other accessories to the power
plug.
• Do not modify or extend the power cable.
• Ensure that the outlet socket is properly grounded, and that the earth
pin on the power cord is not damaged or removed from the power
plug. For more details on grounding, inquire at an LG Electronics
customer information centre.
• This appliance is equipped with a power cord having an equipmentgrounding conductor and a grounding power plug. The power plug
must be plugged into an appropriate outlet socket that is installed
and grounded in accordance with all local codes and ordinances.

global_main.book.book Page 8 Wednesday, May 20, 2020 3:38 PM
8
EN
SAFETY INSTRUCTIONS
• Never start up an appliance showing any signs of damage. If in doubt,
consult your dealer.
• Dispose of all packaging materials (such as plastic bags and
styrofoam) away from children. The packaging materials can cause
suffocation.
• Do not plug the appliance into a multi socket adapter which does not
have a power cable (mounted).
• The appliance should be connected to a dedicated power line which
is separately fused.
• Do not use a multi socket outlet which is not properly grounded
(portable). In case of using a properly-grounded multi socket outlet
(portable), use the multi socket outlet with the current capacity of the
power cord rating or higher and use the multi socket outlet only for
the appliance.
Operation
• Do not use the appliance for any purpose (storage of medical or
experimental materials or shipping) other than any domestic
household food storage use.
• If water penetrates electrical parts of the appliance, disconnect
power plug and contact an LG Electronics customer information
centre.
• Unplug the power plug during a severe thunderstorm or lightening
or when not in use for a long period of time.
• Do not touch the power plug or the appliance controls with wet
hands.
• Do not bend the power cable excessively or place a heavy object on it.
• Immediately unplug the power plug and contact an LG Electronics
customer information centre if you detect a strange sound, odour, or
smoke coming from the appliance.
• Do not place hands or metallic objects inside the area emitting the
cold air, cover or heat releasing grille on the back.
• Do not apply excessive force or impact to the back cover of the
appliance.
CAUTION
global_main.book.book Page 9 Wednesday, May 20, 2020 3:38 PM
SAFETY INSTRUCTIONS
9
EN
• Be careful of nearby children when you open or close the appliance
door. The door may bump the child and cause injury.
• Avoid the danger of children getting trapped inside the appliance. A
child trapped inside the appliance can cause suffocation.
• Do not put animals, such as pets into the appliance.
• Do not place heavy or fragile objects, containers filled with liquid,
combustible substances, flammable objects (such as candles, lamps,
etc.), or heating devices (such as stoves, heaters, etc.) on the
appliance.
• Do not place any electronic appliance (such as heater and mobile
phone) inside the appliance.
• If there is a gas leakage (isobutane, propane, natural gas, etc.), do not
touch the appliance or power plug and ventilate the area
immediately. This appliance uses a refrigerant gas (isobutane,
R600a). Although it uses a small amount of the gas, it is still
combustible gas. Gas leakage during appliance transport, installation
or operation can cause fire, explosion or injury if sparks are caused.
• Do not use or store flammable or combustible substances (ether,
benzene, alcohol, chemical, LPG, combustible spray, insecticide, air
freshener, cosmetics, etc.) near the appliance.
Disposal
• When discarding the appliance, remove the door gasket while leaving
the shelves and baskets in place and keep children away from the
appliance.
CAUTION
To reduce the risk of minor injury to persons, malfunction, or damage
to the product or property when using this product, follow basic
precautions, including the following:
global_main.book.book Page 10 Wednesday, May 20, 2020 3:38 PM
10
EN
SAFETY INSTRUCTIONS
Operation
• Do not touch frozen food or the metal parts in the freezer
compartment with wet or damp hands. It may cause frostbite.
• Do not place glass containers, bottles or cans (especially those
containing carbonated drinks) in the freezer compartment, shelves or
ice bin that will be exposed to temperatures below freezing.
• The tempered glass on the front side of the appliance door or the
shelves can be damaged by an impact. If it is broken, do not touch it
with hands.
• Do not hang from the appliance doors, storage room, shelf or climb
up into it.
• Do not store an excessive amount of water bottles or containers for
side dishes on the door baskets.
• Do not open or close the appliance door with excessive force.
• If the hinge of the appliance door is damaged or operates
improperly, stop using the appliance and contact an authorized
service centre.
• Prevent animals from nibbling on the power cable or water hose.
• Never eat frozen foods immediately after they have been taken out in
the freezer compartment.
• Do not use a thin crystal cup or chinaware when dispensing.
• Make sure not to get a hand or foot stuck upon opening or closing the
appliance door or door in door.
Maintenance
• Do not clean glass shelves or covers with warm water when they are
cold. They may shatter if exposed to sudden temperature changes.
• Do not insert the shelves upside down. The shelves may fall.
• To remove frost from the appliance, contact an LG Electronics
customer information centre.
• Dispose of the ice inside the ice bin in the freezer compartment
during an extended power outage.
NOTE
NOTE
global_main.book.book Page 11 Wednesday, May 20, 2020 3:38 PM
INSTALLATION
Before Installation
Dimensions and Clearances
Too small of a distance from adjacent items may
result in the degradation of freezing capability and
increased electricity costs. Allow over 50 mm of
clearance between the back of the appliance and
the wall when installing the appliance.
A
D E
G
F
B
H
C
- Type A (mm) Type B (mm)
A912 912
B 1790 1790
C927 738
INSTALLATION
11
EN
Ambient Temperature
• The appliance is designed to operate within a
limited range of ambient temperatures,
depending on the climate zone.
• The internal temperatures could be affected by
the location of the appliance, the ambient
temperature, the frequency of door opening and
so on.
• The climate class can be found on the rating
label.
Climate Class Ambient Temperature
Range ºC
SN (Extended
Temperate)
N (Temperate) +16 - +32
ST (Subtropical) +16 - +38 / +18 - +38**
T (Tropical) +10 - +43* / +16 - +43 /
* Australia, India, Kenya
** Argentina
+10 - +32
+18 - +43**
D797 615
E877 690
F922 733
G 1384 1180
H 1713 1750
• You can determine what type of appliance it is by
looking at the label inside the appliance.
• The appliances rated from SN to T are intended
to be used at an ambient temperature between
10 ºC and 43 ºC.
Accessories
*1 This feature is only available on some models.
a
Spanner A
*1
WARNING
CAUTION
global_main.book.book Page 12 Wednesday, May 20, 2020 3:38 PM
12
EN
INSTALLATION
b
Spanner B
c
Water Filter
d
Water Tube
e
Tube Connector and Clip
f
Tube Connector and Valve
*1
*1
*1
*1
Removing the Fridge and
Freezer Door
If your entrance door is too narrow for the
appliance to pass through, remove the appliance
doors and pass the appliance laterally.
• Disconnect the power cord, house fuse or circuit
breaker before installing, removing the doors, or
cleaning the appliance. Failure to follow these
instructions may result in death, fire or electric
shock.
Removing the Freezer Door
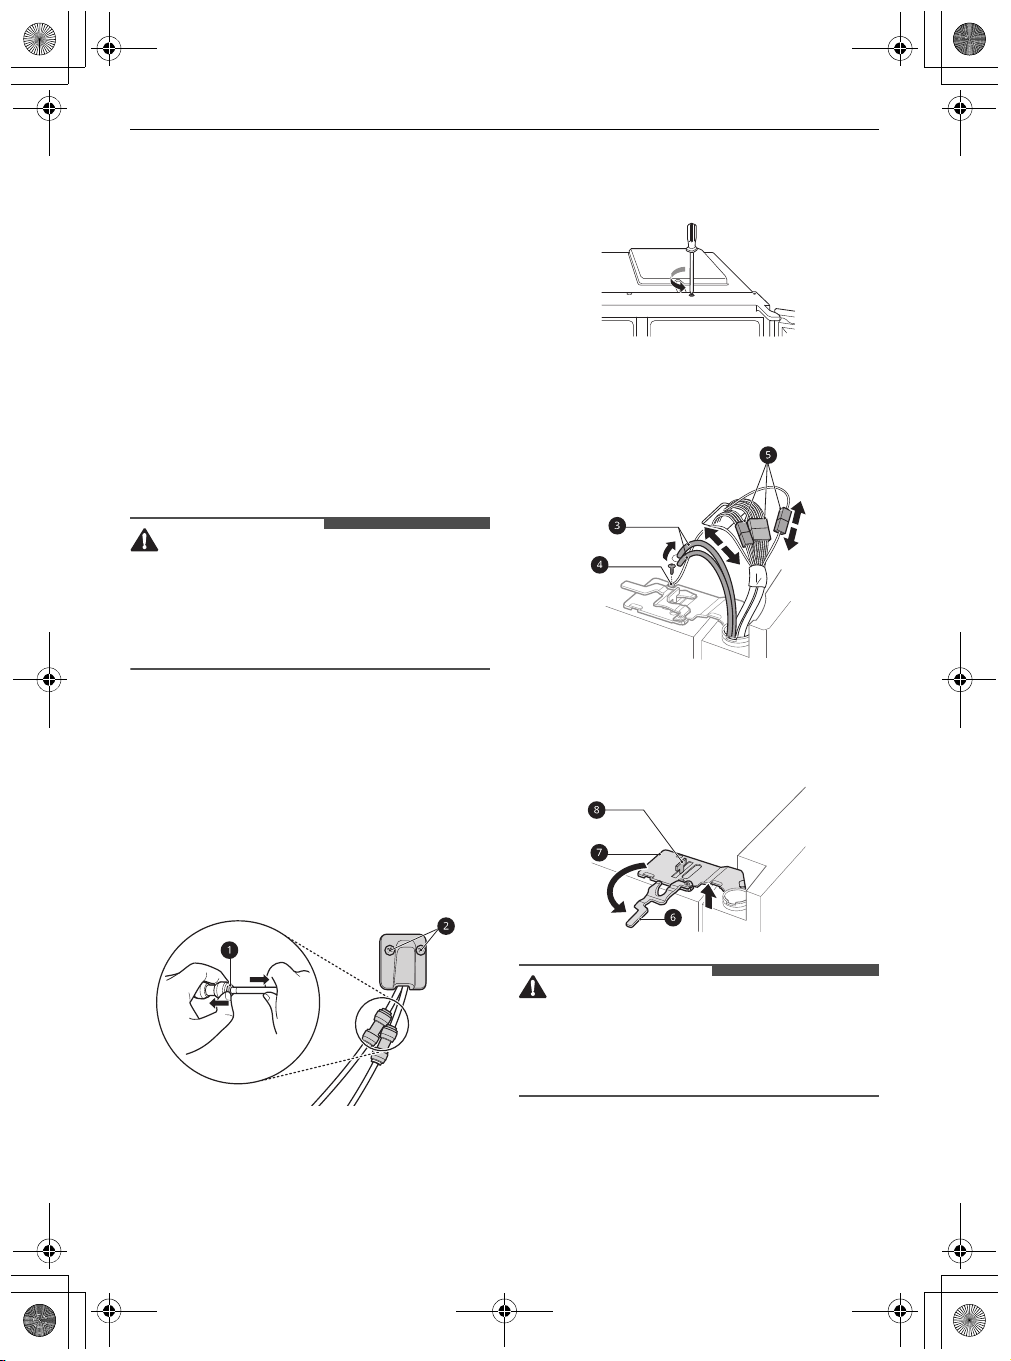
1
The water supply line is connected to the top
right part in the back of the appliance. Hold the
water supply connection and gently push the
collet
a
to detach the water supply line.
Unscrew the cover
b
.
the bottom of the front side of the cover, with
a flat-head screwdriver.
3
Pull out the tube c. Unscrew the ground wire
d
. Disconnect all wire harnesses e.
4
Rotate the hinge lever f counterclockwise. Lift
the top hinge
.
g
free of the hinge lever latch h
2
Remove the screw from the hinge cover at the
top of the appliance. Lift the hook, located at
• When lifting the hinge free of the latch, be
careful that the door does not fall forward. It is
recommended that two or more people carry
out the door removal and refitting.
CAUTION
CAUTION
CAUTION
CAUTION
NOTE
global_main.book.book Page 13 Wednesday, May 20, 2020 3:38 PM
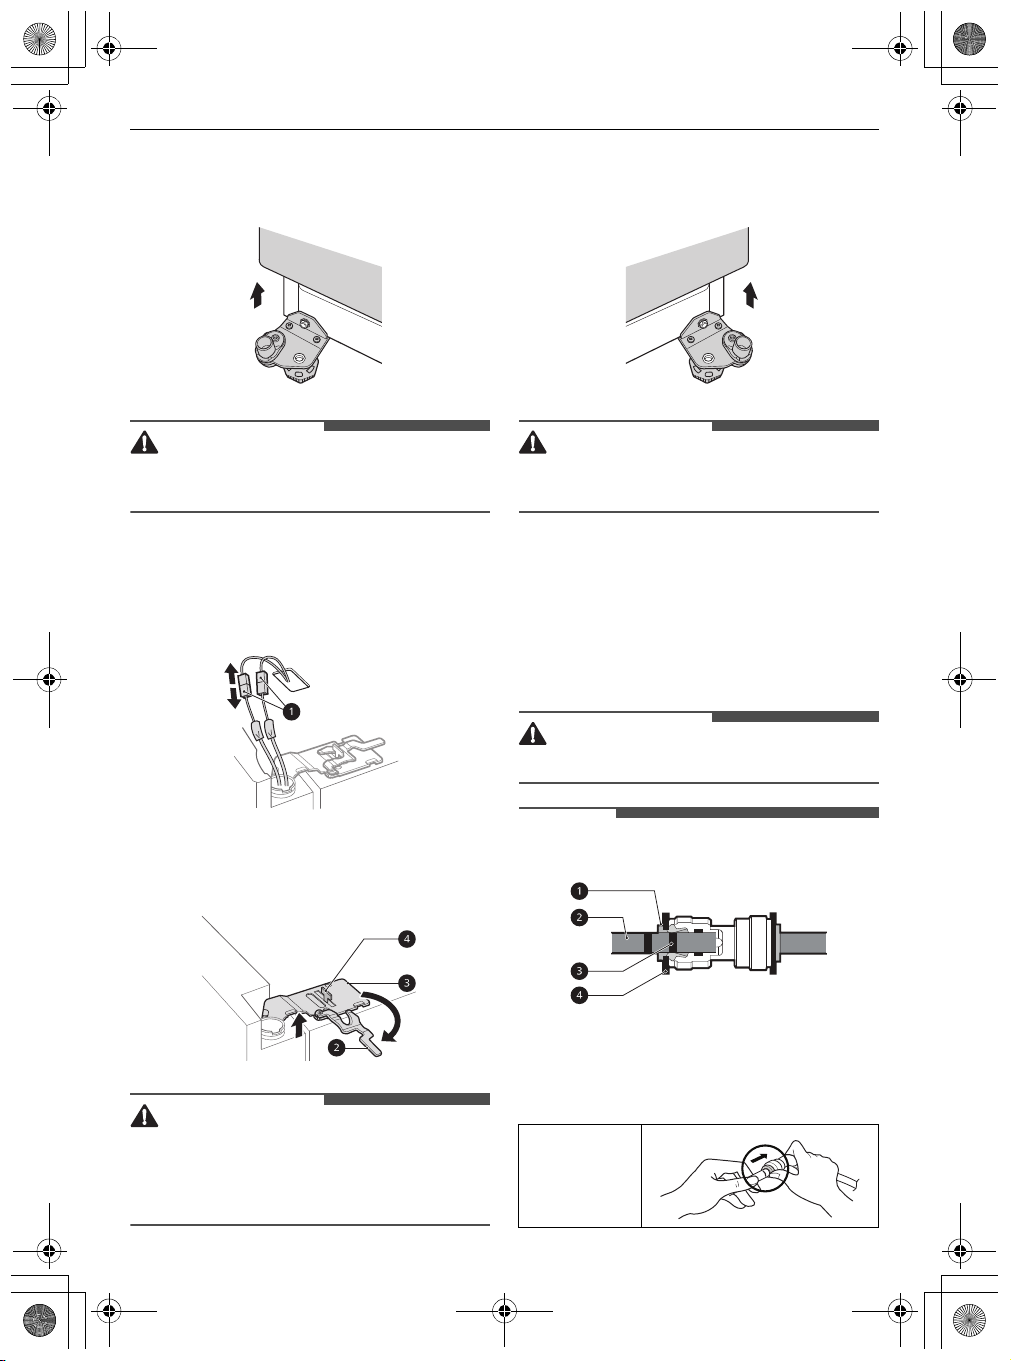
5
Lift the freezer door until it is free of the
bottom hinge assembly.
• Place the door on a non-scratching surface with
the inner side facing up.
Removing the Fridge Door
1
Disconnect all wire harnesses a.
INSTALLATION
3
Lift the fridge door until it is free of the bottom
hinge assembly.
• Place the door on a non-scratching surface with
the inner side facing up.
13
EN
Refitting the Fridge and Freezer
Door
Refit the doors in the reverse sequence of their
removal once the appliance has been passed
through all access doors.
2
Rotate the hinge lever b clockwise. Lift the top
hinge
c
free of the hinge lever latch d .
• When lifting the hinge free of the hinge lever
latch, be careful that the door does not fall
forward. It is recommended that two or more
people carry out the door removal and refitting.
• Install the fridge door first.
• Disassembling/Assembling the water lines
a
Collet b Tube c Insert line d Clip
• Gently insert the tube until only one of the tube’s
lines is visible. Pull on the tube to make sure that
it is tightly fastened.
Correct

NOTE
WARNING
NOTE
global_main.book.book Page 14 Wednesday, May 20, 2020 3:38 PM
14
EN
INSTALLATION
Incorrect
• If the water tube end is damaged, it should be
trimmed to ensure it does not leak when refitted.
e
Not straight f Damaged g Stretched
Connecting the Water Line
This section is applied only to models with plumbed
water or ice dispenser.
Water Supply Requirements
A cold water supply with water pressure between
138 kPa and 827 kPa (1.4-8.4 kgf/cm²) is required to
operate the water dispenser. If the refrigerator is
installed in an area with low water pressure (below
138 kPa), you can install a booster pump to
compensate for the low pressure.
If a reverse osmosis water filtration system is
connected to your cold water supply, the water
pressure to the reverse osmosis system needs to
be a minimum of 138 kPa to 827 kPa (1.4-8.4 kgf/
cm²)
• Connecting the water line must only be installed
by a qualified plumber and in accordance with
local legislation and regulations governing
water quality.
• This water line installation is not covered by the
appliance warranty.
Connecting Water to the
Appliance
1
Unscrew the metal threaded collar nut at the
back of the appliance and place it over one end
of the water tube.
2
Firmly push the water tube onto the water inlet
valve and tighten up the collar nut.
Checking the Water Connection
1
Turn on the water supply and switch on the
appliance. Carefully check all fittings for
possible leaks due to poorly fitted hoses.
• Unplug the appliance before carrying out any
work on connecting the water line. Failure to do
so may cause electric shock.
• Only connect the water line to a cold water
supply. Failure to do so may cause the water
filter to malfunction. Water hammer (water
banging in the pipes) in house plumbing can
cause damage to appliance parts and can lead to
water leakage or flooding.
• Connect to potable water supply only.
2
Press and hold the
three seconds. The new water filter has been
activated.
3
Place a cup under the water dispenser to verify
that water is flowing through the appliance.
4
Check the connecting tube and joints for leaks
once again.
Water Filter
button for
NOTE
global_main.book.book Page 15 Wednesday, May 20, 2020 3:38 PM
Levelling and Door
Alignment
Before Beginning
When the appliance doors appear to be uneven,
follow the instructions below to align the doors.
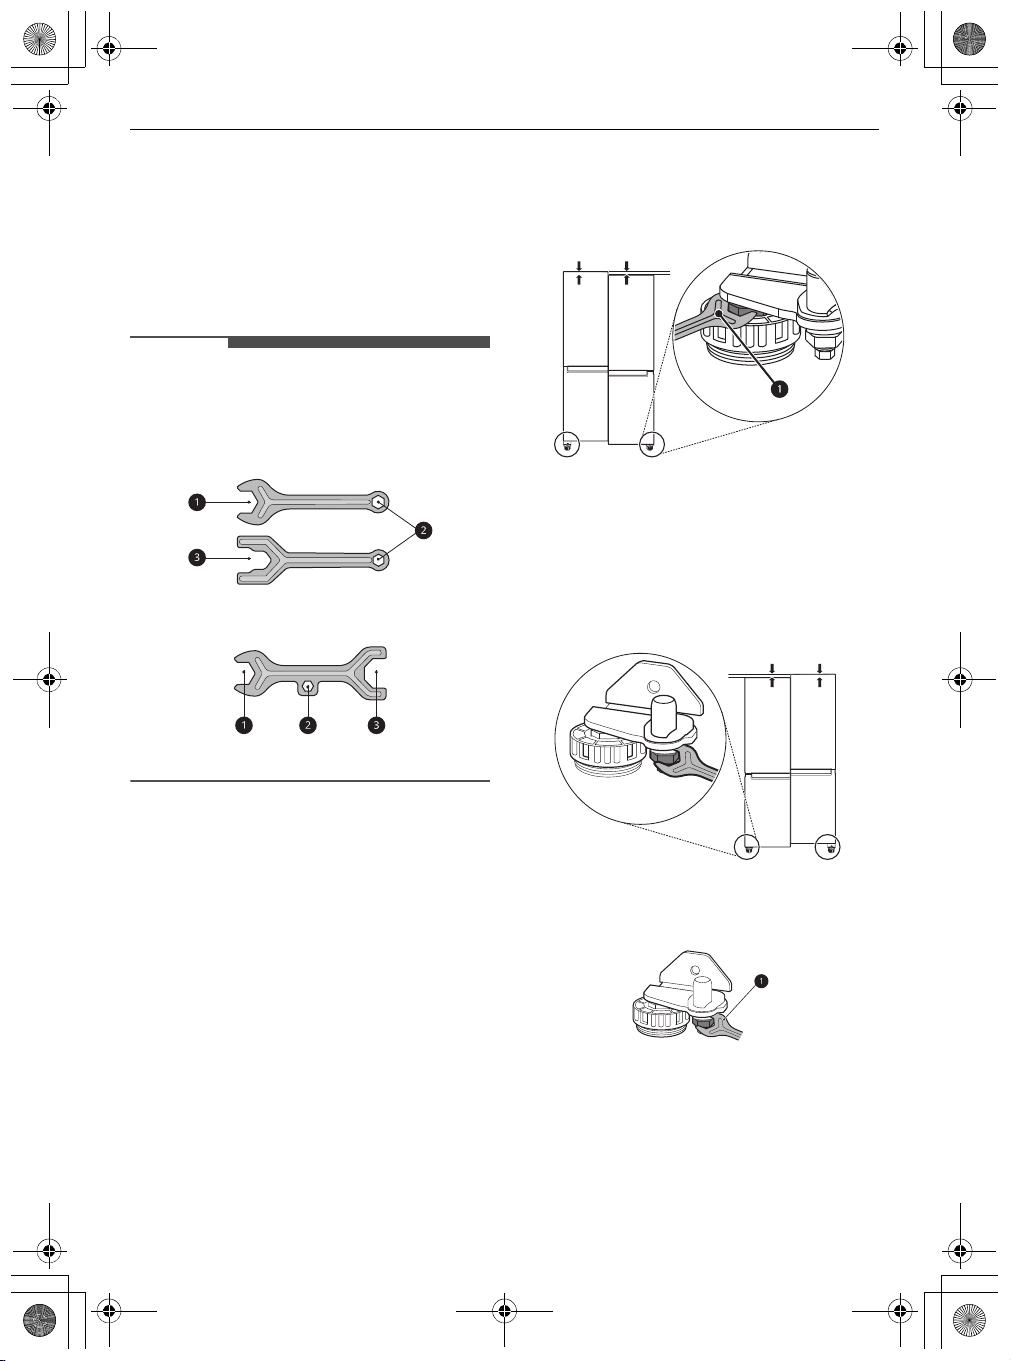
• The spanner may differ depending on the model.
You will be provided with either spanner type A
or B.
- Spanner Type A
- Spanner Type B
INSTALLATION
Use the spanner
the levelling leg to the left to raise it or to the right
to lower it.
a
to adjust the height by turning
15
EN
Door Alignment for Freezer and
Fridge Door
If the door of the appliance is not level, adjust the
difference in the height of appliance door.
Levelling the Appliance
The appliance has two front levelling legs. Adjust
the legs to alter the tilt from front to back or side to
side. If the appliance seems unsteady, or the doors
do not close easily, adjust the appliance’s tilt using
the instructions below.
1
Open the door and use the spanner a to
loosen the keeper nut by turning it to the left.
CAUTION
NOTE
NOTE
global_main.book.book Page 16 Wednesday, May 20, 2020 3:38 PM
16
EN
INSTALLATION
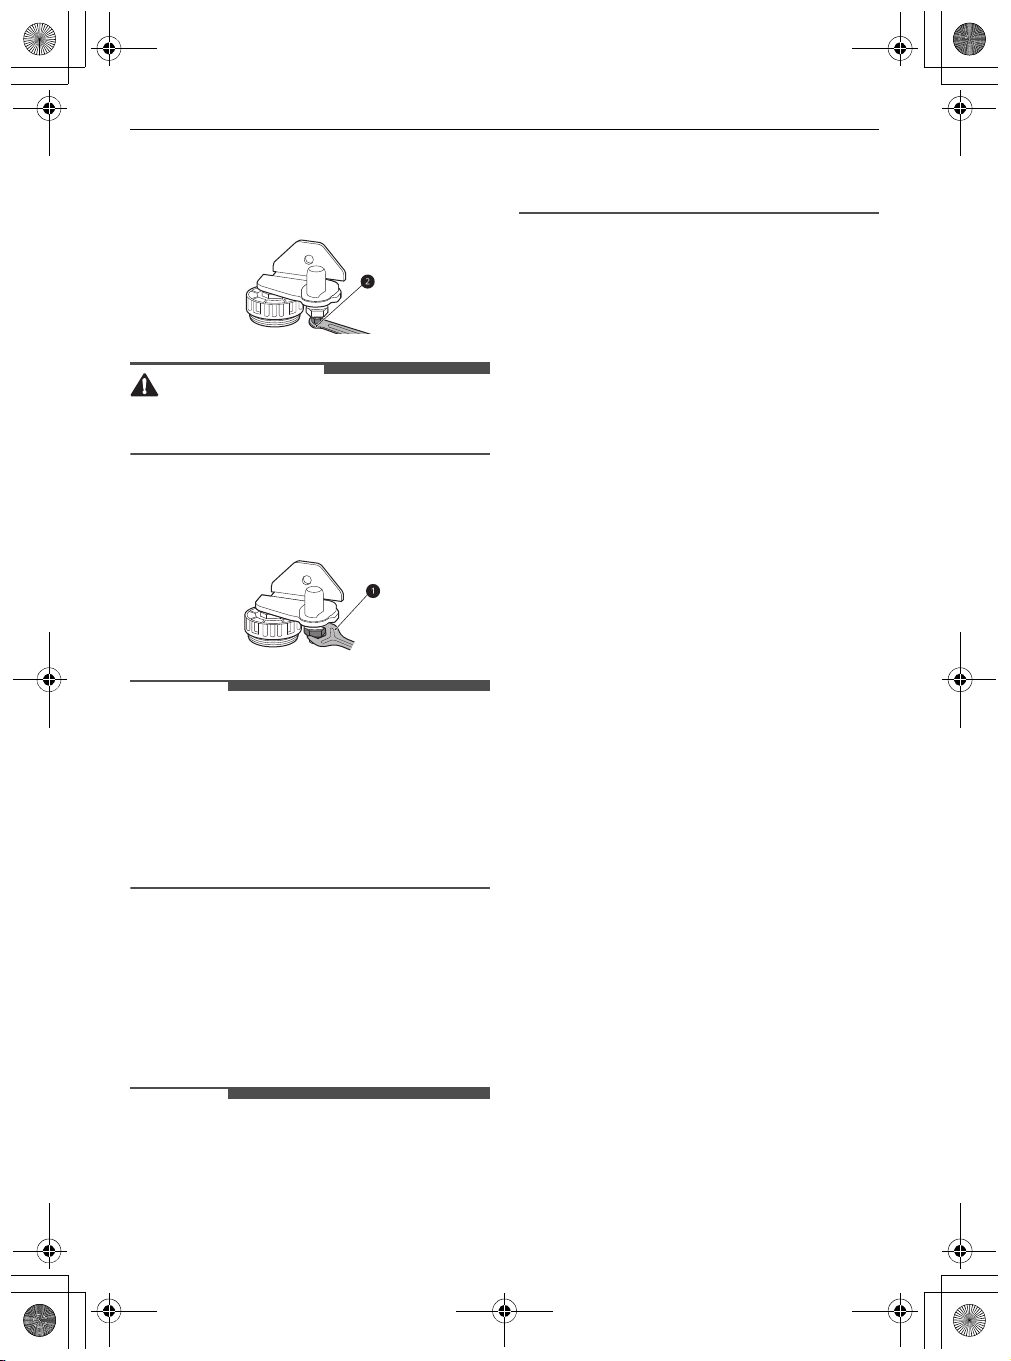
2
Use the spanner b to adjust the height by
turning the adjustment hinge pin to the left or
to the right.
• Do not adjust the height of the appliance door
more than 3 mm.
3
Use the spanner a to fasten the keeper nut by
turning it to the right.
• Leveling the doors may not be possible when the
floor is not leveled, or is of weak or poor
construction.
• The refrigerator is heavy and should be installed
on a rigid and solid surface.
• Some timber flooring may cause levelling
difficulties if it flexes excessively.
the appliance has cooled completely, your food
may spoil.
Moving the Appliance for
Relocation
Preparing for Relocation
1
Remove all food from inside the appliance.
2
Pull the power plug out, insert and fix it into the
power plug hook at the rear or on top of the
appliance.
3
Tape parts such as shelves and the door handle
to prevent from falling off while moving the
appliance.
4
Move the appliance with more than two people
carefully. When transporting the appliance
over a long distance, keep the appliance
upright.
5
After installing the appliance, connect the
power plug into a mains outlet socket and
switch it on.
Turning on the Power
Connecting the Appliance
After installing the appliance, connect the power
plug into the outlet socket.
• After connecting the power supply cord (or plug)
to the outlet, wait 3 or 4 hours before you put
food into the appliance. If you add food before
NOTE
NOTE
global_main.book.book Page 17 Wednesday, May 20, 2020 3:38 PM
OPERATION
Before Use
Notes for Operation
• Users should keep in mind that frost can form if
the door is not closed completely or if the
humidity is high during the summer.
• Ensure there is sufficient space between food
stored on the shelf or door basket to allow the
door to close completely.
• Opening the door for long periods can cause a
significant increase of the temperature in the
compartments of the appliance.
• If the refrigerating appliance is left empty for
long periods, switch off, defrost, clean, dry, and
leave the door open to prevent mould
developing within the appliance.
Door Open Alarm
The alarm sounds 3 times in 30 second intervals if
the door is left open or not completely closed for 1
minute.
• Contact the LG Electronics customer information
centre if the alarm sound continues after 30
seconds even after closing all doors.
OPERATION
the repair technician from the our information
centre may have difficulty finding the problem.
17
EN
Suggestion for Energy Saving
• Ensure there is sufficient space between stored
foods. This allows cold air to be circulated evenly
and lowers electricity bills.
• Store hot food only after it has cooled in order to
prevent dew or frost.
• When storing food in the freezer compartment,
set the freezer temperature lower than the
temperature indicated on the food.
• Do not set the temperature of the appliance
lower than needed.
• Do not put food near the temperature sensor of
the fridge compartment. Keep a distance of at
least 3 cm from the sensor.
• Note that a temperature rise after defrosting has
a permissible range in the appliance
specifications. If you wish to minimise the impact
on the food storage due to a temperature rise,
seal or wrap the stored food in several layers.
• The automatic defrosting system in the
appliance ensures that the compartment
remains free of ice buildup under normal
operating conditions.
Failure Detection
The appliance can automatically detect problems
during the operation.
• If a problem is detected, the appliance may not
operate and an error code is displayed even
when any button is pressed.
• If an error code is indicated on the display, do
not turn off the power. Immediately contact the
LG Electronics customer information centre and
report the error code. If you turn off the power,
Storing Foods Effectively
• Store frozen food or refrigerated food inside
sealed containers.
• Check the expiration date and label (storage
instructions) before storing food in the
appliance.
• Do not store food for a long period of time (more
than 4 weeks) if it spoils easily at a low
temperature.
• Place the refrigerated food or frozen food in
each fridge or freezer compartment
immediately after purchasing.
CAUTION
NOTE
global_main.book.book Page 18 Wednesday, May 20, 2020 3:38 PM
18
EN
OPERATION
• Store raw meat and fish in suitable containers in
the refrigerator, so that it is not in contact with or
drip onto other food.
• Refrigerated foods and other food items can be
stored on top of the vegetable drawer.
• Avoid refreezing any food which has been
completely thawed. Freezing any food which has
been completely thawed again will lower its taste
and nutrition.
• Do not overfill the appliance. Cold air can not
circulate properly if the appliance is overfilled.
• Cool hot food before storing. If too much hot
food is placed inside, the internal temperature of
the appliance can increase and negatively affect
other foods stored in the appliance.
• If you set an excessively low temperature for
food, it may become frozen. Do not set a
temperature lower than the required
temperature for the food to be stored correctly.
• If there are chill compartments in the appliance,
do not store vegetables and fruits with higher
moisture content in the chill compartments as
they may freeze due to the lower temperature.
• In the event of a blackout, call the electricity
company and ask how long it is going to last.
- You should avoid door openings while the
power is off.
- When the power supply gets back to normal,
check the condition of the food.
Freezing the Maximum Amount
of Food
If large quantities of food are to be stored, all the
freezer drawers should be taken out of the
appliance and the food should be stacked directly
on the freezer shelves in the freezer compartment.
• To remove the drawers, first remove the food
from drawers and then pull out the drawers
carefully. Not doing so could cause injury or
damage to the drawers.
• The shape of each drawer may be different,
insert in the right position.
Two Star Compartment
• Two star (a) basket or drawer can be used to
store ice and food from -12 °C to -18 °C for short
periods.
• Two star frozen food compartments are suitable
for storing pre-frozen food, storing or making
icecream and making ice cubes.
• Two star compartments are not suitable for the
freezing of fresh food.
Max Freezing Capacity
•
Express Freeze
reach its maximum freezing capacity. This
generally takes up to 24 hours and automatically
switches off.
•
Express Freeze
before fresh products are placed in the freezer
compartment.
• To get better air circulation, insert all inner parts
like baskets, drawers, and shelves.
function will allow the freezer to
must be switched on for 2 hours
global_main.book.book Page 19 Wednesday, May 20, 2020 3:38 PM
OPERATION
Product Features
The appearance or components of the appliance may differ from model to model.
Exterior
*1 This feature is only available on some models.
a
Control Panel
Sets the refrigerator temperature and freezer temperature, the water filter condition and the dispenser
mode.
b
Door in Door
This is a convenient storage area for frequently-used items that require easy access.
c
Door in Door Lever
Opens Door-in-Door.
d
InstaView Door in Door
The InstaView Door-in-Door compartment allows for easy access to commonly used food items.
*1
*1
*1
19
EN
global_main.book.book Page 20 Wednesday, May 20, 2020 3:38 PM
20
EN
OPERATION
Interior (Two Star a)
*1 This feature is only available on some models.
a
LED Lamp
The LED lamps inside the appliance light up when you open the door.
b
Automatic Icemaker
This is where ice is automatically produced and stored.
c
Freezer Shelf
This is where frozen foods such as meat, fish, and ice cream can be stored.
d
Freezer Drawer
This is for long-term storage of frozen items.
*1
CAUTION
global_main.book.book Page 21 Wednesday, May 20, 2020 3:38 PM
OPERATION
e
Freezer Door Basket
This is where small packaged frozen food or frequently used foods can be stored.
f
Door in Door Compartment
This is where foods which are taken out frequently such as beverages and snacks are stored.
g
Bottle Rack
This is where drinks tall bottles or containers are stored.
• Do not store short bottles or containers. The items may fall and cause an injury or appliance damage.
h
Fridge Shelf
This is where refrigerated foods and other items are stored. Store the foods with higher moisture
content at the front of the shelf.
The shelf height can be adjusted by inserting the shelf in another groove of different height.
The actual number of shelves will differ from model to model.
i
Air Filter
This reduces odours inside the fridge compartment.
j
Snack Drawer
This is where small packages of refrigerated foods are stored.
k
Temperature Sensor
This sensor senses the temperature of the fridge compartment.
• Maintain the distance between the sensor and food to accurately sense the temperature.
l
Water Tank
This is where water to supply the dispenser or the automatic icemaker is stored. It requires manual
filling.
m
Fresh Vegetable Drawer
This is where fruits and vegetables are stored to help maintain freshness by adjusting the humidity
controller.
n
Egg Box
This is where eggs are stored.
• Do not use it as the ice bin or place it on the shelf on top of the fridge or the vegetable drawer.
o
Vegetable Drawer
This is where fruits and vegetables are stored to remain fresh for as long as possible.
p
Fridge Door Basket
This is where small packages of refrigerated foods, drinks and sauce containers are stored.
*1
*1
*1
*1
*1
*1
*1
*1
21
EN
NOTE
global_main.book.book Page 22 Wednesday, May 20, 2020 3:38 PM
22
EN
OPERATION
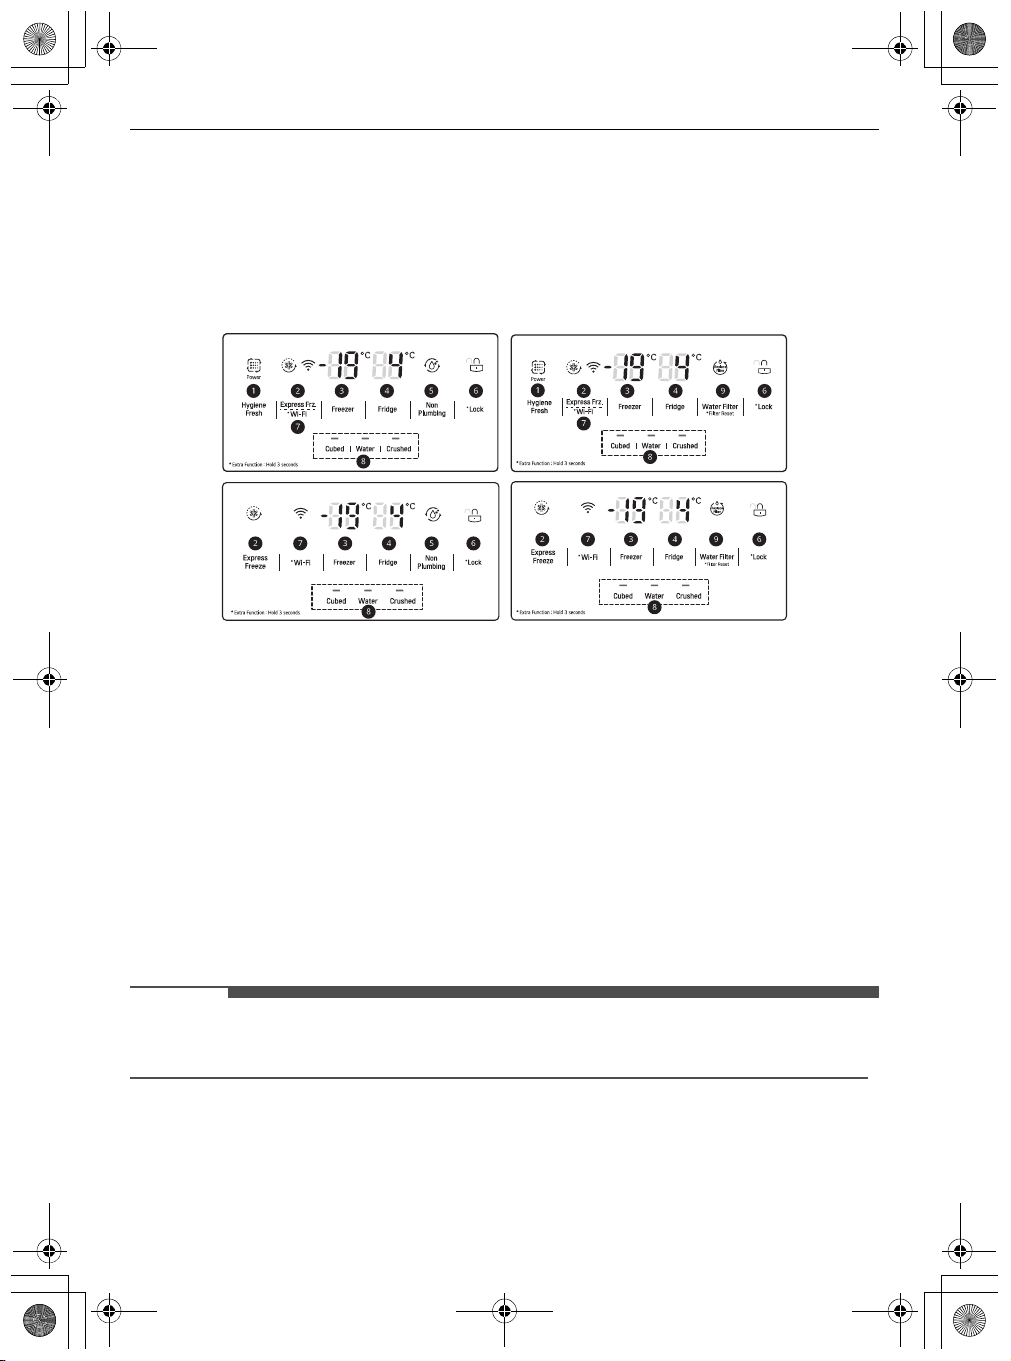
Control Panel
The actual control panel may differ from model to model.
Control Panel and Functions
*1 This feature is only available on some models.
a
Hygiene Fresh
This function reduces odours inside the fridge.
b
Express Freeze
This function can quickly freeze a large amount of ice or frozen foods.
• This function is enabled and disabled in turn each time you press the button.
• This function automatically terminates after a specific period has passed.
c
Freezer
Press this button repeatedly to select a desired temperature between -24 °C and -14 °C.
• The initial freezer temperature is -19 °C.
d
Fridge
Press this button repeatedly to select a desired temperature between 1 °C and 7 °C.
• The initial fridge temperature is 4 °C.
• The actual inner temperature varies depending on the food status, as the indicated setting temperature
is a target temperature, not actual temperature within the appliance.
e
Non Plumbing
The
Non Plumbing
f
Lock
This locks the buttons on the control panel.
*1
*1
icon is illuminated when the water dispenser tank is installed correctly.

NOTE
CAUTION
NOTE
global_main.book.book Page 23 Wednesday, May 20, 2020 3:38 PM
OPERATION
• To lock the control panel buttons, press and hold the
appears and the function is activated.
• To disable the function, press and hold the
the function is deactivated.
g
Wi-Fi
This button allows the appliance to connect to a home Wi-Fi network. Refer to Smart Functions for
information on the initial setup of the
h
Water & Ice Type
Select a desired dispenser mode from the buttons on the control panel. Press the dispenser switch with
a glass or other container to dispense cubed ice, water or crushed ice.
i
Water Filter
Replace the water filter when the h indicator lights up.
• The control panel automatically turns off for energy saving.
• If there is any finger or skin contacts to the control panel while cleaning it, the button function may
operate.
*1
Lock
LG ThinQ
Ice and Water Dispenser
Lock
button for 3 seconds until the k icon
button for 3 seconds until the l icon appears and
application.
air in the water will eventually clear and is safe to
drink during this transition.
23
Before Using the Ice and Water
Dispenser
EN
• Keep children away from the dispenser to
prevent children playing with or damaging the
controls.
• Throw away the first few batches of ice (about 20
cubes and 7 cups of water). This is also necessary
if the appliance has not been used for a long
time.
• Clean the water dispensing system if they have
not been used for 48 hours. Flush the water
system connected to a water supply if water has
not been drawn for 5 days.
• To clean the water dispensing system, flush the
water through the dispenser about 5 minutes
and throw away the first few batches of ice.
• It is normal for milky / cloudy water to be
dispensed after replacing the water filter. This
• If you open the freezer door while water is being
dispensed, the water dispensing will stop.
• If you open the fridge door while water, cubed
ice or crushed ice is being dispensed, dispensing
will be paused. When you close the door, the
selected item will continue to be dispensed.
• If the cup rim is small, water may splash out of
the glass or miss it completely.
• Use a cup with a rim of over 68 mm in diameter
when dispensing water, cubed ice or crushed ice.
• When the ice maker produces smaller ice cubes,
or the cubes become lumped together, the
amount of water supplied to the ice maker may
be low due to insufficient water in the water
tank. If ice is not used frequently or the freezer
set temperature is too warm, it may also lump
together.
NOTE
global_main.book.book Page 24 Wednesday, May 20, 2020 3:38 PM
24
EN
OPERATION
Using the Ice and Water
Dispenser
Press the dispenser selection button repeatedly
until the light above the icon that you want
illuminates.
Press the dispenser paddle
container to dispense cubed ice, water or crushed
ice.
a
with a glass or other
Cleaning the Dispenser
Cleaning the Ice and Water Outlet
Wipe the water outlet a or ice outlet b frequently
with a clean cloth as it may get dirty easily.
Cleaning the Dispenser Tray
Wipe the entire area with a damp cloth. The
dispenser tray may become wet easily due to
spilled ice or water.
Filling the Water Tank with
Water
This feature is only available on some models.
The water tank holds the water to be dispensed or
used by the automatic icemaker to make ice.
1
Remove the water dispenser tank by pulling it
out while holding the handle.
• Lint from a cloth may adhere to the outlets.
2
Open the cover or cap of the water dispenser
tank.
WARNING
CAUTION
NOTE
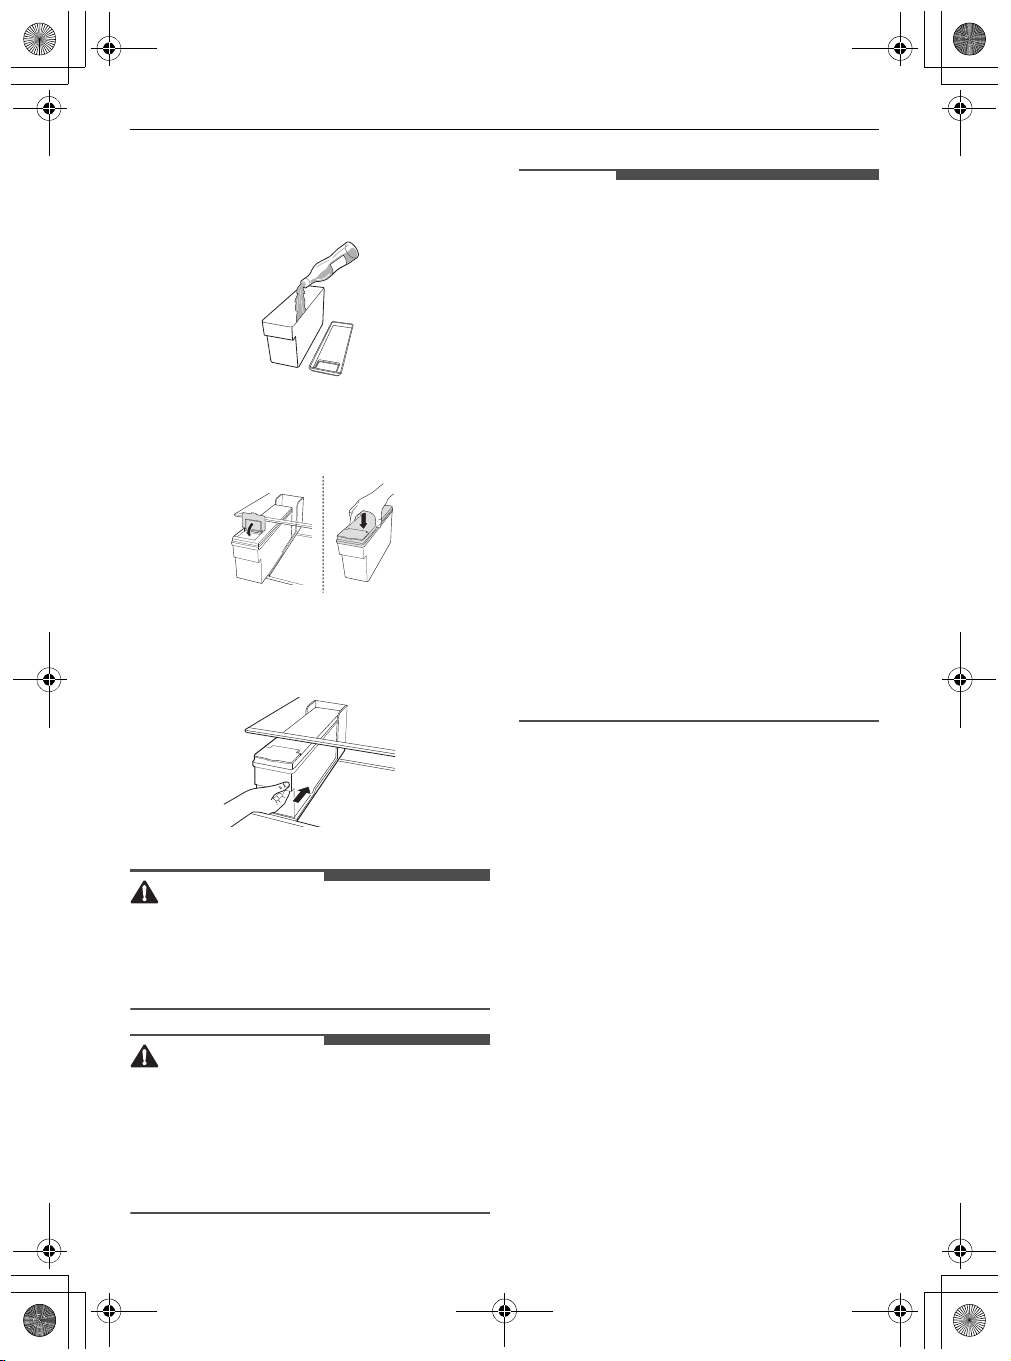
global_main.book.book Page 25 Wednesday, May 20, 2020 3:38 PM
3
Fill with bottle filtered or clean filtered water up
to the reference line indicated inside the water
dispenser tank. (Total capacity: 4 ℓ)
4
After filling with water, close the cover or cap of
the water dispenser tank.
5
Refit the water dispenser tank on the fridge
shelf.
OPERATION
• Before using the water dispenser tank after
installing the appliance, it should be washed
before filling it with water.
• Check if the water dispenser tank has been
placed on the appliance correctly. If it is not
assembled correctly, water may leak from the
tank into the appliance.
• If there is an insufficient amount of water in the
water dispenser tank, ice cube size and quantity
may be affected and may result in no ice being
made.
• If there is no water in the water dispenser tank,
the cold water and ice dispensing function of the
dispenser cannot be used. Check if there is water
in the water dispenser tank and then fill it with
water if there is not.
• Wait at least 15 seconds before removing the
water tank after having dispensed water or ice
from the dispenser.
• Sound from the water tank will be normal when
supplying water to the dispenser and the
Automatic Ice Maker. It is not a sign of
malfunction.
25
EN
• Fill with potable water only into icemaker or
dispenser water tank.
• Do not fill the water tank with drinks other than
water or fill with hot water.
• Do not apply excessive force or impact when
removing or assembling the water dispenser
tank. Doing so can cause appliance damage or
injury.
• Children should not be allowed near the
dispenser tank.
Automatic Icemaker
This feature is only available on some models.
This feature may vary depending on model
purchased.
Before Using the In-Door
Icemaker
• The icemaker produces ice normally when
approximately 48 hours have passed after the
appliance is initially installed.
• If the ice bin is completely filled with ice, ice
production will stop.
• Sound of ice dropping into the ice bin is normal.
• If ice cubes are stored in the ice bin for a long
period of time, they may clump together and
may not be separated easily. In such a case,
empty the ice bin and allow fresh ice to be made.
CAUTION
CAUTION
global_main.book.book Page 26 Wednesday, May 20, 2020 3:38 PM
26
EN
• It is normal for milky or cloudy water to be
dispensed after replacing the water filter. This
air in the water will clear eventually and is safe to
drink.
• The first ice and water dispensed may include
particles or odour from the water supply line or
the water tank.
• If discolored ice is dispensed, check the water
tank and the water supply for a possible source.
If the problem continues, contact the LG
Electronics customer information centre. Do not
use the ice or water until the problem is
corrected.
• Do not touch the ice outlet or the automatic
icemaker with your hand or a tool.
• Dispense ice into a glass before filling it with
water or other beverages. Splashing will occur if
ice is dispensed into a glass that already contains
liquid.
• Never use a glass that is exceptionally narrow or
deep. Ice may jam in the ice passage, affecting
the performance of the appliance.
• Keep the glass at a proper distance from the ice
outlet. A glass held too close to the outlet may
prevent ice from dispensing.
• Dispose of the ice inside the ice bin if you go on
vacation or if an extended power outage occurs.
Water from melting ice may drop from the
dispenser onto the floor.
OPERATION
a
Power Switch
• Do not insert your hands into the mechanical
part of the automatic icemaker such as the ice
bin or the ice dispenser.
• Do not remove the cover of the automatic
icemaker. Touching any mechanical part of the
automatic icemaker. It may result in injury.
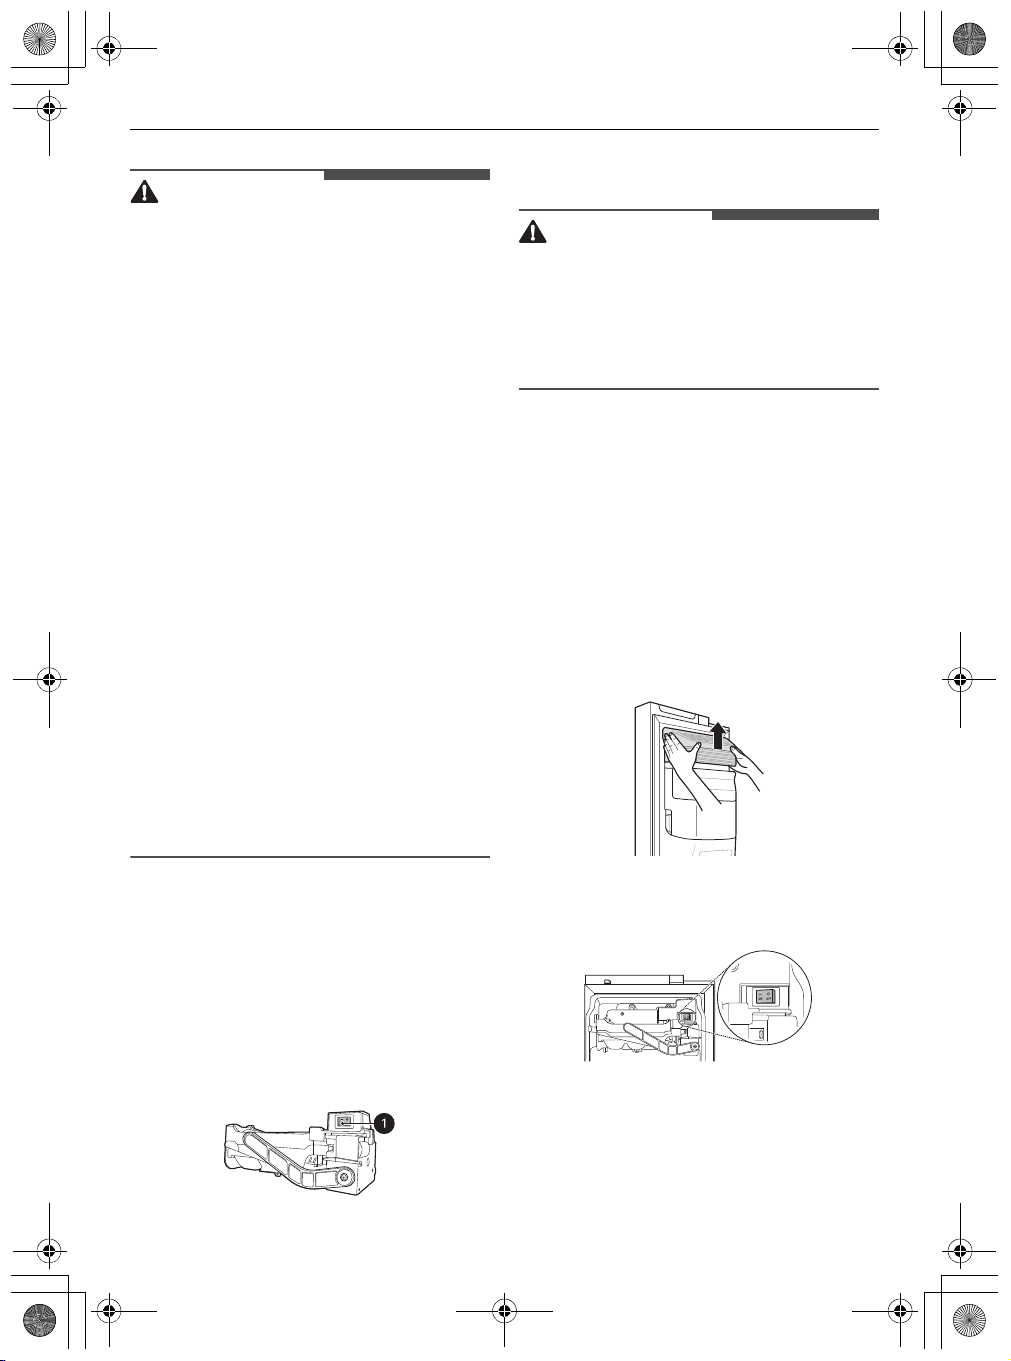
Removing/Refitting the Ice
Storage Bin
The ice dispensing chute may become blocked with
frost if only crushed ice is used. Remove the frost
that accumulates by removing the ice bin and
clearing the passage with a rubber spatula.
Dispensing cubed ice periodically can also help
prevent frost buildup.
1
Hold and remove the cover of the automatic
icemaker by lifting it upward.
Freezer Icemaker
The automatic icemaker can automatically make
40-84 cubes at a time, within a 24-hour period if
conditions are favorable. This amount may vary
according to the environment (ambient
temperature around the appliance, frequency of
the door being opened, amount of food stored in
the appliance, etc.).
2
To turn off the automatic icemaekr, set the
switch to OFF ( O ).

CAUTION
NOTE
NOTE
global_main.book.book Page 27 Wednesday, May 20, 2020 3:38 PM
3
Hold the ice bin with both hands and pull it out
while lifting it upward.
4
Mount them in the reverse order of the
removal process.
• Do not touch the automatic icemaker’s
mechanical parts with your hand or a tool.
Otherwise, appliance damage or injury may
occur.
• Do not disassemble, repair or alter the
automatic icemaker. These tasks should only be
done by a service technician.
• Caution should be taken, as the automatic
icemaker operates continuously after the freezer
door is opened when the automatic icemaker
switch is set to the on position.
• Keep children away from the dispenser.
• When refitting the ice bin, ensure that it is placed
correctly. If it is tilted or unlevel, it may not
continue to make ice due to sensor disruption.
OPERATION
• Do not keep the power turned on to the
icemaker if the water line is not connected.
Doing so can damage the icemaker.
27
EN
Preparing for Vacation
If the ambient temperature will drop below
freezing, have a qualified technician drain the
water supply system to prevent serious property
damage due to flooding caused by ruptured water
lines or connections. Set the icemaker power
switch to OFF (O) and shut off the water supply to
the appliance.
• The ice bin should be emptied any time the
icemaker on/off switch is turned to the OFF (O)
position.
InstaView
This feature is only available on some models.
Using the InstaView Door in
Door
Turning the Automatic
Icemaker On or Off
To turn the automatic icemaker On/Off, press the
power switch on the icemaker to the ON ( | ) or OFF
(O) position.
Normal Sounds You May Hear
The icemaker water valve will buzz as the icemaker
fills with water. If the power switch is in the ON (|)
position, it will buzz even if it has not yet been
hooked up to water. To stop the buzzing, move the
power switch to OFF (O).
The InstaView function on the Door in Door lets you
see if you’re running low on frequently used items
like beverages and snacks, without opening the
refrigerator door.

NOTE
CAUTION
CAUTION
CAUTION
global_main.book.book Page 28 Wednesday, May 20, 2020 3:38 PM
28
EN
1
2
• The InstaView Door in Door function is disabled
for 2 seconds after closing the left or right
freezer door, and momentarily disabled whilst
the ice dispenser is in use.
• Knock near the center of the glass. Knocking
near the edges of the glass may not activate the
InstaView Door in Door function.
• Knock hard enough so that the knocking sound
is audible.
• The InstaView Door in Door function may
activate if a loud noise occurs near the
refrigerator.
• Clean the glass door with a dry cloth. To remove
stubborn stains, slightly moisten a clean cloth
with lukewarm water or a glass cleaner. Do not
spray glass cleaner directly at the glass door.
OPERATION
Knock twice on the glass to turn the LED light
inside the Door in Door on or off.
The LED light turns off automatically after ten
seconds.
• Do not open the door of the appliance with the
door in door open, or do not open the door in
door while the door of the appliance is open. The
door in door may be struck by the edge of the
appliance and damaged.
Removing/Refitting the Door in
Door Case
• Remove contents from the Door in Door
compartment before removal.
1
Open the doors completely and remove the
contents of the Door in Door case. Lift up and
pull out the Door in Door case.
Door in Door
This feature is only available on some models.
Using the Door in Door
Pull the lever at the bottom of the door upwards
until the door in door opens.
There is plenty of storage space inside the door in
door and its surrounding baskets, allowing you to
store food in an organized manner.
2
Mount them in the reverse order of the
removal process.
Drawer
• Always empty the drawers before removing
them, and use both hands when removing and
refitting them.

CAUTION
CAUTION
global_main.book.book Page 29 Wednesday, May 20, 2020 3:38 PM
• Make sure that the fridge doors are fully open
before removing and refitting the drawers.
Using the Vegetable Drawer
*1 This feature is only available on some models.
The humidity in the vegetable crisper drawer can
be controlled by sliding the lever in either direction.
• If moved to the left side, the air guide will be
open and allow air to circulate through the
drawer for reduced humidity.
• If moved to the right side, the air guide will be
closed and will maintain any humidity that is
currently in the crisper drawer.
*1
Type A
*1
Type B
OPERATION
2
Lift the vegetable drawer up and remove it by
pulling it out.
3
Mount them in the reverse order of the
removal process.
• Always empty the drawers before removing
them, and use both hands when removing and
refitting them.
• Make sure that the fridge doors are fully open
before removing and assembling the drawers.
29
Shelf
EN
Removing/Refitting the
Drawers
1
Remove the contents of the drawer. Hold the
handle of the vegetable drawers and gently
pull them out.
• Glass shelves are heavy. Use special care when
removing them.
• Do not clean glass shelves with warm water
while they are cold. Shelves may break if
exposed to sudden temperature changes or
impact.
Removing/Refitting the Shelf
1
Tilt up the front of the shelf and then lift the
shelf straight up.

CAUTION
global_main.book.book Page 30 Wednesday, May 20, 2020 3:38 PM
30
EN
2
3
• Glass shelves are heavy. Use special care when
removing them.
• Do not clean glass shelves with warm water
while they are cold. Shelves may break if
exposed to sudden temperature changes or
impact.
• Make sure that shelves are level from one side to
the other. Failure to do so may result in the shelf
falling or food spilling.
OPERATION
Pull the shelf out.
Mount them in the reverse order of the
removal process.
3
Mount them in the reverse order of the
removal process.
Door Basket
Removing/Refitting the Door
Basket
1
2
Hold both edges of the basket and remove it by
lifting it upward.
Refit the door baskets in the reverse order of
the removal process.

NOTE
NOTE
global_main.book.book Page 31 Wednesday, May 20, 2020 3:38 PM
SMART FUNCTIONS
LG ThinQ Application
This feature is only available on models with Wi-Fi.
LG ThinQ
The
communicate with the appliance using a
smartphone.
LG ThinQ Application Features
Communicate with the appliance from a
smartphone using the convenient smart features.
Smart Diagnosis
• If you experience a problem while using the
appliance, this smart diagnosis feature will help
you diagnose the problem.
Settings
• Allows you to set various options on the
appliance and in the application.
• If you change your wireless router, internet
service provider, or password, delete the
registered appliance from the
application and register it again.
• The application is subject to change for
appliance improvement purposes without notice
to users.
• Functions may vary by model.
Before Using LG ThinQ
Application
1
Check the distance between the appliance and
the wireless router (Wi-Fi network).
• If the distance between the appliance and
application allows you to
LG ThinQ
the wireless router is too far, the signal
strength becomes weak. It may take a long
time to register or installation may fail.
SMART FUNCTIONS
2
Turn off the
your smartphone.
3
Connect your smartphone to the wireless
router.
• To verify the Wi-Fi connection, check that f icon
on the control panel is lit.
• The appliance supports 2.4 GHz Wi-Fi networks
only. To check your network frequency, contact
your Internet service provider or refer to your
wireless router manual.
•
LG ThinQ
connection problems or any faults,
malfunctions, or errors caused by network
connection.
• If the appliance is having trouble connecting to
the Wi-Fi network, it may be too far from the
router. Purchase a Wi-Fi repeater (range
extender) to improve the Wi-Fi signal strength.
• The Wi-Fi connection may not connect or may be
interrupted because of the home network
environment.
• The network connection may not work properly
depending on the Internet service provider.
• The surrounding wireless environment can
make the wireless network service run slowly.
• The appliance cannot be registered due to
problems with the wireless signal transmission.
Unplug the appliance and wait about a minute
before trying again.
Mobile data
is not responsible for any network
or
Cellular Data
31
EN
on

NOTE
NOTE
NOTE
global_main.book.book Page 32 Wednesday, May 20, 2020 3:38 PM
32
EN
SMART FUNCTIONS
• If the firewall on your wireless router is enabled,
disable the firewall or add an exception to it.
• The wireless network name (SSID) should be a
combination of English letters and numbers. (Do
not use special characters.)
• Smartphone user interface (UI) may vary
depending on the mobile operating system (OS)
and the manufacturer.
• If the security protocol of the router is set to
WEP
, you may fail to set up the network. Please
change it to other security protocols (
recommended) and register the product again.
WPA2
is
Installing the LG ThinQ
Application
Search for the
Google Play Store or Apple App Store on a
smartphone. Follow instructions to download and
install the application.
LG ThinQ
application from the
Connecting to Wi-Fi
The
Wi-Fi
button, when used with the
application, allows the appliance to connect to a
f
home Wi-Fi network. The
of the appliance’s network connection. The icon
illuminates when the appliance is connected to the
Wi-Fi network.
•
Initial Appliance Registration
Run the
LG ThinQ
instructions in the application to register the
appliance.
•
Re-registering the Appliance or Registering
Another User
Press and hold the
temporarily turn it off. Run the
application and follow the instructions in the
application to register the appliance.
icon shows the status
application and follow the
Wi-Fi
button for 3 seconds to
LG ThinQ
LG ThinQ
• To disable the Wi-Fi function, press and hold the
Wi-Fi
button for 3 seconds. The f icon will be
turned off.
Open Source Software Notice
Information
To obtain the source code under GPL, LGPL, MPL,
and other open source licenses, that is contained in
this product, please visit http://
opensource.lge.com.
In addition to the source code, all referred license
terms, warranty disclaimers and copyright notices
are available for download.
LG Electronics will also provide open source code to
you on CD-ROM for a charge covering the cost of
performing such distribution (such as the cost of
media, shipping, and handling) upon email request
to opensource@lge.com. This offer is valid for a
period of three years after our last shipment of this
product. This offer is valid to anyone in receipt of
this information.
Smart Diagnosis
This feature is only available on models with the c
d
logo.
or
Use this feature to help you diagnose and solve
problems with your appliance.
• For reasons not attributable to LGE’s negligence,
the service may not operate due to external
factors such as, but not limited to, Wi-Fi
unavailability, Wi-Fi disconnection, local app
store policy, or app unavailability.
• The feature may be subject to change without
prior notice and may have a different form
depending on where you are located.

NOTE
global_main.book.book Page 33 Wednesday, May 20, 2020 3:38 PM
Using LG ThinQ to Diagnose
Issues
If you experience a problem with your Wi-Fi
equipped appliance, it can transmit
troubleshooting data to a smartphone using the
LG ThinQ
• Launch the
application.
LG ThinQ
Smart Diagnosis
the instructions provided in the
application.
application and select the
feature in the menu. Follow
LG ThinQ
Using Audible Diagnosis to
Diagnose Issues
Follow the instructions below to use the audible
diagnosis method.
• Launch the
Smart Diagnosis
the instructions for audible diagnosis provided
in the
1
Press the
function.
• If the display has been locked for over 5
LG ThinQ
LG ThinQ
Lock
minutes, you must deactivate the lock and
then reactivate it.
application and select the
feature in the menu. Follow
application.
button to activate the lock
SMART FUNCTIONS
• For best results, do not move the phone while
the tones are being transmitted.
33
EN
2
Open the fridge door and then hold the phone
on the upper right speaker hole.
3
Press and hold the
seconds or longer while holding your phone to
the speaker until the data transfer is complete.
• The diagnosis sound is generated after
around 3 seconds.
4
After the data transfer is complete, the
diagnosis will be displayed in the application.
Freezer
button for three

global_main.book.book Page 34 Wednesday, May 20, 2020 3:38 PM
34
EN
MAINTENANCE
MAINTENANCE
Cleaning
General Cleaning Tips
• When cleaning the inside or outside of the
appliance, do not wipe it with a rough brush,
toothpaste, or flammable materials. Do not use
cleaning agents containing flammable
substances. This may cause discolouration or
damage to the appliance.
- Flammable substances: alcohol (ethanol,
methanol, isopropyl alcohol, isobutyl alcohol,
etc.), thinner, bleach, benzene, flammable
liquid, abrasive, etc.
• After cleaning, check if the power cable is
damaged.
Cleaning the Exterior
• When cleaning the outside air vents of the
appliance by means of vacuuming, then the
power cord should be unplugged from the outlet
to avoid any static discharge that can damage
the electronics or cause an electric shock.
Regular cleaning of the rear and side ventilation
covers is recommended to maintain reliable and
economical operation of the unit.
• Keep the air vents on the exterior of the
appliance clean. Blocked air vents can cause fire
or appliance damage.
• For the appliance exterior, use a clean sponge or
soft cloth and a mild detergent in warm water.
Do not use abrasive or harsh cleaners. Dry
thoroughly with a soft cloth. Do not use
contaminated cloths when cleaning the stainless
steel doors. Always use a dedicated cloth and
wipe in the same direction as the grain. This
helps reduce surface staining and tarnishing.
the appliance. Otherwise, injury may occur due
to the weight of stored foods.
• Detach the shelves and drawers and clean them
with water, and then dry them sufficiently,
before replacing them.
• Regularly wipe the door gaskets with a wet soft
towel.
• Door basket spills and stains should be cleaned
as they can compromise storage ability of the
basket and could even be damaged.
• Never clean the shelves or containers in the
dishwasher. The parts may become deformed
due to the heat.
Cleaning the Condenser Cover
Use a vacuum cleaner with a brush to clean the
condenser cover and vents. Do not remove the
panel covering the condenser coil area.
We recommend that this be done every 12 months
to maintain operating efficiency.
Cleaning the Interior
• When removing a shelf or drawer from inside
the appliance, remove all stored foods from the
shelf or drawer to prevent injury or damage to

WARNING
CAUTION
NOTE
global_main.book.book Page 35 Wednesday, May 20, 2020 3:38 PM
Water Filter
Before Replacing the Water
Filter
• Do not allow children to have access to small
parts during the installation of this product.
• Do not use with water that is microbiologically
unsafe or of unknown quality without adequate
disinfection before or after the system. Systems
certified for cyst reduction may be used on
disinfected water that may contain filterable
cysts.
• Do not install if water pressure exceeds 827 kPa.
If your water pressure exceeds 827 kPa, you
must install a pressure limiting valve. Contact a
plumbing professional if you are uncertain how
to check your water pressure.
• Do not install where water hammer conditions
may occur. If water hammer conditions exist,
you must install a water hammer arrester.
Contact a plumbing professional if you are
uncertain how to check for this condition.
• Do not install on hot water supply lines. The
maximum operating water temperature of this
filter system is 37.8 °C.
• Protect filter from freezing. Drain filter when
temperatures drop below 4.4 °C.
• The disposable filter cartridge MUST be replaced
every 6 months, at the rated capacity or if a
noticeable reduction in flow rate occurs.
• Where a backflow prevention device is installed
on a water system, a device for controlling
pressure due to thermal expansion must be
installed.
• Ensure all tubing and fittings are secure and free
of leaks.
MAINTENANCE
• It is essential that the manufacturer’s
recommended installation, maintenance and
filter replacement requirements be carried out
for the product to perform as advertised.
Application Guidelines/Water Supply
Service Flow 1.9 lpm
Water Supply Community or Private Well -
Water Pressure 138 - 827 kPa
Water
Temperature
Capacity 1892 litres
Parameters
Potable Water
0.6 - 37.8°C
35
EN
Replacing the Water Filter
(Plumbed Model)
*1 This feature is only available on some models.
The filter must be changed every 6 months or when
the indicator lights turns on or the water dispenser
output decreases.
• To purchase a replacement water filter:
- Use replacement cartridge: ADQ736939**
- Visit your local dealer or distributor or contact
the LG Electronics Customer Information
Centre. For further assistance, visit our
website at lg.com
Thread Nut Type
1
Loose the screw cap.
*1
• While the testing was performed under standard
laboratory conditions, actual performance may
vary.

CAUTION
global_main.book.book Page 36 Wednesday, May 20, 2020 3:38 PM
36
EN
2
3
4
MAINTENANCE
Pull the pipe out from the water filter cap until
the colored line
Push the pipe into the water fitler cap, making
sure the end is fully sealed.
Tighten the screw cap until the colored line in
the water filter is no longer visible.
a
is visble.
2
Pull the pipe out from the water fitler.
3
Push the pipe into the water fitler, making sure
the end is fully sealed.
4
Insert the screw cap until the colored line in the
water filter is no longer visible.
5
Press and hold the
three seconds. That resets the
Filter
icon. The new water filter has been
activated.
6
Dispense water for approximately 5 minutes to
remove trapped air and contaminants from the
system.
Push fit connector type
1
Remove the screw cap.
Water Filter
*1
button for
Replacement
5
Press and hold the
three seconds. That resets the
Filter
icon. The new water filter has been
activated.
6
Dispense water for approximately 5 minutes to
remove trapped air and contaminants from the
system.
• Failure to replace filters when required or using
non LG authorised water filters can cause the
filter cartridge to leak and result in property
damage.
Water Filter
button for
Replacement

global_main.book.book Page 37 Wednesday, May 20, 2020 3:38 PM
TROUBLESHOOTING
Before Calling for Service
Cooling
Symptoms Possible Cause & Solution
There is no
refrigeration or
freezing.
There is poor
refrigeration or
freezing.
The appliance contains
a bad smell.
Is there a power interruption?
• Check the power of other appliances.
Check the power of other appliances.
• Plug the power plug in the outlet properly.
Is the fridge or freezer temperature set to its warmest setting?
• Set the fridge or freezer temperature to a colder setting.
Is the appliance in direct sunlight, or is it near a heat generating object
such as cooking oven or heater?
• Check the installation area and reinstall it away from heat generating
objects.
Did you store hot food without cooling it first?
• Cool the hot food first before putting it in the fridge or freezer
compartment.
Did you put in too much food?
• Maintain an appropriate space between food.
Are the appliance doors completely closed?
• Completely close the door and make sure that stored food is not
obstructing in the door.
Is there enough space around the appliance?
• Adjust the installation position to make enough space around the
appliance.
Is the fridge or freezer temperature set to 'Warm'?
• Set the fridge or freezer temperature to a colder setting.
Did you put in food with a strong smell?
• Store foods with strong smells in sealed containers.
Vegetables or fruit may have spoiled in the drawer.
• Throw away rotten vegetables and clean the vegetable drawer. Do not
store vegetables too long in the vegetable drawer.
TROUBLESHOOTING
37
EN

global_main.book.book Page 38 Wednesday, May 20, 2020 3:38 PM
38
EN
TROUBLESHOOTING
Ice & Water
Symptoms Possible Cause & Solution
The automatic
icemaker does not
produce ice or
produces a small
amount of ice.
Ice is not dispensed. Unable to hear the sound of ice coming out?
Did you install the appliance recently?
• The ice maker produces ice normally when approximately 48 hours have
passed after the appliance is installed.
• If the fridge compartment temperature is too cold, the water filter can
freeze and block the water flow to the ice maker.
Did you connect the water supply pipe to the appliance and open the
supply valve?
• Connect the water supply pipe to the appliance and open the supply valve
completely.
Is the water supply hose bent?
• If the water supply hose is bent, the water flow could be compromised.
Have you dispensed a large amount of ice recently?
• It takes approximately 24 hours to produce more ice in the automatic
icemaker. Please wait.
Did you set the ice maker switch or the automatic icemaker button on
the control panel to ON?
• Press I on the automatic icemaker switch or set ON for the automatic
icemaker button on the control panel. (For more details on how to use, visit
LG Electronics website or use your smart device.)
Is the temperature of the freezer compartment set too high?
• If the set temperature is too warm, ice will be produced slowly or not at all.
Set the Freezer temperature to -18 °C for normal operation of the
automatic icemaker.
Have you been opening the appliance door frequently?
• If you open the appliance door frequently, cold air will escape, lowering
the speed of ice production. Do not open and close the appliance door
frequently.
Is the appliance door completely closed?
• If the appliance door is not completely closed, the temperature of the
freezer compartment will increase, slowing down the ice production
speed. Close the appliance door completely.
• In the control panel, select the modes for cubed ice and crushed ice
alternately to dispense the ice.
Is the ice path blocked? (You can check the ice passage by separating the
ice bin.)
• Ice may not be dispensed properly if the ice passage is blocked. Check the
ice and clean the ice path regularly.

global_main.book.book Page 39 Wednesday, May 20, 2020 3:38 PM
TROUBLESHOOTING
39
EN
Symptoms Possible Cause & Solution
Water does not come
out.
The supply valve may be turned off. (For Plumbed models Only)
• Open the water supply valve.
• Check if the fridge compartment temperature is too cold, as the water
filter can freeze and block the water flow to the dispenser.
The water dispenser tank may be empty. (Non plumbed models only)
• Fill the water dispenser tank.
Is the water supply valve closed? (For Plumbed models Only)
• Open the water supply valve.
Are you using unfiltered water?
• Unfiltered water can contain a large amount of various heavy metals or
foreign substances, so the filter may be clogged in the early stage
regardless of the life of the filter.
Water tastes strange. Is the taste of water different when comparing it with the taste of water
from the previous water purifier?
• Has the purified water or cold water not been used for an extended period
of time?
Has it been a long time since you installed and replaced the filter?
• If an expired filter is used, the purification performance may decline. It is
recommended to replace the filter according to the filter replacement
period.
Have you flushed out the filter properly in the initial stage after
installing it?
• When you install or replace the filter for the first time, you need to remove
air and activated carbon residue from inside the filter. Use the appliance
after dispensing and discharging approximately 5 litres of purified water
from the dispenser by pressing the water dispensing lever. (Activated
carbon is harmless to humans.)
Has the purified water or cold water not been used for an extended
period of time?
• The taste of old water may change due to bacterial growth. Use the
product after dispensing and discharging approximately 5 litres
(approximately three minutes) from the water dispenser.

global_main.book.book Page 40 Wednesday, May 20, 2020 3:38 PM
40
EN
TROUBLESHOOTING
Condensation & Frost
Symptoms Possible Cause & Solution
There is condensation
inside the appliance or
on the bottom of the
vegetable drawer
cover.
Frost has formed in the
freezer compartment.
Frost or condensation
has formed inside or
outside the appliance.
The side or front of the
appliance is warm.
Did you store hot food without cooling it first?
• Cool the hot food first before putting it inside the fridge or freezer.
Did you leave the appliance door open?
• Although the condensation will disappear soon after you close the
appliance door, you can wipe it with a dry cloth.
Do you open and close the appliance door too frequently?
• Condensation can form due to the temperature difference from the
outside. Wipe out the dampness with a dry cloth.
Did you put warm or moist food inside without sealing it in a container?
• Store food in a covered or sealed container.
Doors may not be closed properly.
• Check if the food item inside the appliance is blocking the door and make
sure that the door is tightly closed.
Did you store hot food without cooling it first?
• Cool the hot food first before putting it in the fridge or freezer
compartment.
Is the air entry or exit of the freezer compartment blocked?
• Make sure that air entry or exit is not blocked so that the air can circulate
inside.
Is the freezer compartment overfilled?
• Maintain an appropriate space between items.
Did you open and close the appliance door frequently or is the appliance
door improperly closed?
• Frosts or condensation can form if the outside air penetrates inside the
appliance.
Is the installation environment humid?
• Condensation can appear on the exterior of the appliance if the installation
area is too humid or on a humid day such as a rainy day. Wipe off any
moisture with a dry cloth.
There are anti condensation pipes fitted to these areas of the appliance
to reduce condensation forming from around the door area.
• The heat releasing pipe to prevent condensation is installed on the front
and side of the appliance. You may feel it particularly hot right after the
appliance is installed or during the summer. You can be assured that this
is not a problem and is quite normal.

global_main.book.book Page 41 Wednesday, May 20, 2020 3:38 PM
Symptoms Possible Cause & Solution
There is water inside or
outside of the
appliance.
Is there water leakage around the appliance?
• Check if the water has leaked from a sink or another place.
Is there water on the bottom of the appliance?
• Check if the water is from the thawed frozen food or a broken or dropped
container.
Parts & Features
Symptoms Possible Cause & Solution
The appliance door is
not closed tightly.
It is difficult to open
the appliance door.
Door mullion does not
fold in and out
properly.
The inside lamp in the
appliance does not
turn on.
Is the appliance leaning forward?
• Adjust the front feet to raise the front side slightly.
Were the shelves properly assembled?
• Refit the shelves if needed.
Did you close the door with excessive force?
• If you apply too much force or speed when closing the door, it may remain
briefly open before closing. Make sure that you do not slam the door
closed. Close the door gently.
Did you open the door right after you closed it?
• If you try to open the appliance door within one minute after you closed it,
you may have difficulties because of the pressure inside the appliance. Try
to open the appliance door again in a few minutes so that the internal
pressure stabilizes.
Are front levelling legs extended, the appliance level, and doors aligned?
• Once the door baskets are filled, the doors may become misaligned,
preventing the door mullion or the Auto Open Door function from working
properly. Extend both front levelling legs fully so they are in firm contact
with the floor. Follow the instruction in the Door Alignment section to raise
the left fridge door until the door mullion is once again working properly.
Adjust the right fridge door so it aligns with the left fridge door.
Lamp failure
• Close the door and re-open. If the lamp does not turn on, please contact
the LG Electronics customer information centre. Do not attempt removal
of the lamp.
TROUBLESHOOTING
41
EN

global_main.book.book Page 42 Wednesday, May 20, 2020 3:38 PM
42
EN
TROUBLESHOOTING
Noises
Symptoms Possible Cause & Solution
The appliance is noisy
and generates
abnormal sounds.
Clicking noises The defrost control will click when the automatic defrost cycle begins
Rattling noises Rattling noises may come from the flow of appliance, the water line on
Whooshing noises Evaporator fan motor is circulating air through the fridge and freezer
Gurgling noises Appliance flowing through the cooling system.
Popping noises Contraction and expansion of the inside walls due to changes in
Is the appliance installed on a weak floor or improperly levelled?
• Install the appliance on a solid and flat area.
Does the rear of the appliance touch the wall?
• Adjust the installation position to allow enough clearance around the
appliance.
Are objects scattered behind the appliance?
• Remove the scattered objects from behind the appliance.
Is there an object on top of the appliance?
• Remove the object on top of the appliance.
and ends. The thermostat control (or appliance control on some models)
will also click when cycling on and off.
• Normal Operation
the back of the unit (for plumbed models only), or items stored on top of
or around the appliance.
• Normal Operation
Appliance is not resting evenly on the floor.
• Floor is weak or uneven or levelling legs need to be adjusted. See the Door
Alignment section.
Appliance with linear compressor was moved while operating.
• Normal operation. If the compressor does not stop rattling after three
minutes, turn the power to the appliance off and then on again.
compartments.
• Normal Operation
Air is being forced over the condenser by the condenser fan.
• Normal Operation
• Normal Operation
temperature.
• Normal Operation

global_main.book.book Page 43 Wednesday, May 20, 2020 3:38 PM
TROUBLESHOOTING
Symptoms Possible Cause & Solution
Vibrating If the side or back of the appliance is touching a cabinet or wall, some of
the normal vibrations may make an audible sound.
• To eliminate the noise, make sure that the sides and back do not make any
contact with any wall or cabinet.
43
Wi-Fi
Symptoms Possible Cause & Solution
Your home appliance
and smartphone are
not connected to the
Wi-Fi network.
The password for the Wi-Fi that you are trying to connect to is incorrect.
• Find the Wi-Fi network connected to your smartphone and remove it, then
register your appliance on
Mobile data for your smartphone is turned on.
• Turn off the
using the Wi-Fi network.
The wireless network name (SSID) is set incorrectly.
• The wireless network name (SSID) should be a combination of English
letters and numbers. (Do not use special characters.)
The router frequency is not 2.4 GHz.
• Only a 2.4 GHz router frequency is supported. Set the wireless router to 2.4
GHz and connect the appliance to the wireless router. To check the router
frequency, check with your Internet service provider or the router
manufacturer.
The distance between the appliance and the router is too far.
• If the distance between the appliance and the router is too far, the signal
may be weak and the connection may not be configured correctly. Move
the location of the router so that it is closer to the appliance.
Mobile data
LG ThinQ
of your smartphone and register the appliance
.
EN

global_main.book.book Page 44 Wednesday, May 20, 2020 3:38 PM
Memo

global_main.book.book Page 45 Wednesday, May 20, 2020 3:38 PM
Memo

ar_main.book.book Page 39 Wednesday, May 20, 2020 3:35 PM
39
AR
وأ كﺑ صﺎﺧﻟا تﻧرﺗﻧﻹا ﺔﻣدﺧ ودوزﻣ ﻊﺟار ،ﮫﯾﺟوﺗﻟا زﺎﮭﺟ ددرﺗ نﻣ ﻖﻘﺣﺗﻠﻟ .ﻲﻛﻠﺳﻼﻟا ﮫﯾﺟوﺗﻟا زﺎﮭﺟﺑ زﺎﮭﺟﻟا
ﺎﮭﺣﻼﺻإو لﺎطﻋﻷا فﺎﺷﻛﺗﺳا
LG ThinQ
.
ﺔﻛﺑﺷ مادﺧﺗﺳﺎﺑ زﺎﮭﺟﻟا لﺟﺳو ﻲﻛذﻟا كﻔﺗﺎھ ﻰﻠﻋ Wi-Fi.
ﺔﻛﺑﺷﺑ لﺎﺻﺗﻼﻟ رورﻣﻟا ﺔﻣﻠﻛWi-Fi.ﺔﺣﯾﺣﺻ رﯾﻏ ﺎﮭﺑ لﺎﺻﺗﻻا لوﺎﺣﺗ ﻲﺗﻟا
.ﺔّﻠﻌﻔُﻣ ﻲﻛذﻟا كﻔﺗﺎھ ﻲﻓ لوﻣﺣﻣﻟا فﺗﺎﮭﻟا تﺎﻧﺎﯾﺑ
لوﻣﺣﻣﻟا فﺗﺎﮭﻟا تﺎﻧﺎﯾﺑ
) ﺔﯾﻛﻠﺳﻼﻟا ﺔﻛﺑﺷﻟا مﺳا دادﻋإ مﺗﯾ مﻟSSID.ﺢﯾﺣﺻ لﻛﺷﺑ (
سﯾﻟ ﮫﯾﺟوﺗﻟا زﺎﮭﺟ ددرﺗ2.4.زﺗرھ ﺎﻐﯾﻏ
.ﮫﯾﺟوﺗﻟا زﺎﮭﺟ ﻊّﻧﺻﻣ
.مزﻼﻟا نﻣ دﻌﺑأ ﮫﯾﺟوﺗﻟا زﺎﮭﺟو زﺎﮭﺟﻟا نﯾﺑ ﺔﻓﺎﺳﻣﻟا
.زﺎﮭﺟﻟا ﻰﻟإ برﻗأ ﺢﺑﺻﯾ ﻰﺗﺣ ﮫﻧﺎﻛﻣ نﻣ ﮫﯾﺟوﺗﻟا زﺎﮭﺟ لﻘﻧا .ﺢﯾﺣﺻ
.ﺎًﻋوﻣﺳﻣ
(ﺔﺻﺎﺧ
ضارﻋﻷالﺣﻟاو لﻣﺗﺣﻣﻟا بﺑﺳﻟا
ةرﻏرﻏ تاوﺻأ.دﯾرﺑﺗﻟا مﺎظﻧ لﻼﺧ زﺎﮭﺟﻟا ﻖﻓدﺗ
•يدﺎﻋ لﯾﻐﺷﺗ
ﺔﻌﻗرﻓ تاوﺻأ.ةرارﺣﻟا ﺔﺟرد ﻲﻓ تارﯾﻐﺗﻟا بﺑﺳﺑ ﺎﮭﻌﺳوﺗو ﺔﯾﻠﺧادﻟا ناردﺟﻟا شﺎﻣﻛﻧا
•يدﺎﻋ لﯾﻐﺷﺗ
ضارﻋﻷالﺣﻟاو لﻣﺗﺣﻣﻟا بﺑﺳﻟا
رﯾﻏ ﻲﻛذﻟا كﻔﺗﺎھ وأ ﻲﻟزﻧﻣﻟا كزﺎﮭﺟ
• ﺔﻛﺑﺷ ﻰﻠﻋ رﺛﻋاWi-Fi ﻰﻠﻋ كزﺎﮭﺟ لﺟﺳ مﺛ ،ﺎﮭﺗﻟازﺈﺑ مﻗ مﺛ ﻲﻛذﻟا كﻔﺗﺎﮭﺑ ﺔﻠﺻﺗﻣﻟا
• فﻗوأ
•) ﺔﯾﻛﻠﺳﻼﻟا ﺔﻛﺑﺷﻟا مﺳا نوﻛﯾ نأ بﺟﯾSSID ًازوﻣر مدﺧﺗﺳﺗ ﻻ) .ﺔﯾزﯾﻠﺟﻧﻹا ﺔﻐﻠﻟﺎﺑ مﺎﻗرأو فرﺣأ نﻣ ًﺎﻧوﻛﻣ (
• ددرﺗﺑ ﮫﯾﺟوﺗﻟا زﺎﮭﺟ مﻋد مﺗﯾ2.4 ﻰﻠﻋ ﻲﻛﻠﺳﻼﻟا ﮫﯾﺟوﺗﻟا زﺎﮭﺟ طﺑﺿا .طﻘﻓ زﺗرھ ﺎﻐﯾﻏ 2.4 لﺻو مﺛ زﺗرھ ﺎﻐﯾﻏ
• لﻛﺷﺑ ﮫﻧﯾوﻛﺗ رذﻌﺗﯾ دﻗو ﺔﻔﯾﻌﺿ ةرﺎﺷﻹا نوﻛﺗ دﻗ ،مزﻼﻟا نﻣ دﻌﺑأ ﮫﯾﺟوﺗﻟا زﺎﮭﺟو زﺎﮭﺟﻟا نﯾﺑ ﺔﻓﺎﺳﻣﻟا تﻧﺎﻛ اذإ
ﺔﻛﺑﺷﺑ نﯾﻠﺻﺗﻣWi-Fi.
زازﺗھﻻا ﺎًﺗوﺻ ﺔﯾدﺎﻌﻟا تازازﺗھﻻا ضﻌﺑ ردﺻُﺗ دﻗ ،طﺋﺎﺣ وأ ﺔﻧازﺧ سﻣﻼﯾ زﺎﮭﺟﻟا نﻣ ﻲﻔﻠﺧﻟا وأ ﻲﺑﻧﺎﺟﻟا ءزﺟﻟا نﺎﻛ لﺎﺣ ﻲﻓ
Wi-Fi(يﺎﻓ ياو)

ar_main.book.book Page 38 Wednesday, May 20, 2020 3:35 PM
؟ﺔﯾذﺎﺣﺗﻣ باوﺑﻷاو ،ﺔﯾوﺗﺳﻣ ﺔﺟﻼﺛﻟاو ،ةدﺗﻣﻣ ﺔﯾﻣﺎﻣﻷا لﺟرﻷا لھ
لﺎﺻﺗا ﻲﻓ نﺎﻧوﻛﺗ ثﯾﺣﺑ لﻣﺎﻛﻟﺎﺑ نﯾﺗﯾﻣﺎﻣﻷا ىوﺗﺳﻣﻟا طﺑﺿ ﻲﻣدﻗ دﻣﺑ مﻗ .ﺢﯾﺣﺻ لﻛﺷﺑ لﻣﻌﻟا نﻣ ﺎًﯾﺋﺎﻘﻠﺗ بﺎﺑﻟا ﺢﺗﻓ
بﺎﺑﻟا دﺎﻣِﻋ ﺢﺑﺻﯾ ﻰﺗﺣ رﺳﯾﻷا ﺔﺟﻼﺛﻟا بﺎﺑ ﻊﻓرﻟ بﺎﺑﻟا ةاذﺎﺣﻣ
.رﺳﯾﻷا ﺔﺟﻼﺛﻟا بﺎﺑ ﻊﻣ ﮫﺗاذﺎﺣﻣ مﺗﯾﻟ نﻣﯾﻷا ﺔﺟﻼﺛﻟا بﺎﺑ طﺑﺿﺑ مﻗ .ىرﺧأ ةرﻣ ﺢﯾﺣﺻ لﻛﺷﺑ لﻣﻌﯾ
؟ﺢﯾﺣﺻ لﻛﺷﺑ ﺔﯾوﺗﺳﻣ رﯾﻏ وأ ﺔﻔﯾﻌﺿ ﺔﯾﺿرأ ﻰﻠﻋ زﺎﮭﺟﻟا تﯾﺑﺛﺗ مﺗ لھ
.ﺎﮭﻓﺎﻘﯾإو ةرودﻟا لﯾﻐﺷﺗ دﻧﻋ ﺔﻘطﻘط ﺎًﺿﯾأ (زرطﻟا ضﻌﺑ ﻲﻓ زﺎﮭﺟﻟا ﻲﻓ مﻛﺣﺗﻟا وأ) تﺎﺗﺳوﻣرﺗﻟا
مﺳﻗ ﻲﻓ ةدوﺟوﻣﻟا تﺎﻣﯾﻠﻌﺗﻟا ﻊﺑﺗا .ضرﻷﺎﺑ تﺑﺎﺛ
حﺎﺑﺻﻣﻟا ﻲﻓ لطﻋ
Electronics.حﺎﺑﺻﻣﻟا كﻓ لوﺎﺣﺗ ﻻ .
؟طﺋﺎﺣﻟا زﺎﮭﺟﻟا نﻣ ﺔﯾﻔﻠﺧﻟا ﺔﮭﺟﻟا سﻣﻼﺗ لھ
؟زﺎﮭﺟﻟا فﻠﺧ ةرﺛﻌﺑﻣ ءﺎﯾﺷﻷا لھ
؟زﺎﮭﺟﻟا نﻣ يوﻠﻌﻟا ءزﺟﻟا ﻰﻠﻋ نﺋﺎﻛ دﺟوﯾ لھ
.زﺎﮭﺟﻟا لوﺣ وأ يوﻠﻌﻟا ءزﺟﻟا ﻲﻓ ﺔﻧّزﺧﻣﻟا رﺻﺎﻧﻌﻟا
.ﺔﯾﺿرﻷا ﻰﻠﻋ ٍوﺎﺳﺗﻣ لﻛﺷﺑ رﻘﺗﺳﻣ رﯾﻏ زﺎﮭﺟﻟا
.لﯾﻐﺷﺗﻟا ءﺎﻧﺛأ كرﺣﺗﯾ دﻗ ﻲﻟوط طﻏﺎﺿﺑ دوزﻣﻟا زﺎﮭﺟﻟا
.ىرﺧأ ةرﻣ ﺎﮭﻠﯾﻐﺷﺗ مﻗ مﺛ زﺎﮭﺟﻠﻟ
.فﺛﻛﻣﻟا ﺔﺣورﻣ ﺔطﺳاوﺑ فﺛﻛﻣﻟا رﺑﻋ ءاوﮭﻟا ﻊﻓد مﺗﯾ
ﺎﮭﺣﻼﺻإو لﺎطﻋﻷا فﺎﺷﻛﺗﺳا
ضارﻋﻷالﺣﻟاو لﻣﺗﺣﻣﻟا بﺑﺳﻟا
جرﺎﺧﻟاو لﺧادﻠﻟ يوطﻧﯾ ﻻ بﺎﺑﻟا دﺎﻣِﻋ
• ﺔﻔﯾظو وأ بﺎﺑﻟا دﺎﻣِﻋ ﺔﻔﯾظو ﻊﻧﻣﯾ ﺎﻣﻣ ،ﺔﺣﯾﺣﺻ رﯾﻏ ﺔﻘﯾرطﺑ ﺔﯾذﺎﺣﺗﻣ باوﺑﻷا ﺢﺑﺻﺗ دﻗ ،بﺎﺑﻟا تّﻼﺳ ءلﻣ درﺟﻣﺑ
ﻻ زﺎﮭﺟﻟا ﻲﻓ ﻲﻠﺧادﻟا حﺎﺑﺻﻣﻟا
• ﺔﻛرﺷ ﻲﻓ ءﻼﻣﻌﻟا تﺎﻣوﻠﻌﻣ زﻛرﻣﺑ لﺎﺻﺗﻻا ﻰﺟرُﯾﻓ ،حﺎﺑﺻﻣﻟا لﯾﻐﺷﺗ مﺗﯾ مﻟ اذإ .ﮫﺣﺗﻓ دﻋأو بﺎﺑﻟا ﻖﻠﻏأLG
ضارﻋﻷالﺣﻟاو لﻣﺗﺣﻣﻟا بﺑﺳﻟا
رﯾﻏ ﺎًﺗاوﺻأ ردﺻﯾو بﺧﺎﺻ زﺎﮭﺟﻟا
•.ﺔﯾوﺗﺳﻣو ﺔﺑﻠﺻ ﺔﯾﺿرأ ﻰﻠﻋ زﺎﮭﺟﻟا بﯾﻛرﺗﺑ مﻗ
•.زﺎﮭﺟﻟا لوﺣ ﺔﯾﻓﺎﻛ ﺔطﯾﺣﻣ ﺔﺣﺎﺳﻣﺑ حﺎﻣﺳﻠﻟ تﯾﺑﺛﺗﻟا ﻊﺿو طﺑﺿا
•.زﺎﮭﺟﻟا فﻠﺧ نﻣ ةرﺛﻌﺑﻣﻟا ءﺎﯾﺷﻷا لزأ
•.زﺎﮭﺟﻟا نﻣ يوﻠﻌﻟا ءزﺟﻟا ﻰﻠﻋ دوﺟوﻣﻟا نﺋﺎﻛﻟا لزأ
•يدﺎﻋ لﯾﻐﺷﺗ
•يدﺎﻋ لﯾﻐﺷﺗ
•.بﺎﺑﻟا ةاذﺎﺣﻣ مﺳﻗ رظﻧا .لﯾدﻌﺗ ﻰﻟإ جﺎﺗﺣﺗ ﺔﯾوﺳﺗﻟا لﺟرأ وأ ﺔﯾوﺗﺳﻣ رﯾﻏ وأ ﺔﻔﯾﻌﺿ ﺔﯾﺿرﻷا
• ﺔﻗﺎطﻟا لﯾﻐﺷﺗ فﺎﻘﯾﺈﺑ مﻗ ،ٍناوﺛ ثﻼﺛ دﻌﺑ ﺔﻌﻘﻌﻘﻟا نﻋ فﻗوﺗﯾ ﻻ طﻏﺎﺿﻟا نﺎﻛ لﺎﺣ ﻲﻓ .ﺔﯾﻌﯾﺑطﻟا لﯾﻐﺷﺗﻟا ﺔﯾﻠﻣﻋ
•يدﺎﻋ لﯾﻐﺷﺗ
•يدﺎﻋ لﯾﻐﺷﺗ
38
.ﺢﯾﺣﺻ ٍلﻛﺷﺑ
ﺞﯾﺟﺿﻟا
ﺔﻘطﻘطﻟا تاوﺻأ ﻲﻓ مﻛﺣﺗﻟا ردﺻﯾﺳ .ةرودﻟا ءﺎﮭﺗﻧاو ﻲﺋﺎﻘﻠﺗﻟا ﻊﯾﻘﺻﻟا ﺔﻟازإ ةرود ءدﺑ دﻧﻋ ﺔﻘطﻘط ﻊﯾﻘﺻﻟا ﺔﻟازإ ﻲﻓ مﻛﺣﺗﻟا ردﺻﯾﺳ
ﺔﻌﻘﻌﻗ تاوﺻأ وأ ،(طﻘﻓ ﺔﯾﺳأرﻟا زرطﻠﻟ) ةدﺣوﻟا نﻣ ﻲﻔﻠﺧﻟا ءزﺟﻟا ﻲﻓ هﺎﯾﻣﻟا طﺧ وأ ،زﺎﮭﺟﻟا ﻖﻓدﺗ نﻣ ﺔﻌﻘﻌﻘﻟا تاوﺻأ ردﺻﺗ دﻗ
زﯾزأ تاوﺻأ.ﺔﺟﻼﺛﻟاو دﻣﺟُﻣﻟا تادﺣو لﺧاد ءاوﮭﻟا رﺧﺑُﻣﻟا ﺔﺣورﻣ كرﺣﻣ رﺷﻧﯾ
AR
.ءﻲﺿﯾ
.ﺔﯾﻌﯾﺑط

ar_main.book.book Page 37 Wednesday, May 20, 2020 3:35 PM
37
AR
ﻲﻌﯾﺑط رﻣﻷا اذھ نأو ﺔﻠﻛﺷﻣ تﺳﯾﻟ هذھ نﺄﺑ دﻛﺄﺗﺗ نأ كﻧﻛﻣﯾ .فﯾﺻﻟا ءﺎﻧﺛأ وأ زﺎﮭﺟﻟا تﯾﺑﺛﺗ دﻌﺑ ةرﺷﺎﺑﻣ صﺧﻷﺎﺑ
ﺎﮭﺣﻼﺻإو لﺎطﻋﻷا فﺎﺷﻛﺗﺳا
؟ًﻻوأ هدﯾرﺑﺗ نود نﺧﺎﺳﻟا مﺎﻌطﻟا نﯾزﺧﺗﺑ تﻣﻗ لھ
؟دودﺳﻣ دﻣﺟُﻣﻟﺎﺑ صﺎﺧﻟا ءاوﮭﻟا جرﺧﻣ وأ لﺧدﻣ لھ
؟دﻣﺟُﻣﻟا ءلﻣ ﻲﻓ طارﻓﻹا مﺗ لھ
؟ﺢﯾﺣﺻ رﯾﻏ لﻛﺷﺑ ﻖﻠﻐﻣ زﺎﮭﺟﻟا بﺎﺑ لھ وأ اًرﯾﺛﻛ ﮫﻘﻠﻐﺗو زﺎﮭﺟﻟا بﺎﺑ ﺢﺗﻔﺗ لھ
؟ﺔﺑطر تﯾﺑﺛﺗﻟا ﺔﺋﯾﺑ لھ
.ﺔﻓﺎﺟ شﺎﻣﻗ ﺔﻌطﻗ مادﺧﺗﺳﺎﺑ ﺔﺑوطر ﺔﯾأ ﺢﺳﻣا .رطﻣُﻣ
.بﺎﺑﻟا ﺔﻘطﻧﻣ لوﺣ نوﻛﺗﻣﻟا فﯾﺛﻛﺗﻟا لﯾﻠﻘﺗﻟ زﺎﮭﺟﻟا نﻣ ﻖطﺎﻧﻣﻟا هذﮭﺑ ﺔﺗﺑﺛﻣ فﯾﺛﻛﺗﻟا نﻣ صﻠﺧﺗﻟا بﯾﺑﺎﻧأ دﺟوﺗ
؟زﺎﮭﺟﻟا نﻣ ﻲﻠﻔﺳﻟا ءزﺟﻟا ﻰﻠﻋ هﺎﯾﻣ دﺟوﺗ لھ
•.مﺎﻛﺣﺈﺑ ﻖﻠﻐﻣ بﺎﺑﻟا نأ نﻣ دﻛﺄﺗو بﺎﺑﻟا ﻖﯾﻌﯾ زﺎﮭﺟﻟا لﺧاد دوﺟوﻣﻟا مﺎﻌطﻟا رﺻﻧﻋ نﺎﻛ اذإ ﺎﻣ صﺣﻓا
•.دﻣﺟُﻣﻟا وأ ﺔﺟﻼﺛﻟا لﺧاد ﮫﻌﺿو لﺑﻗ ًﻻوأ نﺧﺎﺳﻟا مﺎﻌطﻟا د
رﺑ
ّ
ِ
•.لﺧادﻟﺎﺑ ءاوﮭﻟا رﯾودﺗ نﻛﻣﯾ ﻰﺗﺣ ءاوﮭﻟا جرﺧﻣ وأ لﺧدﻣ دادﺳﻧا مدﻋ نﻣ دﻛﺄﺗ
•.داوﻣﻟا نﯾﺑ ﺔﺑﺳﺎﻧﻣ ﺔﻓﺎﺳﻣ دوﺟو ﻰﻠﻋ ظﻓﺎﺣ
لﺧاد نّوﻛﺗ فﯾﺛﻛﺗﻟا وأ ﻊﯾﻘﺻﻟا
•.زﺎﮭﺟﻟا لﺧاد قرﺗﺧﯾ ﻲﺟرﺎﺧﻟا ءاوﮭﻟا نﺎﻛ لﺎﺣ ﻲﻓ فﯾﺛﻛﺗﻟا وأ ﻊﯾﻘﺻﻟا لﻛﺷﺗﯾ نأ نﻛﻣﯾ
• موﯾ لﺛﻣ بطر موﯾ ﻲﻓ وأ اًدﺟ ﺔﺑطر تﯾﺑﺛﺗﻟا ﺔﻘطﻧﻣ تﻧﺎﻛ لﺎﺣ ﻲﻓ زﺎﮭﺟﻟا ﺢطﺳ ﻰﻠﻋ فﯾﺛﻛﺗﻟا رﮭظﯾ نأ نﻛﻣﯾ
زﺎﮭﺟﻟا نﻣ ﻲﻣﺎﻣﻷا وأ ﻲﺑﻧﺎﺟﻟا ءزﺟﻟا
• نﺧﺎﺳ ﮫﻧﺄﺑ رﻌﺷﺗ دﻗ .فﯾﺛﻛﺗﻟا ﻊﻧﻣﻟ زﺎﮭﺟﻟا نﻣ ﻲﺑﻧﺎﺟﻟاو ﻲﻣﺎﻣﻷا بﻧﺎﺟﻟا ﻰﻠﻋ ةرارﺣﻟا رﯾرﺣﺗ بوﺑﻧأ تﯾﺑﺛﺗ مﺗﯾ
.اًدﺟ
.ﮫﺟرﺎﺧو زﺎﮭﺟﻟا لﺧاد هﺎﯾﻣ دﺟوﺗ؟زﺎﮭﺟﻟا لوﺣ هﺎﯾﻣ برﺳﺗ دﺟوﯾ لھ
•.رﺧآ نﺎﻛﻣ نﻣ وأ ضاوﺣﻷا دﺣأ نﻣ هﺎﯾﻣﻟا تﺑرﺳﺗ اذإ ﺎﻣﻣ ﻖﻘﺣﺗ
•.ﺔطﻗﺎﺳ وأ ةروﺳﻛﻣ ﺔﯾوﺎﺣ نﻣ وأ بﺋاذﻟا دﻣﺟﻣﻟا مﺎﻌطﻟا نﻋ ﺔﺟﺗﺎﻧ هﺎﯾﻣﻟا تﻧﺎﻛ اذإ ﺎﻣﻣ ﻖﻘﺣﺗ
ضارﻋﻷالﺣﻟاو لﻣﺗﺣﻣﻟا بﺑﺳﻟا
.دﻣﺟُﻣﻟﺎﺑ ﻊﯾﻘﺻﻟا نّوﻛﺗ.ﺢﯾﺣﺻ لﻛﺷﺑ ﺔﻘﻠﻐﻣ باوﺑﻷا نوﻛﺗ ﻻ دﻗ
.ﮫﺟرﺎﺧ وأ زﺎﮭﺟﻟا
.ﺊﻓاد
؟مﯾﻠﺳ لﻛﺷﺑ فﻓرﻷا بﯾﻛرﺗ مﺗ لھ
؟ﺔطرﻔﻣ ةوﻘﺑ بﺎﺑﻟا تﻘﻠﻏأ لھ
.ﻖﻓرﺑ بﺎﺑﻟا ﻖﻠﻏأ .فﻧﻌﺑ بﺎﺑﻟا ﻖﻠﻐﺗ ﻻ كﻧأ نﻣ دﻛﺄﺗ
.ﻲﻠﺧادﻟا طﻐﺿﻟا رﻘﺗﺳﯾ ﻰﺗﺣ ﺔﻠﯾﻠﻗ ﻖﺋﺎﻗد نوﺿﻏ ﻲﻓ ىرﺧأ ةرﻣ زﺎﮭﺟﻟا بﺎﺑ ﺢﺗﻔﺗ نأ لوﺎﺣ .زﺎﮭﺟﻟا لﺧاد
صاوﺧﻟاو ءازﺟﻷا
ضارﻋﻷالﺣﻟاو لﻣﺗﺣﻣﻟا بﺑﺳﻟا
.مﺎﻛﺣﺈﺑ ﻖﻠﻐﻣ رﯾﻏ زﺎﮭﺟﻟا بﺎﺑ؟مﺎﻣﻸﻟ لﺋﺎﻣ زﺎﮭﺟﻟا لھ
•.ًﻼﯾﻠﻗ ﻲﻣﺎﻣﻷا بﻧﺎﺟﻟا ﻊﻓرﻟ ﺔﯾﻣﺎﻣﻷا مدﻘﻟا طﺑﺿا
•.رﻣﻷا مزﻟ اذإ فﻓرﻷا بﯾﻛرﺗ دﻋأ
• .قﻼﻏﻹا لﺑﻗ ةزﯾﺟو ةرﺗﻔﻟ ﺎًﺣوﺗﻔﻣ لظﯾ دﻗ ،بﺎﺑﻟا ﻖﻠﻏ دﻧﻋ مزﻼﻟا نﻣ رﺛﻛأ ﺔﻋرﺳ وأ ةوﻗ مدﺧﺗﺳﺗ تﻧﻛ لﺎﺣ ﻲﻓ
.زﺎﮭﺟﻟا بﺎﺑ ﺢﺗﻓ بﻌﺻﻟا نﻣ؟ًةرﺷﺎﺑﻣ ﮫﻗﻼﻏإ دﻌﺑ بﺎﺑﻟا تﺣﺗﻓ لھ
• دوﺟوﻣﻟا طﻐﺿﻟا بﺑﺳﺑ تﺎﺑوﻌﺻ ﮫﺟاوﺗ دﻗ ،ﮫﻗﻼﻏإ دﻌﺑ ﺔﻘﯾﻗد نوﺿﻏ ﻲﻓ زﺎﮭﺟﻟا بﺎﺑ ﺢﺗﻓ لوﺎﺣﺗ تﻧﻛ لﺎﺣ ﻲﻓ

ar_main.book.book Page 36 Wednesday, May 20, 2020 3:35 PM
ﺎﮭﺣﻼﺻإو لﺎطﻋﻷا فﺎﺷﻛﺗﺳا
.هﺎﯾﻣﻟا عزوﻣ ﻲﻓ هﺎﯾﻣﻟا ﻖﻓدﺗ
(طﻘﻓ ﺔﯾﺳأرﻟا رﯾﻏ زرطﻟا) .ﺎًﻏرﺎﻓ هﺎﯾﻣﻟا عزوﻣ نازﺧ نوﻛﯾ دﻗ
(طﻘﻓ ﺔﯾﺳأرﻟا زرطﻠﻟ) ؟ﻖﻠﻐﻣ هﺎﯾﻣﻟا دوزﻣ مﺎﻣﺻ لھ
؟ﺔﺣﺷرﻣ رﯾﻏ هﺎﯾﻣ مدﺧﺗﺳﺗ لھ
.ﺢﺷرﻣﻟا رﻣﻋ نﻋ رظﻧﻟا ضﻐﺑ ﺔﯾوﻟوﻷا ﺔﻠﺣرﻣﻟا ﻲﻓ اًدودﺳﻣ نوﻛﯾ
؟ﮫﻟادﺑﺗﺳاو ﺢﺷرﻣﻟا تﯾﺑﺛﺑ تﻣﻗ نأ ذﻧﻣ لﯾوط تﻗو ﻰﺿﻣ لھ
.ﺢﺷرﻣﻟا
؟ﮫﺗﯾﺑﺛﺗ دﻌﺑ ﺔﯾﻟوﻷا ﺔﻠﺣرﻣﻟا ﻲﻓ مﯾﻠﺳ لﻛﺷﺑ ﻖﻓدﺗﻣ ءﺎﻣﺑ ﺢﺷرﻣﻟا فﯾظﻧﺗﺑ تﻣﻗ لھ
ﻲﻟاوﺣ ﻎﯾرﻔﺗو ﻊﯾزوﺗ دﻌﺑ زﺎﮭﺟﻟا مدﺧﺗﺳا5 ﺔﻌﻓار ﻰﻠﻋ طﻐﺿﻟا ﻖﯾرط نﻋ عزوﻣﻟا نﻣ ﺔﯾﻘﻧﻟا هﺎﯾﻣﻟا نﻣ تارﺗﻟ
(رﺷﺑﻠﻟ ٍرﺎﺿ رﯾﻏ طﺷﻧﻣﻟا نوﺑرﻛﻟا) .هﺎﯾﻣﻟا ﻊﯾزوﺗ
؟نﻣزﻟا نﻣ ﺔﻠﯾوط ةرﺗﻔﻟ مدﺧﺗﺳﺗ مﻟ ةدرﺎﺑﻟا هﺎﯾﻣﻟا وأ ﺔﯾﻘﻧﻟا هﺎﯾﻣﻟا لھ
.هﺎﯾﻣﻟا عزوﻣ نﻣ (ﻖﺋﺎﻗد
36
AR
ضارﻋﻷالﺣﻟاو لﻣﺗﺣﻣﻟا بﺑﺳﻟا
.جرﺧﺗ ﻻ هﺎﯾﻣﻟا(طﻘﻓ ﺔﯾﺳأرﻟا زرطﻠﻟ) .دوزﻣﻟا مﺎﻣﺻ لﯾﻐﺷﺗ فﺎﻘﯾإ مﺗﯾ دﻗ
•.هﺎﯾﻣﻟا دوزﻣ مﺎﻣﺻ ﺢﺗﻓا
• ﻊﻧﻣو هﺎﯾﻣﻟا (رﺗﻠﻓ) ﺢﺷرﻣ دﻣﺟﺗ ﻰﻟإ كﻟذ يدؤﯾﺳ ،ةدورﺑﻟا ةدﯾدﺷ تﻧﺎﻛ اذﺈﻓ ﺔﺟﻼﺛﻟا ةدﺣو ةرارﺣ ﺔﺟرد نﻣ ﻖﻘﺣﺗ
•.هﺎﯾﻣﻟا عزوﻣ نازﺧ ﻸﻣا
•.هﺎﯾﻣﻟا دوزﻣ مﺎﻣﺻ ﺢﺗﻓا
• دﻗ ﺢﺷرﻣﻟا نﺈﻓ اذﻟ ،ﺔﺑﯾرﻐﻟا داوﻣﻟا وأ ﺔﻠﯾﻘﺛﻟا ندﺎﻌﻣﻟا نﻣ ةرﯾﺑﻛ ﺔﯾﻣﻛ ﻰﻠﻋ ﺔﺣﺷرﻣﻟا رﯾﻏ هﺎﯾﻣﻟا يوﺗﺣﺗ نأ نﻛﻣﯾ
.ﺎًﺑﯾرﻏ هﺎﯾﻣﻟا قاذﻣ ودﺑﯾ؟ﺔﯾﻘﻧﺗ زﺎﮭﺟ نﻣ هﺎﯾﻣ قاذﻣﺑ ﮫﺗﻧرﺎﻘﻣ دﻧﻋ ﺎًﻔﻠﺗﺧﻣ هﺎﯾﻣﻟا قاذﻣ لھ
•؟نﻣزﻟا نﻣ ﺔﻠﯾوط ةرﺗﻔﻟ مدﺧﺗﺳﺗ مﻟ ةدرﺎﺑﻟا هﺎﯾﻣﻟا وأ ﺔﯾﻘﻧﻟا هﺎﯾﻣﻟا لھ
• لادﺑﺗﺳا ةرﺗﻔﻟ ﺎًﻘﻓو ﺢﺷرﻣﻟا لادﺑﺗﺳﺎﺑ ﻰﺻوُﯾ .ﺔﯾﻘﻧﺗﻟا ءادأ ضﻔﺧﻧﯾ دﻗ ،ﺔﯾﺣﻼﺻﻟا ﻲﮭﺗﻧﻣ ﺢﺷرﻣ مادﺧﺗﺳا لﺎﺣ ﻲﻓ
• .ﺢﺷرﻣﻟا لﺧاد نﻣ طﺷﻧﻟا نوﺑرﻛﻟا ﺎﯾﺎﻘﺑو ءاوﮭﻟا ﺔﻟازﻹ ﺔﺟﺎﺣﺑ تﻧأ ،ﻰﻟوﻷا ةرﻣﻠﻟ ﺢﺷرﻣﻟا لادﺑﺗﺳا وأ تﯾﺑﺛﺗ دﻧﻋ
• ﻲﻟاوﺣ ﻎﯾرﻔﺗو ﻊﯾزوﺗ دﻌﺑ ﺞﺗﻧﻣﻟا مدﺧﺗﺳا .يرﯾﺗﻛﺑﻟا وﻣﻧﻟا بﺑﺳﺑ ﺔﻣﯾدﻘﻟا هﺎﯾﻣﻟا قاذﻣ رﯾﻐﺗﯾ دﻗ5 ثﻼﺛ ﻲﻟاوﺣ) تارﺗﻟ
؟ًﻻوأ هدﯾرﺑﺗ نود نﺧﺎﺳﻟا مﺎﻌطﻟا نﯾزﺧﺗﺑ تﻣﻗ لھ
؟ﺎًﺣوﺗﻔﻣ زﺎﮭﺟﻟا بﺎﺑ كرﺗﺗ لھ
؟اًدﺟ اًرﯾﺛﻛ ﮫﻘﻠﻐﺗو زﺎﮭﺟﻟا بﺎﺑ ﺢﺗﻔﺗ لھ
؟ﺔﯾوﺎﺣ ﻲﻓ ﮫﻟزﻋ نودﺑ لﺧادﻟﺎﺑ ﺎًﺋﻓاد وأ ﺎًﺑطر ﺎًﻣﺎﻌط ﻊﺿﺗ لھ
ّ
زﺧ
ِ
ﻊﯾﻘﺻﻟاو فﯾﺛﻛﺗﻟا
ضارﻋﻷالﺣﻟاو لﻣﺗﺣﻣﻟا بﺑﺳﻟا
ﻰﻠﻋ وأ زﺎﮭﺟﻟا لﺧاد فﯾﺛﻛﺗ دﺟوﯾ
.تاوارﺿﺧﻟا جرد ءﺎطﻏ لﻔﺳأ
•.دﻣﺟُﻣﻟا وأ ﺔﺟﻼﺛﻟا لﺧاد ﮫﻌﺿو لﺑﻗ ًﻻوأ نﺧﺎﺳﻟا مﺎﻌطﻟا دﯾرﺑﺗﺑ مﻗ
•.ﺔﻓﺎﺟ شﺎﻣﻗ ﺔﻌطﻗ مادﺧﺗﺳﺎﺑ ﮫﺣﺳﻣ كﻧﻛﻣﯾ ،زﺎﮭﺟﻟا بﺎﺑﻟ كﻘﻠﻏ دﻌﺑ ةرﺷﺎﺑﻣ ﻲﻔﺗﺧﯾﺳ فﯾﺛﻛﺗﻟا نأ نﻣ مﻏرﻟا ﻰﻠﻋ
•.ﺔﻓﺎﺟ شﺎﻣﻗ ﺔﻌطﻗ مادﺧﺗﺳﺎﺑ ﺔﺑوطرﻟا ﺢﺳﻣا .جرﺎﺧﻟا نﻋ ﺔﻔﻠﺗﺧﻣﻟا ةرارﺣﻟا بﺑﺳﺑ فﯾﺛﻛﺗﻟا نوﻛﺗﯾ نأ نﻛﻣﯾ
•.ﻖﻠﻐﻟا مﻛﺣﻣ وأ ﻰطﻐﻣ ءﺎﻋو ﻲﻓ مﺎﻌطﻟا ن

ar_main.book.book Page 35 Wednesday, May 20, 2020 3:35 PM
35
AR
ﻰﻠﻋ
ﺎﮭﺣﻼﺻإو لﺎطﻋﻷا فﺎﺷﻛﺗﺳا
؟اًرﺧؤﻣ زﺎﮭﺟﻟا تﯾﺑﺛﺗﺑ تﻣﻗ لھ
؟دوزﻣﻟا مﺎﻣﺻ ﺢﺗﻓو زﺎﮭﺟﻟﺎﺑ هﺎﯾﻣﻟا دوزﻣ بوﺑﻧأ لﯾﺻوﺗﺑ تﻣﻗ لھ
؟ٍنﺣﻧﻣ هﺎﯾﻣﻟا دوزﻣ موطرﺧ لھ
؟اًرﺧؤﻣ ﺞﻠﺛﻟا نﻣ ةرﯾﺑﻛ ﺔﯾﻣﻛ ﻊﯾزوﺗﺑ تﻣﻗ لھ
؟لﯾﻐﺷﺗﻟا ﻊﺿو ﻰﻠﻋ مﻛﺣﺗﻟا ﺔﺣوﻟ ﻰﻠﻋ ﻲﺋﺎﻘﻠﺗﻟا ﺞﻠﺛﻟا ﻊﻧﺎﺻ لﯾﻐﺷﺗ رز وأ ﺞﻠﺛﻟا ﻊﻧﺎﺻ حﺎﺗﻔﻣ طﺑﺿﺑ تﻣﻗ لھ
ON
ﺔﻛرﺷ ﻊﻗوﻣ ةرﺎﯾزﺑ مﻗ ،مادﺧﺗﺳﻻا ﺔﯾﻔﯾﻛ لوﺣ لﯾﺻﺎﻔﺗﻟا نﻣ دﯾزﻣﻟا ﻰﻠﻋ لوﺻﺣﻠﻟ) .مﻛﺣﺗﻟا ﺔﺣوﻟLG
Electronics(.كﺑ صﺎﺧﻟا ﻲﻛذﻟا زﺎﮭﺟﻟا مدﺧﺗﺳا وأ
؟ﺔﯾﺎﻐﻠﻟ ﺔﻌﻔﺗرﻣ نوﻛﺗﻟ ﺎﮭطﺑﺿ مﺗ دﻣﺟُﻣﻟا ةدﺣو ةرارﺣ ﺔﺟرد لھ
ﻰﻠﻋ دﻣﺟُﻣﻟا ةرارﺣ ﺔﺟرد18.ﻲﺋﺎﻘﻠﺗﻟا ﺞﻠﺛﻟا ﻊﻧﺎﺻﻟ ﺔﯾﻌﯾﺑط لﯾﻐﺷﺗ ﺔﯾﻠﻣﻋ ﻰﻠﻋ لوﺻﺣﻠﻟ ﺔﯾوﺋﻣ ﺔﺟرد
؟اًرﯾﺛﻛ زﺎﮭﺟﻟا بﺎﺑ ﺢﺗﻔﺑ موﻘﺗ لھ
؟لﻣﺎﻛﻟﺎﺑ لﻔﻘﻣ زﺎﮭﺟﻟا بﺎﺑ لھ
.ﺎًﻣﺎﻣﺗ زﺎﮭﺟﻟا بﺎﺑ
(.ﺞﻠﺛﻟا قودﻧﺻ لﺻﻓ ﻖﯾرط نﻋ ﺞﻠﺛﻟا رﻣﻣ صﺣﻓ كﻧﻛﻣﯾ) ؟دودﺳﻣ ﺞﻠﺛﻟا رﺎﺳﻣ لھ
.اًرﯾﺛﻛ
ءﺎﻣﻟاو ﺞﻠﺛﻟا
ضارﻋﻷالﺣﻟاو لﻣﺗﺣﻣﻟا بﺑﺳﻟا
وأ ﺎًﺟﻠﺛ ﻲﺋﺎﻘﻠﺗﻟا ﺞﻠﺛﻟا ﻊﻧﺎﺻ ﺞﺗﻧﯾ ﻻ
• ءﺎﺿﻘﻧا دﻧﻋ ﻲﻌﯾﺑط لﻛﺷﺑ ﺎًﺟﻠﺛ ﺞﻠﺛﻟا ﻊﻧﺎﺻ ﺞﺗﻧﯾ48.زﺎﮭﺟﻟا تﯾﺑﺛﺗ دﻌﺑ ﺎًﺑﯾرﻘﺗ ﺔﻋﺎﺳ
•.ةدورﺑﻟا ةدﯾدﺷ ﺔﺟﻼﺛﻟا ةدﺣو ةرارﺣ ﺔﺟرد تﻧﺎﻛ اذإ ﺞﻠﺛﻟا ﻊﻧﺎﺻ ﻲﻓ ءﺎﻣﻟا ﻖﻓدﺗ ﻊﻧﻣﯾو ﺢﺷرﻣﻟا دﻣﺟﺗﯾ دﻗ
•.لﻣﺎﻛﻟﺎﺑ دوزﻣﻟا مﺎﻣﺻ ﺢﺗﻓاو زﺎﮭﺟﻟﺎﺑ هﺎﯾﻣﻟا دوزﻣ بوﺑﻧأ لﯾﺻوﺗﺑ مﻗ
•.هﺎﯾﻣﻟا ﻖﻓدﺗ لﯾﻠﻘﺗ نﻛﻣﯾ ،ﺎًﯾﻧﺣﻧﻣ هﺎﯾﻣﻟا دوزﻣ موطرﺧ نﺎﻛ لﺎﺣ ﻲﻓ
• رﻣﻷا بﻠطﺗﯾ24.رﺎظﺗﻧﻻا ﻰﺟرﯾ .ﻲﺋﺎﻘﻠﺗﻟا ﺞﻠﺛﻟا ﻊﻧﺎﺻ ﻲﻓ ﺞﻠﺛﻟا نﻣ دﯾزﻣﻟا جﺎﺗﻧﻹ ﺎًﺑﯾرﻘﺗ ﺔﻋﺎﺳ
• ﻰﻠﻋ طﻐﺿاI لﯾﻐﺷﺗﻟا ﻊﺿو ﻰﻠﻋ ﻲﺋﺎﻘﻠﺗﻟا ﺞﻠﺛﻟا ﻊﻧﺎﺻ رز طﺑﺿا وأ ﻲﺋﺎﻘﻠﺗﻟا ﺞﻠﺛﻟا ﻊﻧﺎﺻ حﺎﺗﻔﻣ ﻰﻠﻋ
• طﺑﺿا .قﻼطﻹا ﻰﻠﻋ ﮫﺟﺎﺗﻧإ مﺗﯾ نﻟ وأ ءطﺑﺑ ﺞﻠﺛﻟا جﺎﺗﻧإ مﺗﯾﺳ ،اًدﺟ ﺔﺋﻓاد ةددﺣﻣﻟا ةرارﺣﻟا ﺔﺟرد تﻧﺎﻛ لﺎﺣ ﻲﻓ
• ﮫﻘﻠﻐﺗو زﺎﮭﺟﻟا بﺎﺑ ﺢﺗﻔﺗ ﻻ .ﺞﻠﺛﻟا جﺎﺗﻧإ ﺔﻋرﺳ لﻘﺗﺳو ،درﺎﺑﻟا ءاوﮭﻟا برﺳﺗﯾﺳ ،اًرﯾﺛﻛ زﺎﮭﺟﻟا بﺎﺑ ﺢﺗﻔﺗ تﻧﻛ لﺎﺣ ﻲﻓ
• ﻖﻠﻏأ .ﺞﻠﺛﻟا جﺎﺗﻧإ ﺔﻋرﺳ لﻘﺗﺳو ،ﻊﻔﺗرﺗﺳ دﻣﺟُﻣﻟا ةدﺣو ةرارﺣ ﺔﺟرد نﺈﻓ ،ﺎًﻣﺎﻣﺗ ًﻼﻔﻘﻣ زﺎﮭﺟﻟا بﺎﺑ نﺎﻛ لﺎﺣ ﻲﻓ
•.ﺞﻠﺛﻟا ﻊﯾزوﺗﻟ ﻲﻟدﺎﺑﺗ لﻛﺷﺑ شورﺟﻣﻟا ﺞﻠﺛﻟاو بﻌﻛﻣﻟا ﺞﻠﺛﻟا ﻲﻌﺿو ددﺣ ،مﻛﺣﺗﻟا ﺔﺣوﻟ ﻲﻓ
•.مظﺗﻧﻣ لﻛﺷﺑ ﺞﻠﺛﻟا رﺎﺳﻣ فﯾظﻧﺗﺑ مﻗو ﺞﻠﺛﻟا صﺣﻓا .اًدودﺳﻣ ﺞﻠﺛﻟا رﻣﻣ نﺎﻛ اذإ ﺢﯾﺣﺻ لﻛﺷﺑ ﺞﻠﺛﻟا ﻊﯾزوﺗ مﺗﯾ ﻻ دﻗ
.ﺞﻠﺛﻟا نﻣ ةرﯾﻐﺻ ﺔﯾﻣﻛ ﺞﺗﻧﯾ
.ﺞﻠﺛﻟا ﻊﯾزوﺗ مﺗﯾ ﻻ؟ﺞﻠﺛﻟا جورﺧ توﺻ عﺎﻣﺳ كﯾﻠﻋ رذﻌﺗﯾ

ar_main.book.book Page 34 Wednesday, May 20, 2020 3:35 PM
ﺎﮭﺣﻼﺻإو لﺎطﻋﻷا فﺎﺷﻛﺗﺳا
ﺎﮭﺣﻼﺻإو لﺎطﻋﻷا فﺎﺷﻛﺗﺳا
ﺔﻣدﺧﻟا ﻰﻠﻋ لوﺻﺣﻠﻟ لﺎﺻﺗﻻا لﺑﻗ
.ىرﺧﻷا ةزﮭﺟﻷا ﺔﻗﺎط صﺣﻓا
؟نﺎﺧﺳ وأ ﻲﮭط نرﻓ لﺛﻣ ةرارﺣﻠﻟ دﻟوُﻣ نﺋﺎﻛ نﻣ بﯾرﻗ وھ لھ وأ ،رﺷﺎﺑﻣ سﻣﺷ ءوﺿﻟ ضرﻌﻣ زﺎﮭﺟﻟا لھ
؟ًﻻوأ هدﯾرﺑﺗ نود نﺧﺎﺳﻟا مﺎﻌطﻟا نﯾزﺧﺗﺑ تﻣﻗ لھ
رﺑ
ّ
ِ
؟ﺔﻣﻌطﻷا نﻣ اًدﺟ رﯾﺛﻛﻟا ﻊﺿﺗ لھ
؟لﻣﺎﻛﻟﺎﺑ ﺔﻠﻔﻘﻣ زﺎﮭﺟﻟا باوﺑأ لھ
؟زﺎﮭﺟﻟا لوﺣ ﺔﯾﻓﺎﻛ ﺔﺣﺎﺳﻣ دﺟوﺗ لھ
؟ﺔﯾوﻗ ﺔﺣﺋار اذ ﺎًﻣﺎﻌط تﻌﺿو لھ
.جردﻟا ﻲﻓ ﺔﮭﻛﺎﻔﻟا وأ تاورﺿﺧﻟا دﺳﻔﺗ دﻗ
ّ
ظﻧو ﺔﻧﻔﻌﺗﻣﻟا تاورﺿﺧﻟا نﻣ صﻠﺧﺗ
ِ
.تاورﺿﺧﻟا
34
AR
دﯾرﺑﺗﻟا
ضارﻋﻷالﺣﻟاو لﻣﺗﺣﻣﻟا بﺑﺳﻟا
.دﯾﻣﺟﺗ وأ دﯾرﺑﺗ دﺟوﯾ ﻻ؟ﻲﺑرﮭﻛﻟا رﺎﯾﺗﻟا ﻲﻓ عﺎطﻘﻧا كﺎﻧھ لھ
•.ىرﺧﻷا ةزﮭﺟﻷا ﺔﻗﺎط صﺣﻓا
•.مﯾﻠﺳ لﻛﺷﺑ ﻲﺑرﮭﻛﻟا رﺎﯾﺗﻟا ذﺧﺄﻣ ﻲﻓ ﺔﻗﺎطﻟا سﺑﺎﻗ لﯾﺻوﺗﺑ مﻗ
.ءيدر دﯾﻣﺟﺗ وأ دﯾرﺑﺗ دﺟوﯾ؟ﺎﮭﺑ صﺎﺧﻟا ﺎًﺋﻓد رﺛﻛﻷا دادﻋﻹا ﻰﻟإ دﻣﺟُﻣﻟا ةرارﺣ ﺔﺟرد طﺑﺿ مﺗ لھ
•.ةدورﺑ رﺛﻛأ دادﻋإ ﻰﻠﻋ دﻣﺟُﻣﻟا وأ ﺔﺟﻼﺛﻟا ةرارﺣ ﺔﺟرد نﯾﯾﻌﺗﺑ مﻗ
•.ةرارﺣﻟا ردﺻﺗ ﻲﺗﻟا ءﺎﯾﺷﻷا نﻋ اًدﯾﻌﺑ ﺞﺗﻧﻣﻟا بﯾﻛرﺗ دﻋأو بﯾﻛرﺗﻟا ﺔﻘطﻧﻣ نﻣ ﻖﻘﺣﺗ
•.دﻣﺟُﻣﻟا وأ ﺔﺟﻼﺛﻟا لﺧاد ﮫﻌﺿو لﺑﻗ ًﻻوأ نﺧﺎﺳﻟا مﺎﻌطﻟا د
•.ﺔﻣﻌطﻷا نﯾﺑ ﺔﺑﺳﺎﻧﻣ ﺔﻓﺎﺳﻣ دوﺟو ﻰﻠﻋ ظﻓﺎﺣ
•.بﺎﺑﻟا ﻖﯾﻌﯾ ﻻ نزﺧُﻣﻟا مﺎﻌطﻟا نأ نﻣ دﻛﺄﺗو لﻣﺎﻛ لﻛﺷﺑ بﺎﺑﻟا قﻼﻏﺈﺑ مﻗ
•.زﺎﮭﺟﻟا لوﺣ ﺔﯾﻓﺎﻛ ﺔﺣﺎﺳﻣ رﯾﻓوﺗﻟ تﯾﺑﺛﺗﻟا ﻊﺿو طﺑﺿا
.ﺔﺋﯾﺳ ﺔﺣﺋار ﻰﻠﻋ زﺎﮭﺟﻟا يوﺗﺣﯾ؟"ﺊﻓاد" ﻊﺿو ﻰﻠﻋ دﻣﺟُﻣﻟا ةرارﺣ ﺔﺟرد طﺑﺿ مﺗ لھ
•.ةدورﺑ رﺛﻛأ دادﻋإ ﻰﻠﻋ دﻣﺟُﻣﻟا وأ ﺔﺟﻼﺛﻟا ةرارﺣ ﺔﺟرد نﯾﯾﻌﺗﺑ مﻗ
•.ﺔﻘﻠﻐﻣ تﺎﯾوﺎﺣ ﻲﻓ ﺔﯾوﻗ ﺢﺋاور ﻰﻠﻋ يوﺗﺣﺗ ﻲﺗﻟا ﺔﻣﻌطﻷا نﯾزﺧﺗﺑ مﻗ
• جرد ﻲﻓ اًدﺟ ﺔﻠﯾوط ةرﺗﻔﻟ تاورﺿﺧﻟا نﯾزﺧﺗﺑ مﻘﺗ ﻻ .تاورﺿﺧﻟا جرد ف

ﮫﯾﺑﻧﺗ
ar_main.book.book Page 33 Wednesday, May 20, 2020 3:35 PM
33
AR
ﺔﻧﺎﯾﺻﻟا
ﺢﺷرﻣ ﻲﻓ نوﻠﻣﻟا طﺧﻟا ﺢﺑﺻﯾ ﻰﺗﺣ مﺎﻛﺣﺈﺑ ﻲﻧوزﻠﺣﻟا سأرﻟا بﯾﻛرﺗﺑ مﻗ
.ﻲﺋرﻣ رﯾﻏ هﺎﯾﻣﻟا
ثﯾﺣ .ٍناوﺛ ثﻼﺛ ةدﻣﻟ
ﺢﺷرﻣ لﯾﻌﻔﺗ مﺗ .
ةدﻣﻟ هﺎﯾﻣﻟا ﻊﯾزوﺗﺑ مﻗ ،مﺎظﻧﻟا نﻣ تﺎﺛوﻠﻣﻟاو سوﺑﺣﻣﻟا ءاوﮭﻟا ﺔﻟازﻹ5
Replacement Filter
Water Filter
رز ﻰﻠﻋ رارﻣﺗﺳﻻا ﻊﻣ طﻐﺿا
زﻣرﻟا طﺑﺿ كﻟذ دﯾﻌﯾ
.دﯾدﺟﻟا هﺎﯾﻣﻟا
.ﺎًﺑﯾرﻘﺗ ﻖﺋﺎﻗد
نﻣ ةدﻣﺗﻌﻣLG ﺢﺷرﻣﻟا ةدﺣو ﻲﻓ بﯾرﺳﺗ ثودﺣ ﻲﻓ بﺑﺳﺗﯾ نأ نﻛﻣﯾ
.تﺎﻛﻠﺗﻣﻣﻟا فﻼﺗإو
هﺎﯾﻣﻟا ﺢﺷرﻣ ﻲﻓ نوﻠﻣﻟا طﺧﻟا ﺢﺑﺻﯾ ﻰﺗﺣ مﺎﻛﺣﺈﺑ ﻲﻧوزﻠﺣﻟا سأرﻟا طﺑرا
4
ثﯾﺣ .ٍناوﺛ ثﻼﺛ ةدﻣﻟ
5
ﺢﺷرﻣ لﯾﻌﻔﺗ مﺗ .
ةدﻣﻟ هﺎﯾﻣﻟا ﻊﯾزوﺗﺑ مﻗ ،مﺎظﻧﻟا نﻣ تﺎﺛوﻠﻣﻟاو سوﺑﺣﻣﻟا ءاوﮭﻟا ﺔﻟازﻹ5
Water Filter
Replacement Filter
رز ﻰﻠﻋ رارﻣﺗﺳﻻا ﻊﻣ طﻐﺿا
زﻣرﻟا طﺑﺿ كﻟذ دﯾﻌﯾ
6
*1
.ﻲﻏارﺑﻠﻟ ﻲﻧوزﻠﺣﻟا سأرﻟا لزأ
• رﯾﻏ هﺎﯾﻣ تﺎﺣﺷرﻣ مادﺧﺗﺳا وأ موزﻠﻟا دﻧﻋ ﺢﺷرﻣﻟا لادﺑﺗﺳا ﻲﻓ لﺷﻔﻟا
.هﺎﯾﻣﻟا ﺢﺷرﻣ جرﺎﺧ بوﺑﻧﻷا بﺣﺳا
4
.ﻲﺋرﻣ رﯾﻏ
5
.دﯾدﺟﻟا هﺎﯾﻣﻟا
6
.ﺎًﺑﯾرﻘﺗ ﻖﺋﺎﻗد
ﻊﻓدﻟ ﺔﺑﺳﺎﻧﻣ تﻼﺻوﻣ عوﻧ
1
2
.ﮫﻓرط ﻰﺗﺣ لﺧادﻟﺎﺑ ﮫﻧأ نﻣ دﻛﺄﺗو ،هﺎﯾﻣﻟا ﺢﺷرﻣ ﻲﻓ بوﺑﻧﻷا ﻊﻓدا
3

رﯾذﺣﺗ
ﮫﯾﺑﻧﺗ
ﺔظﺣﻼﻣ
ar_main.book.book Page 32 Wednesday, May 20, 2020 3:35 PM
ﺔﻧﺎﯾﺻﻟا
32
AR
هﺎﯾﻣﻟﺎﺑ دادﻣﻹا تﺎﻣﻠﻌﻣ/لﯾﻐﺷﺗﻟا لﯾﻟد
ءﺎﻣﻟا ةرارﺣ ﺔﺟرد0.6 - 37.8ﺔﯾوﺋﻣ ﺔﺟرد
(ﻲﺳأر زارط) هﺎﯾﻣﻟا ﺢﺷرﻣ لادﺑﺗﺳا
لﻛ ﺢﺷرﻣﻟا لادﺑﺗﺳا بﺟﯾ6 جارﺧإ ةردﻗ لﻘﯾ وأ رﺷؤﻣﻟا ﺊﺿﯾ ﺎﻣدﻧﻋ وأ رﮭﺷأ
دﯾزﻣﻟا ﻰﻠﻋ لوﺻﺣﻠﻟو .
نوﻠﻣﻟا طﺧﻟا ﺢﺑﺻﯾ ﻰﺗﺣ هﺎﯾﻣﻟا ﺢﺷرﻣ سأر جرﺎﺧ بوﺑﻧﻷا بﺣﺳا
a
ﺔﻛرﺷ ﻲﻓ ءﻼﻣﻌﻟاLG Electronics نﻣ
ﺎﻧﻌﻗوﻣ ةرﺎﯾزﺑ مﻗ ةدﻋﺎﺳﻣﻟاlg.com
*1
ﺔﯾﺑﻟوﻟ نوﻧﺳ ﺔﻟوﻣﺎﺻ عوﻧﻟا
.ﻲﻧوزﻠﺣﻟا سأرﻟا كﻓ
ءﺎﻣﻟا طﻐﺿ138 - 827لﺎﻛﺳﺑ وﻠﯾﻛ
ﺔﻌﺳﻟا1892رﺗﻟ
.هﺎﯾﻣﻟا عزوﻣ
- :ﺔﻠﯾدﺑﻟا ةدﺣوﻟا مدﺧﺗﺳاADQ736939**
- تﺎﻣوﻠﻌﻣ زﻛرﻣﺑ لﺎﺻﺗﻻا وأ ﻲﻠﺣﻣﻟا عزوﻣﻟا وأ رﺟﺎﺗﻟا ةرﺎﯾزﺑ مﻗ
.ﺎًﯾﺋرﻣ
Water Filter(هﺎﯾﻣﻟا ﺢﺷرﻣ)
هﺎﯾﻣﻟا رﺗﻠﻓ لادﺑﺗﺳا ﺔﯾﻠﻣﻋ لﺑﻗ
مادﺧﺗﺳا نﻛﻣﯾ .هدﻌﺑ وأ مﺎظﻧﻟا مادﺧﺗﺳا لﺑﻗ ٍفﺎﻛ رﯾﮭطﺗ نود ﺔﻓورﻌﻣﻟا رﯾﻏ
دﻗ ﻲﺗﻟاو ةرﮭطﻣﻟا رﯾﻏ هﺎﯾﻣﻟا ﻲﻓ تﺎﯾﻠﯾﻔطﻟا ﺔﺑﺳﻧ ضﯾﻔﺧﺗﻟ ةدﻣﺗﻌﻣ ﺔﻣظﻧأ
*1 .زرُطﻟا ضﻌﺑ ﻲﻓ ﻻإ ﺔﯾﺻﺎﺧﻟا هذھ رﻓوﺗﺗ ﻻ
•:لﯾدﺑﻟا هﺎﯾﻣ رﺗﻠﻓ ءارﺷﻟ
طﻐﺿ نﻣ ﻖﻘﺣﺗﻟا ﺔﯾﻔﯾﻛ نﻣ دﻛﺄﺗﻣ رﯾﻏ تﻧﻛ اذإ ﺔﻛﺎﺑﺳﻟا ﻲﻧﻔﺑ لﺻﺗا .طﻐﺿﻟا
ﺦﺿ زﺟﺣ مﺎظﻧ بﯾﻛرﺗ بﺟﯾﻓ ،(ﺔﯾﺋﺎﻣﻟا ﺔﻗرطﻣﻟا) هﺎﯾﻣﻟا ﺦﺿ تﻻﺎﺣ عوﻗو
هذھ نﻣ ﻖﻘﺣﺗﻟا ﺔﯾﻔﯾﻛ نﻣ دﻛﺄﺗﻣ رﯾﻏ تﻧﻛ اذإ ﺔﻛﺎﺑﺳﻟا ﻲﻧﻔﺑ لﺻﺗا .هﺎﯾﻣﻟا
.ﺔﯾﻔﺻﺗﻠﻟ ﺔﻠﺑﺎﻗ تﺎﯾﻠﯾﻔط ﻰﻠﻋ يوﺗﺣﺗ
1
اذھ ﺔﯾﻔﺻﺗﻟا مﺎظﻧﻟ ءﺎﻣﻟا ةرارﺣ ﺔﺟردﻟ37.8.ﺔﯾوﺋﻣ ﺔﺟرد
نﻣ هﺎﯾﻣﻟا فﯾرﺻﺗﺑ مﻗ .دﻣﺟﺗﻟا نﻣ رﺗﻠﻔﻟا ﻰﻠﻋ ظﻓﺎﺣ
.ﻖﻓدﺗﻟا لدﻌﻣ ﻲﻓ ظوﺣﻠﻣ ضﺎﻔﺧﻧا ثودﺣ دﻧﻋ وأ ﺎﮭﻟ ةررﻘﻣﻟا ﺔﻌﺳﻟا ﻰﻠﻋ
2
.يرارﺣﻟا ددﻣﺗﻟا نﻋ ﺞﺗﺎﻧﻟا طﻐﺿﻟا ﻲﻓ مﻛﺣﺗﻠﻟ
نﻣ لﻗأ ﻰﻟإ ةرارﺣﻟا ﺔﺟرد4.4.ﺔﯾوﺋﻣ ﺔﺟرد
ﺔﯾﺎﻣﺣ زﺎﮭﺟ بﯾﻛرﺗ دﻧﻋ
•.ﮫﺑﯾﻛرﺗ ءﺎﻧﺛأ ةرﯾﻐﺻﻟا ﺞﺗﻧﻣﻟا ءازﺟﺄﺑ ثﺑﻌﻟﺎﺑ لﺎﻔطﻸﻟ ﺢﻣﺳﺗ ﻻ
• هﺎﯾﻣﻟا ﺔﯾﻣﻛ ﻊﻣ وأ ﺎﯾﺟوﻟوﯾﺑورﻛﻣ ﺔﻧﻣﻵا رﯾﻏ هﺎﯾﻣﻟا ﻊﻣ زﺎﮭﺟﻟا مدﺧﺗﺳﺗ ﻻ
• هﺎﯾﻣﻟا طﻐﺿ زوﺎﺟﺗ اذإ ﺞﺗﻧﻣﻟا بﯾﻛرﺗ رظﺣﯾ827 ﺔﻟﺎﺣ ﻲﻓ .لﺎﻛﺳﺑ وﻠﯾﻛ
هﺎﯾﻣﻟا طﻐﺿ زوﺎﺟﺗ827 ﻲﻓ مﻛﺣﺗﻟا مﺎﻣﺻ بﯾﻛرﺗ بﺟﯾﻓ لﺎﻛﺳﺑ وﻠﯾﻛ
.هﺎﯾﻣﻟا
• دﻧﻋ .(ﺔﯾﺋﺎﻣﻟا ﺔﻗرطﻣﻟا) هﺎﯾﻣﻟا ﺦﺿ تﻻﺎﺣ تﻌﻗو اذإ ﺞﺗﻧﻣﻟا بﯾﻛرﺗ رظﺣُﯾ
.ﺔﻟﺎﺣﻟا
• ﻰﺻﻗﻷا دﺣﻟا ﻎﻠﺑﯾ .نﺧﺎﺳﻟا ءﺎﻣﻟا دادﻣإ طوطﺧ قوﻓ ﺞﺗﻧﻣﻟا بﯾﻛرﺗ رظﺣُﯾ
• تﺿﻔﺧﻧا اذإ رﺗﻠﻔﻟا
• ًءﺎﻧﺑ رﮭﺷأ ﺔﺗﺳ لﻛ مادﺧﺗﺳﻻا ةدﺎﻋﻹ ﺔﻠﺑﺎﻘﻟا رﯾﻏ رﺗﻠﻔﻟا ةدﺣو لادﺑﺗﺳا بﺟﯾ
• زﺎﮭﺟ بﯾﻛرﺗ بﺟﯾﻓ ،هﺎﯾﻣﻟا مﺎظﻧ ﻰﻠﻋ ﻖﻓدﺗﻟا نﻣ
•.تﺎﺑﯾرﺳﺗ يأ نﻣ ﺔﯾﻟﺎﺧو مﺎﻛﺣﺈﺑ ﺔﺗﺑﺛﻣ تازﯾﮭﺟﺗﻟاو بﯾﺑﺎﻧﻷا ﻊﯾﻣﺟ نأ دﻛﺄﺗ
.ﮫﻓرط ﻰﺗﺣ لﺧادﻟﺎﺑ ﮫﻧأ نﻣ دﻛﺄﺗو ،هﺎﯾﻣﻟا ﺢﺷرﻣ سأر ﻲﻓ بوﺑﻧﻷا ﻊﻓدا
• ءادﻷا فﻠﺗﺧﯾ دﻘﻓ ،ﺔﯾﺳﺎﯾﻗ ﺔﯾرﺑﺧﻣ فورظ ﻲﻓ رﺎﺑﺗﺧﻻا ءارﺟإ نﻣ مﻏرﻟﺎﺑ
.ﻲﻠﻌﻔﻟا
• ﺔﻧﺎﯾﺻﻟاو بﯾﻛرﺗ ءﺎﻧﺛأ ﺔﻌﻧﺻﻣﻟا ﺔﻛرﺷﻟا تﺎﯾﺻوﺗ عﺎﺑﺗا يرورﺿﻟا نﻣ
3
.ﮫﻧﻋ نﻠﻌﻣ وھ ﺎﻣﻛ ﺞﺗﻧﻣﻟﺎﺑ صﺎﺧﻟا رﺗﻠﻔﻟا لادﺑﺗﺳاو
هﺎﯾﻣﻟﺎﺑ دادﻣﻹا تﺎﻣﻠﻌﻣ/لﯾﻐﺷﺗﻟا لﯾﻟد
ﺔﻣدﺧﻟا ﻖﻓدﺗ1.9ﺔﻘﯾﻗدﻟا ﻲﻓ رﺗﻟ
هﺎﯾﻣﻟﺎﺑ دادﻣﻹا هﺎﯾﻣ - ﺔﻧﯾدﻣﻟﺎﺑ صﺎﺧ رﺋﺑ وأ صﺎﺧ رﺋﺑ
برﺷﻟا

ar_main.book.book Page 31 Wednesday, May 20, 2020 3:35 PM
31
AR
ﺔﻧﺎﯾﺻﻟا
ﺔﻧﺎﯾﺻﻟا
فﺛﻛﻣﻟا ءﺎطﻏ فﯾظﻧﺗ
.ﺔﯾوﮭﺗﻟا تﺎﺣﺗﻓو فﺛﻛﻣﻟا ءﺎطﻏ فﯾظﻧﺗﻟ ةﺎﺷرﻔﻟا ﻊﻣ ﺔﯾﺋﺎﺑرﮭﻛﻟا ﺔﺳﻧﻛﻣﻟا مدﺧﺗﺳا
.فﺛﻛﻣﻟا فﺋﺎﻔﻟ ﺔﻘطﻧﻣ ﻲطﻐﺗ ﻲﺗﻟا ﺔﺣوﻠﻟا ﺔﻟازإ بﻧﺟﺗ
لﻛ ءارﺟﻹا اذﮭﺑ مﺎﯾﻘﻟا ﻲﺻوﻧ12.لﯾﻐﺷﺗﻟا ةءﺎﻔﻛ ﻰﻠﻋ ﺔظﻓﺎﺣﻣﻠﻟ اًرﮭﺷ
فﯾظﻧﺗﻟا
فﯾظﻧﺗﻟا لوﺣ ﺔﻣﺎﻋ ﺢﺋﺎﺻﻧ
ﻲﺗﻟا فﯾظﻧﺗﻟا داوﻣ مادﺧﺗﺳا بﻧﺟﺗ .لﺎﻌﺗﺷﻼﻟ ﺔﻠﺑﺎﻗ داوﻣ وأ ،نﺎﻧﺳأ نوﺟﻌﻣ
وأ ناوﻟﻷا رﯾﯾﻐﺗ ﻲﻓ كﻟذ بﺑﺳﺗﯾ دﻗ .لﺎﻌﺗﺷﻼﻟ ﺔﻠﺑﺎﻗ تﺎﻧوﻛﻣ ﻰﻠﻋ يوﺗﺣﺗ
.زﺎﮭﺟﻟا فﻼﺗإ
،(رﻧﺗﻟا) ﺔﻔﻔﺧﻣﻟا داوﻣﻟا ،(
.ﺦﻟا ،ﺔطﺷﺎﻛﻟا داوﻣﻟا ،لﺎﻌﺗﺷﻼﻟ لﺑﺎﻘﻟا لﺋﺎﺳﻟا ،نﯾزﻧﺑﻟا ،ضﯾﺑﻣﻟا
بﻧﺟﺗﻟ ذﺧﺄﻣﻟا نﻣ لﺻوﻣ رﯾﻏ ﺔﻗﺎطﻟا لﺑﻛ نوﻛﯾ نأ بﺟﯾ ٍذﺋدﻧﻋ ،ﺔﯾﺋﺎﺑرﮭﻛﻟا
ﺔﻣدﺻ بﺑﺳﯾ دﻗ وأ ﺔﯾﻧورﺗﻛﻟﻹا ةزﮭﺟﻷا فﻠﺗﯾ دﻗ تﺎﻧﺣﺷ ﻎﯾرﻔﺗ يأ
ﺔﯾﺟرﺎﺧﻟا ﺔﯾوﮭﺗﻟا تﺎﺣﺗﻓ ﺔﯾطﻏﻷ مظﺗﻧﻣ فﯾظﻧﺗ ءارﺟﺈﺑ ﻰﺻوُﯾ .ﺔﯾﺋﺎﺑرﮭﻛ
.زﺎﮭﺟﻠﻟ يدﺎﺻﺗﻗاو ﮫﺑ قوﺛوﻣ لﯾﻐﺷﺗ
.زﺎﮭﺟﻟا فﻠﺗ وأ ﻖﯾرﺣ بوﺷﻧ ﺔﯾوﮭﺗﻟا تﺎﺣﺗﻓ دادﺳﻧا نﻋ مﺟﻧﯾ ثﯾﺣ .زﺎﮭﺟﻟا
بﺟﯾ ﺎﻣﻛ .ﺔﻧﺷﺧ وأ ﺔﻓﺎﺟ تﺎﻔظﻧﻣ مدﺧﺗﺳﺗ ﻻو .ﺔﺋﻓاد هﺎﯾﻣ ﻲﻓ ﺎًﻔﯾﻔﺧ ﺎ
بﻠﺻﻟا نﻣ ﺔﻋوﻧﺻﻣﻟا باوﺑﻷا فﯾظﻧﺗ دﻧﻋ ﺔﺛوﻠﻣﻟا شﺎﻣﻘﻟا ﻊطﻗ مدﺧﺗﺳﺗ ﻻأ
ﺔﺣﺳﻣو ﺔﺻﺻﺧﻣ شﺎﻣﻗ ﺔﻌطﻗ مادﺧﺗﺳا ﻰﻠﻋ ﺎًﻣﺋاد صرﺣا .أدﺻﻠﻟ موﺎﻘﻣﻟا
ﺢطﺳﻟا ﻰﻠﻋ ﻊﻘﺑﻟا ثودﺣ لﯾﻠﻘﺗ ﻲﻓ كﻟذ مھﺎﺳﯾ ثﯾﺣ .ﺢطﺳﻟا هﺎﺟﺗا سﻔﻧ ﻲﻓ
ﺦﻟا ،لﯾﺗوﯾﺑوزﯾﻷا لوﺣﻛﻟا ،ﻲﻠﯾﺑورﺑوزﯾﻷا
ﻲﺟرﺎﺧﻟا لﻛﯾﮭﻟا فﯾظﻧﺗ
ﻰﻠﻋ ﺔظﻓﺎﺣﻣﻠﻟ ﺔﯾﺑﻧﺎﺟﻟاو
.ﮫﻧﺎﻌﻣﻟ نادﻘﻓ وأ
ً
ﻔظﻧﻣو
• وأ ،ﺔﻧﺷﺧ ةﺎﺷرﻔﺑ ﮫﺣﺳﻣ بﻧﺟﺗ ،جرﺎﺧﻟا وأ لﺧادﻟا نﻣ زﺎﮭﺟﻟا فﯾظﻧﺗ دﻧﻋ
- لوﺣﻛﻟا ،لوﻧﺎﺛﯾﻣﻟا ،لوﻧﺎﺛﯾﻹا) لوﺣﻛﻟا :لﺎﻌﺗﺷﻼﻟ ﺔﻠﺑﺎﻘﻟا داوﻣﻟا
•.ًﺎﻔﻟﺎﺗ ﺔﻗﺎطﻟا لﺑﺎﻛ نﺎﻛ اذإ دﻛﺄﺗ ،فﯾظﻧﺗﻟا دﻌﺑ
• ﺔﺳﻧﻛﻣﻟا ﻖﯾرط نﻋ زﺎﮭﺟﻟا نﻣ ﺔﯾﺟرﺎﺧﻟا ﺔﯾوﮭﺗﻟا تﺎﺣﺗﻓ فﯾظﻧﺗ لﺎﺣ ﻲﻓ
• ﺢطﺳ ﻰﻠﻋ ةدوﺟوﻣﻟا ﺔﯾﺟرﺎﺧﻟا ﺔﯾوﮭﺗﻟا تﺎﺣﺗﻓ ﺔﻓﺎظﻧ ﻰﻠﻋ ﺔظﻓﺎﺣﻣﻟا بﺟﯾ
• ﺔﻣﻋﺎﻧ شﺎﻣﻗ ﺔﻌطﻗ وأ ﺔﻔﯾظﻧ ﺔﺟﻧﻔﺳإ زﺎﮭﺟﻟا ﺢطﺳ فﯾظﻧﺗ ﻲﻓ مدﺧﺗﺳا
ﻲﻠﺧاد فﯾظﻧﺗ
،كﻟذ فﻼﺧﺑ .زﺎﮭﺟﻟﺎﺑ فﻠﺗ وأ ﺔﺑﺎﺻﻹ ضرﻌﺗﻟا ﻊﻧﻣﻟ جردﻟا وأ فرﻟا نﻣ
.ﺔﻧزﺧﻣﻟا ﺔﻣﻌطﻷا نزو بﺑﺳﺑ ﺔﺑﺎﺻﻹا ثدﺣﺗ دﻗ
.ﺎﮭﻧﺎﻛﻣ ﻰﻟإ ﺎﮭﺗدﺎﻋإ لﺑﻗ ،ﺔﯾﺎﻔﻛﻟا ﮫﯾﻓ
.ﺔﻠﻠﺑﻣ ﺔﻣﻋﺎﻧ ﺔﻔﺷﻧﻣ مادﺧﺗﺳﺎﺑ بﺎﺑﻟا ﺔﯾﺷﺣ ﺢﺳﻣﺑ مﻗ مظﺗﻧﻣ لﻛﺷﺑ
.فﻠﺗﺗ نأ ﻰﺗﺣ ﺎﮭﻧﻛﻣﯾو ﺔﻠﺳﻟﺎﺑ ﺔﺻﺎﺧﻟا نﯾزﺧﺗﻟا ةردﻗ لﻠﻘﺗ
.ةرارﺣﻟا بﺑﺳﺑ ﺔھوﺷﻣ
ﻊطﻘﻟا
• ﺔﻧزﺧﻣﻟا ﺔﻣﻌطﻷا ﻊﯾﻣﺟ ﺔﻟازﺈﺑ مﻗ ،زﺎﮭﺟﻟا لﺧاد نﻣ جرد وأ فر ﺔﻟازإ دﻧﻋ
• ﺎﻣﺑ ﺎﮭﻔﯾﻔﺟﺗﺑ مﻗ مﺛ ،هﺎﯾﻣﻟا مادﺧﺗﺳﺎﺑ ﺎﮭﻔﯾظﻧﺗﺑ مﻗو جاردﻷاو فوﻓرﻟا لﺻﻓا
•
• نأ نﻛﻣﯾ ﺎﮭﻧﻷ ﻊﻘﺑﻟاو بﺎﺑﻟا ﺔﻠﺳ نﻣ ﺔﺑﻛﺳﻧﻣﻟا تﺎﯾﻣﻛﻟا فﯾظﻧﺗ مﺗﯾ نأ بﺟﯾ
• ﺢﺑﺻﺗ دﻗ .قﺎﺑطﻷا ﺔﻟﺎﺳﻏ ﻲﻓ ﺔﯾﻋوﻷا وأ فﻓرﻷا فﯾظﻧﺗ ﻰﻟإ ﺎًﻘﻠطﻣ دﻣﻌﺗ ﻻ

ﺔظﺣﻼﻣ
ﺔظﺣﻼﻣ
ﺔظﺣﻼﻣ
ar_main.book.book Page 30 Wednesday, May 20, 2020 3:35 PM
ﻖﯾﺑطﺗ مادﺧﺗﺳاLG ThinQ صﯾﺧﺷﺗ ضرﻐﺑ
تﻼﻛﺷﻣﻟا
ﺔﻛﺑﺷﺑ دوزﻣﻟا زﺎﮭﺟﻟا مادﺧﺗﺳا ءﺎﻧﺛأ ﺔﻠﻛﺷﻣ تﮭﺟاو اذإWi-Fi نﻛﻣﯾ ﺎﮭﻧﯾﺣﻓ ،
ﻖﯾﺑطﺗ مادﺧﺗﺳﺎﺑ ﻲﻛذ فﺗﺎھ ﻰﻟإ ﺎﮭﺣﻼﺻإو ءﺎطﺧﻷا فﺎﺷﻛﺗﺳا تﺎﻧﺎﯾﺑ لﻘﻧ
LG
Smart Diagnosis
LG ThinQ
.
ةزﯾﻣ رﺗﺧاو
LG ThinQ
ﻖﯾﺑطﺗ ﻲﻓ ةدراوﻟا تﺎﻣﯾﻠﻌﺗﻟا ﻊﺑﺗا .ﺔﻣﺋﺎﻘﻟا نﻣ
ThinQ
.
صﯾﺧﺷﺗ ضرﻐﺑ "عوﻣﺳﻣﻟا صﯾﺧﺷﺗﻟا" مادﺧﺗﺳا
تﻼﻛﺷﻣﻟا
.عوﻣﺳﻣﻟا صﯾﺧﺷﺗﻟا ﺔﻘﯾرطﺑ ﺔﻧﺎﻌﺗﺳﻼﻟ هﺎﻧدأ تﺎﻣﯾﻠﻌﺗﻟا ﻊﺑﺗا
Smart Diagnosis
ﻖﯾﺑطﺗ ﻲﻓ ةدراوﻟا عوﻣﺳﻣﻟا صﯾﺧﺷﺗﻟا مادﺧﺗﺳا تﺎﻣﯾﻠﻌﺗ ﻊﺑﺗا .ﺔﻣﺋﺎﻘﻟا نﻣ
.ﺔﯾوﻠﻌﻟا ﻰﻧﻣﯾﻟا ﺔﻋﺎﻣﺳﻟا ﺔﺣﺗﻓ ﻰﻠﻋ فﺗﺎﮭﻟا كﺳﻣأ مﺛ ﺔﺟﻼﺛﻟا بﺎﺑ ﺢﺗﻓا
ةزﯾﻣ رﺗﺧاو
.لﻔﻘﻟا ﺔﻔﯾظو طﯾﺷﻧﺗﻟ
LG ThinQ
رز ﻰﻠﻋ طﻐﺿا
Lock
.ﮫﻠﯾﻌﻔﺗ ةدﺎﻋإ مﺛ لﯾﻌﻔﺗﻟا
LG ThinQ
.
• نﻋ دﯾزﺗ ةدﻣﻟ ضرﻌﻟا ﺔﺷﺎﺷ لﻔﻗ مﺗ اذإ٥ ءﺎﻐﻟﺎﺑ موﻘﺗ نا بﺟﯾ ، ﻖﺋﺎﻗد
ﺔﯾﻛذﻟا فﺋﺎظوﻟا
ﺔﻛﺑﺷﺑ لﺎﺻﺗﻻاWi-Fi
Wi-Fi
زﺎﮭﺟﻟا لﯾﺻوﺗ ﺔﯾﻧﺎﻛﻣإ
ثﯾﺣ .زﺎﮭﺟﻟا ﺔﻛﺑﺷ لﺎﺻﺗا ﺔﻟﺎﺣ
• ﻖﯾﺑطﺗ لﯾﻐﺷﺗﺑ مﻗ
.زﺎﮭﺟﻟا لﯾﺟﺳﺗﻟ ﻖﯾﺑطﺗﻟا ﻲﻓ تﺎﻣﯾﻠﻌﺗﻟا ﻊﺑﺗاو
.زﺎﮭﺟﻟا لﯾﺟﺳﺗﻟ ﻖﯾﺑطﺗﻟا ﻲﻓ تﺎﻣﯾﻠﻌﺗﻟا ﻊﺑﺗاو
Wi-Fi
ةدﻣﻟ 3
• ﻖﯾﺑطﺗ لﯾﻐﺷﺗﺑ مﻗ
1
ردﺻﻣﻟا ﺔﺣوﺗﻔﻣﻟا ﺞﻣارﺑﻟا رﺎﻌﺷإ لوﺣ تﺎﻣوﻠﻌﻣ
2
صﯾﺧرﺗﻟا مﺎﻛﺣأ لﻛ رﻓوﺗﺗ ،ردﺻﻣﻟا ﺔﯾﺟﻣرﺑﻟا تﺎﻣﯾﻠﻌﺗﻟا ﻰﻟإ ﺔﻓﺎﺿﻹﺎﺑ
ﻲﻧورﺗﻛﻟﻹا دﯾرﺑﻟا رﺑﻋ لﺳرُﯾ بﻠط ﻰﻠﻋ ًءﺎﻧﺑ (مﯾﻠﺳﺗﻟاو نﺣﺷﻟاو لﻘﻧﻟا لﺋﺎﺳو
ﻰﻘﻠﺗﯾ صﺧﺷ يﻷ ضرﻌﻟا اذھ رﻓوﺗﯾ .ﺞﺗﻧﻣﻟا اذﮭﻟ ةرﯾﺧﻷا نﺣﺷﻟا ﺔﯾﻠﻣﻋ دﻌﺑ
LG ThinQ
ﺔﻛﺑﺷﺑ لﺻﺗﻣ زﺎﮭﺟﻟا نوﻛﯾ ﺎﻣدﻧﻋ ﺔﻧوﻘﯾﻷا ءﻲﺿﺗWi-Fi.
بﺟوﻣﺑ ردﺻﻣﻟا ﺔﯾﺟﻣرﺑﻟا تﺎﻣﯾﻠﻌﺗﻟا ﻰﻠﻋ لوﺻﺣﻠﻟGPL و LGPL و
.لﯾزﻧﺗﻠﻟ رﺷﻧﻟا قوﻘﺣ تارﺎﻌﺷإو ﺔﯾﻟوؤﺳﻣﻟا ءﻼﺧإ تارﺎﻌﺷإو
ﻊﯾزوﺗﻟا اذﮭﺑ مﺎﯾﻘﻟا ﺔﻔﻠﻛﺗ ﻲطﻐﯾ مﺳر لﺑﺎﻘﻣ
ﻖﯾﺑطﺗ ﻊﻣ
f
زﺎﮭﺟﻠﻟ ﻲﻟوﻷا لﯾﺟﺳﺗﻟا
LG ThinQ
.رﺧآ مدﺧﺗﺳﻣ لﯾﺟﺳﺗ وأ زﺎﮭﺟﻟا لﯾﺟﺳﺗ ةدﺎﻋإ
رز ﻰﻠﻋ رارﻣﺗﺳﻻا ﻊﻣ طﻐﺿا
Wi-Fi
ةدﻣﻟ 3 لّﻐﺷ .ًﺎﺗﻗؤﻣ ﮫﻓﺎﻘﯾﻹ ٍناوﺛ
LG ThinQ
ﺔﻧوﻘﯾأ لﯾﻐﺷﺗ فﺎﻘﯾإ مﺗﯾ فوﺳ .ٍناوﺛ
f
.
30
AR
رز مادﺧﺗﺳا ﺢﯾﺗﯾ
ﺔﻛﺑﺷﺑWi-Fi ﺔﻧوﻘﯾأ ﺢﺿوﺗ .ﺔﯾﻟزﻧﻣ
ﻖﯾﺑطﺗ لّﻐﺷ
ﻖﯾﺑطﺗ
MPL ةرﺎﯾز ﻰﺟرﯾ ،ﺞﺗﻧﻣﻟا اذھ ﺎﮭﻧﻣﺿﺗﯾ ىرﺧأ ردﺻﻣﻟا ﺔﺣوﺗﻔﻣ صﯾﺧارﺗو
ﻊﻗوﻣﻟاhttp://opensource.lge.com.
رﻓوﺗﺳLG Electronics ﻰﻠﻋ ردﺻﻣﻟا ﺔﺣوﺗﻔﻣﻟا ﺔﯾﺟﻣرﺑﻟا تﺎﻣﯾﻠﻌﺗﻟا ًﺎﺿﯾأ
صرﻗCD-ROM ﺔﻔﻠﻛﺗ لﺛﻣ)
ﻰﻟإopensource@lge.com تاوﻧﺳ ثﻼﺛ ةرﺗﻔﻟ ٍرﺎﺳ ضرﻌﻟا اذھ نإ .
.تﺎﻣوﻠﻌﻣﻟا هذھ
•
•
• ﺔﻔﯾظو لﯾطﻌﺗﻟWi-Fi رز ﻰﻠﻋ رارﻣﺗﺳﻻا ﻊﻣ طﻐﺿا ،
رزﻟا ﻰﻠﻋ رارﻣﺗﺳﻻا ﻊﻣ طﻐﺿا
رﺛﻛأ وأ ٍناوﺛ ثﻼﺛ ةدﻣﻟ
.ﻖﯾﺑطﺗﻟا ﺔﺷﺎﺷ ﻰﻠﻋ صﯾﺧﺷﺗﻟا رﮭظﯾﺳ ،تﺎﻧﺎﯾﺑﻟا لﻘﻧ مﺎﻣﺗإ دﻌﺑ
Freezer
.تﺎﻧﺎﯾﺑﻟا لﻘﻧ مﺗﯾ ﻰﺗﺣ ﺔﻋﺎﻣﺳﻟا ﺔﯾﺣﺎﻧ كﻔﺗﺎھ كﺳﻣﺗ ﺎﻣﻧﯾﺑ
• دﻌﺑ صﯾﺧﺷﺗﻟا توﺻ رَدﺻُﯾ3.ﺎًﺑﯾرﻘﺗ ٍناوﺛ
.تاوﺻﻷا
3
ﻲﻛذﻟا صﯾﺧﺷﺗﻟا
ﺔﻣﻼﻌﻟا لﻣﺣﺗ ﻲﺗﻟا زرطﻟا ﻲﻓ طﻘﻓ ةزﯾﻣﻟا هذھ رﻓوﺗﺗ
c
وأ
d
.
مادﺧﺗﺳا ءﺎﻧﺛأ كﮭﺟاوﺗ ﻲﺗﻟا تﻼﻛﺷﻣﻟا صﯾﺧﺷﺗﻟ ةزﯾﻣﻟا هذﮭﺑ ﺔﻧﺎﻌﺗﺳﻻا كﻧﻛﻣﯾ
4
• رادﺻإ مﺗﯾ ﺎﻣﻧﯾﺑ فﺗﺎﮭﻟا كﯾرﺣﺗ بﻧﺟﺗ ،ﺞﺋﺎﺗﻧ لﺿﻓأ ﻰﻠﻋ لوﺻﺣﻠﻟ
ﺔﻛﺑﺷ رﻓوﺗ مدﻋ ،رﺻﺣﻟاWi-Fi ﺔﻛﺑﺷﺑ لﺎﺻﺗﻻا عﺎطﻘﻧا وأ Wi-Fi وأ
مﻧﺗ ﻻ بﺎﺑﺳأ هذھو ﻖﯾﺑطﺗﻟا رﻓوﺗ مدﻋ وأ تﺎﻘﯾﺑطﺗﻟا رﺟﺗﻣﻟ ﺔﯾﻠﺣﻣﻟا ﺔﺳﺎﯾﺳﻟا
ةزﯾﻣﻟا هذھ ضرﻌﺗﺗ دﻗ
.ﺎﮭﯾﻓ نﻛﺳﺗ ﻲﺗﻟا ﺔﻘطﻧﻣﻠﻟ
.ﺎﮭﻠﺣو زﺎﮭﺟﻟا
• ﻻ لﺎﺛﻣﻟا لﯾﺑﺳ ﻰﻠﻋ ﺔﯾﺟرﺎﺧ لﻣاوﻌﻟ دوﻌﯾ كﻟذو ﺔﻣدﺧﻟا هذھ لﻣﻌﺗ ﻻ دﻗ
نﻣ رﯾﺻﻘﺗ نﻋLGE.
• ﺎًﻘﻓو ﺎﮭﻠﻛﺷ فﻠﺗﺧﯾ دﻗو راذﻧإ ﻖﺑﺎﺳ نود تارﯾﻐﺗﻟ

ﺔظﺣﻼﻣ
ﺔظﺣﻼﻣ
ar_main.book.book Page 29 Wednesday, May 20, 2020 3:35 PM
29
AR
ﺔﯾﻛذﻟا فﺋﺎظوﻟا
ﺔﯾﻛذﻟا فﺋﺎظوﻟا
.ﻲﻛﻠﺳﻼﻟا ﮫﯾﺟوﺗﻟا زﺎﮭﺟﺑ ﻲﻛذﻟا كﻔﺗﺎھ لّﺻو
نﺎﻛ اذإ ﺎﻣ مﻛﺣﺗﻟا ﺔﺣوﻟ ﻰﻠﻋ
زﺎﮭﺟ لﯾﻟد ﻊﺟار وأ تﻧرﺗﻧﻹا ﺔﻣدﺧ دوزﻣﺑ لﺻﺗا ،كﺑ ﺔﺻﺎﺧﻟا ﺔﻛﺑﺷﻟا
يأ وأ ﺔﻛﺑﺷﻟﺎﺑ لﺎﺻﺗﻻا لﻛﺎﺷﻣ يأ نﻋ ًﻻوؤﺳﻣ سﯾﻟ
.ﺔﻛﺑﺷﻟﺎﺑ لﺎﺻﺗﻻا ﻖﯾرط نﻋ تﺟﺗﻧ ءﺎطﺧأ وأ ،لﻠﺧ وأ ،لﺎطﻋأ
.ًاددﺟﻣ
فﺗﺎﮭﻟا لﯾﻐﺷﺗ مﺎظﻧ بﺳﺣ ﻲﻛذﻟا فﺗﺎﮭﻟا مادﺧﺗﺳا ﺔﮭﺟاو فﻠﺗﺧﺗ دﻗ
WEP
،
رﺧآ نﺎﻣأ لوﻛوﺗورﺑ ﻰﻟإ هرﯾﯾﻐﺗ ءﺎﺟرﻟا .ﺔﻛﺑﺷﻟا دادﻋإ كﯾﻠﻋ رذﻌﺗﯾ دﻘﻓ
f
.ﻲﻛﻠﺳﻼﻟا ﮫﯾﺟوﺗﻟا
LG ThinQ
ﺔﯾوﻘﺗ زﺎﮭﺟ ِرﺗﺷا .ﮫﯾﺟوﺗﻟا زﺎﮭﺟ نﻋWi-Fi ةوﻗ نﯾﺳﺣﺗﻟ (ىدﻣﻟا ﻊﺳوﻣ)
.ﺔﯾﻠﺣﻣﻟا ﺔﻛﺑﺷﻟا
لوﺎﺣﺗ نأ لﺑﻗ ﺔﻘﯾﻗد ةدﻣﻟ رظﺗﻧاو ﺔﻗﺎطﻟا نﻋ زﺎﮭﺟﻟا سﺑﺎﻗ
.ًءﺎﻧﺛﺗﺳا ﮫﯾﻟإ فﺿا وأ ﮫﻠﯾطﻌﺗﺑ
(ﺔﺻﺎﺧ ًازوﻣر مدﺧﺗﺳﺗ ﻻ) .ﺔﯾزﯾﻠﺟﻧﻹا ﺔﻐﻠﻟﺎﺑ
.ﺔﻌﻧﺻﻣﻟا ﺔﻛرﺷﻟا
رﺎﯾﺗﺧﺎﺑ ﺢﺻﻧُﯾ)
.ﺞﺗﻧﻣﻟا لﯾﺟﺳﺗ دﻋأ مﺛ (
WPA2
.ﺎًﺋﯾﺿﻣ
ةرﺎﺷإWi-Fi.
مﺗﯾ ﻻ دﻗWi-Fi ﺔﺋﯾﺑ ةدوﺟ بﺳﺣ لﺎﺻﺗﻻا ﻊطﻗ مﺗﯾ دﻗ وأ
3
ﺔﻛﺑﺷﺑ ةدوزﻣﻟا زرطﻟا ﻲﻓ طﻘﻓ ةزﯾﻣﻟا هذھ رﻓوﺗﺗWi-Fi.
.ﻲﻛذ فﺗﺎھ مادﺧﺗﺳﺎﺑ زﺎﮭﺟﻟا ﻊﻣ لﺻاوﺗﻟﺎﺑ كﻟ
.ﺔﺣﯾرﻣﻟا ﺔﯾﻛذﻟا تازﯾﻣﻟا مادﺧﺗﺳﺎﺑ ﻲﻛذ فﺗﺎھ نﻣ زﺎﮭﺟﻟا ﻊﻣ لﺻاوﺗ
• لﺎﺻﺗا نﻣ ﻖﻘﺣﺗﻠﻟWi-Fi زﻣر صﺣﻓا ،
• تﺎﻛﺑﺷ زﺎﮭﺟﻟا مﻋدﯾWi-Fi ددرﺗﺑ 2.4 ددرﺗ ﺔﻓرﻌﻣﻟ .طﻘﻓ زﺗرھ ﺎﻐﯾﻏ
• ﻖﯾﺑطﺗ
LG ThinQ
• ﺔﻛﺑﺷﺑ لﺎﺻﺗا ﺔﻠﻛﺷﻣ زﺎﮭﺟﻟا ىدﻟ نﺎﻛ اذإWi-Fi دﻌﺑﻟا لﻛ ةدﯾﻌﺑ نوﻛﺗ دﻗ ،
• ﺔﻛﺑﺷﺑ لﺎﺻﺗﻻا
•.تﻧرﺗﻧﻹا ﺔﻣدﺧ دوزﻣﻟ ﺎًﻘﻓو ﺢﯾﺣﺻ لﻛﺷﺑ ﺔﻛﺑﺷﻟﺎﺑ لﺎﺻﺗﻻا لﻣﻌﯾ ﻻ دﻗ
•.ءطﺑﺑ لﻣﻌﺗ ﺔﯾﻛﻠﺳﻼﻟا ﺔﻛﺑﺷﻟا ﺔﻣدﺧ ﺔطﯾﺣﻣﻟا ﺔﯾﻛﻠﺳﻼﻟا ﺔﺋﯾﺑﻟا لﻌﺟﺗ نأ نﻛﻣﯾ
• لﺻﻓا .ًﺎﯾﻛﻠﺳﻻ ةرﺎﺷﻹا لﺎﺳرإ ﻲﻓ تﻼﻛﺷﻣ بﺑﺳﺑ زﺎﮭﺟﻟا لﯾﺟﺳﺗ رذﻌﺗ
• مﻗ ،ًﺎﻧّﻛﻣُﻣ كﺑ صﺎﺧﻟا ﮫﯾﺟوﺗﻟا زﺎﮭﺟ ﻰﻠﻋ دوﺟوﻣﻟا ﺔﯾﺎﻣﺣﻟا رادﺟ نﺎﻛ اذإ
ًﻼﯾوط ﺎًﺗﻗو لﯾﺟﺳﺗﻟا قرﻐﺗﺳﯾ دﻗ .ﺔﻔﯾﻌﺿ ةرﺎﺷﻹا ةوﻗ ﺢﺑﺻﺗﺳ ،مزﻼﻟا
•) ﺔﯾﻛﻠﺳﻼﻟا ﺔﻛﺑﺷﻟا مﺳا نوﻛﯾ نأ بﺟﯾSSID مﺎﻗرأو فرﺣأ نﻣ ًﺎﻧوﻛﻣ (
كﻔﺗﺎھ ﻰﻠﻋ
• بﺳﺣو
• ﻰﻠﻋ ﺎًطوﺑﺿﻣ ﮫﯾﺟوﺗﻟا زﺎﮭﺟﺑ صﺎﺧﻟا نﺎﻣﻷا لوﻛوﺗورﺑ نﺎﻛ اذإ
ﻖﯾﺑطﺗ نﻣ لﺟﺳﻣﻟا زﺎﮭﺟﻟا ﺢﺳﻣﺑ مﻘﻓ ،رورﻣﻟا ﺔﻣﻠﻛ وأ
ﺔﻛﺑﺷ) ﻲﻛﻠﺳﻼﻟا ﮫﯾﺟوﺗﻟا زﺎﮭﺟو زﺎﮭﺟﻟا نﯾﺑ ﺔﻓﺎﺳﻣﻟا نﻣ دﻛﺄﺗWi-Fi.(
لوﻣﺣﻣﻟا فﺗﺎﮭﻟا تﺎﻧﺎﯾﺑ
ﺔﯾوﻠﺧﻟا تﺎﻧﺎﯾﺑﻟا
وأ
LG ThinQ
ﻖﯾﺑطﺗ ﺎﯾازﻣLG ThinQ
Smart Diagnosis
.زﺎﮭﺟﻟا مادﺧﺗﺳا
.دﯾدﺟ نﻣ ﮫﻠﺟﺳو
ﻖﯾﺑطﺗ مادﺧﺗﺳا لﺑﻗLG ThinQ
.تﯾﺑﺛﺗﻟا لﺷﻔﯾ دﻗ وأ
قﻼﻏﺈﺑ مﻗ
ﻖﯾﺑطﺗLG ThinQ
ﻖﯾﺑطﺗ ﺢﻣﺳﯾ
• ءﺎﻧﺛأ كﮭﺟاوﺗ ﺔﻠﻛﺷﻣ يأ صﯾﺧﺷﺗ ﻰﻠﻋ ﻲﻛذﻟا صﯾﺧﺷﺗﻟا ةزﯾﻣ كدﻋﺎﺳﺗ
تادادﻋﻹا
•.ﻖﯾﺑطﺗﻟا ﻲﻓو زﺎﮭﺟﻟا ﻰﻠﻋ ةددﻌﺗﻣ تارﺎﯾﺧ نﯾﯾﻌﺗﺑ كﻟ ﺢﻣﺳﯾ
• ،تﻧرﺗﻧﻹا ﺔﻣدﺧ دوزﻣ وأ ،كﺑ صﺎﺧﻟا ﻲﻛﻠﺳﻼﻟا ﮫﯾﺟوﺗﻟا زﺎﮭﺟ ترﯾﻏ اذإ
•.نﯾﻣدﺧﺗﺳﻣﻟا رﺎﻌﺷإ نودﺑ زﺎﮭﺟﻟا نﯾﺳﺣﺗ ضارﻏﻷ رﯾﯾﻐﺗﻠﻟ ﻖﯾﺑطﺗﻟا ﻊﺿﺧﯾ
•.زارطﻟا بﺳﺣ تازﯾﻣﻟا رﯾﯾﻐﺗﺗ دﻗ
1
• نﻣ رﺛﻛأ ةدﯾﻌﺑ ﻲﻛﻠﺳﻼﻟا ﮫﯾﺟوﺗﻟا زﺎﮭﺟو زﺎﮭﺟﻟا نﯾﺑ ﺔﻓﺎﺳﻣﻟا تﻧﺎﻛ اذإ
2
.ﻲﻛذﻟا
LG ThinQ
ﻰﻠﻋ Apple App Store & Google
ﻖﯾﺑطﺗ تﯾﺑﺛﺗLG ThinQ
ﻖﯾﺑطﺗ نﻋ ثﺣﺑا
Play Store.ﮫﺗﯾﺑﺛﺗو ﻖﯾﺑطﺗﻟا لﯾزﻧﺗﻟ تﺎﻣﯾﻠﻌﺗﻟا ﻊﺑﺗا .ﻲﻛذ فﺗﺎھ ﻰﻠﻋ نﻣ

ﮫﯾﺑﻧﺗ
ar_main.book.book Page 28 Wednesday, May 20, 2020 3:35 PM
لﯾﻐﺷﺗﻟا
28
AR
.جرﺎﺧﻠﻟ فرﻟا بﺣﺳا
.جارﺧﻹا ﺔﯾﻠﻣﻋ بﯾﺗرﺗ سﻛﻋ بﯾﺗرﺗﺑ ﺎﮭﺑﯾﻛرﺗﺑ مﻗ
.ﺎﮭﺟارﺧإ دﻧﻋ
.ةرارﺣﻟا تﺎﺟرد ﻲﻓ ﺊﺟﺎﻔﻣ رﯾﻐﺗﻟ تﺿرﻌﺗ لﺎﺣ ﻲﻓ فوﻓرﻟا
.مﺎﻌطﻟا بﺎﻛﺳﻧا وأ فرﻟا
بﺎﺑﻟا ﺔﻠﺳ
2
3
• صﺎﺧ لﻛﺷﺑ رذﺣﻟا ﻰﺧوﺗ .نزوﻟا ﺔﻠﯾﻘﺛ ﺔﯾﺟﺎﺟزﻟا فوﻓرﻟا نأ رﻛذﻟﺎﺑ رﯾدﺟ
• رﺳﻛﻧﺗ دﻗ .ةدرﺎﺑ نوﻛﺗ ﺎﻣدﻧﻋ ﺔﺋﻓادﻟا هﺎﯾﻣﻟﺎﺑ ﺔﯾﺟﺎﺟزﻟا فوﻓرﻟا فظﻧﺗ ﻻ
• طوﻘﺳ ﻰﻟإ اذﮭﺑ مﺎﯾﻘﻟا مدﻋ يدؤﯾ دﻗ .نﯾﺑﻧﺎﺟﻟا ﻰﻠﻋ ﺔﯾوﺗﺳﻣ فﻓرﻷا نأ دﻛﺄﺗ
بﺎﺑﻟا ﺔﻠﺳ بﯾﻛرﺗ ةدﺎﻋإ/ﺔﻟازإ
.ﻰﻠﻋﻷ ﺎﮭﻌﻓرﺑ ﺎﮭﺗﻟازﺈﺑ مﻗو ﺔﻠﺳﻟا ﻲﻓرط نﻣ ًﻼﻛ كﺳﻣأ
.جارﺧﻹا ﺔﯾﻠﻣﻋ بﯾﺗرﺗ سﻛﻌﺑ ﺔﺟﻼﺛﻟا بﺎﺑ تﻼﺳ بﯾﻛرﺗ ةدﺎﻋﺈﺑ مﻗ
.جارﺧﻹا ﺔﯾﻠﻣﻋ بﯾﺗرﺗ سﻛﻋ بﯾﺗرﺗﺑ ﺎﮭﺑﯾﻛرﺗﺑ مﻗ
1
2
3

ﮫﯾﺑﻧﺗ
ﮫﯾﺑﻧﺗ
ﮫﯾﺑﻧﺗ
ar_main.book.book Page 27 Wednesday, May 20, 2020 3:35 PM
27
AR
لﯾﻐﺷﺗﻟا
جاردﻷا بﯾﻛرﺗ ةدﺎﻋإ/كﻓ
وﺣﻧ ﮫﺑﺣﺳأو تاورﺿﺧﻟا جرد ضﺑﻘﻣﺑ كﺳﻣأو .جردﻟا تﺎﯾوﺗﺣﻣ غرﻓأ
.ﻖﻓرﺑ جرﺎﺧﻟا
.جرﺎﺧﻠﻟ ﮫﺑﺣﺳ ﻖﯾرط نﻋ ﮫﺗﻟازﺈﺑ مﻗو ﻰﻠﻋﻷ تاوارﺿﺧﻟا جرد ﻊﻓرا
.جارﺧﻹا ﺔﯾﻠﻣﻋ بﯾﺗرﺗ سﻛﻋ بﯾﺗرﺗﺑ ﺎﮭﺑﯾﻛرﺗﺑ مﻗ
.ﺎﮭﺑﯾﻛرﺗ ةدﺎﻋإو ﺎﮭﻛﯾرﺣﺗ
1
.ﺎﮭﺑﯾﻛرﺗ ةدﺎﻋإو ﺎﮭﻛﯾرﺣﺗ
تاورﺿﺧﻟا جرد مادﺧﺗﺳﺎﺑ
2
كﯾرﺣﺗ ﻖﯾرط نﻋ ﺔﺟزﺎطﻟا تاوارﺿﺧﻟا جرد ﻲﻓ ﺔﺑوطرﻟا ﻲﻓ مﻛﺣﺗﻟا نﻛﻣﯾ
.نﯾھﺎﺟﺗﻻا نﻣ يأ ﻲﻓ ﺔﻌﻓارﻟا
.ﺔﺑوطرﻟا لﯾﻠﻘﺗﻟ جردﻟا لﻼﺧ رﺎﺷﺗﻧﻻﺎﺑ
ﻖﻠﻏ مﺗﯾﺳ ،نﻣﯾﻷا بﻧﺎﺟﻠﻟ ﺎﮭﻛﯾرﺣﺗ مﺗ اذإو
.جردﻟا ﻲﻓ ةدوﺟوﻣ نوﻛﺗ ﺔﺑوطر يأ ﻰﻠﻋ
3
• ءﺎﻧﺛأ نﯾدﯾﻟا ﺎﺗﻠﻛ مدﺧﺗﺳاو ﺎﮭﻛﯾرﺣﺗ لﺑﻗ جاردﻷا ﻎﯾرﻔﺗ ﻰﻠﻋ ﺎًﻣﺋاد صرﺣا
•.ﺎﮭﻌﯾﻣﺟﺗ ةدﺎﻋإو جاردﻷا ﺔﻟازإ لﺑﻗ لﻣﺎﻛﻟﺎﺑ نﺎﺣوﺗﻔﻣ ﺔﺟﻼﺛﻟا ﻲﺑﺎﺑ نأ دﻛﺄﺗ
جردﻟا
*1
أ عوﻧﻟا
*1
ب عوﻧﻟا
• ءﺎﻧﺛأ نﯾدﯾﻟا ﺎﺗﻠﻛ مدﺧﺗﺳاو ﺎﮭﻛﯾرﺣﺗ لﺑﻗ جاردﻷا ﻎﯾرﻔﺗ ﻰﻠﻋ ﺎًﻣﺋاد صرﺣا
•.ﺎﮭﺑﯾﻛرﺗ ةدﺎﻋإو جاردﻷا ﺔﻟازإ لﺑﻗ لﻣﺎﻛﻟﺎﺑ نﺎﺣوﺗﻔﻣ ﺔﺟﻼﺛﻟا ﻲﺑﺎﺑ نأ دﻛﺄﺗ
*1 .زرُطﻟا ضﻌﺑ ﻲﻓ ﻻإ ﺔﯾﺻﺎﺧﻟا هذھ رﻓوﺗﺗ ﻻ
• ءاوﮭﻠﻟ ﺢﻣﺳﯾ ﺎﻣﻣ ءاوﮭﻟا طﺑﺿ ةادأ ﺢﺗﻓ مﺗﯾﺳ ،رﺳﯾﻷا بﻧﺎﺟﻠﻟ ﺎﮭﻛﯾرﺣﺗ مﺗ اذإ
• ظﻓﺎﺣﯾﺳ ﺎﻣﻣ ءاوﮭﻟا طﺑﺿ ةادأ
فرﻟا
.ﺎﮭﺟارﺧإ دﻧﻋ
.ةرارﺣﻟا تﺎﺟرد ﻲﻓ ﺊﺟﺎﻔﻣ رﯾﻐﺗﻟ تﺿرﻌﺗ لﺎﺣ ﻲﻓ فوﻓرﻟا
فرﻟا ةدﺎﻋإ/ﺔﻟازإ
.ﻰﻠﻋﻷ ﺔﻣﺎﻘﺗﺳﺎﺑ ﮫﻌﻓراو فرﻟا ﺔﻣدﻘﻣ ﺔﻟﺎﻣﺈﺑ مﻗ
• صﺎﺧ لﻛﺷﺑ رذﺣﻟا ﻰﺧوﺗ .نزوﻟا ﺔﻠﯾﻘﺛ ﺔﯾﺟﺎﺟزﻟا فوﻓرﻟا نأ رﻛذﻟﺎﺑ رﯾدﺟ
• رﺳﻛﻧﺗ دﻗ .ةدرﺎﺑ نوﻛﺗ ﺎﻣدﻧﻋ ﺔﺋﻓادﻟا هﺎﯾﻣﻟﺎﺑ ﺔﯾﺟﺎﺟزﻟا فوﻓرﻟا فظﻧﺗ ﻻ
1

ﺔظﺣﻼﻣ
ﮫﯾﺑﻧﺗ
ﮫﯾﺑﻧﺗ
ar_main.book.book Page 26 Wednesday, May 20, 2020 3:35 PM
لﯾﻐﺷﺗﻟا
26
AR
ﺢﻣﺳﯾ ﺎﻣﻣ ،ﺔطﯾﺣﻣﻟا لﻼﺳﻟاو ﻲﻠﺧادﻟا بﺎﺑﻟا لﺧاد ةرﯾﺑﻛ نﯾزﺧﺗ ﺔﺣﺎﺳﻣ دﺟوﺗ
.ﺔﻣظﻧﻣ ﺔﻘﯾرطﺑ مﺎﻌطﻟا نﯾزﺧﺗﺑ كﻟ
جودزﻣﻟا بﺎﺑﻟا مدطﺻﯾ دﻗ .ﺎًﺣوﺗﻔﻣ زﺎﮭﺟﻟا بﺎﺑ نوﻛﯾ ﺎﻣدﻧﻋ جودزﻣﻟا بﺎﺑﻟا
.فﻠﺗﯾو زﺎﮭﺟﻟا ﺔﻓﺎﺣﺑ
ﻲﻠﺧادﻟا بﺎﺑﻟا ﺔظﻓﺎﺣ بﯾﻛرﺗ ةدﺎﻋإ/كﻓ
ﻊﻓراو .ﻲﻠﺧادﻟا بﺎﺑﻟا ﺔظﻓﺎﺣ تﺎﯾوﺗﺣﻣ ﺔﻟازﺈﺑ مﻗو لﻣﺎﻛﻟﺎﺑ باوﺑﻷا ﺢﺗﻓا
.ﻲﻠﺧادﻟا بﺎﺑﻟا ﺔظﻓﺎﺣ بﺣﺳاو
ﻲﻠﺧادﻟا بﺎﺑﻟا ﺔﯾﺻﺎﺧ مادﺧﺗﺳاInstaView
كﯾدﻟ دﺟوﯾ نﺎﻛ اذإ ﺎﻣ ﺔﯾؤر ﻲﻠﺧادﻟا بﺎﺑﻟا ﻲﻓ ﻊﯾرﺳﻟا ضرﻌﻟا ﺔﻔﯾظو كﻟ ﺢﻣﺳﺗ
تﺎﺑﺟوﻟاو تﺎﺑورﺷﻣﻟا لﺛﻣ ﺎﮭﻣادﺧﺗﺳا رﺛﻛﯾ ﻲﺗﻟا رﺻﺎﻧﻌﻟا نﻣ ﺔﻠﯾﻠﻗ تﺎﯾﻣﻛ
.ﺔﺟﻼﺛﻟا بﺎﺑ ﺢﺗﻓ نودﺑ ،ﺔﻔﯾﻔﺧﻟا
• ﺢﺗﻔﺑ مﻘﺗ ﻻ وأ ،ﺎًﺣوﺗﻔﻣ جودزﻣﻟا بﺎﺑﻟا نوﻛﯾ ﺎﻣدﻧﻋ زﺎﮭﺟﻟا بﺎﺑ ﺢﺗﻔﺑ مﻘﺗ ﻻ
حﺎﺑﺻﻣﻟا لﯾﻐﺷﺗﻟ جﺎﺟزﻟا ﻰﻠﻋ نﯾﺗرﻣ رﻘﻧﻟﺎﺑ مﻗLED ﮫﻠﯾﻐﺷﺗ فﺎﻘﯾإ وأ
.ﻲﻠﺧادﻟا بﺎﺑﻟا لﺧاد
حﺎﺑﺻﻣ لﯾﻐﺷﺗ فﺎﻘﯾإ مﺗﯾLED.ٍناوﺛ ةرﺷﻋ دﻌﺑ ﻲﺋﺎﻘﻠﺗ لﻛﺷﺑ
•.كﻔﻟا لﺑﻗ ﻲﻠﺧادﻟا بﺎﺑﻟا ةدﺣو نﻣ تﺎﯾوﺗﺣﻣﻟا غرﻓأ
دﯾﻗ ﺞﻠﺛﻟا عزوﻣ نوﻛﯾ ﺎﻣدﻧﻋ تﺎظﺣﻠﻟ لطﻌُﺗ ﺎﻣﻛ ،رﺳﯾﻷا وأ نﻣﯾﻷا دﻣﺟُﻣﻟا
1
.ﻲﻠﺧادﻟا بﺎﺑﻠﻟ ﻊﯾرﺳﻟا ضرﻌﻟا ﺔﻔﯾظو لّﻌﻔُﯾ
توﺻ ﺎﮭﺑ نوﻛﯾ ﺔﯾﻓﺎﻛ ةوﻘﺑ رﻘﻧا
.ﺔﺟﻼﺛﻟا نﻣ برﻘﻟﺎﺑ
شرﺑ مﻘﺗ ﻻ .جﺎﺟز فظﻧﻣ وأ ةرﺗﺎﻓ هﺎﯾﻣﺑ ﺔﻔﯾظﻧ شﺎﻣﻗ ﺔﻌطﻗ بﯾطرﺗﺑ
.ًةرﺷﺎﺑﻣ ﻲﺟﺎﺟزﻟا بﺎﺑﻟا ﻰﻠﻋ جﺎﺟز فظﻧﻣ
1
2
• بﺎﺑ ﻖﻠﻏ دﻌﺑ نﯾﺗﯾﻧﺎﺛ ةدﻣﻟ ﻲﻠﺧادﻟا بﺎﺑﻠﻟ ﻊﯾرﺳﻟا ضرﻌﻟا ﺔﻔﯾظو لﯾطﻌﺗ مﺗﯾ
.مادﺧﺗﺳﻻا
• ﻻ دﻗ جﺎﺟزﻟا فاوﺣ نﻣ برﻘﻟﺎﺑ رﻘﻧﻟﺎﻓ .جﺎﺟزﻟا فﺻﺗﻧﻣ نﻣ برﻘﻟﺎﺑ رﻘﻧا
•.عوﻣﺳﻣ رﻘﻧﻟا
• ٍلﺎﻋ توﺻ رودﺻ دﻧﻋ ﻲﻠﺧادﻟا بﺎﺑﻠﻟ ﻊﯾرﺳﻟا ضرﻌﻟا ﺔﻔﯾظو لﻣﻌﺗ ﺎﻣﺑر
• مﻗ ،ةدﯾدﺷﻟا ﻊﻘﺑﻟا ﺔﻟازﻹ .ﺔﻓﺎﺟ شﺎﻣﻗ ﺔﻌطﻘﺑ ﻲﺟﺎﺟزﻟا بﺎﺑﻟا فﯾظﻧﺗﺑ مﻗ
.جارﺧﻹا ﺔﯾﻠﻣﻋ بﯾﺗرﺗ سﻛﻋ بﯾﺗرﺗﺑ ﺎﮭﺑﯾﻛرﺗﺑ مﻗ
InstaView
.زرُطﻟا ضﻌﺑ ﻲﻓ ﻻإ ﺔﯾﺻﺎﺧﻟا هذھ رﻓوﺗﺗ ﻻ
2
ﻰﻟإ ﻰﻠﻋﻷا وﺣﻧ ﻲﻠﺧادﻟا بﺎﺑﻟا نﻣ ﺔﯾﻠﻔﺳﻟا ﺔﻓﺎﺣﻟا ﻰﻠﻋ ةدوﺟوﻣﻟا ﺔﻌﻓارﻟا بذﺟا
ﻲﻠﺧادﻟا بﺎﺑﻟا مادﺧﺗﺳا
.ﺢﺗﻔﻧﺗ نأ

ﮫﯾﺑﻧﺗ
ﺔظﺣﻼﻣ
ﺔظﺣﻼﻣ
ar_main.book.book Page 25 Wednesday, May 20, 2020 3:35 PM
25
AR
لﯾﻐﺷﺗﻟا
بارطﺿا بﺑﺳﺑ ﺞﻠﺛ لﻣﻋ ﻲﻓ رﻣﺗﺳﯾ ﻻ دﻗ ،يوﺗﺳﻣ رﯾﻏ وأ ًﻼﺋﺎﻣ
.رﻌﺷﺗﺳﻣﻟا
ﺎﮭﻠﯾﻐﺷﺗ فﺎﻘﯾإو ﺔﯾﺋﺎﻘﻠﺗﻟا ﺞﻠﺛﻟا ﻊﻧﺻ ةدﺣو لﯾﻐﺷﺗ
حﺎﺗﻔﻣ ﻰﻠﻋ طﻐﺿﻟﺎﺑ مﻗ ،ﮫﻠﯾﻐﺷﺗ فﺎﻘﯾإ وأ ﻲﺋﺎﻘﻠﺗﻟا ﺞﻠﺛﻟا ﻊﻧﺎﺻ ةدﺣو لﯾﻐﺷﺗﻟ
ﻊﺿو ﻰﻠﻋ ﺞﻠﺛﻟا ﻊﻧﺎﺻ ةدﺣو ﻰﻠﻋ ﺔﻗﺎطﻟاON وأ ( | ) OFF (O).
ﺎﮭﻌﻣﺳﺗ دﻗ ﻲﺗﻟا ﺔﯾﻌﯾﺑطﻟا تاوﺻﻷا
ﺞﻠﺛﻟا ﻊﻧﺎﺻ ءلﻣ ءﺎﻧﺛأ نﯾﻧط توﺻ ﺞﻠﺛﻟا ﻊﻧﺻ ةدﺣو ءﺎﻣ مﺎﻣﺻ ردﺻﯾ فوﺳ
لﯾﻐﺷﺗﻟا ﻊﺿو ﻲﻓ ﺔﻗﺎطﻟا حﺎﺗﻔﻣ نﺎﻛ اذإ .ءﺎﻣﻟﺎﺑON (I) توﺻ ردﺻﯾﺳﻓ ،
حﺎﺗﻔﻣ كﯾرﺣﺗﺑ مﻗ ،لﯾﻐﺷﺗﻟا فﺎﻘﯾﻹ .ءﺎﻣﻟﺎﺑ ُدﻌﺑ ﮫﻠﯾﺻوﺗ مﺗﯾ مﻟ وﻟ ﻰﺗﺣ ،نﯾﻧط
لﯾﻐﺷﺗﻟا فﺎﻘﯾإ ﻊﺿو ﻰﻟإ ﺔﻗﺎطﻟاOFF (O).
.ﺞﻠﺛﻟا ﻊﻧﺻ ةدﺣوﺑ اًررﺿ كﻟذ ﻖﺣﻠﯾ دﻗ ﻻإو .لﺻﺗﻣ
ﺔﻠطﻋ ءﺎﺿﻘﻟ رﯾﺿﺣﺗﻟا
نﻣ بﻠطﺎﻓ ،دﻣﺟﺗﻟا ﺔﺟرد نﻣ لﻗأ ﻰﻟإ ﺔطﯾﺣﻣﻟا ةرارﺣﻟا ﺔﺟرد تﺿﻔﺧﻧا اذإ
ثﺎﺛﻷا ﻲﻓ مﯾﺳﺟ ررﺿ ثودﺣ ﻊﻧﻣﻟ هﺎﯾﻣﻟا دادﻣإ مﺎظﻧ فﯾرﺻﺗ لھؤﻣ ﻲﻧﻓ
وأ هﺎﯾﻣﻟا طوطﺧ قزﻣﺗ نﻋ ﺔﻣﺟﺎﻧﻟا هﺎﯾﻣﻟا نﺎﺿﯾﻓ بﺑﺳﺑ زﺎﮭﺟﻟﺎﺑ طﯾﺣﻣﻟا
ﻊﺿوﻟا ﻰﻠﻋ ﺞﻠﺛﻟا ﻊﻧﺻ ةدﺣوﺑ صﺎﺧﻟا ﺔﻗﺎطﻟا حﺎﺗﻔﻣ طﺑﺿا .تﻼﺻوﻟاOFF
ردﺻﻣ ﻖﻠﻏأو (
• نﺎﻛ اذإ .ﺢﯾﺣﺻ لﻛﺷﺑ ﮫﻌﺿو نﻣ دﻛﺄﺗ ،ﺞﻠﺛﻟا قودﻧﺻ بﯾﻛرﺗ ةدﺎﻋإ دﻧﻋ
مﻗ .طﻘﻓ شورﺟﻣﻟا ﺞﻠﺛﻟا مادﺧﺗﺳا مﺗ اذإ ﻊﯾﻘﺻﻟﺎﺑ ﺞﻠﺛﻟا ﻊﯾزوﺗ ﺔﺑﻠﻋ دﺳ مﺗﯾ دﻗ
ﺔﻘﻠﻌﻣ مادﺧﺗﺳﺎﺑ رﻣﻣﻟا فﯾظﻧﺗو ﺞﻠﺛﻟا قودﻧﺻ ﺔﻟازﺈﺑ نوﻛﺗﯾ يذﻟا ﻊﯾﻘﺻﻟا ﺔﻟازﺈﺑ
ﻊﻧﻣ ﻲﻓ يرود لﻛﺷﺑ بﻌﻛﻣﻟا ﺞﻠﺛﻟا ﻊﯾزوﺗ ﺎًﺿﯾأ دﻋﺎﺳﯾ نأ نﻛﻣﯾ .طﺎطﻣﻟا نﻣ
• رﯾﻏ هﺎﯾﻣﻟا طﺧ نﺎﻛ اذإ ﺞﻠﺛﻟا ﻊﻧﺻ ةدﺣو ﻰﻟإ ﺔﻟوﺻوﻣ ﺔﻗﺎطﻟا كرﺗﺗ ﻻ
)O.زﺎﮭﺟﻟا نﻋ هﺎﯾﻣﻟا
ﺞﻠﺛﻟا نﯾزﺧﺗ قودﻧﺻ بﯾﻛرﺗ ةدﺎﻋإ/ﺔﻟازإ
.ﻰﻠﻋﻸﻟ ﮫﻌﻓر ﻖﯾرط نﻋ ﮫﺗﻟازإو ﺞﻠﺛﻟا ﻊﻧﺎﺻ ءﺎطﻐﺑ كﺎﺳﻣﻹﺎﺑ مﻗ
ﻰﻠﻋ حﺎﺗﻔﻣﻟا طﺑﺿا ،ﻲﺋﺎﻘﻠﺗﻟا ﺞﻠﺛﻟا ﻊﻧﺎﺻ لﯾﻐﺷﺗ فﺎﻘﯾﻹOFF ( O ).
ﮫﻌﻓر ﻊﻣ جرﺎﺧﻠﻟ ﮫﺑﺣﺳﺑ مﻗو كﯾدﯾ ﺎﺗﻠﻛﺑ ﺞﻠﺛﻟا قودﻧﺻﺑ كﺎﺳﻣﻹﺎﺑ مﻗ
.ﻊﯾﻘﺻﻟا نوﻛﺗ
1
2
3
.ﻰﻠﻋﻸﻟ
ﻊﺿو ﻰﻟإ ﺞﻠﺛﻟا ﻊﻧﺻOFF (O).
ﻲﻠﺧادﻟا بﺎﺑﻟا
.زرُطﻟا ضﻌﺑ ﻲﻓ ﻻإ ﺔﯾﺻﺎﺧﻟا هذھ رﻓوﺗﺗ ﻻ
• ةدﺣو لﯾﻐﺷﺗ فﺎﻘﯾإ/لﯾﻐﺷﺗ حﺎﺗﻔﻣ ةرادإ مﺗ ﺎﻣﻠﻛ ﺞﻠﺛﻟا قودﻧﺻ ﻎﯾرﻔﺗ بﺟﯾ
.جارﺧﻹا ﺔﯾﻠﻣﻋ بﯾﺗرﺗ سﻛﻋ بﯾﺗرﺗﺑ ﺎﮭﺑﯾﻛرﺗﺑ مﻗ
.ﺔﺑﺎﺻإ ثدﺣﺗ وأ زﺎﮭﺟﻟا فﻠﺗﯾ دﻗ
.تﺎﻣدﺧﻟا ﻲﻧﻓ ﻖﯾرط نﻋ طﻘﻓ ﺎھذﯾﻔﻧﺗ
طوﺑﺿﻣ ﻲﺋﺎﻘﻠﺗﻟا ﺞﻠﺛﻟا ﻊﻧﺎﺻ حﺎﺗﻔﻣ نوﻛﯾ ﺎﻣدﻧﻋ رزﯾرﻔﻟا ةدﺣو بﺎﺑ ﺢﺗﻓ
بﺟﯾ
.لﯾﻐﺷﺗﻟا ﻊﺿو ﻰﻠﻋ
4
• ،ﻻإو .ةادأ ﺔﯾأ وأ كﯾدﯾﺑ ﻲﺋﺎﻘﻠﺗﻟا ﺞﻠﺛﻟا ﻊﻧﺎﺻﻟ ﺔﻛرﺣﻟا ﺔﯾﻟآ ءازﺟﻷا سﻣﻠﺗ ﻻ
• بﺟﯾ مﺎﮭﻣﻟا هذھ .ﮫﻠﯾدﺑﺗ وأ ﮫﺣﻼﺻإ وأ ﻲﺋﺎﻘﻠﺗﻟا ﺞﻠﺛﻟا ﻊﻧﺎﺻ كﻔﺑ مﻘﺗ ﻻ
• دﻌﺑ رارﻣﺗﺳﺎﺑ لﯾﻐﺷﺗﻟا دﯾﻗ نوﻛﯾ ﻲﺋﺎﻘﻠﺗﻟا ﺞﻠﺛﻟا ﻊﻧﺎﺻ نإ ثﯾﺣ ،هﺎﺑﺗﻧﻹا
•.عزوﻣﻟا نﻋ لﺎﻔطﻷا دﻌﺑا

رﯾذﺣﺗ
ﮫﯾﺑﻧﺗ
ﺔظﺣﻼﻣ
ﮫﯾﺑﻧﺗ
ﮫﯾﺑﻧﺗ
ar_main.book.book Page 24 Wednesday, May 20, 2020 3:35 PM
لﯾﻐﺷﺗﻟا
24
AR
نوﻠﺑو ﺎًﻧﻣآ ءﺎﻣﻟا ﻲﻓ يرﺎﺟﻟا ءاوﮭﻟا اذھ نوﻛﯾﺳ رﻣﻷا ﺔﯾﺎﮭﻧ ﻲﻓ .هﺎﯾﻣﻟا
.برﺷﻠﻟ ءﺎﻣﻟا ﺢﻠﺻﯾو ﺎًﻣﺎﻣﺗ فﺎﻔﺷ
.هﺎﯾﻣﻟا نازﺧ وأ هﺎﯾﻣﻟﺎﺑ دﯾوزﺗﻟا
دوزﻣو هﺎﯾﻣﻟا نازﺧ نﻣ ﻖﻘﺣﺗ ،ﮫﻧوﻟ رﯾﻐﺗﻣ ﺞﻠﺛ ﻊﯾزوﺗ مﺗ اذإ
ﺔﻛرﺷ ءﻼﻣﻋ تﺎﻣوﻠﻌﻣ زﻛرﻣﺑ لﺻﺗا ،ﺔﻠﻛﺷﻣﻟا ترﻣﺗﺳا اذإ .لﻣﺗﺣﻣﻟاLG
Electronics.ﺔﻠﻛﺷﻣﻟا ﺔﺟﻟﺎﻌﻣ مﺗﺗ ﻰﺗﺣ هﺎﯾﻣﻟا وأ ﺞﻠﺛﻟا مدﺧﺗﺳﺗ ﻻ .
ءﺎﻣﻟﺎﺑ ﮫﺋﻠﻣ لﺑﻗ سﺄﻛ ﻲﻓ ﺞﻠﺛﻟا ﻊﯾزوﺗﺑ مﻗ
.لﺋﺎﺳ ﻰﻠﻋ لﻌﻔﻟﺎﺑ يوﺗﺣﯾ ٍسﺄﻛ ﻲﻓ ﺞﻠﺛﻟا ﻊﯾزوﺗ مﺗ اذإ اًزازر ثدﺣﯾ
.زﺎﮭﺟﻟا ءادأ ﻰﻠﻋ رﺛؤﯾ ﺎﻣﻣ ﺞﻠﺛﻟا رﻣﻣ
جرﺧﻣ نﻣ ﺔﺑﺳﺎﻧﻣ ﺔﻓﺎﺳﻣ ﻰﻠﻋ سﺄﻛﻟا ﻰﻠﻋ ظﻓﺎﺣ
.ﺞﻠﺛﻟا ﻊﯾزوﺗ ﻊﻧﻣﺗ دﻗ جرﺧﻣﻟا نﻣ اًدﺟ ﺔﺑﯾرﻘﻟا
عزوﻣﻟا نﻣ ﺞﻠﺛﻟا نﻣ بﺋاذﻟا ءﺎﻣﻟا طﻘﺳﯾ دﻗ .ﻲﺋﺎﺑرﮭﻛﻟا رﺎﯾﺗﻟا ﻲﻓ عﺎطﻘﻧا
.ضرﻷا ﻰﻠﻋ
دﻣﺟﻣﻟا ﺞﻠﺛ ﻊﻧﺎﺻ
جﺎﺗﻧإ ﻲﺋﺎﻘﻠﺗﻟا ﺞﻠﺛﻟا ﻊﻧﺎﺻﻟ نﻛﻣﯾ40-84 ةرﻣﻟا ﻲﻓ ﻲﺋﺎﻘﻠﺗ لﻛﺷﺑ بﻌﻛﻣ
ةرﺗﻓ لﻼﺧ ،ةدﺣاوﻟا24 اذھ فﻠﺗﺧﯾ دﻗ .ﺔﻣﺋﻼﻣ فورظﻟا تﻧﺎﻛ اذإ ﺔﻋﺎﺳ
،بﺎﺑﻟا ﺢﺗﻓ تارﻣ ددﻋ ،زﺎﮭﺟﻟﺎﺑ ﺔطﯾﺣﻣﻟا ةرارﺣﻟا ﺔﺟرد) ﺔﺋﯾﺑﻠﻟ ﺎًﻘﺑط رادﻘﻣﻟا
.(ﺦﻟإ ،زﺎﮭﺟﻟا ﻲﻓ نزﺧﻣﻟا مﺎﻌطﻟا رادﻘﻣ
• (رﺗﻠﻓ) ﺢﺷرﻣ لادﺑﺗﺳا دﻌﺑ رﻛﻌﺗﻣﻟا وأ نﺑﻠﻣﻟا ءﺎﻣﻟا فﯾرﺻﺗ ﻲﻌﯾﺑطﻟا نﻣ
• طﺧ نﻣ ﺢﺋاور وأ تﺎﺋﯾزﺟ ﻰﻠﻋ ﺔﯾﻟوﻷا ﺔﻋزوﻣﻟا هﺎﯾﻣﻟاو ﺞﻠﺛﻟا لﻣﺷﯾ دﻗ
• ردﺻﻣﻠﻟ هﺎﯾﻣﻟا
.ﺔﺑﺎﺻإ وأ فﻠﺗ بﺑﺳﯾ نأ نﻛﻣﯾ كﻟذﺑ
•.ةادأ يﺄﺑ ﻻو كﯾدﯾﺑ ﺔﯾﺋﺎﻘﻠﺗﻟا ﺞﻠﺛﻟا ﻊﻧﺻ ةدﺣو وأ ﺞﻠﺛﻟا جرﺧﻣ سﻣﻠﺗ ﻻ
• فوﺳ .ىرﺧأ تﺎﺑورﺷﻣ يأ وأ
• ﻲﻓ ﺞﻠﺛﻟا سدﻛﺗﯾ ﺎﻣﺑر .رﯾﺑﻛ لﻛﺷﺑ ﺎًﻘﯾﻣﻋ وأ ﺎًﻘﯾﺿ ﺎًﺳﺄﻛ ﺎًﻘﻠطﻣ مدﺧﺗﺳﺗ ﻻ
• سﺄﻛﻟا نإ ثﯾﺣ .ﺞﻠﺛﻟا
.زﺎﮭﺟﻟا لﺧاد نازﺧﻟا نﻣ هﺎﯾﻣﻟا برﺳﺗﺗ دﻗ ،ﺢﯾﺣﺻ لﻛﺷﺑ ﮫﻌﯾﻣﺟﺗ مﺗﯾ مﻟ اذإ
• ثدﺣ اذإ وأ ةزﺎﺟإ ﻲﻓ تﺑھذ اذإ ﺞﻠﺛﻟا قودﻧﺻ لﺧاد ﺞﻠﺛﻟا نﻣ صﻠﺧﺗ
.ﺞﻠﺛ نوﻛﺗ مدﻋ كﻟذ نﻋ ﺞﺗﻧﯾ دﻗو ﺞﻠﺛﻟا بﻌﻛﻣ مﺟﺣو
هﺎﯾﻣﻟا عزوﻣ نازﺧ ﻲﻓ هﺎﯾﻣ دوﺟو نﻣ ﻖﻘﺣﺗ .عزوﻣﻠﻟ ﺞﻠﺛﻟاو ةدرﺎﺑﻟا هﺎﯾﻣﻟا
.هﺎﯾﻣ دﺟوﺗ مﻟ اذإ هﺎﯾﻣﻟا مادﺧﺗﺳﺎﺑ
.لﻠﺧ دوﺟو ﻰﻠﻋ ﺔﻣﻼﻋ سﯾﻟ .هﺎﯾﻣﻟﺎﺑ ﻲﺋﺎﻘﻠﺗﻟا ﺞﻠﺛﻟا ﻊﻧﺎﺻو
ﻲﻓ هﺎﯾﻣﻟا نﻣ ِفﺎﻛ رادﻘﻣ دﺟوﯾ مﻟ اذإ
.عزوﻣﻟا نﻣ عزوﻣ ﺞﻠﺛ وأ
•.برﺷﻠﻟ ﺔﺣﻟﺎﺻ هﺎﯾﻣﺑ طﻘﻓ هﺎﯾﻣﻟا عزوﻣ نازﺧ وأ ﺞﻠﺛﻟا ﻊﻧﺎﺻ ﺊﻠﻣأ
•.نﺧﺎﺳﻟا ءﺎﻣﻟﺎﺑ هﻸﻣﺗ وأ هﺎﯾﻣﻟا فﻼﺧﺑ تﺎﺑورﺷﻣﻟﺎﺑ هﺎﯾﻣﻟا نازﺧ ﻸﻣﺗ ﻻ
• مﺎﯾﻘﻟا .هﺎﯾﻣﻟا عزوﻣ نازﺧ ﻊﯾﻣﺟﺗ وأ ﺔﻟازإ دﻧﻋ ﺔﯾوﻗ ﺔﻣدﺻ وأ ةوﻗ مدﺧﺗﺳﺗ ﻻ
•.ﻊﯾزوﺗﻟا نازﺧ نﻣ ﺔﺑرﻘﻣ ﻰﻠﻋ اوﻧوﻛﯾ نأ لﺎﻔطﻸﻟ حﺎﻣﺳﻟا مدﻋ بﺟﯾ
• مﺗﯾ نأ لﺑﻗ ﮫﻠﺳﻏ بﺟﯾ ،زﺎﮭﺟﻟا تﯾﺑﺛﺗ لﺑﻗ هﺎﯾﻣﻟا عزوﻣ نازﺧ مادﺧﺗﺳا لﺑﻗ
.ﮫﻠﺧادﺑ هﺎﯾﻣﻟا ﻊﺿو
• .ﺢﯾﺣﺻ لﻛﺷﺑ زﺎﮭﺟﻟا ﻲﻓ ﮫﻌﺿو مﺗ دﻗ هﺎﯾﻣﻟا عزوﻣ نازﺧ نﺎﻛ اذإ ﺎﻣ ﻖﻘﺣﺗ
• ﺔﯾﻣﻛ رﺛﺄﺗﺗ دﻗ ،هﺎﯾﻣﻟا عزوﻣ نازﺧ
• ﻊﯾزوﺗ ﺔﻔﯾظو مادﺧﺗﺳا نﻛﻣﯾ ﻻ ،هﺎﯾﻣﻟا عزوﻣ نازﺧ ﻲﻓ هﺎﯾﻣ دﺟوﺗ مﻟ اذإ
نازﺧﻟا ءلﻣﺑ مﻗ مﺛ
• لﻗﻷا ﻰﻠﻋ رظﺗﻧا15 هﺎﯾﻣ ﻰﻠﻋ لوﺻﺣﻟا دﻌﺑ هﺎﯾﻣﻟا نازﺧ ﺔﻟازإ لﺑﻗ ﺔﯾﻧﺎﺛ
• عزوﻣﻟا دﯾوزﺗ نﻋ ﺎًﯾﻌﯾﺑط هﺎﯾﻣﻟا نازﺧ نﻣ ﺞﺗﺎﻧﻟا توﺻﻟا نوﻛﯾ فوﺳ
.ﺔﺑﺎﺻإ كﻟ ثدﺣﯾ دﻗ ﺞﻠﺛﻟا ﻊﻧﺎﺻ
ﺔﻗﺎطﻟا حﺎﺗﻔﻣ
.ﺞﻠﺛﻟا عزوﻣ وأ ﺞﻠﺛﻟا
ﻲﺋﺎﻘﻠﺗﻟا ﺞﻠﺛﻟا ﻊﻧﺎﺻ
.زرُطﻟا ضﻌﺑ ﻲﻓ ﻻإ ﺔﯾﺻﺎﺧﻟا هذھ رﻓوﺗﺗ ﻻ
.هؤارﺷ مﺗ يذﻟا زارطﻟا عوﻧﻟ ﺎًﻘﻓو ﺔﯾﺻﺎﺧﻟا هذھ فﻠﺗﺧﺗ
a
• قودﻧﺻ لﺛﻣ ﻲﺋﺎﻘﻠﺗﻟا ﺞﻠﺛﻟا ﻊﻧﺎﺻ نﻣ ﻲﻛﯾﻧﺎﻛﯾﻣﻟا ءزﺟﻟا ﻰﻟإ كﯾدﯾ لﺧدﺗ ﻻ
• نﻣ ﻲﻛﯾﻧﺎﻛﯾﻣ ءزﺟ يأ سﻣﻟ نﺈﻓ ،ﻲﺋﺎﻘﻠﺗﻟا ﺞﻠﺛﻟا ﻊﻧﺎﺻ ءﺎطﻏ ﺔﻟازﺈﺑ مﻘﺗ ﻻ
ﻎﯾرﻔﺗﺑ مﻗ ،ﺔﻟﺎﺣﻟا هذھ لﺛﻣ ﻲﻓ .ﺔﻟوﮭﺳﺑ ﺎﮭﻠﺻﻓ نﻛﻣﯾ ﻻ دﻗو ﺎﮭﺿﻌﺑ ﻊﻣ لﺗﻛﺗﺗ
.بﺎﺑﻟﺎﺑ دوﺟوﻣﻟا ﺞﻠﺛﻟا ﻊﻧﺎﺻ مادﺧﺗﺳا لﺑﻗ
.زﺎﮭﺟﻠﻟ ﻲﻟوﻷا بﯾﻛرﺗﻟا دﻌﺑ
.دﯾدﺟ ﺞﻠﺛ نّوﻛﺗ ﺢﯾﺗﺗ ﻰﺗﺣ ﺞﻠﺛﻟا قودﻧﺻ
مﺗ اذإ
• رورﻣ دﻌﺑ ﻲﻌﯾﺑط لﻛﺷﺑ ﺞﻠﺛﻟا ﺔﻋﺎﻧﺻﺑ ﺞﻠﺛﻟا ﻊﻧﺎﺻ موﻘﯾ48 ﺎًﺑﯾرﻘﺗ ﺔﻋﺎﺳ
•.ﺞﻠﺛﻟا جﺎﺗﻧإ فﻗوﺗﯾ فوﺳ ،ﺞﻠﺛﻟﺎﺑ لﻣﺎﻛ لﻛﺷﺑ اًءوﻠﻣﻣ ﺞﻠﺛﻟا قودﻧﺻ نﺎﻛ اذإ
•.ﻲﻌﯾﺑط ﺞﻠﺛﻟا قودﻧﺻ ﻲﻓ ﺞﻠﺛﻟا طوﻘﺳ توﺻ
• ﺎﻣﺑر ،ﺞﻠﺛﻟا قودﻧﺻ ﻲﻓ تﻗوﻟا نﻣ ﺔﻠﯾوط ةرﺗﻔﻟ ﺞﻠﺛﻟا تﺎﺑﻌﻛﻣ نﯾزﺧﺗ

ﺔظﺣﻼﻣ
ar_main.book.book Page 23 Wednesday, May 20, 2020 3:35 PM
23
AR
لﯾﻐﺷﺗﻟا
.ضﺑﻘﻣﻟا لﻣﺣ ﻊﻣ جرﺎﺧﻠﻟ ﮫﺑﺣﺳ ﻖﯾرط نﻋ هﺎﯾﻣﻟا عزوﻣ نازﺧ ﺔﻟازﺈﺑ مﻗ
.هﺎﯾﻣﻟا عزوﻣ نازﺧ سأر وأ ءﺎطﻏ ﺢﺗﻔﺑ مﻗ
طﺧﻟا ﻰﻟإ ﺔﻔﯾظﻧ ﺔﺣﺷرﻣ هﺎﯾﻣ وأ ﺔﺣﺷرﻣ هﺎﯾﻣ ﺔﺟﺎﺟز مادﺧﺗﺳﺎﺑ ءلﻣﻟﺎﺑ مﻗ
:ﺔﯾﻟﺎﻣﺟﻹا ﺔﻌﺳﻟا) .هﺎﯾﻣﻟا عزوﻣ نازﺧ لﺧادﺑ ﺢﺿوﻣﻟا يرﺎﯾﻌﻣﻟا4(رﺗﻟ
1
بﻌﻛﻣ لوﺻﺣﻠﻟ ىرﺧأ ﺔﯾوﺎﺣ وأ بوﻛ مادﺧﺗﺳﺎﺑ
2
ررﻛﺗﻣ لﻛﺷﺑ ﺔﻔﯾظﻧ شﺎﻣﻗ ﺔﻌطﻘﺑ
3
ﺞﻠﺛﻟا جرﺧﻣ وأ
b
عزوﻣﻟا رز ﻰﻠﻋ طﻐﺿا
a
.شورﺟﻣ ﺞﻠﺛ وأ ءﺎﻣ وأ ﺞﻠﺛ
عزوﻣﻟا فﯾظﻧﺗ
هﺎﯾﻣﻟاو ﺞﻠﺛﻟا جرﺧﻣ فﯾظﻧﺗ
هﺎﯾﻣﻟا جرﺧﻣ ﺢﺳﻣﺑ مﻗ
a
.ﺔﻟوﮭﺳﺑ ﺦﺳﺗﺗ دﻗ ﺎﮭﻧﻷ
.هﺎﯾﻣﻟا عزوﻣ نازﺧ سأر وأ ءﺎطﻏ ﻖﻠﻐﺑ مﻗ ،هﺎﯾﻣﻟا مادﺧﺗﺳﺎﺑ ءلﻣﻟا دﻌﺑ
.ﺔﺟﻼﺛﻟا فر ﻲﻓ هﺎﯾﻣﻟا عزوﻣ نازﺧ بﯾﻛرﺗ ةدﺎﻋﺈﺑ مﻗ
•.جرﺎﺧﻣﻟﺎﺑ ﻖﺻﺗﻠﺗ دﻘﻓ ﻲﻧﺎﺗﻛﻟا ﺞﯾﺳﻧﻟا نﻣ شﺎﻣﻗ ﺔﻌطﻗ مادﺧﺗﺳا ﺔﻟﺎﺣ ﻲﻓ
4
عزوﻣﻟا جرد فﯾظﻧﺗ
ﺔﻟوﮭﺳﺑ ًﻼﻠﺑﻣ عزوﻣﻟا ﺢﺑﺻﯾ دﻗ .ﮫﻠﻠﺑﻣ شﺎﻣﻗ ﺔﻌطﻘﺑ ﺎﮭﻠﻛ ﺔﺣﺎﺳﻣﻟا ﺢﺳﻣﺑ مﻗ
.نﯾﺑﻛﺳﻧﻣﻟا ءﺎﻣﻟا وأ ﺞﻠﺛﻟا بﺑﺳﺑ
5
ءﺎﻣﻟﺎﺑ هﺎﯾﻣﻟا نازﺧ ءلﻣ
.زرُطﻟا ضﻌﺑ ﻲﻓ ﻻإ ﺔﯾﺻﺎﺧﻟا هذھ رﻓوﺗﺗ ﻻ
ﻊﻧﺎﺻ ﻖﯾرط نﻋ ﺎﮭﻣادﺧﺗﺳا وأ ﺎﮭﻌﯾزوﺗ مﺗﯾ يذﻟا هﺎﯾﻣﻟﺎﺑ هﺎﯾﻣﻟا نازﺧ ظﻔﺗﺣﯾ
.ﺞﻠﺛ لﻣﻌﻟ ﻲﺋﺎﻘﻠﺗﻟا ﺞﻠﺛﻟا

ﺔظﺣﻼﻣ
ﮫﯾﺑﻧﺗ
ﺔظﺣﻼﻣ
ar_main.book.book Page 22 Wednesday, May 20, 2020 3:35 PM
لﯾﻐﺷﺗﻟا
22
AR
زﻣرﻟا رﮭظﯾ ﻰﺗﺣ ٍناوﺛ ثﻼﺛ ةدﻣﻟ
.ﺔﻔﯾظوﻟا لﯾﻌﻔﺗ مﺗﯾو
.ﺔﻔﯾظوﻟا لﯾﻌﻔﺗ ءﺎﻐﻟإ مﺗﯾو
LG ThinQ
.
ﺞﻠﺛ وأ ءﺎﻣ وأ ﺞﻠﺛ بﻌﻛﻣ لوﺻﺣﻠﻟ رﺧآ ءﺎﻋو وأ ٍبوﻛ ةدﻋﺎﺳﻣﺑ عزوﻣﻟا حﺎﺗﻔﻣ ﻰﻠﻋ طﻐﺿا .مﻛﺣﺗﻟا ﺔﺣوﻟ رارزأ نﻣ ﮫﯾﻓ بﻏرﺗ يذﻟا عزوﻣﻟا ﻊﺿو ددﺣ
،بﺎﺑﻟا ﻖﻠﻏ دﻧﻋ .تﻗؤﻣ لﻛﺷﺑ ﻊﯾزوﺗﻟا فﻗوﺗﯾ فوﺳﻓ ،شورﺟﻣﻟا ﺞﻠﺛﻟا
اًرظﻧ ﺎًﺿﻔﺧﻧﻣ ﺞﻠﺛﻟا ﻊﻧﺎﺻﻟ دودﻣﻣﻟا هﺎﯾﻣﻟا رادﻘﻣ نوﻛﯾ
وأ رﻣﺗﺳﻣ لﻛﺷﺑ ﺞﻠﺛﻟا مدﺧﺗﺳُﯾ مﻟ اذإو .هﺎﯾﻣﻟا نازﺧ ﻲﻓ هﺎﯾﻣﻟا ﺔﯾﺎﻔﻛ مدﻌﻟ
ﮫﺿﻌﺑ ﻊﻣ ﺞﻠﺛﻟا لﺗﻛﺗﯾ دﻗ ،اًدﺟ ﺔﺋﻓاد دﻣﺟُﻣﻠﻟ ةددﺣﻣﻟا ةرارﺣﻟا ﺔﺟرد تﻧﺎﻛ
k
زﻣرﻟا رﮭظﯾ ﻰﺗﺣ ٍناوﺛ ثﻼﺛ ةدﻣﻟ
l
.ددﺣﻣﻟا رﺻﻧﻌﻟا ﻊﯾزوﺗ رﻣﺗﺳﯾ فوﺳ
،ةرﯾﻐﺻ بوﻛﻟا ﺔﻓﺎﺣ تﻧﺎﻛ اذإ
.لﻣﺎﻛ لﻛﺷﺑ ﺎﮭﻧﻣ
.شورﺟﻣ ﺞﻠﺛ وأ بﻌﻛﻣ
ﺎﻣﺑر ،ﺎﮭﺿﻌﺑ ﻊﻣ
.ﺎًﺿﯾأ
هﺎﯾﻣﻟاو ﺞﻠﺛﻟا عزوﻣ مادﺧﺗﺳا
ﻰﻠﻋأ دوﺟوﻣﻟا زﻣرﻟا ءﻲﺿﯾ ﻰﺗﺣ ررﻛﺗﻣ لﻛﺷﺑ عزوﻣﻟا دﯾدﺣﺗ رز ﻰﻠﻋ طﻐﺿا
.ﮫﺑ بﻏرﺗ يذﻟا رﺎﯾﺗﺧﻻا
Lock
Lock
ﺔﻛﺑﺷﺑ زﺎﮭﺟﻟا لﯾﺻوﺗﺑ رزﻟا اذھ ﺢﻣﺳﯾWi-Fi ﻖﯾﺑطﺗﻟ ﺔﯾﻟوﻷا تادادﻋﻹا لوﺣ تﺎﻣوﻠﻌﻣ ﻰﻠﻋ لوﺻﺣﻠﻟ ﺔﯾﻛذﻟا فﺋﺎظوﻟا ﻊﺟار .ﺔﯾﻟزﻧﻣ
رﺷؤﻣﻟا ءﻲﺿﯾ ﺎﻣدﻧﻋ هﺎﯾﻣﻟا رﺗﻠﻓ لدﺑﺗﺳا
h
.
• وأ ،بﻌﻛﻣﻟا ﺞﻠﺛﻟا وأ ،هﺎﯾﻣﻟا ﻊﯾزوﺗ ءﺎﻧﺛأ ﺔﺟﻼﺛﻟا ةدﺣو بﺎﺑ ﺢﺗﻔﺑ تﻣﻗ اذإ
(ﺞﻠﺛﻟاو هﺎﯾﻣﻟا عزوﻣ)Ice and Water
Dispenser
• جورﺧﻟا وأ سﺄﻛﻟا جرﺎﺧ هﺎﯾﻣﻟا رﺛﺎﻧﺗﺗ دﻗ
• نﻣ رﺛﻛﻷ لﺻﯾ ﺎھرطﻗ ﺔﻓﺎﺣﺑ ﺎًﺑوﻛ مدﺧﺗﺳا68 ﺞﻠﺛ وأ هﺎﯾﻣ ﻊﯾزوﺗ دﻧﻋ مﻣ
• ﺔﻠﺗﻛﺗﻣ ﺞﻠﺛﻟا تﺎﺑﻌﻛﻣ ﺢﺑﺻﺗ وأ ،ةرﯾﻐﺻ ﺞﻠﺛ تﺎﺑﻌﻛﻣ ﺞﻠﺛﻟا ﻊﻧﺎﺻ ﺞﺗﻧﯾ ﺎﻣدﻧﻋ
ةرﺗﻔﻟ زﺎﮭﺟﻟا مادﺧﺗﺳا مﺗﯾ مﻟ اذإ ﺎًﺿﯾأ يرورﺿ اذھ نوﻛﯾ .(هﺎﯾﻣﻟا نﻣ
نوﻠﺑو ﺎًﻧﻣآ ءﺎﻣﻟا ﻲﻓ يرﺎﺟﻟا ءاوﮭﻟا اذھ نوﻛﯾﺳ رﻣﻷا ﺔﯾﺎﮭﻧ ﻲﻓو .هﺎﯾﻣﻟا
(ﺞﻠﺛﻟاو هﺎﯾﻣﻟا عزوﻣ مادﺧﺗﺳا لﺑﻗIce and
Water Dispenser
ةدﻣﻟ هﺎﯾﻣﻟا مدﺧﺗﺳُﺗ مﻟ اذإ هﺎﯾﻣ دوزﻣﺑ لّﺻوﻣﻟا هﺎﯾﻣﻟا مﺎظﻧ5.مﺎﯾأ
.ﺞﻠﺛﻟا نﻣ ﻰﻟوﻷا ﺔﻠﯾﻠﻘﻟا تﺎﻌﻓدﻟا ِﻖﻟأو ﺎًﺑﯾرﻘﺗ ﻖﺋﺎﻗد
رﻛﻌﺗﻣﻟا ءﺎﻣﻟا فﯾرﺻﺗ نأ ﻲﻌﯾﺑطﻟا نﻣ
.لﺎﻘﺗﻧﻻا اذھ ءﺎﻧﺛأ برﺷﻠﻟ ءﺎﻣﻟا ﺢﻠﺻﯾو ﺎًﻣﺎﻣﺗ فﺎﻔﺷ
ﺞﻠﺛﻟاو ءﺎﻣﻟا عوﻧ
*1
Water Filter
.مﻛﺣﺗﻟا لﺋﺎﺳو
ﻊﯾزوﺗ مﺎظﻧ فﯾظﻧﺗﺑ مﻗ48 فﯾظﻧﺗﺑ مﻗ .ﺔﻋﺎﺳ
.شورﺟﻣ
Wi-Fi
.ﺔﻠﯾوط
• رزﻟا ﻰﻠﻋ رارﻣﺗﺳﻻا ﻊﻣ طﻐﺿا ،مﻛﺣﺗﻟا ﺔﺣوﻟ رارزأ لﻔﻘﻟ
• رزﻟا ﻰﻠﻋ رارﻣﺗﺳﻻا ﻊﻣ طﻐﺿا ،ﺔﻔﯾظوﻟا لﯾطﻌﺗﻟ
g
h
i
•.ﺔﻗﺎطﻟا رﯾﻓوﺗﻟ ﺎًﯾﺋﺎﻘﻠﺗ مﻛﺣﺗﻟا ﺔﺣوﻟ لﯾﻐﺷﺗ فﺎﻘﯾإ مﺗﯾ
•.رزﻟا ﺔﻔﯾظو لﻣﻌﺗ دﻘﻓ ،ﺎﮭﻔﯾظﻧﺗ ءﺎﻧﺛأ مﻛﺣﺗﻟا ﺔﺣوﻟ ﻊﻣ مﺳﺟﻟا وأ ﻊﺑﺎﺻﻷﺎﺑ لﺎﺻﺗا يأ كﺎﻧھ نﺎﻛ اذإ
• مﯾطﺣﺗ وأ ﻲﻓ بﻌﻠﻟا نﻣ لﺎﻔطﻷا ﻊﻧﻣﻟ عزوﻣﻟا نﻋ اًدﯾﻌﺑ لﺎﻔطﻷا ﻰﻠﻋ ظﻓﺎﺣ
• ﻲﻟاوﺣ) ﺞﻠﺛﻟا نﻣ ﻰﻟوﻷا ﺔﻠﯾﻠﻘﻟا رﯾدﺎﻘﻣﻟا نﻣ صﻠﺧﺗ20و بﻌﻛﻣ 7 باوﻛأ
• ةدﻣﻟ مدﺧﺗﺳُﯾ مﻟ اذإ هﺎﯾﻣﻟا
• ةدﻣﻟ هﺎﯾﻣﻟﺎﺑ عّزوﻣﻟا فﯾظﻧﺗﺑ مﻗ ،هﺎﯾﻣﻟا ﻊﯾزوﺗ مﺎظﻧ فﯾظﻧﺗ صﺧﯾ ﺎﻣﯾﻓ5
• (رﺗﻠﻓ) ﺢﺷرﻣ لادﺑﺗﺳا دﻌﺑ نﺑﻠﻣﻟا /
• دﯾوزﺗﻟا فﻗوﺗﯾ فوﺳﻓ ،هﺎﯾﻣﻟا ﻊﯾزوﺗ مﺗﯾ ﺎﻣﻧﯾﺑ دﻣﺟُﻣﻟا بﺎﺑ ﺢﺗﻔﺑ تﻣﻗ اذإ
.هﺎﯾﻣﻟﺎﺑ

ﺔظﺣﻼﻣ
ar_main.book.book Page 21 Wednesday, May 20, 2020 3:35 PM
21
AR
لﯾﻐﺷﺗﻟا
مﻛﺣﺗﻟا ﺔﺣوﻟ
.رﺧﻵ زارط نﻣ ﺔﯾﻠﻌﻔﻟا مﻛﺣﺗﻟا ﺔﺣوﻟ فﻠﺗﺧﺗ دﻗ
فﺋﺎظوﻟاو مﻛﺣﺗﻟا ﺔﺣوﻟ
*1 .زرُطﻟا ضﻌﺑ ﻲﻓ ﻻإ ﺔﯾﺻﺎﺧﻟا هذھ رﻓوﺗﺗ ﻻ
.ﺔﺟﻼﺛﻟا لﺧاد ﺔﮭﯾرﻛﻟا ﺢﺋاورﻟا نﻣ ﺔﻔﯾظوﻟا هذھ لﻠﻘﺗ
.ﺔﻋرﺳﺑ ﺔﺟﻠﺛﻣﻟا وأ ةدﻣﺟﻣﻟا ﺔﻣﻌطﻷا نﻣ ةرﯾﺑﻛ ﺔﯾﻣﻛ دﯾﻣﺟﺗ ﺔﻔﯾظوﻟا هذﮭﻟ نﻛﻣﯾ
- نﻣ ﺎﮭطﺑﺿ بوﻏرﻣﻟا ةرارﺣﻟا ﺔﺟرد دﯾدﺣﺗﻟ ررﻛﺗﻣ لﻛﺷﺑ رزﻟا اذھ ﻰﻠﻋ طﻐﺿا24- ﻰﺗﺣ ﺔﯾوﺋﻣ ﺔﺟرد 14.ﺔﯾوﺋﻣ ﺔﺟرد
ﻰﻠﻋ ﺎﮭطﺑﺿ بوﻏرﻣﻟا ةرارﺣﻟا ﺔﺟرد دﯾدﺣﺗﻟ ررﻛﺗﻣ لﻛﺷﺑ رزﻟا اذھ ﻰﻠﻋ طﻐﺿا1 و ﺔﯾوﺋﻣ ﺔﺟرد 7.ﺔﯾوﺋﻣ ﺔﺟرد
.ﺢﯾﺣﺻ لﻛﺷﺑ هﺎﯾﻣﻟا عزوﻣ نازﺧ بﯾﻛرﺗ مﺗﯾ ﺎﻣدﻧﻋ (فرﺻﻟا مدﻋ)
.مﻛﺣﺗﻟا ﺔﺣوﻟ ﻰﻠﻋ ةدوﺟوﻣﻟا رارزﻷا لﻔﻗ ﻰﻠﻋ لﻣﻌﯾ
*1
Hygiene Fresh
Express Freeze
.زﺎﮭﺟﻟا لﺧاد ﺔﯾﻠﻌﻔﻟا
*1
Non Plumbing
Non Plumbing
Freezer
Fridge
زﻣر ءﻲﺿﯾ
Lock
a
b
•.رزﻟا ﻰﻠﻋ ﺎﮭﯾﻓ طﻐﺿﺗ ةرﻣ لﻛ ﻲﻓ ﺎﮭﻠﯾطﻌﺗو ﺔﻔﯾظوﻟا هذھ نﯾﻛﻣﺗ مﺗﯾ
•.ﺔﻧﯾﻌﻣ ةرﺗﻓ رورﻣ دﻌﺑ ﻲﺋﺎﻘﻠﺗ لﻛﺷﺑ ﺔﻔﯾظوﻟا هذھ فﻗوﺗﺗ
c
• ﻲھ دﻣﺟُﻣﻠﻟ ﺔﯾﻟوﻷا ةرارﺣﻟا ﺔﺟرد19.ﺔﯾوﺋﻣ ﺔﺟرد -
d
• ﻲھ ﺔﺟﻼﺛﻠﻟ ﺔﯾﻟوﻷا ةرارﺣﻟا ﺔﺟرد4.ﺔﯾوﺋﻣ ﺔﺟرد
• ةرارﺣﻟا ﺔﺟرد تﺳﯾﻟو ،ﺔﻓدﮭﺗﺳﻣﻟا ةرارﺣﻟا ﺔﺟرد ﻲھ ﺎﮭﯾﻟإ رﺎﺷﻣﻟا ةرارﺣﻟا ﺔﺟرد دادﻋإ نإ ثﯾﺣ ،مﺎﻌطﻟا ﺔﻟﺎﺣﻟ ﺎًﻘﻓو ﺔﯾﻠﺧادﻟا ﺔﯾﻠﻌﻔﻟا ةرارﺣﻟا ﺔﺟرد فﻠﺗﺧﺗ
e
f

ﮫﯾﺑﻧﺗ
ar_main.book.book Page 20 Wednesday, May 20, 2020 3:35 PM
لﯾﻐﺷﺗﻟا
20
AR
.ﺎﮭﻣادﺧﺗﺳا ررﻛﺗﯾ ﻲﺗﻟا ﺔﻣﻌطﻷا وأ فﻠﻐﻣﻟا دﻣﺟُﻣﻟا مﺎﻌطﻟا نﻣ ةرﯾﻐﺻ تﺎﻋوﻣﺟﻣ نﯾزﺧﺗ نﻛﻣﯾ ثﯾﺣ
.ﺔﻔﯾﻔﺧﻟا تﺎﺑﺟوﻟاو تﺎﺑورﺷﻣﻟا لﺛﻣ ررﻛﺗﻣ ٍلﻛﺷﺑ ﮫﺟارﺧإ مﺗﯾ يذﻟا مﺎﻌطﻟا ظﻔﺣُﯾ ثﯾﺣ
.فرﻟا نﻣ ﻲﻣﺎﻣﻷا ءزﺟﻟا ﻲﻓ ﺔﯾﻟﺎﻌﻟا ﺔﺑوطرﻟا تاذ ﺔﻣﻌطﻷا ن
.فﻠﺗﺧﻣ عﺎﻔﺗرﺎﺑ رﺧآ ىرﺟﻣ ﻲﻓ فرﻟا لﺎﺧدإ ﻖﯾرط نﻋ فرﻟا عﺎﻔﺗرا لﯾدﻌﺗ نﻛﻣﯾ
.ﺎًﯾودﯾ ًﻸﻣ بﻠطﺗﯾ ﮫﻧإ .ﻲﺋﺎﻘﻠﺗﻟا ﺞﻠﺛﻟا ﻊﻧﺎﺻ وأ عزوﻣﻠﻟ ةدوزﻣﻟا هﺎﯾﻣﻟا نزﺧُﺗ ثﯾﺣ
.ﺔﺑوطرﻟﺎﺑ مﻛﺣﺗﻟا زﺎﮭﺟ طﺑﺿﺑ ﺎﮭﺗرﺎﺿﻧ ﻰﻠﻋ ظﺎﻔﺣﻟا ﻲﻓ ةدﻋﺎﺳﻣﻠﻟ تاورﺿﺧﻟاو ﺔﮭﻛﺎﻔﻟا ظﻔﺣُﺗ ثﯾﺣ
.نﻛﻣﻣ ٍتﻗو لوطﻷ ﺔﺟزﺎط ﻰﻘﺑﺗﻟ تاورﺿﺧﻟاو ﺔﮭﻛﺎﻔﻟا ظﻔﺣُﺗ ثﯾﺣ
.ةدرﺑﻣﻟا ﺔﺻﻠﺻﻟا ﺔﯾﻋوأو تﺎﺑورﺷﻣﻟاو ﺔﻣﻌطﻷا نﻣ ةرﯾﻐﺻﻟا مزﺣﻟا نﯾزﺧﺗ نﺎﻛﻣ نﻋ ةرﺎﺑﻋ
رزﯾرﻔﻟا ةدﺣو بﺎﺑ ﺔﻠﺳ
*1
ﻲﻠﺧادﻟا بﺎﺑﻟا ةرﯾﺟﺣ
*1
تﺎﺟﺎﺟزﻟا فر
.ﺎﮭﯾﻓ تﺎﯾوﺎﺣﻟا وأ ﺔﻠﯾوطﻟا تﺎﺑورﺷﻣﻟا تﺎﺟﺎﺟز نﯾزﺧﺗ مﺗﯾ
ﺔﺟﻼﺛﻟا فر
ّ
زﺧ .ىرﺧﻷا داوﻣﻟاو ةدرﺑﻣﻟا ﺔﻣﻌطﻷا نﯾزﺧﺗ نﺎﻛﻣ وھ اذھ
ِ
.رﺧﻵ زارط نﻣ فﻓرﻸﻟ ﻲﻠﻌﻔﻟا ددﻌﻟا فﻠﺗﺧﯾ فوﺳ
*1
ءاوﮭﻟا رﺗﻠﻓ
.ﺔﺟﻼﺛﻟا ةرﺟﺣ لﺧاد ﺔﮭﯾرﻛﻟا ﺢﺋاورﻟا نﻣ ﺔﻔﯾظوﻟا هذھ لﻠﻘﺗ
*1
ﺔﻔﯾﻔﺧﻟا تﺎﺑﺟوﻟا جرد
.ةدرﺑُﻣﻟا ﺔﻣﻌطﻷا نﻣ ةرﯾﻐﺻ تﺎﻋوﻣﺟﻣ نﯾزﺧﺗ نﻛﻣﯾ ثﯾﺣ
*1
ةرارﺣﻟا رﻌﺷﺗﺳُﻣ
.ﺔﺟﻼﺛﻟا ةدﺣو ةرارﺣ ﺔﺟرد رﺎﻌﺷﺗﺳا ﮫﻧﻛﻣﯾ رﻌﺷﺗﺳُﻣﻟا اذھ
*1
هﺎﯾﻣﻟا نازﺧ
*1
ﺔﺟزﺎطﻟا تاوارﺿﺧﻟا جرد
*1
ضﯾﺑﻟا قودﻧﺻ
.ضﯾﺑﻟا ظﻔﺣُﯾ ثﯾﺣ
تاورﺿﺧﻟا جرد
ﺔﺟﻼﺛﻟا ةدﺣو بﺎﺑ ﺔﻠﺳ
e
f
g
•.زﺎﮭﺟﻟا ﻲﻓ فﻠﺗ وأ ﺔﺑﺎﺻإ يأ بﺑﺳﯾ ﺎﻣﻣ رﺻﺎﻧﻌﻟا طﻘﺳﺗ دﻘﻓ .ةرﯾﺻﻗ تﺎﯾوﺎﺣ وأ تﺎﺟﺎﺟز ﺔﯾأ نﯾزﺧﺗﺑ مﻘﺗ ﻻ
h
i
j
k
•.ﺔﻗدﺑ ةرارﺣﻟا ﺔﺟرد رﻌﺷﺗﺳﯾﻟ مﺎﻌطﻟاو رﻌﺷﺗﺳُﻣﻟا نﯾﺑ ﺔﻓﺎﺳﻣﻟا ﻰﻠﻋ ظﺎﻔﺣﻟا
l
m
n
•.تاورﺿﺧﻟا جرد ﻲﻓ وأ ﺔﺟﻼﺛﻟا ﻰﻠﻋأ فرﻟا ﻰﻠﻋ ﮫﻌﺿﺗ وأ ﺞﻠﺛ قودﻧﺻﻛ نﺎﻛﻣﻟا اذھ مدﺧﺗﺳﺗ ﻻ
o
p

ar_main.book.book Page 19 Wednesday, May 20, 2020 3:35 PM
19
AR
لﯾﻐﺷﺗﻟا
نﺎﺗﻣﺟﻧ) ﻲﻠﺧادﻟا ءزﺟﻟا
a
(
*1 .زرُطﻟا ضﻌﺑ ﻲﻓ ﻻإ ﺔﯾﺻﺎﺧﻟا هذھ رﻓوﺗﺗ ﻻ
حﺎﺑﺻﻣLED
ﺢﯾﺑﺎﺻﻣ ءﻲﺿُﺗLED.بﺎﺑﻟا ﺢﺗﻔﺗ ﺎﻣدﻧﻋ زﺎﮭﺟﻟا لﺧاد
*1
ﻲﺋﺎﻘﻠﺗﻟا ﺞﻠﺛﻟا ﻊﻧﺎﺻ
.ﮫﻧﯾزﺧﺗو ﺎًﯾﺋﺎﻘﻠﺗ ﺞﻠﺛﻟا جﺎﺗﻧإ مﺗﯾ ثﯾﺣ
دﻣﺟُﻣﻟا فر
.مﯾرﻛ سﯾﻵاو كﺎﻣﺳﻷاو موﺣﻠﻟﺎﻛ ةدﻣﺟﻣﻟا ﺔﻣﻌطﻷا نﯾزﺧﺗ نﺎﻛﻣ نﻋ ةرﺎﺑﻋ
دﻣﺟُﻣﻟا جرد
.لﯾوطﻟا ىدﻣﻟا ﻰﻠﻋ ةدﻣﺟﻣﻟا داوﻣﻟا نﯾزﺧﺗﻟ صﺻﺧﻣﻟا نﺎﻛﻣﻟا نﻋ ةرﺎﺑﻋ
a
b
c
d

ar_main.book.book Page 18 Wednesday, May 20, 2020 3:35 PM
18
لﯾﻐﺷﺗﻟا
AR
ﺞﺗﻧﻣﻟا صاوﺧ
.رﺧﻵ زارط نﻣ ﮫﺗﺎﻧوﻛﻣ وأ زﺎﮭﺟﻠﻟ ﻲﺟرﺎﺧﻟا لﻛﺷﻟا فﻠﺗﺧﯾ دﻗ
ﺔﯾﺟرﺎﺧﻟا ﺔﮭﺟﻟا
*1 .زرُطﻟا ضﻌﺑ ﻲﻓ ﻻإ ﺔﯾﺻﺎﺧﻟا هذھ رﻓوﺗﺗ ﻻ
مﻛﺣﺗﻟا ﺔﺣوﻟ
.عزوﻣﻟا ﻊﺿوو هﺎﯾﻣﻟا ﺢﺷرﻣ ﺔﻟﺎﺣو ،دﻣﺟﻣﻟاو ﺔﺟﻼﺛﻟا ﻲﻓ ةرارﺣﻟا تﺎﺟرد طﺑﺿا
*1
ﻲﻠﺧادﻟا بﺎﺑﻟا
.ﺔﻟوﮭﺳﺑ ﺎﮭﯾﻟإ لوﺻوﻟا ﻰﻟإ جﺎﺗﺣﺗو ﺎﮭﻣادﺧﺗﺳا رﺛﻛﯾ ﻲﺗﻟا ضارﻏﻸﻟ ﺔﺑﺳﺎﻧﻣ نﯾزﺧﺗ ﺔﺣﺎﺳﻣ هذھ
*1
ﻲﻠﺧادﻟا بﺎﺑﻟا ﺔﻌﻓار
ﻲﻠﺧادﻟا بﺎﺑﻟا ﺢﺗﻔﺗ
*1
ﻲﻠﺧادﻟا بﺎﺑﻟاInstaView
.ًةدﺎﻋ ﺔﻣدﺧﺗﺳﻣﻟا مﺎﻌطﻟا رﺻﺎﻧﻋ ﻰﻟإ ﻊﯾرﺳﻟا لوﺻوﻟﺎﺑ بﺎﺑﻟا ةدﺣو ﻲﻓ ﻊﯾرﺳﻟا ضرﻌﻟا بﺎﺑ ﺢﯾﺗﯾ
a
b
c
d

ﮫﯾﺑﻧﺗ
ﺔظﺣﻼﻣ
ar_main.book.book Page 17 Wednesday, May 20, 2020 3:35 PM
17
AR
لﯾﻐﺷﺗﻟا
دﯾﻣﺟﺗ ﺔﻌﺳ ﻰﺻﻗأ
.ﮫﻟ دﯾﻣﺟﺗ ةءﺎﻔﻛ ﻰﺻﻗﺄﺑ مﺎﯾﻘﻠﻟ دﻣﺟُﻣﻟا
ﻊﺿو لﺑﻗ نﯾﺗﻋﺎﺳ ةدﻣﻟ
Express Freeze
ﻰﻟإ لﺻﺗ ةدﻣ ﺔﻔﯾظوﻟا هذھ قرﻐﺗﺳﺗ ،مﺎﻋ لﻛﺷﺑ24 فﺎﻘﯾإ مﺗﯾﺳو ﺔﻋﺎﺳ
.ﻲﺋﺎﻘﻠﺗ لﻛﺷﺑ ﺎﮭﻠﯾﻐﺷﺗ
Express Freeze
.دﻣﺟﻣﻟا ةدﺣو ﻲﻓ ﺔﺟزﺎطﻟا ﺔﻣﻌطﻷا
.فوﻓرﻟاو ،جاردﻷاو ،لﻼﺳﻟا
مﺎﻌطﻟا ﺔﯾﻣﻛﻟ ﻲﺻﻗﻷا دﺣﻟا دﯾﻣﺟﺗ
جاردأ لﻛ جارﺧإ بﺟﯾ ،ﺎﮭﻧﯾزﺧﺗ دارﯾ ﺔﻣﻌطﻷا نﻣ ةرﯾﺑﻛ تﺎﯾﻣﻛ دوﺟو ﺔﻟﺎﺣ ﻲﻓ
ةدﺣو ﻲﻓ جاردﻷا ﻰﻠﻋ ًةرﺷﺎﺑﻣ ﺔﻣﻌطﻷا صر بﺟﯾو زﺎﮭﺟﻟا جرﺎﺧ دﻣﺟﻣﻟا
فﻠﺗ وأ ﺔﺑﺎﺻإ ﻲﻓ كﻟذ بﺑﺳﺗﯾ نأ نﻛﻣﯾ تاءارﺟﻹا هذھ ﻊﺑﺗﺗ مﻟ اذإ .ﺔﯾﺎﻧﻌﺑ
.دﻣﺟﻣﻟا
.جاردﻷا
• ﺔﻔﯾظو ﺢﯾﺗﺗ
• ﺔﻔﯾظو لﯾﻐﺷﺗ بﺟﯾ
• لﺛﻣ ﺔﯾﻠﺧادﻟا ءازﺟﻷا ﻊﯾﻣﺟ لﺎﺧدﺈﺑ مﻗ ،لﺿﻓأ ءاوھ ﻊﯾزوﺗ ﻰﻠﻋ لوﺻﺣﻠﻟ
• جاردﻷا بﺣﺳا مﺛ ًﻻوأ جاردﻷا ﻲﻓ دوﺟوﻣﻟا مﺎﻌطﻟا ﺔﻟازﺈﺑ مﻗ،جاردﻷا كﻔﻟ
•.ﺔﺣﯾﺣﺻﻟا ﺎﮭﻌﺿاوﻣ ﻲﻓ ﺎﮭﻠﺧدأ اذﻟ ،ﺎًﻔﻠﺗﺧﻣ جرد لﻛ لﻛﺷ نوﻛﯾ دﻗ
نﯾﺗﻣﺟﻧ تاذ ورﺟﺣ
ﺞﻠﺛﻟا نﯾزﺧﺗﻟ نﯾﺗﻣﺟﻧﻟا تاذ (
.ﺞﻠﺛﻟا تﺎﺑﻌﻛﻣ ﺔﻋﺎﻧﺻﻟ وأ ،ﺎﮭﺗﻋﺎﻧﺻ وأ تﺎﺟﻠﺛﻣﻟا نﯾزﺧﺗﻟ وأ ،ﺎًﻘﺑﺳﻣ ﺔﺟﻠﺛﻣﻟا
a
- نﻣ مﺎﻌطﻟاو12- ﻰﻟإ ﺔﯾوﺋﻣ ﺔﺟرد 18.ةرﯾﺻﻗ تارﺗﻔﻟ ﺔﯾوﺋﻣ ﺔﺟرد
•) نﯾزﺧﺗﻟا ﺔﻠﺳ وأ جردﻟا مادﺧﺗﺳا نﻛﻣﯾ
• ﺔﻣﻌطﻷا نﯾزﺧﺗﻟ ﺔﺑﺳﺎﻧﻣ نﯾﺗﻣﺟﻧﻟا تاذ ﺔﺟﻠﺛﻣﻟا ﺔﻣﻌطﻷا تارﯾﺟﺣ دﻌُﺗ
•.ﺔﺟزﺎطﻟا ﺔﻣﻌطﻷا دﯾﻣﺟﺗﻟ ﺔﺑﺳﺎﻧﻣ رﯾﻏ نﯾﺗﻣﺟﻧﻟا تاذ تارﯾﺟﺣﻟا دﻌُﺗ

ﺔظﺣﻼﻣ
ﺔظﺣﻼﻣ
ar_main.book.book Page 16 Wednesday, May 20, 2020 3:35 PM
لﯾﻐﺷﺗﻟا
16
AR
لﯾﻐﺷﺗﻟا
.مﺎﻌطﻟا ﻰﻠﻋ ﺔﺣﺿوﻣﻟا نﻣ لﻗأ ةرارﺣ
مﺎﻌطﻟا نﯾزﺧﺗ ﻰﻠﻋ
ةدﻋ ﻲﻓ نزﺧﻣﻟا مﺎﻌطﻟا ظﻔﺣ وأ قﻼﻏﺈﺑ مﻘﻓ ،ةرارﺣﻟا ﺔﺟرد عﺎﻔﺗرا بﺑﺳﺑ
رﯾﺛﺄﺗﻟا لﯾﻠﻘﺗ ﻲﻓ بﻏرﺗ تﻧﻛ اذإ .زﺎﮭﺟﻟا تﺎﻔﺻاوﻣ
.ﺔﯾدﺎﻌﻟا لﯾﻐﺷﺗﻟا فورظ ﻲﻓ ﺞﻠﺛﻟا
ﺔﺟرد
ﺔﻓﺎﺳﻣ ﻰﻠﻋ3.رﻌﺷﺗﺳﻣﻟا نﻣ لﻗﻷا ﻰﻠﻋ مﺳ
.تﺎﻘﺑط
ةءﺎﻔﻛﺑ ﺔﻣﻌطﻷا نﯾزﺧﺗ
.زﺎﮭﺟﻟا ﻲﻓ مﺎﻌطﻟا
.ﺔﺿﻔﺧﻧﻣ ةرارﺣ ﺔﺟرد دﻧﻋ ﺔﻟوﮭﺳﺑ
نﻣ يأ لﺧاد دﻣﺟﻣﻟا مﺎﻌطﻟا وأ ةدرﺑﻣﻟا ﺔﻣﻌطﻷا ﻊﺿ
.ﮫﺋارﺷ روﻓ
.ﺎﮭﯾﻠﻋ رطﻘُﺗ وأ ىرﺧﻷا ﺔﻣﻌطﻷا سﻣﻼﺗ ﻻ ﻰﺗﺣ
.تاوارﺿﺧﻟا
مﺎﻌط يأ دﯾﻣﺟﺗ ةدﺎﻋإ بﻧﺟﺗ
.ﮫﺗﯾذﻐﺗو ﮫﻗاذﻣ نﻣ لﻠﻘﯾ فوﺳ لﻣﺎﻛ لﻛﺷﺑ هدﯾﻣﺟﺗ نﺎﺑوذ مﺗ دﻗ نﺎﻛ مﺎﻌط يأ
.مزﻼﻟا دﺣﻟا نﻣ رﺛﻛأ اًءوﻠﻣﻣ زﺎﮭﺟﻟا نﺎﻛ
نﯾزﺧﺗﻟا لﺑﻗ نﺧﺎﺳﻟا مﺎﻌطﻟا دّرﺑ
بﻠﺳﻟﺎﺑ رﺛؤﯾ ﺎﻣﻣ زﺎﮭﺟﻠﻟ ﺔﯾﻠﺧادﻟا ةرارﺣﻟا ﺔﺟرد دادزﺗ نأ نﻛﻣﯾ ،لﺧادﻟا
.زﺎﮭﺟﻟا ﻲﻓ ﺔﻧزﺧﻣﻟا ىرﺧﻷا ﺔﻣﻌطﻷا ﻰﻠﻋ
ﮫﻧﯾزﺧﺗ مﺗﯾﻟ مﺎﻌطﻠﻟ ﺔﺑوﻠطﻣﻟا ةرارﺣﻟا ﺔﺟرد نﻣ لﻗأ ةرارﺣ ﺔﺟرد طﺑﺿﺑ مﻘﺗ
تاورﺿﺧﻟا نزﺧﺗ ﻻ ،زﺎﮭﺟﻟا ﻲﻓ دﯾرﺑﺗ تارﯾﺟﺣ دوﺟو لﺎﺣ ﻲﻓ
دﻗ ﺎﮭﻧﻷ دﯾرﺑﺗﻟا ةرﯾﺟﺣ ﻲﻓ ﺔﯾﻟﺎﻋ ﺔﺑوطر يذ ىوﺗﺣﻣ ﻰﻠﻋ يوﺗﺣﺗ ﻲﺗﻟا
.ةرارﺣﻟا ﺔﺟرد ضﺎﻔﺧﻧا بﺑﺳﺑ دﻣﺟﺗﺗ
.ﺢﯾﺣﺻ لﻛﺷﺑ
.عﺎطﻘﻧﻻا ةدﻣ نﻋ
بﺟﯾ
• ﻰﻠﻋ دﻣﺟُﻣﻟا ةرارﺣ ﺔﺟرد طﺑﺿﺑ مﻗ ،دﻣﺟُﻣﻟا ةدﺣو ﻲﻓ مﺎﻌطﻟا نﯾزﺧﺗ دﻧﻋ
•.مزﻼﻟا نﻣ لﻗأ ﺔﺟرد ﻰﻠﻋ ﺞﺗﻧُﻣﻟا ةرارﺣ ﺔﺟرد نﯾﯾﻌﺗﺑ مﻘﺗ ﻻ
• ظﻓﺎﺣ . ﺔﺟﻼﺛﻟا ةدﺣو ﻲﻓ ةرارﺣﻟا ﺔﺟرد رﻌﺷﺗﺳﻣ نﻣ برﻘﻟﺎﺑ مﺎﻌطﻟا ﻊﺿﺗ ﻻ
• ﻲﻓ ﮫﺑ حوﻣﺳﻣ قﺎطﻧ ﮫﻟ ﺞﻠﺛﻟا ﺔﻟازإ دﻌﺑ ةرارﺣﻟا ﺔﺟرد عﺎﻔﺗرا نأ ظﺣﻻ
• مﻛارﺗ نﻣ دﻣﺟُﻣﻟا ةرﯾﺟﺣ وﻠﺧ زﺎﮭﺟﻟا ﻲﻓ ًﺎﯾﺋﺎﻘﻠﺗ ﺞﻠﺛﻟا ﺔﻟازإ مﺎظﻧ نﻣﺿﯾ
ّ
•.ﻖﻠﻐﻟا ﺔﻣﻛﺣﻣ ﺔﯾﻋوأ لﺧاد ةدرﺑﻣﻟا ﺔﻣﻌطﻷا وأ دﻣﺟﻣﻟا مﺎﻌطﻟا ن
زﺧ
ِ
• نﯾزﺧﺗ لﺑﻗ (نﯾزﺧﺗﻟا تﺎﻣﯾﻠﻌﺗ) ﻖﺻﻠُﻣﻟاو ﺔﯾﺣﻼﺻﻟا ءﺎﮭﺗﻧا ﺦﯾرﺎﺗ نﻣ ﻖﻘﺣﺗ
• نﻣ رﺛﻛأ) تﻗوﻟا نﻣ ﺔﻠﯾوط ةرﺗﻔﻟ مﺎﻌطﻟا نزﺧﺗ ﻻ4 دﺳﻔﯾ نﺎﻛ اذإ (ﻊﯾﺑﺎﺳأ
• دﻣﺟُﻣﻟا وأ ﺔﺟﻼﺛﻟا
• ،داّرﺑﻟا لﺧاد ﺔﺑﺳﺎﻧﻣ تﺎﯾوﺎﺣ ﻲﻓ ﺔﺟزﺎطﻟا كﺎﻣﺳﻷاو موﺣﻠﻟا نﯾزﺧﺗﺑ مﻗ
• جرد ﻰﻠﻋأ ﺔﻣﻌطﻷا نﻣ ﺎھرﯾﻏو ةدرﺑﻣﻟا ﺔﻣﻌطﻷا نﯾزﺧﺗ نﻛﻣﯾ
.فﯾﺻﻟا لﻼﺧ ﺔﻌﻔﺗرﻣ ﺔﺑوطرﻟا تﻧﺎﻛ لﺎﺣ ﻲﻓ وأ ،لﻣﺎﻛﻟﺎﺑ بﺎﺑﻟا
لﺧاد نﻔﻌﻟا نوﻛﺗ ﻊﻧﻣﻟ ﺎًﺣوﺗﻔﻣ بﺎﺑﻟا عدو ،ﮫﻔﻔﺟو ،ﮫﻔظﻧو ،ﮫﯾﻓ مﻛارﺗﻣﻟا
كرﺗ ﺔﻟﺎﺣ ﻲﻓ ﺔﯾﻧﺎﺛ نﯾﺛﻼﺛ ﮫﺗدﻣ ﻲﻧﻣز لﺻﺎﻔﺑ تارﻣ ثﻼﺛ ﺎًﺗوﺻ راذﻧﻹا ردﺻﯾ
.ةدﺣاو ﺔﻘﯾﻗد لﻼﺧ ﻲﻓ مﺎﻛﺣﺈﺑ ﮫﻗﻼﻏإ مﺗﯾ مﻟ وأ ﺎًﺣوﺗﻔﻣ بﺎﺑﻟا
.باوﺑﻷا لﻛ لﻔﻗ دﻌﺑ ﻰﺗﺣ ﺔﯾﻧﺎﺛ نﯾﺛﻼﺛ نﻣ رﺛﻛأ ﻲﻧﻣز لﺻﺎﻔﺑ ﮫﺑﻧﻣﻟا توﺻ
مادﺧﺗﺳﻻا لﺑﻗ
لﯾﻐﺷﺗﻟا تﺎظﺣﻼﻣ
.لﻣﺎﻛﻟﺎﺑ بﺎﺑﻟا قﻼﻏﺈﺑ ﺢﻣﺳﯾﻟ
بﺎﺑﻟا ﺢﺗﻓ بﺑﺳﺗﯾ دﻗ
.زﺎﮭﺟﻟا تارﯾﺟﺣ لﺧاد ﺔظوﺣﻠﻣ
.زﺎﮭﺟﻟا
بﺎﺑﻟا ﺢﺗﻓ راذﻧإ
• ﻖﻠﻐُﯾ مﻟ اذإ نوﻛﺗﯾ دﻗ ﻊﯾﻘﺻﻟا نأ مھرﺎﺑﺗﻋا ﻲﻓ نوﻣدﺧﺗﺳﻣﻟا ﻊﺿﯾ نأ بﺟﯾ
• بﺎﺑﻟا ﺔﻠﺳ وأ فرﻟا ﻰﻠﻋ نزﺧُﻣﻟا مﺎﻌطﻟا نﯾﺑ ﺔﯾﻓﺎﻛ ﺔﻓﺎﺳﻣ دوﺟو نﻣ دﻛﺄﺗ
• ةروﺻﺑ ةرارﺣﻟا ﺔﺟرد ةدﺎﯾز ﻲﻓ ﺔﻠﯾوط تارﺗﻔﻟ
• ﺞﻠﺛﻟا ﺔﺑاذﺈﺑ مﻗو ،ﮫﻘﻠﻏﺄﻓ ،ﺔﻠﯾوط تارﺗﻔﻟ ﺎًﻏرﺎﻓ دﯾرﺑﺗﻟا زﺎﮭﺟ كرُﺗ اذإ
• ﺔﻛرﺷﻟ ءﻼﻣﻌﻟا تﺎﻣوﻠﻌﻣ زﻛرﻣﺑ لﺻﺗاLG Electronics رﻣﺗﺳا اذإ
لﺎطﻋﻷا فﺷﻛ
• دﯾﻣﺟﺗ .لﻣﺎﻛ لﻛﺷﺑ هدﯾﻣﺟﺗ نﺎﺑوذ مﺗ دﻗ نﺎﻛ
• اذإ ﺢﯾﺣﺻ لﻛﺷﺑ رﻣﯾ نأ درﺎﺑﻟا ءاوﮭﻠﻟ نﻛﻣﯾ ﻻ .زﺎﮭﺟﻟا ءلﻣ ﻲﻓ طرﻔﺗ ﻻ
• ﻲﻓ اًدﺟ نﺧﺎﺳ مﺎﻌط ﻊﺿو لﺎﺣ ﻲﻓ .
• ﻻ .دﻣﺟﺗﯾ ﺎﻣﺑر ،مﺎﻌطﻠﻟ رﯾﺑﻛ لﻛﺷﺑ ﺔﺿﻔﺧﻧﻣ ةرارﺣ ﺔﺟرد طﺑﺿﺑ تﻣﻗ اذإ
تﺎﻣوﻠﻌﻣﻟا زﻛرﻣ نﻣ ﺢﯾﻠﺻﺗﻟا ﻲﻧﻓ ﮫﺟاوﯾ دﻘﻓ ،ﺔﻗﺎطﻟا لﯾﻐﺷﺗ
• ﮫﻛاوﻔﻟاو
• لﺄﺳاو ءﺎﺑرﮭﻛﻟا ﺔﻛرﺷﺑ لﺻﺗا ،ﻲﺋﺎﺑرﮭﻛﻟا رﺎﯾﺗﻟا عﺎطﻘﻧا ثودﺣ ﺔﻟﺎﺣ ﻲﻓ
-.زﺎﮭﺟﻟا نﻋ ﺔﻗﺎطﻟا لﺻﻓ ءﺎﻧﺛأ باوﺑﻷا ﺢﺗﻓ بﻧﺟﺗﺗ نأ
-.مﺎﻌطﻟا ﺔﻟﺎﺣ نﻣ ﻖﻘﺣﺗ ،ﻲﻌﯾﺑطﻟا ﮫﻌﺿو ﻰﻟإ ﺔﻗﺎطﻟا ردﺻﻣ دوﻌﯾ ﺎﻣدﻧﻋ
.لﯾﻐﺷﺗﻟا ءﺎﻧﺛأ ﻲﺋﺎﻘﻠﺗ لﻛﺷﺑ لﻛﺎﺷﻣﻟا نﻋ فﺷﻛﻟا زﺎﮭﺟﻠﻟ نﻛﻣﯾ
• دﻧﻋ ﻰﺗﺣ ﺄطﺧ زﻣر ضرﻋ مﺗﯾو زﺎﮭﺟﻟا لﻣﻌﯾ ﻻ ،ﺔﻠﻛﺷﻣ نﻋ فﺷﻛﻟا مﺗ اذإ
.رز يأ ﻰﻠﻋ طﻐﺿﻟا
• اًروﻓ لﺻﺗاو .ﺔﻗﺎطﻟا لﯾﻐﺷﺗ فﺎﻘﯾﺈﺑ مﻘﺗ ﻻ ،ﺔﺷﺎﺷﻟا ﻰﻠﻋ ﺄطﺧ رﮭظ اذإ
ﺔﻛرﺷ ءﻼﻣﻋ تﺎﻣوﻠﻌﻣ زﻛرﻣﺑLG Electronics اذإ .ﺄطﺧﻟا نﻋ ﻎﻠﺑأو
فﺎﻘﯾﺈﺑ تﻣﻗ
.ﺔﻠﻛﺷﻣﻟا فﺎﺷﺗﻛا ﻲﻓ ﺔﺑوﻌﺻ
ﺔﻗﺎطﻟا رﯾﻓوﺗ حارﺗﻗا
• درﺎﺑﻟا ءاوﮭﻠﻟ اذھ ﺢﻣﺳﯾ .ﺔﻧزﺧﻣﻟا ﺔﻣﻌطﻷا نﯾﺑ ﺔﯾﻓﺎﻛ ﺔﻓﺎﺳﻣ دوﺟو نﻣ دﻛﺄﺗ
.ءﺎﺑرﮭﻛﻟا رﯾﺗاوﻓ نﻣ ضﻔﺧﯾو يوﺎﺳﺗﻟﺎﺑ رﺎﺷﺗﻧﻻﺎﺑ
•.دﻣﺟﺗﻟا وأ فﺛﻛﺗﻟا ﻊﻧﻣﻟ درﺑﺗ نأ دﻌﺑ طﻘﻓ ﺔﻧﺧﺎﺳﻟا ﺔﻣﻌطﻷا نزﺧ

ar_main.book.book Page 15 Wednesday, May 20, 2020 3:35 PM
15
AR
بﯾﻛرﺗﻟا
ءﺎﻧﺛأ طوﻘﺳﻟا ﻊﻧﻣﻟ طﯾرﺷﺑ بﺎﺑﻟا ضﺑﻘﻣو فﻓرﻷا لﺛﻣ ءازﺟﻷا تﯾﺑﺛﺗﺑ مﻗ
.زﺎﮭﺟﻟا كﯾرﺣﺗ
زﺎﮭﺟﻟا ﻞﻘﻧ ﺪﻨﻋ .ﺔﯾﺎﻧﻌﺑ نﯾﺻﺧﺷ نﻣ رﺛﻛأ ﺔطﺳاوﺑ زﺎﮭﺟﻟا كﯾرﺣﺗﺑ مﻗ
.ﻲﺳأر ﻊﺿو ﻲﻓ زﺎﮭﺟﻟا ﻖﺑا ،ﺔﻠﯾﻮﻃ ﺔﻓﺎﺳﻣﻟ
سﺑﻘﻣﻟ ﻲﺳﯾﺋرﻟا ذﺧﺄﻣﻟا ﻲﻓ ﺔﻗﺎطﻟا سﺑﺎﻗ لﯾﺻوﺗﺑ مﻗ ،زﺎﮭﺟﻟا بﯾﻛرﺗ دﻌﺑ
.ﮫﻠﯾﻐﺷﺗﺑ مﻗو ،جرﺧﻟا
3
4
5

ﮫﯾﺑﻧﺗ
ﺔظﺣﻼﻣ
ﺔظﺣﻼﻣ
ar_main.book.book Page 14 Wednesday, May 20, 2020 3:35 PM
مادﺧﺗﺳﺎﺑ زﺎﮭﺟﻟا لﯾﻣ طﺑﺿﺑ مﻗ ،باوﺑﻷا ﻖﻠﻏ ﻲﻓ ﺔﺑوﻌﺻ دوﺟو دﻧﻋ وأ
رﺎﺳﯾﻠﻟ ءاوﺗﺳﻹا لﺟر ةرادإ لﻼﺧ نﻣ عﺎﻔﺗرﻻا طﺑﺿﻟ
• نﻣ ﻰﻠﻋﻷ زﺎﮭﺟﻟا بﺎﺑ عﺎﻔﺗرا طﺑﺿﺗ ﻻ3.مﻣ
14
بﯾﻛرﺗﻟا
.هﺎﻧدأ ةدراوﻟا تﺎﻣﯾﻠﻌﺗﻟا
طﺑرﻟا حﺎﺗﻔﻣ مدﺧﺗﺳا
a
.ﺎﮭﺿﻔﺧﻟ نﯾﻣﯾﻠﻟ وأ ﺎﮭﻌﻓرﻟ
AR
ﺔﻟوﻣﺎﺻﻟا حﺎﺗﻔﻣ مدﺧﺗﺳا
ﺎھرﯾودﺗ لﻼﺧ نﻣ تﯾﺑﺛﺗﻟا ﺔﻟوﻣﺎﺻ تﯾﺑﺛﺗﻟ
a
.ﺎًﻧﯾﻣﯾ
.يوﻗ رﯾﻏ وأ فﯾﻌﺿ ءﺎﻧﺑﻟا نﺎﻛ وأ
.ءﺎﻧﺛﻧﻻا
ﺔﻗﺎطﻟا لﯾﻐﺷﺗ
زﺎﮭﺟﻟا لﯾﺻوﺗ
.جرﺧ سﺑﻘﻣ ﻲﻓ ﺔﻗﺎطﻟا سﺑﺎﻗ لﯾﺻوﺗﺑ مﻗ ،زﺎﮭﺟﻟا بﯾﻛرﺗ دﻌﺑ
لﺑﻗ مﺎﻌطﻟا ﺔﻓﺎﺿﺈﺑ تﻣﻗ اذإ .زﺎﮭﺟﻟا ﻲﻓ مﺎﻌطﻟا ﻊﺿو لﺑﻗ تﺎﻋﺎﺳ ﻊﺑرأ
.مﺎﻌطﻟا دﺳﻔﯾ دﻘﻓ ،لﻣﺎﻛﻟﺎﺑ زﺎﮭﺟﻟا دﯾرﺑﺗ
3
• ﺔﯾوﺗﺳﻣ رﯾﻏ ﺔﯾﺿرﻷا تﻧﺎﻛ ﺔﻟﺎﺣ ﻲﻓ ﺔﺟﻼﺛﻟا ﻲﺑﺎﺑ ءاوﺗﺳا طﺑﺿ نﻛﻣﯾ ﻻ دﻗ
•.ﺔﯾوﺗﺳﻣو ﺔﺑﻠﺻ ﺔﯾﺿرأ ﻰﻠﻋ ﺎﮭﺑﯾﻛرﺗﺑ مﻘﻓ ،ﺔﺟﻼﺛﻟا مﺟﺣ لﻘﺛﻟ اًرظﻧ
.زﺎﮭﺟﻟا بﺎﺑﺑ صﺎﺧﻟا عﺎﻔﺗرﻻا قرﻓ طﺑﺿا ،ٍوﺗﺳﻣ زﺎﮭﺟﻟا بﺎﺑ نﻛﯾ مﻟ لﺎﺣ ﻲﻓ
• ةدﯾدﺷ تﻧﺎﻛ اذإ زﺎﮭﺟﻟا ﺔﯾوﺳﺗ ﺔﺑوﻌﺻ ﻲﻓ ﺔﯾﺑﺷﺧﻟا تﺎﯾﺿرﻷا بﺑﺳﺗﺗ دﻗ
• وأ ثﻼﺛ ةدﻣﻟ رظﺗﻧا ،سﺑﻘﻣﺑ (سﺑﺎﻘﻟا وأ) ﻲﺋﺎﺑرﮭﻛﻟا رﺎﯾﺗﻟا كﻠﺳ لﯾﺻوﺗ دﻌﺑ
ﺔﻟوﻣﺎﺻ ءﺎﺧرإ نﻣ نﻛﻣﺗﺗﻟ
ﺔﺟﻼﺛﻟاو دﻣﺟﻣﻟا ﻲﺑﺎﺑ ةاذﺎﺣﻣ
ﺔﻟوﻣﺎﺻﻟا حﺎﺗﻔﻣ مدﺧﺗﺳاو بﺎﺑﻟا ﺢﺗﻓا
a
.اًرﺎﺳﯾ ﺎھرﯾودﺗ لﻼﺧ نﻣ تﯾﺑﺛﺗﻟا
1
رﺧآ نﺎﻛﻣ ﻰﻟإ ﮫﻠﻘﻧﻟ زﺎﮭﺟﻟا كﯾرﺣﺗ
زﺎﮭﺟﻟا لﻘﻧﻟ زﯾﮭﺟﺗﻟا
.زﺎﮭﺟﻟا لﺧاد نﻣ مﺎﻌطﻟا جارﺧﺈﺑ مﻗ
ﻲﻓ ﺔﻗﺎطﻟا سﺑﺎﻗ ﺔﻠﺻو ﻲﻓ ﮫﺗﯾﺑﺛﺗو ﮫﻟﺎﺧدإو ءﺎﺑرﮭﻛﻟا سﺑﺎﻗ بﺣﺳﺑ مﻗ
.زﺎﮭﺟﻟا ﻰﻠﻋأ وأ ﻲﻔﻠﺧﻟا ءزﺟﻟا
ﻖﯾرط نﻋ زﺎﮭﺟﻟا عﺎﻔﺗرا لﯾدﻌﺗ نﻣ نﻛﻣﺗﺗﻟ
1
2
ﺔﻟوﻣﺎﺻﻟا حﺎﺗﻔﻣ مدﺧﺗﺳا
.ﺎًﻧﯾﻣﯾ وأ اًرﺎﺳﯾ طﺑﺿﻟا ﺔﻠﺻﻔﻣ نﺳ رﯾودﺗ
b
2

رﯾذﺣﺗ
ﺔظﺣﻼﻣ
ﺔظﺣﻼﻣ
ar_main.book.book Page 13 Wednesday, May 20, 2020 3:35 PM
13
AR
بﯾﻛرﺗﻟا
هﺎﯾﻣﻟﺎﺑ لﯾﺻوﺗﻟا نﻣ ﻖﻘﺣﺗﻟا
ﻊﯾﻣﺟ نﻣ رذﺣﺑ ﻖﻘﺣﺗ .زﺎﮭﺟﻟا ﺢﺗﻔﺑ مﻗو هﺎﯾﻣﻟا دوزﻣ لﯾﻐﺷﺗﺑ مﻗ
مﺗ ﻲﺗﻟا هﺎﯾﻣﻟا مﯾطارﺧﻟ ﺔﺟﯾﺗﻧﻛ ﺔﻠﻣﺗﺣﻣ تﺎﺑﯾرﺳﺗ يأ فﺷﻛﻟ تازﯾﮭﺟﺗﻟا
.ءﻲﺳ ٍلﻛﺷﺑ ﺎﮭﺑﯾﻛرﺗ
مﺗ .ٍناوﺛ ثﻼﺛ ةدﻣﻟ
.زﺎﮭﺟﻟا لﻼﺧ نﻣ هﺎﯾﻣﻟا ﻖﻓدﺗ نﻣ ﻖﻘﺣﺗﻠﻟ هﺎﯾﻣﻟا عزوﻣ تﺣﺗ ﺎًﺑوﻛ ﻊﺿ
.ىرﺧأ ةرﻣ تﺎﺑﯾرﺳﺗﻟا لﺟأ نﻣ تﻼﺻﻔﻣﻟاو لﯾﺻوﺗﻟا بوﺑﻧأ نﻣ ﻖﻘﺣﺗ
Water Filter
رزﻟا ﻰﻠﻋ رارﻣﺗﺳﻻا ﻊﻣ طﻐﺿا
.دﯾدﺟﻟا هﺎﯾﻣﻟا ﺢﺷرﻣ لﯾﻌﻔﺗ
بﺎﺑﻟا ةاذﺎﺣﻣو زﺎﮭﺟﻟا ءاوﺗﺳا طﺑﺿ
ءدﺑﻟا لﺑﻗ
هﺎﻧدأ ةدراوﻟا تﺎﻣﯾﻠﻌﺗﻟا ﻊﺑﺗﺎﻓ ،ﺔﯾوﺎﺳﺗﻣ رﯾﻏ باوﺑﻷا نﯾﺑ ﺔﻓﺎﺳﻣﻟا تﻧﺎﻛ اذإ
.باوﺑﻷا ةاذﺎﺣﻣﻟ
عوﻧ نﻣ ﺎﻣإ طﺑر حﺎﺗﻔﻣﺑA وأ B.
هﺎﯾﻣﻟﺎﺑ دوزﺗﻟا تﺎﺑﻠطﺗﻣ
1
.ضﻔﺧﻧﻣﻟا طﻐﺿﻟا ضﯾوﻌﺗﻟ زﯾزﻌﺗ ﺔﺧﺿﻣ بﯾﻛرﺗ كﻧﻛﻣﯾ ،(لﺎﻛﺳﺎﺑ
ةدرﺎﺑﻟا هﺎﯾﻣﻟا
2
ٍدﺣﻛ ﻲﺳﻛﻌﻟا ﺢﺿﺎﻧﺗﻟا مﺎظﻧﻟ ﺔﺑﺳﻧﻟﺎﺑ هﺎﯾﻣﻟا طﻐﺿ نوﻛﯾ نأ بﺟﯾ ،كﺑ صﺎﺧﻟا
نﯾﺑ حوارﺗﯾ هﺎﯾﻣ طﻐﺿ ةدرﺎﺑﻟا هﺎﯾﻣﻟا دوزﻣ بﻠطﺗﯾ138و لﺎﻛﺳﺎﺑ وﻠﯾﻛ 827
نﻣ لﻗأ) ضﻔﺧﻧﻣ هﺎﯾﻣ طﻐﺿ يذ نﺎﻛﻣ ﻲﻓ ﺔﺟﻼﺛﻟا بﯾﻛرﺗ مﺗ138 وﻠﯾﻛ
دوزﻣﺑ ﻲﺳﻛﻌﻟا ﺢﺿﺎﻧﺗﻟﺎﺑ هﺎﯾﻣﻟا ﺢﯾﺷرﺗ مﺎظﻧ لﯾﺻوﺗ لﺎﺣ ﻲﻓ
3
4
ﺔﯾﻟزﻧﻣﻟا ﺔﻛﺎﺑﺳﻟا ﻲﻓ (بﯾﺑﺎﻧﻷا ﻲﻓ هﺎﯾﻣﻟا ﻖﻓدﺗ) هﺎﯾﻣﻟا ﺦﺿ .هﺎﯾﻣﻟا ﺢﯾﺷرﺗ
ضﯾﻓ وأ برﺳﺗ ﻰﻟإ يدؤﯾ نأ
• كدﯾوزﺗ مﺗﯾ فوﺳ .كﺑ صﺎﺧﻟا زارطﻟا بﺳﺣ طﺑرﻟا حﺎﺗﻔﻣ فﻠﺗﺧﯾ نأ نﻛﻣﯾ
- عوﻧﻟا ﻲﻏارﺑﻟا حﺎﺗﻔﻣA
.ﺔﯾﺋﺎﺑرﮭﻛ ﺔﻣدﺻ ﻲﻓ بﺑﺳﺗﯾ دﻗ كﻟذﺑ
نﻛﻣﯾو زﺎﮭﺟﻟا ءازﺟﻷ فﻠﺗ بﺑﺳُﯾ نأ نﻛﻣﯾ
.هﺎﯾﻣﻟا ةدوﺟ مظﻧﺗ ﻲﺗﻟا ﺔﯾﻠﺣﻣﻟا ﺢﺋاوﻠﻟاو
) لﺎﻛﺳﺎﺑ وﻠﯾﻛ1.4-8.4مﺳ/ﻲﻠﻘﺛ مارﺟ وﻠﯾﻛ 2 لﺎﺣ ﻲﻓ .هﺎﯾﻣﻟا عزوﻣ لﯾﻐﺷﺗﻟ (
نﻣ ﻰﻧدأ138 ﻰﻟإ لﺎﻛﺳﺎﺑ وﻠﯾﻛ 827) لﺎﻛﺳﺎﺑ وﻠﯾﻛ 1.4-8.4 مارﺟ وﻠﯾﻛ
مﺳ/ﻲﻠﻘﺛ2(
• مﺎﯾﻘﻟا لﺷﻓ .هﺎﯾﻣﻟا طﺧ لﯾﺻوﺗﺑ ﻖﻠﻌﺗﯾ لﻣﻋ يﺄﺑ مﺎﯾﻘﻟا لﺑﻗ زﺎﮭﺟﻟا لﺻﻓا
• لطﻌﺗ ﻲﻓ بﺑﺳﺗﯾ دﻗ كﻟذﺑ مﺎﯾﻘﻟا لﺷﻓ .ةدرﺎﺑ هﺎﯾﻣ دوزﻣﺑ طﻘﻓ هﺎﯾﻣﻟا طﺧ لﺻو
.هﺎﯾﻣﻟا
•.طﻘﻓ برﺷﻟا هﺎﯾﻣ دوزﻣﺑ لﯾﺻوﺗﻟا
• نﯾﻧاوﻘﻠﻟ ﺎًﻘﻓوو لھؤﻣ كﺎﺑﺳ ﺔطﺳاوﺑ طﻘﻓ ﮫﺑﯾﻛرﺗ بﺟﯾ هﺎﯾﻣﻟا طﺧ لﯾﺻوﺗ
•.زﺎﮭﺟﻟا نﺎﻣﺿ تﺣﺗ جردﻧﯾ ﻻ اذھ هﺎﯾﻣﻟا طﺧ بﯾﻛرﺗ
- عوﻧﻟا ﻲﻏارﺑﻟا حﺎﺗﻔﻣB
زﺎﮭﺟﻟا ىوﺗﺳﻣ طﺑﺿ
لﯾﻣﻟا رﯾﯾﻐﺗﻟ مادﻗﻷا هذھ طﺑﺿا .نﯾﯾوﺗﺳﻣ نﯾﯾﻣﺎﻣأ نﯾﻣدﻗ ﻰﻠﻋ زﺎﮭﺟﻟا يوﺗﺣﯾ
،زﺎﮭﺟﻟا ءاوﺗﺳا مدﻋ ﺔﻟﺎﺣ ﻲﻓ .رﺧآ ﻰﻟإ بﻧﺎﺟ نﻣ وأ ًﻼﺛﻣ فﻠﺧﻟا ﻰﻟإ مﺎﻣﻷا نﻣ
زﺎﮭﺟﻟﺎﺑ هﺎﯾﻣﻟا لﯾﺻوﺗ
زﺎﮭﺟﻟا نﻣ ﻲﻔﻠﺧﻟا ءزﺟﻟا ﻲﻓ ﺔﻧﻧﺳﻣﻟا ﺔﯾﻧدﻌﻣﻟا دﯾرﺑﺗﻟا ﺔﻟوﻣﺎﺻ كﻓ
.هﺎﯾﻣﻟا بوﺑﻧأ ﻲﻓرط دﺣأ ﻰﻠﻋ ﺎﮭﻌﺿو
.قوطﻟا ﺔﻟوﻣﺎﺻ طﺑر مﻛﺣأو بﺣﺳﻟا مﺎﻣﺻ لﺧاد ةوﻘﺑ هﺎﯾﻣﻟا بوﺑﻧأ ﻊﻓدا
1
2

ﮫﯾﺑﻧﺗ
ﮫﯾﺑﻧﺗ
ﮫﯾﺑﻧﺗ
ﺔظﺣﻼﻣ
ar_main.book.book Page 12 Wednesday, May 20, 2020 3:35 PM
بﯾﻛرﺗﻟا
12
AR
دﻣﺟُﻣﻟاو ﺔﺟﻼﺛﻟا بﺎﺑ بﯾﻛرﺗ ةدﺎﻋإ
لﻼﺧ نﻣ زﺎﮭﺟﻟا رورﻣ درﺟﻣﺑ كﻔﻟا تاءارﺟإ بﯾﺗرﺗ سﻛﻋ باوﺑﻷا بﯾﻛرﺗﺑ مﻗ
لﺎﺧدﻹا طﺧ
d
كﺑﺷﻣﻟا
.ﮫطﺑر مﺎﻛﺣإ نﻣ دﻛﺄﺗﺗ ﻰﺗﺣ بوﺑﻧﻷا اذھ دﺷ مﺛ
c
بوﺑﻧﻷا
.لﺧدﻣﻟا باوﺑأ لﻛ
a
قوطﻟا
b
ﺢﯾﺣﺻ
ﺢﯾﺣﺻ رﯾﻏ
ﺔﺟﻼﺛﻟا بﺎﺑ ﺔﻟازإ
ﺔﯾﻛﻠﺳﻟا تﻼﯾﺻوﺗﻟا ﻊﯾﻣﺟ لﺻﻔﺑ مﻗ
a
.
•.ًﻻوأ ﺔﺟﻼﺛﻟا بﺎﺑ بﯾﻛرﺗﺑ مﻗ
•هﺎﯾﻣﻟﺎﺑ دادﻣﻹا طوطﺧ ﻊﯾﻣﺟﺗ / كﻓ
ﺔﻠﺻَﻔﻣﻟا عارذ رﯾودﺗﺑ مﻗ
ﺔَﻠّﺻَﻔﻣﻟا ﻊﻓرا مﺛ .ﺔﻋﺎﺳﻟا برﺎﻘﻋ هﺎﺟﺗا ﻲﻓ
• .بوﺑﻧﻷا طوطﺧ نﻣ اًدﺣاو ﺎًطﺧ كﻟ رﮭظﯾ ﻰﺗﺣ ﻖﻓرﺑ بوﺑﻧﻷا لﺎﺧدﺈﺑ مﻗ
ﺔﻟازﺈﺑ رﺛﻛأ وأ نﯾﺻﺧﺷ موﻘﯾ نأ ﮫﺑ ﻲﺻوﻣﻟا نﻣ .مﺎﻣﻷا ﻰﻟإ بﺎﺑﻟا طوﻘﺳ
ﺔﻠﺻﻔﻣﻟا عارذ جﻻزﻣ نﻣ ﺎھرﯾرﺣﺗﻟ
d
.
b
.ﮫﺑﯾﻛرﺗ ةدﺎﻋإو بﺎﺑﻟا
c
1
2
ﺔﯾوﻠﻌﻟا
• مدﻋ نﻣ دﻛﺄﺗ ،ﻲﻠﺻﻔﻣﻟا تﯾﺑﺛﺗﻟا عارذ نﻣ ﺎھرﯾرﺣﺗو ﺔﻠﺻﻔﻣﻟا ﻊﻓر دﻧﻋ
.ﮫﺑﯾﻛرﺗ ةدﺎﻋإ دﻧﻋ ﮫﺑﯾرﺳﺗ
ددﻣﻣ
g
فﻟﺎﺗ
مﯾﻘﺗﺳﻣ رﯾﻏ
f
e
هﺎﯾﻣﻟا طﺧ لﯾﺻوﺗ
.ﺞﻠﺛﻟا وأ هﺎﯾﻣﻟا عزوﻣﺑ ةدوزﻣﻟا زرُطﻟا ﻊﻣ ﻻإ رﻓوﺗﻣ رﯾﻏ مﺳﻘﻟا اذھ
.ﺔﯾﻠﻔﺳﻟا ﺔﯾﻠﺻﻔﻣﻟا ﺔﻋوﻣﺟﻣﻟا نﻋ لﺻﻔﻧﯾ ﻰﺗﺣ ﺔﺟﻼﺛﻟا بﺎﺑ ﻊﻓرا
• مدﻋ نﻣ دﻛﺄﺗﻠﻟ فﯾظﻧﺗﻟا ﻊﻣ ﮫﺻﺣﻓ بﺟﯾ ،بوﺑﻧﻷا فرط فﻠﺗ لﺎﺣ ﻲﻓ
.ﻰﻠﻋﻷ ﺎًﮭﺟﺗﻣ
3
• ﻲﻠﺧادﻟا بﻧﺎﺟﻟا لﻌﺟ ﻊﻣ شودﺧﻟا بﺑﺳﯾ ﻻ ﺢطﺳ ﻰﻠﻋ بﺎﺑﻟا ﻊﺿوﺑ مﻗ

رﯾذﺣﺗ
ﮫﯾﺑﻧﺗ
ﮫﯾﺑﻧﺗ
ar_main.book.book Page 11 Wednesday, May 20, 2020 3:35 PM
11
AR
بﯾﻛرﺗﻟا
ﻲﺿرﻷا كﻠﺳﻟا كﻔﺑ مﻗ .
ﻊﯾﻣﺟ لﺻﻔﺑ مﻗ .
ﻊﻓرا .ﺔﻋﺎﺳﻟا برﺎﻘﻋ هﺎﺟﺗا سﻛﻌﺑ
.
d
ﻲﻠﺻﻔﻣﻟا تﯾﺑﺛﺗﻟا عارذ نﻋ ﺎﮭﻠﺻﻔﺗﻟ
h
بوﺑﻧﻷا بﺣﺳا
c
ﺔﯾﻛﻠﺳﻟا تﻼﯾﺻوﺗﻟا
e
.
ﺔﯾﻠﺻﻔﻣﻟا ﺔﻌﻓارﻟا رﯾودﺗﺑ مﻗ
f
ﺔﯾوﻠﻌﻟا ﺔﻠﺻﻔﻣﻟا
g
3
باوﺑأ ﺔﻟازﺈﺑ مﻗ ،ﮫﻟﻼﺧ نﻣ زﺎﮭﺟﻟا رورﻣﻟ ﺎًﻘﯾﺿ كﯾدﻟ لﺧدﻣﻟا بﺎﺑ نﺎﻛ لﺎﺣ ﻲﻓ
تﺎﻣﯾﻠﻌﺗﻟا هذھ عﺎﺑﺗا لﺷﻓ بﺑﺳﺗﯾ دﻗ .زﺎﮭﺟﻟا فﯾظﻧﺗ وأ ﺎﮭﺗﻟازإ وأ باوﺑﻷا
دﻣﺟُﻣﻟاو ﺔﺟﻼﺛﻟا بﺎﺑ ﺔﻟازإ
.ﺎًﯾﻘﻓأ زﺎﮭﺟﻟا ررﻣو زﺎﮭﺟﻟا
.ﺔﯾﺋﺎﺑرﮭﻛ ﺔﻣدﺻ وأ ﻖﯾرﺣ ثودﺣ وأ ةﺎﻓوﻟا ﻲﻓ
دﻣﺟُﻣﻟا بﺎﺑ ﺔﻟازإ
ﻲﻔﻠﺧﻟا ءزﺟﻟا ﻲﻓ نﻣﯾﻷا يوﻠﻌﻟا ءزﺟﻟﺎﺑ هﺎﯾﻣﻟﺎﺑ دادﻣﻹا طﺧ لﯾﺻوﺗ مﺗﯾ
قوطﻟا ﻖﻓرﺑ ﻊﻓداو هﺎﯾﻣﻟﺎﺑ دادﻣﻹا لﯾﺻوﺗ فﺎﻘﯾﺈﺑ مﻗ .زﺎﮭﺟﻟا نﻣ
a
4
ءﺎطﻐﻟا ﻲﻏارﺑ ّكُﻓ مﺛ .هﺎﯾﻣﻟﺎﺑ دادﻣﻹا طﺧ لﺻﻔﻟ
b
.
• بﯾﻛرﺗ لﺑﻗ ةرﺋادﻟا ﻊطﺎﻗ وأ ،ﻲﻟزﻧﻣﻟا رﮭﺻﻧﻣﻟا وأ ،ﺔﻗﺎطﻟا كﻠﺳ لﺻﻓا
1
ةدﺎﻋإو بﺎﺑﻟا ﺔﻟازﺈﺑ رﺛﻛأ وأ نﯾﺻﺧﺷ موﻘﯾ نأ ﮫﺑ ﻲﺻوﻣﻟا نﻣ .مﺎﻣﻷا
.ﮫﺑﯾﻛرﺗ
.ﺔﯾﻠﻔﺳﻟا ﺔﯾﻠﺻﻔﻣﻟا ﺔﻋوﻣﺟﻣﻟا نﻋ لﺻﻔﻧﯾ ﻰﺗﺣ دﻣﺟُﻣﻟا بﺎﺑ ﻊﻓرا
.ﻰﻠﻋﻷ ﺎًﮭﺟﺗﻣ
• ﻰﻟإ بﺎﺑﻟا طوﻘﺳ مدﻋ نﻣ دﻛﺄﺗ ،جﻻْزِﻣﻟا نﻣ ﺎھرﯾرﺣﺗو ﺔﻠﺻﻔﻣﻟا ﻊﻓر دﻧﻋ
.ﺔﺟﻼﺛﻟا نﻣ يوﻠﻌﻟا ءزﺟﻟا ﻲﻓ ﻲﻠﺻﻔﻣﻟا ءﺎطﻐﻟا نﻣ ﻲﻏرﺑﻟا ﺔﻟازﺈﺑ مﻗ
كﻔﻣ مادﺧﺗﺳﺎﺑ ،ءﺎطﻐﻠﻟ ﻲﻣﺎﻣﻷا بﻧﺎﺟﻟا لﻔﺳأ دوﺟوﻣﻟا ،فﺎطﺧﻟا ﻊﻓرا
5
• ﻲﻠﺧادﻟا بﻧﺎﺟﻟا لﻌﺟ ﻊﻣ شودﺧﻟا بﺑﺳﯾ ﻻ ﺢطﺳ ﻰﻠﻋ بﺎﺑﻟا ﻊﺿوﺑ مﻗ
2
.سأرﻟا ﺢطﺳُﻣ ﻲﻏارﺑ

ﺔظﺣﻼﻣ
ﺔظﺣﻼﻣ
A
C
H
D E
F
G
B
ar_main.book.book Page 10 Wednesday, May 20, 2020 3:35 PM
بﯾﻛرﺗﻟا
10
AR
بﯾﻛرﺗﻟا
"ﺔﯾوﺋﻣ
+ -43**
خﺎﻧﻣﻟا ﺔﺋﻓ ﺔﺟرد" ﺔطﯾﺣﻣﻟا ةرارﺣﻟا ﺔﺟرد قﺎطﻧ
ﺎﯾﻧﯾﻛ ،دﻧﮭﻟا ،ﺎﯾﻟارﺗﺳأ *
نﯾﺗﻧﺟرﻷا **
) "ﺔﯾﺋاوﺗﺳﻻا" ةرارﺣﻟاT ﺔطﯾﺣﻣ ةرارﺣ ﺔﺟرد ﻲﻓ مادﺧﺗﺳﻼﻟ ﺔﻣﻣﺻُﻣ (
نﯾﺑ حوارﺗﺗ10 و 43.ﺔﯾوﺋﻣ ﺔﺟرد
تﺎﻘﺣﻠﻣﻟا
•.فﯾﻧﺻﺗﻟا ﻖﺻﻠﻣ ﻲﻓ خﺎﻧﻣﻟا ﺔﺋﻓ ﻰﻠﻋ روﺛﻌﻟا كﻧﻛﻣﯾ
بﯾﻛرﺗﻟا ءارﺟإ لﺑﻗ
تﺎﺻوﻠﺧﻟاو دﺎﻌﺑﻷا
SN(ةدﺗﻣﻣﻟا ةرارﺣﻟا ﺔﺟرد) +10+ - 32
ST(ﻲﺋاوﺗﺳا ﮫﺑﺷ) +16+ - 38+ / 18+ - 38**
ﻲﻧدﺗ ﻰﻟإ ﮫﻟ ةروﺎﺟﻣﻟا رﺻﺎﻧﻌﻟاو زﺎﮭﺟﻟا نﯾﺑ اًدﺟ ةرﯾﻐﺻﻟا ﺔﻓﺎﺳﻣﻟا يدؤﺗ دﻗ
رﮭظ نﯾﺑ ﺔﻓﺎﺳﻣﻟا نوﻛﺗ نأ ﻰﻋارُﯾ .ءﺎﺑرﮭﻛﻟا فﯾﻟﺎﻛﺗ ةدﺎﯾزو دﯾﻣﺟﺗﻟا ﻰﻠﻋ ﮫﺗردﻗ
N(ةرارﺣﻟا ﺔﺟرد) +16+ - 32
T(ﻲﺋاوﺗﺳا) +10+ - 43+ / *16+ - 43+ / 18
•) "ةدﺗﻣﻣﻟا ةرارﺣﻟا ﺔﺟرد" ﺔﺋﻓ نﻣﺿ جردﻧﺗ ﻲﺗﻟا ةزﮭﺟﻷاSN ﺔﺟرد ﻰﻟإ (
*1 .زرُطﻟا ضﻌﺑ ﻲﻓ ﻻإ ﺔﯾﺻﺎﺧﻟا هذھ رﻓوﺗﺗ ﻻ
نﻣ رﺛﻛأ طﺋﺎﺣ يأو زﺎﮭﺟﻟا50.زﺎﮭﺟﻟا بﯾﻛرﺗ دﻧﻋ مﻠﻣ
-(مﻠﻣ) أ عوﻧﻟا(مﻠﻣ) ب عوﻧﻟا
A912912
B17901790
C927738
D797615
E877690
F922733
G13841180
H17131750
*1
ﻲﻏارﺑﻟا حﺎﺗﻔﻣA
*1
ﻲﻏارﺑﻟا حﺎﺗﻔﻣB
Water Filter(هﺎﯾﻣﻟا ﺢﺷرﻣ)
*1
هﺎﯾﻣﻟا بوﺑﻧأ
*1
كﺑﺷﻣو بوﺑﻧﻷا لﺻوﻣ
*1
مﺎﻣﺻو بوﺑﻧﻷا لﺻوﻣ
a
b
c
d
e
f
•.ﮫﻠﺧاد ةدوﺟوﻣﻟا ﺔﻗﺎطﺑﻟا ﺔﻌﺟارﻣ دﻧﻋ زﺎﮭﺟﻟا عوﻧ دﯾدﺣﺗ كﻧﻛﻣﯾ
ﺔطﯾﺣﻣﻟا ةرارﺣﻟا ﺔﺟرد
• ،ﺔطﯾﺣﻣﻟا ةرارﺣﻟا تﺎﺟرد نﻣ دودﺣﻣ قﺎطﻧ نﻣﺿ لﻣﻌﻠﻟ زﺎﮭﺟﻟا مﯾﻣﺻﺗ مﺗ
.ﺔﯾﺧﺎﻧﻣﻟا ﺔﻘطﻧﻣﻟا بﺳﺣ كﻟذو
• ةرارﺣﻟا ﺔﺟردو ،زﺎﮭﺟﻟا ﻊﻗوﻣ بﺑﺳﺑ ﺔﯾﻠﺧادﻟا ةرارﺣﻟا تﺎﺟرد رﺛﺄﺗﺗ دﻗ
.كﻟذ ﻰﻟإ ﺎﻣو ،بﺎﺑﻟا ﺢﺗﻓ ةرﯾﺗوو ،ﺔطﯾﺣﻣﻟا

ar_main.book.book Page 9 Wednesday, May 20, 2020 3:35 PM
9
AR
ﺔﻣﻼﺳﻟا تادﺎﺷرإ
•.ﻲﺋﺎﺑرﮭﻛﻟا رﺎﯾﺗﻠﻟ دﺗﻣﻣ عﺎطﻘﻧا ءﺎﻧﺛأ رزﯾرﻔﻟا ةدﺣو ﻲﻓ ﺞﻠﺛﻟا قودﻧﺻ لﺧاد ﺞﻠﺛﻟا نﻣ صﻠﺧﺗ

ﮫﯾﺑﻧﺗ
ar_main.book.book Page 8 Wednesday, May 20, 2020 3:35 PM
ﺔﻣﻼﺳﻟا تادﺎﺷرإ
8
AR
صﻠﺧﺗﻟا
• لﺎﻔطﻷا دﺎﻌﺑﺈﺑ مﻗو ﺎﮭﻧﺎﻛﻣ ﻲﻓ لﻼﺳﻟاو فوﻓرﻟا كرﺗﺗ ﺎﻣﻧﯾﺑ بﺎﺑﻟا ﺔﯾﺷﺣ ﺔﻟازﺈﺑ مﻗ ،زﺎﮭﺟﻟا نﻣ صﻠﺧﺗﻟا دﻧﻋ
.زﺎﮭﺟﻟا نﻋ
ﮫﯾﺑﻧﺗ
دﻧﻋ تﺎﻛﻠﺗﻣﻣﻟا وأ ﺞﺗﻧﻣﻠﻟ فﻠﺗ وأ ،لطﻋ ثودﺣ وأ ،صﺎﺧﺷﻸﻟ ﺔﻔﯾﻔط تﺎﺑﺎﺻإ ثودﺣ رطﺎﺧﻣ نﻣ دﺣﻠﻟ
:ﻲﻠﯾ ﺎﻣ ﺎﮭﯾﻓ ﺎﻣﺑ ،ﺔﯾﺳﺎﺳﻷا ﺔﻣﻼﺳﻟا تﺎطﺎﯾﺗﺣا عﺎﺑﺗا بﺟﯾ ،ﺞﺗﻧﻣﻟا مادﺧﺗﺳا
لﯾﻐﺷﺗﻟا
• ةدﺷ نﻣ دﻠﺟﻟا حرﻘﺗﯾ دﻗ .ﺔﺑطر وأ ﺔﻠﻠﺑُﻣ ٍدﯾﺄﺑ رزﯾرﻔﻟا ةرﺟﺣ ﻲﻓ ﺔﯾﻧدﻌﻣﻟا ءازﺟﻷا وأ دﻣﺟُﻣﻟا مﺎﻌطﻟا سﻣﻠﺗ ﻻ
.درﺑﻟا
• لﺧاد (ﺔﯾزﺎﻏ تﺎﺑورﺷﻣ ﻰﻠﻋ يوﺗﺣﺗ ﻲﺗﻟا كﻠﺗ ﺔﺻﺎﺧ) ﺔﯾﺟﺎﺟزﻟا بﻠﻌﻟا وأ ﻲﻧﺎﻧﻘﻟا وأ تﺎﯾوﺎﺣﻟا ﻊﺿو بﻧﺟﺗ
.دﻣﺟﺗﻟا نود ةرارﺣ تﺎﺟردﻟ ضرﻌﺗﯾﺳ يذﻟا ﺞﻠﺛﻟا قودﻧﺻ ﻲﻓ وأ فوﻓرﻟا ﻰﻠﻋ وأ دﻣﺟُﻣﻟا
• .مادطﺻﻻا بﺑﺳﺑ ررﺿﻟا ﻰﻟإ فﻓرﻷا وأ زﺎﮭﺟﻟا بﺎﺑ نﻣ ﻲﻣﺎﻣﻷا بﻧﺎﺟﻟا ﻰﻠﻋ ﻲّﺳﻘﻣﻟا جﺎﺟزﻟا ضرﻌﺗﯾ دﻗ
.نﯾدﯾﻟﺎﺑ ﮫﺳﻣﻟ بﻧﺟﺗ ،هرﺳﻛ لﺎﺣ ﻲﻓ
LG Electronics.
ﺔﻧﺎﯾﺻﻟا
.ةرارﺣﻟا تﺎﺟردﺑ ءﻲﺟﺎﻔﻣ
•.ﮫﯾﻠﻋ دوﻌﺻﻟا وأ ،فرﻟا وأ نﯾزﺧﺗﻟا ةرﺟﺣ وأ زﺎﮭﺟﻟا باوﺑﺄﺑ ﻖﻠﻌﺗﻟا بﻧﺟﺗ
•.بﺎﺑﻟا تﺎﻛﺑﺷ ﻰﻠﻋ ﺔﯾﺑﻧﺎﺟﻟا قﺎﺑطﻷا تﺎﯾوﺎﺣ وأ هﺎﯾﻣﻟا تﺎﺟﺎﺟز نﻣ ﺔطرﻔﻣ ةﺎﯾﻣﻛ نّزﺧﺗ ﻻ
•.ﺔطرﻔﻣ ةوﻘﺑ ﮫﻘﻠﻐﺗ وأ زﺎﮭﺟﻟا بﺎﺑ ﺢﺗﻔﺗ ﻻ
• ﺔﻣدﺧ زﻛرﻣﺑ لﺻﺗاو ﮫﻣادﺧﺗﺳا نﻋ فﻗوﺗﻓ ،مﯾﻠﺳ رﯾﻏ لﻛﺷﺑ لﻣﻌﺗ وأ ﺔﻔﻟﺎﺗ ﺞﺗﻧﻣﻟا بﺎﺑ ﺔﻠﺻﻔﻣ تﻧﺎﻛ اذإ
•.هﺎﯾﻣﻟا موطرﺧ وأ ﺔﻗﺎطﻟا لﺑﻛ مﺿﻗ نﻣ تﺎﻧاوﯾﺣﻟا ﻊﻧﻣا
•.رزﯾرﻔﻟا ةرﺟﺣ نﻣ ﺎﮭﺟارﺧإ روﻓ ةدﻣﺟﻣﻟا ﺔﻣﻌطﻷا ﺎًﻘﻠطﻣ لﻛﺄﺗ ﻻ
•.ﻊﯾزوﺗﻟا دﻧﻋ ﺔﯾﻧﯾﺻ ﻲﻧاوأ وأ ﻊﯾﻓر ﻲﻟﺎﺗﺳﯾرﻛ بوﻛ مادﺧﺗﺳﺎﺑ مﻘﺗ ﻻ
•.ﮫﻗﻼﻏإ وأ جودزﻣﻟا بﺎﺑﻟا وأ زﺎﮭﺟﻟا بﺎﺑ ﺢﺗﻓ دﻧﻋ كﻣدﻗ وأ كادﯾ ﻖﻠﻌﺗ ﻻأ صرﺣا
• رﯾﻐﺗﻟ ﺎﮭﺿرﻌﺗ لﺎﺣ ﻲﻓ رﺳﻛﻧﺗ دﻗ .ةدرﺎﺑ نوﻛﺗ ﺎﻣدﻧﻋ ﺔﺋﻓادﻟا هﺎﯾﻣﻟﺎﺑ ﺔﯾﺟﺎﺟزﻟا فﻓرﻷا وأ ﺔﯾطﻏﻷا فظﻧﺗ ﻻ
•.ﺎﮭﻧﺎﻛﻣ نﻣ طﻘﺳﺗ دﻘﻓ .ﻲﺳﻛﻌﻟا هﺎﺟﺗﻻا ﻲﻓ فﻓرﻷا ﻊﺿو بﻧﺟﺗ
• ﺔﻛرﺷ ﻲﻓ ءﻼﻣﻌﻟا تﺎﻣوﻠﻌﻣ زﻛرﻣ ﻊﻣ لﺻاوﺗ ،زﺎﮭﺟﻟا نﻣ ﻊﯾﻘﺻﻟا ﺔﻟازﻹLG Electronics.

ar_main.book.book Page 7 Wednesday, May 20, 2020 3:35 PM
7
AR
ﺔﻣﻼﺳﻟا تادﺎﺷرإ
وأ يوﺎﺳﺗ رﺎﯾﺗ ﺔﻌﺳ لّﻣﺣﺗﯾ يذﻟا سﺑﺎﻘﻣﻟا ددﻌﺗﻣ ذﺧﺄﻣﻟا مدﺧﺗﺳا ،(لوﻣﺣﻣ) سﺑﺎﻘﻣﻟا ددﻌﺗﻣ بﺳﺎﻧﻣ لﻛﺷﺑ
.هدﺣو زﺎﮭﺟﻠﻟ طﻘﻓ ﮫﻣدﺧﺗﺳاو ،زﺎﮭﺟﻠﻟ ﺔﻧﻧﻘﻣﻟا ﺔﻌﺳﻟا ﻰﻠﻋ دﯾزﺗ
لﯾﻐﺷﺗﻟا
.فوﻟﺄﻣ ﻲﻟزﻧﻣ مﺎﻌط
ﺔﻛرﺷ ﻲﻓ ءﻼﻣﻌﻟاLG Electronics.
.زﺎﮭﺟﻟا نﻣ ردﺎﺻ بﯾرﻏ نﺎﺧد وأ ﺔﺣﺋار وأ توﺻﻟ كﻓﺎﺷﺗﻛا
•.لﺻﻔﻧﻣ رﮭﺻﻣﺑ ًادّوزﻣو ﮫﻟ ًﺎﺻﺻﺧﻣ نوﻛﯾ ءﺎﺑرﮭﻛ طﺧﺑ زﺎﮭﺟﻟا لﯾﺻوﺗ بﺟﯾ
• ضرؤﻣ ذﺧﺄﻣ مادﺧﺗﺳا لﺎﺣ ﻲﻓ .(لوﻣﺣﻣ) بﺳﺎﻧﻣ لﻛﺷﺑ ضرؤﻣ رﯾﻏو سﺑﺎﻘﻣﻟا ددﻌﺗﻣ ذﺧﺄﻣ مادﺧﺗﺳا بﻧﺟﺗ
• يأ نﯾزﺧﺗﻟ مادﺧﺗﺳﻻا فﻼﺧﺑ (نﺣﺷﻠﻟ وأ ﺔﯾﺑﯾرﺟﺗ وأ ﺔﯾﺑط داوﻣ نﯾزﺧﺗ) ضرﻏ يﻷ زﺎﮭﺟﻟا مدﺧﺗﺳﺗ ﻻ
• تﺎﻣوﻠﻌﻣ زﻛرﻣ ﻊﻣ لﺻاوﺗو ﺔﻗﺎطﻟا سﺑﻘﻣ لﺻﻓا ،زﺎﮭﺟﻟا نﻣ ﺔﯾﻧورﺗﻛﻟإ ءازﺟﻷ هﺎﯾﻣﻟا قارﺗﺧا لﺎﺣ ﻲﻓ
•.تﻗوﻟا نﻣ ﺔﻠﯾوط ةرﺗﻔﻟ ﮫﻣادﺧﺗﺳا مدﻋ ﺔﻟﺎﺣ ﻲﻓ وأ دﯾدﺷ قرﺑ وأ ﺔﯾدﻋر ﺔﻔﺻﺎﻋ ءﺎﻧﺛأ ﺔﻗﺎطﻟا سﺑﻘﻣ لﺻوﺗ ﻻ
•.نﯾﺗﻠﺗﺑﻣ نﯾدﯾﺑ زﺎﮭﺟﻟا ﻲﻓ مﻛﺣﺗﻟا رﺻﺎﻧﻋ وأ ﺔﻗﺎطﻟا سﺑﺎﻗ سﻣﻟ بﻧﺟﺗ
•.ﮫﯾﻠﻋ لﯾﻘﺛ ءﻲﺷ ﻊﺿو وأ طرﻔﻣ لﻛﺷﺑ ﺔﻗﺎطﻟا لﺑﺎﻛ ﻲﻧﺛ مدﻋ ﻰﻠﻋ صرﺣا
• ﺔﻛرﺷ ﻲﻓ ءﻼﻣﻌﻟا تﺎﻣوﻠﻌﻣ زﻛرﻣ ﻊﻣ لﺻاوﺗو ﺔﻗﺎطﻟا سﺑﻘﻣ اًروﻓ لﺻﻓLG Electronics لﺎﺣ ﻲﻓ
.فﻠﺧﻟا ﻲﻓ ةرارﺣ
.ﺔﺑﺎﺻﺈﺑ
ﻰﻠﻋ (كﻟذ ﻰﻟإ ﺎﻣو تﺎﻧﺎﺧﺳﻟاو نارﻓﻷا لﺛﻣ) ﺔﺋﻓدﺗ ةزﮭﺟأ وأ (كﻟذ ﻰﻟإ ﺎﻣو ﺢﯾﺑﺎﺻﻣﻟاو عوﻣﺷﻟا لﺛﻣ)
.زﺎﮭﺟﻟا
،نﺎﺗوﯾﺑوزﯾأ) دﯾرﺑﺗ زﺎﻏ زﺎﮭﺟﻟا اذھ مدﺧﺗﺳﯾ .روﻔﻟا ﻰﻠﻋ نﺎﻛﻣﻟا ﺔﯾوﮭﺗﺑ مﻗو ﺔﻗﺎطﻟا سﺑﺎﻗR600a ﻰﻠﻋ .(
برﺳﺗ بﺑﺳﺗﯾ نأ نﻛﻣﯾ .لﺎﻌﺗﺷﻼﻟ ًﻼﺑﺎﻗ اًزﺎﻏ لازﯾ ﻻ ﮫﻧأ ﻻإ ،زﺎﻐﻟا نﻣ ةرﯾﻐﺻ ﺔﯾﻣﻛ مدﺧﺗﺳﯾ ﮫﻧأ نﻣ مﻏرﻟا
.ررﺷﻟا ثودﺣ ﺔﻟﺎﺣ ﻲﻓ ﺔﺑﺎﺻإ وأ رﺎﺟﻔﻧا وأ ﻖﯾرﺣ بوﺷﻧ ﻲﻓ زﺎﮭﺟﻟا لﯾﻐﺷﺗ وأ بﯾﻛرﺗ وأ لﻘﻧ ءﺎﻧﺛأ زﺎﻐﻟا
(كﻟذ ﻰﻟإ ﺎﻣو ،لﯾﻣﺟﺗ تارﺿﺣﺗﺳﻣو ،ءاوھ رطﻌﻣو ،تارﺷﺣ دﯾﺑﻣو ،قارﺗﺣﻼﻟ لﺑﺎﻗ ذاذرو ،لﺎﺳﻣ ﻲطﻔﻧ
.زﺎﮭﺟﻟا نﻣ برﻘﻟﺎﺑ ﺎﮭﻧزﺧﺗ وأ
• ردﺻُﯾ زﺎﮭﺟ وأ ءﺎطﻏ وأ ،درﺎﺑﻟا ءاوﮭﻟا ﺎﮭﻧﻣ ثﻌﺑﻧﯾ ﻲﺗﻟا ﺔﻘطﻧﻣﻟا لﺧاد ﺔﯾﻧدﻌﻣ ءﺎﯾﺷأ وأ كﯾدﯾ ﻊﺿﺗ ﻻ
•.زﺎﮭﺟﻠﻟ ﻲﻔﻠﺧﻟا ءﺎطﻐﻟﺎﺑ مدطﺻﺗ وأ ﺔطرﻔﻣ ةوﻗ مدﺧﺗﺳﺗ ﻻ
• ﮫﻟ بﺑﺳﺗﯾو بﺎﺑﻟﺎﺑ لﻔطﻟا مدطﺻﯾ دﻗ .ﮫﻘﻠﻐﺗ وأ زﺎﮭﺟﻟا بﺎﺑ ﺢﺗﻔﺗ ﺎﻣدﻧﻋ راوﺟﻟﺎﺑ لﺎﻔطﻷا دﺟاوﺗ نﻣ رذﺣا
•.قﺎﻧﺗﺧﺎﺑ زﺎﮭﺟﻟا لﺧاد زﺟﺗﺣﻣﻟا لﻔطﻟا بﺎﺻُﯾ نأ نﻛﻣﯾ .زﺎﮭﺟﻟا لﺧاد لﺎﻔطﻷا زﺎﺟﺗﺣا رطﺧ بﻧﺟﺗ
•.زﺎﮭﺟﻟا لﺧاد ﺔﻔﯾﻟﻷا تﺎﻧاوﯾﺣﻟا لﺛﻣ ﺔﯾﺣﻟا تﺎﻧاوﯾﺣﻟا ﻊﺿﺗ ﻻ
• لﺎﻌﺗﺷﻼﻟ ﺔﻠﺑﺎﻗ ءﺎﯾﺷأ وأ ،قارﺗﺣﻼﻟ ﺔﻠﺑﺎﻗ داوﻣ وأ لﺋﺎﺳﺑ ةءوﻠﻣﻣ تﺎﯾوﺎﺣ وأ ﺔﺷھ وأ ﺔﻠﯾﻘﺛ ءﺎﯾﺷأ ﻊﺿﺗ ﻻ
•.زﺎﮭﺟﻟا لﺧاد (لوﻣﺣﻣ فﺗﺎھ وأ ةﺄﻓدﻣ لﺛﻣ) ﺔﯾﻧورﺗﻛﻟإ ةزﮭﺟأ ﺔﯾأ ﻊﺿﺗ ﻻ
• وأ زﺎﮭﺟﻟا سﻣﻠﺗ ﻼﻓ ،(كﻟذ ﻰﻟإ ﺎﻣ وأ ،ﻲﻌﯾﺑط زﺎﻏ وأ ،نﺎﺑورﺑ وأ ،ﻲﻧﺎﺗوﺑوزﯾأ) زﺎﻏ برﺳﺗ كﺎﻧھ نﺎﻛ اذإ
• زﺎﻏو ،ﺔﯾﺋﺎﯾﻣﯾﻛ داوﻣو ،لوﺣﻛو ،نﯾزﻧﺑو ،رﺛﯾإ لﺛﻣ داوﻣ) لﺎﻌﺗﺷﻼﻟ ﺔﻠﺑﺎﻗ وأ قارﺗﺣﻼﻟ ﺔﻠﺑﺎﻗ داوﻣ مدﺧﺗﺳﺗ ﻻ

ar_main.book.book Page 6 Wednesday, May 20, 2020 3:35 PM
ﺔﻣﻼﺳﻟا تادﺎﺷرإ
6
لﺎﻌﺗﺷﻼﻟ ﺔﻠﺑﺎﻘﻟا داوﻣﻟاو ﻖﯾرﺣﻟا رطﺎﺧﻣ
ثدﺣ لﺎﺣ ﻲﻓ لﺎﻌﺗﺷﻼﻟ لﺑﺎﻗ يزﺎﻏ ءاوھ طﯾﻠﺧ نوﻛﺗ بﻧﺟﺗﺗ ﻲﻛﻟ .ﻖﺋﺎﻗد ةدﻌﻟ زﺎﮭﺟﻟا ﺎﮭﺑ دﺟاوﺗﯾ ﻲﺗﻟا
دﯾرﺑﺗﻟا زﺎﻏ ﺔﯾﻣﻛ ﻊﻣ زﺎﮭﺟﻟا ﺎﮭﯾﻓ مدﺧﺗﺳﻣﻟا ﺔﻓرﻐﻟا مﺟﺣ ﻰﺷﺎﻣﺗﯾ نأ بﺟﯾ ،دﯾرﺑﺗﻟا ةرﺋاد ﻲﻓ بﯾرﺳﺗ
ﺔﻓرﻐﻟا ﺔﺣﺎﺳﻣ نوﻛﺗ نأ بﺟﯾ .مدﺧﺗﺳﻣﻟا1 لﻛﻟ ﻊﺑرﻣ رﺗﻣ 8 دﯾرﺑﺗﻟا زﺎﻏ نﻣ مارﺟ R600a.زﺎﮭﺟﻟا لﺧاد
بﯾﻛرﺗﻟا
نود ةرارﺣﻟا تﺎﺟرد وأ رطﻣﻟا وأ حﺎﯾرﻟا وأ رﺷﺎﺑﻣﻟا سﻣﺷﻟا ءوﺿﻛ ﺔﯾوﺟﻟا
تارﯾﺛﺄﺗﻠﻟ ﺔﺿرﻌﻣ ﺔﺣﺎﺳﻣ
.دﻣﺟﺗﻟا ﺔﺟرد
.ﺊﻓادﻣﻟا
AR
• ﺔﻓرﻐﻟا ﺔﯾوﮭﺗﺑ مﻗو لﺎﻌﺗﺷﻼﻟ ﺔﻠﻣﺗﺣﻣ ردﺎﺻﻣ وأ ﺔﻓوﺷﻛﻣ بﮭﻟ ﺔﻧﺳﻟأ ﺔﯾأ بﻧﺟﺗ ،بﯾرﺳﺗ فﺎﺷﺗﻛا لﺎﺣ ﻲﻓ
•.رﺎﺟﻔﻧا ﻲﻓ بﺑﺳﺗﯾ وأ بﯾﺑﺎﻧﻷا نﻣ برﺳﺗﻣﻟا دﯾرﺑﺗﻟا زﺎﻏ لﻌﺗﺷﯾ دﻗ
•.زﺎﮭﺟﻟا لﺧاد ةدوﺟوﻣﻟا فﯾرﻌﺗﻟا ﺔﺣوﻟ ﻰﻠﻋ صﺎﺧﻟا زﺎﮭﺟﻟا لﺧاد دﯾرﺑﺗﻟا زﺎﻏ رادﻘﻣ ﺢﯾﺿوﺗ مﺗﯾ
•.مﺎﻛﺣﺈﺑ ﮫﺑ كﺎﺳﻣﻺﻟ رﺛﻛأ وأ نﯾﺻﺧﺷ رﻓوﺗ ﻲﻐﺑﻧﯾ ، زﺎﮭﺟﻟا اذھ لﻘﻧ دﻧﻋ
•.ﺔﯾوﺗﺳﻣو ﺔﺑﻠﺻ ﺔﯾﺿرأ ﻰﻠﻋ زﺎﮭﺟﻟا بﯾﻛرﺗﺑ مﻗ
• ﻲﻓ وأ ﻖﻠطﻟا ءاوﮭﻟا ﻲﻓ زﺎﮭﺟﻟا نﯾزﺧﺗ وأ بﯾﻛرﺗ بﻧﺟﺗ .رﺎﺑﻐﻟاو ﺔﺑوطرﻟا نﻛﺎﻣأ ﻲﻓ زﺎﮭﺟﻟا بﯾﻛرﺗ بﻧﺟﺗ
• وأ دﻗاوﻣﻟا لﺛﻣ ﺔﯾرارﺣ ةزﮭﺟأ لﺑِﻗ نﻣ ةرارﺣﻠﻟ ﮫﺿﯾرﻌﺗ وأ رﺷﺎﺑﻣﻟا سﻣﺷﻟا ءوﺿ تﺣﺗ زﺎﮭﺟﻟا ﻊﺿﺗ ﻻ
ءﻼﻣﻌﻟا تﺎﻣوﻠﻌﻣ زﻛرﻣ نﻣ كﻟذ نﻋ رﺎﺳﻔﺗﺳﻻا كﻧﻛﻣﯾ ،ضﯾرﺄﺗﻟا نﻋ لﯾﺻﺎﻔﺗﻟا نﻣ دﯾزﻣﻟ .ﺔﻗﺎطﻟا سﺑﻘﻣ نﻣ
ﺔﻛرﺷ ﻲﻓLG Electronics.
.ﺔﯾﻠﺣﻣﻟا ﺢﺋاوﻠﻟاو نﯾﻧاوﻘﻟا ﻊﯾﻣﺟﻟ ﺎًﻘﻓو ضرؤﻣو تﺑﺛﻣ بﺳﺎﻧﻣ جرﺧ سﺑﻘﻣﺑ ﺔﻗﺎطﻟا سﺑﺎﻗ لﯾﺻوﺗ
.قﺎﻧﺗﺧﻻا بﺑﺳﺗ نأ فﯾﻠﻐﺗﻟا داوﻣﻟ نﻛﻣﯾ
•.بﯾﻛرﺗﻟا دﻧﻋ زﺎﮭﺟﻟا نﻣ ﻲﻔﻠﺧﻟا ءزﺟﻟا فﺷﻛ مدﻋ ﻰﻠﻋ صرﺣا
•.زﺎﮭﺟﻟا نﻋ ﺔﻗﺎطﻟا سﺑﺎﻗ لﺻﻓ لﮭﺳﯾ ثﯾﺣ نﺎﻛﻣ ﻲﻓ زﺎﮭﺟﻟا بﯾﻛرﺗﺑ مﻗ
•.كﯾﻛﻔﺗﻟا وأ ﻊﯾﻣﺟﺗﻟا ءﺎﻧﺛأ طوﻘﺳﻟﺎﺑ زﺎﮭﺟﻟا بﺎﺑﻟ حﺎﻣﺳﻟا مدﻋ ﻰﻠﻋ صرﺣا
•.ﮫﻛﯾﻛﻔﺗ وأ زﺎﮭﺟﻟا بﺎﺑ ﻊﯾﻣﺟﺗ ءﺎﻧﺛأ ﺔﻗﺎطﻟا لﺑﻛ رﯾﻣدﺗ وأ ،ﻖﺣﺳ وأ ،ﻊطﻗ مدﻋ ﻰﻠﻋ صرﺣا
•.ﺔﻗﺎطﻟا سﺑﻘﻣ هﺎﺟﺗا سﻛﻋ ﻲﻓ لﯾﻣﯾ نأ زﺎﮭﺟﻠﻟ حﺎﻣﺳﻟا وأ ﻰﻠﻋﻷ ﺔﻗﺎطﻟا سﺑﻘﻣ ﮫﯾﺟوﺗ مدﻋ ﻰﻠﻋ صرﺣا
•.ﺔﻗﺎطﻟا سﺑﺎﻘﺑ ىرﺧأ تﺎﻘﺣﻠﻣ ﺔﯾأ وأ سﺑﺎﻘﻟا ﺊﯾﺎﮭﻣ لﯾﺻوﺗﺑ مﻘﺗ ﻻ
•هدﯾدﻣﺗ وأ ﺔﻗﺎطﻟا كﻠﺳ لﯾدﻌﺗﺑ مﻘﺗ ﻻ.
• ﮫﺗﻟازإ مﺗﺗ وأ ﺔﻗﺎطﻟا كﻠﺳ ﻰﻠﻋ ضﯾرﺄﺗﻟا نﺳ فﻠﺗﯾ ﻻ كﻟذﺑو ،ﺢﯾﺣﺻ ٍلﻛﺷﺑ ضرؤﻣ جرﺧﻟا سﺑﻘﻣ نأ دﻛﺄﺗ
• بﺟﯾ . ضﯾرﺄﺗ ﺔﻠﺻوﺑ ﺔﻗﺎط سﺑﺎﻗو زﺎﮭﺟﻠﻟ ضﯾرﺄﺗ لﺻوﻣ ﻰﻠﻋ يوﺗﺣﯾ ﺔﻗﺎط كﻠﺳﺑ اًدوزﻣ زﺎﮭﺟﻟا اذھ ﻲﺗﺄﯾ
•.لﯾﻛوﻟﺎﺑ لﺻﺗﺎﻓ ،كوﻛﺷﻟا كﺗروﺎﺳ اذإ .فﻠﺗ تﺎﻣﻼﻋ يأ ﮫﯾﻠﻋ ودﺑﺗ زﺎﮭﺟ يأ لﯾﻐﺷﺗ ءدﺑ ﻰﻟإ ﺎًﻘﻠطﻣ دﻣﻌﺗ ﻻ
• ذإ ،لﺎﻔطﻷا لوﺎﻧﺗﻣ نﻋ اًدﯾﻌﺑ (موﻓورﯾﺎﺗﺳﻟا ةدﺎﻣو كﯾﺗﺳﻼﺑﻟا سﺎﯾﻛأ لﺛﻣ) ﺔﺋﺑﻌﺗﻟا داوﻣ ﻊﯾﻣﺟ نﻣ صﻠﺧﺗ
•.(ﮫﺑ لﺻوﻣ) ﺔﻗﺎط لﺑﺎﻛ دﺟوﯾ ﻻ سﺑﺎﻘﻣﻟا ددﻌﺗﻣ لّوﺣﻣﺑ زﺎﮭﺟﻟا لّﺻوﺗ ﻻ

ar_main.book.book Page 5 Wednesday, May 20, 2020 3:35 PM
5
AR
ﺔﻣﻼﺳﻟا تادﺎﺷرإ
ﻖﯾرﺣ ﺎﮭﻧﻋ بﺷﻧﯾ نأ وأ لﻌﺗﺷﺗ نأ نﻛﻣُﯾ لﺎﻌﺗﺷﻼﻟ ﺔﻠﺑﺎﻘﻟا داوﻣﻟا نﺄﺑ زﻣرﻟا اذھ كرذﺣُﯾ
.رذﺣﻟا ﻲﺧوﺗ مدﻋ ﺔﻟﺎﺣ ﻲﻓ
.فﻠﺗﻠﻟ دﯾرﺑﺗﻟا ةرﺋاد نﻣ ءازﺟأ ضرﻌﺗ مدﻋ نﺎﻣﺿﻟ رذﺣﻟا ﻲﺧوﺗ بﺟﯾ ،زﺎﮭﺟﻟا بﯾﻛرﺗو لﻘﻧ دﻧﻋ .ﺎًﺿﯾأ
.ﺎﻣﮭﻧﻣ صﻠﺧﺗﻟا لﺑﻗ لﺛﺎﻣﻣ لﻛﺷﺑ ًﻼھؤﻣ ﺎًﺻﺧﺷ وأ ﺔﻣدﺧﻟا لﯾﻛو رﺷﺗﺳا .ﺎﻣﮭﻧﻣ
.ﺔﻣﯾﻘﺗﺳﻣ ﺔﯾﻌﺿو ﻲﻓ ﮫﺑذﺟﺑ موﻘﺗ نأ لﺑﻗ مﺎﻛﺣﺈﺑ ﮫﺑ كﺎﺳﻣﻹا ﻰﻠﻋ ﺎًﻣﺋاد صرﺣا جرﺧﻟا سﺑﻘﻣ
-.ﺔﻠﻣﺟﻟا رﺟﺎﺗﻣﻟ ﺔﻠﺛﺎﻣﻣﻟا تﺎﻘﯾﺑطﺗﻟاو مﻋﺎطﻣﻟا تﺎﻣدﺧ
•
•) نﺎﺗوﺑوزﯾﻵا دﯾرﺑﺗ طﯾﺳو نﻣ ةرﯾﻐﺻ ﺔﯾﻣﻛ ﻰﻠﻋ زﺎﮭﺟﻟا اذھ يوﺗﺣﯾR600a لﺎﻌﺗﺷﻼﻟ لﺑﺎﻗ ﮫﻧﻛﻟو ،(
• صﻠﺧﺗﻠﻟ ﺔﺻﺎﺧ تاءارﺟإ زﺎﮭﺟﻟﺎﺑ نﺎﻣدﺧﺗﺳﻣﻟا لﺎﻌﺗﺷﻼﻟ لﺑﺎﻘﻟا ﺔﻟزﺎﻌﻟا ةدﺎﻣﻟا زﺎﻏو دﯾرﺑﺗﻟا زﺎﻏ بﻠطﺗﯾ
•.دﯾرﺑﺗﻟا زﺎﻏ ةرﺋاد فﻠﺗﺗ ﻻ
•.دﻣﺗﻌﻣ ﺔﻣدﺧ زﻛرﻣﺑ لﺻﺗاو ﺔﻗﺎطﻟا كﻠﺳ مدﺧﺗﺳﺗ ﻻ ،سﺑﻘﻣﻟا ﺔﺣﺗﻓ ءﺎﺧﺗرا وأ ﺔﻗﺎطﻟا كﻠﺳ فﻠﺗ ﺔﻟﺎﺣ ﻲﻓ
•.زﺎﮭﺟﻟا فﻠﺧ ﺔﻟوﻣﺣﻣﻟا ﻲﺋﺎﺑرﮭﻛﻟا رﺎﯾﺗﻟا كﻼﺳأ وأ سﺑﺎﻘﻣﻟا/جرﺎﺧﻣﻟا ةددﻌﺗﻣ ﺔﻟوﻣﺣﻣﻟا ذﺧﺂﻣﻟا ﻊﺿﺗ ﻻ
•.لﻣﺎﻛ لﻛﺷﺑ رﺎﺑﻏ وأ ﺔﺑوطر يأ ﺔﻟازإ دﻌﺑ جرﺧﻟا سﺑﻘﻣ ﻲﻓ مﺎﻛﺣﺈﺑ ﺔﻗﺎطﻟا سﺑﺎﻗ لﺧدأ
• نﻣ ﺔﻗﺎطﻟا سﺑﺎﻗ جارﺧﻹو .ﺔﻗﺎطﻟا لﺑﺎﻛ دﺷ لﻼﺧ نﻣ زﺎﮭﺟﻟا نﻋ ﺔﻗﺎطﻟا لﺻﻓ مدﻋ ﻰﻠﻋ ﺎًﻣﺋاد صرﺣا
زﺎﮭﺟﻟا نﻣ ﻲﺟرﺎﺧﻟا وأ ﻲﻠﺧادﻟا ءزﺟﻟا ﻰﻠﻋ (كﻟذ ﻰﻟإ ﺎﻣو فﯾظﻧﺗﻟا داوﻣو ،لﺎﻌﺗﺷﻼﻟ ﺔﻠﺑﺎﻘﻟا لﺋاوﺳﻟاو
.ﮫﻔﯾظﻧﺗﻟ
.ﺔﯾﻧدﻌﻣ
ﺔﻛرﺷ ﻲﻓ ءﻼﻣﻌﻟا تﺎﻣوﻠﻌﻣ زﻛرﻣ ﻊﻣ لﺻاوﺗ .ﮫﻠﯾدﻌﺗ وأ ﮫﺣﻼﺻإLG Electronics لﻘﻧﺗ تﻧﻛ لﺎﺣ ﻲﻓ
.فﻠﺗﺧﻣ ﻊﻗوﻣ ﻲﻓ ﮫﺑﯾﻛرﺗﺑ موﻘﺗو زﺎﮭﺟﻟا
•.ﻖﺋاوﻌﻟا نﻣ ،زﺎﮭﺟﻠﻟ ﺞﻣدﻣﻟا لﻛﯾﮭﻟﺎﺑ وأ ﻲﺟرﺎﺧﻟا فﻼﻐﻟا ﻰﻠﻋ ةدوﺟوﻣﻟا ﺔﯾوﮭﺗﻟا تﺎﺣﺗﻓ وﻠﺧ ﻰﻠﻋ ظﻓﺎﺣ
•.زﺎﮭﺟﻟا اذھ لﺧاد لﺎﻌﺗﺷﻼﻟ لﺑﺎﻘﻟا ﻊﻓادﻟا تاذ لوﺳورﯾﻷا بﻠﻋ لﺛﻣ ةرﺟﻔﺗﻣﻟا داوﻣﻟا نﯾزﺧﺗﺑ مﻘﺗ ﻻ
•.ﮫﻠﻘﻧ دﻧﻋ ﮫﺑذﺟ وأ ﮫﻌﻓدﻟ زﺎﮭﺟﻟا ﺔﻟﺎﻣﺈﺑ مﻘﺗ ﻻ
•.فﻟﺎﺗ وأ ﻖﻟﺎﻋ رﯾﻏ ﻲﺋﺎﺑرﮭﻛﻟا رﺎﯾﺗﻟا كﻠﺳ نأ نﻣ زﺎﮭﺟﻟا ﻊﺿو دﻧﻋ دﻛﺄﺗ
•ﻻ.ﺞﻠﺛﻟا ﺔﺑاذإ ﺔﯾﻠﻣﻋ ﻊﯾرﺳﺗﻟ لﺋﺎﺳوﻟا نﻣ ﺎھرﯾﻏ وأ ﺔﯾﻛﯾﻧﺎﻛﯾﻣﻟا ةزﮭﺟﻷا مدﺧﺗﺳﺗ
•.ﺢﺋاورﻟا ﺔﻟازﻹ لﺧادﻟﺎﺑ ﺔﻌﻣﺷ ﻊﺿﺗ وأ لﺧادﻟا نﻣ زﺎﮭﺟﻟا فﯾﻔﺟﺗﻟ رﻌﺷﻟا فﻔﺟﻣ مدﺧﺗﺳﺗ ﻻ
•.ﺔﺟﻼﺛﻟا لﺧاد ﺔﯾﺋﺎﺑرﮭﻛ ةزﮭﺟأ مدﺧﺗﺳﺗ ﻻ
•.زﺎﮭﺟﻟا كﯾرﺣﺗ ءﺎﻧﺛأ مدﻘﻟا وأ دﯾﻟا لﺛﻣ دﺳﺟﻟا نﻣ ءزﺟ ﻖﻠﻌﯾ ﻻأ صرﺣا
•.(ﮫﺑﯾﻛرﺗ بﺟوﺗﯾ ثﯾﺣ) ﻲﻠﺧادﻟا حﺎﺑﺻﻣﻟا لﯾدﺑﺗ وأ زﺎﮭﺟﻟا فﯾظﻧﺗ لﺑﻗ ﺔﻗﺎطﻟا كﻠﺳ لﺻﻓا
• ،نﯾزﻧﺑﻟاو ،نﺎھدﻟا فﻔﺧُﻣو ،لوﺣﻛﻟاو ،نﺎﻧﺳﻷا نوﺟﻌﻣ) لﺎﻌﺗﺷﻼﻟ ﺔﻠﺑﺎﻘﻟا داوﻣﻟا وأ هﺎﯾﻣﻟا شرﺑ مﻘﺗ ﻻ
• ةدﺎﻣ نﻣ ﺔﻋوﻧﺻﻣﻟا كﻠﺗ وأ ﺔﻧﺷﺧﻟا ﺢطﺳﻷا تاذ تﺎﺟﻧﻔﺳﻹا وأ ،سﺑﻼﻣ ﻊطﻗ وأ ،شَرُﻔﺑ زﺎﮭﺟﻟا فظﻧﺗ ﻻ
• ﺔﻛرﺷ ﺔﻣدﺧ زﻛرﻣ نﻣ لھؤﻣ ﺔﻣدﺧ فظوﻣ طﻘﻓ موﻘﯾ نأ بﺟﯾLG Electronics وأ زﺎﮭﺟﻟا كﯾﻛﻔﺗﺑ

رﯾذﺣﺗ
ar_main.book.book Page 4 Wednesday, May 20, 2020 3:35 PM
ﺔﻣﻼﺳﻟا تادﺎﺷرإ
4
ﺔﻣﻼﺳﻟا تادﺎﺷرإ
مادﺧﺗﺳﻻا لﺑﻗ تﺎﻣﯾﻠﻌﺗﻟا لﻛ أرﻗا
رارﺿﻷا وأ ﺔﻌﻗوﺗﻣﻟا رﯾﻏ رطﺎﺧﻣﻟا عوﻗو نود ﺔﻟوﻠﯾﺣﻟا ﻲﻓ ﺔﯾﻟﺎﺗﻟا ﺔﻣﻼﺳﻟا تادﺎﺷرإ نﻣ ضرﻐﻟا لﺛﻣﺗﯾ
.ﺞﺗﻧﻣﻠﻟ ﺢﯾﺣﺻﻟا رﯾﻏ وأ نﻣﻵا رﯾﻏ لﯾﻐﺷﺗﻟا نﻋ ﺔﻣﺟﺎﻧﻟا
.هﺎﻧدأ ﺢﺿوﻣﻟا وﺣﻧﻟا ﻰﻠﻋ
"ﮫﯾﺑﻧﺗ"
"رﯾذﺣﺗ"
و
،رطﺎﺧﻣ بﺑﺳﺗ نأ نﻛﻣﯾ ﻲﺗﻟا لﯾﻐﺷﺗﻟا تﺎﯾﻠﻣﻋو روﻣﻷا ﻰﻟإ ةرﺎﺷﻺﻟ زﻣرﻟا اذھ ضرﻋ مﺗﯾ
.رطﺎﺧﻣﻟا بﻧﺟﺗﻟ تادﺎﺷرﻹا ﻊﺑﺗاو ﺔﯾﺎﻧﻌﺑ زﻣرﻟا اذھ لﻣﺣﯾ يذﻟا ءزﺟﻟا ةءارﻗ ﻰﻠﻋ صرﺣﺎﻓ
.ةﺎﻓوﻟا وأ ةرﯾطﺧ ﺔﺑﺎﺻإ عوﻗو بﺑﺳﯾ دﻗ تادﺎﺷرﻹا عﺎﺑﺗا مدﻋ نأ ﻰﻟإ اذھ رﯾﺷﯾ
.ﺞﺗﻧﻣﻟا فﻠﺗ وأ ﺔﻔﯾﻔط ﺔﺑﺎﺻإ عوﻗو ﻲﻓ بﺑﺳﺗﯾ دﻗ تادﺎﺷرﻹا عﺎﺑﺗا مدﻋ نأ ﻰﻟإ اذھ رﯾﺷﯾ
ﻰﻟإ تادﺎﺷرﻹا مﯾﺳﻘﺗ مﺗﯾ
ﺔﻣﻼﺳﻟا لﺋﺎﺳر
رﯾذﺣﺗ
ﮫﯾﺑﻧﺗ
AR
رﯾذﺣﺗ
،ﺔﺑﺎﺻإ ثودﺣ وأ ،ﺔﯾﺑرﮭﻛ ﺔﻣدﺻﻟ ضرﻌﺗﻟا وأ ،ةﺎﻓو ثودﺣ وأ ،ﻖﯾرﺣ بوﺷﻧ وأ ،رﺎﺟﻔﻧا عوﻗو رطﺎﺧﻣ لﯾﻠﻘﺗﻟ
:ﻲﻠﯾ ﺎﻣ ﺎﮭﯾﻓ ﺎﻣﺑ ،ﺔﯾﺳﺎﺳﻷا ﺔﻣﻼﺳﻟا تﺎطﺎﯾﺗﺣا عﺎﺑﺗا بﺟﯾ ،ﺞﺗﻧﻣﻟا مادﺧﺗﺳا دﻧﻋ صﺎﺧﺷﻸﻟ قورﺣ وأ
ﺔﯾﻧﻔﻟا ﺔﻣﻼﺳﻟا
تادﺎﺷرﻹا مﮭﻟ مدﻘﺗ وأ مﮭﯾﻠﻋ فارﺷﻹا مﺗﯾ مﻟ ﺎﻣ ،ﺔﻓرﻌﻣو ةرﺑﺧ مﮭﯾدﻟ سﯾﻟ وأ ،ﺔﯾﻠﻘﻌﻟا وأ ﺔﯾﺳﺣﻟا وأ ﺔﯾﻧدﺑﻟا
دﻛﺄﺗﻠﻟ لﺎﻔطﻷا ﻰﻠﻋ فارﺷﻹا بﺟﯾ كﻟذﻛ ،مﮭﺗﻣﻼﺳ نﻋ لوؤﺳﻣ صﺧﺷ لﺑﻗ نﻣ زﺎﮭﺟﻟا مادﺧﺗﺳﺎﺑ ﺔﻘﻠﻌﺗﻣﻟا
.زﺎﮭﺟﻟﺎﺑ مﮭﺛﺑﻋ مدﻋ نﻣ
-؛ىرﺧﻷا لﻣﻌﻟا تﺎﺋﯾﺑو بﺗﺎﻛﻣﻟاو رﺟﺎﺗﻣﻟا ﻲﻓ ﺦﺑﺎطﻣﻟا ﻖطﺎﻧﻣ
-؛ىرﺧﻷا ءﻻزُﻧﻟا ﺔﻣﺎﻗإ نﻛﺎﻣأو لُزُﻧﻟاو قدﺎﻧﻔﻟا ءﻻزﻧ مادﺧﺗﺳاو ﺔﯾﻋارزﻟا توﯾﺑﻟا
-؛رﯾرﺳﻟا ﻲﻓ ﺔﻣدﻘﻣﻟا تﺎﺑﺟوﻟاو رﺎطﻓﻹا تﺎﺑﺟو مﯾدﻘﺗ تﺎﺋﯾﺑ
• مﮭﺗاردﻗ ﻲﻓ صﻘﻧ نﻣ نوﻧﺎﻌﯾ نﯾذﻟا (لﺎﻔطﻷا كﻟذ ﻲﻓ ﺎﻣﺑ) دارﻓﻷا مادﺧﺗﺳﻻ صﺻﺧﻣ رﯾﻏ زﺎﮭﺟﻟا اذھ
•:لﺛﻣ ﺔﻠﺛﺎﻣﻣﻟا تﻻﺎﻣﻌﺗﺳﻻاو ﻲﻟزﻧﻣﻟا مادﺧﺗﺳﻼﻟ صﺻﺧﻣ زﺎﮭﺟﻟا اذھ

ar_main.book.book Page 3 Wednesday, May 20, 2020 3:35 PM
ﺎﮭﺣﻼﺻإو لﺎطﻋﻷا فﺎﺷﻛﺗﺳا
ﺔﻣدﺧﻟا ﻰﻠﻋ لوﺻﺣﻠﻟ لﺎﺻﺗﻻا لﺑﻗ.................................................................................34

ar_main.book.book Page 2 Wednesday, May 20, 2020 3:35 PM
زارطﻟا نﻋ فﻠﺗﺧﯾ ىوﺗﺣﻣ وأ روﺻ ﻰﻠﻋ لﯾﻟدﻟا اذھ يوﺗﺣﯾ دﻗ
.ﮫﺋارﺷﺑ تﻣﻗ يذﻟا
.ﺔﻌّﻧﺻﻣﻟا ﺔﻛرﺷﻟا نﻣ ﺔﻌﺟارﻣﻠﻟ لﯾﻟدﻟا اذھ ﻊﺿﺧﯾ
تﺎﯾوﺗﺣﻣﻟا لودﺟ
ﺔﻣﻼﺳﻟا تادﺎﺷرإ
مادﺧﺗﺳﻻا لﺑﻗ تﺎﻣﯾﻠﻌﺗﻟا لﻛ أرﻗا......................................................................................4
رﯾذﺣﺗ...................................................................................................................4
ﮫﯾﺑﻧﺗ.....................................................................................................................8
بﯾﻛرﺗﻟا
بﯾﻛرﺗﻟا ءارﺟإ لﺑﻗ..................................................................................................10
دﻣﺟُﻣﻟاو ﺔﺟﻼﺛﻟا بﺎﺑ ﺔﻟازإ..........................................................................................11
هﺎﯾﻣﻟا طﺧ لﯾﺻوﺗ....................................................................................................12
بﺎﺑﻟا ةاذﺎﺣﻣو زﺎﮭﺟﻟا ءاوﺗﺳا طﺑﺿ................................................................................13
ﺔﻗﺎطﻟا لﯾﻐﺷﺗ.........................................................................................................14
رﺧآ نﺎﻛﻣ ﻰﻟإ ﮫﻠﻘﻧﻟ زﺎﮭﺟﻟا كﯾرﺣﺗ.................................................................................14
لﯾﻐﺷﺗﻟا
مادﺧﺗﺳﻻا لﺑﻗ........................................................................................................16
ﺞﺗﻧﻣﻟا صاوﺧ........................................................................................................18
مﻛﺣﺗﻟا ﺔﺣوﻟ..........................................................................................................21
(ﺞﻠﺛﻟاو هﺎﯾﻣﻟا عزوﻣ)Ice and Water Dispenser........................................................22
ﻲﺋﺎﻘﻠﺗﻟا ﺞﻠﺛﻟا ﻊﻧﺎﺻ..................................................................................................24
ﻲﻠﺧادﻟا بﺎﺑﻟا.........................................................................................................25
InstaView........................................................................................................26
جردﻟا.................................................................................................................27
فرﻟا.................................................................................................................27
بﺎﺑﻟا ﺔﻠﺳ.............................................................................................................28
ﺔﯾﻛذﻟا فﺋﺎظوﻟا
ﻖﯾﺑطﺗLG ThinQ................................................................................................29
ﻲﻛذﻟا صﯾﺧﺷﺗﻟا.....................................................................................................30
فﯾظﻧﺗﻟا..............................................................................................................31
Water Filter(هﺎﯾﻣﻟا ﺢﺷرﻣ) ....................................................................................32
ﺔﻧﺎﯾﺻﻟا

ar_main.book.book Page 1 Wednesday, May 20, 2020 3:35 PM
دﻣﺟُﻣﻟاو ﺔﺟﻼﺛﻟا
كﻟﺎﻣﻟا لﯾﻟد
بﯾﻛرﺗﻟا ﺔﯾﻠﻣﻋ كﻟذ طﺳﺑﯾﺳ ثﯾﺣ .ﺔﯾﺎﻧﻌﺑ تﺎﻣﯾﻠﻌﺗﻟا هذھ أرﻗا ،زﺎﮭﺟﻟا بﯾﻛرﺗ ﻲﻓ ءدﺑﻟا لﺑﻗ
دﻌﺑ ﺞﺗﻧﻣﻟا نﻣ برﻘﻟﺎﺑ تﺎﻣﯾﻠﻌﺗﻟا هذﮭﺑ ظﻔﺗﺣاو .نﻣآو ﺢﯾﺣﺻ لﻛﺷﺑ زﺎﮭﺟﻟا بﯾﻛرﺗ نﻣﺿﯾو
.لﺑﻘﺗﺳﻣﻟا ﻲﻓ ﺎﮭﯾﻟإ عوﺟرﻠﻟ بﯾﻛرﺗﻟا
www.lg.com
رﺷﻧﻟا قوﻘﺣ2020-2019ﺔظوﻔﺣﻣ قوﻘﺣﻟا لﻛ .تﺎﯾﻧورﺗﻛﻟﻼﻟ ﻲﺟ لإ
AR ﺔﯾﺑرﻌﻟاENGLISH EN
MFL71401509
Rev.02_052020
 Loading...