

global_main.book.book Page 1 Tuesday, July 28, 2020 8:24 AM
OWNER'S MANUAL
FRIDGE & FREEZER
Before beginning installation, read these instructions
carefully. This will simplify installation and ensure that the
product is installed correctly and safely. Leave these
instructions near the product after installation for future
reference.
EN ENGLISH FR FRANÇAIS PT PORTUGUÊS
MFL70583752
Rev.00_072820
Copyright © 2020 LG Electronics Inc. All Rights Reserved.
www.lg.com
global_main.book.book Page 2 Tuesday, July 28, 2020 8:24 AM
TABLE OF CONTENTS
This manual may contain images or
content that may be different from the
model you purchased.
This manual is subject to revision by the
manufacturer.
SAFETY INSTRUCTIONS
READ ALL INSTRUCTIONS BEFORE USE...........................................................3
WARNING............................................................................................................3
CAUTION .............................................................................................................9
INSTALLATION
Before Installation ...........................................................................................11
Removing the Fridge and Freezer Door........................................................12
Connecting the Water Line .............................................................................14
Levelling and Door Alignment........................................................................15
Turning on the Power......................................................................................16
Moving the Appliance for Relocation ............................................................17
OPERATION
Before Use ........................................................................................................18
Product Features..............................................................................................20
Control Panel....................................................................................................23
Ice and Water Dispenser.................................................................................24
Automatic Icemaker ........................................................................................26
Door in Door.....................................................................................................28
Drawer...............................................................................................................28
Shelf ...................................................................................................................29
Door Basket ......................................................................................................30
MAINTENANCE
Cleaning ............................................................................................................31
Water Filter .......................................................................................................32
TROUBLESHOOTING
Before Calling for Service................................................................................34
WARNING
global_main.book.book Page 3 Tuesday, July 28, 2020 8:24 AM
SAFETY INSTRUCTIONS
3
SAFETY INSTRUCTIONS
READ ALL INSTRUCTIONS BEFORE USE
The following safety guidelines are intended to prevent unforeseen
risks or damage from unsafe or incorrect operation of the appliance.
The guidelines are separated into
described below.
Safety Messages
This symbol is displayed to indicate matters and operations
that can cause risk. Read the part with this symbol carefully
and follow the instructions in order to avoid risk.
WARNING
This indicates that the failure to follow the instructions can
cause serious injury or death.
‘WARNING’
and
‘CAUTION’
as
EN
CAUTION
This indicates that the failure to follow the instructions can
cause the minor injury or damage to the product.
WARNING
To reduce the risk of explosion, fire, death, electric shock, injury or
scalding to persons when using this product, follow basic precautions,
including the following:
Technical Safety
• This appliance can be used by children aged from 8 years and above
and persons with reduced physical, sensory or mental capabilities or
lack of experience and knowledge if they have been given supervision
or instruction concerning use of the appliance in a safe way and
understand the hazards involved. Children shall not play with the
global_main.book.book Page 4 Tuesday, July 28, 2020 8:24 AM
4
EN
SAFETY INSTRUCTIONS
appliance. Cleaning and user maintenance shall not be made by
children without supervision.
• This appliance is not intended for use by persons (including children)
with reduced physical, sensory or mental capabilities, or lack of
experience and knowledge, unless they have been given supervision
or instruction concerning use of the appliance by a person
responsible for their safety. Children should be supervised to ensure
that they do not play with the appliance.
• Children aged from 3 to 8 years are allowed to load and unload
refrigerating appliances.
• This appliance is intended to be used in household and similar
applications such as:
- staff kitchen areas in shops, offices and other working
environments;
- farm houses and by clients in hotels, motels and other residential
type environments;
- bed and breakfast type environments;
- catering and similar non-retail applications.
•
This symbol alerts you to flammable materials that can
ignite and cause a fire if you do not take care.
• This appliance contains a small amount of isobutane refrigerant
(R600a), but it is also combustible. When transporting and installing
the appliance, care should be taken to ensure that no parts of the
refrigerating circuit are damaged.
• The refrigerant and insulation blowing gas used in the appliance
require special disposal procedures. Consult with service agent or a
similarly qualified person before disposing of them.
• Do not damage the refrigerant circuit.
• If the power cord is damaged or the hole of the outlet socket is loose,
do not use the power cord and contact an authorized service centre.
• Do not locate multiple portable outlet sockets or portable power
supplies at the rear of the appliance.

global_main.book.book Page 5 Tuesday, July 28, 2020 8:24 AM
SAFETY INSTRUCTIONS
5
EN
• Securely plug the power plug in the outlet socket after completely
removing any moisture and dust.
• Never unplug the appliance by pulling on the power cable. Always
grip the power plug firmly and pull straight out from the outlet
socket.
• Keep ventilation openings, in the appliance enclosure or in the builtin structure, clear of obstruction.
• Do not store explosive substances such as aerosol cans with a
flammable propellant in this appliance.
• Do not tilt the appliance to pull or push it when transporting.
• When positioning the appliance, ensure the supply cord is not
trapped or damaged.
• Do not use mechanical devices or other means to accelerate the
defrosting process.
• Do not use a hair drier to dry the inside of the appliance or place a
candle inside to remove the odours.
• Do not use electrical appliances inside the refrigerator.
• Make sure not to get a body part such as a hand or foot stuck while
moving the appliance.
• Disconnect the power cord before cleaning the appliance interior or
exterior.
• Do not spray water or inflammable substances (toothpaste, alcohol,
thinner, benzene, flammable liquid, abrasive, etc.) over the interior or
exterior of the appliance to clean it.
• Do not clean the appliance with brushes, cloths or sponges with
rough surfaces or which are made of metallic material.
• Only qualified service personnel from LG Electronics service centre
should disassemble, repair, or modify the appliance. Contact an LG
Electronics customer information centre if you move and install the
appliance in a different location.

global_main.book.book Page 6 Tuesday, July 28, 2020 8:24 AM
6
EN
SAFETY INSTRUCTIONS
Risk of Fire and Flammable Materials
• If a leak is detected, avoid any naked flames or potential sources of
ignition and air the room in which the appliance is standing for
several minutes. In order to avoid the creation of a flammable gas air
mixture if a leak in the refrigerating circuit occurs, the size of the
room in which the appliance is used should correspond to the
amount of refrigerant used. The room must be 1 m² in size for every
8 g of R600a refrigerant inside the appliance.
• Refrigerant leaking out of the pipes could ignite or cause an
explosion.
• The amount of refrigerant in your particular appliance is shown on
the identification plate inside the appliance.
Installation
• This appliance should only be transported by two or more people
holding the appliance securely.
• Install the appliance on a firm and level floor.
• Do not install the appliance in a damp and dusty place. Do not install
or store the appliance in any outdoor area, or any area that is subject
to weathering conditions such as direct sunlight, wind, rain, or
temperatures below freezing.
• Do not place the appliance in direct sunlight or expose it to the heat
from heating appliances such as stoves or heaters.
• Be careful not to expose the rear of the appliance when installing.
• Install the appliance in a place where it is easy to unplug the power
plug of the appliance.
• Be careful not to let the appliance door fall during assembly or
disassembly.
• Be careful not to pinch, crush, or damage the power cable during
assembly or disassembly of the appliance door.
• Be careful not to point the power plug up or let the appliance lean
against the power plug.
• Do not connect a plug adapter or other accessories to the power
plug.
global_main.book.book Page 7 Tuesday, July 28, 2020 8:24 AM
SAFETY INSTRUCTIONS
7
EN
• Do not modify or extend the power cable.
• Ensure that the outlet socket is properly grounded, and that the earth
pin on the power cord is not damaged or removed from the power
plug. For more details on grounding, inquire at an LG Electronics
customer information centre.
• This appliance is equipped with a power cord having an equipmentgrounding conductor and a grounding power plug. The power plug
must be plugged into an appropriate outlet socket that is installed
and grounded in accordance with all local codes and ordinances.
• Never start up an appliance showing any signs of damage. If in doubt,
consult your dealer.
• Dispose of all packaging materials (such as plastic bags and
styrofoam) away from children. The packaging materials can cause
suffocation.
• Do not plug the appliance into a multi socket adapter which does not
have a power cable (mounted).
• The appliance should be connected to a dedicated power line which
is separately fused.
• Do not use a multi socket outlet which is not properly grounded
(portable). In case of using a properly-grounded multi socket outlet
(portable), use the multi socket outlet with the current capacity of the
power cord rating or higher and use the multi socket outlet only for
the appliance.
Operation
• Do not use the appliance for any purpose (storage of medical or
experimental materials or shipping) other than any domestic
household food storage use.
• If water penetrates electrical parts of the appliance, disconnect
power plug and contact an LG Electronics customer information
centre.
• Unplug the power plug during a severe thunderstorm or lightening
or when not in use for a long period of time.

global_main.book.book Page 8 Tuesday, July 28, 2020 8:24 AM
8
EN
SAFETY INSTRUCTIONS
• Do not touch the power plug or the appliance controls with wet
hands.
• Do not bend the power cable excessively or place a heavy object on it.
• Immediately unplug the power plug and contact an LG Electronics
customer information centre if you detect a strange sound, odour, or
smoke coming from the appliance.
• Do not place hands or metallic objects inside the area emitting the
cold air, cover or heat releasing grille on the back.
• Do not apply excessive force or impact to the back cover of the
appliance.
• Be careful of nearby children when you open or close the appliance
door. The door may bump the child and cause injury.
• Avoid the danger of children getting trapped inside the appliance. A
child trapped inside the appliance can cause suffocation.
• Do not put animals, such as pets into the appliance.
• Do not place heavy or fragile objects, containers filled with liquid,
combustible substances, flammable objects (such as candles, lamps,
etc.), or heating devices (such as stoves, heaters, etc.) on the
appliance.
• Do not place any electronic appliance (such as heater and mobile
phone) inside the appliance.
• If there is a gas leakage (isobutane, propane, natural gas, etc.), do not
touch the appliance or power plug and ventilate the area
immediately. This appliance uses a refrigerant gas (isobutane,
R600a). Although it uses a small amount of the gas, it is still
combustible gas. Gas leakage during appliance transport, installation
or operation can cause fire, explosion or injury if sparks are caused.
• Do not use or store flammable or combustible substances (ether,
benzene, alcohol, chemical, LPG, combustible spray, insecticide, air
freshener, cosmetics, etc.) near the appliance.
CAUTION
global_main.book.book Page 9 Tuesday, July 28, 2020 8:24 AM
SAFETY INSTRUCTIONS
9
EN
Disposal
• When discarding the appliance, remove the door gasket while leaving
the shelves and baskets in place and keep children away from the
appliance.
CAUTION
To reduce the risk of minor injury to persons, malfunction, or damage
to the product or property when using this product, follow basic
precautions, including the following:
Operation
• Do not touch frozen food or the metal parts in the freezer
compartment with wet or damp hands. It may cause frostbite.
• Do not place glass containers, bottles or cans (especially those
containing carbonated drinks) in the freezer compartment, shelves or
ice bin that will be exposed to temperatures below freezing.
• The tempered glass on the front side of the appliance door or the
shelves can be damaged by an impact. If it is broken, do not touch it
with hands.
• Do not hang from the appliance doors, storage room, shelf or climb
up into it.
• Do not store an excessive amount of water bottles or containers for
side dishes on the door baskets.
• Do not open or close the appliance door with excessive force.
• If the hinge of the appliance door is damaged or operates
improperly, stop using the appliance and contact an authorized
service centre.
• Prevent animals from nibbling on the power cable or water hose.
• Never eat frozen foods immediately after they have been taken out in
the freezer compartment.

global_main.book.book Page 10 Tuesday, July 28, 2020 8:24 AM
10
EN
SAFETY INSTRUCTIONS
• Make sure not to get a hand or foot stuck upon opening or closing the
appliance door or door in door.
Maintenance
• Do not clean glass shelves or covers with warm water when they are
cold. They may shatter if exposed to sudden temperature changes.
• Do not insert the shelves upside down. The shelves may fall.
• To remove frost from the appliance, contact an LG Electronics
customer information centre.
• Dispose of the ice inside the ice bin in the freezer compartment
during an extended power outage.
NOTE
NOTE
global_main.book.book Page 11 Tuesday, July 28, 2020 8:24 AM
INSTALLATION
Before Installation
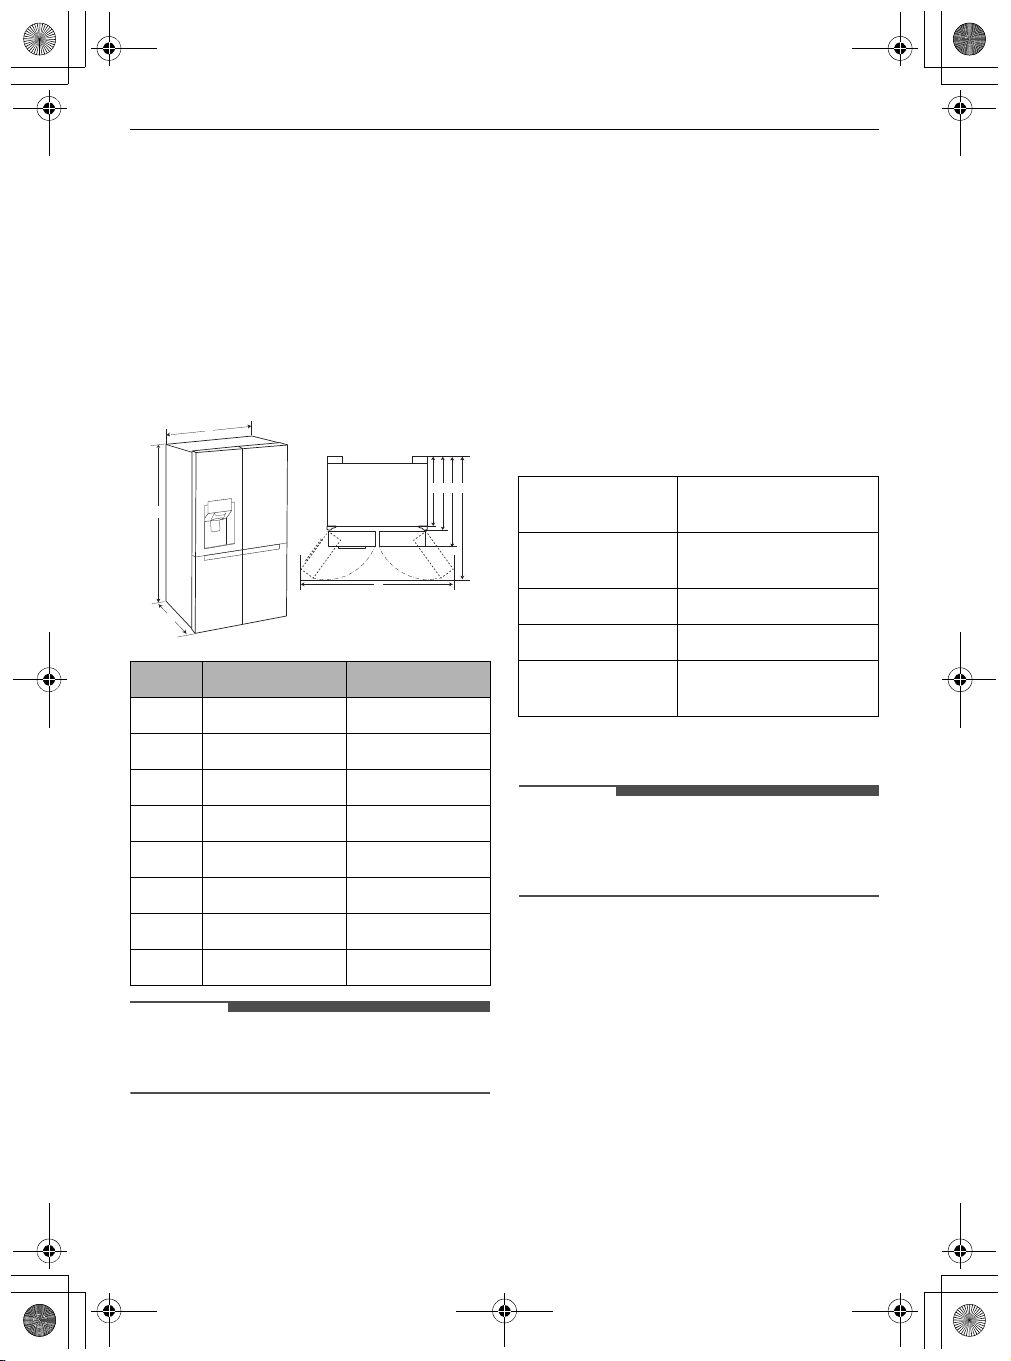
Dimensions and Clearances
Too small of a distance from adjacent items may
result in the degradation of freezing capability and
increased electricity costs. Allow over 50 mm of
clearance between the back of the appliance and
the wall when installing the appliance.
A
D E
G
F
B
H
C
- Type A (mm) Type B (mm)
A912 912
B 1790 1790
C927 738
INSTALLATION
11
EN
Ambient Temperature
• The appliance is designed to operate within a
limited range of ambient temperatures,
depending on the climate zone.
• The internal temperatures could be affected by
the location of the appliance, the ambient
temperature, the frequency of door opening and
so on.
• The climate class can be found on the rating
label.
Climate Class Ambient Temperature
Range ºC
SN (Extended
Temperate)
N (Temperate) +16 - +32
ST (Subtropical) +16 - +38 / +18 - +38**
T (Tropical) +10 - +43* / +16 - +43 /
* Australia, India, Kenya
** Argentina
+10 - +32
+18 - +43**
D797 615
E877 690
F922 733
G 1384 1180
H 1713 1750
• You can determine what type of appliance it is by
looking at the label inside the appliance.
• The appliances rated from SN to T are intended
to be used at an ambient temperature between
10 ºC and 43 ºC.
WARNING
global_main.book.book Page 12 Tuesday, July 28, 2020 8:24 AM
12
EN
Accessories
*1 This feature is only available on some models.
INSTALLATION
collet
Unscrew the cover
a
to detach the water supply line.
b
.
a
Spanner A
b
Spanner B
c
Water Filter
d
Water Tube
e
Tube Connector and Clip
f
Tube Connector and Valve
*1
*1
*1
*1
*1
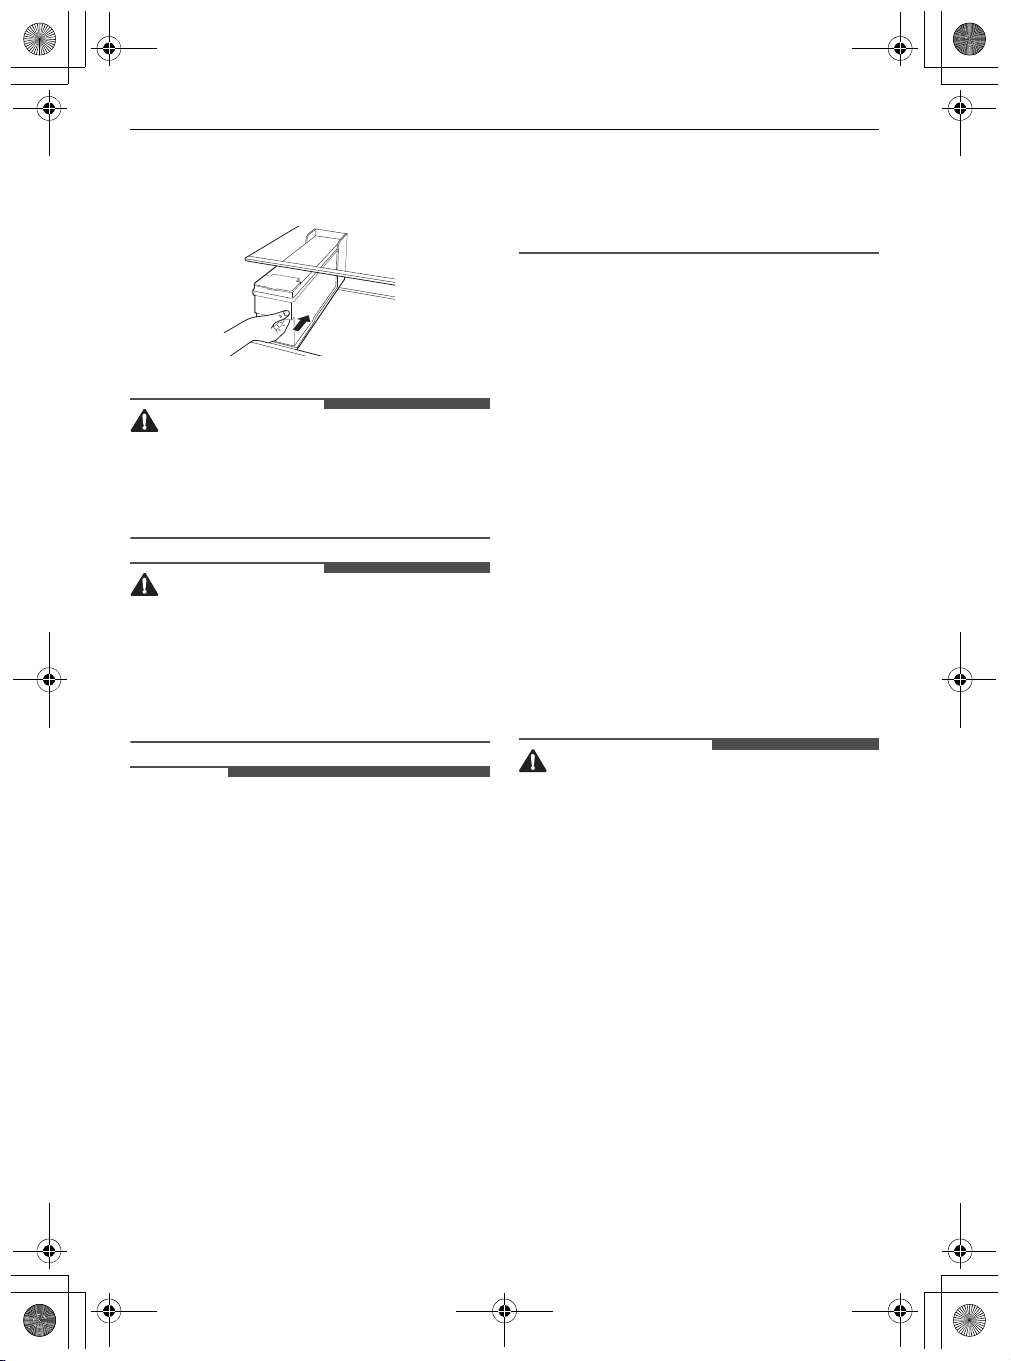
Removing the Fridge and
Freezer Door
If your entrance door is too narrow for the
appliance to pass through, remove the appliance
doors and pass the appliance laterally.
• Disconnect the power cord, house fuse or circuit
breaker before installing, removing the doors, or
cleaning the appliance. Failure to follow these
instructions may result in death, fire or electric
shock.
Removing the Freezer Door
2
Remove the screw from the hinge cover at the
top of the appliance. Lift the hook, located at
the bottom of the front side of the cover, with
a flat-head screwdriver.
3
Pull out the tube c. Unscrew the ground wire
d
. Disconnect all wire harnesses e.
1
The water supply line is connected to the top
right part in the back of the appliance. Hold the
water supply connection and gently push the
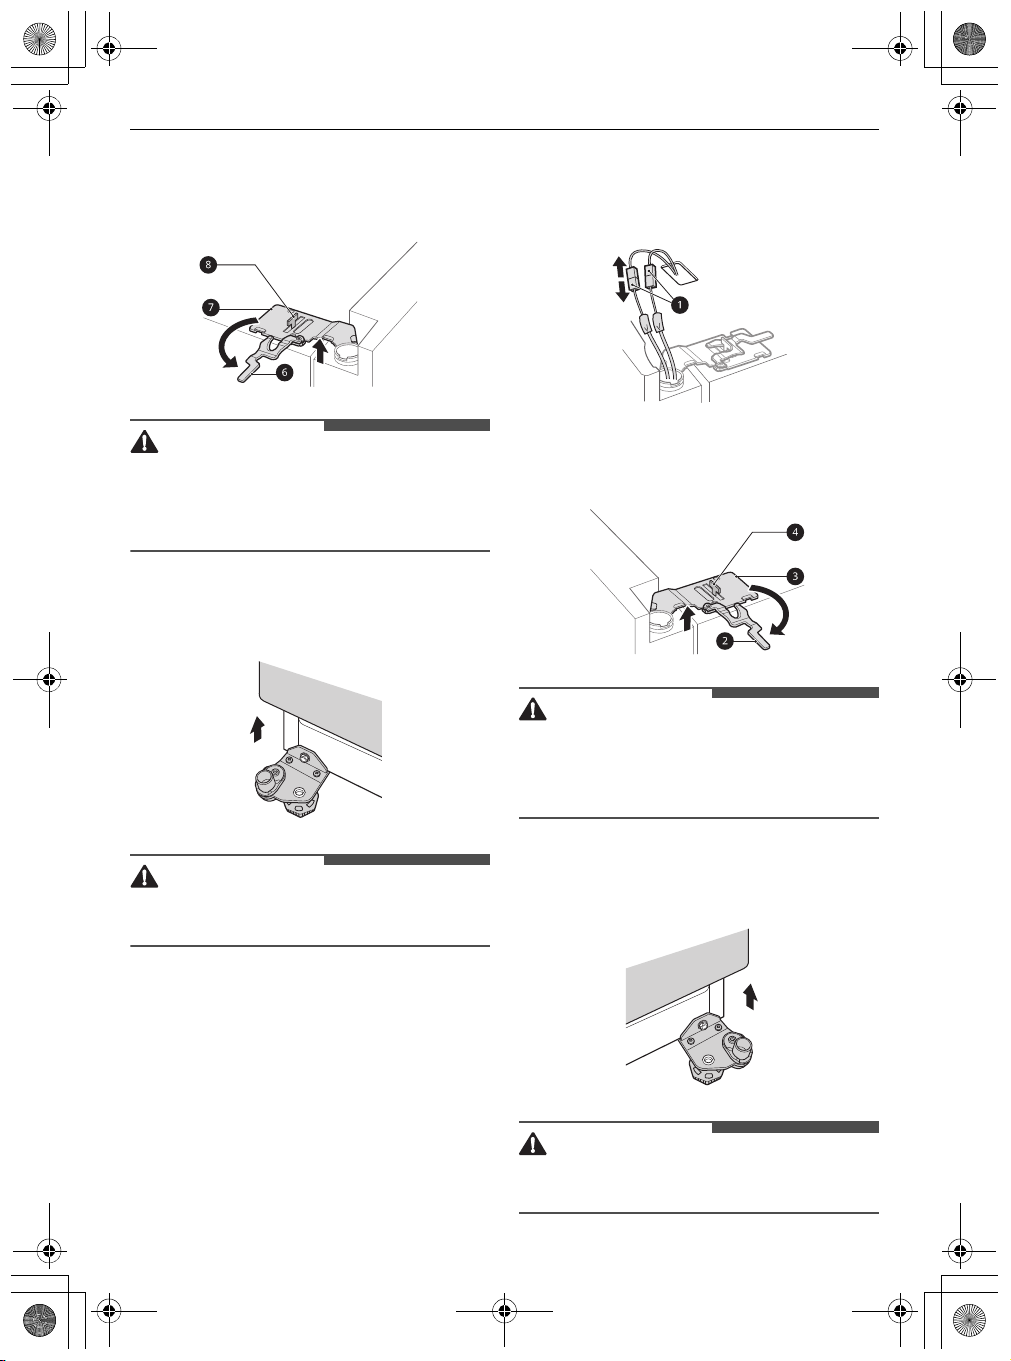
CAUTION
CAUTION
CAUTION
CAUTION
global_main.book.book Page 13 Tuesday, July 28, 2020 8:24 AM
4
Rotate the hinge lever f counterclockwise. Lift
the top hinge
.
• When lifting the hinge free of the latch, be
careful that the door does not fall forward. It is
recommended that two or more people carry
out the door removal and refitting.
5
Lift the freezer door until it is free of the
bottom hinge assembly.
g
free of the hinge lever latch h
INSTALLATION
Removing the Fridge Door
1
Disconnect all wire harnesses a.
2
Rotate the hinge lever b clockwise. Lift the top
hinge
c
free of the hinge lever latch d .
13
EN
• Place the door on a non-scratching surface with
the inner side facing up.
• When lifting the hinge free of the hinge lever
latch, be careful that the door does not fall
forward. It is recommended that two or more
people carry out the door removal and refitting.
3
Lift the fridge door until it is free of the bottom
hinge assembly.
• Place the door on a non-scratching surface with
the inner side facing up.
CAUTION
NOTE
WARNING
NOTE
global_main.book.book Page 14 Tuesday, July 28, 2020 8:24 AM
14
EN
INSTALLATION
Refitting the Fridge and Freezer
Door
Refit the doors in the reverse sequence of their
removal once the appliance has been passed
through all access doors.
• Install the fridge door first.
• Disassembling/Assembling the water lines
a
Collet b Tube c Insert line d Clip
• Gently insert the tube until only one of the tube’s
lines is visible. Pull on the tube to make sure that
it is tightly fastened.
Correct
Incorrect
Connecting the Water Line
This section is applied only to models with plumbed
water or ice dispenser.
Water Supply Requirements
A cold water supply with water pressure between
138 kPa and 827 kPa (1.4-8.4 kgf/cm²) is required to
operate the water dispenser. If the refrigerator is
installed in an area with low water pressure (below
138 kPa), you can install a booster pump to
compensate for the low pressure.
If a reverse osmosis water filtration system is
connected to your cold water supply, the water
pressure to the reverse osmosis system needs to
be a minimum of 138 kPa to 827 kPa (1.4-8.4 kgf/
cm²)
• Unplug the appliance before carrying out any
work on connecting the water line. Failure to do
so may cause electric shock.
• Only connect the water line to a cold water
supply. Failure to do so may cause the water
filter to malfunction. Water hammer (water
banging in the pipes) in house plumbing can
cause damage to appliance parts and can lead to
water leakage or flooding.
• Connect to potable water supply only.
• Connecting the water line must only be installed
by a qualified plumber and in accordance with
local legislation and regulations governing
water quality.
• If the water tube end is damaged, it should be
trimmed to ensure it does not leak when refitted.
e
Not straight f Damaged g Stretched
• This water line installation is not covered by the
appliance warranty.
Connecting Water to the
Appliance
1
Unscrew the metal threaded collar nut at the
back of the appliance and place it over one end
of the water tube.
NOTE
global_main.book.book Page 15 Tuesday, July 28, 2020 8:24 AM
2
Firmly push the water tube onto the water inlet
valve and tighten up the collar nut.
Connecting to the Water Tap
This feature is only available on some models.
1
Push the water tube into the hole of the tap
connector supplied in the accessories. The pipe
should be held firmly whilst the connector is
pushed onto the pipe.
INSTALLATION
2
Press and hold the
three seconds. The new water filter has been
activated.
3
Place a cup under the water dispenser to verify
that water is flowing through the appliance.
4
Check the connecting tube and joints for leaks
once again.
Water Filter
15
button for
EN
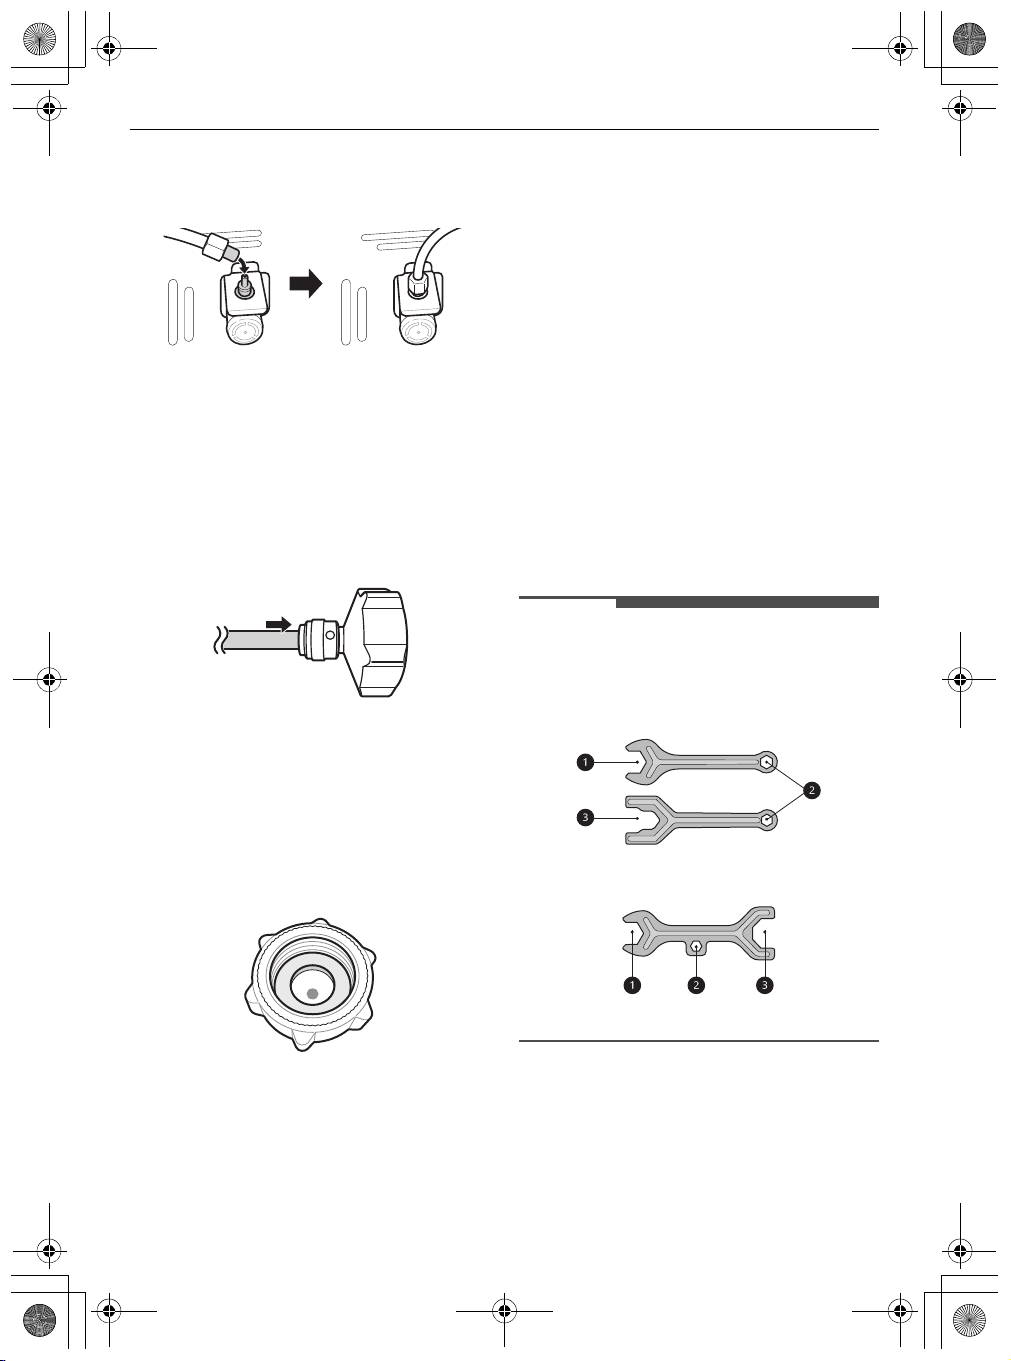
Levelling and Door
Alignment
Before Beginning
When the appliance doors appear to be uneven,
follow the instructions below to align the doors.
• The spanner may differ depending on the model.
You will be provided with either spanner type A
or B.
- Spanner Type A
2
Ensure that the rubber washer is fitted to the
inside of the tap connector before screwing it
onto the tap.
• A separate connector or adaptor may need
to be purchased if your tap fitting does not
match the thread size of the connector
provided.
Checking the Water Connection
1
Turn on the water supply and switch on the
appliance. Carefully check all fittings for
possible leaks due to poorly fitted hoses.
- Spanner Type B
Levelling the Appliance
The appliance has two front levelling legs. Adjust
the legs to alter the tilt from front to back or side to
side. If the appliance seems unsteady, or the doors
do not close easily, adjust the appliance’s tilt using
the instructions below.
CAUTION
NOTE
NOTE
global_main.book.book Page 16 Tuesday, July 28, 2020 8:24 AM
16
EN
Use the spanner a to adjust the height by turning
the levelling leg to the left to raise it or to the right
to lower it.
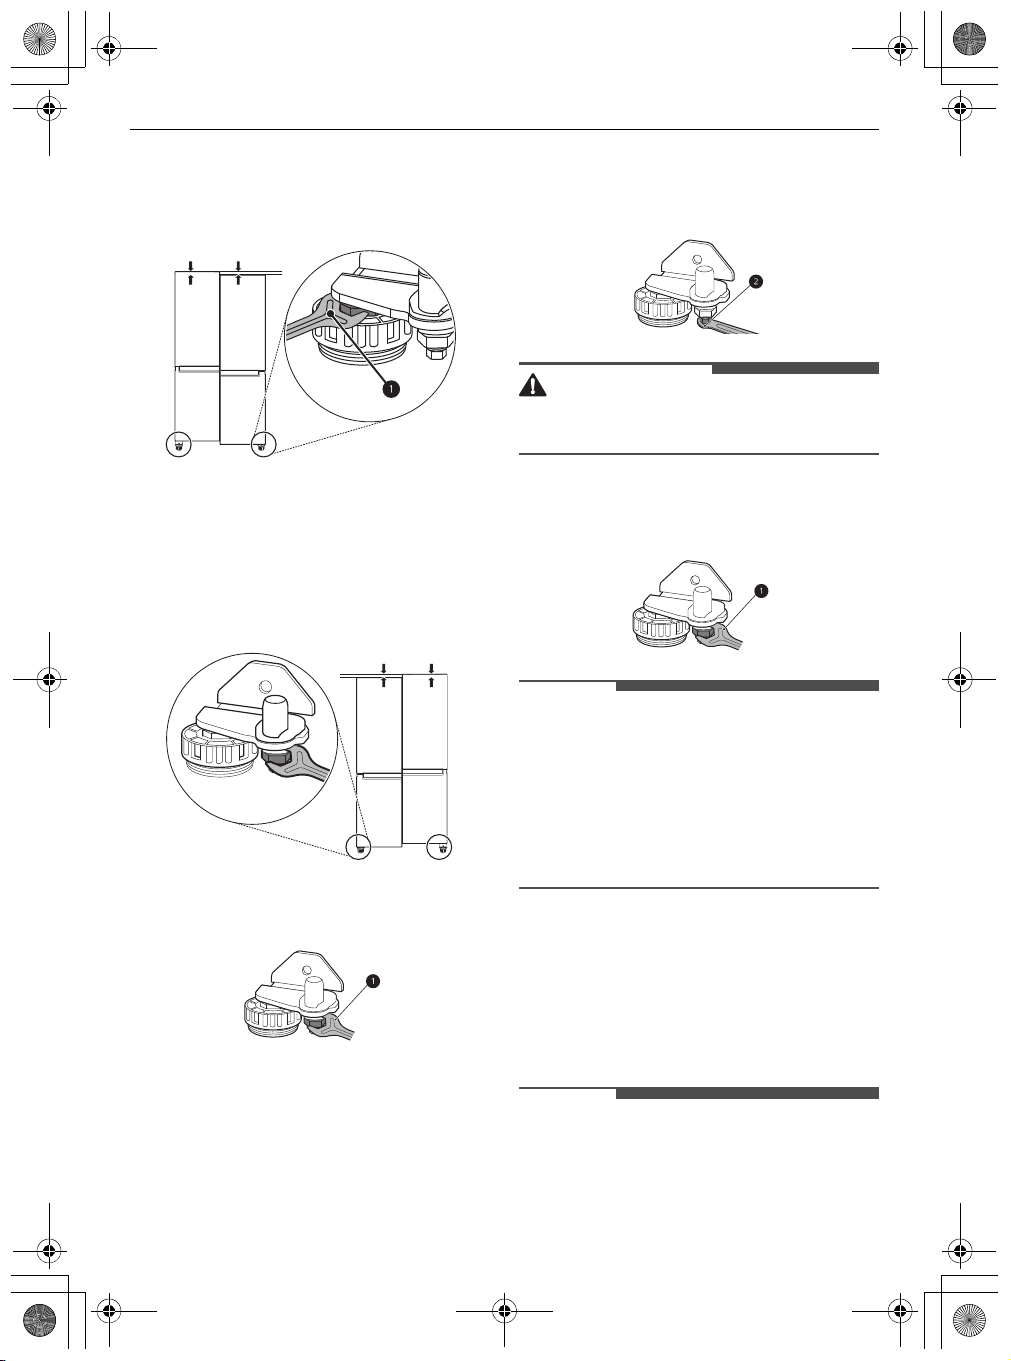
Door Alignment for Freezer and
INSTALLATION
2
Use the spanner b to adjust the height by
turning the adjustment hinge pin to the left or
to the right.
• Do not adjust the height of the appliance door
more than 3 mm.
3
Use the spanner a to fasten the keeper nut by
turning it to the right.
Fridge Door
If the door of the appliance is not level, adjust the
difference in the height of appliance door.
1
Open the door and use the spanner a to
loosen the keeper nut by turning it to the left.
• Leveling the doors may not be possible when the
floor is not leveled, or is of weak or poor
construction.
• The refrigerator is heavy and should be installed
on a rigid and solid surface.
• Some timber flooring may cause levelling
difficulties if it flexes excessively.
Turning on the Power
Connecting the Appliance
After installing the appliance, connect the power
plug into the outlet socket.
• After connecting the power supply cord (or plug)
to the outlet, wait 3 or 4 hours before you put
food into the appliance. If you add food before
global_main.book.book Page 17 Tuesday, July 28, 2020 8:24 AM
the appliance has cooled completely, your food
may spoil.
Moving the Appliance for
Relocation
Preparing for Relocation
1
Remove all food from inside the appliance.
2
Pull the power plug out, insert and fix it into the
power plug hook at the rear or on top of the
appliance.
3
Tape parts such as shelves and the door handle
to prevent from falling off while moving the
appliance.
4
Move the appliance with more than two people
carefully. When transporting the appliance
over a long distance, keep the appliance
upright.
INSTALLATION
17
EN
5
After installing the appliance, connect the
power plug into a mains outlet socket and
switch it on.
NOTE
NOTE
global_main.book.book Page 18 Tuesday, July 28, 2020 8:24 AM
18
EN
OPERATION
OPERATION
Before Use
Notes for Operation
• Users should keep in mind that frost can form if
the door is not closed completely or if the
humidity is high during the summer.
• Ensure there is sufficient space between food
stored on the shelf or door basket to allow the
door to close completely.
• Opening the door for long periods can cause a
significant increase of the temperature in the
compartments of the appliance.
• If the refrigerating appliance is left empty for
long periods, switch off, defrost, clean, dry, and
leave the door open to prevent mould
developing within the appliance.
Door Open Alarm
The alarm sounds 3 times in 30 second intervals if
the door is left open or not completely closed for 1
minute.
• Contact the LG Electronics customer information
centre if the alarm sound continues after 30
seconds even after closing all doors.
the repair technician from the our information
centre may have difficulty finding the problem.
Suggestion for Energy Saving
• Ensure there is sufficient space between stored
foods. This allows cold air to be circulated evenly
and lowers electricity bills.
• Store hot food only after it has cooled in order to
prevent dew or frost.
• When storing food in the freezer compartment,
set the freezer temperature lower than the
temperature indicated on the food.
• Do not set the temperature of the appliance
lower than needed.
• Do not put food near the temperature sensor of
the fridge compartment. Keep a distance of at
least 3 cm from the sensor.
• Note that a temperature rise after defrosting has
a permissible range in the appliance
specifications. If you wish to minimise the impact
on the food storage due to a temperature rise,
seal or wrap the stored food in several layers.
• The automatic defrosting system in the
appliance ensures that the compartment
remains free of ice buildup under normal
operating conditions.
Failure Detection
The appliance can automatically detect problems
during the operation.
• If a problem is detected, the appliance may not
operate and an error code is displayed even
when any button is pressed.
• If an error code is indicated on the display, do
not turn off the power. Immediately contact the
LG Electronics customer information centre and
report the error code. If you turn off the power,
Storing Foods Effectively
• Store frozen food or refrigerated food inside
sealed containers.
• Check the expiration date and label (storage
instructions) before storing food in the
appliance.
• Do not store food for a long period of time (more
than 4 weeks) if it spoils easily at a low
temperature.
• Do not place unfrozen food in direct contact with
food that is already frozen. It could be necessary
to reduce the quantity to be frozen if freezing
every day is anticipated.
CAUTION
NOTE
global_main.book.book Page 19 Tuesday, July 28, 2020 8:24 AM
• Place the refrigerated food or frozen food in
each fridge or freezer compartment
immediately after purchasing.
• Store raw meat and fish in suitable containers in
the refrigerator, so that it is not in contact with or
drip onto other food.
• Refrigerated foods and other food items can be
stored on top of the vegetable drawer.
• Avoid refreezing any food which has been
completely thawed. Freezing any food which has
been completely thawed again will lower its taste
and nutrition.
• Do not overfill the appliance. Cold air can not
circulate properly if the appliance is overfilled.
• Cool hot food before storing. If too much hot
food is placed inside, the internal temperature of
the appliance can increase and negatively affect
other foods stored in the appliance.
• If you set an excessively low temperature for
food, it may become frozen. Do not set a
temperature lower than the required
temperature for the food to be stored correctly.
• If there are chill compartments in the appliance,
do not store vegetables and fruits with higher
moisture content in the chill compartments as
they may freeze due to the lower temperature.
• In the event of a blackout, call the electricity
company and ask how long it is going to last.
- You should avoid door openings while the
power is off.
- When the power supply gets back to normal,
check the condition of the food.
OPERATION
19
EN
Freezing the Maximum Amount
of Food
If large quantities of food are to be stored, all the
freezer drawers should be taken out of the
appliance and the food should be stacked directly
on the freezer shelves in the freezer compartment.
• To remove the drawers, first remove the food
from drawers and then pull out the drawers
carefully. Not doing so could cause injury or
damage to the drawers.
• The shape of each drawer may be different,
insert in the right position.
Two Star Compartment
• Two star (a) basket or drawer can be used to
store ice and food from -12 °C to -18 °C for short
periods.
• Two star frozen food compartments are suitable
for storing pre-frozen food, storing or making
icecream and making ice cubes.
• Two star compartments are not suitable for the
freezing of fresh food.
Max Freezing Capacity
•
Express Freeze
reach its maximum freezing capacity. This
generally takes up to 24 hours and automatically
switches off.
•
Express Freeze
before fresh products are placed in the freezer
compartment.
• To get better air circulation, insert all inner parts
like baskets, drawers, and shelves.
function will allow the freezer to
must be switched on for 2 hours
global_main.book.book Page 20 Tuesday, July 28, 2020 8:24 AM
20
EN
OPERATION
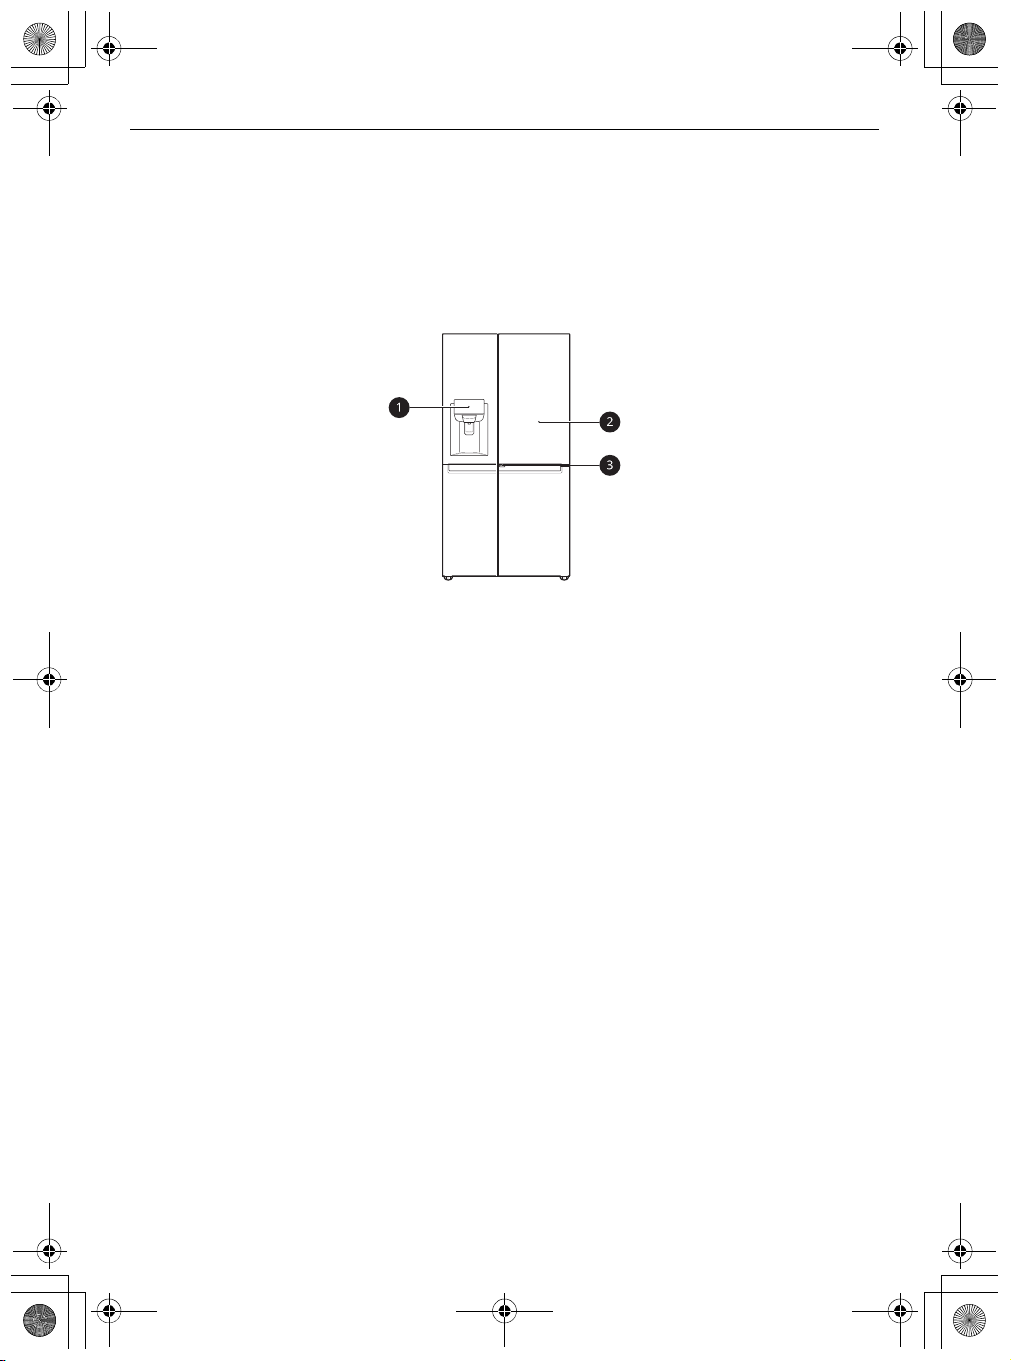
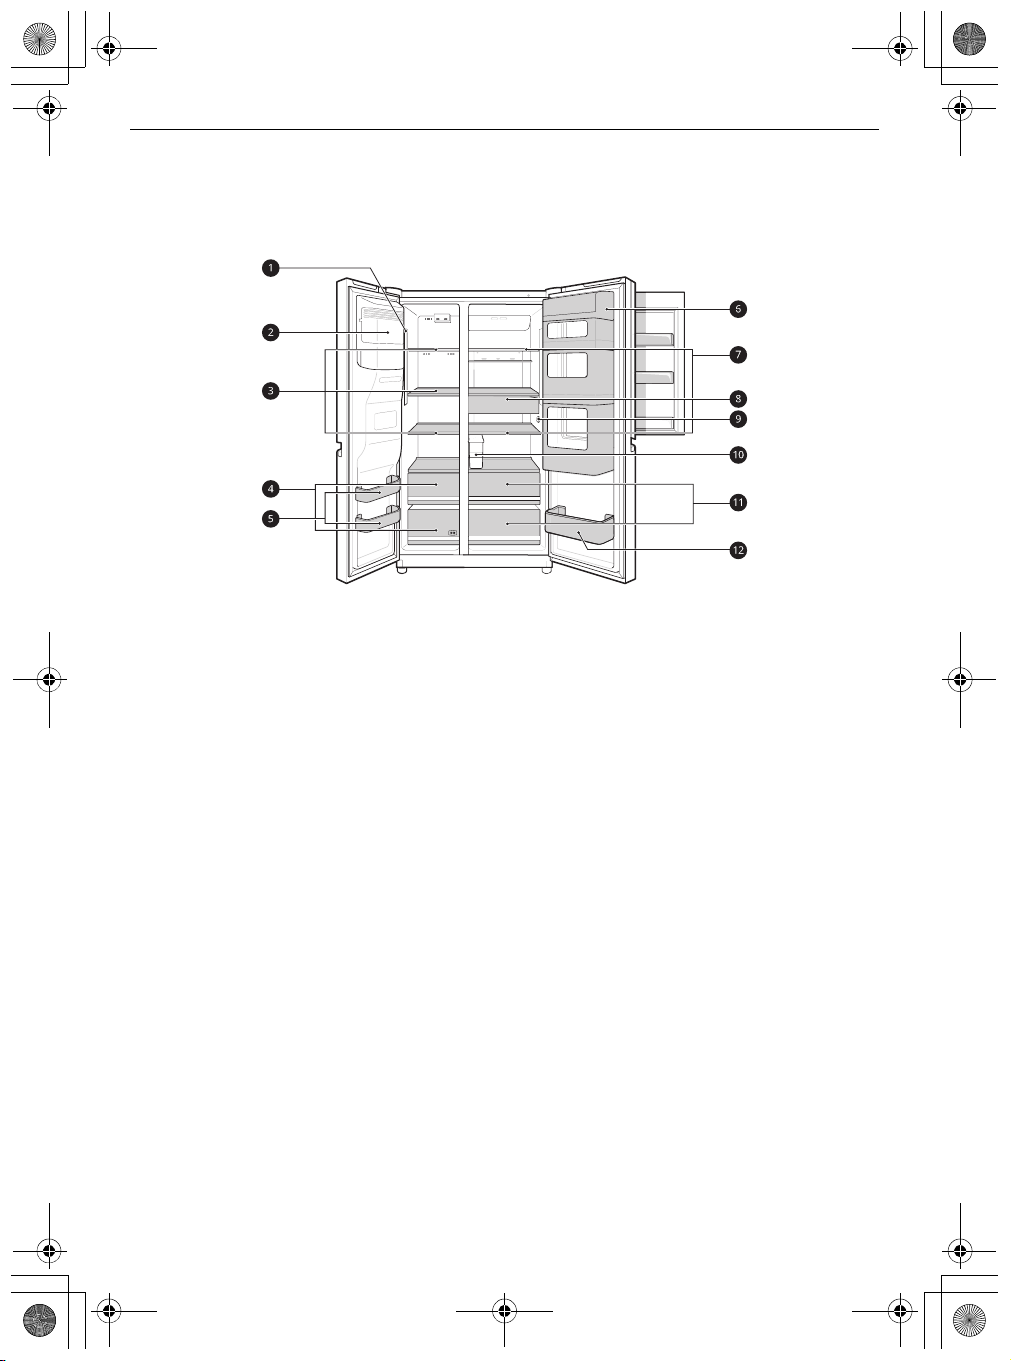
Product Features
The appearance or components of the appliance may differ from model to model.
Exterior
*1 This feature is only available on some models.
a
Control Panel
Sets the refrigerator temperature and freezer temperature, the water filter condition and the dispenser
mode.
b
Door in Door
This is a convenient storage area for frequently-used items that require easy access.
c
Door in Door Lever
Opens Door-in-Door.
*1
*1
global_main.book.book Page 21 Tuesday, July 28, 2020 8:24 AM
OPERATION
Interior (Two Star a)
*1 This feature is only available on some models.
a
LED Lamp
Lights up the inside of the refrigerator.
b
Automatic Icemaker
Produces and stores ice automatically in the freezer compartment.
c
Freezer Shelf
Stores small packaged frozen food or frequently-used foods.
d
Freezer Drawer
Stores frozen food for longer storage.
e
Freezer Door Basket
Stores small packages of frozen food. Do not store ice cream or food which will be stored for a long
period of time.
f
Door in Door Compartment
Stores commonly used food items such as beverages and snacks.
g
Fridge Shelf
Stores refrigerated foods and fresh foods.
Stores the foods with higher moisture content at the front of the shelf.
The shelf height can be adjusted by inserting the shelf in another groove of different height.
The actual number of shelves will differ from model to model.
h
Snack Drawer
Stores small packages of refrigerated foods.
i
Temperature Sensor
This sensor senses the temperature of the fridge compartment.
*1
*1
*1
*1
*1
*1
*1
21
EN

global_main.book.book Page 22 Tuesday, July 28, 2020 8:24 AM
22
EN
j
k
l
OPERATION
• Maintain the distance between the sensor and food to accurately sense the temperature.
Water Tank
Stores water to supply the dispenser or ice produced by the automatic icemaker. It requires manual
filling.
Vegetable Drawer
Stores fruits and vegetables to keep fresh for as long as possible.
Fridge Door Basket
Stores small packages of refrigerated foods, drinks and sauce containers.
*1
*1
NOTE
global_main.book.book Page 23 Tuesday, July 28, 2020 8:24 AM
OPERATION
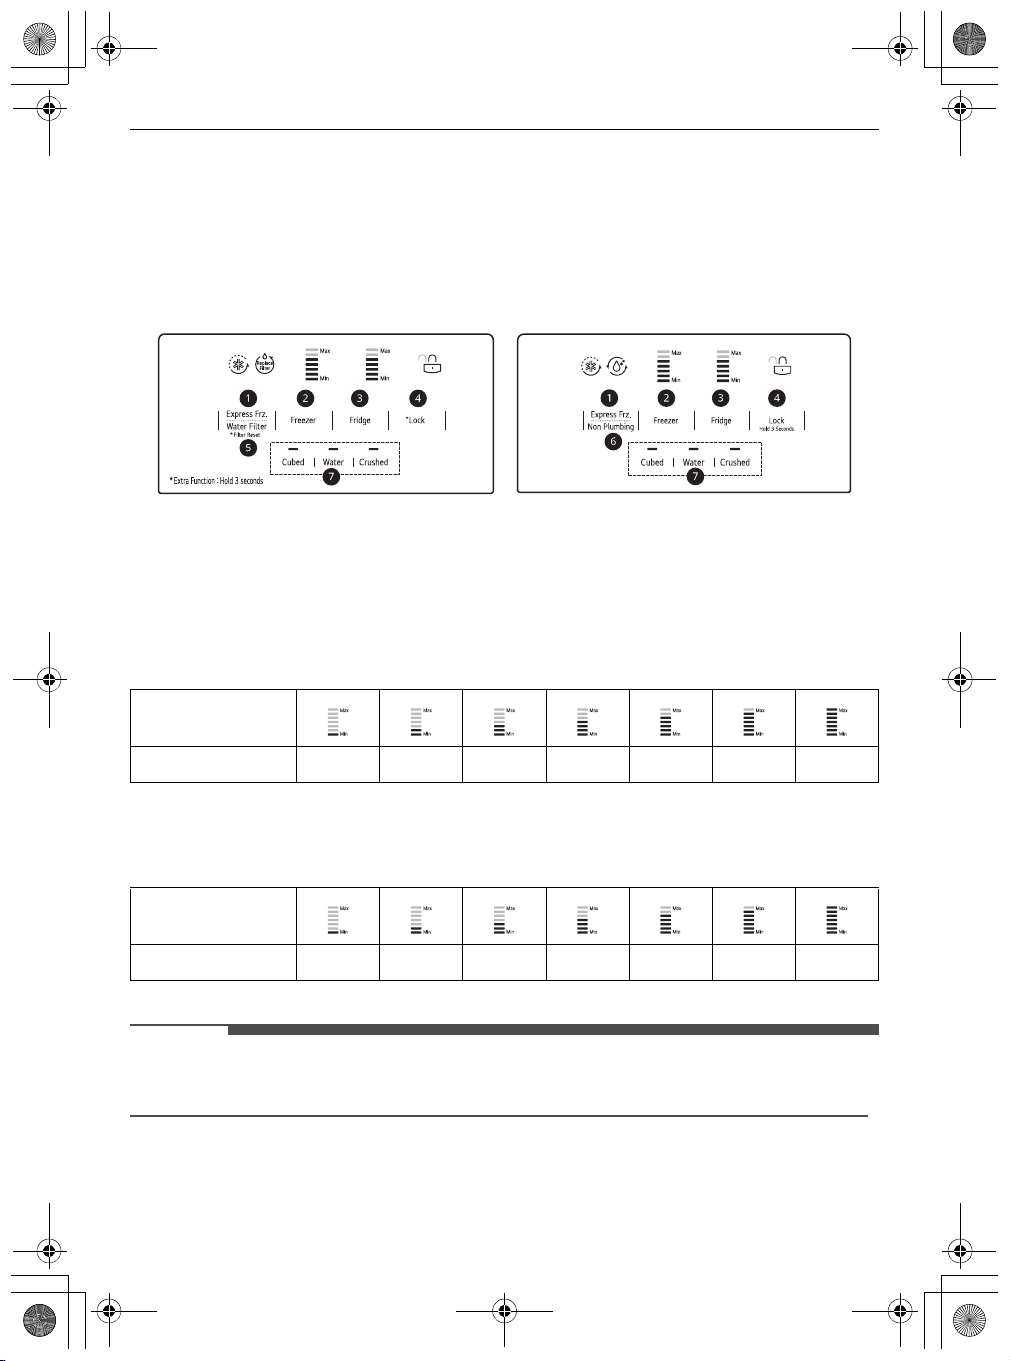
Control Panel
The actual control panel may differ from model to model.
Control Panel and Functions
*1 This feature is only available on some models.
a
Express Freeze
This function can quickly freeze a large amount of ice or frozen foods.
• This function is enabled and disabled in turn each time you press the button.
• This function automatically terminates after a specific period has passed.
b
Freezer
Press this button repeatedly to select a desired temperature between -24 °C and -14 °C.
•
Temperature
Indicator
23
EN
Temperature
• The initial freezer temperature is -19 °C.
c
Fridge
Press this button repeatedly to select a desired temperature between 1 °C and 7 °C.
•
Temperature
Indicator
Temperature
• The initial fridge temperature is 4 °C.
• The actual inner temperature varies depending on the food status, as the indicated setting temperature
is a target temperature, not actual temperature within the appliance.
d
Lock
This locks the buttons on the control panel.
• To lock the control panel buttons, press and hold the
appears and the function is activated.
-14 °C -16 °C -18 °C -19 °C -20 °C -22 °C -24 °C
7 °C 6 °C 5 °C 4 °C 3 °C 2 °C 1 °C
Lock
button for 3 seconds until the k icon
NOTE
CAUTION
NOTE
global_main.book.book Page 24 Tuesday, July 28, 2020 8:24 AM
24
EN
OPERATION
• To disable the function, press and hold the
the function is deactivated.
e
Water Filter
Replace the water filter when the h indicator lights up.
f
Non Plumbing
The
g
Water & Ice Type
Select a desired dispenser mode from the buttons on the control panel. Press the dispenser switch with
a glass or other container to dispense cubed ice, water or crushed ice.
• The control panel automatically turns off for energy saving.
• If there is any finger or skin contacts to the control panel while cleaning it, the button function may
operate.
*1
*1
Non Plumbing
icon is illuminated when the water dispenser tank is installed correctly.
Ice and Water Dispenser
Before Using the Ice and Water
Dispenser
• Keep children away from the dispenser to
prevent children playing with or damaging the
controls.
• Throw away the first few batches of ice (about 20
cubes and 7 cups of water). This is also necessary
if the appliance has not been used for a long
time.
• Clean the water dispensing system if they have
not been used for 48 hours. Flush the water
system connected to a water supply if water has
not been drawn for 5 days.
• To clean the water dispensing system, flush the
water through the dispenser about 5 minutes
and throw away the first few batches of ice.
• Do not use a thin crystal cup or chinaware when
dispensing water or ice.
Lock
button for 3 seconds until the l icon appears and
• If you open the fridge door while water, cubed
ice or crushed ice is being dispensed, dispensing
will be paused. When you close the door, the
selected item will continue to be dispensed.
• If the cup rim is small, water may splash out of
the glass or miss it completely.
• Use a cup with a rim of over 68 mm in diameter
when dispensing water, cubed ice or crushed ice.
• When the ice maker produces smaller ice cubes,
or the cubes become lumped together, the
amount of water supplied to the ice maker may
be low due to insufficient water in the water
tank. If ice is not used frequently or the freezer
set temperature is too warm, it may also lump
together.
• It is normal for milky / cloudy water to be
dispensed after replacing the water filter. This
air in the water will eventually clear and is safe to
drink during this transition.
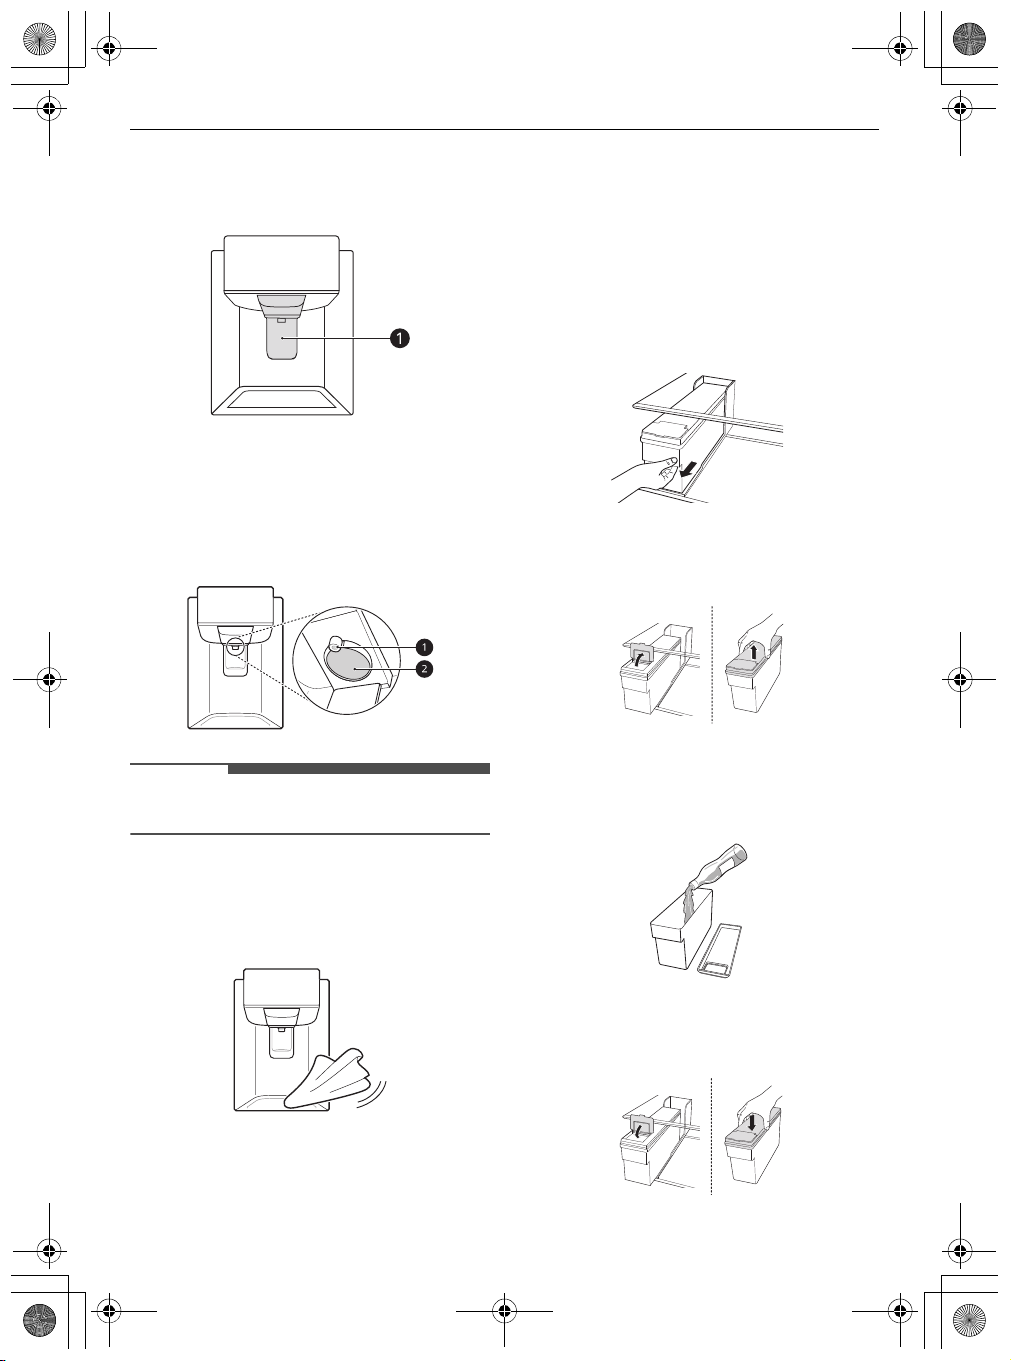
Using the Ice and Water
Dispenser
• If you open the freezer door while water is being
dispensed, the water dispensing will stop.
Press the dispenser selection button repeatedly
until the light above the icon that you want
illuminates.
NOTE
global_main.book.book Page 25 Tuesday, July 28, 2020 8:24 AM
Press the dispenser paddle a with a glass or other
container to dispense cubed ice, water or crushed
ice.
Cleaning the Dispenser
Cleaning the Ice and Water Outlet
Wipe the water outlet a or ice outlet b frequently
with a clean cloth as it may get dirty easily.
OPERATION
25
EN
Filling the Water Tank with
Water
This feature is only available on some models.
The water tank holds the water to be dispensed or
used by the automatic icemaker to make ice.
1
Remove the water dispenser tank by pulling it
out while holding the handle.
2
Open the cover or cap of the water dispenser
tank.
• Lint from a cloth may adhere to the outlets.
Cleaning the Dispenser Tray
Wipe the entire area with a damp cloth. The
dispenser tray may become wet easily due to
spilled ice or water.
3
Fill with bottle filtered or clean filtered water up
to the reference line indicated inside the water
dispenser tank. (Total capacity: 4 ℓ)
4
After filling with water, close the cover or cap of
the water dispenser tank.
WARNING
CAUTION
NOTE
CAUTION
global_main.book.book Page 26 Tuesday, July 28, 2020 8:24 AM
26
EN
OPERATION
5
Refit the water dispenser tank on the fridge
shelf.
• Fill with potable water only into icemaker or
dispenser water tank.
• Do not fill the water tank with drinks other than
water or fill with hot water.
• Do not apply excessive force or impact when
removing or assembling the water dispenser
tank. Doing so can cause appliance damage or
injury.
• Children should not be allowed near the
dispenser tank.
• Sound from the water tank will be normal when
supplying water to the dispenser and the
Automatic Ice Maker. It is not a sign of
malfunction.
Automatic Icemaker
This feature is only available on some models.
This feature may vary depending on model
purchased.
Before Using the In-Door
Icemaker
• The icemaker produces ice normally when
approximately 48 hours have passed after the
appliance is initially installed.
• If the ice bin is completely filled with ice, ice
production will stop.
• Sound of ice dropping into the ice bin is normal.
• If ice cubes are stored in the ice bin for a long
period of time, they may clump together and
may not be separated easily. In such a case,
empty the ice bin and allow fresh ice to be made.
• Before using the water dispenser tank after
installing the appliance, it should be washed
before filling it with water.
• Check if the water dispenser tank has been
placed on the appliance correctly. If it is not
assembled correctly, water may leak from the
tank into the appliance.
• If there is an insufficient amount of water in the
water dispenser tank, ice cube size and quantity
may be affected and may result in no ice being
made.
• If there is no water in the water dispenser tank,
the cold water and ice dispensing function of the
dispenser cannot be used. Check if there is water
in the water dispenser tank and then fill it with
water if there is not.
• Wait at least 15 seconds before removing the
water tank after having dispensed water or ice
from the dispenser.
• It is normal for milky or cloudy water to be
dispensed after replacing the water filter. This
air in the water will clear eventually and is safe to
drink.
• The first ice and water dispensed may include
particles or odour from the water supply line or
the water tank.
• If discolored ice is dispensed, check the water
tank and the water supply for a possible source.
If the problem continues, contact the LG
Electronics customer information centre. Do not
use the ice or water until the problem is
corrected.
• Do not touch the ice outlet or the automatic
icemaker with your hand or a tool.
• Dispense ice into a glass before filling it with
water or other beverages. Splashing will occur if
ice is dispensed into a glass that already contains
liquid.
CAUTION
CAUTION
global_main.book.book Page 27 Tuesday, July 28, 2020 8:24 AM
• Never use a glass that is exceptionally narrow or
deep. Ice may jam in the ice passage, affecting
the performance of the appliance.
• Keep the glass at a proper distance from the ice
outlet. A glass held too close to the outlet may
prevent ice from dispensing.
• Dispose of the ice inside the ice bin if you go on
vacation or if an extended power outage occurs.
Water from melting ice may drop from the
dispenser onto the floor.
Freezer Icemaker
The automatic icemaker can automatically make
40-84 cubes at a time, within a 24-hour period if
conditions are favorable. This amount may vary
according to the environment (ambient
temperature around the appliance, frequency of
the door being opened, amount of food stored in
the appliance, etc.).
OPERATION
1
Hold and remove the cover of the automatic
icemaker by lifting it upward.
2
To turn off the automatic icemaekr, set the
switch to OFF ( O ).
3
Hold the ice bin with both hands and pull it out
while lifting it upward.
27
EN
a
Power Switch
• Do not insert your hands into the mechanical
part of the automatic icemaker such as the ice
bin or the ice dispenser.
• Do not remove the cover of the automatic
icemaker. Touching any mechanical part of the
automatic icemaker. It may result in injury.
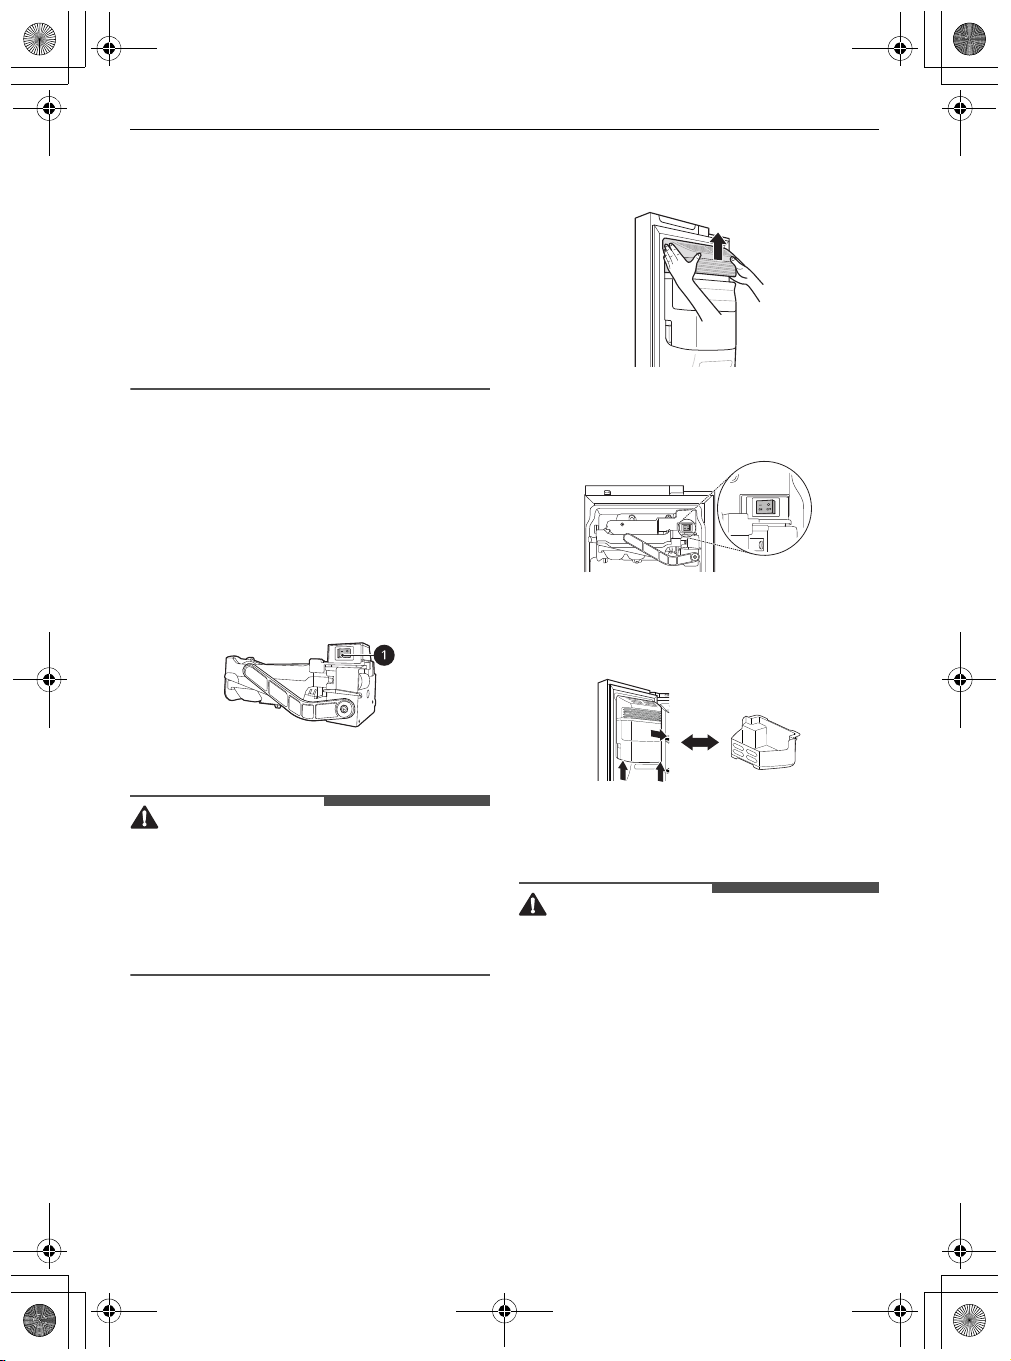
Removing/Refitting the Ice
Storage Bin
The ice dispensing chute may become blocked with
frost if only crushed ice is used. Remove the frost
that accumulates by removing the ice bin and
clearing the passage with a rubber spatula.
Dispensing cubed ice periodically can also help
prevent frost buildup.
4
Mount them in the reverse order of the
removal process.
• Do not touch the automatic icemaker’s
mechanical parts with your hand or a tool.
Otherwise, appliance damage or injury may
occur.
• Do not disassemble, repair or alter the
automatic icemaker. These tasks should only be
done by a service technician.
• Caution should be taken, as the automatic
icemaker operates continuously after the freezer
door is opened when the automatic icemaker
switch is set to the on position.
• Keep children away from the dispenser.
CAUTION
CAUTION
CAUTION
CAUTION
global_main.book.book Page 28 Tuesday, July 28, 2020 8:24 AM
28
EN
• When refitting the ice bin, ensure that it is placed
correctly. If it is tilted or unlevel, it may not
continue to make ice due to sensor disruption.
OPERATION
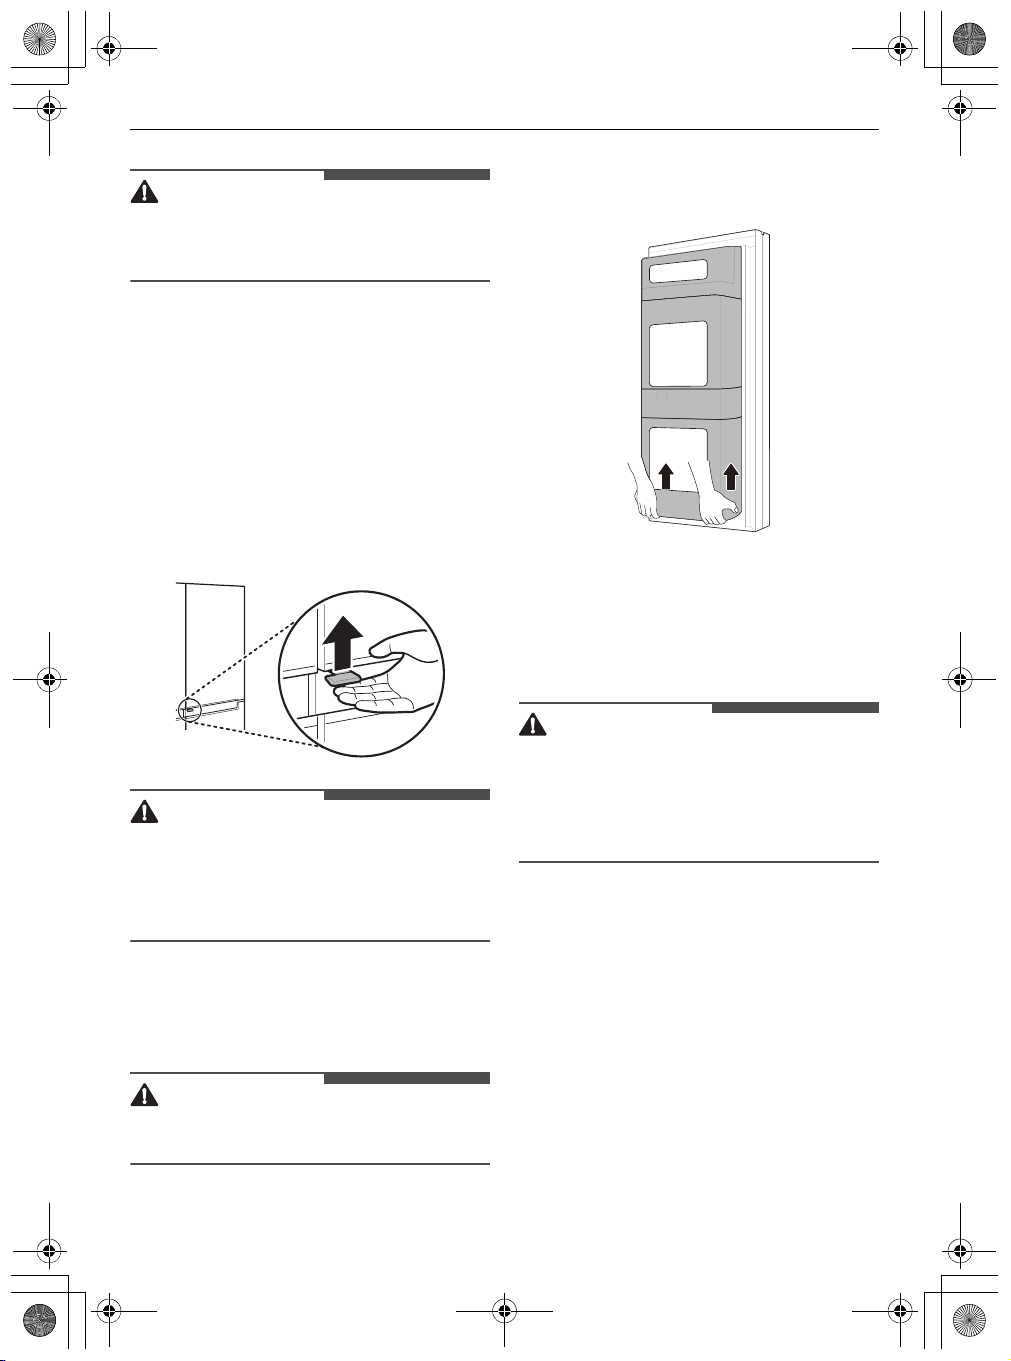
1
Open the doors completely and remove the
contents of the Door in Door case. Lift up and
pull out the Door in Door case.
Door in Door
This feature is only available on some models.
Using the Door in Door
Pull the lever at the bottom of the door upwards
until the door in door opens.
There is plenty of storage space inside the door in
door and its surrounding baskets, allowing you to
store food in an organized manner.
2
Mount them in the reverse order of the
removal process.
• Do not open the door of the appliance with the
door in door open, or do not open the door in
door while the door of the appliance is open. The
door in door may be struck by the edge of the
appliance and damaged.
Removing/Refitting the Door in
Door Case
• Remove contents from the Door in Door
compartment before removal.
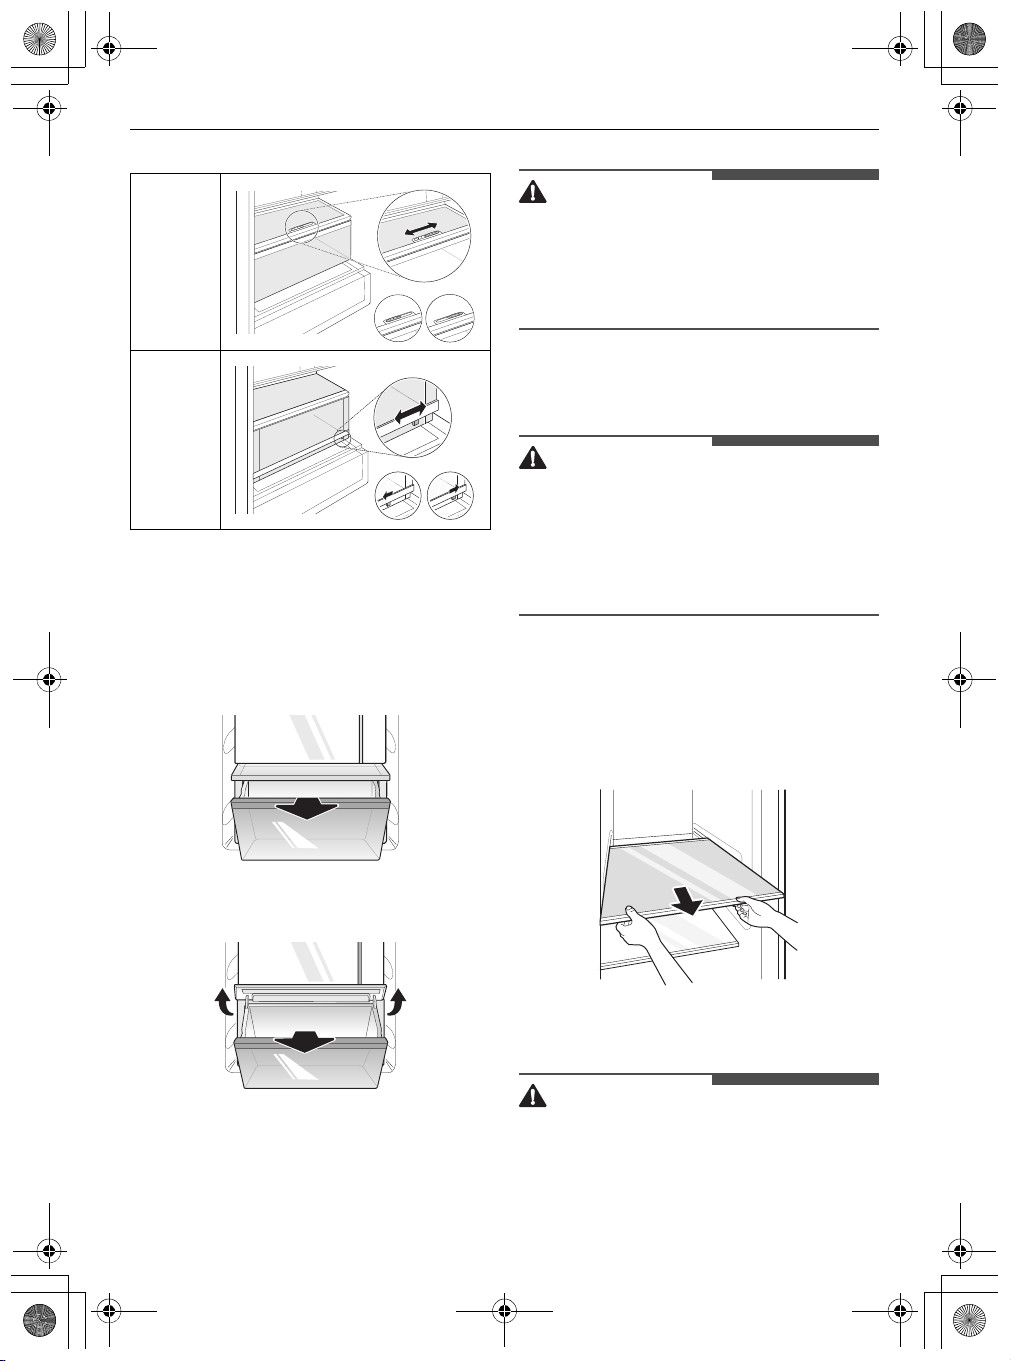
Drawer
• Always empty the drawers before removing
them, and use both hands when removing and
refitting them.
• Make sure that the fridge doors are fully open
before removing and refitting the drawers.
Using the Vegetable Drawer
*1 This feature is only available on some models.
The humidity in the vegetable crisper drawer can
be controlled by sliding the lever in either direction.
• If moved to the left side, the air guide will be
open and allow air to circulate through the
drawer for reduced humidity.
• If moved to the right side, the air guide will be
closed and will maintain any humidity that is
currently in the crisper drawer.
CAUTION
CAUTION
CAUTION
global_main.book.book Page 29 Tuesday, July 28, 2020 8:24 AM
*1
Type A
*1
Type B
Removing/Refitting the
Drawers
1
Remove the contents of the drawer. Hold the
handle of the vegetable drawers and gently
pull them out.
OPERATION
• Always empty the drawers before removing
them, and use both hands when removing and
refitting them.
• Make sure that the fridge doors are fully open
before removing and assembling the drawers.
29
EN
Shelf
• Glass shelves are heavy. Use special care when
removing them.
• Do not clean glass shelves with warm water
while they are cold. Shelves may break if
exposed to sudden temperature changes or
impact.
Removing/Refitting the Shelf
1
Tilt up the front of the shelf and then lift the
shelf straight up.
2
3
Lift the vegetable drawer up and remove it by
pulling it out.
Mount them in the reverse order of the
removal process.
2
Pull the shelf out.
3
Mount them in the reverse order of the
removal process.
• Glass shelves are heavy. Use special care when
removing them.
CAUTION
global_main.book.book Page 30 Tuesday, July 28, 2020 8:24 AM
30
EN
• Do not clean glass shelves with warm water
while they are cold. Shelves may break if
exposed to sudden temperature changes or
impact.
• Make sure that shelves are level from one side to
the other. Failure to do so may result in the shelf
falling or food spilling.
OPERATION
Door Basket
Removing/Refitting the Door
Basket
1
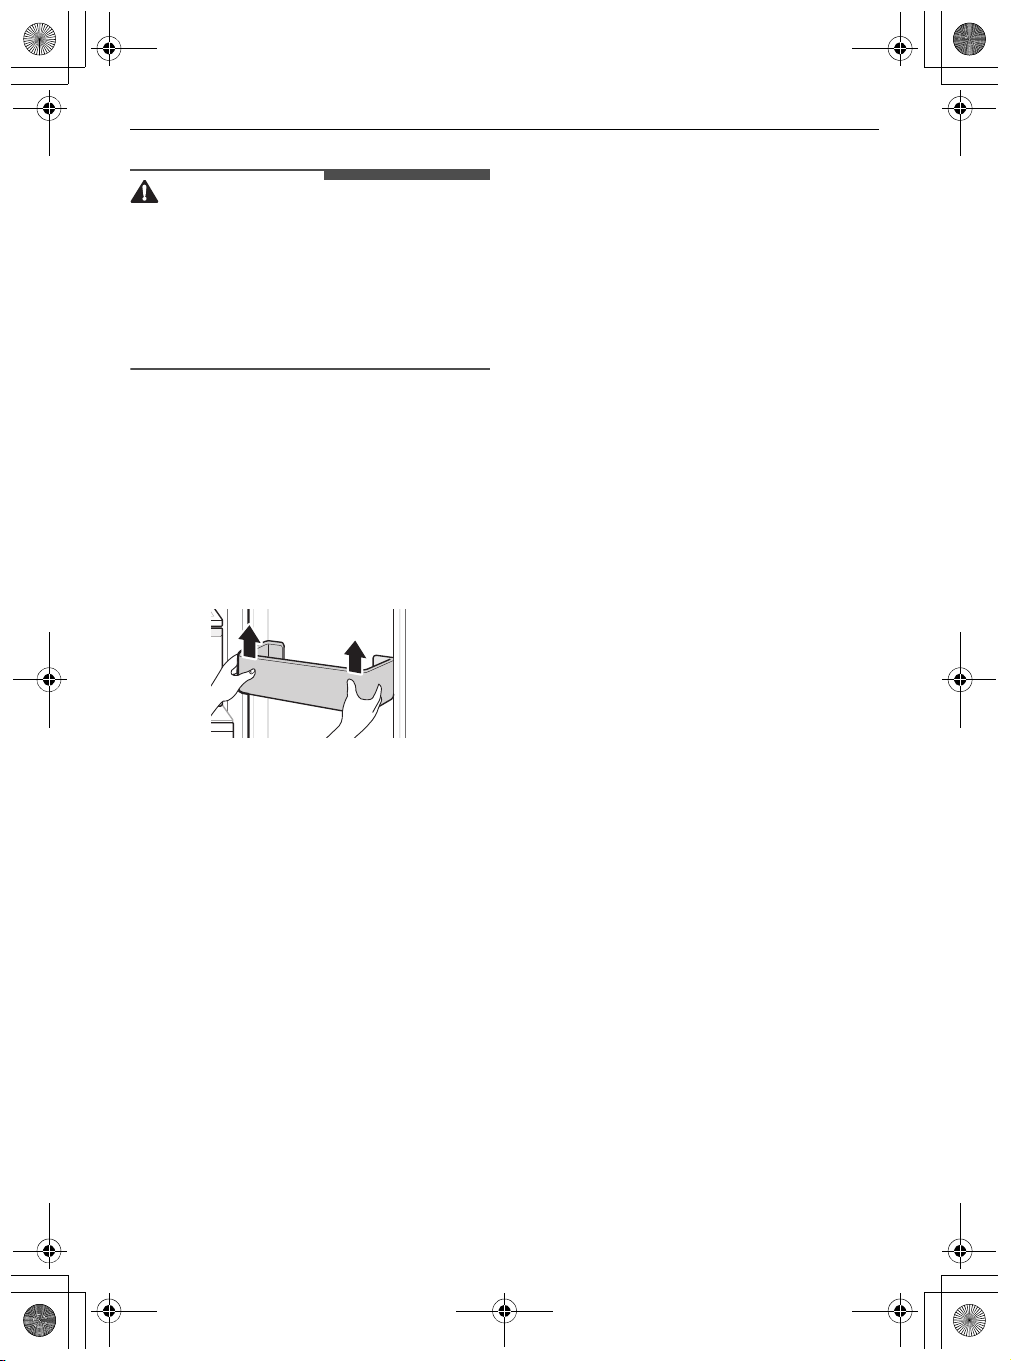
Hold both edges of the basket and remove it by
lifting it upward.
2
3
Refit the door baskets in the reverse order of
the removal process.
Mount them in the reverse order of the
removal process.

global_main.book.book Page 31 Tuesday, July 28, 2020 8:24 AM
MAINTENANCE
Cleaning
General Cleaning Tips
• Performing manual defrosting, maintenance or
cleaning of the appliance while food is stored in
the freezer can raise the temperature of the food
and reduce its storage life.
• Regularly clean any surfaces that can come in
contact with food.
• When cleaning the inside or outside of the
appliance, do not wipe it with a rough brush,
toothpaste, or flammable materials. Do not use
cleaning agents containing flammable
substances. This may cause discolouration or
damage to the appliance.
- Flammable substances: alcohol (ethanol,
methanol, isopropyl alcohol, isobutyl alcohol,
etc.), thinner, bleach, benzene, flammable
liquid, abrasive, etc.
• After cleaning, check if the power cable is
damaged.
Cleaning the Exterior
• When cleaning the outside air vents of the
appliance by means of vacuuming, then the
power cord should be unplugged from the outlet
to avoid any static discharge that can damage
the electronics or cause an electric shock.
Regular cleaning of the rear and side ventilation
covers is recommended to maintain reliable and
economical operation of the unit.
• Keep the air vents on the exterior of the
appliance clean. Blocked air vents can cause fire
or appliance damage.
• For the appliance exterior, use a clean sponge or
soft cloth and a mild detergent in warm water.
Do not use abrasive or harsh cleaners. Dry
thoroughly with a soft cloth. Do not use
contaminated cloths when cleaning the stainless
steel doors. Always use a dedicated cloth and
wipe in the same direction as the grain. This
helps reduce surface staining and tarnishing.
MAINTENANCE
31
EN
Cleaning the Interior
• When removing a shelf or drawer from inside
the appliance, remove all stored foods from the
shelf or drawer to prevent injury or damage to
the appliance. Otherwise, injury may occur due
to the weight of stored foods.
• Detach the shelves and drawers and clean them
with water, and then dry them sufficiently,
before replacing them.
• Regularly wipe the door gaskets with a wet soft
towel.
• Door basket spills and stains should be cleaned
as they can compromise storage ability of the
basket and could even be damaged.
• Never clean the shelves or containers in the
dishwasher. The parts may become deformed
due to the heat.
Cleaning the Condenser Cover
Use a vacuum cleaner with a brush to clean the
condenser cover and vents. Do not remove the
panel covering the condenser coil area.
We recommend that this be done every 12 months
to maintain operating efficiency.

WARNING
CAUTION
NOTE
global_main.book.book Page 32 Tuesday, July 28, 2020 8:24 AM
32
EN
MAINTENANCE
Water Filter
Before Replacing the Water
Filter
• Do not allow children to have access to small
parts during the installation of this product.
• Do not use with water that is microbiologically
unsafe or of unknown quality without adequate
disinfection before or after the system. Systems
certified for cyst reduction may be used on
disinfected water that may contain filterable
cysts.
• Do not install if water pressure exceeds 827 kPa.
If your water pressure exceeds 827 kPa, you
must install a pressure limiting valve. Contact a
plumbing professional if you are uncertain how
to check your water pressure.
• Do not install where water hammer conditions
may occur. If water hammer conditions exist,
you must install a water hammer arrester.
Contact a plumbing professional if you are
uncertain how to check for this condition.
• Do not install on hot water supply lines. The
maximum operating water temperature of this
filter system is 37.8 °C.
• Protect filter from freezing. Drain filter when
temperatures drop below 4.4 °C.
• The disposable filter cartridge MUST be replaced
every 6 months, at the rated capacity or if a
noticeable reduction in flow rate occurs.
• Where a backflow prevention device is installed
on a water system, a device for controlling
pressure due to thermal expansion must be
installed.
• Ensure all tubing and fittings are secure and free
of leaks.
• It is essential that the manufacturer’s
recommended installation, maintenance and
filter replacement requirements be carried out
for the product to perform as advertised.
Application Guidelines/Water Supply
Service Flow 1.9 lpm
Water Supply Community or Private Well -
Water Pressure 138 - 827 kPa
Water
Temperature
Capacity 1892 litres
Parameters
Potable Water
0.6 - 37.8°C
Replacing the Water Filter
(Plumbed Model)
*1 This feature is only available on some models.
The filter must be changed every 6 months or when
the indicator lights turns on or the water dispenser
output decreases.
• To purchase a replacement water filter:
- Use replacement cartridge: ADQ736939**
- Visit your local dealer or distributor or contact
the LG Electronics Customer Information
Centre. For further assistance, visit our
website at lg.com
Thread Nut Type
1
Loose the screw cap.
*1
• While the testing was performed under standard
laboratory conditions, actual performance may
vary.

CAUTION
global_main.book.book Page 33 Tuesday, July 28, 2020 8:24 AM
2
Pull the pipe out from the water filter cap until
the colored line
3
Push the pipe into the water fitler cap, making
sure the end is fully sealed.
4
Tighten the screw cap until the colored line in
the water filter is no longer visible.
a
is visble.
MAINTENANCE
2
Pull the pipe out from the water fitler.
3
Push the pipe into the water fitler, making sure
the end is fully sealed.
4
Insert the screw cap until the colored line in the
water filter is no longer visible.
33
EN
5
Press and hold the
three seconds. That resets the
Filter
icon. The new water filter has been
activated.
6
Dispense water for approximately 5 minutes to
remove trapped air and contaminants from the
system.
Push fit connector type
1
Remove the screw cap.
Water Filter
*1
button for
Replacement
5
Press and hold the
three seconds. That resets the
Filter
icon. The new water filter has been
activated.
6
Dispense water for approximately 5 minutes to
remove trapped air and contaminants from the
system.
• Failure to replace filters when required or using
non LG authorised water filters can cause the
filter cartridge to leak and result in property
damage.
Water Filter
button for
Replacement

global_main.book.book Page 34 Tuesday, July 28, 2020 8:24 AM
34
EN
TROUBLESHOOTING
TROUBLESHOOTING
Before Calling for Service
Cooling
Symptoms Possible Cause & Solution
There is no
refrigeration or
freezing.
There is poor
refrigeration or
freezing.
The appliance contains
a bad smell.
Is there a power interruption?
• Check the power of other appliances.
Check the power of other appliances.
• Plug the power plug in the outlet properly.
Is the fridge or freezer temperature set to its warmest setting?
• Set the fridge or freezer temperature to a colder setting.
Is the appliance in direct sunlight, or is it near a heat generating object
such as cooking oven or heater?
• Check the installation area and reinstall it away from heat generating
objects.
Did you store hot food without cooling it first?
• Cool the hot food first before putting it in the fridge or freezer
compartment.
Did you put in too much food?
• Maintain an appropriate space between food.
Are the appliance doors completely closed?
• Completely close the door and make sure that stored food is not
obstructing in the door.
Is there enough space around the appliance?
• Adjust the installation position to make enough space around the
appliance.
Is the fridge or freezer temperature set to 'Warm'?
• Set the fridge or freezer temperature to a colder setting.
Did you put in food with a strong smell?
• Store foods with strong smells in sealed containers.
Vegetables or fruit may have spoiled in the drawer.
• Throw away rotten vegetables and clean the vegetable drawer. Do not
store vegetables too long in the vegetable drawer.

global_main.book.book Page 35 Tuesday, July 28, 2020 8:24 AM
Ice & Water
Symptoms Possible Cause & Solution
The automatic
icemaker does not
produce ice or
produces a small
amount of ice.
Ice is not dispensed. Unable to hear the sound of ice coming out?
Did you install the appliance recently?
• The ice maker produces ice normally when approximately 48 hours have
passed after the appliance is installed.
• If the fridge compartment temperature is too cold, the water filter can
freeze and block the water flow to the ice maker.
Did you connect the water supply pipe to the appliance and open the
supply valve?
• Connect the water supply pipe to the appliance and open the supply valve
completely.
Is the water supply hose bent?
• If the water supply hose is bent, the water flow could be compromised.
Have you dispensed a large amount of ice recently?
• It takes approximately 24 hours to produce more ice in the automatic
icemaker. Please wait.
Did you set the ice maker switch or the automatic icemaker button on
the control panel to ON?
• Press I on the automatic icemaker switch or set ON for the automatic
icemaker button on the control panel. (For more details on how to use, visit
LG Electronics website or use your smart device.)
Is the temperature of the freezer compartment set too high?
• If the set temperature is too warm, ice will be produced slowly or not at all.
Set the Freezer temperature to -18 °C for normal operation of the
automatic icemaker.
Have you been opening the appliance door frequently?
• If you open the appliance door frequently, cold air will escape, lowering
the speed of ice production. Do not open and close the appliance door
frequently.
Is the appliance door completely closed?
• If the appliance door is not completely closed, the temperature of the
freezer compartment will increase, slowing down the ice production
speed. Close the appliance door completely.
• In the control panel, select the modes for cubed ice and crushed ice
alternately to dispense the ice.
Is the ice path blocked? (You can check the ice passage by separating the
ice bin.)
• Ice may not be dispensed properly if the ice passage is blocked. Check the
ice and clean the ice path regularly.
TROUBLESHOOTING
35
EN

global_main.book.book Page 36 Tuesday, July 28, 2020 8:24 AM
36
EN
TROUBLESHOOTING
Symptoms Possible Cause & Solution
Water does not come
out.
The supply valve may be turned off. (For Plumbed models Only)
• Open the water supply valve.
• Check if the fridge compartment temperature is too cold, as the water
filter can freeze and block the water flow to the dispenser.
The water dispenser tank may be empty. (Non plumbed models only)
• Fill the water dispenser tank.
Is the water supply valve closed? (For Plumbed models Only)
• Open the water supply valve.
Are you using unfiltered water?
• Unfiltered water can contain a large amount of various heavy metals or
foreign substances, so the filter may be clogged in the early stage
regardless of the life of the filter.
Water tastes strange. Is the taste of water different when comparing it with the taste of water
from the previous water purifier?
• Has the purified water or cold water not been used for an extended period
of time?
Has it been a long time since you installed and replaced the filter?
• If an expired filter is used, the purification performance may decline. It is
recommended to replace the filter according to the filter replacement
period.
Have you flushed out the filter properly in the initial stage after
installing it?
• When you install or replace the filter for the first time, you need to remove
air and activated carbon residue from inside the filter. Use the appliance
after dispensing and discharging approximately 5 litres of purified water
from the dispenser by pressing the water dispensing lever. (Activated
carbon is harmless to humans.)
Has the purified water or cold water not been used for an extended
period of time?
• The taste of old water may change due to bacterial growth. Use the
product after dispensing and discharging approximately 5 litres
(approximately three minutes) from the water dispenser.

global_main.book.book Page 37 Tuesday, July 28, 2020 8:24 AM
Condensation & Frost
Symptoms Possible Cause & Solution
There is condensation
inside the appliance or
on the bottom of the
vegetable drawer
cover.
Frost has formed in the
freezer compartment.
Frost or condensation
has formed inside or
outside the appliance.
The side or front of the
appliance is warm.
Did you store hot food without cooling it first?
• Cool the hot food first before putting it inside the fridge or freezer.
Did you leave the appliance door open?
• Although the condensation will disappear soon after you close the
appliance door, you can wipe it with a dry cloth.
Do you open and close the appliance door too frequently?
• Condensation can form due to the temperature difference from the
outside. Wipe out the dampness with a dry cloth.
Did you put warm or moist food inside without sealing it in a container?
• Store food in a covered or sealed container.
Doors may not be closed properly.
• Check if the food item inside the appliance is blocking the door and make
sure that the door is tightly closed.
Did you store hot food without cooling it first?
• Cool the hot food first before putting it in the fridge or freezer
compartment.
Is the air entry or exit of the freezer compartment blocked?
• Make sure that air entry or exit is not blocked so that the air can circulate
inside.
Is the freezer compartment overfilled?
• Maintain an appropriate space between items.
Did you open and close the appliance door frequently or is the appliance
door improperly closed?
• Frosts or condensation can form if the outside air penetrates inside the
appliance.
Is the installation environment humid?
• Condensation can appear on the exterior of the appliance if the installation
area is too humid or on a humid day such as a rainy day. Wipe off any
moisture with a dry cloth.
There are anti condensation pipes fitted to these areas of the appliance
to reduce condensation forming from around the door area.
• The heat releasing pipe to prevent condensation is installed on the front
and side of the appliance. You may feel it particularly hot right after the
appliance is installed or during the summer. You can be assured that this
is not a problem and is quite normal.
TROUBLESHOOTING
37
EN

global_main.book.book Page 38 Tuesday, July 28, 2020 8:24 AM
38
EN
There is water inside or
outside of the
appliance.
TROUBLESHOOTING
Symptoms Possible Cause & Solution
Is there water leakage around the appliance?
• Check if the water has leaked from a sink or another place.
Is there water on the bottom of the appliance?
• Check if the water is from the thawed frozen food or a broken or dropped
container.
Parts & Features
Symptoms Possible Cause & Solution
The appliance door is
not closed tightly.
It is difficult to open
the appliance door.
Door mullion does not
fold in and out
properly.
The inside lamp in the
appliance does not
turn on.
Is the appliance leaning forward?
• Adjust the front feet to raise the front side slightly.
Were the shelves properly assembled?
• Refit the shelves if needed.
Did you close the door with excessive force?
• If you apply too much force or speed when closing the door, it may remain
briefly open before closing. Make sure that you do not slam the door
closed. Close the door gently.
Did you open the door right after you closed it?
• If you try to open the appliance door within one minute after you closed it,
you may have difficulties because of the pressure inside the appliance. Try
to open the appliance door again in a few minutes so that the internal
pressure stabilizes.
Are front levelling legs extended, the appliance level, and doors aligned?
• Once the door baskets are filled, the doors may become misaligned,
preventing the door mullion or the Auto Open Door function from working
properly. Extend both front levelling legs fully so they are in firm contact
with the floor. Follow the instruction in the Door Alignment section to raise
the left fridge door until the door mullion is once again working properly.
Adjust the right fridge door so it aligns with the left fridge door.
Lamp failure
• Close the door and re-open. If the lamp does not turn on, please contact
the LG Electronics customer information centre. Do not attempt removal
of the lamp.

global_main.book.book Page 39 Tuesday, July 28, 2020 8:24 AM
TROUBLESHOOTING
39
Noises
Symptoms Possible Cause & Solution
The appliance is noisy
and generates
abnormal sounds.
Clicking noises The defrost control will click when the automatic defrost cycle begins
Rattling noises Rattling noises may come from the flow of appliance, the water line on
Whooshing noises Evaporator fan motor is circulating air through the fridge and freezer
Gurgling noises Appliance flowing through the cooling system.
Popping noises Contraction and expansion of the inside walls due to changes in
Is the appliance installed on a weak floor or improperly levelled?
• Install the appliance on a solid and flat area.
Does the rear of the appliance touch the wall?
• Adjust the installation position to allow enough clearance around the
appliance.
Are objects scattered behind the appliance?
• Remove the scattered objects from behind the appliance.
Is there an object on top of the appliance?
• Remove the object on top of the appliance.
and ends. The thermostat control (or appliance control on some models)
will also click when cycling on and off.
• Normal Operation
the back of the unit (for plumbed models only), or items stored on top of
or around the appliance.
• Normal Operation
Appliance is not resting evenly on the floor.
• Floor is weak or uneven or levelling legs need to be adjusted. See the Door
Alignment section.
Appliance with linear compressor was moved while operating.
• Normal operation. If the compressor does not stop rattling after three
minutes, turn the power to the appliance off and then on again.
compartments.
• Normal Operation
Air is being forced over the condenser by the condenser fan.
• Normal Operation
• Normal Operation
temperature.
• Normal Operation
EN

global_main.book.book Page 40 Tuesday, July 28, 2020 8:24 AM
40
EN
TROUBLESHOOTING
Symptoms Possible Cause & Solution
Vibrating If the side or back of the appliance is touching a cabinet or wall, some of
the normal vibrations may make an audible sound.
• To eliminate the noise, make sure that the sides and back do not make any
contact with any wall or cabinet.

fr_main.book.book Page 1 Tuesday, July 28, 2020 8:45 AM
MANUEL DU PROPRIÉTAIRE
RÉFRIGÉRATEUR
ET CONGÉLATEUR
Avant de commencer l'installation, lire attentivement ces
instructions. Cela simplifiera l'installation et assurera que le
produit soit installé correctement et en toute sécurité.
Conserver ces instructions à proximité du produit après
installation pour référence ultérieure.
www.lg.com
Copyright © 2020 LG Electronics Inc. Tous droits réservés

fr_main.book.book Page 2 Tuesday, July 28, 2020 8:45 AM
TABLE DES MATIÈRES
Ce manuel peut contenir des images ou
un contenu différent du modèle que vous
avez acheté.
Ce manuel est sujet à révision par le
fabricant.
CONSIGNES DE SÉCURITÉ
LISEZ TOUTES LES INSTRUCTIONS AVANT UTILISATION..............................3
AVERTISSEMENT.................................................................................................3
ATTENTION .........................................................................................................9
INSTALLATION
Avant l'installation............................................................................................12
Remonter les portes du réfrigérateur et du congélateur...........................13
Connexion de la ligne d'eau ...........................................................................15
Mise à niveau et alignement de la porte.......................................................17
Mettre l’alimentation sous tension................................................................18
Déplacer l’appareil pour un déménagement ...............................................18
UTILISATION
Avant utilisation ...............................................................................................19
Caractéristiques du produit............................................................................22
Panneau de commande ..................................................................................25
Distributeur de glace et d'eau........................................................................26
Machine à glaçons automatique....................................................................28
Door in Door.....................................................................................................30
Tiroir ..................................................................................................................31
Tablette .............................................................................................................32
Panier de porte.................................................................................................32
MAINTENANCE
Nettoyage .........................................................................................................34
Filtre à eau ........................................................................................................35
DÉPANNAGE
Avant d'appeler le service...............................................................................38

AVERTISSEMENT
fr_main.book.book Page 3 Tuesday, July 28, 2020 8:45 AM
CONSIGNES DE SÉCURITÉ
3
FR
CONSIGNES DE SÉCURITÉ
LISEZ TOUTES LES INSTRUCTIONS AVANT UTILISATION
Les consignes de sécurité suivantes sont destinées à éviter les risques
ou dommages imprévus issus d'une utilisation dangereuse ou
incorrecte de l'appareil.
Les consignes sont séparées en '
comme décrit ci-dessous.
Messages de sécurité
Ce symbole s'affiche pour indiquer des problèmes et des
utilisations qui peuvent présenter des risques. Lire
attentivement la partie qui comporte ce symbole et suivre
les instructions afin d'éviter tout risque.
AVERTISSEMENT
Cela indique que tout manquement à suivre les instructions
peut entraîner des blessures graves ou la mort.
AVERTISSEMENT
' et '
ATTENTION
'
ATTENTION
Cela indique que tout manquement à suivre les instructions
peut entraîner des blessures légères ou endommager
l'appareil.
AVERTISSEMENT
Pour réduire le risque d'explosion, d'incendie, de décès, de choc
électrique, de blessure ou d'ébouillantage de personnes lors de
l'utilisation de cet appareil, suivez les précautions de base, y compris
les suivantes :

fr_main.book.book Page 4 Tuesday, July 28, 2020 8:45 AM
4
FR
CONSIGNES DE SÉCURITÉ
Sécurité technique
• Cet appareil peut être utilisé par des enfants âgés de 8 ans et plus et
par des personnes ayant des capacités physiques, sensorielles ou
mentales réduites ou bien manquant d'expérience et de
connaissances, s'ils sont surveillés ou ont reçu des instructions
relatives à l'utilisation de l'appareil d'une manière sûre et s'ils
comprennent les dangers impliqués. Les enfants ne doivent pas jouer
avec l'appareil. Le nettoyage et la maintenance par l'utilisateur ne
doivent pas être exécutés par des enfants sans surveillance.
• Cet appareil n'est pas destiné à être utilisé par des personnes (y
compris des enfants) ayant des capacités physiques, sensorielles ou
mentales réduites, ou manquant d'expérience et de connaissances, à
moins qu'elles ne soient supervisées ou aient reçu des instructions
quant à l'utilisation de l'appareil par une personne responsable de
leur sécurité. Les enfants doivent être surveillés pour s'assurer qu'ils
ne jouent pas avec l'appareil.
• Les enfants âgés de 3 à 8 ans sont autorisés à charger et à décharger
des appareils de réfrigération.
• Cet appareil est destiné à être utilisé uniquement dans des
applications de ménage ou similaires, telles que :
- les cuisines du personnel dans les magasins, bureaux et autres
environnements de travail ;
- les maisons rurales et par les clients d’hôtels, motels et d’autres
environnements résidentiels ;
- les gîtes touristiques ;
- les applications de restauration et hors détail similaires.
•
Ce symbole vous avertit de matériaux inflammables qui
peuvent s’enflammer et provoquer un incendie si vous ne
prenez pas de précautions.
• Cet appareil contient une petite quantité de réfrigérant isobutane
(R600a), mais il est également combustible. Lors du transport et de
l'installation de l'appareil, veillez à ce qu'aucune pièce du circuit
frigorifique ne soit endommagée.

fr_main.book.book Page 5 Tuesday, July 28, 2020 8:45 AM
CONSIGNES DE SÉCURITÉ
5
FR
• Le réfrigérant et le gaz d'isolation utilisés dans l'appareil nécessitent
des procédures d'élimination particulières. Consultez un agent de
service ou une personne qualifiée avant de les éliminer.
• Ne pas endommager le circuit frigorifique.
• Si le câble d'alimentation est endommagé ou si les trous de la prise
sont lâches, ne pas utiliser le cordon d'alimentation et contacter un
centre de service agréé.
• Ne pas placer plusieurs prises de courant portables ou alimentations
portables à l’arrière de l’appareil.
• Brancher correctement le cordon d'alimentation dans la prise de
courant après avoir enlevé complètement toute humidité et
poussière.
• Ne jamais débrancher l'appareil en tirant sur le câble d'alimentation.
Toujours saisir fermement la prise électrique et la tirer tout droit pour
la sortir de la prise de courant.
• Gardez les ouvertures de ventilation, dans l'enceinte de l'appareil ou
dans la structure intégrée, exemptes d'obstruction.
• Ne pas stocker dans cet appareil de substances explosives comme
des aérosols avec un propulseur inflammable.
• Ne pas incliner l'appareil pour le tirer ou le pousser lors de son
transport.
• Lors du positionnement de l’appareil, assurez-vous que le cordon
d’alimentation ne soit pas coincé ou endommagé.
• Ne pas utiliser de dispositifs mécaniques ou d'autres moyens pour
accélérer le processus de dégivrage.
• Ne pas utiliser de sèche-cheveux pour sécher l'intérieur de l'appareil
ni placer de bougie à l'intérieur pour éliminer les odeurs.
• N'utilisez pas d'appareils électriques à l'intérieur du réfrigérateur.
• Assurez-vous de ne pas vous coincer une partie du corps, comme la
main ou un pied en déplaçant l'appareil.
• Déconnecter le cordon d’alimentation avant de nettoyer l’intérieur ou
l’extérieur de l’appareil.
• Ne pas pulvériser d’eau ou de substances inflammables (dentifrice,
alcool, diluant, liquide inflammable, abrasif, etc.) sur l’intérieur ou

fr_main.book.book Page 6 Tuesday, July 28, 2020 8:45 AM
6
FR
CONSIGNES DE SÉCURITÉ
l’extérieur de l’appareil pour le nettoyer.
• Ne pas nettoyer l'appareil avec des brosses, chiffons ou éponges avec
des surfaces rugueuses ou à base de matériau métallique.
• Le démontage, la réparation ou la modification de l'appareil ne doit
être effectuée que par un personnel de service qualifié du centre de
service LG Electronics. Si vous déplacez et installez l'appareil dans un
endroit différent, veuillez contacter un centre d'information client LG
Electronics.
Risque d’incendie et matériaux inflammables
• Si une fuite est détectée, éviter toutes flammes ou sources
potentielles d'inflammation et aérer la pièce où se trouve l'appareil
pendant plusieurs minutes. Afin d'éviter l'accumulation d'un mélange
de gaz-air inflammable si une fuite se produit dans le circuit
réfrigérant, la taille de la pièce dans laquelle l'appareil est utilisé doit
correspondre à la quantité de réfrigérant utilisée. La pièce doit faire
1 m² par 8 g de réfrigérant R600a à l'intérieur de l'appareil.
• Tout réfrigérant fuyant des tuyaux peut provoquer un incendie ou
une explosion.
• La quantité de réfrigérant dans votre appareil est indiquée sur la
plaque signalétique à l'intérieur de l'appareil.
Installation
• Cet appareil ne doit être transporté que par deux personnes ou plus
tenant l'appareil en toute sécurité.
• Installer l'appareil sur un sol ferme et de niveau.
• Ne pas installer l'appareil dans un endroit humide et poussiéreux. Ne
pas installer ou ranger l'appareil dans une zone en plein air, ou toute
autre zone soumise à des conditions telles que la lumière du soleil, le
vent ou la pluie ou à des températures inférieures à zéro.
• Ne pas placer l'appareil en plein soleil ni l'exposer à la chaleur
d'appareils de chauffage tels que poêles ou des radiateurs.

fr_main.book.book Page 7 Tuesday, July 28, 2020 8:45 AM
CONSIGNES DE SÉCURITÉ
7
FR
• Veiller à ne pas exposer l'arrière de l'appareil lors de l'installation.
• Installer l'appareil dans un endroit où il est facile de débrancher le
cordon d'alimentation de l'appareil.
• Attention à ne pas laisser tomber la porte de l'appareil lors du
montage ou du démontage.
• Attention à ne pas pincer, écraser ou endommager le câble
d'alimentation pendant le montage ou le démontage de la porte de
l'appareil.
• Veiller à ne pas faire pointer la fiche d'alimentation vers le haut ni à
laisser l'appareil appuyer sur la fiche électrique.
• Ne pas brancher un adaptateur ou d'autres accessoires à la prise
d'alimentation.
• Ne pas modifier ou étendre le cordon d'alimentation.
• S'assurer que la prise de courant soit correctement mise à la terre, et
que la broche de terre du cordon d'alimentation ne soit pas
endommagée ou retirée de la prise d'alimentation. Pour plus de
détails sur la mise à la terre, renseignez-vous auprès d'un centre
d'information client LG Electronics.
• Cet appareil est équipé d'un cordon d'alimentation doté d'un
conducteur de terre et d'une fiche de terre. La fiche doit être
branchée dans une prise appropriée, installée et mise à la terre
conformément à tous les codes et règlements locaux.
• Ne jamais mettre en marche un appareil montrant des signes de
dommages. En cas de doute, consultez votre revendeur.
• Éliminer tous les matériaux d'emballage (comme les sacs en
plastique et le polystyrène) loin des enfants. Les matériaux
d'emballage peuvent provoquer une suffocation.
• Ne pas brancher l'appareil à un adaptateur multi-supports ne
disposant pas d'un câble d'alimentation (monté). L'omission de se
conformer à cette consigne pourrait entraîner un incendie.
• L'appareil doit être connecté à une ligne électrique dédiée qui est sur
un fusible séparé.
• N'utilisez pas une multiprise qui n'est pas correctement mise à la
terre (portable). Si vous utilisez une multiprise (portable)

fr_main.book.book Page 8 Tuesday, July 28, 2020 8:45 AM
8
FR
CONSIGNES DE SÉCURITÉ
correctement mise à la terre, utilisez la multiprise avec la capacité du
cordon d’alimentation actuelle ou supérieure et utilisez uniquement
la multiprise pour l'appareil.
Utilisation
• Ne pas utiliser l'appareil à des fins (stockage de matériel médical ou
expérimental ou expédition) autres qu'un usage domestique de
stockage d'aliments.
• Si de l'eau pénètre dans les pièces électriques de l'appareil,
débrancher la fiche d'alimentation et contacter un centre
d'information client LG Electronics.
• Débrancher la prise d'alimentation en cas d'orage violent ou d'éclairs,
ou lorsque l'appareil n'est pas utilisé pendant une longue période.
• Ne pas toucher la fiche d'alimentation ou les commandes de
l'appareil avec des mains mouillées.
• Ne pas plier excessivement le câble d'alimentation ou placer un objet
lourd sur celui-ci.
• Débrancher immédiatement la fiche d'alimentation et contacter un
centre d'information client LG Electronics si vous détectez tout bruit
anormal, odeur ou fumée sortant de l'appareil.
• Ne pas mettre les mains ou des objets métalliques dans la zone
émettant l'air froid, le carter ou la grille de dégagement de la chaleur
à l'arrière.
• Ne pas appliquer de force excessive ou frapper le carter arrière de
l'appareil.
• Attention aux enfants qui se trouvent à proximité lorsque vous
ouvrez ou fermez la porte de l'appareil. La porte peut heurter l'enfant
et causer des blessures. Ne pas laisser les personnes se balancer sur
les portes, car cela peut provoquer la chute de l'appareil et causer des
blessures graves.
• Eviter qu'un enfant se retrouve piégé à l'intérieur de l'appareil. Un
enfant coincé à l'intérieur de l'appareil peut souffrir de suffocation.
• Ne pas mettre d'animaux vivants dans l'appareil, comme des
animaux domestiques.

ATTENTION
fr_main.book.book Page 9 Tuesday, July 28, 2020 8:45 AM
CONSIGNES DE SÉCURITÉ
9
FR
• Ne pas placer d’objets lourds ou fragiles, de récipients remplis de
liquide, de combustibles, d’objets inflammables (comme des bougies,
lampes, etc.), ou de dispositifs de chauffage (tels que des poêles,
radiateurs, etc.) sur l’appareil.
• Ne pas placer un autre appareil électronique (tels qu'un chauffage et
un téléphone mobile) à l'intérieur de l'appareil.
• En cas de fuite de gaz (isobutane, propane, gaz naturel, etc.), ne pas
toucher l’appareil ni la fiche d’alimentation et ventiler
immédiatement la zone. Cet appareil utilise un gaz réfrigérant
(isobutane R600a). Bien qu’il n’utilise qu’une petite quantité de ce gaz,
cela demeure un gaz inflammable. Toute fuite de gaz pendant le
transport, l’installation ou l’utilisation de l’appareil peut provoquer un
incendie, une explosion ou des blessures en cas d’étincelles.
• Ne pas utiliser ou stocker de substances inflammables ou
combustibles (éther, benzène, alcool, produits chimiques, GPL,
pulvérisateur combustible, insecticide, désodorisant, cosmétique,
etc.) à proximité de l'appareil.
Élimination
• Avant de jeter l'appareil, retirer le joint de la porte tout en laissant les
tablettes et les paniers en place et garder les enfants éloignés de
l'appareil.
ATTENTION
Pour réduire le risque de blessures légères à une personne,
dysfonctionnement ou dommages au produit ou à la propriété lors de
l'utilisation de cet appareil, suivre les précautions de base, notamment
les suivantes :

fr_main.book.book Page 10 Tuesday, July 28, 2020 8:45 AM
10
FR
CONSIGNES DE SÉCURITÉ
Utilisation
• Ne pas toucher d'aliments surgelés ou de pièces métalliques dans le
compartiment congélateur avec des mains mouillées ou humides.
Cela peut causer des gelures.
• Ne pas placer de récipients, de bouteilles ou de boîtes en verre (en
particulier celles contenant des boissons gazeuses) dans le
compartiment congélateur, les étagères ou le bac à glaçons qui
seront exposés à des températures au-delà du point de congélation.
• Le verre trempé sur le devant de la porte de l'appareil ou sur les
étagères peut être endommagé par un choc. S'il est cassé, ne le
touchez pas avec les mains.
• Ne pas s'accrocher aux portes de l'appareil, dans l'espace de
stockage, sur une tablette ni monter dessus.
• Ne pas stocker une quantité excessive de bouteilles d'eau ou de
récipients pour des plats d'accompagnement sur les paniers de la
porte.
• Ne pas ouvrir ou fermer la porte de l'appareil avec une force
excessive.
• Si la charnière de la porte de l'appareil est endommagée ou
fonctionne mal, cesser l'utilisation et contacter un centre de service
LG Electronics.
• Empêcher les animaux de grignoter le câble d'alimentation ou le
tuyau d'eau.
• Ne jamais manger d'aliments congelés immédiatement après les
avoir sortis du congélateur.
• Assurez-vous de ne pas coincer une main ou un pied lors de
l’ouverture ou de la fermeture de la porte de l’appareil ou de la porte
dans la porte.
Maintenance
• Ne pas nettoyer les tablettes en verre ou les couvrir d'eau chaude
quand elles sont froides. Elles peuvent exploser si elles sont exposées
à des changements brusques de température.
• N'insérez pas les étagères à l'envers. Les étagères peuvent tomber.

fr_main.book.book Page 11 Tuesday, July 28, 2020 8:45 AM
CONSIGNES DE SÉCURITÉ
11
FR
• Pour enlever le givre de l'appareil, contacter un centre d'information
client LG Electronics.
• Jeter la glace contenue dans le bac à glaçons du congélateur en cas
de panne électrique prolongée.

REMARQUE
REMARQUE
A
C
H
D E
F
G
B
fr_main.book.book Page 12 Tuesday, July 28, 2020 8:45 AM
12
FR
INSTALLATION
INSTALLATION
Avant l'installation
Dimensions et espaces
Une distance trop faible avec les éléments
adjacents peut entraîner une dégradation de la
capacité de congélation et des coûts d’électricité
élevés. Laisser plus de 50 mm d'espaces entre
l’arrière de l’appareil et le mur lors de l’installation
de l’appareil.
- Type A (mm) Type B (mm)
A912 912
B 1790 1790
C927 738
D797 615
E877 690
Température ambiante
• L'appareil est conçu pour fonctionner dans une
gamme limitée de températures ambiantes, en
fonction de la zone climatique.
• Les températures internes peuvent être
affectées par l'emplacement de l'appareil, la
température ambiante, la fréquence de
l'ouverture de la porte, etc.
• La classe climatique se trouve sur l'étiquette de
classement.
Classe climatique Plage de température
ambiante °C
SN (Tempérée
étendue)
N (Tempérée) +16 - +32
ST (Subtropicale) +16 - +38 / +18 - +38**
T (Tropicale) +10 - +43* / +16 - +43 /
* Australie, Inde, Kenya
** Argentine
• Les dispositifs classés de SN à T sont destinés à
être utilisés à une température ambiante entre
10°C et 43°C.
+10 - +32
+18 - +43**
F922 733
G 1384 1180
H 1713 1750
• Vous pouvez déterminer le type de l'appareil en
consultant l'étiquette à l'intérieur de l’appareil.

AVERTISSEMENT
fr_main.book.book Page 13 Tuesday, July 28, 2020 8:45 AM
Accessoires
*1 Cette fonctionnalité n'est disponible que sur
certains modèles.
*1
a
Clé A
*1
b
Clé B
c
Filtre à eau
d
Tuyau d'eau
e
Raccord de tuyau et clip
f
Raccord de tuyau et soupape
*1
*1
*1
Remonter les portes du
réfrigérateur et du
congélateur
Si votre porte d'entrée est trop étroite pour laisser
passer l'appareil, retirer les portes de l'appareil et
passer l'appareil de côté.
INSTALLATION
douille de serrage
conduite. Dévisser le cache
2
Retirez la vis du cache de la charnière en haut
de l’appareil. Soulevez le crochet situé en bas à
l’avant du cache avec un tournevis à tête plate.
3
Sortir le tuyau c. Dévisser le fil de terre d.
Débrancher tous les faisceaux de câbles
a
pour détacher la
b
.
13
e
FR
.
• Déconnecter le cordon d'alimentation, le fusible
ou le disjoncteur avant d'installer ou de
démonter les portes ou bien de nettoyer
l'appareil. Le non-respect de ces instructions
peut entraîner la mort, un incendie ou un choc
électrique.
Retrait de la Porte du
Congélateur
1
La conduite d’alimentation en eau est
raccordée dans la partie supérieure droite à
l’arrière de l’appareil. Tenir le raccord
d’alimentation en eau et pousser doucement la
4
Tourner le levier de charnière f dans le sens
inverse des aiguilles d'une montre. Soulever la

ATTENTION
ATTENTION
ATTENTION
fr_main.book.book Page 14 Tuesday, July 28, 2020 8:45 AM
14
FR
INSTALLATION
charnière supérieure g du verrou du levier de
charnière
• Lors du levage de la charnière dégagée du pêne,
s’assurer que la porte ne tombe pas en avant. Il
est recommandé que deux personnes ou plus
procèdent au retrait et au remontage de la
porte.
5
Soulevez la porte du congélateur jusqu’à ce
qu’elle soit dégagée de la charnière inférieure.
h
.
Retrait de la porte du
réfrigérateur
1
Débranchez tous les faisceaux de câbles a.
2
Tourner le levier de charnière b dans le sens
des aiguilles d'une montre. Soulever la
charnière supérieure
charnière
d
.
c
du verrou du levier de
• Placer la porte sur une surface ne provocant pas
d'égratignures avec la face intérieure tournée
vers le haut.
• Lors du levage de la charnière dégagée du
verrou du levier de charnière, s’assurer que la
porte ne tombe pas en avant. Il est recommandé
que deux personnes ou plus procèdent au retrait
et au remontage de la porte.
3
Soulevez la porte du réfrigérateur jusqu’à ce
qu’elle soit dégagée de la charnière inférieure.

ATTENTION
ATTENTION
REMARQUE
AVERTISSEMENT
fr_main.book.book Page 15 Tuesday, July 28, 2020 8:45 AM
• Placer la porte sur une surface ne provocant pas
d'égratignures avec la face intérieure tournée
vers le haut.
Remontage de la porte du
réfrigérateur et du congélateur
Remonter les portes dans l'ordre inverse du retrait
après avoir passé l'appareil à travers la porte
d'accès.
• Installer d’abord la porte du réfrigérateur.
• Démontage / Montage des conduites d’eau
a
Douille de serrage b Tuyau c Insérer la
conduite
• Insérer doucement le tuyau jusqu’à ce qu’une
seule des lignes du tuyau soit visible. Tirer sur la
conduite pour vous assurer qu’elle soit
fermement fixée.
Correct
Incorrect
d
Clip
INSTALLATION
• Si l'extrémité du tuyau d'eau est endommagée,
elle doit être coupée afin de s'assurer qu'il ne fuit
pas quand il est remonté.
e
Pas droit f Endommagé g Étiré
15
FR
Connexion de la ligne d'eau
Cette section s’applique uniquement aux modèles
équipés d’un distributeur d’eau courante ou de
glaçons.
Exigences
d'approvisionnement en eau
Une alimentation en eau froide avec une pression
d'eau comprise entre 138 kPa et 827 kPa (1,4~8,4
kgf/cm²) est requise pour faire fonctionner le
distributeur d'eau. Si le réfrigérateur est installé
dans une zone à faible pression d'eau (inférieure à
138 kPa), vous pouvez installer une pompe de
surpression pour compenser la pression faible.
Si un système de filtration d'eau par osmose
inverse est raccordé à votre alimentation en eau
froide, la pression d'eau du circuit d'osmose
inverse doit être d'au moins 138 kPa à 827 kPa
(1,4~8,4 kgf/cm²)
• Débrancher l'appareil avant d'effectuer des
travaux lors du raccordement de la conduite
d'eau. Tout manquement à suivre ces
instructions peut provoquer un choc électrique.
• Ne brancher la conduite d'eau qu'à une
alimentation en eau froide. Tout manquement à
suivre ces instructions peut causer un
dysfonctionnement du filtre à eau. Des coups de
bélier (claquement de l'eau dans les tuyaux)
dans la plomberie peuvent causer des
dommages aux pièces de l'appareil et conduire à
une fuite d'eau ou une inondation.
• Connectez-vous à l'alimentation en eau potable
uniquement.

AVERTISSEMENT
REMARQUE
fr_main.book.book Page 16 Tuesday, July 28, 2020 8:45 AM
16
FR
• Le raccordement de la conduite d'eau ne doit
être installé que par un plombier qualifié et
conformément aux lois et règlements régissant
la qualité de l'eau locale.
INSTALLATION
être fermement maintenu lorsque le
connecteur est poussé sur le tuyau.
• Cette installation de conduite d'eau n'est pas
couverte par la garantie de l'appareil.
Raccorder l’eau à l'appareil
1
Dévisser l'écrou chapeau à filetage métallique
à l'arrière de l'appareil et le placer sur une
extrémité du tuyau d'eau.
2
Pousser fermement le tuyau d'eau sur le
robinet d'arrivée d'eau et serrer l'écrou
chapeau.
Raccordement à un robinet
d'eau
Cette fonctionnalité n'est disponible que sur
certains modèles.
2
S'assurer que la rondelle en caoutchouc soit
montée sur le raccord du robinet avant de le
visser sur le robinet.
• Vous devrez peut-être acheter un raccord ou
un adaptateur séparé si votre robinetterie
ne correspond pas à la taille du filetage du
raccord fourni.
Vérifier le raccordement à l'eau
1
Ouvrir l'alimentation en eau et mettre
l'appareil sous tension. Vérifier avec soin les
fuites éventuelles dues à des tuyaux mal
montés sur tous les raccords.
2
Appuyer et maintenir le bouton
pendant trois secondes. Le nouveau filtre à eau
a été activé.
Water Filter
1
Pousser le tuyau d'eau dans le trou du raccord
du robinet fourni en accessoire. Le tuyau doit
3
Placer une tasse sous le distributeur d'eau
pour vérifier que l'eau s'écoule dans l'appareil.
4
Vérifier à nouveau les fuites sur le tuyau de
raccordement et les joints.

REMARQUE
fr_main.book.book Page 17 Tuesday, July 28, 2020 8:45 AM
Mise à niveau et
alignement de la porte
Avant de commencer
Lorsque les portes de l’appareil sont inégales,
suivez les instructions ci-dessous afin d’aligner les
portes.
• La clé peut différer selon le modèle. Une clé de
type A ou B vous sera fournie.
- Clé de type A
- Clé de type B
INSTALLATION
Utiliser la clé
le pied de mise à niveau vers la gauche afin de le
relever ou vers la droite pour l’abaisser.
a
pour régler la hauteur en tournant
17
FR
Alignement de la porte du
congélateur et du réfrigérateur
Si la porte de l'appareil n'est pas de niveau, régler
la différence de hauteur de porte de l'appareil.
Mise à niveau de l’appareil
L’appareil a deux pieds de mise à niveau à l’avant.
Ajustez les pieds pour modifier l’inclinaison de
l’avant vers l’arrière ou d’un côté à l’autre. Si
l’appareil semble instable ou si les portes ne se
ferment pas facilement, réglez l’inclinaison de
l’appareil en suivant les instructions ci-dessous.
1
Ouvrir la porte et utiliser la clé a pour
desserrer l’écrou de blocage en le tournant à
gauche.

ATTENTION
REMARQUE
REMARQUE
fr_main.book.book Page 18 Tuesday, July 28, 2020 8:45 AM
18
FR
INSTALLATION
2
Utiliser la clé b pour régler la hauteur en
tournant l'axe de la charnière de réglage vers
la gauche ou vers la droite.
• Ne pas régler la hauteur de la porte de l’appareil
à plus de 3 mm.
3
Utiliser la clé a pour serrer l’écrou de blocage
en le tournant à droite.
• Il se peut que la mise à niveau des portes ne soit
pas possible lorsque le sol n'est pas de niveau,
ou de construction faible ou médiocre.
• Le réfrigérateur est lourd et doit être installé sur
une surface rigide et solide.
• Certains revêtements de sol en bois peuvent
poser des problèmes de mise à niveau s'ils
présentent une flexion excessive.
avant de mettre des aliments dans l’appareil. Si
vous ajoutez des aliments avant que l’appareil
n’ait complètement refroidi, vos aliments
peuvent s’abîmer.
Déplacer l’appareil pour un
déménagement
Préparer le déménagement
1
Retirer tous les aliments à l'intérieur de
l'appareil.
2
Débrancher la fiche électrique, l'insérer et la
fixer dans le crochet de fiche d'alimentation à
l'arrière ou sur le dessus de l'appareil.
3
Fixer les pièces telles que les étagères et la
poignée de la porte avec du ruban adhésif afin
d’éviter qu’elles ne tombent lors du
déplacement de l’appareil.
4
Déplacez l’appareil avec précaution avec plus
de deux personnes. Lorsque vous transportez
l’appareil sur une longue distance, maintenez
l’appareil à la verticale.
5
Après avoir installé l’appareil, branchez la fiche
d’alimentation dans une prise de courant et
mettez-le sous tension.
Mettre l’alimentation sous
tension
Raccorder l’appareil
Après avoir installé l’appareil, brancher la fiche
d’alimentation dans une prise de courant.
• Après avoir branché le cordon d'alimentation (ou
la fiche) dans la prise, attendre 3 à 4 heures

REMARQUE
REMARQUE
fr_main.book.book Page 19 Tuesday, July 28, 2020 8:45 AM
UTILISATION
Avant utilisation
Notes pour l'utilisation
• Les utilisateurs doivent garder à l'esprit que du
givre peut se former si la porte n'est pas
complètement fermée ou si l'humidité est élevée
pendant l'été.
• S'assurer qu'il y a suffisamment d'espace entre
les aliments stockés sur la tablette ou le panier
de la porte pour permettre à la porte de se
fermer complètement.
• L'ouverture prolongée de la porte peut entraîner
une augmentation significative de la
température dans les compartiments de
l'appareil.
• Si l'appareil de réfrigération reste vide pendant
de longues périodes, mettez-le hors tension,
décongelez-le, nettoyez-le, séchez-le et laissez la
porte ouverte afin d’éviter le développement de
moisissure dans l'appareil.
Alarme de porte ouverte
L'alarme retentit 3 fois par intervalles de 30
secondes si la porte est laissée ouverte ou n'est pas
complètement fermée pendant 1 minute.
• Contacter un centre d'information client LG
Electronics si l'alarme continue de sonner après
30 secondes même après la fermeture de toutes
les portes.
Détection de pannes
L'appareil peut détecter automatiquement des
problèmes lors de l'utilisation.
UTILISATION
• Si un code d'erreur est indiqué sur l’écran, ne pas
mettre l'appareil hors tension. Contacter
immédiatement un centre d'information client
LG Electronics et lui signaler le code d’erreur. Si
vous mettez l'appareil hors tension, le technicien
de réparation de notre centre d'information
peut avoir des difficultés à identifier le problème.
19
FR
Suggestions relatives à
l'économie d'énergie
• S'assurer qu'il y ait suffisamment d'espace entre
les aliments stockés. Cela permet à l'air froid de
circuler uniformément et réduit les factures
d'électricité.
• Conserver les aliments chauds seulement après
qu'ils ont refroidi afin d'éviter une formation de
condensation ou de givre.
• Lors du stockage d’aliments dans le congélateur,
régler la température du congélateur à une
valeur inférieure à la température indiquée sur
l’aliment.
• Ne pas régler la température de l'appareil en
dessous de ce qui est nécessaire.
• Ne pas mettre d'aliments à proximité du capteur
de température du réfrigérateur. Garder une
distance d'au moins 3 cm autour du capteur.
• Noter que les spécifications de l’appareil
permettent une certaine augmentation de la
température après le dégivrage. Si l'on souhaite
réduire l’impact d’une élévation de la
température sur le stockage des aliments,
sceller ou envelopper dans plusieurs couches la
nourriture stockée.
• Le système de dégivrage automatique dans
l'appareil garantit que le compartiment reste
exempt d'accumulation de glace dans des
conditions de fonctionnement normales.
• Si un problème est détecté, l'appareil ne
fonctionne pas et un code d'erreur s'affiche,
même lorsqu'un bouton est pressé.

ATTENTION
REMARQUE
fr_main.book.book Page 20 Tuesday, July 28, 2020 8:45 AM
20
FR
UTILISATION
Conservation efficace des
aliments
• Conservez les aliments surgelés ou réfrigérés à
l'intérieur de récipients hermétiques.
• Vérifier la date d'expiration et l'étiquette
(instructions de stockage) avant de stocker de la
nourriture dans l'appareil.
• Ne pas stocker de nourriture pendant une
longue période (plus de 4 semaines) si elle se
détériore facilement à basse température.
• Ne pas placer les aliments non surgelés en
contact direct avec les aliments déjà congelés. Il
pourrait être nécessaire de réduire la quantité
de produits à congeler si la congélation
quotidienne est anticipée.
• Mettre les aliments réfrigérés ou surgelés à
l'intérieur de chaque compartiment
réfrigérateur ou congélateur immédiatement
après l'achat.
• Conserver la viande et le poisson crus dans des
récipients appropriés au réfrigérateur, de
manière à ce qu'ils ne soient pas en contact avec
d'autres aliments ni ne gouttent dessus.
• Les aliments réfrigérés et autres aliments
peuvent être rangés sur le dessus du bac à
légumes.
• Éviter de recongeler tout aliment qui a été
complètement décongelé. La recongélation d'un
aliment qui a été complètement décongelé
réduit son goût et ses propriétés nutritives.
• Ne pas remplir l’appareil en excès. L’air froid ne
peut pas circuler correctement si l’appareil est
trop rempli.
• Refroidir les aliments chauds avant de les
stocker. Si trop d'aliments chauds sont stockés à
l'intérieur, la température interne de l'appareil
peut augmenter et affecter négativement
d'autres aliments stockés dans l'appareil.
• Si vous réglez une température trop basse pour
la nourriture, elle peut geler. Ne pas régler une
température inférieure à la température requise
pour un stockage correct de la nourriture.
• S'il existe des compartiments fraîcheur dans
l'appareil, ne pas stocker les légumes et les fruits
avec une teneur en humidité plus élevée dans les
compartiments fraîcheur car ils peuvent geler en
raison de la température plus basse.
• En cas de panne de courant, appeler la
compagnie d'électricité et demander combien
de temps cela durera.
- Vous devriez éviter les ouvertures de porte
lorsque l'alimentation est éteinte.
- Lorsque l'alimentation est rétablie, vérifier
l'état de la nourriture.
Capacité maximale de
congélation
• La fonction
congélateur d’atteindre sa capacité de
congélation maximale. Elle prend généralement
jusqu’à 24 heures et s’arrête automatiquement.
•
Express Freeze
heures avant que les produits frais ne soient
placés dans le compartiment congélateur.
• Pour une meilleure circulation de l'air, insérer
toutes les parties intérieures comme les paniers,
tiroirs et tablettes.
Express Freeze
doit être activé pendant 2
permettra au
Congeler la quantité maximale
d’aliments
Si de grandes quantités d’aliments doivent être
stockées, tous les tiroirs du congélateur doivent
être retirés de l’appareil et les aliments doivent être
empilés directement sur les étagères du
congélateur dans le compartiment congélateur.
• Pour retirer les tiroirs, commencez par retirer les
aliments des tiroirs, puis retirez-les
délicatement. Ne pas le faire pourrait causer des
blessures ou des dommages aux tiroirs.
• La forme de chaque tiroir peut être différente,
les insérer dans la bonne position.

fr_main.book.book Page 21 Tuesday, July 28, 2020 8:45 AM
Compartiment deux étoiles
• Un panier ou tiroir 2 étoiles (a) peut être utilisé
pour stocker de la glace et des aliments de -12°C
à -18°C pendant de courtes périodes.
• Les compartiments à aliments congelés deux
étoiles sont adaptés au stockage d’aliments précongelés, au stockage ou à la fabrication de
glaces et à la fabrication de glaçons.
• Les compartiments deux étoiles ne sont pas
adaptés à la congélation d'aliments frais.
UTILISATION
21
FR

fr_main.book.book Page 22 Tuesday, July 28, 2020 8:45 AM
22
FR
UTILISATION
Caractéristiques du produit
L'aspect des composants de l'appareil peuvent varier d'un modèle à l'autre.
Extérieur
*1 Cette fonctionnalité n'est disponible que sur certains modèles.
a
Panneau de commande
Règle la température du réfrigérateur et la température du congélateur, l’état du filtre à eau et le mode
du distributeur.
b
Door in Door
Il s'agit d’une zone de stockage pratique pour les articles fréquemment utilisés qui nécessitent un accès
facile.
c
Levier du Door in Door
Ouvre la Door in Door.
*1
*1

fr_main.book.book Page 23 Tuesday, July 28, 2020 8:45 AM
UTILISATION
Intérieur (deux étoiles a)
*1 Cette fonctionnalité n'est disponible que sur certains modèles.
a
Lampe LED
Allume l'intérieur du réfrigérateur.
b
Machine à glaçons automatique
Produit et conserve des glaçons automatiquement dans le compartiment congélateur.
c
Étagère du congélateur
Conserve de petits paquets d'aliments congelés ou fréquemment utilisés.
d
Tiroir du congélateur
Conserve les aliments surgelés pendant une plus longue durée.
e
Panier de porte du congélateur
Conserve de petits emballages d’aliments surgelés. Ne pas stocker de crème glacée ou d’aliments qui
seront conservés pendant une longue période.
f
Compartiment Door in Door
Conserve les aliments couramment utilisés tels que les boissons et les collations.
g
Tablette du réfrigérateur
Conserve les aliments réfrigérés et autres aliments frais.
Conserve les aliments à plus forte teneur en humidité à l’avant de l’étagère.
La hauteur d'étagère peut être ajustée en insérant l'étagère dans une autre rainure de hauteur
différente.
Le nombre réel de tablettes diffère d'un modèle à l'autre.
h
Tiroir à collations
Conserve de petits paquets d’aliments réfrigérés.
i
Capteur de température
*1
*1
*1
*1
*1
*1
*1
23
FR

fr_main.book.book Page 24 Tuesday, July 28, 2020 8:45 AM
24
FR
j
k
l
UTILISATION
Ce capteur règle la température du réfrigérateur.
• Maintenir la distance entre le capteur et la nourriture pour détecter la température avec précision.
Réservoir D'eau
Conserve l’eau pour alimenter le distributeur ou fournir les glaçons produits par la machine à glaçons
automatique. Elle nécessite un remplissage manuel.
Bac à légumes
Conserve les fruits et légumes pour qu’ils restent frais aussi longtemps que possible.
Panier de porte du réfrigérateur
Conserve de petits paquets d’aliments réfrigérés, de boissons et de récipients de sauce.
*1
*1

REMARQUE
fr_main.book.book Page 25 Tuesday, July 28, 2020 8:45 AM
UTILISATION
Panneau de commande
Le panneau de commande peut différer d'un modèle à l'autre.
Panneau de commande et fonctions
*1 Cette fonctionnalité n'est disponible que sur certains modèles.
a
Express Freeze
Cette fonction permet de congeler rapidement une grande quantité de glace ou d'aliments surgelés.
• Cette fonction est activée et désactivée à chaque fois que vous appuyez sur le bouton.
• Cette fonction s’arrête automatiquement après un délai spécifique.
b
Freezer
Appuyez à plusieurs reprises sur ce bouton pour sélectionner la température souhaitée entre -24 °C et
-14 °C.
•
Indicateur de
température
25
FR
Thermostat
• La température initiale du congélateur est de -19 °C.
c
Fridge
Appuyez à plusieurs reprises sur ce bouton pour sélectionner la température souhaitée entre 1°C et
7°C.
•
Indicateur de
température
Thermostat
• La température initiale du réfrigérateur est de 4 °C.
• La température interne réelle varie en fonction de l'état des aliments, étant donné que la température
de réglage indiquée est une température cible, non la température réelle à l'intérieur de l'appareil.
d
Lock
Verrouille les boutons du panneau de commande.
-14 °C -16 °C -18 °C -19 °C -20 °C -22 °C -24 °C
7 °C 6 °C 5 °C 4 °C 3 °C 2 °C 1 °C

REMARQUE
ATTENTION
REMARQUE
fr_main.book.book Page 26 Tuesday, July 28, 2020 8:45 AM
26
FR
UTILISATION
• Pour verrouiller les boutons du panneau de commande, appuyer et maintenir le bouton
pendant 3 secondes jusqu'à ce que l'icône
• Pour désactiver la fonction, appuyer et maintenir le bouton
l
l’icône
e
Water Filter
Remplacer le filtre à eau lorsque le voyant h s'allume.
f
Non Plumbing
L’icône
g
Type d'eau et de glace
Sélectionnez un mode de distribution souhaité sur les boutons du panneau de commande. Appuyez sur
l’interrupteur du distributeur avec un verre ou un autre récipient pour distribuer des glaçons, de l’eau
ou de la glace pilée.
• Le panneau de commande s’éteint automatiquement pour économiser l’énergie.
• S’il y a un doigt ou un contact avec la peau sur le panneau de commande pendant le nettoyage, la
fonction du bouton peut être déclenchée.
apparaisse et que la fonction soit désactivée.
*1
*1
Non Plumbing
est allumée lorsque le réservoir de distribution d'eau est installé correctement.
Distributeur de glace et
d'eau
k
apparaisse et que la fonction soit activée.
Lock
pendant 3 secondes jusqu’à ce que
• Lors de la distribution de l’eau ou des glaçons, ne
pas utiliser de coupe en cristal fin ou de
porcelaine.
Lock
Avant d'utiliser le distributeur
de glace et d'eau
• Tenir les enfants éloignés du distributeur afin
d'empêcher les enfants de jouer avec ou
d'endommager les commandes.
• Jeter les premiers lots de glace (environ 20
glaçons et 7 tasses d'eau). Cela est également
nécessaire si l'appareil n'a pas été utilisé
pendant longtemps.
• Nettoyer le circuit de distribution d'eau s'il n'a
pas été utilisé pendant 48 heures. Rincer le
circuit d’eau raccordé à une arrivée d’eau si l’eau
n’a pas été aspirée pendant 5 jours.
• Pour nettoyer le circuit de distribution d'eau,
faire couler l'eau dans le distributeur pendant
environ 5 minutes et jeter les premiers lots de
glaçons.
• Si vous ouvrez la porte du congélateur lors de la
distribution d’eau, celle-ci s’arrête.
• Si vous ouvrez la porte du réfrigérateur pendant
la distribution d'eau, de glaçons ou glace pilée, la
distribution est mise en pause. Lorsque vous
fermez la porte, l'élément sélectionné continue
d'être distribué.
• Si le rebord de la tasse est petit, l'eau peut
éclabousser hors du verre ou le manquer
complètement.
• Utiliser une tasse avec un rebord de plus de 68
mm de diamètre lors de la distribution de l'eau,
de glaçons ou de glace pilée.
• Lorsque la machine à glaçons produit de petits
cubes de glace ou si les cubes se regroupent, la
quantité d'eau fournie à la machine à glaçons
peut être faible en raison d'une insuffisance
d'eau dans le réservoir d'eau. Si la glace n'est pas
utilisée fréquemment ou que la température

REMARQUE
fr_main.book.book Page 27 Tuesday, July 28, 2020 8:45 AM
réglée du congélateur est trop chaude, elle peut
aussi s'amalgamer.
• Il est normal que de l'eau laiteuse ou trouble soit
distribuée après le remplacement du filtre à eau.
Cet air dans l’eau finira par s’éclaircir et elle est
potable pendant cette transition.
Utiliser le distributeur de glace
et d'eau
Appuyez plusieurs fois sur le bouton de sélection
du distributeur jusqu'à ce que le voyant situé audessus de l'icône souhaitée s'allume.
Appuyez sur la palette de distribution
verre ou un autre récipient pour distribuer des
glaçons, de l'eau ou de la glace pilée.
a
avec un
UTILISATION
Nettoyage du bac du distributeur
Essuyer toute la zone avec un chiffon humide. Le
plateau de distribution peut devenir humide
facilement à cause d'eau ou de glace renversée.
27
FR
Remplir le réservoir d'eau avec
de l'eau
Cette fonctionnalité n'est disponible que sur
certains modèles.
Le réservoir d'eau contient l'eau à distribuer ou
utilisée par la machine à glaçons automatique pour
faire de la glace.
1
Retirer le réservoir de distribution d'eau en le
tirant tout en maintenant la poignée.
Nettoyer le distributeur
Nettoyer la sortie de glace et d'eau
Essuyer fréquemment la sortie d'eau a ou de g lac e
b
avec un chiffon propre car elle peut se salir
facilement.
• Les peluches d'un chiffon peuvent adhérer aux
sorties.
2
Ouvrir le couvercle ou le bouchon du réservoir
de distribution d'eau.
3
Remplir avec une bouteille filtrée ou de l'eau
filtrée potable jusqu'à la ligne de référence

AVERTISSEMENT
ATTENTION
REMARQUE
fr_main.book.book Page 28 Tuesday, July 28, 2020 8:45 AM
28
FR
UTILISATION
indiquée à l'intérieur du réservoir de
distribution d'eau. (Capacité totale : 4 ℓ)
4
Après avoir rempli l'eau, fermer le couvercle ou
le bouchon du réservoir de distribution d'eau.
5
Reposer le réservoir de distribution d'eau sur la
tablette du réfrigérateur.
• Les enfants ne devraient pas être autorisés près
du réservoir du distributeur.
• Avant d'utiliser le réservoir de distribution d'eau
après l'installation de l'appareil, il doit être lavé
avant d'être rempli d'eau.
• Vérifier si le réservoir de distribution d’eau a été
correctement placé sur l’appareil. S’il n’a pas
correctement monté, l’eau peut fuir du réservoir
dans l’appareil.
• S'il y a une quantité d'eau insuffisante dans le
réservoir de distribution d'eau, la taille des
Glaçons et leur quantité peuvent être affectées
et cela peut entraîner un manque de glaçons.
• S'il n'y a pas d'eau dans le réservoir de
distribution d'eau, la fonction de distribution
d'eau froide et de glace du distributeur ne peut
pas être utilisée. Vérifier s'il y a de l'eau dans le
réservoir de distribution d'eau, puis le remplir
d'eau s'il n'y en a pas.
• Attendre au moins 15 secondes avant de retirer
le réservoir d'eau après avoir distribué de l'eau
ou de la glace du distributeur.
• Le son du réservoir d'eau est normal lorsque
l'eau est alimentée dans le distributeur et la
machine à glaçons automatique. Ce n'est pas un
signe de dysfonctionnement.
• Remplir d'eau potable uniquement le réservoir
d'eau de la machine à glaçons ou du
distributeur.
• Ne pas remplir le réservoir d'eau avec des
boissons autres que l'eau ou avec de l'eau
chaude.
• Ne pas appliquer une force excessive ou un
impact lors du retrait ou du montage du
réservoir de distribution d’eau. Cela peut causer
des dommages à l’appareil ou des blessures.
Machine à glaçons
automatique
Cette fonctionnalité n'est disponible que sur
certains modèles.
Cette fonctionnalité peut varier en fonction du
modèle acheté.
Avant d'utiliser la machine à
glaçons dans la porte
• La machine à glaçons produit normalement de la
glace lorsqu’ environ 48 heures se sont écoulées
après que l'appareil a été initialement installé.
• Si le bac à glaçons est complètement rempli de
glace, la production de glace s'arrête.

ATTENTION
ATTENTION
fr_main.book.book Page 29 Tuesday, July 28, 2020 8:45 AM
• Le bruit de la chute de glace dans le bac à
glaçons est normal.
• Si les glaçons sont stockés dans le bac à glaçons
pendant une longue période, ils peuvent se
regrouper devenir difficiles à séparer. Dans ce
cas, vider le bac à glaçons et faire fabriquer de
nouveaux glaçons.
• Il est normal que de l'eau laiteuse ou trouble soit
distribuée après le remplacement du filtre à eau.
Cet air dans l’eau finira par s’éclaircir et elle est
potable.
• La première glace et l'eau distribuée peuvent
comporter des particules ou une odeur de
conduite d'alimentation en eau ou de réservoir
d'eau.
• Si de la glace décolorée est distribuée, vérifier le
réservoir d'eau et l'approvisionnement en eau
d'une source possible. Si le problème persiste,
contacter le centre d'information client LG
Electronics. Ne pas utiliser de glace ou d'eau tant
que le problème n'a pas été corrigé.
• Ne pas toucher la sortie de glace ou la machine
à glaçons automatique avec votre main ou un
outil.
• Distribuer la glace dans un verre avant de le
remplir d'eau ou d'autres boissons. Des
éclaboussures se produiront si la glace est
distribuée dans un verre qui contient déjà du
liquide.
• N’utilisez jamais du verre exceptionnellement
étroit ou profond. La glace peut se coincer dans
le passage, affectant le fonctionnement de
l’appareil.
• Garder le verre à une bonne distance de la sortie
de glace. Un verre tenu trop près de la sortie
peut empêcher la distribution de glace.
• Jetez la glace qui se trouve à l’intérieur du bac à
glaçons si vous partez en vacances ou en cas de
panne d’électricité prolongée, car l’eau de la
glace fondante peut tomber du distributeur sur
le sol.
UTILISATION
29
FR
Machine à glaçons du
congélateur
La machine à glaçons automatique peut fabriquer
automatiquement 40 à 84 cubes à la fois, dans un
délai de 24 heures si les conditions sont favorables.
Cette quantité peut varier en fonction de
l’environnement (température ambiante autour de
l’appareil, fréquence d’ouverture de la porte,
quantité des aliments stockés dans l’appareil, etc.).
a
Interrupteur
• Ne pas mettre vos mains dans la partie
mécanique de la machine à glaçons
automatique, comme le bac à glaçons ou le
distributeur de glaçons.
• Ne pas retirer le couvercle de la machine à
glaçons automatique. Toucher une partie
mécanique de la machine à glaçons
automatique peut entraîner des blessures.
Retrait / Remontage du bac de
stockage de glaçons
Le passage de la goulotte de distribution peut
s'obstruer avec du givre, si seule de la glace pilée
est utilisée. Retirer le givre qui s'accumule en
retirant le bac à glaçons et dégager le passage avec
une spatule en caoutchouc. Une distribution
régulière de glaçons peut aussi aider à prévenir
l'accumulation de givre.

ATTENTION
ATTENTION
fr_main.book.book Page 30 Tuesday, July 28, 2020 8:45 AM
30
FR
UTILISATION
1
Tenir et retirer le couvercle de la machine à
glaçons automatique en le soulevant vers le
haut.
2
Pour désactiver la machine à glaçons
automatique, positionner le commutateur sur
OFF (O).
3
Tenir le bac à glaçons avec les deux mains et le
retirer en le soulevant vers le haut.
commutateur de la machine à glaçons
automatique est réglé en position.
• Tenir les enfants éloignés du distributeur.
• Lors du replacement de la corbeille à glaçons,
assurez-vous qu’elle est placée correctement. Si
elle est inclinée ou mal alignée, cela peut
empêcher la production des glaçons en raison
de la perturbation du capteur.
Door in Door
Cette fonctionnalité n'est disponible que sur
certains modèles.
Utilisation de la porte Door in
Door
Tirer le levier en bas de la porte vers le haut jusqu'à
ce que la porte Door-in-Door s'ouvre.
Il y a beaucoup d'espace de rangement à l'intérieur
de la porte Door-in-Door et ses paniers
environnants, vous permettant de stocker la
nourriture d'une manière organisée.
4
Les monter dans l'ordre inverse du processus
de retrait.
• Ne touchez pas les pièces mécaniques de la
machine à glaçons automatique avec vos mains
ou un outil. Sinon, cela peut provoquer des
blessures ou endommager l’appareil.
• Ne pas démonter, réparer ou modifier la
machine à glaçons automatique. Ces travaux ne
doivent être effectués que par un technicien de
maintenance.
• Il convient d'être prudent, car la machine à
glaçons automatique fonctionne en continu une
fois la porte du congélateur ouverte lorsque le
• Ne pas ouvrir la porte de l'appareil avec le Door
In Door ouvert, ou ne pas ouvrir le Door In Door
si la porte de l'appareil est ouverte. Le Door In
Door peut être heurté par le bord de l'appareil et
ainsi endommagé.

ATTENTION
ATTENTION
fr_main.book.book Page 31 Tuesday, July 28, 2020 8:45 AM
Déposer / Remonter le casier de
la porte Door in Door
• Retirer le contenu du compartiment Door in
Door avant sa dépose.
1
Ouvrir complètement les portes et retirer le
contenu du casier Doorin-Door. Le soulever et
tirer le casier Door-in-Door.
UTILISATION
L'humidité dans le bac à légumes peut être
contrôlée en faisant glisser le levier dans un sens
ou dans l'autre.
• S'il est déplacé du côté gauche, le guide d'air
sera ouvert et permettra à l'air de circuler dans le
bac pour réduire l'humidité.
• S'il est déplacé du côté droit, le guide d'air sera
fermé et maintiendra l'humidité qui se trouve
actuellement dans le bac à légumes.
*1
Type A
*1
Type B
31
FR
2
Les monter dans l'ordre inverse du processus
de retrait.
Tiroir
• Toujours vider les tiroirs avant de les retirer et
utiliser les deux mains pour les retirer et les
remonter.
• S’assurer que les portes du réfrigérateur soient
complètement ouvertes avant de retirer et de
remonter les tiroirs.
Utilisation du bac à légumes
*1 Cette fonctionnalité n'est disponible que sur
certains modèles.
Retrait / Remontage des tiroirs
1
Retirer le contenu du tiroir. Tenir la poignée
des bacs à légumes et les tirer doucement vers
l’extérieur.

ATTENTION
ATTENTION
ATTENTION
fr_main.book.book Page 32 Tuesday, July 28, 2020 8:45 AM
32
FR
2
3
• Toujours vider les tiroirs avant de les retirer et
utiliser les deux mains pour les retirer et les
remonter.
• S’assurer que les portes du réfrigérateur soient
complètement ouvertes avant de retirer et de
monter les tiroirs.
UTILISATION
Soulever le bac à légumes et le sortir en le
tirant.
Les monter dans l'ordre inverse du processus
de retrait.
2
3
• Les étagères en verre sont lourdes. Faire
• Ne pas nettoyer les étagères en verre avec de
• Assurez-vous que les étagères sont à niveau d’un
Tablette
Tirer l'étagère.
Les monter dans l'ordre inverse du processus
de retrait.
attention lorsque vous les retirez.
l'eau chaude si elles sont froides. Les étagères
peuvent se casser si elles sont exposées à des
changements brusques de température ou à un
impact.
côté à l’autre. Le manquement à cette instruction
peut provoquer la chute de l’étagère ou le
renversement des aliments.
• Les étagères en verre sont lourdes. Faire
attention lorsque vous les retirez.
• Ne pas nettoyer les étagères en verre avec de
l'eau chaude si elles sont froides. Les étagères
peuvent se casser si elles sont exposées à des
changements brusques de température ou à un
impact.
Retrait / Remontage de
l’étagère
1
Incliner vers le haut l'avant de l’étagère et
soulever l'étagère.
Panier de porte
Retrait / Remise en place du
panier de porte
1
Tenir les deux bords du panier et le retirer en le
soulevant vers le haut.
2
Remonter les paniers de porte dans l’ordre
inverse du processus de retrait.

fr_main.book.book Page 33 Tuesday, July 28, 2020 8:45 AM
3
Les monter dans l'ordre inverse du processus
de retrait.
UTILISATION
33
FR

fr_main.book.book Page 34 Tuesday, July 28, 2020 8:45 AM
34
FR
MAINTENANCE
MAINTENANCE
Nettoyage
Conseils de nettoyage
généraux
• L’exécution du dégivrage manuel, de la
maintenance ou du nettoyage de l’appareil alors
que les aliments sont congelés dans le
congélateur peut augmenter la température des
produits alimentaires et réduire leur durée de
conservation.
• Nettoyer régulièrement les surfaces pouvant
entrer en contact avec des aliments.
• Lors du nettoyage intérieur ou extérieur de
l'appareil, ne pas l'essuyer avec une brosse dure,
du dentifrice ou des matériaux inflammables. Ne
pas utiliser de produits de nettoyage contenant
des substances inflammables. Cela peut
provoquer une décoloration ou des dommages
à l'appareil.
- Substances inflammables : alcool (éthanol,
méthanol, alcool isopropylique, alcool
isobutylique, etc.), diluant, eau de javel,
benzène, liquide inflammable, abrasif, etc.
• Après le nettoyage, vérifier si le câble
d’alimentation est endommagé.
Nettoyage de l'extérieur
dans de l'eau tiède. Ne pas utiliser de nettoyants
abrasifs ou corrosifs. Sécher soigneusement
avec un chiffon doux. Ne pas utiliser de chiffons
contaminés lors du nettoyage des portes en
acier inoxydable. Toujours utiliser un chiffon
dédié et essuyer dans le même sens que le grain.
Cela aide à réduire les taches et le ternissement
de la surface.
Nettoyage de l'intérieur
• Lorsque vous retirez une tablette ou un tiroir
dans l'appareil, enlever tous les aliments stockés
sur la tablette ou le tiroir afin d'éviter des
blessures ou des dommages à l'appareil. Dans le
cas contraire, des blessures peuvent survenir en
raison du poids des aliments stockés.
• Détacher les tablettes et les tiroirs et les nettoyer
avec de l'eau, puis les sécher suffisamment
avant de les replacer.
• Essuyer régulièrement les joints de la porte avec
un chiffon doux et humide.
• Le panier de porte fuit et les taches doivent être
nettoyées car elles peuvent compromettre la
capacité de stockage du panier et même
l'endommager.
• Ne jamais nettoyer les tablettes ou les récipients
au lave-vaisselle. Les parties peuvent se
déformer en raison de la chaleur.
• En cas de nettoyage des bouches d’aération à
l’extérieur de l’appareil au moyen d’un
aspirateur, le cordon d’alimentation doit être
débranché de la prise afin d’éviter toute
décharge statique qui peut endommager les
composants électroniques ou provoquer un
choc électrique. Un nettoyage régulier des
capots de ventilation arrière et latéraux est
recommandé pour maintenir un
fonctionnement fiable et économique de
l’appareil.
• Veiller à la propreté des bouches d'aération à
l'extérieur de l'appareil. Des bouches d'aération
obstruées peuvent provoquer un incendie ou
endommager l'appareil.
• Pour l'extérieur de l'appareil, utiliser une éponge
propre ou un chiffon doux et un détergent doux
Nettoyage du couvercle du
condenseur
Utilisez un aspirateur avec une brosse pour
nettoyer le couvercle du condenseur et les trous
d'aération. Ne retirez pas le panneau couvrant la
zone de la bobine du condenseur.

AVERTISSEMENT
ATTENTION
REMARQUE
fr_main.book.book Page 35 Tuesday, July 28, 2020 8:45 AM
Nous recommandons de le faire tous les 12 mois
pour maintenir l'efficacité opérationnelle.
Filtre à eau
Avant de remplacer le filtre à
eau
• Ne pas laisser les enfants avoir accès à de petites
pièces lors de l’installation de ce produit.
• Ne pas utiliser avec une eau
microbiologiquement dangereuse ou de qualité
inconnue sans une désinfection adéquate avant
ou après le système. Des systèmes certifiés pour
la réduction de kystes peuvent être utilisés avec
de l'eau désinfectée qui peut contenir des kystes
filtrables.
MAINTENANCE
• Protéger le filtre du gel. Vidanger le filtre lorsque
la température descend en dessous de 4,4°C.
• La cartouche filtrante jetable DOIT être
remplacée tous les 6 mois, à la capacité
nominale ou en cas de réduction notable du
débit.
• Lorsqu'un dispositif anti-refoulement est installé
sur un système d'eau, un dispositif de contrôle
de la pression due à la dilatation thermique doit
être installé.
• S’assurer que tous les tuyaux et raccords soient
bien fixés et qu’ils ne présentent pas de fuites.
• Bien que les tests aient été effectués dans des
conditions de laboratoire standard, les
performances réelles peuvent varier.
• Il est essentiel que les exigences d'installation,
de maintenance et de remplacement du filtre
recommandées par le fabricant soient
respectées pour que le produit fonctionne
comme indiqué.
Directives d'application / Paramètres
d'alimentation en eau
Débit de service 1,9 l/min
Alimentation en
eau
Puits communautaire ou
privé - Eau potable
35
FR
• Ne pas installer si la pression de l'eau dépasse
827 kPa. Si votre pression d'eau dépasse 827
kPa, vous devez installer une soupape de
limitation de pression. Contacter un
professionnel de la plomberie si vous ne savez
pas comment vérifier votre pression d'eau.
• Ne pas installer là où des coups de bélier
peuvent se produire. Si des conditions de coup
de bélier existent, vous devez installer un parecoups de coup de bélier. Contacter un
professionnel de la plomberie si vous ne savez
pas comment vérifier cette condition.
• Ne pas installer sur des lignes d'alimentation en
eau chaude. La température maximale de l'eau
d’exploitation de ce système de filtration est de
37,8°C.
Pression d'eau 138 - 827 kPa
Température de
l'eau
Capacité 1892 litres
0,6 - 37,8°C
Remplacement du filtre à eau
(modèle à plomberie)
*1 Cette fonctionnalité n'est disponible que sur
certains modèles.
Le fi ltre doit êtr e cha ngé tous les 6 mois ou lorsq ue
le voyant d’indication s'allume ou que la sortie du
distributeur d'eau diminue.

fr_main.book.book Page 36 Tuesday, July 28, 2020 8:45 AM
36
FR
MAINTENANCE
• Pour acheter un filtre à eau de remplacement :
- Utiliser une cartouche de remplacement :
ADQ736939**
- Rendez-vous chez votre revendeur ou
distributeur local ou contactez le centre
d’information client de LG Electronics. Pour
obtenir une aide supplémentaire, visitez notre
site Web sur lg.com
Type d'écrou fileté
1
Desserrer le bouchon à vis.
2
Tirer le tuyau pour le sortir du bouchon du
filtre à eau jusqu'à ce que la ligne colorée
soit visible.
3
Pousser le tuyau dans le bouchon du filtre à
eau en vous assurant que l'extrémité soit
complètement hermétique.
*1
a
Replacement Filter
été activé.
6
Distribuer de l’eau pendant environ 5 minutes
pour éliminer l’air emprisonné et les
contaminants du système.
Type de raccord à pousser
1
Retirer le bouchon à vis.
2
Tirer le tuyau pour le sortir du filtre à eau.
3
Pousser le tuyau dans le filtre à eau en vous
assurant que l'extrémité soit complètement
hermétique.
. Le nouveau filtre à eau a
*1
4
Serrez le bouchon à vis jusqu'à ce que la ligne
colorée sur le filtre à eau ne soit plus visible.
5
Appuyer et maintenir le bouton
pendant 3 secondes. Cela réinitialise l'icône
Water Filter
4
Insérer le bouchon à vis jusqu'à ce que la ligne
colorée sur le filtre à eau ne soit plus visible.
5
Appuyer et maintenir le bouton
pendant 3 secondes. Cela réinitialise l'icône
Replacement Filter
été activé.
. Le nouveau filtre à eau a
Water Filter

ATTENTION
fr_main.book.book Page 37 Tuesday, July 28, 2020 8:45 AM
6
Distribuer de l’eau pendant environ 5 minutes
pour éliminer l’air emprisonné et les
contaminants du système.
• Tout manquement à remplacer les filtres si
nécessaire ou l’utilisation de filtres à eau non
agréés par LG peut entraîner une fuite de la
cartouche filtrante et des dommages matériels.
MAINTENANCE
37
FR

fr_main.book.book Page 38 Tuesday, July 28, 2020 8:45 AM
38
FR
DÉPANNAGE
DÉPANNAGE
Avant d'appeler le service
Refroidissement
Symptômes Cause possible et solution
Il n'y a pas de
réfrigération ou de
congélation.
La réfrigération ou la
congélation est
mauvaise.
L'appareil a une
mauvaise odeur.
Y a-t-il une coupure de courant ?
• Vérifier l'alimentation électrique d'autres appareils.
Vérifier l'alimentation électrique d'autres appareils.
• Brancher correctement la fiche d'alimentation dans la prise.
La température du réfrigérateur ou du congélateur est-elle réglée au
plus chaud ?
• Régler la température du réfrigérateur ou du congélateur à un réglage
plus froid.
L'appareil se trouve-t-il en plein soleil, ou est-il près d'un objet générant
de la chaleur, tel qu'un four ou un radiateur ?
• Vérifier la zone d'installation et le réinstaller loin d'objets produisant de la
chaleur.
Avez-vous stocké de la nourriture chaude sans la refroidir au préalable ?
• Refroidir la nourriture chaude avant de la mettre dans le compartiment
réfrigérateur ou le congélateur.
Avez-vous mis trop de nourriture ?
• Maintenir un espace approprié entre les aliments.
Les portes de l'appareil sont-elles complètement fermées ?
• Fermer complètement la porte et s'assurer que la nourriture stockée ne
coince pas la porte.
Y a-t-il suffisamment d'espace autour de l'appareil ?
• Ajuster la position de l'installation pour qu'il y ait suffisamment d'espace
autour de l'appareil.
La température du réfrigérateur ou du congélateur est-elle réglée sur
« Chaud » ?
• Régler la température du réfrigérateur ou du congélateur à un réglage
plus froid.
Avez-vous mis des aliments avec une forte odeur ?
• Conserver les aliments ayant de fortes odeurs dans des récipients
hermétiques.
Il se peut que des légumes ou des fruits se soient gâtés dans le tiroir.
• Jeter les légumes pourris et nettoyer le bac à légumes. Ne pas stocker de
légumes trop longtemps dans le bac à légumes.

fr_main.book.book Page 39 Tuesday, July 28, 2020 8:45 AM
Glace et eau
Symptômes Cause possible et solution
La machine à glaçons
automatique ne
produit pas de glace ou
produit une petite
quantité de glace.
Avez-vous installé l'appareil récemment ?
• La machine à glaçons produit normalement de la glace lorsqu’environ 48
heures se sont écoulées après que l'appareil a été installé.
• Si la température du compartiment réfrigérateur est trop froide, le filtre à
eau peut geler et bloquer le débit d'eau vers la machine à glaçons.
Avez-vous branché le tuyau d'alimentation en eau vers l'appareil et
ouvert le robinet d'alimentation ?
• Raccorder le tuyau d'alimentation en eau à l'appareil et ouvrir
complètement le robinet d'alimentation.
Le tuyau d'alimentation en eau est-il plié ?
• Si le tuyau d'alimentation en eau est plié, le débit d'eau peut être
compromis.
Avez-vous récemment distribué une grande quantité de glace ?
• Il faut environ 24 heures pour produire plus de glace dans la machine à
glaçons automatique. Veuillez patienter.
Avez-vous réglé le commutateur de la machine à glaçons ou le bouton de
la machine à glaçons automatique sur le panneau de commande sur
Marche ?
• Appuyer I sur le commutateur de la machine à glaçons ou positionner le
bouton automatique de la machine à glaçons sur
commande (Pour plus de détails sur la façon de l'utiliser, visitez le site Web
LG Electronics ou utilisez votre appareil intelligent).
La température du congélateur est-elle trop élevée ?
• Si la température réglée est trop chaude, la glace sera produite lentement
ou ne sera pas produite du tout. Régler la température du congélateur à 18°C pour un fonctionnement normal de la machine à glaçons
automatique.
Avez-vous ouvert la porte de l'appareil fréquemment ?
• Si vous ouvrez la porte de l'appareil, l'air froid s'échappe, réduisant la
vitesse de production de glace. Ne pas ouvrir et fermer fréquemment la
porte de l'appareil.
La porte de l'appareil est-elle complètement fermée ?
• Si la porte de l'appareil n'est pas complètement fermée, la température du
congélateur augmente, ce qui ralentit la vitesse de production de glace.
Fermer complètement la porte de l'appareil.
DÉPANNAGE
ON
sur le panneau de
39
FR

fr_main.book.book Page 40 Tuesday, July 28, 2020 8:45 AM
40
FR
DÉPANNAGE
Symptômes Cause possible et solution
La glace n'est pas
distribuée.
Impossible d'entendre le bruit de la glace qui sort ?
• Dans le panneau de commande, sélectionnez alternativement les modes
glaçons et glace pilée pour distribuer de la glace.
Le passage de la glace est-il bloqué ? (Vous pouvez vérifier le passage de
la glace en séparant le bac à glaçons.)
• La glace ne peut être correctement distribuée si le passage de la glace est
bloqué. Vérifiez la glace et nettoyez régulièrement le passage de la glace.
L'eau ne sort pas. Le robinet d'alimentation est peut-être fermé. (Modèles à raccordement
uniquement)
• Ouvrir le robinet d'alimentation en eau.
• Vérifier si la température du compartiment réfrigérateur est trop froide,
car le filtre à eau peut geler et bloquer le débit d'eau vers le distributeur.
Le réservoir de distribution d'eau est peut-être vide. (Modèles sans
plomberie uniquement)
• Remplir le réservoir du distributeur d'eau.
Le robinet d'alimentation en eau est-il fermé ? (Modèles à raccordement
uniquement)
• Ouvrir le robinet d'alimentation en eau.
Est-ce que vous utilisez de l'eau non filtrée ?
• L'eau non filtrée peut contenir une grande quantité de métaux lourds
divers ou de substances étrangères, de sorte que le filtre peut être obstrué
à un stade précoce, quelle que soit la durée de vie du filtre.

fr_main.book.book Page 41 Tuesday, July 28, 2020 8:45 AM
Symptômes Cause possible et solution
L'eau a un goût
étrange.
Le goût de l'eau est-il différent lorsqu'on le compare avec le goût de
l'eau du purificateur d'eau précédent ?
• L'eau purifiée ou l'eau froide n'a peut-être pas été utilisée pendant une
longue période ?
S'est-il écoulé longtemps depuis que vous avez installé et remplacé le
filtre ?
• Si un filtre expiré est utilisé, la performance de purification peut diminuer.
Il est recommandé de remplacer le filtre en fonction de la période de
remplacement du filtre.
Avez-vous rincé correctement le filtre dans la phase initiale après l'avoir
installé ?
• Lorsque vous installez ou remplacez le filtre pour la première fois, vous
devez éliminer l'air et les résidus de charbon actif à l'intérieur du filtre.
Utiliser l'appareil après distribution et décharge d'environ 5 litres d'eau
purifiée du distributeur en appuyant sur le levier de distribution d'eau. (Le
charbon actif est inoffensif pour les humains.)
L'eau purifiée ou l'eau froide n'a peut-être pas été utilisée pendant une
longue période ?
• Le goût de l'ancienne eau peut changer en raison d'un développement
bactérien. Utiliser le produit après distribution et décharge d'environ 5
litres (environ 3 minutes) du distributeur d'eau.
DÉPANNAGE
41
FR
Condensation et givre
Symptômes Cause possible et solution
Il y a de la
condensation à
l'intérieur de l'appareil
ou sur le fond du capot
du bac à légumes.
Avez-vous stocké de la nourriture chaude sans la refroidir au préalable ?
• Laissez refroidir les aliments chauds avant de les placer au congélateur.
Avez-vous laissé la porte de l'appareil ouverte ?
• Bien que la condensation disparaisse lorsque vous fermez la porte de
l'appareil, vous pouvez l'essuyer avec un chiffon sec.
Avez-vous ouvert et fermé la porte de l'appareil trop fréquemment ?
• Il se peut que de la condensation se forme en raison de la différence de
température avec l'extérieur. Essuyer l'humidité avec un chiffon sec.
Avez-vous mis des aliments chauds ou humides à l'intérieur sans les
sceller dans un récipient ?
• Conserver les aliments dans un récipient couvert ou hermétique.

fr_main.book.book Page 42 Tuesday, July 28, 2020 8:45 AM
42
FR
DÉPANNAGE
Symptômes Cause possible et solution
Du givre s'est formé
dans le compartiment
congélateur.
Les portes ne sont peut-être pas bien fermées.
• Vérifier qu'aucun aliment à l'intérieur de l'appareil ne bloque la porte et
s'assurer que la porte soit bien fermée.
Avez-vous stocké de la nourriture chaude sans la refroidir au préalable ?
• Refroidir la nourriture chaude avant de la mettre dans le compartiment
réfrigérateur ou le congélateur.
L'entrée ou la sortie d'air du congélateur est-elle obstruée ?
• S'assurer que l'entrée ou la sortie d'air ne soit pas obstruée afin que l'air
puisse circuler à l'intérieur.
Le congélateur est-il trop rempli ?
• Maintenir un espace approprié entre les articles.
Du givre ou de la
condensation s'est
formé à l'intérieur ou à
l'extérieur de
l'appareil.
Avez-vous ouvert et fermé la porte de l'appareil trop fréquemment ou la
porte de l'appareil est-elle mal fermée ?
• Du givre ou de la condensation peuvent se former si l'air extérieur pénètre
à l'intérieur de l'appareil.
L'environnement d'installation est-il humide ?
• De la condensation peut apparaître sur l'extérieur de l'appareil si la zone
d'installation est trop humide ou lors d'une journée humide comme un
jour de pluie. Essuyer l'humidité avec un chiffon sec.
Le côté ou l'avant de
l'appareil est chaud.
Des tuyaux anti-condensation sont installés sur ces zones de l'appareil
afin de réduire la formation de condensation autour de la zone de la
porte.
• Le tuyau de dégagement de la chaleur pour empêcher la condensation est
installé sur l'avant et le côté de l'appareil. Vous pouvez le trouver
particulièrement chaud juste après l'installation de l'appareil ou pendant
l'été. Vous pouvez être assuré qu'il ne s'agit pas d'un problème et que c'est
normal.
Il y a de l'eau à
l'intérieur ou à
l'extérieur de
l'appareil.
Y a-t-il une fuite d'eau autour de l'appareil ?
• Vérifier si de l'eau a fui d'un évier ou d'un autre endroit.
Y a-t-il de l'eau sur le fond de l'appareil ?
• Vérifier si l'eau provient d'aliments congelés qui se sont décongelés ou
d'un récipient cassé ou tombé.

fr_main.book.book Page 43 Tuesday, July 28, 2020 8:45 AM
Pièces et caractéristiques
Symptômes Cause possible et solution
La porte de l'appareil
n'est pas bien fermée.
La porte de l'appareil
est difficile à ouvrir.
Le meneau de porte ne
se plie ni ne se déplie
correctement.
La lampe à l'intérieur
de l'appareil ne
s'allume pas.
L'appareil est-il penché vers l'avant ?
• Régler le pied avant afin de soulever légèrement la face avant.
Les tablettes ont-elles été correctement montées ?
• Remonter les tablettes si nécessaire.
Avez-vous fermé la porte avec une force excessive ?
• Si vous appliquez trop de force ou de vitesse lors de la fermeture de la
porte, elle peut rester légèrement ouverte. S'assurer de ne pas pousser la
porte trop violemment. Fermer doucement la porte.
Avez-vous ouvert la porte juste après l'avoir fermée ?
• Si vous essayez d'ouvrir la porte de l'appareil moins de 1 minute après
l'avoir fermée, vous pouvez avoir des difficultés en raison de la pression
qui se trouve à l'intérieur de l'appareil. Essayer d'ouvrir à nouveau la porte
de l'appareil au bout de quelques minutes afin que la pression interne se
stabilise.
Les pieds avant de mise à niveau sont-ils déployés, l’appareil de niveau
et les portes alignées ?
• Une fois les paniers de porte remplis, les portes risquent de ne plus être
alignées, ce qui empêchera le fonctionnement correct du meneau de porte
ou de la fonction Auto Open Door. Étendre complètement les deux pieds
de mise à niveau avant afin qu’ils soient en contact ferme avec le sol. Suivre
les instructions de la section Alignement de la Porte pour soulever la porte
gauche du réfrigérateur jusqu’à ce que le meneau de la porte fonctionne
de nouveau correctement. Ajuster la porte droite du réfrigérateur pour
l’aligner avec la porte gauche du réfrigérateur.
Défaillance de la lampe
• Fermez la porte et rouvrez-la. Si la lampe ne s'allume pas, veuillez
contacter le centre d'informations client de LG Electronics. Ne tentez pas
de retirer la lampe.
DÉPANNAGE
43
FR

fr_main.book.book Page 44 Tuesday, July 28, 2020 8:45 AM
44
FR
DÉPANNAGE
Bruits
Symptômes Cause possible et solution
L'appareil est bruyant
et génère des sons
anormaux.
Bruits de clics Le contrôle de dégivrage émet un clic lorsque le cycle de dégivrage
Bruits de cliquetis Des vibrations sonores peuvent provenir de l'écoulement de l'appareil,
Crissements Le moteur du ventilateur de l'évaporateur fait circuler l'air à travers les
Gargouillements Débit de l'appareil à travers le système de refroidissement.
Claquements Contraction et expansion des parois internes du fait de changements de
L'appareil est-il installé sur un sol faible ou qui n'est pas de niveau ?
• Installer l'appareil sur un sol ferme et de niveau.
L'arrière de l'appareil touche-t-il le mur ?
• Ajuster la position de l'installation pour qu'il y ait suffisamment d'espace
autour de l'appareil.
Y a-t-il des objets éparpillés derrière l'appareil ?
• Retirer les objets éparpillés derrière l'appareil.
Y a-t-il un objet sur le dessus de l'appareil ?
• Enlever l'objet sur le dessus de l'appareil.
automatique commence et se termine. La commande du thermostat (ou
la commande de l'appareil sur certains modèles) émet également un clic
lorsque le cycle démarre et s'arrête.
• Fonctionnement normal
de la conduite d'eau à l'arrière de l'appareil (modèles à raccordement
seulement) ou d'objets posés sur ou autour de l'appareil.
• Fonctionnement normal
L'appareil ne repose pas de manière égale au sol.
• Le sol est fragile ou irrégulier les jambes de mise à niveau nécessitent un
ajustement. Voir la section d’Alignement des Portes.
L'appareil avec un compresseur linéaire a été déplacé pendant son
fonctionnement.
• Fonctionnement normal. Si le cliquetis du compresseur ne s'arrête pas au
bout de 3 minutes, mettre l'alimentation de l'appareil hors tension, puis à
nouveau sous tension.
compartiments du réfrigérateur et du congélateur.
• Fonctionnement normal
L'air est forcé sur le condenseur par le ventilateur du condenseur.
• Fonctionnement normal
• Fonctionnement normal
température.
• Fonctionnement normal

fr_main.book.book Page 45 Tuesday, July 28, 2020 8:45 AM
DÉPANNAGE
45
Symptômes Cause possible et solution
Vibrations Si le côté ou l'arrière de l'appareil touche un meuble ou un mur, une
partie des vibrations normales peut devenir audible.
• Pour éliminer le bruit, s'assurer que les côtés et l'arrière ne puissent pas
toucher un mur ou une armoire.
FR

fr_main.book.book Page 46 Tuesday, July 28, 2020 8:45 AM
Note

pt_main.book.book Page 1 Tuesday, July 28, 2020 9:02 AM
MANUAL DO UTILIZADOR
FRIGORÍFICO E
CONGELADOR
Antes de iniciar a instalação, leia cuidadosamente as
instruções. Esta ação simplificará a instalação e garantirá que
o produto é instalado de forma correta e segura. Após a
instalação, guarde estas instruções num local próximo ao
produto para consulta futura.
www.lg.com
Copyright © 2020 LG Electronics Inc. Todos os direitos reservados

pt_main.book.book Page 2 Tuesday, July 28, 2020 9:02 AM
ÍNDICE
Este manual pode incluir imagens ou
conteúdos que não correspondem ao
modelo comprado.
Este manual está sujeito a revisão por
parte do fabricante.
INSTRUÇÕES DE SEGURANÇA
LEIA TODAS AS INSTRUÇÕES ANTES DE UTILIZAR.........................................3
AVISO...................................................................................................................3
ADVERTÊNCIA.....................................................................................................9
INSTALAÇÃO
Antes de proceder à instalação......................................................................12
Remover da porta do frigorífico e do congelador.......................................13
Ligar o tubo de água .......................................................................................15
Nivelamento e alinhamento da porta ...........................................................16
Ligar o aparelho...............................................................................................18
Mover o aparelho para o deslocar.................................................................18
FUNCIONAMENTO
Antes de utilizar................................................................................................19
Funcionalidades do produto...........................................................................22
Painel de controlo............................................................................................25
Dispensador de gelo e água...........................................................................26
Máquina de gelo automática..........................................................................28
Door in Door.....................................................................................................30
Gaveta................................................................................................................31
Prateleira...........................................................................................................32
Prateleira da porta...........................................................................................32
MANUTENÇÃO
Limpeza .............................................................................................................33
Filtro de água....................................................................................................34
RESOLUÇÃO DE PROBLEMAS
Antes de requisitar o serviço de manutenção..............................................37

AVISO
pt_main.book.book Page 3 Tuesday, July 28, 2020 9:02 AM
INSTRUÇÕES DE SEGURANÇA
3
INSTRUÇÕES DE SEGURANÇA
LEIA TODAS AS INSTRUÇÕES ANTES DE UTILIZAR
As seguintes diretrizes de segurança destinam-se a evitar riscos ou
danos imprevistos resultantes de utilização incorreta ou perigosa do
equipamento.
As diretrizes encontram-se divididas em
conforme descrito abaixo.
Mensagens de segurança
Este símbolo é apresentado para assinalar assuntos e
utilizações que podem representar perigo. Leia
cuidadosamente a secção com este símbolo e siga as
instruções de forma a evitar riscos.
AVISO
Isto indica que a não observância das instruções pode
provocar ferimentos graves ou morte.
"AVISO”
e
"ADVERTÊNCIA”
PT
,
ADVERTÊNCIA
Isto indica que a não observância das instruções pode
provocar ferimentos menores ou danos no produto.
AVISO
Para reduzir o risco de explosão, incêndio, morte, choque elétrico,
ferimentos ou queimaduras causadas pela água em pessoas aquando
da utilização deste produto, siga as precauções básicas, incluindo o
que se segue:
Segurança técnica
• Este equipamento pode ser utilizado por crianças com idades a partir
dos 8 anos e por pessoas com capacidades físicas, sensoriais ou

pt_main.book.book Page 4 Tuesday, July 28, 2020 9:02 AM
4
PT
INSTRUÇÕES DE SEGURANÇA
mentais reduzidas ou com falta de experiência e conhecimentos,
desde que tenham sido advertidas e instruídas relativamente à
utilização do equipamento de uma forma segura e que
compreendam os riscos envolvidos. As crianças não devem brincar
com o equipamento. A limpeza e a manutenção destinadas ao
utilizador não devem ser realizadas por crianças sem supervisão.
• Este equipamento não se destina a ser utilizado por pessoas
(incluindo crianças) com capacidades físicas, sensoriais ou mentais
reduzidas ou sem experiência e conhecimentos, exceto se
acompanhadas ou instruídas relativamente à utilização do
equipamento por uma pessoa responsável pela sua segurança. As
crianças devem ser supervisionadas para garantir que não brincam
com o equipamento.
• Crianças com idade entre 3 e 8 anos podem encher e esvaziar
aparelhos de refrigeração.
• Este equipamento deve ser usado em aplicações domésticas e
similares como:
- áreas de cozinha da equipe em lojas, escritórios e outros ambientes
de trabalho;
- casas de fazenda e clientes em hotéis, motéis e outros ambientes
residenciais;
- ambientes do tipo pousada;
- bufê e aplicações similares não comerciais.
•
Este símbolo alerta sobre materiais inflamáveis que
podem se inflamar e causar um incêndio se você não
tomar cuidado.
• Este equipamento contém uma pequena quantidade de refrigerante
isobutano (R600a), mas também é combustível. Ao transportar e
instalar o equipamento, é necessário garantir que nenhuma das
peças do circuito de refrigeração fica danificada.
• O gás refrigerante e o gás de expansão de isolamento utilizado no
equipamento exigem procedimentos de eliminação especiais.
Consulte o técnico da assistência ou uma pessoa igualmente
qualificada antes de proceder à sua eliminação.

pt_main.book.book Page 5 Tuesday, July 28, 2020 9:02 AM
INSTRUÇÕES DE SEGURANÇA
5
PT
• Não danifique o circuito de refrigeração.
• Se o cabo de alimentação estiver danificado ou se a tomada estiver
solta, não utilize o cabo de alimentação e entre em contacto com um
centro de atendimento autorizado.
• Não coloque várias tomadas portáteis ou fontes de energia portáteis
na parte traseira do equipamento.
• Ligue firmemente a ficha elétrica à tomada após eliminar
completamente quaisquer vestígios de humidade ou sujidade.
• Nunca desligue o equipamento da tomada puxando pelo cabo de
alimentação. Segure sempre firmemente a ficha elétrica e retire-a da
tomada.
• Mantenha as aberturas de ventilação, na caixa do equipamento ou na
estrutura incorporada, livres de obstruções.
• Não armazene neste equipamento substâncias explosivas tais como
latas de aerossol como carburantes inflamáveis.
• Não incline o equipamento para o puxar ou empurrar durante o
transporte.
• Ao posicionar o equipamento, certifique-se de que o cabo de
alimentação não esteja enredado ou danificado.
• Não utilize dispositivos mecânicos ou outros meios para acelerar o
processo de descongelamento.
• Não utilize um secador de cabelo para secar o interior do
equipamento nem coloque uma vela no interior para remover
odores.
• Não utilize aparelhos elétricos dentro do frigorífico.
• Certifique-se de que não fica com uma parte do corpo, tal como uma
mão ou pé preso ao mover o aparelho.
• Desligue a ficha elétrica antes de limpar o interior ou exterior do
equipamento.
• Não pulverize água ou substâncias inflamáveis (pasta de dentes,
álcool, diluente, benzeno, líquidos inflamáveis, abrasivos, etc.) sobre
o interior ou exterior do aparelho com o objectivo de o limpar.

pt_main.book.book Page 6 Tuesday, July 28, 2020 9:02 AM
6
PT
INSTRUÇÕES DE SEGURANÇA
• Não proceda à limpeza do equipamento com escovas, panos ou
esponjas com superfícies abrasivas ou que sejam feitas de um
material metálico.
• Apenas um técnico de assistência autorizado pelo centro de
atendimento da LG Electronics pode desmontar, reparar ou alterar o
equipamento. Entre em contacto com o centro de apoio ao cliente da
LG Electronics caso mova ou instale o equipamento num local
diferente.
Risco de incêndio e materiais inflamáveis
• Se for detetada uma fuga, evite produzir chamas ou outras potenciais
fontes de ignição e areje a divisão onde o equipamento se encontra
durante alguns minutos. De forma a evitar a criação de uma mistura
de gás e ar inflamável, caso tenha ocorrido uma fuga no circuito de
refrigeração, a dimensão da divisão onde o equipamento é utilizado
deve corresponder à quantidade de refrigerante utilizado. A divisão
deve possuir uma dimensão de 1 m² para cada 8 g de refrigerante
R600a no interior do equipamento.
• Uma fuga de refrigerante dos tubos pode inflamar ou provocar uma
explosão.
• A quantidade de refrigerante no seu equipamento em particular é
apresentada na placa de identificação no interior do equipamento.
INSTALAÇÃO
• Este equipamento só deve ser transportado por duas ou mais
pessoas, segurando-o firmemente.
• Instale o equipamento num piso firme e nivelado.
• Não instale o equipamento num local húmido ou empoeirado. Não
instale nem mantenha o equipamento numa área exterior ou em
qualquer área sujeita às condições climatéricas, tais como luz solar
direta, vento, chuva ou temperaturas abaixo de zero.
• Não coloque o equipamento em contacto direto com a luz solar nem
exposto ao calor de equipamentos de aquecimento como fornos ou
aquecedores.

pt_main.book.book Page 7 Tuesday, July 28, 2020 9:02 AM
INSTRUÇÕES DE SEGURANÇA
7
PT
• Tenha o cuidado de não expor a parte traseira do equipamento
durante a instalação.
• Instale o equipamento num local onde seja fácil desligar a ficha
elétrica do equipamento.
• Tenha o cuidado de não deixar a porta do equipamento cair durante
a montagem ou desmontagem.
• Tenha o cuidado de não perfurar, esmagar ou, de outro modo,
danificar o cabo de alimentação durante a montagem ou
desmontagem da porta do equipamento.
• Tenha o cuidado de não colocar a ficha elétrica voltada para cima e
de não deixar o equipamento encostado à ficha elétrica.
• Não ligue um adaptador de ficha ou outros acessórios à ficha de
alimentação.
• Não modifique nem aumente o comprimento do cabo de
alimentação.
• Certifique-se de que a tomada está devidamente ligada à terra e de
que o pino de ligação à terra no cabo de alimentação não está
danificado nem removido da ficha elétrica. Para obter mais detalhes
acerca da ligação à terra, entre em contacto com um centro de
atendimento ao cliente da LG Electronics.
• Este equipamento está equipado com um cabo de alimentação que
possui um condutor e uma ficha de ligação à terra. A ficha elétrica
deve estar ligada a uma tomada adequada devidamente instalada e
ligada à terra em conformidade com todos os códigos e
regulamentos locais.
• Nunca ligue um equipamento que apresente sinais de danos. Se tiver
dúvidas, consulte o seu fornecedor.
• Elimine todo o material de embalagem (tal como sacos de plástico e
esferovite) para fora do alcance de crianças. O material de
embalagem pode causar asfixia.
• Não ligue o aparelho a um adaptador multi-tomadas sem um cabo de
alimentação (instalado).
• O aparelho deve estar ligado a uma linha de alimentação para o
efeito, com fusíveis separados.

pt_main.book.book Page 8 Tuesday, July 28, 2020 9:02 AM
8
PT
INSTRUÇÕES DE SEGURANÇA
• Não utilize uma extensão multi-tomadas que não está bem ligada à
terra (portátil). Caso utilize uma extensão multi-tomadas bem ligada
à terra (portátil), utilize a extensão multi-tomadas com a capacidade
de corrente da classificação do cabo de alimentação ou superior e
utilize a extensão multi-tomadas apenas para o aparelho.
Funcionamento
• Não utilize o equipamento para nenhum outro fim (transporte ou
armazenamento de materiais médicos ou experimentais) que não
seja o armazenamento doméstico de alimentos.
• Se entrar água nas partes elétricas do equipamento, desligue a ficha
elétrica e entre em contacto com o centro de apoio ao cliente da LG
Electronics.
• Desligue a ficha elétrica em caso de trovoada ou quando esta não for
utilizada durante um longo período de tempo.
• Não toque na ficha elétrica ou nos controlos do equipamento com as
mãos molhadas.
• Não dobre excessivamente o cabo de alimentação nem coloque um
objeto pesado sobre o mesmo.
• Desligue imediatamente a ficha elétrica e entre em contacto com o
centro de apoio ao cliente da LG Electronics se detetar um ruído, odor
ou fumo anormal provenientes do equipamento.
• Não coloque as mãos ou objetos metálicos no interior da área que
emana o ar frio, da cobertura ou da grelha dissipadora de calor na
parte traseira.
• Não aplique força ou impactos excessivos na cobertura traseira do
equipamento.
• Tenha cuidado ao abrir ou fechar a porta do equipamento junto a
crianças. A porta poderá bater na criança e provocar ferimentos. Não
permita que alguém se pendure em qualquer uma das portas, uma
vez que a unidade pode cair e provocar ferimentos graves.
• Evite o perigo de alguma criança ficar presa no interior do
equipamento. Uma criança presa no interior do equipamento pode
sufocar.

ADVERTÊNCIA
pt_main.book.book Page 9 Tuesday, July 28, 2020 9:02 AM
INSTRUÇÕES DE SEGURANÇA
9
PT
• Não coloque animais, tais como animais domésticos, dentro do
equipamento.
• Não coloque objetos pesados ou frágeis, recipientes com líquidos,
substâncias combustíveis, objetos inflamáveis (tais como velas, luzes,
etc.) ou dispositivos de aquecimento (tais como fornos, aquecedores,
etc.) em cima do aparelho.
• Não coloque outro equipamento eletrónico (como um aquecedor ou
telemóvel) no interior do equipamento.
• Se ocorrer um escapamento de gases (isobutano, propano, gás
natural, etc.), não toque no aparelho nem na ficha eléctrica,
procedendo imediatamente à ventilação da área. Este equipamento
utiliza um gás refrigerante (isobutano, R600a), embora apenas
consuma pequenas quantidades, continua a ser inflamável. Uma
fuga de gás durante o transporte, instalação ou utilização do
aparelho pode provocar incêndio, explosão ou ferimentos se faíscas
ocorrerem.
• Não utilize ou armazene substâncias inflamáveis ou combustíveis
(éter, benzeno, álcool, produtos químicos, GPL, spray combustível,
inseticida, ambientador, cosméticos, etc.) junto ao equipamento.
Eliminação
• Quando eliminar o equipamento, remova as juntas da porta e deixe
as prateleiras e as prateleiras da porta no sítio e mantenha as
crianças afastadas do equipamento.
ADVERTÊNCIA
Para reduzir o risco de ferimentos menores a pessoas, avarias ou
danos no produto ou na propriedade aquando da utilização deste
produto, siga as precauções básicas, incluindo o seguinte:

pt_main.book.book Page 10 Tuesday, July 28, 2020 9:02 AM
10
PT
INSTRUÇÕES DE SEGURANÇA
Funcionamento
• Não toque nos alimentos congelados ou nas partes metálicas do
compartimento do congelador com as mãos molhadas ou húmidas.
Esta ação pode provocar ferimentos devido ao gelo.
• Não coloque recipientes de vidro, garrafas ou latas (especialmente os
recipientes com bebidas gaseificadas) no compartimento do
congelador, prateleiras ou compartimento de gelo que serão
expostos a temperaturas negativas.
• O vidro temperado na parte frontal da porta do aparelho ou
prateleiras pode ser danificado por um impacto. Se estiver quebrado,
não lhe toque com as mãos.
• Não se agarre às portas, ao espaço de armazenamento ou às
prateleiras do equipamento nem suba para o mesmo.
• Não armazene uma quantidade excessiva de garrafas de água ou
recipientes para acompanhamentos nas prateleiras da porta.
• Não abra ou feche a porta do equipamento com força excessiva.
• Se as dobradiças da porta do produto estiverem danificadas ou
funcionarem incorretamente, interrompa imediatamente a sua
utilização e contacte um centro de atendimento da LG Electronics.
• Evite que os animais mordam o cabo elétrico ou a mangueira de
água.
• Nunca consuma alimentos congelados imediatamente após estes
terem sido retirados do compartimento do congelador.
• Certifique-se de que não fica com uma mão ou pé preso ao abrir ou
fechar a porta do aparelho ou o Door-in-Door.
Manutenção
• Não limpe as prateleiras ou as coberturas de vidro com água morna
quando estas estiverem frias. Estas podem quebrar se forem
expostas a alterações súbitas de temperatura.
• Não introduza as prateleiras viradas ao contrário. Podem cair.
• Para remover o gelo do equipamento, entre em contacto com um
centro de apoio ao cliente da LG Electronics.

pt_main.book.book Page 11 Tuesday, July 28, 2020 9:02 AM
INSTRUÇÕES DE SEGURANÇA
• Elimine o gelo que se encontra dentro do balde de gelo no
congelador durante uma falha de energia prolongada.
11
PT

OBSERVAÇÃO
OBSERVAÇÃO
pt_main.book.book Page 12 Tuesday, July 28, 2020 9:02 AM
12
PT
INSTALAÇÃO
INSTALAÇÃO
Antes de proceder à
instalação
Dimensões e distâncias
Uma distância demasiado pequena em relação aos
itens adjacentes pode resultar na degradação da
capacidade de congelação e no aumento dos
custos da eletricidade. Permita uma distância
superior a 50 mm entre a parte traseira do
equipamento e a parede ao instalar o
equipamento.
A
D E
G
F
B
H
C
- Tipo A (mm) Tipo B (mm)
A912 912
Temperatura ambiente
• O equipamento foi criado para funcionar dentro
de um intervalo limitado de temperatura
ambiente, consoante a zona climática.
• As temperaturas internas podem ser afetadas
pela localização do equipamento, pela
temperatura ambiente, pela frequência de
abertura da porta e assim por diante.
• A classe climática pode ser encontrada na
etiqueta de classificação.
Classe climática Intervalo de temperatura
ambiente ºC
SN (Temperado
Abrangente)
N (Temperado) +16 - +32
ST (Sub-tropical) +16 - +38 / +18 - +38**
T (Tropical) +10 - +43* / +16 - +43 /
* Austrália, Índia, Quénia
** Argentina
+10 - +32
+18 - +43**
B 1790 1790
C927 738
D797 615
E877 690
F922 733
G 1384 1180
H 1713 1750
• Pode determinar o tipo de aparelho que é
olhando para a etiqueta no interior do
equipamento.
• Os equipamentos classificados de SN a T
destinam-se a ser utilizados com uma
temperatura ambiente entre 10 ºC e 43 ºC.

AVISO
pt_main.book.book Page 13 Tuesday, July 28, 2020 9:02 AM
Acessórios
*1 Este recurso está disponível apenas em alguns
modelos.
a
b
c
d
e
f
*1
Chave A
*1
Chave B
Filtro de água
Tubo de água
Conector de tubo e anel
Conector de tubo e válvula
*1
*1
*1
Remover da porta do
frigorífico e do congelador
Se a sua porta de entrada for demasiado estreita
para o equipamento passar, remova as portas do
equipamento e passe-o lateralmente.
INSTALAÇÃO
do abastecimento de água. Desaperte a
b
cobertura
2
Retire o parafuso da tampa da dobradiça na
parte superior do equipamento. Levante o
gancho, localizado na parte inferior do lado da
frente da tampa, com uma chave de fenda de
cabeça plana.
3
Retire o tubo c. Desapertar o fio de terra d.
Desconectar todos os arreios de arame
.
13
e
PT
.
• Desligue o cabo de alimentação, os fusíveis e o
disjuntor de casa antes de instalar, remover as
portas, ou limpar o equipamento. O
incumprimento destas instruções pode resultar
em morte, incêndio ou choque elétrico.
Remover a porta do congelador
1
A linha de abastecimento de água está ligada à
parte superior direita na superfície posterior
do equipamento. Segure a ligação de
abastecimento de água
a
para soltar a linha

ADVERTÊNCIA
ADVERTÊNCIA
ADVERTÊNCIA
pt_main.book.book Page 14 Tuesday, July 28, 2020 9:02 AM
14
PT
4
• Ao levantar a dobradiça sem o trinco, tenha
cuidado para que a porta não caia para a frente.
É recomendável que a remoção e recolocação da
porta sejam efetuadas por duas ou mais
pessoas.
5
INSTALAÇÃO
Gire a alavanca da dobradiça f no sentido
anti-horário. Levante a dobradiça superior
livre da trava da alavanca da dobradiça
Levante a porta do congelador até que esteja
livre da montagem da dobradiça inferior.
h
g
.
Remover a porta do frigorífico
1
2
Desligue todas as cablagens a.
Rode a alavanca da dobradiça b para a direita.
Separe a dobradiça superior
alavanca da dobradiça
d
.
c
do engate da
• Coloque a porta numa superfície que não risca
com o lado interior virado para cima.
• Ao levantar a dobradiça da trava de alavanca da
dobradiça, tenha cuidado para que a porta não
caia para a frente. É recomendável que a
remoção e recolocação da porta sejam
efetuadas por duas ou mais pessoas.
3
Levante a porta da frigorífico até que esteja
livre da montagem da dobradiça inferior.
 Loading...