

Page 1
www.lg.com
OWNER'S MANUAL
FRIDGE&
FREEZER
Read this owner’s manual thoroughly before operating the appliance and keep it handy for
reference at all times.
EN ENGLISH KK ҚАЗАҚША RU РУССКИЙ
MFL70583744
Rev.00_051520
Copyright © 2020 LG Electronics Inc. All Rights Reserved
Page 2
TABLE OF CONTENTS
SAFETY INSTRUCTIONS ............................................................3
IMPORTANT SAFETY INSTRUCTIONS ..........................................................3
INSTALLATION ...........................................................................11
Before Installation ........................................................................................... 11
Dimensions and Clearances ........................................................................... 11
Ambient Temperature ...................................................................................... 11
Removing the Doors .......................................................................................12
Adjusting the Height of the Door .....................................................................14
Connecting the Water Line (For Plumbed models Only) .................................14
Connecting the Appliance ...............................................................................16
Moving the Appliance ...................................................................................... 16
OPERATION ................................................................................ 17
Parts and Functions ........................................................................................17
Notes for Operation .........................................................................................21
Using Control Panel ........................................................................................23
Water Dispenser Tank (Non plumbed models only) ........................................24
Water and Ice Dispenser .................................................................................26
Automatic Icemaker ........................................................................................26
Door in Door* ..................................................................................................28
Fresh Vegetable Drawer* ................................................................................29
InstaView Function* ........................................................................................29
Other Functions...............................................................................................29
This manual may contain images or content
different from the model you purchased.
This manual is subject to revision by the
manufacturer.
SMART FUNCTIONS ..................................................................30
LG ThinQ Application ......................................................................................30
Smart Diagnosis ..............................................................................................32
MAINTENANCE ........................................................................... 33
Notes for Cleaning ..........................................................................................33
Cleaning the Condenser Cover .......................................................................33
Cleaning the Door Basket ...............................................................................34
Cleaning the Shelf ...........................................................................................34
Cleaning the Vegetable Drawer ......................................................................34
Cleaning the Water Dispenser ........................................................................35
Replacing the Water Filter (For Plumbed models Only) ..................................36
TROUBLESHOOTING ................................................................37
Page 3
EN
SAFETY INSTRUCTIONS
The following safety guidelines are intended to prevent unforeseen
risks or damage from unsafe or incorrect operation of the
appliance.
The guidelines are separated into ‘WARNING’ and ‘CAUTION’ as
described below.
This symbol is displayed to indicate matters and
operations that can cause risk. Read the part with this
symbol carefully and follow the instructions in order to
avoid risk.
WARNING
This indicates that the failure to follow the instructions can
cause serious injury or death.
CAUTION
This indicates that the failure to follow the instructions can
cause the minor injury or damage to the product.
IMPORTANT SAFETY INSTRUCTIONS
WARNING
To reduce the risk of explosion, fire, death, electric shock,
injury or scalding to persons when using this product, follow
basic precautions, including the following:
Children in the Household
• This appliance is not intended for use by persons (including children)
with reduced physical, sensory or mental capabilities, or lack of
experience and knowledge, unless they have been given supervision
or instruction concerning use of the appliance by a person
responsible for their safety. Children should be supervised to ensure
that they do not play with the appliance.
• If the appliance is equipped with a lock (some models only), keep the
key out of reach of children.
3
Page 4

EN
Installation
• This appliance should only be transported by two or more people
holding the appliance securely.
• Ensure that the socket outlet is properly grounded, and that the earth
pin on the power cord is not damaged or removed from the power
plug. For more details on grounding, inquire at an LG Electronics
customer information centre.
• This appliance is equipped with a power cord having an equipment-
grounding conductor and a grounding power plug. The power plug
must be plugged into an appropriate socket outlet that is installed and
grounded in accordance with all local codes and ordinances.
• If the power cord is damaged or the hole of the socket outlet is loose,
do not use the power cord and contact an authorized service centre.
• Do not plug the appliance into a multi socket adapter which does not
have a power cable (mounted).
• Do not modify or extend the power cable.
• The appliance should be connected to a dedicated power line which
is separately fused.
• Do not use a multi socket outlet which is not properly grounded
(portable). In case of using a properly-grounded multi socket outlet
(portable), use the multi socket outlet with the current capacity of the
power code rating or higher and use the multi socket outlet only for
the appliance.
• Install the appliance in a place where is easy to unplug the power
plug of the appliance.
• Be careful not to point the power plug up or let the appliance lean
against the power plug.
• Install the appliance on a firm and level floor.
• Do not install the appliance in a damp and dusty place. Do not
install or store the appliance in any outdoor area, or any area that is
subject to weathering conditions such as direct sunlight, wind, rain, or
temperatures below freezing.
• Do not place the appliance in direct sunlight or expose it to the heat
from heating appliances such as stoves or heaters.
4
Page 5

EN
• Be careful not to expose the rear of the appliance when installing.
• Be careful not to let the appliance door fall during assembly or
disassembly.
• Be careful not to pinch, crush, or damage the power cable during
assembly or disassembly of the appliance door.
• Do not connect a plug adapter or other accessories to the power
plug.
Operation
• Do not use the appliance for any purpose (storage of medical
or experimental materials or shipping) other than any domestic
household food storage use.
• Unplug the power plug during a severe thunderstorm or lightening or
when not in use for a long period of time.
• Do not touch the power plug or the appliance controls with wet hands.
• Do not bend the power cable excessively or place a heavy object on
it.
• If water penetrates electrical parts of the appliance, disconnect power
plug and contact an LG Electronics customer information centre.
• Do not place hands or metallic objects inside the area emitting the
cold air, cover or heat releasing grille on the back.
• Do not apply excessive force or impact to the back cover of the
appliance.
• Do not put animals, such as pets into the appliance.
• Be careful of nearby children when you open or close the appliance
door. The door may bump the child and cause injury.
• Avoid the danger of children getting trapped inside the appliance. A
child trapped inside the appliance can cause suffocation.
• Do not place heavy or fragile objects, containers filled with liquid,
combustible substances, flammable objects (such candles, lamps,
etc.), or heating devices (such as stoves, heaters, etc.) on the
appliance.
5
Page 6
EN
• If there is a gas leakage (isobutane, propane, natural gas,
etc.), do not touch the appliance or power plug and ventilate
the area immediately. This appliance uses a refrigerant gas
(isobutane,R600a). Although it uses a small amount of the gas, it
is still combustible gas. Gas leakage during appliance transport,
installation or operation can cause fire, explosion or injury if sparks
are caused.
• Do not use or store flammable or combustible substances (ether,
benzene, alcohol, chemical, LPG, combustible spray, insecticide, air
freshener, cosmetics, etc.) near the appliance.
• Immediately unplug the power plug and contact an LG Electronics
customer information centre if you detect a strange sound, odour, or
smoke coming from the appliance.
• Fill with potable water only into icemaker or dispenser water tank.
• Do not damage the refrigerant circuit.
• Do not place any electronic appliance (such as heater and mobile
phone) inside the appliance.
Maintenance
• Disconnect the power cord before cleaning the appliance or replacing
the inside lamp (where fitted).
• Securely plug the power plug in the socket outlet after completely
removing any moisture and dust.
• Never unplug the appliance by pulling on the power cable. Always
grip the power plug firmly and pull straight out from the socket outlet.
• Do not spray water or inflammable substances (toothpaste, alcohol,
thinner, benzene, flammable liquid, abrasive, etc.) over the interior or
exterior of the appliance to clean it.
• Do not clean the appliance with brushes, cloths or sponges with
rough surfaces or which are made of metallic material.
• Only qualified service personnel from LG Electronics service centre
should disassemble, repair, or modify the appliance. Contact an LG
Electronics customer information centre if you move and install the
appliance in a different location.
6
Page 7

EN
• Do not use a hair drier to dry the inside of the appliance or place a
candle inside to remove the odours.
• Do not use mechanical devices or other means to accelerate the
defrosting process.
• Connect the water supply line (for plumbed models only) to a potable
water source only. Otherwise, impurities in the water may cause
illness.
Disposal
• When discarding the appliance, remove the door gasket while leaving
the shelves and baskets in place and keep children away from the
appliance.
• Dispose of all packaging materials (such as plastic bags and
styrofoam) away from children. The packaging materials can cause
suffocation.
Technical Safety
• Keep ventilation openings, in the appliance enclosure or in the built-in
structure, clear of obstruction.
• Do not use electrical appliances inside the refrigerator.
• The refrigerant and insulation blowing gas used in the appliance
require special disposal procedures. Consult with service agent or a
similarly qualified person before disposing of them.
• Refrigerant leaking out of the pipes could ignite or cause an
explosion.
• The amount of refrigerant in your particular appliance is shown on the
identification plate inside the appliance.
• Never start up an appliance showing any signs of damage. If in
doubt, consult your dealer.
• This appliance is intended to be used in household and similar
applications only. It should not be used for commercial, or catering
purposes, or in any mobile application such as a caravan or boat.
• Do not store explosive substances such as aerosol cans with a
flammable propellant in this appliance.
7
Page 8
EN
Risk of Fire and Flammable Materials
This symbol alerts you to flammable materials that can
ignite and cause a fire if you do not take care.
• This appliance contains a small amount of isobutane refrigerant
(R600a), but it is also combustible. When transporting and installing
the appliance, care should be taken to ensure that no parts of the
refrigerating circuit are damaged.
• If a leak is detected, avoid any naked flames or potential sources
of ignition and air the room in which the appliance is standing for
several minutes. In order to avoid the creation of a flammable gas
air mixture if a leak in the refrigerating circuit occurs, the size of the
room in which the appliance is used should correspond to the amount
of refrigerant used. The room must be 1 m² in size for every 8 g of
R600a refrigerant inside the appliance.
• When positioning the appliance, ensure the supply cord is not
trapped or damaged.
• Do not locate multiple portable socket-outlets or portable power
supplies at the rear of the appliance.
CAUTION
To reduce the risk of minor injury to persons, malfunction, or
damage to the product or property when using this product, follow
basic precautions, including the following:
Installation
• Do not tilt the appliance to pull or push it when transporting.
• Make sure not to get a body part such as a hand or foot stuck while
moving the appliance.
8
Page 9

EN
Operation
• Do not touch frozen food or the metal parts in the freezer
compartment with wet or damp hands. It may cause frostbite.
• Do not place glass containers, bottles or cans (especially those
containing carbonated drinks) in the freezer compartment, shelves or
ice bin that will be exposed to temperatures below freezing.
• The tempered glass on the front side of the appliance door or the
shelves can be damaged by an impact. If it is broken, do not touch it
with hands.
• Do not place heavy objects on top of the door in door.
• Do not use the door in door as a chopping board and ensure it is not
scratched by a sharp tool, as this may cause appliance damage.
• Do not hang from the appliance door, storage room, shelf or fridge
door in door or climb up into it.
• Do not store an excessive amount of water bottles or containers for
side dishes on the door baskets.
• Prevent animals from nibbling on the power cable or water hose.
• Do not open or close the appliance door with excessive force.
• If the hinge of the appliance door is damaged or operates improperly,
stop using the appliance and contact an authorized service centre.
• Do not clean glass shelves or covers with warm water when they are
cold.
• Never eat frozen foods immediately after they have been taken out in
the freezer compartment.
9
Page 10
EN
• Do not insert your hands into the mechanical part of the automatic
icemaker such as the ice bin or the ice dispenser.
• Do not use a thin crystal cup or chinaware when dispensing.
• Do not remove the cover of the automatic icemaker. Touching any
mechanical part of the automatic icemaker. It may result in injury.
• Make sure not to get a hand or foot stuck upon opening or closing the
appliance door or door in door.
• Do not open the door of the appliance with the door in door open, or
do not open the door in door while the door of the appliance is open.
The door in door may be struck by the edge of the appliance and
damaged.
Maintenance
• Do not insert the shelves upside down. The shelves may fall.
• To remove frost from the appliance, contact an LG Electronics
customer information centre.
10
Page 11
EN
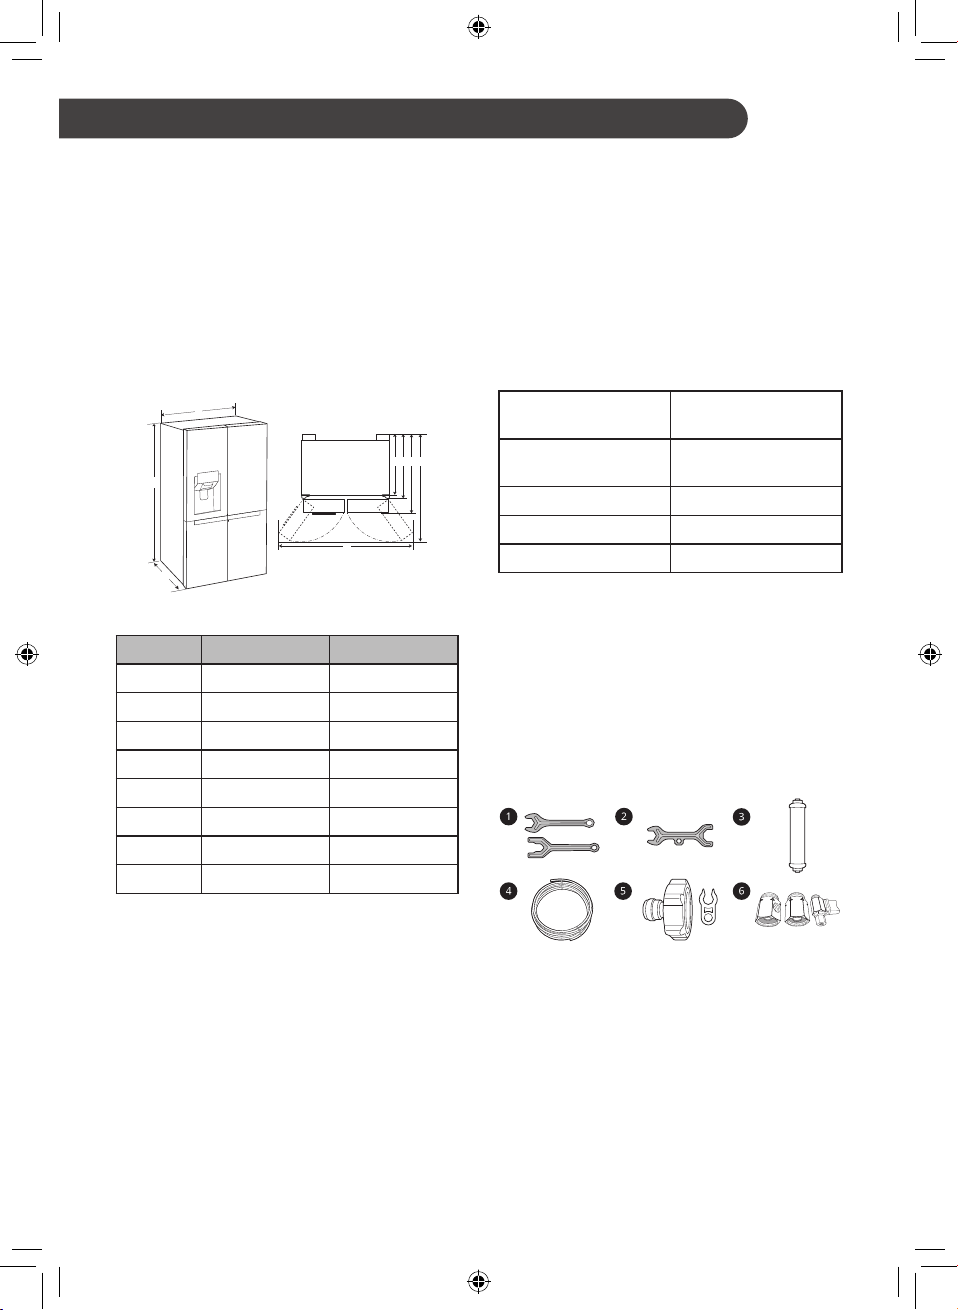
INSTALLATION
Before Installation
Dimensions and
Clearances
Too small of a distance from adjacent items may
result in the degradation of freezing capability and
increased electricity costs. Allow over 50 mm of
clearance from each adjacent wall when installing
the appliance.
A
D E
G
F
B
H
C
Ambient Temperature
• The appliance is designed to operate within
a limited range of ambient temperatures,
depending on the climate zone.
• The internal temperature could be affected
by the location of the appliance, the ambient
temperature, the frequency of door opening and
so on.
• The climate class can be found on the rating
label.
Climate Class
SN (Extended
Temperate)
N (Temperate) +16 - +32
ST (Subtropical) +16 - +38
T (Tropical) +16 - +43 / +10 - +43*
*Australia, India, Kenya
Ambient Temperature
Range ºC
+10 - +32
- Type A (mm) Type B (mm)
A 912 912
B 1790 1790
C 927 738
D 797 615
E 877 690
F 922 733
G 1384 1180
H 1713 1750
NOTE
• The appliances rated from SN to T are intended
to be used at an ambient temperature between
10 ºC and 43 ºC.
Accessories
*1:This feature is only available on some models.
Spanner A*1
a
Spanner B*1
b
Water Filter*1
c
Water Tube*1
d
Tube Connector and Clip*1
e
Tube Connector and Valve*1
f
11
Page 12

EN
Removing the Doors
If your entrance door is too narrow for the
appliance to pass through, remove the appliance
doors and pass the appliance laterally.
WARNING
• Disconnect the power cord, house fuse or
circuit breaker before installing or servicing the
appliance. Failure to follow these instructions
may result in death, fire or electric shock.
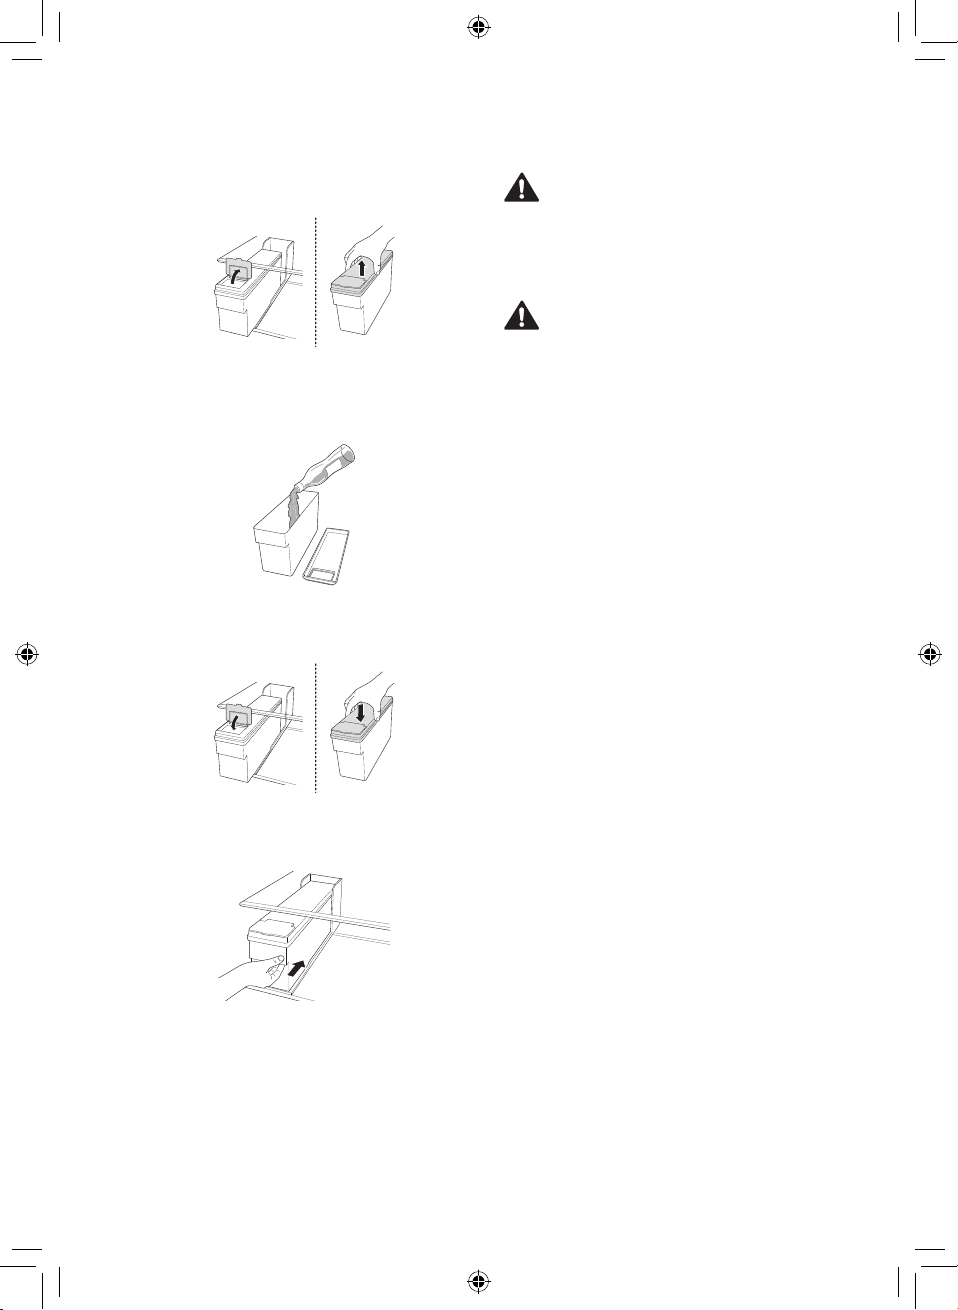
Rotate the hinge lever d counterclockwise.
4
Lift the top hinge e free of the hinge lever
latch f.
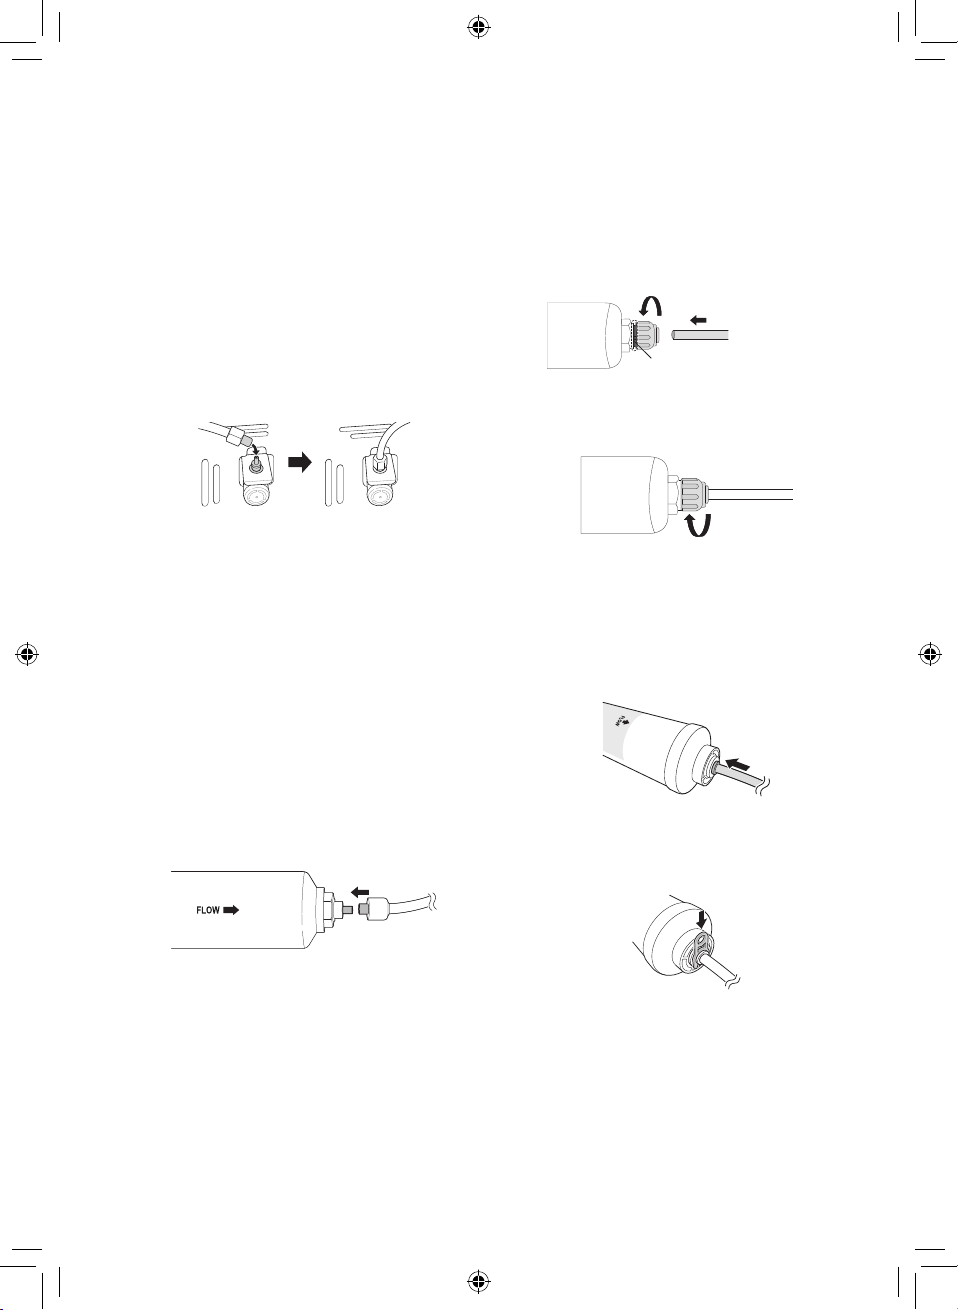
Removing the Freezer Door
The water supply line is connected to the
1
top right part in the back of the appliance.
Remove the connected water tube by
pressing the collet towards the tube
connector.
Remove the screw of the hinge cover
2
on top of the appliance by rotating it
counterclockwise.
Pull out the water supply line a. Disconnect
3
all wire harnesses b. Unscrew the ground
wire c.
CAUTION
• When lifting the hinge free of the latch, be
careful that the door does not fall forward. It is
recommended that two or more people carry out
the door removal and refitting.
Remove the door by lifting it off the bottom
5
hinge pin.
CAUTION
• Place the door on a non-scratching surface with
the inner side facing up.
Removing the Fridge Door
Disconnect all wire harnesses a.
1
12
Page 13

EN
Rotate the hinge lever b clockwise. Lift the
2
top hinge c free of the hinge lever latch d.
NOTE
• Disassembling/Assembling the water lines.
CAUTION
• When lifting the hinge free of the latch, be
careful that the door does not fall forward. It is
recommended that two or more people carry out
the door removal and refitting.
Remove the door by lifting it off the bottom
3
hinge pin.
CAUTION
• Place the door on a non-scratching surface with
the inner side facing up.
Refitting the Fridge and Freezer
Doors
Mount the doors in the reverse sequence of their
removal once the appliance has been passed
through all access doors.
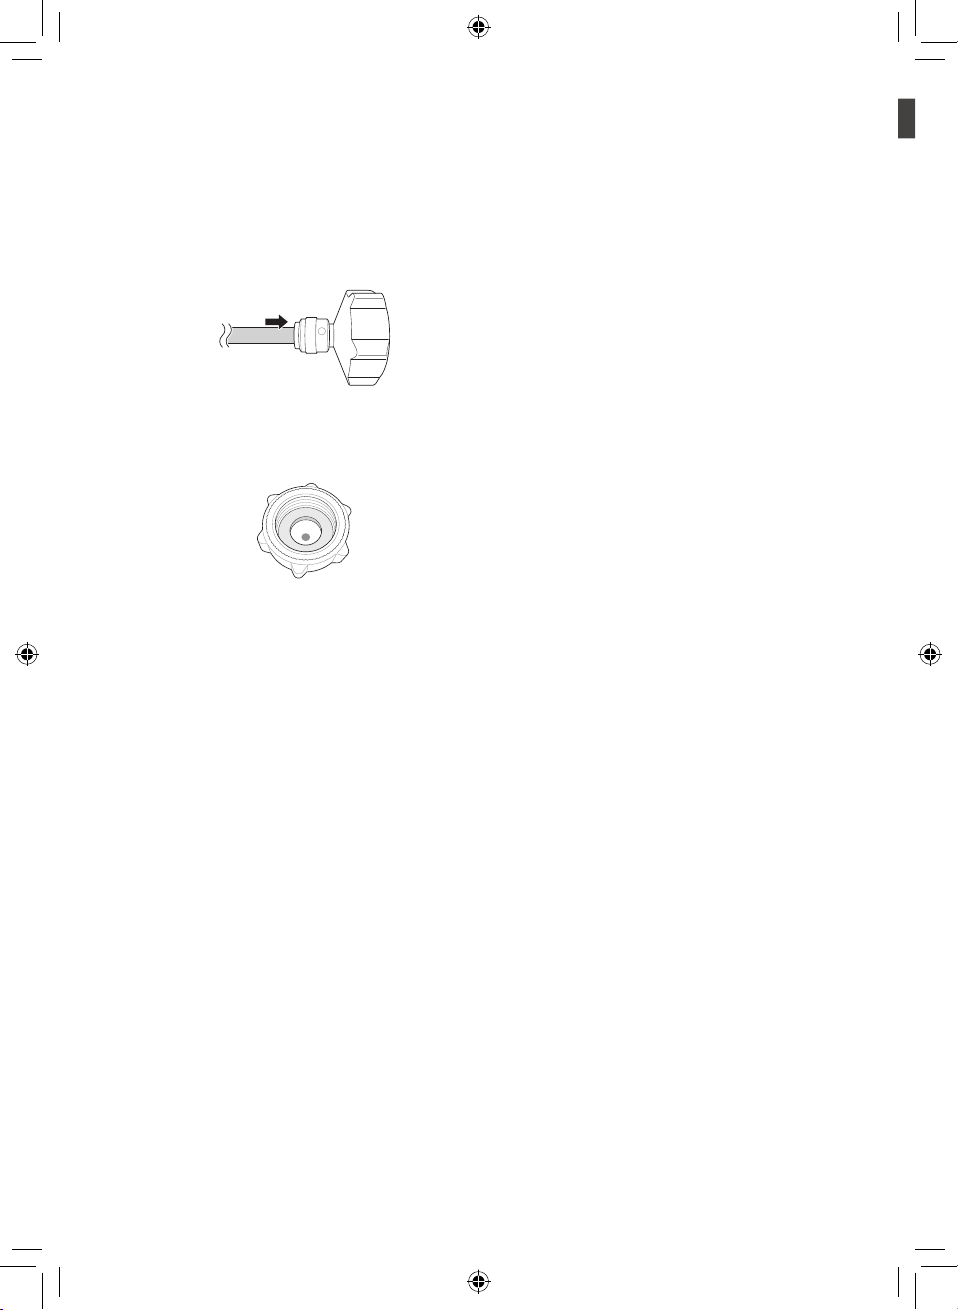
a Collet b Water supply line c Insert line d Clip
• Gently insert the water supply line until only one
of the line’s insert lines is visible. Pull on the line
to make sure that it is tightly fastened.
Correct
Incorrect
• If the end of the water supply line is damaged,
it should be trimmed to ensure it does not leak
when refitted.
• e Not straight f Damaged g Stretched
CAUTION
• Install the right fridge door first.
13
Page 14
EN
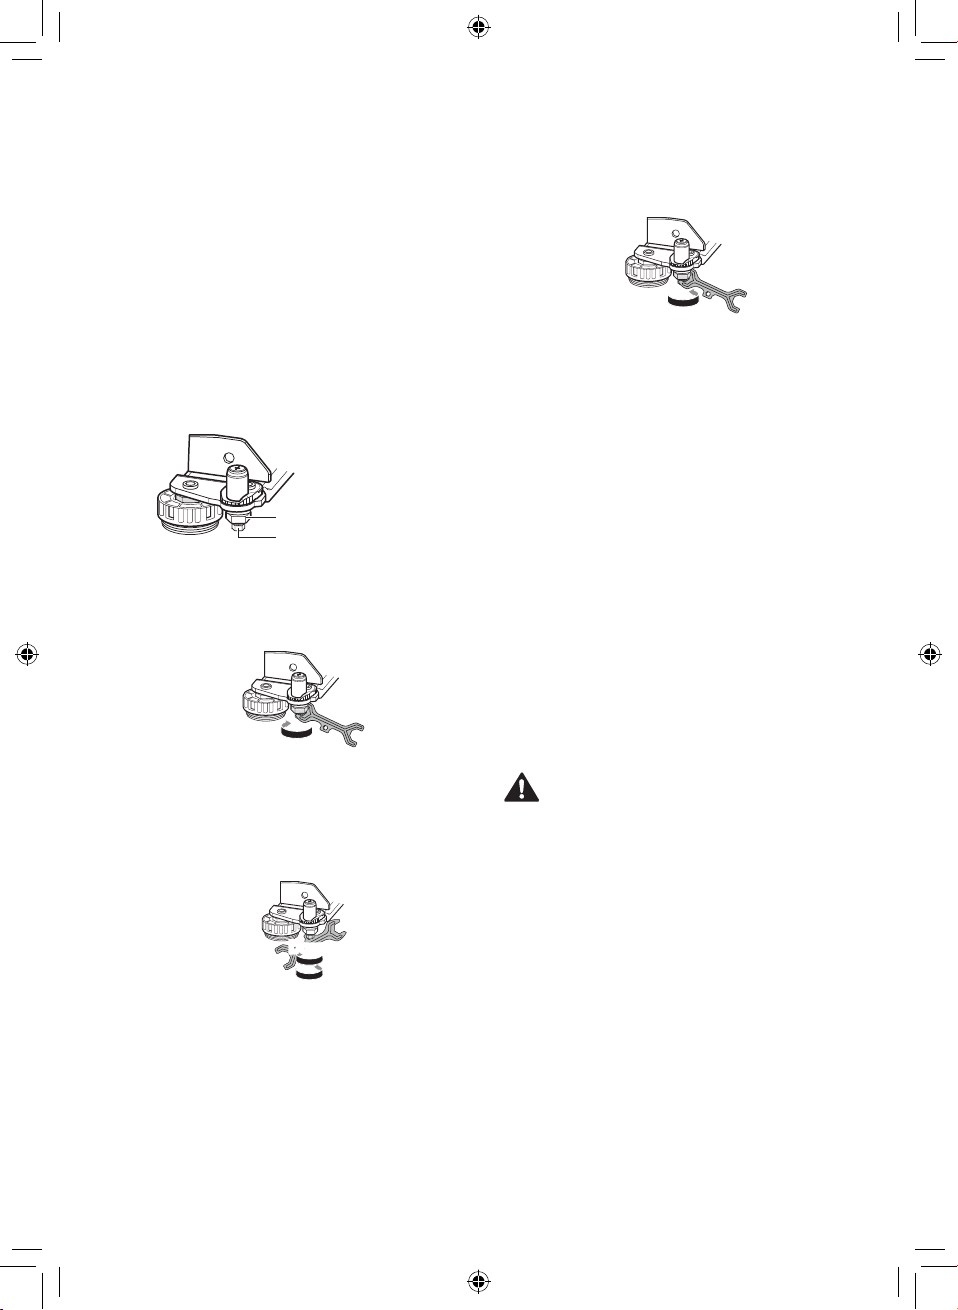
Adjusting the Height of the
Door
If the door of the appliance is not level, adjust the
difference in the height of appliance door using the
following method.
Fasten the keeper nut by turning it
3
counterclockwise.
NOTE
• Because the hinge pin may fall out, do not
adjust the height of the appliance door more
than 5 mm.
*Reference
Keeper nut
Adjustment hinge pin
Turn the keeper nut clockwise using the
1
spanner.
To loosen the nut
Adjust the difference in the height of the
2
appliance door by rotating the adjustment
hinge pin clockwise or counterclockwise with
an 8 mm spanner.
Down
Up
To tighten the nut
Connecting the Water Line
(For Plumbed models
Only)
Water Supply Requirements
A cold water supply with water pressure
between 138 kPa and 827 kPa (1.4-8.4 kgf/
cm²) is required to operate the water dispenser.
If the refrigerator is installed in an area with low
water pressure (below 138 kPa), you can install
a booster pump to compensate for the low
pressure.
If a reverse osmosis water filtration system is
connected to your cold water supply, the water
pressure to the reverse osmosis system needs
to be a minimum of 138 kPa to 827 kPa (1.4-8.4
kgf/cm²)
WARNING
• Unplug the appliance before carrying out any
work on connecting the water line. Failure to do
so may cause electric shock.
• Only connect the water line to a cold water
supply. Failure to do so may cause the water
filter to malfunction. Water hammer (water
banging in the pipes) in house plumbing can
cause damage to appliance parts and can lead
to water leakage or flooding.
• Connecting the water line must only be installed
by a qualified plumber and in accordance with
local legislation and regulations governing water
quality.
14
Page 15
EN
NOTE
(1)
• This water line installation is not covered by the
appliance warranty.
Connecting to the Appliance
Unscrew the metal threaded collar nut at the
1
back of the appliance and place it over one
end of the water tube.
Firmly push the water tube onto the water
2
inlet valve and tighten up the collar nut.
<Type 2>
Cut the tubing end squarely, then check for
1
and remove any burrs. Push the fitting onto
the end of tubing, making sure the end is fully
sealed.
(2)
Colored line in the water filter
Tighten the screw cap until the colored line in
2
the water filter is no longer visible.
Connecting to the Water Filter
There are two types of filters. The methods of
connection are different. One has a threaded
plastic nut fitting and the other uses a self locking
push fit connectors. The filter is marked with the
direction of the water flow from the water tap to the
appliance.
<Type 1>
Unscrew the threaded connector and place it
1
over the end of the cut section of pipe coming
from the appliance. Push the pipe over the
end of the filter that the flow arrow points to
and tighten up the threaded connector.
Repeat the same process on the other end
2
of the filter using the remainder of the water
tube.
<Type 3>
Firmly push the water tube connected from
1
the appliance into the end that has the arrow
pointing outward. Push the tube all the way in
(approx. 10-12 mm).
After inserting the tube securely into the filter,
2
fit the locking clip into position under the pull
up collar.
Repeat on the other end of the filter using the
3
remainder of the water tube.
15
Page 16
EN
Connecting to the Water Tap*
Push the water tube into the hole of the
1
tap connector supplied in the accessories.
The pipe should be held firmly whilst the
connector is pushed onto the pipe.
Ensure that the rubber washer is fitted inside
2
to the inside of the tap connector before
screwing it onto the tap.
NOTE
• (*) means that this feature varies depending on
the model purchased.
Checking the Water Connection
Turn on the water supply and switch on the
1
appliance. Carefully check all fittings for
possible leaks due to poorly fitted hoses.
Press and hold the Water Filter button for
2
three seconds. That resets the Replacement
Filter icon. The new water filter has been
activated.
Place a cup under the water dispenser
3
to verify that water is flowing through the
appliance.
Check the connecting tube and joints for
4
leaks once again.
The water filter should be fixed at a
5
appropriate place where it is easy to reach for
replacement purposes.
Connecting the Appliance
After installing the appliance, connect the power
plug into a socket outlet.
NOTE
• After connecting the power supply cord (or plug)
to the outlet, wait 2 or 3 hours before you put
food into the appliance. If you add food before
the appliance has cooled completely, your food
may spoil.
Moving the Appliance
Remove all food from inside the appliance.
1
Pull the power plug out, insert and fix it into
2
the power plug hook at the rear or on top of
the appliance.
Tape parts such as shelves and the door
3
handle to prevent from falling off while moving
the appliance.
Move the appliance with more than two
4
people carefully. When transporting the
appliance over a long distance, keep the
appliance upright.
After installing the appliance, connect the
5
power plug into a socket out to switch on the
appliance.
16
Page 17
EN
OPERATION
Parts and Functions
Exterior
1
Control Panel
Displays the ice maker and dispenser modes the water filter status.
Door-in-Door*
The Door in Door is a double layered door system. It can be opened individually or together with the
main door. You can conveniently locate and access your favourite snacks or food items.
Door-in-Door Lever*
This lever opens Door in Door.
InstaView Door in Door*
The InstaView Door in Door compartment allows for easy access to commonly used food items.
1 4
2
3
3
NOTE
• (*) means that this feature varies depending on the model purchased.
• The appearance or components of the appliance may differ from model to model.
17
Page 18
Interior
6
6
1
2
3
(1)
EN
7
8
9
10
11
12
13
4
5
14
15
16
17
1
7
2
(1)
8
9
10
3
11
12
13
4
5
14
15
16
17
18
Page 19
EN
LED Lamp
The LED lamps inside the appliance light up when you open the door.
Automatic Icemaker*
This is where ice is automatically produced and stored.
Freezer Shelf*
This is where frozen foods such as meat, fish, and ice cream can be stored.
Freezer Drawer*
This is for long-term storage of frozen items.
Freezer Door Basket
This is where small packages of frozen food can be stored.
• Do not store ice cream or food which will be stored for a long period of time within these baskets.
Smart Diagnosis Unit
Use this function when contacting LG Electronics customer information centre to help make an
accurate diagnosis when the appliance operates abnormally or a failure occurs.
Door in Door*
This is where foods which are taken out frequently such as beverages and snacks are stored.
Bottle Rack*
This is where drinks tall bottles or containers are stored.
CAUTION
• Do not store short bottles or containers. The items may fall and cause an injury or appliance
damage.
Fridge Shelf
This is where refrigerated foods and other items are stored.
• The shelf height can be adjusted by inserting the shelf in another groove of different height.
• Store the foods with higher moisture content at the front of the shelf.
• The actual number of shelves will differ from model to model.
Hygiene Fresh*
• This function reduces and removes odors inside the fridge compartment.
Snack Drawer*
This is where small packages of refrigerated foods are stored.
Temperature Sensor
This sensor senses the temperature of the fridge compartment.
• Maintain the distance between the sensor and food to accurately sense the temperature.
19
Page 20
EN
Water Dispenser Tank*
This is where water to supply the dispenser or the automatic icemaker is stored. It requires manual
filling. (Non plumbed models only)
Fresh Vegetable Drawer*
This is where fruits and vegetables are stored to help maintain freshness by adjusting the humidity
controller.
Movable Egg Box*
This is where eggs are stored.
• You can move it to and use it at a desired position as needed. However, do not use it as the ice bin
or place it on the shelf on top of the fridge or the vegetable drawer.
Vegetable Drawer
This is where fruits and vegetables are stored to remain fresh for as long as possible.
• The actual number of drawers will differ from model to model.
Fridge Door Basket
This is where small packages of refrigerated foods, drinks and sauce containers are stored.
NOTE
• (*) means that this feature varies depending on the model purchased.
• The 2-star section (
short periods.
• The top shelf of the freezer(1) will reach the set temperature the most quickly.
20
) basket or drawer can be used to store ice and food from -12 °C to -18 °C for
Page 21

EN
Notes for Operation
• Do not use the ice water dispenser tank for
beverages other than drinking water.
• Users should keep in mind that frost can form. If
the door is not closed completely, if the humidity
is high during the summer, or if the freezer door
is opened frequently.
• Ensure there is sufficient space between food
stored on the shelf or door basket to allow the
door to close completely.
• Opening the door lets warm air enter the
appliance, and may cause the internal
temperature to rise.
• If you are leaving the appliance turned off for an
extended period of time, remove all food and
unplug the power cord. Clean the interior, and
leave the doors slightly ajar to prevent mold
from growing in the appliance.
Suggestion for Energy Saving
• Ensure there is sufficient space between stored
foods. This allows cold air to be circulated
evenly and lowers electricity bills.
• Store hot food only after it has cooled in order to
prevent dew or frost.
• When storing food in the freezer compartment,
set the freezer temperature lower than the
temperature indicated on the food.
• Do not put food near the temperature sensor of
the fridge compartment. Keep a distance of at
least 3 cm from the sensor.
• Note that a temperature rise after defrosting
has a permissible range in the appliance
specifications. If you wish to minimise the
impact this may have on the food storage due to
a temperature rise, seal or wrap the stored food
in several layers.
• The automatic defrosting system in the
appliance ensures that the compartment
remains free of ice buildup under normal
operating conditions.
21
Page 22

EN
Storing Foods Effectively
• Store frozen food or refrigerated food inside
sealed containers.
• Check the expiration date and label (storage
instructions) before storing food in the
appliance.
• Do not store food for a long period of time
(more than four weeks) if it spoils easily at a low
temperature.
• Place the refrigerated food or frozen food in
each fridge or freezer compartment immediately
after purchasing.
• Avoid refreezing any food which has been
completely thawed. Freezing any food which
has been completely thawed again will lower its
taste and nutrition.
• Do not wrap and store vegetables with
newspaper. Printing material of newspaper
or other foreign substances may smear and
contaminate food.
• Do not overfill the appliance. Cold air can not
circulate properly if the appliance is overfilled.
• If you set an excessively low temperature
for food, it may become frozen. Do not
set a temperature lower than the required
temperature for the food to be stored correctly.
• If there are chill compartments in the appliance,
do not store vegetables and fruits with higher
moisture content in the chill compartments as
they may freeze due to the lower temperature.
Max Freezing Capacity
• The Express Freeze function will set the freezer
to its maximum freezing capacity.
• This generally takes up to 24 hours and
automatically switches off.
• If the maximum freezing capacity is to be used,
Express Freeze must be switched on for seven
hours before fresh produce is placed in the
freezer compartment.
Maximum Storage
• To get better air circulation, insert all drawers.
• If large quantities of food are to be stored,
all the freezer drawers shall be taken out of
the appliance and the food shall be stacked
directly on the freezer shelves in the freezer
compartment.
NOTE
• To remove the drawers, first pick the food out of
drawers. Then use the handle of drawers, pull
out the drawers carefully. It may cause injury.
• The shape of each drawer may be different,
insert in the right position.
22
Page 23
EN
Using Control Panel
Units and Functions
<Type 1> <Type 2>
3seconds
<Type 3> <Type 4>
3seconds
Hygiene Fresh
* Lock
• This sets the Hygiene Fresh function.
Express Freeze
• This sets Express Freeze functions.
* Wi-Fi
Freezer Temperature
• This sets the freezer target temperature.
Water Dispenser
Fridge Temperature
• This sets the fridge target temperature.
Non Plumbing
Water Filter*
• This Non Plumbing icon is illuminated
when the water dispenser tank is installed
correctly.
3seconds
3seconds
• This locks the buttons on the control
panel.
• This sets the appliance to connect to your
home’s Wi-Fi network.
• This sets the function of Cubed ice, Water,
Crushed ice.
• This shows the replacement period of the
water filter automatically (plumbed models
only).
NOTE
• (*) means that this feature varies depending on the model purchased.
• The actual control panel may differ from model to model.
• The control panel will turn off automatically for energy saving.
• If there is any finger or skin contacts to the control panel while cleaning it, the button function may
operate.
23
Page 24
EN
Setting the Temperature
This sets the fridge temperature or freezer
temperature.
• Press the Fridge button or Freezer button to
adjust the temperature.
• The temperature can be adjusted.
− Fridge : from 1 °C to 7 °C
− Freezer : from -14 °C to -24 °C
NOTE
• The default temperature setting may vary
depending on the appliance.
• Wait until two or three hours have passed after
connecting the appliance to the outlet before
storing food in the appliance.
• For ice making in normal climates, the freezer
temperature should be set to -19 °C or colder.
Setting Express Freeze
The function can quickly freeze a large amount of
ice or frozen foods.
• When you press the Express Freeze button,
the Express Freeze icon lights on the control
panel.
• The function is enabled and disabled in turn
each time you press the button.
• The Express Freeze function automatically
terminates after a specific period has passed.
Setting and Resetting Lock
This locks the buttons on the control panel.
• Press and hold the Lock button for 3 seconds
. When the Lock function is set, all buttons are
locked.
• When you press the Lock button for 3 seconds,
the Lock/Unlock icon on the control panel
lights. The function is enabled and disabled in
turn each time you press the button.
• If you press a button other than lock when the
lock is set, the button will not function.
• When you press a button other than lock when
the lock is set, the Lock/Unlock icon on the
control panel will flash 3 times.
• To change a setting, first press the Lock button
for three seconds to disable the function.
Water Dispenser Tank (Non
plumbed models only)
The water tank holds the water in which is to be
dispensed or used by the automatic ice maker to
make ice. Do not fill this tank with any other liquid
other than water. Doing so can damage the water
dispensing system.
Remove the water dispenser tank by pulling it
1
out while holding the handle.
Setting Hygiene Fresh
Bacteria and odor inside the appliance can be
minimized with the Hygiene Fresh function.
However, the function is only effective for bacteria
floating in the appliance, not bacteria adsorbed
onto food.
• Each time you press the Hygiene Fresh button,
the Hygiene Fresh function mode will change to
Auto → Power → Off → Auto alternatively.
24
Page 25
EN
Open the cover or cap of the water dispenser
2
tank.
Fill with bottle filtered or clean filtered water
3
up to the reference line indicated inside the
water dispenser tank. (Total capacity: 4 ℓ)
After filling with water, close the cover or cap
4
of the water dispenser tank.
Refit the water dispenser tank on the fridge
5
shelf.
WARNING
• Children should not be allowed near the
dispenser tank.
• Do not fill the water tank with drinks other than
water or fill with hot water.
CAUTION
• Do not apply excessive force or impact when
removing or assembling the water dispenser
tank. Doing so can cause appliance damage or
injury.
NOTE
• Before using the water dispenser tank after
installing the appliance, it should be washed
before filling it with water.
• Check if the water dispenser tank has been
placed on the appliance correctly. If it is not
assembled correctly, water may leak from the
tank into the appliance.
• If there is an insufficient amount of water in the
water dispenser tank, ice cube size and quantity
may be affected and may result in no ice being
made.
• If there is no water in the water dispenser tank,
the cold water and ice dispensing function of
the dispenser cannot be used. Check if there is
water in the water dispenser tank and then fill it
with water if there is not.
• Wait at least 15 seconds before removing the
water tank after having dispensed water or ice
from the dispenser.
• Sound from the water tank will be normal
when supplying water to the dispenser and
the Automatic Ice Maker. It is not a sign of
malfunction.
25
Page 26
EN
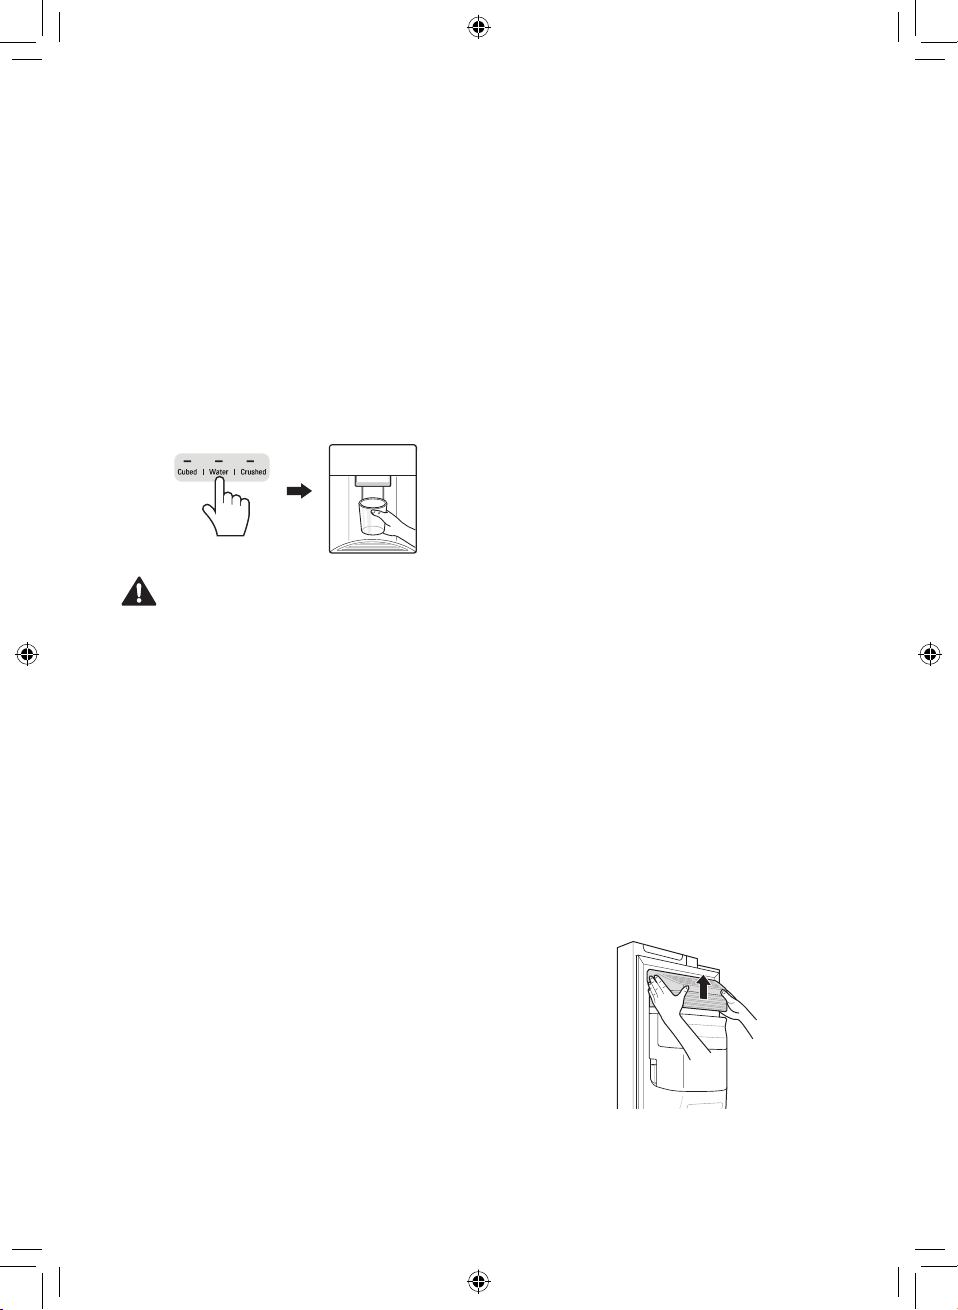
Water and Ice Dispenser
You can dispense cubed ice, water and crushed
ice by pressing the respective button for the
desired mode.
• When you press the Cubed, Water or Crushed
button on the control panel, the lamp on the
control panel will turn on and the desired mode
will be set. At this time, when you press the
dispenser lever, the selected function (cubed
ice, water and crushed ice) will be dispensed.
• The function is enabled and disabled in turn
each time you press the button on the control
panel.
CAUTION
• Keep children away from the dispenser to
prevent children playing with or damaging the
controls.
• Throw away the first few batches of ice (about
20 cubes and 7 cups of water). This is also
necessary if the appliance has not been used
for a long time.
NOTE
• If you open the freezer door while water is being
dispensed, the water supply will stop and the
control panel will return to the initial screen.
• If you open the fridge door while water,
cubed ice or crushed ice is being dispensed,
dispensing will be paused. When you close the
door, the selected item for the previously set
mode will continue to be dispensed.
• If the cup rim is small, water may splash out of
the glass or miss it completely.
• Use a cup with a rim of over 68 mm in diameter
when dispensing water, cubed ice or crushed
ice.
• When the ice maker produces smaller ice
cubes, or the cubes become lumped together,
the amount of water supplied to the ice maker
may be low due to insufficient water in the water
tank. If ice is not used frequently, it may also
lump together.
Automatic Icemaker
The automatic icemaker can automatically make
6 cubes at a time, 50-60 pieces within a 24hr
period if conditions are favorable. This amount
may vary according to the environment (ambient
temperature around the appliance, frequency of
the door being opened, amount of food stored in
the appliance, etc.).
• If the ice bin is completely filled with ice, ice
production will stop.
• While the automatic icemaker is operating, do
not touch it with your hands directly.
• If ice cubes are stored in the ice bin for a long
period of time, they may clump together and
may not be separated easily. In such a case,
clean the ice bin before using it.
• Discard ice produced for the first time without
using it.
• While the automatic icemaker is operating, do
not touch it with your hands directly.
• If ice cubes are stored in the ice bin for a long
period of time, they may clump together and
may not be separated easily. In such a case,
clean the ice bin before using it.
Switching the Automatic
Icemaker On and Off
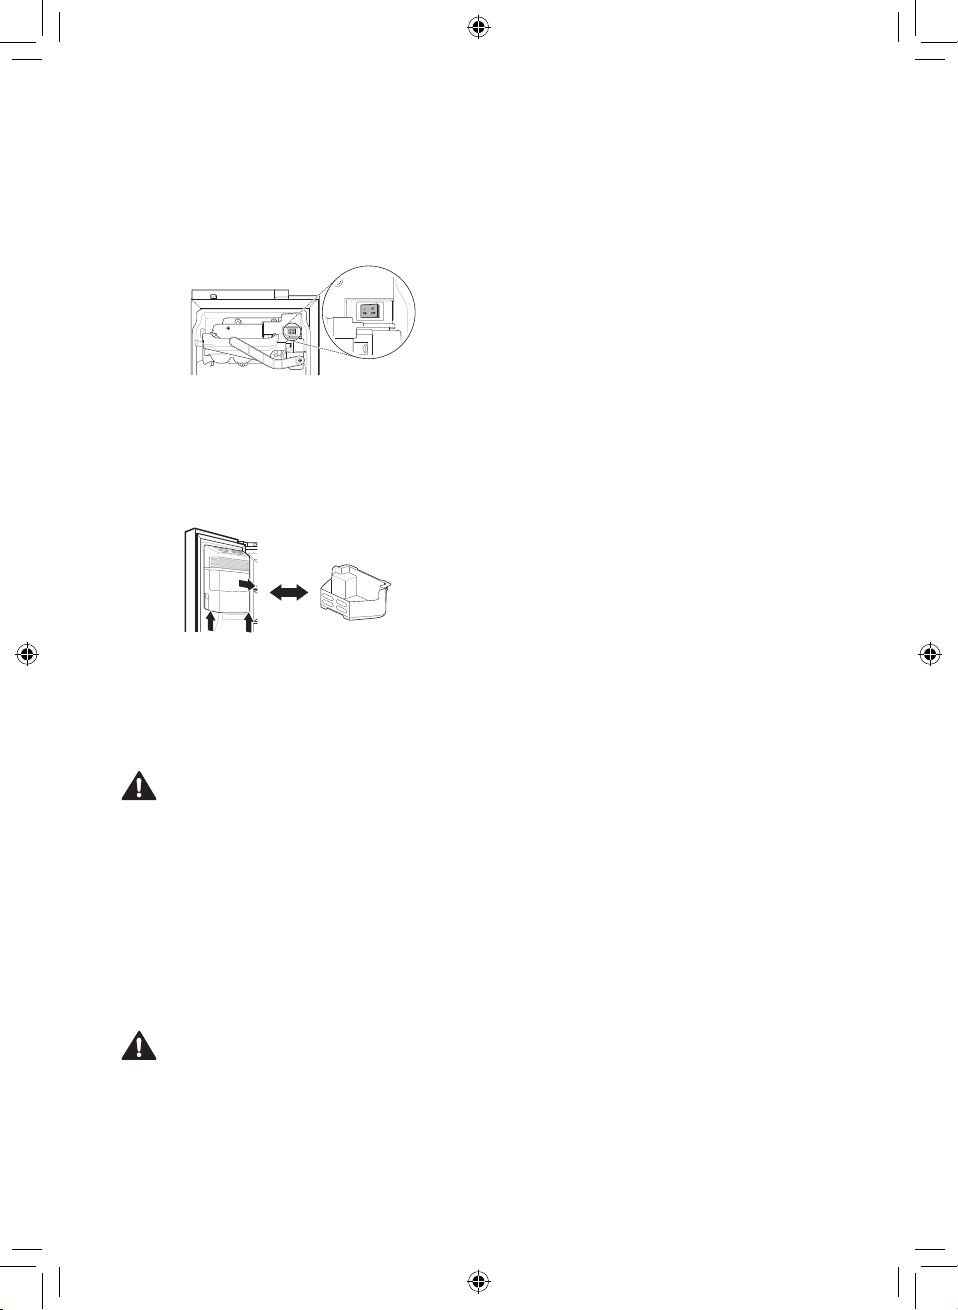
Hold and remove the cover of the automatic
1
icemaker by lifting it upward.
26
Page 27
EN
When the automatic icemaker is not used,
2
the ice bin can be used as a freezer basket
after selecting the icemaker switch to the off
position.
Removing the Ice Bin*
Hold the ice bin with both hands and pull it out
while lifting it upward.
• When the automatic icemaker is not used, the
ice bin can be used as a freezer basket.
• If the ice bin is completely filled with ice, it may
be heavy. Remove it using both hands.
WARNING
• Do not touch the automatic icemaker
mechanical parts with your hand or a tool.
Otherwise, appliance damage or injury may
occur.
• Caution should be taken, as the automatic
icemaker operates continuously after the freezer
door is opened when the automatic icemaker
switch is set to the on position.
• Do not disassemble, repair or alter the
automatic ice maker. These tasks should only
be done by a service technician.
CAUTION
• Throw away the first few batches of ice (about
20 cubes and 7 cups of water). This is also
necessary if the appliance has not been used
for a long time.
• The first ice and water dispensed may include
particles or odor from the water supply line or
the water tank.
• Keep children away from the dispenser.
Children may play with or damage the controls.
• The ice passage may become blocked with
frost if only crushed ice is used. Remove the
frost that accumulates by removing the ice bin
and clearing the passage with a rubber spatula.
Dispensing cubed ice periodically can also help
prevent frost buildup.
• If discolored ice is dispensed, check the water
tank and the water supply for a possible
source. If the problem continues, contact the
LG Electronics customer information centre.
Do not use the ice or water until the problem is
corrected.
• Never use thin crystal glass or crockery to
collect ice. Such containers may chip or break
resulting in glass fragments in the ice.
• Dispense ice into a glass before filling it with
water or other beverages. Splashing may occur
if ice is dispensed into a glass that already
contains liquid.
• Do not touch the ice outlet or the automatic
icemaker with your hand or a tool. Otherwise,
appliance damage or injury may occur.
• When refitting the ice bin, ensure it is placed
correctly. If it is tilted or unleveled, it may not
continue to make ice due to sensor disruption.
• Never use a glass that is exceptionally narrow
or deep. Ice may jam in the ice passage and
appliance performance may be affected.
• Keep the glass at a proper distance from the ice
outlet. A glass held too close to the outlet may
prevent ice from dispensing.
• Dispose of the ice inside the ice bin in the
freezer compartment if you go out on vacation
or an extended power outage occurs. Water
from melting ice may drop from the dispenser
onto the floor.
NOTE
• (*) means that this feature varies depending on
the model purchased.
27
Page 28
EN
Door in Door*
Pull the lever at the bottom of the door upwards
until the door in door opens.
There is plenty of storage space inside the door in
door and its surrounding baskets, allowing you to
store food in an organized manner.
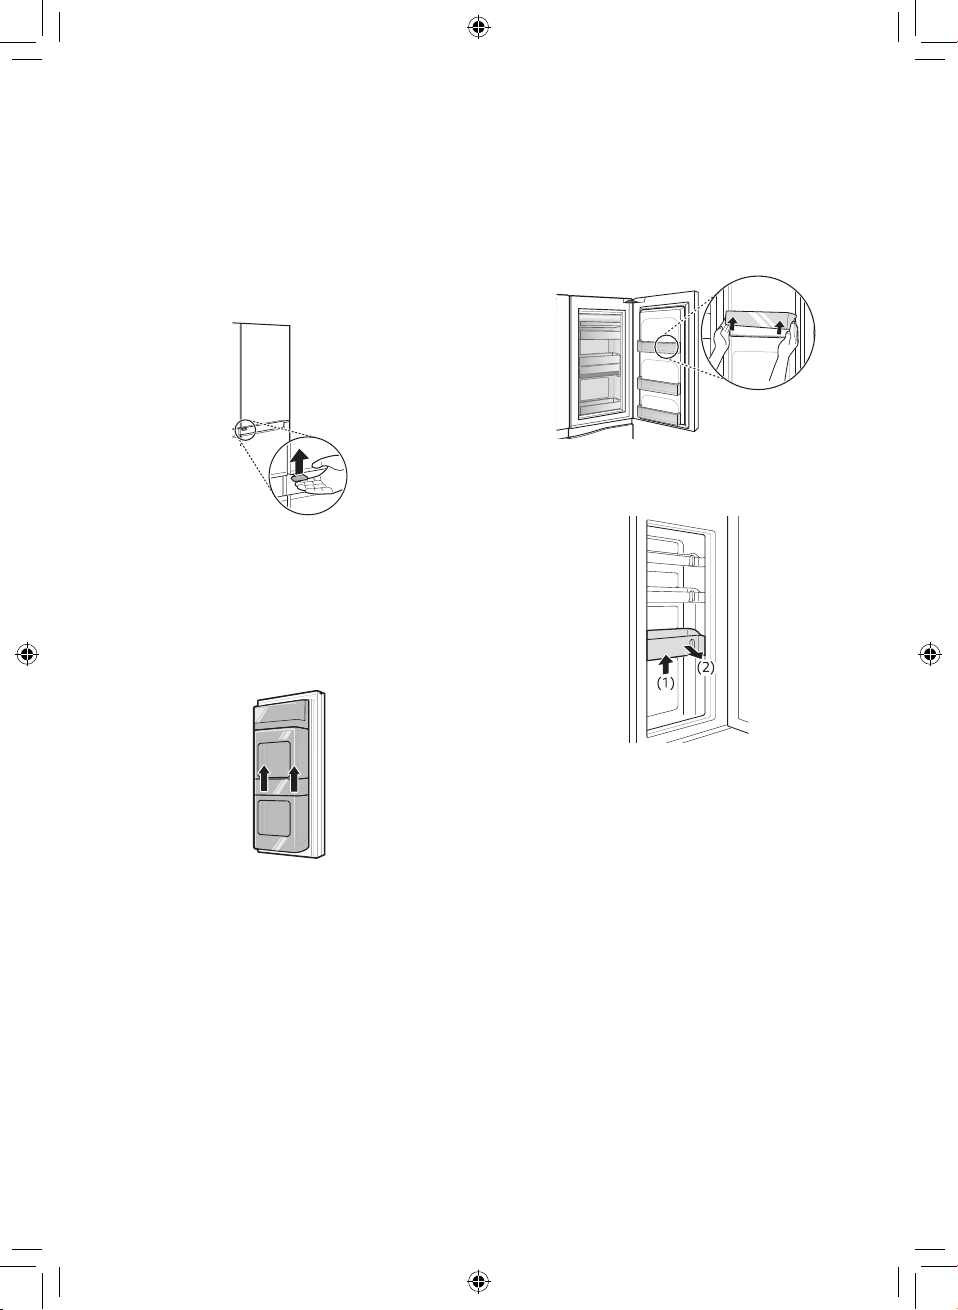
Removing the Case from the
Door in Door
Hold the case from inside the door in door with
both hands and remove it by lifting it upward.
Removing the Baskets from the
Door in Door
Hold both edges of the basket and remove it
1
by lifting it upward.
Lift the fixed basket up as shown in (1) and
2
remove it by pulling it out as shown in (2).
Refitting the Door in Door Case
Mount them in the reverse order of the removal
process.
28
Refitting the Baskets to the Door
in Door
Mount them in the reverse order of the removal
process.
NOTE
• (*) means that this feature varies depending on
the model purchased.
Page 29
EN
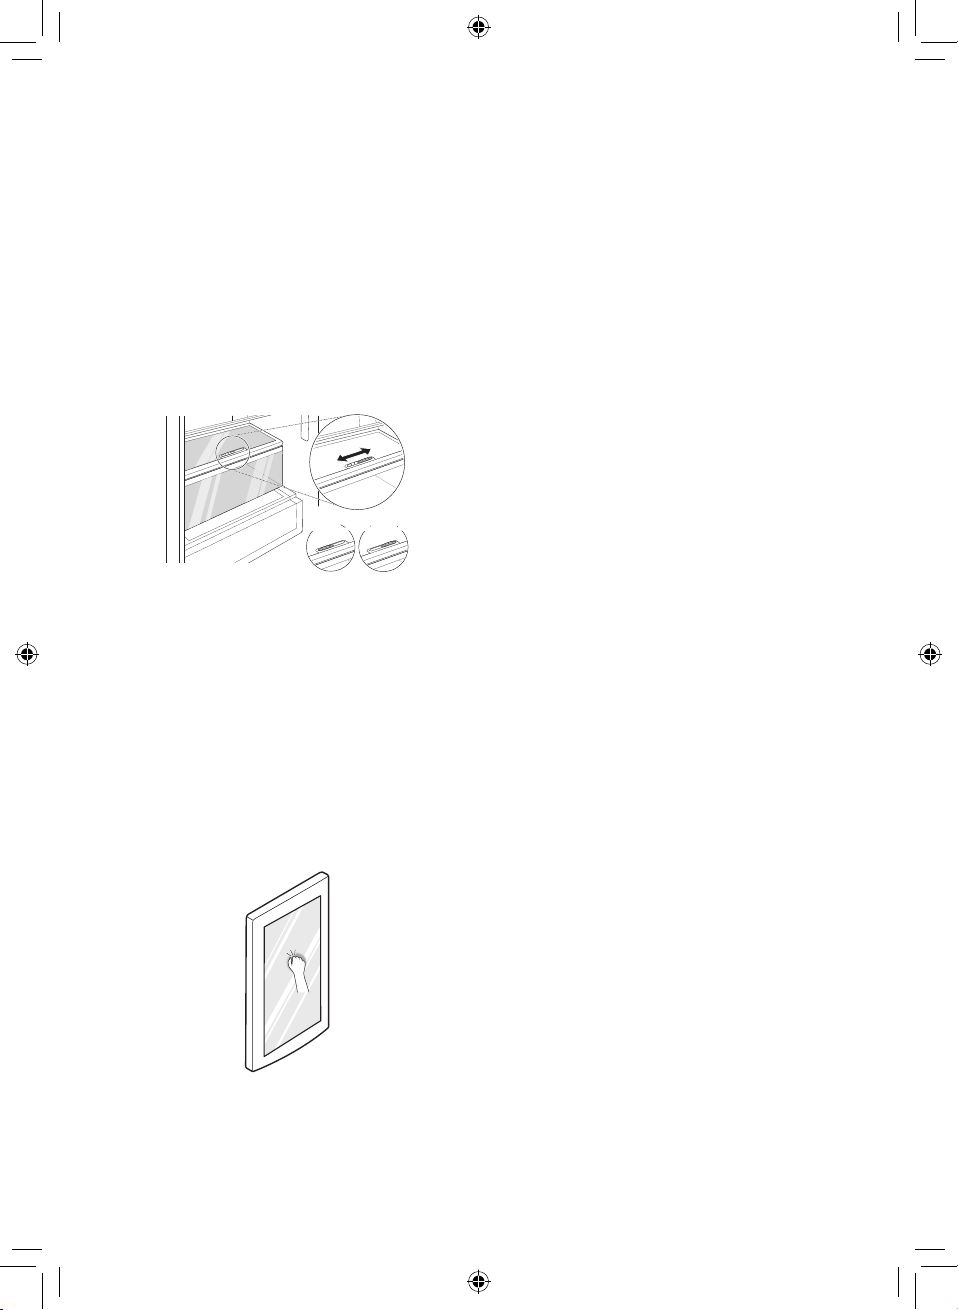
Fresh Vegetable Drawer*
The Humidity in the vegetable crisper drawer can
be controlled by sliding the lever in either direction.
If moved to the left side, the air guide will be open
and allow air to circulate through the drawer for
reduced humidity. And if moved to the right side,
the air guide will be closed and will maintain any
humidity that is currently in the crisper drawer.
The closed state is recommended for storing
vegetables, and open state is recommended for
storing fruit.
The LED light turns off automatically after ten
2
seconds.
• The InstaView Door-in-Door function is disabled
when the right refrigerator door and the left
freezer door are open, for two seconds after
closing the door, and when the ice dispenser is
in use.
• Knock near the center of the glass. Knocking
near the edges of the glass may not activate the
InstaView Door-in-Door function properly.
• Knock hard enough that the knocking sound is
audible.
• The InstaView Door-in-Door function may
activate if a loud noise occurs near the
refrigerator.
Type 1 Type 2
NOTE
• (*) means that this feature varies depending on
the model purchased.
InstaView Function*
The InstaView function on the Door-in-Door lets
you see if you’re running low on frequently used
items like beverages and snacks, without
opening the refrigerator door.
NOTE
• (*) means that this feature varies depending on
the model purchased.
Other Functions
Door Open Alarm
The alarm sounds 3 times in 30 second
intervals if the door (fridge compartment, freezer
compartment, door in door) is left open or not
completely closed for one minute.
• Contact the LG Electronics customer
information centre if the alarm sound continues
even after closing the door.
Failure Detection
The appliance can automatically detect problems
during the operation.
• If a problem is detected, the appliance may not
operate and an error code is displayed even
when any button is pressed.
• When this occurs, do not turn off the power
and immediately contact the LG Electronics
customer information centre. If you turn off
the power, the repair technician from the LG
Electronics customer information centre may
have difficulty finding the problem.
Knock twice on the glass to turn the LED light
1
inside the Door-in-Door on or off.
29
Page 30

EN
SMART FUNCTIONS
LG ThinQ Application
This feature is only available on models with Wi-Fi.
The LG ThinQ application allows you to
communicate with the appliance using a
smartphone.
LG ThinQ Application Features
Communicate with the appliance from a
smartphone using the convenient smart features.
Smart Diagnosis
• If you experience a problem while using the
appliance, this smart diagnosis feature will help
you diagnose the problem.
Settings
• Allows you to set various options on the
appliance and in the application.
NOTE
• If you change your wireless router, internet
service provider, or password, delete the
registered appliance from the LG ThinQ
application and register it again.
• The application is subject to change for
appliance improvement purposes without
notice to users.
• Functions may vary by model.
Before Using LG ThinQ
Application
Check the distance between the appliance
1
and the wireless router (Wi-Fi network).
• If the distance between the appliance and
the wireless router is too far, the signal
strength becomes weak. It may take a long
time to register or installation may fail.
Turn off the Mobile data or Cellular Data on
2
your smartphone.
Connect your smartphone to the wireless
3
router.
NOTE
• To verify the Wi-Fi connection, check that
Wi-Fi icon on the control panel is lit.
• The appliance supports 2.4 GHz Wi-Fi networks
only. To check your network frequency, contact
your Internet service provider or refer to your
wireless router manual.
• LG ThinQ is not responsible for any network
connection problems or any faults, malfunctions,
or errors caused by network connection.
• If the appliance is having trouble connecting
to the Wi-Fi network, it may be too far from
the router. Purchase a Wi-Fi repeater (range
extender) to improve the Wi-Fi signal strength.
• The Wi-Fi connection may not connect or may
be interrupted because of the home network
environment.
• The network connection may not work properly
depending on the Internet service provider.
• The surrounding wireless environment can
make the wireless network service run slowly.
• The appliance cannot be registered due to
problems with the wireless signal transmission.
Unplug the appliance and wait about a minute
before trying again.
• If the firewall on your wireless router is enabled,
disable the firewall or add an exception to it.
• The wireless network name (SSID) should be a
combination of English letters and numbers. (Do
not use special characters.)
• Smartphone user interface (UI) may vary
depending on the mobile operating system (OS)
and the manufacturer.
• If the security protocol of the router is set to
WEP, you may fail to set up the network. Please
change it to other security protocols (WPA2 is
recommended) and register the product again.
30
Page 31

EN
Installing LG ThinQ
Search for the LG ThinQ application from the
Google Play Store or Apple App Store on a smart
phone. Follow instructions to download and install
the application.
Connecting to Wi-Fi
The Wi-Fi button, when used with the LG ThinQ
application, allows the appliance to connect to a
home Wi-Fi network. The Wi-Fi icon shows the
status of the appliance’s network connection. The
icon illuminates when the appliance is connected
to the Wi-Fi network.
Re-registering the Appliance or
Registering Another User
Press and hold the Wi-Fi button for 3 seconds
to temporarily turn it off. Run the LG ThinQ
application and follow the instructions in the
application to register the appliance.
NOTE
• To disable the Wi-Fi function, press and hold the
Wi-Fi button for 3 seconds. Wi-Fi icon will
be turned off.
Wireless LAN Module Specifications
Initial Appliance Registration
Run the LG ThinQ application and follow the
instructions in the application to register the
appliance.
Model LCW-004
Frequency Range 2412 to 2472 MHz
Output
Power(Max)
Wireless function S/W version : V 1.0
For consideration of the user, this device should be
installed and operated with a minimum distance of
20 cm between the device and the body.
IEEE 802.11b:17.82 dBm
IEEE 802.11g:17.72 dBm
IEEE 802.11n:16.61 dBm
Open Source Software Notice
Information
To obtain the source code under GPL, LGPL, MPL,
and other open source licenses, that is contained
in this product, please visit http://opensource.lge.
com.
In addition to the source code, all referred license
terms, warranty disclaimers and copyright notices
are available for download.
LG Electronics will also provide open source code
to you on CD-ROM for a charge covering the cost
of performing such distribution (such as the cost of
media, shipping, and handling) upon email request
to opensource@lge.com. This offer is valid for a
period of three years after our last shipment of this
product. This offer is valid to anyone in receipt of
this information.
31
Page 32

EN
Smart Diagnosis
This feature is only available on models with the
or logo.
Use this feature to help you diagnose and solve
problems with your appliance.
NOTE
• For reasons not attributable to LGE’s
negligence, the service may not operate due to
external factors such as, but not limited to, WiFi unavailability, Wi-Fi disconnection, local app
store policy, or app unavailability.
• The feature may be subject to change without
prior notice and may have a different form
depending on where you are located.
Open the fridge door and then hold the phone
2
on the upper right speaker hole.
Press and hold the Freezer button for three
3
seconds or longer while continuing to hold
your phone to the speaker.
After the data transfer is complete, the
4
diagnosis will be displayed in the application.
Using LG ThinQ to Diagnose
Issues
If you experience a problem with your Wi-Fi
equipped appliance, it can transmit troubleshooting
data to a smartphone using the LG ThinQ
application.
• Launch the LG ThinQ application and select
the Smart Diagnosis feature in the menu.
Follow the instructions provided in the LG
ThinQ application.
Using Audible Diagnosis to
Diagnose Issues
Follow the instructions below to use the audible
diagnosis method.
• Launch the LG ThinQ application and select
the Smart Diagnosis feature in the menu.
Follow the instructions for audible diagnosis
provided in the LG ThinQ application.
Press the Lock button to activate the lock
1
function.
• If the display has been locked for over 5
minutes, you must deactivate the lock and
then reactivate it.
NOTE
• For best results, do not move the phone while
the tones are being transmitted.
32
Page 33

EN
MAINTENANCE
Notes for Cleaning
• When removing a shelf or drawer from inside
the appliance, remove all stored foods from the
shelf or drawer to prevent injury or damage to
the appliance.
− Otherwise, injury may occur due to the
weight of stored foods.
• If cleaning the outside air vents of the appliance
by means of vacuuming, then the power cord
should be unplugged from the outlet to avoid
any static discharge that can damage the
electronics or cause an electric shock.
• Detach the shelves and drawers and clean them
with water, and then dry them sufficiently, before
replacing them.
• Regularly wipe the door gaskets with a wet soft
towel.
• Door basket spills and stains should be cleaned
as they can compromise storage ability of the
basket and could even be damaged.
• After cleaning, check if the power cable is
damaged, warm or improperly plugged.
• Keep the air vents on the exterior of the
appliance clean.
− Blocked air vents can cause fire or appliance
damage.
• When cleaning the inside or outside of the
appliance, do not wipe it with a rough brush,
toothpaste, or flammable materials. Do not
use cleaning agents containing flammable
substances.
− This may cause discoloration or damage to
the appliance.
− Flammable substances: alcohol (ethanol,
methanol, isopropyl alcohol, isobutyl alcohol,
etc.), thinner, bleach, benzene, flammable
liquid, abrasive, etc.
• For the appliance exterior, use a clean sponge
or soft cloth and a mild detergent in warm water.
Do not use abrasive or harsh cleaners. Dry
thoroughly with a soft cloth.
• Never clean the shelves or containers in the
dishwasher.
− The parts may become deformed due to the
heat.
• If the appliance is equipped with an LED lamp,
do not remove lamp cover and LED lamp in any
attempt to repair or service it. Please, contact an
LG Electronics customer information centre.
Cleaning the Condenser
Cover
Use a vacuum cleaner with a brush to clean the
condenser cover and vents. Do not remove the
panel covering the condenser coil area.
33
Page 34

EN
Cleaning the Door Basket
Cleaning the Shelf
Removing the Fridge/Freezer
Door Basket
Hold both edges of the basket and remove it by
lifting it upward.
Refitting the Fridge/Freezer Door
Basket
Hold both edges of the door basket, gently
1
push one edge to assemble, and then in the
same manner assemble the other edge.
After assembling, tap the door basket gently
2
to fix it horizontally.
Removing the Fridge/Freezer
Shelf
Remove the shelf by pulling it out.
Refitting the Fridge/Freezer Shelf
Remove the shelf by pulling it out while slightly
lifting the rear edge of the fridge shelf.
Cleaning the Vegetable
Drawer
Removing the Vegetable Drawer
Remove the contents of the drawer. Hold the
1
handle of the vegetable drawer and pull it out
completely until it outward gently until it stops.
34
Page 35

EN
Lift the vegetable drawer up and remove it by
2
pulling it out.
Refitting the Vegetable Drawer
If the vegetable drawer has a cover, lift it.
1
Insert the bottom of the vegetable drawer into
2
its original position and gently push it back in
while lowering it.
CAUTION
• Please note that injuries can be caused by
the weight of stored foods when removing the
vegetable drawer.
Cleaning the Water
Dispenser
Cleaning the Dispenser Tray
The dispenser tray may become wet easily due
to spilled ice or water. Wipe the entire area with a
damp cloth.
Cleaning the Water and Ice Outlet
Wipe the water or ice outlet frequently with a clean
cloth as it may get dirty easily. Please note that lint
from a cloth may adhere to the outlet.
Water Outlet
Ice Outlet
35
Page 36

EN
Replacing the Water Filter
(For Plumbed models
Only)
Replace the disposable water filter when indicated
on the Replacement Filter icon or at least every
6 months.
To give you enough time to get a new filter, the
light will come on just before the capacity of the
current filter runs out. Changing the filter on time
ensures that you always get fresh and clean water
from the appliance.
Unplug the appliance.
1
Turn off the water supply to the appliance.
2
Remove the disposable water filter.
3
Install the replacement water filter by
4
following the ‘Connecting to the Water Filter’
section.
Turn on the water supply and switch on the
5
appliance.
Press and hold the Water Filter button for
6
three seconds. That resets the Replacement
Filter icon. The new water filter has been
activated.
36
Page 37

EN
TROUBLESHOOTING
Symptoms Possible Cause & Solution
Is there a power interruption?
There is no
refrigeration or
freezing.
There is poor
refrigeration or
freezing.
The appliance contains
a bad smell.
The inside lamp in the
appliance does not
turn on.
• Check the power of other appliances.
If the power plug unplugged from the outlet?
• Plug the power plug in the outlet properly.
Is the fridge or freezer temperature set to its warmest setting?
• Set the fridge or freezer temperature to 'Medium'.
Is the appliance in direct sunlight, or is it near a heat generating object
such as cooking oven or heater?
• Check the installation area and reinstall it away from heat generating
objects.
Did you store hot food without cooling it first?
• Cool the hot food first before putting it in the fridge or freezer compartment.
Did you put in too much food?
• Maintain an appropriate space between food.
Are the appliance doors completely closed?
• Completely close the door and make sure that stored food is not obstructing
in the door.
Is there enough space around the appliance?
• Adjust the installation position to make enough space around the appliance.
Is the fridge or freezer temperature set to 'Warm'?
• Set the fridge or freezer temperature to 'Medium'.
Did you put in food with a strong smell?
• Store foods with strong smells in a sealed containers.
Vegetables or fruit may have spoiled in the drawer?
• Throw away rotten vegetables and clean the vegetable drawer. Do not store
vegetables too long in the vegetable drawer.
Does the inside lamp in the appliance turn off?
• It is not possible for customers to replace the inside lamp in the appliance as
they are not serviceable. If the inside lamp does not turn on, please contact
the LG Electronics customer information centre.
37
Page 38

EN
Symptoms Possible Cause & Solution
Is the appliance leaning forward?
• Adjust the front feet to raise the front side slightly.
Were the shelves properly assembled?
The appliance door is
not closed tightly.
It is difficult to open
the appliance door.
There is condensation
inside the appliance
or on the bottom of
the vegetable drawer
cover.
Frost has formed in the
freezer compartment.
• Refit the shelves if needed.
Did you close the door with excessive force?
• If you apply too much force or speed when closing the door, it may remain
briefly open before closing. Make sure that you do not slam the door closed.
Close without force.
Did you open the door right after you closed it?
• If you try to open the appliance door within one minute after you closed
it, you may have difficulties because of the pressure inside the appliance.
Try to open the appliance door again in a few minutes so that the internal
pressure stabilizes.
Did you store hot food without cooling it first?
• Cool the hot food first before putting it in the fridge or freezer compartment.
Did you leave the appliance door open?
• Although the condensation will disappear soon after you close the appliance
door, you can wipe it with a dry cloth.
Do you open and close the appliance door too frequently?
• Condensation can form due to the temperature difference from the outside.
Wipe out the dampness with a dry cloth.
Did you put warm or moist food inside without sealing it in a container?
• Store food in a covered or sealed container.
Doors may not be closed properly?
• Check if the food item inside the appliance is blocking the door and make
sure that the door is tightly closed.
Did you store hot food without cooling it first?
• Cool the hot food first before putting it in the fridge or freezer compartment.
38
Page 39

EN
Symptoms Possible Cause & Solution
Is the air entry or exit of the freezer compartment blocked?
Frost has formed in the
freezer compartment.
Frost or condensation
has formed inside or
outside the appliance.
The appliance is
noisy and generates
abnormal sounds.
The side or front of the
appliance is warm.
There is water inside
or outside of the
appliance.
• Make sure that air entry or exit is not blocked so that the air can circulate
inside.
Is the freezer compartment overfilled?
• Maintain an appropriate space between items.
Did you open and close the appliance door frequently or is the appliance
door improperly closed?
• Frost or condensation can form if the outside air penetrates inside the
appliance.
Is the installation environment humid?
• Condensation can appear on the exterior of the appliance if the installation
area is too humid or on a humid day such as a rainy day. Wipe off any
moisture with a dry cloth.
Is the appliance installed on a weak floor or improperly leveled?
• Install the appliance on a solid and flat area.
Does the rear of the appliance touch the wall?
• Adjust the installation position to allow enough clearance around the
appliance.
Are objects scattered behind the appliance?
• Remove the scattered objects from behind the appliance.
Is there an object on top of the appliance?
• Remove the object on top of the appliance.
There are anti condensation pipes fitted to these areas of the appliance
to reduce condensation forming from around the door area.
• The heat releasing pipe to prevent condensation is installed on the front and
side of the appliance. You may feel it particularly hot right after the appliance
is installed or during the summer. You can be assured that this is not a
problem and is quite normal.
Is there water leakage around the appliance?
• Check if the water has leaked from a sink or another place.
Is there water on the bottom of the appliance?
• Check if the water is from the thawed frozen food or a broken or dropped
container.
39
Page 40

EN
Symptoms Possible Cause & Solution
Did you install the appliance recently?
• The ice maker produces ice normally when approximately 48 hours have
passed after the appliance is installed.
Did you connect the water supply pipe to the appliance and open the
supply valve?
• Connect the water supply pipe to the appliance and open the supply valve
completely.
Is the water supply hose bent?
• If the water supply hose is bent, the water flow could be compromised.
Have you dispensed a large amount of ice recently?
• It takes approximately 24 hours to produce more ice in the automatic
icemaker. Please wait.
The automatic
icemaker does
not produce ice or
produces a small
amount of ice.
Ice is not dispensed.
Did you set the ice maker switch or the automatic icemaker button on the
control panel to ON?
• Press I on the automatic icemaker switch or set ON for the automatic
icemaker button on the control panel. (For more details on how to use, visit
LG electronics website or use your smart device.)
Is the temperature of the freezer compartment set too high?
• If the set temperature is too warm, ice will be produced slowly or not at all.
Set the Freezer temperature to -18 °C for normal operation of the automatic
icemaker.
Have you been opening the appliance door frequently?
• If you open the appliance door frequently, cold air will escape, lowering
the speed of ice production. Do not open and close the appliance door
frequently.
Is the appliance door completely closed?
• If the appliance door is not completely closed, the temperature of the freezer
compartment will increase, slowing down the ice production speed. Close
the appliance door completely.
Is there ice in the ice bin?
• Check whether there is ice in the ice bin.
Is the ice clumped in the ice bin?
• Separate the ice bin and shake it. Discard the remaining clumped ice after
shaking the ice bin.
40
Page 41

EN
Symptoms Possible Cause & Solution
Unable to hear the sound of ice coming out?
• In the control panel, select the modes for cubed ice and crushed ice
alternately to dispense the ice.
Ice is not dispensed.
Water does not come
out.
Water tastes strange.
Is the ice path blocked? (You can check the ice passage by separating
the ice bin.)
• Ice may not be dispensed properly if the ice passage is blocked. Check the
ice and clean the ice path regularly.
Are you using unfiltered water?
• Unfiltered water can contain a large amount of various heavy metals
or foreign substances, so the filter may be clogged in the early stage
regardless of the life of the filter.
The water dispenser tank may be empty? (For non plumbed models only)
• Fill the water dispenser tank.
Water does not come out when the water tube is filled with air. (For non
plumbed models only)
• Remove the water dispenser tank by pulling it out while holding the handle.
Fill the water dispenser tank with water and refit it on the fridge shelf.
Is the water supply valve closed? (For plumbed models only)
• Open the water supply valve.
Is the taste of water different when comparing it with the taste of water
from the previous water purifier?
• Has the purified water or cold water not been used for an extended period
of time?
Has it been a long time since you installed and replaced the filter?
• If an expired filter is used, the purification performance may decline. It is
recommended to replace the filter according to the filter replacement period.
Have you flushed out the filter properly in the initial stage after installing
it?
• When you install or replace the filter for the first time, you need to remove
air and activated carbon residue from inside the filter. Use the appliance
after dispensing and discharging approximately 5 litres of purified water from
the dispenser by pressing the water dispensing lever. (Activated carbon is
harmless to humans.)
Has the purified water or cold water not been used for an extended
period of time?
• The taste of old water may change due to bacterial growth. Use the product
after dispensing and discharging approximately 5 litres (approximately three
minutes) from the water dispenser.
41
Page 42

EN
Symptoms Possible Cause & Solution
The defrost control will click when the automatic defrost cycle begins
Clicking noises
Rattling noises
Whooshing noises
Gurgling noises
Popping noises
Vibrating
and ends. The thermostat control (or appliance control on some models)
will also click when cycling on and off.
• Normal Operation
Rattling noises may come from the flow of appliance, the water line on
the back of the unit (for plumbed models only), or items stored on top of
or around the appliance.
• Normal Operation
Appliance is not resting evenly on the floor.
• Floor is weak or uneven or leveling legs need to be adjusted. See the Door
Alignment section.
Appliance with linear compressor was moved while operating.
• Normal operation. If the compressor does not stop rattling after three
minutes, turn the power to the appliance off and then on again.
Evaporator fan motor is circulating air through the fridge and freezer
compartments.
• Normal Operation
Air is being forced over the condenser by the condenser fan.
• Normal Operation
Appliance flowing through the cooling system
• Normal Operation
Contraction and expansion of the inside walls due to changes in
temperature.
• Normal Operation
If the side or back of the appliance is touching a cabinet or wall, some of
the normal vibrations may make an audible sound.
• To eliminate the noise, make sure that the sides and back do not make any
contact with any wall or cabinet.
42
Page 43

EN
Symptoms Possible Cause & Solution
The password for the Wi-Fi that you are trying to connect to is incorrect.
• Find the Wi-Fi network connected to your smartphone and remove it, then
register your appliance on LG ThinQ.
Mobile data for your smartphone is turned on.
• Turn off the Mobile data of your smartphone and register the appliance using
the Wi-Fi network.
The wireless network name (SSID) is set incorrectly.
Your home appliance
and smartphone is not
connected to the Wi-Fi
network.
• The wireless network name (SSID) should be a combination of English
letters and numbers. (Do not use special characters.)
The router frequency is not 2.4 GHz.
• Only a 2.4 GHz router frequency is supported. Set the wireless router to
2.4 GHz and connect the appliance to the wireless router. To check the
router frequency, check with your Internet service provider or the router
manufacturer.
The distance between the appliance and the router is too far.
• If the distance between the appliance and the router is too far, the signal
may be weak and the connection may not be configured correctly. Move the
location of the router so that it is closer to the appliance.
43
Page 44

Memo
Page 45

www.lg.com
ПАЙДАЛАНУШЫ НҰСҚАУЛЫҒЫ
ТОҢАЗЫТҚЫШ
МҰЗДАТҚЫШ
МҰЗДАТҚЫШ
Құрылғыны пайдаланбас бұрын пайдаланушы нұсқаулығын мұқият оқып шығыңыз және
анықтама үшін оны әрқашан ыңғайлы жерде сақтаңыз.
Copyright © 2020 LG Electronics Inc. All Rights Reserved
Page 46

МАЗМҰНЫ
Бұл нұсқаулықта сатып алған үлгіден
өзгеше кескіндер немесе мазмұн болуы
мүмкін.
Бұл нұсқаулықты өндіруші түзете алады.
ҚАУІПСІЗДІК НҰСҚАУЛАРЫ ........................................................3
Маңызды қауіпсіздік нұсқаулары ....................................................................3
ОРНАТУ ........................................................................................ 11
Орнату алдында ............................................................................................ 11
Өлшемдер және саңылаулар ....................................................................... 11
Қоршаған орта температурасы.....................................................................11
Есіктерді алу ..................................................................................................12
Есіктің биіктігін реттеу ...................................................................................14
Су желісін жалғау (тек құбыр жүйесіне қосылған үлгілер үшін) .................14
Жабдықты жалғау ..........................................................................................16
Жабдықтың орнын ауыстыру ........................................................................16
ПАЙДАЛАНУ ................................................................................17
Бөлшектер мен функциялар .........................................................................17
Пайдалануға қатысты ескертпелер ..............................................................21
Басқару панелін пайдалану ..........................................................................23
Су диспенсерінің багы (Құбыр жүйесі жоқ үлгілер ғана) ............................25
Су және мұз диспенсері ................................................................................26
Автоматты мұз дайындағыш.........................................................................26
Қосымша есік* ................................................................................................28
Балғын көкөніс тартпасы* .............................................................................29
InstaView функциясы*....................................................................................29
Басқа функциялар .........................................................................................30
СМАРТ ФУНКЦИЯЛАРЫ ............................................................31
LG ThinQ қолданбасы ....................................................................................31
Smart Diagnosis ..............................................................................................33
ҚЫЗМЕТ КӨРСЕТУ .....................................................................34
Тазалау бойынша ескертпелер .................................................................... 34
Конденсатордың қақпағын тазалау .............................................................. 34
Есіктегі жәшікті тазалау .................................................................................35
Сөрені тазалау ...............................................................................................35
Көкөністер тартпасын тазалау ......................................................................35
Су диспенсерін тазалау ................................................................................36
Су сүзгісін ауыстыру (тек құбыр жүйесіне қосылған үлгілер үшін) ............37
АҚАУЛАРДЫ ЖОЮ .....................................................................38
Page 47

KK
ҚАУІПСІЗДІК НҰСҚАУЛАРЫ
Қауіпсіздік нұсқаулары өнімге қауіп тудыра отырып,
пайдалану және дұрыс пайдаланбау салдарынан болатын
қауіптер мен зақымдардың алдын алуға арналған.
Нұсқаулар төменде сипатталғандай «АБАЙЛАҢЫЗ» және
«ЕСКЕРТУ» болып бөлінеді.
Бұл таңба қауіп тудыратын жағдайлар мен жұмысты
анықтау үшін көрсетіледі. Осындай таңбасы бар
бөлімді мұқият оқып шығыңыз және қауіптің алдын
алу үшін нұсқауларды орындаңыз.
АБАЙЛАҢЫЗ
Бұл нұсқаулар орындалмаған жағдайда ауыр жарақатқа
немесе өлімге әкелуі мүмкін екенін білдіреді.
ЕСКЕРТУ
Бұл нұсқаулар орындалмаған жағдайда өнімнің аз деңгейде
зақымдалуы мен бұзылуын білдіреді.
Маңызды қауіпсіздік нұсқаулары
АБАЙЛАҢЫЗ
Құрылғыны пайдаланған кезде жарылу, өрт, өлім, тоқ
соғу, зақымдау немесе адамды күйдіру қауіпінің алдын
алу үшін мыналарды қоса негізгі қауіпсіздік шараларын
қолданыңыз:
Үйдегі балалар
• Бұл құрылғы физикалық мүмкіндігі мен ақыл-есі шектеулі
немесе құрылғыға қатысты тәжірибесі мен білімі аз адамдарды
(балаларды қоса) олардың қауіпсіздігіне жауапты адам
қадағаламаған кезде немесе құрылғыны пайдалануға қатысты
нұсқаулар берілмеген кезде пайдалануға арналмаған.
Балалардың құрылғымен ойнамауы қадағалануы қажет.
3
Page 48

KK
• Егер құрылғы құлыппен жабдықталған болса (кейбiр модельдерi
ғана), кiлттi балалардың қолы жетпейтiн жерде ұстаңыз.
Орнату
• начинай просто с Құрылғыны құрылғыны екі немесе одан көп
адам абайлап көтеріп тасымалдауы қажет.
• Розетканың жерге дұрыс тұйықталғанын және қуат сымындағы
жерге тұйықтау ашасының зақымдалмағанын немесе қуат
ашасынан алынбағанын тексеріңіз. Жерге тұйықтау туралы
қосымша мәліметтерді LG Electronics тұтынушыларды қолдау
орталығынан сұраңыз.
• Бұл құрылғы жабдықты жерге тұйықтау өткізгішіне ие қуат
сымымен және жерге тұйықтау ашасымен жабдықталған. Қуат
ашасы барлық жергілікті нормалар мен ережелерге сәйкес және
жерге тұйықталған тиісті розеткаға жалғануы керек.
• Қуат сымы зақымдалған немесе розетканың тесігі босап қалған
болса, қуат сымын пайдаланбаңыз және өкілетті қызмет көрсету
орталығымен байланысыңыз.
• Жабдықты қуат кабелі жоқ (орнатылмаған) көп розеткалы
адаптерге жалғауға болмайды.
• Қуат сымын өзгертпеңіз немесе ұзартпаңыз.
• Жабдық жеке сақтандырғышы бар арнайы қуат желісіне жалғануы
тиіс.
• Жерге тиісті түрде тұйықталмаған (тасымалы) көп розеткалы
ұяны пайдаланбаңыз. Тиісті түрде жерге тұйықталған (тасымалы)
көп розеткалы ұяны пайдаланған жағдайда, кернеу қуаты
нормаларға сай келетін немесе одан жоғары болатын розетканы
қолданыңыз және оны тек жабдық үшін пайдаланыңыз.
• Құрылғы тоқтан оңай ажыратуға болатын орынға орнатыңыз.
• Қуат сымының жоғары қаратылып тұруына және құрылғының қуат
ашасына қисайып тұруына жол бермеңіз.
• Құрылғыны мықты және тегіс еденге орнатыңыз.
4
Page 49

KK
• Құрылғыны ылғал және шаң жерге орнатпаңыз. Құрылғыны
кез келген сыртқы аймаққа, тікелей күн көзі, жел немесе жауын
сияқты ауа райы жағдайларына ұшырайтын немесе нөлден
төмен температуралы аймаққа орнатпаңыз немесе сақтауға
қоймаңыз.
• Құрылғыны тікелей күн сәулесіне немесе оны пештер мен
жылыту құрылғылары сияқты жылу көздеріне жақындатпаңыз.
• Орнатқан кезде құрылғының артқы жағына тиіп кетпеуді
қамтамасыз етіңіз.
• Құрастыру немесе бөлшектеу кезінде құрылғы есігінің құлап
кетпеуін қамтамасыз етіңіз.
• Құрылғы есігін құрастыру немесе бөлшектеу кезінде қуат сымын
қыспаңыз, баспаңыз немесе зақымдамаңыз.
• Ашалы адаптер немесе басқа да керек-жарақтарды тоқ көзіне
жалғамаңыз.
Пайдалану
• Құрылғыны тұрмыстық тағам сақтаудан басқа мақсатта
(медициналық немесе сараптамалық материалдарды сақтау
немесе тасымалдау) қолданбаңыз.
• Қатты жауын немесе найзағай кезінде немесе ұзақ уақыт
қолданылмайтын болса, тоқтан ажыратыңыз.
• Ашаны немесе құрылғыны басқару бөліктерін ылғал қолдармен
ұстамаңыз.
• Қуат сымын артық бүкпеңіз не оған ауыр зат қоймаңыз.
• Құрылғының электр бөліктеріне су кіріп кететін болса, қуат
ашасын ажыратып, LG Electronics тұтынушыларды қолдау
орталығымен байланысыңыз.
• Салқын ауа шығаратын аймаққа, қақпағына немесе артындағы
жылу шығаратын торына қолдарыңызды немесе металл заттарды
салмаңыз.
• Құрылғының артқы қақпағына шамадан тыс күш немесе ықпал
қолданбаңыз.
• Үй жануарлары сияқты жануарларды құрылғының ішіне
салмаңыз.
5
Page 50

KK
• Құрылғы есігін ашқан немесе жапқан кезде, жаныңызда балалар
болса, абайлаңыз. Есік балаға тиіп кетіп, зақымдауы мүмкін.
• Балалардың құрылғының ішіне кіріп кету қауіпін туғызбаңыз.
Құрылғы ішіне кіріп кетсе, тұншығып қалуы мүмкін.
• Құрылғыға ауыр немесе сынғыш заттар, сұйықтықпен
толтырылған контейнерлер, жанғыш, тұтанғыш заттар (балауыз,
шамдар және т.б.) немесе жылыту құрылғыларын (пештер,
қыздырғыштар және т.б.) қоюға болмайды.
• Егер газ (изобутан, пропан, табиғи газ, т.б.) шығып жатса,
құрылғыны немесе қуат ашасын ұстамаңыз және бөлмені дереу
желдетіңіз. Бұл жабдықта газ түріндегі хладагент (изобутан
,R600a) пайдаланылады. Пайдаланылатын газ көлемі аз болса
да, ол әлі де оңай жанғыш газ болып табылады. Жабдықты
тасымалдау, орнату немесе пайдалануда газ жылыстаған
жағдайда ұшқын пайда болса, ол өртке жарылысқа немесе
жарақатқа әкеліп соғуы мүмкін.
• Құрылғының жанында өртке қауіпті немесе жанатын заттарды
(мыс., жанармай, шарап, химикаттар, сұйытылған көмірсутек
газы, жанатын шашыратқыш, құрт-құмырсқаларды жоюға
арналған құрал, ауаны сергіткіш, косметика, т.б.) қолданбаңыз
немесе сақтамаңыз.
• Өзге дыбыс, иіс немесе құрылғыдан түтін шығатын болса, дереу
ашаны қуат көзінен ажыратып, LG Electronics тұтынушыларды
қолдау орталығымен байланысыңыз.
• Мұз дайындағыштың немесе диспенсердің суға арналған багын
тек ауыз суымен толтырыңыз.
• Салқындатқыш сұйықтық айналымының түтіктерін зақымдап
алмаңыз.
• Құрылғының ішіне электрондық құрылғыларды салмаңыз
(мысалы, жылытқыш және ұялы телефон).
Қызмет көрсету
• Құрылғыны тазаламас немесе ішкі шамын ауыстырмас бұрын
қуат сымын ажыратыңыз (салынған болса).
• Кез келген ылғалды және шаңды толығымен кетірген соң, розетка
саңылауына қуат ашасын қауіпсіз етіп жалғаңыз.
6
Page 51

KK
• Құрылғыны тоқтан ешқашан қуат кабелінен тартып ажыратпаңыз.
Әрқашан қуат ашасын мықтап ұстап, розеткадан тіке тартып
алыңыз.
• Құрылғыны тазалау үшін, оның ішкі немесе сыртқы жағына су
не тұтанғыш заттарды (тіс пастасы, спирт, еріткіш зат, бензол,
жанғыш сұйықтық, жыратын зат және т.б.) шашпаңыз.
• Құрылғыны щеткамен, шүберектермен немесе беттері қатты
губкамен немесе металдан жасалған затпен тазаламаңыз.
• Құрылғыны тек LG Electronics тұтынушыларды қолдау
орталығының білікті маманы бөлшектеу, жөндеу немесе өзгерту
керек. Құрылғыны басқа орынға жылжытатын және орнататын
болсаңыз, LG Electronics тұтынушыларды қолдау орталығымен
байланысыңыз.
• Құрылғының ішін кептіру үшін шаш кептіргішті қолданбаңыз
немесе иісін кетіру үшін ішіне шырақты қоймаңыз.
• Өндіруші ұсынғаннан артық етіп, мұздату процесін үдету
үшін механикалық құрылғыларды немесе басқа заттарды
қолданбаңыз.
• Сумен қамтамасыз ету желісін (тек құбыр жүйесіне қосылған
үлгілер үшін) тек ауыз су ағатын су көзіне жалғаңыз. Әйтпесе,
судағы лас нәрселер ауру тудыруы мүмкін.
Тастау
• Құрылғыны тастаған кезде, сөрелер мен жәшіктерді орнында
қалдырыңыз да, есік тығыздауышын шығарып алып, құрылғыны
балалардан алыс жерге қойыңыз.
• Барлық бума материалдарын (мысалы, пластик қалталар мен
пенопласт) балалардан алысқа тастаңыз. Бума материалдары
тұншықтыруы мүмкін.
Техникалық қауіпсіздік
• Желдеткіш саңылауларын құрылғы корпусында немесе
кірістірілген құрылғыда кедергісіз қалдырыңыз.
• Тоңазытқыштың ішінде электрлік құралдарды пайдаланбаңыз.
7
Page 52

KK
• Құрылғыда қолданылатын суытқыш агент пен оқшаулағыш газ
арнайы процедураларға сәйкес жойылуы керек. Оларды жоймас
бұрын техникалық қызмет жасайтын мамандардан немесе тағы
басқа дәрежелі мамандардан кеңес алуыңыз жөн.
• Түтіктен ағатын салқындатқыш агент тұтануы немесе жарылыс
туғызуы мүмкін.
• Осы құрылғының салқындатқыш сұйықтығының мөлшері құрылғы
ішіндегі белгілері бар тақтайда көрсетіледі.
• Зақым белгілері көрініп тұрған құрылғыны ешқашан іске
қоспаңыз. Күмәндансаңыз, дилеріңізбен кеңесіңіз.
• Бұл құрылғы тұрмыстық жағдайда және тек осыған сай қолдануға
арналады. Ол коммерциялық немесе қоғамдық тамақтандыру
мақсаттарында немесе керуен не кеме сияқты кез келген
қозғалыстарда қолдануға арналмаған.
• Бұл құрылғыда өртке қауіпті жанармайы бар аэрозоль банкалары
сияқты жарылғыш заттарды сақтамаңыз.
Өрт және тұтанғыш материалдар қатері
Бұл таңбалар тұтанатын және күтім жасамаған жағдайда
өрт шығу себебі болатын тұтанғыш материалдар туралы
ескертеді.
• Бұл жабдық аз көлемдегі изобутан хладагенті (R600a) болады,
бірақ ол да оңай жанғыш болып табылады. Жабдықты
тасымалдау және орнату кезінде тоңазыту тізбегінде ешбір
бөлшектің зақымдалмағанына көз жеткізуіңіз қажет.
• Егер газ шығып жатқаны анықталса, ашық от көзі немесе от
шығаратын заттардың болмауын қадағалаңыз және құрылғы
тұрған бөлмені бірнеше тоқтың желдетіңіз. Тоңазыту тізбегінен газ
шыққан жағдайда, тұтанғыш газ бен ауа қоспасы пайда болмауы
үшін, құрылғы қолданылатын бөлменің өлшемі қолданылатын
хладагент мөлшеріне сәйкес келуі керек. Құрылғының ішіндегі
әрбір R600a хладагентінің 8 г-на бөлменің 1 м2-ы шақ келуі керек.
• Құрылғыны орналастыру барысында қуат сымы қысылмағанына
немесе зақымдалмағанына көз жеткізіңіз.
• Бірнеше тасымалды розеткаларды немесе тасымалды қуат
көздерін құрылғы артына орналастырмаңыз.
8
Page 53

KK
ЕСКЕРТУ
Өнімді пайдаланған кезде адамдарға келетін қауіпті азайту,
өнімнің дұрыс жұмыс істемеуін болдырмау үшін келесі
нұсқаулармен бірге негізгі нұсқауларды орындаңыз:
Орнату
• Тасымалдау кезінде құрылғыны тарту немесе итеру үшін оны
еңкейтпеңіз.
• Құрылғыны жылжытқан кезде, қол немесе аяқ сияқты дене
мүшесі қысылып қалмағанына көз жеткізіңіз.
Пайдалану
• Мұздатқыш бөлігіндегі металл бөліктерін немесе мұздап тұрған
тағамды дымқыл немесе ылғал қолыңызбен ұстамаңыз. Ол қатып
қалуға себеп болуы мүмкін.
• Әйнектен жасалған контейнерлерді, бөтелкелерді немесе
банкаларды (әсіресе газдалған сусындары бар) нөлден төмен
температурадағы мұздатқыш камераға, сөрелерге немесе мұз
сақтау құтыларына салмаңыз.
• Жабдық есігінің алдыңғы жағындағы қыздырып шыңдалған шыны
зақымдалуы мүмкін. Сынып қалған жағдайда оған қолыңызды
тигізбеңіз.
• Қосымша есіктің үстіне ауыр зат қоймаңыз.
• Қосымша есікті тақтай ретінде пайдаланбаңыз және оған өткір
затпен сызат түсірмеңіз, себебі ол құрылғыны зақымдауы мүмкін.
• Құрылғы есігіне, сақтау камерасына, сөреге немесе тоңазытқыш
есігіне асылмаңыз және үстіне шықпаңыз.
• Есік жәшіктерінде тым көп су бөтелкелерін немесе гарнирлерге
арналған контейнерлерді сақтамаңыз.
• Үй жануарларының қуат сымын немесе су шлангісін шайнап
тастауына мүмкіндік бермеңіз.
• Құрылғы есігін артық күшпен ашпаңыз немесе жаппаңыз.
9
Page 54

KK
• Жабдықтың есігіндегі топса зақымдалса немесе дұрыс жұмыс
істемесе, жабдықты пайдалануды тоқтатыңыз және өкілетті
қызмет көрсету орталығына хабарласыңыз.
• Шыны сөрелерін немесе қақпақтарын олар салқын кезде жылы
сумен тазаламаңыз.
• Ешқашан мұздатқыштан алынған қатып тұрған тағамдарды дереу
жемеңіз.
• Мұз контейнері немесе мұз диспенсері сияқты автоматты мұз
дайындағыштың механикалық бөліктеріне қолыңызды салмаңыз.
• Суды ағызу кезінде жұқа кристалды шынаяқты немесе фарфор
ыдысты пайдаланбаңыз.
• Автоматты мұз дайындағыштың қақпағын алып тастамаңыз.
Автоматты мұз дайындағыштың қандай да бір механикалық
бөлшегіне тиіп кетсеңіз, жарақат алуыңыз мүмкін.
• Жабдықтың есігін немесе есік ішіндегі есікті ашу және жабу
кезінде қолды немесе аяқты қыстырып алмаңыз.
• Құрылғының негізгі есігін қосымша есігі ашық болғанда, ал
қосымша есігін негізгі есік ашық болғанда ашпаңыз. Қосымша есік
құрылғының жиегіне тиіп кетіп, зақымдалуы мүмкін.
Қызмет көрсету
• Сөрелерді астын үстіне қаратып салуға болмайды. Олар құлап
кетуі мүмкін.
• Құрылғының мұзын алу үшін LG Electronics тұтынушыларды
қолдау орталығымен байланысыңыз.
• Тоқ өшіп қалған кезде, мұздатқыштан мұз сауытындағы мұзды
алып тастаңыз.
10
Page 55

KK
ОРНАТУ
Орнату алдында
Өлшемдер және
саңылаулар
Құрылғы қасындағы нысандарға дейінгі
қашықтық аз болса, ол мұздату мүмкіндігінің
нашарлауына және электр шығындарының
артуына алып келуі мүмкін. Құрылғыны орнатып
жатқан кезде, оның қасындағы әр қабырғаға
дейінгі қашықтық 50 мм болуы тиіс.
A
D E
G
F
B
H
C
- A түрі (мм) B түрі (мм)
A 912 912
B 1790 1790
C 927 738
D 797 615
E 877 690
F 922 733
G 1384 1180
H 1713 1750
Қоршаған орта
температурасы
• Құрылғы климаттық зонаға байланысты,
қоршаған орта температураларының
шектеулі ауқымында пайдалануға арналған.
• Құрылғының ішкі температурасы оның
орналасқан жеріне, қоршаған орта
температурасына, есігінің ашылу жиілігіне
және тағы басқаларына байланысты өзгереді.
• Құрылғының климаттық класы оның
техникалық жапсырмасында берілген.
Климаттық класс
SN (Өте шектеулі) +10 – +32
N (Шектеулі) +16 – +32
ST (Субтропикалық) +16 – +38
T (Тропикалық) +16 - +43 / +10 - +43*
*Австралия, Индия, Кения
ЕСКЕРТПЕ
• SN және T дәрежесіндегі жабдықтар 10
ºC - 43 ºC градус аралығындағы ортада
пайдалануға арналған.
Аксессуарлар
*1:Осы мүмкіндік кейбір модельдерде ғана бар.
Қоршаған орта
температурасының
ауқымы ºC
A түріндегі гайка кілті*1
a
B түріндегі гайка кілті*1
b
Су сүзгісі*1
c
Су түтігі*1
d
Түтік коннекторы және қысқыш*1
e
Түтік коннекторы және клапан*1
f
11
Page 56

KK
Есіктерді алу
Егер сіздің кіре беріс есігіңіз тар болып, құрылғы
одан өте алмайтын болса, құрылғының есігін
алып тастаңыз және құрылғыны бір жағымен
кіргізіңіз.
АБАЙЛАҢЫЗ
• Құрылғыны орнатпас бұрын немесе оған
қызмет көрсетпес бұрын, куат сымын,
үй сақтандырғышын немесе автоматты
ажыратқышты ажыратыңыз. Бұл нұсқаулық
талаптарын орындамаған жағдайда, ол
адам өліміне, өрттің шығуына немесе электр
тогының соғуына себеп болады.
Мұздатқыштың есігін алу
Су құбыры жабдықтың артындағы жоғарғы
1
оң жақ бөлікке жалғанады. Тығынды
түтік коннекторына қарай итеріп тұрып,
жалғанған су түтігін шығарып алыңыз.
Топсалы иінтіректі d сағат тіліне қарсы
4
бағытта айналдырыңыз. Жоғарғы топсаны
e иінтірегіндегі ысырмадан көтеріңіз f.
ЕСКЕРТУ
• Жоғарғы жақ топсаны шығару барысында
есіктің алға қарай құлап кетуінен сақ
болыңыз. Есікті алу және оны қайта орнына
орнату жұмысын екі адам істегені дұрыс.
Есікті төменгі топса істігінен шешіп алыңыз.
5
Құрылғының жоғарғы жағында орналасқан
2
топса қақпағының бұрандасын сағат тілінің
бағытына қарсы бұрау арқылы алыңыз.
Су құбырын шығарып алыңыз a. Барлық
3
сым бұрауларын ажыратыңыз b. Жерге
тұйықтағышты бұрап ашыңыз c.
12
ЕСКЕРТУ
• Есіктің ішкі жағын жоғары қаратып, сызат
түспейтін жерге қойыңыз.
Тоңазытқыштың есігін алу
Барлық сымдарды ажыратыңыз a.
1
Page 57

KK
Топсалы иінтіректі b сағат тілі бағытымен
2
айналдырыңыз. Жоғарғы топсаны
иінтірегіндегі c ысырмадан көтеріңіз d.
ЕСКЕРТПЕ
• Су құбырларын бөлшектеу/орнату
ЕСКЕРТУ
• Жоғарғы жақ топсаны шығару барысында
есіктің алға қарай құлап кетуінен сақ
болыңыз. Есікті алу және оны қайта орнына
орнату жұмысын екі адам істегені дұрыс.
Есікті төменгі топса істігінен шешіп алыңыз.
3
ЕСКЕРТУ
• Есіктің ішкі жағын жоғары қаратып, сызат
түспейтін жерге қойыңыз.
Тоңазытқыш және мұздатқыш
есіктерін қайта салу
Құрылғы есіктен өткенен кейін есікті алғандағы
іс-әрекеттерді кері ретпен орындап, есікті қайта
орнатыңыз.
a Ойықты бөлік b Су құбыры c Енгізу сызығы
d Қысқыш
• Су құбырын енгізу сызықтарының тек біреуі
көрінгенге дейін мұқият енгізіңіз. Құбырды
берік бекітілгенше тартыңыз.
Дұрыс
Дұрыс емес
• Егер су құбырының ұшы зақымдалса, оны
қайта орнатқанда су ақпауы үшін, оған тиісті
шаралар қолданылуы керек.
• e Түзу кесілмеген f Зақымдалған g
Созылған
ЕСКЕРТУ
• Алдымен тоңазытқыштың оң жақ есігін
орнатыңыз.
13
Page 58

KK
Есіктің биіктігін реттеу
Егер құрылғының есігі бір деңгейде тұрмаса,
төменде көрсетілген тәсілдің көмегімен құрылғы
есігінің биіктігіндегі айырмашылықты реттеңіз.
ЕСКЕРТПЕ
• Құрылғы есігінің биіктігін 5 мм-ден артық
реттемеңіз, себебі топсаның өзегі түсіп қалуы
мүмкін.
*Анықтама
Контргайка
Топса өзегін реттеу
Ұстағыштың сомынын сомын кілтімен сағат
1
тілі бағытымен бұраңыз.
Гайканы босату
үшін
8 мм-лік гайка кілтінің көмегімен топса
2
өзегін сағат тілінің бойымен немесе
сағат тіліне қарсы бағытта бұрау
арқылы құрылғы есігінің биіктігіндегі
айырмашылықты реттеңіз.
Төмен
Жоғары
Ұстағыш сомынды сағат тілі бағытына
3
қарсы бұрау арқылы бекітіңіз.
Гайканы қатайту үшін
Су желісін жалғау (тек
құбыр жүйесіне қосылған
үлгілер үшін)
Сумен қамтамасыз ету
талаптары
Су диспенсерінің жұмыс істеу үшін суық су
қысымы 138 кПа және 827 кПа (1,4-8,4 кгк/
см²) арасында болуы керек. Егер тоңазытқыш
су қысымы төмен (138 кПа шамасынан
төмен) аймақта орнатылған болса, үдеткіш
сорғы пайдалануыңызға болады.
Кері осмос әдісімен суды сүзгіден өткізетін
жүйе сіздің суық сумен қамтамасыз ететін
жүйегіңізге жалғанса, кері осмос әдісімен
суды сүзгіден өткізетін жүйеге берілетін су
қысымы кемінде 138 кПа - 827 кПа (1,4-8,4
кгк/см²) аралығында болуы керек.
АБАЙЛАҢЫЗ
• Су желісін жалғау жұмыстарын бастамас
бұрын құрылғыны қуат көзінен ажыратыңыз.
Олай етпесеңіз, электр тоғы соғуы мүмкін.
• Су желісін тек суық сумен қамтамасыз
ететін желіге қосыңыз. Әйтпесе, су сүзгісі
дұрыс жұмыс істемеуі мүмкін. Су құбыры
жүйесіндегі гидравликалық соққы құрылғы
бөлшектеріне зақым келтіруі мүмкін және
судың жылыстап ағынуа немесе үйді су
басуға себеп болуы мүмкін.
• Су желісіне қосу жұмыстарын су құбырын
жүргізуші білікті маман істеуі және су
сапасына қатысты жергілікті нормативтік
актілер мен ережелер ескерілуі керек.
14
Page 59

KK
ЕСКЕРТПЕ
(1)
• Су желісін орнату жұмысынан туындаған
қандай да бір зақым құрылғы кепілдігі
тарапынан қамтылмайды.
Құрылғыға қосу
Құрылғының артындағы металл резьбалы
1
контргайканы бұрап шығарыңыз және оны
су түтігінің бір ұшына қойыңыз.
Су түтігін су кіретін клапанға мықтап тығып,
2
контргайканы қатайтыңыз.
Су сүзгісіне қосу
Сүзгілердің екі түрі бар. Байланыс әдістері
өзгеше болады. Біреуінің резьбалы пластик
гайкалы фитингісі бар, ал екіншісі өздігінен
құлыпталатын, нық киілетін коннекторларды
пайдаланады. Сүзгіден су кранынан құрылғыға
қарай бағытталған су ағынның бағыты
белгіленеді.
<1-түрі>
Бұрандалы коннекторды бұрап алып, оны
1
жабдықтан шығатын түтіктегі кесілген
бөліктің ұшына қойыңыз. Түтікті сүзгінің
ұшындағы ағын көрсеткісі меңзеген
бағытта итеріп, бұрандалы коннекторды
қатайтыңыз.
<2-түрі>
Барлық бұдырларын жоя отырып, су
1
құбырын қажетті ұзындықта болатындай
түзу кесіңіз. Фитингіні су құбырының ұшына
итеріңіз. Фитингілер тығыздамас бұрын,
қысып алады. Ұшы құбырдың шетіне
толықтай тигенге дейін су құбырының
фитингіде екеніне көз жеткізіңіз.
(2)
Су сүзгісіндегі
боялған сызық
Қақпақшалы сомынды су сүзгісіндегі
2
боялған сызық көрінбей қалғанға дейін
бұраңыз.
<3-түрі>
Құрылғыдан сыртқа бағытталған көрсеткісі
1
бар ұшына қарай су түтігін мықтап итеріңіз.
Түтікті толығымен кіргізіңіз (шамамен 10 12 мм)
Түтікті сүзгіге мықтап енгізгеннен кейін,
2
құлыптайтын қысқышты тартып шығаруға
болатын сақинаның астына орнатыңыз.
Су түтігінің қалдығын пайдаланып,
2
сүзгінің екінші ұшына да дәл сол процесті
орындаңыз.
Су түтігінің қалдығын пайдаланып, сүзгінің
3
екінші ұшына да сол процесті орындаңыз.
15
Page 60

KK
Су кранына қосу*
* бұл мүмкіндіктің сатып алынған модельге
байланысты әртүрлі болатындығын білдіреді.
Су түтігін керек-жарақтармен бірге берілген
1
кран коннекторының саңылауына кіргізіңіз.
Коннектор түтікке кигізілген кезде, түтік нық
тұруы керек.
Оны кранға бекітпес бұрын, оның ішіне
2
резеңке шайба орнатылғанына көз
жеткізіңіз.
Су қосылымын тексеру
Сумен қамтамасыз ету көзін және
1
құрылғыны қосыңыз. Шлангілердің
дұрыс жалғанбауынан ешбір жерде су
ақпайтынын мұқият тексеріңіз.
Water Filter түймесін үш секунд басып
2
тұрыңыз. Ол Replacement Filter
белгішесін қайта орнатады. Жаңа су сүзгісі
белсендірілді.
Құрылғыдан су ағатынын тексеру үшін су
3
диспенсерінің астына шынаяқ қойыңыз.
Шлангілердің жалғанған жерлерін және
4
қоспаларды тағы бір тексеріңіз.
Су сүзгісін ауыстырған кезде оған оңай
5
қол жеткізуге болатындай, тиісті орынға
орнатылуы керек.
Жабдықты жалғау
Құрылғыны орнатқаннан кейін, қуат ашасын
розеткаға жалғаңыз.
ЕСКЕРТПЕ
• Қуат көзінің сымын (немесе ашасын)
розеткаға қосқан соң, азық-түлікті жабдыққа
2 немесе 3 сағат өткеннен кейін қойыңыз.
Жабдық толық суымай тұрып, азық-түлікті
қойсаңыз, азық-түлік бұзылып кетуі мүмкін.
Жабдықтың орнын
ауыстыру
Жабдықтың ішіндегі барлық азық-түлікті
1
алып тастаңыз.
Қуат ашасын шығарып, оны құрылғының
2
артқы немесе жоғарғы жағындағы қуат
ашасының ілгегіне енгізіп, бекітіңіз.
Жабдықты тасымалдау кезінде түсіп
3
қалмауы үшін сөрелер мен есік тұтқасы
сияқты бөлшектерді таспамен бекітіңіз.
Жабдықты кем дегенде екі адам
4
абайлап жылжытуы тиіс. Жабдықты ұзақ
қашықтыққа тасымалдағанда, оны тік күйде
ұстаңыз.
Құрылғыны орнатқаннан кейін, құрылғыны
5
қосу үшін қуат ашасын розеткаға жалғаңыз.
16
Page 61

KK
Пайдалану
Бөлшектер мен функциялар
* бұл мүмкіндіктің сатып алынған модельге байланысты әртүрлі болатындығын білдіреді.
Сырты
1
Басқару панелі
a
Мұз дайындағыш пен диспенсер режимдерінің су сүзгісінің күйін көрсетеді.
1 4
2
3
3
Door in Door*
b
Есік ішіндегі есік дегеніміз – екі қабатты есік жүйесі. Оны бөлек немесе негізгі есікпен бірге
ашуға болады. Сүйікті тіскебасарларды салуға және алып шығаруға ыңғайлы болады.
Есік ішіндегі есік иінтірегі*
c
Бұл иінтірек қосымша есікті ашады.
InstaView Door-in-Door*
d
InstaView қосымша есігіндегі бөлімі жиі қолданылатын тағам түрлеріне оңай қол жеткізуге
мүмкіндік береді.
ЕСКЕРТПЕ
• Құрылғының беті немесе бөліктері үлгі түріне байланысты өзгеше болуы мүмкін.
17
Page 62

Іші
6
6
* бұл мүмкіндіктің сатып алынған модельге байланысты әртүрлі болатындығын білдіреді.
1
2
3
(1)
KK
7
8
9
10
11
12
13
4
5
14
15
16
17
1
7
2
(1)
8
9
10
3
11
12
13
4
5
14
15
16
17
18
Page 63

KK
ЖШД шамы
a
Құрылғының ішіндегі ЖШД шамдары есік ашылған кезде жанады.
Автоматты мұз дайындағыш*
b
Бұл жерде мұз автоматты түрде жасалып, сақталады.
Мұздатқыш сөресі*
c
Бұл – ет, балық және балмұздақ сияқты қатырылған тағамдарды сақтайтын орын.
Тоңазытқыш тартпасы*
d
Бұл қатырылған заттарды ұзақ уақытқа сақтау бөлігі.
Мұздатқыш есігіндегі себет
e
Мұнда мұздатылған азық-түліктің шағын бумаларын сақтауға болады.
• Бұл себетерде ұзақ уақыт бойы сақталатын балмұздақ немесе тамақты сақтамаңыз.
Смарт диагностикалық құрылғы
f
Құрылғы дұрыс жұмыс істемегенде немесе ақаулық пайда болғанда диагностиканың дұрыс
жасалуы үшін LG Electronics тұтынушыларына арналған ақпараттық орталыққа хабарласқан
кезде осы функцияны пайдаланыңыз.
Door in Door*
g
Бұл жерде сусындар мен жеңіл тамақ сияқты жиі алынатын азық-түлік сақталады.
Бөтелке сөресі*
h
Бұл – ішімдікке арналған ұзын бөтелкелерді немесе контейнерлерді сақтайтын орын.
ЕСКЕРТУ
• Қысқа бөтелкелерді немесе контейнерлерді сақтамаңыз. Заттар құлап, жарақаттануға немесе
құрылғының зақымдануына себеп болуы мүмкін.
Тоңазытқыш сөресі
i
Бұл тоңазытылған тағамдар мен басқа заттар сақтауға үшін арналған орын.
• Сөре биіктігін басқа биіктіктегі ойыққа енгізу арқылы баптауға болады.
• Ылғалдылығы қатты тағамдарды сөренің алдыңғы жағында сақтаңыз.
• Сөрелердің нақты саны үлгісіне байланысты өзгеріп отырады.
Hygiene Fresh*
j
• Бұл функция тоңазытқыш бөлімінің ішіндегі иістерді азайтады және жояды.
Жеңіл тамақ тартпасы*
k
Бұл – мұздатылған тағамдардың кішкентай пакеттерін сақтайтын орын.
Температура датчигі
l
Бұл датчик тоңазытқыш бөліміндегі температураны анықтайды.
• Температураның дәлме-дәл анықталуы үшін, датчик пен азық-түлік арасындағы қашықтық
жеткілікті болуы керек.
19
Page 64

KK
Су диспенсер багы*
m
Осы жерде диспенсер пен автоматты мұз генераторына берілетін су сақталады. Қолмен
толтыруды қажет етеді. (Қорғасындалмаған үлгілер ғана)
Балғын көкөніс тартпасы*
n
Жеміс-жидектер мен көкөністер балғындығын сақтау үшін ылғалдылық контроллері арқылы
реттеліп, осы жерде сақталады.
Жылжымалы жұмыртқа жәшігі*
o
Осы жерде жұмыртқаларды сақтайды.
• Осыны жылжытып, қалағаныңыздай қажетті орында пайдалана аласыз. Дегенмен, оны
мұз контейнері ретінде пайдаланбаңыз, тоңазытқыштың үстіңгі сөресіне немесе көкөніс
суырмасының үстіне қоймаңыз.
Көкөністер тартпасы
p
Олардың балғындығын мүмкіндігінше ұзақ уақытқа сақтау үшін мұнда жемістер мен
көкөністерді сақтауға болады.
• Тартпалардың нақты саны үлгісіне байланысты өзгеріп отырады.
Тоңазытқыш есігіндегі жәшік
q
Бұл тоңазытылған тағамдар, сусындар мен тұздықтар контейнерлерінің кішкентай бумалары
сақталатын орын.
ЕСКЕРТПЕ
• 2 жұлдызды ( a ) себетті немесе тартпаны -12 °C және -18 аралығындағы температурада мұз және
азық-түлікті қысқа мерзімге сақтау үшін қолдануға болады.
• Мұздатқыштың жоғарғы сөресі (1) белгіленген температураға әлдеқайда тез жетеді.
20
Page 65

KK
Пайдалануға қатысты
ескертпелер
• Пайдалану бойынша ескертпелер: мұзды
су диспенсерінің багын ауыз судан басқа
сусындар үшін пайдаланбаңыз.
• Есік толық жабылмаса, жаз кезінде
ылғалдылық жоғары болса немесе
мұздатқыш есігі жиі ашылатын болса, мұздың
түзілуі мүмкін екендігін есте сақтауыңыз
керек.
• Есіктің толық жабылуы үшін сөреде сақталған
тағам немесе есік арасында жеткілікті бос
орын қалу керек.
• Есікті ашу құрылғы ішіне жылы ауаның
кіруіне мүмкіндік беріп, ішкі температураның
көтерілуін туғызуы мүмкін.
• Егер құрылғыны ұзақ уақыт бойына өшірулі
күйде қалдырсаңыз, оның ішіндегі барлық
азы-түліктерді шығарып, қуат сымын
розеткадан ажыратыңыз. Құрылғы ішінде зең
басуды болдырмас үшін, оның ішін тазалап,
есіктерін кішкене ашық күйде қалдырыңыз.
Қуат үнемдеуге қатысты
ұсыныс
• Сақталған тағамдар арасында жеткілікті бос
орын болуын қамтамасыз етіңіз. Бұл ауаның
тегіс айналуына мүмкіндік береді және электр
энергиясын тұтыну шоттарын азайтады.
• Буланудың немесе қатып қалудың алдын
алу үшін ыстық тағамды салқындатып барып
салыңыз.
• Мұздатқыш ішінде тағамды сақтаған кезде,
тоңазытқыш температурасын азықта
көрсетілген температурадан төмен етіп
орнатыңыз.
• Тағамды тоңазытқыштың температура
датчигінің жанына қоймаңыз. Датчиктен
кемінде 3 см қашықтық қалдырыңыз.
• Құрылғының техникалық сипаттамаларында
рұқсат етілген ауқымда мұзы ерітілген соң,
температураны көтеру қажеттігін ескеріңіз.
Температураның көтерілуіне байланысты
тағамды сақтауға ықпалды азайтуды
қаласаңыз, сақталған тағамды бірнеше
қабатқа нығыздап салыңыз немесе ораңыз.
• Құрылғының автоматты мұздату жүйесі
қалыпты жұмыс істеу режимінде оның
сөрелеріне мұздың жиналмауын қамтамасыз
етеді.
21
Page 66

KK
Тағамдарды тиімді түрде сақтау
• Мұздатылған тағамды немесе қатырылған
тағамды жабық контейнерлерде сақтаңыз.
• Тағамды құрылғыда сақтамас бұрын мерзімі
аяқталу күні мен жапсырмасын (сақтау
нұсқаулары) қараңыз.
• Ол төмен температурада оңай бұзылатын
болса, тағамды ұзақ мерзімге (4 аптадан
ұзақ) сақтамаңыз.
• Мұздатылған тағамды немесе қатырылған
тағамды сатып алған соң дереу
тоңазытқыштың немесе мұздатқыштың ішіне
салыңыз.
• Толығымен еріп кеткен тағамды мұздатпаңыз.
Толығымен еріген тағамды қайтадан мұздату
оның дәмін және құнарлылығын төмендетеді.
• Көкөністерді газетпен орамаңыз және олай
сақтамаңыз. Газетте басылған материал
не басқа заттар тағамдарға жағылып қалуы
мүмкін.
• Жабдыққа азық-түлікті толтырып салмаңыз.
Жабдық қатты толып тұрса, суық ауа ішінде
дұрыс айналмайды.
• Тағам үшін тым төмен температураны
орнататын болсаңыз, ол қатып қалуы
мүмкін. Бастапқы температурадан төмен
температураны орнатпаңыз.
• Егер құрылғыда мұздатқыш сөрелер болса,
көкөністер мен жеміс-жидектерді су күйінше
сол сөрелерге салмаңыз, себебі олар төмен
температурада үсіп кетуі мүмкін.
Ең жоғарғы мұздату көлемі
• Жылдам мұздату функциясы мұздатқыштың
максималды мұздату сыйымдылығын
белгілейді.
• Бұл жалпы 24 сағаттық уақыт алып,
автоматты түрде өшеді.
• Егер максималды мұздату сыйымдылығы
пайдаланылса, Жылдам мұздату функциясы
мұздатқыш ішіне жаңа азық-түлікті салмастан
бұрын жеті сағат ішінде қосылып тұруы қажет.
Максималды сақтау
• Ауа айналымы жақсы болуы үшін, барлық
тартпаларды салыңыз.
• Көп мөлшердегі азық сақталуы керек болса,
басқа барлық мұздатқыш тартпалары
құрылғыдан алынуы керек және азық тікелей
мұздатқыш бөліміндегі мұздатқыш сөрелеріне
қойылуы тиіс.
ЕСКЕРТПЕ
• Тартпаларды шығару үшін, алдымен
тартпалардағы тағамды шығару керек. Содан
кейін тартпалардың тұтқаларын пайдаланып,
тартпаларды абайлап шығарыңыз. Жарақат
алу қауіпі бар.
• Әрбір тартпаның пішіні әртүрлі болуы мүмкін,
әрқайсысын өз орнына қойыңыз.
22
Page 67

KK
Басқару панелін пайдалану
Құралдар мен функциялары
* бұл мүмкіндіктің сатып алынған модельге байланысты әртүрлі болатындығын білдіреді.
<1-түрі> <2-түрі>
3seconds
<3-түрі> <4-түрі>
3seconds
Hygiene Fresh
• Бұл Гигиеналық балғындық функциясын
орнатады.
Express Freeze (Жылдам мұздату)
• Бұл Жылдам мұздату функцияларын
орнатады.
Freezer Temperature
(Мұздатқыш температурасы)
• Бұл мұздатқыштың бастапқы
температурасын орнатады.
Fridge Temperature
(Тоңазытқыш температурасы)
• Бұл тоңазытқыштың бастапқы
температурасын орнатады.
3seconds
3seconds
* Lock (Құлыптау)
• Басқару панеліндегі түймелерді
құлыптайды.
* Wi-Fi
• Бұл құрылғыңызды үйдегі Wi-Fi желісіне
қосады.
Water Dispenser (Су диспенсері)
• Бұл текшелі мұз, су, ұсақ мұз
функциясын орнатады.
Water Filter (Су сүзгісі)*
• Бұл автоматты түрде су сүзгісін
ауыстыру кезеңін көрсетеді (құбыр
жүйесіне қосылған үлгілерде ғана).
Non Plumbing (Құбыр жүйесінсіз)
• Құбыр жүйесінсіз белгішесі су
диспенсерінің багы дұрыс орнатылған
кезде жанады.
23
Page 68

KK
ЕСКЕРТПЕ
• Әр үлгіде өзінің нақты басқару панелі бар.
• Қуатты үнемдеу үшін басқару тақтасы автоматты түрде өшіріледі.
• Тазалау кезінде басқару панеліне саусақ немесе дене тиіп кетсе, түйме функциясы жұмыс істеуі
мүмкін.
Температураны орнату
Бұл тоңазытқыштың немесе мұздатқыштың
температурасын орнатады.
• Температураны реттеу үшін Fridge түймесін
немесе Freezer түймесін басыңыз.
• Температураны өзгертуге болады.
− Тоңазытқыш : 1 °C және 7 °C аралығы
− Мұздатқыш: -14 °C және -24 °C
аралығында
ЕСКЕРТПЕ
• Әдепкі температура параметрі құрылғыға
байланысты өзгеруі мүмкін.
• Құрылғының ішіне тағам қоймас бұрын,
құрылғыны розеткаға жалғағаннан кейін екі
немесе үш сағат күтіңіз.
• Қалыпты климаттық жағдайда мұз жасау үшін
мұздатқыш температурасы -19 °C немесе
одан төмен деңгейге орнатылуы тиіс.
Жылдам мұздатуды орнату
Функция мұздың көп мөлшерін немесе қатқан
тағамдарды жылдам мұздатуы мүмкін.
• Express Freeze түймесін басқанда, басқару
тақтасында Express Freeze белгішесі
жанады.
• Функция түймені әрбір басқан сайын
қосылады және өшіріледі.
• Express Freeze функциясы белгілі бір мерзім
өткен соң автоматты түрде тоқтайды.
Гигиеналық тазалық режимін
орнату
Hygiene Fresh функциясымен бактерияларды
және құрылғының ішкі жағындағы иісті
азайтуға болады. Дегенмен, функция тағамға
сіңген бактерия емес, құрылғы ішінде жүрген
бактериялар үшін тиімді.
• Hygiene Fresh (Гигиеналық балғындық)
түймесін әр басқан сайын, Hygiene Fresh
функция режимі Auto (Авто) → Power (Қуат)
→ Off (Өшіру) → Auto (Авто) режимдеріне
кезекпен өзгереді.
Құлыптауды орнату және
ысыру
Басқару панеліндегі түймелерді құлыптайды.
• Lock түймесін үш секунд бойы басып
тұрыңыз. Құлыптау функциясы орнатылғанда,
барлық түймелер құлыпталады.
• Lock түймесін 3 секунд басып тұрсаңыз,
басқару панеліндегі Lock/Unlock белгішесі
жанады. Аталмыш функция түймені басқан
сайын қосылады және өшеді.
• Құлып орнатылып тұрғанда, құлыптан басқа
түймені басатын болсаңыз, түйме жұмыс
істемейді.
• Құлып орнатылып тұрғанда, құлыптан
басқа түймені басатын болсаңыз, басқару
панеліндегі Lock/Unlock белгішесі 3 рет
жыпылықтайды.
• Параметрді өзгерту үшін, функцияны өшіру
мақсатында Lock түймесін үш секунд басып
тұрыңыз.
24
Page 69

KK
Су диспенсерінің багы
(Құбыр жүйесі жоқ
үлгілер ғана)
Су багында автоматты мұз дайындағыштың
мұз жасауына беретін немесе қолданатын су
тұрады. Бұл бакты судан басқа сұйықтықпен
толтыруға болмайды. Олай етсеңіз, су беру
жүйесін зақымдауыңыз мүмкін.
Тұтқаны ұстап тұрып, су диспенсерінің
1
багын тартып шығарыңыз.
Су диспенсері багының қақпағын немесе
2
жапқышын ашыңыз.
Су диспенсері багының ішінде белгіленген
3
анықтамалық сызыққа дейін сүзгіден
өткен бөтелкедегі суды немесе сүзгіден
өткен таза суды құйыңыз. (Жалпы
сыйымдылығы: 4 л)
Су толтырғаннан кейін, су диспенсері
4
багының қақпағын немесе жапқышын
жабыңыз.
Су диспенсерінің багын тоңазытқыш
5
сөресіне қайта орнатыңыз.
АБАЙЛАҢЫЗ
• Диспенсер багына балаларды жолатпаңыз.
• Су багына судан басқа сусындарды немесе
ыстық су құюға болмайды.
ЕСКЕРТУ
• Су диспенсерінің багын алғанда немесе
жинақтағанда, шамадан тыс күш немесе
соққыны қолданбаңыз. Олай жасасаңыз,
жабдықтың зақымдалуы немесе
жарақаттануыңыз мүмкін.
ЕСКЕРТПЕ
• Жабдықты орнатқан соң, су диспенсерінің
багын пайдаланар алдында оған су құймас
бұрын, оны жуу керек.
• Су диспенсерінің багын жабдықта дұрыс
орналастырылғанын тексеріңіз. Егер дұрыс
жинақталмаса, бактағы су жабдықтың ішіне
ағуы мүмкін.
• Егер су диспенсерінің багындағы су
жеткіліксіз болса, ол мұз текшесінің өлшеміне
және санына әсер етуі мүмкін және мүлде
мұз жасалмай қалуы мүмкін.
• Су диспенсерінің багында су болмаса,
диспенсердің суық су және мұз жасау
функциясын пайдалану мүмкін емес. Су
диспенсерінің багында судың бар-жоқтығын
тексеріп, егер жоқ болса, сумен толтырыңыз.
25
Page 70

KK
• Су багын алмас бұрын, суды құйғаннан соң
немесе мұз жасалған соң, кем дегенде 15
секунд күтіңіз.
• Диспенсерге және автоматты мұз
дайындағышқа су құйылғанда, су багынан
дыбыстың шығуы қалыпты болады. Бұл
ақаулықтың белгісі емес.
Су және мұз диспенсері
Қалаған режиміңіздің тиісті түймесін басу
арқылы мұз текшелерін, су мен жарма мұзды
құюға болады.
• Басқару панелінде Cubed, Water немесе
Crushed түймесін басқан кезде, басқару
панеліндегі шам жанады және қажетті режим
орнатылады. Осы уақытта диспенсердің
тетігін бассаңыз, таңдалған функция (мұз
текшелері, су және майдаланған мұз) жұмыс
істейді.
• Аталмыш функция басқару панеліндегі
түймені әр басқан сайын қосылып өшеді.
ЕСКЕРТУ
• Балалардың диспенсермен ойнап, оны
зақымдап алмауы үшін, балаларды
диспенсерге жақындатпаңыз.
• Мұздың бірінші азғантай топтамаларын
шығарып алыңыз (шамамен 20 текше мұз
және 7 стақан су). Бұл әрекетті құрылғы ұзақ
уақыт бойы пайдаланылмай тұрған жағдайда
да орындау қажет.
ЕСКЕРТПЕ
• Су құйылып жатқан кезде мұздатқыш есігін
ашқан жағдайда, судың берілуі тоқтатылып,
басқару панелі бастапқы экранға қайтып
оралады.
• Су, мұз текшелері немесе ұсақ мұз құйылып
жатқан кезде тоңазытқыш есігін ашқан
жағдайда, құю кідіртіледі. Есікті жапқанда,
алдында орнатылған режим үшін таңдалған
заттың құйылуы жалғасады.
• Егер шыныаяқ тоғыны шағын болса, су
стаканнан шашырай ағып кетуі мүмкін
немесе оған мүлде құйылмауы мүмкін.
• Суды, мұз текшелерін немесе ұсақ мұзды
құйғанда диаметрі 68 мм-ден үлкен болатын
тоғыны бар шынаяқты пайдаланыңыз.
• Мұз дайындағыш кіші мұз текшелерін
өндіргенде немесе мұз текшелері бірбіріне жабыса бастаса, су багындағы
судың жеткіліксіз мөлшеріне байланысты
мұз дайындағышына жеткізілген судың
мөлшері аз болуы мүмкін. Текшелер мұз жиі
пайдаланылмағанда да бір-біріне жабысуы
мүмкін.
Автоматты мұз
дайындағыш
Қолайлы жағдайларда автоматты мұз
дайындағышы бір уақытта автоматты түрде
6 текше, 24 сағаттық мерзімде 50-60 дана
жасауы мүмкін. Бұл мөлшер қоршаған ортаға
байланысты өзгешеленуі мүмкін (құрылғы
айналасындағы орта температурасы, есік
ашудың жиілігі, құрылғы ішінде сақталған
тамақтың мөлшері және т.б.).
• Мұз контейнері мұзбен толықтай
толтырылған болса, мұз өндіру тоқтатылады.
• Автоматты мұз дайындағышы жұмыс істеп
тұрған кезде, оны қолыңызбен ұстамаңыз.
• Мұз текшелері мұз контейнерінде ұзақ
уақыт бойы сақталған болса, олар бір-біріне
жабысып, оларды бөлшектеу қиынға соғуы
мүмкін. Мұндай жағдайда мұз контейнерін
пайдаланбас бұрын тазалап шығыңыз.
• Ең алғаш даындалған мұзды пайдаланбастан
тастаңыз.
• Автоматты мұз дайындағышы жұмыс істеп
тұрған кезде, оны қолыңызбен ұстамаңыз.
• Мұз текшелері мұз контейнерінде ұзақ
уақыт бойы сақталған болса, олар бір-біріне
жабысып, оларды бөлшектеу қиынға соғуы
мүмкін. Мұндай жағдайда мұз контейнерін
пайдаланбас бұрын тазалап шығыңыз.
26
Page 71

KK
Автоматты мұз дайындағышты
қосу және өшіру
Автоматты мұз дайындағыштың қақпағын
1
ұстап тұрып, жоғары көтеру арқылы алып
тастаңыз.
Автоматты мұз дайындағыш
2
пайдаланылмаған кезде, мұз
дайындағыштың ауыстырып-қосқышын
өшірулі күйіне ауыстыру арқылы мұз
контейнерін мұздатқыш қорабы ретінде
пайдалануға болады.
Мұз контейнерін алып тастау
Мұз контейнерін екі қолыңызбен ұстап тұрып,
жоғары көтеру арқылы тартып шығарыңыз.
• Автоматты мұз дайындағышты
пайдаланбайтын уақытта, мұз контейнерін
мұздатқыш қорабы ретінде пайдалануға
болады.
• Мұз контейнері мұзбен толықтай
толтырылған болса, ол ауыр болуы мүмкін.
Оны екі қолмен шығарып алу керек.
АБАЙЛАҢЫЗ
• Автоматты мұз дайындағыштың механикалық
бөліктеріне қолыңыз не құралыңызды
тигізбеңіз. Әйтпесе құрылғы зақымдалуы
немесе өзіңіз жарақат алуыңыз мүмкін.
• Автоматты мұз дайындағыштың ауыстырып-
қосқышы қосулы күйге орнатылған кезде,
мұздатқыш есігі ашылған соң, автоматты
мұз дайындағыш үздіксіз жұмыс істеп
тұратындықтан сақ болуыңыз керек.
• Автоматты мұз дайындағышты бөлшектеуге,
жөндеуге немесе конструкциясына өзгеріс
енгізуге тыйым салынады. Бұл тапсырмалар
тек қызмет көрсетуші маман тарапынан
орындалуы тиіс.
ЕСКЕРТУ
• Мұздың бірінші азғантай топтамаларын
шығарып алыңыз (шамамен 20 текше мұз
және 7 стақан су). Бұл әрекетті құрылғы ұзақ
уақыт бойы пайдаланылмай тұрған жағдайда
да орындау қажет.
• Құйылған алғашқы мұз бен суда сумен
қамтамасыз ету желісінен немесе су багынан
бөлшектер немесе иіс болуы мүмкін.
• Балаларды диспенсерден алшақ ұстаңыз.
Балалар басқару элементтерімен ойнап,
оларға зақым келтіруі мүмкін.
• Тек қана ұсақ мұз пайдаланылса, мұз
өткелі қыраумен бұғатталуы мүмкін. Мұз
контейнерін шығарып алу және өткелді
резеңке қалақшамен тазалау арқылы
жиналатын қырауды кетіріңіз. Мұз текшелерін
жүйелі түрде құю да қыраудың пайда
болуына жол бермеуге көмектесе алады.
• Түссіздендірілген мұз құйылған жағдайда,
су багы мен сумен қамтамасыз ету
желісіндегі ықтимал қайнар көзді тексеріңіз.
Егер мәселе шешілмесе, LG Electronics
тұтынушыларының ақпараттық орталығына
хабарласыңыз. Мәселе шешілмегенше мұз
не суды қолданбаңыз.
• Мұзды жинау үшін ешқашан жұқа таза шыны
не фаянс ыдысты қолданбаңыз. Мұндай
контейнерлер жарылып немесе сынып, мұзға
шыны сынықтарын түсіруі мүмкін.
• Стақанға су немесе басқа да сусын құймас
бұрын, оған мұз салыңыз. Егер ішінде
сұйықтығы бар стақанға мұз салатын
болсаңыз, сұйықтық шашырауы мүмкін.
27
Page 72

KK
• Мұз шығатын саңылауды немесе автоматты
мұз дайындағышты қолмен немесе құралмен
ұстамаңыз. Әйтпесе құрылғы зақымдалуы
немесе өзіңіз жарақат алуыңыз мүмкін.
• Мұз контейнерін қайта орнату кезінде,
оның дұрыс қойылғанына көз жеткізіңіз.
Егер ол қисайып тұрса немесе тегіс
тұрмаса, датчиктің дұрыс жұмыс істемеуіне
байланысты ол мұз дайындамай қалуы
мүмкін.
• Өте жіңішке немесе терең стақан
пайдаланбаңыз. Мұз өткелде кептеліп қалуы
мүмкін, ал ол өз кезегінде құрылғының
жұмысына әсер етеді.
• Стақанды мұз шығатын саңылаудан тиісті
қашықтықта ұстаңыз. Стақан өте жақын
болса, мұз берілмей қалуы мүмкін.
• Егер демалысқа кететін болсаңыз немесе
ұзақ уақыт бойы электр қуаты болмаса,
мұздатқыш бөлімінде орналасқан мұз
контейнеріндегі мұзды шығарып тастаңыз.
Еріген мұздың суы диспенсерден еденге
тамшылауы мүмкін.
Жәшікті қосымша есіктен алып
тастау
Қосымша есіктің ішіндегі жәшікті екі қолыңызбен
ұстап, жоғары көтеру арқылы шығарып алыңыз.
Қосымша есіктегі жәшікті қайта
орнату
Оларды алу процесінің кері тәртібімен салыңыз.
Қосымша есік*
* бұл мүмкіндіктің сатып алынған модельге
байланысты әртүрлі болатындығын білдіреді.
Есіктің төменгі жағындағы иінтіректі есік ішіндегі
есік ашылғанша жоғары тартыңыз.
Қосымша есіктің ішіндегі және оның
айналасындағы себеттердегі орын жеткілікті,
сондықтан тағамдарыңызды реттеп қоюға
болады.
Жәшіктерді қосымша есіктен
алып тастау
Жәшіктің екі ұшын бірге ұстап тұрып, оны
1
жоғары қарай тарту арқылы шығарып
алыңыз.
28
Page 73

KK
(1)-суретте көрсетілгендей бекітілген
2
себетті жоғары көтеріңіз және оны
(2)-суретте көрсетілгендей тартып
шығарыңыз.
Себеттерді қосымша есікке
қайта орнату
Оларды алу процесінің кері тәртібімен салыңыз.
Балғын көкөніс тартпасы*
* бұл мүмкіндіктің сатып алынған модельге
байланысты әртүрлі болатындығын білдіреді.
Иінтіректі екі бағытқа сырғыту арқылы көкөніс
контейнер тартпасындағы ылғалдықты
басқаруға болады.
Егер сол жаққа жылжытсаңыз, ауа бағыттағышы
ашылады және тартпадағы ылғалдылықты
азайту үшін ауа тартпаның ішінде айналады.
Егер оң жаққа жылжытсаңыз, ауа бағыттағышы
жабылады және тартпадағы ылғалдылық
сақталатын болады.
Көкөністерді ауа бағыттағышының жабық
күйінде сақтаған дұрыс, ал жеміс-жидекті ашық
күйінде сақтаған абзал.
InstaView функциясы*
* бұл мүмкіндіктің сатып алынған модельге
байланысты әртүрлі болатындығын білдіреді.
Қосымша есіктегі InstaView функциясы
тоңазытқыштың есігін ашпастан сусындар
мен жеңіл тамақтар сияқты жиі қолданылатын
тағамдардың қаншалықты қалғанын көруге
мүмкіндік береді.
Қосымша есіктің ішіндегі жарық диодының
1
шамын қосып, өшіру үшін әйнекті екі рет
қағыңыз.
Он секундтан кейін жарық диодты шам
2
автоматты түрде өшеді.
• Тоңазытқыштың оң жақ есігі мен
мұздатқыштың сол жақ есігі ашық тұрғанда,
есік жабылған соң екі минуттан кейін және
мұз диспенсері қолданылып жатқанда
InstaView Door-in-Door функциясы өшеді.
• Әйнектің орталық аймағын қағыңыз.
Әйнектің шеткі жақтарын қақсаңыз,
InstaView Door-in-Door функциясы дұрыс
жұмыс істемеуі мүмкін.
• Әйнекті қаққанда, дыбыс шығатындай
қағыңыз.
• Тоңазытқыштың жанында қатты дыбыс
шығатын болса, InstaView Door-in-Door
функциясы іске қосылуы мүмкін.
1-түрі 2-түрі
29
Page 74

KK
Басқа функциялар
Есік ашық дабылы
Егер есік (тоңазытқыштың, мұздатқыштың,
қосымша есіктің) бір минут бойы ашық қалса
немесе дұрыс жабылмаса, арасы 30 секундтық
3 рет дыбыстық сигнал беріледі.
• дыбыс сигналы есікті жапқаннан кейін де
естілсе, LG Electronics тұтынушыларына
арналған ақпараттық орталыққа
хабарласыңыз.
Ақаулықты анықтау
Құрылғы пайдалану кезінде ақаулықтарды
автоматты түрде анықтай алады.
• Ақаулық туындаса, құрылғы жұмыс істемейді
және түйме басылғаннан кейін де қате коды
көрсетіледі.
• Осындай жағдай туындайтын болса,
тоқтан ажыратпай, дереу LG Electronics
тұтынушыларды қолдау орталығымен
байланысыңыз. Тоқтан ажырататын
болсаңыз, LG Electronics тұтынушыларды
қолдау орталығының маманына ақаулықты
табу қиынға соғуы мүмкін.
30
Page 75

KK
СМАРТ ФУНКЦИЯЛАРЫ
LG ThinQ қолданбасы
Бұл функция тек Wi-Fi желісі бар үлгілерде
қолжетімді.
LG ThinQ қолданбасы смартфон арқылы
құрылғыны басқаруға мүмкіндік береді.
LG ThinQ қолданбасының
функциялары
Ыңғайлы смарт функцияларды пайдаланып,
смартфоныңыз арқылы құрылғыңызды
басқарыңыз.
Smart Diagnosis
• Құрылғыны пайдалану кезінде мәселе болса,
бұл Smart Diagnosis мүмкіндігі сізге мәселені
диагностикалауға көмектеседі.
Параметрлер
• Құрылғы мен қолданбада әртүрлі
опцияларды орнатуға мүмкіндік береді.
ЕСКЕРТПЕ
• Егер сымсыз роутеріңізді, интернет
провайдеріңізді немесе құпия сөзді
ауыстыратын болсаңыз, LG ThinQ
қолданбасынан тіркелген құрылғыны жойып,
оны жаңадан тіркеңіз.
• Құрылғыны жетілдіру мақсатында қолданба
пайдаланушыларға ескертілместен өзгертілуі
мүмкін.
• Ерекшеліктері үлгісіне қарай әр түрлі болуы
мүмкін.
LG ThinQ қолданбасын
пайдалану алдында
Құрылғы мен сымсыз бағдарлауыш
1
арасындағы қашықтықты (Wi-Fi желісін)
тексеріңіз.
• Жабдық пен сымсыз роутер арасы
тым алыс болса, сигнал беру деңгейі
әлсірейді. Тіркеуге көп уақыт кетуі мүмкін
немесе жабдық орнатылмауы мүмкін.
Смартфоныңыздағы Мобильді интернет
2
немесе Ұялы деректер функциясын
өшіріңіз.
Смартфоныңызды сымсыз роутерге
3
қосыңыз.
ЕСКЕРТПЕ
• Wi-Fi байланысын тексеру үшін, басқару
панеліндегі Wi-Fi белгішесі жанып
тұрғанын тексеріңіз.
• Құрылғы 2,4 Ггц Wi-Fi желілерімен ғана
жұмыс істейді. Желінің жиілігін анықтау
үшін интернет қызметінің провайдеріне
хабарласыңыз немесе сымсыз
бағдарлауыштың нұсқаулығын қараңыз.
• LG ThinQ қолданбасы желілік байланысқа
немесе желілік байланысқа қатысты қандай
да бір ақаулыққа, олқылықтарға немесе
қателіктерге жауапты емес.
• Егер құрылғыны Wi-Fi желілеріне қосуда
қандай да бір қиындықтар туындаса, ол
көп жағдайда роутерге байланысты емес.
Wi-Fi сигналының қуатын жақсарту үшін,
Wi-Fi репитерін (диапазон кеңейткіші) сатып
алыңыз.
• Үйдегі желі ортасына байланысты Wi-Fi
байланысы қосылмауы мүмкін немесе
ажырап кетуі мүмкін.
• Желілік байланыс интернет қызметінің
провайдеріне байланысты да дұрыс жұмыс
істемеуі мүмкін.
• Айналадағы сымсыз орта сымсыз желі
қызметін баяулатуы мүмкін.
• Сымсыз сигналды тарату жүйесіндегі
ақаулыққа байланысты, жабдықты тіркеу
мүмкін емес. Жабдықты электр жүйесінен
ажыратып, әрекетті қайталамас бұрын бір
минуттай күтіңіз.
31
Page 76

KK
• Сымсыз роутердегі брандмауэр қосулы
болса, оны өшіріңіз немесе оны ерекше
жағдай ретінде қосыңыз.
• Сымсыз желінің атауы (SSID) ағылшын
әріптері мен сандардан тұруы қажет. (Ерекше
таңбаларды қолданбаңыз)
• Смартфонның пайдаланушы интерфейсі
(UI) телефонның операциялық жүйесіне (OS)
және өндірушіге байланысты әртүрлі болуы
мүмкін.
• Егер роутердің қауіпсіздік протоколы WEP
күйіне орнатылған болса, желіні орната
алмауыңыз мүмкін. Оны басқа қауіпсіздік
протоколдарына өзгертіңіз (WPA2
ұсынылады) және өнімді қайтадан тіркеңіз.
Құралды қайта тіркеу немесе басқа
пайдаланушыны тіркеу
Уақытша өшіру үшін, Wi-Fi түймесін 3 секунд
басып тұрыңыз. Құралды тіркеу үшін, LG ThinQ
бағдарламасын іске қосып, қолданбада берілген
нұсқауларды орындаңыз.
ЕСКЕРТПЕ
• Wi-Fi функциясын өшіру үшін Wi-Fi түймесін
3 секунд басып тұрыңыз. Wi-Fi белгішесі
өшеді.
Сымсыз LAN модулінің
сипаттамалары
LG ThinQ қолданбасын орнату
Google Play & Apple App дүкенінен смартфон
арқылы LG ThinQ қолданбасын табыңыз.
Жүктеу үшін нұсқауларды орындап, қолданбаны
орнатыңыз.
Wi-Fi желісіне қосылу
Wi-Fi- түймесі LG ThinQ қолданбасымен
пайдаланғанда, құрылғыны үйдегі Wi-Fi желісіне
қосуға мүмкіндік береді. Wi-Fi белгішесі
құрылғының желілік байланыс күйін көрсетеді.
Құрылғы Wi-Fi желісіне қосылған кезде белгіше
жанады.
Құралды алғаш рет тіркеу
Құралды тіркеу үшін, LG ThinQ бағдарламасын
іске қосып, ішіндегі нұсқауларды орындаңыз.
Моделі LCW-004
Жиілік
диапазоны
Шығыс қуаты
(макс.)
Сымсыз функцияның Б/ж нұсқасы: V 1.0
Пайдаланушының назарына, бұл құрылғы
құрылғы мен дене арасындағы минималды
20 см қашықтықта орнатылып, пайдаланылуы
керек.
2412 - 2472 МГц
IEEE 802.11b:17.82 dBm
IEEE 802.11g:17.72 dBm
IEEE 802.11n:16.61 dBm
Бастапқы коды ашық бағдарламалық
құрал ескертуі туралы ақпарат
Осы өнімдегі GPL, LGPL, MPL және басқа
да бастапқы коды ашық лицензиялардағы
бастапқы кодты алу үшін http://opensource.lge.
com веб-торабына өтіңіз.
Бастапқы кодқа қоса, барлық қажетті
лицензиялардың шарттарын, кепілдік
міндеттерінен бас тарту құжаттарын және
авторлық құқық туралы мәліметтерін алуға
болады.
LG Electronics компаниясы сізге CD-ROM
дискісінде ашық бастапқы кодты ақылы түрде
береді. Қызмет ақысына opensource@lge.
com мекенжайына электрондық хатпен сұрау
жіберілгеннен кейін мұндай үлестіруді орындау
құны (мысалы, тасығыш, жеткізу және өңдеу
құны) жатады. Бұл ұсыныс осы өнімді соңғы
рет жібергеннен кейін үш жыл ішінде жарамды
болады. Ұсыныс осы ақпаратты алған әр тұлға
үшін жарамды болып келеді.
32
Page 77

KK
Smart Diagnosis
Бұл мүмкіндік тек немесе логотипі бар
үлгілерде қолжетімді.
Бұл функция құрылғыға қатысты мәселелерді
табу және шешу үшін қолданылады.
ЕСКЕРТПЕ
• LGE-ге байланысты емес себептер бойынша
қызмет сыртқы факторларға байланысты
жұмыс істемеуі мүмкін, мысалы, Wi-Fi қол
жетімсіздігі, Wi-Fi қосылымының істен шығуы,
қолданылған қолданбаларды сақтау саясаты
немесе қосымшаның қол жетімді еместігі.
• Бұл мүмкіндік алдын ала ескертусіз өзгертілуі
мүмкін және қайда орналасқаныңызға
байланысты басқа түрде болуы мүмкін.
LG ThinQ қолданбасын
ақаулықтарды диагностикалау
үшін пайдалану
Wi-Fi жабдықталған құрылғыңызда мәселе орын
алса, ол LG ThinQ қолданбасын пайдаланып
ақаулықтарды жою туралы деректерді
смартфонға тасымалдай алады.
• LG ThinQ қолданбасын іске қосып, мәзірде
Smart Diagnosis мүмкіндігін таңдаңыз. LG
ThinQ қолданбасында қамтамасыз етілетін
нұсқауларды орындаңыз.
Тоңазытқыш есігін ашыңыз да, телефонды
2
жоғарғы оң жақ динамик саңылауына ұстап
тұрыңыз.
Телефонды динамикке жақындатып ұстап
3
тұрған күйі Freezer түймесін үш секунд
бойы немесе одан да көп уақыт басып
тұрыңыз.
Деректерді тасымалдау аяқталғаннан кейін
4
диагноз қолданбада көрсетіледі.
ЕСКЕРТПЕ
• Ең жақсы нәтижелер алу үшін үндер
тасымалданып жатқанда телефонды
жылжытпаңыз.
Мәселелерді диагностикалау
үшін дыбыстық
диагностикалауды пайдалану
Дыбыстық диагностикалау әдісін пайдалану
үшін төмендегі нұсқауларды орындаңыз.
• LG ThinQ қолданбасын іске қосып, мәзірде
Smart Diagnosis мүмкіндігін таңдаңыз. LG
ThinQ қолданбасында дыбыстық диагностика
үшін нұсқауларды орындаңыз.
Lock түймесін басып, құлыптау
1
функциясын белсендіріңіз.
• Дисплей 5 минуттан ұзақ құлыптаулы
тұрса, құлыпты алдымен өшіріп, содан
кейін қайта белсендіруіңіз қажет.
33
Page 78

KK
Қызмет көрсету
Тазалау бойынша
ескертпелер
• Құрылғының ішінен сөрені немесе тартпаны
алған кезде, жарақаттанудың немесе
құрылғыны зақымдаудың алдын алу үшін,
сөреден немесе тартпадан барлық сақталған
тағамдарды алыңыз.
− Әйтпесе, сақталған тағамдардың
салмағына байланысты жарақат алуыңыз
мүмкін.
• Құрылғының сыртқы ауа желдеткіштерін
шаңсорғышпен тазаласаңыз, электрондық
бөліктеріне зақым келтіретін немесе электр
тоғы соғу қаупін туғызатын статикалық
зарядтың алдын алу үшін қуат сымын тоқтан
ажырату керек.
• Сөрелері мен тартпаларын шығарып алып,
оларды сумен тазалаңыз да, қайта салмас
бұрын мұқият кептіріп алыңыз.
• Есік тығыздауыштарын жиі ылғал жұмсақ
сүлгімен сүртіп тұрыңыз.
• Есік жәшіктеріндегі төгілген заттар мен
іздерді тазалап тұру керек, себебі олар
жәшіктің сақтау мүмкіндігін нашарлатады
және тіптен зақымдауы да мүмкін.
• Тазалап болған соң, қуат сымы
зақымдалмағанын, қызып кетпегенін немесе
дұрыс жалғанғанын тексеріңіз.
• Құрылғының сыртқы жағындағы ауа
желдеткіштерін салқын күйде ұстаңыз.
− Ауа желдеткіштерінің бітелуі өрт туғызуы
немесе құрылғыны зақымдауы мүмкін.
• Жабдықтың ішін не сыртын қатты қылшақпен,
тіс қылшағымен немесе тұтанғыш
материалдармен тазаламаңыз. Құрамында
тұтанғыш заттар бар тазалау құралдарын
пайдалануға болмайды.
− Бұл жабдықтың түссізденуіне әкелуі мүмкін
немесе оны зақымдауы мүмкін.
− Тұтанғыш заттар: спирт (этанол, метанол,
изопропил спирті, изобутил спирті, және
т.б.), сұйылтқыш, ағартқыш, бензол,
тұтанғыш сұйықтық, қажағыш материал
және т.б.
• Жабдықтың сырт жағы үшін таза губка
немесе жұмсақ шүберек пен жылы судағы
жұмсақ химиялық тазартқыш құралды
пайдаланыңыз. Жыратын немесе өткір
тазартқыштарды пайдаланбаңыз. Жұмсақ
шүберекпен мұқият құрғатып сүртіңіз.
• Сөрелерді немесе контейнерлерді ешқашан
ыдыс жуғыш машинада жумаңыз.
− Қызып кетуге байланысты бөліктерінің
пішімі бүлінуі мүмкін.
• Жабдықта жарық диодты шам орнатылған
болса, оны жөндеу немесе қызмет көрсету
үшін шамның қақпағын және жарық диодты
шамды алмаңыз. LG Electronics тұтынушыға
ақпарат беру орталығына хабарласыңыз.
Конденсатордың
қақпағын тазалау
Конденсатордың қақпағын және желдету
саңылауларын шаңсорғышпен және щеткамен
тазалаңыз. Конденсатордың ирек түтігін жауып
тұрған панельді алмаңыз.
34
Page 79

KK
Есіктегі жәшікті тазалау
Сөрені тазалау
Тоңазытқыш/Мұздатқыш есігінің
жәшігін алу
Жәшіктің екі ұшын бірге ұстап тұрып, оны
жоғары қарай тарту арқылы шығарып алыңыз.
Тоңазытқыш/мұздатқыш есігі
жәшігін қайта салу
Есік жәшігінің екі шетін ұстап тұрып,
1
құрастыру үшін бір шетін жайлап басыңыз
да, одан кейін бірдей мәнерде басқа шетін
құрастырыңыз.
Құрастырған соң, оны көлденеңінен реттеу
2
үшін есік жәшігін жайлап басыңыз.
Тоңазытқыш/мұздатқыш
сөресін алу
Сөрені тартып алыңыз.
Тоңазытқыш/мұздатқыш
сөресін қайта салу
Сөрені шығару үшін, тоңазытқыштың артқы
шетін сәл көтере отырып, сөрені тартыңыз.
Көкөністер тартпасын
тазалау
Көкөністер тартпасын алу
Тартпаның ішіндегілерді алыңыз. Көкөніс
1
тартпасының тұтқасын ұстап тұрып ол
тоқтап, тірелгенше толығымен сыртқа
қарай жаймен тартыңыз.
35
Page 80

KK
Көкөніс тартпасын жоғары көтеріп, оны
2
тартып шығарып алыңыз.
Көкөністер тартпасын қайта
салу
Егер көкөніс тартпасының қақпағы бар
1
болса, оны көтеріңіз.
Көкөніс тартпасының түбін оның бастапқы
2
күйіне қойып, оны төмендете итеріп
кіргізіңіз.
Су диспенсерін тазалау
Диспенсер науасын тазалау
Диспенсер науасы төгілген мұз немесе су
салдарынан оңай ылғалданып қалуы мүмкін.
Аймақты түгелдей дымқыл шүберекпен сүртіңіз.
Су және мұз шығысын тазалау
Су немесе мұз шығысын таза шүберекпен
жиі сүртіп тұрыңыз, өйткені ол оңай кірленеді.
Шығыс шүмегіне шүберек қылшығы жабысып
қалуы мүмкін екенін ескеріңіз.
Су шығысы
Мұз шығысы
ЕСКЕРТУ
• Көкөніс тартпасын алып жатқанда ішінде
сақталған азық-түлік салмағы жарақатқа
себеп болуы мүмкін.
36
Page 81

KK
Су сүзгісін ауыстыру (тек
құбыр жүйесіне қосылған
үлгілер үшін)
Replacement Filter белгішесі көрсеткен
уақытта немесе кемінде 6 ай сайын су сүзгісін
ауыстырып тұрыңыз.
Жаңа сүзгіні алуға уақыт беру үшін, шам
ағымдағы сүзгінің мерзімі аяқталардан бұрын
жанады. Сүзгіні уақытында алмастырып
тұрсаңыз, құрылғыдан әрдайым балғын әрі таза
су шығады.
Құрылғыны қуат көзінен ажыратыңыз.
1
Құрылғыны сумен қамтамасыз ету көзін
2
өшіріңіз.
Бір реттік су сүзгісін алып тастаңыз.
3
«Су сүзгісіне қосу» бөліміндегі
4
нұсқауларды орындау арқылы
ауыстырылмалы су сүзгісін орнатыңыз.
Сумен қамтамасыз ету көзін және
5
құрылғыны қосыңыз.
Water Filter түймесін үш секунд басып
6
тұрыңыз. Ол Replacement Filter
белгішесін қайта орнатады. Жаңа су сүзгісі
белсендірілді.
37
Page 82

KK
АҚАУЛАРДЫ ЖОЮ
Белгілер Ықтимал себебі мен шешімі
Тоқ өшіп қалды ма?
Тоңазыту немесе
мұздату әрекеті
орындалмауда.
Тоңазыту немесе
мұздату әрекеті
нашар.
Құрылғы жағымсыз
иіс шығарады.
Құрылғының ішіндегі
шам қосылмайды.
• Басқа құрылғылардың қуатын тексеріңіз.
Қуат ашасы розеткадан ажыратылған ба?
• Қуат ашасын розеткаға дұрыс тығыңыз.
Тоңазытқыш немесе мұздатқыш температурасы ең жылы деңгейге
орнатылған ба?
• Тоңазытқыш немесе мұздатқыш температурасын орташа деңгейге
орнатыңыз.
Құрылғы пісіретін пеш немесе жылытқыш сияқты жылу шығаратын
заттың жанында немесе тікелей күн көзінде тұр ма?
• Орнату аймағын тексеріңіз және оны жылу бөлетін заттардан әрі
қойыңыз.
Оны алдымен салқындатып алмай, ыстық тағамды салдыңыз ба?
• Тоңазытқышқа немесе мұздатқышқа салмас бұрын, алдымен ыстық
тағамды салқындатып алыңыз.
Тым көп тағам салдыңыз ба?
• Тағам арасында сәйкес бос орынды қалдырыңыз.
Құрылғының есіктері толығымен жабылған ба?
• Есігін мықтап жауып, сақталған тағамның есікке кедергі келтіріп
тұрмағанын тексеріңіз.
Құрылғының айналасындағы бос орын жеткілікті ме?
• Құрылғының айналасында жеткілікті орын қалдыру үшін орнату қалпын
реттеңіз.
Тоңазытқыш немесе мұздатқыш температурасы «жылы» деңгейіне
орнатылған ба?
• Тоңазытқыш немесе мұздатқыш температурасын орташа деңгейге
орнатыңыз.
Иісі қатты шығатын тағамды салдыңыз ба?
• Қатты иіс шығаратын тағамдарды жабық контейнерлерде сақтаңыз.
Тартпадағы көкөністер немесе жеміс бүлінген бе?
• Ескіріп кеткен көкөністерді тастап, көкөністер тартпасын тазалап
қойыңыз. Көкөністер тартпасында көкөністерді ұзақ уақыт бойы
сақтамаңыз.
Құрылғының ішіндегі шам өшірілген бе?
• Тұтынушы жабдықтың ішкі шамын ауыстыра алмайды, себебі олар
қызмет көрсетілмейтін болып табылады. Егер ішкі шамы жанбайтын
болса, LG Electronics тұтынушыға ақпарат беру орталығына
хабарласыңыз.
38
Page 83

KK
Белгілер Ықтимал себебі мен шешімі
Құрылғы алға еңкейіп тұр ма?
• Алдыңғы жағын аздап көтеру үшін алдыңғы аяғын реттеңіз.
Сөрелер дұрыс қойылған ба?
Құрылғы есігі мықтап
жабылмаған.
Құрылғы есігін ашу
қиын.
Құрылғының ішінде
немесе көкөністер
тарпасы қақпағының
төменгі жағында
конденсация бар.
Тоңазытқышта мұз
қатып қалған.
Тоңазытқышта мұз
қатып қалған.
• Қажет болса, сөрелерін қайта салыңыз.
Есікті қатты күшпен жаптыңыз ба?
• Есікті жапқан кезде тым көп күш немесе жылдамдық қолданатын
болсаңыз, жаппас бұрын ол аз уақытқа ашық қалуы мүмкін. Жабылған
есікті тарсылдатпаңыз. Күш қолданбай жабыңыз.
Оны жапқан бойда қайтадан есікті аштыңыз ба?
• Оны жапқан бойда 1 минут ішінде құрылғы есігін ашуға әрекет
жасасаңыз, құрылғының ішкі жағындағы қысымға байланысты
қиындықтар туындауы мүмкін. Құрылғы есігін ішкі қысым
тұрақтандырылған соң, бірнеше минуттан кейін ашып көріңіз.
Оны алдымен салқындатып алмай, ыстық тағамды салдыңыз ба?
• Тоңазытқышқа немесе мұздатқышқа салмас бұрын, алдымен ыстық
тағамды салқындатып алыңыз.
Құрылғы есігін ашық қалдырдыңыз ба?
• Құрылғы есігі жабылған соң конденсация да жоғалады, оны құрғақ
шүберекпен сүртіп алуға болады.
Құрылғы есігін тым жиі ашып-жабасыз ба?
• Сырттағы температураның өзгешелігіне байланысты конденсация
түзілуі мүмкін. Дымқыл жерді құрғақ шүберекпен сүртіп алыңыз.
Контейнерге салмай ішіне жылы немесе ылғал тағам салдыңыз ба?
• Тағамды қапталған немесе тығыздалған контейнерде сақтаңыз.
Есіктерінің дұрыс жабылмаған болуы мүмкін бе?
• Құрылғының ішкі жағындағы тағамдардың есікке тіреліп тұрмағанын
және есіктің мықтап жабылғанын тексеріңіз.
Оны алдымен салқындатып алмай, ыстық тағамды салдыңыз ба?
• Тоңазытқышқа немесе мұздатқышқа салмас бұрын, алдымен ыстық
тағамды салқындатып алыңыз.
Мұздатқыштың ауа кірісі немесе шығысы бітелген бе?
• Ауа ішінде айнала алатындай ауа кіретін немесе шығатын жерлері
бітелмегенін тексеріңіз.
Мұздатқыш шамадан тыс толтырылған ба?
• Бөліктері арасында сәйкес бос орынды қалдырыңыз.
39
Page 84

KK
Белгілер Ықтимал себебі мен шешімі
Құрылғы есігін жиі ашып-жабасыз ба немесе құрылғы есігі дұрыс
жабылмаған ба?
Қату немесе
конденсация
құрылғының ішінде
немесе сыртында
түзіледі.
Құрылғы шулы
және қалыпты
дыбыстарды
шығарады.
Құрылғының бүйірі
немесе алдыңғы
жағы жылы.
Құрылғының ішінде
немесе сыртында су
бар.
• Құрылғының ішіне сыртқы ауа кіріп кететін болса, мұздар немесе
конденсат түзілуі мүмкін.
Орнату ортасы ылғал ма?
• Орнату аймағы тым ылғал болса немесе жаңбырлы күн сияқты ылғал
күн туындаса, құрылғының сыртқы жағында конденсация пайда болуы
мүмкін. Кез келген ылғалды құрғақ шүберекпен сүртіп алыңыз.
Құрылғы әлсіз еденге орнатылған ба немесе деңгейі дұрыс
реттелмеген бе?
• Құрылғыны мықты және тегіс еденге орнатыңыз.
Құрылғының артқы жағы қабырғаға тиіп тұр ма?
• Құрылғының айналасында жеткілікті бос орынның болуы үшін орнату
қалпын реттеңіз.
Заттар құрылғының артына шашылып қалды ма?
• Құрылғының артқы жағына шашылып қалған заттарды жинап алыңыз.
Құрылғының жоғарғы жағына зат қойылған ба?
• Құрылғының жоғарғы жағындағы затты алыңыз.
Есік аймағы айналасынан конденсацияның түзілуін азайту үшін
құрылғының осы аймақтарында конденсацияға қарсы түтіктер
болады.
• Конденсация түзілуінің алдын алу үшін жылуды шығару түтігі
құрылғының алдыңғы жағына және бүйіріне орнатылады. Жаз кезінде
немесе құрылғы орнатылған соң оның өте ыстық болып сезілуі мүмкін.
Бұл ақаулық еместігіне және қалыпты жұмысы екендігіне сенімді
болуыңызға болады.
Құрылғының айналасына су аққан ба?
• Судың шұңғылшадан немесе басқа орыннан ағып кеткенін тексеріңіз.
Құрылғының төменгі жағында су бар ма?
• Судың қатқан еріген тағамнан немесе сынған не төгілген контейнерден
ағатынын тексеріңіз.
40
Page 85

KK
Белгілер Ықтимал себебі мен шешімі
Жабдықты жақында орнаттыңыз ба?
• Мұз генераторы жабдық орнатылған соң шамамен 48 сағат өткен соң
мұзды қалыпты түрде өндіреді.
Сумен жабдықтау түтігін жабдыққа қосып, жабдықтау клапанын
аштыңыз ба?
• Сумен жабдықтау түтігін жабдыққа қосып, жабдықтау клапанын
толығымен ашыңыз.
Сумен жабдықтау шлангісі бүгулі ма?
• Егер сумен жабдықтау шлангісі бүгулі болса, су ағыны нашарлауы
мүмкін.
Жақын арада көп мөлшерде мұз алдыңыз ба?
• Автоматты мұз генераторында көбірек мұз жасауға шамамен 24 сағат
жұмсалады. Күте тұрыңыз.
Автоматты мұз
генераторы мұз
өндірмейді немесе
аз мөлшерде мұз
өндіреді.
Мұз берілмейді.
Мұз берілмейді.
Басқару панеліндегі мұз генераторы қосқышын немесе автоматты
мұз генераторының түймесін ҚОСУЛЫ күйіне қойдыңыз ба?
• Автоматты мұз генераторындағы I түймесін басыңыз немесе басқару
панелінде автоматты мұз генераторы үшін ON параметрін орнатыңыз.
(Пайдалану бойынша қосымша мәлімет алу үшін LG electronics вебсайтына кіріңіз немесе смарт құрылғыны пайдаланыңыз.)
Мұздатқыш камераның температурасы тым жоғары мәнге
орнатылған ба?
• Егер орнатылған температура тым жылы болса, мұз баяу өндіріледі не
мүлде өндірілмейді. Автоматты мұз генераторы қалыпты жұмыс істеуі
үшін мұздатқыш температурасын -18 °C-ге орнатыңыз.
Жабдық есігін жиі ашатын ба едіңіз?
• Егер жабдық есігін жиі ашсаңыз суық ауа шығып кетіп, мұз өндірілуінің
жылдамдығы азаяды. Жабдық есігін жиі ашып-жаппаңыз.
Жабдық есігі толығымен жабық па?
• Егер жабдық есігі толығымен жабылмаса, мұздатқыш камераның
температурасы артып, мұз өндіру жылдамдығын баяулатады. Жабдық
есігін толығымен жабыңыз.
Мұз контейнерінде мұз бар ма?
• Мұз контейнерінде мұздың бар-жоғын тексеріңіз.
Мұз контейнерінде мұз жентектеліп қалған ба?
• Мұз контейнерін ағытып алыңыз да, сілкілеңіз. Мұз контейнерін
сілкілегеннен кейін қалған жентек мұзды тастаңыз.
Шығып жатқан мұздың дыбысы естілмей ме?
• Мұзды беру үшін басқару панелінде мұзды кесектеу мен жару әдісін
кезек таңдаңыз.
Мұз өткелі бітеліп қалған ба? (Мұз өткелін мұз контейнерін ағытып
алу арқылы тексеруге болады.)
• Егер мұз өткелі бітелген болса, мұз дұрыс берілмеуі мүмкін. Мұзды
мезгіл-мезгіл тексеріп, мұз өткелін тазалап тұрыңыз.
41
Page 86

KK
Белгілер Ықтимал себебі мен шешімі
Сүзілмеген су пайдаланып жатырсыз ба?
• Сүзілмеген судың құрамында көп мөлшерде әртүрлі ауыр металдар
немесе бөгде заттар болуы мүмкін, сондықтан да сүзгінің жарамдылық
мерзіміне қарамастан сүзгі ерте бастан бітеліп қалуы мүмкін.
Су диспенсерінің багы бос болуы мүмкін бе? (Тек қорғасындалмаған
модельдер үшін)
• Су диспенсерінің багын толтырыңыз.
Су шықпайды.
Судың дәмі біртүрлі.
Су түтігіне ауа толтырылғанда, су шықпайды. (Тек қорғасындалмаған
модельдер үшін)
• Су диспенсері багының тұтқасынан ұстап, оны тартып шығарыңыз. Су
диспенсерінің багын суға толтырып, тоңазытқыштың сөресіне қайта
орнатыңыз.
Сумен жабдықтау клапаны жабық па? (Тек қорғасындалған үлгілер
үшін)
• Сумен жабдықтау клапанын ашыңыз.
Судың дәмі бұрынғы су тазартқыштан алынған сумен
салыстырғанда басқаша ма?
• Тазартылған су немесе суық су ұзақ уақыт бойы пайдаланылған жоқ па?
Сүзгіні орнатқан және ауыстырғаннан бері көп уақыт өтті ме?
• Егер мерзімі өткен сүзгі пайдаланылса, тазарту өнімділігі азаюы мүмкін.
Сүзгіні сүзгі ауыстыру кезеңіне сәйкес ауыстыру ұсынылады.
Сүзгіні орнатқаннан кейін бастапқы жұмыс кезеңінде оны тиісінше
шайдыңыз ба?
• Сүзгіні бірінші рет орнатқан немесе ауыстырған кезде сүзгінің ішінен
ауа мен белсендірілген көміртегі қалдығын шығарып тастау керек.
Жабдықты су диспенсерінің иінтірегін басу арқылы диспенсерден
шамамен 5 литр тазартылған су алып, шығарғаннан кейін
пайдаланыңыз. (Белсендірілген көмір адамдарға зиянсыз.)
Тазартылған су немесе суық су ұзақ уақыт бойы пайдаланылған жоқ
па?
• Ескірген судың дәмі бактериялардың көбеюіне байланысты өзгеруі
мүмкін. Өнімді су диспенсерінен шамамен 5 литр (шамамен үш
минуттай) су алып, шығарып тастағаннан кейін пайдаланыңыз.
42
Page 87

KK
Белгілер Ықтимал себебі мен шешімі
Автоматты мұзын еріту айналымы басталған және аяқталған
кезде мұзын ерітуді басқару қосылады. Термо реттегіш (немесе
Тырс ету шулары
Тырсылдаған шулар
Гуілдеген шулар
Сылдырлаған
дыбыстар
кейбір үлгілердегі құрылғыны реттегіш) те айналым қосылған және
өшірілген кезде сырт еткен дыбыс шығарады.
• Қалыпты жұмысы
Тырсылдаған дыбыстардың салқындатқыш ағынынан, құрылғының
артындағы су жолынан (тек тазартқыш бар үлгілерде) немесе
құрылғының айналасында немесе жоғарғы жағына қойылған
заттардан туындауы мүмкін.
• Қалыпты жұмысы
Құрылғы еденде тегіс тұрған жоқ.
• Еден әлсіз не тегіс емес немесе теңестіру аяқтарын түзету қажет. "Есікті
теңестіру" бөлімін қараңыз.
Пайдаланған кезде сызықтық компрессор бар құрылғы
жылжытылған.
• Қалыпты жұмысы. Компрессор 3 минуттан кейін тырсылдағанын
тоқтатпайтын болса, құрылғыны токтан ажыратып, қайта қосыңыз.
Мотордың булағыш желдеткіші тоңазытқыш пен мұздатқыш бөліктері
бойымен ауаны айналдырады.
• Қалыпты жұмысы
Конденсатор желдеткіші арқылы конденсатор үстінде ауа басып тұр.
• Қалыпты жұмысы
Салқындату жүйесінен ағатын салқындатқыш
• Қалыпты жұмысы
43
Page 88

KK
Белгілер Ықтимал себебі мен шешімі
Температурадағы өзгерістерге байланысты ішкі қабырғаларында
Тарсылдаған шулар
Дірілдеу
Тұрмыстық
жабдығыңыз бен
смартфоныңыз Wi-Fi
желісіне қосылмаған.
нығыздалу және кеңейту орын алуы мүмкін.
• Қалыпты жұмысы
Құрылғының бүйірі немесе артқы жағы шкафқа немесе қабырғаға
тиіп тұрса, қалыпты дірілдеулердің кейбірі естілетін дыбыс шығаруы
мүмкін.
• Шуды азайту үшін бүйірлері мен артқы жағын қабырғаға немесе шкафқа
тигізіп қоймаңыз.
Wi-Fi желісіне қосылу үшін пайдаланып жатқан құпиясөзіңіз дұрыс
емес.
• Смартфоныңызға қосылған Wi-Fi желісін тауып, жойыңыз да,
жабдығыңызды LG ThinQ қолданбасына қайта тіркеңіз.
Смартфоныңыздың мобильді деректері қосулы.
• Смартфонның Мобильді деректер функциясын өшіріңіз де, жабдықты
Wi-Fi желісі арқылы қайта тіркеңіз.
Сымсыз желі атауы (SSID) қате орнатылды.
• Сымсыз желінің атауы (SSID) ағылшын әріптері мен сандардан тұруы
қажет. (Ерекше таңбаларды қолданбаңыз)
Роутердің жиілігі 2,4 ГГц емес.
• Жиілігі 2,4 ГГц болатын роутерге ғана қолдау көрсетіледі. Сымсыз
роутер жиілігін 2,4 ГГц мәніне орнатып, жабдықты сымсыз роутерге
қосыңыз. Роутер жиілігін тексеру үшін, интернет провайдеріне немесе
роутер өндірушісіне хабарласыңыз.
Жабдық пен роутердің арасы тым алыс.
• Жабдық пен роутердің арасы тым алыс болса, сигнал әлсіз болып,
байланыс дұрыс конфигурацияланбауы мүмкін. Роутерді жабдыққа
жақын орналастырыңыз.
44
Page 89

Еске салу
Page 90

Символ Кедендік одақтың 005/2011 техникалық регламентіне сәйкес қолданылады және осы
өнімнің қаптамасын екінші рет пайдалануға арналмағанын және жоюға жататынын көрсетеді.
Осы өнімнің қаптамасын азық-түлік өнімдерін сақтау үшін пайдалануға тыйым салынады.
Символ қаптаманы жою мүмкіндігін көрсетеді. Символ сандық код және/немесе әріп белгілері
түріндегі қаптама материалының белгісімен толықтырылуы мүмкін.
Мәлімет
Дайындалған күні тоңазытқыштың ішінде орналасқан жапсырмада көрсетілген.
Page 91

www.lg.com
РУКОВОДСТВО ПОЛЬЗОВАТЕЛЯ
ХОЛОДИЛЬНИК С
МОРОЗИЛЬНЫМ
ОТДЕЛЕНИЕМ
Перед началом работы с прибором внимательно прочитайте данное руководство и держите
его постоянно под рукой.
Copyright © 2020 LG Electronics Inc. Все права защищены.
Page 92

СОДЕРЖАНИЕ
В данном руководстве могут встречаться
изображения или материалы, не
относящиеся к купленной вами модели.
Производитель может вносить изменения
в содержание руководства.
ТЕХНИКА БЕЗОПАСНОСТИ ........................................................3
Важные указания по технике безопасности ..................................................3
УСТАНОВКА ................................................................................ 12
Перед установкой ..........................................................................................12
Размеры и зазоры .........................................................................................12
Температура окружающей среды.................................................................12
Снятие дверей ...............................................................................................13
Регулировка высоты двери ...........................................................................15
Подключение подачи воды (только подключаемые устройства) ...............15
Подключение устройства ..............................................................................17
Транспортировка устройства ........................................................................17
ЭКСПЛУАТАЦИЯ ......................................................................... 18
Детали и функции ..........................................................................................18
Примечания по эксплуатации .......................................................................22
Использование панели управления ............................................................. 24
Резервуар диспенсера воды
(только модели без подключения к водопроводу) ......................................26
Диспенсер для воды и льда .........................................................................27
Автоматический льдогенератор ................................................................... 27
Система Дверь-в-двери* ...............................................................................29
Овощной контейнер* .....................................................................................30
Функция InstaView* ........................................................................................30
Прочие функции ............................................................................................30
ИНТЕЛЛЕКТУАЛЬНЫЕ ФУНКЦИИ ............................................ 31
Приложение LG ThinQ...................................................................................31
Smart Diagnosis ..............................................................................................33
ТЕХНИЧЕСКОЕ ОБСЛУЖИВАНИЕ ........................................... 34
Примечания по очистке устройства .............................................................34
Очистка крышки конденсатора .....................................................................34
Очистка лотка на дверце устройства ..........................................................35
Очистка полок ................................................................................................35
Очистка овощного контейнера .....................................................................35
Очистка диспенсера воды ............................................................................36
Замена водяного фильтра (только подключаемые устройства) ................37
ПОИСК И УСТРАНЕНИЕ НЕИСПРАВНОСТЕЙ ......................... 38
Page 93

RU
ТЕХНИКА БЕЗОПАСНОСТИ
Следующие рекомендации по технике безопасности призваны
предотвратить непредвиденные риски и ущерб, вызванные
небезопасной либо неверной эксплуатацией изделия.
Рекомендации делятся на две категории: ОСТОРОЖНО
и ВНИМАНИЕ (см. ниже).
Этим символом помечены действия, связанные
с повышенной опасностью. Внимательно прочтите
соответствующий текст и следуйте инструкциям,
чтобы избежать риска.
ВНИМАНИЕ!
Означает, что несоблюдение инструкций может привести
к серьезной травме или смерти.
ОСТОРОЖНО!
Означает, что несоблюдение инструкций может привести
к легкой травме или к поломке изделия.
Важные указания по технике безопасности
ВНИМАНИЕ!
Чтобы снизить опасность пожара, удара током или
получения травм при использовании изделия, необходимо
принять следующие основные меры предосторожности.
Дети в доме
• Прибор не предназначен для использования лицами
(включая детей) с пониженными физическими, сенсорными
или умственными способностями или при отсутствии у них
жизненного опыта или знаний, если они не находятся под
присмотром или не проинструктированы об использовании
прибора лицом, ответственным за их безопасность. Дети должны
находиться под присмотром для недопущения игр с прибором.
3
Page 94

RU
• Если изделие оснащено замком (только для некоторых моделей),
держите ключ в недоступном для детей месте.
Установка
• Для безопасной транспортировки данного устройства требуются
два человека или более.
• Убедитесь в том, что розетка была должным образом заземлена,
а контакт заземления на кабеле питания имеется в наличии и не
поврежден. Более подробные сведения можно получить в центре
поддержки клиентов компании LG Electronics.
• Изделие снабжено шнуром электропитания с жилой заземления
оборудования и вилкой с заземляющим контактом. Вилку следует
подключать к правильно установленной и заземленной согласно
местным нормам и правилам розетке.
• При повреждении шнура питания его замену во избежание
опасности должны производить изготовитель, сервисная служба
или подобный квалифицированный персонал.
• Не подключайте устройство к многорозеточному переходнику,
который не имеет силового кабеля питания (установленного).
• Не вносите изменения и не удлиняйте кабель питания.
• Устройство должно быть подсоединено к отдельной линии
питания с отдельным предохранителем.
• Не используйте неправильно заземленные портативные
розетки-разветвители. Правильно заземленная портативная
розетка-разветвитель должна иметь допустимую нагрузку
по току, соответствующую номинальной или превышающую
ее. Используйте розетку-разветвитель только для данного
устройства.
• Установите устройство в месте со свободным доступом к розетке
электропитания.
• Соблюдайте осторожность и не допускайте, чтобы вилка
электропитания была направлена вертикально или чтобы
холодильник касался вилки питания.
• Установите устройство на ровный прочный пол.
4
Page 95

RU
• Не устанавливайте устройство в местах с высокой влажностью
или большим количеством пыли. Не устанавливайте и не храните
устройство вне помещений или в местах, подверженных прямому
воздействию погодных условий (прямой солнечный свет, ветер,
дождь или температура ниже нуля градусов).
• Не устанавливайте устройство в местах с прямым воздействием
на него солнечных лучей или теплого воздуха от нагревательных
приборов (газовых плит, обогревателей).
• Не подвергайте заднюю часть устройства указанным выше типам
воздействия во время установки.
• Соблюдайте осторожность, чтобы не уронить дверцу устройства
при сборке или разборке.
• Соблюдайте осторожность, чтобы не пережать, передавить
или повредить кабель питания во время установки или снятия
дверцы устройства.
• Не подключайте адаптер-штекер или другие принадлежности к
разъему электропитания.
Эксплуатация
• Не используйте устройство в каких-либо целях (хранение или
перевозка медикаментов, экспериментальных материалов),
отличающихся от хранения продуктов в домашних условиях.
• Отсоединяйте вилку питания от розетки во время сильной грозы,
а также в том случае, если планируете прекратить эксплуатацию
холодильника на длительное время.
• Не прикасайтесь к вилке электропитания или кнопкам
управления устройством мокрыми руками.
• Не перегибайте шнур питания слишком сильно и не помещайте
на него тяжелые предметы.
• Если вода попадает на электрические компоненты устройства,
вытащите вилку питания из розетки и свяжитесь с центром
поддержки клиентов компании LG Electronics.
• Не суйте руки или металлические предметы в зону, откуда идет
холодный воздух, под крышку или к решетке сзади, откуда
выходит тепло.
5
Page 96

RU
• Не допускайте чрезмерных усилий или ударов по задней крышке
устройства.
• Не помещайте животных внутрь изделия.
• Если поблизости находятся дети, будьте осторожны при открытии
или закрытии дверцы устройства. Случайный удар дверцей
может привести к травме ребенка.
• Следите за тем, чтобы дети не оказались запертыми внутри
устройства. Ребенок, оказавшийся запертым внутри устройства,
может задохнуться.
• Не ставьте тяжелые или хрупкие предметы, контейнеры,
заполненные жидкостью, горючими веществами,
воспламеняемые предметы (такие как свечи, лампы и т. д.) или
нагревательные приборы (такие как печи, обогреватели и т. д.) на
прибор.
• Если выявлена утечка газа (изобутан, пропан, природный газ
и т. п.), не касайтесь устройства или вилки электропитания
и немедленно проветрите помещение. В этом устройстве
используется хладагент изобутан (R600a). Также используется
небольшое количество легковоспламеняющегося газа. Утечка
газа во время транспортировки, установки или эксплуатации
прибора может привести к пожару, взрыву или травме, если
возникнут искры.
• Не используйте и не храните воспламеняющиеся или горючие
вещества (эфир, бензол, спирт, химические реагенты, сжиженную
пропан-бутановую смесь, горючие спреи, средства от насекомых,
освежитель воздуха, косметические средства и т. д.) вблизи
устройства.
• В случае обнаружения необычных звуков, неприятного запаха
или дыма немедленно отключите питание и свяжитесь с центром
поддержки клиентов компании LG Electronics.
• В льдогенератор или водяной бачок диспенсера можно заливать
только питьевую воду.
• Не допускайте повреждения контура хладагента.
• Не помещайте внутрь устройства электронные приборы (такие
как нагреватели или мобильные телефоны).
6
Page 97

RU
Обслуживание
• Отсоедините кабель питания перед очисткой устройства или
заменой лампы внутреннего освещения (при ее наличии).
• После полного удаления влаги и пыли аккуратно вставьте вилку
электропитания в розетку.
• Никогда не отключайте вилку электропитания из розетки, потянув
за кабель питания. Обязательно надежно удерживайте вилку
в руках и извлекайте ее из розетки, не допуская перекосов.
• Не распыляйте воду или легковоспламеняющиеся
вещества (зубная паста, спирт, растворитель, бензол,
легковоспламеняющиеся жидкости, абразивы и т. д.) внутри или
снаружи прибора для его чистки.
• Не проводите очистку устройства с использованием щеток, ткани
или губок с грубой или металлической поверхностью.
• К разборке, ремонту и модификации изделия допускаются только
уполномоченные специалисты центра поддержки клиентов
компании LG Electronics. Свяжитесь с центром поддержки
клиентов компании LG Electronics, если вы планируете
переместить или установить устройство в новое место.
• Не используйте фен для сушки волос для испарения влаги
внутри устройства, а также не используйте ароматические свечи
для избавления от неприятного запаха внутри устройства.
• Не используйте механические устройства или другие средства
для ускорения процесса оттаивания, кроме рекомендуемых
производителем.
• Подключите линию подачи воды (только подключаемые модели)
только к источнику питьевой воды. В противном случае примеси
в воде могут вызвать недомогание.
Утилизация
• При утилизации устройства снимите уплотнитель двери,
оставьте полки и лотки на своих местах и не допускайте детей
к устройству.
• Утилизируйте упаковочные материалы (например, пластиковые
пакеты и пенопласт) в местах, недоступных для детей.
Упаковочные материалы могут стать причиной удушения.
7
Page 98

RU
Техническая безопасность
• Не загораживайте вентилляционные отверстия, расположенные
в корпусе прибора или во встраиваемой конструкции.
• Не используйте электрические приборы внутри отделений
для хранения продуктов, за исключением рекомендованных
производителем.
• Хладагент и изолирующий газ, используемые в устройстве,
должны утилизироваться в соответствии со специальными
процедурами. Перед их утилизацией проконсультируйтесь
со специалистом по техническому обслуживанию или другим
специалистом с достаточной квалификацией.
• Утечки хладагента из патрубков могут привести к возгоранию или
взрыву.
• Количество хладагента в вашем конкретном устройстве указано
на табличке с паспортными данными внутри устройства.
• Никогда не включайте устройство с признаками повреждений.
При наличии сомнений в исправности устройства обратитесь в
службу поддержки клиентов LG Electronics.
• Данное устройство предназначено только для домашнего
использования или аналогичных областей применения.
Устройство не должно использоваться в коммерческих целях,
на предприятиях общественного питания или на средствах
передвижения, таких как трейлеры или яхты.
• Не храните взрывоопасные вещества, например баллоны
с аэрозолем, содержащим воспламеняющиеся компоненты,
внутри устройства.
8
Page 99

RU
Легковоспламеняемые материалы и риск
возникновения пожара
Данный символ предупреждает о наличии
легковоспламеняемых материалов, которые при
ненадлежащем обращении могут стать причиной
возникновения пожара.
• Данное устройство содержит небольшое количество
изобутанового хладагента (R600a), который является горючим
газом. При транспортировке и установке устройства соблюдайте
осторожность, чтобы не повредить элементы охлаждающего
контура устройства.
• При обнаружении утечки не допускайте использования открытого
пламени или потенциальных источников воспламенения,
в течение нескольких минут проветрите комнату, в которой
установлено устройство. В целях предотвращения образования
огнеопасной смеси газа и воздуха при утечке в охлаждающем
контуре, размер комнаты, в которой установлено устройство,
должен соответствовать количеству используемого хладагента.
Площадь комнаты должна составлять 1 кв. м на каждые 8 грамм
хладагента R600а внутри устройства.
• Устанавливая устройство убедитесь, что кабель питания не
пережат и не поврежден.
• Запрещается размещать переносные розетки или переносные
источники питания вблизи данного устройства.
ОСТОРОЖНО!
Чтобы уменьшить риск незначительной травмы,
неисправности или повреждения продукта или имущества при
использовании этого продукта, соблюдайте основные меры
предосторожности, включая следующие.
Установка
• Не наклоняйте и не кантуйте устройство при транспортировке.
• Следите за тем, чтобы никакие части тела, например руки или
ноги, не застряли при перемещении прибора.
9
Page 100

RU
Эксплуатация
• Не касайтесь замороженных продуктов или металлических
деталей в морозильной камере мокрыми или влажными руками.
Это может вызвать обморожение.
• Не ставьте стеклянные контейнеры, бутылки или банки (особенно
содержащие газированные напитки) в морозильную камеру,
на полки или в лоток для льда, где они будут подвергаться
воздействию отрицательных температур.
• Закаленное стекло на передней стороне дверцы прибора или на
полках может быть повреждено ударом. Если стекло треснуло,
не прикасайтесь к нему руками.
• Не кладите тяжелые предметы на дверцу системы Дверь-в-
двери.
• Не используйте дверцу в качестве разделочной доски,
старайтесь не поцарапать ее острым инструментом, поскольку
это приведет к поломке устройства.
• Запрещается висеть на двери устройства, камере хранения,
полках и дверце системы Дверь-в-двери, а также забираться на
них.
• Запрещается хранить избыточное количество бутылок с водой
или контейнеров с готовыми гарнирами в лотках на дверце
устройства.
• Следите за тем, чтобы животные не грызли кабель питания или
шланг подачи воды.
• Не прилагайте чрезмерных усилий при открывании/закрытии
дверцы устройства.
• Если петля дверцы прибора повреждена или работает
ненадлежащим образом, прекратите использование прибора и
обратитесь в авторизованный сервисный центр.
• Запрещается использовать теплую воду для очистки стеклянных
полок или крышек, если они холодные.
• Никогда не употребляйте в пищу замороженные продукты сразу
после того, как они были извлечены из морозильной камеры.
• Не кладите руки в механическую часть автоматического
льдогенератора, например в сосуд или диспенсер для льда.
10
 Loading...