

LG GC-3992SL User Manual

Table of Contents
Introduction
Installation
Operation
Suggestion On
Food storage
Registration
Important Safety Instruction
Identification of Parts
Installation
Starting
Temperature Control
Quick Freeze
Vacation
Self Test
Door Alarm
Ice Making
Defrosting
Storing Food
4
4
6
7
7
8
8
9
9
9
9
9
10
Care and
Maintenance
Trouble Shooting
To Reverse the
Doors
General Information
Lamp Replacement
Cleaning
Trouble Shooting
Precaution
How to Reverse the Doors.
3
11
11
12
13
15
15

Introduction
Registration
Introduction
Precaution
The model and serial number are found on the rear of
this unit. This number is unique to this unit and not
available to others. You should record requested
information here and retain this guide as a permanent
record of your purchase. Staple your receipt here.
Date of Purchas
Dealer Purchased Fro
Dealer Address :
Dealer Phone No
Model No
Serial No. :
e :
m :
. :
. :
Important Safety Instruction
This fridge-freezer must be properly installed and
located in accordance with the Installation
Instruction before it is used.
Never unplug your fridge-freezer by pulling on the
power cord. Always grip plug firmly and pull straight out
from the outlet.
When moving your appliance away from the wall,
be careful not to roll over or damage the power
cord.
After your fridge-freezer is in operation, do not
touch the cold surfaces in the freezer compartment,
particularly when hands are damp or wet. Skin may
adhere to these extremely cold surfaces.
4
Introduction
Freezer Temperature
Control
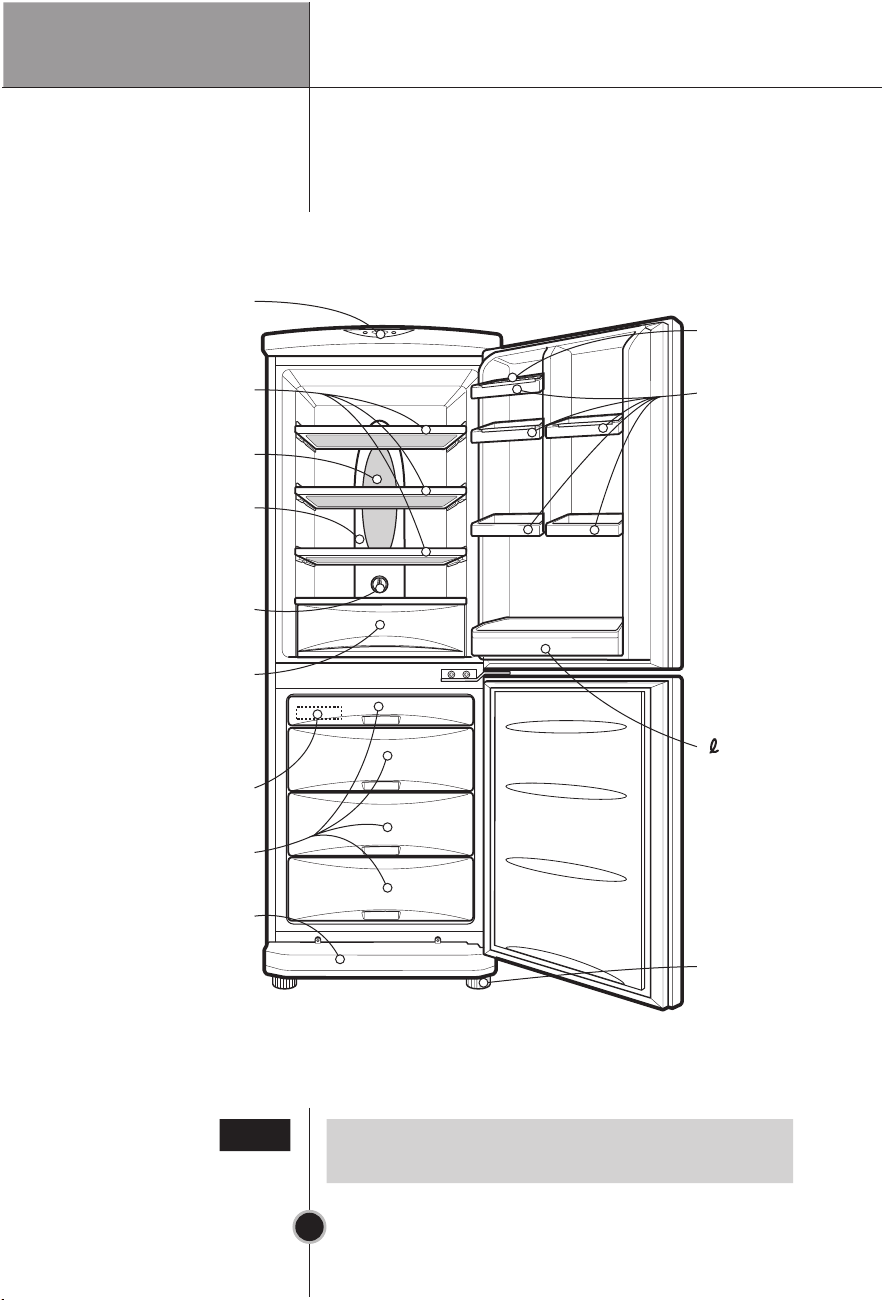
Identification of Parts
Egg Tray
Removable
Glass Shelf(2 or 3)
Lamp
Multi-air Flow Duct
Fridge Temperature
Control
Vegetable Drawer
Used to keep fruits
and vegetables, etc.
fresh and crisp.
Ice Cube Tray
Storage
Drawer
Removable
Plinth
Rotatable
Door Basket
2 Bottle
Door Basket
Leveling Screw
Note
If you found some parts missing from your unit,
they may be parts only used in other models.
6
Installation
Installation
1.
Select a good location.
Place your fridge-freezer where it is easy to use.
2.
Avoid placing the unit near heat sources,
direct sunlight or moisture.
3.
There must be proper air circulation around your
fridge-freezer to keep it operating efficiently.
4.
To avoid vibration, the unit must be leveled.
If required, adjust the leveling screws to compensate
for the uneven floor.
The front should be slightly higher than the rear to aid
in door closing.
Leveling screws can be turned easily by tipping the
cabinet slightly.
Turn the leveling screws counterclockwise( ) to
raise the unit, clockwise( ) to lower it.
5.
Don’t install this appliance below 5°. It may cause the
debasement of the refrigerator.
Starting
6.
Install accessories such as ice cube box, etc., in their
proper places.They are packed together to prevent
possible damage during shipment.
7.
Connect the power supply cord (or plug) to the outlet.
Don't double up with other appliances on the same
outlet.
8.
To ensure proper air circulation around the fridge-freezer,
please maintain sufficient space on both the sides as well
as top and maintain at least 2 inches (5 cm) from the rear
wall.
When your fridge-freezer is installed, allow it 2-3 hours to
stabilize at normal operating temperature prior to filling
it with fresh or frozen foods.
If power plug is disconnected, allow 5 minutes delay
before restarting.
Your fridge-freezer is now ready for use.
7
 Loading...