

Page 1

OWNER’S MANUAL
FRIDGE &
FREEZER
Read this owner's manual thoroughly before operating the appliance
and keep it handy for reference at all times.
EN ENGLSH
PL POLSKI
*AFN36881839*
AFN36881839
MFL42818347
Rev.00_010317
www.lg.com
Copyright © 2017 LG Electronics. All Rights Reserved.
Page 2

TABLE OF CONTENTS
SAFETY INSTRUCTIONS ......................................03
Important Safety Instructions .......................................................03
INSTALLATION .......................................................09
Notes for Movement and Transport ............................................. 09
Leg Adjustment
Notes for Installation
Reversible doors...... ....................................................................10
OPERATION ...........................................................12
Parts and Functions ..................................................................... 12
Notes for Operation ....................................................................13
Using the Control Panel ............................................................... 14
Using Ice Maker ...........................................................................16
Temperature control in Fresh Converter .....................................16
Pull-out drawer Fresh Balancer .....................................16..............
Using the Folding Shelf 16...............................................................
This manual may contain images or content
different from the model you purchased.
This manual is subject to revision by the
manufacturer.
.........
................................................................... 09
....................................................................09
SMART FUNCTIONS ..............................................17
Using Smart ThinQ Application .................................................17
Open Source Software Notice Information ..................................17
Smart Diagnosis™ Through the Customer Information Centre . . ...17
MAINTENANCE ......................................................19
Notes for cleaning ...................................................................... 19
Removing and refitting the fridge Door Basket ....................... 19
Removing the Fridge Shelf .....................20
Removing the Folding Shelf 20
Removing and refitting the Vegetable Drawer 20
Removing the pull-out Cover Drawer .......................................21
Removing the refrigerator drawer 21
Removing and refitting the freezer drawers 21
..................
...................................
.....................................
.........................
...................
.........
.........................
.......
....................
TROUBLESHOOTING ............................................22
OPERATING DATA 26..............................................
Page 3
SAFETY INSTRUCTIONS
The following safety guidelines are intended to prevent unforeseen risks or
damage from unsafe or incorrect operation of the appliance.
The guidelines are separated into ‘WARNING’ and ‘CAUTION’ as described
below.
This symbol is displayed to the indicate matters and operations that
can cause risk. Read the part with this symbol carefully and follow
the instructions in order to avoid risk.
WARNING
This indicates that the failure to follow the instructions can casuse
serious injury or death.
CAUTION
This indicates that the failure to follow the instructions can cause the
minor injury or damage to the product.
IMPORTANT SAFETY INSTRUCTIONS
EN
WARNING
To reduce the risk of explosion, fire, death, electric shock, injury or
scalding to persons when using this product, follow basic precautions,
including the following:
For use in Europe:
This appliance can be used by children aged from 8 years and above and persons with
reduced physical, sensory or mental capabilities or lack of experience and knowledge
if they have been given supervision or instruction concerning use of the appliance
in a safe way and understand the hazards involved. Children shall not play with the
appliance. Cleaning and user maintenance shall not be made by children without
supervision.
Children in the Household
This appliance is not intended for use by persons (including children) with reduced
physical, sensory or mental capabilities, or lack of experience and knowledge, unless
they have been given supervision or instruction concerning use of the appliance by a
person responsible for their safety. Children should be supervised to ensure that they
do not play with the appliance.
03
Page 4

EN
Installation
•This appliance should only be transported by two or more people holding the
appliance securely.
•Ensure that the socket outlet is properly grounded, and that the earth pin on the
power cord is not damaged or removed from the power plug. For more details on
grounding, inquire at an LG Electronics customer information centre.
•This appliance is equipped with a power cord having an equipment-grounding
conductor and a grounding power plug. The power plug must be plugged into an
appropriate socket outlet that is installed and grounded in accordance with all local
codes and ordinances.
•If the power cord is damaged or the hole of the socket outlet is loose, do not use the
power cord and contact an authorized service centre.
•Do not plug the appliance into multiple socket outlets or extension power cable.
•Do not modify or extend the power cord.
•Avoid using any extension cords or double adaptor. The appliance should be
connected to a dedicated power line which is separately fused.
•Install the appliance in a place where is easy to unplug the power plug of the
appliance.
•Be careful not to point the power plug up or let the appliance lean against the power
plug.
•
Install the appliance on a film and level floor.
•Do not install the appliance in a damp and dusty place. Do not install or store the
appliance in any outdoor area, or any area that is subject to weathering conditions
such as direct sunlight, wind or rain or temperatures below freezing.
•Do not place the appliance in direct sunlight or expose it to the heat from heating
appliances such as stoves or heaters.
•Be careful not to expose the rear of the appliance when installing.
•Be careful not to let the appliance door fall during assembly or disassembly.
•Be careful not to pinch, crush, or damage the power cable during assembly or
disassembly of the appliance door.
04
Page 5
Operation
•Do not use the appliance for any purpose (storage of medical or experimental
materials or shipping) other than any domestic household food storage use.
•In case of flood, disconnect the power plug and contact the LG Electronics
customer information centre.
•Unplug the power plug during a severe thunderstorm or lightening or when not in use
for a long period of time.
•Do not touch the power plug or the appliance controls with wet hands.
•Do not bend the power cable excessively or place a heavy object on it.
•If water penetrates electrical parts of the appliance, disconnect power plug and
contact an LG Electronics customer information centre.
•Do not place hands or metallic objects inside the area emitting the cold air, cover or
heat releasing grill on the back.
•Do not apply excessive force or impact to the back cover of the appliance.
•Do not put animals, such as pets into the appliance.
•Be careful of nearby children when you open or close the appliance door. The door
may bump the child and cause injury.
•Avoid the danger of children getting trapped inside the appliance. A child trapped
inside the appliance can cause suffocation.
•Do not place heavy or fragile objects, liquid filled containers, combustible
substances, or flammable objects (such as candles and lamps) on the appliance.
•If there is a gas leakage (isobutane, propane, natural gas, etc.), do not touch the
appliance or power plug and ventilate the area immediately. This appliance uses a
very eco-friendly gas (isobutane, R600a) as the refrigerant. Although it uses a small
amount of the gas, it is still combustible gas. Gas leakage during appliance transport,
installation or operation can cause fire, explosion or injury if sparks are caused.
EN
•Do not damage the pipes of the refrigerant circuit.
Do not use or store flammable or combustible substances (ether, benzene, alcohol,
•
chemical, LPG, combustible spray, insecticide, air freshener, cosmetics, etc.) near
the appliance.
•Immediately unplug the power plug and contact an LG Electronics customer
information centre if you detect a strange sound, odour, or smoke coming from the
appliance.
Maintenance
•Disconnect the power cord before cleaning the appliance or replacing the inside
lamp(where fitted).
•Securely plug the power plug in the socket outlet after completely removing any
moisture and dust.
05
Page 6

EN
•Never unplug the appliance by pulling on the power cable. Always grip the power
plug firmly and pull straight out from the socket outlet.
•Do not spray water inside or outside the appliance to clean it.
•Do not clean the appliance with brushes, cloths or sponges with rough surfaces or
which are made of metallic material.
Only a qualified service personnel from LG Electronics service centre should
•
disassemble, repair, or modify the appliance. Contact an LG Electronics customer
information centre if you move and install the appliance in a different location.
•Do not use a hair drier to dry the inside of the appliance or place a candle inside to
remove the odours.
•Do not use mechanical devices or other means to accelerate the defrosting process,
other than those recommended by the manufacturer.
Disposal
•When discarding the appliance, remove the door gasket while leaving the shelves
and baskets in place and keep children away from the appliance.
•Dispose of all packaging materials (such as plastic bags and styrofoam) away from
children. The packaging materials can cause suffocation.
Prohibition of Storage of Explosive Substances
Do not store explosive substances such as aerosol cans with a flammable propellant
in this appliance.
Technical safety
•Keep ventilation openings, in the appliance enclosure or in the built-in structure,
clear of obstruction.
•Do not use electrical appliances inside the food storage compartments of the
appliance, unless they are of the type recommended by the manufacturer.
•The refrigerant and insulation blowing gas used in the appliance require special
disposal procedures. Consult with service agent or a similarly qualified person
before disposing of them.
•This appliance contains a small amount of isobutane refrigerant (R600a), natural gas
with high environmental compatibility, but it is also combustible. When transporting
and installing the appliance, care should be taken to ensure that no parts of the
refrigerating circuit are damaged.
•Refrigerant leaking out of the pipes could ignite or cause an explosion.
•The amount of refrigerant in your particular appliance is shown
plate inside the appliance.
•Never start up an appliance showing any signs of damage. If in doubt, consult your
dealer.
06
Page 7
EN
•If a leak is detected, avoid any naked flames or potential sources of ignition and air
the room in which the appliance is standing for several minutes. In order to avoid the
creation of a flammable gas air mixture if a leak in the refrigerating circuit occurs, the
size of the room in which the appliance is used should correspond to the amount of
refrigerant used. The room must be 1 m
2
in size for every 8 g of R600a refrigerant
inside the appliance.
•This appliance is intended to be used in household and similar applications such as
-staff kitchen areas in shops, offices and other working environments;
-farm houses and by clients in hotels, motels and other residential type environments;
-bed and breakfast type environments;
-catering and similar non-retail applications.
CAUTION
To reduce the risk of minor injury to persons, malfunction, or damage to
the product or property when using this product, follow basic precautions,
including the following:
Installation
•Do not tilt the appliance to pull or push it when transporting.
Operation
•Do not touch frozen food or the metal parts in the freezer compartment with wet or
damp hands. It may cause frostbite.
•Do not place glass containers or bottles inside the freezer, shelves or ice bin that will
be exposed to temperatures below freezing.
•The tempered glass on the front side of the appliance door or the shelves can be
damaged by an impact. If it is broken, do not touch it with hands, as this may result
in injury.
•Make sure your hands and feet do not get stuck when opening and closing the
appliance door.
•Do not hang from the appliance doors, storage room, shelf or climb up into it.
•Do not store an excessive amount of water bottles or containers for side dishes
on the door baskets. The basket may break or your hand may bump into the
surrounding structure, causing injury.
•Keep food organized inside the appliance.
•Prevent animals from nibbling on the power cable.
07
Page 8
EN
•Do not open or close the appliance door with excessive force.
•If the hinge of the appliance door is damaged or operates improperly, stop using the
appliance and contact an authorized service centre.
•Supervise a child or a person with poor cognitive skills to ensure they use the
appliance safety.
•Do not place any electronic appliance (such as heater and mobile phone) inside the
appliance.
•Do not clean glass shelves or covers with warm water when they are cold. They may
break if exposed to sudden temperature changes.
•Never eat frozen foods immediately after they have been taken out in the freezer.
Maintenance
Do not insert the shelves upside down. The shelves may fall, causing injury.
•
•To remove frost from the appliance, contact an LG Electronics customer information
centre.
•Dispose of the ice inside the ice bin in the freezer during an extended power outage.
Disposal of Your Old Appliance
•This crossed-out wheeled bin symbol indicates that waste electrical and
electronic products (WEEE) should be disposed of separately from the
municipal waste stream.
•Old electrical products can contain hazardous substances so correct
disposal of your old appliance will help prevent potential negative
consequences for the environment and human health.
Your old appliance may contain reusable parts that could be used to
repair other products, and other valuable materials that can be recycled
to conserve limited resources.
•You can take your appliance either to the shop where you purchased
the product, or contact your local government waste office for detail of
your nearest authorized WEEE collection point. For the most up to date
information for your country please see www.lg.com/global/recycling
08
Page 9
INSTALLATION
EN
CLIMATE CLASS
The climate class is indicated on the
refrigerator's specification label located inside
the refrigerator compartment. Do not use the
refrigerator at a temperature exceeding the
established limits. The climate class is
defined by the refrigerator’s conditions of
use.
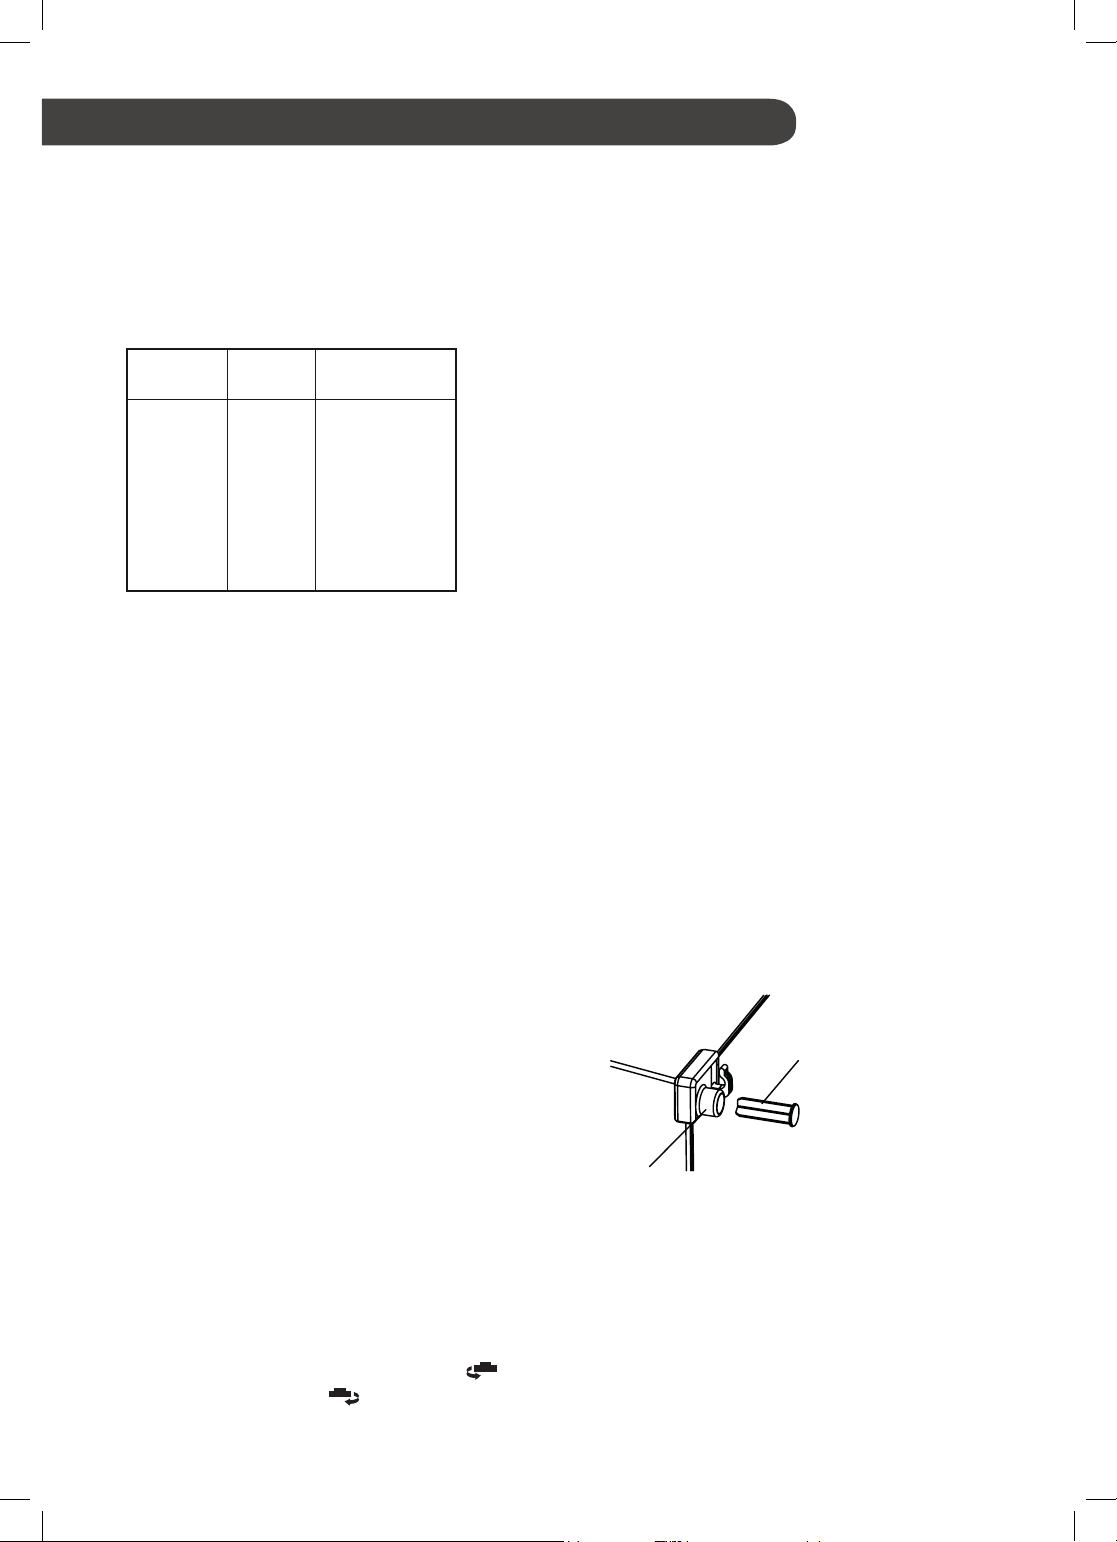
Class
Extended
temperate
Temperate
Subtropical
Tropical
Designation
SN
ST
Outside temperature
range, in °C
From +10 to +32
N
From +16 to +32
From +16 to +38
T
From +16 to +43
Notes for Movement and
Transport
•Remove all food from inside the appliance. Then,
transport the appliance only after fixing fragile parts
such as shelves and the door handle with tape.
Failure to do so may cause appliance damage.
Pull the power plug out, insert and fix it into the
•
power plug hook at the rear or on top of the
appliance. Failure to do so may cause damage to
the power plug or floor scratch.
•When transporting the appliance, more than two
people should transport the appliance carefully.
Dropping the appliance, which is extremely heavy,
may cause personal injury or appliance failure.
•When transporting the appliance over a long
distance, keep the appliance upright.
The appliance may fall over, causing malfunctions.
Never transport the appliance laying down as it
can cause a refrigerant circulation malfunction
when it is turned back on again.
Notes for Installation
•
Install the appliance on a solid and flat area.
If the appliance is installed on an uneven floor,
–
it can cause vibration and noise causing the
appliance to fall resulting in injury. It could also
cause the doors not to close correctly and introduce
moisture inside the unit during operation.
–If the appliance front or rear is not level, adjust the
front feet so that it can be corrected. Severe cases
may need the floor to be packed out with strips of
thin timber.
•Avoid placing the unit near heat sources, direct
sunlight or moisture.
•Connect the power supply cord (or plug) to the outlet.
Don't double up with other appliances on the same
outlet.
•After connecting the power supply cord (or plug) to
the outlet, Wait 2-3 hours before you put food into the
appliance. If you add food before the appliance has
cooled completely, your food may spoil.
•Models with handles should be located at least 55 mm
from the wall on the hinge side to open door by 90°.
•Allow over 55 mm clearance to the right, left, back and
top when installing.
•To provide necessary air circulation, you should leave
enough space on each side, top and behind the
refrigerator-freezer.
•Set the limit stops in the upper corners of the back
plate of the device as shown in Fig.1 Stops (2) can be
found in the drawer inside appliance compartment.
–Fig.1 : Push Stopper (2) into part (1) until the end.
Push the refrigerator to the wall.
2
Leg Adjustment
To avoid vibration, the unit must be leveled.
If required, adjust the leveling screws to compensate
for the uneven floor.
The front should be slightly higher than the rear to
aid in door closing.
Leveling screws can be turned easily by tipping the
cabinet slightly.
Turn the leveling screws counterclockwise (
raise the unit, clockwise (
) to lower it.
) to
1
09
Page 10
Reversible doors
Your appliance is designed with reversible doors,
do that they may open from either the left of right
hand side to suit your kitchen design
Required tools:
10 mm and 6 mm wrenches;
•
• 5 mm hex wrench;
Crosstip screwdriver
•
NOTE
If you need to reverse the doors, you
should call a service technician. The
warranty does not cover door reversal.
Before reversing the refrigerator doors,
unplug the device and remove the food
and all removable accessories like
shelves and drawers from the
refrigerator.
Do not lay the refrigerator down on the
floor.
Be careful to not drop the door while
disassembling and reassembling the
refrigerator.
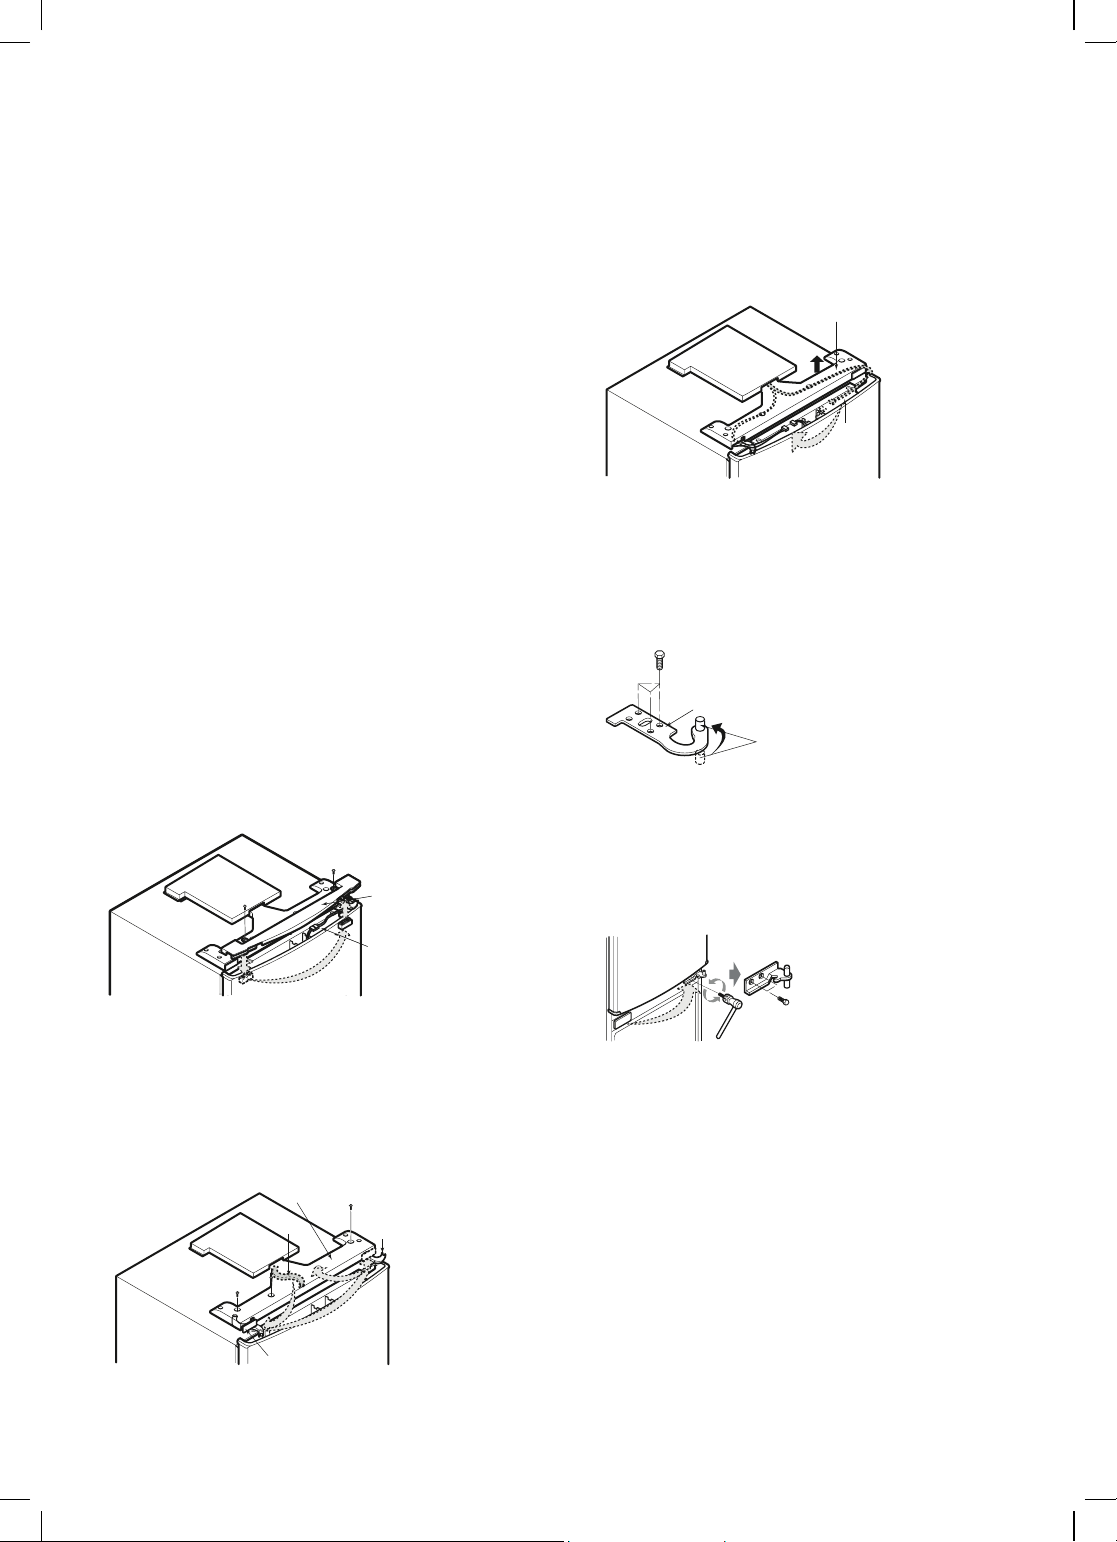
•
Remove the upper cover (2) of the refrigerator
compartment door by removing the screws (1).
• Move the plug (3) to the opposite side of
the upper cover (2).
• Disconnect the connector cable (4).
(1)
(1)
(2)
•
Pull the wire holder (8) out of the central
part of the cover (6) and attach it to the
opposite side of the cover (6).
•
Move the lead wires (10) to the opposite
side of the cover (6).
(6)
(10)
•
Remove the upper door hinge (12) by
removing the screws (11).
Remove the refrigerator compartment door;
•
•
Unscrew the rod (13) and affix it to the
opposite side of the hinge (12) using a 6
mm wrench.
(11)
(12)
(13)
•
Remove the center door hinge (15) by
removing the screws (14) with a 5 mm hex
wrench.
•
Remove the freezer compartment door.
•
Attach the plug (16) to the opposite side on
the refrigerator
EN
(4)
(3)
•
After removing the screws (5), pull it
forward and lift the cover without
damaging the wire (6).
•
Remove the wire holder (7) and attach it to
the center of the cover (6).
•
Install the plug (9) on the opposite side of
the cover (6).
(6) (5)
(8)
(5)
(9)
(7)
10
(15)
(16)
•
Remove the lower door hinge (18) by
removing the screws (17).
•
Unscrew the rod (19) and affix it to the
opposite side of the hinge (18) using a 6
mm wrench.
•
Remove the plug (20) in the upper part of
the freezer compartment door and install it
on the opposite side
(14)
Page 11
(20)
(18)
(19)
(17)
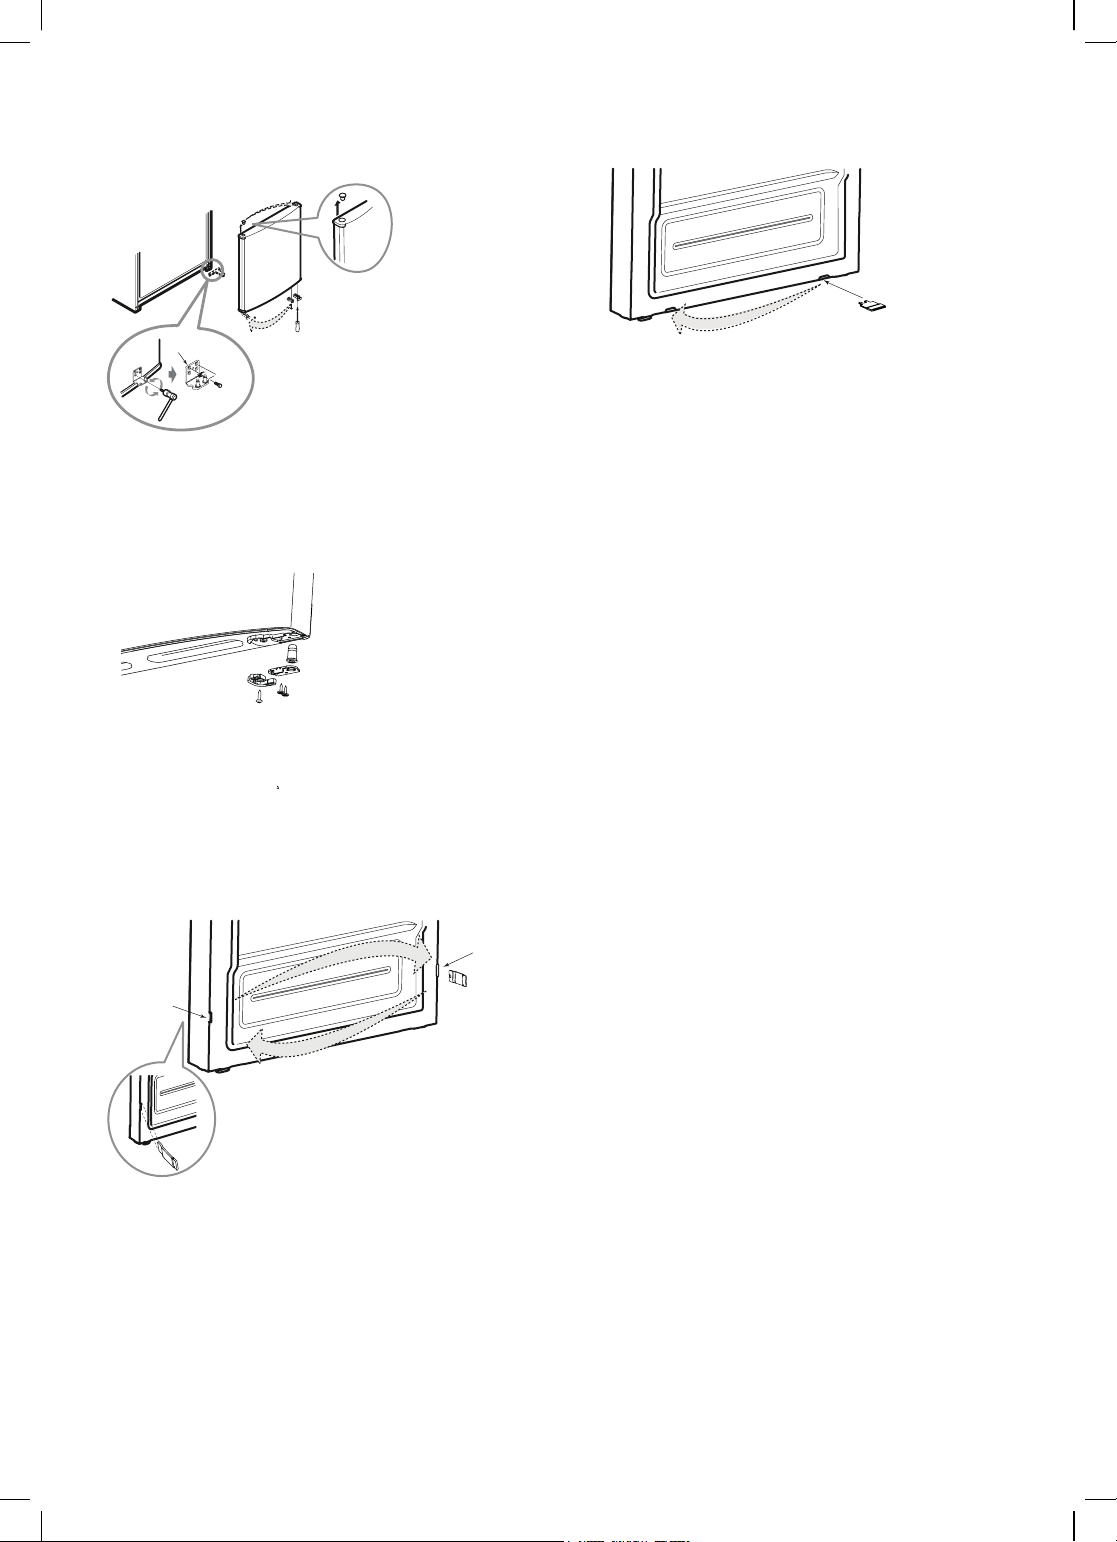
•
Remove the doorstop (21), the bush (22)
and door closer (23) in the lower part of the
refrigerator compartment by removing the
screws (24) and reattach them on the
opposite side.
Do the same for the freezer door.
(22)
(23)
(21)
(24)
(1)
•
Install the lower hinge (18) of the freezer
compartment, then the freezer
compartment door, then the center door
hinge (15) of the refrigerator compartment,
then the refrigerator compartment door,
then the upper door hinge (12), then
connect the connector cable (4), install the
cover (6) and (2) reverse the sequence.
EN
For models: GBB940DFQZT/GBB940BMQZT
GBB940LBQZT
•
After removal the refrigerator compartment
door, remove the plug (2) and slider (1) and
place each of them on the opposite side as
shown in the picture.
(2)
For models: GBB940DNQZN/GBB940SWQZT
Remove the slider (1) and place it on the
•
opposite side as shown in picture.
(1)
11
Page 12
OPERATION
EN
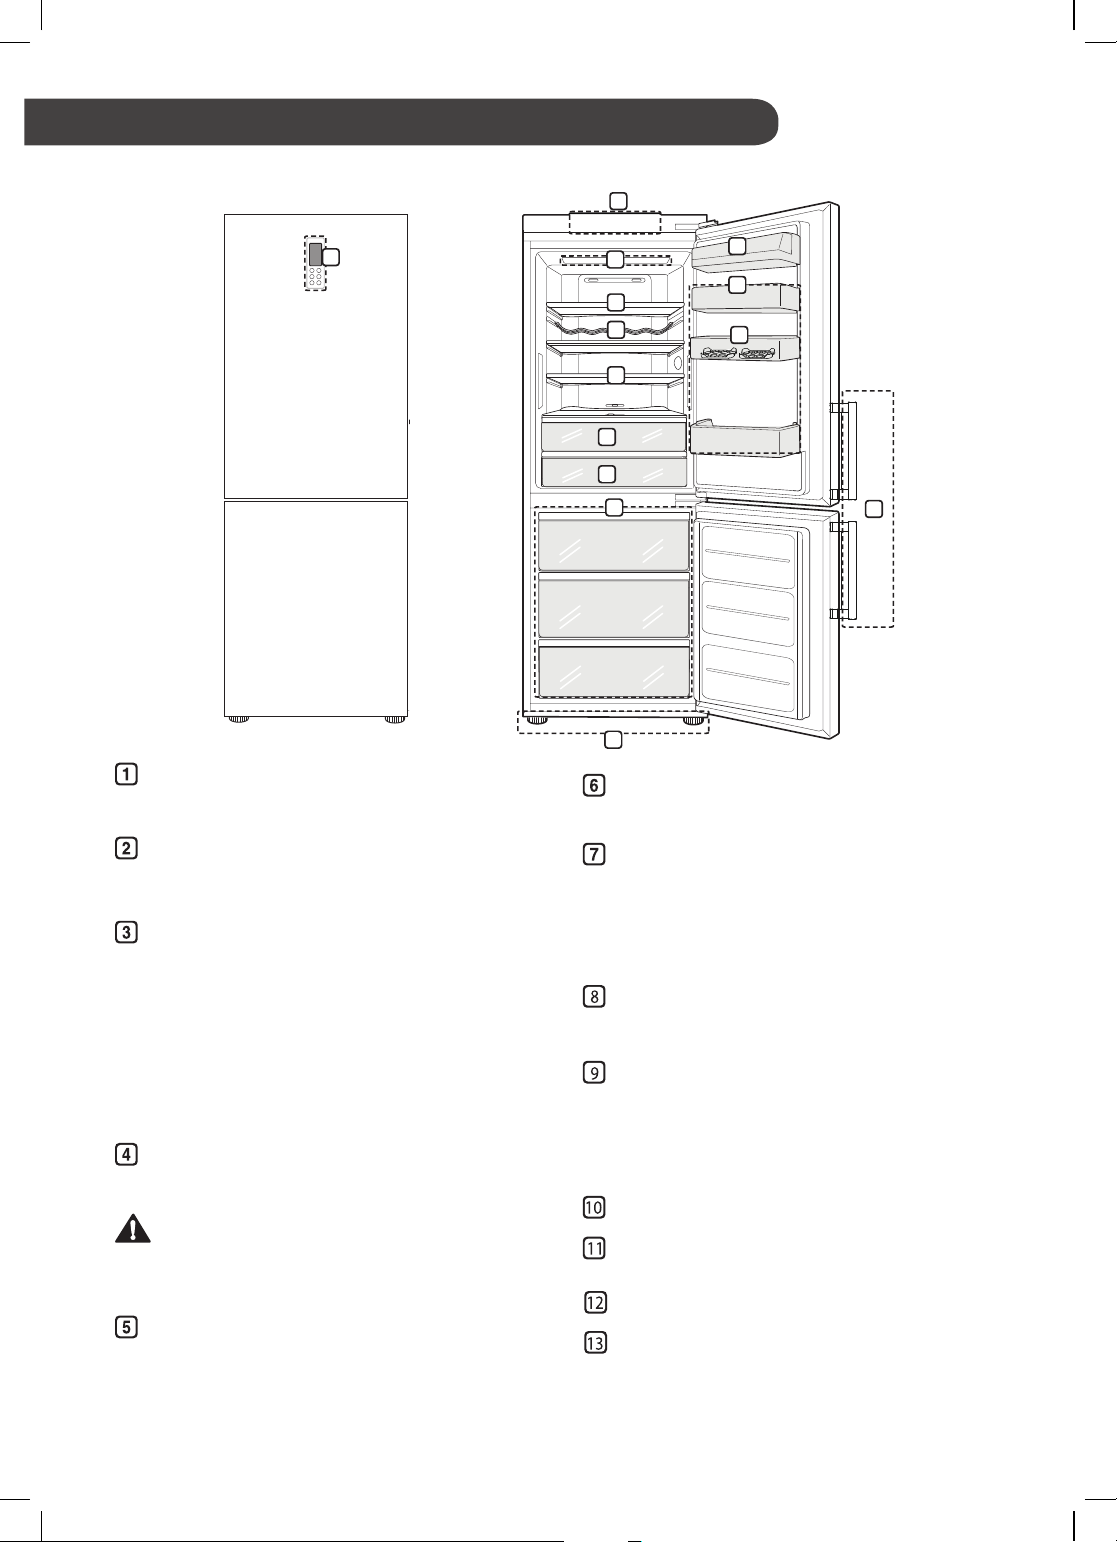
Parts and Functions
1
Control Panel
This sets the fridge temperature or freezer
temperature.
LED Lamp
The LED lamps inside the appliance light up
when you open the door.
Fridge Shelf
This is where refrigerated foods and other items
are stored.
•This adjusts the shelf height by inserting the
shelf in another groove of different height.
•Store the foods with higher moisture content at
the front of the shelf.
•The actual number of shelves will differ from
model to model.
Bottle Rack (Optional)*
This is where drinks tall bottles or containers are
stored.
CAUTION
•Do not store short bottles or containers. The items
may fall and to cause an inju ry or app liance da m age.
Folding Shelf (Optional)*
This is where refrigerated foods and high items
are stored.
1
2
3
4
5
6
7
11
13
Pull-out Vegetable drawer (Fresh Balancer)*
This is where fruits and vegetables are stored.
Vegetable compartment (Fresh Converter)*
This is a pull-out drawer that maintains optimal
temperature for storing fruits and vegetables
or fish and meat.
•The actual number of drawers will differ from
model to model.
Dairy Corner
This is where dairy products such as the butter or
cheese are stored.
Fridge Door Basket
This is where small packages of refrigerated
foods, drinks and sauce containers are stored.
•
The actual number of baskets will differ from
model to model.
Egg Tray (x2)
Freezer Drawer
This is for long-term storage of frozen items.
Door Handle (Optional)*
Adjustable legs(x2)
•The appearance or components of the appliance may differ from model to model.
8
9
10
12
12
Page 13

EN
Notes for Operation
•Users should keep in mind that frost can form If the
door is not closed completely, if the humidity is high
during the summer, or if the freezer door is opened
frequently.
Ensure there is sufficient space between food stored
•
on the shelf or door basket to allow the door to close
completely.
•Opening the door lets warm air enter the appliance,
and may cause the internal temperature to rise.
•Do not open or close the appliance door excessively.
•The LED lamp is only intended for use in domestic
appliances and is not suitable for household room
illumination.
Suggestion for Energy Saving
Ensure there is sufficient space between stored foods.
•
This allows cold air to be circulated evenly and lowers
electricity bills.
•Store hot food only after it has cooled in order to
prevent dew or frost.
•Do nor block holes for cold air flow which located
on rear side of the refrigerator compartment. Free
air circulation allows you to maintain a uniform
temperature throughout the volume of compartment.
Products placed close to such holes can be
damaged due to lowc temperature explosure of the
air flow.
Max Freezing Capacity
•The Express Freeze function will allow the freezer
to freezer to its maximum freezing capacity. This
generally takes up to 24 hours, however, it will
automatically turn off after a given time and can also
be turned off manually at any given time.
•To get better air circulation, insert all inner parts like
baskets, drawers, and shelves.
Power Failure
A 1 to 2 hour power failure will not harm the food stored
in the refrigerator. Try to open and close the doors as
little as possible during a power failure.
Refrigerator Features
Storing Foods Effectively
•Store frozen food or refrigerated food inside sealed
containers.
•Check the expiration date and label (storage
instructions) before storing food in the appliance.
•Not recommended to store foods like bananas
and melons that go bad quickly at low
temperatures.
•Do not store bottles in the freezer, as they
may explode as they freeze
•Do not refreeze items that have been defrosted.
This causes food to lose its flavor and
nutritional value.
•Do not wrap and store vegetables with newspape
Printing material of newspaper or other foreign
substances may smear foods.
Do not overfill the appliance. Fill less than 70% of
•
the space. Cold air can not circulate properly if the
appliance is overfilled.
Do not store pharmaceutical products, scientific
•
research materials or other products that
require a constant temperature.
Frozen foods should be packaged (plastic
•
wrap, aluminum foil, etc.) to be stored in
the freezer.
As a result of temperature - induced deformations
of refrigerator components, you may hear a slight
crackling noise. Sounds typically heard when a
thermal regulator or compressor turns on are
normal and may be heard during the operation
of any electrical device.
The refrigerant circulating inside the refrigeration
system may produce a slight gurgling sound, even
if the compressor is off. Do not worry, it is absolutely
normal. During refrigerator operation, you may hear:
- sound of compressor working;
- rustling of fans blades;
- sound of circulating air flow of cooling system
No Frost;
- relay operating clicks;
- buzzing of drive when openning and closing
damper;
- gurgling of refrigerant circulating through pipes
of refrigeration system;
- a slight crackling when materials deform due
to temperature changes.
These noises are not related to any defect and
have functional character.
13
Page 14
OPERATION
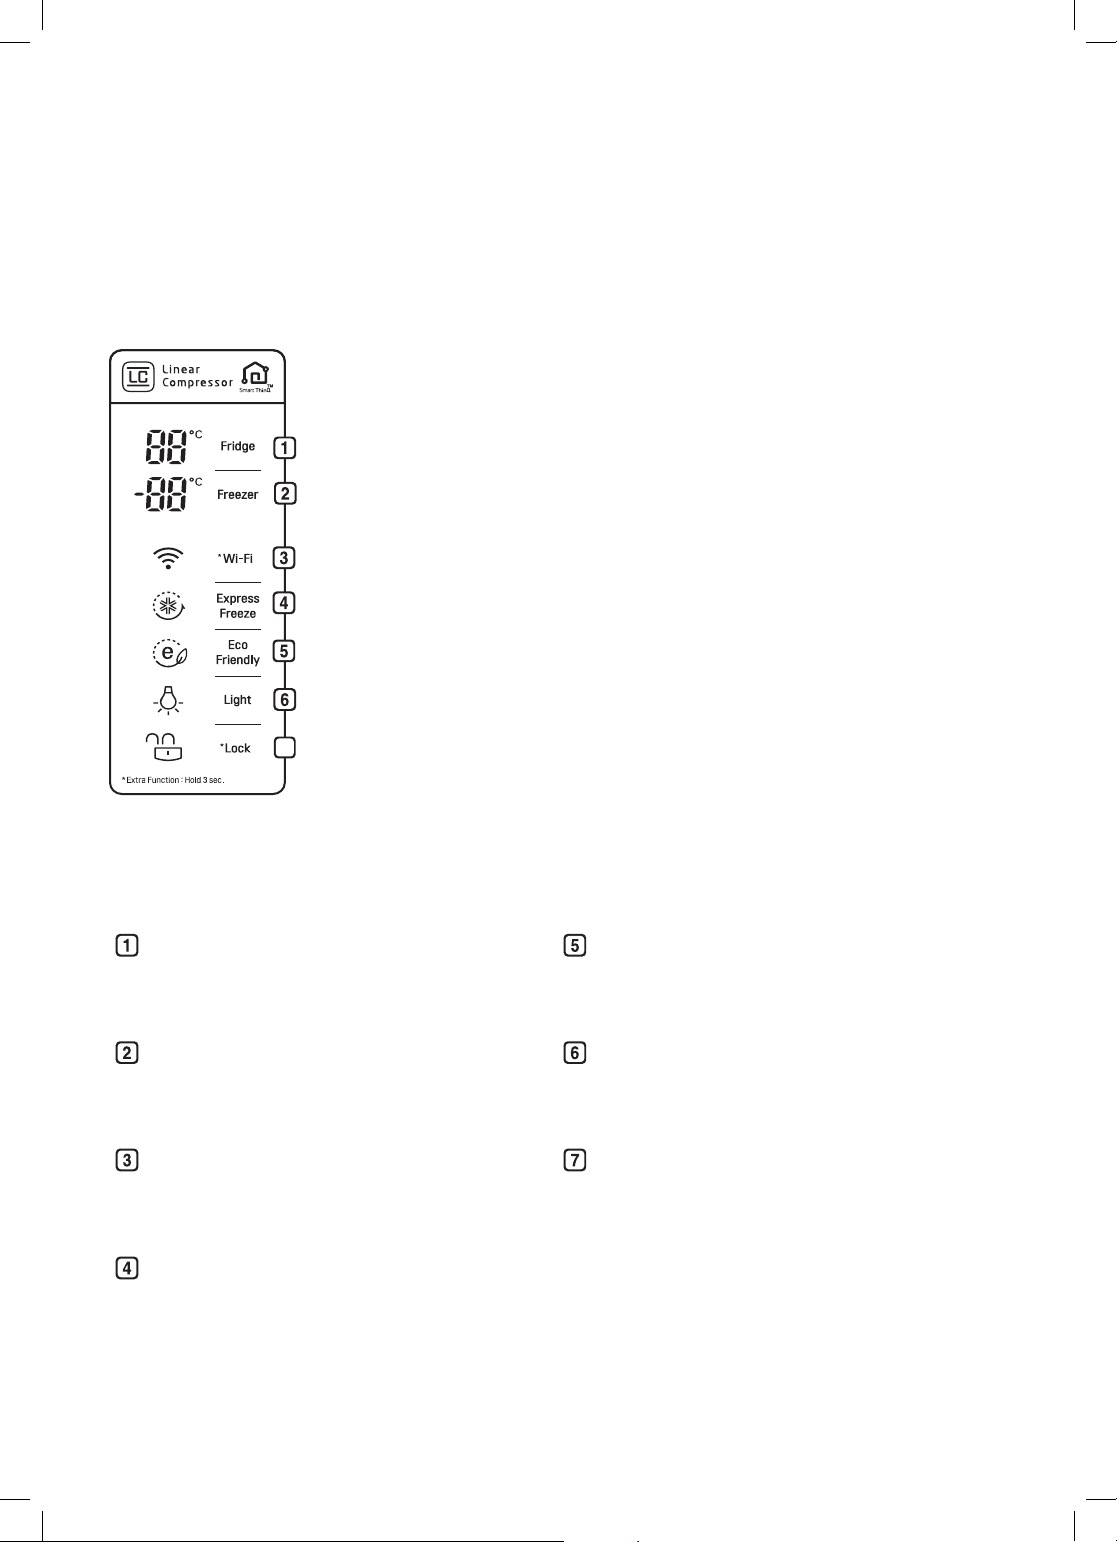
Using the Control Panel
Units and Functions
<Type 1>
EN
7
Fridge Temperature
•This sets the fridge target temperature.
Freezer Temperature
•This sets the freezer target temperature.
Wi - Fi
•This sets the refrigerator to connect to your
home’s Wi-Fi network.
Express Freeze
•This sets Express Freeze function.
Eco Friendly
•This controls the Power Save mode for lowering
energy consumption.
Light
•ON/OF Freezer compartment lamp.
Lock
•This locks the buttons on the control panel.
•The actual control panel may differ from model to model.
14
Page 15

EN
Notes for Use the Control Panel
• The control panel will turn on in any of the
following cases.
– When the power is turned on
– When a button is touched
– When the appliance door (fridge
compartment, freezer compartment) is
opened.
• The control panel will turn off automatically
for energy saving in any of the following
cases.
– When one minute has passed after turning
on the power
– When no button operation is carried out
for 20 seconds after a desired button is
pressed
– When 20 seconds has passed after the
appliance door (fridge compartment,
freezer compartment) is opened and closed
Setting the Temperature
This sets the fridge temperature or freezer temperature.
•Press the Fridge button or Freezer button to adjust
the temperature.
•The initial temperature of the fridge is set to 3 °C, and
the temperature can be adjusted between 1 °C – 7 °C.
•The initial temperature of the freezer is set to -20 °C,
and the temperature can be adjusted between -15 °C
– -23 °C.
•Sets the refrigerator temperature according to food
storage appliance. The actual inner temperature
varies depending on the food status, as the indicated
setting temperature is a target temperature, not actual
temperature within appliance.
NOTE
•Wait until 2 or 3 hours have passed after connecting
the appliance to the outlet before storing food in the
appliance.
•The temperature indicated on the LED display is
its designated temperature because the actual
temperature inside the refrigerator changes
depending on how intensively external factors
impact it, like the temperature of any foodstuffs
placed in it and how often the doors are opened.
After it is turned on, the refrigerator will begin
operating in the specified mode within 2-3 days.
Setting Express Freeze
The function can quickly freeze a large amount of ice
or frozen foods.
•When you press the Express Freeze button, the
Express Freeze icon lights on the control panel.
•The function is enabled and disabled in turn each
time you press the button.
•The Express Freeze function automatically
terminates after a specific period has passed.
Setting Eco Friendly
•The function makes the fridge-freezer work
in the power saving mode which is useful when
you are away on a holiday as it reduces energy
consumption.
•Pressing the Eco Friendly button starts the
operation with the lamp on, and pressing it
again stops the operation.
Setting and Resetting Lock
This lockes the buttons on the control panel.
• Press and hold the Lock button for 3
seconds . When the Lock function is set, all
buttons are locked.
Setting Light
This ON/OFF Freezer copartment lamp.
•When you press the Light button, the
freezer conpartment lighting ON/OF.
Subsequently pressing this button may
turn the light permanently on, reduce it
brightness, and turn it off.
When the doors of the freezer
•
compartment are open, the light
remains on.
15
Page 16
EN
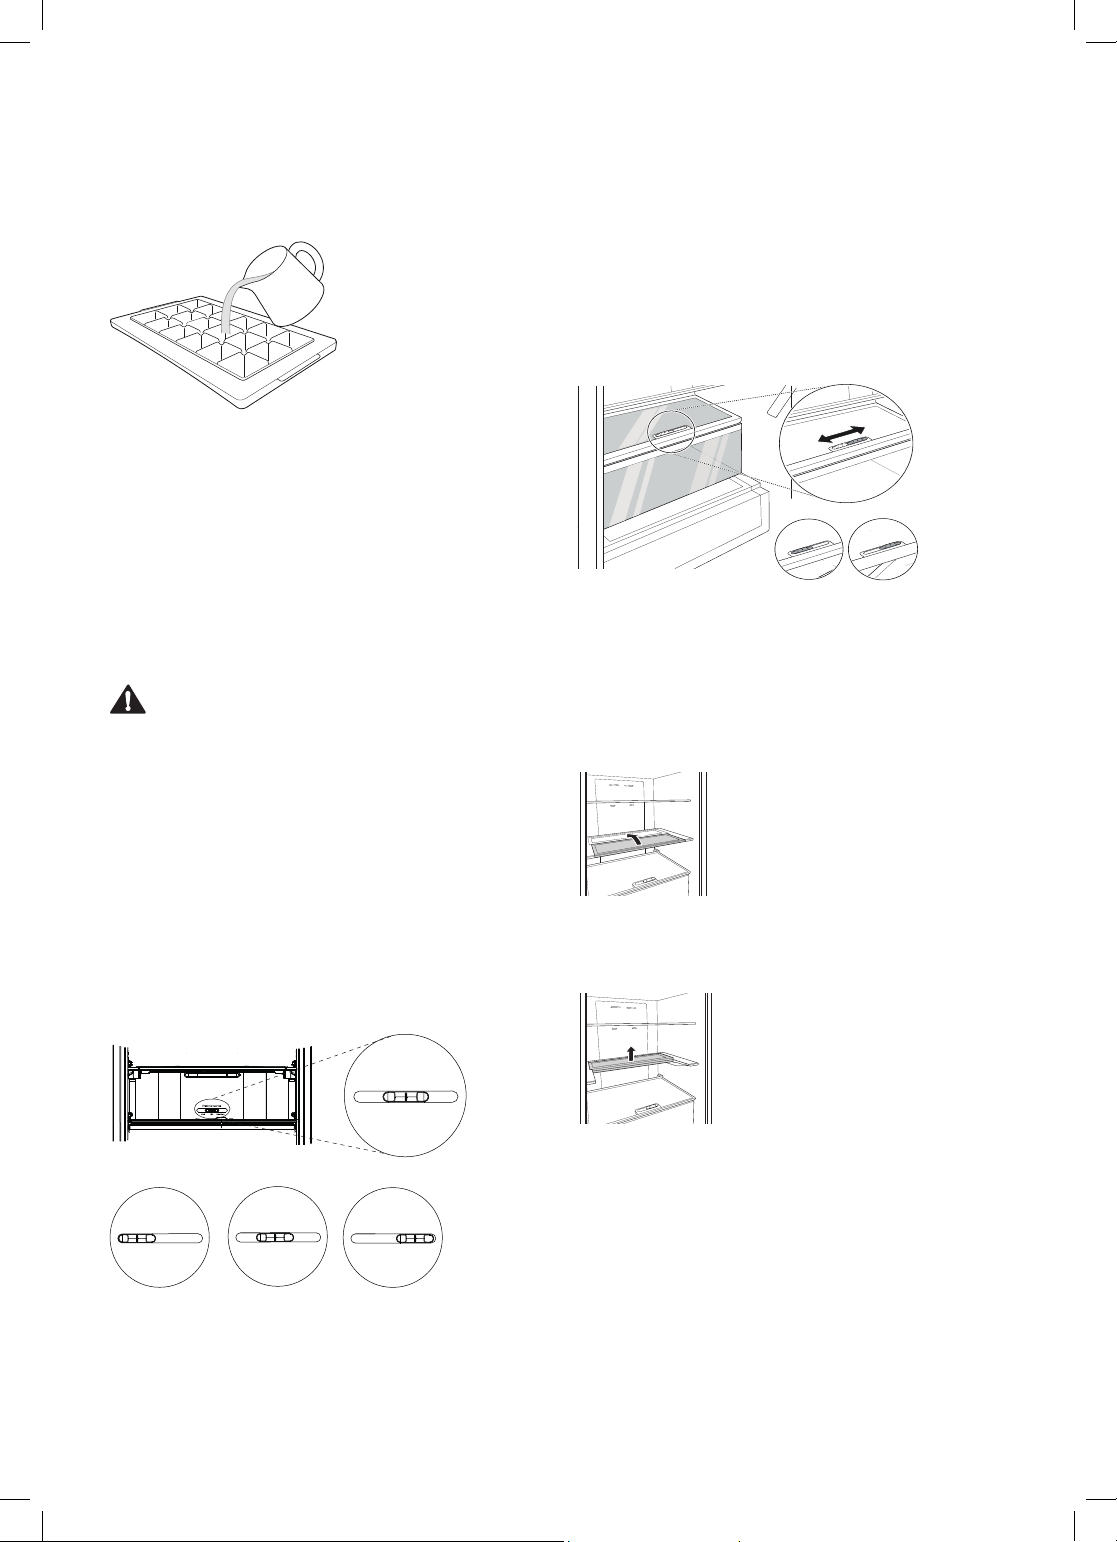
Using Ice Maker
Fill the ice maker up to the indicator line with water.
If the icemaker is overfilled, the ise cubes may stick
•
together and be difficult to remove.
•Press the Express Freeze button on the control panel
to make ice quickly.
•Ice can be removed more easily by pouring water on
the ice maker or immersing it in water and twisting the
tray first.
•Do not store ice that is not completely frozen.
•You can remove the icemaker or ice bucket to create
more space inside the freezer if you do not use it.
WARNING
•Fill with potable water only.
•Be careful not to twist the ice maker with force since
it can be broken.
Pull-out drawer Fresh Balancer
Vegetable compartment can adjust the humidity by
moving the knob.
If moved to the left side, cover and tray are opened,
and if moved to the right side, cover and tray are
closed – therefore, it can maintain the humidity.
Closed state is recommended for keeping
vegetables (type 2), and open state is recommended for
keeping fruits (type 1).
Type 1 Type 1
Folding Shelf
Store taller items, such as a gallon container
or bottles, by pushing the front half of the shelf
underneath the back half the shelf. Pull the front
of the shelf forward to return to a full shelf.
Lift the front side of the shelf and shift it on
•
its back side.
Temperature control in
Fresh Converter
Fresh Converter storage compartment can control
the temperature by adjusting the position of the
temperature knob and generally its temperature is
maintained lower than the set-up temperature of
the refrigerator.
Type 1 designed for storing meat, type 2 for fish
and type 3 for vegetables.
Fresh Converter
Meat Fish Vegetable
Type 1 Type 2 Type 3
Fresh Converter
Fish
Meat
Vegetable
To store more food in "Fresh Converter",
•
pull out the drawer.
For optimal storage conditions of meat, fish or
•
vegetables it is recommended to set the knob in
mode according to goods.
Fresh Converter
Fish
Meat
Vegetable
Fresh Converter
Fish
Meat
Vegetable
Lift the front side of the shelf and shift it
•
under its back side. From this position, both
sides of the shelf can be lifted up to free
more space.
NOTE
Recommended state:
Temperature for the refrigerator: +3
•
Temperature for the freezer: -20
•
Middle position (type 2) in Fresh Converter
•
° С
° С
16
Page 17
SMART FUNCTIONS
EN
Using Smart ThinQ
Application
Installing Smart ThinQ
Search for the LG Smart ThinQ application from
the Google Play Store or Apple App Store on a
smart phone. Follow instructions to download
and install the application.
Wi-Fi Function
• For appliances with the or logo
Communicate with the appliance from a smart
phone using the convenient smart features.
Settings
Allows you to set various options on the
refrigerator and in the application.
NOTE
• To verify the Wi-Fi connection, check that
Wi-Fi icon on the control panel is lit.
• LG Smart ThinQ is not responsible for any
network connection problems or any faults,
malfunctions, or errors caused by network
connection.
• The machine supports 2.4 GHz Wi-Fi
networks only.
• If the appliance is having trouble connecting
to the Wi-Fi network, it may be too far from
the router. Purchase a Wi-Fi repeater (range
extender) to improve the Wi-Fi signal strength.
• The Wi-Fi connection may not connect or may
be interrupted because of the home network
environment.
• The network connection may not work properly
depending on the internet service provider.
• The surrounding wireless environment can
make the wireless network service run slowly.
• The application is subject to change for
appliance improvement purposes without
notice to users.
• Functions may vary by model.
Wireless LAN Module Specifications
Model LCW-004
Frequency
Range
Output
Power(Max)
2412 to 2472 MHz
IEEE 802.11b:17.82 dBm
IEEE 802.11g:17.72 dBm
IEEE 802.11n:16.61 dBm
LG Electronics European Shared Service Centre
B.V.
Krijgsman 1
1186 DM Amstelveen
The Netherlands
or can be requested at our dedicated DoC
website:
http://www.lg.com/global/support/cedoc/cedoc#
This device is a 2.4 GHz wideband transmission
system, intended for use in all EU member
states and EFTA countries.
For consideration of the user, this device should
be installed and operated with a minimum
distance of 20 cm between the device and the
body.
Open Source Software Notice
Information
To obtain the source code under GPL, LGPL,
MPL, and other open source licenses, that is
contained in this product, please visit http://
opensource.lge.com.
In addition to the source code, all referred
license terms, warranty disclaimers and
copyright notices are available for download.
LG Electronics will also provide open source
code to you on CD-ROM for a charge covering
the cost of performing such distribution (such as
the cost of media, shipping, and handling) upon
email request to opensource@lge.com. This
offer is valid for three (3) years from the date on
which you purchased the product.
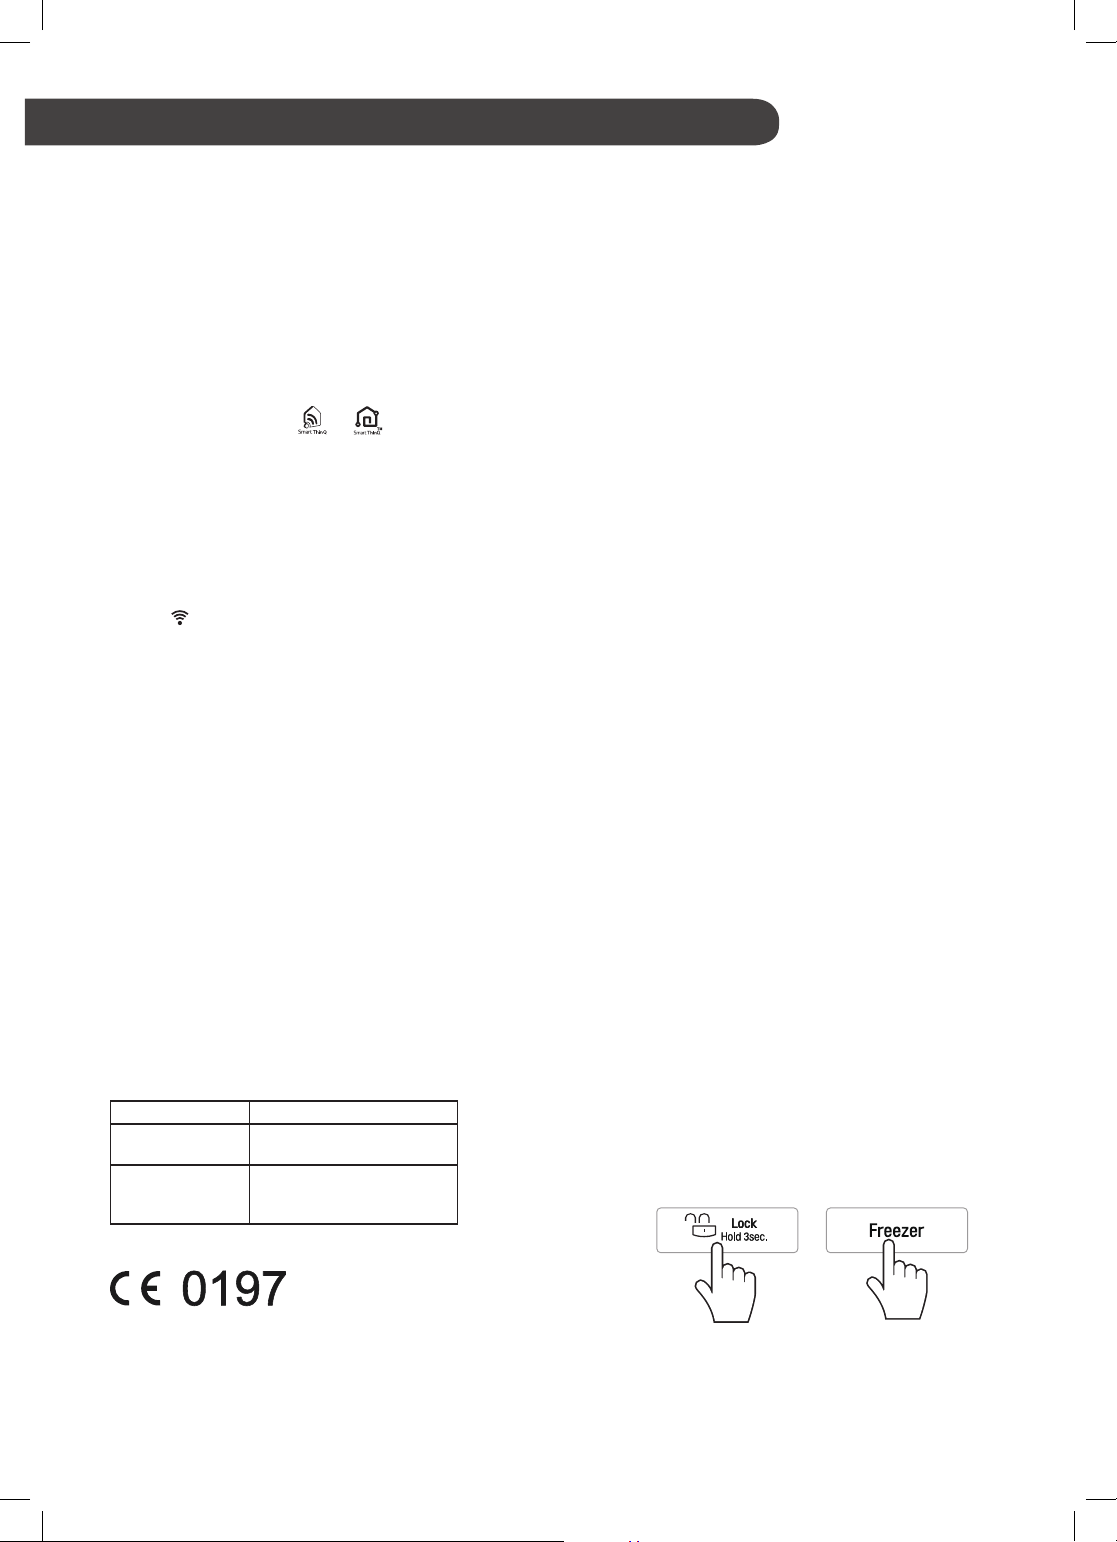
Smart Diagnosis™ Through the
Customer Information Centre
Use this function if you need an accurate diagnosis
by an LG Electronics customer information center
when the appliance malfunctions or fails. Use this
function only to contact the service representative,
not during normal operation.
Close the refrigerator compartment door, push
1
«Lock Hold 3sec.» button and hold it for 3
seconds until lock function activation, then push
the freezer compartment temperature control button
and hold it for 3 seconds, then open the refrigerator
compartment door
Declaration of Conformity
Hereby, LG Electronics European Shared
Service Centre B.V., declares that this
Refrigerator is in compliance with the essential
requirements and other relevant provisions of
Directive 1999/5/EC. The complete Declaration
of Conformity may be requested through the
following postal address:
17
Page 18
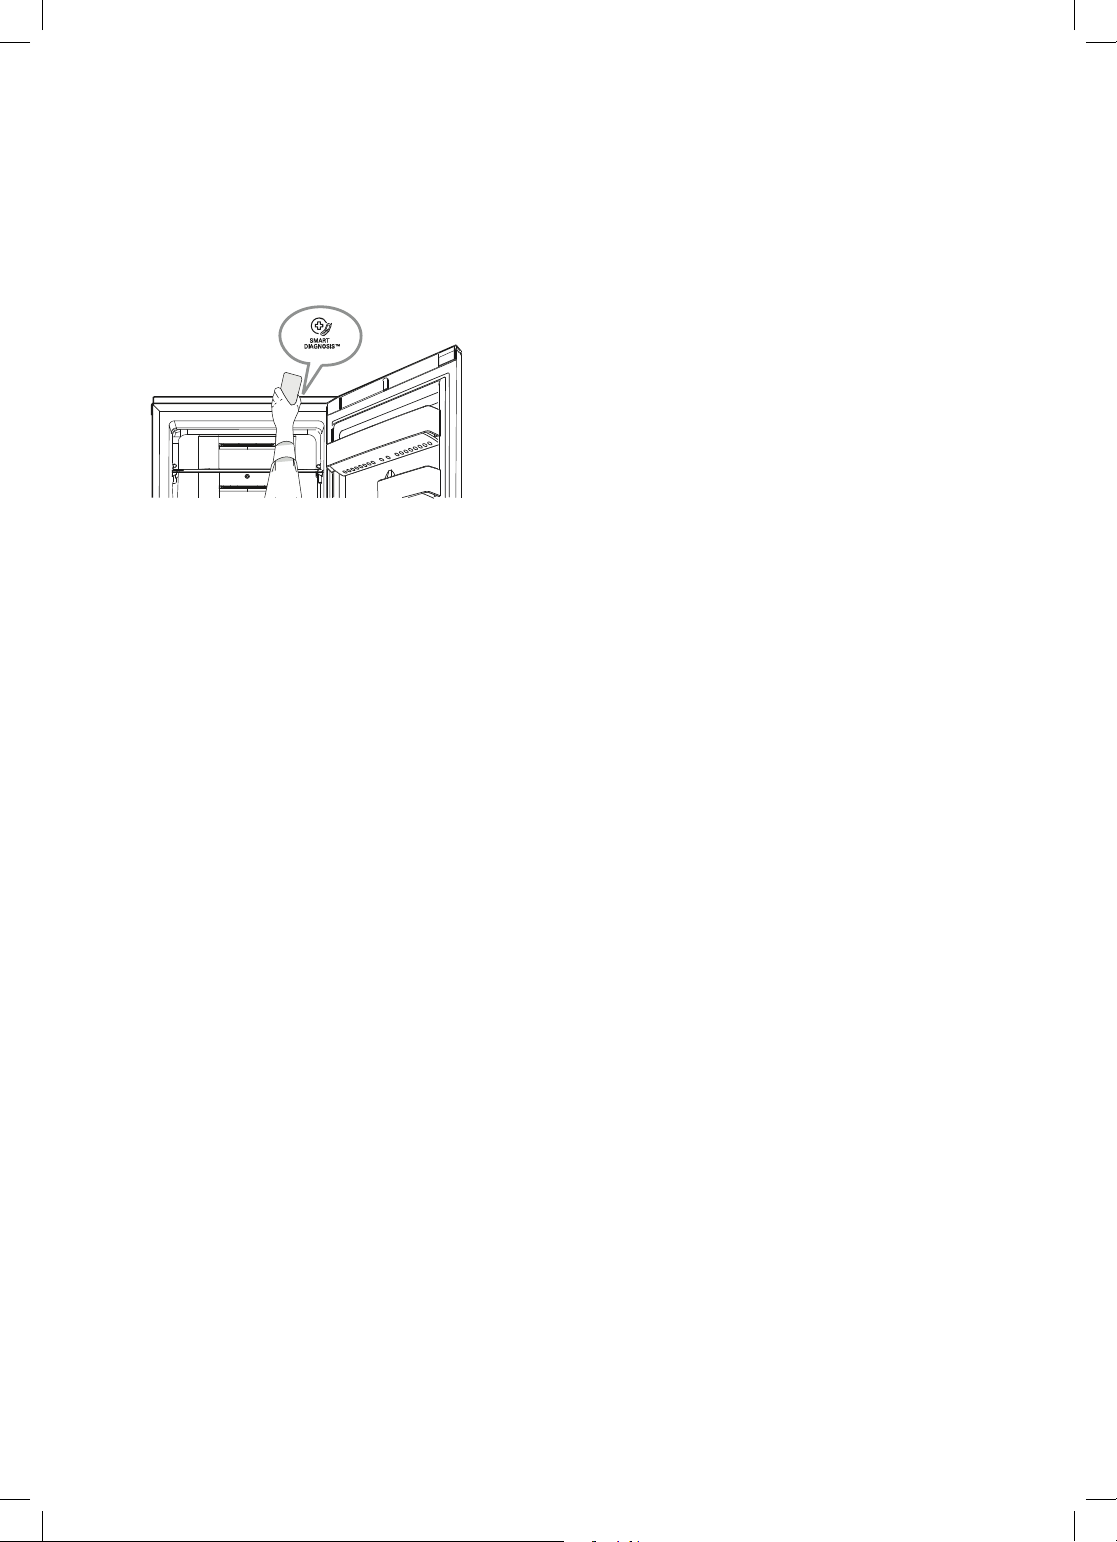
Following the operator's instructions, bring
2
the microphone of your phone as close to
the SmartDiagnosis sign as possible. Hold
your phone in this position until the data
transfer is complete.
The Customer Support Center operator
3
may ask you to repeat the data transfer if
operator considers the results corrupted or
incomplete.
In order to cease transmitting data and
4
turn off SmartDiagnosis™, push Lock
button and Freezer Temperature Control
buttons.
As soon as the transfer is complete, you
4
can continue the conversation with the
operator, who will send the information to
technical support for analysis.
EN
NOTE
•Position the phone so that its microphone is
aligned with the speaker hole.
•The Smart Diagnosis™ sound is generated
after around 3 seconds.
•Do not take the phone o ff the speak hole
while the data is transmitted.
•Hold the phone on the upper right speaker
hole and wait while the data is transmitted.
•The data transfer sound may be harsh to the
ear while the Smart Diagnosis™ data is being
transmitted, but do not take the phone o ff the
speaker hole fo r accurate diagnosis until the
data transfer sound has stopped.
•The Smart Diagnosis™ function depends on the
local call quality..
•The Smart Diagnosis™ function cannot
be used if the refrigerator is not plugged in.
•If the Smart Diagnosis™ data transfer is
poor due to poor call quality, you may not
receive the best Smart Diagnosis™ service.
18
Page 19
MAINTENANCE
EN
Notes for Cleaning
•When removing a shelf or drawer from inside the
appliance, remove all stored foods.
–Otherwise, injury may occur due to the weight of
stored foods.
•If cleaning the outside air vents of the appliance by
means of vacuuming, then the power cord should
be unplugged from the outlet to avoid any static
discharge than can damage the electronics or cause
an electric shock.
•Detach the shelves and drawers and clean them with
water, and then dry them sufficiently, before
replacing them.
•Regularly wipe the door gasket with a wet soft towel.
•Door basket spills and stains should be cleaned as
they can compromise storage ability of the basket and
could even be damaged.
•After cleaning, check if the power cable is damaged,
warm or improperly plugged.
•Keep the air vents on the exterior of the appliance
clean.
–
Blocked air vents can cause fire or appliance damage.
•For the appliance exterior, use a clean sponge or soft
cloth and a mild detergent in warm water. Do not use
abrasive or harsh cleaners. Dry thoroughly with a soft
cloth.
•Never clean the shelves or containers in the
dishwasher.
–The parts may become deformed due to the heat.
•If the appliacne is equipped with an LED lamp, do not
remove lamp cover and LED lamp in any attempt to
repair or service it. Please, contact an LG Electronics
customer information centre.
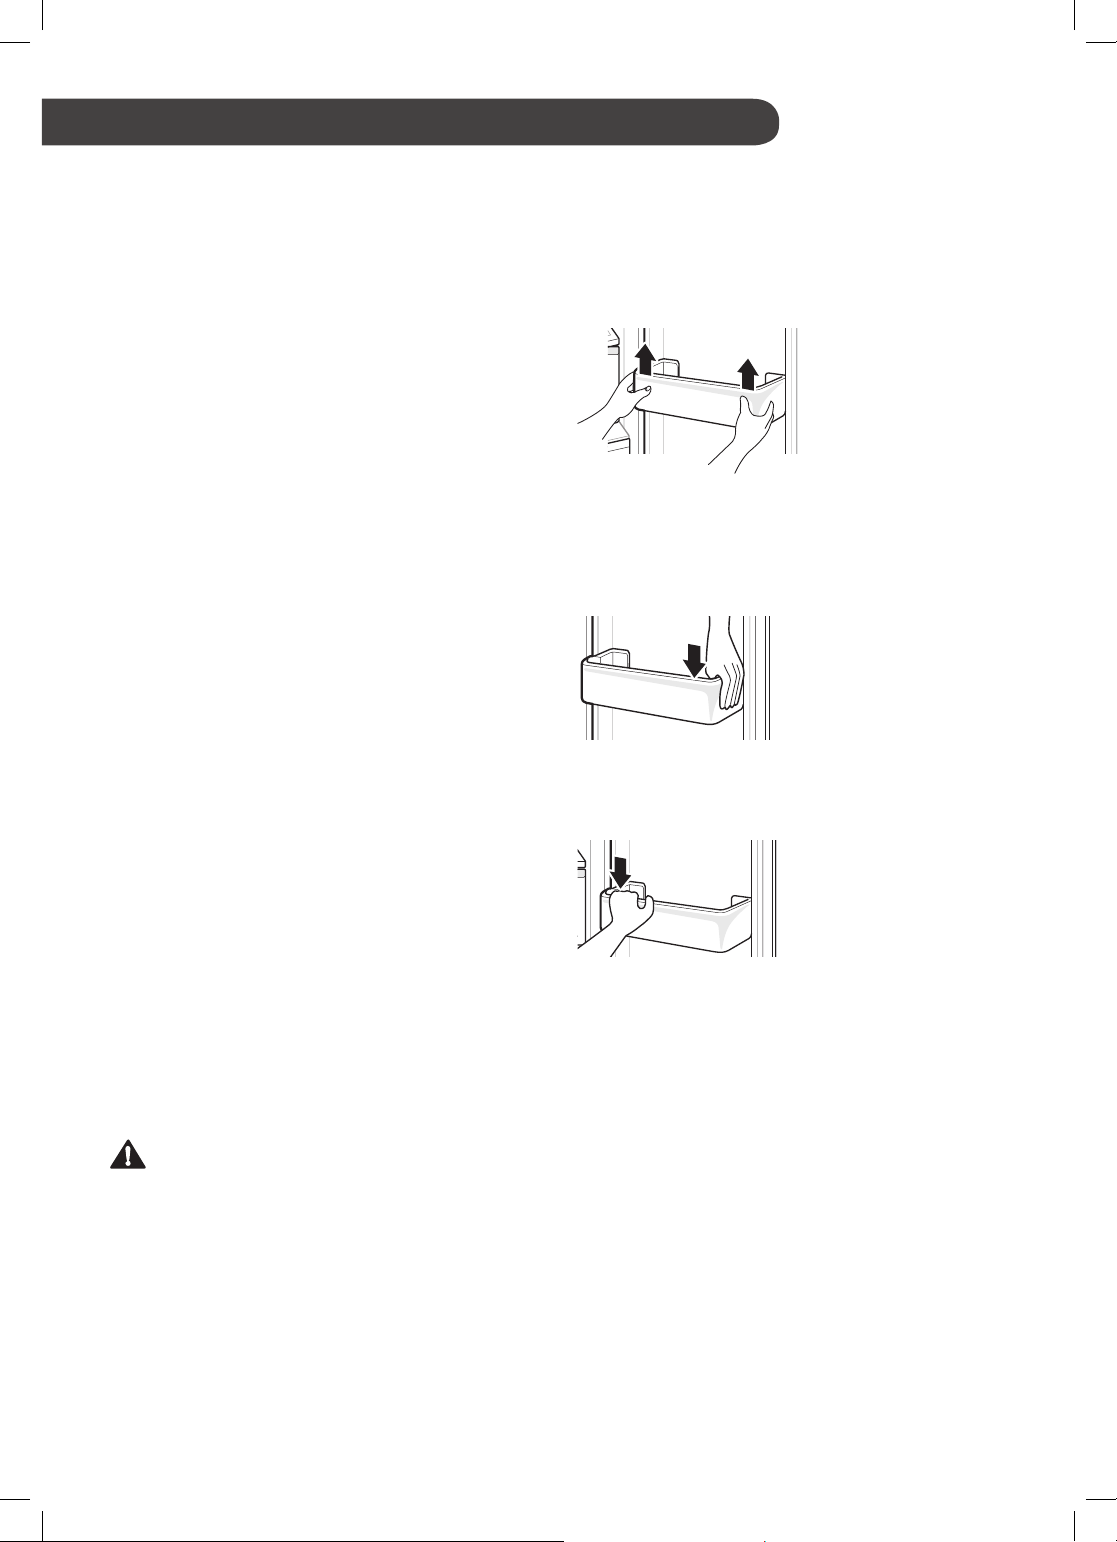
Removing the Fridge Door
Basket
Hold both edges of the basket and remove it by lifting it
upward.
Refitting the Fridge Door Basket
Hold both edges of the door basket, gently push
1
one edge to assemble, and then in the same
manner assemble the other edge.
After refitting, tap the door basket gently to
2
fix it horizontally.
CAUTION
•Do not use abrasive substances, gasoline,
benzene, solvents, hydrochloride, hot water,
abrasive sponges or other things that can
damage the refrigerator surface.
19
Page 20
EN
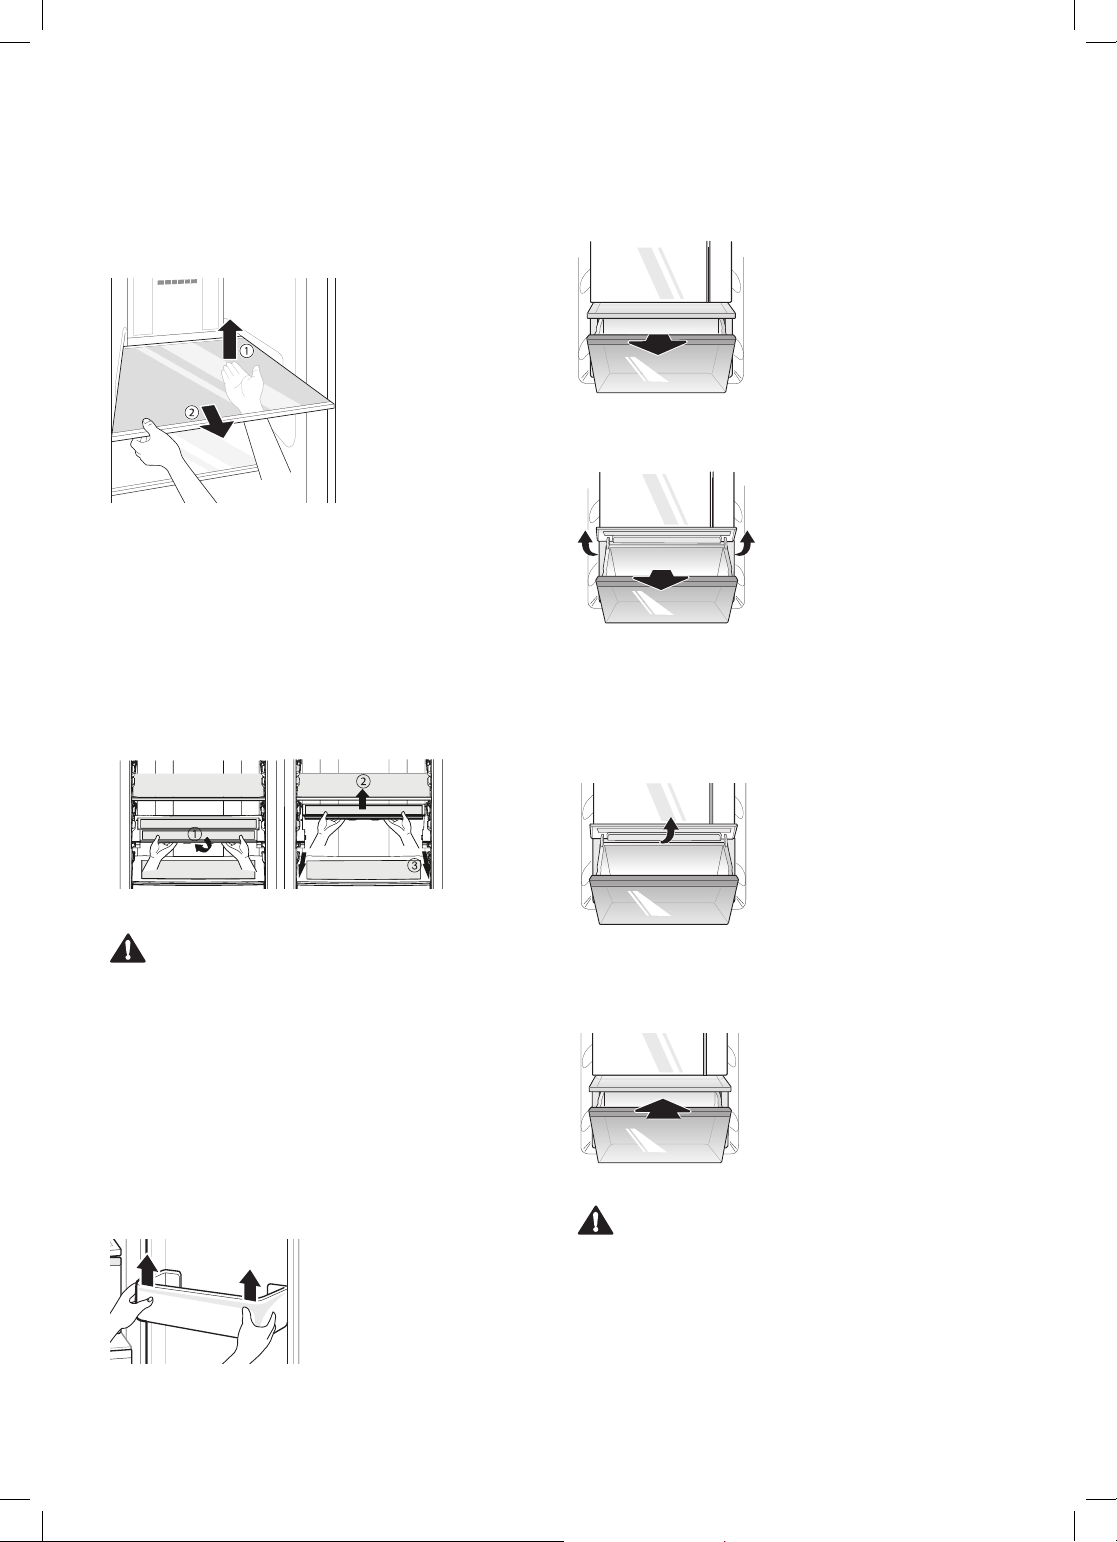
Removing the Fridge Shelf
Remove the fridge shelf by pulling it out while slightly
lifting the rear edge of the fridge shelf.
Removing the Folding Shelf
Slightly lift the front half of the shelf and slide
1
it under the rear half.
Take both halves of the shelf out of the frame
2
by lifting them up.
Lifting the shelf frame and pull.
3
Remove the contents of the drawer. Hold the
2
handle of the vegetable drawer and pull it out
completely until it outward gently until it stops.
Lift the vegetable drawer up and remove it
3
by pulling it out.
Refitting the Vegetable Drawer
If the vegetable drawer has a cover, lift it.
1
CAUTION
•Glass shelves are heavy. Use special care
when removing them.
•Do not clean glass shelves with warm water
while they are cold. Shelves may break if
exposed to sudden temperature changes or
impact.
Removing the Vegetable Drawer
Remove the fridge door lower basket by pulling
1
it up.
20
Insert the bottom of the vegetable drawer into its
2
original position and ently push it back in while
lowering it.
CAUTION
•Please note that injuries can be caused by the weight
of stored foods when removing the vegetable drawer.
Page 21

EN
Removing the pull-out
cover drawer
To remove the cover of the vegetable drawer,
lift the cover and pull it out.
Mount them in the reverse order of the
removal process.
Removing the refrigerator
drawer
Remove the pull-out drawer by pulling it toward
you until it stops, and then lift it with both hands.
Removing the freezer drawers
Remove the drawer by pulling it out, and then
lift it.
NOTE
• The freezer compartment has metal shelves,
which provides more room for food storage.
To store large quantities of food, pull out the
top and middle drawers and store food on the
shelves.
Refitting the freezer drawers
Place the drawer in the slide rails at 45° and
gently push it back.
NOTE
•
Do not apply too much force when pulling
out shelves and drawers. This, as well as
incorrect removal and installation, may
damage the internal components of your
refrigerator.
•
The warranty does not cover mechanical
damage (cracks, chips, dents, signs of
break-in, etc.) caused by violations in
operating, storage, transportation, and
maintenance procedures, as well as by
application of excessive physical force.
21
Page 22

TROUBLESHOOTING
Symptoms Reason Solution
EN
There is no refrigeration
or freezing.
There is poor
refrigeration or
freezing.
Is the power turned off?
If the power plug unplugged from
the outlet?
Is the fridge or freezer
temperature set to its warmest
setting?
Is the appliance in direct sunlight,
or is it near a heat generating
object such as cooking oven or
heater?
Did you store hot food without
cooling it first?
Did you put in too much food?
Are the appliance doors
completely closed?
Is there enough space around the
appliance?
•Press the power button on the control
panel to turn it on.
•Plug the power plug in the outlet properly.
•Set the fridge or freezer temperature to
'Medium'.
•Check the installation area and reinstall it
away from heat generating objects.
Cool the hot food first before putting it
•
inside the fridge or freezer.
•Maintain an appropriate space between
food.
•Completely close the door and make sure
that stored food is not obstructing in the
door.
•Adjust the installation position to make
enough space around the appliance.
The appliance contains
a bad smell.
The inside lamp in the
appliance does not turn
on.
22
Is the fridge or freezer
temperature set to 'Warm'?
Did you put in food with a strong
smell?
Vegetables or fruit may have
spoiled in the drawer?
Does the inside lamp in the
appliance turn off?
•Set the fridge or freezer temperature to
'Medium'.
•Store foods with strong smells in sealed
containers.
•Throw away rotten vegetables and clean
the vegetable drawer. Do not store
vegetables too long in the vegetable
drawer.
•It is hard for customers to replace the
inside lamp in the appliance as they
are not serviceable. If the inside lamp
does not turn on, please contact an LG
Electronics customer information centre.
Page 23

Symptoms Reason Solution
EN
The appliance door is
not closed tightly.
It is difficult to open the
appliance door.
There is condensation
inside the appliance or
on the bottom of the
vegetable drawer cover.
Is the appliance leaning forward?
Were the shelves properly
assembled?
Did you close the door with
excessive force?
Did you open the door right after
you closed it?
Did you store hot food without
cooling it first?
Did you leave the appliance door
open?
Do you open and close the
appliance door frequently?
•Adjust the front feet to raise the front side
slightly.
•
Refit the shelves if needed.
•If you apply too much force or speed
when closing the door, it may remain
briefly open before closing. Make sure
that you do not slam the door closed.
Close without force.
•If you try to open the appliance door
within 1 minute after you closed it, you
may have difficulties because of the
pressure inside the appliance. Try to open
the appliance door again in a few minutes
so that the internal pressure stabilizes.
•
Cool the hot food first before putting it
inside the fridge or freezer.
•Although the condensation will disappear
soon after you close the appliance door,
you can wipe it with a dry cloth.
•Condensation can form due to the
temperature difference from the outside.
Wipe out the dampness with a dry cloth.
Frosts has formed in
the freezer.
Did you put warm or moist food
inside without sealing it in a
container?
Doors may not be closed
properly?
Did you store hot food without
cooling it first?
•Store food in a covered or sealed
container.
•Check if the food item inside the
appliance is blocking the door and make
sure that the door is tightly closed.
•Cool the hot food first before putting it
inside the fridge or freezer.
23
Page 24

Symptoms Reason Solution
EN
Frosts has formed in
the freezer.
Frost or condensation
has formed inside or
outside the appliance.
The appliance is
noisy and generates
abnormal sounds.
Is the air entry or exit of the
freezer blocked?
Is the freezer overfilled?
Did you open and close the
appliance door frequently or is
the appliance door improperly
closed?
Is the installation environment
humid?
Is the appliance installed on a
weak floor or improperly leveled?
Does the rear of the appliance
touch the wall?
Are objects scattered behind the
appliance?
•Make sure that air entry or exit is not
blocked so that the air can circulate
inside.
•Maintain an appropriate space between
items.
•Frosts or condensation can form if
the outside air penetrates inside the
appliance.
•Condensation can appear on the exterior
of the appliance if the installation area is
too humid or on a humid day such as a
rainy day. Wipe off any moisture with a
dry cloth.
•Install the appliance on a solid and flat
area.
•Adjust the installation position to allow
enough clearance around the appliance.
•Remove the scattered objects from
behind the appliance.
The side or front of the
appliance is warm.
There is water inside
or outside of the
appliance.
Is there an object on top of the
appliance?
There are anti condensation
pipes fitted to these areas of the
appliance to reduce condensation
forming from around the door
area.
Is there water leakage around the
appliance?
Is there water on the bottom of
the appliance?
•Remove the object on top of the
appliance.
•The heat releasing pipe to prevent
condensation is installed on the front and
side of the appliance. You may feel it
particularly hot right after the appliance is
installed or during the summer. You can
be assured that this is not a problem and
is quite normal.
•Check if the water has leaked from a sink
or another place.
•Check if the water is from the thawed
frozen food or a broken or dropped
container.
24
Page 25

Symptoms Reason Solution
The defrost control will click
when the automatic defrost cycle
Clicking noises
begins and ends. The thermostat
control (or appliance control
on some models) will also click
when cycling on and off.
Rattling noises may come from
the flow of appliance, the water
line on the back of the unit (for
plumbed models only), or items
stored on top of or around the
appliance.
•Normal Operation
•Normal Operation
EN
Rattling nosies
Whooshing nosies
Gurgling nosies
Popping nosies
Vibrating
Appliance is not resting evenly
on the floor.
Appliance with linear compressor
was moved while operating.
Evaporator fan motor is
circulating air through the fridge
and freezer compartments.
Air is being forced over the
condenser by the condenser fan.
Appliance flowing through the
cooling system.
Contraction and expansion of the
inside walls due to changes in
temperature.
If the side or back of the
appliance is touching a cabinet
or wall, some of the normal
vibrations may make an audible
sound.
•Floor is weak or uneven or leveling
legs need to be adjusted. See the door
alignment section.
•Normal operation. If the compressor does
not stop rattling after 3 minutes, turn the
power to the appliance off and then on
again.
•Normal Operation
•Normal Operation
•Normal Operation
•Normal Operation
•To eliminate the noise, make sure that the
sides and back do not make any contact
with any wall or cabinet.
25
Page 26

OPERATING DATA
EN
EN
Trade Mark
A
B
Model
Category
C
Energy efficiency class
D
E
Annual energy consumption
“XYZ” [kWh per year], based
on standard test results for
24 hours
Fresh Food
F
Storage Volume [L]
G
Frozen Food
Storage Volume [L]
H
Design temperature of other
compartments (>14°C)
I
Frost-Free
Compartments
Temperature Rise time [h]
J
Freezing Capacity [kg/24h]
K
L
Climate class
Airborne acoustical noise
M
emissions [dB(A)]
Free standing / Built-in
N
PRODUCT FICHEENGLISH
LG Electronics
GBB940DFQZT / GBB940BMQZT / GBB940LBQZT
GBB940DNQZN / GBB940SWQZT
7 (Refrigerator-Freezer)
A++
246
Actual energy consumption will depend on how the
appliance is used and where it is located
255
105
None
Fresh Food,
Frozen Food
16
11.3
SN-T
This appliance is intended to be used at ambient
temperature between 10°C and 43°C
39
Free standing
26
Page 27

Page 28

LG products are certified.
For information about product certificates,
please contact our Customer Support Center.
Model Name
Manufacturer
Information
GBB940****T, GBB940****N
«LG Electronics RUS» LLC
Address: 143160, Russian Federation, Moscow
region, Ruza district, Dorokhovskoye rural village,
86th km of Minskoe highway, building 9
Month and year of manufacturing is located
on label inside the refrigerator compartment.
Page 29

PODRĘCZNIK OBSŁUGI
LODÓWKO-
ZAMRAŻARKA
Przed przystąpieniem do obsługi urządzenia należy dokładnie
przeczytać instrukcję obsługi i przechowywać ją w łatwo dostępnym
miejscu, aby móc w każdej chwili do niej sięgnąć.
Copyright © 2017 LG Electronics. Wszelkie prawa zastrzeżone.
www.lg.com
Page 30

SPIS TREŚCI
Zamieszczone w instrukcji ilustracje lub treści mogą
różnić się od modelu posiadanego przez
użytkownika.
Niniejszy podręcznik może podlegać zmianom
wprowadzanym przez producenta.
INSTRUKCJE BEZPIECZEŃSTWA ........................03
WAŻNE INSTRUKCJE DOTYCZĄCE BEZPIECZEŃSTWA . .......03
INSTALACJA ...........................................................09
Przeznaczenie urządzenia ........................................................... 09
Uwagi dotyczące przemieszczania i transportu . ...........................09
Nóżki poziomujące .......................................................................09
Uwagi dotyczące instalacji . .......................................................... 09
Zmiana kierunku otwierania drzwi
. ............................................... 10
UŻYTKOWANIE .......................................................12
Części i funkcje ............................................................................12
Uwagi dotyczące użytkowania .................................................... 13
Korzystanie z panelu sterowania .....................12
Przygotowanie lodu .....................16................................................
Regulacja temperatury w komorze świeżości „Fresh Converter” 16
Wysuwana szuflada „Fresh Balancer”..........................................16
Składana szklana półka ................................................................16
............................
..
FUNKCJE SMART ....................................................17
Korzystanie z aplikacji SmartThinQ ............................................. 17
Informacje dotyczące oprogramowania Open Source .................17
Smart Diagnosis™ Informacje centrum obsługi klientaNależy
.....17
EKSPLOATACJA I KONSERWACJA .....................19
Uwagi dotyczące czyszczenia .....................................................19
Wyjmowanie i wkładanie koszyka drzwiowego .............................19
Wyjmowanie i wkładanie szklanych półek ......................19
Wyjmowanie i wkładanie składanej półki 19
Wyjmowanie i wkładanie szuflady na warzywa 20
Wyjmowanie pokrywy wysuwanej szuflady na owoce ..................20
Wyjmowanie wysuwanych szuflad lodówki
Wyjmowanie wkładanie szuflad zamrazarki
..............
....................................
............................
.................................
20.................................
20
WYSZUKIWANIE I ROZWIĄZYWANIE
PROBLEMÓW
.........................................................22
SPECYFIKACJA TECHNICZNA 26.............................
Page 31

INSTRUKCJE BEZPIECZEŃSTWA
Poniższe wytyczne dotyczące bezpieczeństwa mają za zadanie zapobiegać
nieprzewidzianym zagrożeniom i uszkodzeniom wynikającym z nieprawidłowej
lub niezgodnej z zasadami bezpieczeństwa obsługi urządzenia. Wytyczne
podzielono na dwie kategorie: OSTRZEŻENIE oraz UWAGA opisane poniżej.
Symbol ten wskazuje działania, z którymi może się wiązać zwiększone
zagrożenie. Aby uniknąć zagrożeń, należy uważnie przeczytać sekcje
oznaczone tym symbolem i postępować zgodnie z instrukcją.
PL
UWAGA
Wskazuje, że nieprzestrzeganie instrukcji może powodować poważne
obrażenia lub śmierć.
OSTRZEŻENIE
Wskazuje, że nieprzestrzeganie instrukcji może powodować lekkie
obrażenia lub uszkodzenia produktu.
WAŻNE INSTRUKCJE DOTYCZĄCE BEZPIECZEŃSTWA
UWAGA
Aby zmniejszyć ryzyko eksplozji, pożaru, śmierci, porażenia elektrycznego,
obrażeń lub poparzenia osób podczas używania produktu, należy
przestrzegać środków ostrożności obejmujących poniższe:
Do użytkowania w Europe:
Urzadzenie przeznaczone jest do uzytku przez dzieci w wieku od 8 lat, osoby o
ograniczonej sprawnosci fizycznej, sensorycznej lub psychicznej oraz przez osoby
niedoswiadczone, jezeli sa one pod nadzorem lub otrzymały instrukcje dotyczace
uzytkowania urzadzenia od osoby odpowiedzialnej za ich bezpieczenstwo. Nalezy
zabronic dzieciom zabawy z urzadzeniem.Czyszczenie oraz konserwacja nie moga byc
wykonywane przez dzieci bez nadzoru.
Dzieci w gospodarstwie domowym
To urządzenie nie jest przeznaczone do użytkowania przez osoby (łącznie z dziećmi)
o ograniczonej sprawności fizycznej, sensorycznej czy umysłowej, lub którym brak
doświadczenia i wiedzy, chyba że są one nadzorowane bądź instruowane w zakresie
użytkowania urządzenia przez osobę odpowiedzialną za ich bezpieczeństwo. Dzieci
powinny być pod nadzorem w celu zapewnienia, że nie bawią się urządzeniem
03
Page 32

Montaż
•Upewnić się, że gniazdo jest prawidłowo uziemione oraz że wtyk uziemienia kabla
zasilającego nie jest uszkodzony bądź usunięty z wtyczki. Więcej szczegółów na
temat uziemienia można uzyskać w centrum obsługi klienta LG Electronics.
•Urządzenie jest wyposażone w przewód zasilający z żyłą uziemiającą oraz
uziemioną wtyczkę. Wtyczka musi być prawidłowo podłączona do odpowiedniego
gniazdka, które jest poprawnie zainstalowane i uziemione zgodnie z lokalnymi
przepisami i normami
•Jeśli przewód zasilania jest uszkodzony lub gniazdko zasilania jest poluzowane,
nie należy korzystać z przewodu i należy skontaktować się z autoryzowanym
centrum serwisowym.
Nie wolno zamieniać ani przedłużać przewodu zasilającego. To może spowodować
•
jego uszkodzenie. Po uszkodzeniu przewodu zasilającego jego wymiany powinien
dokonać producent, obsługa serwisowa lub odpowiednio wykwalifikowany personel.
Unikać stosowania przedłużaczy. Urządzenie podłączyć do dedykowanej linii
•
zasilania. Korzystać z osobnego gniazda. Nie podłączać do tego gniazda innych
urządzeń elektronicznych.
Zainstalować urządzenie w miejscu, w którym można łatwo i szybko wyjąć wtyczkę
•
z gniazda.
PL
Zainstalować urządzenie na wytrzymałej i równej posadzce
•
Nie umieszczać urządzenia w miejscu bezpośredniego oddziaływania promieni
•
słonecznych ani ciepła generowanego przez inne urządzenia (płyty gazowe,
grzejniki).
Należy dołożyć wszelkich starań, aby podczas instalacji nie narazić tylnej części
•
urządzenia na tego rodzaju oddziaływania.
•
Należy dołożyć wszelkich starań, aby podczas montażu lub demontażu nie doszło
do upuszczenia drzwi urządzenia.
•Należy dołożyć wszelkich starań, aby nie przedziurawić, rozbić ani nie uszkodzić
przewodu zasilającego podczas montażu lub demontażu drzwi urządzenia.
Nie instalować urządzenia w wilgotnym i zakurzonym miejscu.
•
Użytkowanie
Nie należy stosować urządzenia do celu innego niż użytkowanie domowe
•
(przechowywanie materiałów medycznych lub eksperymentalnych, używanie
urządzenia na łodzi itd.).
W razie zalania wodą należy odłączyć wtyczkę od sieci zasilającej i skontaktować
•
.
się z centrum obsługi klienta.
04
Page 33

Podczas gwałtownej burzy z wyładowaniami elektrycznymi lub gdy urządzenie nie
•
będzie używane przez dłuższy czas należy wyciągnąć wtyczkę z gniazda zasilania.
Nie wolno dotykać wtyczki ani elementów sterujących urządzeniem mokrymi rękami.
•
Nie należy nadmiernie zaginać przewodu zasilania, ani stawiać na nim ciężkich
•
przedmiotów.
W przypadku, gdy woda dostanie się do elektrycznych elementów urządzenia,
•
odłączyć wtyczkę i skontaktować się z centrum obsługi klienta.
Nie należy umieszczać dłoni ani przedmiotów wewnątrz obszaru emitującego zimne
•
powietrze, na osłonie, w otworach z tyłu urządzenia.
Nie należy wkładać do urządzenia zwierząt.
•
Należy zachować ostrożność przy otwieraniu i zamykaniu drzwi urządzenia, gdy w
•
pobliżu są dzieci. Przypadkowe uderzenie. drzwiami może spowodować obrażenia
u dziecka.
Nie wolno zamykać dzieci w urządzeniu. Uwięzione w urządzeniu dziecko może
•
się udusić.
•Na urządzeniu nie należy stawiać ciężkich ani delikatnych przedmiotów, zbiorników
z cieczami, substancji palnych i łatwopalnych (świece, lampy).
Jeśli wystąpi wyciek gazu, nie należy dotykać urządzenia ani wtyczki zasilania.
•
Trzeba natychmiast przewietrzyć pomieszczenie i skontaktować się z obsługą
serwisową. W urządzeniu jako środek chłodniczy wykorzystano przyjazny
środowisku gaz (izobutan, R600a). Wyciek gazu podczas transportu, montażu lub
pracy urządzenia przy kontakcie z iskrą może skutkować pożarem lub wybuchem.
PL
W pobliżu urządzenia nie należy stosować ani przechowywać substancji palnych
•
(eter, benzen, alkohol, chemikalia, LPG, palne aerozole, środki owadobójcze,
odświeżacze powietrza, kosmetyki itp.).
W przypadku wykrycia nietypowego dźwięku, zapachu lub dymu emitowanego
•
z urządzenia należy natychmiast odłączyć wtyczkę od zasilania i skontaktować się
z centrum obsługi klienta LG Electronics.
Nie wolno dopuścić do uszkodzenia obwodu zamrażania.
•
Konserwacja
Przed rozpoczęciem mycia urządzenia lub wymiany lampy wewnątrz urządzenia
•
(jeśli istnieje) należy odłączyć przewód zasilania.
Po całkowitym usunięciu wilgoci i kurzu włożyć ostrożnie wtyczkę do gniazda.
•
Nie wolno odłączać wtyczki z gniazdka, ciągnąc za przewód zasilający. Należy
•
zawsze mocno trzymać wtyczkę i ruchem do siebie wyciągnąć ją z gniazda.
W celu wyczyszczenia urządzenia nie należy spryskiwać go wodą wewnątrz ani na
•
zewnątrz.
05
Page 34

•W celu wyczyszczenia urządzenia nie należy spryskiwać go wodą wewnątrz ani na
zewnątrz.
•Urządzenie może być demontowane, naprawiane i poddawane przeróbkom
wyłącznie przez uprawniony personel centrum serwisowego LG Electronics
Nie należy stosować suszarki do włosów do wysuszenia wnętrza urządzenia ani
•
umieszczać wewnątrz świeczki w celu pozbycia się zapachu.
W celu przyśpieszenia procesu rozmrażania nie wolno używać żadnych
•
mechanicznych urządzeń lub innych środków, oprócz tych zalecanych przez
producenta.
Utylizacja
Utylizując urządzenie, należy zdjąć osłonę drzwi, pozostawiając półki i kosze.
•
Trzymać dzieci z dala od urządzenia.
Opakowań (np. worki plastikowe i styropian) należy pozbyć się w sposób, który
•
nie narazi dzieci na kontakt z nimi. Materiały opakowaniowe mogą doprowadzić
do uduszenia się.
Zakaz przechowywania materiałów wybuchowych
W urządzeniu nie należy przechowywać materiałów wybuchowych, takich jak puszki
aerozolowe, zawierające palny materiał pędny.
PL
Bezpieczeństwo techniczne
Należy dbać, by otwory wentylacyjne w obudowie urządzenia i w jego wnętrzu nie
•
zostały niczym zablokowane.
Nie należy stosować urządzeń elektrycznych wewnątrz schowków na produkty
•
spożywcze, chyba że są dopuszczone do takiego stosowania przez producenta
urządzenia.
Środek chłodniczy oraz gaz izolacyjny użyte w urządzeniu można utylizować
•
wyłącznie w sposób zgodny z właściwymi dla takich produktów procedurami.
Jeśli chcesz wyrzucić urządzenie, skontaktuj się z obsługą serwisową.
Izobutan (R600a) jest gazem przyjaznym dla środowiska, ale posiadającym
•
właściwości palne. Podczas transportu i montażu urządzenia należy zadbać, aby
żadna część obwodu zamrażania nie została uszkodzona.
Środek chłodniczy może ulec zapłonowi lub wywołać wybuch.
•
Ilość środka chłodniczego zastosowana w urządzeniu podana jest na tabliczce
•
identyfikacyjnej wewnątrz urządzenia.
Nie wolno włączać urządzenia noszącego jakiekolwiek ślady uszkodzenia obwodu
•
zamrażania. W przypadku wystąpienia wątpliwości należy skontaktować się ze
sprzedawcą.
W przypadku wykrycia wycieku należy zlikwidować źródła otwartego ognia i inne
•
potencjalne źródła zapłonu oraz wietrzyć przez kilka minut pomieszczenie, w którym
jest urządzenie. Wyciek gazu z obwodu zamrażania przy bezpośrednim kontakcie
może spowodować uszkodzenie oczu i skóry, a także spowodować zapłon.
06
Page 35

•Oznaką wycieku środka chłodniczego może być niedostatecznie niska temperatura
w lodówce i zamrażarce.
Aby uniknąć wytworzenia palnej mieszaniny gazów z powietrzem w przypadku
•
wystąpienia wycieku środka chłodniczego, wielkość pomieszczenia, w którym
użytkowane jest urządzenie powinna odpowiadać ilości zastosowanego środka
chłodniczego. Na każde 8 g środka R600a zastosowanego w urządzeniu powinien
przypadać 1 m² pomieszczenia. Dolna granica stężenia danego środka chłodniczego
w powietrzu wynosi 1,8%.
Urządzenie przeznaczone jest do stosowania w gospodarstwie domowym i
•
podobnych warunkach, na przykład:
- w obszarach kuchennych magazynów, biur i innych służbowych pomieszczeń;
- w gospodarstwach rolnych, hotelach i innych typach lokali mieszkalnych;
- w sypialniach i pomieszczeniach do przygotowywania śniadań;
- w jadalniach i podobnych miejscach nieprzeznaczonych do handlu detalicznego.
OSTRZEŻENIE
Aby zmniejszyć ryzyko obrażeń ciała, nieprawidłowego funkcjonowania
urządzenia lub uszkodzenia produktu podczas jego używania, należy
przestrzegać podstawowych środków ostrożności obejmujących poniższe:
PL
Użytkowanie
Nie wolno dotykać żywności ani metalowych części w zamrażarce mokrymi lub
•
wilgotnymi dłońmi. Może dojść do pojawienia się odmrożeń.
Hartowane szkło w przedniej części drzwi urządzenia lub półki mogą ulec
•
uszkodzeniu na skutek uderzenia. W przypadku uszkodzenia, nie wolno dotykać ich
mokrymi rękoma, ponieważ może dojść do obrażeń.
Nie opierać się ani nie wdrapywać na drzwi urządzenia, komory do przechowywania
•
produktów i półki.
Żywność należy przechowywać odpowiednio uporządkowaną.
•
Należy uniemożliwić zwierzętom dostęp do przewodu zasilania i jego gryzienie.
•
Nie wolno przechowywać zbyt dużej liczby butelek z wodą lub pojemników w
•
koszykach na drzwiach. Koszyk może pęknąć i może dojść do obrażenia dłoni.
Nie należy stosować dużej siły do otwierania i zamykania drzwi urządzenia.
•
Jeśli zawiasy drzwi urządzenia są uszkodzone lub działają nieprawidłowo, należy
•
zaprzestać użytkowania urządzenia i skontaktować się z autoryzowanym centrum
serwisowym.
Nie należy umieszczać innych urządzeń elektrycznych (takich jak grzejnik lub telefon
•
komórkowy) wewnątrz urządzenia.
Nie wolno czyścić szklanych półek za pomocą ciepłej wody, gdy półki są zimne.
•
W przypadku bardzo nagłej zmiany temperatury może dojść do ich pęknięcia.
Nie wolno spożywać zmrożonej żywności bezpośrednio po jej wyciągnięciu z
•
zamrażarki.
07
Page 36

PL
•W celu zapewnienia bezpieczeństwa, dzieci oraz osoby o ograniczonej sprawności
umysłowej powinny korzystać z urządzenia pod nadzorem.
Nie wolno umieszczać szklanych przedmiotów i butelek w zamrażarce, na półkach
•
lub w dozowniku lodu, gdzie istnieje możliwość występowania temperatury poniżej
zera.
Konserwacja
Nie wkładać odwrotnie półek. Półki mogą spaść i przyczynić się do powstania
•
obrażeń.
Podczas dłuższego braku zasilania należy usunąć lód z pojemnika w zamrażarce.
•
Przechowywanie
Nie wolno przechowywać urządzenia poza budynkami lub w miejscu narażonym na
•
działanie warunków atmosferycznych, takich jak promienie słońca, wiatr lub deszcz
oraz temperatura poniżej zera stopni Celsjusza).
Transport
Urządzenie jest transportowane dowolnym środkiem transportu zgodnie z działającymi
regulacjami przewozu ładunków, funkcjonującymi w odniesieniu do danego rodzaju
transportu.
Warunki transportu powinny wykluczyć możliwość uszkodzenia urządzenia.
•
Podczas prac załadowczo-wyładowczych zabrania się narażania urządzenia na
•
obciążenie o charakterze udarowym.
Transport
Sprzedaż produkcji jest zgodna z warunkami, ustalonymi przez obowiązujące
•
ustawodawstwo kraju, na terytorium którego jest realizowana.
Utylizacja
Symbol przekreślonego pojemnika na odpady na kółkach oznacza, że
•
produkty elektryczne lub elektroniczne (WEEE) należy zutylizować poza
obiegiem odpadów komunalnych.
Stare produkty elektroniczne mogą zawierać niebezpieczne substancje.
•
Właściwa utylizacja starego urządzenia pozwoli uniknąć potencjalnych
negatywnych skutków dla środowiska i zdrowia. Stare urządzenie może
zawierać części wielokrotnego użytku, które mogą zostać wykorzystane
do naprawy innych produktów lub inne wartościowe materiały, które
można przetworzyć, aby oszczędzać zasoby naturalne.
Mozesz zaniesc urzadzenie do sklepu, w którym zostało kupione lub
•
skontaktowac sie z lokalnym urzedem gospodarki odpadami, aby
uzyskac informacje o najblizszym punkcie zbiórki WEEE. Aby uzyskac
aktualne informacje z zakresu gospodarki odpadami obowiazujacej
w Twoim kraju, odwiedz strone http://www.lg.com/global/sustainability/
environment/take-back-recycling/global-network-europe (plik PDF :
„For more information about how to recycle LG products in your
country”.)
08
Page 37

INSTALACJA
PL
Przeznaczenie urządzenia
Dane urządzenie jest przeznaczone do
zamrażania i przechowywania zamrożonych i
schłodzonych produktów żywnościowych.
Klasa klimatyczna
Klasa klimatyczna jest wskazana na etykiecie
opisu technicznego lodówki, znajdującej się
wewnątrz urządzenia. Zabrania się użytkowania
lodówki w temperaturze, przekraczającej
dopuszczalne normy. Klasa klimatyczna określa
warunki użytkowania lodówki.
SN
N
ST
T
Zakres temperatury
zewnetrznej, w °C
Od +10 do +32
Od +16 do +32
Od +16 do +38
Od +16 do +43
Klasa
Podwyzszona
temperatura
Temperatura
Podzwrotnikowa
Tropikalna
Oznaczenie
Uwagi dotyczące
przemieszczania i transportu
• Wyjąć żywność z urządzenia. Następnie
transportować urządzenie wyłącznie po
zabezpieczeniu za pomocą taśmy delikatnych
części, takich jak półki oraz uchwyty drzwi.
Żeby nie uszkodzić lodówki i nie porysować
•
podłogi, przed transportem należy je owinąć w
kierunku przeciwnym do ruchu wskazówek zegara.
Podczas przenoszenia urządzenia trzymać je
•
za uchwyty umieszczone z przodu u dołu i z tyłu u
góry. W przeciwnym wypadku ręce mogą się
ześliznąć, co spowoduje obrażenia
Podczas transportu na dużą odległość urządzenie
•
musi pozostawać w pionie. Upadek urządzenia
może doprowadzić do jego wadliwego działania.
Nie wolno transportować leżącego urządzenia,
ponieważ taka pozycja może powodować
nieprawidłową cyrkulację czynnika chłodniczego
po ponownym włączeniu urządzenia.
W celu unikania uderzeń i upadków wewnątrz
•
pojazdu podczas transportu, lodówkę należy
obowiązkowo odpowiednio zabezpieczyć.
Nóżki poziomujące
W celu wyeliminowania wibracji sprawdzić, czy
lodówka jest wypoziomowana. W razie potrzeby
wyregulować nóżki, żeby dostosować urządzenie
do nierówności posadzki. Żeby drzwi lepiej się
zamykały, lodówka musi być nieznacznie
odchylona do tyłu. W celu wypoziomowania nóżek
należy nieznacznie pochylić lodówkę. Żeby
podnieść przednią część lodówki, przesunąć
nóżki poziomujące w kierunku odwrotnym do ruchu wskazówek
zegara ( ), żeby opuścić - zgodnie z ruchem wskazówek
zegara ( ).
Uwagi dotyczące instalacji
•
Ustaw podpory w górnych rogach z tyłu lodówki, jak
pokazano na rysunku 1. Podpory są dołączone
w komplecie z lodówką.
UWAGA
Podpory służą do zwiększenia efektywności pracy lodówki
i muszą być zamontowane.
Rys. 1. Montaż podpór
Należy unikać ustawiania urządzenia w pobliżu źródeł
•
ciepła, w bezpośrednim nasłonecznieniu lub wilgotnym
miejscu.
Upewnić się, że napięcie wskazane w podręczniku
•
odpowiada parametrom gospodarstwa domowego.
Podłączyć przewód zasilania do gniazda. Do gniazda
nie należy podłączać już innych urządzeń.
Po podłączeniu przewodu zasilającego do gniazda
•
należy odczekać 2-3 godziny, zanim wewnątrz nie
zacznie panować odpowiednia temperatura i tylko
wtedy należy umieścić w nim świeże lub zamrożone
produkty spożywcze. Po wyłączeniu urządzenia z
gniazda należy odczekać co najmniej 5 minut przed
ponownym podłączeniem. W przeciwnym razie
urządzenie może ulec uszkodzeniu.
Przy ustawieniu lodówki boczną stroną do ściany
•
należy zapewnić odpowiednią przestrzeń, aby możliwe
było otwarcie drzwi pod kątem 90°, co pozwoli na
wyjmowanie półek i koszyków.
Lodówka nie może być wbudowana. Należy zapewnić
•
5 cm prześwitu z prawej i lewej strony, oraz z tyłu
urządzenia i od góry dla lepszej cyrkulacji powietrza
i zmniejszenia zużycia energii elektrycznej.
Lodówka jest urządzeniem pracującym nieustannie i
•
wydaje charakterystyczne dźwięki, dlatego nie należy
jej instalować w miejscu odpoczynku i snu.
Nie należy usuwać okrągłych naklejek z tyłu lodówki.
•
Pełnią one funkcję dekoracyjną, zasłaniając otwory
techniczne.
Przed użyciem należy dokładnie umyć lodówkę. Nie
•
należy usuwać silikonowego smaru, znajdującego się
na uszczelce i przedniej części od strony zawiasów.
Smar zapobiega załamywaniu się uszczelki podczas
zamykania drzwi.
W niektórych modelach na przedniej części półek
•
(koloru metalowego) jest naklejona przezroczysta
ochronna folia. Przez użytkowaniem urządzenia zaleca
się jej usunięcie.
09
Page 38

Zmiana kierunku otwierania
drzwi
Lodówka jest zaprojektowana tak, aby w
zależności od planu kuchni drzwi mogły się
otwierać w prawo lub w lewo
POTRZEBNE NARZĘDZIA:
klucz 10 mm i 6 mm;
•
• klucz imbusowy 5 mm;
śrubokręt krzyżakowy
•
UWAGA
W razie potrzeby zmiany kierunku otwierania
drzwi należy wezwać wykwalifikowanego
specjalistę. Gwarancja nie obejmuje zmiany
kierunku otwierania drzwi.
Przed zmianą kierunku otwierania drzwi należy
odłączyć przewód zasilający i wyjąć wszystkie
produkty z lodówki oraz niezamocowane
akcesoria - półki, szufladki. Nie wolno układać
lodówki na posadzce.
Podczas demontażu i montażu należy zachować
ostrożność i nie upuszczać drzwi.
•
Zdemontować górną pokrywę (2) lodówki,
wykręcając śruby (1).
• Umieścić zaślepkę (3) po przeciwnej stronie
pokrywy górnej (2).
• Odłączyć przewód zasilający (4)
PL
•
Zdemontować uchwyt przewodu (8) ze środkowej
części pokrywy (6) i umieścić go po przeciwnej
stronie pokrywy (6).
•
Przełożyć wiązkę przewodów (10) na przeciwną
stronę pokrywy (6).
(6)
(10)
•
Po wykręceniu śrub (11) zdemontować górny
zawias (12).
Zdemontować drzwi lodówki;
•
•
Wykręcić trzpień (13) i wkręcić go po przeciwnej
stronie zawiasów (12) za pomocą klucza 6 mm.
(11)
(12)
(13)
(1)
(1)
(3)
•
Po wykręceniu śrub (5) pociągnąć pokrywę
(2)
(4)
do siebie, a następnie, uważając aby nie
uszkodzić przewodów, podnieść pokrywę (6).
•
Zdjąć uchwyt przewodów (7) i umieścić go w
środkowej części pokrywy (6).
•
Zaślepkę (9) ustawia się w przeciwnym
kierunku do pokrywy (6).
(6) (5)
(8)
(5)
(9)
(7)
•
Zdemontować środkowy zawias (15), wykręcając
śruby (14) kluczem imbusowym 5 mm.
•
Zdemontować drzwi zamrażarki.
•
Zaślepkę (16) umieścić po przeciwnej stronie
lodówki.
(15)
(16)
•
Po wykręceniu śrub (17) zdemontować dolny
zawias (18).
•
Wykręcić trzpień (19) i wkręcić go po przeciwnej
stronie (18) za pomocą klucza 6 mm.
•
Zdemontować zaślepkę (20) w górnej części
drzwi zamrażarki i umieścić ją po przeciwnej
stronie.
(14)
10
Page 39

(20)
(18)
(19)
(17)
•
Zdemontować ogranicznik (21), tuleję (22)
i samozamykacz (23) w dolnej części drzwi
lodówki, wykręcając śruby (24) i umieścić
je po przeciwnej stronie. Postępować tak
samo w przypadku drzwi zamrażarki.
(22)
(23)
(21)
(24)
Dla modeli:
GBB940DFQZT/ GBB940BMQZT
GBB940LBQZT
•
Zdemontować zaślepki (2) oraz suwak (1) i
umieścić je po przeciwnych stronach, jak
pokazano na rysunku.
PL
•
Zamontować dolny zawias (18) zamrażarki,
następnie drzwi zamrażarki, środkowy zawias (15),
drzwi lodówki, górny zawias drzwi (12), podłączyć
przewód zasilający (4), zamocować pokrywę (6) i
(2) w odwrotnej kolejności.
(2)
Dla modeli:
GBB940DNQZN/GBB940SWQZT
Zdjąć suwak (1) i umieścić go po przeciwnej
•
stronie, jak pokazano na rysunku.
(1)
(1)
11
Page 40

UŻYTKOWANIE
Elementy i funkcje
PL
1
1
Panel sterowania
Ustawianie temperatury w zamrażarce i
lodówce.
Dioda LED
Diody LED wewnątrz urządzenia włączają
się po otwarciu drzwi.
Wymienne szklane półki
Umożliwia przechowywanie schłodzonych
produktów.
Wysokość półki można regulować poprzez
•
wykorzystanie dodatkowych mocowań
na półki.
Rzeczywista liczba półek zależy od modelu.
•
Stojak na butelki *
Do przechowywanie butelek z winem.
Składana szklana półka *
Umożliwia przechowywanie schłodzonych
produktów
Strefa świeżości (Fresh Balancer) *
Umożliwia długoterminowe przechowywanie
owoców i warzyw.
2
3
4
5
6
7
11
13
Komora świeżości (Fresh Converter) *
Wysuwana szuflada, w której jest utrzymywana
optymalna temperatura do przechowywania
woców, warzyw, ryby i mięsa
Rzeczywista ilość i typ szuflad mogą różnić się w
•
zależności od modelu urządzenia.
Strefa do nabiału
Do przechowywanie sera lub masła.
Kosz drzwiowy
Do przechowywania napojów, sosów, pojemników
na żywność.
Rzeczywista liczba koszy zależy od modelu
•
urządzenia.
Pojemnik na jajka (2 szt.)
Wysuwane szuflady zamrażarki
Do długoterminowego przechowywania
zamrożonych produktów
Uchwyt drzwiowy (2 szt.) *
Nóżki poziomujące (2 szt.)
8
9
10
12
*
W przypadku niektórych modeli nie należy do kompletu.
UWAGA
Jeśli w lodówce brakuje pewnych elementów, być może należą one do kompletu innych dostarczanych modeli.
Producent ma prawo zmieniać zawartość kompletu lodówki bez uprzedniego powiadomienia.
12
Page 41

PL
Uwagi dotyczące użytkowania
• Należy pamiętać, że w przypadku
niedomknięcia drzwi lub ich częstego
otwierania wewnątrz może tworzyć się
szron lub nadmierna wilgoć.
• Upewnić się, że między żywnością
przechowywaną w półce lub w koszyku
na drzwiach jest wystarczająco dużo
miejsca, aby całkowicie zamknąć drzwi
lodówki.
• Nie należy zbyt często otwierać drzwi
urządzenia. Otwieranie drzwi pozwala
na przedostanie się do lodówki ciepłego
powietrza, co powoduje podwyższenie
panującej w niej temperatury.
• Lampa LED służy do oświetlania urządzenia
i nie jest dostosowana do oświetlania
pomieszczeń domowych.
Sugestie dotyczące oszczędzania
energii
•Upewnić się, że między przechowywanymi
produktami jest wystarczająco dużo miejsca.
Dzięki temu zimne powietrze cyrkuluje
prawidłowo, co obniża koszty energii
elektrycznej.
•Gorącą żywność można przechowywać
dopiero po jej wystygnięciu w celu
zapobiegania procesom skraplania lub
szronienia.
Efektywne przechowywanie żywności
•Należy przechowywać mrożoną i schłodzoną
żywność wewnątrz szczelnie zamkniętych
pojemników.
Przed rozpoczęciem przechowywania
•
żywności w urządzeniu należy sprawdzić
datę ważności oraz informacje na etykiecie
(instrukcje przechowywania).
Nie należy przechowywać w lodówce
•
żywności, która przy niskiej temperaturze
ulega szybkiemu zepsuciu, takiej jak banany
czy dynia.
Nie wolno przechowywać butelek w
•
zamrażarce — podczas zamarzania mogą
one pęknąć.
Unikać ponownego mrożenia żywności, która
•
uległa całkowitemu rozmrożeniu. Ponowne
zamrożenie żywności, która uległa całkowitemu
rozmrożeniu obniża jej walory smakowe i
odżywcze.
Nie owijać ani nie przechowywać warzyw w
•
gazecie. Nadruki w gazecie i inne obce
substancje mogą przenikać do żywności i
ją skazić.
•Urządzenia nie należy przepełniać. Należy wypełniać
nie więcej niż 70 % dostępnej przestrzeni.
W przepełnionym urządzeniu zimne powietrze nie
może prawidłowo cyrkulować.
• W lodówce nie wolno przechowywać produkty
farmaceutycznych, materiałów do badań naukowych
lub innych produktów, których przechowywanie
wymaga utrzymywania ścisłej temperatury.
•Nie wolno zasłaniać wentylatorów, znajdujących się
z tyłu lodówki. Swobodna cyrkulacja powietrza
pozwala na podtrzymywanie równomiernej temperatury
w lodówce. Produkty, umieszczone zaraz przy otworach
wentylacyjnych, mogą ulec zepsuciu z powodu działania
niskiej temperatury powietrza.
Ekspresowe mrożenie
„EXPRESS FREEZE”
•Jeśli istnieje potrzeba zamrożenie produktu, możesz
skorzystać z funkcji ekspresowego mrożenia. Wcisnąć
przycisk „EXPRESS FREEZE”,
zapali się kontrolka „EXPRESS FREEZE”
i rozpocznie się ekspresowe mrożenie.
Funkcja ekspresowego mrożenia potrzebuje około 24
godzin i automatycznie wyłączy się po zadanym czasie,
może także w dowolnym czasie zostać wyłączona
ręcznie.
•W celu uzyskania lepszej cyrkulacji powietrza należy
zamontować wszystkie części wewnętrzne, takie jak
kosze, szuflady i półki.
Awaria zasilania
Przerwa w zasilaniu w ciągu 1-2 godzin nie będzie
posiadała negatywnego wpływu na przechowywane
produkty. W tym czasie rzadziej otwierać i zamykać
drzwi lodówki.
Charakterystyka pracy lodówki
W wyniku deformacji termicznych części składowych
lodówki możliwe są odgłosy trzeszczenia.
Charakterystyczne dźwięki włączania regulatora
temperatury i kompresora są dźwiękami naturalnymi,
wynikającymi z pracy sprzętu elektrycznego urządzenia.
Środek chłodniczy, cyrkulujący wewnątrz systemu
chłodzenia, może cicho bulgotać, nawet jeśli kompresor
jest wyłączony. Nie należy się martwić — to normalne
działanie. Podczas pracy lodówki mogą być słyszalne:
- dźwięki pracy kompresora;
- szelest łopatek wentylatorów;
- dźwięki powietrza przepływającego w systemie
chłodzenia No Frost;
- kliknięcia przekaźnika;
- brzęczenie napędu podczas otwierania i zamykania
przepustnicy powietrza;
- szmer środka chłodzącego, przepływającego w rurach
systemu chłodzenia;
- ciche odgłosy trzeszczenia, wynikające z deformacji
termicznych materiałów.
Dane dźwięki nie są związane z jakąkolwiek wadą, są
naturalnym efektem funkcjonowania urządzenia.
13
Page 42

Korzystanie z panelu sterowania
Typy i funkcje
< Тип 1>
PL
7
Ustawianie temperatury w lodówce/
Fridge
Ustawianie temperatury w zamrażarce/
Freezer
Wi - Fi
Ta funkcja służy do połączenia lodówki
•
z domową siecią Wi-Fi
Express Freezer
•
Umożliwia regulację funkcji
ekspresowego mrożenia
Eco Friendly
Zarządza stanem zasilania, zmniejszając
•
zużycie energii
Light
7
Lock
Umożliwia zablokowanie przycisków
•
panelu sterowania.
UWAGA
Wygląd zewnętrzny lub przyciski panelu sterowania mogą się różnić w zależności od modelu.
14
Page 43

Nastawa temperatury
• Domyślna temperatura w lodówce i
zamrażarce wynosi odpowiednio 3°С i -20°С.
• Opcjonalnie można ją zmienić po naciśnięciu
przycisku nastawy temperatury odpowiedniej
komory na panelu sterowania.
Panel sterowania
Fridge Freezer
Daną funkcję można każdorazowo włączyć i
•
wyłączyć po naciśnięciu przycisku
Alarm ostrzegający o źle
zamkniętych drzwiach
•Jeśli drzwi lodówki są otwarte przez jakiś czas
(~ 1 min.), uruchamia się sygnał dźwiękowy,
powtarzający się co 30 sek.
UWAGA
•Jeśli alarm nie wyłącza się nawet po
zamknięciu drzwi, należy skontaktować się z
centrum obsługi klienta LG Electronics.
PL
UWAGA
•Po podłączeniu przewodu zasilającego do
gniazda należy odczekać 2-3 godziny, zanim
wewnątrz nie zacznie panować odpowiednia
temperatura i tylko wtedy należy umieścić w
nim świeże lub zamrożone produkty spożywcze.
•Temperatura widoczna na panelu sterowania
jest docelową, ponieważ faktyczna temperatura
wewnątrz lodówki zmienia się w zależności od
oddziaływania zewnętrznych czynników, takich
jak temperatura umieszczonych produktów i
częstotliwości otwierania drzwi.
Tryb ekspresowego mrożenia
„EXPRESS FREEZE”
Dana funkcja umożliwia szybkie zamrożenie
dużej ilości lodu lub produktów
Po naciśnięciu przycisku „Express Freeze”
•
na panelu sterowania pojawi się podświetlony
znaczek szybkiego mrożenia
Daną funkcję można każdorazowo włączyć i
•
wyłączyć po naciśnięciu przycisku.
Funkcja ekspresowego mrożenia automatycznie
•
się wyłącza po upływie określonego czasu i
lodówka zmienia zmienia tryb pracy na ustawiony
wcześniej.
Blokada/Lock
Dana funkcja blokuje wszystkie przyciski
panelu sterowania.
•W celu zablokowania/odblokowania panelu
sterowania lodówki, nacisnąć przycisk „Lock”
i przytrzymać go przez 3 sekundy.
Podświetlenie zamrażarki
•
Dany przycisk steruje pracą oświetlenia
zamrażarki
Za pomocą kolejnych wciśnięć można włączyć
•
tryb stałego oświetlenia, zmniejszyć jasność w
tym samym trybie i wyłączyć oświetlenie.
Po otworzeniu drzwi zamrażarki oświetlenie
•
jest zawsze włączone.
Tryb oszczędzania energii
„Eco Friendly”
Umożliwia uruchomienie trybu oszczędzania
energii, przydatnego podczas długiej nieobecności.
•Po wciśnięciu na panelu sterowania przycisku
Eco Friendly” włączy się podświetlenie
przycisku „Eco Friendly”
15
Page 44

Przygotowanie lodu
Napełnić pojemnik na lód wodą do
oznaczonego poziomu
•
Używać tylko wody pitnej.
Jeśli pojemnik do lodu jest przepełniony,
•
kostki lodu mogą przymarznąć do siebie,
co spowolni proces ich wyjmowania z
pojemnika.
W celu szybkiego wytworzenia lodu
•
skorzystać z funkcji ekspresowego mrożenia.
Proces wyjmowania lodu można przyśpieszyć
•
za pomocą polania pojemnika wodą lub jego
całkowitego zanurzenia w wodzie i lekkiego
wykręcania w różne strony.
UWAGA
•Nie wolno skręcać pojemnika zbyt mocno,
ponieważ może ulec uszkodzeniu.
Wysuwana szuflada
Fresh Balancer
(nie we wszystkich modelach)
Strefa utrzymywania optymalnej wilgoci
„Fresh Balancer”, wysuwana szuflada do
przechowywania warzyw i owoców.
Za pomocą regulatora kontroluje się poziom
wilgotności. Stan zamknięty do przechowywania
warzyw (typ 2) i stan otwarty do przechowywania
owoców (typ 1).
Typ1 Typ 2
Składana szklana półka
(nie we wszystkich modelach)
•W celu postawienia w lodówce wysokich
przedmiotów, na przykład butelek, trzeba podnieść
przednią część połowy półki i zsunąć ją pod tylną
połowę.
PL
Regulacja temperatury w
komorze świeżości
„Fresh Converter”
(nie we wszystkich modelach)
Dana funkcja służy do regulacji
temperatury w komorze świeżości
Fresh Converter.
Typ 1 służy do przechowywania mięsa,
typ 2 do ryb i typ 3 do warzyw
Fresh Converter
Meat Fish Vegetable
Typ 1 Typ 2 Typ 3
Fresh Converter
Fish
Meat
Vegetable
Aby przechowywać większą ilość pokarmu w
•
„Fresh Converter” wysunąć szufladę.
Aby uzyskać optymalne warunki
•
przechowywania mięsa, ryb lub warzyw
zaleca się ustawienie pokrętła w trybie
według towarów.
Fresh Converter
Fish
Meat
Vegetable
Fresh Converter
Fish
Meat
Vegetable
•W danej sytuacji można podnieść do góry obie
połówki półki, udostępniając tym samym więcej
miejsca.
•Aby ustawić półkę z powrotem należy opuścić
obie połówki, a następnie pociągnąć do siebie
dolną część.
UWAGA
Producent zaleca następujące nastawy:
•
Temperatura w lodówce: +3°С
•
Temperatura w zamrażarce: -20°С
•
Tryb Typ 2 w komorze świeżości „Fresh Converter”
16
Page 45

FUNKCJE SMART
PL
Korzystanie z aplikacji
SmartThinQ
Instalowanie SmartThinQ
Wyszukać aplikację LG Smart ThinQ w sklepie
Google Play & Apple App Store na smartfonie.
Postępować zgodnie z instrukcjami, aby pobrać
i zainstalować aplikację.
Funkcja Wi-Fi
• Dla urządzeń z logo lub
Komunikacja z urządzeniem za pomocą
smartfonu oraz wygodnych i zaawansowanych
funkcji.
Ustawienia
Ta funkcja służy do zmiany różnych opcji
w lodówce i aplikacji.
UWAGA
• Aby zweryfikować połączenie z siecią Wi-Fi,
sprawdzić, czy ikona Wi-Fi na panelu
sterowania jest podświetlona.
• LG Smart ThinQ nie ponosi odpowiedzialności
za jakiekolwiek problemy z połączeniem
sieciowym, usterki, awarie lub błędy
spowodowane przez nieprawidłowe połączenie
sieciowe.
• Urządzenie obsługuje tylko sieci bezprzewodowe
Wi-Fi o częstotliwości 2,4 GHz.
• Jeśli urządzenie nie może nawiązać połączenia
sieciowego Wi-Fi, może znajdować się w zbyt
dużej odległości od routera. Aby poprawić siłę
sygnału Wi-Fi, należy zakupić wzmacniacz
sygnału Wi-Fi.
• Inne urządzenia w sieci domowej mogą
przerwać połączenie z siecią Wi-Fi lub
powodować jego zakłócenia.
• W zależności od dostawcy usług internetowych
połączenie sieciowe może nie działać prawidłowo.
• Inne urządzenia połączone z siecią
bezprzewodową mogą obniżać jej szybkość.
• Aplikacja może być modyfikowana w celu poprawy
wydajności urządzenia bez uprzedniego
powiadomienia.
• Funkcje mogą się różnić w zależności od modelu.
Dane techniczne modułu sieci
bezprzewodowej LAN
Model LCW-004
Zakres
częstotliwości
Moc wyjściowa
(maks.)
2412 to 2472 MHz
IEEE 802.11b:17.82 dBm
IEEE 802.11g:17.72 dBm
IEEE 802.11n:16.61 dBm
Deklaracja zgodności
Niniejszym, LG Electronics European Shared
Service Centre B.V., deklaruje, że Lodówka jest
zgodna z podstawowymi wymogami i innymi
zapisami Dyrektywy 1999/5/WE. Kompletną
Deklarację Zgodności można uzyskać, wysyłając
zapytanie na następujący adres pocztowy:
LG Electronics European Shared Service
Centre B.V. Krijgsman 1 1186 DM Amstelveen
The Netherlands lub uzyskać na naszej
dedykowanej stronie internetowej pod adresem:
http://www.lg.com/global/support/cedoc/cedoc#
Urządzenie jest szerokopasmowym systemem
transmisyjnym o częstotliwości 2,4 GHz. Urządzenie
jest przeznaczone do użycia we wszystkich krajach
członkowskich UE i krajach EFTA.
Zaleca się montaż oraz obsługę urządzenia z
odległości co najmniej 20 cm.
Informacje dotyczące
oprogramowania Open Source
SourceAby uzyskać zawarty w tym produkcie kod
źródłowy w ramach licencji GPL, LGPL, MPL oraz
innych licencji Open Source, należy odwiedzić witrynę
internetową http://opensource.lge.com.
Witryna, oprócz kodu źródłowego, umożliwia pobranie
wszystkich informacji o warunkach użytkowania,
wyłączeniach gwarancji oraz prawach autorskich.
Po wysłaniu na adres opensource@lge.com prośby o
dostarczenie kodu źródłowego na płycie CD-ROM
firma LG Electronics wyśle ją za opłatą
(pokrywającą m.in. koszty nośnika, wysyłki i
przetwarzania). Niniejsza oferta jest ważna przez trzy
(3) lata od daty zakupu produktu.
Smart Diagnosis™ Informacje
centrum obsługi klientaNależy
klientaNależy skorzystać z tej funkcji, jeśli potrzebna
jest precyzyjna diagnostyka dla centrum obsługi klienta
LG Electronics w przypadku wystąpienia awarii lub
nieprawidłowego działania produktu. Z funkcji należy
korzystać wyłącznie w celu kontaktowania się z
przedstawicielem serwisu, a nie podczas normalnej
obsługi urządzenia.
Zamknij drzwi lodówki, nacisnij «Lock Hold 3 sec.»
1
i trzymaj przycisk wcisniety przez 3 sekundy, az do
aktywacji funkcji zamka, nastepnie nacisnij przycisk
kontroli przez 3 sekundy, nastepnie otwórz drzwi
lodówki
17
Page 46

Postepujac wg. instrukcji operatora przystaw
2
mikrofon swojego telefonu jak najblizej
znaczka SmartDiagnosis. Trzymaj swój
telefon w tej pozycji az do zakonczenia
procesu przesyłania danych.
Operator centrum obsługi klienta moze
3
poprosic cie o powtórzenie procesu
przesyłania danych, jezeli uzna jego wyniki
za uszkodzone lub niekompletne.
Aby przerwac przesyłanie danych i wyłaczyc
4
funkcje SmartDiagnosis™, nacisnij przyciski
blokady i regulacji temperatury komory
zamrazarki.
Po zakonczeniu procesu przesyłania danych
5
bedziesz mógł kontynuowac swoja rozmowe
z operatorem, który wysle te informacje do
wsparcia technicznego w celu analizy.
PL
UWAGA
•
Ułożyć telefon tak, aby mikrofon znajdował się
tuż przy głośniku.
•
Po około 3 sekundach wygenerowany zostanie
dźwięk funkcji Smart Diagnosis™.
•
Nie należy oddalać telefonu od głośnika w trakcie
trwania transmisji danych.
•
Trzymać telefon naprzeciwko głośnika i zaczekać
na zakończenie transmisji danych.
•
Dźwięk towarzyszący transmisji danych do
Smart Diagnosis™ może być nieprzyjemny dla
ucha, jednak aby przeprowadzić rzetelną
diagnostykę, telefon można odsunąć od głośnika
dopiero po zakończeniu emitowania dźwięku
transmisji danych.
•
Działanie funkcji Smart Diagnosis™ zależne jest
od jakości lokalnego połączenia telefonicznego.
•
Połączenie i zależna od niego jakość usługi
ulegnie poprawie i będzie można przekazywać
lepszy sygnał, jeśli zostanie użyty telefon
stacjonarny.
•
Jeśli jakość transmisji danych do Smart
Diagnosis™ jest zła z powodu niskiej jakości
połączenia telefonicznego, jakość usługi Smart
Diagnosis™ może być ograniczona.
18
Page 47

EKSPLOATACJA I KONSERWACJA
PL
Uwagi dotyczące czyszczenia
•Wyjmując półkę lub szufladę z urządzenia, usunąć
żywność z półki lub szuflady w celu zapobiegania
ewentualnym obrażeniom ciała lub uszkodzeniu
urządzenia.
Wyjąć półki oraz szuflady i umyć je wodą.
•
Następnie osuszyć przed ich wymianą.
•Uszczelki drzwi należy regularnie przecierać
mokrym, miękkim ręcznikiem.
•Nie wolno czyścić półek ani pojemników w
zmywarce.
- Części mogą ulegać deformacji na skutek
ciepła.
•Zewnętrzną i wewnętrzną część urządzenia
myć czystą tkaniną, stosując ciepłą wodę z
dodatkiem delikatnego detergentu. Wysuszyć za
pomocą miękkiej szmatki.
•Lodówka jest wyposażona w lampę LED.
Nie zdejmować samodzielnie osłony lampy i
samej lampy. W celu wymiany lampy należy
skontaktować się z centrum obsługi klienta
LG Electronics.
•Po wyczyszczeniu sprawdzić, czy przewód
zasilający nie został uszkodzony. Następnie
dobrze włożyć wtyczkę do gniazda.
Po zamontowaniu stuknąć delikatnie kosz w
2
celu jego zabezpieczenia w pozycji poziomej.
Wyjmowanie i wstawianie szklanych
półek
Nieznacznie podnieść półkę i pociągnąć ją do
siebie.
OSTRZEŻENIE
•Zabrania się korzystania z materiałów ściernych,
benzyny, benzenu, rozcieńczalnika, preparatu
ChlorGuard, gorącej wody, szczotek o twardym
włosiu itd., co może uszkodzić powierzchnię lodówki.
Demontaż koszy drzwiowych
Przytrzymać obie krawędzie kosza i podnieść go do
góry.
Montaż koszy drzwiowych
Przytrzymać obie krawędzie kosza drzwiowego,
1
a następnie delikatnie nacisnąć najpierw jedną
krawędź, a potem drugą.
W celu ponownego montażu koszy wykonać
czynności demontażu w odwrotnej kolejności.
Wyjmowanie i wkładanie
składanej półki
Podnieść przednią część półki, wsunąć
1
pod drugą połowę
Wyjąć obie połówki z ramki, podnosząc
2
do góry.
Podnieść ramkę półki i pociągnąć do s
3
iebie.
W celu ponownego montażu półki wykonać
czynności demontażu w odwrotnej kolejności.
19
Page 48

PL
Wyjmowanie szuflady na
warzywa
Wyjąć dolny kosz, podnosząc go do
1
góry
Wysunąć szufladę.
2
Podnieść i pociągnąć szufladę do
3
siebie.
Wyjmowanie wysuwanych
szuflad lodówki
Pociągnąć szufladę do siebie.
1
Podnieść obiema rękoma.
2
W celu ponownego włożenia szuflady
wykonać czynności wyciągania w odwrotnej
kolejności.
Wyjmowanie pokrywy
wysuwanej szuflady na owoce
Podnieść pokrywę wysuwanej szuflady
1
Pociągnąć do siebie
2
Wyjmowanie wysuwanych
szuflad lodówki
Wysunąć szufladę.
1
Podnieść szufladę za przednią część i
2
pociągnąć do siebie.
UWAGA
• W celu zapewnienia poprawnej cyrkulacji
powietrza szuflady w zamrażarce muszą być
wsunięte mocno.
20
Page 49

• W komorze zamrażarki znajdują się
metalowe półki, pozwalające na zwiększenie
ilości przechowywanych produktów.
• W razie potrzeby przechowywania w
zamrażarce dużej ilości produktów górną i
środkową szufladę można wyjąć, a produkty
przechowywać na półkach.
Wkładanie szuflad zamrażarki
Ustawić szufladę pod kątem 45°.
1
Opuścić równolegle przednią część szuflady
2
Wsunąć szufladę do końca
3
PL
UWAGA
•
Nie należy zbyt mocno wyciągać szuflad i półek to, oraz ich nieprawidłowe wyjmowanie lub
wkładanie, może spowodować uszkodzenie
elementów wewnętrznych lodówki.
•
Gwarancja nie obejmuje uszkodzeń mechanicznych
(pęknięcia, wgniecenia, ślady otwierania itd.),
spowodowanych naruszeniem zasad przechowywania,
transportu, eksploatacji i konserwacji lodówki oraz
zastosowaniem nadmiernej siły fizycznej.
21
Page 50

WYSZUKIWANIE I ROZWIĄZYWANIE
Objawy Przyczyny Rozwiązanie
PL
Podłączona do prądu
lodówka nie działa.
Słabe chłodzenie lub
mrożenie.
Urządzenie wydziela
nieprzyjemny zapach.
Awaria zasilania
Wtyczka nie jest włożona do
gniazda zasilania
Czy temperatura chłodzenia lub
mrożenia ustawiona została na
najwyższy poziom?
Czy urządzenie jest w miejscu
bezpośredniego nasłonecznienia
lub w pobliżu źródeł ciepła, takich
jak piekarnik czy grzejnik?
Czy przechowywana była gorąca
żywność?
Czy do urządzenia włożono zbyt
dużą ilość żywności?
Czy drzwi urządzenia zostały
szczelnie zamknięte?
Czy wokół urządzenia zachowana
jest odpowiednia ilość wolnej
przestrzeni?
Nieprawidłowo ustawiona
temperatura w lodówce lub
zamrażarce.
Czy do środka włożono żywność
wydzielającą silny zapach?
Czy warzywa lub owoce mogły się
zepsuć w szufladzie?
•Czy nie nastąpiła przerwa w dostawie
prądu?
Czy gniazdo zasilania jest pod napięciem?
•
Włożyć wtyczkę do gniazda zasilania.
Ustawić temperaturę chłodzenia lub
•
mrożenia na poziom „średni”. Patrz.
rozdział „Regulacja temperatury”.
Sprawdzić miejsce instalacji urządzenia.
•
Przenieść je w miejsce oddalone od źródeł
ciepła.
•Przed włożeniem gorącej żywności do
lodówki należy ją schłodzić.
Pomiędzy produktami spożywczymi
•
powinna być zachowana odpowiednia
odległość.
•Należy szczelnie zamknąć drzwi i upewnić
się, że przechowywana żywność nie
utknęła w drzwiach.
Dostosować miejsce instalacji, aby
•
zapewnić właściwą ilość wolnej przestrzeni
wokół urządzenia. Patrz. rozdział
„Instalacja”.
Ustawić temperaturę chłodzenia lub
•
mrożenia na poziom „średni”.
Żywność wydzielającą silny zapach należy
•
przechowywać w szczelnych pojemnikach.
•Wyrzucić zepsute warzywa i oczyścić
szufladę na warzywa. Nie należy
przechowywać warzyw zbyt długo w
szufladzie na warzywa i owoce.
Patrz. rozdział „Eksploatacja i
konserwacja”. Nie przechowywać
produktów zbyt długo.
Wewnętrzna lampka w
urządzeniu nie włącza
się.
22
Wtyczka nie jest włożona do
gniazda zasilania.
Jeżeli wewnętrzna lampa nie włącza się
•
prosimy o kontakt ze sprzedawcą lub
centrum obsługi klienta LG Electronics.
Page 51

Objawy Przyczyny Rozwiązanie
PL
Drzwi urządzenia nie
zostały szczelnie
zamknięte.
Drzwi urządzenia
otwierają się z
trudnością.
Wewnątrz urządzenia
lub na spodzie pokrywy
szuflady na warzywa
zbiera się kondensat.
W zamrażarce pojawił
się szron.
Czy urządzenie przechyla się do
przodu?
Czy półki zostały właściwie
zamocowane?
Czy drzwi zostały zamknięte z
nadmierną siłą?
Czy drzwi zostały otwarte zaraz po
tym, jak zostały zamknięte?
Czy przechowywana była gorąca
żywność?
Czy drzwi urządzenia
pozostawiono otwarte?
Czy drzwi urządzenia były
otwierane i zamykane zbyt często?
Czy do urządzenia wsadzono
ciepłą lub wilgotną żywność bez
jej zabezpieczenia w pojemniku?
Czy drzwi nie zostały poprawnie
zamknięte?
Czy przechowywana była gorąca
żywność?
Czy wlot lub wylot powietrza
zamrażarki nie jest zablokowany?
•Wyregulować przednie nóżki, aby unieść
nieco przód.
•
Sprawdzić, czy półki w lodówce są
włożone do końca.
Jeśli drzwi zostaną zamknięte zbyt mocno
•
lub zbyt szybko, przed zamknięciem przez
krótki czas pozostaną otwarte.
Drzwiami nie należy trzaskać.
Otwarcie drzwi w ciągu 1 minuty od
•
zamknięcia może sprawić trudności ze
względu na ciśnienie panujące wewnątrz
urządzenia. Podjąć ponownie próbę
otwarcia drzwi urządzenia za kilka minut,
aby wewnętrzne ciśnienie ustabilizowało
się.
•
Przed włożeniem gorącej żywności do
zamrażarki lub lodówki należy ją schłodzić.
Mimo że wilgoć zniknie szybko po
•
zamknięciu drzwi urządzenia, można ją
zetrzeć suchą szmatką.
Skraplanie może wystąpić jako skutek
•
różnicy temperatur pomiędzy wnętrzem
produktu i otoczeniem. Wytrzeć wilgoć
suchą szmatką.
Żywność należy przechowywać w
•
zamkniętych i szczelnych pojemnikach.
Sprawdzić, czy wewnątrz urządzenia
•
żywność nie blokuje drzwi i upewnić się,
że są one szczelnie zamknięte.
Przed włożeniem gorącej żywności do z
•
amrażarki lub lodówki należy ją schłodzić.
Należy sprawdzić, czy wlot i wylot
•
powietrza zamrażarki nie są zablokowane,
co mogłoby uniemożliwić swobodny obieg
powietrza wewnątrz urządzenia.
Wewnątrz lub na
zewnątrz urządzenia
doszło do skraplania
lub oszronienia.
Czy zamrażarka nie jest
przepełniona?
Czy drzwi urządzenia były
otwierane i zamykane zbyt często
oraz czy drzwi urządzenia zostały
niewłaściwie zamknięte?
Należy sprawdzić, czy wlot i wylot
•
powietrza zamrażarki nie są zablokowane,
co mogłoby uniemożliwić swobodny obieg
powietrza wewnątrz urządzenia.
Szron i skroplona wilgoć mogą gromadzić
•
się, jeśli powietrze z otoczenia przedostaje
się do wnętrza urządzenia. Należy
szczelnie zamknąć drzwi i upewnić się, że
przechowywana żywność nie utknęła w
drzwiach.
23
Page 52

Symptoms Reason Solution
PL
Boczna lub przednia
część urządzenia jest
ciepła.
Wewnątrz lub poza
urządzeniem znajduje
się woda.
Urządzenie pracuje
głośno i emituje
nietypowe dźwięki.
Czy miejsce instalacji lodówki nie
jest zawilgocone?
W tych miejscach zamontowano
elementy obwodu
zapobiegającego tworzeniu się
kondensatu wokół powierzchni
drzwi.
Czy w pobliżu urządzenia jest
wyciek wody?
Czy na dnie urządzenia jest woda?
Czy urządzenia zamontowano na
niestabilnej podłodze lub
nieprawidłowo ustawiono?
Czy tylna część urządzenia
dotyka ściany?
Czy na urządzeniu znajduje się
jakiś przedmiot?
he
•Do skraplania może dochodzić na
zewnętrznej części urządzenia, jeśli
zamontowano je w zbyt wilgotnym
otoczeniu. Wytrzeć wilgoć suchą
•
Rurka odprowadzająca ciepło w celu
zapobieżenia skraplaniu jest
zamontowana w przedniej i bocznej części
urządzenia. Może być szczególnie ciepła
zaraz po instalacji urządzenia oraz w
czasie gorących dni. Taka sytuacja jest
typowa i nie stanowi powodu do niepokoju.
Sprawdzić, czy nie doszło do wycieku
•
wody ze zlewu lub innego miejsca.
Sprawdzić, czy woda nie pochodzi z
•
rozmrożonych produktów żywnościowych
lub uszkodzonego albo przewróconego
pojemnika.
Urządzenie należy ustawić na płaskiej i
•
stabilnej powierzchni.
Dostosować miejsce instalacji, aby
•
zapewnić właściwą ilość wolnej przestrzeni
wokół urządzenia.
Należy usunąć przedmiot z urządzenia.
•
Klikanie
Terkotanie
Czy na urządzeniu znajduje się
jakiś przedmiot?
Regulator rozmrażania zacznie
wydawać dźwięki przypominające
klikanie na początku i końcu cyklu
automatycznego rozmrażania.
Termostat (lub w niektórych
modelach regulator urządzenia)
także będzie wydawał takie
dźwięki podczas włączania i
wyłączania.
Terkotanie może wydobywać się
na skutek przepływu środka
chłodniczego w instalacji wodnej
z tyłu urządzenia (modele z
instalacją doprowadzania wody)
oraz z elementów na zamrażarce
oraz w jej pobliżu.
Urządzenie nie jest ustawione
stabilnie na podłożu.
Urządzenie ze sprężarką zostało
poruszone podczas pracy.
•Należy usunąć wszystkie przedmioty z
urządzenia.
Normalne działanie.
•
Normalne działanie.
•
Nóżki poziomujące urządzenia wymagają
•
regulacji. Patrz. rozdział „Instalacja”.
Normalne działanie. Jeżeli sprężarka nie
•
przestaje terkotać po 3 minutach, wyłączyć
urządzenie i włączyć je ponownie.
24
Page 53

Objawy Przyczyny Rozwiązanie
Silnik wentylatora parownika
Świst
powoduje krążenie powietrza
pomiędzy elementami lodówki i
zamrażarki.
Powietrze jest kierowane
nad skraplacz przez wentylator
skraplacza.
Normalne działanie.
•
Normalne działanie.
•
PL
Bulgotanie
Trzeszczenie
Wibracje
Czynnik chłodniczy przepływa
przez system chłodniczy.
Zmniejszanie i zwiększanie
objętości ścianek wewnętrznych z
powodu zmian temperatury.
Jeśli bok lub tył urządzenia dotyka
szafki lub ściany, normalne
wibracje mogą generować dźwięki.
Normalne działanie.
•
•
Normalne działanie.
Aby wyeliminować hałas, boki i tył
•
urządzenia nie powinny stykać się z
powierzchnią ściany ani szafki.
25
Page 54

SPECYFIKACJA TECHNICZNA
PL
PL
Marka handlowa
A
B
Model
Kategoria
C
Klasa energetyczna
D
E
Roczne zuzycie energii "XYZ"
[kWh/rok], w oparciu o wyniki
standardowych badan w ciagu
24 godzin
F
Objetosc chłodziarki [L]
G
Objetosc zamrazarki [L]
H
Temperatura obliczeniowa
innych komór (>14°C)
I
Komory Frost-Free
Czas wzrostu temperatury
J
[godz.]
FWydajnosc zamrazania
K
[kg/24 godz.]
L
Klasa klimatyczna
Poziom emitowanego
M
hałasu [dB(A)]
Wolnostojaca/do zabudowy
N
ETYKIETA PRODUKTUPOLSKA
LG Electronics
GBB940DFQZT / GBB940BMQZT / GBB940LBQZT
GBB940DNQZN / GBB940SWQZT
7 (Chłodziarko-zamrazarka)
A++
246
Rzeczywiste zuzycie energii zalezy od tego, jak
urzadzenie jest uzywane oraz gdzie sie znajduje
255
105
Brak
Komora chłodziarki
Komora zamrazarki
16
11.3
SN-T
Urzadzenie to przeznaczone jest do uzycia w
temperaturze otoczenia pomiedzy 10°C a 43°C
39
Wolnostojaca
26
Page 55

Page 56

Produkty LG posiadają odpowiednie certyfikacje.
Informację o certyfikacji naszych produktów, dane o numerach
certyfikatów i terminie ich ważności można otrzymać w centrum obsługi klienta.
Model
Producent
Informacja
GBB940****T, GBB940****N
«LG Electronics RUS» LLC
Adres: 143160, Federacja Rosyjska, region
Moskwa, dystrykt Ruza, miejscowosc
Dorokhovskoye, 86-ty km autostrady Minskoe,
budynek 9.
Miesiac i rok produkcji jest umieszczony na
naklejce znajdujacej sie wewnatrz lodówki.
Page 57

PRODUCT FICHE
www.lg.com
Copyright © 2017 LG Electronics. All Rights Reserved.
Page 58

EN
Trade Mark
A
B
Model
Category
C
Energy efficiency class
D
E
Annual energy consumption
“XYZ” [kWh per year], based
on standard test results for
24 hours
Fresh Food
F
Storage Volume [L]
G
Frozen Food
Storage Volume [L]
H
Design temperature of other
compartments (>14°C)
I
Frost-Free
Compartments
Temperature Rise time [h]
J
Freezing Capacity [kg/24h]
K
L
Climate class
Airborne acoustical noise
M
emissions [dB(A)]
Free standing / Built-in
N
PRODUCT FICHEENGLISH
LG Electronics
GBB940DFQZT / GBB940BMQZT / GBB940LBQZT
GBB940DNQZN / GBB940SWQZT
7 (Refrigerator-Freezer)
A++
246
Actual energy consumption will depend on how the
appliance is used and where it is located
255
105
None
Fresh Food,
Frozen Food
16
11.3
SN-T
This appliance is intended to be used at ambient
temperature between 10°C and 43°C
39
Free standing
A (EN) Trade Mark /(AL) Marka tregtare /(BA) Zaštitni znak /(BG) Търговска марка / (CZ) Ochranná
známka /(DE) Warenzeichen des Lieferanten /(DK) Varemærke /(EE) Kaubamärk /(ES) Marca comercial
/(FI) Tavaramerkki /(FR) Marque /(GR) Εμπορικό σήμα· / (HR) Zaštitni znak /(HU) Gyártó /(IE) Trád-
mharc /(IS) Vörumerki /(IT) Marchio /(LT) Prekės ženklas /(LV) Preču zīme /(MK) Трговска марка / (MT)
Trademark /(NO
comerț /(RS) Trgovačka marka /(SE) Märke /(SI) Blagovna znamka /(SK) Obchodná značka /(TR) Ticari
marka
B (EN) Model /(AL) Modeli /(BA) Model /(BG) Модел /(CZ) Model /(DE) Modell /(DK) Model /(EE) Mudel /
(ES) Modelo /(FI) Malli /(FR) Modèle /(GR) Μοντέλο / (HR) Model /(HU) Modell /(IE) Múnla /(IS) Gerð /
(IT) Modello /(LT) M
Model /(PT) Modelo /(RO) Model /(RS) Model /(SE) Modell /(SI) Model /(SK) Model /(TR) Model
02
) Varemerke /(NL) Handelsmerk /(PL) Marka /(PT) Marca comercial /(RO) Marca de
odelis /(LV) Modelis /(MK) Модел /(MT) Mudell /(NO) Modell /(NL) Model /(PL)
Page 59

C (EN) Category : 7 (Regrigerator-Freezer) /(AL) Kategoria : 7 (Frigorifer-Ngrirës) /(BA) Kategorija :
7 (Hladnjak-zamrzivač) /(BG) Категория : 7 (Хладилник-фризер) / (CZ) Kategorie : 7 (Lednice s
mrazničkou) /(DE) Kategorie : 7 (Kühl- und Gefrierschrank) /(DK) Kategori : 7 (Køleskab - Fryser) /
(EE) Kategooria : 7 (Külmik-sügavkülmik) /(ES) Categoría : 7 (Refrigerador-congelador) /(FI) Kategoria : 7 (Jääkaappi-pakastin) /(FR) Catégorie : 7 (Réfrigérateur
(Ψυγειοκαταψύκτης) / (HR) Kategorija : 7 (Hladnjak-zamrzivač) /(HU) Kategóriája : 7 (Hűtőszekrényfagyasztó) /(IE) Catagóir : 7 (Cuisneán-reoiteoir) /(IS) Flokkur : 7 (Ísskápur - frystir) /(IT) Categoria : 7
(Frigorifero-freezer) /(LT) Kategorija : 7 (šaldytuvas-šaldiklis) /(LV) Kategorija : 7 (Ledusskapis-saldētava)
/(MK) Категорија : 7 (Ладилник-Замрзнувач) / (MT) Kategorija : 7 (Refriġeratur-friża) /(NO) Kategor
: 7 (Kjøleskap med fryser) /(NL) Categorie : 7 (Koel-vriescombinatie) /(PL) Kategoria : 7 (Chłodziarkozamrażarka) /(PT) Categoria : 7 (Frigorífico-congelador) /(RO) Categoria : 7 (Frigider-Congelator) /(RS)
Kategorija : 7 (Frižider-zamrzivač) /(SE) Kategori : 7 (Kombinerat kyl- och frysskåp) /(SI) Kategorija : 7
(Hladilnik-zamrzovalnik) /(SK) Kategória : 7 (Chladnička s mrazničkou) /(TR) Kategori : 7 (Buz dolabıdondurucu)
-congélateur) /(GR) Κατηγορία : 7
i
D (EN) Energy efficiency class /(AL) Klasa e efikasiteti
/(BG) Клас на енергийната ефективност / (CZ) Třída energetické účinnosti /(DE) Energieeffizien-
zklasse /(DK) Energieffektivitetsklasse /(EE) Energiaklass /(ES) Clase de eficiencia energética /(FI)
Energiatehokkuusluokka /(FR) Classe d’efficacité énergétique /(GR) Τάξη ενεργειακής απόδοσης /
(HR) Razred energetske učinkovitosti /(HU) Energiahatékonysági osztály /(IE) Aicmiúchán i dtac
héifeachtúlacht fuinnimh /(IS) Orkunýtniflokkur /(IT) Classe di efficienza energetica /(LT) Energijos vartojimo efektyvumo klasė /(LV) Energoefektivitātes klase /(MK) Класа на енергетска ефикасност / (MT)
Klassi tal-Effiċjenzja fl-Enerġija /(NO) Energieffektivitetsklasse /(NL) Energie-efficiëntieklasse /(PL) Klasa
efektywności energetycznej /(PT) Classe de eficiência energética /(RO) Clasa de eficiență energetică /
(RS) Klasa energet
(SK) Trieda energetickej efektívnosti /(TR) Enerji verimlilik sınıfı
E (EN) Annual energy consumption “XYZ” [kWh per year], based on standard test results for 24 hours.
Actual energy consumption will depend on how the appliance is used and where it is located. /(AL) Konsumi i energjisë “XYZ” kWh në vit, bazuar në rezultatet e testimit për 24 orë. Konsumi aktual i energjisë
do të varet nga mënyra se si përdoret pajisja dhe ku ndodhet ajo. /(BA) Godišnja potrošnja energije
"XYZ" [kWh po godini], bazirana na rezultatima standardnih testiranja u toku 24 časa. Stvarna potrošnja
energije će zavisiti toga kako se aparat koristi i gdje je lociran. /(BG) Консумация на енергия „XYZ“
kWh годишно въз основа на резултати от стандартно 24-часово изп итване. Действител
консумация на енергия ще зависи от това как се използва уредът и къде се намира. /(CZ)
Spotřeba energie ‚XYZ‘ kWh za rok, založená na výsledcích normalizované zkoušky po dobu 24 hodin.
Skutečná spotřeba energie závisí na způsobu použití a umístění spotřebiče. /(DE) Energieverbrauch
‚XYZ‘ kWh/Jahr, auf der Grundlage von Ergebnissen der Normprüfung über 24 Stunden. Der tatsächliche Verbrauch hängt von der Nutzung und vom Standort des Geräts ab. /(DK) Elforbrug »XYZ« kWh/
år, på grundlag af standardiserede prøvningsresultater for 24 timer. Det faktiske elforbrug vil afhænge
af, hvordan apparatet anvendes og dets placering. /(EE) Aastane energiatarbimine “XYZ” [kWh aastas]
põhineb standardsetel katsetulemustel 24 tunni jooksul. Tegelik energiatarve oleneb seadme kasutusviisist ja asukohast. /(ES) Consumo de energía “XYZ” kWh/año, según los resul
ba estándar de 24 horas; el consumo de energía real depende de las condiciones de uso del aparato y
de su localización. /(FI) Energiankulutus ’XYZ’ kWh vuodessa laskettuna vakio-olosuhteissa mitatun 24
tunnin tuloksen perusteella. Tosiasiallinen energiankulutus riippuu laitteen käyttötavoista ja laitteen sijoituksesta. /(FR) Consommation d’énergie de “XYZ” kWh par an, calculée sur la base du
pour 24 heures dans des conditions d’essai normalisées. La consommation d’énergie réelle dépend des
conditions d’utilisation et de l’emplacement de l’appareil. /(GR) Κατανάλωση ενέργειας “ΧΥΖ” kWh ανά
έτος, βάσει αποτελεσμάτων 24ωρης πρότυπης δοκιμής. Η πραγματική κατανάλωση ενέργειας
εξαρτάται από τον τρόπο χρήσης και τη θέση της συσκευής. / (HR) Potrošnja energije ‚XYZ’ kWh
godišnje (kWh/ god), na temelju r
potrošnja energije ovisit će načinu na koji se uređaj koristi i gdje je smješten. /(HU) kWh/év energiafog-
yasztás 24 órás szabványos teszteredmények alapján. A tényleges energiafogyasztás függ a készülék
elhelyezésétől és használatának módjától. /(IE) Ídiú fuinnimh bliantúil "XYZ" [kWh in aghaidh na bliana],
bunaithe ar thorthaí tástála caighdeánacha ar feadh 24 huai
ar conas a úsáidtear an fearas agus an áit ina bhfuil sé. /(IS) Árleg orkunýting "XYZ" [kWh á ári], byggt
ske efikasnosti /(SE) Energieffektivitetsklass /(SI) Razred energetske učinkovitosti /
ezultata dobivenih za 24 sata u standardnim ispitnim uvjetima. Stvarna
t të energjisë /(BA) Razred energetske efikasnosti
a le
ната
tados obtenidos en la prue-
résultat obtenu
re. Beidh an t-ídiú fuinnimh iarmhír ag brath
03
Page 60

á niðurstöðum úr stöðluðum prófum fyrir 24 klst. Raunveruleg orkunýting fer eftir því hvernig tækið er
notað og hvar það er staðsett. /(IT) Consumo di energia “XYZ” kWh/anno basato sui risultati di prove
standard per 24 ore. Il consumo effettivo dipende dalla modalità di utilizzo dell’apparecchio e dal luogo
in cui è installato. /(LT) Metinės energijos sąnaudos XYZ (kWh per metus) pagrįstos bandymo rezultatais, gautais per 24 valandas. Faktinės
naudojamas. /(LV) Enerģijas patēriņš gadā “XYZ” [kWh gadā], pamatojoties uz 24 stundu standarta testa
rezultātiem. Reālais enerģijas patēriņš būs atkarīgs no tā, kā ierīce tiek lietota un kur tā atrodas. /(MK)
Потрошувачка на електрична енергија “XYZ” киловат-часови годишно, на основа на стандардни
тест резултати за 24 часа. Вистинската потрошувачка на електрична енергија ќе
како се користи апаратот и каде е поставен. / (MT) Konsum tal-Enerġija fis-Sena "XYZ" (kWh kull
sena), ibbażat fuq riżultati tat-test standard għal 24 siegħa. Il-konsum propju tal-enerġija jiddependi fuq
kif it-tagħmir jintuża u fejn ikun jinsab /(NO) Energiforbruk "XYZ" kWh per år, basert på standard testresultater over 24 timer. Faktisk energiforbruk vil avhenge av hvordan apparatet brukes og hvor det er. /
(NL) Energieverbruik „XYZ” kWh per jaar, gebaseerd op de resultaten van standaardtests gedurende 24
uur. Het feitelijke energieverbruik is afhankelijk van de manier waarop het apparaat wordt gebruikt en de
plaats waar het zich bevindt. /(PL) Klasa efektywności energetycznej /(PT) Zużycie energii »XYZ« kWh
rocznie na podstawie wyników testu przeprowadzonego w normalnych warunkach w cyklu 24 godzinnym. Rzeczywiste zużycie energii zależy od sposobu użytkowania urządzenia i miejsca, w którym się
ono znajduje. /(RO) C
24 ore. Consumul real de energie va depinde de modul de utilizare a aparatului și de amplasamentul
acestuia. /(RS) Energetska efikasnost "XYZ“ kWh godišnje, na osnovu rezultata standardnih testiranja
u periodu od 24 časa. Stvarna energetska efikasnost će zavisiti od načina na koji se uređaj koristi i
gde je postavljen. /(SE) Energiförbrukning ’XYZ’ kWh per år, baserad på
provningar under 24 timmar. Den verkliga energiförbrukningen beror på hur apparaten används och var
den placeras. /(SI) Letna poraba energije XYZ kWh na leto na podlagi rezultatov standardnega preskusa
za 24 ur. Dejanska poraba energije je odvisna od načina uporabe aparata in njegove lokacije. /(SK)
Spotreba energie ‚XYZ‘ kWh za rok na základe výsledkov štandardného testu za 24 hodín. Skutočná
spotreba energie bude závisieť od toho, ako sa spotre
tüketimi "XYZ" [yıllık kWs], 24 saatlik standart test sonuçlarına dayandırılmıştır. Esas enerji tüketimi
aygıtın nasıl kullanıldığına ve nerede konumlandığına bağlıdır.
onsum de energie «XYZ» kWh pe an, pe baza rezultatelor testelor standard pentru
energijos sąnaudos priklausys nuo to, kaip ir kur aparatas bus
зависи од тоа
resultat från standardiserade
bič používa a kde je umiestnený. /(TR) Yıllık enerji
F (EN) Fresh Food Storage Volume [L] /(AL) Volumi i magazinimit të ushqimit të freskët [L] /(BA)
Zapremina odjeljka svježih namirnica [L] /(BG) Обем на съхранение на пресни храни [L] / (CZ) Objem
čerstvých potravin [L] /(DE) Fassungs
til friske fødevarer [L] /(EE) Värskete toiduainete maht [L] /(ES) Volumen total de almacenaje de alimentos frescos [L] /(FI) Tuoreen ruoan säilytystilavuus [L] /(FR) Volume de stockage des aliments frais [L] /
(GR) Όγκος Αποθήκευσης Φρέσκων Τροφίμων [L] / (HR) Zapremnina čuvanja svježe hrane [L] /(HU)
Friss élelmiszer-tárolókapacitás [L] /(IE) Méid stórála bia úire [L] /(IS) Geymsl
/(IT) Capacità conservazione cibi freschi [L] /(LT) Šviežių maisto produktų laikymo kameros talpa, [L] /
(LV) Svaigās pārtikas uzglabāšanas nodalījuma tilpums [L] /(MK) Волумен на складирање на свежа
храна [L] /(MT) Volum talħżin ta' ikel frisk [L] /(NO) Ferskmat Lagringsvolum [L] /(NL) Volume voor
opslag van vers voedsel [L] /(PL) Pojemność użytkowa chłodziarki [L] /(PT) Volume de alimentos frescos
armazenados [L] /(RO) Volum de depozitare pentru alimente proaspete [L] /(RS) Zapremina prostora za
čuvanje svežih namirnica [L] /(SE) Förvaringsvolym för färska livsmedel [L] /(SI) Prostornina za shranjevanje svežih živil [L] /(SK) Objem čerstvých potravín [L] /(TR) Taze gıda depolama hacmi [L]
G (EN) Frozen Food Storage Volume [L] /(AL) Volumi i magazinimit të ushqimit të ngrirë [L] /(BA)
Zapremina odjeljka zamrznutih namirnica [L] /(BG) Обем на съхранение на замразени храни [L]
(CZ) Objem mražených potravin [L] /(DE) Fassungsvermögen für Tiefkühlkost [L] /(DK) Kapacitet til
frosne fødevarer [L] /(EE) Külmutatud toiduainete maht [L] /(ES) Volumen de almacenaje de alimentos
congelados [L] /(FI) Pakasteruoan säilytystilavuus [L] /(FR) Volume de stockage des aliments congelés
[L] /(GR) Όγκος Αποθήκευσης Κατεψυγμένων Τροφίμων [L] / (HR) Zapremnina čuvanja zamrznute
hrane [L] /(HU) Fagyasztókapacitás [L] /(IE) Méid stórála bia reoite [L] /(IS) Geymslurými fyrir frystan
mat [L] /(IT) Capacità totale conservazione cibi congelati [L] /(LT) Užšaldytų maisto produktų laikymo
talpa, [L] /(LV) Saldētas pārtikas uzglabāšanas nodalījuma tilpums [L] /(MK) Волумен на складирање
на смрзната храна [L] / (MT) Volum tal-ħżin ta' ikel iffriżat [L] /(NO) Frossenmat Lagringsvolum [L] /(NL)
Volume voor opslag van bevroren voedsel [L] /(PL) Pojemność użytkowa chłodziarki [L] /(PT)
vermögen für frische Lebensmittel [L] /(DK) Opbevaringskapacitet
urými fyrir ferskan mat [L]
Pojemność
/
04
Page 61

użytkowa zamrażarki [L] /(RO) Volum de depozitare pentru alimente congelate [L] /(RS) Zapremina prostora za čuvanje zamrznutih namirnica [L] /(SE) Förvaringsvolym för frysta livsmedel [L] /(SI) Prostornina
za shranjevanje zamrznjenih živil [L] /(SK) Objem mrazených potravín [L] /(TR) Donmuş gıda depolama
hacmi [L]
H (EN) Design temperature of other compartments (>14°C) : – /(AL) Temperatura e dhomës tjetër ( >14°C)
: – /(BA) Predviđena temperatura drugog odjeljka (>14°C) : – /(BG) Температура в останалото
деление ( >14°C) : – /(CZ) Teplota ostatních oddílů ( >14°C) : – /(DE) Temperatur im anderen Fach
от
(>14°C) : – /(DK) Temperatur andet rum ( >14°C) : – /(EE) Lähtetemperatuur teistes kambrites (>14°C)
: – /(ES) Temperatura de otros compartimentos ( >14°C) : – /(FI) Muun osan lämpötila ( >14°C) : – /(FR)
Température des autres compartiments (>14°C) : – /(GR) Θερμοκρασία άλλου θαλάμου ( >14°C) : – /
(HR) Temperatura ostalih pretinaca ( >14°C) : – /(H
deartha den urrann eile (>14°C) : – /(IS) Hannið hitastig annara hólfa (>14°C) : – /(IT) Temperatura di
altro compartimento ( >14°C) : – /(LT) Kitos kameros projektinė temperatūra (>14°C) : – /(LV) Aplēses
temperatūra citā nodalījumā (>14°C) : – /(MK) Температура на другиот оддел ( >14°C) : – / (MT)
Temperatura tad-disinn tal-kompartiment ieħor (>14°C) : – /(NO) Temperatur annen avdeling ( >14°C) : –
/(NL) Temperatuur van andere ruimten ( >14°C) : – /(PL) Temperatura pozostałych komór (> 14°C) : – /
(PT) Temperatura de outro compartimento (> 14°C) : – /(RO) Temperatura altui compartiment ( >14°C)
: – /(RS) Temperatura drugih odeljaka ( >14°C) : – /(SE) Temperatur, övrigt utrymme ( >14°C) : – /(SI)
Temperatura drugih predelkov ( >14°C) : – /(SK) Teplota ostatných oddelení ( >14°C) : – /(TR) Diğer
bölmenin tasarım sıcaklığı (>14°C) : –
U) Többi tér hőmérséklete ( >14°C) : – /(IE) Teocht
I (EN) Frost-Free Compartments : Fresh Food, Frozen Food /
ndarjet e frigoriferit /(BA) Odjeljak bez leda : Svježih namirnica, Zamrznutih namirnica /(BG) Без скреж :
Отделение за съхранение на пресни храни, Отделение за замразени храни / (CZ) Beznámrazový :
Prostorem pro čerstvé potraviny, Prostorem pro mražené potraviny /(DE) Frostfrei : Lagerfach für frische
Lebensmittel, Gefriergut-Lagerfach /(DK) No frost : Rum til opbevaring af ferske madvarer, Rum til
opbevaring af frosne madvarer /(EE) Jäävaba : Värske toidu, Külmutatud toidu /(ES) Libre de escarcha
: Compartimento de conservación de alimentos frescos, Compartimento de conservación de alimentos
congelados /(FI) Automaattisulatteinen : Tuoreiden ruoka-aineiden säilytysosastolla, Pakastinosastolla /
(FR) Sans givre : Compartiment de stockage de denrées alimentaires fraîches, Compartiment de stockage de denrées alimentaires congelées /(GR) θάλαμος χωρίς πάγο : θάλαμος αποθήκευσης νωπών
τροφίμων, θάλαμος αποθήκευσης κατεψυγμένων τροφίμων / (HR) Bez nakupljanja leda : Odjeljak
za čuvanje svježe hrane, Odjeljak za čuvanje zamrznute hrane /(HU) Jegesedésmentes : Friss élelmiszerek tárolására alkalmas tér, Fagyasztott élelmiszer tárolására szánt tér /(IE) Urrann gan sioc : - Bia úire,
Bia reoite /(IS) Frystifrítthólf : Ferskan mat, Frystan mat /(IT) Antibrin : Scomparto per la conservazione
di alimenti freschi, Scomparto per surgelati /(LT) Bešerkšnė kamera : Šviežių maisto produktų, Užšaldytų
maisto produktų /(LV) Bezsarmas nodalījums : Svaigās pārtikas, Saldētas pārtikas /(MK) Без мраз :
Фрижидер оддел, Замрзнувач оддел / (MT) Kompartiment mingħajr ġlata : Ikel frisk, Ikel iffriżat /(NO)
Frostfri : Kjøleskap, Fryser avdeling /(NL) No-frost : Bewaarruimte voor verse levensmiddelen, Diepvriesbewaarruimte /(PL) System bezszronowy : Komora do przechowywania świeżej żywności, Komora do
przechowywania zamrożonej żywności /(PT) Sem gelo : Compartimento de armazenagem de alimentos
frescos, Compartimento de armazenagem de alimentos congelados /(RO) Fără gheață : Compartiment de păstra
zamrzavanja : Frižider, Zamrzivač /(SE) Frostfri : Utrymme för förvaring av färska matvaror, Förvaringsutrymme för frysta matvaror /(SI) Brez ledu : Predelek za shranjevanje sveže hrane, Predelek za shranjevanje zamrznjene hrane /(SK) Beznámrazový systém : Oddelenie na uchovávanie čerstvých potravín,
Oddelenie na uchovávanie mrazených potravín /(TR) Buzlanmayan bölme : Taze gıda, Donmuş gıda
J (EN) Temperature Rise time [h] /(AL) Koha
perature [h] /(BG) Време за повишаване на температурата [ч] / (CZ) Bezpečná doba uchování bez
napájení [h] /(DE) Temperaturanstiegszeit [h] /(DK) Temperaturstigningstid [h] /(EE) Temperatuuri tõusu
aeg [h] /(ES) Tiempo de incremento de temperatura [h] /(FI) Lämpötilan nousuaika [t] /(FR) Durée de
l'augmentation de température [h] /(GR) Χρόνος αύξησης θερμοκρασίας [ωρο] / (HR) Vrijeme porasta
temperature [h] /(HU) Hőmérséklet emelkedés ideje [óra] /(IE) Am ardaithe teochta [u] /(IS) Timi hitastigshækkunar [h] /(IT) Tempo necessario per l’aumento della temperatura [h] /(LT) Temperatūros nuostačio
pasiekimo trukmė [h] /(LV) Temperatūras paaugstināšanās laiks [h] /(MK) Време на зголемување на
re a alimentelor proaspete, Compartiment de păstrare a alimentelor congelate /(RS) Bez
e ngritjes së temperaturës [h] /(BA) Vrijeme porasta tem-
(AL) Pa formim bryme : ndarjet e frigoriferit,
05
Page 62

температура [ч] / (MT) Ħin taż-żieda tat-temperatira [h] /(NO) Temperaturstigningstid [time] /(NL) Tijd
temperatuurstijging [uur] /(PL) Czas wzrostu temperatury [h] /(PT) Tempo de subida da temperatura [h] /
(RO) Timp de creștere a temperaturii [h] /(RS) Vreme rasta temperature [h] /(SE) Temperaturstigtid [tim] /
(SI) Čas dviga temperature [h] /(SK) Čas teplotného nárastu [h] /(TR) Sıcaklık yükselme süresi [h]
K (EN) Freezing Capacity [kg/24h] /(AL) Kapaciteti ngrirës [kg/24 h] /(BA) Kapacitet zamrzavanja [kg/24h]
/(BG) Капацитет на замразяване [kg/24 ч] / (CZ) Mrazicí výkon [kg/24 h] /(DE) Gefrierkapazität [kg/24
h] /(DK) Indfrysningskapacitet [kg/24 h] /(EE) Külmutusvõimsus [kg/24h] /(ES) Capacidad de congelación
[kg/24 h] /(FI) Pakastusteho [kilogrammoina vuorokaudessa] /(FR) Capacité de congélation [kg/24 h] /
(GR) Ικανότητα ψύξης [kg/24 ωρο] / (HR) Kapacitet zamrzavanja [kg/24 h] /(HU) Fagyasztási kapacitás
[kg/24 órában] /(IE) Acmhainn reo [kg/24u] /(IS) Frystigeta [kg/24h] /(IT) Potenza di congelamento [kg/24
h] /(LT) Šaldymo geba [kg/24h] /(LV) Saldēšanas jauda [kg/24h] /(MK) Капацитет за замрзнување
[кг/24ч] /(MT) Kapaċità ta' friża [kg/24h] /(NO) Frysekapasitet [kg/døgn] /(NL) Vriesvermogen [kg/24 uur]
/(PL) Wydajność zamrażania [kg/24 h] /(PT) Capacidade de congelamento [kg/24 h] /(RO) Capacitatea
frigiderului (kg/24 ore) /(RS) Kapacitet zamrzavanja [kg/24 h] /(SE) Fryskapacite
zovalna zmogljivost [kg/24 h] /(SK) Kapacita mrazenia [kg/24 h] /(TR) Dondurma kapasitesi [kg/24h]
L (EN) Climate class : This appliance is intended to be used at ambient temperature between 16°C
and 43°C. /(AL) Kategoria e klimës : Kjo pajisje është ndërtuar të përdoret në temperaturë ambienti
mes 16°C dhe 43°C. /(BA) Klimatski razred : Ovaj aparat je namjenjen za upotrebu na temperaturi
ambijenta između 16
пространства стемпература на околната среда от 16°C до 43°C. / (CZ) Klimatická třída : Tento
spotřebič je určen k použití za teploty okolí od 16°C do 43°C. /(DE) Klimaklasse : Dieses Gerät ist für
den Betrieb bei einer Umgebungstemperatur zwischen 16°C und 43°C bestimmt. /(DK) Klimaklasse :
Apparatet er beregnet til brug ved en omgivelsestemperatur på mellem 16°C og 43°C. /(EE) Kliimatüüp :
Seade on mõeldud kasutamiseks ümbritseva õhutemperatuuriga 16°C kuni 43°C. /(ES) Clase climática
: Este aparato está destinado a ser utilizado en una temperatura ambiente entre 16°C e 43°C. /(FI)
Ilmastoluokka : Tämä laite on tarkoitettu käytettäväksi ympäristössä, jonka lämpötila on 16°C – 43°C. /
(FR) Classe climatique : Cet appareil est conçu pour être utilisé à une température ambiante com-
prise entre 16°C et 43°C. /(GR) Κλιματική κλάση : Η παρούσα συσκευή προορίζεται για χρήση σε
θερμοκρασία περιβάλλοντος μεταξύ 16°C και 43°C. / (HR) Klimatski razred : Ovaj je uređaj namijen-
jen upotrebi na temperaturi okoline između 16°C i 43°C. /(HU) Klíma osztály : Ezt a készüléket 16°C és
43°C közötti környezeti hőmérsékleten való használatra tervezték. /(IE) Aicmiúchán i dtaca le haeráid :
Beartaítear go mbainfear úsáid as an fearas seo ag teocht chomhthimpeallach idir 16°C agus 43°C. /(IS)
Loftslagsflokkur : Þetta tæki er ætlað til notkunar við stofuhita milli 16 °C og 43 °C. /(IT)
: Questo apparecchio è destinato all’uso con una temperatura ambiente compresa tra 16°C e 43°C. /(LT)
Klimato klasė : Šis aparatas skirtas naudoti 16–43 °C temperatūros aplinkoje. /(LV) Klimata klase : Šī
ierīce ir paredzēta izmantošanai vides temperatūrā starp 16°C un 43°C . /(MK) Климатска класа : Овој
уред е наменет за користење во околина со температура меѓу 16°C и 43°C /(MT) Klassi tal-Klima
: Dan it-tagħmir hu maħsub li jintuża f'temperatura ambjentali
Dette apparatet er beregnet på bruk ved omgivelsestemperaturer mellom 16°C og 43°C. /(NL) Klimaatklasse : Dit apparaat is bedoeld voor gebruik bij een omgevingstemperatuur tussen 16°C en 43°C. /(PL)
Klasa klimatyczna : Urządzenie przeznaczone do użytku w temperaturze otoczenia od 16°C do 43°C. /
(PT) Classe climática : Este aparelho destina-se a ser utilizado a uma temperatura ambiente entre 16°C
e 43°C. /(RO) Clasă de climatizare : Acest aparat este destinat utilizării
16°C și 43°C. /(RS) Klimatska klasa : Ovaj uređaj je namenjen za upotrebu na sobnoj temperaturi od
16°C do 43°C. /(SE) Miljöklass : Denna apparat är avsedd att användas vid en omgivningstemperatur
mellan 16°C och 43°C. /(SI) Klimatski razred : Ta aparat se uporablja pri temperaturah prostora od 16°C
do 43°C. /(SK) Klimatická trieda : Tento spotrebič je určený na používanie pri izbovej teplote od 16°C do
43°C. /(TR) İklim sınıfı : Bu aygıtın 16 ve 43 arası ortam sıcaklığında kullanılması amaçlanmıştır.
i 43 . / (BG) Климатичен клас : Този уред е предназначен за работа в
ta' bejn 16°C u 43°C. /(NO) Klimaklasse :
t [kg/24 tim] /(SI) Zamr-
Classe climatica
la o temperatură ambiantă între
M (EN) Airborne acoustical noise emissions [dB(A)] /(AL) Fuqia e zhurmës [dB(A)] /(BA) Emisija buke [dB
(A)] /(BG) Излъчваният въздушен шум [dB(A)] / (CZ) Emise hluku šířeného vzduchem [dB(A)] /(DE)
Luftschallemissionen [dB(A)] /(DK) Emission af luftbåren støj [dB(A)] /(EE) Õhus leviva müra tase [dB(A)]
/(ES) Emisiones de ruido acústico aéreo [dB(A)] /(FI) Äänitaso ilmaistuna äänen tehona dB(A) /(FR)
Émissions acoustiques
/(HR) Emisije buke koja se prenosi zrakom [dB(A)] /(HU) Levegőben terjedő akusztikus zajkibocsátás
dans l’air [dB(A)] /(GR) Εκπομπές αερόφερτου ακουστικού θορύβου [dB(A)]
06
Page 63

[dB(A)] /(IE) Astaíochtaí fuaimthorainn aerbheirthe [dB (A)] /(IS) Hávaðamengun hljóðstyrks sem berst
með loftinu [dB (A)] /(IT) Emissioni di rumore aereo [dB(A)] /(LT) Ore sklindantis skleidžiamas akustinis triukšmas, [dB(A)] /(LV) Gaisā pārraidīto akustisko trokšņu emisijas [dB(A)] /(MK) Ниво на сила
на звук [dB(A)] /(MT) Emmissjonijiet fl-arja ta' storbju akustiku [dB (A)] /(NO) Lydeffekt [dB(A)] /(NL)
Geluidsemissie via de lucht [
de ruído [dB(A)] /(RO) Emisiile de zgomot transmis prin aer [dB(A)] /(RS) Nivo proizvedene buke [dB(A)]
/(SE) Luftburet akustiskt buller [dB(A)] /(SI) Emisije akustičnega hrupa, ki se prenaša po zraku [dB(A)] /
(SK) úrovne vydávaného hluku prenášaného vzduchom [dB(A)] /(TR) Hava ile yayılan akustik gürültü
salımları [dB (A)]
dB(A)] /(PL) Poziom emitowanego hałasu [dB(A)] /(PT) Nível de emissões
N (EN) Free stand
самостоятелно /(CZ) Volně stojící /(DE) Freistehend /(DK) Fritstående /(EE) Vabalt seisev /(ES) Independiente /(FI) Vapaasti seisova /(FR) Autonome /(GR) Ελεύθερο / (HR) Samostojeći /(HU) Szabadon
álló /(IE) As féin /(IS) Frístandandi /(IT) Autoportante /(LT) Pastatomasis /(LV) Brīvi stāvošs /(MK)
Слободно стоечки / (MT) Jieqa
Solto /(RO) Independent /(RS) Samostalno /(SE) Fristående /(SI) Prostostoječi /(SK) Voľne stojace /(TR)
Bağımsız
ing / Built-in : Free standing /(AL) Me qëndrim të lirë /(BA) Stojeći /(BG) Стоящ
f waħdu /(NO) Frittstående /(NL) Los staand /(PL) Wolnostojący /(PT)
07
Page 64

Warning for flammable material
WARNING
Warning : Risk of fire /
Flammable materials
Isobutane, R600a
Cyclopentane
A (EN) WARNING /(AL) PARALAJMËRIM /(BA) UPOZORENJE /(BG) ПРЕДУПРЕЖДЕНИЕ / (CZ)
VAROVÁNÍ /(DE) WARNUNG /(DK) ADVARSEL /(EE) HOIATUS /(ES) ADVERTENCIA /(FI) VAROITUS
/(FR) AVERTISSEMENT /(GR) ΠΡΟΕΙΔΟΠΟΊΗΣΗ /(HR) UPOZORENJE /(HU) FIGYELMEZTE-
TÉS /(IE) RABHADH /(IS) VIÐVÖRUN /(IT) ATTENZIONE /(LT) ĮSPĖJIMAS /(LV) BRĪDINĀJUMS /
(MK) ПРЕДУПРЕДУВАЊЕ / (MT) TWISSIJA /(NO) ADVARSEL /(NL) WAARSCHUWING /(PL)
OSTRZEŻENIE /(PT) AVISO /(RO) AVERTISMENT /(RS) UPOZORENJE /(SE) VARNING /(SI) OPOZORILO /(SK) VAROVANIE /(TR) UYARı
B (EN) Warning : Risk of fire / Flammable materials /(AL) Paralajmërim : Rrezik zjarri / Materiale të
ndezshme /(BA) Upozorenje: Opasnost od požara / Zapaljivi materijali /(BG) Предупреждение : Риск
от пожар / Запалими материали / (CZ) Varování : Nebezpečí vzniku požáru / Hořlavé materiály /(DE)
Warnung : Brandgefahr / Brennbare Materialien /(DK) Adva
/(EE) Hoiatus : tuleoht / Tuleohtlikud materjalid /(ES) Advertencia : Riesgo de incendio / Materiales
inflamables /(FI) Varoitus : Tulipalovaara / Syttyviä materiaaleja /(FR) Avertissement : Risque d'incendie
/ Matériaux inflammables /(GR) Προειδοποίηση : Κίνδυνος φωτιάς / Εύφλεκτα υλικά / (HR) Upozo-
renje: Opasnost od požara / Zapaljivi materijali /(HU) Figyelmeztetés : Tűzveszély / Gyúlékony anyagok
/(IE) Rabhadh: Baol Dóiteáin / Ábhair inlasta /(IS) Viðvörun: Hætta á bruna / Eldfim efni /(IT) Attenzione
: rischio d’incendio / Materiale infiammabile /(LT) Įspėjimas: gaisro rizika / Degiosios medžiagos /(LV)
Brīdinājums: Ugunsgrēka risks / Viegli uzliesmojoši materiāli /(MK) Предупредување : Опасност
од пожар / Запаливи материјали / (MT) Twissija: Riskju ta' nar / Materjali fjammabbli /(NO) Advarsel : Brannfare / Brennbare materialer /(NL) Waarschuwing : Brandgevaar / Brandbare materialen
(PL) Ostrzeżenie : Ryzyko pożaru / Materiały łatwopalne /(PT) Aviso : Risco de incêndio / Materiais
inflamáveis /(RO) Avertisment : Risc de incendiu / Materiale inflamabile /(RS) Upozorenje : Opasnost od
požara / Zapaljivi materijali /(SE) Varning : Brandrisk / Brandfarligt material /(SI) Opozorilo : nevarnost
požara / Vnetljivi materiali /(SK) Varovanie : Nebezpečenstvo požiaru / Horľavé materiály /(TR) Uyarı:
Yangın riski / Yanabilir maddeler
A
B
C
D
rsel : Brandrisiko / Brandfarlige materialer
/
C (EN) Isobutane, R600a /(
Izobutan, R600a /(DE) Isobutan, R600a /(DK) Isobutan, R600a /(EE) Isobutaan, R600a /(ES) Isobutano,
R600a /(FI) Isobutaani, R600a /(FR) Isobutane, R600a /(GR) Ισοβουτάνιο, R600a / (HR) Izobutan,
R600a /(HU) Izobután, R600a /(IE) Isobutane, R600a /(IS) Ísóbútan, R600a /(IT) Isobutano, R600a /
(LT) Izobutanas, R600a /(LV) Izobutāns, R600a /(MK) Изобутан
Isobutan, R600a /(NL) Isobutaan, R600a /(PL) Izobutan, R600a /(PT) Isobutano, R600a /(RO) Izobutan,
R600a /(RS) Izobutan, R600a /(SE) Isobuten, R600a /(SI) Izobutan, R600a /(SK) Izobután, R600a /(TR)
İzobutan, R600a
D (EN) Cyclopentane /(AL) Ciklopentan /(BA) Ciklopentan /(BG) Циклопентан / (CZ) Cyklopentan /(DE)
Zyklo-Pentan /(DK) Cyklopentan /(EE) Tsüklopentaan /(ES) Ciclopentano
Cyclopentane /(GR) Κυκλοπεντάνιο / (HR) Ciklopentan /(HU) Ciklopentán /(IE) Cioglaipeintéin /(IS)
Svklópentan /(IT) Ciclopentano /(LT) Ciklopentanas /(LV) Ciklopentāns /(MK) Циклопентан /(MT) Cyclopentane /(NO) Syklopentan /(NL) Cyclopentaan /(PL) Cyklopentan /(PT) Ciclopentano /(RO) Ciclopentan
/(RS) Ciklopentan /(SE) Cyclopentan /(SI) Ciklopentan /(SK) Cyklopentán /(TR) Siklopentan
AL) Izobutan, R600a /(BA) Izobutan, R600a /(BG) Изобутан, R600a /(CZ)
, R600a /(MT) Isobutane, R600a /(NO)
/(FI) Syklopentaani /(FR)
08
Page 65

Rating label
B
A
D
F/G
J/K
Serial number
Polska
Italia
www.lg.com
Mod el:
Refrigerator-Freezer
Rated voltage
Rated input :
- Of sheath heater
Volume total, Storage/Gross :
- fresh food compartment
- frozen food compartment
Class of protection against
electric shock
Insulation Blowing agent
Manufacturer: «LG Electronics RUS» LLC
Address: 143160, Russian Federation, Moscow
region, Ruza district, Dorokhovskoye rural village,
86th km of Minskoe highway, building 9
Single contact point - for compliance matters
LG Electronics Inc. EU Representative
Address: Krijgsman 1, 1186 DM Amstelveen,
The Netherlands
199-600-099
Cyclopentane
România
Сlimate сlass
Rated сurrent
Freezing capacity- Defrost input
Energy Efficiency Class
- chiller compartment
- section "Two star"
Refrigerant / Weight
Weigth
Dimensions
Made in Russian Federation
031-228-3542
C
E
I
H
L
A (EN) Refrigerator-freezer Frost free /(AL) Frigorifer-ngrirës Pa formim bryme /(BA) Hladnjak-zamrzivač
bez leda /(BG) Хладилник-фризер Без скреж / (CZ) Lednice s mrazničkou Beznámrazový /(DK)
Køleskab - Fryser No frost /(EE) Külmik-sügavkülmik Külmumiskindel /(ES) Refrigerador-congelador
Libre de escarcha /(FI) Jääkaappi-pakastin Automaattisulatteinen /(FR) Réfrigérateur-congélateur Sans
givre /(HR) Hladn
jak-zamrzivač Bez nakupljanja leda /(HU) Hűtőszekrény-fagyasztó Jegesedésmentes
/(IE) Cuisneán-reoiteoir Urrann gan sioc /(IS) Ísskápur – frystir Frystifrítthólf /(LT) Šaldytuvas-šaldiklis
Be šerkšno /(LV) Ledusskapis-saldētava Bezsarmas sistēma /(MK) Ладилник-замрзнувач Без мраз /
(MT) Refriġeratur-friża mingħajr ġlata /(NO) Kjøleskap-Fryser Frostfri /(NL) Réfrigérateur-congélateur
No-frost /(PL) Chłodziarko-zamra
żarka System bezszronowy /(PT) Frigorífico-congelador Sem gelo /
(RO) Combină frigorifică Fără gheață /(RS) Frižider-zamrzivač Bez zamrzavanja /(SE) Kyl- och frysskåp
Frostfri /(SI) Hladilnik-zamrzovalnik Brez ledu /(SK) Chladnička s mrazničkou Beznámrazový systém /
(TR) Buz dolabı-dondurucu ompartiment mingħajr ġlata
B (EN) Model /(AL) Modeli /(BA) Model /(BG) Модел /(CZ) Model /(DK) Model /(EE) Mudel /(ES) Modelo /
(FI) Malli /(FR) Modèle /(HR) Model /(HU) Modell /(IE) Múnla /(IS) Gerð /(LT) Modelis /(LV) Modelis /(MK)
Модел /(MT) Mudell /(NO) Modell /(NL) Model /(PL) Model /(PT) Modelo /(RO) Model /(RS) Model /(SE)
Modell /(SI) Model /(SK) Model /(TR) Model
C (EN) Climate class /(AL) Kategoria e klimës /(BA) Klimatski razred /(BG) Климатичен клас / (CZ)
Klimatická třída /(DK) Klimaklasse /(EE) Kliimatüüp /(
ES) Clase climática /(FI) Ilmastoluokka /(FR)
Classe climatique /(HR) Klimatski razred /(HU) Klíma osztály /(IE) Aicmiúchán i dtaca le haeráid /(IS)
Loftslagsflokkur /(LT) Klimato klasė /(LV) Klimata klase /(MK) Климатска класа / (MT) Klassi tal-Klima /
(NO) Klimaklasse /(NL) Klimaatklasse /(PL) Klasa klimatyczna /(PT) Classe climática /(RO) Clasa de climatizare /(RS) Klimatska klasa /(SE) Miljöklass
/(SI) Klimatski razred /(SK) Klimatická trieda /(TR) İklim
sınıfı
D (EN) Defrosting input /(AL) Hyrja e shkrirjes /(BA) Ulaz odmrzavanja /(BG) Потребявана мощност за
размразяване /(CZ) Příkon při rozmrazování /(DK) Optøningsindgang /(EE) Sulatamise sisend /(ES)
Entrada de desescarche /(FI) Sulatuksen tulo /(FR) Entrée de décongélation /(HR) Ulaz odmrzavanja /
(HU) Leolvasztási bemenet /(IE) Ionchur dí-reoite /(IS) Inntak þiðnunar /(LT) Energijos poreikis atšildymui
/(LV) Atsaldēšanas ievade /(MK) Одмрзнувачки влез /(MT) Input ta' iddiffrostjar /(NO) Nominelt av
tining /(NL) Ingang ontdooien /(PL) Wejście odmrażania /(PT) Entrada para descongelação /(RO) Putere
dezghețare /(RS) Ulazna snaga za odmrzavanje /(SE) Avfrostningseffekt /(SI) Odjemna moč za odleditev
/(SK) Príkon rozmrazovania /(TR) Buz çözme girişi
09
Page 66

E (EN) Freezing Capacity /(AL) Kapaciteti ngrirës /(BA) Kapacitet zamrzavanja /(BG) Капацитет на
замразяване /(CZ) Mrazicí výkon /(DK) Indfrysningskapacitet /(EE) Külmutusvõimsus /(ES) Capacidad
de congelación /(FI) Pakastusteho /(FR) Capacité de congélation /(HR) Kapacitet zamrzavanja /(HU)
Fagyasztási kapacitás /(IE) Acmhainn reo /(IS) Frystigeta /(LT) Šaldymo geba /(LV) Saldēšanas jauda /
(MK) Капац
(PL) Wydajność zamrażania /(PT) Capacidade de congelamento /(RO) Capacitatea frigiderului /(RS)
Kapacitet zamrzavanja /(SE) Fryskapacitet /(SI) Zamrzovalna zmogljivost /(SK) Kapacita mrazenia /(TR)
Dondurma kapasitesi
F (EN) Storage VOL /(AL) volumit të ruajtjes /(BA) skladišna zapremina /(BG) полезен обем /(CZ) úložný
prostor
säilytystilavuus /(FR) volume de stockage /(HR) obujam skladištenja /(HU) tároló térfogat /(IE) Méid iomlán stórála /(IS) rgeymslurými /(LT) volume di conservazione /(LV) nodalījuma tilpums /(MK) волумен
за складирање /(MT) tal-volum tal-ħżin /(NO) Lagringsvolum /(NL) opslagvolume /(PL) pojemność
przechowywania /(PT
na /(SE) lagringsvolym /(SI) prostornina shranjevalnega prostora /(SK) objem úložného priestoru /(TR)
depolama hacmi
G (EN) Gross VOL /(AL) Volumi bruto /(BA) Bruto zapremina /(BG) Бруто обем /(CZ) Hrubý objem
úložného prostoru /(DK) Bruttokapacitet /(EE) Kogumaht /(ES) Volumen bruto /(FI)
Volume brut /(HR) Bruto obujam /(HU) Bruttó térfogat /(IE) Ollmhéid /(IS) Heildarmagn /(LT) Bendroji talpa /(LV) Bruto tilpums /(MK) Бруто волумен /(MT) Volum gross /(NO) Bruttovolum /(NL) Bruto volume /
(PL) Pojemność brutto /(PT) Volume bruto /(RO) Volum brut /(RS) Bruto zapremina /(SE) Bruttovolym /
(SI) Bruto prostornina /(SK) Hrubý objem /(TR) Brüt hacim
H (EN) 2star section /(AL) Seksioni me 2 yje /(BA) Odjeljak 2 zvjezdice /(BG) Отделение с 2 звезди /
(CZ) sekce s 2 hvězdičkami energetické účinnosti /(DK) 2-stjernet afsnit /(EE) 2-tärniline osa /(ES) Sección 2 estrellas /(FI) 2star-osa /(FR) Section 2star /(HR) Odjeljak s 2 zvjezdice /(HU) 2 csillagos rész /
(IE) Cuid 2réalta /(IS) 2stjörnu hluti /(LT) Dviejų žvaigždučių kamera /(LV) 2 zvaigžņu nodalījums /(MK)
оддел со 2 ѕвезди /(MT) sezzjoni 2star /(NO) 2-stjernersseksjon /(NL) 2-ster-gedeelte /(PL) Sekcja
2star /(PT) Secção 2 estrelas /(RO) secțiunea 2stele /(RS) 2star odeljak /(SE) Tvåstjärnig avdelning /(SI)
Oddelek z dvema zvezdicama /(SK) Sekcia s 2 hviezdičkovým energetickým hodnotením /(TR) 2yıldız
bölümü
итет за замрзнување / (MT) Kapaċità ta' friża /(NO) Frysekapasitet /(NL) Vriesvermogen /
/(DK) opbevaringskapacitet /(EE) Hoiustamise kohumaht /(ES) Volumen de almacenaje /(FI)
) Volume de armazenamento /(RO) Volum de depozitare /(RS) skladišna zapremi-
Bruttotilavuus /(FR)
I (EN) CHILL /(AL) ftohtësi /(BA) hladnoća /(BG) студенина /(CZ) chlad /(DK) Kold /(EE) külmus /(ES)
frío
/(FI) kylmyys /(FR) froideur /(HR) hladnoća /(HU) hidegség /(IE) Chill /(IS) slappað /(LT) šaltumas /
(LV) aukstums /(MK) студенило /(MT) kesħa /(NO) kjølig /(NL) koude /(PL) chłód /(PT) frio /(RO) racoare /(RS) хладноћа /(SE) kyla /(SI) hladnost /(SK) chlad /(TR) soğuk
J (EN) Insulation blowing gas /(AL) Izolimi i gazit qarkullues /(BA) Izolacioni plin /(BG) Пенообразувател
за изолацията /(CZ) Pohonný plyn pěnové izolace /(DK) Gas til isoleringsskum /(EE) Isolatsioon puhub
gaasi /(ES) Gas aislante insuflado /(FI) Eristyspuhallusilma /(FR) Gaz isolant /(HR) Izolacija ispušnog
plina /(HU) Szigetelő üveggyapot /(IE) Gás séidte inslithe /(IS) Einangrun blástursgass /(LT) Izoliacijos
pūtimo dujos /(LV) Izplūstošās gāzes izolācija /(MK) Изолационен гас за дување / (MT) Gas tal-infiħ
tal-insulazzjoni /(NO) Isolasjonsgass /
lamento /(RO) Aer comprimat izolare /(RS) Izolacioni gas /(SE) Isoleringsblåsgas /(SI) Izolacijski potisni
plin /(SK) Pohonný plyn pre izolačnú penu /(TR) Yalıtım üfleme gazı
K (EN) Cyclopentane /(AL) Ciklopentan /(BA) Ciklopentan /(BG) Циклопентан /(CZ) Cyklopentan /
(DK) Cyklopentan /(EE) Tsüklopentaan /(ES) Ciclopentano /(FI) Syklopentaani /(FR) Cyclopentane /
(HR) Ciklopentan /(HU) Ciklopentán /(IE) Cioglaipeintéin /(IS) Svklópentan /(LT) Ciklopentanas /(LV)
Ciklopentāns /(MK) Циклопентан /(MT) Cyclo-pentane /(NO) Syklopentan /(NL) Cyclopentaan /(PL)
Cyklopentan /(PT) Ciclopentano /(RO) Ciclopentan /(RS) Ciklopentan /(SE) Cyclopentan /(SI) Ciklopentan
/(SK) Cyklopentán /(TR) Siklopentan
L (EN) Made in Russian Federation /(AL) Made in Russian Federation /(BA) Proizvedeno u Ruskoj Federaciji /
(BG) Произведено в Русия /(CZ) Vyrobeno v Ruské federaci /(DK) Made in Russiske Føderation /(EE) Made
in Venemaa Föderatsioon /(ES) Hecho en la Federación Rusa /(FI) Made in Venäjä /(FR) Fabriqué en
Fédération de Russie /(HR) Proizvedeno u Ruskoj Federaciji /(HU) Made in Orosz Föderáció /(IE) Déanta i
Cónaidhm na Rúise /(IS) Made í Rússlandi /(LT) Pagaminta Rusijos Federacijos /(LV) Made in Krievijas
Federācija /(MK) Произведено во Руската Федерација / (MT) Magħmula fi Federazzjoni Russa /(NO) Made
in Russian Federation /(NL) Gemaakt in de Russische Federatie /(PL) Wykonane w Federacji Rosyjskiej /(PT)
Feito na Federação Russa /(RO) Made in Federația Rusă /(RS) Proizvedeno u Ruskoj Federaciji /(SE)
Tillverkad i Ryssland /(SI) Izdelano v Ruski federaciji /(SK) Vyrobené v Ruskej federácii /(TR) Rusya
Federasyonu'ndan
(NL) Isolatiegas /(PL) Gaz izolacyjny /(PT) Gás de sopro de iso-
10
Page 67

Page 68

 Loading...