

Page 1

User Guide
[UG template version 17a]
[spr_lg_g6_ug_en_210317_d5]
Page 2

Table of Contents
Getting Started .............................................................................................................................................. 1!
Introduction ........................................................................................................................................... 2!
About the User Guide ................................................................................................................... 2!
Access Instructions on the Phone ................................................................................................ 2!
Launch the Quick Help.......................................................................................................... 2!
Access Help .......................................................................................................................... 2!
Get Support from Sprint Zone ............................................................................................... 3!
Feature Highlights ......................................................................................................................... 3!
Wide-Angle Cameras ............................................................................................................ 3!
FullVision .............................................................................................................................. 4!
Water and Dust Resistant Properties ................................................................................... 5!
Set Up Your Phone ............................................................................................................................... 7!
Parts and Functions ...................................................................................................................... 7!
Battery Use ................................................................................................................................... 9!
Charge the Battery ................................................................................................................ 9!
Nano SIM Card ........................................................................................................................... 10!
microSD Card.............................................................................................................................. 12!
Insert microSD Card ........................................................................................................... 12!
Unmount and Remove the microSD Card .......................................................................... 13!
Format microSD Card ......................................................................................................... 14!
Turn Your Phone On and Off ...................................................................................................... 15!
Use the Touchscreen .................................................................................................................. 15!
Activate Your Phone ................................................................................................................... 16!
Complete the Setup Screens ...................................................................................................... 17!
Basic Operations ................................................................................................................................. 18!
Basics .......................................................................................................................................... 18!
Home Screen ...................................................................................................................... 18!
Phone Settings Menu.......................................................................................................... 19!
Portrait and Landscape Screen Orientation ....................................................................... 19!
Capture Screenshots .......................................................................................................... 20!
Applications ................................................................................................................................. 20!
Launch Applications ............................................................................................................ 20!
Preinstalled Apps ................................................................................................................ 21!
TOC i
Page 3

Fingerprint Recognition ............................................................................................................... 22!
Precautions for Fingerprint Recognition ............................................................................. 23!
Registering Fingerprints ...................................................................................................... 23!
Managing Fingerprints ........................................................................................................ 24!
Unlocking the Screen with a Fingerprint ............................................................................. 24!
Multi-tasking Feature .................................................................................................................. 25!
Multi-Window ...................................................................................................................... 25!
Overview Screen ................................................................................................................. 25!
Phone Number ............................................................................................................................ 25!
Airplane Mode ............................................................................................................................. 26!
Enter Text .................................................................................................................................... 26!
QWERTY Keyboard ............................................................................................................ 27!
Phone Keyboard ................................................................................................................. 28!
Tips for Editing Text ............................................................................................................ 29!
Google Account .......................................................................................................................... 31!
Create a Google Account ................................................................................................... 31!
Create an Exchange Account ............................................................................................. 32!
Sign into Your Google Account ........................................................................................... 33!
Factory Reset Protection .................................................................................................... 33!
Google Play Store ....................................................................................................................... 34!
Find and Install an App ....................................................................................................... 34!
Request a Refund for a Paid App ....................................................................................... 35!
Update an App .................................................................................................................... 35!
Uninstall an App .................................................................................................................. 35!
Get Help with Google Play .................................................................................................. 36!
Lock and Unlock Your Screen .................................................................................................... 36!
Update Your Phone .................................................................................................................... 38!
Update Your Phone Software ............................................................................................. 38!
Update Your Profile ............................................................................................................. 40!
Update Your PRL ................................................................................................................ 40!
Your Phone's Home Screen ................................................................................................................ 41!
Home Screen Basics .................................................................................................................. 41!
Status Bar and Notification Panel ............................................................................................... 42!
Status Bar ........................................................................................................................... 42!
Notification Panel ................................................................................................................ 44!
TOC ii
Page 4

Customize the Home Screen ...................................................................................................... 45!
Change the Wallpaper ........................................................................................................ 45!
Add Widgets to the Home Screen ...................................................................................... 46!
Add Folders to the Home Screen ....................................................................................... 46!
Making Connections .................................................................................................................................... 47!
Phone Calls and Voicemail ................................................................................................................. 48!
Place and Answer Calls .............................................................................................................. 48!
Call Using the Phone Dialer ................................................................................................ 48!
Call Emergency Numbers ................................................................................................... 49!
Answer Phone Calls ............................................................................................................ 50!
In-Call Screen Layout and Operations................................................................................ 50!
Place a Call from Contacts ................................................................................................. 52!
Call from Call Logs .............................................................................................................. 52!
Voicemail ..................................................................................................................................... 52!
Voicemail Setup .................................................................................................................. 52!
Visual Voicemail Setup ....................................................................................................... 53!
Review Visual Voicemail ..................................................................................................... 54!
Visual Voicemail Options .................................................................................................... 55!
Configure Visual Voicemail Settings ................................................................................... 55!
Optional Calling Services ............................................................................................................ 57!
Wi-Fi Calling ........................................................................................................................ 57!
Caller ID Blocking ............................................................................................................... 58!
Call Waiting ......................................................................................................................... 58!
Conference Calling ............................................................................................................. 58!
Call Forwarding ................................................................................................................... 59!
Call Settings Menu ...................................................................................................................... 59!
Contacts .............................................................................................................................................. 63!
Add Contacts............................................................................................................................... 63!
View Contacts ............................................................................................................................. 64!
Contacts Screen Layout .............................................................................................................. 65!
Edit Contacts ............................................................................................................................... 66!
Delete Contacts .......................................................................................................................... 66!
Share Contacts ........................................................................................................................... 67!
Import Contacts ........................................................................................................................... 67!
Back Up Contacts ....................................................................................................................... 67!
TOC iii
Page 5

Messaging ........................................................................................................................................... 68!
Messenger .................................................................................................................................. 68!
Send a Text Message ......................................................................................................... 68!
Send a Multimedia Message (MMS) ................................................................................... 68!
Save and Resume a Draft Message ................................................................................... 69!
New Messages Notification ................................................................................................ 70!
Manage Message Conversations ....................................................................................... 70!
Text and MMS Options ....................................................................................................... 71!
Gmail ........................................................................................................................................... 72!
Create and Send Gmail ...................................................................................................... 73!
Open Gmail Messages ....................................................................................................... 73!
Use Gmail Labels ................................................................................................................ 74!
Archive Gmail Threads ....................................................................................................... 74!
Mute Gmail Threads ........................................................................................................... 75!
Delete Gmail Threads ......................................................................................................... 75!
Search Gmail Messages ..................................................................................................... 75!
Report Spam Gmail ............................................................................................................ 75!
Add Another Google (Gmail) Account ................................................................................ 76!
Switch between Gmail Accounts ........................................................................................ 76!
Gmail Settings ..................................................................................................................... 76!
Email ........................................................................................................................................... 77!
Set Up Email Account ......................................................................................................... 77!
Add Email Account .............................................................................................................. 77!
Add Exchange ActiveSync Accounts .................................................................................. 78!
Create and Send Email ....................................................................................................... 79!
Open Email Messages ........................................................................................................ 79!
Delete Email Account.......................................................................................................... 80!
Manage Your Email Inbox .................................................................................................. 80!
Microsoft Exchange Email Features ................................................................................... 81!
Internet and Social Networking ........................................................................................................... 83!
Data Services General Information (4G LTE and 3G Networks) ................................................ 83!
4G LTE ................................................................................................................................ 83!
Data Connection Status and Indicators .............................................................................. 84!
Chrome Browser ......................................................................................................................... 84!
Use the Browser ................................................................................................................. 84!
TOC iv
Page 6

Add a Bookmark ................................................................................................................. 84!
View Browser History .......................................................................................................... 85!
Open New Browser Tabs .................................................................................................... 85!
Browser Settings ................................................................................................................. 85!
Facebook .................................................................................................................................... 86!
Twitter ......................................................................................................................................... 86!
Duo .............................................................................................................................................. 87!
Global Services ................................................................................................................................... 88!
Activate Sprint Worldwide Service on Your Account .................................................................. 88!
<RXU3KRQH¶V6,0&DUGIRU,QWHUQDWLRQDO*605RDPLQJ ........................................................... 88!
Enable Global Roaming Mode .................................................................................................... 89!
Set the Communications Method for Global Use ........................................................................ 90!
Select a Carrier ........................................................................................................................... 90!
Make and Receive Worldwide Calls ........................................................................................... 90!
Sprint International Voicemail Service ........................................................................................ 91!
Set Up Your Voicemail Access Number for International Use............................................ 91!
Access Your Voicemail Internationally ................................................................................ 92!
International Data Roaming ........................................................................................................ 92!
Contact Sprint for Assistance with International Service ............................................................ 93!
Connectivity ......................................................................................................................................... 95!
Wi-Fi ............................................................................................................................................ 95!
Turn Wi-Fi On and Connect to a Wireless Network ............................................................ 95!
Wi-Fi Settings ...................................................................................................................... 95!
Disconnect Wi-Fi ................................................................................................................. 96!
Wi-Fi Direct ......................................................................................................................... 96!
Bluetooth ..................................................................................................................................... 97!
Enable the Bluetooth Feature ............................................................................................. 97!
Pair Bluetooth Devices........................................................................................................ 98!
Connect to a Paired Bluetooth Device ................................................................................ 98!
Send Information Using Bluetooth ...................................................................................... 99!
Receive Information via Bluetooth ...................................................................................... 99!
Hotspot ...................................................................................................................................... 100!
Tethering ................................................................................................................................... 100!
Transfer Files Between Your Phone and a Computer .............................................................. 101!
Content Sharing ........................................................................................................................ 102!
TOC v
Page 7

Playing Content ................................................................................................................. 102!
Sending or Receiving Files ............................................................................................... 102!
Using Nearby Devices ...................................................................................................... 103!
Apps and Entertainment ............................................................................................................................ 104!
Camera and Video ............................................................................................................................ 105!
Camera Overview ..................................................................................................................... 105!
Take Pictures and Record Videos ............................................................................................ 106!
Take Pictures .................................................................................................................... 106!
Record Videos .................................................................................................................. 110!
Zoom In or Out .................................................................................................................. 110!
Take Various Shots ........................................................................................................... 110!
Take Specialty Shots ........................................................................................................ 114!
View Pictures and Videos Using Gallery .................................................................................. 116!
Edit Pictures .............................................................................................................................. 118!
Edit Videos ................................................................................................................................ 120!
Share Pictures and Videos ....................................................................................................... 121!
Send Pictures or Videos by Email .................................................................................... 121!
Send a Picture or Video by Multimedia Message ............................................................. 122!
Send Pictures or Videos Using Bluetooth ......................................................................... 122!
Share Pictures or Videos via Additional Apps or Social Media ........................................ 123!
Share Videos on YouTube ................................................................................................ 123!
Camera Settings ....................................................................................................................... 124!
Switch Cameras ................................................................................................................ 124!
Set Camera Functions ...................................................................................................... 124!
Productivity ........................................................................................................................................ 125!
Calendar .................................................................................................................................... 125!
Add an Event to the Calendar ........................................................................................... 125!
View Calendar Events....................................................................................................... 126!
Sync Calendars ................................................................................................................. 126!
Synchronize an Microsoft Exchange Calendar ................................................................. 126!
Navigation Apps ........................................................................................................................ 127!
Google Maps ..................................................................................................................... 127!
Scout ................................................................................................................................. 127!
Google Search .......................................................................................................................... 128!
Use Google Search ........................................................................................................... 128!
TOC vi
Page 8

Use Google Voice Search ................................................................................................ 129!
Calculator .................................................................................................................................. 130!
Clock ......................................................................................................................................... 130!
Set Alarms ........................................................................................................................ 130!
Additional Clock Features ................................................................................................. 131!
Capture+ ................................................................................................................................... 132!
QuickMemo+ ............................................................................................................................. 133!
File Manager ............................................................................................................................. 133!
LG Mobile Switch ...................................................................................................................... 133!
HD Audio Recorder ................................................................................................................... 134!
Studio Mode ...................................................................................................................... 134!
Entertainment and Activities ............................................................................................................. 136!
Music ......................................................................................................................................... 136!
Music Player ..................................................................................................................... 136!
Sprint Music Plus ...................................................................................................................... 137!
Back Up Your Downloaded Music Files............................................................................ 138!
YouTube .................................................................................................................................... 139!
Sprint Zone................................................................................................................................ 139!
NASCAR MOBILE .................................................................................................................... 140!
LG Health .................................................................................................................................. 141!
Settings ..................................................................................................................................................... 143!
Networks Settings ............................................................................................................................. 144!
Basic Settings ........................................................................................................................... 144!
Airplane Mode ........................................................................................................................... 145!
Wi-Fi Calling .............................................................................................................................. 145!
Wi-Fi Settings ............................................................................................................................ 145!
Bluetooth Settings ..................................................................................................................... 145!
Mobile Data Settings ................................................................................................................. 145!
Call Settings .............................................................................................................................. 146!
Share & Connect Settings ......................................................................................................... 146!
Tethering Settings ..................................................................................................................... 148!
More .......................................................................................................................................... 148!
Roaming Settings ...................................................................................................................... 149!
Virtual Private Networks (VPN) ................................................................................................. 151!
Prepare Your Phone for VPN Connection ........................................................................ 151!
TOC vii
Page 9

Set Up Secure Credential Storage ................................................................................... 151!
Add a VPN Connection ..................................................................................................... 151!
Connect to or Disconnect From a VPN............................................................................. 152!
Sound Settings .................................................................................................................................. 153!
Sound Profile............................................................................................................................. 154!
Volume ...................................................................................................................................... 154!
Ringtone .................................................................................................................................... 154!
Ringtone ID ............................................................................................................................... 155!
Vibration Strength ..................................................................................................................... 155!
Sound with Vibration ................................................................................................................. 155!
Vibrate Type .............................................................................................................................. 155!
Do Not Disturb .......................................................................................................................... 156!
Lock Screen .............................................................................................................................. 156!
Apps .......................................................................................................................................... 156!
More .......................................................................................................................................... 156!
Display Settings ................................................................................................................................ 158!
Home Screen ............................................................................................................................ 159!
Lock Screen .............................................................................................................................. 161!
Theme ....................................................................................................................................... 163!
Home Touch Buttons ................................................................................................................ 164!
Font Type .................................................................................................................................. 164!
Font Size ................................................................................................................................... 164!
Bold Text ................................................................................................................................... 164!
App Scaling ............................................................................................................................... 165!
Display Size .............................................................................................................................. 165!
Comfort View............................................................................................................................. 165!
Brightness ................................................................................................................................. 165!
Always-on Display ..................................................................................................................... 165!
Auto-Rotate Screen .................................................................................................................. 166!
Screen Timeout ......................................................................................................................... 166!
More Settings ............................................................................................................................ 166!
General Settings ............................................................................................................................... 168!
Language & Keyboard .............................................................................................................. 169!
Location ..................................................................................................................................... 170!
Accounts & Sync ....................................................................................................................... 170!
TOC viii
Page 10

Cloud ......................................................................................................................................... 170!
Accessibility............................................................................................................................... 171!
Shortcut Keys ............................................................................................................................ 173!
Google Services ........................................................................................................................ 173!
Fingerprints & Security .............................................................................................................. 173!
Smart Settings .......................................................................................................................... 174!
Date & Time .............................................................................................................................. 175!
Storage ...................................................................................................................................... 175!
Battery & Power Saving ............................................................................................................ 175!
Memory ..................................................................................................................................... 175!
Smart Cleaning ......................................................................................................................... 175!
System Updates ........................................................................................................................ 176!
Apps .......................................................................................................................................... 176!
Tap & Pay ................................................................................................................................. 176!
Backup & Reset ........................................................................................................................ 176!
Factory Data Reset ........................................................................................................... 177!
About Phone ............................................................................................................................. 178!
Getting Help .............................................................................................................................................. 180!
For Assistance .................................................................................................................................. 181!
Troubleshooting ........................................................................................................................ 181!
Sprint Account Information and Help ........................................................................................ 182!
Sprint Account Passwords ................................................................................................ 182!
Manage Your Account ...................................................................................................... 183!
Sprint Support Services .................................................................................................... 183!
Anti-Theft Guide ........................................................................................................................ 184!
Copyright Information ................................................................................................................ 185!
Index .......................................................................................................................................................... 186!
TOC ix
Page 11

Getting Started
The following set of topics will introduce you to your phone, help you get set up with service, provide an
overview of the phone screen, and get you started with basic phone operations.
1
Page 12

Introduction
The following topics describe the basics of using this guide and your new phone.
About the User Guide
Thank you for purchasing your new LG G6. The following topics explain how best to use this guide to get
the most out of your phone.
Before Using Your Phone
Read the Important Information booklet that was packaged with your phone thoroughly for proper usage.
Accessible services may be limited by subscription contract conditions.
Descriptions in the User Guide
Note that most descriptions in this guide are based on your phone's setup at the time of purchase. Unless
otherwise noted, instructions begin from the phone's home screen, which is displayed by tapping the
Home key . Some operation descriptions may be simplified.
Screenshots and Key Labels
Screenshots in the user guide may appear differently on your phone. Key labels in the user guide are
simplified for description purposes and differ from your phone's display.
Other Notations
,QWKHXVHUJXLGHWKHSKRQHPD\EHUHIHUUHGWRHLWKHUDVSKRQHGHYLFHRUKDQGVHW$PLFUR6'RU
microSDXCFDUGLVUHIerred to as an "SD Card" or a "memory card."
Access Instructions on the Phone
These topics will help you find help on your new phone.
Launch the Quick Help
Use the Quick Help to get help about the device usage.
Ŷ Tap > Quick Help .
Access Help
8VHHDFKDSS¶V+HOSPHQXWROHDUQDERXWWKHDSS
Ŷ In each app, tap > Help to access help.
Introduction 2
Page 13
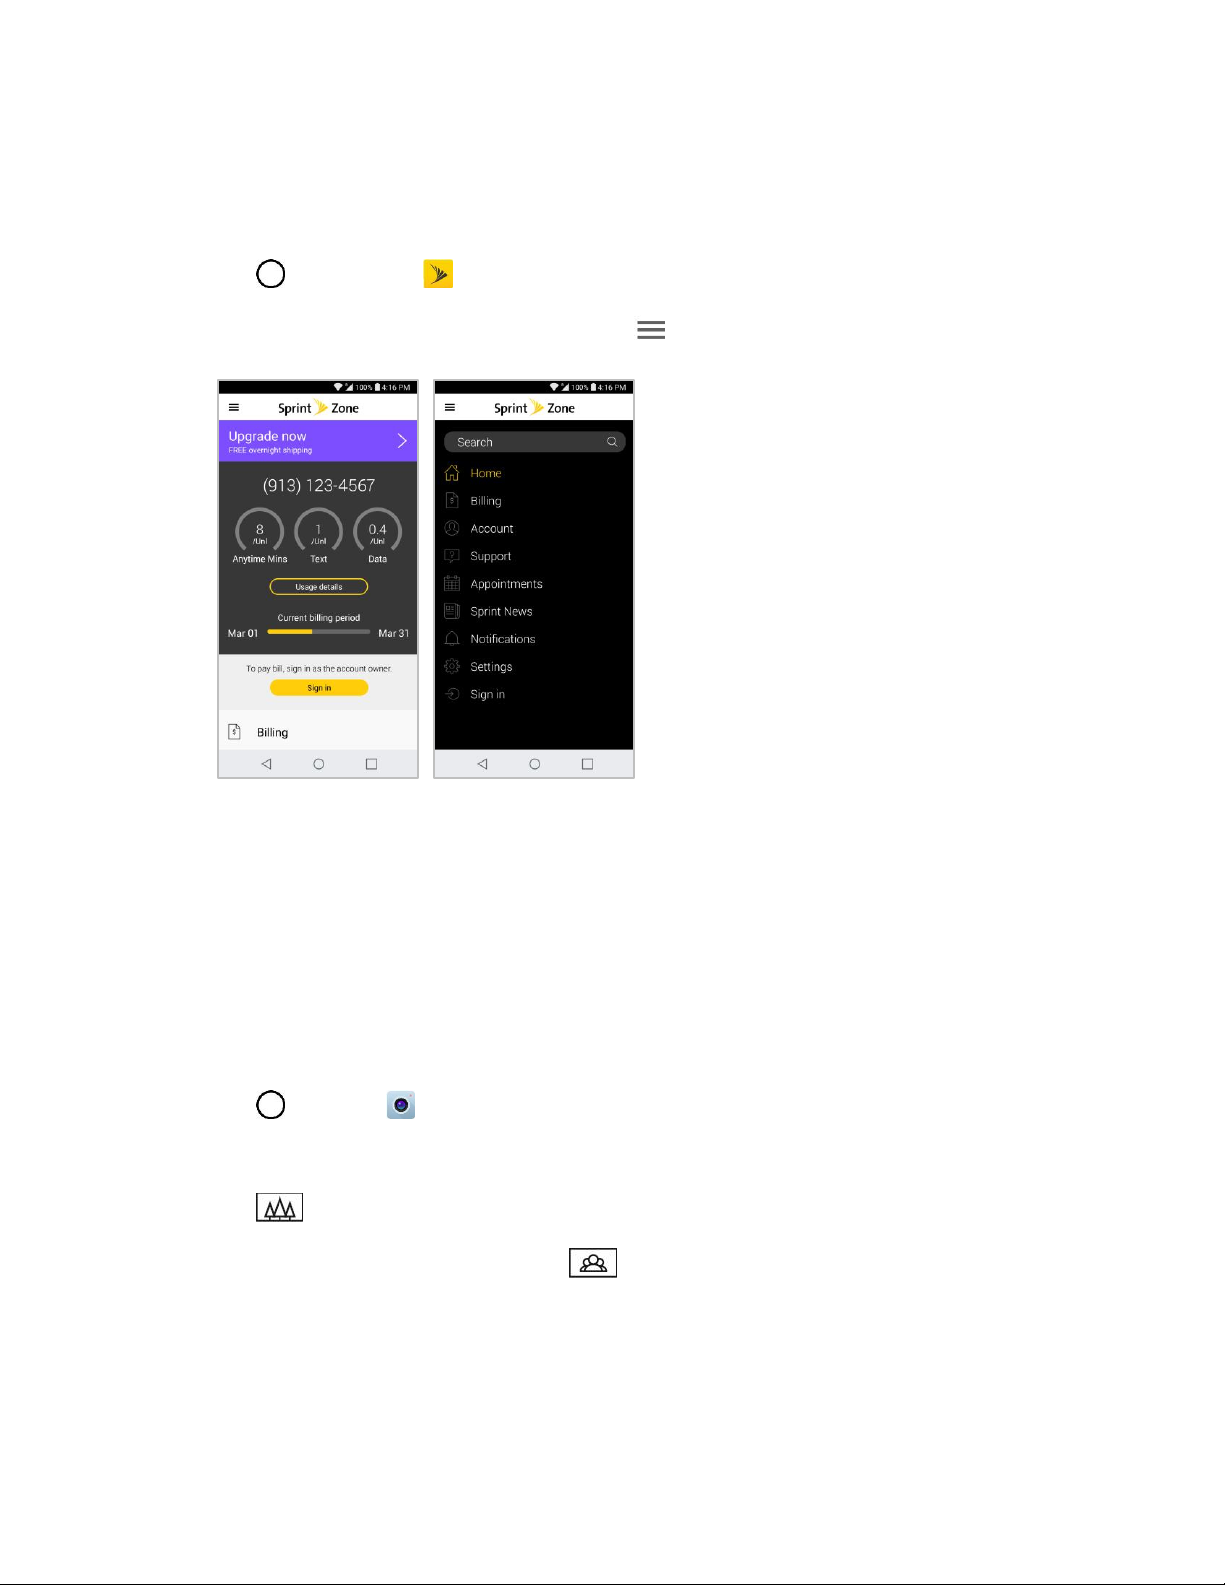
Get Support from Sprint Zone
,QDGGLWLRQWR\RXUSKRQH¶VEXLOW-in Help menu, you can also access support for your phone and service
through the preloaded Sprint Zone app.
1. Tap > Sprint Zone .
2. Tap an option on the main screen or tap Menu and select from a full list of options.
Note: Sprint Zone categories and options are subject to change. Check back frequently for new content
and updates.
Feature Highlights
The LG G6 has the following key features.
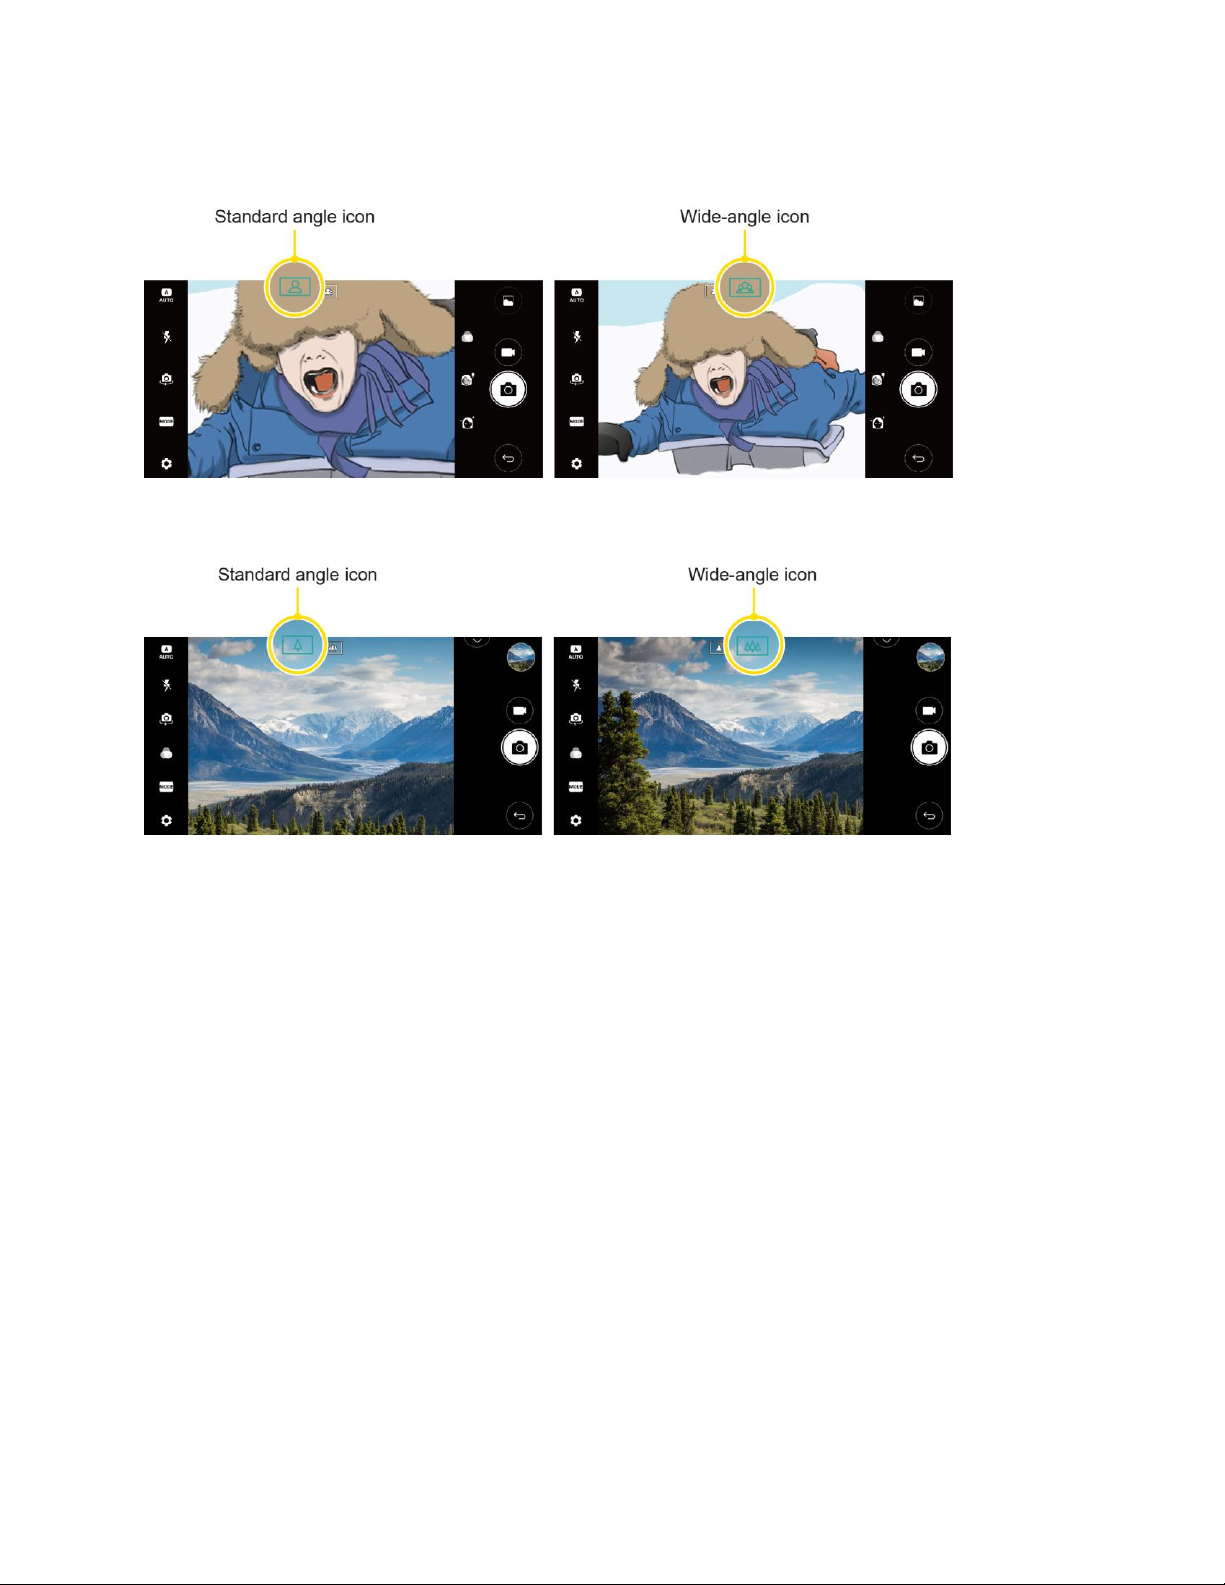
Wide-Angle Cameras
Capture photos with a wider background using both the rear and front wide-angle lenses²for more
inclusive scenic shots or to get all your friends in.
1. Tap > Camera .
2. Access either the rear or front camera.
3. Tap to switch to Wide Angle.
On the front camera viewfinder, tap to switch to Wide Angle.
Note: See Camera Overview for more details about Camera.
Introduction 3
Page 14
Front Camera
Rear Camera
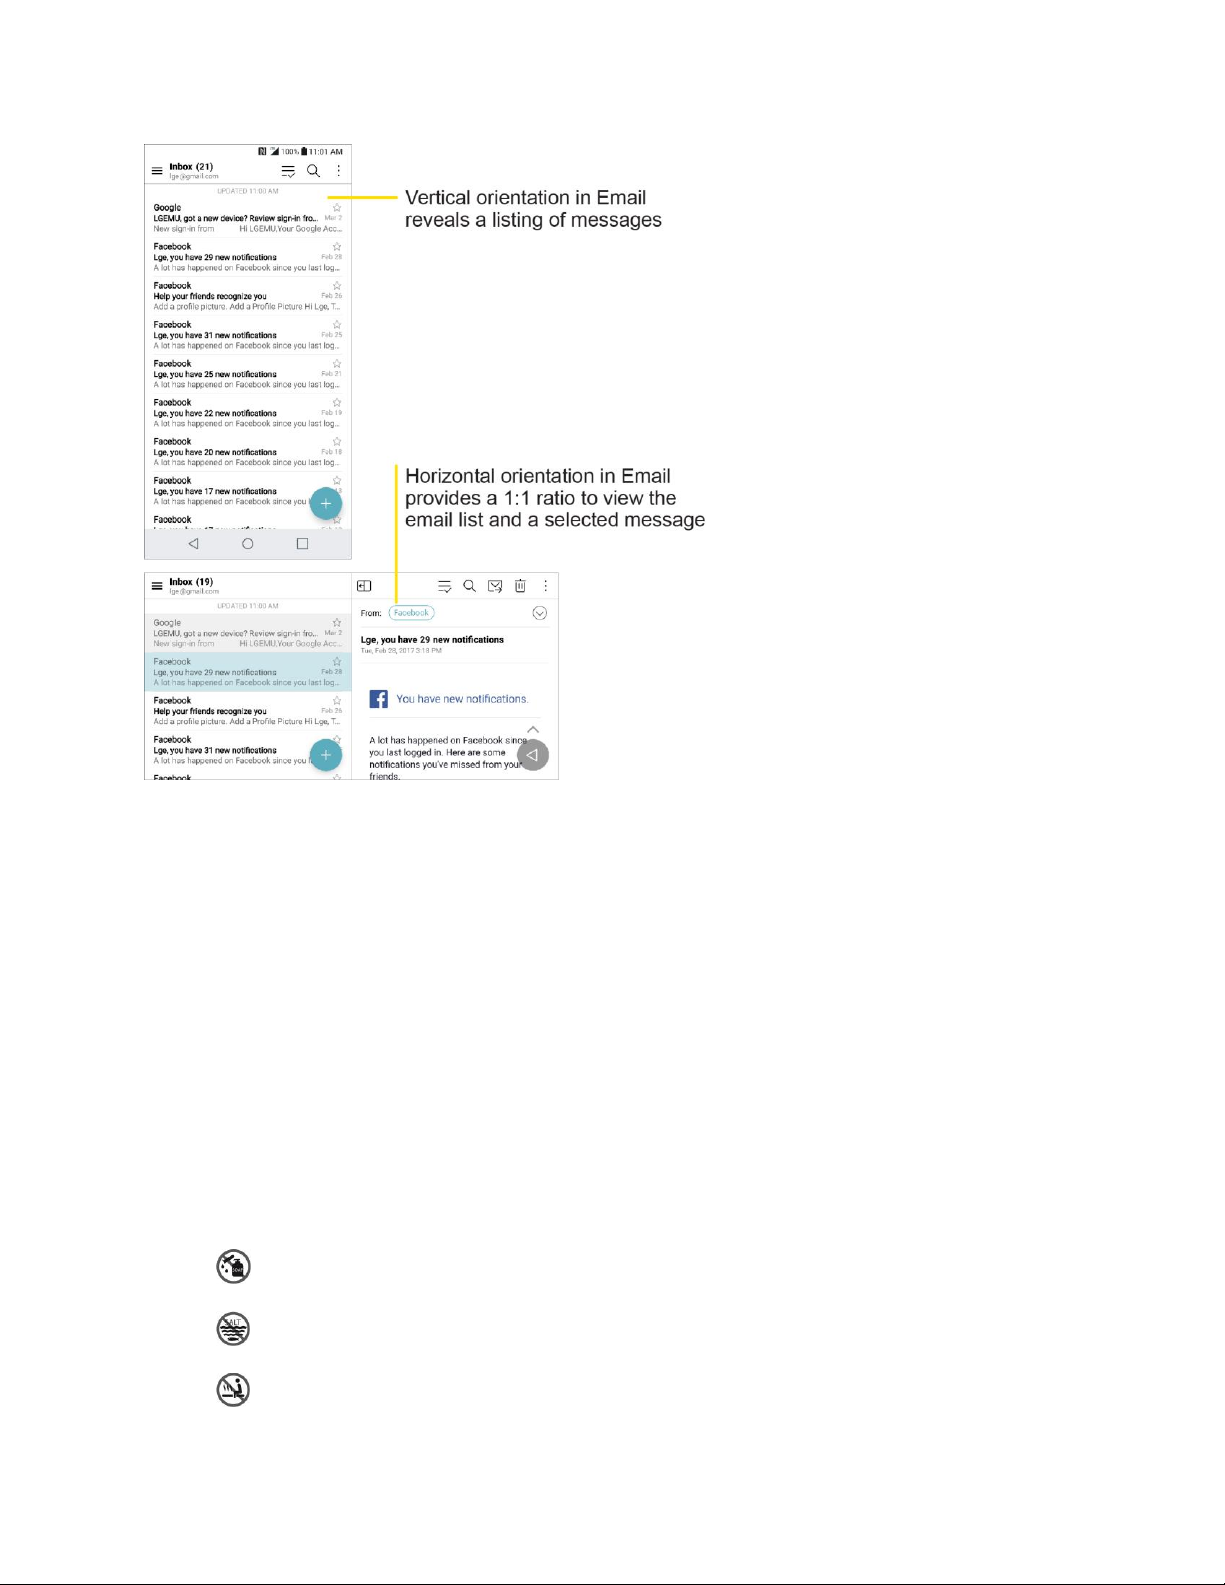
FullVision
The enhanced screen ratio allows you to take full advantage of your apps, providing an easy, one-handed
user experience and useful information at a glance.
On the Email, Calendar and Music app, rotate the screen horizontally to view in an optimized side-by-side
view.
Note: Not all applications feature this side-by-side view.
Introduction 4
Page 15
Water and Dust Resistant Properties
This product is water and dust resistant in compliance with the Ingress Protection rating IP68.
Your product has undergone testing in a controlled environment and is proven to be water and dust
resistant in certain circumstances (meets the requirements of classification IP68 as described by the
international standard IEC 60529 - Degrees of Protection provided by Enclosures [IP Code]; test
conditions: 15-35ºC/59-95ºF, 86-106kPa, 1.5 meters, for 30 minutes).
Note: Do not expose the device in conditions that are different from the test conditions. Results may vary
in actual use.
Warning: Despite a rating of IP68, your device is not impervious WRFRQGLWLRQVQRWWHVWHGLQ/*¶V
controlled environment. Please note that any damages that occur due to such causes changes the color
of the LDI (Liquid Damage Indicator). If the color of LDI located inside the product changes, the product is
to be considered ineligible for any free-of-charge repair services provided under the product's limited
warranty. Avoid exposing the product to environments with excessive dust or moisture. Do not use the
product in the following environments:
Ɣ Do not immerse the product in any liquid chemicals (soap, etc.) other than water.
Ɣ Do not immerse the product in salt water, including seawater.
Ɣ Do not immerse the product in a hot spring.
Introduction 5
Page 16

Ɣ Do not swim with this product.
Ɣ Do not place the product directly on sand (such as at a beach) or mud.
Ɣ Do not immerse your product in water deeper than approximately 1.5 meters. Do not
immerse your product in water for longer than 30 minutes.
If your product becomes wet, be sure to wipe the microphone, speaker, and stereo jack with a dry cloth
before use.
Ɣ Should your product or your hands become wet, dry them before handling the product.
Ɣ Do not use the product in places where it may be sprayed with high pressure water (e.g. near a
faucet or shower head) or submerge it in water for extended periods of time, as the product is not
designed to withstand high water pressure.
Ɣ This product is not resistant to shock. Do not drop the product or subject it to shock. Doing so
might damage or deform the main unit, causing water leakage.
Ɣ 7KHSURGXFW¶VZDWHUDQGGXVWUHVLVWDQW features may be damaged by dropping or receiving an
impact.
Ɣ If the product gets wet, use a clean, soft cloth to dry it thoroughly.
Ɣ The touch screen and other features may not work properly if the device is used while wet.
Ɣ Your product is water resistant only when the SIM/Memory card tray is properly inserted into the
product.
Ɣ Do not open or close the SIM/Memory card tray while the product is wet or immersed in water.
Exposing the open tray to water or moisture may damage the product.
Ɣ The SIM/Memory card tray contains rubber packing to help prevent dust, water, or moisture from
entering the product. Do not damage the rubber packing as this may allow dust, water, or
moisture to enter your product and cause damage.
Warning: Failure to follow the provided instructions PD\LQYDOLGDWH\RXUGHYLFH¶VOLPLWHGZDUUDQW\
Introduction 6
Page 17
Part
Description
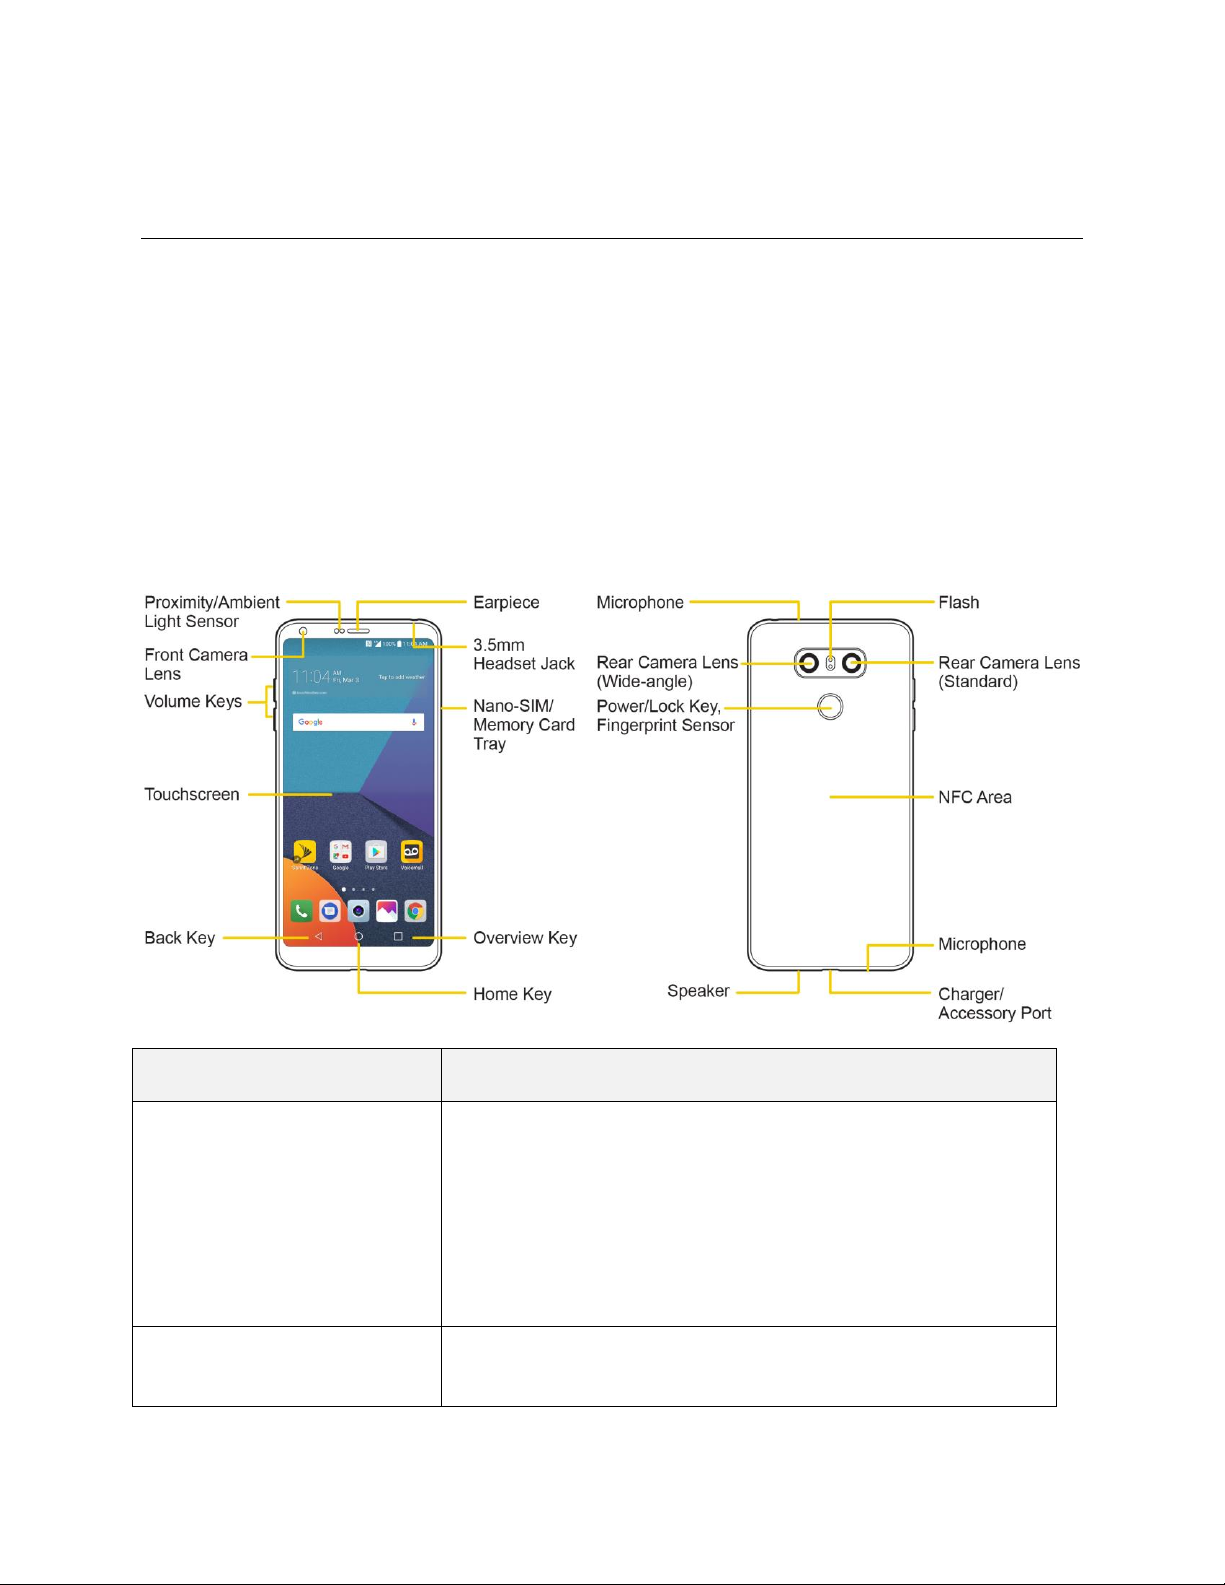
Proximity/Ambient Light
Sensor
Senses proximity towards other objects (such as your head) so
that touch commands are not accidentally activated during a call.
Note: Please be careful not to cover the sensors with a protective
film, pouch, or a protective case not authorized by LG.
The ambient light sensor analyzes the ambient light intensity when
the auto-brightness control mode is turned on.
Front Camera Lens
Allows you to take pictures and videos of yourself. Also lets you
participate in video chats.
Set Up Your Phone
The following topics give you all the information you need to set up your phone and wireless service for
the first time.
Parts and Functions
7KHVHWRSLFVLOOXVWUDWH\RXUSKRQH¶VSULPDU\SDUWVDQGNH\IXQFWLRQV
Note: Your phone's screens and apps layouts are subject to change. This user guide uses sample
images only.
Phone Layout
The following illustration outlines your phone¶s primary external features and buttons.
Set Up Your Phone 7
Page 18
Volume Keys
Allows you to adjust the ringer and media volumes, or to adjust the
in-call volume during a call.
Touchscreen
Displays all the information needed to operate your phone, such
as the applications, call status, the Contacts list, the date and time,
and the signal and battery strength.
Back Key
Returns to the previous screen. It also closes pop-up display items
such as menus and dialog boxes.
Home Key
Returns to the home screen. If you're already viewing one of
extension canvases, it opens the central home screen. Touch and
hold to access Google Assistant.
Overview Key
Allows you to access recently-used apps. While using an app,
touch and hold to use two apps at the same time with the MultiWindow feature.
Nano-SIM/Memory Card Tray
Holds the Nano-SIM card and a memory card.
3.5mm Headset Jack
Allows you to plug in a headset for convenient, hands-free
conversations.
Earpiece
Lets you hear the caller and automated prompts.
Microphone
Transmits your voice for phone calls or records your voice or
ambient sounds for voice recordings and videos.
Rear Camera Lens
(Wide-angle)
Lets you take pictures and record videos in a wide angle.
Rear Camera Lens (Standard)
Lets you take pictures and record videos.
Power/Lock Key with
Fingerprint Sensor
Locks the screen. Press and hold to open the phone options menu
for the following options: Power off, Power off and restart, and
Turn on/off Airplane mode.
Turn on the fingerprint recognition feature to simplify the process
of unlocking the screen. See Fingerprint Recognition for details.
Speaker
Lets you hear the different ringers and sounds. The speaker also
OHWV\RXKHDUWKHFDOOHU¶VYRLFHLQVSHDNHUSKRQHPRGH
Charger/Accessory Port
Allows you to connect the phone charger or an optional USB
cable.
NFC Area
Allows the phone exchange data with other NFC-enabled devices
by touching it with this area.
Set Up Your Phone 8
Page 19
Flash
Helps you take pictures and video in dim lighting.
CAUTION! Inserting an accessory into the incorrect jack may damage the phone.
Battery Use
The following topics explain how to charge \RXUSKRQH¶VEDWWHU\
Warning: This device has a non-removable battery. Do not attempt to remove the back cover.
Warning: Do not charge while the device or charging cable is wet or contains moisture. This can cause
fire, electric shock, injury or damage to device.
Charge the Battery
Your phone is equipped with a Li-Ion battery. It allows you to recharge your battery before it is fully
drained. The battery provides up to 28 hours of continuous digital talk time.
You can charge \RXUSKRQH¶VEDWWHU\XVLQJHLWKer the included the fast charge adapter or via a USB
connection with your computer.
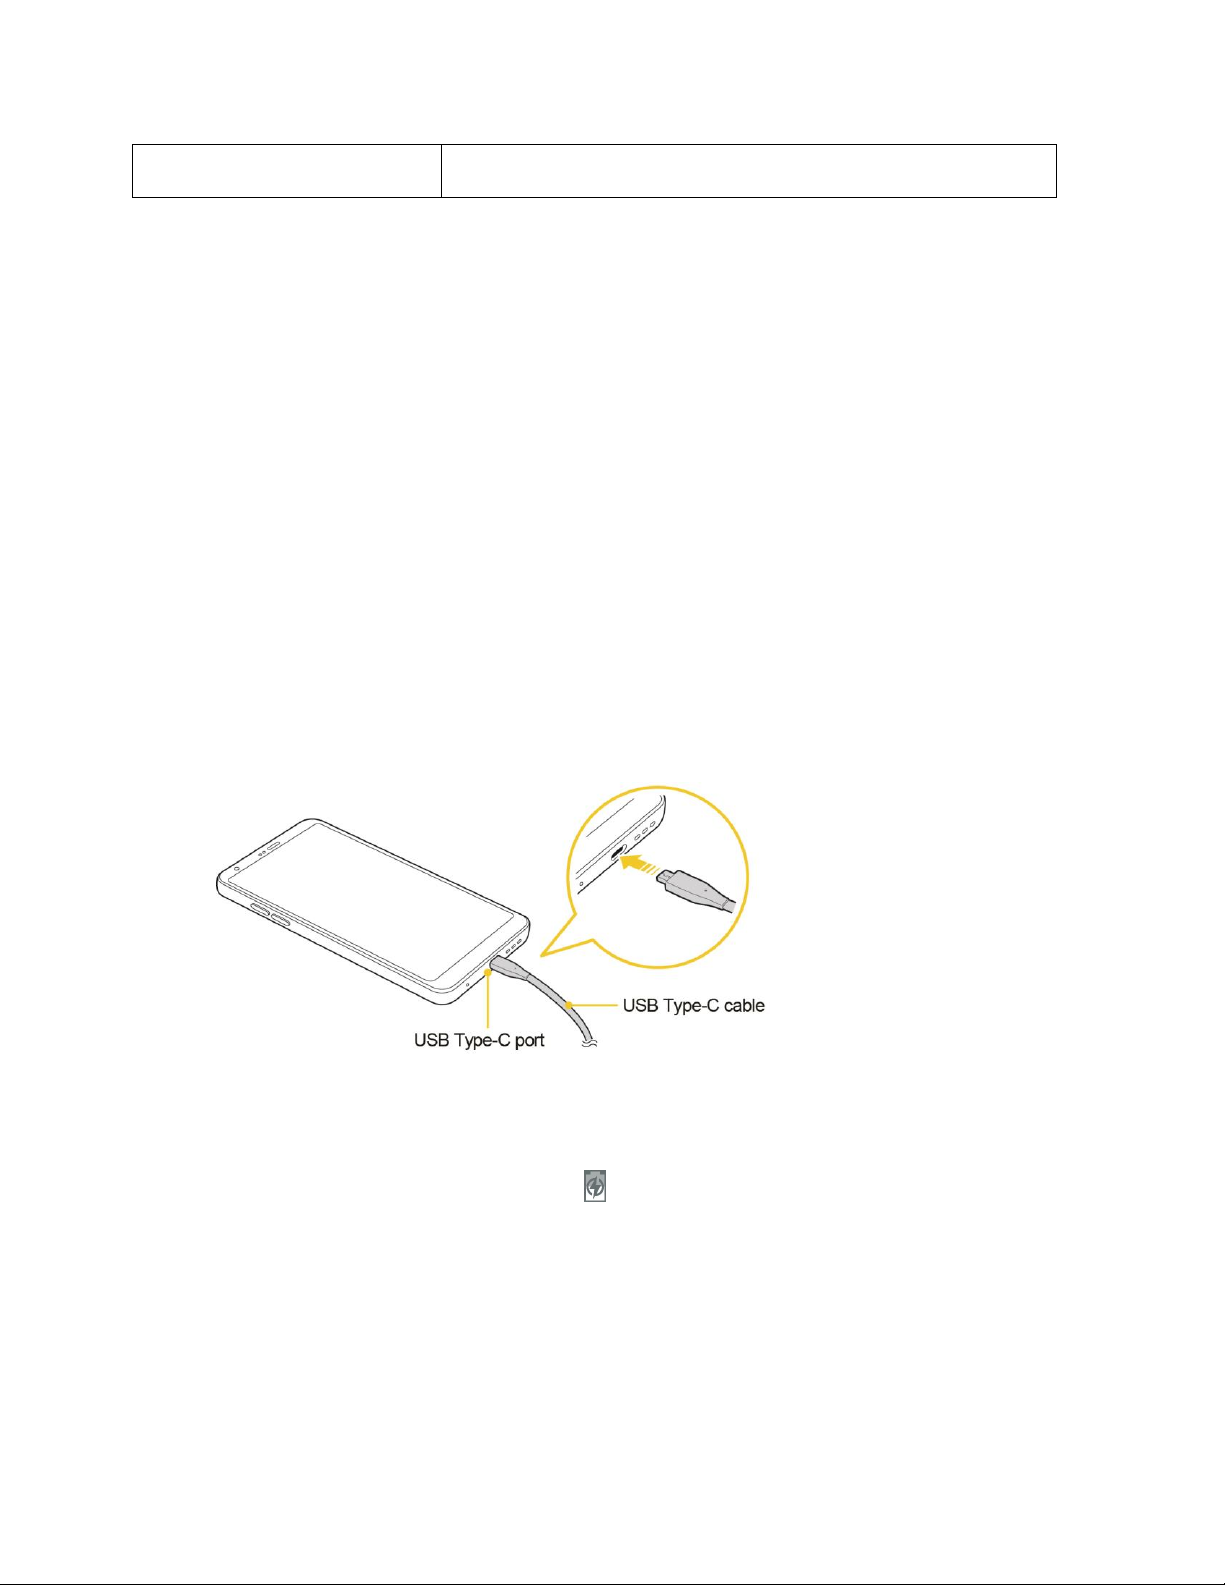
Charge Using the Fast Charge Adapter
1. Plug the USB cable into the charger/accessory port at the bottom of your phone.
2. Plug the other end of the USB cable into the fast charge adapter.
3. Plug the fast charge adapter into an electrical outlet.
The battery status icon is changed to charging when charging starts. The light goes off
when the battery is fully charged. Fully charging a battery may take up to four hours.
4. After charging, disconnect the phone from the charger.
Unplug the fast charge adapter from the outlet, and remove the USB cable from the phone
and the adapter.
Note: Always unplug the charger from the wall socket after the phone is fully charged to save
unnecessary power consumption of the charger.
Set Up Your Phone 9
Page 20
Note: Do not use third party chargers with your device as they may not support fast charging and may
cause damage to your device.
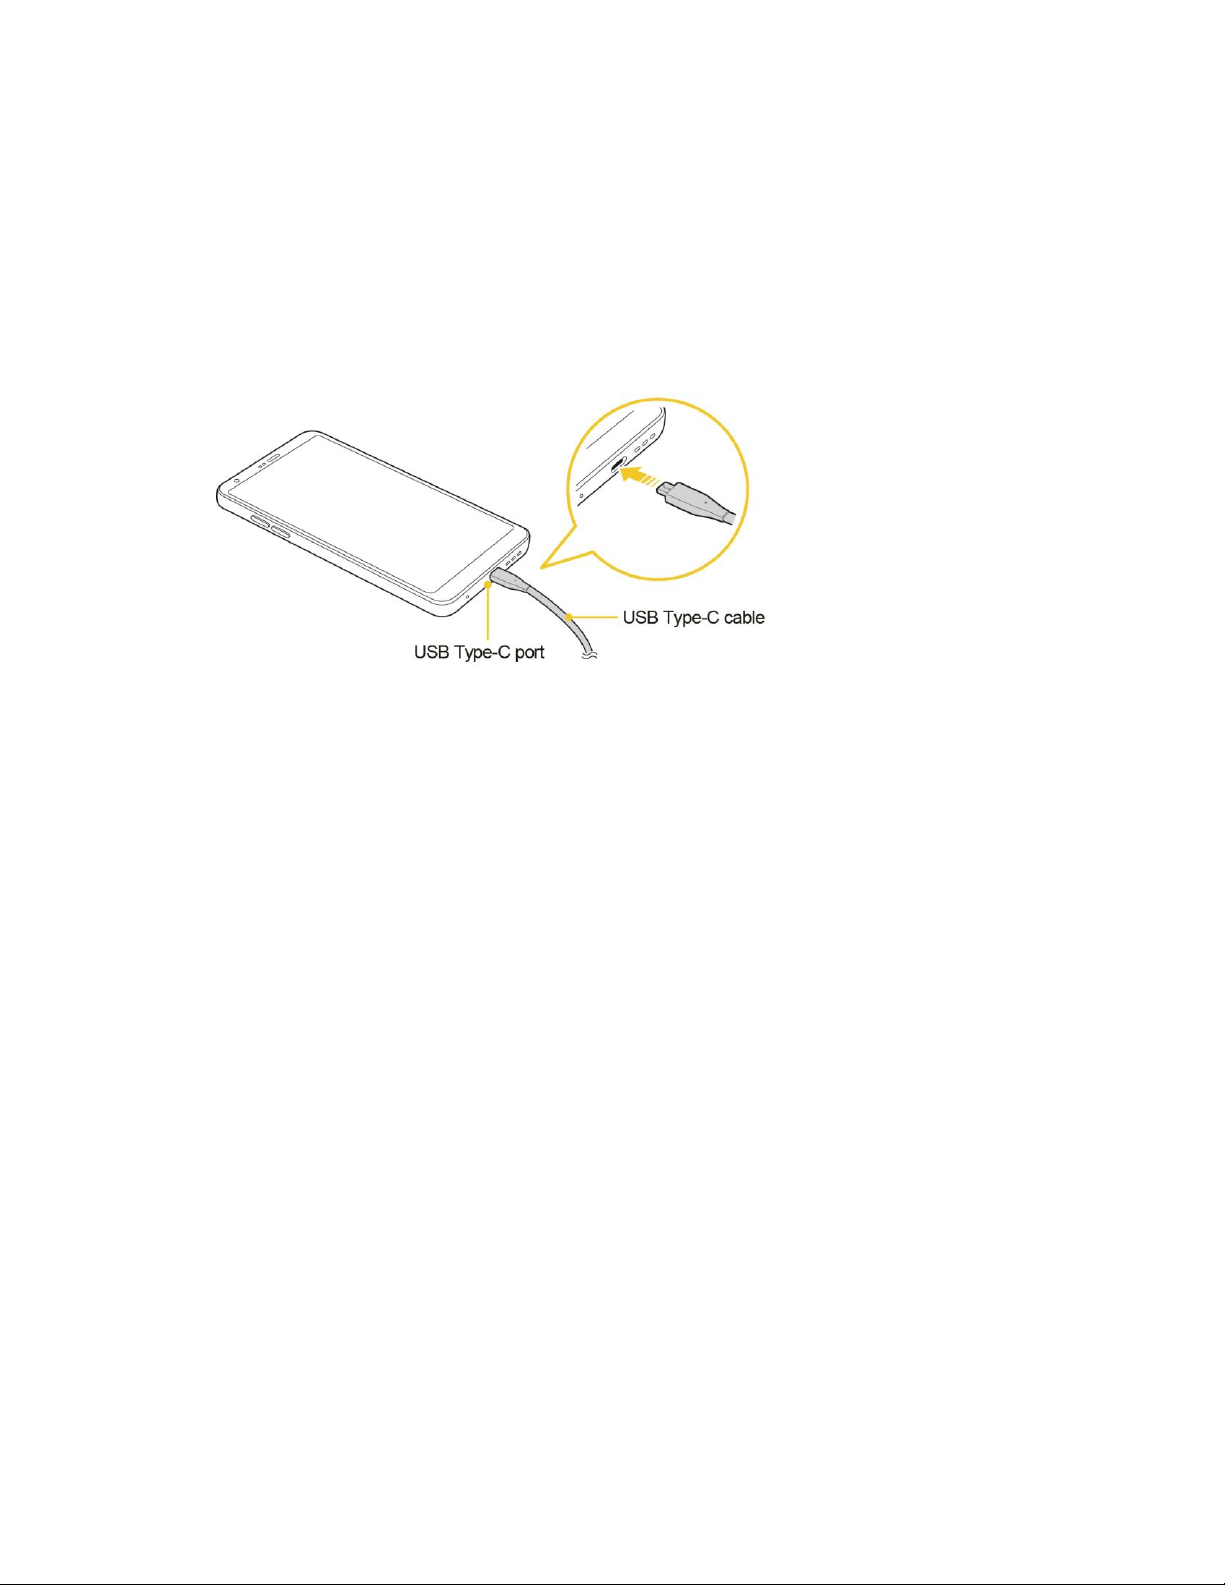
Charge Using a PC Connection
Before using a PC connection to charge your phone, ensure that the computer is turned on. Depending
RQWKHW\SHRIFRQQHFWLRQ\RXUSKRQH¶VEDWWHU\PD\QRWFKDUJH
1. Insert the small end of the USB cable into the charger/accessory port at the bottom of your phone.
2. Insert the large end of the USB cable into an external USB port on your computer.
3. After charging, remove the USB cable from both the phone and the computer.
Warning: Make sure to use the USB cable provided; do not use third party USB cables or chargers with
your device. The LG limited warranty does not cover the use of third party accessories.
Warning: Failure to follow the instructions in this guide and improper use may damage the device.
Warning: Using the device when it is charging may cause electric shock. To use the device, stop
charging it.
Nano SIM Card
The Nano SIM card is an IC (Integrated Circuit) card containing phone number and other customer
information. <RXUSKRQH¶V6,0FDUGLVSUHLQVWDOOHGDQGVKRXOGRQO\EHDFFHVVHGLIGLUHFWHGE\DFXVWRPHU
service representative.
Handling the Nano SIM Card
Keep the following in mind when handling a Nano SIM card.
Ɣ You are responsible for any damage caused by inserting the SIM card in another-brand IC card
reader, etc. Sprint is not responsible in such a case.
Ɣ Always keep the IC chip clean.
Ɣ Wipe clean with a dry, soft cloth.
Ɣ Avoid applying labels. May damage the Nano SIM card.
Set Up Your Phone 10
Page 21
Ɣ See instructions included with the Nano SIM card for handling.
Ɣ The Nano SIM card is the property of Sprint.
Ɣ The Nano SIM card is replaceable (at cost) in case of loss/damage.
Ɣ Return the Nano SIM card to Sprint when cancelling your subscription.
Ɣ Returned Nano SIM cards are recycled for environmental purposes.
Ɣ Note that Nano SIM card specifications and performance may change without notice.
Ɣ It is recommended that you keep a separate copy of information that is stored on the Nano SIM
card. Sprint is not responsible for damages from stored information that is lost.
Ɣ Always follow emergency procedures to suspend service if your Nano SIM card or phone (Nano
SIM card inserted) is lost/stolen. For details, contact Customer Service.
Ɣ Always power off the phone before inserting/removing a Nano SIM card.
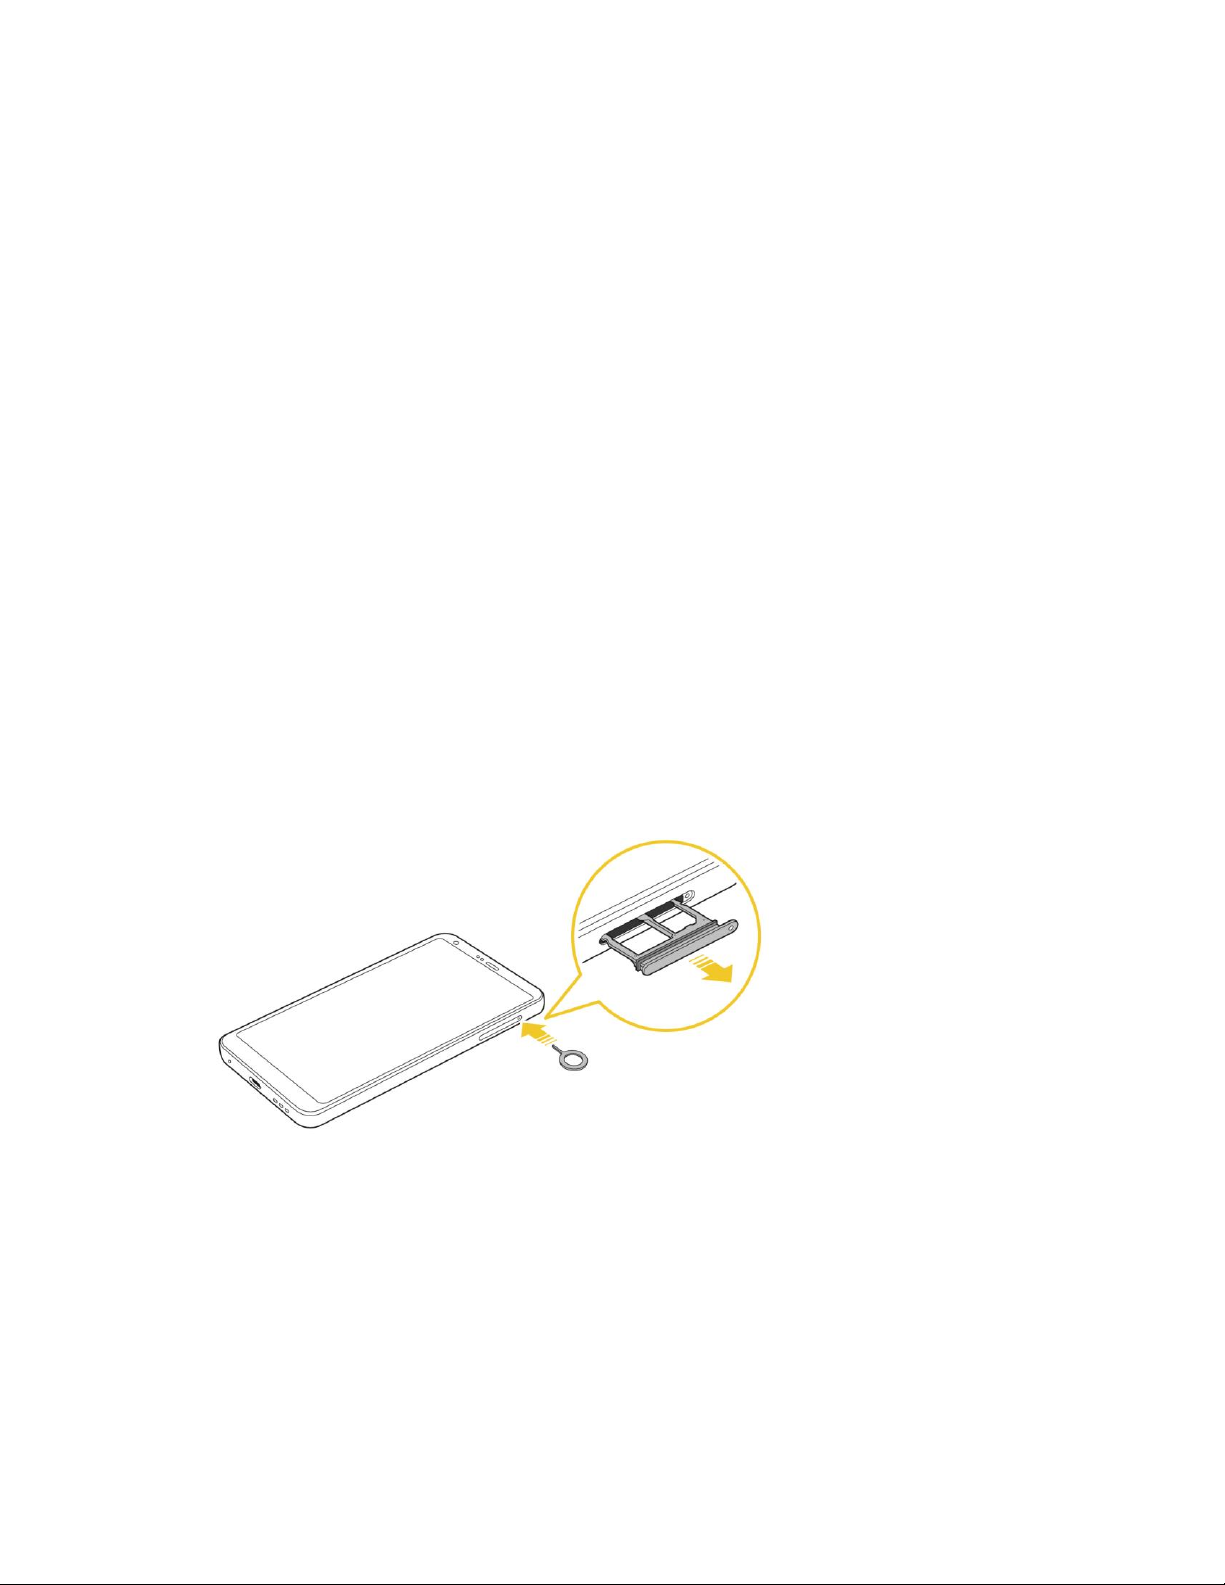
Insert a Nano SIM Card
Follow these instructions to insert a Nano SIM card. Remember to power off your phone before inserting
a Nano SIM card.
Note<RXUSKRQH¶V6,0FDUGLVSUHLQVWDOOHG7KHVHLQVWUXFWLRQVDUHIRUUHIHUHQFHRQO\
1. Gently insert the ejection pin into the hole on the card tray and then pull out the ejected tray.
Set Up Your Phone 11
Page 22
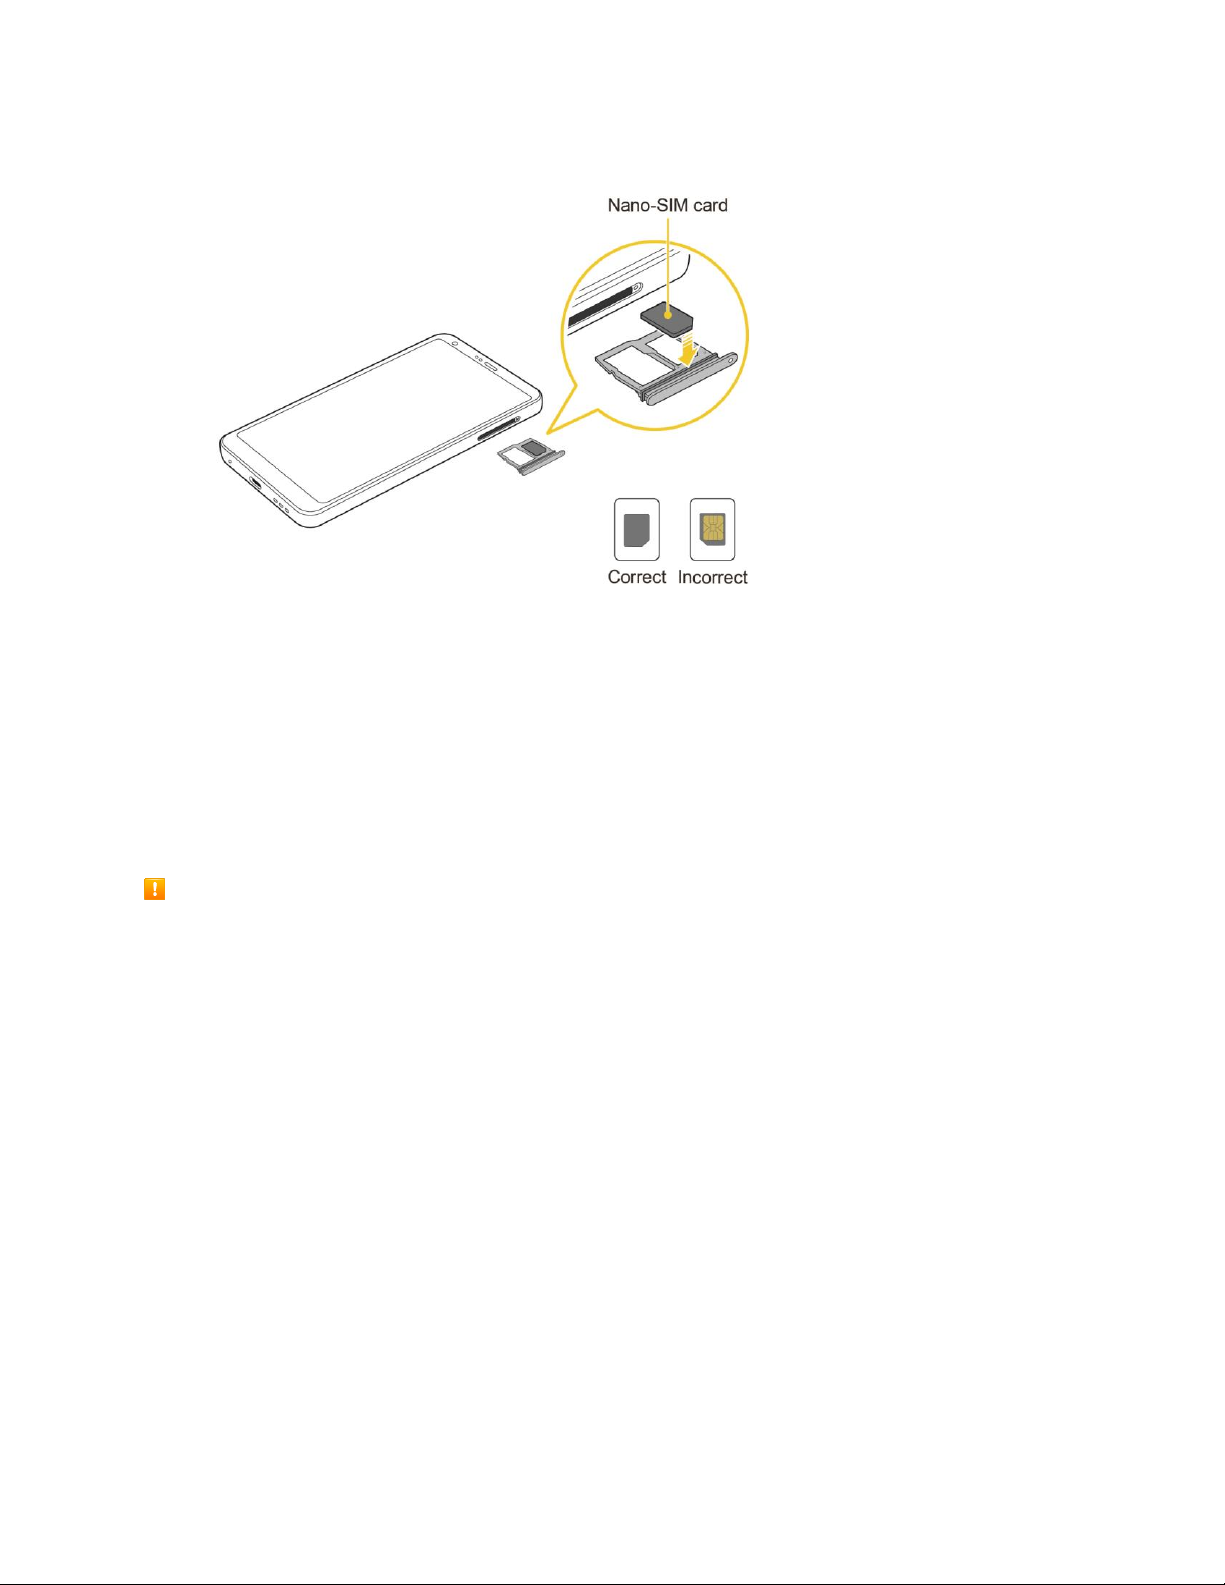
2. Place the Nano SIM card into the correct section of the tray.
Place gently with gold IC chip facing downward.
3. Insert the card tray back into the slot.
Note: Always use a genuine Nano-SIM card supplied by the service provider.
microSD Card
Your phone supports the use of an optional microSD card (not included) to expand its storage capacity. It
supports cards up to 2TB. Some cards may not operate properly with your phone.
microSD card Cautions
Data: Information stored on the microSD card can become lost or changed accidently or as a result of
damage. It is recommended that you keep a separate copy of important data. Sprint is not
responsible for damages from data that is lost or changed.
Reading/Writing Data: Never power off while reading or writing data.
Battery Level: A low battery charge may prevent reading/writing to a microSD card.
Handling microSD card: Use/store microSD cards away from the reach of infants. May cause
choking if swallowed.
Insert microSD Card
Follow these steps to insert an optional microSD card (not included). Make sure to power your phone off
before inserting or removing a microSD card.
Set Up Your Phone 12
Page 23
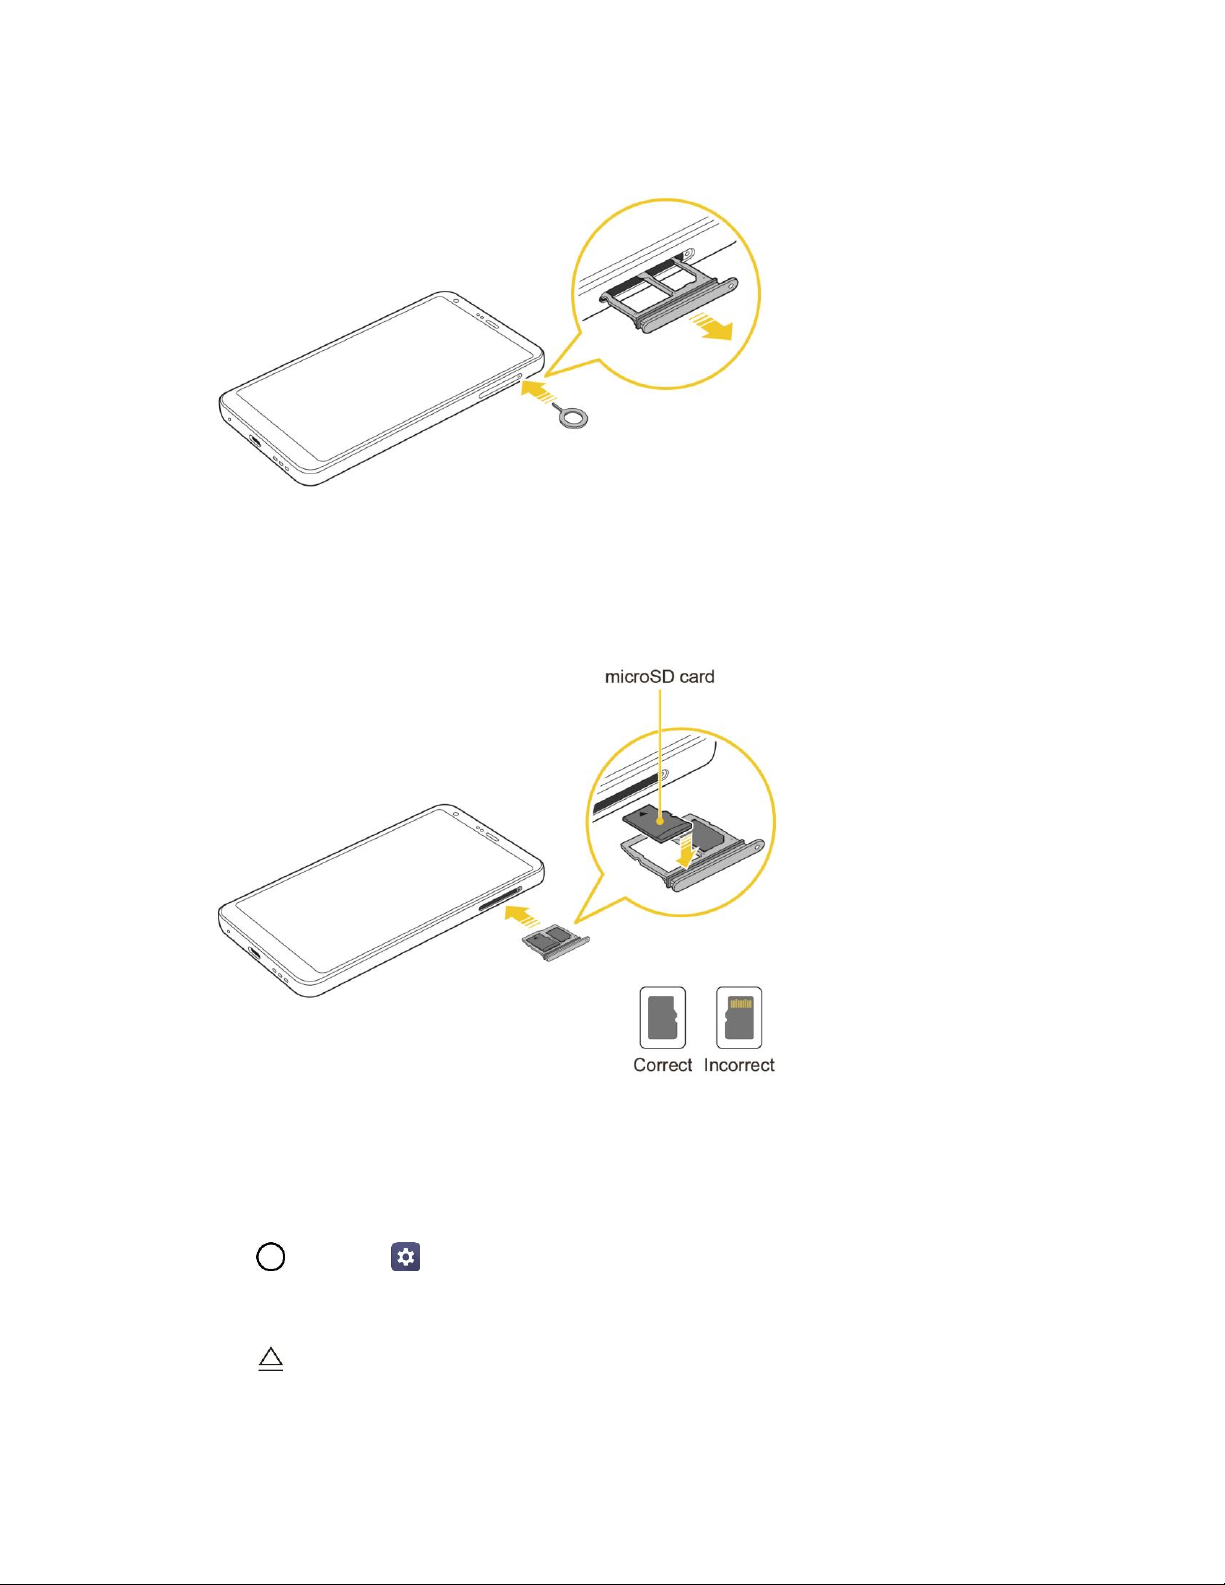
1. Gently insert the ejection pin into the hole on the card tray and then pull out the ejected tray.
2. Place the memory card into the correct section of the tray, with the arrows oriented correctly.
When inserting the SIM card, make sure that the metallic contacts face down.
3. Insert the card tray back into the slot.
Unmount and Remove the microSD Card
Follow these instructions to unmount and remove a microSD card. Always unmount the microSD card
before removing it from your phone, and always power the phone off before inserting or removing a
microSD card.
1. Tap > Settings > General tab.
2. Tap Storage.
3. Tap .
The status of the SD card changes from Ejecting to Ejected. The card is now unmounted.
Set Up Your Phone 13
Page 24
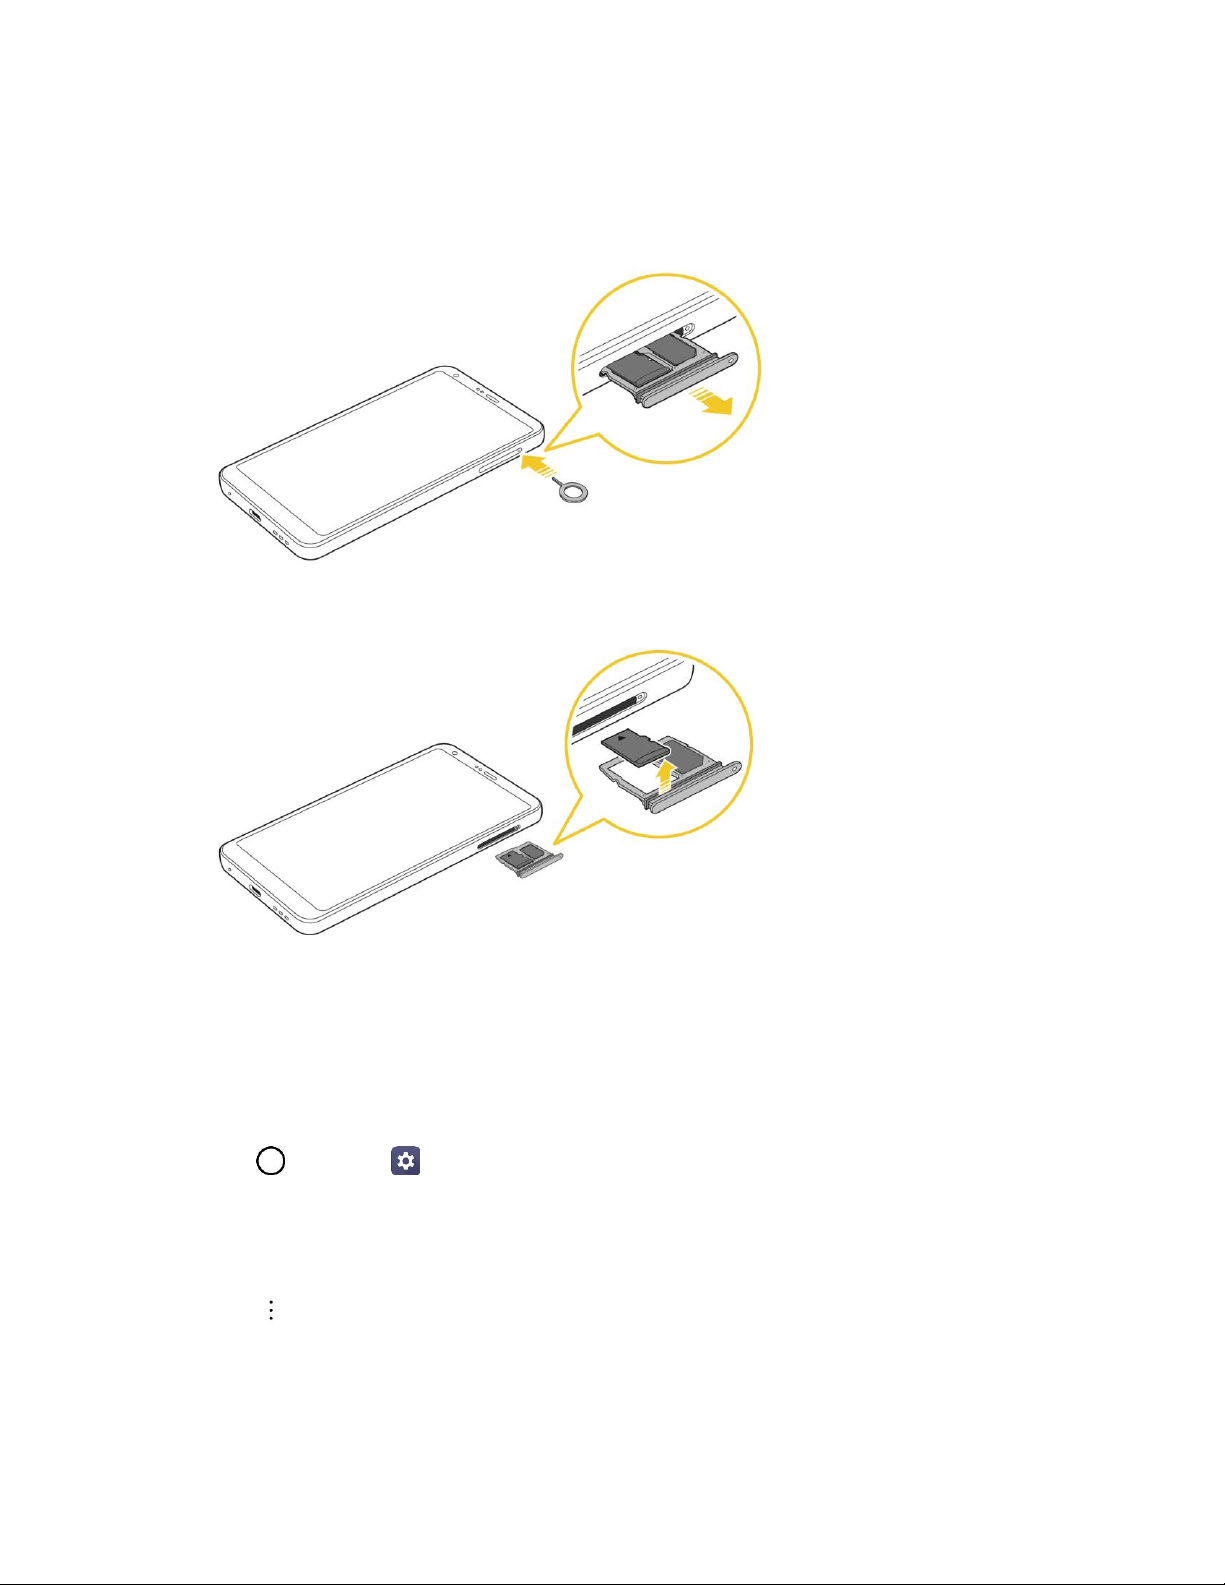
4. Press and hold the Power/Lock key and then tap Power Off > POWER OFF to turn off your
phone.
5. Gently insert the ejection pin into the hole on the card tray and then pull out the ejected tray.
6. Take the microSD card out of the tray to remove it.
Format microSD Card
When you insert an optional microSD card for the first time, it is recommended that you format it on your
phone.
Note: Formatting an SD card permanently erases all data stored on the card. It is recommended you back
up any card contents to your computer before formatting the SD card.
1. Tap > Settings > General tab.
2. Tap Storage.
3. Tap SD card.
4. Tap > Storage settings.
5. Tap Format > FORMAT.
All data on the microSD card is erased, and the card is formatted for use on your phone.
Set Up Your Phone 14
Page 25

Turn Your Phone On and Off
The instructions below explain how to turn your phone on and off.
Turn Your Phone On
Ŷ Press and hold the Power/Lock key.
Your phone will power on. Depending on the settings, you may see the lock screen.
See Lock and Unlock Your Screen and Select Screen Lock for information about using the
screen lock.
The first time you turn the phone on, you will see the setup screens. See Complete the Setup
Screens for details.
If your phone is not yet activated, see Activate Your Phone for more information.
Turn Your Phone Off
1. Press and hold the Power/Lock key to open the phone options menu.
2. Tap Power off to turn the phone off.
3. Tap POWER OFF to confirm.
Your phone will power off.
Your screen remains blank while your phone is off (unless the battery is charging).
Tip: The KnockON feature allows you to double-tap the screen to easily turn it on or off.
Use the Touchscreen
<RXUSKRQH¶VWRXFKVFUHHQOHWV\RXFRQWURODFWLRQVWKURXJKDYDULHW\RIWRXFKJHVWXUHV
Tap
When you want to type using the onscreen keyboard, select items onscreen such as application and
settings icons, or press onscreen buttons by simply tapping or touching them with your finger.
Touch and Hold
To open the available options for an item (for example, a contact or link in a Web page), touch and hold
the item.
Swipe or Slide
To swipe or slide means to quickly drag your finger vertically or horizontally across the screen.
Set Up Your Phone 15
Page 26

Drag
To drag, touch and hold your finger with some pressure before you start to move your finger. While
dragging, do not release your finger until you have reached the target position.
Flick
Flicking the screen is similar to swiping, except that you need to swipe your finger in light, quick strokes.
This finger gesture is always in a vertical direction, such as when flicking the contacts or message list.
Rotate
For most screens, you can automatically change the screen orientation from portrait to landscape by
turning the phone sideways. When entering text, you can turn the phone sideways to bring up a bigger
keyboard. See Touchscreen Keyboards for more details.
Note: The Auto-rotate switch needs to be selected for the screen orientation to automatically change. Tap
> Settings > Display tab > Auto-rotate screen.
Tip: You can also access the screen rotation setting from the notification panel. Drag the status bar down
and tap / (Rotation) to select or deselect the option.
Pinch and Spread
³3LQFK´WKHVFUHHQXVLQJ\RXUWKXPEDQGIRUHILQJHUWR]RRPRXWRU³VSUHDG´WKH screen to zoom in when
viewing a picture or a Web page. (Move fingers inward to zoom out and outward to zoom in.)
Activate Your Phone
Follow the instructions below to activate your phone if it has not already been activated. Depending on
your account or how and where you purchased your phone, it may be ready to use or you may need to
activate it on your Sprint account.
Ɣ If you purchased your phone at a Sprint Store, it should be activated and ready to use.
Ɣ If you received your phone in the mail, and it is for a new Sprint account or a new line of service,
it will activate automatically when you first turn it on.
Ɣ If youĜre swapping phones for a number already on your Sprint account, go to sprint.com/activate
and follow the instructions.
To confirm activation, make a phone call. If your phone is still not activated, visit sprint.com/support for
assistance. If you do not have access to the Internet, call Sprint Customer Service at 1-888-211-4727
from another phone.
Tip: Do not press the Power/Lock key while the phone is being activated. Pressing the Power/Lock key
cancels the activation process.
Note: If you are having any difficulty with activation, visit sprint.com/support.
Set Up Your Phone 16
Page 27

Complete the Setup Screens
The setup screens help you set up certain features and preferences on your phone. Once your phone has
been turned on, you will see a Welcome message. You can then complete the setup process.
Note: You may be able to complete the setup screens before your phone has been activated on your
account.
1. On the configuration screen, touch NEXT to get started.
2. Follow the onscreen instructions to complete each section. For each topic, you will have the
option to skip it and continue to the next screen.
Language Selection - Select a desired language.
Set internet connection - If prompted, follow the prompts to sign in to an available Wi-Fi®
network. For secured Wi-Fi networks, you will need to enter a password. See Wi-Fi for more
details.
Set up your LG-LS993 - You can choose to restore a backup or copy from a device or set up
as a new device.
Google Account - Sign in or set up a Google Account.
Google services - Read all of the information for the available Google Services and, if you
agree, tap NEXT. Otherwise, uncheck the options and tap NEXT.
Help apps find your location - Helps apps determine location. This means sending
anonymous location to Google, even when no apps are running. Tap Learn more for
additional information.
Improve location accuracy - Allows apps and services to scan for Wi-Fi networks even
when Wi-Fi is off.
Help improve your Android experience - Allows your device to send diagnostic and
usage data to Google automatically. Tap Learn more for additional information.
Add your fingerprint - Prevent others from using this phone without your permission by
activating device protection features.
Legal documents - Read all of the information about legal documents.
EULA (End-User License Agreement) - Read the End-User License Agreement and tap
the I agree check box if you agree to the terms.
Low power location estimation - Read the Low power location estimation information
and tap the I agree check box if you agree to the terms.
3. Tap DONE. Your setup is now complete. Follow the onscreen instructions to learn about basic
touch menu navigation, view tutorials, or just get started.
Set Up Your Phone 17
Page 28
Basic Operations
The following topics outline basic features and operations of your phone.
Basics
7KHIROORZLQJWRSLFVRIIHUDQRYHUYLHZRI\RXUSKRQH¶VEDVLFRSHUDWLRQV
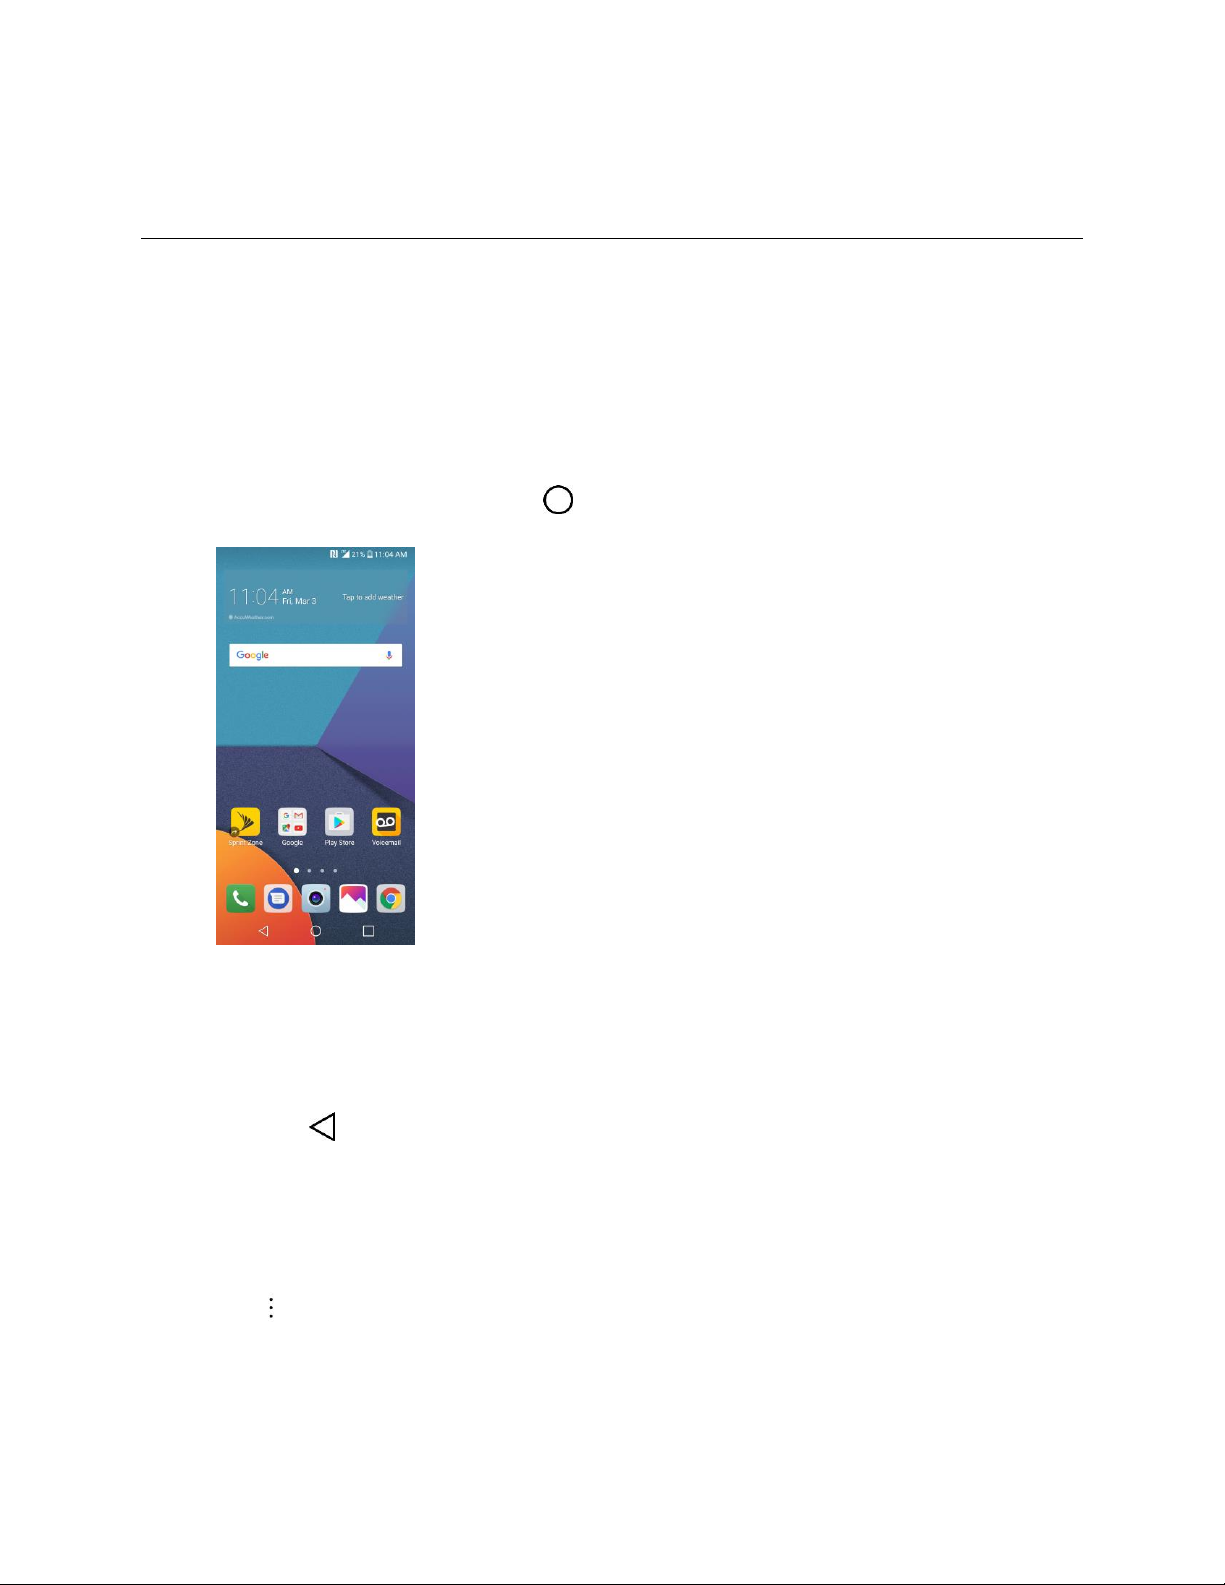
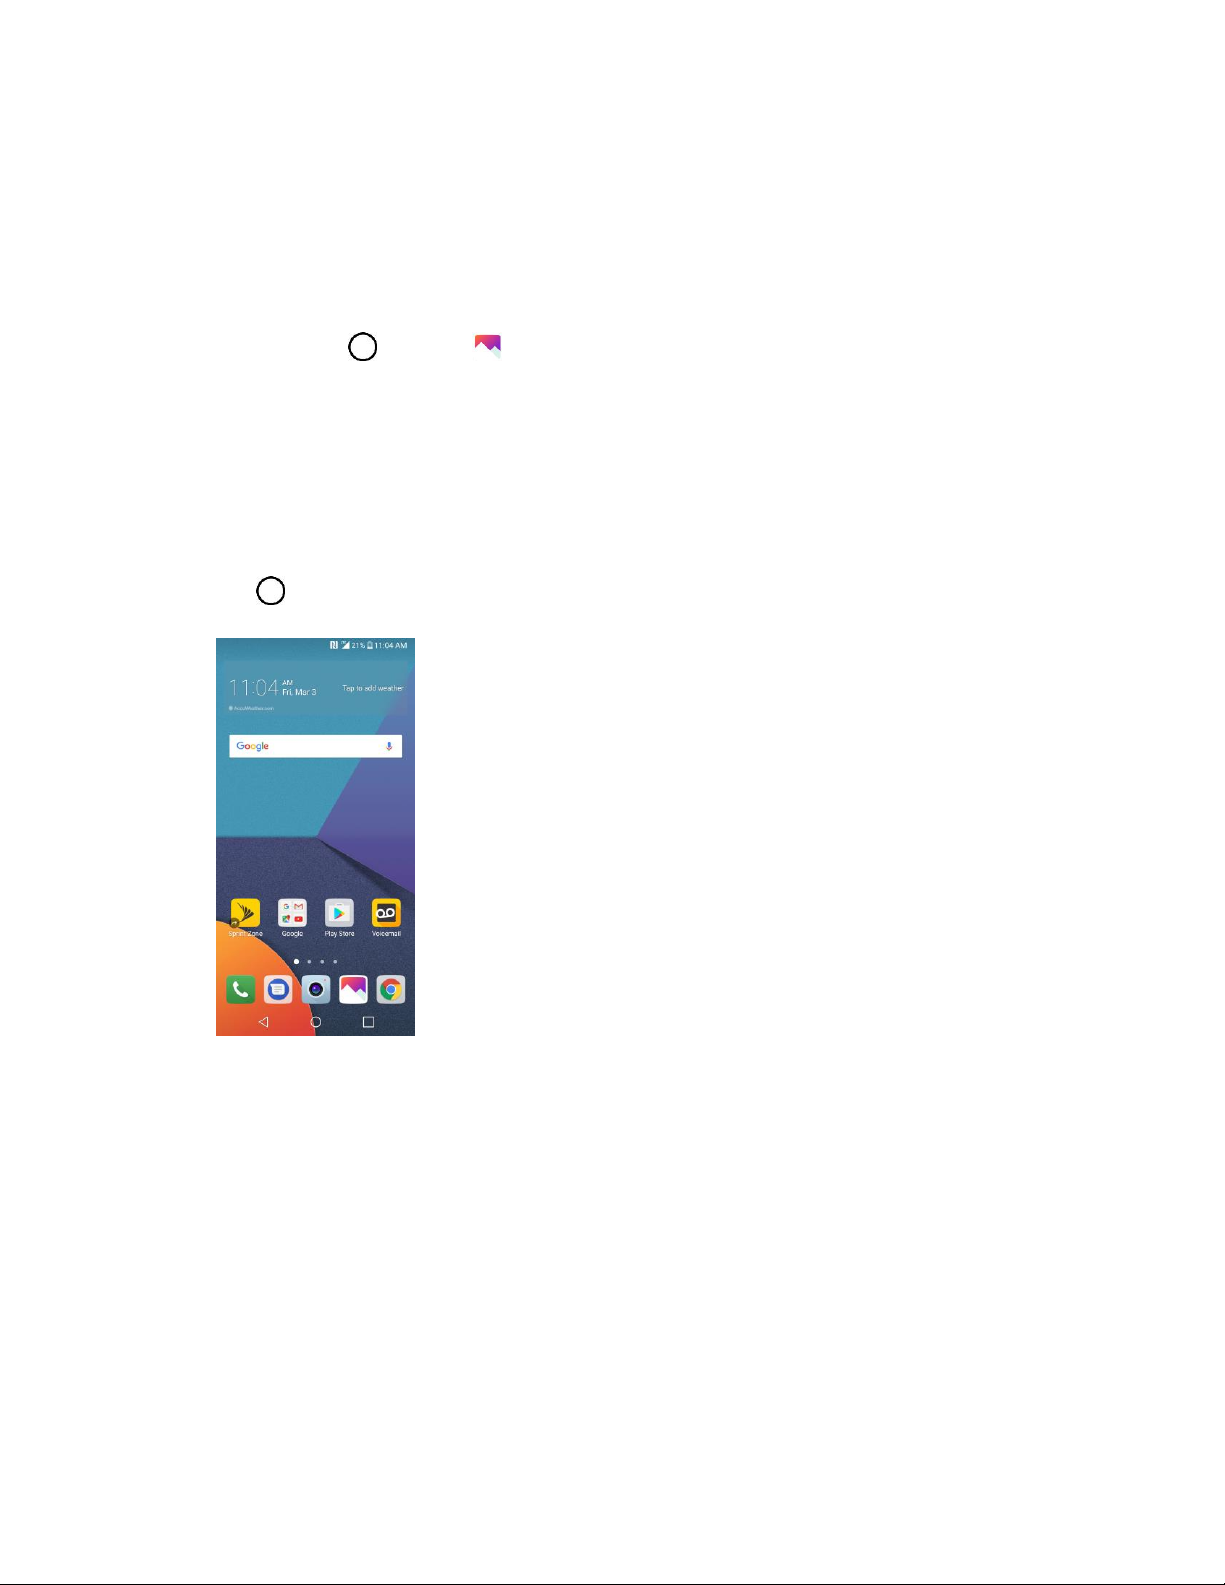
Home Screen
0RVWRI\RXUSKRQH¶VRSHUDWLRQVRULJLQDWHIURPWKHhome screen.
Ŷ From any screen, tap the Home key to display the home screen.
For information about using the home screen, see Home Screen Basics.
Select Options and Navigate Screens
Tap icons, onscreen keys, and other items to open or activate the assigned function.
Ŷ Tap Back to return to the previous screen.
Menu Operations
You can display options menus using the menu key, any app-specific menu icon, or by tapping and
holding a screen area, depending on your current app.
Ŷ Tap to view available settings and options.
Recent Applications
You can display a list of recently used applications using the Overview key.
Basic Operations 18
Page 29
Ŷ Tap Overview to view a list of recently used applications.
Phone Settings Menu
<RXFDQFXVWRPL]H\RXUSKRQH¶VVHWWLQJVDQGRSWLRQVWKURXJK the Settings menu.
Ŷ Tap > Settings .
± or ±
Drag the status bar down and tap > Settings .
For more information, see Settings.
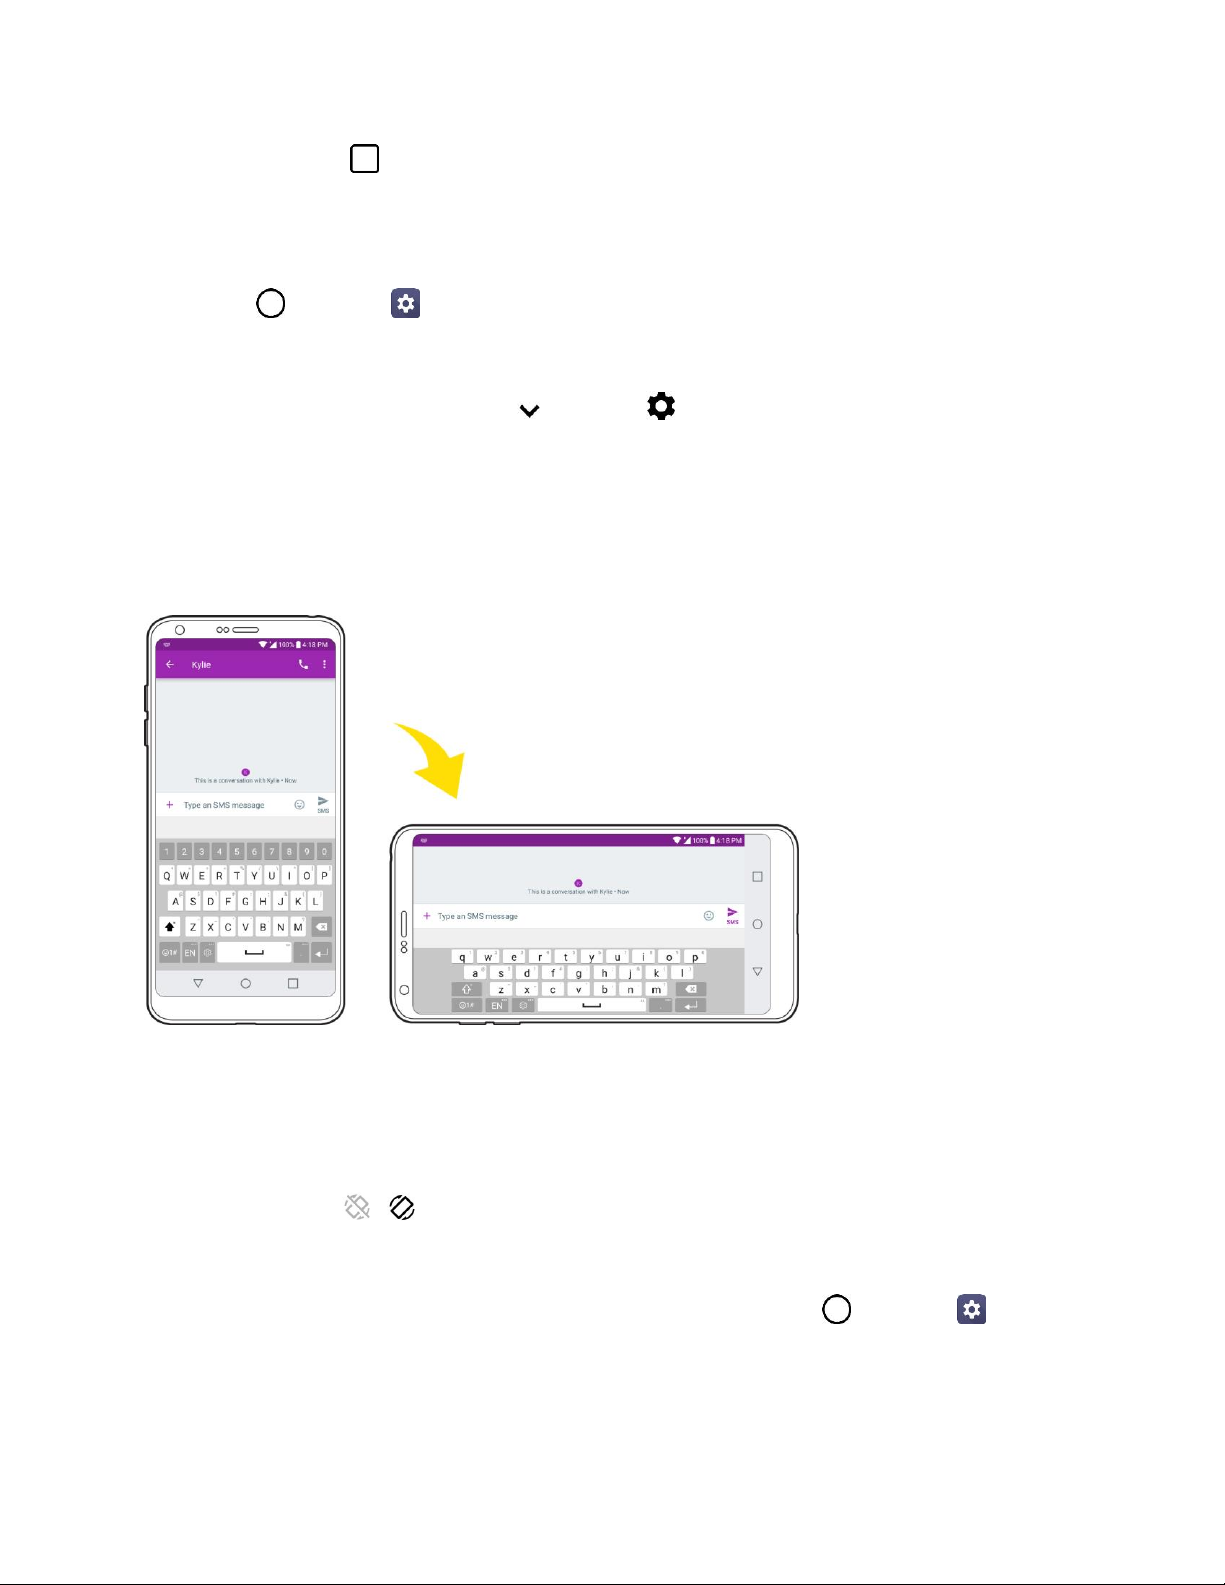
Portrait and Landscape Screen Orientation
The GHIDXOWRULHQWDWLRQIRU\RXUSKRQH¶VVFUHHQLVSRUWUDLWYHUWLFDOEXWPDQ\DSSVZLOOFKDQJHWR
landscape orientation (widescreen) when you rotate the phone sideways.
Note: Not all screens will adjust for landscape orientation.
Turn Screen Rotation On or Off
1. Pull down the status bar to display the quick settings menu.
2. Tap Rotation / to turn the option on or off.
You may need to scroll left or right to see the Screen rotation option.
Note: You can also set the rotation option from the main settings menu. Tap > Settings > Display
tab > Auto-rotate screen.
Basic Operations 19
Page 30
Capture Screenshots
<RXFDQXVH\RXUSKRQH¶VSRZHUDQGvolume keys to capture screenshots.
Ŷ Press and hold the Power/Lock key and Volume Down key at the same time to capture a
screenshot of the current screen.
7KHFXUUHQWVFUHHQVKRWZLOOEHFDSWXUHGDQGVWRUHGLQWKH6FUHHQVKRWVDOEXPLQWKHSKRQH¶V
Gallery. Tap > Gallery .
Applications
The following topics describe how to access the applications (apps) list and launch apps on your phone.
Launch Applications
All installed apps can be accessed and launched from the home screen.
1. Tap .
Basic Operations 20
Page 31

App
Function/Service
Calendar
Launch the Calendar app. See Calendar.
Camera
Take pictures and record videos using the front and rear cameras. See
Camera Overview.
Chrome
Browse the Internet. See Chrome Browser.
Contacts
Displays the Contacts that can be synchronized with your phone from
either your Google or Outlook account. Contacts can only be synched
to a managed account. See Add Contacts.
Email
Launch the Email app. See Email.
Emergency Alert
Provides access to your emergency messages and its settings.
Essentials
Access essential apps such as Contacts, QuickMemo+, Clock, Tasks,
Music, Calculator, LG Health, and HD Audio Recorder.
Gallery
Displays a Gallery of camera images and video saved on your phone.
See View Pictures and Videos Using Gallery.
2. Tap an app icon to launch the corresponding application.
The application opens.
Preinstalled Apps
The following table outlines the primary apps that have been preinstalled on your phone.
Basic Operations 21
Page 32

Google
Access the Google applications.
Management
Access power and storage space management apps.
Messenger
Provides access to your text and multimedia messages. See
Messenger.
Phone
Access the dial pad to make calls. See Call Using the Phone Dialer.
Play Store
Browse, search for, and download applications from the Google Play
Store app. See Google Play Store.
Quick Help
Allows you to view help information about the device and FAQ.
Settings
Access the phoneĜs settings menu. See Basic Settings.
Sprint Zone
Access your Sprint account, get device information and help, find
recommended apps, and more. See Sprint Zone.
Square Camera
Launch Square Camera to take multiple photos or videos in the form of
a collage using the front and rear cameras. See Square Mode.
Voicemail
Use Visual Voicemail for a quick and easy way to access your
voicemail. Now you can find exactly the message you are looking for
without having to listen to every voicemail message first. See
Voicemail.
Fingerprint Recognition
You must register your fingerprint on your device first before using the fingerprint recognition function.
You can use the fingerprint recognition function in the following cases:
Ɣ To unlock the screen
Ɣ To view the locked content in the Gallery or QuickMemo+
Ɣ To confirm a purchase by signing in to an app or identifying yourself with your fingerprint
Note: Your fingerprint can be used by the device for user identification. Very similar fingerprints from
different users may be recognized by the fingerprint sensor as the same fingerprint. To enhance the
device security, set the screen lock to a pattern, PIN or password.
Basic Operations 22
Page 33

Precautions for Fingerprint Recognition
Fingerprint recognition accuracy may decrease due to a number of reasons. To maximize the recognition
accuracy, check the following before using the device:
Ɣ The deviceĜs Power/Lock key has a fingerprint sensor. Ensure that the Power/Lock key is not
damaged by a metallic object, such as coin or key.
Ɣ When water, dust or another foreign substance is on the Power/Lock key or your finger, the
fingerprint registration or recognition may not work. Clean and dry your finger before having the
fingerprint recognized.
Ɣ A fingerprint may not be recognized properly if the surface of your finger has a scar or is not
smooth due to being soaked in water.
Ɣ If you bend your finger or use the fingertip only, your fingerprint may not be recognized. Make
sure that your finger covers the entire surface of the Power/Lock key.
Ɣ Scan only one finger for each registration. Scanning more than one finger may affect fingerprint
registration and recognition.
Ɣ The device may generate static electricity if the surrounding air is dry. If the surrounding air is dry,
avoid scanning fingerprints, or touching a metallic object such as coin or key before scanning
fingerprints to remove static electricity.
Registering Fingerprints
You can register and save your fingerprint on the device to use fingerprint identification.
1. Tap > Settings > General tab > Fingerprints & security > Fingerprints.
Note: This feature is available when the secured lock is activated. Lock the device with Knock Code,
Pattern, PIN or Password. If the screen lock is not active, configure the lock screen by following the onscreen instructions. See Select Screen Lock for details.
2. Locate the Power/Lock key on the back of the device and gently put your finger on it to register
the fingerprint.
Note: Gently press the Power/Lock key so that the sensor can recognize your fingerprint. If you press the
Power/Lock key with an excessive force, the screen lock function may start or the screen may be turned
off. Ensure that your fingertip covers the entire surface of the sensor of the Power/Lock key.
Basic Operations 23
Page 34

3. Follow the on-screen instructions.
Repeat scanning the fingerprint by moving your finger little by little until the fingerprint
registers.
4. When the fingerprint registration is done, tap OK.
Tap ADD MORE to register another fingerprint. If you register only one fingerprint and the
corresponding finger is not in a good condition, the fingerprint recognition may not work well.
As the preventive measure against this kind of situation, register multiple fingerprints.
Managing Fingerprints
You can edit or delete registered fingerprints.
1. Tap > Settings > General tab > Fingerprints & security > Fingerprints.
2. Unlock according to the specified lock method.
3. From the fingerprint list, tap a fingerprint to rename it.
To delete it, tap .
Unlocking the Screen with a Fingerprint
You can unlock the screen or view the locked content by using your fingerprint.
Activate the desired function:
1. Tap > Settings > General tab > Fingerprints & security > Fingerprints.
2. Unlock according to the specified lock method.
3. On the fingerprint settings screen, activate the desired function:
Screen lock: Unlock the screen with a fingerprint.
Content lock: Unlock content with a fingerprint. To do this, make sure that the content lock is
set.
Basic Operations 24
Page 35

Multi-tasking Feature
You can use two apps at the same time by separating the screen into multiple windows.
Multi-Window
While using an app, touch and hold from the Home touch buttons, then select an app from the
recently-used apps list.
Ɣ You can use two apps at the same time.
Ɣ To stop the Multi-Window feature, touch and hold .
Note: The Multi-Window feature is not supported by some apps, including downloaded apps.
Overview Screen
The Overview screen provides a preview of your recently-used apps.
To view the list of recently-used apps, tap on the Home touch buttons.
Ŷ Touch and hold an app and drag it to the top of the screen to start the app with the Multi-Window
feature. You can also tap at the top of each app preview.
Phone Number
)ROORZWKHLQVWUXFWLRQVEHORZWRGLVSOD\\RXUSKRQH¶VZLUHOHVVSKRQHQXPEHU
1. Tap > Settings > General tab.
2. Tap About phone.
3. Tap Status.
Basic Operations 25
Page 36

You will see the number listed under My phone number.
Airplane Mode
Airplane mode turns off all functions that emit or receive signals, while leaving your phone on so you can
use apps that don¶t require a signal or data.
To turn on airplane mode:
1. Press and hold the Power/Lock key to display the phone options menu.
2. Tap Turn on Airplane mode > TURN ON.
Your phone is now in airplane mode. You will see the airplane mode icon in the status bar.
Tip: You can also access airplane mode through the status bar menu. Drag the status bar down and tap
Airplane mode > TURN ON.
To turn off airplane mode:
1. Press and hold the Power/Lock key to display the phone options menu.
2. Tap Turn off Airplane mode.
Your phone¶s wireless connection features are now restored.
Tip: You can also turn off airplane mode through the status bar menu. Drag the status bar down and tap
Airplane mode .
Enter Text
You can type on your phone using one of the available touchscreen keyboards or Google voice typing.
Touchscreen Keyboards
Your phone offers you a choice of touchscreen keyboards for entering text. The keyboard appears
automatically onscreen when you tap a text entry field, and they can be used in either portrait or
landscape mode.
The methods available include:
Ɣ Google voice typing allows to use Google voice recognition to convert speech to text.
Ɣ LG Keyboard allows you to use a LG keyboard to enter text.
Note.H\ERDUGOD\RXWVDQGRSWLRQVPD\FKDQJHGHSHQGLQJRQZKHUH\RX¶UHXVLQJWKHP)RUH[DPSOHLI
\RX¶UHHQWHULQJWH[WWRGRD:HEsearch, a search icon may be available instead of an enter key.
To change the keyboard:
1. From any screen where you can enter text, tap the input field to reveal the keyboard.
Basic Operations 26
Page 37

2. Drag the status bar down and tap Change keyboard.
QWERTY Keyboard
You can enter text using the on-screen keyboard. The on-screen keyboard appears on the screen when
you tap an available text entry field.
Basic Operations 27
Page 38

Phone Keyboard
When T9 is off, to enter text, tap the key labeled with the desired letter until it appears on the screen. For
example, tap once for ³a´, twice for ³b´, or three times for ³c."
Basic Operations 28
Page 39

Tips for Editing Text
Your phone gives you many options to make entering text easier, including copying, cutting, and pasting
text, using voice-to-text input, customizing the user dictionary, using predictive text, and more.
To cut/copy and paste:
1. Touch and hold a word to highlight it.
2. Drag the blue highlight markers to highlight the text you want.
ė or ±
To select all the text, tap > SELECT ALL in the context menu.
To cancel the selection, simply tap unselected text or empty area.
3. Tap CUT or COPY in the context menu.
4. Place the cursor on the location where you want to paste the text.
5. Touch and hold the text field and tap PASTE. The text that you pasted also remains in the
phone's memory (temporarily), so you can paste that same text in another location.
Move Cursor Using the Space Bar
Touch and hold the space bar and slide your finger to the left or right to move the cursor.
Basic Operations 29
Page 40

Split Keyboard Using Gesture
The split keyboard feature allows you to use both hands to type while in landscape view. Each half of the
keyboard withdraws to the left and right of the screen. Place both thumbs on the keyboard and slide them
outwards in opposite directions.
To change the keyboard height:
1. Tap > Keyboard height and layout > Keyboard height.
2. Drag the blue bar to adjust the keyboard height.
Basic Operations 30
Page 41

To change the bottom row keys:
1. Tap > Settings > General tab > Language & keyboard > LG Keyboard > Keyboard
height and layout > QWERTY keyboard layout.
2. Drag to add or delete keys or change the order. To change to another character on the visible key,
tap the key and choose the desired character that you want displayed.
Note: This function does not support some languages.
Google Account
You will need a Google Account to access several phone features such as Gmail, Google Maps, Duo,
and the Google Play applications. Before you are able to access Google applications, you must enter
your account information. These applications sync between your phone and your online Google Account.
Google Account Cautions
Be sure not to forget your Google Account ID or password.
Create a Google Account
You must create and/or sign into a Google Account to use Gmail, DuoTM, Google CalendarTM, and other
Google Apps. Signing into a Google Account is also necessary to download applications from the Google
Play Store app to sync your data (if applicable) with the Google servers, and to take advantage of any
other available Google services on your phone.
,I\RXGRQ¶WKDYHD*RRJOH$FFRXQW\RXZLOOEHSURPSWHGWRFUHDWHRQH,I\RXKDYHDQHQWHUSULVe account
through your company or other organization, your IT department may have special instructions on how to
sign into that account.
Create a Google Account Online
1. From a computer, or from your phone's Browser, navigate to www.google.com.
2. On the main page, tap or click Sign in > Create an account.
3. Follow the on-screen prompts to create your free account.
4. Log into your provided email address, locate the email from Google, and respond to the new
email to both confirm and activate your new account.
Basic Operations 31
Page 42

Create a Google Account Using Your Phone
1. Tap > Settings > General tab > Accounts & sync > ADD ACCOUNT > Google.
2. Tap Google and then tap Or create a new account.
3. Follow the prompts to set up your account. Tap NEXT to proceed between steps, which may
include:
Enter your First name and Last name.
Enter a desired Username.
Enter and reenter a password.
Create a security question and answer, enter a secondary email address to help you recover
your password if you ever lose it.
On the Finish account screen, select your Web history and additional Google Play options.
Enter the letters from the Authenticating screen.
After your phone connects with the Google servers, select the items you would like to sync
with your phone and then tap Sync now.
4. Tap Finish setup.
You are signed in to your Google Account, and your phone will synchronize the selected items.
Note: When setting up a new Google Account, either on your phone or online, you will be prompted to
add a secondary email address. Enter a second Gmail address or any other email address from which
you currently send and receive email. This address is used to authenticate your account should you ever
encounter problems or forget your password. It is strongly encouraged for Android users so you can
regain access to Google services and purchases on your phone.
Create an Exchange Account
If you synchronize your phone with your Exchange account, you can read, manage, and send email in the
same easy way as with a Gmail Account.
1. Tap > Settings > General tab > Accounts & sync > ADD ACCOUNT > Microsoft
Exchange.
2. Enter the EMAIL ADDRESS and tap NEXT.
3. Enter the PASSWORD and then tap NEXT.
4. Follow the onscreen prompts to configure options for the account.
5. Enter an account name and a display name and tap NEXT to complete setup.
Your corporate email account is set up and you will begin receiving email for the account.
Basic Operations 32
Page 43

Sign into Your Google Account
If you have a Google Account but have not yet signed in with your phone, follow these instructions to sign
in to your Google Account.
1. Tap > Settings > General tab > Accounts & sync > ADD ACCOUNT > Google.
2. Enter a Google Account and tap NEXT.
Note: If you do not already have a Google Account, tap Or create a new account and follow the onscreen prompts to create your new account.
3. Enter your Password and tap NEXT.
4. Select if you want to back up your phone's apps, app data, settings, and Wi-Fi passwords and tap
NEXT.
5. Checkmark the entries you want to set up payment info (if necessary) and tap NEXT.
Your phone then communicates with the Google servers to confirm your information.
Factory Reset Protection
When you sign in to a Google Account on your device, Factory Reset Protection is turned on. Factory
Reset Protection (FRP) prevents other people from using your device if it is reset to factory settings
without your permission. For example, if your device is lost or stolen and a factory data reset is performed,
only someone with your Google Account username and password can use the device.
You will not be able to access the device after a factory data reset if you do not have your Google
Account username and password. For more information, see Factory Data Reset.
Caution: You should remove your Google Account before shipping your device to LG or any other
service provider for service and before resetting the device to factory settings.
Enable Factory Reset Protection
Adding a Google Account to your device automatically turns on the Factory Reset Protection (FRP)
security feature. No further action is necessary to turn on FRP.
Disable Factory Reset Protection
To disable FRP, remove all Google Accounts from the device.
1. Tap > Settings > General tab > Accounts & sync > Google.
2. Tap a Google Account.
3. Tap > Remove account > REMOVE.
Basic Operations 33
Page 44

Google Play Store
*RRJOH3OD\LVWKHSODFHWRJRWRILQGQHZ$QGURLGDSSVERRNVPRYLHVDQGPXVLFIRU\RXUSKRQH
Choose from a wide variety of free and paid content ranging from productivity apps and games to
bestselling books and blockbuster movies and music. When you find what you want, you can easily
download and install it on your phone.
7RDFFHVVWKH*RRJOH3OD\VWRUHDSS\RXPXVWILUVWFRQQHFWWRWKH,QWHUQHWXVLQJ\RXUSKRQH¶V:L-Fi or
mobile data connection and sign in to your Google Account. See Sign into Your Google Account for
details.
Installing Applications
Many different kinds of applications can be installed on your phone from Google Play (provided by
Google Inc.). Sprint is not responsible in any way for user-installed applications (quality, reliability,
legality, fitness for a purpose, credibility, accuracy, etc.) or resulting malfunctions (viruses, etc.).
Important: Our policies often do not apply to third-party applications. Third-party applications may access
your personal information or require us to disclose your customer information to the third-party application
provider. To find out how a third-party application will collect, access, use, or disclose your personal
LQIRUPDWLRQFKHFNWKHDSSOLFDWLRQSURYLGHU¶VSolicies, which can usually be found on their website. If you
DUHQ¶WFRPIRUWDEOHZLWKWKHWKLUG-SDUW\DSSOLFDWLRQ¶VSROLFLHVGRQ¶WXVHWKHDSSOLFDWLRQ
Find and Install an App
When you install apps from Google Play app and use them on your phone, they may require access to
your personal information (such as your location, contact data, and more) or access to certain functions
or settings of your phone. Download and install only apps that you trust.
1. Tap > Play Store .
2. Browse for an application. Once you have decided on one, tap it to view its details.
3. Read the application descriptions and comments.
4. Tap INSTALL (for free applications) or the price button (for paid applications).
Warning: Use caution with applications which request access to any personal data, functions, or
significant amounts of data usage times.
5. Check the progress of the current download by opening the Notifications Panel.
6. You will be notified when the item is downloaded and installed on your phone.
7. On the Play Store screen, tap > My apps & games, tap the installed application in the list,
and then tap OPEN.
Purchasing Applications
Purchase apps at your own risk. Sprint is not responsible for any harm to you or third parties resulting
from the use of purchased applications.
Basic Operations 34
Page 45

Request a Refund for a Paid App
If you are not satisfied with an app, you can ask for a refund within 15 minutes of the purchase. Your
credit card is not charged and the app is uninstalled from your phone.
,I\RXFKDQJH\RXUPLQG\RXFDQLQVWDOOWKHDSSDJDLQEXW\RXFDQ¶WUHTXHVWDUHIXQGDVHFRQGWLPH
1. Tap > Play Store .
2. Tap > My apps & games.
3. Tap the app to uninstall for a refund.
The details screen for the app opens.
4. Tap Refund, and then tap Yes to confirm.
Your app is uninstalled and the charge is canceled.
Update an App
Depending on your settings, many apps will update automatically, or you can update apps directly from
the Play Store app.
Update an App Directly
1. Tap > Play Store .
2. Tap > My apps & games.
3. Tap the app you want to update, and then tap UPDATE > CONTINUE.
The app update is downloaded and installed.
Set Automatic App Updates
1. Tap > Play Store .
2. Tap > Settings.
3. Tap Auto-update apps and select an option.
The app is set to update automatically whenever an update becomes available (depending on
your settings).
Note: Automatic updates are unavailable for some apps.
Uninstall an App
You can uninstall any app that you have downloaded and installed from Google Play.
1. Tap > Play Store .
Basic Operations 35
Page 46

2. Tap > My apps & games.
3. On the Installed screen, tap the app you want to uninstall, and then tap UNINSTALL > OK.
The app is uninstalled and removed from your phone.
Get Help with Google Play
The Google Play store app offers an online help option if you have questions or want to know more about
the app.
1. Tap > Play Store .
2. Tap > Help & feedback.
The Web browser will take you to the Google Play Help Web page, where you will find
comprehensive, categorized information about Google Play.
Lock and Unlock Your Screen
Your phone allows you to quickly turn the screen off when not in use and to turn it back on and unlock it
when you need it.
Turn the Screen Off When Not in Use
Ŷ To quickly turn the screen off, press the Power/Lock key. Pressing the Power/Lock key again or
receiving an incoming call will turn on your phone screen and show the lock screen.
To save battery power, the phone automatically turns off the screen after a certain period of time when
you leave it idle. You will still be able to receive messaJHVDQGFDOOVZKLOHWKHSKRQH¶VVFUHHQLVRII
Note: For information on how to adjust the time before the screen turns off, see Display Settings.
Turn the Screen On and Unlock It
1. To turn the screen on, press the Power/Lock key.
The lock screen appears.
Basic Operations 36
Page 47

2. Swipe your finger across the screen to unlock it.
The screen is unlocked.
If you have set up a screen lock, you will be prompted to draw the pattern or enter the
password or PIN. See Select Screen Lock.
Unlock Your Screen Using the Knock Code Feature
The Knock Code feature allows you to create your own unlock code using a combination of knocks (or
taps) on the screen.
To activate the Knock Code feature:
1. Tap > Settings > Display tab.
2. Tap Lock screen.
3. Tap Select screen lock > Knock Code.
Basic Operations 37
Page 48

4. Use the 2x2 grid to create a sequence of knocks (or taps) to set your knock code.
To unlock the phone using Knock Code:
Ŷ While the screen is off, tap the same sequence you established anywhere on the screen. The
home screen will be accessed directly.
Update Your Phone
From time to time, updates may become available for your phone. You can download and apply updates
through the Settings > General tab > System updates menu.
Software Update Cautions
During update: The phone cannot be used until the software update is complete. It may take time to
XSGDWH\RXUSKRQH¶VVRIWZDUH
Signal during update: Update your phone where signal reception is good, and do not change
location during the update process. Make sure the battery is adequately charged before beginning an
update. A weak signal or low battery during an update may cause the update to fail. An update failure
may disable the phone.
Other functions during update: Other phone functions cannot be used during a software update.
Update Your Phone Software
You can update your phone's software using the System Update option.
Before Updating Your Phone
Updating your phone may result in a loss of saved data depending on the condition of your phone
(malfunctioning, damaged, water seepage, etc.). You must back up all critical information before updating
your phone firmware.
Basic Operations 38
Page 49

Back Up All Data Prior to Update
To back up your Gmail information:
1. Tap > Settings > General tab > Accounts & sync.
2. Tap the Auto-sync data option to enable the feature.
If the Auto-sync option is on, email, Calendar and Contacts automatically synchronize
whenever a change is made.
If the Auto-V\QFRSWLRQLVRIIWDSWKHV\QFLFRQZLWKLQWKHDFFRXQWILHOGWRUHYHDOWKHDFFRXQW¶V
synchronization settings screen.
3. Select an account and then tap > Sync now to sync your Google Account information.
To back up your Exchange Mail information:
1. Tap > Settings > General tab > Accounts & sync > Microsoft Exchange.
2. Select an account and then tap > Sync now to sync your Microsoft Exchange account
information.
Toggle the onscreen buttons to manually synchronize the desired parameters (Contacts or
Calendar).
To restore your Google apps following the update:
1. Tap > Play Store .
2. Tap > My apps & games > ALL tab.
3. Scroll through the list of previously downloaded Google apps and choose those you wish to
reinstall.
4. Follow the onscreen instructions.
Note: Your Google app purchases are reloaded remotely and can be re-installed after the update is
applied.
As an added precaution, to preserve any data on your microSD card, please unmount it from your phone
prior to starting the update process. Tap > Settings > General tab > Storage > .
8SGDWH<RXU3KRQH¶V6RIWZDUH
2QFH\RXKDYHEDFNHGXSDOO\RXUGDWDXVHWKH8SGDWHQRZRSWLRQWRXSGDWH\RXUSKRQH¶VVRIWZDUH
1. Tap > Settings > General tab > System updates.
2. Tap Update LG software > CHECK FOR UPDATE.
Basic Operations 39
Page 50

Your phone automatically downloads and installs any available updates. You may be required
to power your phone off and back on to complete the software upgrade.
Alternatively, you can access system updates through the notification panel.
1. Locate the System Update Available icon in notifications.
2. Pull down the status bar.
3. Tap to open the System Updates screen.
4. Tap Download and follow the onscreen instructions.
The downloading icon appears within the status bar to indicate the phone is downloading the
necessary files.
5. Tap Restart and install to complete the process.
Confirm Your Current Phone Software
1. Tap > Settings > General tab > About phone.
2. Tap Software info.
Update Your Profile
This option allows you to automatically update your online user profile information. If you choose to
change your user name and select a new one online, you must then update the user name on your phone.
1. Tap > Settings > General tab > System updates > Update profile.
2. Follow the onscreen instructions.
The phone will download and install the profile update and you will see a confirmation when
complete.
Note: If your data services or account syncing ever seems to go out unexpectedly, use this feature to
reconnect with the network.
Update Your PRL
This option allows you to download and update the PRL (preferred roaming list) automatically.
1. Tap > Settings > General tab > System updates > Update PRL.
2. Follow the onscreen instructions.
The phone will download and install the PRL update and you will see a confirmation when
complete.
Basic Operations 40
Page 51

Item
Description
Notifications
Displays your current notifications.
Phone App
Tap to open the dial pad. Also provides additional tabs to access
Call logs, Contacts, and Groups.
Back Key
Tap to return to the previous screen.
Home Key
Tap to display the main home screen.
Your Phone's Home Screen
7KHIROORZLQJWRSLFVGHVFULEHKRZWRXVHDQGFXVWRPL]H\RXUSKRQH¶VKRPHVFUHHQXQGHUVWDQGWKH
status bar, and use the notification panel.
Home Screen Basics
The home screen is the starting point for your SKRQH¶VDSSOLFDWLRQVIunctions, and menus. You can
customize your home screen by adding application icons, shortcuts, folders, widgets, and more.
Home Screen Layout
Your home screen extends beyond the initial screen. Swipe the screen left or right to display additional
screens.
Your Phone's Home Screen 41
Page 52

Overview Key
Tap to access a list of your most recently-used apps. Touch and
hold while using an app to use the Multi-window feature.
Application Icons
Tap an icon (application, folder, etc.) to open and use it.
Status Bar
Shows device status information including the time, signal
strength, battery status, and notification icons.
Icon
Status
Bluetooth® active
GPS active
Extended Home Screens
In addition to the main home screen, your phone features extended home screens provide more space
for adding icons, widgets, and more. Swipe across the screen to move from the main screen to an
extended screen. The small circles above the primary shortcuts let you know your current screen position.
Ŷ Tap the Home Key to display the main home screen.
To go directly to a particular screen:
Ɣ Swipe left and right to access additional home screen panels.
Ɣ Tap the location dots near the bottom of the home screen to move to the selected panel.
Status Bar and Notification Panel
<RXUSKRQH¶Vstatus and notifications are available at a glance at the top of the screen.
Status Bar
The status bar at the top of the home screen provides phone and service status information on the right
side and notification alerts on the left. To view the notification panel or access the quick settings menu,
pull down the status bar from the top of the screen.
Note: Status and notification icons are subject to change. Not all icons are depicted below.
Status Bar Layout
Main Status Icons
Your Phone's Home Screen 42
Page 53

Wi-Fi active
Downloading
Vibrate
Network (full signal)
Network (roaming)
4G LTE data service
3G (data service)
Airplane mode
Sync active
Alarm set
Battery (fast charging)
Battery (full charge)
Icon
Notification
Missed call
New voicemail
New email
New Gmail
New text or MMS message
Main Notification Icons
Your Phone's Home Screen 43
Page 54

New Sprint Zone message
Event
USB connection
Warning
Update available
Update downloading
Update successful
Keyboard active
More notifications available (pull down to view)
Note: Additional notification icons may appear. All notifications may be accessed through the notification
panel.
Notification Panel
Your SKRQH¶VQRWLILFDWLRQVDSSHDUDWWKHOHIWVLGHRIWKHVWDWXVEDUDQG\RXFDQDFFHVVWKHIXOOQRWLILFDWLRQ
panel by pulling down the status bar. From there, you can check notifications, download updates, open
messaging apps, use the quick settings menu, and more.
Open the Notification Panel
Ŷ Pull down the status bar. (Slide your finger down from the top of the screen.)
The notification panel opens. To check notifications, tap an item in the list.
Close the Notification Panel
Ŷ Slide the notification panel up. (Slide your finger up from the bottom of the screen.)
± or ±
Tap Back to close the notification panel.
Your Phone's Home Screen 44
Page 55

Notification Panel Layout
The notification panel gives you access both to notifications and the quick settings menu.
Customize the Home Screen
Learn how to set the wallpaper and add, move, or remove shortcuts, widgets, and folders from the home
screen.
Rearranging Items on the Home Screen
Ɣ Moving Widgets and Icons: From home, touch and hold an item and then drag it to the desired
location.
Ɣ Deleting Widgets: From home, touch and hold an item and then drag it to Remove.
Ɣ Displaying the Home Screen Menu: From home, touch and hold an empty space to display the
home screen menu. Menu options include Widgets, Theme, Home screen settings and App trash.
Change the Wallpaper
6HOHFWDQGDVVLJQ\RXUSKRQH¶VEDFNJURXQGZDOOSDSHU
1. Tap > Settings > Display tab > Home screen/Lock screen > Wallpaper.
2. Tap an option to select the wallpaper.
Home screen to set the background wallpaper for your home screen. Select from Wallpaper
gallery, Gallery, Sprint ID, Live wallpapers, and Photos.
Lock screen WRVHWWKHZDOOSDSHUIRU\RXUSKRQH¶VORFNVFUHHQ6HOHFWIURPWallpaper
gallery, Gallery, or Collage Wallpapers.
3. Select a wallpaper and tap OK or SET WALLPAPER.
Your Phone's Home Screen 45
Page 56

The wallpaper is set.
Note: If you select Gallery, you will need to select an album and a picture. Once selected, use the crop
tool to resize and position the image and then tap OK.
Note: If you select Live Wallpapers, before you tap APPLY, you can tap EDIT to select custom
animation settings, etc., for the live wallpaper.
Add Widgets to the Home Screen
<RXFDQDGGZLGJHWVWR\RXUSKRQH¶VKRPHscreen. Widgets are self-contained apps that display on a
home screen. Unlike a shortcut, the Widget works like an onscreen application. There are all kinds of
widgets, including links to a specific contact, Internet bookmarks, Facebook® status windows, Gmail and
email accounts, and many others.
1. Tap , touch and hold an empty space, and then tap Widgets.
The widget list opens.
2. Touch and hold a widget icon.
The icon will disengage and you will see thumbnails of your home screens.
3. Drag the icon to an empty location on one of the home screens.
The widget is added to the home screen.
Add Folders to the Home Screen
You can group home screen shortcuts into folders for convenient access.
1. Tap , touch and hold a shortcut you want to place in a folder and drag it over another icon you
want to place in the folder. Then release it.
A new folder is created.
2. To add more app shortcuts to the folder, touch and hold a shortcut and drag it on top of the new
folder.
The new shortcut is added to the folder.
Change Folder Names
Once you have added folders, you can change the name easily from the folder display.
1. Tap , tap the folder to open it, and then tap the folder name.
2. Type a new name and then tap OK.
Your Phone's Home Screen 46
Page 57

Making Connections
7KHIROORZLQJVHWRIWRSLFVZLOOFRYHU\RXUSKRQH¶VDELOLW\WRKHOS\RXPDNHFRQQHFWLRQVIURPSKRQHFDOOV
and maintaining contacts, to text messages, email, Internet, and international services.
47
Page 58

Phone Calls and Voicemail
7KHIROORZLQJWRSLFVRXWOLQHWKHXVHRI\RXUGHYLFH¶VSKRQHDSSWRSODFHDQGUHFHLYHFDOOVXVHYRLFHPDLO
set up and manage contacts, and more.
Place and Answer Calls
The following topics describe how to directly dial calls, how to answer incoming calls, and how to use the
in-call screen options.
Adjust In-Call Volume
Ŷ Adjusting Call Volume: Press the Volume keys during the call.
Emergency Call Cautions
Emergency calls are restricted in Airplane mode.
Call Using the Phone Dialer
The most "traditional" way to place a call is by using the phone's dialer screen.
1. Tap > Phone > Dial tab.
2. Enter a phone number using the on-screen dialpad and tap .
If you enter a wrong number, tap to erase digits one by one.
To erase the entire number, touch and hold .
Phone Calls and Voicemail 48
Page 59

You can open other applications during a call. The will appear in the status bar while the
call is underway.
Press the Volume Up/Down keys to adjust the call volume.
Use the on-screen buttons to add another call, put a call on hold, to use the speakerphone,
and for other options, as described in In-Call Screen Layout and Operations.
3. Tap to end the call.
Tip: To redial your last outgoing call, follow step 1 to access the Dialer, tap the Call logs tab, locate the
call entry and tap .
You can also make calls from your Contacts list and from the Call logs.
Call Emergency Numbers
You can place calls to 9-1-HYHQLIWKHSKRQH¶VVFUHHQLVORFNHGRU\RXUDFFRXQWLVUHVWULFWHG
To call the 9-1-1 emergency numbeUZKHQWKHSKRQH¶VVFUHHQLVORFNHGZLWKDVFUHHQORFN
1. From the lock screen, tap Emergency call.
2. Tap .
As long as you are in an area covered by wireless service, the emergency call is placed.
To call the 9-1-1 emergency number normally or when your account is restricted:
1. Unlock the screen. For more information, see Lock and Unlock Your Screen.
2. Tap > Phone > Dial tab.
3. Tap .
As long as you are in an area covered by wireless service, the emergency call is placed.
Enhanced 9-1-1 (E 9-1-1) Information
This phone features an embedded Global Positioning System (GPS) chip necessary for utilizing E 9-1-1
emergency location services where available.
When you place an emergency 9-1-1 call, the GPS feature of your phone seeks information to calculate
your approximate location. Depending on several variables, including availability and access to satellite
signals, it may take up to 30 seconds or more to determine and report your approximate location.
Important: Always report your location to the 9-1-1 operator when placing an emergency call. Some
designated emergency call takers, known as Public Safety Answering Points (PSAPs), may not be
equipped to receive GPS location information from your phone.
Phone Calls and Voicemail 49
Page 60

Answer Phone Calls
The following information lets you know how to answer incoming calls, mute the ringer on incoming calls,
reject incoming calls, and more.
When you receive a phone call from a contact, the Incoming call screen appears and displays the caller
ID icon, name, and phone number of the calling party. When you receive a phone call from someone who
is not stored in your contacts, only the default caller ID icon and phone number appear on the Incoming
call screen.
Note: If your phone is turned off, all calls automatically go to voicemail.
Answer an Incoming Call
1. When a call arrives, drag in any direction to answer it.
2. To end the call, tap .
Mute the Ringing Sound
To mute the ringer without rejecting the call, you can do any of the following:
Ɣ Press the Volume Down key.
Ɣ Place the phone face down on a level surface.
Reject an Incoming Call
Ŷ When a call arrives, drag in any direction to reject it.
The ringtone or vibration will stop and call will be sent directly to voicemail.
Reject a Call and Send a Text Message
You can reject an incoming call and automatically send a text message to the caller.
1. When a call arrives, slide Decline with message up from the bottom of the screen.
The ringtone or vibration will stop and you will see a list of preset text messages.
2. Tap one of the messages to send it to the caller.
The selected message will be delivered to the caller.
You can edit the reject messages through the Call settings menu. From the phone app, tap
> Call settings > Call blocking & Decline with message > Decline with message and
edit or create the reject messages.
In-Call Screen Layout and Operations
While \RX¶UHRQDFDOO\RXZLOOVHHDQXPEHURIRQVFUHHQRSWLRQV7DSDQRSWLRQWRVHOHFWLW
Phone Calls and Voicemail 50
Page 61

In-Call Screen Layout
Tap options to activate them during a call.
Ɣ Add call to initiate a 3-way call.
Ɣ End to end the current call.
Ɣ Dialpad to display the dialpad to enter additional numbers, for example, an extension or access
code.
For example: When you call your bankěs 800 number, use your dialpad to enter your account
number and PIN.
Ɣ Speaker to route the phoneĜs audio through the speaker (On) or through the earpiece (Off).
$FWLYDWHWKHVSHDNHUWRURXWHWKHSKRQH¶VDXGLRWKURXJKWKHVSHDNHU<RXFDQDGMXVWWKH
speaker volume using the volume keys.)
'HDFWLYDWHWKHVSHDNHUWRXVHWKHSKRQH¶VHDUSLHFH
Warning: Because of higher volume levels, do not place the phone near your ear during speakerphone
use.
Ɣ Mute to mute the microphone during an active call. Tap again to unmute the microphone.
Ɣ Bluetooth (Only available when a Bluetooth headset is connected to your phone) to route the
phoneĜs audio through a connected Bluetooth headset (On) or through the speaker (Off).
When the call is routed to a Bluetooth headset, the current call area shows the Bluetooth call
icon ( ).
Note: The Headset button is activated to show the current call is routed to the connected Bluetooth
headset.
Phone Calls and Voicemail 51
Page 62

To route the current call back to the phone, tap Bluetooth to temporarily use the phone. Tap
it again to route the call back to the connected Bluetooth headset.
When Bluetooth or the Bluetooth headset is turned off, the call is routed through either the
earpiece or speaker and shows ( ).
Ɣ Tap during a call to display a list of additional in-call features:
Contacts: Display your contacts list.
Place a Call from Contacts
You can place phone calls directly from entries in your Contacts list.
1. Tap > Phone to display the phone app.
2. Tap the Contacts tab to display the Contacts list.
3. Tap a contact.
4. Tap Call next to the number you want to call.
5. To end the call, tap .
Call from Call Logs
The Call logs list lets you quickly place calls to recent incoming, outgoing, or missed numbers.
1. Tap > Phone to display the phone app.
2. Tap the Call logs tab to display the Call logs list.
3. Tap an entry to display the call details.
4. Tap Call to place a call.
5. To end the call, tap .
Voicemail
The following topics describe how to set up and use your phone's voicemail and visual voicemail features.
Voicemail Setup
You should set up your voicemail and personal greeting as soon as your phone is activated. Always use a
password to protect against unauthorized access. Your phone automatically transfers all unanswered
calls to your voicemail, even if your phone is in use or turned off.
1. Tap > Phone > Dial tab.
Phone Calls and Voicemail 52
Page 63

2. Touch and hold to dial your voicemail number.
3. Follow the system prompts to:
Create your password.
Record your name announcement.
Record your greeting.
Important: Voicemail passcode ± It is strongly recommended that you create a password when setting
up your voicemail to protect against unauthorized access. Without a password, anyone who has access
to your phone is able to access your voicemail messages.
Visual Voicemail Setup
This topic describes the Visual Voicemail feature of your phone's service, as well as the steps required to
set up Visual Voicemail on your phone.
About Visual Voicemail
Visual Voicemail gives you a quick and easy way to access your voicemail. Now you can find exactly the
message you are looking for without having to listen to every voicemail message first. This feature
periodically goes out to your voicemail, and gathers the caller information from all of the current
voicemails. It then populates a list with the caller name and number, along with the length of time and
priority level of the voicemail message.
Set Up Visual Voicemail
Setting up Visual Voicemail follows many of the same procedures as setting up traditional voicemail. You
should set up your voicemail and personal greeting as soon as your phone is activated. Your phone
automatically transfers all unanswered calls to your voicemail, even if your phone is in use or turned off.
Note: To set up your traditional voicemail box, see Voicemail Setup.
Phone Calls and Voicemail 53
Page 64

1. Tap > Voicemail .
<RX¶OOVHHD:HOFRPHWR9LVXDO9RLFHPDLOscreen.
2. Scroll through the introduction screens to view a brief explanation of visual voicemail services.
3. At the end of the welcome screens, you'll come to a Personalize your voicemail prompt.
4. Tap PERSONALIZE and follow the system prompts to:
Create a password (part of standard voicemail).
Record your name announcement.
Record your greeting.
Important: Voicemail passcode ± It is strongly recommended that you create a password when setting
up your voicemail to protect against unauthorized access. Without a password, anyone who has access
to your phone is able to access your voicemail messages.
Review Visual Voicemail
Visual Voicemail lets you easily access and select which messages you want to review.
Phone Calls and Voicemail 54
Page 65

1. Tap > Voicemail .
You will see the voicemail inbox.
2. Tap a message to review it.
3. Tap Back to return to the voicemail inbox to review additional messages.
Tip: There are several icons at the bottom of the review screen for maintenance, storage, messaging,
and other options. For an explanation of all your options, tap Menu > Help > Visual Voicemail Menu.
Visual Voicemail Options
Use the following options to access and configure your Visual Voicemail options.
1. Tap > Voicemail .
2. From this initial screen, you can:
Tap to view the voicemail messages in other folder: Inbox, Sent, Archive, and Trash.
Tap to access New Voice SMS, New Avatar message, Search, Store, Help, and
Settings.
Configure Visual Voicemail Settings
The Visual Voicemail settings menu lets you access settings for notifications, pictures, greetings, and
more.
1. Tap > Voicemail .
2. Tap > Settings and select from the following:
Phone Calls and Voicemail 55
Page 66

Avatar
Disable Avatar to disable Avatar compose features and content store.
Avatar Facebook ad signature to enable avatar advertising signature when posting on
Facebook.
SMS delivery to allow sending SMS message to recipients who do not have Avatar
capability.
Display
Themes to choose the type of theme used for the application.
Display name to enter a name to identify yourself to people when replying or forwarding
messages.
Help/Info to see the visual voicemail help.
Preferences
Manage subscription to subscribe and unsubscribe from the visual voicemail premium
monthly subscription service. This may take a minute.
Data consent agreement to agree or disagree to send speech data to assist with the
quality of the voicemail feature.
Auto forward to email to send a copy of new messages to an email address of your
choice.
Personalize voicemail to change your voicemail greeting for incoming calls and update
password.
Transcription language to choose the transcription language (if available).
Delete messages to set Visual Voicemail to permanently delete messages from the
Trash folder after a specific number of days.
Transcriptions displayed to transcribe Voicemails from voice to text.
Enable/Disable free trials to opt in or out of future free trials.
SMS delivery of voice message to allow voice message delivery via SMS to recipients
who do not always have VoiceSMS capability.
Sound
Notifications to determine how you are notified of new voicemails. Set the notification
sound and vibrate option.
Speakerphone to automatically turn the speaker on or off.
Updates to search for an upgrade to your Visual message software.
Phone Calls and Voicemail 56
Page 67

About Voicemail to view build information about the current visual voicemail application.
Change Your Main Greeting via the Voicemail Menu
Your main greeting can be changed directly via the Visual Voicemail system. This direct access saves
you from having to navigate within the voicemail menu.
1. Tap > Voicemail .
2. Tap > Settings > Preferences > Personalize voicemail.
3. Tap OK to connect to the voicemail system. Follow the prompts to change your current greeting.
Edit the Display Name via the Voicemail Menu
From your Visual Voicemail menu, you can quickly change the name or number attached to your voice
messages.
1. Tap > Voicemail .
2. Tap > Settings > Display > Display name.
3. Tap the existing identification field and enter a new identifying name or number (used to identify
you to recipients of your voice messages).
4. Tap OK to save your information.
Optional Calling Services
The following topics outline additional voice-related services available with your phone, including Wi-Fi
calling, call services and more.
Wi-Fi Calling
Wi-Fi Calling uses Wi-Fi networks to help improve voice and data coverage. It sends and receives calls
and text messages over a connected Wi-Fi network and may offer better coverage in buildings and areas
of poor cellular reception.
For more information about Wi-Fi and your phone, see Wi-Fi.
Set Up Wi-Fi Calling
1. Tap > Settings > Networks tab.
2. Tap Wi-Fi Calling and follow the online prompts to set up Wi-Fi Calling.
Wi-Fi Calling is set up. You will see in the status bar when Wi-Fi Calling is active, or if
Wi-Fi Calling is set up but you are not currently connected to a Wi-Fi network.
Tip: For more information about Wi-Fi Calling, visit this FAQ link at sprint.com/support.
Phone Calls and Voicemail 57
Page 68

Enable or Disable Wi-Fi Calling
1. Tap > Settings > Networks tab > Wi-Fi Calling.
2. Tap to turn Wi-Fi Calling on or off.
Wi-Fi Calling will be turned off, and the Wi-Fi Calling icon will not appear in the status bar.
Tip: You can also turn Wi-Fi Calling on or off through the quick settings menu. Pull down the status bar to
display the quick settings menu and tap Wi-Fi Calling to enable or disable the feature.
Caller ID Blocking
Caller ID identifies a caller before you answer the phone by displaying the number of the incoming call. If
you do not want your number displayed when you make a call, follow these steps.
1. Tap > Phone > Dial tab.
2. Tap .
3. Enter a phone number.
4. Tap .
<RXUFDOOHULQIRUPDWLRQZLOOQRWDSSHDURQWKHUHFLSLHQW¶VSKRQH
To permanently block your number, call Sprint Customer Service.
Call Waiting
When \RX¶UHRQDFDOO&DOO:DLWLQJDOHUWV\RXWRLQFRPLQJFDOOVE\VRXQGLQJWZREHHSV<RXUSKRQH¶V
VFUHHQLQIRUPV\RXWKDWDQRWKHUFDOOLVFRPLQJLQDQGGLVSOD\VWKHFDOOHU¶VSKRQHQXPEHULILWLVDYDLODEOH
7RUHVSRQGWRDQLQFRPLQJFDOOZKLOH\RX¶UHRQDcall:
Ŷ Swipe in any direction. (This puts the first caller on hold and answers the second call.)
To switch back to the first caller:
Ŷ Tap Swap calls.
Note: )RUWKRVHFDOOVZKHUH\RXGRQ¶WZDQWWREHLQWHUUXSWHG\RXFDQWHPSRUDULO\GLVDEOH&DOO:DLWLQJE\
pressing before placing your call. Call Waiting is automatically reactivated once you end
the call.
Conference Calling
With conference calling, also known as 3-way calling, you can talk to two people at the same time. When
using this feature, the normal airtime rates will be charged for each of the two calls.
1. On the dial pad screen, enter a number and tap (or place a call from Log or Contacts).
Phone Calls and Voicemail 58
Page 69

2. Once you have established the connection, tap Add call, and dial the second number (or place
the call from Logs or Contacts).
This puts the first caller on hold and dials the second number.
3. :KHQ\RX¶UHFRQQHFWHGWRWKHVHFRQGSDUW\WDSMerge calls. Your conference call is now in
session.
4. To end the three-way call, tap .
Note: If one of the people you called hangs up during your call, you and the remaining caller stay
connected. If you initiated the call and are the first to hang up, all callers are disconnected.
Call Forwarding
Call Forwarding lets you forward all your incoming calls to another phone number ± even when your
phone is turned off. You can continue to make calls from your phone when you have activated Call
Forwarding.
Note: You are charged a higher rate for calls you have forwarded.
To activate Call Forwarding:
1. Tap > Phone > Dial tab.
2. Tap .
3. Enter the area code and phone number to which you want your calls forwarded.
4. Tap .
You will hear a tone to confirm the activation of Call Forwarding. All calls to your wireless
number will be forwarded to the designated phone number.
To deactivate Call Forwarding:
1. Tap > Phone > Dial tab.
2. Tap .
3. Tap .
You will hear a tone to confirm the deactivation.
Call Settings Menu
<RXUSKRQH¶V&DOO6HWWLQJVPHQXOHWV\RXFRQILJXUH\RXUYRLFHPDLORSWLRQVDQGDQXPEHURIRWKHUVHWWLQJV
for the phone application.
Phone Calls and Voicemail 59
Page 70

Setting
Description
Decline with message
under Call blocking & Decline
with message
You can send out a text message when you want to ignore an incoming
call and respond to the caller with a text instead. You can add or edit
quick messages.
Blocked numbers
under Call blocking & Decline
with message
You can set call rejections and manage the reject list.
Digit filter
under Call blocking & Decline
with message
Block calls based on the starting or ending digits in their number.
Private numbers
under Call blocking & Decline
with message
You can set call rejections from a private number.
End calls with the Power key
under Answer and end calls
You can set the phone to end calls with the Power/Lock key.
Auto answer
under Answer and end calls
Allows you to set the time before a connected hands-free device
automatically answers an incoming call.
Voice clarity
You can set the phone to enhance voice clarity in noisy environments
so you can hear more clearly.
Use the Call Settings Menu
1. Tap > Phone .
The phone app opens.
2. Tap > Call settings.
The call settings menu appears.
3. Configure your options.
Tap a menu item to display its options.
Select your options and follow the prompts to set them.
Your call settings options are set.
Call Settings Overview
Use the Call Settings menu to adjust the following settings:
Phone Calls and Voicemail 60
Page 71

Incoming voice call pop-up
under More
Activate to display the incoming call pop-up when using an application.
Vibrate when call ends
Under More
Activate to vibrate when a call ends.
Smart dialing
under More
Activate to make a call to the U.S. from abroad without entering the
national code. Touch and hold or tap the contact.
Answer incoming call
under More > Gestures
You can answer an incoming call by bringing the phone to your ear.
Silence incoming calls
under More > Gestures
You can set the phone to silence incoming calls by just flipping the
phone.
Save unknown numbers
under More
You can set the phone to save the phone numbers not saved in
Contacts yet.
Proximity Sensor
under More
When receiving and making calls, this sensor automatically turns the
backlight off and locks the touch keypad by sensing when the phone is
near your ear. This extends battery life and prevents the touch keypad
from activating unintentionally during calls.
TTY mode
under More
A TTY (also known as a TDD or Text Telephone) is a
telecommunications phone that allows people who are deaf, hard of
hearing, or who have speech or language disabilities, to communicate
by telephone. Your phone is compatible with select TTY phones.
Please check with the manufacturer of your TTY phone to ensure that it
is compatible with digital cell phones. Your phone and TTY phone will
connect via a special cable that plugs into your phone's headset jack. If
this cable was not provided with your TTY phone, contact your TTY
phone manufacturer to purchase the connector cable.
Hearing aids
under More
Tap to turn on hearing aid compatibility.
TTY Mode
A TTY (teletypewriter, also known as a TDD or Text Telephone) is a telecommunications device that
allows people who are deaf, hard of hearing, or who have speech or language disabilities, to
communicate by telephone.
Your phone is compatible with select TTY devices. Please check with the manufacturer of your TTY
device to ensure that it supports digital wireless transmission. Your phone and TTY device will connect
using a special cable that plugs into your pKRQH¶VKHDGVHWMDFN,IWKLVFDEOHZDVQRWSURYLGHGZLWK\RXU
TTY device, contact your TTY device manufacturer to purchase the connector cable.
Phone Calls and Voicemail 61
Page 72

To turn TTY Mode on or off:
1. Tap > Phone > Dial tab.
2. Tap > Call settings > More > TTY mode.
3. Tap TTY Full, TTY HCO, or TTY VCO to turn TTY mode on.
ė or ė
Tap TTY Off to turn TTY mode off.
<RXUSKRQH¶V77<PRGHLVVHW
Note: When enabled, TTY mode may impair the audio quality of non-TTY devices connected to the
headset jack.
Warning: 9-1-1 Emergency Calling
It is recommended that TTY users make emergency calls by other means, including Telecommunications
Relay Services (TRS), analog cellular, and landline communications. Wireless TTY calls to 9-1-1 may be
corrupted when received by public safety answering points (PSAPs), rendering some communications
unintelligible. The problem encountered appears related to TTY equipment or software used by PSAPs.
This matter has been brought to the attention of the FCC, and the wireless industry and the PSAP
community are currently working to resolve this.
Phone Calls and Voicemail 62
Page 73

Contacts
The Contacts application lets you store and manage contacts from a variety of sources, including
contacts you enter and save directly in your phone as well as contacts synchronized with your Google
Account, your PC, compatible email programs (including Exchange Server), and your friends from
compatible social networking applications.
Cautions
Information saved in Contacts may be lost or changed if the battery is left uncharged. Accident or
malfunction may also cause loss or change to information. It is recommended that you keep a
separate copy of contacts and other important information. Sprint is not responsible for any damages
from lost or changed contacts.
Add Contacts
You can add contacts on your phone and synchronize them with the contacts in your Google Account,
Microsoft Exchange account, or other accounts that support syncing contacts.
The Contacts application tries to join new addresses with existing contacts to create a single entry. You
can also manage that process manually.
1. Tap > Essentials > Contacts .
2. Tap to add a contact.
3. Tap a destination type, Phone contact or Google (if available).
4. Tap to select a picture to display next to the name in your list of contacts and in the Caller ID.
5. Tap the Name field and enter a name for your contact.
6. Tap the Phone field and enter a phone number.
Note: To select a type (label) for a phone number, email address, or postal address (such as Mobile,
Home, Work, etc.), tap the type next to the field and select the appropriate type.
Note: To add more phone numbers, email addresses, etc., tap Add phone or Add email.
Contacts 63
Page 74

7. Enter any additional information you may want to save and when you're finished tap SAVE.
The contact is added.
Save a Phone Number
You can save a phone number to Contacts directly from the phone keypad.
1. Tap > Phone .
2. Enter a phone number.
3. To add the number to an existing contact, tap Update contact. To add a new contact, tap Create
contact.
For an existing contact, tap the contact name and select a number type for the new number.
For a new contact, enter the name and any additional information.
4. Tap SAVE.
The contact is added.
View Contacts
9LHZDFRQWDFW¶VGHWDLOVE\GLVSOD\LQJDFRQWDFWHQWU\
1. Tap > Essentials > Contacts .
You will see the Contacts list.
Contacts 64
Page 75

Item
Description
Groups tab
Show contact groups.
Contacts tab
Show all contacts.
Contact
Tap to show a FRQWDFW¶VGHWDLOV
2. Tap a contact to view its details.
Contacts Screen Layout
The following illustration shows your Contacts app layout and describes the various features.
Contacts 65
Page 76

Image
Tap to show a thumbnail of the contact entry. Tap an icon to place a call, send a
message, etc.
Search
Search contacts.
Index
Browse contacts by letter.
Add new
Add a new contact.
Edit Contacts
Once \RX¶YHDGGHGDFRQWDFW\RXFDQDGGRUHGLWDQ\RIWKHLQIRUPDWLRQLQWKHHQWU\DVVLJQDFDOOHU,'
picture, customize with a unique ringtone, and more.
1. Tap > Essentials > Contacts .
You will see the Contacts list.
2. Tap the contact to view its details.
7KHFRQWDFW¶VGHWDLOHGOLVWLQJDSSHDUV
3. Tap Edit .
4. Tap any field you want to change or add. See Add Contacts.
5. Add or edit the information, and then tap SAVE.
Your changes are saved to the contact entry.
Note: To select a type (label) for a phone number, email address, or postal address (such as Mobile,
Home, Work, etc.), tap the type next to the field and select the appropriate type.
Note: To add more phone numbers, email addresses, etc., tap Add phone or Add email.
Delete Contacts
You can delete a contact from the contacts details page.
1. Tap > Essentials > Contacts .
You will see the Contacts list.
2. Tap a contact to view its details.
7KHFRQWDFW¶VGHWDLOHGOLVWLQJDSSHDUV
3. Tap .
4. Tap DELETE.
Contacts 66
Page 77

The contact is deleted.
Tip: You can also touch and hold the contact from the contact list and then tap Delete contact >
DELETE.
Share Contacts
You can quickly share contacts using Bluetooth, email, Gmail, or text messaging.
1. Tap > Essentials > Contacts .
You will see the Contacts list.
2. Tap > Share.
3. Tap the contacts you want to share, then tap SHARE.
4. Choose the method for sending.
5. Complete the required steps as prompted for the selected method.
The selected contact will be shared.
Import Contacts
You can import contacts from your internal storage directly to your Contacts application.
1. Copy the vCard files to your phone from your computer.
2. Tap > Essentials > Contacts .
3. Tap > Manage contacts > Import.
4. Select where to import from and save to, then tap OK.
5. Tap the files you wish to import and tap IMPORT and IMPORT to confirm.
Back Up Contacts
You can back up and export all of the contacts on your phone, as vCard files. You can then copy this file
to a computer or another phone that is compatible with this format, such as an address book application.
1. Tap > Essentials > Contacts .
2. Tap > Manage contacts > Back up.
3. Select a storage location and then tap OK.
4. Tap the contacts you want to export, then tap BACK UP and BACK UP to confirm.
5. Enter a file name and tap OK.
Contacts 67
Page 78

Messaging
:LWKZLUHOHVVVHUYLFHDQG\RXUSKRQH¶VPHVVDJLQJFDSDELOLWLHV\RXKDYHWKHRSSRUWXQLW\WRVKDUH
information through many different channels and accounts, including Messenger, Gmail (Google),
personal and corporate email.
Messenger
You can send and receive text messages, photos, voice messages, and video using Messenger. When
you receive a new message, you will be notified by your phone. Messaging is available via the
Messenger application. The icon appears status bar when a new message is received.
Send a Text Message
Quickly compose and send text messages (SMS) on your phone.
Note: See your service plan for applicable charges for text messaging.
1. Tap > Messenger .
2. Tap .
3. Tap the To field and enter a contact's names, phone numbers, or email addresses that you'd like
to message. You can also pick from your top contacts or your whole contact list.
4. Tap .
5. Tap the text field and enter your message.
To enter a emoji, tap . Select a category and make a selection from the list to insert it into
your current message.
6. Review your message and tap .
Send a Multimedia Message (MMS)
When you need to add a little more to a text message, you can send a multimedia message (MMS) with
the contents such as images, videos, etc.
Note: See your service plan for applicable charges for multimedia messaging.
Compose Multimedia Messages
1. Tap > Messenger .
2. Tap .
Messaging 68
Page 79

3. Tap the To field and enter a contact's names, phone numbers, or email addresses that you'd like
to message. You can also pick from your top contacts or your whole contact list.
4. Tap .
5. Tap the text field and enter your message.
6. Tap .
7. Select a multimedia attachment type:
Sticker: Diverse stickers are available.
Take picture/Record video: Take a picture or record a video to insert in your message.
To take a picture, tap .
To see the camera in full-screen view, tap .
To swap the camera lens, tap .
To start recording a video, tap .
To stop recording a video, tap .
Gallery: Opens the Gallery application. Tap a picture or a video to attach to your
message.
Record audio: Touch and hold until you finish recording.
Location: You can send your location.
Note: To remove or replace a picture or an audio attachment, on the Compose screen, tap next to the
attachment.
8. When you are finished creating your new MMS message, tap .
Save and Resume a Draft Message
While composing a text or multimedia message, tap to automatically save your message as a draft.
To resume composing the message:
1. On the screen with all message threads, tap the message. The Draft label is shown if a saved
draft is available.
2. When you finish editing the message, tap .
Messaging 69
Page 80

New Messages Notification
Depending on your notification settings, the phone will play a ringtone, vibrate, or display the message
briefly in the status bar when you receive a new text or multimedia message. To change the notification
for new text and multimedia messages, see Text and MMS Options for details.
A new message icon also appears in the notifications area of the status bar to notify you of a new text
or multimedia message. The Messages application icon (if shown on the home screen) also displays the
number of new messages .
Ŷ To open the message, pull down the status bar to open the notification panel. Tap the new
message to open and read it. For information on reading and replying to messages see Manage
Message Conversations.
Manage Message Conversations
Text and multimedia messages that are sent to and received from a contact (or a number) are grouped
into conversations or message threads in the Messenger screen. This allows you to see exchanged
messages (similar to a chat program) with a contact on the same screen.
Read a Text Message
Ɣ Do one of the following:
On the Messenger screen, tap the message thread to open and read it.
If you have a new message notification, drag the status bar down to open the notification
panel. Tap the new message to open and read it.
View a Multimedia Message (MMS)
1. Tap > Messenger .
2. On the Messenger screen, tap a message thread to open it.
3. While viewing a message, tap the play icon (on the video or audio file) to playback the file or tap
the image to view the picture.
Tip: The file attachment on the multimedia message can be saved to your phone's internal storage. To
save the attachment, touch and hold the file and tap .
Note: When Auto-download MMS is disabled, only the message header is downloaded. To download the
entire message, tap the Download button in the message. For details, see Text and MMS Options.
Reply to a Message
1. Tap > Messenger .
2. On the Messenger screen, tap a message thread to open it.
3. While viewing a message, tap the text field and type your reply message.
Messaging 70
Page 81

4. Once completed, tap .
To return to the All messages screen from a text message thread, tap .
Note: To view the details of a particular message, in the message thread, touch and hold the message to
open the options menu, and then tap .
Note: If a message contains a link to a web page, tap the message and then tap the link to open it in the
web browser.
Note: If a message contains a phone number, tap the message and then tap the phone number to dial
the number or add it to your contacts.
Delete Conversations
1. Tap > Messenger .
2. On the Messenger screen, touch and hold a message thread to display .
To select multiple conversations, tap each conversation to delete. will be shown.
3. Tap and then tap DELETE to confirm.
Tip: You can also delete a conversation while you're viewing it. While viewing a conversation, tap >
Delete.
Delete a Single Message
1. While viewing a conversation, touch and hold the message that you want to delete.
2. Tap and then tap DELETE to confirm.
View Contact Information from a Message
:KHQ\RXKDYHUHFHLYHGDPHVVDJHIURPVRPHRQHLQ\RXUVWRUHGFRQWDFWV\RXFDQWDSWKHFRQWDFW¶V
photo or icon in the message thread to open a menu of options. Depending on the stored contact
information, you can view the contact details, place a phone call, send an email message to the contact,
and more.
Text and MMS Options
The messages settings menu lets you control options for your text and multimedia messages including
message limits, size settings, and notifications.
1. Tap > Messenger .
2. On the Messenger screen, tap > Settings.
3. Adjust the following settings according to your needs:
Messaging 71
Page 82

Default SMS app: To change your default messenger app.
Get notifications: Select whether to get notifications or not when a new message arrives.
Notification sound: Allows you to select a ringer to sound when a new message is received.
Tap this option, and then select a ringtone that is specific to new text and multimedia
messages. A sample will briefly be played upon selection, then tap OK to save your new
setting.
Hear outgoing message sounds: Select whether to hear sounds when you send a
message.
Vibrate: Enable this option if you want the phone to vibrate when a new text or multimedia
message is received.
Advanced
Enhanced features: Configure the enhanced features (available when the mobile
network allows).
Group messaging: Select the group messaging option between Send an SMS reply to
all recipients and get individual replies (mass text) and Send an MMS reply to all
recipients (group MMS).
Auto-download MMS: Enable this option to automatically retrieve the entire content of
your multimedia message. When enabled, the multimedia message header, message
body, and any attachments will automatically download to your phone when the message
is received. If you disable this option, only the multimedia message header will be
retrieved and displayed.
Auto-download MMS when roaming: Disable this option if you only desire the
multimedia message headers to download while roaming. Enable this option to
automatically download your complete multimedia messages even while roaming.
Use simple characters: Turn this on to change special characters in text messages into
simple ones.
SIM card messages: You can view SIM card messages.
Phone number: Tap this to change the phone number you use to send messages.
Gmail
8VH*RRJOH¶V*PDLOVHUYLFHDQG\RXU*RRJOH$FFRXQWWRVHQGUHFHLYHDQGPDQDJH\RXU*PDLO
messages. Before using Gmail, you must register a Google (Gmail) Account on your phone. See Google
Account for details.
Gmail Cautions
Gmail is handled as email from a PC. Restricting email from PCs on your phone prevents your phone
from receiving Gmail.
Messaging 72
Page 83

Create and Send Gmail
Use your phone to create and send Gmail messages.
1. Tap > Google > Gmail .
The Gmail inbox opens.
2. In the inbox, tap .
The Gmail composition window opens.
3. Enter the message recipient(s), subject, and message, and then tap Send .
The Gmail message is sent.
Gmail Composition Options
Ɣ Adding Cc/Bcc: In the mail composition window, tap and then add recipients.
Ɣ Attaching Pictures or Videos: In the mail composition window, tap Attach file . Locate the
file and then tap the picture or video you want to attach.
Ɣ Save as a Draft (Send Later): While composing your message, tap > Save draft. The
message is saved as a draft for later.
Ɣ Delete Mail Being Composed: In the mail composition window, tap > Discard.
Note: To view your draft email messages, in the inbox, tap > Drafts.
Note: To view your sent messages, in the inbox, tap > Sent.
Open Gmail Messages
Your phone allows you to access, read, and reply to all your Gmail messages.
Open Gmail Messages from Notifications
When new Gmail arrives, you will see in the status bar.
1. Pull down the status bar to display the notification panel.
2. Tap the new message from the notification panel.
The new Gmail message opens.
If you have two or more new Gmail messages, tapping the notification opens the Gmail inbox.
Open Gmail Messages from the Inbox
You can also read and reply to all your Gmail messages from the Gmail inbox.
Messaging 73
Page 84

1. Tap > Google > Gmail .
The Gmail inbox opens.
2. Tap the message thread you want to view.
The message thread opens, with the newest message displayed.
Options when Reviewing Gmail Messages
Ɣ Replying to Gmail Messages: With the Gmail message open, tap Reply , compose your
reply message, and tap Send .
To reply to all, tap > Reply all.
Ɣ Forwarding Gmail Messages: With the Gmail message open, tap > Forward, enter a
recipient and an additional message, and tap Send .
Use Gmail Labels
Gmail saves all mail in one box, but you can add labels that allow you to sort your Gmail conversation
threads. For example, when a new thread starts with a received mail, the label "Inbox" is automatically
added to the thread. By then adding the label "travel," all threads with "travel" are shown in a list.
1. Tap > Google > Gmail .
The inbox opens.
2. Touch and hold a conversation thread to add a checkmark to it, and then tap > Change
labels.
3. Tap a label for the thread.
The thread is added to the selected label.
Archive Gmail Threads
Remove sent and received Gmail threads so they do not appear in the inbox. When replies arrive for
archived threads, they appear in the inbox again.
1. Tap > Google > Gmail .
The inbox opens.
2. Touch and hold a conversation thread to add a checkmark to it, and then tap Archive .
The thread is now archived.
Messaging 74
Page 85

Mute Gmail Threads
If registered on a mailing list, there will be threads with always-continuing conversations. For long threads
that are not important, mute the threads and they will no longer appear in the inbox. When mail arrives
that includes user's address as a recipient or in Cc, mail will again appear in the inbox.
1. Tap > Google > Gmail .
The inbox opens.
2. Touch and hold a conversation thread to add a checkmark to it, and then tap > Mute.
The thread is now hidden.
Delete Gmail Threads
If you no longer wish to keep a Gmail conversation thread, you can simply delete it from the inbox.
1. Tap > Google > Gmail .
The inbox opens.
2. Touch and hold a conversation thread to add a checkmark to it, and then tap Delete .
The thread is deleted.
Search Gmail Messages
If you need to find a specific message or message thread, you can search Gmail from the inbox.
1. Tap > Google > Gmail .
The inbox opens.
2. Tap .
3. Enter your search text and tap .
The search results appear. Tap a message or thread from the list to display it.
Report Spam Gmail
You can report spam Gmail messages from your SKRQH¶V*PDLOLQER[
1. Tap > Google > Gmail .
The inbox opens.
2. Touch and hold a conversation thread to add a checkmark to it, and then tap > Report spam.
The selected message is reported as spam Gmail.
Messaging 75
Page 86

Add Another Google (Gmail) Account
If you have multiple Gmail accounts you wish to view on your phone, you can add them from the Settings
> Accounts & sync menu.
1. Tap > Settings > General tab > Accounts & sync > ADD ACCOUNT.
2. Tap Google, and then tap Email or phone.
3. Enter your Gmail username and password, and then tap NEXT.
4. After your phone connects with the Google servers, select the items you would like to sync with
your phone and then tap Sync now.
5. Tap Finish setup.
You are signed in to your Google Account, and you can access both of your Gmail accounts
from the Gmail app.
Note: You can also sign up for a new Gmail account from the Settings menu. In step 2 above, tap Or
create a new account and follow the prompts.
Switch between Gmail Accounts
If you have more than one Gmail account set up, you can switch between them in the Gmail app.
1. Tap > Google > Gmail .
The inbox opens.
2. Tap .
3. Tap the account you want to view from the list at the top of the menu.
The selected account inbox is displayed.
Gmail Settings
You can access settings for the Gmail app and for your individual Gmail accounts from the Gmail Settings
menu.
1. Tap > Google > Gmail .
The Primary inbox opens.
2. Tap > Settings .
3. Tap General settings to access settings for all accounts, or tap an account name to configure
settings for a specific Gmail account.
General settings: Gmail default action, Conversation view, Swipe actions, Sender image,
Reply all, Auto-fit messages, Auto-advance, Confirm before deleting, Confirm before
archiving, and Confirm before sending.
Messaging 76
Page 87

Account settings: Inbox type, Inbox categories, Notifications, Inbox sound & vibrate,
Signature, Vacation responder, Sync Gmail, Days of mail to sync, Manage labels, Download
attachments, and Images.
Note: Available settings are subject to change.
Use the Email application to send and receive emails from your webmail or other accounts, using POP3
or IMAP, or access your Exchange account for your corporate email needs.
Set Up Email Account
Your phone supports several types of email accounts and allows you to have multiple email accounts set
up at one time.
Before setting up an email account, make sure you have the username (user ID), password, server name,
etc., so you can get set up successfully.
1. Tap > Email .
A popup window for adding an account appears if no email account has been previously set up.
2. Follow the onscreen instructions to set up your email account.
The email account is set up and you will begin receiving email.
Add Email Account
You can add several types of personal email accounts, such as POP3 and IMAP accounts, on your
phone.
Add an Email Account from the Email App
You can add email accounts directly from the email app, even if you have another email account set up.
1. Tap > Email .
The email inbox opens.
2. Tap > Settings.
3. Tap Add account.
4. Follow the onscreen instructions to complete the account setup.
The email account is added and you will begin receiving email for the account.
Add an Email Account from the Settings Menu
You can also set up email accounts from the Settings > General tab > Accounts & sync menu.
Messaging 77
Page 88

1. Tap > Settings > General tab > Accounts & sync > ADD ACCOUNT > Email > Yahoo
or Other.
2. Enter the EMAIL ADDRESS and PASSWORD for the email account and then tap NEXT.
Tapping NEXT prompts your phone to attempt a "regular" email setup and test the incoming
and outgoing servers.
If you have custom settings you need to configure, tap MANUAL SETUP and enter your
settings. These may include mail type, user name, password, server, security type, etc.
3. Select your sync settings and then tap NEXT.
4. Enter an account name and a display name and tap DONE to complete setup.
The email account is set up and you will begin receiving email for the account.
Important: If the account type you want to set up is not in the phone database, you will be asked to enter
more details. You should get all pertinent information for the email account, such as incoming and
outgoing server settings, before you proceed.
Add Exchange ActiveSync Accounts
If you synchronize your phone with your Exchange account, you can read, manage, and send email in the
same easy way as with a POP3/IMAP account. However, you can also access some powerful Exchange
features.
Important%HIRUHVHWWLQJXSD0LFURVRIW([FKDQJH$FFRXQWFRQWDFW\RXUFRPSDQ\¶V([FKDQJH6HUYHU
administrator for required account settings information.
1. Tap > Settings > General tab > Accounts & sync > ADD ACCOUNT > Microsoft
Exchange.
2. Enter the EMAIL ADDRESS and PASSWORD for the email account and then tap NEXT.
3. Enter the required information:
DOMAIN/USERNAME: Enter \RXUQHWZRUNGRPDLQDQGXVHUQDPHVHSDUDWHGE\³\.´
PASSWORD: Enter your network access password (case-sensitive).
SERVER ADDRESS(QWHU\RXUV\VWHP¶V([FKDQJHVHUYHUUHPRWHHPDLODGGUHVV2EWDLQ
this information from your company network administrator.
Use secure connection (SSL): Tap to enable this feature, if your system requires SSL
encryption.
Client certificate: Tap add a certificate, if your system requires certification.
4. Follow the onscreen prompts to configure options for the account.
5. Enter an account name and a display name and tap DONE to complete setup.
Messaging 78
Page 89

Your corporate email account is set up and you will begin receiving email for the account.
Create and Send Email
Compose and send email using any account you have set up on your phone. Increase your productivity
by attaching files such as pictures, videos, or documents to email messages.
1. Tap > Email .
2. From the Inbox, tap .
3. (QWHUWKHUHFLSLHQW¶VHPDLODGGUHVVLQWKHTo field.
You can add as many message recipients as you want.
Note: To send an additional carbon copy (Cc) or a blind carbon copy (Bcc) of the current email to other
recipients, enter the recipients in the Cc or Bcc field.
4. Tap the Subject field and enter the email subject.
5. Tap the body field and compose your email.
To add an attachment (such as picture, video, contact, event, audio, etc.), tap .
You can access the internal storage and navigate to the file you wish to attach.
Tap the file you wish to attach.
6. Tap to send the email.
Note: If you close the messaging window before sending it, the message will be stored in Drafts.
Open Email Messages
You can open and read email messages directly from the email inbox. Reading and replying to email on
your phone is as simple as on your computer.
1. Tap > Email .
The email inbox opens.
2. Tap the message you want to view.
The email message opens.
3. Tap to reply to the message.
Tip: Tap the account name at the top of the screen to switch to a different email account.
Tip: You can also access new email messages from the notification panel. Pull down the status bar to
display the notification panel, and then tap an email notification. The email inbox will open and display the
new email message.
Messaging 79
Page 90

Options when Reviewing Email Messages
Ɣ Resetting Mail as Unread: Tap . Tap the check box on the left side of a read message and
then tap MARK AS UNREAD.
Ɣ Deleting Email: Tap . Tap the check box on the left side of a message or messages and then
tap DELETE.
Delete Email Account
You can delete an email account from your phone if you no longer wish to receive messages for the
account on your phone.
1. Tap > Email .
The email inbox opens.
2. Tap > Settings.
3. Tap > Remove account.
4. Select the account(s) to delete, and then tap REMOVE.
5. Tap REMOVE to confirm.
The account is deleted from your phone.
Manage Your Email Inbox
Your email inbox provides management options for viewing, sorting, and deleting your email messages.
View Your Email Inbox
1. Tap > Email .
The email inbox opens.
2. Tap to select a different inbox, or tap COMBINED VIEW to see all your email inboxes at
once.
Refresh an Email Account
Whatever your automatic synchronization settings are, you can also synchronize your sent and received
email messages manually at any time.
1. Tap > Settings > General tab > Accounts & sync.
2. Tap an DFFRXQWWRUHYHDOWKHDFFRXQWµVV\QFKURQL]DWLRQVHWWLQJVVFUHHQ
Messaging 80
Page 91

3. If the option is available, turn on each option you want the phone to automatically synchronize. If
you want to manually synchronize, tap > Sync now.
Sort Email Messages
1. From the inbox, tap > Sort by.
2. Select from the options to sort email messages.
Delete an Email Message
1. From the inbox, touch and hold the message you want to delete.
2. On the options menu, tap DELETE.
Delete Multiple Email Messages
1. From the inbox, touch and hold each message you want to delete.
2. Tap DELETE.
Microsoft Exchange Email Features
Set options for your corporate Microsoft Exchange email messages, including synchronization options,
flagging messages, out-of-office messages, meeting requests, and message priority.
1. Tap > Settings > General tab > Accounts & sync.
2. Tap Microsoft Exchange, then select Email Settings and tap the desired account to reveal the
DFFRXQW¶VV\QFKURQL]DWLRQVHWWLQJVVFUHHQ
3. The following settings are available.
Account name: Displays the name used by the phone to track the account.
Signature: To add a signature or other information to outgoing email.
Edit signature: Displays a signature. Tap this to change it.
Notifications: Allows you to decide whether to notify you of new email.
Notification sound: Allows you to select the notification sound for new emails.
Vibrate: Allows you to configure vibrate options for new emails.
Vibration type: Allows you to select the vibration type for new emails.
Sent email sound: Plays a sound when an email is sent.
Auto-sync email: Allows you to automatically sync email.
Sync schedule: Allows you to choose when to sync your email.
Messaging 81
Page 92

Folders to sync: Select the folders you want to synchronize.
Email sync period: Choose how many days of email you want to sync.
Default email size: Allows you to set the size limit for messages.
Message format: Select the format you want to view email messages in.
Auto-download attachments: Allows you to download attachments for new emails while
connected to Wi-Fi.
Always Cc/Bcc me: Allows you to copy yourself to emails sent out.
Auto-resend times: Set the number of tries to resend a failed email message.
Out of office: Allows you to set your out of office settings and message.
Security settings: Set digital signatures and encryption to secure email.
Calendar sync period: Allows you to set the period of time to sync with your calendar.
Corporate directory: Searches online directory for the recipient input.
Server policy: View the server policy currently applied.
Server info: Allows you to change the server settings for your account.
4. Tap to return to the previous screen, your changes will be saved.
Messaging 82
Page 93

Internet and Social Networking
The following topics describe how to connect to and use the Internet on your phone, and how to access
popular social networking sites such as Facebook, Twitter, and Duo.
Data Services General Information (4G LTE and 3G Networks)
The following topics will help you learn the basics of using your data services, including managing your
user name, launching a data connection, and navigating the Web with your phone.
Important: Certain data services requests may require additional time to process. While your phone is
loading the requested service, the touchscreen or QWERTY keyboard may appear unresponsive when in
fact they are functioning properly. Allow the phone some time to process your data usage request.
4G LTE
The 4G enhanced LTE network provides your phone with wireless Internet access over greater distances
than Wi-Fi and delivers data transfer rates of up to 60 Mbps. To connect your phone to 4G, you need to
be in an area covered by the 4G enhanced LTE network.
For more information about the availability of 4G in your location, visit sprint.com/coverage.
Note: The availability and range of the network depends on a number of factors including your distance to
the base station, infrastructure, and other objects through which the signal passes.
Set Your Network Options
1. Tap > Settings > Networks tab > More > Mobile networks > Network mode.
2. Select the desired option.
By default, the phone will scan for the best available Sprint network and will automatically
connect to it.
When your phone is connected via 4G, the LTE icon appears in the status bar.
Note: The 4G network is self-discoverable, which means no additional steps are required for your phone
to connect to it.
Internet and Social Networking 83
Page 94

Icon
Status
Network (full signal): The number of bars indicate the strength of the signal. More bars
mean a better signal.
Enhanced 4G LTE data service: Your phone is connected to the 4G enhanced LTE
network.
3G (data service): Your phone is connected to the 3G network.
Wi-Fi connection: Your phone is connected to a Wi-Fi network for data.
Data Connection Status and Indicators
Your phone displays the current status of your data connection through indicators at the top of the screen.
The following symbols are used:
Chrome Browser
You can use the Chrome mobile Web browser to browse the Web on your phone. If you are signed in
with a Google Account, the Chrome browser will import all your bookmarks and other Web preferences
for use on your phone.
Use the Browser
Launching the browser is as easy as tapping an icon.
1. Tap > Chrome .
The browser opens.
2. Tap the address bar at the top and enter search words (for a Google search) or a Web address.
The search results appear or a Web page opens.
Chrome Support
Ŷ To find help in the Chrome browser, tap > Help & feedback.
A Web page will open displaying Google help for Chrome.
Tip: For more information, visit: google.com/intl/en/chrome/browser/mobile/.
Add a Bookmark
Bookmark favorite sites using the browser menu options.
1. Tap > Chrome .
The browser opens.
Internet and Social Networking 84
Page 95

2. Navigate to the Web page you want to bookmark, and tap > .
The Web page is added to bookmarks.
Bookmark Options
Ɣ Editing Bookmarks: From the browser, tap > Bookmarks > > Edit > edit the favorite >
.
Ɣ Deleting Bookmarks: From the browser, tap > Bookmarks > > Delete.
View Browser History
Use the browser menu options to view your browsing history.
1. Tap > Chrome .
The browser opens.
2. Tap > History.
The browser history window opens.
3. Tap an entry to open the Web page.
Open New Browser Tabs
Use tabbed browsing to switch between websites quickly and easily.
1. Tap > Chrome .
The browser opens.
2. Tap > New tab.
A new tab appears.
Tip: To view recently-closed tabs, tap > Recent tabs.
Browser Settings
Customize your experience with the Internet through the browser settings menu.
1. Tap > Chrome .
The browser opens.
2. Tap > Settings and customize your browser settings.
Your browser settings are saved.
Internet and Social Networking 85
Page 96

Post updates, read what your friends are up to, upload pictures and check-ins, and more with on-the-go
Facebook access.
Install the Facebook App on Your Phone
Before you use Facebook on your phone, you must download and install the app from the Google Play
store app. See Find and Install an App for details.
1. Tap > Facebook .
2. Tap INSTALL (or UPDATE).
The app will be downloaded and installed on your phone.
3. When the download has completed, tap OPEN.
Tap > Facebook .
Sign in to Your Facebook Account from Account Settings
1. Tap > Settings > General tab > Accounts & sync > ADD ACCOUNT.
2. Tap Facebook .
3. Enter your Email or Phone and password and tap LOG IN.
Your Facebook account is added to your phone.
Use Facebook
2QFH\RX¶YHGRZQORDGHGWKHDSSDQGVLJQHGLQ\RXFDQSRVWDQGUHDGXSGDWHVXSORDGSLFWXUHVWDJ
locations, and more, all from your phone.
1. Tap > Facebook .
The Facebook app launches.
,IWKLVLVWKHILUVWWLPH\RX¶YHXVHG)DFHERRNRQ\RXUSKRQHHQWHU\RXUEmail or Phone and
password and tap LOG IN to sign in to an existing account, or tap CREATE NEW
FACEBOOK ACCOUNT to set up a new Facebook account.
2. Tap What's on your mind? and type an update, tap Photo/Video and upload a picture or video
from the gallery, tap Check In WRVKDUH\RXUORFDWLRQ³/LNH´DQGFRPPHQWRQIULHQGV¶SRVWVDQG
more.
Tweet (post messages) and view other people's tweets on Twitter. Login may be required to use Twitter.
For details on Twitter, visit twitter.com.
Internet and Social Networking 86
Page 97

Install the Twitter App on Your Phone
Before you can use Twitter on your phone, you have to download and install the app from Google Play.
1. Tap > Play Store .
2. Tap the Search icon and search for "twitter."
3. Tap Twitter from the results list.
4. Tap INSTALL (or UPDATE).
The app will be downloaded and installed on your phone.
5. When the download has completed, tap OPEN.
Tap > Twitter.
Use Twitter
Read Twitter feeds, follow your friends, and tweet your own updates right from your phone.
1. Tap > Twitter.
The Twitter app launches.
,IWKLVLVWKHILUVWWLPH\RX¶YHXVHG7ZLWWHURQ\RXUSKRQHWDSLog in to sign in to an existing
account, or tap Sign up to set up a new Twitter account.
2. Tap type a tweet, and tap Tweet.
The tweet is sent and appears on your Twitter feed.
Duo
Duo is a one-to-one simple video calling app for everyone, regardless of OS (Android/iOS).
Open the Duo Application
Ŷ Tap > Google > Duo .
Internet and Social Networking 87
Page 98

Global Services
With your phone and global roaming service from Sprint WorldwideSM Wireless Service, you can make
phone calls and use wireless data services around the globe on compatible CDMA and GSM/UMTS
networks. For a country-specific travel guide, select your phone and destination from sprint.com/traveltips.
Note: Global roaming is auto-enabled on your new Sprint phone. Visit sprint.com/globalroaming for more
information.
Activate Sprint Worldwide Service on Your Account
Before using your phone in global roaming mode, you must activate Sprint Worldwide service.
To activate Sprint Worldwide service:
Ŷ Chat with or email an international support rep by visiting sprint.com/swwsupport.
ė or ±
Call Sprint Worldwide Customer support at 1-888-226-7212.
<RXU3KRQH¶V6,0&DUGIRU,QWHUQDWLRQDl GSM
Roaming
Your phone comes with a preinstalled SIM (Subscriber Identity Module) card to support roaming on
compatible GSM networks.
Note: Your SIM card should be preinstalled. If you need to reinstall your SIM card, follow the instructions
below.
Note: The SIM card included with your phone contains information specific to your phone and should be
retained for use on GSM networks.
Insert a SIM Card
Follow these instructions to insert a Nano SIM card. Remember to power off your phone before inserting
a Nano SIM card.
Global Services 88
Page 99

1. Gently insert the ejection pin into the hole on the card tray and then pull out the ejected tray.
2. Place the Nano SIM card into the correct section of the tray.
Place gently with gold IC chip facing downward.
3. Insert the card tray back into the slot.
For more information, see Nano SIM Card.
Enable Global Roaming Mode
Your phone is designed to enter global roaming mode automatically when you activate your Sprint
Worldwide service, meaning that it should automatically connect to an appropriate CDMA/LTE network or
GSM/UMTS network when you travel. You may set global roaming options through the settings menu.
You may also need to set your network mode options through the settings menu. See Set the
Communications Method for Global Use.
Note: Global roaming is auto-enabled on your new Sprint phone. Visit sprint.com/globalroaming for more
information.
Global Services 89
Page 100

To set your roaming options manually:
1. Tap > Settings > Networks tab > More > Mobile networks > Roaming.
2. Tap Use roaming .
3. Select the desired roaming options for each category.
The selected options are set.
Set the Communications Method for Global Use
Select a communications method for an overseas carrier as needed.
1. Tap > Settings > Networks tab > More > Mobile networks.
2. Tap Network mode > Automatic / LTE/CDMA / CDMA / GSM/UMTS.
The communications method is set.
Note: At the time of purchase, your phone is set to the Automatic mode by default. This allows global
usage and normally will not need to be changed.
Select a Carrier
You can select a specific local carrier to use when traveling internationally. At the time of purchase, your
phone is preset to connect automatically to an appropriate carrier in your current area.
1. Tap > Settings > Networks tab > More > Mobile networks > 4G settings > Network
operator.
2. Tap an available network.
The selected carrier is set.
To automatically select an appropriate carrier (default), tap Choose automatically.
To search for all available networks, tap Search networks.
Make and Receive Worldwide Calls
When traveling on international networks, you can place and answer calls as you would on the Sprint
network (see Place and Answer Calls), although some additional instructions may be required to place a
call. Some features and services are not available in all countries. For more information on services that
are available while roaming, visit sprint.com/sww.
Make Calls Using Plus (+) Code Dialing
Placing calls from one country to another country is simple with the Plus (+) Code Dialing feature. When
placing international calls, you can use Plus Code Dialing to enter the appropriate international access
code for your location (for example, 011 for international calls placed from the United States).
Global Services 90
 Loading...