

LG G5600 User guide [zh]
MODEL: G5600
P/N : MMBB0121913
PRINTED IN KOREA
ISSUE 1.0
USER’S MANUAL
GPRS Phone
USER’S MANUAL
MODEL: G5600
Please read this manual carefully
before operating your mobile phone.
Retain it for future reference.
G•P•R•S•P•H•O•N•E

ENGLISH
GPRS Phone
USER’S MANUAL
MODEL: G5600
Please read this manual carefully
before operating your mobile phone.
Retain it for future reference.


For Your Safety
All radio transmitters carry risks of interference with electronics in
close proximity.
Mobile Phones must be switched off at all times in an
aircraft.
Do not use your phone near petrol stations, fuel depots,
chemical plants or blasting operations.
Switch off the phone in any area where required by
special regulations. For example, do not use your phone
in hospitals or it may affect sensitive medical equipment.
Minor interference may affect TVs, radios, PCs, etc.
Do not hold the phone in your hand while driving.
Do not dismantle the phone or battery.
Keep the phone in a safe place out of children’s reach.
It includes small parts which if detached may cause a
choking hazard.
Do not touch the charger or phone with wet hands.
3
For Your Safety
For your safety, use ONLY specified ORIGINAL
batteries and chargers.
Please note:
Batteries should be disposed of in accordance with
relevant legislation.
Only use ORIGINAL accessories to avoid damage to
your phone.
Emergency call may not be available under all cellular
networks. Therefore, you should never depend solely on
the phone for emergency calls.
Important Information
• This user’s guide contains important information on the use
and operation of this phone. Please read all the information
carefully for optimal performance and to prevent any
damage to or misuse of the phone. Any changes or
modifications not expressly approved in this user’s guide
could void your warranty for this equipment.
• In spite of the attention to details used in this manual, some
features of the phone may be slightly different from the
description in this manual. For further information on the
product, contact your local LG Customer Care.
4

SAFETY
It should be noted that compliance with the radiation safety standard
does not of itself confer immunity from legal obligations and
requirements imposed by national health or safety authorities.
IDA may at its discretion, withdraw the type approval, which it
grants, if IDA is satisfied, that the continued uses of the equipment
will likely cause safety or health hazards to users.
IDA requires that the safety provisions contained in Appendix 1 is
prominently reflected in the user instructions supplied with GSM
mobile equipment.
AMENDMENT AND DECISION
IDA may change the specification without prior notice in order to
keep pace with the continuous improvement in standard
development.
In cases of doubt with regard to the interpretation of type approval
specification, the method of carrying out the tests and the validity of
the statements made by the manufacturers of the equipment, the
decision of IDA shall be final.
SUMMARY OF USER AND THIRD PARTY SAFETY
REQUIREMENTS
GSM MoU doc. :
TP.03 provides advisory and cautionary instructions to users of
GSM mobile equipment regarding their own and third party safety.
IDA requires the following instructions or its equivalent to be
included in all user handbooks for GSM mobile equipment.
5

For Your Safety
Electrical Safety
Where provision is made for the connection of any class of mobile
equipment to power supply units or battery chargers using voltages
in excess of 50Vac or 75Vdc, user handbooks for mobile equipment
shall specify the power supply unit(s) or battery charger(s) approved
for use with the mobile station and shall include the following
statement :
“This apparatus is intended for use when supplied with power from
(identification of battery charger(s) and/ or power supply unit(s).
Other usage will invalidate any approval given to this apparatus and
may be dangerous”.
Aircraft Safety
User handbooks for transportable and handportable equipment shall
include the following :
Switch off your cellular telephone when in an aircraft.
The use of cellular telephones in an aircraft may be dangerous to
the operation of the aircraft, disrupt the cellular network and is
illegal.
Failure to observe this instruction may lead to suspension or denial
of cellular telephone services to the offender, or legal action or both.
Explosive Atmospheres
User handbooks for all classes of mobile equipment shall include
the following:
• Users are advised not to use the equipment when at a refuelling
point.
• Users are reminded of the need to observe restrictions on the
use of radio equipment in fuel depots, chemical plants or where
blasting operations are in progress.
6

Road Safety
Mobile equipment may not use an ‘Alert’ device to cause a vehicle
horn to sound or lights to flash on receipt of a call on public roads.
• No installation instructions may show how to make such a
connection and the use of terms such as ‘horn relay’ are not
accepted. Reference may be made to a port enabling other
apparatus to be controlled.
• User handbooks offering an ‘Alert’ facility are required to contain
the following text :
“The use of the Alert device to operate a vehicle’s lights or horn
on public roads is not permitted”.
It is advised that hand-held microphone or telephone handset
should not be used by the driver while the vehicle is moving, except
in an emergency.
Speak only into a fixed, neck slung or clippedon microphone when it
would not distract your attention from the road.
Non-Ionising Radiation
User handbooks for mobile equipment shall draw attention to the
following, in the case of Class 1 transmitted output power (1W) for
GSM 1800 or Class 2 transmitted output power (8W) for GSM 900
equipment:
As with other mobile radio transmitting equipment, users are
advised that for satisfactory operation of the equipment and for the
safety of personnel, it is recommended that no part of the human
body be allowed to come too close to the antenna during operation
of the equipment.
Installation instructions for vehicle mounted equipment shall include,
for Class 1 transmitted output power (1W) for GSM 1800 and Class
2 transmitted output power (8W) for GSM 900 equipment:
7

For Your Safety
• The radio equipment shall be connected to the antenna via a
non-radiating cable (e.g. coaxial cables).
• The antenna shall be mounted in a position such that no part of
the human body will normally rest too close to any part of the
antenna unless there is an intervening metallic screen, for
example, the metallic roof.
Radio wave exposure and Specific Absorption
Rate (SAR) information
This mobile phone model has been designed to comply with
applicable safety requirement for exposure to radio waves. These
requirements are based on scientific guidelines that include safety
margins designed to assure this safety of all persons, regardless of
age and health.
• The radio wave exposure guidelines employ a unit of
measurement known as the Specific Absorption Rate, or SAR.
Tests for SAR are conducted using standardized methods with
the phone transmitting at its highest certified power level in all
used frequency bands.
• While there may be differences between the SAR levels of
various phone models, they are all designed to meet the relevant
guidelines for exposure to radio waves.
• SAR data information for residents in countries/regions that have
adopted the SAR limit recommended by the international
Commission on Non-Ionizing Radiation Protection (ICNIRP),
which is 2W/kg averaged over ten (10) gram of tissue (for
example European Union, Japan, Brazil and New Zealand):
• The highest SAR value for this model phone for use at the ear is
0.302 W/kg (10g).
• SAR data information for residents in countries/regions that have
adopted the SAR limit recommended by the Institute of Electrical
and Electronics Engineers (IEEE), which is 1.6 W/kg averaged
over one (1) gram of tissue (for example USA, Canada, Australia
and Taiwan).
8

Overview
Part of the Phone
• Front of the Phone
• Rear of the Phone
Key Description
• Keypad Description
• Side of the Key
• Letter Keys
....................................................................
................................................................
.................................................................
.......................................................................
...............................................................
.....................................................................
............................................................................
Display Information
Display Information
• On-Screen Icons
................................................................
...................................................................
Getting Started
Installation
• Inserting the SIM Card
• Removing the SIM Card
• Installing the Battery
• Charging the Battery
• Disconnecting the charger
Making and Answering Calls
• Making a call
• International Calls
• Making a call using the Phonebook
...............................................................................
..........................................................
........................................................
.............................................................
.............................................................
....................................................
.................................................
.........................................................................
.................................................................
Contents
......................................
13
13
14
15
15
16
17
18
18
20
20
20
21
22
23
24
24
24
24
Additional Functions
In call Menu
• During a call
• Multiparty or Conference Calls
.............................................................................
..........................................................................
..............................................
25
25
27
9

Contents
Access Codes
• PIN code (4 to 8 digits)
• PIN2 code (4 to 8 digits)
• PUK code (4 to 8 digits)
• PUK2 code (4 to 8 digits)
• Security code (4 to 8 digits)
.........................................................................
.........................................................
.......................................................
........................................................
......................................................
Accessing the Menu
Menu Tree
Profiles [Menu 1]
• Vibrate only [Menu 1-1]
• Silent [Menu 1-2]
• General [Menu 1-3]
• Loud [Menu 1-4]
• Headset [Menu 1-5]
• Car [Menu 1-6]
Call register [Menu 2]
• Missed calls [Menu 2-1]
• Received calls [Menu 2-2]
• Dialled calls [Menu 2-3]
• Delete recent calls [Menu 2-4]
• Call charges [Menu 2-5]
• GPRS information [Menu 2-6]
Tools [Menu 3]
• Calculator [Menu 3-1]
• Unit converter [Menu 3-2]
• World time [Menu 3-3]
• Voice recorder [Menu 3-4]
• Memory status [Menu 3-5]
................................................................................
.....................................................................
.........................................................
...................................................................
................................................................
....................................................................
..............................................................
......................................................................
.............................................................
........................................................
.....................................................
..........................................................
........................................................
.........................................................................
............................................................
.....................................................
...........................................................
..................................................
..............................................
...............................................
....................................................
....................................................
30
30
30
30
30
31
32
34
34
34
34
34
34
34
37
37
37
37
37
37
40
41
41
41
41
42
42
10

Organiser [Menu 4]
• Scheduler [Menu 4-1]
• Contacts [Menu 4-2]
Messages [Menu 5]
• Write text message [Menu 5-1]
• Write multimedia message [Menu 5-2]
• Inbox [Menu 5-3]
• Outbox [Menu 5-4]
• Drafts [Menu 5-5]
• Listen to voice mail [Menu 5-6]
• Info message [Menu 5-7]
• Templates [Menu 5-8]
• Settings [Menu 5-9]
Camera [Menu 6]
• Take picture [Menu 6-1]
• Take in modes [Menu 6-2]
• Take continuously [Menu 6-3]
• My album [Menu 6-4]
• Settings [Menu 6-5]
Settings [Menu 7]
• Alarm clock [Menu 7-1]
• Date & Time [Menu 7-2]
• Phone settings [Menu 7-3]
• Call settings [Menu 7-4]
• Security settings [Menu 7-5]
• Network settings [Menu 7-6]
• Reset settings [Menu 7-7]
.................................................................
............................................................
..............................................................
.................................................................
.............................................
...................................................................
................................................................
..................................................................
.............................................
......................................................
...........................................................
...............................................................
.....................................................................
........................................................
....................................................
...............................................
.............................................................
...............................................................
....................................................................
.........................................................
........................................................
....................................................
........................................................
.................................................
.................................................
.....................................................
.................................
43
43
45
51
51
53
58
60
61
61
62
63
63
67
67
68
68
69
70
71
71
71
72
73
76
79
79
11

Contents
Service [Menu 8]
• Internet [Menu 8-1]
• SIM Services [Menu 8-2]
• On browsing menu
Downloads [Menu 9]
• Pictures [Menu 9-1]
• Sounds [Menu 9-2]
• Games & more [Menu 9-3]
Accessories
Care and Maintenance
Technical Data
.....................................................................
................................................................
................................................................
...............................................................
...............................................................
...............................................................
.............................................................................
............................................................
.........................................................................
.......................................................
....................................................
80
80
84
85
86
86
86
86
89
90
92
12
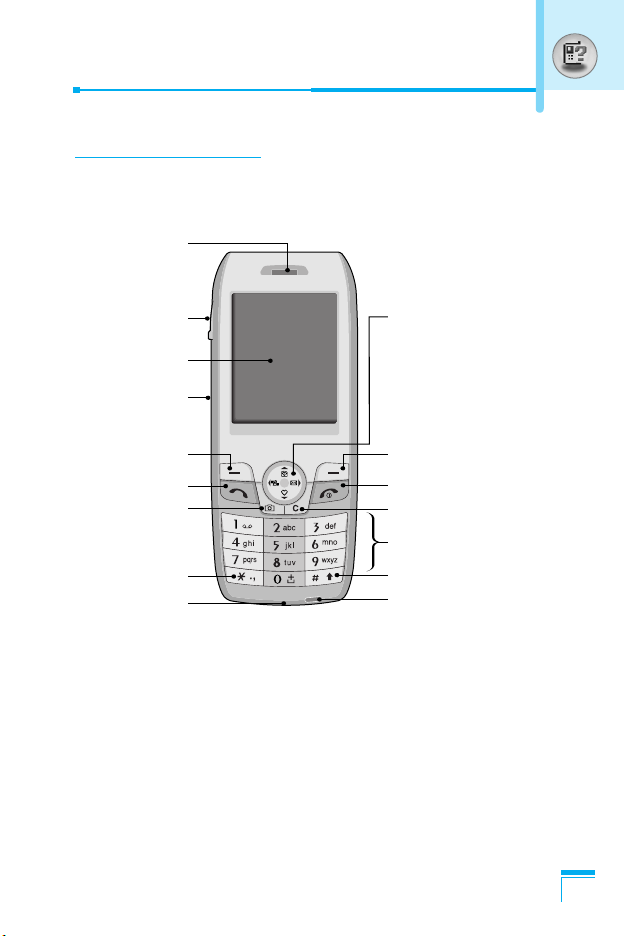
Front of the Phone
Earpiece
Part of the Phone
Headset
connector
LCD Screen
Camera key
Left soft Key
Send Key
Camera key
Star Key
Microphone
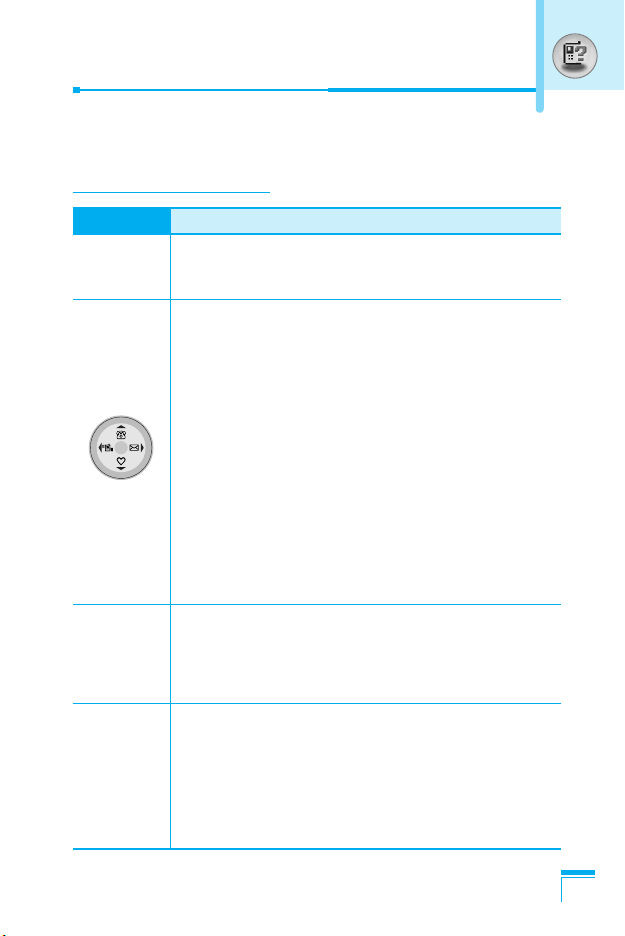
Navigation Keys and easy
access to functions:
- Left: Audio profiles
- Right: Messages/agenda
- Up: Phonebook
- Down: Favourites functions
Right soft Key
End/Power Key
Clear/Voice recorder Key
Alphanumeric keys
Hash Key
LED indicator
Overview
13
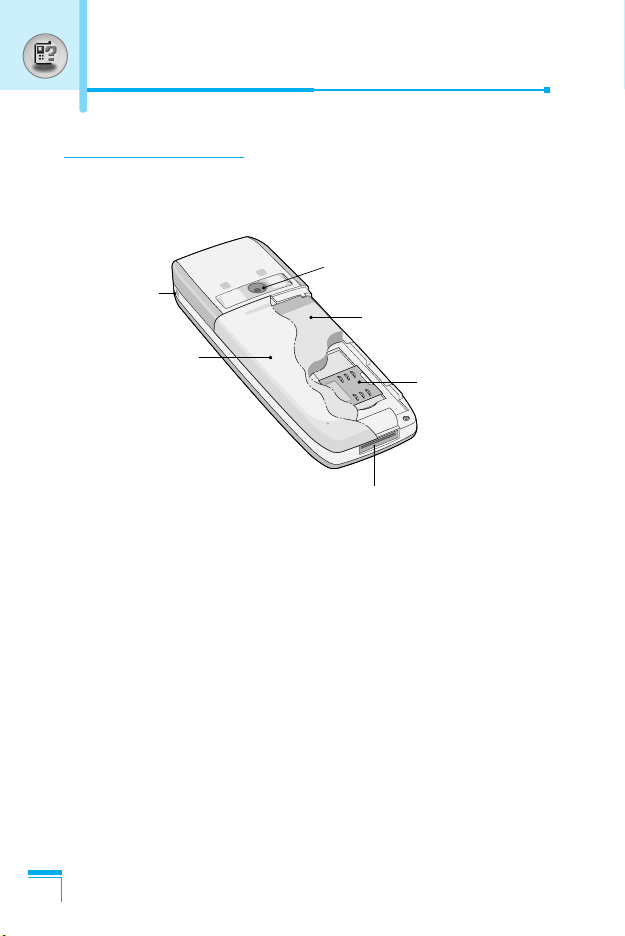
Part of the Phone
Rear of the Phone
Overview
Handstrap
Hole
Battery Cover
Camera
Battery
SIM Card Socket
Cable Connector/
Battery Charging Connector/
Hands-Free Car kit Connector
14
Key Description
The following shows key components of the phone.
Keypad Description
Key Description
Soft Left Key / Soft Right Key
<>
S
0
~
9
Each of these keys performs the function indicated
by the text on the display immediately above it.
Navigation keys
Use to scroll through menus and move the cursor.
You can also use these keys for quick access to the
following functions.
- Message key
Press “right” navigation key to retrieve or send text
messages.
- Profile key
Press “left” navigation key to choose the audio profile
you want.
- Phonebook key
Press “up” key to access phonebook menu.
- Favorite key
Press “down” navigation key to access the list of
preferred functions.
Send Key
Y
ou can dial a phone number and answer a call. If
you press this key without entering a number, your
phone shows the most recently dialled, received and
missed numbers.
Numeric Keys
These keys are used mainly to dial in standby mode
and enter numbers or characters in editing mode.
When you press these keys for a long time.
• Used to call your voicemail box by 1.
• Used to call for international call by 0.
• Used to call Speed dials by from 2 to 9.
Overview
15

Key Description
Key Description
END/PWR Key
E
C
Q
Side of the Key
Key Description
P
Used to end or reject a call. This key is also used as
Power Key by pressing this key for a few seconds.
You can delete the characters, go back the menu.
In addition, you can view voice memo list when you
press this key shortly in a standby mode. If you
press a key for a long time, you can record the
voice.
Camera key
This key is used to take a picture and save it.
Camera key
This key is used to take a picture and save it.
Overview
16

Letter Keys
Each key can be used for several symbols. There are shown below.
Key Description
1
. , / ? ! - : ' " 1
2 A B C 2 Ä À Á Â Ã Å Æ Ç a b c ä à á â ã å æ ç
3 D E F 3 Ë È É Ê d e f ë è é ê
4 G H I 4 Ï Ì Í Î ˝ g h i ï ì í î ©
5 J K L 5 j k l
6 M N O 6 Ñ Ö Ø Ò Ó Ô Õ Œ m n o ñ ö ø ò ó ô õ œ
7 P Q R S 7 ß ™ p q r s ß ∫
8 T U V 8 Ü Ù Ú Û t u v ü ù ú û
9 W X Y Z 9 w x y z
0 [space] 0
Overview
17
Display Information
The screen displays several icons. There are described below.
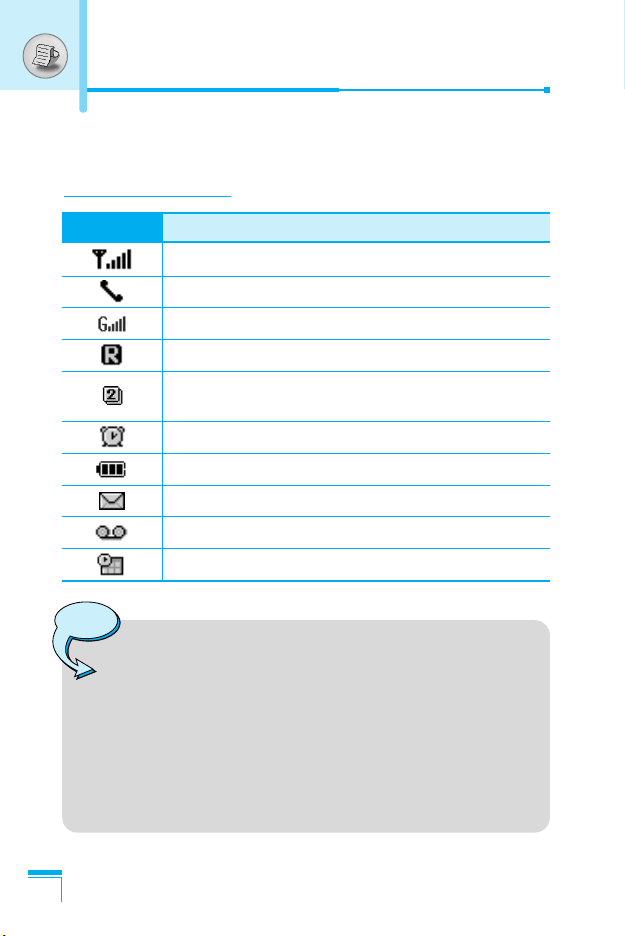
On-Screen Icons
Icon/Indicator
Note
Display Information
❈ The quality of the conversation may change depending
Description
Tells you the strength of the network signal.
Call is connected.
You can use GPRS service.
Shows that you are using a roaming service.
Line 1/2 is in use for outgoing calls – if you
subscribe to the Two Line Service.
The alarm has been set and is on.
Tells you the status of the battery.
You have received a text message.
You have received a voice message.
You can view your schedule.
on network coverage. When the signal strength is
below 2 bars, you may experience muting, call drop
and bad audio. Please take the network bars as
indicator for your calls.
When there are no bars, that means that there is no
network coverage: in this case, you won’t be able to
access the network for any service (call, messages
and so on).
❈
18
Icon/Indicator
Description
Vibrate only menu in profile.
General menu in profile.
Loud menu in profile.
Silent menu in profile.
Headset menu in profile.
Car menu in profile.
You can divert a call.
Indicates that the phone is accessing the WAP.
Indicates that you are using GPRS.
Display Information
19
1
2
Installation
1. Inserting the SIM Card
Locate the SIM card socket in the back
of the phone. Follow the steps below to
install the SIM card.
1. Remove the battery if attached.
2. Slide the SIM card into the slot,
under the silvery holders, with the
golden connectors facing down.
2. Removing the SIM Card
Follow the steps below to remove the
SIM card.
1. Remove the battery if attached.
2. Take out the SIM card from the slot.
Getting Started
Notice
20
• Removing the battery from the phone whilst it is
switched on may cause it to malfunction.
• The metal contact of the SIM card can be easily
damaged by scratches. Pay special attention to the SIM
card when you handle and install. Follow the
instructions supplied with the SIM card.
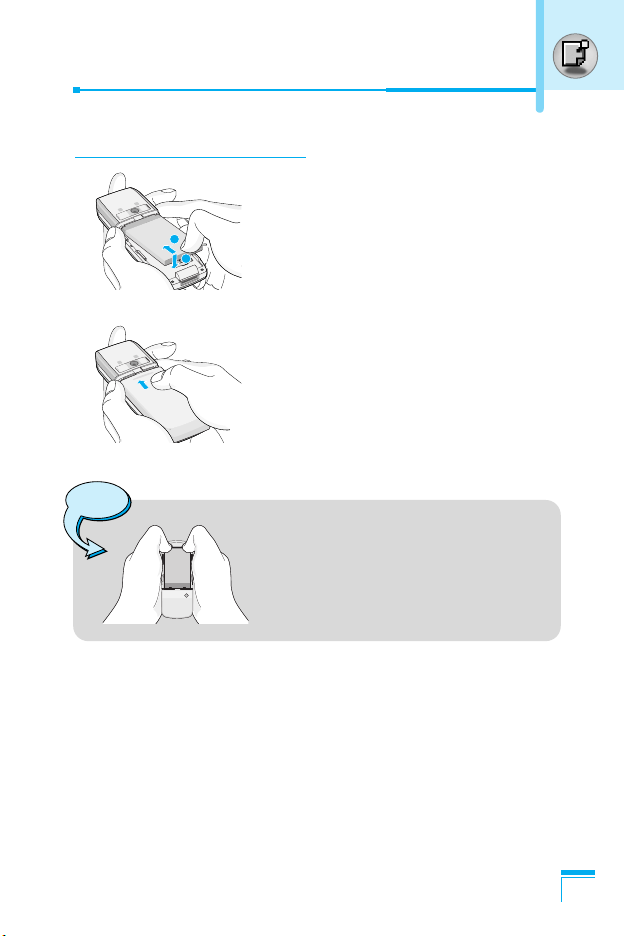
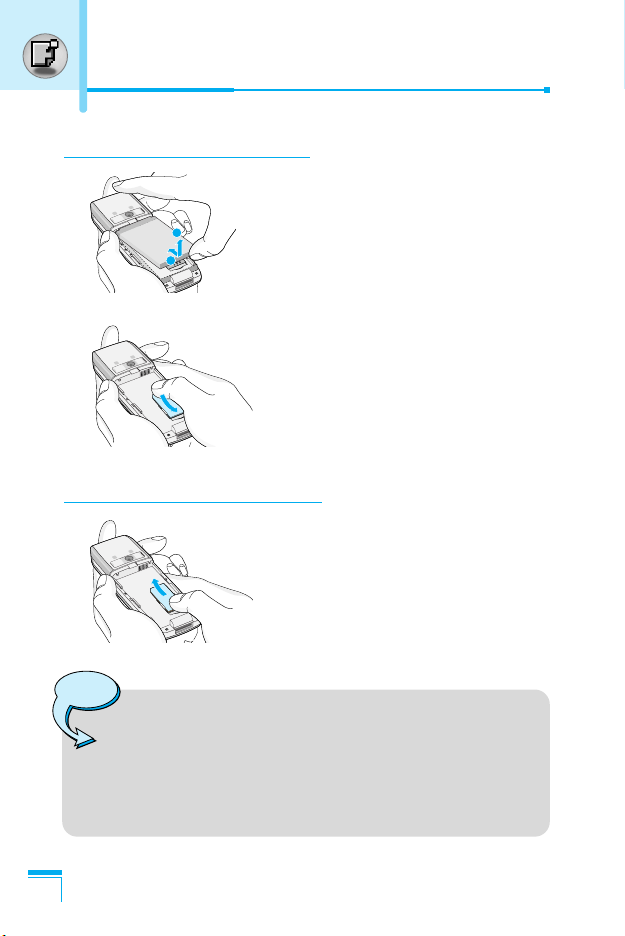
3. Installing the Battery
1. Position the lugs on the top of the
1
2
Notice!
2. Then push the bottom of the battery
3. Attach back cover by sliding up into
• When you remove the battery, you
should use both hands.
battery into the retaining holder.
into position until it clicks.
position until it clicks.
Getting Started
21
Installation
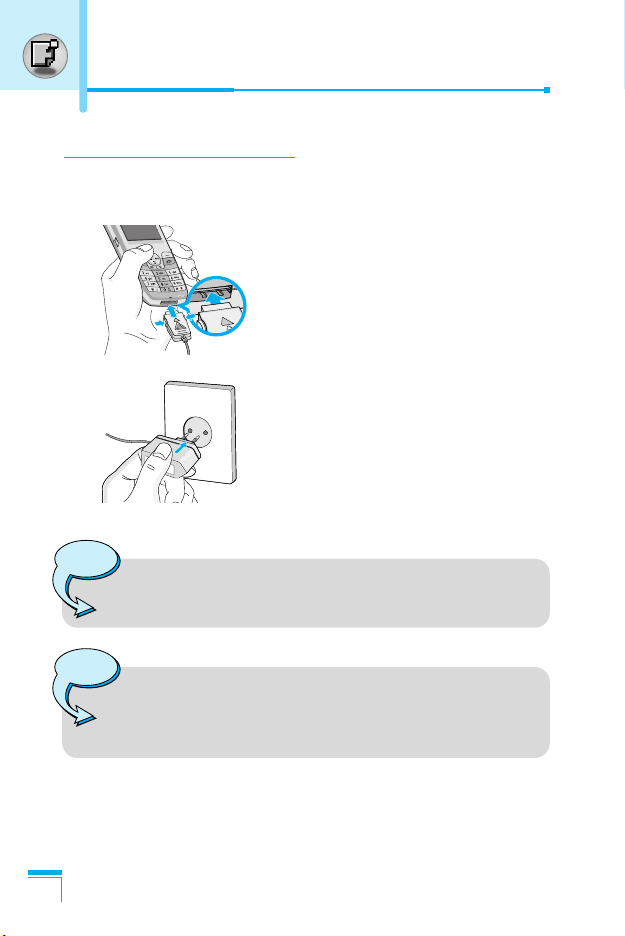
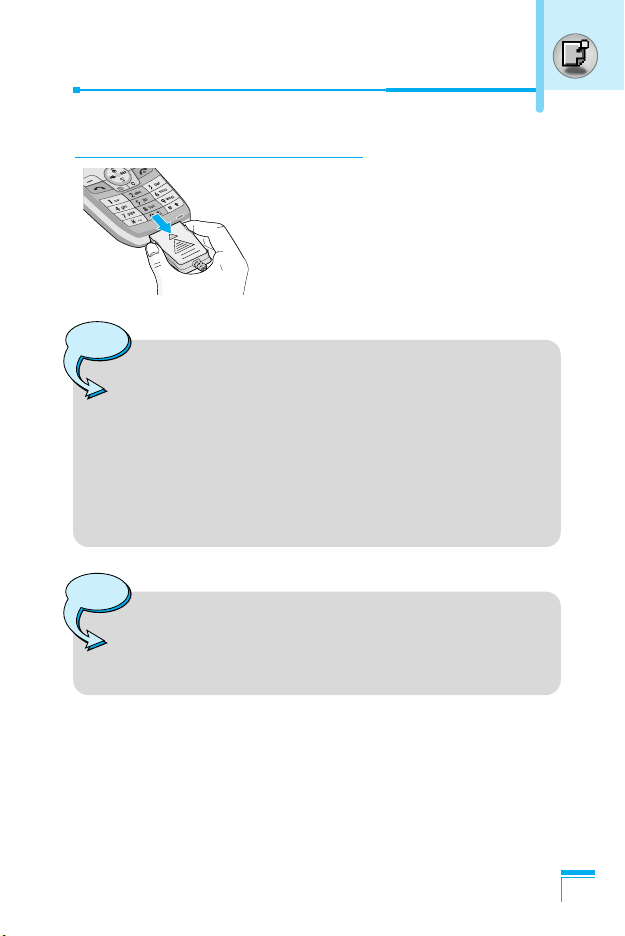
4. Charging the Battery
To connect the travel adapter to the phone, you must have installed
the battery.
1. With the arrow facing you as shown
in the diagram push the plug on the
battery adapter into the socket on
the bottom of the phone until it
clicks into place.
2. Connect the other end of the travel
adapter to the mains socket.
Use only the included packing
charger.
Warning
• Do not force the connector as this may damage the
phone and/or the travel adapter.
Note
Getting Started
22
• “Charging” is displayed on the screen after connecting
the travel adapter. Only if the battery is totally empty,
Call indicator Light is on without displaying “Charging”.
5. Disconnecting the charger
Disconnect the travel adapter from the
phone by pressing its side buttons as
shown in the diagram.
Note
• Ensure the battery is fully charged before using the
phone.
• Do not remove your battery or the SIM card while
charging.
• The moving bars of battery icon will stop after charging
is complete.
• If the battery is completely discharged, the charge
could take some minutes before starting.
Note
If the battery does not charge,
• switch the phone off.
• ensure the battery is correctly fit.
Getting Started
23

Making and Answering Calls
Making a call
1. Key in phone number including the area code. If you want to
delete number, press C.
2. Press S to call the number.
3. Press E to end the call.
International Calls
1. Press and hold the 0 key for the international prefix.
“+” character may replace with the international access code.
2. Enter the country code, area code, and the phone number.
3. Press S.
Making a call using the Phonebook
1. In standby mode, press > [Contacts].
2. When the menu is displayed, you select Search by pressing <.
3. If you find out the desired item through searching by a name or a
number, press S to call.
Getting Started
24

In call Menu
The menu displayed on the handset screen during a call is different
to the default main menu reached from the idle screen, and the
options are described here.
1 During a call
Pressing the menu key during a call, you can access the following
menu:
Volume: Change the volume of the conversation.
Hold: Hold the current call.
End all calls: End all the calls in progress.
Messages: Access the messages menu.
DTMF off/on: Enable/Disable the DTMF tones.
Mute: Mute the microphone.
Sim Tool Kit: Access the Sim Tool Kit menu (if available in the
SIM).
In the next pages, you’ll find all details related to call hold and
conference calls.
1-1 Putting a Call on Hold
When a call is made or answered, press the S [Send] to place it
on hold. When a call is held, press the S [Send] to make it active.
1-2 Making a Second Call
You can get a dial number from phonebook to make a second call.
Press > [Contacts] then select Search. To save the dial number
into phonebook during call, press > [Contacts] then select Add
new.
Additional Functions
25

In call Menu
1-3 Swapping Between Two Calls
To switch between two calls, select < [Options], then select Swap
or just press S [Send] key.
You can make one of two calls focused by pressing up/down arrow
key. If you want to end one of two calls, make the call you want to
end focused, then press E [End] key when the call you want to
end is focused.
1-4 Answering an Incoming Call
To answer an incoming call when the handset is ringing, simply
press the S [Send] key.
The handset is also able to warn you of an incoming call while you
are already in a call. A tone sounds in the earpiece, and the display
will show that a second call is waiting. This feature, known as Call
Waiting, is only available if your network supports it. For details of
how to activate and deactivate it see Call waiting [Menu 7-4-4].
If Call Waiting is on, you can put the first call on hold and answer
the second, by pressing S [Send] or by selecting < [Answer],
then Hold & Answer.
You can end the current call and answer the waiting call by
selecting < [Menu], then End & Answer.
1-5 Rejecting an Incoming Call
Additional Functions
When not in a call you can reject an incoming call without answering
it by simply pressing the E [End].
When in a call you can reject an incoming call by pressing the <
[Menu] key and selecting Multiparty/Reject or by pressing E
[End] key.
26

1-6 Muting the Microphone
You can mute the microphone during a call by pressing the <
[Options] key then selecting Mute. The handset can be unmuted by
pressing the < [Unmute].
When the handset is muted, the caller cannot hear you, but you can
still hear them.
1-7 Switching DTMF Tones on During a Call
To turn DTMF tones on during a call, for example, to allow your
handset to make use of an automated switchboard, select <
[Options], then DTMF On. DTMF tones can be turned off the same
way.
1-8 Calling up Messages and SIM Tool kit main menu
The Messages and SIM Tool kit main menu options can be reached
from the in-call menu by selecting < [Options]. SIM Tool kit menu
is shown only when SIM in the handset supports SIM Tool kit
service.
2 Multiparty or Conference Calls
The multiparty or conference service provides you with the ability to
have a simultaneous conversation with more than one caller, if your
network service provider supports this feature.
A multiparty call can only be set up when you have one active call
and one call on hold, both calls having been answered. Once a
multiparty call is set up, calls may be added, disconnected or
separated (that is, removed from the multiparty call but still
connected to you) by the person who set up the multiparty call.
The maximum callers in a multiparty call is five. Once started, you
are in control of the multiparty call, and only you can add calls to the
multiparty call.
Additional Functions
27

In call Menu
2-1 Making a Second Call
You can make a second call while you are already in a call. To do
this, enter the second number and press S [Send]. When you get
second call the first call is automatically put on hold. You can swap
between calls by selecting <[Options] then Swap.
2-2 Setting up a Multiparty Call
You can connect a call on hold to the currently active call to form a
multiparty call by selecting <[Options] then Multiparty / Join all.
2-3 Putting the Multiparty Call on Hold
To put a multiparty call on hold, select <[Options] then
Multiparty / Hold all.
2-4 Activate the Multiparty Call on Hold
To make a multiparty call on hold active, select <[Options] then
Multiparty / Join all.
2-5 Adding Calls to the Multiparty Call
To join an active call to the held multiparty call, select <[Options]
then Multiparty / Join all.
2-6 Displaying Callers in a Multiparty Call
Additional Functions
To scroll though the numbers of the callers who make up a
multiparty call on the handset screen, press Dand Ukeys.
2-7 Putting a Member of a Multiparty Call on Hold
To place one selected caller (whose number is currently displayed
on-screen) of a multiparty call on hold, select <[Options] then
Multiparty / Exclude.
28

2-8 A Private Call in a Multiparty Call
To have a private call with one caller of a multiparty call, display the
number of the caller you wish to talk to on the screen, then select
<[Options] and Multiparty / Private to put all the other callers on
hold.
2-9 Ending a Multiparty Call
The currently displayed caller of a multiparty call can be
disconnected by pressing the E [End] key. To end a multiparty
call, press <[Options] then select Multiparty / End multiparty.
Selecting <[Options] then Multiparty / End all, will end all the
active and held calls.
Additional Functions
29
 Loading...