

Page 1

MODEL: G5400
ENGLISH
P/N : MMBB0084027
Revision 1.1
PRINTED IN KOREA
USER’S MANUAL
GPRS & MMS Phone
USER’S MANUAL
MODEL: G5400
Please read this manual carefully
before operating your mobile phone.
Retain it for future reference.
G•P•R•S•&•M•M•S•P•H•O•N•E
Page 2

ENGLISH
GPRS & MMS Phone
USER’S MANUAL
MODEL: G5400
Please read this manual carefully
before operating your mobile phone.
Retain it for future reference.
Page 3

Page 4

For Your Safety
Mobile Phones must be switched off at all times in an
aircraft.
Do not use your phone near petrol stations, fuel depots,
chemical plants or blasting operations.
Switch off the phone in any area where required by
special regulations. For example, do not use your phone
in hospitals or it may affect sensitive medical equipment.
All radio transmitters carry risks of interference with
electronics in close proximity. Minor interference may
affect TVs, radios, PCs, etc.
Do not hold the phone in your hand while driving.
Do not dismantle the phone or battery.
Keep the phone in a safe place out of children’s reach.
It includes small parts which if detached may cause a
choking hazard.
Do not touch the charger or phone with wet hands.
3
Page 5
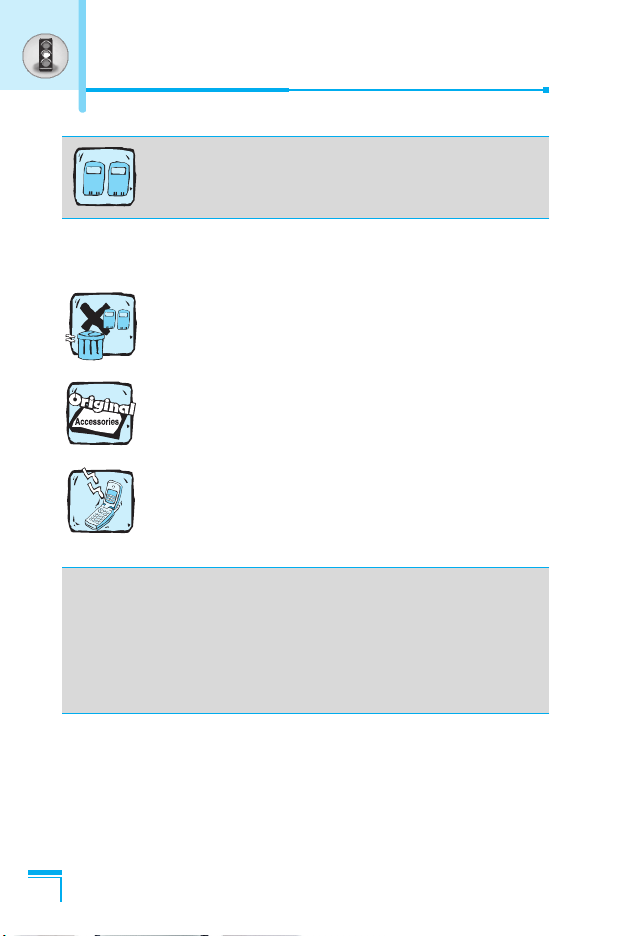
For Your Safety
For your safety, use ONLY specified ORIGINAL
batteries and chargers.
Please note:
Batteries should be disposed of in accordance with
relevant legislation.
Only use ORIGINAL accessories to avoid damage to
your phone.
Emergency call may not be available under all cellular
networks. Therefore, you should never depend solely on
the phone for emergency calls.
Important Information
This user’s guide contains important information on the use and
operation of this phone. Please read all the information carefully
for optimal performance and to prevent any damage or misuse of
the phone. Any changes or modifications not expressly approved
in this user’s guide could void your warranty for this equipment.
4
Page 6

Overview
Part of the Phone
• Main body of the Phone
• Outside of the Phone
Key Description
• Side of the Key
• Letter Keys
......................................................................
..........................................................
............................................................
.......................................................................
.....................................................................
............................................................................
Display Information
Display Information
• On-Screen Icons
................................................................
...................................................................
Getting Started
Installation
• Inserting the SIM Card
• Removing the SIM Card
• Installing the Battery
• Charging the Battery
• Disconnecting the charger
Making and Answering Calls
• Making a call
• International Calls
• Making a call using the Phonebook
...............................................................................
..........................................................
........................................................
.............................................................
.............................................................
....................................................
.................................................
.........................................................................
.................................................................
Contents
......................................
9
9
10
11
12
13
14
14
15
15
15
16
16
17
18
18
18
18
Additional Functions
In call Menu
• During a call
.............................................................................
.........................................................................
19
19
5
Page 7

Contents
Access Codes
• PIN code (4 to 8 digits)
• PIN2 code (4 to 8 digits)
• PUK code (4 to 8 digits)
• PUK2 code (4 to 8 digits)
• Security code (4 to 8 digits)
.........................................................................
.........................................................
.......................................................
........................................................
......................................................
..................................................
Accessing the Menu
Menu Tree
Messages [Menu 1]
• Write short message [Menu 1-1]
• Write multimedia message [Menu 1-2]
• Inbox [Menu 1-3]
• Outbox [Menu 1-4]
• Voice mail [Menu 1-5]
• Info service [Menu 1-6]
• Templates [Menu 1-7]
• Settings [Menu 1-8]
Call register [Menu 2]
• Missed calls [Menu 2-1]
• Received calls [Menu 2-2]
• Dialled calls [Menu 2-3]
• All calls [Menu 2-4]
• Delete recent calls [Menu 2-5]
• Call charges [Menu 2-6]
• GPRS information [Menu 2-7]
................................................................................
.................................................................
...........................................
...................................................................
................................................................
...........................................................
.........................................................
...........................................................
...............................................................
.............................................................
........................................................
.....................................................
.........................................................
................................................................
..............................................
........................................................
...............................................
.................................
21
21
21
21
22
22
23
25
25
27
31
32
34
35
37
37
41
41
41
41
41
41
41
43
6
Page 8

Profiles [Menu 3]
• Vibrate only [Menu 3-1]
• Quiet [Menu 3-2]
• General [Menu 3-3]
• Loud [Menu 3-4]
• Headset [Menu 3-5]
• Car [Menu 3-6]
Settings [Menu 4]
• Alarm clock [Menu 4-1]
• Date & Time [Menu 4-2]
• Phone settings [Menu 4-3]
• Call settings [Menu 4-4]
• Security settings [Menu 4-5]
• Network settings [Menu 4-6]
• Reset settings [Menu 4-7]
Organiser [Menu 5]
• Scheduler [Menu 5-1]
• Phonebook [Menu 5-2]
Fun & Tools [Menu 6]
• Games [Menu 6-1]
• My folder [Menu 6-2]
• Melody composer [Menu 6-3]
• Calculator [Menu 6-4]
• Unit converter [Menu 6-5]
• World time [Menu 6-6]
• Voice recorder [Menu 6-7]
• Infrared [Menu 6-8]
.....................................................................
.........................................................
...................................................................
...............................................................
....................................................................
..............................................................
......................................................................
....................................................................
.........................................................
........................................................
........................................................
.................................................................
............................................................
.........................................................
.............................................................
................................................................
.............................................................
............................................................
...........................................................
...............................................................
....................................................
.................................................
.................................................
.....................................................
...............................................
.....................................................
....................................................
44
44
44
44
44
44
44
47
47
47
48
49
54
56
57
58
58
59
66
66
66
67
68
68
68
69
69
7
Page 9

Contents
Internet [Menu 7]
• Home [Menu 7-1]
• Bookmarks [Menu 7-2]
• Push messages [Menu 7-3]
• Profiles [Menu 7-4]
• Goto URL [Menu 7-5]
• Cache settings [Menu 7-6]
• Security certification [Menu 7-7]
• Reset profiles [Menu 7-8]
• Browser version [Menu 7-9]
On browsing menu
Java [Menu 8]
• Applications [Menu 8-1]
• Download [Menu 8-2]
• Memory status [Menu 8-3]
Accessories
Care and Maintenance
Technical Data
.....................................................................
..................................................................
..........................................................
..................................................
................................................................
............................................................
....................................................
......................................................
..................................................
.................................................................
..........................................................................
........................................................
............................................................
....................................................
.............................................................................
............................................................
.........................................................................
............................................
70
70
70
70
70
73
73
73
73
73
74
75
75
75
75
76
77
79
8
Page 10
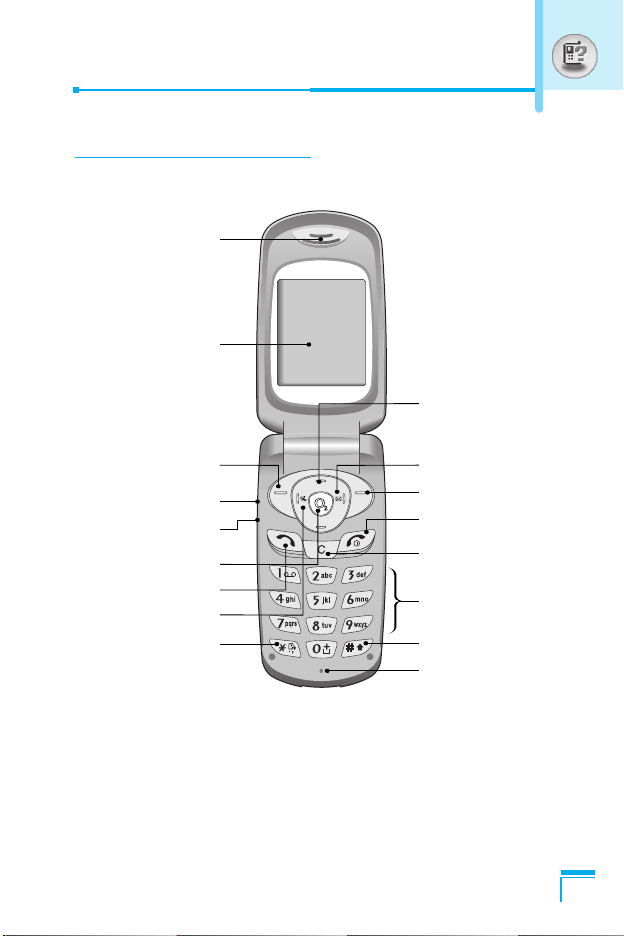
Main body of the Phone
Earpiece
Display Screen
Part of the Phone
Navigation Keys
Soft Left Key
Up/Down Side Key
Voice Memo Key
Confirm Key
Send Key
Vibration Key
Star Key
Message key
Soft Right Key
End/Power Key
Clear/Cancel Key
Numeric Keys
Hash Key
Microphone
Overview
9
Page 11

Part of the Phone
Outside of the Phone
Battery
Handstrap Hole
Battery Lock
SIM Card Socket
Cable Connector
Battery Charging Connector
Hands-Free Car kit Connector
Overview
10
Page 12

Key Description
The following shows key components of the phone.
Keypad Description
Key Description
Soft Left Key / Soft Right Key
< >
S
0
~
9
E
Each of these keys performs the function indicated
by the text on the display immediately above it.
Vibration key
You can activate the vibration directly by holding down
this key.
Message key
You can go to Message menu (Inbox, Voice mail, Push
messages, Scheduler or Alarm) directly without
scrolling.
Navigation Keys
Used to scroll through name, phone numbers, menus
or setting options.
WAP Hot key (=Confirm key)
Press and hold this key to access O2 Active.
Send Key
Y
ou can dial a phone number and answer a call. If
you press this key without entering a number, your
phone shows the most recently dialled, received and
missed numbers.
Numeric Keys
These keys are used mainly to dial in standby mode
and enter numbers or characters in editing mode.
When you press these keys for a long time.
• Used to call your voicemail box by 1.
• Used to call for international call by 0.
• Used to call Speed dials by from 2 to 9.
END/PWR Key
Used to end or reject a call. This key is also used as
Power Key by pressing this key for a few seconds.
Overview
C
You can delete the characters, go back the menu.
11
Page 13

Key Description
Side of the Key
Key Description
Up/Down Side Key
When the flip is open, you can control the volume of
key tone in the standy mode and the volume during
a call. If flip is closed, press Up/Down side key once
to turn on Back light and press once more to view
the current date in standby mode.
External EZ key
• When the flip is closed, hold down the key to
enable manner mode.
• When incoming a call, press the key to reject the
call.
• When the flip is open, you can record voice
memo in standby mode.
Overview
12
Page 14

Letter Keys
Each key can be used for several symbols. There are shown below.
Key Description
1
2 A B C 2 Ä À Á Â Ã Å Æ Ç a b c ä à á â ã å æ ç
3 D E F 3 Ë È É Ê d e f ë è é ê
4 G H I 4 | Ï Ì Í Î ˝ g h i ı ï ì í î ©
5 J K L 5 j k l
6 M N O 6 Ñ Ö Ø Ò Ó Ô Õ Œ m n o ñ ö ø ò ó ô õ œ
7 P Q R S 7 ß ™ p q r s ß ∫
8 T U V 8 Ü Ù Ú Û t u v ü ù ú û
9 W X Y Z 9 w x y z
0 [space] 0
. , / ? ! - : ' " 1
Overview
13
Page 15

Display Information
The screen displays several icons. There are described below.
On-Screen Icons
Icon/Indicator
Display Information
Description
Tells you the strength of the network signal.
Call is connected.
You can use GPRS service.
Shows that you are using a roaming service.
Line 1/2 is in use for outgoing calls – If you
subscribe to the Two Line Service.
The alarm has been set and is on.
Tells you the status of the battery.
You have received a text message.
You have received a voice message.
You have received a push message.
You can view your schedule.
All audible signals are turned off.
General menu in profile.
Loud menu in profile.
Silent menu in profile.
Headset menu in profile.
Car menu in profile.
You can divert a call.
14
Page 16

1. Inserting the SIM Card
Locate the SIM card socket in the back
of the phone. Follow the steps below to
install the SIM card.
1. Remove the battery if attached.
2. Slide the SIM card into the slot,
under the silvery holders, with the
golden connectors facing down and
the cut corner to the right.
2. Removing the SIM Card
Follow the steps below to Remove the
SIM card.
1. Remove the battery if attached.
2. Take out the SIM card from the slot.
Notice
• Removing the battery from the phone whilst it is
switched on may cause it to malfunction.
• The metal contact of the SIM card can be easily
damaged by scratches. Pay special attention to the SIM
card when you handle and install. Follow the
instructions supplied with the SIM card.
Installation
Getting Started
15
Page 17

Installation
3. Installing the Battery
1. Position the lugs on the bottom of
the battery into the retaining holder.
2. Then push to the half of the battery
into position.
4. Charging the Battery
To connect the travel adapter to the phone, you must have installed
the battery.
1. With the arrow facing you as shown
in the diagram push the plug on the
battery adapter into the socket on
the bottom of the phone until it
clicks into place.
Getting Started
16
2. Connect the other end of the travel
adapter to the mains socket.
Use only the included packing
charger.
Page 18

Warning
• Do not force the connector as this may damage the
phone and/or the travel adapter.
5. Disconnecting the charger
Disconnect the travel adapter from the
phone by pressing its side buttons as
shown in the diagram.
Note
• Ensure the battery is fully charged before using the
phone.
• Do not remove your battery or the SIM card while
charging.
• The moving bars of battery icon will stop after
charging is complete.
• At the begining of charging or at the moment of
disconnecting the charger from the phone the Sub
LCD backlight will flash red/green.
• When charging is complete, it will flash green. Please
note in this case that it may require a longer initial
charging time before displaying “Charging” on the
screen of the phone.
• The charging time depends on the charger and the
battery used.
Getting Started
Note
If the battery does not charge,
• switch the phone off.
• ensure the battery is correctly fit.
17
Page 19

Making a call
1. Key in phone number including the area code. If you want to
delete number, press C.
2. Press S to call the number.
3. Press E to end the call.
International Calls
1. Press and hold the 0 key fol70 0 Tf81x.d hol-10715nt to
Getting Started
18
Page 20
In call Menu
The menu displayed on the handset screen during a call is different
to the default main menu reached from the idle screen, and the
options are described here.
During a call
Answering an Incoming Call
To answer an incoming call when the handset is ringing, simply
press the S [Send] key.
The handset is also able to warn you of an incoming call while you
are already in a call. A tone sounds in the earpiece, and the display
will show that a second call is waiting. This feature, known as Call
Waiting, is only available if your network supports it. For details of
how to activate and deactivate it see Call waiting [Menu 4-4-4].
If Call Waiting is on, you can put the first call on hold and answer
the second, by pressing S [Send] or by selecting < [Answer],
then Hold & Answer.
You can end the current call and answer the waiting call by
selecting < [Menu], then End & Answer.
Note
• Multiparty Calls and Call hold are not available on O2
Pay & Go.
Additional Functions
Rejecting an Incoming Call
When not in a call you can reject an incoming call without answering
it by simply pressing the E [End] or External EZ key when the
flip is closed.
When in a call you can reject an incoming call by pressing the <
[Menu] key and selecting Multiparty/Reject or by pressing E
[End] key.
19
Page 21

In call Menu
Muting the Microphone
You can mute the microphone during a call by pressing the <
[Options] key then selecting Mute. The handset can be unmuted by
pressing the < [Unmute].
When the handset is muted, the caller cannot hear you, but you can
still hear them.
Switching DTMF Tones on During a Call
To turn DTMF tones on during a call, for example, to allow your
handset to make use of an automated switchboard, select <
[Options], then DTMF On. DTMF tones can be turned off the same
way.
Calling up Messages and SIM Tool kit main menu
The Messages and SIM Tool kit main menu options can be reached
from the in-call menu by selecting < [Options]. SIM Tool kit menu
is shown only when SIM in the handset supports SIM Tool kit
service.
Additional Functions
20
Page 22

Access Codes
You can use the access codes described in this section to avoid
unauthorized use of your phone. The access codes (except PUK
and PUK2 codes) can be changed by using [Menu 4-5-5].
PIN code (4 to 8 digits)
The PIN (Personal Identification Number) code protects your SIM
card against unauthorized use. The PIN code is usually supplied
with the SIM card. When PIN code is set On, your phone will
request the PIN code every time it is switched on. On the contrary,
when PIN code is set Off, your phone connects to the network
directly without the request PIN code.
Note
• Your O2 Pay & Go mobile is supplied with PIN
deactivated.
PIN2 code (4 to 8 digits)
The PIN2 code, supplied with some SIM cards, is required to
access some functions such as Advice of call charge, Fixed Dial
number. These functions are only available if supported by your SIM
card.
Note
Additional Functions
• This service is not available on O2 Pay & Go.
PUK code (4 to 8 digits)
The PUK (PIN Unblocking Key) code is required to change a
blocked PIN code. The PUK code may be supplied with the SIM
card. If not, contact your local service provider for the code. If you
lose the code, also contact your service provider.
21
Page 23

Access Codes
PUK2 code (4 to 8 digits)
The PUK2 code, supplied with some SIM cards, is required to
change a blocked PIN2 code. If you lose the code, also contact your
service provider.
Security code (4 to 8 digits)
The security code protects the unauthorized use of your phone. It is
usually supplied with the phone. This code is required to delete all
phone entries and to activate “Reset settings” menu. The default
number is “0000”.
Additional Functions
22
Page 24

Menu Tree
1 Messages
1 Write short message
2 Write multimedia message
3 Inbox
4 Outbox
5 Voice mail
6 Info service
7 Templates
8 Settings
2 Call register
1 Missed calls
2 Received calls
3 Dialled calls
4 All calls
5 Delete recent calls
6 Call charges
7 GPRS information
3 Profiles
1 Vibrate only
2 Quiet
3 General
4 Loud
5 Headset
6 Car
4 Settings
1 Alarm clock
2 Date & Time
3 Phone settings
4 Call settings
5 Security settings
6 Network settings
7 Reset settings
5 Organiser
1 Scheduler
2 Phonebook
Accessing the Menu
23
Page 25
Menu Tree
6 Fun & Tools
1 Games
2 My folder
3 Melody composer
4 Calculator
5 Unit converter
6 World time
7 Voice recorder
8 Infrared
7 Internet
1 Home
2 Bookmarks
3 Push messages
4 Profiles
Accessing the Menu
5 Goto URL
6 Cache settings
7 Security certification
8 Reset profiles
9 Browser version
8 Java
1 Applications
2 Download
3 Memory status
9 SIM Service
This function appears as my
services on your O2 Pay &
Go mobile.
24
Page 26

Messages [Menu 1]
This menu includes functions related to SMS (Short Message
Service), MMS (Multimedia Message Service),voice mail, as well as
the network’s service messages.
Write short message [Menu 1-1]
You can write and edit text message, checking the number of
message pages.
1. Enter the Messages menu by pressing < [Select].
2. If you want to write a new message, select Write short
message.
3. To make text input easier, use T9. For details, see How to Use
T9 (Page 29).
4. Press [Insert] to attach the followings.
5. If you want to set option for your text, or to finish your writing,
press < [Options].
Note
• The phone which supports EMS release 5 is available
to send colour pictures, sounds, text styles, etc.. The
other party may not receive pictures, sounds or text
styles you sent properly if the phone does not support
such options.
Accessing the Menu
Insert
• Symbol
You can add special characters.
• Picture
You can insert the Default pictures or pictures in My folder that
are available for short messages.
• Sound
You can insert sounds that are available for short messages.
25
Page 27

Messages [Menu 1]
• Text templates
You can use Text templates already set in the phone.
• Phonebook
You can add phone numbers or e-mail addresses in Phonebook.
• Business card
You can add your contact information to the message.
Option
• Send
Sends text messages.
1. Enter numbers of recipient.
D
2. Press
3. You can add phone numbers in the phone book.
4. Press < after entering numbers.
• Save
Stores messages in Outbox.
• Font
You can select Size and Style of fonts.
Accessing the Menu
• Colour
You can select Colour of foreground and background.
key to add more recipients.
• Alignment
You can make the message contents aligned Right, Centre or
Left.
• Add T9 dictionary
You can add your own word. This menu can be shown only when
edit mode is Predictive (T9Abc/T9abc/T9ABC).
26
Page 28

• T9 langauges
Select a T9 input mode.
• Exit
If you press Exit while writing a message, you can end the writing
message and back to the Message menu. The message you have
written is not saved.
Write multimedia message [Menu 1-2]
You can write and edit multimedia messages, checking message
size.
1. Enter the Messages menu by pressing < [Select].
2. If you want to write a new message, select Write multimedia
message.
3. You can create a new message or choose one of the multimedia
message templates already made.
4. Press Insert to add Symbol, Picture, Sound, Text templates,
Phonebook or Business card.
Option
• Preview
You can preview multimedia messages you wrote.
• Send
You can send multimedia messages to multiple recipients,
prioritise your message, and make it sent later as well.
Accessing the Menu
Note
• When you defer sending a message, please contact
the service provider. This service depends on network.
27
Page 29

Messages [Menu 1]
• Save
You can save multimedia messages in the outbox or as templates.
• Add slide
You can add a slide before or after current slide.
• Move to slide
You can move to previous or next slide.
• Delete slide
You can delete current slides.
• Set slide format
- Set timer
You can set timer for slide, text, picture and sound.
- Swap text and picture
You can switch the position of picture and text of the message.
• Remove media
You can remove pictures or sounds in the slide. This option can be
shown only when any media exists.
• Add T9 dictionary
Accessing the Menu
You can add your own word. This menu can be shown only when
edit mode is Predictive (T9Abc/T9abc/T9ABC).
• T9 langauges
Select a T9 input mode.
• Exit
You can back to the Message menu.
28
Page 30

How to Use T9
T9Abc
T9abcT9abc
T9abc
T9abc
160/1
159/1
158/1
156/1
157/1
T9 allows you to input text quickly.
In T9, you only need to press the key with the corresponding
letter once. This is based on a built-in dictionary to which you
can also add new words.
• Writing words by using T9.
1. Start writing a word by using the keys 2 to 9.
Press each key only once for one letter.
To write for instance ‘Girl’.
The word changes after each keystroke. Therefore you
shouldn’t pay too much attention to how the word appears
on the display until you have pressed all the appropriate
keys.
To delete a character to the left, press C.
To insert several numbers, hold # down and key in the
numbers.
If you hold * down, you can change the type of
language. (You can also use options.)
Also, the phone supports three modes: Predictive (T9Abc,
T9ABC, T9abc), Multitap (ABC, abc), Numeric (123). If
you want to change a mode, press # key.
Accessing the Menu
29
Page 31

Messages [Menu 1]
Alternatively : Press * key and select insert symbols.
2. When you have finished wirting a word, check whether the
word is correct.
If the word is correct
If the word is not correct
Alternatively : If there is no word you want you can add your
Select the desired character and press
Select.
: Press 0 and write the next word.
: Search by
and Next word).
own word.
Press < [Options] in the Predictive edit
mode. Select Add T9 dictionary Menu.
You can see the following.
Input
your word
U , D
LGGSM
➭
3. To insert a punctuation mark, press 1 repeatedly until the
Accessing the Menu
desired mark appears.
(Previous
30
Page 32

Inbox [Menu 1-3]
You will be alerted when you have received messages. They will be
stored in Inbox.
In Inbox, you can identify each message by icons. For detail, see
the icon directive.
Icon directive
[ ] Multimedia message
[ ] Short message
[ ] SIM message
[ ] Read
[ ] Notified multimedia message
If the phone shows ‘No space for SIM message’, you have to delete
any SIM messages from inbox or outbox. If the phone displays ‘No
space for message’, you can make space of each repository as
deleting messages, media and applications.
❇
SIM message
SIM message means the message exceptionally stored in SIM card.
For notified multimedia message, you have to wait for downloading
and processing of the message. For notification setting, see [Menu
1-8-2] for detail.
To read a message, select one of the messages by pressing <.
Reply
You can reply to the sender.
Accessing the Menu
Forward
You can forward the selected message to another party.
31
Page 33

Messages [Menu 1]
Return call
You can call back to the sender.
Delete
You can delete the current message.
Extract
You can extract picture, sound and text. They will be saved in My
folder or Phonebook.
View information
You can view information about received messages; Sender’s
address, Subject (only for Multimedia message), Message date &
time, Message type, Message size.
Replay (applicable to Multimedia message only)
You can replay multimedia messages.
❇
Receive (In case of notification message)
If Multimedia message is set to Auto download off, you can get
only Notification. To receive a message, you need to select
[Receive]. Although Mulimedia message is set to Auto download
on, on the network condition or other reasons, you can get
Accessing the Menu
notification message.
Outbox [Menu 1-4]
You can see sent and unsent messages here. For sent message,
you can see the delivery status.
The browsing is same as that for the inbox message.
32
Page 34

❇ When you use the message which is already sent
Edit
You can send the message after editing it.
Forward
You can forward the current message to other recipients.
Delete
You can delete the current message.
View information
You can view information about outbox messages; Recipient’s
address, Subject (only for Multimedia message), Message date &
time, Message type, Message size.
Accessing the Menu
33
Page 35

Messages [Menu 1]
Voice mail [Menu 1-5]
You can receive the voicemail if this feature is supported by your
network service provider. When a new voicemail is arrived, the
symbol will be displayed on the screen. Please check with your
network service provider for details of their service in order to
configure the phone accordingly.
Note
• On O2 Pay & Go your voicemail number is 901.
Simply call 901 to listen to your messages at any time.
Listen to voice mail [Menu 1-5-1]
You can listen to voice mail.
Voice mail centre [Menu 1-5-2]
1. Hold down 1 key in standby mode.
2. You can check the following submenus.
• Home
You can listen to voice mails by selecting Home.
• Roaming
Accessing the Menu
Even when you are in abroad, you can listen to voice mails if
roaming service is supported. Please consult your O2 Welcome
pack for details on how to use voicemail whilst abroad.
34
Page 36

Info service [Menu 1-6]
(Dependent to network and subscription)
Info service messages are text messages delivered by the network
to GSM. They provide general information such as weather reports,
traffic news, taxis, pharmacies, and stock prices. Each type of
information has the number; therefore, you can contact service
provider as long as you have input the certain number for the
information. When you have received an info service message, you
can see the popup message to show you that you have received a
message or the info service message is directly displayed. To view
the message again or not in standby mode, follow the sequence
shown below;
Note
• This service is not available on O2 Pay & Go.
Read [Menu 1-6-1]
1. When you have received an info service message and select
Read to view the message,it will be displayed on the screen. You
can read another message by scrolling L , R or < [Next].
2. The message will be shown until another message is reached.
Receive [Menu 1-6-2]
• Yes
If you select this menu, your phone will receive Info service
messages.
Accessing the Menu
• No
If you select this menu, your phone will not receive Info service
messages any more.
35
Page 37

Messages [Menu 1]
Alert [Menu 1-6-3]
• Yes
Your phone will beep when you have received Info service
message numbers.
• No
Your phone will not beep even though you have received info
service messages.
Languages [Menu 1-6-4]
You can select the language you want by pressing [On/Off]. Then,
the info service message will be shown in the language that you
selected.
Topics [Menu 1-6-5]
(Dependent to network and subscription)
• Add new
You can add Info service message numbers in the Phone memory
with its nickname.
• View list
You can see Info service message numbers which you added. If
you press < [Options], you can edit and delete info message
Accessing the Menu
category which you added.
• Active list
You can select Info service message numbers in the active list.
If you activate an info service number, you can receive messages
sent from the number.
36
Page 38

Templates [Menu 1-7]
Text [Menu 1-7-1]
You have 11 text templates. You can change the predefined
templates into your favorite ones or fill the <empty>s.
Multimedia [Menu 1-7-2]
You can use the following options.
Edit : You can edit multimedia templates.
Add new : Allows you to add new multimedia templates.
Write message
Delete : You can delete multimedia templates.
: You can write multimedia messages using
multimedia templates.
Business card [Menu1-7-3]
You can make your business card. Key in Name, Phone number,
Fax number and Email.
Settings [Menu 1-8]
Short message [Menu 1-8-1]
• Message types
Text, Voice, Fax, Natl. paging, X.400, E-mail, ERMES
Usually, the type of message is set to Text. You can convert your
text into alternative formats. Contact your service provider for the
availability of this function.
Accessing the Menu
• Validity period
This network service allows you to set how long your text
messages will be stored at the message centre.
37
Page 39

Messages [Menu 1]
• Delivery report
If you set to Yes, you can check whether your message is sent
successfully.
• Reply via same service centre
When a message is sent, it allows the recipients to reply and
charge the cost of the reply to your telephone bill.
• SMS centre
If you want to send the text message, you can receive the address
of SMS centre through this menu.
Multimedia message [Menu 1-8-2]
• Validity period
This network service allows you to set how long your text
messages will be stored at the message centre.
• Delivery report
If it is set to Yes in this menu, you can check whether your
message is sent successfully.
• Auto download
If you select On, you receive multimedia messages automatically.
If you select Off, you receive only notification message in the
Accessing the Menu
inbox and then you can check this notification.
• Network settings
If you select multimedia message server, you can set URL for
multimedia message server.
Note
• Your settings on your O2 Pay & Go mobile should
already be set up for you. If not, call O2 customer
services using hot key 9 or dial 08705 678 678.
38
Page 40

- Homepage
This menu allows to connect MMS sentre (MMSC).
- Bearer
• Data
• GPRS
- Data settings
Appeares only if you select Data settings as a Bearer\service.
IP address
Dial number : Enter the telephone number to dial to access
your WAP gateway.
User ID
Password
Call type : Select the type of data call, Analogue or Digital
(ISDN).
Call speed : The speed of your data connection 9600 or
14400.
- GPRS settings
The service settings are only available when GPRS is chosen as
a bearer service.
IP address
APN : Insert APN (Access Point Name) of GPRS.
User ID
Password
- Connection type
The options for connection type are Temporary or Continuous.
Accessing the Menu
- Secure settings
Depending on the chosen gateway port, you can select this
option On or Off.
39
Page 41

Messages [Menu 1]
• Permitted message types
Personal : Persornal message.
Advertisements
Information : Necessary information.
Memory status [Menu 1-8-3]
You can check free space and memory usage of each repository,
SIM memory. You can go to each repository menu.
Accessing the Menu
: Commercial message.
40
Page 42

Call register [Menu 2]
Missed calls [Menu 2-1]
This menu shows recently missed numbers. You can call these
numbers, save and view the date and the time.
Received calls [Menu 2-2]
This menu shows recently received numbers. You can call these
numbers, save and view the date and the time.
Dialled calls [Menu 2-3]
This menu shows recently dialed numbers. You can call these
numbers, save and view the date and the time.
All calls [Menu 2-4]
You can save the phone number and check the date, time for a call.
Moreover, you can call back to another party.
Delete recent calls [Menu 2-5]
You can delete recent calls of Missed calls, Received calls,
Dialled calls or All calls.
Call charges [Menu 2-6]
Within these submenus, you can view the duration and the call cost
of your calls.
Call duration [Menu 2-6-1]
This function allows you to view the duration of your Last Call, All
Calls, Received calls and Dialled calls in hours, minutes and
seconds. You can also reset the call timers.
1. Press < [Menu] in standby mode.
2. Press 2 for direct access or use L and R to enter Call
register, then select Call charges.
Accessing the Menu
41
Page 43

Call register [Menu 2]
3. Scroll to highlight Call duration and Press < [Select].
The following 5 submenus: Last call, All calls, Received calls,
Dialled calls and Reset all.
Call costs [Menu 2-6-2]
This function allows you to check the cost of your last call, all calls,
remaining and reset the cost. To reset the cost, you need the PIN2
code.
1. Press < [Menu] in standby mode.
2. Press 2 for direct access or use L and R to enter Call
register, then select Call charges.
3. Scroll to highlight Call costs and Press < [Select].
The following 4 submenus: Last call, All calls, Remaining and
Note
• This service is not available on O2 Pay & Go.
Settings [Menu 2-6-3] (SIM Dependent)
• Set tariff
Accessing the Menu
You can set the currency type and the unit price. Contact your
service providers to obtain charging unit prices. To select the
currency or unit in this menu, you need the PIN2 code.
If you want to input @, £, $ symbol, clear all currency strings and
then press * key. If you want to change symbol, press * key
again.
Reset all.
42
Note
• When all units have been used, no calls can be made
except emergency calls. Depending on the SIM card,
you need the PIN2 code to set a call cost limit.
Page 44

• Set credit
This network service allows you to limit the cost of your calls by
selected charging units. If you select Read, the number of
remaining unit is shown. If you select Change, you can change
your charge limit.
• Auto display
This network service allows you to see automatically the cost of
your last calls. If set to On, you can see the last cost when the call
is released.
GPRS information [Menu 2-7]
You can check the amount of data transferred over the network
through GPRS. In addition, you can view how much time you are
online.
Call duration [Menu 2-7-1]
You can check the duration of Last call and All calls. You can also
reset the call timers.
Data volumes [Menu 2-7-2]
You can check the Sent, Received or All data volumes and Reset
all.
Accessing the Menu
43
Page 45

Profiles [Menu 3]
In this menu, you can adjust and customize the phone tones for
different events and environments.
1. Press < [Menu] in standby mode.
2. Press 3 for direct access or use L and R.
3. You can also enter this menu directly by pressing L key in
standby mode.
Vibrate only [Menu 3-1]
You can adjust the profile as Vibrate only if you need vibration
mode. In the mode, all kinds of alert are Vibrate or Silent.
Quiet [Menu 3-2]
You can adjust the profile as Quiet if you are in quiet place.
General [Menu 3-3]
You can adjust the profile as General.
Loud [Menu 3-4]
You can adjust the profile as Loud if you are in a noisy
environment.
Accessing the Menu
Headset [Menu 3-5]
You can adjust the profile as Headset when you put on a headset.
Car [Menu 3-6]
You can adjust the profile as Car when you activate Handsfree kit.
44
Page 46

Note
• Headset and Car profiles can be activated only when
Handsfree kit or Ear microphone put on the handset.
However, their properties can be personalised.
Activate [Menu 3-x-1]
Activates the selected Profile.
Personalise [Menu 3-x-2]
Each has the submenus as shown below except for Vibrate only.
Call alert type
Allows to select alert type such as Ring, Vibrate, etc. for the
incoming for adjusting environment.
Ring tone
Allows to set the ring tone for adjusting environment.
Ring volume
Allows to set the ring volume for adjusting environment. The volume
of Power on / off sound and all the alert sounds set according to
Ring volume.
Message alert type
Allows to alert when receiving a message for adjusting environment.
Accessing the Menu
Message tone
Allows to select the alert tone for message reception.
Keypad volume
Allows to set the keypad volume for adjusting environment.
45
Page 47

Profiles [Menu 3]
Keypad tone
Allows to select the keypad tone for adjusting environment.
Auto answer
This function will be activated only when your phone is connected to
the headset or handsfree kit.
• Off : The phone will not answer automatically.
• After 5 secs : After 5 seconds, the phone will answer
• After 10 secs : After 10 seconds, the phone will answer
Note
Accessing the Menu
automatically.
automatically.
• If you set the Handsfree kit to the phone, you can’t
use the vibrate mode related with Call alert type or
Message alert menu. In car menu, the following
submenus are available;
- Call alert type : Ring, Silent
- Message alert type : Ring once, Ring periodically,
Silent
46
Page 48

Settings [Menu 4]
You can set the following menus for your convenience and
preferences.
1. Press < [Menu] in standby mode.
2. Press 4 for direct access to enter Settings.
Alarm clock [Menu 4-1]
You can set up to 5 alarm clocks to go off at a specified time.
1. Select On and enter the alarm time you want.
2. Select the repeat period : Once, Mon~Fri, Mon~Sat, Everyday.
3. Select the alarm tone you want and press < [OK].
4. Edit the alarm name and press < [OK].
5. If you set Alarm clock to Power off alarm the alarm goes off at
a specified time even though the phone is switched off.
Date & Time [Menu 4-2]
You can set functions relating to the date and time.
Set date [Menu 4-2-1]
You can enter the current date.
Date format [Menu 4-2-2]
You can set the Date format such as DD/MM/YYYY, MM/DD/YYYY,
YYYY/MM/DD. (D: Day / M: Month / Y: Year)
Set time [Menu 4-2-3]
You can enter the current time.
Time format [Menu 4-2-4]
Your can set the time format between 24-hour and 12-hour.
Accessing the Menu
47
Page 49

Settings [Menu 4]
Phone settings [Menu 4-3]
You can set functions relating to the phone.
Display settings [Menu 4-3-1]
• Wallpaper
You can select the background pictures in standby mode.
- Default
You can select a picture or an animation of wallpaper by
pressing L or R.
- My folder
You can select a picture or an animation as wallpaper.
• Incoming calls
You can set the animation as getting a call.
• Outgoing calls
You can set the animation as making a call.
• Greeting note
If you select On, you can edit the text which is displayed in
standby mode.
Accessing the Menu
• Backlight
You can set the light-up duration of the Inernal display.
• LCD contrast
You can set the brightness of LCD by pressing L , R.
• Information window
You can preview the current state of the selected menu before
open the menu. The state is shown at bottom of the display.
48
Page 50

• Menu colour
You can select the preferred menu colour among various
combination.
Sub-LCD colour [Menu 4-3-2]
• Standby
You can select the colour of sub LCD Backlight in standby mode.
• Incoming calls
You can select the colour of sub LCD Backlight when receiving a
call from callers whose number has not been categorised as a
specified group.
Language [Menu 4-3-3]
You can change the language for the display texts in your phone.
This change will also affect the Language Input mode.
Call settings [Menu 4-4]
You can set the menu relevant to a call by pressing < [Select] in
the Setting menu.
Call divert [Menu 4-4-1]
The Call divert service allows you to divert incoming voice calls, fax
calls, and data calls to another number. For details, contact your
service provider.
Note
• You can only divert your calls to 901 on your O2 Pay &
Go mobile.
Accessing the Menu
49
Page 51

Settings [Menu 4]
• All voice calls
Diverts voice calls unconditionally.
• If busy
Diverts voice calls when the phone is in use.
• If no reply
Diverts voice calls which you do not answer.
• If out of reach
Diverts voice calls when the phone is switched off or out of
coverage.
• All data calls
Diverts to a number with a PC connection unconditionally.
• All fax calls
Diverts to a number with a fax connection unconditionally.
• Cancel all
Cancels all call divert service.
The submenus
Call divert menus have the submenus shown below.
Accessing the Menu
- Activate
Activate the corresponding service.
To voice mail centre
Forwards to message centre. This function is not shown at All data
calls and All fax calls menus.
To other number
Inputs the number for diverting.
To favourite number
You can check recent 5 diverted numbers.
50
Page 52

- Cancel
Deactivate the corresponding service.
- View status
View the status of the corresponding service.
Answer mode [Menu 4-4-2]
• Flip open
If you select this menu, you can receive an incoming call by only
opening the flip.
• Press any key
If you select this menu, you can receive a call by pressing any key
except E [End] key.
• Send only
If you select this menu, you can receive a call by only pressing
S [Send] key.
Send my number [Menu 4-4-3]
(network and subscription dependent)
• On
You can send your phone number to another party. Your phone
number will be shown on the receiver’s phone.
• Off
Your phone number will not be shown.
Accessing the Menu
• Set by network
If you select this, you can send your phone number depending on
two line service such as line 1 or line 2.
51
Page 53

Settings [Menu 4]
Call waiting [Menu 4-4-4]
(network dependent)
• Activate
If you select Activate, you can accept a waiting (receiving) call.
• Cancel
If you select Cancel, you cannot recognize the waiting (receiving)
call.
• View status
Shows the status of Call waiting.
Note
• This service is not available on O2 Pay & Go.
Minute minder [Menu 4-4-5]
If you select On, you can check the call duration by deep sound
every minute during a call.
Voice dial [Menu 4-4-6]
• Automatic : You can enter the voice dial mode whenever you
Accessing the Menu
• Manual : You can enter the voice dial mode by holding down
open the flip.
* key.
Auto redial [Menu 4-4-7]
• On
When this function is activated, the phone will automatically try to
redial in the case of failure to connect a call.
52
Page 54

• Off
Your phone will not make any attempts to redial when the original
call has not connected.
Select line [Menu 4-4-8]
This function is only used if Two Line Service is supported by the
Service Provider. If this function is supported by your service
provider, the following menu will be displayed.
• Line 1
• Line 2
Closed User Group [Menu 4-4-9]
(network dependent)
Restricts usage of the phone with numbers that belong to certain
user groups. When this function is used, every outgoing call is
associated with a group index. If a group index is specified, it is
used for all outgoing calls. If no group index is specified, the
network will use the preferential index (a specific index that is stored
in the network).
A. Default : Activate the default group agreed on with the network
B. Set : Setting the selected CUG Index.
C. Edit : Editing the CUG name and CUG Index.
D. Delete : Deleting the selected CUG.
E.
Delete all
operator.
: Deleting All CUG.
Accessing the Menu
53
Page 55

Settings [Menu 4]
Security settings [Menu 4-5]
PIN code request [Menu 4-5-1]
In this menu, you can set the phone to ask for the PIN code of your
SIM card when the phone is switched on. If this function is
activated, you’ll be requested to enter the PIN code.
1. Select PIN code request in the security settings menu, and then
press < [Select].
2. Set On/Off.
3. If you want to change the setting, you need to enter PIN code
when you switch on the phone.
4. If you enter wrong PIN code more than 3 times, the phone will
lock out. If the PIN is blocked, you will need to key in PUK code.
5. You can enter your PUK code up to 10 times. If you put wrong
PUK code more than 10 times, you can not unlock your phone.
You will need to contact your service provider.
Phone lock [Menu 4-5-2]
You can use security code to avoid unauthorized use of the phone.
Whenever you switch on the phone, the phone will request security
code if you set phone lock to “On”. If you set phone lock to
“Automatic”, your phone will request security code only when you
change your SIM card.
Accessing the Menu
Call barring [Menu 4-5-3]
The Call barring service prevents your phone from making or
receiving certain category of calls. This function requires the call
barring password. You can view the following submenus.
Note
• This service is not available on O2 Pay & Go.
54
Page 56

• All outgoing
The barring service for all outgoing calls.
• Outgoing international
The barring service for all outgoing international calls.
• Outgoing international except home country
The barring service for all international outgoing calls except home
network.
• All incoming
The barring service for all incoming calls
• Incoming when abroad
The barring service for all incoming calls when roaming
• Cancel all
You can cancel all barring services.
• Change password
You can change the password for Call Barring Service.
Each all barring menu has following submenus:
• Activate
Allows to request the network to set call restriction on.
• Cancel
Set the selected call restriction off.
Accessing the Menu
• View status
Check if the calls are barred or not.
55
Page 57

Settings [Menu 4]
Fixed Dial Number [Menu 4-5-4] (SIM dependent)
You can restrict your outgoing calls to selected phone numbers. The
numbers are protected by your PIN2 code.
• Activate
You can restrict your outgoing calls to selected phone numbers.
• Cancel
You can deactivate fixed dialling function.
• Number list
You can view the number list saved as Fixed dial number.
Change codes [Menu 4-5-5]
PIN is an abbreviation of Personal Identification Number used to
prevent use by only unauthorized person.
You can change the access codes: PIN code, PIN2 code, Security
code.
1. If you want to change the Security code/PIN/PIN2 code input
your original code, and then press < [OK].
2. Input new Security code/PIN/PIN2 code and verify them.
Network settings [Menu 4-6]
Accessing the Menu
You can select a network which will be registered either
automatically or manually. Usually, the network selection is set to
Automatic.
56
Page 58

Note
• Only available whilst roaming with your O2 Pay & Go
mobile.
Automatic [Menu 4-6-1]
If you select Automatic mode, the phone will automatically search
for and select a network for you. Once you have selected
Automatic, the phone will be set to “Automatic” even though the
power is off and on.
Manual [Menu 4-6-2]
The phone will find the list of available networks and show you
them. Then you can select the network which you want to use if this
network has a roaming agreement with your home network
operator. The phone let you select another network if the phone fails
to access the selected network. If you switch off the phone, the
phone will be reset to Automatic.
Preferred [Menu 4-6-3]
You can set a list of preferred networks and the phone attempts to
register with first, before attempting to register to any other
networks. This list is set from the phone’s predefined list of known
networks.
Reset settings [Menu 4-7]
You can initialize all factory defaults. You need Security code to
activate this function.
Accessing the Menu
57
Page 59

Organiser [Menu 5]
Scheduler [Menu 5-1]
When you enter this menu a Calendar will show up. On top of the
screen there are sections for date. Also on bottom of the screen
there are sections for icons (schedule, memo). Whenever you
change the date, the calendar will be updated according to the date.
And square cursor will be used to locate the certain day. If you see
under bar on the calendar, it means that there is a schedule or
memo that day. This function helps to remind you of your schedule
and memo. The phone will sound an alarm tone if you set this for
the note.
For changing the day, month, and year.
Key Description
13
*#
Yearly
Monthly
Key Description
U D
LR
Weekly
Daily
Add new [Menu 5-1-1]
You can edit maximum 39 characters (21 characters in Chinese)
and take up to 20 notes.
• Schedule
Accessing the Menu
Input the subject, the schedule time, the repeat, the alarm by
pressing allowed keys.
• Memo
1. Select Add new by pressing < [Select].
2. Press Memo.
3. Input the memo and then press < [OK].
58
Page 60

View [Menu 5-1-2]
Shows the note for the chosen day. Use
through the note lists. If you set alarm for the note, Alarm watch is
displayed. At that time, if you press < [Select], you can see the
note in detail. Press < [Options] to delete, edit the note you
selected.
U , D
to browse
View all [Menu 5-1-3]
Shows the notes that are set for all days. Use
through the note lists. You can use the same menu as View by
pressing < [Options].
U , D
to browse
Delete past [Menu 5-1-4]
You can delete the past schedule that has been already notified
you.
Delete all [Menu 5-1-5]
You can delete for the all note(s).
Phonebook [Menu 5-2]
1. To use Phonebook, press > [Names] in standby mode.
2. To use Phonebook, press < [Menu] in standby mode and
select Organiser.
Accessing the Menu
59
Page 61

Organiser [Menu 5]
Search [Menu 5-2-1]
(Calling from phonebook)
1. In standby mode, press > [Names].
2. Search by pressing < [Select].
3. Enter the name whose phone numbers or e-mail address you
want to search or Select ‘List’ to view phonebook.
4. Instant searching is available by inputting the initial letter of the
name or number you want to search.
5. If you want to edit, delete, copy an entry, or to add the voice to
one, select < [Options]. The following menu will be displayed.
• Edit : You can edit the name, number, E-mail and fax
•
Write message
• Copy : You can copy an entry from SIM to phone or
• Voice : You can add the voice to the entry or change
• Main number : You can select the one out of mobile, home,
• Delete : You can delete an entry.
Accessing the Menu
Add new [Menu 5-2-2]
You can add phonebook entry by using this function.
Phone memory capacity is 200 entries. SIM card memory capacity
depends on the cellular service provider.
You can also save 20 characters of name in The Phone memory,
and save characters in the SIM card. The number of character is
SIM dependent feature.
by pressing < [OK].
: After you have found the number you want, you
can send a message to the selected number.
from phone to SIM.
the voice tag.
office that you often use. The main number will
be displayed first, if you set this.
60
Page 62

1. Open the phonebook first by pressing > [Names] in standby
mode.
2. Scroll to highlight Add new, and press < [Select].
3. Select the memory you want to save: SIM or Phone. If set to
Phone, you need to select which number you want as Main
number.
a. Press < [OK] to input a name.
b. Press < [OK], then you can input a number.
c. Press < [OK].
You can set a group for the entry by pressing
d.
L , R
:
e. You can set a character for the entry by pressing L , R. The
chosen character will be shown on display when receiving call
from the selected name.
f. If you want to add the voice, press < [Yes].
You should speak words within 2 seconds, and the phone asks you
to speak it again to ensure the accuracy of voice recognition. After
voice recognition has finished, Voice is attached successfully.
Note
• The voice can only be attached to the main number
which you set. For example, if you change the main
number, voice will be automatically attached to the
changed number. This means that you cannot attach
voice to mobile, office, home number simultaneously.
• You can add voice tag to phone number in SIM card.
The voice tag can be erased if you remove or change
SIM card.
Accessing the Menu
61
Page 63

Organiser [Menu 5]
Caller Groups [Menu 5-2-3]
You can list up to 20 members per one group. There are 7 groups
you can make lists to.
1. In standby mode, press > [Names].
2. Scroll to Caller groups item then press <[Select], and every
Group list will be displayed.
3. Select Group name you want by pressing <[Select].
• Member list
Shows the group members you have selected.
• Group ring tone
Allows you to specify ring tone for the group members’ call.
• Group icon
Allows you to select the icon dependent on Group.
• Sub-LCD colour
You can set Sub-LCD colour dependent on Group, and change
in 7 colors.
• Add member
You can add group members. Each group member souldn’t be
exceeded 20.
Accessing the Menu
• Remove member
You can remove the member from the Group member list. But
the name and the number still remain in phonebook.
• Rename
You can change a group name.
62
Page 64

Speed dials [Menu 5-2-4]
You can assign any of the keys, 2 to 9 with a Name list entry.
You can call directly by pressing this key for 2-3 seconds.
Note
• Your O2 Pay & Go mobile has been preset for you with
some useful services using this function – see O2
welcome pack for more details.
1. Open the phonebook first by pressing > [Names] in standby
mode.
2. Scroll to Speed dial, then press < [Select].
3. If you want to add Speed dial, select <Empty>. Then, you can
search the name in phonebook.
4. Select allocated a name by speed dial, and choose Change or
Delete to edit the name.
• Change
You can allocate a new phone number to the dial key.
• Delete
You can remove the allocated phone number from the dial key.
Voice list [Menu 5-2-5]
You can see all phone numbers which contain voice. After selecting
phone number by using Uand
can see the following submenus.
• Play : You can play voice which is attached to phone number.
• Change : You can change voice.
• Delete : You can delete voice.
• Call : You can call by selecting this menu.
D
and press < [Options], you
Accessing the Menu
63
Page 65

Organiser [Menu 5]
Settings [Menu 5-2-6]
1. Press > [Names] in standby mode.
2. Scroll to Settings, then press < [Select].
• Set memory
Scroll to highlight Set memory, then press < [Select].
- If you select Variable, when adding entry, the phone will ask
where to store.
- If you select SIM or Phone, the phone will store an entry to
SIM or phone.
• Search by
Scroll to highlight Search by, then press < [Select].
- If you select Variable, the phone will ask how to search.
- If you select Name or Number, the phone will search an
entry by Name or Number.
Copy all [Menu 5-2-7]
You can copy/move entries from SIM card memory to Phone
memory and vice versa.
1. Open the Phonebook first by pressing > [Names] in standby
mode.
2. Scroll to Copy all, then press < [Select] to enter this menu.
Accessing the Menu
• SIM to Phone : You can copy the entry from SIM Card to
• Phone to SIM : You can copy the entry from Phone memory
3. You can see the following submenus.
• Keep original : When copying, Original Dial Number is kept.
• Erase original : When copying, Original Dial Number will be
Phone memory.
to SIM Card.
erased.
64
Page 66

Delete all [Menu 5-2-8]
You can delete all entries in SIM, Phone, and Voice. This function
requires Security code except for voice.
1.
Press> [Names] in standby mode and select Delete all, press
<[Select]
2. Then select a memory to erase.
3. Enter security code and Press < [OK] or > [Back].
.
Information [Menu 5-2-9]
• Service dial Number
Use this function to access a particular list of services provided by
your network operator (if supported by the SIM card).
1. Open the phonebook first by pressing > [Names] in standby
mode and select Information.
2. Scroll to Service dial number, then press < [Select] to enter.
3. The names of the available services will be shown.
4. Use
U
and
D
to select a service. Press S [Send].
• Memory status
This feature allows you to see how many free and in-use are in
your phonebook.
1. Open the phonebook first by pressing > [Names] in standby
mode. Select Information by pressing < [Select].
2. Scroll to Memory status, then press < [OK].
• Own number list (SIM dependent)
You can check your own number in SIM card.
Accessing the Menu
65
Page 67

Fun & Tools [Menu 6]
Games [Menu 6-1]
The phone offers you the games to play with.
Note
• The control keys are different depending on a game.
However, each one has an introduction to explain the
main control keys. The rest ones are as follows.
[Common Key Function]
<
: Game menu
>
: Back
C
: Pause or resume a game
My folder [Menu 6-2]
Enables you to view the downloaded pictures and sounds. They can
be set as Wallpaper or Ring tone. You can view, listen, delete or
rename downloaded data.
Pictures [Menu 6-2-1]
Sound [Menu 6-2-2]
The Submenus for each main one
Accessing the Menu
• Edit title
You can edit the title for each download contents.
• Write message
You can write Short message/Multimedia message(available
depending on type of Media) with attachment pictures or sounds.
• Set as Wallpaper/Set as ring tone
You can set downloaded sounds or pictures as wallpaper or Ring
tone.
66
Page 68

• Delete
You can delete each downloaded content.
• Delete all
You can delete all downloaded contents.
Melody composer [Menu 6-3]
You can compose a ring tone melody which you want. When you
enter this function, the tones that you composed before are played.
To enter a new or edit an existing tone:
1. Enter the desired notes. (1 ~ 7 : CDEFGAB)
2. To adjust the characters of the note, do as follows:
- Duration : 8 shortens and 9 lengthens the duration of
the note or rest.
- Rest : 0 inserts a rest of the same duration as the
previous note.
- Octave : * sets the octave for new notes.
- Sharp note : # makes the note sharp.
Accessing the Menu
67
Page 69

Fun & Tools [Menu 6]
Calculator [Menu 6-4]
This contains the standard functions such as +, –, *, ÷ : Addition,
Subtraction, Multiplication, and Division.
1. Input the numbers by pressing numeric keys.
2. Use a navigation key to select a sign for calculation.
3. Then input the numbers.
4. Press < [Result] to view the result.
5. Press [Reset] or enter numbers to repeat the procedure above.
6. Use C key to erase any numbers or signs.
7. If you press * key, you can input a minus number. In addition,
If you press # key, you can input a decimal number.
8. To end Calculator, press > [Back].
Unit converter [Menu 6-5]
This converts any measurement into a unit you want. There are 4
types that can be converted into units: Length, Area, Weight, and
Volume.
1. You can select one of four unit types by pressing < [Unit] key.
2. Select the standard value by using L , R.
3. Select the unit you want to convert by pressing Uand D.
Accessing the Menu
4. You can check the converted value for the unit you want. Also,
you can input a decimal number by pressing #.
World time [Menu 6-6]
You can view clocks of the world’s major cities.
1. Select the city belonged to the time zone by pressing L , R
key.
2. You can set the current time to the city time you select by
pressing < [Set].
68
Page 70

Voice recorder [Menu 6-7]
The voice memo feature you to record up to 10 voice messages and
each memo is up to 20 Seconds.
Record [Menu 6-7-1]
1. You can record voice memo in Voice recorder menu and also
holding down [External EZ key] in the standby mode.
2. Once recording is started, the message Recording and the
remaining time is displayed.
3. If you want to finish recording, press < [Save].
4. Key in Voice memo title, press < [OK].
View list [Menu 6-7-2]
The phone shows voice memo list. You can Playback and Delete
the recorded voice memo.
Infrared [Menu 6-8]
If you activate this function, you can use PC-Sync by infrared. You
can’t use serial port and infrared function at the same time.
PC Sync
PC Sync is a program for data exchange between PC and the
phone by data cable. For more information, you can use the
guide of PC Sync Help file in CD.
Accessing the Menu
69
Page 71

Internet [Menu 7]
The phone supports services based on Wireless Application
Protocol (WAP). You can access services supported by your
network. The services menu allows you to get the information such
as news, weather reports, and flight times.
Home [Menu 7-1]
Connect to a homepage. The homepage may be the site which is
defined in the activated profile. It will be defined by Service Provider
if you don’t make in activated profile.
Bookmarks [Menu 7-2]
Press < [Select] to access available options, or press > [Back] to
exit.
• Connect : Connect to the selected bookmark.
• Add new : Add a new bookmark manually.
• Edit : Edit the title and the address of the selected bookmark.
• Delete : Delete the selected bookmark from the bookmark list.
Push messages [Menu 7-3]
Inbox [Menu 7-3-1]
You can read or delete push messages.
•
Information
Accessing the Menu
• Load : You can connect to a specific site using the
• Delete : Delete the selected push message.
: Show the information of received push messages.
information in the received push message.
Receive [Menu 7-3-2]
You can set the option whether you will receive the message or not.
Profiles [Menu 7-4]
You can make up to 10 profiles and activate only one out of them.
Scroll to the desired profile and press < to access available
options.
70
Page 72

• Activate
You can activate the profile you want.
• Settings
You can edit and change WAP settings of the selected profile.
Your settings on your O2 Pay & Go mobile should already be set
up for you. If not, call O2 customer services using hot key 9 or dial
08705 678 678.
- Homepage
This setting allows you to enter the address (URL) of a site you
want to use as homepage. You do not need to type “http://” at the
front of each URL as the WAP Browser will automatically add it.
- Bearer
You can set the bearer data service.
• Data
• GPRS
- Data settings
Appeares only if you select Data settings as a Bearer\service.
IP address : Enter the IP address of the WAP gateway you
want.
Dial number : Enter the telephone number to dial to access
your WAP gateway.
User ID : The users identity for your dial-up server (and
NOT the WAP gateway).
Password : The password required by your dial-up server
(and NOT the WAP gateway) to identify you.
Call type : Select the type of data call: Analogue or Digital
(ISDN).
Call speed : The speed of your data connection; 9600 or
14400.
Linger time : You need to enter timeout period.After entering
that, the WAP navigation service will be
unavailable if any data is not input or transfered.
Accessing the Menu
71
Page 73

Internet [Menu 7]
- GPRS settings
The service settings are only available when GPRS is chosen as
a bearer service.
IP address : Input the IP address of the WAP gateway you
APN : Input the APN of the GPRS.
User ID : The users identify for your APN server.
Password : The password required by your APN server.
- Display image
You can select whether images on WAP cards are displayed or
not.
- Connection type
The options for connection type are Temporary or Continuous
and depend on the gateway you are using.
Continuous
A confirmed delivery mechanism but generates more network
traffic.
Temporary
A non-confirmed (connectionless) service.
- Secure settings
Accessing the Menu
According to the used gateway port, you can choose this option
as On or Off.
access.
• Rename
Edit the Profile Name.
• Delete
Delete the Profile.
• Add new
You can add a new profile manually.
72
Page 74

• Email server
- Connect
Connect to the E-mail server that you configured.
- Edit address
Edit the E-mail address.
Goto URL [Menu 7-5]
You can directly connect to the site you want. You need to enter a
specific URL.
Cache settings [Menu 7-6]
You can remove the contents of Cache memory or change the
Cache mode.
Clear cache [Menu 7-6-1]
The contents of Cache memory will be removed.
Check cache [Menu 7-6-2]
You can set the option whether you will check the cache memory or
not.
Security certification [Menu 7-7]
A list of the available certificates is shown.
Reset profiles [Menu 7-8]
You can reset profiles to return to original settings.
Accessing the Menu
Browser version [Menu 7-9]
The WAP Browser version is displayed.
73
Page 75

On browsing menu
If you are on line, you can view the following menus.
Home
■
Refer to [Menu 7-1].
■ Reload
Reloads the current page.
■ Bookmarks
See [Menu 7-2].
■ Save as bookmark
You can save a site as bookmark.
■ Messages
During Wap connection, you can see the Short messages.
Push messages
■
See [Menu 7-3].
■
Goto URL
You can move to the site you want. In this menu, you can also
edit the site address.
Accessing the Menu
■
Goto email server
You can move to the E-mail server that you configured.
■ Set as email server
You can set the address of current site as E-mail server.
■ Clear cache
The contents of cache memory will be removed.
■ Save Images
You can save the image which is provided by the WAP.
74
Page 76

Java [Menu 8]
(i) (application 1)
(i) (application 2)
(i) (application 3)
(i) (application 4)
...
Applications
Options
1. Open
2. Delete
3. Update
4. Information
5. Phone settings
(application name)
Select
Applications [Menu 8-1]
Java Menu Options
Scroll to an application and select Options.
1. Open : Launches the selected MIDlet.
2. Delete : Deletes the selected MIDlet.
3. Update : Accesses the server and updates the selected
MIDlet.
4. Information : Displays information about the selected
MIDlet.
5. Phone settings : Allows you to set backlight and sound for java
game.
Download [Menu 8-2]
See [Menu 7-2]. You can edit and set MIDlet server address.
Download MIDlets using WAP Browser and store them in the
phone. You can also view the list of MIDlets stored on the
Applicatons screen.
Accessing the Menu
Memory status [Menu 8-3]
Shows the size of memory available for game and application
installations. You can also see the whole memory status of
Handset.
JAVA™ is a trademark of Sun Microsystems, Inc.
75
Page 77

Accessories
There are various accessories for your mobile phone. You can
select these options according to your personal communication
requirements.
Standard Battery
Portable Handsfree
This connects to your phone, allowing
handsfree operation.
Travel Adapter
This charger allows you to charge the
battery while away from home or your
office.
Neckstrap
CD/Data cable
You can connect your phone to PC to
exchange the data between them.
76
Note
• Accessories may be different in different regions;
please check with our regional service company or
agent for further enquires.
Page 78

Care and Maintenance
When using this unit, basic safety precautions as below should
be always followed.
• Do not disassemble this unit. (Take it to a qualified service
technician when repair work is required.)
• Away from electrical appliance such as a TV, radio or personal
computer.
• The unit should be situated from heat sources such as radiators
or cookers.
• Do not drop.
• Do not subject this unit to mechanical vibration or shock.
• The coating of the phone may be damaged if covered with wrap
or vinyl wrapper.
• Use dry cloth to clean the exterior of the unit. (Do not use solvent
such as benzene, thinner or alcohol.)
• Do not subject this unit to excessive smoke or dust.
• Do not keep the phone next to credit cards or transport tickets; it
can affect the information on the magnetic strips.
• Do not tap the screen with a sharp object; otherwise, it may
damage the phone.
• Do not expose the phone to liquid or moisture.
• Use the accessories like an earphone cautiously. Do not touch
the antenna unnecessarily.
77
Page 79

Care and Maintenance
❏ Caring for the Battery
• You do not need to completely discharge the battery before
recharging. Unlike other battery systems, there is no memory
effect that could compromise the battery’s performance.
• Use only LG batteries and chargers. LG chargers are designed
to maximize the battery life.
• Do not disassemble or short-circuit the battery pack.
• Keep the metal contacts of the battery pack clean.
• Replace the battery when it no longer provides acceptable
performance. The battery pack may be recharged hundreds of
times until it needs replacing.
• Recharge the battery if it has not been used for a long time to
maximize usability.
• Do not expose the battery charger to direct sunlight or use it in
high humidity, such as the bathroom.
• Do not leave the battery in hot or cold places, this may
deteriorate the battery performance.
78
Page 80

General
Product name : G5400
System : GSM 900 / DCS 1800
Ambient Temperatures
Max : +55°C
Min : -10°C
Technical Data
79
Page 81

80
 Loading...