


GPRS Phone
USER’S MANUAL
MODEL: G5300S
Please read this manual carefully
before operating your set.
Retain it for future reference.
ENGLISH

ENGLISH
3
G5300S Phone

For Your Safety
ENGLISH
4
Important Information
This user guide contains important information on the use and
operation of this phone. Please read all the information carefully
for optimal performance and to prevent any damage to, or misuse
of, the phone. Any changes or modifications not expressly
approved in this user guide could void your warranty for this
equipment.
Before You Start
Safety Instructions
WARNING! To reduce the possibility of electric shock, do not
expose your phone to high humidity areas, such as the bathroom,
swimming pool, etc.
Always store your phone away from heat. Never store your
phone in settings that may expose it to temperatures less than 32
°F or greater than 104 °F, such as outside during a snowstorm or
in your car on a hot day. Exposure to excessive cold or heat will
result in malfunction, damage and/or catastrophic failure.
Be careful when using your phone near other electronic
devices. RF emissions from your mobile phone may affect nearby
inadequately shielded electronic equipment. You should consult
with manufacturers of any personal medical devices such as
pacemakers and hearing aides to determine if they are susceptible
to interference from your mobile phone. Turn off your phone in a
medical facility or at a gas station. Never place your phone in a
microwave oven as this will cause the battery to explode.
IMPORTANT! Please read the TIA SAFETY INFORMATION on
page 96 before using your phone.

Safety Information
Please read and observe the following information for the safe and
proper use of your phone and to prevent any unanticipated damage.
Also, keep the user’s manual in an accessible place at all the times
after reading it.
• Unplug the power cord and charger during a lightning storm to
avoid electric shock or fire.
• Do not use your phone in high explosive areas as the phone may
generate sparks.
• Do not put your phone in a place subject to excessive dust, and
keep the minimum required distance between the power cord and
heat sources.
• Unplug the power cord prior to cleaning your phone, and clean the
power plug pin when it is dirty.
• Do not damage the power cord by bending, twisting, pulling, or
subjecting it to heat. Do not use the plug if it is loose as it may
cause fire or electric shock.
• Hold the power cord plug firmly to plug and unplug the power cord.
Ensure the plug is firmly connected. If it is not firmly connected, it
may cause excessive heat or fire.
• Do not place a heavy item on the power cord. Do not allow the
power cord to be crimped as it may cause fire or electric shock.
• Be careful not to let the battery contact metal conductors such as a
necklace or coins. When shorted, it may cause an explosion.
• Do not disassemble or impact the battery as it may cause electric
shock, short-circuit, and fire. Store the battery in a place out of
reach of children.
ENGLISH
5

• Using a damaged battery or placing a battery in your mouth may
cause serious injury.
• Do not place items containing magnetic components such as a
credit card, phone card, bank book or a subway ticket, near your
phone. The magnetic strip can be damaged by the phone.
• Do not hold or let the antenna come in contact with your body
during a call.
• Talking on your phone for a long period of time may reduce the call
quality due to heat generated during the use of the phone.
• Do not allow excessive vibration or impact to the phone.
• When you do not plan to use the phone for a long period of time,
store it in a safe area with the power cord unplugged.
FCC RF Exposure Information
WARNING! Read this information before operating the phone. In
August 1996, the Federal Communications (FCC) of the United
States, with its action in Report and Order FCC 96-326, adopted an
updated safety standard for human exposure to radio frequency (RF)
electromagnetic energy emitted by FCC regulated transmitters.
Those guidelines are consistent with the safety standard previously
set by both U.S. and international standards bodies.
The design of this phone complies with the FCC guidelines and
these international standards.
CAUTION
Use only the supplied and approved antenna. Use of unauthorized
antennas or modifications could impair call quality, damage the
phone, void your warranty and/or result in violation of FCC
regulations. Do not use the phone with a damaged antenna. If a
damaged antenna comes into contact with skin, a minor burn may
result. Contact your local dealer for a replacement of antenna.
ENGLISH
6
For Your Safety

ENGLISH
7
Body-worn Operation
This device was tested for typical body-worn operations with the
back of the phone kept 1.5 cm from the body. To comply with FCC
RF exposure requirements, a minimum separation distance
of 1.5 cm must be maintained between the user’s body and
the back of the phone. Third-party belt-clips, holsters, and
similar accessories containing metallic components should not be
used. Body-worn accessories that cannot maintain 1.5 cm
separation distance between the user’s body and the back of the
phone, and have not been tested for typical body-worn operations
may not comply with FCC RF exposure limits and should be avoided.
Vehicle Mounted External Antenna (optional, if available)
A minimum separation distance of 8 inches (20 cm) must be
maintained between the user/bystander and the vehicle mounted
external antenna to satisfy FCC RF exposure requirements. For
more information about RF exposure, visit the FCC website at
www.fcc.gov
FCC Part 15 Class B Compliance
This device and its accessories comply with part 15 of FCC rules.
Operation is subject to the following two conditions: (1) This device
and its accessories may not cause harmful interference, and (2) this
device and its accessories must accept any interference received,
including interference that may cause undesired operation.
Cautions for Battery
• Do not disassemble.
• Do not short-circuit.
• Do not expose to high temperature: 60°C (140°F).
• Do not incinerate.

Battery Disposal
• Please dispose of your battery properly or bring to your local
wireless carrier for recycling.
• Do not dispose in fire or with hazardous or flammable materials.
Adapter (Charger) Cautions
• Using the wrong battery charger could damage your phone and
void your warranty.
• The adapter or battery charger is intended for indoor use only.
Do not expose the adapter or battery charger to direct sunlight or use
it in places with high humidity, such as the bathroom.
ENGLISH
8
For Your Safety

ENGLISH
9
Overview
Part of the Phone
................................................................
13
• Front of the Phone
.............................................................
13
• Rear of the Phone
..............................................................
14
Key Description
...................................................................
15
• Alphanumeric Keys
............................................................
17
Display Information
Display Information
.............................................................
18
• On-Screen Icons
................................................................
18
Getting Started
Installation
...........................................................................
20
• Inserting the SIM Card
.......................................................
20
• Installing the Battery
..........................................................
21
• Charging the Battery
..........................................................
22
• Disconnecting the charger
.................................................
23
Powering On Sequence
......................................................
24
• To get started with the phone
............................................
24
• To turn off the phone
..........................................................
24
Access Codes
......................................................................
25
• PIN code (4 to 8 digits)
......................................................
25
• PIN2 code (4 to 8 digits)
....................................................
25
• PUK code (4 to 8 digits)
.....................................................
25
• PUK2 code (4 to 8 digits)
...................................................
26
• Security code (4 to 8 digits)
...............................................
26
Contents

ENGLISH
10
Accessing the Menu
Phonebook
...........................................................................
27
Menu Tree
............................................................................
28
Messages [Menu 1]
.............................................................
30
• Write short message [Menu 1-1]
........................................
30
• Write multimedia message [Menu 1-2]
..............................
32
• Inbox [Menu 1-3]
................................................................
38
• Outbox [Menu 1-4]
.............................................................
40
• Voice mail [Menu 1-5]
........................................................
41
• Info service [Menu 1-6]
......................................................
42
• Templates [Menu 1-7]
........................................................
43
• Settings [Menu 1-8]
............................................................
44
Call Register [Menu 2]
........................................................
47
• Missed calls [Menu 2-1]
.....................................................
47
• Received calls [Menu 2-2]
..................................................
47
• Dialled calls [Menu 2-3]
......................................................
47
• All calls list [Menu 2-4]
.......................................................
47
• Delete recent calls [Menu 2-5]
...........................................
47
• Call charge [Menu 2-6]
.......................................................
49
• GPRS information [Menu 2-7]
............................................
50
Profiles [Menu 3]
.................................................................
51
• Vibrate only [Menu 3-1]
......................................................
51
• Quiet [Menu 3-2]
................................................................
51
• General [Menu 3-3]
............................................................
51
• Loud [Menu 3-4]
.................................................................
51
• Headset [Menu 3-5]
...........................................................
51
• Car [Menu 3-6]
...................................................................
52

ENGLISH
11
Settings [Menu 4]
................................................................
54
• Alarm clock [Menu 4-1]
......................................................
54
• Date & Time [Menu 4-2]
.....................................................
54
• Phone settings [Menu 4-3]
.................................................
55
• Call settings [Menu 4-4]
.....................................................
57
• Security settings [Menu 4-5]
..............................................
61
• Network settings [Menu 4-6]
..............................................
64
• Reset settings [Menu 4-7]
..................................................
65
Organizer [Menu 5]
..............................................................
66
• Scheduler [Menu 5-1]
.........................................................
66
• Phone book [Menu 5-2]
......................................................
67
Fun & Tools [Menu 6]
..........................................................
76
• Calculator [Menu 6-1]
.........................................................
76
• My folder [Menu 6-2]
..........................................................
76
• Game [Menu 6-3]
...............................................................
77
• Unit converter [Menu 6-4]
..................................................
78
• World time [Menu 6-5]
........................................................
78
WAP services [Menu 7]
.......................................................
79
• Home [Menu 7-1]
...............................................................
79
• Bookmarks [Menu 7-2]
.......................................................
79
• Push messages [menu 7-3]
...............................................
79
• Profiles [Menu 7-4]
.............................................................
80
• Go to URL [Menu 7-5]
........................................................
82
• Cache settings [Menu 7-6]
.................................................
83
• Security certifications [Menu 7-7]
.......................................
83
• Reset profiles [Menu 7-8]
...................................................
83

ENGLISH
12
Java [Menu 8]
......................................................................
84
• Applications [Menu 8-1]
.....................................................
84
• Memory status [Menu 8-2]
.................................................
85
• Download [Menu 8-3]
.........................................................
85
Internet On-line menu
.........................................................
86
Additional Functions
How to Use Data and Fax call
............................................
87
• Sending Data or Fax Calls
.................................................
87
• Receiving Data or Fax Calls
..............................................
87
In call Menu
..........................................................................
89
1. During a call
.....................................................................
89
2. Multiparty or Conference Calls
.........................................
91
Accessories
.........................................................................
94
Safety Guidelines
.................................................................
96
Technical Data
...................................................................
111
ENGLISH
13
Front of the Phone
1 Earpiece
2 Display Screen
3 Soft Left Key
4 Navigation Keys
5 Send Key
6 Star Key
7 Soft Right Key
8 END/PWR keys
9 Numeric Keys
10 Hash Key
11 Microphone
12 Ear Microphone
Connector
13 WAP Hotkey/
Clear key
Part of the Phone
Overview
ENGLISH
14
Rear of the Phone
1 Battery
2 Cable Connector/
Battery Charging Connector/
Hands-Free Car kit Connector
3 Battery Terminals
4 SIM Card Socket
5 Handstrap Hole
6 Battery Lock
7 Ear Microphone Connector
6
5
7
4
3
2
1
Part of the Phone
Overview
ENGLISH
15
Key Description
Overview
The following shows key components of the phone.
Keypad Description
Key Description
< >
Soft Left Key / Soft Right Key
Each of these keys performs the function indicated
by the text on the display immediately above it.
WAP Hotkey / Clear key
Used to connect to WAP directly by pressing this key.
Used to delete character(s).
Navigation Keys
Used to scroll through name, phone numbers, menus
or setting options.
Used to enter Message menu directly.
Used to scroll through names, phone numbers.
Send Key
S
You can dial a phone number and answer a call.
If you press this key without entering a number,
your phone shows the most recently dialed number.
Numeric Keys
0
These keys are used mainly to dial in standby mode
and enter numbers or characters in editing mode.
When you press these keys for a long time.
9
• Used to call your voicemail box by 1 .
• Used to call for international call by 0 .
• Used to call Speed dials by from 2 to 9.
~

ENGLISH
16
Key Description
Overview
Key Description
*
Used to enter the vibration mode by pressing this key
for a long time.
#
Used to call by voice dial with long pressing this key.
This key is also used as Ear mic. hook key when
connecting Ear mic.
END/PWR Key
E
Used to end or reject a call. This key is also used as
Power Key. Pressing and holding this key for a few
seconds.
ENGLISH
17
Alphanumeric Keys
The alphabet and numerical keypad mapping relation are listed as
the following table.
Key Description
1
. , / ? ! - : ’ "
2 A B C 2 Ä À Á Â Ã Å Æ Ç a b c ä à á â ã å ç
3
D E F 3 Ë È É Ê d e f ë è é ê
4 G H I 4 Ï Ì Í Î ˝ g h i ï ì í î ©
5 J K L 5 j k l
6 M N O 6 Ñ Ö Ò Ó Ô Õ Œ m n o ñ ö ò ó ô õ œ
7 P Q R S 7 Í p q r s ß ß
8 T U V 8 Ü Ù Ú Û t u v ü ù ú û
9 W X Y Z 9 w x y z
0 0 [Space Key]
Overview

ENGLISH
18
Display Information
Display Information
The screen displays several icons the following describe each of
them you may see on the phone.
On-Screen Icons
Icon/Indicator
Description
Tells you the strength of the network signal.
Call is connected.
You can use GPRS service.
Shows that you are using a roaming service.
Line 1/2 is in use for outgoing calls – If you
subscribe to the Two Line Service.
The alarm has been set and is on.
Tells you the status of the battery.
You have received a text message.
You have received a voice message.
You have received an E-mail.
You can view your schedule.
All audible signals are turned off.
General menu in profile.
Loud menu in profile.
Quiet menu in profile.
ENGLISH
19
Icon Description
Messages
Call Register
Profiles
Settings
Organizer
Fun & Tools
Wap services
Java
Top Menu Icons
Icon/Indicator
Description
Headset menu in profile.
Car menu in profile.
You can divert a call.
You can use Push message service through WAP.
Display Information
ENGLISH
20
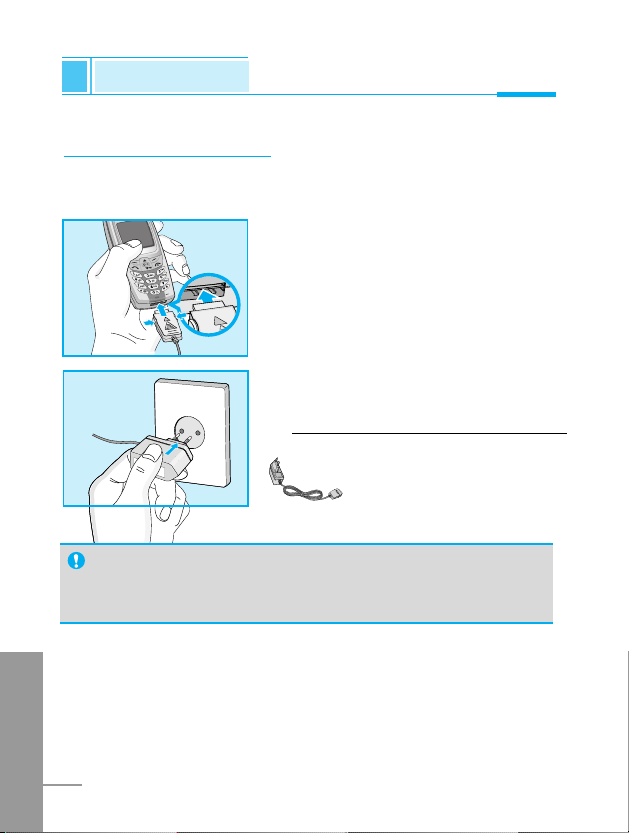
Installation
Getting Started
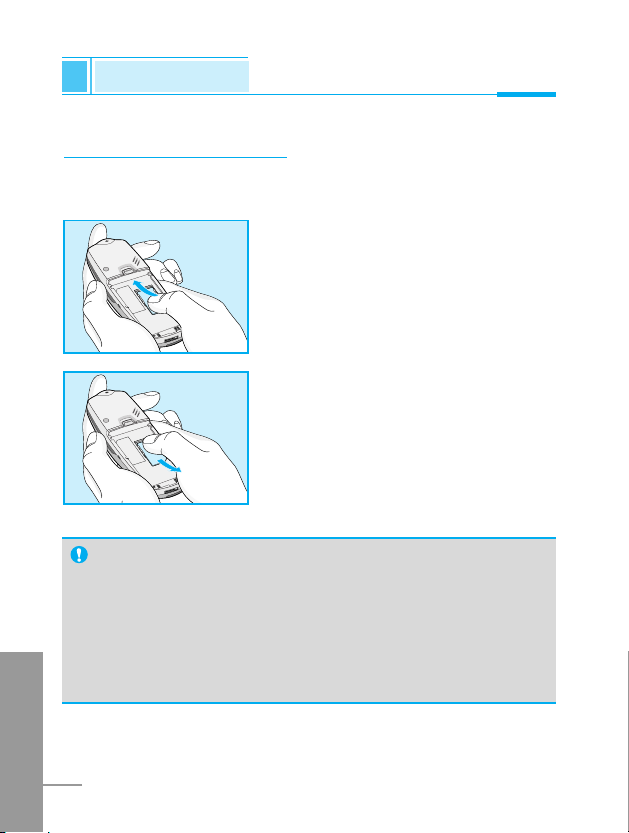
Inserting the SIM Card
Locate the SIM card socket in the back of the phone.
Follow the steps below to install the SIM card.
1. Remove the battery if attached.
2. Slide the SIM card into the slot,
under the silvery holders, with the
golden connectors facing down and
the cut corner to the right.
3. If you need to remove the SIM card,
press the upper part of SIM card with
the thumb, then carefully slide it out
of the SIM card slot.
Notice
• Before installing always make sure that the phone is
switched off and remove the battery.
• The metal contact of the SIM card can be easily damaged
by scratches. Pay special attention to the SIM card when
you handle and install. Follow the instructions supplied with
the SIM card.
➊
ENGLISH
21
Getting Started
➋
1. Place the battery on the back of the
phone.
2. Push it until you hear a click.
Installing the Battery
ENGLISH
22
Installation
Getting Started
Charging the Battery
To connect the travel adapter to the phone, you must have installed
the battery.
1. Insert one end of the travel adapter
into the bottom of the phone.
➌
2. Connect the other end of the travel
adapter to an AC wall outlet.
Use only the included packing charger.
Warning
• Do not force the connector as this may damage the phone
and/or the travel adapter.
ENGLISH
23
Getting Started
Disconnecting the charger
Disconnect the travel adapter from the
phone by pressing its side buttons.
➍
Notice
• The battery delivered with your phone has to be fully
charged before using it.
• Do not remove your battery or the SIM card while charging.
• “Charging” is displayed on the screen after connecting the
travel adapter. Only if the battery is totally empty, Back light
is on without displaying “Charging”. Please note in this
case, it may require a longer initial charging time before
displaying “Charging” on the screen of the phone.
The charging time depends on the charger and the battery
used.
• The moving bars of battery icon will stop after charging
completely.
ENGLISH
24
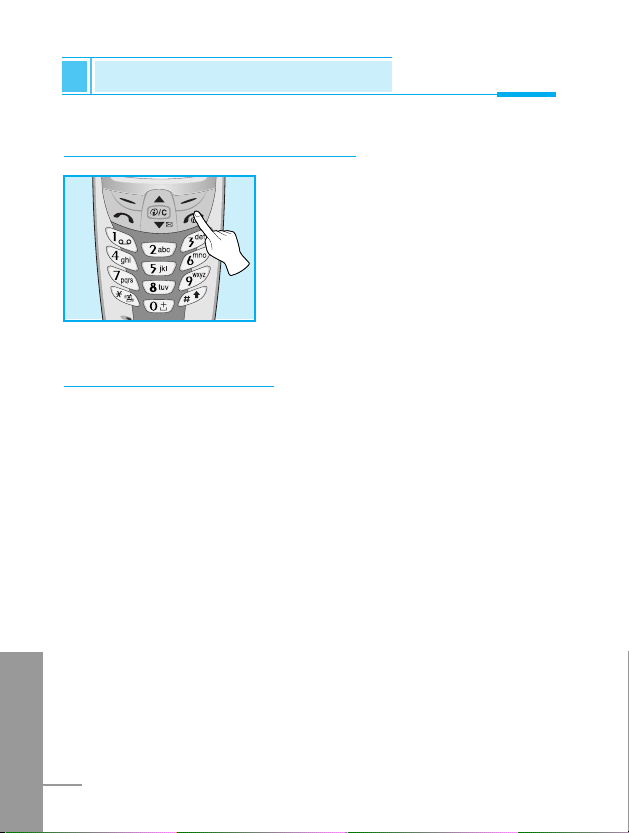
Powering On Sequence
Getting Started
To get started with the phone
1. Press and hold E key until you
hear a tone.
2. Depending on setting PIN code
request, you can enter PIN code or
not.
3. If your phone connects to a
network, the network name will be
displayed shortly.
To turn off the phone
In standby mode, press and hold E key until you hear a tone.
➊
➋

ENGLISH
25
You can use the access codes described in this section to avoid
unauthorised use of your phone. The access codes (except PUK1
and PUK2 codes) can be changed by using [Menu 4-5-6].
PIN code (4 to 8 digits)
The PIN (Personal Identification Number) code protects your SIM
card against unauthorised use. The PIN code is usually supplied with
the SIM card. When PIN code request is set Enable, your phone
will request the PIN code every time it is switched on. On the
contrary, when PIN code request is set Disable, your phone
connects to the network directly without the request PIN code.
PIN2 code (4 to 8 digits)
The PIN2 code, supplied with some SIM cards, is required to access
some functions such as Advice of call charge, Fixed Dial number.
These functions are only available if supported by your SIM card.
PUK code (4 to 8 digits)
The PUK(PIN Unblocking Key) code is required to change a blocked
PIN code. The PUK code may be supplied with the SIM card. If not,
contact your local service provider for the code. If you lose the code,
also contact your service provider.
Access Codes
Getting Started

ENGLISH
26
PUK2 code (4 to 8 digits)
The PUK2 code, supplied with some SIM cards, is required to
change a blocked PIN2 code. If you lose the code, also contact your
service provider.
Security code (4 to 8 digits)
The security code protects the unauthorised use of your phone. It is
usually supplied with the phone. This code is required to delete all
phone entries and to activate “Reset settings” menu. The default
number is “0000”.
Access Codes
Getting Started
ENGLISH
27
To select a menu in phonebook, press
[Names] in standby mode and then
scroll to a desired item.
Phonebook
Accessing the Menu
Name Description
1 Search Allows you to search for a specific name,
number.
2 Add new Allows you to add new names and numbers.
3 Speed dials Allows you to assign up to 8 ( 2 - 9 )
one-touch dial allocations.
4 Voice list Allows you to list phone numbers which is
attached voice.
5 Caller groups Allows you to show group list.
6 Copy all Allows you to copy entries from your Phone
memory to SIM card or from SIM card to
Phone memory.
7 Delete all Allows you to erase all the data in either your
phonebook or the SIM card to the phone
memory.
8 Settings Allows you to set the memory and to search
item by Variable, name and number.
9 Information Allows you to check the status of memory,
SDN (Service Dial Number), and Own
number list.
Name Description
ENGLISH
28
Menu Tree
Accessing the Menu
1 Messages
1 Write short message
2 Write multimedia message
3 Inbox
4 Outbox
5 Voice mail
6 Info service
7 Templates
8 Settings
2 Call Register
1 Missed calls
2 Received calls
3 Dialled calls
4 All calls list
5 Delete recent calls
6 Call charge
7 GPRS information
3 Profiles
1 Vibrate only
2 Quiet
3 General
4 Loud
5 Headset
6 Car
4 Settings
1 Alarm clock
2 Date & Time
3 Phone settings
4 Call settings
5 Security settings
6 Network settings
7 Reset settings

ENGLISH
29
5 Organizer
1 Scheduler
2 Phone book
6 Fun & Tools
1 Calculator
2 My folder
3 Game
4 Unit converter
5 World time
7 WAP services
1 Home
2 Bookmarks
3 Push messages
4 Profiles
5 Go to URL
6 Cache settings
7 Security certifications
8 Reset profiles
8 Java
1 Applications
2 Memory status
3 Download
Accessing the Menu

ENGLISH
30
This menu includes functions related to SMS (Short Message
Service), MMS (Multimedia Message Service), voice mail, as well as
the network’s service messages.
Write short message [Menu 1-1]
You can write and edit text messages, checking the number of
characters.
1. Enter Messages then select Write short message.
2. To write a message, use T9 text. For details, see How to use T9
(Page 31).
3. Press [Insert] to attach the followings.
4. When you finish writing, press [Options].
Insert
• Symbol
You can add special characters.
• Picture
You can insert the Default pictures or pictures in My folder that
are available for short messages.
• Sound
You can insert sounds that are available for short messages.
• Text templates
You can use Text templates already set in the phone.
Messages [Menu 1]
Accessing the Menu
 Loading...