

LG Flat Panel Monitor User Manual

A1
Introduction
The Monitor has an active matrix TFT (Thin-Film Transistor) LCD (Liquid
Crystal Display).
This monitor is designed for use in small working areas or for those who need
more working space on the desk.
Features
The monitor is a 17-inch (17 inches viewable) intelligent micro-processor based
monitor.
USB (Universal Serial Bus) ports at the back of the monitor are prepared for the
USB cable and hub. You can easily and flexibly connect USB-designed devicessuch as a mouse, keyboard - to the monitor for true Plug and Play function.
The monitor has two signal connectors (D-sub and DVI) so that it can support
both an existing analog input (D-sub) and an advanced standard digital input
(DVI). Two computers can be simultaneously used while connected to this
monitor.
Digitally controlled auto-scanning is done with the micro-processor for horizontal
scan frequencies between 30 and 80kHz, and vertical scan frequencies
between 56 - 85Hz. The microprocessor-based intelligence allows the monitor
to operate in each frequency mode with the precision of a fixed frequency
monitor.
Plug and play capability if supported by your system.
This monitor has E- DDC function.*
Compliant with the following regulated specifications :*
-
EPA ENERGY STAR
-
Swedish TCO’99
*
For detailed information, please refer to the Reference Guide provided .
ENGLISH
A2
Connecting the Monitor
Note : If you see the INPUT SIGNAL OUT OF RANGE message, check to make sure
your system is set to one of the factory preset modes (see page A11), or is set to a
resolution and refresh rate within the specification limits of this monitor.
Power Cord
Signal Cable
DVI
There should be
a DVI port on
the computer
1
2
4
3
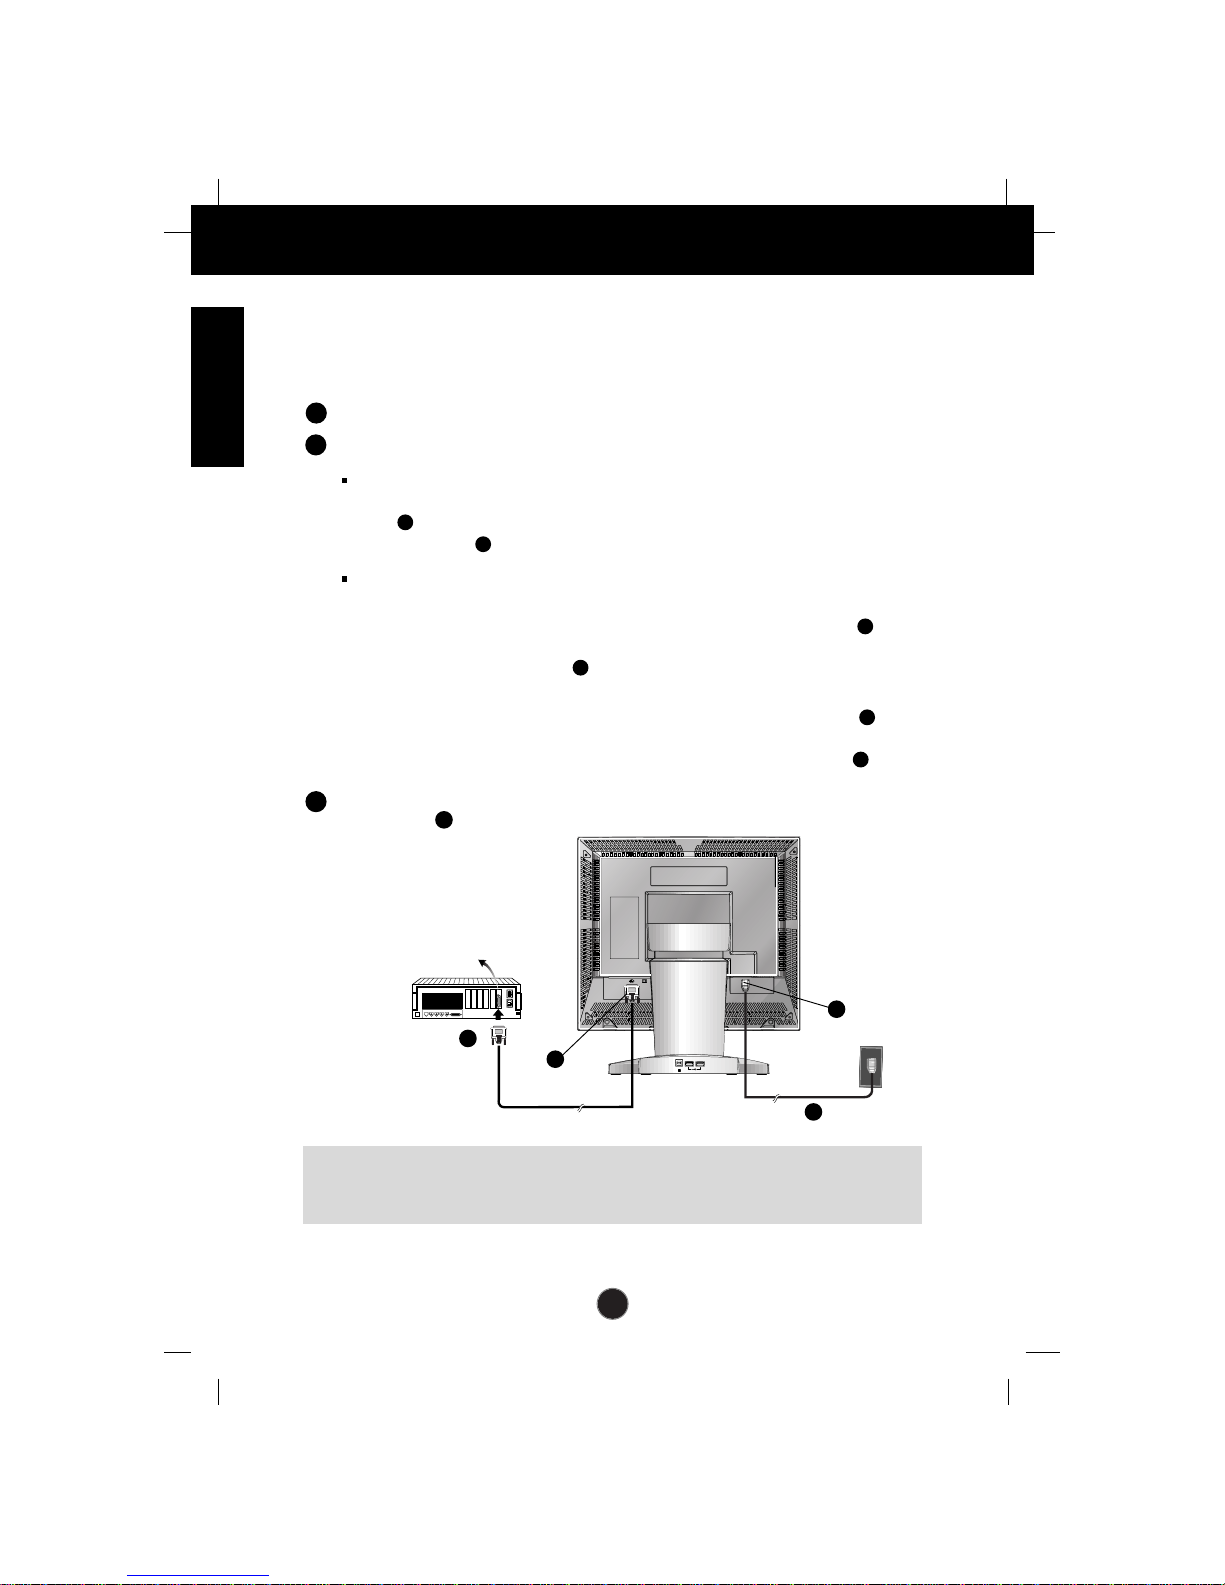
To set up the monitor, ensure that the power is turned off to the monitor, computer
system, and other attached devices, then follow these steps:
Place the monitor in a convenient, well-ventilated location near your computer.
Connect the signal cable.
When connecting the DVI signal cable .....Figure 1
Connect the end of monitor signal cable to the port on the rear panel of the monitor through
the slot. Connect the other end to the DVI port on the rear panel of the computer and
tighten the screws.
When connecting the Dsub signal cable
PC
..........
Figure 2
Connect one end of the monitor signal cable to either of the connectors on the rear
panel of the monitor. Connect the other end to the Dsub port on the rear panel of the
computer and tighten the screws.
MAC
..........
Figure 3
Connect one end of the monitor signal cable to either of the connectors on the rear
panel of the monitor. Connect the other end of the monitor signal cable to the rear panel of
Macintosh computer through a Macintosh adapter and then tighten screws.
One end of the power cord is connected into the power connetor on the back of
the monitor.
3
2
1
2
1
2
1
1
2
3
Figure 1

Power Cord
Dsub
Signal Cable
A3
Connecting the Monitor
Figure 3
Power Cord
Signal Cable
MAC Adapter
Dsub
NOTE : The figure3 shows the connection to an Apple Macintosh, using a separately
purchased adapter. For more information on adapter requirements, contact your authorized
dealer, reseller, or service provider.
2
4
3
1
Dsub to DVI Adapter for
supporting dual Dsub analog
signals (Optional)
Dsub
Figure 2
MAC6MAC6
2
4
3
1
Dsub to DVI Adapter for
supporting dual Dsub analog
signals (Optional)
Dsub
Connect one end to a properly grounded AC outlet that is easily accessible
and close to the monitor.
Power ON the PC, then the monitor.
If you see the NO SIGNAL message, check the signal cable and connectors.
After using the system, power OFF the monitor, then the PC.
4
4
5
6
7
Making use of USB (Universal Serial Bus) Feature
A4
12V
USB (Universal Serial Bus) is an innovation in connecting your different
desktop peripherals conveniently to your computer. By using the USB, you will
be able to connect your mouse, keyboard and other peripherals to your
monitor instead of having to connect them to your computer. This will give you
greater flexibility in setting up your system. USB allows you to connect chain up
to 120 devices on a single USB port, and you can “hot” plug (attach them while
the computer is running) or unplug them while maintaining Plug and Plug auto
detection and configuration. This monitor has an integrated BUS-powered
USB hub, allowing up to 2 other USB devices to be attached it.
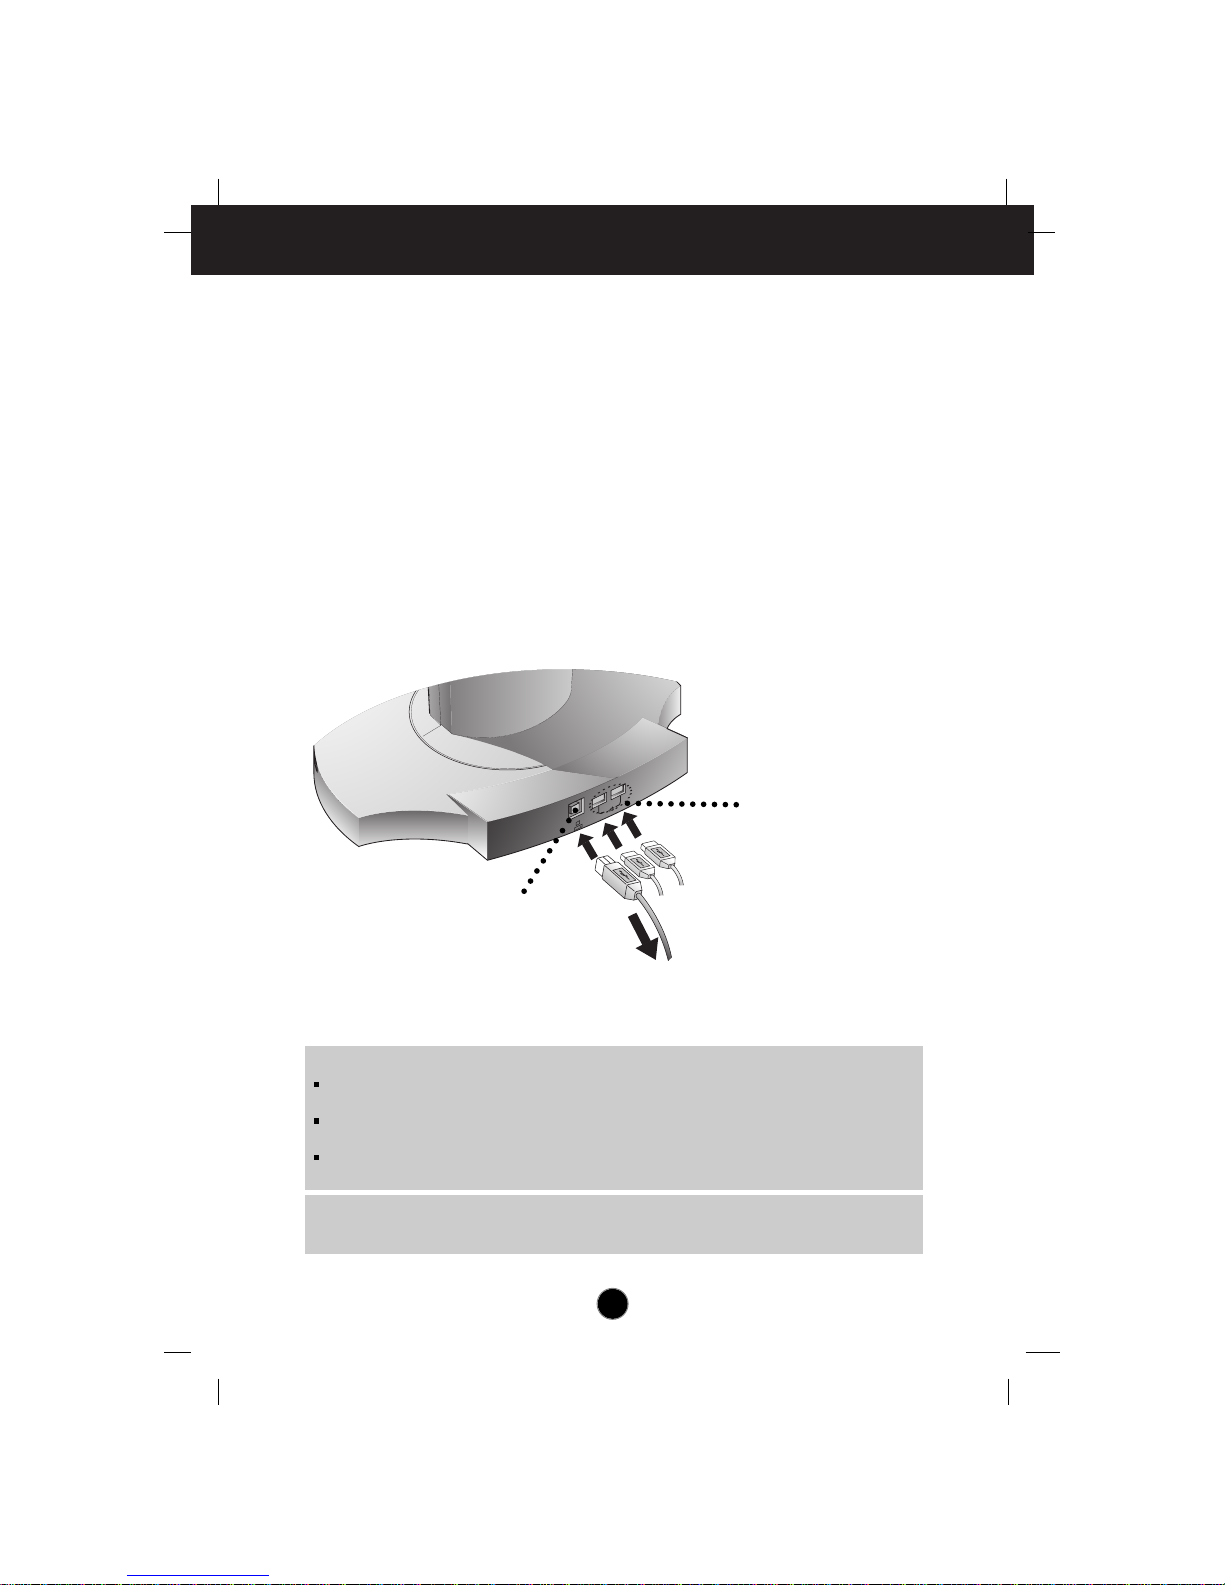
USB connection
1. Connect the upstream port of the monitor to the downstream port of the USB
compliant PC or another hub using the USB cable. (Computer must have a
USB port)
2. Connect the USB compliant peripherals to the downstream ports of the
monitor.
NOTE
To activate the USB hub function, the monitor must be connected to a USB compliant
PC(OS) or another hub with the USB cable(enclosed).
When connecting the USB cable, check that the shape of the connector at the cable side
matches the shape at the connecting side.
Even if the monitor is in a power saving mode, USB compliant devices will function when
they are connected the USB ports(both the upstream and downstream) of the monitor.
USB downstream Ports
Connect the cables from USB
compliant peripherals-such as
keyboard, mouse, etc
To USB downstream port
of the USB compliant PC
or another hub cable
Keyboard
Mouse
IMPORTANT: These USB connectors are not designed for use with high-power USB devices
such as video cameras, scanners, etc. LGE recommends connecting high-power USB devices
directly to the computer
USB upstream Poort
A5
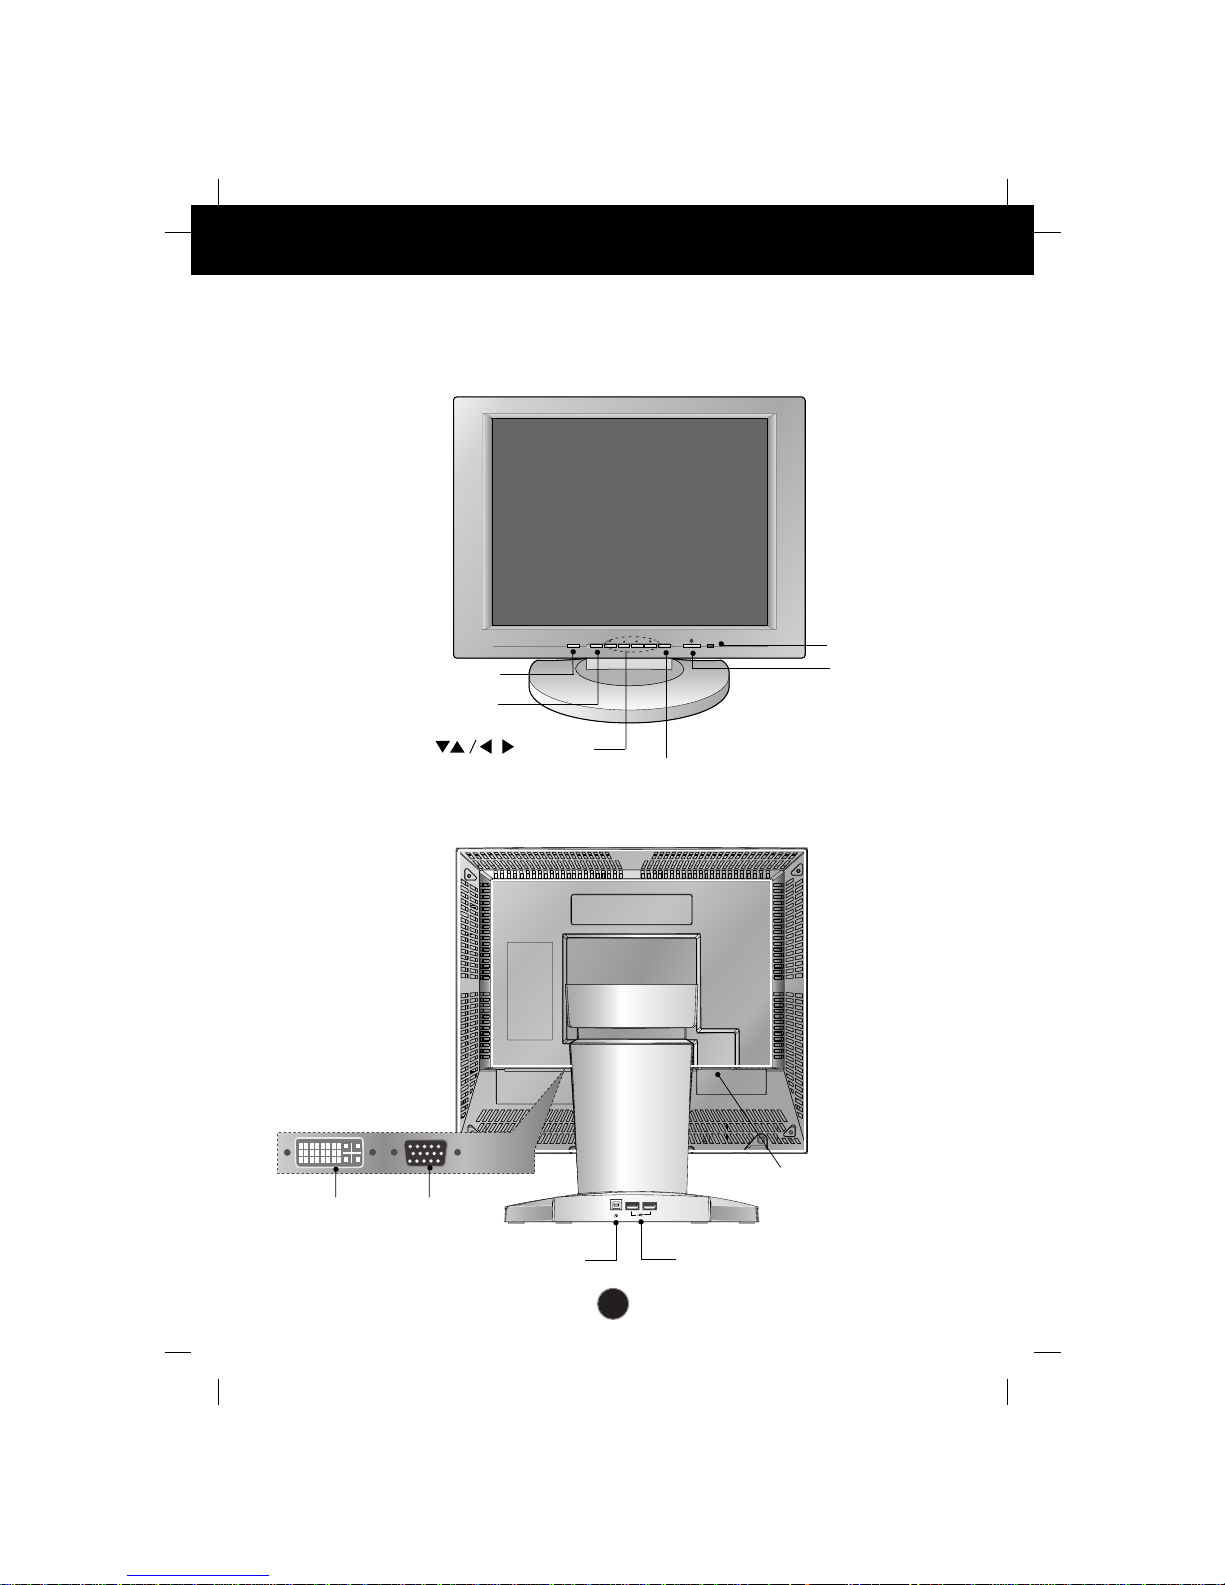
Location and Function of Controls
Rear View
Front View
MENU
SOURCE AUTO/SET
Power Button
Power Indicator
MENU Button
SOURCE Button
Buttons
AUTO/SET Button
DVI port
Dsub Signal port
Power Connector
USB upstream port
USB downstream ports
 Loading...