How it Works
Log In / Sign Up
Buy Points
How it Works
FAQ
Contact Us
Questions and Suggestions
Users
LG
Loading...
F
FH039NDS2
FH069FD2F
FH069FD2FS
FH069FD3FS
FH069FD3PS
FH069FD4F
FH069FD4FS
FH069FD4P
FH069FD7L
FH069FDF
2
FH069FDFS
FH069FDP
FH096ND
FH096ND3
2
FH096NDA
FH096NDA3
FH0A8TDN2
FH0 B8/96 Q D SERIES
FH0 B8/96 T D SERIES
FH0B8EDL21
FH0B8LD0
FH0B8LD6
2
FH0B8MD1
FH0B8MD5
FH0B8ND
FH0B8ND1
FH0B8ND6
FH0B8ND7
FH0B8NDA0
3
FH0B8NDL21
FH0B8NDP
FH0B8NDP2
FH0B8NDP5
FH0B8QD
FH0B8QD5
2
FH0B8QDA
FH0B8QDG2
2
FH0B8QDG5
FH0B8QDL25
FH0B8QDP
2
FH0B8QDP5
FH0B8QDT2
FH0B8TDA
FH0B8WD6
FH-0B8WD7
2
FH-0C3LD
5
FH0C3LDP
FH0C3LDP2
2
FH0C3ND
3
FH0C3ND1
2
FH0C3QD
2
FH0C3QDP
FH0C3QDP2
2
FH0C7FD3
FH0C7FD3S
FH0C7FD4
4
FH0C7FD7
FH0C8CDSK73
FH0C9CDHK7
2
FH0C9CDHK72
2
FH0D7DDMK02
FH0D7DDMK62
FH-0G6QD1
FH-0G6SD0
3
FH-0G6SD2
FH-0H3LD1
2
FH-0H3NDS1
2
FH-0H3QD0
2
FH-0H3SD1
2
FH-0M7NDS0
FH-0M7NDS6
FH/10G6/G7T/QD(N(W)(0~9)
FH/12G6/G7T/QD(N)(W)(0~9)
FH/14G6/G7T/QD(N)(W)(0~9)
FH-2A8HDN4
FH-2G6NDG2
FH-2G6TD4
2
FH-2G6WD2
2
FH-2G6WD4
2
FH-2G6WDS3
2
FH-2G6WDS7
3
FH-2H3HDS0
FH-2H3HDS1
FH-2H3MD0
2
FH-2H3MD1
3
FH-2H3ND0
2
FH-2H3ND1
2
FH-2H3QD5
FH-2H3SD2
2
FH-2H3TD0
2
FH-2H3TD5
FH-2H3WD2
2
FH-2H3WD4
2
FH-2H3WDS2
2
FH-2H3WDS4
2
FH-2H4WDS0
FH-495BDS6
2
FH-4A8TDS4
2
FH-8B8LD6
2
FH-X1
Loading...
Loading...
Nothing found
FH069FD7L
Owner’s Manual
92 pgs
6 Mb
0
Table of contents
Loading...
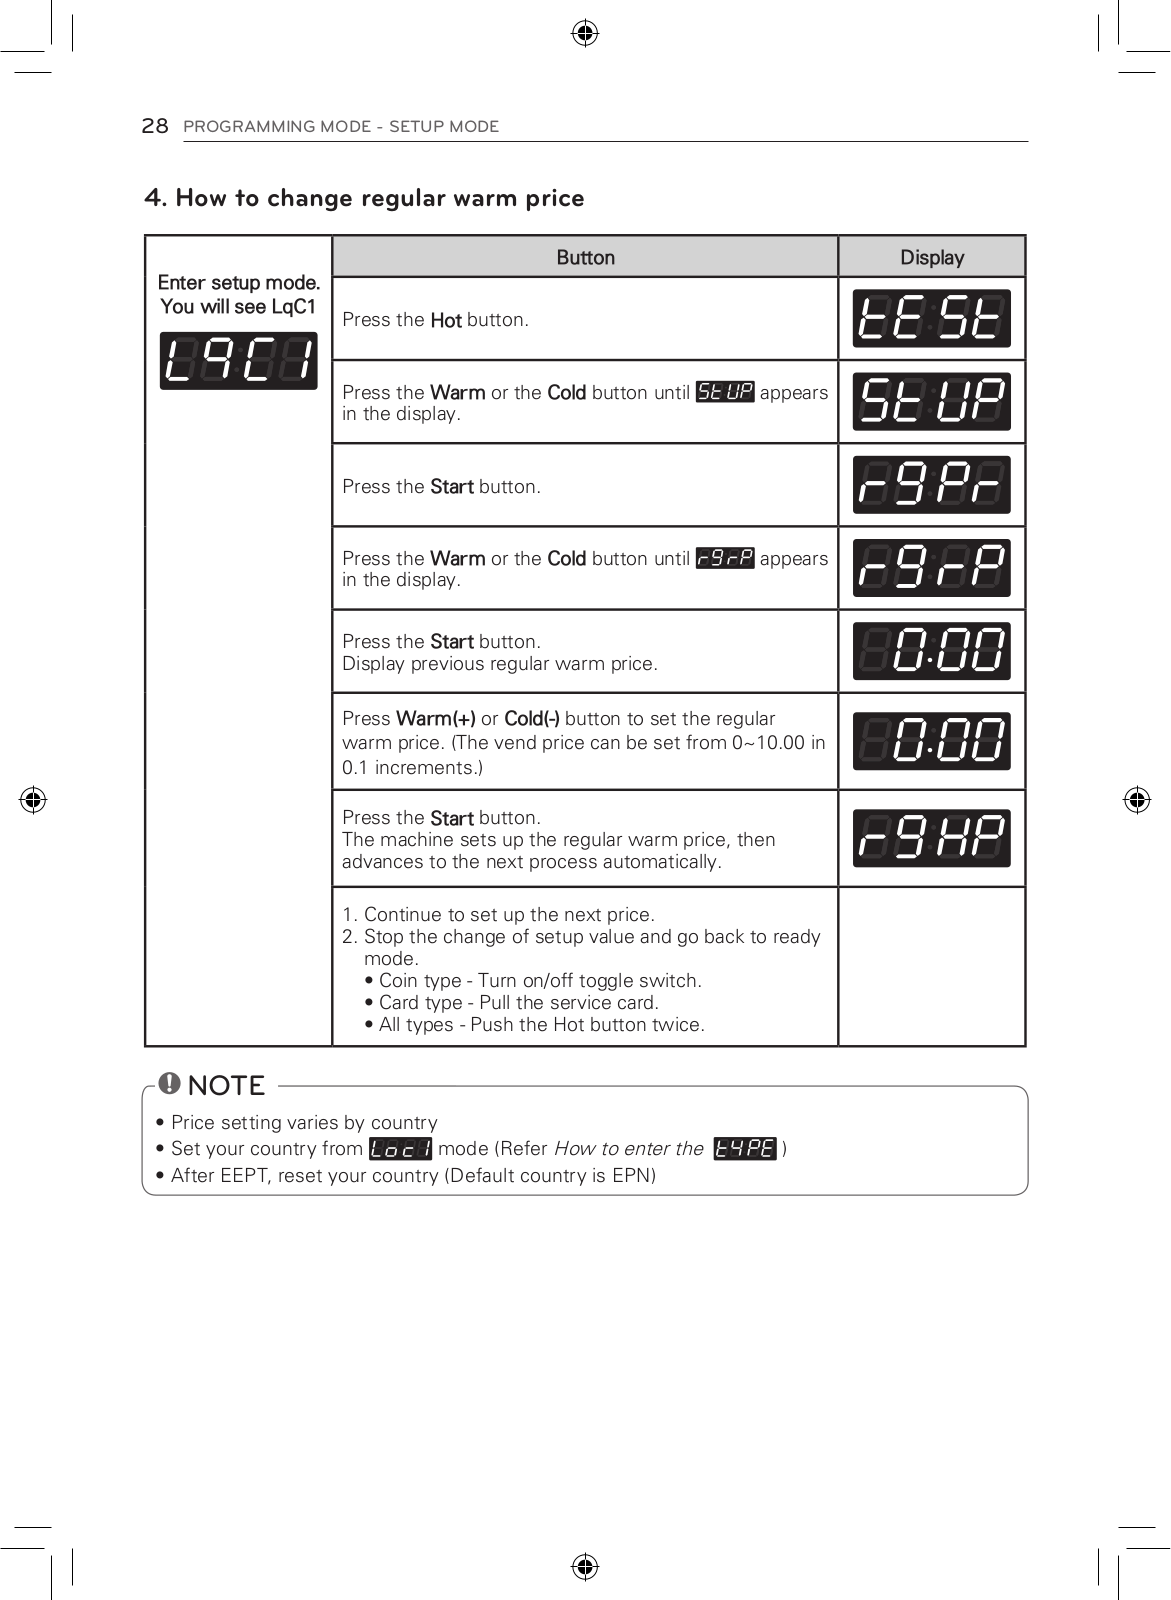
LG FH069FD7L Owner’s Manual
...
LG Owner’s Manual
Download
Specifications and Main Features
Frequently Asked Questions
User Manual
Download
Loading...
+
64
hidden pages
Unhide
You need points to download manuals.
1 point = 1 manual.
You can buy points or you can get point for every manual you upload.
Buy points
Upload your manuals
 Loading...