

Page 1

P/N : MMBB0193002 (1.0)
LG Electronics Inc.
F3 00 0 USER’S MANUAL
F3000 USER’S MANUAL
WE SHOULD INFORM USER THAT THIS MANUAL CAN HAVE SOME DIFFERENCES
FROM PHONE DEPENDING ON PHONE S/W AND SERVICE PROVIDER.
F3000 USER’S MANUAL
LG Electronics Inc.
http://www.lge.com
Page 2
F3000 USER’S MANUAL
WE SHOULD INFORM USER THAT THIS MANUAL CAN HAVE
SOME DIFFERENCES FROM PHONE DEPENDING ON PHONE S/W
AND SERVICE PROVIDER.
ENGLISH
Page 3

GUIDELINES FOR SAFE AND EFFICIENT USE 4
F3000 FEATURES 7
Part of the phone 7
Display Information 9
On-Screen Icons 9
GETTING STARTED 10
Installing the SIM card and the handset battery 10
Charging the Battery 11
Disconnecting the charger 11
GENERAL FUNCTIONS 12
Entering Text 12
MENU TREE 14
PROFILES 15
Activate 15
Personalise 15
Rename 15
CALL REGISTER 16
Missed calls 16
Received calls 16
Dialled calls 16
Delete recent calls 16
Call charges 16
GPRS information 17
TOOLS 18
Favourite 18
Alarm clock 18
Bluetooth 18
Calculator 19
Unit converter 19
World time 19
ORGANISER 20
Contacts 20
Scheduler 22
Memo 22
2
TABLE OF CONTENTS
\TableofContents
Page 4

MESSAGES 23
Write text message 23
Write multimedia message 24
Inbox 24
Outbox 25
Drafts 26
Listen to voice mail 26
Info message 26
Templates 27
Settings 28
MULTIMEDIA 29
Camera 29
Voice recorder 31
MP3 31
Memory status 33
SETTINGS 34
Date &Time 34
Phone settings 34
Call settings 34
Security settings 36
Network settings 37
GPRS setting 38
Reset settings 38
Memory status 38
SERVICE 39
Internet 39
SMS-Services 40
DOWNLOADS 41
Games & more 41
Pictures 42
Sounds 42
ACCESSORIES 43
TECHNICAL DATA 44
3
|
TableofContents
Page 5

4
\Guidelinesforsafeandefficientuse
Radio wave exposure and Specific Absorption Rate (SAR)
information
This mobile phone model F3000 has been designed to comply
with applicable safety requirement for exposure to radio
waves. This requirement is based on scientific guidelines that
include safety margins designed to assure this safety of all
persons, regardless of age and health.
• The radio wave exposure guidelines employ a unit of
measurement known as the Specific Absorption Rate, or SAR.
Tests for SAR are conducted using standardized method with
the phone transmitting at its highest certified power level in
all used frequency bands.
• While there may be differences between the SAR levels of
various LG phone models, they are all designed to meet the
relevant guidelines for exposure to radio waves.
• The SAR limit recommended by the international Commission
on Non-Ionizing Radiation Protection (ICNIRP), which is
2W/kg averaged over ten (10) gram of tissue.
• The highest SAR value for this model phone tested by DASY4
for use at the ear is 0.988 W/kg (10g).
• SAR data information for residents in countries/
regions that have adopted the SAR limit recommended by the
Institute of Electrical and Electronics Engineers (IEEE), which
is 1.6 W/kg averaged over one (1) gram of tissue.
Product care and maintenance
Warning: Use only batteries, charger and accessories
approved for use with this particular phone model. The use of
any other types may invalidate any approval or warranty
applying to the phone, and may be dangerous.
• Do not disassemble this unit. Take it to a qualified service
technician when repair work is required.
• Keep away from electrical appliance such as a TV, radio or
personal computer.
• The unit should be kept away from heat sources such as
radiators or cookers.
• Do not drop.
• Do not subject this unit to mechanical vibration or shock.
• The coating of the phone may be damaged if covered with
wrap or vinyl wrapper.
• Do not use harsh chemicals (such as alcohol, benzene,
thinners, etc.) or detergents to clean your phone. There is a
risk of this causing a fire.
• Do not subject this unit to excessive smoke or dust.
• Do not keep the phone next to credit cards or transport
tickets; it can affect the information on the magnetic strips.
• Do not tap the screen with a sharp object; otherwise, it may
damage the phone.
GUIDELINES FOR SAFE AND EFFICIENT USE
Page 6

5
|
Guidelinesforsafeandefficientuse
• Do not expose the phone to liquid or moisture.
• Use the accessories like an earphone cautiously.
• If you put your phone in a pocket or bag without covering the
receptacle of the phone (power plug pin), metallic articles
(such as a coin, paperclip or pen) may short-circuit the
phone. Always cover the receptacle when not in use.
• Never place your phone in a microwave oven as it will cause
the battery to explode.
• Only authorized personnel should service the phone and its
accessories. Faulty installation or service may result in
accidents and consequently invalidate the warranty.
• Do not use the phone if the antenna is damaged.
If a damaged antenna contacts skin, it may cause a slight
burn. Please contact an LG Authorized Service Center to
replace the damaged antenna.
• The label of the phone contains important information for
customer support purposes. Do not remove it.
Efficient phone operation
To enjoy optimum performance with minimum power
consumption please:
• Hold the phone as you speak to any other telephone. While
speaking directly into the microphone, angle the antenna in a
direction up and over your shoulder. If the antenna is
extendable/retractable, it should be extended during a call.
• Do not hold the antenna when the phone is in use. If you hold
it, it can affect call quality, it also may cause the phone to
operate as a higher power level that needed and shorten talk
and standby times.
• If your mobile phone supports infrared, never direct the
infrared ray at anyone’s eye.
Electronics devices
All mobile phones may get interference, which could
affect performance.
• Do not use your mobile phone near medical equipment
without requesting permission. Avoid placing the phone over
the pacemaker, i.e. in your breast pocket.
• Some hearing aids might be disturbed by mobile phones.
• Minor interference may affect TVs, radios, PCs, etc.
• Do not bend, scratch, or expose to static electricity.
Road safety
Check the laws and regulations on the use of mobile
phones in the areas when you drive.
• Do not use a hand-held phone while driving.
• Give full attention to driving.
• Use a hands-free kit, if available.
Page 7

• Pull off the road and park before making or answering a call if
driving conditions so require.
• RF energy may affect some electronic systems in your motor
vehicle such as car stereo, safety equipment.
• When riding in a car, do not leave your phone or set up the
hands-free kit near to the air bag. If wireless equipment is
improperly installed and the air bag is activated, you may be
seriously injured.
Blasting area
Do not use the phone where blasting is in progress. Observe
restrictions, and follow any regulations or rules.
Potentially explosive atmospheres
• Do not use the phone at a refueling point. Don’t use near fuel
or chemicals.
• Do not transport or store flammable gas, liquid, or explosives
in the compartment of your vehicle, which contains your
mobile phone and accessories.
In aircraft
Wireless devices can cause interference in aircraft.
• Turn off your mobile phone before boarding any aircraft.
• Do not use it on the ground without crew permission.
Battery information and care
• You do not need to completely discharge the battery before
recharging. Unlike other battery systems, there is no memory
effect that could compromise the battery’s performance.
• Use only LG batteries and chargers. LG chargers are
designed to maximize the battery life.
• Do not disassemble or short-circuit the battery pack.
• Keep the metal contacts of the battery pack clean.
• Replace the battery when it no longer provides acceptable
performance. The battery pack may be recharged hundreds
of times until it needs replacing.
• Recharge the battery if it has not been used for a long time to
maximize usability.
•
Do not expose the battery charger to direct sunlight or use it in
high humidity, such as the bathroom.
• Do not leave the battery in hot or cold places, this may
deteriorate the battery performance.
Network service
• Some services and functions described in this user’s guide
are dependent on network or subscription. Therefore, all
menus may not be available in your phone. Please consult
network operator for more information about your
subscription.
6
GUIDELINES FOR SAFE AND EFFICIENT USE
\Guidelinesforsafeandefficientuse
Page 8
7
F3000 FEATURES
|
F3000features
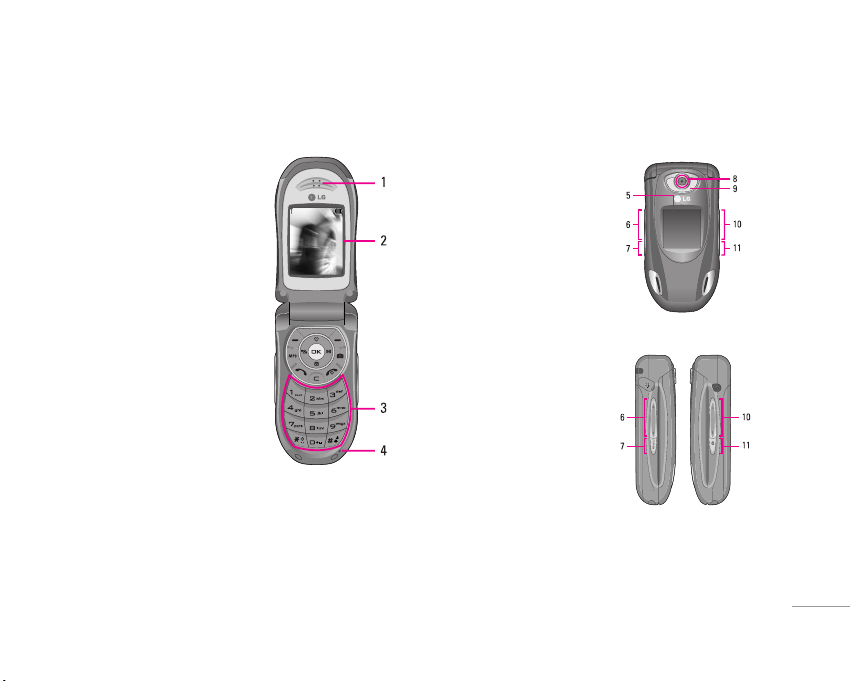
Part of the phone
1. Earpiece
2. Main LCD
• Top: Signal strength, battery
level and various function
•
Bottom: Soft key indications
3. Alpha numeric keys
• In standby mode: Input
numbers to dial
Hold down:
0– International calls
1 – Activate Voice mail
centre menu
2 to 9 – Speed dials
* – Activate Timer in Take
picture mode
• In editing mode: Enter
numbers & characters
4. Microphone
5. Sub LCD
6. Left side keys
• In standby mode (opened):
Volume of key tone
•
In standby mode (closed):
Change the wallpaper of the
sub-LCD (hold down)
•
In menu: scroll up & down
•
During a call: volume of the
earpiece
7. MP3 key
8. Camera lens
9. Flash
10. Right side keys
11. Side camera key
Menu ContactsContacts
Page 9
8
F3000 FEATURES
\F3000features
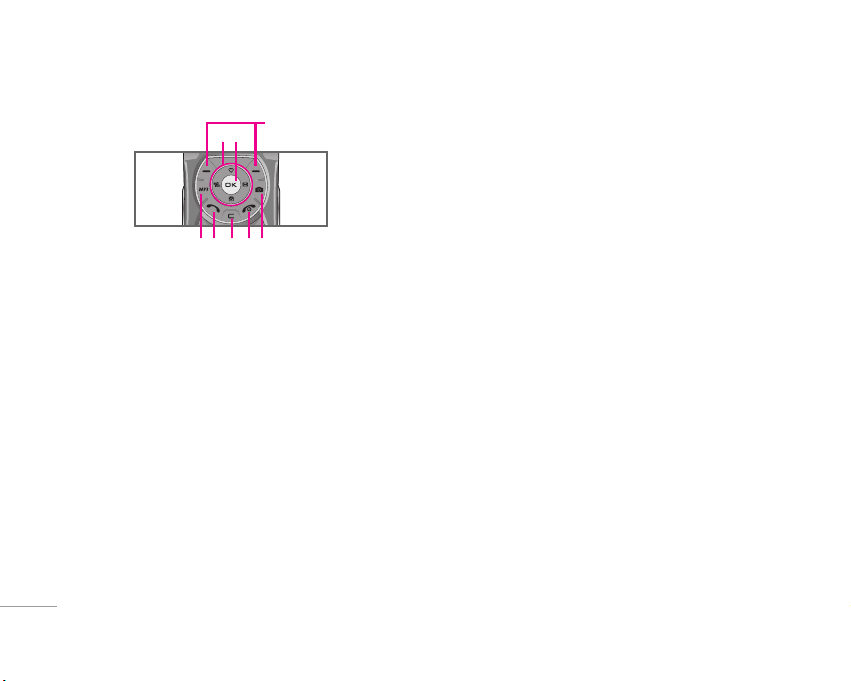
1. Navigation key
• In standby mode:
U Briefly: List of Favorites
D Briefly: List of Names
R Briefly: List of Messages
L Briefly: List of Profiles
Hold down: Activate/Deactivate Vibrate mode
•
In menu: scroll up & down
2. Confirm key
3. Soft keys
• These keys perform the function Indicated in the bottom of
the display.
4. MP3 hot key
• Activate the MP3 Player menu directly.
5. Camera hot key
• Activates Camera menu directly.
6. Send key
• Dial a phone number and answer a call.
• In standby mode: shows recently dialled, received and
missed call.
7. End key
• Switched on/off (hold down)
• End or reject a call.
8. Clear key
4
12
3
6875
Page 10
9
|
F3000features
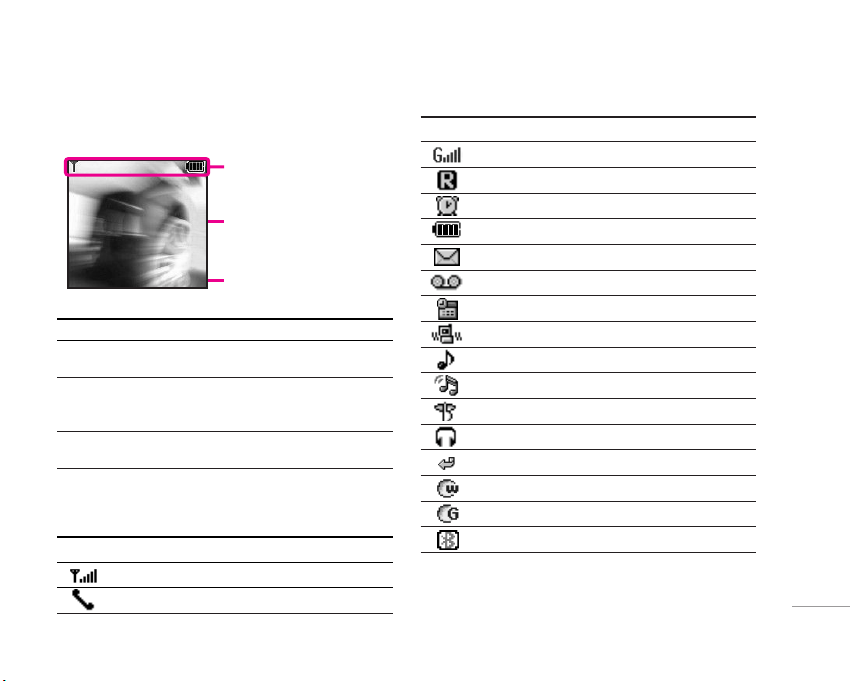
Display Information
Area Description
First line Displays several icons.
See the right side.
Middle lines Display messages, instructions and any
information that you enter, such as number
to be dialled.
Last line Shows the functions currently assigned to
the two soft keys.
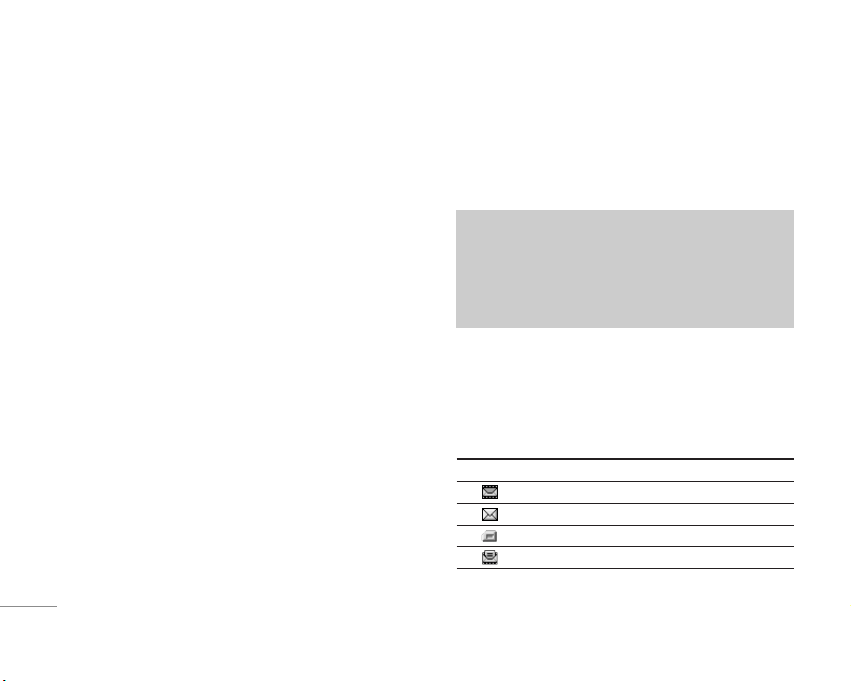
On-Screen Icons
Icon Description
Tells you the strength of the network signal.
Call is connected.
Icon Description
You can use GPRS service.
Shows that you are using a roaming service.
The alarm has been set and is on.
Tells you the status of the battery.
You have received a text message.
You have received a voice message.
You can view your schedule.
Vibrate only menu in profile.
General menu in profile.
Loud menu in profile.
Silent menu in profile.
Headset menu in profile.
You can divert a call.
Indicates that the phone is accessing the WAP.
Indicates that you are using GPRS.
Bluetooth enabled.
Menu ContactsMenu Contacts
Icon area
Text and graphic area
Soft key indications
Page 11
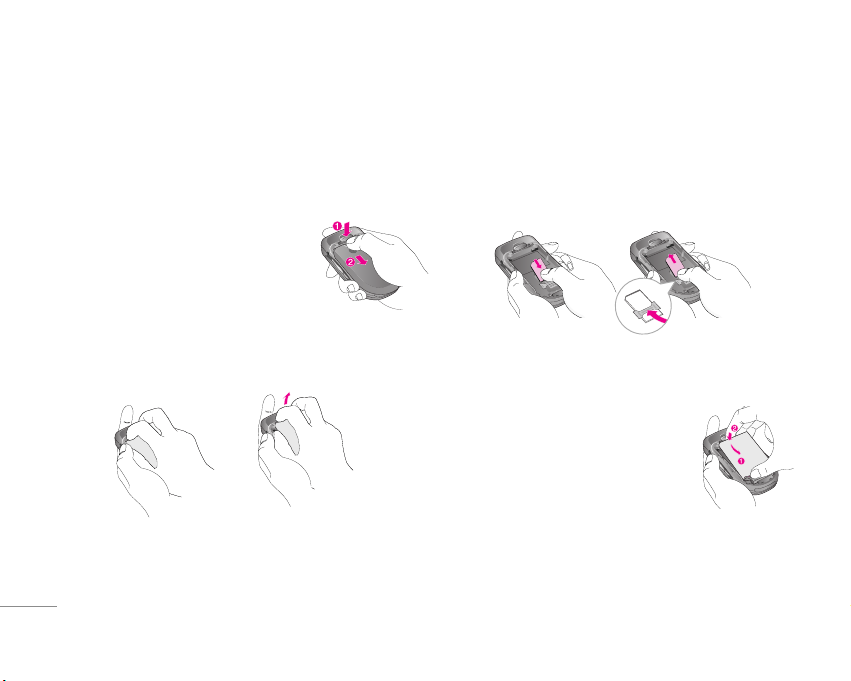
Installing the SIM card and the handset
battery
Make sure the power is off before you remove the battery.
1. Remove the battery cover.
Press the battery release latch and
slide the battery cover toward the
bottom of the phone. And remove
the battery cover.
2. Remove the battery.
Hold the top edge of the battery and lift the battery from the
battery compartment.
3. Install the SIM card.
Insert the SIM card into the holder. Slide the SIM card into
the SIM card holder. Make sure that the SIM card is inserted
properly and that the gold contact area on the card is facing
downwards. To remove the SIM card, press down lightly and
pull it in the reverse direction.
4. Install the battery.
Insert the bottom of the battery first into
the bottom edge of the battery
compartment. Push down the top of the
battery until it snaps into space.
10
GETTING STARTED
\Gettingstarted
To insert the SIM card To remove the SIM card
Page 12
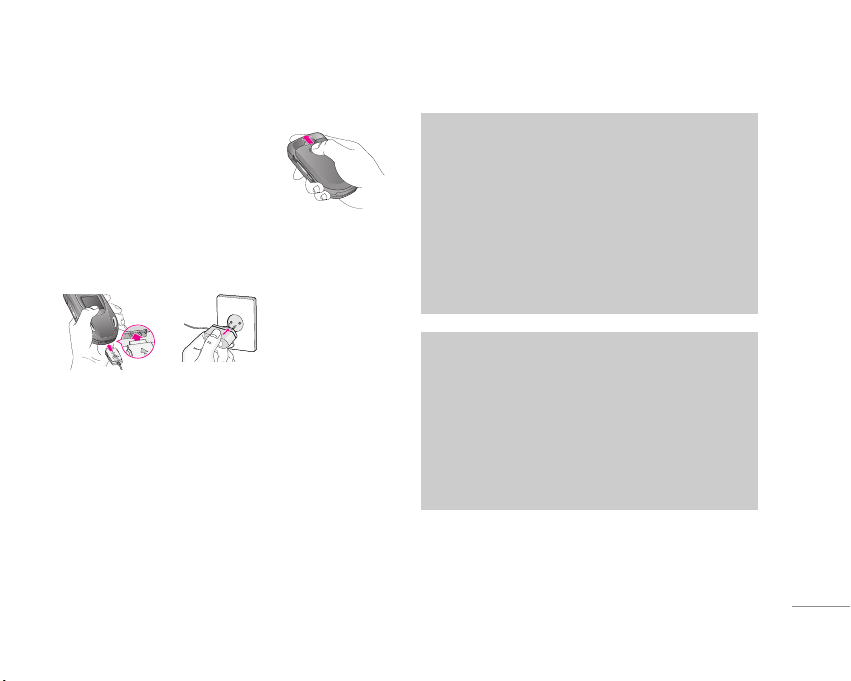
5. Replace the battery cover.
Lay the battery cover in place of
the phone and slide it until the
latch clicks.
Charging the Battery
To connect the travel adapter to the phone, you must have
installed the battery.
1. With the arrow facing you as shown in the diagram push the
plug on the battery adapter into the socket on the bottom of
the phone until it clicks into place.
2. Connect the other end of the travel adapter to the mains
socket. Use only the included packing charger.
Disconnecting the charger
Disconnect the travel adapter from the phone by pressing its
side buttons as shown in the diagram.
11
|
Gettingstarted
Caution
• Do not force the connector as this may damage the
phone and/or the travel adapter.
• Insert the battery pack charger vertically to wall
power outlet.
• If you use the battery pack charger out of your own
country, use an attachment plug adaptor for the
proper configuration.
• Do not remove your battery or the SIM card while
charging.
Warning
• Unplug the power cord and charger during lightning
storms to avoid electric shock or fire.
• Make sure that no sharp-edged items such as animal
teeth, nails, come into contact with the battery. There
is a risk of this causing a fire.
• Do not place or answer calls while charging the
phone as it may short-circuit the phone and/or cause
electric shock or fire.
Page 13

Entering Text
You can enter alphanumeric characters by using the phone’s
keypad. For example, storing names in the Address Book,
writing a message, creating scheduling events in the calendar
all require entering text.
Changing the Text Input Mode
1. When you are in a field that allows characters to be entered,
you will notice the text input mode indicator in the upper right
corner of the display.
2. If you want to change modes, press
#.
The available modes are changed.
Using the T9 Mode
The T9 predictive text input mode allows you to enter words
easily with a minimum number of key presses. As you press
each key, the phone begins to display the characters that it
thinks you are typing based on a built-in dictionary. As new
letters are added, the word changes to reflect the most likely
candidate from the dictionary.
1. When you are in the T9 predictive text input mode, start
entering a word by pressing keys
2 to 9. Press one key
per letter.
• The word changes as letters are typed – ignore what’s on
the screen until the word is typed completely.
• If the word is still incorrect after typing completely, press
the down navigation key once or more to cycle through the
other word options.
Example: Press 4 6 6 3 to type Good.
Press
4 6 6 3 [down navigation key] to
type Home.
2. Enter the whole word before editing or deleting any
keystrokes.
3. Complete each word with a space by pressing the
0key or
R key.
To delete letters, press
C. Press and hold down C to erase
the letters continuously.
Using the ABC Mode
Use the 2to 9keys to enter your text.
1. Press the key labeled with the required letter:
• Once for the first letter.
• Twice for the second letter.
• And so on.
12
GENERAL FUNCTIONS
\GeneralFunctions
Notice
To exit the text input mode without saving your input,
press
E. The phone returns to the idel screen.
Page 14

13
|
GeneralFunctions
2. To insert a space, press the 0key once.
To delete letters, press the
C key. Press and hold down the
C key to erase the letters continuously.
Key
Characters in the order display
Upper Case Lower Case
1 . , / ? ! - : ' " 1 . , / ? ! - : ' " 1
2
A B C 2 Ä À Á Â Ã Å Æ Ç a b c 2 ä à á â ã å æ ç
3
D E F 3 Ë È É Ê d e f 3 ë è é ê
4
G H I 4 Ï Ì Í Î ˝ g h i 4 ï ì í î ©
5
J K L 5 j k l 5
6
M N O 6 Ñ Ö Ø Ò Ó Ô Õ Œ m n o 6 ñ ö ø ò ó ô õ œ
7
P Q R S 7 ß ™ p q r s 7 ß ∫
8
T U V 8 Ü Ù Ú Û t u v 8 ü ù ú û
9
W X Y Z 9 w x y z 9
0 Space
0
Space
0
Using the 123 (Numbers) Mode
The 123 Mode enables you to enter numbers in a text message
(a telephone number, for example).
Press the keys corresponding to the required digits before
manually switching back to the appropriate text entry mode.
Using the Symbol Mode
The Symbol Mode enables you to enter various symbols or
special characters.
To enter a symbol, press the
*key. Use the navigation keys
to select the desired symbol and press the [OK] key.
Page 15

1 PROFILES
1 Vibrate only
2 Silent
3 General
4 Loud
5 Headset
2 CALL REGISTER
1 Missed calls
2 Received calls
3 Dialled calls
4 Delete recent calls
5 Call charges
6 GPRS information
3 TOOLS
1 Favourite
2 Alarm clock
3 Bluetooth
4 Calculator
5 Unit converter
6 World time
4 ORGANISER
1 Contacts
2 Scheduler
3 Memo
5 MESSAGES
1 Write text message
2 Write multimedia
message
3 Inbox
4 Outbox
5 Drafts
6 Listen to voice mail
7 Info message
8 Templates
9 Settings
6 MULTIMEDIA
1 Camera
2 Voice recorder
3 MP3
4 Memory status
7 SETTINGS
1 Date &Time
2 Phone settings
3 Call settings
4 Security settings
5 Network settings
6 GPRS setting
7 Reset settings
8 Memory status
8 SERVICE
1 Internet
2 SMS-Services
9 DOWNLOADS
1 Games & more
2 Pictures
3 Sounds
14
MENU TREE
\MenuTree
Page 16

15
PROFILES
|
Profiles
In Profiles, you can adjust and customise the phone tones for
different events, environments, or caller groups.
There are five preset profiles:
Vibrate only, Silent, General,
Loud
and Headset. Each profile can be personalised.
Activate Menu 1.x.1
1. A list of profiles is displayed.
2. In the
Profiles list, scroll to the profile you want to activate
and press the left soft key
<[Select] or OK key.
3. Then, select
Activate.
Personalise Menu 1.x.2
Scroll to the desired profile in the Profile list. After pressing the
left soft key
<or the OK key, select Personalise. This menu is
only available for General, Loud, and Headset.
•
Call alert type: Set the alert type for incoming calls.
•
Ring tone: Select the desired ring tone from the list.
•
Ring volume: Set the volume of the ringing tone.
•
Message alert type: Set the alert type for messages.
•
Message tone: Select the alert tone for messages.
•
Keypad tone: Select the desired keypad tone.
•
Keypad volume: Set the volume of keypad tone.
•
Flip tone: Allows to set the flip tone for adjusting environment.
•
Effect sound volume: Set the volume of effect sound.
•
Power on/off volume: Set the volume of the ringing tone when
switching the phone on/off.
•
Auto answer: This function will be activated only when your
phone is connected to the headset.
- Off: The phone will not answer automatically.
-
After 5 secs: After 5 seconds, the phone will answer
automatically.
-
After 10 secs: After 10 seconds, the phone will answer
automatically.
Rename Menu 1.x.3
You can rename a profile and give it any name you want.
1. To change the name of a profile, scroll to the profile in the
profile list and after pressing the left soft key
<or the OK
key, select
Rename.
2. Key in the desired name and press the OK key or the left soft
key
<[OK].
Notice
Vibrate only, Silent and Headset profiles cannot be
renamed.
Page 17

You can check the record of missed, received, and dialled calls
only if the network supports the Calling Line Identification (CLI)
within the service area.
The number and name (if available) are displayed together with
the date and time at which the call was made. You can also
view call times.
Missed calls Menu 2.1
This option lets you view the last 10 unanswered calls.
Received calls Menu 2.2
This option lets you view the last 10 incoming calls.
Dialled calls Menu 2.3
This option lets you view the last 20 outgoing calls (called or
attempted).
Delete recent calls Menu 2.4
Allows you to delete Missed calls and Received calls lists. You
can delete
Dialled calls and All calls lists at one time.
Call charges Menu 2.5
Call duration Menu 2.5.1
Allows you to view the duration of your incoming and outgoing
calls. You can also reset the call times. The following timers are
available:
•
Last call: Length of the last call.
•
All calls: Total length of all calls made and incoming calls
since the timer was last reset.
• Received calls: Length of the incoming calls.
•
Dialled calls: Length of the outgoing calls.
•
Reset all: Allows you to clear the length of all calls by
pressing the left soft key
<[Yes].
Call costs Menu 2.5.2
Allows you to check the cost of your last call, all calls,
remaining and reset the cost. To reset the cost, you need to
PIN2 code.
Settings (SIM Dependent) Menu 2.5.3
• Set tariff: You can set the currency type and the unit price.
Contact your service providers to obtain charging unit prices.
To select the currency or unit in this menu, you need the PIN2
code.
16
CALL REGISTER
\Callregister
Page 18

• Set credit: This network allows you to limit the cost of your
calls by selected charging units.If you select Read, the
number of remaining unit is shown. If you select Change, you
can change your change limit.
• Auto display: This network service allows you to see
automatically the cost of your last calls. If set to On, you can
see the last cost when the call is released.
GPRS information Menu 2.6
You can check the amount of data transferred over the network
through the GPRS information option. In addition, you can also
view how much time you are online.
Call duration Menu 2.6.1
You can check the duration of Last call and All calls. You can
also reset the call timers.
Data volumes Menu 2.6.2
You can check The Sent, Received or All data volumes and
Reset all.
17
|
Callregister
Page 19

Favourite Menu 3.1
This option allows you to add your own favourites to the list
already provided. Once you create your own menu, you can
access the desired function quickly in the idle screen by
pressing the up navigation key.
Alarm clock Menu 3.2
You can set up to 5 alarm clocks to go off at a specified time.
1. Select
On and enter the alarm time you want.
2. Select the repeat period:
Once, Mon~Fri, Mon~Sat, Everyday.
3. Select the alarm tone you want and press <[OK].
4. Edit the alarm name and press
< [OK].
Bluetooth Menu 3.3
This handset supports built-in Bluetooth connectivity, which
makes it possible to connect them with compatible Bluetooth
headsets, computer applications and so on.
Paired devices Menu 3.3.1
You can view all devices which are compatible with bluetooth
phone.
Handsfree devices Menu 3.3.2
If you enter My devices or Handsfree devices menu, you
access the options as follow.
• Connect/Disconnect: Allows to connect the other bluetooth
devices.
• Add new: Allows to search new bluetooth device.
• Assign name: Allows to change the name of bluetooth.
• Set as authorised/Set as unauthorised: Allows to set the
authorised connection between each blue-tooth devices.
• All service: Allows to view all services which are supported
by bluetooth device.
• Delete: Allows to delete the bluetooth device.
• Delete all: Allows to delete all bluetooth devices.
Settings Menu 3.3.3
You can register new device which is compatible with
bluetooth. If you already have added the device, you can
search it after entering a password.
• Set bluetooth: You can activate or cancel bluetooth function.
18
TOOLS
\Tools
Note
Supported Bluetooth software (Bluetooth stacks) for
DUN: WIDCOMM Bluetooth for Windows 1.4 and 3.0
Page 20

19
|
Tools
• My phone’s visibility: You can set the function that your
phone is shown on the other bluetooth devices.
•
My phone’s name: You can set the name of bluetooth device.
The default name is F3000.
Calculator Menu 3.4
This contains the standard functions such as +, –, x, ÷ :
Addition, Subtraction, Multiplication, and Division.
1. Input the numbers by pressing numeric keys.
2. Use a navigation key to select a sign for calculation.
3. Then input the numbers.
4. Press the left soft key
<[Result] to view the result.
5. Press the left soft key
<[Reset] or enter numbers to repeat
the procedure above.
6. To end Calculator, press the right soft key >[Back].
Unit converter Menu 3.5
This converts any measurement into a unit you want. There are
4 types that can be converted into units:
Length, Area, Weight,
and
Volume.
1. You can select one of four unit types by pressing
< [Unit]
key.
2. Select the standard value by using
L , R.
3. Select the unit you want to convert by pressing
U and D.
4. You can check the converted value for the unit you want.
Also, you can input a decimal number by pressing
*.
World time Menu 3.6
You can view clocks of the world’s major cities.
1. Select the city belonged to the time zone by pressing
L, R
key.
2. You can set the current time to the city time you select by
pressing the left soft key
<[Set].
Note
Use C key to erase any numbers or signs. If you
press key
#, you can input a minus number. In
addition, press key
*, you can input a decimal
number.
Page 21

Contacts Menu 4.1
Search (Calling from phonebook) Menu 4.1.1
1. Select Search by press the left soft key <[Select] or [OK].
2. Enter the name that you want to search or select left soft key
<[List] to view all the phonebook list.
3. If you want to edit, delete, copy an entry, or to add the voice
to one, select left soft key
<[Options]. The following menu
will be displayed.
• Edit: You can edit the name, number, group, character and
picture by using the navigation key.
•
Write text/multimedia message:
After you have found the
number you want, you can send a text/multimedia message
to the selected number.
• Email: You can send e-mail.
•
Send via Bluetooth: This menu allows to send your list of
contacts by bluetooth.
•
Copy: You can copy an entry from SIM to phone or from
phone to SIM.
•
Main number: You can select the one out of mobile, home,
office that you often use. After you set this, the main
number will be displayed first, when you search.
•
Delete: You can delete an entry.
Add new Menu 4.1.2
You can add phonebook entry by using this function.
Phone memory capacity is 1000 entries. SIM card memory
capacity depends on the cellular service provider.
You can also save 20 characters of name in The Phone memory,
and save characters in the SIM card. The number of character is
SIM dependent feature.
Caller groups Menu 4.1.3
You can list up to 20 members per one group. There are 7
groups you can make lists to.
•
Member list: Shows the group members you have selected.
•
Group ring tone: Allows you to specify ring tone for the group
members’ call.
•
Group icon: Allows you to select the icon dependent on Group.
• Add member: You can add group members. Each group
member shouldn’t be exceeded 20.
•
Remove member: You can remove the member from the
Group member list. But the name and the number still remain
in phonebook.
•
Rename: You can change a group name.
20
ORGANISER
\Organiser
Note
In standby mode, press right soft key > [Contacts] to
access directly.
Note
Instant searching is available by inputting the initial
letter of the name or number you want to search.
Page 22

21
|
Organiser
Speed dial Menu 4.1.4
You can assign any of the keys, 2 to 9 with a Name list
entry. You can call directly by pressing this key.
Settings Menu 4.1.5
• Set memory: Scroll to highlight Set memory, and then press
the left soft key
<[Select].
- If you select
Variable, when adding entry, the phone will
ask where to store.
- If you select SIM or Phone, the phone will store an entry
to SIM or phone.
•
Search by: Scroll to highlight Search by, then press the left
soft key
<[Select].
- If you select
Variable, the phone will ask how to search.
- If you select
Name or Number, the phone will search an
entry by Name or Number.
• View options: Scroll to highlight View options, and then
press the left soft key [Select].
-
Name only: Set the phonebook list with displaying only
name.
-
With pictures: Set the phonebook list with the information
of character and picture.
- Name & number: Set the phonebook list with displaying
name and number.
Copy all Menu 4.1.6
You can copy/move entries from SIM card memory to Phone
memory and vice versa.
1. Scroll to Copy all, and then press the left soft key < [Select]
to enter this menu.
• SIM to Phone: You can copy the entry from SIM Card to
Phone memory.
•
Phone to SIM: You can copy the entry from Phone memory
to SIM Card.
2. You can see the following submenus.
•
Keep original: When copying, Original Dial Number is kept.
•
Delete original: When copying, Original Dial Number will be
erased.
Delete all Menu 4.1.7
You can delete all entries in SIM and Phone. This function
requires Security code.
Information Menu 4.1.8
• Service dial number
Use this function to access a particular list of services
provided by your network operator (if supported by the SIM
card).
• Memory status
This feature allows you to see how many free and in-use are
in your phonebook.
Page 23

• Own number (SIM dependent)
You can save and check your own number in SIM card.
Scheduler Menu 4.2
When you enter this menu a Calendar will show up. And square
cursor will be used to locate the certain day.
The phone will sound an alarm tone if you set this for the note.
To change the day, month, and year.
In the scheduler mode, press left soft key
<[Options] as
follows;
Add new Menu 4.2.1
Allows you to add new schedule and memo for the chosen day.
You can store up to 20 notes.
Input the subject and then press left soft key
<[OK]. You enter
the appropriate information in the follow section;
Time, Repeat
and Alarm.
View Menu 4.2.2
View all schedules and memo for the chosen day. Press left
soft key
< [Options] to delete, edit the note you selected.
View all Menu 4.2.3
Shows the notes that are set for all days. Use U , Dto browse
through the note lists. If you want to view the note in detail,
press left soft key [Select].
Delete past Menu 4.2.4
You can delete the past schedule that has been already notified
you.
Delete all Menu 4.2.5
You can delete for the all notes.
Memo Menu 4.3
1. Select the Memo by pressing the left soft key <[Select].
2. If being empty, Add new by pressing the left soft key
<
[Add].
3. Input the memo and then press left soft key
<[OK].
22
ORGANISER
\Organiser
Key Description
1 3
Yearly
* # Monthly
Key Description
U D Weekly
L R Daily
Page 24

23
MESSAGES
|
Messages
This menu includes functions related to SMS (Short Message
Service), MMS (Multimedia Message Service), voice mail, as
well as the network’s service messages.
Write text message Menu 5.1
You can write and edit text message, checking the
number of message pages.
Insert
• Symbol: You can add special characters.
•
Picture: You can insert the Default graphics or graphics in My
pictures that are available for short messages.
•
Sound: You can insert sounds that are available for short
messages.
•
Text templates: You can use Text templates already set in the
phone.
•
Contacts: You can add phone numbers or e-mail addresses in
address book.
•
Bussiness card: You can add your signature to the message.
Options
• Send: Sends text messages.
1. Enter numbers of recipient.
2. Press Dkey to add more recipients.
3. You can add phone numbers in the address book.
4. Press the left soft key <after entering numbers.
•
Save: Stores messages in Drafts.
•
Font: You can select Size and Style of fonts.
•
Colour: You can select Colour of foreground and background.
•
Alignment: You can make the message contents aligned Left,
Center
or Right.
•
Add T9 dictionary: You can add your own word. This menu
can be shown only when edit mode is
Predictive
(T9Abc/T9abc /T9ABC).
• T9 languages: Select a T9 input mode.
•
Exit: If you press Exit while writing a message, you can end
the writing message and back to the Message menu. The
message you have written is not saved.
Note
The phone which supports EMS release 5 is available to
send colour pictures, sounds, text styles, etc.. The other
party may not receive pictures, sounds or text styles you
sent properly if the phone does not support such options.
Page 25
Write multimedia message Menu 5.2
You can write and edit multimedia messages, checking
message size.
1. You can create a new message or choose one of the
multimedia message templates already made.
2. Press
Insert to add Symbol, Photo, Take photo, Picture,
Sound, Voice memo, Text templates, Contacts,
and
Signature.
Options
• Send: You can send multimedia messages to multiple
recipients, priorities your message, and make it sent later as
well.
•
Preview: You can preview multimedia messages you wrote.
•
Save: You can save multimedia messages In drafts or As
template
.
•
Add slide: You can add a slide before or after current slide.
•
Move to slide: You can move to previous or next slide.
•
Delete slide: You can delete current slides.
•
Set slide format
- Set timer: You can set timer for slide, text, picture and
sound.
•
Remove media: You can remove picture, sound or video in the
slide.
•
Add T9 dictionary: You can add your own word. This menu
can be shown only when edit mode is Predictive
(T9Abc/T9abc /T9ABC).
•
T9 languages: Select a T9 input mode.
•
Exit: You can back to the Message menu.
Inbox Menu 5.3
You will be alerted when you have received messages. They
will be stored in Inbox.
In Inbox, you can identify each message by icons. For detail,
see the icon directive.
Icon Icon directive
Multimedia message
Short message
SIM message
Read multimedia message
24
MESSAGES
\Messages
Note
If you select the picture (15K) on writing multimedia
message, loading duration will take around 15 seconds at
least. Furthermore, you can’t activate any key during
loading time. After 15 seconds, it is available to write
multimedia message.
Page 26

25
|
Messages
Icon Icon directive
Read text message
Push message
Notified multimedia message
If the phone shows ’No space for SIM message’, you have to
delete only SIM messages from Inbox.
If the phone displays ’No space for message’, you can make
space of each repository as deleting messages, media and
applications.
• SIM message
SIM message means the message exceptionally stored in
SIM card.
To read a message, select one of the messages by pressing the
left soft key
<.
•
View: You can view the received messages.
•
Reply: You can reply to the sender.
•
Forward: You can forward the selected message to another
party.
•
Return call: You can call back to the sender.
•
Delete: You can delete the current message.
•
View information: You can view information about received
messages; Sender’s address, Subject (only for Multimedia
message), Message date & time, Message type, Message
size.
• Delete All: You can delete all messages.
Outbox Menu 5.4
You can see sent and unsent messages here.
For sent message, you can see the delivery status.
The browsing is same as that for the inbox message.
Icon Icon directive
MMS sent
MMS unsent
MMS delivery confirmed
SMS sent
SMS unsent
SMS delivery confirmed
When you already sent the message:
• View: You can view the sent messages.
•
Forward: You can forward the current message to other
recipients.
•
Delete: You can delete the current message.
•
View Information: You can view information about outbox
messages; Recipient’s address, Subject (only for Multimedia
message), Message date & time, Message type, Message
size, To, Delivery report.
• Delete All: You can delete all messages didn’t send.
Page 27

26
MESSAGES
\Messages
Drafts Menu 5.5
Using this menu, you can preset up to five multimedia messages
that you use most frequently. This menu shows the preset
multimedia message list.
The following options are available.
•
View: You can see the multimedia messages.
•
Edit: Modifies the massage you choose.
•
Delete: Deletes the message you choose.
•
Information: To view the information of the message.
•
Delete All: Deletes all of the messages in the folder.
Listen to voice mail Menu 5.6
Once this menu has been selected, simply press the left soft
key
<[OK] to listen to voice mail. You can also hold down 1
the key in standby mode to listen to voice mail.
Info message Menu 5.7
(Dependent to network and subscription)
Info service messages are text messages delivered by the
network to GSM. They provide general information such as
weather reports, traffic news, taxis, pharmacies, and stock
prices. Each type of has the number; therefore, you can contact
service provider as long as you have input the certain number
for the information. When you have received an info service
message, you can see the popup message to show you that
you have received a message or the info service message is
directly displayed. To view the message again or not in standby
mode, follow the sequence shown below;
Read Menu 5.7.1
When you have received an info service message and select
Read to view the message, it will be displayed on
the screen. You can read another message by scrolling
L , Ror <[Next].
Topics Menu 5.7.2
(Dependent to network and subscription)
• Add new: You can add Info service message numbers in the
Phone memory with its nickname.
Note
When you receive a voice mail, your phone displays the
icon and you hear an alert. Please check with your
network provider for details of their service in order to
configure the handset correctly.
Page 28

27
|
Messages
• View list: You can see Info service message numbers which
you added. If you press
<[Options], you can edit and delete
info message category which you added.
•
Active list: You can select info service message numbers in
the active list. if you activate an info service number, you can
receive messages sent from the number.
Templates Menu 5.8
Text templates Menu 5.8.1
You can use the text templates by just selecting them when you
send message.
Multimedia templates Menu 5.8.2
You can use the following options.
•
View: You can see multimedia templates.
•
Edit: You can edit multimedia templates.
•
Add new: Allows you to add new multimedia templates.
•
Write messages: You can write and send multimedia
messages.
•
Delete: You can delete multimedia templates.
•
Delete All: Allows you to delete all multimedia messages.
Business card Menu 5.8.3
You can make your Business card to the message.
Settings Menu 5.9
Text message Menu 5.9.1
• Message types: Text, Voice, Fax, Natl. paging, X.400, Email,
ERMES
Usually, the type of message is set to Text. You can convert
your text into alternative formats. Contact your service
provider for the availability of this function.
•
Validity period: This network service allows you to set how
long your text messages will be stored at the message centre.
•
Delivery report: If you set to Yes, you can check whether your
message is sent successfully.
• Reply via same service centre: When a message is sent, it
allows the recipients to reply and charge the cost of the reply
to your telephone bill.
•
SMS centre: If you want to send the text message, you can
receive the address of SMS centre through this menu.
Multimedia message Menu 5.9.2
• Priority: You can set the priority of the message you choose.
•
Validity period: This network service allows you to set how
long your text messages will be stored at the message centre.
Page 29

• Delivery report: If it is set to Yes in this menu, you can check
whether your message is sent successfully.
•
Auto download: If you select On, you receive multimedia
messages automatically. If you select
Off, you receive only
notification message in the inbox and then you can check this
notification. If you select
Home network only, you receive
multimedia messages depends on Homenetwork.
•
Network settings: If you select multimedia message server,
you can set URL for multimedia message server.
•
Permitted types
Personal:
Personal message.
Advertisements: Commercial message.
Information: Necessary information.
Voice mail centre Menu 5.9.3
You can receive the voicemail if your network service provider
supports this feature. When a new voicemail is arrived, the
symbol will be displayed on the screen.
•
Home: You can listen to voice mails by selecting Home.
•
Roaming: Even when you are in abroad, you can listen to
voice mails if roaming service is supported.
Info message Menu 5.9.4
• Receive
Phone will receive Info service messages or not.
• Alert
Your phone will beep when you have received Info service
message numbers or not.
• Languages
You can select the language.
Push messages Menu 5.9.5
You can set the option whether you will receive the message or
not.
28
MESSAGES
\Messages
Page 30
29
MULTIMEDIA
|
MULTIMEDIA
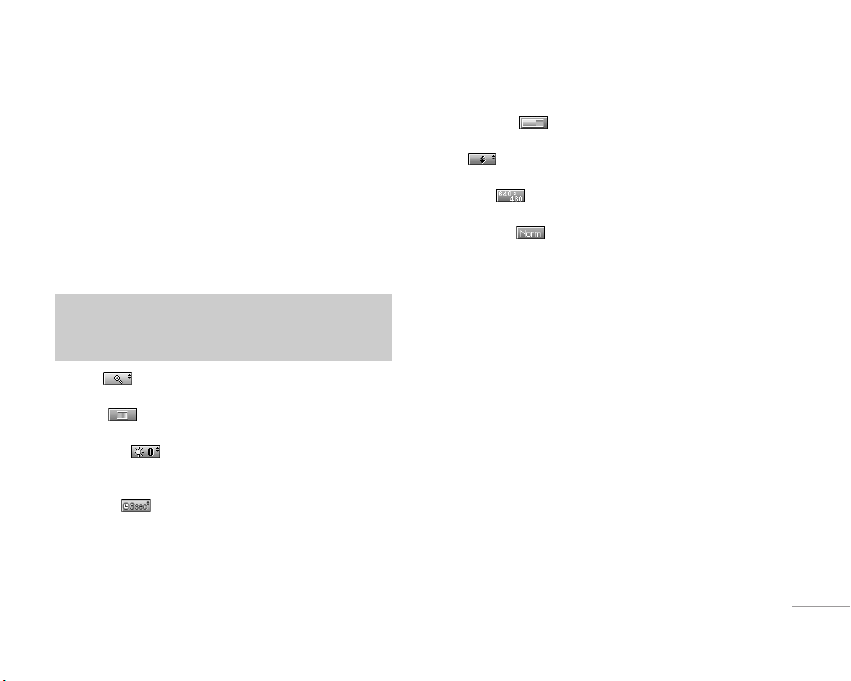
Camera Menu 6.1
Take picture Menu 6.1.1
To take a picture with Folder opened
1. Select Take picture, and then press <. If you want to reach
this menu directly, press
qfor a long time.
2. Focus on the subject to capture the image, and then press
the
Okey.
3. If you want to save it, press the left soft key
<or the O key.
•
Zoom [ ]: Allows you to set the zooming value from x1 to
x5 depends on resolution.
• Colour [ ]: 3 settings are available: Color, Sepia,
Black/White
•
Brightness [ ]: Use the right/left navigation
keys to adjust lighting. 5 lighting levels are available:
-2, -1, 0, +1, +2.
•
Autoshot [ ]: Allows you to select the delay time (off, 3
Seconds and 5 Seconds). Then the phone takes a photo after
the specified time.
•
Memory status [ ]: Check the available memory to take
new pictures.
•
Flash [ ]: Allow you to set the flash when you take a
photo in dark place.
•
Resolution [ ]: Allows you to set the image size to one of
1280x960, 640x480, 320x240, 160x128 and phonebook (48x48).
• Picture quality [ ]: Allows you to set the image quality
from Basic, Normal and Fine.
To take a picture with Folder closed
You can see yourself by sub LCD, when you take your selfportrait.
1. Press [
q] for a long time.
2. Select Take picture highlight with side volume key [
[], then
press [
q].
3. Focus on the subject to capture the image, and then press
[q]. This time, the picture is saved automatically.
Take in modes Menu 6.1.2
You can take a picture on the various of backgrounds.
Furthermore, you can select a frame by pressing the navigation
key (
U or D).
Note
You can control the image size, brightness, colour and
zooming by pressing the navigation key. (
U or D).
Page 31

30
MULTIMEDIA
\Multimedia
Take continuously Menu 6.1.3
You can take the maximum of 9 pictures subsequently at the
same time. After taking a picture, you can view it by pressing
the left soft key
<.
You can also save it by pressing the left soft key
<.
Album Menu 6.1.4
You can view and send a picture. In addition, you can set the
window as a background.
•
All pictures: You can view all pictures in order.
•
General pictures: You can view all pictures except of frame
and phone book ones.
•
Mode pictures: You can view all frame pictures.
Options
- Multi view: You can view the maximum of 9 thumbnails in a
screen.
-
Write multimedia message: You can send a picture thru
MMS.
-
Send via Bluetooth:You can send a picture via Bluetooth.
-
Set as wallpaper: You can set a picture as a wallpaper.
-
Slide show: This menu allows you to view as a slide show
automatically.
-
Delete: You can delete a picture.
-
Edit title: You can edit the title of picture.
-
View information: You can view the information about Title,
Size, Date and Time you’ve taken.
-
Protection: You can lock the picture for deleting in mistakes
in this menu.
• Phonebook pictures: You can view all phonebook pictures.
-
Set as wallpaper: You can set a picture as a wallpaper.
-
Slide show: This menu allows you to view as a slide show
automatically.
-
Delete: You can delete a picture.
-
Edit title: You can edit the title of picture.
-
View information: You can view the information about Title,
Size, Date and Time you’ve taken.
-
Protection: You can lock the picture for deleting in mistakes
in this menu.
Settings Menu 6.1.5
• Memory status: You can check the capacity of photo and free
memory.
•
Clear album: You can delete all pictures which saved in a
memory.
• Auto save: Automatically saves the pictures taken with the
camera.
Note
If you set 320x240 in resolution, you can take only 6
pictures. In case of 128x160, it is available to 9 pictures.
Page 32

31
|
Multimedia
Voice recorder Menu 6.2
The voice memo feature you to record up to 10 voice messages
and each memo is up to 15 Seconds.
Record Menu 6.2.1
You can record voice memo in Voice recorder menu.
1. Once recording is started, the message Recording and the
remaining time is displayed.
2. If you want to finish recording, press the left soft key
<
[Save].
3. Key in Voice memo title, press the left soft key
< [OK].
View list Menu 6.2.2
The phone shows voice memo list. You can Playback and
Delete the recorded voice memo.
MP3 Menu 6.3
You can enjoy listening to MP3 music files on a memory in your
phone using a compatible headset or via the internal
loudspeaker.
The music player supports:
•
MPEG-1 Layer III: Sampling frequency up to 48KHz, Bit rate up
to 192Kbps, stereo
•
MPEG-2 Layer III: Sampling frequency up to 24KHz, Bit rate up
to 160Kbps, stereo
•
AAC: ADIF, ADTS formats (Sampling frequency up to 48KHz)
You can transfer MP3 files from a compatible PC to the memory
in your phone using the LG Contents Bank on the CD-ROM in
the sales package.
When you connect the phone to a PC using the USB cable
(supplied in the same package), you need to install a driver. For
further details, refer to the CD-ROM manual.
Note
F3000 doesn’t support the variable rate of AAC file.
Therefore, you can’t change the file from MP3 format to
AAC.
Note
• The PC should run Windows 98 SE, Windows ME,
Windows 2000, Windows XP operating system.
• To download MP3 file in Windows 2000, you should set
folder option in PC as follow: View WEB
➝ Use
Windows default folder (I).
Page 33

32
MULTIMEDIA
\Multimedia
MP3 player Menu 6.3.1
1. Press MP3 menu, and then select MP3 player.
2. Press the left soft key
<[Options] to access the following
menus.
• View play list: You can view the play list on listening to the
music.
•
Settings
- Equalizer: This menu helps you to adjust various of
environment on listening to the music. This phone
supports four preset menus. When you enter this menu,
you can view current value of equalizer.
-
Playmode: This menu allows to set the play mode: Play
all, Repeat all, Random all, Play one and Repeat one.
-
Set shuffle: It you selece On, you can listen to the music
at random.
- Player skin: This menu allows to change the backgroud of
main LCD on playing MP3 file.
- Flip setting:
Continue playing: Although you close the flip on playing,
the play mode is continued without a pause.
Stop playing: When you close the flip, you can stop the
play mode.
•
Set as ring tone: This menu allows to set the MP3 file as a
ring tone. You can also set it as a ring tone in Profile.
Play list Menu 6.3.2
You can move the track by pressing the navigation key.
In addition, if you select option menu, you can delete the file or
view its information.
Settings Menu 6.3.3
• Equalizer
This menu helps you to adjust various of environ-ment on
listening to the music. This phone supports four preset
menus. When you enter this menu, you can view current
value of equalizer, and change the equalizer here. We
support some equalizers like General, Classic, Jazz, Pop,
Rock, and Bass.
• Playmode
This menu allows to set the play mode: Play all, Repeat all,
Repeat one.
• Set shuffle
It you selece On, you can listen to the music at random.
• Player skin
You can select the visual effect menus: Light, Bounce and
Guitarist. This menu allows to change the background of
main LCD and sub LCD on play-ing MP3 file.
Page 34

33
|
Multimedia
• Flip setting:
- Continue playing
Although you close the flip on playing, the play mode is
continued without a pause.
- Stop playing
When you close the flip, you can stop the play mode.
Memory status Menu 6.4
You can check the status of memory in use.
Page 35

34
SETTINGS
\Settings
You can set the following menus for your convenience and
preferences.
Date & Time Menu 7.1
You can set functions relating to the date and time.
Set date Menu 7.1.1
You can enter the current date.
Date format Menu 7.1.2
You can set the Date format such as DD/MM/YYYY,
MM/DD/YYYY, YYYY/MM/DD.
(D: Day / M: Month / Y: Year)
Set time Menu 7.1.3
You can enter the current time.
Time format Menu 7.1.4
Your can set the time format between 24-hour and 12-hour.
Phone settings Menu 7.2
You can set functions relating to the phone.
Display settings Menu 7.2.1
• Wallpaper: You can select the background pictures in
standby mode.
- My folder
You can select a picture or an animation as wallpaper.
•
Handset scheme: You can choose 4 kind of color schemes:
Car, Space, Calm and Possion style.
•
Top menu style: You can select the style to display the menu.
•
Standby text: If you select On, you can edit the text which is
displayed in standby mode.
• Backlight: You can set the light-up duration of the display.
•
Information window: You can preview the current state of the
selected menu before open the menu. The state is shown at
bottom of the display.
•
Network name: If you set ON, Network name (the name of
service provider) will be appeared in Internal LCD.
Language Menu 7.2.2
You can change the language for the display texts in your
phone. This change will also affect the Language Input mode.
Call settings Menu 7.3
You can set the menu relevant to a call by pressing <[Select]
in the Setting menu.
Page 36

35
|
Settings
Call divert Menu 7.3.1
The Call divert service allows you to divert incoming voice calls,
fax calls, and data calls to another number. For details, contact
your service provider.
• All voice calls
Diverts voice calls unconditionally.
• If busy
Diverts voice calls when the phone is in use.
• If no reply
Diverts voice calls which you do not answer.
• If out of reach
Diverts voice calls when the phone is switched off or out of
coverage.
• All data calls
Diverts to a number with a PC connection unconditionally.
• All fax calls
Diverts to a number with a fax connection unconditionally.
• Cancel all
Cancels all call divert service.
The submenus
Call divert
menus have the submenus shown below.
• Activate
Activate the corresponding service.
To voice mail centre
Forwards to message centre. This function is not shown at All
data calls and All fax calls menus.
To other number
Inputs the number for diverting.
To favourite number
You can check recent 5 diverted numbers.
• Cancel
Deactivate the corresponding service.
• View status
View the status of the corresponding service.
Answer mode Menu 7.3.2
• Flip open
If you select this menu, you can receive an incoming call
when only opening flip.
• Press any key
If you select this menu, you can receive a call by pressing
any key except
E[End] key.
• Send only
If you select this menu, you can receive a call by only
pressing
S [Send] key.
Page 37

36
SETTINGS
\Settings
Send my number Menu 7.3.3
(network and subscription dependent)
• On
You can send your phone number to another party. Your
phone number will be shown on the receiver’s phone.
• Off
Your phone number will not be shown.
• Set by network
If you select this, you can send your phone number
depending on two line service such as line 1 or line 2.
Call waiting Menu 7.3.4
(network dependent)
• Activate
If you select Activate, you can accept a waiting (receiving)
call.
• Cancel
If you select Cancel, you cannot recognize the waiting
(receiving) call.
• View status
Shows the status of Call waiting.
Minute minder Menu 7.3.5
If you select On, you can check the call duration by deep sound
every minute during a call.
Auto redial Menu 7.3.6
Security settings Menu 7.4
PIN code request Menu 7.4.1
In this menu, you can set the phone to ask for the PIN code of
your SIM card when the phone is switched on. If this function is
activated, you’ll be requested to enter the PIN code.
If you enter wrong PIN code more than 3 times, the phone will
lock out. If the PIN is blocked, you will need to key in PUK code.
You can enter your PUK code up to 10 times. If you put wrong
PUK code more than 10 times, you can not unlock your phone.
You will need to contact your service provider.
Handset lock Menu 7.4.2
You can use security code to avoid unauthorized use of the
phone. Whenever you switch on the phone, the phone will
request security code if you set phone lock to On. If you set
phone lock to
Automatic, your phone will request security code
only when you change your SIM card.
Call barring Menu 7.4.3
The Call barring service prevents your phone from making or
receiving certain category of calls. This function requires the
call barring password.
You can view the following submenus.
Page 38

37
|
Settings
• All outgoing
The barring service for all outgoing calls.
• International
The barring service for all outgoing international calls.
• International when roaming
The barring service for all international outgoing calls except
home network.
• All incoming
The barring service for all incoming calls.
• Incoming when roaming
The barring service for all incoming calls when roaming.
• Cancel all
You can cancel all barring services.
• Change password
You can change the password for Call Barring Service.
The submenus:
• Activate: Allows to request the network to set call restriction
on.
•
Cancel: Set the selected call restriction off.
•
View status: View the status whether the calls are
barred or not.
Fixed dial number Menu 7.4.4
(SIM dependent)
You can restrict your outgoing calls to selected phone
numbers. The numbers are protected by your PIN2 code.
• Activate
You can restrict your outgoing calls to selected phone
numbers.
• Cancel
You can cancel fixed dialling function.
• Number list
You can view the number list saved as Fixed dial number.
Change codes Menu 7.4.5
PIN is an abbreviation of Personal Identification Number to
prevent use by unauthorized person.
You can change the access codes: PIN code, PIN2 code,
Security code.
1. If you want to change the Security code/PIN/PIN2 code input
your original code, and then press
<[OK].
2. Input new Security code/PIN/PIN2 code and verify them.
Network Settings Menu 7.5
You can select a network which will be registered either
automatically or manually. Usually, the network selection is set
to
Automatic.
Page 39

38
SETTINGS
\Settings
Network selection Menu 7.5.1
• Automatic
If you select Automatic mode, the phone will automatically
search for and select a network for you. Once you have
selected “Automatic”, the phone will be set to “Automatic”
even though the power is off and on.
• Manual
The phone will find the list of available networks and show you
them. Then you can select the network which you want to use if
this network has a roaming agreement with your home network
operator. The phone let you select another network if the phone
fails to access the selected network.
• Preferred
You can set a list of preferred networks and the phone
attempts to register with first, before attempting to register to
any other networks. This list is set from the phone’s
predefined list of known networks.
Band selection Menu 7.5.2
• EGSM/DCS
According to depending on Network situation, you can select
EGSM/DCS.
• EGSM/PCS
According to depending on Network situation, you can select
EGSM/PCS.
GPRS setting Menu 7.6
You can set GPRS service depending on various situations.
Reset settings Menu 7.7
You can initialize all factory defaults. You need Security code to
activate this function.
Memory status Menu 7.8
You can check free space and memory usage of each
repository, Internal memory, Multimedia memory and External
memory. You can go to each repository menu.
Page 40

39
SERVICE
|
Service
Internet Menu 8.1
Home Menu 8.1.1
Connects to a homepage. The homepage will be the site which is
defined in the activated profile. It will be defined by the service
provider if you have not defined it in the activated profile.
Bookmarks Menu 8.1.2
• Connect: Connects to the selected bookmark.
•
Add new: Select this to create a new bookmark.
•
Edit: You can edit the URL and/or the title of the selected
bookmark.
Profiles Menu 8.1.3
A profile is the network information used to connect to the
Internet. Each profile has submenus as follows:
• Activate: Activates the selected profile.
•
Settings: Use this to edit and change WAP settings for the
selected profile.
- Homepage: This setting allows you to enter the address
(URL) of a site you want to use as homepage. You do not
need to type http:// at the front of each URL as the WAP
Browser will automatically add it.
-
Bearer: You can set the bearer data service.
1 Data
2 GPRS
-
Data settings: Appears only if you select Data Settings as a
Bearer / service.
IP address: Enter the IP address of the WAP gateway you
want.
Dial number: Enter the telephone number to dial to access
your WAP gateway.
User ID: The users identity for your dial-up server (and NOT
the WAP gateway).
Password: The password required by your dial-up server
(and NOT the WAP gateway) to identify you.
Call type: Select the type of data call : Analogue of Digital
(ISDN)
Call speed: The speed of your data connection ; 9600
Linger time: You need to enter timeout period. After
entering that, the WAP navigation service will be
unavailable if any data is not input or transferred.
-
GPRS settings: The service settings are only available
when GPRS is chosen as a bearer service.
IP address: Input the IP address of the WAP gateway you
access.
APN: Input the APN of the GPRS.
User ID: The users identify for your APN server.
Password: The password required by your APN server.
-
Connection type: The options for connection type are
Temporary or Continuous and depend on the gateway you
are using.
Page 41

40
SERVICE
\Service
Continuous
A confirmed delivery mechanism but generates more
network traffic.
Temporary
A non-confirmed (connectionless) service.
HTTP
Connecting Clients to Server directly in HTTP
-
Proxy settings
IP address:
Input the IP address of the Proxy server you
access.
Port: Input the Proxy Port
-
DNS settings
Primary server:
Input the IP address of the primary DNS
server you access
Secondary server: Input the IP address of the secondary
DNS server you access
-
Secure settings: According to the used gateway port, you
can choose this option as On or Off.
-
Display image: You can select whether images on WAP
cards are displayed or not.
•
Rename: You can change the profile name.
•
Delete: Deletes the selected profile from the list.
•
Add new: You can add a new profile.
Go to URL Menu 8.1.4
You can connect directly to the site you want. After entering a
specific URL, press the OK key.
Cache settings Menu 8.1.5
The information or services you have accessed are saved in
the cache memory of the phone.
• Clear cache
Removes all context saved in cache.
• Check cache
Set a value whether a connection attempt is made through
cache or not.
Cookies settings Menu 8.1.6
The information or services you have accessed are saved in
the cache memory of the phone.
• Clear cookies
Removes all context saved in cookie.
• Check cookies
Check whether a cookie is used or not.
Security certification Menu 8.1.7
A list of the available certification is shown.
Reset profiles Menu 8.1.8
You can reset profiles to return to original settings.
Browser version Menu 8.1.9
The WAP browser version is displayed.
SMS-Services Menu 8.2
This menu depends on SIM and the network services.
Page 42

41
DOWNLOADS
|
Downloads
Games & more Menu 9.1
My games & more: In this menu, you can manage the Java
applications installed in your phone. You can play or delete
downloaded applications, or set the connect option.
•
Launch: Start the selected application.
•
Info: Shows the information of the application.
•
Option: Some Java applications may require a data
connection to be made. Select this to set the connecting
options.
-
Always: The connection is created immediately without a
notification.
-
Prompt: You will be asked before the application makes the
connection.
-
Never: No connection is allowed.
Java™‚ is a technology developed by Sun Microsystems.
Similar to the way you would download the Java Applet using
the standard Netscape or MS Internet Explorer browsers, Java
MIDlet can be downloaded using the WAP enabled phone.
Depending on the service provider, all Java based programs
such as Java games can be downloaded
and run on a phone. Once downloaded, the Java program can
be viewed in the
My games & more menu where you can
select, execute, or delete. The Java program files saved in the
phone are in .JAD or .JAR format.
Note
You cannot remove or rename the preinstalled folder or
a game in the folder.
Note
• The JAR file is a compressed format of the Java
program and the JAD file is a description file that
includes all detailed information. From the network,
prior to download, you can view all detailed file
descriptions from the JAD file.
• While being based on a standard language (J2ME),
not all Java applications are compatible with all
handsets on sale insofar as specific libraries may be
used for a telephone model. The software may be
blocked or switch itself on when Java applications not
specifically developed for the phone this manual
refers to are downloaded, making it necessary to
“restart” the handset. We would like to point out that
these problems are caused by incompatible
applications and are not a product fault.
Caution
Only J2ME (Java 2 Micro Edition) based programs will
run in a phone environment. The J2SE (Java 2 Standard
Edition) based programs will only run in a PC
environment.
Page 43

42
DOWNLOADS
\Downloads
Pictures Menu 9.2
The left soft key <[Options] will bring up the following options.
•
Set as wallpaper: Currently selected Picture can be set as a
Wallpaper.
•
Write multimedia message: Downloaded Picture can be sent
via MMS.
•
Send via Bluetooth: You can send the picture by bluetooth.
Sounds Menu 9.3
The left soft key < [Options] will bring up the following
options.
• Set as ringtone: This sets the Ring Tone with currently
selected Sound.
•
Write messages: Melody Sound can be sent via SMS and
MMS.
•
Send via Bluetooth: You can send sound by bluetooth.
Page 44

43
ACCESSORIES
|
Accessories
Standard Battery
Stereo headset
Allows hands-free operation.
Includes earpiece and microphone.
Travel Adapter
This charger allows you to charge the
battery while away from home or your
office.
Data cable/CD
You can connect your phone to PC to
exchange the data between them.
There are various accessories for your mobile phone. You can select these options according to your personal communication
requirements.
Note
• Always use genuine LG accessories.
• Failure to do this may invalidate your warranty.
• Accessories may be different in different regions; please check with our regional service company or agent for further
enquires.
Page 45

44
TECHNICAL DATA
\TechnicalData
General
Product name : F3000
System : GSM 900 / DCS 1800 / PCS 1900
Ambient Temperatures
Max : +55°C
Min : -10°C
Name
Address
Signature of representative
Name Issued Date
Product Name
Model Name
LG Electronics Inc
GSM 900 / DCS 1800 / PCS1900 Tri-Band Terminal Equipment
Suppliers Details
R&TTE Directive 1999/5/EC
EN 301 489-1 V1.5.1( 2004-11), EN 301 489-7 V1.2.1(2002-08), EN 301 489-17 V1.2.1(2002-08)
EN 60950-1 : 2001
EN 50360 2001, EN50361 2001
EN 300 328 V1.4.1(2003-04)
TS51.010-1 V6.4.0
Selection according to GCF-CC 3.19.1 including requirements of EN 301 511 V.9.0.2
Jin Seog, Kim / Director
11. Nov . 2005
Product Details
Applicable Standards Details
Declaration
Supplementary Information
LG Electronics Inc. Amsterdam Office
Veluwezoom 15, 1327 AE Almere, The Netherlands
Tel : +31 - 36- 547 - 8940, e-mail : seokim @ lge.com
LG Twin Tower
20, Yeouido-dong, Yeongdeungpo-gu Seoul, Korea 150-721
Trade Name
F3000
LG
0889
Page 46

45
MEMO
Page 47

46
MEMO
Page 48

F 3 0 0 0 用户手册
因手机软件和服务提供商的不同,本手册中的内容可能与
手机中的实际显示有一定出入。
简体中文
1
Page 49

目 录
\ 目 录
安全及有效使用指南 4
F3000特点 7
显示信息 9
屏幕上的图标 9
开 始 10
安装SIM卡和手机电池 10
给电池充电 1
断开充电器 1
常规功能 12
输入文本 12
菜单树 14
更改 1
启动 15
更改 15
重命名 15
通话记录 16
未接来电 16
已接来电 16
拨出电话 16
删除最近呼叫 16
通话计费 16
GPRS信息 17
1
工具 18
1
收藏夹 18
闹钟 18
蓝牙 18
计算器 19
单位转换器 19
时区设置 19
5
公文包 20
联系人 20
日程表 22
备忘录 23
Page 50

信息 24
写短信 24
写多媒体写短信 24
收信箱 25
发信箱 26
草稿箱 27
收听语音邮件 27
小区广播 27
常用短语 28
设定 28
多媒体 30
照相 30
语音备忘录 31
MP3 32
内存状态 33
设定 34
日期和时间 34
手机设定 34
通话设定 34
保密设定 36
网络设定 38
GPRS设置 38
恢复初始设定 38
内存状态 38
互联网 39
互联网 39
SIM服务 41
下载 42
游戏&更多 42
图片 43
声音 43
附件 44
技术数据 4
| 目 录
5
3
Page 51

安全及有效使用指南
\ 安全及有效使用指南
辐射波照射和吸收比率(SAR)信息
该款F3000型移动电话的设计完全遵循了辐射波照射的相关
安全要求。该要求基于科学的指导原则,包括用于确保所有人
(无论年龄和健康状况)安全的辐射允许限度。
•
辐射波照射指导原则采用了一种称为吸收比率(或SAR)的
测量单位。进行SAR测试时,手机将使用一种标准化的方
法,在所有可用的频段上以其最高测定能量级发射频率。
•
虽然各种型号LG手机的SAR级可能不尽相同,但它们均是
遵循辐射波曝露的相关规定设计制造而成。
•
国际非电离辐射保护委员会(ICNIRP)所规定的SAR界限是
在十(10)克人体组织上平均为2W/kg。
•
经DASY4测试表明,此型号手机在手持使用时SAR的最大
值为0.988W/kg(10克)。
•
各国/地区政府所采用的SAR数据信息是由电气和电子工程
师协会(IEEE)评估制定,其标准是在一(1)克人体组织上平
均为1.6W/kg(例如美国、加拿大、澳大利亚和台湾)。
产品的保养与维护
警告: 请仅使用经过认可且与特定手机型号相符的电池、充电
器和配件。使用其它类型的配件将可能终止该手机的相关证
明或担保,甚至可能造成危险。
4
•
请勿擅自拆装手机。(如需任何维修,请将其交给具备相关
资格的服务技术人员。)
•
手机应远离诸如电视机、收音机或个人计算机等电器
设备。
•
切勿将手机置于散热设备或炊具附近。
•
切勿抛掷手机。
•
切勿对手机造成任何机械振动或震荡。
•
手机套或乙烯基外包装均有可能对手机表面造成损伤。
•
不要使用刺激性的化学药品(如酒精、苯、稀释剂等)或
清洁剂来清洁手机。这存在引发火灾的危险。
•
切勿将手机置于过度烟尘环境中。
•
切勿将手机靠近信用卡或交通票卡,这有可能影响磁条中
存储的信息。
•
切勿以尖锐物体接触屏幕,否则将对手机造成损伤。
•
切勿将手机置于液体或潮湿的环境中。
•
谨慎使用耳机等手机配件。
•
如果将手机放在口袋或手提包时没有盖上手机插孔(电源
插销),则金属物件(如硬币、回形针或钢笔)会使手机短
路。请在不使用时始终盖好插孔。
•
千万不要将手机放在微波炉上,否则会使电池爆炸。
Page 52

•
只有授权人员才能对手机及其配件进行维修。安装不当或
非法维修可能会发生意外,并因此使保修失效。
•
如果天线损坏,请勿使用手机。如果损坏的天线接触
机壳,则会导致其轻度灼伤。请联系LG授权维修中心,
以便更换损坏的天线。
•
手机标签包含有用于客户支持目的的重要信息。不要将其
撕掉。
有效的手机操作
要以最少的耗电量发挥手机的最佳性能,请您注意以下
事项:
•
通话时请握住手机。直接向话筒中说话,天线朝上,并且
手机应位于肩部之上。如果天线可以抽出/伸缩,则在通话
时应拉出天线。
•
使用手机时请勿握住天线,因为这样不仅会影响通话
质量,还将增加手机工作时的耗电量,从而缩短通话和
待机时间。
•
如果您的手机支持红外线,切勿将红外线对准人的眼睛。
电器设备
| 安全及有效使用指南
所有无线电话均会造成干扰,这可能会影响电器设备的
性能。
•
在未得到允许的情况下,切勿将手机靠近医疗设备。请避免
将手机放置在起搏器上方,例如,放在您胸前的口袋中。
•
手机还可能对某些助听设备造成影响。
•
少量干扰还可能影响到电视机、收音机、PC等。
•
不要折弯、刮擦或将其暴露在静电下。
道路安全
在您驾驶时,请查阅所在区域有关手机使用的法规。
•
请勿在驾驶时使用手持电话。
•
驾驶时应全神贯注。
•
如有条件,可使用免提装置。
•
如驾驶条件不允许,请将车停在路边或空地旁,然后再
拨打或接听电话。
•
射频能量可能影响机动车辆上的某些电子系统,例如车载
音响、安全设备等。
5
Page 53

安全及有效使用指南
\ 安全及有效使用指南
•
在驾车时,不要将手机或免提装置放在靠近安全气囊的
地方。如果无线装置安装不当,则在安全气囊弹出时,
您可能会受到严重创伤。
爆破现场
切勿在引爆过程中使用手机。请遵守相关限制,并按照规定
行事。
潜在的爆炸性环境
•
切勿在加油站使用手机。切勿将手机靠近燃料或化学
物品。
•
如车辆上携带有移动电话或其配件,请勿在车厢里装载或
运输可燃性气体、液体或易爆物品。
飞机上
无线设备将对飞机通讯造成影响。
•
登机前请关闭移动电话。
•
未经乘务人员允许,请勿擅自使用手机。
6
电池信息与保养
•
您不必在充电前将电池完全放电。与其它电池系统不同,
该手机电池不存在影响电池性能的记忆效应。
•
请仅使用LG电池和充电器。LG充电器根据电池而设计,
可最大限度地延长电池寿命。
•
切勿拆卸电池,或造成电池短路。
•
保持电池组上金属触点的干净清洁。
•
电池无法再使用时,请更换电池组。电池组在更换前一般可
进行数千次充电。
•
新换电池应继续充电,以利发挥其最大功效。
•
切勿将电池充电器直接曝露于阳光下,也不应在过度
潮湿的环境中使用(如浴室)。
•
切勿将电池置于高温或寒冷的环境中,这将影响电池的
性能。
网络服务
•
本用户手册中所述的服务和功能视网络类型或预订情况而
定。因此,您的手机中并非所有菜单均可用。有关预订服务
和功能的更多信息,请联系您的网络运营商。
Page 54

F3000特点
手机部件
1. 听筒
2. 主LCD屏幕
•
顶部: 信号强度、电池电量及
其它功能
•
底部: 软键指示
3. 数字和字符键
•
在待机模式下: 输入号码以
便拨号。
长按:
0
- 国际电话
1
- 激活语音邮件中心菜单
2
至 9 - 快速拨号
*
- 在拍照模式下激活
定时器功能
•
在编辑模式下: 输入数字和字符。
4. 话筒
5. 外LCD屏幕
6. 左侧按键
•
在待机模式下(开盖):
按键音量
•
在待机模式下关闭
•
在功能表中: 上拉与下拉
•
通话时: 听筒音量
7. MP3键
8. 相机镜头
9. 闪光灯
10. 右侧按键
11. 侧相机键
| F3000特点
7
Page 55

4
12
3
6875
F3000 特点
\ F3000特点
1. 导航键
•
在待机模式下
U
短按: 列出收藏夹
D
短按: 列出电话簿
R
短按: 列出信息/语音邮件/日程表/闹铃
L
短按: 列出情景模式
长按: 激活/取消振动模式
•
在菜单中: 上拉与下拉
2. 确认键
3. 软键
•
这些按键执行显示屏底部所示的功能。
4. MP3热键
•
直接激活MP3菜单。
5. 照相热键
•
直接激活照相菜单。
6. 发送键
•
拨打电话或接听来电。
•
在待机模式下: 显示最近的拨出电话、已接来电和未接
来电。
7. 结束/电源键
•
开机/关机(长按)
•
结束通话或拒接来电。
8. 清除/取消键
8
Page 56

显示信息
图标区域
文本和图形区域
软键指示
区域 说明
第一行 显示多种图标。请看屏幕右侧。
中间各行 显示信息、说明以及输入的任何信息,
如要拨打的号码等。
最后一行 显示当前给两个软键指定的功能
屏幕上的图标
图 标 描 述
表示网络信号的强度。
通话连接成功。
您可以使用GPRS服务。
图 标 描 述
您正在使用漫游服务。
闹铃已设定并启动。
显示电池电量。
收到文本信息。
收到语音信息。
查看日程表。
情景模式中的振动功能。
情景模式中的私人功能。
情景模式中的大声功能。
情景模式中的无声功能。
情景模式中的耳机功能。
转接来电。
指示手机目前正在访问WAP。
指示您目前正在使用GPRS。
蓝牙已启动。
| F3000特点
9
Page 57

开 始
\ 开 始
10
安装SIM卡和手机电池
在卸下电池前确保电源已关闭。
1. 卸下电池盖。
按电池释放闩,将电池盖沿着
手机底部滑动。卸下电池盖。
2. 卸下电池
轻推电池前端,将电池从电池室取出。
3. 安装 SIM卡
将SIM卡推进SIM卡插槽中。确保SIM卡以正确方式插入
并且卡上的金色接触区域面朝下。要取出SIM卡,轻轻将
卡向下按并反向推出。
插入SIM卡 取出SIM卡
4. 安装电池。
先将电池后端插入电池室底
部。向下推电池前端,直至电
池卡入到位。
Page 58

5. 安装电池盖。
将电池盖放到手机的适当位
置,并滑动它直至闩锁卡入
到位。
给电池充电
要用旅行充电器为手机充电,您必须先装上电池。
1. 将旅行充电器的一端插入手机底部。
2. 将旅行充电器的另一端连接到墙上的AC电源插座。仅使用
原装充电器。
断开充电器
如图所示,按充电器适配器两侧的按钮,将其与手机断开。
小心
•
不可强行插入充电接口,因为这将损坏手机及旅行充
电器。
•
将电池组充电器垂直插到墙上电源插座。
•
如果在本国外使用电池组充电器,务必使用附属的适配插
头进行适当的配置。
•
充电时切勿取出电池或SIM卡。
警告
•
在发生雷电时,务必拔掉电线和充电器,以免遭受电击或
发生火灾。
•
确保没有细尖的物体,如动物牙齿、指甲等进入手机内触
碰电池。这存在引发火灾的危险。
•
手机在充电时,不要拨打或接听电话,否则会使手机短路
和/或发生电击或引发火灾。
| 开 始
11
Page 59

常规功能
输入文本
您可以使用手机键盘输入字母数字字符。例如,在电话本中存
\ 常规功能
储姓名、写短信、创建个人问候语或者在日历中安排事件等,
都需要输入文本。
更改文本输入模式
1. 当处于允许输入字符的区域中时,在LCD屏幕的右上角可以
看到文本输入模式指示符。
#
2. 通过按
选定。
使用 T9 英文模式
T9 预测性文本输入模式允许您以最少的按键次数输入单词。
当您按每个按键时,手机开始显示它根据内置词典认为
正确的字符。您还可以在词典中添加新单词。当添加新单词
时,手机将从词典中选择可能性最大的单词。
1. 当处于T9预测性文本输入模式时,通过按
始输入单词。每个字母按一次键。
12
更改文本输入模式。T9模式只能通过左软键
2到9
键开
•
在输入字母时,单词不断更改。请忽略屏幕上显示的
单词,直到整个单词输入完毕。
•
如果在完成输入之后单词仍不正确,按向下导航键一次
或多次以循环选择其它单词。
例: 按
4663
按
4663
2. 输入整个单词之后再对输入的内容进行编辑或删除。
0或R
3. 按
按住
C
删除整个单词。
输入Good
[向下导航键]输入Home
键以空格结束每个单词。要删除字母按C。
备注
要从文本输入模式中退出而不保存输入内容,按E。手机
返回待机模式。
使用 ABC 模式
使用2至9键输入文本。
1. 按标示为所需字母的按键:
•
按一次输入第一个字母
•
按两次输入第二个字母
•
依此类推
Page 60

0
2. 要插入空格,按
C
键以清除显示的所有内容。
按 键
大 写 小 写
. , / ? ! - : ' " 1 . , / ? ! - : ' " 1
1
A B C Ä À Á Â Å Æ 2 a b c ä à á â ã å æ 2
2
D E F Ë È É Ê 3 d e f ë è é ê 3
3
G H I Ï Ì Í Î Ğ 4 g h i ï ì í î ğ 4
4
J K L 5 j k l 5
5
M N O Ñ Ö Ø Ò Ó Ô Õ Œ 6 m n o ñ ö ø ò ó ô õ œ 6
6
P Q R S ß Ş 7 p q r s ß ş 7
7
T U V Ü Ù Ú Û 8 t u v ü ù ú û 8
8
W X Y Z 9 w x y z 9
9
[空格键]
0
键一次。要删除字母,按C键。按住
按顺序显示的字符
0
[空格键]
0
使用123(数字)模式
使用123模式,您可以在文本信息中输入数字(例如电话号
码)。按与所需数字对应的按键,然后手动切换回适当的文本
输入模式。
使用符号模式
使用符号模式可输入各种符号或特殊字符。
*
要输入符号,请按
按[OK]键。
键。使用导航键选择所需的符号,然后
| 常规功能
13
Page 61

\ 菜单树
1 更改
1 振动
2 静音
3 普通
4 大声
5 耳机
4 公文包
1 联系人
日程表
2
3 备忘录
6 多媒体
1 照相
语音备忘录
2
MP3
3
内存状态
4
8 互联网
1 互联网
2 SIM服务
14
2 通话记录
1 未接来电
2 已接来电
3 拨出电话
4 删除最近呼叫
5 通话计费
6 GPRS信息
3 工具
1 收藏夹
2 闹钟
蓝牙
3
4 计算器
5 单
位转换器
时区设置
6
5 信息
1 写短信
2 写多媒体写短信
3 收信箱
4 发信箱
5 草稿箱
6 收听语音邮件
7 小区广播
8 常用短语
9 设定
7 设定
1 日期和时间
2 手机设定
3 通话设定
4 保密设定
5 网络设定
6 GPRS设置
7
恢复初始设定
内存状态
8
9 下载
1 游戏&更多
2 图片
3
声音
Page 62

更改菜单树
在“情景模式”中,您可以调节和自定义手机铃声,用于不同的
事件、环境或群组。有五种预设的情景模式: 振动、静音、
普通、大声和耳机。除振动和无声模式外,其他模式均可以
被更改。
启动 功能表 1.x.1
1. 屏幕上显示情景模式的列表。
2. 在情景模式列表中,滚动到要启动的情景模式,然后按左
<
[选择]或“确定”键。
软键
3. 然后,选择启动
。
更改 功能表 1.x.2
在情景模式列表中,滚动到所需的情景模式。按左软键<或
OK键后,选择“更改”。只有私人、大声和耳机模式拥有该
功能表。
•
来电提示: 设置来电提示类型。
•
铃声类型: 从列表中选择所需的铃声类型。
•
铃声音量: 设置铃声的音量。
•
信息提示: 设置信息的提示类型。
•
信息提示音: 选择信息的提示音。
•
按键音: 选择所需的按键音。
•
按键音量: 设置按键音的音量。
•
翻盖音: 设置翻盖音的类型。
•
确认音音量: 设置声效的音量。
•
开/关机音量: 设置开机/关机时的铃声音量。
•
自动应答: 请注意只有耳机模式拥有该子功能表。
- 关: 即使您的手机响铃,也不会自动应答。
- 5秒后: 在5秒后自动应答。
- 10秒后: 在10秒后自动应答。
重命名 功能表 1.x.3
您可以将情景模式重命名为所要的任何名称。
注意
不能重命名振动、无声和耳机情景模式。
1. 要更改情景模式的名称,在情景模式列表中滚动到该情景
模式,在按“确定”键或左软键
2. 键入所需的名称,然后按左软键
<
之后,选择重命名。
<
[确认]。
| 更改
15
Page 63

通话记录
仅当网络支持服务区内的主叫线路识别(CLI)时,您才能检查
未接来电、已接来电和拨出电话。
屏幕上显示电话号码和姓名(如果有)以及通话日期和时间。
您还可以查看通话计时和计费。
\ 通话记录
未接来电 功能表 2.1
此选项允许您查看最后10个未应答的来电。
已接来电 功能表 2.2
此选项允许您查看最后10个已接来电。
拨出电话 功能表 2.3
此选项允许您查看最后20个去电(拨出或尝试)。
删除最近呼叫 功能表 2.4
使用此功能删除未接来电列表、已接来电列表或拨出电话列
表。您也可以选择全部通话一次性删除所有通话列表。
16
通话计费 功能表 2.5
通话计时 功能表 2.5.1
可查看来电和去电的通话时间长度。您也可以重置通话
时间。可以使用以下计时方式:
•
最后通话: 最后一次通话的时间长度。
•
所有通话时间: 上次计时器重设之后,所有来电和去电的总
时间长度。
•
已接来电: 来电的时间长度。
•
拨出电话: 去电的时间长度
•
全部清零: 允许您按左软键<[是]来清除所有通话的时
间长度。
通话费用 功能表 2.5.2
可检查最后通话、全部通话的费用,余额或全部清零。要全部
清零,您需要PIN2码。
设定 功能表 2.5.3
(需SIM卡支持)
•
通话费率: 您可设置货币类型和计费单价。请与通话费率的
服务提供商联系以获得计费单价。要在该功能表选择货币
或单位,您需要PIN2码。
Page 64

•
设定话费: 该网络服务可让您通过选择计费单位来限制
您的通话费用。如果您选择读取,将显示余额。如果您选择
更改,您可以更改计费限制。
•
自动显示: 该网络服务可让您自动查看最后通话的费用。
如果您在自动显示功能表中选择开,通话结束时,您即可
查看最后通话的费用。
GPRS信息 功能表 2.6
您可以查看通过GPRS在网络上传输的数据量。另外,您还可
以查看您的在线时间。
通话计时 功能表 2.6.1
您能查看GPRS的最后浏览时间和全部浏览时间,您也可以将
通话计时器全部清零。
数据量 功能表 2.6.2
您可以查看已发送,已接收,全部和全部清零。
| 通话记录
17
Page 65

工具
收藏夹 功能表 3.1
此选项允许您将自己喜欢的项目添加至已提供的列表中。创建
自己的菜单后,您可通过按向上导航键从待机屏幕中快速访
问所需的功能。
\ 工具
闹钟 功能表 3.2
您最多可以设置五个闹钟。
1. 选择开并输入闹钟的时间。
2. 选择重复周期: 一次,周一~周五,周一~周六,每天。
3. 选择闹钟铃声之后按
4. 编辑闹钟名称之后按
<
<
[确认]。
[确认]。
蓝牙 功能表 3.3
本手机支持内置蓝牙连接,这样使其可与兼容的蓝牙手机、计
算机应用程序等连接。
注意
支持DUN连接的蓝牙软件(蓝牙堆栈):Windows 1.4以及
Windows 3.0版本蓝牙驱动。
18
配套设备 功能表 3.3.1
您可以查看与蓝牙手机兼容的所有设备。
免提设备 功能表 3.3.2
如果您进入“我的设备”或“免提设备”菜单,则可以访问以
下选项。
•
连接/断开: 允许您连接其它蓝牙设备。
•
新增: 允许您搜索新的蓝牙设备。
•
重命名:允许您更改蓝牙设备名称。
•
设为准许/设为不准许: 允许您在各个蓝牙设备间设置已验
证的连接。
•
全部服务: 允许您查看蓝牙设备支持的所有服务。
•
删除: 允许您删除蓝牙设备。
•
全部删除: 允许您删除所有蓝牙设备。
设定 功能表 3.3.3
您可以注册与蓝牙兼容的新设备。如果您已经添加了此设
备,则可以在输入密码后搜索该设备。
•
设置蓝牙: 您可以激活或取消蓝牙设备功能。
Page 66

•
我的手机的可见性: 您可以设置您的手机显示在其它蓝牙
设备上的功能。
•
我的手机的名称: 您可以设置蓝牙设备的名称。
默认名称为 LG F3000。
计算器 功能表 3.4
该功能表包含的标准功能包括 +、-、×、÷: 加、减、乘、
除。
1. 通过按数字键输入数字。
2. 通过导航键选择一个运算符。
3. 然后输入数字。
4. 您可以按
5. 按
6. 您可按
<
[结果]查看计算结果。
<
[重设]或继续输入数字,重复上述过程。
>
键退出计算器。
注意
使用C按键删除任何数字或符号。如果按按键#,则可
输入负数。此外,如果按按键*,则可输入小数。
单位转换器 功能表 3.5
该功能可将任何单位转换为您需要的单位。有4种可以转换的
单位类型: 长度、面积、重量和音量。
<
1. 您可以通过按
L和R
2. 按
3. 您可以按
4. 您可以查看转换后的结果。您可以按
入数字。
[单位]键选择4种单位类型中的一种。
选择您想转换的单位。
U和D
在当前值和转换值之间切换。
*
在小数点后输
时区设置 功能表 3.6
您可以查看世界各个城市的时间。
L和R
1. 通过按
间。
2. 您可以使用
键,您可以查看属于不同时区的城市时
<
[设定]键设置您选择的城市的时间。
| 工具
19
Page 67

公文包
联系人 功能表 4.1
注意
或者,在待机模式中按右软键>[电话本]。
搜索 功能表 4.1.1
\ 公文包
(从电话簿呼叫)
1. 按左软键<[选择]或[确定]进行搜索。
2. 输入要搜索的姓名或选择左软键
簿列表。
注意
在中、英文模式下,也可以通过输入要搜索的姓名的第一个
字母立即进行搜索。
3. 如果要编辑、删除、复制条目或向一个条目发送信息,请选
<
择左软键
•
编辑: 可通过使用导航键编辑姓名、号码、群组、头像
和图片。
•
写文本信息/写多媒体信息: 找到您要的号码后,则可给
选定的号码发送一条文本信息/多媒体信息。
[选项]。屏幕上显示以下菜单。
20
<
[列表]查看所有电话
•
电子邮件: 您可以发送电子邮件。
•
通过蓝牙发送: 您可以通过蓝牙发送电话本的数据到蓝
牙适配器。
•
复制: 可将一个条目从 SIM 卡复制到手机或从手机复
制到 SIM卡。
•
主要号码: 可从您常用的移动电话、家庭电话和办公电
话中选择一个号码作为主号码。设置此号码后,在搜索
时主号码将优先显示。
•
删除: 可删除一个条目。
新增 功能表 4.1.2
您可以使用该功能来添加电话簿条目。
手机内存容量为1000个条目。SIM卡内存容量取决于移动电
话服务提供商。
您一般可以在手机内存中保存英文20个、中文5个字符的
姓名。您可以在SIM卡中保存字符,而字符的数量取决于
SIM卡。
群组 功能表 4.1.3
每个群组最多可以列出20个成员。您可以设定7个群组列表。
•
成员列表: 您可以查看您想要的成员。
•
群组来电铃声: 您可以根据群组不同设定来电铃声。
Page 68

•
群组标志: 您可以根据群组不同设定标志。
•
添加成员: 选择添加成员。每个群组不能超过20名成员。
•
删除成员: 您可以把成员从该群组中删除。
•
重命名: 您可以修改和编辑群组名称。
快速拨号 功能表 4.1.4
您可以为姓名列表条目指定按键2~9中的任一键。
可按此按键直接呼叫。
设定 功能表 4.1.5
滚动到“设定”,然后按左软键<[选择]。
•
保存至: 滚动光标到保存至,然后按<[选择]进入。
- 如果您选择自选,在添加条目时,手机将提示保存至
何处。
- 如果您选择
直接将条目保存在SIM卡或手机。
•
查找方式: 滚动屏幕光标到查找方式,然后按
[选择]进入。
- 如果您选择自选,在查找时,手机将提示如何查找。
- 如果您选择姓名或号码,手机不提示您如何查找,直接
按姓名或号码查找条目。
SIM卡或手机,手机不提示您保存至何处,
<
•
查看选项: 滚动屏幕光标到查看选项,然后按
<
[选
择]进入。
- 只显示姓名: 您可设置电话薄只显示姓名。
- 图片电话本: 您可设置电话薄显示个性图片。
- 姓名与号码: 您可设置电话簿显示姓名和号码。
全部复制 功能表 4.1.6
您可以将条目从SIM卡内存复制/移动到手机内存或从手机内
存复制/移动到SIM卡内存。
<
1. 滚动到全部复制,然后按
•
SIM 卡转到手机: 将SIM卡中的条目复制到手机内存。
•
手机转到SIM卡: 将手机内存中的条目复制到SIM卡。
[选择]进入该功能表。
2. 您可以看到下列子功能表。
•
保留原号码: 复制的同时,原来的电话记录被保留。
•
删除原号码: 复制的同时,原来的电话记录被清除。
全部清除 功能表 4.1.7
您可以删除SIM卡和手机中的所有条目。该功能需要安全
密码。
| 公文包
21
Page 69

公文包
信息提示 功能表 4.1.8
•
特别服务号码
使用该功能访问您的网络运营商提供的特殊服务
(如果您的SIM卡支持)。
•
内存状态
\ 公文包
该功能可让您查看电话簿的已用内存和可用内存。
•
本手机号码(取决于SIM卡)
您可以存储并查看自己的SIM卡号码。
日程表 功能表 4.2
当您进入这一功能表,会有一个日历显示出来。屏幕顶端是日
期部分,在屏幕底端是图标(日程表和备忘录)。
如果您已设定提示,手机将发出提示音。
更改日、月、年。
按 键 描述 按 键 描述
1 3
* #
在日程表模式下,按左软键<[选项],如下所示;
每年
每月
U D
L R
22
每周
每天
新增 功能表 4.2.1
可为选定的日期添加新的日程和所选日期的备忘录。可存储多
达 20 条记事。
<
输入主题然后按左软键
信息: 时间、重复和闹钟。
[确认]。在以下各部分输入相应的
查看 功能表 4.2.2
如果要查看记事详情,请按左软键<[选择]。按左软键
<
[选项]删除、修改选定的记事。
查看全部 功能表 4.2.3
显示为所有日期所设定的提示。使用U,D浏览提示列表。
如果要查看记事详情,请按左软键[选择]。
删除已过日程 功能表 4.2.4
您可以删除已经过期的日程。
全部删除 功能表 4.2.5
您可以删除所有提示。
Page 70

备忘录 功能表 4.3
1. 按左软键<[选择]选择备忘录。
<
2. 如果备忘录为空,可按左软键
3. 输入备忘录内容,然后按左软键
[添加]增加记事。
<
[确认]。
| 公文包
23
Page 71

信息
本功能表涉及的功能包括: SMS(短消息服务),MMS(多媒体
信息服务),语音邮件和网络服务信息。
写短信 功能表 5.1
您可写入并编辑文本信息。您也可以查询信息页数。
\ 信息
注意
支持EMS R5的手机可以发送彩色图片、音乐、文字字体等
等,但其他不支持此功能的手机可能并不能正确接收您发送
的彩色图片、音乐或文字字体。
添加
•
符号: 您可以添加特殊符号。
•
图片: 可插入预设图片或我的文件夹中的图片,以便用文本
信息发送。
•
歌曲: 您可以添加支持短信的歌曲。
•
常用短语: 您可以使用已在手机中设置过的常用短语。
•
联系人: 您可以在信息中添加电话本中的电话号码。
•
名片: 您可以添加您的个人名片。
24
选项
•
发送: 发送文本信息。
1. 输入接收者的号码。
2. 按D键可加入更多的接收者。
3. 可在电话本中添加电话号码。
4. 输入号码后按<键。
•
保存: 将信息储存在草稿箱内。
•
字体: 您可以选择字体的“大小”和“风格”。
•
颜色: 您可以选择背景和文字的颜色。
•
对齐: 您可以将信息内容调整为居左、居中或居右。
•
字典: 您可以增加自己的单词,此选项仅在编辑模式为
T9英文输入法(T9Abc/ T9abc/T9ABC)时才显示。
•
T9语言输入法: 选择T9输入法。
•
退出: 如果在写信息时按“退出”,可结束写信息并返回“写
文本信息”菜单。您写的信息不会保存。
写多媒体写短信 功能表 5.2
您可以编写多媒体信息,查看信息大小。
Page 72

1.
您可以创建一条新信息或者选择已经编制好的多媒体模板。
2. 按添加可以向信息里添加符号,照片,照相,图片,歌曲,
语音备忘录,常用短语,电话本,名片。
选项
•
发送: 您可以发送多媒体信息给多个接收人,并可以设定
信息优先级、有效期和发送报告。
•
预览: 您可以预览编写的多媒体信息。
•
保存:
您可以将多媒体信息保存到草稿箱或者保存为模板。
•
增加页面: 您可以在当前编辑的片段之前或之后增加一
条新片段。
•
转到: 您可以移至前一或后一片段。
•
删除幻灯片: 您可以删除当前的片段。
•
设置信息格式
- 设置定时器: 您可以为多媒体信息片断中的文本,图片
和歌曲设置定时器。
•
删除多媒体: 您可以删除片断中的图片或者歌曲。这一选项
仅在有多媒体存在时才显示。
•
字典: 您可以增加自己的单词,此选项仅在编辑模式为
T9英文输入法(T9Abc/ T9abc/T9ABC)时才显示。
•
T9语言输入法: 选择一种T9输入法。
•
退出: 您可以退回到“写多媒体信息”菜单,你写的信息不
会保存。
注意
如果您在编写多媒体短信时选择图片(15K),载入持续时间至
少约需15秒。此外,在载入期间您不能激活按键。15秒后,即
可用它来编写多媒体短信。
收信箱 功能表 5.3
当收到信息时,手机会给予提示。收到的信息会存储到收信箱
中。在收信箱中,您可以通过指示图标识别每一条信息。图标
的含义如下图所示。
图 标 指示图标
多媒体短信
短信息
SIM卡短信
已读多媒体短信
已读短信息
Push信息
多媒体信息通知
| 信息
25
Page 73

信息
如果手机显示“SIM卡信息已满”,您将需要从SIM卡的
收信箱中删除信息。如果手机显示“没有空间存储信息”,
您可以通过删除信息、媒体和应用程序释放存储空间。
•
SIM 信息
SIM信息是指存储在SIM卡上的特殊信息。
<
若要读取一条信息,通过按
\ 信息
•
查看: 您可以查看收到信息。
•
回复信息: 您可以向发送方回复信息。
•
转发: 您可以转发信息给另一方。
•
回复电话: 您可以向发送方回复电话。
•
删除: 删除所选信息。
•
查看详情: 您可以查看收信箱中信息的标题(仅适用于多媒体
选择读取信息。
信息)、信息发送的日期和时间、信息的类型和信息的大小。
•
全部删除: 您可以删除收信箱中的所有信息。
发信箱 功能表 5.4
您可以看到已经被发送和没有被发送的信息。对于已经发送
的信息,您可以看到发送状态报告。
26
同在收信箱中一样,您可以通过图标识别信息。
图 标 指示图标
多媒体信息已发
多媒体信息未发
多媒体信息发送已确认
短信息已发
短信息未发
短信息发送已确认
当您使用已发送信息时,可以使用以下选项。
•
查看: 您可以查看已发送的信息。
•
转发: 您可以转发当前信息给其他接收方。
•
删除: 您可以删除所选信息。
•
查看详情: 您可以查看发信箱中信息的标题(仅适用于
多媒体信息)、信息发送的日期和时间、信息的类型和信息
的大小及状态报告。
•
全部删除: 您可以删除发信箱中的所有信息。
Page 74

草稿箱 功能表 5.5
使用此功能表,您可以查看并编辑保存在草稿箱中的信息。
可以使用以下选项。
•
查看: 您可以查看选择的信息。
•
编辑: 修改您选择的信息。
•
删除: 删除您选择的信息。
•
查看详情: 用于查看信息的详情。
•
全部删除: 删除草稿箱中的所有信息。
收听语音邮件 功能表 5.6
一旦选择此菜单,输入语音邮箱号码后,只需按左软键<[确
认]即可收听语音邮件。您也可以在待机模式下长按
收听语音邮件。
注意
当您收到语音邮件时,您的手机会显示相应的图标并且您可
以听到提示音。请与网络提供商联系,了解有关其服务的详细
信息,以便对您的手机正确进行配置。
1
键来
小区广播 功能表 5.7
(视网络和您所申请的服务而定)
小区广播信息是通过网络以文本信息形式向 GSM 用户发送
的。它们提供诸如天气报告、交通新闻、出租车、药店和股票
行情之类的一般信息。不同类型的信息有不同的号码;因此您
可以联系服务提供商,以便正确输入特定信息的特定号码。在
收到小区广播信息时,您会看到弹出信息,告诉您已收到
信息,或者直接显示小区广播信息。要再次查看信息或者手
机不在待机模式下,请按下述步骤操作:
读取 功能表 5.7.1
当您接收到小区广播信息时,可以通过选择读取显示
信息。
U,D
移动光标读取其他的信息。
栏目 功能表 5.7.2
(视网络和您所申请的服务而定)
•
新增: 您可以在手机中添加小区广播信息号码并加上
标题。
•
查看列表: 您可以查看添加的小区广播信息栏目。如果您
按<[选项],您可以修改和删除被添加的小区广播信息
栏目。
| 信息
27
Page 75

信息
•
当前列表: 您可以在启动列表中选择小区广播信息栏目。
如果您启动了一个栏目,您将会接收此栏目的信息。
常用短语 功能表 5.8
常用短语 功能表 5.8.1
手机中有预设的文本模板。
\ 信息
多媒体模板 功能表 5.8.2
您可以使用以下的功能。
•
查看: 您可以查看多媒体信息模板。
•
修改: 您可以编辑多媒体信息模板。
•
新增: 您可以添加新的多媒体信息模板。
•
写信息: 您可以使用模板写多媒体信息。
•
删除: 您可以删除多媒体信息模板。
•
全部删除: 允许您删除所有多媒体信息模板。
名片 功能表 5.8.3
您可以添加自己的个人名片。
28
设定 功能表 5.9
文本信息 功能表 5.9.1
•
信息类型: 文本、语音、传真、国内传呼、X.400、电子邮件、
ERMES
通常,信息类型设定为文本格式。您可以将文本信息转换为
其它格式,以配合接收信息的设备。要获取有关该功能的
信息,请联系您的服务提供商。
•
有效期: 该网络服务可让您在发送信息时设定文本信息在
信息中心储存的期限。
•
状态报告: 如果您在该功能表中设定是,您即可查询您的信
息是否已成功发送。
•
回复付费: 发送信息时,可以让接收信息者回复并将回复费
用记入您的话费清单。
•
短信中心: 如果您想发送文本信息,您可以通过短信中心
发送。
彩信 功能表 5.9.2
•
优先级: 您可以设置多媒体信息的优先级。
•
有效期: 该网络服务可让您在发送信息时设定信息在信息
中心储存的期限。
Page 76

•
发送报告: 如果您在该功能表中设定是,您即可查询您的
信息是否已成功发送。
•
自动下载: 如果您选择开,您将自动接收多媒体信息。
如果您选择关,您将仅能在收件箱中收到通知信息,
然后再查阅这些通知信息。如果您选择仅限本地网络,
当您在本地网络时将自动下载彩信,当您不在本地网络
时您需要确认是否接收彩信。
•
网络设定: 如果选择多媒体信息中心,您可以设置多媒体
信息中心的URL地址。
•
允许的类型
个人: 私人信息。
广告: 商业信息。
信息提示: 必要信息。
语音邮件中心 功能表 5.9.3
如果您的网络服务提供商支持此功能,则可接收语音邮件。
当新语音邮件已接收,屏幕上将显示符号。
•
本地中心: 选择本地中心听取语音邮件。
•
漫游地中心: 如果支持漫游服务,您在漫游中可以收取
语音邮件。
小区广播 功能表 5.9.4
•
接收
如果您选择此选项,您的手机将接收小区广播信息。
•
来电提示
如果您选择该功能,当您收到小区广播信息时,
手机将发出提示音。
•
语言
手机将以您所选的语言来接收小区广播信息。
增加信息 功能表 5.9.5
选择是否接收Push 信息。
| 信息
29
Page 77
多媒体
照相 功能表 6.1
照相 功能表 6.1.1
要在手机翻盖打开时拍照
<
1. 选择照相,然后按
可以长按
2. 对准您要拍照的对象,然后按
\ 多媒体
3. 如果您要存储照片,按
注意
您可以通过按导航键控制图像尺寸、亮度、颜色和缩放。
(U或D)。
•
缩放[ ]: 允许您设置的缩放值为x1至x5,视分辨率
而定(默认值为x1)。
•
颜色[ ]: 具有3种可用设置: 彩色、怀旧和黑白使用。
•
亮度[ ]: 使用上/下导航键来调节光照。
具有5种光照级别可用:-2、-1、0、+1和+2。
•
自动拍摄[ ]: 允许您选择延迟时间(关闭、3秒和
5秒)。手机将会在指定的时间之后拍照。
•
内存状况[ ]: 检查可用内存以便拍摄新的照片。
30
q
。如果您想直接进入此功能表,
。
O
<或O
。
。
•
闪光灯 [ ]: 允许您在黑暗的场所拍照时设置闪光灯。
•
分辨率[ ]: 允许您将图像尺寸设置为以下一种:
(1280×960)、(640x480)、( 320x240)、(128x160)和
(48x48)。
•
图片质量[ ]: 允许您将图像质量设置为: 基本、正常和
精细。
要在手机翻盖关闭时拍照
当您自拍时通过外屏就可以看到自己。
1. 长按
q
。
q
2. 使用侧面的音量键[
3. 对准拍摄对象,以便拍摄一幅图像,然后按
此时,照片会自动保存。
]选中照相,然后按[q].
q
。
照在相框中 功能表 6.1.2
您可以在不同的背景上拍摄照片。
U或D
此外,您也可以通过按导航键(
)来选择相框。
连续拍摄 功能表 6.1.3
您可以连续拍摄最多9张照片。照相之后,您可以通过按左软
键(
<
)浏览照片,您也可以通过按<存储照片。
Page 78

注意
如果您将分辨率设置为320x240,您只能照6张照片。如果是
128x160,则可以照9张照片。
相册 功能表 6.1.4
您可以浏览和发送照片,另外,您可以将照片设置为墙纸。
•
全部图片: 您可以按顺序浏览所有的照片。
•
普通图片: 您可以浏览除了相框图片和电话本图片以外
所有的图片。
•
相框图片: 您可以浏览所有的相框图片。
选项
-
图片预览: 可以在一个屏幕中查看最多9个缩略图。
-
写多媒体信息: 可以通过多媒体信息发送照片。
-
通过蓝牙发送: 可通过蓝牙发送图片。
-
设为墙纸: 可以将照片设置为墙纸。
-
放映幻灯片: 您可以通过此菜单自动的连续浏览照片。
- 删除:
可以删除照片。
-
编辑标题: 可以编辑照片的标题。
-
查看详情: 可以查看有关标题、大小、拍摄日期和时间
的信息。
-
保护: 可以在此菜单中锁定照片,以防误删。
•
电话本图片: 您可以浏览所有的电话本照片。
-
设为墙纸: 可以将照片设置为墙纸。
-
放映幻灯片: 您可以通过此菜单自动的连续浏览照片。
- 删除:
可以删除照片。
-
编辑标题: 可以编辑照片的标题。
-
查看信息: 可以查看有关标题、大小、拍摄日期和时间
的信息。
- 保护:
可以在此菜单中锁定照片,以防误删。
设定 功能表 6.1.5
•
内存状态: 您可以查看各个存储器、SIM卡内存的可用空间
和内存使用率。您还可以进入各个存储器功能表。
•
清空相册: 您可以删除内存中所有的照片。
•
自动保存: 自动保存用相机拍摄的照片。
语音备忘录 功能表 6.2
语音记录功能允许您记录 10 条 15 秒长的语音信息。
记录 功能表 6.2.1
您可使用功能表按键记录语音。
1. 开始记录后,会显示记录时间信息。
| 多媒体
31
Page 79

多媒体
2. 按<键结束记录。
<
键选择语音记录标题。
3. 按
查看列表 功能表 6.2.2
您可查看语音记录列表,并可以播放、写多媒体信息、删除和
全部删除语音记录。
\ 多媒体
MP3 功能表 6.3
F3000 有一个内置MP3 播放器。通过使用兼容耳机或通过内
置听筒,您可以欣赏手机内存中的 MP3 音乐文件。
音乐播放器支持:
•
MPEG-1 Layer III:采样频率高达 48KHz,位速率高达
192Kbps,立体声
•
MPEG-2 Layer III:采样频率高达 24KHz,位速率高达
160Kbps,立体声
•
AAC:ADIF、ADTS 格式(采样频率高达 48KHz)
注意
F3000 不支持 AAC 文件的可变频率。因此,您无法将文件
从 MP3 格式更改为 A AC 格式。
32
可以用销售包装盒中光盘上的 LG Contents Bank 程序从兼
容的电脑向手机中的存储器传送 MP3 文件。
用 USB 电缆(在相同的包装盒中附带)将手机连接到电脑
时,需要安装驱动程序。有关详情,请参阅光盘程序中的帮
助内容。
.
注意
•
电脑应运行 Windows 98 SE、Windows ME、Windows
2000 或 Windows XP 操作系统。
•
要在 Windows 2000 系统下下载 MP3 文件,您应当依
据下列步骤设置文件夹选项:控制面板 → 文件夹选项
→ 查看WEB → 使用Windows 默认文件夹(I)。
MP3播放器 功能表 6.3.1
1. 按 MP3 菜单,然后选择音乐播放器。
<
2. 按左软键
•
查看播放列表: 您可以在收听音乐时查看播放列表。
•
设置:
- 平衡: 此菜单可帮助您调整收听音乐时的各种环境。本
手机支持四种预设菜单。进入此菜单后,您可以查看均
衡器的当前值。
[选项] 访问以下菜单。
Page 80

-
播放模式: 此菜单允许您设置播放模式:全部播放、重复
全部播放、随机全部播放、播放单曲和重复单曲。
- 设置随机模式: 如果您选择“开”,则您将以随机方式
收听音乐。
- 播放器外观: 此菜单允许您更改播放 MP3 文件时主
LCD 屏幕的背景。
- 剪辑设置:
连续播放: 尽管您在播放时关闭了翻盖,但播放模式仍将继
续播放而不停止。
停止播放: 您在关闭翻盖时,可以停止播放模式。
•
设为铃声: 此菜单允许您将MP3文件设 置为铃声。您还可
以在情景模式中将其设为铃声。
播放列表 功能表 6.3.2
您可以按导航键来移动曲目。此外,如果选择选项菜单,您可以
音频播放、删除、查看资料。
•
播放模式
此菜单允许您设置播放模式: 播放所有、重复所有、重复
一首。
•
设置随机模式
如果您选择开,您可以随机的听歌曲。
•
播放器外观
您可以选择视觉效果菜单: 灯光、跳跃、吉他弹奏者。此菜
单允许您更改播放 MP3 文件时的主 LCD 屏幕和外 LCD 屏
幕的背景。
•
剪辑设置
- 连续播放
尽管您在播放时关闭了翻盖,但播放模式仍将继续播放
而不停止。
- 停止播放
您在关闭翻盖时,可以停止播放模式。
设定 功能表 6.3.3
•
平衡
此菜单可帮助您调整收听音乐时的各种音乐模式。本款手
机支持五种预设模式。进入此菜单后,您就可以查看均衡
器的当前值。本手机支持多种均衡器设置: 普通, 古典, 爵
士乐, 流行乐, 摇和贝司。
内存状态 功能表 6.4
您可以检查存储器使用状态。.
| 多媒体
33
Page 81

设定
您可以根据您的需要设置下面的功能表。
日期和时间 功能表 7.1
您可设置与日期和时间相关的功能。
日期设定 功能表 7.1.1
在该功能表中,您可以设定手机日期。
日期格式 功能表 7.1.2
\ 设定
在该功能表中,您可以设定日期格式比如: 日/月/年,月/日/
年,年/月/日。
时间设定 功能表 7.1.3
您可以设定当前手机时间。
时间格式 功能表 7.1.4
您可以选择时间格式为12小时制或24小时制。
手机设定 功能表 7.2
您可以按需要完成手机设定。
显示设定 功能表 7.2.1
•
墙纸: 您可以选择待机模式下的背景图片。
34
- 主LCD
您可以选择一张图片或动画作为墙纸。
•
手机配置: 您可以选择以下4种颜色方案: 汽车,空格,
无声,激烈。
•
顶部菜单样式: 您可以选择显示菜单的样式。
•
待机文字: 如果您选择开,您将编辑手机在待机
模式下显示的文本。
• 背光:
您可以设定按键后背景灯开启的时间。
•
信息提示: 您可以在打开功能表之前预览该功能表当前设
置。提示显示在屏幕的下端。
•
网络名称: 如果您选择开,网络名称(服务供应商的名称)将
会出现在内屏上。
语言 功能表 7.2.2
您可以选择手机上文本显示的语言。此设定会影响到语言
输入法。
通话设定 功能表 7.3
在设定功能表中,您可以按<[选择]设定和通话相关的
功能。
Page 82

呼叫转接 功能表 7.3.1
呼叫转移服务可让您将语音来电、传真来电和数据来电转移
到其它号码。要获取更多信息,请联系您的服务提供商。
•
转接所有语音来电
无条件转移语音来电。
•
正在通话时转接来电
当手机正在通话时转移语音来电。
•
无人接听时转接来电
转移您没有应答的语音来电。
•
无网络或关机时转接来电
当手机关机或不在服务区时转移语音来电。
•
转接所有数据来电
无条件转移到使用PC连接的号码。
•
转接所有传真来电
无条件转移到使用传真连接的号码。
•
全部取消
取消全部呼叫转接。
子功能表
呼叫转接功能表有以下子功能表。
•
启动
启动相应服务。
语音信箱
转发到信息中心。该功能不包括在所有数据来电和所有传
真来电功能表中。
其它号码
输入接受转移呼叫的电话号码。
常用号码
您可以查询5个转移号码。
•
关闭
取消相应服务。
•
查询状态
查看相应服务的状态。
| 设定
接听模式 功能表 7.3.2
•
翻盖接听
选择此功能表,您可以通过翻盖接听来电。
•
按任意键
选择此功能表,您可按任意键接听来电,但不包括
[结束]键、侧键(照相侧键除外)和右软键。
E
35
Page 83

设定
•
按发送键接听
选择此功能表,您只可按S[接听]键或左软键<接听
来电。
发送号码 功能表 7.3.3
(视网络和所申请的服务而定)
•
开启
您可以将手机号码发送给对方,在接收方手机上将显示您
\ 设定
36
的手机号码。
•
关闭
在接收方手机上不会显示您的手机号码。
•
网络设定
如果您选择该功能,是否发送您的手机号码将视您两条线
路的服务而定,比如线路一或者线路二。
呼叫等待 功能表 7.3.4
(视网络而定)
•
启动
如果启用该服务,您可以接收待接来电。
•
取消
如果关闭该服务,您将取消此服务。
•
查看状态
显示呼叫等待的设置状态。
分钟提示 功能表 7.3.5
如果您选择开,可以在通话期间通过每分钟的蜂鸣声检查通
话时间。
自动重拨 功能表 7.3.6
保密设定 功能表 7.4
需要PIN码 功能表 7.4.1
在该功能表中,您可以设定手机在开机时需要SIM卡的PIN码。
如果启动该功能,您将被要求输入PIN码。
如果您连续三次输错PIN码,手机将被锁定,这时您需要输入
PUK码。
您最多可以连续十次输入PUK码,如果您连续十次输错PUK码,
您将无法解锁您的手机。这时,您只能联系服务中心寻求帮助。
Page 84

手机锁 功能表 7.4.2
您可以使用安全密码防止他人未经授权使用您的手机。如果您将
手机锁设定为开,则开机时手机将要求您输入安全密码。如果您
将手机锁设定为自动,则只有当您更换SIM卡时,手机才要求您
输入安全密码。
呼叫限制 功能表 7.4.3
呼叫限制服务可以防止您的手机拨打或接听某种电话。该功能
需要呼叫限制密码。您可以查看以下子功能表。
•
所有拨出电话
您可以限制所有拨出电话。
•
国际
您可以限制拨出国际长途。
•
漫游时国际
您可以限制在国际漫游时所拨打的电话。
•
所有来电
您可以限制所有来电。
•
漫游时来话
您可以限制国外漫游时来电。
•
全部取消
您可以取消所有限制服务。
•
更换密码
您可以更改呼叫限制服务的密码。
子功能表:
•
启动: 请求网络启动呼叫限制服务。
•
关闭: 取消所选子功能表呼叫限制服务。
•
查询状态: 查询呼叫限制服务开启或关闭的状态。
固定拨号 功能表 7.4.4
(需SIM卡支持)
您可以限制特定电话号码的拨打。这些号码由PIN2码保护。
•
激活
您可以限制拨打您所选择的电话号码。
•
取消
您可以不限制对电话号码的拨打。
•
成员列表
您可以查看被保存为FDN的号码列表。
更改密码 功能表 7.4.5
PIN是Personal Identification Number(个人识别号码)的缩写。可
用来防止未经授权的人使用您的手机。您可以更改访问密码:安
全密码,PIN码,PIN2码。
| 设定
37
Page 85

1. 如果您想更改访问密码: 安全密码, PIN码, PIN2码,先输入原
密码然后按<[确认]。
2. 输入新的 安全密码, PIN码,或PIN2码,然后确认。
带宽选择 功能表 7.5.2
使用此功能可在以下两项中进行选择,以此设置网络频带:
EGSM/DCS或EGSM/ PCS。
网络设定 功能表 7.5
您可以选择能够自动或手动注册的网络。通常,手机网络选择设
定为自动。
\ 设定
网络选择 功能表 7.5.1
•
自动
如果您选择“自动”,手机会自动选择在您区域内的可用网
络。一旦您选择“自动”,无论手机在开机状态还是关机状
态,都将保持设置为“自动”。
•
手动
手机会找到可用的网络列表并显示出来。然后您可以选择您
想使用的网络,前提是该网络与您本地网络运营商已签订漫
游协议。如果手机无法接入到您选择的网络中,手机允许您
选择另一个网络。
•
首选网络
您可以设定手机在注册其它网络前首先注册的首选网络列
表。该列表从手机预设的已知网络列表中创建。
38
GPRS设置 功能表 7.6
您可以选择开机或当需要时设置GPRS服务。
恢复初始设定 功能表 7.7
您可以通过选择该功能表将手机恢复为预设配置。您需要安全
密码启动该功能。
内存状态 功能表 7.8
您可以查看各个存储器、SIM卡内存的可用空间和内存
使用率。
Page 86

互联网设定
互联网 功能表 8.1
住宅 功能表 8.1.1
回到主页。主页是您在启动的上网设定中所设定的WAP站
点。如果您没有进行设置,将使用运营商预先设定的站点。
书签 功能表 8.1.2
•
连接: 连接到所选书签。
• 新增:
选择此选项创建新的书签。
• 修改:
您可以编辑所选书签的 URL 和/或标题。
更改 功能表 8.1.3
上网设定为用于连接互联网的网络信息。每个上网设定均有
子菜单,如下所示:
• 启动:
启动所选上网设定。
• 设置:
使用此功能编辑和更改所选上网设定的 WAP
设置。
- 主页: 该设定可让您输入您想作为主页使用的网站地址
(URL)。您不需要在每个URL前键入“http://”, 因为
WAP浏览器会自动加入。
- 连接方式
数据
GPRS
- 数据设定
IP地址: 输入访问WAP网关的IP地址。
拨出号码: 输入访问WAP网关的拨号号码。
用户名: 拨号服务器(不是WAP网关)的用户身份。
密码: 拨号服务器(不是WAP网关)识别您身份所需的密码。
呼叫类型: 选择数据来电的类型: 模拟或ISDN(数码)。
呼叫速率: 数据连接的速度;9600
空闲时限: 您可以设定限制时间。超过此时间限制而没有
数据输 入或传输时,服务将自动关闭。
- GPRS 设置
只有当选择GPRS作为载体服务时,服务设定才可用。
IP地址: 输入访问WAP网关的IP地址。
APN: 输入APN。
用户ID: APN服务器的用户身份。
密码: APN服务器识别您身份所需的密码。
| 互联网
39
Page 87

互联网
\ 互联网
40
- 连接类型
连接类型的选项为临时或持续,视网关而定。
固定连续
固定的传输机制,会增加网络通信量。
自选连接
非固定(无连接)的服务。
HTTP
直接在HTTP 中将客户端连接至服务器。
- 代理设置
IP地址: 输入您访问的代理服务器的 IP 地址。
端口: 输入代理服务器端口。
- DNS 设置
主服务器: 输入您访问的首选 DNS 服务器的 IP 地址
从服务器: 输入您访问的备用 DNS 服务器的 IP 地址
- 安全设置
该选项可以设定为开或关,视网关而定。
- 显示图象
您可以选择开或关来决定是否显示WAP卡上的图象。
•
重命名: 编辑上网设定的名称。
•
删除: 删除上网设定。
•
添加: 您可手动添加上网设定。
转到URL 功能表 8.1.4
您可以直接连接到想要的站点。输入特定的 URL 后,
按 OK 键。
缓存 功能表 8.1.5
您已访问的信息或服务保存在手机的缓存中。
•
清除缓存
删除缓存中保存的所有信息。
•
查询缓存
设置是否通过缓存尝试进行连接。
Cookies 设置 功能表 8.1.6
您已访问的信息或服务保存在手机的缓存中。
•
清除Cookies
删除保存在 cookie 中的所有上下文。
•
查询 cookies
检查是否使用了 cookie。
Page 88

安全设置 功能表 8.1.7
显示安全证书的列表。
重新设定 功能表 8.1.8
您可以将上网设定的所有当前设定复零为初始设定。
浏览器版本 功能表 8.1.9
显示WAP浏览器的版本。
SIM服务 功能表 8.2
该功能需要卡及网络服务商的支持。
| 互联网
41
Page 89

下载
游戏&更多 功能表 9.1
我的游戏: 在此菜单中,您可以管理手机中安装的Java
应用程序。您可以播放或删除下载的应用程序,或者设置连
接选项。下载的应用程序可在文件夹中整理。
•
开始: 启动选定的应用程序。
•
信息: 显示应用程序的信息。
•
选项: 某些Java 应用程序可能需要建立数据连接。选择此
项以设置连接选项。
\ 下载
- 经常查询: 立即建立连接,而不显示通知。
- 提示: 在应用程序建立连接时进行询问。
- 从不查询: 不允许建立连接。
注意
您不可删除或重命名预先安装的文件夹或文件夹中的
游戏。
Java是由Sun Microsystems开发的一项技术。与使用标准
Netscape或微软Internet Explorer浏览器下载Java Applet的
方式相同,可以使用具有WAP功能的手机下载Java MIDlet。
视服务提供商而定,所有基于Java的程序(如Java游戏)均可
以下载到手机上并运行。
42
一旦下载之后,即可以在“我的游戏”菜单中查看Java 程序,
并可在此选择执行和删除Java程序。Java程序文件以.JAD和.
JAR格式保存在手机中。
注意
•
JAR文件是Java程序的压缩格式,JAD文件是包含所有
详细信息的描述文件。在下载之前,您可以从网络上的
JAD文件中查看所有详细的文件说明。
•
视标准语言(J2ME) 而定,并非所有Java 应用程序均兼
容当前市场上销售的各种手机,这是因为不同手机型号
所使用的库可能不同。如果下载了不是为本手册中所述
的手机专门开发的Java 应用程序,软件可能会被屏蔽或
自动开启,这时候您有必要“重新启动”手机。我们希望
让您知道这些问题是由于应用程序不兼容导致的,而不
是产品故障。
注意
只有基于J2ME(Java 2 微版本)的程序会在手机上运行。
基于J2SE(Java 2 标准版本)的程序只能在PC环境中运行。
Page 90

图片 功能表 9.2
左软键<[选项]可激活以下选项。
•
设为墙纸: 可将选定的图片设置为墙纸。
•
写多媒体信息: 可通过彩信发送下载的图片。
•
通过蓝牙发送: 可通过蓝牙发送图片。
声音 功能表 9.3
左软键<[选项]可激活以下选项。
•
设为铃声: 此选项可将当前选定的声音设置为铃声。
•
写信息: 可通过短信和彩信发送音乐。
•
通过蓝牙发送: 可通过蓝牙发送音乐。
| 下载
43
Page 91

附件
我们为您的手机准备了多种附件。您可以根据个人的通信要求来选择合适的附件。
标准电池
耳机
用于免提操作。包括听筒和
麦克风。
\ 附件
注意
•
•
•
44
旅行用适配器
当您不在办公室或家中时,可以
使用此充电器为电池充电。
数据套件/CD
您可以将手机与PC相连,进行
数据交换。
确保使用正规的LG配件。
仿冒品或替代品及非原厂配件可能会让您丧失保修权益。
各个地区的配件可能不同;如有任何疑问,请与我们的地区服务公司或代理查证核实。
Page 92

常规
产品名称: F3000
系统: GSM 900 / DCS 1800 / PCS1900
环境温度
最高: +55°C
最低: -10°C
技术数据
| 技术数据
45
Page 93

备忘录
46
Page 94

F3000 BUKU PANDUAN PENGGUNA
KAMI HARUS MEMBERITAHU PENGGUNA BAHAWA BUKU
PANDUAN INI MEMPUNYAI BEBERAPA PERBEZAAN DENGAN
TELEFON BERGANTUNG KEPADA S/W TELEFON DAN PEMBEKAL
SERVIS.
MALAY
Page 95

GARIS PANDUAN BAGI PENGGUNAAN YANG
SELAMAT DAN CEKAP 4
CIRI-CIRI F3000 8
Bahagian Telefon 8
Maklumat Paparan 10
Ikon Pada Skrin 10
PENYEDIAAN TELEFON 11
Memasang kad SIM dan bateri telefon 11
Mengecas Bateri 12
Memutuskan sambungan pengecas 12
FUNGSI-FUNGSI UMUM 13
Memasukkan Teks 13
POKOK MENU 15
PROFIL AUDIO 16
Getar sahaja 16
Senyap 16
Umum 16
Kuat 16
Alat dengar 16
DAFTAR PANGGILAN 17
Panggilan Tidak Dijawab 17
Panggilan Diterima 17
Panggilan Dail 17
Padam Panggilan Terkini 17
Caj Panggilan 17
Maklumat GPRS 18
ALATAN 19
Kegemaran 19
Jam Loceng 19
Bluetooth 19
Kalkulator 20
Pengubah Unit 20
Waktu Dunia 20
PENYELENGGARAAN 21
Hubungi 21
Jadual 23
Memo 23
2
KANDUNGAN
\Kandungan
Page 96

MESEJ 24
Tulis Mesej Pendek 24
Tulis Mesej Multimedia 25
Peti Masuk 25
Peti Keluar 26
Draf 27
Dengar Mel Suara 27
Maklumat Servis 27
Templat 28
Aturan 28
MULTIMEDIA 32
Kamera 32
Perakam Suara 34
MP3 34
Status memori 35
ATURAN 36
Tarikh & Masa 36
Tetapan Telefon 36
Tetapan Panggilan 36
Tetapan Sekuriti 38
Tetapan Rangkaian 40
Tetapan GPRS 40
Tetap Semula Aturan 40
Status Memori 40
SERVIS 41
Internet 41
SIM Pintar 43
MUAT TURUN 44
Permainan & lagi 44
Gambar 45
Bunyian 45
AKSESORI 46
DATA TEKNIKAL 47
3
|
Kandungan
Page 97

4
\GarisPanduanbagiPenggunaanyangSelamatdanCekap
Pendedahan kepada gelombang radio dan maklumat Kadar
Penyerapan Tertentu (Specific Absorption Rate) (SAR)
Telefon bimbit model F3000 ini telah direka bentuk supaya
mematuhi keperluan keselamatan yang berkenaan bagi
pendedahan kepada gelombang radio. Keperluan ini adalah
berdasarkan garis panduan saintifik yang termasuk margin
keselamatan yang bertujuan memastikan keselamatan bagi
semua orang, tidak kira umur atau tahap kesihatan.
• Garis panduan mengenai pendedahan kepada gelombang
radio ini menggunakan unit pengukuran yang disebut Kadar
Penyerapan Tertentu (Specific Absorption Rate), atau SAR.
Ujian-ujian bagi SAR dijalankan menggunakan kaedah yang
dipiawaikan dengan telefon memancarkan pada aras kuasa
diperakui yang tertinggi dalam semua jalur frekuensi.
• Walaupun mungkin terdapat perbezaan antara aras-aras
SAR bagi pelbagai model telefon LG, kesemuanya direka
bentuk supaya memenuhi garis panduan relevan bagi
pendedahan kepada gelombang radio.
• Had SAR yang disyorkan oleh Suruhanjaya mengenai
Perlindungan Sinaran Bukan-Ion (Commission on NonIonizing Radiation Protection) (ICNIRP) antarabangsa, iaitu
2W/kg dipuratakan ke atas sepuluh (10) gram tisu.
• Nilai SAR yang tertinggi bagi telefon model ini yang diuji oleh
DASY4 bagi penggunaan pada telinga ialah 0.988 W/kg (10g).
• Maklumat SAR bagi penduduk di negara/kawasan yang telah
mengambil had SAR yang disyorkan oleh Institut Jurutera
Elektrik dan Elektronik (Institute of Electrical and Electronics
Engineers) (IEEE), iaitu 1.6 W/kg dipuratakan ke atas satu (1)
gram tisu.
Penjagaan dan Penyenggaraan Produk
Amaran: Gunakan hanya bateri, pengecas dan aksesori yang
diluluskan untuk digunakan khususnya dengan telefon model
ini. Penggunaan sebarang jenis lain boleh mentaksahkan
sebarang kelulusan atau waranti yang berkaitan dengan
telefon ini, dan mungkin merbahaya.
• Jangan buka bahagian-bahagian unit ini. (Bawa ia ke
juruteknik khidmat yang berkelayakan apabila kerja
pembaikan perlu dilakukan.)
• Jauhkan dari alat elektrik seperti TV, radio atau komputer
peribadi.
• Unit ini harus diletakkan jauh dari sumber haba seperti
penyinar atau alat memasak.
• Jangan jatuhkan.
• Jangan biarkan unit ini terkena getaran atau kejutan
mekanikal.
• Salut telefon boleh rosak jika dibalut dengan pembalut atau
pembalut vinil.
• Jangan gunakan bahan kimia yang keras (seperti alkohol,
benzena, pencair, dll.) atau bahan pencuci untuk
membersihkan telefon anda. Terdapat risiko ini boleh
menyebabkan kebakaran.
• Jangan biarkan unit ini terdedah kepada asap atau debu yang
berlebihan.
• Jangan simpan telefon bersebelahan dengan kad kredit atau
tiket pengangkutan; ia boleh menjejas maklumat di dalam
jalur bermagnetnya.
GARIS PANDUAN BAGI PENGGUNAAN YANG SELAMAT DAN CEKAP
Page 98

5
|
GarisPanduanbagiPenggunaanyangSelamatdanCekap
• Jangan ketuk skrin dengan benda tajam; ia boleh merosakkan
telefon.
• Jangan dedahkan telefon kepada cecair atau lembapan.
• Gunakan aksesori seperti telefon telinga dengan berhati-hati.
• Jika anda meletakkan telefon anda di dalam kocek atau beg
tanpa menutup wadah telefon (pin palam kuasa), barangbarang berlogam (seperti duit syiling, klip kertas atau pen)
boleh melitar pintas telefon. Sentiasa tutup wadah telefon
apabila tidak digunakan.
• Jangan sekali-kali letakkan telefon anda di dalam ketuhar
gelombang mikro kerana ini akan menyebabkan bateri
meletup.
• Hanya kakitangan yang berdaftar seharusnya menservis
telefon dan aksesori-aksesorinya. Pemasangan atau servis
yang tidak betul boleh menyebabkan kemalangan dan
akibatnya mentaksahkan waranti.
• Jangan gunakan telefon jika antenanya rosak. Jika antena
yang rosak tersentuh kulit, ia boleh mengakibatkan sedikit
kelecuran. Sila hubungi Pusat Servis Berdaftar LG untuk
menggantikan antena yang rosak.
• Label telefon mengandungi maklumat penting bagi tujuan
sokongan pelanggan. Jangan tanggalkan ia.
Operasi Telefon yang Cekap
Untuk menikmati prestasi optimum dengan penggunaan
kuasa minimum sila:
• Pegang telefon sepertimana anda memegang telefon lain
untuk bercakap. Semasa bercakap langsung ke dalam
mikrofon, halakan antena ke arah atas dan melepasi bahu
anda. Memastikan antenna di panjangkan apabila membuat
panggilan.
• Jangan memegang antenna sambil membuat panggilan
telefon. Ini akan menjejas mutu panggilan dan menyebabkan
telefon beroperasi pada aras kuasa lebih tinggi daripada yang
diperlukan dan masa pengguanaan kuasa bateri di
kurangkan.
• Jika telefon bimbit anda menyokong inframerah, jangan
sekalikali menghalakan alur inframerah ke arah mata
seseorang.
Peranti Elektronik
Semua telefon wayarles boleh mendapat gangguan, yang
boleh menjejas prestasinya.
• Jangan gunakan telefon bimbit anda berdekatan dengan
kelengkapan perubatan tanpa meminta izin. Elakkan daripada
meletakkan telefon di atas perentak jantung, iaitu di dalam
saku dada anda.
• Sesetengah alat bantuan pendengaran boleh mendapat
gangguan daripada telefon bimbit.
Page 99

• Gangguan yang sedikit boleh menjejas TV, radio, PC, dan
sebagainya.
• Jangan bengkokkan, calarkan, atau dedahkan ia kepada
elektrik statik.
Keselamatan Di Jalan Raya
Periksa undang-undang dan peraturan mengenai
penggunaan telefon bimbit di kawasan-kawasan tempat
anda memandu.
• Jangan gunakan telefon pegang tangan semasa memandu.
• Berikan sepenuh perhatian kepada kegiatan memandu.
• Gunakan kit bebas tangan, jika terdapat.
• Keluar dari jalan raya dan letakkan kereta sebelum membuat
dan menjawab panggilan jika keadaan memandu
memerlukan.
• Tenaga RF boleh menjejas sesetengah sistem elektronik di
dalam kenderaan bermotor anda seperti stereo kereta,
kelengkapan keselamatan.
• Apabila berada di dalam kereta, jangan biarkan telefon anda
atau pasang kit bebas tangan berdekatan dengan beg udara.
Jika kelengkapan wayarles tidak dipasang dengan betul dan
beg udara diaktifkan, anda boleh mengalami kecederaan
serius.
Kawasan Letupan
Jangan gunakan telefon di mana peletupan sedang dijalankan.
Ikut sekatan-sekatan, dan patuhi sebarang undang-undang
atau peraturan.
Persekitaran Boleh Meletup
• Jangan menggunakan telefon di tempat mengisi bahan bakar.
Jangan gunakan berdekatan dengan bahan bakar atau kimia.
• Jangan angkut atau simpan gas atau cecair mudah terbakar,
atau bahan letupan di dalam petak simpanan kenderaan
anda, yang mengandungi telefon bimbit anda dan
aksesoriaksesorinya.
Di Dalam Pesawat
Peranti-peranti wayarles boleh menyebabkan gangguan di
dalam pesawat.
• Matikan telefon bimbit anda sebelum menaiki sebarang
pesawat.
• Jangan gunakan ia di lapangan terbang tanpa izin daripada
kakitangan.
6
GARIS PANDUAN BAGI PENGGUNAAN YANG SELAMAT DAN CEKAP
\GarisPanduanbagiPenggunaanyangSelamatdanCekap
Page 100

Maklumat dan Penjagaan Bateri
• Anda tidak perlu menyahcas bateri sepenuhnya sebelum
mengecasnya semula. Tidak seperti sistem bateri lain, tiada
kesan ingatan yang boleh menjejas prestasi bateri.
• Gunakan hanya bateri dan pengecas LG. Pengecas LG direka
bentuk untuk memaksimumkan hayat bateri.
• Jangan buka atau melitar pintas pek bateri.
• Pastikan sentuhan logam pek bateri sentiasa bersih.
• Gantikan bateri apabila ia tidak lagi memberikan prestasi
yang boleh diterima. Pek bateri boleh dicas beratus-ratus kali
sehingga ia perlu diganti.
• Cas semula bateri jika ia tidak digunakan untuk masa yang
lama bagi memaksimumkan kegunaannya.
• Jangan dedahkan pengecas bateri kepada cahaya matahari
langsung atau gunakan ia dalam kelembapan tinggi seperti di
dalam bilik air.
• Jangan biarkan bateri di tempat yang panas atau sejuk; ini
boleh melemahkan prestasi bateri.
Khidmat rangkaian
• Sesetengah perkhidmatan dan fungsi yang diterangkan di
dalam panduan pengguna ini bergantung kepada rangkaian
atau langganan. Oleh itu, tidak semua menu akan terdapat di
dalam telefon anda. Sila hubungi operator rangkaian untuk
maklumat lanjut mengenai langganan anda.
7
|
GarisPanduanbagiPenggunaanyangSelamatdanCekap
 Loading...