

Page 1
MFL70183001
RELEASING THIS DRAWING
WITHOUT PERMISSION LG
Electronics SHOULD BE
ACCUSED ACCORDING TO THE
LAWS AND COMPANY RULES.
이 도면은 LG전자의 자산으로 불법
유출시 관계법과 회사규정에 의해 처벌됨.
WORK
84
SEC.
257+/-3
A
BRAND
LG
<BACK>
B
MODEL
F1K2CS2W
F1K2CS2T
<FRONT>
A
B
C
Copyright © 2017 LG Electronics Inc. All Rights Reserved
C
P/NO.
MFL70183001
12 +/-2
PRINTING DEGREE
1
MATERIAL AND PRINTING DESCRIPTION
내지:SNOW WHITE 80g OFFSET 인쇄
F1K2CSV2*
외지:SNOW WHITE 150g OFFSET 인쇄
<< NOTES >>
1. Material, printing and exterier size are refer to work tables.
2. Printing, text size and line are based on LG design film.
3. Exterier size on the drawing is cutting line.
4. Before product controlled by criteria sample.
5. The part should not contain prohibited substances(Pb,Cd,Hg,Cr+6,PBB,PBDE)and details
LG MODEL Name
SUFFIX
A**QPOR
LANGUAGE
ENGLISH+
PORTUGAL
PAGE
101
REMARK
VICTOR 1399
182+/-3
1
2
3
4
5
182+/-3
<FRONT>
A
B
Copyright © 2017 LG Electronics Inc. Todos os direitos reservados
182+/-3
APPROVEDPREPAREDDATEREF. NO.REV. NO. REVISION DESCRIPTION
12 +/-2
should comply with LG standard of LG(63)-A-5501-34
TRIG.
MODELING
LG 전자 (주)
LG Electronics Inc.
N.V.HA
17.05.04
UNIT SCALE
REVIEWEDDESIGNED
D.J.LEE
17.05.04
mm
CHECKED APPROVED
D.J.LEE
RELATED DWG.
N
DM.KIM
17.05.0417.05.04
S
T
I
T
L
E
DWG.
No.
MANUAL,OWNER’S
MFL70183001
PDF
ILLUSTRATOR
VICTOR 1399
DR COMPLETED
도면 DR 완료
완료일 :
16.04.01
1/1
Page 2

OWNER’S MANUAL
WASHING
ENGLISH
PORTUGUÊS
MACHINE
Before beginning installation, read these instructions carefully.
This will simplify installation and ensure that the product is installed
correctly and safely. Leave these instructions near the product after
installation for future reference.
F1K2CS2W
F1K2CS2T
MFL70183001
ver080517.00
www.lg.com
Copyright © 2017 LG Electronics Inc. All Rights Reserved
Page 3

TABLE OF CONTENTS
SAFETY INSTRUCTIONS ......................................03
Important Safety Instructions ............................................................... 05
INSTALLATION .......................................................08
Parts ....................................................................................................08
Accessories
Specifications
Installation Place Requirements
Unpacking and Removing Shipping Bolts
Anti–Slip Sheets
Using
Wooden Floors (Suspended Floors)
Leveling the Washing Machine
Connecting Inlet Hose
Installation of Drain Hose
Electrical Connections (In the UK Only)
This manual is produced for a group of products
and may contain images or content different from
the model you purchased.
This manual is subject to revision by the
manufacturer.
.........................................................................................08
......................................................................................09
.......................................................... 10
........................................... 11
(Optional) ........................................................12
....................................................12
............................................................ 13
.........................................................................13
....................................................................16
.............................................. 16
OPERATION ...........................................................17
Using the Washing Machine ................................................................17
Sorting Iaundry
Adding Cleaning Products
Control Panel
Programme Table
Option Cycle
....................................................................................18
................................................................... 19
....................................................................................... 21
................................................................................22
........................................................................................ 26
SMART FUNCTIONS ..............................................30
Using SmartThinQ Application............................................................. 30
Using Smart Diagnosis™
....................................................................32
MAINTENANCE ......................................................33
Cleaning your Washing Machine .........................................................33
Cleaning the Water Inlet Filter
Cleaning the Drain Pump Filter
Cleaning the Dispenser Drawer...........................................................35
Limpeza da cuba (Tub Clean)
Caution on Freezing During Winter
............................................................. 33
...........................................................34
.............................................................35
..................................................... 36
TROUBLESHOOTING ............................................38
Diagnosing Problems ..........................................................................38
Error Messages
...................................................................................41
WARRANTY ............................................................43
OPERATING DATA
.................................................46
Page 4
ENGLISH
SAFETY INSTRUCTIONS
The following safety guidelines are intended to prevent unforeseen risks or
damage from unsafe or incorrect operation of the product.
The guidelines are separated into ‘WARNING’ and ‘CAUTION’ as described
below.
This symbol is displayed to indicate matters and operations that can
cause risk. Read the part with this symbol carefully and follow the
instructions in order to avoid risk.
WARNING
can cause serious injury or death.
CAUTION
can cause the minor injury or damage the product.
- This indicates that the failure to follow the instructions
- This indicates that the failure to follow the instructions
WARNING
To reduce the risk of fire, electric shock, or injury to persons when using
your product, basic safety precautions should be followed, including the
following.
CHILDREN IN THE HOUSEHOLD
This appliance is not intended for use by persons (including children) with reduced
physical, sensory or mental capabilities, or lack of experience and knowledge, unless
they have been given supervision or instruction concerning use of the appliance by a
person responsible for their safety. Children should be supervised to ensure that they do
not play with the appliance.
For use in Europe:
This appliance can be used by children aged from 8 years and above and persons with
reduced physical, sensory or mental capabilities or lack of experience and knowledge if
they have been given supervision or instruction concerning use of the appliance in a safe
way and understand the hazards involved. Children shall not play with the appliance.
Cleaning and user maintenance shall not be made by children without supervision.
Children of less than 3 years should be kept away unless continuously supervised.
03
Page 5
GROUNDING REQUIREMENTS
WARNING
For your safety, the information in this manual must be followed to
minimize the risk of fire, explosion, or electric shock, or to prevent
property damage, injury to persons, or death.
This appliance must be grounded. In the event of malfunction or breakdown, grounding
•
will reduce the risk of electric shock by providing a path of least resistance for electric
current.
This appliance is equipped with a cord having an equipment-grounding conductor and
•
grounding plug. The plug must be plugged into an appropriate outlet that is properly
installed and grounded in accordance with all local codes and ordinances.
Improper connection of the equipment-grounding conductor can result in risk of electric
•
shock. Check with a qualied electrician or service person if you are in doubt as to
whether the appliance is properly grounded.
Do not modify the plug provided with the appliance. If it does not t the outlet, have a
•
proper outlet installed by a qualied electrician.
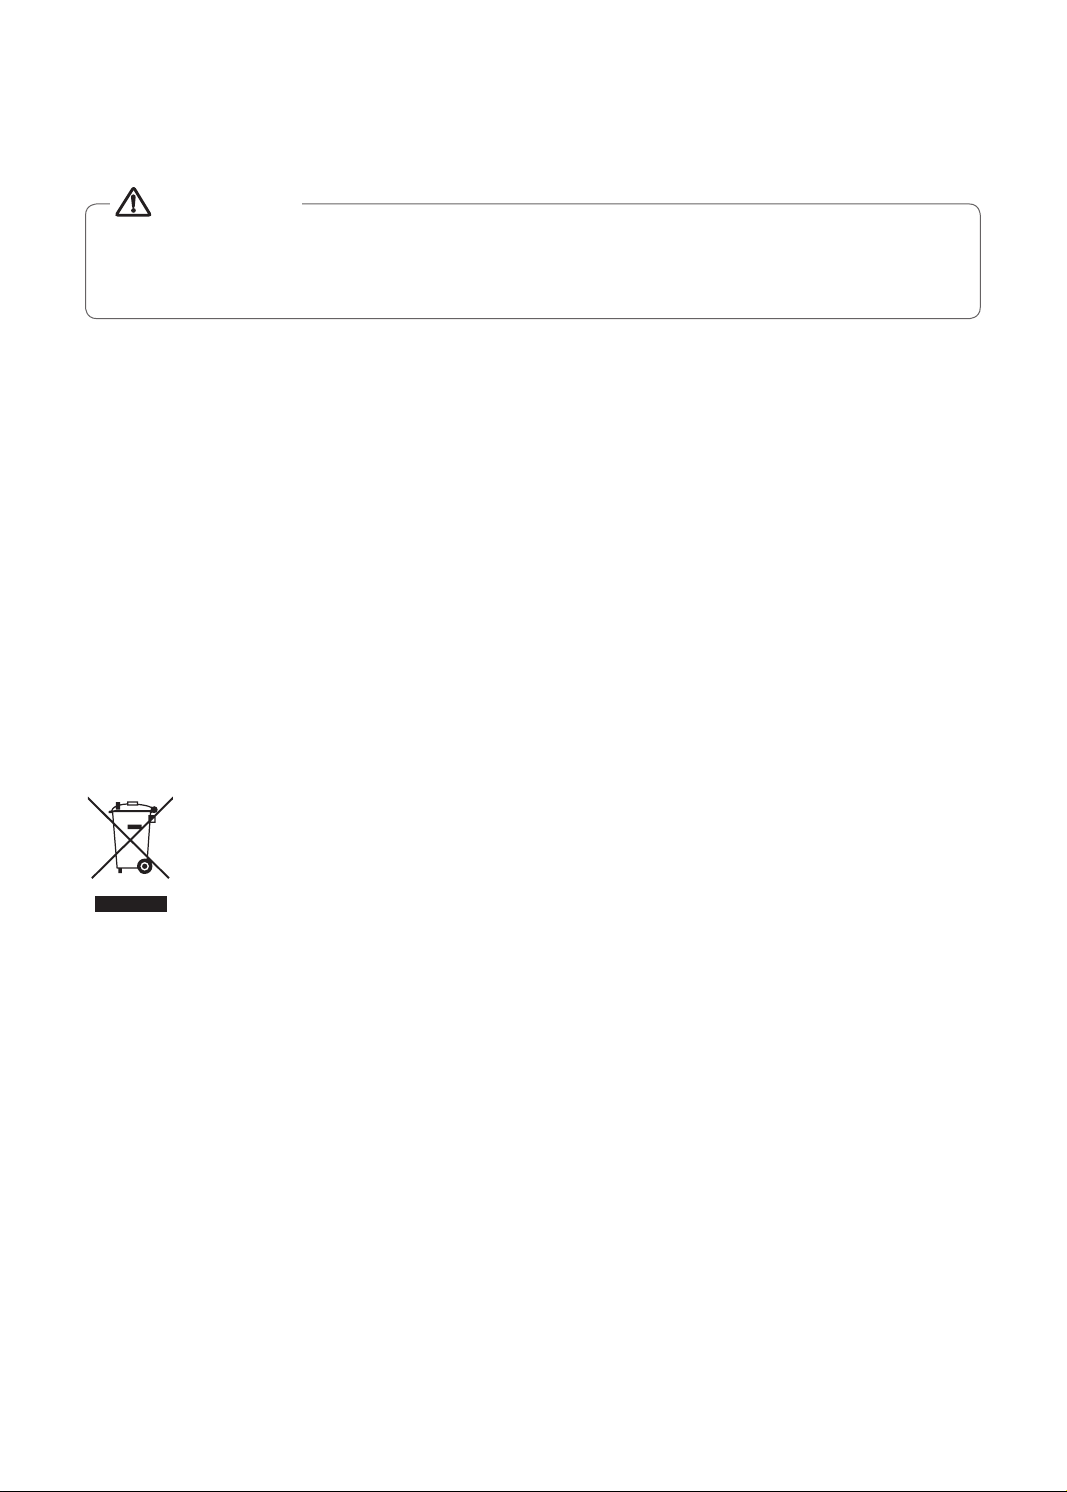
DISPOSAL OF YOUR OLD APPLIANCE
1. This crossed-out wheeled bin symbol indicates that waste electrical and
electronic products (WEEE) should be disposed of separately from the
municipal waste stream.
2. Old electrical products can contain hazardous substances so correct
disposal of your old appliance will help prevent potential negative
consequences for the environment and human health.
Your old appliance may contain reusable parts that could be used to
repair other products, and other valuable materials that can be recycled to
conserve limited resources.
3. You can take your appliance either to the shop where you purchased
the product, or contact your local government waste ofce for details of
your nearest authorised WEEE collection point. For the most up to date
information for your country please see www.lg.com/global/recycling
04
Page 6

ENGLISH
Important Safety Instructions
WARNING
To reduce the risk of fire, electric shock, or injury to persons when using
your product, basic safety precautions should be followed, including the
following.
Installation
Never attempt to operate this appliance
•
if it is damaged, malfunctioning, partially
disassembled, or has missing or broken
parts, including a damaged cord or plug.
It can cause electric shock or injury.
This appliance is heavy. Two or more
•
people may be needed to install and
move the appliance. Failure to do so
can result in injury.
Store and install this appliance where
•
it will not be exposed to temperatures
below freezing or exposed to outdoor
weather conditions. Failure to do so can
result in leakage.
Tighten the drain hose to avoid
•
separation. Splashing of water may
cause electric shock.
Operation
Do not use a sharp object like drill or pin
•
to press or separate an operation unit. It
can cause the electric shock or injury.
Only an authorized repair person from
•
LG Electronics service centre should
disassemble, repair, or modify the
product. Improper service may cause
injury, electric shock or re.
Do not spray the water inside or outside
•
the product to clean it. Water can
damage the insulation, causing electric
shock or re.
Keep the area underneath and around
•
your appliances free of combustible
materials such as lint, paper, rags,
chemicals, etc. Improper use can cause
re or explosion.
If the supply cord is damaged, it must
•
be replaced by the manufacturer or
its service agents or similarly qualied
person in order to avoid a hazard.
The appliance must not be installed
•
behind a lockable door, a sliding door
or a door with a hinge on the opposite
side to that of the tumble dryer, in such
a way that a full opening of the tumble
dryer door is restricted. The washing
machine shall not be installed at a
humid place.
Do not put living animals, such as pets
•
into the product. It may cause injury.
Do not leave this appliance door open.
•
Children may hang on the door or crawl
inside the appliance, causing damage
or injury.
Never reach into this appliance while
•
it is operating. Wait until the drum has
completely stopped. Failure to do so
may result in injury.
05
Page 7

Do not put in, wash or dry articles that
•
have been cleaned in, washed in,
soaked in, or spotted with combustible
or explosive substances (such as
wax, oil, paint, gasoline, degreasers,
drycleaning solvents, kerosene,
vegetable oil, cooking oil, etc.). Improper
use can cause re or explosion.
In case of ood, stop using the product
•
and contact the LG Electronics service
centre. Contact with water can cause
electric shock.
Do not push down the door excessively,
•
when the appliance door is open. Doing
so may topple over the appliance and it
can cause the injury.
Use new hose-sets supplied with the
•
appliance. Old hose-sets should not
be reused. Water leakage may cause
property damage.
Do not touch the door during steam
•
cycles, drying or high-temperature
washing. The door surface can become
very hot. Allow the door lock to release
before opening the door. Failure to do
so may result in injury.
Do not use inammable gas and
•
combustible substances (benzene,
gasoline, thinner, petroleum, alcohol,
etc.) around the product. It may cause
explosion or re.
If the drain hose or inlet hose is frozen
•
during winter, use it only after thawing.
Freezing may cause re or electric
shock, and frozen parts may cause
product malfunction or reduction in
product life span.
Keep all washing detergents, softener
•
and bleach away from children. These
products contain poisonous materials.
Do not plug multiple products into
•
multiple socket-outlets or extension
cords. This can cause re.
Remove the power plug when you clean
•
the product. Not removing the plug may
result in electric shock or injury.
Do not touch the power plug with wet
•
hands. It can cause the electric shock
or injury.
When pulling out the power plug from
•
an outlet, hold the power plug, not the
cable. Damage of the cable can cause
the electric shock or injury.
Do not bend the power cable
•
excessively or place a heavy object on
top of it. Damage of the power cable
can cause electric shock or re.
06
Page 8

ENGLISH
Disposal
Before discarding an old appliance,
•
unplug it. Render the plug useless.
Cut off the cable directly behind the
appliance to prevent misuse.
Dispose of the packaging material (such
•
as vinyl and styrofoam) away from
children. The packaging material can
suffocate a child.
Remove the door to the washing
•
compartment before this appliance is
removed from service or discarded to
avoid the danger of children or small
animals getting trapped inside. Failure
to do so can result in serious injury to
persons or death.
07
Page 9
INSTALLATION
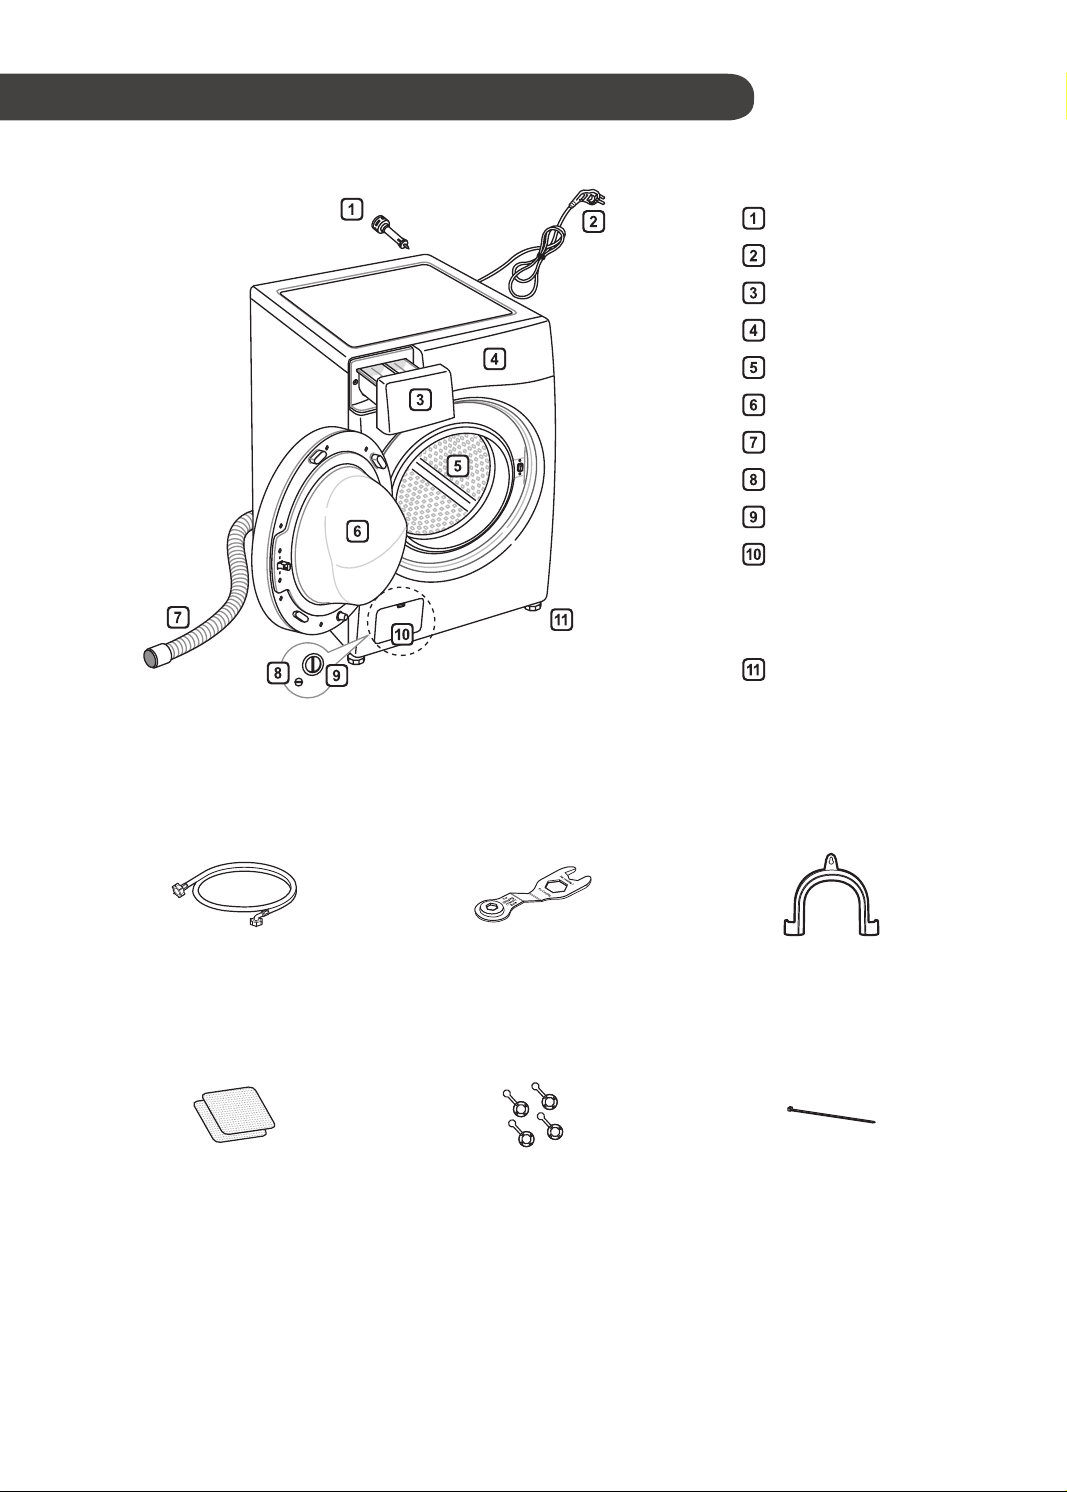
Parts
Transit bolts
Power plug
Drawer
Control panel
Drum
Door
Drain hose
Drain plug
Drain pump lter
Cover cap
(Location may
vary depending on
products)
Adjustable feet
Accessories
Inlet hose (1EA)
(Option : Cold (1EA))
Anti–slip sheets (2EA)
(Optional)
Spanner Elbow Bracket
(for securing drain hose)
Caps for covering shipping bolt holes Tie strap
08
Page 10

ENGLISH
Specification
Model F1K2CS2W F1K2CS2T
Wash Capacity
Power Supply
Size
Product Weight
Max. Watt
Permissible Water pressure
Appearance and specications may change without notice to improve the quality of the product.
•
700 mm (W) x 770 mm (D) x 990 mm (H)
0.1 - 1.0 MPa (1.0 - 10.0 kgf / cm²)
17 kg
220-240 V~, 50 Hz
93 kg
2000 - 2250 W
09
Page 11

Installation Place Requirements
Location
cm
0.5
cm
cm
2
Level floor
10
Allowable slope under the entire washing
machine is 1°.
Power outlet : Must be within 1.5 meters of either side
of the location of the washing machine.
Do not overload the outlet with more than one
•
appliance.
Additional Clearance : For the wall, 10 cm: rear
/2 cm: right & left side
Do not place or store laundry products on top of the
•
washing machine at any time.
These products may damage the nish or controls.
•
Positioning
Install the washing machine on a at hard oor.
•
Make sure that air circulation around the washing
•
machine is not impeded by carpets, rugs, etc.
Never try to correct any unevenness in the oor with
•
pieces of wood, cardboard or similar materials under
the washing machine.
If it is impossible to avoid positioning the washing
•
machine next to a gas cooker or coal burning
insulation (85x60 cm) covered with aluminum foil on
the side facing the cooker or stove must be inserted
between the two appliances.
cm
2
Do not install your washing machine in rooms where
•
freezing temperatures may occur. Frozen hoses may
burst under pressure. The reliability of the electronic
control unit may be impaired at temperatures below
freezing point.
Please ensure that when the washing machine is
•
installed, it is easily accessible for an engineer in the
event of a breakdown.
With the washing machine installed, adjust all four feet
•
using the transit bolt spanner provided to ensure the
appliance is stable, and a clearance of approximately
5 mm is left between the top of the washing machine
and the underside of any work-top.
This equipment is not designed for maritime use or for
•
use in mobile installations such as caravans, aircraft
etc.
Electrical Connection
Do not use an extension cord or double adapter.
•
Always unplug the washing machine and turn off the
•
water supply after use.
Connect the washing machine to an earthed socket in
•
accordance with current wiring regulations.
The washing machine must be positioned so that the
•
plug is easily accessible.
Repairs to the washing machine must only be carried
•
out by qualied personnel. Repairs carried out by
inexperienced persons may cause injury or serious
malfunctioning. Contact your local service centre.
If the washing machine is delivered in winter and
•
temperatures are below freezing, place the washing
machine at room temperature for a few hours before
putting it into operation.
10
Page 12
ENGLISH
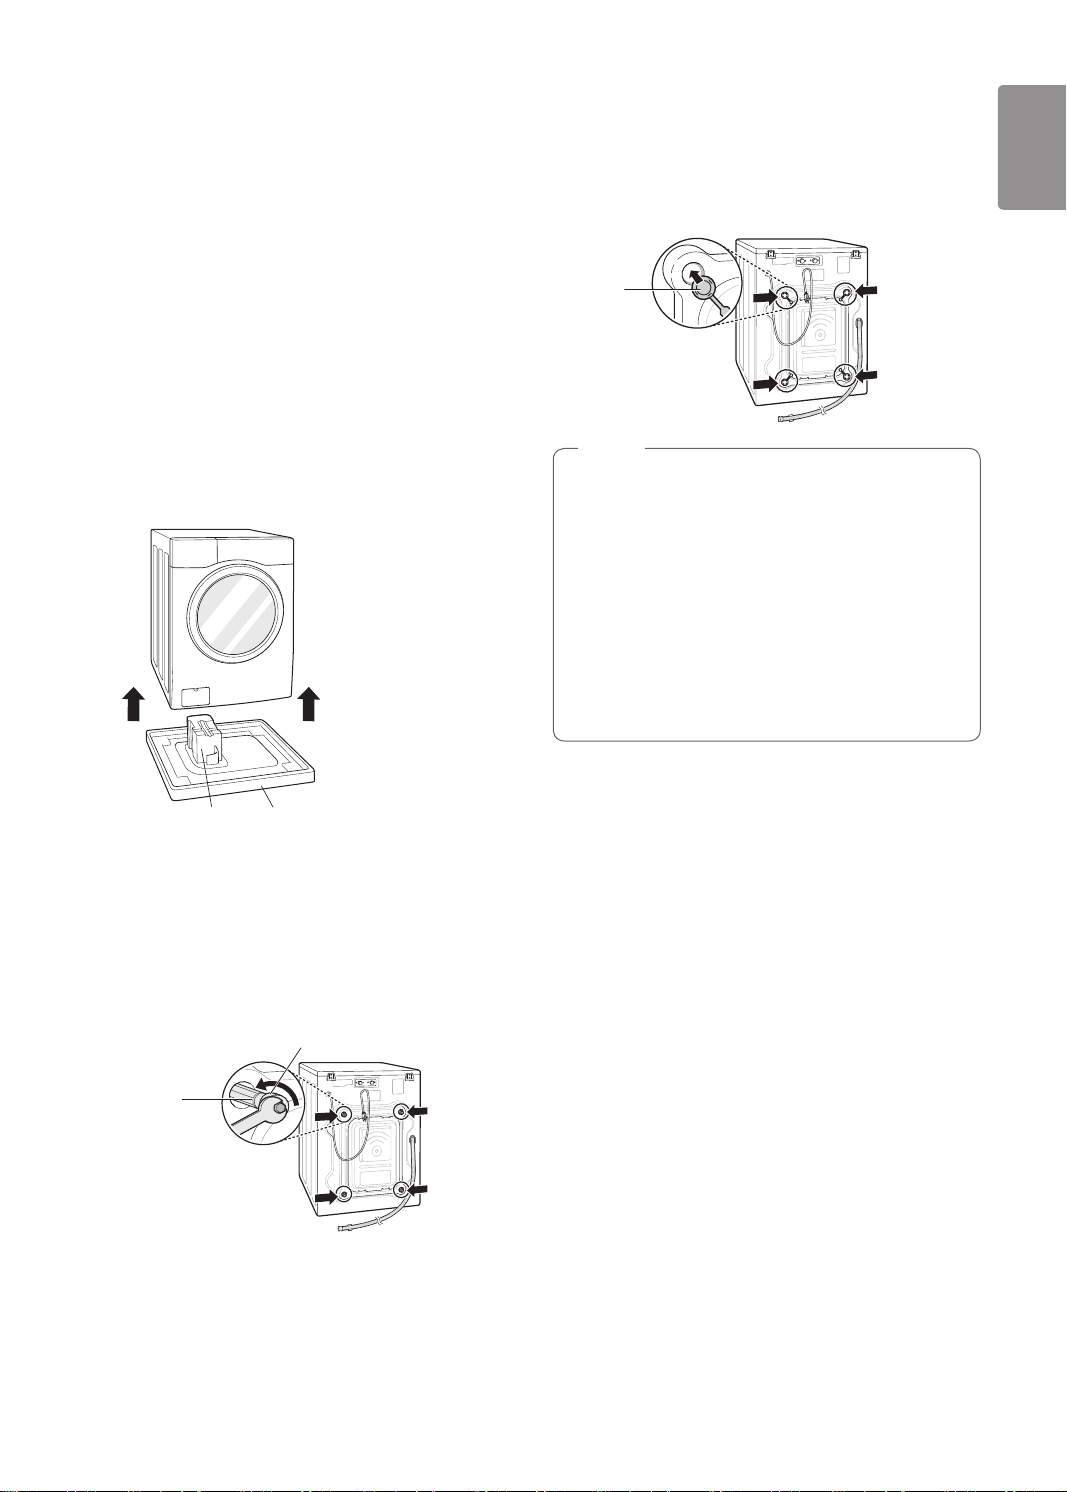
Unpacking and Removing
Shipping Bolts
Lift the washing machine off the foam base.
1
After removing the carton and shipping material,
•
lift the washing machine off the foam base. Make
sure the tub support comes of
and is not stuck to the bottom of the washing
machine.
If you must lay the washing machine down to
•
remove the carton base, always protect the side
of the washing machine and lay it carefully on
its side. DO NOT lay the washing machine on its
front or back.
f with the base
Install the hole caps.
3
Locate the hole caps included in the accessory
•
pack and install them in the shipping bolt holes.
Cap
NOTE
•Save the bolt assemblies for future use. To
prevent damage to internal components, DO NOT
transport the washing machine without reinstalling
the shipping bolts.
•Failure to remove shipping bolts and retainers
may cause severe vibration and noise, which
can lead to permanent damage to the washing
machine. The cord is secured to the back of the
washing machine with a shipping bolt to help
prevent operation with shipping bolts in place.
Tub Support
(Optional)
Remove the bolt assemblies.
2
Starting with the bottom two shipping bolts, use
•
the spanner (included) to fully loosen all shipping
bolts by turning them counterclockwise. Remove
the bolt assemblies by wiggling them slightly
while pullin
Shipping
bolt
Carton base
g them out.
Retainer
11
Page 13
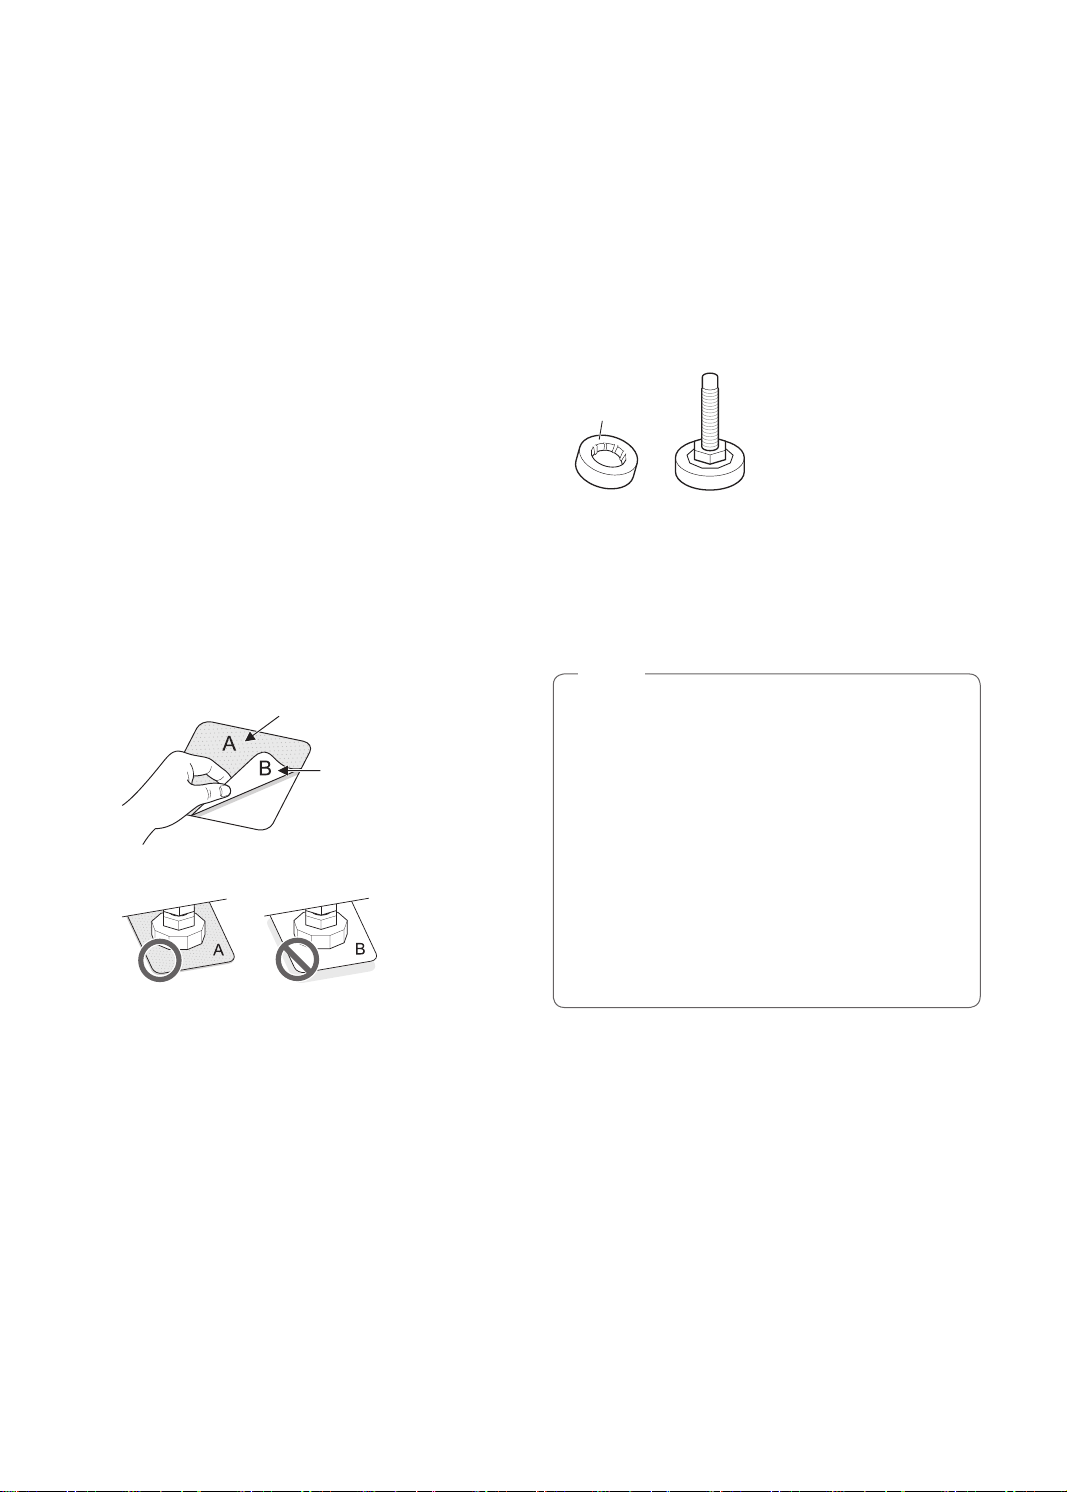
Using Anti–Slip Sheets (Optional)
Wooden Floors (Suspended
If you install the washing machine on a slippery surface,
it may move because of excessive vibration. Incorrect
leveling may cause malfunction through noise and
vibration. If this occurs, install the anti–slip sheets under
the leveling feet and adjust the level.
Clean the oor to attach the anti–slip sheets.
1
Use a dry rag to remove and clean foreign
•
objects and moisture. If moisture remains, the
anti–slip sheets may slip.
Adjust the level after placing the washing machine
2
in the installation area.
Place the adhesive side of the anti–slip sheet on
3
the oor.
It is most effective to install the anti–slip sheets
•
under the front legs. If it is difcult to place the
pads under the front legs, place them under the
back legs.
This side up
Adhesive side
Floors)
Wooden oors are particularly susceptible to vibration.
•
To prevent vibration we recommend you place rubber
•
cups at least 15 mm thick of the each foot of the
washing machine, secured to at least two oor beams
with screws.
Rubber Cup
If possible install the washing machine in one of the
•
corners of the room, where the oor is more stable.
Fit the rubber cups to reduce vibration.
•
You can obtain rubber cups (p/no.4620ER4002B) from
•
the LG Service Centre.
NOTE
•Proper placement and leveling of the washing
machine will ensure long, regular, and reliable
operation.
•The washing machine must be 100% horizontal
and stand rmly in position.
•It must not ‘Seesaw’ across corners under the
load.
•The installation surface must be clean, free from
oor wax and other lubricant coatings.
•Do not let the feet of the washing machine get
wet. Failure to do so may cause vibration or noise.
Ensure the washing machine is level.
4
Push or rock the top edges of the washing
•
machine gently to make sure that the washing
machine does not rock. If the washing machine
rocks, level the washing machine again.
12
Page 14
ENGLISH
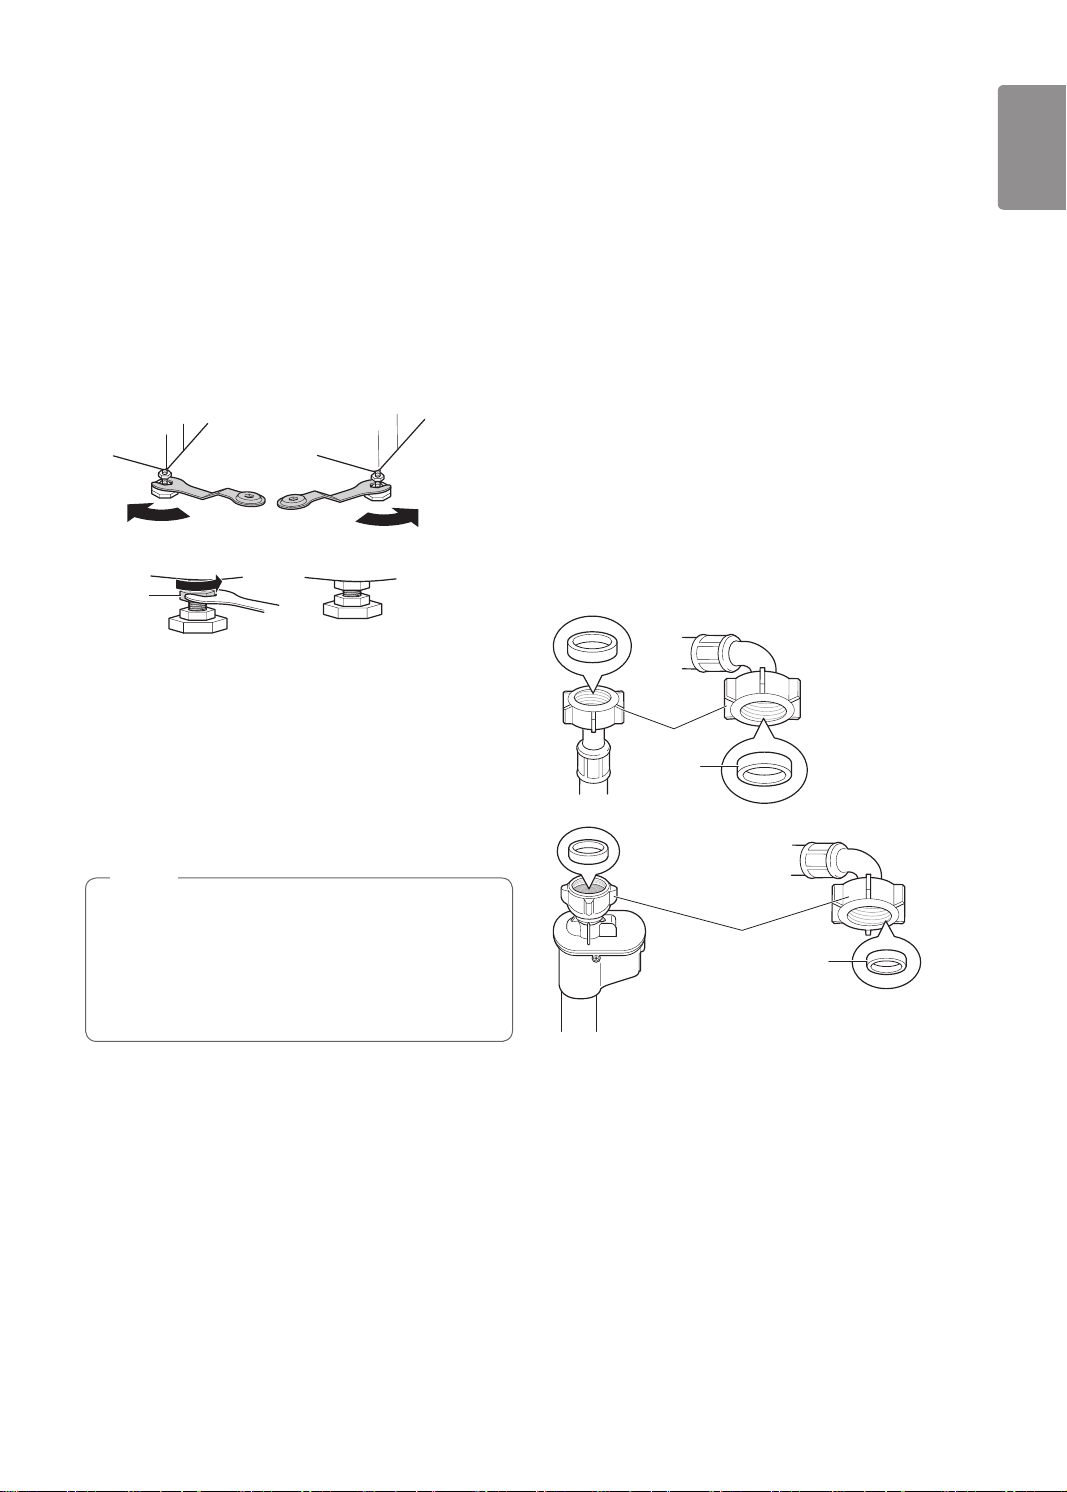
Leveling the Washing Machine
Connecting Inlet Hose
If the oor is uneven, turn the adjustable feet as required
(Do not insert pieces of wood etc. under the feet). Make
sure that all four feet are stable and resting on the oor
and then check that the appliance is perfectly level (Use
a spirit level).
Once the washing machine is level, tighten the lock
•
nuts up towards the base of the washing machine. All
lock nuts must be tightened.
Raise
Lock Nut
Diagonal Check
•
Lower
Tighten all 4
locknuts securely
When pushing down the edges of the washing
machine top plate diagonally, the washing machine
should not move up and down at all (Check both
directions). If the washing machine rocks when
pushing the machine top plate diagonally, adjust the
feet again.
Water supply pressure must be between 0.1 MPa and
•
1.0 MPa (1.0 ‒ 10.0 kgf/cm
Do not strip or crossthread when connecting inlet hose
•
2
).
to the valve.
If the water supply pressure is more than 1.0 MPa, a
•
decompression device should be installed.
Periodically check the condition of the hose and
•
replace the hose if necessary.
Checking Rubber Seal Inlet Hose
Two rubber seals are supplied with the water inlet hoses.
They are used for preventing water leaks. Make sure the
connection to taps is sufciently tight.
Hose connector
Rubber seal
NOTE
•Timber or suspended type ooring may contribute
to excessive vibration and unbalance.
•If the washing machine is installed on a raised
platform, it must be securely fastened in order to
eliminate the risk of falling off.
Hose connector
Rubber seal
13
Page 15
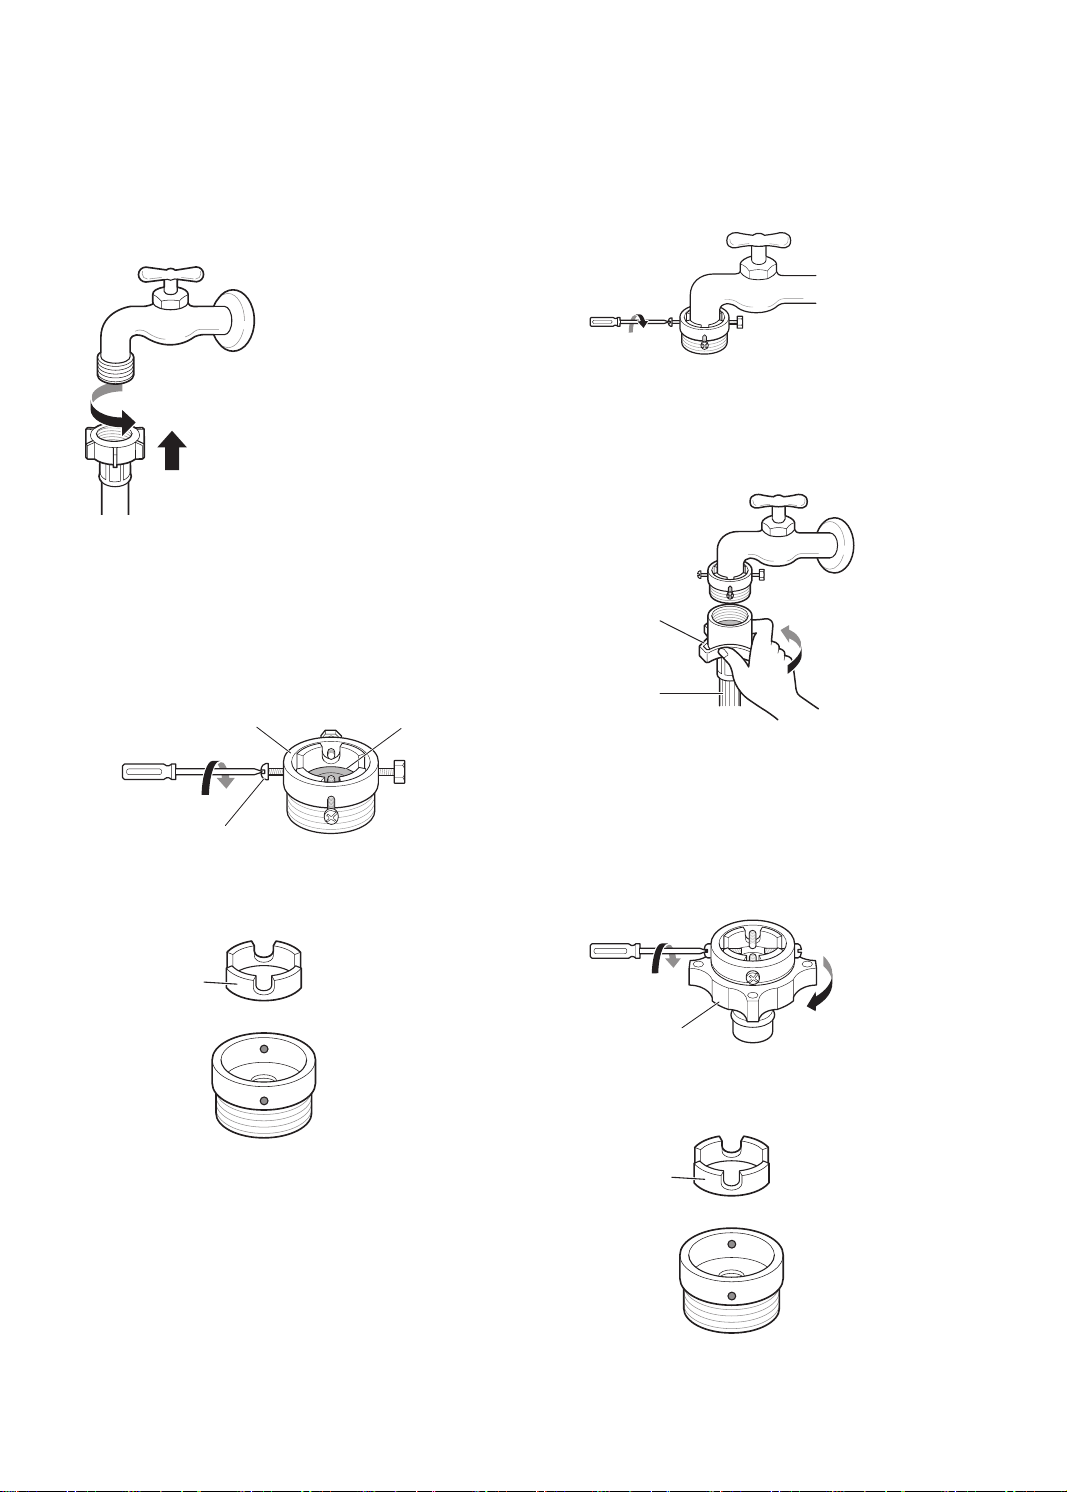
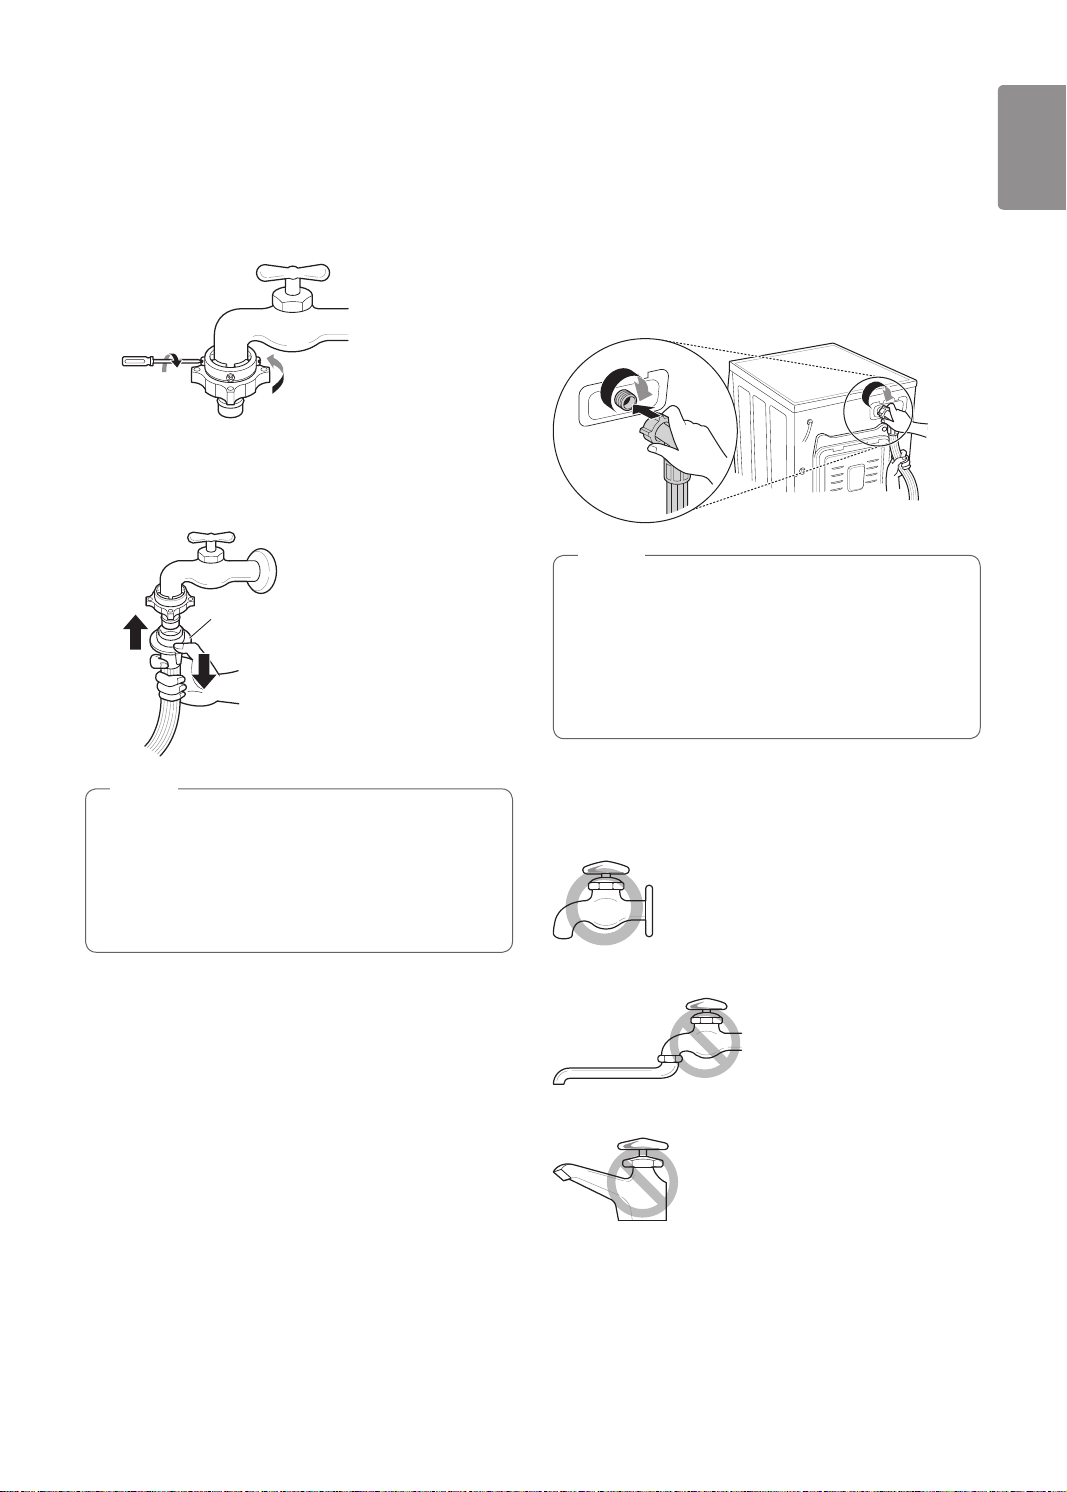
Connecting Hose to Water Tap
Connecting screw-type hose to tap with thread
Screw the hose connector onto the water supply tap.
Push the adapter onto the end of the tap so that
3
the rubber seal forms a watertight connection.
Tighten the four xing screws.
Push the inlet hose vertically upwards so that the
4
rubber seal within the hose can adhere completely
to the tap and then tighten it by screwing it to the
right.
Connecting screw-type hose to tap without
thread
Loose the four xing screws.
1
Upper
connector
Fixing screw
Remove the guide plate if the tap is too large to t
2
the adapter.
Guide plate
Rubber
seal
Plate
Inlet hose
Connecting one touch type hose to tap without
thread
Unscrew the adapter ring plate and loose the four
1
xing screws.
Ring plate
Remove the guide plate if the tap is too large to t
2
the adapter.
Guide plate
14
Page 16
ENGLISH
Push the adapter onto the end of the tap so that
3
the rubber seal forms a watertight connection.
Tighten the adapter ring plate and the four xing
screws.
Pull the connector latch plate down, push the inlet
4
hose onto the adapter, and release the connector
latch plate. Make sure the adapter locks into place.
Latch plate
Connecting Hose to Washing Machine
Make sure that there are no kinks in the hose and that
they are not crushed.
When your washing machine has two valves.
The Inlet hose with the red connector is for the hot
•
water tap.
NOTE
•After completing connection, if water leaks from
the hose, repeat the same steps.
Use the most conventional type of tap for the
water supply
remove the guide plate before inserting the tap
into the adaptor
. In case the tap is square or too big,
.
NOTE
•After connecting the inlet hose to the water
tap, turn on the water tap to ush out foreign
substances (dirt, sand, sawdust, etc.) in the water
lines. Let the water drain into a bucket, and check
the water temperature.
Using the horizontal tap
Horizontal tap
Extension tap
Square tap
15
Page 17
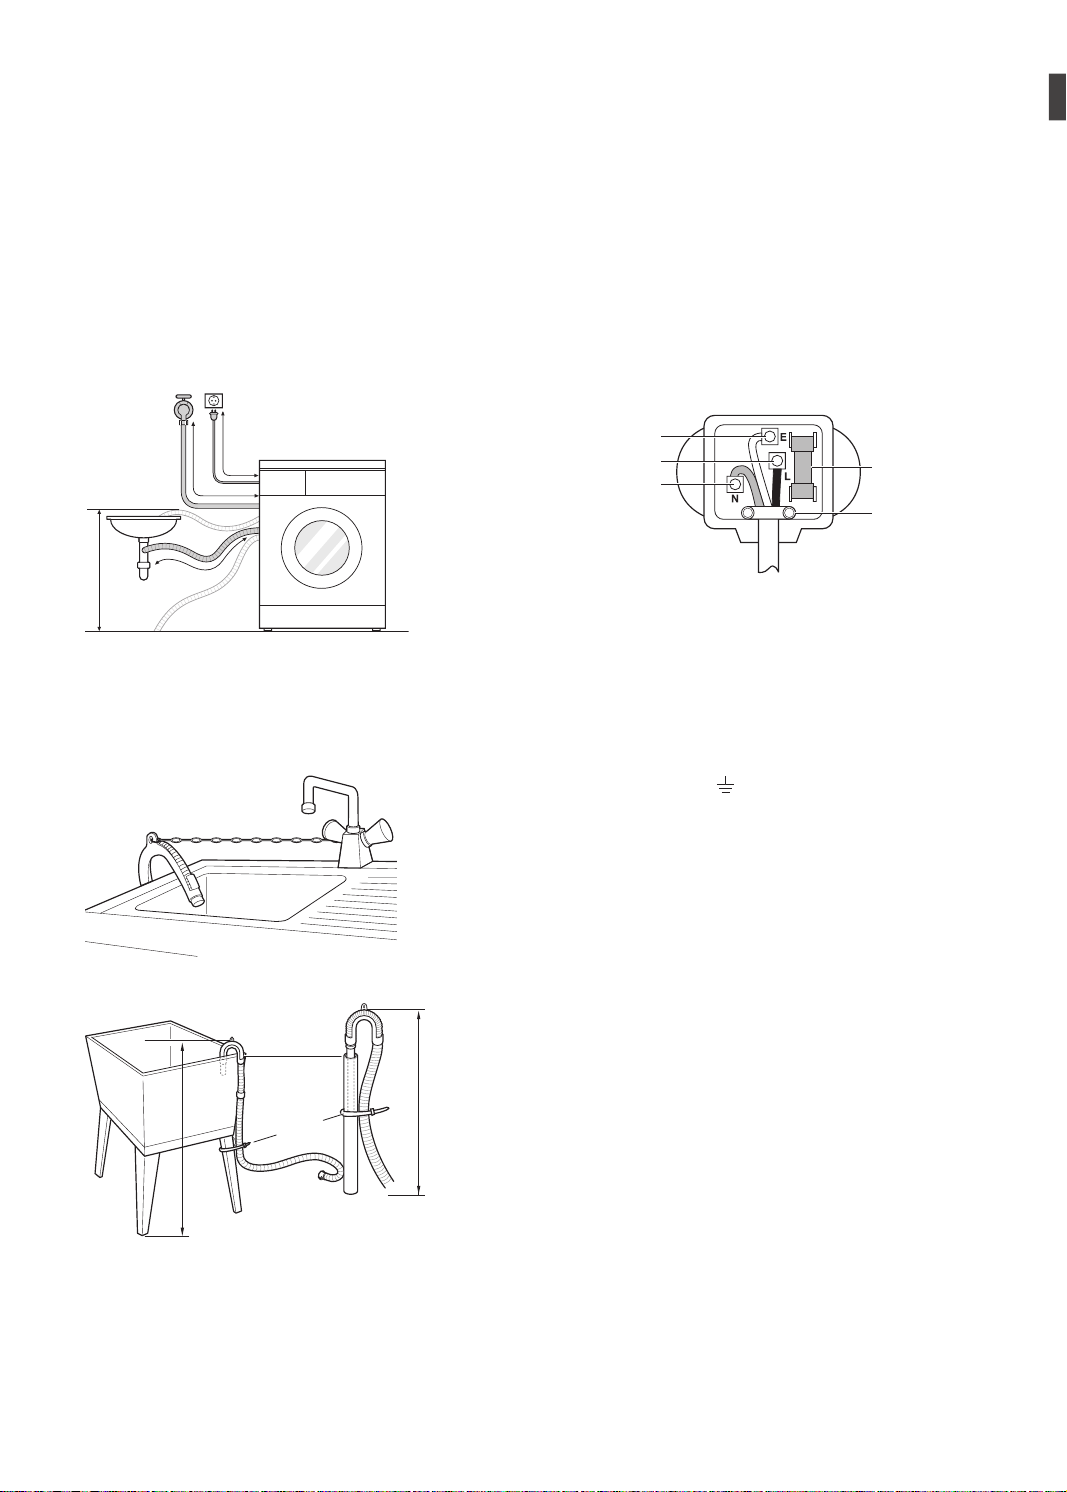
Installation of Drain Hose
Electrical Connections (In the UK
The drain hose should not be placed higher than 100
•
cm above the oor. Water in the washing machine
may not drain or may drain slowly.
Securing the drain hose correctly will protect the oor
•
from damage due to water leakage.
If the drain hose is too long, do not force it back into
•
the washing machine. This will cause abnormal noise.
about 100 cm
about 145 cm
max. 100 cm
When installing the drain hose to a sink, secure it
•
about 105 cm
tightly with string.
Securing the drain hose correctly will protect the oor
•
from damage due to water leakage.
Laundry tub
Hose
retainer
Only)
The wires in the mains lead are coloured in accordance
with the following code:
Green and Yellow: Earth
Blue: Neutral
Brown: Live
This appliance must be earthed.
Green and
Yellow (Earth)
Brown (Live)
Blue (Neutral)
As the colours of the wires in the mains lead of this
apparatus may not correspond with the coloured
markings identifying the terminals in your plug, proceed
as follows:
The green and yellow wire must be connected to the
terminal in the plug which is marked with the letter E or
by the earth symbol (
) or coloured Green or Green
and Yellow.
The blue wire must be connected to the terminal which
is marked with the letter N or coloured Black.
The brown wire must be connected to the terminal which
is marked with the letter L or coloured Red.
If a 13 amp (BS 1363) plug is used, t a 13 amp BS
1362 fuse.
Fuse
Cord grip
16
max. 100 cm
Tie strap
max. 100 cm
Page 18
ENGLISH
OPERATION
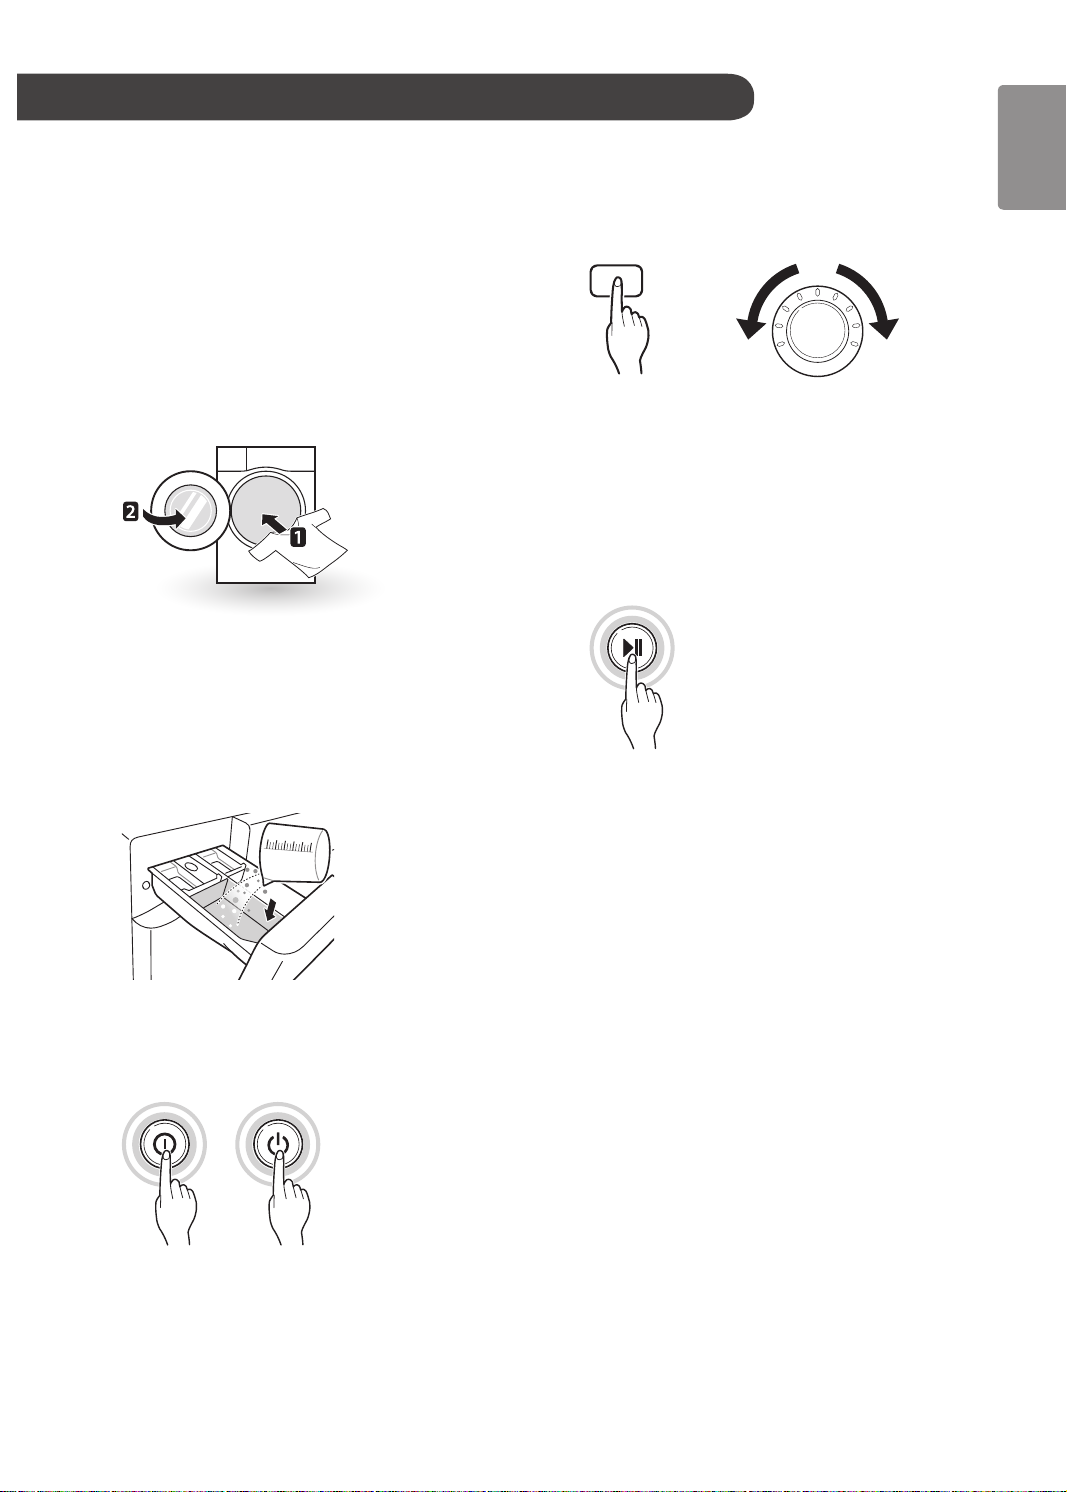
Using the Washing Machine
Before the rst wash, select a cycle (Cotton 60 °C, add
a half load of detergent), allow the washing machine
to wash without clothing. This will remove residue and
water from the drum that may have been left during
manufacturing.
Sort laundry and load items.
1
Sort laundry by fabric type, soil level, colour and
•
load size as needed. Open the door and load
items into the washing machine.
Add cleaning products and/or detergent and
2
softener.
Add the proper amount of detergent to the
•
detergent dispenser drawer. If desired, add
bleach or fabric softener to the appropriate areas
of the dispenser.
Choose the desired washing cycle.
4
Press the Cycle button repeatedly or turn the
•
cycle selector knob until the desired cycle is
selected.
Begin cycle.
5
Press the Inicio/Pausa button to begin the cycle.
•
The washing machine will agitate briefly
without water to measure the weight of the
load. If the Inicio/Pausa button is not pressed
within 14 minutes, the washing machine will
shut off and all settings will be lost.
End of cycle.
6
When the cycle is nished, a melody will sound.
•
Immediately remove your clothing from the
washing machine to reduce wrinkling. Check
around the door seal when removing the load for
small items that may be caught in the seal.
Turn on the washing machine.
3
Press the Ligar/Desligar button to turn ON the
•
washing machine.
17
Page 19
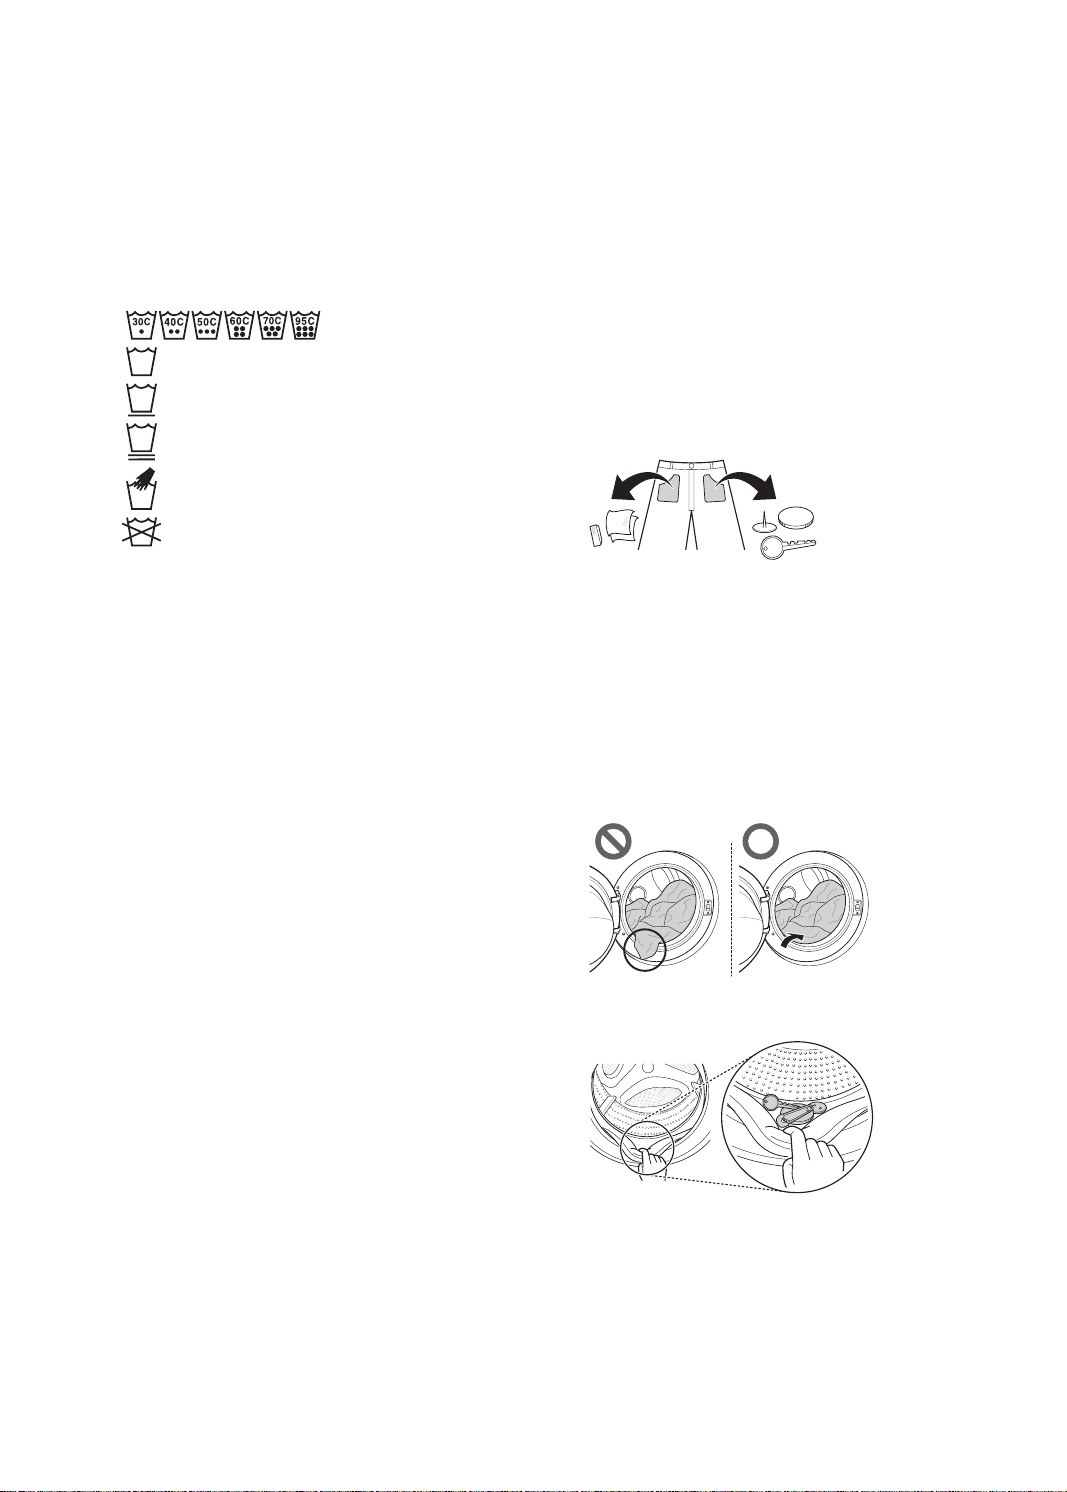
Sorting Iaundry
Look for a care label on your clothes.
1
This will tell you about the fabric content of your
•
garment and how it should be washed.
Symbols on the care labels.
•
Wash temperature
Normal machine wash
Permanent press
Delicate
Hand wash
Do not wash
Sorting laundry.
2
To get the best results, sort clothes into loads
•
that can be washed with the same wash cycle.
Different fabrics need to be washed at varying
•
temperatures and spin speeds.
Always sort dark colours from pale colours and
•
whites. Wash separately as dye and lint transfer
can occur causing discolouration of white and
pale garments. If possible, do not wash heavily
soiled items with lightly soiled ones.
– Soil (Heavy, Normal, Light)
Separate clothes according to amount of soil.
– Colour (White, Lights, Darks)
Separate white fabrics from coloured fabrics.
– Lint (Lint producers, Collectors)
Wash lint producers and lint collectors
separately.
Caring before loading.
3
Combine large and small items in a load. Load
•
large items rst.
Large items should not be more than half the
•
total wash load. Do not wash single items. This
may cause an unbalanced load. Add one or two
similar items.
Check all pockets to make sure that they are
•
empty. Items such as nails, hair clips, matches,
pens, coins and keys can damage both your
washing machine and your clothes.
Close zippers, hooks and strings to make sure
•
that these items don’t snag on other clothes.
Pre-treat dirt and stains by brushing a small
•
amount of detergent dissolved water onto stains
to help lift dirt.
Check the folds of the exible gasket (gray) and
•
remove any small articles.
Check inside the drum and remove any items
•
from a previous wash.
Remove any clothing or items from the exible
•
gasket to prevent clothing and gasket damage.
18
Page 20
ENGLISH
Adding Cleaning Products
Adding Detergent and Fabric Softener
Detergent Dosage
Detergent should be used according to the instruction
•
of the detergent manufacturer and selected according
to type, colour, soiling of the fabric and washing
temperature.
If too much detergent is used, too many suds can
•
occur and this will result in poor washing results or
cause heavy load to the motor.
If you wish to use liquid detergent follow the guidelines
•
provided by the detergent manufacturer.
You can pour liquid detergent directly into the
•
main detergent drawer if you are starting the cycle
immediately.
Do not use liquid detergent if you are using Time
•
delay, or if you have selected Pre Wash, as the liquid
may harden.
If too many suds occur, reduce the detergent amount.
•
Detergent usage may need to be adjusted for water
•
temperature, water hardness, size and soil level of the
load. For best results, avoid oversudsing.
Refer to the label of the clothes, before choosing the
•
detergent and water temperature:
When using the washing machine, use designated
•
detergent for each type of clothing only:
– General powdered detergents for all types of fabric
– Powdered detergents for delicate fabric
– Liquid detergents for all types of fabric or
designated detergents only for wool
For better washing performance and whitening, use
•
detergent with the general powdered bleach.
Detergent is ushed from the dispenser at the
•
beginning of the cycle.
NOTE
•Do not let the detergent harden.
Doing so may lead to blockages, poor rinse
performance or odour.
•Full load : According to manufacturer’s
recommendation.
•Part load : 3/4 of the normal amount
•Minimum load : 1/2 of full load
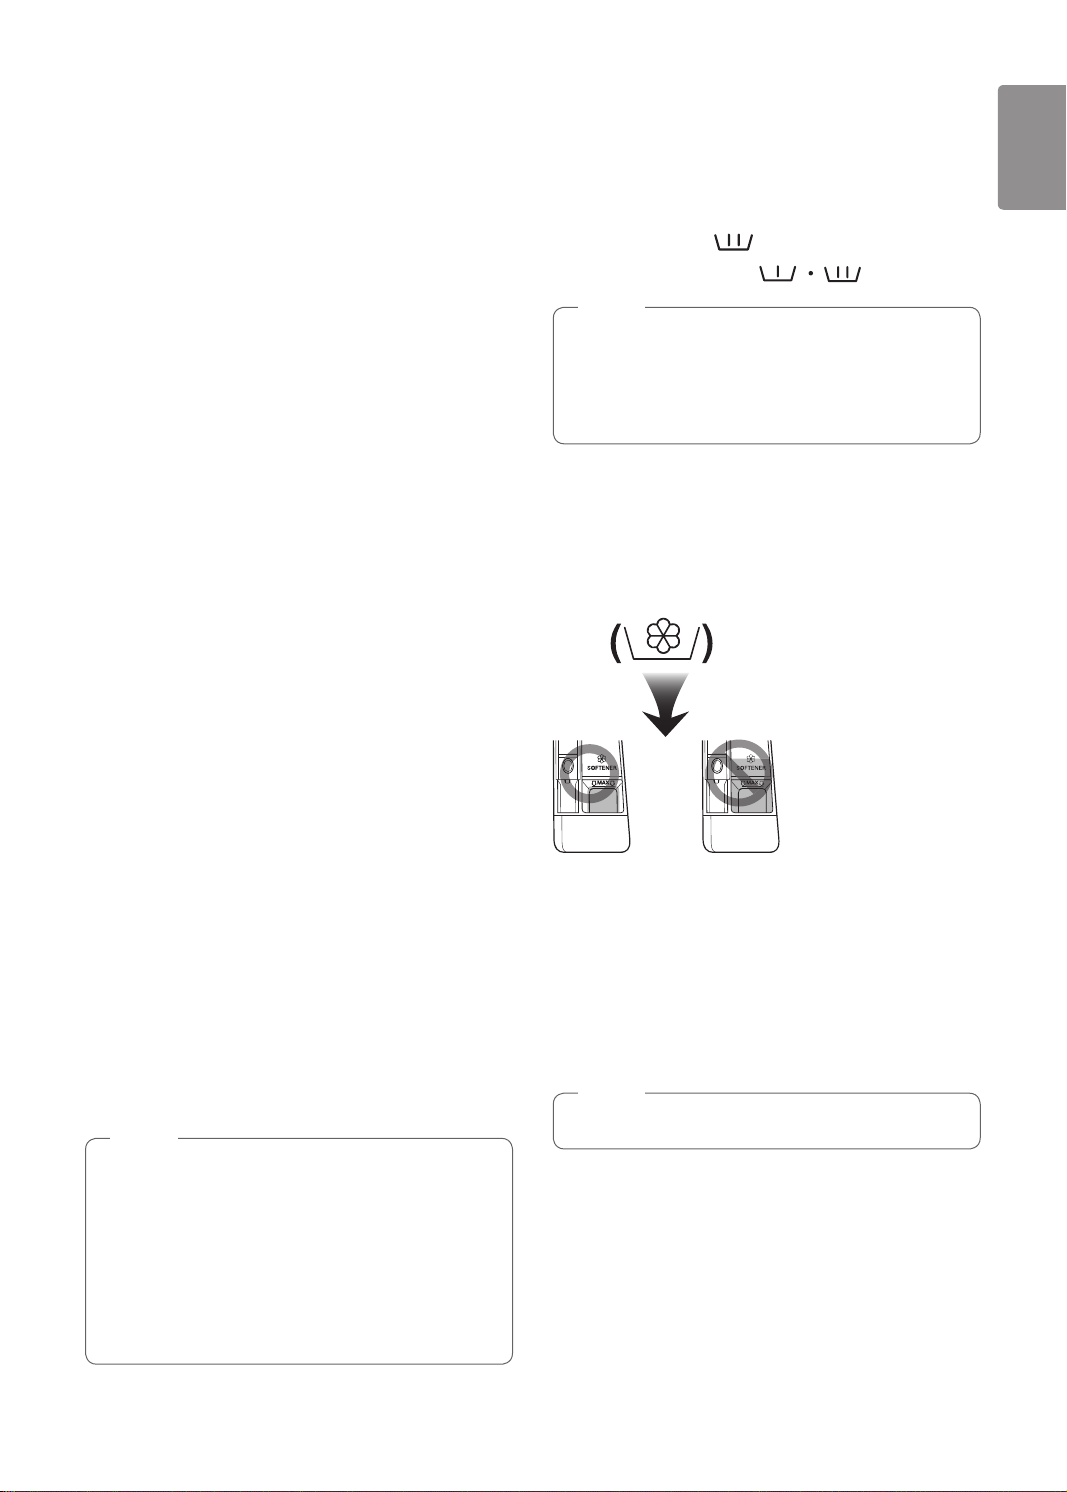
Adding detergent
Main wash only →
•
Pre wash+Main wash →
•
NOTE
•Too much detergent, bleach or softener may
cause an overow.
•Be sure to use the appropriate amount of
detergent.
Adding fabric softener
Do not exceed the maximum ll line. Overlling can
•
cause early dispensing of the fabric softener, which
may stain clothes. Close the dispenser drawer slowly.
Do not leave the fabric softener in the detergent
•
drawer for more than 2 days (Fabric softener may
harden).
Softener will automatically be added during the last
•
rinse cycle.
Do not open the drawer when water is being supplied.
•
Solvents (benzene, etc) should not be used.
•
NOTE
•Do not pour fabric softener directly on the clothes.
19
Page 21
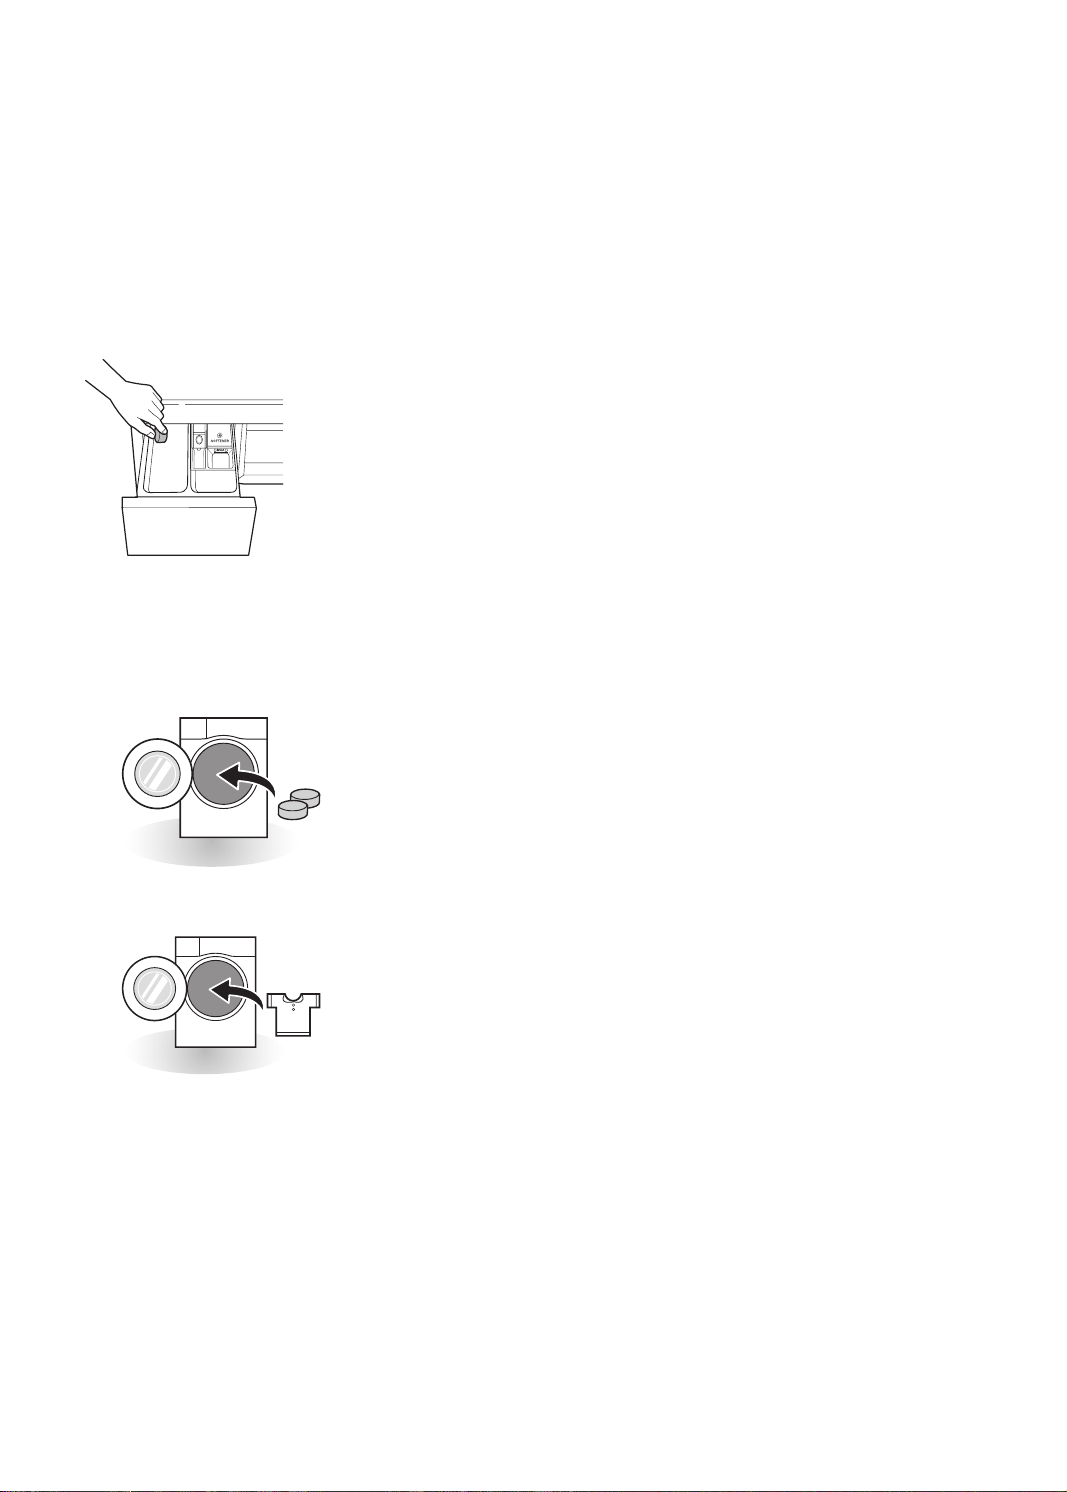
Adding water softener
A water softener, such as Anti-limescale (e.g. Calgon)
•
can be used to cut down on the use of detergent in
extremely hard water areas. Dispense according to
the amount specied on the packaging. First add
detergent and then the water softener.
Use the quantity of detergent required for soft water.
•
Using tablet
Open the door and put tablets into the drum.
1
Load the laundry into the drum and close the door.
2
20
Page 22
ENGLISH
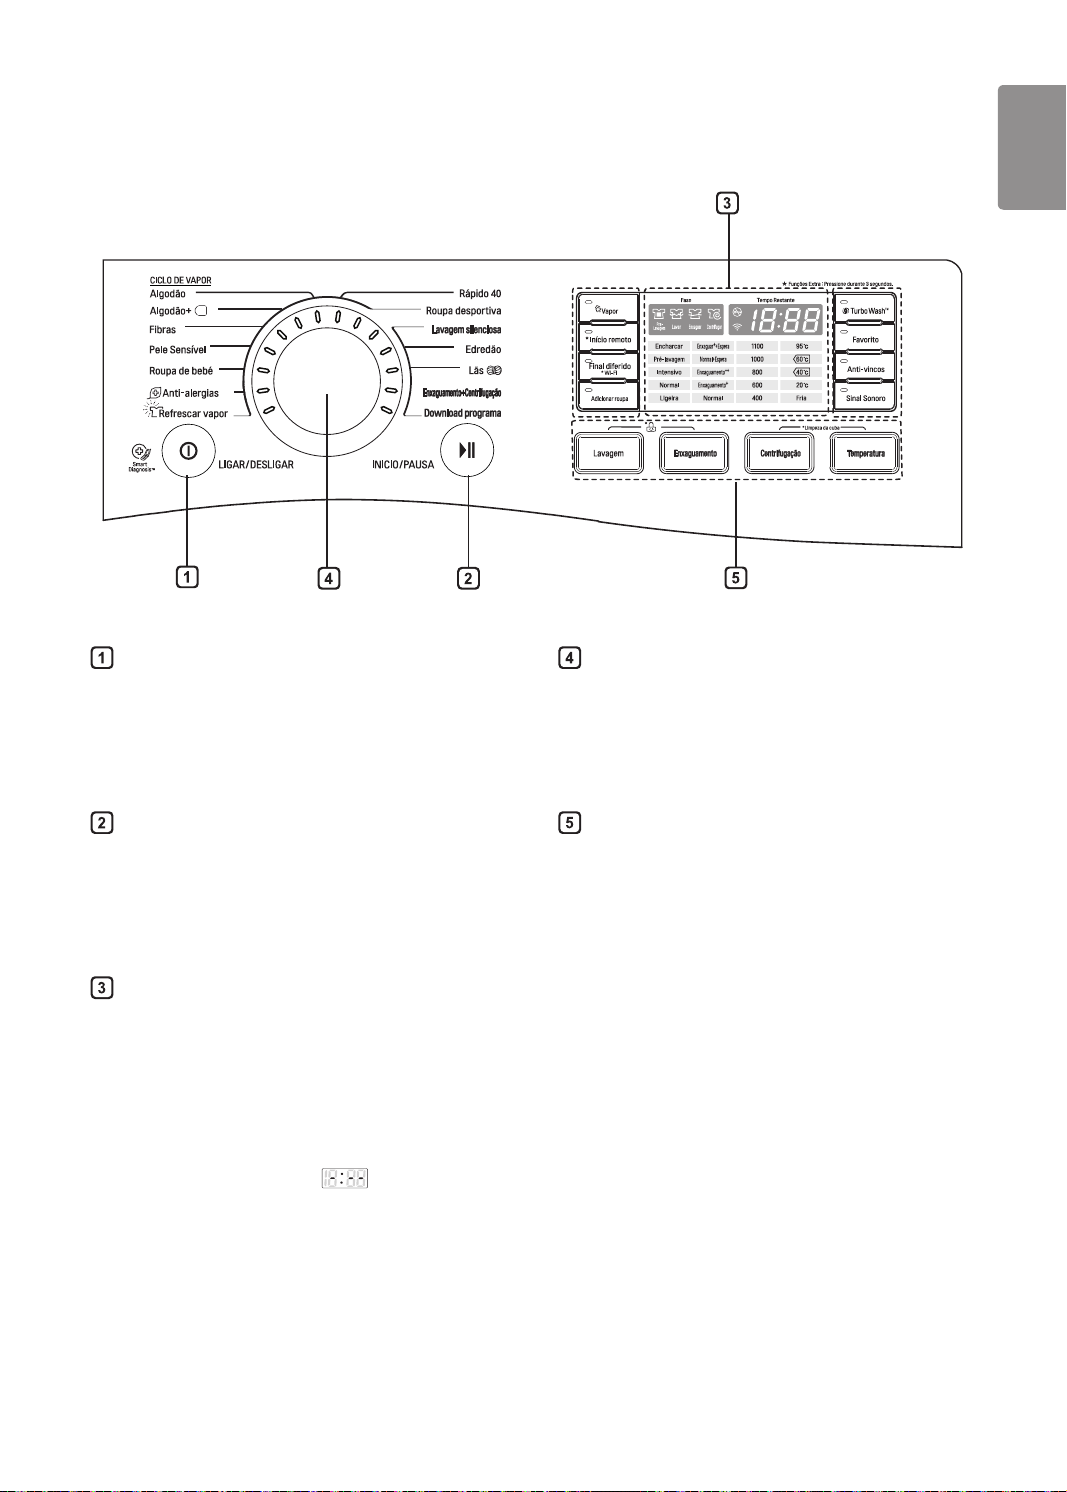
Control Panel
Ligar/Desligar (Power) button
Press the Ligar/Desligar button to turn the
•
washing machine on.
To cancel the Final diferido function, the Ligar/
•
Desligar button should be pressed.
Inicio/Pausa (Start/Pause) button
This Inicio/Pausa button is used to start the
•
wash cycle or pause the wash cycle.
If a temporary stop of the wash cycle is needed,
•
press the Inicio/Pausa button.
Display
The display shows the settings, estimated
•
time remaining, options, and status messages.
When the product is turned on, the default
settings in the display will illuminate.
The display shows estimate time remaining.
•
While the size of the load is being calculated
automatically, blinking ‘
appears.
’ or ‘Detecting’
Programme dial
Programmes are available according to laundry
•
type.
Lamp will light up to indicate the selected
•
programme.
Options
This allows you to select an additional cycle
•
and will light when selected.
Use these buttons to select the desired cycle
•
options for the selected cycle.
21
Page 23
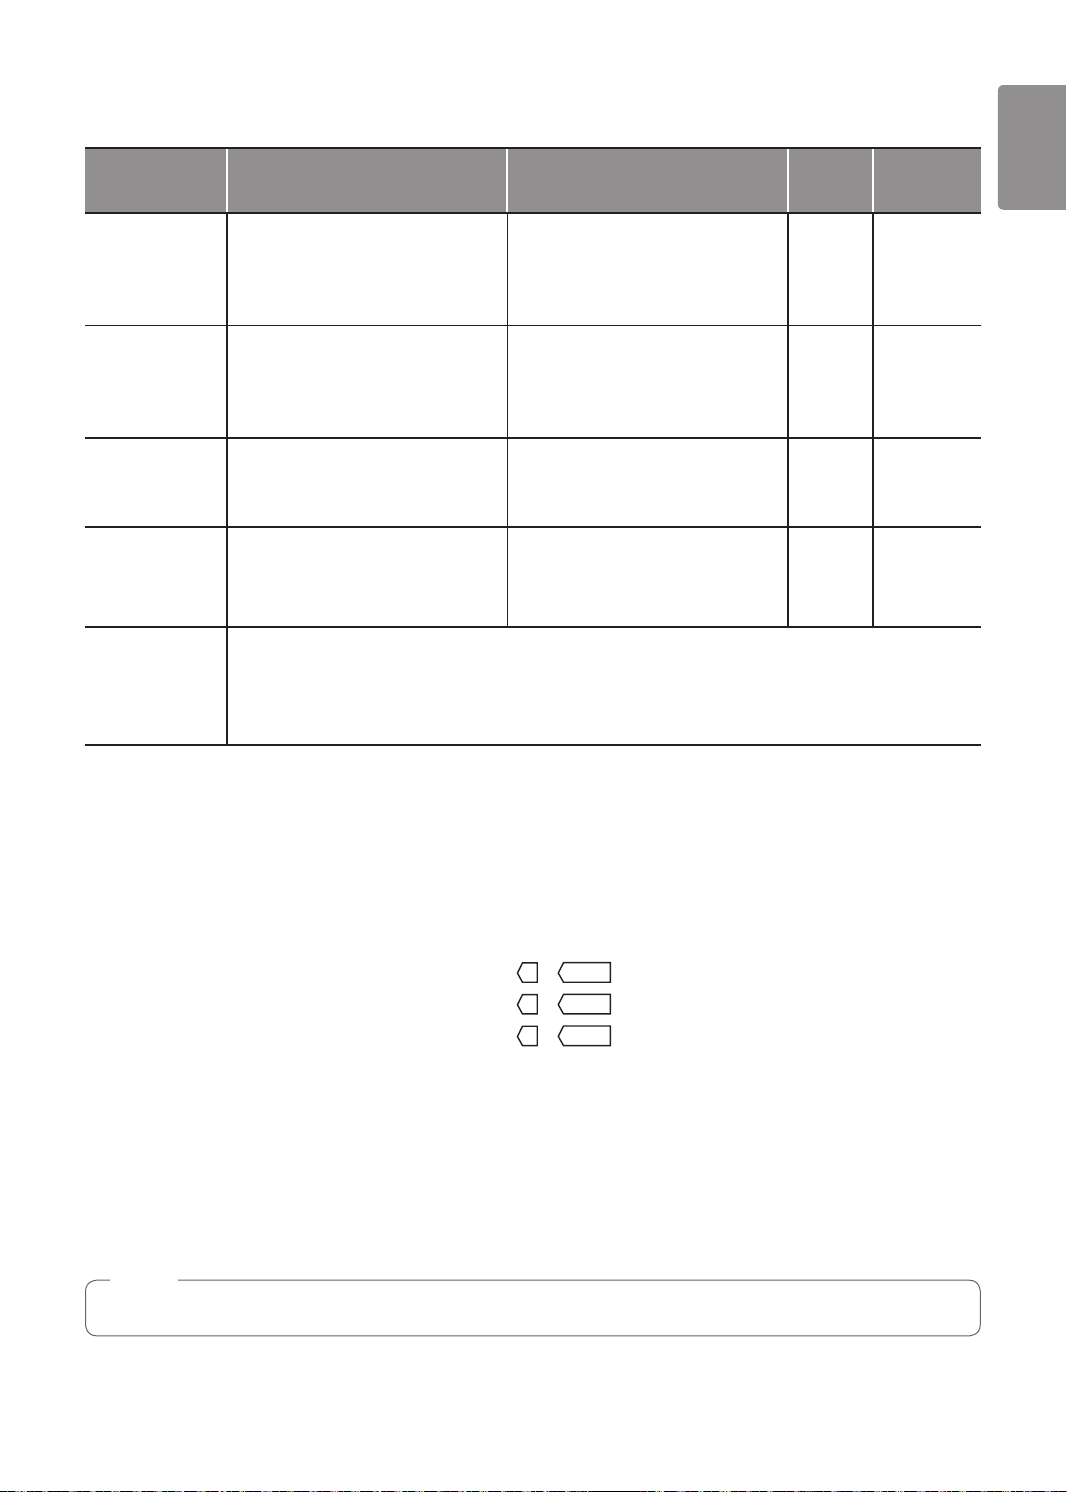
Programme Table
Washing Programme
Programme Description Fabric Type
Algodão
(Cotton)
Algodão+
(Cotton+)
Fibras
(Easy Care)
Pele Sensível
(Hygiene)
Roupa de bebé
(Baby Care)
Provides better performance by
combining various drum motions.
Provides optimized washing
performance with less energy
consumption.
This cycle is suitable for casual
shirts that do not need ironing after
washing.
Washes laundry in a hot cycle.
Removes solid and protein stains,
provides better rinse performance.
Coloured fast garments (shirts,
nightdresses, pajamas, etc)
and normally soiled cotton load
(underwear).
Polyamide, Acrylic, Polyester.
Cotton, underwear, pillow covers,
bed sheets, baby wear
Lightly soiled baby wear.
Proper
Temp.
40 °C
(Cold to
60 °C)
60°C
(Cold to
60°C)
40°C
(Cold to
60°C)
95 °C 3.0 kg
Maximum
Load
Rating
4.5 kg
5.0 kg
Anti-alergias
(Allergy Care)
Refrescar
vapor
(Steam
Cleaning)
Rápido 40
(Speed 40)
Roupa
desportiva
(Sports Wear)
22
Removes allergens such as house
mites, pollen, and cat fur.
Removes wrinkles within 25 mins
with steam.
This cycle provides fast washing
time for small loads and lightly
soiled clothes.
This cycle is suitable for sports
wear such as jogging clothes and
running wear.
Cotton, underwear, pillow covers,
bed sheets, baby wear
Cotton mixed, Polyester mixed
Dress shirts, blouses.
Coloured laundry which is lightly
soiled.
CAUTION : Use less than 20
g of detergent (for 2.0 kg load)
otherwise detergent may remain on
the clothes.
Coolmax, Gore-tex, Fleece and
Sympatex.
No
choice
*30 °C
(Cold to
30 °C)
*30 °C
(Cold to
30 °C)
3.0 kg
3 items
3.0 kg
Page 24
ENGLISH
Programme Description Fabric Type
Proper
Temp.
Maximum
Load
Lavagem
silenciosa
(Silent Wash)
Edredão
(Duvet)
Lãs
(Wool)
Enxaguamento+
Centrifugação
(Rinse+Spin)
Download
programa
(Download
Cycle)
* : Proper temperature can be selected after deleting the steam option, automatically-included in the cycle.
•
Water Temperature: Select the appropriate water temperature for chosen wash cycle. Always follow garment
•
manufacturer’s care label or instructions when washing.
If you select the Hygiene cycle and change the spin mode to No Spin, the drum may still spin very slowly. This is
•
normal and will not affect performance.
Set program at "Algodão+ (Cotton+) 40 °C (Half Load)", "Algodão+ (Cotton+) 60 °C (Half Load)", "Algodão+ (Cotton+)
•
60 °C (Full Load)" option for test in conformity with EN60456 and Regulation 1015/2010.
- Standard 60 °C cotton program : Algodão+ (Cotton+)
- Standard 60 °C cotton program : Algodão+ (Cotton+)
- Standard 40 °C cotton program : Algodão+ (Cotton+)
(They are suitable to clean normally soiled cotton laundry.)
(They are the most efcient programmes in terms of combined energy and water consumptions for washing that
type of cotton laundry.)
*
Actual water temperature may differ from the declared cycle temperature.
The test results depend on water pressure, water hardness, water inlet temperature, room temperature, type and
•
amount of load, degree of soiling utilized detergent, uctuations in the main electricity supply and chosen additional
options.
Provides less noise and vibration
and saves money by using
overnight electricity.
This cycle is for large items such as
bed cover, pillows, sofa covers, etc.
Enables to wash wool fabrics.
(Please use detergent for
machinewashable woolens).
Use for laundry that need rinsing
only of to add rinse-added fabric
softener to laundry
For downloadable cycles. If you did not download any cycles, the default is Cold Wash.
Coloured fast garments (shirts,
nightdresses, pajamas, etc)
and normally soiled cotton load
(underwear).
Cotton bedding except special
garments (delicates, wool, silk, etc.)
with lling: duvets, pillows, blankets,
sofa covers with light lling.
Machine washable woolens with
pure now wool only
Normal fabrics which can be
washable.
60 °C
+
+
+
60 °C
40 °C
(Full Load)
(Half Load)
(Half Load)
40°C
(Cold to
60°C)
Cold
(Cold to
40 °C)
40 °C
(Cold to
40 °C)
No
choice
3.0 kg
1 king size
3.0 kg
Rating
NOTE
•Neutral detergent is recommended.
23
Page 25

Extra Options
Programme
Algodão
(Cotton)
Algodão+
(Cotton+)
Fibras
(Easy Care)
Pele Sensível
(Hygiene)
Roupa de bebé
(Baby Care)
Anti-alergias
(Allergy Care)
Refrescar vapor
(Steam Cleaning)
Rápido 40
(Speed 40)
Final
diferido
(Time Delay)
Vapor
(Steam)
Adicionar
roupa
(Add Item)
Turbo
Wash™
Favorito
(Favorite)
● ● ● ●** ● ●
● ● ● ●** ●
● ● ● ●** ● ●
● ● ● ● ● ●
● ●* ● ● ● ●
● ●* ● ● ● ●
● ●* ●
● ●** ● ●** ●
Anti-vincos
(Crease
Care)
●
Roupa desportiva
(Sports Wear)
Lavagem
silenciosa
(Silent Wash)
Edredão
(Duvet)
Lãs
(Wool)
Enxaguamento+
Centrifugação
(Rinse+Spin)
Download
programa
(Download Cycle)
* : This option is automatically included in the cycle and can not be deleted.
** : This option is automatically included in the cycle and can be deleted.
● ●** ● ● ● ●
● ● ● ●
● ● ● ●
● ● ●
● ● ● ●
● ● ● ● ●
24
Page 26
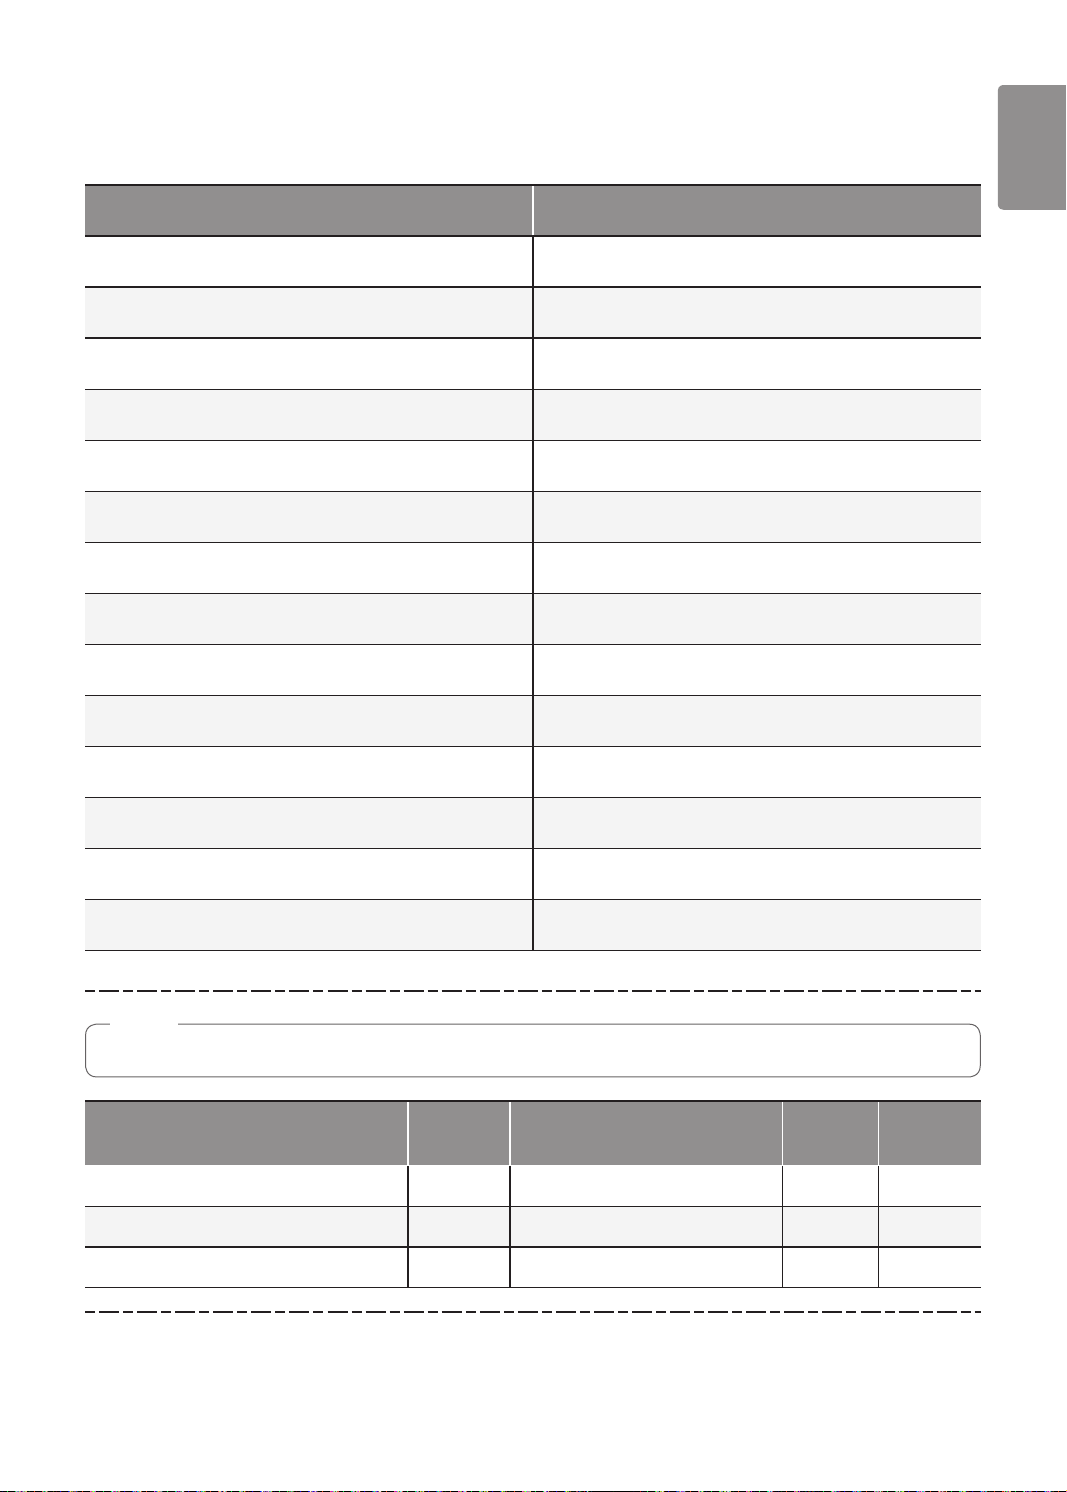
ENGLISH
Operating Data
Programme Max RPM
Algodão (Cotton)
Algodão+ (Cotton+)
Fibras (Easy Care)
Pele Sensível (Hygiene)
Roupa de bebé (Baby Care)
Anti-alergias (Allergy Care)
Refrescar vapor (Steam Cleaning)
Rápido 40 (Speed 40)
Roupa desportiva (Sports Wear)
Lavagem silenciosa (Silent Wash)
Edredão (Duvet)
Lãs (Wool)
1100
1100
1100
1100
1100
1100
-
1100
400
1100
800
600
Enxaguamento+Centrifugação (Rinse+Spin)
Download programa (Download Cycle)
NOTE
•Information of main washing programmes at half load.
Program
Algodão+ (Cotton+) (40 °C)
Algodão+ (Cotton+) (60 °C)
Algodão+ (Cotton+) (60 °C)
(Half Load) 225 49 % 78 1.30
(Half Load) 255 49 % 78 1.60
(Full Load) 277 48 % 78 2.10
Time in
minutes
1100
1100
Remaining moisture content
Water
in Liter
Energy
in kWh
25
Page 27

Option Cycle
Adicionar roupa (Add Item)
Final diferido (Time Delay)
You can set a time delay so that the washing machine
will start automatically and nish after a specied time
interval.
Press the Ligar/Desligar button.
1
Select a washing programme.
2
Press the Final diferido button and set time
3
required.
Press the Inicio/Pausa button.
4
NOTE
•The delay time is the time to the end of the
programme, not the start. The actual running time
may vary due to water temperature, wash load
and other factors.
Turbo Wash™
Wash cycle in under 1 hour with energy and water
saving. (based on half of laundry)
Press the Ligar/Desligar button.
1
Select a washing programme.
2
Use this function to add loads or remove the foreign
material.
Press the Adicionar roupa button.
1
Close the door after add loads or remove the
2
foreign material. (e.g. coin or pin etc.)
Press the Inicio/Pausa button.
3
Results when choosing Adicionar roupa during
•
cycles.
- When the tub is spinning : Tub stops and
is off.
- When water temperature in the tub is higher than
45°C : Adicionar roupa is not available with short
warning sound for safety.
- When lots of water is in the tub :
after draining by safe water level.
NOTE
•Open the door when Door Lock is off after
checking the safety.
•Adicionar roupa doesn't work when Tub Cleaning
course is in progress for safety.
•Put the laundry into the tub completely. Laundry
caught in between door closing part can damage
door packing (rubber part) and might cause failure.
Door Lock is off
Door Lock
Press the Turbo Wash™ button.
3
Press the Inicio/Pausa button.
4
NOTE
•Turbo Wash™ function of Some courses is
selected automatically.
26
Page 28

ENGLISH
Vapor (Steam)
Anti-vincos (Crease Care)
Steam Wash features enhance washing performance
with low energy consumption.
Press the Ligar/Desligar button.
1
Select steam course.
2
Press the Vapor button.
3
Press the Inicio/Pausa button.
4
Steam Wash
For heavily stained clothes, underwear, or baby
•
clothes.
Do not use Steam Wash for delicates such as wool,
•
silk, and easily discoloured clothes.
Favorito (Favorite)
Favorite programme allows you to store a customized
wash cycle for future use.
Press the Ligar/Desligar button.
1
Select a washing programme.
2
Select the option. (Washing method, number of
3
rinses, spin speed, water temperature etc.)
Press and hold the Favorito button for 3 seconds.
4
NOTE
•The favorite programme is now stored for future
use.
•To reuse the programme, select favorite
programme and press the Inicio/Pausa button.
If you want to prevent creasing, select Crease Care
option.
Press the Ligar/Desligar button.
1
Select a washing programme.
2
Press the Anti-vincos button.
3
Press the Inicio/Pausa button.
4
Lavagem (Wash)
Encharcar (Soak)
Use this mode to wash normal clothes or thick and
heavy clothes which are excessively dirty.
Pré-lavagem (Pre Wash)
If the laundry is heavily soiled, the Pre Wash cycle is
recommended.
Intensivo (Intensive)
If the laundry is normal and heavily soiled, the Intensivo
option is effective.
Normal (Normal)
This option is automatically selected in every course
except for Enxaguamento+Centrifugação, Roupa de
bebé.
Ligeira (Light)
This cycle is suitable for lightly soiled clothing.
NOTE
•Selectable options will differ depending on
selected course.
27
Page 29

Enxaguamento (Rinse)
Child Lock ( )
Enxaguar++Espera (Rinse++Hold)
Add rinse once then after rinsing process, the course is
paused until Inicio/Pausa button is pressed again.
Normal+Espera (Normal+Hold)
The course is paused until start button is pressed again
when rinse is nished.
Enxaguamento++(Rinse++)
Add rinse twice.
Enxaguamento+ (Rinse+)
Add rinse once.
Centrifugação (Spin)
Spin speed level can be selected by pressing the
•
Centrifugação button repeatedly
Spin Only
•
Press the Ligar/Desligar button.
1
.
Select this function to lock the buttons on the control
assembly to prevent tampering.
Locking the control panel
Press and hold the Lavagem and Enxaguamento
1
button for 3 seconds.
A beeper will sound, and ‘ ’ will appear on the
2
display.
When the child lock is set, all buttons are locked
except the Ligar/Desligar button.
NOTE
•Turning off the power will not reset the child lock
function. You must deactivate child lock before
you can access any other functions.
Unlocking the control panel
Press and hold the Lavagem and Enxaguamento
button for 3 seconds.
A beeper will sound and the remaining time for the
•
current programme will reappear on the display.
Press the Centrifugação button to select RPM.
2
Press the Inicio/Pausa button.
3
Temperatura (Temp.)
The Temperatura button selects the wash and rinse
temperature combination for the selected cycle. Press
this button until the desired setting is lit. All rinses use
cold tap water.
Select the water temperature suitable for the type of
•
load you are washing. Follow the garment fabric care
labels for best results.
28
Sinal Sonoro (Buzzer On/Off)
Press the Ligar/Desligar button.
1
Press the Inicio/Pausa button.
2
Press the Sinal Sonoro button set the buzzer on/
3
off function.
NOTE
•Once the Buzzer on/off function is set, the setting
is memorized even after the power is turned off.
•If you want to turn the Beeper off, simply repeat
this process.
Page 30

ENGLISH
Wi-Fi( )
Download programa (Download Cycle)
Press and hold the Wi-Fi button for 3 seconds. When
Wi-Fi is turned on, the Wi-Fi icon (
panel is lit.
) on the control
Início remoto (Remote Start)
Use a smart phone to control your appliance remotely.
You can also monitor your cycle operation so you know
how much time is left in the cycle.
NOTE
•You must rst connect to a gateway and register
your appliance in order to use the Remote Start
function.
To use Remote Start:
Press the Ligar/Desligar button.
1
Put the laundry in the drum.
2
Press and hold Início remoto button for 3 seconds
3
to enable Remote Start function.
The Download Cycle features of this appliance allow
you to download new and special cycles that are not
included in the appliance's basic cycles.
Appliances that have been successfully registered
can download a variety of specialty cycles specic to
the appliance. Only one cycle can be stored on the
appliance at a time.
Once Cycle Download is completed in the washer, the
product keeps the downloaded cycle until you change it
to a new downloaded cycle.
NOTE
•You can download cycles after registering the
product and conguring the Wi-Fi connection.
•You can download a desired cycle through the 'LG
SmartThinQ' app. For more information on each
cycle, refer to the 'LG SmartThinQ' app.
•Depending on the type of washer purchased,
different cycles will be available.
•The downloaded cycles may be different
depending on the updated version of the 'LG
SmartThinQ' app.
Start a cycle from the LG SmartThinQ application
4
on your smart phone.
NOTE
•If you do not start your appliance, it will wait to
start a cycle until you turn off your appliance
from the application or disable the Remote Start
function.
•When Remote Start is turned on, the door is
automatically locked.
To disable Remote Start:
When the Remote Start is activated, press and hold
Início remoto button for 3 seconds.
29
Page 31

SMART FUNCTIONS
Using SmartThinQ Application
Installing SmartThinQ
Search for the LG SmartThinQ application from the
Google Play Store or Apple App Store on a smart
phone. Follow instructions to download and install the
application.
Wi-Fi Function
For appliances with the
•
Communicate with the appliance from a smart phone
using the convenient smart features.
Washer Cycle
Set or download any perferred cycle and operate by
remote control.
Tub Clean Coach
Check the appropriate Tub Clean period based on the
washing frequency.
or logo
NOTE
•To verify the Wi-Fi connection, check the Wi-Fi
icon on the control panel is lit.
•LG SmartThinQ is not responsible for any network
connection problems or any faults, malfunctions,
or errors caused by network connection.
•The machine supports 2.4 GHz Wi-Fi networks
only.
•If the appliance is having trouble connecting to the
Wi-Fi network, it may be too far from the router.
Purchase a Wi-Fi repeater (range extender) to
improve the Wi-Fi signal strength.
•The Wi-Fi connection may not connect or may
be interrupted because of the home network
environment.
•The network connection may not work properly
depending on the internet service provider.
•The surrounding wireless environment can make
the wireless network service run slowly.
•The application is subject to change for appliance
improvement purposes without notice to users.
•Functions may vary by model.
Energy Monitoring
Check the energy consumption of the recently used
cycles and monthly average.
Smart Diagnosis
This function provides useful information for diagnosing
and solving issues with the appliance based on the
pattern of use.
Settings
Various functions are available.
Push Alert
Turn on the Push Alerts to receive appliance status
notications. The notications are triggered even if the
LG SmartThinQ application is off.
30
Page 32

ENGLISH
Wireless LAN Module Specification
Open Source Software Notice Information
Model LCW-004
Frequency Range 2412 ~ 2472 MHz
IEEE 802.11b: 17.82 dBm
Output Power (Max.)
Wireless function S/W version : V 1.0
For consideration of the user, this device should be
installed and operated with a minimum distance of
20 cm between the device and the body.
Standby power consumption 0.5 W
Network standby power consumption 3.0 W
The period of time after which the power
management function, or a similar function,
switches the equipment automatically
into standby and/or off mode and/or the
condition providing networked standby
IEEE 802.11g: 17.72 dBm
IEEE 802.11n: 16.61 dBm
20 min.
Declaration of Conformity
To obtain the source code under GPL, LGPL, MPL, and
other open source licenses, that is contained in this
product, please visit http://opensource.lge.com.
In addition to the source code, all referred license terms,
warranty disclaimers and copyright notices are available
for download.
LG Electronics will also provide open source code to you
on CD-ROM for a charge covering the cost of performing
such distribution (such as the cost of media, shipping,
and handling) upon email request to opensource@lge.
com. This offer is valid for three (3) years from the date
on which you purchased the product.
Smart Diagnosis™ Using a Smart Phone
For appliances with the
•
Use this function if you need an accurate diagnosis by
an LG Electronics customer information centre when the
appliance malfunctions or fails.
Smart Diagnosis™ can not be activated unless the
appliance is connected to power. If the appliance is
unable to turn on, then troubleshooting must be done
without using Smart Diagnosis™.
or logo
Hereby, LG Electronics declares that the radio
equipment type Washing machine is in compliance with
Directive 2014/53/EU. The full text of the EU declaration
of conformity is available at the following internet
address:
http://www.lg.com/global/support/cedoc/cedoc#
LG Electronics European Shared Service Center B.V.
Krijgsman 1
1186 DM Amstelveen
The Netherlands
31
Page 33

Using Smart Diagnosis™
Smart Diagnosis™ Through the
Customer Information Centre
Use this function if you need an accurate diagnosis by
an LG Electronics customer information center when the
appliance malfunctions or fails. Use this function only
to contact the service representative, not during normal
operation.
Press the Ligar/Desligar button to turn on the
1
washing machine. Do not press any other buttons
or turn the cycle selector knob.
When instructed to do so by the call centre, place
2
the mouthpiece of your phone close to the Ligar/
Desligar button.
Max
10 mm
NOTE
•The Smart Diagnosis™ function depends on the
local call quality.
•The communication performance will improve and
you can receive better service if you use the home
phone.
•If the Smart Diagnosis™ data transfer is poor due
to poor call quality, you may not receive the best
Smart Diagnosis™ service.
Press and hold the Temperatura button for 3
3
seconds, while holding the phone mouthpiece to
the icon or Ligar/Desligar button.
Keep the phone in place until the tone transmission
4
has nished. Time remaining for data transfer is
displayed.
For best results, do not move the phone while
•
the tones are being transmitted.
If the call centre agent is not able to get an
•
accurate recording of the data, you may be
asked to try again.
Once the countdown is over and the tones have
5
stopped, resume your conversation with the call
centre agent, who will then be able to assist you
using the information transmitted for analysis.
32
Page 34

ENGLISH
MAINTENANCE
WARNING
•Unplug the washing machine before cleaning to
avoid the risk of electric shock. Failure to follow
this warning may result in serious injury, re,
electric shock, or death.
•Never use harsh chemicals, abrasive cleaners, or
solvents to clean the washing machine. They may
damage the nish.
Cleaning your Washing Machine
Care After Wash
After the cycle is nished, wipe the door and the inside
•
of the door seal to remove any moisture.
Leave the door open to dry the drum interior.
•
Wipe the body of the washing machine with a dry cloth
•
to remove any moisture.
Cleaning the Exterior
Proper care of your washing machine can extend its life.
Care and Cleaning of the Interior
Use a towel or soft cloth to wipe around the washing
•
machine door opening and door glass.
Always remove items from the washing machine as
•
soon as the cycle is complete. Leaving damp items
in the washing machine can cause wrinkling, colour
transfer, and odour.
Run the Tub Clean cycle once a month (or more often
•
if needed) to remove detergent buildup and other
residue.
Cleaning the Water Inlet Filter
Turn off the stopclock if the washing machine is to be
•
left for any length of time (e.g. holiday), especially if
there is no oor drain (gully) in the immediate vicinity.
‘
’ icon will be displayed on the control panel when
•
water is not entering the detergent drawer.
If water is very hard or contains traces of lime deposit,
•
the water inlet lter may become clogged. It is
therefore a good idea to clean it occasionally.
Door:
Wash with a damp cloth on the outside and inside and
•
then dry with a soft cloth.
Exterior:
Immediately wipe off any spills.
•
Wipe with a damp cloth.
•
Do not press the surface or the display with sharp
•
objects.
Turn off the water tap and unscrew the water inlet
1
hose.
Clean the lter using a hard bristle brush.
2
33
Page 35

Cleaning the Drain Pump Filter
2
The drain lter collects threads and small objects left
•
in the laundry. Check regularly that the lter is clean to
ensure smooth running of your washing machine.
Allow the water to cool down before cleaning the drain
•
pump, carrying out emergency emptying, or opening
the door in an emergency.
Open the cover cap and pull out the hose.
1
Unplug the drain plug and open the lter by turning
2
it to the left.
Container to
collect the
drained water.
After cleaning, turn the pump lter and insert the
4
drain plug.
Close the cover cap.
5
CAUTION
•First drain using the drain hose and then open the
pump lter to remove any threads or objects.
•Be careful when draining, as the water may be
hot.
Remove any extraneous matter from the pump
3
lter.
1
34
Page 36

ENGLISH
Cleaning the Dispenser Drawer
Limpeza da cuba (Tub Clean)
Detergent and fabric softener may build up in the
dispenser drawer. Remove the drawer and inserts and
check for buildup once or twice a month.
Remove the detergent dispenser drawer by pulling
1
it straight out until it stops.
Press down hard on the disengage button and
•
remove the drawer.
Remove the inserts from the drawer.
2
Rinse the inserts and the drawer with warm
•
water to remove buildup from laundry products.
Use only water to clean the dispenser drawer
Dry the inserts and drawer with a soft cloth or
towel.
To clean the drawer opening, use a cloth or small,
3
non-metal brush to clean the recess.
Remove all residue from the upper and lower
•
parts of the recess.
Wipe any moisture off the recess with a soft cloth
4
or towel.
Return the inserts to the proper compartments and
5
replace the drawer.
.
Tub Clean is a special cycle to clean the inside of the
washing machine.
A higher water level is used in this cycle at higher spin
speed. Perform this cycle regularly.
Remove any clothing or items from the washing
1
machine and close the door.
Open the dispenser drawer and add Anti limescale
2
(e.g. Calgon) to the main wash compartment.
Close the dispenser drawer slowly.
3
Power On and then press and hold the
4
Centrifugação and T
seconds.
Then ‘
Press the Inicio/Pausa button to start.
5
After the cycle is complete, leave the door open to
6
allow the washing machine door opening, exible
gasket and door glass to dry
•If there is a child, be careful not to leave the door
open for too long.
NOTE
•Do not add any detergent to the detergent
compartments. Excessive suds may generate and
leak from the washing machine.
’ will be displayed on the display.
CAUTION
emperatura button for 3
.
35
Page 37

Caution on Freezing During
Winter
When frozen, the product does not operate normally.
•
Make sure to install the product where it will not freeze
during winter.
In case the product must be installed outside on a
•
porch or in other outdoor conditions, make sure to
check the following.
How to Keep the Product from Freezing
After washing, remove water remaining inside the
•
pump completely with the opening hose plug used for
removal of residual water. When the water is removed
completely, close the hose plug used for removal of
residual water and cover cap.
After closing the tap, disconnect the cold inlet hose
•
from the tap, and remove water while keeping the
hose facing downwards.
Cold inlet
hose
Check for Freezing
If water does not drain when opening the hose plug
•
used for removal of residual water, check the drainage
unit.
Drain plug
Drain plug
Hang down drain hose to pull out water inside the
•
hose completely.
Drain hose
Cover cap
CAUTION
•When the drain hose is installed in a curved
shape, the inner hose may freeze.
Cover cap
Turn the power on, select Rinse and Spin, and press
•
the Inicio/Pausa button.
Detergent drawer
Drain hose
NOTE
•Check that water is coming into the detergent
drawer while rinsing, and water is draining through
the drain hose while spinning.
When ‘
•
product is in operation, check water supply unit and
drainage unit (Some models do not have an alarm
function that indicates freezing).
’ is shown in display window while the
36
Page 38

ENGLISH
How to Handle Freezing
Make sure to empty the drum, pour warm water of
•
50–60 °C up to the rubber part inside the drum, close
the door, and wait for 1–2 hours.
When water is removed completely from the drum,
•
close the hose plug used for removal of residual
water, select Rinse and Spin, and press the Inicio/
Pausa button.
50‒60 °C
CAUTION
•Do not use boiling water. It may cause burns or
damage to the product.
Open the cover cap and hose plug used for removal
•
of residual water to extract water completely.
Drain plug
Cover cap
NOTE
•If when water does not drain, this means the ice is
not melted completely. Wait more.
Detergent drawer
Drain hose
NOTE
•Check that water is coming into the detergent
drawer while rinsing, and water is draining through
the drain hose while spinning.
When water supply problems occur, take the following
•
measures.
– Turn off the tap, and thaw out the tap and both
connection areas of inlet hose of the product using
a hot water cloth.
– Take out inlet hose and immerse in warm water
below 50–60 °C.
Inlet hose
50‒60 °C
37
Page 39

TROUBLESHOOTING
Your washing machine is equipped with an automatic error-monitoring system to detect and diagnose problems at
•
an early stage. If your washing machine does not function properly or does not function at all, check the following
before you call for service:
Diagnosing Problems
Symptoms Reason Solution
Stop washing machine, check drum and
•
Rattling and clanking
noise
Thumping sound
Vibrating noise
Foreign objects such as coins
or safety pins may be in drum or
pump.
Heavy wash loads may produce a
thumping sound. This is usually
normal.
Have all the transit bolts and tub
support been removed?
Are all the feet resting firmly on
the ground?
drain lter.
If noise continues after washing machine
•
is restarted, call your authorised service
centre.
If sound continues, washing machine
•
is probably out of balance. Stop and
redistribute wash load.
If not removed during installation, refer
•
to Installation guide for removing transit
bolts.
Make sure the washing machine is level
•
and tighten the lock nuts up towards the
base of the appliance.
Water leaks
Oversudsing
Water does not enter
washing machine or it
enters slowly
Water in the washing
machine does not drain
or drains slowly
Inlet hoses or drain hose are
loose at tap or washing machine.
House drain pipes are clogged.
Water supply is not adequate in
that location.
Water supply tap is not
completely open.
Water inlet hose(s) are kinked.
The filter of the inlet hose(s)
clogged.
Drain hose is kinked or clogged.
The drain filter is clogged
Check and tighten hose connections.
•
Unclog drain pipe. Contact plumber if
•
necessary.
Too much detergent or unsuitable
•
detergent may cause excessive foaming
which may result in water leaks.
Check another tap in the house.
•
Fully open tap.
•
Straighten hose.
•
Check the lter of the inlet hose.
•
Clean and straighten the drain hose.
•
Clean the drain lter.
•
38
Page 40

ENGLISH
Symptoms Reason Solution
Electrical power cord may not be
Washing machine does
not start
plugged in or connection may be
loose.
House fuse blown, circuit breaker
tripped,or a power outage has
occurred.
Make sure plug ts tightly in wall outlet.
•
Reset circuit breaker or replace fuse. Do
•
not increase fuse capacity. If problem is
a circuit overload, have it corrected by a
qualied electrician.
Washing machine will
not spin
Door does not open
Wash cycle time
delayed
Fabric softener
overflow
Water supply tap is not turned on.
Check that the door is firmly shut
Too much softener may cause an
overflow.
Turn on water supply tap.
•
Close the door and press the Inicio/
•
Pausa button. After pressing the Inicio/
Pausa
button, it may take a few moments
before the washing machine begins to
spin. The door must be locked before spin
can be achieved. Add 1 or 2 similar items
to help balance the load. Rearrange load
to allow proper spinning.
Once washing machine has started,
•
the door cannot be opened for safety
reasons. Check if the ‘Door Lock’ icon is
illuminated. You can safely open the door
after the ‘Door Lock’ icon turns off.
The washing time may vary by the
•
amount of laundry, water pressure, water
temperature and other usage conditions.
If an imbalance is detected or if the suds
removing programme is on, the wash time
will increase.
Follow softener guidelines to ensure
•
appropriate amount is used. Do not
exceed the maximum ll line.
Softeners dispensed
too early
Dry problem Does not dry
Close the dispenser drawer slowly. Do not
•
open the drawer during the wash cycle.
Do not overload. Check that the washing
•
machine is draining properly to extract
adequate water from the load. Clothes
load is too small to tumble properly. Add a
few towels.
39
Page 41

Symptoms Reason Solution
It is the normal odor of new rubber and
This odor is caused by the rubber
attached to the washing machine.
•
will disappear after the machine has been
run a few times.
Odor
If the rubber door gasket and
door seal area are not cleaned
regularly, odors can occur from
mold or foreign substances.
Odors can occur if foreign
substances are left in the
drainage pump filte .
Odors can occur if the drainage
hose is not properly installed,
causing siphoning (water
flowing back inside the washing
machine).
Using the dry function, odors can
occur from lint and other laundry
matter sticking to the heater.
(Dryer model only)
A particular odor can occur from
drying wet clothes with hot air.
(Dryer model only)
Be sure to clean the gasket and door
•
seal regularly and check under the door
seal for small items when unloading the
washer.
Be sure to clean the drainage pump lter
•
regularly.
When installing the drainage hose, be
•
sure that it doesn’t become kinked or
blocked.
This is not a malfunction.
•
The odor will disappear after a short
•
while.
40
Page 42

ENGLISH
Error Messages
Symptoms Reason Solution
Water supply is not adequate in
area.
Water supply taps are not
completely open.
Water inlet hose(s) are kinked.
The filter of the inlet hose(s) are
clogged.
If water leakage occurred in
the inlet hose, indicator ‘
become red.
May vary depending on the model.
•
Drain hose is kinked or clogged.
The drain filter is clogged
’ will
Check another tap in the house.
•
Fully open tap.
•
Straighten hose(s).
•
Check the lter of the inlet hose.
•
Clean and straighten the drain hose.
•
Clean the drain lter.
•
Load is too small.
Load is out of balance.
The appliance has an imbalance
detection and correction system.
If individual heavy articles are
loaded (e.g. bath mat, bath
robe, etc.) this system may stop
spinning or even interrupt the
spin cycle altogether.
If the laundry is still too wet at
the end of the cycle, add smaller
articles of laundry to balance the
load and repeat the spin cycle.
Add 1 or 2 similar items to help balance
•
the load.
Add 1 or 2 similar items to help balance
•
the load.
Rearrange load to allow proper spinning.
•
Rearrange load to allow proper spinning.
•
41
Page 43

Symptoms Reason Solution
Door is not closed properly.
Door sensor has malfunctioned.
Water overfills due to the faulty
water valve.
Water level sensor has
malfunctioned.
Over load in motor.
Water leaks.
Close the door completely.
•
If ‘ , , , ’ is not released,
call for service.
Unplug the power plug and call for
•
service.
Close the water tap.
•
Unplug the power plug.
•
Call for service.
•
Close the water tap.
•
Unplug the power plug.
•
Call for service.
•
Allow the washing machine to stand for
•
30 minutes to allow the motor to cool,
then restart the cycle.
Call for service.
•
42
The washer experienced a power
failure.
Control Error
Is Inlet/outlet hose or drainage
pump frozen?
Restart the cycle.
•
Unplug the power plug and call for
•
service.
Supply warm water into the tub and
•
unfreeze outlet hose and drainage pump.
Wet a towel in warm water and apply to
inlet hose.
Page 44

ENGLISH
WARRANTY
This limited warranty does not cover:
Service trips to deliver, pick up, or install or repair the product; instruction to the customer on operation of the
•
product; repair or replacement of fuses or correction of wiring or plumbing, or correction of unauthorized repairs/
installation.
Failure of the product to perform during power failures and interruptions or inadequate electrical service.
•
Damage caused by leaky or broken water pipes, frozen water pipes, restricted drain lines, inadequate or interrupted
•
water supply or inadequate supply of air.
Damage resulting from operating the Product in a corrosive atmosphere or contrary to the instructions outlined in the
•
Product’s owner’s manual.
Damage to the Product caused by accidents, pests and vermin, lightning, wind, re, oods, or acts of God.
•
Damage or failure caused by unauthorized modication or alteration, or if it is used for other than the intended
•
purpose, or any water leakage where the product was not properly installed.
Damage or failure caused by incorrect electrical current, voltage, or plumbing codes, commercial or industrial use,
•
or use of accessories, components, or consumable cleaning products that are not approved by LG.
Damage caused by transportation and handling, including scratches, dents, chips, and/or other damage to the nish
•
of your product, unless such damage results from defects in materials or workmanship.
Damage or missing items to any display, open box, discounted, or refurbished Product.
•
Products with original serial numbers that have been removed, altered, or cannot be readily determined. Model and
•
Serial numbers, along with original retail sales receipt, are required for warranty validation.
Increases in utility costs and additional utility expenses.
•
Repairs when your Product is used in other than normal and usual household use or contrary to the instructions
•
outlined in the Product’s owner’s manual.
Costs associated with removal of your Product from your home for repairs.
•
The removal and reinstallation of the Product if it is installed in an inaccessible location or is not installed in
•
accordance with published installation instructions, including LG’s owner’s and installation manuals.
Damage resulting from misuse, abuse, improper installation, repair, or maintenance. Improper repair includes use of
•
parts not approved or specied by LG.
Strange vibration or noise
caused by not removing transit
bolts or tub support.
Leakage caused by dirt (hair,
lint) on gasket and door glass.
Tub
support
Carton
base
Transit
bolt
Remove the transit bolts &
tub support.
Clean the gasket & door
glass.
43
Page 45

Not draining caused by clogging
of pump lter.
Clean the pump lter.
Water is not coming because
water inlet valve lters are
clogged or water inlet hoses are
kinked.
Water is not coming because too
much detergent use.
Laundry is hot or warm after
nished washing because the
inlet hoses are installed in
reverse.
Water is not supplied because
the water tap is not turned on.
Leakage caused by improper
installation of drain hose or
clogged drain hose.
Dispenser
Cold
Water
Inlet
water tap
Inlet Filter
Hot
Water
Inlet
Elbow
Bracket
Tie Strap
Clean the inlet valve lter
or reinstall the water inlet
hoses.
Clean the detergent
disperser drawer.
Reinstall the inlet hoses.
Turn on the water tap.
Reinstall the drain hose.
Leakage caused by improper
installation of water inlet hose or
using other brand inlet hoses.
No power problem caused by
loose connection of power cord
or electrical outlet problem.
44
Reinstall the inlet hose.
Reconnect the power cord
or change the electrical
outlet.
Page 46

ENGLISH
Service trips to deliver, pick
up, install the product or for
instruction on product use. The
removal and reinstallation of the
Product.
Level
The warranty covers
manufacturing defects
only. Service resulting from
improper Installation is not
1°
covered.
If all screws are not installed
properly, it may cause excessive
vibration (Pedestal model only).
Water hammering (banging)
noise when washing machine is
lling with water.
High
Pressure
Water
Hit!!
Loud noise
Natural
water ow
Sudden
stopping
water ow
Install 4 screws at each
corner (Total 16EA).
Adjust the water pressure
by turning down the water
valve or water tap in the
home.
45
Page 47

OPERATING DATA
Product fiche_Commission Delegated Regulation(EU) No 1061/201
Supplier’s trade mark LG
Supplier’s model identier F1K2CS2W / F1K2CS2T
Rated capacity 17 kg
Energy efciency class A++
Awarded an “EU Ecolabel award” under Regulation (EC) No 66/2010 No
Energy consumption “X” kWh per year, based on 220 standard washing cycles for
cotton programmes at 60 °C and 40 °C at full and partial load, and the consumption of
the low-power modes. Actual energy consumption will depend on how the appliance is
used.
The energy consumption
- the standard 60 °C cotton programme at full load. 2.10 kWh
- the standard 60 °C cotton programme at partial load. 1.60 kWh
- the standard 40 °C cotton programme at partial load. 1.30 kWh
442
kWh/
year
Weighted power consumption of the off-mode and of the left-on mode.
Water consumption “X” litres per year, based on 220 standard washing cycles for cotton
programmes at 60 °C and 40 °C at full and partial load. Actual water consumption will
depend on how the appliance is used.
Spin-drying efciency class “X” on a scale from G (least efcient) to A (most efcient)
Maximum spin speed attained for the standard 60 °C cotton programme at full load
or the standard 40 °C cotton programme at partial load, whichever is the lower, and
remaining moisture content attained for the standard 60 °C cotton programme at full
load or the standard 40 °C cotton programme at partial load, whichever is the greater.
Standard washing programmes to which the information in the label and the che
relates, that these programmes are suitable to clean normally soiled cotton laundry and
that they are the most efcient programmes in terms of combined energy and water
consumption;
The programme time
- the standard 60 °C cotton programme at full load. 277 min.
- the standard 60 °C cotton programme at partial load. 255 min.
- the standard 40 °C cotton programme at partial load. 225 min.
The duration of the left-on mode (Tl) 0 min.
Airborne acoustical noise emissions expressed in dB(A) re 1 pW and rounded to the
nearest integer during the washing and spinning phases for the standard 60 °C cotton
programme at full load.
0.50
17000
1100 rpm
49 %
"Cotton+ 60 °C /40 °C"
78 dB(A)
W
litres/
year
Free-Standing
46
Page 48

Memo
Page 49

Memo
Page 50

Memo
Page 51

Memo
Page 52

MANUAL DO
UTILIZADOR
MÁQUINA DE
LAVAR ROUPA
PORTUGUÊS
F1K2CS2W
F1K2CS2T
Antes de iniciar a instalação, leia cuidadosamente as instruções.
Esta ação simplificará a instalação e garantirá que o produto é
instalado de forma correta e segura. Após a instalação, guarde estas
instruções num local próximo ao produto para consulta futura.
www.lg.com
Copyright © 2017 LG Electronics Inc. Todos os direitos reservados
Page 53

ÍNDICE
Este manual foi elaborado para um conjunto de
produtos e pode incluir imagens ou conteúdos que
não correspondem ao modelo comprado.
Este manual está sujeito a revisão por parte do
fabricante.
INSTRUÇÕES DE SEGURANÇA ...........................03
Instruções importantes de segurança .................................................05
INSTALAÇÃO .........................................................08
Peças...................................................................................................08
Acessórios
Especificações.....................................................................................09
Requisitos do local de instalação
Desembalar e remover os parafusos de transporte
Utilizar placas antiderrapantes (opcional)
Pisos em madeira (pisos suspensos)
Nivelar a máquina de lavar roupa........................................................13
Ligar o tubo de entrada
Instalação do tubo de drenagem
........................................................................................... 08
........................................................ 10
............................ 11
...........................................12
.................................................. 12
.......................................................................13
......................................................... 16
FUNCIONAMENTO .................................................17
Utilizar a máquina de lavar roupa ........................................................ 17
Separar a roupa...................................................................................18
Adicionar produtos de limpeza
Painel de controlo
Tabela de programas
Programa de opção
................................................................................ 21
........................................................................... 22
............................................................................. 26
............................................................ 19
FUNÇÕES SMART .................................................31
Usar a aplicação SmartThinQ .............................................................31
Utilizar o Smart Diagnosis™................................................................33
MANUTENÇÃO .......................................................34
Limpar a sua máquina de lavar roupa ................................................. 34
Limpar o filtro de entrada de água.......................................................34
Limpar o filtro da bomba de drenagem................................................35
Limpar a gaveta do dispensador
Limpeza da cuba
Cuidado com o congelamento durante o inverno
.................................................................................36
......................................................... 36
................................ 37
RESOLUÇÃO DE PROBLEMAS ............................39
Diagnosticar problemas ....................................................................... 39
Mensagens de erro..............................................................................42
GARANTIA ..............................................................44
DADOS DE FUNCIONAMENTO
.............................47
Page 54

PORTUGUÊS
INSTRUÇÕES DE SEGURANÇA
As diretrizes de segurança seguintes destinam-se a evitar riscos ou danos
imprevistos resultantes de utilização incorreta ou perigosa do produto.
As diretrizes encontram-se divididas em “AVISO” e “ADVERTÊNCIA”,
conforme descrito abaixo.
Este símbolo é apresentado para assinalar assuntos e utilizações que
podem representar perigo. Leia cuidadosamente a secção com este
símbolo e siga as instruções de forma a evitar riscos.
AVISO
provocar ferimentos graves ou morte.
ADVERTÊNCIA
pode provocar ferimentos menores ou danos no produto.
– Isto indica que a não observância das instruções pode
– Isto indica que a não observância das instruções
AVISO
Para reduzir o risco de incêndio, choque elétrico ou ferimentos nas
pessoas ao utilizar o produto, siga as precauções de segurança básicas,
incluindo o que se segue.
CRIANÇAS EM CASA
Este equipamento não se destina a ser utilizado por pessoas (incluindo crianças)
com capacidades físicas, sensoriais ou mentais reduzidas, ou sem experiência e
conhecimentos, exceto se acompanhadas e instruídas relativamente à utilização do
equipamento por uma pessoa responsável pela sua segurança. As crianças devem ser
supervisionadas para garantir que não brincam com o equipamento.
Para utilização na Europa:
Este equipamento pode ser utilizado por crianças com idades a partir dos 8 anos e por
pessoas com capacidades físicas, sensoriais ou mentais reduzidas ou sem experiência
e conhecimentos, desde que tenham acompanhamento e sejam instruídas relativamente
à utilização do equipamento de uma forma segura e para que compreendam os
riscos envolvidos. As crianças não devem brincar com o equipamento. A limpeza e
a manutenção destinadas ao utilizador não devem ser realizadas por crianças sem
supervisão.
As crianças com idade inferior a 3 anos devem ser mantidas afastadas exceto se
continuamente supervisionadas.
03
Page 55

REQUISITOS DE LIGAÇÃO À TERRA
AVISO
Para sua segurança, as informações contidas neste manual devem ser
seguidas com vista a minimizar o risco de incêndio, explosão ou choque
elétrico, ou para evitar danos na propriedade, ferimentos nas pessoas ou
morte.
Este equipamento deve ter ligação à terra. Em caso de falha ou avaria, a ligação à
•
terra reduzirá o risco de choque elétrico fornecendo um caminho de menor resistência
para a corrente elétrica.
Este equipamento está equipado com um cabo que possui um condutor e uma
•
cha de ligação à terra. A cha deve ser ligada a uma tomada adequada que esteja
devidamente instalada e ligada à terra em conformidade com todos os códigos e
regulamentos locais.
A ligação incorreta do condutor de ligação à terra do equipamento pode resultar
•
no risco de choque elétrico. Se tiver dúvidas quanto ao facto de o equipamento
estar devidamente ligado à terra, consulte um eletricista qualicado ou técnico de
manutenção.
Não modique a cha fornecida com o equipamento. Se ela não encaixar na tomada,
•
solicite a um eletricista qualicado para instalar uma tomada adequada.
ELIMINAÇÃO DO SEU APARELHO USADO
1. Este símbolo de um caixote do lixo com rodas e linhas cruzadas
sobrepostas indica que os resíduos de produtos elétricos e eletrónicos
(WEEE) devem ser eliminados separadamente do lixo doméstico.
2. Os produtos elétricos usados podem conter substâncias perigosas, pelo
que, a eliminação correta do seu aparelho usado pode contribuir para
evitar potenciais danos para o ambiente e saúde humana. O seu aparelho
usado pode conter peças reutilizáveis que podem ser usadas para
reparar outros aparelhos e materiais úteis que podem ser reciclados para
preservar os recursos limitados.
3. Pode levar o seu aparelho à loja onde o adquiriu ou contactar a sua
entidade local de recolha e tratamento de resíduos para obter mais
informações sobre o ponto de recolha WEEE autorizado mais próximo.
Para obter informações mais atualizadas relativas ao seu país, visite
www.lg.com/global/recycling
04
Page 56

PORTUGUÊS
Instruções importantes de segurança
AVISO
Para reduzir o risco de incêndio, choque elétrico ou ferimentos nas
pessoas ao utilizar o produto, siga as precauções de segurança básicas,
incluindo o que se segue.
Instalação
•
•
•
•
•
•
Nunca tente utilizar este equipamento
caso esteja danicado, avariado,
parcialmente desmontado ou tiver peças
partidas ou em falta, incluindo um cabo ou
uma cha danicados. Essa ação pode
provocar choque elétrico ou ferimentos.
Este equipamento é pesado. Poderão ser
necessárias duas ou mais pessoas para
instalar e mover o equipamento. Não o
fazer pode resultar em ferimentos.
Armazene e instale este equipamento
num local onde não que exposto
a temperaturas abaixo de zero ou a
condições climáticas exteriores. Não o
fazer pode resultar em fugas.
Aperte o tubo de drenagem para evitar
a separação. Salpicos de água podem
provocar choque elétrico.
Se o cabo de alimentação estiver
danicado, deve ser substituído pelo
fabricante ou pelos seus respetivos técnicos
de manutenção ou uma pessoa igualmente
qualicada para evitar situações de risco.
O equipamento não deve ser instalado
atrás de uma porta de tipo batente, de
uma porta deslizante ou de uma porta
com as dobradiças posicionadas do lado
oposto ao secador, de forma a permitir a
abertura total da porta do secador.
Funcionamento
Não utilize um objeto aado como uma
•
broca ou um alnete para pressionar ou
separar uma unidade operacional. Esta
ação pode provocar choque elétrico ou
ferimentos.
Apenas um técnico de reparação
•
autorizado pelo centro de atendimento
da LG Electronics pode desmontar,
reparar ou alterar o produto. Uma
manutenção inadequada pode provocar
ferimentos, choque elétrico ou incêndio.
Para proceder à limpeza do produto,
•
não pulverize água no interior ou
exterior do mesmo. A água pode
danicar o isolamento, provocando
choque elétrico ou incêndio.
Mantenha a zona por baixo e em
•
torno dos seus equipamentos livre de
materiais combustíveis tais como cotão,
papel, panos, produtos químicos, etc.
A utilização inadequada pode provocar
incêndio ou explosão.
Não coloque animais vivos, tais como
•
animais domésticos, dentro do produto.
Esta ação pode provocar ferimentos.
Não deixe a porta deste equipamento
•
aberta. As crianças podem pendurarse na porta ou gatinhar para dentro do
equipamento, provocando danos ou
ferimentos.
05
Page 57

Nunca aceda ao interior deste equipamento
•
durante o seu funcionamento. Aguarde que
o tambor tenha parado totalmente. Não o
fazer pode resultar em ferimentos.
Não coloque, lave ou seque artigos
•
que tenham sido limpos em, lavados
em, embebidos em ou manchados com
substâncias combustíveis ou explosivas
(tais como cera, óleo, tinta, gasolina,
desengordurantes, solventes de limpeza
a seco, querosene, óleo vegetal, óleo de
cozinha, etc.). A utilização inadequada
pode provocar incêndio ou explosão.
Não utilize gás inamável e substâncias
•
combustíveis (benzeno, gasolina,
diluente, petróleo, álcool, etc.) próximo
do produto. Esta ação pode provocar
explosão ou incêndio.
Se o tubo de drenagem ou tubo de
•
entrada car congelado durante o
inverno, utilize-o unicamente após
descongelamento. O congelamento
pode provocar incêndio ou choque
elétrico e peças congeladas podem
provocar avarias no produto ou
diminuição na vida útil do produto.
Em caso de inundação, interrompa
•
a utilização do produto e entre em
contacto com o centro de atendimento
da LG Electronics. O contacto com
água pode provocar choque elétrico.
Não empurre excessivamente a
•
porta para baixo quando a porta do
equipamento estiver aberta. Essa
ação pode derrubar o equipamento e
provocar ferimentos.
Utilize os novos conjuntos de tubos
•
fornecidos com o equipamento. Os
conjuntos de tubos antigos não devem
ser reutilizados. Fugas de água podem
danicar a propriedade.
Não toque na porta durante programas
•
de vapor, secagem ou lavagem a alta
temperatura. A superfície da porta pode
car muito quente. Permita que o bloqueio
da porta se solte antes de abrir a porta.
Não o fazer pode resultar em ferimentos.
Mantenha todos os detergentes para
•
lavagem, amaciadores e lixívia fora do
alcance das crianças. Estes produtos
contêm materiais tóxicos.
Não ligue vários produtos às mesmas
•
tomadas múltiplas ou a extensões. Esta
ação pode provocar incêndio.
Desligue a cha elétrica durante a
•
limpeza do produto. Não desligar a cha
pode resultar em choque elétrico ou
ferimentos.
Não toque na cha elétrica com as
•
mãos molhadas. Esta ação pode
provocar choque elétrico ou ferimentos.
Ao retirar a cha elétrica de uma
•
tomada, pegue na cha elétrica e não
no cabo. A danicação do cabo pode
provocar choque elétrico ou ferimentos.
Não dobre o cabo de alimentação de
•
forma excessiva nem coloque um objeto
pesado sobre o mesmo.
A danicação
do cabo de alimentação pode provocar
choque elétrico ou incêndio.
06
Page 58

PORTUGUÊS
Eliminação
Antes de eliminar um equipamento
•
antigo, desligue-o. Inutilize a cha.
Corte o cabo diretamente atrás do
equipamento para evitar uma utilização
indevida.
Elimine o material da embalagem (tal
•
como vinil e esferovite) para fora do
alcance de crianças. O material da
embalagem pode provocar asxia.
Remova a porta do compartimento de
•
lavagem antes deste equipamento ser
retirado de serviço ou eliminado para
evitar o risco de crianças ou pequenos
animais carem presos no interior do
produto. Não o fazer pode resultar
em ferimentos graves nas pessoas ou
morte.
07
Page 59

INSTALAÇÃO
Peças
Parafusos de
transporte
Ficha elétrica
Gaveta
Painel de controlo
Tambor
Porta
Tubo de drenagem
Tampão de drenagem
Filtro da bomba de
drenagem
Tampa de proteção
(a localização pode
variar dependendo
dos produtos)
Acessórios
Tubo de entrada (1EA)
(opção: fria (1EA))
Placas antiderrapantes (2EA)
(opcional)
Chave Canto de suporte
Tampas para cobrir os buracos dos
parafusos de transporte
Pés ajustáveis
(para proteção da mangueira de
drenagem)
Braçadeiras
08
Page 60

PORTUGUÊS
Especificaçõe
Modelo F1K2CS2W F1K2CS2T
Capacidade de
lavagem
Tensão de alimentação
Tamanho
Peso do produto
Max. Watts
Pressão admissível da água
O aspeto e as especicações podem variar sem aviso prévio para melhorar a qualidade do produto.
•
700 mm (An) x 770 mm (P) x 990 mm (AI)
0,1 - 1,0 MPa (1,0 - 10,0 kgf / cm²)
17 kg
220-240 V~, 50 Hz
93 kg
2000 - 2250 W
09
Page 61

Requisitos do local de instalação
Localização
cm
0,5
cm
10
Solo:
A inclinação admissível sob toda a máquina de
cm
2
lavar roupa é de 1°.
Tomada elétrica: Deve estar no espaço de 1,5 metros
de cada lado da localização da máquina de lavar roupa.
Não sobrecarregue a tomada com mais do que um
•
equipamento.
Folga adicional: Para a parede, 10 cm: na retaguarda/
2 cm: nos lados direito e esquerdo
Nunca coloque nem armazene produtos de limpeza
•
em cima da máquina de lavar roupa.
Esses produtos podem danicar o acabamento ou os
•
controlos.
Posicionamento
Instale a máquina de lavar roupa sobre uma superfície
•
plana e dura.
Certique-se de que a circulação do ar em torno da
•
máquina de lavar roupa não é dicultada por tapetes,
carpetes, etc.
Nunca tente corrigir desníveis do solo com pedaços
•
de madeira, cartão ou materiais semelhantes por
baixo da máquina de lavar roupa.
Se for impossível evitar o posicionamento da máquina
•
de lavar roupa junto de um forno a gás ou carvão,
deve ser introduzido entre os dois equipamentos um
isolante (85 x 60 cm) coberto com folha de alumínio
no lado voltado para o forno ou fogão.
cm
2
Não instale a sua máquina de lavar roupa em divisões
•
onde podem ocorrer temperaturas abaixo de zero.
Tubos congelados podem estourar sob pressão. A
abilidade da unidade de controlo eletrónico pode ser
prejudicada a temperaturas abaixo de zero.
Quando a máquina de lavar roupa é instalada,
•
certique-se de que é facilmente acessível a um
técnico no caso de uma avaria.
Com a máquina de lavar roupa instalada, ajuste
•
os quatro pés usando a chave de parafusos de
transporte fornecida para garantir que o equipamento
ca estável e deixe uma folga de aproximadamente
5 mm entre o topo da máquina de lavar roupa e a
parte inferior de qualquer bancada.
Este equipamento não se destina a uso marítimo ou
•
em instalações móveis tais como caravanas, aviões,
etc.
Ligação elétrica
Não utilize uma extensão ou um adaptador duplo.
•
Desligue sempre a cha da máquina de lavar roupa e
•
o
abastecimento de água após utilização.
Ligue a máquina de lavar roupa a uma tomada ligada
•
à terra de acordo com os regulamentos de instalação
elétrica em vigor.
A máquina de lavar roupa deve estar posicionada de
•
forma a que a cha esteja facilmente acessível.
As reparações na máquina de lavar roupa devem
•
ser realizadas apenas por pessoal qualicado.
Reparações realizadas por pessoas não qualicadas
podem provocar ferimentos ou avarias graves.
Contacte o seu centro de atendimento local.
Se a máquina de lavar roupa for entregue durante o
•
inverno e as temperaturas estiverem abaixo de zero,
coloque a máquina de lavar roupa à temperatura
ambiente durante algumas horas antes de a colocar
em funcionamento.
10
Page 62

PORTUGUÊS
Desembalar e remover os
parafusos de transporte
Retire a máquina de lavar roupa da base de
1
esferovite.
Após remover o cartão e material de transporte,
•
retire a máquina de lavar roupa da base de
esferovite. Certique-se de que o suporte da
cuba sai juntamente com a base e não ca preso
à parte inferior da máquina de lavar roupa.
Se tiver de deitar a máquina de lavar roupa
•
para remover a base de cartão, proteja sempre
as partes laterais da máquina e deite-a
cuidadosamente de lado. NÃO deite a máquina
de lavar roupa pelo seu lado frontal ou traseiro.
Instale as tampas para buracos.
3
Localize as tampas para buracos incluídas no
•
conjunto de acessórios e instale-as nos buracos
dos parafusos de transporte.
Tampa
OBSERVAÇÃO
•Guarde os conjuntos de parafusos para utilização
futura. Para evitar danicar os componentes
internos, NÃO transporte a máquina de lavar
roupa sem reinstalar os parafusos de transporte.
•Não remover os parafusos de transporte e
dispositivos de retenção pode provocar fortes
vibrações e ruído que podem resultar em danos
permanentes na máquina de lavar roupa. O cabo
está xo à parte traseira da máquina de lavar
roupa com um parafuso de transporte para ajudar
a evitar o funcionamento com os parafusos de
transporte instalados.
2
Suporte da cuba
(opcional)
Remova os conjuntos de parafusos.
Começando pelos dois parafusos de transporte
•
inferiores, utilize a chave (incluída) para
desapertar totalmente todos os parafusos
de transporte, girando-os para a esquerda.
Remova os conjuntos de parafusos, agitando-os
ligeiramente enquanto os puxa para fora.
Parafuso de
transporte
Base de cartão
Dispositivo de retenção
11
Page 63

Utilizar placas antiderrapantes
Pisos em madeira (pisos
(opcional)
Se instalar a máquina de lavar roupa sobre uma
superfície escorregadia, a mesma poderá mover-se
devido a vibração excessiva. O nivelamento incorreto
pode provocar avaria devido a ruído e vibração. Se isso
ocorrer, instale placas antiderrapantes sob os pés de
nivelamento e ajuste o nível.
Limpe o chão para xar as placas antiderrapantes.
1
Utilize um pano seco para remover e
•
limpar objetos estranhos e humidade. Se
permanecerem restos de humidade, as placas
antiderrapantes podem escorregar
Ajuste o nível após colocar a máquina de lavar
2
roupa no local de instalação.
Coloque a face adesiva da placa antiderrapante
3
voltada para o chão.
É mais ecaz instalar as placas antiderrapantes
•
por baixo dos pés dianteiros. Se for difícil colocar
as placas por baixo dos pés dianteiros, coloqueas por baixo dos pés traseiros.
Este lado para cima
Face adesiva
Certique-se de que a máquina de lavar roupa está
4
nivelada.
Empurre ou agite cuidadosamente as superfícies
•
superiores da máquina de lavar roupa para
certicar-se de que a mesma não oscila. Se
a máquina de lavar roupa oscilar, nivele-a
novamente.
.
suspensos)
Os pisos em madeira são particularmente suscetíveis
•
a vibrações.
Para evitar vibrações, recomendamos a colocação
•
de vedantes de borracha com pelo menos 15 mm
de espessura em cada pé da máquina de lavar
roupa, xos a pelo menos duas vigas do soalho com
parafusos.
Vedante de borracha
Se possível, instale a máquina de lavar roupa num
•
dos cantos da divisão, onde o piso é mais estável.
Encaixe os vedantes de borracha para reduzir a
•
vibração.
Pode obter vedantes de borracha (n.º de peça
•
4620ER4002B) no Centro de atendimento da LG.
OBSERVAÇÃO
•O posicionamento e nivelamento adequados
da máquina de lavar roupa garantirão um
funcionamento prolongado, regular e ável.
•A máquina de lavar roupa deve estar 100% na
horizontal e manter-se em posição rme.
•Não deve “balançar” pelos cantos sob a carga.
•A superfície de instalação deve estar limpa,
sem cera para chão ou outros revestimentos
lubricantes.
•Não permita que os pés da máquina de lavar
roupa se molhem. Não o fazer pode provocar
vibração ou ruído.
12
Page 64

PORTUGUÊS
Nivelar a máquina de lavar roupa
Ligar o tubo de entrada
Se o piso for irregular, gire os pés ajustáveis conforme
necessário (não introduza pedaços de madeira, etc.
sob os pés). Certique-se de que todos os pés estão
estáveis e apoiados no chão e, em seguida, verique se
o equipamento está perfeitamente nivelado (utilize um
nível de bolha de ar).
Quando a máquina de lavar roupa estiver nivelada,
•
aperte as porcas de bloqueio na direção da base da
máquina de lavar roupa. Todas as porcas de bloqueio
devem ser apertadas.
Elevar
Porca de
bloqueio
Vericação diagonal
•
porcas de bloqueio
Baixar
Apertar as 4
com rmeza
Quando pressiona diagonalmente as extremidades da
placa superior da máquina de lavar roupa, a máquina
não deve deslocar-se para cima nem para baixo
(verique ambas as direções). Se a máquina oscilar
quando pressiona diagonalmente a placa superior da
máquina, ajuste novamente os pés.
A pressão de abastecimento de água deve estar entre
•
0,1 MPa e 1,0 MPa (1,0‒10,0 kgf/cm
Não desnude ou cruze os os quando liga o tubo de
•
2
).
entrada à válvula.
Se a pressão de abastecimento de água for superior
•
a 1,0 MPa, deve ser instalado um dispositivo de
descompressão.
Verique regularmente o estado do tubo e substitua-o
•
se necessário.
Verificar o tubo de entrada com vedação
de borracha
São fornecidas duas vedações de borracha com os
tubos de entrada de água.
Estas são utilizadas para evitar fugas de água.
Certique-se de que a ligação às torneiras está
sucientemente apertada.
Conetor do tubo
Vedação de
borracha
OBSERVAÇÃO
•Pisos em madeira ou suspensos podem contribuir
para vibrações e desequilíbrios excessivos.
•Se a máquina de lavar roupa estiver instalada
sobre uma plataforma elevada, a mesma deve ser
rmemente xada para eliminar o risco de queda.
Conetor do tubo
Vedação de
borracha
13
Page 65

Ligar o tubo a uma torneira de água
Ligar tubo tipo parafuso a uma torneira com
rosca
Aperte o conetor do tubo à torneira de abastecimento de
água.
Empurre o adaptador na direção da extremidade
3
da torneira para que a vedação de borracha
forme uma ligação impermeável.
parafusos de xação.
Empurre o tubo de entrada verticalmente para
4
cima de forma que a vedação de borracha dentro
do tubo possa aderir por completo à torneira e, em
seguida, enrosque rodando para a direita.
Aperte os quatro
Ligar tubo tipo parafuso a uma torneira sem
rosca
Desaperte os quatro parafusos de xação.
1
Conetor
superior
Parafuso de xação
Remova a placa de guia se a torneira for
2
demasiado grande para encaixar no adaptador.
Placa de guia
Vedação de
borracha
Placa
Tubo de entrada
Ligar um tubo de tipo simples a uma torneira
sem rosca
Desaperte a placa anular do adaptador e solte os
1
quatro parafusos de xação.
Placa anular
Remova a placa de guia se a torneira for
2
demasiado grande para encaixar no adaptador.
Placa de guia
14
Page 66

PORTUGUÊS
Empurre o adaptador na direção da extremidade
3
da torneira para que a vedação de borracha forme
uma ligação impermeável.
Aperte a placa anular do adaptador e os quatro
parafusos de xação.
Puxe a placa de bloqueio do conetor para
4
baixo, empurre o tubo de entrada na direção do
adaptador e liberte a placa de bloqueio do conetor
Certique-se de que o adaptador encaixa no local
certo.
Placa de bloqueio
Ligar o tubo à máquina de lavar roupa
Certique-se de que o tubo não ca dobrado nem
esmagado.
Quando a sua máquina de lavar roupa tem duas
válvulas.
O tubo de entrada com o conetor vermelho é para a
•
torneira de água quente.
.
OBSERVAÇÃO
•Após completar a ligação, se o tubo vazar água,
repita os mesmos passos.
Utilize o tipo de torneira mais convencional para
o abastecimento de água. Caso a torneira seja
quadrada ou demasiado grande, remova a placa
de guia antes de inserir a torneira no adaptador.
OBSERVAÇÃO
•Após ligar o tubo de entrada à torneira de água,
abra a torneira de água para limpar substâncias
estranhas (sujidade, areia, serradura, etc.) das
condutas de água. Drene a água para um balde e
verique a temperatura da mesma.
Utilizar a torneira horizontal
Torneira horizontal
Extensão de torneira
Torneira quadrada
15
Page 67

Instalação do tubo de drenagem
O tubo de drenagem não deve ser colocado a mais
•
de 100 cm acima do solo. A água na máquina de
lavar roupa pode não conseguir drenar ou drenar
lentamente.
Fixar o tubo de drenagem corretamente irá proteger o
•
chão de danos devido a fugas de água.
Se o tubo de drenagem for demasiado longo, não o
•
force novamente para o interior da máquina de lavar
roupa. Esta ação irá provocar ruídos estranhos.
aprox. 100 cm
aprox. 145 cm
máx. 100 cm
•
aprox. 105 cm
Quando instalar o tubo de drenagem num lava-louça,
xe-o rmemente com cordel.
Fixar o tubo de drenagem corretamente irá proteger o
•
chão de danos devido a fugas de água.
Cuba de lavagem
máx. 100 cm
Dispositivo de
retenção do
tubo
Cinta de
ligação
máx. 100 cm
16
Page 68

PORTUGUÊS
FUNCIONAMENTO
Utilizar a máquina de lavar roupa
Antes da primeira lavagem, selecione um programa
(Algodão 60 °C, adicione meia medida de detergente)
e permita que a máquina lave sem roupa. Esta ação
eliminará resíduos e água do tambor que podem ter
permanecido durante o fabrico.
Separe a roupa e encha a máquina.
1
Separe a roupa por tipo de tecido, nível de
•
sujidade, cor e tamanho da carga, conforme
necessário.
lavar roupa com as peças.
Adicione produtos de limpeza e/ou detergente e
2
amaciador.
Adicione a quantidade adequada de detergente
•
na gaveta do dispensador de detergente.
Adicione lixívia ou amaciador de roupa nas
zonas apropriadas do dispensador, se assim o
pretender.
Abra a porta e encha a máquina de
Escolha o programa de lavagem pretendido.
4
Prima o botão programa repetidamente ou gire
•
o botão seletor de programa até o programa
pretendido ser selecionado.
Inicie o programa.
5
Prima o botão Início/Pausa para iniciar o
•
programa. A máquina de lavar roupa irá agitar
brevemente sem água para medir o peso da
carga. Se o botão Início/Pausa não for premido
no espaço de 14 minutos, a máquina de lavar
roupa desligará e todas as denições se
perderão.
Fim de programa.
6
Quando o programa estiver terminado, será
•
emitido um sinal sonoro. Retire de imediato as
suas roupas da máquina de lavar roupa para
reduzir o enrugamento. V
vedação da porta existem peças pequenas que
possam ter cado presas.
erique se em torno da
Ligue a máquina de lavar roupa.
3
Prima o botão Ligar/Desligar para ligar a
•
máquina de lavar roupa.
17
Page 69

Separar a roupa
Procure uma etiqueta de conservação nas suas
1
roupas.
A mesma especicará o conteúdo do tecido da
•
sua roupa e como esta deverá ser lavada.
Símbolos existentes nas etiquetas de
•
conservação.
Temperatura de lavagem
Lavagem normal
Plissado permanente
Tecidos delicados
Lavar à mão
Não lavar
Separar a roupa.
2
Para obter os melhores resultados, separe a
•
roupa em pilhas que podem ser lavadas no
mesmo programa de lavagem.
Tecidos diferentes precisam de ser lavados a
•
temperaturas e velocidades de centrifugação
diferentes.
Separe sempre as roupas de cores escuras
•
das roupas brancas e de cores claras. Laveas separadamente visto que pode ocorrer
transferência de tinta e cotão, provocando a
descoloração de roupas brancas e de cores
claras. Se possível, não lave peças muito sujas
juntamente com peças pouco sujas.
– Sujidade (elevada, normal, ligeira)
Separe a roupa de acordo com a sujidade.
– Cores (branco, claras, escuras)
Separe tecidos brancos de tecidos coloridos.
– Cotão (produção de cotão, coleção de cotão)
Lave peças produtoras de cotão e peças
coletoras de cotão separadamente.
Cuidados antes de encher a máquina.
3
Combine peças grandes e pequenas numa
•
carga. Coloque as peças grandes em primeiro
lugar.
As peças grandes não devem atingir mais de
•
metade do total da carga de lavagem. Não lave
só uma peça. Esta ação pode provocar uma
carga desequilibrada. Adicione uma ou duas
peças semelhantes.
Verique todos os bolsos para certicar-se de
•
que estão vazios. Objetos tais como pregos,
ganchos de cabelo, fósforos, canetas, moedas e
chaves podem danicar a sua máquina de lavar
roupa e a própria roupa.
Mantenha fechos, ganchos e molas fechados
•
para certicar-se de que os mesmos não
engatam noutras roupas.
Realize um pré-tratamento de manchas e
•
sujidade, esfregando uma pequena quantidade
de detergente dissolvido em água sobre as
manchas para ajudar a remover a sujidade.
Verique as dobras da junta exível (cinzento) e
•
retire todas as peças pequenas.
Verique o interior do tambor e retire todas as
•
peças de uma lavagem anterior.
Retire todas as roupas ou peças da junta exível
•
para evitar danos na roupa e na junta.
18
Page 70

PORTUGUÊS
Adicionar produtos de limpeza
Dose de detergente
O detergente deve ser utilizado de acordo com as
•
instruções do fabricante do detergente e selecionado
de acordo com o tipo, a cor, sujidade do tecido e
temperatura de lavagem.
Se for utilizado detergente em excesso, pode formar
•
demasiada espuma e isso pode resultar em maus
resultados de lavagem ou causar sobrecarga no
motor.
Se pretender utilizar detergente líquido, siga as
•
instruções fornecidas pelo fabricante do detergente.
Pode verter detergente líquido diretamente na gaveta
•
de detergente principal se for iniciar o programa de
imediato.
Não utilize detergente líquido se estiver a utilizar Final
•
diferido ou se tiver selecionado Pré-lavagem, visto
que o líquido pode solidicar.
Se formar muita espuma, reduza a quantidade de
•
detergente.
A utilização de detergente poderá necessitar de ajuste
•
relativamente à temperatura da água, dureza da água,
ao tamanho e nível de sujidade da roupa. Para obter
os melhores resultados, evite a formação excessiva
de espuma.
Consulte a etiqueta das roupas antes de escolher o
•
detergente e a temperatura da água:
Quando estiver a utilizar a máquina de lavar roupa,
•
utilize apenas o detergente designado para cada tipo
de roupa:
– Detergente em pó normal para todos os tipos de
tecido
– Detergente em pó para tecidos delicados
– Detergente líquido para todos os tipos de tecido ou
detergente designado apenas para peças de lã
Para obter uma melhor ecácia de lavagem e
•
branqueamento, utilize um detergente com lixívia
normal em pó.
O detergente é despejado do dispensador no início do
•
programa.
OBSERVAÇÃO
•Não deixe o detergente solidicar.
Essa ação pode provocar bloqueios, mau
enxaguamento ou odores.
•Carga total: De acordo com as recomendações
do fabricante.
•Carga parcial: 3/4 da quantidade normal
•Carga mínima: 1/2 da carga total
Adicionar detergente e amaciador de
roupa
Adicionar detergente
Apenas lavagem principal →
•
Pré-lavagem + Lavagem principal →
•
OBSERVAÇÃO
•Demasiado detergente, lixívia ou amaciador pode
causar um transbordamento.
•Certique-se de que utiliza a quantidade
adequada de detergente.
19
Page 71

Adicionar amaciador de roupa
Adicionar amaciador de água
Não ultrapasse a linha de enchimento máximo. O
•
enchimento excessivo pode causar uma distribuição
antecipada do amaciador de roupa, o que pode
manchar as roupas. Feche a gaveta do dispensador
devagar.
Não deixe o amaciador de roupa na gaveta do
•
detergente durante mais de dois dias (o amaciador de
roupa pode solidicar).
O amaciador será automaticamente adicionado
•
durante o último programa de enxaguamento.
Não abra a gaveta quando a água está a ser
•
fornecida.
Não deve utilizar solventes (benzeno, etc.).
•
Um amaciador de água, tal como um anticalcário (ex.:
•
Calgon), pode ser utilizado para reduzir a utilização
de detergente em zonas onde a água é extremamente
dura. Administre de acordo com a quantidade
especicada na embalagem. Primeiro adicione o
detergente e, em seguida, o amaciador de água.
Utilize a quantidade de detergente necessária para
•
amaciar a água.
Utilizar pastilhas
Abra a porta e coloque as pastilhas dentro do
1
tambor.
OBSERVAÇÃO
•Não verta amaciador de roupa diretamente sobre
as peças.
Coloque a roupa dentro do tambor e feche e porta.
2
20
Page 72

PORTUGUÊS
Painel de controlo
Botão Ligar/Desligar
Prima o botão Ligar/Desligar para ligar a
•
máquina de lavar roupa.
Para cancelar a funcão Final diferido,
•
pressione o botão
Botão Inicio/Pausa
Este botão Inicio/Pausa é utilizado para iniciar
•
o programa de lavagem ou para fazer uma
pausa no programa de lavagem.
Se for necessária uma paragem temporária do
•
programa de lavagem, prima o botão Inicio/
Pausa.
Ecrã
O ecrã mostra as denições, o tempo restante
•
estimado, opções e mensagens de estado.
Quando o produto é ligado, as predenições no
ecrã irão acender.
O ecrã mostra o tempo restante estimado.
•
Enquanto o tamanho da carga está a ser
calculado automaticamente, surge o “
piscar ou “Detecting” (A detetar).
Ligar/Desligar
.
” a
Seleção de programa
Os programas estão disponíveis de acordo
•
com o tipo de roupa.
A lâmpada irá acender para indicar o programa
•
selecionado.
Opções
Permite selecionar um programa adicional e irá
•
acender quando selecionado.
Utilize estes botões para selecionar as opções
•
de programa pretendidas para o programa
selecionado.
21
Page 73

Tabela de programas
Programas de lavagem
Programa Descrição Tipo de tecido
Oferece um melhor desempenho
Algodão
Algodão+
Fibras
Pele Sensível Lava a roupa num ciclo quente
Roupa de bebé
Anti-alergias
combinando diversos movimentos
do tambor.
Oferece um desempenho de
lavagem otimizado para grandes
quantidades de roupa com um
menor consumo energético.
Este programa é adequado para
camisas casuais que não precisam
de ser passadas a ferro após a
lavagem.
Remove manchas sólidas e de
proteínas e oferece um melhor
enxaguamento.
Ajuda a remover alergénios tais
como ácaros, pólen e pelo de gato.
Roupas de cores permanentes
(camisas, camisas de noite,
pijamas, etc.) e roupa de
algodão com um nível de
sujidade normal (roupa interior)
Poliamida, acrílico, poliéster
Algodão, roupa interior, fronhas,
lençóis de cama, roupa de bebé
Roupa de bebé pouco suja.
Algodão, roupa interior, fronhas,
lençóis de cama, roupa de bebé
Temp.
adequada
40 °C
(Água fria
até 60 °C)
40 °C
(Água fria
até 60 °C)
40 °C
(Água fria
até 60 °C)
95 °C 3,0 kg
máxima
nominal
Carga
Valor
4,5 kg
5,0 kg
3,0 kg
Refrescar vapor
Rápido 40
Roupa desportiva
Lavagem
silenciosa
22
Retira vincos em 25 minutos com
vapor.
Este programa oferece um tempo
de lavagem rápido para pequenas
cargas e roupas pouco sujas.
Este programa é adequado para
roupa desportiva tal como roupa de
jogging.
Produz menor ruído e vibração e é
económica utilizando eletricidade
durante a noite.
Camisas, blusas com mistura de
algodão, mistura de poliéster.
Roupa colorida pouco suja
Atenção: Use menos de 20 g
de detergente (para quantidade
de 2,0 kg), caso contrário o
detergente pode permanecer
nas roupas.
Coolmax, gore-tex, velo e
sympatex
Roupas de cores permanentes
(camisas, camisas de noite,
pijamas, etc.) e roupa de
algodão com um nível de
sujidade normal (roupa interior)
Sem
escolha
*40 °C
(Água fria
até 60 °C)
3 pe
3,0 kg
ças
Page 74

PORTUGUÊS
Programa Descrição Tipo de tecido
Lençóis de algodão exceto
roupas especiais (tecidos
delicados, lã, seda, etc.)
com enchimento: edredões,
almofadas, cobertores, capas
de sofá com ligeiro enchimento
Edredão
Este programa destina-se a peças
grandes tais como colchas de cama,
almofadas, capas de sofá, etc.
Temp.
adequada
Água fria
(Água fria
até 40 °C)
Carga
máxima
1
tamanho
único
Tecidos de lã que possam ser
Lãs
Enxaguamento+
Centrifugação
Download
programa
* : Temperatura adequada pode ser selecionada depois de eliminar a opção de vapor, automaticamente incluídos
•
no ciclo .
Temperatura da água: Selecione a temperatura da água apropriada para o programa de lavagem selecionado. Siga
•
sempre as instruções ou a etiqueta de conservação do fabricante durante a lavagem.
Se selecionar o ciclo Pele Sensível e mudar o modo de centrifugação para sem centrifugação, o tambor ainda
•
pode girar muito lentamente. Isso é normal e não afetará o desempenho.
Dena o programa para a opção "Algodão+ 40 °C (meia carga)", "Algodão+ 60 °C (meia carga)", "Algodão+ 60 °C
•
(carga total)" para efetuar um teste em conformidade com a EN60456 e o Regulamento 1015/2010.
–
Programa Algodão 60 °C padrão: Algodão+
–
Programa Algodão 60 °C padrão: Algodão+
–
Programa Algodão 40 °C padrão: Algodão+
(São adequados para lavar roupa de algodão com um nível de sujidade normal.)
(São os programas mais ecientes em termos de consumo combinado de água e energia para lavar esse tipo de
roupas de algodão.)
* A temperatura real da água pode ser diferente da temperatura de ciclo declarada.
Os resultados do teste dependem da pressão da água, dureza da água, temperatura da água de entrada,
•
temperatura ambiente, do tipo e da quantidade de roupa, do grau de detergente utilizado para a sujidade, das
utuações na fonte de alimentação elétrica e opções adicionais escolhidas.
lavados. (Por favor, utilizar
detergente para tecidos de lã
laváveis a máquina.
Utilize somente para roupas que
precisam ser enxaguadas ou para
adicionar o amaciador de tecidos
Para programas descarregáveis. Se não efetuar o download de nenhum programa, a predenição
é Lavagem Frio.
+
+
+
Roupas de lã laváveis na
máquina apenas com pura lã.
Tecidos normais que podem ser
lavavél.
60 °C
(carga total)
60 °C
(meia carga)
40 °C
(meia carga)
*40 °C
(Água fria
até 40 °C)
Sem
escolha
3,0 kg
Valor
nominal
OBSERVAÇÃO
•Recomendamos um detergente neutro.
23
Page 75

Opções extra
Programa Final diferido Vapor
Algodão
Algodão+
Fibras
Pele Sensível
Roupa de bebé
Anti-alergias
Refrescar vapor
Rápido 40
Roupa
desportiva
Lavagem
silenciosa
● ● ● ●** ● ●
● ● ● ●** ● ●
● ● ● ●** ● ●
● ● ● ● ● ●
● ●* ● ● ● ●
● ●* ● ● ● ●
● ●* ●
● ●** ● ●** ●
● ●** ● ● ● ●
● ● ● ●
Adicionar
roupa
Turbo Wash™ Favorito Anti-vincos
Edredão
Lãs
Enxaguamento+
Centrifugação
Download
programa
* : Esta opção é incluído automaticamente no ciclo e não pode ser excluído.
** : Esta opção é incluído automaticamente no ciclo e pode ser excluído.
24
● ● ● ●
● ● ●
● ● ● ●
● ● ● ● ●
Page 76

PORTUGUÊS
Dados de funcionamento
Programa
Algodão
Algodão+
Fibras
Pele Sensível
Roupa de bebé
Anti-alergias
Refrescar vapor
Rápido 40
Roupa desportiva
Lavagem silenciosa
Edredão
RPM máx.
1100
1100
1100
1100
1100
1100
-
1100
400
1100
800
Lãs
Enxaguamento+Centrifugação
Download programa
OBSERVAÇÃO
•Informações sobre os principais programas de lavagem com meia carga.
Tempo
Algodão+
Algodão+
Algodão+
Programa
(40 °C) (meia carga)
(60 °C) (meia carga)
(60 °C) (carga total)
em
minutos
225 49 % 78 1,30
255 49 % 78 1,60
277 48 % 78 2,10
Teor de humidade restante
600
1100
1100
Água
em
litros
Energia
em kWha
25
Page 77

Programa de opção
Adicionar roupa
Final diferido
Pode denir um tempo de atraso para que a máquina de
lavar roupa inicie e termine automaticamente após um
intervalo de tempo especicado.
Prima o botão Ligar/Desligar.
1
Selecione um programa de lavagem.
2
Prima o botão Final diferido e dena o tempo
3
desejado.
Prima o botão Inicio/Pausa.
4
OBSERVAÇÃO
•O tempo de atraso é o tempo para o nal
do programa, não para o início. O tempo
de funcionamento real pode variar devido à
temperatura da água, carga de lavagem e outros
fatores.
Utilize esta função para adicionar cargas ou remover o
material estranho.
Prima o botão Adicionar roupa.
1
Feche a porta após adicionar a carga ou retire
2
o material estranho (por exemplo, moedas ou
alnetes, etc.)
Prima o botão Inicio/Pausa.
3
Resultados ao escolher Adicionar roupa durante os
•
ciclos.
- Quando a cuba está a centrifugar: A cuba para e
Bloqueio da porta é desativado.
- Quando a temperatura da água é superior a 45°C:
Adicionar roupa não está disponível com um curto
sinal sonoro de aviso para segurança.
- Quando existe muita água na cuba: Bloqueio da
porta é desativado após drenagem até um nível
seguro de água.
Turbo Wash™
Ciclo de lavagem inferior a 1 hora com poupança de
água e energia. (com base em meia carga)
Prima o botão Ligar/Desligar.
1
Selecione um programa de lavagem.
2
Prima o botão Turbo Wash™.
3
Prima o botão Inicio/Pausa.
4
OBSERVAÇÃO
•A função Turbo Wash™ de alguns programas é
selecionada automaticamente.
OBSERVAÇÃO
•Abra a porta quando Bloqueio da porta é
desativado após vericar a segurança.
•Por razões de segurança, Adicionar roupa não
funciona quando Limpeza da cuba está em curso.
•Coloque a roupa totalmente na cuba. A roupa
presa entre a peça de fecho da porta pode
danicar o vedante da porta (peça de borracha) e
causar falhas.
26
Page 78

PORTUGUÊS
Vapor
Anti-vincos
Lavagem a vapor apresenta um melhor desempenho de
lavagem com um menor consumo energético.
Prima o botão Ligar/Desligar.
1
Seleccione o curso do vapor.
2
Prima o botão Vapor.
3
Prima o botão Inicio/Pausa.
4
Lavagem a vapor
Para roupas muito sujas, roupa interior e roupa de
•
bebé.
Não utilize Lavagem a vapor para roupas facilmente
•
descoloráveis e tecidos delicados tais como lã e seda.
Favorito
O programa Favorito permite memorizar um programa
de lavagem personalizado para utilização futura.
Prima o botão Ligar/Desligar.
1
Selecione um programa de lavagem.
2
Selecione a opção. (método de lavagem, número
3
de enxaguamentos, velocidade de centrifugação,
temperatura da água, etc.).
Prima o botão Favorito sem o soltar durante 3
4
segundos.
OBSERVAÇÃO
•O programa Favorito está agora memorizado para
utilização futura.
•Para reutilizar o programa, selecione o programa
Favorito e prima o botão Inicio/Pausa.
Se desejar reduzir vincos, selecione a opção Anti-
vincos.
Prima o botão Ligar/Desligar.
1
Selecione um programa de lavagem.
2
Prima o botão Anti-vincos.
3
Prima o botão Inicio/Pausa.
4
Lavagem
Encharcar
Esta opção pode ser usada para lavar roupa normal ou
roupa grossa e pesada que esteja excessivamente suja.
Pré-lavagem
Se a roupa estiver muito suja, recomendamos o
programa de Pré-lavagem.
Intensivo
Se a roupa tiver um nível de sujidade normal e elevado,
a opção Intensivo é ecaz
Normal
Esta opção é selecionada automaticamente em todo
processo excepto por
Roupa de bebé
Ligeira
Este ciclo é adequado para roupa ligeiramente suja.
OBSERVAÇÃO
•As opções selecionáveis serão diferentes
dependendo do programa selecionado.
Enxaguamento+Centrifugação
.
,
27
Page 79

Enxaguamento
Temperatura
Enxaguamento++Cuba cheia
Adicionar enxaguamento uma vez, sendo que, após o
processo de enxaguamento, o programa é parado até
o botão Inicio/Pausa ser premido novamente.
Normal+Cuba cheia
O programa está parado até que o botão Início seja
novamente premido quando o enxaguamento estiver
terminado.
Enxaguamento++
Adicionar enxaguamento duas vezes.
Enxaguamento+
Adicione enxaguamento uma vez.
Centrifugação
O nível de velocidade de Centrifugação pode ser
•
selecionado premindo o botão Centrifugação
repetidamente.
Apenas Centrifugação
•
Prima o botão Ligar/Desligar.
1
Prima o botão Centrifugação para selecionar as
2
RPM.
O botão Temperatura seleciona a combinação
de temperatura de lavagem e enxaguamento
para o programa selecionado. Prima este botão
até a conguração pretendida acender. Todos os
enxaguamentos utilizam água fria da torneira.
Selecione a temperatura da água adequada para o
•
tipo de carga que está a lavar. Para obter os melhores
resultados, respeite as etiquetas de conservação das
roupas.
Bloqueio Crianças ( )
Selecione esta função para bloquear os botões do
painel de controlo para evitar a sua manipulação.
Bloquear o painel de controlo
Prima o botão Lavagem e Enxaguamento sem
1
soltar durante 3 segundos.
Será emitido um sinal sonoro e “ ” irá surgir no ecrã.
2
Quando o Bloqueio Crianças está denido, todos
os botões estão bloqueados exceto o botão Ligar/
Desligar.
OBSERVAÇÃO
•Desligar a máquina não irá redenir a função
Bloqueio Crianças. Terá de desativar o Bloqueio
Crianças para conseguir aceder a quaisquer
outras funções.
Prima o botão Inicio/Pausa.
3
28
Desbloquear o painel de controlo
Prima o botão Lavagem e Enxaguamento sem soltar
durante 3 segundos.
Será emitido um sinal sonoro e o tempo restante para
•
o programa atual reaparecerá no ecrã.
Page 80

PORTUGUÊS
Sinal Sonoro ligado/desligado
Início remoto
Prima o botão Ligar/Desligar.
1
Prima o botão Inicio/Pausa.
2
Prima o botão Sinal Sonoro para denir a função
3
de Sinal sonoro ligado/desligado.
OBSERVAÇÃO
•Quando a função de Sinal sonoro ligado/
desligado está denida, a denição é memorizada
mesmo após desligar a energia.
•Se pretender desligar o Sinal sonoro, basta repetir
este processo.
Wi-Fi ( )
Prima sem soltar o botão Wi-Fi durante 3 segundos.
Quando o Wi-Fi está ligado, o ícone Wi-Fi ( ) no
painel de controlo acende.
Utilize um smartphone para controlar o seu equipamento
remotamente. Também pode monitorizar a evolução do
programa para saber o tempo restante do mesmo.
OBSERVAÇÃO
•Em primeiro lugar, é necessário estabelecer
ligação a um gateway e registar o seu
equipamento para usar a função Início remoto.
Para usar o Início remoto:
Prima o botão Ligar/Desligar.
1
Coloque a roupa no tambor.
2
Prima sem soltar o botão Início remoto durante
3
3 segundos para ativar a função Início remoto.
Inicie um programa a partir da aplicação LG
4
SmartThinQ no seu smartphone.
OBSERVAÇÃO
•Se não iniciar o seu equipamento, a aplicação
irá aguardar pelo início de um programa até que
desligue o equipamento a partir da aplicação ou
desative a função Início remoto.
•Quando a opção Início remoto é ligada, a porta
ca automaticamente bloqueada.
Para desativar a opção Início remoto:
Com a opção Início remoto ativada, prima sem soltar o
botão Início remoto
durante 3 segundos.
29
Page 81

Download programa
As funcionalidades de Download programa deste
aparelho permitem transferir ciclos novos e especiais
que não estão incluídos nos ciclos básicos do aparelho.
Os aparelhos que foram registados com sucesso pode
transferir vários ciclos de especialidade especícos do
aparelho. Apenas pode ser armazenado um ciclo de
cada vez no aparelho.
Assim que a Transferência do ciclo estiver concluída
na máquina, o produto mantém o ciclo transferido até o
alterar para uma nova transferência de ciclo
OBSERVAÇÃO
•É possível transferir programas após registar o
produto e congurar a ligação Wi-Fi.
•Também pode transferir um programa através
da aplicação "LG SmartThinQ". Para obter mais
informações sobre cada programa, consulte a
aplicação "LG SmartThinQ".
•Os programas disponíveis variam consoante o
tipo de máquina de lavar roupa adquirida.
•Os programas transferidos podem ser diferentes
em função da versão atualizada da aplicação "LG
SmartThinQ".
30
Page 82

PORTUGUÊS
FUNÇÕES SMART
Usar a aplicação SmartThinQ
Instalar a SmartThinQ
Procure a aplicação LG SmartThinQ na Google Play
Store & Apple App Store num smartphone. Siga as
instruções para transferir e instalar a aplicação.
Função Wi-Fi
Para aparelhos com o logótipo
•
Comunique com o aparelho a partir de um smartphone
utilizando as funcionalidades inteligentes adequadas.
Ciclo de Lavagem
Dena ou transra quaisquer programas desejados e
opere-os por controlo remoto.
Instrutor de Limpeza do Tambor
Selecione o intervalo adequado da função Limpeza do
Tambor com base na frequência das lavagens.
Monitorização de Energia
Verique o consumo de energia dos programas
recentemente utilizados e a média mensal.
ou
OBSERVAÇÃO
•Para vericar a ligação Wi-Fi, certique-se de
que o ícone Wi-Fi
aceso.
•A aplicação LG SmartThinQ não é responsável
por quaisquer problemas ou falhas de ligação à
rede, avarias ou erros causados pela ligação à
rede.
•A máquina só é compatível com redes Wi-Fi de 2,4
GHz.
•Se houver diculdades na ligação à rede WiFi, o equipamento poderá estar fora do alcance
do router. Adquira um repetidor de sinal Wi-Fi
(extensor de sinal) para melhorar a intensidade
do sinal Wi-Fi.
•A ligação Wi-Fi pode não funcionar ou ser
interrompida devido ao ambiente de rede
doméstica.
•A ligação à rede pode não funcionar corretamente
em função do fornecedor de serviços de Internet.
•O ambiente sem os envolvente pode tornar o
serviço de rede sem os mais lento.
•A aplicação está sujeita a alterações para ns de
melhoria do equipamento sem aviso prévio aos
utilizadores.
•As funcionalidades podem variar consoante o
modelo.
no painel de controlo está
Smart Diagnosis
Esta função fornece informações úteis para diagnosticar
e resolver problemas do equipamento com base no
padrão de utilização.
Definiçõe
Estão disponíveis várias funções.
Alertas push
Ative a função Alertas push para receber noticações
sobre o estado do equipamento. As noticações são
acionadas mesmo que a aplicação LG SmartThinQ
esteja desligada.
31
Page 83

Especificações do módulo LAN sem fi
Modelo LCW-004
Gama de frequência 2412 ~ 2472 MHz
Potência de saída
(máx.)
Versão S/W da função sem fios: V 1.0
Para consideração do utilizador, este dispositivo
deve ser instalado e operado com uma distância
mínima de 20 cm entre o dispositivo e o corpo.
Consumo de energia em espera
Consumo de energia em rede em
espera
período de tempo ao fim do qual a função
de gestão de energia ou função
semelhante comuta automaticamente o
equipamento para o modo de espera e/ou
desativação e/ou para o estado que
permite a espera em rede.
IEEE 802.11b: 17.82 dBm
IEEE 802.11g: 17.72 dBm
IEEE 802.11n: 16.61 dBm
0,5 W
3,0 W
20 min.
Declaração de conformidade
Informação sobre software de código aberto
Para obter o código fonte deste produto ao abrigo de
uma licença GPL, LGPL, MPL ou outra, visite http://
opensource.lge.com.
Além do código fonte, todos os termos das licenças
referidas, renúncias de garantia e avisos de direitos de
autor se encontram disponíveis para transferência.
A LG Electronics também pode fornecer-lhe o código
fonte aberto em CD-ROM mediante o pagamento
de uma taxa que cobre o custo de realização de tal
distribuição (como o custo do suporte, transporte e
processamento), a pedido por e-mail para opensource@
lge.com. Esta oferta é válida por três (3) anos a partir da
data em que adquiriu o produto.
Smart Diagnosis™ com um smartphone
Para aparelhos com o logótipo
•
Se o equipamento avariar ou falhar, utilize esta função
caso necessite de um diagnóstico preciso por parte do
centro de apoio ao cliente da LG Electronics.
O Smart Diagnosis™ não pode ser utilizado se o
equipamento não estiver ligado à rede elétrica. Se o
equipamento não ligar, a resolução de problemas terá
de ser realizada sem utilizar o Smart Diagnosis™.
ou
Pelo presente, a LG Electronics declara que a máquina
de lavar roupa tipo equipamento rádio está em
conformidade com a Diretiva 2014/53/EU. O texto
completo da declaração de conformidade da EU está
disponível no seguinte endereço da internet:
http://www.lg.com/global/support/cedoc/cedoc#
LG Electronics European Shared Service Center B.V.
Krijgsman 1
1186 DM Amstelveen
The Netherlands
32
Page 84

PORTUGUÊS
Utilizar o Smart Diagnosis™
Smart Diagnosis™ através do centro de
apoio ao cliente
Se o equipamento avariar ou falhar, utilize esta função
caso necessite de um diagnóstico preciso por parte do
centro de apoio ao cliente da LG Electronics. Utilize
esta função apenas para contactar o representante de
assistência técnica e nunca durante o funcionamento
normal.
Prima o botão Ligar/Desligar para ligar a máquina
1
de lavar roupa. Não prima outros botões nem gire
o botão seletor de programa.
Quando instruído a fazê-lo pelo centro de
2
atendimento, coloque o bocal do seu telefone
próximo do botão Ligar/Desligar.
Max
10 mm
OBSERVAÇÃO
•A função Smart Diagnosis™ depende da
qualidade da chamada local.
•O desempenho da comunicação será melhor e
será possível obter um melhor serviço se utilizar o
telefone xo.
•Se a transferência de dados da função Smart
Diagnosis™ for deciente devido à fraca
qualidade da chamada, poderá não obter o
melhor serviço de Smart Diagnosis™.
3
4
5
Prima o botão Temperatura sem soltar durante
3 segundos, mantendo o bocal do telefone na
direção do ícone ou do botão Ligar/Desligar.
Mantenha o telefone na mesma posição até a
transmissão da mensagem sonora ter terminado.
O tempo restante para a transferência de dados é
apresentado.
Para obter os melhores resultados, não
•
movimente o telefone enquanto a mensagem
sonora está a ser transmitida.
Se o técnico do centro de atendimento não
•
obtiver um registo exato dos dados, poderá
solicitar-lhe que tente novamente.
Assim que a contagem decrescente tiver terminado
e a mensagem sonora tiver parado, retome a sua
conversa com o técnico do centro de atendimento,
que depois será capaz de ajudá-lo a utilizar a
informação transmitida para análise.
33
Page 85

MANUTENÇÃO
AVISO
•Desligue a máquina de lavar roupa da corrente
elétrica antes de iniciar a limpeza para evitar
o risco de choque elétrico. A não observância
deste aviso pode resultar em ferimentos graves,
incêndio, choque elétrico ou morte.
•Nunca utilize produtos químicos agressivos,
produtos de limpeza abrasivos ou solventes para
limpar a máquina de lavar roupa. Estes poderão
danicar o acabamento.
Limpar a sua máquina de lavar
roupa
Cuidados após a lavagem
Após o programa ter terminado, limpe a porta e o
•
interior da vedação da porta para remover quaisquer
restos de humidade.
Deixe a porta aberta para secar o interior do tambor.
•
Limpe a estrutura principal da máquina de lavar roupa
•
com um pano seco para remover quaisquer restos de
humidade.
Cuidado e limpeza do interior
Utilize uma toalha ou um pano macio para limpar em
•
torno da abertura da porta e para limpar o vidro da
porta da máquina de lavar roupa.
Retire sempre as peças da máquina de lavar roupa
•
assim que o programa estiver concluído. Deixar peças
húmidas dentro da máquina de lavar roupa pode
provocar enrugamento, transferência de cores e odores.
Execute o programa de Limpeza da cuba uma vez por
•
mês (ou com uma maior frequência se necessário) para
remover a acumulação de detergente e outros resíduos.
Limpar o filtro de entrada de águ
Feche a torneira de passagem se a máquina de lavar
•
roupa car parada durante um período de tempo (por
ex., férias), especialmente se não existir qualquer
drenagem de solo (sarjeta) nas imediações.
O ícone “
•
a água não estiver a entrar na gaveta do detergente.
Se a água for muito dura ou tiver depósitos de calcário,
•
o ltro de entrada de água pode car entupido.
Recomenda-se por isso limpá-lo ocasionalmente.
” será exibido no painel de controlo quando
Limpar o exterior
O cuidado adequado da sua máquina de lavar roupa
pode prolongar a sua vida útil.
Porta:
Lave com um pano húmido na parte interior e exterior
•
e depois seque com um pano macio.
Exterior:
Limpe de imediato qualquer derrame.
•
Limpe com um pano húmido.
•
Não faça pressão sobre a superfície ou o ecrã com
•
objetos aados.
34
Feche a torneira da água e desaperte o tubo de
1
entrada de água.
Limpe o ltro usando uma escova de cerdas duras.
2
Page 86

PORTUGUÊS
Limpar o filtro da bomba de
2
drenagem
O ltro de drenagem recolhe os e pequenos objetos
•
deixados nas roupas. Verique regularmente se o
ltro está limpo para garantir o bom funcionamento da
sua máquina de lavar roupa.
Permita que a água arrefeça antes de limpar a
•
bomba de drenagem, realizando um esvaziamento
de emergência ou abrindo a porta em caso de
emergência.
Abra a tampa de proteção e puxe o tubo para fora.
1
Desligue o tampão de drenagem e abra o ltro,
2
girando-o para a esquerda.
Recipiente
para recolher a
água drenada.
Após a limpeza, gire o ltro da bomba para a
4
direita e introduza o tampão de drenagem.
Feche a tampa de proteção.
5
ADVERTÊNCIA
•Em primeiro lugar, drene utilizando o tubo de
drenagem e, em seguida, abra o ltro da bomba
para remover quaisquer os ou objetos.
•Tenha cuidado durante a drenagem uma vez que
a água pode estar quente.
3
1
Remova todas as matérias estranhas do ltro da
bomba.
35
Page 87

Limpar a gaveta do dispensador
Limpeza da cuba
Detergente e amaciador de roupa podem acumular na
gaveta do dispensador. Retire a gaveta e as divisórias e
verique se existe acumulação uma ou duas vezes por
mês.
Retire a gaveta do dispensador de detergente,
1
puxando-a para fora até parar.
Pressione o botão de desengate com força e
•
retire a gaveta.
Retire as divisórias da gaveta.
2
Limpe as divisórias e a gaveta com água
•
quente e remova a acumulação de produtos
de lavagem. Utilize apenas água para limpar a
gaveta do dispensador. Seque as divisórias e a
gaveta com um pano ou uma toalha macios.
Para limpar a abertura da gaveta, utilize um pano
3
ou uma escova pequena não metálica para limpar
a reentrância.
Remova todos os resíduos das partes superiores
•
e inferiores da reentrância.
Limpe todos os restos de humidade da reentrância
4
com um pano ou uma toalha macios.
A Limpeza do tambor é um programa especial para
limpar o interior da máquina de lavar roupa.
É utilizado um nível mais elevado de água neste
programa a uma maior velocidade de centrifugação.
Realize este programa regularmente.
Retire todas as roupas e peças da máquina de
1
lavar roupa e feche a porta.
Abra a gaveta do dispensador e adicione
2
anticalcário (por ex., Calgon) no compartimento
principal de lavagem.
Feche a gaveta do dispensador devagar.
3
Ligue e, em seguida, prima o botão Centrifugação
4
e Temperatura sem soltar durante 3 segundos. Em
seguida, “
Prima o botão Inicio/Pausa para iniciar.
5
Após o programa estar concluído, deixe a porta
6
aberta para permitir que a abertura da porta, a
junta exível e o vidro da porta da máquina de
lavar roupa sequem.
ADVERTÊNCIA
•Se tiver uma criança em casa, tenha cuidado para
não deixar a porta aberta durante demasiado
tempo.
” será exibido no ecrã.
Coloque as divisórias de volta nos compartimentos
5
respetivos e reponha a gaveta.
36
OBSERVAÇÃO
•Não adicione detergente nos compartimentos de
detergente. Pode formar-se demasiada espuma e
esta vazar da máquina de lavar roupa.
Page 88

PORTUGUÊS
Cuidado com o congelamento
durante o inverno
Quando congelado, o produto não funciona
•
normalmente. Certique-se de que instala o produto
num local onde não congele durante o inverno.
Caso o produto tenha de ser instalado no exterior,
•
num alpendre ou noutras condições ao ar livre,
certique-se de que verica o seguinte.
Como impedir que o produto congele
Após a lavagem, remova por completo a água
•
remanescente dentro da bomba com a tampa do
tubo de abertura utilizada para a remoção da água
residual. Quando a água for removida por completo,
feche a tampa do tubo para remoção da água residual
e a tampa de proteção.
Após fechar a torneira, desligue o tubo de entrada
•
de água fria da torneira e remova a água enquanto
mantém o tubo virado para baixo.
Tubo de
entrada de
água fria
Verificar o congelament
Se a água não drenar quando abrir a tampa do tubo
•
utilizado para a remoção da água residual, verique a
unidade de drenagem.
Tampão de
drenagem
Tampão de
drenagem
Segure o tubo de drenagem para baixo para remover
•
Tampa de proteção
por completo a água no interior do tubo.
Tubo de drenagem
ADVERTÊNCIA
•Quando o tubo de drenagem está instalado numa
forma curva, o tubo interior pode congelar.
Tampa de proteção
Ligue a energia, selecione Enxaguamento e
•
Centrifugação e prima o botão Inicio/Pausa.
Gaveta do detergente
Tubo de drenagem
OBSERVAÇÃO
•Verique se a água está a entrar na gaveta do
detergente durante o enxaguamento e se a água
está a drenar através do tubo de drenagem
durante a centrifugação.
Quando “
•
está em funcionamento, verique a unidade de
abastecimento de água e a unidade de drenagem
(alguns modelos não têm uma função de alarme que
indique o congelamento).
” é mostrado no ecrã enquanto o produto
37
Page 89

Como lidar com o congelamento
Certique-se de que esvazia o tambor, verta água
•
quente a 50–60 °C sobre a parte de borracha no
interior do tambor, feche a porta e aguarde 1–2 horas.
Quando a água for removida por completo da cuba,
•
feche a tampa do tubo utilizado para a remoção
da água residual, selecione Enxaguamento e
Centrifugação e prima o botão Inicio/Pausa.
50‒60 °C
ADVERTÊNCIA
•Não utilize água a ferver. Pode provocar
queimaduras ou danicar o produto.
Abra a tampa de proteção e a tampa do tubo utilizado
•
para a remoção da água residual para extrair a água
por completo.
Tampão de
drenagem
Tampa de proteção
OBSERVAÇÃO
•Se a água não drenar, isso signica que o gelo
não derreteu por completo. Aguarde mais algum
tempo.
Gaveta do detergente
Tubo de drenagem
OBSERVAÇÃO
•Verique se a água está a entrar na gaveta do
detergente durante o enxaguamento e se a água
está a drenar através do tubo de drenagem
durante a centrifugação.
Quando ocorrerem problemas de abastecimento de
•
água, tome as medidas seguintes:
– Feche a torneira e descongele a torneira e ambas
as zonas de ligação do tubo de entrada do produto,
utilizando um pano com água quente;
– Extraia o tubo de entrada e mergulhe-o em água
quente abaixo dos 50–60 °C.
Tubo de
entrada
50‒60 °C
38
Page 90

PORTUGUÊS
RESOLUÇÃO DE PROBLEMAS
A sua máquina de lavar roupa está equipada com um sistema automático de monitorização de erros para detetar
•
e diagnosticar problemas numa fase inicial. Se a sua máquina de lavar roupa não funcionar corretamente ou não
funcionar de todo, verique o seguinte antes de telefonar para a assistência:
Diagnosticar problemas
Sintomas Motivo Solução
Pare a máquina de lavar roupa, verique o
•
tambor e o ltro de drenagem.
Se o ruído continuar após a máquina de
•
lavar roupa ser reiniciada, contacte o nosso
centro de atendimento autorizado.
Ruídos de chocalhos e
rangidos
Objetos estranhos tais como
moedas ou alfinetes de segurança
podem estar no tambor ou na
bomba.
Som de batidas
Ruído vibratório
Fugas de água
Formação excessiva de
espuma
A água não entra na
máquina de lavar roupa
ou entra lentamente
Cargas pesadas de lavagem podem
produzir um som de batidas.
Geralmente, isto é normal.
Foram removidos todos os
parafusos de transporte e o suporte
da cuba?
Todos os pés estão firmemente
assentes no solo?
O tubo de drenagem ou os tubos
de entrada estão soltos na torneira
ou na máquina de lavar roupa.
Os tubos de drenagem da casa
estão entupidos.
O abastecimento de água não é
adequado para o local.
A torneira de abastecimento de
água não está totalmente aberta.
O(s) tubo(s) de entrada de água
está/estão dobrado(s).
Se o som continuar, a máquina está
•
provavelmente desequilibrada. Pare e
redistribua a carga de lavagem.
Se não tiverem sido removidos durante a
•
instalação, consulte o Guia de instalação
para remover os parafusos de transporte.
Certique-se de que a máquina de lavar
•
está nivelada e de que as porcas estão
viradas para a base do aparelho.
Verique e aperte as ligações do tubo.
•
Desentupa o tubo de drenagem. Contacte
•
um canalizador, se necessário.
Demasiado detergente ou detergente
•
inadequado podem causar formação
excessiva de espuma, o que pode resultar
em fugas de água.
Verique outra torneira na casa.
•
Abra totalmente a torneira.
•
Endireite o(s) tubo(s).
•
A água na máquina de
lavar roupa não drena ou
drena lentamente
O filtro do(s) tubo(s) de entrada
entupiu.
O tubo de drenagem está dobrado
ou entupido.
O filtro de drenagem está entupido
Verique o ltro do tubo de entrada.
•
Limpe e endireite o tubo de drenagem.
•
Limpe o ltro de drenagem.
•
39
Page 91

Sintomas Motivo Solução
A máquina de lavar
roupa não arranca
A máquina de lavar
roupa não centrifuga
A porta não abre
O cabo de energia elétrica pode
não estar ligado ou a ligação pode
estar solta.
Fusível queimado na casa, disjuntor
disparado ou ocorreu falha elétrica.
A torneira de abastecimento de
água não está aberta.
Verifique se a porta está bem
fechada.
Certique-se de que a cha encaixa
•
perfeitamente na tomada elétrica.
Rearme o disjuntor ou substitua o fusível.
•
Não aumente a capacidade do fusível. Se
o problema for uma sobrecarga do circuito,
peça a um eletricista qualicado para o
corrigir.
Abra a torneira de abastecimento de água.
•
Feche a p
•
Após premir o botão Inicio/Pausa, pode
demorar alguns instantes até a máquina de
lavar roupa começar a centrifugar.
deve estar bloqueada até a centrifugação
estar concluída. Adicione uma ou duas
peças semelhantes para ajudar a equilibrar
a carga. Reorganize a carga para permitir
uma centrifugação adequada.
Após a máquina de lavar roupa iniciar, a
•
porta não pode ser aberta por motivos de
segurança. Verique se o ícone “Bloqueio
da porta” está aceso. Pode abrir a porta
com segurança após o ícone “Bloqueio da
porta” apagar.
orta e prima o botão Inicio/Pausa.
A porta
Tempo do programa de
lavagem atrasado
Transbordamento de
amaciador de roupa
O amaciador é
dispensado cedo demais
Problema de secagem Não seca
Demasiado amaciador pode
provocar um transbordamento.
40
O tempo de lavagem pode variar
•
dependendo da quantidade de roupa,
pressão da água, temperatura da água e
de outras condições de utilização. Se for
detetado um desequilíbrio ou se o programa
de remoção da espuma estiver ligado, o
tempo de lavagem vai aumentar.
Siga as instruções do amaciador para
•
garantir que utiliza uma quantidade
apropriada. Não ultrapasse a linha de
enchimento máximo.
Feche a gaveta do dispensador devagar.
•
Não abra a gaveta durante o programa de
lavagem.
Não sobrecarregue. Verique se a máquina
•
de lavar roupa está a drenar corretamente
para extrair a água adequada da carga.
A pilha de roupa é demasiado pequena
para girar corretamente. Adicione algumas
toalhas.
Page 92

PORTUGUÊS
Sintomas Motivo Solução
Cheiro
Este cheiro é causado pela
borracha instalada na máquina de
lavar roupa.
Se a junta de borracha da porta e a
área do vedante da porta não forem
limpas regularmente, podem surgir
cheiros do bolor ou substâncias
estranhas.
Podem surgir cheiros se forem
deixadas substâncias estranhas no
filtro da bomba de drenagem
Podem surgir cheiros se o tubo
flexível de drenagem não estiver
bem instalado, causando sifonagem
(água a fluir para trás no interior da
máquina de lavar roupa).
Ao utilizar a função de secagem,
podem surgir cheiros de cotão e
outra matéria da roupa que adere à
resistência.
(Apenas modelo de máquina de
secar roupa)
É o cheiro normal a borracha nova e vai
•
desaparecer após a máquina ser utilizada
algumas vezes.
Certique-se de que limpa a junta e o
•
vedante da porta regularmente e inspecione
sob o vedante da porta por artigos
pequenos ao descarregar a máquina de
lavar roupa.
Certique-se de que limpa regularmente o
•
ltro da bomba de drenagem.
Ao instalar o tubo exível de drenagem,
•
certique-se de que não ca dobrado ou
obstruído.
Isto não é uma avaria.
•
Pode surgir um cheiro particular
da secagem de roupa molhada
com ar quente. (Apenas modelo de
máquina de secar roupa)
O cheiro vai desaparecer após um curto
•
período de tempo.
41
Page 93

Mensagens de erro
Sintomas Motivo Solução
O abastecimento de água não é
adequado para o local.
As torneiras de abastecimento de
água não estão totalmente abertas.
O(s) tubo(s) de entrada de água está/
estão dobrado(s).
O filtro do(s) tubo(s) de entrada está
entupido.
Se ocorrer uma fuga de água no tubo
de entrada, o indicador “
vermelho.
Poderá variar, dependendo do modelo.
•
O tubo de drenagem está dobrado ou
entupido.
O filtro de drenagem está entupido
” ficará
Verique outra torneira na casa.
•
Abra totalmente a torneira.
•
Endireite o(s) tubo(s).
•
Verique o ltro do tubo de entrada.
•
Limpe e endireite o tubo de drenagem.
•
Limpe o ltro de drenagem.
•
42
A carga é demasiado pequena.
A carga está desequilibrada.
O equipamento tem uma deteção
de desequilíbrio e um sistema de
correção. Se artigos individuais
pesados forem carregados (por ex.,
tapete de banho, robe de banho,
etc.), este sistema poderá parar
de centrifugar ou até interromper
o programa de centrifugação por
completo.
Se a roupa ainda estiver muito húmida
no final do programa, adicione
peças de roupa mais pequenas para
equilibrar a carga e repita o programa
de centrifugação.
Adicione uma ou duas peças semelhantes
•
para ajudar a equilibrar a carga.
Adicione uma ou duas peças semelhantes
•
para ajudar a equilibrar a carga.
Reorganize a carga para permitir uma
•
centrifugação adequada.
Reorganize a carga para permitir uma
•
centrifugação adequada.
Page 94

PORTUGUÊS
Sintomas Motivo Solução
A porta não está bem fechada.
O sensor da porta não está a
funcionar corretamente.
Enchimento excessivo de água
devido a falha na válvula de água.
O sensor do nível de água não está a
funcionar corretamente.
Sobrecarga no motor.
Fugas de água.
A maquina de lavar experimentou a
falha de energia..
Feche bem a porta.
•
Se “
, , ,
entre em contacto com a assistência.
Desligue a energia e entre em contacto com a
•
assistência.
Feche a torneira da água.
•
Desligue a cha elétrica.
•
Entre em contacto com a assistência.
•
Feche a torneira da água.
•
Desligue a cha elétrica.
•
Entre em contacto com a assistência.
•
Deixe a máquina de lavar roupa repousar
•
durante 30 minutos para permitir ao motor
arrefecer e depois reinicie o programa.
Entre em contacto com a assistência.
•
Reinicie o ciclo
•
” não apagar,
Erro de controlo
Está a entrada/saida da mangueira
ou bomba de drenagem congelada?
Desligue a cha elétrica e entre em contacto
•
com a assistência.
Coloque água quente numa banheira para
•
descongelar a saida da mangueira e a bomba
de drenagem. Molhe uma toalha em agua
morna e aplique a entrada da mangueira.
43
Page 95

GARANTIA
A presente garantia limitada não abrange:
Viagens de serviço para entrega, recolha, instalação ou reparação do produto; instruções para o cliente
•
relativamente ao funcionamento do produto; reparação ou substituição de fusíveis ou correção de cabos ou
canalização ou correção de reparações/instalação não autorizadas.
Não funcionamento do produto durante falhas e interrupções energéticas ou serviço elétrico inadequado.
•
Danos causados por tubos de água rompidos ou com fugas, tubos de água congelados, linhas de drenagem com
•
saída impedida, abastecimento de água inadequado ou interrompido ou fornecimento de ar inadequado.
Danos resultantes da utilização do Produto num ambiente corrosivo ou contrário às instruções estabelecidas no
•
manual do utilizador do Produto.
Danos ao Produto causados por acidentes, pragas e parasitas, relâmpagos, vento, incêndio, inundações ou
•
catástrofes naturais.
Danos ou falhas causados por modicação ou alteração não autorizada ou se o Produto for utilizado para uma
•
nalidade diferente da prevista ou em caso de fuga de água devido ao produto não estar instalado corretamente.
Danos ou falhas causados por corrente elétrica, tensão ou códigos de canalização incorretos, utilização comercial
•
ou industrial ou utilização de acessórios, componentes ou produtos de limpeza consumíveis que não estejam
aprovados pela LG.
Danos causados por transporte e manuseamento, incluindo arranhões, amolgadelas, lascas e/ou outros danos ao
•
acabamento do seu produto, exceto se tais danos resultarem de defeitos nos materiais ou da mão-de-obra.
Danos ou peças em falta a algum ecrã, caixa aberta, Produto descontado ou remodelado.
•
Produtos com números de série originais que foram removidos, alterados ou não conseguem ser facilmente
•
determinados. O modelo e número de série, bem como o recibo original da compra a retalho, são necessários para
a validação da garantia.
Aumentos nas despesas de consumo e nas despesas com serviços públicos adicionais.
•
Reparações quando o seu Produto é utilizado de forma diferente da utilização doméstica normal e habitual ou
•
contrária às instruções estabelecidas no manual do utilizador do Produto.
Custos associados à retirada do seu Produto da sua casa para reparações.
•
A retirada e reinstalação do Produto caso esteja instalado num local inacessível ou não esteja instalado de acordo
•
com as instruções de instalação publicadas, incluindo os manuais de instalação e do utilizador da LG.
Danos resultantes de utilização incorreta, abuso, instalação, reparação ou manutenção incorretas. Uma reparação
•
incorreta inclui a utilização de peças não aprovadas ou especicadas pela LG.
Vibração ou ruídos estranhos
causados pela não remoção de
parafusos de transporte ou do
suporte da cuba.
Fugas causadas por sujidade
(cabelos, cotão) na junta e no
vidro da porta.
44
Suporte da
cuba
Base de
cartão
Parafuso de
transporte
Remova os parafusos de
transporte e o suporte da
cuba.
Limpe a junta e o vidro da
porta.
Page 96

PORTUGUÊS
Impossibilidade de drenagem
devido a entupimento do ltro da
bomba.
A água não está a entrar porque
os ltros da válvula de entrada
de água estão entupidos ou os
tubos de entrada de água estão
dobrados.
Limpe o ltro da bomba.
Limpe o ltro da válvula
de entrada ou reinstale os
tubos de entrada de água.
Filtro de entrada
A água não está a entrar devido
à utilização excessiva de
detergente.
A roupa está quente ou morna
após a conclusão da lavagem
porque os tubos de entrada
estão instalados no sentido
inverso.
A água não é fornecida porque
a torneira da água não está
aberta.
Fugas causadas devido a
instalação incorreta do tubo de
drenagem ou tubo de drenagem
entupido.
Fugas causadas devido a
instalação incorreta do tubo de
entrada de água ou utilização
de tubos de entrada de outras
marcas.
Dispensador
Entrada
de água
fria
torneira da
água
Entrada
de água
quente
Suporte
curvo
Cinta de ligação
Limpe a gaveta do
dispensador de
detergente.
Reinstale os tubos de
entrada.
Abra a torneira da água.
Reinstale o tubo de
drenagem.
Reinstale o tubo de
entrada.
Problema de falha de energia
causado por ligação solta do
cabo de energia ou um problema
na tomada elétrica.
Volte a ligar o cabo de
energia ou substitua a
tomada elétrica.
45
Page 97

Viagens de serviço para entrega,
recolha, instalação do produto
ou para instruções sobre a
utilização do produto. Remoção
e reinstalação do Produto.
Se todos os parafusos estiverem
instalados incorretamente,
isso pode causar vibrações
excessivas (apenas modelo
Pedestal).
Nível
A garantia cobre apenas
defeitos de fabrico. A
assistência resultante de
Instalação incorreta não é
1°
abrangida.
Instale quatro parafusos
em cada canto (total
16EA).
Ruídos de pancadas (batidas)
quando a máquina de lavar
roupa está a encher de água.
Água
sob alta
pressão
Pancada!
Ruído
intenso
Fluxo natural
da água
Paragem
repentina
do uxo de
água
Ajuste a pressão da água,
desligando a válvula da
água ou a torneira da água
na casa.
46
Page 98

PORTUGUÊS
DADOS DE FUNCIONAMENTO
Ficha de produto_Regulamento delegado (UE) n.º 1061/2010 da Comissão
Marca comercial do fornecedor LG
Identicação do modelo do fornecedor F1K2CS2W / F1K2CS2T
Capacidade nominal 17 kg
Classe de eciência energética A++
Recebeu o "Rótulo ecológico da UE" nos termos do Regulamento (CE) n.º 66/2010 Não
Consumo de energia de “X” kWh por ano, com base em 220 ciclos de lavagem dos
programas de lavagem normal de algodão a 60 °C e a 40 °C em plena carga e em carga
parcial, e no consumo dos modos de baixo consumo de energia. O valor real do consumo
de energia dependerá do modo de utilização do aparelho.
Consumo energético
- Programa padrão de lavagem de algodão a 60 °C com carga total. 2,10 kWh
- Programa padrão de lavagem de algodão a 60 °C com carga parcial. 1,60 kWh
- Programa padrão de lavagem de algodão a 40 °C com carga parcial. 1,30 kWh
442
kWh /
ano
Consumo de energia ponderado em modo desligado e em modo ligado.
Consumo de água de “X” litros por ano, com base em 220 ciclos de lavagem dos programas
de lavagem normal de algodão a 60 °C e a 40 °C em plena carga e em carga parcial. O
valor real do consumo de água dependerá do modo de utilização do aparelho.
classe de eciência de secagem “X” numa escala de G (menos eciente) a A (mais eciente) B
Velocidade máxima de centrifugação obtida no programa de lavagem padrão de algodão a
60 °C com carga total ou no programa de lavagem padrão de algodão a 40 °C com carga
parcial, conforme a que for menor, e o teor de humidade residual obtido no programa de
lavagem padrão de algodão a 60 °C com carga total ou no programa de lavagem padrão de
algodão a 40 °C com carga parcial, conforme o que for maior.
Programas de lavagem padrão a que se referem as informações na etiqueta energética
e na cha, indicando que estes programas são adequados para a lavagem de roupa de
algodão com grau de sujidade normal e que os mesmos são os mais ecientes em termos
de consumo combinado de energia e água;
Duração do programa
- Programa padrão de lavagem de algodão a 60 °C com carga total. 277 min
- Programa padrão de lavagem de algodão a 60 °C com carga parcial. 255 min
- Programa padrão de lavagem de algodão a 40 °C com carga parcial. 225 min
Duração do estado ligado (Tl) 0 min
Emissões de ruído aéreo expressas em dB(A) re 1 pW e arredondadas às unidades, durante
as fases de lavagem e centrifugação no programa de lavagem padrão de algodão a 60 °C
com carga completa.
0,50
17000
1200 rpm
49 %
"Algodão+ 60 °C/40 °C"
78 dB(A)
W
litros /
ano
Instalação livre
47
Page 99

Circular
Page 100

Circular
 Loading...