

Page 1
OWNER'S MANUAL
WASHER-DRYER
Before beginning installation, read these instructions
carefully. This will simplify installation and ensure that the
product is installed correctly and safely. Leave these
instructions near the product after installation for future
reference.
EN ENGLISH
F0K6DMK2S2P
MFL71485485
Rev.00_032720
www.lg.com
Copyright © 2020 LG Electronics Inc. All Rights Reserved.
Page 2

TABLE OF CONTENTS
SAFETY INSTRUCTIONS ................................. 3
READ ALL INSTRUCTIONS BEFORE USE............................ 3
WARNING.............................................................................3
INSTALLATION ............................................... 9
Parts and Specifications.....................................................9
Installation Place Requirements.....................................11
Unpacking the Appliance.................................................12
Levelling the Appliance ....................................................13
Connecting the Water Supply Hose................................15
Installing the Drain Hose .................................................17
OPERATION .................................................. 18
Operation Overview .........................................................18
Preparing the Wash Load ................................................18
Adding Detergents and Softeners..................................19
Control Panel.....................................................................22
Programme Table.............................................................24
Drying Programme...........................................................27
Extra Options and Functions ...........................................28
This manual may contain images or
content that may be different from the
model you purchased.
This manual is subject to revision by the
manufacturer.
SMART FUNCTIONS...................................... 31
LG ThinQ Application........................................................31
Smart Diagnosis................................................................33
MAINTENANCE............................................. 34
Cleaning After Every Wash ..............................................34
Cleaning the Appliance Periodically & Performing an
Emergency Water Evacuation .........................................35
TROUBLESHOOTING .................................... 38
Before Calling for Service ................................................38
Page 3
SAFETY INSTRUCTIONS
WARNING
3
SAFETY INSTRUCTIONS
READ ALL INSTRUCTIONS BEFORE USE
The following safety guidelines are intended to prevent unforeseen
risks or damage from unsafe or incorrect operation of the appliance.
The guidelines are separated into ‘WARNING’ and ‘CAUTION’ as
described below.
Safety Messages
This symbol is displayed to indicate matters and operations
that can cause risk. Read the part with this symbol carefully
and follow the instructions in order to avoid risk.
WARNING
This indicates that the failure to follow the instructions can
cause serious injury or death.
EN
CAUTION
This indicates that the failure to follow the instructions can
cause the minor injury or damage to the product.
WARNING
To reduce the risk of explosion, fire, death, electric shock, injury or
scalding to persons when using this product, follow basic precautions,
including the following:
Technical Safety
• This appliance is not intended for use by persons (including children)
with reduced physical, sensory or mental capabilities, or lack of
experience and knowledge, unless they have been given supervision
or instruction concerning use of the appliance by a person
responsible for their safety.
Page 4

4
EN
SAFETY INSTRUCTIONS
• Children should be supervised to ensure that they do not play with
the appliance.
• If the power cord is damaged, it must be replaced by the
manufacturer, its service agent or similarly qualified persons in order
to avoid a hazard.
• Use a new hose or hose-set supplied with the appliance. Reusing old
hoses can cause a water leak and subsequent property damage.
• Ventilation openings must not be obstructed by a carpet.
• This appliance is intended to be used in household only.
• The inlet water pressure must be between 100 kPa and 1000 kPa.
Maximum Capacity
The maximum capacity in some cycles for dry clothes to be used is
Wash (14 kg)/Dry (8 kg)
.
Technical Safety for Using the Dryer
• Do not dry unwashed items in the appliance.
• Items that have been soiled with substances such as cooking oil,
vegetable oil, acetone, alcohol, petroleum, kerosene, spot removers,
turpentine, waxes and wax removers should be washed in hot water
with an extra amount of detergent before being dried in the
appliance.
• Never stop the appliance before the end of the drying cycle unless all
items are quickly removed and spread out so that the heat is
dissipated.
• Items such as foam rubber (latex foam), shower caps, waterproof
textiles, rubber backed articles and clothes or pillows fitted with foam
rubber pads should not be dried in the appliance.
• Fabric softeners, or similar products, should be used as specified by
the fabric softener instructions.
• Remove all objects from pockets such as lighters and matches.
• The appliance is not to be used if industrial chemicals have been used
for cleaning.
Page 5

SAFETY INSTRUCTIONS
5
EN
Installation
• Never attempt to operate the appliance if it is damaged,
malfunctioning, partially disassembled, or has missing or broken
parts, including a damaged cord or plug.
• This appliance should only be transported by two or more people
holding the appliance securely.
• Do not install the appliance in a damp and dusty place. Do not install
or store the appliance in any outdoor area, or any area that is subject
to weathering conditions such as direct sunlight, wind, rain, or
temperatures below freezing.
• Make sure the power plug is completely pushed into the power
outlet.
• Do not plug the appliance into multiple outlet sockets, power boards,
or an extension power cable.
• Do not modify the power plug provided with the appliance. If it does
not fit the power outlet, have a proper outlet installed by a qualified
electrician.
• This appliance is equipped with a power cord having an equipmentearthing / grounding conductor (earthing pin) and a grounding
power plug. The power plug must be plugged into an appropriate
outlet socket that is installed and earthed / grounded in accordance
with all local codes and ordinances.
• Improper connection of the equipment-grounding conductor can
result in risk of electric shock. Check with a qualified electrician or
service personnel if you are in doubt as to whether the appliance is
properly grounded.
• This appliance must not be installed behind a lockable door, a sliding
door or a door with a hinge on the opposite side to that of the
appliance, in such a way that a full opening of the appliance door is
restricted.
Operation
• Do not apply any sharp objects to the control panel in order to
operate the appliance.
Page 6

6
EN
SAFETY INSTRUCTIONS
• Do not attempt to separate any panels or disassemble the appliance.
• Do not repair or replace any part of the appliance. All repairs and
servicing must be performed by qualified service personnel unless
specifically recommended in this Owner's Manual. Use only
authorized factory parts.
• Do not push down the door excessively, when the appliance door is
open.
• Do not put animals, such as pets into the appliance.
• Do not wash rugs, mats, shoes or pet blankets, stuffed toys, or any
other items other than clothes or sheets, in this machine.
• Keep the area underneath and around the appliance free of
combustible materials such as lint, paper, rags, chemicals, etc.
• Do not leave the appliance door open. Children may hang on the door
or crawl inside the appliance, causing damage or injury.
• Do not put in, wash or dry articles that have been cleaned in, washed
in, soaked in, or spotted with combustible or explosive substances
(such as waxes, wax removers, oil, paint, gasoline, degreasers,
drycleaning solvents, kerosene, petrol, spot removers, turpentine,
vegetable oil, cooking oil, acetone, alcohol, etc.). Improper use can
cause fire or explosion.
• Do not use or store flammable or combustible substances (ether,
benzene, alcohol, chemical, LPG, combustible spray, gasoline,
thinner, petroleum, insecticide, air freshener, cosmetics, etc.) near
the appliance.
• Never reach into the appliance while it is operating. Wait until the
drum has completely stopped.
• Do not touch the door during a high temperature programme.
• In case of a water leak from the appliance or flood, disconnect the
power plug and contact the LG Electronics customer information
centre.
• Turn off water taps to relieve pressure on hoses and valves and to
minimize leakage if a break or rupture should occur. Check the
condition of the fill hoses; they should be replaced after 5 years.
Page 7

SAFETY INSTRUCTIONS
7
EN
• If there is a gas leakage (isobutane, propane, natural gas, etc.) within
the home, do not touch the appliance or power plug and ventilate the
area immediately.
• If the drain hose or inlet hose is frozen during winter, use it only after
thawing.
• Keep all washing detergents, softener and bleach away from
children.
• Do not touch the power plug or the appliance controls with wet
hands.
• Do not bend the power cable excessively or place a heavy object on it.
• Avoid touching any water that is drained from the appliance during
the wash.
• Make sure that drainage is working properly. If water is not drained
properly, your floor may get flooded.
• When the air temperature is high and the water temperature is low,
condensation may occur and thus wet the floor.
• Wipe off dirt or dust on the contacts of the power plug.
Maintenance
• Disconnect the appliance from the power supply before cleaning the
appliance. Setting the controls to the OFF or stand by position does
not disconnect this appliance from the power supply.
• Securely plug the power plug in the outlet socket after completely
removing any moisture and dust.
• Do not spray water inside or outside the appliance to clean it.
• Never unplug the appliance by pulling on the power cable. Always
grip the power plug firmly and pull straight out from the outlet
socket.
• Only qualified service personnel from LG Electronics service centre
should disassemble, repair, or modify the appliance. Contact an LG
Electronics customer information centre if you move and install the
appliance in a different location.
Page 8

8
EN
SAFETY INSTRUCTIONS
Disposal
• Before discarding an old appliance, unplug it. Cut off the cable
directly behind the appliance to prevent misuse.
• Dispose of all packaging materials (such as plastic bags and
styrofoam) away from children. The packaging materials can cause
suffocation.
• Remove the door before disposing of or discarding this appliance to
avoid the danger of children or small animals getting trapped inside.
Page 9
INSTALLATION
NOTE
9
INSTALLATION
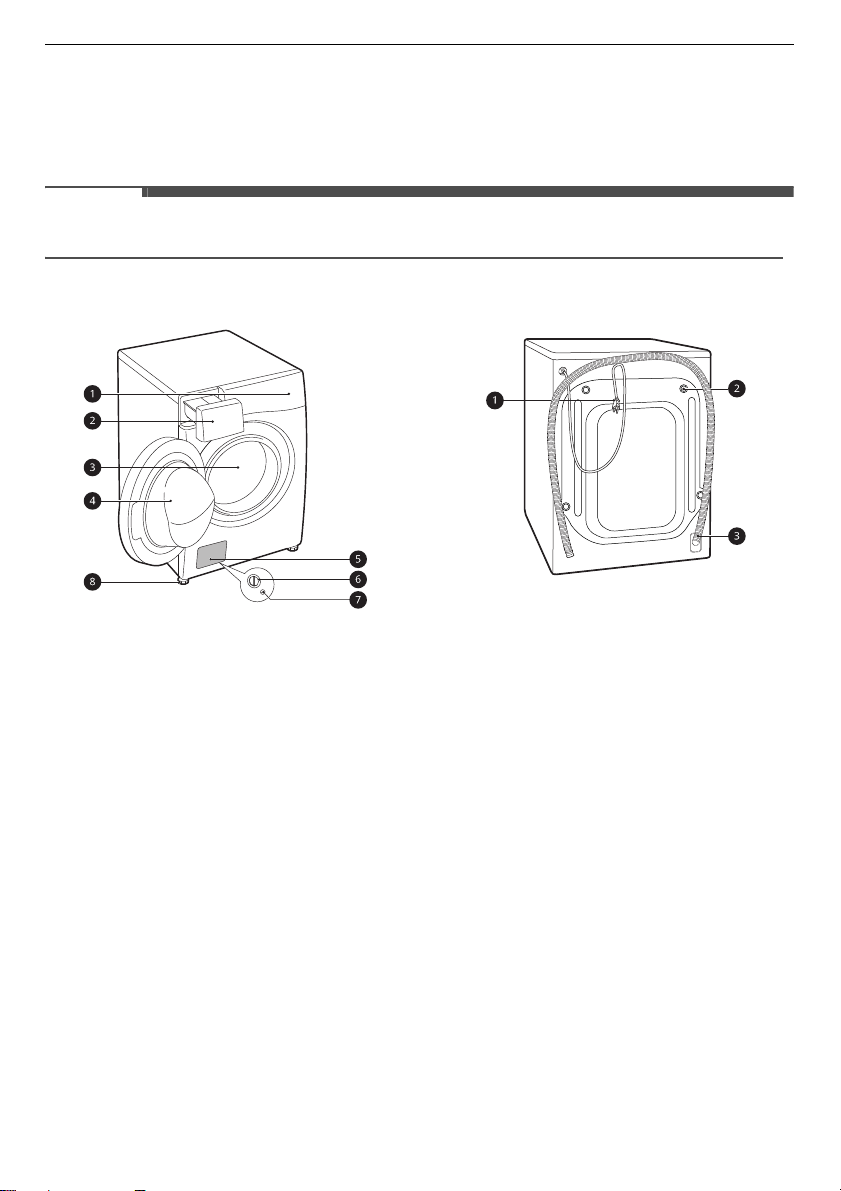
Parts and Specifications
• Appearance and specifications may change without notice to improve the quality of the appliance.
EN
Front View
a
Control Panel
b
Detergent Dispenser Drawer
c
Drum
d
Door
e
Cover Cap
f
Drain Pump Filter
g
Drain Plug
h
Levelling Feet
Rear View
a
Power Plug
b
Transit Bolts
c
Drain Hose
Page 10
10
EN
INSTALLATION
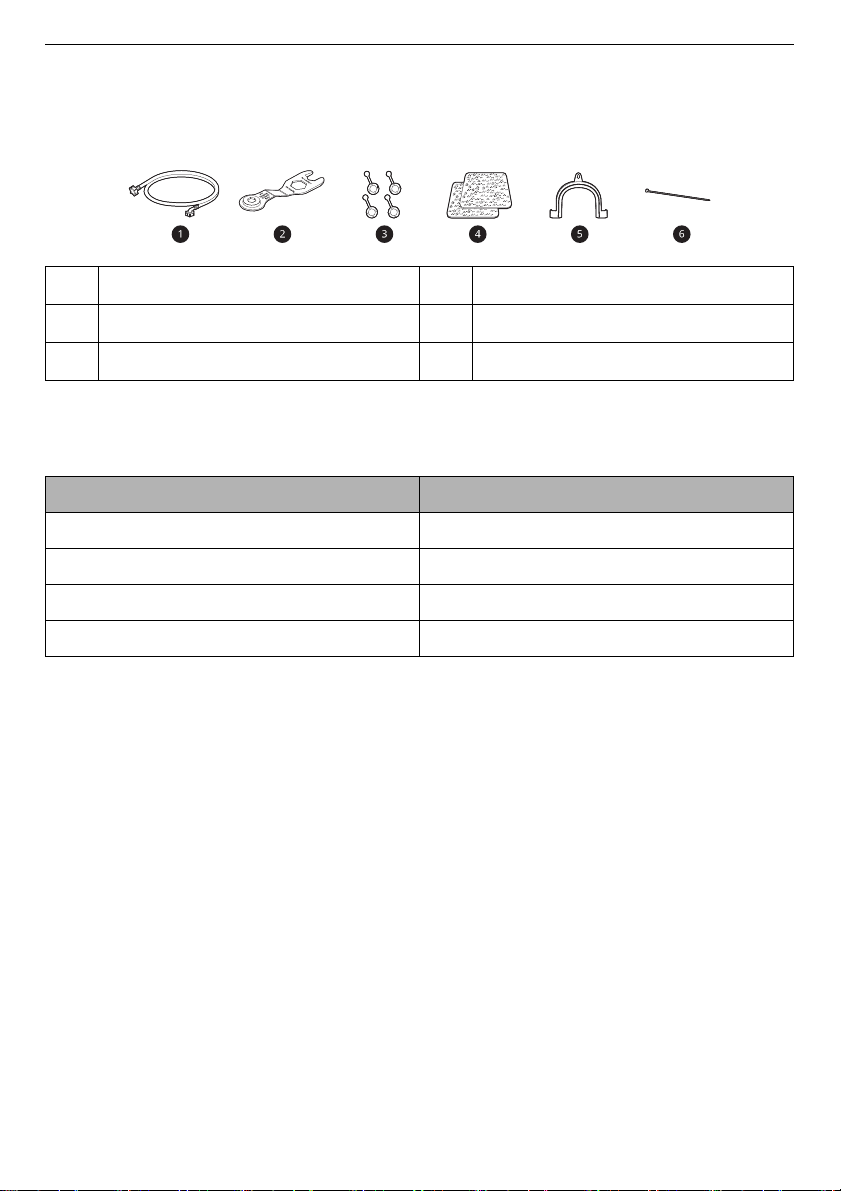
Accessories
*1:The included accessories vary depending on the model you purchased.
Cold Supply Hose
a
Spanner
b
Caps for Covering Transit Bolt Holes
c
Anti–slip Sheets*1
d
Elbow Bracket for Securing Drain Hose
e
Tie Strap*1
f
Specifications
Model F0K6DMK2S2P
Power Supply 220‒240 V~, 50 Hz
Maximum Power 2000-2200 W (Wash) / 2100-2300 W (Dry)
Dimension (Width X Depth X Height) 645 mm X 770 mm X 940 mm
Product Weight 81 kg
Page 11
Installation Place
WARNING
NOTE
CAUTION
A C
B
C
Requirements
Before installing the appliance, check the following
information to make sure that the appliance
should be installed in a correct place.
Installation Location
• This appliance must be installed on firm flooring
to minimize vibration during the spin cycle.
Concrete flooring is best, being far less prone to
vibration during the spin cycle than wooden
floorboards or a carpeted surface.
• If it is impossible to avoid positioning the
appliance next to a gas cooker or coal burning
stove, an insulation (850 X 600 mm) covered with
aluminum foil on the side facing the cooker or
stove must be inserted between the two
appliances.
• Ensure that when the appliance is installed, it is
easily accessible for an engineer in the event of a
breakdown.
• When installing the appliance, adjust all four feet
using the transit bolt spanner provided to
ensure the appliance is stable.
INSTALLATION
• This appliance must only be used for domestic
household purposes and should not be used in
mobile applications.
• Never try to level any uneven floor by putting
pieces of wood, cardboard or similar materials
under the appliance.
11
EN
Wooden Floors (Suspended
Floors)
When installing the appliance on wooden floors,
use rubber cups to reduce excessive vibration and
unbalance. Timber or suspended type flooring may
contribute to excessive vibration and unbalance,
errors and malfunction.
Floor Installation
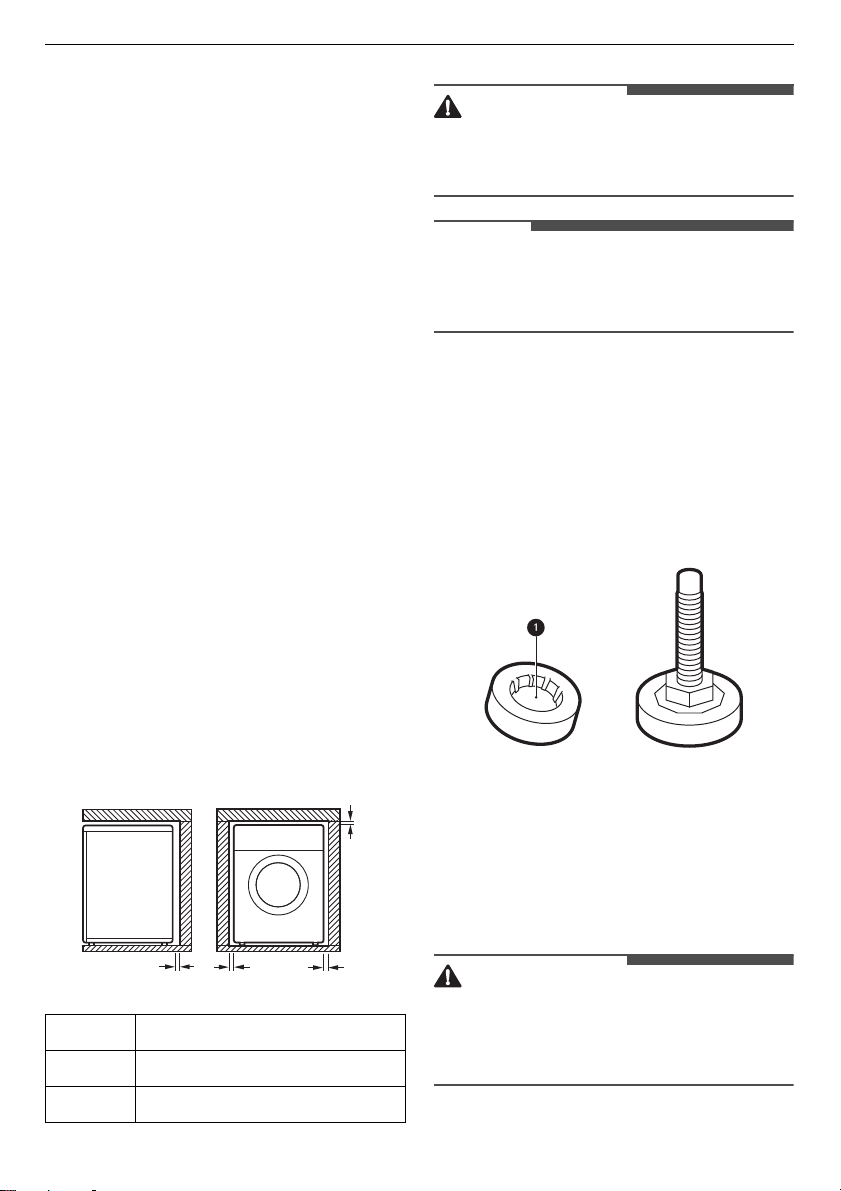
To ensure sufficient clearance for water inlet hoses,
drain hose and airflow, allow minimum clearances
of at least 20 mm at the sides and 100 mm behind
the appliance. Be sure to allow for wall, door, or
floor moldings that may increase the required
clearances.
A
B
C
100 mm
5 mm
20 mm
• To reduce vibration, we recommend placing at
least 15 mm thickness of rubber caps
each adjusting foot of the appliance, secured to
at least two floor beams with screws.
• If possible, install the appliance in one of the
corners of the room, where the floor is more
stable.
• Fit the rubber cups to reduce vibration.
• If the appliance is installed on the unstable floor
(e.g. wooden floor), the warranty does not cover
any damages and cost occurred due to the
installation on the unstable floor.
a
under
Page 12
12
NOTE
WARNING
*
EN
• You can purchase rubber cups (part No.
4620ER4002B
INSTALLATION
) from the LG service centre.
grounded/earthed in accordance with all local
codes and ordinances.
Unpacking the Appliance
Ventilation
• Make sure that air circulation around the
appliance should not be impeded by carpets,
rugs, etc.
Ambient Temperature
• Do not install the appliance in rooms where
freezing temperatures may occur. Frozen hoses
may burst under pressure. The reliability of the
electronic control unit may be impaired at
temperatures below freezing point.
• If the appliance is delivered in winter and
temperatures are below freezing, place the
appliance at room temperature for a few hours
before putting it into operation.
Electrical Connection
• Do not use an extension cord or double adapter.
• Always unplug the appliance and turn off the
water supply after use.
• Connect the appliance to an earthed socket in
accordance with current wiring regulations.
• The appliance must be positioned so that the
plug is easily accessible.
• Power outlet must be within 1 meter of either
side of the appliance.
Lifting the Appliance Off the
Foam Base
* This feature may vary depending on the model
purchased.
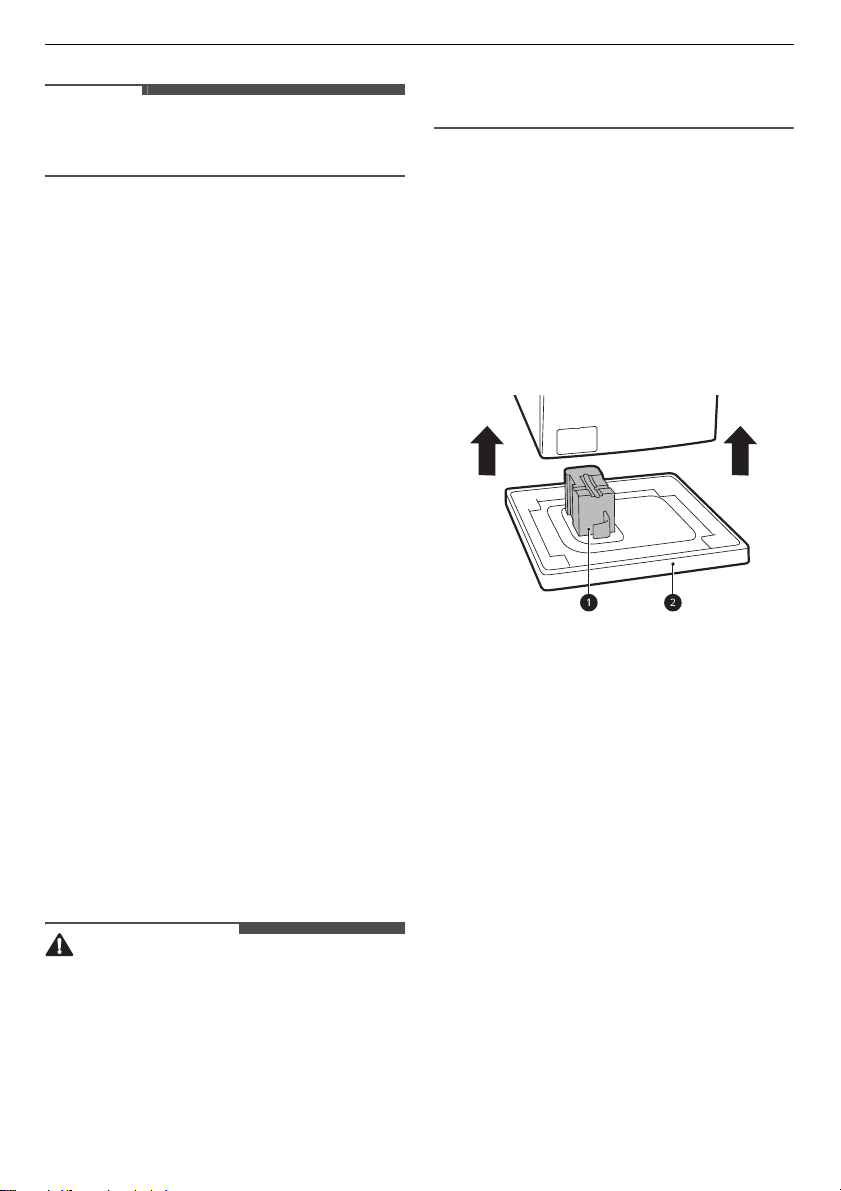
After removing the carton and shipping material,
lift the appliance off the foam base.
• Make sure the tub support
the base and is not stuck to the bottom of the
appliance.
• If you must lay the appliance down to remove
the carton base
appliance and lay it carefully on its side. Do not
lay the appliance on its front or back.
b
, always protect the side of the
a
* comes off with
Removing the Transit Bolt
Assemblies
To prevent the appliance from severe vibration and
breakage, remove transit bolts and retainers.
• Repairs to the appliance must only be carried out
by qualified personnel. Repairs carried out by
inexperienced persons may cause injury or
serious malfunctioning. Contact your local
authorised LG repairer.
• The power plug must be plugged into an
appropriate outlet socket that is installed and
Page 13
INSTALLATION
NOTE
NOTE
13
EN
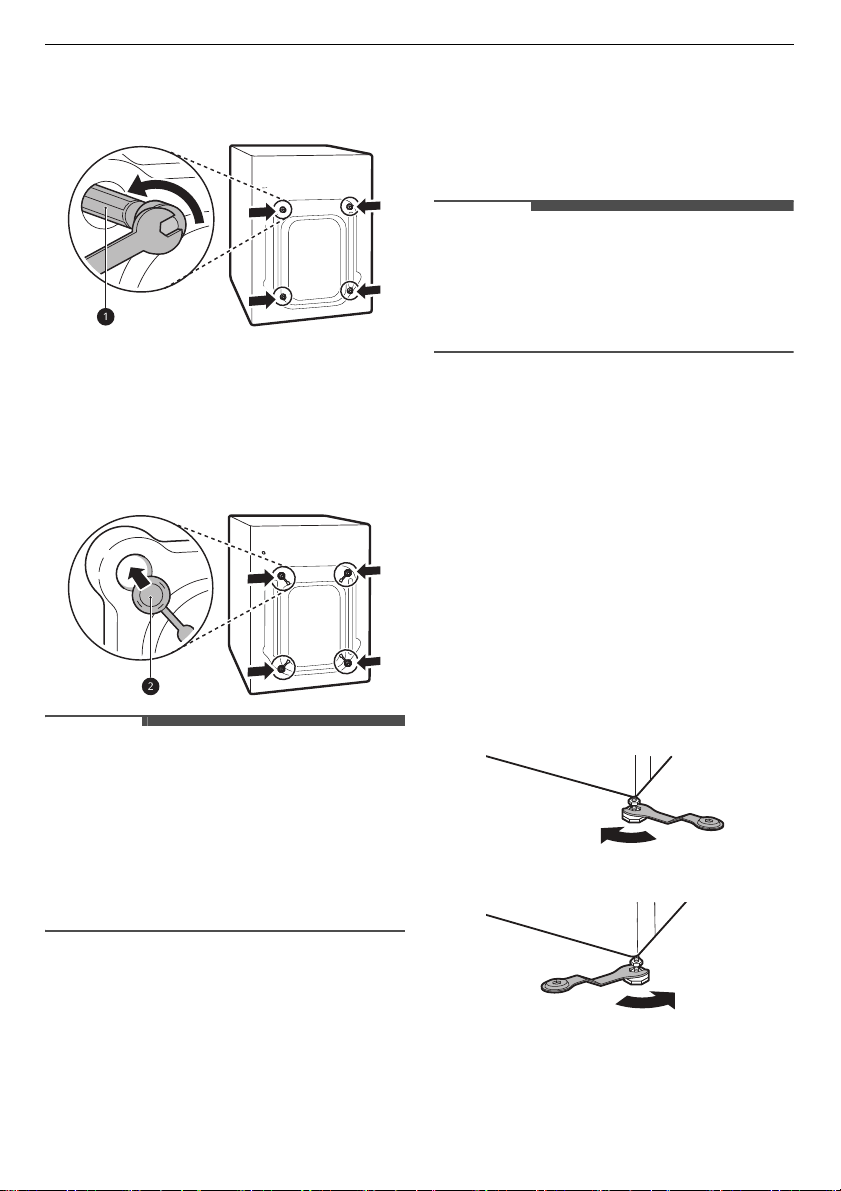
1
Starting with the bottom two transit bolts a,
use the spanner (included) to fully loosen all
transit bolts by turning them counterclockwise.
2
Remove the bolt assemblies by wiggling them
slightly while pulling them out.
3
Install the hole caps.
b
• Locate the hole caps
accessory pack or attached on the back.
included in the
• If the appliance rocks when pushing the top
plate of the appliance diagonally, adjust the feet
again.
• Check whether the appliance is perfectly level
after installation.
• Timber or suspended type flooring may
contribute to excessive vibration and unbalance.
Reinforcement or bracing of the timber floor
may need to be considered to stop or reduce
excessive noise and vibration.
Adjusting and Levelling the
Feet
When installing the appliance, the appliance
should be aligned and perfectly level. If the
appliance is not aligned and level properly, the
appliance may be damaged or may not operate
properly.
1
Turn the levelling feet as required if the floor is
uneven.
• Do not insert pieces of wood etc. under the
feet.
• Make sure that all four feet are stable and
resting on the floor.
• Save the transit bolts and retainers for future
use.
• Transport this appliance for the prevention of
breakage as below:
- The transit bolts are reinstalled.
- The power cord is secured to the back of the
appliance.
Levelling the Appliance
Checking the Level
When pushing down the edges of the top plate
diagonally, the appliance should not move up and
down at all (check both directions).
Page 14
EN
NOTE
NOTE
NOTE
14
INSTALLATION
Using Anti-Slip Sheets
• Do not install the washing machine on a plinth,
stand or elevated surface unless it is
manufactured by LG Electronics for use with this
model.
2
Check if the appliance is perfectly level using a
spirit level
3
Secure the levelling feet with the lock nuts b
by turning anti-clockwise against the bottom of
the appliance.
a
.
This feature may vary depending on the model
purchased.
If you install the appliance on a slippery surface, it
may move because of excessive vibration.
Incorrect levelling may cause malfunction through
noise and vibration. If this occurs, install the antislip sheets under the levelling feet and adjust the
level.
1
Clean the floor to attach the anti-slip sheets.
• Use a dry rag to remove and clean foreign
objects and moisture. If moisture remains,
the anti-slip sheets may slip.
2
Adjust the level after placing the appliance in
the installation area.
3
Place the adhesive side a of the anti-slip
sheets on the floor.
• The most effective way is to install the antislip sheets under the front feet. If it is
difficult to place the sheets under the front
feet of the appliance, attach them under the
rear feet.
4
Check if all lock nuts at the bottom of the
appliance are secured properly.
• Proper placement and levelling of the appliance
will ensure long, regular, and reliable operation.
• The appliance must be 100% horizontal and
stand firmly in position on a hard flat floor.
• It must not ‘Seesaw’ across corners under the
load.
• Do not let the feet of the appliance get wet.
Failure to do so may cause vibration or noise.
4
Put the appliance on the anti-slip sheets.
a
• Do not attach the adhesive side
slip sheets to the feet of the appliance.
• Additional anti-slip sheets are available at LG
Electronics service centre.
of anti-
Page 15
Connecting the Water
NOTE
Supply Hose
Note for Connection
• Water pressure must be between
1000 kPa
pressure is more than
decompression device should be installed.
• Periodically check the condition of the water
supply hose and replace the water supply hose if
necessary.
• Do not overtighten the water supply hose or use
mechanical devices to tighten onto the inlet
valves.
• No further backflow protection required for
connection to the water inlet.
(1.0‒10.0 kgf/cm²). If the water
1000 kPa
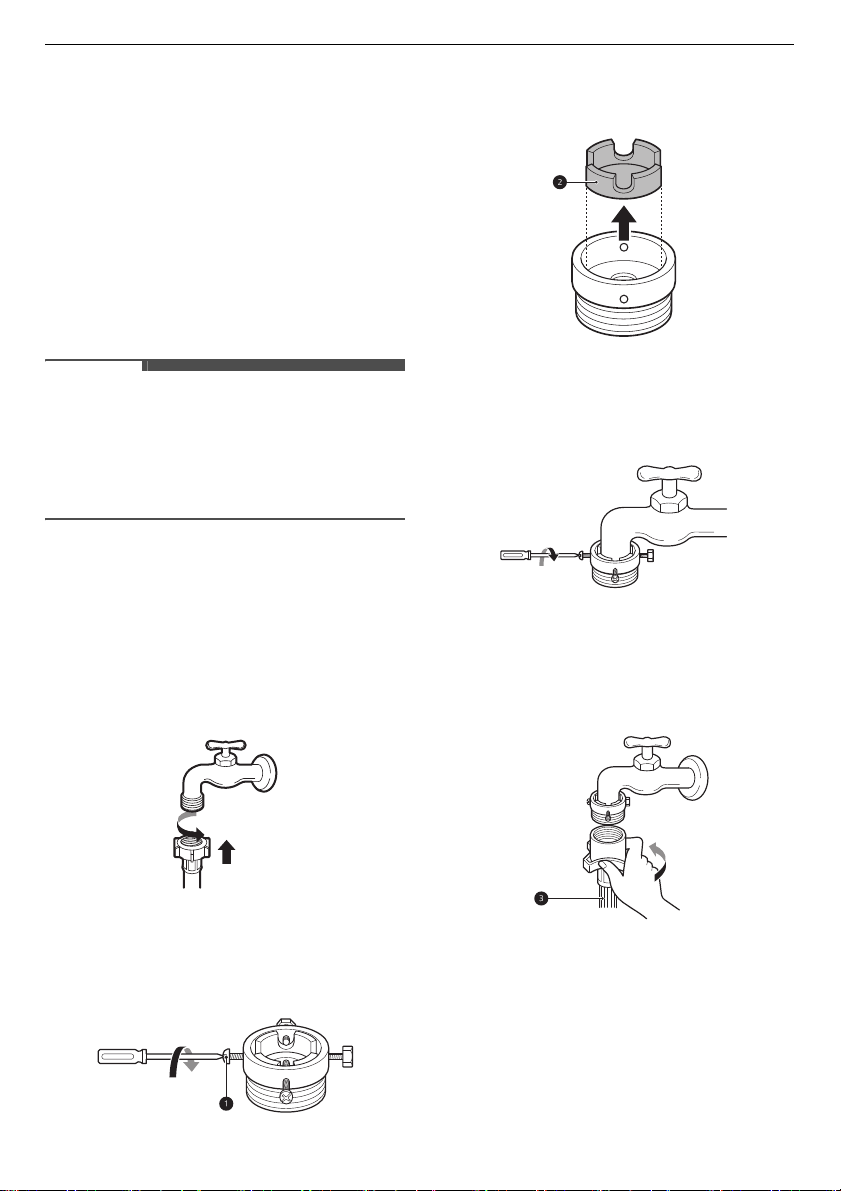
Connecting the Hose to the
Water Tap
Connecting Screw-Type Hose to Tap with Thread
Screw the supply hose connector onto the water
supply tap.
100 kPa
, a
and
INSTALLATION
2
Remove the guide plate b if the tap is too large
to fit the adapter.
3
Push the adapter onto the end of the tap so
that the rubber seal is connected to be
watertight. Tighten the 4 fixing screws.
4
Push the inlet hose c vertically upwards so
that the rubber seal within the hose can adhere
completely to the tap and then tighten the
hose by screwing it to the right.
15
EN
Connecting Screw-Type Hose to Tap Without
Thread
1
Loose the 4 fixing screws a.
Page 16
EN
NOTE
NOTE
16
INSTALLATION
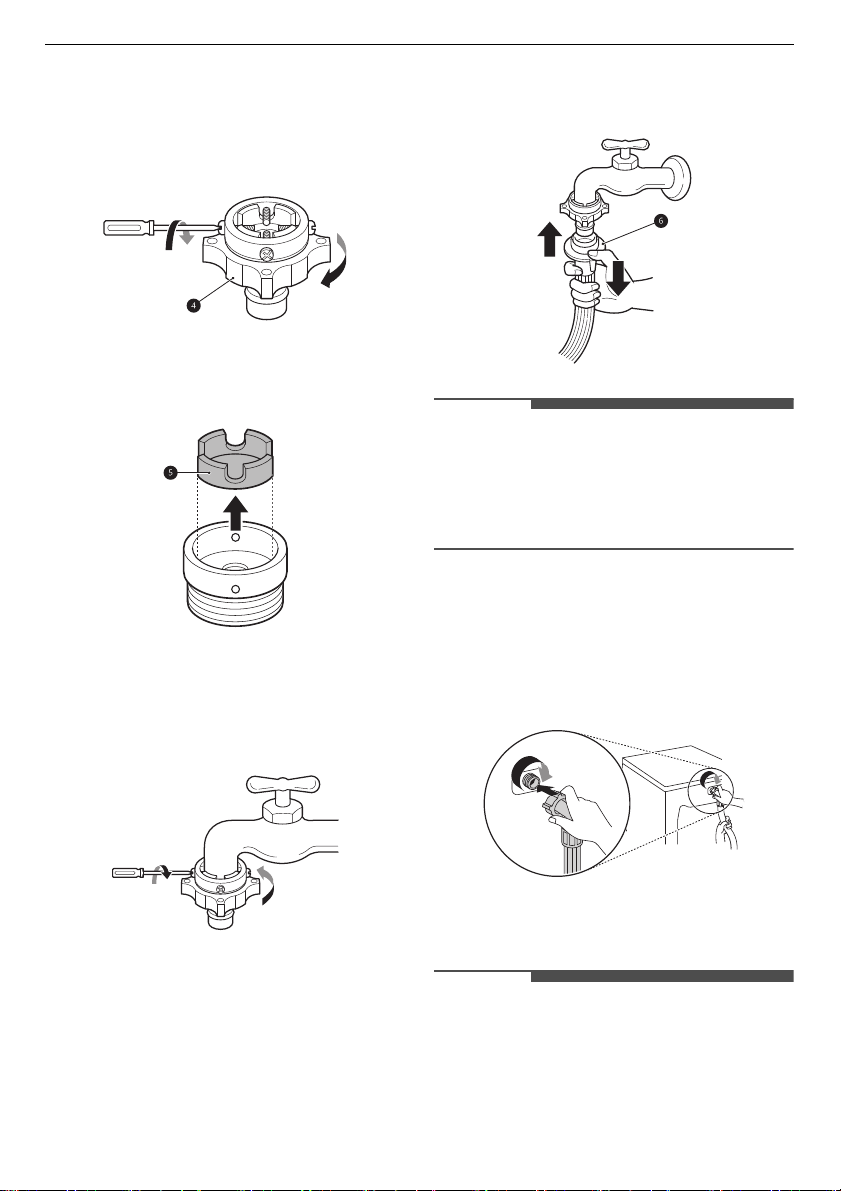
Connecting One Touch Type Hose to Tap
Without Thread
1
Unscrew the adapter ring plate d and loose
the 4 fixing screws.
2
Remove the guide plate e if the tap is too large
to fit the adapter.
3
Push the adapter onto the end of the tap so
that the rubber seal is connected to be
watertight. Tighten the 4 fixing screws and the
adapter ring plate.
connector latch plate. Make sure the adapter
locks into place.
• After connecting the water inlet hose to the
water tap, turn on the water tap to flush out
foreign substances (dirt, sand, sawdust, and etc.)
in the water lines. Let the water drain into a
bucket, and check the water temperature.
Connecting the Hose to the
Appliance
Screw the supply hose to the water inlet valve on
the back of the appliance.
4
Pull the connector latch plate f down, push
the inlet hose onto the adapter, and release the
• Do not connect the hose to the hot water supply
for models with one water inlet. Connect to the
cold water supply only.
• After completing connection, if water leaks from
the hose, repeat the same steps. Use the most
conventional type of tap for the water supply. In
case that the tap is square or too big, remove the
guide plate before inserting the tap into the
adaptor.
Page 17
INSTALLATION
DN
17
EN
• Make sure that the hose should not be kinked or
trapped.
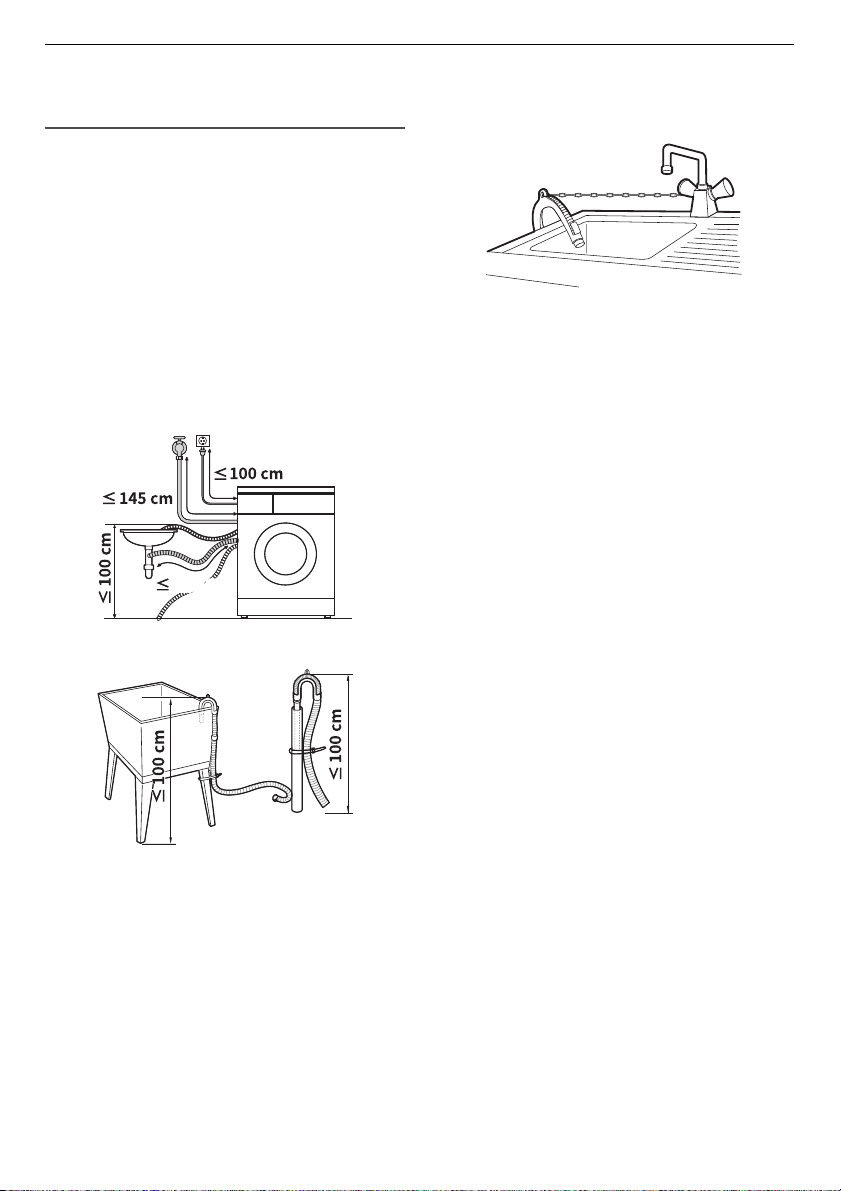
Installing the Drain Hose
Installing the Drain Hose with
the Elbow Bracket
The drain hose should not be placed higher than
100 cm
above the floor. Water in the appliance may
not drain or may drain slowly.
• Securing the drain hose correctly will protect the
floor from damage due to water leakage.
• When installing the drain hose to a sink, secure it
tightly with string.
• If the drain hose is too long, do not force it back
into the appliance. This will cause abnormal
noise.
Page 18
18
CAUTION
EN
OPERATION
OPERATION
Operation Overview
Using the Appliance
Before the first wash, select the
programme and add a half amount of the
detergent. Start the appliance without clothes. This
will remove possible residues and water from the
drum that may have been left during
manufacturing.
1
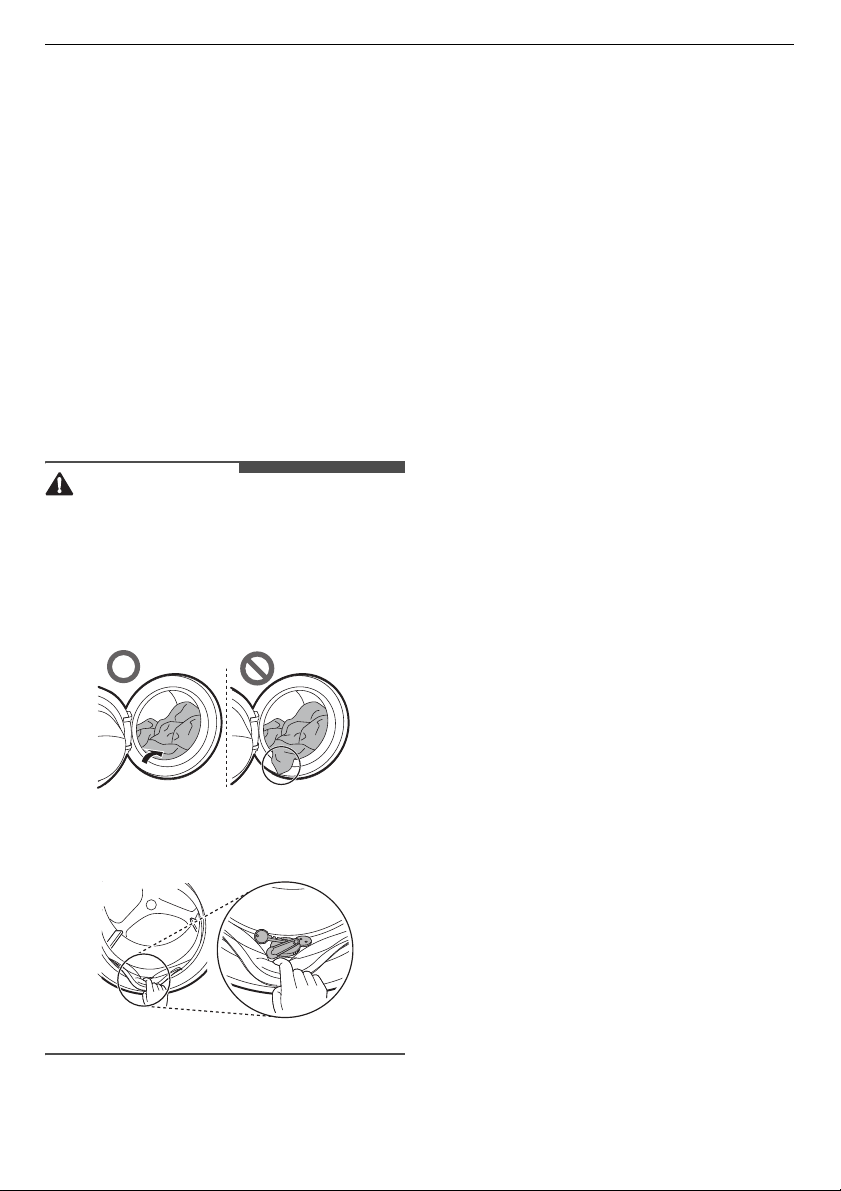
Sort clothes and load items.
• Sort clothes by fabric type, soil level, colour
and load size as needed. Open the door and
load items into the appliance.
• Before closing the door, ensure that all clothes
and items are inside the tub and not
overhanging on the rubber door seal where they
will become caught when the door is closed.
Failing to do so will cause damage to the door
seal and the clothes.
Cotton
wash
• Add the proper amount of detergent to the
detergent dispenser. If desired, add bleach
or fabric softener to the appropriate areas of
the dispenser.
3
Turn on the appliance.
Power
• Press the
appliance.
4
Choose the desired cycle.
• Press the cycle button repeatedly or turn the
cycle selector knob until the desired cycle is
selected.
• Now select a wash temperature and spin
speed. Pay attention to the fabric care label
of your clothes.
5
Begin cycle.
• Press the
cycle. The appliance will agitate briefly
without water to measure the weight of the
load. If the
pressed within a certain time, the appliance
will shut off and all settings will be lost.
button to turn on the
Start/Pause
Start/Pause
button to begin the
button is not
• Remove items from the flexible door seal gasket
to prevent clothing and door seal damage.
2
Add cleaning products or detergent and
softener.
6
End of cycle.
• When the cycle is finished, a melody will
sound. Immediately remove your clothing
from the appliance to reduce wrinkling.
Check around the door seal when removing
the load for small items that may be caught
in the seal.
Preparing the Wash Load
Sort the wash load for best washing results, and
then prepare the clothes according to the symbols
on their care labels.
Sorting the Clothes
• For best washing results, sort your clothes
according to the care label stating fabric type
and washing temperature. Adjust the spin speed
or spin intensity in accordance to the fabric type.
Page 19
OPERATION
NOTE
19
EN
• Soil level (Heavy, Normal, Light): Separate
clothes according to soil level. If possible, do not
wash heavily soiled items with lightly soiled
ones.
• Colour (White, Lights, Darks): Wash dark or dyed
clothes separately from whites or light colours.
Mixing dyed clothes with light clothes can result
in dye transfer or discolouration of lighter
clothes.
• Lint (Lint producers, Collectors): Wash separately
lint producing fabrics from lint collecting fabrics.
Lint producers can result in pilling and linting on
the lint collectors.
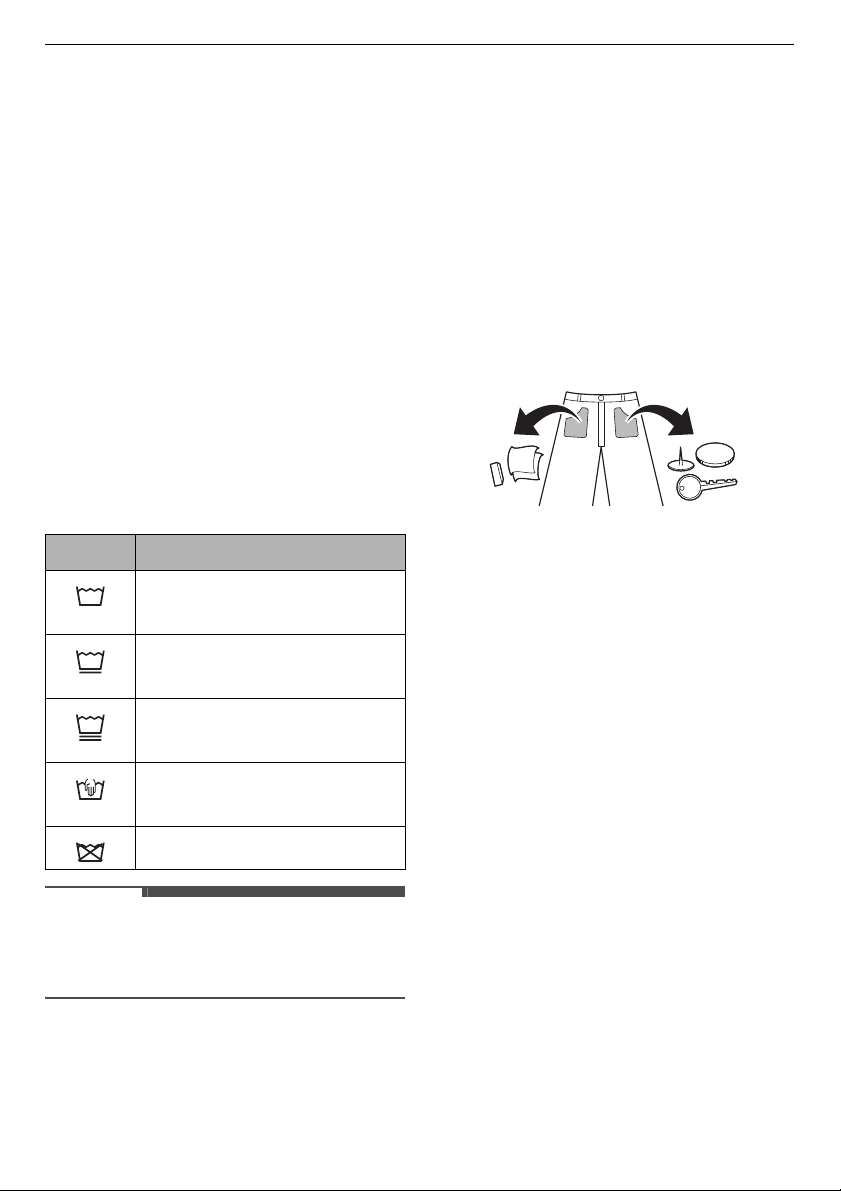
Checking the Clothes Care Label
The symbols tell you about the fabric content of
your garment and how it should be washed.
Symbols on the Care Labels
Symbol Wash / Fabric type
• Normal Wash
• Cotton, Mixed Fabrics
• Easy Care
• Synthetic, Mixed Fabrics
Checking the Clothes before
Loading
• Combine large and small items in a load. Load
large items first.
• Large items should not be more than half of the
total wash load. Do not wash single items. This
may cause an unbalanced load. Add one or two
similar items.
• Check all pockets to make sure that they are
empty. Items such as nails, hair clips, matches,
pens, coins and keys can damage both your
appliance and clothes.
• Wash delicates (stockings, underwired bras) in a
wash net.
• Close zippers, hooks and strings to make sure
that these items do not snag on other clothes.
• Pre-treat dirt and stains by brushing a small
amount of detergent dissolved water onto stains
to help lift dirt.
• Special Delicate Wash
• Delicates
• Hand Wash Only
• Wool, Silk
• Do not wash
• The dashes under the symbol give you
information about the type of fabric and the
maximum allowance of mechanical stress.
Adding Detergents and
Softeners
Detergent Dosage
• Detergent should be used according to the
instruction of the detergent manufacturer and
selected according to type, colour, soiling of the
fabric and the washing temperature. Use only
detergents that are suitable for Drum (front
load) type washers.
• If too many suds occur, reduce the detergent
amount.
• If too much detergent is used, too many suds
can occur and this will result in poor washing
results or cause heavy load to the motor.
Page 20
EN
NOTE
20
OPERATION
• If you wish to use liquid detergent, follow the
guidelines provided by the detergent
manufacturer.
• You can pour liquid detergent directly into the
main detergent drawer if you are starting the
wash cycle immediately.
• Do not use liquid detergent if you are using the
Delay End
Wash
immediately and may harden in the drawer or
the tub.
• Detergent usage may need to be adjusted for
water temperature, water hardness, size and soil
level of the load. For best results, avoid
overdosing the detergent. Failing to do so will
cause oversudsing.
• Refer to the label of the clothes, before adding
the detergent and choosing the water
temperature.
• Use only suitable detergents for the respective
type of clothing:
- Liquid detergent is often designed for special
- Powdered detergent is suitable for all types of
- For better washing results of white and pale
- Detergent is flushed from the dispenser at the
function, or if you have selected
option, as the liquid will dispense
applications, e.g. for coloured fabric, wool,
delicate or dark clothes.
fabric.
garments, use powdered detergent with
bleach.
beginning of the wash cycle.
Pre
1
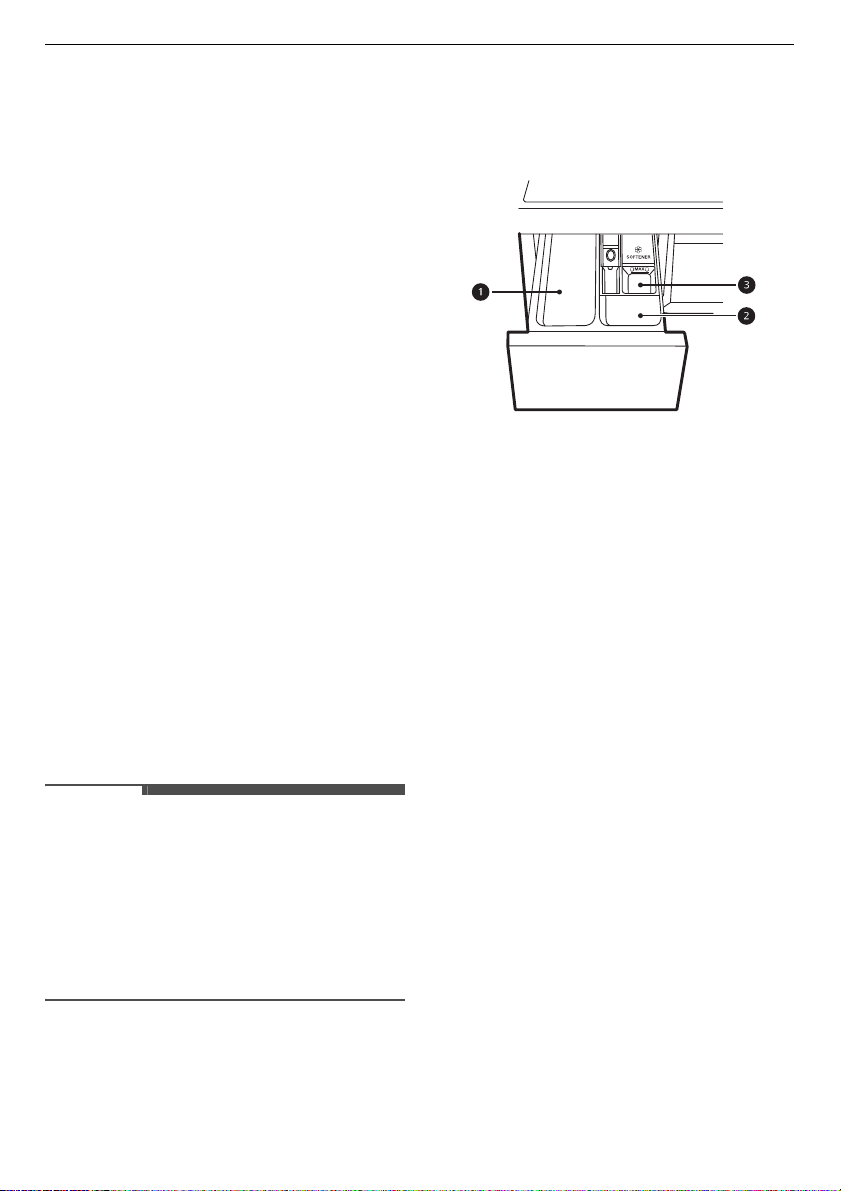
Open the dispenser drawer.
2
Add the detergent and softener into the
appropriate compartments.
a
Main wash detergent compartment
b
Pre-wash detergent compartment
c
Liquid fabric softener compartment
3
Gently close the detergent dispenser drawer
before starting the cycle.
• Slamming the drawer closed may result in
the detergent overflowing into another
compartment or dispensing into the drum
earlier than programmed.
• Be careful not to get a hand caught in the
drawer while closing.
• It is normal for a small amount of water to
remain in the dispenser compartments at
the end of the cycle.
• Do not let the detergent harden. Doing so may
lead to blockages, poor rinse performance or
odour.
• Full load: According to manufacturer’s
recommendation.
• Part load: 1/2 of the normal amount.
• Minimum load: 1/3 of full load.
Using the Dispenser
To add detergent dosage to the dispenser:
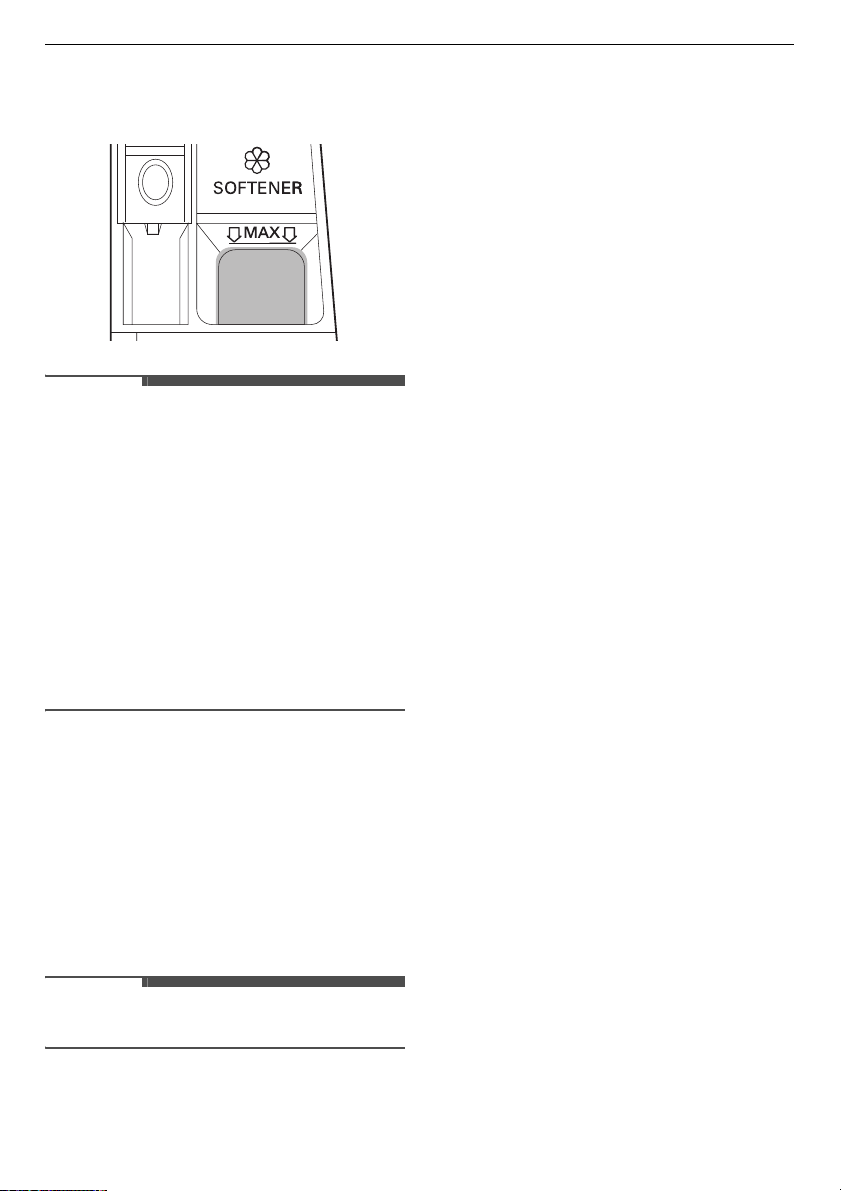
Fabric Softener Compartment
This compartment holds liquid fabric softener,
which is automatically dispensed during the final
rinse cycle. Either powdered or liquid fabric
softener may be used.
• Pour fabric softer to the maximum fill line.
Pouring excessive fabric softener over the
Page 21
OPERATION
NOTE
NOTE
21
EN
maximum fill line can cause it to dispense too
early, which may stain the clothes.
• Do not pour fabric softener directly onto the
clothes in the wash drum, doing so will cause
dark staining on the clothes that will be difficult
to remove.
• Do not leave the fabric softener in the detergent
drawer for more than 1 day. Fabric softener may
harden. Softener may remain in the dispenser if
it is too thick. The softener should be diluted if
the consistency is too thick so that it can flow
easily.
• Do not open the drawer when water is being
supplied during the wash.
• Solvents (benzene, etc.) must never be used.
Adding Water Softener
A water softener, such as anti-limescale can be
used to cut down on the use of detergent in areas
with high water hardness level.
• First add detergent, and then the water softener.
Dispense according to the amount specified on
the packaging.
Adding Detergent Tablets
Detergent tablets can also be used when washing.
1
Open the door and put detergent tablets into
the drum before loading the clothes.
2
Load the clothes into the drum and close the
door.
• Do not put tablets into the dispenser.
Page 22
22
EN
OPERATION
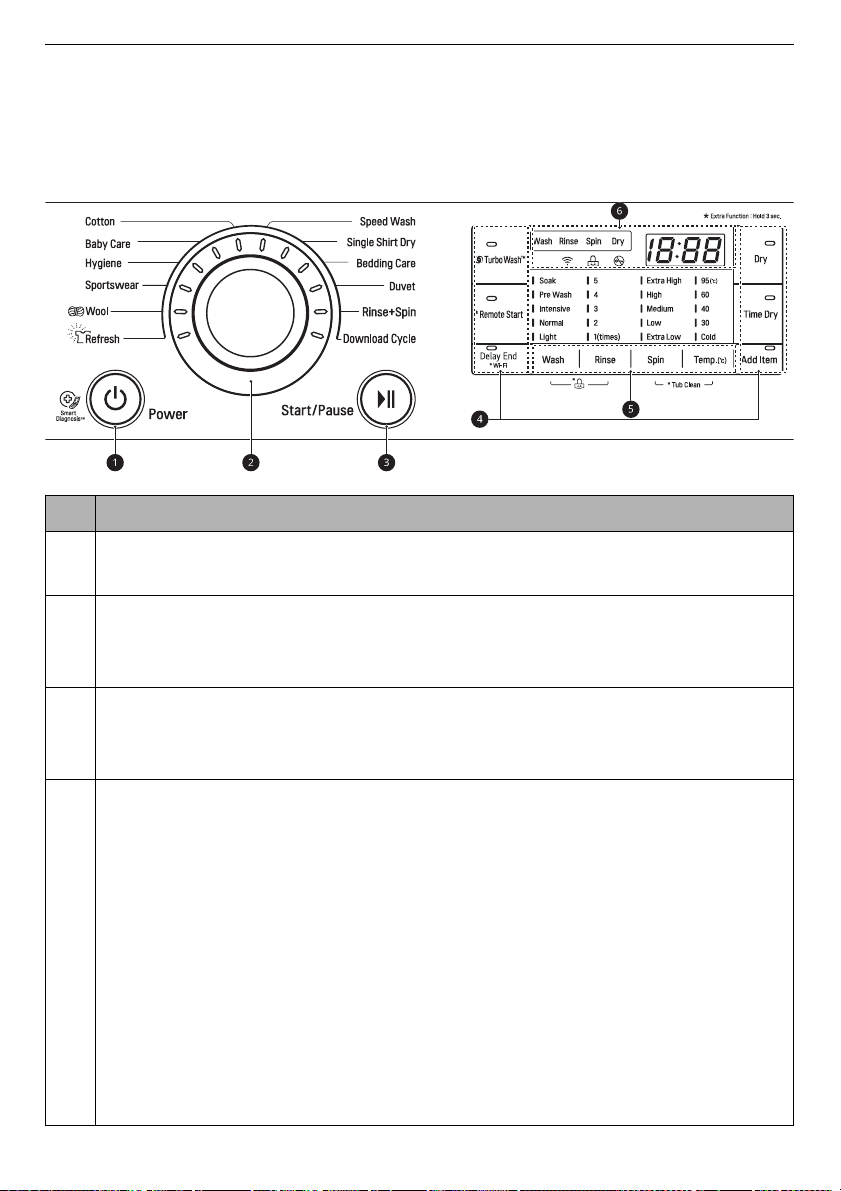
Control Panel
The actual control panel may differ from model to model.
Control Panel Features
Description
Power On/Off Button
a
• Press this button to turn the washing machine on.
Programme Knob
b
• Programmes are available according to the clothes type.
• The lamp will light up to indicate the selected programme.
Start/Pause Button
c
• This button is used to start the wash programme or pause the wash programme.
• If a temporary stop of the wash programme is needed, press this button.
Extra Options and Functions
d
• To use the extra functions, press and hold the corresponding button for 3 seconds. The
corresponding symbol lights up in the display.
• This allows you to select an additional programmes and will light when selected.
Remote Start
With the
• In order to use this function, refer to
Wi-Fi
Press and hold the
the
i
Use this option to disable the controls. This function can prevent children from changing cycles
or operating the appliance.
LG ThinQ
LG ThinQ
Child Lock
app, you can use a smartphone to control your appliance remotely.
Delay End
application.
SMART FUNCTIONS
button for 3 seconds to initiate the connection of the appliance to
.
Page 23
OPERATION
Description
Customizing Washing Programme Buttons
e
Use these buttons to adjust the water temperature, spin speed and soil level settings for the
selected programme.
• The current settings are shown in the display.
• Press the button for that option to select other settings.
Display
f
• The display shows the settings, estimated remaining time, options, and status messages.
When the appliance is turned on, the default settings in the display will illuminate.
• While the load weight is sensed automatically, the display on the control panel blinks.
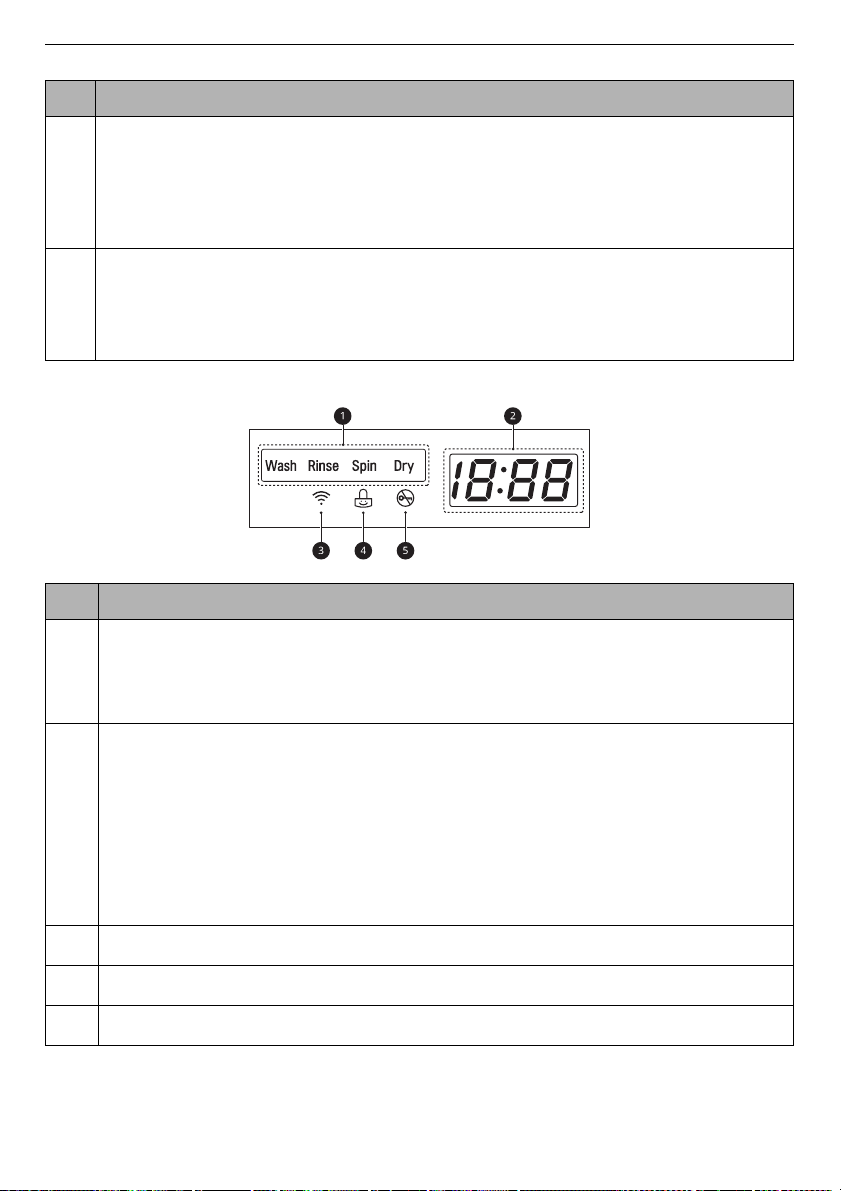
Time and Status Display
Description
23
EN
Programme Status Indicators
a
• When a washing programme is running, LED for the active stage will blink, and the LEDs for
the remaining stages will remain steady. Once a stage is complete, the LED will turn off. If a
cycle is paused, the active stage LED will stop blinking.
Estimated Time Remaining
b
• When a washing programme is selected, the default time for that programme is displayed.
This time will change as options are selected.
• If the display shows
the load size. This is normal.
• The time shown is only an estimate. This time is based on normal operating conditions.
Several external factors (load weight, room temperature, incoming water temperature, etc.)
can affect the actual time.
c
f
lights up when the appliance is connected to Wi-Fi network at home.
d
i
lights up when the control panel is locked except for the
e
H
lights up when the programme starts and the door is locked.
---
, then the time will be displayed after the load sensing has detected
Power
button.
Page 24
24
EN
OPERATION
Programme Table
Washing Programme
Cotton 40 °C (Cold to 60 °C) Max. Load: Rating
Description Washes normally soiled clothes by combining various drum motions.
• Pressing the
Cotton
Baby Care 60 °C Max. Load 5 kg
Description Washes baby clothes with gentle motion and better performance.
Hygiene 95 °C Max. Load 3 kg
Description Washes clothes at a high temperature.
Sportswear 30 °C (Cold to 30 °C) Max. Load 5 kg
Description Washes special garments like sports and outdoor wear.
• Use for water-repellent fabric laminate used on clothing.
Start/Pause
programme to begin immediately, using the default settings.
button without selecting a programme will cause the
Wool Cold (Cold to 40 °C) Max. Load 4 kg
Description Washes hand-washable and machine-washable delicate clothes such as washable
Refresh - 5 items
Description Uses steam to help reduce wrinkles from dry clothes such as cotton, polyester blend
Speed Wash 40 °C (Cold to 40 °C) Max. Load 5 kg
Description Washes small loads of lightly soiled clothes in a short time.
Single Shirt Dry - 1 item
Description Dry a small load in a short time.
wool, lingerie, dresses etc.
• Use detergent for machine washable woolens.
shirts or blouses.
• Clothes may be wet right after the programme is completed. Put the clothes on a
hangar to dry out.
Page 25
OPERATION
NOTE
NOTE
NOTE
Bedding Care - 1 king size
Description Helps reduce moisture and odour in duvets, blankets, pillowcases or shams without
washing.
• Check fabric care labels before using this programme. The heated air may damage
any items.
Duvet Cold (Cold to 40 °C) 1 king size
Description Washes large items such as bed covers, pillows, sofa covers, etc.
Rinse+Spin - Max. Load 3 kg
Description Rinses and spins clothes. Use fabric softener if needed.
Download Cycle - -
Description This programme allows you to download a new and special washing programme to
your appliance with a smartphone. The default programme is
Cold Wash
25
EN
.
• Select the appropriate water temperature for chosen wash programme. Always follow garment
manufacturer’s care label or instructions when washing to avoid damage to clothes.
• Select the proper wash temperature and spin speed for the desired programmes.
• Actual water temperature may differ from the declared cycle temperature.
• Neutral detergent is recommended.
Extra Options
*1:This option is automatically inserted in the programme and can not be deselected.
*2:This option is automatically included in the cycle and can be deleted.
• The
Delay End
Programme Turbo Wash Dry Time Dry Add Item
Cotton
option can be selected for every washing programme in the table below.
#
*2
###
Page 26

26
EN
OPERATION
Programme Turbo Wash Dry Time Dry Add Item
Baby Care
Hygiene
Sportswear
Wool
Refresh
Speed Wash
Single Shirt Dry
Bedding Care
Duvet
Rinse+Spin
####
####
##
#
#
*2
###
#
*1
#
##
#
#
Page 27

OPERATION
NOTE
27
EN
Drying Programme
General Tips for Drying
Use the automatic programmes to dry most loads.
Electronic sensors measure the temperature of the
exhaust to increase or decrease drying
temperatures for faster reaction time and tighter
temperature control.
• Cold water tap must be left on during drying
cycles.
• This appliance’s automatic process from
washing to drying can be selected easily.
• For most drying, make sure all clothes are similar
in material and thickness.
• Do not overload the appliance by stuffing too
many articles into the drum. Items must be able
to tumble freely.
• If you open the door and remove the load before
the appliance has finished its programme,
remember to press the
• After the drying programme is finished,
[d
(crease reduction) is displayed. At default, the
drum will periodically rotate for about 4 hours to
reduce creases unless the clothes are unloaded
from the drum. To stop this default function,
press any button and unload the clothes from
the drum.
Woolen Articles
Do not tumble dry woolen articles. Pull them to
their original shape and dry them flat.
Start/Pause
button.
Blankets and Duvets
Check fabric care labels on blankets and duvets
before using the drying programme. Some
blankets and duvets may shrink by the heated air.
Rubber and Plastics
Do not dry any items made from or containing
rubber or plastics, such as:
• Aprons, bibs, chair covers
• Curtains and table cloths
• Bathmats
Fiber Glass
Do not dry fiber glass articles in the appliance.
Glass particles left in the appliance may be picked
up by your clothes and cause skin irritation.
• When you turn off the drying cycle of the
appliance, the drying fan motor can be operated
to save itself for 60 seconds.
• Be careful when removing your clothing from
the appliance, as the clothing or appliance may
be hot.
• The estimated drying time varies from the actual
drying time during the Automatic cycle. The type
of fabric, size of the load, and the dryness
selected affect drying time.
• When you select drying only, spinning runs
automatically for energy efficiency.
Woven and Loopknit Materials
Some woven and loopknit materials may shrink, by
varying amounts, depending on their quality.
Always stretch these materials out immediately
after drying.
Permanent Press and Synthetics
Do not overload your appliance. Take out
permanent press articles as soon as the appliance
stops to reduce wrinkles.
Baby Clothes and Night Gowns
Always check the manufacturer’s instructions.
Using a Dry Programme
You can customize the programmes by using the
following drying functions:
Dry
Use this function for gerneral drying.
Time Dry
Use this function to change the drying time
according to the maximum load.
Press the
through the selections:
• Drying time: 30/60/90/120/150 minitues
Time Dry
button repeatedly to toggle
Page 28

EN
NOTE
28
OPERATION
Using a Wash and Dry Function
1
Prepare the clothes and load the drum.
• For consistently dry loads, all articles in the
load should be similar in material and
thickness.
• Do not overload the drum. There should be
enough room for clothes to tumble freely.
2
Press the
3
Select a washing programme and add
detergent.
4
Press the
5
Press the
Power
button.
Dry
or
Time Dry
Start/Pause
button as necessary.
button.
Only Using a Dry Function
1
Prepare the clothes and load the drum.
• For consistently dry loads, all articles in the
load should be similar in material and
thickness.
• Do not overload the drum. There should be
enough room for clothes to tumble freely.
Extra Options and
Functions
You can use the extra options and functions to
customize the programmes.
Customizing a Washing
Programme
Each programme has default settings that are
selected automatically. You may also customize
these settings using these buttons.
Wash
Press the
soil level is selected.
•
•
•
•
•
• Selectable options will differ depending on the
Wash
button repeatedly until the desired
Soak
: for excessively dirty clothes
Pre Wash
Intensive
Normal
- This option is automatically selected in every
Light
selected programme.
: for heavily soiled clothes
: for normal and heavily soiled clothes
: for normal soiled clothes
washing programme except for
Baby Care
.
: for lightly soiled clothes
Rinse+Spin
,
2
Press the
• Do not select a washing programme and do
3
Press the
4
Press the
Power
button.
not add a detergent.
Dry
or
Time Dry
Start/Pause
button as necessary.
button.
Rinse
The number of rinses can be selected by pressing
the
Rinse
button. This function is recommended
for people with detergent allergies.
Spin
The spin intensity level can be selected by pressing
this button repeatedly.
Spin
Press the
Temp.
This button selects the wash temperature for the
selected programme.
Press the
lit.
• Select the water temperature suitable for the
type of load you are washing. Follow the
garment fabric care labels for best results.
button to select spin speed.
Temp.
button until the desired setting is
Page 29

OPERATION
NOTE
NOTE
29
EN
Follow the next steps to customize a
washing programme:
1
Prepare the clothes and load the drum.
2
Press the
3
Add detergent.
4
Select a washing programme.
5
Customize the washing programme (
Rinse, Spin
6
Press the
Power
button.
, and
Temp.
Start/Pause
) as necessary.
button.
Wash
,
Only Using a Spin Function
1
Prepare the clothes and load the drum.
2
Press the
• Do not select a washing programme and do
Power
button.
not add a detergent.
Follow the next steps to use a special
option.
1
Press the
2
Select a washing programme.
3
Change the washing programme (
Spin
4
To use special options, press
button.
5
Press the
Power
button.
) as necessary.
Start/Pause
button.
Temp.
Turbo Wash
or
Using Basic Options
You can customize the programmes by using the
following basic options:
Add Item
You can use this option in order to add or remove
clothes after the washing programme has started.
1
Press the
Power
button.
3
Press the
4
Press the
• If you select the washing programme, you will be
unable to select a spin only. If this occurs, press
Power
back on.
Spin
button.
Start/Pause
button twice to cycle the machine off and
button.
Using Special Options
You can customize the programmes by using the
following special options:
Turbo Wash
Adding this option reduces the programme time
but the similar washing results will be provided.
2
Select a washing programme.
3
Press the
4
Press the
5
Open the door after it unlocks itself and add or
remove necessary clothing items.
6
Close the door and press the
button.
• For safety reasons, the door remains locked
when the water level or temperature inside of
the drum is high. It is not possible to add clothes
at this time.
Start/Pause
Add Item
button as necessary.
button.
Start/Pause
Page 30

EN
NOTE
NOTE
30
OPERATION
Delay End
You can set this function so that the appliance
starts automatically and finishes after a specified
time interval.
1
Press the
2
Select a washing programme.
3
Press the
4
Press the
• The delay time is the time to the end of the
programme, not the start. The actual running
time may vary due to water temperature, clothes
and other factors.
• To cancel the function, the
be pressed.
• Avoid using liquid detergent for this function.
Power
button.
Delay End
Start/Pause
button as necessary.
button.
Power
button should
Settings
2
Press and hold the
the same time for 3 seconds to activate this
function.
• A beeper will sound, and
the display.
Unlocking the Control Panel
1
Turn on the power.
2
Press and hold the
the same time for 3 seconds to deactivate this
function.
Wash
Wash
and
Rinse
CL
will appear on
and
Rinse
buttons at
buttons at
Child Lock
Use this option to disable the controls. This
function can prevent children from changing cycles
or operating the appliance.
• Once this function is set, all buttons are locked
except the
• When the controls are locked,
remaining time are alternatively shown on the
display during the wash while this function is
engaged.
• Turning off the power will not reset this function.
You must deactivate this function before you can
access any other functions.
Locking the Control Panel
1
Turn on the power.
Power
button.
[L
and the
Page 31

SMART FUNCTIONS
NOTE
NOTE
SMART FUNCTIONS
31
EN
LG ThinQ Application
The
LG ThinQ
communicate with the appliance using a
smartphone.
LG ThinQ Application Features
Communicate with the appliance from a
smartphone using the convenient smart features.
Remote Start
It allows you to control the appliance remotely
from the
Download Cycle
You can download new and special cycles that are
not included in the basic cycles on the appliance.
A variety of specialty cycles specific to the appliance
can be downloaded to the successfully registered
appliances.
Once cycle download is completed in the appliance,
the appliance keeps the downloaded cycle until a
new cycle is downloaded.
• Only one downloaded cycle can be stored on the
appliance at a time.
application allows you to
LG ThinQ
application.
notifications on a smartphone. The notifications
are triggered even if the
off.
• If you change your wireless router, Internet
service provider, or password, delete the
registered appliance from the
application and register it again.
• The application is subject to change for
appliance improvement purposes without notice
to users.
• Functions may vary by model.
LG ThinQ
application is
LG ThinQ
Before Using LG ThinQ
Application
1
Check the distance between the appliance and
the wireless router (Wi-Fi network).
• If the distance between the appliance and
the wireless router is too far, the signal
strength becomes weak. It may take a long
time to register or installation may fail.
Tub Clean Coach
This function shows how many cycles remain
before it is time to run the
Energy Monitoring
This function checks the energy consumption of
the recently used cycles and monthly average.
Smart Diagnosis
This function provides useful information for
diagnosing and solving issues with the appliance
based on the pattern of use.
Settings
Allows you to set various options on the appliance
and in the application.
Push Alert
When the cycle is complete or the appliance has
problems, you have the option of receiving push
Tub Clean
function.
2
Turn off the
your smartphone.
3
Connect your smartphone to the wireless
router.
Mobile data
or
Cellular Data
on
Page 32

32
NOTE
NOTE
EN
• To verify the Wi-Fi connection, check that f icon
on the control panel is lit.
• The appliance supports 2.4 GHz Wi-Fi networks
only. To check your network frequency, contact
your Internet service provider or refer to your
wireless router manual.
•
LG ThinQ
connection problems or any faults,
malfunctions, or errors caused by network
connection.
• If the appliance is having trouble connecting to
the Wi-Fi network, it may be too far from the
router. Purchase a Wi-Fi repeater (range
extender) to improve the Wi-Fi signal strength.
• The Wi-Fi connection may not connect or may be
interrupted because of the home network
environment.
• The network connection may not work properly
depending on the Internet service provider.
• The surrounding wireless environment can
make the wireless network service run slowly.
• The appliance cannot be registered due to
problems with the wireless signal transmission.
Unplug the appliance and wait about a minute
before trying again.
• If the firewall on your wireless router is enabled,
disable the firewall or add an exception to it.
• The wireless network name (SSID) should be a
combination of English letters and numbers. (Do
not use special characters.)
• Smartphone user interface (UI) may vary
depending on the mobile operating system (OS)
and the manufacturer.
• If the security protocol of the router is set to
WEP
change it to other security protocols (
recommended) and register the product again.
SMART FUNCTIONS
is not responsible for any network
, you may fail to set up the network. Please
WPA2
is
smartphone. Follow instructions to download and
install the application.
Using the Appliance Remotely
Remote Start
Use a smartphone to control your appliance
remotely. You can also monitor your cycle
operation so you know how much time is left in the
cycle.
Using this function
1
Put the clothes into the drum.
• If desired, add bleach or fabric softener to
the appropriate areas of the dispenser.
2
Press the
3
Press and hold
seconds to enable the remote control function.
4
Start a cycle from the
your smartphone.
• Once this function is enabled, you can only start
a cycle from the
application. If the cycle is not started, the
appliance will wait to start the cycle until it is
turned off remotely from the application or this
function is disabled.
• If the door has been opened, you can not start a
cycle remotely.
Disable this function manually
When this function is activated, press and hold the
Remote Start
Power
button.
Remote Start
LG ThinQ
LG ThinQ
button for 3 seconds.
smartphone
button for 3
application on
Installing the LG ThinQ
Application
Search for the
Google Play Store or Apple App Store on a
LG ThinQ
application from the
Open Source Software Notice
Information
To obtain the source code under GPL, LGPL, MPL,
and other open source licenses, that is contained in
Page 33

SMART FUNCTIONS
NOTE
NOTE
Max.
10 mm
33
EN
this product, please visit http://
opensource.lge.com.
In addition to the source code, all referred license
terms, warranty disclaimers and copyright notices
are available for download.
LG Electronics will also provide open source code to
you on CD-ROM for a charge covering the cost of
performing such distribution (such as the cost of
media, shipping, and handling) upon email request
to opensource@lge.com. This offer is valid for a
period of three years after our last shipment of this
product. This offer is valid to anyone in receipt of
this information.
Smart Diagnosis
This feature is only available on models with the c
d
logo.
or
Use this feature to help you diagnose and solve
problems with your appliance.
• For reasons not attributable to LGE’s negligence,
the service may not operate due to external
factors such as, but not limited to, Wi-Fi
unavailability, Wi-Fi disconnection, local app
store policy, or app unavailability.
• The feature may be subject to change without
prior notice and may have a different form
depending on where you are located.
Using Audible Diagnosis to
Diagnose Issues
Follow the instructions below to use the audible
diagnosis method.
• Launch the
Smart Diagnosis
the instructions for audible diagnosis provided
in the
1
Press the
appliance.
• Do not press any other buttons.
2
Place the mouthpiece of your smartphone
close to the
3
Press and hold the
or longer while holding the smartphone
mouthpiece to the logo until the data transfer
is complete.
• Keep the smartphone in place until the data
LG ThinQ
LG ThinQ
Power
transfer has finished. Time remaining for
data transfer is displayed.
application and select the
feature in the menu. Follow
application.
button to turn on the
c
or d logo.
Temp.
button for 3 seconds
Using LG ThinQ to Diagnose
Issues
If you experience a problem with your Wi-Fi
equipped appliance, it can transmit
troubleshooting data to a smartphone using the
LG ThinQ
• Launch the
application.
Smart Diagnosis
LG ThinQ
the instructions provided in the
application.
application and select the
feature in the menu. Follow
LG ThinQ
4
After the data transfer is complete, the
diagnosis will be displayed in the application.
• For best results, do not move the smartphone
while the tones are being transmitted.
Page 34

34
WARNING
WARNING
WARNING
EN
MAINTENANCE
MAINTENANCE
• Unplug the appliance before cleaning to avoid the risk of electric shock. Failure to follow this warning
may result in serious injury, fire, electric shock, or death.
• Never use harsh chemicals, abrasive cleaners, or solvents to clean the appliance. They may damage the
finish.
Cleaning After Every Wash
What to Clean
Always remove items from the washing machine as
soon as the cycle is complete. Leaving damp items
in the washing machine can cause wrinkling, colour
transfer, and odour.
• After the wash cycle is finished, wipe the door
and door seal to remove any moisture.
• Leave the door slightly open to dry the drum.
• Wipe the appliance with a dry cloth to remove
any moisture.
Cleaning the Exterior
Proper care of your appliance can extend the
service life.
Exterior
• Immediately wipe off any spills.
• Wipe with a damp cloth and then again with a
dry cloth ensuring there is no moisture in
cabinet joints or crevices.
• Do not press on the surface or the display with
sharp objects.
Door
• Wash with a damp cloth on the outside and
inside and then dry with a soft cloth.
• Do not attempt to separate any panels or
disassemble the appliance. Do not apply any
sharp objects to the control panel in order to
operate the appliance.
• Leave the door open to dry inside of the
appliance only if the children are supervised at
home.
Page 35

Cleaning the Appliance
NOTE
WARNING
Periodically & Performing
an Emergency Water
Evacuation
Tub Clean
This is a special function to help clean the inside of
the appliance by soaking, washing, rinsing and
spinning.
Run this function
needed) to reduce build-up of detergent and
softener and other residue.
• If there is a bad smell or mildew inside the
appliance, run this function
weeks
in addition to the regularly prompted
intervals.
• The
tcL
recommendation of operating this function.
1
Remove any clothing or items from the
appliance and close the door.
once a month
message will be displayed to alert to the
(or more often if
once a week for 3
MAINTENANCE
• Leave the door open to dry inside of the
appliance only if the children are supervised at
home.
35
EN
Cleaning the Water Inlet Filter
The water inlet filter collects lime or any sediment
that may be in water that is supplied to the
appliance. If the water is very hard or contains
traces of limescale, the filter on the water inlet may
clog regularly.
• Turn off the water supply taps to the appliance if
the appliance is to be left for a certain period of
time (e.g. holiday), especially if there is no floor
drain (gully) in the immediate vicinity.
•
1E
error message will be displayed on the
control panel when the water is not entering the
detergent drawer.
1
Turn off the power and the water tap and then
unscrew the water inlet hose.
2
Open the dispenser drawer and add anti
limescale powder to the main wash
compartment.
• Tablets can be placed directly into the drum
3
Close the dispenser drawer slowly.
4
Turn on the power, and then press the
and
seconds.
5
Press the
6
Leave the door open to dry the inside of the
appliance completely.
• When the inside of the appliance is not dried
as an alternative to powder.
Spin
Temp.
buttons at the same time for 3
Start/Pause
completely, it may cause a bad smell or
mildew.
button to start.
2
Remove the water inlet filter with small pliers
and then clean the filter using a medium bristle
tooth brush.
Page 36

36
CAUTION
EN
MAINTENANCE
Cleaning the Drain Pump Filter
and Performing an Emergency
Water Evacuation
The drain filter collects threads and small objects
that may have been accidentally left in the clothes.
Check regularly that the filter is clean to ensure
smooth running of your appliance.
Allow the water to cool before cleaning the drain
pump filter. Open the door in an emergency or
perform an emergency water evacuation.
1
Unplug the appliance.
2
Open the cover cap and pull out the drain tube.
• Be careful when draining, as the water may be
hot.
• Run the drum cleaning programme once a
month (or more often, as needed) to remove
excess detergent and other debris.
Cleaning the Dispenser Drawer
Detergent and fabric softener can build up in the
dispenser drawer. Liquid detergents can remain
under the dispenser drawer and not dispense
completely. Remove the drawer and inserts and
check for build-up of cleaning products
twice a month
1
Remove the detergent dispenser drawer by
pulling the drawer straight out until the drawer
stops.
• Then gently pull the drawer outward while
pressing hard the disengage button.
.
once or
3
Remove the drain plug from the drain tube first
a
, and then drain the water. Then slowly
unscrew the drain pump filter
remaining water and then proceed to remove
any debris or objects from the filter.
4
After cleaning the drain pump filter, carefully
reinsert the filter and screw the drain cap back
in clockwise carefully to avoid cross threading
and leakage. Reinsert the plug back into the
drain tube and place the tube into its holder.
5
Close the cover cap.
b
to drain the
2
Remove the build-up of detergent and
softener.
• Rinse the drawer and the components of the
drawer with warm water to remove the
build-up from detergent and softener. Use
only water to clean the dispenser drawer.
Dry the drawer and the components of the
drawer with a soft cloth or towel.
3
To clean the drawer opening, use a cloth or
small, non-metal brush to clean the recess.
• Remove all residue from the upper and
lower parts of the recess.
Page 37

4
Wipe any moisture off the recess with a soft
cloth or towel.
5
Reassemble the components of the drawer to
the proper compartments and insert the
drawer.
MAINTENANCE
37
EN
Page 38

38
EN
TROUBLESHOOTING
TROUBLESHOOTING
Operation of your appliance can lead to errors and malfunctions. The following tables contain possible
causes and notes for resolving an error message or malfunction. It is recommended to read the tables
carefully below in order to save your time and money that may cost for calling to LG Electronics service
centre.
Before Calling for Service
Your appliance is equipped with an automatic error-monitoring system to detect and diagnose problems
at an early stage. If the appliance does not function properly or does not function at all, check the following
tables before calling to LG Electronics service centre.
Error Messages
Symptoms Possible Cause & Solution
1E
INLET ERROR
UE
UNBALANCE ERROR
Water supply is not adequate in that location. Water does not enter
appliance or it enters slowly.
• Check another tap in the house.
Water supply tap is not completely open. Water does not enter the
appliance or it enters slowly.
• Open fully tap.
Water supply hose(s) are kinked.
• Straighten hose or reinstall the water inlet hose
The filter of the supply hose(s) are clogged.
• Check and clean the inlet valve filter after turning off the taps and
removing the hose connections to the washing machine.
The appliance has a system which detects and corrects the unbalance of
the appliance.
• The clothes may be too wet at the end of the cycle, rearrange the load to
allow proper spinning. Close the door and press
may take a few moments before the appliance begins to spin.The door
must be locked before spin can be achieved.
Load is too small. This system may stop spinning or even interrupt the
spin cycle altogether if individual heavy articles (e.g. bath mat, bath
robe, etc.) are loaded.
• Add 1 or 2 similar items or smaller articles of clothes to help balance the
load. Close the door and press
moments before the appliance begins to spin. The door must be locked
before spin can be achieved.
Start/Pause
Start/Pause
button. It may take a few
button. It
Page 39

Symptoms Possible Cause & Solution
OE
WATER OUTLET ERROR
dE dE1 dEz dE4
DOOR ERROR
tE
CONTROL ERROR
LE
MOTOR LOCKED ERROR
FE
OVERFLOW ERROR
PE
PRESSURE SENSOR
ERROR
vs
VIBRATION SENSOR
ERROR
FF
FROZEN FAILURE
AE
WATER LEAKAGE
PF
POWER FAILURE
dHE
DRY ERROR
Drain hose is kinked or clogged. Water in the appliance does not drain
or drains slowly.
• Clean and straighten the drain hose.
The drain filter is clogged.
• Check and clean the drain filter.
Door sensor malfunctions.
• Please call LG service centre. You can find your local LG service centre
phone number in the warranty card.
This is a control error.
• Unplug the power plug and call for service.
Over load in motor.
• Let the appliance wait for 30 minutes until the motor is cooled down and
then, restart the cycle.
Water overfills due to a possible faulty water valve.
• Close the water tap. Unplug the power plug. Call for service.
Water level sensor malfunctions.
• Close the water tap. Unplug the power plug. Call for service.
Vibration sensor malfunctions.
• Call for service.
Is supply/drain hose or drain pump frozen?
• Supply warm water into the drum in order to unfreeze the drain hose and
the drain pump. Cover the supply hose with wet and warm towel.
Water leaks.
• Call for service.
The appliance experienced a mains power failure.
• Restart the cycle.
Drying functions only are not working.
• Call for service.
TROUBLESHOOTING
39
EN
Page 40

40
EN
TROUBLESHOOTING
Noises You Might Hear
Symptoms Possible Cause & Solution
Rattling and clanking
noise
Thumping sound Heavy clothes may produce a thumping sound. This is usually normal.
Vibrating noise Package materials are not removed.
Foreign objects, such as keys, coins, or safety pins may be in the drum.
• Stop the appliance, check the drum for foreign objects. If the noise
continues after the appliance is restarted, call for service.
• If the sound continues, the appliance is probably out of balance. Stop and
redistribute the clothes.
The clothes may be out of balance.
• Pause the programme and redistribute the clothes after the door unlocks.
• Remove package materials.
The clothes may be unevenly distributed in the drum.
• Pause the programme and redistribute the clothes after the door unlocks.
Not all levelling feet are resting firmly and evenly on the floor.
• See the
Floor not rigid enough.
• Check if the floor is sold and does not flex. See the
Levelling the Appliance
appliance.
Requirements
instruction to adjust the levelling of the
Installation Place
to select the proper location.
Operation
Symptoms Possible Cause & Solution
Water is leaking. House drain pipes are clogged.
• Unclog waste pipes. Contact plumber if necessary.
Leakage is caused by improper installation of drain hose or clogged
drain hose.
• Clean and straighten the drain hose. Check and clean the drain filter
regularly.
Drain pump filter cap is not fitted correctly.
• Refit the drain pump filter.
Page 41

TROUBLESHOOTING
Symptoms Possible Cause & Solution
Appliance does not
operate.
Buttons may not
function properly.
Door does not open. The door cannot be opened for safety reasons once the appliance starts.
Control panel has powered off due to inactivity.
• This is normal. Press the
Appliance is unplugged.
• Make sure that the cord is plugged securely into a working outlet.
Water supply is turned off.
• Turn the water supply tap completely.
Controls are not set properly.
• Make sure that the programme is correctly set. Close the door and press
the
Start/Pause
Door is open.
• Close the door and make sure that nothing is caught under the door
preventing it from closing completely.
Circuit breaker/fuse is tripped/blown.
• Check house circuit breakers/fuses. Replace fuses or reset breaker. The
appliance should be on a dedicated branch circuit. The appliance will
resume the programme where it stopped once power is restored.
Control needs to be reset.
• Press the
the
Start/Pause
Start/Pause was not pressed after a programme was set.
• Press the
the
Start/Pause
button is not pressed within a certain time.
Extremely low water pressure.
• Check another tap in the house to make sure that household water
pressure is adequate.
Appliance is heating the water or making steam.
• The drum may stop operating temporarily during certain cycles, while
water is safely heated to a set temperature.
The Child Lock option is activated.
• Deactivate the
• This is normal. You can safely open the door after H turns off.
button.
Power
button.
Power
button. The appliance is turned off if the
Child Lock
Power
button to turn the appliance on.
button, then reselect the desired programme and press
button, then reselect the desired programme and press
option if necessary.
Start/Pause
41
EN
Page 42

42
EN
Appliance is not filling
properly.
Appliance does not
drain water.
Detergent is not
dispensed
incompletely or not
dispensed at all.
Cycle time is longer
than usual.
Cycle end is delayed Unbalance is detected or suds removing programme is on.
TROUBLESHOOTING
Symptoms Possible Cause & Solution
Inlet filter clogged.
• Make sure the inlet filters on the fill valves are not clogged.
Inlet hoses may be kinked.
• Check that inlet hoses are not kinked or clogged.
Insufficient water supply.
• Make sure that both hot and cold water taps are turned on all the way.
Hot and cold supply hoses are reversed.
• Check supply hose connections.
Kinked drain hose.
• Ensure that the drain hose is not kinked.
Drain located higher than 1.2 m above the floor.
• Make sure that the drain hose is no higher than 1.2 m above the bottom of
the appliance.
Too much detergent is used.
• Follow the guidelines provided by the detergent manufacturer.
Drain Pump Filter may be blocked.
• Clean the Drain filter.
The load is too small.
• Add more items to allow the appliance to balance the loads.
Heavy articles are mixed with lighter items.
• Always try to wash articles with similar weight in order to allow the
appliance to evenly distribute the weight of the load for spinning.
The load is out of balance.
• Manually redistribute the load if articles have become tangled.
• This is normal. The time remaining shown on the display is only an
estimated duration. Actual time may vary.
Performance
Symptoms Possible Cause & Solution
Poor stain removal Previously set stains.
• Articles that have been previously washed may have stains which have
been set. These stains may be difficult to remove and may require hand
washing or pre-treating to aid in stain removal.
Page 43

Symptoms Possible Cause & Solution
Staining Bleach or softener is dispensed too soon.
• Dispenser compartment is overfilled. It makes bleach or softer dispensed
rapidly. Always measure bleach or softener to prevent overfilling.
• Close the detergent dispenser slowly.
Bleach or softener was added directly to the clothes in the drum.
• Always use the detergent dispenser to ensure that bleach or softener is
properly dispensed at the right time in the programme.
Clothes were not properly sorted.
• Always wash dark colours separately from light colours and whites to
prevent discoloration.
• Never wash heavily soiled items with lightly soiled items.
Wrinkling Appliance is not unloaded promptly.
• Always remove items from the appliance as soon as the programme is
complete.
Appliance is overloaded.
• The appliance can be fully loaded, but the drum should not be tightly
packed with items. The door of the appliance should be closed easily.
Hot and cold water supply hoses are reversed.
• Hot water rinse can set wrinkles in garments. Check the supply hose
connections.
Spin speed may be too high.
• Set the spin speed to suit the garment type.
TROUBLESHOOTING
43
EN
Page 44

44
EN
TROUBLESHOOTING
Odour
Symptoms Possible Cause & Solution
Musty or mildewy
odour in appliance
Inside of drum is not cleaned properly.
• Run the
The drain hose is not properly installed, causing siphoning (water
flowing back inside of the appliance).
• When installing the drain hose, make sure that it does not get kinked or
blocked.
The detergent dispenser is not cleaned regularly.
• Remove and clean the detergent dispenser, especially the top and the
bottom of the dispenser’s opening.
Odours can occur if the drain hose is not properly installed, causing
siphoning (water flowing back inside of the appliance).
• When installing the drain hose, make sure that it does not get kinked or
blocked.
If the detergent dispenser is not cleaned regularly, odours can occur
from mold or foreign substances.
• Remove and clean the detergent dispenser, especially the top and bottom
of the dispenser’s opening.
Tub Clean
function regularly.
Drying
Symptoms Possible Cause & Solution
Dry problem Check water supply tap.
• Do not overload. Check that the washing machine is draining properly to
extract adequate water from the load. When load of laundry is too small to
tumble properly. Add a few towels.
• Turn off water supply tap.
Drying time is too long. The ambient temperature is low.
• Make sure the temperature is allowable range.
Page 45

Symptoms Possible Cause & Solution
Drying performance is
too low or bad.
A warm air comes out
from the rear side of
the appliance.
Water is not properly supplied. The water is used for auto-cleaning of
lint-filter on drum during the drying.
• Make sure the water supply tap is open.
Water does not properly drain.
• Make sure the drain filter is not clogged.
The appliance is overloaded.
• Check the load capacity for the selected programme. If necessary, add a
time dry programme.
The spin speed is too low.
• Select the highest spin speed allowed for the wash programme.
This appliance makes a warm air to dry the clothes.
• This warm air dries the clothes and comes out from the rear side of the
appliance.
Wi-Fi
Symptoms Possible Cause & Solution
Your home appliance
and smartphone are
not connected to the
Wi-Fi network.
The password for the Wi-Fi that you are trying to connect to is incorrect.
• Find the Wi-Fi network connected to your smartphone and remove it, then
register your appliance on
Mobile data for your smartphone is turned on.
• Turn off the
using the Wi-Fi network.
The wireless network name (SSID) is set incorrectly.
• The wireless network name (SSID) should be a combination of English
letters and numbers. (Do not use special characters).
The router frequency is not 2.4 GHz.
• Only a 2.4 GHz router frequency is supported. Set the wireless router to 2.4
GHz and connect the appliance to the wireless router. To check the router
frequency, check with your internet service provider or the router
manufacturer.
The distance between the appliance and the router is too far.
• If the distance between the appliance and the router is too far, the signal
may be weak and the connection may not be configured correctly. Move
the location of the router so that it is closer to the appliance.
Mobile data
LG ThinQ
of your smartphone and register the appliance
TROUBLESHOOTING
.
45
EN
Page 46

Memo
Page 47

Memo
Page 48

Memo
Page 49

Memo
Page 50

Memo
Page 51

ةرﻛذﻣ
Page 52

41
AR
وأ كﺑ صﺎﺧﻟا تﻧرﺗﻧﻹا ﺔﻣدﺧ يدوزﻣ ﻊﺟار ،ﮫﯾﺟوﺗﻟا زﺎﮭﺟ ددرﺗ نﻣ ﻖﻘﺣﺗﻠﻟ .ﻲﻛﻠﺳﻼﻟا ﮫﯾﺟوﺗﻟا زﺎﮭﺟﺑ زﺎﮭﺟﻟا
ﺎﮭﺣﻼﺻإو لﺎطﻋﻷا فﺎﺷﻛﺗﺳا
LG ThinQ
.
.ﺔّﻠﻌﻔُﻣ ﻲﻛذﻟا كﻔﺗﺎھ ﻲﻓ لوﻣﺣﻣﻟا فﺗﺎﮭﻟا تﺎﻧﺎﯾﺑ
ﺔﻛﺑﺷ مادﺧﺗﺳﺎﺑ زﺎﮭﺟﻟا لﺟﺳو ﻲﻛذﻟا كﻔﺗﺎھ ﻰﻠﻋ Wi-Fi.
.مزﻼﻟا نﻣ دﻌﺑأ ﮫﯾﺟوﺗﻟا زﺎﮭﺟو زﺎﮭﺟﻟا نﯾﺑ ﺔﻓﺎﺳﻣﻟا
.زﺎﮭﺟﻟا ﻰﻟإ برﻗأ ﺢﺑﺻﯾ ﻰﺗﺣ ﮫﻧﺎﻛﻣ نﻣ ﮫﯾﺟوﺗﻟا زﺎﮭﺟ لﻘﻧا .ﺢﯾﺣﺻ
لوﻣﺣﻣﻟا فﺗﺎﮭﻟا تﺎﻧﺎﯾﺑ
) ﺔﯾﻛﻠﺳﻼﻟا ﺔﻛﺑﺷﻟا مﺳا دادﻋإ مﺗﯾ مﻟSSID.ﺢﯾﺣﺻ لﻛﺷﺑ (
ﺔﻛﺑﺷﺑ لﺎﺻﺗﻼﻟ رورﻣﻟا ﺔﻣﻠﻛWi-Fi.ﺔﺣﯾﺣﺻ رﯾﻏ ﺎﮭﺑ لﺎﺻﺗﻻا لوﺎﺣﺗ ﻲﺗﻟا
.(ﺔﺻﺎﺧ
سﯾﻟ ﮫﯾﺟوﺗﻟا زﺎﮭﺟ ددرﺗ2.4.زﺗرھ ﺎﻐﯾﻏ
.ﮫﯾﺟوﺗﻟا زﺎﮭﺟ ﻊّﻧﺻﻣ
ضارﻋﻷالﺣﻟاو لﻣﺗﺣﻣﻟا بﺑﺳﻟا
رﯾﻏ ﻲﻛذﻟا كﻔﺗﺎھ وأ ﻲﻟزﻧﻣﻟا كزﺎﮭﺟ
• ﺔﻛﺑﺷ ﻰﻠﻋ رﺛﻋاWi-Fi ﻰﻠﻋ كزﺎﮭﺟ لّﺟﺳ كﻟذ دﻌﺑ ،ﺎﮭﺗﻟازﺈﺑ مﻗ مﺛ ﻲﻛذﻟا كﻔﺗﺎﮭﺑ ﺔﻠﺻﺗﻣﻟا
• فﻗوأ
•) ﺔﯾﻛﻠﺳﻼﻟا ﺔﻛﺑﺷﻟا مﺳا نوﻛﯾ نأ بﺟﯾSSID ًازوﻣر مدﺧﺗﺳﺗ ﻻ) .ﺔﯾزﯾﻠﺟﻧﻹا ﺔﻐﻠﻟﺎﺑ مﺎﻗرأو فرﺣأ نﻣ ﺎًﻧوﻛﻣ (
• ددرﺗﺑ ﮫﯾﺟوﺗﻟا زﺎﮭﺟ مﻋد مﺗﯾ2.4 ﻰﻠﻋ ﻲﻛﻠﺳﻼﻟا ﮫﯾﺟوﺗﻟا زﺎﮭﺟ طﺑﺿا .طﻘﻓ زﺗرھ ﺎﻐﯾﻏ 2.4 لﺻو مﺛ زﺗرھ ﺎﻐﯾﻏ
• لﻛﺷﺑ ﮫﻧﯾوﻛﺗ رذﻌﺗﯾ دﻗو ﺔﻔﯾﻌﺿ ةرﺎﺷﻹا نوﻛﺗ دﻗ ،مزﻼﻟا نﻣ دﻌﺑأ ﮫﯾﺟوﺗﻟا زﺎﮭﺟو زﺎﮭﺟﻟا نﯾﺑ ﺔﻓﺎﺳﻣﻟا تﻧﺎﻛ اذإ
Wi-Fi(يﺎﻓ ياو)
ﺔﻛﺑﺷﺑ لﺻﺗﻣWi-Fi.
Page 53

.فﺷﺎﻧﻣﻟا نﻣ لﯾﻠﻘﻟا فﺿأ .مﯾﻠﺳ ٍلﻛﺷﺑ ﺎﮭﺑﯾﻠﻘﺗ مﺗﯾ نﻟ اًدﺟ ﺔﻠﯾﻠﻗ لﯾﺳﻐﻟا ﺔﻟوﻣﺣ
.فﯾﻔﺟﺗﻟا ﺔﯾﻠﻣﻋ
.ﺔﺣﯾﺣﺻ ةروﺻﺑ هﺎﯾﻣﻟا فﯾرﺻﺗ مﺗﯾ ﻻ
.زﺎﮭﺟﻟا ﻰﻠﻋ ﺔطرﻔﻣ ﺔﻟوﻣﺣ كﺎﻧھ
.ﺔﯾﺎﻐﻠﻟ ﺔﺋﯾطﺑ نارودﻟا ﺔﻋرﺳ
.سﺑﻼﻣﻟا فﯾﻔﺟﺗﻟ ﺊﻓاد ءاوھ قﻼطﺈﺑ زﺎﮭﺟﻟا موﻘﯾ
ﺎﮭﺣﻼﺻإو لﺎطﻋﻷا فﺎﺷﻛﺗﺳا
ضارﻋﻷالﺣﻟاو لﻣﺗﺣﻣﻟا بﺑﺳﻟا
• نوﻛﺗ ﺎﻣدﻧﻋ .ﺔﻟوﻣﺣﻟا نﻋ دﺋازﻟا ءﺎﻣﻟا درطو مﯾﻠﺳ ٍلﻛﺷﺑ فﯾﻔﺟﺗﻟا ﺔﯾﻠﻣﻌﺑ موﻘﺗ ﺔﻟﺎﺳﻐﻟا نأ دﻛﺄﺗ .ﺔﻟوﻣﺣﻟا ﻲﻓ طرﻔﺗ ﻻ
•.ءﺎﻣﻟﺎﺑ دادﻣﻹا روﺑﻧﺻ ﺢﺗﻓا
.ًﻼﯾوط ﺎًﺗﻗو قرﻐﺗﺳﯾ فﯾﻔﺟﺗﻟا.ﺔﯾﺎﻐﻠﻟ ﺔﺿﻔﺧﻧﻣ ﺔطﯾﺣﻣﻟا ةرارﺣﻟا ﺔﺟرد
•.ﮫﺑ حوﻣﺳﻣ ةرارﺣﻟا ﺔﺟرد قﺎطﻧ نأ دﻛﺄﺗ
.ءﻲﺳ وأ ﺔﯾﺎﻐﻠﻟ ءﻲطﺑ فﯾﻔﺟﺗﻟا ءادأ ءﺎﻧﺛأ ﻲﻓ لﯾﺳﻐﻟا ضوﺣ ﻲﻓ ﺔﻟﺎﺳﻧﻟا رﺗﻠﻔﻟ ﻲﺋﺎﻘﻠﺗ فﯾظﻧﺗ ءارﺟﻹ هﺎﯾﻣﻟا مدﺧﺗﺳُﺗ .ﺔﺣﯾﺣﺻ ةروﺻﺑ هﺎﯾﻣﻟا لﺎﺧدإ مﺗﯾ ﻻ
•.حوﺗﻔﻣ هﺎﯾﻣﻟﺎﺑ دادﻣﻹا روﺑﻧﺻ نأ دﻛﺄﺗ
•.اًدودﺳﻣ سﯾﻟ فﯾرﺻﺗﻟا رﺗﻠﻓ نأ دﻛﺄﺗ
•.رﻣﻷا مزﻟ اذإ ،تﻗوﺑ ددﺣﻣ فﯾﻔﺟﺗ ﺞﻣﺎﻧرﺑ فﺿأ ،ﺔﻟوﻣﺣﻟا ﻊﺳﯾ ﮫﺗرﺗﺧا يذﻟا ﺞﻣﺎﻧرﺑﻟا نأ دﻛﺄﺗ
•.لﯾﺳﻐﻟا ﺞﻣﺎﻧرﺑﻟ ﺎﮭﺑ حوﻣﺳﻣ نارودﻠﻟ ﺔﻋرﺳ ﻰﺻﻗأ رﺗﺧا
ﻲﻔﻠﺧﻟا بﻧﺎﺟﻟا نﻣ ﺊﻓاد ءاوھ جرﺧﯾ
•.زﺎﮭﺟﻟا نﻣ ﻲﻔﻠﺧﻟا بﻧﺎﺟﻟا نﻣ جرﺧﯾ ﺎﻣﻛ سﺑﻼﻣﻟا فﯾﻔﺟﺗﺑ ﺊﻓادﻟا ءاوﮭﻟا اذھ موﻘﯾ
فﯾﻔﺟﺗﻟا
فﯾﻔﺟﺗﻟا ﺔﻠﻛﺷﻣ.ءﺎﻣﻟا دادﻣإ روﺑﻧﺻ نﻣ ﻖﻘﺣﺗ
.زﺎﮭﺟﻟا نﻣ
40
AR
Page 54

AR
39
ﺎﮭﺣﻼﺻإو لﺎطﻋﻷا فﺎﺷﻛﺗﺳا
ضارﻋﻷالﺣﻟاو لﻣﺗﺣﻣﻟا بﺑﺳﻟا
ﻊﻘﺑﻟا.ةرودﻟا نﻣ رﻛﺑﻣ تﻗو ﻲﻓ مّﻌﻧﻣﻟا وأ ضّﯾﺑﻣﻟا ﻊﯾزوﺗ مﺗﯾ
• بﻧﺟﺗﻟ ضّﯾﺑﻣﻟا ةرﯾﺎﻌﻣﺑ ﺎًﻣﺋاد مﻗ .ﺔﻋرﺳﺑ مﻌﻧﻣﻟا وأ ضّﯾﺑﻣﻟا ﻊﯾزوﺗ بﺑﺳﯾ ﺎﻣﻣ ،دﺋاز لﻛﺷﺑ ةءوﻠﻣﻣ عزوﻣﻟا ةدﺣو
.طرﻔﻣﻟا ءلﻣﻟا
•.ءودﮭﺑ تﺎﻔظﻧﻣﻟا عزوﻣ ﻖﻠﻏأ
.لﺳﻐﻟا ضوﺣ ﻲﻓ سﺑﻼﻣﻟا ﻰﻠﻋ ةرﺷﺎﺑﻣ مﻌﻧﻣﻟا وأ ضّﯾﺑﻣﻟا ﺔﻓﺎﺿإ تﻣﺗ
• ءﺎﻧﺛأ بﺳﺎﻧﻣﻟا تﻗوﻟا ﻲﻓو ﺔﺣﯾﺣﺻ ﺔﻘﯾرطﺑ مﻌﻧﻣﻟا وأ ضﯾﺑﻣﻟا ﻊﯾزوﺗ نﺎﻣﺿﻟ تﺎﻔظﻧﻣﻟا عزوﻣ ﺎًﻣﺋاد مدﺧﺗﺳا
.ﺞﻣﺎﻧرﺑﻟا
.ﺔﺣﯾﺣﺻ ﺔﻘﯾرطﺑ سﺑﻼﻣﻟا زرﻓ مﺗﯾ مﻟ
• ءﺎﺿﯾﺑﻟاو ﺔﺣﺗﺎﻔﻟا ناوﻟﻷا تاذ سﺑﻼﻣﻟا نﻋ لﺻﻔﻧﻣ لﻛﺷﺑ ﺔﻘﻣﺎﻐﻟا ناوﻟﻷا تاذ سﺑﻼﻣﻟا لﺳﻏ ﻰﻠﻋ ﺎًﻣﺋاد صرﺣا
.ﺎﮭﻧاوﻟأ رّﯾﻐﺗ بﻧﺟﺗﻟ
•.خﺎﺳﺗﻻا ﺔﻠﯾﻠﻗ ضارﻏﻷا ﻊﻣ خﺎﺳﺗﻻا ةدﯾدﺷ ضارﻏﻷا لﺳﻐﺑ اًدﺑأ مﻘﺗ ﻻ
سﺑﻼﻣﻟا دﯾﻋﺎﺟﺗ.ﺔﻋرﺳﺑ لﯾﺳﻐﻟا ﺔﻟوﻣﺣ ﻎﯾرﻔﺗ مﺗﯾ ﻻ
•.ﺞﻣﺎﻧرﺑﻟا لﺎﻣﺗﻛا درﺟﻣﺑ زﺎﮭﺟﻟا نﻣ ضارﻏﻷا جارﺧإ ﻰﻠﻋ ﺎًﻣﺋاد صرﺣا اذﻟ
.طرﻔﻣ لﻛﺷﺑ لﻣﺣﻣ زﺎﮭﺟﻟا
• ﻲﻐﺑﻧﯾ .لﺳﻐﻟا ضوﺣ لﺧاد ضارﻏﻷا نﻣ ةرﯾﺑﻛ ﺔﯾﻣﻛ سﯾدﻛﺗ بﺟﯾ ﻻ نﻛﻟو ،زﺎﮭﺟﻟا ﻲﻓ ﺔﻠﻣﺎﻛ ﺔﻟوﻣﺣﻟا ﻊﺿو نﻛﻣﯾ
.ﺔﻟوﮭﺳﺑ ﺔﻟﺎﺳﻐﻟا بﺎﺑ قﻼﻏإ مﺗﯾ نأ
.درﺎﺑﻟا ءﺎﻣﻟاو نﺧﺎﺳﻟا ءﺎﻣﻟا دادﻣإ ﻲﻣوطرﺧ سﻛﻋ مﺗ
•.دادﻣﻹا موطرﺧ تﻼﯾﺻوﺗ صﺣﻓا .سﺑﻼﻣﻟﺎﺑ ﺔﺷﻣرﻛ ثادﺣإ ﻰﻟإ نﺧﺎﺳﻟا ءﺎﻣﻟﺎﺑ فطﺷﻟا يدؤﯾ نأ نﻛﻣﯾ
.اًدﺟ ﺔﻌﻔﺗرﻣ نارودﻟا ﺔﻋرﺳ نوﻛﺗ دﻗ
•.سﺑﻼﻣﻟا عوﻧ مﺋﻼﺗﻟ نارودﻟا ﺔﻋرﺳ طﺑﺿا
.ﺔﺣﯾﺣﺻ ﺔﻘﯾرطﺑ لﺧادﻟا نﻣ لﺳﻐﻟا ضوﺣ فﯾظﻧﺗ مﺗﯾ مﻟ
.مﺎظﺗﻧﺎﺑ
.(ﺔﻟﺎﺳﻐﻟا ﻰﻟإ ىرﺧأ ةرﻣ ءﺎﻣﻟا عﺎﺟﺗرا) طﻔﺷ ثودﺣ بﺑﺳﯾ ﺎﻣﻣ ،ﺢﯾﺣﺻ لﻛﺷﺑ فﯾرﺻﺗﻟا موطرﺧ بﯾﻛرﺗ مﺗﯾ مﻟ
عﺎﺟﺗرا) طﻔﺷ ثودﺣ بﺑﺳﯾ ﺎﻣﻣ ،ﺢﯾﺣﺻ لﻛﺷﺑ فﯾرﺻﺗﻟا موطرﺧ بﯾﻛرﺗ مﺗﯾ ﻻ ﺎﻣدﻧﻋ ﺔﮭﯾرﻛﻟا ﺢﺋاورﻟا ثﻌﺑﻧﺗ دﻗ
.ﺔﺑﯾرﻐﻟا داوﻣﻟا وأ بﻟﺎﻘﻟا نﻣ ﺔﮭﯾرﻛﻟا ﺢﺋاورﻟا ثﻌﺑﻧﺗ ،مﺎظﺗﻧﺎﺑ تﺎﻔظﻧﻣﻟا عزوﻣ فﯾظﻧﺗ ﻰﻠﻋ ﺔﺑظاوﻣﻟا مدﻋ دﻧﻋ
Tub Clean(ضوﺣﻟا فﯾظﻧﺗ)
.مﺎظﺗﻧﺎﺑ ﮫﻔﯾظﻧﺗ مﺗﯾ مﻟ تﺎﻔظﻧﻣﻟا عزوﻣ
.(زﺎﮭﺟﻟا ﻰﻟإ ىرﺧأ ةرﻣ ءﺎﻣﻟا
ضارﻋﻷالﺣﻟاو لﻣﺗﺣﻣﻟا بﺑﺳﻟا
نﻣ ﺔﮭﯾرﻛ وأ ﺔﻧﻔﻋ ﺔﺣﺋار ثﻌﺑﻧﺗ
• ﺔﻔﯾظو لﯾﻐﺷﺗﺑ مﻗ
•.هدادﺳﻧا وأ ﮫﺋاوﺗﻟا مدﻋ ﻰﻠﻋ صرﺣا ،فﯾرﺻﺗﻟا موطرﺧ بﯾﻛرﺗ دﻧﻋ
•.عزوﻣﻟا ﺔﺣﺗﻓ لﻔﺳأو ﻰﻠﻋأ ﺎﻣﯾﺳﻻو ﮫﻔظﻧو تﺎﻔظﻧﻣﻟا عزوﻣ جرﺧأ
•.هدادﺳﻧا وأ ﮫﺋاوﺗﻟا مدﻋ ﻰﻠﻋ صرﺣا ،فﯾرﺻﺗﻟا موطرﺧ بﯾﻛرﺗ دﻧﻋ
•.عزوﻣﻟا ﺔﺣﺗﻓ لﻔﺳأو ﻰﻠﻋأ ﺎﻣﯾﺳﻻو ﮫﻔظﻧو تﺎﻔظﻧﻣﻟا عزوﻣ جرﺧأ
ﺔﺣﺋارﻟا
زﺎﮭﺟﻟا
Page 55

ﺎﮭﺣﻼﺻإو لﺎطﻋﻷا فﺎﺷﻛﺗﺳا
.ﺔﯾوﺗﻠﻣ هﺎﯾﻣﻟا لﺎﺧدإ مﯾطارﺧ نوﻛﺗ دﻗ
.ٍفﺎﻛ رﯾﻏ ءﺎﻣﻟا دادﻣإ
.درﺎﺑﻟا ءﺎﻣﻟاو نﺧﺎﺳﻟا ءﺎﻣﻟا دادﻣإ ﻲﻣوطرﺧ سﻛﻋ مﺗ
نﻣ ﻰﻠﻋأ عﺎﻔﺗرا ﻰﻠﻋ فﯾرﺻﺗﻟا موطرﺧ ﻊﺿو1.2.ﺔﯾﺿرﻷا ﺢطﺳ قوﻓ م
.فظﻧﻣﻟا نﻣ رﯾﺑﻛ رادﻘﻣ مادﺧﺗﺳا
.دﺳﻧﻣ فﯾرﺻﺗﻟا ﺔﺧﺿﻣ رﺗﻠﻓ نوﻛﯾ دﻗ
.ﺔﻔﯾﻔﺧﻟا سﺑﻼﻣﻟا ﻊﻣ ﺔﻠﯾﻘﺛﻟا سﺑﻼﻣﻟا طﻠﺧ مﺗ
.رﺻﻌﻟا ﺔﻠﺣرﻣ ﻲﻓ
.ﺔﻧزاوﺗﻣ تﺳﯾﻟ ﺔﻟوﻣﺣﻟا
ضارﻋﻷالﺣﻟاو لﻣﺗﺣﻣﻟا بﺑﺳﻟا
.ﺔﺣﯾﺣﺻ ﺔﻘﯾرطﺑ زﺎﮭﺟﻟا ءلﻣ مﺗﯾ ﻻ.لﺎﺧدﻹا رﺗﻠﻓ دادﺳﻧا
•.ةدودﺳﻣ رﯾﻏ ءلﻣﻟا تﺎﻣﺎﻣﺻ دﻧﻋ ةدوﺟوﻣﻟا هﺎﯾﻣﻟا لﺎﺧدإ رﺗﻼﻓ نأ نﻣ دﻛﺄﺗ
•.هﺎﯾﻣﻟا لﺎﺧدإ مﯾطارﺧ دادﺳﻧا وأ ءاوﺗﻟا مدﻋ نﻣ دﻛﺄﺗ
•.لﻣﺎﻛ لﻛﺷﺑ درﺎﺑﻟاو نﺧﺎﺳﻟا ءﺎﻣﻟا يروﺑﻧﺻ ﺢﺗﻓ نﻣ دﻛﺄﺗ
•.دادﻣﻹا موطرﺧ تﻼﯾﺻوﺗ صﺣﻓا
.هﺎﯾﻣﻟا فﯾرﺻﺗﺑ زﺎﮭﺟﻟا موﻘﯾ ﻻ.ٍوﺗﻠﻣ فﯾرﺻﺗﻟا موطرﺧ
•.ٍوﺗﻠﻣ رﯾﻏ فﯾرﺻﺗﻟا موطرﺧ نأ نﻣ دﻛﺄﺗ
• نﻣ ﻰﻠﻋأ عﺎﻔﺗرا ﻰﻠﻋ فﯾرﺻﺗﻟا موطرﺧ ﻊﺿو مدﻋ نﻣ دﻛﺄﺗ1.2.زﺎﮭﺟﻟا ةدﻋﺎﻗ نﻣ م
ﻻ وأ لﻣﺎﻛ لﻛﺷﺑ فظﻧﻣﻟا ﻊﯾزوﺗ مﺗﯾ ﻻ
•.فظﻧﻣﻟا ﻊﯾﻧﺻﺗ ﺔﮭﺟ تادﺎﺷرإ ﻊﺑﺗا
•.فﯾرﺻﺗﻟا رﺗﻠﻓ فﯾظﻧﺗﺑ مﻗ
•.ﺔﻟوﻣﺣﻟا ﺔﻧزاوﻣ نﻣ زﺎﮭﺟﻟا نﻛﻣﺗﯾ ﻲﻛ ضارﻏﻷا نﻣ اًدﯾزﻣ فﺿأ
• يوﺎﺳﺗﻟﺎﺑ ﺔﻟوﻣﺣﻟا نزو ﻊﯾزوﺗ نﻣ زﺎﮭﺟﻟا نﻛﻣﺗﯾ ﻰﺗﺣ ﺎًﻌﻣ ﺔﮭﺑﺎﺷﺗﻣﻟا نازوﻷا تاذ سﺑﻼﻣﻟا ﻊطﻗ لﺳﻏ ﺎًﻣﺋاد لوﺎﺣ
•.ﺔﻛﺑﺎﺷﺗﻣ سﺑﻼﻣﻟا ﻊطﻗ تﻧﺎﻛ اذإ ﺎﯾودﯾ ﺔﻟوﻣﺣﻟا ﻊﯾزوﺗ ةدﺎﻋﺈﺑ مﻗ
•.ﻲﻠﻌﻔﻟا تﻗوﻟا فﻠﺗﺧﯾ دﻗ مﺛ نﻣو .ﺔﯾرﯾدﻘﺗ ةدﻣ ﻻإ وھ ﺎﻣ ضرﻌﻟا ﺔﺷﺎﺷ ﻰﻠﻋ رھﺎظﻟا ﻲﻘﺑﺗﻣﻟا تﻗوﻟﺎﻓ ،ﻲﻌﯾﺑط رﻣأ اذھ
.قﻼطﻹا ﻰﻠﻋ ﮫﻌﯾزوﺗ ّمﺗﯾ
.دﺎﺗﻌﻣﻟا نﻣ لوطأ ةرودﻟا تﻗو.ﺔﯾﺎﻐﻠﻟ ةرﯾﻐﺻ ﺔﻟوﻣﺣﻟا
.ةرودﻟا ﺔﯾﺎﮭﻧ ءﺎﻐﻟإ ّمﺗ.نوﺑﺎﺻﻟا ةوﻏر ﺔﻟازإ ﺞﻣﺎﻧرﺑ لﯾﻐﺷﺗ ّمﺗ وأ نزاوﺗﻟا ﻲﻓ لﻠﺧ دوﺟو نﻋ فﺷﻛﻟا ّمﺗ
38
AR
.ﻊﻘﺑﻟا ﺔﻟازإ ﻲﻓ ةدﻋﺎﺳﻣﻠﻟ ﺎًﻘﺑﺳﻣ ﺎﮭﺗﺟﻟﺎﻌﻣ وأ ﺎًﯾودﯾ
ءادﻷا
ضارﻋﻷالﺣﻟاو لﻣﺗﺣﻣﻟا بﺑﺳﻟا
ﻊﻘﺑﻠﻟ ﺔﻔﯾﻌﺿ ﺔﻟازإ.ﺔﺑﻌﺻﻟا ﻊﻘﺑﻟا ﺔﻟازإ ﺔﻟوﺎﺣﻣ
• ﺎﮭﻠﺳﻏ رﻣﻷا بﻠطﺗﯾ دﻗو ﻊﻘﺑﻟا هذھ ﺔﻟازإ بﻌﺻﯾ ﺎﻣﺑر .ﺔﯾﺳﺎﻗ ﻊﻘﺑﺑ ﺔﺛوﻠﻣ ﺎًﻘﺑﺎﺳ ﺎﮭﻠﺳﻏ مﺗ ﻲﺗﻟا ضارﻏﻷا نوﻛﺗ ﺎﻣﺑر
Page 56

AR
37
ﺎﮭﺣﻼﺻإو لﺎطﻋﻷا فﺎﺷﻛﺗﺳا
.زﺎﮭﺟﻟا لﯾﻐﺷﺗﻟ
Start/Pause فﺎﻘﯾإ/ءدﺑ)
.ﺔﻗﺎطﻟا ةدﺎﻌﺗﺳا درﺟﻣﺑ فﻗوﺗ ثﯾﺣ نﻣ ﺞﻣﺎﻧرﺑﻟا زﺎﮭﺟﻟا فﻧﺄﺗﺳﯾﺳ .زﺎﮭﺟﻟﺎﺑ ﺔﺻﺎﺧ ﺔﯾﻋرﻓ ﺔﯾﺋﺎﺑرﮭﻛ
Start/Pause
Start/Pause
رز ﻰﻠﻋ طﻐﺿاو ﺎﮭﯾﻓ بوﻏرﻣﻟا ﺞﻣارﺑﻟا دﯾدﺣﺗ دﻋأ مﺛ ،
رزﻟا ﻰﻠﻋ طﻐﺿاو بوﻠطﻣﻟا ﺞﻣﺎﻧرﺑﻟا دﯾدﺣﺗ دﻋأ مﺛ ،
Start/Pause فﺎﻘﯾإ/ءدﺑ)
رزﻟا ﻰﻠﻋ طﻐﺿﻟا مﺗﯾ مﻟ اذإ لﯾﻐﺷﺗﻟا نﻋ زﺎﮭﺟﻟا فﻗوﺗﯾ فوﺳ .
.ﺔﺟﺎﺣﻟا دﻧﻋ
H
.
Power(ﺔﻗﺎطﻟا)
.ﻲﺋﺎﺑرﮭﻛﻟا رﺎﯾﺗﻟﺎﺑ لﺻﺗﻣ رﯾﻏ زﺎﮭﺟﻟا
.ﺔﺣﯾﺣﺻ ﺔﻘﯾرطﺑ ةددﺣﻣ رﯾﻏ مﻛﺣﺗﻟا رﺻﺎﻧﻋ
.قرﺗﺣﻣ وأ لوﺻﻔﻣ رﮭﺻﻣﻟا/رﺎﯾﺗﻟا ﻊطﺎﻗ
.ﮫطﺑﺿ ةدﺎﻋإ مزﻠﯾ مﻛﺣﺗﻟا رﺻﻧﻋ
Power(ﺔﻗﺎطﻟا)
.اًرﺎﺧﺑ ثدﺣﯾ وأ ءﺎﻣﻟا ﺔﻧوﺧﺳ زﺎﮭﺟﻟا بﺑﺳﯾ
Child Lock(لﺎﻔطﻷا لﻔﻗ)
.ءﺎﻣﻟا دادﻣإ فﻗوﺗ
(تﻗؤﻣ
.
.حوﺗﻔﻣ بﺎﺑﻟا
Power(ﺔﻗﺎطﻟا)
(تﻗؤﻣ فﺎﻘﯾإ/ءدﺑ)
.
Start/Pause(تﻗؤﻣ فﺎﻘﯾإ/ءدﺑ) .ﺞﻣﺎﻧرﺑﻟا دﯾدﺣﺗ دﻌﺑ ﮫﯾﻠﻋ طﻐﺿﻟا مﺗﯾ مﻟ
(تﻗؤﻣ فﺎﻘﯾإ/ءدﺑ)
.نﯾﻌﻣ تﻗو لﻼﺧ
.ﺔﯾﺎﻐﻠﻟ ضﻔﺧﻧﻣ ءﺎﻣﻟا طﻐﺿ
(تﻗؤﻣ
.ةددﺣﻣﻟا ةرارﺣﻟا
ضارﻋﻷالﺣﻟاو لﻣﺗﺣﻣﻟا بﺑﺳﻟا
.لﻣﻌﯾ ﻻ زﺎﮭﺟﻟا.تاءارﺟﺈﺑ مﺎﯾﻘﻟا مدﻋ بﺑﺳﺑ لﻣﻌﻟا نﻋ مﻛﺣﺗﻟا ﺔﺣوﻟ تﻔﻗوﺗ
• رزﻟا ﻰﻠﻋ طﻐﺿا ،ﻲﻌﯾﺑط رﻣأ اذھ
•.لﻣﻌﯾ سﺑﻘﻣ ﻲﻓ نﺎﻣﺄﺑ كﻠﺳﻟا لﯾﺻوﺗ نﻣ دﻛﺄﺗ
•.لﻣﺎﻛﻟﺎﺑ هﺎﯾﻣﻟا روﺑﻧﺻ ردأ
• رزﻟا ﻰﻠﻋ طﻐﺿاو بﺎﺑﻟا ﻖﻠﻏأ .ﺢﯾﺣﺻ ٍلﻛﺷﺑ طوﺑﺿﻣ ﺞﻣﺎﻧرﺑﻟا نأ نﻣ دﻛﺄﺗ
•.لﻣﺎﻛ لﻛﺷﺑ قﻼﻏﻹا نﻣ ﮫﻌﻧﻣﯾ ﺎﻣﻣ بﺎﺑﻟا تﺣﺗ ضارﻏﻷا نﻣ يأ رﺎﺷﺣﻧا مدﻋ نﻣ دﻛﺄﺗو بﺎﺑﻟا ﻖﻠﻏأ
• ةرﺋاد صﯾﺻﺧﺗ ﻲﻐﺑﻧﯾ .ﻊطﺎﻘﻟا طﺑﺿ دﻋأ وأ تارﮭﺻﻣﻟا لدﺑﺗﺳا .لزﻧﻣﻟﺎﺑ تارﮭﺻﻣﻟا/رﺎﯾﺗﻟا ﻊطاوﻗ صﺣﻓا
• رز ﻰﻠﻋ طﻐﺿا
• رزﻟا ﻰﻠﻋ طﻐﺿا
•.بﺳﺎﻧﻣ لزﻧﻣﻟﺎﺑ ءﺎﻣﻟا طﻐﺿ نأ نﻣ دﻛﺄﺗﻠﻟ لزﻧﻣﻟﺎﺑ رﺧآ اًروﺑﻧﺻ صﺣﻓا
• ﺔﺟرد دﻧﻋ نﻣآ لﻛﺷﺑ ءﺎﻣﻟا نﯾﺧﺳﺗ مﺗﯾ ﻰﺗﺣ ﺔﻧﯾﻌﻣ تارود لﻼﺧ ﺔﺗﻗؤﻣ ةرﺗﻔﻟ لﻣﻌﻟا نﻋ لﺳﻐﻟا ضوﺣ فﻗوﺗﯾ دﻗ
.ﺔﺣﯾﺣﺻ ﺔﻘﯾرطﺑ لﻣﻌﺗ ﻻ دﻗ رارزﻷا رﺎﯾﺧﻟاChild Lock(لﺎﻔطﻷا لﻔﻗ) .طﯾﺷﻧﺗﻟا دﯾﻗ
• رﺎﯾﺧﻟا لﯾﻌﻔﺗ فﺎﻘﯾﺈﺑ مﻗ
.ﺢﺗﻔُﯾ ﻻ بﺎﺑﻟا.ﺔﻣﻼﺳﻟﺎﺑ ﻖﻠﻌﺗﺗ بﺎﺑﺳﻷ زﺎﮭﺟﻟا لﯾﻐﺷﺗ درﺟﻣﺑ بﺎﺑﻟا ﺢﺗﻓ نﻛﻣُﯾ ﻻ
• لﯾﻐﺷﺗ فﺎﻘﯾإ دﻌﺑ نﺎﻣﺄﺑ بﺎﺑﻟا ﺢﺗﻓ كﻧﻛﻣﯾ .ﻲﻌﯾﺑط رﻣأ اذھ
Page 57

.زﺎﮭﺟﻟا ﻊﺿوﻟ بﺳﺎﻧﻣﻟا نﺎﻛﻣﻟا دﯾدﺣﺗﻟ
.هدادﺳﻧا بﺑﺳﺑ وأ فﯾرﺻﺗﻟا موطرﺧﻟ ﺢﯾﺣﺻﻟا رﯾﻏ بﯾﻛرﺗﻟا بﺑﺳﺑ بﯾرﺳﺗ ثودﺣ
.لﯾﺳﻐﻟا ضوﺣ ﻲﻓ ٍوﺎﺳﺗﻣ رﯾﻏ ٍلﻛﺷﺑ ﺔﻋزوﻣ سﺑﻼﻣﻟا نوﻛﺗ دﻗ
.ﺔﺗﺑﺎﺛ رﯾﻏو يوﺎﺳﺗﻟﺎﺑ ضرﻷا ﻰﻠﻋ ةرﻘﺗﺳﻣ رﯾﻏ ءاوﺗﺳﻻا لﺟرأ ﻊﯾﻣﺟ
.هاوﺗﺳﻣ طﺑﺿﻟ
بﯾﻛرﺗﻟا نﺎﻛﻣ تﺎﺑﻠطﺗﻣ
زﺎﮭﺟﻟا ىوﺗﺳﻣ طﺑﺿ
.ﻲﻔﻛﯾ ﺎﻣﺑ ﺔﺑﻠﺻ تﺳﯾﻟ ضرﻷا
.ﺔﺣﯾﺣﺻ ٍﺔﻘﯾرطﺑ بّﻛرُﻣ رﯾﻏ فﯾرﺻﺗﻟا ﺔﺧﺿﻣ رﺗﻠﻓ
ﺎﮭﺣﻼﺻإو لﺎطﻋﻷا فﺎﺷﻛﺗﺳا
ضارﻋﻷالﺣﻟاو لﻣﺗﺣﻣﻟا بﺑﺳﻟا
•.فﯾﻠﻐﺗﻟا داوﻣ ﺔﻟازﺈﺑ مﻗ
•.بﺎﺑﻟا لﻔﻗ كﻓ دﻌﺑ سﺑﻼﻣﻟا ﻊﯾزوﺗ دﻋأو ﺎًﺗﻗؤﻣ ةرودﻟا لﯾﻐﺷﺗ فﺎﻘﯾﺈﺑ مﻗ
• تﺎﻣﯾﻠﻌﺗ ﻰﻟإ رظﻧا
• رظﻧا .ﺎﮭﺗﻧوﯾﻟ مدﻋو ضرﻷا ﺔﺑﻼﺻ نﻣ ﻖﻘﺣﺗ
ضارﻋﻷالﺣﻟاو لﻣﺗﺣﻣﻟا بﺑﺳﻟا
•.رﻣﻷا مزﻟ اذإ كﺎﺑﺳﻟﺎﺑ لﺻﺗا .فﯾرﺻﺗﻟا بﯾﺑﺎﻧأ نﻣ ﻖﺋاوﻌﻟا لزأ
•.مﺎظﺗﻧﺎﺑ ﮫﻔﯾظﻧﺗﺑ مﻗو فﯾرﺻﺗﻟا رﺗﻠﻓ صﺣﻓا .ﮫﺗﯾوﺳﺗو فﯾرﺻﺗﻟا موطرﺧ فﯾظﻧﺗﺑ مﻗ
•.فﯾرﺻﺗﻟا ﺔﺧﺿﻣ رﺗﻠﻓ بﯾﻛرﺗ دﻋأ
زازﺗھﻻا ءﺎﺿوﺿ.فﯾﻠﻐﺗﻟا داوﻣ ﺔﻟازإ مﺗﺗ مﻟ
36
لﯾﻐﺷﺗﻟا
ءﺎﻣﻟا بّرﺳﺗ.لزﻧﻣﻟﺎﺑ فﯾرﺻﺗﻟا بﯾﺑﺎﻧأ دادﺳﻧا
AR
Page 58

AR
35
ﺎﮭﺣﻼﺻإو لﺎطﻋﻷا فﺎﺷﻛﺗﺳا
.كرﺣﻣﻟا ﻰﻠﻋ ةدﺋاز ﺔﻟوﻣﺣ
.ءﺎﻣﻟا مﺎﻣﺻ ﻲﻓ بﯾﻋ دوﺟو ﻰﻟإ اًرظﻧ ءﺎﻣﻟا ﻖﻓدﺗﯾ
.هﺎﯾﻣﻟا بوﺳﻧﻣ رﻌﺷﺗﺳﻣ لطﻌﺗ
.زازﺗھﻻا رﻌﺷﺗﺳﻣ لطﻌﺗ
؟ةدﻣﺟﻣ فﯾرﺻﺗﻟا ﺔﺧﺿﻣ وأ ،فﯾرﺻﺗﻟا /دادﻣﻹا موطرﺧ لھ
.ﺔﺋﻓادو ﺔﻠﻠﺑﻣ ﺔﻔﺷﻧﻣﺑ دادﻣﻹا موطرﺧ
.ءﺎﻣﻟا تﺎﺑﯾرﺳﺗ
.ﻲﺋﺎﺑرﮭﻛﻟا رﺎﯾﺗﻟا عﺎطﻘﻧﻻ زﺎﮭﺟﻟا ضّرﻌﺗ
.لﻣﻌﺗ ﻻ ﻲﺗﻟا ﻲھ طﻘﻓ فﯾﻔﺟﺗﻟا فﺋﺎظو
ضارﻋﻷالﺣﻟاو لﻣﺗﺣﻣﻟا بﺑﺳﻟا
LE
• ةدﻣﻟ زﺎﮭﺟﻟا كرﺗا30.ةرودﻟا لﯾﻐﺷﺗ دﻋأ مﺛ ،كرﺣﻣﻟا درﺑﯾ ﻰﺗﺣ ﺔﻘﯾﻗد
كرﺣﻣﻟا فﻗوﺗ ﺄطﺧ
FE
•.ﺔﻣدﺧﻟا زﻛرﻣﺑ لﺻﺗا .سﺑﺎﻗ نﻋ ﺔﻗﺎطﻟا لﺻﻓا .هﺎﯾﻣﻟا روﺑﻧﺻ ﻖﻠﻏأ
ﻖﻓدﺗﻟا ةدﺎﯾز ﺄطﺧ
PE
•.ﺔﻣدﺧﻟا زﻛرﻣﺑ لﺻﺗا .سﺑﺎﻗ نﻋ ﺔﻗﺎطﻟا لﺻﻓا .هﺎﯾﻣﻟا روﺑﻧﺻ ﻖﻠﻏأ
طﻐﺿﻟا رﻌﺷﺗﺳﻣ ﻲﻓ ﺄطﺧ
vs
•.ﺔﻣدﺧﻟا زﻛرﻣﺑ لﺻﺗا
زازﺗھﻻا رﻌﺷﺗﺳﻣ ﻲﻓ ﺄطﺧ
FF
• ﺔﯾطﻐﺗﺑ مﻗ .فﯾرﺻﺗﻟا ﺔﺧﺿﻣو فﯾرﺻﺗﻟا موطرﺧ يرﺗﻌﯾ يذﻟا دﯾﻣﺟﺗﻟا كﻔﻟ لﺳﻐﻟا ضوﺣ ﻰﻟإ ﺊﻓاد ءﺎﻣ ﺔﻓﺎﺿﺈﺑ مﻗ
دﻣﺟﺗﻟا بﺑﺳﺑ ﺄطﺧ
AE
•.ﺔﻣدﺧﻟا زﻛرﻣﺑ لﺻﺗا
ءﺎﻣﻟا بﯾرﺳﺗ
PF
•.ةرودﻟا لﯾﻐﺷﺗ ةدﺎﻋﺈﺑ مﻗ
ﻲﺋﺎﺑرﮭﻛﻟا رﺎﯾﺗﻟا عﺎطﻘﻧا
dHE
•.ﺔﻣدﺧﻟا زﻛرﻣﺑ لﺻﺗا
فﯾﻔﺟﺗﻟا ﻲﻓ لطﻋ
.ﺔﻣدﺧﻟا بﻠطﻟ لﺻﺗﺎﻓ ،زﺎﮭﺟﻟا لﯾﻐﺷﺗ ةدﺎﻋإ
.سﺑﻼﻣﻟا ﻊﯾزوﺗ دﻋأو
.ﺔﻧزاوﺗﻣ رﯾﻏ سﺑﻼﻣﻟا نوﻛﺗ دﻗ
ﺎﮭﻋﺎﻣﺳ لﻣﺗﺣُﯾ ءﺎﺿوﺿ
ضارﻋﻷالﺣﻟاو لﻣﺗﺣﻣﻟا بﺑﺳﻟا
ﺔﻌﻘﻌﻘﻟاو جﺎﺟﺗرﻻا توﺻ.نﺎﻣﻷا سﯾﺑﺎﺑد وأ ﺔﯾﻧدﻌﻣﻟا ﻊطﻘﻟا وأ ﺢﯾﺗﺎﻔﻣﻟا لﺛﻣ لﺳﻐﻟا ضوﺣ ﻲﻓ ﺔﺑﯾرﻏ مﺎﺳﺟأ دﺟوﺗ دﻗ
• دﻌﺑ ﺞﯾﺟﺿﻟا توﺻ رودﺻ رﻣﺗﺳا اذإ .ﺔﺑﯾرﻏ مﺎﺳﺟأ نﻋ ﺎًﺛﺣﺑ لﺳﻐﻟا ضوﺣ صﺣﻓاو ،زﺎﮭﺟﻟا لﯾﻐﺷﺗ فﺎﻘﯾﺈﺑ مﻗ
يدﺎﯾﺗﻋا رﯾﻏ ﺎًﺗوﺻ ردﺻﺗ ﺔﻟﺎﺳﻐﻟا.ةدﺎﻋ ﻲﻌﯾﺑط رﻣأ اذھ .يدﺎﯾﺗﻋا رﯾﻏ توﺻ رادﺻإ ﺔﻠﯾﻘﺛﻟا سﺑﻼﻣﻟا نﻋ ﺞﺗﻧﯾ دﻗ
• لﯾﻐﺷﺗﻟا فﺎﻘﯾﺈﺑ مﻗ .نزاوﺗﻣ رﯾﻏ ٍلﻛﺷﺑ ﺎًﺗﺑﺛﻣ زﺎﮭﺟﻟا نوﻛﯾ نأ لﻣﺗﺣﻣﻟا نﻣﻓ ،توﺻﻟا رادﺻإ رارﻣﺗﺳا ﺔﻟﺎﺣ ﻲﻓ
•.بﺎﺑﻟا لﻔﻗ كﻓ دﻌﺑ سﺑﻼﻣﻟا ﻊﯾزوﺗ دﻋأو ﺎًﺗﻗؤﻣ ةرودﻟا لﯾﻐﺷﺗ فﺎﻘﯾﺈﺑ مﻗ
Page 59

ﺎﮭﺣﻼﺻإو لﺎطﻋﻷا فﺎﺷﻛﺗﺳا
34
AR
ﺎﮭﺣﻼﺻإو لﺎطﻋﻷا فﺎﺷﻛﺗﺳا
.لطﻋ وأ ﺄطﺧ ﺔﻟﺎﺳر يأ ﺔﺟﻟﺎﻌﻣﺑ موﻘﺗ ﻲﺗﻟا تﺎظﺣﻼﻣﻟاو ﺔﻠﻣﺗﺣﻣﻟا بﺎﺑﺳﻷا ﻰﻠﻋ ﺔﯾﻟﺎﺗﻟا لوادﺟﻟا يوﺗﺣﺗ .لﺎطﻋأو ءﺎطﺧأ ثودﺣ ﻰﻟإ كزﺎﮭﺟ لﯾﻐﺷﺗ يدؤﯾ دﻗ
ﺔﻣدﺧ زﻛرﻣ ﻊﻣ لﺻاوﺗﻟا دﻧﻋ هدﺑﻛﺗﺗ دﻗ يذﻟا لﺎﻣﻟاو تﻗوﻠﻟ اًرﯾﻓوﺗ ﺔﯾﺎﻧﻌﺑ ﺔﯾﻟﺎﺗﻟا لوادﺟﻟا ةءارﻘﺑ ﻰﺻوُﯾLG Electronics.
ﺔﻣدﺧﻟا زﻛرﻣﺑ لﺎﺻﺗﻻا لﺑﻗ
نﻣ ﻖﻘﺣﺗﻓ ،قﻼطﻹا ﻰﻠﻋ لﻣﻌﯾ مﻟ وأ ﺢﯾﺣﺻ لﻛﺷﺑ زﺎﮭﺟﻟا لﻣﻌﯾ مﻟ اذإو .ةرﻛﺑﻣ ﺔﻠﺣرﻣ ﻲﻓ ﺎﮭﺻﯾﺧﺷﺗو تﻼﻛﺷﻣﻟا فﺷﻛﻟ ﺎًﯾﻟآ ﺄطﺧﻟا دﺻر مﺎظﻧﺑ زﺎﮭﺟﻟا دﯾوزﺗ مﺗ
ﺔﻣدﺧ زﻛرﻣﺑ لﺎﺻﺗﻻا لﺑﻗ ﺔﯾﻟﺎﺗﻟا لوادﺟﻟاLG Electronics.
ﺄطﺧﻟا لﺋﺎﺳر
ضارﻋﻷالﺣﻟاو لﻣﺗﺣﻣﻟا بﺑﺳﻟا
.ءطﺑﺑ لﺧدﺗ وأ زﺎﮭﺟﻟا ﻰﻟإ هﺎﯾﻣﻟا لﺧدﺗ ﻻ .ﻊﻗوﻣﻟا اذھ ﻲﻓ ٍفﺎﻛ رﯾﻏ ءﺎﻣﻟا دادﻣإ
.ءطﺑﺑ لﺧدﺗ وأ زﺎﮭﺟﻟا ﻰﻟإ هﺎﯾﻣﻟا لﺧدﺗ ﻻ .لﻣﺎﻛﻟﺎﺑ حوﺗﻔﻣ رﯾﻏ هﺎﯾﻣﻟﺎﺑ دادﻣﻹا روﺑﻧﺻ
.ٍوﺗﻠﻣ ءﺎﻣﻟﺎﺑ دادﻣﻹا (مﯾطارﺧ) موطرﺧ
.دودﺳﻣ ءﺎﻣﻟﺎﺑ دادﻣﻹا (مﯾطارﺧ) موطرﺧ رﺗﻠﻓ
.ﺎﮭﺣﯾﺣﺻﺗو زﺎﮭﺟﻟﺎﺑ نزاوﺗﻟا مدﻋ تﻻﺎﺣ فﺎﺷﺗﻛا ﻰﻠﻋ ردﺎﻗ مﺎظﻧ دوﺟوﺑ زﺎﮭﺟﻟا زﯾﻣﺗﯾ
زﺎﮭﺟﻟا أدﺑﯾ نأ لﺑﻗ ﺔﻠﯾﻠﻗ تﺎظﺣﻟ رﻣﻷا قرﻐﺗﺳﯾ دﻗ .
.رﺻﻌﻟا ءدﺑ لﺑﻗ ﺎًﻘﻠﻐﻣ بﺎﺑﻟا نوﻛﯾ نأ بﺟﯾ ثﯾﺣ ،رﺻﻌﻟا ﻲﻓ
ﻰﻟإ ﺎﻣو مﺎﻣﺣﻟا سﻧارﺑو مﺎﻣﺣﻟا ةدﺎﺟﺳ لﺛﻣ) ﺔﮭﺑﺎﺷﺗﻣﻟا رﯾﻏ ﺔﻠﯾﻘﺛﻟا ضارﻏﻷا لﯾﻣﺣﺗ دﻧﻋ .ﺔﯾﺎﻐﻠﻟ ةرﯾﻐﺻ ﺔﻟوﻣﺣﻟا
.لﻣﺎﻛﻟﺎﺑ رﺻﻌﻟا ةرود ﺔﻗﺎﻋإ وأ رﺻﻌﻟا فﺎﻘﯾإ ﻰﻟإ كﻟذ يدؤﯾ دﻗ ،(كﻟذ
ﻲﻓ زﺎﮭﺟﻟا أدﺑﯾ نأ لﺑﻗ ﺔﻠﯾﻠﻗ تﺎظﺣﻟ رﻣﻷا قرﻐﺗﺳﯾ دﻗ .
.نارودﻟا ﻲﻓ ﺔﻟﺎﺳﻐﻟا أدﺑﺗ نأ لﺑﻗ بﺎﺑﻟا ﻖﻠﻏ مﺎﻛﺣإ بﺟﯾ .رﺻﻌﻟا ﺔﯾﻠﻣﻋ
.ءطﺑﺑ ﮫﻔﯾرﺻﺗ مﺗﯾ وأ زﺎﮭﺟﻟا ﻲﻓ دوﺟوﻣﻟا ءﺎﻣﻟا فﯾرﺻﺗ مﺗﯾ ﻻ .دودﺳﻣ وأ ٍوﺗﻠﻣ فﯾرﺻﺗﻟا موطرﺧ
Start/Pause(تﻗؤﻣ فﺎﻘﯾإ/ءدﺑ)
رز ﻰﻠﻋ طﻐﺿاو بﺎﺑﻟا
Start/Pause(تﻗؤﻣ فﺎﻘﯾإ/ءدﺑ)
.بﺎﺑﻟا رﺎﻌﺷﺗﺳا زﺎﮭﺟ لطﻌﺗ
.مﻛﺣﺗﻟا ةدﺣو ﻲﻓ لطﻋ ﺔﻣﺛ
رز ﻰﻠﻋ طﻐﺿاو
.دودﺳﻣ فﯾرﺻﺗﻟا رﺗﻠﻓ
.نﺎﻣﺿﻟا
•.لزﻧﻣﻟا ﻲﻓ رﺧآ اًروﺑﻧﺻ مدﺧﺗﺳا
•.لﻣﺎﻛﻟﺎﺑ هﺎﯾﻣﻟا روﺑﻧﺻ ﺢﺗﻓا
•.ءﺎﻣﻟا لﺎﺧدإ موطرﺧ بﯾﻛرﺗ دﻋأ وأ موطرﺧﻟا ﺔﯾوﺳﺗﺑ مﻗ
•.ﺔﻟﺎﺳﻐﻟا نﻣ موطرﺧﻟا تﻼﺻو ﺔﻟازإو رﯾﺑﺎﻧﺻﻟا قﻼﻏإ لﺑﻗ ﮫﻔظﻧو لﺎﺧدﻹا مﺎﻣﺻ رﺗﻠﻓ صﺣﻓا
• قﻼﻏﺈﺑ مﻗ .ﺔﺣﯾﺣﺻ ﺔﻘﯾرطﺑ رﺻﻌﻟا مﺗﯾ ﻲﻛ ﺔﻟوﻣﺣﻟا طﺑﺿ ةدﺎﻋﺈﺑ مﻗ اذﻟ ،ةرودﻟا ﺔﯾﺎﮭﻧ ﻲﻓ ﺔﻠﻠﺑﻣ سﺑﻼﻣﻟا نوﻛﺗ دﻗ
• بﺎﺑﻟا قﻼﻏﺈﺑ مﻗ .ﺔﻟوﻣﺣﻟا نزاوﺗ ﻰﻠﻋ ﺔظﻓﺎﺣﻣﻠﻟ سﺑﻼﻣﻟا ضارﻏأ نﻣ نﯾﮭﺑﺎﺷﺗﻣ نﯾﻧﺛا وأ اًدﺣاو ﺎًﺿرﻏ فﺿأ
•.ﮫﺗﯾوﺳﺗو فﯾرﺻﺗﻟا موطرﺧ فﯾظﻧﺗﺑ مﻗ
•.ﮫﻔﯾظﻧﺗﺑ مﻗو فﯾرﺻﺗﻟا رﺗﻠﻓ صﺣﻓا
لﺎﺧدﻹا مﯾطارﺧ ﻲﻓ ﺄطﺧ
نزاوﺗﻟا مدﻋ ﻲﻓ ﺄطﺧ
هﺎﯾﻣﻟا فﯾرﺻﺗ ﻲﻓ ﺄطﺧ
dE dE1 dEz dE4
• ﺔﻣدﺧ زﻛرﻣﺑ لﺎﺻﺗﻻا ﻰﺟرﯾLG ﺔﻣدﺧ زﻛرﻣ فﺗﺎھ مﻗر ﻰﻠﻋ روﺛﻌﻟا نﻛﻣُﯾ .LG ﺔﻗﺎطﺑ ﻰﻠﻋ ﺎًﺑوﺗﻛﻣ ﻲﻠﺣﻣﻟا
•.ةدﻋﺎﺳﻣﻟا ﻰﻠﻋ لوﺻﺣﻠﻟ ﺔﻣدﺧﻟا زﻛرﻣﺑ لﺻﺗاو ﺔﻗﺎطﻟا سﺑﺎﻗ لﺻﻓا
مﻛﺣﺗﻟا ةدﺣو ﻲﻓ لطﻋ
1E
UE
OE
بﺎﺑﻟا ﻲﻓ ﺄطﺧ
tE
Page 60

AR
ﮫﯾﺑﻧﺗ
33
ﺔﻧﺎﯾﺻﻟا
.لﺻﻔﻟا
.شﺎﻣﻘﻟا مﻌﻧﻣو فظﻧﻣﻟا نﻣ ﺔﻣﻛارﺗﻣﻟا داوﻣﻟا ﺔﻟازﺈﺑ مﻗ
ﻲﻓ طﻘﻓ ءﺎﻣﻟا مدﺧﺗﺳا .شﺎﻣﻘﻟا مﻌﻧﻣو فظﻧﻣﻟا نﻣ ﺔﻣﻛارﺗﻣﻟا داوﻣﻟا
مادﺧﺗﺳﺎﺑ ﮫﺑ ﺔﺻﺎﺧﻟا ءازﺟﻷاو جردﻟا فﻔﺟ .عزوﻣﻟا جردﻟا فﯾظﻧﺗ
.ﺔﻣﻋﺎﻧ ﺔﻔﺷﻧﻣ وأ شﺎﻣﻗ ﺔﻌطﻗ
ةرﯾﻐﺻ ﺔﯾﻧدﻌﻣ رﯾﻏ ةﺎﺷرﻓ وأ شﺎﻣﻗ ﺔﻌطﻗ مدﺧﺗﺳا ،جردﻟا ﺔﺣﺗﻓ فﯾظﻧﺗﻟ
.فﯾوﺟﺗﻟا فﯾظﻧﺗﻟ
.ﺔﻣﻋﺎﻧ ﺔطوﻓ وأ شﺎﻣﻗ ﺔﻌطﻗ مادﺧﺗﺳﺎﺑ فﯾوﺟﺗﻟا ﻲﻓ ﺔﺑوطر يأ ﺢﺳﻣا
مﺛ ﺎﮭﻟ ﺔﺻﺻﺧﻣﻟا نﻛﺎﻣﻷا ﻲﻓ ﺎﮭﻌﺿوﺑ جردﻟا ءازﺟأ ﻊﯾﻣﺟﺗ ةدﺎﻋﺈﺑ مﻗ
.جردﻟا لﺧدأ
• رز ﻰﻠﻋ ةدﺷﺑ طﻐﺿﻟا ءﺎﻧﺛأ فطﻠﺑ جرﺎﺧﻟا ﻰﻟإ جردﻟا بﺣﺳا مﺛ
كﻟذو ءطﺑﺑ
2
• ﺔﻟازﻹ ﺊﻓادﻟا ءﺎﻣﻟا مادﺧﺗﺳﺎﺑ ﮫﺑ ﺔﺻﺎﺧﻟا ءازﺟﻷاو جردﻟا فطﺷا
.جرﺎﺧﻠﻟ فﯾرﺻﺗﻟا ضوﺣ بﺣﺳا مﺛ فﻼﻐﻟا ءﺎطﻏ ﺢﺗﻓا
ًﻻوأ فﯾرﺻﺗﻟا ضوﺣ نﻣ فﯾرﺻﺗﻟا ةدادﺳ ﺔﻟازﺈﺑ مﻗ
a
مﻗ مﺛ ،
فﯾرﺻﺗﻟا ﺔﺧﺿﻣ رﺗﻠﻓ كﻔﺑ مﻗ كﻟذ دﻌﺑ .هﺎﯾﻣﻟا فﯾرﺻﺑ
b
.رﺗﻠﻔﻟا ﻲﻓ ﺔﻘﻟﺎﻌﻟا مﺎﺳﺟﻷا وأ تﺎﻔﻠﺧﻣﻟا ﺔﻟازإ مﺛ نﻣو هﺎﯾﻣﻟا فﯾرﺻﺗﻟ
2
3
3
•.فﯾوﺟﺗﻠﻟ ﺔﯾﻠﻔﺳﻟاو ﺔﯾوﻠﻌﻟا ءازﺟﻷا نﻣ بﺳاورﻟا ﻊﯾﻣﺟ لزأ
4
ءﺎطﻏ تﺑﺛو ﺔﯾﺎﻧﻌﺑ رﺗﻠﻔﻟا لﺎﺧدإ دﻋأ ،فﯾرﺻﺗﻟا ﺔﺧﺿﻣ رﺗﻠﻓ فﯾظﻧﺗ دﻌﺑ
طوﯾﺧﻟا كﺑﺎﺷﺗ بﻧﺟﺗﻟ رذﺣﺑ ﺔﻋﺎﺳﻟا برﺎﻘﻋ هﺎﺟﺗا ﻲﻓ فﯾرﺻﺗﻟا
ﻲﻓ ضوﺣﻟا ﻊﺿ مﺛ فﯾرﺻﺗﻟا ضوﺣ ﻲﻓ ةدادﺳﻟا لﺎﺧدإ دﻋأ .بﯾرﺳﺗﻟاو
5
4
.ﮫﻠﻣﺎﺣ
.فﻼﻐﻟا ءﺎطﻏ ﻖﻠﻏأ
تﺎﻔﻠﺧﻣﻟاو فظﻧﻣﻟا نﻣ ﺔﻣﻛارﺗﻣﻟا داوﻣﻟا ﺔﻟازﻹ كﻟذو (ﺔﺟﺎﺣﻟا بﺳﺣ
.ىرﺧﻷا
عزوﻣﻟا جرد فﯾظﻧﺗ
فظﻧﻣﻟا لظﯾ نأ نﻛﻣﯾ .عزوﻣﻟا جرد ﻲﻓ شﺎﻣﻘﻟا مﻌﻧﻣو فظﻧﻣﻟا مﻛارﺗﯾ دﻗ
ﻖﻘﺣﺗو تﺎﻘﺣﻠﻣﻟاو جردﻟا لزأ .ﺎًﯾﻠﻛ ﮫﻔﯾرﺻﺗ ّمﺗﯾ ﻻو عزوﻣﻟا جرد تﺣﺗ لﺋﺎﺳﻟا
رﮭﺷﻟا ﻲﻓ نﯾﺗرﻣ وأ ةرﻣ
.
مﯾﻘﺗﺳﻣ لﻛﺷﺑ جرﺎﺧﻟا ﻰﻟإ ﮫﺑﺣﺳ ﻖﯾرط نﻋ فظﻧﻣﻟا عزوﻣ جرد جرﺧأ
فﯾظﻧﺗﻟا تﺎﺟﺗﻧﻣ نﻣ ﺔﻣﻛارﺗﻣ ءازﺟأ كﺎﻧھ نﺎﻛ اذإ
.فﻗوﺗﯾ ﻰﺗﺣ
5
•.ﺎًﻧﺧﺎﺳ نوﻛﯾ دﻗ ءﺎﻣﻟا نإ ثﯾﺣ فﯾرﺻﺗﻟا دﻧﻋ سرﺗﺣا
• ةرﻣ نﻣ رﺛﻛأ وأ) رﮭﺷﻟا ﻲﻓ ةدﺣاو ةرﻣ لﺳﻐﻟا ضوﺣ فﯾظﻧﺗ ﺞﻣﺎﻧرﺑ لﻐﺷ
1
Page 61

ﺔﻧﺎﯾﺻﻟا
ﺔظﺣﻼﻣ
رﯾذﺣﺗ
32
AR
ﻲﻓ فرﺻ دوﺟو مدﻋ دﻧﻋ ﺎﻣﯾﺳﻻ ،(ﺔﻠطﻋ لﺎﺛﻣﻟا لﯾﺑﺳ ﻰﻠﻋ) ﺔﯾﻧﻣز ةرﺗﻔﻟ
.ةرﺷﺎﺑﻣ روﺎﺟﻣ نﺎﻛﻣ ﻲﻓ (فرﺻﻣ) ﺔﯾﺿرﻷا
ﻰﻟإ ءﺎﻣﻟا لوﺧد مدﻋ دﻧﻋ مﻛﺣﺗﻟا ﺔﺣوﻟ ﻰﻠﻋ ﺄطﺧ ﺔﻟﺎﺳر رﮭظﺗ فوﺳ
.ءﺎﻣﻟا لﺎﺧدإ موطرﺧ كﻓ مﺛ ءﺎﻣﻟا روﺑﻧﺻو ﻲﺋﺎﺑرﮭﻛﻟا رﺎﯾﺗﻟا ﻖﻠﻏأ
ةﺎﻔﺻﻣﻟا فظﻧ مﺛ ةرﯾﻐﺻ ﺔﯾدارز مادﺧﺗﺳﺎﺑ ﺔﻠﺧدُﻣﻟا هﺎﯾﻣﻟا ةﺎﻔﺻﻣ لزأ
.ﺔطﺳوﺗﻣ تارﯾﻌﺷ تاذ نﺎﻧﺳأ ةﺎﺷرﻓ مادﺧﺗﺳﺎﺑ
1E
.فظﻧﻣﻟا جرد
1
2
ﻎﯾرﻔﺗﻟﺎﺑ مﺎﯾﻘﻟاو فﯾرﺻﺗﻟا ﺔﺧﺿﻣ رﺗﻠﻓ فﯾظﻧﺗ
ءﺎﻣﻠﻟ ءيرﺎطﻟا
لﻛﺷﺑ سﺑﻼﻣﻟا ﻲﻓ ﺔﯾﻘﺑﺗﻣﻟا ةرﯾﻐﺻﻟا مﺎﺳﺟﻷاو طوﯾﺧﻟا فﯾرﺻﺗﻟا رﺗﻠﻓ طﻘﺗﻠﯾ
ﺔﺳﻠﺳ لﯾﻐﺷﺗ ﺔﯾﻠﻣﻋ نﻣﺿﺗ ﻰﺗﺣ فﯾظﻧ رﺗﻠﻔﻟا نأ نﻣ مﺎظﺗﻧﺎﺑ ﻖﻘﺣﺗ .ﻲﺿرﻋ
ﺔﻟﺎﺣ ﻲﻓ بﺎﺑﻟا ﺢﺗﻓا .فﯾرﺻﺗﻟا ﺔﺧﺿﻣ رﺗﻠﻓ فﯾظﻧﺗ لﺑﻗ درﺑﯾ ﻰﺗﺣ ءﺎﻣﻟا كرﺗا
.ءﺎﻣﻠﻟ ئرﺎطﻟا ﻎﯾرﻔﺗﻟا وأ ئراوطﻟا
.زﺎﮭﺟﻠﻟ
• مادﺧﺗﺳا نود زﺎﮭﺟﻟا كرﺗﺗﺳ تﻧﻛ اذإ زﺎﮭﺟﻟا ﻰﻟإ ءﺎﻣﻟا لﺎﺧدإ روﺑﻧﺻ ﻖﻠﻏأ
مﺎﯾﻘﻟاو ﺔﯾرود ةروﺻﺑ زﺎﮭﺟﻟا فﯾظﻧﺗ
ءﺎﻣﻠﻟ ءيرﺎطﻟا ﻎﯾرﻔﺗﻟﺎﺑ
•
لﺳﻐﻟاو ﻊﻘﻧﻟﺎﺑ لﺧادﻟا نﻣ زﺎﮭﺟﻟا فﯾظﻧﺗ ﻲﻓ ةدﻋﺎﺳﻣﻠﻟ ةزﯾﻣﻣ ﺔﯾﺻﺎﺧ ﻲھو
مﻛرﺗ نﻣ دﺣﻠﻟ (رﻣﻷا مزﻟ اذإ رﺛﻛأ وأ)
ةرﻣ
.ﺔﻔﯾظوﻟا هذھ لﯾﻐﺷﺗﻟ ﺔﯾدﺎﻌﻟا تارﺗﻔﻟا بﻧﺎﺟ ﻰﻟإ
.ﺎﮭﺑ ﻰﺻوﻣﻟا ﺔﻔﯾظوﻟا لﯾﻐﺷﺗ ﻰﻟإ مدﺧﺗﺳﻣﻟا ﮫﯾﺑﻧﺗﻟ
.بﺎﺑﻟا ﻖﻠﻏأو زﺎﮭﺟﻟا نﻣ ضارﻏأ وأ سﺑﻼﻣ يأ لزأ
ﻲﻓ ﺔﯾﺳﻠﻛﻟا بﺳاورﻠﻟ موﺎﻘﻣﻟا قوﺣﺳﻣﻟا فﺿأو عزوﻣﻟا جرد ﺢﺗﻓا
رز ﻰﻠﻋ طﻐﺿا مﺛ ﺔﻗﺎطﻟا لﯾﻐﺷﺗ رز ﻰﻠﻋ طﻐﺿا
رزو
Spin(نارود)
.ٍناوﺛ ثﻼﺛ ةدﻣﻟ ﮫﺳﻔﻧ تﻗوﻟا ﻲﻓ
.ءدﺑﻠﻟ
.ﺎًﻣﺎﻣﺗ زﺎﮭﺟﻟا نﻣ ﻲﻠﺧادﻟا ءزﺟﻟا فﺟﯾ ﻰﺗﺣ ﺎًﺣوﺗﻔﻣ بﺎﺑﻟا كرﺗا
رﮭﺷﻟا ﻲﻓ ةرﻣ
.ىرﺧﻷا بﺳاورﻟاو مّﻌﻧﻣﻟاو فظﻧﻣﻟا ءازﺟأ
Start/Pause(تﻗؤﻣ فﺎﻘﯾإ/ءدﺑ)
ضوﺣﻟا فﯾظﻧﺗ
tcL
.ﺔﯾﺳﯾﺋرﻟا لﯾﺳﻐﻟا ةرﯾﺟﺣ
.ءطﺑﺑ عزوﻣﻟا جرد ﻖﻠﻏأ
رزﻟا ﻰﻠﻋ طﻐﺿا
.رﺻﻌﻟاو فطﺷﻟاو
ﺔﻔﯾظوﻟا هذھ لﯾﻐﺷﺗﺑ مﻗ
• ﺔﻔﯾظوﻟا هذھ لﯾﻐﺷﺗﺑ مﻘﻓ ،ﺔﻧﻔﻋ وأ ﺔﮭﯾرﻛ ﺔﺣﺋار زﺎﮭﺟﻟا نﻣ تﺛﻌﺑﻧا اذإ
ةدﻣﻟ عوﺑﺳﻷا ﻲﻓ3ﻊﯾﺑﺎﺳأ
• ﺔﻟﺎﺳر رﮭظﺗﺳ
1
2
•.قوﺣﺳﻣﻠﻟ لﯾدﺑﻛ لﺳﻐﻟا ضوﺣ ﻲﻓ ًةرﺷﺎﺑﻣ صارﻗﻷا ﻊﺿو نﻛﻣﯾ
3
4
Temp(ةرارﺣﻟا ﺔﺟرد) .
5
6
• ﻲﻠﺧادﻟا ءزﺟﻟا فﺟﯾ مﻟ ﺎﻣ ﺔﻧﻔﻋ وأ ﺔﮭﯾرﻛ ﺔﺣﺋار زﺎﮭﺟﻟا نﻣ ثﻌﺑﻧﺗ دﻗ
.ﺎًﻣﺎﻣﺗ ﮫﻧﻣ
.ﺔﻗﺎطﻟا ردﺻﻣ نﻋ زﺎﮭﺟﻟا لﺻﻓا
1
• ﺔﺑﻗارﻣ ﺔﻟﺎﺣ ﻲﻓ طﻘﻓ ،لﺧادﻟا نﻣ زﺎﮭﺟﻟا فﺟﯾ ﻲﺗﺣ ًﺎﺣوﺗﻔﻣ بﺎﺑﻟا كرﺗا
.كﻟذﺑ مﺎﯾﻘﻟا دﻧﻋ لزﻧﻣﻟﺎﺑ لﺎﻔطﻷا
ءﺎﻣﻟا لﺎﺧدإ رﺗﻠﻓ فﯾظﻧﺗ
ﻲﻓ نوﻛﺗ دﻗ بﺳاور يأ وأ رﯾﺟﻟا بﯾﺳرﺗ ﻊﻣﺟ ﻰﻠﻋ هﺎﯾﻣﻟا لﺎﺧدإ رﺗﻠﻓ لﻣﻌﯾ
ﻰﻠﻋ يوﺗﺣﯾ وأ ﺔﯾﻟﺎﻋ ﺔﺟردﺑ اًرﺳﻋ ءﺎﻣﻟا نﺎﻛ اذإ .زﺎﮭﺟﻟا ﻰﻟإ ﺔﻠﺧدﻣﻟا هﺎﯾﻣﻟا
.رﻣﺗﺳﻣ لﻛﺷﺑ هﺎﯾﻣﻟا لﺎﺧدإ رﺗﻠﻓ دﺳﻧﯾ دﻘﻓ ،يرﯾﺟ بﯾﺳرﺗﻟ رﺎﺛآ
Page 62

AR
رﯾذﺣﺗ
رﯾذﺣﺗ
رﯾذﺣﺗ
31
ﺔﻧﺎﯾﺻﻟا
ﺔﻧﺎﯾﺻﻟا
• وأ ،ﻖﯾرﺣ بوﺷﻧ وأ ،ةرﯾطﺧ ﺔﺑﺎﺻإ ﻰﻟإ ضرﻌﺗﻟا ﻰﻟإ رﯾذﺣﺗﻟا اذھ عﺎﺑﺗا مدﻋ يدؤﯾ دﻗ .ﺔﯾﺋﺎﺑرﮭﻛ ﺔﻣدﺻﻟ ضرﻌﺗﻟا رطﺧ بﻧﺟﺗﻟ فﯾظﻧﺗﻟا لﺑﻗ زﺎﮭﺟﻟا لﺻﻓا
.ةﺎﻓو ثودﺣ وأ ،ﺔﯾﺋﺎﺑرﮭﻛ ﺔﻣدﺻﻟ ضرﻌﺗﻟا
•.ﺔﻟﺎﺳﻐﻟا بﯾطﺷﺗ فﻠﺗ ﻲﻓ كﻟذ بﺑﺳﺗﯾ دﻗ .زﺎﮭﺟﻟا فﯾظﻧﺗﻟ تﺎﺑﯾذﻣ وأ ،ﺔطﺷﺎﻛ تﺎﻔظﻧﻣ وأ ،ةزﻛرﻣ ﺔﯾﺋﺎﯾﻣﯾﻛ اًداوﻣ اًدﺑأ مدﺧﺗﺳﺗ ﻻ
.قوﻘﺷﻟا وأ ﺔﻧﯾﺑﺎﻛﻟا لﺻﺎﻔﻣ ﻲﻓ ﺔﺑوطر دوﺟو
.ﺔﻣﻋﺎﻧ شﺎﻣﻗ ﺔﻌطﻗ مادﺧﺗﺳﺎﺑ
.زﺎﮭﺟﻟا لﯾﻐﺷﺗﻟ مﻛﺣﺗﻟا ﺔﺣوﻟ ﻰﻠﻋ ةدﺎﺣ
بﺎﺑﻟا
• مدﻋ نﺎﻣﺿﻟ ﺔﻓﺎﺟ شﺎﻣﻗ ﺔﻌطﻘﺑ ىرﺧأ ةرﻣ مﺛ ﺔﻠﻠﺑﻣ شﺎﻣﻗ ﺔﻌطﻘﺑ ﺢﺳﻣا
•.ةدﺎﺣ تاودأ مادﺧﺗﺳﺎﺑ ضرﻌﻟا ﺔﺷﺎﺷ ﻰﻠﻋ وأ ﺢطﺳﻟا ﻰﻠﻋ طﻐﺿﺗ ﻻ
سﺑﻼﻣﻟا كرﺗ بﺑﺳﺗﯾ دﻗ .ةرودﻟا لﺎﻣﺗﻛا درﺟﻣﺑ ﺔﻟﺎﺳﻐﻟا نﻣ ضارﻏﻷا ﺎًﻣﺋاد لزأ
.ﺎﮭﺗﺣﺋار رﯾﻐﺗو ،ﺎﮭﻧوﻟ نادﻘﻓو ،ﺎﮭﺗﺷﻣرﻛ ﻲﻓ ﺔﻟﺎﺳﻐﻟا لﺧاد ﺔﻠﻠﺑﻣ
• فﻔﺟ مﺛ ﺔﻠﻠﺑﻣ شﺎﻣﻗ ﺔﻌطﻗ مادﺧﺗﺳﺎﺑ ﻲﺟرﺎﺧﻟاو ﻲﻠﺧادﻟا ءزﺟﻟا ﺢﺳﻣا
• تاودأ يأ مدﺧﺗﺳﺗ ﻻ .زﺎﮭﺟﻟا كﻓ وأ حاوﻟﻷا نﻣ حوﻟ يأ لﺻﻓ لوﺎﺣﺗ ﻻ
ﺔﻠْﺳﻏ ّلﻛ دﻌﺑ فﯾظﻧﺗﻟا
ﮫﻠﺳﻏ بﺟﯾ يذﻟا ﺎﻣ
.ﺔﺑوطرﻠﻟ رﺎﺛآ يأ
ﺔﻟازﻹ ﺔﻓﺎﺟ شﺎﻣﻗ ﺔﻌطﻘﺑ زﺎﮭﺟﻟا ﺢﺳﻣا
.كﻟذﺑ مﺎﯾﻘﻟا دﻧﻋ لزﻧﻣﻟﺎﺑ لﺎﻔطﻷا
• ﺔﻟازﻹ بﺎﺑﻟا ﻲﻓ برﺳﺗﻟا ﻊﻧﺎﻣ ةدادﺳو بﺎﺑﻟا ﺢﺳﻣا ،لﯾﺳﻐﻟا ةرود ءﺎﮭﺗﻧا دﻌﺑ
•.لﺳﻐﻟا ضوﺣ فﯾﻔﺟﺗﻟ ﺎًﯾﺋزﺟ ﺎًﺣوﺗﻔﻣ بﺎﺑﻟا كرﺗا
•.ﺔﺑوطرﻠﻟ رﺎﺛآ يأ
• ﺔﺑﻗارﻣ ﺔﻟﺎﺣ ﻲﻓ طﻘﻓ ،لﺧادﻟا نﻣ زﺎﮭﺟﻟا فﺟﯾ ﻲﺗﺣ ًﺎﺣوﺗﻔﻣ بﺎﺑﻟا كرﺗا
ﻲﺟرﺎﺧﻟا لﻛﯾﮭﻟا فﯾظﻧﺗ
.ﻲﺿارﺗﻓﻻا رﻣﻌﻟا ﺔﻟﺎطإ ﻰﻠﻋ زﺎﮭﺟﻟﺎﺑ ةدﯾﺟﻟا ﺔﯾﺎﻧﻌﻟا دﻋﺎﺳﺗ
ﻲﺟرﺎﺧﻟا لﻛﯾﮭﻟا
•.روﻔﻟا ﻰﻠﻋ تﺎﺑﯾرﺳﺗ يأ ﺢﺳﻣا
Page 63

ﺔﯾﻛذﻟا فﺋﺎظوﻟا
ﺔظﺣﻼﻣ
Max.
10 mm
30
AR
صﯾﺧﺷﺗ ضرﻐﺑ "عوﻣﺳﻣﻟا صﯾﺧﺷﺗﻟا" مادﺧﺗﺳا
تﻼﻛﺷﻣﻟا
.عوﻣﺳﻣﻟا صﯾﺧﺷﺗﻟا ﺔﻘﯾرطﺑ ﺔﻧﺎﻌﺗﺳﻼﻟ هﺎﻧدأ تﺎﻣﯾﻠﻌﺗﻟا ﻊﺑﺗا
" ةزﯾﻣ رﺗﺧاو
Smart
عوﻣﺳﻣﻟا صﯾﺧﺷﺗﻟا مادﺧﺗﺳا تﺎﻣﯾﻠﻌﺗ ﻊﺑﺗا .ﺔﻣﺋﺎﻘﻟا نﻣ "
LG ThinQ
LG ThinQ
.
Diagnosis
ﻖﯾﺑطﺗ ﻲﻓ ةدراوﻟا
• ﻖﯾﺑطﺗ لﯾﻐﺷﺗﺑ مﻗ •
رزﻟا ﻰﻠﻋ طﻐﺿا
.زﺎﮭﺟﻟا لﯾﻐﺷﺗﻟ
زﻣرﻟا نﻣ برﻘﻟﺎﺑ ﻲﻛذﻟا كﻔﺗﺎھ ﻲﻓ مﻠﻛﺗﻟا ناوﺻ ﻊﺿ
c
وأ
d
.
ةدﻣﻟ 3 ٍناوﺛ
نﻣ ﻲﻛذﻟا كﻔﺗﺎھ ﻲﻓ مﻠﻛﺗﻟا ناوﺻﺑ كﺎﺳﻣﻹا ﻲﻓ رارﻣﺗﺳﻻا ﻊﻣ رﺛﻛأ وأ
.ﻖﯾﺑطﺗﻟا ﺔﺷﺎﺷ ﻰﻠﻋ صﯾﺧﺷﺗﻟا رﮭظﯾﺳ ،تﺎﻧﺎﯾﺑﻟا لﻘﻧ مﺎﻣﺗإ دﻌﺑ
Power(ﺔﻗﺎطﻟا)
رزﻟا ﻰﻠﻋ رارﻣﺗﺳﻻا ﻊﻣ طﻐﺿا
Temp(ةرارﺣﻟا ﺔﺟرد) .
.تﺎﻧﺎﯾﺑﻟا لﻘﻧ ءﺎﮭﺗﻧا ﻰﺗﺣ زﻣرﻟا
.تﺎﻧﺎﯾﺑﻟا لﻘﻧﻟ ﻲﻘﺑﺗﻣﻟا
1
•.ىرﺧأ رارزأ يأ ﻰﻠﻋ طﻐﺿﺗ ﻻ
2
3
• تﻗوﻟا ضرﻋ مﺗﯾو .تﺎﻧﺎﯾﺑﻟا لﻘﻧ ءﺎﮭﺗﻧا ﻰﺗﺣ ﮫﻧﺎﻛﻣ ﻲﻓ فﺗﺎﮭﻟا ﻖﺑأ
4
•.تﺎﻣﻐﻧﻟا لﻘﻧ ءﺎﻧﺛأ ﻲﻛذﻟا فﺗﺎﮭﻟا كرﺣﺗ ﻻ ،ﺞﺋﺎﺗﻧﻟا لﺿﻓأ ﻰﻠﻋ لوﺻﺣﻠﻟ
Page 64

29
ﺔظﺣﻼﻣ
ﺔظﺣﻼﻣ
ﺔظﺣﻼﻣ
AR
ﺔﯾﻛذﻟا فﺋﺎظوﻟا
رز ﻰﻠﻋ رارﻣﺗﺳﻻا ﻊﻣ طﻐﺿا ،ﺔﻔﯾظوﻟا هذھ لﯾﻌﻔﺗ مﺗﯾ ﺎﻣدﻧﻋ
Remote
ةدﻣﻟ 3.ٍناوﺛ
ﺎًﯾودﯾ ﺔﻔﯾظوﻟا هذھ لﯾطﻌﺗ
Start(دﻌﺑ نﻋ ءدﺑﻟا)
ردﺻﻣﻟا ﺔﺣوﺗﻔﻣ ﺞﻣارﺑﻟا رﺎﻌﺷإ لوﺣ تﺎﻣوﻠﻌﻣ
بﺟوﻣﺑ ردﺻﻣﻟا ﺔﯾﺟﻣرﺑﻟا تﺎﻣﯾﻠﻌﺗﻟا ﻰﻠﻋ لوﺻﺣﻠﻟGPL و LGPL و
صﯾﺧرﺗﻟا مﺎﻛﺣأ لﻛ رﻓوﺗﺗ ،ردﺻﻣﻟا ﺔﯾﺟﻣرﺑﻟا تﺎﻣﯾﻠﻌﺗﻟا ﻰﻟإ ﺔﻓﺎﺿﻹﺎﺑ
.لﯾزﻧﺗﻠﻟ رﺷﻧﻟا قوﻘﺣ تارﺎﻌﺷإو ﺔﯾﻟوؤﺳﻣﻟا ءﻼﺧإ تارﺎﻌﺷإو
ﻊﯾزوﺗﻟا اذﮭﺑ مﺎﯾﻘﻟا ﺔﻔﻠﻛﺗ ﻲطﻐﯾ مﺳر لﺑﺎﻘﻣ
ﻲﻧورﺗﻛﻟﻹا دﯾرﺑﻟا رﺑﻋ لﺳرُﯾ بﻠط ﻰﻠﻋ ًءﺎﻧﺑ (مﯾﻠﺳﺗﻟاو نﺣﺷﻟاو لﻘﻧﻟا لﺋﺎﺳو
ﻰﻘﻠﺗﯾ صﺧﺷ يﻷ ضرﻌﻟا اذھ رﻓوﺗﯾ .ﺞﺗﻧﻣﻟا اذﮭﻟ ةرﯾﺧﻷا نﺣﺷﻟا ﺔﯾﻠﻣﻋ دﻌﺑ
MPL ةرﺎﯾز ﻰﺟرﯾ ،ﺞﺗﻧﻣﻟا اذھ ﺎﮭﻧﻣﺿﺗﯾ ىرﺧأ ردﺻﻣﻟا ﺔﺣوﺗﻔﻣ صﯾﺧارﺗو
ﻊﻗوﻣﻟاhttp://opensource.lge.com.
رﻓوﺗﺳLG Electronics ﻰﻠﻋ ردﺻﻣﻟا ﺔﺣوﺗﻔﻣﻟا ﺔﯾﺟﻣرﺑﻟا تﺎﻣﯾﻠﻌﺗﻟا ًﺎﺿﯾأ
صرﻗCD-ROM ﺔﻔﻠﻛﺗ لﺛﻣ)
ﻰﻟإopensource@lge.com تاوﻧﺳ ثﻼﺛ ةرﺗﻔﻟ ٍرﺎﺳ ضرﻌﻟا اذھ نإ .
.تﺎﻣوﻠﻌﻣﻟا هذھ
.ًاددﺟﻣ لوﺎﺣﺗ نأ لﺑﻗ ﺔﻘﯾﻗد ةدﻣﻟ رظﺗﻧاو ﺔﻗﺎطﻟا نﻋ زﺎﮭﺟﻟا سﺑﺎﻗ
.ًءﺎﻧﺛﺗﺳا ﮫﯾﻟإ فﺿا وأ ﮫﻠﯾطﻌﺗﺑ
مﺎﻗرأو فرﺣأ نﻣ ًﺎﻧوﻛﻣ (
(ﺔﺻﺎﺧ ًازوﻣر مدﺧﺗﺳﺗ ﻻ) .ﺔﯾزﯾﻠﺟﻧﻹا ﺔﻐﻠﻟﺎﺑ
.ﺔﻌﻧﺻﻣﻟا ﺔﻛرﺷﻟا
WEP
،
رﺧآ نﺎﻣأ لوﻛوﺗورﺑ ﻰﻟإ هرﯾﯾﻐﺗ ءﺎﺟرﻟا .ﺔﻛﺑﺷﻟا دادﻋإ كﯾﻠﻋ رذﻌﺗﯾ دﻘﻓ
.ﺞﺗﻧﻣﻟا لﯾﺟﺳﺗ دﻋأ مﺛ (
WPA2
رﺎﯾﺗﺧﺎﺑ ﺢﺻﻧُﯾ)
ﻖﯾﺑطﺗ تﯾﺑﺛﺗLG ThinQ
• لﺻﻓا .ًﺎﯾﻛﻠﺳﻻ ةرﺎﺷﻹا لﺎﺳرإ ﻲﻓ تﻼﻛﺷﻣ بﺑﺳﺑ زﺎﮭﺟﻟا لﯾﺟﺳﺗ رذﻌﺗ
• مﻗ ،ًﺎﻧّﻛﻣُﻣ كﺑ صﺎﺧﻟا ﮫﯾﺟوﺗﻟا زﺎﮭﺟ ﻰﻠﻋ دوﺟوﻣﻟا ﺔﯾﺎﻣﺣﻟا رادﺟ نﺎﻛ اذإ
•) ﺔﯾﻛﻠﺳﻼﻟا ﺔﻛﺑﺷﻟا مﺳا نوﻛﯾ نأ بﺟﯾSSID
• بﺳﺣو فﺗﺎﮭﻟا لﯾﻐﺷﺗ مﺎظﻧ بﺳﺣ ﻲﻛذﻟا فﺗﺎﮭﻟا مادﺧﺗﺳا ﺔﮭﺟاو فﻠﺗﺧﺗ دﻗ
• ﻰﻠﻋ ﺎًطوﺑﺿﻣ ﮫﯾﺟوﺗﻟا زﺎﮭﺟﺑ صﺎﺧﻟا نﺎﻣﻷا لوﻛوﺗورﺑ نﺎﻛ اذإ
Smart Diagnosis صﯾﺧﺷﺗﻟا)
(ﻲﻛذﻟا
ﺔﻣﻼﻌﻟا لﻣﺣﺗ ﻲﺗﻟا زرطﻟا ﻲﻓ طﻘﻓ ةزﯾﻣﻟا هذھ رﻓوﺗﺗ
c
وأ
d
.
مادﺧﺗﺳا ءﺎﻧﺛأ كﮭﺟاوﺗ ﻲﺗﻟا تﻼﻛﺷﻣﻟا صﯾﺧﺷﺗﻟ ةزﯾﻣﻟا هذﮭﺑ ﺔﻧﺎﻌﺗﺳﻻا كﻧﻛﻣﯾ
.ﺎﮭﻠﺣو زﺎﮭﺟﻟا
ﺔﻛﺑﺷ رﻓوﺗ مدﻋ ،رﺻﺣﻟاWi-Fi ﺔﻛﺑﺷﺑ لﺎﺻﺗﻻا عﺎطﻘﻧا وأ Wi-Fi وأ
مﻧﺗ ﻻ بﺎﺑﺳأ هذھو ﻖﯾﺑطﺗﻟا رﻓوﺗ مدﻋ وأ تﺎﻘﯾﺑطﺗﻟا رﺟﺗﻣﻟ ﺔﯾﻠﺣﻣﻟا ﺔﺳﺎﯾﺳﻟا
نﻣ رﯾﺻﻘﺗ نﻋLGE.
ةزﯾﻣﻟا هذھ ضرﻌﺗﺗ دﻗ
.ﺎﮭﯾﻓ نﻛﺳﺗ ﻲﺗﻟا ﺔﻘطﻧﻣﻠﻟ
ﻖﯾﺑطﺗ مادﺧﺗﺳاLG ThinQ صﯾﺧﺷﺗ ضرﻐﺑ
تﻼﻛﺷﻣﻟا
ﻖﯾﺑطﺗ مادﺧﺗﺳﺎﺑ ﻲﻛذ فﺗﺎھ ﻰﻟإ ﺎﮭﺣﻼﺻإو ءﺎطﺧﻷا فﺎﺷﻛﺗﺳا تﺎﻧﺎﯾﺑ لﻘﻧ
LG
Smart Diagnosis
"
ﺔﻛﺑﺷﺑ دوزﻣﻟا زﺎﮭﺟﻟا مادﺧﺗﺳا ءﺎﻧﺛأ ﺔﻠﻛﺷﻣ تﮭﺟاو اذإWi-Fi نﻛﻣﯾ ﺎﮭﻧﯾﺣﻓ ،
LG ThinQ
.
ThinQ
.
" ةزﯾﻣ رﺗﺧاو
ﻖﯾﺑطﺗ ﻲﻓ ةدراوﻟا تﺎﻣﯾﻠﻌﺗﻟا ﻊﺑﺗا .ﺔﻣﺋﺎﻘﻟا نﻣ
LG ThinQ
LG ThinQ
ﻰﻠﻋ Apple App Store وأ Google
دﻌﺑ نﻋ زﺎﮭﺟﻟا مادﺧﺗﺳا
لﯾﻐﺷﺗ ﺔﺑﻗارﻣ ﺎًﺿﯾأ كﻧﻛﻣﯾ .دﻌﺑ نﻋ كزﺎﮭﺟ ﻲﻓ مﻛﺣﺗﻠﻟ ﺎًﯾﻛذ ﺎًﻔﺗﺎھ مدﺧﺗﺳا
.ةرودﻠﻟ ﻲﻘﺑﺗﻣﻟا تﻗوﻟا ﻰﻠﻋ فرﻌﺗﻠﻟ ةرودﻟا
• ﻻ لﺎﺛﻣﻟا لﯾﺑﺳ ﻰﻠﻋ ﺔﯾﺟرﺎﺧ لﻣاوﻌﻟ دوﻌﯾ كﻟذو ﺔﻣدﺧﻟا هذھ لﻣﻌﺗ ﻻ دﻗ
.لﺳﻐﻟا ضوﺣ ﻲﻓ سﺑﻼﻣﻟا ﻊﺿ
• ﺎًﻘﻓو ﺎﮭﻠﻛﺷ فﻠﺗﺧﯾ دﻗو راذﻧإ ﻖﺑﺎﺳ نود تارﯾﻐﺗﻟ
رزﻟا ﻰﻠﻋ طﻐﺿا
Power(ﺔﻗﺎطﻟا)
.
ةدﻣﻟ
.ﻲﻛذﻟا كﻔﺗﺎھ ﻰﻠﻋ
• ﻖﯾﺑطﺗ لﯾﻐﺷﺗﺑ مﻗ
لﯾﻐﺷﺗ ءدﺑﻟ زﺎﮭﺟﻟا رظﺗﻧﯾﺳﻓ ،ةرودﻟا أدﺑﺗ مﻟ لﺎﺣ ﻲﻓ .
.ﺔﻔﯾظوﻟا هذھ لﯾطﻌﺗ وأ ﻖﯾﺑطﺗﻟا نﻣ دﻌُﺑ نﻋ ﺎﮭﻠﯾﻐﺷﺗ فﺎﻘﯾإ مﺗﯾ ﻰﺗﺣ ةرودﻟا
Remote Start(دﻌﺑ نﻋ ءدﺑﻟا)
LG ThinQ
رز ﻰﻠﻋ رارﻣﺗﺳﻻا ﻊﻣ طﻐﺿا
ﻖﯾﺑطﺗﻟا نﻣ تارودﻟا ىدﺣإ أدﺑا
LG ThinQ
ﻖﯾﺑطﺗ نﻋ ثﺣﺑا
Play Store.ﮫﺗﯾﺑﺛﺗو ﻖﯾﺑطﺗﻟا لﯾزﻧﺗﻟ تﺎﻣﯾﻠﻌﺗﻟا ﻊﺑﺗا .ﻲﻛذ فﺗﺎھ ﻰﻠﻋ نﻣ
Remote Start(دﻌﺑ نﻋ ءدﺑﻟا)
ﺔﻔﯾظوﻟا هذھ مادﺧﺗﺳا
1
• دﻧﻋ عزوﻣﻟا ﻲﻓ ﺔﺑﺳﺎﻧﻣﻟا ﺔﻘطﻧﻣﻟا ﻰﻟإ شﺎﻣﻘﻟا مﻌﻧﻣ وأ ضﯾﺑﻣﻟا فﺿأ
.ﺔﺟﺎﺣﻟا
2
3
3.دﻌُﺑ نﻋ مﻛﺣﺗﻟا ﺔﻔﯾظو نﯾﻛﻣﺗﻟ ٍناوﺛ
4
• فﺗﺎﮭﻟا ﻖﯾﺑطﺗ نﻣ ةرود أدﺑﺗ نأ كﻧﻛﻣﯾ ،ﺔﻔﯾظوﻟا هذھ لﯾﻐﺷﺗ مﺗﯾ نأ درﺟﻣﺑ
ﻲﻛذﻟا
•.دﻌُﺑ نﻋ ةرودﻟا لﯾﻐﺷﺗ ءدﺑ ﻊﯾطﺗﺳﺗ نﻠﻓ ،ﺎًﺣوﺗﻔﻣ بﺎﺑﻟا نﺎﻛ اذإ
Page 65

ﺔﯾﻛذﻟا فﺋﺎظوﻟا
ﺔظﺣﻼﻣ
ﺔظﺣﻼﻣ
ﺔظﺣﻼﻣ
28
ﺔﯾﻛذﻟا فﺋﺎظوﻟا
AR
ﻖﯾﺑطﺗ مادﺧﺗﺳا لﺑﻗLG ThinQ
ﺔﻛﺑﺷ) ﻲﻛﻠﺳﻼﻟا ﮫﯾﺟوﺗﻟا زﺎﮭﺟو زﺎﮭﺟﻟا نﯾﺑ ﺔﻓﺎﺳﻣﻟا نﻣ دﻛﺄﺗWi-Fi.(
ًﻼﯾوط ﺎًﺗﻗو لﯾﺟﺳﺗﻟا قرﻐﺗﺳﯾ دﻗ .ﺔﻔﯾﻌﺿ ةرﺎﺷﻹا ةوﻗ ﺢﺑﺻﺗﺳ ،مزﻼﻟا
.تﯾﺑﺛﺗﻟا لﺷﻔﯾ دﻗ وأ
كﻔﺗﺎھ ﻰﻠﻋ
لوﻣﺣﻣﻟا فﺗﺎﮭﻟا تﺎﻧﺎﯾﺑ
ﺔﯾوﻠﺧﻟا تﺎﻧﺎﯾﺑﻟا
وأ
.ﻲﻛﻠﺳﻼﻟا ﮫﯾﺟوﺗﻟا زﺎﮭﺟﺑ ﻲﻛذﻟا كﻔﺗﺎھ لّﺻو
قﻼﻏﺈﺑ مﻗ
.ﻲﻛذﻟا
•.زارطﻟا بﺳﺣ تازﯾﻣﻟا رﯾﻐﺗﺗ دﻗ
.ﻲﻛذ فﺗﺎھ مادﺧﺗﺳﺎﺑ زﺎﮭﺟﻟا ﻊﻣ لﺻاوﺗﻟﺎﺑ كﻟ
LG ThinQ
ﻖﯾﺑطﺗLG ThinQ
ﻖﯾﺑطﺗ ﺢﻣﺳﯾ
ﻖﯾﺑطﺗ ﺎﯾازﻣLG ThinQ
1
• نﻣ رﺛﻛأ ةدﯾﻌﺑ ﻲﻛﻠﺳﻼﻟا ﮫﯾﺟوﺗﻟا زﺎﮭﺟو زﺎﮭﺟﻟا نﯾﺑ ﺔﻓﺎﺳﻣﻟا تﻧﺎﻛ اذإ
2
3
.ﺔﻣﺋﻼﻣﻟا ﺔﯾﻛذﻟا صﺋﺎﺻﺧﻟا مادﺧﺗﺳﺎﺑ ﻲﻛذ فﺗﺎھ رﺑﻋ زﺎﮭﺟﻟا ﻊﻣ لﺻاوﺗ
LG ThinQ
.
تارودﻟا ﻲﻓ ﺎﮭﻧﯾﻣﺿﺗ مﺗﯾ مﻟ ﻲﺗﻟا ﺔﺻﺎﺧﻟاو ةدﯾدﺟﻟا تارودﻟا لﯾزﻧﺗ كﻧﻛﻣﯾ
تارودﻟا نﻣ ﺔﻋوﻧﺗﻣ ﺔﻋوﻣﺟﻣ لﯾزﻧﺗ حﺎﺟﻧﺑ ﺎﮭﻠﯾﺟﺳﺗ مﺗ ﻲﺗﻟا ةزﮭﺟﻸﻟ نﻛﻣﯾ
ﺎﮭﻠﯾزﻧﺗ مﺗ ﻲﺗﻟا ةرودﻟﺎﺑ زﺎﮭﺣﻟا ظﻔﺗﺣﯾ ،زﺎﮭﺟﻟا ﻲﻓ ةرودﻟا لﯾزﻧﺗ لﺎﻣﺗﻛا درﺟﻣﺑ
Tub
اًرﺧؤﻣ ﺎﮭﻣادﺧﺗﺳا مﺗ ﻲﺗﻟا تارودﻠﻟ ﺔﻗﺎطﻟا كﻼﮭﺗﺳا نﻣ ﺔﻔﯾظوﻟا هذھ ﻖﻘﺣﺗﺗ
ﻖﯾﺑطﺗ لﻼﺧ نﻣ دﻌﺑ نﻋ زﺎﮭﺟﻟا ﻲﻓ مﻛﺣﺗﻟا كﻟ ﺢﯾﺗﯾ
ﺔﻔﯾظو لﯾﻐﺷﺗ لﺑﻗ ﺔﯾﻘﺑﺗﻣﻟا تارودﻟا ددﻋ نﻋ ﺔﻔﯾظوﻟا هذھ رﮭظُﺗ
Remote Start(دﻌﺑ نﻋ ءدﺑﻟا)
Download Cycle(ةرودﻟا لﯾﻣﺣﺗ)
.زﺎﮭﺟﻟا ﻰﻠﻋ ﺔﯾﺳﺎﺳﻷا
.زﺎﮭﺟﻠﻟ ﺔﻣﻣﺻﻣﻟا ﺔﺻﺻﺧﺗﻣﻟا
.ةدﯾدﺟ ةرود لﯾزﻧﺗ مﺗﯾ ﻰﺗﺣ
ضوﺣﻟا فﯾظﻧﺗ ﻰﻠﻋ بﯾردﺗﻟا
.
.يرﮭﺷﻟا كﻼﮭﺗﺳﻻا طﺳوﺗﻣو
Clean(ضوﺣﻟا فﯾظﻧﺗ)
ﺔﻗﺎطﻟا ﺔﺑﻗارﻣ
•.ةرﻣ لﻛ ﻲﻓ زﺎﮭﺟﻟا ﻲﻓ ةدﺣاو ةرود نﯾزﺧﺗ نﻛﻣﯾ
اذإ ﺎﻣ مﻛﺣﺗﻟا ﺔﺣوﻟ ﻰﻠﻋ
زﺎﮭﺟ لﯾﻟد ﻊﺟار وأ تﻧرﺗﻧﻹا ﺔﻣدﺧ دوزﻣﺑ لﺻﺗا ،كﺑ ﺔﺻﺎﺧﻟا ﺔﻛﺑﺷﻟا
يأ وأ ﺔﻛﺑﺷﻟﺎﺑ لﺎﺻﺗﻻا لﻛﺎﺷﻣ يأ نﻋ ًﻻوؤﺳﻣ سﯾﻟ
.ﺔﻛﺑﺷﻟﺎﺑ لﺎﺻﺗﻻا ﻖﯾرط نﻋ تﺟﺗﻧ ءﺎطﺧأ وأ ،لﻠﺧ وأ ،لﺎطﻋأ
f
.ﺎًﺋﯾﺿﻣ نﺎﻛ
.ﻲﻛﻠﺳﻼﻟا ﮫﯾﺟوﺗﻟا
LG ThinQ
ﺔﯾوﻘﺗ زﺎﮭﺟ ِرﺗﺷا .ﮫﯾﺟوﺗﻟا زﺎﮭﺟ نﻋWi-Fi ةوﻗ نﯾﺳﺣﺗﻟ (ىدﻣﻟا ﻊﺳوﻣ)
ﺔﻛﺑﺷﺑ لﺎﺻﺗﻻا مﺗﯾ ﻻ دﻗWi-Fi ﺔﺋﯾﺑ ةدوﺟ بﺳﺣ لﺎﺻﺗﻻا ﻊطﻗ مﺗﯾ دﻗ وأ
.ﺔﯾﻠﺣﻣﻟا ﺔﻛﺑﺷﻟا
بﺳﺣ ﺎﮭﻠﺣو زﺎﮭﺟﻟا تﻼﻛﺷﻣ صﯾﺧﺷﺗ لوﺣ ةدﯾﻔﻣ تﺎﻣوﻠﻌﻣ ﺔﻔﯾظوﻟا هذھ رﻓوﺗ
• لﺎﺻﺗا نﻣ ﻖﻘﺣﺗﻠﻟWi-Fi زﻣر صﺣﻔﺑ مﻗ ،
• تﺎﻛﺑﺷ زﺎﮭﺟﻟا مﻋدﯾWi-Fi ددرﺗﺑ 2.4 ددرﺗ ﺔﻓرﻌﻣﻟ .طﻘﻓ زﺗرھﺎﺟﯾﺟ
تارﺎﻌﺷإ مﻼﺗﺳا كﻧﻛﻣﯾ ،زﺎﮭﺟﻟا ﻲﻓ لطﻋ ثودﺣ وأ ةرودﻟا نﻣ ءﺎﮭﺗﻧﻻا دﻧﻋ
• ﻖﯾﺑطﺗ
LG ThinQ
• ﺔﻛﺑﺷﺑ لﺎﺻﺗا ﺔﻠﻛﺷﻣ زﺎﮭﺟﻟا ىدﻟ نﺎﻛ اذإWi-Fi اًدﺟ اًدﯾﻌﺑ نوﻛﯾ دﻗ دﻗ ،
ةرﺎﺷإWi-Fi.
•
نﻣ ﮫﻠﺟﺳو
•.تﻧرﺗﻧﻹا ﺔﻣدﺧ دوزﻣﻟ ﺎًﻘﻓو ﺢﯾﺣﺻ لﻛﺷﺑ ﺔﻛﺑﺷﻟﺎﺑ لﺎﺻﺗﻻا لﻣﻌﯾ ﻻ دﻗ
•.ءطﺑﺑ لﻣﻌﺗ ﺔﯾﻛﻠﺳﻼﻟا ﺔﻛﺑﺷﻟا ﺔﻣدﺧ ﺔطﯾﺣﻣﻟا ﺔﯾﻛﻠﺳﻼﻟا ﺔﺋﯾﺑﻟا لﻌﺟﺗ نأ نﻛﻣﯾ
.ﻖﯾﺑطﺗﻟا ﻲﻓو زﺎﮭﺟﻟا ﻰﻠﻋ ةددﻌﺗﻣ تارﺎﯾﺧ نﯾﯾﻌﺗﺑ كﻟ ﺢﻣﺳﯾ
ﻖﯾﺑطﺗ نﺎﻛ وﻟ ﻰﺗﺣ تارﺎﻌﺷﻹا هذھ ﻖﻠطﻧﺗ .ﻲﻛذﻟا كﻔﺗﺎھ ﻰﻠﻋ
LG ThinQ
ﻖﯾﺑطﺗ نﻣ لﺟﺳﻣﻟا زﺎﮭﺟﻟا ﺢﺳﻣﺑ مﻗ ،رورﻣﻟا
Smart Diagnosis(ﻲﻛذﻟا صﯾﺧﺷﺗﻟا)
.مادﺧﺗﺳﻻا طﻣﻧ
تادادﻋﻹا
تﺎﮭﯾﺑﻧﺗﻟا لﺎﺳرإ
.ﺎًﻘﻠﻐﻣ
• ﺔﻣﻠﻛ وأ ،ﺔﻣدﺧﻟا دوزﻣ وأ ،كﺑ صﺎﺧﻟا ﻲﻛﻠﺳﻼﻟا ﮫﯾﺟوﺗﻟا زﺎﮭﺟ ترﯾﻏ اذإ
.دﯾدﺟ
•.نﯾﻣدﺧﺗﺳﻣﻟا رﺎﻌﺷإ نودﺑ زﺎﮭﺟﻟا نﯾﺳﺣﺗ ضارﻏﻷ رﯾﯾﻐﺗﻠﻟ ﻖﯾﺑطﺗﻟا ﻊﺿﺧﯾ
Page 66

AR
ﺔظﺣﻼﻣ
27
لﯾﻐﺷﺗﻟا
تادادﻋﻹا
لﺎﻔطﻷا ةزﯾﻣﻟا هذھ ﻊﻧﻣﺗ نأ نﻛﻣﯾ .مﻛﺣﺗﻟا تاودأ لﯾطﻌﺗﻟ رﺎﯾﺧﻟا اذھ مدﺧﺗﺳا
.زﺎﮭﺟﻟا لﯾﻐﺷﺗ وأ تارودﻟا رﯾﯾﻐﺗ نﻣ
ﻰﻠﻋ بوﺎﻧﺗﻟﺎﺑ نارﮭظﯾ ﻲﻘﺑﺗﻣﻟا تﻗوﻟاو
.ىرﺧأ فﺋﺎظو يأ ﻰﻟإ لوﺻوﻟا نﻣ نﻛﻣﺗﺗﻟ ﺔﻔﯾظوﻟا هذھ لﯾﻌﻔﺗ
رزو
ةدﻣﻟ ﺎًﻌﻣ
.ضرﻌﻟا ﺔﺷﺎﺷ ﻰﻠﻋ
ةدﻣﻟ ﺎًﻌﻣ
Rinse(فطﺷ)
CL
رزو
Rinse(فطﺷ)
]L
.ﺔﻔﯾظوﻟا هذھ لﯾﻐﺷﺗو لﯾﺳﻐﻟا ءﺎﻧﺛأ ﺔﺷﺎﺷﻟا
.لﯾﻐﺷﺗﻠﻟ ﺔﻗﺎطﻟا رز طﻐﺿا
Wash(لﯾﺳﻏ)
.ﺔﻔﯾظوﻟا هذھ لﯾﻌﻔﺗﻟ ٍناوﺛ ثﻼﺛ
.لﯾﻐﺷﺗﻠﻟ ﺔﻗﺎطﻟا رز طﻐﺿا
Wash(لﯾﺳﻏ)
.ﺔﻔﯾظوﻟا هذھ لﯾﻌﻔﺗ فﺎﻘﯾﻹ ٍناوﺛ ثﻼﺛ
Child Lock(لﺎﻔطﻷا لﻔﻗ)
Power(ﺔﻗﺎطﻟا)
.
مﻛﺣﺗﻟا ﺔﺣوﻟ لﻔﻗ
رز ﻰﻠﻋ طﻐﺿا
• رﮭظﯾﺳو ،ةرﻓﺎﺻ توﺻ ردﺻﯾﺳ
مﻛﺣﺗﻟا ﺔﺣوﻟ لﻔﻗ ءﺎﻐﻟإ
رز ﻰﻠﻋ طﻐﺿا
• رز ءﺎﻧﺛﺗﺳﺎﺑ رارزﻷا ﻊﯾﻣﺟ لﻔﻗ مﺗﯾ ،ﺔﻔﯾظوﻟا هذھ نﯾﯾﻌﺗ مﺗﯾ نأ درﺟﻣﺑ
• .،مﻛﺣﺗﻟا لﺋﺎﺳو قﻼﻏإ دﻧﻋ
• ءﺎﻐﻟإ بﺟﯾ .ﺔﻔﯾظوﻟا هذھ نﯾﯾﻌﺗ ةدﺎﻋإ ﻰﻟإ ﺔﻗﺎطﻟا لﯾﻐﺷﺗ فﺎﻘﯾإ يدؤﯾ نﻟ
1
2
1
2
Page 67

لﯾﻐﺷﺗﻟا
ﺔظﺣﻼﻣ
ﺔظﺣﻼﻣ
ﺔظﺣﻼﻣ
26
AR
ﺔﯾﺳﺎﺳﻷا تارﺎﯾﺧﻟا مادﺧﺗﺳا
:ﺔﯾﺗﻵا ﺔﯾﺳﺎﺳﻷا تارﺎﯾﺧﻟا مادﺧﺗﺳﺎﺑ ﺞﻣارﺑﻟا صﯾﺻﺧﺗ كﻧﻛﻣﯾ
ﺞﻣﺎﻧرﺑ ءدﺑ دﻌﺑ ﻰﺗﺣ ﺎﮭﺗﻟازإ وأ سﺑﻼﻣ ﺔﻓﺎﺿﻹ رﺎﯾﺧﻟا اذھ مادﺧﺗﺳا كﻧﻛﻣﯾ
Power(ﺔﻗﺎطﻟا)
.
.
.ﺔﺟﺎﺣﻟا بﺳﺣ
بﺳﺣ ﺎﮭﺟرﺧأ وأ سﺑﻼﻣﻟا ﻊطﻗ فﺿأو ﺎًﯾﺗاذ ﺢﺗﻔُﯾ ﺎﻣدﻌﺑ بﺎﺑﻟا ﺢﺗﻓا
.
Start/Pause(تﻗؤﻣ فﺎﻘﯾإ/ءدﺑ)
.ءﺎﻧﺛﻷا هذھ ﻲﻓ سﺑﻼﻣ ﻊطﻗ ﺔﻓﺎﺿإ نﻛﻣﯾ ﻻو .ةرارﺣﻟا
Start/Pause(تﻗؤﻣ فﺎﻘﯾإ/ءدﺑ)
Add Item(رﺻﻧﻋ ﺔﻓﺎﺿا)
رز ﻰﻠﻋ طﻐﺿا مﺛ بﺎﺑﻟا ﻖﻠﻏأ
Add Item(رﺻﻧﻋ ﺔﻓﺎﺿا)
.لﯾﺳﻐﻟا
رزﻟا ﻰﻠﻋ طﻐﺿا
.لﯾﺳﻐﻟا ﺞﻣﺎﻧرﺑ ددﺣ
رزﻟا ﻰﻠﻋ طﻐﺿا
رزﻟا ﻰﻠﻋ طﻐﺿا
.ﺔﺟﺎﺣﻟا
و ،
.ﺔﺟﺎﺣﻟا بﺳﺣ (
1
2
3
4
5
6
ةدﺎﻋإو ﺔﻟﺎﺳﻐﻟا فﺎﻘﯾﻹ نﯾﺗرﻣ
• ﺔﺟرد عﺎﻔﺗرا وأ هﺎﯾﻣﻟا ىوﺗﺳﻣ عﺎﻔﺗرا دﻧﻋ ﺎًﻘﻠﻐﻣ بﺎﺑﻟا لظﯾ ،نﺎﻣﻸﻟ
.لﯾﺳﻐﻟا ﺞﻣﺎﻧرﺑ ددﺣ
) لﯾﺳﻐﻟا ﺞﻣﺎﻧرﺑ صﺻﺧ
و ،
Rinse(فطﺷ)
.
Wash(لﯾﺳﻏ)
و ،
Temp(ةرارﺣﻟا ﺔﺟرد) .
Start/Pause(تﻗؤﻣ فﺎﻘﯾإ/ءدﺑ)
رزﻟا ﻰﻠﻋ طﻐﺿا
4
5
Spin(نارود)
6
طﻘﻓ نارودﻟا ﺔﻔﯾظو مادﺧﺗﺳا
.لﺳﻐﻟا ضوﺣ لﺧاد ﺎﮭﻌﺿو سﺑﻼﻣﻟا ز
رزﻟا ﻰﻠﻋ طﻐﺿا
Power(ﺔﻗﺎطﻟا)
.
رزﻟا ﻰﻠﻋ طﻐﺿا
Spin(نارود)
.
رزﻟا ﻰﻠﻋ طﻐﺿا ،كﻟذ
Power(ﺔﻗﺎطﻟا)
رزﻟا ﻰﻠﻋ طﻐﺿا
.
Start/Pause(تﻗؤﻣ فﺎﻘﯾإ/ءدﺑ)
ﮭﺟ
ّ
ِ
•.فظﻧﻣﻟا فﺿﺗ ﻻو لﯾﺳﻐﻟا ﺞﻣﺎﻧرﺑ ددﺣﺗ ﻻ
.ﺎﮭﻠﯾﻐﺷﺗ
1
2
3
4
• ثدﺣ اذإو .طﻘﻓ نارودﻟا رﺎﯾﺧ دﯾدﺣﺗ ﻊﯾطﺗﺳﺗ نﻠﻓ ،لﯾﺳﻐﻟا ﺞﻣﺎﻧرﺑ تددﺣ اذإ
Delay End(ﻰﮭﺗﻧا رﯾﺧﺄﺗﻟا تﻗو)
ةرﺗﻔﻟا دﻌﺑ ﻲﮭﺗﻧﯾو ﺎًﯾﺋﺎﻘﻠﺗ زﺎﮭﺟﻟا لﯾﻐﺷﺗ أدﺑﯾ ثﯾﺣﺑ ﺔﻔﯾظوﻟا هذھ طﺑﺿ كﻧﻛﻣﯾ
.ةددﺣﻣﻟا ﺔﯾﻧﻣزﻟا
رزﻟا ﻰﻠﻋ طﻐﺿا
Power(ﺔﻗﺎطﻟا)
.
.لﯾﺳﻐﻟا ﺞﻣﺎﻧرﺑ ددﺣ
.ﺔﺟﺎﺣﻟا بﺳﺣ
.
.ىرﺧأ لﻣاوﻋو ،سﺑﻼﻣﻟاو ،ءﺎﻣﻟا ةرارﺣ ﺔﺟرد بﺑﺳﺑ ﻲﻠﻌﻔﻟا لﯾﻐﺷﺗﻟا
Power(ﺔﻗﺎطﻟا)
.
Delay End(ﻰﮭﺗﻧا رﯾﺧﺄﺗﻟا تﻗو)
Start/Pause(تﻗؤﻣ فﺎﻘﯾإ/ءدﺑ)
رزﻟا ﻰﻠﻋ طﻐﺿا
رزﻟا ﻰﻠﻋ طﻐﺿا
ﺔﺻﺎﺧ تارﺎﯾﺧ مادﺧﺗﺳا
:ﺔﯾﺗﻵا ﺔﺻﺎﺧﻟا تارﺎﯾﺧﻟا مادﺧﺗﺳﺎﺑ ﺞﻣارﺑﻟا صﯾﺻﺧﺗ كﻧﻛﻣﯾ
1
.لﯾﺳﻐﻟا ﺞﺋﺎﺗﻧ سﻔﻧ رﯾﻓوﺗ ﻊﻣ ﺞﻣﺎﻧرﺑﻟا تﻗو نﻣ رﺎﯾﺧﻟا اذھ ﺔﻓﺎﺿإ لﻠﻘﯾ
2
3
.ﺔﺻﺎﺧﻟا تارﺎﯾﺧﻟا دﺣأ مادﺧﺗﺳﻻ ﺔﯾﻟﺎﺗﻟا تاوطﺧﻟا ﻊﺑﺗا
Power(ﺔﻗﺎطﻟا)
.
4
وأ
Spin(نارود)
(
• تﻗو فﻠﺗﺧﯾ ﺎﻣﺑر .ءدﺑﻟا تﻗو سﯾﻟو ،ﺞﻣﺎﻧرﺑﻟا ءﺎﮭﺗﻧا تﻗو وھ رﯾﺧﺄﺗﻟا تﻗو
• رز ﻰﻠﻋ طﻐﺿﻟا بﺟﯾ ،ﺔﻔﯾظوﻟا هذھ ءﺎﻐﻟﻹ
•.ﺔﻔﯾظوﻟا هذھ ﻊﻣ لﺋﺎﺳﻟا فظﻧﻣﻟا مادﺧﺗﺳا بﻧﺟﺗ
Turbo Wash لﺳﻏ)
.
رز ﻰﻠﻋ طﻐﺿا ،ﺔﺻﺎﺧ تارﺎﯾﺧ مادﺧﺗﺳﻻ
Temp(ةرارﺣﻟا ﺔﺟرد) .
Start/Pause(تﻗؤﻣ فﺎﻘﯾإ/ءدﺑ)
Turbo Wash(وﺑرﯾﺗ لﺳﻏ)
رزﻟا ﻰﻠﻋ طﻐﺿا
.لﯾﺳﻐﻟا ﺞﻣﺎﻧرﺑ ددﺣ
) لﯾﺳﻐﻟا ﺞﻣﺎﻧرﺑ ر
.ﺔﺟﺎﺣﻟا بﺳﺣ
(وﺑرﯾﺗ
.
رزﻟا ﻰﻠﻋ طﻐﺿا
1
2
3
ﯾﻏ
ّ
ِ
4
5
Page 68

AR
ﺔظﺣﻼﻣ
25
لﯾﻐﺷﺗﻟا
ﺔﯾﻓﺎﺿإ فﺋﺎظوو تارﺎﯾﺧ
.ﺞﻣارﺑﻟا صﯾﺻﺧﺗﻟ ﺔﯾﻓﺎﺿﻹا فﺋﺎظوﻟاو تارﺎﯾﺧﻟا مادﺧﺗﺳا كﻧﻛﻣُﯾ
لﯾﺳﻐﻟا ﺞﻣﺎﻧرﺑ صﯾﺻﺧﺗ
تادادﻋﻹا هذھ صﯾﺻﺧﺗ كﻟذﻛ كﻧﻛﻣﯾو .ﺔﯾﺿارﺗﻓا تادادﻋﺈﺑ ﺞﻣﺎﻧرﺑ لﻛ زﯾﻣﺗﯾ
خﺎﺳﺗﻻا ﺔﺟرد دﯾدﺣﺗ مﺗﯾ نأ ﻰﻟإ تارﻣ ةدﻋ
خﺎﺳﺗﻻا دﯾدﺷ لﯾﺳﻐﻠﻟ :
خﺎﺳﺗﻻا دﯾدﺷ لﯾﺳﻐﻠﻟ :
خﺎﺳﺗﻻا دﯾدﺷ لﯾﺳﻐﻟاو يدﺎﻌﻟا لﯾﺳﻐﻠﻟ :
يدﺎﻌﻟا ﺦﺳﺗﻣﻟا لﯾﺳﻐﻠﻟ :
Baby Care ﺔﯾﺎﻧﻋ)
Rinse(فطﺷ)
.
.تﺎﻔظﻧﻣﻟا ﺔﯾﺳﺎﺳﺣ نﻣ نوﻧﺎﻌﯾ نﯾذﻟا صﺎﺧﺷﻸﻟ ﺔﻔﯾظوﻟا هذﮭﺑ ﻰﺻوﯾ
و
خﺎﺳﺗﻻا لﯾﻠﻗ لﯾﺳﻐﻠﻟ :
رزﻟا ﻰﻠﻋ طﻐﺿﻟﺎﺑ فطﺷﻟا تارﻣ ددﻋ دﯾدﺣﺗ كﻧﻛﻣﯾ
.رارزﻷا هذھ مادﺧﺗﺳﺎﺑ
رزﻟا ﻰﻠﻋ طﻐﺿا
Wash(لﯾﺳﻏ)
Soak(ﻊﻘﻧ)
Pre Wash( ﻲﺋدﺑﻣ لﯾﺳﻏ)
Intensive(فﯾﺛﻛ)
Normal(يدﺎﻋ لﯾﺳﻏ)
Rinse+Spin(نارود + فطﺷ)
(لﺎﻔطﻷا سﺑﻼﻣﺑ
.
Light(فﯾﻔﺧ)
Wash(لﯾﺳﻏ)
.ﺔﺑوﻠطﻣﻟا
- ﻲﺟﻣﺎﻧرﺑ ادﻋ ﺎﻣ لﯾﺳﻏ ﺞﻣﺎﻧرﺑ لﻛ لﻼﺧ ﺎًﯾﺋﺎﻘﻠﺗ رﺎﯾﺧﻟا اذھ دﯾدﺣﺗ مﺗﯾ
Rinse(فطﺷ)
.
Start/Pause(تﻗؤﻣ فﺎﻘﯾإ/ءدﺑ)
رزﻟا ﻰﻠﻋ طﻐﺿا
5
طﻘﻓ فﯾﻔﺟﺗﻟا ﺔﻔﯾظو مادﺧﺗﺳا
.رﻣﻷا
1
ﮭﺟ
ّ
ِ
• ﻲﻓ ﻊطﻘﻟا ﻊﯾﻣﺟ نوﻛﺗ نأ بﺟﯾ ،ﺔﻔﻔﺟﻣ ﺎﮭﻠﻣﻛﺄﺑ ﺔﻟوﻣﺣﻟا نوﻛﺗﻟو
• رودﺗ ﻰﺗﺣ ﺔﺣﺎﺳﻣ رﯾﻓوﺗ بﺟﯾ ذإ .لﺳﻐﻟا ضوﺣ ﻰﻠﻋ ﺔﻟوﻣﺣﻟا دزﺗ ﻻ
2
•.فظﻧﻣﻟا فﺿﺗ ﻻو لﯾﺳﻐﻟا ﺞﻣﺎﻧرﺑ ددﺣﺗ ﻻ
3
4
.لﺳﻐﻟا ضوﺣ لﺧاد ﺎﮭﻌﺿو سﺑﻼﻣﻟا ز
.ﺔﻓﺎﺛﻛﻟاو ةدﺎﻣﻟا ﻲﻓ ﺔﮭﺑﺎﺷﺗﻣ ﺔﻟوﻣﺣﻟا
.ﺔﯾرﺣﺑ سﺑﻼﻣﻟا
•
•
•
•
مزﻟ اذإ
•
•.ددﺣﻣﻟا ﺞﻣﺎﻧرﺑﻟا بﺳﺣ دﯾدﺣﺗﻠﻟ ﺔﻠﺑﺎﻘﻟا تارﺎﯾﺧﻟا فﻠﺗﺧﺗ
.
.
Time Dry(فﺎﺟ تﻗو)
وأ
Start/Pause(تﻗؤﻣ فﺎﻘﯾإ/ءدﺑ)
Power(ﺔﻗﺎطﻟا)
Dry(فﯾﻔﺟﺗ)
رزﻟا ﻰﻠﻋ طﻐﺿا
رزﻟا ﻰﻠﻋ طﻐﺿا
رزﻟا ﻰﻠﻋ طﻐﺿا
.تارﻣ ةدﻋ رزﻟا اذھ ﻰﻠﻋ طﻐﺿﻟﺎﺑ نارودﻟا ةدﺷ ىوﺗﺳﻣ دﯾدﺣﺗ كﻧﻛﻣﯾ
.نارودﻟا ﺔﻋرﺳ دﯾدﺣﺗﻟ
.ددﺣﻣﻟا ﺞﻣﺎﻧرﺑﻠﻟ لﯾﺳﻐﻟا ةرارﺣ ﺔﺟرد رزﻟا اذھ ددﺣﯾ
بﻏرﺗ يذﻟا دادﻋﻹا ﺊﺿﯾ ﻰﺗﺣ
.ﺞﺋﺎﺗﻧﻟا لﺿﻓأ ﻰﻠﻋ لوﺻﺣﻠﻟ سﺑﻼﻣﻟا ﺞﯾﺳﻧﺑ ﺔﯾﺎﻧﻌﻟا
Spin(نارود)
رزﻟا ﻰﻠﻋ طﻐﺿا
Temp(ةرارﺣﻟا ﺔﺟرد) .
.لﯾﺳﻐﻟا ﺞﻣﺎﻧرﺑ صﯾﺻﺧﺗﻟ ﺔﯾﻟﺎﺗﻟا تاوطﺧﻟا ﻊﺑﺗا
.لﺳﻐﻟا ضوﺣ لﺧاد ﺎﮭﻌﺿو سﺑﻼﻣﻟا ز
رزﻟا ﻰﻠﻋ طﻐﺿا
Power(ﺔﻗﺎطﻟا)
.
.فظﻧﻣﻟا فﺿأ
Spin(نارود)
Temp(ةرارﺣﻟا ﺔﺟرد) .
رز ﻰﻠﻋ طﻐﺿا
1
ﮭﺟ
ّ
ِ
2
3
.ﮫﺑ
• تﺎﻘﺻﻠﻣ ﻊﺑﺗاو .ﺎﮭﻠﺳﻐﺗ ﻲﺗﻟا ﺔﻟوﻣﺣﻟا عوﻧﻟ ﺔﺑﺳﺎﻧﻣﻟا ءﺎﻣﻟا ةرارﺣ ﺔﺟرد ددﺣ
Page 69

لﯾﻐﺷﺗﻟا
ﺔظﺣﻼﻣ
24
AR
ﺔﯾﺟﺎﺟزﻟا فﺎﯾﻟﻷا
نأ نﻛﻣﯾ .زﺎﮭﺟﻟا ﻲﻓ ﺔﯾﺟﺎﺟزﻟا فﺎﯾﻟﻷا نﻣ ﺔﻋوﻧﺻﻣﻟا ضارﻏﻷا فﻔﺟﺗ ﻻ
ﻲﻓ ﺎًﺟﯾﮭﺗ بﺑﺳﺗو كﺳﺑﻼﻣ ﻲﻓ زﺎﮭﺟﻟا ﻲﻓ ﺔﻛورﺗﻣﻟا جﺎﺟزﻟا تﺎﺋﯾزﺟ ﻖﺻﺗﻠﺗ
ةدﻣﻟ لطﻋ يأ نﻣ ﮫﺗﯾﺎﻣﺣﻟ فﯾﻔﺟﺗﻟا60.ﺔﯾﻧﺎﺛ
تﻗو ﻰﻠﻋ ددﺣﻣﻟا
فﯾﻔﺟﺗﻟاو ،ﺔﻟوﻣﺣﻟا مﺟﺣو ،شﺎﻣﻘﻟا عوﻧ رﺛؤﯾو .ﺔﯾﻟﻵا
.دﻠﺟﻟا
.ﺎًﻧﺧﺎﺳ زﺎﮭﺟﻟا
.فﯾﻔﺟﺗﻟا
فﯾﻔﺟﺗﻟا ﺞﻣﺎﻧرﺑ مادﺧﺗﺳا
:ﺔﯾﺗﻵا فﯾﻔﺟﺗﻟا فﺋﺎظو مادﺧﺗﺳﺎﺑ ﺞﻣارﺑﻟا صﯾﺻﺧﺗ كﻧﻛﻣﯾ
.ًﺔﻣﺎﻋ فﯾﻔﺟﺗﻠﻟ ﺔﻔﯾظوﻟا هذھ مدﺧﺗﺳا
.ﺔﻟوﻣﺣﻠﻟ ﻰﺻﻗﻷا دﺣﻠﻟ ﺎًﻘﻓو فﯾﻔﺟﺗﻟا تﻗو رﯾﻐﺗﻟ ﺔﻔﯾظوﻟا هذھ مدﺧﺗﺳا
:تارﺎﯾﺧﻟا نﯾﺑ لﻘﻧﺗﻠﻟ تارﻣ ةدﻋ
Time Dry(فﺎﺟ تﻗو)
فﯾﻔﺟﺗﻟاو لﯾﺳﻐﻟا ﺔﻔﯾظو مادﺧﺗﺳا
.لﺳﻐﻟا ضوﺣ لﺧاد ﺎﮭﻌﺿو سﺑﻼﻣﻟا ز
.ﺔﻓﺎﺛﻛﻟاو ةدﺎﻣﻟا ﻲﻓ ﺔﮭﺑﺎﺷﺗﻣ ﺔﻟوﻣﺣﻟا
Power(ﺔﻗﺎطﻟا)
.
.فظﻧﻣﻟا فﺿأو لﯾﺳﻐﻟا ﺞﻣﺎﻧرﺑ ددﺣ
Time Dry(فﺎﺟ تﻗو)
رزﻟا ﻰﻠﻋ طﻐﺿا
.ﺔﯾرﺣﺑ سﺑﻼﻣﻟا
رزﻟا ﻰﻠﻋ طﻐﺿا
ﮭﺟ
ّ
ِ
• ﻲﻓ ﻊطﻘﻟا ﻊﯾﻣﺟ نوﻛﺗ نأ بﺟﯾ ،ﺔﻔﻔﺟﻣ ﺎﮭﻠﻣﻛﺄﺑ ﺔﻟوﻣﺣﻟا نوﻛﺗﻟو
• رودﺗ ﻰﺗﺣ ﺔﺣﺎﺳﻣ رﯾﻓوﺗ بﺟﯾ ذإ .لﺳﻐﻟا ضوﺣ ﻰﻠﻋ ﺔﻟوﻣﺣﻟا دزﺗ ﻻ
•ةدﺋﺎﻣﻟا شرﺎﻔﻣو رﺋﺎﺗﺳﻟا
•مﺎﻣﺣﻟا دﺎﺟﺳ
فﯾﻔﺟﺗﻟا ﺞﻣﺎﻧرﺑ
فﯾﻔﺟﺗﻟا نﻋ ﺔﻣﺎﻋ ﺢﺋﺎﺻﻧ
تارﻌﺷﺗﺳﻣﻟا سﯾﻘﺗ .تﻻوﻣﺣﻟا مظﻌﻣ فﯾﻔﺟﺗﻟ ﺔﯾﺋﺎﻘﻠﺗﻟا ﺞﻣارﺑﻟا مدﺧﺗﺳا
ﺎﮭﺿﻔﺧ وأ فﯾﻔﺟﺗﻟا ةرارﺣ تﺎﺟرد ةدﺎﯾزﻟ مدﺎﻌﻟا ةرارﺣ ﺔﺟرد ﺔﯾﻧورﺗﻛﻟﻹا
.ةرارﺣﻟا ﺔﺟرد ﻲﻓ مﻛﺣﺗﻟا ىوﺗﺳﻣ ةدﺎﯾزو ﺔﺑﺎﺟﺗﺳﻻا تﻗو ﻊﯾرﺳﺗﻟ
• ﺔﺣورﻣ كرﺣﻣ لﯾﻐﺷﺗ نﻛﻣﯾ ،زﺎﮭﺟﻟا ﻲﻓ فﯾﻔﺟﺗﻟا ةرود لﯾﻐﺷﺗ فﺎﻘﯾإ دﻧﻋ
• وأ سﺑﻼﻣﻟا نوﻛﺗ دﻗ ثﯾﺣ ،زﺎﮭﺟﻟا نﻣ سﺑﻼﻣﻟا جارﺧإ دﻧﻋ رذﺣﻟا خوﺗ
.ﺔﯾرﺣﺑ نارودﻟا نﻣ ضارﻏﻷا نﻛﻣﺗﺗ نأ بﺟﯾو .لﺳﻐﻟا ضوﺣ لﺧاد
• ةرودﻟا ءﺎﻧﺛأ ﻲﻓ ﻲﻠﻌﻔﻟا فﯾﻔﺟﺗﻟا تﻗو نﻋ ردﻘُﻣﻟا فﯾﻔﺟﺗﻟا تﻗو فﻠﺗﺧﯾ
.
(crease reduction (
•.ﺔﻗﺎطﻟا دﯾﺷرﺗﻟ ﺎًﯾﻟآ فﯾﺷﻧﺗﻟا لﻣﻌﯾ ،طﻘﻓ فﯾﻔﺟﺗ ةرود دﯾدﺣﺗ دﻧﻋ
ﺔﯾﺻﺎﺧﻟا هذھ لﯾﻐﺷﺗ فﺎﻘﯾﻹ .سﺑﻼﻣﻟا نﻣ لﯾﺳﻐﻟا ضوﺣ ﻎﯾرﻔﺗ مﺗ اذإ ﻻإ
.سﺑﻼﻣﻟا نﻣ لﯾﺳﻐﻟا ضوﺣ ﻎﯾرﻔﺗﺑ مﻗو رز يأ ﻰﻠﻋ طﻐﺿا ،ﺔﯾﺋﺎﻘﻠﺗﻟا
ﻲﻓ ﺎﮭﻔﻔﺟو ﻲﻠﺻﻷا ﺎﮭﻠﻛﺷ ﻰﻟإ ﺎﮭﺑﺣﺳاو .ﺔﻓﺎﺟﻟا ﺔﯾﻓوﺻﻟا ضارﻏﻷا بﻠﻘﺗ ﻻ
Dry(فﯾﻔﺟﺗ)
]d
Start/Pause(تﻗؤﻣ فﺎﻘﯾإ/ءدﺑ)
ةدﻣﻟ لﯾﺳﻐﻟا ضوﺣ رودﯾﺳ4 سﺑﻼﻣﻟا دﯾﻌﺟﺗ نﻣ دﺣﻠﻟ ﻲﺋﺎﻘﻠﺗ لﻛﺷﺑ تﺎﻋﺎﺳ
ﺔﻛﯾﺣﻣﻟاو ﺔﺟوﺳﻧﻣﻟا داوﻣﻟا
ﺎًﻘﻓو ،ﮫﺗوﺎﻔﺗﻣ رﯾدﺎﻘﻣﺑ ،ﺔﻛﯾﺣﻣﻟاو ﺔﺟوﺳﻧﻣﻟا ضارﻏﻷا ضﻌﺑ شﻣﻛﻧﺗ نأ نﻛﻣﯾ
.ﺎﮭﻔﯾﻔﺟﺗ دﻌﺑ روﻔﻟا ﻰﻠﻋ ضارﻏﻷا هذھ دﯾدﻣﺗﺑ مﻗ
• :فﯾﻔﺟﺗﻟا تﻗو30/60/90/120/150ﺔﻘﯾﻗد
ﺔﯾﻋﺎﻧﺻﻟا فﺎﯾﻟﻷاو ﺔﻣﺋادﻟا ﺔﻌﺑطﻟا
ﺔﻣﺋادﻟا تﺎﻌﺑطﻟا تاذ ضارﻏﻷا جرﺧأ .زﺎﮭﺟﻟا ﻰﻠﻋ ةدﺋاز ﺔﻟوﻣﺣﺑ ِﻖﻠﺗ ﻻ
1
.ﺔﺷﻣرﻛﻟا نﻣ دﺣﻠﻟ ﺔﻟﺎﺳﻐﻟا فﻗوﺗ درﺟﻣﺑ
موﻧﻟا نﺎﺻﻣﻗو لﺎﻔطﻷا سﺑﻼﻣ
.ﺔﻌﻧﺻﻣﻟا ﺔﻛرﺷﻟا تﺎﻣﯾﻠﻌﺗ نﻣ ﺎًﻣﺋاد ﻖﻘﺣﺗ
ﺔﻔﺣﻟﻷاو تﺎﯾﻧﺎطﺑﻟا ﻰﻠﻋ ةدوﺟوﻣﻟا سﺑﻼﻣﻟا ﺞﯾﺳﻧﺑ ﺔﯾﺎﻧﻌﻟا تﺎﻘﺻﻠﻣ نﻣ ﻖﻘﺣﺗ
2
ضﻌﺑ شﺎﻣﻛﻧا ﻲﻓ نﺧﺎﺳﻟا ءﺎﻣﻟا بﺑﺳﺗﯾ دﻗ .فﯾﻔﺟﺗﻟا ﺞﻣﺎﻧرﺑ مادﺧﺗﺳا لﺑﻗ
3
.
ﺔﻟﺎﺳﻐﻟا هذھ ﻲﻓ
.ﺔﻓﺎﺛﻛﻟاو ةدﺎﻣﻟا ﻲﻓ
ﺔﻟازإو بﺎﺑﻟا ﺢﺗﻓ دﻧﻋ
رزﻟا ﻰﻠﻋ
ﺔﯾﻓوﺻﻟا ضارﻏﻷا
.ٍوﺗﺳﻣ ﻊﺿو
.ﺎﮭﺗدوﺟﻟ
ﺔﻔﺣﻟﻷاو تﺎﯾﻧﺎطﺑﻟا
.ﺔﻔﺣﻟﻷاو تﺎﯾﻧﺎطﺑﻟا
•.فﯾﻔﺟﺗﻟا تارود ءﺎﻧﺛأ ﻲﻓ ﺎًﺣوﺗﻔﻣ درﺎﺑﻟا ءﺎﻣﻟا روﺑﻧﺻ كرﺗ بﺟﯾ
• ﺔﻟوﮭﺳﺑ فﯾﻔﺟﺗﻟا ﻰﻟإ لﯾﺳﻐﻟا ةرود نﻣ زﺎﮭﺟﻠﻟ ﻲﺋﺎﻘﻠﺗﻟا لﯾوﺣﺗﻟا دﯾدﺣﺗ نﻛﻣﯾ
• ﺔﮭﺑﺎﺷﺗﻣ سﺑﻼﻣﻟا ﻊطﻗ ﻊﯾﻣﺟ نأ نﻣ دﻛﺄﺗ ،فﯾﻔﺟﺗﻟا ﺞﻣارﺑ مظﻌﻣﺑ ﻖﻠﻌﺗﯾ ﺎﻣﯾﻓ
• ضارﻏﻷا نﻣ رﯾﺛﻛﻟا ﻊﺿو لﻼﺧ نﻣ مزﻼﻟا نﻣ رﺛﻛأ زﺎﮭﺟﻟا ﺔﻟوﻣﺣ دزﺗ ﻻ
• طﻐﺿﺗ نأ رﻛذﺗ ،ﮫﺟﻣﺎﻧرﺑ زﺎﮭﺟﻟا ءﺎﮭﻧإ لﺑﻗ ﺔﻟوﻣﺣﻟا
• رﮭظﯾﺳ ،فﯾﻔﺟﺗﻟا ﺞﻣﺎﻧرﺑ نﻣ ءﺎﮭﺗﻧﻻا دﻌﺑ
مزﻟ اذإ
ﺔﯾﻛﯾﺗﺳﻼﺑﻟاو ﺔﯾطﺎطﻣﻟا ضارﻏﻷا
.رﻣﻷا
4
:لﺛﻣ ﺎﻣﮭﯾﻠﻋ يوﺗﺣﺗ وأ كﯾﺗﺳﻼﺑ وأ طﺎطﻣ نﻣ ﺔﻋوﻧﺻﻣ ضارﻏأ يأ فﻔﺟﺗ ﻻ
•ﻲﺳارﻛﻟا ﺔﯾطﻏأو ،لﯾارﻣﻟاو ،ﺔﯾﻗاوﻟا ﺔﯾطﻏﻷا
رزﻟا ﻰﻠﻋ طﻐﺿا
Time Dry(فﺎﺟ تﻗو)
وأ
Dry(فﯾﻔﺟﺗ)
Page 70

AR
23
لﯾﻐﺷﺗﻟا
Add Item ﺔﻓﺎﺿا)
(رﺻﻧﻋ
#
#
#
#
Dry(فﯾﻔﺟﺗ) Time Dry(فﺎﺟ تﻗو)
#
Turbo Wash لﺳﻏ)
(وﺑرﯾﺗ
##
####
##
#
#
#
*1
#
*2
##
#
#
ﺞﻣﺎﻧرﺑﻟا
Baby Care ﺔﯾﺎﻧﻋ)
(لﺎﻔطﻷا سﺑﻼﻣﺑ
Hygiene(مﻘﻌﻣ لﯾﺳﻏ)
Sportswear
(ﺔﯾﺿﺎﯾرﻟا سﺑﻼﻣﻟا)
Wool(فوﺻﻟا)
Refresh ةدﺎﻋإ)
(شﺎﻌﻧﻹا
Speed Wash لﯾﺳﻏ)
(ﻊﯾرﺳ
Single Shirt Dry
Bedding Care
(فﺷا شﻟﺎﺑ ﺔﯾﺎﻧﻋ)
Duvet(فﺎﺣﻠﻟا)
Rinse+Spin فطﺷ)
(نارود +
Page 71

ﺔظﺣﻼﻣ
ﺔظﺣﻼﻣ
ﺔظﺣﻼﻣ
.رﺻﺎﻧﻌﻟا هذھ نﻣ يأ فﻠﺗ ﻲﻓ نﺧﺎﺳﻟا
22
لﯾﻐﺷﺗﻟا
Bedding Care(فﺷا شﻟﺎﺑ ﺔﯾﺎﻧﻋ) - مﺟﺣ1مﺟﻛ
• ءاوﮭﻟا بﺑﺳﺗﯾ دﻗ ثﯾﺣ ،ﺞﻣﺎﻧرﺑﻟا اذھ مادﺧﺗﺳا لﺑﻗ ﺔﻔﺣﻟﻷاو تﺎﯾﻧﺎطﺑﻟا ﻰﻠﻋ ةدوﺟوﻣﻟا سﺑﻼﻣﻟا ﺞﯾﺳﻧﺑ ﺔﯾﺎﻧﻌﻟا تﺎﻘﺻﻠﻣ نﻣ ﻖﻘﺣﺗ
Rinse+Spin(نارود + فطﺷ) - ﺔﻟوﻣﺣﻠﻟ ﻰﺻﻗﻷا دﺣﻟا3مﺟﻛ
AR
فﺻوﻟا.ﺎﮭﻠﺳﻐﻟ ﺔﺟﺎﺣﻟا نود دﺋﺎﺳوﻟا ﺔﯾطﻏأ وأ ﺔﻔﺣﻟﻷا وأ تﺎﯾﻧﺎطﺑﻟا نﻣ ﺔﮭﯾرﻛﻟا ﺢﺋاورﻟاو ﺔﺑوطرﻟا ﺔﻟازإ ﻰﻠﻋ دﻋﺎﺳﯾ
Duvet(فﺎﺣﻠﻟا) Cold(درﺑﻟا) ) Cold(درﺑﻟا) ﻰﻟإ 40° C( مﺟﺣ1مﺟﻛ
فﺻوﻟا.كﻟذ ﻰﻟإ ﺎﻣو ،ﺔﻛﯾرﻷا ﺔﯾطﻏأو ،دﺋﺎﺳوﻟاو ،رﯾرﺳﻟا ﺔﯾطﻏأ لﺛﻣ مﺟﺣﻟا ةرﯾﺑﻛ ﻊطﻗ لﯾﺳﻏ ﻲﻓ مدﺧﺗﺳﺗ
ﻌﻧﻣ مدﺧﺗﺳا .لﯾﺳﻐﻟا نارودو فطﺷﻟ ﺔﺑﺳﺎﻧﻣ
ِ
ّ
Download Cycle(ةرودﻟا لﯾﻣﺣﺗ) --
Cold Wash لﯾﺳﻏ)
.ﻲﺿارﺗﻓﻻا ﺞﻣﺎﻧرﺑﻟا وھ
.سﺑﻼﻣﻟﺎﺑ ررﺿ عوﻗو بﻧﺟﺗﻟ كﻟذو لﯾﺳﻐﻟا ةرﺷﺎﺑﻣ دﻧﻋ
(درﺎﺑ
ةرارﺣ ﺔﺟرد فﻠﺗﺧﺗ دﻗ
فﺻوﻟا.ﺔﺟﺎﺣﻟا بﺳﺣ ﺔﺷﻣﻗﻸﻟ م
فﺻوﻟا .ﻲﻛذﻟا فﺗﺎﮭﻟا مادﺧﺗﺳﺎﺑ كﻟذو كزﺎﮭﺟ بﺳﺎﻧﯾ صﺎﺧو دﯾدﺟ لﯾﺳﻏ ﺞﻣﺎﻧرﺑ لﯾزﻧﺗﺑ ﺞﻣﺎﻧرﺑﻟا اذھ كﻟ ﺢﻣﺳﯾ
• تﺎﻣﯾﻠﻌﺗ نﻣ رﻛُذ ﺎﻣ وأ سﺑﻼﻣﻠﻟ ﺔﻌﻧﺻﻣﻟا ﺔﻛرﺷﻟا نﻣ ﺔﻣدﻘﻣﻟا ﺔﯾﺎﻧﻌﻟا تﺎﻘﺻﻠﻣ عﺎﺑﺗا ﻰﻠﻋ بظاو .ﮫﺗرﺗﺧا يذﻟا لﯾﺳﻐﻟا ﺞﻣﺎﻧرﺑﻟ ﺔﺑﺳﺎﻧﻣﻟا ةرارﺣﻟا ﺔﺟرد ددﺣ
•.ﺎھدﯾرﺗ ﻲﺗﻟا ﺞﻣارﺑﻠﻟ نﯾﺗﺑﺳﺎﻧﻣﻟا نارودﻟا ﺔﻋرﺳو لﯾﺳﻐﻟا ةرارﺣ ﺔﺟرد ددﺣ
•.ﺔﺣﺿوﻣﻟا ةرودﻟا ةرارﺣ ﺔﺟرد نﻋ ﺔﯾﻠﻌﻔﻟا هﺎﯾﻣﻟا
•.دﯾﺎﺣﻣ فظﻧﻣ مادﺧﺗﺳﺎﺑ ﻰﺻوﯾ
ﺔﯾﻓﺎﺿإ تارﺎﯾﺧ
*1:.هدﺎﻌﺑﺗﺳا نﻛﻣﯾ ﻻو ﺞﻣﺎﻧرﺑﻟا ﻲﻓ ﺎًﯾﺋﺎﻘﻠﺗ رﺎﯾﺧﻟا اذھ نﯾﻣﺿﺗ مﺗﯾ
*2:.ﮫﻓذﺣ نﻛﻣﯾو ةرودﻟا ﻲﻓ ﺎًﯾﺋﺎﻘﻠﺗ رﺎﯾﺧﻟا اذھ نﯾﻣﺿﺗ مﺗﯾ
.هﺎﻧدأ دراوﻟا لودﺟﻟا اذھ ﻲﻓ لﯾﺳﻐﻟا ﺞﻣارﺑ لﻛﻟ
Delay End(ﻰﮭﺗﻧا رﯾﺧﺄﺗﻟا تﻗو)
• رﺎﯾﺧﻟا دﯾدﺣﺗ نﻛﻣﯾ
Add Item ﺔﻓﺎﺿا)
(رﺻﻧﻋ
Dry(فﯾﻔﺟﺗ) Time Dry(فﺎﺟ تﻗو)
###
Turbo Wash لﺳﻏ)
(وﺑرﯾﺗ
#
*2
ﺞﻣﺎﻧرﺑﻟا
Cotton(يدﺎﻋ لﯾﺳﻏ)
Page 72

21
AR
Cotton
لﯾﻐﺷﺗﻟا
ﺞﻣﺎﻧرﺑﻟا لﯾﻐﺷﺗ ءدﺑ ﻲﻓ بﺑﺳﺗﯾ لﻣﻌﻠﻟ ﺞﻣﺎﻧرﺑ دﯾدﺣﺗ نود
.ﺔﯾﺿارﺗﻓﻻا تادادﻋﻹا مادﺧﺗﺳﺎﺑ روﻔﻟا ﻰﻠﻋ
Start/Pause(تﻗؤﻣ فﺎﻘﯾإ/ءدﺑ)
ﺞﻣارﺑﻟا لودﺟ
لﯾﺳﻐﻟا ﺞﻣﺎﻧرﺑ
Cotton(يدﺎﻋ لﯾﺳﻏ) 40° C) Cold(درﺑﻟا) ﻰﻟإ 60° C(نﻧﻘﻣ :ﺔﻟوﻣﺣﻠﻟ ﻰﺻﻗﻷا دﺣﻟا
فﺻوﻟا.ﺔﻔﻠﺗﺧﻣﻟا لﺳﻐﻟا ضوﺣ تﺎﻛرﺣ نﯾﺑ ﻊﻣﺟﻟا لﻼﺧ نﻣ يدﺎﻌﻟا ﺦﺳﺗﻣﻟا لﯾﺳﻐﻟا لﺳﻐﺑ موﻘﯾ
• رزﻟا ﻰﻠﻋ طﻐﺿﻟا
(يدﺎﻋ لﯾﺳﻏ)
Baby Care(لﺎﻔطﻷا سﺑﻼﻣﺑ ﺔﯾﺎﻧﻋ) 60° C ﺔﻟوﻣﺣﻠﻟ ﻰﺻﻗﻷا دﺣﻟا5مﺟﻛ
فﺻوﻟا.لﺿﻓأ ءادأو ﺔطﯾﺳﺑ تﺎﻛرﺣﺑ لﺎﻔطﻷا سﺑﻼﻣ لﺳﻐﺑ موﻘﯾ
Hygiene(مﻘﻌﻣ لﯾﺳﻏ) 95° C ﺔﻟوﻣﺣﻠﻟ ﻰﺻﻗﻷا دﺣﻟا3مﺟﻛ
فﺻوﻟا.ﺔﻌﻔﺗرﻣ ةرارﺣ ﺔﺟرد ﻰﻠﻋ سﺑﻼﻣﻟا لﯾﺳﻐﻟ بﺳﺎﻧﻣ
Sportswear(ﺔﯾﺿﺎﯾرﻟا سﺑﻼﻣﻟا) 30° C) Cold(درﺑﻟا) ﻰﻟإ 30° C( ﺔﻟوﻣﺣﻠﻟ ﻰﺻﻗﻷا دﺣﻟا5مﺟﻛ
فﺻوﻟا.جورﺧﻟا سﺑﻼﻣو ﺔﯾﺿﺎﯾرﻟا سﺑﻼﻣﻟا لﺛﻣ سﺑﻼﻣﻟا نﻣ ﺔﺻﺎﺧ عاوﻧﻷ بﺳﺎﻧﻣ
•.سﺑﻼﻣﻟا ﻲﻓ ﺔﻣدﺧﺗﺳﻣﻟاو هﺎﯾﻣﻠﻟ ةدرﺎطﻟا شﺎﻣﻘﻟا ﺔﻘﺑط ﻊﻣ ﮫﻣدﺧﺗﺳا
.لﯾﺳﻐﻠﻟ ﺔﻠﺑﺎﻘﻟا
Wool(فوﺻﻟا) Cold(درﺑﻟا) ) Cold(درﺑﻟا) ﻰﻟإ 40° C( ﺔﻟوﻣﺣﻠﻟ ﻰﺻﻗﻷا دﺣﻟا4مﺟﻛ
فﺻوﻟا سﺑﻼﻣﻟا نﻣ ﺎھرﯾﻏو نﯾﺗﺎﺳﻔﻟاو ﺔﯾﻠﺧادﻟا سﺑﻼﻣﻟاو فوﺻﻟا لﺛﻣ ،ﺔﻟﺎﺳﻐﻟا لﺧاد وأ دﯾﻟﺎﺑ ﺎﮭﻠﺳﻏ نﻛﻣﯾ ﻲﺗﻟا ﺔﻘﯾﻗرﻟا سﺑﻼﻣﻠﻟ بﺳﺎﻧﻣ
•.ﺔﻟﺎﺳﻐﻟا ﻲﻓ لﯾﺳﻐﻠﻟ لﺑﺎﻘﻟا فوﺻﻟﺎﺑ صﺎﺧﻟا فظﻧﻣﻟا مادﺧﺗﺳﺎﺑ ﺢﺻﻧُﯾ
Refresh(شﺎﻌﻧﻹا ةدﺎﻋإ) -5ضارﻏأ
فﺻوﻟا.رﺗﺳﯾﻟوﺑﻟا نﻣ ﺔﻋوﻧﺻﻣﻟاو ﺔﯾﻧطﻘﻟا سﺑﻼﻣﻟا :لﺛﻣ ﺔﻓﺎﺟﻟا سﺑﻼﻣﻟا ﺔﺷﻣرﻛ لﯾﻠﻘﺗ ﻰﻠﻋ لﻣﻌﻠﻟ رﺎﺧﺑﻟا مدﺧﺗﺳﯾ
•.ﺎًﻣﺎﻣﺗ فﺟﺗ ﻰﺗﺣ جرﺎﺧﻟﺎﺑ ﺎﮭﻌﺿو بﺟﯾ اذﻟو ،ﺞﻣﺎﻧرﺑﻟا ءﺎﮭﺗﻧا دﻌﺑ ﺔﻠﻠﺑﻣ سﺑﻼﻣﻟا نوﻛﺗ دﻗ
Speed Wash(ﻊﯾرﺳ لﯾﺳﻏ) 40° C) Cold(درﺑﻟا) ﻰﻟإ 40° C( ﺔﻟوﻣﺣﻠﻟ ﻰﺻﻗﻷا دﺣﻟا5مﺟﻛ
فﺻوﻟا.رﯾﺻﻗ ٍتﻗو ﻲﻓ خﺎﺳﺗﻻا ﺔﻠﯾﻠﻗ سﺑﻼﻣﻟاو ةرﯾﻐﺻﻟا تﻻوﻣﺣﻟا لﺳﻐﻟ بﺳﺎﻧﻣ
Single Shirt Dry-1ضرﻏ
فﺻوﻟا.رﯾﺻﻗ تﻗو ﻲﻓ ةرﯾﻐﺻ ﺔﻟوﻣﺣ فﯾﻔﺟﺗﻟ ﺔﺑﺳﺎﻧﻣ
Page 73

فﺻوﻟا
لﯾﻐﺷﺗﻟا
20
AR
لﯾﺳﻐﻟا ﺞﻣﺎﻧرﺑ رارزأ صﯾﺻﺧﺗ
.ددﺣﻣﻟا ﺞﻣﺎﻧرﺑﻠﻟ خﺎﺳﺗﻻا ﺔﺟرد تادادﻋإو ،نارودﻟا ﺔﻋرﺳو ،ءﺎﻣﻟا ةرارﺣ ﺔﺟرد طﺑﺿﻟ رارزﻷا هذھ مدﺧﺗﺳا
.ضرﻌﻟا ﺔﺷﺎﺷ ﻲﻓ ﺔﯾﺿارﺗﻓﻻا
فﺻوﻟا
ﺞﻣﺎﻧرﺑﻟا ﺔﻟﺎﺣ تارﺷؤﻣ
حﺎﺑﺻﻣ ﻖَﻠﻐﯾﺳ ،ﺔﻠﺣرﻣﻟا لﺎﻣﻛﺗﺳاLED حﺎﺑﺻﻣ فﻗوﺗﯾﺳﻓ ،ﺎًﺗﻗؤﻣ ةرودﻟا فﺎﻘﯾإ مﺗ اذإ .LED.ضﯾﻣوﻟا نﻋ ﺔطﺷﻧﻟا ﺔﻠﺣرﻣﻠﻟ
ﻲﻘﺑﺗﻣﻟا يرﯾدﻘﺗﻟا تﻗوﻟا
.ﻲﻌﯾﺑط رﻣﻷا اذھ .ﺎﮭﻣﺟﺣ نﻋ ﺔﻟوﻣﺣﻟا رﺎﻌﺷﺗﺳا رﺎﯾﺧ فﺷﻛﯾ ﺎﻣدﻌﺑ تﻗوﻟا رﮭظﯾﺳﻓ ،ﺔﺷﺎﺷﻟا ﻰﻠﻋ
.ﻲﻘﯾﻘﺣﻟا تﻗوﻟا ﻲﻓ (ﺎھرﯾﻏو لﺧادﻟا ءﺎﻣﻟا ةرارﺣ ﺔﺟردو ،ﺔﻓرﻐﻟا ةرارﺣ
•.ﺔﺷﺎﺷﻟا ﻲﻓ ﺔﯾﻟﺎﺣﻟا تادادﻋﻹا رﮭظﺗ
•.ىرﺧأ تادادﻋإ دﯾدﺣﺗﻟ رﺎﯾﺧﻟا اذھ رز ﻰﻠﻋ طﻐﺿا
ضرﻌﻟا ﺔﺷﺎﺷ
• تادادﻋﻹا ءﻲﺿﺗﺳ ،زﺎﮭﺟﻟا لﯾﻐﺷﺗ مﺗﯾ ﺎﻣدﻧﻋ .ﺔﻟﺎﺣﻟا لﺋﺎﺳرو ،تارﺎﯾﺧﻟاو ،ردﻘُﻣﻟا ﻲﻘﺑﺗﻣﻟا تﻗوﻟاو ،تادادﻋﻹا ضرﻌﻟا ﺔﺷﺎﺷ ضرﻌﺗ
•.مﻛﺣﺗﻟا ﺔﺣوﻟ ﻰﻠﻋ ةدوﺟوﻣﻟا ﺔﺷﺎﺷﻟا ضﻣوﺗ ،ﺎًﯾﺋﺎﻘﻠﺗ ﺔﻟوﻣﺣﻟا نزو رﺎﻌﺷﺗﺳا مﺗﯾ ﺎﻣﻧﯾﺑ
ﺔﻟﺎﺣﻟاو تﻗوﻟا ﺔﺷﺎﺷ
• حﺎﺑﺻﻣ ضﻣوﯾﺳLED ﺢﯾﺑﺎﺻﻣ لظﺗﺳ ﺎﻣﻧﯾﺑ لﯾﺳﻐﻟا ﺞﻣﺎﻧرﺑ لﯾﻐﺷﺗ دﻧﻋ ﺔطﺷﻧﻟا ﺔﻠﺣرﻣﻠﻟ LED دﻌﺑ .رارﻘﺗﺳﻻا ﺔﯾﻌﺿو ﻲﻓ ىرﺧﻷا لﺣارﻣﻠﻟ
•.ةددﺣﻣﻟا تارﺎﯾﺧﻠﻟ ﺎًﻌﺑﺗ تﻗوﻟا اذھ رﯾﻐﺗﯾﺳ .ﺞﻣﺎﻧرﺑﻟا اذﮭﻟ ددﺣﻣﻟا ﻲﺿارﺗﻓﻻا تﻗوﻟا ضرﻋ مﺗﯾ ،لﯾﺳﻐﻟا ﺞﻣﺎﻧرﺑ دﯾدﺣﺗ دﻧﻋ
---
• رﮭظ اذإ
• ﺔﺟردو ،ﺔﻟوﻣﺣﻟا نزو) ةرﯾﺛﻛ ﺔﯾﺟرﺎﺧ لﻣاوﻋ رﺛؤﺗ دﻗ .ﺔﯾﻌﯾﺑطﻟا لﯾﻐﺷﺗﻟا فورظ ﻰﻠﻋ تﻗوﻟا فﻗوﺗﯾ ذإ .بﺳﺣﻓ يرﯾدﻘﺗ تﻗو وھ رھﺎظﻟا تﻗوﻟا
e
f
a
b
c
ﺔﻛﺑﺷﺑ زﺎﮭﺟﻟا لﯾﺻوﺗ دﻧﻋ ةءﺎﺿﻹا دﯾﻗ نوﻛﯾ Wi-Fi.لزﻧﻣﻟا ﻲﻓ
رزﻟا ءﺎﻧﺛﺗﺳﺎﺑ مﻛﺣﺗﻟا ﺔﺣوﻟ قﻼﻏإ دﻧﻋ ةءﺎﺿﻹا دﯾﻗ نوﻛﯾ
Power(ﺔﻗﺎطﻟا)
.
.بﺎﺑﻟا قﻼﻏإو ﺞﻣﺎﻧرﺑﻟا ءدﺑ دﻧﻋ ةءﺎﺿﻹا دﯾﻗ نوﻛﯾ
f
i
H
d
e
Page 74

AR
19
لﯾﻐﺷﺗﻟا
فﺻوﻟا
.رﺧﻵ زارط نﻣ ﺔﻘﯾﻘﺣﻟا مﻛﺣﺗﻟا ﺔﺣوﻟ فﻠﺗﺧﺗ دﻗ
مﻛﺣﺗﻟا ﺔﺣوﻟ صاوﺧ
لﯾﻐﺷﺗﻟا فﺎﻘﯾإ/لﯾﻐﺷﺗﻟا رز
مﻛﺣﺗﻟا ﺔﺣوﻟ
Power(ﺔﻗﺎطﻟا)
a
•.ﺔﻟﺎﺳﻐﻟا لﯾﻐﺷﺗﻟ رزﻟا اذھ ﻰﻠﻋ طﻐﺿا
LG ThinQ
.
ﺞﻣﺎﻧرﺑﻟا ضﺑﻘﻣ
Start/Pause(تﻗؤﻣ فﺎﻘﯾإ/ءدﺑ)
ﺔﯾﻓﺎﺿإ فﺋﺎظوو تارﺎﯾﺧ
Remote Start(دﻌﺑ نﻋ ءدﺑﻟا)
ﻖﯾﺑطﺗ مادﺧﺗﺳا كﻧﻛﻣﯾ
رزﻟا ﻰﻠﻋ رارﻣﺗﺳﻻا ﻊﻣ طﻐﺿا
ﺔﯾﻛذﻟا فﺋﺎظوﻟا
.
Delay End(ﻰﮭﺗﻧا رﯾﺧﺄﺗﻟا تﻗو)
LG ThinQ
.دﻌﺑ نﻋ كزﺎﮭﺟ ﻲﻓ مﻛﺣﺗﻠﻟ ﻲﻛذ فﺗﺎھ يأ ﻲﻓ
ةدﻣﻟ 3 ﻖﯾﺑطﺗﺑ زﺎﮭﺟﻟا لﯾﺻوﺗ ءدﺑﻟ ٍناوﺛ
.زﺎﮭﺟﻟا لﯾﻐﺷﺗ وأ تارودﻟا رﯾﯾﻐﺗ نﻣ لﺎﻔطﻷا ةزﯾﻣﻟا هذھ ﻊﻧﻣﺗ نأ نﻛﻣﯾ .مﻛﺣﺗﻟا تاودأ لﯾطﻌﺗﻟ رﺎﯾﺧﻟا اذھ مدﺧﺗﺳا
Wi-Fi
i
Child Lock(لﺎﻔطﻷا لﻔﻗ)
b
•.سﺑﻼﻣﻟا عوﻧﻟ ﺎًﻘﻓو ﺞﻣارﺑﻟا رﻓوﺗﺗ
•.ددﺣﻣﻟا ﺞﻣﺎﻧرﺑﻟا ﻰﻟإ ةرﺎﺷﻺﻟ حﺎﺑﺻﻣﻟا ﺊﯾﺿﯾﺳ
رز
c
•.ﺎًﺗﻗؤﻣ ﮫﻓﺎﻘﯾإ وأ لﯾﺳﻐﻟا ﺞﻣﺎﻧرﺑ ءدﺑﻟ رزﻟا اذھ مدﺧﺗﺳُﯾ
•.رزﻟا اذھ ﻰﻠﻋ طﻐﺿا ،ﺎًﺗﻗؤﻣ لﯾﺳﻐﻟا ﺞﻣﺎﻧرﺑ فﺎﻘﯾإ ﻰﻟإ ﺔﺟﺎﺣﻟا ﺔﻟﺎﺣ ﻲﻓ
d
• ةدﻣﻟ لﺑﺎﻘﻣﻟا رزﻟا ﻰﻠﻋ رارﻣﺗﺳﻻا ﻊﻣ طﻐﺿا ،ﺔﯾﻓﺎﺿﻹا فﺋﺎظوﻟا مادﺧﺗﺳﻻ3.ضرﻌﻟا ﺔﺷﺎﺷ ﻰﻠﻋ لﺑﺎﻘﻣﻟا زﻣرﻟا ﺊﺿﯾ فوﺳ ﺎھدﻧﻋو .ٍناوﺛ
•.هدﯾدﺣﺗ مﺗﯾ ﺎﻣدﻧﻋ ﺊﺿﯾﺳو ﻲﻓﺎﺿإ ﺞﻣﺎﻧرﺑ دﯾدﺣﺗﺑ رﺎﯾﺧﻟا اذھ كﻟ ﺢﻣﺳﯾ
• ﻊﺟار ،ﺔﻔﯾظوﻟا هذھ مادﺧﺗﺳﻻ
Page 75

لﯾﻐﺷﺗﻟا
ﺔظﺣﻼﻣ
ﺔظﺣﻼﻣ
18
AR
ﻲﻐﺑﻧﯾ .كﻣُﺳﻟا دﯾدﺷ نﺎﻛ اذإ عزوﻣﻟا لﺧاد لظﯾ دﻘﻓ .شﺎﻣﻘﻟا مﻌﻧﻣ بﻠﺻﺗﯾ
.ﺔﻟوﮭﺳﺑ
ﻖﻓدﺗﯾ ﻰﺗﺣ ﺔﯾﺎﻐﻠﻟ ﺎًﻔﯾﺛﻛ نﺎﻛ اذإ مّﻌﻧﻣﻟا فﯾﻔﺧﺗ
فﯾظﻧﺗﻟا صارﻗأ ﺔﻓﺎﺿإ
.لﯾﺳﻐﻟا ءﺎﻧﺛأ فﯾظﻧﺗﻟا صارﻗأ مادﺧﺗﺳا كﻧﻛﻣﯾ
ﻊﺿو لﺑﻗ لﺳﻐﻟا ضوﺣ لﺧاد فﯾظﻧﺗﻟا صارﻗأ ﻊﺿو بﺎﺑﻟا ﺢﺗﻓا
.سﺑﻼﻣﻟا
.بﺎﺑﻟا ﻖﻠﻏأو لﺳﻐﻟا ضوﺣ ﻲﻓ سﺑﻼﻣﻟا ﻊﺿ
ءﺎﻣﻟا ﻲﻘﻧﻣ ﺔﻓﺎﺿإ
مادﺧﺗﺳا نﻣ دﺣﻠﻟ ،ﺔﯾﺳﻠﻛﻟا بﺳاورﻟا موﺎﻘﻣ لﺛﻣ ءﺎﻣﻟا ﻲﻘﻧﻣ مادﺧﺗﺳا نﻛﻣُﯾ
.ءﺎﻣﻟا رﺳﻋ ﻖطﺎﻧﻣ ﻲﻓ تﺎﻔظﻧﻣﻟا
.ةوﺑﻌﻟا ﻰﻠﻋ ةددﺣﻣﻟا
• نأ نﻛﻣﯾ ثﯾﺣ .موﯾ نﻣ رﺛﻛﻷ تﺎﻔظﻧﻣﻟا جرد ﻲﻓ شﺎﻣﻘﻟا مّﻌﻧﻣ كرﺗﺗ ﻻ
•.ءﺎﻣﻟﺎﺑ دادﻣﻹا ءﺎﻧﺛأ ﻲﻓ جردﻟا ﺢﺗﻔﺗ ﻻ ،لﯾﺳﻐﻟا رَﺷﺎﺑﯾ ﺎﻣﻧﯾﺑ
•.(كﻟذ ﻰﻟإ ﺎﻣو ،نﯾزﻧﺑﻟا) تﺎﺑﯾذﻣﻟا مادﺧﺗﺳا مدﻋ بﺟﯾ
1
2
•.عزوﻣﻟا لﺧاد فﯾظﻧﺗﻟا صارﻗأ ﻊﺿﺗ ﻻ
.ﺔﻣﺋﻼﻣﻟا تارﯾﺟﺣﻟا لﺧاد مّﻌﻧﻣﻟاو فظﻧﻣﻟا فﺿأ
ﻲﺳﯾﺋرﻟا لﯾﺳﻐﻟا فظﻧﻣ ةرﯾﺟﺣ
ﻲﺋدﺑﻣﻟا لﯾﺳﻐﻟا فظﻧﻣ ةرﯾﺟﺣ
لﺋﺎﺳﻟا شﺎﻣﻘﻟا مّﻌﻧﻣ ةرﯾﺟﺣ
.ةرودﻟا ءدﺑ لﺑﻗ ءودﮭﺑ تﺎﻔظﻧﻣﻟا عزوﻣ جرد ﻖﻠﻏأ
.ﺞﻣﺎﻧرﺑﻟا طﺑﺿ لﺑﻗ لﺳﻐﻟا ضوﺣ لﺧاد ﮫﻌﯾزوﺗ وأ ىرﺧأ
شﺎﻣﻘﻟا مّﻌﻧﻣ ةرﯾﺟﺣ
.فطﺷ ةرود رﺧآ لﻼﺧ ﺎًﯾﺋﺎﻘﻠﺗ عَزوﯾ يذﻟا لﺋﺎﺳﻟا شﺎﻣﻘﻟا مّﻌﻧﻣ ةرﯾﺟﺣﻟا يوﺣﺗ
• ﺔﯾﻣﻛﻠﻟ ﺎًﻘﻓو ﻊﯾزوﺗﻟا مﺗﯾو .ءﺎﻣﻟا ﻲﻘﻧﻣ مﺛ فظﻧﻣﻟا ﺔﻓﺎﺿإ ًﻻوأ كﯾﻠﻋ نﯾﻌﺗﯾ
ﮫﻧاوأ لﺑﻗ ﮫﻌﯾزوﺗ ﻲﻓ بﺑﺳﺗﯾ دﻗ ءلﻣﻠﻟ دﺣ ﻰﺻﻗأ طﺧ
.ﮫﻧﻣ لﺋﺎﺳﻟا عوﻧﻟا وأ شﺎﻣﻘﻟا مّﻌﻧﻣ قوﺣﺳﻣ مادﺧﺗﺳا كﻧﻛﻣﯾ
زوﺎﺟﺗﯾ ثﯾﺣﺑ شﺎﻣﻘﻟا
.سﺑﻼﻣﻟا ﻰﻠﻋ ﻊﻘﺑ روﮭظ ﻲﻟﺎﺗﻟﺎﺑو
دوﺟو
.ﻲﻌﯾﺑط
2
a
b
c
3
• ةرﯾﺟﺣ لﺧاد فظﻧﻣﻟا ﻖﻓدﺗ ةدﺎﯾز ﻲﻓ بﺑﺳﺗﯾ دﻗ ةوﻘﺑ جردﻟا قﻼﻏإ
•.ﮫﻘﻠﻏ ءﺎﻧﺛأ جردﻟا ﻲﻓ كدﯾ ﻖﻠﻌﺗ ﻻ ﻰﺗﺣ اًرذﺣ نﻛ
• رﻣأ ةرودﻟا ﺔﯾﺎﮭﻧ ﻲﻓ عزوﻣﻟا تارﯾﺟﺣ لﺧاد هﺎﯾﻣﻟا نﻣ لﯾﻠﻘﻟا
• مّﻌﻧﻣ بﻛﺳ .ءلﻣﻠﻟ دﺣ ﻰﺻﻗأ طﺧ ﻰﻟإ لﺻﯾ نأ ﻰﻟإ شﺎﻣﻘﻟا مّﻌﻧﻣ بﻛﺳا
• يدؤﯾ دﻘﻓ ،لﺳﻐﻟا ضوﺣ لﺧاد ًةرﺷﺎﺑﻣ سﺑﻼﻣﻟا ﻰﻟإ شﺎﻣﻘﻟا مّﻌﻧﻣ فﺿﺗ ﻻ
.ﺎﮭﺗﻟازإ بﻌﺻﯾ سﺑﻼﻣﻟا ﻰﻠﻋ ﻊﻘﺑ نﯾوﻛﺗ ﻰﻟإ كﻟذ
Page 76

AR
ﺔظﺣﻼﻣ
ﺔظﺣﻼﻣ
17
لﯾﻐﺷﺗﻟا
ﺔﻣﻌﻧﻣﻟا داوﻣﻟاو تﺎﻔظﻧﻣﻟا ﺔﻓﺎﺿإ
فظﻧﻣﻟا رادﻘﻣ
مدﺧﺗﺳا .لﺳﻐﻟا ةرارﺣ ﺔﺟردو ﮫﺧﺎﺳﺗا ىدﻣو ﮫﻧوﻟو ﺞﯾﺳﻧﻟا عوﻧﻟ ﺎًﻘﻓو
نﻣ عوﻧﻟا اذﮭﻟ (ﻲﻣﺎﻣﻷا لﯾﻣﺣﺗﻟا) لﺳﻐﻟا ضوﺣ طﻘﻓ ﺔﺑﺳﺎﻧﻣﻟا تﺎﻔظﻧﻣﻟا
.تﻼﺳﻐﻟا
ثدﺣﺗ دﻘﻓ ،فظﻧﻣﻟا نﻣ رﯾﺑﻛ رادﻘﻣ مادﺧﺗﺳا دﻧﻋ
.كرﺣﻣﻟا ﻰﻠﻋ ﺔﻟوﻣﺣﻟا لﻘﺛ ﻰﻟإ يدؤﯾ وأ لﯾﺳﻐﻟا ةءﺎﻔﻛ نﻣ
.فظﻧﻣﻠﻟ ﺔﻌﻧﺻﻣﻟا ﺔﻛرﺷﻟا
.روﻔﻟا ﻰﻠﻋ لﯾﺳﻐﻟا ةرود أدﺑﺗﺳ
Delay End تﻗو)
.ضوﺣﻟا وأ جردﻟا ﻲﻓ بﻠﺻﺗﯾ دﻗو روﻔﻟا ﻰﻠﻋ لﺋﺎﺳﻟا ﻊﯾزوﺗ مﺗﯾﺳ ثﯾﺣ
لﺿﻓأ ﻰﻠﻋ لوﺻﺣﻠﻟ .خﺎﺳوﻷا ىوﺗﺳﻣو ،ﺔﻟوﻣﺣﻟا مﺟﺣو ،ءﺎﻣﻟا رﺳﻋو
يدؤﯾ كﻟذ لﻌﻓ نﻋ سﻋﺎﻘﺗﻟا .فظﻧﻣﻟا مادﺧﺗﺳا ﻲﻓ طارﻓﻷا بﻧﺟﺗ ،ﺞﺋﺎﺗﻧﻟا
.ﺔﻘﻣﺎﻐﻟا وأ ﺔﺳﺎﺳﺣﻟا سﺑﻼﻣﻟا وأ فوﺻﻟاو ﺔﻧوﻠﻣﻟا ﺔﺟﺳﻧﻸﻟ ،لﺎﺛﻣﻟا
ﺔﻔﯾظو مدﺧﺗﺳﺗ تﻧﻛ اذإ لﺋﺎﺳﻟا فظﻧﻣﻟا مدﺧﺗﺳﺗ ﻻ
Pre Wash( ﻲﺋدﺑﻣ لﯾﺳﻏ)
.ضﯾﺑﻣ ﻰﻠﻋ يوﺗﺣﯾ لﯾﺳﻏ قوﺣﺳﻣ مدﺧﺗﺳا ،ﺔﺣﺗﺎﻔﻟا
رﺎﯾﺧ دﯾدﺣﺗﺑ تﻣﻗ اذإ وأ
.دﺣﻟا نﻋ ةدﺋاز ٍوﺎﻏر ثودﺣ ﻰﻟإ
سﺑﻼﻣﻠﻟ لﺿﻓأ لﯾﺳﻏ ﺞﺋﺎﺗﻧ ﻰﻠﻋ لوﺻﺣﻠﻟ
.ﺔﺣﺋار وأ ،فطﺷﻟا ءادأ ﻲﻓ فﻌﺿ وأ
(ﻰﮭﺗﻧا رﯾﺧﺄﺗﻟا
ﺔﯾﺎﻧﻌﻟا تﺎﻘﺻﻠﻣ ﻰﻠﻋ ةدوﺟوﻣﻟا زوﻣرﻟا
• هرﺎﯾﺗﺧاو ،فظﻧﻣﻠﻟ ﺔﻌﻧﺻﻣﻟا ﺔﻛرﺷﻟا تﺎﻣﯾﻠﻌﺗﻟ ﺎًﻘﻓو فظﻧﻣﻟا مادﺧﺗﺳا بﺟﯾ
•.فظﻧﻣﻟا ﺔﯾﻣﻛ لﯾﻠﻘﺗ كﯾﻠﻋ نﯾﻌﺗﯾ ،يوﺎﻏرﻟا نﻣ رﯾﺛﻛﻟا ثودﺣ ﺔﻟﺎﺣ ﻲﻓ
• لﻠﻘﯾ اذھو اًدﺟ ةرﯾﺛﻛ ةوﻏر
• ﺎھرﻓوﺗ ﻲﺗﻟا تادﺎﺷرﻹا ﻊﺑﺗﺎﻓ ،لﺋﺎﺳ فظﻧﻣ مادﺧﺗﺳا ﻲﻓ بﻏرﺗ تﻧﻛ اذإ
• تﻧﻛ اذإ ﻲﺳﯾﺋرﻟا تﺎﻔظﻧﻣﻟا جرد ﻲﻓ ًةرﺷﺎﺑﻣ لﺋﺎﺳﻟا فظﻧﻣﻟا بﻛﺳ كﻧﻛﻣﯾ
•
• ،ءﺎﻣﻟا ةرارﺣ ﺔﺟرد بﺳﺣ فظﻧﻣﻟا مادﺧﺗﺳا رادﻘﻣ لﯾدﻌﺗ ﻰﻟإ جﺎﺗﺣﺗ دﻗ
.حوﻣﺳﻣﻟا ﻰﺻﻗﻷا ﻲﻛﯾﻧﺎﻛﯾﻣﻟا طﻐﺿﻟا رادﻘﻣ كﻟذﻛو
•.ءﺎﻣﻟا ةرارﺣ ﺔﺟرد رﺎﯾﺗﺧاو فظﻧﻣﻟا ﺔﻓﺎﺿإ لﺑﻗ ،سﺑﻼﻣﻟا ﻖﺻﻠﻣ ﻊﺟار
•:سﺑﻼﻣﻟا نﻣ عوﻧ لﻛﻟ ﺔﺻﺻﺧﻣﻟا تﺎﻔظﻧﻣﻟا مدﺧﺗﺳا
- لﯾﺑﺳ ﻰﻠﻋ ،ةددﺣﻣ تﺎﻣادﺧﺗﺳﻻ لﺋﺎﺳﻟا فظﻧﻣﻟا ﻊﯾﻧﺻﺗ مﺗﯾ ﺎﻣ ﺎًﺑﻟﺎﻏ
-.ﺔﺟﺳﻧﻷا عاوﻧأ ﻊﯾﻣﺟﻟ ﺎًﻣﺋﻼﻣ نوﻛﯾ لﯾﺳﻐﻟا قوﺣﺳﻣ
- ناوﻟﻷا تاذو ءﺎﺿﯾﺑﻟا
فﺿأو .ﺔﻟوﻣﺣﻟا ﻲﻓ نزاوﺗﻟا مدﻋ ﻰﻟإ اذھ يدؤﯾ دﻗ ثﯾﺣ .ﺔﯾدرﻓ ﺎًﺿارﻏأ
-.لﯾﺳﻐﻟا ةرود ﺔﯾادﺑ ﻲﻓ عزوﻣﻟا نﻣ فظﻧﻣﻟا ﻖﻓدﺗﯾ
ثادﺣإ ﻰﻟإ ﺢﯾﺗﺎﻔﻣﻟاو ،ﺔﯾﻧدﻌﻣﻟا ﻊطﻘﻟاو ،مﻼﻗﻷاو ،بﺎﻘﺛﻟاو ،رﻌﺷﻟا كﺑﺎﺷﻣو
• ،دادﺳﻧا ثودﺣ ﻰﻟإ كﻟذ يدؤﯾ نأ نﻛﻣﯾ ثﯾﺣ .بﻠﺻﺗﺗ تﺎﻔظﻧﻣﻟا كرﺗﺗ ﻻ
•.ﺔﻌﻧﺻﻣﻟا ﺔﻛرﺷﻟا تﺎﯾﺻوﺗﻟ ﺎًﻘﻓو :ﺔﻠﻣﺎﻛﻟا ﺔﻟوﻣﺣﻟا
• :ﺔﯾﺋزﺟﻟا ﺔﻟوﻣﺣﻟا1/2.ةدﺎﺗﻌﻣﻟا ﺔﯾﻣﻛﻟا
• :ﺔﻟوﻣﺣﻠﻟ ﻰﻧدﻷا دﺣﻟا1/3.ﺔﻠﻣﺎﻛﻟا ﺔﻟوﻣﺣﻟا
ﺔﻟوﻣﺣﻟا ﻊﺿو لﺑﻗ سﺑﻼﻣﻟا صﺣﻓ
.نﯾﺗﮭﺑﺎﺷﺗﻣ نﯾﺗﻌطﻗ وأ ﺔﻌطﻗ
.كﺳﺑﻼﻣو زﺎﮭﺟﻟا نﻣ لﻛ ﻲﻓ ررﺿ
زﻣرﻟاﺞﯾﺳﻧﻟا عوﻧ/لﯾﺳﻐﻟا
•يدﺎﻋ لﯾﺳﻏ
•ﺔطﻠﺗﺧﻣ ﺔﺟﺳﻧأ ،نطﻗ
•Easy Care(ﺔﻠﮭﺳ ﺔﯾﺎﻧﻋ)
•ﺔطﻠﺗﺧﻣ ﺔﺟﺳﻧأ ،ﻲﻋﺎﻧﺻ
•صﺎﺧ سﺎﺳﺣ لﯾﺳﻏ
•ﺔﺳﺎﺳﺣ سﺑﻼﻣ
•طﻘﻓ يودﯾ لﯾﺳﻏ
•رﯾرﺣ ،فوﺻ
•لﺳﻐﻟا عوﻧﻣﻣ
.ًﻻوأ ةرﯾﺑﻛﻟا
دﻛﺄﺗﻠﻟ بوﯾﺟﻟا ﻊﯾﻣﺟ صﺣﻓا
• ﺞﯾﺳﻧﻟا عوﻧﺑ ﺔﻘﻠﻌﺗﻣﻟا تﺎﻣوﻠﻌﻣﻟا زﻣرﻟا لﻔﺳأ ﺔﻋوﺿوﻣﻟا طرُﺷﻟا كﯾطﻌﺗ
• ضارﻏﻷا ﻊﺿو .ﺔﻟوﻣﺣﻟا ﻲﻓ ةرﯾﻐﺻﻟاو ةرﯾﺑﻛﻟا ضارﻏﻷا نﯾﺑ ﻊﻣﺟا
• لﺳﻐﺗ ﻻو .ﺔﻟوﻣﺣﻟا ﻲﻟﺎﻣﺟإ فﺻﻧ نﻋ ةرﯾﺑﻛﻟا ضارﻏﻷا دﯾزﺗ نأ بﺟﯾ ﻻ
• ،رﯾﻣﺎﺳﻣﻟا لﺛﻣ ءﺎﯾﺷأ يدؤﺗ دﻘﻓ .ﺔﻏرﺎﻓ ﺎﮭﻧأ نﻣ
عزوﻣﻟا مادﺧﺗﺳا
:عزوﻣﻟا ﻰﻟإ فظﻧﻣﻟا نﻣ رادﻘﻣ ﺔﻓﺎﺿﻹ
.عزوﻣﻟا جرد ﺢﺗﻓا
1
.لﯾﺳﻐﻟا ﺔﻛﺑﺷ ﻲﻓ (ﺔﯾﻠﺧاد
.ىرﺧﻷا سﺑﻼﻣﻟﺎﺑ
رادﻘﻣ ﻊﺿو لﻼﺧ نﻣ ﻊﻘﺑﻟاو خﺎﺳوﻷا ﺢﺳﻣا
.خﺎﺳوﻷا ﺔﻟازإ ﻲﻓ ةدﻋﺎﺳﻣﻠﻟ ﺎﮭﻠﺳﻏو ﻊﻘﺑﻟا ﻰﻠﻋ ءﺎﻣﻟا ﻲﻓ
• كﻼﺳﺄﺑ ةدوزﻣﻟا ردﺻﻟا تﻻﺎﻣﺣ وأ براوﺟﻟا) ﺔﺳﺎﺳﺣﻟا ﺔﺷﻣﻗﻷا لﺳﻏا
• ﻖﻠﻌﺗ نﻟ ءﺎﯾﺷﻷا هذھ نأ نﻣ دﻛﺄﺗﻠﻟ لﺳﻼﺳﻟاو تﺎﻓﺎطﺧﻟاو تﺎﺑﺎﺣﺳﻟا ﻖﻠﻏأ
• باذﻣﻟا فظﻧﻣﻟا نﻣ رﯾﻐﺻ
Page 77

لﯾﻐﺷﺗﻟا
ﮫﯾﺑﻧﺗ
16
AR
لﯾﻐﺷﺗﻟا
.ﺔﺑوﻠطﻣﻟا لﯾﺳﻐﻟا ةرود رﺗﺧا
• ةرودﻟا رﺎﯾﺗﺧا ضﺑﻘﻣ فﻠﺑ مﻗ وأ ررﻛﺗﻣ لﻛﺷﺑ ةرودﻟا رز ﻰﻠﻋ طﻐﺿا
.ﺔﺑوﻠطﻣﻟا ةرودﻟا رﺎﯾﺗﺧا مﺗﯾ ﻰﺗﺣ
• ﻖﺻﻠﻣ ﻰﻟإ ﮫﺑﺗﻧا .نارودﻟا ﺔﻋرﺳو لﯾﺳﻐﻟا ةرارﺣ ﺔﺟرد نﻵا رﺗﺧا
.كﺳﺑﻼﻣ ﻰﻠﻋ دوﺟوﻣﻟا ﺞﯾﺳﻧﻟﺎﺑ ﺔﯾﺎﻧﻌﻟا
.ةرودﻟا ءدﺑ
ءدﺑﻟ
نزو سﺎﯾﻘﻟ هﺎﯾﻣ نودﺑ ةزﯾﺟو ةرﺗﻔﻟ ﺔﻟﺎﺳﻐﻟا كرﺣﺗﺗﺳ .ةرودﻟا
Start/Pause فﺎﻘﯾإ/ءدﺑ)
ﻊﯾﻣﺟ دﻘﻔﺗﺳو ﺔﻟﺎﺳﻐﻟا لﯾﻐﺷﺗ فﻗوﺗﯾﺳﻓ ،نﯾﻌﻣ تﻗو لﻼﺧ
دﻧﻋ بﺎﺑﻟا ﻲﻓ برﺳﺗﻟا ﻊﻧﺎﻣ صﺣﻓا .دﯾﻋﺎﺟﺗﻟا لﯾﻠﻘﺗﻟ زﺎﮭﺟﻟا نﻣ
.بﯾرﺳﺗﻟا ﺔﻌﻧﺎﻣ ﻲﻓ ﻖﻠﻌﺗ نأ نﻛﻣﯾ ةرﯾﻐﺻ سﺑﻼﻣ ﺔﻟوﻣﺣ جارﺧإ
Start/Pause(تﻗؤﻣ فﺎﻘﯾإ/ءدﺑ)
رزﻟا ﻰﻠﻋ طﻐﺿﻟا مﺗﯾ مﻟ اذإ .ﺔﻟوﻣﺣﻟا
(تﻗؤﻣ
.تادادﻋﻹا
.ةرودﻟا ءﺎﮭﻧإ
• رزﻟا ﻰﻠﻋ طﻐﺿا
• سﺑﻼﻣﻟا جرﺧأ ،روﻔﻟا ﻰﻠﻋ .ةرودﻟا ءﺎﮭﻧإ دﻧﻋ ﺔﻣﻐﻧ توﺻ ردﺻﯾﺳ
لﯾﺳﻐﻟا ﺔﻟوﻣﺣ زﯾﮭﺟﺗ
سﺑﻼﻣﻟا زﯾﮭﺟﺗﺑ مﻗ ﺎھدﻌﺑو ،ﺞﺋﺎﺗﻧﻟا لﺿﻓأ ﻰﻠﻋ لﺻﺣﺗﻟ لﯾﺳﻐﻟا ﺔﻟوﻣﺣ زرﻓا
.ﺔﯾﺎﻧﻌﻟا تﺎﻘﺻﻠﻣ ﻰﻠﻋ ةدوﺟوﻣﻟا زوﻣرﻟا بﺳﺣ
سﺑﻼﻣﻟا فﯾﻧﺻﺗ
لﯾدﻌﺗﺑ مﻗ .لﺳﻐﻟا ةرارﺣ ﺔﺟردو ﺞﯾﺳﻧﻟا عوﻧ ﻰﻠﻋ يوﺗﺣﯾ يذﻟا ﻖﺻﻠﻣﻟا
.ﺞﯾﺳﻧﻟا عوﻧﻟ ﺎًﻘﻓو نارودﻟا ةدﺷ وأ نارودﻟا ﺔﻋرﺳ
سﺑﻼﻣﻟا ﻊﻣ خﺎﺳﺗﻻا ةدﯾدﺷ سﺑﻼﻣﻟا لﺳﻐﺑ مﻘﺗ
طﻠﺧ نﻋ ﺞﺗﻧﯾ نأ نﻛﻣﯾ .ﺔﺣﺗﺎﻔﻟا وأ ءﺎﺿﯾﺑﻟا تﺎﺟوﺳﻧﻣﻟا نﻋ لﺻﻔﻧﻣ لﻛﺷﺑ
نوﻟ رﯾﯾﻐﺗ وأ نوﻠﻟا لﺎﻘﺗﻧا ﺔﻏوﺑﺻﻣﻟا تﺎﺟوﺳﻧﻣﻟﺎﺑ ﺔﺣﺗﺎﻔﻟا تﺎﺟوﺳﻧﻣﻟا
مﻛارﺗ ﻰﻟإ ﺔﯾﻧﺎﺗﻛﻟا تﺎﺟﺗﻧﻣﻟا لﻣﻌﺗ نأ نﻛﻣﯾ .نﺎﺗﻛﻟا ﻊﻣﺟﺗ ﻲﺗﻟا تﺎﺟﺗﻧﻣﻟاو
سﺑﻼﻣﻟﺎﺑ ﺔﯾﺎﻧﻌﻟا ﻖﺻﻠﻣ نﻣ ﻖﻘﺣﺗﻟا
.ﺎﮭﻠﺳﻏ ﺔﻘﯾرطو سﺑﻼﻣﻟا ﺞﯾﺳﻧ تﺎﻧوﻛﻣ زوﻣرﻟا كﻟ ﺢﺿوﺗﺳ
ﻼﻓ ،ﺎًﻧﻛﻣﻣ كﻟذ نﺎﻛ اذإو
.خﺎﺳﺗﻻا ﺔﻔﯾﻔﺧ
.ﺎًﻧوﻟ ﺢﺗﻓﻷا سﺑﻼﻣﻟا
تﺎﺟﺗﻧﻣ) نﺎﺗﻛﻟا
.نﺎﺗﻛﻠﻟ ﺔﻌﻣﺟﻣﻟا داوﻣﻟا ﻰﻠﻋ نﺎﺗﻛﻟا
4
فﺿأو
لﯾزﯾ اذھ .سﺑﻼﻣ ﻊﺿو نودﺑ لﻣﻌﯾ زﺎﮭﺟﻟا كرﺗاو ،تﺎﻔظﻧﻣﻟا ﺔﯾﻣﻛ فﺻﻧ
.ﻊﯾﻧﺻﺗﻟا ءﺎﻧﺛأ ﻰﻘﺑﺗ دﻗ ﻲﺗﻟاو لﯾﺳﻐﻟا ضوﺣ نﻣ ﺔﻠﻣﺗﺣﻣﻟا بﺳاورﻟا
لﯾﻐﺷﺗﻟا ﻰﻠﻋ ﺔﻣﺎﻋ ةرظﻧ
لﯾﺳﻏ ﺞﻣﺎﻧرﺑ رﺗﺧا ،لوﻷا لﯾﺳﻐﻟا لﺑﻗ
Cotton(يدﺎﻋ لﯾﺳﻏ)
5
.سﺑﻼﻣﻟا ﻊﺿو لﯾﺳﻐﻟا زرﻓا
ﻲﻓ ضارﻏﻷا لّﻣﺣو بﺎﺑﻟا ﺢﺗﻓاو ،ﺔﺟﺎﺣﻟا بﺳﺣ لﯾﺳﻐﻟا لﻣِﺣ
6
.ﮫﻗﻼﻏإ دﻧﻋ ﻖﻠﻌﺗﺳ ثﯾﺣ ﺔﯾطﺎطﻣﻟا بﺎﺑﻟا ةدادﺳ ﻰﻠﻋ ﺔﯾﻟدﺗﻣ رﯾﻏو ضوﺣﻟا
.سﺑﻼﻣﻟﺎﺑو بﺎﺑﻟا ةدادﺳﺑ ررﺿ عوﻗو ﮫﻧﻋ ﺞﺗﻧﯾﺳ كﻟذ لﻌﻓ نﻋ سﻋﺎﻘﺗﻟا نإ
• ﻰﻠﻋ بوﺗﻛﻣﻠﻟ ﺎًﻘﻓو سﺑﻼﻣﻟا فﯾﻧﺻﺗﺑ مﻗ ،ﺞﺋﺎﺗﻧﻟا لﺿﻓأ ﻰﻠﻋ لوﺻﺣﻠﻟ
• .ﺎﮭﺧﺎﺳﺗا ﺔﺟردﻟ ﺎًﻘﻓو سﺑﻼﻣﻟا زرﻓا :(فﯾﻔﺧ ،يدﺎﻋ ،دﯾدﺷ) خﺎﺳﺗﻻا ﺔﺟرد
• ﺔﻏوﺑﺻﻣﻟا وأ ﺔﻘﻣﺎﻐﻟا تﺎﺟوﺳﻧﻣﻟا لﺳﻏا :(ﻖﻣﺎﻏ ،ﺢﺗﺎﻓ ،ضﯾﺑأ) نوﻠﻟا
• ﺔﯾﻧﺎﺗﻛﻟا تﺎﺟﺗﻧﻣﻟا لﺻﻔﺑ مﻗ : (نﺎﺗﻛﻟا ﻊﻣﺟﺗ تﺎﺟﺗﻧﻣ ،ﺔﯾﻧﺎﺗﻛ
.مّﻌﻧﻣﻟاو فظﻧﻣﻟا وأ فﯾظﻧﺗﻟا تﺎﺟﺗﻧﻣ فﺿأ
.عزوﻣﻟا ﻲﻓ ﺔﺑﺳﺎﻧﻣﻟا ﻖطﺎﻧﻣﻟا ﻰﻟإ شﺎﻣﻘﻟا مﻌﻧﻣ وأ ضﯾﺑﻣﻟا فﺿأ
.زﺎﮭﺟﻟا لﯾﻐﺷﺗﻟ
Power(ﺔﻗﺎطﻟا)
زﺎﮭﺟﻟا مادﺧﺗﺳا
• مﺟﺣو نوﻟو ،خﺎﺳﺗﻻا ﺔﺟردو ،ﺞﯾﺳﻧﻟا عوﻧ بﺳﺣ لﯾﺳﻐﻟا فﯾﻧﺻﺗﺑ مﻗ
.ﺔﻟﺎﺳﻐﻟا
.ةدادﺳﻟاو سﺑﻼﻣﻟا ﻲﻓ
• ،ﺔﺟﺎﺣﻟا دﻧﻋو .فظﻧﻣﻟا عزوﻣ ﻰﻟإ فظﻧﻣﻟا نﻣ ﺔﺑﺳﺎﻧﻣ ﺔﯾﻣﻛ فﺿأ
.زﺎﮭﺟﻟا لﯾﻐﺷﺗﺑ مﻗ
• رزﻟا ﻰﻠﻋ طﻐﺿا
1
• لﺧاد ةدوﺟوﻣ ضارﻏﻷاو سﺑﻼﻣﻟا ﻊﯾﻣﺟ نأ نﻣ دﻛﺄﺗ ،بﺎﺑﻟا قﻼﻏإ لﺑﻗ
• فﻠﺗ ثادﺣإ ﻊﻧﻣﻟ بﺎﺑﻟا ةدادﺳﺑ ﺔﺻﺎﺧﻟا ﺔﻧرﻣﻟا ﺔﯾﺷﺣﻟا نﻣ ﻊطﻗ يأ جرﺧأ
2
3
Page 78

AR
DN
15
بﯾﻛرﺗﻟا
فﯾرﺻﺗﻟا موطرﺧ بﯾﻛرﺗ
ﺔﻣﺎﻋد مادﺧﺗﺳﺎﺑ فﯾرﺻﺗﻟا موطرﺧ بﯾﻛرﺗﺑ مﻗ
نﻣ ﻰﻠﻋأ فﯾرﺻﺗﻟا موطرﺧ ﻊﺿو مدﻋ بﺟﯾ
.ضرﻷا ىوﺗﺳﻣ نﻣ
100مﺳ
.ءطﺑﺑ ﮫﻔﯾرﺻﺗ مﺗﯾ وأ زﺎﮭﺟﻟا ﻲﻓ ءﺎﻣﻟا فﯾرﺻﺗ مﺗﯾ ﻻ دﻗ
.ءﺎﻣﻟا برﺳﺗ نﻋ ﺞﺗﺎﻧﻟا ررﺿﻟا
ﺔﯾﻘﻓرﻣ
• نﻣ ﺔﯾﺿرﻷا ﺔﯾﺎﻣﺣ ﻰﻟإ ﺔﺣﯾﺣﺻ ﺔﻘﯾرطﺑ فﯾرﺻﺗﻟا موطرﺧ تﯾﺑﺛﺗ يدؤﯾﺳ
.يدﺎﻋ رﯾﻏ ﺞﯾﺟﺿ ثادﺣإ ﻰﻟإ يدؤﯾ
• ةوﻘﻟﺎﺑ ىرﺧأ ةرﻣ ﮫﻟﺎﺧدإ لوﺎﺣﺗ ﻼﻓ ،اًدﺟ ًﻼﯾوط فﯾرﺻﺗﻟا موطرﺧ نﺎﻛ اذإ
دﻗ ثﯾﺣ .زﺎﮭﺟﻟا لﺧاد
•.ﺔﻠﺳﻠﺳ مادﺧﺗﺳﺎﺑ ﮫﺗﯾﺑﺛﺗ مﻛﺣأ ،ﺔﻋوﻟﺎﺑﻟا ﻲﻓ فﯾرﺻﺗﻟا موطرﺧ بﯾﻛرﺗ دﻧﻋ
Page 79

بﯾﻛرﺗﻟا
ﺔظﺣﻼﻣ
ﺔظﺣﻼﻣ
14
AR
لﺻوﻣﻟا جﻻزﻣ ﺔﺣوﻟ بﺣﺳا
ﻰﻟإ لﺎﺧدﻹا موطرﺧ ﻊﻓداو ،لﻔﺳأ ﻰﻟإ
ﻲﻓ لوﺣﻣﻟا لﺎﻔﻗأ نأ دﻛﺄﺗو .لﺻوﻣﻟا جﻻزﻣ ﺔﺣوﻟ ررﺣو ،لوﺣﻣﻟا
ﻲﻓ ةدوﺟوﻣﻟا (كﻟذ ﻰﻟإ ﺎﻣو ،بﺷﺧﻟا ةرﺎﺷﻧو ،لﻣرﻟاو ،رﺎﺑﻐﻟا) ﺔﺑﯾرﻐﻟا
ةرارﺣ ﺔﺟرد نﻣ ﻖﻘﺣﺗو ،وﻟد ﻲﻓ ﮫﻔﯾرﺻﺗ مﺗﯾ ءﺎﻣﻟا لﻌﺟاو .ءﺎﻣﻟا طوطﺧ
f
4
.ﺎﮭﻧﺎﻛﻣ
.ءﺎﻣﻟا
زﺎﮭﺟﻟﺎﺑ موطرﺧﻟا لﯾﺻوﺗ
.زﺎﮭﺟﻟا نﻣ ﻲﻔﻠﺧﻟا ءزﺟﻟﺎﺑ دوﺟوﻣﻟا هﺎﯾﻣﻟا لﺎﺧدإ مﺎﻣﺻﺑ دادﻣﻹا موطرﺧ تﺑﺛ
لﺎﺧدﻹا موطرﺧ ﻊﻓدا
ةدادﺳﻠﻟ نﻛﻣﯾ ثﯾﺣﺑ ﻰﻠﻋﻷ يدوﻣﻋ لﻛﺷﺑ
مﻛﺣأ مﺛ ﺎًﻣﺎﻣﺗ روﺑﻧﺻﻟﺎﺑ ﻖﺻﺗﻠﺗ نأ موطرﺧﻟا لﺧاد ةدوﺟوﻣﻟا ﺔﯾطﺎطﻣﻟا
نﺎﻧﺳﺄﺑ دوزﻣﻟا رﯾﻏ روﺑﻧﺻﻟﺎﺑ ةدﺣاوﻟا ﺔﺳﻣﻠﻟا عوﻧ نﻣ موطرﺧ لﯾﺻوﺗ
.ﺔﻌﺑرﻷا تﯾﺑﺛﺗﻟا رﯾﻣﺎﺳﻣ ررﺣو
• داوﻣﻟا درطﻟ ءﺎﻣﻟا روﺑﻧﺻ لﯾﻐﺷﺗﺑ مﻗ ،ءﺎﻣﻟا لﺎﺧدإ موطرﺧ لﯾﺻوﺗ دﻌﺑ
.لوﺣﻣﻟا مﺋﻼﯾ ﻰﺗﺣ اًدﺟ اًرﯾﺑﻛ روﺑﻧﺻﻟا نﺎﻛ اذإ
c
.نﯾﻣﯾﻟا ﻰﻟإ هرﯾودﺗ ﻖﯾرط نﻋ ﮫطﺑر
لوﺣﻣﻠﻟ ﺔﯾﻘﻠﺣﻟا ﺔﺣوﻠﻟا كﻔﺑ مﻗ
d
e
ﮫﯾﺟوﺗﻟا ﺔﺣوﻟ لزأ
4
1
2
.طﻘﻓ ةدرﺎﺑ هﺎﯾﻣ عزوﻣﺑ ﮫﻠﯾﺻوﺗﺑ مﻗ لﺑ ﺔﻧﺧﺎﺳ هﺎﯾﻣ
اذإ .هﺎﯾﻣﻟا دادﻣإ روﺑﻧﺻﻟ ﺔﯾدﯾﻠﻘﺗ رﺛﻛﻷا عاوﻧﻷا مدﺧﺗﺳا .ﺎﮭﺳﻔﻧ تاوطﺧﻟا
لﺎﺧدإ لﺑﻗ ﮫﯾﺟوﺗﻟا ﺔﺣوﻟ عزﻧﺎﻓ ،ﺔﯾﺎﻐﻠﻟ اًرﯾﺑﻛ وأ لﻛﺷﻟا ﻊﺑرﻣ روﺑﻧﺻﻟا نﺎﻛ
.لوﺣﻣﻟا ﻲﻓ روﺑﻧﺻﻟا
• عزوﻣﺑ موطرﺧﻟا لﯾﺻوﺗﺑ مﻘﺗ ﻻ ،دﺣاو هﺎﯾﻣ لﺎﺧدﺈﺑ ةدوزﻣﻟا زرطﻠﻟ ﺔﺑﺳﻧﻟﺎﺑ
ﺔﻠﺻو ﺔﯾطﺎطﻣﻟا ةدادﺳﻟا لﻛﺷﺗ ثﯾﺣﺑ روﺑﻧﺻﻟا فرط ﻰﻟإ لوﺣﻣﻟا ﻊﻓدا
.لوﺣﻣﻠﻟ ﺔﯾﻘﻠﺣﻟا ﺔﺣوﻠﻟاو ﺔﻌﺑرﻷا تﯾﺑﺛﺗﻟا رﯾﻣﺎﺳﻣ طﺑر مﻛﺣأ .ءﺎﻣﻠﻟ ﺔﻌﯾﻧﻣ
• ررﻛ ،موطرﺧﻟا نﻣ ءﺎﻣ برﺳﺗ دوﺟو ﺔﻟﺎﺣ ﻲﻓو ،لﯾﺻوﺗﻟا نﻣ ءﺎﮭﺗﻧﻻا دﻌﺑ
•.ﮫﻘﻠﻌﺗ وأ موطرﺧﻟا ءاوﺗﻟا مدﻋ نﻣ دﻛﺄﺗ
3
Page 80

AR
ﺔظﺣﻼﻣ
ﺔظﺣﻼﻣ
13
بﯾﻛرﺗﻟا
ءﺎﻣﻟا روﺑﻧﺻﺑ موطرﺧﻟا لﯾﺻوﺗ
نﺎﻧﺳﺄﺑ دوزﻣﻟا روﺑﻧﺻﻟﺎﺑ ﻲﺑﻟوﻠﻟا موطرﺧﻟا لﯾﺻوﺗ
.ءﺎﻣﻟا دادﻣإ روﺑﻧﺻﺑ موطرﺧﻟا لﺻوﻣ تﺑﺛ
نﺎﻧﺳﺄﺑ دوزﻣﻟا رﯾﻏ روﺑﻧﺻﻟﺎﺑ ﻲﺑﻟوﻟ موطرﺧ لﯾﺻوﺗ
ﺔﻌﺑرﻷا تﯾﺑﺛﺗﻟا رﯾﻣﺎﺳﻣ كﻓ
a
.
.لوﺣﻣﻟا مﺋﻼﯾ ﻰﺗﺣ اًدﺟ اًرﯾﺑﻛ روﺑﻧﺻﻟا نﺎﻛ اذإ
ﮫﯾﺟوﺗﻟا ﺔﺣوﻟ لزأ
b
ﺔﻌﻧﺎﻣﻟا ﺢﺋارﺷﻟا تﯾﺑﺛﺗ دﻌﯾ .ﺔﯾﻔﻠﺧﻟا لﺟرﻷا تﺣﺗ ﺎﮭﻌﺿﻓ ،ﺔﯾﻣﺎﻣﻷا
.ﺔﯾﻟﺎﻌﻓ رﺛﻛﻷا رﺎﯾﺧﻟا وھ ﺔﯾﻣﺎﻣﻷا مادﻗﻷا تﺣﺗ قﻻزﻧﻼﻟ
.قﻻزﻧﻼﻟ ﺔﻌﻧﺎﻣﻟا ﺢﺋارﺷﻟا ﻰﻠﻋ زﺎﮭﺟﻟا ﻊﺿ
1
.زﺎﮭﺟﻟا لﺟرﺄﺑ
2
a
ءﺎﻣﻟا دادﻣإ موطرﺧ لﯾﺻوﺗ
• لﺟرﻷا تﺣﺗ قﻻزﻧﻼﻟ ﺔﻌﻧﺎﻣﻟا ﺢﺋارﺷﻟا ﻊﺿو بﻌﺻﻟا نﻣ نﺎﻛ اذإ
4
• قﻻزﻧﻼﻟ ﺔﻌﻧﺎﻣﻟا ﺢﺋارﺷﻠﻟ ﻖﺻﻠﺗ ﻻ
• ﺔﻣدﺧ زﻛرﻣ نﻣ قﻻزﻧﻼﻟ ﺔﻌﻧﺎﻣ ﺢﺋارﺷ ﻰﻠﻋ لوﺻﺣﻟا نﻛﻣﯾLG
Electronics.
لﯾﺻوﺗﻠﻟ ﺔظوﺣﻠﻣ
ﺔﯾطﺎطﻣﻟا ةدادﺳﻟا لﯾﺻوﺗ مﺗﯾ ثﯾﺣﺑ روﺑﻧﺻﻟا فرط ﻰﻟإ لوﺣﻣﻟا ﻊﻓدا
.ﺔﻌﺑرﻷا تﯾﺑﺛﺗﻟا رﯾﻣﺎﺳﻣ طﺑر مﻛﺣأو .ءﺎﻣﻠﻟ ﺔﻌﯾﻧﻣ ﺔﻠﺻو ﺢﺑﺻﺗﻟ
و
1000لﺎﻛﺳﺎﺑ وﻠﯾﻛ
1000 وﻠﯾﻛ
100لﺎﻛﺳﺎﺑ وﻠﯾﻛ
.طﺎﻐﺿﻧﻻا فﯾﻔﺧﺗ زﺎﮭﺟ بﯾﻛرﺗ بﺟﯾ ،
.لﺎﺧدﻹا مﺎﻣﺻﺑ ﺎﮭطﺑرﻟ ﺔﯾﻟﻵا
3
• نﯾﺑ هﺎﯾﻣﻟا طﻐﺿ نوﻛﯾ نأ بﺟﯾ
)1.0‒10.0مﺳ / ﻲﻠﻘﺛ مﺟﻛ ² نﻣ رﺛﻛأ هﺎﯾﻣﻟا طﻐﺿ نﺎﻛ اذإ .(
لﺎﻛﺳﺎﺑ
•.رﻣﻷا مزﻟ اذإ ﮫﻟدﺑﺗﺳاو ﺔﯾرود ةروﺻﺑ ءﺎﻣﻟا دادﻣإ موطرﺧ ﺔﻟﺎﺣ نﻣ ﻖﻘﺣﺗ
• تادﻌﻣﻟا مدﺧﺗﺳا وأ مﺎﻣﺻﻟﺎﺑ هﺎﯾﻣﻟا لﺎﺧدإ مﯾطارﺧ طﺑر مﺎﻛﺣإ ﻲﻓ ﻎﻟﺎﺑﺗ ﻻ
• لﺎﺧدإ ﺔﻠﺻوﻟ ﻲﻋﺎﺟﺗرﻻا ﻖﻓدﺗﻟا دﺿ ﺔﯾﺎﻣﺣﻟا نﻣ دﯾزﻣﻟ ﺔﺟﺎﺣ كﺎﻧھ سﯾﻟ
.ءﺎﻣﻟا
Page 81

بﯾﻛرﺗﻟا
ﺔظﺣﻼﻣ
ﺔظﺣﻼﻣ
ﺔظﺣﻼﻣ
12
AR
لﻔﻘﻟا لﯾﻣاوﺻ مادﺧﺗﺳﺎﺑ لﺟرﻷا طﺑﺿ مﻛﺣأ
ﺎھرﯾودﺗ ﻖﯾرط نﻋ
.زﺎﮭﺟﻟا نﻣ ﻲﻠﻔﺳﻟا ءزﺟﻟا هﺎﺟﺗا سﻛﻌﺑ ﺔﻋﺎﺳﻟا برﺎﻘﻋ هﺎﺟﺗا سﻛﻋ
نﻣ ﻲﻠﻔﺳﻟا ءزﺟﻟا ﻲﻓ ةدوﺟوﻣﻟا لﻔﻘﻟا لﯾﻣاوﺻ ﻊﯾﻣﺟ مﺎﻛﺣإ نﻣ ﻖﻘﺣﺗ
b
.ﺢﯾﺣﺻ لﻛﺷﺑ زﺎﮭﺟﻟا
.ﺔﻟﺎّﻌﻓو ،ﺔﻣظﺗﻧﻣو
.ﺔﺣطﺳﻣو ﺔﺑﻠﺻ ﺔﯾﺿرأ ﻰﻠﻋ
مادﻗأ عدﺗ ﻻ
.ءﺎﺿوﺿﻟا
قﻻزﻧﻼﻟ ﺔﻌﻧﺎﻣ ﺢﺋارﺷ مادﺧﺗﺳا
3
ءﺎﺿوﺿﻟا لﯾﻠﻘﺗ وأ فﺎﻘﯾإ ﻰﻟإ يدؤﯾ دﻗ ﺎﮭﺗﯾﺑﺛﺗ وأ ﺔﯾﺑﺷﺧﻟا تﺎﯾﺿرﻷا زﯾزﻌﺗ
ءاوﺗﺳا ﻊﺿو ﻲﻓو ﺔﯾذﺎﺣﺗﻣ زﺎﮭﺟﻟا لﺟرأ نوﻛﺗ نأ بﺟﯾ ،زﺎﮭﺟﻟا بﯾﻛرﺗ دﻧﻋ
4
لﺟرأ نﻛﺗ مﻟ اذإ ﺢﯾﺣﺻ لﻛﺷﺑ لﻣﻌﯾ ﻻ دﻗ وأ فﻠﺗﻠﻟ زﺎﮭﺟﻟا ضرﻌﺗﯾ دﻗ .مﺎﺗ
.مﯾﻠﺳ ءاوﺗﺳا ﻊﺿو ﻲﻓو ﺔﯾذﺎﺣﺗﻣ زﺎﮭﺟﻟا
.ﺔﯾوﺗﺳﻣ رﯾﻏ ﺔﯾﺿرﻷا تﻧﺎﻛ اذإ ﺔﺟﺎﺣﻟا بﺳﺣ لﺟرﻷا ﺔﯾوﺳﺗﺑ مﻗ
• ،ﺔﻠﯾوط ةرﺗﻔﻟ لﯾﻐﺷﺗ ﺔﻟﺎﺳﻐﻠﻟ نﯾﺑﺳﺎﻧﻣﻟا ىوﺗﺳﻣﻟاو نﺎﻛﻣﻟا دﯾدﺣﺗ نﻣﺿﯾ
• ﻲﻘﻓأ ﻊﺿو ﻲﻓ زﺎﮭﺟﻟا نوﻛﯾ نأ بﺟﯾ100 ﮫﻧﺎﻛﻣ ﻲﻓ تﺎﺑﺛﺑ ﺎًﺑوﺻﻧﻣو %
•.لﻣﺣﻣ وھو ﺎﯾاوزﻟا نﯾﺑ "ﺎًﺣﺟرﺄﺗﻣ" نوﻛﯾ ﻻأ بﺟﯾو
• وأ زازﺗھﻻا ﻰﻟإ كﻟذﺑ مﺎﯾﻘﻟا مدﻋ يدؤﯾ دﻗ .لﺗﺑﺗ ﺔﻟﺎﺳﻐﻟا
.زازﺗھﻻا وأ ةدﯾدﺷﻟا
مادﻗﻷا ﺔﯾوﺳﺗو طﺑﺿ
• .نازﺗا مدﻋو ﺎًﻔﯾﻧﻋ اًزازﺗھا ﺔﻘﻠﻌﻣﻟا وأ ﺔﯾﺑﺷﺧﻟا تﺎﯾﺿرﻷا ثدﺣُﺗ نأ نﻛﻣﯾ
1
•.زﺎﮭﺟﻟا لﺟرأ تﺣﺗ كﻟذ ﻰﻟإ ﺎﻣو بﺷﺧﻟا ﻊطﻗ ﻊﺿﺗ ﻻ
•.ﺔﯾﺿرﻷا ﻰﻠﻋ ﺎﮭﺗﺎﺑﺛو ﺔﻌﺑرﻷا لﺟرﻷا رارﻘﺗﺳا نﻣ دﻛﺄﺗ
.هؤارﺷ مﺗ يذﻟا زارطﻟا عوﻧﻟ ﺎًﻘﻓو ﺔﯾﺻﺎﺧﻟا هذھ فﻠﺗﺧﺗ
.دﯾدﺷﻟا زازﺗھﻼﻟ ﺔﺟﯾﺗﻧ ﺔﻟﺎﺳﻐﻟا كرﺣﺗﺗ دﻗ ،ﻖﻟز ٍﺢطﺳ ﻰﻠﻋ زﺎﮭﺟﻟا بﯾﻛرﺗ دﻧﻋ
ءﺎﺿوﺿﻟا لﻼﺧ نﻣ لطﻋ ثودﺣ ﻰﻟإ ﺔﺣﯾﺣﺻﻟا رﯾﻏ ﺔﯾوﺳﺗﻟا يدؤﺗ نأ نﻛﻣﯾو
قﻻزﻧﻼﻟ ﺔﻌﻧﺎﻣ ﺢﺋارﺷ بﯾﻛرﺗ كﯾﻠﻋ نﯾﻌﺗﯾ ،كﻟذ ثودﺣ ﺔﻟﺎﺣ ﻲﻓ .زازﺗھﻻاو
.قﻻزﻧﻼﻟ ﺔﻌﻧﺎﻣﻟا ﺢﺋارﺷﻟا ﻊﺿوﻟ ﺔﯾﺿرﻷا فّظﻧ
ﺢﺋارﺷﻟا ﻖﻟزﻧﺗ دﻘﻓ ،ﺔﺑوطرﻟا ضﻌﺑ نﺎﻛﻣﻟﺎﺑ لظ اذإو .ﺎﮭﻔﯾظﻧﺗو
.بﯾﻛرﺗﻟا ﺔﻘطﻧﻣ ﻲﻓ زﺎﮭﺟﻟا ﻊﺿو دﻌﺑ ىوﺗﺳﻣﻟا طﺑﺿا
.ضرﻷا ﻰﻠﻋ قﻻزﻧﻼﻟ ﺔﻌﻧﺎﻣﻟا ﺢﺋارﺷﻠﻟ
.ىوﺗﺳﻣﻟا طﺑﺿو ءاوﺗﺳﻻا لﺟرأ لﻔﺳأ
1
• ﺔﺑوطرﻟاو ﺔﺑﯾرﻐﻟا مﺎﺳﺟﻷا ﺔﻟازﻹ ﺔﻓﺎﺟ شﺎﻣﻗ ﺔﻌطﻗ مدﺧﺗﺳا
.قﻻزﻧﻼﻟ ﺔﻌﻧﺎﻣﻟا
2
ﻖﺻﻼﻟا بﻧﺎﺟﻟا ﻊﺿ
a
3
LG Electronics.زارطﻟا اذھ ﻊﻣ مدﺧﺗﺳُﯾﻟ ﮫﺗﻋﺎﻧﺻﺑ
ءﺎﻣﻟا نازﯾﻣ ﺎًﻣدﺧﺗﺳﻣ ﺎًﻣﺎﻣﺗ ضرﻷا ﻰﻠﻋ زﺎﮭﺟﻟا ءاوﺗﺳا نﻣ دﻛﺄﺗ
a
.
• مﻘﺗ مﻟ ﺎﻣ ﻊﻔﺗرﻣ ﺢطﺳ وأ ﺔﺻﻧﻣ وأ دوﻣﻋ ةدﻋﺎﻗ ﻰﻠﻋ ﺔﻟﺎﺳﻐﻟا بﯾﻛرﺗﺑ مﻘﺗ ﻻ
2
Page 82

AR
رﯾذﺣﺗ
ﺔظﺣﻼﻣ
*
11
بﯾﻛرﺗﻟا
لﻘﻧﻟا يرﺎﻣﺳﻣﺑ أدﺑا
طﺑرﻟا حﺎﺗﻔﻣ مادﺧﺗﺳﺎﺑ ،لﻔﺳﻷﺎﺑ نﯾدوﺟوﻣﻟا ,
سﻛﻋ ﻲﻓ ﺎھرﯾودﺗ ﻖﯾرط نﻋ لﻣﺎﻛﻟﺎﺑ لﻘﻧﻟا رﯾﻣﺎﺳﻣ ﻊﯾﻣﺟ كﻔﻟ (ﻖﻓرﻣﻟا)
.جرﺎﺧﻟا ﻰﻟإ ﺎﮭﺑﺣﺳ ﻊﻣ فطﻠﺑ ﺎھزھ ﻖﯾرط نﻋ رﯾﻣﺎﺳﻣﻟا ﻊﻣﺟﻣ جرﺧأ
وأ تﺎﻘﺣﻠﻣﻟا ةوﺑﻋ ﻲﻓ ةدوﺟوﻣﻟا
.ﺔﻟﺎﺳﻐﻟا نﻣ ﻲﻔﻠﺧﻟا ءزﺟﻟﺎﺑ ﺔﺗﺑﺛﻣﻟا
a
.ﺔﻋﺎﺳﻟا برﺎﻘﻋ هﺎﺟﺗا
.تﺎﺣﺗﻔﻟا ﺔﯾطﻏأ بﯾﻛرﺗ
b
1
.زﺎﮭﺟﻟا ﻲﺑﻧﺎﺟ ﻼﻛ نﻣ رﺗﻣ
ﻰﻟإ ضرﻌﺗﻟا ﻰﻟإ ةرﺑﺧ مﮭﯾدﻟ سﯾﻟ صﺎﺧﺷأ لﺑﻗ نﻣ مﺗﺗ ﻲﺗﻟا تﺎﺣﻼﺻﻹا
2
نﻣ دﻣﺗﻌﻣﻟا ﻲﻠﺣﻣﻟا حﻼﺻﻹا ﻲﻧﻔﺑ لﺻﺗا .رﯾطﺧ لطﻋ وأ ﺔﺑﺎﺻإLG.
3
• رﯾﻣﺎﺳﻣﻟا ﺔﯾطﻏأ بﯾﻛرﺗﺑ مﻗ
ﺔﯾﺋﺎﺑرﮭﻛﻟا تﻼﯾﺻوﺗﻟا
•.ﺎًﺟودزﻣ ًﻻوﺣﻣ ﻻو ﺔﻟﺎطإ كﻠﺳ مدﺧﺗﺳﺗ ﻻ
•.مادﺧﺗﺳﻻا دﻌﺑ ءﺎﻣﻟا دادﻣإ فﺎﻘﯾإو زﺎﮭﺟﻟا لﺻﻓ ﻰﻠﻋ ﺎًﻣﺋاد صرﺣا
• كﻼﺳﻷا لﯾﺻوﺗ ﺢﺋاوﻠﻟ ﺎًﻘﻓو ضرؤﻣ سﺑﻘﻣﺑ زﺎﮭﺟﻟا لﯾﺻوﺗ نﯾﻌﺗﯾ
.ﺔﯾﻟﺎﺣﻟا ﺔﯾﺋﺎﺑرﮭﻛﻟا
•.ﺔﻟوﮭﺳﺑ سﺑﺎﻘﻟا ﻰﻟإ لوﺻوﻟا نﻛﻣﯾ ثﯾﺣﺑ زﺎﮭﺟﻟا ﻊﺿو بﺟﯾ
• لوطﺑ ﻲﺑرﮭﻛﻟا رﺎﯾﺗﻟا ذﺧﺄﻣ نوﻛﯾ نأ بﺟﯾ1
• يدؤﺗ نأ نﻛﻣﯾ ثﯾﺣ ،لھؤﻣ صﺧﺷ ﺔطﺳاوﺑ ﻻإ زﺎﮭﺟﻟا حﻼﺻإ مدﻋ بﺟﯾ
• ضرؤﻣو بﱠﻛرﻣ بﺳﺎﻧﻣ ﻲﺑرﮭﻛ رﺎﯾﺗ سﺑﻘﻣﺑ ﺔﻗﺎطﻟا سﺑﺎﻗ لﯾﺻوﺗ بﺟﯾ
.ﺔﯾﻠﺣﻣﻟا ﺢﺋاوﻠﻟاو نﯾﻧاوﻘﻟا ﻊﯾﻣﺟﻟ ﺎًﻘﻓو
زﺎﮭﺟﻟا فﯾﻠﻐﺗ ﺢﺗﻓ
نﯾﻠﻔﻟا ةدﻋﺎﻗ نﻋ زﺎﮭﺟﻟا ﻊﻓر
.هؤارﺷ مﺗ يذﻟا زارطﻟا بﺳﺣ ﺔﯾﺻﺎﺧﻟا هذھ فﻠﺗﺧﺗ *
.موﻔﻟا ةدﻋﺎﻗ ﻰﻠﻋ نﻣ زﺎﮭﺟﻟا ﻊﻓرا ،نﺣﺷﻟا داوﻣو ﺔﻧوﺗرﻛﻟا ﺔﻟازإ دﻌﺑ
-.لﻘﻧﻟا رﯾﻣﺎﺳﻣ بﯾﻛرﺗ دﺎﻌُﯾ
-.زﺎﮭﺟﻟا نﻣ ﻲﻔﻠﺧﻟا ءزﺟﻟﺎﺑ ﺔﻗﺎطﻟا كﻠﺳ تﺑﺛُﯾ
زﺎﮭﺟﻟا ىوﺗﺳﻣ طﺑﺿ
ىوﺗﺳﻣﻟا طﺑﺿ نﻣ ﻖﻘﺣﺗﻟا
كرﺣﺗﯾ ّﻻأ بﺟﯾﻓ ،يرطﻗ لﻛﺷﺑ زﺎﮭﺟﻠﻟ ﺔﯾوﻠﻌﻟا ﺔﺣوﻠﻟا فاوﺣ ﻰﻠﻋ طﻐﺿﻟا دﻧﻋ
.(نﯾھﺎﺟﺗﻻا ﻼﻛ صﺣﻓا) قﻼطﻹا ﻰﻠﻋ لﻔﺳﻷو ﻰﻠﻋﻷ زﺎﮭﺟﻟا
.ىرﺧأ ةرﻣ مادﻗﻷا لﯾدﻌﺗﺑ مﻗ ،يرطﻗ
ﻖﻘﺣﺗ
•.ًﻼﺑﻘﺗﺳﻣ ﺎﮭﻣدﺧﺗﺳﺗﻟ تﯾﺑﺛﺗﻟا رﺻﺎﻧﻋو لﻘﻧﻟا رﯾﻣﺎﺳﻣﺑ ظﻔﺗﺣا
•:رﺳﻛﻠﻟ ﮫﺿرﻌﺗ بﻧﺟﺗﻟ هﺎﻧدأ ﺢﺿوﻣ وھ ﺎﻣﻛ زﺎﮭﺟﻟا لﻘﻧا
لﻔﺳﺄﺑ ﻖﺻﺗﻠﺗ ﻻو ةدﻋﺎﻘﻟا نﻋ ةدﯾﻌﺑ *
ﺎًﻣﺋاد كﯾﻠﻋ بﺟﯾﻓ ،
بﻧﺎﺟﻟا ﻰﻠﻋ زﺎﮭﺟﻟا بﻠﻘﺗ ﻻ .ﺎﮭﺑﻧﺎﺟ ﻰﻠﻋ رذﺣﺑ ﺎﮭﺑﻠﻗو ﺔﻟﺎﺳﻐﻟا بﻧﺎﺟ ﺔﯾﺎﻣﺣ
• لﻛﺷﺑ زﺎﮭﺟﻠﻟ ﺔﯾوﻠﻌﻟا ﺔﺣوﻠﻟا ﻰﻠﻋ طﻐﺿﻟا دﻧﻋ زﺎﮭﺟﻟا ﺢﺟرﺄﺗ ﺔﻟﺎﺣ ﻲﻓ
.تﯾﺑﺛﺗﻟا رﺻﺎﻧﻋو لﻘﻧﻟا رﯾﻣﺎﺳﻣ لزأ ،زﺎﮭﺟﻠﻟ رﺳﻛو دﯾدﺷ زازﺗھا ثودﺣ ﻊﻧﻣﻟ
•.ﮫﺑﯾﻛرﺗ دﻌﺑ ﺢﯾﺣﺻ ٍوﺣﻧ ﻰﻠﻋ ﺔﯾوﺗﺳﻣ ﺔﯾﻌﺿو ﻲﻓ زﺎﮭﺟﻟا ﻊﺿو نﻣ
b
a
.ﻲﻔﻠﺧﻟا وأ ﻲﻣﺎﻣﻷا
لﻘﻧﻟا رﯾﻣﺎﺳﻣ تﺎﻋوﻣﺟﻣ ﺔﻟازإ
• ضوﺣﻟا ﺔﻣﺎﻋد نأ نﻣ دﻛﺄﺗ
.زﺎﮭﺟﻟا
• ﺔﯾﻧوﺗرﻛﻟا ةدﻋﺎﻘﻟا ﺔﻟازﻹ لﻔﺳﻷ ﺔﻟﺎﺳﻐﻟا بﻠﻗ مزﻟ اذإ
Page 83

بﯾﻛرﺗﻟا
رﯾذﺣﺗ
ﺔظﺣﻼﻣ
ﮫﯾﺑﻧﺗ
ﺔظﺣﻼﻣ
10
AR
(ﺔﻘﻠﻌﻣﻟا تﺎﯾﺿرﻷا) ﺔﯾﺑﺷﺧﻟا تﺎﯾﺿرﻷا
نﻣ دﺣﻠﻟ ﺔﯾطﺎطﻣ ﺎًﺑاوﻛأ مدﺧﺗﺳا ﺔﯾﺑﺷﺧ تﺎﯾﺿرأ ﻰﻠﻋ زﺎﮭﺟﻟا بﯾﻛرﺗ دﻧﻋ
وأ ﺔﯾﺑﺷﺧﻟا تﺎﯾﺿرﻷا ثدﺣُﺗ نأ نﻛﻣﯾ .نازﺗﻻا ﻲﻓ لﻠﺧو يوﻗ زازﺗھا ثودﺣ
.ًﻻﺎطﻋأو ًءﺎطﺧأو نازﺗﻻا ﻲﻓ ًﻼﻠﺧو ﺎًﯾوﻗ اًزازﺗھا ﺔﻘﻠﻌﻣﻟا
نﻋ لﻘﯾ ﻻ ﺎﮭﻛﻣﺳ 15
لﻗﻷا ﻰﻠﻋ نﯾﺗﺿرﺎﻋ ﻰﻠﻋ ﺎﮭﺗﯾﺑﺛﺗ مﺗﯾو ،زﺎﮭﺟﻟا لﺟرأ نﻣ لﺟر لﻛ لﻔﺳأ مﻣ
ﺢطﺳ ﻰﻠﻋ تﯾﺑﺛﺗﻟا بﺑﺳﺑ ﺔﺟﺗﺎﻧﻟا فﯾﻟﺎﻛﺗﻟاو رارﺿﻷا ﻲطﻐﯾ ﻻ نﺎﻣﺿﻟا
a
.ﻲﻏارﺑ مادﺧﺗﺳﺎﺑ ﺔﯾﺿرﻷا ضراوﻋ نﻣ
.ﺎًﺗﺎﺑﺛ رﺛﻛأ ﺔﯾﺿرﻷا
.رﻘﺗﺳﻣ رﯾﻏ
بﯾﻛرﺗﻟا نﺎﻛﻣ تﺎﺑﻠطﺗﻣ
نﺎﻛﻣﻟا ﻲﻓ ﮫﺑﯾﻛرﺗ نﻣ دّﻛﺄﺗﻠﻟ زﺎﮭﺟﻟا بﯾﻛرﺗ لﺑﻗ ﺔﯾﻟﺎﺗﻟا تﺎﻣوﻠﻌﻣﻟا نﻣ ﻖﻘﺣﺗ
بﯾﻛرﺗﻟا نﺎﻛﻣ
لﻗأ ﻲﮭﻓ ،رﺎﯾﺗﺧا لﺿﻓأ ﻲھ ﺔﯾﻧﺎﺳرﺧﻟا ﺔﯾﺿرﻷا .فﯾﺷﻧﺗﻟا ةرود ءﺎﻧﺛأ
ﺔﯾﺿرﻷا حاوﻟﻷﺎﺑ ﺔﻧرﺎﻘﻣ فﯾﺷﻧﺗﻟا ةرود ءﺎﻧﺛأ ثدﺣﯾ يذﻟا زازﺗھﻼﻟ ﺔﺿرﻋ
.نﯾزﺎﮭﺟﻟا نﯾﺑ دﻗوﻣﻟا وأ نرﻔﻠﻟ ﮫﺟاوﻣﻟا بﻧﺎﺟﻟا ﻰﻠﻋ
• ﺔﯾطﺎطﻣ باوﻛأ ﻊﺿوﺑ كﺣﺻﻧﻧ ،زازﺗھﻻا لﯾﻠﻘﺗﻟ
• نوﻛﺗ ثﯾﺣﺑ ،ﺔﻓرﻐﻟا ﺎﯾاوز نﻣ ﺔﯾواز ﻲﻓ زﺎﮭﺟﻟا بﯾﻛرﺗﺑ مﻗ ،نﻛﻣأ نإ
فﯾرﺻﺗﻟا موطرﺧو مﺎﻣﺻﻟﺎﺑ هﺎﯾﻣﻟا لﺎﺧدإ مﯾطارﺧﻟ ﺔﯾﻓﺎﻛ ﺔﻓﺎﺳﻣ دوﺟو نﺎﻣﺿﻟ
•.زازﺗھﻻا نﻣ دﺣﻠﻟ ﺔﯾطﺎطﻣﻟا باوﻛﻷا تﺑﺛ
اذﻟ ،ﺔﻓﺎﺳﻣﻟا ةدﺎﯾز ﺔﯾﺿرﻷا ﺔﺑﻟوﻘﻟاو ،بﺎﺑﻟاو ،طﺋﺎﺣﻟا بﻠطﺗﯾ .زﺎﮭﺟﻟا فﻠﺧ مﻣ
• نﺈﻓ (ﺔﯾﺑﺷﺧ ﺔﯾﺿرأ لﺛﻣ) ةرﻘﺗﺳﻣ رﯾﻏ ﺔﯾﺿرأ ﻰﻠﻋ زﺎﮭﺟﻟا بﯾﻛرﺗ مﺗ اذإ
.دﺎﺟﺳﻟﺎﺑ ةﺎطﻐﻣﻟا ﺢطﺳﻷا وأ
)
لزﺎﻋ ﻊﺿو بﺟﯾﻓ ،مﺣﻔﻟﺎﺑ850 × 600 موﯾﻧﻣوﻟﻷا ﻖﺋﺎﻗرﺑ ﻰطﻐﻣ (مﻣ
.زﺎﮭﺟﻟا رارﻘﺗﺳا نﺎﻣﺿﻟ ةرﻓوﻣﻟا لﻘﻧﻟا
ﻲﺿرﻷا بﯾﻛرﺗﻟا
نﻋ لﻘﺗ ﻻ ﺔﻓﺎﺳﻣ كرﺗا ،ءاوﮭﻟا ﻖﻓدﺗو20و بﻧاوﺟﻟا دﻧﻋ ﻰﻧدأ دﺣﻛ مﻣ 100
.ﺢﯾﺣﺻﻟا
• زازﺗھا ثودﺣ نﻣ دﺣﻠﻟ كﻟذو ﺔﺗﺑﺎﺛ ﺔﯾﺿرأ ﻰﻠﻋ زﺎﮭﺟﻟا اذھ بﯾﻛرﺗ بﺟﯾ
• لﻣﻌﯾ دﻗوﻣ وأ زﺎﻏ دﻗوﻣ بﻧﺎﺟﺑ زﺎﮭﺟﻟا ﻊﺿو بﻧﺟﺗ لﯾﺣﺗﺳﻣﻟا نﻣ نﺎﻛ اذإ
•.ﮫﻠطﻌﺗ ﺔﻟﺎﺣ ﻲﻓ ﮫﯾﻟإ سدﻧﮭﻣﻟا لوﺻو ﺔﻟوﮭﺳ نﻣ زﺎﮭﺟﻟا بﯾﻛرﺗ دﻧﻋ دﻛﺄﺗ
• لﯾﻣاوﺻ حﺎﺗﻔﻣ مادﺧﺗﺳﺎﺑ ﺔﻌﺑرﻷا مادﻗﻷا لﻛ طﺑﺿا ،زﺎﮭﺟﻟا بﯾﻛرﺗ دﻧﻋ
.ﺎھرﻓوﺗ نﻣ دﻛﺄﺗ
B
4620ER4002B
زﻛرﻣ نﻣ (
ﺔﻣدﺧLG.
ﺔﯾوﮭﺗﻟا
.زﺎﮭﺟﻟا
ﺔطﯾﺣﻣﻟا ةرارﺣﻟا ﺔﺟرد
ةدﺣو ةءﺎﻔﻛ لﻘﺗ نأ نﻛﻣﯾ .طﻐﺿﻟا تﺣﺗ ةدﻣﺟﺗﻣﻟا مﯾطارﺧﻟا رﺟﻔﻧﺗ نأ نﻛﻣﯾ
.دﻣﺟﺗﻟا ﺔﺟرد نﻣ لﻗﻷا ةرارﺣﻟا تﺎﺟرد لظ ﻲﻓ ﺔﯾﻧورﺗﻛﻟﻹا مﻛﺣﺗﻟا
لﺑﻗ تﺎﻋﺎﺳ
ﻊﺿﺑﻟ ﺔﻓرﻐﻟا ةرارﺣ ﺔﺟرد ﻲﻓ زﺎﮭﺟﻟا ﻊﺿﻓ ،دﻣﺟﺗﻟا ﺔﺟرد
.ﮫﻠﯾﻐﺷﺗ
• ﺔﻌطﻘﻟا مﻗر) ﺔﯾطﺎطﻣ باوﻛأ ءارﺷ نﻛﻣﯾ
A C
C
100مﻣ
5مﻣ
• لوﺣ ءاوﮭﻟا نارودﻟ كﻟذ ﻰﻟإ ﺎﻣ وأ طُﺳُﺑﻟا وأ دﺎﺟﺳﻟا ﺔﻗﺎﻋإ مدﻋ نﻣ دﻛﺄﺗ
• ثﯾﺣ ،دﻣﺟﺗﻟا ﻰﻟإ ﺎﮭﺗرارﺣ ﺔﺟرد لﺻﺗ نأ نﻛﻣﯾ فرﻏ ﻲﻓ زﺎﮭﺟﻟا بﻛرﺗ ﻻ
• نﻣ لﻗأ ةرارﺣﻟا تﺎﺟرد تﻧﺎﻛو ءﺎﺗﺷﻟا ﻲﻓ زﺎﮭﺟﻟا ﻰﻠﻋ لوﺻﺣﻟا ﺔﻟﺎﺣ ﻲﻓ
20مﻣ
.ﺔﻠﻘﻧﺗﻣﻟا تﺎﻣادﺧﺗﺳﻻا
.زﺎﮭﺟﻟا تﺣﺗ ﺔﮭﺑﺎﺷﻣ داوﻣ وأ ىوﻘﻣﻟا قروﻟا
A
B
C
• ﻲﻓ ﮫﻣادﺧﺗﺳا ﻲﻐﺑﻧﯾ ﻻو طﻘﻓ ﺔﯾﻟزﻧﻣﻟا ضارﻏﻸﻟ ﻻإ زﺎﮭﺟﻟا اذھ مدﺧﺗﺳﯾ ﻻ
• وأ بﺷﺧﻟا نﻣ ﻊطﻗ ﻊﺿوﺑ ﺔﯾوﺗﺳﻣ رﯾﻏ ﺔﯾﺿرأ يأ ﺔﯾوﺳﺗ اًدﺑأ لوﺎﺣﺗ ﻻ
Page 84

AR
9
بﯾﻛرﺗﻟا
تﺎﻘﺣﻠﻣﻟا
*1:.ﮫﺗﯾرﺗﺷا يذﻟا لﯾدوﻣﻠﻟ ﺎًﻌﺑﺗ ﺔﻘﻓرﻣﻟا تﺎﻘﺣﻠﻣﻟا فﻠﺗﺧﺗ
*قﻻزﻧﻼﻟ ﺔﻌﻧﺎﻣ ﺢﺋارﺷ1
فﯾرﺻﺗﻟا موطرﺧ تﯾﺑﺛﺗﻟ ﺔﯾﻘﻓرﻣ ﺔﻣﺎﻋد
طﺑرﻟا مازﺣ*1
d
e
f
ءﺎﻣﻟا دادﻣإ موطرﺧ
طﺑر حﺎﺗﻔﻣ
لﻘﻧﻟا رﯾﻣﺎﺳﻣ تﺎﺣﺗﻓ ﺔﯾطﻐﺗﻟ ﺔﯾطﻏأ
تﺎﻔﺻاوﻣﻟا
زارطﻟاF0K6DMK2S2P
ﺔﻗﺎطﻠﻟ ﻰﺻﻗﻷا دﺣﻟا2000-2200 / (لﺳﻐﻟا) تاو 2100-2300(فﯾﻔﺟﺗﻟا) تاو
(عﺎﻔﺗرﻻا × ﻖﻣﻌﻟا × ضرﻌﻟا) دﺎﻌﺑﻷا645 × مﻣ 770 × مﻣ 940مﻣ
a
b
c
ﺔﻗﺎطﻟا ردﺻﻣ220-240 ،~تﻟوﻓ 50زﺗرھ،
ﺞﺗﻧﻣﻟا نزو81مﺟﻛ
Page 85

بﯾﻛرﺗﻟا
ﺔظﺣﻼﻣ
8
AR
بﯾﻛرﺗﻟا
تﺎﻔﺻاوﻣﻟاو ءازﺟﻷا
•.زﺎﮭﺟﻟا ةدوﺟ نﯾﺳﺣﺗ لﺟأ نﻣ كﻟذﺑ رﺎطﺧﻹا نود تﺎﻔﺻاوﻣﻟاو لﻛﺷﻟا رﯾﯾﻐﺗ نﻛﻣُﯾ
فﻠﺧﻟا نﻣ زﺎﮭﺟﻟا لﻛﺷ
ﺔﻗﺎطﻟا سﺑﺎﻗ
لﻘﻧﻟا رﯾﻣﺎﺳﻣ
فﯾرﺻﺗﻟا موطرﺧ
a
b
c
ﻲﻣﺎﻣﻷا لﻛﺷﻟا
مﻛﺣﺗﻟا ﺔﺣوﻟ
فظﻧﻣﻟا عزوﻣ جرد
لﺳﻐﻟا ضوﺣ
بﺎﺑﻟا
فﻼﻐﻟا ءﺎطﻏ
فﯾرﺻﺗﻟا ﺔﺧﺿﻣ رﺗﻠﻓ
فﯾرﺻﺗﻟا ةدادﺳ
ﺔﯾوﺳﺗﻟا مادﻗأ
a
b
c
d
e
f
g
h
Page 86

AR
7
ﺔﻣﻼﺳﻟا تادﺎﺷرإ
• ذإ ،لﺎﻔطﻷا لوﺎﻧﺗﻣ نﻋ اًدﯾﻌﺑ (موﻓورﯾﺎﺗﺳﻟا ةدﺎﻣو كﯾﺗﺳﻼﺑﻟا سﺎﯾﻛأ لﺛﻣ) ﺔﺋﺑﻌﺗﻟا داوﻣ ﻊﯾﻣﺟ نﻣ صﻠﺧﺗ
.قﺎﻧﺗﺧﻻا بﺑﺳﺗ نأ فﯾﻠﻐﺗﻟا داوﻣﻟ نﻛﻣﯾ
•.ﮫﻠﺧادﺑ ةرﯾﻐﺻﻟا تﺎﻧاوﯾﺣﻟا وأ لﺎﻔطﻷا سﺎﺑﺗﺣا رطﺧﻟ ﺎًﯾدﺎﻔﺗ زﺎﮭﺟﻟا اذھ نﻣ صﻠﺧﺗﻟا لﺑﻗ بﺎﺑﻟا ﺔﻟازﺈﺑ مﻗ
Page 87

ﺔﻣﻼﺳﻟا تادﺎﺷرإ
.ءﻼﻣﻌﻟا ﻰﻟإ تﺎﻣوﻠﻌﻣﻟا مﯾدﻘﺗﻟ
دﻌﺑ ﺎﮭﻟادﺑﺗﺳا بﺟﯾ ثﯾﺣ ءﺎﻣﻟا ﺔﯾذﻐﺗ مﯾطارﺧ ﺔﻟﺎﺣ نﻣ دﻛﺄﺗ .قزﻣﺗ5.تاوﻧﺳ
.روﻔﻟا ﻰﻠﻋ ﺔﻘطﻧﻣﻟا ﺔﯾوﮭﺗﺑ مﻗو ﺔﻗﺎطﻟا سﺑﺎﻗ وأ زﺎﮭﺟﻟا سﻣﻠﺗ
6
.نﺎﺑوذﻟا
AR
• زﻛرﻣﺑ لﺻﺗاو ﺔﻗﺎطﻟا سﺑﻘﻣ لﺻﻓا ،زﺎﮭﺟﻟا نﻣ ﺎﮭﺿﯾﻓ وأ هﺎﯾﻣﻟا برﺳﺗ لﺎﺣ ﻲﻓLG Electronics
• وأ ﻊطﻗ ثودﺣ دﻧﻋ برﺳﺗﻟا نﻣ دﺣﻟاو تﺎﻣﺎﻣﺻﻟاو مﯾطارﺧﻟا نﻋ طﻐﺿﻟا رﯾرﺣﺗﻟ هﺎﯾﻣﻟا رﯾﺑﺎﻧﺻ ﻖﻠﻏأ
• ﻻ ،لزﻧﻣﻟا ﻲﻓ (كﻟذ ﻰﻟإ ﺎﻣ وأ ،ﻲﻌﯾﺑطﻟا زﺎﻐﻟا وأ ،نﺎﺑورﺑﻟا وأ ،نﯾﺗوﯾﺑوﺳﯾأ) زﺎﻏ برﺳﺗ دوﺟو ﺔﻟﺎﺣ ﻲﻓ
• دﻌﺑ ﻻإ ءﺎﺗﺷﻟا لﺻﻓ لﻼﺧ ﺎﻣھدﻣﺟﺗ ﺔﻟﺎﺣ ﻲﻓ لﺎﺧدﻹا موطرﺧ وأ فﯾرﺻﺗﻟا موطرﺧ مادﺧﺗﺳا كﻧﻛﻣﯾ ﻻ
•.لﺎﻔطﻷا لوﺎﻧﺗﻣ نﻋ اًدﯾﻌﺑ تﺎﺿﯾﺑﻣﻟاو ،ﺔﻣﻌﻧﻣﻟا داوﻣﻟاو ،لﯾﺳﻐﻟا تﺎﻔظﻧﻣ ﻊﯾﻣﺟ ظﻔﺣا
•.نﯾﺗﻠﺗﺑﻣ نﯾدﯾﺑ زﺎﮭﺟﻟا ﻲﻓ مﻛﺣﺗﻟا رﺻﺎﻧﻋ وأ ﺔﻗﺎطﻟا سﺑﺎﻗ سﻣﻟ بﻧﺟﺗ
•.ﮫﯾﻠﻋ لﯾﻘﺛ ءﻲﺷ ﻊﺿو وأ طرﻔﻣ لﻛﺷﺑ ﺔﻗﺎطﻟا لﺑﺎﻛ ﻲﻧﺛ مدﻋ ﻰﻠﻋ صرﺣا
•.لﺳﻐﻟا ءﺎﻧﺛأ زﺎﮭﺟﻟا نﻣ ﺎﮭﻔﯾرﺻﺗ مﺗ هﺎﯾﻣ يأ سﻣﻟ بﻧﺟﺗ
ﻲﻓ .ﺢﯾﺣﺻ لﻛﺷﺑ فﯾرﺻﺗﻟا لﻣﻋ نﻣ دﻛﺄﺗ
.هﺎﯾﻣﻟﺎﺑ كﺗﯾﺿرأ
.ضرﻷا لﻼﺗﺑا ﻰﻟإ
ﺔﻧﺎﯾﺻﻟا
.زﺎﮭﺟﻟا اذھ نﻋ ﺔﻗﺎطﻟا لﺻﻓ ﻰﻟإ
.ﺔﻣﯾﻘﺗﺳﻣ ﺔﯾﻌﺿو ﻲﻓ ﻲﺑرﮭﻛﻟا رﺎﯾﺗﻟا ذﺧﺄﻣ نﻣ ﮫﺑذﺟﺑ مﻗو مﺎﻛﺣﺈﺑ ﮫﺑ
ﺔﻛرﺷ ﻲﻓ ءﻼﻣﻌﻟا تﺎﻣوﻠﻌﻣ زﻛرﻣ ﻊﻣ لﺻاوﺗ .ﮫﻠﯾدﻌﺗ وأ ﮫﺣﻼﺻإLG Electronics لﻘﻧﺗ تﻧﻛ لﺎﺣ ﻲﻓ
.فﻠﺗﺧﻣ ﻊﻗوﻣ ﻲﻓ ﮫﺑﯾﻛرﺗﺑ موﻘﺗو زﺎﮭﺟﻟا
صﻠﺧﺗﻟا
• رﻣﻏ ﻰﻟإ كﻟذ يدؤﯾ دﻗ ،ﺢﯾﺣﺻ لﻛﺷﺑ فﯾرﺻﺗﻟا مدﻋ لﺎﺣ
• يدؤﯾ مﺛ نﻣو فﯾﺛﻛﺗ ثدﺣﯾ دﻗ ،ﺔﺿﻔﺧﻧﻣ ءﺎﻣﻟا ةرارﺣ ﺔﺟردو ﺔﻌﻔﺗرﻣ ءاوﮭﻟا ةرارﺣ ﺔﺟرد نوﻛﺗ ﺎﻣدﻧﻋ
•.ﺔﻗﺎطﻟا سﺑﺎﻗ سﻣﻼﺗ ءازﺟأ ﻰﻠﻋ نﻣ ﺔﺑرﺗﻷا وأ رﺎﺑﻐﻟا ﺢﺳﻣا
• دادﻌﺗﺳﻻا ﻊﺿو ﻰﻟإ وأ فﺎﻘﯾإ ﻰﻟإ مﻛﺣﺗﻟا رﺻﺎﻧﻋ طﺑﺿ يدؤﯾ ﻻ .ﮫﻔﯾظﻧﺗ لﺑﻗ زﺎﮭﺟﻟا نﻋ ﺔﻗﺎطﻟا لﺻﻓا
•.رﺎﺑﻏ وأ ﺔﺑوطر يﻷ ﺔﻠﻣﺎﻛﻟا ﺔﻟازﻹا دﻌﺑ ﻲﺑرﮭﻛﻟا رﺎﯾﺗﻟا ذﺧﺄﻣ ﻲﻓ مﺎﻛﺣﺈﺑ ﺔﻗﺎطﻟا سﺑﺎﻗ لﺧدأ
•.ﮫﻔﯾظﻧﺗﻟ ﮫﺟرﺎﺧ وأ زﺎﮭﺟﻟا لﺧاد ءﺎﻣﻟا شرﺑ مﻘﺗ ﻻ
• كﺎﺳﻣﻹا ﻰﻠﻋ ﺎًﻣﺋاد صرﺣا .ﺔﻗﺎطﻟا لﺑﺎﻛ دﺷ لﻼﺧ نﻣ زﺎﮭﺟﻟا نﻋ ﺔﻗﺎطﻟا لﺻﻓ مدﻋ ﻰﻠﻋ ﺎًﻣﺋاد صرﺣا
• ﺔﻛرﺷ ﺔﻣدﺧ زﻛرﻣ نﻣ لھؤﻣ ﺔﻣدﺧ فظوﻣ طﻘﻓ موﻘﯾ نأ بﺟﯾLG Electronics وأ زﺎﮭﺟﻟا كﯾﻛﻔﺗﺑ
•.ﮫﻣادﺧﺗﺳا ءوﺳ ﻊﻧﻣﻟ ًةرﺷﺎﺑﻣ زﺎﮭﺟﻟا فﻠﺧ دوﺟوﻣﻟا لﺑﺎﻛﻟا ﻊطﻗا .ﮫﻠﺻﻔﺑ مﻗ ،مﯾدﻗ زﺎﮭﺟ نﻣ صﻠﺧﺗﻟا لﺑﻗ
Page 88

5
AR
ﺔﻣﻼﺳﻟا تادﺎﺷرإ
نﯾﻧاوﻘﻟا ﻊﯾﻣﺟﻟ ﺎًﻘﻓو ضرؤﻣو تﺑﺛﻣ بﺳﺎﻧﻣ ﻲﺑرﮭﻛ رﺎﯾﺗ ذﺧﺄﻣﺑ ﺔﻗﺎطﻟا سﺑﺎﻗ لﯾﺻوﺗ بﺟﯾ .ضﯾرﺄﺗ ﺔﻠﺻوﺑ
.ﺔﯾﻠﺣﻣﻟا ﺢﺋاوﻠﻟاو
ﺢﯾﺣﺻ لﻛﺷﺑ ﺎًﺿرؤﻣ زﺎﮭﺟﻟا نﺎﻛ اذإ ﺎﻣ لوﺣ كﺷ يأ كﯾدﻟ نﺎﻛ اذإ ًﻼھؤﻣ ﺔﻣدﺧ فظوﻣ وأ ﺎًﯾﺋﺎﺑرﮭﻛ رﺷﺗﺳا
.ﻻ مأ
.لﻣﺎﻛﻟﺎﺑ زﺎﮭﺟﻟا بﺎﺑ ﺢﺗﻓ ﺔﻗﺎﻋإ ﻰﻟإ اذھ يدؤﯾ ثﯾﺣ ،زﺎﮭﺟﻠﻟ
لﺑﺎﻘﻣﻟا
لﯾﻐﺷﺗﻟا
.ةدﻣﺗﻌﻣﻟا ﻊﻧﺻﻣﻟا ءازﺟأ طﻘﻓ مدﺧﺗﺳا .ددﺣﻣ لﻛﺷﺑ كﻟذ رﯾﻐﺑ ﻲﻟﺎﺣﻟا كﻟﺎﻣﻟا لﯾﻟد ﻰﺻوأ اذإ ﻻإ لھؤﻣ ﺔﻣدﺧ
• ﺔﻗﺎط سﺑﺎﻗو (ضﯾرﺄﺗ رﺎﻣﺳﻣ) زﺎﮭﺟﻠﻟ ضﯾرﺄﺗ لﺻوﻣ ﻰﻠﻋ يوﺗﺣﯾ ﺔﻗﺎط كﻠﺳﺑ اًدوزﻣ زﺎﮭﺟﻟا اذھ ﻲﺗﺄﯾ
• .ﺔﯾﺋﺎﺑرﮭﻛ ﺔﻣدﺻﻟ ضرﻌﺗﻟا رطﺧ ﻰﻟإ زﺎﮭﺟﻠﻟ ضﯾرﺄﺗ لﺻوﻣﻟ بﺳﺎﻧﻣﻟا رﯾﻏ لﯾﺻوﺗﻟا يدؤﯾ نأ نﻛﻣﯾ
• بﻧﺎﺟﻟا ﻰﻠﻋ ﺔﻠﺻﻔﻣﺑ دوزﻣ بﺎﺑ وأ ،ﻖﻟزﻧﻣ بﺎﺑ وأ ،لﻔﻘﻠﻟ لﺑﺎﻗ بﺎﺑ فﻠﺧ زﺎﮭﺟﻟا اذھ بﯾﻛرﺗ مدﻋ بﺟﯾ
•.زﺎﮭﺟﻟا لﯾﻐﺷﺗﻟ مﻛﺣﺗﻟا ﺔﺣوﻟ ﻊﻣ ةدﺎﺣ تاودأ يأ مدﺧﺗﺳﺗ ﻻ
•.زﺎﮭﺟﻟا كﻓ وأ حاوﻟﻷا نﻣ حوﻟ يأ لﺻﻓ لوﺎﺣﺗ ﻻ
• فظوﻣ لﻼﺧ نﻣ ﺔﻣدﺧﻟاو تﺎﺣﯾﻠﺻﺗﻟا ﻊﯾﻣﺟ ءارﺟإ بﺟﯾ .زﺎﮭﺟﻟا نﻣ ءزﺟ يأ لادﺑﺗﺳا وأ حﻼﺻإ بﻧﺟﺗ
•.ﺎًﺣوﺗﻔﻣ زﺎﮭﺟﻟا بﺎﺑ نوﻛﯾ ﺎﻣدﻧﻋ ةدﺷﺑ لﻔﺳﻸﻟ بﺎﺑﻟا ﻰﻠﻋ طﻐﺿﺗ ﻻ
•.زﺎﮭﺟﻟا لﺧاد ﺔﻔﯾﻟﻷا تﺎﻧاوﯾﺣﻟا لﺛﻣ ﺔﯾﺣﻟا تﺎﻧاوﯾﺣﻟا ﻊﺿﺗ ﻻ
.ﺔﻟﺎﺳﻐﻟا هذھ ﻲﻓ تاءﻼﻣﻟاو سﺑﻼﻣﻟا فﻼﺧﺑ ىرﺧأ رﺻﺎﻧﻋ يأ
.كﻟذ ﻰﻟإ ﺎﻣو ،ﺔﯾﺋﺎﯾﻣﯾﻛﻟا داوﻣﻟاو ،شﺎﻣﻘﻟا ﻊطﻗو
.ﺔﺑﺎﺻﻺﻟ ضرﻌﺗﻟا وأ فﻠﺗﻟا بﺑﺳﯾ
موﺣﺷﻟا تﻼﯾزﻣو نﯾﻟوزﺎﺟﻟاو ءﻼطﻟاو تﯾزﻟاو ﺔﯾﻌﻣﺷﻟا ﻊﻘﺑﻟا تﻼﯾزﻣو ﻊﻣﺷﻟا لﺛﻣ) قارﺗﺣﻼﻟ ﺔﻠﺑﺎﻗ وأ
توﯾزو ﺔﯾﺗﺎﺑﻧﻟا توﯾزﻟاو نﯾﺗﻧﺑرﺗﻟا تﯾزو ﻊﻘﺑﻟا تﻼﯾزﻣو نﯾزﻧﺑﻟاو نﯾﺳورﯾﻛﻟاو فﺎﺟﻟا فﯾظﻧﺗﻟا تﺎﺑﯾذﻣو
عوﻗو وأ ﻖﯾرﺣ بوﺷﻧ ﻲﻓ مﯾﻠﺳﻟا رﯾﻏ مادﺧﺗﺳﻻا بﺑﺳﺗﯾ دﻘﻓ .(.كﻟذ ﻰﻟإ ﺎﻣو ،لوﺣﻛﻟا و نوﺗﯾﺳﻷاو ﻲﮭطﻟا
.رﺎﺟﻔﻧا
،ﺔﯾﻟورﺗﺑﻟا داوﻣﻟاو ،"رﻧﺗﻟا" نﺎھدﻟا فﯾﻔﺧﻣو ،نﯾﻟوزﺎﺟﻟاو ،قارﺗﺣﻼﻟ لﺑﺎﻗ ذاذرﻟاو ،لﺎﺳﻣﻟا ﻲطﻔﻧﻟا زﺎﻐﻟاو
.زﺎﮭﺟﻟا نﻣ برﻘﻟﺎﺑ ﺎﮭﻧزﺧﺗ وأ (كﻟذ ﻰﻟإ ﺎﻣو ،لﯾﻣﺟﺗﻟا تارﺿﺣﺗﺳﻣو ،ءاوﮭﻟا رطﻌﻣو ،تارﺷﺣﻟا دﯾﺑﻣو
• وأ ةوﺷﺣﻣﻟا بﺎﻌﻟﻷا وأ ﺔﻔﯾﻟﻷا تﺎﻧاوﯾﺣﻟﺎﺑ ﺔﺻﺎﺧﻟا ﺔﯾطﻏﻷا وأ ﺔﯾذﺣﻷا وأ ﺔطﺳﺑﻷا وأ دﺎﺟﺳﻟا لﺳﻐﺑ مﻘﺗ ﻻ
• ،قروﻟاو ،نﺎﺗﻛﻟا لﺛﻣ قارﺗﺣﻼﻟ ﺔﻠﺑﺎﻘﻟا داوﻣﻟا نﻣ ﺔﯾﻟﺎﺧ ﮫﻟوﺣو زﺎﮭﺟﻟا لﻔﺳأ ةدوﺟوﻣﻟا ﺔﻘطﻧﻣﻟا ﻰﻠﻋ ظﻓﺎﺣ
• دﻗ ﺎﻣﻣ ،زﺎﮭﺟﻟا لﺧاد ﻰﻟإ اوﻔﺣزﯾ وأ بﺎﺑﻟﺎﺑ لﺎﻔطﻷا ﻖﻠﻌﺗﯾ نأ نﻛﻣﯾ ثﯾﺣ .ﺎًﺣوﺗﻔﻣ زﺎﮭﺟﻟا بﺎﺑ كرﺗﺗ ﻻ
• لﺎﻌﺗﺷﻼﻟ ﺔﻠﺑﺎﻗ داوﻣﺑ تﺧﺳﺗا وأ ﺎﮭﻌﻘﻧ وأ ﺎﮭﻠﺳﻏ وأ ﺎﮭﻔﯾظﻧﺗ مﺗ ﻲﺗﻟا ضارﻏﻷا فﻔﺟﺗ وأ لﺳﻐﺗ وأ ﻊﺿﺗ ﻻ
• ،ﺔﯾﺋﺎﯾﻣﯾﻛﻟا داوﻣﻟاو ،لوﺣﻛﻟاو ،نﯾزﻧﺑﻟاو ،رﺛﯾﻹا لﺛﻣ) لﺎﻌﺗﺷﻼﻟ ﺔﻠﺑﺎﻗ وأ قارﺗﺣﻼﻟ ﺔﻠﺑﺎﻗ داوﻣ مدﺧﺗﺳﺗ ﻻ
•.ﺎًﻣﺎﻣﺗ لﺳﻐﻟا ضوﺣ فﻗوﺗﯾ ﻰﺗﺣ رظﺗﻧا .ﮫﻠﯾﻐﺷﺗ ءﺎﻧﺛأ ﻲﻓ زﺎﮭﺟﻟا نﻣ اًدﺑأ برﺗﻘﺗ ﻻ
•.ﺔﻌﻔﺗرﻣﻟا ةرارﺣﻟا ﺔﺟرد تاذ ﺞﻣارﺑﻟا ءﺎﻧﺛأ بﺎﺑﻟا سﻣﻟ مدﻋ بﺟﯾ
Page 89

ﺔﻣﻼﺳﻟا تادﺎﺷرإ
4
ىوﺻﻘﻟا ﺔﻌﺳﻟا
تارودﻟا ضﻌﺑ ﻲﻓ ﺔﻓﺎﺟﻟا سﺑﻼﻣﻠﻟ ﺎﮭﻣادﺧﺗﺳا ررﻘﻣﻟا ىوﺻﻘﻟا ﺔﻌﺳﻟا ﻎﻠﺑﺗ
)14) /لﯾﺳﻐﻠﻟ (مﺟﻛ 8 (مﺟﻛ
.
فﯾﻔﺟﺗﻠﻟ
فﻔﺟﻣﻟا مادﺧﺗﺳﻻ ﺔﯾﻧﻔﻟا ﺔﻣﻼﺳﻟا
ﻊﻣ نﺧﺎﺳ ءﺎﻣ ﻲﻓ ،ﻊﻣﺷﻟا تﻼﯾزﻣو ،ﻊﻣﺷﻟاو ،نﯾﺗﻧﺑرﺗﻟا تﯾزو ،ﻊﻘﺑﻟا تﻼﯾزﻣو ،نﯾﺳورﯾﻛﻟاو ،نﯾزﻧﺑﻟاو
.زﺎﮭﺟﻟا ﻲﻓ ﺎﮭﻔﯾﻔﺟﺗ لﺑﻗ فظﻧﻣﻟا نﻣ ﺔﯾﻓﺎﺿإ ﺔﯾﻣﻛ
.ةرارﺣﻟا
يوﻏرﻟا طﺎطﻣﻟا تﺎﯾﺷﺣﺑ ةدوزﻣﻟا دﺋﺎﺳوﻟا وأ طﺎطﻣﻟﺎﺑ ﺔﻣوﻋدﻣﻟا سﺑﻼﻣﻟاو ضارﻏﻷا وأ هﺎﯾﻣﻠﻟ ةدﺎﺿﻣﻟا
.زﺎﮭﺟﻟا ﻲﻓ
AR
•.طﻘﻓ ﺔﯾﻟزﻧﻣﻟا ضارﻏﻷا ﻲﻓ مادﺧﺗﺳﻼﻟ ﻻإ صﺻﺧﻣ رﯾﻏ زﺎﮭﺟﻟا اذھ
• نﯾﺑ ﺎﻣ هﺎﯾﻣﻟا لﺎﺧدإ طﻐﺿ حوارﺗﯾ نأ بﺟﯾ100و لﺎﻛﺳﺎﺑ وﻠﯾﻛ 1000.لﺎﻛﺳﺎﺑ وﻠﯾﻛ
•.زﺎﮭﺟﻟا ﻲﻓ ﺔﻟوﺳﻐﻣﻟا رﯾﻏ ضارﻏﻷا فﻔﺟﺗ ﻻ
• ،لوﺣﻛﻟاو ،نوﺗﯾﺳﻷاو ،ﺔﯾﺗﺎﺑﻧﻟا توﯾزﻟاو ،ﻲﮭطﻟا توﯾز لﺛﻣ داوﻣﺑ ﺔﺧﺳﺗﻣﻟا ضارﻏﻷا لﺳﻐﺗ نأ بﺟﯾ
• ددﺑﺗﺗ ثﯾﺣﺑ ﺎھرﺷﻧو ﺔﻋرﺳﺑ ضارﻏﻷا ﻊﯾﻣﺟ ﺔﻟازإ مﺗﯾ مﻟ ﺎﻣ فﯾﻔﺟﺗﻟا ةرود ءﺎﮭﺗﻧا لﺑﻗ زﺎﮭﺟﻟا اًدﺑأ فﻗوﺗ ﻻ
• تﺎﺟوﺳﻧﻣﻟا وأ مﺎﻣﺣﺗﺳﻻا تﺎﻋﺎّﺑﻗ وأ (ﺔﯾطﺎطﻣ ةوﻏر) يوﻏرﻟا طﺎطﻣﻟا لﺛﻣ ضارﻏﻷا فﯾظﻧﺗ بﺟﯾ ﻻ
بﯾﻛرﺗﻟا
.فﻟﺎﺗ سﺑﺎﻗ وأ كﻠﺳ كﻟذ ﻲﻓ ﺎﻣﺑ ،ﺔﻣطﺣﻣ
نود ةرارﺣﻟا تﺎﺟرد وأ رطﻣﻟا وأ حﺎﯾرﻟا وأ رﺷﺎﺑﻣﻟا سﻣﺷﻟا ءوﺿﻛ ﺔﯾوﺟﻟا تارﯾﺛﺄﺗﻠﻟ ﺔﺿرﻌﻣ ﺔﺣﺎﺳﻣ
.دﻣﺟﺗﻟا ﺔﺟرد
.لھؤﻣ ﻲﺋﺎﺑرﮭﻛ لﻼﺧ نﻣ بﺳﺎﻧﻣ رﺎﯾﺗ
•.شﺎﻣﻘﻠﻟ ﺔﻣﻌﻧﻣﻟا داوﻣﻟا تﺎﻣﯾﻠﻌﺗﺑ ددﺣﻣ وھ ﺎﻣﻛ ﺔﮭﺑﺎﺷﻣﻟا تﺎﺟﺗﻧﻣﻟا وأ شﺎﻣﻘﻠﻟ ﺔﻣﻌﻧﻣﻟا داوﻣﻟا مادﺧﺗﺳا بﺟﯾ
•.بﺎﻘﺛﻟاو تﺎﺣادﻘﻟا لﺛﻣ بوﯾﺟﻟا نﻣ ضارﻏﻷا ﻊﯾﻣﺟ غرﻓأ
•.فﯾظﻧﺗﻟا ﻲﻓ ﺔﯾﻋﺎﻧﺻﻟا ﺔﯾﺋﺎﯾﻣﯾﻛﻟا داوﻣﻟا لﺎﻣﻌﺗﺳا ﺔﻟﺎﺣ ﻲﻓ زﺎﮭﺟﻟا مادﺧﺗﺳا مﺗﯾ ﻻ
• وأ ةدوﻘﻔﻣ ءازﺟأ ﮫﺑ وأ ،ﻲﺋزﺟ لﻛﺷﺑ ﺎًﻛﻛﻔﻣ وأ ،لطﻋ ﮫﺑ وأ ،ﺎًﻔﻟﺎﺗ نﺎﻛ اذإ زﺎﮭﺟﻟا اذھ لﯾﻐﺷﺗ اًدﺑأ لوﺎﺣﺗ ﻻ
•.مﺎﻛﺣﺈﺑ ﮫﺑ كﺎﺳﻣﻺﻟ رﺛﻛأ وأ نﯾﺻﺧﺷ رﻓوﺗ ﻲﻐﺑﻧﯾ ،زﺎﮭﺟﻟا اذھ لﻘﻧ دﻧﻋ
• ﻲﻓ وأ ﻖﻠطﻟا ءاوﮭﻟا ﻲﻓ زﺎﮭﺟﻟا نﯾزﺧﺗ وأ بﯾﻛرﺗ بﻧﺟﺗ .رﺎﺑﻐﻟاو ﺔﺑوطرﻟا نﻛﺎﻣأ ﻲﻓ زﺎﮭﺟﻟا بﯾﻛرﺗ بﻧﺟﺗ
•.ﻲﺑرﮭﻛﻟا رﺎﯾﺗﻟا ذﺧﺄﻣﺑ لﻣﺎﻛ لﻛﺷﺑ لﺻوﻣ ﺔﻗﺎطﻟا سﺑﺎﻗ نأ نﻣ دﻛﺄﺗ
•.ﺔﻗﺎطﻠﻟ دﯾدﻣﺗ لﺑﻛ وأ ءﺎﺑرﮭﻛﻟﺎﺑ مﻛﺣﺗ تﺎﺣوﻟ وأ ةددﻌﺗﻣ سﺑﺎﻘﻣﺑ زﺎﮭﺟﻟا لﯾﺻوﺗﺑ مﻘﺗ ﻻ
• ذﺧﺄﻣ تﯾﺑﺛﺗ كﻧﻛﻣﯾﻓ ،رﺎﯾﺗﻟا ذﺧﺄﻣﻟ ﺎًﺑﺳﺎﻧﻣ سﺑﺎﻘﻟا نﻛﯾ مﻟ اذإ .زﺎﮭﺟﻟا ﻊﻣ رﻓوﺗﻣﻟا ﺔﻗﺎطﻟا سﺑﺎﻗ لﯾدﻌﺗﺑ مﻘﺗ ﻻ
Page 90

3
رﯾذﺣﺗ
AR
ﺔﻣﻼﺳﻟا تادﺎﺷرإ
ﺔﻣﻼﺳﻟا تادﺎﺷرإ
مادﺧﺗﺳﻻا لﺑﻗ تادﺎﺷرﻹا ﻊﯾﻣﺟ أرﻗا
رارﺿﻷا وأ ﺔﻌﻗوﺗﻣﻟا رﯾﻏ رطﺎﺧﻣﻟا عوﻗو نود ﺔﻟوﻠﯾﺣﻟا ﻲﻓ ﺔﯾﻟﺎﺗﻟا ﺔﻣﻼﺳﻟا تادﺎﺷرإ نﻣ ضرﻐﻟا لﺛﻣﺗﯾ
.ﺞﺗﻧﻣﻠﻟ ﺢﯾﺣﺻﻟا رﯾﻏ وأ نﻣﻵا رﯾﻏ لﯾﻐﺷﺗﻟا نﻋ ﺔﻣﺟﺎﻧﻟا
.هﺎﻧدأ ﺢﺿوﻣﻟا وﺣﻧﻟا ﻰﻠﻋ "ﮫﯾﺑﻧﺗ"و "رﯾذﺣﺗ" ﻰﻟإ تادﺎﺷرﻹا مﯾﺳﻘﺗ مﺗﯾ
ﺔﻣﻼﺳﻟا لﺋﺎﺳر
،رطﺎﺧﻣ بﺑﺳﺗ نأ نﻛﻣﯾ ﻲﺗﻟا لﯾﻐﺷﺗﻟا تﺎﯾﻠﻣﻋو روﻣﻷا ﻰﻟإ ةرﺎﺷﻺﻟ زﻣرﻟا اذھ ضرﻋ مﺗﯾ
.رطﺎﺧﻣﻟا بﻧﺟﺗﻟ تادﺎﺷرﻹا ﻊﺑﺗاو ﺔﯾﺎﻧﻌﺑ زﻣرﻟا اذھ لﻣﺣﯾ يذﻟا ءزﺟﻟا ةءارﻗ ﻰﻠﻋ صرﺣﺎﻓ
رﯾذﺣﺗ
.ةﺎﻓوﻟا وأ ةرﯾطﺧ ﺔﺑﺎﺻإ عوﻗو بﺑﺳﯾ دﻗ تادﺎﺷرﻹا عﺎﺑﺗا مدﻋ نأ ﻰﻟإ اذھ رﯾﺷﯾ
ﮫﯾﺑﻧﺗ
.ﺞﺗﻧﻣﻟا فﻠﺗ وأ ﺔﻔﯾﻔط ﺔﺑﺎﺻإ عوﻗو ﻲﻓ بﺑﺳﺗﯾ دﻗ تادﺎﺷرﻹا عﺎﺑﺗا مدﻋ نأ ﻰﻟإ اذھ رﯾﺷﯾ
رﯾذﺣﺗ
،ﺔﺑﺎﺻإ ثودﺣ وأ ،ﺔﯾﺑرﮭﻛ ﺔﻣدﺻﻟ ضرﻌﺗﻟا وأ ،ةﺎﻓو ثودﺣ وأ ،ﻖﯾرﺣ بوﺷﻧ وأ ،رﺎﺟﻔﻧا عوﻗو رطﺎﺧﻣ لﯾﻠﻘﺗﻟ
:ﻲﻠﯾ ﺎﻣ ﺎﮭﯾﻓ ﺎﻣﺑ ،ﺔﯾﺳﺎﺳﻷا ﺔﻣﻼﺳﻟا تﺎطﺎﯾﺗﺣا عﺎﺑﺗا بﺟﯾ ،ﺞﺗﻧﻣﻟا مادﺧﺗﺳا دﻧﻋ صﺎﺧﺷﻸﻟ قورﺣ وأ
ﺔﯾﻧﻔﻟا ﺔﻣﻼﺳﻟا
تادﺎﺷرﻹا مﮭﻟ مدﻘﺗ وأ مﮭﯾﻠﻋ فارﺷﻹا مﺗﯾ مﻟ ﺎﻣ ،ﺔﻓرﻌﻣو ةرﺑﺧ مﮭﯾدﻟ سﯾﻟ وأ ،ﺔﯾﻠﻘﻌﻟا وأ ﺔﯾﺳﺣﻟا وأ ﺔﯾﻧدﺑﻟا
.مﮭﺗﻣﻼﺳ نﻋ لوؤﺳﻣ صﺧﺷ لﺑﻗ نﻣ زﺎﮭﺟﻟا مادﺧﺗﺳﺎﺑ ﺔﻘﻠﻌﺗﻣﻟا
.رطﺎﺧﻣﻟا بﻧﺟﺗﻟ ردﻘﻟا سﻔﻧﺑ نﯾﻠھؤﻣ صﺎﺧﺷأ وأ ﺎﮭﻟ ﻊﺑﺎﺗﻟا
.تﺎﻛﻠﺗﻣﻣﻟا فﻠﺗ ﻲﻟﺎﺗﻟﺎﺑو هﺎﯾﻣﻟا برﺳﺗ ﻰﻟإ يدؤﺗ دﻗ
• مﮭﺗاردﻗ ﻲﻓ صﻘﻧ نﻣ نوﻧﺎﻌﯾ نﯾذﻟا (لﺎﻔطﻷا كﻟذ ﻲﻓ ﺎﻣﺑ) دارﻓﻷا مادﺧﺗﺳﻻ صﺻﺧﻣ رﯾﻏ زﺎﮭﺟﻟا اذھ
•.زﺎﮭﺟﻟﺎﺑ مﮭﺛﺑﻋ مدﻋ نﻣ دﻛﺄﺗﻠﻟ لﺎﻔطﻷا ﻰﻠﻋ فارﺷﻹا بﺟﯾ كﻟذﻛ
• ﺔﻣدﺧﻟا لﯾﻛو وأ ﺔﻌﻧﺻﻣﻟا ﺔﻛرﺷﻟا ﺔطﺳاوﺑ ﮫﻟادﺑﺗﺳا بﺟﯾ ،ﺔﯾﺋﺎﺑرﮭﻛﻟا ﺔﻗﺎطﻟا لﯾﺻوﺗ كﻠﺳ فﻠﺗ ﺔﻟﺎﺣ ﻲﻓ
• ﺔﻣﯾدﻘﻟا مﯾطارﺧﻟا مادﺧﺗﺳا ةدﺎﻋإ نﺄﺑ ﺎًﻣﻠﻋ .زﺎﮭﺟﻟا ﻊﻣ ﺔﻘﻓرﻣﻟا مﯾطارﺧﻟا ﺔﻋوﻣﺟﻣ وأ اًدﯾدﺟ ﺎًﻣوطرﺧ مدﺧﺗﺳا
•.ةدﺎﺟﺳ ﻊﺿوﺑ ﺔﯾوﮭﺗﻟا تﺎﺣﺗﻓ ﺔﻗﺎﻋإ مدﻋ بﺟﯾ
Page 91

زارطﻟا نﻋ فﻠﺗﺧﯾ ىوﺗﺣﻣ وأ روﺻ ﻰﻠﻋ لﯾﻟدﻟا اذھ يوﺗﺣﯾ دﻗ
.ﮫﺋارﺷﺑ تﻣﻗ يذﻟا
.ﺔﻌّﻧﺻﻣﻟا ﺔﻛرﺷﻟا نﻣ ﺔﻌﺟارﻣﻠﻟ لﯾﻟدﻟا اذھ ﻊﺿﺧﯾ
تﺎﯾوﺗﺣﻣﻟا لودﺟ
ﺔﻣﻼﺳﻟا تادﺎﺷرإ.........................................................3
مادﺧﺗﺳﻻا لﺑﻗ تادﺎﺷرﻹا ﻊﯾﻣﺟ أرﻗا...................................................3
رﯾذﺣﺗ....................................................................................3
بﯾﻛرﺗﻟا...................................................................8
تﺎﻔﺻاوﻣﻟاو ءازﺟﻷا...................................................................8
بﯾﻛرﺗﻟا نﺎﻛﻣ تﺎﺑﻠطﺗﻣ...............................................................10
زﺎﮭﺟﻟا فﯾﻠﻐﺗ ﺢﺗﻓ.....................................................................11
زﺎﮭﺟﻟا ىوﺗﺳﻣ طﺑﺿ.................................................................11
ءﺎﻣﻟا دادﻣإ موطرﺧ لﯾﺻوﺗ..........................................................13
فﯾرﺻﺗﻟا موطرﺧ بﯾﻛرﺗ............................................................15
لﯾﻐﺷﺗﻟا.................................................................16
لﯾﻐﺷﺗﻟا ﻰﻠﻋ ﺔﻣﺎﻋ ةرظﻧ.............................................................16
لﯾﺳﻐﻟا ﺔﻟوﻣﺣ زﯾﮭﺟﺗ.................................................................16
ﺔﻣﻌﻧﻣﻟا داوﻣﻟاو تﺎﻔظﻧﻣﻟا ﺔﻓﺎﺿإ....................................................17
مﻛﺣﺗﻟا ﺔﺣوﻟ...........................................................................19
ﺞﻣارﺑﻟا لودﺟ.........................................................................21
فﯾﻔﺟﺗﻟا ﺞﻣﺎﻧرﺑ.......................................................................24
ﺔﯾﻓﺎﺿإ فﺋﺎظوو تارﺎﯾﺧ............................................................25
ﺔﯾﻛذﻟا فﺋﺎظوﻟا.........................................................28
ﻖﯾﺑطﺗLG ThinQ.................................................................28
Smart Diagnosis(ﻲﻛذﻟا صﯾﺧﺷﺗﻟا) .........................................29
ﺔﻧﺎﯾﺻﻟا.................................................................31
ﺔﻠْﺳﻏ ّلﻛ دﻌﺑ فﯾظﻧﺗﻟا................................................................31
ءﺎﻣﻠﻟ ءيرﺎطﻟا ﻎﯾرﻔﺗﻟﺎﺑ مﺎﯾﻘﻟاو ﺔﯾرود ةروﺻﺑ زﺎﮭﺟﻟا فﯾظﻧﺗ.....................32
ﺎﮭﺣﻼﺻإو لﺎطﻋﻷا فﺎﺷﻛﺗﺳا.........................................34
ﺔﻣدﺧﻟا زﻛرﻣﺑ لﺎﺻﺗﻻا لﺑﻗ..........................................................34
Page 92

فﻔﺟﻣﻟا - ﺔﻟﺎﺳﻐﻟا
بﯾﻛرﺗﻟا ﺔﯾﻠﻣﻋ كﻟذ طﺳﺑﯾﺳ ثﯾﺣ .ﺔﯾﺎﻧﻌﺑ تﺎﻣﯾﻠﻌﺗﻟا هذھ أرﻗا ،زﺎﮭﺟﻟا بﯾﻛرﺗ ﻲﻓ ءدﺑﻟا لﺑﻗ
دﻌﺑ ﺞﺗﻧﻣﻟا نﻣ برﻘﻟﺎﺑ تﺎﻣﯾﻠﻌﺗﻟا هذﮭﺑ ظﻔﺗﺣاو .نﻣآو ﺢﯾﺣﺻ لﻛﺷﺑ زﺎﮭﺟﻟا بﯾﻛرﺗ نﻣﺿﯾو
.لﺑﻘﺗﺳﻣﻟا ﻲﻓ ﺎﮭﯾﻟإ عوﺟرﻠﻟ بﯾﻛرﺗﻟا
F0K6DMK2S2P
كﻟﺎﻣﻟا لﯾﻟد
ARﺔﯾﺑرﻌﻟا
www.lg.com
رﺷﻧﻟا قوﻘﺣ 2020 ﺔظوﻔﺣﻣ قوﻘﺣﻟا لﻛ .تﺎﯾﻧورﺗﻛﻟﻼﻟ ﻲﺟ لإ
MFL71485485
Rev.00_032720
 Loading...