

LG Exalt II User Manual

This booklet is printed with soy ink. Printed in Mexico
This booklet is made from 98% post-consumer recycled paper.
User Guide
Usuario
Guía del
User Guide
MFL69264801 (1.0)
ME

Copyright©2015 LG Electronics, Inc. All rights reserved.
LG and the LG logo are registered trademarks of LG Corp.
Exalt is a trademark of LG Electronics, Inc.
All other trademarks are the property of their respective
owners.

Table of Contents
Table of Contents ·········1
Phone Overview ···········6
Rear view ·························7
Menus Overview ··········8
Getting Started with Your
Phone ··················10
Step 1. Remove the Back Cover ·····10
Step 2. Insert the Battery ··········10
Step 3. Replace the Back Cover ·····10
Step 4. Charge the Phone ··········10
Removing the Battery ·············11
Charging with USB ················11
Battery Temperature Protection ····11
Battery Charge Level ··············11
Signal Strength ···················11
Powering your phone on/off ········11
Making Calls ·····················12
Correcting Dialing Mistakes ········12
Redialing Calls ····················12
Receiving Calls ···················12
Screen Icons ·····················12
Quick Access to Convenient
Features ················13
Vibrate Mode ····················13
Sounds Off ······················13
Mute Function ····················13
Quick Volume Adjustment ··········13
Quick Font Resize ·················13
Call Waiting ······················13
3-way call ·······················13
Caller ID ·························14
Voice Commands ·················14
Entering and Editing
Information ·············16
Text Input ·······················16
Text Input Modes ················16
Contacts in Your Phone’s
Memory ················17
Creating a Contact ················17
Customizing Individual Entries ······17
Speed Dial ·······················17
Storing a Number with Pauses ······18
Adding a Pause to an Existing Contact
Entry ···························18
Adding Another Phone Number ·····18
From standby mode ··············18
From the Contact List Screen ······19
Changing Saved Information ········19
Changing the Default Number ······19
Deleting ·························20
Deleting a Contact Entry ········· 20
Removing a Speed Dial ··········· 20
Speed Dialing ····················20
Single Digit Speed Dials ·········· 20
Multiple Digit Speed Dials ········ 20
Speed Dials 96, 97, 98,
and 99 ························ 20
1
Table of Contents
Contacts ················22
1. New Contact ···············22
2. Contact List ················22
3. Backup Assistant ············23
4. Favorites ···················23
5. Groups ····················23
Adding Contacts to a Group ·······24
6. Speed Dials ················24
7. In Case of Emergency (ICE) · · · 25
Entering Your ICE Personal Info· · · · ·25
To unassign an ICE Contacts ·······25
To delete Personal Info entry· · · · · · ·25
8. My Name Card ·············26
Messaging ··············27
New Message Alert ···············27
1. New Message ···············27
The Basics of Sending
a Text Message ··················27
Select Recipient(s) Using Add ···· 28
Multimedia Message
Using Options ·················· 28
2. Messages ··················29
Viewing Your Inbox ·············· 29
Message Icon Reference ·········· 30
3. Drafts ····················30
Message Icon Reference ···········31
4. Voice mail ·················31
5. Social Networks ············32
Messaging Settings ············32
Message Settings Sub-Menu
Descriptions ·····················32
Erasing Messages ··············34
Recent Calls ·············35
1. Missed ····················35
2. Received ··················35
3. Dialed ····················36
4. All ························36
5. View Timers ················37
Internet ·················38
Media Center ············39
1. Music & Tones ··············39
1.1 Shop Ringtones ···············39
1.2 My Ringtones ················39
1.3 My Music ····················39
1.4 My Sounds ···················40
2. Picture & Video ·············41
2.1 Shop Pictures· · · · · · · · · · · · · · · · · 41
2.2 My Pictures ··················41
2.3 My Videos ···················42
2.4 Take Picture ··················42
2.5 Record Video ·················43
3. Games ····················44
4. Internet ···················44
5. Browser & Download ········45
6. Extras ·····················45
Settings & Tools ·········46
1. My Verizon ·················46
2

2. Master Volume ·············46
3. Accessibility ················46
3.1 Readout ·····················46
3.1.1 Full Readout ·············· 46
3.1.2 Menu Readout ·············47
3.1.3 Digit Dial Readout ··········47
3.1.4 Caller ID Readout ···········47
3.1.5 Passwords Readout ·········47
3.1.6 Speech Rate ·············· 48
3.2 Invert Color ··················48
3.3 Large Text ····················48
3.4 Mono Audio ··················48
3.5 Turn Off All Sounds ···········49
4. Tools ·····················49
4.1 Voice Commands ·············49
Access and Options ············· 49
4.1.1 Call <Name or Number>· · · · · 50
4.1.2 Send Msg to <Name or Number
or Group> ··········· 50
4.1.3 Go to <Menu> ············· 50
4.1.4 Check <Item> ·············· 50
4.1.5 Contacts <Name> ·········· 50
4.1.6 Search ··················· 50
4.1.7 Redial ·····················51
4.1.8 Play· · · · · · · · · · · · · · · · · · · · · · ·51
4.1.9 My Verizon ················51
4.1.10 Help ·····················51
4.2 Calculator ···················51
4.3 Ez Tip Calculator ··············51
4.4 Eco-Calculator ················52
4.5 Calendar ·····················52
Editing and deleting calendar entries 53
4.6 Alarm Clock ··················53
How to delete alarms ·············53
How to edit alarms ··············54
4.7 Info Search ···················54
4.8 Stopwatch ···················54
4.9 World Clock ·················55
4.10 Notepad ···················55
4.11 USB Mass Storage ············55
5. Bluetooth Menu ············56
Turn On Bluetooth
······················56
5.1. Add New Device ··············56
For pairing with a new Bluetooth device
56
Icon Reference in
Adding New Device ···············57
Icon References When a Bluetooth
Wireless Connection is Searched
(neither connected nor paired)· · · · ·57
My Phone Info ···················58
Discovery Mode ··················58
Supported Profiles ················58
6. Sounds Settings ············59
6.1 Easy Set-up ··················59
6.2 Call Sounds ··················59
6.2.1 Call Ringtone ··············59
6.2.2 Call Vibrate ················59
6.3 Alert Sounds ·················60
6.4 Keypad Volume · · · · · · · · · · · · · · ·60
6.5 Service Alerts ················60
6.6 Hearing Assist ················61
7. Display Settings ·············61
7.1 Easy Set-up ···················61
3

Table of Contents
7.2 Banner ·······················62
7.2.1 Personal Banner ·············62
7.2.2 ERI Banner ················ 63
7.3 Backlight ····················63
7.4 Brightness ····················63
7.5 Wallpaper ····················63
7.6 Display Themes ···············64
7.7 Main Menu Settings ············64
7.8 Font Type ····················64
7.9 Font Size ·····················65
7.10 Clock Format ················65
7.11 Exalt Display ·················66
7.11.1 Exalt Display Type ········· 66
7.11.2 Clock Option ·············66
8. Phone Settings ·············66
8.1 Airplane Mode ···············66
8.2 Set Shortcut Keys ·············67
8.2.1 Set My Shortcuts ···········67
8.2.2 Set Navigation Keys ·········67
8.3 Voice Commands ·············67
8.4 Language ····················68
8.5 Location ····················68
8.6 Security ·····················68
8.6.1 Edit Codes ···············69
8.6.2 Restrictions ·············· 69
8.6.3 Phone Lock Setting ········ 69
8.6.4 Lock Phone Now· · · · · · · · · · · ·70
8.6.5 Reset Default ·············70
8.6.6 Restore Phone ·············70
8.7 System Select ················71
8.8 NAM Select ··················71
8.9 Data Roaming Access ··········71
9. Call Settings ···············71
9.1 Answer Options ···············71
9.2 Call Forwarding ···············72
9.3 Auto Retry ···················72
9.4 TTY Mode ···················72
Connecting TTY Equipment and a
Terminal ························73
9.5 One Touch Dial ··············74
9.6 Voice Privacy ·················74
9.7 DTMF Tones ·················74
9.8 Assisted Dialing ···············74
10. USB Mode ················75
11. Memory ··················75
11.1 Save Options ················75
11.2. Phone Memory ··············76
11.3. Card Memory ···············76
12. Phone Info ················76
12.1 My Number ·················76
12.2 SW/HW Version ·············76
12.3 Icon Glossary ················77
12.4 Software Update ·············77
12.5 Front Display Patterns· · · · · · · · ·78
13. Set-up Wizard ·············78
Important Safety
Precautions ·············79
Safety ··················82
Consumer Information About
Radio Frequency Emissions ·····84
Consumer Information on SAR · ·88
4

FCC Hearing-Aid Compatibility
(HAC) Regulations for Wireless
Devices ······················89
Caution:
Avoid potential hearing loss. · · · · 91
TIA Safety Information ·········93
Safety Information ············96
FDA Consumer Update ········101
Driving ·····················108
10 Driver Safety Tips ·········109
LIMITED WARRANTY
STATEMENT ···········112
Technical Details ········119
Important Information ············119
Glossary ···············124
Terminology ················124
Acronyms and Abbreviations · · · 124
Index ··················126
5
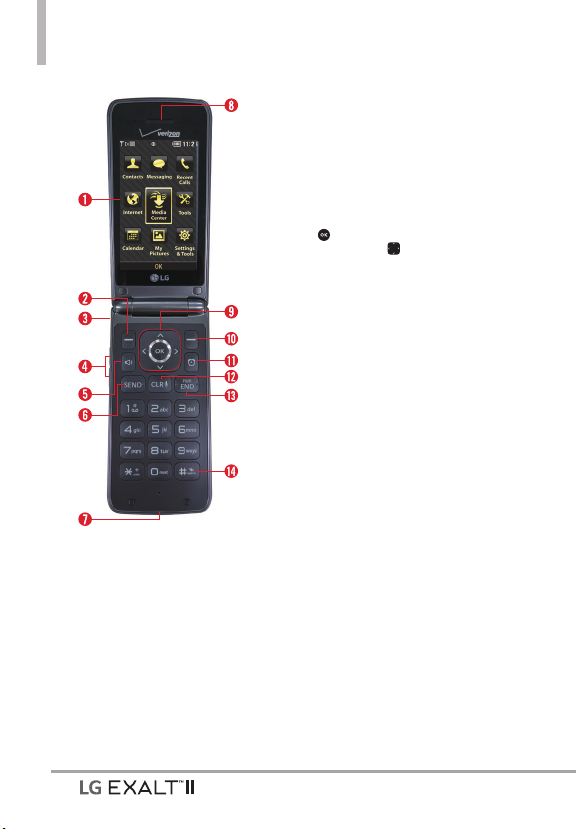
Phone Overview
1. Main Screen Displays messages, indicator
icons and active functions.
2. Left Soft Key Performs functions identified on
the bottom-left corner of the screen.
3. Headset Jack Allows you to plug in an optional
3.5mm headset for convenient, hands-free
conversations.
4. Volume Keys Use to adjust the Master Volume
in standby mode* and the Earpiece Volume
during a call. Use to adjust font sizes when
viewing messages, entering phone numbers (in
standby mode) or browsing menus (except for
the Main menu).
5. Speakerphone Key Use to enable or disable
the speakerphone mode.
6. SEND Key Use to make and answer calls. Press
from standby mode to access the All Calls list.
7. USB/Charger Port Connects the phone to
the Wall/USB charger, or other compatible
accessories.
8. Earpiece Lets you hear the caller and
automated prompts.
9. OK Key / Navigation Key Use the OK Key
to select options and menus. Use the
Navigation Key
items and highlight a specific field or object.
10. Right Soft Key Performs functions identified
on the bottom-right corner of the screen.
11. Alarm Clock Key Allows quick access to the
Alarm Clock menu.
12. Clear/Voice Commands Key Deletes single
spaces or characters with a quick press, or
press and hold to delete entire words in text
entry screens. Press to back out of menus,
one level at a time. Use for quick access to
Voice Commands from standby mode.
13. PWR/END Key Use to turn the power on/
off and to end a call. Also exits menus and
returns to standby mode.
14. Vibrate Mode Key Use to set Vibrate mode
(from standby mode press and hold for
about 3 seconds).
* Standby mode is when the phone is waiting
for input from you. No menu is displayed and
the phone isn’t performing any action. It’s the
starting point for all of the instruction steps.
to scroll through the menu
6
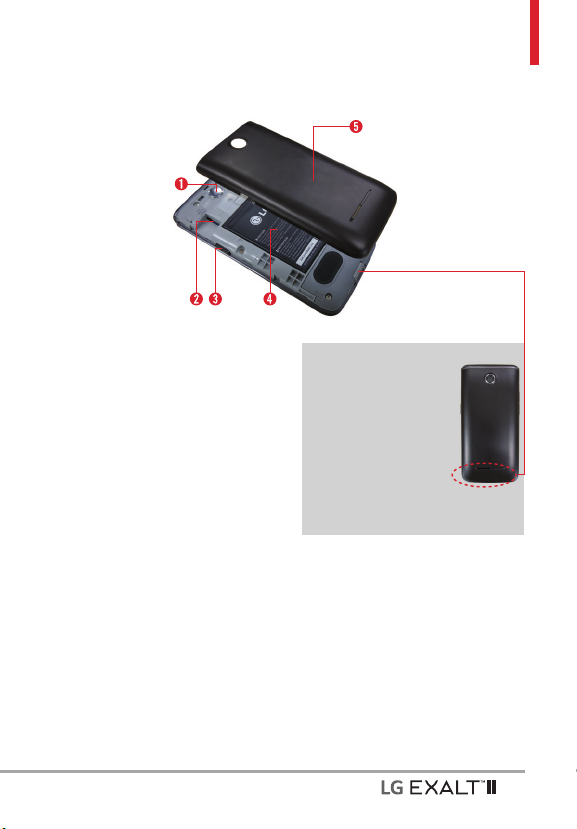
Rear view
1. Camera Lens Use to take photos. Keep it clean
for optimal photo quality.
™
2. microSD
3. Camera Key Briefly press to access camera
4. Battery
5. Back Cover
NOTE
•
• Battery life and signal strength are
Slot
mode to take pictures. Press and hold to
access video mode to record videos.
It’s important to fully charge the battery
before using the phone for the first time.
significant factors (among others) that
affect your phone’s ability to send/receive
calls or data transfer.
NOTE
The antenna is located
inside y
our phone.
Tip
If you hold the phone
enclosing the lo
you may interfere with the
antenna's ability to receive
a clear signal which affects
call quality for voice or data
transfer.
wer edge,
7
Menus Overview
Contacts
1. New Contact
2. Contact List
3. Backup Assistant
4. Favorites
5. Groups
6. Speed Dials
7. In Case of Emergency
8. My Name Card
Messaging
1. New Message
2. Messages
3. Drafts
4. Voice mail
5. Social Networks
Settings
1. Messages View
2. Entry Mode
3. Auto Save Sent
4. Auto Erase Inbox
5. Messaging Font Size
6. TXT Auto View
7. TXT Instant Reply
8. Group Messaging
9. TXT Auto Scroll
10. Multimedia Auto
Receive
11. Quick Text
12. Emergency Alerts
1. Receive Alerts
2. Alert Reminder
3. Alert Vibrate
13. Voice mail #
14. Callback #
15. Signature
16. Delivery Receipt
17. TXT-Media Msg
Notification
Options
1. Erase Sent/Received
2. Erase Drafts
3. Erase All Messages
Recent Calls
1. Missed
2. Received
3. Dialed
4. All
5. View Timers
Internet
Media Center
1. Music & Tones
1. Shop Ringtones
2. My Ringtones
3. My Music
4. My Sounds
2. Picture & Video
1. Shop Pictures
2. My Pictures
3. My Videos
4. Take Picture
5. Record Video
3. Games
4. Internet
5. Browse &
Download
6. Extras
Tools
1. Voice Commands
1. Call <Name or
Number>
2. Send Msg to <Name
or Number>
3. Go to <Menu>
4. Check <Item>
5. Contacts <Name>
6. Search
7. Redial
8. Play
9. My Verizon
10. Help
2. Calculator
3. Ez Tip Calculator
4. Eco-Calculator
5. Calendar
6. Alarm Clock
7. Info Search
8. Stopwatch
9. World Clock
8

10. Notepad
11. USB Mass Storage
Calendar
My Pictures
Settings & Tools
1. My Verizon
2. Master Volume
3. Accessibility
1. Readout
2. Invert Color
3. Large Text
4. Mono Audio
5. Turn Off All Sounds
4. Tools
1. Voice Commands
2. Calculator
3. Ez Tip Calculator
4. Eco-Calculator
5. Calendar
6. Alarm Clock
7. Info Search
8. Stopwatch
9. World Clock
10. Notepad
11. USB Mass Storage
5. Bluetooth Menu
1. Add New Device
6. Sounds Settings
1. Easy Set-up
2. Call Sounds
3. Alert Sounds
4. Keypad Volume
5. Service Alerts
6. Hearing Assist
7. Sounds Settings
1. Easy Set-up
2. Banner
3. Backlight
4. Brightness
5. Wallpaper
6. Display Themes
7. Main Menu Settings
8. Font Type
9. Font Size
10. Clock Format
11. Exalt Display
8. Phone Settings
1. Airplane Mode
2. Set Shortcut Keys
3. Voice Commands
4. Language
5. Location
6. Security
7. System Select
8. NAM Select
9. Data Roaming Access
9. Call Settings
1. Answer Options
2. Call Forwarding
3. Auto Retry
4. TTY Mode
5. One Touch Dial
6. Voice Privacy
7. DTMF Tones
8. Assisted Dialing
10. USB Mode
11. Memory
1. Save Options
2. Phone Memory
3. Card Memory
12.Phone Info
1. My Number
2. SW/HW Version
3. Icon Glossary
4. Software Update
5. Front Display Patterns
13. Set-up Wizard
9
Getting Started with Your Phone
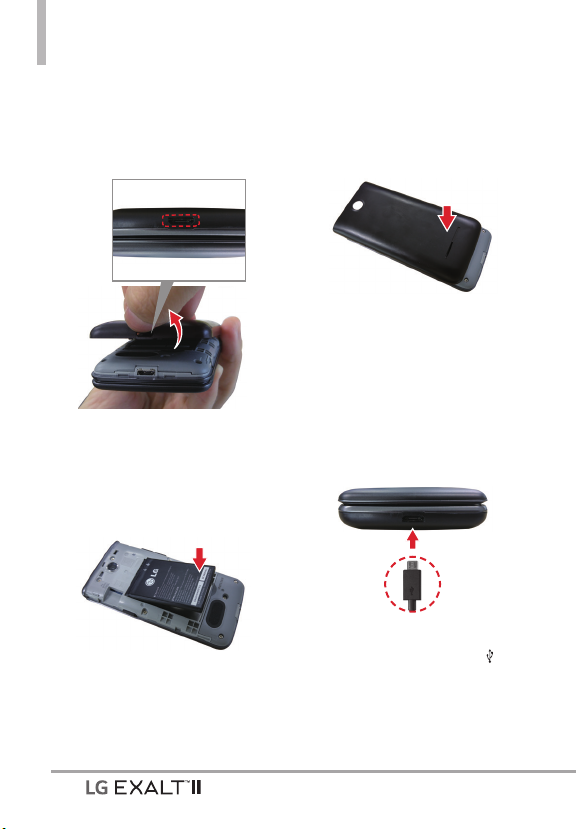
Step 1. Remove the Back Cover
Use the fingertip cutout at the
bottom of the phone to pull the
back cover off.
Step 2. Insert the Battery
Align the battery contacts with
the terminals in the battery
compartment and push the battery
down until it clicks into place.
Step 3. Replace the Back Cover
Place the back cover over the
battery compartment, the press it
downward until it clicks into place.
Step 4. Charge the Phone
Your device comes with a Wall/USB
charger and a USB cable which
connect together to charge your
phone.
Before turning on your phone,
charge it fully.
USB ca ble
NOTICE: Please make sure that the ‘ ’
side faces up before inserting a charger
or USB cable into the Accessory/Charger
Port of your phone.
10
Removing the Battery
1. Turn the phone off.
2. Use the fingertip cutout at the
bottom of the phone to pull the
back cover off.
3. Use the fingertip opening
near the bottom of the battery
compartment to lift the battery
out.
Charging with USB
You can use your computer to
charge your phone. To be able to
charge with the USB cable, you
may need to have the necessary
USB Driver installed on your PC
first. Connect one end of the USB
cable to the Accessory/Charger
Port on your phone and the other
end to the USB port on your PC.
NOTE Low-power USB ports are not
supported, such as the USB ports on
your keyboard or bus-powered USB hub.
Battery Temperature Protection
If the battery gets overheated, the
phone will automatically turn off.
When you turn the phone back on,
a message pops up alerting you
that the phone was powered off for
your safety.
Battery Charge Level
You can find the battery charge
level
at the top right corner of
the screen. When the charge level
becomes low, the battery sensor
sounds a warning tone, blinks the
battery icon, and/or displays a
warning message. As the charge
level approaches empty, the phone
automatically switches off without
saving.
Signal Strength
Call quality depends on the signal
strength in your area. You can tell
how much signal strength you have
by the number of bars next to the
signal strength icon
bars, the stronger the signal. If
you’re having problems with signal
quality, move to an open area or,
when inside a building, try moving
near a window.
: the more
Powering your phone on/off
Press and hold the PWR/
END Key until the screen
lights up.
Press and hold the PWR/
END Key until the display
turns off.
11
Getting Started with Your Phone
Making Calls
Open the flip and enter the phone
number using the keypad.
Press the SEND Key to
dial the number.
Press the PWR/END Key
to end the call.
NOTE Your phone has a Voice
Commands feature that also lets you
make calls by saying a phone number or
Contact name. To access it, press
and say Call followed by the name or
number.
Correcting Dialing Mistakes
While entering a phone number,
press the Clear/Voice Commands
Key
once to erase the last
digit entered, or hold it down for
at least two seconds to delete all
the digits.
Redialing Calls
With the flip open, press the SEND
Key
twice to redial the last
number dialed.
Receiving Calls
When the flip is open and you
receive an incoming call, the
following options are available.
[Quiet] Press the Left Soft
Key to mute the ringing or
vibration for that call.
[Ignore] Press the Right Soft
Key to end the call and send
the caller directly to Voice
mail.
[TEXT] Press to end the call
and send a quick text
message.
Press the PWR/END Key
to end the call, or simply
close the flip.
Screen Icons
When the phone is on, the top line
of the screen displays phone status
icons.
To see the icon glossary, with the
flip open, press
Settings & Tools > Phone Info
>
Icon Glossary and select a
subcategory.
[MENU] >
12
Quick Access to Convenient Features
Vibrate Mode
Sets the phone to vibrate instead
of ringing (
Vibrate Mode, with the flip open,
press and hold
Normal Mode, press and hold
again.
is displayed). To set
. To return to
Sounds Off
Quickly deactivate your phone's
sounds when you're in a place
where phone sounds would be
disruptive.
From standby mode with the flip
open, press and hold the Volume
Down Key
sounds mode, press and hold the
Volume Up Key
. To return to normal
.
Mute Function
The Mute Function prevents the
transmission of your voice to the
caller. To quickly activate Mute
while on a call, press the Left Soft
Key
[Mute]. To unmute press
the Left Soft Key
[Unmute].
Quick Volume Adjustment
Quickly adjust ringer and earpiece
volumes by pressing the Volume
Keys
on the left side of the
phone. Press the Volume Up Key
to increase the volume and Volume
Down Key
volume.
NOTE The earpiece volume can only
be adjusted during a call and Keypad
Volume can only be adjusted through the
Sounds Settings menu.
to decrease the
Quick Font Resize
When you view messages, enter
phone numbers, or view submenus, press the Volume Keys
simultaneously to quickly adjust
the font size.
NOTE Not supported on the Main menu.
Call Waiting
During a call, one beep indicates
another incoming call. Press the
SEND Key
put the first call on hold. Press the
SEND Key
the first call.
to answer it and
again to return to
3-way call
You can talk with two people at
the same time with a three-way
conversation on your wireless
phone. Airtime and other charges,
which may include toll or long
distance charges, will apply for all
simultaneous calls until you end
one call.
13

Quick Access to Convenient Features
1. While on the first call, dial the
10-digit number of the second
person.
2. Press the SEND Key
first person is automatically put
on hold while the call is made.
3. When the second person
answers, press
create a conference call.
4. If the second person does not
answer, press the SEND Key
twice to end the connection
and go back to the first person.
5. To end both conversations
completely, press the PWR/
END Key
.
. The
[MERGE] to
Caller ID
Caller ID displays the number and/
or name and picture (if applicable)
of the person calling when your
phone rings.
Voice Commands
Voice Commands allow you to
do things by verbal commands
(e.g., make calls, check Voice mail,
etc.). With the flip open, press the
Clear/Voice Commands Key
on the keypad.
1. Call Say "Call" and then call
someone simpl
name or phone number.
2. Send Msg to Say "Send
Message" and the command
will prompt you for the type of
message.
3. Go to This allows you to access
a men
4. Check This allows you to check
out a wide range of items such
as Phone Status, Voice mail,
Messages, Missed Calls, Time,
Signal Strength, Battery Level,
Volume, Balance, Minutes,
Payment and My Number.
5. Contacts You can look up
s in your Contacts as well
name
as manage your Contact List
including creating, erasing or
modifying.
6. Search Say "Search" to open
V
erizon Opera Mini to perform
a search.
7. Redial Say "Redial" and the
phone will r
number.
8. Play Allows you to play music.
9. My Verizon This command
provides you with direct access
to your Verizon Wireless
account information.
y by saying the
u within the phone.
edial the last phone
14

10. Help Provides a general
guideline to using Voice
Commands.
NOTE Voice Commands can also be
started with the designated key on your
Bluetooth device. Please check the user
manual of the Bluetooth device for
further instructions.
15

Entering and Editing Information
Text Input
The following key functions are
available to help with text entry:
Left Soft Key: Press to change
the text input mode.
Shift: Press to change
capitalization (initial cap, caps
lock, lowercase).
Next: Press to display other
matching words in the
database in T9 word mode.
Space: Press to insert a space.
Right Soft Key: Press to
select one of the following
options:
Attach/ Insert Quick Text/
Copy Text/ Save As Draft/
Priority Level/ Cancel
Message
Clear: Press to delete a single
space or character. Press and
hold to delete entire words or
sentences.
Punctuation: Press to insert
punctuation symbols.
Text Input Modes
In a text field, press the Left Soft
to select a text input mode:
Key
T9 Word/ Abc/ ABC/ 12 3/
T9 Palabra/ Symbols/
Quick Text/ Simplified Chinese
(ݟࡗ)/ Korean(a)
NOTE
alabra is the Spanish counterpart
s T9 P
of T9 Word which utilizes accents,
tildas, etc. for correct Spanish word
spelling.
s Simplified Chine
entry mode.
orean provides a key guide. To use
s K
the key guide, select Options > Show
Key Guide.
se supports PinYin as
16

Contacts in Your Phone’s Memory
Creating a Contact
1. With the flip open, enter a
number (max. 48 digits), then
press the Left Soft Key
[Save].
2. Use the Navigation Key
highlight Add New Contact or
Update Existing, then press
3. Use the Navigation Key
highlight Mobile 1/ Home/
Business/ Mobile 2/ Fax, then
press
.
4. Enter a name (max. 32
characters), and any additional
information, then press
[SAVE].
NOTE If you selected the number type
after selecting Update Existing, the
contact information is automatically
updated.
to
to
Customizing Individual Entries
1. With the flip open, press the
Right Soft Key
then use the Navigation Key
to highlight an entry.
2. Press the Left Soft Key
[Edit].
3. Use the Navigation Key
highlight the information to
customize.
[Contacts],
to
4. Change the entry as you want,
then press
your changes.
[SAVE] to save
Speed Dial
Allows you to set up your Speed
Dials.
1. With the flip open, press the
.
Right Soft Key
then use the Navigation Key
to highlight an entry.
2. Press the Left Soft Key
[Edit].
3. Use the Navigation Key
highlight a phone number, then
press the Right Soft Key
[Options].
4. Use the Navigation Key
highlight Set Speed Dial, then
press
5. Select a Speed Dial digit.
Enter a digit using the
keypad, then press
Use the Navigation Key to
highlight the Speed Dial digit,
then press
6. Press
press
contact entry.
[Contacts],
.
[SET].
[Yes] to confirm, then
[SAVE] to update your
to
to
[SET].
17

Contacts in Your Phone’s Memory
Storing a Number with Pauses
Pauses allow you to enter
additional series of numbers to
access automated systems such
as Voice mail or credit billing
numbers. Pause types are:
Wait (W) The phone stops dialing
until you press the Left Soft Key
[Release] to advance to the
following series of numbers.
2-Sec Pause (P) The phone waits
two seconds before dialing the
next string of digits.
1. With the flip open, enter the
phone number, then press the
Right Soft Key
2. Use the Navigation Key
highlight Add 2-Sec Pause or
Add Wait, then press
3. Enter the additional number(s)
(e.g., pin number, credit card
number, etc.).
4. Press the Left Soft Key
[Save].
5. Choose Add New Contact or
Update Existing.
6. Choose Mobile 1/ Home/
Business/ Mobile 2/ Fax.
7. Continue entering information
for the Contact entry as
necessary.
[Options].
to
.
NOTE If you selected the number type
after selecting Update Existing, the
contact information is automatically
updated. You do not have the option to
enter additional information.
8. Press [SAVE] to update your
contact entry.
Adding a Pause to an Existing Contact Entry
1. With the flip open, press the
Right Soft Key
2. Use the Navigation Key
[Contacts].
to highlight a Contact entry,
then press the Left Soft Key
[Edit].
3. Use the Navigation Key
to highlight the number, then
press the Right Soft Key
[Options].
4. Press
Add 2-Sec Pause or
Add Wait.
5. Enter the additional number(s),
then press
[SAVE] to update
your contact entry.
Adding Another Phone Number
From standby mode
1. With the flip open, enter a
phone number, then press the
Left Soft Key
2. Use the Navigation Key
highlight Update Existing, then
press
[Save].
to
.
18

3. Use the Navigation Key to
highlight an existing entry then
press
to update your contact
entry.
4. Use the Navigation Key
highlight Mobile 1/ Home/
Business/ Mobile 2/ Fax, then
press
to update your contact
entry.
From the Contact List Screen
1. With the flip open, press the
Right Soft Key
2. Use the Navigation Key
highlight an entry, then press
the Left Soft Key
3. Use the Navigation Key
highlight the phone number
field you wish to add. Then
enter the number and press
[SAVE] to update your contact
entry.
[Contacts].
to
to
[Edit].
to
Changing Saved Information
To edit any information you stored,
access the Edit Contact screen:
1. With the flip open, press the
Right Soft Key
2. Use the Navigation Key
to highlight a Contact entry,
then press the Left Soft Key
[Edit].
[Contacts].
3. Use the Navigation Key
highlight the field you want to
change.
4. Make the changes, then press
[SAVE] to update your
contact entry.
Changing the Default Number
The default number is the phone
number you first entered when
you created the Contact. However,
another number can be saved as
the default number.
1. With the flip open, press the
Right Soft Key
2. Use the Navigation Key
highlight an entry.
3. Press the Left Soft Key
[Edit].
4. Use the Navigation Key
highlight a phone number, then
press the Right Soft Key
[Options].
5. Use the Navigation Key
highlight Set As Default, then
press
6. Press
new number as the default.
A confirmation message is
displayed.
7. Press
contact entry.
[Contacts].
.
[Yes] to confirm the
[SAVE] to update your
to
to
to
to
19
Contacts in Your Phone’s Memory
Deleting
Deleting a Contact Entry
1. With the flip open, press the
Right Soft Key
2. Use the Navigation Key
highlight an entry.
3. Press the Right Soft Key
[Options].
4. Press
5. Press
Removing a Speed Dial
1. With the flip open, press the
Right Soft Key
2. Use the Navigation Key
highlight a Contact entry to
edit and press
3. Highlight the phone number
with the Speed Dial, then press
[EDIT].
4. Press the Right Soft Key
[Options].
5. Press
6. Press
7. Press
contact entry.
[Contacts].
to
Erase.
[Yes] to confirm.
[Contacts].
to
[VIEW].
Remove Speed Dial.
[Yes] to confirm.
[SAVE] to update your
Speed Dialing
Allows you to make phone calls
quickly and easily to numbers
stored in Contacts.
NOTE Speed Dial 1 is reserved for
Voice mail.
Single Digit Speed Dials
Press and hold the Speed Dial
digit. Your phone recalls the phone
number from your Contacts,
displays it, and dials it for you.
Multiple Digit Speed Dials
When you press and hold a
number key, it signals the phone
to call a Speed Dial. To dial Speed
Dials with multiple digits, press
the first digit(s), then press and
hold the last digit. For example, to
call Speed Dial 25, press
press and hold
NOTE You can also enter the Speed Dial
digit(s) and press the SEND Key
.
Speed Dials 96, 97, 98, and 99
Speed Dials 96, 97, 98, and 99
are preset to access certain phone
account information:
96 (#DATA - Data Used),
97 (#BAL - Check Balance),
98 (#MIN - Minutes Used),
99 (#PMT - Make a Payment).
, then
.
20

Unlike Speed Dial 1, these can be
changed if you want.
21

Contacts
Contacts
Contacts
The Contacts menu allows you to
store names, phone numbers and
other information in your phone’s
memory.
Shortcut The Right Soft Key is a
shortcut key to the Contact List from
standby mode.
1. New Contact
Allows you to add a new contact to
your Contact List.
NOTE Using this submenu, the number
is saved as a new Contact, not into an
existing Contact.
1. Open the flip and press
[MENU].
2. Press
3. Press
4. Enter the name and press the
5. Enter the number and any
NOTE For more detailed information, see
page 17.
Contacts.
New Contact.
Navigation Key
downward
until the phone number type
you want is highlighted.
additional contact information
and press
[SAVE] to update
your contact entry.
2. Contact List
Allows you to view your Contact
List.
1. Open the flip and press
[MENU].
2. Press
3. Press
Contacts.
Contact List.
4. Use the Navigation Key
scroll through your Contacts
alphabetically.
Press the Right Soft Key
[Options] to select one of
the following:
New Contact/ Erase/
New Message/
Set As ICE Contact/ Call/
Manage Contacts/ Set
As Favorite/ Search Entry
Mode
Press the Left Soft Key
[Edit] to edit.
Press [VIEW] to view the
entry details.
Shortcut Use the Go To field, for quick
access to an entry without scrolling.
For example, to go to "Vet", enter the
letter V.
to
22

3. Backup Assistant
You can save your phone’s address
book to a secure server. If your
phone is lost or damaged, or if
you upgrade to a new phone,
Backup Assistant will restore your
contacts. Go to verizonwireless.
com/baplus.
NOTE Subject to specific terms of use.
See verizonwireless.com/baplus for
details.
1. Open the flip and press
[MENU].
2. Press
3. Press
Contacts.
Backup Assistant.
4. Follow the instructions to
configure the application.
4. Favorites
Allows you to add Contact entries
or Contact groups to your list of
Favorites to easily view, call, or
send messages.
1. Open the flip and press
[MENU].
2. Press
3. Press
4. Press
Shortcut You can add up to 10 Contacts
and/or Contact groups as Favorites to
Contacts.
Favorites.
[ADD].
easily make calls, send messages, and
view messages.
5. Select whether you want to add
a favorite from your Contacts
or Group.
6. Use the Navigation Key
to
scroll through your Contacts or
Groups alphabetically and press
[MARK].
7. Press the Left Soft Key
[Done]. Once you have added
Contacts to the Favorites
list, the following options
will become available in the
Favorites menu:
Left Soft Key
OK Key
: View
: New Message/ View
Messages
Right Soft Key
: Options
Move Position/ Remove/
Remove All/ Set As ICE
Contact
5. Groups
Allows you to view your grouped
Contacts, add a new group, change
the name of a group, delete a
group, or send a message to
everyone in the selected group.
1. Open the flip and press
[MENU].
2. Press
Contacts.
23

Contacts
3. Press Groups.
4. View a Group
Use the Navigation Key
highlight a group, then press
[VIEW].
Add a New Group
Press the Left Soft Key
to add a new group to the list.
Enter a name and picture (if
desired) and press
Group's options
Press the Right Soft Key
[Options] to select one of the
following:
New Message/ Edit Group
Name & ID/ Edit Members/
Erase Group/ Set As Favorite/
Send Name Card/ Search
Entry Mode
Adding Contacts to a Group
1. From Groups submenu, press
[VIEW] and press
OR
If the Group already has
members added, highlight the
group name and press the Right
Soft Key
press
2. Highlight a desired contact and
press
[Options], then
Edit Members.
[MARK].
to
[New]
[SAVE].
[ADD].
3. Press the Left Soft Key
[Done] to add contact to a
group.
6. Speed Dials
Allows you to view your list of
Speed Dials or designate Speed
Dials for numbers entered in your
Contacts.
1. Open the flip and press
[MENU].
2. Press
3. Press
4. Use the Navigation Key
5. Use the Navigation Key
6. Press
Contacts.
Speed Dials.
to highlight the Speed Dial
position, or enter the Speed
Dial digit and press
to highlight the Contact then
press
[SET]. (For Contacts
with multiple numbers, highlight
the number for the Speed Dial,
then press
A confirmation message is
displayed.
[SET].)
[Yes] to confirm.
[SET].
24

7. In Case of Emergency
(ICE)
This menu allows you to store
names, phone numbers and other
information, which will be very
helpful in case of emergency.
1. Open the flip and press
[MENU].
2. Press
3. Press
Contacts.
In Case of
Emergency.
4. Use the Navigation Key
highlight Contact 1, 2, or 3,
then press
5. Press
[ADD].
From Contacts or
From Favorites to add a
Contact from your Contact List.
OR
Press
New Contact to enter
information not stored in your
Contact List.
6. Select the contact and press
7. The Contact label changes to
the specified name.
Entering Your ICE Personal Info
1. Open the flip and press
[MENU].
2. Press
3. Press
Contacts.
In Case of Emergency.
to
4. Use the Navigation Key
highlight Personal Info, then
press
[VIEW].
5. Use the Navigation Key
to highlight one of the Note
entries, then press
6. Enter information that would be
helpful in an emergency (e.g.,
your medical record number),
then press
[SAVE]. The
note label changes to the text
entered.
Shortcut When you've assigned ICE
Contacts and your phone is locked,
the Left Soft Key
allowing the emergency information to
be viewed without unlocking the phone.
appears as [ICE]
To unassign an ICE Contacts
From the ICE Contacts menu, press
the Right Soft Key
then press
press
[Yes].
[Options],
Unassign. Then
To delete Personal Info entry
.
From the Personal Info menu, press
the Right Soft Key [Erase].
Then press
[Yes].
to
[ADD].
25
Contacts
8. My Name Card
Allows you to create, edit, and
view your own personal Contact
information including name, phone
numbers, and email address in one
entry.
1. Open the flip and press
[MENU].
2. Press
3. Press
4. Press
5. Use the Navigation Key
6. Enter your information as
NOTE Press the Right Soft Key
[Send] to send your name card.
Contacts.
My Name Card.
[EDIT] to enter your
personal Contact information.
scroll to the information you
want to enter.
necessary, then press
[SAVE].
to
26

Messaging
Shortcut From standby mode, pressing
the Left Soft Key
Messaging.
Depending on the content and
size of your messages, the phone
can store up to 790 messages
(including a max. of 300 text
messages, 100 emergency
alerts, 100 multimedia message
notifications, and 100 multimedia
messages in the Inbox; 100 text
messages and 50 multimedia
messages in the Outbox; 20 text
messages and 20 multimedia
messages in Drafts). Content
stored in the message may be
limited by phone model and service
capability. Other limits to available
characters per message may exist.
Please check with your service
provider for system features and
capabilities.
When viewing a received
message, you can call the
sender back by pressing the
SEND Key
New Message Alert
Your phone can alert you when
you have new messages. Options
include:
is a shortcut to
.
Messaging
The phone displays a message
on the screen.
The message icon ( ) is
displayed on the screen. In the
case of a high priority message,
the icon(
1. New Message
Allows you to send messages
(Text, Picture, Video and Voice).
Depending on the type of message
you choose to send, you can
also attach files to your messages
including pictures, videos, sounds,
voice recordings and name cards.
The Basics of Sending a Text Message
1. Open the flip and press
[MENU].
2. Press
3. Press
To access this feature, you
can press the Left Soft Key
[Message] from standby mode.
4. Enter a phone number or a
recipient's name in the To field.
As you enter the phone number
or a recipient's name, matching
contacts appear. You can
choose a suggested recipient
) will appear.
Messaging.
New Message.
27

Messaging
or continue entering the phone
number.
5. Press
6. Use the keypad to enter your
7. Press
Select Recipient(s) Using Add
1. Open the flip and press
2. Press
3. Press
4. With the To field highlighted,
5. Select an option and press
6. Use the keypad to enter your
7. Press
to access the text field.
message.
[SEND].
[MENU].
Messaging.
New Message.
press the Right Soft Key
Add.
From Contacts To select a
r
ecipient from your Contact List.
From Recent Calls To select a
recipient from Recent Calls.
Favorites To select a recipient
from Favorites.
Groups To Select a recipient
from your Groups.
message.
[SEND].
Multimedia Message Using Options
Allows you send messages with
text, picture, video, sound and
name card attachments.
1. Open the flip and press
[MENU].
2. Press
3. Press
4. Enter a phone number or a
5. Press
6. Use the keypad to enter your
7. Press the Right Soft Key
.
8. Select an option and press
Messaging.
New Message.
recipient's name in the To field.
to access the text field.
message.
Options.
1. Attach
1. Picture Allows you to
insert a picture.
2. Ta ke Picture Allows you to
take a picture and insert it.
3. Video Allows you to insert
a video.
4. Record Video Allows you
to record a video and
insert it.
5. Sound Allows you to insert
a sound file.
.
28
 Loading...