

Page 1

OWNER’S MANUAL
Energy Storage
System
Rev.C 04/11/2020
ENGLISH
Please read this manual carefully before installing
your set and retain it for future reference.
MODEL
LG ESS Home 10 (D010KE1N211)
LG ESS Home 8 (D008KE1N211)
*MFL71429401*
https://www.lg.com/global/business/ess/business-resources/download
Copyright © 2019-2020 LG Electronics Inc. All Rights Reserved.
Page 2

Getting Started
2
Safety Information
1
IMPORTANT : THIS PRODUCT SHOULD NOT BE USED FOR ANY PURPOSE OTHER THAN THE
Getting Started
PURPOSE DESCRIBED IN THIS INSTALLATION MANUAL.
WARNING
yThere is high possibility of electric shock or serious burns due to the high voltages in power
conditioning circuits.
yHigh voltages on AC and DC cables. Risk of death or serious injury due to electric shock.
yA potentially hazardous circumstance such as excessive heat or electrolyte mist may occur due to
improper operating conditions, damage, misuse and/or abuse.
yThis product have potential danger such as death or serious injury by re, high voltages or
explosion if appropriate precautions are not read or fully understood.
yDo not place ammable or potentially explosive objects near the product.
yDo not place any kind of objects on top of the product during operation.
yAll works on the PV modules, power conditioning system, and battery system must be carried out
by qualied personnel only.
yElectrical installations must be done in accordance with the local and national electrical safety
standards.
yWear rubber gloves and protective clothing (protective glasses and boots) when working on high
voltage/high current systems such as PCS and battery systems.
yThere is a risk of electric shock. Do not remove cover. There is no user serviceable parts inside.
Refer servicing to qualied and accredited service technician.
yElectrical shock hazard. Do not touch uninsulated wires when the product cover is removed.
yIn the event of fault, the system must not be restarted. Product maintenance of repairs must be
performed by qualied personnel, or personnel from an authorized support center.
yIf the connected batteries are not LG battery, not only the batteries but also the PCS is not
guaranteed by LG Electronics.
Indicates a potentially dangerous situation. Death or serious
injury may result if appropriate precautions are not taken.
Page 3

Getting Started
Indicates a situation where damage or injury could occur. If
CAUTION
yThis product is intended for residential use only and should not be used for commercial or
industrial.
yBefore testing electrical parts inside the system, it takes at least 10-minute standby period of
time to complete discharging the system.
yThe contents included in this box are power conditioning system and its accessories, and the
entire weight is very heavy. Serious injury may occur due to the heavy weight of the package with
PCS and accessories. Therefore, special care must be taken in handling. Make sure to have at least
two persons deliver and remove the package.
yDo not use the damaged, cracked or frayed electrical cables and connectors. Protect the electrical
cables from physical or mechanical abuse, such as being twisted, kinked, pinched, closed in a door
or walked upon. Periodically examine the electrical cables of your product, and if its appearance
indicates damage or deterioration, discontinue use of this product, and have the cables replaced
with an exact replacement part by a qualied personnel.’
yEnsure that you connect the earth ground wire to prevent possible electric shock. Do not try to
ground the product by connecting it to telephone wires, lightning rods or gas pipes.
yThe product should not be exposed to water (dripping or splashing) and no objects lled with
liquids, such as vases, should be placed on the product.
yTo prevent re or electric shock hazard, do not expose this production to rain or moisture.
yDo not block any ventilation openings. Ensure reliable operation of the product and protect it
from over heating. The openings shall never be blocked by placing any object on this product.
yThe temperature of metal enclosure may be high during operation.
yIn order to avoid radio-interference, all accessories (like a energy meter) intended for connection
to the product shall be suitable for use in residential, commercial and light-industry areas. Usually
this requirement is fullled if the equipment complies with the class B limits of EN55022.
yThe product must be disposed of according to local regulations.
yThe electrical installation of this unit must only be performed by LGE service person or trained
installer, qualied to install PCS.
yIf the AC circuit breaker is turned off and the PCS is not operated for a long time, the battery may
be overdischarged.
yConnect the DC+ and DC- cables to the correct DC+ and DC- terminals on the product.
yDanger of damaging the PCS by overload. Only connect the proper wire to DC terminal block.
Refer to the installation wiring diagram for details.
yDo not step on the product or the product package. The product may be damaged.
yDo not dispose of batteries in a re. The batteries may explode.
yDo not open or damage batteries. Released electrolyte is harmful to the skin and eyes. It may be
toxic.
it is not avoided, minor injury and/or damage to property
may result.
3
1
Getting Started
Page 4
Getting Started
4
yA battery can present a risk of electrical shock and high short-circuit current. The following
precautions should be observed when working on batteries.
a) Remove watches, ring, or other metal objects.
b) Use tools with insulated handles.
1
Getting Started
c) Wear rubber gloves, boots and glasses
d) Do not lay tools or metal parts on top of battery.
yDo not leave the ESS in the Fault standby state for a long time because of the battery discharge
may occur during the long standby state.
yIf the battery fault occurs immediately after starting PCS it means Battery failure. Check the
battery SOC also voltage and fault information, and turn off the power of the ESS until service
action is taken.
yIf the battery SOC is low the battery may charge from the grid for self-protection. (Emergency
Charging) This function is to prevent shutdown of the ESS, deep discharge and failure of the
Battery. An Emergency Charge is not an ESS fault.
NOTE
yBefore making connections, please make sure the PV array open circuit voltage is within 1000 V.
Otherwise the product could be damaged.
yNever use any solvents, abrasives or corrosive materials to clean this product.
yDo not store on or place against any objects to the product. It may cause serious defects or
malfunction.
yBefore making a connection, make sure the PV switch on this product is switched off.
yThis unit is designed to feed power to the public grid only. Do not connect this unit to an AC
source or generator. Connecting the product to external devices could result in serious damage to
your equipment.
yServing of batteries should be performed or supervised by LG service person or trained installer.
yThe battery does not discharged when the load is under the certain level.
yThis product can cause current with a DC component. Where a Residual Current-operated
protective (RCD) or monitoring (RCM) device is used for protection in case of direct or indirect
contact, only an RCD or RCM of Type A (or type B) is allowed on the supply side of this product.
yThis product is designed to be installed indoor use only. Do not install this product outdoor.
yThis document is for your reference only. Read the installation manual on the website below.
https://www.lg.com/global/business/ess/business-resources/download
yPlease check the following website for warranty policy.
https://www.lg.com/global/business/ess/business-resources/download
Indicates a risk of possible damage to the product.
Page 5
Table of Contents
Table of Contents
5
Getting Started
Safety Information ......................2
Product Features ........................6
Name of Each Part ......................9
Front and Rear .........................9
LED Indications ........................10
Bottom ...............................11
Operating
Connecting to a Mobile Device ...........12
Installing 'LG EnerVu Plus' App .........12
Connect via Home WLAN .............13
Connect directly to ESS ...............14
About Main Screen .....................17
ESS Status Menu ......................18
ESS Setting Menu .....................22
Language .............................22
Battery ...............................22
Energy Device .........................23
Quick Install Guide ....................23
Open source ..........................24
Application information ...............24
Installer Settings ......................24
ESS Information Menu ..................25
Energy Analysis .......................25
System Information ...................26
Using EnerVu
Using EnerVu system ...................27
Creating a New Account ...............27
Checking EnerVu Activation ...........30
Overview of my EnerVu page ..........31
Making a Statistical Graph .............33
Checking System Event. . . . . . . . . . . . . . . .37
Making a Statistical Report ............37
Transferring your system to
other owner ..........................38
Appendix
Maintenance ...........................39
Cleaning the Product ..................39
Inspecting Regularly ...................39
Contact ..............................39
Disposing the product .................40
Specifications ..........................41
Open Source Software Notice
Information .......................43
1
2
3
4
Page 6
Getting Started
6
Product Features
1
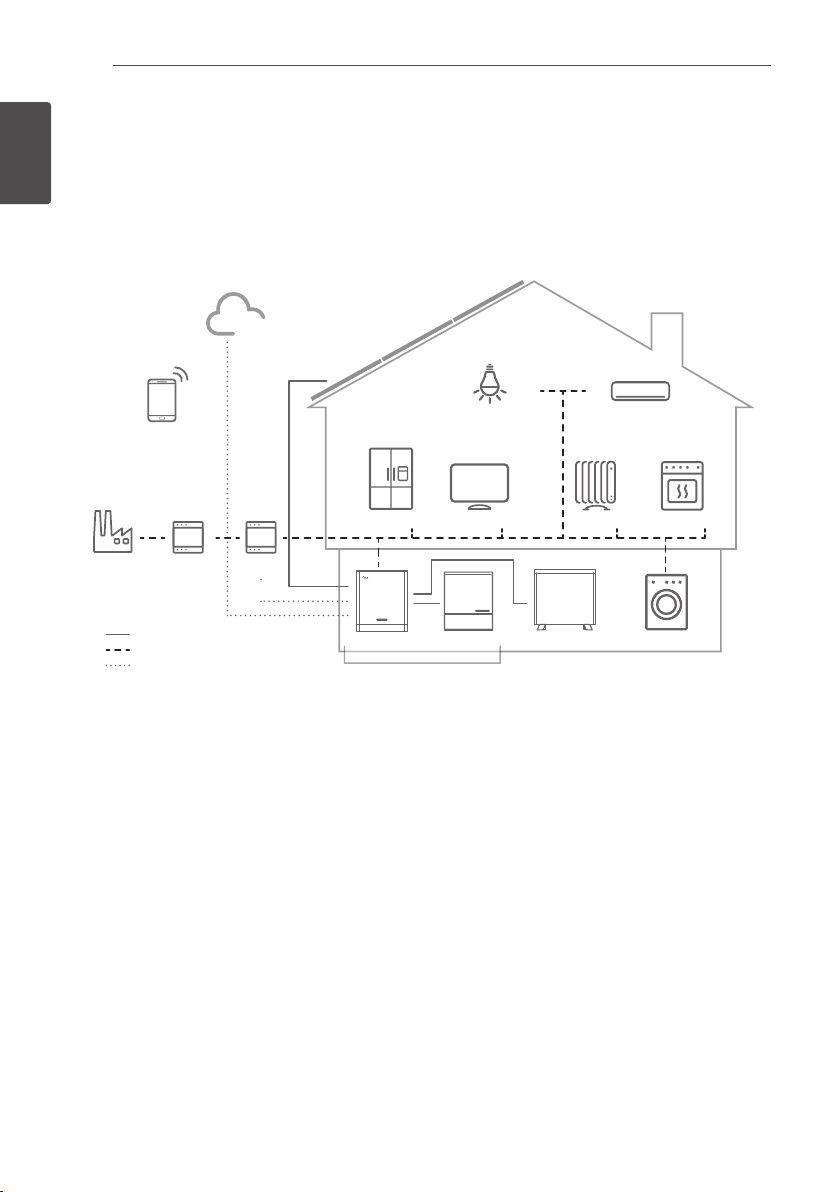
This product is intended to store direct current (DC) electricity generated from photovoltaic (PV) to
Getting Started
the connected Lithium-Ion Battery, and convert direct current (DC) electricity from the connected
battery and PV to alternating current (AC) electricity and feed this into the power grid.
And, the battery supplies power to the household load in an emergency.
PV Module
LED Lighting
PCS
Energy Storage System
Battery
System boiler
Air Conditioning
OvenTVRefrigerator Heater
Washing Machine
Smart Phone
Grid
Energy
Meter
Direct Current
Alternative Current
Data Line
Internet Cloud
ABB
Smart
Meter
The electricity generated from a PV array can be stored to the connected battery or sold to energy
supply companies.
yDC-Coupled ESS
LG ESS can achieve higher system efciency due to simpler power conversion process.
yThree-Phase Connection
3-phase connection secures phase balancing.
ySmart Management
With built-in Smart PMS, it analyses PV generation and load consumption and implements to
charge and discharge immediately. Also it monitors main system & battery conditions to maintain
its stable condition always.
yWeb-monitoring Service
Customers and installers can monitor their ESS with various devices such as PC, tablet or smart
phones.
yBackup Mode
In an emergency, the battery supplies power to the household load.
Page 7

Abbreviations on this manual
Abbreviation Designation Explanation
ESS Energy Storage
System
Inverter system that stores energy into a battery and
uses it.
Getting Started
7
1
Getting Started
PCS Power Conditioning
System
PV Photovoltaic Solar panel system that converts solar energy into
SOC State of charge Current state of a battery
BMS Battery Management
System
DC Direct Current -
AC Alternating Current -
DHCP Dynamic Host
Conguration
Protocol
LAN Local Area Network Network that interconnects computers within a
IP Internet Protocol A set of rules for sending data across a network
A device intended to convert DC electricity generated
from PV system to AC electricity and feed it to
household appliances.
direct current electricity
Electronic system that manages a rechargeable
battery.
Standardized network protocol used on Internet
Protocol (IP) networks for automatic distributing
network conguration parameters, such as IP
addresses for interfaces and services.
limited area.
Page 8
1
Getting Started
Getting Started
8
Glossary
Terms Explanation
Azimuth In the Northern hemisphere, the azimuth angle indicates by how much
degrees the module surface deviates from a full south aspect. In the
southern hemisphere, it indicates the deviation from a full north aspect.
The azimuth angle is counted with positive values within the range from
south (0°) to west (90°) and it counted with negative values within the
range from south (0°) to east (-90°).
Tilt angle The tilt angle indicates by how much degrees the tilt of the module surface
deviates from the horizontal.
PV module The PV module refers to a panel designed to absorb the sun’s rays as a
source of energy for generating electricity.
PV array Technical device for the conversion of solar energy into electrical energy. All
serial and parallel installed and connected to PV modules of a PV system
are referred to as a PV array.
Page 9
Name of Each Part
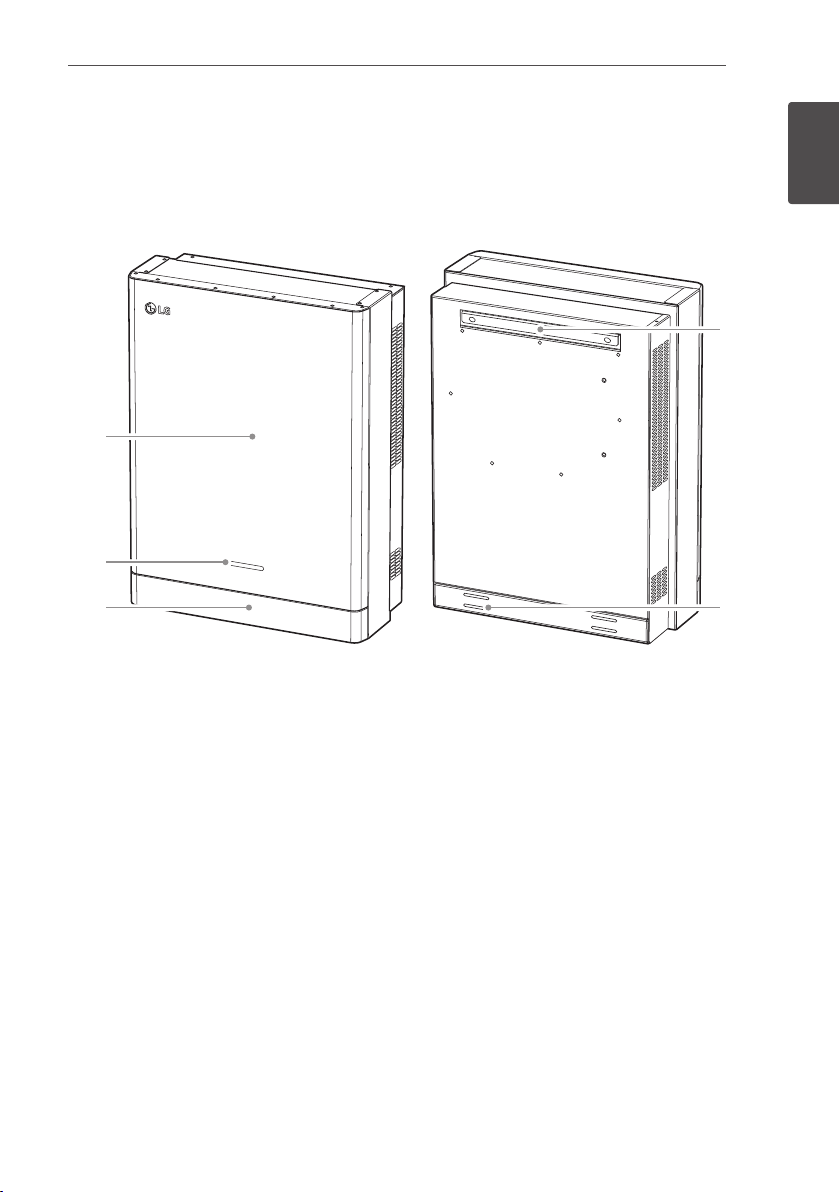
Front and Rear
A
B
Getting Started
9
1
Getting Started
D
C
PCS body
A
LED Indications
B
Lower Cover
C
Bracket connected part
D
Screw holes for wall mounting
E
E
Page 10
Getting Started
10
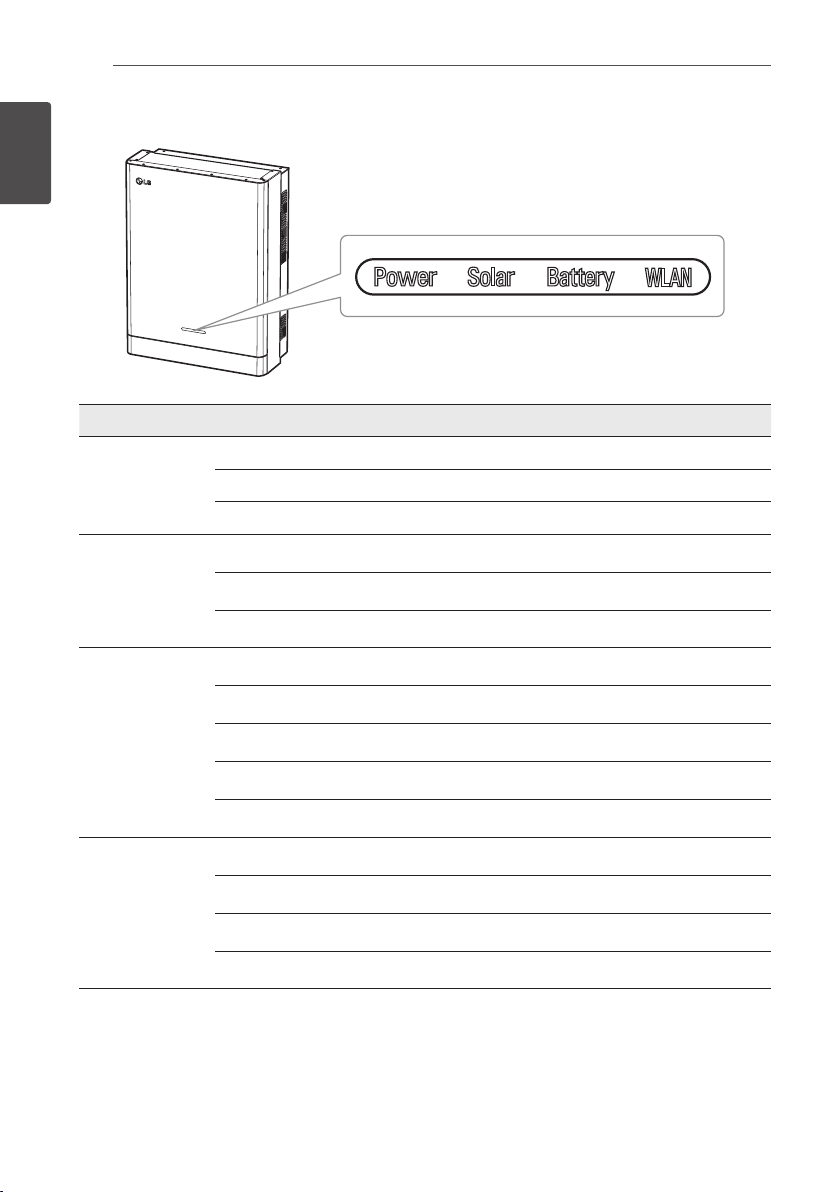
LED Indications
1
Getting Started
LED Color Description
Power
Off Grid is not connected.
White Grid is connected.
White (Blink) PCS Fault
Off Energy is not being generated.
Solar
Battery
WLAN
Green Energy is being generated.
White (Blink) PCS Fault
Off Stand by
Green Battery is in charging
Blue Battery is in discharging
Red (Blink) Battery error
White (Blink) PCS Fault
Off Unplugged WLAN dongle
Green Network connected
Blue WLAN network connected
Red (Blink) Network disconnected
Page 11
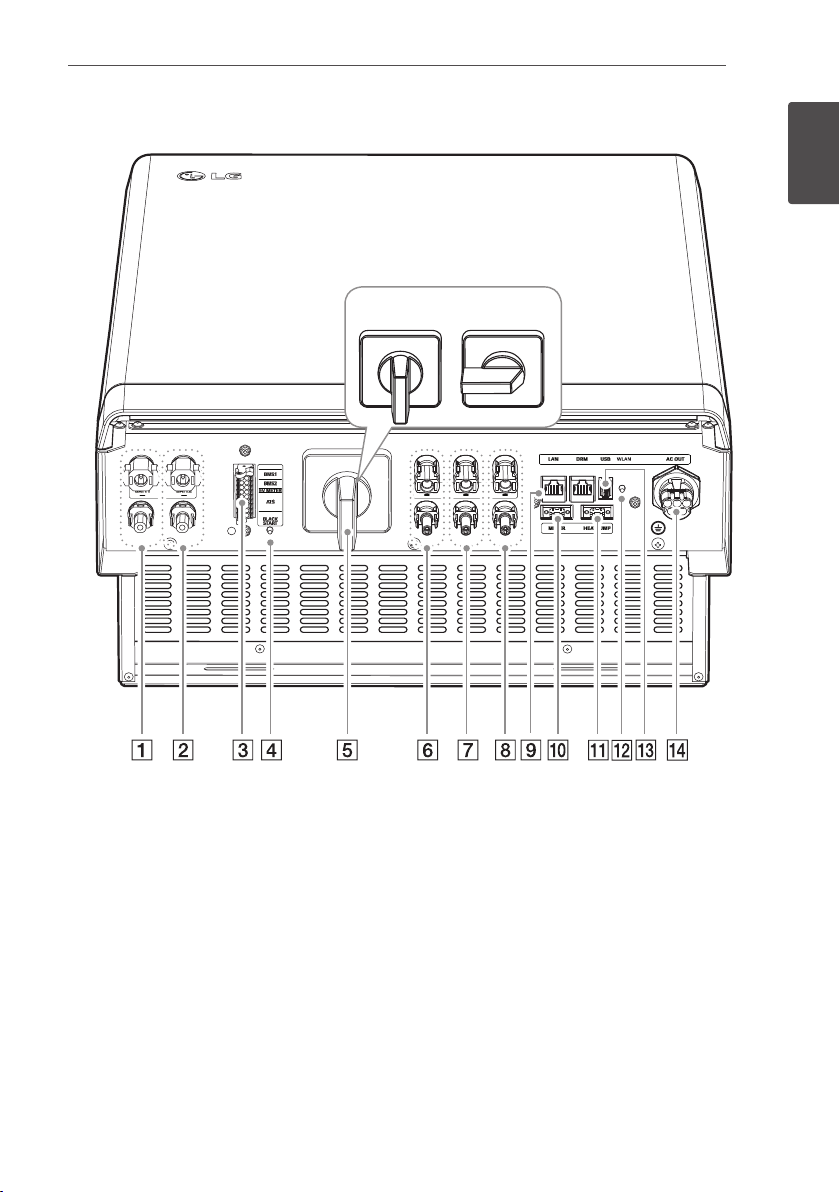
Bottom
Getting Started
11
1
Getting Started
Battery DC cable connectors 1
A
Battery DC cable connectors 2
B
Communication terminals
C
Black start button
D
PV switch (DC Disconnect)
E
PV1(+ and -) connectors
F
PV2 (+ and -) connectors
G
PV3 (+ and -) connectors
H
OFF
I
J
K
L
M
N
ON
Ethernet port
WLAN dongle port (USB type)
Meter connector
Heat pump connector
Wireless connection button
AC grid cable connector
Page 12
Operating
12
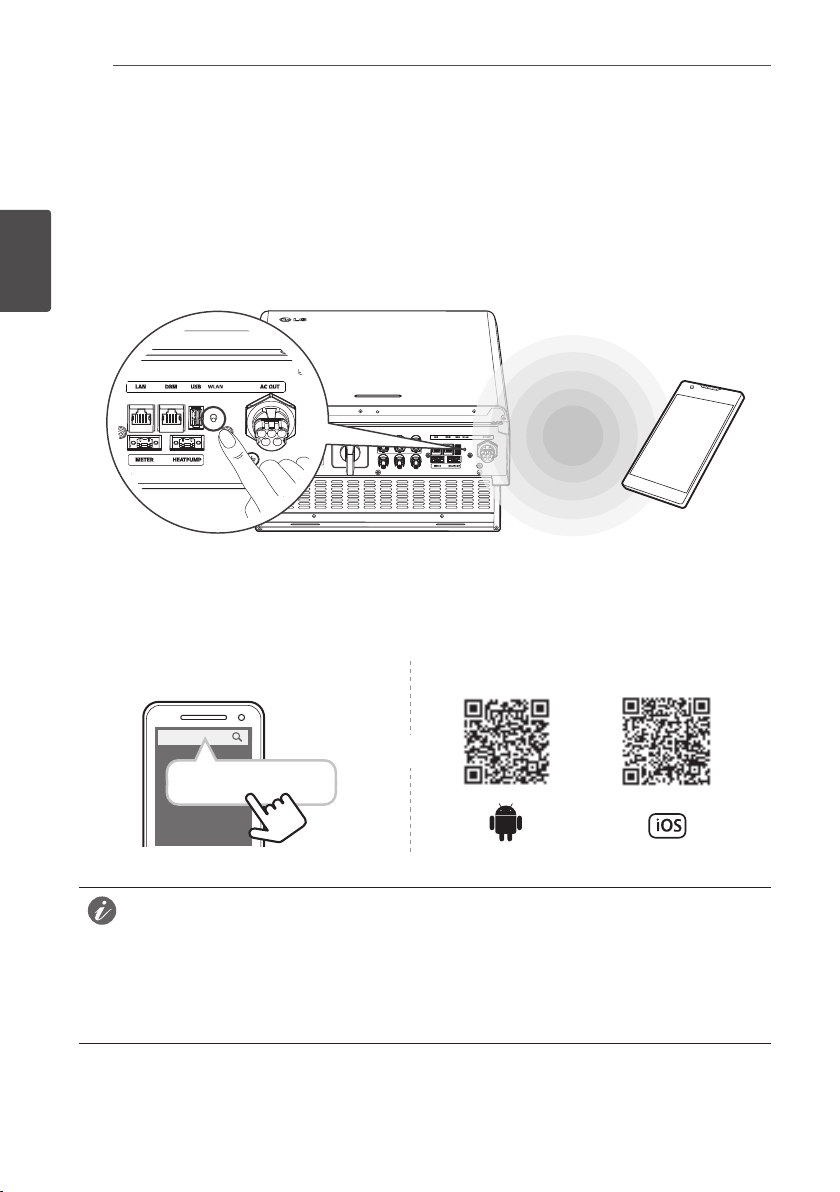
Connecting to a Mobile Device
To connect the system to a mobile device, the LG EnerVu Plus mobile application must be installed
on your mobile device. Search and download ‘LG EnerVu Plus’ application from Apple App store or
Google Play store.
To connect to the system directly, the WLAN dongle must be connected to the system. Make sure
that the supplied WLAN dongle is connected to the system.
2
Operating
Installing 'LG EnerVu Plus' App
Download ‘LG EnerVu Plus’ on the Apple App Store or Google Play Store.
OR
LG EnerVu Plus
NOTE
yDepending on the device, ‘LG EnerVu Plus’ app may not work.
yLG EnerVu Plus app will be available in version of the software as follow;
- Android O/S : Lollipop (5.0) or later
- iOS O/S : iPhone 6 (9.0) or later
Page 13
Operating
Connect via Home WLAN
Preparation
yTo connect the mobile device with the system via home network, the system must be connected
to your home network. Check the [Network] setting menu on the system.
yNote the SSID of your home network.
13
A
B
C
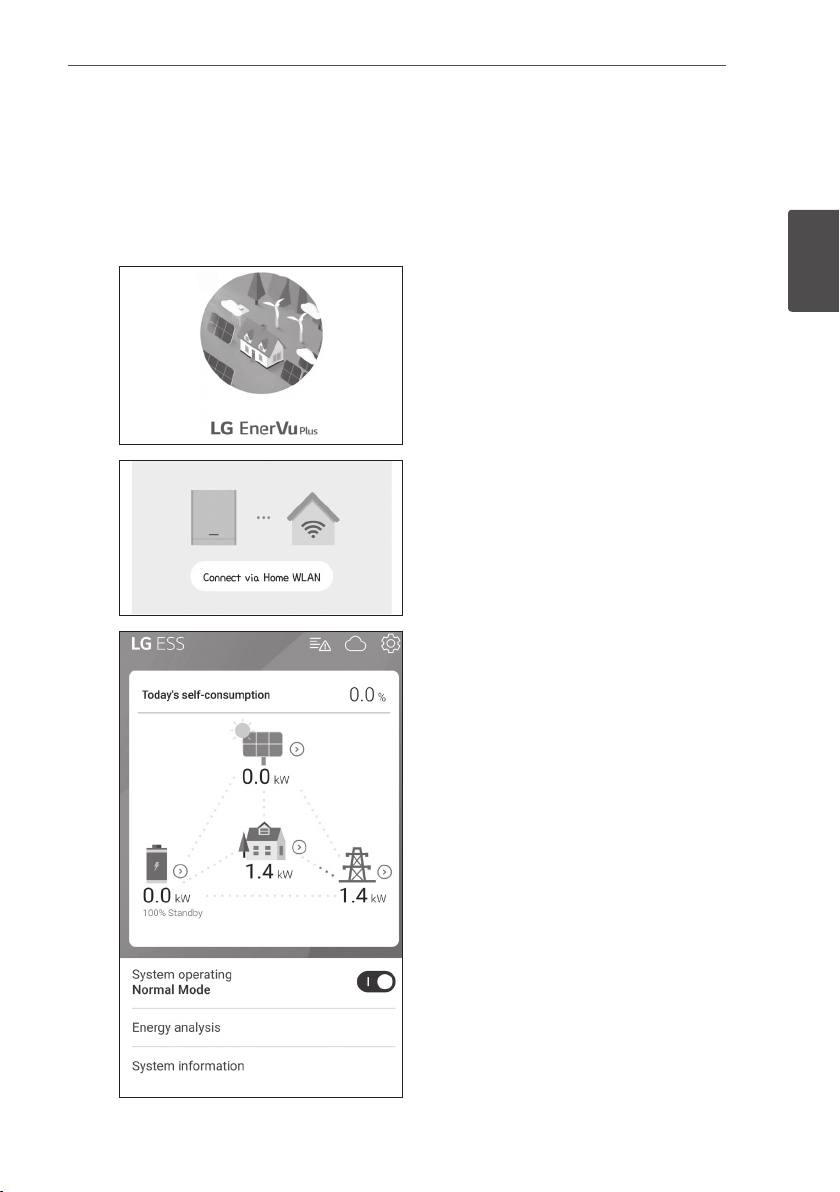
Run ‘LG EnerVu Plus’ app on your mobile device.
2
Operating
Tap [Connect via Home WLAN] in the
connection method selection screen.
The connection will automatically be proceeded
and main screen appears when the connection
is successful.
Page 14
14
Operating
D
2
Operating
Connect directly to ESS
A
B
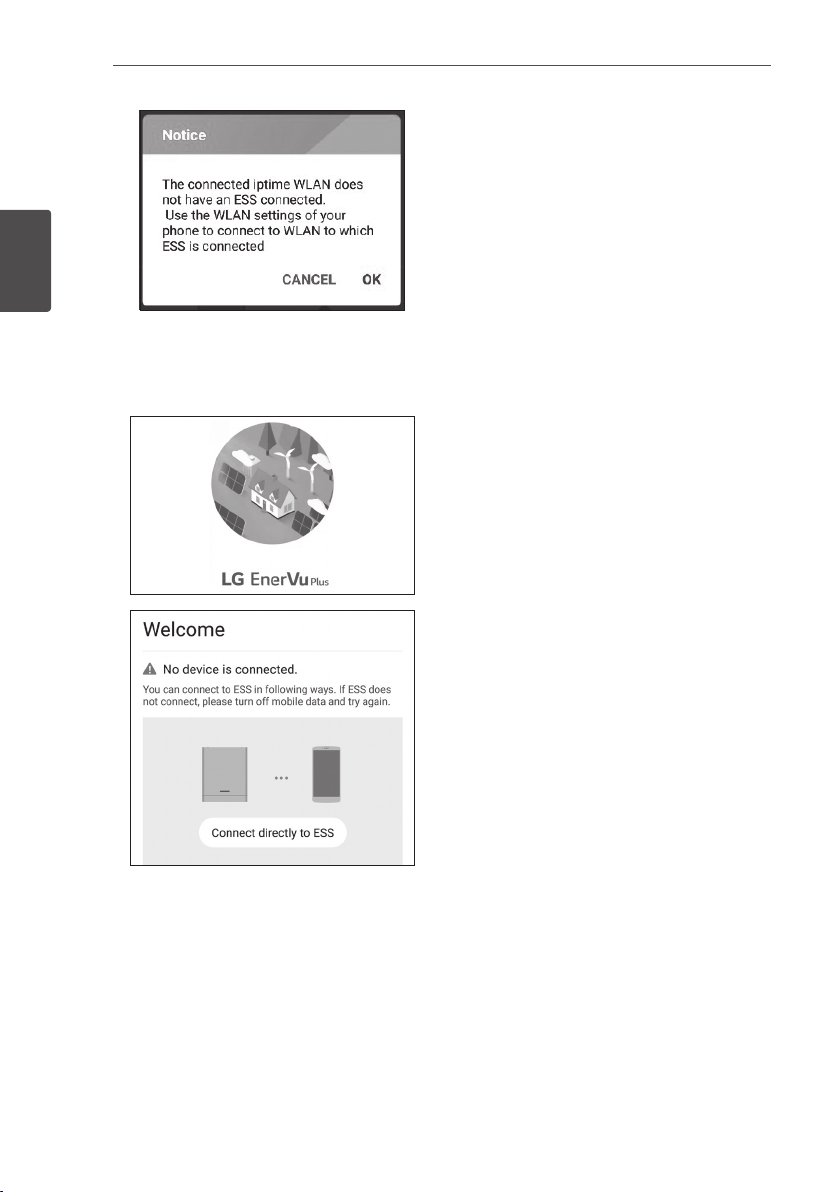
If the connection fails, a pop-up message
appears on the screen.
Tap [OK] to move to the WLAN selection menu
of the mobile device.
Select the SSID of your home network.
Run ‘LG EnerVu Plus’ app on your mobile device.
If it is the rst time to connect to the system,
connection method selection screen appears.
Tap [Connect directly to ESS] option.
Page 15
Operating
NOTE
15
C
D
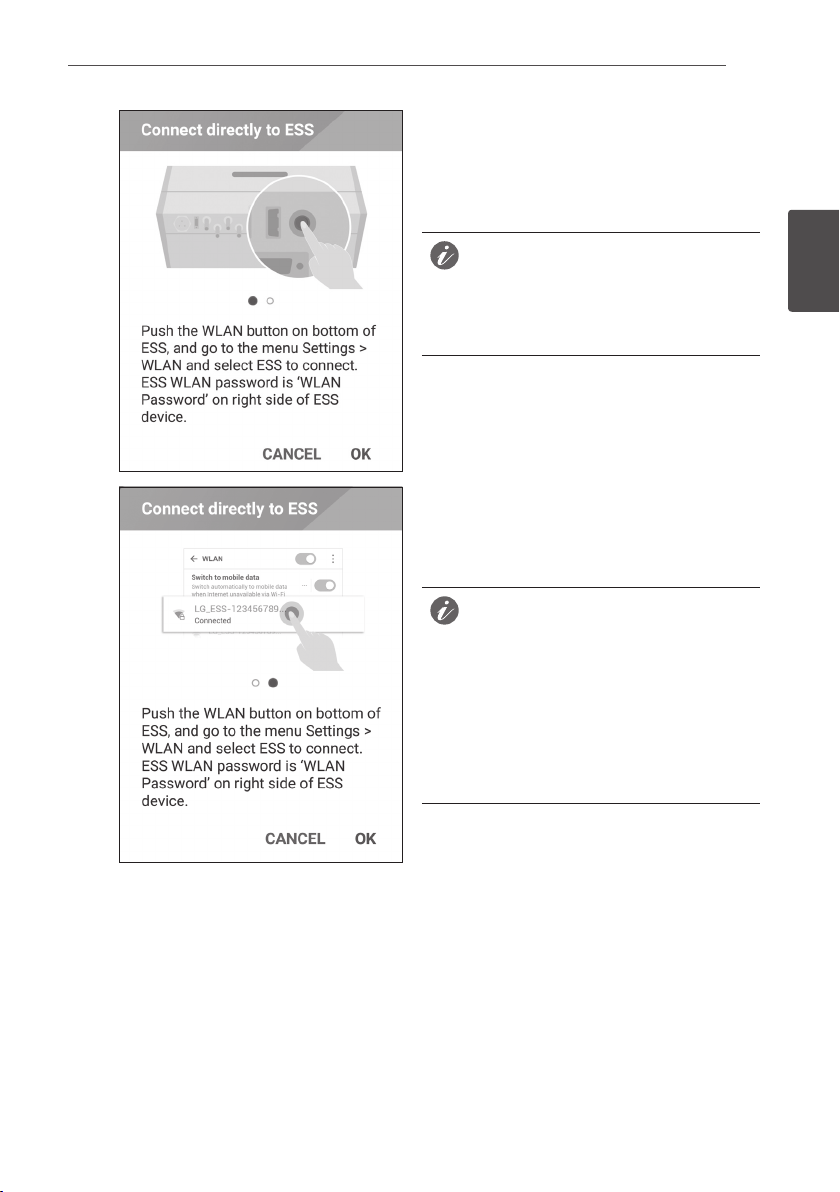
Press and hold the wireless connection button
on the system until [WLAN] LED is lights in
blue.
On your mobile device, tap [OK] to go to the
next step.
If the connection has not been made for 5
minutes, the [WLAN] LED lights green and
the WLAN signal is disabled.
Read the guidance and tap [OK] to display
WLAN selection screen.
Select the SSID which starts with ‘LGE_ESS’.
The password input screen appears.
NOTE
The last 2 characters of the SSID are the
same as the last 2 characters of the system
registration number.
Example :
SSID (LGE_ESS-5E)
Registration No. (LGE-ESS-
DE1710BKRH00685E)
2
Operating
Page 16
16
NOTE
Operating
2
Operating
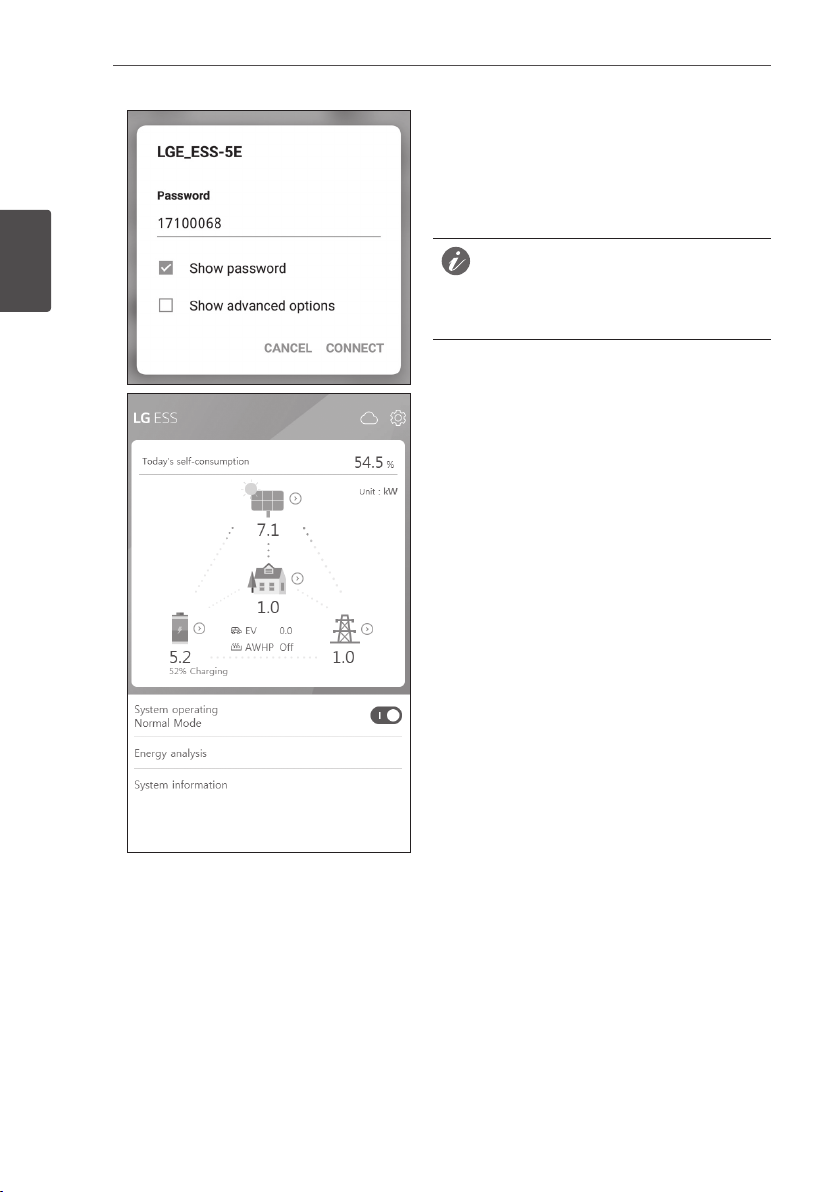
E
Input WLAN password in the password eld to
connect to the system.
The WLAN password is 8 digit numbers. Find
the ‘WLAN password’ printed in the label
outside of the PCS.
If the connection failed, try after turning off
the mobile data option on your mobile device.
Android : If the connection is successful, main
screen appears as shown in the gure.
iOS : If the connection is successful, run [LG
EnerVu Plus] app to display the main screen as
shown in the gure.
Page 17
Operating
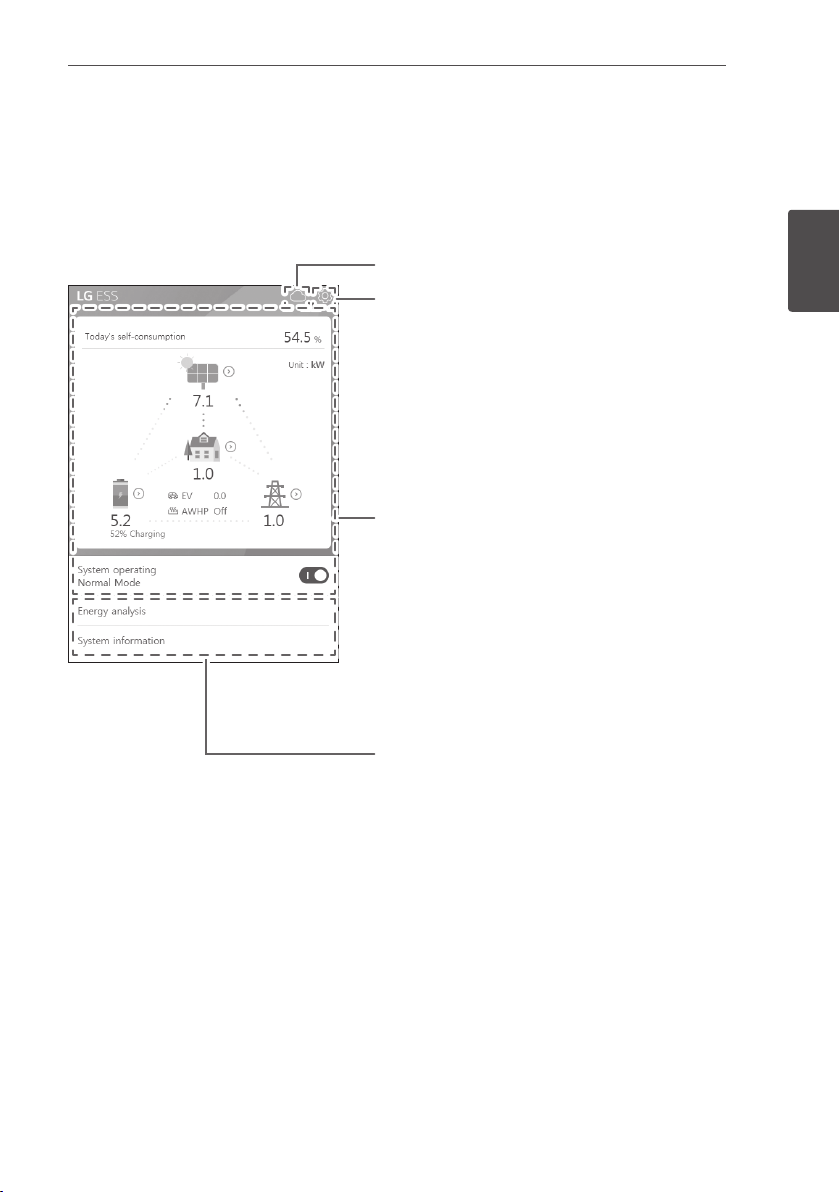
About Main Screen
The main screen displays and indicates current ESS status in the ESS status menu area. And you
can check the several settings and information in the ESS setting menu and ESS Information menu
areas.
EnerVu web page link
17
ESS Setting menu
yLanguage
yBattery
yEnergy Device
yQuick install guide
yOpen source
yApplication information
yInstaller Settings
ESS Status menu
yLoad
yBattery
yEnergy Device
yPV
yGrid
yEnergy overview
yNotice list
ySystem operating
ESS Information menu
yEnergy Analysis
ySystem information
2
Operating
Page 18
Operating
NOTE
18
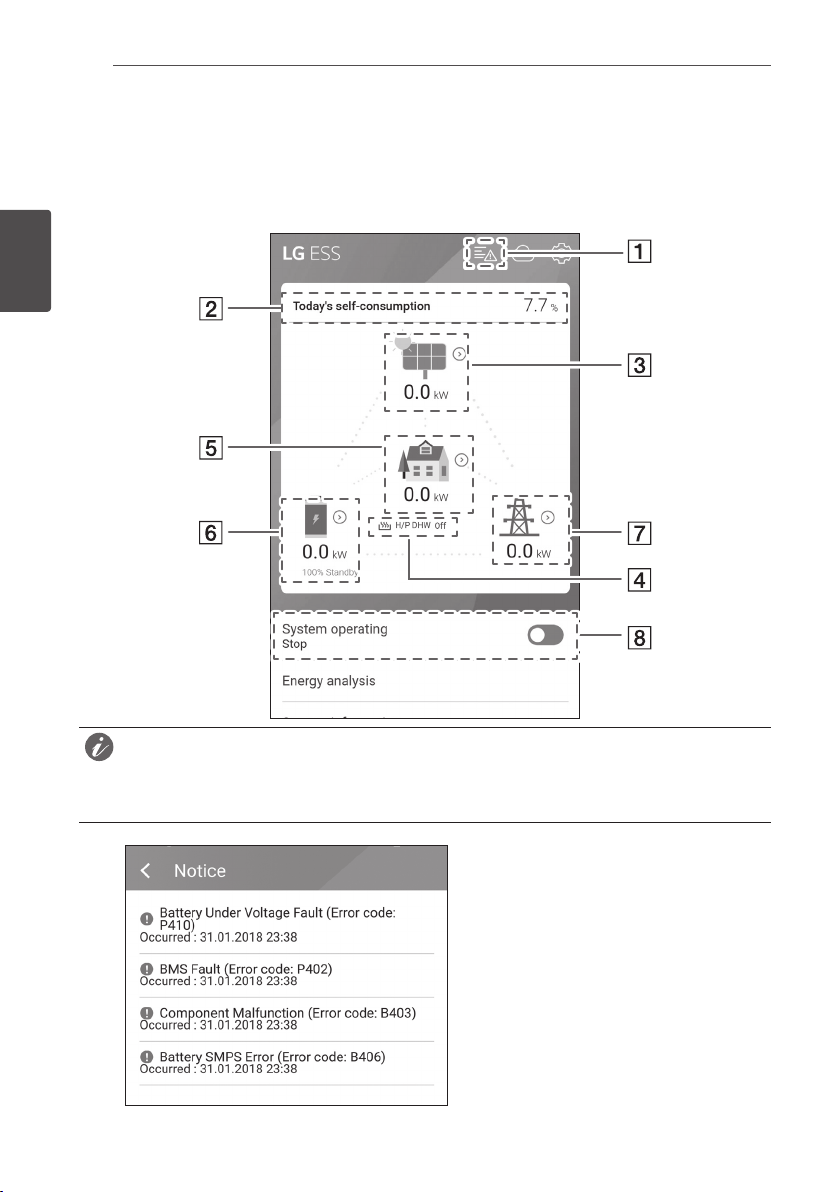
ESS Status Menu
The main screen displays and indicates current ESS status briey. When you select an area indicated
above, it displays detailed information.
2
Operating
yThe displayed values are not exact values. The values may differ from actual values.
yPlease turn on the AP again, if there is a problem at connection with AP.
A
Displays a notice list of system status.
When there is an error occurred, error code,
time and date are displayed on the list.
Refer to installation manual for more
information of messages.
Page 19
Operating
19
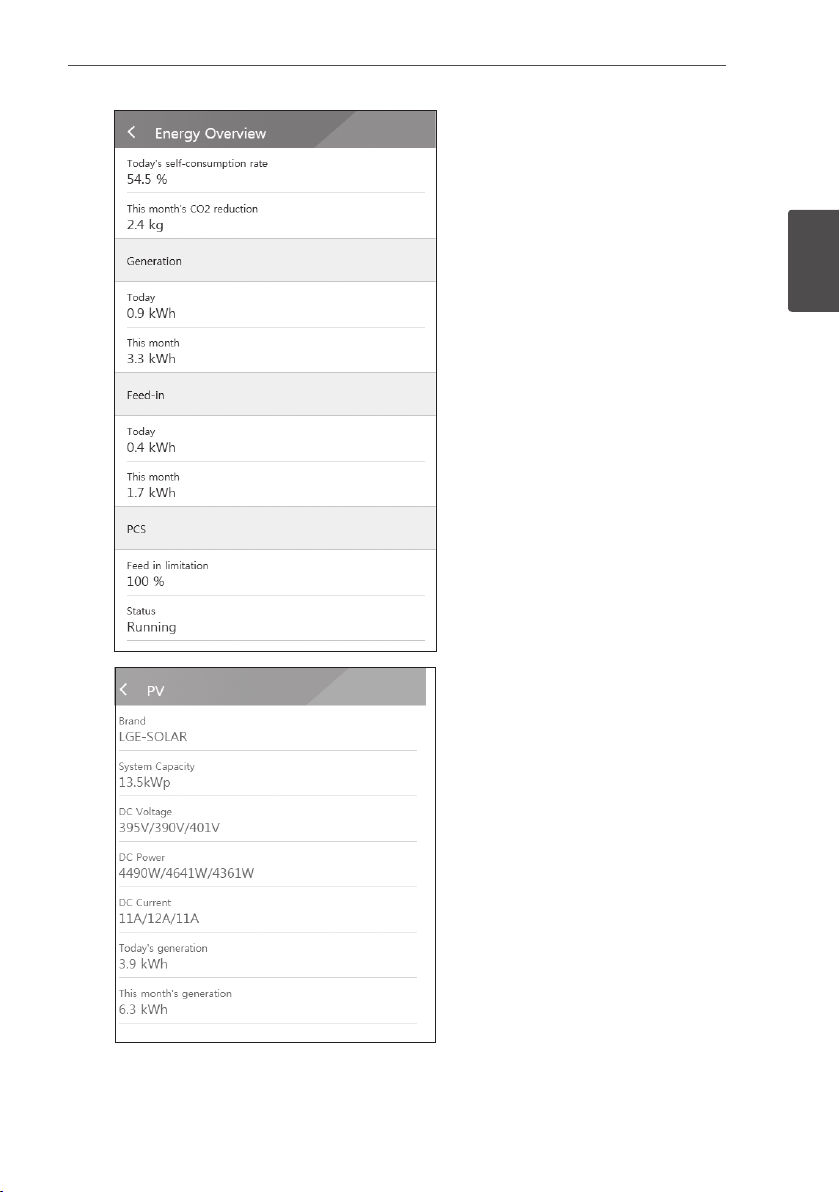
B
C
Displays the [Energy Overview] information
on the screen.
Today’s self-consumption rate : Displays
rate of the consumed energy amount from
ESS today.
This month’s CO2 reduction : Displays
monthly amonut of CO2 reduction.
Generation: Displays generated energy
information.
Feed-in : Displays consumed energy
information.
PCS : Displays PCS information.
Displays generating status of the
connected PV briey.
The status values are the sum of PV1, PV2
and PV3.
Brand : PV Manufacturer (Default : LGE)
System Capacity : PV capability
DC Voltage : Current PV voltage
DC Power : Current PV power
DC Current : Current PV electric current
Today’s generation: Generated PV energy
today.
2
Operating
Page 20
2
NOTE
Operating
Operating
20
After the heat pump setup is completed, you can check the heat pump status on the Home
D
screen.
Description of each state is as follows.
yNone : AWHP setting is disabled or not connected.
yH/P DHW On : ESS make increase the desired temperature of AWHP.
yH/P DHW Off : AWHP retains a original desired temperature
If PV system generate surplus power, Heat up the water in the heat pump and raise the
Self consumption.
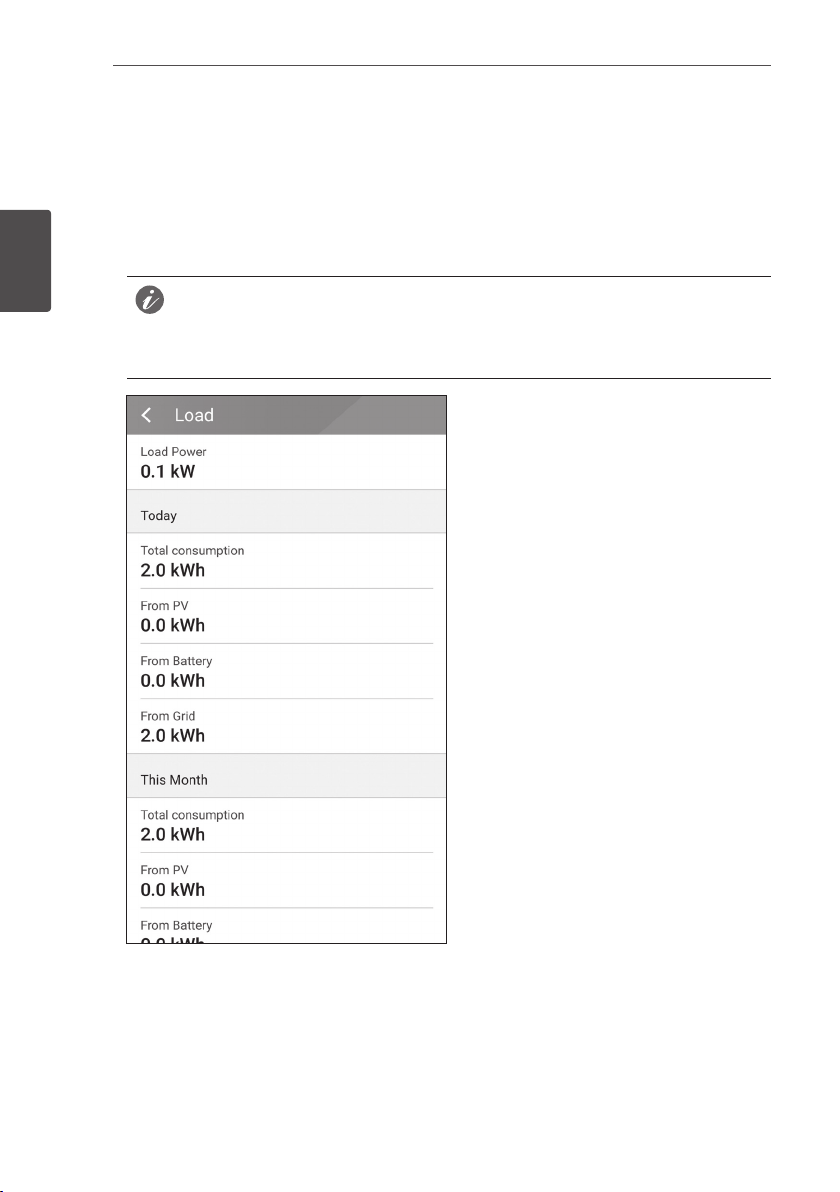
E
Displays detailed status of energy
consumed in household.
Load Power : Current power consumed in
household
Today
Total consumption : Amount of
consumed energy today
From PV : Amount of energy from PV to
household today
From Battery : Amount of energy from
the battery to household today
From Grid : Amount of energy from the
power grid to household today
This month
Total consumption : Amount of
consumed energy this month
From PV : Amount of energy from PV to
household this month
From Battery : Amount of energy from
the battery to household this month
From Grid : Amount of energy from the
power grid to household this month
Page 21
Operating
21
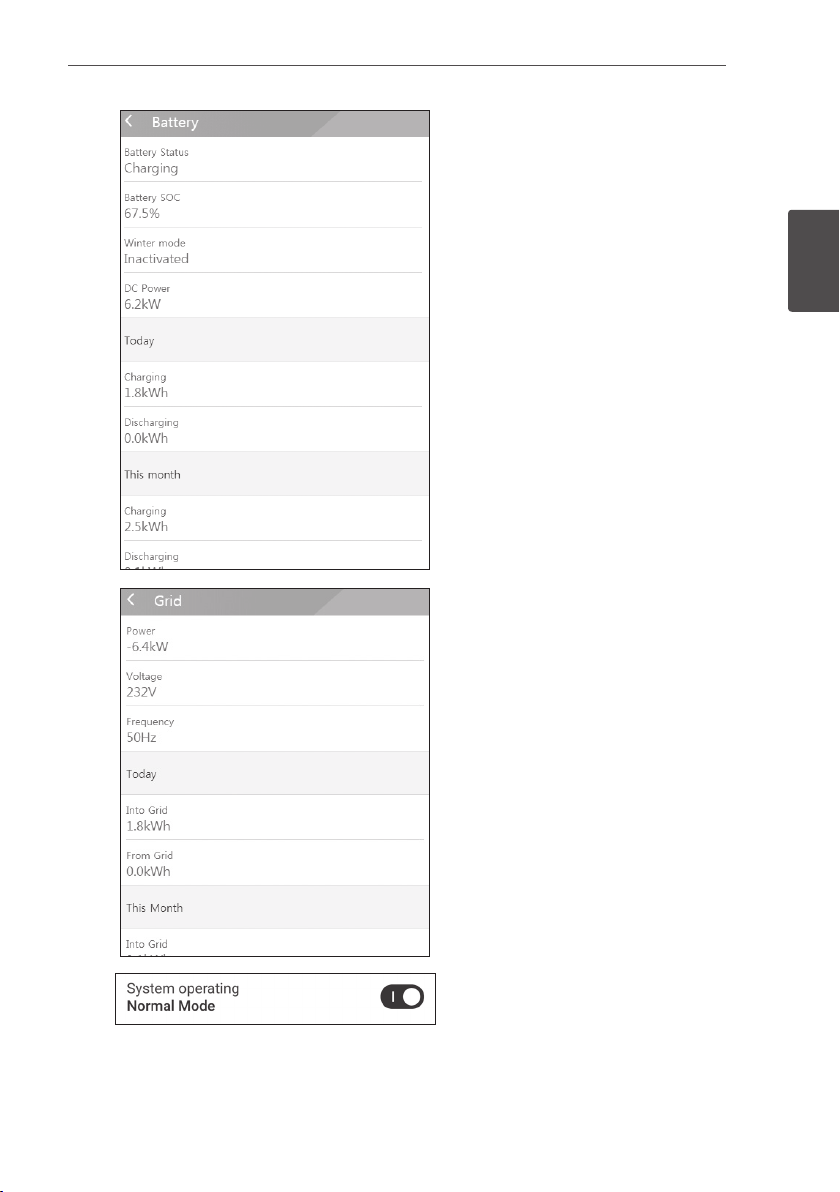
F
G
Displays charging and discharging status of
the battery briey.
Battery Status : Charging/Discharging/
Standby
Battery SOC: Current SOC (state of
charge) level
Winter Mode : Shows winter mode status.
DC Power : Current output power from
battery
Today
Charging : Amount of charged energy
to the battery today.
Discharging : Amount of discharged
energy from the battery today
This month
Charging : Amount of charged energy
to the battery in this month
Discharging : Amount of discharged
energy from the battery in this month
Displays current status of power grid.
Power: Current grid power
Voltage: Current grid voltage
Frequency : Current grid frequency
Today
Into Grid : Amount of sold energy today
From Grid : Amount of purchased
energy today
This month
Into Grid : Amount of sold energy today
and this month
From Grid : Amount of purchased
energy this month
2
Operating
H
[System Operating]
Tap switch to start or stop system
operation.
Page 22
Operating
22
ESS Setting Menu
You can adjust general settings of the system. Select [main screen] > [ ] to display the [Setting]
screen.
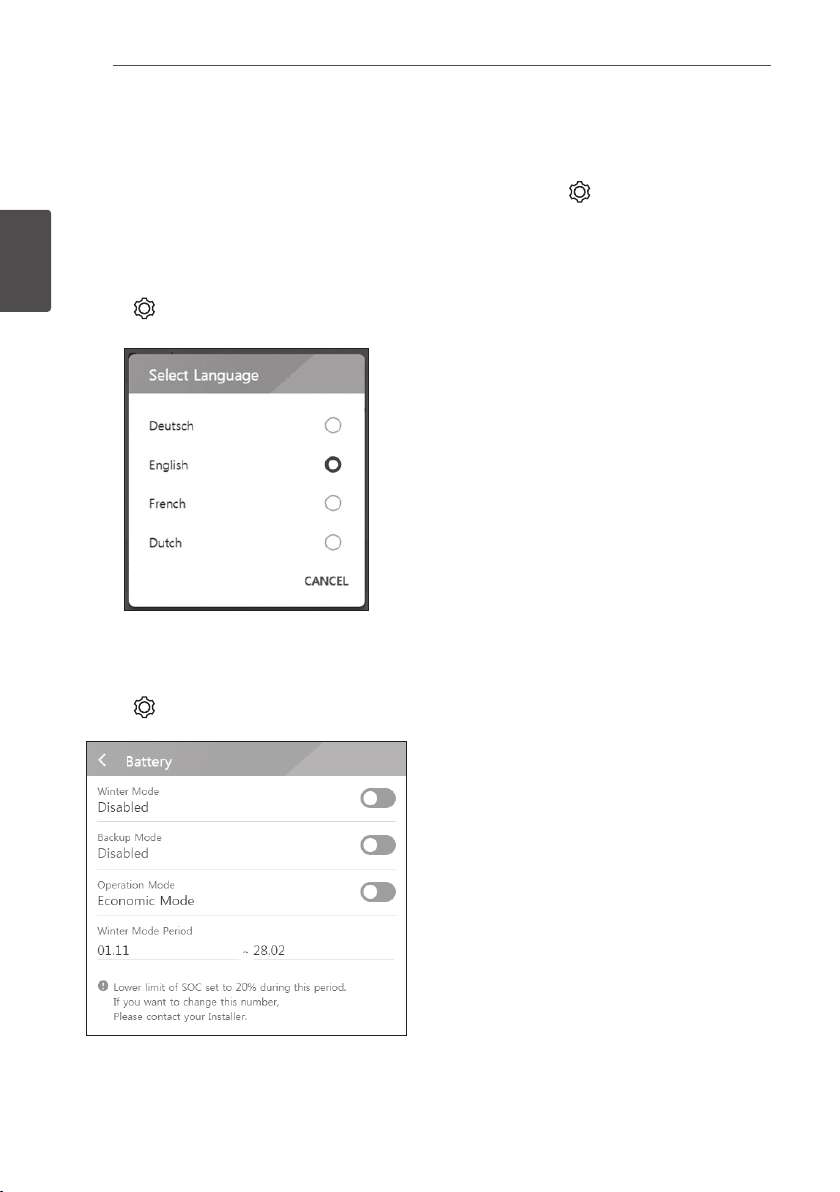
Language
2
Select [ ] > [Language] to display the language selection screen.
Operating
Select the desired language.
Battery
Select [ ] > [Battery] to display the battery setting screen.
[Winter mode]
Tap this switch to select [Enable] or [Disable].
The minimum SOC level of winter mode can be
changed by the installer only.
[Backup mode]
Tap this switch to select [Enable] or [Disable].
The minimum SOC level of Backup mode can be
changed by the installer only.
[Operation Mode]
Tap this switch to select [Economic Mode] or
[Fast Charge Mode]. You can change mode on
your own.
Economic Mode : Make Feed- in more and make more efciency to System.
Fast Charge Mode : Make fast charge to battery First.
Page 23
Operating
[Winter Mode Period]
Tap current value to display the setting menu. You can change the period
1. Select the currently selected value. Period setting menu is displayed.
2. Adjust [Month] and [Day] using S or W.
3. Select [APPLY] to complete the setting.
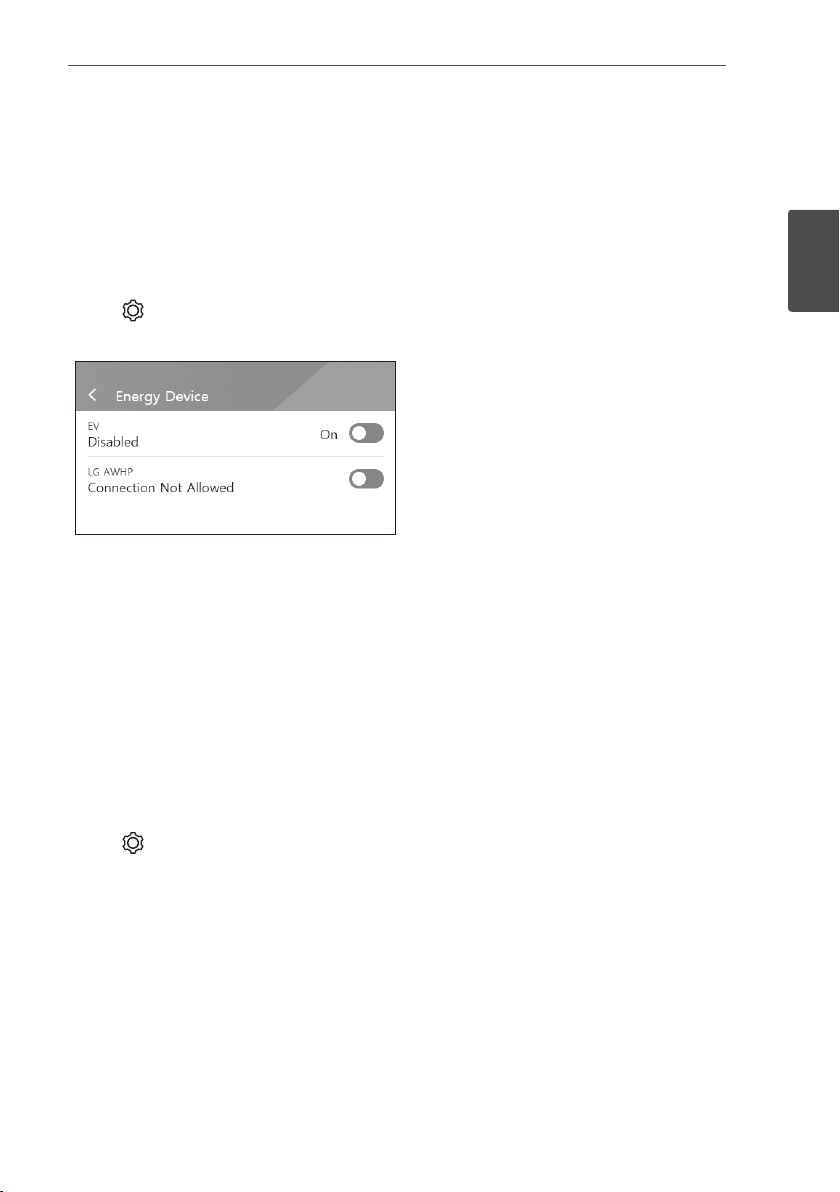
Energy Device
Select [ ] > [Energy Device] to display the Energy Device screen.
[EV]
Tap this switch to select [On] or [Off].
When ‘EV Meter Enable’ not setting, Error Popup
occurred.
Set the option [On] to enable EV monitoring.
[AWHP]
Tap this switch to select [On] or [Off].
If its status is “Connection Available“, wait until it becomes “Connected.” If it is not connected to
the end, check heat pump connection is connected properly.
The status description of the energy device is as follows.
yConnection Not Allowed : AWHP setting is disabled
yConnection Available : AWHP setting is enabled and is not connected
yConnected : AWHP setting is enabled and is connected
23
2
Operating
Quick Install Guide
Select [ ] > [Quick install guide] to display the install guidance screen.
You can check the brief installation instruction on the [Quick install Guide] screen.
Page 24
Operating
24
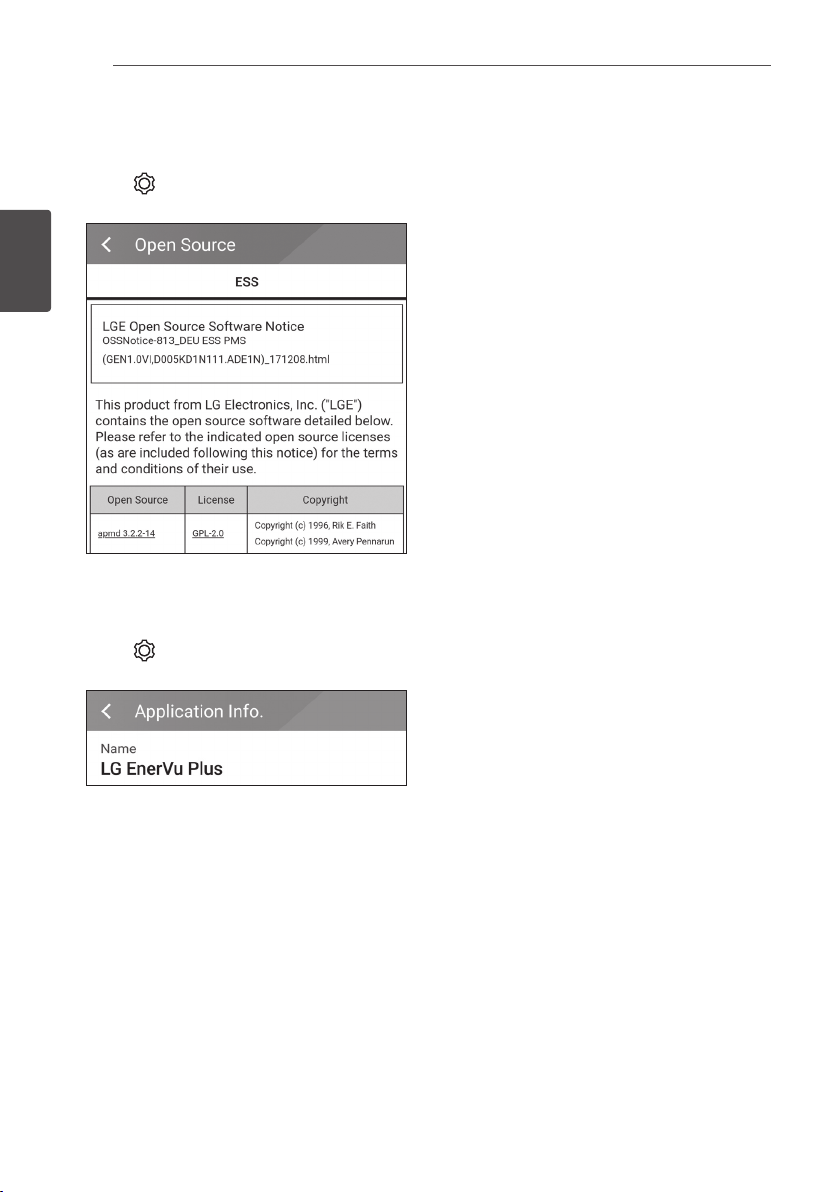
Open source
You can check the open source information of the application and the system.
Select [
2
Operating
] > [Open source] to display the open source notice screen.
To obtain the source code under GPL, LGPL, MPL,
and other open source licenses, that is contained
in this product, please visit http://opensource.lge.
com.
In addition to the source code, all referred license
terms,
warranty disclaimers and copyright notices are
available for download. LG Electronics will also
provide open source code to you on CD-ROM
for a charge covering the cost of performing
such distribution (such as the cost of media,
shipping, and handling) upon email request to
opensource@lge.com. This offer is valid for
three(3) years from the date on which you
purchased the product.
Application information
Select [ ] > [Application information] to display the application information screen.
You can check the information of this application
such as application name, application package
name and application version.
Installer Settings
The system needs various system settingsby installer when installing. Users are not allowed to enter
[Installer Settings] menu. Try not to enter the menu. It may cause serious malfuction on the system,
if user changes settings on the[Installer Settings] menu.
Page 25
Operating
ESS Information Menu
Energy Analysis
On [Energy Analysis], you can check the statistical information of this system.
You can review the amount of energy generated, consumed, sold and purchased on this system.
The statistical data of the day, week, month and year are supported.
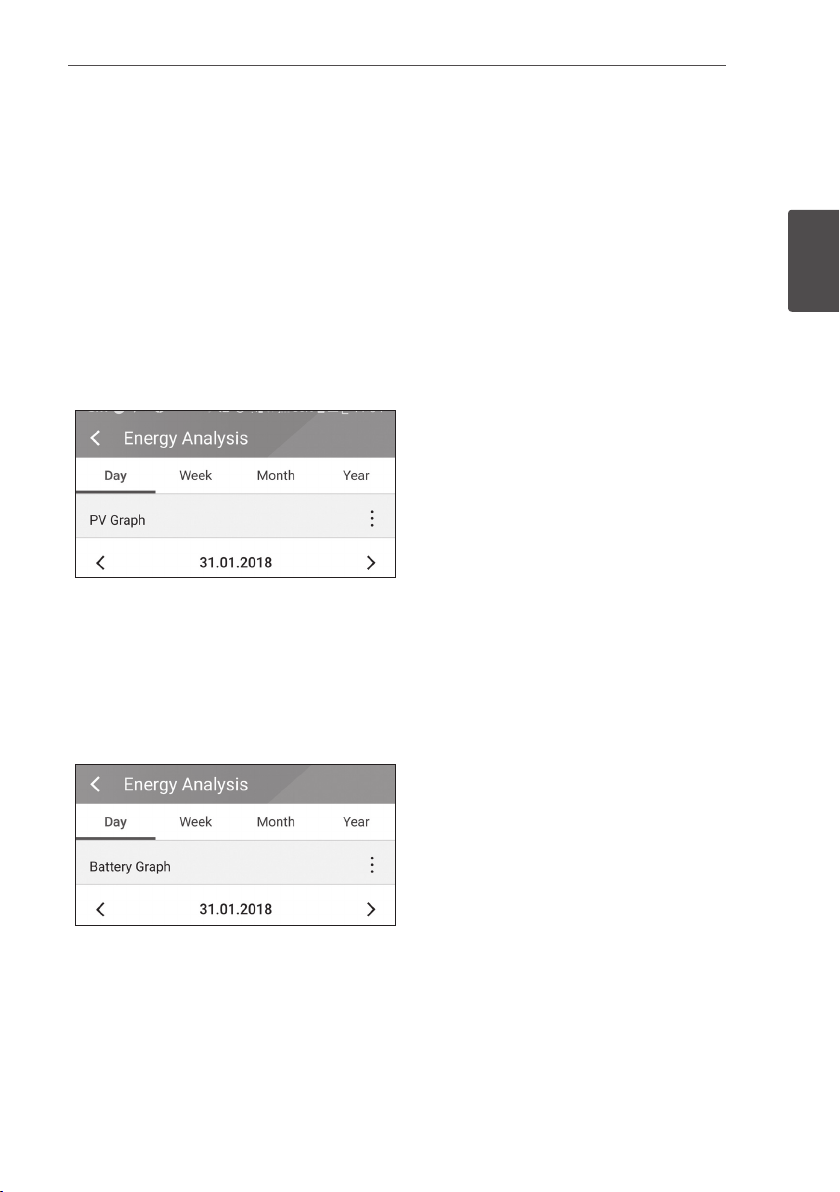
PV Graph
Analyzes the energy generated and sold from PV within selected period and displays as a graph.
Select [PV Graph] on [Energy Analysis].
Generated energy is marked with green and sold
energy is marked with purple on the line graph.
You can change the period by tapping [Day],
[Week], [Month] and [Year].
: Goes to previous [Day], [Week], [Month] or
A
[Year].
: Goes to next [Day], [Week], [Month] or
D
[Year].
25
2
Operating
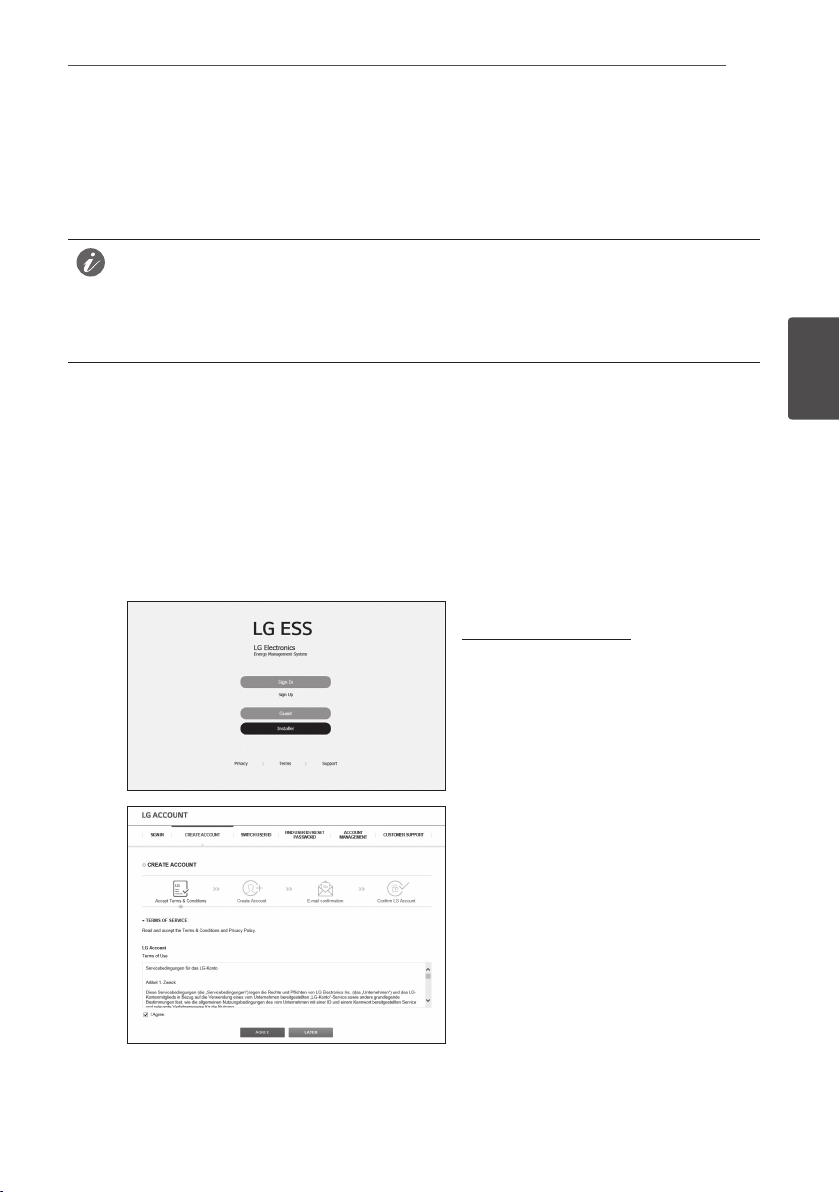
Battery Graph
Analyzes the energy charged and discharged on the battery within selected period and displays as a
graph.
Select [Batt Graph] on [Energy Analysis].
Charged energy is marked with green, discharged
energy is marked with purple, and current status
of the battery is marked with yellow on the line
graph.
You can change the period by tapping [Day],
[Week], [Month] and [Year].
: Goes to previous [Day], [Week], [Month] or
A
[Year].
: Goes to next [Day], [Week], [Month] or
D
[Year].
Page 26

Operating
26
Load Graph
Analyzes the energy consumed and purchased from grid within selected period and displays as a
graph.
Select [Load Graph] on [Energy Analysis].
Consumed energy is marked with green, and
purchased energy is marked with purple.
2
Operating
You can change the period by tapping [Day],
[Week], [Month] and [Year].
: Goes to previous [Day], [Week], [Month] or
A
[Year].
: Goes to next [Day], [Week], [Month] or
D
[Year].
System Information
Displays system information of this ESS. You can
check information on PCS, battery and network
status. Scroll up or down to display next or
previous information.
Page 27
Using EnerVu
Using EnerVu system
When this product is connected to the internet, you can check variety of information such as
system status, information, report using LG EnerVu web monitoring system.
NOTE
End users do not have to register in the EnerVu service. However, if the end user does not use
this service, it is not possible to enable maintenance via remote service (such as rmware update)
over the Internet.
27
Preparation
yAn internet browser installed computer, tablet or mobile with internet access are needed to
access LG ESS web monitoring system.
yThis product must be connected to internet. Check [Network] setting menu on the system.
Creating a New Account
A
B
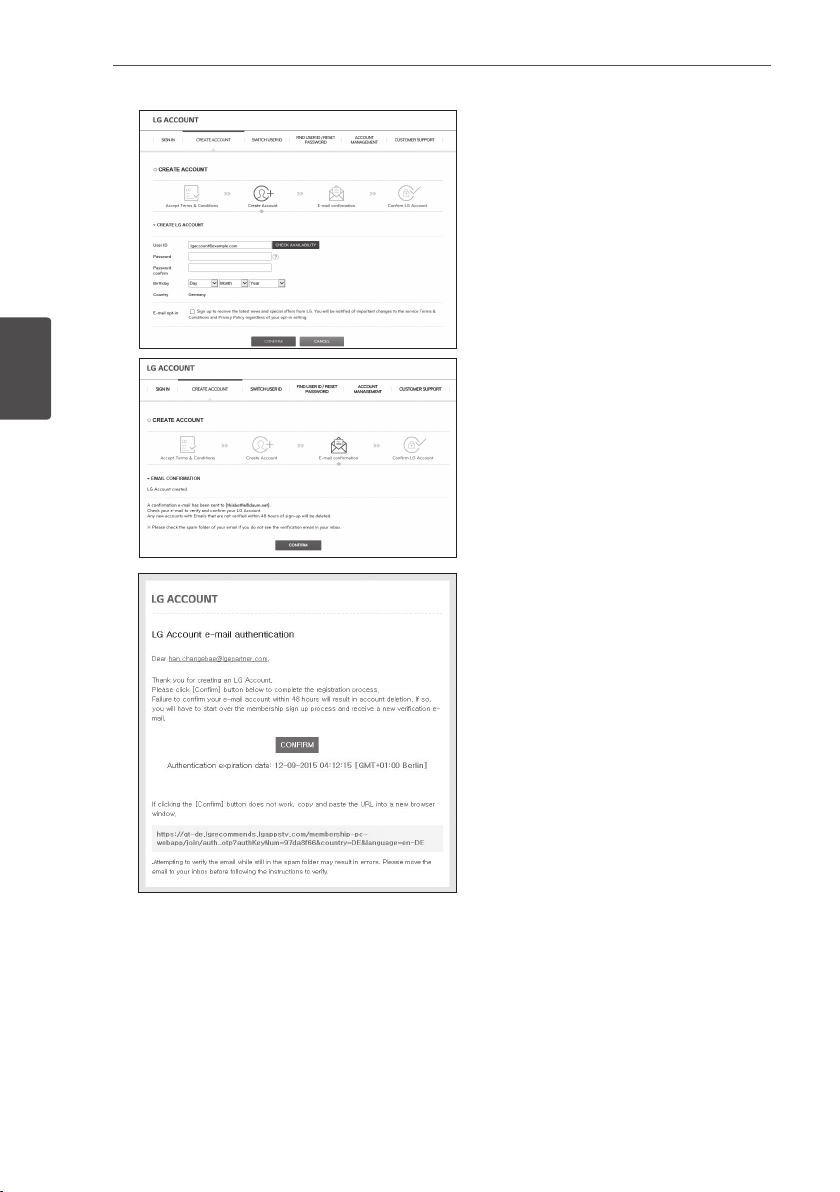
On your browser, visit LG EnerVu page at
http://enervu.lg-ess.com.
Select [Sign Up] and then select your
nationality in the pop-up window. The
service agreement page appears.
Read the terms, conditions and privacy
policy carefully.
If you agree with every term and
condition, click the [I Agree] check box
and select [AGREE].
The account creation page appears.
3
Using EnerVu
Page 28
Using EnerVu
28
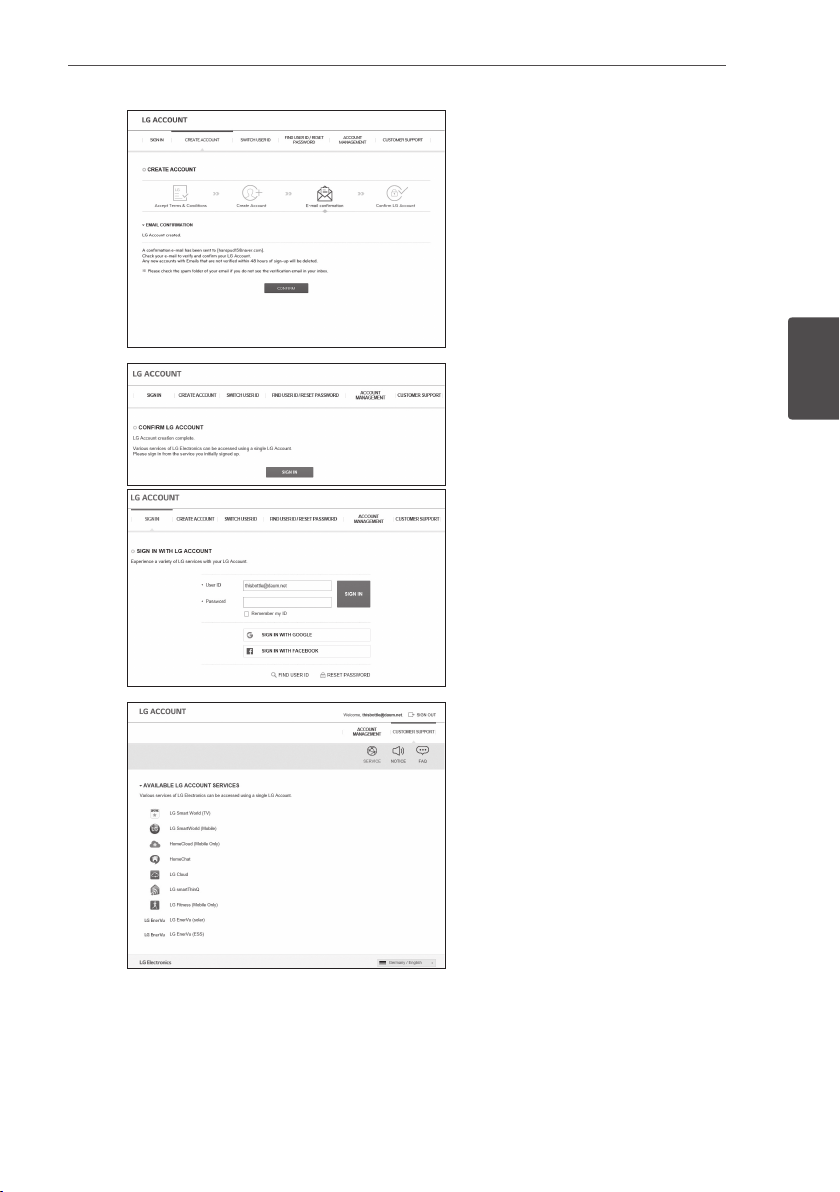
C
3
Using EnerVu
D
Fill your mail address in [User ID] eld and
select [CHECK AVAILABILITY].
Fill in [Password], [Password conrm] and
[Birthday] elds and select [CONFIRM].
The e-mail conrmation page appears.
A conrmation e-mail will be sent to
your e-mail address. On your e-mail,
select [CONFIRM] to complete the e-mail
conrmation.
Page 29
Using EnerVu
29
E
F
On the account creation page, select
[CONFIRM] to complete creating your
account.
Select [SIGN IN] to go to the [SIGN IN
WITH LG ACCOUNT] page.
Input your [User ID] and [Password] and
select [SIGN IN].
3
Using EnerVu
G
Available LG account services are
displayed on the screen.
Page 30
Using EnerVu
30
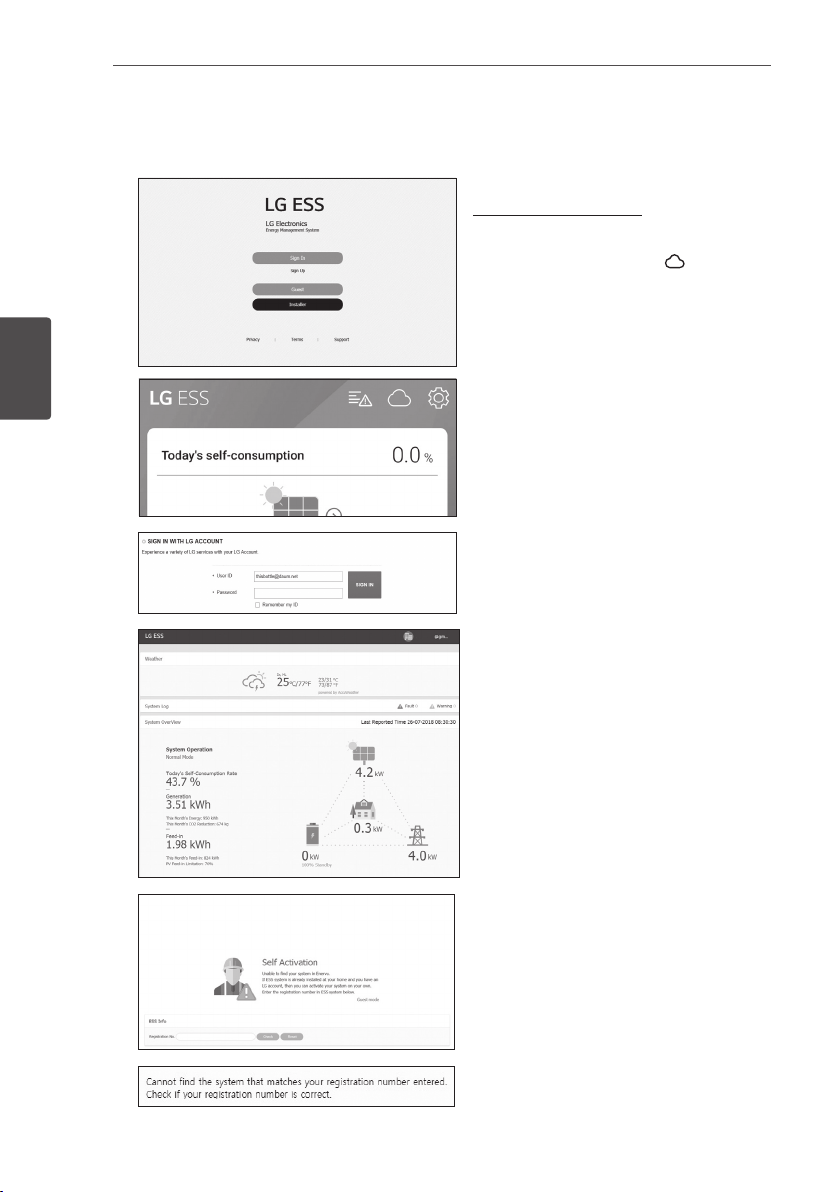
Checking EnerVu Activation
A
3
Using EnerVu
B
C
On your browser, visit LG EnerVu page at
http://enervu.lg-ess.com.
OR
On your mobile app, select [
open the LG EnerVu page with a mobile
browser.
Input your [User ID] and [Password] and
select [SIGN IN].
You can see the screen on the left
when the registration and activation are
completed.
] to
You can see the screen on the left when
the registration is in incomplete status.
Input the registration number printed in
the label attached outside of the PCS
and select [Check] to complete the
registration and activation.
If a pop-up message on the left appears
on the screen, contact the installer to
activate your system.
Page 31

Overview of my EnerVu page
Weather
Using EnerVu
When you enter the main
page of your EnerVu, you
can nd and check various
information related to your
system.
Displays the weather of the
location the system has
been installed. This page
provides you
31
3
Using EnerVu
System Log
Displays the system fault.
Page 32

Using EnerVu
32
System Overview
3
Using EnerVu
Analysis
Displays the status of
the system. This page
provides you with system
information such as current
power generated from PV,
power purchased from grid,
power charged/discharged
from the battery. ALL the
information is renewed
every 10 seconds.
On this page, you can make
a statistical graph of the
energy analysis.
You can review the amount
of energy generated,
consumed, sold and
purchased on the system.
The variety of statistical
charts are supported on the
page.
On the [Event] tab, you can
check the issues occurred
on the system.
System Info
Report
Displays information on
your system.
You can make a monthly
or an yearly report of
statistical data for energy
management on your
system.
Page 33

Using EnerVu
33
Making a Statistical Graph
You can make a daily, monthly or an yearly graph of statistical data for energy management on your
system.
Select the [Day], [Month], [Year] or [Total] option to make a graph of statistical data.
3
Using EnerVu
1. Select a tab on the left side of the screen.
Energy View Makes an overall graph of statistical data.
PV Graph Makes a graph of statistical data on PV. (Generation and Grid feed-in)
ESS Graph Makes a graph of statistical data on ESS (Charging, Discharging and
SOC)
Load Graph Makes a graph of statistical data on household load. (Consumption
and Purchase)
2. Select a duration option among [Day], [Month], [Year] or [Total].
3. Select a date, month or year to make a statistical graph.
After the selection, the graph will be displayed in a short time.
Page 34

Using EnerVu
34
3
Using EnerVu
Page 35

Using EnerVu
4. There are several options at the bottom of a graph, click each option to show or hide the
statistical information on the graph.
Available options differ depending on the graph. Refer to table described below for more
information of graph options.
35
3
Using EnerVu
Tab Graph Options Description
Direct Consumption Amount of directly used energy from
PV.
CONSUMPTION
Energy
View
Discharging Amount of energy that used from
the battery.
Purchased
electricity
Purchased energy through the power
grid.
Direct Consumption Amount of directly used energy from
PV
GENERATION
Charging Amount of energy that charged to
the battery.
Grid feed-in Amount of sold energy to the power
grid.
Page 36

Using EnerVu
36
PV
Graph
ESS
Graph
Energy
Energy
Generation Amount of generated energy from
PV.
Grid feed-in Amount of sold energy to the power
grid.
Charging Amount of energy that charged to
the battery.
Discharging Amount of used energy from the
battery.
SOC State of charge
3
Using EnerVu
5. Select [
Load
Graph
Consumption Amount of used energy from ESS.
Energy
Purchase Amount of purchased energy from
] to print a graph or download as an image le.
the power grid.
Page 37

Using EnerVu
Checking System Event
When you select the [Event] tab, the page shows a list of issues occurred such as system fault,
warning.
1. Select the [Event] tab on the left side of the screen. A list of issues such as system faults,
warnings appears on the screen.
2. Select the [Type] option among [All], [Fault] and [Warning]. The event list will be ltered by
selected type option.
Making a Statistical Report
You can make a monthly or an yearly report of statistical data for energy on your system.
37
3
Using EnerVu
1. Select a report option among [PV Report], [ESS Report], [Load Report], [Balance Report] or
[Total Report].
2. Select a reporting period option between [Yearly report] or [Monthly report].
3. Select desired month or year.
4. Select [Run Report]. A statistical report will be displayed.
Select to download the statistical data as Excel.
Select
to print the statistical data.
Page 38

Using EnerVu
38
Transferring your system to other owner
You can transfer your system to other owner. Once your system is transferred, the system can not
be monitored with your account.
Preparation
yNote the email address of recipient.
yThe email address of recipient must be registered as a LG member. If the recipient is still not a LG
member, an automatic email requesting to become a member will be sent to the recipient.
A
3
Using EnerVu
B
C
D
On your browser, visit LG EnerVu page at
http://enervu.lg-ess.com.
Select [Sign Up] and then select your
nationality in the pop-up window. The
[SIGN IN WITH LG ACCOUNT] page
appears.
Enter your [User ID] and [Password] then
select [SIGN IN] to enter the EnerVu web
monitoring system.
Select your [User ID] on top of the screen.
A menu appears on the screen.
Select [System transfer]. The system
transfer page appears on the screen.
Enter the email address of the recipient in
the [ID] eld and select [Check].
If the recipient is not a LG member, a popup message appears for sending mail to
make a LG account.
And select the nationality of the recipient
in the [Nationality] option.
Enter the recipient information in the
[First Name] and [Last Name] elds and
select [Done] to complete the system
transferring.
The system will automatically log off.
Page 39

Appendix
39
Maintenance
Cleaning the Product
Wipe off the outside of the product with a soft towel with lukewarm water and wipe it with a clean
hand towel so that dirt will not occur when using a neutral detergent. When cleaning the outside
of the product, do not brush it with a rough brush, toothpaste, or ammable materials. Do not use
cleaning agents containing ammable substances.
- It may cause discoloration of the product or damage to the product.
- Flammable substances : Alcohol (Ethanol, Methanol, Isopropyl alcohol, Isobutyl alcohol, etc.),
Thinner, Benzene, Flammable liquid, Abrasive etc.)
Wiping with strong pressure may damage the surface. Do not leave rubber or plastic products in
contact with the product for a long period of time.
When cleaning the air duct, shut off all the systems including PCS, PV module, battery, AC circuit
breaker. After that, clean the lter with soft brush.
Inspecting Regularly
It is recommended to check the operating status and connection status once a year. It should be
done by technician or authorized people. Contact authorized dealer or where you purchased.
4
Appendix
Contact
If you have technical problems or questions, contact installation company or LG Electronics.
1. Installation Company
Address : Tel :
2. Customer Service
LG Electronics ESS | Solar Service
E-Service Haberkorn GmbH
Augustenhöhe 7
06493 Harzgerode
3. LG Electronics Contact
LG Electronics Deutschland GmbH
Alfred-Herrhausen-Allee 3-5
65760 Eschborn
Tel. : + 0049 18 06 807 020
E-Mail: b2b.service@lge.de
Tel : Germany: 0049 (0)39484 / 976 380
Austria: 0043 (0)720 / 11 66 01
Switzerland: 0041 (0)44 / 505 11 42
Belgium, Netherlands, Luxembourg:
0031 20 / 456 1660
E-Mail : lge@e-service48.de
LG Electronics Benelux
Krijgsman 1, 1186 DM, Amstelveen,
The Netherlands
Tel: +0031 (0)20 456 3100
E-Mail: b2b.service@lge.de
Page 40

Appendix
40
Disposing the product
When the product reached to the end of its service life or defect beyond repair, dispose the product
according to the disposal regulations for electronic waste in your area. Disposing the product must
be carried out by qualied personnel only. Contact authorized dealer or where you purchased.
1. This crossed-out wheeled bin symbol indicates that waste electrical and electronic products
(WEEE) should be disposed of separately from the municipal waste stream.
2. Old electrical products can contain hazardous substances so correct disposal of your old
appliance will help prevent potential negative consequences for the environment and human
health.
Your old appliance may contain reusable parts that could be used to repair other products, and
other valuable materials that can be recycled to conserve limited resources.
3. You can take your appliance either to the shop where you purchased the product, or contact
your local government waste office for details of your nearest authorised WEEE collection
point. For the most up to date information for your country please see www.lg.com/global/
recycling
Removal of waste batteries and accumulators
4
(Product with embedded battery ONLY)
Appendix
In case this product contains a battery incorporated within the product which cannot be readily
removed by end-users, LG recommends that only qualied professionals remove the battery, either
for replacement or for recycling at the end of this product’s working life. To prevent damage to
the product, and for their own safety, users should not attempt to remove the battery and should
contact LG Service Helpline, or other independent service providers for advice.
Removal of the battery will involve dismantling of the product case, disconnection of the electrical
cables/contacts, and careful extraction of the battery cell using specialized tools. If you need the
instructions for qualied professionals on how to remove the battery safely, please visit http://www.
lge.com/global/sustainability/environment/take-back-recycling
Disposal of waste batteries/accumulators
1. This symbol may be combined with chemical symbols for mercury (Hg), cadmium (Cd) or lead
(Pb) if the battery contains more than 0.0005% of mercury, 0.002% of cadmium or 0.004%
of lead.
2. All batteries/accumulators should be disposed separately from the municipal waste stream via
designated collection facilities appointed by the government or the local authorities.
3. The correct disposal of your old batteries/accumulators will help to prevent potential negative
consequences for the environment, animal and human health.
4. For more detailed information about disposal of your old batteries/ accumulators, please
contact your city office, waste disposal service or the shop where you purchased the product.
(http://www.lg.com/global/sustainability/environment/take-back-recycling/global-networkeurope)
Page 41

Appendix
Specications
PV Input LG ESS Home 8 LG ESS Home 10
Input Voltage Range 150 ~ 1,000 V
Max. DC Power (per channel) 12 kW (6 kW) 13.5 kW (7.5 kW)
Usable MPP Voltage Range 150 ~ 800 V
Number of MPPT 3
Number of String per MPPT 1
Max. Input Current per MPPT 13 A
Max. inverter backfeed current to the array 0 A
AC Output LG ESS Home 8 LG ESS Home 10
Rated Grid Voltage 3-NPE 400 V / 230 V
AC Voltage Range 319 ~ 458 V / 184 ~ 264.5 V
Frequency(Range) 50Hz (47.5 Hz ~ 51.5 Hz)
Rated Output Power 8 kVA 10 kVA
Rated Output current 11.5 A 14.4 A
THD / Power Factor
Inrush current (peak and duration) 70 Aac / 0.02 ms
Max. output fault current 80 Aac / 20 ms
Max. output overcurrent protection 55.6 A
< 5 % / ± 0.8
peak
DC
41
4
Appendix
Backup output LG ESS Home 8 LG ESS Home 10
Dual Batteries
Maximum usable home load capacity
in backup operation
Total 3.5 kW 5 kW 7 kW
Each phase 1.2 kW 1.7 kW 2.3 kW
1) The capacity may decrease as the battery ages.
1)
Single Battery
LGHB 7H
Single Battery
LGHB 10H
LGHB 10H+10H
LGHB 10H+7H
LGHB 7H+7H
Page 42

Appendix
42
Battery LGHB 7H LGHB 10H
Battery Type Lithium Polymer High Voltage
Total Capacity 7.0 kWh 9.8 kWh
Usable Capacity
Max. Charge/Discharge power
(Single/Dual)
1)
2)
Peak Power (Single/Dual)
6.6 kWh 9.3 kWh
3.5 kW / 7kW 5 kW / 7 kW
5 kW / 10 kW
for 5 sec.
Rated output voltage 400 V
Communication Interface RS485
Max. Charge/Discharge Current
Voltage (nominal or range)
1) Value for battery cell only (depth of discharge 95%), capacity may be limited to protect system.
2) The capacity may decrease as the battery ages.
4
Appendix
Efciency (PCS)
8.5 A@420 V
/10 A@350 V
Charge : 400-450 V
Discharge: 350-430 V
Max. Efciency (PV to Grid) 97.7 %
General Data
Dimensions (W/H/D, mm)
Weight 34 kg (PCS) / 75 kg (LGHB 7H) / 97 kg (LGHB 10H)
Operating temperature 0 °C to 40 °C (derating at 40-60 °C)
746/688/206 (LGHB 7H)
746/903/206 (LGHB 10H)
7 kW / 10 kW
11.9 A@420 V
/14.3 A@350 V
DC
DC
Charge: 400-450 VDC
Discharge: 350-430 V
450/599/210 (PCS)
for 10 sec.
DC
Energy Meter Compatibility
ABB B23 112-100, B23 212-100, B23 312-100
ATS (option)
enwitec Type 10013677, Type 10013678, Type 10013679
Page 43

Feature & function
Noise emission (Typical) < 40 dB
Cooling Forced convection
Topology Transformerless
Degree of protection IP21
Max. permissible value of relative humidity
(non-condensing)
Warranty (PCS) 10 years
Warranty (Battery)
Certication (PCS)
Class B Group 1 Product Protection Class(Class I)
Pollution degree 2
1) Germany (DACH) : SOH 80%, other countries : SOH 60%
1)
TOR Erzeuger TypeA, C10/11, EN50549-1, IEC/EN61000
85 % (Climate class 3K5)
10 years
IEC/EN62109-1/-2, VDE-AR-N 4105,
E DIN VDE V 0124-100, VDE 0126-1-1,
Appendix
43
yThe noise emission value is measured in a soundproof room and can vary depending on the environment.
yIf you are installing in a place sensitive to noise, please consult the installer.
yDesign and specications are subject to change without notice.
Open Source Software Notice Information
To obtain the source code under GPL, LGPL, MPL, and other open source licenses, that is contained
in this product, please visit http://opensource.lge.com. In addition to the source code, all referred
license terms, warranty disclaimers and copyright notices are available for download. LG Electronics
will also provide open source code to you on CD-ROM for a charge covering the cost of performing
such distribution (such as the cost of media, shipping, and handling) upon email request to
opensource@lge.com. This offer is valid for three (3) years from the date on which you purchased
the product.
4
Appendix
Page 44

Page 45

BEDIENUNGSANLEITUNG
Energiespeichersystem
Rev.C 04/11/2020
DEUTSCH
Bitte lesen Sie diese Anleitung vor der Installation
des Gerätes sorgfältig durch und bewahren Sie sie
zum späteren Nachschlagen auf.
MODELL
LG ESS Home 10 (D010KE1N211)
LG ESS Home 8 (D008KE1N211)
*MFL71429401*
https://www.lg.com/global/business/ess/business-resources/download
Copyright © 2019-2020 LG Electronics Inc. Alle Rechte vorbehalten.
Page 46

Erste Schritte
WARNUNG
2
Sicherheitshinweise
1
WICHTIG: DIESES PRODUKT DARF AUSSCHLIESSLICH FÜR DEN ZWECK BENUTZT WERDEN,
Erste Schritte
DER IN DIESER INSTALLATIONSANLEITUNG BESCHRIEBEN IST.
Kennzeichnet eine möglicherweise gefährliche Situation.
Es besteht Lebens-und Verletzungsgefahr, wenn keine
geeigneten Vorkehrungen getroffen werden.
yBei Spannungsaufbereitungsschaltkreisen besteht aufgrund von Hochspannungen
Stromschlag- sowie Brandgefahr und die Gefahr schwerer Verbrennungen.
yHochspannungen an Wechselstromkabeln (AC-Kabel) und Gleichstromkabeln (DC-Kabel). Es
besteht Lebens- und Verletzungsgefahr durch Stromschlag.
yUngeeignete Betriebsbedingungen, Schäden, Missbrauch und/oder falscher Umgang können
gefährliche Situationen zur Folge haben, z. B. durch Überhitzung, Elektrolyt-Nebel usw.
yFalls die Sicherheitshinweise nicht aufmerksam gelesen, verstanden und beachtet werden, kann
dieses Produkt Gefahren mit sich bringen, z. B. durch Lebens- und ernste Verletzungsgefahren
durch Feuer, Hochspannungen oder Explosion.
yKeine entammbaren oder potentiell explosiven Objekte in der Nähe des Produkts abstellen.
yAuf keinen Fall Gegenstände oben auf dem Produkt ablegen, während es in Betrieb ist.
y Alle Installationsarbeiten an PV-Modulen (PV - Photovoltaik), Steuer- und Regelungsanlagen
und Akkusystemen dürfen nur durch qualiziertes Fachpersonal durchgeführt werden.
yElektroinstallationen müssen in Übereinstimmung mit den vor Ort und im Land geltenden
Sicherheitsstandards durchgeführt werden.
yBei Arbeiten an Hochspannungs-/Starkstromsystemen, wie zum Beispiel an PCS- und
Akkusystemen (PCS - Power Conditioning System - Spannungsaufbereitungssystem),
unbedingt Gummihandschuhe und Schutzkleidung (Schutzbrille und Schutzschuhe) tragen.
yEs besteht Stromschlaggefahr. Nicht die Abdeckung entfernen. Im Inneren benden sich keine
Teile, die vom Benutzer gewartet werden könnten. Wartungsarbeiten sind durch qualizierte
und akkreditierte Servicetechniker auszuführen.
yStromschlaggefahr. Wenn die Produktabdeckung entfernt worden ist, keine unisolierten Drähte
berühren!
yBei einem Fehler darf das System nicht neu gestartet werden. Produktwartung oder
Reparaturen müssen durch Fachpersonal oder durch Personen durchgeführt werden, die vom
Kundendienstzentrum dazu autorisiert sind.
yFalls die angeschlossenen Akkus nicht von LG sind, übernimmt LG Electronics keine Garantie
für die Akkus und auch nicht für das PCS-System (Spannungsaufbereitungssystem).
Kennzeichnet eine Situation, in der Gefahr in Form von
VORSICHT
yDieses Produkt ist ausschließlich für den Wohnbereich konzipiert und darf nicht für gewerbliche
oder industrielle Zwecke verwendet werden.
yBevor Sie elektrische Teile im Inneren des Systems prüfen, warten Sie zunächst mindestens 10
Minuten, denn solange dauert es, bis sich das System entladen hat.
möglichen Sach- oder Personenschäden besteht. Falls
nicht abgewendet, können kleinere Verletzungen und/oder
Sachschäden entstehen.
Page 47

Erste Schritte
yDie Box enthält das Spannungsaufbereitungssystem und dessen Zubehör, sodass das Paket
sehr schwer ist. Aufgrund des schweren Gewichtes des Pakets mit dem PCS-System und
dessen Zubehör könnte es schwere Verletzungen verursachen. Darum muss die Handhabung
mit besonderer Vorsicht erfolgen. Bei der Anlieferung und beim Entfernen des Pakets müssen
mindestens zwei Personen mitwirken.
yAuf keinen Fall beschädigte, rissige oder zerfranste Elektrokabel oder -stecker verwenden.
Elektrokabel vor unsachgemäßen Einüssen physikalischer oder mechanischer Art schützen,
damit sie nicht verdreht, geknickt, geklemmt, durch eine Tür eingeklemmt werden oder auf
sie getreten wird. Überprüfen Sie von Zeit zu Zeit die Elektrokabel Ihres Produkts, und falls
Sie Schäden oder Abnutzungserscheinungen entdecken, benutzen Sie das Produkt nicht
länger und beauftragen Sie eine Fachkraft, die Kabel durch exakt passende Austauschkabel zu
ersetzen.
yDarauf achten, die Erdleitung anzuschließen, um möglichen Stromschlag zu verhindern. Auf
keinen Fall versuchen, das Produkt zu erden, indem Sie es mit einem Telefondraht, Blitzableiter
oder einer Gasleitung verbinden.
yDas Produkt darf nicht (tropfendem oder spritzendem) Wasser ausgesetzt werden, und es
dürfen auch keine mit Flüssigkeit gefüllten Gefäße auf ihm abgestellt werden, wie z. B. eine
Blumenvase.
yUm Stromschlag- und Brandgefahr zu vermeiden, das Produkt keiner Nässe, Feuchtigkeit oder
Regen aussetzen.
yVentilationsöffnungen dürfen niemals blockiert werden. Sorgen Sie für einen ordnungsgemäßen
Betrieb des Produkts und schützen Sie es vor Überhitzung. Auf keinen Fall dürfen Öffnungen
blockiert werden, z. B. indem Gegenstände auf dem Produkt abgelegt werden.
yWährend des Betriebs kann die Temperatur im Metallgehäuse hoch sein.
yUm Funkwellen-Interferenzen zu vermeiden, müssen alle Zubehörteile (wie zum Beispiel
der Energiezähler), die für den Anschluss an das Produkt vorgesehen sind, geeignet sein, in
Wohnbereichen sowie in gewerblichen Bereichen und in der Leichtindustrie eingesetzt zu
werden. Das ist normalerweise der Fall, wenn die Geräte die Anforderungen von EN55022
Klasse B erfüllen.
yDie Entsorgung dieses Produkts muss den vor Ort gültigen Vorschriften und Gesetzen
entsprechen.
yNur LGE Servicepersonal oder ausgebildete Installateure, die qualiziert sind, PCS-Anlagen zu
installieren, dürfen die elektrische Installation dieser Einheit durchführen.
yWenn der AC-Hauptschalter ausgeschaltet wird und das PCS für längere Zeit nicht betrieben
worden ist, ist der Akku möglicherweise extrem entladen.
yDie Plus- und Minus-Gleichstromkabeladern (DC+) und (DC-) an die richtigen Anschlüsse DC+
und DC- des Produkts anschließen.
yBei Überladung besteht die Gefahr, dass die PCS-Anlage beschädigt wird. Schließen Sie nur
ordnungsgemäße Kabel an den DC-Klemmenblock an. Im Elektroschaltplan für die Installation
nden Sie weitere Details dazu.
yNicht auf dem Produkt oder der Produktverpackung stehen oder darauf treten. Das Produkt
könnte beschädigt werden.
yAkkus nicht durch Verbrennen entsorgen! Die Akkus könnten explodieren.
yAkkus nicht öffnen oder beschädigen. Ausgelaufenes Elektrolyt ist schädlich für die Haut und
die Augen. Er kann giftig sein.
3
1
Erste Schritte
Page 48

Erste Schritte
4
yEin Akku kann die Gefahr eines Stromschlags und einer hohen Kurzschluss-Stromstärke
beinhalten. Darum müssen beim Umgang mit Akkus folgende Sicherheitshinweise befolgt
werden.
1
Erste Schritte
a) Armbanduhren, Ringe oder metallische Objekte sind zu entfernen.
b) Nur Werkzeuge mit isolierten Griffen benutzen.
c) Gummihandschuhe, Stiefel und Schutzbrille tragen.
d) Keine Werkzeuge oder Metallteile oben auf den Akku legen.
yLassen Sie dass ESS nicht lange im Fehler-Bereitschaftszustand, da während des langen
Standby-Zustands die Batterie entladen werden kann.
yWenn der Batteriefehler unmittelbar nach dem Start von PCS auftritt, bedeutet dies
einen Batteriefehler. Überprüfen Sie den Batterie-Ladezustand sowie die Spannungs- und
Fehlerinformationen, und schalten Sie das ESS aus, bis Wartungsmaßnahmen ergriffen werden.
yIst der Ladestatus der Batterie niedrig kann es vorkommen, dass die Batterie aus dem
Netz geladen wird. (Notfallauadung) Diese Funktion dient dazu zu verhindern, dass das
Energiespeichersystem sich abschaltet, es zu einer vollständigen Entladung und zu einem
Ausfall des Akkus kommt. Eine Notfallauadung ist keine Fehlfunktion des ESS
HINWEIS
yBevor Sie irgendwelche Anschlüsse ausführen, vergewissern Sie sich zunächst, dass die
Spannung im offenen Schaltkreis der PV-String (PV - Photovoltaik) ungefähr 1000 V beträgt.
Sonst könnte das Produkt beschädigt werden.
yZum Reinigen dieses Produkts keine Lösungsmittel, Scheuermittel oder ätzenden Mittel
benutzen.
yKeine Gegenstände auf dem Produkt ablegen oder daran anlehnen. Das könnte zu schweren
Defekten oder Funktionsstörungen führen.
yÜberzeugen Sie sich vor Anschließen des Produkts davon, dass der PV-Schalter dieses Produkts
ausgeschaltet ist.
yDie Einheit ist dazu ausgelegt, Strom in das öffentliche Stromversorgungsnetz einzuspeisen.
Auf keinen Fall die Einheit an eine Wechselstromquelle oder einen Wechselstromgenerator
anschließen! Anschließen des Produkts an externe Geräte kann dazu führen, dass Ihre Geräte
stark beschädigt werden.
yDie Wartung von Akkus sollte nur durch LG Servicepersonal oder ausgebildete Installateure
ausgeführt oder angeleitet werden.
yDer Akku wird nicht weiter entladen, wenn dessen Restladung unter einer bestimmten Stufe ist.
yDieses Produkt kann zusammen mit einer DC-Komponente das Fließen von
Strom bewirken. Wird im Fall eines direkten oder indirekten Kontaktes zum
Schutz ein Fehlerstromschutzschalter (RCD - Residual Current Device) oder ein
Fehlerstromüberwachungsgerät (RCM - Residual Current Monitor) verwendet, dann ist auf der
Lieferseite dieses Produkts nur ein RCD oder RCM des Typs A (oder Typ B) zulässig.
yDieses Produkt ist ausschließlich für die Inneninstallation. Dieses Produkt auf keinen Fall im
Freien installieren.
yDieses Dokument dient lediglich informativen Zwecken. Lesen Sie die Installationsanleitung auf
der unten angegebenen Website.
https://www.lg.com/global/business/ess/business-resources/download
yÜber die Garantiebestimmungen informieren Sie sich bitte auf der folgenden Website:
https://www.lg.com/global/business/ess/business-resources/download
Kennzeichnet eine mögliche Gefahr, dass das Produkt
beschädigt werden könnte.
Page 49

Inhaltsverzeichnis
Inhaltsverzeichnis
5
Erste Schritte
Sicherheitshinweise .....................2
Produkteigenschaften ...................6
Bezeichnung der einzelnen Teile ...........9
Vorne und hinten .......................9
LED-Anzeigen .........................10
Unten .................................11
Betrieb
Verbindung zu einem Mobilgerät herstellen 12
Die App 'LG EnerVu Plus' installieren ...12
Über Heim-WLAN verbinden ..........13
Direkt mit dem ESS verbinden .........14
Über den Hauptbildschirm ...............17
Menü ESS-Status ......................18
Menü ESS-Einstellungen ................22
Sprache ...............................22
Akku ..................................22
Energiegerät ..........................23
Anleitung zur Schnellinstallation .......23
Open Source ..........................24
Anwendungsinformationen ............24
Installateur-Einstellungen .............24
Menü ESS-Information ..................25
Energie Analyse .......................25
System informationen .................26
EnerVu benutzen
Das EnerVu-System benutzen ...........27
Ein neues Konto anlegen ..............27
EnerVu-Aktivierung prüfen ............30
Überblick über die Seite my EnerVu ....31
Ein Statistik-Diagramm erstellen .......33
Systemereignisse einsehen ............37
Ein Statistik-Bericht erstellen ..........37
Das System an einen anderen Benutzer
transferieren ..........................38
Anhang
Wartung ..............................39
Das Produkt reinigen ..................39
Regelmäßige Inspektionen .............39
Kontakt ..............................39
Entsorgung Ihrer Altgeräte ............40
Technische Daten .......................41
Hinweise zu Open Source-Software
Informationen. . . . . . . . . . . . . . . . . . . . .43
1
2
3
4
Page 50

Erste Schritte
6
Produkteigenschaften
1
Dieses Produkt dient dazu, den von einem Photovoltaiksystem (PV) erzeugten Gleichstrom
Erste Schritte
(DC - Direct Current) im angeschlossenen Lithium-Ionen-Akku zu speichern und die im Akku
als Gleichspannung vorliegende Elektrizität und die vom PV-System erzeugte Elektrizität unter
Umwandlung in Wechselstrom (AC - Alternating Current) ins Stromnetz zu speisen. Und im Notfall
liefert der Akku dem Haushalt Strom.
PV-Modul
LED-Beleuchtung
PCS
ESS (Energiespeichersystem)
Akku
Systemkessel
Klimatisierung
BackofenTV-GerätKühlschrank Heizgerät
Waschmaschine
Smartphone
Bidirektionaler
Stromzähler
Stromversorgungsnetz
Gleichstrom (Direct Current)
Wechselstrom (Alternating Current)
Datenleitung
Internet Cloud
ABB
Energiezähler
Die von einer PV-String erzeugte Elektrizität kann im angeschlossenen Akku gespeichert oder an
ein Energieversorgungsunternehmen verkauft werden.
yGalvanisch gekoppelte ESS
Das galvanisch gekoppelte ESS von LG (ESS - Energy Storage System - Energiespeichersystem)
erzielt eine höhere Systemefzienz, weil der Vorgang zur Stromumwandlung einfacher ist.
y3-phasiger Anschluss
Der 3-phasige Anschluss sorgt für Phasenausgleich.
ySmart Management
Das eingebaute PMS (Power Management System - Leistungsregulierungssystem) analysiert
die PV-Stromerzeugung (PV - Photovoltaik) sowie die Lastverteilung und den Verbrauch und
sorgt dafür, dass bei Vorliegen entsprechender Bedingungen Laden bzw. Entladen unmittelbar
eingeleitet wird. Auch werden die Stati von Hauptsystem und Akkus überwacht, damit diese stets
stabil sind.
yWeb-Überwachungs-Service
Kunden und Installateure können mithilfe verschiedener Geräte wie PC, Tablet oder Smartphone
das ESS überwachen.
yReserve-Modus
Im Notfall liefert der Akku dem Haushalt Strom.
Page 51

In diesem Handbuch benutzte Abkürzungen
Abkürzung Bezeichnung Erklärung
ESS Energy Storage System
(Energiespeichersystem)
Wechselrichter-System, das Energie in einem Akku
speicher und zum Eigenverbrauch entläd.
Erste Schritte
7
1
Erste Schritte
PCS Power Conditioning
System (Spannungsaufbereitungssystem)
PV Photovoltaik Sonnenkollektorsystem, das Solarenergie in
SOC Ladezustand (SOC -
State of Charge)
BMS Battery Management
System
DC Gleichstrom (DC - Direct
Current)
AC Wechselstrom (AC -
Alternating Current)
DHCP Dynamic Host
Conguration Protocol
LAN Local Area Network Netzwerk, das in einem begrenzten Bereich
IP Internet Protocol Regelwerk, das bestimmt, wie Daten über ein
Erneuerbare Energie Technologie, die mittels
Solarzellen Energie aus der Sonne in Gleichstrom
umwandelt.
Gleichstrom verwandelt.
Ladezustand des Akkus
Kontroll-Einheit, die das Laden und Entladen des
Akkus steuert
-
-
Standardisiertes Netzwerkprotokoll, das in Internet
Protocol (IP) Netzwerken benutzt wird, um
Netzwerkkongurationsparameter automatisch zu
verteilen, z. B. IP-Adressen für Schnittstellen und
Dienste.
Computer miteinander verbindet.
Netzwerk gesendet werden
Page 52

1
Erste Schritte
Erste Schritte
8
Glossar
Begriffe Erklärung
Azimut Auf der Nordhalbkugel gibt der Azimutwinkel an, um wie viel Grad die
Moduloberäche von einer vollständigen Süd-Ausrichtung abweicht. Auf
der Südhalbkugel gibt er die Abweichung von einer vollständigen Nord-
Ausrichtung an. Der Azimutwinkel wird im Bereich von Süden (0°) bis
Westen (90°) mit positiven Werten angegeben, im Bereich von Süden (0°)
bis Osten (-90°) mit negativen Werten.
Neigungswinkel Der Neigungswinkel gibt an, um wie viel Grad die Neigung der
Moduloberäche von der Horizontalen abweicht.
PV-Modul Zusammenschaltung mehrerer Solarzellen in einem Modul zur
Umwandlung von Solarenergie in einen elektrischen Gleichstrom bzw.
-spannung
PV-String Zusammenschalten von PV-Modulen in einer Reihen- oder
Parallelschaltung
Page 53

Bezeichnung der einzelnen Teile
Vorne und hinten
A
B
Erste Schritte
9
1
Erste Schritte
D
C
PCS-Körper
A
LED-Anzeigen
B
Untere Abdeckung
C
Wandhalterungsverbindungsteil
D
Schraubenlöcher für Wandmontage
E
E
Page 54

Erste Schritte
10
LED-Anzeigen
1
Erste Schritte
Power
LED Farbe Beschreibung
Aus Stromversorgungsnetz ist nicht angeschlossen.
Weiß Stromversorgungsnetz ist angeschlossen.
Weiß (blinkend) PCS-Fehler
Aus Es wird kein Strom erzeugt.
Solar
Battery
WLAN
Grün Es wird Strom erzeugt.
Weiß (blinkend) PCS-Fehler
Aus Standby
Grün Akku wird geladen.
Blau Akku wird entladen.
Rot (blinkend) Fehler bei Akku
Weiß (blinkend) PCS-Fehler
Aus Ungesteckter WLAN-Dongle
Grün Mit Netzwerk verbunden
Blau Mit WLAN verbunden
Rot (blinkend) Von Netzwerk getrennt
Page 55

Unten
Erste Schritte
11
1
Erste Schritte
Konnektoren 1 von DC-Kabel Akku
A
Konnektoren 2 von DC-Kabel Akku
B
Kommunikations-Anschlüsse ATS, BMS,
C
EV-ZÄHLER
Schwarze Starttaste
D
PV-Schalter (DC trennen)
E
Anschlüsse PV1 (+ und -)
F
Anschlüsse PV2 (+ und -)
G
Anschlüsse PV3 (+ und -)
H
AUS
EIN
Ethernet-Anschluss
I
Anschluss Zähler
J
Anschluss Wärmepumpe
K
Taste für Drahtlosverbindung
L
Anschluss für WLAN-Dongle (Typ USB)
M
AC-Kabelstecker Netz
N
Page 56

Betrieb
12
Verbindung zu einem Mobilgerät herstellen
Um das System mit einem Mobilgerät zu verbinden, muss auf diesem die App 'LG EnerVu Plus'
installiert sein. Im Apple App Store oder Google Play Store die App 'LG EnerVu Plus' suchen und
herunterladen.
Um eine Verbindung zum System herstellen zu können, muss am System der WLAN-Dongle
angeschlossen sein. Vergewissern Sie sich, dass der WLAN-Dongle am System angeschlossen ist.
2
Betrieb
Die App 'LG EnerVu Plus' installieren
Die App 'LG EnerVu Plus' aus dem Apple App Store oder Google Play Store herunterladen.
OR
LG EnerVu Plus
HINWEIS
yEs ist vom Gerät abhängig, ob ‘LG EnerVu Plus’ auf ihm ausgeführt werden kann oder nicht.
yLG EnerVu Plus gibt es für folgende Betriebssystem-Versionen:
- Android: Lollipop (5.0) oder höher
- iOS: iPhone 6 (9.0) oder höher
Page 57

Betrieb
Über Heim-WLAN verbinden
Vorbereitung
yUm das System über das Heimnetzwerk mit einem Mobilgerät zu verbinden, muss auf diesem die
App 'LG EnerVu Plus' installiert sein. Überprüfen Sie bei diesem System die Einstellungen unter
[Netzwerk].
yNotieren Sie sich die SSID ihres Heimnetzwerks.
13
A
B
C
Auf dem Mobilgerät die App ‘LG EnerVu Plus’
ausführen.
Auf dem Bildschirm zur Auswahl der
Verbindungsmethode auf [Verbinden Sie sich
über Home WLAN] tippen.
Der Verbindungsaufbau erfolgt automatisch,
und nachdem dieser Vorgang beendet ist, wird
der Hauptbildschirm angezeigt.
2
Betrieb
Page 58

14
Betrieb
D
2
Betrieb
Direkt mit dem ESS verbinden
A
B
Falls der Verbindungsaufbau fehlschlägt, wird
eine Popup-Meldung eingeblendet.
Auf [OK] tippen, um zum Bildschirm zur
Auswahl des WLAN zu gelangen.
Notieren Sie sich die SSID ihres Heimnetzwerks.
Auf dem Mobilgerät die App ‘LG EnerVu Plus’
ausführen.
Wird die Verbindung zum System erstmals
hergestellt, wird der Bildschirm zur Auswahl der
Verbinungsmethode angezeigt.
Auf die Option [Verbinden Sie sich direkt mit
ESS] tippen.
Page 59

Betrieb
15
C
D
Beim System so lange auf die Taste für
drahtlose Verbindung drücken, bis die [WLAN]-
LED blau leuchtet.
Auf dem Mobilgerät auf [OK] tippen, um zum
nächsten Schritt zu gehen.
HINWEIS
Wenn nach 5 Minuten die Verbindung nicht
hergestellt ist, leuchtet die [WLAN]-LED grün
und das WLAN-Signal wird deaktiviert.
Lesen Sie die Anleitung und tippen Sie auf [OK],
um den Bildschirm für die WLAN-Auswahl
anzuzeigen.
Die SSID auswählen, welche mit ‘LGE_ESS’
beginnt. Der Bildschirm zur Eingabe des
Passworts erscheint.
2
Betrieb
HINWEIS
Die letzten 2 Zeichen der SSID sind
identisch mit den letzten 2 Zeichen der
Systemregistrierungsnummer.
Beispiel :
SSID (LGE_ESS-71)
Registrierungsnummer (LGE-ESSDE1710BKRH006871)
Page 60

16
Betrieb
2
Betrieb
E
Ins Passwortfeld das WLAN-Passwort
eingeben, um die Verbindung zum System
herzustellen.
Das WLAN-Passwort besteht aus 8 Ziffern. Sie
nden den ‘WLAN password’ aufgedruckt auf
dem Etikett außen am PCS.
HINWEIS
Falls der Verbindungsaufbauversuch
fehlschlägt, versuchen Sie es noch einmal,
nachdem Sie bei Ihrem Mobilgerät die Option
"Mobile Daten" ausgeschaltet haben.
Android: Ist die Verbindung erfolgreich
aufgebaut worden, wird der Hauptbildschirm
angezeigt - siehe Abbildung.
iOS: Ist die Verbindung erfolgreich aufgebaut
worden, die App [LG EnerVu Plus] ausführen,
um den Hauptbildschirm anzuzeigen - siehe
Abbildung.
Page 61

Betrieb
17
Über den Hauptbildschirm
Der Hauptbildschirm zeigt im ESS-Statusbereich den aktuellen ESS-Status an. Über die Menüpunkte
ESS-Einstellungen und ESS-Information können Sie verschiedene Einstellungen und Informationen
einsehen und überprüfen.
Link zur EnerVu-Webseite
Menü ESS-Einstellungen
ySprache
yAkku
yEnergiegerät
yAnleitung zur Schnellinstallation
yOpen Source
yInformationen zur Anwendung
yInstallateur-Einstellungen
Menü ESS-Status
yLast
yAkku
yEnergiegerät
yPV
yStromversorgungsnetz
yEnergieübersicht
yListe der Meldungen
ySystembetrieb
Menü ESS-Information
yEnergie Analyse
ySysteminformationen
2
Betrieb
Page 62

Betrieb
18
Menü ESS-Status
Auf dem Hauptbildschirm wird der aktuelle Status des Energiespeichersytems (ESS) im Überblick
angezeigt. Wenn Sie auf einen der oben gekennzeichneten Bereiche tippen, werden detaillierte
Informationen angezeigt.
2
Betrieb
HINWEIS
yBei den angezeigten Werten handelt es sich nicht um exakte Werte. Sie können von den
tatsächlichen Werten etwas abweichen.
ySchalten Sie den Zugriffspunkt bitte noch einmal ein, um zu sehen, ob es bei der Verbindung
zum Zugriffspunkt ein Problem gibt.
A
Zeigt die Liste der Meldungen über den
Systemstatus. Falls ein Fehler auftritt,
werden in der Liste Fehlercode, Uhrzeit und
Datum angezeigt.
Weitere Informationen zu den Meldungen
nden Sie in der Installationsanleitung.
Page 63

Betrieb
19
B
C
Zeigt die [Energieübersicht] auf dem
Bildschirm.
Heutiger Eigenverbrauchsanteil: Zeigt an,
wie viel Energie vom Energiespeichersystem
(ESS) heute verbraucht worden ist.
CO2-Reduzierung in diesem Monat: Zeigt
an, wie hoch die CO2-Reduzierung diesen
Monat ist.
Erzeugung: Zeigt an, wie viel Energie
erzeugt worden ist.
Einspeisung: Zeigt an, wie viel Energie
verbraucht worden ist.
PCS: Zeigt Informationen über das PCS an
(PCS - Power Conditioning System).
Zeigt einen Überblick über den
Erzeugungsstatus des angeschlossenen
PV-Systems (PV - Photovoltaik).
Die Statuswerte werden aus der Summe
von PV1, PV2 und PV3 gebildet.
Hersteller: PV-Hersteller (Standard : LGE)
Systemleistung: PV-Leistung
DC-Spannung: Derzeitige PV-Spannung
DC-Leistung: Derzeitiger PV-Strom
DC-Stromstärke: Derzeitige elektrische
Stromstärke von PV
Erzeugung heute: Die heute erzeugte PV-
Energie.
2
Betrieb
Page 64

2
Betrieb
Betrieb
20
Nach Setup der Wärmepumpe können Sie den Wärmepumpenstatus auf dem Start-
D
Bildschirm einsehen.
Die Beschreibungen der einzelnen Status sind wie folgt:
ykeiner: Bezeichnet den Zustand, in dem die AWHP-Einstellung deaktiviert ist oder keine
Verbindung besteht
yH/P DHW Auf: Bezeichnet den Zustand, in dem das ESS eine gewünschte Temperatur in
AWHP erhöht.
yH/P DHW Aus: Bezeichnet den Zustand, in dem AWHP die ursprünglich gewünschte
Temperatur beibehält.
HINWEIS
Wenn das Photovoltaik-System überschüssigen Strom produziert, wird das Wasser in der
Wärmepumpe erhitzt und der Eigenverbrauch wird erhöht.
E
Zeigt detailliert an, wie viel Energie im
Haushalt verbraucht wird.
Belastungsleistung: Derzeit im Haushalt
verbrauchter Strom
Heute
Verbrauch insgesamt: Menge der
heute verbrauchten Energie
Von PV: Menge der heute von PV
erzeugten Energie an Haushalt
Von Akku: Menge der heute vom Akku
gelieferten Energie an Haushalt
Von Stromversorgungsnetz: Menge
der heute vom Stromversorgungsnetz
(Netz) zugeführten Energie an den
Haushalt
Diesen Monat
Verbrauch insgesamt: Menge der in
diesem Monat verbrauchten Energie
Von PV: Menge der in diesem Monat
von PV erzeugten Energie an Haushalt
Von Akku: Menge der in diesem Monat
vom Akku gelieferten Energie an den
Haushalt
Von Stromversorgungsnetz:
Menge der in diesem Monat vom
Stromversorgungsnetz (Netz)
zugeführten Energie an den Haushalt
Page 65

Betrieb
21
F
G
H
Zeigt einen kurzen Überblick über den
Lade- und Entladestatus des Akkus.
Akku-Status: Laden / Abführen / Standby
Akku SOC : Derzeitiger Ladezustand (SOC
- State Of Charge)
Winter-Modus: Zeigt den Status des
Winter-Modus.
DC-Leistung: Derzeitige Ausgangsleistung
von Akku
Heute
Aufladen: Menge der Energie, die heute
in den Akku geladen worden ist.
Entladen: Menge der Energie, die heute
vom Akku abgeführt worden ist.
Diesen Monat
Aufladen: Menge der Energie, die
diesen Monat in den Akku geladen
worden ist.
Entladen: Menge der Energie, die
diesen Monat vom Akku abgeführt
worden ist.
Zeigt den aktuellen Status des
Stromversorgungsnetzes an.
Leistung: Derzeitiger Strom im Stromnetz
Spannung: Derzeitige Spannung im
Stromnetz
Frequenz: Derzeitige Frequenz im
Stromnetz
Heute
Ins Stromversorgungsnetz: Menge der
heute verkauften Energie
Von Stromversorgungsnetz: Menge
der heute gekauften Energie
Diesen Monat
Ins Stromversorgungsnetz: Menge
der verkauften Energie, die heute und
im Laufenden Monat an das Stromnetz
verkauft worden ist
Von Stromversorgungsnetz: Menge
der in diesem Monat gekauften Energie
[Systembetrieb]
Um den Systembetrieb zu starten oder zu
stoppen, auf den Schalter tippen.
2
Betrieb
Page 66

Betrieb
22
Menü ESS-Einstellungen
Sie können allgemeine Einstellungen am System vornehmen. Wählen Sie [Hauptbildschirm] > [ ],
damit der Bildschirm [Einstellung] angezeigt wird.
Sprache
2
Um den Bildschirm zur Auswahl der Sprache anzuzeigen, wählen Sie [ ] > [Sprache].
Betrieb
Wählen Sie die gewünschte Sprache aus.
Akku
Um den Bildschirm zur Durchführung von Akku-Einstellungen anzuzeigen, wählen Sie [ ] >
[Akku].
[Winter-Modus]
Um auf [Aktiviert] oder [Deaktiviert] zu schalten,
auf diesen Schalter tippen.
Nur der Installateur hat die Möglichkeit, das
Mindest-SOC-Niveau des Winter-Modus zu
ändern.
[Reserve-Modus]
Um auf [Aktivieren] oder [Deaktivieren] zu
schalten, auf diesen Schalter tippen. Nur der
Installateur hat die Möglichkeit, das Mindest-
SOC-Niveau des Reserve-Modus zu ändern.
[Betriebsmodus]
Mit diesem Schalter wählen Sie [Ökonomie-Modus] oder [Schnelllademodus]. Sie können selber den
Modus wechseln.
Ökonomie-Modus : Einspeisung erhöhen, sodass das System efzienter arbeitet.
Schnelllademodus : Erst den Akku per Schellladung auaden.
Page 67

Betrieb
[Zeitraum des Winter-Modus]
Auf das Feld mit dem aktuell eingestellten Wert tippen, damit das Einstellmenü angezeigt wird. Sie
können den Zeitraum ändern.
1. Den derzeit ausgewählten Wert auswählen. Das Menü zum Einstellen des Zeitraums wird
angezeigt.
2. Um [Monat] und [Wochentag] anzupassen, S oder W benutzen.
3. Auf [ANWENDEN] tippen, um die Einstellung abzuschießen.
23
Energiegerät
Um den Energie-Gerät-Bildschirm anzuzeigen, [ ] > [Energiegerät] auswählen.
[EV]
Auf diesen Schalter tippen, um auf [Ein] oder
[Aus] zu schalten.
Ist ‘EV-Messaktivierung’ nicht eingeschaltet, wird
eine Fehlermeldung eingeblendet.
Um EV-Überwachung einzuschalten, die Funktion
auf [Ein] schalten.
[AWHP]
Auf diesen Schalter tippen, um auf [Auf] oder [Aus] zu schalten.
Falls der Status „Verbindung verfügbar“ ist, dann warten Sie, bis der Status „In Verbindung
gebracht“ lautet. Falls es nicht bis zum Ende verbunden ist, überprüfen Sie, dass die Wärmepumpe
ordnungsgemäß angeschlossen ist.
Die Status-Beschreibung des Energie-Geräts lautet wie folgt:
yVerbindung nicht erlaubt : AWHP-Einstellung ist deaktiviert
yVerbindung verfügbar : AWHP-Einstellung ist aktiviert und nicht verbunden
yIn Verbindung gebracht : AWHP-Einstellung ist aktiviert und verbunden
Anleitung zur Schnellinstallation
2
Betrieb
Wählen Sie [ ] > [Anleitung zur Schnellinstallation], um den Bildschirm mit der Anleitung zur
Schnellinstallation anzuzeigen.
Auf dem Bildschirm [Anleitung zur Schnellinstallation] erhalten Sie eine Kurzanleitung zur
Installation.
Page 68

Betrieb
24
Open Source
Sie können die Open Source-Informationen über die Anwendung und über das System einsehen.
Wählen Sie [
anzuzeigen.
2
Betrieb
] > [Open Source], um den Bildschirm mit den Open Source-Informationen
Eine Kopie der GPL-, LGPL- und MPL- und
anderer in diesem Gerät genutzten Open Source-
Lizenzen nden Sie unter http://opensource.lge.
com.
Zusätzlich zum Quellcode sind alle angegebenen
Lizenzbedingungen, Gewährleistungsausschlüsse
und Copyright-Hinweise zum Download
verfügbar. Auf Wunsch und gegen anfallende
Gebühren (Versand, Datenträger, Lieferung und
Arbeitsaufwand) liefert LG Electronics den Open
Source-Code der Software auf CD-ROM. Richten
Sie Ihre Bestellung an LG Electronics an folgende
E-Mail-Adresse: opensource@lge.com Dieses
Angebot gilt für drei (3) Jahre ab dem Datum, an
dem Sie das Produkt gekauft haben.
Anwendungsinformationen
Wählen Sie [ ] > [Anwendungsinformationen], um den Bildschirm mit Anwendungsinformationen
anzuzeigen.
Sie erhalten Informationen über diese
Anwendung wie deren Name, Paketname der
Anwendung und Version.
Installateur-Einstellungen
Bei der Installation muss der Installateur verschiedene Systemeinstellungen durchführen. Benutzern
ist es nicht erlaubt, ins Menü [Installateur-Einstellungen] zu gelangen. Versuchen Sie also nicht,
dieses Menü aufzurufen. Falls ein Benutzer im Menü [Installateur-Einstellungen] Einstellungen
ändert, kann es beim System zu ernsten Betriebsstörungen kommen.
Page 69

Betrieb
Menü ESS-Information
Energie Analyse
Über [Energieanalyse] können Sie Statistikdaten des Systems einsehen. Sie können ermitteln, wie
viel Energie vom System erzeugt worden ist, wie viel verbraucht, verkauft und gekauft wurde. Sie
können sich Statistikdaten gruppiert nach Tag, Woche, Monat und Jahr ausgeben lassen.
PV-Diagramm
Analysiert die während des ausgewählten Zeitraums vom PV-System erzeugte und verkaufte
Energie und zeigt ein entsprechendes Diagramm.
Unter [Energieanalyse] die Option [PVDiagramm] auswählen.
Im Liniendiagramm ist die erzeugte Energie grün
gekennzeichnet, die verkaufte violett.
Durch Tippen auf [Wochentag], [Woche],
[Monat] oder [Jahr] wechseln Sie den zugrunde
gelegten Zeitraum.
: Geht zum/zur vorigen [Wochentag], [Woche],
A
[Monat] oder [Jahr].
: Geht zum/zur nächsten [Wochentag],
D
[Woche], [Monat] oder [Jahr].
25
2
Betrieb
Akku-Diagramm
Analysiert die während des ausgewählten Zeitraums in/aus den/m Akku geladene bzw. abgeführte
Energie und zeigt ein entsprechendes Diagramm.
Unter [Energieanalyse] die Option [AkkuDiagramm] auswählen.
Im Liniendiagramm ist die Energie, die in den
Akku geladen wurde, grün gekennzeichnet,
abgeführte Energie violett. Und der aktuelle
Status des Akkus ist gelb gekennzeichnet.
Durch Tippen auf [Wochentag], [Woche],
[Monat] oder [Jahr] wechseln Sie den zugrunde
gelegten Zeitraum.
: Geht zum/zur vorigen [Wochentag], [Woche],
A
[Monat] oder [Jahr].
: Geht zum/zur nächsten [Wochentag],
D
[Woche], [Monat] oder [Jahr].
Page 70

Betrieb
26
Last-Diagramm
Analysiert die während des ausgewählten Zeitraums vom Stromversorgungsnetz gekaufte und
verbrauchte Energie und zeigt ein entsprechendes Diagramm.
Unter [Energieanalyse] die Option [LastDiagramm] auswählen.
Im Liniendiagramm ist die verbrauchte Energie
2
Betrieb
grün gekennzeichnet, die gekaufte violett.
Durch Tippen auf [Wochentag], [Woche],
[Monat] oder [Jahr] wechseln Sie den zugrunde
gelegten Zeitraum.
: Geht zum/zur vorigen [Wochentag], [Woche],
A
[Monat] oder [Jahr].
: Geht zum/zur nächsten [Wochentag],
D
[Woche], [Monat] oder [Jahr].
System informationen
Zeigt Systeminformationen über das ESS an. Sie
erhalten Informationen über das PCS, den Akku
und den Netzwerkstatus. Durch Scrollen blättern
Sie zu nächsten bzw. vorigen Information.
Page 71

EnerVu benutzen
Das EnerVu-System benutzen
Wenn dieses Produkt mit dem Internet verbunden ist, können Sie die verschiedenen Informationen
einsehen, wie zum Beispiel den Systemstatus, Informationen und Berichte, die mit dem LG EnerVuWeb-Überwachungssystem erstellt werden.
HINWEIS
Endbenutzer müssen sich nicht im EnerVu-Dienst registrieren. Wenn der Endbenutzer diesen
Dienst jedoch nicht verwendet, ist es nicht möglich, die Wartung per Remote-Dienst (z. B.
Firmware-Update) über das Internet zu aktivieren.
27
Vorbereitung
yUm auf das ESS-Web-Überwachungssystem von LG zuzugreifen, ist ein Computer, Tablet oder
Mobilgerät mit installiertem Internet Browser und Internetzugang erforderlich.
yDas Produkt muss mit dem Internet verbunden sein. Überprüfen Sie bei diesem System die
Einstellungen unter [Netzwerk].
Ein neues Konto anlegen
A
B
Mit dem Browser die LG EnerVu-Seite
besuchen unter http://enervu.lg-ess.com.
Wählen Sie [Sich registrieren] und
wählen Sie dann im Popup-Fenster
Ihre Nationalität. Die Seite mit dem
Servicevertrag wird angezeigt. Lesen Sie
die Bestimmungen und Konditionen sowie
die Datenschutzrichtlinien aufmerksam
durch.
Wenn Sie diese allgemeinen
Geschäftsbedingungen akzeptieren,
klicken Sie auf das Kontrollkästchen
[Ich stimme zu] und wählen dann
[ZUSTIMMEN]. Die Seite zum Erstellen
des Kontos wird angezeigt.
3
EnerVu benutzen
Page 72

EnerVu benutzen
28
C
Ins Feld [BENUTZER- ID] tragen Sie Ihre
E-Mail-Adresse ein und wählen dann
[VERFÜGBARKEIT PRÜFEN]. Dann die
Felder [Passwort], [Passwort bestätigen]
und [Geburtsdatum] ausfüllen und dann
[BESTÄTIGEN] wählen.
3
EnerVu benutzen
D
An die angegebene E-Mail-Adresse wird
eine Bestätigungs-E-Mail gesendet.
Klicken in der E-Mail auf [BESTÄTIGEN],
um die Bestätigung per E-Mail
abzuschließen.
E
Auf der Seite zum Anlegen des Kontos
[BESTÄTIGEN] wählen, um das Anlegen
des Kontos abzuschließen.
Page 73

EnerVu benutzen
29
F
G
[EINLOGGEN] auswählen, um zur Seite
[MELDEN SIE SICH MIT IHREM LGKONTO AN] zu gelangen.
[Benutzer-ID] und [Passwort] eingeben
und [EINLOGGEN] auswählen.
3
EnerVu benutzen
Auf dem Bildschirm werden die
verfügbaren Dienste des LG-Kontos
angezeigt.
Page 74

EnerVu benutzen
30
EnerVu-Aktivierung prüfen
A
Mit dem Browser die LG EnerVu-Seite
besuchen unter http://enervu.lg-ess.com.
ODER
Auf Ihrem Mobilgerät [
sodass im Browser des Mobilgeräts die
LG EnerVu-Seite angezeigt wird.
] auswählen,
3
EnerVu benutzen
B
C
[BENUTZER-ID] und [Passwort] eingeben
und [ANMELDEN] auswählen.
Nach Abschluss der Registrierung und
Aktivierung wird der links abgebildete
Bildschirm angezeigt.
Ist die Registrierung noch nicht
abgeschlossen, wird der links abgebildete
Bildschirm angezeigt.
Geben Sie die Registrierungsnummer
ein, die auf dem Etikett angegeben ist,
das außen am PCS angebracht ist, und
wählen Sie [Überprüfen].
Falls eine Popup-Meldung eingeblendet
wird, kontaktieren Sie den Installateur,
damit er Ihr System aktiviert.
Page 75

Überblick über die Seite my EnerVu
Wetter
EnerVu benutzen
Wenn Sie sich auf Ihrer
Hauptseite von EnerVu
benden, können Sie
verschiedene Informationen zu
Ihrem System einsehen.
Zeigt an, wie an dem Ort, an
dem das System installiert ist,
das Wetter ist.
31
3
EnerVu benutzen
Systemprotokoll
Zeigt Ihnen Meldungen über Fehler beim System.
Page 76

32
Systemüberblick
3
Analyse
EnerVu benutzen
EnerVu benutzen
Zeigt den Systemstatus an. Sie erhalten
Systeminformationen über die erzeugte
Energie aus dem PV-System, die Menge des
aus dem Stromversorgungsnetz gekauften
Stroms und die Strommenge, die in den Akku
geladen wird bzw. aus ihm entnommen, d. h.
abgeführt wird. ALLE diese Daten werden alle
10 Sekunden aktualisiert.
Auf dieser Seite ist es möglich,
Energieanalysen in Form
von Statistik-Diagrammen
durchzuführen. Sie können
ermitteln, wie viel Energie vom
System erzeugt worden ist,
wie viel verbraucht, verkauft
und gekauft wurde. Und Sie
können sich Statistikdaten und
Diagramme anzeigen lassen.
Auf dem Register [Ereignis]
haben Sie die Möglichkeit,
Probleme zu prüfen, die beim
System aufgetreten sind.
Systeminformationen
Bericht
Zeigt Informationen über Ihr
System.
Sie können auf Grundlage
statistischer Daten auf Monatsoder Jahresbasis einen Bericht
über den Energiehaushalt Ihres
Systems erstellen.
Page 77

EnerVu benutzen
Ein Statistik-Diagramm erstellen
Sie können auf Grundlage statistischer Daten ein Diagramm auf Tages-, Monats- oder Jahresbasis
über den Energiehaushalt Ihres Systems erstellen.
Um ein Statistik-Diagramm zu erstellen, wählen Sie entweder [Wochentag], [Monat], [Jahr] oder
[Gesamt], um den Zeitraum festzulegen.
33
3
EnerVu benutzen
1. Auf der linken Seite des Bildschirms ein Register auswählen.
Energie-Ansicht Erstellt ein Diagramm auf Grundlage aller statistischen Daten.
PV-Diagramm Erstellt ein Diagramm auf Grundlage der statistischen Daten des PV-
Systems. (Strom-Erzeugung sowie Strom-Einspeisung ins Stromnetz)
ESS-Diagramm Erstellt ein Diagramm auf Grundlage der statistischen Daten des ESS
(Auaden, Abführen und Akku-Ladezustand).
Last-Diagramm Erstellt ein Diagramm auf Grundlage der statistischen Daten über die
Last durch den Haushalt. (Verbrauch und Kauf)
2. Mit [Wochentag], [Monat], [Jahr] oder [Gesamt] den Zeitraum wählen.
3. Nach Auswahl von Tag, Monat oder Jahr wird ein entsprechendes Statistik-Diagramm erstellt.
Nach der Auswahl wird in kurzer Zeit auf dem Bildschirm das Diagramm angezeigt.
Page 78

EnerVu benutzen
34
3
EnerVu benutzen
Page 79

EnerVu benutzen
4. Beim Diagramm unten werden mehrere Option angeboten und Sie können damit die
statistischen Daten zum Diagramm einblenden und ausblenden.
Welche Optionen zur Verfügung stehen, hängt vom Diagramm ab. Weitere Informationen über
die Optionen bei den Diagrammen entnehmen Sie der Tabelle unten.
35
3
EnerVu benutzen
Register Diagramm Optionen Beschreibung
Direkter Verbrauch Menge der direkt verbrauchen
Energie, erzeugt von der PV
(Photovoltaikanlage).
VERBRAUCH
Entladen Menge des vom Akku gelieferten und
verbrauchen Stroms.
Gekaufter Strom Vom öffentlichen
EnergieAnsicht
Stromversorgungsnetz gekaufter
Strom.
Direkter Verbrauch Menge der verbrauchten Energie, die
direkt vom PV-System erzeugt wurde.
ERZEUGUNG
Auaden Menge der in den Akku geladenen
Energie.
Einspeisung ins
Stromnetz
Menge des ans Stromnetz verkauften
Stroms.
Page 80

EnerVu benutzen
36
PVDiagramm
ESSDiagramm
Energie
Energie
Erzeugung Menge der vom PV-System
(Photovoltaikanlage) erzeugten
Energie.
Einspeisung ins
Stromnetz
Menge des ans Stromnetz verkauften
Stroms.
Auaden Menge der in den Akku geladenen
Energie.
Entladen Menge des vom Akku gelieferten
verbrauchen Stroms.
3
SOC Ladezustand (SOC - State of Charge)
EnerVu benutzen
LastDiagramm
Energie
5. Um das Diagramm zu drucken oder als Bilddatei herunterzuladen, [
Verbrauch Menge des vom ESS-System
Kauf Menge des gekauften Stroms,
gelieferten verbrauchten Stroms.
geliefert vom Stromnetz.
] auswählen.
Page 81

EnerVu benutzen
37
Systemereignisse einsehen
Nach Auswahl des Registers [Ereignis] zeigt die Seite eine Liste von Ereignissen, die beim System in
Form von Fehlern und Warnungen aufgetreten sind.
1. Auf der linken Sie des Bildschirms das Register [Ereignis] auswählen. Auf dem Bildschirm wird
die Liste mit Systemfehlern und Warnungen angezeigt.
2. Unter [Alle], [Fehler] und [Warnung] den [Typ] auswählen. Je nach ausgewähltem Typ wird dann
die Liste geltert.
Ein Statistik-Bericht erstellen
Sie können auf Grundlage statistischer Daten auf Monats- oder Jahresbasis einen Energiebericht
Ihres Systems erstellen.
3
EnerVu benutzen
1. Unter [Übersicht PV], [Übersicht ESS], [Übersicht Verbrauch], [Saldo-Übersicht] oder
[Gesamtbericht] die gewünschte Berichtsart auswählen.
2. Mit [Jahresbericht] oder [Monatsbericht] den Berichtszeitraum auswählen.
3. Den gewünschten Monat oder das gewünschte Jahr auswählen.
4. [Übersicht erstellen] auswählen. Es wird ein Statistik-Bericht angezeigt.
Um den Statistik-Bericht in Form einer Excel-Datei herunterzuladen, auswählen.
Um den Statistik-Bericht zu drucken,
auswählen.
Page 82

EnerVu benutzen
38
Das System an einen anderen Benutzer transferieren
Sie können Ihr System an einen anderen Eigner transferieren. Sobald das System transferiert ist, ist
es Ihnen nicht mehr möglich, das System über Ihr Konto zu überwachen.
Vorbereitung
yNotieren Sie sich die E-Mail-Adresse des Empfängers.
yDie E-Mail-Adresse des Empfängers muss als die eines LG-Mitglieds registriert werden. Falls der
Empfänger noch kein LG-Mitglied ist, wird automatisch eine E-Mail an den Empfänger gesendet,
in der er aufgefordert wird, Mitglied zu werden.
A
3
EnerVu benutzen
B
Mit dem Browser die LG EnerVu-Seite
besuchen unter http://enervu.lg-ess.com.
Wählen Sie [Sich registrieren] und wählen
Sie dann im Popup-Fenster Ihre Nationalität.
Die Seite [MELDEN SIE SICH MIT IHREM LGKONTO AN] wird angezeigt.
Geben Sie Ihre [BENUTZER-ID] und das
[Passwort] ein und wählen Sie [ANMELDEN],
um ins EnerVu-Web-Überwachungssystem zu
gelangen.
Oben auf dem Bildschirm Ihre [BENUTZERID] angeben. Dann wird auf dem Bildschirm ein
Menü angezeigt.
[Systemtransfer] auswählen. Auf dem
Bildschirm wird die Seite für den Systemtransfer
angezeigt.
C
D
Ins Feld [ID] die E-Mail-Adresse des Empfängers
eingeben und [Überprüfen] auswählen.
Falls der Empfänger kein LG-Mitglied ist, wird
eine Popup-Meldung angezeigt, die darüber
informiert, dass eine E-Mail versendet wird mit
der Aufforderung, ein LG-Konto anzulegen.
Bei der Option [Staatsangehörigkeit] wählen
Sie die Nationalität des Empfängers.
In die Felder [Vorname] und [Nachname] die
entsprechenden Namen des Empfängers
eintragen und [Fertig] auswählen, um den
Transfer des Systems durchzuführen.
Sie werden automatisch aus dem System
abgemeldet.
Page 83

Anhang
39
Wartung
Das Produkt reinigen
Wischen Sie die Außenseite des Produkts mit einem weichen Tuch mit lauwarmem Wasser ab.
und Wischen Sie es mit einem sauberen Handtuch ab, damit bei Verwendung eines neutralen
Reinigungsmittels kein Schmutz entsteht. Reinigen Sie die Außenseite des Produkts nicht mit einer
groben Bürste, Zahnpasta oder brennbaren Materialien. Verwenden Sie keine Reinigungsmittel mit
brennbaren Substanzen.
- Dies kann zur Verfärbung des Produkts oder zur Beschädigung des Produkts führen.
- Brennbare Stoffe: Alkohol (Ethanol, Methanol, Isopropylalkohol, Isobutylalkohol usw.), Verdünner,
Benzol, brennbare Flüssigkeit, Schleifmittel usw.)
Durch Abwischen mit zu viel Druck könnte die Oberäche beschädigt werden. Darauf achten, dass
Gummi oder Plastikprodukte nicht über einen längeren Zeitraum in Kontakt sind mit dem Produkt.
Zum Reinigen des Luftkanals alle System-Komponenten einschließlich PCS, PV-Module, Akku und
AC-Hauptschalter ausschalten. Danach den Filter mit einer weichen Bürste reinigen.
Regelmäßige Inspektionen
Es wird empfohlen, jedes Jahr den Betriebszustand und die Anschlüsse zu überprüfen. Das sollte ein
Techniker oder eine autorisierte Fachkraft tun. Wenden Sie sich dazu an einen autorisierten Händler
oder an die Stelle, bei der Sie das Produkt gekauft haben.
4
Anhang
Kontakt
Falls Sie technische Probleme oder Fragen haben, kontaktieren Sie die Installationsrma oder LG
Electronics.
1. Installationsfirma
Adresse: Tel.:
2. Kundendienst
LG Electronics ESS | Solar Service
E-Service Haberkorn GmbH
Augustenhöhe 7
06493 Harzgerode
3. LG Electronics Kontakt
LG Electronics Deutschland GmbH
Alfred-Herrhausen-Allee 3-5
65760 Eschborn
Tel. : + 0049 18 06 807 020
E-Mail: b2b.service@lge.de
Tel : Deutschland: 0049 (0)39484 / 976 380
Österreich: 0043 (0)720 / 11 66 01
Schweiz: 0041 (0)44 / 505 11 42
Benelux: 0031 20 / 456 1660
E-Mail : lge@e-service48.de
LG Electronics Benelux
Krijgsman 1, 1186 DM, Amstelveen,
The Netherlands
Tel: +0031 (0)20 456 3100
E-Mail: b2b.service@lge.de
Page 84

Anhang
40
Entsorgung Ihrer Altgeräte
Wenn das Produkt das Ende seiner Lebensdauer erreicht oder ein Defekt nicht repariert werden
kann, muss das Produkt gemäß den vor Ort geltenden Entsorgungsvorschriften für Elektroschrott
entsorgt werden. Die Entsorgung des Produkts darf nur von dafür qualiziertem Fachpersonal
durchgeführt werden. Wenden Sie sich dazu an einen autorisierten Händler oder an die Stelle, bei
der Sie das Produkt gekauft haben.
1. Das durchgestrichene Symbol eines fahrbaren Abfallbehälters weist darauf hin, dass Elektround Elektronik-Produkte (WEEE) getrennt vom Hausmüll entsorgt werden müssen.
2. Alte elektrische Produkte können gefährliche Substanzen enthalten, die eine korrekte
Entsorgung dieser Altgeräte erforderlich machen, um schädliche Auswirkungen auf die
Umwelt und die menschliche Gesundheit zu vermeiden. Ihre ausgedienten Geräte können
wiederverwendbare Teile enthalten, mit denen möglicherweise andere Produkte repariert
werden können, aber auch sonstige wertvolle Materialien enthalten, die zur Schonung
knapper Ressourcen recycelt werden können.
3. Sie können Ihr Gerät entweder in den Laden zurückbringen, in dem Sie das Produkt
ursprünglich erworben haben oder Sie kontaktieren Ihre Gemeindeabfallstelle für
Informationen über die nächstgelegene autorisierte WEEE Sammelstelle. Die aktuellsten
4
Entfernen von Abfallbatterien und -Akkus
Anhang
(Nur für Produkte mit integrierter Batterie)
Falls dieses Produkt eine im Produkt eingearbeitete Batterie/Akku enthält, die nicht ohne weiteres
durch den Endbenutzer entfernt werden kann, empehlt LG, dass nur qualizierte Fachkräfte
Batterie oder Akku entfernen, die/der entweder wegen einer Ersatzlieferung oder für ein Recycling
am Ende der Lebensdauer dieses Produkts ausgetauscht werden muss. Um Schäden am Produkt zu
vermeiden, und für ihre eigene Sicherheit, sollten Benutzer nicht versuchen, Batterie oder Akku zu
entfernen und diesbezüglich die LG-Beratungsstelle oder einen anderen unabhängigen Dienstleister
zwecks Beratung kontaktieren.
Das Entfernen von Batterie oder Akku erfordert ein Zerlegen des Produkts, die Trennung der
elektrischen Leitungen/Kontakte und eine sorgfältige Entnahme der Batterie-/Akkuzelle mit
Spezialwerkzeugen. Wenn Sie die Anweisungen für qualizierte Fachkräfte benötigen, wie man
Batterie/Akku sicher entfernen kann, besuchen Sie bitte http://www.lge.com/global/sustainability/
environment/take-back-recycling
Informationen für Ihr Land finden Sie unter www.lg.com/global/recycling
Entsorgen von alten Akkus
1. Dieses Symbol kann mit den chemischen Symbolen für Quecksilber (Hg), Kadmium (Cd)
oder Blei (Pb) kombiniert sein, wenn die Akkus mehr als 0,0005 % Quecksilber, 0,002 %
Kadmium oder 0,004 % Blei enthalten.
2. Akkus müssen immer getrennt vom Hausmüll in staatlichen oder kommunalen
Sammeleinrichtungen und entsprechend den geltenden Vorschriften entsorgt werden.
3. Durch eine vorschriftsmäßige Entsorgung Ihrer alten Akkus können schädliche
Auswirkungen auf Mensch, Tier und Umwelt vermieden werden.
4. Ausführliche Informationen zur Entsorgung von alten Akkus erhalten Sie bei den lokalen
Behörden, der Entsorgungseinrichtung oder dem Fachhändler, bei dem Sie das Produkt
erworben haben.
(http://www.lg.com/global/sustainability/environment/take-back-recycling/globalnetwork-europe)
Page 85

Anhang
Technische Daten
PV-Input LG ESS Home 8 LG ESS Home 10
Eingangsspannungsbereich 150 ~ 1,000 V
Max. DC-Strom (pro Kanal) 12 kW (6 kW) 13.5 kW (7.5 kW)
Nutzbarer MPP-Spannungsbereich 150 ~ 800 V
Anzahl an MPPT 3
String-Anzahl pro MPPT 1
Max. Eingangsstromstärke pro MPPT 13 A
Max. Inverter Nachspeisungs-Stromstärke an Reihe 0 A
AC-Output LG ESS Home 8 LG ESS Home 10
Nennspannung Stromversorgungsnetz 3-NPE 400 V / 230 V
AC-Spannungsbereich 319 ~ 458 V / 184 ~ 264.5 V
Frequenz(bereich) 50Hz (47.5 Hz ~ 51.5 Hz)
Nenn-Ausgangsleistung 8 kVA 10 kVA
Nenn-Ausgangsstromstärke 11.5 A 14.4 A
THD / Phasenwinkel
Einschaltstrom (Spitze und Dauer) 70 Aac / 0.02 ms
Max. Ausgangs-Fehlerstrom 80 Aac / 20 ms
Überstromschutz bei Output maximal 55.6 A
< 5 % / ± 0.8
peak
DC
41
4
Anhang
Reserve-Ausgabe LG ESS Home 8 LG ESS Home 10
Doppel-Akku
Maximal nutzbare Heimlast-Leistung
bei Reservebetrieb
Insgesamt 3,5 kW 5 kW 7 kW
Jede Phase 1,2 kW 1,7 kW 2,3 kW
1) Wenn der Akku älter wird, kann die Leistung sinken.
1)
Einzel-Akku
LGHB 7H
Einzel-Akku
LGHB 10H
LGHB 10H+10H
LGHB 10H+7H
LGHB 7H+7H
Page 86

Anhang
42
Akku LGHB 7H LGHB 10H
Akku-Typ Lithium-Polymer Hochspannung
Kapazität insgesamt 7.0 kWh 9.8 kWh
Nutzbare Kapazität
Max. Leistung bei Laden / Entladen
(Einzel/Doppelt)
Leistungsspitze (Einzel/Doppel)
Nenn-Ausgangsspannung 400 V
Kommunikationsschnittstelle RS485
Max. Lade-/Entladestrom
Spannung (nominal oder Bereich)
1) Wert ausschließlich für die Akku-Zelle (Entladungstiefe 95%), die Leistung ist möglicherweise begrenzt, um das System zu
schützen.
2) Wenn der Akku älter wird, kann die Leistung sinken.
4
Anhang
Wirkungsgrad (PCS)
Max. Wirkungsgrad (PV an Stromversorgungsnetz) 97.7 %
1)
2)
6.6 kWh 9.3 kWh
3.5 kW / 7kW 5 kW / 7 kW
5 kW / 10 kW
7 kW / 10 kW
für 5 Sek.
8.5 A@420 V
/10 A@350 V
Auaden : 400-450 V
Entladen: 350-430 V
DC
DC
11.9 A@420 V
/14.3 A@350 V
Auaden: 400-450 VDC
Entladen: 350-430 V
für 10 Sek.
DC
Allgemeine Daten
450/599/210 (PCS)
Abmessungen (B/H/T, mm)
746/688/206 (LGHB 7H)
746/903/206 (LGHB 10H)
Gewicht 34 kg (PCS) / 75 kg (LGHB 7H) / 97 kg (LGHB 10H)
Betriebstemperatur 0 °C to 40 °C (arbeitend bei 40 bis 60°C)
Energiezähler Kompatibilität
ABB B23 112-100, B23 212-100, B23 312-100
ATS (Option)
enwitec Type 10013677, Type 10013678, Type 10013679
Page 87

Eigenschaften und Funktionen
Geräuschemission (typisch) < 40 dB
Kühlen Erzwungene Konvektion
Topologie Transformatorlos
Schutzgrad IP21
Max. zulässige relative Luftfeuchtigkeit (nicht
kondensierend)
Garantie (PCS) 10 Jahre
Garantie (Akku)
Zertizierung (PCS)
Class B Group 1 Produkt Schutzklasse (Class I)
Verschmutzungsgrad 2
1) Deutschland (DACH - Deutschland, Österreich, Schweiz): SOH 80%, andere Länder: SOH 60%
1)
TOR Erzeuger TypeA, C10/11, EN50549-1, IEC/EN61000
85 % (Klimaklasse 3K5)
10 Jahre
IEC/EN62109-1/-2, VDE-AR-N 4105,
E DIN VDE V 0124-100, VDE 0126-1-1,
Anhang
43
yDer Lärm wird in einem schalltoten Raum gemessen und kann je nach Umgebung variieren.
yWenn Sie an ein einem geräuschempnichen Ort installieren, wenden Sie sich bitte zuvor an den Installateur.
yKonstruktion und Spezikationen können ohne Vorankündigung geändert werden.
Hinweise zu Open Source-Software Informationen
Eine Kopie der GPL-, LGPL- und MPL- und anderer in diesem Gerät genutzten Open Source-Lizenzen
nden Sie unter http://opensource.lge.com. Zusätzlich zum Quellcode sind alle angegebenen
Lizenzbedingungen, Gewährleistungsausschlüsse und Copyright-Hinweise zum Download verfügbar.
Auf Wunsch und gegen anfallende Gebühren (Versand, Datenträger, Lieferung und Arbeitsaufwand)
liefert LG Electronics den Open Source-Code der Software auf CD-ROM. Richten Sie Ihre Bestellung
an LG Electronics an folgende E-Mail-Adresse: opensource@lge.com Dieses Angebot gilt für drei (3)
Jahre ab dem Datum, an dem Sie das Produkt gekauft haben.
4
Anhang
Page 88

Page 89

MANUEL D’UTILISATION
Système de
stockage
d’énergie
Rev.C 04/11/2020
FRANÇAIS
Veuillez lire attentivement ce manuel avant d’installer
votre appareil et conservez-le pour référence ultérieure.
MODÈLE
LG ESS Home 10 (D010KE1N211)
LG ESS Home 8 (D008KE1N211)
*MFL71429401*
https://www.lg.com/global/business/ess/business-resources/download
Copyright © 2019-2020 LG Electronics Inc. Tous droits réservés.
Page 90

Démarrage
2
Consignes de sécurité
1
IMPORTANT : CE PRODUIT NE DOIT PAS ÊTRE UTILISÉ À UNE AUTRE FIN QUE CELLE
Démarrage
DÉCRITE DANS CE MANUEL D’INSTALLATION.
Indique une situation potentiellement
AVERTISSEMENT
yIl existe une forte probabilité de choc électrique ou de brûlures graves due à la présence de
hautes tensions dans les circuits de conditionnement d’énergie.
yHautes tensions sur les câbles CA et CC. Risque de blessures graves voire mortelles par choc
électrique.
yUne circonstance potentiellement dangereuse peut se produire, telle une chaleur excessive
ou des vapeurs d’électrolyte, suite à de mauvaises conditions de fonctionnement, à des
dommages ou à une utilisation inadéquate ou abusive.
yCe produit présente un danger potentiel pouvant entraîner des blessures graves voire
mortelles causé par un incendie, des hautes tensions ou une explosion si les précautions
adéquates ne sont pas lues ou mal comprises.
yNe pas situer d’objets inammables ou pouvant exploser près du produit.
yNe poser aucun objet sur le dessus du produit pendant son fonctionnement.
y Les travaux sur les modules PV, le système de conditionnement d’énergie et sur la batterie
doivent être uniquement entrepris par du personnel qualié.
yLes installations électriques doivent être conformes aux normes de sécurité électrique
standard tant locales que nationales.
yIl est nécessaire de porter des gants en caoutchouc et des vêtements de protection (bottes et
lunettes de protection) pour travailler sur les systèmes à haute tension/haut courant, comme
une batterie ou le PCS.
yIl existe un risque de choc électrique. Ne pas retirer le couvercle. Aucune pièce de cet appareil
n’est susceptible d’être réparée par l’utilisateur. Coner l’entretien à un technicien d’entretien
qualié et accrédité.
yRisque de choc électrique. Ne pas toucher les ls non isolés lorsque le couvercle du produit est
déposé.
yEn cas de panne, le système ne doit pas être redémarré. Les réparations du produit doivent
être effectuées par du personnel qualié, ou par du personnel d’un centre d’assistance agréé.
ySi les batteries connectées ne sont pas des batteries LG, les batteries tout comme le PCS ne
seront pas garantis par LG Electronics.
dangereuse. Si les précautions adéquates
ne sont pas prises, cela peut entraîner des
blessures graves voire mortelles.
Indique une situation susceptible de provoquer
MISE EN GARDE
yCe produit est conçu uniquement pour usage résidentiel, et ne peut donc pas être utilisé à
titre commercial ou industriel.
des dommages ou une blessure. Si elle n’est
pas évitée, il pourrait se produire une blessure
bénigne ou un endommagement du bien.
Page 91

Démarrage
yAvant de tester les parties électriques à l’intérieur du système, il faut patienter au moins
10 minutes avant que le système ne se soit complètement déchargé.
yCe boîtier comprend le système de conditionnement d’énergie et ses accessoires. L’ensemble
pèse très lourd. Le poids élevé de l’ensemble incluant le PCS et ses accessoires peut causer de
graves blessures. Il faut donc prendre des précautions particulières pour le manipuler. Veiller à
disposer d’au moins de deux personnes pour livrer et déplacer l’emballage.
yNe pas utiliser de câbles ou de connecteurs électriques endommagés, fendillés ou dénudés.
Protéger les câbles électriques de sorte qu’ils ne puissent pas être tordus, entortillés, pincés,
coincés dans une porte ni être piétinés. Examiner régulièrement les câbles électriques de
votre produit. Si leur aspect indique un dommage ou une détérioration, arrêter d’utiliser ce
produit jusqu’au remplacement des câbles par du personnel qualié par une pièce exactement
identique.
yS’assurer de connecter le l de mise à la terre pour éviter un éventuel choc électrique. Ne pas
essayer de relier l’appareil à la terre en le raccordant aux ls téléphoniques, à un paratonnerre
ou aux conduites de gaz.
yL’appareil ne doit pas être exposé à des projections d’eau ou à des éclaboussures, et aucun
objet rempli de liquide tel qu’un vase ne doit être posé sur le produit.
yPour prévenir tout risque d’incendie ou d’électrocution, ne pas exposer ce produit à la pluie ou
à l’humidité.
yNe bloquer aucune ventilation. Vérier le fonctionnement able du produit an de le protéger
contre la surchauffe. Les ouvertures ne doivent jamais être obstruées par des objets posés sur
ce produit.
yLa température du boîtier métallique peut être élevée pendant le fonctionnement.
yAn d’éviter des interférences radioélectriques, tous les accessoires (comme un compteur
d’énergie) prévus pour être connectés au produit doivent être conformes pour une utilisation
en zones résidentielle, commerciale et industrielle légère. En général, cette exigence est
satisfaite si l’équipement est conforme aux limites de classe B de la norme EN55022.
yLe produit doit être mis au rebut conformément à la réglementation locale.
yL’installation électrique de cette unité ne peut être faite que par du personnel d’entretien LGE
ou par un installateur formé et qualié pour installer les PCS.
ySi le disjoncteur du circuit CA est éteint, et que le PCS ne fonctionne pas pendant une longue
période, la batterie peut être trop déchargée.
yBrancher les câbles CC+ et CC- aux bornes correspondantes CC+ et CC- sur le produit.
yRisque d’endommager le PCS suite à une surcharge. Connecter uniquement le bon l au bloc
de jonction CC. Consulter le schéma de câblage de l’installation pour plus de détails.
yNe pas se tenir debout sur le produit ou l’emballage du produit. Il y a risque d’endommager le
produit.
yNe pas jeter les batteries au feu. Elles pourraient exploser.
yNe pas ouvrir ni endommager les batteries. L’électrolyte qu’elles contiennent est nocif et
dangereux pour la peau et les yeux. Il peut s’avérer toxique.
3
1
Démarrage
Page 92

1
REMARQUE
Démarrage
Démarrage
4
yUne batterie peut présenter un risque de choc électrique et un courant de court-circuit élevé.
Pour travailler sur une batterie, il faut respecter les précautions suivantes.
a) Retirer montre, bracelets, bagues ou tout autre objet métallique.
b) Utiliser des outils dont les manches sont isolés.
c) Porter des gants en caoutchouc, des bottes et des lunettes.
d) Ne pas poser d’outils ou de pièces métalliques sur le dessus de la batterie.
yNe pas laisser l’ESS dans l’état de veille par défaut de manière prolongée : cela pourrait
entraîner le déchargement de la batterie.
yEn cas de panne de la batterie immédiatement après le démarrage du PCS, cela indique une
défaillance de la batterie. Vérier aussi les informations de défaut et la tension de l’état de
charge de la batterie (SOC), éteindre l’ESS jusqu’à ce que l’entretien soit effectué.
ySi l’état de charge est faible, la batterie peut se charger du réseau électrique pour se protéger.
(Chargement d’urgence) Cette fonction sert à éviter l’arrêt de l’ESS, une décharge profonde et
la défaillance de la batterie. Un chargement d’urgence n’est pas un défaut d’ESS.
Indique un risque possible d’endommagement du produit.
yAvant de procéder aux branchements, vérier que la tension du circuit ouvert de l’ensemble PV
est de 1000 V. Si ce n’est pas le cas, le produit pourrait être endommagé.
yNe jamais utiliser de produits solvants, abrasifs ou corrosifs pour nettoyer ce produit.
yNe pas ranger ni poser d’objets sur le produit. Cela pourrait provoquer de graves défauts ou un
dysfonctionnement.
yAvant de procéder à un branchement, vérier que l’interrupteur PV du produit est en position
éteinte.
yCette unité est conçue pour alimenter uniquement le réseau électrique en énergie. Ne pas
connecter cette unité à une source CA ou à un générateur. Le branchement de ce produit à
des appareils externes peut endommager sérieusement votre équipement.
yL’entretien des batteries doit être effectué ou supervisé par du personnel d’entretien de LG ou
in installateur dûment formé.
yLa batterie ne doit pas se décharger si la charge est inférieure à un certain seuil.
yCe produit peut créer un courant avec un composant CC. Si un dispositif différentiel résiduel
(DDR) ou de surveillance de courant résiduel (RCM) est utilisé à titre de protection en cas de
contact direct ou indirect, seul un DDR ou un RCM de type A (ou B) est permis sur le côté
alimentation du produit.
yCe produit est conçu pour être installé uniquement en intérieur. Ne pas installer ce produit en
extérieur.
yCe document n’est proposé qu’à titre indicatif. Lisez le manuel d’installation à l’adresse ci-après.
https://www.lg.com/global/business/ess/business-resources/download
yVeuillez visiter le site Web suivant pour consulter notre politique de garantie.
https://www.lg.com/global/business/ess/business-resources/download
Page 93

Table des matières
Table des matières
5
Démarrage
Consignes de sécurité. . . . . . . . . . . . . . . . . . . . 2
Fonctionnalités du produit. . . . . . . . . . . . . . . .6
Nom de chaque pièce ....................9
Avant et arrière ........................9
Indications LED .......................10
Bas ...................................11
Fonctionnement
Se connecter à un appareil mobile ........12
Installer l’App « LG EnerVu Plus » ......12
Se connecter via le WLAN domestique .13
Connexion directe au ESS .............14
À propos de l’écran principal .............17
Menu de l’état d’ESS ...................18
Menu de paramétrage de l’ESS ..........22
Langue ...............................22
Batterie ...............................22
Appareil d’énergie .....................23
Guide d’installation rapide .............23
Open source ..........................24
Informations application ...............24
Paramétrage par l’installateur .........24
Menu des informations de l’ESS ..........25
Analyse d’énergie ......................25
Info système ..........................26
Utilisation de la fonction EnerVu
Utilisation du système EnerVu ...........27
Créer un nouveau compte .............27
Vérifier l’activation d’EnerVu ...........30
Aperçu de ma page EnerVu ............31
Réaliser un graphique statistique ......33
Vérifier les événements du système ....37
Réaliser un rapport statistique .........37
Transférer votre système à un autre
propriétaire ...........................38
Annexe
Entretien ..............................39
Nettoyer le produit ....................39
Examiner régulièrement ...............39
Contact ..............................39
Caractéristiques .......................41
Informations sur les logiciels
open source ......................43
1
2
3
4
Page 94

Démarrage
6
Fonctionnalités du produit
1
Ce produit est conçu pour stocker l’électricité à courant continu (CC) générée par l’ensemble
Démarrage
photovoltaïque (PV) dans la batterie lithium-ion connectée, et pour transformer l’électricité à
courant continu (CC) de la batterie connectée et du module PV en électricité à courant alternatif
(CA) pour alimenter le réseau électrique. Et, la batterie alimente en énergie la charge domestique en
cas d’urgence.
Module PV
Éclairage LED
PCS
Système de stockage d'énergie
Climatisation
FourTVRéfrigérateur Chauffage
Chaudière systèmeBatterie
Machine à laver
Réseau
électrique
Smartphone
Compteur
bidirectionnel
Courant continu
Courant alternatif
Ligne de données
Cloud Internet
ABB
Compteur
d’énergie
L’électricité générée par un ensemble PV peut être stockée dans la batterie connectée ou vendue à
des fournisseurs d’énergie.
yESS couplé en CC
LG ESS peut s’avérer plus efcace grâce à son processus de conversion de l’énergie plus simple.
yConnexion triphasée
La connexion triphasée assure l’équilibre des phases.
yGestion intelligente
Grâce à la fonction Smart PMS intégrée, il analyse la génération PV et la consommation de
la charge, et s’exécute pour charger et décharger immédiatement. Il surveille également les
conditions du système principal et de la batterie pour qu’elles demeurent toujours stables.
yServices de surveillance Internet
Les clients et les installateurs peuvent surveiller leur ESS depuis plusieurs appareils, tels qu’un
ordinateur, une tablette ou un smartphone.
yMode de sauvegarde
En cas d’urgence, la batterie alimente en énergie la charge domestique.
Page 95

Abréviations de ce manuel
Abréviation Désignation Explication
ESS Système de stockage
d’énergie
Onduleur permettant de stocker l’énergie dans une
batterie puis de l’utiliser.
Démarrage
7
1
Démarrage
PCS Système de
conditionnement
d’énergie
PV Photovoltaïque Panneau solaire transformant l’énergie solaire en
SOC État de charge État actuel de la charge de la batterie
BMS Système de gestion
de la batterie
CC Courant continu -
CA Courant alternatif -
DHCP Protocole de
conguration
dynamique des hôtes
LAN Réseau local Réseau reliant des ordinateurs entre eux dans une
IP Protocole internet Ensemble de règles permettant d’envoyer des données
Appareil prévu pour transformer l’électricité CC
générée depuis le système PV en électricité CA pour
alimenter les appareils ménagers.
électricité à courant continu
Système électronique gérant une batterie
rechargeable.
Protocole normalisé de réseau utilisé sur les réseaux IP
(protocole internet) pour paramétrer la conguration
du réseau de distribution automatique, tel que des
adresses IP pour les interfaces et les services.
zone limitée.
au travers d’un réseau.
Page 96

1
Démarrage
Démarrage
8
Glossaire
Termes Explication
Azimut Dans l’hémisphère Nord, l’angle d’azimut indique de combien de degrés la
surface du module se dévie de l’orientation plein sud. Dans l’hémisphère
Sud, il indique la déviation par rapport à l’orientation plein nord. L’angle
d’azimut se compte en valeurs positives de 0° (sud) à 90° (ouest) et en
valeurs négatives de 0° (sud) à 90° (est).
Angle d’inclinaison L’angle d’inclinaison indique de combien de degrés l’inclinaison de la surface
du module se dévie de l’horizontale.
Module PV Le module PV est un panneau conçu pour absorber les rayons du soleil
comme source d’énergie pour générer de l’électricité.
Ensemble PV Appareil technique pour transformer l’énergie solaire en énergie électrique.
Toutes les installations en série et en parallèle connectées aux modules PV
d’un système PV sont regroupées sous l’abréviation d’ensemble PV.
Page 97

Nom de chaque pièce
Avant et arrière
A
B
Démarrage
9
1
Démarrage
D
C
Corps PCS
A
Indications LED
B
Couvercle inférieur
C
Partie reliée au support
D
Trou de vis pour fixation murale
E
E
Page 98

Démarrage
10
Indications LED
1
Démarrage
Voyant LED Couleur Description
Power
(Alimentation)
Solar
(Solaire)
Éteint Le réseau n’est pas connecté.
Blanc Le réseau est connecté.
Blanc (clignotant) Défaut PCS
Éteint Pas de génération d’énergie.
Vert Génération d’énergie.
Blanc (clignotant) Défaut PCS
Battery
(Batterie)
WLAN
Éteint Veille
Vert Batterie en cours de chargement
Bleu Batterie en cours de déchargement
Rouge (clignotant) Erreur de batterie
Blanc (clignotant) Défaut PCS
Éteint Débranché le dongle WLAN
Vert Réseau connecté
Bleu Réseau WLAN connecté
Rouge (clignotant) Réseau déconnecté
Page 99

Bas
Démarrage
11
1
Démarrage
Connecteurs 1 du câble CC de batterie
A
Connecteurs 2 du câble CC de batterie
B
Bornes de communication ATS, BMS,
C
COMPTEUR EV
Bouton de démarrage à froid
D
Interrupteur PV (Déconnexion CC)
E
Connecteurs PV1 (+ et -)
F
Connecteurs PV2 (+ et -)
G
Connecteurs PV3 (+ et -)
H
ARRÊT
MARCHE
Port Ethernet
I
Connecteur de compteur
J
Connecteur de pompe à chaleur
K
Bouton de connexion sans fil
L
Port de dongle WLAN (type USB)
M
Connecteur de câble pour réseau à CA
N
Page 100

Fonctionnement
REMARQUE
12
Se connecter à un appareil mobile
Pour connecter le système à un appareil mobile, il faut d’abord installer l’application mobile LG
EnerVu Plus sur votre appareil mobile. Rechercher puis télécharger l’application « LG EnerVu Plus »
depuis Apple App Store ou Google Play Store.
Pour connecter directement le système, le dongle WLAN doit être connecté au système. S’assurer
que le dongle WLAN fourni est connecté au système.
2
Fonctionnement
Installer l’App « LG EnerVu Plus »
Télécharger « LG EnerVu Plus » depuis Apple App Store ou Google Play Store.
OR
LG EnerVu Plus
yEn fonction de votre appareil, l’application « LG EnerVu Plus » peut ne pas fonctionner.
yL’application « LG EnerVu Plus » sera disponible dans les versions de logiciel suivantes :
- Android O/S : Lollipop (5.0) ou supérieure
- Système d’exploitation iOS : iPhone 6 (9.0) ou supérieure
 Loading...