

LG ES441S Owner’s Manual

Operating Instructions
Built in Oven
Please read this instruction manual carefully before using the oven.
This will ensure that you know the important safety information and the
correct operation of the oven.
Please keep this manual in a easily accessible place and refer to it
anytime. Please transfer this manual to new owner if you sell the oven.
ES441S
www.lg.com
3828W5A4645

표2는 백지

3
Foreword
Dear Customer,
You have purchased a high-quality appliance from our Company.
Thank you for your custom.
To ensure many years of pleasure in the use of your oven, and to
familiarise yourself with all of the appliance's functions, please read
through this Instruction Manual carefully.
Please pay particular intention to the section containing safety
instructions in the first few pages.
Keep the Instruction Manual in a safe place for reference if
questions should arise. If you should sell the appliance on, please
pass the Instruction Manual on to the new owner.

4
Contents
Safety ............................................................................... 6~10
Appliance description ..................................................... 11
Control panel ................................................................... 12~13
Accessories ..................................................................... 14~15
Telescopic slides (special accessory) .......................... 16~17
Before initial use ............................................................. 18
Setting the time of day .................................................... 18
Initial cleaning .................................................................. 19
Using the oven ................................................................ 20~37
Operating modes ............................................................ 20~23
Switching the oven on ..................................................... 24
Changing the oven temperature ..................................... 25
Switching the oven off ..................................................... 26
Safety cut-out .................................................................. 27
Clock functions and symbols .......................................... 28
Setting the timers ............................................................ 29
Programming the overall cooking / baking time .............. 30~31
Programming the end of cooking / baking time ............... 32~33
Combining overall cooking /
baking time and end of cooking/ baking time .................. 34~35
Setting the time of day..................................................... 36
Childproof safety device .................................................. 37
Baking .............................................................................. 38~39
Baking table ..................................................................... 40~44
Roasting............................................................................ 45
Roasting table .................................................................. 46~47
Grilling............................................................................... 48~49
Grilling table ..................................................................... 49
Defrosting ......................................................................... 50

Defrosting table................................................................ 50
Special functions ............................................................ 51
Yoghurt making .............................................................. 51
Letting dough rise............................................................ 51
Test dishes as per 44547 ................................................. 52~53
Cleaning and care ........................................................... 54~57
Oven light ......................................................................... 58
Oven door ........................................................................ 59~65
Troubleshooting .............................................................. 66~67
Error codes....................................................................... 68
Technical specifications.................................................. 69
Installation instructions................................................... 70
Customer service & spare parts .................................... 71
5

Proper use
Use the oven only for the preparation of foodstuffs in your home. Do
not use the oven other than as indicated in this Instruction Manual.
No other application or use is permitted and may be dangerous.
Do not use the oven to heat rooms. Because of the high
temperatures inside the oven, easily inflammable objects in the
vicinity may start to burn.
The manufacturer is not liable for any damages caused by improper
use.
General safety instructions
Electrical Safety
• Before connecting the appliance, check that the details on the
rating plate are compatible with your power supply. (The rating
plate is located to the left on the inside of the door).
• If the appliance has been visibly damaged during transportation,
do not use. In these circumstances, contact your supplier or the
LG Service Centre.
• You must arrange for the appliance to be connected by a qualified
professional electrician only.
Electrical safety is only guaranteed if the appliance is connected
to a properly- installed protective system with an earth conductor.
Improper installation can give rise to considerable risks and
damage for which the manufacturer accepts no liability.
• In the event of any damage or any fault in the appliance,
disconnect from the power supply by
- completely removing or switching off safety fuse for the building
installation,
- disconnecting the mains plug.
6
Safety

7
• Do not pull the plug out of its socket by the cable, but always by
gripping the plug itself.
• If the mains supply cable is damaged, it must be replaced with a
special cable fitted by a qualified electrician to avoid any risk. This
cable is available from the manufacturer or your specialist dealer.
• The oven must be connected to the power supply using an all-pole
isolating switch with a contact gap of at least 3 mm.
• Multiple adaptors or extension cables must not be used.
• You must arrange for the appliance to be repaired by a qualified
professional electrician only. Contact our LG Service Centre or
your specialist dealer.
• Proceed with caution when connecting electrical appliances to
sockets in the vicinity of this appliance: electrical cables must not
be run near the hotplate cooking area or oven doors. Cables can
melt with the subsequent risk of a short circuit.
• Switch the machine off before changing the oven light bulb to
avoid any risk of electric shock.

8
Safety
Safety during operation
Warning!
• When the oven is in use, the following areas heat up:
- the inside of the oven, especially the heating elements;
- the switches, and the oven door handle after extended operation.
There is a risk of being burned. You should therefore keep children away
from the oven.
• If you are using ingredients containing alcohol in the oven, a flammable
mixture of air and alcohol may be created. In this case, open the oven door
with care. Avoid any naked light, sparks or flames in the vicinity of the
oven.
• Accessible parts may become hot during use. Young children should be
kept away.
• Accessible parts may become hot when the grill is in use.
Children should be kept away.
• When opening the door in the course of cooking, the upper heating
elements will remain on for 10 minutes if they were already in operation
prior to the door being opened. This reduces heat loss and heating
recovery time when the door remains opened for longer periods.
Warning!
• When the grill is in use, exposed parts of the oven may become hot. You
should keep children at a distance.
• This appliance is not intended for use by persons (including children) with
reduced physical, sensory or mental capabilities, or lack of experience and
knowledge, unless they have been given supervision or instruction
concerning use of the appliance by a person responsible for their safety.
Safety during cleaning
Warning!
• Do not clean the appliance using steam-jet or high-pressure cleaners. The
steam may give rise to short-circuiting in live components.

9
How to avoid damage to your appliance:
• Do not place any aluminium foil, baking trays, pots or the like
directly on the oven floor. The resulting build-up of heat can cause
damage to the enamel floor.
• Cook deep-frozen foodstuffs such as pizza on the shelves and not
on the oven trays. Because of the great temperature difference
created, oven trays can warp.
• Fruit juices dripping from the baking tray cause marks which
cannot be removed. For very moist cakes use only the deep pan.
• Do not apply any load to the open oven door.
• Never pour water straight into the hot oven. Because of the water
vapour produced, this can result in burns, electrical malfunctions
or damage to the enamel floor.
• Treat your oven with care to avoid damage (e.g. the glass insert
panels in the oven doors).
• Never store any flammable materials inside the oven, as these
may be ignited when the oven is switched on.
• Never store any foodstuffs inside the oven, as this can cause
damage to the enamel surface.
• Do not use harsh abrasive cleaners or sharp metal scrapers to
clean the oven door glass since they can scratch the surface,
which may result in shattering of the glass.
• This connection may be achieved by having the plug accessible or
by incorporation a switch in the fixed wiring in accordance with the
wiring rules.

10
Safety
Disposal
Packaging material
• Your new oven has been correctly packaged for transportation.
Remove all of the packaging material before putting the appliance
into use.
• The packaging material can be completely recycled. You can
obtain addresses for environmentally-friendly disposal operations
from your local authority.
Used appliances
Warning!
• Used appliances must be rendered unusable prior to disposal so
that they no longer present a risk. To achieve this, disconnect from
the mains supply and remove the power supply cable.
For the protection of the environment, used appliances must
be disposed of properly.
• The appliance must not be disposed of along with normal
domestic waste.
• Your local authority will inform you of times for uplifting special
waste or identify public disposal facilities for you.
Overview
11
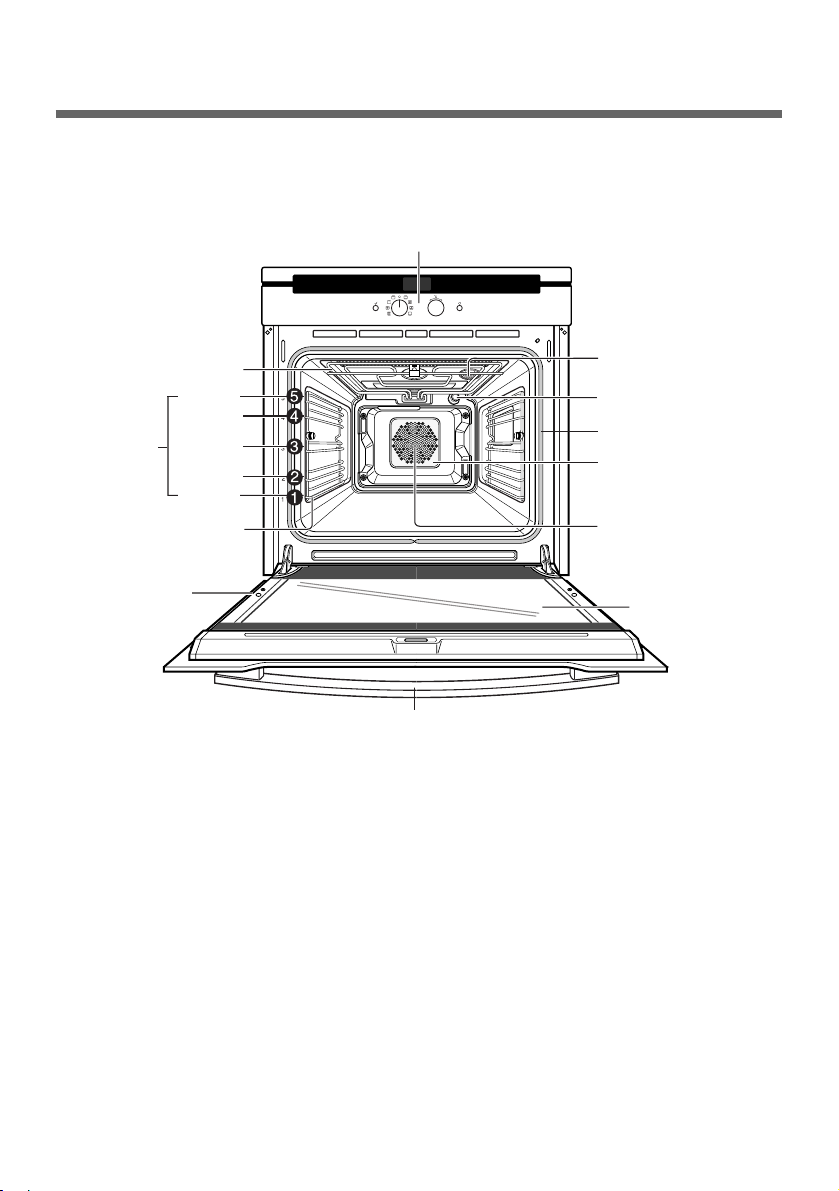
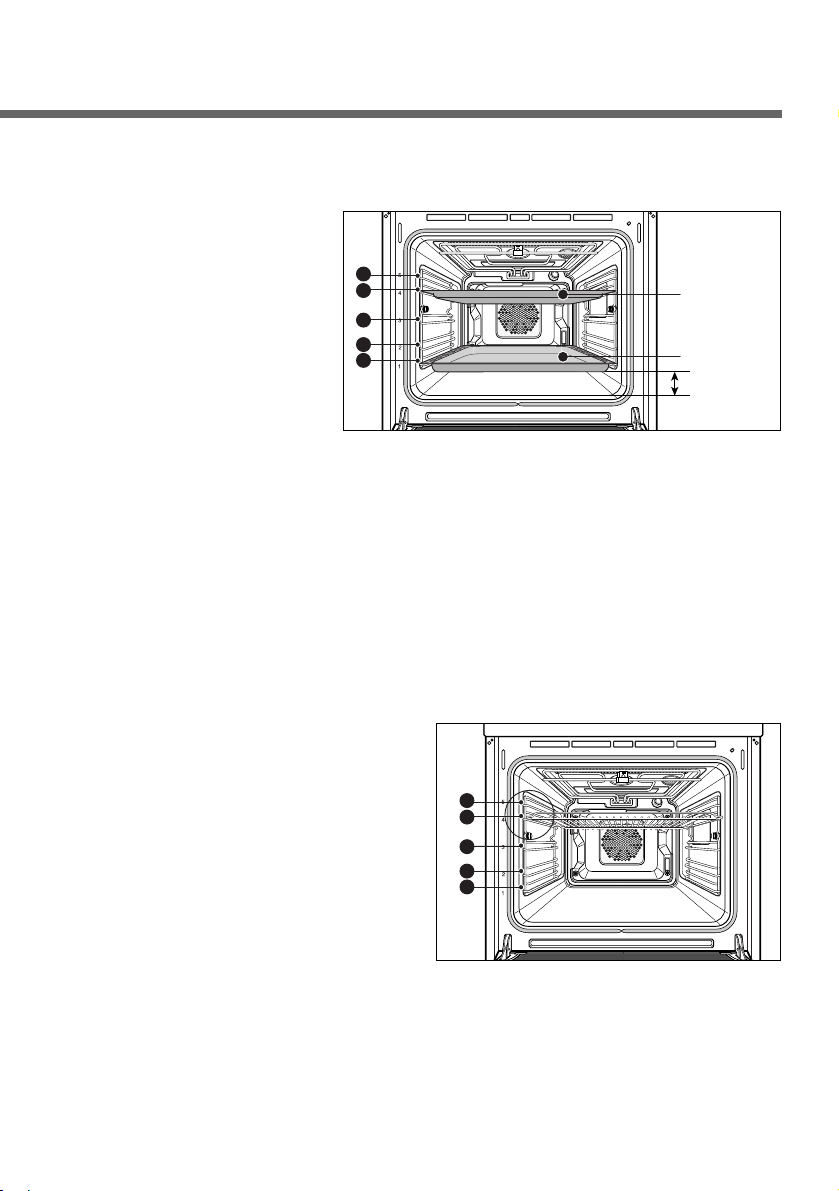
Appliance description
Top-heating and grill
heating element
Shelf-
support
levels
Control panel
Door handle
Glass door
Oven light
Air outlet filter
Door seal
Rear wall heating
element
Fat filter
Level 5
Level 4
Level 3
Level 2
Level 1
Oven levels are numbered from the bottom up.
The 4 and 5 levels are mainly used for grill functions. Always grill
with the door closed.
The cooking tables throughout this operating instructions give you
suggested oven level (shelf positions), however you can change
these to suit yourself.
Side shelf support
Rating plate
12
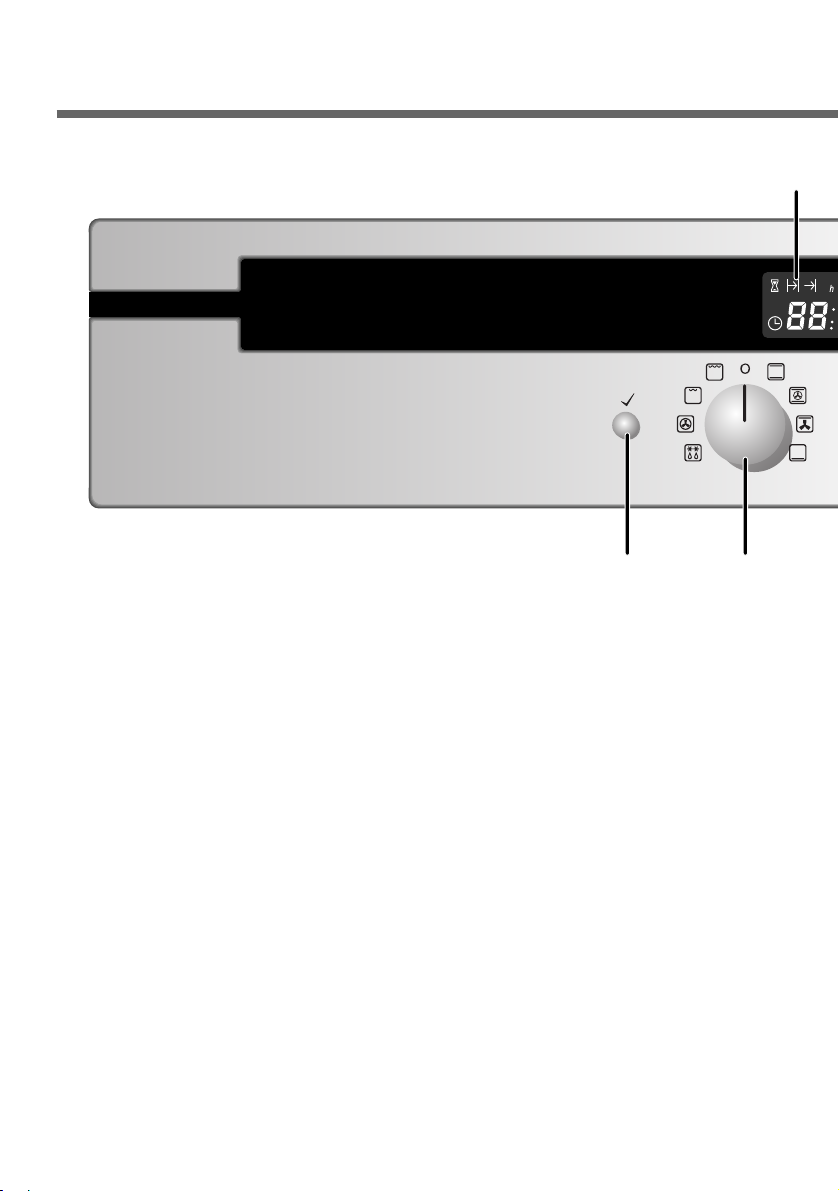
Control Panel
1
3
2
1. Time/Temperature display
2. OK button
3. Operating mode knob (for setting operating mode)
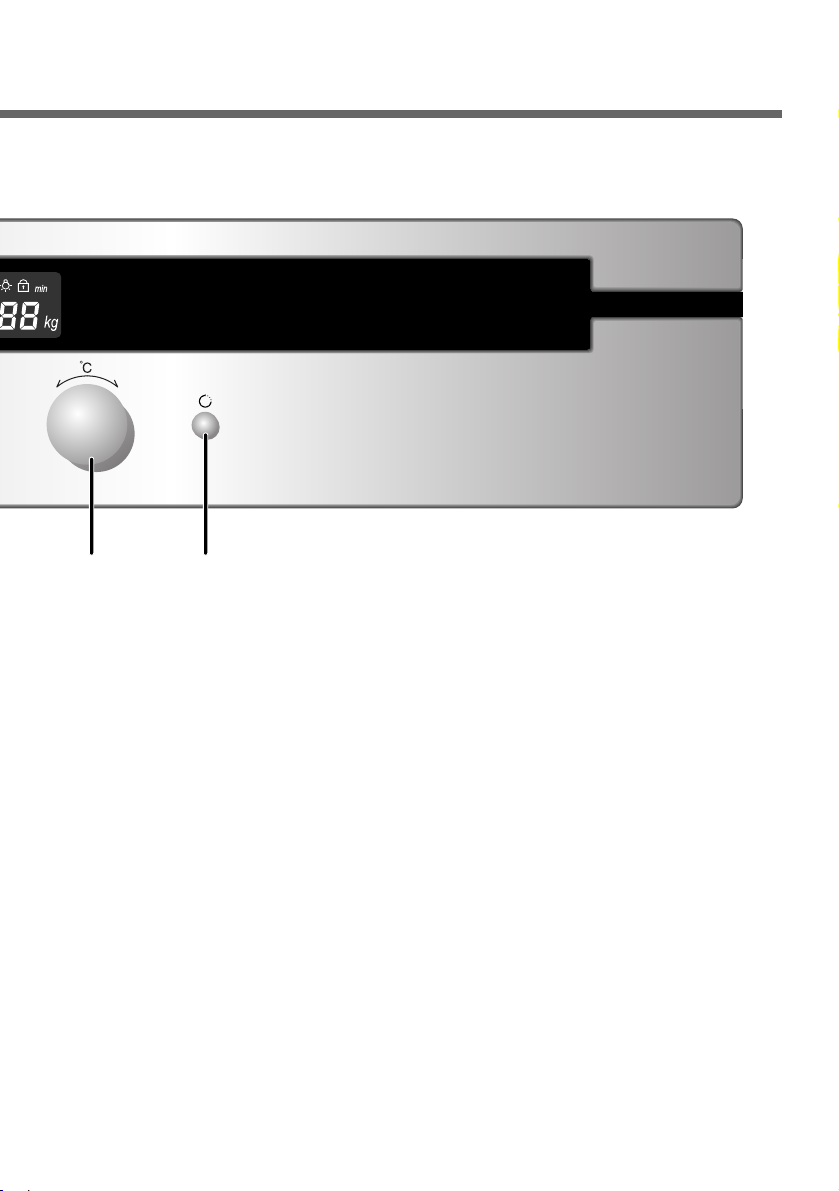
4. Temperature/Control knob (for setting temperature,
grill settings 1 - 3)
5. Timer/Clock button
13
4 5
TIP
Push the knobs and control knobs in to recess flush.
Press them briefly to bring them back out for use.
14
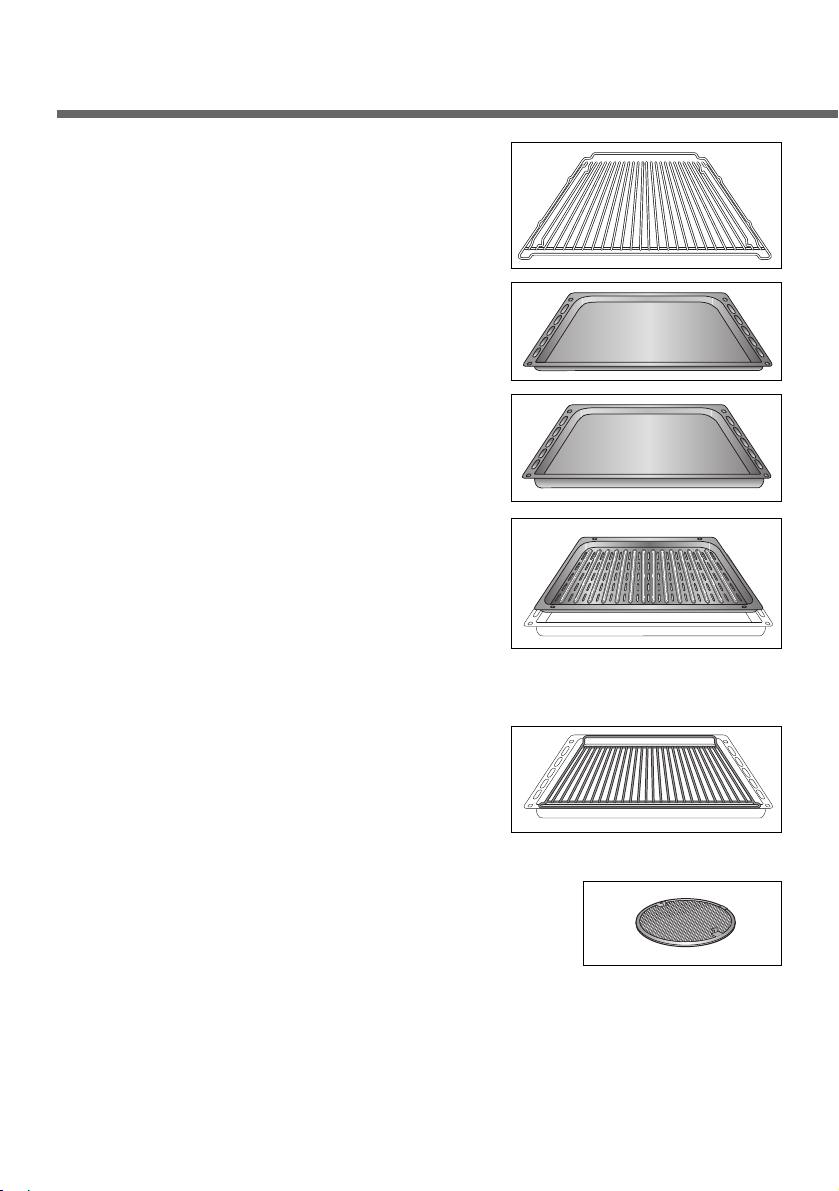
Wire grill
For dishes, baking tins, grilling and
roasting tins.
Baking tray
For cakes, sponges and biscuits.
Deep pan
For juicy cakes,for roasting and for
catching roasting juices or fat.
Grill tray
For fatty meat (for positioning in the Deep
pan). For grilling and/or roasting, we
recommend using the grill/roast system
provided. The Grill tray sits inside the
Deep pan so they can be placed in the oven together.
Grill rack
You can use Grill rack instead of Grill tray,
if necessary, for effective cooking
preformance.
Fat filter
To protect the fan from accumulations of grease
when roasting with 3D hot air,convection heat or
the convection grill.Attach the fat filter by its
hooks to the openings in the fan cover.The fat
filter must completely cover the opening.
TIP
Do not use the fat filter when baking,as this extends the baking time
and you will consume more electricity.
Accessories
15
Hints on using the trays and shelves
Ensure that the trays
and shelves are properly
fitted into the two side
shelf supports.Take
particular care when
removing finished dishes
and meals from the
oven!Use suitable cloth
pot holder or oven
gloves.
If you are using the grill grid in combination with the deep pan or
some other tray to catch dripping liquids or fat,then do not put the
trays down on the oven floor,but slide them into the shelf supports
as well. If you place trays on the oven floor,the resulting build-up of
heat can damage the surface of the oven.For this reason,there
must always be a minimum gap of 2 cm between the accessories
and the oven floor. With grill grids,always ensure that they are
properly in position in the shelf supports.
Fitting the grill grid,baking tray
and deep pan
Slide the tray or shelf in at the
desired level.
The shelf support levels are
numbered from the bottom up to
the top.
5
4
3
2
1
Baking tray
Deep pan
gap 2cm
5
4
3
2
1
16
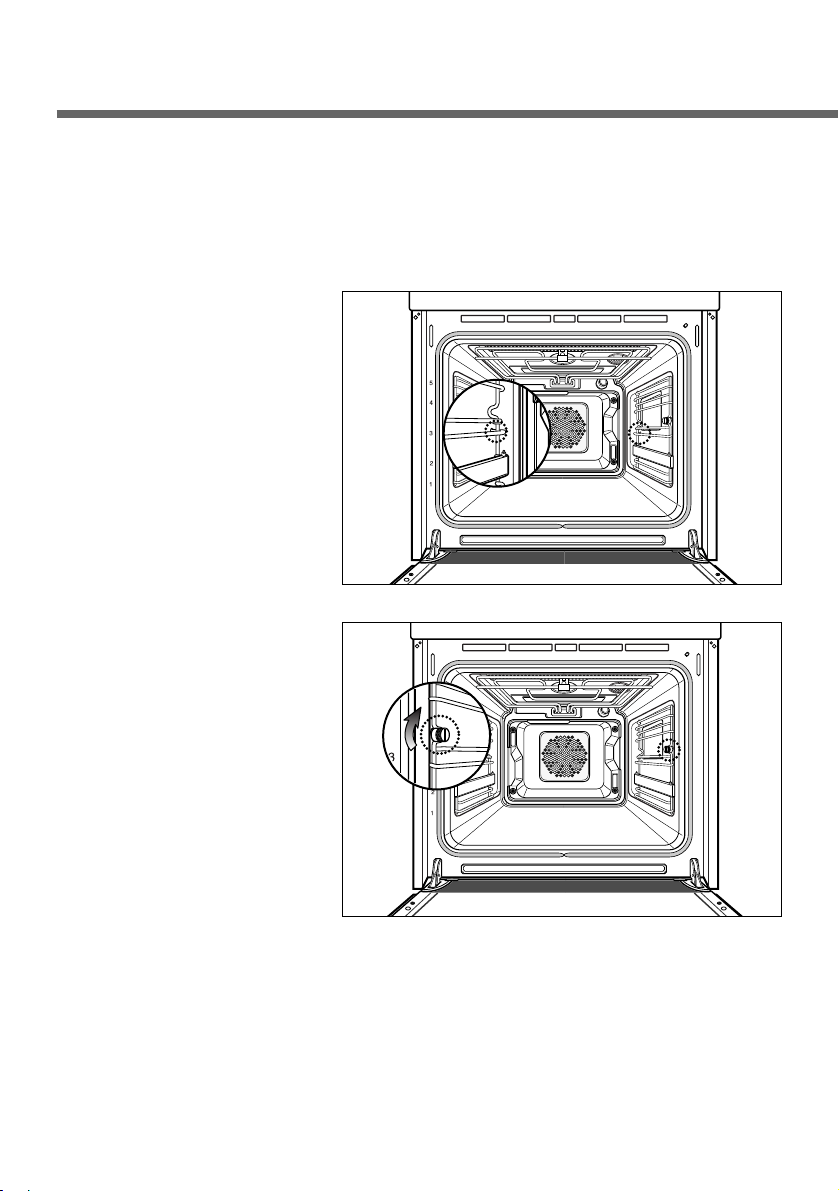
Telescopic slides (special accessory)
Installation
The telescopic slides are installed as follows:
1. Put the inserting bar of
the telescopic slide into
the hole.
2. Align the front recess
with the front screw
hole. Turn a screw in
and tighten both
screws. Repeat the
procedure for the
second telescopic slide
arm.
17
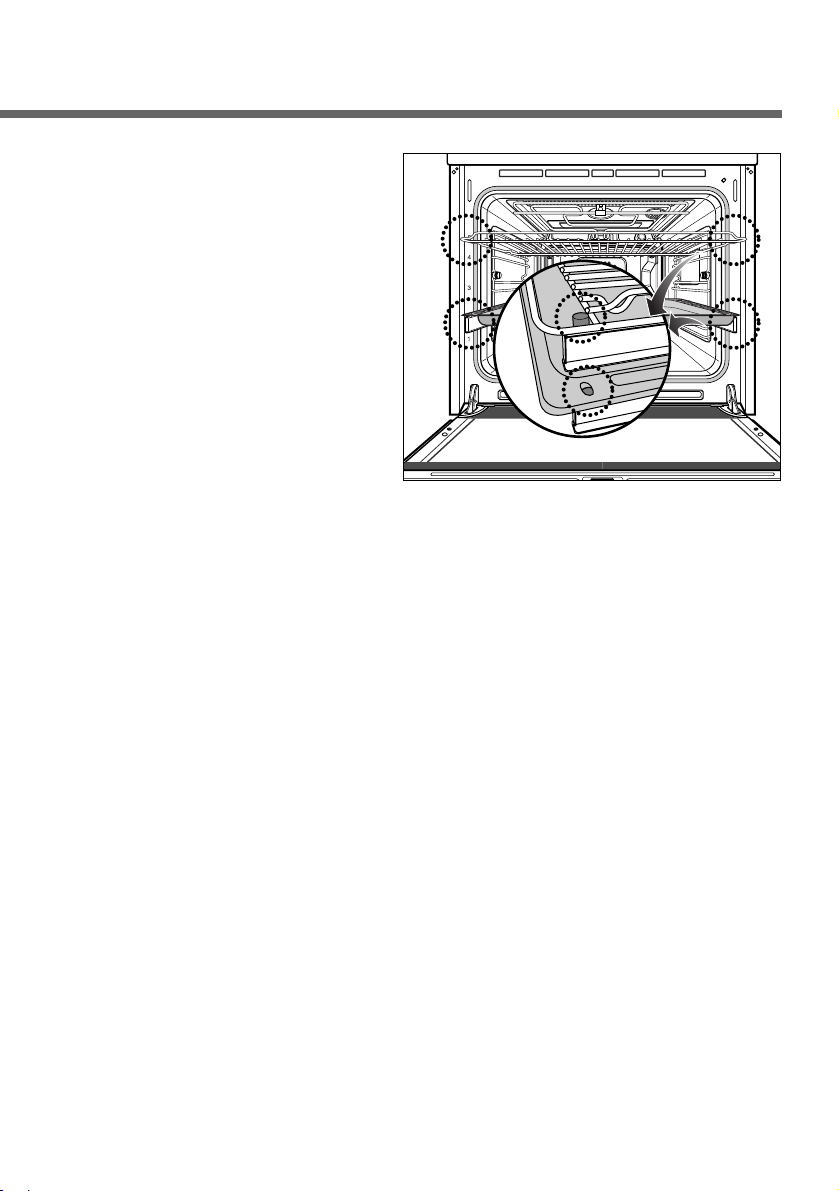
3. Trays and shelves must be
placed on the telescopic
slide arms with care so as to
avoid any accidental tipping
over. To prevent this, place
trays and shelves on the
telescopic slide arms as
shown in the illustration
below, so that the securing
pins on the slide arm catch
the tray or shelf to prevent
any slipping.
18
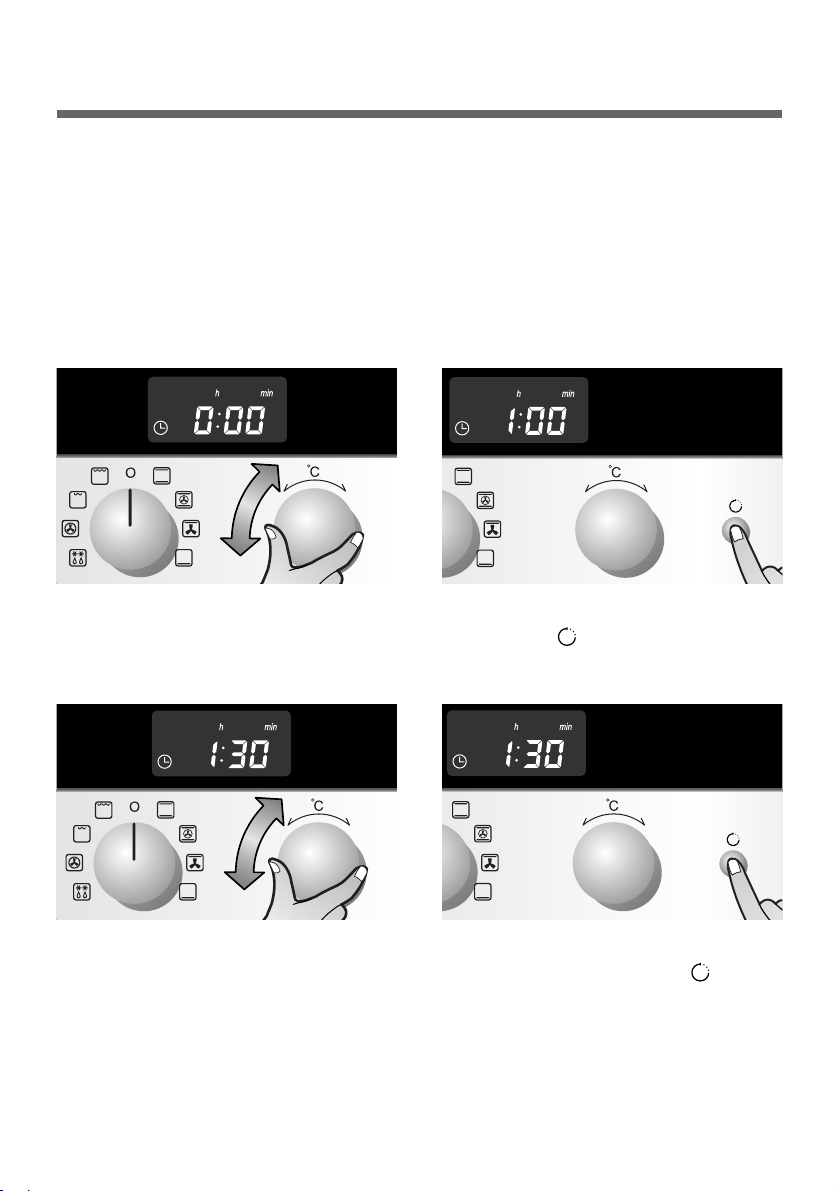
Setting the time of day
The oven cannot be used until the time of day is set.
When the appliance is connected for the first time or after a power
failure, the time display flashes at "0:00".
Example: to set the current time of day to 1:30:
Before initial use
Turn the Temp./Control
knob to set hour of current
time.
1
Press the Timer/Clock
button( ).
The <00> will blink.
2
Turn the Temp./Control
knob to set minute of
current time.
3
Confirm by pressing the
Timer/Clock button( ).
The appliance is now ready
to use.
4

19
Clean the oven carefully before putting it into use.
Important: Do not use any caustic or abrasive cleaners. These can
damage the oven surfaces.
Appliance front
Ovens with a metal front must be cleaned with standard detergents
only. Wipe the front of the appliance with a slightly damp cloth.
Oven interior
1. Open the oven door. The oven light comes on.
2. Clean all baking trays, accessories and the side shelf supports
with warm water and dishwashing liquid.
3. Clean the oven interior in the same way, using warm water and
dishwashing liquid.
4. Allow the oven to dry.
Heating up
Before baking or roasting, heat up the oven, the first time it is
switched on an unpleasant smell may arise.
Open the windows and ensure there is adequate ventilation during
this procedure.
1. Ensure that the time of day is set correctly.
2. Remove all accessories from the oven.
3. Use the knob to select the operating mode: 3D Hot Air( ) or
Convection grill( ) at 200°C (see next page).
4. Leave the oven on in this operating mode for one hour.
Initial cleaning
20
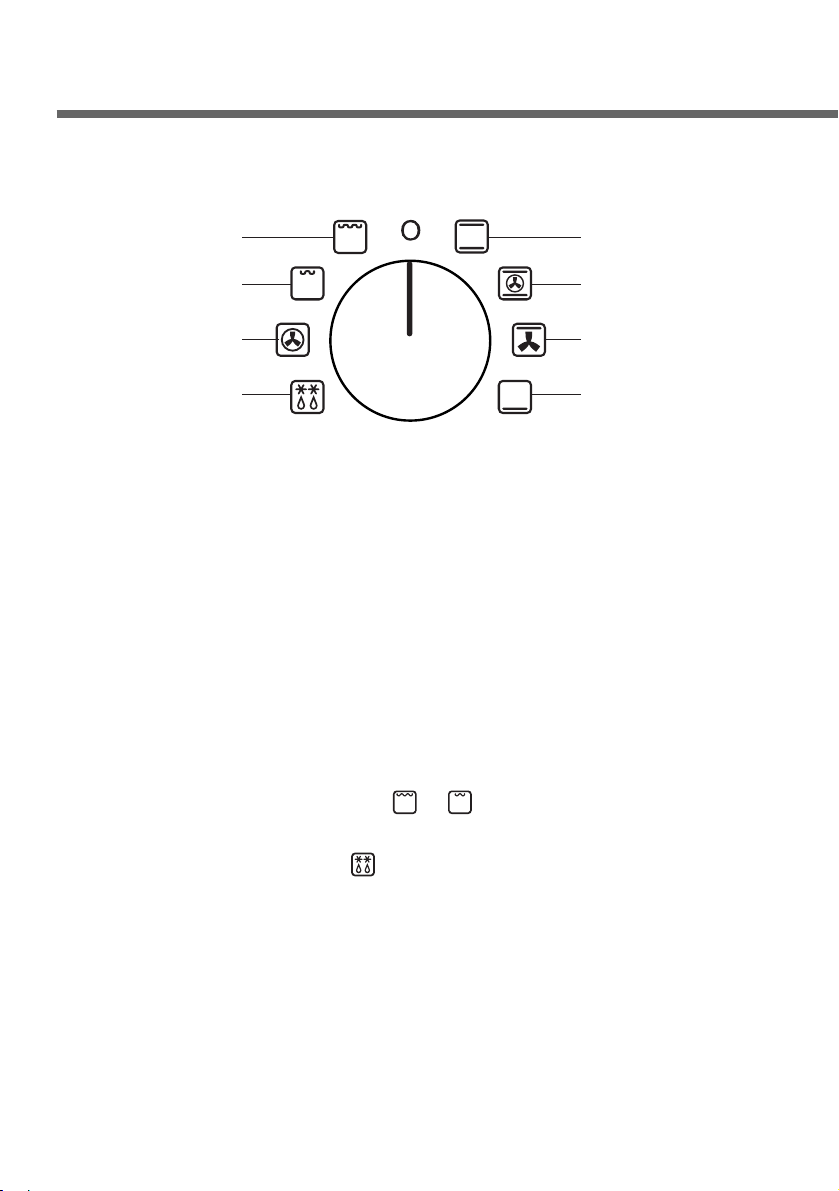
Operating modes
Description of operating modes
The individual operating modes differ in that they involve a
combination of different heating elements. The various combinations
are suitable for producing a variety of heated areas and Convection
heat circulation paths in the oven, as required for the optimum
preparation of various dishes.
For the roasting and baking functions there are preset recommended
temperatures which you can, of course, adjust using the
"Temperature" knob.
When using the grill functions ( ) ( ), you can use the
"Temperature" knob to select any of three settings in each case.
When using the defrosting( ) , there are no other settings available.
Using the oven
Large grill
Small grill
Convection heat
Defrosting
Conventional heat
3D hot air
Convection grill
Bottom heat
21
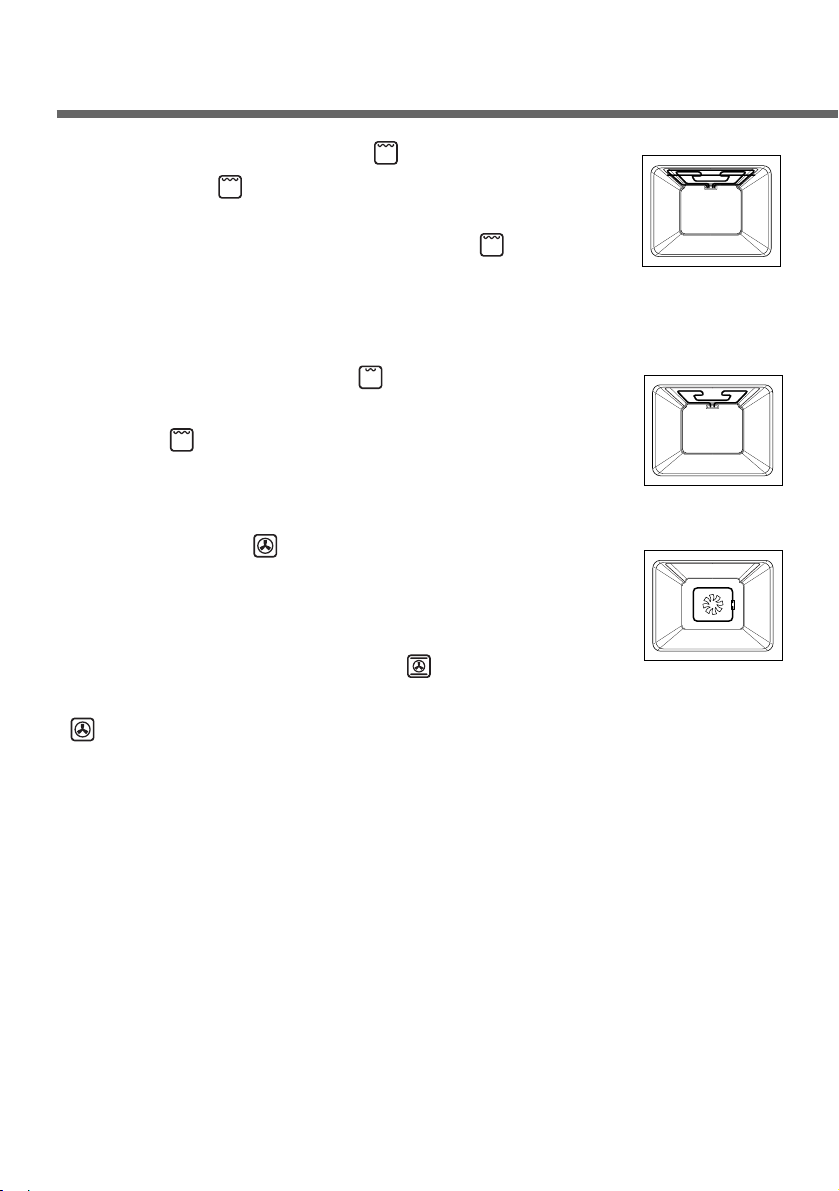
Conventional heat
For conventional heat, the heating elements above
and below the baking chamber are used. This
operating mode is suitable for baking cakes, baking
with a short baking time, sensitive doughs and for
roast beef and fillet of beef on the one level. The recommended
temperature is 190°C.
3D hot air
In addition to the conventional heat elements, 3D hot
air mode uses the heating element in the back wall
and the hot-air fan. This means that the roasting and
baking temperature can be reduced by 20-40°C. The
preset temperature is 150°C. This mode is suitable for cakes and
biscuits, as it is possible to bake on more than one level at the same
time.
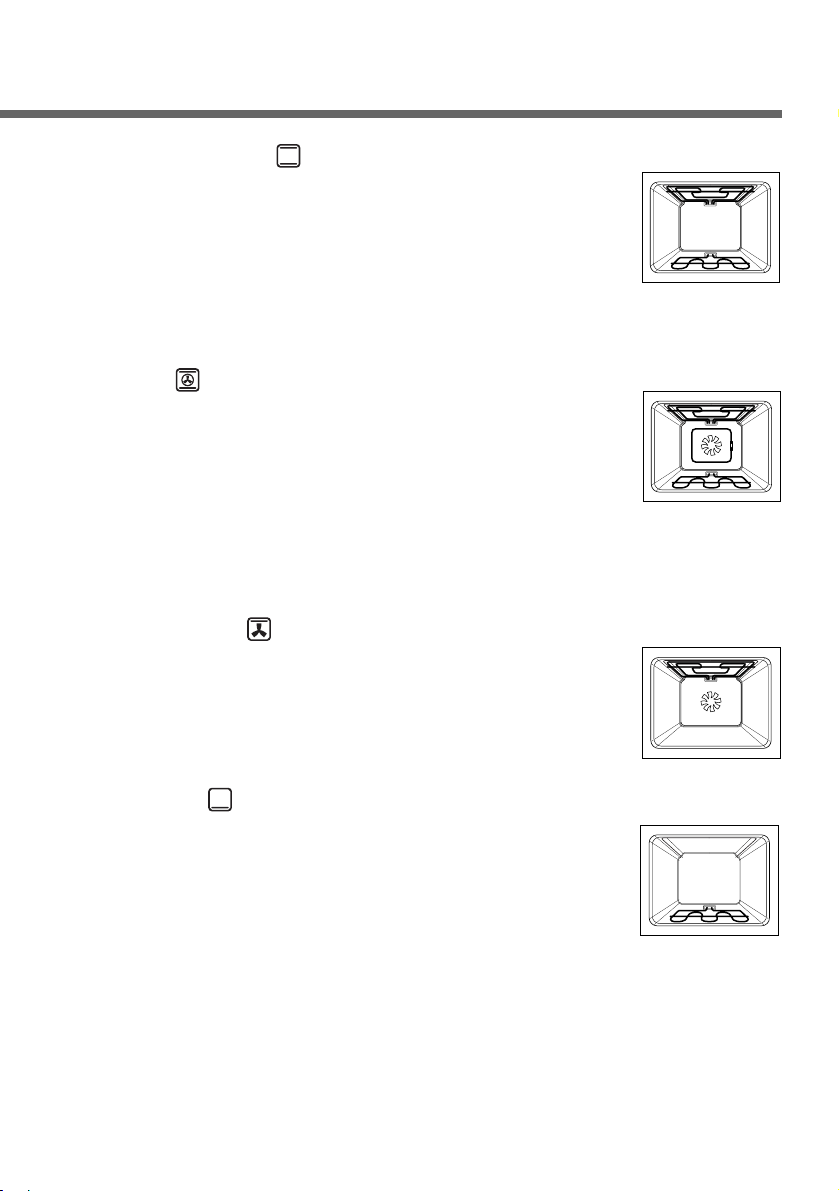
Convection grill
In this mode, the grill element is used in convection
heat mode. The recommended temperature is 190°C.
This function is suitable for pizzas, quiche lorraine or
cheesecakes.
Bottom heat
In bottom heat mode, only the heating element in the
oven floor is used. The recommended temperature is
170°C. This function is particularly suitable for
finishing off cakes or pizzas supposed to have a
crispy base, on one of the shelf support levels.
22
Using the oven
Large grill (Settings 1, 2, 3)
The large grill( ) uses the entire heating element.
No specific temperature can be set. You can choose
between three settings. The large grill ( ) is
suitable for cooking steaks, cutlets, fish or making
toast, and when cooking larger quantities for browning or with a
gratin topping.
Small grill (Setting 1, 2, 3)
The small grill operates in the same way as the
large grill( ), however, only part of the top heating
element is used. This makes it suitable for smaller
quantities.
Convection heat
Convection heat mode uses only the heating element
in the back wall and the convection heat fan.
Accordingly, at 200°C, the recommended temperature
is higher than that for 3D hot air( ).
It is also possible to bake on more than one level in convection heat
( ) mode. This means that it is suitable for fruit cakes and stirred
cake or yeast-dough, for example a bread plait.

23
Defrosting
In defrosting mode, the fan is used without heating.
The circulating air speeds up the defrosting process.
Place the frozen food in a suitable container to trap
the liquid produced during defrosting. Where
appropriate, you can use the grill grid and the deep
pan to avoid soiling the oven. If water is allowed to run out into the
oven, the door seals will be contaminated and an unpleasant odour
may result.
NB: During cooking, baking or roasting, when you open the door to
turn or baste dishes, the oven switches off. If you leave the
door open for more than 10 minutes, all settings are cancelled.
When opening the door in the course of cooking, the upper
heating elements will remain on for 10 minutes if they were
already in operation prior to the door being opened. This
reduces heat loss and heating recovery time when the door
remains opened for longer periods.
24
Using the oven
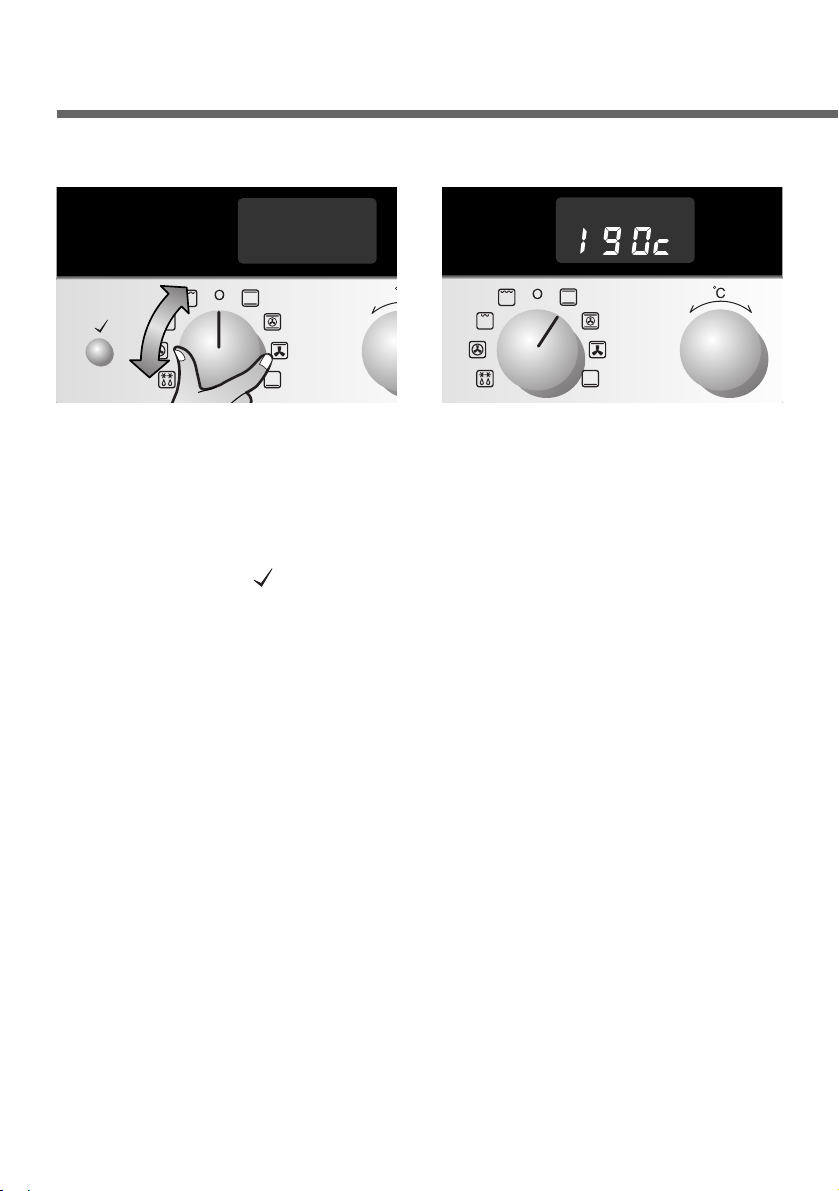
Switching the oven on
Select the desired mode
with the Operating mode
knob.
1
The relevant recommended
temperature is shown in the
display.
2
Start operation by pressing
the OK button( ) or wait
until the oven starts
automatically in 8 seconds.
You will hear a signal tone
and the symbol now
remains lit without flashing.
If you do not apply any
further settings on the
control panel, the oven will
remain on for the maximum
possible time
(approximately 8 hours).
3
NB: The oven light goes out
after 20 seconds to save
electricity.
The light can be switched back
on at any time by pressing the
oven light button.
 Loading...