

Page 1

LIMITED WARRANTY STATEMENT
1. WHAT THIS WARRANTY COVERS :
LG offers you a limited warranty that the enclosed
subscriber unit and its enclosed accessories will be free
from defects in material and workmanship, according to
the following terms and conditions:
1. The limited warranty for the product extends for TWELVE
(12) MONTHS beginning on the date of purchase of the
product with valid proof of purchase, or absent valid
proof of purchase, FIFTEEN (15) MONTHS from date of
manufacture as determined by the unit’s manufacture
date code.
2. The limited warranty extends only to the original
purchaser of the product and is not assignable or
transferable to any subsequent purchaser/end user.
3. This warranty is good only to the original purchaser of
the product during the warranty period as long as it is
in the U.S, including Alaska, Hawaii, U.S. Territories and
Canada.
4. The external housing and cosmetic parts shall be free of
defects at the time of shipment and, therefore, shall not
be covered under these limited warranty terms.
5. Upon request from LG, the consumer must provide
information to reasonably prove the date of purchase.
6. The customer shall bear the cost of shipping the product
to the Customer Service Department of LG. LG shall bear
the cost of shipping the product back to the consumer
after the completion of service under this limited
warranty.
2. WHAT THIS WARRANTY DOES NOT
COVER :
1. Defects or damages resulting from use of the product in
other than its normal and customary manner.
2. Defects or damages from abnormal use, abnormal
conditions, improper storage, exposure to moisture or
dampness, unauthorized modifications, unauthorized
connections, unauthorized repair, misuse, neglect, abuse,
accident, alteration, improper installation, or other acts
which are not the fault of LG, including damage caused
by shipping, blown fuses, spills of food or liquid.
3. Breakage or damage to antennas unless caused directly
by defects in material or workmanship.
4. That the Customer Service Department at LG was
not notified by consumer of the alleged defect or
malfunction of the product during the applicable limited
warranty period.
5. Products which have had the serial number removed or
made illegible.
6. This limited warranty is in lieu of all other warranties,
express or implied either in fact or by operations of
law, statutory or otherwise, including, but not limited
to any implied warranty of marketability or fitness for a
particular use.
7. Damage resulting from use of non-LG approved
accessories.
8. All plastic surfaces and all other externally exposed parts
that are scratched or damaged due to normal customer
use.
Page 2

9. Products operated outside published maximum ratings.
10. Products used or obtained in a rental program.
11. Consumables (such as fuses).
Some states do not allow the exclusive of limitation of
3. WHAT LG WILL DO:
LG will, at its sole discretion, either repair, replace or
refund the purchase price of any unit that does not
conform to this limited warranty. LG may choose at its
discretion to use functionally equivalent reconditioned,
refurbished or new units or parts or any units. In
addition, LG will not re-install or back-up any data,
applications or software that you have added to your
phone. It is therefore recommended that you back-up
any such data or information prior to sending the unit to
LG to avoid the permanent loss of such information.
4. STATE LAW RIGHTS :
No other ex warranty is applicable to this product.
THE DURATION OF ANY IMPLIED WARRANTIES,
INCLUDING THE IMPLIED WARRANTY OF
MARKETABILITY, IS LIMITED TO THE DURATION OF
THE EXPRESS WARRANTY HEREIN. LG INFOCOMM
INC. SHALL NOT BE LIABLE FOR THE LOSS OF THE
USE OF THE PRODUCT, INCONVENIENCE, LOSS OR
ANY OTHER DAMAGES, DIRECT OR CONSEQUENTIAL,
ARISING OUT OF THE USE OF, OR INABILITY TO
USE, THIS PRODUCT OR FOR ANY BREACH OF ANY
EXPRESS OR IMPLIED WARRANTY, INCLUDING THE
IMPLIED WARRANTY OF MARKETABILITY APPLICABLE
TO THIS PRODUCT.
5. HOW TO GET WARRANTY
To obtain warranty service, please call or fax to the
Tel. 1-800-793-8896 or Fax. 1-800-448-4026
Or visit www.lg.com.
LG Electronics MobileComm U.S.A., Inc.
201 James Record Road Huntsville, AL 35824
DO NOT RETURN YOUR PRODUCT TO THE ABOVE
incidental or consequential damages or limitations on
how long an implied warranty lasts; so these limitations
or exclusions may not apply to you. This warranty gives
you specific legal rights and you may also have other
rights which vary from state to state.
SERVICE :
following telephone numbers from anywhere in the
continental United States:
Correspondence may also be mailed to:
ADDRESS.
Please call or write for the location of the LG authorized
service center nearest you and for the procedures for
obtaining warranty claims.
Page 3

Table of Contents
LIMITED WARRANTY STATEMENT ......... 2
Table of Contents ........................................ 4
Important Notice ......................................... 7
Your Phone ................................................. 12
Getting Started .......................................... 14
Installing the micro SIM card and microSD
card............................................................... 14
Charging your phone .................................... 15
Removing the microSD card......................... 15
Formatting the microSD card ....................... 16
Switching between and exiting applications 16
Your Home screen .................................... 17
Touch screen tips ......................................... 17
Proximity sensor ........................................... 17
Lock your phone ...........................................18
Quick Switch to Silent/Vibrate Mode .......... 18
Home screen panels ................................... 19
Customizing your Home screen.................... 19
Customizing apps icons on the Home screen 20
Getting back to a recently used application 20
Home screen clean view .............................. 21
Notifi cations Panel ....................................... 21
Viewing the Status Bar ................................ 21
On-screen Keyboard ..................................... 23
123 Mode ..................................................... 26
Entering Special Characters......................... 26
Google Account Setup ............................. 27
Creating your Google account...................... 27
Signing into your Google account ................ 27
Calls ............................................................ 29
Making a call................................................ 29
Calling your contacts.................................... 29
Answering and rejecting a call .................... 29
Adjusting the in-call volume ........................ 29
Making a second call ................................... 30
Viewing your call logs .................................. 30
Call settings .................................................30
Contacts...................................................... 31
Searching for a contact ................................ 31
Adding a new contact .................................. 31
Favorite Contacts .........................................31
AT&T Address Book (AAB) ........................... 32
Messaging/Email ...................................... 33
Messaging.................................................... 33
Email............................................................. 34
Social Networking ................................... 37
Adding an account to your phone ................ 37
Adding a social networking widget on the
Home screen ................................................37
Viewing and updating your status .............. 38
Syncing accounts on your phone .................38
Removing accounts on your phone .............. 38
Page 4

Camera........................................................ 39
Getting to know the viewfi nder ................... 39
Taking a photo ............................................. 40
Once you’ve taken the photo .......................40
Using the advanced settings........................ 40
Viewing your saved photos .......................... 42
Setting a photo as wallpaper....................... 42
Video Camera ............................................ 43
Getting to know the viewfi nder ................... 43
Recording a video......................................... 44
After recording a video ................................44
Using the advanced settings........................ 44
Watching your saved videos ........................ 45
Adjusting the volume when viewing a video 45
Multimedia................................................. 46
Gallery .......................................................... 46
Video Wiz ..................................................... 46
How to save music/video fi les to the phone 47
How to play music/video fi les on the phone 47
Playing a song .............................................. 47
Working with Playlists ................................. 48
To add a song to a playlist ........................... 48
To remove a song from a playlist ................. 48
To rename or delete a playlist ..................... 48
FileShare ...................................................... 49
Using SmartShare ........................................ 49
Media Home................................................. 51
Google Applications ................................53
About Google applications........................... 53
Google Maps™............................................. 53
Searching For Locations and Places ............53
Getting Directions ........................................ 54
Clear Map..................................................... 55
Latitude ........................................................ 55
Places ........................................................... 55
Play Store™ .................................................. 56
Gmail™ ......................................................... 56
Google Talk™ ............................................... 57
Utilities ....................................................... 59
QSlide Function ............................................ 59
QuickMemo .................................................. 59
View the Saved QuickMemo ........................ 60
Setting the alarm .........................................60
Using the calculator ..................................... 60
Adding an event to your calendar ................ 60
Polaris Offi ce ................................................ 61
Voice Command ...........................................62
LG Tag+ ......................................................... 63
The Web .....................................................64
Browser ........................................................ 64
Using options ...............................................64
Adding bookmarks........................................ 65
Changing the Browser settings.................... 65
Settings....................................................... 66
Networks tab................................................ 66
Airplane mode ............................................. 66
Wi-Fi ............................................................. 66
Data networks ............................................. 67
Bluetooth ...................................................... 68
File networking............................................. 69
Page 5

Table of Contents
Portable Wi-Fi hotspot ................................. 70
Miracast ....................................................... 70
Bluetooth tethering ...................................... 70
NFC ............................................................... 71
Android Beam............................................... 71
VPN............................................................... 71
Mobile networks .......................................... 72
Call ............................................................... 72
Sound tab ..................................................... 72
Sound profi le ................................................ 72
Volumes ....................................................... 72
Quiet time..................................................... 72
Ringtone with vibration................................ 73
Phone ringtone ............................................ 73
Notifi cation sound ....................................... 73
Wise ringtone .............................................. 73
Touch feedback & system .......................... 73
Display tab ...................................................73
Home screen ................................................73
Lock screen................................................... 73
Brightness ...................................................74
Screen timeout ............................................ 74
Wise screen ................................................74
Auto-rotate screen ...................................... 74
Aspect ratio correction ................................ 74
Font type ...................................................... 74
Font size ......................................................74
Front key light .............................................. 74
Notifi cation fl ash ......................................... 75
Motion sensor calibration ............................ 75
General tab................................................... 75
Power saver.................................................. 75
Applications ................................................. 75
Quad core control ......................................... 76
Storage ......................................................... 76
Gestures ....................................................... 76
Accounts & sync........................................... 76
Location services ......................................... 77
Security ........................................................ 77
Backup & reset ............................................. 78
Date & time ................................................. 78
Language & input ........................................ 78
Accessibility ................................................. 79
PC connection............................................... 79
Developer options ....................................... 80
About phone ................................................. 80
LG On-Screen Phone 3.0 .......................... 81
Software Update ....................................... 83
Phone Software Update ............................... 83
LG Mobile Phone Software update via Over-
the-Air (OTA).................................................83
Trademarks ................................................ 84
Trademarks ................................................... 84
DivX Mobile ................................................ 84
DTS .............................................................. 84
Dolby Mobile ............................................... 84
Q&A ............................................................. 85
Accessories ............................................... 86
For Your Safety .......................................... 87
Safety Guidelines .....................................92
Page 6

Important Notice
Please check to see if any problems you have
encountered with your phone are described
in this section before taking the phone in for
service or calling a service representative.
1. Phone Memory
In order to make more memory available, you
will have to manage your applications and
delete some data, such as applications or
messages.
Managing Applications
1 From the Home screen, tap the
and tap
> Applications
2 Tap one of the available tabs at the top of
the screen and select the application you
want to uninstall.
3 Tap
Uninstall
that you want to uninstall the desired
application.
Menu Key
All settings > General tab
.
and then tap OK to confirm
2. Optimizing Battery Life
You can extend your battery's life between
charges by turning off features that you don't
need to run constantly in the background. You
can also monitor how applications and system
resources consume battery power.
To extend the life of your battery
- Turn off radio communications that you aren't
using, such as Wi-Fi, Bluetooth, or GPS.
Wi-Fi will be set to On the first time you use
your newly purchased phone.
- Lower screen brightness and set a shorter
screen timeout.
- Turn off automatic syncing for Gmail™,
Calendar, Contacts, and other applications.
- Some applications you have downloaded may
cause your battery power to be reduced.
- While using downloaded applications, check
the battery charge level.
To view the battery charge level
1 From the Home screen, tap the Menu Key
and tap
and tap
All settings
All settings
Power saver.
2 Slide the screen up to see the BATTERY
INFORMATION section. The battery status
(charging or discharging) and level are
displayed at the bottom of the screen.
To monitor and control what uses the
battery
1 From the Home screen, tap the
> General tab >
Menu Key
> General tab >
7
Page 7

Important notice
Power saver
2 It lists all of the applications or services
using battery power from the greatest
amount of energy used to the least amount.
You can also use it to turn off applications
or services, if they are consuming too much
power. Tap any of the listed items for more
options.
>
Battery use.
3. Installing an Open Source
Operating System
Installing an open source operating system
on your phone and not using the operating
system provided by the manufacturer can
cause your phone to malfunction.
n
Warning
•
If you install and use an operating system
other than the one provided by the
manufacturer, your phone is no longer
covered by the warranty.
•
To protect your phone and personal data,
download applications only from trusted
sources, such as Play Store. If some
applications are not properly installed
on your phone, your phone may not work
properly- or serious errors may occur. You
8
will need to uninstall those applications
and all of its data and settings from the
phone.
4. Using Swipe, Face Unlock,
Pattern, PIN, or Password
Set Swipe, Face Unlock, Pattern, PIN, or
Password to secure your phone. To set the
screen lock, follow the process below.
From the Home screen, tap the
,
tap
Lock screen settings > Select
screen lock
from
and Password
n
In case that you have trouble with Face Unlock,
you can unlock the screen a Backup Pattern
or PIN. Please note that this feature is only
available after you set up your Google account
on your device.
n
Take precautions when using an unlock
Pattern, PIN, or Password. It is very
important that you remember the screen
unlock information you set. You are allowed
and select a desired screen lock
Swipe, Face Unlock, Pattern, PIN
.
NOTE
Warning
Menu Key
Page 8

Important notice
5 attempts to enter your screen unlock
information. If you used up all 5 opportunities,
you will have to wait 30 seconds to attempt
unlocking the phone again.
When you can’t recall your Unlock
Pattern, PIN, or Password:
If you logged into a Google account on
the phone and failed to use the correct
pattern 5 times, tap Forgot pattern? You
will be required to sign in with your Google
account and prompted to create a new
unlock pattern.
If you have set a backup PIN, you can
unlock the screen with keying in the backup
PIN.
If you haven’t created a Google account on
the phone or you forgot your PIN, Password,
and the backup PIN, you need to perform a
hard reset.
n
Caution
If you perform a hard reset, all user
applications and user data will be deleted.
Please remember to back up any important
data before performing a hard reset.
Read ALL steps before attempting.
1 Turn the phone off.
2 Press and hold Volume Down Key +
Power/Lock Key
3 Release the keys when the FACTORY HARD
RESET screen appears.
4 Read the warning and press the Power/
Lock Key to confirm. Press any other
key to cancel.
5 Press the Power/Lock Key to confirm
once more or press any other key to cancel.
6 Your device will perform a hard reset.
at the same time.
5. Using Safe Mode
Using Safe mode
To recover your phone when malfunctioning.
1 Turn off your phone and reboot. When you
see the booting animation
press and hold the Volume Down
. Your Home screen will then be
Key
displayed with the words "Safe mode" in
lower left corner.
2 From the Home screen, tap the
and tap All settings > General tab >
Applications.
(Rethink Possible SM)
Menu Key
9
Page 9

Important notice
3 Tap one of the available tabs at the top of
the screen and select the application you
wish to uninstall.
4 Tap Uninstall and OK to confirm.
5 After uninstalling the application, turn off
and reboot your phone.
6. Using a microSD Card
Pictures, music and video files can be saved to
external memory. Before saving these files to
external memory, you need to insert a microSD
card. If you have not inserted a microSD card,
you will not be able to save these items on
external memory.
n
Warning
Do not remove the microSD card without
unmounting it first. Otherwise, it may damage
the microSD card as well as your phone, and
the data stored on the microSD card may be
corrupted. To remove the microSD card safely,
from the Home screen, tap the
and tap
All settings
>
Unmount SD card
10
Menu Key
> General tab >
> OK.
Storage
7.
Connecting your phone to a
computer via USB
1 Use the USB cable that was provided with
your phone to connect the phone to a USB
port on your computer. You'll receive a
notification that the USB is connected and
can see USB connection mode screen.
2 Tap Media sync (MTP) or Camera (PTP) to
confirm that you want to transfer files between
your phone’s microSD card and the computer.
8. Unlock screen when using
data connection
Your screen will go dark if untouched
for a period of time when using a data
connection. To turn on your LCD screen,
press the
Power/Lock Key
lengh of time the screen takes to turn off, tap
the
Menu Key > All settings > Display
tab > Screen timeout and select the desired
amount.
. To change the
Page 10

9.
Internal antenna
Please hold the mobile phone straight up
as a regular phone.
While making/receiving calls or sending/
receiving data, try to avoid holding the lower
part of the phone where the antenna is
located. It may affect call quality.
10. When the screen freezes
If the phone does not respond to user
input or the screen freezes:
Press and hold the Power/Lock Key for 10
seconds to reboot it.
11. Do not connect your phone
when you power on/off
your PC
Make sure to disconnect your phone from the
PC when powering your PC on or off as it might
result in PC errors.
Important notice
11
Page 11
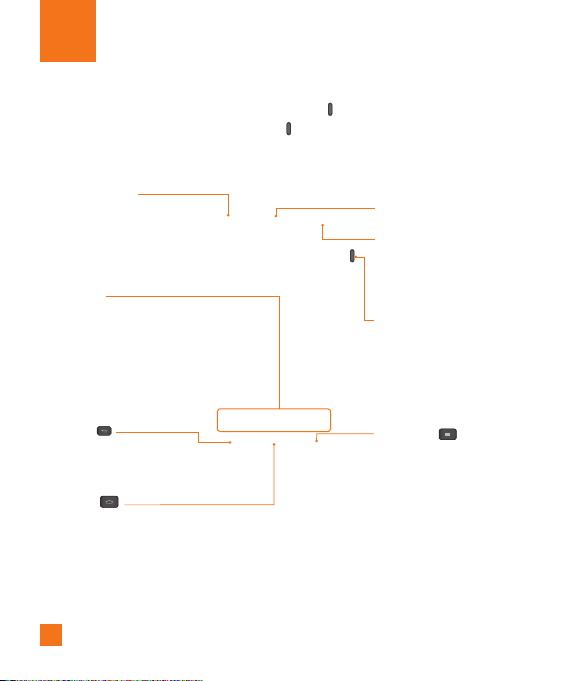
Your Phone
To turn on the phone, press and hold the Power/Lock Key on the right side of the phone for 3 seconds.
To turn off the phone, press the
Power off and Yes to confirm.
Front view
Proximity Sensor
- Senses proximity toward other
objects, such as your head
during a call, so that you do not
accidentally activate unwanted
features.
Quick Keys
- Gives you quick access to your
most used applications.
- To add an icon, drag and drop it
in the bar.
- To remove an icon, touch and
hold it and remove it from
the bar.
Back Key
- Returns to the previous screen.
- Closes pop-up menus and dialog
boxes.
Home Key
- Returns to the Home screen from
any screen.
n
Warning
Placing a heavy object on the phone or sitting on it can damage its LCD and touch screen
functionalities. Do not cover the LCD’s proximity sensor with a protective fi lm. This can
cause the sensor to malfunction.
12
Power/Lock Key on the right side of the phone for 3 seconds and tap
Earpiece
Front Camera Lens
- Use to take a picture of
yourself or to video chat on
supported applications.
Power/Lock Key
- Press and hold to power on
and off, restart, or enable
Airplane mode.
- Turns your screen on and
off and locks it.
Menu Key
- Displays available options for
the current screen or
application.
- Touch and hold to search
within the current application
(not available for all
applications).
Page 12

Your Phone
n
TIPS
- Tap the Menu Key, whenever you open an application to check what options are available.
Side view
3.5mm Headset Jack
Volume Keys
- Allows you to adjust the ringer
and media volumes, or to adjust
the in-call volume during a call.
- Press and hold the Volume Down
Key to switch to the silent mode.
- Press and hold both Volume
Keys at the same time to use the
QuickMemo feature.
micro SIM & microSD card
Access Panel
Microphone
Power/Lock Key
Microphone
Charger/Accessory Port
Rear view
Back Camera
Lens
n
Notice
The NFC antenna for this model is on the back cover.
LED Flash
Speaker
13
Page 13
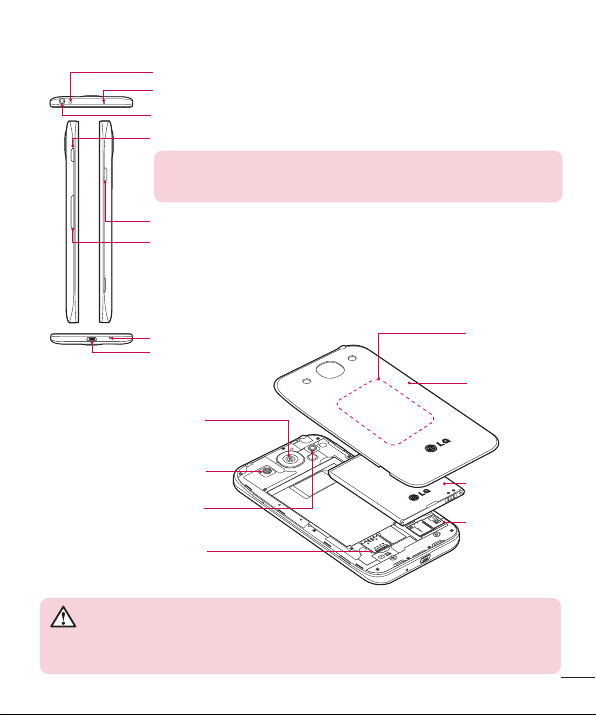
IR LED
Microphone
Earphone Jack
QuickButton Key
TIP!
Select apps you wishs to get quick access to using QuickButton.
Power/Lock Key
Volume keys
• On the Home screen: Controls ringer volume
• During a call: Control your earpiece volume
• When playing a track: Controls volume continuously
Microphone
Charger/USB port
NFC touch
point
Battery Cover
Camera lens
Speaker
Flash
Micro-USIM card slot
WARNING
• Be careful not to damage the NFC touch point on the phone, which is part
of the NFC antenna.
Battery
microSD Card
Slot
Page 14

Getting Started
Installing the micro SIM card
and microSD card
Before you can start exploring your new phone,
you’ll need to set it up. To insert the SIM card:
1 Open the micro SIM card and microSD card
access panel located on the left side of
the phone.
2 Position the micro SIM card into the upper
slot (as shown on the next image) and insert
it until it clicks into place.
3 Position the microSD card into the lower slot
(as shown on the next image) and insert it
until it clicks into place.
4 Close the micro SIM card and microSD card
access panel.
n
NOTE
•
Turn the phone off before inserting or removing
the SIM card.
•
This device supports up to a 64GB microSD
card.
•
Some applications from Play Store store data
on the microSD card as well as on the phone.
Due to this feature, if you skip the unmount
procedure, it can cause an error because
information between the microSD card and the
phone is not accorded properly. In the worst
case, the microSD card can be corrupted or
damaged.
14
Page 15
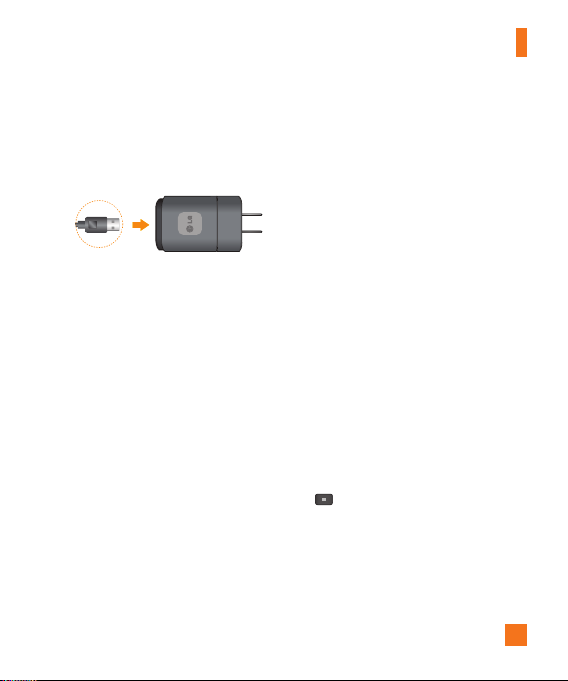
Charging your phone
1 Connect the wall adapter and USB cable as
shown below. The USB symbol on the USB
cable should face toward you.
2 Plug the USB cable (as shown below) into
the phone's Charger/Accessory Port. Make
sure the USB symbol is facing upwards.
Always unplug the charger from the wall
socket after the phone is fully charged to
save unnecessary power consumption of
the charger.
n
NOTE
The battery must be fully charged initially
to improve battery lifetime.
Getting Started
n
NOTE
Your phone has an internal antenna. Be
careful not to scratch or damage this
rear area, as that will cause loss of
performance.
When the battery becomes fully discharged
and you connect the phone to a charger, the
LED lights for the keys at the bottom of the
phone will blink. This is normal operation
for a completely discharged battery to
prevent overfl owing current because the
phone is designed to provide reasonable
protection against damage to the battery.
Once the battery has enough charge, the
screen will turn on and display a battery
image.
Removing the microSD card
To safely remove the microSD card from your
phone, you must first unmount it.
1 From the Home screen, tap the
and tap All settings > General tab >
Storage > Unmount SD card > OK.
2 Remove the access panel and push the card
in. Then gently pull the microSD card from
the slot.
Menu Key
15
Page 16

Getting Started
n
Warning
Do not remove the microSD card without
unmounting it fi rst. Otherwise, it may
damage the microSD card as well as your
phone, and the data stored on the microSD
card may be corrupted.
Formatting the microSD card
Your microSD card may already be formatted.
If it isn’t, you must format it before you can
use it.
n
NOTE
All fi les on the card are deleted when you
format the microSD card.
1 From the Home screen, tap the
and tap
Storage > Unmount SD card > OK.
2 Tap
3 If you set an unlock pattern, enter it and tap
Erase everything.
formatted and ready to use.
n
If there is content on your microSD card,
the folder structure may be different after
formatting since all the fi les will have been
deleted.
All settings
Erase SD card
NOTE
Menu Key
> General tab >
twice.
The card will then be
Switching between and
exiting applications
Multi-tasking is easy with Android because
open applications keep running even when you
open another application. There is no need to
quit an application before opening another. Use
and switch among several open applications.
Android manages each application, stopping
and starting them as needed, to ensure that
idle applications don’t consume resources
unnecessarily.
Switching between applications
- Touch and hold the Home Key . A list of
recently used applications will be displayed.
Then tap the application you want to access.
To stop/exit an application
1 From the Home screen, tap the
and tap
> Applications.
2 Tap one of the tabs at the top of the
screen, choose the desired application
and tap
application.
All settings > General tab
Force stop
Menu Key
(or Stop) to stop the
16
Page 17

Your Home screen
Touch screen tips
With the touch of your finger, you can access
available applications, make menu selections, and
access data saved to your phone. The following
terms are used for describing the different
available actions using the touchscreen:
Tap - A single finger tap selects items, links,
shortcuts and letters on the on-screen keyboard.
Touch and hold the screen by touching it and not lifting your
finger until an action occurs. For example, to
open a contact's available options, touch and
hold the contact in the Contacts list until the
context menu opens.
Drag - Touch and hold an item for a moment
and then, without lifting your finger, move your
finger on the screen until you reach the target
position. You can drag items on the Home screen
to reposition them.
Swipe or slide move your finger across the surface of the
screen, without pausing when you first touch
it (so you don’t drag an item instead). For
example, you can slide the screen up or down
to scroll through a list, or browse through the
different Home screens by swiping from left to
right (and vice versa).
Touch and hold an item on
To swipe or slide, quickly
Double-tap - Double-tap to zoom on a Web
page or a map. For example, quickly double-tap a
section of a Web page to adjust that section to fit
the width of the screen. You can also double-tap
to zoom in and out when using Maps.
Pinch-to-Zoom thumb in a pinch or spread motion to zoom in
or out when using the browser, Maps, Camera,
or browsing pictures.
Rotate the screen - From many applications
and menus, the orientation of the screen adjusts
to the device's physical orientation.
n
NOTE
•
To select an item, tap the center of the icon.
•
Do not to press too hard; the touch screen is
sensitive enough to pick up a light, firm touch.
• Use the tip of your finger to tap the option
you want. Be careful not to tap any other
keys or icons.
Use your index finger and
Proximity sensor
When receiving and making calls, this sensor
automatically turns the backlight off and locks
the touch keypad by sensing when the phone
is near your ear. This extends battery life and
prevents the touch keypad from activating
unintentionally during calls.
17
Page 18

Your Home screen
Lock your phone
When you are not using the phone, press the
Power/Lock Key
This helps prevent accidental presses and saves
battery power.
Also, if you do not use the phone for a while, the
Home screen, or other screen you are viewing, is
automatically replaced with the lock screen after
30 seconds (default) of inactivity to conserve the
battery and prevent pocket dialing.
To wake up your phone, press the
Lock Key
Swipe the screen in any direction to unlock.
The last screen you were working on opens.
n
NOTE
•
The automatic screen timeout can be
configured manually in Settings. To change
it, tap the
Display tab > Screen timeout.
• If there are any programs running when you
lock the phone, they may still be running in
lock mode. It is recommended that you exit
all programs before entering the lock mode
to avoid unnecessary charges (e.g., phone
call, web access and data communications).
18
to lock your phone.
.
The lock screen will appear.
Menu Key
Power/
> All settings >
Setting Swipe, Face Unlock, Pattern,
PIN, Password to unlock your phone
You can slide the screen without entering any
information, utilize facial recognition, draw your
own unlock Pattern or enter a PIN or Password to
add more security to your device. To set Swipe,
Face Unlock, Pattern, PIN, or Password, from the
Home screen tap the Menu Key
screen settings > Select screen lock. Then
choose from Swipe, Face Unlock, Pattern,
PIN, or Password and enter the desired
information.
n
Caution
You are allowed 5 attempts to enter your
screen unlock information. If you used up all 5
opportunities, you will have to wait 30 seconds
to attempt unlocking the phone again.
n
NOTE
The Face Unlock feature is only available after
you set up your Google account on your device.
> Lock
Quick Switch to Silent/Vibrate
Mode
To quickly set your phone to silent or vibrate
mode, slide the Status Bar down and tap
.
Page 19

Your Home screen
Home screen panels
Simply swipe your finger to the left or right to
view the different Home screen panels.
You can also customize each panel with
shortcuts, folders, and widgets, which are
shortcuts to your favorite applications.
n
NOTE
On the Home screen, you can view the Quick
Keys at the bottom of the screen. The Quick
Keys provide easy, one-tap access to the
functions you use the most.
Customizing your Home screen
You can customize your Home screen by
adding quick access items, such as shortcuts
to an application, widgets, or changing the
wallpaper.
•
Apps
: Add shortcuts to applications on the
Home screen.
•
Downloads
applications on the Home screen.
•
Widgets
widgets to your Home screen to allow quick
access to applications without opening the
full application
Wallpapers
•
wallpaper.
: Add shortcuts to downloaded
: Add dynamically updating
: Change the Home screen
To add shortcuts to apps or Widgets on
the Home screen:
1 Select a location (Home screen panels) to
add an item by swiping the Home screen
from left to right or vice versa.
2 Tap the . Or touch and hold an empty part
of the Home screen.
3 Tap the type of item you want to add on the
screen:
Wallpapers.
4 Tap the desired app or widget.
5 You will see a new icon on the Home screen.
To place it on a different panel, touch and
hold it to drag it to the desired location on the
desired panel and release your finger from
the screen.
n
TIP
To add a preloaded application or an application
you have downloaded from Play Store to the
Home screen, simply touch and hold the icon
you want in the Apps screen and drag it to the
desired Home screen panel.
n
NOTE
If there is no available space on a particular
Home screen panel, you must delete or remove
an item before you can add another item. In
this case, you have the option of switching to
another Home screen panel.
Apps, Downloads, Widgets
, or
19
Page 20
Your Home screen
To delete an application icon from the Home
screen, touch and hold the shortcut icon you
want to delete and drag to Remove
top of the screen.
, lift your finger.
You cannot delete the preloaded applications.
(Only their icons can be deleted from the screen).
When > changes to
2 Tap the application icon again and select the
at the
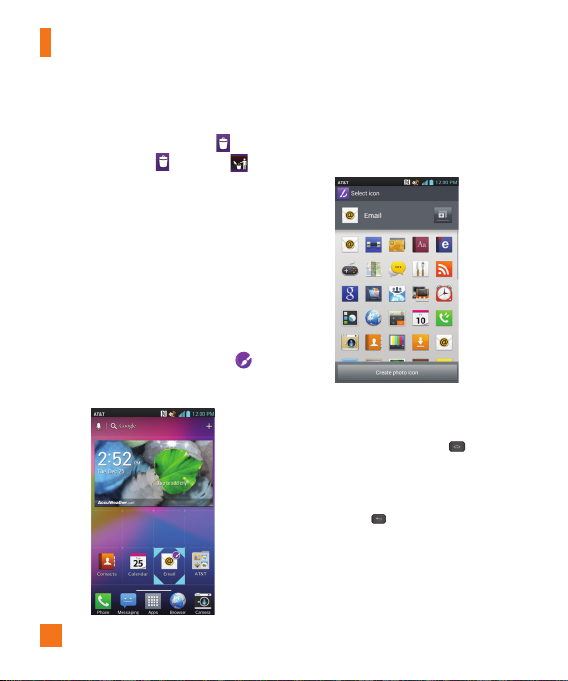
Customizing apps icons on the
Home screen
You can customize each application icon with
images from your Gallery.
1 Touch and hold an application icon until it’s
unlocked from its current position. Then
drop it on the screen. The editing icon
will appear in the upper right corner of the
application.
Getting back to a recently
used application
1 Touch and hold the
2 Tap an icon to open its application or tap
20
desired icon design. Or tap Create photo icon
to take a new picture or select a picture from
the Gallery.
screen will display the icons of applications
that you have used recently.
Back Key
the
application.
Home Key .
to return to the current
The
Page 21
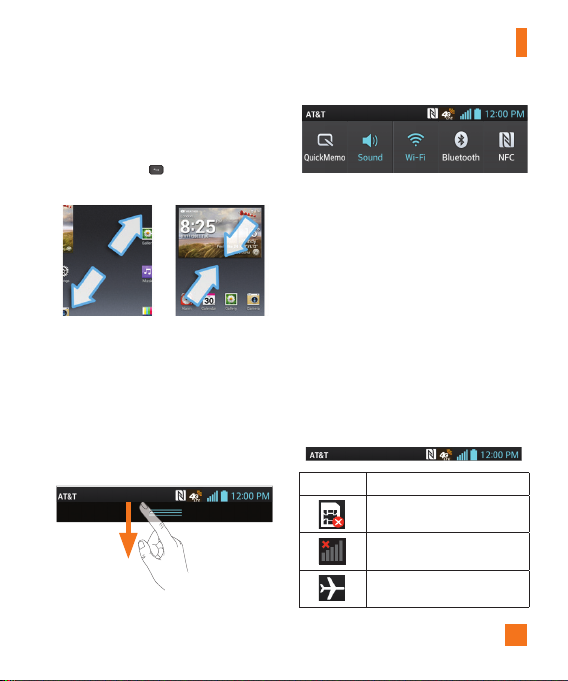
Home screen clean view
You can see the wallpaper without items on
the Home screen by pinching out. Pinch in or
tap the Back Key
widgets again.
to see applications and
Notifications Panel
Notification icons on the Status Bar report
the arrival of new messages, calendar events,
alarms, as well as ongoing events, such as
when you are in a call. You can view a list of
all recent notifications.
The Notifications Panel runs across the top of
your screen.
Your Home screen
Touch and hold the Status Bar and slide
it down with your finger to open the
Notifications Panel. From here, you can check
and quickly turn on and off Sound, Wi-Fi,
Bluetooth, GPS, and any other options you add.
Viewing the Status Bar
The Status Bar uses different icons to display
phone information, such as signal strength,
new messages, battery life, and activate
Bluetooth and data connections.
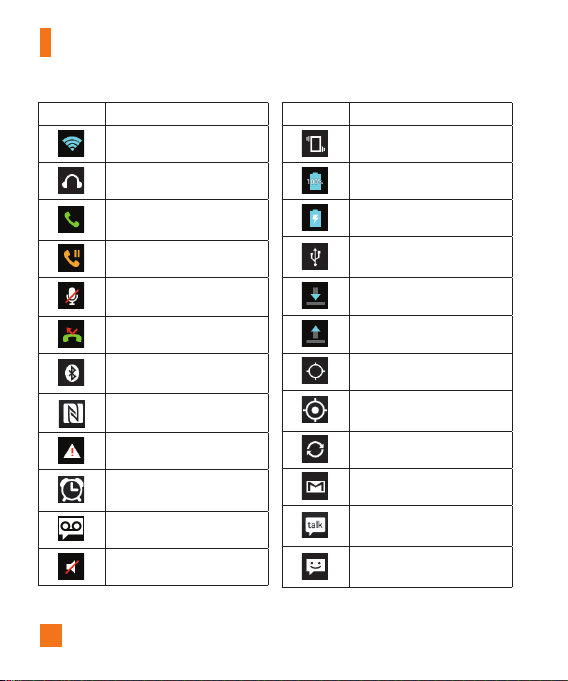
Below is a table explaining the meaning of
icons you are likely to see in the Status Bar.
[Status Bar]
Icon Description
No SIM card inserted
No network signal available
Airplane mode is on
21
Page 22
Your Home screen
Icon Description
Connected to a Wi-Fi network
Wired headset connected
Call in progress
Call on hold
Phone microphone is muted
Missed call
Bluetooth is on
NFC is on
System warning
An alarm is set
New voicemail available
Ringer is silenced
22
Icon Description
Vibrate mode is on
Battery fully charged
Battery is charging
Phone is connected to PC via
USB cable
Downloading data
Uploading data
GPS is on
Receiving location data from
GPS
Data is synchronizing
New Gmail message available
New Google Talk message
available
New text or multimedia
message
Page 23
Your Home screen
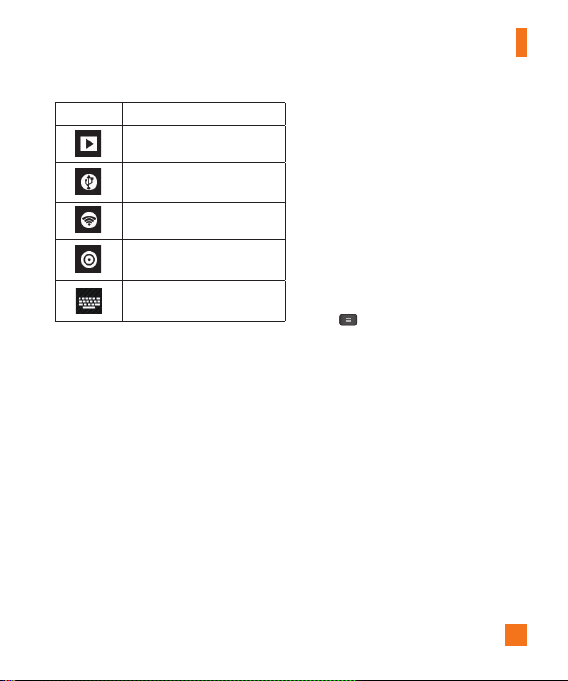
Icon Description
A song is currently playing
USB tethering is active
Portable Wi-Fi hotspot is active
USB tethering and Portable
Wi-Fi hotspot are active
Select input method
On-screen Keyboard
You can enter text using the on-screen
keyboard. The on-screen keyboard displays
automatically on the screen when you need to
enter text. To manually display the keyboard,
simply tap a text field where you want to
enter text.
There are two types of keypads that you can
use:
Android keyboard and LG keyboard.
To select the keyboard:
1 From the Home screen, tap the Menu
Key > All settings > General tab
> Language & input > Default (Under
KEYBOARD & INPUT METHODS).
2 Select the default keyboard between
Android keyboard and LG Keyboard.
OR
1 While entering text, drag the Status Bar
down and tap Select input method.
2 Select the desired input method from
Android keyboard, Google voice
typing or LG Keyboard (default).
23
Page 24
Your Home screen
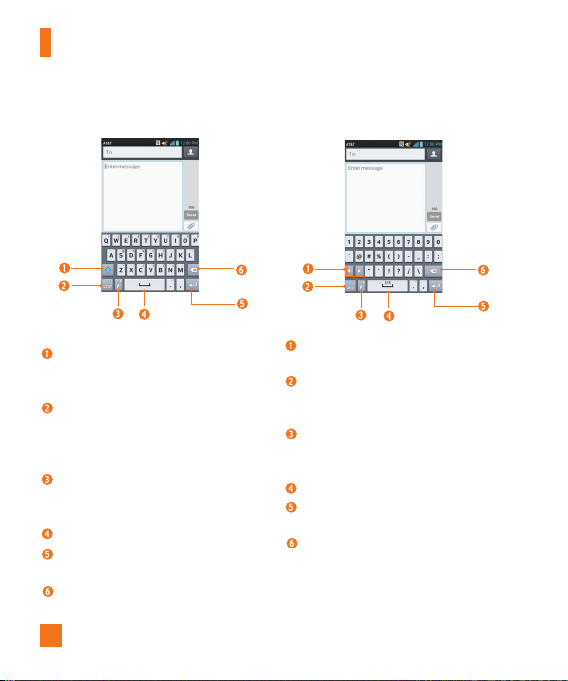
LG keyboard - Letters Entry
Shift Key - Tap once to capitalize the
next letter you type. Double-tap for all
caps.
Number and Symbols/Settings
Key - Tap to change input to number
and symbol entry. Touch and hold to set
various LG keyboard settings.
Handwriting/Voice to Text Key - Tap
to enter text by handwriting. Touch and
hold to enter text by voice.
Space Key - Tap to enter a space.
Enter Key - Tap to move the cursor to
the next line.
Delete Key - Tap to delete characters to
the left of the cursor.
24
LG keyboard - Numbers and Symbols
Arrow Keys - Tap to display additional
keyboard layout for other symbols.
Letters/Settings Key - Tap to change
input to letters entry. Touch and hold to
set various LG keyboard settings.
Handwriting/Voice to Text Key - Tap
to enter text by handwriting. Touch and
hold to enter text by voice.
Space Key - Tap to enter a space.
Enter Key - Tap to move the cursor to
the next line.
Delete Key - Tap to delete characters to
the left of the cursor.
Entry
 Loading...