

Page 1

LG-E975K User Guide
All screen shots in this guide are simulated. Actual
•
displays and the color of the phone may vary.
Some of the contents of this manual may not apply
•
to your phone, depending on the software and your
service provider. All information in this document is
subject to change without notice.
This handset is not suitable for people who have a
•
visual impairment due to the touch screen keyboard.
Copyright ©2012 LG Electronics, Inc. All rights
•
reserved. LG and the LG logo are registered
trademarks of LG Group and its related entities. All
other trademarks are the property of their respective
owners.
Google™, Google Maps™, Gmail™, YouTube™,
•
Google Talk™ and Play Store™ are trademarks of
Google, Inc.
ENGLISH
Page 2

7KLV GHYLFHLVQRWLQWHQGHGIRUVDOHLQWKH86$
2CTVUVCVGOGPV
&KDQJHRU0RGLILFDWLRQVWKDWDUHQRWH[SUHVVO\DSSURYHGE\WKHPDQXIDFWXUHUFRXOGYRLG
WKHXVHUVDXWKRULW\WRRSHUDWHWKHHTXLSPHQW
2CTVUVCVGOGPV
7KLVHTXLSPHQWKDVEHHQWHVWHGDQGIRXQGWRFRPSO\ZLWKWKHOLPLWVIRUDFODVV%GLJLWDO
GHYLFHSXUVXDQWWR3DUWRIWKH)&&5XOHV7KHVHOLPLWVDUHGHVLJQHGWRSURYLGH
UHDVRQDEOHSURWHFWLRQDJDLQVWKDUPIXOLQWHUIHUHQFHLQDUHVLGHQWLDOLQVWDOODWLRQ7KLV
HTXLSPHQWJHQHUDWHVXVHVDQGFDQUDGLDWHUDGLRIUHTXHQF\HQHUJ\DQGLIQRWLQVWDOOHGDQG
XVHGLQDFFRUGDQFHZLWKWKHLQVWUXFWLRQVPD\FDXVHKDUPIXOLQWHUIHUHQFHWRUDGLR
FRPPXQLFDWLRQV+RZHYHUWKHUHLVQRJXDUDQWHHWKDWLQWHUIHUHQFHZLOOQRWRFFXULQD
SDUWLFXODULQVWDOODWLRQ,IWKLVHTXLSPHQWGRHVFDXVHKDUPIXOLQWHUIHUHQFHRUWHOHYLVLRQ
UHFHSWLRQZKLFKFDQEHGHWHUPLQHGE\WXUQLQJWKHHTXLSPHQWRIIDQGRQWKHXVHULV
HQFRXUDJHGWRWU\WRFRUUHFWWKHLQWHUIHUHQFHE\RQHRUPRUHRIWKHIROORZLQJPHDVXUHV
5HRULHQWRUUHORFDWHWKHUHFHLYLQJDQWHQQD
,QFUHDVHWKHVHSDUDWLRQEHWZHHQWKH HTXLSPHQWDQGUHFHLYHU
&RQQHFWWKHHTXLSPHQWLQWRDQRXWOHWRQDFLUFXLWGLIIHUHQWIURPWKDWWRZKLFKWKH
UHFHLYHULVFRQQHFWHG
&RQVXOWWKHGHDOHURUDQH[SHULHQFHGUDGLR79WHFKQLFLDQIRUKHOS
FCC Part 15.19 Statement
This device complies with part15 of FCC rules.
Operation is subject to the following two conditions:
(1) This device may not cause harmful interference.
(2) This device must accept any interference received,
including interference that may cause undesired operation.
$QF[YQTP1RGTCVKQP
7KLVGHYLFHKDVEHHQWHVWHGIRUERG\ZRUQRSHUDWLRQVZLWKWKHGLVWDQFHRIFP
LQFKHVEHWZHHQWKHXVHUĜVERG\DQGWKHSKRQH7RFRPSO\ZLWK)&&5)H[SRVXUH
UHTXLUHPHQWVDPLQLPXPVHSDUDWLRQGLVWDQFHRIFPLQFKHVPXVWEHPDLQWDLQHG
IURPWKHXVHUVERG\7KLUGSDUW\EHOWFOLSVKROVWHUVDQGVLPLODUDFFHVVRULHVFRQWDLQLQJ
PHWDOOLFFRPSRQHQWVPD\QRWEHXVHG%RG\ZRUQDFFHVVRULHVWKDWFDQQRWPDLQWDLQFP
LQFKHVVHSDUDWLRQGLVWDQFHEHWZHHQWKHXVHUVERG\DQGWKHSKRQHDQGKDYHQRW
EHHQWHVWHGIRUW\SLFDOERG\ZRUQRSHUDWLRQVPD\QRWFRPSO\ZLWK)&&5)H[SRVXUHOLPLWV
DQGVKRXOGEHDYRLGHG
9+(+%CWVKQP
7KLVGHYLFHLVFDSDEOHRIRSHUDWLQJLQDQPRGH)RUDQGHYLFHVRSHUDWLQJ
LQWKHIUHTXHQF\UDQJHRI *+]WKH\DUHUHVWULFWHGIRULQGRRURSHUDWLRQVWR
UHGXFHDQ\SRWHQWLDOKDUPIXOLQWHUIHUHQFHIRU0RELOH6DWHOOLWH6HUYLFHV066LQWKH86
:,),$FFHVV3RLQWVWKDWDUHFDSDEOHRIDOORZLQJ\RXUGHYLFHWRRSHUDWHLQDQ
PRGH *+]EDQGDUHRSWLPL]HGIRULQGRRUXVHRQO\
,I\RXU:,),QHWZRUNLVFDSDEOHRIRSHUDWLQJLQWKLVPRGHSOHDVHUHVWULFW\RXU:,),XVH
LQGRRUVWRQRWYLRODWHIHGHUDOUHJXODWLRQVWRSURWHFW0RELOH6DWHOOLWH6HUYLFHV
Page 3

Table of contents
Guidelines for safe and effi cient use .........4
Important notice ......................................10
Getting to know your phone ....................16
Phone overview ......................................16
Installing the Micro-USIM card .................18
Charging the phone ................................19
Locking and unlocking the screen ............19
Your Home screen ...................................20
Touch screen tips ....................................20
Home .....................................................20
Customizing the Home screen .................20
Returning to recently-used applications ....21
Notifi cation drawer ..................................21
Viewing the status bar .............................22
Onscreen keyboard .................................23
Entering accented letters .........................23
Google account set up .............................24
Connecting to Networks and Devices ......25
Wi-Fi ......................................................25
Connecting to Wi-Fi networks ..................25
Calls .........................................................26
Making a call ..........................................26
Calling your contacts ...............................26
Answering and rejecting a call .................26
Adjusting the in-call volume .....................26
Making a second call ..............................26
Viewing your call logs ..............................27
Call settings ...........................................27
2
Contacts ...................................................28
Searching for a contact ...........................28
Adding a new contact..............................28
Favourite contacts ...................................28
Moving contacts from your Old Device to
your New Device ..................................... 29
Messaging ...............................................30
Sending a message ................................30
Threaded box ........................................30
Changing your message settings .............30
E-mail ......................................................31
Managing an email account .....................31
Working with account folders ...................31
Composing and sending email .................31
Camera ....................................................33
Getting to know the viewfi nder ................. 33
Taking a quick photo ..............................34
Once you've taken the photo ...................34
Using the advanced settings ....................35
Video camera ...........................................36
Getting to know the viewfi nder ................. 36
Recording a quick video ..........................37
Using the advanced settings ....................37
Adjusting the volume when viewing a
video ......................................................37
Multimedia ...............................................38
Gallery ...................................................38
After recording a video ............................38
Page 4

Videos ....................................................38
Playing a video .......................................38
Video Wiz ...............................................39
Media Home ........................................... 40
Music Player ...........................................40
Transferring music fi les using USB mass
storage devices ......................................40
Playing a song ........................................41
LG Tag+ .................................................41
QuickMemo function ...............................42
Using the QuickMemo options .................42
Viewing the saved QuickMemo ...............43
Notebook ................................................43
Making a note ........................................43
Getting to know the Notebook ..................43
Utilities .....................................................45
Setting your alarm...................................45
Using your calculator ...............................45
Adding an event to your calendar .............45
Voice recorder ........................................45
Recording a sound or voice .....................45
Sending the voice recording ....................46
Voice Control ..........................................46
Task Manager .........................................46
Polaris Offi ce ..........................................46
FileShare ................................................47
Backup ..................................................47
Back up your smart phone data ...............47
Scheduling automatic backups ................48
Restoring smart phone data .....................48
Using SmartShare ...................................49
The web ...................................................51
Internet ..................................................51
Using the web toolbar .............................51
Using options ..........................................51
LG SmartWorld .........................................52
How to Get to LG SmartWorld from Your
Phone ....................................................52
How to use LG SmartWorld ......................52
Settings ...................................................53
WIRELESS & NETWORKS.........................53
DEVICE ...................................................58
PERSONAL .............................................60
SYSTEM .................................................61
Phone software update ............................63
Phone software update ...........................63
Specifi cations ..........................................65
DivX HD ..................................................65
Dolby Mobile ..........................................65
DTS .......................................................65
Accessories .............................................66
Troubleshooting .......................................67
3
Page 5

Guidelines for safe and effi cient use
Please read these simple guidelines.
Not following these guidelines may be
dangerous or illegal.
Exposure to radio frequency
energy
Radio wave exposure and Specific
Absorption Rate (SAR) information.
This mobile phone model LG-E975K has
been designed to comply with applicable
safety requirements for exposure to radio
waves. These requirements are based on
scientific guidelines that include safety
margins designed to assure the safety of
all persons, regardless of age and health.
•
The radio wave exposure guidelines
employ a unit of measurement known
as the Specific Absorption Rate (SAR).
Tests for SAR are conducted using
standardised methods with the phone
transmitting at its highest certified
power level in all used frequency bands.
•
While there may be differences between
the SAR levels of various LG phone
models, they are all designed to meet
the relevant guidelines for exposure to
radio waves.
•
The SAR limit recommended by the
International Commission on NonIonizing Radiation Protection (ICNIRP) is
4
2 W/kg averaged over 10g of tissue.
•
The highest SAR value for this model
phone tested by DASY4 for use at the
ear is X.XXX W/kg (10g) and when worn
on the body is X.XXX W/Kg (10g).
•
This device meets RF exposure
guidelines when used either in the
normal use position against the ear or
when positioned at least 1.5 cm away
from the body. When a carry case, belt
clip or holder is used for body-worn
operation, it should not contain metal
and should position the product at least
1.5 cm away from your body. In order
to transmit data files or messages, this
device requires a quality connection
to the network. In some cases,
transmission of data files or messages
may be delayed until such a connection
is available. Ensure the above separation
distance instructions are followed until
the transmission is completed.
Page 6
This device meets RF exposure guidelines
0.65
1.03
the phone.
the phone.
when used either in the normal use
position against the ear or when
positioned at least 1.5 cm away from
the body. When a carry case, belt clip or
holder is used for body-worn operation,
it should not contain metal and should
position the product at least 1.5 cm away
from your body. In order to transmit data
files or messages, this device requires
a quality connection to the network. In
some cases, transmission of data files
or messages may be delayed until such
a connection is available. Ensure the
above separation distance instructions
are followed until the transmission is
completed.
The highest SAR value for this device
when tested for use at the body is X.XXX
W/kg.
* The SAR limit for mobile devices used by
the public is 2.0 watts/ kilogram (W/kg)
averaged over ten grams of body tissue.
The guidelines incorporate a substantial
margin of safety to give additional
protection for the public and to account
for any variations in measurements.
SAR values may vary depending on
national reporting requirements and the
network band.
FCC SAR information
Your mobile device is also designed to
meet the requirements for exposure to
radio waves established by the Federal
Communications Commission (USA) and
Industry Canada.
These requirements set a SAR limit of
1.6 W/kg averaged over 1 gram of tissue.
The highest SAR value reported under
this standard during product certifi cation
for use at the ear is X.XX W/kg and when
properly worn on the body is X.XX W/kg.
Additionally, this device was tested for
typical body-worn operations with the
back of the phone kept 1cm (0.39 inches)
between the users body and the back of
the phone.
To comply with FCC RF exposure
requirements, a minimum separation
distance of 1cm (0.39 inches) must be
maintained between the user’s body and
the back of the phone.
5
Page 7

Guidelines for safe and effi cient use
or fix broken, chipped or cracked glass.
Damage to the glass display due to
abuse or misuse is not covered under
the warranty.
•
Your phone is an electronic device that
generates heat during normal operation.
Extremely prolonged, direct skin contact
in the absence of adequate ventilation
may result in discomfort or minor burns.
Therefore, use care when handling
your phone during or immediately after
operation.
•
If your phone gets wet, immediately
unplug it to dry off completely. Do not
attempt to accelerate the drying process
with an external heating source,such as
an oven, microwave or hair dryer.
•
The liquid in your wet phone, changes
the color of the product label inside
your phone. Damage to your device
as a result of exposure to liquid is not
covered under your warranty.
Efficient phone operation
Electronics devices
All mobile phones may receive
interference, which could affect
performance.
•
Do not use your mobile phone near
medical equipment without requesting
6
permission. Avoid placing the phone
over pacemakers, for example, in your
breast pocket.
•
Some hearing aids might be disturbed
by mobile phones.
•
Minor interference may affect TVs,
radios, PCs etc.
Road safety
Check the laws and regulations on the
use of mobile phones in the area when
you drive.
Do not use a hand-held phone while
•
driving.
Give full attention to driving.
•
Pull off the road and park before making
•
or answering a call if driving conditions
so require.
RF energy may affect some electronic
•
systems in your vehicle such as car
stereos and safety equipment.
When your vehicle is equipped with an
•
air bag, do not obstruct with installed
or portable wireless equipment.
It can cause the air bag to fail or
cause serious injury due to improper
performance.
If you are listening to music whilst
•
out and about, please ensure that the
volume is at a reasonable level so that
Page 8
you are aware of your surroundings.
This is of particular importance when
near roads.
Avoid damage to your hearing
To prevent possible hearing
damage, do not listen at
high volume levels for long
periods
Damage to your hearing can occur if
you are exposed to loud sound for long
periods of time. We therefore recommend
that you do not turn on or off the handset
close to your ear. We also recommend
that music and call volumes are set to a
reasonable level.
When using headphones, turn the
•
volume down if you cannot hear the
people speaking near you, or if the
person sitting next to you can hear what
you are listening to.
NOTE: Excessive sound pressure
from earphones and headphones
can cause hearing loss
Glass Parts
Some parts of your mobile device are
made of glass. This glass could break if
your mobile device is dropped on a hard
surface or receives a substantial impact. If
the glass breaks, do not touch or attempt
to remove it. Stop using your mobile
device until the glass is replaced by an
authorised service provider.
Blasting area
Do not use the phone where blasting is in
progress. Observe restrictions and follow
any regulations or rules.
Potentially explosive
atmospheres
Do not use your phone at a refueling
•
point.
Do not use near fuel or chemicals.
•
Do not transport or store flammable
•
gas, liquid or explosives in the same
compartment of your vehicle as your
mobile phone or accessories.
In aircraft
Wireless devices can cause interference
in aircraft.
Turn your mobile phone off before
•
boarding any aircraft.
Do not use it on the ground without
•
permission from the crew.
7
Page 9

Guidelines for safe and effi cient use
Children
Keep the phone in a safe place out of the
reach of small children. It includes small
parts which may cause a choking hazard
if detached.
Emergency calls
Emergency calls may not be available on
all mobile networks. Therefore you should
never depend solely on your phone for
emergency calls. Check with your local
service provider.
Battery information and care
You do not need to completely discharge
•
the battery before recharging. Unlike
other battery systems, there is no
memory effect that could compromise
the battery's performance.
Use only LG batteries and chargers. LG
•
chargers are designed to maximise the
battery life.
Do not disassemble or short-circuit the
•
battery.
Replace the battery when it no longer
•
provides acceptable performance.
The battery pack may be recharged
hundreds of times before it needs
replacing.
8
Recharge the battery if it has not been
•
used for a long time to maximise
usability.
Do not expose the battery charger to
•
direct sunlight or use it in high humidity,
such as in the bathroom.
Do not leave the battery in hot or cold
•
places, as this may deteriorate battery
performance.
There is risk of explosion if the battery is
•
replaced with an incorrect type.
Dispose of used batteries according to
•
the manufacturer's instructions. Please
recycle when possible. Do not dispose
as household waste.
If you need to replace the battery, take it
•
to the nearest authorised LG Electronics
service point or dealer for assistance.
Always unplug the charger from the
•
wall socket after the phone is fully
charged to save unnecessary power
consumption of the charger.
Actual battery life will depend on
•
network configuration, product
settings, usage patterns, battery and
environmental conditions.
Make sure that no sharp-edged items
•
such as animal’s teeth or nails, come
into contact with the battery. This could
cause a fire.
Page 10
Notice!
(i) The device for operation in the
band 5150-5250 MHz is only for
indoor use to reduce the potential
for harmful interference to cochannel mobile satellite systems;
(ii) the maximum antenna gain
permitted for devices in the bands
5250-5350 MHz and 5470-5725
MHz shall comply with the e.i.r.p.
limit; and
(iii) the maximum antenna gain
permitted for devices in the band
5725-5825 MHz shall comply with
the e.i.r.p. limits specified for pointto-point and non point-to-point
operation as appropriate.
* High-power radars are allocated
as primary users (i.e. priority users)
of the bands 5250-5350 MHz and
5650-5850 MHz and these radars
could cause interference and/or
damage to LE-LAN devices.
DECLARATION OF
CONFORMITY
Hereby, LG Electronics declares
that this LG-E975K product is
in compliance with the essential
requirements and other relevant
provisions of Directive 1999/5/
EC. A copy of the Declaration of
Conformity can be found at http://
www.lg.com/global/support/
cedoc/RetrieveProductCeDOC.jsp
Ambient temperatures
Max: +50°C (discharging),
+45°C (charging)
Min: -10°C
Regulatory and Safety
Go to "System settings > About
phone > Regulatory and Safety"
to get regulatory and safety
information
9
Page 11
Important notice
Before you start using the phone, please read this!
Please check to see whether any
problems you encountered with your
phone are described in this section before
taking the phone for service or calling a
service representative.
1. Phone memory
When there is less than 10% of space
available in your phone memory, your
phone cannot receive new messages. You
need to check your phone memory and
delete some data, such as applications
or messages, to make more memory
available.
To uninstall applications:
Touch
1
Apps from the DEVICE category.
Once all applications appear, scroll to
2
and select the application you want to
uninstall.
Touch Uninstall.
3
> Apps tab > Settings >
2. Optimising battery life
Extend your battery's life between
charges by turning off features that you
don't need to having running constantly
in the background. You can monitor
how applications and system resources
consume battery power.
10
Extending your phone's battery life:
•
Turn off radio communications you are
not using. If you are not using Wi-Fi,
Bluetooth or GPS, turn them off.
•
Reduce screen brightness and set a
shorter screen timeout.
•
Turn off automatic syncing for
Gmail, Calendar, Contacts and other
applications.
•
Some applications you have downloaded
may reduce battery power.
To check the battery power level:
•
Touch
About phone from the SYSTEM >
Battery
The battery status (charging or not
charging) and battery level (percentage
charged) is displayed at the top of the
screen.
To monitor and control how battery
power is being used:
•
Touch
> Power saver from the DEVICE
> Battery use from the BATTERY
INFORMATION
Battery usage time is displayed at the
bottom of the screen. It tells you how long
it has been since you last connected your
> Apps tab > Settings >
> Apps tab > Settings
Page 12
phone to a power source or, if currently
connected, how long the phone was last
running on battery power. The screen
shows the applications or services using
battery power, listed in order from the
greatest to smallest amount used.
3. Before installing an open
source application and OS
WARNING
If you install and use an OS other
than the one provided by the
manufacturer it may cause your
phone to malfunction. In addition,
your phone will no longer be
covered by the warranty.
WARNING
To protect your phone and
personal data, only download
applications from trusted sources,
such as Play Store™. If there are
improperly installed applications
on your phone, it may not work
normally or a serious error may
occur. You must uninstall those
applications and all associated data
and settings from the phone.
4. Using unlock pattern
Set unlock pattern to secure your phone.
Touch
Lock screen from DEVICE > Select
screen lock > Pattern.This opens a
screen that guide you through how to
draw a screen unlock pattern. You have to
create a Backup PIN as a safety measure
if you forgot pattern lock.
Caution: Create a Google account
before setting an unlock pattern and
remember Backup PIN you created
while creating Pattern lock.
When you can’t recall your unlock
Pattern, PIN, or Password:
< If you have forgotten pattern >
If you logged in to your Google account
> Apps tab > Settings >
WARNING
Precautions to take when using
pattern lock.
It is very important to remember
the unlock pattern you set. You will
not be able to access your phone
if you use an incorrect pattern 5
times. You have 5 opportunities
to enter your unlock pattern, PIN
or password. If you have used all
5 opportunities, you can try again
after 30 seconds.
11
Page 13
Important notice
on the phone but failed to enter the
correct pattern 5 times, tab the Forgot
Pattern button on the bottom of the
screen. You are then required to log in
with your Google Account or you have to
enter Backup PIN which you entered while
creating Pattern Lock.
If you have not created a Google account
on the phone or you forgot Backup PIN,
you have to perform a hard reset.
< If you have forgotten PIN or
Password >
If you forgot your PIN or Password, you
need to do hard reset.
Caution: If you perform a hard reset,
all user applications and user data are
deleted.
Note: If you have not logged in
Google Account and forgot Unlock
Pattern, you need to enter Backup
PIN.
5. Using the hard reset
(Factory reset)
If your phone does not restore to the
original condition, use a Hard Reset
(Factory Reset) to initialize it.
1
Turn the power off.
2
Press and hold the Power/Lock key
+ Volume Down key.
12
Once LG Logo appears on the screen,
3
release all Keys.
After some seconds, allow you to
4
select factory reset function in the
Android system recovery utility.
Scroll the list by Volume keys and
5
select it by Power/Lock key.
WARNING
If you perform a Hard Reset, all
user applications, user data and
DRM licenses will be deleted.
Please remember to back up any
important data before performing a
Hard Reset.
6. Opening and switching
applications
Multitasking is easy with Android because
you can keep more than one application
running at the same time. There's no
need to quit an application before opening
another. Use and switch between several
open applications. Android manages each
application, stopping and starting them
as needed to ensure that idle applications
don't consume resources unnecessarily.
Page 14
To return to view list recently used
applications:
Simply press Recent apps key
To stop applications:
1
Touch
> Apps tab > Settings >
Apps > Running
Scroll and touch the desired applica-
2
tion and touch Stop to stop it.
7. Installing PC Software (LG
PC Suite)
"LG PC Suite" PC Application is a program
that helps you connect your device to
a PC via a USB cable and Wi-Fi. Once
connected, you can use the functions of
your device from your PC.
With your "LG PC Suite" PC
Application, You Can...
Manage and play your media contents
•
(music, movie, pictures) on your PC.
Send multimedia contents to your
•
device.
Synchronizes data (schedules, contacts,
•
bookmarks) in your device and PC.
Backup the applications in your device.
•
Update the softwares in your device.
•
Backup and restore the device.
•
Play multimedia contents of your PC
•
from your device.
NOTE: You can use the Help menu
from the application to find out
how to use your "LG PC Suite" PC
application.
Installing "LG PC Suite" PC Application
"LG PC Suite" PC application can be
downloaded from the webpage of LG.
1
Go to www.lg.com and select a country of your choice.
2
Go to Support > MOBILE SUPPORT
> LG Mobile Phones > Select the
Model (LG-E975K) or Go to Support >
Mobile Phone Support > Select the
Model (LG-E975K).
3
Click PC Sync from MANUALS &
DOWNLOAD, and click DOWNLOAD to
download “LG PC Suite” PC software
or Click PC Sync from Download, and
click WINDOW PC Sync Download to
download "LG PC Suite" PC software.
System Requirements for "LG PC
Suite" PC software
•
OS: Windows XP 32 bit(Service pack 2),
Windows Vista 32 bit/64 bit, Windows 7
32 bit/64 bit
•
CPU: 1 GHz or higher processors
•
Memory: 512 MB or higher RAMs
•
Graphic card: 1024 x 768 resolution,
13
Page 15
Important notice
32 bit color or higher
•
HDD: 100 MB or more free hard disk
space (More free hard disk space may
be needed depending on the volume of
data stored.)
•
Required software: LG integrated drivers,
Windows Media Player 10 or later
NOTE: LG Integrated USB Driver
LG integrated USB driver is
required to connect an LG device
and PC and installed automatically
when you install "LG PC Suite" PC
software.
8. Synchronising your phone
to a Computer
Data from your device and PC can be
synchronized easily with "LG PC Suite"
PC application for your convenience.
Contacts, schedules, and bookmarks can
be synchronized.
The procedure is as follows:
1
Connect your device to PC. (Use a USB
cable or Wi-Fi connection.)
2
After connection, run the program
and select the device section from the
category on the left side of the screen.
3
Click [Personal information] to select.
Select the checkbox of contents to
4
synchronize and click the Sync button.
9. Synchronising your phone
to a computer via USB
NOTE: To synchronize your phone
with your PC using the USB cable,
you need to install LG PC Suite
onto your PC.
Please refer to previous pages to
install LG PC Suite.
Touch > Apps tab > Settings >
1
Storage from the DEVICE to check out
the storage media.
Connect the phone to your PC using
2
the USB cable.
USB connection type list will appear in
3
your phone screen, and select Media
sync (MTP) option.
Open the memory folder on your PC.
4
You can view the mass storage content on your PC and transfer the fi les.
Copy the fi les from your PC to the
5
drive folder.
Select Charge only option to discon-
6
nect the phone.
14
Page 16

To disconnect your phone from the
computer:
Open the notification drawer and touch
> Charge only to disconnect your
phone from the computer safely.
10. Hold your phone upright
Hold your mobile phone vertically, as you
would a regular phone. The LG-E975K
has an internal antenna. Be careful not to
scratch or damage the back of the phone,
as this may affect performance.
While making/receiving calls or sending/
receiving data, avoid holding the lower
part of the phone where the antenna is
located. Doing so may affect call quality.
11. When the screen freezes
If the screen freezes or the phone
does not respond when you try to
operate it:
Press and hold the Power/Lock key for
10 seconds to turn it off.
If it still does not work, please contact the
service centre.
15
Page 17
Getting to know your phone
Phone overview
Earpiece
Front-Facing Camera lens
Proximity / Luminance Sensor
Power/Lock key
•
Switch your phone on/off by pressing and holding this key.
•
Short press to lock/unlock the screen.
Back key
Return to the previous screen.
Home key
Return to the home screen from any screen.
Menu key
Check what options are available.
•
Go to Google Search™ by touching and holding this key.
•
NOTE: Proximity sensor
When receiving and making calls,
the proximity sensor automatically
turns the backlight off and locks
the touch screen by sensing when
the phone is near your ear. This
extends battery life and prevents
you from unintentionally activating
the touch screen during calls.
16
WARNING
Placing a heavy object on the
phone or sitting on it can damage
the LCD and touch screen
functions. Do not cover the LCD
proximity sensor with protective
film. This could cause the sensor to
malfunction.
Page 18
olume keys
V
•
In the home screen: Control ringer volume.
•
During a call: Control your earpiece volume.
•
When playing a track: Control volume continuously.
TIP! QuickMemo function
Press and hold the Volume Up and Volume Down Keys for one
second to use the QuickMemo function.
Power/Lock key
SIM card tray
Earphone Jack
Camera lens
Flash
Speaker
WARNING
Encloses the battery compartment. Please do not open the back cover.
17
Page 19
Getting to know your phone
Installing the Micro-USIM card
Before you start exploring your new phone, you may insert the Micro-USIM card.
The eject button is a small round aperture just above the tray door. To install a new
Micro-USIM card:
Insert the SIM ejection tool that comes with the phone (or a thin pin) into the eject
button aperture, and push fi rmly but gently until the tray pops out.
Remove the tray and place the Micro-USIM card inside it, with the contacts out and
the angled corner to the right. There is only one possible way to fi t the card snugly
into the tray.
Carefully reposition the tray in the slot and push it gently back into the phone.
NOTE: Make sure the gold contact area on the card is facing downwards.
18
Page 20
Charging the phone
The charger connector is at the bottom of the phone. Insert one end of the charging
cable into the phone and plug the other end into an electrical socket.
NOTE: The battery must be fully charged initially to improve battery lifetime.
Locking and unlocking the screen
If you do not use the phone for a while, the screen is turned off and locked
automatically. This helps to prevent accidental touches and saves battery power.
When you are not using the LG-E975K, press the Power/Lock key
phone.
If there are any programs running when you set lock screen, they may be still running
in Lock mode. It is recommended that you exit all programs before entering Lock mode
to avoid unnecessary charges (e.g. phone calls, web access and data communications).
To wake up your phone, press the Power/Lock key
appear. Touch and slide the lock screen in any direction to unlock your home screen.
The last screen you viewed will open.
. The lock screen will
to lock your
19
Page 21
Your Home screen
Touch screen tips
Here are some tips on how to navigate
around your phone.
Touch – To choose a menu/option or
open an application, touch it.
Touch and hold – To open an options
menu or grab an object you want to move,
touch and hold it.
Drag – To scroll through a list or move
slowly, drag across the touch screen.
Flick – To scroll through a list or move
quickly, flick across the touch screen (drag
quickly and release).
NOTE:
To select an item, touch the centre
•
of the icon.
Do not press too hard; the touch
•
screen is sensitive enough to pick up
a light, firm touch.
Use the tip of your finger to touch
•
the option you want. Be careful not
to touch any other keys.
Home
Simply swipe your finger to the left or right
to view the panels. You can customize
each panel with Apps, Downloads,
Widgets and wallpapers.
NOTE: Some screen images may
be different depending on your
phone provider.
On your home screen, you can view menu
icons at the bottom of the screen. Menu
icons provide easy, one-touch access to
the functions you use the most.
Touch the Phone icon to bring up the
touch screen dialpad to make a call.
Touch the Contacts icon to open your
contacts.
Touch the Messaging icon to access
the messaging menu. This is where
you can create a new message.
Touch the Browser icon to access the
web browser.
Touch the Apps icon at the bottom of
the screen. You can then view all your
installed applications. To open any
application, simply touch the icon in
the applications list.
Customizing the Home screen
You can customize your home screen
by adding Apps, Downloads, Widgets or
Wallpapers. For more convenience using
your phone, add your favourite apps and
widgets to the home screen.
20
Page 22
To add items on your home screen:
1
Touch and hold the empty part of the
home screen.
Or touch
at the top of the right
side.
2
In the Add Mode menu, select items
you want to add. You will then see
added items on the home screen.
3
Drag it to the location you want and lift
your fi nger.
To remove an item from the home
screen:
•
Home screen > touch and hold the
icon you want to remove > drag it to
TIP! To add an application icon
to the home screen from the
Apps menu, touch and hold the
application you want to add.
TIP! Using folders
You can combine several app icons
in a folder. Drop one app icon over
another on a home screen, and the
two icons will be combined.
Returning to recently-used
applications
1
Touch and hold the Home key. The
screen displays a pop-up with icons of
applications you used recently.
2
Touch an icon to open the application.
Or touch the Back key to return to
your previous screen.
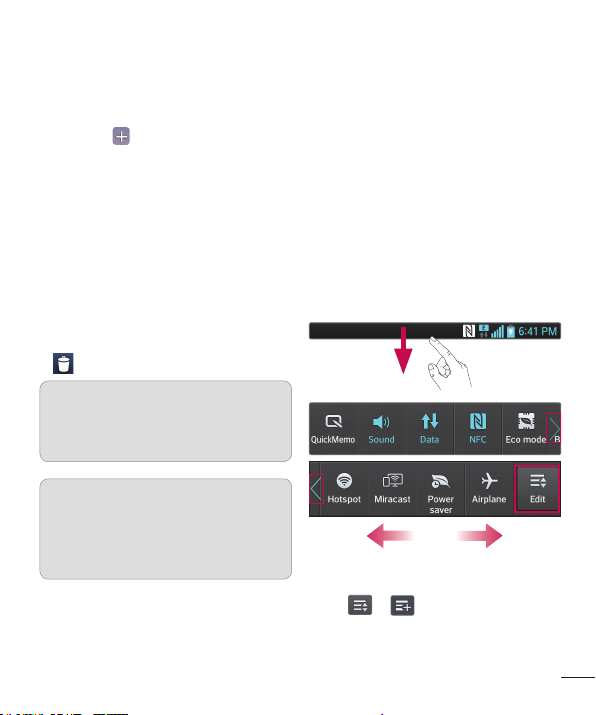
Notification drawer
The notification drawer runs across the
top of your screen.
Touch and slide the notification drawer
down with your finger.
Touch
notification panel.
> to manage the
21
Page 23
Your Home screen
Viewing the status bar
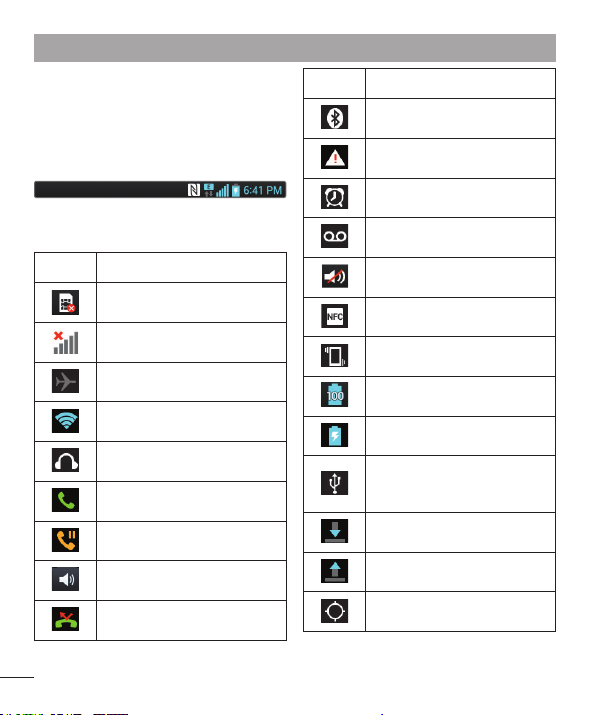
The status bar uses different icons to
display phone information such as signal
strength, new messages, battery life,
active Bluetooth and data connections.
Icon Description
Bluetooth is on
System warning
Below is a table explaining the meaning of
icons you're likely to see in the status bar.
Icon Description
No Micro-USIM card
No signal
Airplane mode
Connected to a Wi-Fi network
Wired headset
Call in progress
Call hold
Speakerphone
Missed call
22
Alarm is set
New voicemail
Ringer is silenced
NFC is on
Vibrate mode
Battery fully charged
Battery is charging
Phone is connected to PC via
USB cable
Downloading data
Uploading data
GPS is acquiring
Page 24
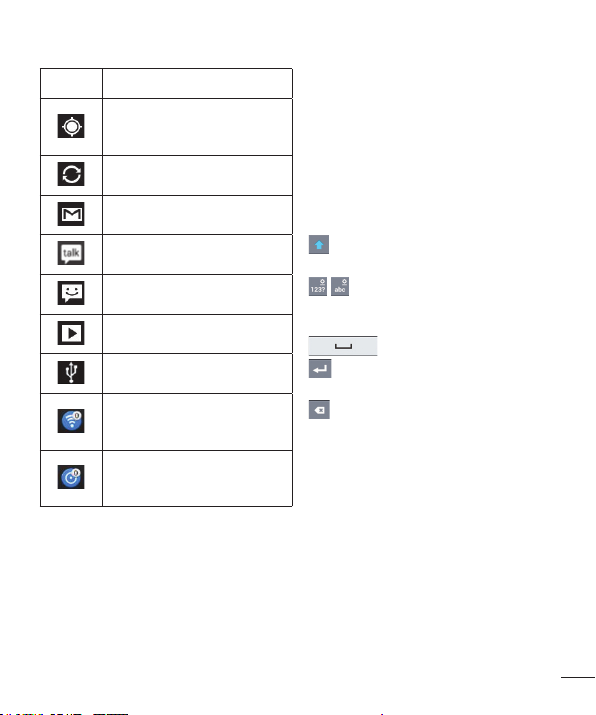
Icon Description
Receiving location data from
GPS
Data is syncing
New Gmail
New Google Talk message
New message
Song is playing
USB tethering is active
Portable Wi-Fi hotspot is
active
Both USB tethering and
portable hotspot are active
Onscreen keyboard
You can enter text using the onscreen
keyboard. The onscreen keyboard appears
automatically on the screen when you
need to enter text. To manually display the
keyboard, simply touch a text field where
you want to enter text.
Using the keypad & entering text
Tap once to capitalize the next letter
you type. Double-tap for all caps.
Tap to switch to the numbers and
symbols keyboard. You can also touch and
hold this tab to view the Settings menu.
Tap to enter a space.
Tap to create a new line in the
message field.
Tap to delete the previous character.
Entering accented letters
When you select French or Spanish as the
text entry language, you can enter special
French or Spanish characters (e.g. "á").
For example, to input "á", touch and hold
the "a" key until the zoom-in key grows
bigger and displays characters from
different languages.
Then select the special character you
want.
23
Page 25
Google account set up
When you first turn on your phone, you
have the opportunity to activate the
network, to sign into your Google Account
and how you want to use some Google
services.
To set up your Google account:
Sign into a Google Account from the
•
prompted set up screen.
OR
•
Touch
Google application, such as Gmail >
select New to create a new account.
If you have a Google account, touch
Existing, enter your email address and
password, then touch Sign in.
Once you have set up your Google
account on your phone, your phone
automatically synchronizes with your
Google account on the web.
Your contacts, Gmail messages, Calendar
events and other information from these
applications and services on the web
are synchronized with your phone. (This
depends on your synchronisation settings.)
After signing in, you can use Gmail™
and take advantage of Google services on
your phone.
> Apps tab > select a
24
Page 26
Connecting to Networks and Devices
Tap Wi-Fi menu again to see a list of
Wi-Fi
With Wi-Fi, you can use high-speed
Internet access within the coverage of
the wireless access point WAP. Enjoy
wireless Internet using Wi-Fi, without extra
charges.
Connecting to Wi-Fi networks
To use Wi-Fi on your phone, you need
to access a wireless access point or
"hotspot". Some access points are
open and you can simply connect to
them. Others are hidden or use security
features, you must configure your phone
to be able to connect to them.
Turn off Wi-Fi when you're not using it to
extend the life of your battery.
NOTE: If you are out of the Wi-Fi
zone or set Wi-Fi to OFF, additional
charges may be applied by your
mobile operator for mobile data
use.
Turning Wi-Fi on and connecting to a
Wi-Fi network
1
Touch
> Wi-Fi from the WIRELESS &
NETWORKS
Set Wi-Fi to ON to turn it on and start
2
scanning for available Wi-Fi networks.
> Apps tab > Settings
3
active and in-range Wi-Fi networks.
Secured networks are indicated by a
•
lock icon.
Touch a network to connect to it.
4
If the network is secured, you are
•
prompted to enter a password or
other credentials. (Ask your network
administrator for details)
After connecting to a Wi-Fi
5
network,the status bar displays icon
that indicate Wi-Fi status.
25
Page 27
Calls
Making a call
Touch to open the keypad.
1
Enter the number using the keypad. To
2
delete a digit, touch the
Touch
3
To end a call, touch the End icon
4
TIP! To enter "+" to make
international calls, touch and hold
to make a call.
.
Calling your contacts
Touch to open your contacts.
1
Scroll through the contact list or enter
2
the fi rst few letters of the contact
you want to call by touching Search
contacts.
In the list, touch the contact twice or
3
touch
you want to call.
Answering and rejecting a call
When you receive a call in Lock state,
hold and slide the
call.
Hold and slide the
incoming call.
Hold and slide the Quick msg icon
from the bottom if you want to send a
message.
.
to Answer incoming
to Decline an
TIP! Quick messages
You can send a message quickly
using this function. This is useful
if you need to reject a call with
message during a meeting.
.
Adjusting the in-call volume
To adjust the in-call volume during a call,
use the Volume up and down keys on the
left-hand side of the phone.
Making a second call
During your fi rst call, touch Menu >
1
Add call and dial the number. Also,
you can go recent dialled list by
touching
by touching
you want to call.
2
Touch
3
Both calls are displayed on the call
screen. Your initial call is locked and
put on hold.
4
Touch the displayed number to toggle
between calls. Or touch
call to make a conference call.
To end active calls, touch End or press
5
Home Key and slide the notifi cation
bar down and select End call icon
or can search contacts
and select the contact
to make the call.
Merge
.
26
Page 28
NOTE: You are charged for each
call you make.
Viewing your call logs
On the home screen, touch and
choose the Call logs tab
.
View a complete list of all dialled, received
and missed calls.
TIP! Touch any call log entry to
view the date, time and duration of
the call.
TIP! Press the Menu key, then
touch Delete all to delete all the
recorded items.
Call settings
You can configure phone call settings
such as call forwarding and other special
features offered by your carrier.
1
On the home screen, touch
Touch the Menu key.
2
Tap Call settings and choose the
3
options that you want to adjust.
.
27
Page 29
Contacts
Add contacts to your phone and
synchronize them with the contacts in
your Google account or other accounts
that support contact syncing.
Searching for a contact
In the home screen
Touch
1
Touch Search contacts and enter the
2
contact name using the keyboard.
Adding a new contact
Touch , enter the new contact's
1
number, then press the Menu key.
Touch Add to Contacts > Create
new contact.
If you want to add a picture to the new
2
contact, touch the image area.
Choose from Take photo or Select
from Gallery.
Select the contact type by touching
3
Touch a category of contact informa-
4
tion and enter the details about your
contact.
Touch Save.
5
to open your contacts.
.
Favourite contacts
You can classify frequently called contacts
as favourites.
Adding a contact to your favourites
1
Touch
Touch a contact to view their details.
2
Touch the star to the right of the
3
contact's name. The star turns yellow
color.
Removing a contact from your
favourites list
Touch
1
Touch the
2
contact to view its details.
Touch the yellow color star to the right
3
of the contact's name. The star turns
grey and the contact is removed from
your favourites.
to open your contacts.
to open your contacts.
tab, and choose a
28
Page 30

Moving contacts from your
Old Device to your New
Device
Export your contacts as a CSV file from
your old device to your PC using a PC
sync program.
1
Install "LG PC Suite" on the PC fi rst.
Run the program and connect your
Android mobile phone to the PC using
a USB cable.
2
On the top menu, select Device >
Import to device > Import contacts.
3
A popup window to select the fi le type
and a fi le to import will appear.
4
On the popup, click the Select a fi le
and Windows Explorer will appear.
5
Select the contacts fi le to import in
Windows Explorer and click the Open.
6
Click OK.
7
A Field mapping popup to link the
contacts in your device and new
contacts data will appear.
8
If there is a confl ict between the data
in your PC contacts and device contacts, make the necessary selections
or modifi cations in LG PC Suite.
9
Click OK.
29
Page 31
Messaging
Your LG-E975K combines SMS and MMS
into one intuitive, easy-to-use menu.
Sending a message
Touch on the home screen, and
1
touch
to open a blank message.
2
Enter a contact name or contact
number in the To fi eld. As you enter
the contact name, matching contacts
appear. You can touch a suggested recipient. You can add multiple contacts.
NOTE: You will be charged for a
text message for every person you
send the message to.
Touch Enter message fi eld and start to
3
compose your message.
Press
4
Choose from Change skin, Add subject, Quick messages, Insert smilry
and Discard.
TIP! You can touch icon to
attach the file you want to share
with your message.
Touch Send to send your message.
5
Responses appear on the screen. As
6
you view and send additional messages, a message thread is created.
to open the Options menu.
WARNING: The 160-character
limit may vary from country to
country depending on the language
and how the SMS is coded.
WARNING: If an image,
video or audio file is added to an
SMS message, it is automatically
converted into an MMS message
and you are charged accordingly.
Threaded box
Messages (SMS, MMS) exchanged
with another party can be displayed
in chronological order so that you can
conveniently see an overview of your
conversation.
Changing your message
settings
Your LG-E975K message settings are
predefined, so you can send messages
immediately. You can change the settings
based on your preferences.
Touch Messaging icon on the home
•
screen, and touch the Menu key, then
tap Settings.
30
Page 32
E-mail
You can use the E-mail application to
read emails from services like Gmail. The
E-mail application supports the following
account types: POP3, IMAP and Exchange.
Your service provider or system
administrator can provide the account
settings you need.
Managing an email account
The first time you open the E-mail
application, a setup wizard opens to help
you to set up an email account.
After the initial setup, E-mail displays the
contents of your inbox. If you have added
more than one account, you can switch
among accounts.
To add another email account:
•
Touch
> touch
Accounts screen, touch
account.
To change an email account's setting:
•
Touch
> touch
Accounts screen, touch
settings.
> Apps tab > E-mail
> Accounts > in the
> Add
> Apps tab > E-mail
> Accounts > in the
> Entire
To delete an email account:
•
Touch
> touch
Accounts screen, touch
account > touch an account you want
to delete > Remove > select Yes.
> Apps tab > E-mail
> Accounts > in the
> Remove
Working with account folders
Touch > Apps tab > E-mail, touch
and select Folders.
Each account has an Inbox, Outbox,
Sent and Drafts folder. Depending on the
features supported by your account's
service provider, you may have additional
folders.
Composing and sending email
To compose and send a message
1
While in the E-mail application, touch
.
the
2
Enter an address for the message's
intended recipient. As you enter text,
matching addresses are offered from
your Contacts. Separate multiple addresses with semicolon.
3
Touch Cc/Bcc fi eld to add Cc/Bcc and
Touch
Enter the text of the message.
4
to attach fi les if required.
31
Page 33
E-mail
Touch the .
5
If you aren't connected to a network,
for example, if you're working in
airplane mode, the messages that you
send are stored in your Outbox folder
until you're connected to a network
again. If it contains any pending messages, the Outbox is displayed on the
Accounts screen.
TIP! When a new email arrives
in the inbox, you will receive a
notification by sound or vibration.
Tap the email notification to stop
notifications.
32
Page 34
Camera
Getting to know the viewfinder
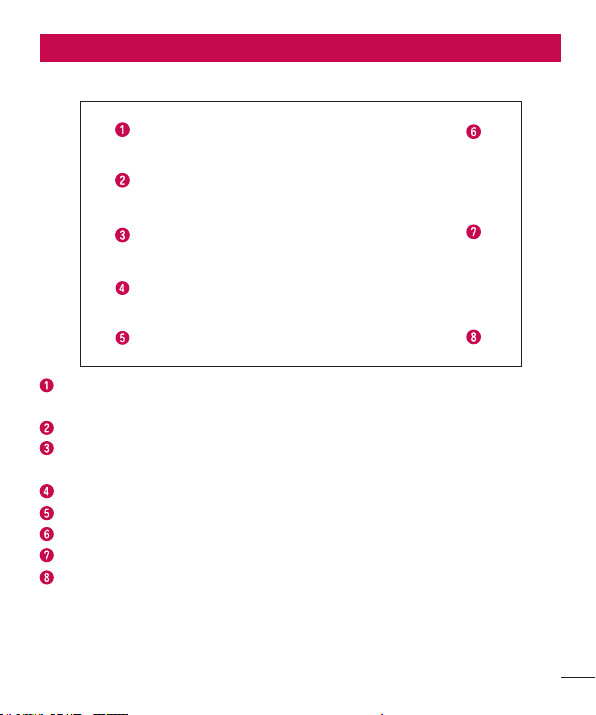
Swap camera – Switch between the rear–facing camera lens and the front–facing
camera lens.
Cheese shutter – Say "Cheese" when you get ready to take a photo.
Time catch shot – Touch this icon to capture the missing moment before pressing
the shutter.
Shot mode – Choose from Normal, HDR, Panorama or Continuous shot.
Settings – Touch this icon to open the Settings menu.
Video mode – Touch this icon to switch to video mode.
Taking a photo
Gallery – Touch to view the last photo you captured. This enables you to access
your gallery and view saved photos within camera mode.
33
Page 35
Camera
Taking a quick photo
1
Open the Camera application.
2
Hold the phone, point the lens towards
the subject you want to photograph.
3
Touch the screen and a focus box will
appear in the viewfi nder screen.
4
When the focus box turns green, the
camera has focused on your subject.
5
Once you've taken the photo
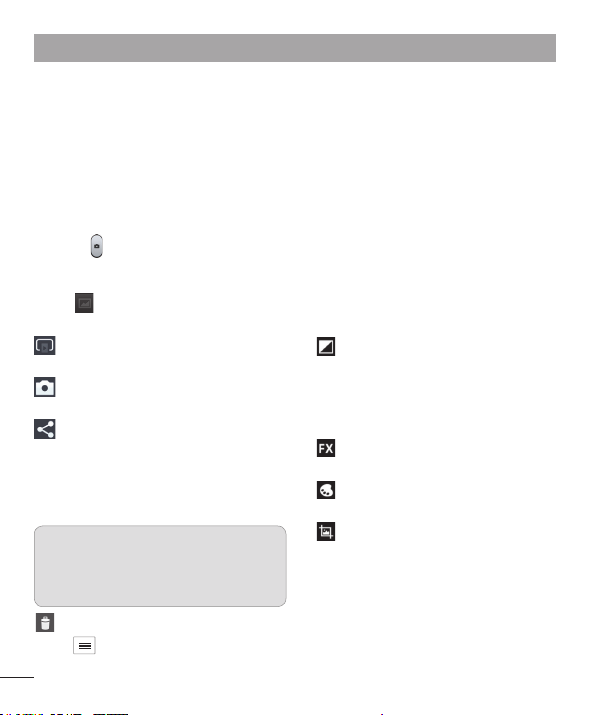
Touch to view the last photo you
captured.
Tou ch
to capture the photo.
Touch
Touch to share your photo via
SmartShare function.
Touch to take another photo
immediately.
Touch to share your photo via
Bluetooth, E-mail, Facebook,
FileShare, Gmail, Google+, Memo,
Messaging, Picasa, Social+ or
Twitter.
TIP! If you have an SNS account
and set it up on your phone, you
can share your photo with the SNS
community.
Touch to delete the photo.
to open the options.
Set image as – Touch to use the photo
as a Contact photo, Home Screen
wallpaper or Lockscreen Wallpaper.
Move – Touch to move the photo to other
place.
Copy – Touch to copy the selected photo
and save it to other album.
Rename – Touch to edit the name of the
selected picture.
Rotate left/right – To rotate left or right.
Crop – Crop your photo. Move your finger
across the screen to select the area.
Edit – View and edit the picture.
Select the photo resolution. If you
choose the high resolution, the file
size will increase, which means you
will be able to store fewer photos in
the memory.
Improves colour qualities in different
lighting conditions.
Applies artistic effects to the
pictures.
Applies the additional options for
pictures.
Slideshow – Automatically shows you the
images one after the other.
Details – Find out more information about
the contents.
34
Page 36
Using the advanced settings
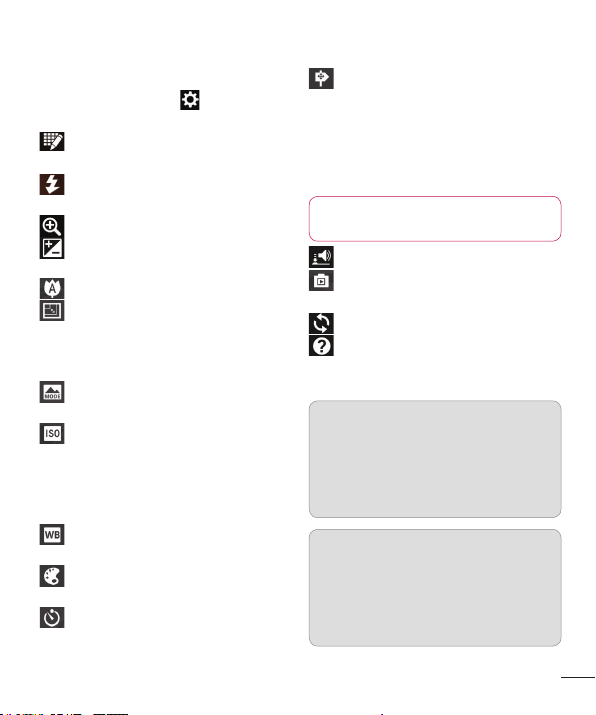
In the viewfinder, touch to open all
advanced options.
– Touch if you want to change the
viewfinder menu.
– Allows you to turn on the flash
when taking a photo in dark conditions.
– Zoom in or out
– This defines and controls the
amount of sunlight entering the photo.
– Focuses on the specific spot.
– Select the photo resolution. If you
choose the high resolution, the file size
will increase, which means you will be
able to store fewer photos in the memory.
– Finds the color and light settings
appropriate for the current environment.
– The ISO rating determines the
sensitivity of the camera's light sensor.
The higher the ISO, the more sensitive
the camera is. This is useful in darker
conditions when you cannot use the flash.
– Improves colour qualities in
different lighting conditions.
– Applies artistic effects to the
pictures.
– Set a delay after the capture button
is pressed. This is ideal if you want to be
in the photo.
– Activate to use your phone's
location-based services. Take pictures
wherever you are and tag them with the
location. If you upload tagged pictures to
a blog that supports geotagging, you can
see the pictures displayed on a map.
NOTE: This function is only
available when GPS is active.
– Select one of shutter sounds.
– It automatically shows you the
picture you just took.
– Restore all camera default settings.
– Touch whenever you want to
know how some function operates. This
provides you with a quick guide.
TIP! When you exit the camera,
some settings return to their
defaults, such as white balance,
colour tone, timer and scene mode.
Check these before you take your
next photo.
TIP! The Settings menu is
superimposed over the viewfinder
so, when you change elements
of the photo colour or quality, you
see a preview of the image change
behind the Settings menu.
35
Page 37
Video camera
Getting to know the viewfinder
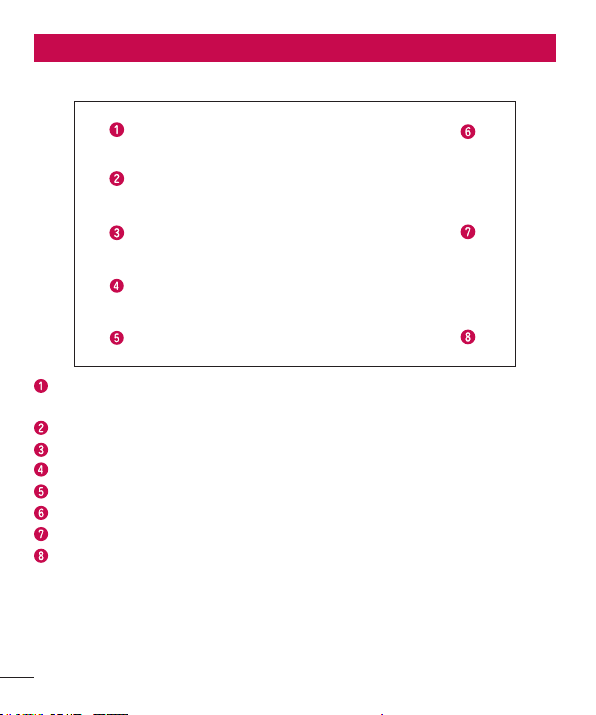
Swap camera – Switch between the rear–facing camera lens and the front-facing
camera lens.
Video size – Touch to set the size (in pixels) of the video you are recording.
Live effect – Live effect provides various visual effects when taking a video.
Flash – Allows you to turn on the flash when taking a video in dark conditions.
Settings – Touch this icon to open the settings menu.
Camera mode – Touch this icon to switch to camera mode.
Start recording
Gallery – Touch to view the last video you recorded. This enables you to access your
gallery and view your saved videos from within video mode.
36
Page 38
Recording a quick video
1
Open the camera application and
touch video mode button.
2
The video camera viewfi nder appears
on the screen.
3
Holding the phone, point the lens towards the subject you want to capture
in your video.
4
5
once to start recording.
Touch
A red light appears at the top corner
of the viewfi nder with a timer showing
the length of the video.
Tip!
Touch
recording a video.
6
to capture image during
Touch on the screen to stop recording.
Using the advanced settings
Using the viewfinder, touch to open all
the advanced options.
– Touch if you want to change the
viewfinder menu.
– Zoom in or zoom out.
– This defines and controls the
amount of sunlight entering the video.
– Improves colour qualities in
different lighting conditions.
– Choose a colour tone to use for
your new view.
– Activate to use your phone's
location-based services.
– Choose Off to record a video
without sound.
– Auto review automatically shows
you the video you just recorded.
– Restore all video camera default
settings.
– Touch if you want to know how this
function operates. This provides you with
a quick guide.
Adjusting the volume when
viewing a video
To adjust the volume of a video while it
is playing, use the volume keys on the
phone.
37
Page 39
Multimedia
Gallery
Touch > Apps tab > Gallery. Open
a list of catalogue bars that store all your
multimedia files.
You can store multimedia files on a
internal memory for easy access to all
your multimedia files.
After recording a video
Your captured video will appear on the
Gallery. Touch
you recorded.
Touch to play the video.
Touch to use the QSlide function. It is
helpful when viewing a video you can also
use other function.
Touch to change the ratio of the video
screen.
Touch to share your video via
SmartShare function.
Touch to lock a video screen.
Touch to share the video via
Bluetooth, E-mail, Facebook, FileShare,
Gmail, Google+, Messaging, Social+ or
YouTube.
Touch to delete the video you just
made. Confirm by touching OK. The
viewfinder reappears.
Tou ch
38
to view the last video
to open the options.
Move – Touch to move the video to other
place.
Copy – Touch to copy the selected video
and save it to other album.
Rename – Tap to edit the name of the
selected video.
Details – Find out more information about
the contents.
Videos
Your LG-E975K has a built-in video player
that lets you play all your favourite videos.
To access the video player, touch
Apps tab > Videos.
>
Playing a video
Touch > Apps tab > Videos.
1
Select the video you want to play.
2
Touch to pause playback a
video.
Touch to resume playback a
video.
Touch to go 10 seconds forward.
Touch to go 10 seconds
backward.
Touch to manage the video
volume.
Page 40
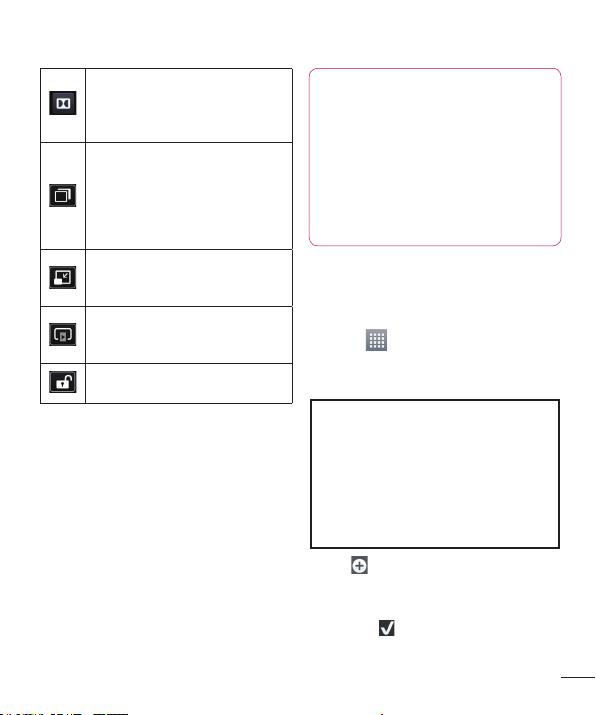
Touch to set Dolby audio effect
when connected with headset
jack.
Touch to use the QSlide function.
It allows you to view a video and
use(or operate) other functions
on the main menu (or launch
screen) at the same time.
Touch to change the ratio of the
video screen.
Touch to share your video via
SmartShare function.
Touch to lock a video screen.
To change the volume while watching
video, press the up and down volume
keys on the phone.
Touch and hold any video in the list. It
displays Delete and Details as options.
Tip!
Brightness Gesture Control
– When viewing the video, flick your
finger up and down to control the
brightness of the video screen.
Live Zooming – When viewing the
video, use your index finger and
thumb in a pinching or spreading
motion to zoom in or out.
Video Wiz
You can make your own movie using your
images/video and music.
1
Touch
After seeing the brief introduction on
2
the Steps, tap OK.
Tap to add images and/or video to
3
your movie.
Tap the desired images and/or videos,
4
then tap
> Apps tab > Video Wiz.
.
39
Page 41
Multimedia
To remove images or videos, tap and
•
select Delete selected or Delete all
files
.
•
To rearrange them, touch and hold an
image/video, drag and drop it to the
desired position.
5
Tap Add style to select the desired
movie style.
•
Scroll through and select the style you
want. As you scroll through the styles, a
preview is displayed.
6
Tap Add music to set the background
music.
to play your movie.
7
Tap
to edit the video clip using
Tap
8
Overlay Text, Overlay Image, or Trim
Video.
After editing the video, tap
•
to save the video.
Tap
9
to view the help information
Tap
10
on using this feature.
Media Home
Using media home
Touch
1
Select the desired function among of
2
Photos, Videos, and Music.
> Apps tab > Media Home
.
Setting media home
1
Touch
> Apps tab > Media
Home > Settings
You can change the settings based on
2
your preferences.
Tip!
Once you connect your device to
a TV or monitor via a MHL cable,
media home apps will be launch
automatically. Any apps that are
running will be interrupted, including
playback of DivX VOD movies.
Music Player
Your LG-E975K has a built-in music player
that lets you play all your favourite tracks.
To access the music player, touch
>
Apps tab > Music Player.
Transferring music files using
USB mass storage devices
Connect the LG-E975K to a PC using
1
a USB cable.
If you haven't installed LG Android
2
Platform Driver on your PC, you need
to change the settings manually.
Choose Settings > Connectivity >
USB connection type, then select
Media sync (MTP).
40
Page 42
You can view the mass storage con-
3
tent on your PC and transfer the fi les.
Playing a song
1
Touch > Apps tab > Music
Player.
2
Touch Songs.
3
Select the song you want to play.
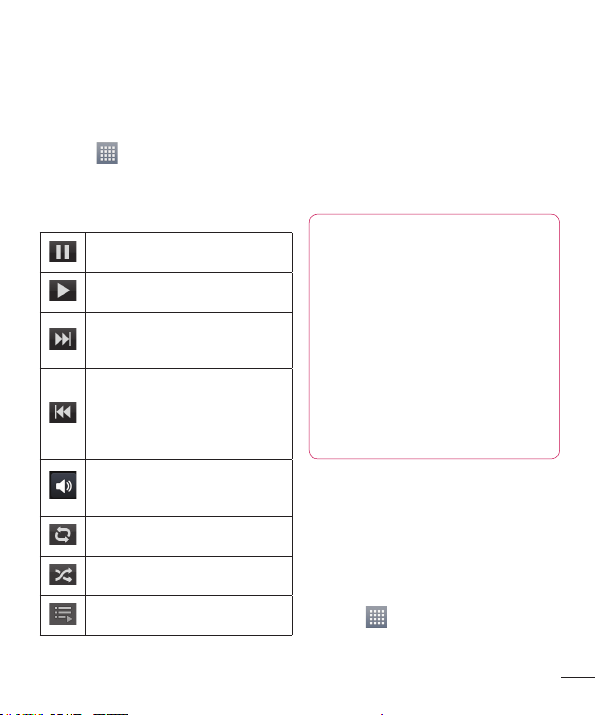
Touch to pause playback.
Touch to resume playback.
Touch to skip to the next track in
the album, playlist.
Touch to go back to the
beginning of the song. Touch
twice to return to the previous
song.
Touch to manage the music
volume.
Touch to set repeat mode.
Touch to set shuffle mode.
Touch to see the current playlist.
To change the volume while listening to
music, press the up and down volume
keys on the right-hand side of the phone.
Touch and hold any song in the list. It
displays Play, Add to playlist, Set as
ringtone, Delete, Share, Search and
Details.
NOTE: Music file copyrights may
be protected by international
treaties and national copyright laws.
Therefore, it may be necessary to
obtain permission or a licence to
reproduce or copy music.
In some countries, national
laws prohibit private copying
of copyrighted material. Before
downloading or copying the file,
check the national laws of the
relevant country concerning the use
of such material.
LG Tag+
What is LG Tag+
LG Tag+ allows easy saving and loading
to NFC tag, which can be customized to
suit certain environments.
Using Tag+ writing
1
Touch
Select the desired mode and tap Write
2
on NFC tag.
> Apps tab > LG Tag+.
41
Page 43
Multimedia
Touch the back of your device to a tag,
3
then launching application and changing settings can be set.
Using Tag+ reading
When touching the set tag, mode will be
activated right away.
QuickMemo function
Use QuickMemo function to practically
and efficiently create memos during a
call, with a saved picture or on the current
phone screen.
Enter the QuickMemo function screen
1
by pressing both the Volume up and
down keys for one second on the
screen you want to capture. Or touch
and slide the status bar downwards
and touch
.
Select the desired menu option from
2
Pen type, Colour, Eraser, and create
a memo.
Touch
3
to save the memo with the current
screen.
NOTE: Please use a fingertip while
using the QuickMemo function. Do
not use your fingernail.
in the Edit menu and select
Using the QuickMemo options
While using the QuickMemo function, you
can easily use the QuickMenu options.
– Select if you want to use the
background screen or not.
42
Page 44
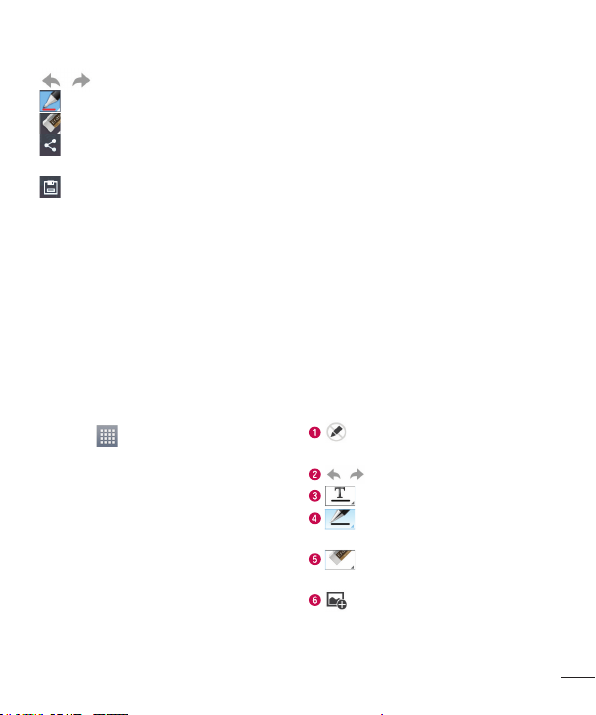
– Undo or Redo.
– Select the pen type and the colour.
– Erase the memo that you created.
– Send or share the current
QuickMemo to others.
– Save the memo with the current
screen.
Viewing the saved QuickMemo
Touch Gallery and select the QuickMemo
album.
Notebook
With Notebook application, you can
manage and personalize a wide variety of
information.
Making a note
Touch > Apps tab > Notebook.
1
Touch New note to create a new note.
2
Select the desired mode(Cover, Title,
3
Paper, Paper colour) and OK.
Getting to know the Notebook
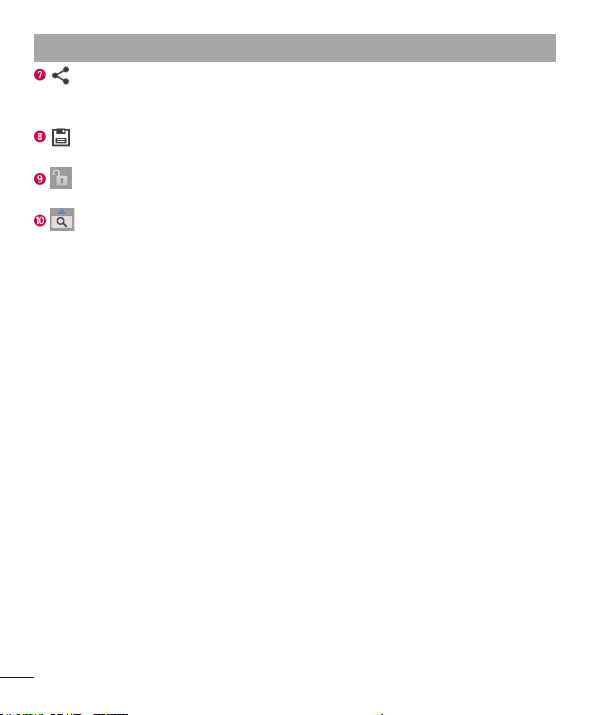
– Select the Read only or edit
mode.
– Undo or Redo.
– Tap this button to write.
– Select the Pen type, Thickness,
Opacity and Colour.
– Erase the memo that you
created.
– Touch to attach the files using
Picture, Capture picture, Video, Capture
video, Audio, Record voice, Location,
Sticker and Date and time.
43
Page 45
Multimedia
– Share the current note to others
via Gmail, E-mail, Social+, Bluetooth,
Messaging, Picasa, Google+, Memo.
– Save the note with the current
screen.
– Select to lock or unlock the
Front key.
– Tap this button to enlarge the
input area.
44
Page 46
Utilities
Setting your alarm
Touch > Apps tab > Alarm/Clock
1
>
.
2
After you set the alarm, the LG-E975K
lets you know how much time is left
before the alarm will invoke.
3
Set Repeat, Snooze duration, Vibration, Alarm sound, Alarm volume,
Auto App Starter, Puzzle lock and
Memo. Touch Save.
NOTE: To change alarm settings on
alarm list screen, touch the Menu
key and select Settings. You can
adjust the below options: Alarm in
silent mode, Alarm volume, Side
button behavior and Puzzle lock
option.
Using your calculator
Touch > Apps tab > Calculator.
1
Touch the number keys to enter
2
numbers.
For simple calculations, touch the
3
function you want (+, –, x or ÷) followed by =.
For more complex calculations, touch
4
, select the Advanced panel, then
choose sin, cos, tan, log and so on.
To check history tap the icon
5
Adding an event to your
calendar
Touch > Apps tab > Calendar.
1
2
On the screen, you can fi nd the different view types of the Calendar (Day,
Week, Month, Agenda).
3
Tap on the date you want to add event
on and touch
Touch Event name then enter the
4
event name.
Touch Location and enter the location.
5
Check the date and enter the time you
want your event to start and fi nish.
If you want to add a note to your
6
event, touch Description and enter
the details.
If you want to repeat the alarm, set
7
REPEAT, and set REMINDERS, if
necessary.
Touch Save to save the event in the
8
calendar.
Voice recorder
Use the voice recorder to record voice
memos or other audio files.
Recording a sound or voice
Touch > Apps tab and select
1
.
Voice Recorder.
.
45
Page 47
Utilities
Touch to begin recording.
2
Touch
3
Touch
4
NOTE: Touch to access your
album. You can listen to the saved
recording. Notice: the available
recording time may differ from the
real time.
Sending the voice recording
Once you have fi nished recording, you
1
can send the audio clip by touching
Choose from Bluetooth, Email, File-
2
Share, Gmail, Memo or Messaging.
When you select Email, Gmail, Memo
or Messaging, the voice recording is
added to the message, then you write
and send the message normally.
Voice Control
You can search by voice and complete
other voice actions, such as calling or
texting a contact, sending an email,
creating a note or getting directions with
just a simple tap of the Voice Control icon.
Touch
1
Voice Control.
46
to end the recording.
to listen to the recording.
.
> Apps tab and select
Wait for the "Say a command"
2
prompt, then say your query.
For a query, the search results will be
displayed in the web browser. Tap the
result you want or continue searching.
Task Manager
You can manage your applications with
Task Manager. You can easily check the
number of currently running applications
and shut down applications. You can
also uninstall the applications you have
installed on your device.
Polaris Office
Polaris Office is a professional mobile
office solution that lets users conveniently
view various types of office documents,
including Word, Excel and PowerPoint
files, anywhere, anytime, using their
mobile devices.
Touch
Viewing files
Mobile users can now easily view a wide
variety of file types, including Microsoft
Office documents and Adobe PDF, right
on their mobile devices. When viewing
documents using Polaris Office, the
objects and layout remain the same as in
their original documents.
> Apps tab > Polaris Office.
Page 48

FileShare
This feature allows you to share files from
your phone.
1
Touch
Choose the types of content you would
2
like to share. Choose from Images,
Videos, Music and Document.
> Apps tab > FileShare.
Backup
About backing up and restoring smart
phone data
It recommends that you regularly create
and save a backup file on the Internal
Storage, especially before you update any
software. Maintaining a current backup
file on Storage memory might allow you
to recover smart phone data if your smart
phone is lost, stolen, or corrupted by an
unforeseen issue.
This Backup application support between
LG smart phones, other S/W version or
OS. And so, when you buy the new LG
smart phone, you can back up the current
LG-E975K smart phone data on your
new one.
If you have preloaded application
Backup & Restore on your smart phone,
you can back up and restore most of
your smart phone data, Applications
including unprotected applications, their
settings, Applications (Downloaded),
Applications (Pre-installed),
Bookmarks, Calendar, Call log,
Contacts, Home screen, Messages, and
System settings using this application.
To perform a manual backup of your
•
smart phone data.
To schedule automatic backups of your
•
smart phone data.
To restore your smart phone data.
•
Back up your smart phone
data
Touch > Apps tab > and then
1
select Backup > Backup > Internal
Storage.
Touch the Add new to enter a name
2
for your backup fi le, and then select
Continue.
Select the check box next to the item
3
you want to back up, and then select
Continue to back up.
When all selected fi les backed up,
4
you will see the message ‘Done’ and
select Continue to fi nish backing up
data.
47
Page 49
Utilities
Scheduling automatic
backups
You can also enable automatic backups of
the data on your smart phone according
to your schedule setting. To do this,
complete the following steps:
1
Touch
select Backup > Schedule.
On the Scheduled Backup Location
2
screen, touch Internal Storage.
From the list, select how often you
3
want to back up your device data and
settings, and select Continue.
Select the check box next to the data
4
you want to back up, and then select
Continue to fi nish the schedule set.
Restoring smart phone data
To restore data that is in your on-board
device memory, mass storage mode must
be turned off.
NOTE: All files that are stored
on your smart phone are deleted
before the backup file is restored.
Touch > Apps tab > and then
1
select Backup > Restore > Internal
Storage.
On the Restore screen, select a
2
48
> Apps tab > and then
backup fi le that contains the data you
want to restore.
3
Select the check box next to the item
you want to restore, and then select
Continue to restore to phone.
NOTE: Please note that your
phone data will be overwritten with
the contents of your backup.
If the backup fi le is encrypted, type the
4
password that you set to encrypt.
When all selected fi les restored, you
5
will see the message ‘Done’ and
select Yes to restart the phone.
NOTE:
• While in Mass storage mode, this
Backup Application cannot be
functioned. Select Charge only
option when the USB cable is
connected.
• You can set Enable encryption to
encrypt your backup files for extra
protection.
Press the Menu from the Backup
screen, and select Settings > Security
> Enable encryption and select the check
box. To restore synchronized organizer
data, you must have an activation
password.
Page 50
NOTE:
You can also enable automatic
delete old backups and only keep
the most recent backup. Press
the Menu from the Backup
screen, and select Settings >
Scheduled backup > Auto delete
old backups to select the number
of scheduled backups to keep.
Using SmartShare
SmartShare uses DLNA (Digital Living
Network Alliance) technology to share
digital content through a wireless network.
Both devices must be DLNA certified to
support this feature.
To turn SmartShare on and allow
sharing contents
1
Touch
Touch the Menu key
2
Touch Discoverable to allow your
3
device to be detected by other devices.
Touch Always accept request if you
•
would like to automatically accept
sharing requests from other devices.
Touch Receive files if you would like to
•
allow the other devices to upload media
files to my phone.
> Apps tab > SmartShare.
> Settings.
Under the My shared contents section,
4
touch to checkmark the types of content you would like to share. Choose
from Photos, Videos, and Music.
SmartShare is now activated and
5
ready to share contents.
To control your renderer devices
Let your renderer device (e.g., TV) play
multimedia contents from your remote
content library (e.g., PC).
NOTE: Make sure that the DLNA
functionality of your devices is
properly configured (e.g., TV and
PC).
Touch > Apps tab > SmartShare.
1
Touch the To button
2
and select the
device from the renderer device list.
Touch the From button
3
and select
the device of the remote content
library.
You can browse the content library.
4
Touch and hold a content thumbnail
5
and fl ick them to the top area with
your fi nger or touch the Menu Key
> Play.
49
Page 51
Utilities
To share contents from your phone to
your renderer device (e.g. TV)
NOTE: Make sure that your
renderer device is properly
configured.
While watching your pictures or videos
1
using the Gallery application, touch tab
/ / on the Title area.
: Need to be connected network
: Select the device on network
: Currently, the content is being
shared through SmartShare.
Select the device from renderer lists to
2
play the fi les.
NOTICE: Check that your device is
connected with your home network
using Wi-Fi connection to use this
application.
Some DLNA enabled devices (e.g.
TV) support only the DMP feature
of DLNA and will not appear in the
renderer device list.
Your device might not be able to
play some contents.
To download contents from the remote
content library
1
Touch
Touch the From button
2
> Apps tab > SmartShare.
and select
the device of the remote content
library.
3
You can browse the content library.
4
Touch and hold a content thumbnail
and then touch Download.
NOTICE: A few types of contents
are not supported.
To upload contents from the remote
content library
NOTE: Make sure that the internal
storage is correctly mounted and
the Receive files option in the
Settings menu is checked.
Touch > Apps tab > SmartShare.
1
Touch the From button
2
and select
My phone.
You can browse the local content
3
library.
Touch and hold a content thumbnail
4
and then touch Upload.
Select the device of the remote
5
content library to be uploaded.
NOTICE: Some DLNA enabled
devices do not support the DMS
upload functionality and will
not upload files. A few types of
contents are not supported.
50
Page 52
The web
Internet
Browser gives you a fast, full-colour
world of games, music, news, sport,
entertainment and much more, right on
your mobile phone. Wherever you are and
whatever you enjoy.
NOTE: Additional charges apply
when connecting to these services
and downloading content. Check
data charges with your network
provider.
Using the web toolbar
Touch to go back a page.
Touch to go forward a page, to the
page you connected to after the
current one. This is the opposite
of what happens when you press
the Back key, which goes to the
previous page.
Touch to go homepage.
Touch to add a new window.
Touch to access bookmarks.
Using options
Touch to view options.
Refresh – Update the current web page.
Save to bookmarks – Add the current
web page as bookmark.
Share page – Allows you to share the
web page with others via Bluetooth,
E-mail, Facebook, FileShare, Gmail,
Google+, Memo, Messaging, Picasa,
Social+ or Twitter.
Find on page – Allows you to find letters
or words on the current web page.
Request desktop site – Allows you to
view the web page as desktop.
Save for offline reading – Save current
page to read it during offline.
Settings – Displays Browser settings.
Exit – Exit from the browser.
51
Page 53
LG SmartWorld
LG SmartWorld offers an assortment of
exciting content - games, applications,
wallpaper and ringtones - giving LG phone
users the chance to enjoy richer "Mobile
Life" experiences.
How to Get to LG SmartWorld
from Your Phone
Touch > Apps tab > tap the
1
icon to access LG SmartWorld.
Tap Sign in and enter ID/PW for LG
2
SmartWorld. If you have not yet signed
up, tap Register and get a LG SmartWorld membership.
Download the content you want.
3
NOTE: What if there is no
icon?
1 Using a mobile Web browser,
access LG SmartW
lgworld.com) and select your
country.
2 Download LG SmartWorld App.
3 Execute and install the
downloaded file.
4 Access LG SmartWorld by
tapping the
orld (www.
icon.
How to use LG SmartWorld
Participate in monthly LG SmartWorld
•
promotions.
– Search Content.
– Find contents by category(e.g.
Games, Edudation, Entertainment
etc).
– List of downloaded/to-be updated
contents.
•
Try the easy "Menu" buttons to find
what you’re looking for fast.
Apps for you – Recommended content
based on your previous choices.
Settings – Set Profile and Display.
Sign in – Set your ID and Password.
•
Try other useful functions as well.
(Content Detail screen)
NOTE: LG SmartWorld may not be
available in all carriers or countries.
52
Page 54
Settings
Touch > Apps tab > Settings.
WIRELESS & NETWORKS
Here, you can manage Wi-Fi and
Bluetooth. You can also set up mobile
networks and switch to airplane mode.
< Wi-Fi >
Wi-Fi – Turns on Wi-Fi to connect to
available Wi-Fi networks.
TIP! How to obtain the MAC
address
To set up a connection in some
wireless networks with MAC filters,
you may need to enter the MAC
address of your LG-E975K into the
router.
You can find the MAC address in
the following user interface: Touch
Apps tab > Settings > Wi-Fi >
> Advanced > MAC address.
< Bluetooth >
Turns on Bluetooth to connect to
Bluetooth devices. You can use Bluetooth
to send data by running a corresponding
application as on most other mobile
phones.
Turning on Bluetooth and pairing up
your phone with a Bluetooth device
You must pair your device with another
device before you connect to it.
1
Touch
> Apps tab > Settings >
Set Bluetooth to ON from the WIRELESS & NETWORKS.
Tap Bluetooth menu again. Your
2
phone will scan for and display the
IDs of all available Bluetooth in-range
devices. If the device you want to pair
which isn’t on the list, make sure the
target device is set to be discoverable,
then tap Search for devices again.
Choose the device you want to pair up
3
with from the list.
Once the paring is successful, your device
will connect to the device.
Sending pictures using Bluetooth
1
Select a picture >
2
Check whether Bluetooth is ON, then
> Bluetooth
select Search for devices.
3
Choose the device you want to send
data to from the list.
Sharing your phone's data connection
USB/Bluetooth tethering and portable WiFi hotspot are great features when there
are no wireless connections available.
53
Page 55
Settings
You can share your phone's mobile data
connection with a single computer via
a USB cable (USB tethering)/Bluetooth
(Bluetooth tethering). You can also share
your phone's data connection with more
than a single device at a time by turning
your phone into a portable Wi-Fi hotspot.
When your phone is sharing its data
connection, an icon appears in the status
bar and as an ongoing notification in the
notifications drawer.
For the latest information about tethering
and portable hotspots, including supported
operating systems and other details, visit
http://www.android.com/tether
To change Portable Wi-Fi hotspot
settings:
Touch
•
More from the WIRELESS & NETWORKS
> Portable Wi-Fi hotspot > Choose
options that you want to adjust.
54
> Apps tab > Settings >
TIP!
If your computer is running
W
indows 7 or a recent distribution
of some flavours of Linux (such
as Ubuntu), you don't usually
need to prepare your computer
for tethering. But if you're running
an earlier version of Windows or
another operating system, you may
need to prepare your computer
to establish a network connection
via USB. For the most current
information about which operating
systems support USB tethering and
how to configure them, visit http://
www.android.com/tether.
To rename or secure your portable
hotspot
You can change the name of your phone's
Wi-Fi network name (SSID) and secure its
Wi-Fi network.
1
Touch
Touch More from the WIRELESS &
2
> Apps tab > Settings.
NETWORKS and select Portable Wi-Fi
hotspot.
Ensure Portable Wi-Fi hotspot is
3
ticked.
Touch Confi gure Wi-Fi hotspot.
4
•
The Configure Wi-Fi hotspot dialog
box will open.
Page 56
You can change the network SSID
•
(name) that other computers or devices
see when scanning for Wi-Fi networks.
You can also touch the Security menu
•
to configure the network with Wi-Fi
Protected Access 2 (WPA2) security
using a pre-shared key (PSK).
If you touch the WPA2 PSK security
•
option, a password field is added to
the Configure Wi-Fi hotspot dialog. If
you enter a password, you will need to
enter that password when you connect
to the phone's hotspot with a computer
or other device. You can set Open in the
Security menu to remove security from
your Wi-Fi network.
Touch Save.
5
ATTENTION!
If you set the security option
as Open, you cannot pr
unauthorized usage of online
services by other people and
additional charges can be incurred.
To avoid unauthorized usage, you
are advised to keep the security
option active.
event
Using the Wi-Fi Cast
You can share your music, picture and
video content between users who use
Android Phones connected via the same
Wi-Fi & Wi-Fi Direct network.
Check your Wi-Fi & Wi-Fi Direct network
in advance and make sure the users are
connected to the same network.
1
Touch
> Apps tab > Settings
> More from the WIRELESS & NETWORKS > Wi-Fi Direct.
Touch the Wi-Fi Direct checkbox to
2
turn on.
Select a device to connect from the
3
scanned device list.
Touch Connect.
4
Enabling Wi-Fi Direct to share through
SmartShare
Wi-Fi Direct automatically scans nearby
Wi-Fi Direct devices and the searched
devices are listed as they are found and
you can select a specific device to share
multimedia data through SmartShare.
Wi-Fi Direct cannot be enabled while
using other Wi-Fi functions.
1
Touch
> Apps tab > Settings
> More from the WIRELESS & NETWORKS > Wi-Fi Direct.
Select a device to connect from the
2
scanned device list.
CREATE GROUP – Touch to activate group
owner mode, which enables the legacy
55
Page 57
Settings
Wi-Fi devices to connect by scanning your
phone. In this case you must enter the
password that is set in Password.
NOTE: When your phone becomes
a group owner, it will consume
more battery power than when it
is a client. Wi-Fi Direct connection
does not provide Internet service.
Additional costs may be incurred
when connecting and using online
services. Check data charges with
your network provider.
< Data usage >
Displays the data usage and set mobile
data usage limit.
< Call >
You can configure phone call settings
such as call forwarding and other special
features offered by your carrier.
Fixed dialing numbers – To turn on
and compile a list of numbers that can
be called from your phone. You’ll need
your PIN2, which is available from your
operator. Only numbers within the fixed
dial list can be called from your phone.
Voicemail service – Allows you to select
your carrier’s voicemail service.
Voicemail settings – If you are using
your carrier’s voicemail service, this option
56
allows you to enter the voicemail number
to use for listening to and managing your
voicemail.
Save unknown numbers – Add
unknown numbers to contacts after a call.
Call reject – Allows you to set the call
reject function. Choose from Disabled,
Reject calls on list or Reject all calls.
Quick messages – When you want
to reject a call, you can send a quick
message using this function. This is
useful if you need to reject a call during
a meeting.
TTY mode – Allows you to set the TTY
mode.
Call forwarding – Choose whether to
divert all calls, when the line is busy, when
there is no answer or when you have no
signal.
Call duration – View the duration of calls
including Last call, All calls, Dialled calls
and received calls.
Additional settings – This lets you
change the following settings:
Caller ID: Choose whether to display
your number on an outgoing call.
Call waiting: If call waiting is activated,
the handset will notify you of an
incoming call while you are in call
Page 58
(depending on your network provider).
< More >
Airplane mode – After switching to
airplane mode, all wireless connections
are disabled.
File Networking – Allows you to share
folders with other devices via wireless
connection.
Portable Wi-Fi hotspot – Allows you to
share mobile network via Wi-Fi and you
can configure the portable Wi-Fi hotspot
settings.
Wi-Fi Direct – Make a connection directly
with Wi-Fi devices without any Access
Point.
Miracast – With Miracast, you can mirror
phone screen and sound onto LG Miracast
dongle or TV wirelessly.
Bluetooth tethering – Allows you to set
your phone whether sharing the internet
connection or not.
NFC – Your LG-E975K is NFC-enabled
mobile phone. NFC (Near Field
Communication) is a wireless connectivity
technology that enables two-way
communication between electronic
devices. It operates over a distance of
a few centimeters. You can share your
contents with a NFC tag or another NFC
support device via simple touch with your
device. If you touch a NFC tag with your
device, it will display the tag contents on
your device.
To switch NFC on or off: From the
home screen, touch and slide the
notification drawer down with your
finger, then select the NFC icon to turn it
on.
NOTE: When the Airplane mode
is activated, NFC application can
be used.
Using NFC: To use NFC, make sure
your device is switched on and activate
the NFC, if disabled.
Android Beam – You can beam a web
page, a video, or other content from your
screen to another device by bringing the
devices together (typically back to back).
NOTE: Make sure both devices
are unlocked, support Near Field
Communication (NFC), and have
both NFC and Android Beam™
turned on.
VPN – Displays the list of Virtual Private
Networks (VPNs) that you've previously
configured. Allows you to add different
types of VPN.
57
Page 59
Settings
Mobile networks – Set options for data
roaming, network mode & operators,
access point names (APNs) and so on.
NOTE: You must set a lock screen
PIN or password before you can
use credential storage.
DEVICE
< Sound >
Sound profile – You can choose the
Sound, Vibrate only or Silent.
Volumes – You can manage the volume
of Phone Ringtone, Notification sound,
Touch feedback & system, Music, video,
games and other media, Alarms.
Phone ringtone – Allows you to set your
default incoming call ringtone.
Notification sound – Allows you to set
your default notification ringtone.
Ringtone with vibration – Vibration
feedback for calls and notifications.
Wise ringtone – You can set your phone
ringtone's volume up automatically when
outside noise is loud.
Quiet time – Set times to turn off all
sounds except alarm and media.
Dial pad touch tones – Allows you to set
the phone to play tones when using the
dialpad to dial numbers.
58
Touch sounds – Allows you to set your
phone to play a sound when you touch
buttons, icons and other onscreen items
that react to your touch.
Screen lock sound – Allows you to set
your phone to play a sound when locking
and unlocking the screen.
Vibrate on touch – Allows you to set
the vibration feedback for phone screen
touch.
< Display >
Brightness – Adjust the screen
brightness.
Auto-rotate screen – Set to switch
orientation automatically when you rotate
the phone.
Screen timeout – Set the time for screen
timeout.
Wise screen – Allows you to keep the
screen on when your phone detects your
face looking at the screen.
Font type – Change the type of the
display font.
Font size – Change the size of the
display font.
Aspect ratio correction – Change the
resolution size of downloaded applications
to fit the screen size.
Page 60

Front key light – Set the front key light
duration.
Motion sensor calibration – Allows you
to Improve the accuracy of the tilt and
speed of the sensor.
< Home screen >
Set the Theme, Animation, Screen
swipe effect, Wallpaper or Portrait
view only. Select the option to set Scroll
wallpaper, Scroll screens circularly and
Home backup & restore.
< Lock screen >
Select screen lock – Set a screen lock
type to secure your phone. Opens a set of
screens that guide you through drawing a
screen unlock pattern. You can set among
of None, Swipe, Face Unlock, Pattern,
PIN, Password.
If you have enabled Pattern lock type then,
When you turn on your phone or wake
up the screen, you're asked to draw your
unlock pattern to unlock the screen.
Wallpaper – You can select the wallpaper
for lockscreen from Wallpapers or Gallery.
Clocks & shortcuts – Customize clocks
& shortcuts on lock screen.
Screen effect – You can select the
screen effect.
Owner info – Show owner info on lock
screen.
Lock timer – Set the lock time after
screen timeout.
Power button instantly locks – Set the
screen lock when press the power button.
Vibrate on touch – Allows you to set
the vibration feedback for phone screen
touch.
< Gesture >
Move home screen items – Press and
hold item and tilt device to move item
within home screens or applications.
Tilt sensitivity – Test and adjust
sensitivity of tilt sensor for home screen
and applications.
Silence incoming calls – Flip device to
mute incoming call.
Snooze or stop alarm – Flip device to
snooze or stop alarm.
Pause video – Flip device to pause
playing video.
Help – Help for gesture functions.
< Storage >
INTERNAL STORAGE – View the internal
storage usage.
< Power saver >
Here, you can manage the battery and
check the power saving items. Also, you
can check the battery use.
59
Page 61

Settings
< Apps >
You can view and manage the
applications.
< Quad core control >
You can set the Eco mode to extend the
battery life by dynamically optimizing CPU
control policy.
PERSONAL
< Accounts & sync >
Permits applications to synchronize data
in the background, whether or not you are
actively working in them. Deselecting this
setting can save battery power and lowers
(but does not eliminate) data usage.
< Location services >
Google's location service – If you select
Google's location service, your phone
determines your approximate location
using Wi-Fi and mobile networks. When
you select this option, you're asked
whether you consent to allowing Google
to use your location when providing these
services.
GPS satellites – If you select GPS
satellites, your phone determines your
location to street level accuracy.
Location & Google search – If you
select google use your location to improve
60
search results and other services.
< Security >
Encrypt phone – If you set this function,
it will be required a PIN or password to
decrypt your phone each time you power
it on.
Set up SIM card lock – Set up MicroUSIM card lock or change the Micro-USIM
PIN.
Password typing visible – Show last
character of the hidden password as you
type.
Phone administrators – View or
deactivate device administrators.
Unknown sources – Default setting to
install non-Market applications.
Trusted credentials – Display trusted CA
certificates.
Install from storage – Choose to install
encrypted certificates.
Clear credentials – Remove all
certificates.
< Language & input >
Use the Language & input settings to
select the language for the text on your
phone and for configuring the on-screen
keyboard, including words you've added
to its dictionary.
Page 62

< Backup & reset >
Change the settings for managing your
settings and data.
Back up my data – Set to back up
your settings and application data to the
Google server.
Backup account – Set to back up your
account.
Automatic restore – Set to restore your
settings and application data when the
applications are reinstalled on your device.
Factory data reset – Reset your settings
to the factory default values and delete
all your data. If you reset the phone in
this way, you are prompted to reenter
the same information as when you first
started Android.
SYSTEM
< Date & time >
Use Date & time settings to set how
dates are displayed. You can also use
these settings to set your own time
and time zone rather than obtaining the
current time from the mobile network.
< Accessibility >
Use the Accessibility settings to
configure accessibility plug-ins you have
installed on your phone.
NOTE: Requires additional plug-ins
to become selectable.
< PC connection >
USB connection type – You can set the
desired mode: Charge only, Media sync
(MTP), USB tethering, LG software or
Camera (PTP).
Ask on connection – Ask USB
connection mode when connecting to a
computer.
Help – Help for USB connection.
PC Suite – Check mark this to use LG PC
Suite with Wi-Fi connection.
Please note that Wi-Fi network should
be connected for LG PC Suite via WiFi connection from the WIRELESS &
NETWORKS.
On-Screen Phone – Displaying screen
and controlling phone from PC are
available through USB, Bluetooth or Wi-Fi
connection.
Help - Help for LG software.
< Developer options >
Keep in mind that turning on these
developer settings may result in irregular
device behavior. The developer options are
recommended only for advanced users.
61
Page 63

Settings
< About phone >
View legal information and check phone
status and software version.
62
Page 64
Phone software update
Phone software update
LG Mobile phone software update from
the Internet
For more information about using this
function, please visit http://update.
lgmobile.com or http://www.lg.com/
common/index.jsp select country and
language.
This feature allows you to update the
firmware on your phone to a newer
version conveniently from the Internet
without needing to visit a service centre.
This feature will only be available if and
when LG makes a newer firmware version
available for your device.
As the mobile phone firmware update
requires the user's full attention for the
duration of the update process, please
make sure you check all instructions and
notes that appear at each step before
proceeding. Please note that removing the
USB data cable during the upgrade may
seriously damage your mobile phone.
NOTE: LG reserves the right to
make firmware updates available
only for selected models at its own
discretion and does not guarantee
the availability of the newer version
of the firmware for all handset
models.
LG Mobile Phone software update via
Over-the-Air (OTA)
This feature allows you to update your
phone's software to a newer version
conveniently via OTA, without connecting
with a USB data cable. This feature will
only be available if and when LG makes a
newer firmware version available for your
device.
First, you can check the software version
on your mobile phone: Settings > About
phone > Software update > Check
now for update.
You can also delay the update by 1 hour,
4 hours, 8 hours or One day. In this
case, the application will notify you to
update when the time is up. You can also
rearrange an update manually.
63
Page 65
Phone software update
NOTE: Your personal data from
internal phone storage—including
information about your Google
account and any other accounts,
your system/application data
and settings, any downloaded
applications and your DRM
licence—might be lost in the
process of updating your
phone's software.Therefore, LG
recommends that you back up your
personal data before updating your
phone's software. LG does not
take responsibility for any loss of
personal data.
NOTE: This feature is dependent
on your network service provider,
region and country.
64
Page 66
Specifi cations
DivX HD
ABOUT DIVX VIDEO: DivX® is a digital
video format created by DivX, LLC, a
subsidiary of Rovi Corporation. This is
an official DivX Certified
plays DivX video. Visit divx.com for more
information and software tools to convert
your files into DivX videos.
ABOUT DIVX VIDEO-ON-DEMAND: This
DivX Certified
®
in order to play purchased DivX Videoon-Demand (VOD) movies. To obtain your
registration code, locate the DivX VOD
section in your device setup menu. Go to
vod.divx.com for more information on how
to complete your registration.
DivX Certified
up to HD 720p, including premium
content.
®
, DivX Certified® and associated
DivX
logos are trademarks of Rovi
Corporation or its subsidiaries and are
used under license.
®
device that
device must be registered
®
to play DivX® video
Dolby Mobile
Manufactured under license from
Dolby Laboratories. Dolby and the
double-D symbol are trademarks of
Dolby Laboratories.
Notice: Open Source Software
To obtain the corresponding source
code under GPL, LGPL, MPL and
other open source licences, please
visit http://opensource.lge.com/
All referred licence terms,
disclaimers and notices are
available for download with the
source code.
DTS
Manufactured under license from DTS
Licensing Limited. DTS and the Symbol
are registered trademarks, & DTS
2.0 Channel and the DTS logos are
trademarks of DTS, Inc. Product includes
software. © DTS, Inc. All Rights Reserved
65
Page 67
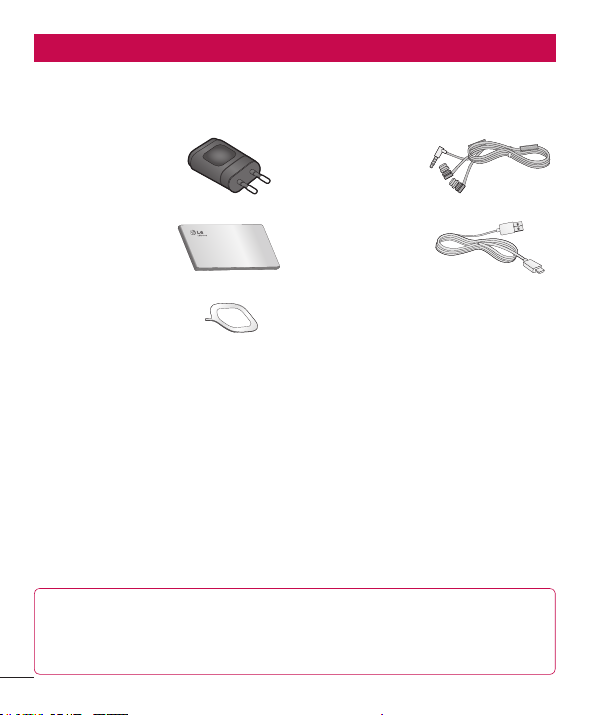
Accessories
These accessories are available for use with the LG-E975K. (Items described below
may be optional.)
Travel adaptor
Stereo headset
User Guide
Learn more about
your LG-E975K.
Micro-USIM Slot
Pin
NOTE:
• Always use genuine LG accessories.
• Failure to do this may void your warranty.
• Accessories may vary in different regions.
66
Data cable
Connect your LGE975K and PC.
Page 68
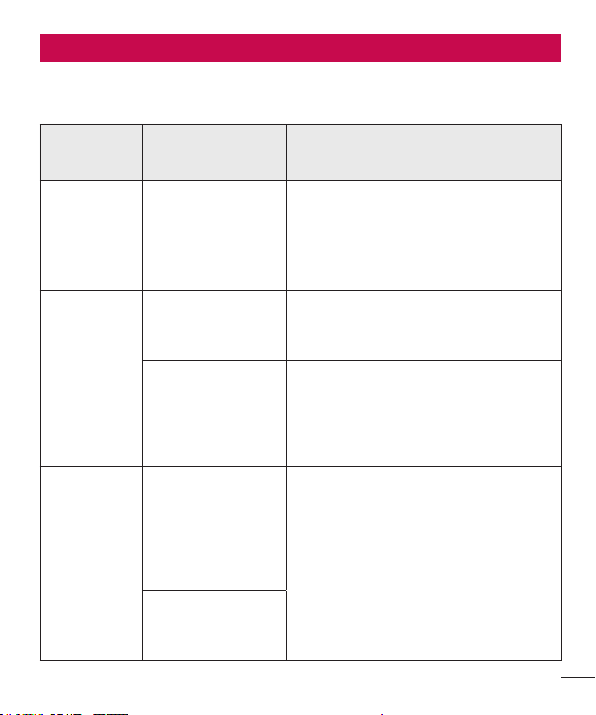
Troubleshooting
This chapter lists some problems you might encounter while using your phone. Some
problems require you to call your service provider, but most are easy to fix yourself.
Message Possible causes Possible corrective measures
There is no
Micro-USIM
error
Micro-USIM card
in the phone
or it is inserted
incorrectly.
Make sure that the Micro-USIM card is
correctly inserted.
No network
connection/
Losing
network
Codes do
not match
Signal is weak or
you're outside the
carrier network.
Operator applied
new services.
To change a
security code,
you will need
to confirm the
new code by reentering it.
The two codes
you have entered
do not match.
Move towards a window or into
an open area. Check the network
operator coverage map.
Check whether the Micro-USIM card
is more than 6~12 months old. If
so, change your Micro-USIM at your
network provider's nearest branch.
Contact your service provider.
If you forget the code, contact your
service provider.
67
Page 69
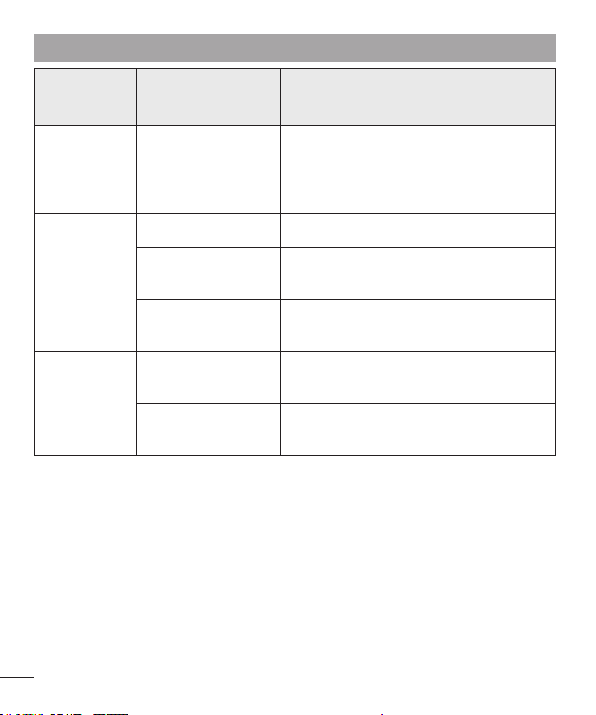
Troubleshooting
Message Possible causes Possible corrective measures
Any
application
cannot be
set
Calls not
available
Phone
cannot be
switched on
68
Not supported by
service provider
or registration
required.
Dialling error New network not authorized.
New Micro-USIM
card inserted.
Pre-paid charge
limit reached.
On/Off key
pressed too briefly.
Battery is not
charged.
Contact your service provider.
Check for new restrictions.
Contact service provider or reset limit
with PIN2.
Press the On/Off key down for at least
two seconds.
Charge battery. Check charging
indicator on the display.
Page 70
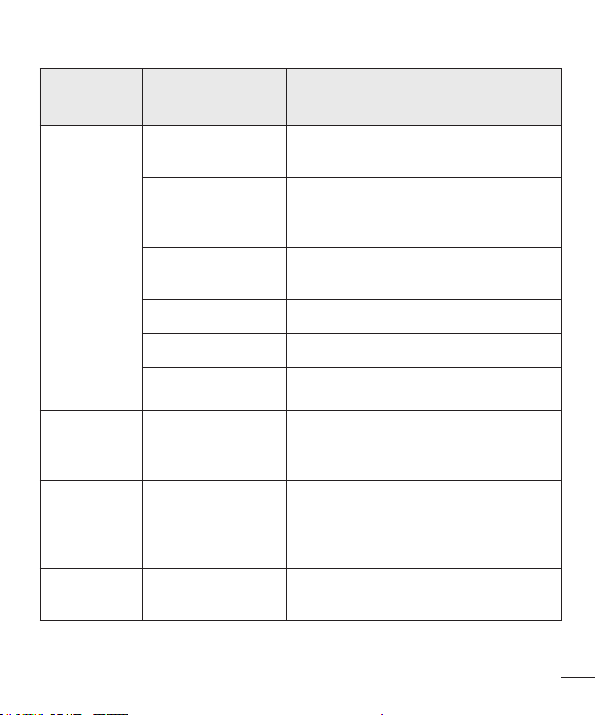
Message Possible causes Possible corrective measures
Charging
error
Number not
permitted
Impossible
to receive /
send SMS
& picture
Files not
opening
Battery is not
charged.
Outside
temperature is too
hot or cold.
Contact problem
No voltage Plug the charger into a different socket.
Charger defective Replace charger.
Wrong charger Only use original LG accessories.
The Fixed dialling
number function
is on.
Memory full
Unsupported file
format
Charge battery.
Make sure phone is charging at a
normal temperature.
Check the charger and connection to
the phone.
Check the Settings menu and turn the
function off.
Delete some messages from the
phone.
Check the file formats that can be
supported.
69
Page 71
Troubleshooting
Message Possible causes Possible corrective measures
The screen
does not
turn on
when I
receive a
call.
No sound Vibration mode
Hang up or
freeze
Proximity sensor
problem
Intermittent
software problem
70
If you use any protection tape or case,
check to see if it has covered the area
around the proximity sensor. Make
sure that the area around the proximity
sensor is clean.
Check the settings status of the sound
menu to make sure you are not in
vibrate or silent mode.
Try to perform a software update via
the website.
 Loading...