

Page 1
Project2 6/29/06 2:54 PM Page 1
MANUAL
USER
P/N:MMBB0202701 (1.1)
G
Page 2

LG Electronics MobileComm Inc.
201 James Record Road Huntsville, AL 35824
Tel. 1-800-793-8896 Fax. 1-800-448-4026
www.lgeser vice.com
DO NOT RETURN YOUR PRODUCT TO THE ABOVE ADDRESS. Please call
or write for the location of the LGIC authorized service center nearest
you and for the procedures for obtaining warranty claims.
Project2 6/29/06 2:54 PM Page 2
Page 3

1
CONTENTS
TABLE OF
Safety Precautions
5
Welcome
8
Important Information 8
FCC Part 15 Class B Compliance 8
Technical Details 9
FCC RF Exposure Information 11
Bodily Contact During Operation 11
Vehicle-Mounted External Antenna 11
Caution 11
Phone Overview
12
Key Functions 13
Menus Overview
15
Getting Started
16
The Battery 16
Installing the Battery 16
Removing the Battery 16
Charging the Battery 17
Battery Charge Level 17
Turning the Phone On and Off 17
Turning the Phone On 17
Turning the Phone Off 18
Signal Strength 18
Screen Icons 19
Making Calls 20
Correcting Dialing Mistakes 20
Redialing Calls 20
Receiving Calls 20
Quick Access to Convenient Features
21
Mute Function 21
Volume Quick Adjustment 21
Call Waiting 21
Caller ID 21
Speed Dialing 22
Entering Information
23
Tex t Input 23
Text Input Modes 23
Text Input Examples 24
DM-L200_LGManual_1.1.qxd 9/18/06 5:03 PM Page 1
Page 4

CONTENTS
TABLE OF
2
Contacts in Your Phone’s Memory
27
Contacts Entries 27
The Basics of Storing Contacts Entries 27
Options to Customize Your Contacts 28
Editing Contacts Entries 30
Deleting 33
Phone Numbers with Pauses 34
Searching Your Phone’s Memory 35
Using Phone Menus
37
Menu Access 37
Contacts 38
Access and Options 38
1. Find/Add Entry 38
2. Groups 39
3. Speed Dial 39
4. Voice Dial 39
5. Services 40
Messaging 41
Access and Options 41
1. Call History 42
1. Recent 42
2. Missed 42
3. Received 43
4. Dialed 43
5. Delete Call History 43
2. Voicemail 44
3. Create Message 44
1. Text Message 44
2. Pix Message 45
4. Inbox 46
1. Text Message 46
2. Pix Message 47
5. Outbox 47
1. Text Message 47
2. Pix Message 48
DM-L200_LGManual_1.1.qxd 9/18/06 5:03 PM Page 2
Page 5

CONTENTS
TABLE OF
3
6. Drafts 48
1. Text Message 48
2. Pix Message 48
Fam ily Cent er
TM
49
Accessing Family Center
TM
51
Fam ily Loca tor
TM
Service 51
Family Monitor
TM
Service 54
Fam ily Aler t!
TM
Service 57
Call Control Feature 61
Entertainment 62
1. Ringtones 63
2. Images 65
3. Theme It 67
4. Games 69
5. Disney Zone 70
6. Applications 71
7. We b 73
Too l bo x 76
Access and Options 76
1. My Profile 76
2. Camera 76
1. Take Pix 76
2. Pix Gallery 78
3. Camcorder 79
1. Record Video 79
2. Video Gallery 79
4. Voice Recorder 80
1. Record Voice 80
2. Voice Gallery 80
5. Tools 81
1. Bluetooth
® 81
2. Calendar 82
3. Alarm Clock 83
4. Notepad 84
5. EZ Tip Calculator 85
6. Calculator 85
DM-L200_LGManual_1.1.qxd 9/18/06 5:03 PM Page 3
Page 6

CONTENTS
TABLE OF
4
7. World Clock 86
6. Settings 86
1. Display 86
2. Volume 88
3. Roaming 89
4. Messaging 90
5. Bluetooth 92
6. Security 93
7. Setup / Others 95
8. Phone Info 98
Safety
100
TIA Safety Information 100
Exposure to Radio Frequency Signal 100
Antenna Care 101
Ph one Ope rati on 101
Tips on Efficient Operation 101
Driving 101
El ectr oni c Devi ces 101
Pacemakers 102
Hearing Aids 102
Other Medical Devices 102
Health Care Facilities 103
Vehi cles 103
Posted Facilities 103
Aircraft 103
Blasting Areas 103
Potentially Explosive Atmosphere 103
For Vehicles Equipped with an Airbag 104
Safety Information 105
Charger and Adapter Safety 105
Battery Information and Care 105
Explosion, Shock and Fire Hazards 106
General Notice 106
FDA Consumer Update 108
Consumer Information on SAR 116
Warranty Information 118
Manufacturer’s Warranty 118
DM-L200_LGManual_1.1.qxd 9/18/06 5:03 PM Page 4
Page 7

5
Please follow these simple guidelines. Breaking these rules
may be dangerous or illegal. Further detailed information is
given in this user guide.
WARNING! Violation of the instructions may
cause serious injury or death.
1. Never use an unapproved battery since
this could damage the phone and/or
battery and could cause the battery to
explode.
2. Never place your phone in a microwave
oven as it will cause the battery to
explode.
3. Do not dispose of your battery by fire or
with hazardous or flammable materials.
4. Make sure that no sharp-edged items (such
as an animal’s teeth or nails) come into
contact with the battery. There is a risk of
this causing a fire.
5. Store the battery out of reach of children.
6. Small parts are a choking hazard. Always
exercise caution around small children.
Some of contents in this user guide may be
different from your phone depending on the
software of the phone or your service provider.
Features and specifications might be subject to
change without prior notice.
PRECAUTIONS
SAFETY
DM-L200_LGManual_1.1.qxd 9/18/06 5:03 PM Page 5
Page 8
6
1. Unplug the power cord and charger during
lightning storms to avoid electric shock or fire.
2. When in a car, do not leave your phone or set up
the hands-free kit near the air bag. If wireless
equipment is improperly installed and the air
bag is activated, you could be seriously injured.
3. Do not use a handheld phone while driving.
4. Do not use the phone in areas where its use is
prohibited (i.e.: aircraft, hospital).
5. Do not expose the battery charger or adapter to
direct sunlight or use it in places with high
humidity, such as a bathroom.
6. Never store your phone in temperatures less
than 5°F (-15°C) or greater than 122°F (50°C).
7. Do not use harsh chemicals (i.e.: alcohol,
benzene, thinners, etc.) or detergents to clean
your phone. This may cause a fire.
8. Do not drop, strike, or shake your phone
severely. Such actions may harm the internal
circuit boards of the phone.
9. Do not use your phone in high explosive areas.
10. Do not damage the power cord by bending,
twisting, pulling or heating. Do not use the
Battery Charger if it is loose as it may cause a
fire or electric shock.
PRECAUTIONS
SAFETY
DM-L200_LGManual_1.1.qxd 9/18/06 5:03 PM Page 6
Page 9
7
1. Do not place any heavy items on the power cord.
Do not allow the power cord to be crimped as it
may cause fire or electric shock.
2. Do not handle the phone with wet hands while it is
being charged. It may cause an electric shock or
seriously damage your phone.
3. Do not disassemble the phone.
4. Do not place or answer calls while charging the
phone as it may short-circuit the phone and/or
cause electric shock or fire.
5. Only use the batteries, antennas and chargers
provided by LG. The warranty will not be applied to
products provided by other suppliers.
6. Only authorized personnel should service the
phone and its accessories. Faulty installation or
service may result in accidents or invalidate the
warranty.
7. Do not hold or let the antenna come in contact
with your body during a call.
8. An emergency call can be made only within a
service area. For an emergency call, make sure
that you are within a service area and that the
phone is turned on.
DM-L200_LGManual_1.1.qxd 9/18/06 5:03 PM Page 7
Page 10

8
Congratulations for choosing the advanced and compact
DM-L200 cellular phone, designed to operate with the latest
digital mobile communication technology, Code Division
Multiple Access (CDMA). Along with the many advanced
features of the CDMA system, such as greatly enhanced
voice clarity, this phone offers:
1. Large, easy-to-read, 9-line backlight LCD with status
icons.
2. Paging, messaging, voicemail and caller ID.
3. 21-key keypad.
4. Menu-driven interface with prompts for easy operation
and configuration.
5. Any key answer, auto answer, auto retry, one-touch dial
and speed dialing with 99 memory locations.
Important Information
This user’s guide provides important information on the use
and operation of your phone. Please read all the information
carefully prior to using the phone for the best performance
and to prevent any damage to or misuse of the phone. Any
unapproved changes or modifications will void your
warranty.
FCC Part 15 Class B Compliance
This device and its accessories comply with part 15 of FCC
rules. Operation is subject to the following two conditions:
(1) This device and its accessories may not cause harmful
interference, and (2) this device and its accessories must
accept any interference received, including interference that
causes undesired operation.
WELCOME
DM-L200_LGManual_1.1.qxd 9/18/06 5:03 PM Page 8
Page 11

9
Technical Details
The DM-L200 is an all-digital phone that operates on both Code
Division Multiple Access (CDMA) frequencies: cellular services at
800 MHz and Personal Communication Services (PCS) at 1.9 GHz.
Also, the DM-L200 works on Advanced Mobile Phone Service
(AMPS). We call it a tri-mode phone.
CDMA technology uses a feature called DSSS (Direct Sequence
Spread Spectrum) that enables the phone to keep communication
from being crossed and to use one frequency channel by multiple
users in the same specific area. This results in a 10-fold capacity
increase when compared with analog mode. In addition, features
such as soft/softer handoff, hard handoff, and dynamic RF power
control technologies combine to reduce call interruptions.
DM-L200_LGManual_1.1.qxd 9/18/06 5:03 PM Page 9
Page 12

WELCOME
10
The Cellular and PCS CDMA networks consist of MSO (Mobile
Switching Office), BSC (Base Station Controller), BTS (Base
Station Transmission System) and MS (Mobile Station). The
following table lists some major CDMA standards.
* TSB -74: Protocol between an IS-95A system and ANSI
J-STD-008
1xRTT system receives twice as many subscribers in the
wireless section as IS-95. High-speed data transmission is
also possible.
CDMA Standard
Basic Air
Interface
TIA/EIA-95A
TSB-74
ANSI J-STD-008
TIA/EIA-IS2000
ANSI TIA/EIA 553A
CDMA Dual-Mode Air Interface
14.4kbps radio link protocol and
inter-band operations
IS-95 adapted for PCS frequency
band CDMA2000 1xRTT Air Interface
Advanced Mobile Phone Service
MAS-BS
PCSC-RS
Intersystem operations
Non-signaling data comm.
Cellular base station
Cellular mobile station
PCS personal station
PCS base station
Speech CODEC
TIA/EIA/IS-634
TIA/EIA/IS/651
TIA/EIA/IS-41-C
TIA/EIA/IS-124
TIA/EIA/IS-97
TIA/EIA/IS-98
ANSI J-STD-018
ANSI J-STD-019
TIA/EIA/IS-125
TIA/EIA/IS-96-B
TIA/EIA/IS-99
TIA/EIA/IS-637
TIA/EIA/IS-657
IS-801
TIA/EIA/IS-707-A
Speech CODEC
Async Data and Fax
Short message service
Packet Data
Position Determination Service
(gpsOne)
High Speed Packet Data
Network
Service
Performance
Designator
Description
DM-L200_LGManual_1.1.qxd 9/18/06 5:03 PM Page 10
Page 13
FCC RF Exposure Information
WARNING! Read this information before operating
the phone.
In August 1996, the Federal Communications Commission (FCC) of the United States, with
its action in Report and Order FCC 96-326, adopted an updated safety standard for human
exposure to Radio Frequency (RF) electromagnetic energy emitted by FCC-regulated
transmitters. Those guidelines are consistent with the safety standard previously set by
both U.S. and international standards bodies.
The design of this phone complies with the FCC guidelines and these international
standards.
Bodily Contact During Operation
This device was tested for typical use with the back of the phone kept 3/4 inches (2 cm)
from the body. To comply with FCC RF exposure requirements, a minimum separation
distance of 3/4 inches (2 cm) must be maintained between the user’s body and the back
of the phone, including the antenna, whether extended or retracted. Third-party belt-clips,
holsters and similar accessories containing metallic components should not be used.
Avoid the use of accessories that cannot maintain 3/4 inches (2 cm) distance between
the user’s body and the back of the phone and have not been tested for compliance with
FCC RF exposure limits.
Vehicle-Mounted External Antenna
(Optional, if available.)
A minimum separation distance of 8 inches (20 cm) must be maintained between
the user / bystander and the vehicle-mounted external antenna to satisfy FCC RF
exposure requirements. For more information about RF exposure, visit the FCC
website at www.fcc.gov.
CAUTION!
Use only the supplied and approved antenna. Use of
unauthorized antennas or modifications could impair call quality,
damage the phone, void your warranty and/or result in violation of FCC
regulations.Do not use the phone with a damaged antenna. If a
damaged antenna comes into contact with the skin a minor burn may
result. Contact your local dealer for a replacement antenna.
11
DM-L200_LGManual_1.1.qxd 9/18/06 5:03 PM Page 11
Page 14
12
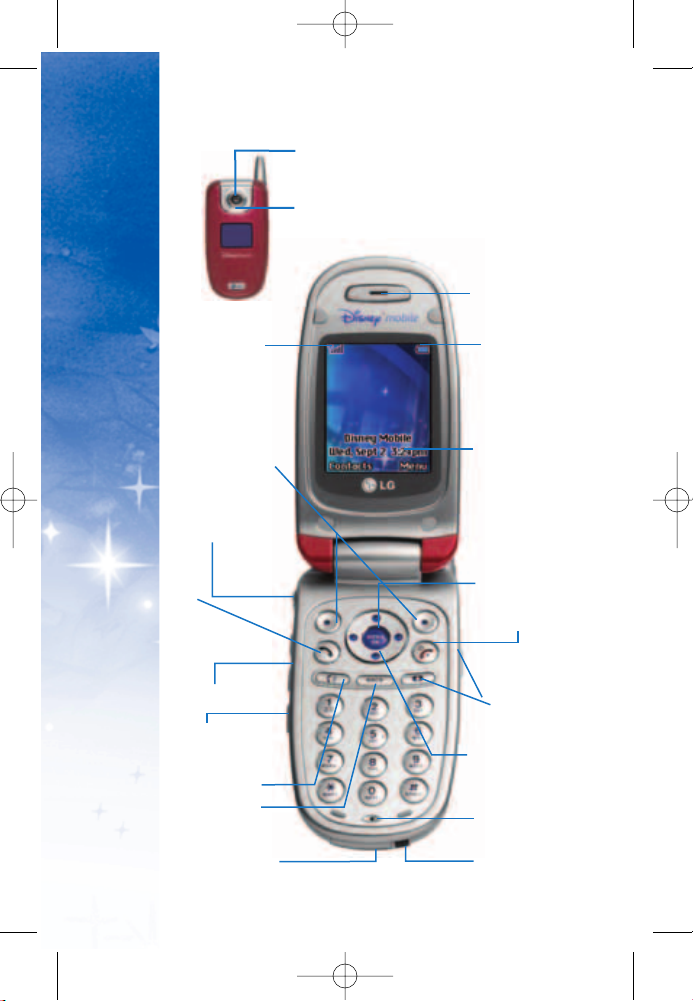
Soft Key Buttons
Ta lk
End (Power)
Navigation Key
Menu/OK
Voice Services
Key
Accessory Jack
Microphone
Charger Jack
Headset Jack
Back (Clear)
Volume Control
Display Screen
Earpiece
Signal
Strength
Indicator
Battery
Strength
Indicator
Speaker Key
Camera Key
Digital Camera
Flash
OVERVIEW
PHONE
DM-L200_LGManual_1.1.qxd 9/18/06 5:03 PM Page 12
Page 15
13
KKee yy FFuu nnccttii oo nnss
SS iigg nnaa ll SS tt rree nn ggtt hh II nn ddii ccaa ttoo rr
represents the signal strength by
displaying bars. The more bars displayed, the better the signal
strength.
SS oo fftt KK eeyy BB uu tttt oo nnss
let you select softkey actions or menu items
corresponding to the bottom left and right lines on the display
screen.
HH eeaa dd ssee tt JJ aa cckk
allows you to plug in an optional headset for
convenient, hands-free conversations.
CAUTION! Inserting an accessory into the incorrect
jack may damage the phone.
TT aa ll kk
allows you to place or receive calls, answer Call Waiting, or
activate Voice Dial.
VVooll uu mm ee CCoonn tt rroo ll
allows you to adjust the ringer volume in standby
mode (with the phone open) or adjust the voice volume during a
call. The volume key can also be used to scroll up or down to
navigate through the different menu options. To mute the ringer
during an incoming call, press the volume key up or down.
VV oo ii ccee SS ee rrvv ii ccee ss KK eeyy
for quick access to voice dials. Also press
and hold during standby mode or during a conversation to record
a voice memo.
SS pp eeaa kk eerr KK eeyy
enables your phone’s built-in speaker, allowing you
to hear other callers.
BB aacc kk ((CC lleeaa rr))
deletes characters from the display in text entry
mode. When in a menu, press the Back key to return to the previous
menu. This key also allows you to return to the previous screen.
AAcc ccee ssss oorr yy JJ aa cc kk
allows you to connect optional accessories, such
as a USB cable. CAUTION! Inserting an accessory into the incorrect
jack may damage the phone.
DD ii ggii tt a
a ll CC aamm eerr aa
This is the lens for the integrated digital camera.
FFll aa sshh
allows you to take pictures indoors or at night. It also
functions as a Message Waiting Indicator.
DM-L200_LGManual_1.1.qxd 9/18/06 5:03 PM Page 13
Page 16

CChh aa rrgg eerr JJ aa cckk
connects the phone to the battery charger.
MM ii ccrroo pp hhoo nn ee
allows the other caller to hear you clearly when
you are speaking to them.
NN aa vv iigg aatt iioonn KK eeyy
scrolls through the phone’s menu options
and acts as a shortcut key from standby mode.
UU pp
= Entertainment
DD ooww nn
= Menu
RR ii gghhtt
= Messaging
LLee ff tt
= Family Center
CCaa mmee rraa KK eeyy
In standby mode, allows you to access the
Pictures menu with the press of a button. Press and hold to
automatically launch the Camera.
EEnn dd ((PPoo wwee rr))
ends a call. Press and hold this key for two
seconds to turn your phone on or off. While in the main
menu, it returns the phone to standby mode and cancels
your input. When you receive an incoming call, press the
volume key to silence the ringer.
MM eenn uu// OO KK
selects the highlighted choice when navigating
through a menu.
DD ii sspp ll aa yy SScc rree eenn
displays all the information needed to
operate your phone, such as the call status, the Contacts list,
the date and time, the signal and battery strength, etc.
BB aatt tt eerr yy SStt rr eenn ggtt hh IInnddii ccaatt oo rr
represents the amount of
remaining battery charge currently available in your phone.
When all bars are displayed in the battery icon, the phone’s
battery is fully charged. When no bars are displayed, the
phone’s battery is completely discharged.
EEaa rrppii ee cc ee
lets you hear the caller and automated prompts.
OVERVIEW
PHONE
14
DM-L200_LGManual_1.1.qxd 9/18/06 5:03 PM Page 14
Page 17

15
MM ee nn uuss OOvveerrvviiee ww
11 .. CC oo nnttaaccttss
1. Find/Add Entry
2. Groups
3. Speed Dial
4. Voice Dial
5. Services
1. Guest Services
2. Dir Assistance
3. Road Assistance
4. Check Usage
22 .. MMee ssssaaggiinn gg
1. Call History
1. Recent
2. Missed
3. Received
4. Dialed
5. Delete Call History
2. Voicemail
1. Call Voicemail
3. Create Message
1. Text
2. Pix
4. Inbox
1. Text
2. Pix
5. Outbox
1. Text
2. Pix
6. Drafts
1. Text
2. Pix
33 .. FFaammiillyy CCeenntt ee rr
TM
1. Family Locator
TM
2. Family Monitor
TM
3. Family Alert!
TM
4. Call Control
5. Shop Family
6. View Info
44 .. EE nntteerr tt aa ii nnmmeenntt
1. Ringtones
2. Images
3. Theme It
4. Games
5. Disney Zone
TM
6. Applications
7. W e b
55 .. TToooo ll bb oo xx
1. My Profile
2. Camera
1. Take Pix
2. Pix Gallery
3. Camcorder
1. Record Video
2. Video Gallery
4. Voice Recorder
1. Record Voice
2. Voice Gallery
5. Tools
1. Bluetooth
2. Calendar
3. Alarm Clock
4. Notepad
5. Ez Tip Calculator
6. Calculator
7. World Clock
6. Settings
1. Display
2. Volume
3. Roaming
4. Messaging
5. Bluetooth
6. Security
7. Setup/Others
8. Phone Info
DM-L200_LGManual_1.1.qxd 9/18/06 5:03 PM Page 15
Page 18

TT hh ee BB aa tt tt eerr yy
The phone comes with a rechargeable battery. Keep the
battery charged while not in use in order to maximize talk
and standby time. The battery charge level is shown at the
top of the LCD screen.
II nnssttaa llll ii nn gg tt hhee BBaa tt ttee rr yy
To install, insert the battery into the opening on the back
of the phone and gently press down until the latch snaps
into place.
RR eemmoovviinn gg tt hh ee BBaa tt tt eerr yy
1. Make sure the power is off so that you don’t lose any
stored numbers or messages.
2. Press the battery release latch up and remove the battery
from the phone at a 45-degree angle.
16
NOTE: It is important to fully charge the battery
before initial use of the phone.
STARTED
GETTING
DM-L200_LGManual_1.1.qxd 9/18/06 5:03 PM Page 16
Page 19
CChhaa rr ggii nn gg tt hh ee BBaa tt tteerryy
To use the charger provided with your phone, plug the end of the
adapter into the phone's charger port and the other end into an
electrical outlet. The charge time varies depending upon the
battery level. The maximum charge time for a fully discharged
battery is 3 hours.
WARNING! Use only the charger provided with the phone.
Using any charger other than the one included with the
DM-L200 may damage your phone or battery.
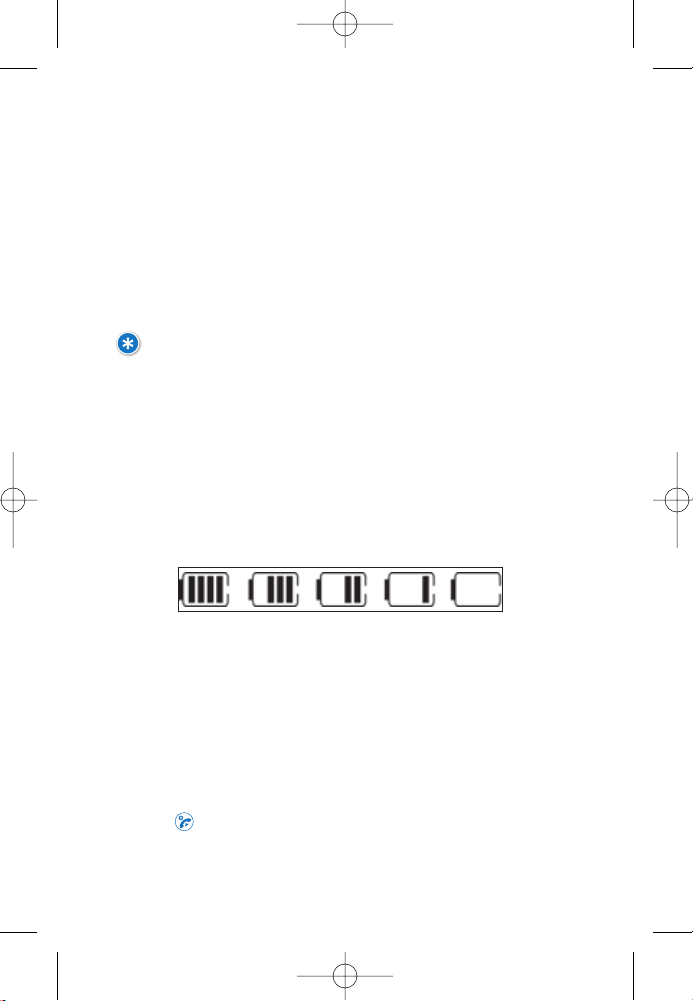
BB aa tttteerr yy CC hh aarr gg ee LL eevvee ll
The battery charge level is shown at the top right of the LCD screen.
When the battery charge level becomes low, the low battery sensor
alerts you in three ways: sounding an audible tone, blinking the
battery icon, and displaying LOW BATTERY WARNING! If the battery
charge level becomes exceedingly low, the phone automatically
switches off and any function in progress is not saved.
TT uu rr nn ii nn gg tt hhee PPhh oo nnee OO nn aann dd OOff ff
TTuurrnnii nn gg tt hh ee PPhhoonnee OO nn
1. Install a charged battery or connect the phone to an external
power source such as a cigarette lighter charger or hands-free
car kit.
2. Press for a few seconds until the LCD screen lights up.
17
Fully Charged
Fully Discharged
DM-L200_LGManual_1.1.qxd 9/18/06 5:03 PM Page 17
Page 20

STARTED
GETTING
18
TTuurrnnii nn gg tt hh ee PPhhoonnee OOff ff
1. Press and hold until the display turns off.
SSii ggnn aa ll SStt rr ee nn gg tt hh
Call quality depends on the signal strength in your area. The
signal strength is indicated on the screen as the number of
bars next to the signal strength icon: The more bars, the
better the signal strength. If the signal quality is poor, move
to an open area. If you are in a building, the reception may
be better near a window.
NOTE: Like any other radio device, avoid any
unnecessary contact with the antenna while your
phone is on.
DM-L200_LGManual_1.1.qxd 9/18/06 5:03 PM Page 18
Page 21
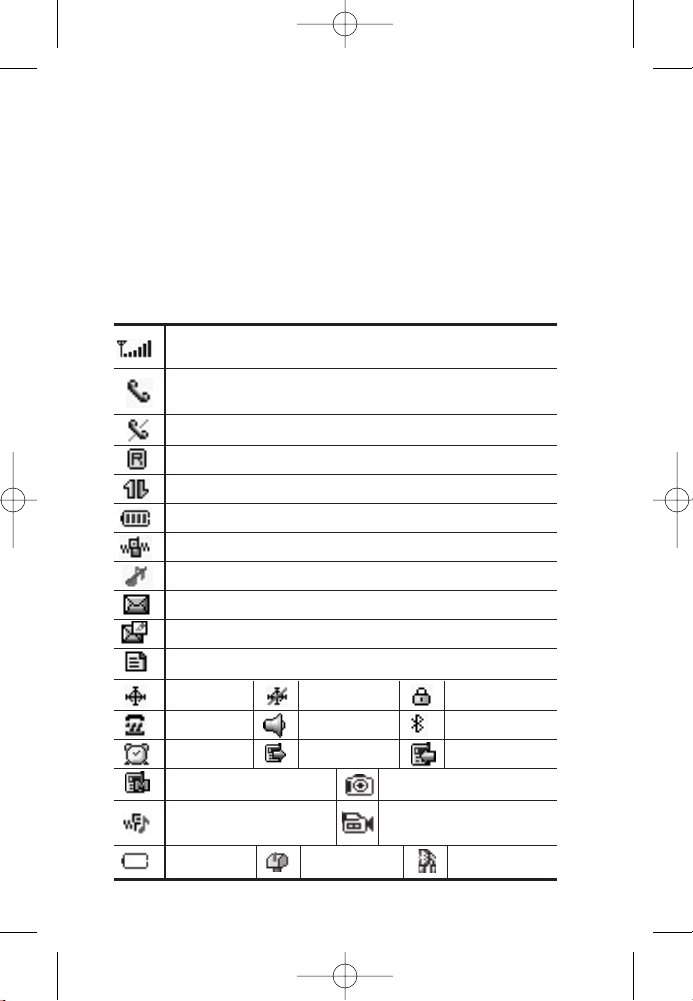
SS ccrr ee eenn II ccoo nn ss
When the phone is powered on, the top line of the LCD screen
displays icons indicating the status of the phone.
To see the icons below, go to Menu->Toolbox->Settings->Phone
Info-> Icon Glossary.
Signal Strength Indicator. The strength of the signal received
by the phone is indicated by the number of bars displayed.
Roaming Indicator. The phone is outside of the home service area.
Indicates your Disney connection is active (data is being transferred).
Camera or Picture is activated
Battery Indicator. Indicates battery charge level.
Indicates ringtone volume is set to vibrate.
In Use Indicator. A call is in progress. No icon indicates
the phone is in standby mode.
No Service Indicator. The phone is not receiving a system signal.
Indicates you have voicemail messages.
Indicates you have new pix messages
Speaker On.
Dialed Calls.
Received Calls.
Alarm.
Missed Calls.
Location On. Location Off.
Bluetooth
TTY mode.
Low Battery
New Messages
Indicates Ringtone Off/Silent: All mode is set.
Indicates ringtone and
vibrate mode is set.
Camcorder or Video
is activated
Indicates you have new text messages.
SSL.
19
Audio Via Bluetooth
DM-L200_LGManual_1.1.qxd 9/18/06 5:03 PM Page 19
Page 22

MM aakk ii nn gg CC aa ll ll ss
1. Make sure the phone is turned on. If not, press for
about 3 seconds.
2. Enter the phone number (include the area code if needed).
3. Press .
lf the phone is locked, enter the lock code.
CCaall ll FFaaiill ee dd
indicates the call did not go through.
4. Press to end the call.
CCoo rr rr ee cc tt ii nn gg DD ii aall ii nngg MM ii sstt aa kk ee ss
If you make a mistake while dialing a number, press
once to delete the last digit entered or hold down for at
least 2 seconds to delete all digits.
RR eeddii aa ll ii nn gg CC aall ll ss
Press twice to redial the last number. The last 50
numbers dialed are stored in the call history list and can be
accessed for redial by pressing and using the down
navigation key until you reach the desired number and
pressing again.
RR eecceeii vvii nn gg CC aa ll ll ss
When the phone rings or vibrates, press to answer.
Press to end the call.
NOTE: If you press or (the side keys) while the
phone is ringing, the ringing or vibration is muted for
that call.
STARTED
GETTING
20
DM-L200_LGManual_1.1.qxd 9/18/06 5:03 PM Page 20
Page 23

CONVENIENT FEATURES
QUICK ACCESS TO
MM uutt ee FF uunn cctt ii oonn
The Mute function prevents the other party from hearing your
voice, but allows you to hear the other party.
MM uutt ee QQuu ii cckk AA ccttii vvaatt ii oo nn
Select Mute during a call.
MM uutt ee QQuuii cckk CC aanncc ee llll aa ttii oo nn
Select Unmute again.
VV oo ll uu mmee QQuu ii cc kk AAdd jj uuss tt mmee nn tt
Use the side keys to adjust the earpiece and master
volumes. The upper key increases the volume and the lower
key decreases the volume.
NOTE: Earpiece volume can be adjusted during a call.
Ringtone volume can be adjusted when phone is idle.
CCaa ll ll WW aa ii tt ii nn gg
Your cellular service may offer call waiting. While a call is in
progress, two beeps indicate another incoming call. When call
waiting is enabled, you may put the active call on hold while you
answer the other incoming call. Check with your cellular service
provider for information about this function.
To Use Call Waiting:
1. Press to receive a waiting call.
2. Press again to switch between calls.
CCaa ll ll eerr II DD
Caller ID displays the number of the person calling when your
phone rings. If the caller’s identity is stored in Contacts, the
name appears on the screen. Check with your service provider
to ensure they offer this feature.
21
DM-L200_LGManual_1.1.qxd 9/18/06 5:03 PM Page 21
Page 24

CONVENIENT FEATURES
QUICK ACCESS TO
22
SS pp eeee dd DD ii aall ii nngg
Speed Dialing is a co
nvenient feature that allows you to make phone
calls quickly and easily with a few keystrokes. Your phone recalls the
number from your Contacts, displays it briefly and then dials it. Speed
Dial number 1 is for Voicemail.
DD iiaa llii nn gg SSii nn gg llee DDii gg iitt SS pp ee eedd DDii aa llss (( ffrr oomm 11 ttoo 99 ))
Press and hold the Speed Dial number.
OR
Enter the Speed Dial number and press .
DD iiaa llii nn gg DDoo uubb llee DDii ggii tt SSppeeeedd DDii aall ss (( ffrr oo mm 1100 tt oo 9999))
Press the first digit and then press and hold the key of the last
digit.
OR
Enter the first and second digits and press .
DM-L200_LGManual_1.1.qxd 9/18/06 5:03 PM Page 22
Page 25

TT eexx tt II nn ppuu tt
You can input and edit your Banner, Notepad, Schedule,
Contacts and Messages.
KK ee yy FFuunncc tt iioo nn ss
RR ii gghh tt SSoo fftt KKeeyy
: Press to scroll access the following text
input modes:
Abc / T9Word / 123 / Symbols / Smileys
SShhii fftt
: Press to change case.
Word text: Word -> WORD -> word
Abc text: Abc -> ABC -> abc
NNeexx tt
: In Word mode, press to display other matching words.
SSppaa ccee
: Press to complete a word and insert a space.
CCllee aarr
: Press to delete a single space or character. Hold to
delete words.
PPuunncc tt uuaa tt iioo nn
: In Word mode, press to insert punctuation
in a word and complete a sentence.
TTeexx tt II nn pp uu tt M
Mooddeess
There are five modes for entering text, numbers, special
characters and punctuation. In a text entry field, pressing
Left Soft Key displays a pop-up list of text modes.
11 .. WWoo rr dd MMooddee
- Use to type text using one keystroke per
letter. The phone translates keystrokes into common words
by using the letters on each key and a compressed database.
22 .. AAbb cc (( MMuull tt ii-- ttaa pp )) MM oo dd ee --
Use to add words to the Word
database.
33 .. 112233 (( NNuummbbeerrss)) MM oo dd ee --
Use to type numbers using one
keystroke per number.
INFORMATION
ENTERING
23
DM-L200_LGManual_1.1.qxd 9/18/06 5:03 PM Page 23
Page 26

INFORMATION
ENTERING
24
44 .. SSyymm bb oo llss MMoo dd ee --
Use to insert special characters or
punctuation. There are 35 special characters.
55 .. CC hh aa nn gg iinngg LL eett tt ee rr CCaassee --
Using Word and Abc text input
modes, you can set the capitalization. Press to reach
the following:
II nnii ttii aa ll CC aapp (( WWoo rr dd // AAbbcc))
- Only the first letter is capitalized
and subsequent letters are lower case.
CCaappss LLoocckk (( WWoorrdd // AAbbcc))
- All letters are capitalized.
LL
oowwee rr CC aassee ((WWoo rr dd // AAbbcc))
- All letters are in lower case.
Text Input Examples
Display the text modes and select a text mode:
1. In a text entry field, press Right Soft Key to display text
modes.
2. Press to highlight the text input mode you want
to use.
3. Press to select the highlighted text input mode.
UU ssiinn gg AA bbcc ((MMuull tt ii--tt aa pp )) TTeexx tt IInnpp uutt
1. Press
RR ii gghh tt SSoo fftt KKeeyy
to change to Abc mode.
2. Press to change to ABC Caps Lock.
3. Press .
LG is displayed.
UU ssiinn gg 112233 (( NNuummbb e
err ss )) TTeexx tt IInnpp uutt
1. Press Right Soft Key to change to 123 mode.
DM-L200_LGManual_1.1.qxd 9/18/06 5:03 PM Page 24
Page 27
25
2. Press .
55 51212 is displayed.
UU ssiinn gg SS yymm bb oo ll TTeexx tt II nn pp uutt
1. Press Right Soft Key to change to Symbols mode.
2. Press Right Soft Key
NNeexx tt
to view the next 12 symbols or Left
Soft Key
PPrr ee vv
to view the previous 11 symbols.
3. Use to highlight the special character you want to insert and
press to select it.
UU ssiinn gg WWoo rr dd MM oo dd ee TTeexx tt IInnppuutt
To type the message “Call the office” follow these steps:
1. Press Right Soft Key to change to Word mode.
2. Press .
3. Press to complete the word and add a space.
4. Press
Call the office is displayed.
UU ssiinn gg tt hhee NNeexx tt KKee yy
After you have finished entering a word, if the word displayed is not
the one you want, press to display additional choices of words
from the database.
1. Press .
Good is displayed.
2. Press .
The display gives you additional choices such as: Home, Gone,
Hood, etc.
DM-L200_LGManual_1.1.qxd 9/18/06 5:03 PM Page 25
Page 28
INFORMATION
ENTERING
26
AAdddd ii nn gg WWoo rr dd ss tt oo tt hh ee WWoorrdd DDaatt aabbaass ee
If a word is not in the Word database, add it using Abc
(Multi-tap) mode text entry.
1. Press Right Soft Key to change to Abc (Multi-tap) mode.
2. Press .
Bop is displayed.
3. Press Right Soft Key to change to Word mode to add the
word Bop to the Word database.
4. Press to erase the existing word.
5. Press .
Bop is displayed.
6. Press .
Cos is displayed.
DM-L200_LGManual_1.1.qxd 9/18/06 5:03 PM Page 26
Page 29
CONTACTS
IN YOUR PHONE’S MEMORY
27
CCoonnttaa cc tt ss EE nnttrriieess
This allows you to have easy access to your most frequently
dialed phone numbers. You may store up to 500 entries with
up to 4 phone numbers each. Each phone number may be up
to 48 digits.
TThh ee BBaa ss iiccss ooff SStt oorr iinngg CC oonn ttaa cctt ss EE nn tt rriieess
1.From Idle Screen, enter the phone number you want to save
(up to 48 digits).
2.Use to select
SSaa vvee
, then press .
3.Use to select
NNaammee EE nn tt rryy
, then press .
SSee lleecctt::
NNee ww EEnn tt rryy //
EE xxiiss ttiinn gg EEnn ttrr yy
4.Enter a name for the phone number (up to 32 characters),
then press .
5.To Set a Speed Dial, highlight the number press Right Soft
Key
OO pp ttii oo nn ss
and select
SSee tt SSppeeee dd DDii aa ll ..
NOTE: Use Existing Entry to add another phone number
to a contact already stored in memory.
NOTE: To skip name entry, press to go to the
next step.
NOTE: Press Left Soft Key
DD oo nnee
to save the Contact
entry or press to return to the Main Menu Screen
without saving.
DM-L200_LGManual_1.1.qxd 9/18/06 5:04 PM Page 27
Page 30
CONTACTS
IN YOUR PHONE’S MEMORY
28
6.Enter a Speed Dial digit (e.g., 2). Use the keypad, then
press or use to highlight the Speed Dial location,
then press twice.
7. To Set a Voice Dial, highlight the number, press Right Soft
Key
OO pp ttii oo nn ss
, and select
SSee tt VV ooii ccee DDiiaall
.
8. Scroll to
OO KK
and press .
9. Record your voice dial after the prompt. (Your recording
will play back.)
OO pp tt ii oo nn ss tt oo CCuussttoo mmiizzee YY oo uu rr CCoonnttaaccttss
Once the basic phone number and name information is stored
in your
CCoonn tt aa ccttss
, you can edit and customize each entry.
HHoo ww ttoo AA cccc eessss tthhe
e EE dd iitt EEnn ttrr yy ss ccrree ee nn ::
1. Press Left Soft Key Contacts from the Idle screen, and go
to
FFiinndd // AA dd dd EEnntt rryy
.
2. Use to highlight the contact entry you want to edit,
then press .
3. Use
to
scroll to
EEddiitt EE nnttrryy
and press .
4. Use to highlight the information you want to
customize, then press .
AAdddd ii nn gg oo rr CC hh aa nn gg iinngg tt hh ee GGrr oo uupp
Allows you to manage your Contacts entries by organizing
them into groups.
1. Access the Edit Entry screen.
2. Use to highlight
NNoo GGrr oo uupp
, then press .
DM-L200_LGManual_1.1.qxd 9/18/06 5:04 PM Page 28
Page 31

29
3. Use to select the Group, then press .
NNoo GGrr oo uu pp // FFrr iiee nn dd ss // SS cchh oo oo ll // BBuussii nnee ssss // CCooll llee aa gg uu ee ss
4. Press Left Soft Key
DD oo nnee
to save the change.
CChhaann gg iinngg tt hh ee RRii nn gg tt oonnee II DD
Allows you to identify who is calling by setting different ringtones
for different phone numbers in your Contacts. It is automatically set
to the default ringtone when the Contact is saved.
1. Access the Edit Entry screen.
2. Use to highlight
RR iinn gg tt oonnee II DD
, then press .
3. Press Right Soft Key
OO pp ttii oo nn ss
to display additional choices.
4. Use to select
RR iinn gg tt oonn ee ss//VV oo iiccee GGaa ll lleerryy
, then press
OO KK
.
5. Use to select a ringtone, then press .
6. Press Left Soft Key
DD oo nnee
to save the change.
AAdddd ii nn gg oo rr CC hh aa nn gg iinngg tt hh ee PP ii xx IIDD
Allows the phone to display an image to identify the caller.
1. Access the Edit Entry screen.
2. Use to highlight
PPii xx IIDD
, then press .
3. Use to select the picture, then press to Save.
4. Press Left Soft Key
DD oo nnee
to save the change.
DM-L200_LGManual_1.1.qxd 9/18/06 5:04 PM Page 29
Page 32

CONTACTS
IN YOUR PHONE’S MEMORY
30
AAdddd ii nn gg SSppeeee dd DDii aa ll
1. Access the Edit Entry screen.
2. Use to highlight the phone number you want to set
with a Speed Dial, then press Right Soft Key
OO pp ttii oo nn ss
.
3. Scroll to
SSee tt SSppeeee dd DDii aa ll
, then press .
4. Enter a Speed Dial digit. Use the Keypad, then press ,
or use to highlight the Speed Dial digit, then
press .
5. Scroll to
SSee tt SSppeeee dd DDii aa ll
and press .
6. Press Left Soft Key
DD oo nnee
to save the change.
AAdddd ii nn gg VV oo iicc ee DDii aa ll
1. Access the Edit Entry screen.
2. Use to highlight the phone number you want to set
with a Voice Dial, then press Right Soft Key
OO pp ttii oo n
nss
.
3. Scroll to
SSee tt VV ooii ccee DDiiaall
, then press .
4. Scroll to
OO KK
and press .
5. Record your voice dial after the prompt. (Your recording
will play back.)
Editing Contacts Entries
AAdddd ii nn gg AA nn oo tt hh ee rr PP hh oo nnee NNuummbbeerr
FFrr oomm tt hhee II dd llee SSccrree ee nn
1. From Idle screen enter the phone number you want to
save (up to 28 digits).
DM-L200_LGManual_1.1.qxd 9/18/06 5:04 PM Page 30
Page 33

31
2. Scroll to
SSaa vvee
and press .
3. Use to highlight
EExx iiss ttii nn gg EEnn tt rryy
and press .
4. Use to highlight the existing contact entry and press
5. Highlight a desired field for numbers and press .
6. Enter the new phone number and press .
7. Press Left Soft Key
DD oo nnee
to save.
A confirmation message is displayed.
TThh rroouugghh CCoonnttaa ccttss
1. Access the Edit Entry screen.
2. Use to highlight a desired field for numbers, then press .
3. Enter the number, then press .
4. Press Left Soft Key
DD oo nnee
to save.
EEddiitt ii nn gg SStt oo rr eedd PPhhoo nn ee NNuummbbeerr ss
1. Access the Edit Entry screen.
2. Use to highlight the phone number, then press .
3. Edit the phone number as necessary, then press .
4. Press Left Soft Key
DD oo nnee
to save.
EEddiitt ii n
ngg SS ttoo rr ee dd NNaammee ss
1. Access the Edit Entry screen.
2. Use to highlight the name, then press .
DM-L200_LGManual_1.1.qxd 9/18/06 5:04 PM Page 31
Page 34

CONTACTS
IN YOUR PHONE’S MEMORY
32
3. Edit the name as necessary, then press .
4. Press Left Soft Key
DD oo nnee
to save the change.
EEddiitt ii nn gg CC uussttoo mmii zzeedd OOpp ttii oo nn ss
Edit any of the Contacts options in the same manner as
when the Contact is created.
1. Access the Edit Entry screen.
2. Use to highlight the information you want to
customize, then press .
3. Edit the information as necessary, then press .
4. Press Left Soft Key
DD oo nn ee
to save the change.
DD ee ff aa uu ll tt NNuumm bb ee rrss
The phone number saved when a Contact is created is the
Default Number. If more than one number is saved in a
Contact entry, another number can be designated as the
Default Number.
CChhaann gg iinngg tt hh ee DDee ffaa uu ll tt NNuumm bb ee rr
1. Access the Edit Entry screen.
2. Use to highlight the phone number you want to set
as the Default Number, then press Right Soft Key
OO pp tti
ioo nnss
.
3. Scroll to
SSee tt aass PP rr iimm aa rryy ##
and press .
A confirmation message is displayed.
4. Press Left Soft Key
DD oo nnee
to save.
DM-L200_LGManual_1.1.qxd 9/18/06 5:04 PM Page 32
Page 35

33
DD eell eett ii nn gg
DD ee llee ttiinn gg aa PP hhoo nn ee NNuummbb ee rr ff rr oomm aa CC oonntt aa cctt
1. Access the Edit Entry screen.
2. Use to highlight the phone number to be deleted.
3. Press Right Soft Key
OO pp ttii oo nn ss
.
4. Highlight
DD ee llee ttee FFii eell dd
, and press .
5. Highlight
YYeess
, and press .
A confirmation message is displayed.
DD ee llee ttiinn gg aa CC oonntt aa cctt
EEnn tt rryy
1. Press Left Soft Key
CCoonn tt aa ccttss
from the Idle screen.
2. Use to highlight the contact entry you want to delete,
then press .
3. Highlight
DD ee llee ttee EE nn tt rryy
, and press .
4. Highlight
YYeess
, and press .
A confirmation message is displayed.
DD ee llee ttiinn gg aa SSppeeee dd DDii aa ll
1. Select
CCoonn tt aa ccttss
from the Main Menu, and select
SSppeeeedd DDii aa ll
.
2. Highlight the Speed Dial you want to delete, then press .
3. Highlight
DD ee llee ttee SS pp ee eed
d DDii aall
, and press .
4. Highlight
YYeess
, and press .
A confirmation message is displayed.
DM-L200_LGManual_1.1.qxd 9/18/06 5:04 PM Page 33
Page 36

CONTACTS
IN YOUR PHONE’S MEMORY
34
Phone Numbers with Pauses
When you call automated systems such as Voicemail or credit billing
numbers, you often have to enter a series of numbers. Instead of
entering these numbers by hand, you can store the numbers in your
Contacts separated by special pause characters (P, T).
There are two different types of pauses you can use when storing
a number:
HHaarrdd PPaauussee ((PP))
The phone stops dialing until you press to advance
to the next number.
22--sseecc PPaauussee ((TT))
The phone waits 2 seconds before sending the
next string of digits.
SSttoo rr iinn gg aa NNuumm bbeerr ww ii tthh PPaa uussee ss
1. Enter the number and highlight the
HHaarrdd ppaauussee// 22--sseecc ppaauussee
,
then press .
2. Enter the second set of numbers.
3. Scroll to
SSaav
vee
and press .
4. Select
NNeeww EEnnttrryy//EExxiissttiinngg EEnnttrryy
, then press .
5. Add more Entry information and press Left Soft Key
DDoonnee
,
if you want to further customize.
DM-L200_LGManual_1.1.qxd 9/18/06 5:04 PM Page 34
Page 37

Searching Your Phone’s Memory
The DM-L200 is able to perform a dynamic search of the contents in
your phone’s memory. A dynamic search compares entered letters
or numbers against the entries in your Contacts. A matching list is
displayed in ascending order. You can then select a number from
the list to call or edit. There are several ways to search:
SSccrr oo llll ii nn gg AA llpphhaabbee tt iiccaa llll yy TThhrr oouu gg hh YYoouurr CCoonnttaacc ttss
1.Select
CCoonn tt aa ccttss
from the Main Menu, and select
FFiinndd // AA dd dd EEnntt rryy
.
2.Use to scroll through the list.
MMaakkii nn gg aa CCaall ll FFrr oo mm YYo
ouurr PPhhoonnee’’ss MMee mmoorr yy
Once you have stored phone numbers in your Contacts, you can
place calls to those numbers quickly and easily.
By pressing after searching for a phone number
in Contacts or Recent Calls and highlighting it.
By Using Speed Dialing.
FFrr oomm CC oonn ttaa cctt ss
1. Select
CCoonnttaaccttss
from the Main Menu, and select
FFiinndd//AA dddd EEnnttrryy
.
2. Use to select the phone number.
3. Press to place the call.
35
Scrolling Alphabetically
Searching by Letter
DM-L200_LGManual_1.1.qxd 9/18/06 5:04 PM Page 35
Page 38

36
FFrr oomm RReecceenn tt CCaall llss
1. Press Right Soft Key
MM ee nnuu
,, .
2. Use to select the type of recent call, then press .
RR eecceenntt // MM ii ssss ee dd // RR ee cceeii vveedd // DDii aa llee dd
3. Use to select the phone number.
4. Press to place the call.
SSppeeeedd DDii aa llii nn gg
For a single-digit Speed Dial, press and hold the digit or
press the digit, then press . For a double-digit Speed
Dial, press the first digit and hold the second digit or
press the first and second digits, then press .
CONTACTS
IN YOUR PHONE’S MEMORY
DM-L200_LGManual_1.1.qxd 9/18/06 5:04 PM Page 36
Page 39

37
PHONE MENUS
USING
MM eenn uu AA cccc eess ss
Press Down Soft Key
MM ee nnuu
to have access to five phone
menus. There are two methods of accessing menus and
submenus:
Use the navigation key to highlight and select, or
Press the number key that corresponds to the sub-menu.
For example:
1. Press Down Soft Key
MM ee nnuu
to display the five menu
items.
Use to scroll through the list of menus.
2.Press the number key that corresponds to the menu
item you want to select. The sub-menu list will be
displayed.
3.Press the number key that corresponds to the
sub-menu you want to access.
4.Use to highlight your preferred setting, then
press to select it.
DM-L200_LGManual_1.1.qxd 9/18/06 5:04 PM Page 37
Page 40

38
PHONE MENUS
USING
CCoonn tt aa ccttss
The Contacts menu allows you to store names, phone
numbers and other information in your phone’s memory.
AAcc cceess ss aa nn dd OOpp ttii oo nnss
1. Press Right Soft Key
MM ee nnuu
.
2. Press
CCoonn tt aa ccttss ..
3. Select a sub-menu.
1. Find/Add Entry
2. Groups
3. Speed Dial
4. Voice Dial
5. Services
1. Find/Add Entry
Allows you to view your Contacts list.
1. Press Right Soft Key
MM ee nnuu
, , .
2. Scroll to
NNee ww EEnn tt rryy
and press .
3. Enter a name for the new entry and press .
4. Scroll to
AAdddd NNuumm bb ee rr
, enter the phone number, then
press .
5. Scroll down to additional fields and enter or edit
information as desired.
6. Press Left Soft Key
DD oo nnee..
DM-L200_LGManual_1.1.qxd 9/18/06 5:04 PM Page 38
Page 41

39
2. Groups
Allows you to view your grouped Contacts, add a new group,
change the name of a group, delete a group, or send a message
to everyone in the selected group.
1. Press Right Soft Key
MM ee nnuu
, , .
2. Scroll to
GG rroouuppss
and press .
3. Scroll through the group titles using .
To display entries belonging to a group, highlight the group
and press .
4. To display an entry within the group, highlight it and press
.
3. Speed Dial
Allows you to view your list of Speed Dials or designate Speed
Dials for numbers entered in your Contacts.
1. Press Right Soft Key
MM ee nnuu
, , .
2. Use to highlight the Speed Dial position (or enter the
Speed Dial digit), then press .
3. Use to highlight the Contact, then press .
A confirmation message is displayed.
4. Voice Dial
Allows you to view your list of Voice Dials or designate Voice Dials
for numbers entered in your Contacts.
1. Press Right Soft Key
MM ee nnuu
, , .
2. Scroll through voice dial entries using , or you can also
RR eeccoorr dd NNeeww
or
DD ee llee ttee AA llll
.
DM-L200_LGManual_1.1.qxd 9/18/06 5:04 PM Page 39
Page 42

40
PHONE MENUS
USING
3. To display an entry, highlight it and press .
Select
PPllaa yy // RR ee -- rr eecc oo rrdd // DDee llee tt ee
and press .
5. Services
Your Contacts list is preprogrammed with contact numbers
for various Disney Services.
1. Press Right Soft Key
MM ee nnuu
, , .
2. Select
GG uu ee sstt SSeerr vviicceess,, DDii rr AAss ssiissttaa nnccee,, RR oo aa dd AA ssss iissttaa nncc ee,,
or
CChhee cckk UU ssaag
gee ..
3. Press to place the call.
TToo ddii aa ll aa sseerr vviiccee ffrr oo mm ssttaa nndd bbyy mm ooddee uu ssii nn gg yy oo uu rr kkeeyyppaa dd ::
Dial the appropriate service number:
GG uu ee sstt SSeerr vviicceess ––
DD iirr AA ssss iissttaa nncc ee ––
RR ooaad
d AAss ssii ssss tt aa nn ccee ––
((** RROOAADD))
CChhee cckk UU ssaaggee ––
DM-L200_LGManual_1.1.qxd 9/18/06 5:04 PM Page 40
Page 43

Messaging
AAcc cceess ss aa nn dd OOpp ttii oo nnss
1. Press Right NAV KEY or Press Right Soft Key
MM ee nnuu
.
2. Press
MM ee ss ssaagg ii nn gg
.
3. Select a sub-menu.
11 ..CC aall ll HHiiss ttoo rr yy
22 .. VVooii cceemmaaiill
33 .. CC rr eeaattee MMee ss ssaaggee
44 .. IInnbb oo xx
55 .. OOuutt bbo
oxx
66 .. DDrraa ff tt ss
Text messages, pages, and the Voicemail box become available as
soon as the phone is powered on.
Check types of messages by pressing the message key.
Make a call to the callback number by pressing
during an Inbox message check.
Read and edit messages saved in the outbox after
transmission and resend them.
The phone can store up to 30 inbox messages. (Outbox: 10
messages, Drafts box: 10 messages) The DM-L200 supports up to
160 characters per message. The information stored in the message
is determined by phone mode and service capability. Other limits to
available characters per message may exist. Please check with your
service provider for system features and capabilities.
41
DM-L200_LGManual_1.1.qxd 9/18/06 5:04 PM Page 41
Page 44

42
PHONE MENUS
USING
NNeeww MMeessss aa gg ee AAllee rr tt
There are 3 ways your phone alerts you to new messages.
1. The phone displays a message on the screen.
2. One of six ring types is heard, if selected.
3. The message icon ( ) is displayed on the screen. In
the case of an urgent message, the icon will flash and
Urgent Message is displayed.
1.Call History
The Call History menu is a list of the last phone numbers or
Contact entries for calls you placed, accepted, or missed.
It is continually updated as new numbers are added to the
beginning of the list and the oldest entries are removed
from the bottom of the list.
11 .. RR eecceenn tt
Allows you to view the list of all calls; up to 50 entries.
1. Press Right Soft Key
MM ee nnuu
, , , .
2. Select the number using , then press to select
option(s):
CCaa ll ll // SS aavv ee // SSeenndd MMee ss ssaagg ee // DDee ll eett ee // NNeexx tt // PPrr ee vv
22 .. MM iis
sss ee dd
Allows you to view the list of missed calls; up to 50 entries.
1. Press Right Soft Key
MM ee nnuu
, , , .
2. Select the number using , then press to select
option(s):
DM-L200_LGManual_1.1.qxd 9/18/06 5:04 PM Page 42
Page 45

43
CCaa ll ll // SS aavv ee // SSeenndd MMee ss ssaagg ee // DD ee llee tt ee // NNeexx tt // PP rr ee vv
3. Select the number, then press to place a call to the
number.
33 .. RRee cceeii vveedd
Allows you to view the list of incoming calls; up to 50 entries.
1. Press Right Soft Key
MM ee nnuu
, , , .
2. Select the number using , then press to select
option(s):
CCaa ll ll // SS aavv ee // SSeenndd MMee ss ssaag
gee // DDee llee tt ee // NNeexx tt // PP rr ee vv
3. Select the number, then press to place a call to the number.
44 .. DD ii aall eedd
Allows you to view the list of outgoing calls; up to 50 entries.
1. Press Right Soft Key
MM ee nnuu
, , , .
2. Select the number using , then press to select
option(s):
CCaa ll ll // SS aavv ee // SSeenndd MMee ss ssaagg ee // DDee ll eett ee // NNeexx tt // PPrr ee vv
3. Select the number, then press to place a call to the
number.
55
.. DDee llee tt ee CC aa ll ll HHii sstt oo rryy
Allows you to erase selected call list(s).
1. Press Right Soft Key
MM ee nnuu
, , , .
2. Use to highlight the list of calls to erase, then
press .
DM-L200_LGManual_1.1.qxd 9/18/06 5:04 PM Page 43
Page 46

44
PHONE MENUS
USING
RR eecceenntt CC aall ll ss // MMii ssssee dd CC aall ll ss // RR eeccee ii vvee dd CC aa ll ll ss // DD ii aall eedd
CCaa ll ll ss // AAllll CC aallll ss
3. Press
YYeess
.
2. Voicemail
Allows you to view new voice messages recorded in the
Voicemail box. Once you exceed the storage limit, old
messages are overwritten. When you have a new voice
message, your phone will alert you.
CChheecckk ii nn gg YYoo uurr VV ooi
icc eemmaa ii ll BB oo xx::
1.Press Right Soft Key
MM ee nnuu
, , .
2. Press .
CCaall ll VVooii cceemmaaiill
Or press and hold to call voicemail.
3. Create Message
11 .. TTeexx tt MMee ss ssaaggee
You can send text messages from one phone to another.
1. Press Right Soft Key
MM ee nnuu
, , , .
2. Enter the phone number of the recipient.
Press Right Soft Key
OO pp ttii oo nn ss
.
Select the option(s) to customize.
AAdddd FFaammii llyy // AA dddd CC oonntt aa ccttss /
/ AAdddd GG rroo uu pp // RReecc eenn tt CC aallll //
RR eecceenntt LLii sstt
3. Press .
DM-L200_LGManual_1.1.qxd 9/18/06 5:04 PM Page 44
Page 47

45
4. Press Left Soft Key
NNeexx tt
when you are finished
selecting/entering recipients (you may include up to 10
recipients).
5. Type your message.
6. Press Left Soft Key
SSee nndd
to send the message.
22 .. PP iixx MMee ss ssaagg ee
You can send pictures and videos from one phone to another.
1. Press Right Soft Key
MM ee nnuu
, , , .
2. Enter the phone number of the recipient.
3. Press Right Soft Key
OO pp ttii oo nn ss
.
Select the option(s) to customize.
AAdddd FFaammii llyy // AA dddd CC oonntt aa ccttss // AAdddd GGrr oo uu pp // RReecc eenn tt CC aalll
l //
RR eecceenntt LLii sstt
Press .
4. Press Left Soft Key
NNeexx tt
when you are finished
selecting/entering recipients (you may include up to 10
recipients).
5. Scroll to
TTeexx tt
and press .
6. Enter the message, and press .
7. Scroll to
AAdddd PP ii xx
and press .
Press Right Soft Key
OO pp ttii oo nn ss
.
Select the option(s) to customize.
DD ee llee ttee IImm aa ggee // PP rreevv ii ee ww // SSaa vvee aass DD rr aafftt // EE xxii tt
8. Scroll to
A
Adddd VV iiddeeoo
and press .
DM-L200_LGManual_1.1.qxd 9/18/06 5:04 PM Page 45
Page 48

46
PHONE MENUS
USING
Press Right Soft Key
OO pp ttii oo nn ss
.
Select the option(s) to customize.
DD ee llee ttee VV iidd ee oo // PP rree vvii ee ww // SSaa vvee aass DD rr aafftt // EE xxii tt
9. Scroll to
AAdddd VVooiicc ee
and press .
Press Right Soft Key
OO pp ttii oo nn ss
.
Select the option(s) to customize.
DD ee llee ttee VVooiiccee // PP rr eevvi
iee ww // SSaavvee aa ss DDrr aa fftt // EE xxiitt
10. Scroll to
SSuubbjj ee cctt
and press .
11. Enter the subject and press Left Soft Key
SSee nndd
.
A sending screen is displayed.
4. Inbox
The phone alerts you in 3 ways when you receive a new
message:
By displaying a message notification on the screen.
By sounding a beep or vibrating, if set.
By blinking (only when you get a high-priority
message).
Received text messages, pix messages and email lists may
be searched and the contents viewed. Received messages
are displayed from newest to oldest.
11 .. TTeexx tt MMee ss ssaaggee
1. Press Right Soft Key
MM ee nnuu
, , , .
2. Select a message with and press .
DM-L200_LGManual_1.1.qxd 9/18/06 5:04 PM Page 46
Page 49

3. Options from here:
Left Soft Key
RR eeppll yy
.
Right Soft Key
OO pp ttii oo nn ss
.
CCaa ll ll // FFoorr ww aa rrdd // SSaa vvee NNuumm bb ee rr // DDeellee tt ee
22 .. PP iixx MMee ss ssaagg ee
1. Press Right Soft Key
MM ee nnuu
, , , .
2. Select a message with and press .
3. Options from here:
Right Soft Key
OO pp ttii oo nn ss
.
PPllaa yy AAgg aa iinn // FFoorr wwaarrdd ,, DDee llee ttee // AA dddd tt oo CC oonntt aa ccttss // LLoocckk //
SSaa vvee PP ii ccttuurr ee // SSaavvee SS oouunndd // SSaa vvee a
ass QQuuii cckknnoott ee //
MM ee ss ssaagg ee II nn ffoo
5. Outbox
Up to 10 messages or 1M memory can be stored in the Outbox. View
lists and contents of sent messages and verify whether the
transmission was successful or not.
11 .. TTeexx tt MMee ss ssaaggee
1. Press Right Soft Key
MM ee nnuu
, , , .
2. Select a message with and press .
3. Options from here:
Left Soft Key
FFoorr wwaa rrdd
.
Right Soft Key
OO pp ttii oo nn ss
.
CCaa ll ll // RReessee nndd // SSaa vvee aass QQuu ii cckknn oott ee // DD ee llee tt ee
47
DM-L200_LGManual_1.1.qxd 9/18/06 5:04 PM Page 47
Page 50

48
PHONE MENUS
USING
22 .. PP iixx MMee ss ssaagg ee
1. Press Right Soft Key
MM ee nnuu
, , , .
2. Select a message with and press .
3. Options from here:
Right Soft Key
OO pp ttii oo nn ss
.
PPllaa yy AAgg aa iinn // RRee ss eenndd // DDee ll eett ee // AAdddd TToo CC oonn ttaaccttss //
LLoocckk // SSaavvee PP iiccttuurr ee (( VV iidd ee oo )) // SSaavvee SS oouunnd
d // SSaa vvee
aass QQuu ii cckk nnoo ttee // MMee ss ssaagg ee II nn ff oo
6.Drafts
Displays draft messages.
11 .. TTeexx tt MMee ss ssaaggee
1. Press Right Soft Key
MM ee nnuu
, , , .
2. Select a message with and press .
3. Options from here:
Left Soft Key
EEddiitt
.
Right Soft Key
OO pp ttii oo nn ss
.
SSee nn dd // DDee ll eett ee
22 .. PP iixx MMee ss ssaagg ee
1. Press Right Soft Key
MM ee nnuu
, , , .
2. Select a message with and press .
3. Options from here:
Left Soft Key
NNeexx tt
.
Right Soft Key
OO pp ttii oo nn ss
. [Add Recipient]
DM-L200_LGManual_1.1.qxd 9/18/06 5:04 PM Page 48
Page 51

49
AAdddd FFaammii llyy // AA dddd CC oonntt aa ccttss // AAdddd GGrr oo uu pp // RReecc eenn tt
CCaa ll ll // RReecc eenn tt LLii sstt
Family Center
TM
Disney Mobile’s Family Center is full of unique family-friendly
features that were created specifically to keep your family
connected.
We’ve broken each feature out into an easy-to-read chart to help
you better understand the roles of adults and kids in each Family
Center application.
FFaammii llyy CCeenntteerr SSeerr vviicceess
FFaammiillyy
MMaannaaggeerr
FFaammiillyy
MMeemmbbeerrss
((1188 aanndd oovveerr))
FFaammiillyy
MMeemmbbeerrss
((UUnnddeerr 1188))
FFaammiillyy LLooccaattoorrTMSSeerrvviiccee
Can locate a kid’s phone on the
account
Yes Yes No
Can locate adults phones on the
account
No No No
Phone can be located No No Yes
FFaammiillyy MMoonniittoorrTMSSeerr vviiccee
Can set spending allowances
for family members
Yes No No
Can have spending allowances
set for them
No No Yes
FFaammiillyy AAlleerrtt!!TMSSeerr vviiccee
Can send Family Alerts Yes Yes Yes
Can receive Family Alerts Yes Yes Yes
DM-L200_LGManual_1.1.qxd 9/18/06 5:04 PM Page 49
Page 52

50
NOTE: A Family Manager is the one person who oversees
the day-to-day activity in a Disney Mobile Family Plan.
The Family Manager monitors the phones of family
members under 18 by using Family Monitor to set usage
allowances and using Call Control (exclusively at
www.disneymobile.com) to restrict time and number
specific usage.
NOTE: Some Family Center
TM
features will not be available
under certain conditions including, but not limited to,
family member phones being turned off, one or more
family members roaming off the Disney Mobile network,
poor network signal or other network limitations.
CCaallll CCoonnttrrooll SS eerrvviiccee vviiaa
DDiissnneeyymmoobbiillee..ccoomm
Can set phone usage
restrictions by day & time
Yes No No
Can set Always On and
Prohibited numbers
Yes No No
Can have restrictions
imposed on usage
No No Ye s
EEnntteerr ttaaiinnmmeenntt FFeeaattuurreess
Can use Theme It to give
their phone a themed
makeover
Yes Yes Ye s
Can download
Disney content from
Disney Zone
Yes Yes Ye s
Can download images, games
and ringtones straight to their
Disney Mobile Phone
Yes Yes Ye s
FFaammiillyy CCeenntteerr SSeerrvviicceess
FFaammiillyy
MMaannaaggeerr
FFaammiillyy
MMeemmbbeerrss
((1188 aanndd oovveerr))
FFaammiillyy
MMeemmbbeerrss
((UUnnddeerr 1188))
PHONE MENUS
USING
DM-L200_LGManual_1.1.qxd 9/18/06 5:04 PM Page 50
Page 53

51
AA cc cc ee ss ss ii nn gg FF aamm ii ll yy CCeenn tt eerr
TM
Here’s how to start managing your family’s communications through
Family Center:
1. Press Left NAV KEY or Press Right Soft Key
MM ee nnuu
.
2. Press
FFaammii ll yy CC eenntt ee rr
.
FFaamm ii ll yy LLoo cc aa tt oo rr
TM
SS ee rr vvii ccee
From within Family Locator, select kid’s member name and press
“OK to Locate” - it’s that simple.
You can use Family Locator to locate your kid’s phone right from
your phone, without calling.
Your account includes a specific number of locates per billing cycle.
Your phone will ask if you would like to accept an additional charge
for each Family Locator usage over your monthly limit.
NOTE: The Family Locator service allows the Family Manager
and other adults on the account to locate children only.
Children cannot locate adults, and adults can’t locate other
adults.
AAcc cceess ssiinngg FF aa mm ii llyy LLoocc aatt oo rr ::
1. Press
MM ee nnuu
, select
FFaammii ll yy CC eenntt ee rr
and press
OO KK
.
2. Select
FFaammii ll yy LL ooccaa tt oorr
and press
OO KK
.
After activation, Family Managers and adults on the family plan can
also access this feature from their computer by going to the Family
Center on www.disneymobile.com.
DM-L200_LGManual_1.1.qxd 9/18/06 5:04 PM Page 51
Page 54

52
PHONE
USING
SS ee tt tt ii nn gg YY oouu rr PP II NN
The first time you use your Family Locator feature from
either the phone or online, you will be prompted to create
your PIN. You will need to enter your PIN each time you
access the Family Locator feature from your phone or online.
1. From Family Locator, under
OO KK ttoo LL ooccaa tt ee
, select a name
and press
OO KK ..
2. Enter your temporary PIN (sent separately), then press
OOKK..
3. If correct, accept or decline the Terms & Conditions.
NOTE: If you have already accepted Terms & Conditions
from www.disneymobile.com, you will not be prompted
again.
NOTE: If you decline the Terms & Conditions, you will
not be able to use Family Locator functionality from
your phone or from www.disneymobile.com. You will
continue to be prompted each time you access the
application until you accept the Terms & Conditions.
4. Under “Create PIN,” enter a new PIN and press
OO KK
.
5. Re-enter your new PIN to confirm and press
OO KK
.
6. If the action has been completed correctly, the message
“New PIN Set” will appear on your phone.
NOTE: It is very important to change your PIN to
safeguard the Family Locator feature on your handset.
Your new PIN must be a different 4-digit number from
your temporary PIN.
DM-L200_LGManual_1.1.qxd 9/18/06 5:04 PM Page 52
Page 55

53
UU ssiinn gg FF aa mm ii llyy LLoocc aatt oorr
Here’s how to use Family Locator to locate a kid’s phone on your
family plan.
1. From Family Locator under
OO KK ttoo LL ooccaa tt ee
, select a name
and press
OO KK ..
2. Enter your PIN and press
OO KK ..
3. Locating message will appear to confirm action in progress.
4. If you have already used all of the locates included in your
plan, you will be prompted to continue the search for an
additional fee. Select “Yes” and press
OO KK
to continue. Select
“No” and press
OO KK
to return to the previous screen.
5. Under “Location,” an address, accuracy range and the
local time will appear.
6. If the location attempt was unsuccessful, press
RR eett rr yy
to
return to the
PPrreess ss OO KK ttoo LLoocc aatt ee
screen.
NOTE: After entering an incorrect PIN three times in a row,
you will be locked out of Family Locator and will need to
reset your PIN. The Account Owner can contact Guest
Services at 1-866-DISNEY2 to reset.
NOTE: Pressing BACK or END while conducting a search will
count against any locates included in your calling plan.
Unsuccessful locate attempts will not be deducted against
any locates included in your calling plan.
NOTE: Some Family Locator
TM
features will not be available
under certain conditions including, but not limited to,
family member phones being turned off, one or more family
members roaming off the Disney Mobile network, poor
network signal or other network limitations.
DM-L200_LGManual_1.1.qxd 9/18/06 5:04 PM Page 53
Page 56

54
VViiee ww iinngg MMaa pp ss
After receiving a location which may include an approximate
address, you can access a map of your child’s phone location.
1. Under Location, press
MM AA PP
.
2. An area map will appear with a shaded circle indicating the
reported location and accuracy range.
NOTE: Location information can only be provided if the
child’s phone is turned on and both phones are within
Disney Mobile's coverage area. Location cannot be
completed if the phone being located is on a voice call
at the time of the location request.
3. Use the up/down/left/right NAV KEY to view surrounding
area. Press
ZZoooomm
to zoom in/out of map.
4. Press
BB aa cckk
to return to the Location page.
FFaamm ii ll yy MM oonn ii tt oorr
TM
SS ee rr vvii ccee
Stay in control of your family’s wireless spending by using
Family Monitor to check total family usage, and set voice,
text and pix usage allowances for all children on the
family plan.
When allowances are reached, both the Family Manager and
child who surpassed his or her limit will receive an alert on
his or her phone. At that time, the Family Manager can do
nothing, increase the number of allowed minutes from the
handset, or go to www.disneymobile.com and access the
CCaa ll ll CCoonn tt rroo ll
feature to restrict service to all but Always
On numbers.
PHONE MENUS
USING
DM-L200_LGManual_1.1.qxd 9/18/06 5:04 PM Page 54
Page 57

55
Phones assigned to Family Members under the age of 18 will be set
up to be managed via Family Monitor, but phones assigned to family
members 18 and over cannot be managed.
AAcc cceess ssiinngg FFaamm ii llyy MMoo nnii tt oo rr
:
1. Press
MM ee nnuu
, select
FFaammii ll yy CC eenntt ee rr
and press
OO KK
.
2. Select
FFaammii ll yy MMoonnii ttoorr
and press
OO KK
.
SSee tt ttiinn gg AA llll oo ww aa nn cceess
Only the Family Manager can set monthly allowances for children
on the account under the age of 18. They can do so through the
following steps:
1. From
FFaammi
illyy MM oo nn ii ttoorr
, select
SSee tt AAll lloo ww aa nn cceess
and press
OO KK
.
2. Select
NNaamm ee
and press
OO KK
.
3. Press up/down NAV KEY to select voice, text, pix or downloads
and press
OO KK
to edit.
4. Under
EEddiitt AA llll oo ww aa nn ccee
, use left/right NAV KEY to
increase/decrease amount.
5. Press
OO KK
to save the new allowance.
Newly saved allowances will be stored immediately and you will
receive an alert on your phone as soon as each of the allowances
you set has been reached. Children will also receive an alert when
they reach allowances that have been set for them.
VViiee ww iinngg UUssaagg ee
NOTE: You can only view usage when the Family Manager’s
handset is within Disney Mobile’s coverage area.
Only the Family Manager can view everyone’s usage. All other family
members on the account can only view their own personal usage.
DM-L200_LGManual_1.1.qxd 9/18/06 5:04 PM Page 55
Page 58

56
PHONE MENUS
USING
FFaammii ll yy MMaa nn aa gg ee rr ::
For up-to-the-minute usage information on
the Family Manager’s phone:
1. From
FFaammii ll yy MMoonnii ttoorr
, select
VViieeww UU ss aaggee
and press
OO KK
.
2. An
UU pp dd aatt ii nn gg UU ss aaggee
message will appear briefly while the
phone gets up-to-the minute usage information for all
family members on your plan.
3. Select
NN AAMMEE
and press
OO KK ..
4. Press up/down NAV KEY to select
VVooii ccee,, TTeexx tt,, PP ii xx
or
DD
oowwnnll oo aaddss ..
5. Usage information appears at the bottom of each screen.
6. You can also set allowances from this screen – follow the
setting allowances instructions.
OO tthhee rr FF aa mm ii llyy MMeemmbbeerr ss’’ PPhhoonnee ss ::
All other family members can only view, not edit, their
personal allowances and usage.
1. From Family Monitor, select
MM yy SS pp ee nn ddii nn gg
and press
OO KK
.
2. Use up/down NAV KEY to view allowances and
voice/text/pix/download usage.
NOTE: The Family Manager can also monitor usage
and set usage allowances from the Family Center at
www.disneymobile.com.
RR eecceeii vvii nn gg SS pp ee nn ddii nn gg AA llee rr tt ss
When a Family Member under the age of 18 reaches a
spending allowance, a Spending Alert pop-up message will
appear on both their phone and the Family Manager’s phone.
DM-L200_LGManual_1.1.qxd 9/18/06 5:04 PM Page 56
Page 59

57
NOTE: Family Monitor services are only available within
Disney Mobile’s coverage area. They are not available or
active when roaming, nor will roaming usage be tracked or
controlled.
NOTE: Voice, text messaging and pix messaging usage will
continue unless service is suspended via Call Control after
receiving alerts.
FFaa mm ii ll yy AAll eerr tt !!
TM
SS ee rr vv ii cc ee
Family Alert! helps keep your family connected by allowing you to
send priority messages that will appear on the recipient’s main
phone screen as soon as they are received. Create new messages
or choose any of the pre-loaded QuickAlerts, and then press OK to
“alert” one or more family members simultaneously.
NOTE: Messages can be sent to and from Disney Mobile family
members regardless of Call Control restrictions.
AAcc cceess ssiinngg FF aa mm ii llyy AAllee rr tt !!
1. Press
MM EE NNUU
, select
FFaammii ll yy CC eenntt ee rr
and press
OO KK
.
2. Select
FFaammii ll yy AAll eerr tt !!
and press
OO KK
.
NOTE: You can also send Family Alert! Messages from the
Family Center at www.disneymobile.com.
NOTE: See page 23, Entering and Editing Information, for more
details on entering letters, numbers and symbols.
DM-L200_LGManual_1.1.qxd 9/18/06 5:04 PM Page 57
Page 60

58
PHONE MENUS
USING
SSee nndd ii nn gg QQ uu ii cckkAA lleerr tt ss oo rr NNee ww AA llee rr tt ss
QuickAlerts are ready-to-send text messages that save time
when communicating with your family. You can use them
as-is or edit them to fit your needs. You can also choose a
blank page and write a new alert.
SSee nndd ii nn gg aa QQuu ii cckkAA lleerr tt ::
1. From
FFaammii ll yy AAll eerr tt !!
, select
SSee nn dd AAllee rr tt
and press
OO KK
.
2. Under
AAdddd RR ee cciip
piieenntt(( ss))
, use the up/down NAV KEY to
select family member(s) and press
NNeexx tt
.
FFaammii ll yy MMeemmbbee rr RR ee ccii pp iiee nn tt OOpp ttii oo nn ss::
Entire Family
Myself
Family Member Name
Family Member Name
3. Under
AAdddd QQ uu ii cckk AA llee rr tt
, use the up/down NAV KEY to
choose a QuickAlert, or select [
CCrree aa ttee YYoouurr OO ww nn]]
to type
your own.
Press
OO KK ..
4. Under Send Alert, select
EEddiitt TTeexx tt orSSee nndd AA ss-- IIss..
5. Press
SSee nndd
. “Alert Sent!” will appear to confirm the
completed action.
NOTE: See page 23, Entering and Editing Information,
for more details on entering letters, numbers and
symbols.
DM-L200_LGManual_1.1.qxd 9/18/06 5:04 PM Page 58
Page 61

59
EEddiitt ii nn gg QQuuii cckkAA llee rr ttss
QuickAlerts can be personalized and stored for repeat usage. Once
saved, an edited QuickAlert is available for use on the “Add
QuickAlert” page.
1. From Family Alert!, select
EEddiitt QQuu ii cckkAAllee rr tt
and press
OO KK
.
2. Under Edit QuickAlert, use the up/down NAV KEY to choose a
QuickAlert to edit or select [
EEnntt ee rr NNeeww]]
to type your own, and
press
OO KK
.
3. Under Edit Alert, change or add text to the QuickAlert and press
SSaavvee
.
4. “Saved!” will appear to confirm the completed action.
5. To send the saved message, follow “Sending QuickAlert” or
“New Alert” directions above.
NOTE: A Family Alert! can only be sent if both the sending and
receiving phones are within Disney Mobile's coverage area.
NOTE: Some Family Alert! features will not be available under
certain conditions including, but not limited to, family
members’ phones being turned off, one or more family
members roaming off the Disney Mobile network, poor
network signal or other network problems.
VViiee ww iinngg AAll ee rr ttss
A Family Alert! will appear on your phone’s main screen as soon as
it is received.
You can also see the last 10 alerts you have received:
DM-L200_LGManual_1.1.qxd 9/18/06 5:04 PM Page 59
Page 62

60
PHONE MENUS
USING
From Family Alert!, select “
AAlleerr tt ss RR ee cceeii vveedd ””
and
press
OO KK
.
RR eeppllyyii nn gg tt oo AA llee rr tt ss
You can easily read or reply to alerts you have received
while on the Idle screen or view the last 10 alerts you’ve
received.
1. From Family Alert!, select “
AAlleerr tt ss RR ee cceeii vveedd ””
and press
OO KK
.
2. Under Alerts Received, select an alert, press
OO KK
(or press
RR eeppllyy
to display the “Add QuickAlert” screen
immediately).
3. Use the left/right NAV KEY to view all alerts. Press
DD ee llee ttee
to delete an alert or
RR eeppll yy
.
4. Use up/down NAV KEY to select family member(s) and
press
NN
eexx tt
.
5. Under Add QuickAlert, use the up/down NAV KEY to
select a Quick Alert or [
CCrree aa ttee YYoouurr OO ww nn]]
and press
OO KK
.
6. Under Send Alert,
EEddiitt TTeexx tt
or
SSeenndd AA ss--II ss
and press
OO KK
to
send.
You can also reply directly from the Family Alert! message
on the Idle screen.
NOTE: Alerts that have not been read display a special
icon with the letter N for “New” next to them.
DD ee llee ttiinn gg AA llee rr tt ss
You can delete one or all messages at any time, but once
deleted, messages cannot be restored.
To delete alerts from the “Alerts Received” screen:
DM-L200_LGManual_1.1.qxd 9/18/06 5:04 PM Page 60
Page 63

61
1. From Family Alert!, select “
AAlleerr tt ss RR ee cceeii vveedd ””
and press
OO KK
.
2. Select an alert, press
OO pp ttii oo nn ss
, select
DD ee llee ttee
or
DD ee llee ttee AA llll
and
press
OO KK ..
3.
DD ee llee tteedd
will appear to confirm the completed action.
CCaa ll ll CC oonn tt rr oo ll FFeeaa tt uu rr ee
Exclusively available at www.disneymobile.com, the Call Control
feature enables the Family Manager to restrict when children can
use their phone by day of the week and time of day. For the
greatest flexibility and security, the Family Manager can also
designate Always On phone numbers that can always be accessed
(as both incoming and outgoing calls) even when phone use is
restricted.
AAcc cceess s
sii nn gg CCaall ll CCoonnttrr oo ll
Call Control is only accessible in the Family Center on
www.disneymobile.com.
SSuussppee nnddii nn gg oorr RRee ss ttrr iicc ttiinn gg UUss aaggee
When usage is restricted by the day or by time of day, your child
will not be able to:
1. Send or receive voice calls, text messages, and pix messages.
2. Purchase downloads.
NOTE: Always On numbers and 911 remain fully accessible.
NOTE: Some Call Control features will not be available under
certain conditions including, but not limited to, family
member phones roaming off the Disney Mobile network, poor
network signal or other network limitations. When in a roaming
area, the restrictions do not apply, and all numbers work.
DM-L200_LGManual_1.1.qxd 9/18/06 5:04 PM Page 61
Page 64

62
PHONE MENUS
USING
AAll wwaa yy ss OOnn NNuummbbeerrss
Always On numbers are phone numbers that can always be
called regardless of Call Control restrictions.
All mobile phone numbers included in your Disney Mobile
Family Plan and 911 are Always On numbers.
You may choose to set other Always On numbers for your
children, such as your home and work phone numbers.
The Family Manager can designate up to 20 Always On
numbers for each child.
PPrr oo hh ii bb ii tt ee dd NNuumm bb ee rr ss
Prohibited numbers are numbers which cannot be called, and
which calls cannot be received from.
The Family Manager can set up to 20 Prohibited numbers for
each child.
SShhoopp FFaamm ii ll yy
You can download new application about family.
VViieeww II nnff oo
You can download new version application of Family Alert,
Monitor or Locator.
NOTE: The Call Control feature is only available and
active when the restricted phone is within Disney
Mobile's coverage area. When in a roaming area, the
restrictions do not apply, and all numbers work.
Entertainment
The entertainment area of your Disney Mobile phone is
where you'll find free, pre-programmed images, ringtones,
themes, games and applications. Plus, you can download
more of your favorites for the ultimate personalized wireless
DM-L200_LGManual_1.1.qxd 9/18/06 5:04 PM Page 62
Page 65

63
experience. Entertainment also includes content from Disney
Mobile’s Disney Zone.
AAcc cceess ssiinngg EEnn ttee rr tt aa ii nn mmeenntt
1. Press Up NAV KEY or Press Right Soft Key
MM ee nnuu
.
2. Press
EEnntt ee rr tt aa ii nn mmeenntt
.
11 .. RRii nn gg tt oonn ee ss
You can preview and assign pre-loaded/purchased ringtones as a
Ringtone ID to identify callers or the ringtone for all incoming calls.
Your saved voice recordings are stored in “Voice Gallery.” All
downloaded ringtones and stored voice recordings may be deleted.
AAcc cceess ssiinngg RRii nn gg tt oo nnee ss
1. Press
MM ee nnuu
, select
EEnntt ee rr tt aa ii n
nmm ee nn tt
and press
OO KK
.
2. Select
RR iinn gg tt oonn ee ss
and press
OO KK
.
3. By connecting Shop Ringtones, you can download
various ringtones.
4. Your ringtones will be listed below
VVooii ccee GG aa llll ee rryy
.
PPrr ee vvii eewwiinn gg RRii nn gg tt oo nnee ss
To listen to your ringtones:
1. Once in Ringtones, scroll through your ringtone list with the NAV
KEY, make a selection and press
OO KK
to play.
PPrr ee vvii eewwiinn gg VV ooii ccee GGaa llll ee rryy
To listen to your voice recordings:
1. Once in Ringtones, select
VV
ooiiccee GG aa llll ee rryy
and press
OO KK
.
DM-L200_LGManual_1.1.qxd 9/18/06 5:04 PM Page 63
Page 66

64
PHONE MENUS
USING
2. Scroll through your voice recording list with the NAV KEY,
make a selection and press
OO KK
to play.
3. Press
PPaauuss ee
to pause the playback. Press
PPaauuss ee
again to
resume.
4. During playback, press
OO KK
at any time to return to Voice
Gallery. At the end of the playback, the screen will
automatically return to the Voice Gallery.
AAss ssiigg nniinn gg RRii nn gg tt oo nnee ss aa nn dd VVooii ccee RReeccoorr dd iinnggss
Ringtones can be assigned via the main Ringtones screen or
when previewing. Voice recordings can be assigned right
from the main“Voice Gallery” screen or when previewing a
specific selection.
AAss ssiigg nniinn gg aa ss aa RR iinn gg tt oo nn ee II DD
1. Select a ringtone or voice recording (see above) and
press
A
Ass ssiiggnn
.
2. Under “Assign,” select
RR iinn gg tt oonnee II DD
and press
OO KK
.
3. Under
FFiinndd
, an alphabetical name list will be displayed.
4. At the cursor, enter a name (or select a name using the
NAV KEY, and press
OO KK
.
5. A confirmation message will appear to confirm the
completed action.
NOTE: See Page 23, Entering and Editing Information,
for more details on entering letters, numbers and
symbols.
DM-L200_LGManual_1.1.qxd 9/18/06 5:04 PM Page 64
Page 67

65
AAss ssiigg nniinn gg aa ss aa RR iinn gg tt oo nnee
1. Select a ringtone or voice recording (see above) and press
AAss ssiiggnn
.
2. Under “Assign,” select
RR iinn gg tt oonn ee
and press
OO KK
.
3. Assigned will appear to confirm the completed action.
DD ee llee ttee RRii nn ggttoonneess // VVooiicc ee RR eeccoo rrddii nn gg ss && VV iiee ww II nn ffoo
Ringtones can be deleted via the main Ringtones screen or when
previewing. Voice recordings can be deleted from the main Voice
Gallery screen or when previewing a specific selection.
1. After selecting a ringtone or voice recording, press
OO p
p tt ii oonnss
, then select one of the following and press OK.
DD ee llee ttee
: Delete the selected ringtone or voice recording.
DD ee llee ttee AA llll
: Deletes all your ringtones or voice recordings.
II nnff oo
: Provides details about a selected ringtone or voice
recording.
22 .. II mm aagg eess
You can preview and assign pre-loaded/purchased images and pix
(photos) as a Pix ID to identify callers or as Wallpaper for your
phone’s Idle screen. Your saved pix are stored in Pix Gallery. All
downloaded images and saved pix may be deleted.
AAcc cceess ssiinngg IImm aaggee ss aanndd PP iixx GGaa llll ee rryy
1. Press
MM ee nnuu
, select
EEnntt ee rr tt aa ii nn mmeenntt
and press
OO KK
.
2. Select
IImm aaggeess
and press
OO KK
.
DM-L200_LGManual_1.1.qxd 9/18/06 5:04 PM Page 65
Page 68

66
PHONE MENUS
USING
3. By connecting Shop Images, you can download various
images.
4. Pix Gallery, Video Gallery and your images will be
listedbelow
"Shop Images."
PPrr ee vvii eewwiinn gg IImm aaggee ss
1. Once in Images, scroll through your image list with the
NAV KEY, make a selection and press
OO KK
.
2. The selected image will now be displayed.
PPrr ee vvii eewwiinn gg PP ii xx (( PP hhoo ttoo ss ))
1. Once in Images, select
PPii xx GGaallll ee rryy
and press
OO KK
.
2. Scroll through your pix list with the NAV KEY, make a
selection and press
OO KK
.
3. The selected pix will now be displayed.
AAss ssiigg nniinn gg IImm aaggee ss aanndd
PP ii xx (( PPhhoottoo ss ))
Images can be assigned via the main Images screen or
when previewing the image. Pix can be assigned right from
the main Pix Gallery screen or when previewing a specific
selection.
11 .. AAss ssiigg nnii nn gg aass aa PP iixx II DD
1. Select an image or pix (see above) and press
AAss ssiiggnn
.
2. Under “Assign,” select
PPiixx II DD
and press
OO KK
.
3. Under Find, an alphabetical name list will be displayed.
DM-L200_LGManual_1.1.qxd 9/18/06 5:04 PM Page 66
Page 69

67
4. At the cursor, enter a name (or select a name using the NAV
KEY) and press
OO KK
.
5. “Assigned: Name” will appear to confirm the complete action.
NOTE: See Page 23, Entering and Editing Information, for more
details on entering letters, numbers and symbols.
22 .. AAss ssiigg nnii nn gg aa ss WWaall ll pp aappee rr
1. Select an image or pix (see above) and press
AAss ssiiggnn
.
2. Under “Assign,” select
WWaa ll llppaappeerr
and press
OO KK
.
3.
AAss ssiigg nnee dd
will appear to confirm the completed action.
DD ee llee ttiinn gg IImm aaggee ss //PP ii xx && VVii ee ww II n
nff oo
Images can be deleted via the main Images screen or when
previewing. Pix can be deleted from the main Pix Gallery screen or
when previewing a specific selection.
Press
OO pp ttii oo nn ss
, select one of the following and press
OO KK
.
AAss ssiiggnn ::
Provides details about a selected image or pix.
DD ee llee ttee ::
Delete the selected image or pix.
DD ee llee ttee AA llll ::
Deletes all of your images or pix.
33 .. TT hh eemmee II tt
You can preview and assign pre-loaded/purchased themes to
completely transform your phone’s entire menu display.
Downloaded and pre-loaded themes are found under Theme It.
DM-L200_LGManual_1.1.qxd 9/18/06 5:04 PM Page 67
Page 70

68
PHONE MENUS
USING
AAcc cceess ssiinngg TT hhee mmee ss
1. Press
MM ee nnuu
, select
EEnntt ee rr tt aa ii nn mmeenntt
and press
OO KK
.
2. Select
TThh eemmee IItt
and press
OO KK
.
3. By connecting Shop Themes, you can download various
themes.
4. Entertainment Theming and your themes will be listed
below "Shop Themes."
PPrr ee vvii eewwiinn gg TT hheemmeess
1. Once in “Theme It,” scroll through your theme list with
the NAV KEY, make a selection and press
OO KK
.
2. The selected theme will now be displayed.
AAss ssiigg nniinn gg TT hhe
emmee ss
Themes are assigned via the main “Theme It” screen or when
previewing.
AAss ssiigg nniinn gg aa TThheemm ee
1. Select a theme and press
AAss ssiiggnn
.
2. “Assigned” will appear to confirm the completed action.
DD ee llee ttiinn gg TT hheemmeess && VV iiee ww II nn ffoo
Themes can be deleted via the main Theme It screen or when
previewing.
Press
OO pp ttii oo nn ss
, select one of the following and press
OO KK
.
DD ee llee ttee AA llll
: Deletes all your themes.
II nnff oo
: Provides details about a selected theme.
DM-L200_LGManual_1.1.qxd 9/18/06 5:04 PM Page 68
Page 71

69
44 .. GG aamm eess
You can preview and play pre-loaded/purchased games. Select from
subscription and non-subscription games.
AAcc cceess ssiinngg GGaamm ee ss
1. Press
MM ee nnuu
, select
EEnntt ee rr tt aa ii nn mmeenntt
and press
OO KK
.
2. Select
GG aammeess
and press
OO KK
.
3. Your games will be listed below “Shop Games.”
PPllaa yy ii nn gg NNoonn--SS uu bb ssccrr iipp ttiioonn GGaa mmee ss
1. Under Games, select a game and press
OO K
K
or
PPllaayy
.
2. By pressing
OO pp ttiioonn ss
, select one of the following, then press
OO KK
:
DD ee llee ttee
: Deletes the selected game.
II nnff oo
: Provides details about a selected game.
PPllaa yy ii nn gg SSuubbss ccrrii pp ttiioonn GGaa mmee ss
1. Under Games, select a game and press
OO KK
or
PPllaayy
.
2. By pressing
OO pp ttii oo nn ss
, you can select one of the following, then
press
OO KK
.
EEnndd SSuubbss ccrri
ipp tt iioo nn
: Ends your subscription to the selected game.
EEnndd && DDee ll ee ttee
: Deletes the selected game and ends your
subscription.
II nnff oo
: Provides details about a selected game.
3. The message “Please Wait/Validating Subscription” will appear.
DM-L200_LGManual_1.1.qxd 9/18/06 5:04 PM Page 69
Page 72

70
PHONE MENUS
USING
4. After validating your subscription, you will be connected to
your game automatically.
55 .. DD ii ssnn ee yy ZZ oo nnee
Be sure to visit Disney Zone on a regular basis to check
out the latest Disney entertainment applications plus
exclusive games, themes, ringtones and wallpapers designed
specifically for your Disney Mobile phone.
AAcc cceess ssiinngg DDiissnnee yy ZZoonnee ::
1. Press
MM ee nnuu
, select
EEnntt ee rr tt aa ii nn mmeenntt
and press
OO KK ..
2 Select
DD iiss nn ee yy ZZoonnee
and press
OO KK ..
PPllaa yy ii nn gg aa DDeemm o
o
1. From Disney Zone, select
OO KK ff oorr MMoo rree
and press
OO KK ..
2. Choose a product and press
OO KK ..
3. When Press OK to Launch appears, press
OO KK ..
4. Select Play Demo and press
OO KK ..
NOTE: When playing content for the first time,
“Downloading” and “Download Complete” messages
may appear before the content launches.
DM-L200_LGManual_1.1.qxd 9/18/06 5:04 PM Page 70
Page 73

71
66 .. AA pp pp ll ii ccaa tt ii oonn ss
To preview, purchase and download ringtones, images, themes,
games and applications:
1. From Entertainment, use the NAV KEY to select
RR iinn gg tt oonn ee ss
,
IImm aaggeess, TThh eemmee IItt, GG aammeess
or
AAppppll iiccaa tt iioonnss
, and press
OO KK
.
2. Select
SShhoo pp [[CC oonn tteenn tt ]]
and press
OO KK
.
3. Choose a content category and press OK.
4. Choose content and press OK.
5. Select one of the following options and press OK.
PPrr ee vvi
ieeww
: To view/listen before buying, scroll left/right to preview
all available content in the selected category.
BB uu yy
: Initiates immediate purchase transaction.
II nnff oo
: Displays content details and allows you to preview/listen to
your selection before buying.
CClloo ssee
: Closes the Option window.
PPrr ee vvii ee ww MMoo ddee
This feature allows you to “try before you buy.” Here’s how:
1. After choosing your content, select
PPrr ee vvii ee ww
and press
OO KK
.
2. View/listen to your selection and press
OO KK
.
3. Select one of the following options and press
OO KK
.
BB uu yy
: Initiates immediate purchase/transaction.
II nnff oo
: Displays content details and allows you to preview/listen
to your selection before buying.
CClloo ssee
: Closes the Option window.
DM-L200_LGManual_1.1.qxd 9/18/06 5:04 PM Page 71
Page 74

72
PHONE MENUS
USING
PPuurr cchhaa ss iinn gg// DDoo ww nnll oo aa dd iinn gg
To buy with or without previewing:
1. After choosing your content, select
BB uu yy
and press
OO KK
.
The purchase price will now be displayed.
2. Select the price and press
OO KK
.
FFoorr IImm aaggeess,, RRii nn gg tt oonn ee ss aa nn dd TThheemm ee ss::
After “Download Complete” appears, the message “Assign?”
will be displayed. You can select Continue Shopping, Exit, or
choose to assign your download Now or Later. Downloaded
images, ringtones or themes are saved and accessible via
the “Entertainment” menu option. Please refer to the images,
ringtones and themes sections for details on assigning
images, ringtones and themes.
FFoorr GGaammeess aanndd AAppppll iiccaa tt i
ioo nnss::
After “Download Complete” appears, the “Shop [CONTENT]”
screen will be displayed. Downloaded games or applications
are now saved and accessible via the “Entertainment” menu
option.
Content (ringtones, graphics, games, themes, etc.) are
not refundable.
NOTE: Though you can delete purchased content, some
pre-loaded images, ringtones, themes, games and
applications cannot be deleted.
DM-L200_LGManual_1.1.qxd 9/18/06 5:04 PM Page 72
Page 75

73
77 .. WW eebb
NOTE: Access limited to a selection of websites on the
Disney Mobile network. Availability of sites and access
is subject to system limitation and may be changed
without notice.
TToo ll aauunncchh yyoouurr BBrroo wwsseerr
From Entertainment, use the NAV KEY to select
Ringtones,Images, Theme It, Games or Applications, Web
and press OK.
Your Browser launch and the your browser home page will
display.
While connecting, the following will appear on the screen:
Web Connecting....
If you had a previous your data services connection, the
last page you visited will display when you launch your
browser.
When this occurs, you may not see the “Connecting...”
message when you launch the session. Though the browser
is open, you are not currently in an active data session - that
is, no data is being sent or received. As soon as you navigate
to another page, the active session will launch and you will
see the “Connecting...”message.
NNaavviigg aa tt ii nngg tthhee WWeebb
Navigating through menus and Web sites during a your data
services session is easy once you've learned a few basics.
Here are some tips for getting around:
DM-L200_LGManual_1.1.qxd 9/18/06 5:04 PM Page 73
Page 76

74
SS oo ff tt kk eeyy ss
During a your data services session, the bottom line of your
phone's display contains one or more softkeys.
These keys are shortcut controls for navigating around the
Web, and they correspond to the softkey buttons directly
below the phone’s display screen.
To use softkey. Press the desired softkey button. (If an
additional pop-up menu appears when you press the softkey
button, select the menu items using your keypad [if they’re
numbered] or by highlighting the option and pressing .)
Scrolling. As with other parts of your phone's menu, you'll
have to scroll up and down to see everything on some Web
sites.
TToo sscc rroollll ll iinn ee bb yy ll iinn ee tt hhrr oo uu gg hh WWee bb ssii tteess::
Press the navigation key up and down.
TToo sscc rroollll ppaagg ee bb yy pp aa gg ee tt hhrr oo uu gg hh WWeebb ss ii tt ee ss ::
Press the volume buttons on the side of the phone
SSeellee ccttiinngg
Once you've learned how to use softkeys and scroll, you can
start navigating the Web.
To select on-screen items: Use the navigation key to
highlight the desired item, then press the desired softkey
button (or press ).
Links, which appear as underlined text, allow you to jump to
different Web pages, select special functions, or even place
phone calls.
PHONE MENUS
USING
DM-L200_LGManual_1.1.qxd 9/18/06 5:04 PM Page 74
Page 77

75
TToo sseelleecctt lliinn kkss
HHii gg hh llii gghhtt tthhee llii nnkk aanndd pp rree ssss tt hhee aa pp pp rr oopprrii aa ttee ss oofftt kk ee yy ..
If the items on a page are numbered, you can use your keypad
(number keys) to select an item. (The tenth item in a numbered
listmay be selected by pressing the 0key on your phone’s keypad,
even though the number 0 doesn’t appear on the screen.)
GG oo iinngg BBaacckk
TToo gg oo bb aa cckk oonnee pp aa gg ee::
Press the BACK key on your phone.
The BACKkey is also used for deleting text (like a BACKSPACE key)
when you are entering text.
You'll find that the left softkey is used primarily for selecting items.
This softkey is often labeled “OK.”
OK
GG ooii nn gg HHoommee
To return to the your data services home page from any other
WW ee bb pp aa gg ee
Press .
OR
Press Menu(right softkey) and select Home.
DM-L200_LGManual_1.1.qxd 9/18/06 5:04 PM Page 75
Page 78

76
PHONE MENUS
USING
TT oooo ll bb ooxx
AAcc cceess ss aa nn dd OOpp ttii oo nnss
1. Press Right Soft Key
MM ee nnuu
.
2. Press
TToooo llbboo xx
.
3. Select a sub-menu:
11 .. MMyy PP rr ooff iill ee
22 .. CC aammeerr aa
33 .. CC aammcc oorr dd ee rr
44 .. VVooii ccee R
Reecc oo rrddee rr
55 .. TToooo llss
66 .. SSee tt ttiinn ggss
11 .. MMyy PP rr ooff ii ll ee
My Profile displays your phone number and available
memory space.
22 .. CCaa mmee rr aa
11 .. TTaakkee PP ii xx --
Lets you take digital pictures.
1. Press Right Soft Key
MM ee nnuu
, , , .
2. Set the brightness , zoom (zoom not
available in 1.3M mode). Press Right Soft Key
OO pp ttii oo nn ss
and change any of the following settings as necessary.
DM-L200_LGManual_1.1.qxd 9/18/06 5:04 PM Page 76
Page 79

77
SS eell eecc tt tt hhee oopp ttii oonn ((ss )) tt oo cc uusstt oommii zzee::
SS wwii tt cchh tt oo CCaammcc oorr ddee rr
Fl ash Off / On This Shot / Always On
Self Timer Off / 5 seconds / 10 seconds
Color Tone Normal / Black & White / Negative /
Sepia
Image Controls Brightness / White Balance
SS eett tt iinnggss
Resolution 1.3M(960*1280) / VGA (480*640) /
QVGA(240*320)
Quality Fine / Normal / Economy
Shutter Sound Shutter 1-4/ Off
Full Screen On / Off
3.Take a picture by pressing , Left Soft Key
TTaakk ee PP ii xx
, or Side
Camera Key .
4. Press Left Soft Key
NNeexx tt
for more options:
AAss ssii ggnn
to assign the picture to a phone task. Select an option:
PPii xx IIDD
to assign the picture to a Contacts entry.
WWaa ll llppaappeerr
to use the picture as Wallpaper.
SSee nndd PP iixx
to send the picture to up to 10 contacts at one time.
UU pp lloo aadd
to view and store all of your phone’s pix online.
DD ee llee ttee
to delete the picture you just took.
GG oo tt oo PP ii xx GGaa llll ee rryy
UU ssiinn gg tt hh ee SS ii ddee CC aa mm ee rr aa KK ee yy
You can use the Side Key to go directly to the camera view finder
when folder is open.
DM-L200_LGManual_1.1.qxd 9/18/06 5:04 PM Page 77
Page 80

78
PHONE MENUS
USING
1. Press the Side Camera Key for about 3 seconds to
enter the Take Pix mode when folder is closed.
2. Take a picture by pressing Side Camera Key .
22 .. PPiixx GGaalllleerryy
- Allows you to view pictures stored in the phone.
1. Press Right Soft Key
MM ee nnuu
, , , .
2. Select your desired picture with and press Right
Soft Key
OO pp ttii oo nn ss
.
AAssssiiggnn
to assign the picture to a phone task.
Select an option:
WWaa ll llpp aa pp eerr
to display the currently highlighted picture
as Wallpaper.
PPii xx IIDD
to display the currently highlighted picture for
incoming calls from a specific Contacts entry. Select the
desired entry and press .
SSee nndd PP iixx
to send an image to another user using pix
message.
UU pp lloo aadd
to upload pictures from the In Phone Folder to
the website.
DD ee llee ttee
to delete pictures in the Pix Gallery Folder.
Select
DD ee llee ttee SSee ll ee ccttii oo nn
, or
DD ee llee ttee AA llll ..
DD ee ttaa iill ss// EE dd iitt
to display the following options:
TTeexx tt CCaapp tt iioonn
to edit the selected picture’s caption.
PPii xx IInnff oo
to display information such as the
picture’s caption, time/date, and size.
TTaakk ee PP ii xx
to switch to Take Pix mode.
DM-L200_LGManual_1.1.qxd 9/18/06 5:04 PM Page 78
Page 81

79
33 .. CCaamm ccoorr dd eerr
11 .. RR eeccoo rrdd VViiddeeoo
1. Press Right Soft Key
MM ee nnuu
, , , .
2. Set the brightness , zoom , and press
Right Soft Key
OO pp ttii oo nn ss
to change other settings.
Select the option(s) to customize:
SSwwii ttcc hh tt oo CC aammeerr aa
Video Light On / Off
Color Tone Normal/Black & White/
Negative/Sepia
Image Controls Brightness/White Balance
SSee tt ttiinn ggss
Cue Sound Cue 1-3/Off
Full Screen On / Off
3. Press Left Soft Key
RR eeccoorr dd
, or to take a video.
4. Press Left Soft Key
DD oo nnee
to save. The recorded video is
stored in Video Gallery.
5. Press Left Soft Key
NNe
exx tt
to display a list of options.
SSee nndd VV ii ddeeoo// UUppll oo aadd//AA ssssii ggnn WWaall llpp aa pp ee rr// PP llaayy// DDeell ee tt ee//
GG oo tt oo VV ii ddeeoo GGaallll ee rryy
22 .. VVii ddee oo GG aall ll eerr yy
Once a video is captured, it is automatically saved to the folder
called Video Gallery. From the Video Gallery Folder, you can view all
the videos you have recorded in your phone and access additional
video options.
1. Press Right Soft Key
MM ee nnuu
, , , .
DM-L200_LGManual_1.1.qxd 9/18/06 5:04 PM Page 79
Page 82

2. Select your desired picture with and press Right Soft
Key
OO pp ttii oo nn ss
.
PPllaayy
to play the selected video clips.
AAssssiiggnn WWaallllppaappeerr
to assign the picture as a wallpaper.
SSeenndd VViiddeeoo
to send a video to another user using picture mail.
UU pp lloo aadd
to upload videos from the Video Gallery Folder to
the website.
DD ee llee ttee
to delete videos in the Video Gallery Folder.
Select
DD ee llee ttee SSee ll ee ccttii oo nn
, or
DD ee llee ttee AA llll
.
DD ee ttaa iill ss// EE dd iitt
to display the following options:
TTeexx tt CCaapp tt iioonn
to edit the selected video’s caption.
VVii ddeeoo IInnff oo
to display video information such as
caption, time/date, resolution, size, etc.
RR eeccoorr dd VVii dd ee oo
to switch camcorder mode.
44 .. VV oo ii ccee RRee ccoo rr dd eerr
Allows you to add, listen to and erase short verbal reminders.
11 .. RR eeccoo rrdd VV ooii ccee
1.Press Right Soft Key
MM ee nnuu
, , , .
The phone prompts you to start recording after the beep.
2. Wait for the beep and then start speaking.
3.To finish recording, press
SSttoopp
.
22 .. VVooii ccee GGaa ll lleerryy
1. Press Right Soft Key Menu, , , .
The phone prompts you to start recording after the beep.
2. Scroll to the voice memo you wish to hear and press
Options.
80
PHONE MENUS
USING
DM-L200_LGManual_1.1.qxd 9/18/06 5:04 PM Page 80
Page 83

81
PPllaayy
to play the selected voice memo.
AAss ssiiggnn
to assign the recording as a
DD ee ff aa uu lltt RR iinn gg tt oo nnee
,
PPrr ii vvaatt ee NNuummbbee rr,, RRoo aa mm ii nn gg
and
RR iinn gg tt oonnee II DD
.
VViieeww DDeettaaii ll ss
to view the selected voice memo
information.
EEddiitt TTii tt llee
to edit the selected voice memo title.
DD ee llee ttee
to erase the selected voice memo.
DD ee llee ttee AA llll
to delete all your voice memo.
3. Scroll to
PPllaayy
and press .
55 .. TT oooo ll ss
11 .. BB ll uuee tt oooo tt hh ®®
Bluetooth is a radio technology developed to deliver shortrange
wireless mobility for up to 30 feet. Wirelessly pair your Bluetoothenabled handset to certain Bluetooth devices, including headsets
and hands-free devices. This section details how to set up and
make the most of your device’s Bluetoothcapabilities.
11. AAdddd DDeevviicc ee
1. Press Right Soft Key
MM ee nnuu
, , , , .
2. Scroll to
AAdddd DDeevviicc ee
and press .
3. Select
SSee aa rr cchh
and press
OO KK
.
4. Select
YYeess
and press
OO K
K
to turn Bluetooth on.
5. Among Bluetooth devices, select the desired device to
register and press .
6. Enter PIN code and press .
DM-L200_LGManual_1.1.qxd 9/18/06 5:04 PM Page 81
Page 84

82
PHONE MENUS
USING
22 .. TTrruussttee dd DDeevvii cceess
Press Right Soft Key
MM ee nnuu
, , , , .
33 .. SS uu pp pp oo rr tt ee dd SSee rr vvii cceess
Press Right Soft Key
MM ee nnuu
, , , , .
44 .. AA uu dd iioo
The audio service is enabled by the headset and handsfree Bluetooth profiles, acting as a wireless earjack. When
an incoming call is received, the ringer can be heard through
the headset, instead of the handset. The call can then
be received by pushing a button on a wireless earjack. While
using the handset, you can use the headset instead of the
phone by pushing a button on the headset, the same as
inserting a jack into the phone. Increase or decrease the
volume by using the volume key on the side of the handset.
22 .. CCaall ee nndd aa rr
Allows you to schedule events and set alarms to serve as
reminders.
1. Press Right Soft Key
MM ee nnuu
, , , .
2. Using your NAV KEY, highlight the day to which
you would like to add an event and press Left Soft Key
AAdddd
.
3. Select a time for the event by highlighting the time field
and pressing .
Using your keypad and/or NAV KEY, set the start
and end time for the event and press .
DM-L200_LGManual_1.1.qxd 9/18/06 5:04 PM Page 82
Page 85

83
4. Select a title for the event by highlighting
CCoonntteenntt
and
pressing .
Enter the event title and press .
5. Select a repeating status for the event by highlighting the
repeat field and pressing .
Highlight
NNoonnee,, DDaaiillyy,, MMoonn -- FFrrii,, WWeeeekkllyy,, MMoonntthhllyy
, or
YYeeaa rr llyy
and
press .
6. Select an alarm time for the event by highlighting the alarm
field and pressing .
Highlight
NNoo nnee ,, OO nn TTiimm ee ,, 55 mmiinnuutt ee ss ,, 1100 mm ii n
nuutteess,, 11 hh oouurr ,, 11
ddaayy
, or
22 dd aa yy ss
and press .
7. Select a ringer type for the alarm by highlighting the ringer
field and pressing .
Highlight your desired ringer and press .
Press Right Soft Key
OO pp ttii oo nn ss
to select
RR iinn gg tt oonn ee ss,,
or
VVooii ccee
GG aall llee rryy ..
8. Press Left Soft Key
SSaa vvee
to save the event.
33 .. AA ll aarr mm CC ll oocc kk
Allows you to set one of four alarms. The current time is displayed
at the top of the screen when you select an alarm to set. At the
alarm time, Alarm 1 (or 2 or 3, as applicable) will be displayed on
the LCD screen and the alarm will sound.
1. Press Right Soft Key
MM ee nnu
u
, , , .
2. Scroll to
AAllaa rrmm 11,, AA llaa rrmm 22 ,, AAll aarr mm 33
, or
QQ uu iicc kk AA llaa rr mm
and
press .
DM-L200_LGManual_1.1.qxd 9/18/06 5:04 PM Page 83
Page 86

84
PHONE MENUS
USING
3. Turn the alarm on or off by highlighting the activation
field and pressing .
Select
OO nn oo rr OO ffff
and press .
4. Select a time for the alarm by highlighting the time field
and pressing .
Using your keypad and/or NAV KEY, set the alarm time
and press .
5. Select a repeating status for the alarm by highlighting
the repeat field and pressing .
Highlight
OO nn ccee,, DDaaii ll yy ,, MMoo nn -- FF rrii ,,
or
WWee ee kk eennddss
and
press .
6. Select a ringer type for the alarm by highlighting the
ringer field and pressing .
Highlight your desired ringer and press .
Press Right Soft Key
OO pp ttii oo nn ss
to select
RR iinn gg tt oonn ee ss
or
VVooii ccee GGaa ll ll ee rryy
.
7. Press Left Soft Key
SSaa vve
e
to save your alarm settings.
44 .. NN oott ee ppaa dd
Your phone comes with a notepad you can use to compose
and store reminders and notes to help keep you organized.
1. Press Right Soft Key
MM ee nnuu
, , , .
2. Scroll to
AAdddd NNeeww
and press .
3. Type your note using the numeric keypad and press .
DM-L200_LGManual_1.1.qxd 9/18/06 5:04 PM Page 84
Page 87

85
TToo rreeaadd aa ssaavv ee dd nnoott ee::
1. Press Right Soft Key
MM ee nnuu
, , , .
2. Highlight a note and press .
TToo dd ee llee tt ee ssaavv ee dd nnoo tt eess::
1. Press Right Soft Key
MM ee nnuu
, , , .
2. Highlight a note and press .
3. Press Right Soft Key
DD ee llee ttee
.
4. Scroll to
YYeess
and press .
55 .. EEzz TT ii pp CCaall ccuu ll aatt oo rr
Allows you to quickly and easily calculate the amounts for a bill
with the amount of the bill, the amount of the tip, and the number
of people as variables.
1. Press Right Soft Key
MM
eennuu
, , , .
2. Use your keypad and NAV KEY to enter the bill amount and
desired tip percentage. (The correct tip will be calculated
instantly.)
3. If you’re splitting the check, highlight
SSppll ii tt
and enter the
number of people in your party. (An equal split of the bill will
be calculated and displayed.)
66 .. CCaall ccuu ll aatt oo rr
Allows you to perform simple mathematical calculations. You can
enter numbers up to the second decimal place.
1. Press Right Soft Key
MM ee nnuu
, , , .
2. Enter the first number using your keypad.
Press to enter decimal points.
DM-L200_LGManual_1.1.qxd 9/18/06 5:04 PM Page 85
Page 88

86
PHONE MENUS
USING
Press to change the numeric value from positive
to negative.
Press Left Soft Key
CCllee aarr
to clear all numbers.
3. Use your NAV KEY to enter the operation (up to add,
down to subtract, left to divide, and right to multiply).
4. Enter the second number and press for the total.
77 .. WW oorr ll dd CCll oocc kk
Allows you to determine the current time in another time
zone or country.
1. Press Right Soft Key
MM ee nnuu
, , , .
2. Press Right Soft Key
CCii tt ii ee ss
to move the time bar across
the world map and display the date/time in that
location.
66 .. SS ee tt tt ii nn ggss
11 .. DDii ssppllaayy
Options to customize the phone's display screen.
11 ..11 GG rr ee eett ii nn gg
Allows you to enter a string of up to 16 characters which
display on the LCD screen.
1.Press Right Soft Key
MM ee nnuu
, , , , .
2.Select
CCu
uss tt oomm
using the navigation key and press .
3.Use the numeric keypad to enter a new custom
greeting. (To erase the existing greeting one character
at a time, press . To erase the entire greeting, press
and hold .)
DM-L200_LGManual_1.1.qxd 9/18/06 5:04 PM Page 86
Page 89

87
4. Highlight
SSaa vvee
and press to save your new greeting.
11 ..22 MMee nn uu SStt yy llee
Your phone allows you to choose how the menu appears on your
display screen.
1. Press Right Soft Key
MM ee nnuu
, , , , .
2. Select
GG rraapphhiicc VViieeww
to view each main menu item as an
animated, single screen icon or
LLiiss tt VViiee ww
to view the main menu
as a list and press .
11 ..33 CCll oocckk && CC aall ee nn dd aarr
Choose whether you want your phone’s clock to display in
analog mode, digital mode, or with time and date.
1. Press Right Soft Key
MM ee nnuu
, , , , .
2. Select
NNoorrmm aall CCl
loo cckk ,, AAnnaall oo gg CC lloocc kk ,, DDii gg iittaall CClloo cckk ,, DD uu aa ll
CClloo cckk
, or
CCaall ee nn dd aa rr
and press .
3. Press to apply the clock display setting.
11 ..44 BBaacc kk llii gg hh tt
Allows you to set the duration for illuminating the LCD backlight.
1. Press Right Soft Key
MM ee nnuu
, , , , .
2. Select
MMaaiinn LLCCDD,, SSuubb LL CC DD
or
KK ee yy pp aa dd
.
3. Select a time setting and press .
11 ..55 SStt aatt uuss LLii gghh tt
This feature shows the status of your phone by blinking the light.
1. Press Right Soft Key
MM ee nnuu
, , , , .
DM-L200_LGManual_1.1.qxd 9/18/06 5:04 PM Page 87
Page 90

88
PHONE MENUS
USING
2. Select
OO nn orOO ff ff
and press .
22 .. VVoolluummee
You can adjust your phone’s volume settings to suit your
needs and your environment.
22 ..11 RR ii nn gg tt oonnee VV ooll uumm ee
1. Press Right Soft Key
MM ee nnuu
, , , , .
2. Using the NAV KEY, choose a volume level and
press .
22 ..22 EE aa rrppii ee ccee VV ooll uumm ee
1. Press Right Soft Key
MM ee nnuu
, , , , .
2. Using the NAV KEY, choose a volume level and
press .
22 ..33 AA llee rr tt VV ooll uumm ee
Your phone can alert you with an audible tone when you
change service areas, once a minute during a voice call, or
when a call has been connected.
1. Press Right Soft Key
MM ee nnuu
, , , , .
2. Select your desired option and press .
3. If you selected
SSee rr vviiccee CC hh aa nn ggee ,, MMii nnuu tt ee BBee ee pp ,, orCCaa ll ll
CCoo nnnnee cctt
, select
OO nn oo rr OO ffff
. If you selected
AAlleerr tt ss
,
select
SSii ll ee nn tt,, VV iibb OOnncc ee ,, BBee eeppss
or
VVi
ibb && BBeeeepp
.
22 ..44 GG aa mm ee VVoolluummee
1. Press Right Soft Key
MM ee nnuu
, , , , .
DM-L200_LGManual_1.1.qxd 9/18/06 5:04 PM Page 88
Page 91

89
2. Using the NAV KEY, choose a volume level and press .
33 .. RRoo aa mm ii nn gg
Your phone allows you to control your roaming capabilities. By
using the Roaming menu option, you can determine which signals
your phone accepts.
33 ..11 SSeett MMooddee
Choose from two different settings on your dual-band phone to
control your roaming experience.
1. Press Right Soft Key
MM ee nnuu
, , , , .
2. To select an option, highlight it and press .
AAuuttoomm aatt iicc
seeks Disney Service. When Disney Service is
unavailable, the phone searches for an alternate system.
DD iiss nn ee yy OO nnll yy
allows you to access the Nationwide Disney
Network only and prevents roaming on other networks.
33 ..22 CCaall ll GGuu aa rrdd
Your phone has two ways of alerting you when you are roaming
off the Disney Mobile Network: the onscreen roaming icon and
Call Guard. Call Guard makes it easy to manage your roaming
charges by requiring an extra step before you can place or
answer a roaming call. (This additional step is not required when
you make or receive calls while on the Disney Mobile Network.)
1. Press Right Soft Key
MM ee nnuu
, , , , .
2. Highlight
OO nn
or
OO ff ff
and press .
DM-L200_LGManual_1.1.qxd 9/18/06 5:04 PM Page 89
Page 92

90
PHONE MENUS
USING
44 .. MM ee ss ssaagg ii nn gg
Your phone’s messaging settings make text messaging even
faster and easier. Now you can choose how you would like to
be notified of new messages, automatically append a callback
number and/or a customized signature with each outgoing
message, and create and edit your phone's quick notes.
44 ..11 NNoottii ffii ccaatt ii oo nn
When you receive a text message, your phone notifies you
by displaying an icon on your display screen. You can also
choose to have the entire text message pop up on your
display screen.
1. Press Right Soft Key
MM ee nnuu
, , , , .
2. Select
MM ee ss ssaagg ee && IIccoonn
or
IIccoonn OOnnll yy
and press .
44 ..22 AAuuttoo DDee ll ee ttee
Allows you to automatically delete read messages when
you exceed the storage limit.
1. Press Right Soft Key
MM ee nnuu
, , , , .
2. Select
OO nn
or
OO
ff ff
and press .
44 ..33 SSii ggnn aa tt uu rr ee
Each message you send can have a customized signature
to reflect your personality.
1. Press Right Soft Key
MM ee nnuu
, , , , .
2. Select
CCuuss ttoomm
and press . (If you do not wish to
attach a signature to your outgoing messages, select
NNoo nnee
and press .)
3. Enter your signature and press .
DM-L200_LGManual_1.1.qxd 9/18/06 5:04 PM Page 90
Page 93

91
44 ..44 QQuuii cckknnoo tteess
Your phone is preset with twenty canned messages to help
make sending text messages faster and easier. These
messages, such as “Where are you?,” “Let’s get lunch” and
“Meet me at” can be customized or deleted to suit your needs.
You can even add your own preset messages to the list.
1. Press Right Soft Key
MM ee nnuu
, , , , .
PPii cckk ff rr oo mm oo nnee ooff tt hhee ssee pprr ee sseett mmeessss aa gg ee ss::
Later Cool
C’ ya Awesome
Miss you On my way
XOXOXO See you later
What’s up? Can’t talk now
Where are you? Talk later
Hey! Got lunch?
Call me Meet me
Happy Birthday
2. To edit or delete a preset message, highlight it and press .
3. Scroll to
EEddiitt
and press , edit the selected message
and press
Or
Scroll to [Send Message] and press OK, add recipients(up to10),
and press [Next] and press [Send] to send message.
Scroll to Delete and press , then select Yes to delete the
selected message. (Select No to cancel the deletion.)
Or
DM-L200_LGManual_1.1.qxd 9/18/06 5:04 PM Page 91
Page 94

Scroll to [Delete All] and press OK, and select [Yes] to
delete all quicknotes except defaults.
TToo aa dd dd aa nn ee ww QQuu ii cckknnoott eess ::
1. Press Right Soft Key
MM ee nnuu
, , , , .
(The list of preset messages displays.)
2. To add a new preset message, scroll to Add New and
press .
3. Enter your message, and press . (Your new
message will be added to the end of the list.)
55 .. BB ll uuee tt oooo tt hh ®®
55 ..11 PP oo wwee rr
By default, your device’s Bluetooth functionality is turned
off. Turning Bluetooth on makes your phone visibility by
other in-range Bluetooth devices.
1. Press Right Soft Key
MM ee nnuu
, , , , .
2. Press the NAV KEY up or down to select
OO nn
and
press to enable Bluetooth.
55 ..22 VV iissiibb iill ii ttyy
The visibility section of the Bluetooth settings menu
allows you to manage your availability to other Bluetooth
devices.
1. Press Right Soft Key
MM ee n
nuu
, , , , .
2. Select your desired Visibility setting and press:
HHii dd ddee nn / VVii ss iibbllee ffoo rr 33 MM iinn / AAll wwaa yy ss VVii ssiibb ll ee
92
PHONE MENUS
USING
DM-L200_LGManual_1.1.qxd 9/18/06 5:04 PM Page 92
Page 95

93
NOTE: Any changes you make to your Bluetooth settings will
be saved to the current profile when you exit the Bluetooth
Settings menu.
55 ..33 BBlluueettoo oo tt hh II nn ffoo
Allows you to select a Bluetooth name for your phone. Your
phone’s Bluetooth name will appear to other in-range Bluetooth
devices, depending on your Visibility settings.
1. Press Right Soft Key
MM ee nnuu
, , , , .
2. Select Left Soft Key
RR eenn aammee
.
3. Press to clear the current name.
4. Use your keypad to enter a new name and press to
SSaa vvee
and exit.
66 .. SS ee cc uu rr ii tt yy
All of your phone’s security settings are available through the
Security menu. You must enter your lock code to view the Security
menu. By default, your lock code is the last four digits of your
mobile number.
1. Press Right Soft Key
MM ee nnuu
, , , .
2. Enter your lock code to display the Security menu.
66 ..11 LL oocckk PPhh oonnee
Keeps your phone from unauthorized use. Once the phone is
locked, it is in restricted mode until the lock code is entered. You
can receive phone calls and still make emergency calls.
You can modify the lock code using the Change Lock Code within
the Security menu:
DM-L200_LGManual_1.1.qxd 9/18/06 5:04 PM Page 93
Page 96

94
PHONE MENUS
USING
1. From the Security menu, scroll to
LLoocckk PP hh oo nn ee
and
press .
2. Highlight
LLoocckk NNooww
and press . (To set your phone
to lock the next time it is turned on, select
OO nn PPoowweerr
UU pp
and press .)
66 ..22 CChhaann gg ee LLoocckk CC ooddee
Allows you to enter a new 4-digit lock code.
1. From the
SSeeccuurr iittyy
menu, scroll to
CChhaann gg ee LL oocckk CC ooddee
and press .
2. Enter your new lock code.
3. Re-enter your new lock code.
66 ..33 SSppee cci
iaa ll NNuumm bb ee rrss
You can save up to ten special numbers in addition to your
Contacts entries (the same number may be in both directories).
1. From the Security menu, scroll to
SSppee ccii aall NNuumm bb ee rr ss
and press .
2. Select a location for your entry and press .
3. Enter the number and press .
66 ..44 DDee ll ee ttee CC oonn ttaa ccttss
You can quickly and easily erase all of the contents of
your Contacts.
1. From the Security menu, scroll to
DD ee llee ttee CCoonnttaa ccttss
and
press .
DM-L200_LGManual_1.1.qxd 9/18/06 5:04 PM Page 94
Page 97

95
2. If you are certain you would like to erase all of your internal
Contacts entries, select
YYeess
and press .
66 ..55 SSee ll ee ccttii vvee CC aall ll BB ll oocc kk
You can enable Call Block for selected calls that you do not
wish to answer.
1. From the Security menu, scroll to
SSee lleeccttii vvee CC aall ll BB ll oocc kk
and
press .
66 ..66 RR ee sseett PP hh oo nn ee
Resetting the phone restores all the factory defaults, including
the ringer types and display settings. The Contacts, Call History,
Scheduler, and Messaging are not affrected.
1. From the Security menu, scroll to
RR eesseett PPhhoonnee
and press .
77.. SS eett uu pp // O
Otthhee rrss
77.. 11 SShhoorr ttcc uuttss
Your phone offers you the option of assigning a navigation key
shortcut to a favorite or often-used function. Once you assign the
key (Up, Down, Right, or Left), you can then press the NAV KEY in
standby mode to launch your personally designated shortcut.
1. Press Right Soft Key
MM ee nnuu
, , , , .
(An informative window displays.)
2. Read the information and press .
3. Select
LLeeff tt NNaavvii gg aatt ii oonn,, RR iigghhtt NNaavvii gg aa ttii oo nn ,, UUpp NNaavv iigg aa ttii oo nn
, or
DD oo ww nn NNaavv ii ggaatt ii oo nn
and press .
4. Use your NAV KEY to select the desired shortcut
and press .
DM-L200_LGManual_1.1.qxd 9/18/06 5:04 PM Page 95
Page 98

96
PHONE MENUS
USING
77.. 22 AA nn sswwee rr CC aall ll
You can determine how to answer incoming calls on your
phone, whether you want to be required to press , to
press any number key, or simply to open the phone.
1. Press Right Soft Key
MM ee nnuu
, , , , .
2. To select an option, highlight it and press .
FFll ii pp AA ccttii vvaattiioonn
to allow an incoming call to be
answered by opening the phone or by pressing any key.
TT AA LL KK OOnnllyy
to require to be pressed to answer
all incoming calls.
77.. 33 AA uu tt oo-- AA nnssww eerr
You may set your phone to automatically pick up incoming
calls when connected to an optional hands-free car kit.
1. Press Right Soft Key
MM ee nnuu
, , , , .
2. To select an option, highlight it and press .
OO ff ff
to disable Auto-Answer.
CCaarr --KK ii tt //HHeeaaddssee tt
to answer calls automatically
when the phone is connected to a hands-free car kit
or a headset (sold separately). Remember, your
phone will answer calls in Auto-Answer mode even if
you are not present.
77.. 44 DD ii aall ii nn gg MMaa tt cchh
Your dialing match options allow you to enable or disable
Abbreviated Dialing and Speed Dialing.
1. Press Right Soft Key
MM ee nnuu
, , , , .
2. Select
AAbbbbrr ee vviiaa tt eedd DDii aa llii nn gg ,, CC oonntt aa ccttss MMaa tt cchh
, or
SSppeeeedd DDii aa ll
and press .
DM-L200_LGManual_1.1.qxd 9/18/06 5:04 PM Page 96
Page 99

97
3. Select
EEnnaabbll ee
and press .
4. Abbreviated Dialing only - If you enable Abbreviated
Dialing, enter a 5- or 6-digit number (for example, area code
and prefix) and press .
77.. 55 TTeexx tt EE nn tt rryy
1. Press Right Soft Key
MM ee nnuu
, , , , .
2. Read the information and press .
3. Select
AAuuttoo -- CC aappiittaa ll ,, WWoo rr dd CC hh oo iicc ee LL iisstt,, WWoorr dd PP rree dd iicc tt ii oo nn ,,
WWoo rr dd CC oommpp ll ee ttiioonn
or
HHee llpp
and press .
77.. 66 LLaanngguuaaggee
Allows you to set the bilingual feature according to your
preference. Choose between English and Spanish.
1. Press Right Soft Key
MM ee nnuu
, , , , .
2. Select
EEnnggll ii sshh
or
EEssppaaññoo ll
and press .
77.. 77 TT TT YY MMoo ddee
Allows you to attach a TTY device enabling you to communicate
with parties also using a TTY device. A phone with TTY support is
able to translate typed characters to voice. Voice can also be
translated into characters and then displayed on the TTY.
** TTTT YY
: Text Telephone (or Teletypewriter for Deaf).
1. Press Right Soft Key
MM ee nnuu
, , , , .
2. Read the disclaimer and press .
3. Select
EEnnaabbll ee TT TTYY
or
DD iissaabb llee TT T
T YY
and press .
DM-L200_LGManual_1.1.qxd 9/18/06 5:04 PM Page 97
Page 100

98
PHONE MENUS
USING
77.. 88 AAiirr pp ll aannee MMooddee
Airplane Mode allows you to use many of your phone’s
features, such as Games, Notepad, Voice Memos, etc.,
when you are in an airplane or in any other area where
making or receiving calls or data is prohibited. When
your phone is in Airplane Mode, it cannot send or receive
any calls or access online information.
1. Press Right Soft Key
MM ee nnuu
, , , , .
2. Read the screen message, then press .
3. Select
OO nn
or
OO ff ff
and press .
While in Airplane Mode, your phone’s standby screen will
display “Phone Off.”
77.. 99 LLoocc aatt iioo nn
The Location feature allows the network to detect your
position. Turning Location off will hide your location from
everyone except 911.
1. Press Right Soft Key
MM ee nnuu
, , , , .
88 .. PP hh oo nn ee II nn ffoo
The Phone Info menu provides you with specific information
pertaining to your phone model.
88 ..11 DDee vvii ccee II nnff oo
Allows you to view your phone number.
Press Right Soft Key
MM ee nnuu
, , , , .
DM-L200_LGManual_1.1.qxd 9/18/06 5:04 PM Page 98
 Loading...