

LG DLEC733W Owner’s Manual
1-800-243-0000
24 HOURS A DAY, 7 DAYS A WEEK FOR LG CUSTOMER SERVICE
I
EectricD
Thank you for Buying an LG Dryer.
manual carefully, as it provides
safe Installatian, Use, and Maintenance_
and Serial NumBers,
_r future reference.
visit our website at
r
P/No. :3828 EL4003H
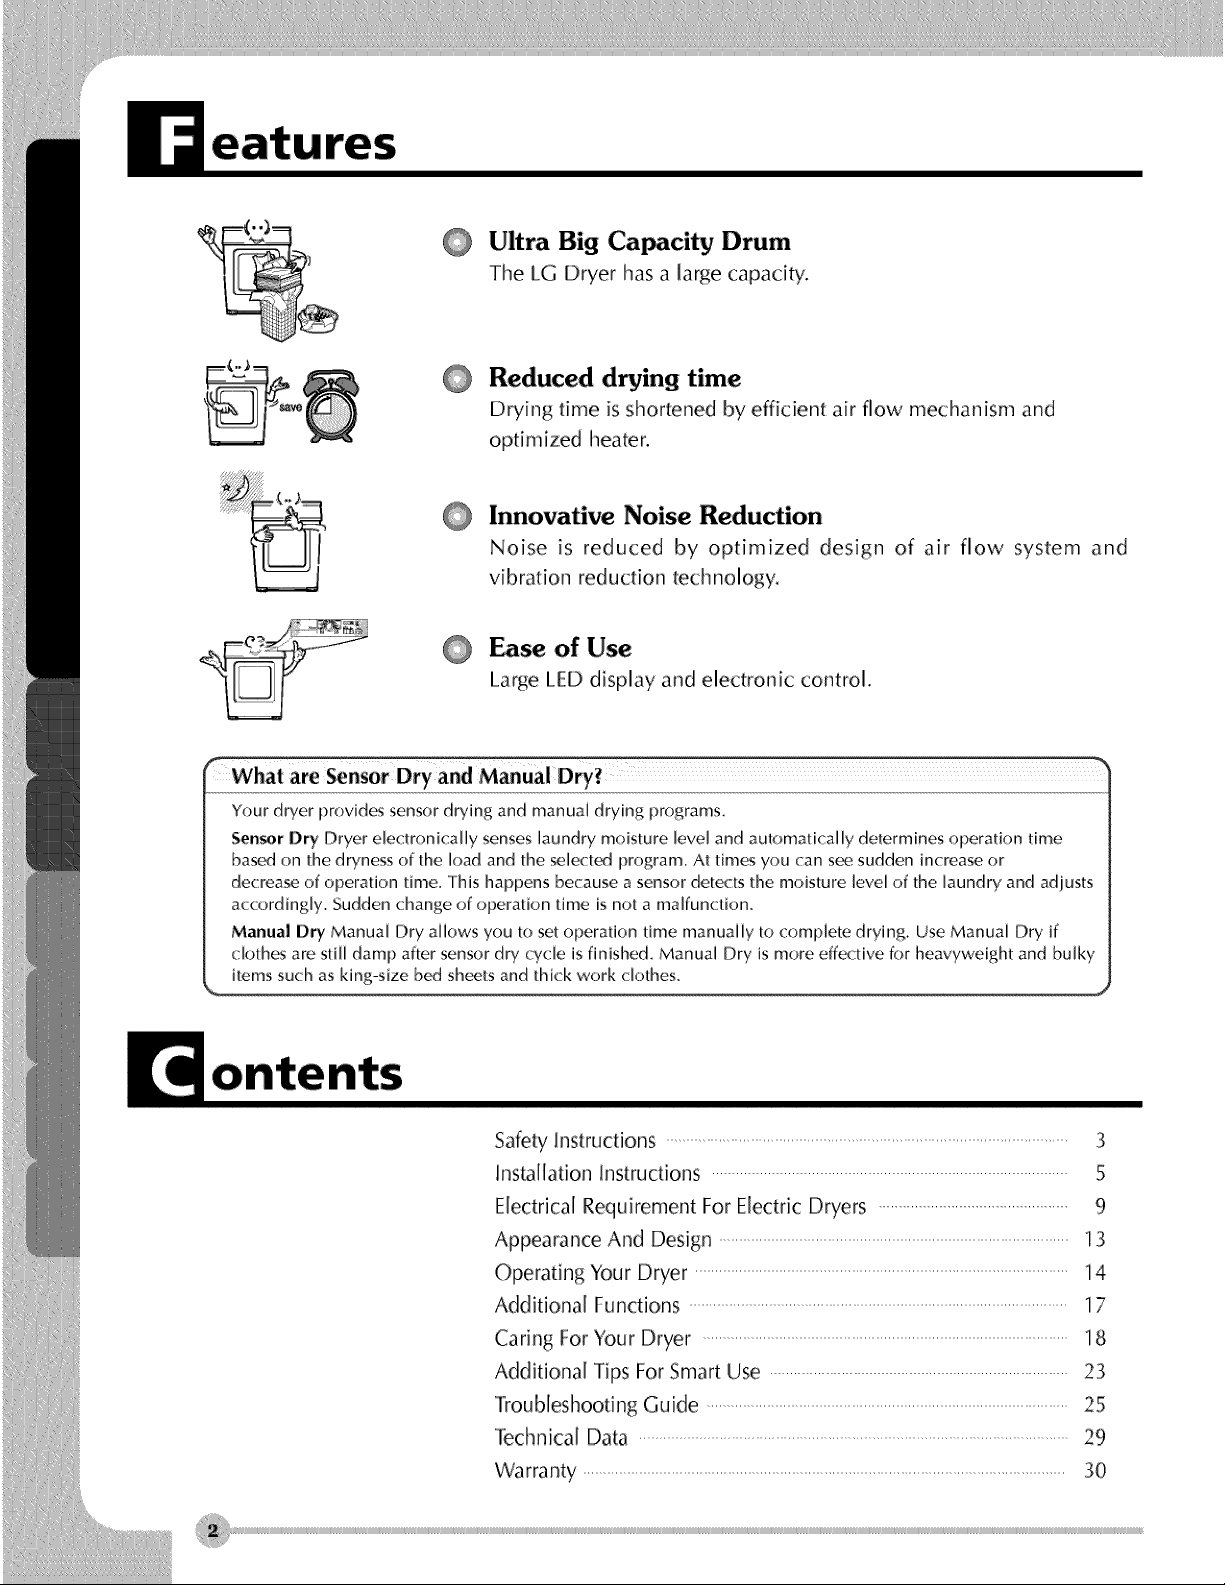
Ultra Big Capacity Drum
The toG Dryer has a large capacity.
Reduced drying time
Drying time is shortened by effk:ient air flow mechanism and
optimized heater.
Innovative Noise Reduction
Noise is reduced by' optimized design of air flow system
vibration reduction technology.
Ease of U_
La_4e LED display and electronic control.
Your dryer i:)rovidc_ sensor drying and manuai drying programs,
Sen_r Dry Dryer electronically senses laundry moisture level and automatically determines operation time
based on the dryness of the k)ad and the s_lected program. At times you can sc<__sudden in( rease or
decrea_ of operation time. This happens because a sensor detects the moisture level of the laundry and adiusts
ac<:ordingJy. Sudden <:hange of operation time is not a malfun(:tion,
Manual Dry Manual Dry allows you to set operation time mar_uai[y to complete drying_ Use Manual Dry ff
c[othc_ are still dami:) after sensor dry cycle is finished. Manual Dry is more effective for heavyweight and bulky
ilems su<h as king-size bed sheets and thkk work clothes,
and
O
Safety Instructions 3
Installation Instructions 5
Electrical Requirement For E[ectdc Dryers 9
Appearance And Design 13
Operating Your Dryer ..........................................................................................................................................14
Additional Functions 17
Caring For Your Dryer 18
Additional Tips For Smart Use ........................................................................................................23
Troubleshooting Guide 25
Technical Data 29
Warranty 30
Instructions
r ¸
IMPORTANT SAFETY INSTRUCTIONS
precautions, including the following:
1) Read all instructions before using the appliance.
2) Do not dry articles that have come into contact with
gasoline, dry-cleaning solvents, or other flammable
or explosive substances, as they give off vapors
that could ignite or explode.
3) Do not allow children to play on or inthe appliance.
Close supervision of children is necessary when
using the appliance.
4) Before the appliance is removed from service or
discarded, remove the door to the drying
compartment.
5) Do not reach into the appliance if the drum is
rotating.
6) Do not install or store this appliance where it will be
exposed to the weather.
7) Do not tamper the with the controls.
SAVE THESE INSTRUCTIONS
GROUNDING INSTRUCTIONS
This appliance must be grounded. Inthe event of
malfunction or breakdown, grounding will reduce the
risk of electric shock by providing a path of least
resistance for electric current. This appliance is
equi_ed with a cord having an equipment-grounding
conductor and a grounding plug. The plug must be
plugged into an appropriate outlet that is properly
installed and grounded in accordance with all I_al
codes and ordinances.
8) Do not repair or replace any part of the appliance or
attempt any servicing unless specifically
recommended in the user-maintenance
instructions.
9) Do not use heat to dry articles containing foam
rubber or similarly textured rubber-like materials.
10)Clean lint screen before or after each load.
11)The interior of the appliance should be cleaned
periodically by qualified service per_nnel.
12)Do not place items exposed to cooking oils inyour
dr/er. Items contaminated with cooking oils may
contribute to a chemical reaction that could cause
a load to catch fire.
13)Do not use fabric softners or products to eliminate
static unless recommended by the manufacturer
of the fabric softner or product.
Do not modify the plugprovided with the appliance.
If itwi[[ not fit the outlet, have a proper outlet installed
by aqualified electrician.
This appliance must be connected to agrounded
metal, permanent wiring system or an equipment-
grounding conductor must be run with the circuit
conductors and connected to the equipment-
grounding terminal or lead on the appliance.
WARNING oImproper connection of the equipment-
grounding conductor can result in a risk of electric
sh_k. Check with a qualified ei_rician or service
person ifyou are in doubt as to whether the
appliance is properly grounded.
iiiiiiiiiiiiiiiiiiiiiiiiiiiiiiiiiiiiiiiiiiiiiiiiiiiiiiiiiiiiiiiiiiiiiiiiiiiiiiiiiiiiiiiiiiiiiiiiiiiiiiiiiiiiiiiiiiiiiii
iiiiiiiiiiiiiiiiiiiiiiiiiiiiiiiiiiiiiiiiiiiiiiiiiiiiiiiiiiiiiiiiiiiiiiiiiiiiiiiiiiiiiiiiiiiiiiiiiiiiiiiiiiiiiiiiiiiiiii
iiiiiiiiiiiiiiiiiiiiiiiiiiiiiiiiiiiiiiiiiiiiiiiiiiiiiiiiiiiiiiiiiiiiiiiiiiiiiiiiiiiiiiiiiiiiiiiiiiiiiiiiiiiiiiiiiiiiiii
iiiiiiiiiiiiiiiiiiiiiiiiiiiiiiiiiiiiiiiiiiiiiiiiiiiiiiiiiiiiiiiiiiiiiiiiiiiiiiiiiiiiiiiiiiiiiiiiiiiiiiiiiiiiiiiiiiiiiii
iiiiiiiiiiiiiiiiiiiiiiiiiiiiiiiiiiiiiiiiiiiiiiiiiiiiiiiiiiiiiiiiiiiiiiiiiiiiiiiiiiiiiiiiiiiiiiiiiiiiiiiiiiiiiiiiiiiiiii
Instructions
To reduce the risk of fire or explosion, electric
shock, property damage, personal :il_jmT,or death
when using this appliance, please follow all
:instruct:ions and :information.
• Do :not store or use any gasoline, dry-cleaning
solvents, or any other flammable vapors or
liquids :in the area surrounding this appliance.
• Do :not dry anything that has ever ihad anything
flammable on :it, even after washing.
• No washer can completely remove oil. Do not
dry any articles that have ever ihad any kind of
oil on them, including cooking oil.
• Art:icles containing foam, rubbel, rubber-like
materials, plastic, or similar materials should be
a:irdFred.
• Failure to follow these instructions can result in
fire, death, or serious injury.
• A qualified service person or company must
perform installaion and service of this
appliance.
• Keep flammable materials and vapors, such
as £asoline, away from dryer.
• Failure to do so can result in death,
explosion or fire.
Instructions
The following insu_uctions will ihelp guide you through the initial steps of setting up your dryer for use.
Please note that every section of this manual provides important int:o_ation regarding the preparation
and use of your dryer, and it is important that you review this entire manual before proceeding with any
installation or use. More detailed instructions concerning electrical connections, gas connections, and
exhaust requirements are provided :inother parts of this manual.
)
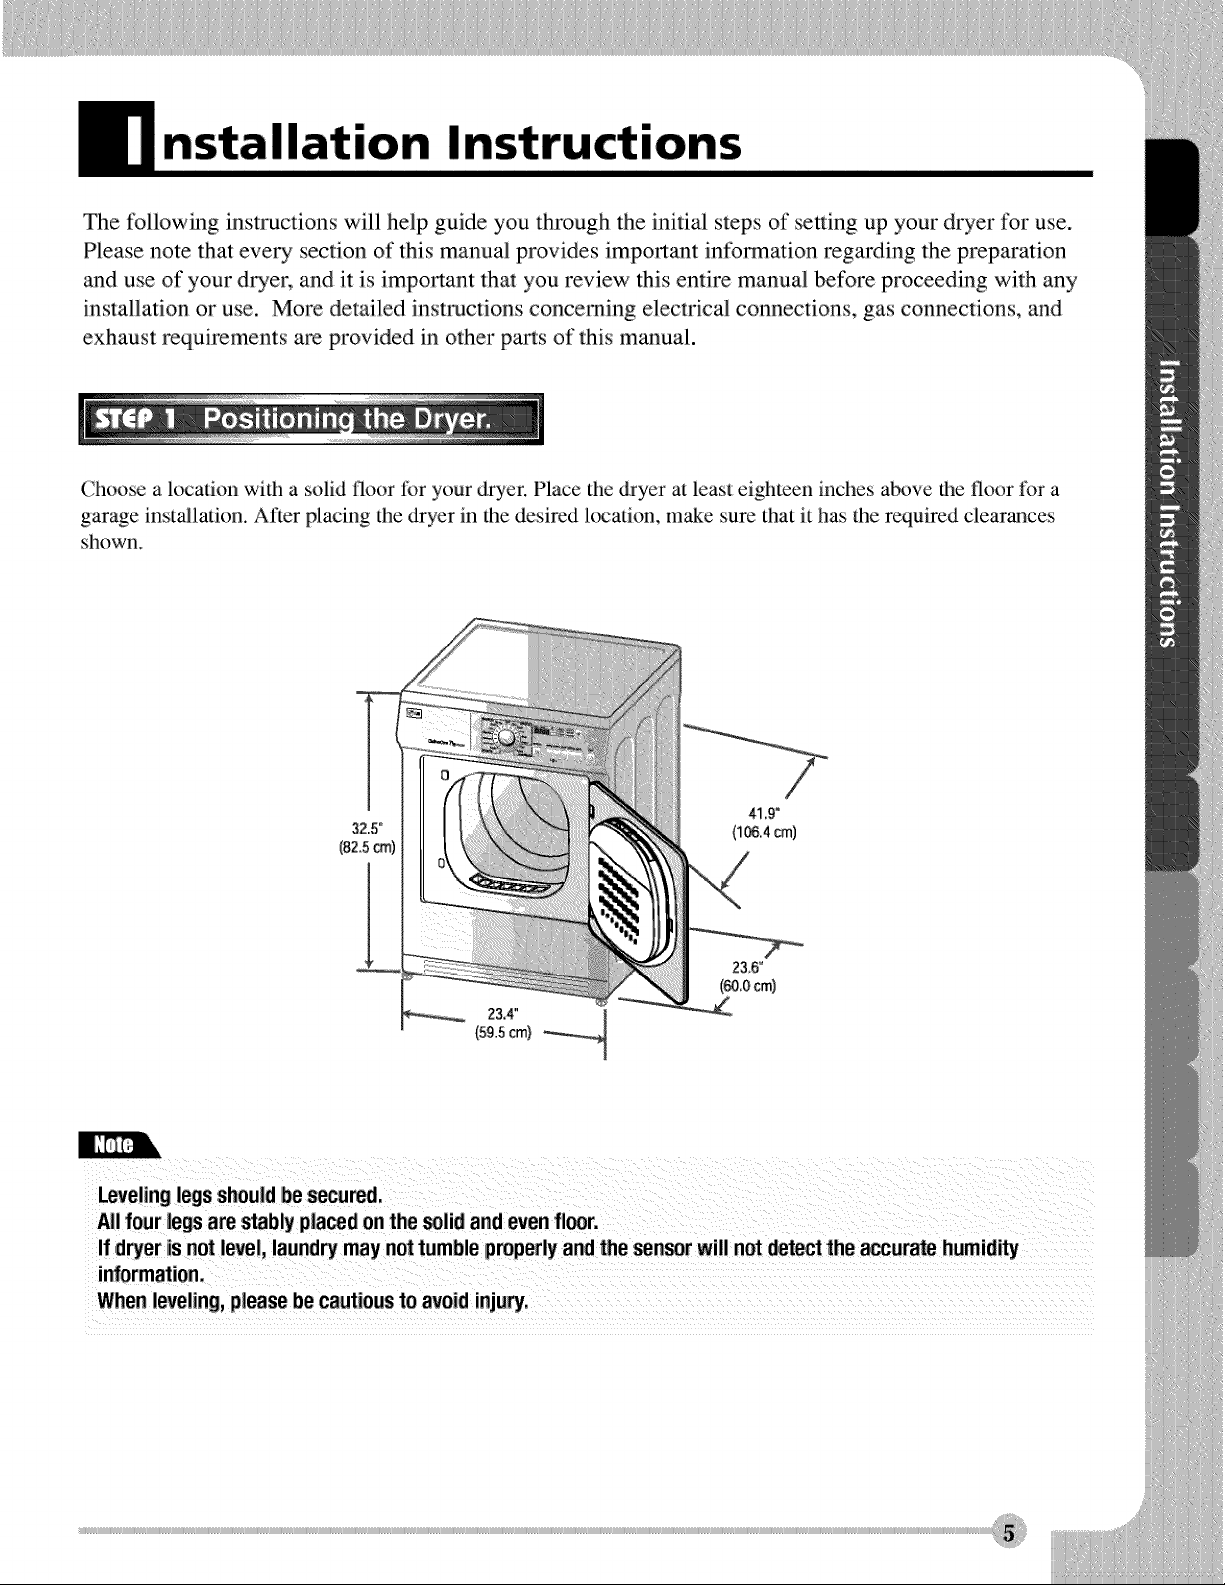
Chocse a location with a solid floor lbr your dryer. Place the dryer at least eighteen inches above the l]oor I_.}ra
garage inst.allat:ion.After placing the dryer in the desired location, make sure that it has the required clearances
shown.
23_6°
(600cm)
Levelinglegsshouldbes_ured.
Allfour legsarestablyplacedonthe solidand_en fl_r.
If dryerisnotlevel, laundrymaynottumbleproperlyandthe sensorwillnot detectthe accuretehumidity
Whenleveling,pleasebecautioustoavoid injury.
nstallat
Following are several warnings and insu'uctions
concerning making the electrical connection |br
electric dryers. More detailed into:rmation
concerning the electrical connection is provided at
the manual section entitled. Electrical Req?airements
/:or Electric D:ryer and :it is imF,ortant that you
thoroug!lly review that section, m_d the remainder of
this manual,, before taking any steps m install or u_e
this dryer.
1. Use only a new U.L. listed No. 10 (copper wire
only) three conductor _}wer supply cord kit :rated
240 _k_lts (minimum) 30 Amperes and labeled as
suitable lbr use in a clothes drym:
2./:our-wire cord is required |or manufactured
(mobile) home installations and use and where
local codes do not allow grounding of this
appliance throug!l neutral.
3. Electrical Plug Connections.
4. For additional instruction on colmecting the dryer
to an electrical power source, please refer to this
manual's section on Electrical Requirements and
Electric l)ryer.
WARNING!
- Use a new UL approved 30 amp power supply cord
or 10 gauge solid copter wire
• use a UL approved s|rain relieL
• DisconnecI power h_lbre m_e_ingeleclrical
COllneclio_ls.
• ConnecI neutral wire (white or cenler wire) m center
uarminM.
• Ground wire ¢gr_:en or bare wire_ must N: c_umecmd
1o gr_2_l _::._13nlld con_leclor.
• Securely lighten all elec|ricN eonneedons
° See installal _on mstructions for complete
ins fftlC tion s.
• Failure to do so can result in fire or electricM sh(_k.
ns
Clo_ the d(_)r to the dryer drum/drying compartment and,
after completing Ml steps in ihis manual for prot_r
installation of this dryer, start the dryer on a hem setting,
as descried more fidly in llle ot>erafing insmlctions thai
accompany tile dryer.
'I]le follow:ing :instruct:ions are applicable m
installations of the dryer in a mmmtactured or
mobile home. Any installation in a matmfacmred
or mobile home must comply with the
Manufactured I:lome Construction and Safety
Standards Title 24 CI;R, Part 32-8(i) or Standard
CAN/('SAOZ240 MII and local codes mid
ordinances. If you am mlcertain whetller your
propsed installation will comply with these
standards, please contact a service mid installation
professional lot assistance.
1) The electrical connection lbr ml electric dryer
must be a 4-wire connection. More detailed
information concerning the electrical connection
is provided at the manual section entitled
Electrical Requiremmlts l_._rElectric I_yer
Prior to the first use of this appliance, use all-purtx)se
cleaning pr(_lucts or a ._)lution of detergent and waler,
with a damp cloth m rcmove fixml the inside of lhe dryer
dram/drying comparlmcni any dusi or dirt thin may have
accmnulatcd in lhe inside of lhe drycr. Plug in your dryer
afler reviewing Ihe lollowing parks on your drycr's
Elcclrieal Requirements.
Instructions
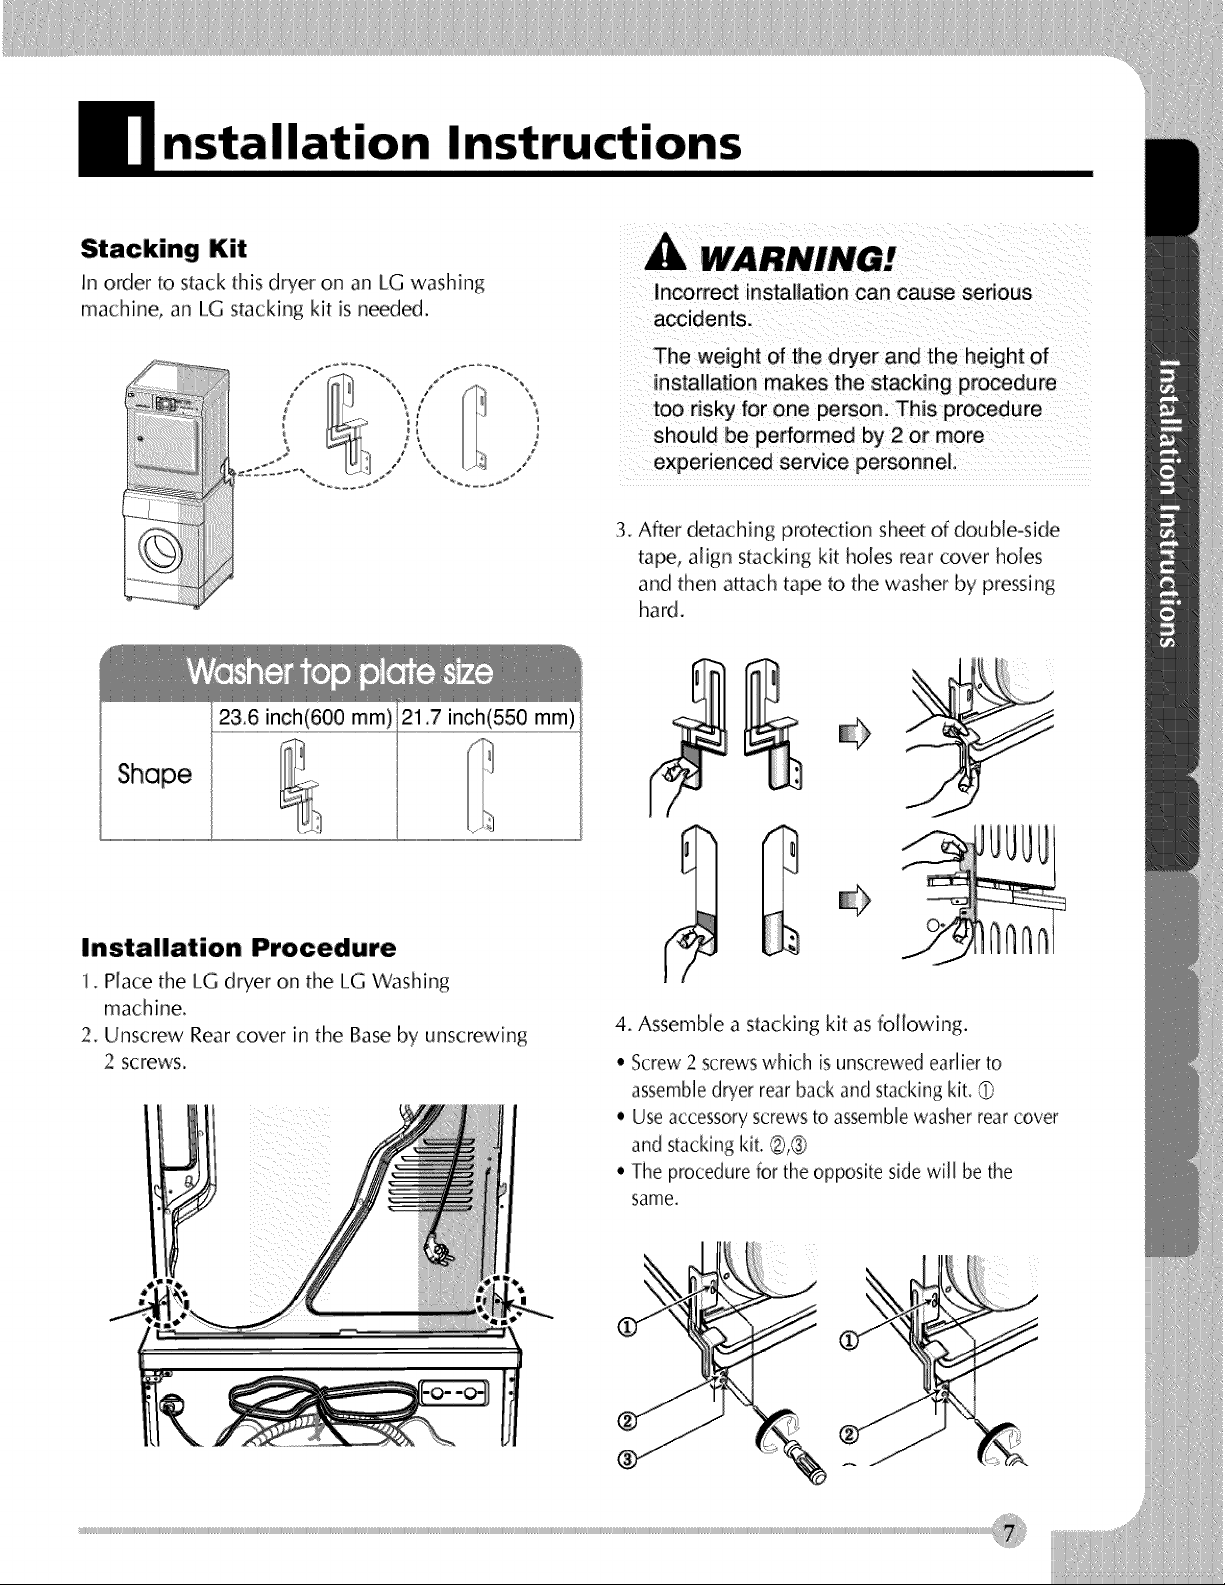
Stacking Kit
In order to stack this dryer on an LG washing
machine, an LG stacking kit is needed.
Incorrect installation can cause serious
accidents.
The weight of the dryer and the height of
installation makes the stacking procedure
too risky for one person. This procedure
should be performed by 2 or more
experienced service personnel.
3. After detaching protection sheet of double-side
taFm, align stacking kit holes rear cover hoies
and then attach ta_ to the washer by pressing
hard.
....2&6inch(6OO mm 21 inch(550 ram)
........................................................................................................
Installation Procedure
1. Place the LG dryer on the LG Washing
machine.
2. Unscrew Rear cover in the Base by unscrewing
2 screws.
4, Assemble a stacking kit as following.
• Screw 2 screws which is unscrewed earlier to
assembledryer rear back and stacking kiL C/
Use accessoryscrews to assemble washer rear cover
and stacking kiL #),®
The procedure for the opposite side will be the
same,

nstallat
vel the dryer
US
1, Levelling the dryer is to prevent undesirable
noise and vibration.
When placing your dryer in a solid and level
area where water is not dripping and freezing,
and flammable materials are not stor_.
Adjustable feet,'
Adjustable feet Adjustable feet
2, ff the dryer is not pro[_rly level, adjust the front
levelling legs up and down as necessary.
Turn them clockwise to raise and
counterclockwise to lower until the dryer is not
wobbling both front-to-back and side4ooside.
Lower
_:_Diagonal Check
When pushing down the edges of the washing machine,
the machitze should not move up and down at all.
(Cheek in both directions.)
!f maehine rocks when pushing the machine lop plate
dblgonally, adjust the feet again.
uirement For E c D
Following are additional instructions regarding electrical c_mnections and. requirements ti_r electtic dryers.
Impo_ant Warning: "I_ help prevent fire, electric shock, serious i1_ury or death, the wiring and grounding
must conform to the latest edition of the National Electrical Code, ANS|/NFPA 70 and all applicable local
regulations. Please contact a qualified electrician to check your home's witing and fuses to ensure that your home
has adequate electrical power m operate the &yer.
120V/240V,. 60 Hertz,. 3-Wire Installation
Instructions for Grounding of your Electric
a) This dryer must be com_ected, to a grounded
metal,, permanent wiring system or an
equipment-grounding conductor must be run
with the circuit conductors and connected to the
equipment-grounding tem_inal or lead on the
dryer.
b) The dryer has its own terminal block that must
t_ connected to a separate 60 Hertz single
phase AC circuit, fused at 30 Am_res (the
circuit must be fused on tx)th sides of the line).
ELECTRICAL SERV|CE FOR THE DRYER
SHOI ,ILl) BE OF MAXIM1 M RATE
VOIJ|"AGE I_ISTEI) ON THE NAMEPLATE.
DO NOT ('.()NNE(rF DRYER TO 110. 115,
OR 120 VO/;/' CIRCUrll Heatil g elements are
available lor field installation in drym> which
are to _ connected to electrical service of
different volta ge than that listed on nameplate.
c) If branch circuit to dryer :is:fifteen tiaet (4.50 m)
o:r less in length, use [.L. (Underwriters
/,aboratories) listed No. 10 A.W.G. wire (copper
wire only), or as required by local codes. If over
|ifteen liaet (4.50 m), use ILL. (Underwriters
Lat_)ratories) listed. No. 8 A.W.(L wire (copper
wire only),, or as required by local codes. Allow
sul]'icient slack in wiring so dryer can t-_e moved
|rom its normal location when necessary.
d)
The lx_wer cord (pigtail) connection between
wall receptacle and dryer terminal block IS NOT
supplied with dryer. Type of pigtail and gauge of
wire nmst cont_.mn to local codes and with
insmactions mentioned on the |k_llowing pages.
e)
'/11e method of wiring the dryer :isoptional arid
subject to local code requirements. Refer to
examples on next page.
0
You must select the method by which to wire
your dryer according m local code and ordinance
:requirements. Sample methods are included in
the |k_llowing pages,
Label all wires prior to disconnection When
servicing the dryer, because wiring errors can
cause serious injury to you and your dryer.
lectrical Requirement For E
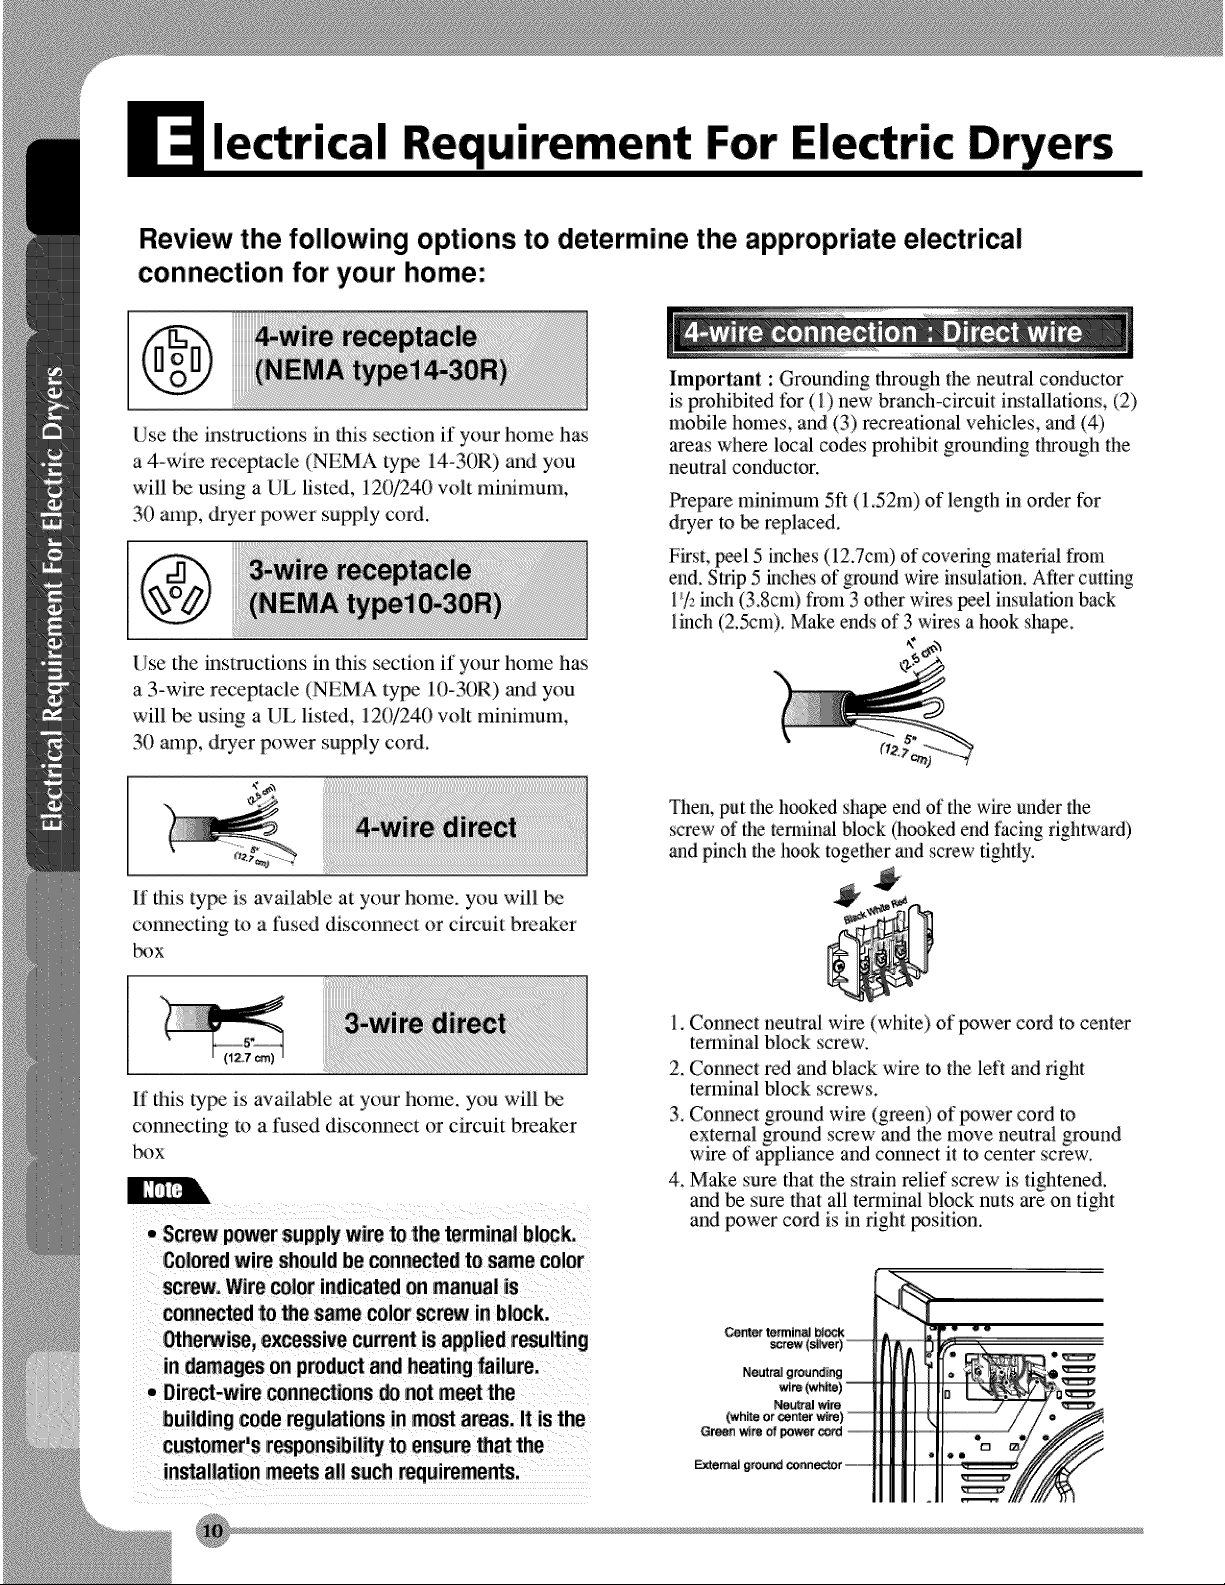
Review the following options to determine the appropriate electrical
connection for your home:
Important : Grounding through the neutral conductor
is p¢ohiNted tor(l) new brm_ch-circuit installations, (2)
Use the instructions hi this section :ifyour home has
a 4-wire receptacle (NEMA type 14-30R) and you
will be using a UL listed, 120/240 volt minimum,.
30 amp, dryer power supply cord.
Ise the instructions in this section if your home has
a 3-wire receptacle (NEMA type 10=30R) and you
will t_e using a IL listed., 120/240 volt n_ininmm,
3(i)amp, dryer power supply cord.
mobile homes, and (3) recreational vehicles, and (4)
areas where local codes prohibit grounding through the
neutral conductor.
Prepare minimum 5ft (1.52m) of length in order for
dryer to _ :replaced.
First, peel 5 inches (12.7cm) of covering material from
end. Strip 5 inches of ground wire insulation. After cutting
1"/2inch (3.8cm) t_3m 3 other wi_s peel insulation back
linch (2.5cm). Make ends of 3 wires a hook sha_.
,¢
If this type is available at your home. you will k,e
connecting to a :tused discolmect or circuit breaker
box
It' this type is available at your home. you will
connecting to a Oa_d disconnect or circuit breaker
t_x
• Screw powersupplywiretothe terminalbl_
Coloredwireshouldheconn_ed tosamecolor
screw.Wirecolorindicatedonmanualis
connectedto thesamecolorscrewin block.
Othe_ise, excessivecurrentisappliedresulting
indamagesonproductandheatingfailure.
• [)irect-wi re connections _ not meetthe
building coderegulationsinmost areas.Itisthe
customer'sresponsibility to ensurethat the
installationmeets all suchrequirements.
Then, put the h_ked shape end of the wire under the
screw of the mnninal bl_k (h_ked end facing rightward)
and pinch the hook together and screw tightly.
1. Connect neutral wi_ (white) of power cord to center
terminal block screw.
2. Connect red and black wire to the left and right
terminal bl_k screws.
3. Connect ground wire }green) of power cord to
external ground screx_ and the move neutral ground
,_,:ireof a}pliance and connect it to center scow.
4. Make sure that the strain relief screw is tightened.
and be sure that N1 terminN block imts are on tight
and power cord is in right position.
C_r terminal Nook
scr_
Neutral grounding
NeL_r_l wire
(white Orcenter _)
Green wire of _ _d
_re_
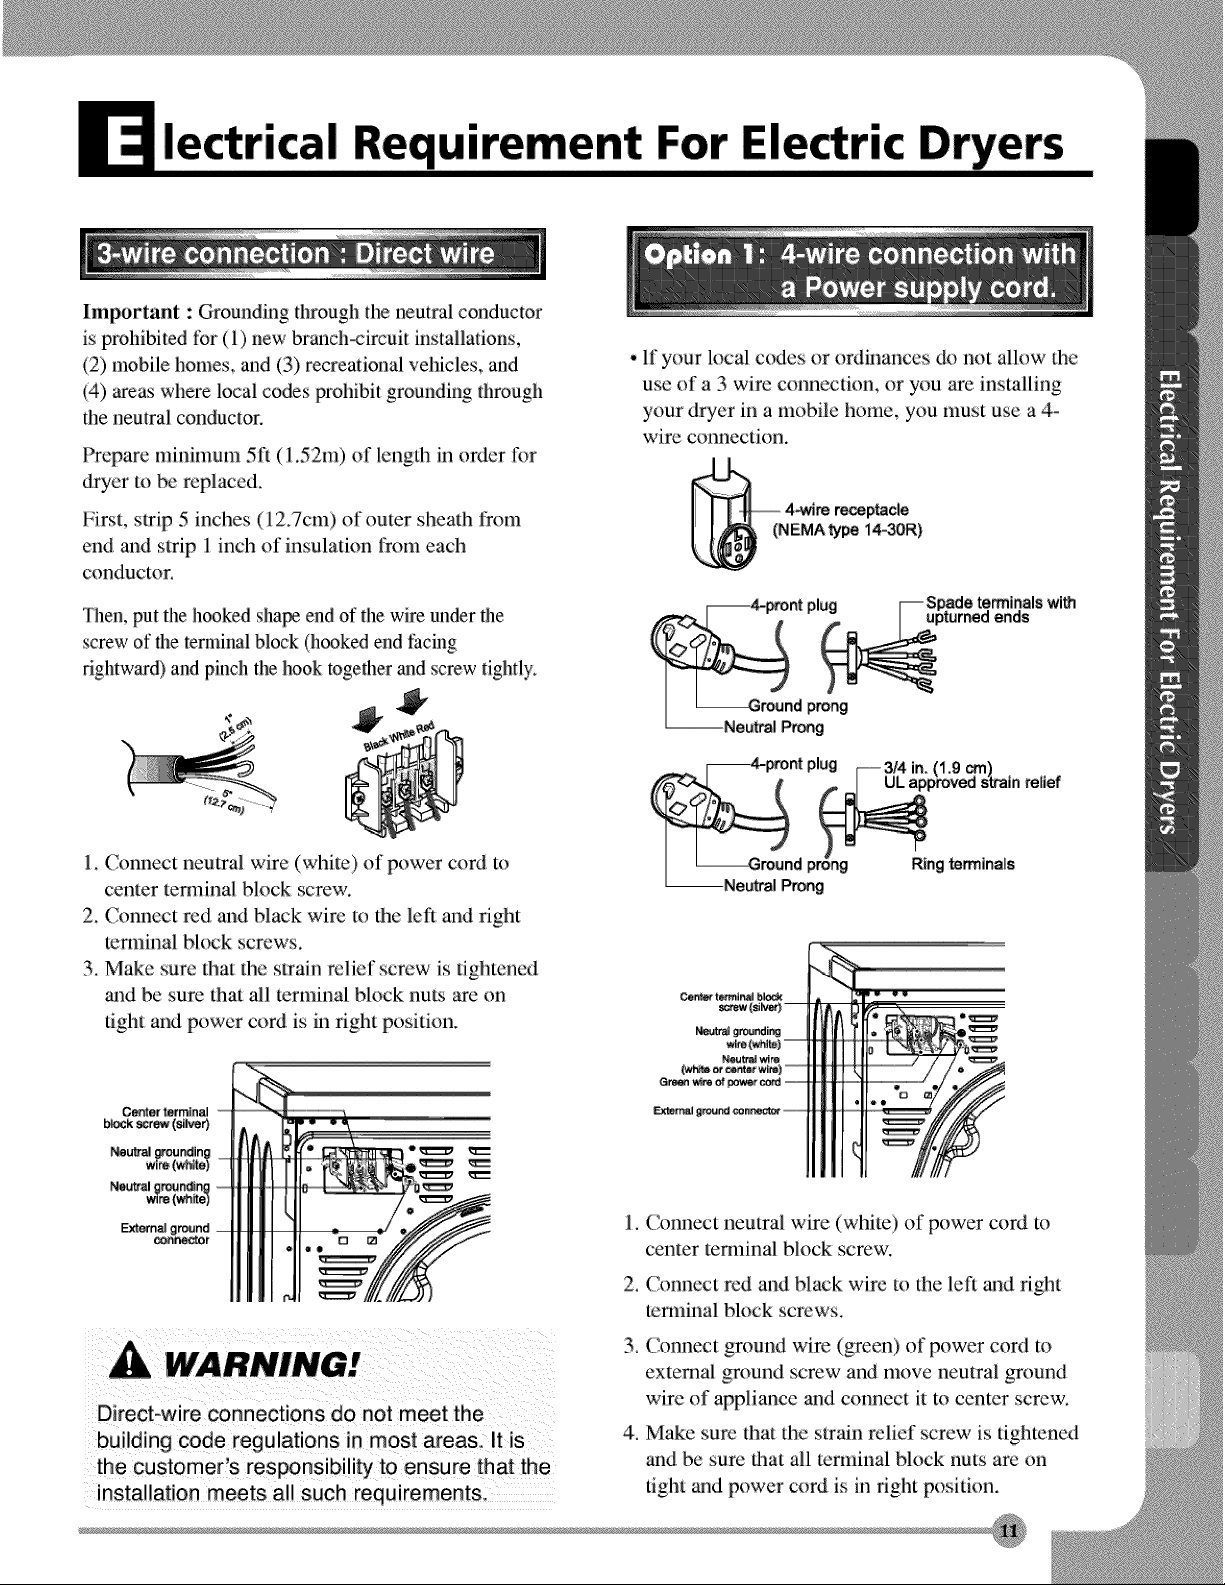
uirement For E c D
hnportant : Grounding _hrough the neutral conductor
is prohibited tbr (1) new branch_ircuit installations,
(2) mobile homes,, and (3):recreational veNcles,, and
(4) areas where local codes prohibit grounding fllrough
the neural conductor.
Prepare minimmn 5fi (1.52m) of length in order for
dryer to be :replaced..
First, strip 5 inches (12.7cm)of outer sheath from
end and strip 1 inch of insulation from each
conductor.
Then, put tile hooked shaN end of the wire under the
screw of fl_eternfinal block (hooked end facing
rightward) and pinch the hook together and screw tightly.
• if your Mcal codes or ordfllmlces do not allow file
use of a 3 wire connection, or you are installing
your dryer in a mobile home, you must use a 4-
wire connection.
1. Comlect neutral wire (white) of power cord to
center terminal block screw.
2. Comlect red mid black wire to the left mid right
terminal block screws.
3. Make sure lhat lhe strain relief screw is lightened
and be sure that all terminal block nuts are on
tight and power cord is ill right position.
Cen_ t_inal
_k _ {silver)
_ _our_ing
wi_ (wN_)
Ne_I g_an_
F_xterr_g_nd
_r
plug
I:_'or_ Ringterminals
--Neutral
.
(_ nnect neutral wire (white) of power cord to
3/4 in. (1.9 _l .
ULapprovedstrainrelief
center terminal block screw.
.
C_ nnect :redand black wire to the left and right
terminal block screws.
Direc>wire connections do not meet the
building code regulations in most areas, !t is
the customer's responsibility to ensure that the
3. Connect ground wire (green) of power cord m
external ground screw and move neutral ground
wire of appliance and connect :itm cenmr screw.
4. Make sure that the strain relief screw is tightened
and be sure that all terminal block nuts arc on
tight and power cord is in right position.

lectrical Requirement For E
If your h_al codes or ordinances F__mnitthe
connection of a frame-grounding conductor to the
neutral wire, use these instructions. If your local
codes or ordinances do not allow the connection of
a frame-grounding conductor to the neutral wire,
use the instructions under
_ction 3: Optional a-wire connection.
-- 3-wire _ptacJe
(NEMAtype 10-30R)
-- 3-wireplug te_inals with
) tum_ ends
-- Neural prong
• If your local codes or ordinances do not allow the
connection of a frame-grom_ding conductor to the
neutral wire, use the instructions under this
section.
3-wire plug r_ 3/4 in. (t.9 cm) ,
, ULapprov_ stratarelief
-- Neu_! nron_ Ringterminals
r .. _Neutral (_ite orcenter wire)
Center termln_ .............
block screw (_lver)
Q_
l,
Connect neutral wire (white) of pwer cord to
center terminal block screw.
.
Connect ground wire of appli_lce and neutral
wire of _-_wer cord to center terminal block
screw.
.
Connect red and black wire to the left and right
terminal block screws.
4. Make sure dlat dae strain relief screw is tightened.
and be sure d_at all terminal block nuts are on
tight aud _we:r cord is in right F_sidon.
5. ( onnect a indele_ndent ground wire l¥om external
ground connector to prope:r g,:aound.
"I]lis is probably a good way to create a g:round
loop and electrcute someone.
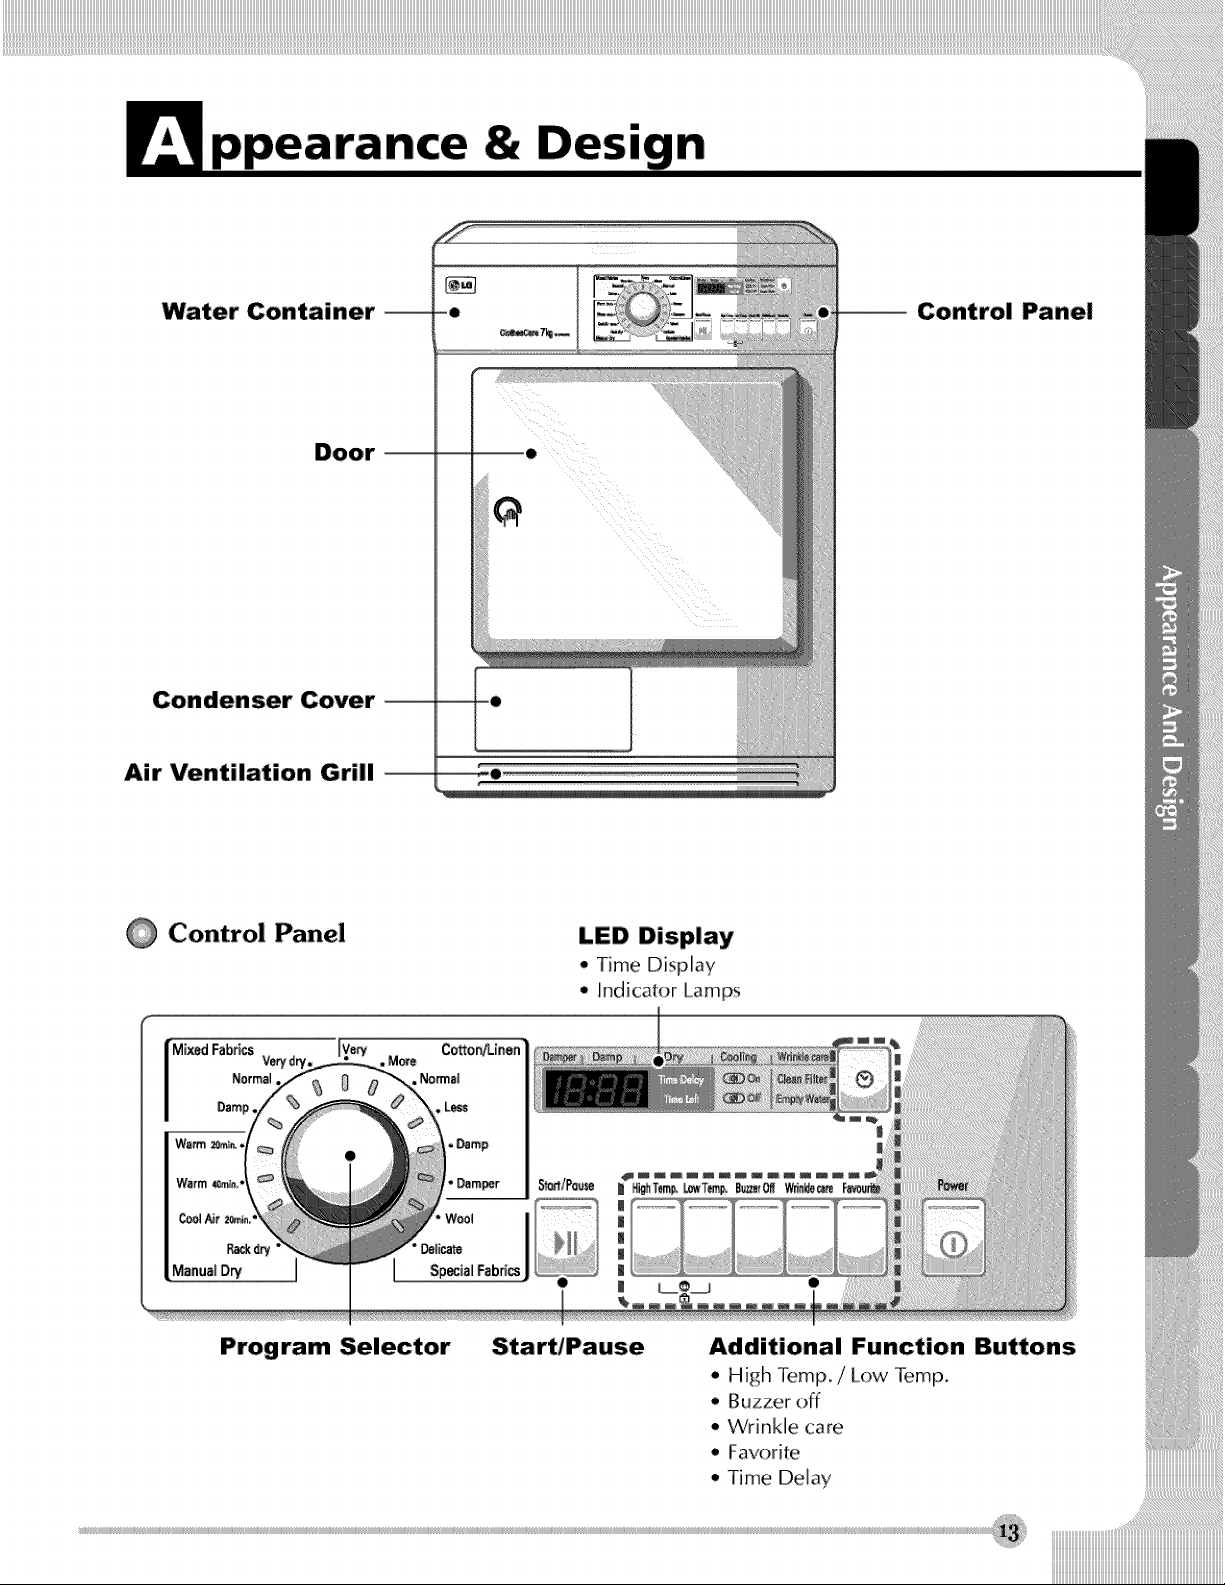
Water Container --
Door --
Condenser Cover --
Air Ventilation GAll
-- Control Panel
Control Panel
Prog ram Selector
LED Display
• Time Display
• hdicator Lamps
Additional Function Buttons
• High Temp. / Low letup.
• Buzzer off
• "vVrink[ecare
• Favorite
• Time Delay
....HH_H_..... _______________________________________________________________________________________________________________________
_______________________________________________________________________________________________________________________
_______________________________________________________________________________________________________________________
_______________________________________________________________________________________________________________________
iiiiiiiiiiiiiiiiiiiiiiiiiiiiiiiiiiiiiiiiiiiiiiiiiiiiiiiiiiiiiiiiiiiiiiiiiiiiiiiiiiiiiiiiiiiiiiiiiiiiiiiiiiiiiiiiiiiiiii
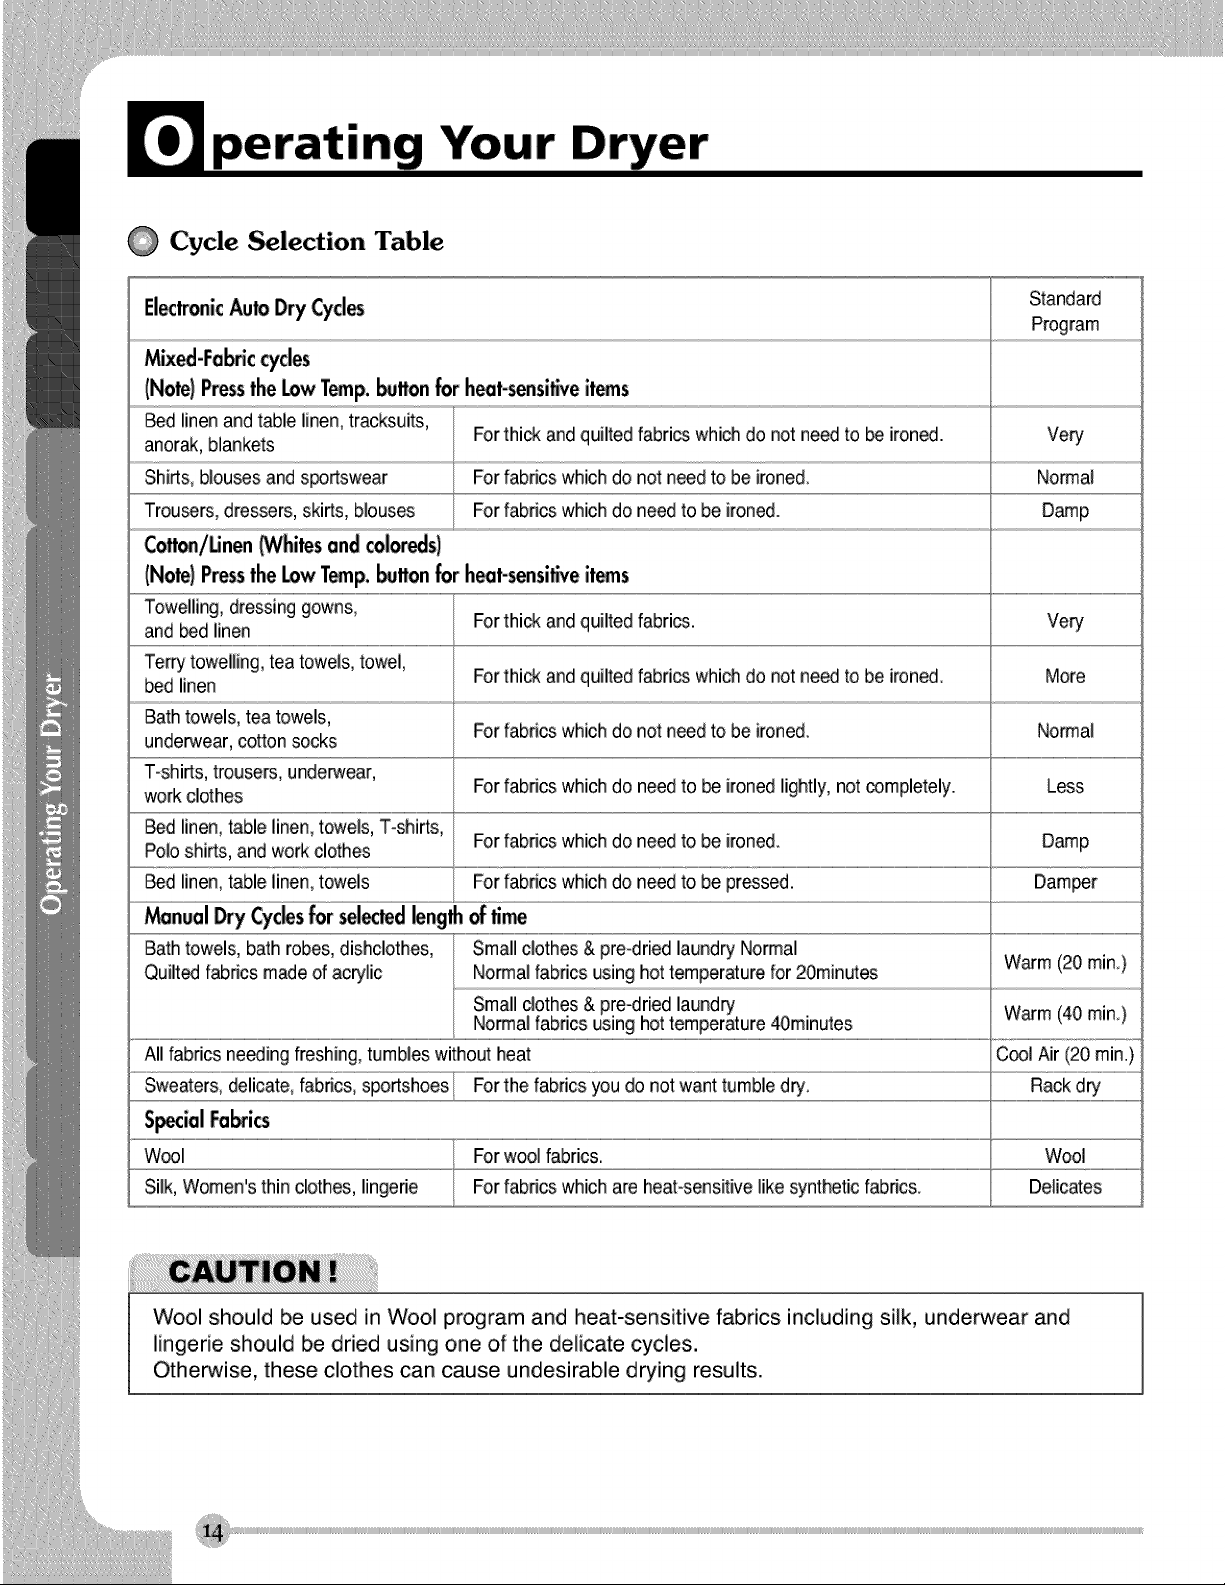
Cycle _lection Table
El_lr_ic AutoDryCycles
(Note)Pressthe LowTemp._lton for h_t-sensi_veitems
_d linenandt_le linen,tracksuJts,
anorak, blankets
Shirts,blouses and s_rtswear
Trou_rs, dressers, skirts, blouses
Cottm_/Linen(Whitesandcol_,,_s)
(Note)Pressthe LowTemp._lton forh_t-sensi_veitems
and bed linen
Terry towelling,tea towels, towel,
bed linen
Bathtowels, tea towels,
underwear, cottonsocks
T-shirts,trou_rs, underwear,
work clothes
Polo shirts, and woA clothes
_d linen,table linen,towels
Forthick and quilted fabrics which do not needto beironed. Very
For fabrics which do not need to be ironed. Normal
For fabrics which do need to be ironed. Damp
Forthick and quilted fabrics.
Forthick and quilted fabrics which do notneed to beironed
For fabrics which do not need to be ironed.
For fabrics which do need to be ironed lightly, notcompletely.
For fabrics which do need to be ironed.
For fabrics which do need to be pressed.
Standard
Program
'very
More
Normal
Less
Damp
Damber
_nual by Cyc_sfor _l_ted lengthoffim_
Bathtowels, bath robes,dJshclothes, Smallclothes & pre-driedlaundry Normal
Quilt_ fabrics made of acrylic Normal fabrics usinghot temperaturefor 20minutes
Small clothes & pre-dried laundry
Normal fabrics using hot temperature40minutes
All fabrics ne_ing freshing,tumbles without heat
Warm (20 min)
Warm (40 rain)
C_l Air (20rain.)
S_ial FaCies
Wool should be used in Wool pr_ram and heat-sensitive fabrics including silk, underwear and
lingerie should be dried using one of the delicate cycles,
Otherwise, these clothes can cause undesirable drying results,
Before first use of the dryer
Before you u_ the dryer for the first time, there are some _in_ that you have to check.
After removing _ckage, you wiJ[ check the produd has no problem and is pro_rly installed.
1. U_ a level to adjust the I_s of the dryer.
2. Check some major _rts such as wa_r container, condenser, control panel and drum.
3. It Run the dryer for 5 minutes to make sure drum inside gets warm.
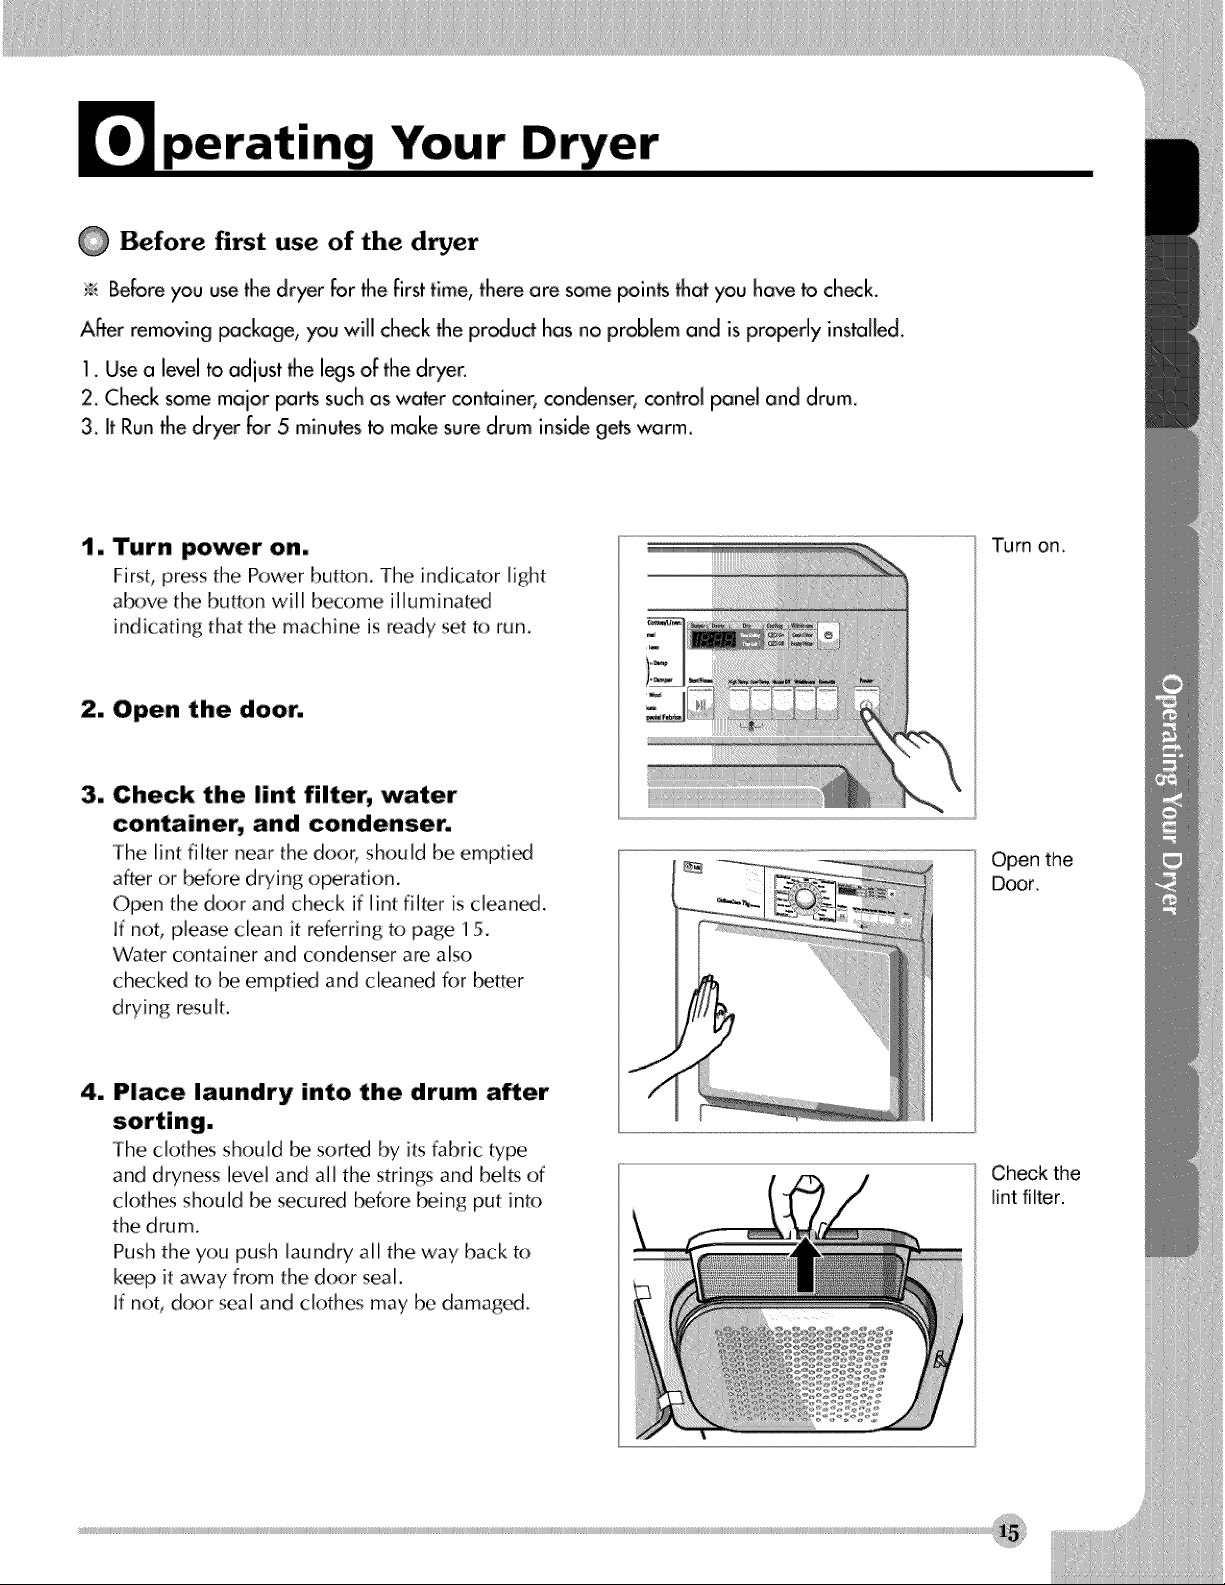
1. Turn power on.
First, press the Power button. The hldicator light
ab_we the button wi[[ become illuminat_
indicating that the machine is ready set to run.
2. Open the door.
3. Check the lint filter, water
container, and condenser.
The lint filter near the door, should be ernpti_
after or b_ore drying operation.
Open the d_×_rand check if lint filter is c[ean_.
ff not, please clean it referring to page 15.
Water container and condenser are also
check_ to be empti_ and cleaned for better
drying resu[t.
4. Place laundry into the drum a_er
Turn om
Open the
Doon
The clothes should be sort_t by its fabric h/pe
and dryness [eve[ and all the strings and belts of
clothes should be secur_ before k_ing put into
the drum.
Push the you push laundry a[[ the way back to
k_p it away from the door sea[.
ff not, d_x_rsea[ and clothes may be damaged,
Check the
Hntfilter.
m
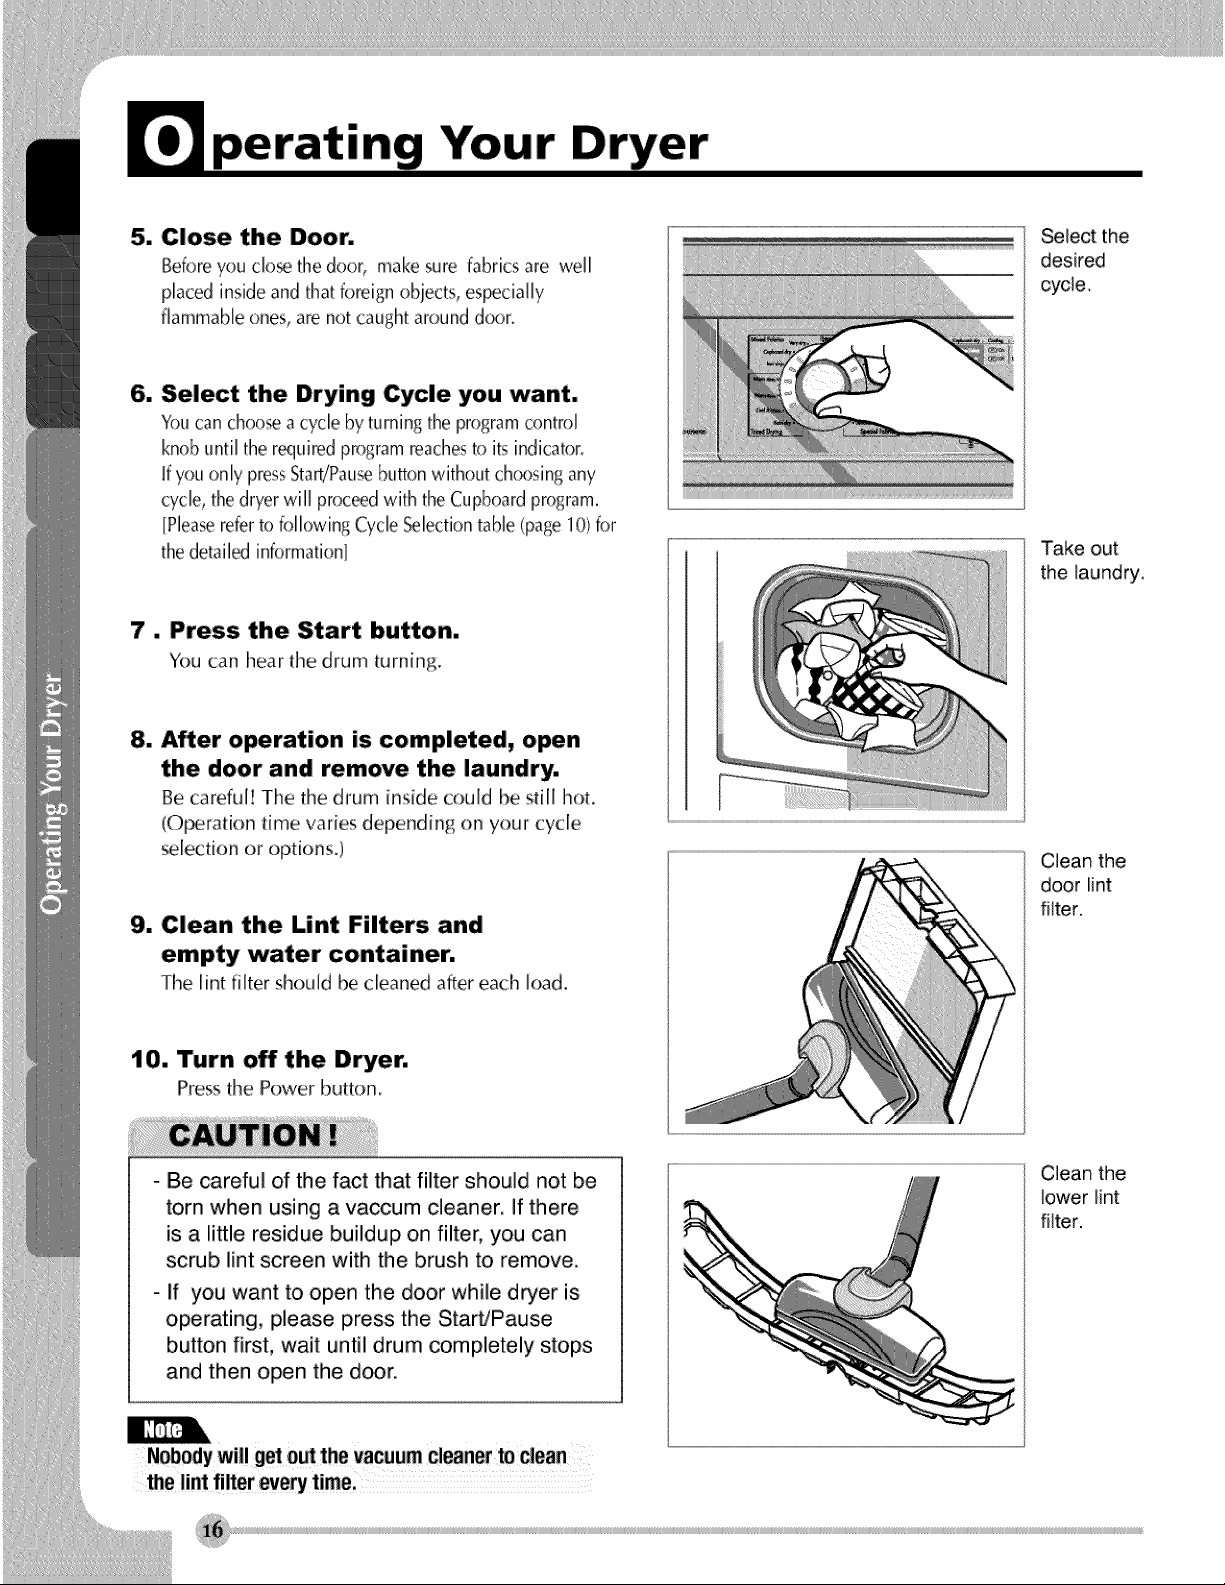
5. Close the Door.
Beforeyou c[o_ the doo_. make sure fabrics are well
placed his[de and that foreign obiects, es_c[a[[y
flammable ones, are not caughtaround &×)r.
6. Select the Drying Cycle you want.
Youcanchoo_ acycle by turnhlgthe programcontrol
knobuntil the r_ui_d program_aches to its hldicator.
Ifyou only pressStarb/Pausebuttonwithout ch<×)singany
cycle, thedryer will proceedwith the Cupboardprogram.
[Pleamreferto following CycleSelectiontable (page1O)for
thedeuil_j information
7. Press the Start button.
You can hear the drum turning.
8. After operation is completed, open
the door and remove the laundry.
Be carefu[! The the drum inside could be still hot.
(Operation time varies depending on your cycle
selection or options.)
9. Clean the Lint Filters and
empty water container.
The lint filter should be cleaned after each [oad.
Seiect the
desired
oycle.
Take out
the iaundry.
Clean the
door lint
filter.
10. Turn off the Dryer.
Press the Power button.
- Be careful of the fact that filter should not be
torn when using a vaccum cleaner. If there
is a little residue buildup on filter, you can
scrub lint screen with the brush to remove.
- If you want to open the door while dryer is
operating, please press the Start/Pause
button first, wait until drum completely stops
and then open the doer.
• e lint filter every time,
Clean the
lower lint
filter.
dditional Functions
ManualDry l
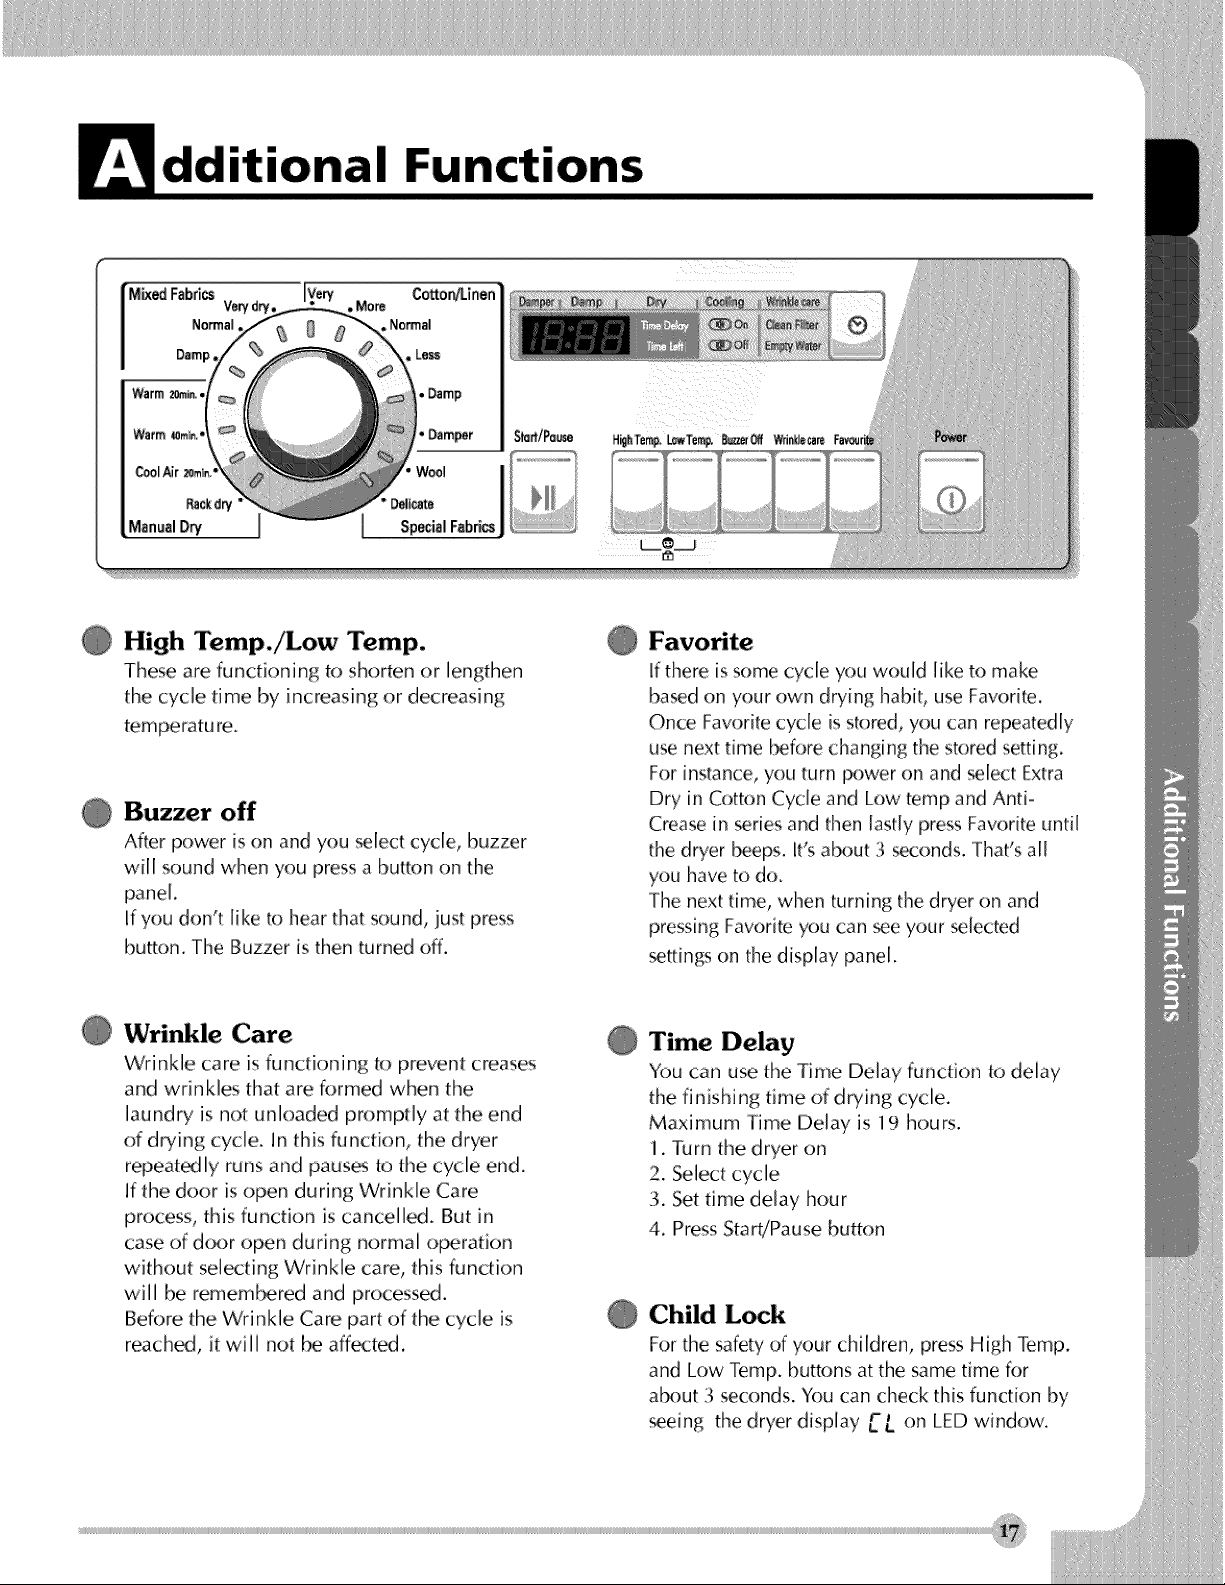
High Temp./Low Temp.
These are functioning to shorten or lengthen
the cycle time by increasing or decreasing
temperatu re.
Buzzer off
After power is on and you select cycle, buzzer
will sound when you press a button on the
panel.
ffyou don't Iike to hear that sound, just press
button. The Buzzer is then turned off.
Wrinkle Care
Wrinkle care is functioning to prevent creases
and wrinkles that are formed when the
laundry is not unloaded promptly at the end
of drying cycle. In this function, the dryer
repeat_[y runs and paus_ to the cycle end.
If the door is open during Wrinkle Care
process, this function is cancelled. But in
case of d_×>ropen during normal o_ration
without selecting Wrinkle care, this function
will be remembered and processed.
Before the Wrinkle Care part of the cycle is
reached, it will not be affected.
Favorite
ff there is some cycle you would like to make
ba_d on your own drying habit, use Favorite.
Once Faw:)ritecycle is sk:)red, you can repeatedly
use next time [_fore changing the stored setting.
For instance, you turn power on and select Extra
Dry in Cotton Cycle and Low temp and Anti°
Crease in _ries and then [astiy press Favorite until
the dryer _eps. It's a_:_:_ut3 seconds. That's all
you have to do.
The next time, when turning the dryer on and
pressing Favorite you can _e your _[ected
_ttings on the display panel.
Time Delay
You can use the Time Delay function to delay
the finishing time of drying cycle.
Maximum Time Delay is 19 hours.
1. Turn the dryer on
2. Select cycle
3. Set time delay hour
4. Press Start/Pause button
Child Lock
For the safety of your children, press High Temp.
and Low Temp. buttons at the same time for
at_ut 3 seconds. You can check this function by
_eblg the dryer display LLr",on LED window.
arin
How important Care and cleaning is ~
Ws not very difficult to care for your dryer. All you
have to do is to follow the informatk)n bek)w.
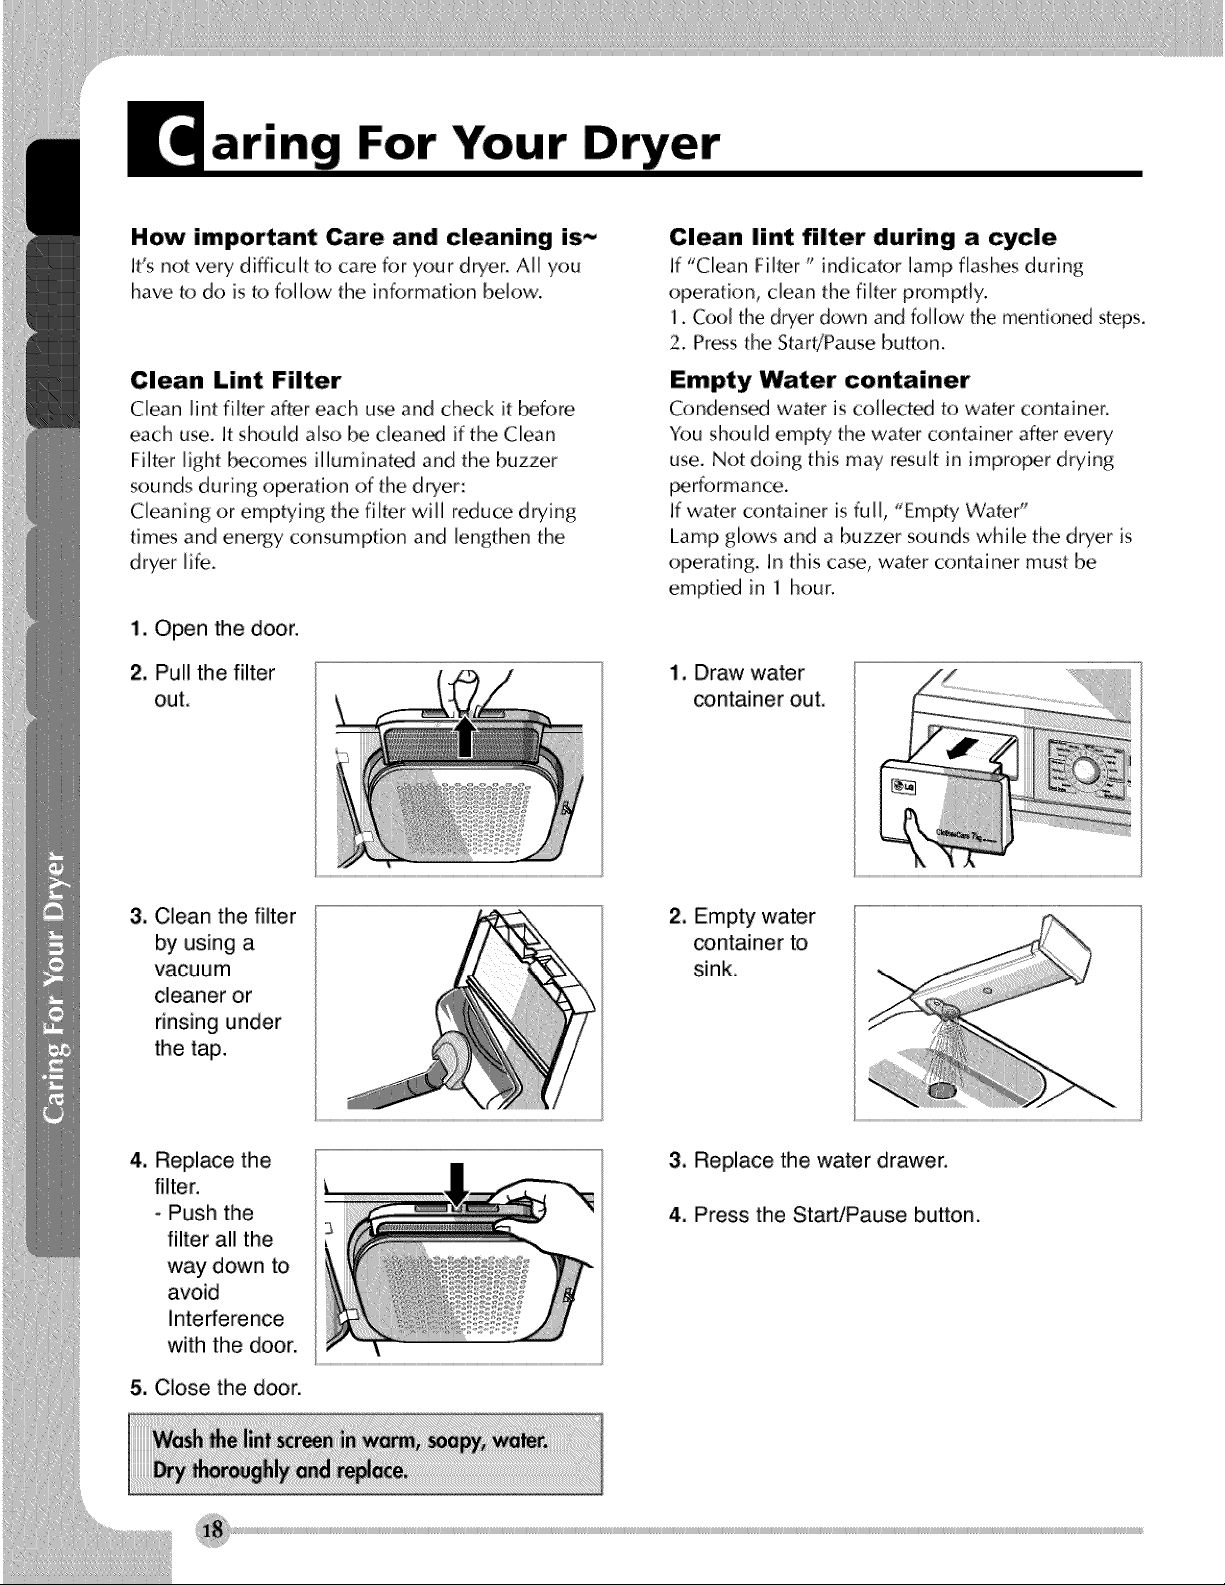
Clean Lint Filter
Clean lint filter after each use and check it before
each use. It should also be cleaned if the Clean
Filter light b_comes illumhlated and the buzzer
sounds during operation of the dryer:
C[eanhlg or emptying the filter will reduce drying
times and energy consumption and lengthen the
dryer life.
1, Open the door.
2, Pull the filter
out.
Clean lint filter during a cycle
]f "Clean Filter" indicator ]amp flashes during
operation, clean the filter promptly.
1. Coo[ the dryer down and follow the mentk)ned steps.
2. Pros the Start!Pause button.
Empty Water container
Condensed water is co]]ect_ to water container.
Y_.)ushould empty the water container after every
use. Not doing this may resuff in irrlpro[_r drying
[_rformance.
If water container [sfull, "Empty Water"
Lamp glows and a buzzer sounds while the dryer is
operating, in this case, water container must be
emptied [n 1 hour.
1. Draw water
container out.
3. Clean the filter
by using a
vacu u m
cleaner or
rinsing under
the tap.
4. Replace the
filter.
- Push the
filter all the
way down to
avoid
Interference
with the door.
5. Close the door.
2, Empty water
container to
sink.
3, Replace the water drawer.
4, Press the Star'dPause button.
arin
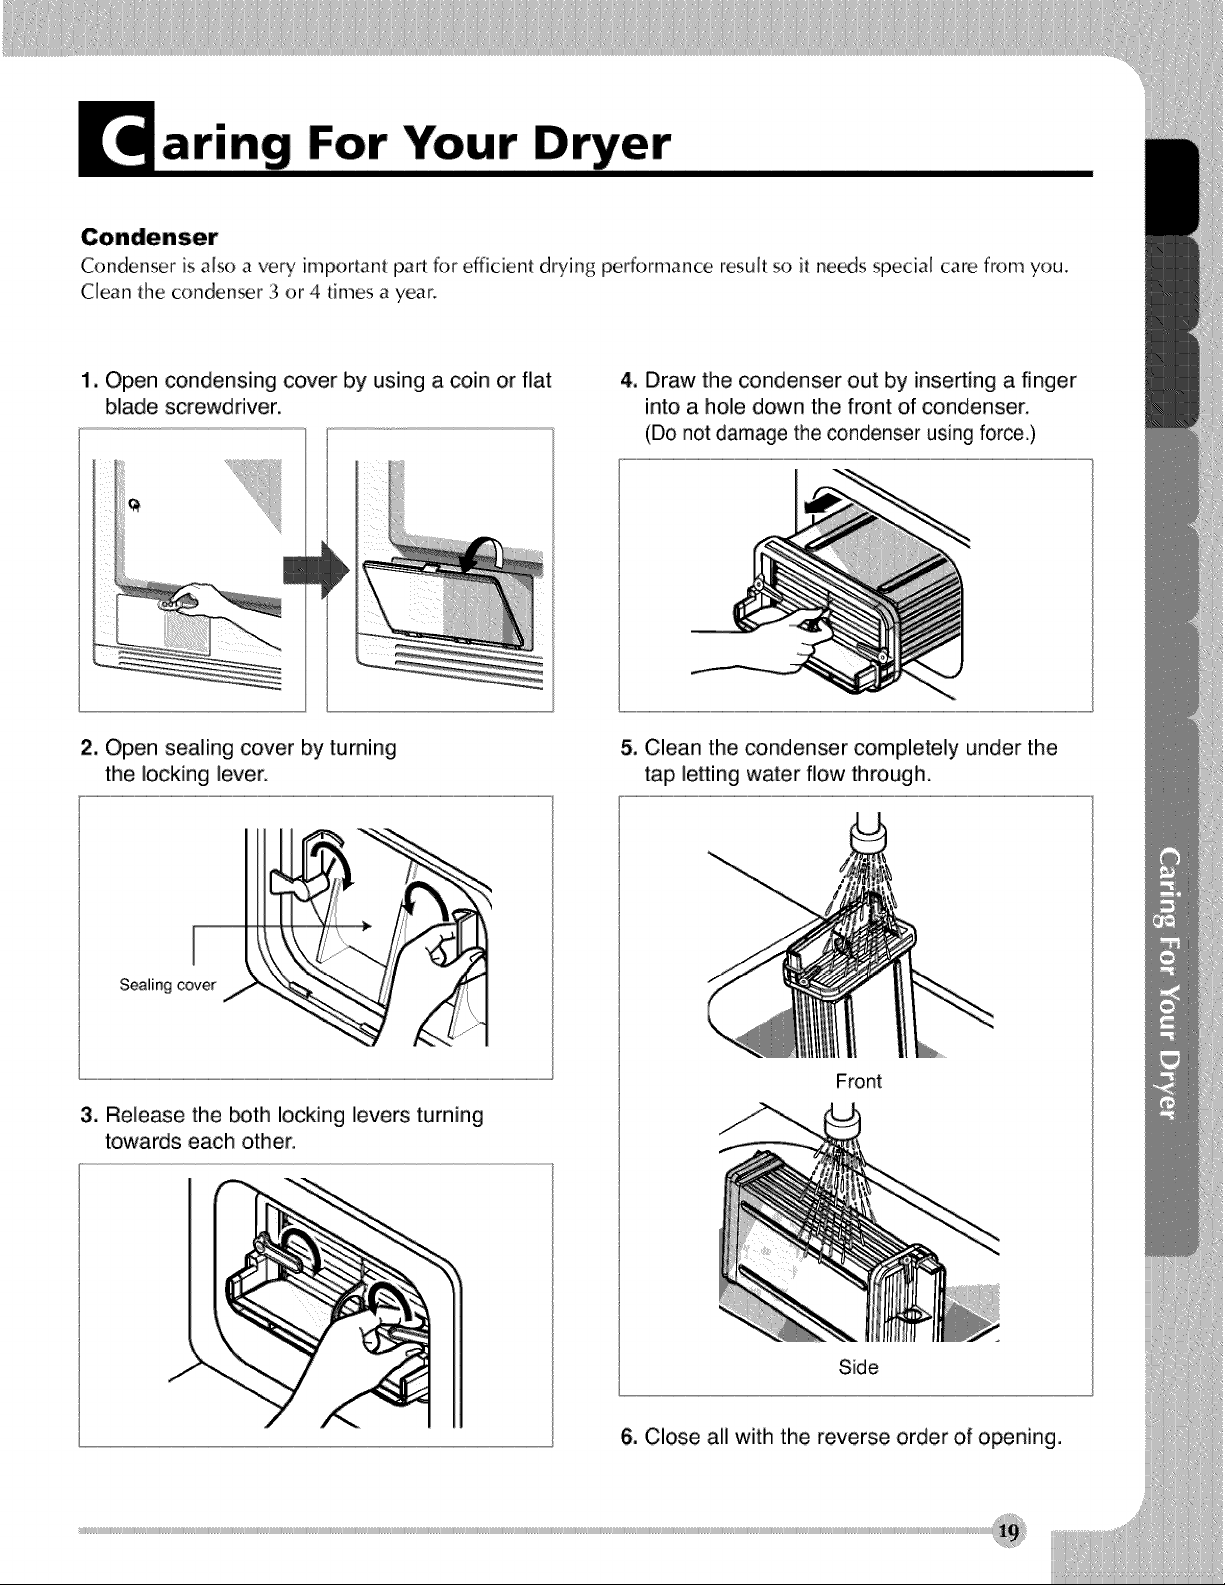
Condenser is also a very important pa_ for efficient drying performance result so it need special care..:,..:_s from you.
Clean the conden_r 3 or 4.times a year.
1. Open condensing cover by using a coin or flat
blade screwdriver,
2. Open sealing cover by turning
the locking lever.
4, Draw the condenser out by inserting a finger
into a hole down the front of condenser,
(Do not damage the condenser using force.)
5, Clean the condenser completely under the
tap letting water flow through,
Sealing cover /
3. Release the both locking levers turning
towards each other,
J
Front
Side
6, Close all with the reverse order of opening,
arin
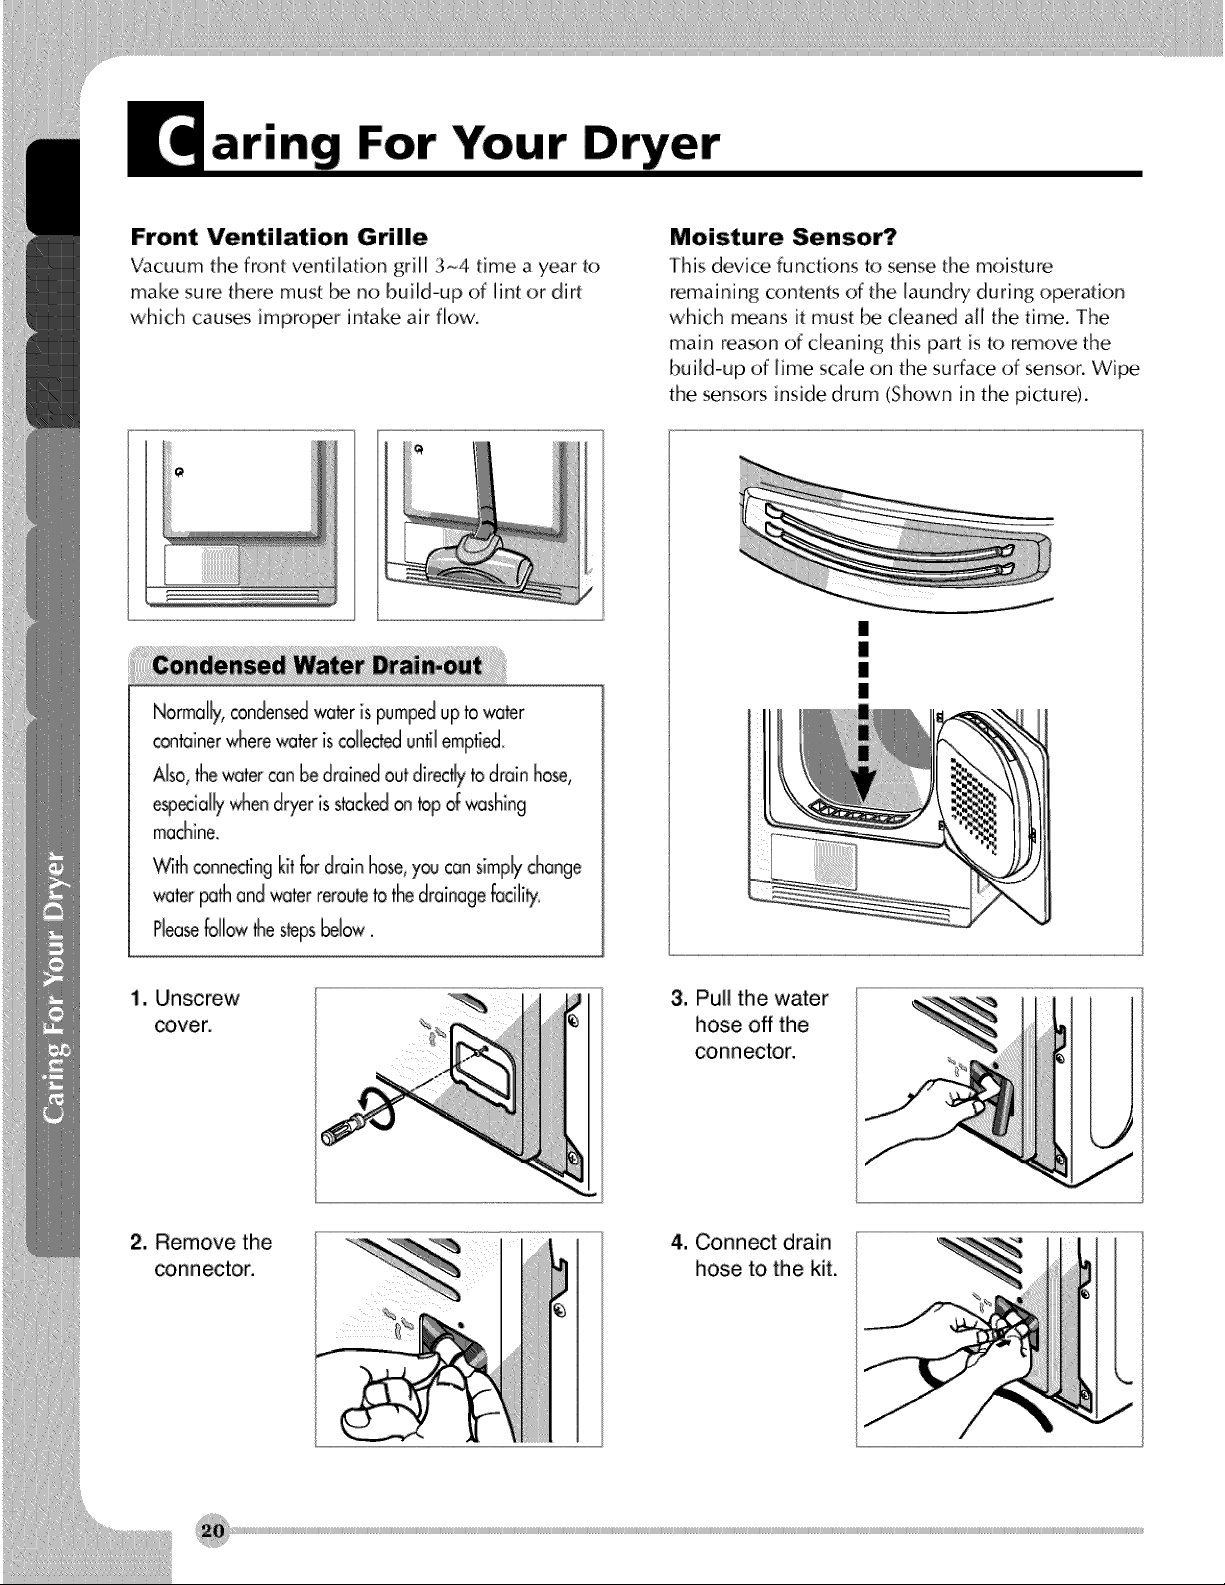
Front Ventilation Grille
Vacuum the front ventilation grill 3~4 time a year to
make sure there must be no build-up of lint or dirt
which causes improper intake air flow.
Norma[_y,conden_ water ispumpedupto water
containerwherewater iscollecteduntil empti_
Also,thewatercan be drainedoutdkect_ to drain hose,
e_ecia[_ whendryer is stacked_ top of washing
machine.
Moisture Sensor?
This device functions to sense the moisture
remai ning contents of the laund ry du ring operation
which means it must be c[ean_ all the time, The
main reasxm of cleaning this part is to remove the
build-up of lime scale on the surface of sensoc Wi_
the sensors inside drum (Shown in the picture).
I
I
I
I
With conning kitfor drain ho_, y_ cansimplychange
water_th andwater reroutetothe drainagefaciJity.
Pleaseb[[ow thestepsbeJow.
1, Unscrew -_
cover. _
2, Remove the
conn ector.
3, Pull the water
hose off the
conn ector.
4, Connect drain
hose to the kit.
!
 Loading...