

LG DLE2516, DLE2516W, DLG2526W Owner's Manual

1-800-243-0000
24 HOURSA DAY,7 DAYSA WEEK FORLG CUSTOMER SERVICE
il ..........t"
ElectricandGasDryer
DLE2516W / DLG2526W
Thank you for buying an LG Dryer.
Pleaseread your manual carefully, as it provides instructions
on safe Installation, use and maintenance.
Record the model and serial numbers,
and retain the manual for future reference.
For more information, visit our website at http:i/us.lge.com
P/No.: 3828EL3004E
OUTSTANDING PERFORMANCE
Not to mention unmatched big capacity, you can benefit from good
time efficiency, quiet operation and energy saving system.
DOUBLE-COATED STEELDRUM
It is coated with one metal coating and the other polymer coating in order to guarantee high
durability and the long life.
ARTISTICDESIGN
Modern front panel look and big crystal-clear glass door make your house look stylish.
DIGITAL FABRICCARE
Multi-level temperature control heater takes a better care on your valued clothes.
EASYOF USE
A whole selection of user-friendly functions always make you comfortable with dryer operation.
Your dryer provides sensor drying and time drying programs.
Sensor Dry
The dryer senses the dampness of the laundry and automatically determines the heat level and operation time. You might
see a sudden increase or decrease in operation time if the sensor determines more or less drying is required. This is not a
malfunction.
Time Dry
Use TIME DRY to select heat level and drying time manually. This can be used if clothes are not as dry as you like them
at the end of the cycle. Use TIME DRY for heaw and bulky items and thick work.
J
PART 1 SPECiFiCATiONS ................................................................................................................................................................................................................. 3
PART 2. iMPORTANT WARRANTY AND SAFETY iNSTRUCTiONS ............................................................................................................................................... 4
PART 3 INITLAL STEPS FOR INSTALLING YOUR DRYER .............................................................................................................................................................. 9
PART 4 ACCESSORIES iNSTALLATiON ........................................................................................................................................................................................ 15
PART 5. ELECTRICAL REQUIREMENTS FOR ELECTRIC DRYERS .............................................................................................................................................. 17
PART 6. ELECTRICAL REQUIREMENTS FOR GAS DRYERS ......................................................................................................................................................... 21
PART 7. GAS REQUEREMENTS AND INSTRUCTIONS .................................................................................................................................................................... 22
PART 8. EXHAUST REQUIREMENTS AND MALNTENANCE ........................................................................................................................................................... 23
PART 9. OPERATING YOUR DRYER ................................................................................................................................................................................................ 25
PART 10. TROUBLESHOOTING GUIDE ............................................................................................................................................................................................ 31
LG DRYER LIMITED WARRANTY ...................................................................................................................................................................................................... 34
2
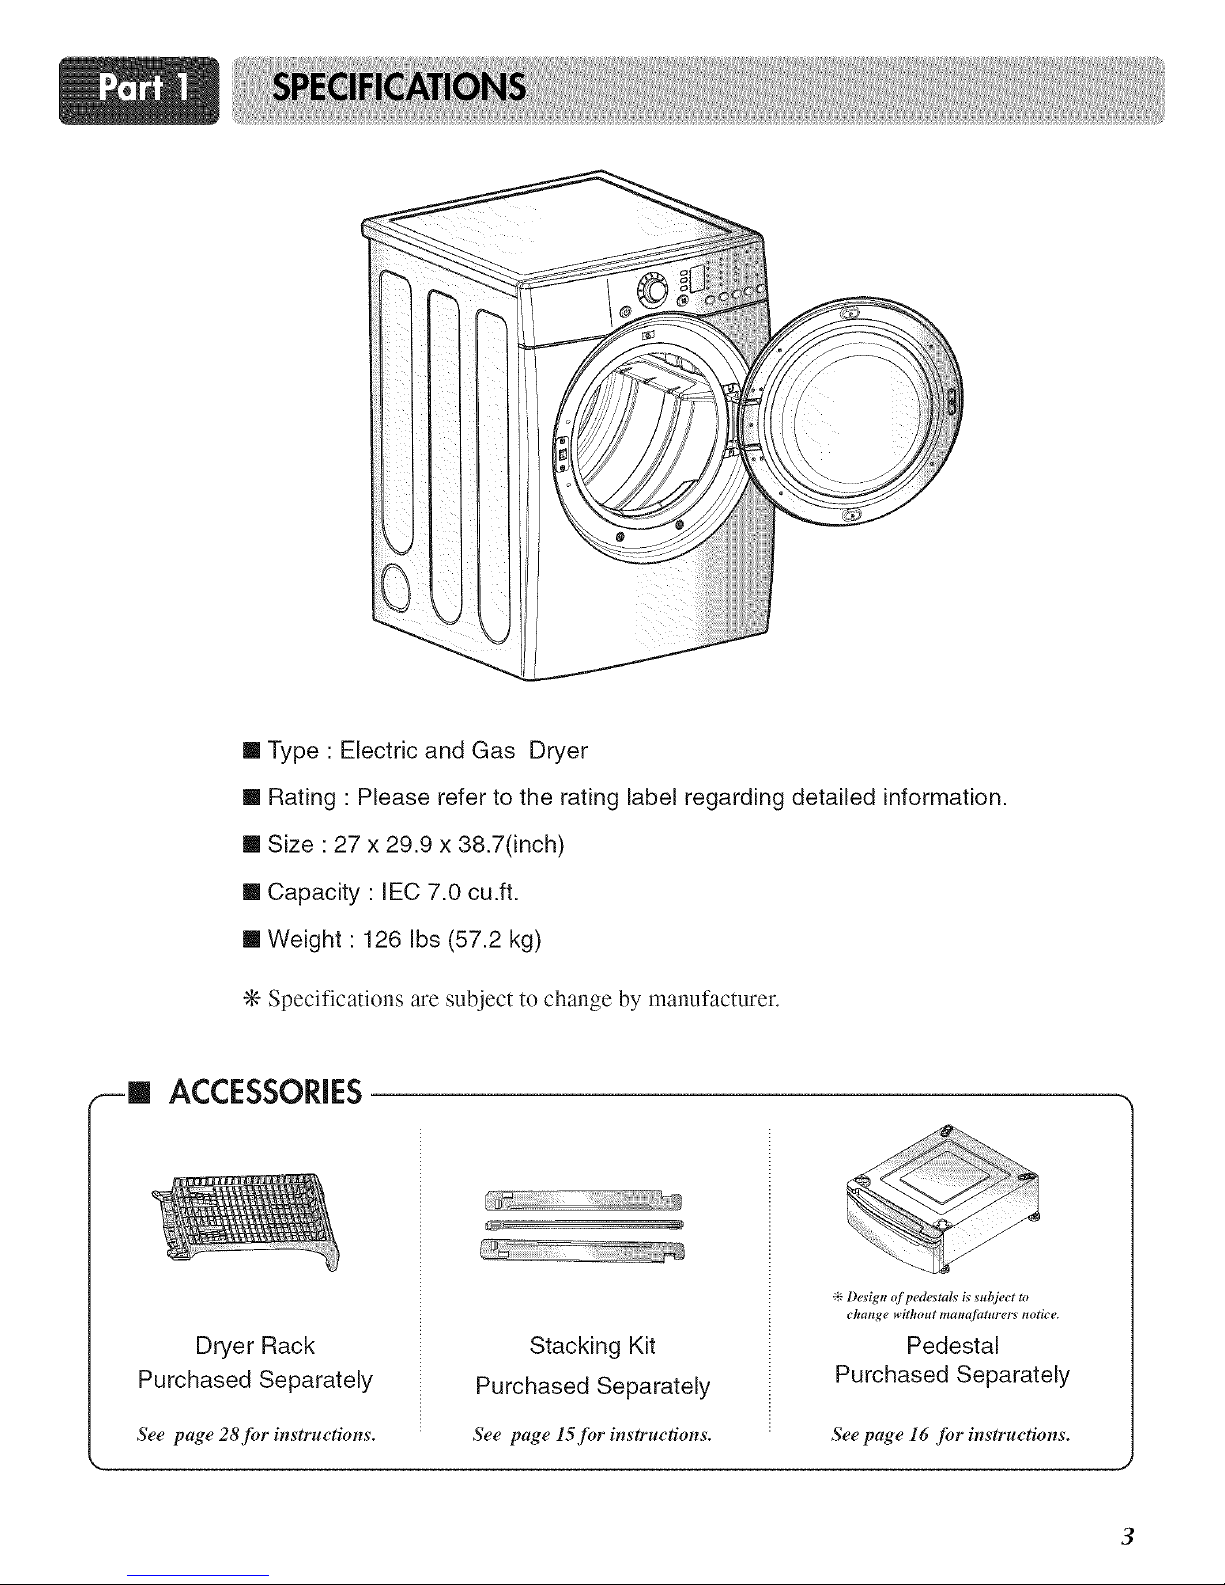
m Type : Electric and Gas Dryer
[] Rating : Please refer to the rating label regarding detailed information.
[] Size : 27 x 29.9 x 38.7(inch)
[] Capacity : IEC 7.0 cu.ft.
[] Weight : 126 Ibs (57,2 kg)
÷ Specifications are subject to change by manufacturer.
ACCESSORIES
Dryer Rack
Purchased Separately
See page 28 Jor instructions.
Stacking Kit
Purchased Separately
See page 15Jor instructions.
:_ Desigu of pede,stals is suhject to
change without ntauaflttttrer_ notice.
Pedestal
Purchased Separately
See page 16 for instructions.
3
SEEKINGWARRANTYSERVICE
The warranty for your dryer is located at the end of this manual. Warranty Service is
available by contacting your nearest LG Service Center. If this product is installed and
operated according to the instructions in this manual, LG will repair or replace any parts
defective in material or workmanship throughout the warranty period, beginning with the
date of purchase.
WARN|NG!
For your safety, the recom mendations in this manual must be followed. To reduce the risk
of fire or explosion, electric shock or to prevent property damage, personal injury, or death
when using your appliance follow basic precautions.
Warranty Restriction: If the dryer is subjected to other than single family use, all warranty
coverage is effective for only 90 days.
You will need the complete model and serial number when requesting warranty service, proof of
purchase date is required.
Use the space below to record the model number and serial number of your new LG dryer.
Model Number.
Serial Number.
Date of Purchase
-_ Staple your receipt here for convenience when contacting service.
READALLINSTRUCTIONSBEFOREUSE
A WARNING Fory0ursafetylthe information inthismanualmust hefollowed tominimizetheriskof fire Or
explosion, electric shock, orto prevent property damage, personal injury, or loss of life.
YourSafety and the safety of others are very important,
We have provided many important safety messages in this manual and on your appliance. Always read and obey
all safety messages.
This is the safety alert symbol.
This symbol alerts you to potential hazards that can kill or hurt you and others.
All safety messages will follow the safety alert symbol and either the word DANGER or WARNING.
These words mean:
A DANGER You can be killed or seriously injured if you don't Immediately follow instructions.
_k. WARNING You can be killed or seriously injured if you don't follow instructions.
All safety messages will tell you what the potential hazard is, tell you how the reduce the chance of injury, and tell you what
can happen if the instructions are not followed.
BASICSAFETYPRECAUTIONS
&. WARNINGToreducether_skOff_re,e=ectr_cshockOr=njurYtopers0"swheuus_ugy0urappHa.Ce,fo.0wbasic
precautions, including the following :
Read all instructions before using the dryer.
• Before use, thedryer must be properly installedas described in
this manual.
• Do not place items exposed to cooking oils in your dryer. Items
contaminated withcooking oils may contribute to a chemical
reaction that could cause a load to catch fire.
Do not dry articlesthat have been previously cleaned in,washed
in, soaked in, or spotted with gasoline, dry-cleaning solvents, other
flammable or explosive substances as they giveoff vaporsthat
could ignite or explode.
• Do not reach into the dryer if the drum is moving.
• Do not repair or replaceany part of the dryer or attempt any
servicing unless specifically recommended in this Use and Care
Guide or in published user-repair instructions that you understand
and have theskills to carry out.
• Do not tamper with controls.
• Before the dryer is removed from service or discarded, remove the
door to the drying compartment.
• Donot allow children to play on or inthe dryer.
Closesupervision of children is necessary when the dryer is used
near children.
• Donot use fabric softeners or products to eliminate static unless
recommended by the manufacturer of the fabric softener or
product.
• Donot use heat to dry articles containing foam rubber or similarly
textured rubber-like materials.
• Keep area around the exhaust opening andadjacent surrounding
areas free from the accumulation of lint, dust, and dirt.
• The interior ofthe dryer and exhaust vent should be cleaned
periodically by qualified service personnel.
• Donot install or store the dryer where it will be exposedto the
weather.
• Donot reach into the dryer while parts are moving.
• Always check the inside of the dryer forforeign objects
• Clean lint screen before or after each load.
SAVETHESEiHSTRUCTIOHS
GROUNDING INSTRUCTIONS
This appliance must be grounded. In the event of malfunction
or breakdown, grounding will reduce the risk of electric shock
by providing a path of least resistance for electric current.
This appliance must be equipped with a cord having an
equipment-grounding conductor and a grounding plug. The
plug must be plugged into an appropriate outlet that is
properly installed and grounded in accordance with all local
codes and ordinances.
WARNING - Improper connection of the equipment- rounding
conductor can result in a risk of electric shock. Check with a
qualified electrician or service person if you are in doubt as to
whether the appliance is properly grounded.
Do not modify the plug provided with the appliance.
If it will not fit the outlet, have a proper outlet installed by a
qualified electrician.
This appliance must be connected to a grounded metal,
permanent wiring system or an equipment-grounding conductor
must be run with the circuit conductors and connected to the
equipment-grounding terminal or lead on the appliance.
READALLINSTRUCTIONSBEFOREUSE
WARNINGForYoursafetyltheinformationinthismanual mustbefollowed tominimizetheriskOffire or
explosion,electricshock,orto preventpropertydamage,personalinjury,orlossoflife,
• Do not store or use gasoline or other flammable vapors and • Installation and service must be performed by a qualified
liquids in the vicinity of this appliance or any other installer, service agency, or the gas supplier.
appliance.
WHATTO DOIF YOUSMELLGAS
!recautions, includingthe following:
1. Do not try to light a match or cigarette, or turn on any gas
or electrical appliance.
2. Do not touch any electrical switches.
Do not use any phone in your building.
3. Clear the room, building, or area of all occupants.
4. Immediately call your gas supplier from a neighboCs
phone. Follow the gas supplier's phone. Follow the gas
supplier's instructions carefully.
5. If you cannot reach your gas supplier, call the fire
department.
CALIFORNIASAFEDRINKINGWATERANDTOXICENFORCEMENTACT
WARNING To reduce the risk of fire, electric shock, or injury to persons when using the appliance, follow basic
precautions, including the following:
This act requires the governor of California to publish a list of substances known to the state to cause cancer, birth defects,
or other reproductive harm and requires businesses to warn customers of potential exposure to such substances.
Gas appliances can cause minor exposure to four of these substances, namely benzene, carbon monxide, formaldehyde,
and soot, caused primarily by the incomplete combustion of natural gas or LP fuels.
Properly adjusted dryers will minimize incomplete combustion. Exposure to these substances can be minimized further by
properly venting the dryer to the outdoors.
6
READALLINSTRUCTIONSBEFOREUSE
WARNING ForYoursafety, the informationin thismanualmust befollowed to minimizethe riskoffire or
explosion,electricshock,orto preventpropertydamage,personalinjury,or lossoflife.
SAFETYINSTRUCTIONFORINSTALLATION
A WARNING To reduce the risk of fire, electric shock, or injury to persons when using the appliance, follow basic
precautions, including the following:
• Properly ground dryer to conform with all governing
codes and ordinances. Follow details in the installation
instructions.
Electrical shock can result if the dryer is not properly
grounded.
• Before use, the dryer must be properly installed as
described in this manual.
Electrical shock can result if the dryer is not properly
grounded.
• Install and store the dryer where it will not be exposed
to temperatures below freezing or exposed to the
weather.
All repairs and servicing must be performed by an
authorized servicer unless specifically recommended in this
Owner's Guide. Use only authorized factory parts. Failure
to follow this warning can cause serious injury,fire,
electrical shock or death.
• Do not install the washer in humid spaces to reduce
the risk of electric shock.
Failure to follow this warning can cause serious injury,fire,
electrical shock or death.
• Connect to a properly rated, protected, and sized
power circuit to avoid electrical overload.
Improper power circuit can melt, creating electrical shock
and/or fire hazard.
• Remove all packing items and dispose of all shipping
materials properly.
Failure to do so can result in death, explosion, fire or burns.
• Place dryer at least 18 in. above the floor for a garage
installation.
Failure to do so can result in death, explosion, fire or burns.
Exhaust/Ducting:
• Gas dryers MUST be exhausted to the outside.
Failure to follow these instructions can result in fire or
death.
The dryer exhaust system must be exhausted to the
outside of the dwelling.
The dryer is not exhausted outdoors, some fine lint and
large amounts of moisture will be expelled into the laundry
area. An accumulation of lint in any area of the home can
create a health and fire hazard.
Use only rigid metal or flexible metal 4in. Diameter
ductwork inside the dryer cabinet or for exhausting to
the outside.
Use of plastic or other combustible ductwork can cause a
fire. Punctured ductwork can cause a fire if it collapses or
becomes otherwise restricted in use or during installation.
Ductwork is not provided with the dryer, and you
should obtain the necessary ductwork locally. The end
cap should have hinged dampers to prevent back draft
when the dryer is not in use.
Failure to follow these instructions can result in fire or
death.
The exhaust duct must be 4 in. (10 cm) in diameter with
no obstructions. The exhaust duct should be kept as
short as possible. Make sure to clean any old ducts
before installing your new dryer.
Failure to follow these instructions can result in fire or
death.
7
READALLINSTRUCTIONSBEFOREUSE
WARNING ForyourSafety,theinformationinthismanualmustbe followed to minimizethe riskOfflreor
explosion,electricshock,orto preventpropertydamage,personalinjury,orlossoflife,
SAFETYINSTRUCTIONFORINSTALLATION(cont.)
• Rigid or semi rigid metal ducting is recommended for
use between the dryer and the wall. In special
installations when it is impossible to make a
connection with the above recommendations, a UL-
listed flexible metal transition duct may be used
between the dryer and wall connection only. The use of
this ducting will affect drying time.
Failure to follow these instructions can result in fire or
death.
• DO NOT use sheet metal screws or other fasteners
which extend into the duct that could catch lint and
reduce the efficiency of the exhaust system. Secure all
joints with duct tape. '[]UFor complete details, follow
the Installation Instructions.
Failure to follow these instructions can result in fire or
death.
SAFETYINSTRUCTIONFORCONNECTINGELECTRICITY
A WARNING To reduce the risk Of firel electric shock Orinjury to pers0ns when using the appliance; follow basic
precautions, including the following:
• Do not, under any circumstances, cut or remove the
ground prong from the power cord.
To prevent personal injury or damage to the dryer, the
electrical power cord must be plugged into a properly
grounded
• For personal safety, this dryer must be properly
grounded.
Failure to do so can result in electrical shock or injury
• Refer to the installation instructions in this manual for
specific electrical requirements for your model.
Failure to follow these instructions can create electrical
shock and/or a fire hazard.
• This dryer must be plugged into a properly grounded
outlet.
Electrical shock can result if the dryer is not properly
grounded.
• Have the wall outlet and circuit checked by a qualified
electrician to make sure the outlet is properly
grounded.
This will prevent shock hazard and assure stability during
operating.
• The dryer should always be plugged into its own
individual electrical outlet which has a voltage rating
that matches the rating plate.
This provides the best performance and also prevents
overloading house wiring circuits which could cause a fire
hazard from overheated wires.
• Never unplug your dryer by pulling on the power cord.
Always grip plug firmly and pull straight out from the
outlet.
The power cord can be cut by any movement of the core,
resulting in electrical shock.
• Repair or replace immediately all power cords that have
become frayed or otherwise damaged. Do not use a
cord that shows cracks or abrasion damage along its
length or at either end.
These power cord can melt, creating electrical shock
and/or fire hazard.
• When installing or moving the dryer, be careful not to
pinch, crush, or damage the power cord.
This will prevent injury and damage to the dryer from fire
and electrical shock.
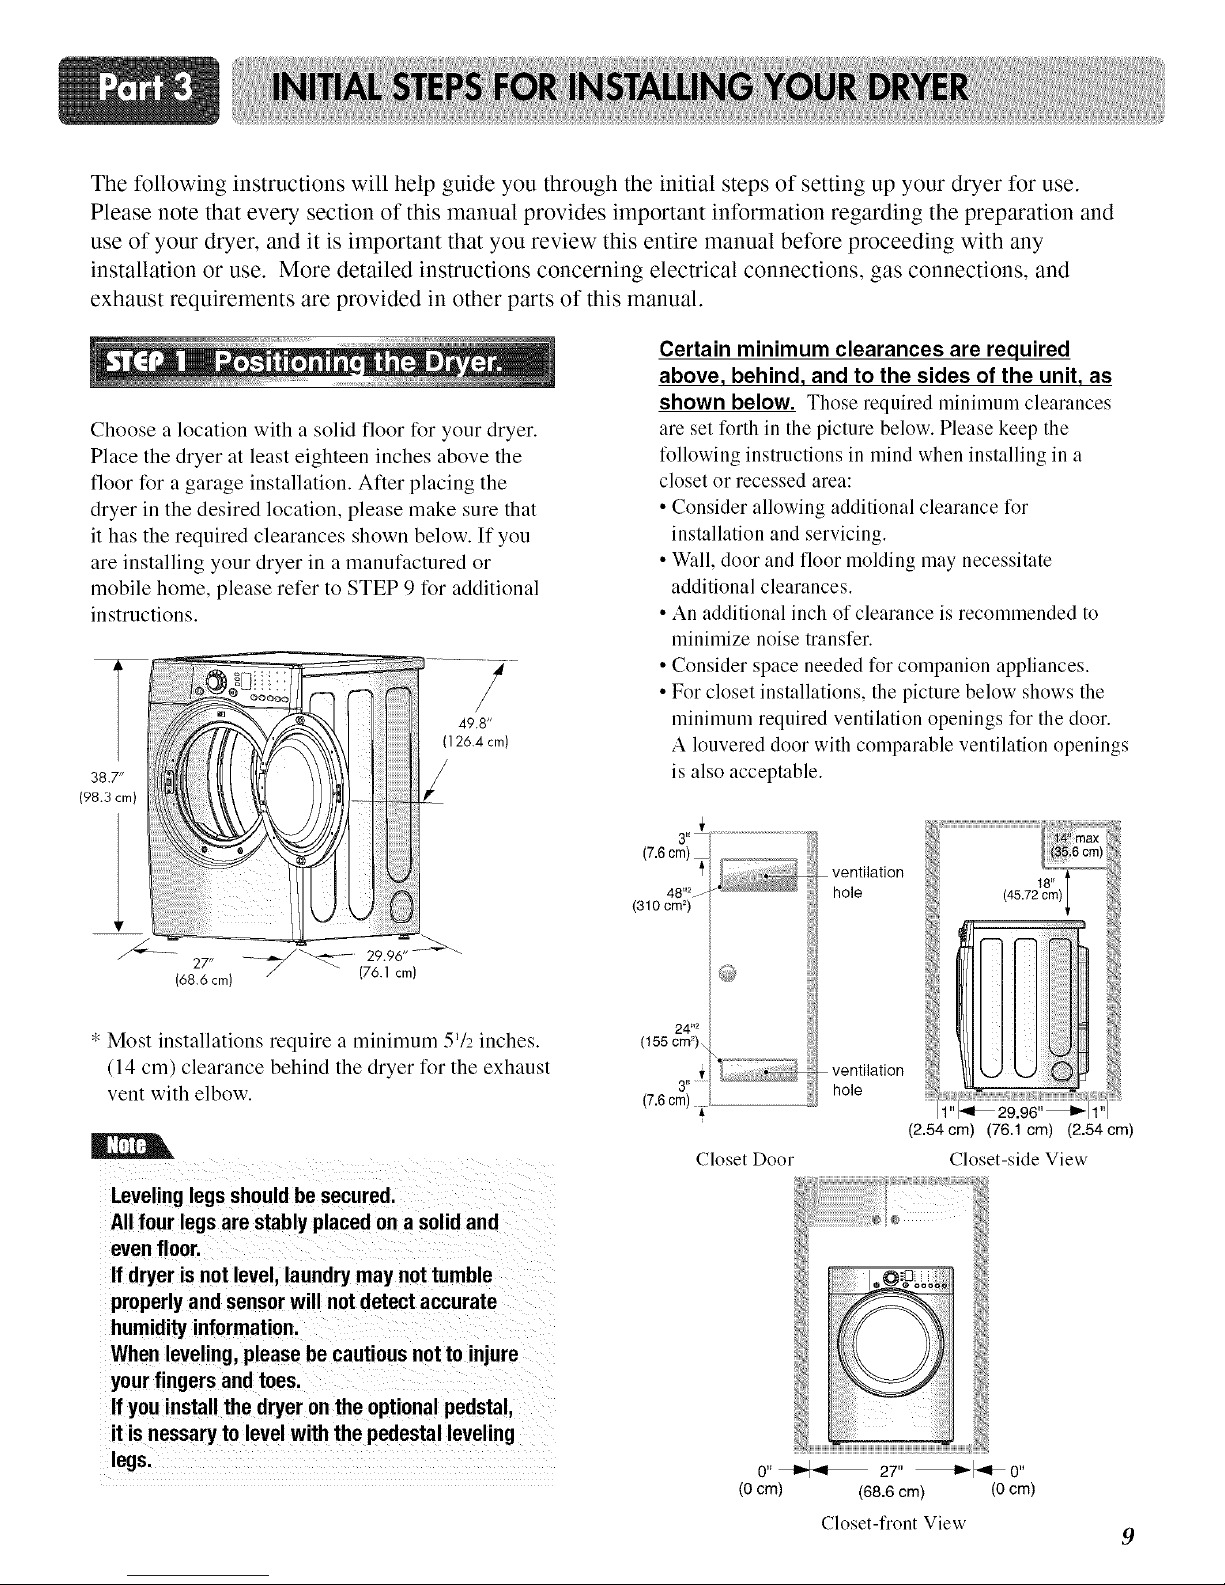
The following instructions will help guide you through the initial steps of setting up your dryer for use.
Please note that every section of this manual provides important information regarding the preparation and
use of your dryer, and it is important that you review this entire manual before proceeding with any
installation or use. More detailed instructions concerning electrical connections, gas connections, and
exhaust requirements are provided in other parts of this manual.
Choose a location with a solid floor for your dryer.
Place the dryer at least eighteen inches above the
floor for a garage installation. After placing the
dryer in the desired location, please make sure that
it has the required clearances shown below. If you
are installing your dryer in a manufactured or
mobile home, please refer to STEP 9 tk_r additional
instructions.
38.7"
(98.3 cm)
/
49.8"
(126.4 cm)
27...... _/_-29"96" ---_
(68.6 cm) (76.1 cm)
* Most installations require a minimum 572 inches.
(14 cm) clearance behind the dryer for the exhaust
vent with elbow.
Leveling legs should be secured.
All four legs are stably placed on a solid and
evenfloor.
If dryer is not level, laundry may not tumble
properly and sensor will not detect accurate
humidity information.
When leveling, please be cautious not to injure
yourfingers and toes.
If you install the dryer on the optional pedstal,
it is nessary to level with the pedestal leveling
legs.
Certain minimum clearances are required
above, behind, and to the sides of the unit, as
shown below. Those required mininmm clearances
are set forth in the picture below. Please keep the
following instructions in mind when installing in a
closet or recessed area:
• Consider allowing additional clearance for
installation and servicing.
• Wall, door and floor molding may necessitate
additional clearances.
• An additional inch of clearance is recommended to
minimize noise transfer.
• Consider space needed for companion appliances.
• For closet installations, the picture below shows the
minimum required ventilation openings t_r the door.
A louvered door with comparable ventilation openings
is also acceptable.
3 B' ..........................................
(7.6cm)
48 t_2.
(310 cm2)
24*'2
(155 cm _)..
(7.6cm)
Closet Door
ventilation
hole
ventilation
i!i_J[iiiiiii
;,_ ax
",_ _ (38.6 cm)
hole
1' 29.96"
(2.54cm) (76.1 cm) (2.54cm)
Closet-side View
0" _ 27" _1_0"
(0 cm) (68.6 cm) (0 cm)
Closet-fl'ont View
9
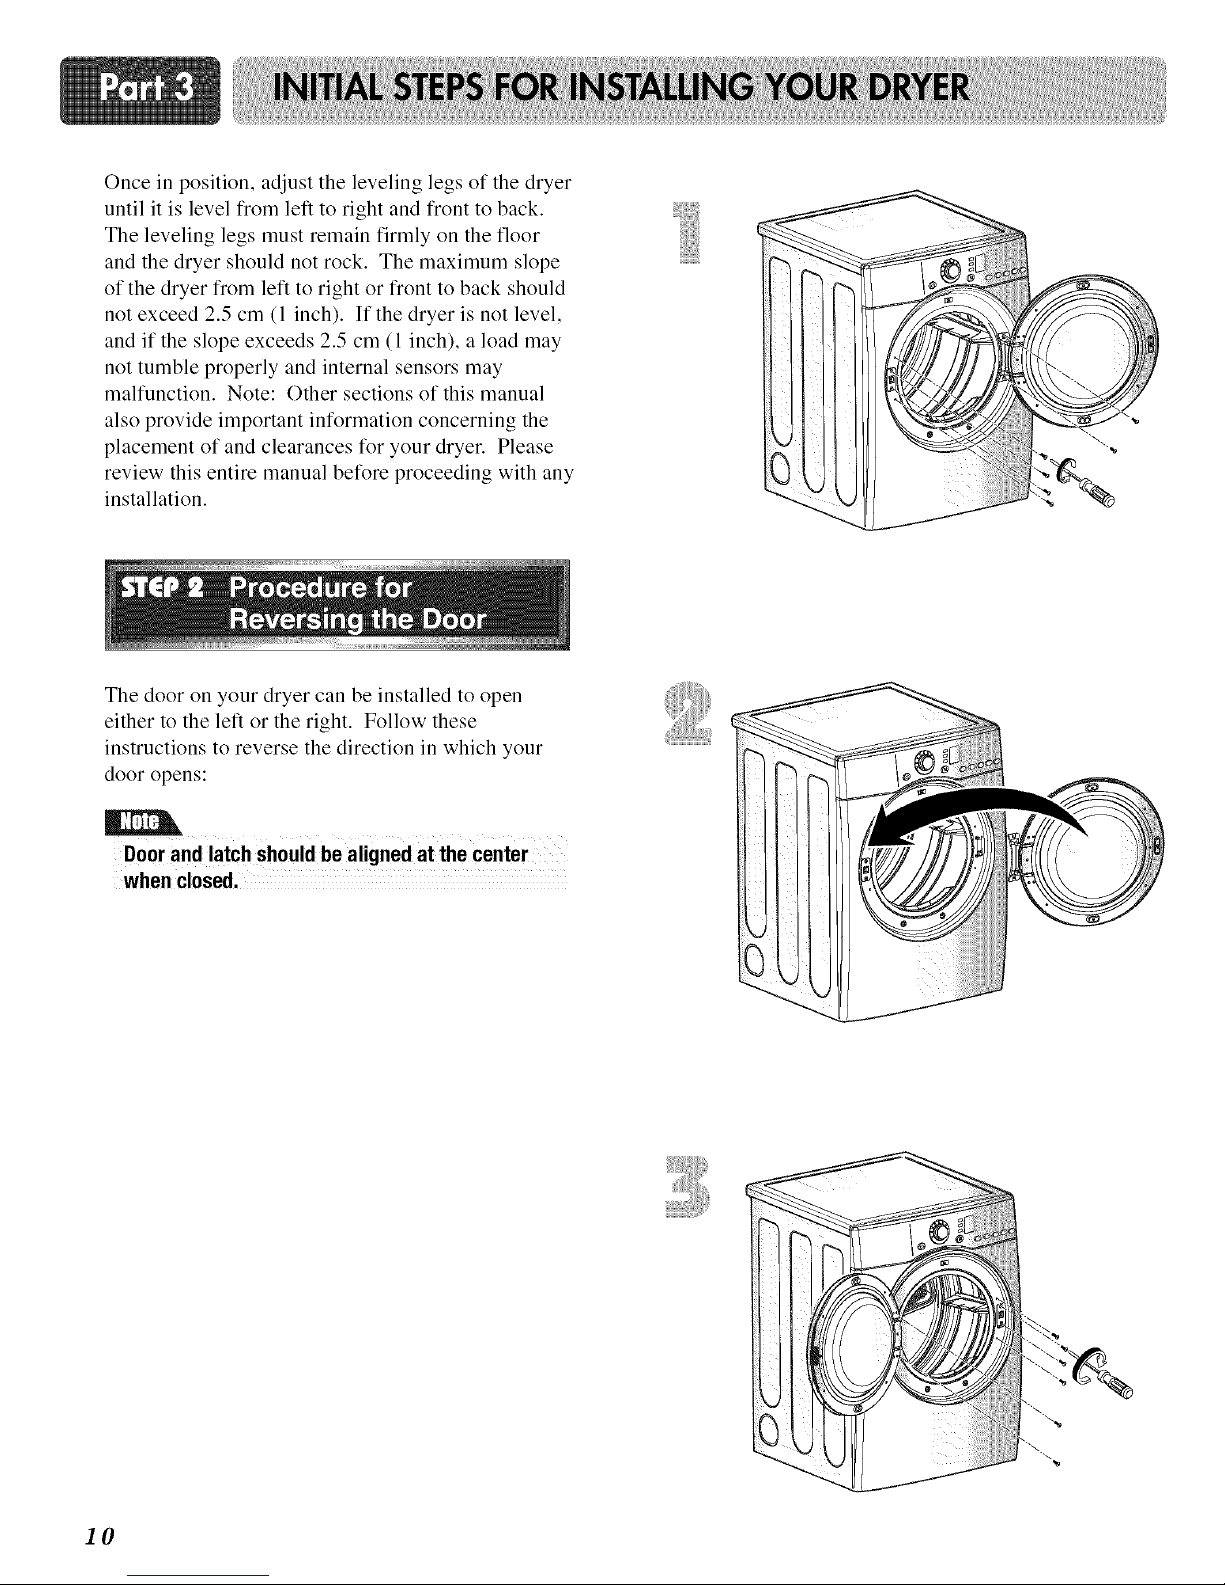
Once in position, adjust the leveling legs of the dryer
until it is level from left to right and front to back.
The leveling legs must remain firmly on the floor
and the dryer should not rock. The maximum slope
of the dryer from left to right or front to back should
not exceed 2.5 cm (1 inch). If the dryer is not level,
and if the slope exceeds 2.5 cm (1 inch), a load may
not tumble properly and internal sensors may
malfunction. Note: Other sections of this manual
also provide important information concerning the
placement of and clearances for your dryer. Please
review this entire manual before proceeding with any
installation.
The door on your dryer can be installed to open
either to the left or the right. Follow these
instructions to reverse the direction in which your
door opens:
Door and latch should be aligned at the center
when closed.
iiiiiiiiiiiiiii .
ii "\ .\_
I0

WARNING!
• Use a heavy metal vent.
• Do not use plastic or thin foil duct.
• Clean old ducts before installing this dryer.
• Failure to follow these instructions can
result in death or fire
Improper taping and incorrect installation will
cause dryer malfunction,
In addition to the following warnings, please refer
to manual section on Exhaust Requirements and
Maintenance. Warning: The dryer must be vented
to the outdoors. Please follow the instructions (and
all others in this manual) very carefully. Failure to
follow these instructions can result in death or fire.
• Do not use plastic or thin foil duct.
• Use 4" (10.2 cm) diameter rigid or semi-rigid
metal duct (NOTE! Venting materials are not
supplied with the dryer, and you should obtain the
venting materials necessary for proper installation)
• Position the dryer such that the exhaust duct run is
as short as possible.
• Clean old duets before installing this dryer
• The male end of each section of exhaust duct must
point away from the dryer.
• Use as few elbow joints as possible.
• Use duct tape on all duct joints.
• Insulate ductwork that runs through unheated
areas in order to reduce condensation and lint
build-up on pipe walls.
• PLEASE BE AWARE THAT FAILURE TO
EXHAUST THE DRYER CORRECTLY WILL
VOID THE DRYER'S WARRANTY.
• ALTERNATE EXHAUST DIRECTIONS
] • Remove screw and exhaust duct.
(Use exhaust kit part #3911 EZ9131X.)
\
2- |. Detach and remove the knockout that
matches the desired venting direction
(Right side not available on Gas Dryers)
f PORTION A
Knockout Q
\
2-2.
Connect a short piece of duct to the
blower housing and attach the duct to
the base.
f
\
3-1. Insert the male end of a 4" elbow into the
female end of a short duct. Tape the joint.
DUCT
TAPE
3-2. Insert this assembly elbow first through the
hole in the dryer and push the female end
of the elbow onto the male end of the
blower output shaft. Tape the joint.
f
II
 Loading...