

LG DF415HSS User Manual
OWNER’S MANUAL
DISHWASHER
Before beginning installation, read these instructions carefully. This will simplify
installation and ensure that the product is installed correctly and safely. Leave
these instructions near the product after installation for future reference.
EN ENGLISH HU MAGYAR SK SLOVENČINA
BG БЪЛГАРСКИ MK МАКЕДОНСКИ SL SLOVENŠČINA
CS ČEŠTINA PL POLSKI SQ SHQIP
HR HRVATSKI RO ROMÂNĂ SR SRPSKI
DF415*** DF215**
MFL70282444
Rev.02_060719
www.lg.com
Copyright © 2019 LG Electronics Inc. All Rights Reserved.

TABLE OF CONTENTS
SAFETY INSTRUCTIONS ..............................................................3
IMPORTANT SAFETY INSTRUCTIONS ..........................................................3
CARING FOR THE ENVIRONMENT ..............................................................10
INSTALLATION .............................................................................11
Specifications .................................................................................................. 11
Accessories (On Some Models)......................................................................12
Preparing Cabinet Opening.............................................................................12
Installing Moisture Barrier Tape (On Some Models) .......................................15
Levelling the Appliance ...................................................................................15
Installing the Drain Hose .................................................................................16
Connecting the Water Supply Hose ................................................................17
Preparing Electrical Wiring ..............................................................................18
Final Check .....................................................................................................18
OPERATION .................................................................................19
Before Using the Appliance .............................................................................19
Using the Appliance ........................................................................................23
Control Panel ..................................................................................................24
Cycles .............................................................................................................26
Cycle Options ..................................................................................................27
Auto Open Dry (On Some Models) .................................................................28
SignaLight™ (On Some Models) ....................................................................28
Programme Guide (model dependent)............................................................29
Available Options ............................................................................................31
Information for Energy Test (EN50242) ...........................................................32
Loading the Dishwasher..................................................................................33
Adding Cleaning Agents .................................................................................. 38
Refilling ...........................................................................................................40
Drying ..............................................................................................................40
Unloading the Dishwasher ..............................................................................40
This manual may contain images or content
different from the model you purchased.
This manual is subject to revision by the
manufacturer.
SMART FUNCTIONS .................................................................... 41
Using LG SmartThinQ Application ..................................................................41
Using Smart Diagnosis....................................................................................43
MAINTENANCE ............................................................................ 45
Cleaning the Exterior.......................................................................................45
Cleaning the Interior ........................................................................................45
Cleaning the Filters .........................................................................................46
Cleaning the Spray Arms ................................................................................47
Cleaning the Water Supply Hose Filter ...........................................................49
TROUBLESHOOTING .................................................................. 50
Diagnosing Problems ......................................................................................50
Error Codes .....................................................................................................55
OPERATING DATA .......................................................................56
SAFETY INSTRUCTIONS
EN
The following safety guidelines are intended to prevent unforeseen risks
or damage from unsafe or incorrect operation of the appliance.
The guidelines are separated into ‘WARNING’ and ‘CAUTION’ as
described below.
This symbol is displayed to indicate matters and operations
that can cause risk. Read the part with this symbol carefully
and follow the instructions in order to avoid risk.
WARNING
This indicates that the failure to follow the instructions can cause
serious injury or death.
CAUTION
This indicates that the failure to follow the instructions can cause the
minor injury or damage to the product.
IMPORTANT SAFETY INSTRUCTIONS
WARNING
To reduce the risk of explosion, fire, death, electric shock,
injury or scalding to persons when using this product, follow
basic precautions, including the following:
Children in the Household
This appliance is not intended for use by persons (including children)
with reduced physical, sensory or mental capabilities, or lack of
experience and knowledge, unless they have been given supervision or
instruction concerning use of the appliance by a person responsible for
their safety. Children should be supervised to ensure that they do not
play with the appliance.
3

Installation
• Never attempt to operate the appliance if it is damaged,
malfunctioning, partially disassembled, or has missing or broken
parts, including a damaged cord or plug.
• If the power cord is damaged or the hole of the socket outlet is loose,
do not use the power cord and contact an authorized service centre.
• Do not modify the power cord provided with the appliance. Please
contact the LG Customer information centre to advise of its
incompatibility.
• This appliance should only be transported by two or more people
holding the appliance securely.
• Do not install the appliance in a damp and dusty place. Do not install
or store the appliance in any outdoor area, or any area that is subject
to weathering conditions such as direct sunlight, wind, or rain or
temperatures below freezing.
• Do not plug multiple socket outlets, an extension power cable or
adapter with this appliance.
• Disconnect the power cord, house fuse or circuit breaker before
installing or servicing the appliance.
EN
• When moving or installing the product in a different location, call
qualified service personnel for installation and service.
• Fix the drain hose securely in place.
• This appliance is not designed for maritime use or for mobile
installations such as in RVs, trailers, or aircraft.
• This appliance must be positioned near to an electrical power supply.
• When installing or moving the appliance, be careful not to pinch,
crush, or damage the power cord.
4

• Use new hose or hose-set supplied with the appliance. Reusing old
hoses can cause a water leak and subsequent property damage.
• Improper connection of the equipment-grounding conductor can
result in risk of electric shock. Check with a qualified electrician or
service personnel if you are in doubt as to whether the appliance is
properly grounded.
• This appliance must be grounded. In the event of malfunction or
breakdown, grounding will reduce the risk of electric shock by
providing a path of least resistance for electric current.
• This appliance is equipped with a power cord having an equipment-
grounding conductor and a grounding power plug. The power plug
must be plugged into an appropriate socket outlet that is installed and
grounded in accordance with all local codes and ordinances.
• After installing, check the hose connection for leaks before moving
the appliance into the cabinet opening.
• Do not damage or place heavy items on the power cord of the
appliance.
• This appliance is intended to be used in household and domestic
applications only and must not be used for commercial purposes.
EN
• For a permanently connected dishwasher: This appliance must
be connected to a grounded metal, permanent wiring system, or
an equipment-grounding conductor must be run with the circuit
conductors and connected to the equipment-grounding terminal or
lead to the appliance.
• Connect the ground wire to the green ground connector in the
terminal box.
5

Operation
• Immediately unplug the power plug and contact an LG Electronics
customer information centre if you detect a strange sound, odour, or
smoke coming from the appliance.
• Do not repair or replace any part of the appliance. All repairs
and servicing must be performed by qualified service personnel
unless specifically recommended in this Owner’s Manual. Use only
authorized factory parts.
• Do not leave the appliance door open. Children may hang on the
door or crawl inside the appliance, causing damage or injury.
• Do not use flammable gas and combustible substances (benzene,
gasoline, thinner, petroleum, alcohol, etc.) near the appliance.
• Do not attempt to separate any panels or disassemble the appliance.
Do not apply any sharp objects to the control panel in order to
operate the appliance.
• Do not bend the power cable excessively or place a heavy object on
it.
• Do not put animals, such as pets into the appliance.
EN
• Do not touch the power plug or the appliance controls with wet hands.
• If there is a gas leakage (isobutane, propane, natural gas, etc.),
do not touch the appliance or power plug and ventilate the area
immediately.
• In case of flood, disconnect the power plug and contact the LG
Electronics Customer Information Centre.
• Under certain conditions, hydrogen gas may be produced in a
hot-water system that has not been used for two weeks or more.
HYDROGEN GAS IS EXPLOSIVE. If the hot-water system has not
been used for such a period, before using the appliance turn on all
hot water tap and let the water flow from each for several minutes.
This will release any accumulated hydrogen gas. As the gas is
flammable, do not smoke or use an open flame during this time.
6

EN
• Keep the area underneath and around your appliances free of
combustible materials such as lint, paper, rags, chemicals, etc.
• Some dishwasher detergents are strongly alkaline. They can be
extremely dangerous if swallowed. Avoid contact with the skin and
eyes and keep children away from the dishwasher when the door is
open. Check that the detergent receptacle is empty after completion
of the wash cycle.
• Do not operate the appliance unless all enclosure panels are properly
in place.
• Use only detergents or wetting agents recommended for use in a
appliance and keep them out of the reach of children.
• Do not wash and dry articles that have been soaked in explosive
substances such as gasoline, solvents, solvent-based detergent.
• When loading items to be washed:
− Locate sharp items so that they are not likely to damage the door
seal.
− Load sharp knives with the handles up to reduce the risk of cut-
type injuries.
• Do not wash plastic items unless they are marked “dishwasher
safe” or the equivalent. For plastic items not so marked, check the
manufacturer’s recommendations.
• Do not touch any heating element (where it is exposed) during or
immediately after use.
• Do not abuse, sit on, or stand on the door or dish rack of the
dishwasher.
• After cleaning the dishes, turn off the tap. Turn on the tap again and
check the connection status of water supply hose before cleaning.
• Do not open the door while the appliance is in operation. Water will
splash out and could cause a slipping hazard.
• Be careful not to catch your hand when closing the door of the
appliance.
• Do not wash and dry articles that have been soaked in explosive
substances such as gasoline, solvents, solvent-based detergent.
7

• Do not come into contact with any fitted steam outlet.
• Small parts, such as rack clips and filter retaining posts can be a
choke hazard to small children if removed from the dishwasher. Keep
out of reach of small children.
• Knives and other utensils with sharp points must be loaded in the
basket with their points down or placed in a horizontal position.
• The door should not be left in the open position since this could
present a tripping hazard.
Maintenance
• Never unplug the appliance by pulling on the power cable. Always
grip the power plug firmly and pull straight out from the socket outlet.
• Securely plug the power plug in the socket outlet after completely
removing any moisture and dust.
• Do not spray water inside or outside the appliance to clean it.
• Disconnect the appliance from the power supply before cleaning the
appliance. Setting the controls to the OFF or stand by position does
not disconnect this appliance from the power supply.
EN
Disposal
• Before discarding an old appliance, unplug it. Cut off the cable
directly behind the appliance to prevent misuse.
• Dispose of all packaging materials (such as plastic bags and
styrofoam) away from children. The packaging materials can cause
suffocation.
• Remove the door before disposing of or discarding this appliance to
avoid the danger of children or small animals getting trapped inside.
8

EN
CAUTION
To reduce the risk of fire, electric shock, or injury to persons when
using your product, basic safety precautions should be followed,
including the following:
Installation
• Install the product on a firm and level floor.
• Do not put the drain hose under the dishwasher during installation.
Operation
• Turn off the water tap and unplug the appliance if the appliance is to
be left for an extended period of time, such as during vacations.
• Do not place objects on the top of the appliance.
• Do not wipe or coat the surface of the product with liquid detergent or
bleach (chlorine bleach, oxygen bleach, etc). Failure to follow these
instructions may result in corrosion or discoloration of the coating.
• Do not touch water draining from the machine as it may be hot.
• If the drain hose and the water supply hose are frozen in winter,
defrost before using.
• Do not put hands, feet, or metal objects below or behind the
appliance.
• Do not wash dishes stained with chemical products such as oil,
cream or lotions used in a massage parlor, skin care shop, beauty
shop or barber shop.
MAINTENANCE
• If cooking oil is spilled on the exterior of the product, wipe it off
immediately. Do not clean the exterior of the product with cleaners
which contain alcohol, thinners, bleach, benzene, flammable liquids,
or abrasives. These substances may discolor or damage the
appliance.
9

CARING FOR THE ENVIRONMENT
Disposal of Your Old Appliance
• This crossed-out wheeled bin symbol indicates that waste electrical and
electronic products (WEEE) should be disposed of separately from the municipal
waste stream.
• Old electrical products can contain hazardous substances so correct disposal
of your old appliance will help prevent potential negative consequences for the
environment and human health. Your old appliance may contain reusable parts
that could be used to repair other products, and other valuable materials that can
be recycled to conserve limited resources.
• You can take your appliance either to the shop where you purchased the
product, or contact your local government waste office for details of your nearest
authorised WEEE collection point. For the most up to date information for your
country, please see www.lg.com/global/recycling.
EN
10
INSTALLATION
4
7
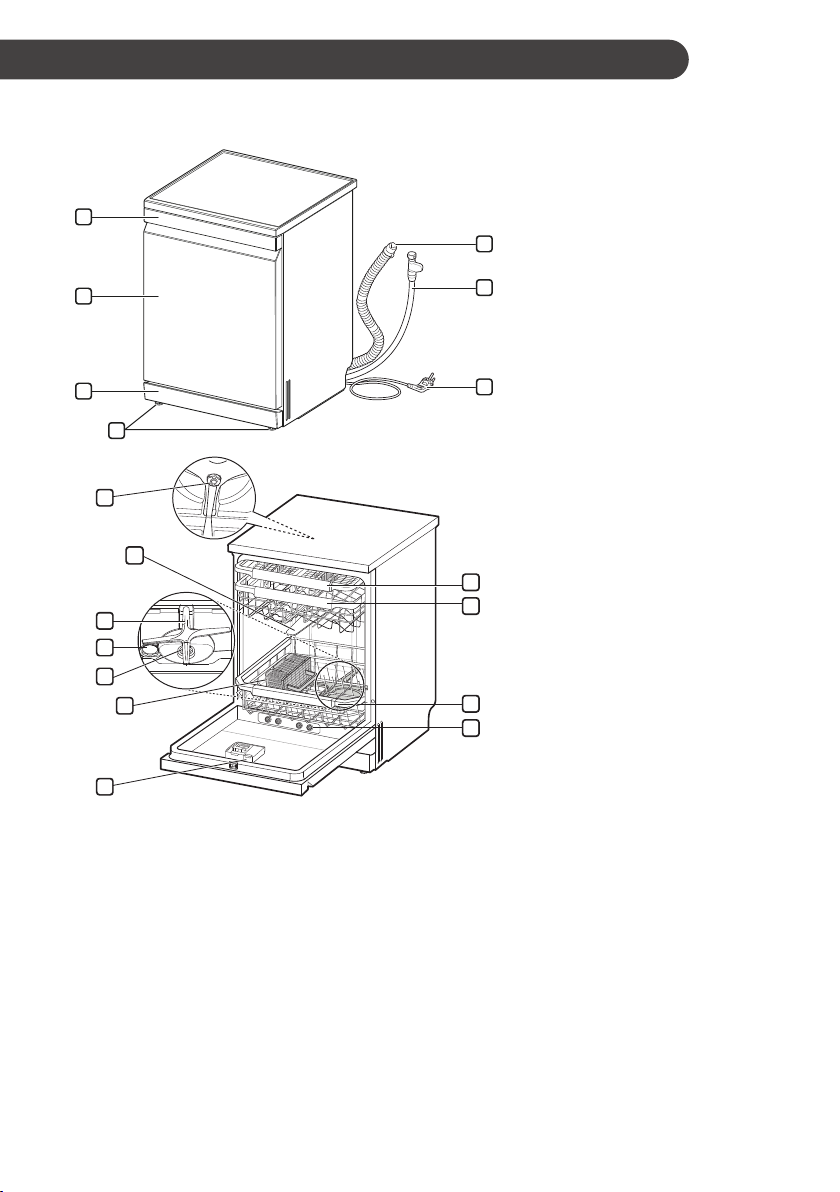
Specifications
1
2
3
1
2
3
4
5
6
EN
Control Panel & Door Handle
a
Front Cover
b
5
Lower Cover
c
6
7
8
9
10
11
Leveling Feet
d
Drain Hose
e
Water Supply Hose
f
Power Cord
g
Top Wash Impeller
a
Upper Spray Arm
b
Lower Spray Arm
c
Salt Container Cap
d
Filtration System
e
Cutlery Basket
f
(On Some Models)
Detergent and Rinse Aid
g
Dispenser
Cutlery Rack
h
(On Some Models)
Upper Rack
i
Lower Rack
j
Steam Nozzle (Steam Models)
k
• Power supply: 220-240 V~, 50 Hz
• Dimension (Width X Depth X Height): 600 mm X 600 mm X 850 mm
• Product weight: DF215** - 49 kg, DF415*** - 52 kg
• Max. capacity: DF215** / DF415*** - 14 place settings
• Water feed pressure: 0.05 – 0.6 MPa
• Power consumption: 1600 – 1800 W
• Appearance and specification is may vary without notice to improve the quality of the appliance.
11
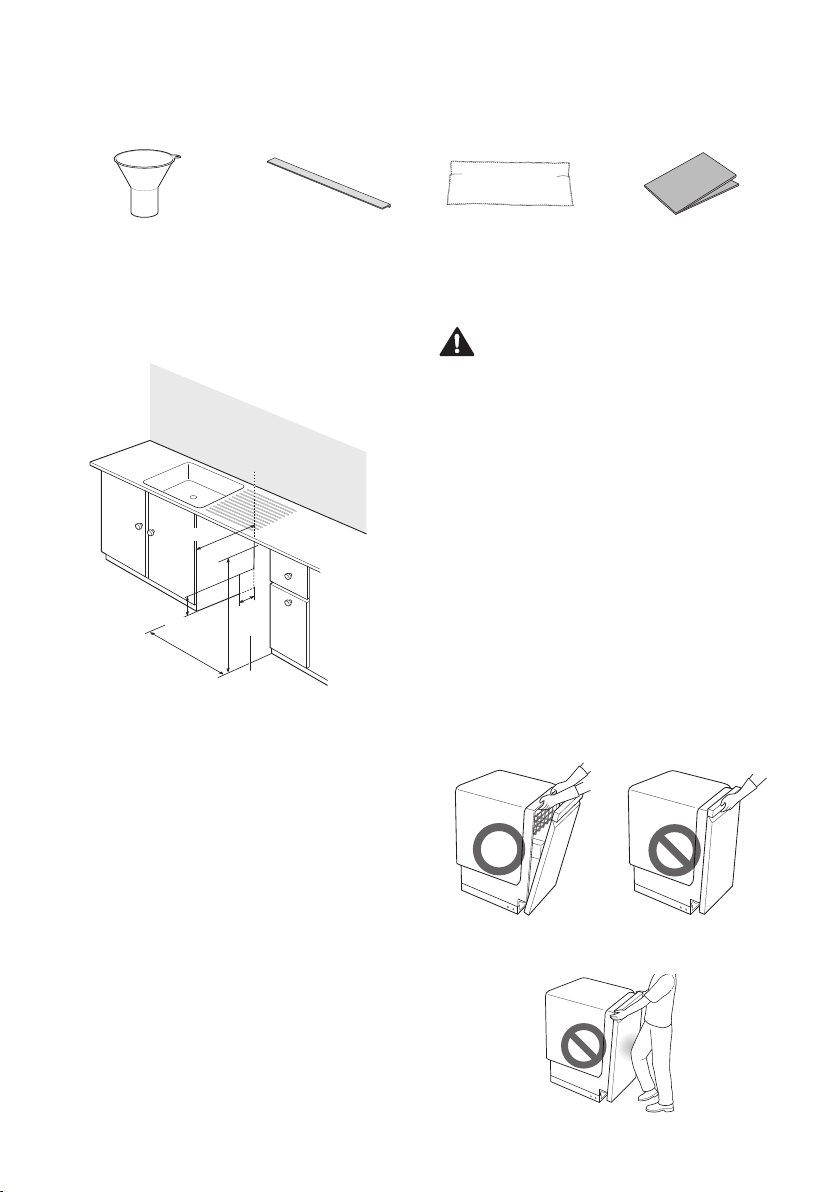
Accessories (On Some Models)
stable area
EN
Funnel
(All models)
Noise Strip
(Lower - 1EA / Front -
1EA / Side - 2EA)
Preparing Cabinet Opening
Min. 600 mm
100 mm
820 - 870 mm
600 - 605 mm
• Cut out for hoses and electrical cables on
either side. (Approximately 100 mm X 75 mm)
• Select a location as close to the sink as
possible for ease of connection to the water
and drain pipes.
• To ensure drainage, the appliance should not
be installed more than 1 metr away from the
sink.
• If the appliance is installed in a corner, allow
minimum clearance of at least 50 mm between
the appliance and an adjacent cabinet or wall.
• Before sliding the appliance into the installation
opening, all necessary height adjustments
should be made using a spanner.
75 mm
Flat and
Cover Felt
Moisture Barrier Tape
(Aluminum Tape)
CAUTION
• Any bare wood surrounding the appliance
should be sealed with a waterproof paint or
sealant to prevent it from swelling.
• Slide the dishwasher into the cabinet, opening
carefully. Make sure that the drain hose behind
the machine and inside the cabinet is not
kinked or stretched.
• Install the appliance on a flat and stable area.
Do not place any objects in-between the floor
and base or leg off the appliance.
NOTE
• This installation must be conducted by qualified
service personnel to ensure it has been
installed correctly.
• Do not pull or lift the appliance using the
handle; dosing so can damage the door and
hinges. Open the door and grab the body frame
and the top front opening of the tub to move or
lift the appliance.
• Do not push the door of the dishwasher with
knees.
12
Attaching the Strip to the
Appliance Base
To reduce noise attach the strip to the appliance
base.
Lay down the appliance and pull on both the
1
hooks at the bottom of the lower cover.
Pull on the lower cover to remove it.
2
Remove the double-sided tape from the lower
4
and front strips.
Attach the black coloured lower strip to the
5
bottom of the lower cover.
Black lower strip
Attach the white coloured front strip to the top
6
of the lower cover.
• The length of the front strip is longer than
the lower cover. Attach the front strip so that
the overhang is equal on both sides of the
lower cover.
EN
Remove the double-sided tape on the back
3
of the felt and attach it to the front side of the
appliance’s bottom.
White front strip
Attach the lower cover with the strip onto the
7
appliance.
Black
White
13

EN
Attaching the Strip to the
Appliance side cabinet
To reduce noise attach the strip to the appliance
sides, if the opening space allows.
Remove the double-side tape from the side
1
strips.
Attach the side strip to the front of the side
2
cabinet and then push down the side strip so
that the side strip adheres well to the cabinet.
View A-A’
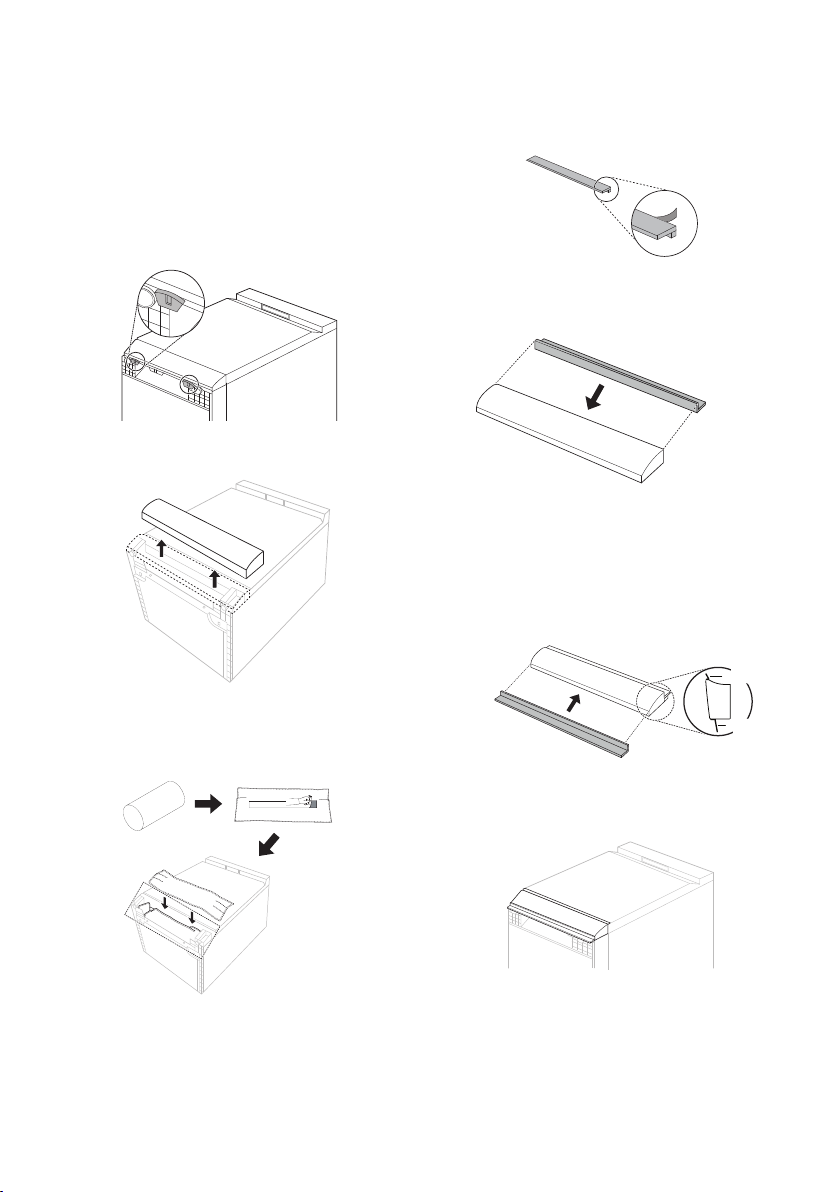
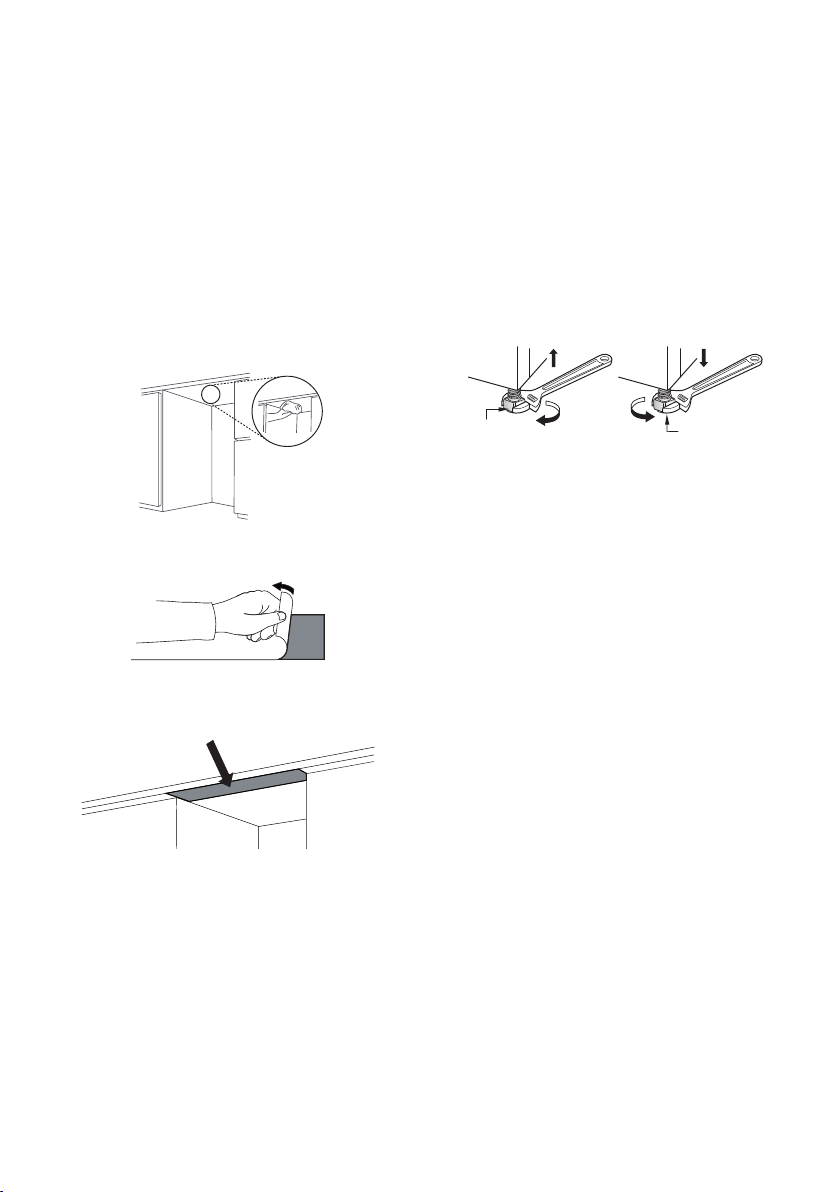
Removing the Top Cover
If the height of the opening is below 850 mm,
follow these instructions.
Remove the 2 screws on the back.
1
Pull the top cover backwards after removing
2
the two screws and then lift it up to remove it.
Remove the locating pins on the top by using
3
a Phillips screw driver.
Repeat the above steps for attaching the
3
opposite side strip to the opposite side
cabinet.
14
NOTE
• When the appliance is correctly leveled, there
should be no slant, stickiness or rubbing sound
when the door is opened.
EN
Installing Moisture Barrier
Tape (On Some Models)
When the appliance is installed without the top
cover, the counter top underside may be damaged
by steam or condensation when the door is
opened.
Install the moisture barrier tape to the underside
of counter top to protect the counter top from
condensation when the appliance opened.
Clean and dry the underside of the counter top
1
on which the tape will be attached.
Remove the protective film from the tape.
2
Install the tape to the underside of the counter
3
top.
Levelling the Appliance
Levelling the appliance prevents unnecessary
leakage and poor washing. Place the appliance on
a solid, level floor. Do not install the appliance on
an elevated surface.
If the appliance is not properly level, adjust all
levelling feet as necessary.
Turn them clockwise to raise and counterclockwise to lower until the appliance no longer
wobbles, both front-to-back and side-to-side and
corner-to-corner.
Levelling feet
NOTE
• The appliance is not level if there is a rubbing
sound or stickiness when the door is opened.
Levelling feet
NOTE
• Moisture barrier tape is included in the manual
assembly bag.
• If the counter top is made of grinite or
waterproof materials, the moisture barrier tape
is not required.
• Condensation may occur on the underside or
along the front edge of the counter top when
the room temperature is low.
15
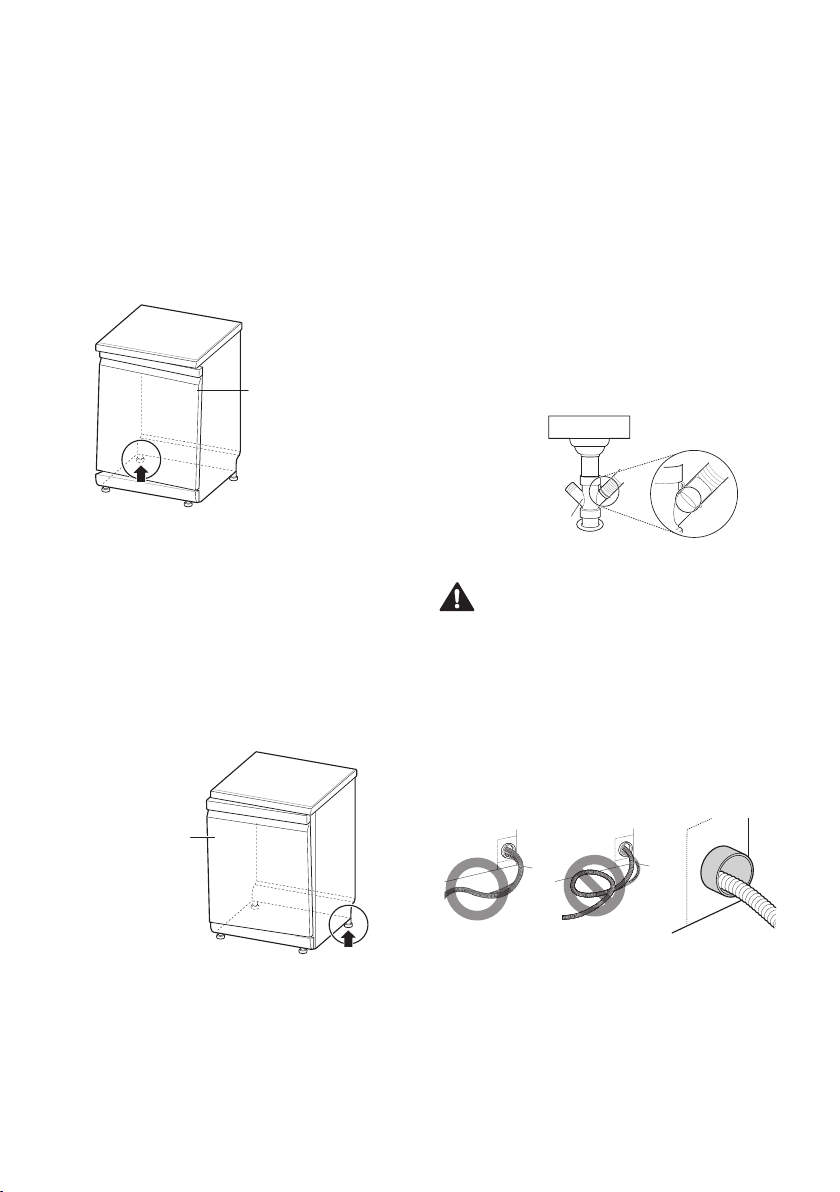
EN
Case 1. The Door is Slanted to
the Right
Unscrew (counter-clockwise) the rear left leg
1
and correct the level.
Check the opening of door and repeat if
2
necessary until the door opens and closes
properly.
Slant to the right
Case 2. The Door is Slanted to
the Left
Unscrew (counter-clockwise) the rear right leg
1
and correct the level.
Check the opening of door and repeat if
2
necessary until the door opens and closes
properly.
Slant to the left
Installing the Drain Hose
If the end of the drain hose does not fit to the drain
line, use a drain extension kit (optional) that is
resistant to heat and detergent.
This should be available from a plumbing shop or
a hardware store.
Connection to the Waste Spigot
Check the waste spigot when initially installing. An
OE error can occur when the waste spigot below
the sink is not drilled out properly. To connect the
drain hose, drill out at least a 15 mm diameter
hole in the waste spigot before connecting and
securing.
Waste spigot
CAUTION
• Make sure that plastic debris is not remaining
inside of spigot after it has been drilled out.
• Do not attempt to open the waste hole with a
screwdriver and hammer. this will induce debris
to become stuck and cause a malfunction.
• Caution should be taken when passing hoses
through Cabinetry holes as they may have
sharp edges and could damage the hoses.
Smooth or sand edges to avoid damaging the
drain or inlet hose.
16
• Make sure that the line is not kinked or sharply
bent.
• Make sure the drain hose is straight before
feeding the end of it through the hole for the
water supply.
EN
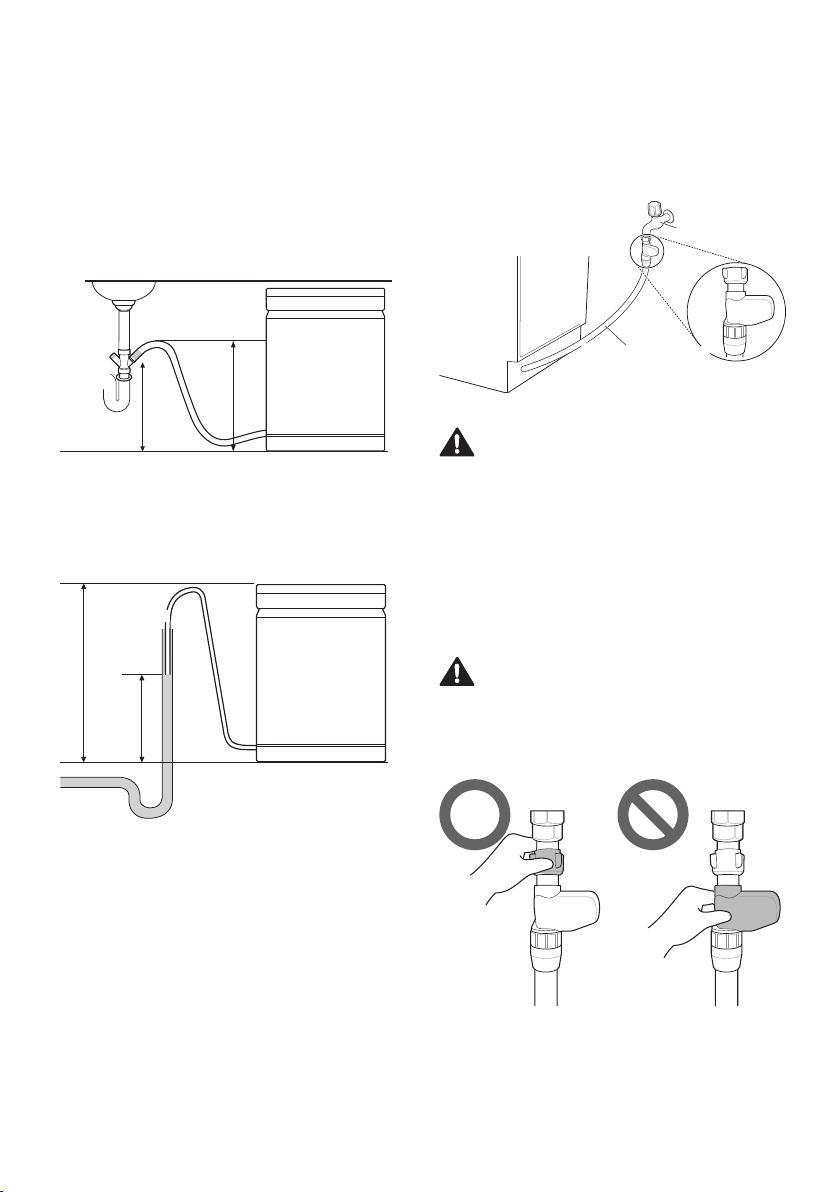
300 mm Min.
770 mm – 1000 mm
To prevent siphoning, one of the following methods
must be used.
Method 1
When the drain hose is connected to a waste
spigot, the hose must be looped up to the
underside of the bench top and secured.
Bench top
Method 2
When the drain hose is connected to a separate
standpipe, it is essential that an airtight connection
be made. If not, it can induce odors.
Air Tight
Connection
700 mm Min.
1000 mm Max.
300 mm Min.
Standpipe 40 mm
diametre Min.
Connecting the Water
Supply Hose
Connect the water supply hose to the water tap.
Water tap
Water supply hose
WARNING
• Do not shorten or damage the water supply
hose as it contains electrical wires and
components. It can not be detached or
removed from the appliance for installation
purposes.
• It is important that the water supply hose not
be tampered with, cut, disassembled, pulled, or
kinked. It contains electrical wiring inside and if
damaged, can cause an electrical hazard.
CAUTION
• Only use the threaded nut of the water supply
hose to tighten it to the tap.
• Do not twist or kink the water supply hose when
connecting it to the tap.
17
 Loading...