

Page 1
OWNER’S MANUAL
AIR CONDITIONER
Read this owner's manual thoroughly before operating the
appliance and keep it handy for reference at all times.
TYPE: WALL MOUNTED
EN ENGLISH
UK УКРАЇНСЬКA
MFL69780819
Rev.01_012021
RU РУССКИЙ
BE БЕЛАРУСКАЯ
KK ҚАЗАҚША
UZ OʻZBEKCHA
www.lg.com
Copyright © 2021 LG Electronics Inc. All Rights Reserved
Page 2
TABLE OF CONTENTS
SAFETY INSTRUCTIONS ................................................... 3
IMPORTANT SAFETY INSTRUCTIONS ................................................4
OPERATION ....................................................................... 12
Notes for Operation ..............................................................................12
Parts and Functions .............................................................................. 12
Wireless Remote Control ...................................................................... 13
Restarting the Air Conditioner Automatically ........................................18
Using the Mode Function ...................................................................... 18
Using the Jet Mode Function ................................................................ 20
Using the Fan Speed Function ............................................................. 21
Using the Air Flow Direction Function ...................................................21
Setting the On/Off Timer ....................................................................... 22
Using the Sleep Function (Optional) ..................................................... 23
Using the Simple Timer Function (Optional) .........................................23
Using the Energy Display Function (Optional) ...................................... 24
Using the Light Off Function (Optional) ................................................24
Using the Comfort Air Function (Optional) ............................................24
Using the Energy Control Function (Optional) ...................................... 25
Using UVnano Function (Optional) ....................................................... 25
Using Special Functions ....................................................................... 26
This manual may contain images or
content different from the model you
purchased.
This manual is subject to revision by the
manufacturer.
SMART FUNCTIONS ......................................................... 28
LG ThinQ Application ............................................................................ 28
Smart Diagnosis ...................................................................................30
MAINTENANCE .................................................................. 31
Clean the Air Filter ................................................................................33
TROUBLESHOOTING ....................................................... 34
Page 3

SAFETY INSTRUCTIONS
The following safety guidelines are intended to prevent
unforeseen risks or damage from unsafe or incorrect
operation of the appliance.
The guidelines are separated into ‘WARNING’ and ‘CAUTION’
as described below.
This symbol is displayed to indicate matters and
operations that can cause risk. Read the part with this
symbol carefully and follow the instructions in order to
avoid risk.
WARNING
This indicates that the failure to follow the instructions can
cause serious injury or death.
CAUTION
This indicates that the failure to follow the instructions can
cause the minor injury or damage to the product.
The following symbols are displayed on indoor and outdoor
units.
EN
This symbol indicates that this appliance uses a
flammable refrigerant. If the refrigerant is leaked and
exposure to an external ignition source, there is a risk
of fire.
This symbol indicates that the Operation Manual should
be read carefully.
This symbol indicates that a service personnel should
be handling this equipment with reference to the
Installation Manual.
This symbol indicates that information is available such
as the Operating Manual or Installation Manual.
3
Page 4
IMPORTANT SAFETY INSTRUCTIONS
WARNING
To reduce the risk of explosion, fire, death, electric shock,
injury or scalding to persons when using this product,
follow basic precautions, including the following:
Children in the Household
This appliance is not intended for use by persons (including
children) with reduced physical, sensory or mental capabilities, or
lack of experience and knowledge, unless they have been given
supervision or instruction concerning use of the appliance by a
person responsible for their safety. Children should be supervised
to ensure that they do not play with the appliance.
Installation
•Do not install the air conditioner on an unstable surface or in a
place where there is danger of it falling.
•Contact an authorized service center when installing or relocating
the air conditioner.
•Install the panel and the cover of the control box safely.
•Do not install the air conditioner in a place where flammable
liquids or gases such as gasoline, propane, paint thinner, etc., are
stored.
•Make sure that the pipe and the power cable connecting the
indoor and outdoor units are not pulled too tight when installing
the air conditioner.
•Use standard circuit breaker and fuse that conform to the rating of
the air conditioner.
•Do not input air or gas into the system except with the specific
refrigerant.
•Use non-flammable gas (nitrogen) to check for leak and to purge
air; using compressed air or flammable gas may cause fire or
explosion.
EN
4
Page 5
•The indoor/outdoor wiring connections must be secured tightly,
and the cable should be routed properly so that there is no force
pulling the cable from the connection terminals. Improper or loose
connections can cause heat generation or fire.
•Install dedicated electric outlet and circuit breaker before using the
air conditioner.
•Do not connect the ground wire to a gas pipe, a lightning rod, or a
telephone ground wire.
•Keep any required ventilation openings clear of obstruction.
•Means for disconnection must be incorporated in the fixed wiring
in accordance with the wiring rules.
•Do not install the unit in potentially explosive atmospheres.
Operation
•Be sure to use only those parts listed in the service parts list.
Never attempt to modify the equipment.
•Make sure that children do not climb on or hit the outdoor unit.
•Dispose of the batteries in a place where there is no danger of
fire.
•Use only the refrigerant specified on the air conditioner label.
•Cut off the power supply if there is any noise, smell, or smoke
coming from the air conditioner.
•Do not leave flammable substances such as gasoline, benzene, or
thinner near the air conditioner.
•Contact an authorized service center when the air conditioner is
submerged by flood waters.
•Do not use the air conditioner for an extended period of time in a
small place without proper ventilation.
•In the event of a gas leak (such as Freon, propane gas, LP gas,
etc.) ventilate sufficiently before using the air conditioner again.
EN
5
Page 6
•To clean the interior, contact an authorized service center or
dealer. Using harsh detergents may cause corrosion or damage to
the unit.
•Be sure to ventilate sufficiently when the air conditioner and a
heating appliance such as a heater are used simultaneously.
•Do not block the inlet or outlet of air flow.
•Do not insert hands or other objects through the air inlet or outlet
while the air conditioner is operating.
•Make sure that the power cable is neither dirty, loose, nor broken.
•Never touch, operate, or repair the air conditioner with wet hands.
•Do not place any objects on the power cable.
•Do not place a heater or other heating appliances near the power
cable.
•Do not modify or extend the power cable. Scratches or peeling
insulation on the power cables may result in fire or electric shock,
and should be replaced.
•Cut off the power supply immediately in the event of a blackout or
a thunderstorm.
•Take care to ensure that power cable could not be pulled out or
damaged during operation.
•Do not touch refrigerant pipe, water pipe and any internal parts
while the unit is operating or immediately after operation.
EN
Maintenance
•Do not clean the appliance by spraying water directly onto the
product.
•Before cleaning or performing maintenance, disconnect the power
supply and wait until the fan stops.
Technical Safety
•Installation or repairs made by unauthorized persons can pose
hazards to you and others.
6
Page 7
EN
•Any person who is involved with working on or breaking into a
refrigerant circuit should hold a current valid certificate from an
industry-accredited assessment authority, which authorizes their
competence to handle refrigerants safely in accordance with an
industry recognized assessment specification.
•Servicing shall only be performed as recommended by the
equipment manufacturer. Maintenance and repair requiring the
assistance of other skilled personnel shall be carried out under the
supervision of the person competent in the use of flammable
refrigerants.
•The information contained in the manual is intended for use by a
qualified service technician who is familiar with the safety
procedures and equipped with the proper tools and test
instruments.
•Failure to read and follow all instructions in this manual can result
in equipment malfunction, property damage, personal injury and/or
death.
•The appliance shall be installed in accordance with national wiring
regulations.
•When the power cord is to be replaced, the replacement work
shall be performed by authorized personnel using only genuine
replacement parts.
•This appliance must be properly grounded to minimize risk of
electric shock.
•Do not cut or remove the grounding prong from the power plug.
•Attaching the earth wire to the power outlet cover screw does not
ground the appliance unless the cover screw is metal, uninsulated,
and the power outlet is grounded through house wiring.
•If you have any doubt whether the air conditioner is properly
grounded, have the power outlet and circuit checked by a qualified
electrician.
7
Page 8

•The refrigerant and insulation blowing gas used in the appliance
require special disposal procedures. Consult a service agent or a
similarly qualified person before disposing of them.
•If the supply cord is damaged, it must be replaced by the
manufacturer, its service agent or similarly qualified person in
order to avoid a hazard.
•The appliance shall be stored in a well-ventilated area where the
room size corresponds to the room area as specified for
operation.
•The appliance shall be stored in a room without continuously
operating open flames (for example an operating gas appliance)
and ignition sources (for example an operating electric heater).
•The appliance shall be stored so as to prevent mechanical
damage from occurring.
•Unintended use of the appliance or damage to the housing may
result in the escape of dangerous UV-C radiation. UV-C radiation
may, even in little doses, cause harm to the eyes and skin.
•This appliance contains a UV-C lamp.
•When the appliances are damaged or need to replaced,
disconnect the power supply and contact the service center.
•Do not operate UV-C lamp outside of the appliance.
•Do not clean and touch air deflector during operation.
•Before opening doors and access panels bearing the ultraviolet
radiation hazard symbol for the conducting user maintenance, it is
recommended to disconnect the power.
•Read the maintenance instructions before opening the appliance.
•Appliances that are obviously damaged must not be operated.
•The appliance must be disconnected from the supply before
replacing the UV-C lamp.
EN
8
Page 9
CAUTION
To reduce the risk of minor injury to persons, malfunction,
or damage to the product or property when using this
product, follow basic precautions, including the following:
Installation
•Do not install the air conditioner in an area where it is directly
exposed to sea wind (salt spray).
•Install the drain hose properly for the smooth drainage of water
condensation.
•Exercise caution when unpacking or installing the air conditioner.
•Do not touch the leaking refrigerant during installation or repair.
•Transport the air conditioner with two or more people or use a
forklift.
•Install the outdoor unit such that it is protected from direct
sunlight. Do not place the indoor unit in a place where it is directly
exposed to sunlight via the windows.
•Safely dispose of packing materials such as screws, nails, plastic
bag or batteries using proper packaging after installation or repair.
•Install the air conditioner in a place where the noise from the
outdoor unit or the exhaust fumes will not inconvenience the
neighbors. Failure to do so may result in conflict with the
neighbors.
EN
Operation
•Remove the batteries if the remote control is not to be used for an
extended period of time.
9
Page 10

•Make sure that the filter is installed before operating the air
conditioner.
•Be sure to check if there is a refrigerant leak after installing or
repairing the air conditioner.
•Do not place any object on the air conditioner.
•Never mix different types of batteries, or old and new batteries for
the remote control.
•Do not let the air conditioner run for a long time when humidity is
very high or when a door or a window has been left open.
•Stop using the remote control if there is a fluid leak in the battery.
If your clothes or skin are exposed to the leaking battery fluid,
wash off with clean water.
•Do not expose people, animals, or plants to the cold or hot wind
from the air conditioner for extended periods of time.
•If the leaking battery fluid has been swallowed, rinse the inside of
the mouth thoroughly and consult a doctor.
•Do not drink the water drained from the air conditioner.
•Do not use the product for special purposes, such as preserving
foods, works of art, and etc. It is an air conditioner for consumer
purposes, not a precision refrigeration system. There is risk of
damage or loss of property.
•Do not recharge or disassemble the batteries.
EN
10
Page 11
Maintenance
•Never touch the metal parts of the air conditioner when removing
the air filter.
•Use a sturdy stool or ladder when cleaning, maintaining, or
repairing the air conditioner at a height.
•Never use strong cleaning agents or solvents when cleaning the
air conditioner or spray water. Use a smooth cloth.
Disposal of Waste Batteries/Accumulators
• This symbol may be combined with chemical symbols for mercury (Hg), cadmium
(Cd) or lead (Pb) if the battery contains more than 0.0005 % of mercury, 0.002 % of
cadmium or 0.004 % of lead.
• All batteries/accumulators should be disposed separately from the municipal waste
stream via designated collection facilities appointed by the government or the local
authorities.
• The correct disposal of your old batteries/accumulators will help to prevent potential
negative consequences for the environment, animal and human health.
• For more detailed information about disposal of your old batteries/accumulators,
please contact your city office, waste disposal service or the shop where you
purchased the product.
EN
11
Page 12

OPERATION
Notes for Operation
Suggestion for Energy Saving
• Do not over-cool the space. This may be harmful for your health and may consume more
electricity.
• Block sunlight with blinds or curtains while you are operating the air conditioner.
• Keep doors or windows closed tightly while you are operating the air conditioner.
• Adjust the direction of the air flow vertically or horizontally to circulate indoor air.
• Speed up the fan to cool or warm indoor air quickly, within a short period of time.
• Open windows regularly for ventilation. The indoor air quality may deteriorate if the air conditioner
is used for long durations.
• Clean the air filter once every 2 weeks. Dust and impurities collected in the air filter may block the
air flow or reduce the unit performance.
Parts and Functions
Indoor Unit Outdoor Unit
EN
Air Filter
1
Air Intake
2
Front Cover
3
Air Outlet
4
Air Deflector (Horizontal Vane)
5
Air Deflector (Vertical Louver)
6
On/Off Button
7
Air Intake Vents
1
Air Outlet Vents
2
NOTE
• The number and location of operation lamps may vary according to the model of the air
conditioner.
• The feature may be changed according to the type of model.
12
Page 13

EN
Swing
Wireless Remote Control
Inserting Batteries
If the display screen of the remote control
begins to fade, replace the batteries. Insert AAA
(1.5 V) batteries before using the remote
control.
Remove the battery cover.
1
Insert the new batteries and make sure that
2
the + and - terminals of the batteries are
installed correctly.
Installing the Remote Control
Holder
To protect the remote control, install the holder
where there is no direct sunlight.
Choose a safe and easily accessible
1
location.
Operating Method
Point the remote control towards the signal
receiver at the right side of the air conditioner to
operate it.
NOTE
• The remote control may operate other
electronic devices if it is directed towards
them. Make sure to point the remote control
towards the air conditioner signal receiver.
• For proper operation, use a soft cloth to clean
the signal transmitter and receiver.
• In case of a function not provided in the
product, no buzzer sound occurs from the
product when a button for such function on
the remote control is pressed except for Air
Flow Direction (
Air Purification function ( ).
), Energy Display ( ),
Fix the holder by fastening 2 screws firmly
2
with a screwdriver.
13
Page 14
EN
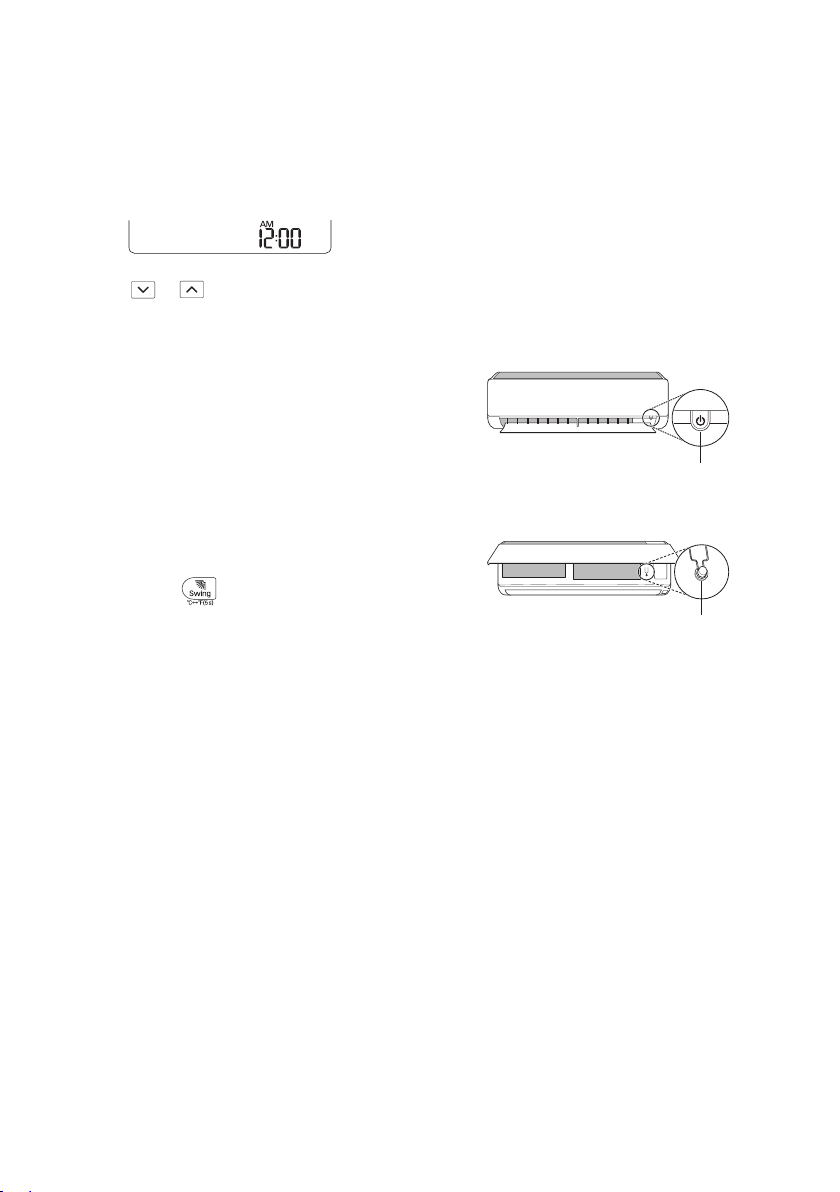
ON/OFF
ON/OFF
Setting the Current Time
Insert batteries.
1
• The icon below blinks at the bottom of the
display screen.
Press or button to select the
2
minutes.
Press Set/Cancel button to finish.
3
NOTE
• The On/Off Timer is available after setting the
current time.
Using the °C/°F Conversion
Function (Optional)
This function changes unit between °C and °F
• Press and hold button about 5 seconds.
Operating the Air Conditioner
without the Remote Control
You can use the ON/OFF button of the indoor
unit to operate the air conditioner when the
remote control is unavailable.
Open the front cover (Type2) or horizontal
1
vane (Type1).
Press the ON/OFF button.
2
Type1
Type2
NOTE
• The stepping motor may be broken, if the
horizontal vane opens rapidly.
• The fan speed is set to high.
• The feature may be changed according to the
type of model.
• The temperature cannot be altered when
using this emergency ON/OFF button.
• For cooling & heating models, the temperature
is set from 22 °C to 24 °C
14
Page 15

Using Wireless Remote Control
Reset
Swing
Swing
You can operate the air conditioner more conveniently with the remote control.
EN
Available Function
Single
Split
Multi
O O
2
Button
Display
Screen
-
Description
To turn on/off the air
conditioner.
To adjust the desired
*
*
room temperature in
cooling, heating or
O O
auto changeover
mode.
*
1
Mode
To select the cooling
mode.
To select the heating
mode.
To select the
dehumidification mode.
To select the fan
mode.
O O
O O
O O
O O
To select the auto
changeover/auto
O O
operation mode.
Jet
Mode
Fan
Speed
To change room
temperature quickly.
To adjust the fan
speed.
O O
O O
To adjust the air flow
direction vertically or
horizontally.
O O
NOTE
• * buttons may be changed according to the type of model.
• When connected to the Multi Outdoor unit, the Energy Display, Energy
Control, Silent and Smart Diagnosis function may not be supported.
15
Page 16

EN
Reset
Button
2
*
*
Set/
Cancel
*
1
*Light
Off
Room
Temp.
°C↔°F
(5 s)
*Comfort
Air
Display
Description
Screen
To turn on/off air
conditioner
automatically at
desired time.
To set/cancel the
-
special functions and
timer.
To cancel the timer
-
settings.
- To adjust time. O O
To set the brightness
-
of the display on the
indoor unit.
To display the room
temperature.
To change unit
between °C and °F
To adjust the air flow
to deflect wind.
Available Function
Single
Split
Multi
O O
O O
O O
O O
O O
O O
O O
To set whether or not
kW(3 s) -
to display information
O X
regarding energy.
*Energy
Ctrl.
To bring the effect of
the power saving.
O X
To conveniently check
Diagnosis
(5 s)
-
maintenance
information of a
O X
product.
UVnano
(3 s)
- To keep the fan clean.
O
(Optional)O (Optional)
16
Page 17

EN
Reset
Button
2
*
*
*
1
Reset -
Display
Screen
Description
The Ion generator uses
millions of ions to help
improve indoor air
quality.
To reduce noise from
outdoor units.
To remove moisture
generated inside the
indoor unit.
To initialize the remote
control settings.
Available Function
Single
Split
O
(Optional)O (Optional)
O X
O O
O O
Multi
NOTE
• Some functions may not be supported, depending on the model.
• * buttons may be changed according to the type of model.
• Press the Set/Cancel button to operate the selected Func.
17
Page 18
EN
ON/OFF
ON/OFF
Restarting the Air Conditioner Automatically
When the air conditioner is turned on again
after a power failure, this function restores the
previous settings.
Disabling Auto Restart
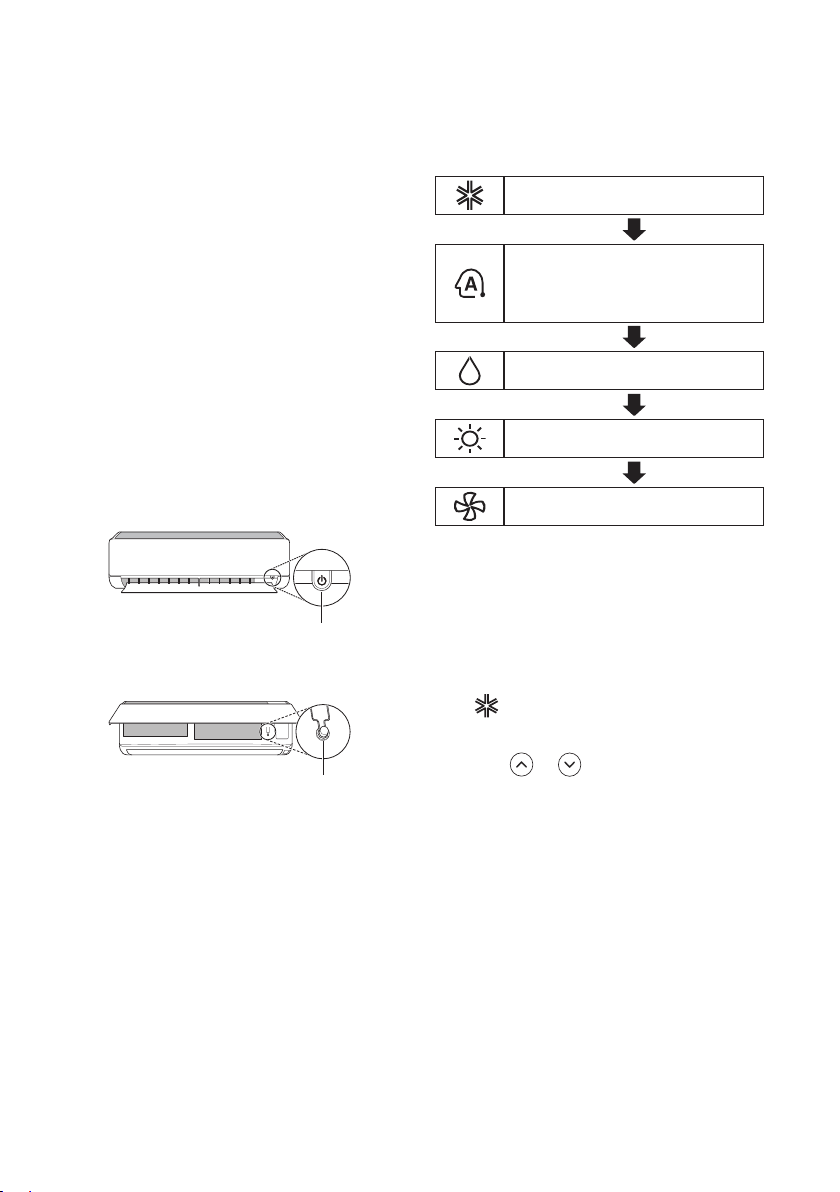
Open the front cover (Type2) or horizontal
1
vane (Type1).
Press the ON/OFF button and hold it for 6
2
seconds, then the unit will beep twice and
the lamp will blink twice 4 times.
• To re-enable the function, press the ON/
OFF button and hold it for 6 seconds. The
unit will beep twice and the lamp will blink
4 times.
Type1
Type2
Using the Mode Function
This function allows you to select the desired
function.
Cooling Mode
Auto Changeover Mode / Auto
Operation(AI) Mode
Dehumidification Mode
Heating Mode
Fan Mode
Cooling Mode
Turn the appliance on.
1
Press Mode button repeatedly to select the
2
Cooling Mode.
• is displayed on the display screen.
NOTE
• The feature may be changed according to the
type of model.
• If you press and hold the ON/OFF button for 3
– 5 seconds, instead of 6 seconds, the unit
will switch to the test operation. In the test
operation, the unit blows out strong cooling air
for 18 minutes and then returns to factory
default settings.
18
3
Press or button to set the desired
temperature.
Page 19

EN
Auto Operation (Artificial
Intelligence)
Multi Model
In this operation mode, the system is
automatically operated by the electronic
controls.
Turn the appliance on.
1
Press Mode button repeatedly to select the
2
Auto Operation.
• is displayed on the display screen.
3
Press or button to set the desired
temperature.
Press Fan Speed button to adjust the fan
4
speed.
Auto Changeover Mode
Single Split Model
This mode changes the mode automatically to
maintain the set temperature at ±2 °C
Turn the appliance on.
1
Press Mode button repeatedly to select the
2
Auto Changeover Mode.
• is displayed on the display screen.
3
Press or button to set the desired
temperature.
Press Fan Speed button to adjust the fan
4
speed.
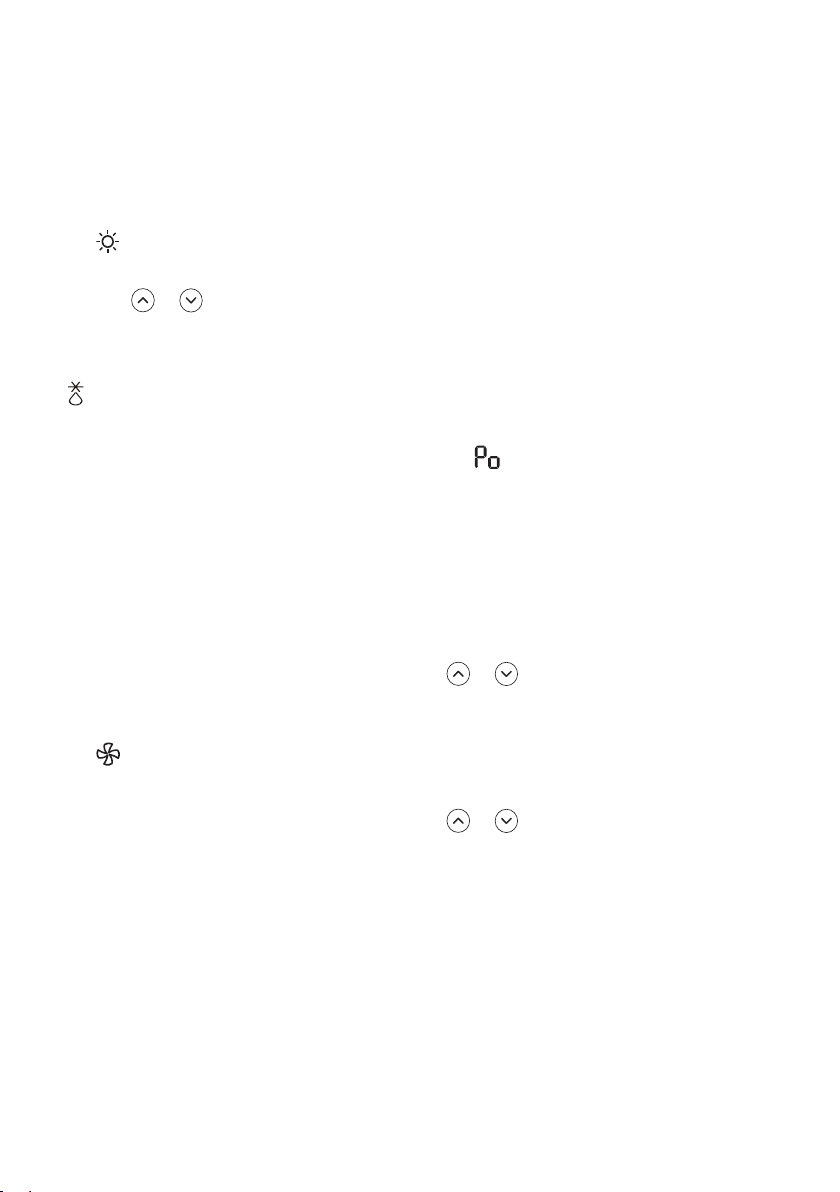
Dehumidification Mode
This mode removes excess moisture from a
highly humid environment or during the rainy
season, in order to prevent mildew from setting
in. This mode adjusts the room temperature and
the fan speed automatically to maintain the
optimal level of humidity.
Turn the appliance on.
1
Press Mode button repeatedly to select the
2
Dehumidification Mode.
• is displayed on the display screen.
NOTE
• In this mode you cannot adjust the room
temperature, it is adjusted automatically.
• The room temperature is not displayed on the
display screen.
• In the dehumidification mode, compressor and
indoor fan may not operate when the room
temperature is below 24 °C
19
Page 20
EN
Heating Mode
Turn the appliance on.
1
Press Mode button repeatedly to select the
2
Heating Mode.
• is displayed on the display screen.
3
Press or button to set the desired
temperature.
NOTE
• will be displayed on the indoor unit when
defrosting is operating.
• Furthermore, this indication will be displayed
on the indoor unit:
− When preheating is operating.
− When the room temperature has been
reached to the set temperature.
Fan Mode
This mode only circulates the indoor air without
changing the room temperature.
Turn the appliance on.
1
Press Mode button repeatedly to select the
2
Fan Mode.
• is displayed on the display screen.
Press Fan Speed button to adjust the fan
3
speed.
Using the Jet Mode Function
Changing Room Temperature
Quickly
This function allows you to cool indoor air
quickly during the summer or warm it quickly
during winter.
• The Jet Mode function is available with
Cooling, Heating and Dehumidification Mode.
Turn the appliance on.
1
Press Mode button repeatedly to select the
2
desired mode.
Press Jet Mode button.
3
• is displayed on the display screen.
NOTE
• Jet Heating Mode is not available on some
models.
• In Jet Cooling Mode, strong air blows out for
30 minutes.
• After 30 minutes later, setting temperature is
maintaining 18 °C
If you want to change the temperature, Press
or button to set the desired
temperature.
• In Jet Heating Mode, strong air blows out for
30 minutes.
• After 30 minutes later, setting temperature is
maintaining 30 °C
If you want to change the temperature, Press
or button to set the desired
temperature.
• This function may operate differently from the
remote control display.
20
Page 21
EN
→ →
→ → → →
Swing
Swing
Swing
Swing
Using the Fan Speed Function
Adjusting the Fan Speed
• Press Fan Speed button repeatedly to adjust
the fan speed.
Display Screen Speed
High
Medium - High
Medium
Medium - Low
Low
- Natural Wind
NOTE
• The fan speed of Natural Wind adjusts
automatically.
• The fan speed icons are displayed on some
indoor units.
• Indoor unit display is displayed only 5 seconds
and return to the setting temperature on some
models.
Using the Air Flow Direction Function
This function adjusts the direction of the air flow
vertically (horizontally).
• Press
the desired direction.
− Select ( ) to adjust the direction of the
air flow automatically.
NOTE
• Adjusting the air flow direction horizontally
may not be supported, depending on the
model.
• Adjusting the air deflector arbitrarily may
cause product failure.
• If you restart the air conditioner, it starts to
operate with the previously set direction of air
flow, so the air deflector may not match the
icon displayed on the remote control. When
this occurs, press
adjust the direction of the air flow again.
• This function may operate differently from the
remote control display.
(
) button repeatedly and select
or
button to
21
Page 22
EN
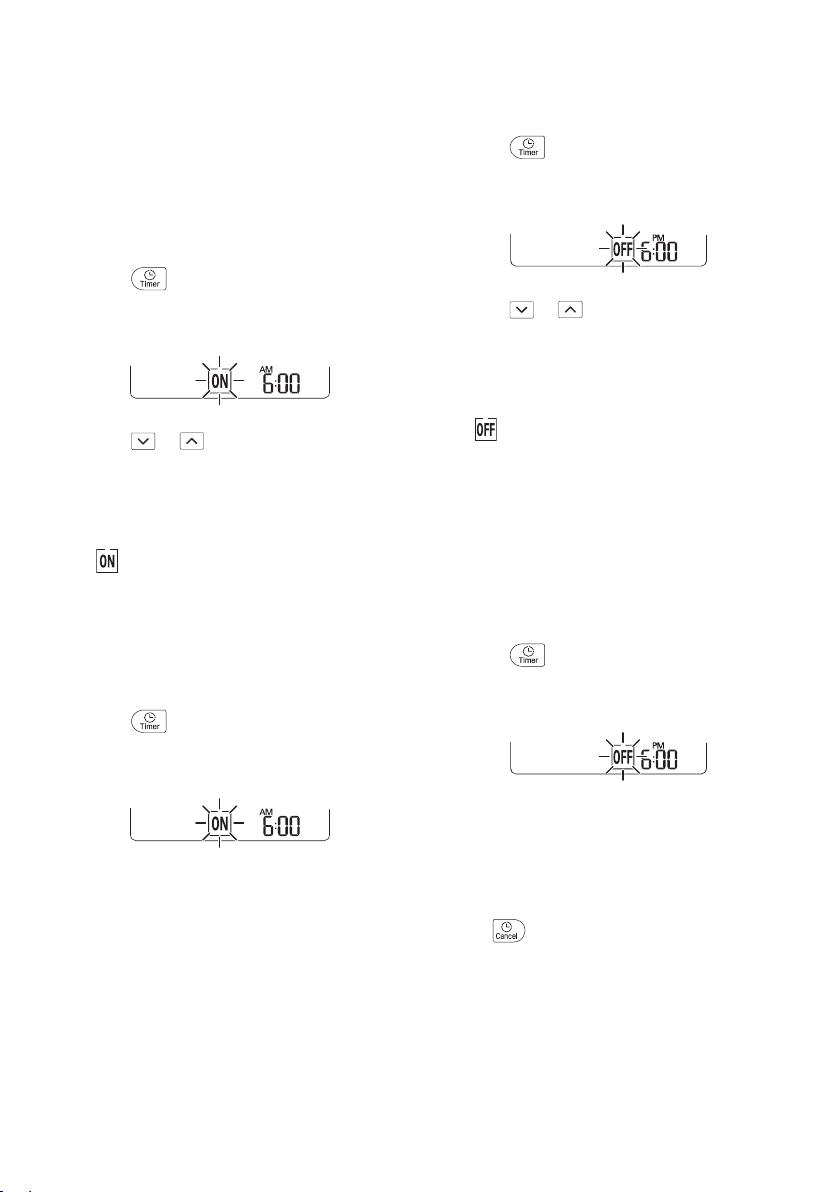
Setting the On/Off Timer
This function sets the air conditioner to turn on/
off automatically at desired time.
On/Off Timer can be set together.
Setting the On Timer
Press button repeatedly.
1
• The icon below blinks at the bottom of the
display screen.
Press or button to select the
2
minutes.
Press Set/Cancel button to finish.
3
• After setting the timer, current time and
icon are displayed on the display
screen indicating that the desired time is
set.
Canceling the On Timer
Press button repeatedly.
1
• The icon below blinks at the bottom of the
display screen.
Setting the Off Timer
Press button repeatedly.
1
• The icon below blinks at the bottom of the
display screen.
Press or button to select the
2
minutes.
Press Set/Cancel button to finish.
3
• After setting the timer, current time and
icon are displayed on the display
screen indicating that the desired time is
set.
NOTE
• This function is disabled when you set Simple
Timer.
Canceling the Off Timer
Press button repeatedly.
1
• The icon below blinks at the bottom of the
display screen.
Press Set/Cancel button to cancel the
2
setting.
22
Press Set/Cancel button to cancel the
2
setting.
Canceling the Timer Setting
• Press button to cancel all timer settings.
Page 23
EN
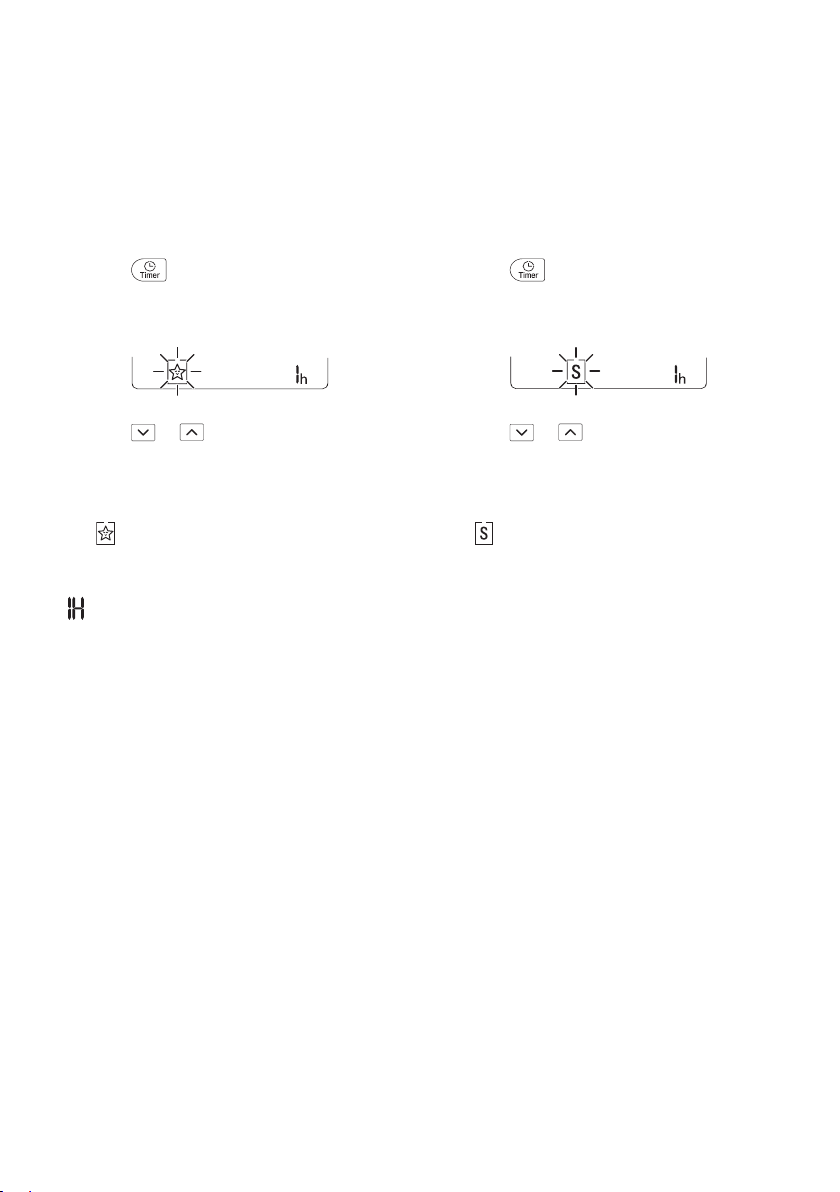
Using the Sleep Function (Optional)
This function turns off the air conditioner
automatically when you go to sleep.
Turn the appliance on.
1
Press button repeatedly.
2
• The icon below blinks at the bottom of the
display screen.
Press or button to select the hour
3
(up to 7 hours).
Press Set/Cancel button to finish.
4
• is displayed on the display screen.
NOTE
• is displayed on some indoor units.
• Indoor unit display is displayed from 1H to 7H
which is displayed only 5 seconds and then
return to the setting temperature.
• In the Cooling and Dehumidification Mode, the
temperature increases by 1 °C after 30
minutes and additional 1 °C after another 30
minutes for a more comfortable sleep.
• The temperature increases up to 2 °C from
the preset temperature.
• Although the remark for fan speed on the
display screen may be changed, the fan
speed is adjusted automatically.
Using the Simple Timer Function (Optional)
This function turns off the air conditioner
automatically when you go to sleep.
Turn the appliance on.
1
Press button repeatedly.
2
• The icon below blinks at the bottom of the
display screen.
Press or button to select the hour
3
(up to 7 hours).
Press Set/Cancel button to finish.
4
• is displayed on the display screen.
NOTE
• This function is disabled when you set Off
Timer.
23
Page 24

EN
Swing
Using the Energy Display Function (Optional)
This function displays the amount of electricity
generated on the indoor display as the product
operates.
Display the Current Energy Usage
Turn the appliance on.
1
2
Press button and hold it about 3
seconds.
• The instantaneous power consumption (
) is displayed for a while on some
indoor units.
NOTE
• The unit of the displayed value is kW.
• It is not displayed on the wireless remote
control.
• If it is more than 99 kW, which is the range of
expression, maintain it as 99 kW.
• Display wattage under 10 kW with 0.1 kW
unit, and display one over 10 kW with 1 kW
unit.
• The actual power may differ from the power
displayed.
• When connected to the Multi Outdoor unit, this
function may not be supported.
Using the Light Off Function (Optional)
Display Screen Brightness
You can set the brightness of the indoor unit
display screen.
• Press Light Off button.
NOTE
• Turn on/off the Display screen.
Using the Comfort Air Function (Optional)
Comfort Vane Operation
This function conveniently sets the vane to a
preset position to deflect the supply air away
from blowing directly onto the occupants in the
room.
Turn the appliance on.
1
Press Comfort Air button repeatedly and
2
select the desired direction.
• or is displayed on the display
screen.
NOTE
• or is displayed on some indoor units.
• This function is disabled when you press
Mode or Jet Mode button.
• This function is disabled and auto swing of
vertical direction is set up when you press
button.
• When this function is off, the horizontal vane
operates automatically depending on the set
mode.
24
Page 25
EN
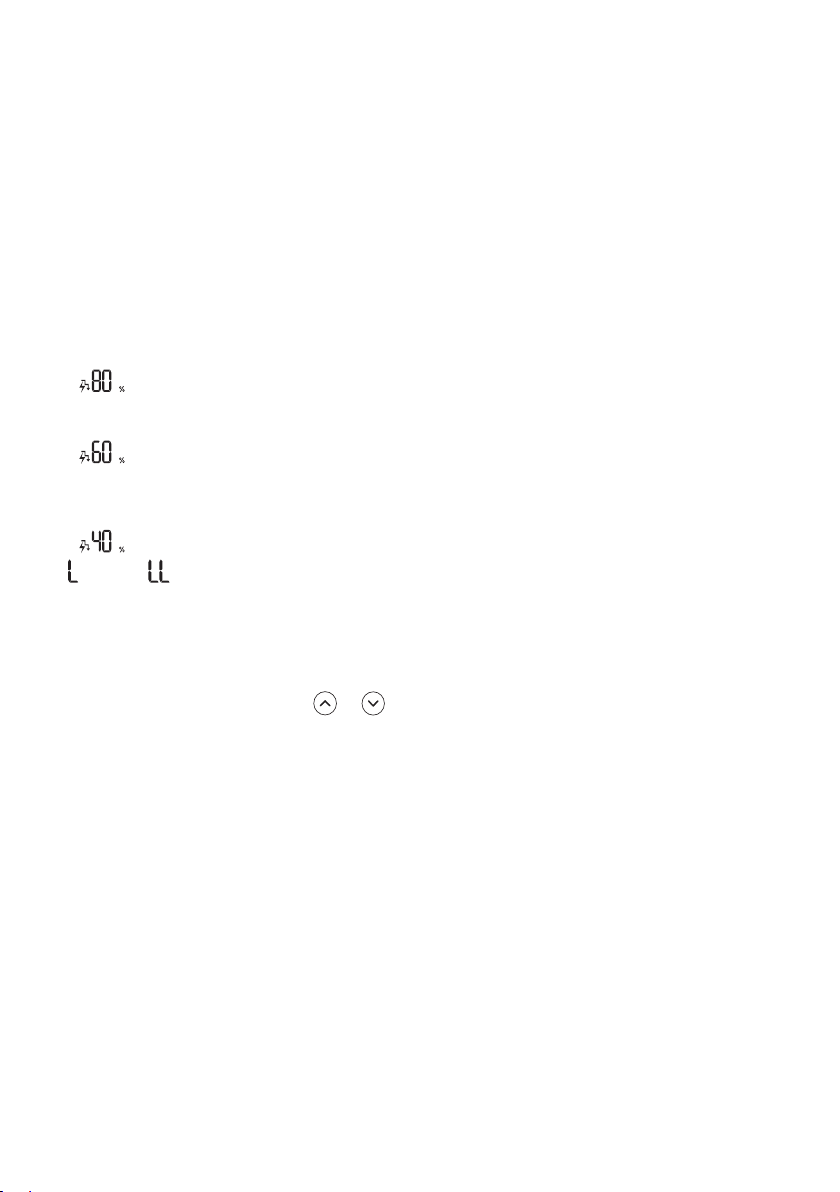
Using the Energy Control Function (Optional)
Turn the appliance on.
1
Press Energy Ctrl button.
2
• Press Energy Ctrl button repeatedly to
select each step.
NOTE
• 1 step : The power Input is decreased by 20
% compared to rated power input.
− is displayed on the display screen.
• 2 step : The power Input is decreased by 40
% compared to rated power input.
− is displayed on the display screen.
• 3 step (Optional) : The power Input is
decreased by 60 % compared to rated power
input.
− is displayed on the display screen.
• (1 step), (2 step) is displayed on some
indoor units.
• This function is available with Cooling Mode.
• Capacity may decrease when Energy Control
mode is selected.
• Desired temperature is displayed about 5
seconds if you press Fan Speed, or
button.
• Room temperature is displayed about 5
seconds if you press Room Temp button.
• When connected to the Multi Outdoor unit, this
function may not be supported.
Using UVnano Function (Optional)
UVnano is a compound word of UV (ultraviolet
rays) and nanometer (length unit).
This function reduces various bacteria inside
the air conditioner.
Model name: LTPL-G35UV275GS-JA
LTPL-G35UV275GS-TWA
CUD7GF1A
Press Jet Mode button and hold it about 3
seconds.
NOTE
• UV is displayed on some indoor units,
depending on the model.
• The UV LED operates at regular intervals to
keep the fan clean.
• The UVnano function stops when the air
conditioner is turned off.
• When Auto Clean Function starts, UVnano
Function works together to keep the fan clean.
• This function is disabled with Heating Mode.
25
Page 26
EN
Using Special Functions
Turn the appliance on.
1
Press Func button repeatedly to select the
2
desired function.
Press Set/Cancel button to finish.
3
Display
Screen
The Ion generator uses millions
of ions to help improve indoor
air quality.
To reduce noise from outdoor
units.
To remove moisture generated
inside the indoor unit.
NOTE
• Some functions may not be supported,
depending on the model.
• Some functions may operate differently from
the remote control display.
Description
Canceling Special Functions
Press Func button repeatedly to select the
1
desired function.
Press Set/Cancel button to cancel the
2
function.
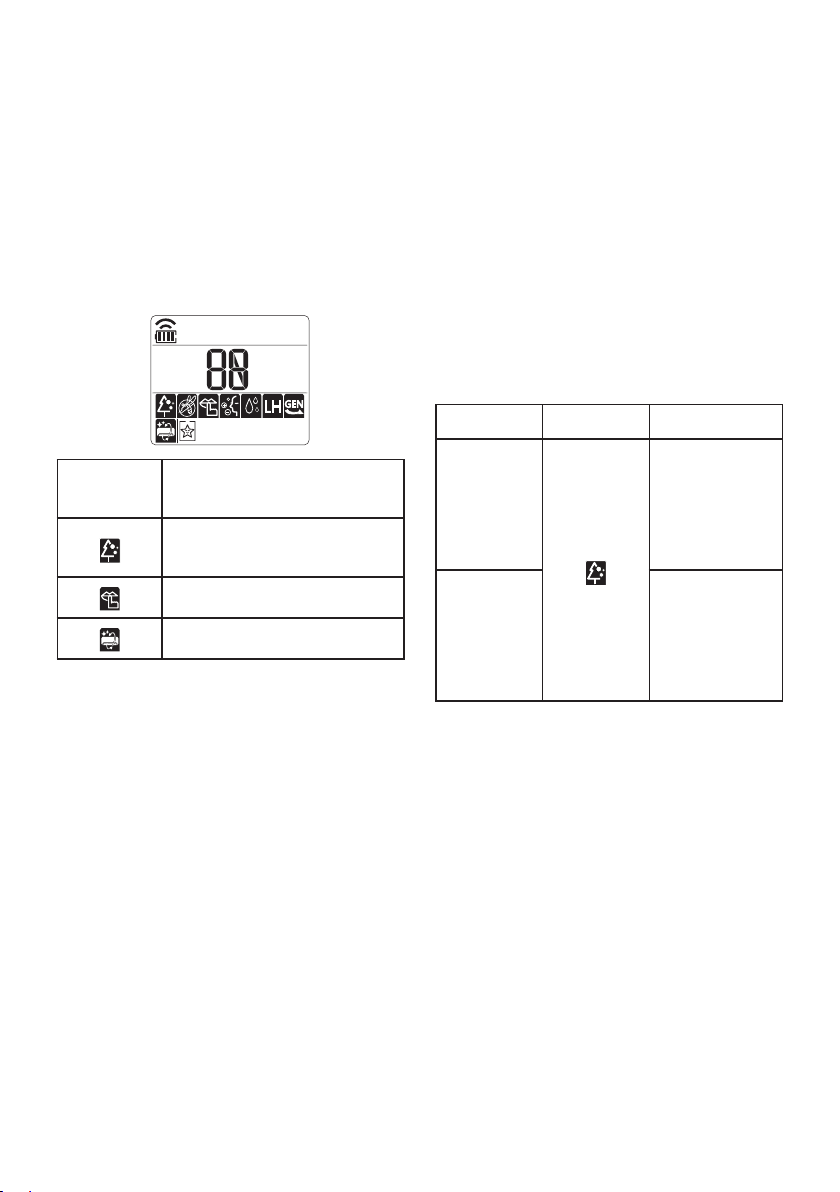
Using the Air Purification
Function
These functions supply clean and fresh air by
ion particles and the filter.
Function Display Description
Ion particles
from Ionizer
Ionizer
Plasma
NOTE
• You can use this function without turning the
air conditioner on.
• Both the plasma lamp and the cooling lamp
light up while Smoke Away/Plasma is in
operation on some models.
• Do not touch ionizer during operation.
• This function may operate differently from the
remote control display.
reduce the
surface bacteria
and other
harmful
substances.
It removes
microscopic
contaminants
from the intake
air completely to
supply clean and
fresh air.
26
Page 27
Using the Silent Function
This function prevents potential claims by
neighbors, reducing noise from outdoor units.
• is displayed on the display screen.
NOTE
• This function is disabled when you press
Mode or Energy Ctrl or Jet Mode button.
• This function is available with Cooling,
Heating, Auto Changeover, Auto Operation
Mode.
• When connected to the Multi Outdoor unit, this
function may not be supported.
Using the Auto Clean Function
In the Cooling and Dehumidification Mode,
moisture is generated inside the indoor unit.
This function removes such moisture.
• is displayed on the display screen.
NOTE
• Some functions cannot be used while the Auto
Clean function is in operation.
• When UVnano Function is set, Auto Clean
Function works together.
• If you turn off the unit, the fan continues to run
for 30 minutes and cleans the inside of the
indoor unit.
• is displayed on some indoor units,
depending on the model.
EN
27
Page 28

SMART FUNCTIONS
EN
LG ThinQ Application
This feature is only available on models with the
or ThinQ logo.
The LG ThinQ application allows you to
communicate with the appliance using a
smartphone.
LG ThinQ Application Features
Communicate with the appliance from a
smartphone using the convenient smart
features.
Smart Diagnosis
• If you experience a problem while using the
appliance, this smart diagnosis feature will
help you diagnose the problem.
Settings
• Allows you to set various options on the
appliance and in the application.
NOTE
• If you change your wireless router, internet
service provider, or password, delete the
registered appliance from the LG ThinQ
application and register it again.
• The application is subject to change for
appliance improvement purposes without
notice to users.
• Functions may vary by model.
Before Using LG ThinQ
Application
Check the distance between the appliance
1
and the wireless router (Wi-Fi network).
• If the distance between the appliance and
the wireless router is too far, the signal
strength becomes weak. It may take a
long time to register or installation may
fail.
Turn off the Mobile data or Cellular Data
2
on your smartphone.
Connect your smartphone to the wireless
3
router.
NOTE
• To verify the Wi-Fi connection, check that
icon on the control panel is lit.
• The appliance supports 2.4 GHz Wi-Fi
networks only. To check your network
frequency, contact your Internet service
provider or refer to your wireless router
manual.
• LG ThinQ is not responsible for any network
connection problems or any faults,
malfunctions, or errors caused by network
connection.
• If the appliance is having trouble connecting to
the Wi-Fi network, it may be too far from the
router. Purchase a Wi-Fi repeater (range
extender) to improve the Wi-Fi signal strength.
• The Wi-Fi connection may not connect or may
be interrupted because of the home network
environment.
• The network connection may not work
properly depending on the Internet service
provider.
• The surrounding wireless environment can
make the wireless network service run slowly.
28
Page 29

EN
• The appliance cannot be registered due to
problems with the wireless signal
transmission. Unplug the appliance and wait
about a minute before trying again.
• If the firewall on your wireless router is
enabled, disable the firewall or add an
exception to it.
• The wireless network name (SSID) should be
a combination of English letters and numbers.
(Do not use special characters.)
• Smartphone user interface (UI) may vary
depending on the mobile operating system
(OS) and the manufacturer.
• If the security protocol of the router is set to
WEP, you may fail to set up the network.
Please change it to other security protocols
(WPA2 is recommended) and register the
product again.
Installing the LG ThinQ
Application
Search for the LG ThinQ application from the
Google Play Store or Apple App Store on a
smartphone. Follow instructions to download
and install the application.
Wireless LAN Module
Specifications
Model LCW-003
Frequency
Range
Output
Power(Max)
Wireless function S/W version: V 1.0
This device should be installed and operated
with a minimum distance of 20 cm between the
device and the body.
2412 to 2472 MHz
IEEE 802.11b:18.37 dBm
IEEE 802.11g:17.67 dBm
IEEE 802.11n:17.67 dBm
Declaration of Conformity
The LG Electronics declares that the type of
radio equipment AIR CONDITIONER
corresponds to the Technical regulations of
radio equipment; The full text of the Declaration
of Conformity is available on the website at the
following address:
https://www.lg.com/global/support/cedoc/cedoc
Open Source Software Notice
Information
To obtain the source code under GPL, LGPL,
MPL, and other open source licenses, that is
contained in this product, please visit http://
opensource.lge.com.
In addition to the source code, all referred
license terms, warranty disclaimers and
copyright notices are available for download.
LG Electronics will also provide open source
code to you on CD-ROM for a charge covering
the cost of performing such distribution (such as
the cost of media, shipping, and handling) upon
email request to opensource@lge.com. This
offer is valid for a period of three years after our
last shipment of this product. This offer is valid
to anyone in receipt of this information.
29
Page 30

EN
Smart Diagnosis
This feature is only available on models with the
or logo.
Use this feature to help you diagnose and solve
problems with your appliance.
NOTE
• For reasons not attributable to LGE’s
negligence, the service may not operate due
to external factors such as, but not limited to,
Wi-Fi unavailability, Wi-Fi disconnection, local
app store policy, or app unavailability.
• The feature may be subject to change without
prior notice and may have a different form
depending on where you are located.
Using LG ThinQ to Diagnose
Issues
If you experience a problem with your Wi-Fi
equipped appliance, it can transmit
troubleshooting data to a smartphone using the
LG ThinQ application.
• Launch the LG ThinQ application and select
the Smart Diagnosis feature in the menu.
Follow the instructions provided in the LG
ThinQ application.
Using Audible Diagnosis to
Diagnose Issues
Follow the instructions below to use the audible
diagnosis method.
• Launch the LG ThinQ application and select
the Smart Diagnosis feature in the menu.
Follow the instructions for audible diagnosis
provided in the LG ThinQ application.
Plug the power plug in the outlet properly.
1
Place the mouthpiece of your smartphone
2
close to the or logo.
Press and hold the Diagnosis(5 s) button
3
for 5 seconds or longer while holding the
smartphone mouthpiece to the logo until the
data transfer is complete.
• Keep the smartphone in place until the
data transfer has finished. Time remaining
for data transfer is displayed.
After the data transfer is complete, the
4
diagnosis will be displayed in the
application.
NOTE
• For best results, do not move the phone while
the tones are being transmitted.
• Be sure to keep ambient noise to a minimum
or the phone may not correctly receive the
buzzer beeps from the indoor unit.
30
Page 31

MAINTENANCE
WARNING
• Before cleaning or performing maintenance, disconnect the power supply and wait until the fan
stops.
If the air conditioner will not be used for an extended period of time, dry the air conditioner to
maintain it in best condition. Clean the product regularly to maintain optimal performance and to
prevent possible breakdown.
• Dry the air conditioner in Fan mode for 3 to 4 hours and disconnect the power. There may be
internal damage if moisture is left in its components.
• Before using the air conditioner again, dry the inner components of the air conditioner in Fan mode
for 3 to 4 hours. This will help to remove the odor generated from moisture.
Air Filter
• The feature may be changed according to the type of model.
EN
31
Page 32

Type Description Interval
Air filter Clean with a vacuum or hand wash. 2 weeks
Ionizer (Optional) Use dry cotton bud to remove any dust. Every 6 months
Clean the Indoor unit surface by using a soft, dry cloth. Regularly
Indoor unit
Outdoor unit
Have a professional clean the condensate drain pan. Once a year
Have a professional clean the condensate drain pipe. Every 4 months
Replace the remote control batteries. Once a year
Have a professional clean the heat exchanger coils and
the panel vents. (Consult with technician.)
Have a professional clean the fan. Once a year
Have a professional clean the condensate drain pan. Once a year
Have a professional verify that all the fan assembly is
firmly tightened.
Clean the electric components with air. Once a year
Once a year
Once a year
NOTE
• Never use water that is higher than 40 °C when you clean the filters. It may cause deformation or
discoloration.
• Never use volatile substances when you clean the filters. They may damage the surface of the
product.
EN
32
Page 33

EN
Clean the Air Filter
Clean the air filters once every 2 weeks, or
more, if necessary.
NOTE
• The air filter can be broken when it is bent.
• When the air filter is not assembled correctly,
dust and other substances can enter into the
indoor unit.
Type1
If you look at the indoor unit from above it, can
assemble the top filter easily.
Turn off the power to the unit.
1
Hold the knobs of the air filter, lift it up
2
slightly.
Remove it from the indoor unit.
3
Push down hooks to assemble the air filter.
7
Check the side of the front cover for correct
8
assembly of the air filter.
Type2
Turn off the power to the unit.
1
Open the front cover.
2
• Lift up both sides of the cover slightly.
Hold the knobs of the air filters, pull them
3
down slightly and remove them from the
indoor unit.
Clean the filters with a vacuum cleaner or
4
with lukewarm water with neutral detergent.
Clean the filter with a vacuum cleaner or
4
with lukewarm water with neutral detergent.
Dry the filter in the shade.
5
Insert the hooks of the air filter into the front
6
cover.
Dry the filters in the shade.
5
Insert the hooks of the air filters into the
6
front cover.
Check the side of the front cover for correct
7
assembly of the air filters.
33
Page 34

TROUBLESHOOTING
Self-diagnosis Function
This product has a built-in self-diagnosis function. If an error occurs, the lamp of the indoor unit will
blink in 2 second intervals. If this occurs, contact your local dealer or service center.
Before Calling for Service
Please check the following before you contact the service center. If the problem persists, contact
your local service center.
Symptoms Possible Causes & Solution
Burning smell and strange sounds are coming from the unit.
• Turn off the air conditioner, switch OFF, or disconnect the power supply,
and contact the service center.
Water leaks from the indoor unit even when the humidity level is low.
• Turn off the air conditioner, switch OFF, or disconnect the power supply,
and contact the service center.
The air conditioner
does not work
normally.
The air conditioner
does not work.
The power cable is damaged or it is generating excessive heat.
• Turn off the air conditioner, switch OFF, or disconnect the power supply,
and contact the service center.
A switch, a circuit breaker (safety, ground), or a fuse is not operated
properly.
• Turn off the air conditioner, switch OFF, or disconnect the power supply,
and contact the service center.
The unit generates an error code from its self-diagnosis.
• Turn off the air conditioner, switch OFF, or disconnect the power supply,
and contact the service center.
The air conditioner is unplugged.
• Check whether the power cord is plugged into the outlet or the power
isolators are switched on.
A fuse exploded, or the power supply is blocked.
• Replace the fuse or check if the circuit breaker has tripped.
A power failure has occurred.
• Turn off the air conditioner when a power failure occurs.
• When the power is restored, wait 3 minutes, and then turn on the air
conditioner.
The voltage is too high or too low.
• Check if the circuit breaker has tripped.
The air conditioner was turned off automatically at a preset time.
• Turn the air conditioner on.
The battery setting in the remote controller is incorrect.
• Make sure that the batteries are inserted correctly in your remote
controller.
• If the batteries are placed correctly, but the air conditioner still does not
operate, replace the batteries and try again.
EN
34
Page 35

Symptoms Possible Causes & Solution
Air is not circulating properly.
• Make sure that there are no curtains, blinds, or pieces of furniture
blocking the front of the air conditioner.
The air filter is dirty.
• Clean the air filter once every 2 weeks.
• See “Clean the Air Filter” for more information.
The room temperature is too high.
• In summer, cooling the indoor air fully may take some time. In this case,
select the Jet Mode to cool the indoor air quickly.
Cold air is escaping from the room.
The air conditioner
does not emit cool
air.
The fan speed
cannot be adjusted.
The temperature
cannot be adjusted.
The air conditioner
stops during
operation.
• Make sure that no cold air is escaping through the ventilation points in
the room.
The desired temperature is higher than the current temperature.
• Set the desired temperature to a level lower than the current
temperature.
There is a heating source nearby.
• Avoid using heat generators like electric ovens or gas burners while the
air conditioner is in operation.
Fan Mode is selected.
• During Fan Mode, air blows from the air conditioner without cooling or
heating the indoor air.
• Switch the operation mode to cooling operation.
Outside temperature is too high.
• The cooling effect may not be sufficient.
The Jet Mode, or Auto Operation Mode is selected.
• In some operation modes, you cannot adjust the fan speed. Select an
operation mode in which you can adjust the fan speed.
The Fan Mode or Jet Mode is selected.
• In some operation modes, you cannot adjust the temperature. Select an
operation mode in which you can adjust the temperature.
The air conditioner is suddenly turned off.
• The Timer Function may have timed out, which turns the unit off. Check
the timer settings.
A power failure has occurred during operation.
• Wait for the power to come back. If you have the Auto Restart function
enabled, your unit will resume its last operation several minutes after
power is restored.
EN
35
Page 36

Symptoms Possible Causes & Solution
The indoor unit is
still operating even
when the unit has
been turned off.
The air outlet on the
indoor unit is
discharging mist.
Water leaks from the
outdoor unit.
There is noise or
vibration.
The indoor unit
gives off an odor.
The air conditioner
does not emit warm
air.
The Auto Clean function is being operated.
• Allow the Auto Clean function to continue since it removes any remaining
moisture inside the indoor unit. If you do not want this feature, you can
turn the unit off.
The cooled air from the air conditioner makes mist.
• When the room temperature decreases, this phenomenon will disappear.
In the heating operations, condensed water drops from the heat
exchanger.
• This symptom requires installing a drain hose under the base pan.
Contact the installer.
A clicking sound can be heard when the unit starts or stops due to
movement of the reversing valve.
Creaking sound: The plastic parts of the indoor unit creak when they
shrink or expand due to sudden temperature changes.
Flowing or Blowing sound: This is the flow of refrigerant through the
air conditioner.
• These are normal symptoms. The noise will stop.
Odors (such as cigarette smoke) may be absorbed into the indoor
unit and discharged with airflow.
• If the smell does not disappear, you need to wash the filter. If this does
not work, contact the service center to clean your heat exchanger.
When Heating Mode starts, the vane is almost closed, and no air
comes out, even though the outdoor unit is operating.
• This symptom is normal. Please wait until the unit has generated enough
warm air to blow through the indoor unit.
The outdoor unit is in Defrosting Mode.
• In Heating Mode, ice/frost is built up on the coils when the outside
temperature falls. This function removes a layer of frost on the coil, and it
should finish in approximately 15 minutes.
Outside temperature is too low.
• The heating effect may not be sufficient.
EN
36
Page 37

Symptoms Possible Causes & Solution
The password for the Wi-Fi that you are trying to connect to is
incorrect.
• Find the Wi-Fi network connected to your smartphone and remove it,
then register your appliance on LG ThinQ.
Mobile data for your smartphone is turned on.
• Turn off the Mobile data of your smartphone and register the appliance
using the Wi-Fi network.
Your home appliance
and smartphone is
not connected to the
Wi-Fi network.
The wireless network name (SSID) is set incorrectly.
• The wireless network name (SSID) should be a combination of English
letters and numbers. (Do not use special characters.)
The router frequency is not 2.4 GHz.
• Only a 2.4 GHz router frequency is supported. Set the wireless router to
2.4 GHz and connect the appliance to the wireless router. To check the
router frequency, check with your Internet service provider or the router
manufacturer.
The distance between the appliance and the router is too far.
• If the distance between the appliance and the router is too far, the signal
may be weak and the connection may not be configured correctly. Move
the location of the router so that it is closer to the appliance.
NOTE
• Some functions may not be supported, depending on the model.
EN
37
Page 38

Memo
Page 39

РУКОВОДСТВО ПОЛЬЗОВАТЕЛЯ
КОНДИЦИОНЕР
Перед началом работы с прибором внимательно прочитайте
данное руководство и держите его постоянно под рукой.
ТИП: НАСТЕННЫЙ
Данное устройство соответствует техническим требованиям по ограничению использования
определенных опасных веществ в электрическом и электронном оборудовании.
www.lg.com
Copyright © 2021 LG Electronics Inc. Все права защищены.
Page 40

СОДЕРЖАНИЕ
ТЕХНИКА БЕЗОПАСНОСТИ .................................................................... 3
ЭКСПЛУАТАЦИЯ ...................................................................................... 12
В данном руководстве могут встречаться
изображения или материалы, не
относящиеся к купленной вами модели.
Производитель может вносить изменения
в содержание руководства.
Важные указания по технике безопасности ..................................................................4
Примечания по эксплуатации .......................................................................................12
Детали и функции ..........................................................................................................12
Беспроводной пульт дистанционного управления ......................................................13
Автоматический перезапуск кондиционера .................................................................18
Использование функции режима ..................................................................................18
Использование функции скоростного режима ............................................................20
Использование функции частоты вращения вентилятора .........................................21
Использование функции направления воздушного потока ........................................21
Установка таймера включения/выключения ................................................................22
Использование функции выключения через заданное время (дополнительно) ......23
Использование функции простого таймера (дополнительно) ....................................23
Использование функции отображения электроэнергии (дополнительно) ................24
Использование функции выключения подсветки (дополнительно) ...........................24
Использование функции комфортного обдува (дополнительно) ...............................24
Использование функции управления энергопотреблением (дополнительно) ..........25
Использование функции UVnano (дополнительно)..................................................... 25
Использование специальных функций ........................................................................26
ИНТЕЛЛЕКТУАЛЬНЫЕ ФУНКЦИИ ....................................................... 28
Приложение LG ThinQ ...................................................................................................28
Smart Diagnosis ..............................................................................................................30
ТЕХНИЧЕСКОЕ ОБСЛУЖИВАНИЕ....................................................... 31
Очистка воздушного фильтра ....................................................................................... 33
ПОИСК И УСТРАНЕНИЕ НЕИСПРАВНОСТЕЙ ................................... 34
Page 41

ТЕХНИКА БЕЗОПАСНОСТИ
Следующие рекомендации по технике безопасности призваны
предотвратить непредвиденные риски и ущерб, вызванные
небезопасной либо неверной эксплуатацией изделия.
Рекомендации делятся на две категории: ОСТОРОЖНО
и ВНИМАНИЕ (см. ниже).
Этим символом помечены действия, связанные
с повышенной опасностью. Внимательно прочтите
соответствующий текст и следуйте инструкциям,
чтобы избежать риска.
ОСТОРОЖНО!
Означает, что несоблюдение инструкций может привести
к серьезной травме или смерти.
ВНИМАНИЕ!
Означает, что несоблюдение инструкций может привести
к легкой травме или к поломке изделия.
На внутренних и наружных блоках отображаются следующие
символы.
RU
Этот символ указывает, что в данном устройстве
используется воспламеняющийся хладагент. В
случае утечки хладагента и воздействия внешнего
источника воспламенения существует опасность
возгорания.
Этот символ указывает, что следует внимательно
прочитать руководство по эксплуатации.
Этот символ указывает, что обслуживающий
персонал должен обращаться с данным
оборудованием в соответствии с руководством по
установке.
Этот символ указывает на наличие таких источников
информации, как руководство по эксплуатации или
руководство по установке.
3
Page 42

Важные указания по технике безопасности
ОСТОРОЖНО!
Чтобы снизить опасность пожара, удара током или
получения травм при использовании изделия,
необходимо принять следующие основные меры
предосторожности.
Дети в доме
Изделие не предназначено для использования лицами
(включая детей) со сниженными физическими или умственными
способностями, болезнями органов чувств, недостаточным
опытом и знаниями. Указанные категории должны использовать
изделие после обучения и под присмотром лица,
ответственного за их безопасность. Не позволяйте детям играть
с изделием.
Установка
•Не устанавливайте кондиционер на неустойчивой поверхности
или в месте, где он может упасть.
•При установке или перемещении кондиционера обратитесь
в авторизованный сервисный центр.
•Надежно установите панель и крышку блока управления.
•Не устанавливайте кондиционер в местах хранения
легковоспламеняющихся жидкостей или газов,таких как бензин,
пропан, растворители и т. д.
•Убедитесь, что труба и кабель питания, соединяющие
внутренний и наружный блоки, при установке кондиционера не
натянуты слишком туго.
•Используйте стандартный автоматический выключатель
и предохранитель, чьи характеристики соответствуют
номинальным параметрам кондиционера.
•Не допускайте попадания воздуха или газа в систему, за
исключением специального хладагента.
•Используйте негорючий газ (азот) для проверки утечки и для
продувки воздуха; использование сжатого воздуха или горючего
газа может привести к пожару или взрыву.
RU
4
Page 43

•Внутренние/наружные электрические соединения должны быть
надежно закреплены, а кабель должен быть проложен
надлежащим образом, так, чтобы не возникало никакого
напряжения при протягивании кабеля от соединительных клемм.
Неправильное или неплотное соединение может привести
к пожару.
•Перед использованием кондиционера установите специальную
электрическую розетку и выключатель.
•Не подключайте провод заземления к газовой трубе,
громоотводу или телефонному заземлению.
•Доступ ко всем необходимым вентиляционным отверстиям
дожен быть свободным от препятствий.
•В соответствии с электротехническими нормами в цепи должно
быть установлено устройство защитного отключения.
•Не устанавливайте блок во взрывоопасных зонах.
Эксплуатация
•Используйте только те детали, которые перечислены в списке
запасных частей. Никогда не пытайтесь модифицировать
оборудование.
•Убедитесь, что дети не могут залезть на наружный блок или
ударить его.
•Располагайте батарею в таком месте, где нет опасности пожара.
•Используйте только тот хладагент, который указан на этикетке
кондиционера.
•Отключите питание, если наблюдается какой-либо шум, запах
или дым от кондиционера.
•Не оставляйте легковоспламеняющиеся вещества, такие как
бензин, бензол или растворитель, вблизи кондиционера.
•Если кондиционер был затоплен водой, обратитесь
в авторизованный сервисный центр.
•Не используйте кондиционер в течение длительного периода
времени в небольшом помещении без надлежащей
вентиляции.
•В случае утечки газа (например, фреона, пропана, сжиженного
газа и т. д.) перед повторным использованием кондиционера
проветрите как следует помещение.
RU
5
Page 44

•Для очистки внутренних частей обратитесь в авторизованный
сервисный центр или к дилеру. Использование агрессивных
моющих средств может вызвать коррозию или повреждение ус
тройства.
•Обязательно проветрите помещение, если кондиционер
и отопительное оборудование, например обогреватель,
используются одновременно.
•Не закрывайте отверстия для впуска или выпуска воздуха.
•Не вставляйте руки или другие предметы в отверстие для
впуска или выпуска воздуха во время работы кондиционера.
•Убедитесь, что кабель питания не запачкан, не ослаблен и не
разорван.
•Запрещается трогать, эксплуатировать или ремонтировать
кондиционер мокрыми руками.
•Не ставьте предметы на кабель питания.
•Не устанавливайте обогреватели или другие отопительные
приборы вблизи кабеля питания.
•Не разбирайте и не удлиняйте кабель питания. Царапины или
отслаивание изоляции на силовых кабелях может привести
к возгоранию или поражению электрическим током, такие
кабели следует заменить.
•Немедленно отключите питание в случае сбоя электропитания
или грозы.
•Обеспечьте условия, при которых кабель питания не сможет
отсоединиться и не будет поврежден во время эксплуатации.
•Не касайтесь труб хладагента, дренажа и любых внутренних
деталей устройства во время его эксплуатации или сразу
после завершения работы.
RU
Обслуживание
•Не выполняйте очистку путем распыления воды
непосредственно на изделие.
•Перед чисткой или техническим обслуживанием отключите
электропитание и подождите, пока вентилятор не остановится.
Техническая безопасность
•Установка или ремонт, выполненные неуполномоченными
лицами, могут представлять опасность для вас и других
людей.
6
Page 45

•У лица, занимающегося работой на контуре охладителя или
вмешивающегося в контур, должно быть действительное
свидетельство от оценочного ведомства, акредитированного в
отрасли, подтверждающее компетентность этого лица для
безопасной работы с охладителями в соответствии с нормами
оценки, признанными в отрасли.
•Обслуживание выполняется только согласно рекомендациям
производителя оборудования. Техобслуживание и ремонт, для
которых требуется помощь обученного персонала, должно
выполнять только под надзором лица, компетентного в
использовании горючего охладителя.
•Информация, содержащаяся в руководстве, предназначена
для квалифицированных технических специалистов, хорошо
знакомых с процедурами безопасности и имеющих
соответствующие инструменты и испытательные приборы.
•Отказ прочитать и выполнять все инструкции в данном
руководстве может привести к сбоям в работе оборудования,
повреждению имущества, получению травмы и/или смерти.
•Прибор должен быть установлен в соответствии
с национальными правилами устройства электроустановок.
•Если необходимо заменить шнур питания, замена
осуществляется квалифицированным персоналом
с использованием только оригинальных запасных частей.
•Этот прибор должен быть заземлен надлежащим образом,
чтобы минимизировать риск поражения электрическим током.
•Не обрезайте и не удаляйте контакт заземления из вилки
питания.
•Присоединение клеммы адаптера заземления к винту крышки
настенной розетки не заземляет прибор, если крышка не
металлическая, изолирована и настенная розетка не
заземлена через бытовую проводку.
•Если у вас есть какие-либо сомнения по поводу правильности
заземления кондиционера, проверьте настенную розетку
и цепь с привлечением квалифицированного электрика.
RU
7
Page 46

•Хладагент и газ для изоляции, используемые в приборе,
требуют специальных процедур утилизации. Перед их
утилизацией проконсультируйтесь с сервисным агентом или
другим квалифицированным специалистом.
•В случае повреждения кабеля питания его должен заменить
изготовитель, сервисный центр или мастер, обладающий
достаточной квалификацией.
•Прибор хранить в хорошо вентилируемом месте, где
пространство соответствует площади помещения,
определенной для эксплуатации.
•Хранить прибор в помещении без непрерывной работы
открытого пламени (например работа газового прибора) и
источников возгорания (например, работа электрического
обогревателя).
•Хранить прибор так, чтобы предотвратить механическое
повреждение.
•Нецелевое использование прибора или повреждение корпуса
может привести к опасному UV-C излучению. Даже в
небольших дозах UV-C излучение может нанести вред глазам
и коже.
•Данный прибор содержит UV-C лампу.
•В случае повреждения прибора или необходимости в его
замене отключите источник питания и обратитесь в сервисный
центр.
•Не включайте UV-C лампу за пределами прибора.
•Во время работы не очищайте дефлектор воздушного потока и
не прикасайтесь к нему.
•Перед тем как открыть двери и съемные панели с
изображением символа опасности УФ-излучения для
технического обслуживания своими силами, рекомендуется
отключить питание.
•Перед открытием прибора прочтите инструкцию по
техническому обслуживанию.
•Не используйте приборы с явными повреждениями.
•Перед заменой УФС-лампы приборы следует следует
отключить от питания.
RU
8
Page 47

ВНИМАНИЕ!
Чтобы уменьшить риск незначительной травмы,
неисправности или повреждения продукта или
имущества при использовании этого продукта,
соблюдайте основные меры предосторожности, включая
следующие.
Установка
•Не устанавливайте кондиционер в местах, где он подвергается
непосредственному воздействию морского ветра (солевого
тумана).
•Установите сливной шланг надлежащим образом для слива
конденсата.
•Соблюдайте осторожность при распаковке и установке
кондиционера.
•Не касайтесь вытекающего хладагента во время монтажа или
ремонта.
•Привлекайте к транспортировке кондиционера двух или более
людей или используйте вилочный погрузчик.
•Установите наружный блок таким образом, чтобы он был
защищен от воздействия прямых солнечных лучей. Не
устанавливайте внутренний блок в месте, где он
непосредственно подвергается воздействию солнечного света
через окна.
•Безопасно утилизируйте применяемые для упаковки
материалы, такие как винты, гвозди, пластиковые мешки, или
батарейки, используя надлежащую упаковку после монтажа
или ремонта.
•Установите кондиционер так, чтобы шум от наружного блока
или выхлопные газы не причиняли неудобства соседям.
Невыполнение этого требования может привести к конфликту
с соседями.
RU
Эксплуатация
•Если пульт дистанционного управления не будет
использоваться в течение длительного времени, выньте из
него батарейки.
9
Page 48

•Перед началом работы кондиционера убедитесь в том, что
установлен фильтр.
•После установки или ремонта кондиционера воздуха
обязательно выполните проверку на утечки хладагента.
•Не ставьте предметы на кондиционер.
•Никогда не смешивайте разные типы батарей или старые
и новые батареи в пульте дистанционного управления.
•Не позволяйте кондиционеру работать в течение длительного
времени при очень высокой влажности или при открытой
двери или окне.
•Прекратите использование пульта дистанционного управления
при наличии утечки жидкости из батареи Если на одежду или
кожу попала жидкость из батареи, смойте ее чистой водой.
•Не подвергайте людей, животных или растения воздействию
холодного или горячего потока воздуха от кондиционера
в течение длительного времени.
•При проглатывании жидкости из батареи тщательно
прополощите рот и обратитесь к врачу.
•Не пейте воду, вытекающую из кондиционера.
•Не используйте продукт для специальных целей, таких как
консервация продуктов питания, произведений искусства
и т. д. Этот кондиционер предназначен для применения в быту,
а не в качестве прецизионной системы охлаждения.
Существует риск повреждения или утраты имущества.
•Не перезаряжайте и не разбирайте батарейки.
RU
10
Page 49

Обслуживание
•Никогда не касайтесь металлических частей кондиционера во
время снятия воздушного фильтра.
•Используйте прочную крепкую табуретку или лестницу при
очистке, обслуживании или ремонте кондиционера на высоте.
•Никогда не используйте сильные чистящие средства или
растворители при очистке кондиционера, не распыляйте воду.
Используйте мягкую ткань.
Утилизация отработанных батарей/аккумуляторов
• Этот символ может сочетаться с химическим обозначением ртути (Hg), кадмия (Cd)
или свинца (Pb), если батарея содержит более 0,0005 % ртути, 0,002 % кадмия или
0,004 % свинца.
• Все батареи/аккумуляторы утилизируются отдельно от бытовых отходов на
специализированном предприятии, уполномоченном правительством или местными
органами власти.
• Правильная утилизация старых батарей/аккумуляторов поможет предотвратить
потенциальные негативные последствия для окружающей среды, животных и
здоровья людей.
• Более подробные сведения об утилизации старых батарей/аккумуляторов можно
получить в городской администрации, службе утилизации отходов или в магазине, где
было куплено изделие.
RU
11
Page 50

ЭКСПЛУАТАЦИЯ
4
6
Примечания по эксплуатации
Рекомендации по энергосбережению
• Не переохлаждайте помещение. Это может нанести вред вашему здоровью и привести
к повышенному потреблению электроэнергии.
• Во время работы кондиционера закройте жалюзи или шторы для защиты от солнечных лучей.
• Держите двери и окна плотно закрытыми.
• Отрегулируйте направление воздушного потока по вертикали или горизонтали, чтобы воздух
циркулировал в помещении.
• Увеличьте частоту вращения вентилятора для быстрого охлаждения или нагрева воздуха
в помещении в течение короткого времени.
• Регулярно открывайте окна для вентиляции, поскольку при длительном использовании
кондиционера качество воздуха в помещениях может ухудшиться.
• Чистите воздушный фильтр один раз каждые 2 недели. Пыль и грязь, скопившиеся в воздушном
фильтре, могут блокировать поток воздуха или ухудшать работу устройства.
Детали и функции
Внутренний блок Наружный блок
RU
Воздушный фильтр
1
Воздухозаборник
2
Передняя крышка
3
Выпуск воздуха
Отражатель (горизонтальная заслонка)
5
Отражатель (вертикальные жалюзи)
Кнопка включения/выключения
7
Отверстия для впуска воздуха
1
Отверстия для выпуска воздуха
2
ПРИМЕЧАНИЕ
• Количество и расположение индикаторов состояния может различаться в зависимости от модели
кондиционера.
• Функции могут быть изменены в зависимости от типа модели.
12
Page 51

RU
Swing
Беспроводной пульт дистанционного управления
Установка батареек
Если экран пульта дистанционного управления
начинает тускнеть, замените батареи. Перед
использованием пульта дистанционного
управления вставьте батарейки ААА (1,5 В).
Снимите крышку отсека для батареек.
1
Вставьте новые батарейки и убедитесь, что
2
полюса + и – батареек установлены
правильно.
Установка держателя пульта
дистанционного управления
Для защиты пульта дистанционного управления
установите держатель там, где нет воздействия
прямого солнечного света.
Выберите безопасное и удобное
1
местоположение.
Метод работы
Для управления направьте пульт дистанционного
управления на приемник сигнала в правой
стороне кондиционера.
ПРИМЕЧАНИЕ
• Пульт дистанционного управления может
управлять другими электронными
устройствами, если он направлен
в соответствующую сторону. Убедитесь, что
пульт дистанционного управления направлен
в сторону приемника сигнала кондиционера.
• Для нормальной работы используйте мягкую
ткань, чтобы очистить передатчик и приемник
сигнала.
• Если функция не предусмотрена продуктом, то
при нажатии кнопки данной функции на пульте
дистанционного управления звуковой сигнал
подан не будет. Исключение составляют
следующие функции: Направление потока
воздуха (
потребления энергии ( ), Очистка воздуха (
).
), Отображение значения
Надежно закрепите держатель 2 винтами
2
с помощью отвертки.
13
Page 52

RU
ON/OFF
ON/OFF
Установка текущего времени
Вставьте батарейки.
1
• Значок, указанный ниже, мигает в нижней
части экрана дисплея.
Нажмите кнопку или , чтобы выбрать
2
минуты.
Нажмите кнопку Set/Cancel для завершения.
3
ПРИМЕЧАНИЕ
• После установки текущего времени можно
воспользоваться таймером On/Off (включение/
выключение).
Использование функции
преобразования °С/°F
(дополнительно)
Эта функция переключает единицы блока между
°С и °F
• Нажмите и удерживайте кнопку около
5 секунд.
Эксплуатация кондиционера без
пульта дистанционного
управления
Если пульт дистанционного управления
отсутствует, то для работы с кондиционером
можно использовать кнопку ON/OFF на
внутреннем блоке.
Откройте фронтальную панель (Тип 2) или
1
горезонтальное жалюзи (Тип 1).
Нажмите кнопку ON/OFF.
2
Тип 1
Тип 2
14
ПРИМЕЧАНИЕ
• Если открывать горизонтальную заслонку
слишком быстро, можно сломать шаговый
двигатель.
• Частота вращения вентилятора
устанавливается на высокий уровень.
• Функции могут быть изменены в зависимости
от типа модели.
• При использовании этой аварийной кнопки ON/
OFF (Вкл./выкл.) невозможно изменить
температуру.
• Для моделей с охлаждением и нагревом
температура устанавливается в диапазоне от
22 до 24 °С
Page 53

Использование беспроводного пульта дистанционного управления
Reset
Swing
Swing
Пульт дистанционного управления позволяет удобно управлять кондиционером.
RU
Кнопка
2
*
*
*
1
Mode
Jet
Mode
Fan
Speed
Экран
дисплея
-
Указания
Включение/выключение
кондиционера.
Настройка нужной
температуры в режиме
охлаждения, нагрева
или автоматического
переключения.
Выбор режима
охлаждения.
Выбор режима нагрева. O O
Выбор режима
осушения.
Выбор режима
вентилятора.
Выбор режима
автоматического
переключения/
автоматической
работы.
Быстрое изменение
температуры
в помещении.
Регулировка частоты
вращения вентилятора.
Регулировка
направления
воздушного потока по
вертикали или
горизонтали.
Доступные функции
Одиночная
сплит-
система
O O
O O
O O
O O
O O
O O
O O
O O
O O
Мульти
система
ПРИМЕЧАНИЕ
• * Кнопки могут быть изменены в зависимости от типа модели.
• При подключении к внешнему мульти-блоку функции Energy Display, Energy
Control, Silent и Smart Diagnosis могут не поддерживаться.
15
Page 54

RU
Reset
Кнопка
2
*
*
*
Set/
Cancel
1
*Light
Off
Room
Temp.
°C↔°F
(5 s)
*Comfort
Air
kW(3 s) -
*Energy
Ctrl.
Diagnosis
(5 s)
UVnano
(3 s)
Экран
дисплея
-
-
- Настройка времени. O O
-
-
-
Указания
Автоматическое
включение/выключение
кондиционера
в заданное время.
Установка/отмена
специальных функций
и таймера.
Отмена настроек
таймера.
Установка яркости
дисплея на внутреннем
блоке.
Отображение
температуры
в помещении.
Переключение единиц
между °C и °F
Регулировка
отклонения воздушного
потока.
Установка или
отключение
отображения
информации об
электроэнергии.
Включение функции
управления
энергопотреблением.
Удобная проверка
информации об
обслуживании
продукта.
Для поддержания
чистоты вентилятора.
Доступные функции
Одиночная
сплит-
система
O O
O O
O O
O O
O O
O O
O O
O X
O X
O X
O
(дополните-
льно)
Мульти
система
O
(дополните-
льно)
16
Page 55

RU
Reset
Кнопка
2
*
*
*
1
Reset -
Экран
дисплея
Указания
Ионный генератор
использует миллионы
ионов, чтобы улучшить
качество воздуха в
помещении.
Уменьшение шума от
наружных блоков.
Удаление влаги,
образующейся во
внутреннем блоке.
Инициализация
параметров
дистанционного
управления.
Доступные функции
Одиночная
сплит-
система
O
(дополните-
льно)
O X
O O
O O
Мульти
система
O
(дополните-
льно)
ПРИМЕЧАНИЕ
• Некоторые функции могут не поддерживаться, в зависимости от модели.
• * Кнопки могут быть изменены в зависимости от типа модели.
• Чтобы управлять выбранной командой Func, нажмите кнопку Set/Cancel.
17
Page 56

RU
ON/OFF
ON/OFF
Автоматический перезапуск кондиционера
Если кондиционер снова включен после сбоя
питания, эта функция восстанавливает
предыдущие настройки.
Отключение автоматического
перезапуска
Откройте фронтальную панель (Тип 2) или
1
горезонтальное жалюзи (Тип 1).
Нажмите кнопку ON/OFF и удерживайте ее
2
в течение 6 секунд: устройство подает
двойной звуковой сигнал, индикатор дважды
мигнет 4 раза.
• Для повторного включения функции
нажмите кнопку ON/OFF и удерживайте
в течение 6 секунд. Устройство подаст
двойной звуковой сигнал, и индикатор
мигнет 4 раза.
Тип 1
Тип 2
Использование функции режима
Позволяет выбрать требуемую функцию.
Режим охлаждения
Режим автоматического
переключения / Режим
автоматической работы (AI)
Режим снижения влажности
Режим обогрева
Режим вентилятора
Режим охлаждения
Включите питание машины.
1
Нажмите кнопку Mode, чтобы выбрать
2
режим охлаждения.
• На экране дисплея отображается .
ПРИМЕЧАНИЕ
• Функции могут быть изменены в зависимости
от типа модели.
• Если нажать и удерживать кнопку ON/OFF
нажатой в течение 3–5 секунд вместо 6 секунд,
прибор перейдет в режим тестирования. В
этом режиме устройство выпускает сильно
охлажденный воздух в течение 18 минут,
а затем возвращается к заводским настройкам
по умолчанию.
18
3
Нажмите кнопку или , чтобы
установить требуемую температуру.
Page 57

RU
Автоматический режим
(искусственный интеллект)
Мульти система
В этом режиме система автоматически
контролируется с помощью электронного
управления.
Включите питание машины.
1
Нажмите кнопку Mode, чтобы выбрать
2
автоматическую работу.
• На экране дисплея отображается .
3
Нажмите кнопку или , чтобы
установить требуемую температуру.
Нажмите кнопку Fan Speed для регулировки
4
частоты вращения вентилятора.
Режим автоматического
переключения
Одиночная сплит-система
Эта операция изменяет режим для
автоматического поддержания заданной
температуры в диапазоне ±2 °С
Включите питание машины.
1
Нажмите кнопку Mode, чтобы выбрать
2
режим автоматического переключения.
• На экране дисплея отображается .
3
Нажмите кнопку или , чтобы
установить требуемую температуру.
Нажмите кнопку Fan Speed для регулировки
4
частоты вращения вентилятора.
Режим снижения влажности
Этот режим удаляет лишнюю влагу из
окружающей среды с высокой влажностью или
во время сезона дождей, для того чтобы
предотвратить свертывание обоев. Этот режим
автоматически регулирует температуру
в помещении и частоту вращения вентилятора,
чтобы поддержать оптимальный уровень
влажности.
Включите питание машины.
1
Нажмите кнопку Mode, чтобы выбрать
2
режим снижения влажности
• На экране дисплея отображается .
ПРИМЕЧАНИЕ
• В этом режиме невозможно настроить
температуру в помещении, она регулируется
автоматически.
• Температура в помещении не отображается на
экране дисплея.
• В режиме осушения компрессор и вентилятор
внутреннего блока могут не работать, если
температура в помещении ниже 24 °C
19
Page 58

RU
Режим обогрева
Включите питание машины.
1
Нажмите кнопку Mode, чтобы выбрать
2
режим обогрева.
• На экране дисплея отображается .
3
Нажмите кнопку или , чтобы
установить требуемую температуру.
ПРИМЕЧАНИЕ
• будет отображаться на внутреннем блоке,
когда идет процесс размораживания.
• Кроме того, это указание будет отображаться
на внутреннем блоке:
− Когда работает предварительный нагрев.
− Когда температура в помещении достигла
заданной.
Режим вентилятора
В этом режиме выполняется только циркуляция
воздуха в помещении без изменения
температуры в нем.
Включите питание машины.
1
Нажмите кнопку Mode, чтобы выбрать
2
режим вентилятора.
• На экране дисплея отображается .
Нажмите кнопку Fan Speed для регулировки
3
частоты вращения вентилятора.
Использование функции скоростного режима
Быстрое изменение температуры
в помещении
Эта функция позволяет быстро охладить воздух
в помещении летом или нагреть его зимой.
• функция скоростного режима доступна
в режимах охлаждения, обогрева и снижения
влажности.
Включите питание машины.
1
Нажмите кнопку Mode, чтобы выбрать
2
нужный режим.
Нажмите кнопку Jet Mode.
3
• На экране дисплея отображается .
ПРИМЕЧАНИЕ
• Режим форсированного обогрева недоступен
на некоторых моделях.
• В режиме скоростного охлаждения сильный
поток воздуха выдувается 30 минут.
• По истечении 30 минут установленная
температура поддерживается на уровне 18 °C
Если требуется изменить температуру,
нажмите кнопку или , чтобы задать
нужную температуру.
• В режиме скоростного обогрева сильный поток
воздуха выдувается 30 минут.
• По истечении 30 минут установленная
температура поддерживается на уровне 30 °C
Если требуется изменить температуру,
нажмите кнопку или , чтобы задать
нужную температуру.
• Эта функция может работать по-другому
с дисплея пульта дистанционного управления.
20
Page 59

RU
→ →
→ → → →
Swing
Swing
Swing
Swing
Использование функции частоты вращения вентилятора
Регулировка частоты вращения
вентилятора
• Нажмите кнопку Fan Speed несколько раз для
регулировки частоты вращения вентилятора.
Экран дисплея Частота вращения
Высокая
Умеренно высокая
Средняя
Умеренно низкая
Низкая
- Естественный ветер
ПРИМЕЧАНИЕ
• Скорость вентилятора при естественном ветре
регулируется автоматически
• На некоторых внутренних блоках имеются
значки частоты вращения вентилятора.
• На некоторых моделях дисплей внутреннего
блока отображается в течение 5 секунд и
возвращается к установленной температуре.
Использование функции направления воздушного потока
Эта функция регулирует направление
воздушного потока по вертикали (по
горизонтали).
• Нажмите кнопку
и выберите нужное направление.
− Выберите ( ) для автоматического
регулирования направления воздушного
потока.
ПРИМЕЧАНИЕ
• Регулировка направления воздушного потока
по горизонтали может не поддерживаться,
в зависимости от модели.
• Произвольная регулировка отражателя может
привести к неисправности продукта.
• При перезапуске кондиционера он начинает
работать с ранее установленным
направлением воздушного потока, так что
режим отражателя может не совпадать со
значком, отображаемым на пульте
дистанционного управления. Если такое
происходит, снова нажмите кнопку
для регулировки направления воздушного
потока.
• Эта функция может работать по-другому
с дисплея пульта дистанционного управления.
(
) несколько раз
или
21
Page 60

RU
Установка таймера включения/выключения
Эта функция настраивает кондиционер для
включения/выключения автоматически
в заданное время.
Таймер вкл./выкл. можно настроить вместе.
Установка таймера включения
Нажмите кнопку несколько раз.
1
• Значок, указанный ниже, мигает в нижней
части экрана дисплея.
Нажмите кнопку или , чтобы выбрать
2
минуты.
Нажмите кнопку Set/Cancel для завершения.
3
• После установки таймера на экране
дисплея отображается текущее время
и значок , указывающий на то, что
установлено требуемое время.
Отмена таймера включения
Установка таймера выключения
Нажмите кнопку несколько раз.
1
• Значок, указанный ниже, мигает в нижней
части экрана дисплея.
Нажмите кнопку или , чтобы выбрать
2
минуты.
Нажмите кнопку Set/Cancel для завершения.
3
• После установки таймера на экране
дисплея отображается текущее время
и значок , указывающий на то, что
установлено требуемое время.
ПРИМЕЧАНИЕ
• Эта функция отключена при выборе простого
таймера.
Отмена таймера выключения
Нажмите кнопку несколько раз.
1
• Значок, указанный ниже, мигает в нижней
части экрана дисплея.
Нажмите кнопку несколько раз.
1
• Значок, указанный ниже, мигает в нижней
части экрана дисплея.
Нажмите кнопку Set/Cancel, чтобы отменить
2
настройку.
22
Нажмите кнопку Set/Cancel, чтобы отменить
2
настройку.
Отмена настройки таймера
• Нажмите кнопку , чтобы отменить все
установки таймера.
Page 61

RU
Использование функции выключения через заданное время (дополнительно)
Эта функция автоматически выключает
кондиционер, когда вы ложитесь спать.
Включите питание машины.
1
Нажмите кнопку несколько раз.
2
• Значок, указанный ниже, мигает в нижней
части экрана дисплея.
Нажмите кнопку или , чтобы выбрать
3
время (до 7 часов).
Нажмите кнопку Set/Cancel для завершения.
4
• На экране дисплея отображается .
ПРИМЕЧАНИЕ
• На некоторых внутренних блоках отображается
.
• На дисплее внутреннего блока в течение
5 секунд показано от 1Н до 7H а затем
дисплей возвращается к отображению
установленной температуры.
• В режиме охлаждения и снижения влажности,
для более комфортного сна, температура
через 30 минут увеличивается на 1 °С и еще
на 1 °C через дополнительные 30 мин.
• Температура повышается на 2 °С от заданной.
• Хотя замечание для частоты вращения
вентилятора на экране дисплея может быть
изменено, частота вращения вентилятора
регулируется автоматически.
Использование функции простого таймера (дополнительно)
Эта функция автоматически выключает
кондиционер, когда вы ложитесь спать.
Включите питание машины.
1
Нажмите кнопку несколько раз.
2
• Значок, указанный ниже, мигает в нижней
части экрана дисплея.
Нажмите кнопку или , чтобы выбрать
3
время (до 7 часов).
Нажмите кнопку Set/Cancel для завершения.
4
• На экране дисплея отображается .
ПРИМЕЧАНИЕ
• Эта функция отключена при выборе функции
таймера выключения.
23
Page 62

RU
Swing
Использование функции отображения электроэнергии (дополнительно)
Эта функция отображает количество
потребляемой электроэнергии на внутреннем
дисплее во время работы устройства.
Отображение текущего
потребления энергии
Включите питание машины.
1
2
Нажмите и удерживайте кнопку около
3 секунд.
• На некоторых блоках внутренней
установки некоторое время отображается (
) мгновенной потребляемой мощности.
ПРИМЕЧАНИЕ
• Единица измерения — кВт.
• Оно не отображается на беспроводном пульте
дистанционного управления.
• Если значение выше 99 кВт, т. е. выше
диапазона отображения, то поддерживайте его
на уровне 99 кВт.
• Мощность до 10 кВт отображается с шагом
0,1 кВт, а мощность свыше10 кВт с шагом 1 кВт.
• Реальная мощность может отличаться от
отображаемого значения.
• При подключении к внешнему мульти-блоку эта
функция может не поддерживаться.
Использование функции выключения подсветки (дополнительно)
Яркость экрана дисплея
Можно настроить яркость экрана дисплея
внутреннего блока.
• Нажмите кнопку Light Off.
ПРИМЕЧАНИЕ
• Включить/выключить экран дисплея.
Использование функции комфортного обдува (дополнительно)
Комфортный режим работы
заслонки
Эта функция удобно устанавливает заслонку
в заданное положение, чтобы подаваемый
воздух не поступал непосредственно на людей,
находящихся в помещении.
Включите питание машины.
1
Нажмите кнопку Comfort Air несколько раз
2
и выберите нужное направление.
• На экране дисплея отображается или
.
ПРИМЕЧАНИЕ
• На экране некоторых внутренних блоков
отображается или .
• Эта функция отключается при нажатии кнопки
Mode или Jet Mode.
• Эта функция отключена и при нажатии кнопки
будет настроено автоматическое качание
в вертикальном направлении.
• Когда эта функция выключена, горизонтальная
заслонка работает автоматически
в зависимости от установленного режима.
24
Page 63

RU
Использование функции управления энергопотреблением (дополнительно)
Включите питание машины.
1
Нажмите кнопку Energy Ctrl.
2
• Нажмите кнопку Energy Ctrl несколько раз,
чтобы выбрать каждый шаг.
ПРИМЕЧАНИЕ
• Шаг 1.Энергопотребление уменьшается на
20 % по сравнению с номинальной величиной.
− На экране дисплея отображается .
• Шаг 2. Энергопотребление уменьшается на
40 % по сравнению с номинальной величиной.
− На экране дисплея отображается .
• Шаг 3 (дополнительный). Энергопотребление
уменьшается на 60 % по сравнению
с номинальной величиной.
− На экране дисплея отображается .
• На экране некоторых внутренних блоков
отображается (1 шаг), (2 шаг).
• Эта функция доступна с режимом охлаждения.
• При выборе режима управления
энергосбережением производительность может
уменьшиться.
• Если нажать кнопку Fan Speed, или ,
заданная температура отображается в течение
5 с.
• Если нажать кнопку Room Temp, отображается
температура в помещении в течение 5 с.
• При подключении к внешнему мульти-блоку эта
функция может не поддерживаться.
Использование функции UVnano (дополнительно)
Название функции UVnano составлено из двух
слов: UV (ультрафиолетовый спектр) и
nanometer (нанометр, единица измерения
длины).
Эта функция сокращает количество различных
бактерий внутри системы кондиционирования
воздуха.
Название модели: LTPL-G35UV275GS-JA
LTPL-G35UV275GS-TWA
CUD7GF1A
Нажмите и удерживайте кнопку Jet Mode около
3 секунд.
ПРИМЕЧАНИЕ
• На некоторых предназначенных для
использования в помещении устройствах
отобразится UV, в зависимости от модели.
• Для поддержания чистоты вентилятора
ультрафиолетовый светодиод срабатывает
через регулярные промежутки времени.
• Функция UVnano прекращает работу при
выключении системы кондиционирования
воздуха.
• При запуске функции автоматической очистки
одновременно запускается функция UVnano
для поддержания чистоты вентилятора.
• Функция UVnano не будет работать, если не
настроена функция автоматической очистки.
25
Page 64

RU
Использование специальных функций
Включите питание машины.
1
Нажмите кнопку Func, чтобы выбрать
2
требуемую функцию.
Нажмите кнопку Set/Cancel для завершения.
3
Экран
дисплея
Ионный генератор использует
миллионы ионов, чтобы
улучшить качество воздуха в
помещении.
Уменьшение шума от наружных
блоков.
Удаление влаги, образующейся
во внутреннем блоке.
ПРИМЕЧАНИЕ
• Некоторые функции могут не поддерживаться,
в зависимости от модели.
• Некоторые функции могут работать по-другому
с дисплея пульта дистанционного управления.
Указания
Отмена специальных функций
Нажмите кнопку Func, чтобы выбрать
1
требуемую функцию.
Нажмите кнопку Set/Cancel, чтобы отменить
2
действие функции.
Использование функции очистки
воздуха
Эти функции обеспечивают подачу чистого
и свежего воздуха с помощью ионов и фильтра.
Функция Дисплей Указания
Ионы из
ионизатора
приводят к
Ионизатор
Плазма
ПРИМЕЧАНИЕ
• Вы можете использовать эту функцию, не
включая кондиционер.
• На некоторых моделях загорается индикатор
плазмы и охлаждения, если устройство
находится в режиме удаления дыма/плазмы.
• Не прикасайтесь к ионизатору во время
работы.
• Эта функция может работать по-другому
с дисплея пульта дистанционного управления.
снижению
количества
бактерий и
других вредных
веществ на
поверхностях.
Полностью
удаляет
микроскопические
загрязняющие
вещества из
всасываемого
воздуха, чтобы
обеспечить
подачу чистого
и свежего
воздуха.
26
Page 65

Использование функции
бесшумной работы
Эта функция предотвращает возникновение
потенциальных претензий соседей, уменьшая
шум от наружных блоков.
• На экране дисплея отображается .
ПРИМЕЧАНИЕ
• Эта функция отключается при нажатии кнопки
Mode, или Energy Ctrl, или Jet Mode.
• Эта функция доступна в режиме охлаждения,
обогрева, автоматического переключения,
автоматической работы.
• При подключении к внешнему мульти-блоку эта
функция может не поддерживаться.
Использование функции
автоматической очистки
В режиме охлаждения и снижения влажности во
внутреннем блоке образуется влага. Эта
функция удаляет такую влагу.
• На экране дисплея отображается .
ПРИМЕЧАНИЕ
• Некоторые функции не могут быть
использованы во время работы функции
автоматической очистки.
• Функция UVnano не будет работать, если не
настроена функция автоматической очистки.
• Если выключить питание, вентилятор работает
в течение 30 минут и очищает внутреннюю
часть внутреннего блока.
• На некоторых предназначенных для
использования в помещении устройствах
отобразится , в зависимости от модели.
RU
27
Page 66

ИНТЕЛЛЕКТУАЛЬНЫЕ ФУНКЦИИ
RU
Приложение LG ThinQ
Данная функция доступна только в моделях с
логотипом или ThinQ.
Приложение LG ThinQ позволяет управлять
данным устройством с помощью смартфона.
Функции приложения LG ThinQ
Подключайтесь к устройству со смартфона при
помощи удобных интеллектуальных функций.
Smart Diagnosis
Если у вас возникли проблемы при
использовании устройства, функция Smart
Diagnosis поможет вам выявить ее причину.
Настройки
Позволяет задавать различные параметры на
устройстве и в приложении.
ПРИМЕЧАНИЕ
• При изменении маршрутизатора беспроводной
сети, поставщика услуг Интернета или пароля
удалите зарегистрированное устройство из
приложения LG ThinQ и зарегистрируйте его
снова.
• В целях улучшения продукта в приложение
могут вноситься изменения без
предварительного уведомления пользователя.
• Характеристики могут меняться в зависимости
от модели.
Перед использованием
приложения LG ThinQ
Проверьте расстояние между прибором и
1
беспроводным маршрутизатором (сеть
Wi-Fi).
• Если расстояние между прибором и
беспроводным маршрутизатором слишком
большое, сила сигнала ослабляется.
Регистрация может занять много времени
или возможен сбой установки.
Отключите передачу мобильных данных
2
или данных телефона на смартфоне.
Подключите смартфон к беспроводному
3
маршрутизатору.
ПРИМЕЧАНИЕ
• Чтобы проверить Wi-Fi-соединение, убедитесь,
что значок на панели управления светится.
• Прибор поддерживает только сети Wi-Fi 2,4
ГГц. Чтобы проверить частоту вашей сети,
обратитесь к поставщику услуг Интернет или
см. инструкции к беспроводному
маршрутизатору.
• Приложение LG ThinQ не предназначено для
решения проблем с подключением к сети, а
также неполадками и ошибками, вызванными
сетевым подключением.
• Если возникли какие-либо проблемы при
подключении устройства к сети Wi-Fi, это
может быть вызвано тем, что устройство
находится слишком далеко от маршрутизатора.
Приобретите ретранслятор (усилитель сигнала)
Wi-Fi, чтобы улучшить сигнал Wi-Fi.
• Подключение Wi-Fi может быть не установлено
или прервано из-за особенностей домашней
сети.
• В зависимости от Интернет-провайдера с
сетевым соединением могут возникать те или
иные проблемы.
• Окружающая беспроводная среда может
замедлить работу беспроводной сети.
28
Page 67

RU
• Устройство может не пройти регистрацию в
связи с проблемами с беспроводной передачей
сигнала. Отключите устройство от сети и
подождите примерно минуту перед тем, как
повторить попытку.
• Если на вашем беспроводном маршрутизаторе
включен брандмауэр, отключите брандмауэр
или добавьте к нему исключение.
• Имя беспроводной сети (SSID) должно
содержать английские буквы и цифры. (Не
используйте специальные символы)
• Пользовательский интерфейс смартфона (ПИ)
может отличаться в зависимости от
операционной системы (ОС) и производителя.
• Если протокол безопасности маршрутизатора
настроен на WEP, возможен сбой настройки
сети. Измените его на другой протокол
безопасности (рекомендуется WPA2) и снова
зарегистрируйте изделие.
Установка приложения LG ThinQ
Найдите приложение LG ThinQ в Google Play
Store & Apple App Store на смартфоне. Следуйте
инструкциям по загрузке и установке
приложения.
Технические характеристики
модуля беспроводной ЛВС
Модель LCW-003
Диапазон
частот:
Выходная
мощность
(макс.)
Версия ПО беспроводной функции: V 1,0
от 2412 до 2472 МГц
IEEE 802.11b:18.37 dBm
IEEE 802.11g:17.67 dBm
IEEE 802.11n:17.67 dBm
Уведомление о программном
обеспечении с открытым
исходным кодом
Для получения исходного кода по условиям
лицензий GPL, LGPL, MPL и других лицензий с
открытым исходным кодом, который содержится
в данном продукте, посетите веб-сайт: http://
opensource.lge.com.
Кроме исходного кода, для загрузки доступны
все соответствующие условия лицензии, отказ
от гарантий и уведомления об авторских правах.
Компания LG Electronics также может
предоставить открытый исходный код на
компакт-диске за плату, покрывающую
связанные с этим расходы (стоимость носителя,
пересылки и обработки), по запросу, который
следует отправить по адресу электронной почты
opensource@lge.com. Это предложение
действительно в течение трех лет с момента
последней поставки нами данного продукта. Это
предложение актуально для любого получателя
данной информации.
29
Page 68

RU
Smart Diagnosis
Данная функция доступна только в моделях с
логотипом или .
Данная функция служит для поиска и решения
проблем с вашим устройством.
ПРИМЕЧАНИЕ
• По причинам, не связанным с LGE, служба
может не работать из-за внешних факторов,
таких как, например, недоступность Wi-Fi, сбой
соединения Wi-Fi, политика используемого
магазина приложений или недоступность
приложения.
• Функция может подвергаться изменениям без
предварительного уведомления и может быть
реализована по-разному в зависимости от
местоположения пользователя.
Использование функции LG ThinQ
для выявления неисправностей
Если с вашим устройством, поддерживающим
Wi-Fi, возникла проблема, оно может передать
данные о неисправности на смартфон через
приложение LG ThinQ.
• Запустите приложение LG ThinQ и выберите
функцию Smart Diagnosis в открывшемся
меню. Следуйте инструкциям в приложении LG
ThinQ.
Использование звуковой
диагностики для выявления
неисправностей
Чтобы использовать функцию звуковой
диагностики, следуйте инструкциям,
приведенным ниже.
• Запустите приложение LG ThinQ и выберите
функцию Smart Diagnosis в открывшемся
меню. Следуйте инструкциям по выполнению
звуковой диагностики в приложении LG ThinQ.
Правильно вставьте вилку в розетку.
1
Поднесите микрофон вашего смартфона к
2
логотипу или .
Нажмите и удерживайте кнопку Diagnosis(5
3
s) в течение не менее 5 секунд,
одновременно держа микрофон смартфона
около логотипа до полной передачи данных.
• Не убирайте смартфон, пока данные не
будут переданы. Оставшееся время
передачи отображается в приложении.
После окончания передачи данных данные о
4
неисправности будут отображены в
приложении.
30
ПРИМЕЧАНИЕ
• Не перемещайте телефон в процессе
передачи.
• Убедитесь в отсутствии окружающего шума,
в противном случае телефон может не принять
звуковой сигнал, поданный из внутреннего
блока.
Page 69

ТЕХНИЧЕСКОЕ ОБСЛУЖИВАНИЕ
ОСТОРОЖНО!
• Перед чисткой или техническим обслуживанием отключите электропитание и подождите, пока
вентилятор не остановится.
Если кондиционер не будет использоваться в течение длительного периода времени, просушите
кондиционер для поддержания его в наилучшем состоянии. Регулярно очищайте продукт, чтобы
поддерживать его оптимальную производительность и предотвратить возможное повреждение.
• Просушите кондиционер в режиме вентилятора от 3 до 4 часов и отключите питание. Если влага
останется в компонентах, может произойти внутреннее повреждение.
• Перед повторным использованием кондиционера просушите внутренние компоненты в режиме
вентилятора от 3 до 4 часов. Это поможет удалить запах, возникший от влаги.
Воздушный фильтр
• Функции могут быть изменены в зависимости от типа модели.
RU
31
Page 70

Тип Указания Интервал
Воздушный
фильтр
Ионизатор
(дополнительно)
Внутренний блок
Наружный блок
Очистка пылесосом или ручная промывка. 2 недели
Используйте сухую ватную палочку, чтобы удалить пыль. Каждые 6 месяцев
Очистка поверхности внутреннего блока с помощью мягкой
сухой ткани.
Профессиональная очистка поддона для слива конденсата. Раз в год
Профессиональная очистка трубы для слива конденсата. Каждые 4 месяца
Замена батареек в пульте дистанционного управления. Раз в год
Профессиональная очистка змеевиков теплообменника
и вентиляционных отверстий панели. (Проконсультируйтесь
с техническим специалистом.)
Профессиональная очистка вентилятора. Раз в год
Профессиональная очистка поддона для слива конденсата. Раз в год
Профессиональная проверка надежной затяжки всех
вентиляторов.
Очистка электрических компонентов с помощью воздуха. Раз в год
Регулярно
Раз в год
Раз в год
ПРИМЕЧАНИЕ
• При очистке фильтров не используйте воду с температурой выше 40 °С. Это может привести
к деформации или обесцвечиванию.
• Никогда не используйте летучие вещества при очистке фильтров. Они могут повредить поверхность
изделия.
RU
32
Page 71

RU
Очистка воздушного фильтра
Очищайте воздушные фильтры через каждые
2 недели или чаще, если необходимо.
ПРИМЕЧАНИЕ
• Если воздушный фильтр согнуть, он может
сломаться.
• Если фильтр собран неправильно, во
внутренний блок могут попасть пыль и другие
вещества.
Тип 1
Если посмотреть на внутренний блок сверху,
можно легко собрать верхний фильтр.
Выключите изделие и отсоедините шнур
1
питания.
Держась за ручку воздушного фильтра,
2
немного приподнимите его.
Выньте фильтр из внутреннего блока.
3
Надавите на крючки, чтобы собрать
7
воздушный фильтр.
Проверьте сторону передней крышки на
8
правильность сборки воздушного фильтра.
Тип 2
Выключите изделие и отсоедините шнур
1
питания.
Откройте переднюю крышку.
2
• Приподнимите обе стороны крышки.
Возьмитесь за ручки воздушных фильтров,
3
потяните их немного вниз и извлеките из
внутреннего блока.
Очистите фильтр с помощью пылесоса или
4
теплой воды с нейтральным моющим
средством.
Высушите фильтр в тени.
5
Вставьте крючки воздушного фильтра
6
в переднюю крышку.
Очистите фильтр с помощью пылесоса или
4
теплой воды с нейтральным моющим
средством.
Высушите фильтры в тени.
5
Вставьте крючки воздушных фильтров
6
в переднюю крышку.
Проверьте сторону передней крышки на
7
правильность сборки воздушных фильтров.
33
Page 72

ПОИСК И УСТРАНЕНИЕ НЕИСПРАВНОСТЕЙ
Функция самодиагностики
Этот продукт имеет встроенную функцию самодиагностики. Если происходит ошибка, индикатор
внутреннего блока будет мигать с интервалом 2 секунды. В этом случае обратитесь к местному
дилеру или в сервисный центр.
Перед обращением в сервисный центр
Перед обращением в сервисный центр проверьте следующее. Если проблема не устраняется,
обратитесь в местный сервисный центр.
Признаки Возможные причины и решение
Из устройства поступают запах гари и странные звуки.
• Выключите кондиционер, отключите кабель питания или отсоедините
электропитание и обратитесь в сервисный центр.
Из внутреннего блока вытекает вода даже при низком уровне
влажности.
• Выключите кондиционер, отключите кабель питания или отсоедините
электропитание и обратитесь в сервисный центр.
Кондиционер
работает
неправильно.
Кондиционер не
работает.
Кабель питания поврежден или чрезмерно нагревается.
• Выключите кондиционер, отключите кабель питания или отсоедините
электропитание и обратитесь в сервисный центр.
Переключатель, автоматический выключатель (безопасность, земля)
или предохранитель не должным образом.
• Выключите кондиционер, отключите кабель питания или отсоедините
электропитание и обратитесь в сервисный центр.
Устройство генерирует код ошибки при выполнении самодиагностики.
• Выключите кондиционер, отключите кабель питания или отсоедините
электропитание и обратитесь в сервисный центр.
Кондиционер отключен.
• Проверьте, что шнур питания подключен к розетке и электрические
разъединители включены.
Предохранитель перегорел или заблокирован блок питания.
• Замените предохранитель или проверьте, не сработал ли автоматический
выключатель.
Произошел сбой питания.
• При сбое питания выключите кондиционер.
• При восстановлении питания подождите 3 минуты, а затем включите
кондиционер.
Напряжение слишком высокое или слишком низкое.
• Проверьте, не сработал ли автоматический выключатель.
Кондиционер был автоматически выключен в заданное время.
• Включите прибор.
Батарейка в пульте дистанционного управления установлена
неправильно.
• Проверьте, что батарейки в пульте дистанционного управления вставлены
правильно.
• Если батарейки вставлены правильно, но кондиционер не работает,
замените батарейки и попробуйте еще раз.
RU
34
Page 73

Признаки Возможные причины и решение
Воздух не циркулирует должным образом.
• Убедитесь, что перед кондиционером нет блокирующих штор, жалюзи или
мебели.
Воздушный фильтр загрязнен.
• Очищайте воздушный фильтр один раз в 2 недели.
• Дополнительную информацию см. в разделе «Очистка воздушного
фильтра».
Температура в помещении слишком высокая.
• В летний период для полного охлаждения воздуха в помещении может
потребоваться некоторое время. В этом случае выберите скоростной
режим, чтобы быстро охладить воздух в помещении.
Кондиционер не
выпускает
охлажденный воздух.
Невозможно
отрегулировать
частоту вращения
вентилятора.
Невозможно
отрегулировать
температуру.
Кондиционер
останавливается во
время работы.
Холодный воздух выходит из комнаты.
• Убедитесь, что холодный воздух не выходит через точки вентиляции
в комнате.
Необходимая температура выше текущей температуры.
• Установите требуемую температуру на более низкий уровень по
сравнению с текущей.
Поблизости находится источник нагрева.
• Во время работы кондиционера избегайте использования нагревательных
элементов, таких как электрические печи или газовые горелки.
Выбран режим вентилятора.
• В режиме вентилятора воздух выходит из кондиционера без охлаждения
или нагрева воздуха в помещении.
• Переключитесь в режим охлаждения.
Наружная температура слишком высокая.
• Охлаждающий эффект может быть недостаточным.
Выбран скоростной режим или режим автоматической работы.
• В некоторых режимах работы частота вращения вентилятора не
регулируется. Выберите режим работы, в котором можно настроить
частоту вращения вентилятора.
Выбран режим вентилятора или скоростной режим.
• В некоторых режимах работы температура не регулируется. Выберите
режим работы, в котором можно настроить температуру.
Кондиционер неожиданно отключается.
• При выключении устройства функция таймера может быть
деактивирована. Проверьте настройки таймера.
Во время работы произошел сбой питания.
• Подождите возобновления подачи электроэнергии. Если включена
функция автоматического перезапуска, устройство возобновит последнюю
операцию через несколько минут после восстановления питания.
RU
35
Page 74

Признаки Возможные причины и решение
Внутренний блок
по-прежнему
работает, даже когда
питание выключено.
Из отверстия для
выпуска воздуха на
внутреннем блоке
выходит туман.
Из наружного блока
вытекает вода.
Слышен шум или
вибрация.
Из внутреннего блока
исходит запах.
Кондиционер не
выпускает теплый
воздух.
Используется функция автоматической очистки.
• Оставьте функцию автоматической очистки работать, поскольку она
обеспечивает удаление оставшейся влаги внутри блока. При желании
можно выключить устройство.
Холодный воздух из кондиционера образует туман.
• При уменьшении температуры в помещении это явление исчезнет.
При операциях нагрева из теплообменника вытекает
конденсированная вода.
• В этом случае необходимо установить сливной шланг под поддоном.
Обратитесь к монтажникам.
Во время запуска или остановки устройства можно услышать щелчки,
вызванные движением обратного клапана.
Скрип: пластиковые части внутреннего блока могут скрипеть, если
они сжимаются или расширяются за счет резких изменений
температуры.
Продувка или шипение: звуки вызваны прохождением потока
хладагента через кондиционер.
• Это нормальные симптомы. Шум прекратится.
Запахи (например, сигаретный дым) могут поглощаться внутренним
блоком и высвобождаться вместе с воздухом.
• Если запах не исчезает, необходимо промыть фильтр. Если это не
помогает, обратитесь в сервисный центр, чтобы очистить теплообменник.
Если запускается режим отопления, заслонка почти закрыта, и воздух
не выходит, хотя наружный блок работает.
• Этот симптом является нормальным. Подождите, пока устройство не
выработает достаточно теплого воздуха для продувки внутреннего блока.
Наружный блок находится в режиме размораживания.
• В режиме обогрева при падении наружной температуры на змеевиках
может образовываться лед/иней. Эта функция удаляет слой инея на
змеевике, ее работа будет завершена в течение 15 минут.
Наружная температура слишком низкая.
• Нагревательный эффект может быть недостаточным.
RU
36
Page 75

Признаки Возможные причины и решение
Пароль для сети Wi-Fi, к которой вы пытаетесь подключиться,
неправильный.
• Найдите сеть Wi-Fi, подключенную к вашему смартфону, и удалите ее,
потом зарегистрируйте свой прибор в LG ThinQ.
Передача мобильных данных для вашего смартфона включена.
• Выключите Мобильные данные своего смартфона и зарегистрируйте
прибор, используя сеть Wi-Fi.
Имя беспроводной сети (SSID) настроено неправильно.
Ваш домашний
прибор и смартфон
не подключены к
сети Wi-Fi.
• Имя беспроводной сети (SSID) должно содержать английские буквы и
цифры. (Не используйте специальные символы)
Частота маршрутизатора не 2,4 ГГц.
• Поддерживается только частота маршрутизатора 2,4 ГГц. Настройте
беспроводной маршрутизатор на 2,4 ГГц и подключите прибор к
беспроводному маршрутизатору. Чтобы проверить частоту
маршрутизатора, обратитесь к своему поставщику Интернет-услуг или
производителю маршрутизатора.
Расстояние между прибором и маршрутизатором слишком большое.
• Если расстояние между прибором и маршрутизатором слишком большое,
сигнал может быть слабым и подключение может не настраиваться
правильно. Измените место нахождения маршрутизатора, чтобы он
находился ближе к прибору.
ПРИМЕЧАНИЕ
• Некоторые функции могут не поддерживаться, в зависимости от модели.
RU
Месяц и год производства: дата производства указана на шильдике продукта.
37
Page 76

Для заметок
Page 77

ПАЙДАЛАНУШЫ НҰСҚАУЛЫҒЫ
АУА КОНДИЦИОНЕРІ
Құрылғыны пайдаланбас бұрын пайдаланушы нұсқаулығын
мұқият оқып шығыңыз және анықтама үшін оны әрқашан
ыңғайлы жерде сақтаңыз.
ТҮРІ: ҚАБЫРҒАҒА ОРНАТЫЛАТЫН
Жабдық Техникалық Ережелер талаптарына сай келеді, электр немесе электронды
жабдыққа белгілі бір қауіпті заттардың қолданылуы шектелген.
www.lg.com
Copyright © 2021 LG Electronics Inc. All Rights Reserved
Page 78

МАЗМҰНЫ
Бұл нұсқаулықта сатып алған үлгіден
өзгеше кескіндер немесе мазмұн болуы
мүмкін.
Бұл нұсқаулықты өндіруші түзете алады.
ҚАУІПСІЗДІК НҰСҚАУЛАРЫ......................................................3
Маңызды қауіпсіздік нұсқаулары ..................................................................4
ПАЙДАЛАНУ..............................................................................12
Пайдалануға қатысты ескертпелер ...........................................................12
Бөлшектер мен функциялар ...................................................................... 12
Сымсыз қашықтан басқару құралы ............................................................ 13
Ауа кондиционерін автоматты түрде қайта іске қосу ............................... 18
Режим функциясын пайдалану ..................................................................18
«Jet Mode» функциясын пайдалану........................................................... 20
Желдеткіш жылдамдығы функциясын пайдалану .................................... 21
Ауа ағынының бағыты функциясын пайдалану ........................................ 21
Қосу/Өшіру таймерін орнату ....................................................................... 22
Ұйқы функциясын пайдалану (Қосымша) .................................................. 23
Кәдімгі таймер функциясын пайдалану (Қосымша) ................................. 23
Қуатты көрсету функциясын пайдалану (Қосымша) ................................. 24
Жарықты өшіру функциясын пайдалану (Қосымша) ................................ 24
Қолайлы ауа функциясын пайдалану (Қосымша).....................................24
Қуатты бақылау функциясын пайдалану (Қосымша) ...............................25
UVnano функциясын пайдалану (Қосымша) ............................................. 25
Арнайы функцияларды пайдалану ............................................................ 26
СМАРТ ФУНКЦИЯЛАРЫ .........................................................28
LG ThinQ қолданбасы .................................................................................28
Smart Diagnosis............................................................................................ 30
ҚЫЗМЕТ КӨРСЕТУ ...................................................................31
Ауа сүзгісін тазарту ..................................................................................... 33
АҚАУЛАРДЫ ЖОЮ ...................................................................34
Page 79

ҚАУІПСІЗДІК НҰСҚАУЛАРЫ
Қауіпсіздік нұсқаулары өнімге қауіп тудыра отырып, пайдалану
және дұрыс пайдаланбау салдарынан болатын қауіптер мен
зақымдардың алдын алуға арналған.
Нұсқаулар төменде сипатталғандай «АБАЙЛАҢЫЗ» және
«ЕСКЕРТУ» болып бөлінеді.
KK
Бұл таңба қауіп тудыратын жағдайлар мен жұмысты
анықтау үшін көрсетіледі. Осындай таңбасы бар
бөлімді мұқият оқып шығыңыз және қауіптің алдын
алу үшін нұсқауларды орындаңыз.
АБАЙЛАҢЫЗ
Бұл нұсқаулар орындалмаған жағдайда ауыр жарақатқа
немесе өлімге әкелуі мүмкін екенін білдіреді.
ЕСКЕРТУ
Бұл нұсқаулар орындалмаған жағдайда өнімнің аз
деңгейде зақымдалуы мен бұзылуын білдіреді.
Ішкі және сыртқы құрылғыларда келесі белгілер көрсетіледі.
Бұл белгі жабдықта жанғыш суық агенті
пайдаланылатынын білдіреді. Суық агент ағып, оған
сырттан ұшқын тиген жағдайда өрт пайда болу қаупі
туындайды.
Бұл белгі пайдалану нұсқаулығын мұқият оқып шығу
керектігін білдіреді.
Бұл белгі қызмет көрсететін адамдардың осы
жабдықты пайдалану нұсқаулығында берілген
нұсқауларға сәйкес жөндеуі қажет екенін көрсетеді.
Бұл белгі пайдалану нұсқаулығы немесе орнату
нұсқаулығы сияқты ақпараттың бар екенін көрсетеді.
3
Page 80

Маңызды қауіпсіздік нұсқаулары
АБАЙЛАҢЫЗ
Құрылғыны пайдаланған кезде жарылу, өрт, өлім, тоқ
соғу, зақымдау немесе адамды күйдіру қауіпінің алдын
алу үшін мыналарды қоса негізгі қауіпсіздік шараларын
қолданыңыз:
Үйдегі балалар
Бұл құрылғы физикалық мүмкіндігі мен ақыл-есі шектеулі
немесе құрылғыға қатысты тәжірибесі мен білімі аз адамдарды
(балаларды қоса) олардың қауіпсіздігіне жауапты адам
қадағаламаған кезде немесе құрылғыны пайдалануға қатысты
нұсқаулар берілмеген кезде пайдалануға арналмаған.
Балалардың құрылғымен ойнамауы қадағалануы қажет.
Орнату
•Ауа кондиционерін тұрақсыз бетке немесе құлап кету қаупі бар
жерге орнатпаңыз.
•Ауа кондиционерін орнатқан немесе орнын ауыстырған кезде
өкілетті қызмет көрсету орталығына хабарласыңыз.
•Басқару құралының панелі мен қақпағын қауіпсіз орынға
орнатыңыз.
•Ауа кондиционерін тұтанғыш сұйықтар немесе бензин, пропан,
бояу еріткіш сияқты заттар сақталған жерге орнатпаңыз.
•Ауа кондиционерін орнату кезінде ішкі және сыртқы
құрылғыларды жалғайтын түтік пен қуат кабелінің қатты
тартылып қалмауын тексеріңіз.
•Ауа кондиционерінің жұмыс режиміне сәйкес келетін
стандартты ажыратқыш пен сақтандырғышты пайдаланыңыз.
•Жүйеге арнайы мұздатқыш агенттен басқа ауа немесе газ
жібермеңіз.
•Агенттің ағуын және ауаның шығуын тексеру үшін тұтанбайтын
газды (нитроген) пайдаланыңыз; қысылған ауаны пайдалану
немесе тұтанғыш газ өрт немесе жарылыс тудыруы мүмкін.
KK
4
Page 81

•Ішкі/сыртқы сым қосылымдары қатты қысылуы керек және
кабель қосатын терминалдардан тартылып тұрмайтындай етіп
жүргізіуі керек. Дұрыс жалғанбау немесе байланыстың
жоғалуы қызып кетуге немесе өртке әкелуі мүмкін.
•Ауа кондиционерін пайдаланбас бұрын соған арналған
штепселді розетка мен ажыратқышты орнатыңыз.
•Жерге жалғайтын сымды газ құбырына, найзағай тартқышына
немесе телефонның жерге жалғанатын сымына жалғамаңыз.
•Ауа айналымына қажетті кез келген саңылаудың бітеліп
қалмауын қадағалау керек.
•Сым жалғау ережелеріне сәйкес, бекітілген сымдарға ажырату
құралдары кірістірілуі қажет.
•Блокты ықтимал жарылғыш атмосфераларда орнатуға
болмайды.
Пайдалану
•Қызмет көрсету бөлшектері тізімінде берілген бөлшектерді
ғана пайдаланыңыз. Құрылғыны өзгертуге ешқашан әрекет
етпеңіз.
•Балалардың сыртқы құрылғыға шықпауын немесе оны
ұрмауын қадағалаңыз.
•Батареяларды өрт болмайтын жерге тастаңыз.
•Ауа кондиционерінің жапсырмасында көрсетілген мұздатқыш
агентті ғана пайдаланыңыз.
•Егер ауа кондиционерінен шу, иіс немесе түтін шықса, электр
қуатын ажыратыңыз.
•Бензин немесе бояу еріткіш сияқты тұтанғыш заттарды ауа
кондиционерінің қасында қалдырмаңыз.
•Ауа кондиционері суға түскен жағдайда өкілетті қызмет көрсету
орталығына хабарласыңыз.
•Ауа кондиционерін дұрыс желдетілмейтін жерде ұзақ уақыт
пайдаланбаңыз.
•Егер газ жіберілсе (фреон, пропан, сығылған газ, тағы басқа),
ауа кондиционерін қайта пайдаланбас бұрын орынды желдетіп
алыңыз.
KK
5
Page 82

•Ішін тазалау үшін өкілетті қызмет көрсету орталығына немесе
дилерге хабарласыңыз. Күшті тазарту құралдарын пайдалану
тот басуға немесе құрылғыны зақымдауы мүмкін.
•Ауа кондиционері мен қыздырғыш сияқты қыздыратын
құрылғылар бір уақытта пайдаланылған кезде жеткілікті түрде
желдетіңіз.
•Ауа ағыны жүретін ішкі не сыртқы саңылауды жаппаңыз.
•Ауа кондиционері жұмыс істеп тұрғанда қолыңызды немесе
басқа заттарды ауа жүретін ішкі немесе сыртқы саңылауларға
салмаңыз.
•Қуат кабелінің лас және бос еместігін немесе үзілмегенін
тексеріңіз.
•Ауа кондиционерін ешқашан ылғал қолыңызбен ұстамаңыз,
іске қоспаңыз немесе жөндемеңіз.
•Қуат кабелінің үстіне ешнәрсе қоймаңыз.
•Қыздырғыш немесе басқа қыздыратын құрылғыларды қуат
кабелінің қасына қоймаңыз.
•Қуат кабелін өзгертпеңіз немесе ұзартпаңыз. Қуат кабеліндегі
сызаттар мен изоляциясының түсуі өрт немесе ток соғу қаупін
тудыруы мүмкін және ол ауыстырылуы керек.
•Электр қуаты өшірілген немесе найзағай болған кезде электр
қуатын бірден өшіріңіз.
•Қуат кабелінің жұмыс барысында ажыратылмайтындығына
немесе зақымдалмайтындығына көз жеткізіңіз.
•Жабдық жұмыс істеп тұрған кезде немесе жұмысынан кейін
дереу суық агент құбырына, су құбырына немесе басқа да ішкі
бөліктеріне тимеңіз.
KK
Қызмет көрсету
•Өнімге тікелей су шашып құрылғыны тазаламаңыз.
•Құрылғыны тазаламас немесе қызмет көрсетпес бұрын қуат
көзін ажыратып, желдеткіш тоқтағанша күтіңіз.
Техникалық қауіпсіздік
•Рұқсаты жоқ адамдардың орнатуы мен жөндеу жұмыстары
сізге немесе басқаларға зақым келтіруі мүмкін.
6
Page 83

•Хладагент тізбегімен жұмыс істейтін немесе оны ашу
жұмысына қатысатын кез келген адамның өндірістік салада
жұмыс істеуге рұқсаты бар орган тарапынан берілген жарамды
сертификаты болуы керек, ол сертификат адамның өнеркәсіп
сипаттамаларына сәйкес келетін хладагенттермен қауіпсіз
түрде жұмыс істей алатындығын растайды.
•Қызмет көрсету жұмыстары міндетті түрде жабдықты өндірген
мекеме тарапынан ұсынылған талаптарға сай орындалуы
керек. Басқа тәжірибелі қызметкерлердің көмегін талап ететін
техникалық қызмет көрсету мен жөндеу жұмыстары тез
тұтанғыш хладагенттерді қолдануға құзыреті бар адамның
бақылауында орындалуы керек.
•Нұсқаулықтағы ақпарат қауіпсіздік процедураларымен таныс
және дұрыс тексеру құралдарымен жабдықталған техникалық
қызмет көрсету маманы пайдалануға арналған.
•Нұсқаулықтағы барлық нұсқауларды оқымау немесе
орындамау құрылғының дұрыс жұмыс істемеуіне, зақымдауға
және/немесе өлімге әкелуі мүмкін.
•Құрылғы жергілікті жалғау ережелеріне сәйкес орнатылуы
керек.
•Қуат сымы ауыстырылатын кезде ол жұмысты тек рұқсаты бар
маман істеуі керек және түпнұсқа бөлшектермен ауыстырылуы
керек.
•Құрылғы электр тогының соғу қаупін азайту үшін жерге дұрыс
жалғануы керек.
•Ашадағы жерге жалғанатын істікті кесіп алып тастамаңыз.
•Адаптерді қабырғалық розетка қақпағының бұрандасына
жалғау құрылғыны қақпақтың бұрандасы темір болмай,
оқшауланбаған және қабырғалық розетка іштегі сым арқылы
жалғанған жағдайда жерге жалғанбайды.
•Егер ауа кондиционерінің жерге дұрыс жалғануына
күмәндансаңыз, қабырғалық розетка мен ажыратқышты электр
маманына тексертіңіз.
KK
7
Page 84

•Құрылғыда пайдаланылатын мұздатқыш агент пен оқшаулағыш
газ арнайы тастау процедуларын қажет етеді. Оларды
тастамас бұрын қызмет көрсету агентіне немесе ұқсас маманға
хабарласыңыз.
•Егер қуат сымы зақымдалса, қауіптің алдын алу үшін оны
өндіруші немесе оның қызмет көрсету агенттері немесе ұқсас
мамандар ауыстыруы керек.
•Құрылғы ауа айналымы жақсы аймақта сақталуы керек,
ондағы бөлменің өлшемі жұмыс істеуге қажетті бөлме
өлшеміне сәйкес келуі керек.
•Құрылғы үздіксіз жанып тұратын от (мысалы, жұмыс істейтін
газ құрылғысы) және тұтану көздері (мысалы, жұмыс істейтін
электрлік жылытқыш) бар бөлмеде сақталмауы керек.
•Құрылғы механикалық зақымға ұшырамайтын жерде сақталуы
керек.
•Құрылғыны мақсатсыз пайдалану немесе корпустың бұзылуы
қауіпті UV-C сәулесінің шығуына әкелуі мүмкін. UV-C
сәулеленуі, тіпті аз мөлшерде болса да, көзге және теріге зиян
тигізуі мүмкін.
•Бұл құрылғының құрамында UV-C шамы бар.
•Құрылғылар зақымданған немесе оларды ауыстыру қажет
болған кезде, қуат көзін ажыратып, қызмет көрсету орталығына
хабарласыңыз.
•UV-C шамын құрылғыдан тыс жерде қолданбаңыз.
•Жұмыс барысында ауа дефлекторын тазаламаңыз және оған
тимеңіз.
•Пайдаланушы техникалық қызмет көрсету процесін жүргізу
үшін ультракүлгін сәулелену қаупін білдіретін белгісі бар
есіктер мен алынбалы тақталарды ашудан бұрын, қуат көзінен
ажырату ұсынылған.
•Аспапты ашудан бұрын, техникалық қызмет көрсету
нұсқауларын оқып шығыңыз.
•Зақымдалған аспаптарды пайдалануға болмайды.
•UV-C шамын ауыстырудан бұрын, аспапты қуат көзінен
ажырату керек.
KK
8
Page 85

ЕСКЕРТУ
Өнімді пайдаланған кезде адамдарға келетін қауіпті
азайту, өнімнің дұрыс жұмыс істемеуін болдырмау үшін
келесі нұсқаулармен бірге негізгі нұсқауларды
орындаңыз:
Орнату
•Ауа кондиционерін тікелей теңіз желі (тұзды бүркінді) болатын
жерге орнатпаңыз.
•Су конденсациясы тегіс кебу үшін саңылауды дұрыс жасаңыз.
•Ауа кондиционерін орамнан шығарған және орнатқан кезде
абайлаңыз.
•Орнату немесе жөндеу кезінде аққан мұздатқыш агентті
ұстамаңыз.
•Ауа кондиционерін екі немесе одан көп адаммен
тасымалдаңыз.
•Сыртқы құрылғыны тікелей күн сәулесінен қорғалатындай етіп
орнатыңыз. Ішкі құрылғыны күн сәулесі тікелей терезе арқылы
түсетін жерге қоймаңыз.
•Орнатудан немесе жөндеуден кейін дұрыс орамды
пайдаланып бұрандалар, пластик пакет немесе батареялар
сияқты нәрселерді қауіпсіз түрде тастаңыз.
•Ауа кондиционерін сыртқы құрылғыдан шығатын шу немесе
пайдаланылған газ көршілерге қолайсыздық тудырмайтын
жерге орнатыңыз. Егер олай істемесеңіз, көршілермен
келіспеушілік болуы мүмкін.
KK
Пайдалану
•Басқару құралы ұзақ уақыт бойы пайдаланылмаса, оның
батареяларын алып тастаңыз.
9
Page 86

•Ауа кондиционерін іске қоспастан бұрын сүзгінің орнатылғанын
тексеріңіз.
•Ауа кондиционерін орнатқаннан немесе жөндегеннен кейін
мұздатқыш агенттің ақпауын тексеріңіз.
•Ауа кондиционеріне ешнәрсе қоймаңыз.
•Қашықтан басқару құралында әр түрлі батареяларды немесе
жаңа не ескі батареяларды араластырмаңыз.
•Ылғалдық деңгейі жоғары болған кезде, есік немесе терезе
ашық қалған кезде ауа кондиционерін ұзақ уақыт қоспаңыз.
•Батереядан сұйықтық ақса, қашықтан басқару құралын
пайдалануды тоқтатыңыз. Киіміңізге немесе терісіңізге
батареядан аққан сұйықтық тисе, оларды таза сумен жуыңыз.
•Адамдарды, жануарларды немесе өсімдіктерді ұзақ уақыт
бойы суық немесе ыстық лепте ұстамаңыз.
•Егер батареядан аққан сұйықтықты жұтып қойсаңыз,
аузыңызды мұқият шайып дәрігерге қаралыңыз.
•Ауа кондиционерінен аққан суды ішпеңіз.
•Өнімді тағам сақтау, өнер туындылары сияқты жеке
мақсаттарға пайдаланбаңыз. Бұл нақты мұздату жүйесі емес
тұтыну мақсаттарына арналған ауа кондиционері. Өнімнің
зақымдалу немесе жойылу қаупі бар.
•Батареяларды қайта зарядтамаңыз немесе бөлшектемеңіз.
KK
10
Page 87

Қызмет көрсету
•Ауа сүзгісін алған кезде ауа кондиционерінің темір
бөлшектерін ешқашан ұстамаңыз.
•Биіктегі ауа кондиционерін тазалаған, қызмет көрсеткен
немесе жөндеген кезде қозғалмайтын орындықты немесе
сатыны пайдаланыңыз.
•Ауа кондиционерін тазалаған кезде күшті тазалау құралдары
мен ерітінділерін пайдаланбаңыз және су шашпаңыз. Жұмсақ
мата пайдаланыңыз.
Қалдық батареяларды/аккумуляторларды қоқысқа тастау
• Батареяның құрамында кем дегенде 0,0005 % сынап, 0,002 % кадмий немесе 0,004 %
қорғасын болса, бұл таңба сынап (Hg), кадмий (Cd) немесе қорғасынның (Pb)
химиялық таңбасымен бірге көрсетілуі мүмкін.
• Батареялардың/аккумуляторлардың барлығы қалалық қоқыстардан бөлек, мемлекет
немесе жергілікті билік органдары тарапынан белгіленген арнайы жинау пункттерінде
тасталуы тиіс.
• Ескі батареяларды/аккумуляторларды дұрыс жерге тастау қоршаған ортаға,
жануарларға және адамдарға тиетін ықтимал зияннан қорғайды.
• Ескі батареяларды/аккумуляторларды қоқысқа тастау туралы қосымша ақпарат алу
үшін қаладағы кеңсеге, қалдықты кәдеге жарату қызметіне немесе өнімді сатып алған
дүкенге хабарласыңыз.
KK
11
Page 88

Пайдалану
4
6
Пайдалануға қатысты ескертпелер
Қуат үнемдеуге қатысты ұсыныс
• Бөлмені өте қатты салқындатпаңыз. Бұл денсаулығыңызға зиян болуы және электр қуатын көп
тұтынуы мүмкін.
• Ауа кондиционерін пайдаланған кезде күн сәулесін пердемен жауып қойыңыз.
• Есіктер мен терезелерді жабулы күйде ұстаңыз.
• Іштегі ауа айналу үшін ауа ағынын көлденеңінен немесе тігінен реттеңіз.
• Іштегі ауаны аз уақыт ішінде жылдам салқындату немесе жылыту үшін желдеткішті жылдамдатыңыз.
• Ауа кондиционері ұзақ пайдалынылса, бөлмедегі ауа нашарлауы мүмкін, сондықтан терезелерді
ашып бөлмені желдетіп тұрыңыз.
• Ауа сүзгісін 2 аптада бір рет тазалаңыз. Ауа сүзгісіне жиналған шаң мен қоқыстар ауа өтетін
саңылауды бітеуі немесе құрылғының өнімділігін төмендетуі мүмкін.
Бөлшектер мен функциялар
Ішкі құрылғы Сыртқы құрылғы
KK
Ауа сүзгісі
1
Ауа кіретін саңылау
2
Алдыңғы қақпақ
3
Ауа шығатын саңылау
Ауа дефлекторы (Көлденең қалқанша)
5
Ауа дефлекторы (Тік қалқанша)
Қосу/Өшіру түймесі
7
Ауа кіретін желдеткіш
1
Ауа шығатын желдеткіш
2
ЕСКЕРТПЕ
• Жұмыс істеудің индикатор шамдарының саны мен орналасуы ауа кондиционерінің моделіне
байланысты әр түрлі болуы мүмкін.
• Мүмкіндік модельдің түріне байланысты әр түрлі болуы мүмкін.
12
Page 89

KK
Swing
Сымсыз қашықтан басқару құралы
Батареялар салу
Егер басқару құралының дисплейі өше бастаса,
батареяларды ауыстырыңыз. Басқару құралын
пайдаланбас бұрын AAA (1,5 В) батареяларын
салыңыз.
Батарея қақпағын алыңыз.
1
Жаңа батереялар салып, олардың + және -
2
клеммаларының дұрыс салынғанын
тексеріңіз.
Қашықтан басқару құралын
ұстағышын орнату
Қашықтан басқару құралын қорғау үшін
ұстағышты күн сәулесі тікелей түспейтін жерге
орнатыңыз.
Қауіпсіз және ыңғайлы орынды таңдаңыз.
1
Жұмыс істеу әдісі
Ауа кондиционерін іске қосу үшін оның оң
жағындағы сигнал қабылдағышына қашықтан
басқару құралын бағыттаңыз.
ЕСКЕРТПЕ
• Қашықтан басқару құралы басқа электрондық
құрылғыларға бағытталса да оларды басқаруы
мүмкін. Қашықтан басқару құралын ауа
кондиционерінің сигнал қабылдағышына
бағыттағаныңызды тексеріңіз.
• Дұрыс жұмыс істеуі және сигнал таратқышы
мен қабылдағышын тазарту үшін жұмсақ мата
пайдаланыңыз.
• Егер өнімде ондай функция берілмесе,
қашықтан басқару құралында Ауа ағынының
бағыты (
тазалау функциясынан ( ) басқа осындай
функцияға арналған түймені басқанда өнімнен
зуммер дыбысы шықпайды.
), Қуат дисплейі ( ), Ауа
Ұстағышты 2 бұранда арқылы бұрағышпен
2
бекітіңіз.
13
Page 90

KK
ON/OFF
ON/OFF
Ағымдағы уақытты орнату
Батареялар салу.
1
• Төмендегі белгішелер дисплейдің төменгі
жағында жыпылықтайды.
Минутты таңдау үшін немесе
2
түймесін басыңыз.
Аяқтау үшін Set/Cancel түймесін басыңыз.
3
ЕСКЕРТПЕ
• Қосу/Өшіру таймері ағымдағы уақытты
орнатқаннан кейін қолжетімді болады.
°C/°F түрлендіру функциясы
(Қосымша)
Бұл функция °C және °F мәндерін ауыстырады.
• түймесін шамамен 5 секунд ұстап
тұрыңыз.
Ауа кондиционерін қашықтан
басқару құралынсыз іске қосу
Қашықтан басқару құралы жоқ болған кезде ауа
кондиционерін қосу үшін іштегі құрылғыдағы ON/
OFF түймесін пайдалануыңызға болады.
Алдыңғы қақпақты (2-түрі) немесе көлденең
1
қалақты (1-түрі) ашыңыз.
ON/OFF түймесін басыңыз.
2
1-түрі
2-түрі
ЕСКЕРТПЕ
• Егер көлденең дефлектор жылдам ашылса,
қадамдық мотор бұзылуы мүмкін.
• Желдеткіштің жылдамдығы жоғары.
• Мүмкіндік модельдің түріне байланысты әр
түрлі болуы мүмкін.
• Осы төтенше жағдай ON/OFF түймесін
пайдаланған кезде температура өзгертілмейді.
• Салқындатқыш және жылытқыш модельдері
үшін температура 22 °C - 24 °C мәніне дейін
қойылады.
14
Page 91

Сымсыз қашықтан басқару құралын пайдалану
Reset
Swing
Swing
Ауа кондиционерін қашықтан басқару құралымен оңай басқарасыз.
KK
Түйме
2
*
*
*
1
Mode
Jet
Mode
Fan
Speed
Дисплей
-
Сипаттама
Ауа кондиционерін
өшіру/қосу.
Салқындату, жылыту
кезінде бөлменің
қалаған
температурасын реттеу
немесе режимді
автоматты түрде
ауыстыру.
Салқындату режимін
таңдау.
Жылыту режимін
таңдау.
Ылғалсыздандыру
режимін таңдау.
Желдеткіш режимін
таңдау.
«Авто
ауыстыру»/«Автоматты
түрде жұмыс істеу»
режимін таңдау.
Бөлменің
температурасын
жылдам өзгерту.
Желдеткіш
жылдамдығын реттеу.
Ауа бағытын тігінен
немесе көлденеңінен
реттеу.
Қолжетімді функция
Бір
тармақты
O O
O O
O O
O O
O O
O O
O O
O O
O O
O O
Көп
тармақты
ЕСКЕРТПЕ
• * түймелер модельдің түріне қарай өзгертілуі мүмкін.
• Көп тармақты сыртқы блокқа қосылған кезде, Қуатты көрсету, Қуатты
басқару, Дыбыссыз және Смарт диагностика функцияларына қолдау
көрсетілмеуі мүмкін.
15
Page 92

KK
Reset
Түйме
2
*
*
*
Set/
Cancel
1
*Light
Off
Room
Temp.
°C↔°F
(5 s)
*Comfort
Air
kW(3 s) -
*Energy
Ctrl.
Diagnosis
(5 s)
UVnano
(3 s)
Дисплей
-
-
- Уақытты реттеу. O O
-
-
-
Сипаттама
Ауа кондиционерінің
қалаған уақытта
өшірілуі/қосылуы.
Арнайы функция мен
таймерді орнату/бас
та рту.
Таймер параметрлерін
орнату.
Ішкі құрылғыдағы
дисплейдің ашықтығын
орнату.
Бөлменің
температурасын
көрсету.
°C және °F мәндерін
ауыстыру.
Желдің бағытын
өзгерту үшін ауа
ағынын реттеу.
Электр қуатына
қатысты ақпараттың
көрсетілуін не
көрсетілмеуін орнату.
Электр қуатын
үнемдеудің әсерін қосу.
Өнімге техникалық
қызмет көрсету туралы
ақпаратты тексеру.
Желдеткішті таза
сақтау үшін.
Қолжетімді функция
Бір
тармақты
O O
O O
O O
O O
O O
O O
O O
O X
O X
O X
O
(Қосымша)O (Қосымша)
Көп
тармақты
16
Page 93

KK
Reset
Түйме
2
*
*
*
1
Reset -
Дисплей
Сипаттама
Ион генераторы іштегі
ауа сапасын жақсарту
үшін миллиондаған
иондарды
пайдаланады.
Сыртқы құрылғыдан
шығатын шуды азайту.
Ішкі құрылғының ішінде
пайда болған ылғалды
жою.
Қашықтан басқару
параметрлерін
бастапқы қалпына
келтіру.
Қолжетімді функция
Бір
тармақты
O
(Қосымша)O (Қосымша)
O X
O O
O O
Көп
тармақты
ЕСКЕРТПЕ
• Кейбір функцияларға модельге байланысты қолдау жоқ болуы мүмкін.
• * түймелер модельдің түріне қарай өзгертілуі мүмкін.
• Таңдалған Func басқару үшін Set/Cancel түймесін басыңыз.
17
Page 94

KK
ON/OFF
ON/OFF
Ауа кондиционерін автоматты түрде қайта іске қосу
Электр қуаты өшірілгеннен кейін ауа
кондиционері қосылған кезде бұл функция
алдыңғы параметрлерді қайта қалпына келтіреді.
Автоматты түрде қайта іске
қосуды ажырату
Алдыңғы қақпақты (2-түрі) немесе көлденең
1
қалақты (1-түрі) ашыңыз.
ON/OFF түймесін 6 секунд басып тұрыңыз,
2
содан кейін құрылғы екі рет дыбыс
шығарады және шам қатарынан 4 рет
жыпылықтайды.
• Функцияны қайта қосу үшін ON/OFF
түймесін 6 секундтай басып тұрыңыз.
Құрылғы екі рет дыбыс шығарады және
шам 4 жыпылықтайды.
1-түрі
2-түрі
Режим функциясын пайдалану
Бұл функция қалаған функцияны таңдауға
мүмкіндік береді.
«Салқындату» режимі
«Авто ауыстыру» режимі /
«Автоматты түрде жұмыс істеу»
(AI) режимі
«Ылғалсыздандыру» режимі
«Жылыту» режимі
«Желдеткіш» режимі
«Салқындату» режимі
Құрылғыны қосыңыз.
1
«Салқындату» режимін таңдау үшін Mode
2
түймесін қайталап басыңыз.
• Дисплейде белгішесі көрсетіледі.
ЕСКЕРТПЕ
• Мүмкіндік модельдің түріне байланысты әр
түрлі болуы мүмкін.
• Егер ON/OFF түймесін 6 секунд басудың
орнына 3 – 5 секундтай басып тұрсаңыз,
құрылғы жұмыс істеуді тексеруге ауысады.
Жұмыс істеуді тексеру кезінде құрылғы 18
минуттай өте салқын ауа шығарып кейін әдепкі
зауыттық параметрге оралады.
18
3
Қалаған температураны орнату үшін
немесе түймесін басыңыз.
Page 95

KK
Автоматты түрде жұмыс істеу
(Жасанды интеллект)
Көп тармақты үлгі
Осы жұмыс режимінде жүйе электрондық
басқару элементтерімен автоматты түрде
басқарылады.
Құрылғыны қосыңыз.
1
«Автоматты түрде жұмыс істеу» режимін
2
таңдау үшін Mode түймесін қайталап
басыңыз.
• Дисплейде белгішесі көрсетіледі.
3
Қалаған температураны орнату үшін
немесе түймесін басыңыз.
Желдеткіштің жылдамдығын реттеу үшін Fan
4
Speed түймесін басыңыз.
«Авто ауыстыру» режимі
Бір тармақты үлгі
Бұл автоматты түрде ±2 °C мәніне қойылған
температураны сақтау үшін режимді
ауыстырады.
Құрылғыны қосыңыз.
1
«Авто ауыстыру» режимін таңдау үшін Mode
2
түймесін қайталап басыңыз.
• Дисплейде белгішесі көрсетіледі.
3
Қалаған температураны орнату үшін
немесе түймесін басыңыз.
Желдеткіштің жылдамдығын реттеу үшін Fan
4
Speed түймесін басыңыз.
«Ылғалсыздандыру» режимі
Бұл режим шірудің алдын алу үшін ылғалдығы
жоғары деңгейдегі ортадан немесе жаңбырлы
күні артық ылғалды шығарады. Режим ылғалдың
тиімді деңгейін сақтау үшін бөлменің
температурасын және желдеткіштің
жылдамдығын реттейді.
Құрылғыны қосыңыз.
1
«Ылғалсыздандыру» режимін таңдау үшін
2
Mode түймесін қайталап басыңыз.
• Дисплейде белгішесі көрсетіледі.
ЕСКЕРТПЕ
• Бұл режимде бөлменің температурасын реттей
алмайсыз, ол автоматты түрде реттеледі.
• Бөлменің температурасы дисплейде
көрсетілмейді.
• Құрғату режимінде бөлме температурасы 24 °
градустан төмен болған кезде компрессор мен
жабық желдеткіш жұмыс істемеуі мүмкін.
19
Page 96

KK
«Жылыту» режимі
Құрылғыны қосыңыз.
1
«Жылыту» режимін таңдау үшін Mode
2
түймесін қайталап басыңыз.
• Дисплейде белгішесі көрсетіледі.
3
Қалаған температураны орнату үшін
немесе түймесін басыңыз.
ЕСКЕРТПЕ
• Еріту функциясы жұмыс істеген кезде іштегі
құрылғыда көрсетіледі.
• Сонымен қатар, бұл көрсеткіш іштегі
құрылғыда көрсетіледі:
− Алдын ала қыздыру жұмыс істеген кезде.
− Бөлме температурасы орнатылған
температураға жеткен кезде.
«Желдеткіш» режимі
Бұл режим бөлменің температурасын
өзгертпестен ішкі ауаны айналдырады.
Құрылғыны қосыңыз.
1
«Желдеткіш» режимін таңдау үшін Mode
2
түймесін қайталап басыңыз.
• Дисплейде белгішесі көрсетіледі.
Желдеткіштің жылдамдығын реттеу үшін Fan
3
Speed түймесін басыңыз.
«Jet Mode» функциясын пайдалану
Бөлменің температурасын
жылдам өзгерту
Бұл функция бөлменің ішін жазда жылдам
салқындатуға немесе қыста жылдам жылытуға
мүмкіндік береді.
• «Jet Mode» функциясын салқындату, жылыту
және ылғалсыздандыру режимдерімен бірге
қолдануға болады.
Құрылғыны қосыңыз.
1
Қалаған режимді таңдау үшін Mode түймесін
2
қайталап басыңыз.
Jet Mode түймесін басыңыз.
3
• Дисплейде белгішесі көрсетіледі.
ЕСКЕРТПЕ
• «Жылдам жылыту» режимі кейбір модельдерде
жоқ.
• «Jet Cooling» күшті ауа 30 минут бойы үреді.
• 30 минуттан кейін белдесу температурасы 18
°C шамасында болады.
Егер температураны өзгерткіңіз келсе, қажетті
температураны орнату үшін немесе
түймесін басыңыз.
• «Jet Heating» күшті ауа 30 минут бойы үреді.
• 30 минуттан кейін белдесу температурасы 30
°C шамасында болады.
Егер температураны өзгерткіңіз келсе, қажетті
температураны орнату үшін немесе
түймесін Басыңыз.
• Бұл функция қашықтан басқару дисплейінен
басқаша жұмыс істейді.
20
Page 97

KK
→ →
→ → → →
Swing
Swing
Swing
Swing
Желдеткіш жылдамдығы функциясын пайдалану
Желдеткіш жылдамдығын реттеу
• Желдеткіш жылдамдығын реттеу үшін Fan
Speed түймесін қайталап басыңыз.
Дисплей Жылдамдығын
Жоғары
Орташа – Жоғары
Орташа
Орташа – Төмен
Төмен
- Табиғи жел
ЕСКЕРТПЕ
• Вентилятордың табиғи жел жылдамдығы
автоматты түрде реттеледі.
• Желдеткіш жылдамдығы белгішелері кейбір
ішкі құрылғыларда көрсетіледі.
• Ішкі құрылғының дисплейі тек 5 секунд
көрсетіліп, кейбір модельдерде температура
орнатуға қайта оралады.
Ауа ағынының бағыты функциясын пайдалану
Бұл функция ауа ағынының бағытын тігінен
(көлденеңінен) реттейді.
•
(
бағытты таңдаңыз.
− Ауа ағынын автоматты түрде реттеу үшін
ЕСКЕРТПЕ
• Модельге байланысты ауа ағынының бағытын
көлденеңге өзгертуге қолдау жоқ.
• Ауа дефлекторын өз бетінше реттеу өнімнің
істен шығуына әкелуі мүмкін.
• Ауа кондиционерін өшіріп қайта қоссаңыз, ол
алдында орнатылған ауа үрлеу бағытымен
жұмыс істейді, сондықтан ауа дефлекторы
қашықтан басқару құралында көрсетілген
белгішемен сәйкес келмеуі мүмкін. Олай
болған жағдайда ауа ағынының бағытын қайта
реттеу үшін
басыңыз.
• Бұл функция қашықтан басқару дисплейінен
басқаша жұмыс істейді.
) түймесін қайталап басып қалаған
( ) түймесін таңдаңыз.
немесе
түймесін
21
Page 98

KK
Қосу/Өшіру таймерін орнату
Бұл функция ауа кондиционерін автоматты
түрде қалаған уақытта қосылуға/өшіруге қояды.
Қосу/өшіру таймерін бірге орнатуға болады.
Қосу таймерін реттеу
1
2
3
Қосу таймерінен бас тарту
1
түймесін қайталап басыңыз.
• Төмендегі белгішелер дисплейдің төменгі
жағында жыпылықтайды.
Минутты таңдау үшін немесе
түймесін басыңыз.
Аяқтау үшін Set/Cancel түймесін басыңыз.
• Таймерді орнатқаннан кейін ағымдағы
уақыт пен белгішесі қалаған уақыттың
орнатылғанын шығара отырып дисплейден
көрсетіледі.
түймесін қайталап басыңыз.
• Төмендегі белгішелер дисплейдің төменгі
жағында жыпылықтайды.
Өшіру таймерін орнату
1
2
3
ЕСКЕРТПЕ
түймесін қайталап басыңыз.
• Төмендегі белгішелер дисплейдің төменгі
жағында жыпылықтайды.
Минутты таңдау үшін немесе
түймесін басыңыз.
Аяқтау үшін Set/Cancel түймесін басыңыз.
• Таймерді орнатқаннан кейін ағымдағы
уақыт пен белгішесі қалаған уақыттың
орнатылғанын шығара отырып дисплейден
көрсетіледі.
• Бұл функция Кәдімгі таймерді орнатқан кезде
ажыратылады.
Өшіру таймерінен бас тарту
1
түймесін қайталап басыңыз.
• Төмендегі белгішелер дисплейдің төменгі
жағында жыпылықтайды.
Орнатудан бас тарту үшін Set/Cancel
2
түймесін басыңыз.
22
Орнатудан бас тарту үшін Set/Cancel
2
түймесін басыңыз.
Таймер параметрінен бас тарту
• Барлық таймер параметрінен бас тарту үшін
түймесін басыңыз.
Page 99

KK
Ұйқы функциясын пайдалану (Қосымша)
Бұл функция ауа кондиционерін сіз ұйқыға
кеткен кезде автоматты түрде өшіреді.
Құрылғыны қосыңыз.
1
2
3
4
ЕСКЕРТПЕ
түймесін қайталап басыңыз.
• Төмендегі белгішелер дисплейдің төменгі
жағында жыпылықтайды.
Сағатты (7 сағатқа дейін) таңдау үшін
немесе түймесін басыңыз.
Аяқтау үшін Set/Cancel түймесін басыңыз.
• Дисплейде белгішесі көрсетіледі.
• Кейбір ішкі құрылғыларда белгішесі
көрсетіледі.
• Ішкі құрылғының дисплейі 1С-7С аралығында
және тек 5 секунд көрсетіледі де температура
орнатуға қайта оралады.
• Салқындату және ылғалдандыру режимінде
температура 30 минуттан кейін 1 °C болып
артады және жайлы ұйқы үшін кейінірек тағы
30 минуттан кейін 1 °C болып артады.
• Температура орнатылған температурадан 2 °C
артады.
• Дисплейдегі желдеткіш жылдамдығының белгісі
өзгертілуі мүмкін болса да желдеткіш
жылдамдығы автоматты түрде реттеледі.
Кәдімгі таймер функциясын пайдалану (Қосымша)
Бұл функция ауа кондиционерін сіз ұйқыға
кеткен кезде автоматты түрде өшіреді.
Құрылғыны қосыңыз.
1
2
3
4
ЕСКЕРТПЕ
түймесін қайталап басыңыз.
• Төмендегі белгішелер дисплейдің төменгі
жағында жыпылықтайды.
Сағатты (7 сағатқа дейін) таңдау үшін
немесе түймесін басыңыз.
Аяқтау үшін Set/Cancel түймесін басыңыз.
• Дисплейде белгішесі көрсетіледі.
• Бұл функция Өшіру таймерін орнатқан кезде
ажыратылады.
23
Page 100

KK
Swing
Қуатты көрсету функциясын пайдалану (Қосымша)
Бұл функция өнімнің жұмысына сәйкес ішкі
құрылғының дисплейінде шығатын электр
қуатының өлшемін көрсетеді.
Ағымдағы электр қуатын
пайдалануды көрсету
Құрылғыны қосыңыз.
1
2
түймесін 3 секундтай басып тұрыңыз.
• Ағымдағы қуат тұтыну ( ) кейбір ішкі
құрылғыларда кішкене уақыт көрсетіледі.
ЕСКЕРТПЕ
• Көрсетілген мәннің бірлігі - кВт.
• Бұл сымсыз қашықтан басқару құралында
көрсетілмейді.
• Егер ол 99 кВт болатын ауқымнан артық болса,
оны 99 кВт көрсеткішінде ұстаңыз.
• 10 кВт-тан төмен ватты 0,1 кВт бірлікпен, ал 10
кВт-тан артық болса 1 кВт бірлігімен көрсету.
• Нақты қуат көрсетілген қуаттан басқа болуы
мүмкін.
• Көп тармақты сыртқы блокқа қосылған кезде,
функцияға қолдау көрсетілмеуі мүмкін.
Жарықты өшіру функциясын пайдалану (Қосымша)
Экранның ашықтығы
Ішкі құрылғы дисплейінің ашықтығын
орнатуыңызға болады.
• Light Off түймесін басыңыз.
ЕСКЕРТПЕ
• Дисплей экранын қосыңыз/өшіріңіз.
Қолайлы ауа функциясын пайдалану (Қосымша)
Қолайлы дефлектордың жұмысы
Бұл функция бөлмедегі адамдарға желдің
тікелей соғу бағытын өзгерту үшін дефлекторды
алдын ала белгіленген күйге орнатады.
Құрылғыны қосыңыз.
1
Comfort Air түймесін қайталап басыңыз
2
және қалаған бағытты таңдаңыз.
• Дисплейде немесе белгішесі
көрсетіледі.
ЕСКЕРТПЕ
• Кейбір ішкі құрылғыларда немесе
белгішесі көрсетіледі.
• Бұл функция Mode немесе Jet Mode түймесін
басқан кезде ажыратылады.
• Фукнция ажыратылады және
басқан кезде тік бағытта автоматты түрде
жылжу орнатылады.
• Бұл функция өшірілген кезде, көлденең
дефлектор орнатылған режимге байланысты
автоматты түрде жұмыс істейді.
түймесін
24
 Loading...