

Page 1

LG-CX670
User Guide
User Guide
ENGLISH
FRANÇAIS
LG-CX670
P/NO : MFL67140201(1.0)
WR
Page 2

Copyright ©2011 LG Electronics, Inc. All rights reserved.
LG and the LG logo are registered trademarks of LG
Group and its related entities. All other trademarks are the
property of their respective owners.
Bluetooth QD ID B016832
Page 3

Contents
Contents . . . . . . . . . . . . . . . . . . . . . . . . . . . . . . . . . . . . . . . . .1
The Basics . . . . . . . . . . . . . . . . . . . . . . . . . . . . . . . . . . . . . . .2
Connecting to Networks and Devices . . . . . . . . . . . . . . . .28
Placing and Receiving Calls . . . . . . . . . . . . . . . . . . . . . . . .34
Web . . . . . . . . . . . . . . . . . . . . . . . . . . . . . . . . . . . . . . . . . . .40
Communication . . . . . . . . . . . . . . . . . . . . . . . . . . . . . . . . . .47
Entertainment . . . . . . . . . . . . . . . . . . . . . . . . . . . . . . . . . . . .72
Tool . . . . . . . . . . . . . . . . . . . . . . . . . . . . . . . . . . . . . . . . . . . .84
Specifications . . . . . . . . . . . . . . . . . . . . . . . . . . . . . . . . . . . .90
Technical Details . . . . . . . . . . . . . . . . . . . . . . . . . . . . . . . . .92
FAQ . . . . . . . . . . . . . . . . . . . . . . . . . . . . . . . . . . . . . . . . . . . .93
Safety . . . . . . . . . . . . . . . . . . . . . . . . . . . . . . . . . . . . . . . . .102
Limited Warranty Statement . . . . . . . . . . . . . . . . . . . . . . .126
1
NOTE
WARNING
With the Android operating system, some available Market applications only operate
correctly with phones that have a specific screen resolution. Please be advised that some
of the applications on the
LCD resolution requirement that does not match your phone. In addition, please be aware
that 3rd party applications with programming defects may cause issues with your phone,
including lock ups and resets.
The user interface of Google applications (Google Search, Google Maps,
Navigation, etc.) can vary depending on its software version.
Android Market may not be available for your phone due to a
Page 4

The Basics
2
Phone Overview
Front View
Earpiece
Quick Keys
- Phone Key
- Contacts Key
- Messaging Key
- Browser Key
Menu Key
Home Key
1.
Earpiece
lets you hear phone calls and automated prompts.
Quick Keys
2.
Phone Key opens the Phone Application for access to the dialpad, Call log, Contacts,
-
and Favorites.
-
Contacts Key opens the Contacts Application.
-
Messaging Key opens the Messaging Application.
-
Browser Key opens the Browser Application.
3.
Menu Key
Opens an options menu
application.
4.
Home Key
returns to the Home screen. If you're already viewing one of the Home screen
extension panes, it navigates you to the central Home screen pane. Press and hold to view
the most recently used applications.
5. Power/Lock
the following options): Silent mode, Airplane mode, and Power off.
Touchscreen
6.
applications, call status, date, time, signal status, and battery strength.
Applications Launcher Key
7.
applica
Search Key
8.
the web. In many applications, you may touch this key to search within the application
itself. Touch and hold to open Google search by voice.
Back Key
9.
and dialog bo
Key
locks the screen. Press and hold to open the phone options menu (for
displays all the information needed to operate your phone, such as
tions.
uick Sear
opens Q
returns to the previous screen. Also closes pop-up display items such as menus
xes.
with options tha
opens the Launch screen, where you can view installed
TM
ch Box
from the Home screen to search the phone and
ect the current screen or
t aff
Power/Lock Key
Touchscreen
Applications
Launcher Key
Sear
Back Key
ch Key
Page 5

Rear View
3.5mm Headset
Jack
Camera Lens
Volume Keys
Back Cover
Voice Control Key
Camera Key
10.
Volume Keys
volume during a call.
Voice Control Key
11.
hold the button on the Home screen or in the Launch screen.
Camera Key
12.
Video recorder function as well.
3.5mm Headset Jack
13.
con
.
Camer
14
performance.
Back Cover
15.
microSD Slot
16.
NOTE Insert a microSD card to use the camera and other multimedia features.
17.
Accessory/Charger Port
compatible accessories.
allow you to adjust the ringer and media volumes, or to adjust the in-call
lets you activate Nuance Voice Control from Home screen. Press and
activates the camera. Once the Camera function is open, you can access the
versations. The 3.5mm jack also allows you to plug in headphones to listen to music.
a Lens
Multimedia contents will be saved to the microSD card.
allows you to plug in an optional headset for convenient, hands-free
for taking pictures and recording videos. Keep clean for optimal
use
encloses the battery compartment.
accommodates the pre-installed 2GB microSDTMcard.
allows you to connect the phone charger, USB cable, or other
microSD Slot
Accessory/
Charger Port
The Basics
3
Page 6
The Basics
4
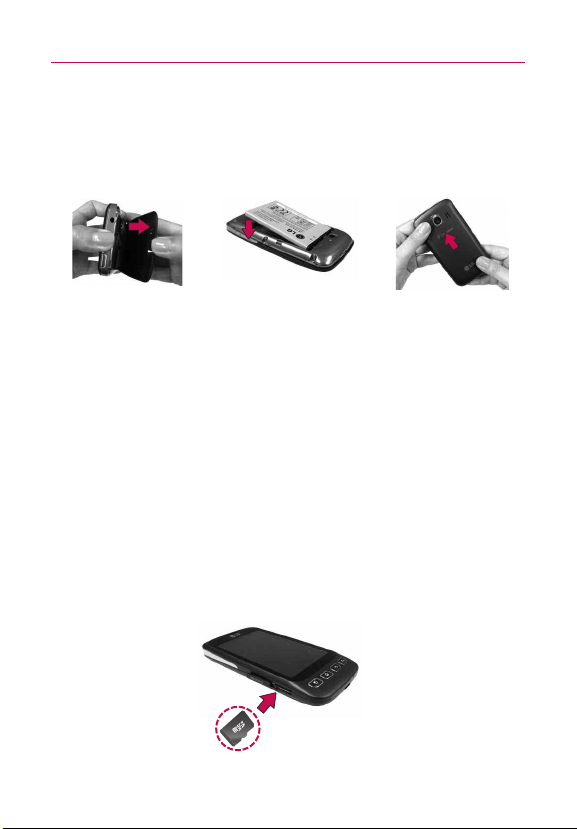
Installing the Battery and microSD Card
NOTE
It is important to fully charge the battery before initial use of the phone.
The phone comes with a rechargeable batter y. Keep the battery
charged while not in use in order to maximize talk, use, and standby
time. The battery charge level is shown at the top of the screen.
1. Hold the phone
with both hands
and use the
fingertip cutout at
the top of the
phone to pull open
the battery cover
(as shown above).
2. Align the battery
contacts with the
terminals near the
top of the phone,
then press the
battery into place.
3. Replace the battery
cover over the back
of the phone (as
demonstrated).
Apply a steady
downward pressure
until it clicks into
place.
Inserting a microSD card
1. Gently uncover the microSD slot located on the left side of the
phone.
2. Position the microSD card with the label facing up and slide it into
place until it is fully inserted and locked in place.
NOTE
●
The microSD card can be easily damaged by improper operation. Please be
careful when inserting, removing or handling it.
●
To safely remove the microSD card from your phone, unmount it from your
phone first.
Page 7

The Basics
5
WARNING!
On the Android 2.2, you can download applications from Android Market
and can store them on microSD card as well as on the device. Due to this
feature, if you skip the unmount procedure, it can cause an error because
information between microSD card and the device is not accorded properly.
In the worst case, the microSD card can be corrupted or damaged.
Charging the Phone
Your LG-CX670 device comes with a wall/USB charger and a USB
cable which connect together to charge your phone.
To charge your phone:
NOTICE
Please use only an approved charging accessory to charge your LG phone.
Improper handling of the charging port, as well as the use of an incompatible charger,
may cause damage to your phone and void the warranty.
1. Connect the wall/USB charger and USB cable. When
connecting, as shown, the LG logo on the USB cable should
face toward you.
USB Cable
2. Plug the USB cable
(as shown below) into the phone's charger port.
Wall/USB charger
Page 8

The Basics
6
Charging with USB
You can use your computer to charge your phone. To be able to
charge with the USB cable, you need to have the necessary USB
drivers installed on your PC first. Connect one end of the USB cable
to the charger port on your phone and connect the other end to a
USB port on your PC. It is best to use the rear USB port when
connecting to a desktop PC. The USB hub should be powered by an
external power source.
NOTES
●
Low-power USB ports are not supported, such as the USB port on your
keyboard or bus-powered USB hub.
Optimizing Battery Life
You can extend your battery's life between charges by turning off
features that run in the background. You can also monitor how
applications and system resources consume battery power.
Tips to extend the life of your battery
©
Turn off radio communications that you aren't using.
If you aren't using Wi-Fi, Bluetooth, or GPS, use the Settings
menu to turn them off. (Note that the GPS receiver is only
turned on when you're using an application that makes use
of it.)
©
Turn down screen brightness and set a shorter screen timeout.
©
If you don't need them, turn off automatic syncing for Gmail,
Calendar, Contacts, and other applications.
©
Use the Power Control widget to control the wireless
connections, GPS connection, Bluetooth power, display
brightness, and syncing activity.
Page 9

The Basics
To check the battery charge level
©
From the Home screen, press the Menu Key and touch
Settings > About phone > Status.
The battery status (charging or discharging) and level (as a
percentage of fully charged) will be displayed at the top of
the screen.
To monitor and control what uses the battery
The Battery use screen allows you to see which applications are
consuming the most battery power. Information on this screen
allows you to identify downloaded applications you may want to
turn off when not being used, so you can get the most out of your
battery power.
©
From the Home screen, press the Menu Key and touch
Settings > About phone > Battery use. The screen will display
battery usage time. Either how long since last connected to
a power source, if connected to a power source, and how
long you were last running on batter y power.
The list of applications or services using battery power are
displayed in order of energy used, from greatest amount to
least.
©
Touch an application in the Battery use screen to see the
details about its power consumption.
Different applications offer different kinds of information, and
they may even include buttons that open settings you can
use to reduce power consumption by that application.
How to change settings
©
Press Menu Key , then touch Settings . You can
change all your phone settings from here.
7
Page 10
The Basics
8
Turning the Phone On and Off
Turning the phone on
©
Press and hold the Power/Lock Key for a couple of
seconds.
NOTE
When you turn on your phone for the first time, follow the instructions on
the screen to activate your device.
Turning the phone off
1. Press and hold the Power/Lock Key until the pop-up
menu appears.
2. Touch
3. Touch
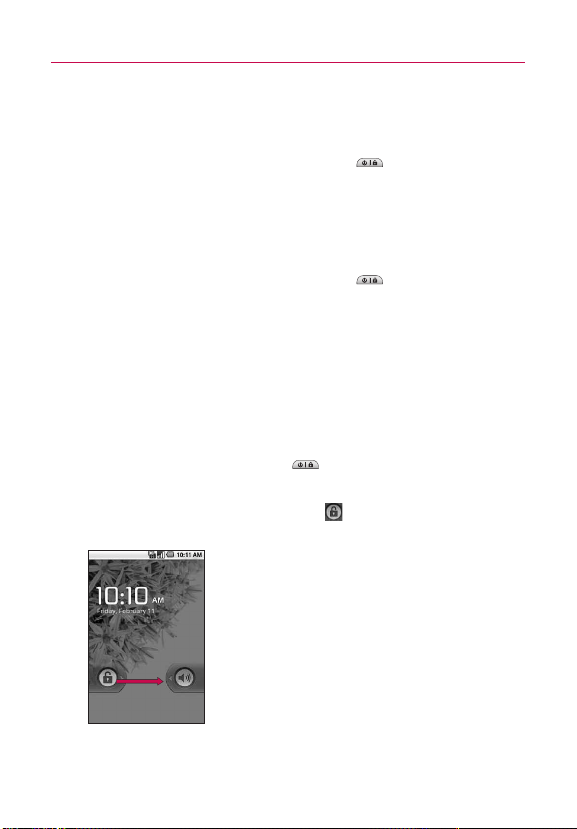
To unlock the phone
If you don’t use the phone for a while, the screen and backlight will
shut off to conserve battery power. To unlock the phone:
1. Press the
2. Touch and drag the Unlock icon to the right.
Power off in the pop-up menu.
OK to confirm that you want to turn off the phone.
Power/Lock Key .
Your Lock Screen will appear.
The last screen you were working on opens.
NOTE
This is the default Lock Screen. If you have set up an
Unlock Pattern, use your fingertip to draw the pattern.
Page 11

The Basics
To turn the phone sounds off
If you're in a place where your phone sounds may disturb others,
you can quickly silence your phone from the lock screen.
1. Press the
2. Drag the
To turn the phone sounds back on, drag the Sounds on icon
Power/Lock Key .
Sounds off icon to the left.
to the left.
Creating a Google Account
Your Google Account
You must create and/or sign into a Google Account to use GmailTM,
Google TalkTM, Google CalendarTM, and other Google Apps; to
download applications from Android MarketTM; to back up your
settings to Google servers; and to take advantage of other Google
services on your device.
If you don’t have a Google Account, you will be prompted to create
one. If you have an enterprise account through your company or
other organization, your IT department may have special instructions
on how to sign into that account.
1. From a computer, or from your device's Browser, navigate to
www.google.com.
2. On the main page, select
3. Follow the onscreen prompts to create your free account.
4. Log into your provided email address, locate the email from
Google, and respond to the new email to both confirm and
activate your new account.
Sign in > Create an account now.
9
Page 12

The Basics
10
Signing into Your Google Account
1. Launch the application that requires a Google account (such as
Android Market or Gmail).
2. Click
Next > Sign in.
NOTE
If you do not already have a Google account, touch Create and follow the
onscreen prompts to create your new account.
3. Touch the Username and Password fields and enter your
information.
4. Touch
IMPORTANT
Sign in. Your device then communicates with the Google
servers to confirm your information.
: Some applications, such as Calendar, work only with the first Google
Account you add. If you plan to use more than one Google Account with
your device, be sure to sign into the one you want to use with such
applications first. When you sign in, your contacts, Gmail messages,
Calendar events, and other information from these applications and
services on the Web are synchronized with your device. You will be
prompted to sign in or to create a Google Account the first time you start
an application that requires one, such as Gmail or Android Market.
Page 13

Phone’s Status Icons
Status icons
3G connected Roaming
3G in use No signal
Connected to a Wi-Fi network No microSD card installed
Bluetooth is on Vibrate mode
Connected to a Bluetooth device Ringer is silenced
Airplane mode is set Phone microphone is muted
Alarm is set Battery is very low
Signal strength Battery is low
Speakerphone is on Battery is partially drained
GPS is on Battery is full
Receiving location data from
GPS Battery is charging
The Basics
11
Page 14

The Basics
12
Notification icons
New Gmail message
New text or multimedia
message
Problem with text or
multimedia message delivery
New Google Talk message Missed call
New voicemail Uploading data
Upcoming event Downloading data
Data is syncing Download finished
Problem with sign-in or sync Connected to VPN
New email Disconnected from VPN
An open Wi-Fi network is
available
Phone is connected via USB
cable
3 more notifications not
displayed
Call in progress
Call in progress using
Bluetooth headset
Song is playing
USB debugging connected
Page 15

The Basics
Getting to Know the Home Screen
Status Bar
Shows device status information
including the time, signal strength,
battery status, and notification
icons.
Application Icon
Touch an icon (application, folder,
etc.) to open and use it.
Quick Keys
Provide easy, one-touch access to
the functions you use the most.
Applications Launcher Key
Touch to open the Launch screen
alled applications.
to view inst
Quick Keys
The Quick Keys are located on a bar along the bottom of the Home
screen and the Launch screen.
: opens the
you can dial an unsaved number. You can also access the Call
log, Contacts and Favorites by touching the tabs across the top.
: opens your Contacts list. You can also access Phone, Call log,
and Favorites by touching the tabs across the top.
: opens the Launch screen and displays phone options and
applications.
: opens the
: opens the
Phone application, which displays the dialpad so
Messaging application.
Browser application.
13
Page 16

The Basics
14
-
T
he dots indicate which Home screen pane you are viewing.
Location Indicator
Touchscreen
The following terms are used for describing the different available
actions using the touchscreen:
Touch A single finger touch selects items.
Touch and hold Touch and hold an item on the screen by
touching it and not lifting your finger until an action occurs.
Drag Touch and hold an item for a moment and then, without
lifting your finger, move your finger on the screen until you reach
the target position. You can drag items on the Home screen to
reposition them.
Swipe or slide To swipe or slide, quickly move your finger across
the surface of the screen, without pausing when you first touch it
(so you don’t drag an item instead).
Double-tap Double-tap to zoom a webpage or a map. For
example, quickly double-tap a section of a webpage to zoom that
section to fit the width of the screen. You can also double-tap to
control the Camera zoom, in Google Maps, and in other applications.
Pinch-to-Zoom Use your index finger and thumb in a pinch or
spread motion to zoom in or out when using the browser, viewing
a map or pictures.
Page 17

The Basics
Rotate the screen From many applications, the orientation of the
screen rotates with the phone as you turn it from vertical to
horizontal and back again.
NOTE
To turn this feature on and off, from the Home screen, touch the Applications
Launcher Key > Settings > Display. Then touch the Auto-rotate screen
checkbox.
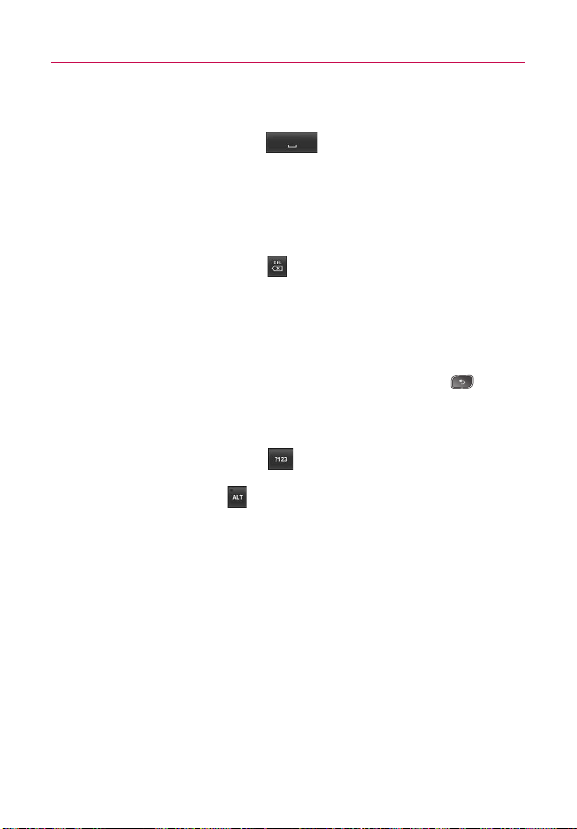
Text Input Methods
You enter text using the onscreen keyboard. Some applications
open the keyboard automatically. In others, you touch a text field
where you want to enter text to open the keyboard.
You can also enter text by speaking instead of by typing.
Swype: Swype™ is a text input method that allows you to enter a
word by sliding your finger from letter to letter, lifting your finger
between words.
Android keyboard (default): The Android keyboard can also be used
to enter text. To switch to the Android keyboard, touch and hold a
text field, then touch Input method > Android keyboard.
Toggles from 123/ABC
mode to SYM mode
15
Page 18

The Basics
16
Swype Tips
Access the Swype Tips to watch a video or tutorial on using Swype.
You can also use the following Swype text entry tips.
©
Create a squiggle (like an S shape) to create a double letter
(such as pp in apple).
©
Touch and hold a key to enter the alternate letter or symbol
located at the top right corner of the key.
©
Move your finger over the apostrophe to enter contractions.
©
Double-touch on the word you want to change to correct a
misspelled word.
©
Touch the delete key to erase one character. Touch and hold
the delete key to erase an entire word.
Using the Android keyboard
s the words predicted.
y
Displa
Touch once to capitalize the next letter you type.
h and hold for all caps.
ouc
T
Touch space or a punctuation
mark to enter the orange
suggestion.
To enter text
1. Touch a text field.
2. Touch the keys on the keyboard to type.
3. Enter text into the text field.
Page 19
©
Touch the word you want as soon as it appears in the
predictive word box.
©
Touch the Space Key or a punctuation key to enter
the predicted word.
©
Touch another word in the predictive word box.
©
Continue touching letters until the word appears in the
predictive word box.
©
Touch the Delete Key to erase characters to the left of
the cursor.
NOTE
Words that do not appear in the predictive word box before you enter it
completely are automatically added to your dictionary for future use. To
manually add a word, touch and hold the word to open a dialog box, then
Add to dictionary.
touch
4. When you're finished typing, press the Back Key to
close the keyboard.
To enter numbers, symbols, and other characters
©
Touch the Symbols Key to switch to the numbers and
symbols keyboard.
Touch the Alt Key on the symbols keyboard to access
additional symbols; touch it again to switch back.
©
Touch and hold any of the letter keys to access alternate
symbols. Initially, the symbol at the top of the key pops up.
When the menu pops up, touch any of the alternate
characters or symbols displayed.
©
Touch and hold the Period Key (.) from abc mode to open a
small window to choose from various symbols.
©
Touch and hold a number or symbol key to open a window of
additional symbols.
The Basics
17
Page 20

The Basics
18
To change the keyboard orientation
©
Turn the phone horizontal or vertical.
You can control whether the screen
changes orientation automatically when
you turn the phone.
Entering text by speaking
To turn on voice input
1. Press the Home Key , then touch the Aplications
Launcher Key
Android keyboard.
You can also touch and hold the
onscreen keyboard; in the dialog that opens, touch Android
keyboard settings
2. Touch Voice input.
3. Touch the setting to display the
main keyboard, on the symbols keyboard, or Off to disable
voice input.
To enter text by speaking
You can enter text by speaking in most places where text is
allowed to be introduced.
1. Touch a text field.
2. Touch the
Microphone Key to appear on the symbols keyboard, touch
the Symbols Key first).
3. When prompted to “Speak now,” speak what you want to
enter.
> Settings > Language & keyboard >
Symbols Key on the
.
Microphone Key on the
Microphone Key on the keyboard (if you set the
Page 21

The Basics
1919
Overview
LG Home screen
Touch to open Launch screen
Launch screen
Slide the screen up or down to
bring more icons into view
Touch an application icon to open
the application
Touch to close Launch screen
Quick Keys
NOTE
The Launch screen closes automatically when you touch an icon to
open its application. Dragging an icon onto your Home screen also
closes the Launch screen automatically.
TIP
You can customize your Home screen with the application icons you
use most often. Applications are located on the Launc
you can copy any application icon to your Home screen for faster
access. No matter where the icon is, on the Launch screen or your
Home screen, just touc
h it to open and use it.
Switching between multiple applications
1. Press and hold the Home Key .
A small window opens with icons of applications that you’ve
used recently.
h screen, but
Page 22

The Basics
20
2. Touch the application icon you want to open.
Or press the Back Key to return to the
current application.
Touch an icon to open an application
you
've used recently.
Adding application icons to the Home screen
Customize your Home screen with the applications you use most
often.
1. Open the Launch screen.
2. Touch and hold the application icon you want to add to your
Home screen. Your Launch screen will be minimized so that
you can place the icon on a Home screen.
3. Lift your finger to place it, or drag the icon to where you
want it on the screen, then lift your finger.
Options menus
Options menus contain tools that apply to the activities of the
current screen or application, not to any specific item on the screen.
To open the available options menu, press the Menu Key . Not
all applications have Options menus; if you press the Menu Key
on a screen that has no Options menu, nothing will happen.
Page 23
The Basics
905-123-4567
905-123-4567
Some applications have more Options menu items than can fit in
the options menu; touch More to open the additional items.
Options menus contain items that
apply to the current screen or
to the application as a whole.
ouch to open more menu items.
T
Context menus
Context menus contain options that apply to a specific item on the
screen. To open a Context menu, touch and hold an item on the
screen. Not all items have Context menus. If you touch and hold an
item that has no Context menu, nothing will happen.
When you touch and hold
certain items on a screen, a
xt menu opens.
Conte
21
Page 24

The Basics
22
Notifications
Notifications appear conveniently on the Status Bar to announce
new messages, calendar events, alarms, and more.
To open the Notifications panel
©
Touch and drag the Status Bar downwards.
OR
©
From the Home screen, press the Menu Key and touch
Notifications.
The Notifications panel displays your wireless
service provider and a list of your current
notifications, organized into ongoing and eventbased notifications.
Page 25

The Basics
Phone and Web search using text entry
1. Press the Search Key .
When you press the Search Key on the Home screen
or in the other applications that support this, the Quick
Search Box will open automatically.
Voice Search
Touch to search by voice.
In some applications, such as Gmail, Contacts, and Browser,
the application's own search box opens when you press the
Search Key . This is indicated by the application's icon
on the left side of the search box.
2. Enter the text you're searching for in the Quick Search Box.
As you type, search results from your phone,
previous search terms, and web search suggestions
appear.
Touch an item to search that term.
23
Page 26

The Basics
24
You can use the Search preferences to configure some
aspects of Google web search (for example, whether it
makes suggestions below the Quick Search Box as you
type), and what phone features you want to include in
searches.
3. Touch to search for the entered terms.
OR
If what you want to search for appears in the suggestions
list, touch that item to conduct the search.
Web search using voice command
©
Press and hold the Search Key .
OR
©
Touch the Microphone icon from the Quick Search Box.
When you stop speaking, Google Search by Voice analyzes
your speech and displays the results of your search.
Locking the Screen
You can lock your screen so that only you can unlock it to make
calls, access your data, buy applications, and so on.
Setting a Lock Pattern
1. From the Home screen, press the Menu Key .
2. Touch Settings > Location & security.
3. Touch
4. You're prompted to draw and redraw your own pattern.
Set up screen lock (under the Screen unlock section).
The first time you do this, you will see a tutorial with
instructions on how to create an unlock pattern.
Page 27

The Basics
Touch Continue to draw your
pattern again to confirm it.
From then on, any time you wish to turn the phone on or
unlock the screen, you will need to draw your unlock pattern to
unlock the screen.
NOTE
●
You have 5 opportunities to enter your unlock Pattern. If you used all the 5 opportunities,
you can attempt it after 30 seconds.
●
When you can’t recall your unlock Pattern:
- If you haven’t created a Google account on the phone, you need to perform a factory
reset.
(Caution: If you perform a factory reset, all user applications and user data will be
deleted. Please remember to back up any important data before performing a factory
reset.)
1. Turn the power off.
2. Press and hold for over 5 seconds: Down Volume Key + Home Key + Power/Lock Key.
3. When the power turns on, release these keys.
25
Page 28

The Basics
26
Customizing the Home Screen
You can add the folloowwing types of items to the Home screen:
Shortcuts Add shortcuts to applications, a bookmarked webpage,
a favorite contact, a destination in Google Maps, a Gmail label, a
music playlist, and more. The shortcuts available depend on the
applications you have installed.
Widgets Add any of a variety of widget applications to your Home
screen, including a clock, a music player, a picture frame, Google
search bar, a power manager, a calendar of upcoming
appointments, and more. Note that more widgets can also be
found on Android Market
Folders Add a folder where you can organize other Home screen
shortcuts and icons, or folders that contain all your contacts,
contacts with phone numbers, or starred contacts. Your folders'
contents are kept up to date automatically.
To change the Home screen wallpaper
©
From the Home screen, press the Menu Key and touch
Wallpaper.
You can also touch and hold an empty spot on the Home
screen, then touch Wallpapers in the menu that opens.
TM
.
Page 29

The Basics
Connecting Quickly With Your Contacts
As you build up your list of contacts on your phone, you can use
Quick Contact for Android to quickly chat, email, text message,
place a call, or to locate your contacts. Quick Contact for Android is
a special set of icons that you can use to quickly and easily connect
to a contact.
©
Open your Contacts list and touch the contact icon to the left
of the contact's name. A bubble will open with the available
options, displayed as icons. This is the Quick Contact bubble.
Depending on the contact information saved, the available
actions will be displayed above the name.
©
Touch a Quick Contact icon to communicate with the
contact.
Depending on the icon you've touched, a different application
will open. For example, the Gmail icon will be available if an
e-mail address is saved in that contact entry. By touching the
Gmail icon, the Gmail application will open and you can view
your messages.
If you add a shortcut for a contact to your Home screen, you will be
able to open Quick Contact for that contact.
27
Page 30
Connecting to Networks and Devices
28
Connecting to Mobile Networks
When you buy your phone and sign up for service, your phone is
configured to use your provider's mobile networks for voice calls
and for transmitting data.
Different locations may have different mobile networks available.
Connected to the 3G network (EVDO Rev A)
Connected to a 2G network (1x)
The more bars that are lit, the stronger the wireless signal
Connected to another wireless service provider’s network (roaming)
To disable data when roaming
You can prevent your phone from transmitting data over other
carriers' mobile networks when you leave an area that is covered by
your carrier's networks. This is useful for controlling expenses if
your cell plan doesn't include data roaming.
1. From the Home screen, press the
2. Touch Settings > Wireless & networks > Mobile networks.
3. Touch Data roaming to remove the checkmark from the box.
With Data roaming unchecked, you can still transmit data
with a Wi-Fi connection.
Menu Key .
Mobile Hotspot
Mobile Hotspot is an application that enables web access for 7 WiFi enabled devices, including netbooks, MP3 players, cameras,
portable gaming systems and more, in one convenient feature.
©
Configure Network SSID and Security Passord are
automatically created for you when using Mobile Hotspot.
You can also configure it manually and change any settings
you desire.
Page 31

Connecting to Networks and Devices
©
Manage device Select which devices are allowed to connect
to your Mobile Hotspot.
©
Manage applications Select which applications are allowed
to connect to your Mobile Hotspot.
©
DHCP server settings Set the DHCP access point.
©
Power mode Set whether to turn the Mobile Hotspot off if
there is no activity in a certain period of time.
To use Mobile Hotspot
From the Home screen, touch the Applications Launcher Key
and Mobile Hotspot .
Connected to a Wi-Fi network (waves indicate connection strength)
Notification that an open Wi-Fi network is in range
Connecting to Wi-Fi Networks
To turn Wi-Fi on and connect to a Wi-Fi network
1. From the Home screen, press the Menu Key .
2. Touch
3. Touch
4. Touch a network to connect to it.
Settings > Wireless & networks > Wi-Fi settings.
Wi-Fi to turn Wi-Fi on and scan for available Wi-Fi
networks.
●
A list of available Wi-Fi networks will be displayed. Secured
networks are indicated by a lock icon.
●
If the phone finds a network that you have connected to
previously, it automatically connects to it.
●
If the network is open, you will be prompted to confirm
that you want to connect to that network by touching
Connect.
29
Page 32

Connecting to Networks and Devices
30
●
If the network is secured, you will be prompted to enter a
password. (Ask your network administrator for details.)
●
When you're connected to a network, you can touch the
network name in the Wi-Fi settings screen for details about
the speed, security, address, and related settings.
NOTE
Some 'Open' networks require you to launch the browser after
connecting to finish the login process before the data connection is
functional. This is common in hotels and other public venues that offer
'Free Wi-Fi'.
Bluetooth is on
Connected to a Bluetooth device
Connecting to Bluetooth Devices
To turn Bluetooth on or off
1. From the Home screen, press the Menu Key .
2. Touch
3. Touch
The phone supports HFP, HSP, A2DP, AVRCP, OPP, PBAP, FTP.
Bluetooth®QD ID B016832
Settings > Wireless & networks.
Bluetooth to turn the function on or off.
Connecting to Virtual Private Networks
Virtual private networks (VPNs) allow you to connect to resources
inside a secured local network, from outside that network.
To add a VPN
1. From the Home screen, press the Menu Key .
2. Touch
3. Touch
Settings > Wireless & networks > VPN settings.
Add VPN.
Page 33

Connecting to Networks and Devices
4. Touch the type of VPN to add.
5. In the screen that opens, follow the instructions from your
network administrator to configure each component of the
VPN settings.
6. Press the
The VPN will be added to the list on the VPN settings
screen.
Menu Key and touch Save.
Working With Secure Certificates
If your organization's VPN or Wi-Fi network relies on secure
certificates, you must obtain the certificates and store them in your
phone's secure credential storage before you can configure access
to that VPN or Wi-Fi network on your phone.
For specific instructions, contact your network administrator.
To install a secure certificate from the microSD card
1. Copy the certificate from your computer to the root (that is,
not in a folder) of the microSD card.
2. From the Home screen, press the Menu Key .
3. Touch
4. Touch
5. Touch the file name of the certificate to install.
6. If prompted, enter the certificate's password then touch
7. Enter a name for the certificate then touch
Settings > Location & security.
Install from SD card.
Only the names of certificates that you have not already
installed on your phone are displayed.
OK.
OK.
If you have not already set a password for your phone's
credential storage, you will be prompted to enter a password
for it, twice, then touch OK.
You can now use the certificate that you installed when
connecting to a secure network. For security purposes, the
certificate will be deleted from the microSD card.
31
Page 34

Connecting to Networks and Devices
32
Connecting Your Device to Your Computer
Before using your device's mass storage capabilities, you need to
prepare your device's data services to synchronize with your
desktop or laptop computer. Once you have connected the device
to the computer, you can transfer your data to or from the microSD
card.
To connect your device to a computer via USB:
1. Use the USB cable that came with your phone to connect
the phone to a USB port on your computer.
2. If necessary, open the Notifications panel, and then touch
USB connected.
3. Touch
Turn on USB Storage and OK to confirm.
●
When the device is connected as USB storage, you receive
a notification.
●
You device's microSD card is mounted as a removable drive
on your computer. You can now copy files to and from the
microSD card.
●
During this time, you will not be able to access the
microSD card in your device, so you can't use applications
that rely on the microSD card, such as Camera, Gallery,
and Music.
Page 35

Connecting to Networks and Devices
To remove the connection:
WARNING!
Carefully follow your computer's instructions to unmount, remove, or
disconnect any removable USB devices or disks, to avoid losing information
on the microSD card when disconnecting your phone from your computer.
1. On your computer, complete the process to safely Stop, or
Remove, the USB device (in this case, the phone). For
example, use the Safely Remove Hardware option to Stop
the USB device, on Windows®XP.
2. If necessary, open the Notifications panel and touch
USB storage
3. Touch
to unmount the microSD card.
Turn off USB storage and remove the USB cable from
the phone.
Important Connection Information
©
To avoid loss of data, DO NOT remove the USB cable, the
microSD card, or the battery while accessing or transferring
files.
©
DO NOT use your computer to change or edit folder or file
names on the microSD card, and do not attempt to transfer
large amounts of data from the computer to the microSD
card. Doing so may cause the microSD card to fail.
©
DO NOT turn off or restart your computer, or put it into
standby mode, while using a mass storage device. Doing so
will result in loss or damage of data.
©
The microSD card can only be mounted for use by either the
device or a connected computer. Prior to accessing the card
via a different method, it must first be unmounted from its
current device (phone or computer-USB).
IMPORTANT
The microSD card can only share a connection with one
device at a time, either your device or your computer
(via its USB connection), not both. You can not browse
the contents of the card via your device if they are
currently being browsed via your computer.
33
Turn off
Page 36

905-555-1234
Placing and Receiving Calls
34
Placing and Ending Calls
Touch and hold to enter +, for
international calls.
Touch the Add call button .The
first participant is put on hold and
ou're prompted to dial the
y
second caller.
●
Press the up/down Volume Keys to adjust the call volume.
●
Use the onscreen buttons to add another call on hold, to
use the speakerphone, and for other options.
Airplane mode
Some locations may require you to turn off your phone's wireless
connections by placing your phone in Airplane mode.
1. Press and hold the
2. Touch
You can also set to Airplane mode with the Wireless &
networks menu.
Airplane mode.
Power/Lock Key .
Touch to erase a digit. Touch
and hold to erase the entire
number.
Touch to dial the number
that you entered.
The duration of the call.
Information from Contacts about
the person you're calling.
Touch to enter additional
numbers during your call.
h
ouc
T
End to end the call.
Page 37

Placing and Receiving Calls
Answering or Rejecting Calls
When you receive a phone call, the Incoming Call screen opens
with the caller ID and any additional information about the caller, if
saved in the Contacts list.
All incoming calls are recorded in the Call log.
To answer a call
©
Use the Answer Key to answer a call. If your screen is
unlocked, simply touch the Answer Key , but if the screen
is locked, drag the Answer Key to the right.
If you were already on a call, the first call is placed on hold
while you answer the new call.
To silence the incoming call ringer, press the up/down
Volume Key.
When unlocked When locked
35
h the
ouc
T
Answer Key to
answer the call.
h the
ouc
T
Send SMS Key to send an Excuse message to
the caller instead of answering the call.
Drag the
Answer Key to
the right to
answer the call
To decline a call and divert it to voicemail
©
Drag the Decline Key to the left.
The caller is sent directly to your voicemail box to leave a
message.
Page 38

Placing and Receiving Calls
36
Drag the Decline Key to the left to
decline the call and send to voicemail.
©
To silence the ringer, press the up/down Volume Key.
To switch between current calls
©
Touch the Swap Key .
The current call will be placed on hold and you will be
connected with the other call.
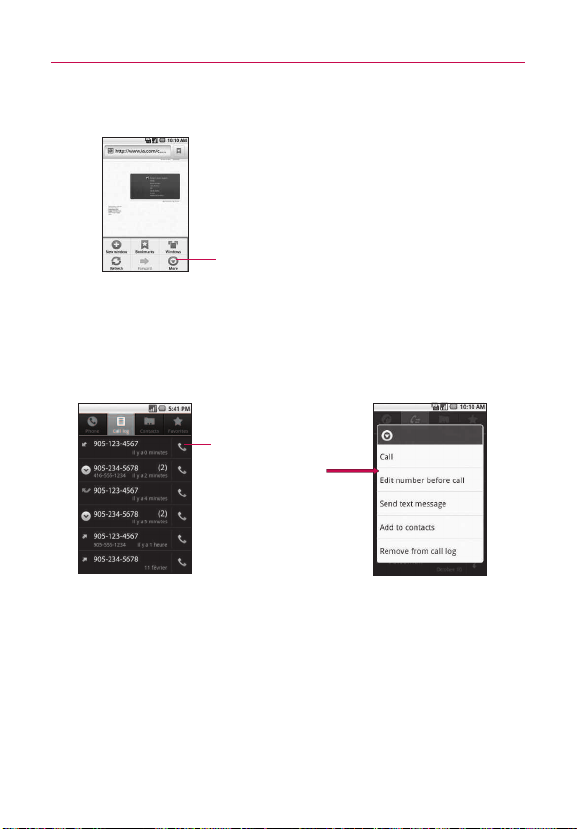
Working with the Call Log
The Call log is a list of all the calls you’ve placed, received, or
missed. It offers a convenient way to redial a number, return a call,
or add a number to your Contacts.
To open the Call log
©
Calls are listed in the Call log tab, the most recent calls are
located at the top of the list. Scroll down to see older
entries.
Missed call
Dialed call
Received call
h to call bac
ouc
T
h and hold an entr
ouc
T
more options
k
y for
Page 39

Placing and Receiving Calls
To add an entry’s number to your Contacts
1. Touch and hold the entry.
2. Touch
Add to contacts.
3. In the list of contacts that opens, touch Create new contact
at the top, or touch an existing contact to add the new
number to that existing contact.
To take other actions on a Call log entry
©
Touch a Call log entry to open a screen from where you can
call the contact, send the contact a message, add the
number to your Contacts list, and learn more about the
original call.
©
Touch and hold a Call log entry to open a menu where you
can call the contact, view contact information, edit the
number before you redial, and more.
To clear the Call log
©
Touch and hold an entry in the log. In the menu that opens,
touch Remove from call log to remove just that entry from
the log.
Calling Your Contacts
To call a contact
1. From the Home screen, touch Contacts .
2. Touch the contact you wish to call.
3. Touch the phone number you wish to call.
37
Page 40

Placing and Receiving Calls
38
To call a favorite contact
1. From the Home screen, touch Contacts then touch the
Favorites tab.
You can add and remove favorites by touching the star next
to their names (when you're viewing information about the
contact).
2. Touch the favorite you wish to call.
3. Touch the phone number you wish to call.
Nuance Voice control
To place a call by speaking
You can call a contact by using Nuance Voice control.
Application Launcher Key and Nuance Voice
1. Touch
control
icon .
2. Follow the instruction
Managing Multiple Calls
If you accept a new call when you're already on a call, you can
switch between the two calls or merge the two calls into a single
conference call. You can also set up a conference call with multiple
callers.
To set up a conference call
Contact your wireless service provider to learn whether they
support conference calls and how many participants you can
include.
Page 41

Addcall
Placing and Receiving Calls
1. Place a call to the first participant.
2. When you're connected, touch
Add call .
The first participant is put on hold and you're prompted to
dial the second caller.
3. Place the next call using the
Phone, Call log, Contacts, or
Favorites tab.
4. After you're connected, touch
Merge calls .
The participant is added to the conference call.
5. Touch
End to end a conference call and disconnect all
callers.
Touch to merge the calls.
Touch to mute the microphone
during a call
h to turn the speakerphone
ouc
Touch to switch between a
Bluetooth headset and the phone
T
on or off
Listening to Your Voicemail
To listen to your Voicemail
©
Open the Notifications panel, then touch New voicemail.
OR
©
From the Home screen, touch the Phone Key , then touch
touch and hold . Typically, your carrier's voicemail system
guides you through the process of listening to and managing
your voicemail. The first time you call your voicemail, it also
guides you through the process of recording greetings,
setting a password, and so on.
39
Page 42

Web
40
Google Search
Google Search is the search engine which helps you to search
through the web, as well as search for applications and contacts on
your phone.
Type the words you want to
search
©
If what you’re searching for is in the list of suggestions,
touch it. The item opens in the appropriate application.
©
If what you’re searching for is not in the list, touch to
search the Web. The web browser opens, displaying results
of a Google search on the Web.
Browser
Web services require a data connection. Contact your operator to
choose the best data plan.
Internet
Learn to access and bookmark your favorite web pages.
NOTE
• You may incur additional charges for accessing the
web and downloading media. For details, contact
your service provider.
NOTE
• Available icons may vary depending on your region.
Page 43

Browse web pages
1. From the Home screen, touch the Applications Launcher
Key
, then touch Browser to launch the browser. To
access a specific web page, touch the URL input field, enter
the web address (URL) of the web page, and touch Go.
2. Navigate web pages using the keys:
Web
41
Press this icon
for voice search
and speak the
word or phrase
you wish to
search.
While browsing the web page, use the following options:
©
To zoom in or out, double-tap the screen. You can also use
the two finger zoom; Place your two fingers on the screen
and slowly pinch or spread apart.
©
To open a new window, press Menu Key > New
window
.
©
To view the currently active windows, press Menu Key
> Windows. You can open multiple pages and switch
back and forth between them.
©
To reload the current web page, press Menu Key >
Refresh.
©
To go to a next page in history, press Menu Key >
Forward.
©
To bookmark the current web page, press Menu Key >
More > Add bookmark.
Enter an web
address of the
web page to
access and
.
press
Page 44

Web
42
©
To search for text on the web page, Menu Key > More
> Find on page.
©
To select text on the web page, press Menu Key >
More > Select text. Highlight the text you want with your
finger.
The highlighted text is copied to the phone's memory and
you can paste it anywhere.
©
To view the web page details, press Menu Key > More
> Page info.
©
To send the web address (URL) of the web page to others,
press Menu Key > More > Share page.
©
To view the download history, press Menu Key > More
> Downloads.
©
To customize the browser settings, press Menu Key >
More > Settings.
Google Maps
TM
To open Google Maps and view your location
1. Touch Maps on the Home screen or in the Launch
screen.
2. Touch My Location on the tool bar near the top.
The map centers on a blue dot that indicates your location. A
blue circle around the dot indicates that your actual location
is within the circle.
To get an address and additional information for a location
©
Touch and hold a location on the map. A balloon with the
address and a thumbnail from Street View (if available) opens
over the location.
Page 45

Touch and hold a location to open a balloon
with its address.
Touch the balloon to access additional
options.
©
Touch the balloon to access additional options.
To view map, satellite, or traffic layers
©
Touch a layer option, including Map layer, Satellite layer,
Terrain, Latitude and Traffic layer.
Searching For Locations and Places
You can search for a location and view it on a map. You can also
search for places on the map that you're viewing.
To search for a location
1. While viewing a map, press the Menu Key and touch
Search or press the Search Key . You can also touch the
search box at the top of the screen.
2. In the search box, enter the place you
enter an address, a city, or a type of business or
establishment. For example, “theater in New York”.
3. Press the
Search icon .
Markers with letter labels indicate search matches on the
map.
're looking for. You can
Web
43
Page 46

Web
44
Getting Directions
To get directions
1. While viewing a map, press the Menu Key and touch
Directions.
2. Enter a starting point in the first text box and your
destination in the second text box. You can also touch to
open a menu with options for selecting an address from
other locations.
Enter starting and ending locations.
Touch a mode of transport.
Touch to get directions.
To reverse directions, press the
Menu Key and touch
Reverse Start & End.
3. Touch the icon for car, public transit, bicycle, or walking
directions.
4. Touch
Go.
The directions to your destination appear in a list.
To view turn-by-turn directions in a list
You can view each turn in your route as a list of written directions.
©
Touch the Directions icon .
©
Touch Navigate to view turn-by-turn directions in Navigation
View.
Page 47

Web
To search for locations along your route
You can search for businesses, points of interest, and other features
along your route. When you search while navigating, your results
include locations along your route, rather than locations that are
near your current location.
©
Press the Search Key and search for locations of
interest.
The results are displayed as markers along your route; the
first result is labeled. You can use the left and right arrow
buttons to move from result to result, zoom in and out, or
touch a label for more information about the marker.
©
When you're finished, touch the Navigation icon to return
to Navigation View.
Latitude
45
Finding Your Friends with Google Latitude
TM
Google Latitude lets you and your friends view each others'
locations on maps and share status messages with each other. You
can also send messages and emails, make phone calls, and get
directions to your friends' locations using Google Latitude.
Your location is not shared automatically. It is by invitation only.
You must join Latitude and then invite your friends to view your
location or accept invitations from your friends.
Press
Menu Key to Refresh friends, See map, Add friends and
Privacy.
Page 48

Web
46
Places
To find places
Touching the Places icon while in Google Maps and you can choose
a category, such as gas stations, coffee shops, bars, restaurants,
etc. Once selected you’ll see a list of closest matches, including
their distance, compass bearing, description and even user reviews.
You can customize your own location search categories, and even
add the Places icon to your Home screen.
©
Open Places from the Launch screen and choose the desired
places from the categories. You can also add the category of
the place you wish to search
RSS Reader
Using RSS reader
RSS (Really Simple Syndication) is a family of web feed formats
used to publish frequently updated content such as blog entries,
news headlines or podcasts. An RSS document, which is called a
feed, web feed, or channel, contains either a summary of content
from an associated web site or the full text. RSS makes it possible
for people to keep up with their favorite web sites in an automated
manner that is easier than checking them manually.
Page 49

Communication
Contacts
Using Your Contacts
Use the Contacts application to add, view, and communicate with
your friends and acquaintances.
To open your Contacts application
©
Touch the Contacts Key on the Home screen or in the
Launch screen.
NOTE
You can also access your contacts by using Quick Contact.
All of your contacts are displayed alphabetically in a list. If you
have a new phone and haven't added any contacts yet, the
Contacts application will display hints on how to start adding
contacts to your phone.
Open your Contacts application then touch the Favorites
tab. The Favorites t ab lists the contacts you've added to
wed by a list of your most frequently called
ollo
the list, f
contacts.
Touch a contact to view its details.
Touch the Contact's picture to open Quick Contact.
To view details about a contact
1. Open your Contacts application.
2. Touch the contact whose details you want to view.
Touch the green phone icon to call the number or touch the
Text icon to start a text message. You can also press the
Menu Key and touch Edit contact to edit the contact's
information, or touch Delete contact to delete the contact
entry.
47
Page 50

Communication
48
To connect by using Quick Contact for Android
TM
1. Touch a contact's picture to open Quick Contact for Android.
2. Touch the icon corresponding to the type of communication
you want to start.
Depending on the contact information saved, the available
actions will be displayed above the name.
To communicate with a contact
1. From the Home screen, touch Contacts .
2. Touch the contact with whom you want to communicate.
3. In the contact's details screen, touch the way to start
communicating with the contact.
●
Touch the Dial Key next to the number you want to call
to automatically.
●
Touch the Message Key next to the number you want to
message.
NOTE
Anytime you see the Dial Key next to a number, such as in your
Favorites or Call log, just touch it to call that number.
To set whether contacts without phone numbers are displayed
If you use your list of contacts only to call people, you can hide any
contacts that don't have phone numbers.
1. From the Home screen, touch
2. Press the
Menu Key and touch Display options.
3. Touch Only contacts with phones to select or deselect this
option. When selected, a green checkmark will appear.
Contacts .
Page 51

Communication
To change which groups are displayed
1. Open your Contacts application.
2. Press the Menu Key and touch Display options.
3. Touch an account to open its list of available groups.
4. Touch each group whose contacts you want to view in your
Contacts application. Contact types with a green checkmark
will appear in your contacts list.
This action affects only which contacts are displayed. Your
sync settings will not be affected.
5. Touch
Done.
To join contacts
1. From the Home screen, touch Contacts .
2. Touch the contact entry to which you want to add
information.
The contact name for this entry will remain unchanged after
you join with another contact.
3. Press the
4. Press the
Your list of contacts is displayed on the screen.
5. Touch the contact whose information you want to join with
the first contact. The information from the two contacts will
be merged and displayed under the name from the first
contact
Menu Key and touch Edit contact.
Menu Key and touch Join.
49
Page 52

Communication
50
Email
Opening Email and the Accounts Screen
You can use the Email application to read email from services other
than GmailTM. The Email application supports the following account
types: POP3, IMAP and Exchange.
To open the Email application
©
From the Home screen, open the Launch screen and touch
Email .
The first time you open the
to help you add an email account. After the initial setup, Email
displays the contents of your Inbox (if you have only one account) or
the Accounts screen (if you have multiple accounts).
You can also add a shortcut to Email on your Home screen so that
you can open it directly from the Home screen.
The Accounts screen
The Accounts screen lists your Combined Inbox and each of your
email accounts. If you have starred, draft, or unsent messages in
any of your accounts, the folders for those items from all accounts
are displayed as well.
©
Open the Email application. If you're not on the Account
screen, press the Menu Key , then touch Accounts.
Accounts Screen
Email application, a setup wizard opens
Touch to open your Combined Inbox, with
messages sent to all of your accounts.
Touch to open a list of just your starred
messages.
h an account to open its Inbo
ouc
T
ouch the folder icon to open the account’s
T
olders.
f
x.
Page 53

Communication
Each folder and account on the Accounts screen displays the
number of unread messages in green, or will display the
number of messages in Starred, Drafts and Outbox in gray.
You can touch an account to view its Inbox, or an account's
folder icon to view a list of that account's folders.
The account from which you send email by default is
indicated with a checkmark.
To open your Combined Inbox
If you have configured Email to send and receive email from more
than one account, you can view all messages sent to all accounts in
your Combined Inbox.
1. Press the
Launcher Key
SHORTCUT
2. If you have multiple email accounts, touch Combined Inbox
(in the Accounts screen).
Messages in the Combined Inbox are color coded along
their left sides, by account, using the same colors that are
used for your accounts in the Accounts screen.
Only your account's most recent emails are downloaded to your
phone. To download more (earlier) email messages, touch
more messages
Home Key , then touch the Applications
> Email .
Press the Home Key , then touch Email on the Home
screen.
Load
at the bottom of the emails list.
51
Page 54

Communication
52
Reading Your Messages
You can read messages from your Combined Inbox, from the Inbox,
or from other folders from the individual accounts.
To read a message
1. Press the Home Key , then touch the Applications
Launcher Key
2. Touch the message you want to read.
The message opens in a screen that includes information
about who sent it, the date it was sent, and other related
information.
> Email .
Attached file.
Corporate Calendar Meeting Invitation.
An Unread message.
Messages are color coded according to the account to
which they were sent.
Touch to star a message.
A previously read message.
The Google Talk
TM
online status will be shown (if available)
next to the name of the sender of each message.
Page 55

Communication
Composing and Sending Email
You can send email to your contacts or to other people or groups.
To compose and send a message
1. While in the Email application, press the Menu Key ,
then touch Compose.
2. Enter an address for the message's intended recipient.
As you enter text, matching addresses are offered from your
Contacts. You can touch a suggested address or continue
entering a new one. Separate multiple addresses with
commas.
3. Press the
to Cc or Bcc other contacts/email addresses.
4. Enter a subject for the message.
5. Enter the text of the message.
6. Press the
send a photo with the message.
7. Touch
If you're not ready to send the message, touch Save as
draft
the Drafts folder. Later, when you're ready to send the
message, touch the message in the Drafts folder to resume
working on it.
If you change your mind about the message, touch Discard
to abandon and delete the message, including any saved
drafts.
If you aren't connected to a network, for example if you're
working in Airplane mode, the messages that you send are
stored in your Outbox folder until you're connected to a
network again. The Outbox is displayed on the Accounts
screen if it contains any pending messages.
Menu Key , then touch Add Cc/Bcc to be able
Menu Key , then touch Add attachment to
Send to send the message.
(or press the Back Key ) to move the message to
53
Page 56

Communication
54
Please note that messages sent using an Exchange account will not
be located on the phone; they will, however, be located on the
Exchange server itself.
If you want to see your sent messages in the Sent folder (or with
the Sent label), you will often need to open the Sent folder/label,
press the Menu Key , then touch Refresh.
Working with Account Folders
Each account has Inbox, Outbox, Sent, and Drafts folders.
Depending on the features supported by your account's service
provider, you may have additional folders.
To view an account’s folders
1. Open the Email application , press the Menu Key ,
then touch Accounts.
2. Touch an account's folder icon.
The account's Folders screen will open, with a list of the
folders in the account. Touch a folder to view a list of the
messages it contains.
Indicates the number of new messages in the
folder.
Touch a folder to open the messages it
contains.
Page 57

Communication
Adding and Editing Email Accounts
To add an email account
1. Open the Accounts screen.
2. Press the
In the Setup Email screen, enter your email address and
password.
If you're adding a second or subsequent email address, you
can also check the option to use the new account as default
when sending outgoing messages.
3. Touch Next or, if you need to enter email account settings
the wizard can't configure for you, touch Manual setup.
If you touch Next, Email attempts to communicate with your
email service provider to validate your account for sending
and receiving mail, using just your email address and
password. This is sufficient for most email services.
Depending on the service provider, you may be asked what
kind of email account you have. If you're not sure, ask your
email service provider.
If the wizard determines that your service provider requires
additional information, or if you touched the
button, you're prompted to enter your email account details.
Contact your email service provider for the values required
for your account.
4. Enter a name for the account, confirm how you want your
name to appear in outgoing mail, then touch
complete adding the account.
If you are adding an Exchange ActiveSync account, you can
also decide whether you want to synchronize your contacts
from the Exchange ActiveSync server to your phone. You can
change this setting later using the
Email will start downloading your email messages so you
can start using it to send and receive messages.
Menu Key and touch Add account.
Manual setup
Done to
Contacts application.
55
Page 58

Communication
56
To change an account’s settings
You can change a number of settings for an account, including how
often email is checked and how you're notified of new mail.
1. Open the Accounts screen.
2. Touch and hold the account whose settings you want to
change. In the menu that opens, touch
3. When you're finished changing settings, press the Back Key
to return to the Accounts screen.
Account settings.
To delete an email account
1. Open the Accounts screen.
2. Touch and hold the account you want to delete.
3. Touch
4. Touch
Remove account in the menu that opens.
OK in the dialog box to confirm that you want to
delete the account.
Facebook for LG
The Facebook for LG application on your phone lets you keep up
and stay close with your friends in Facebook. It offers most of the
features that you are familiar with when using Facebook on your
computer.
Page 59

Communication
Using the Facebook application
1. Touch Application Launcher Key then touch Facebook
for LG
.
2. If this is your first time to use Facebook, enter your Email
and Password to sign in to your Facebook account.
3. On the News Feed screen, press the
Menu Key , then
touch Home to access the other functions.
NOTE
• While on the Facebook home screen, press the Menu Key , then
touch Settings to set refresh and notification options.
• On some Facebook screens, you can press and hold an item to open
an options menu.
Adding the Facebook widget
Add the Facebook widget to the Home screen to let you quickly
share your thoughts and view your friends’ status updates.
NOTE
The widget will only link to the Facebook account that you logged into
on the Facebook application.
1. Touch and hold an area in the Home screen where you want to place
the Widget.
2. Touch Widgets > Social Feed.
Gmail
Opening Gmail and Your Inbox
When you open the Gmail application, the most recent
conversations are displayed in your Inbox.
57
Page 60

Communication
58
To open the Gmail application
©
Touch Gmail on the Home screen or in the Launch
screen.
The number of unread
messages in your Inbox.
Bold subject lines indicate
conversations with new
(unread) messages.
Touch a conversation to open it
and read its messages.
Recipient indicator (see below)
: indicates that this message was sent directly to you.
: indicates that this message was that you were CC'd on.
(No indicator): indicates that this message was sent to a group
that includes you.
To open your Inbox when Gmail is running
©
Press the Back Key until you return to your Inbox.
OR
©
When reading a message, press the Menu Key and
touch Go to Inbox.
OR
©
When viewing a list of labeled conversations, press the
Menu Key and touch More > Go to Inbox.
Your account.
The number in
parentheses indicates the
number of messages in
the conversation
To switch accounts
Gmail displays conversations and messages from one Google
Account at a time. If you have more than one account, you can
open the Accounts screen to view how many unread messages you
have in each account and to switch accounts.
Page 61

Communication
1. From your Inbox, press the Menu Key and touch
Accounts.
2. Touch the account that contains the email you want to read.
Reading Your Messages
When viewing a list of conversations in your Inbox or in any list of
labeled conversations, you can open a conversation to read its
messages.
To read a message
©
Touch a conversation that contains the message you want to
read.
A conversation opens to the first new (unread) message, or
to the first starred message, if you've previously starred a
message in the conversation.
To reread a message
When you open a conversation, messages that you've already read
are minimized into a tab that indicates the number of hidden
messages.
1. From the Home screen, touch
conversation you want to view, then touch the tab indicating
minimized messages.
2. Touch the contact name to open that message.
When reading a message or when its tab is selected, you can press
Menu Key and touch Mark unread to return a read
the
message to the unread state. For example, to remind yourself to
read it again later.
Gmail , touch the
59
Composing and Sending a Message
You can compose and send a message to people or groups with
Gmail addresses or other email addresses.
Page 62

Communication
60
To compose and send a message
1. From the Home screen, touch Gmail , press the Menu
Key
2. Enter a recipient's address.
As you enter text, matching addresses are offered from your
Contacts list. You can touch a suggested address or continue
entering text to enter a new one.
3. Press the
Bcc recipients, if necessary.
4. Enter a subject for the message in the Subject field.
5. Continue into the next field to enter your email message.
6. Press the
attachment to the email.
7. Touch Send to send the email.
If you're not ready to send the message, touch Save draft
instead. You can read your drafts by opening messages with
the Draft label.
Touch
drafts).
If you aren't connected to a network - for example, if you're
working in Airplane mode - the messages that you send are
stored on your phone with the Outbox label until you
connect to a network again.
and touch Compose.
Menu Key and touch Add Cc/Bcc to Cc or
Menu Key and touch Attach to add an
Discard to erase the message (including any saved
Replying to or Forwarding a Message
You can continue an email conversation by replying to a message or
by forwarding it.
To reply to or forward a message
1. Touch to the right of the sender's name to view your
message options.
Page 63

Communication
2. Touch Reply, Reply all, or Forward.
3. Enter the recipient, if necessary, and your message. Then
touch
Send to send the email.
Working with Conversations in Batches
You can archive, label, delete, or perform other actions on a batch of
conversations at once, in your Inbox or in another label views.
1. From the Inbox or messages with another label, touch the
checkmark for all the messages you want to include in the
batch.
When you checkmark a conversation, the
and Labels buttons appear at the bottom of the screen.
2. Touch Archive, Delete, or Label or press the Menu Key
and touch Add star, Report spam, Mute, Mark read/ Mark
unread
, or Deselect all.
Your action affects the selected batch of messages.
If you accidentally delete a batch of conversations, you can
Undo in the green bar (that appears briefly after the
touch
action) at the top of the screen to undelete them. You can
also use Undo after muting, archiving, and reporting spam.
If you never work with batches of messages, you can hide the
checkboxes to leave more room for the subjects of conversations.
Archive, Delete,
Labeling a Conversation
As mentioned previously, conversations are organized by labels.
Gmail has several default labels, but you can also add your own
through Gmail on the web.
61
To label a conversation or change the conversation's label
1. When reading a conversation's messages, press the Menu
Key
and touch Change labels.
Page 64

Communication
62
2. In the dialog box that opens, check the labels you want to
assign to the conversation.
3. Touch
OK.
To label a batch of conversations at once
You can assign or change the labels of one or more conversations at
once.
1. From your Inbox or messages with another label, checkmark
the conversations to select a batch.
2. Touch
Labels at the bottom of the screen.
3. In the dialog box that opens, check the labels you want to
assign to the conversation.
4. Touch
OK.
Starring a Message
You can star an important message or conversation to make it easy
to locate again.
To star a message
©
When reading a message, touch the star in its header.
OR
©
When viewing a list of messages, touch the star to star
the newest message in a conversation.
To unstar a message
©
Touch its star again. The star should appear a gray color when
it is unstarred.
Page 65

Communication
Viewing Conversations by Label
You can view a list of the conversations that have the same label,
including conversations with starred messages.
1. When viewing your Inbox or messages with another label,
press the
2. Touch a label to view a list of conversations with that label.
Note that the conversation list will resemble your Inbox.
Most of the options available while using your Inbox will also
be available while viewing these lists of labeled messages.
Menu Key and touch Go to labels.
Searching for Messages
1. From the Inbox, press the Menu Key and touch Search.
Or from the Inbox, press the Search Key .
2. Enter the word or words to search for then touch the
icon to the right of the text field.
A list of results will appear, displaying all of the
conversations with emails that contain the words you
searched for.
You can open these emails as you would any email in your
Inbox; you also have the same options available.
Search
Changing Gmail Settings
You can change a number of settings for Gmail. Each Google
account has its own settings, so your changes affect only the
current account.
Notification volumes and some synchronization settings can also be
changed in the
©
Settings application.
From the Home screen, touch Gmail , press the Menu
Key
and touch More > Settings.
63
Page 66

Communication
64
Messaging
To open Messaging
©
From the Home screen, touch Messaging .
The Messaging window will open, where you can create a
new message or open an ongoing message thread.
Touch to compose a new text or multimedia
message.
Touch to open an ongoing message thread.
©
Touch New message to start a new text or multimedia message.
©
Touch an existing message thread to open it.
To delete a message thread from the Messaging window
1. Touch and hold the message thread.
2. Touch
3. Touch
Delete thr
OK to confirm.
Excuse Message
Displays your list of Excuse Message phrases that help you to
reduce manual input into messages. To access from the Home
screen, press the Menu Key , then touch Settings > Call
settings > Excuse Messages
messages, multiselect, or deleting all the messages. You can also
touch an Excuse Message to edit it.
ead
in the menu that opens.
. Press the Menu Key to add new
Page 67

Communication
To send a text message
1. On the Messaging screen, touch New message.
2. Enter a mobile phone number in the To field.
As you enter the mobile phone number, matching contacts
appear. You can touch a suggested recipient or continue
entering the phone number.
3. Touch the text field to start entering your message.
Enter a mobile phone number or the name of a
contact with a mobile number.
Touch Send to send your message.
65
If you press the
Back Key while composing a message,
it's saved as a draft in your Messaging menu. Touch the
message to resume composing it.
4. Touch
Send to send the message.
To create and send a multimedia message
1. On the Messaging screen, touch New message.
2. Enter a mobile phone number or email address in the To
field. As you type, matching contacts appear. You can touch
a suggested contact or continue typing.
3. Touch the text field to start entering your message.
4. Press the
message subject.
Menu Key and touch Add subject to add a
Page 68

Communication
66
5. Press the Menu Key , touch Attach and select the type
of media file to attach to the message.
●
If you touch Pictures, you're prompted to select a picture
from your collection.
●
If you touch Capture picture, the Camera application opens
so you can take a picture and attach it.
●
If you touch Videos, you're prompted to select a video
from your collection.
●
If you touch Capture video, the Camcorder application
opens so you can record a video and attach it.
●
If you touch Audio, you're prompted to select an audio file
from embedded audio files.
●
If you touch Record audio, the voice recording function
opens and allows you to record a spoken message and
attach it to your message.
●
If you touch Slideshow, a menu opens and allows you to
assemble photos into a slideshow (up to 10 slides) to
attach to the message. Use the buttons in the Compose
Message screen to preview the message, replace the
picture, or remove the slide.
6. Touch
7. Touch
Done after you finish editing the slideshow.
Send to send the message.
To view details about a message
1. Touch and hold a message in a message window.
2. Touch
View message details in the menu that opens.
Page 69

Communication
Google Talk
Signing in and Opening your Friends List
You sign into Google Talk to chat with your friends.
You remain signed in, even when you're using other applications,
until you deliberately sign out.
To open Google Talk and sign in
our online status.
Y
Touch to open an ongoing chat
Touch a friend to invite them to chat.
Chatting with Friends
To chat with a friend
1. From the Home screen, open the Launch screen and touch
Talk .
If you're already chatting with someone, you can press the
Menu Key and touch Friends list to return to the
friend's list.
2. Touch the friend you want to chat with.
3. Enter your message then touch
Send.
67
Page 70

Communication
68
The messages that you exchange are displayed on the
screen and include information about the chat, such as
whether it's on the record, the time a message was sent (if
there's no response after a short while), and so on.
You can enter an emoticon (smiley), just press the Menu
Key
emoticons.
Your chat session will remain open until you end it.
Friends you're chatting with are displayed at the top of your
Friends list, with the most recent message displayed in a
black-on-white balloon.
and touch More > Insert smiley to open a list of
To set whether you sign into Google Talk automatically
1. From the Friends list, press the Menu Key and touch
Settings.
2. Check or uncheck
When Automatically sign in is checked, you are signed into
Google Talk when you turn on your phone.
Automatically sign in.
Page 71

Communication
Twitter for LG
Home screen
1. Shows all the tweets from your Friends and tweets that you
have sent out.
2. Shows all tweets that mentions your username using the
“@[your username]” convention.
3. Touch to view your Twitter profile. This also shows you all of
your tweets.
4. Shows favorite friends that were marked as favorites.
5. Shows all the people you follow.
6. Shows all private/direct messages that you have received or
sent out.
69
Page 72

Communication
70
Updating your status
1. Open the Twitter for LG application.
2. Touch the text field with the words “What’s happening?”.
3. Update your status and touch
Update.
Phone
This allows you to make a call.
Call log
This shows you the history of your call. You can call or contact any
entry, select multiple entries, or clear the call log.
Contacts
To add a contact, press the Menu Key and touch
©
Accounts to add or configure an account with contacts you
can sync to the phone.
©
New contact to create a new contact.
©
More > Import/Export to import or export contacts from your
microSD card.
You can also choose from
Favorites
To add a contact to your list of favorites :
©
Touch the Contacts tab.
©
Touch the contact you want to add to your favorites.
©
Touch the star next to the contact's name.
Search, Multiselect, and Display options.
Page 73

Communication
Voice Control
Call a contact by voice dialling
You can call numbers directly by saying the contact’s name or
number.
1. From the Home screen, touch the
Key
> Voice Control .
2. Say “Call” or “Dial” and then a name or a phone number.
Alternatively, say "Redial" to call the last dialed number. The
device dials the stated number.
Applications Launcher
Voice Search
You can search by voice with just a simple touch of the Voice
Search
icon .
1. From the Home screen, touch the
Key
> Voice Search .
2. Wait for the "Speak now" prompt, then say your query.
The search results will be displayed and formatted for the
Android browser.
3. Touch the result you want, or continue searching.
Applications Launcher
71
Page 74

Entertainment
72
Camera
Press the Home Key , then touch the Applications Launcher
Key
> Camera .
Getting to know the viewfinder
Brightness – Defines and controls of the amount of
sunlight entering the lens. Touch the brightness indicator
along the bar, towards “-” for a lower brightness image,
or towards “+” for a higher brightness image.
Zoom – Zoom in or z
Keys
will also adjust the zoom.
Settings – Opens the settings menu.
Focus – Choose from Auto, Macr
Scene mode – Choose from Auto, Portrait, Landscape,
Sports, Night, and Sunset.
NOTE
A memory card needs to be inserted and mounted to activate the
Camera application.
TIP!
You can close all the setting icons to give a clearer viewfinder screen by
touching the center of the viewfinder once.
To recall the options, touch the screen again.
oom out. The up/down Volume
Video mode – Slide down this icon to switch
to video mode.
Capture - Takes a photo.
Gallery– Accesses your saved photos from
within the camera mode. Simply touc
your Gallery will appear on the screen.
o, Face tracking,
and Manual.
h, and
Page 75

Entertainment
Viewing your saved photos
1. You can access your saved photos from within the camera
mode. Just touch the Gallery icon , then touch a photo to
display Slideshow and Menu.
TIP!
Flick left or right to view other photos or videos.
Slideshow : Touch to see your photos played in a slideshow.
Menu : Touch to open a menu of options including Share,
Delete
, or More. If you touch More, you have the following
additional options:
Details - Displays the information about the selected photo
(e.g., file type, file size, etc.).
Show on map Displays the location where the picture was taken
on Google Maps. You must have the Tag location menu set to On
for this menu to be displayed.
Set as - Sets the photo as the icon identifying a contact or sets it
as your phone wallpaper.
Crop - Allows you to manually crop the photo. Use your finger to
move or resize the cropping box to encompass only the part of
the photo you want to see, then touch Save.
Rotate - Touch one of the rotation icons to rotate the photo left or
right.
73
Page 76

Entertainment
74
Video Camera
Press the Home Key , then touch the Applications Launcher
Key
> Camera .
Getting to know the viewfinder
Brightness – Defines and controls of the amount of sunlight entering the lens.
Touch the brightness indicator along the bar, towards “-” for a lower brightness
Video, or towards “+” for a higher brightness Video.
Zoom – Zoom in or zoom out. The up/down Volume Keys will also set the zoom. Set the
zoom before starting a video. You cannot change the zoom setting during recording.
Camera mode – Switches between Camera and
Video. Slide up for Camera mode and slide down for
Video mode.
Capture
- Starts video recording
Gallery – Accesses your saved photos and
videos from video camera mode. Simply
our Gallery will appear on the
touch, and y
Settings – Opens the settings menu.
Scene mode
Portrait, Landscape, Sports, Night, and Sunset.
Video size – Sets the size (in pixels) of the video you record. Choose your video image size
from VGA (640x480), QVGA (320x240) or QCIF (176x144).
– Sets the video camera to adjust to the environment. Choose from Auto,
Shooting a quick video
1. Open the Camera application.
Press the Home Key , then touch the Applications
Launcher Key
2. Slide the Camera mode icon down to change to Video mode.
The Camera mode icon changes to and the Capture
button changes to .
screen.
> Camera .
Page 77

Entertainment
3. The video camera’s viewfinder will appear on the screen.
4. Holding the phone horizontally, point the lens towards the
subject of the video.
5. Touch
6. REC will appear in red at the bottom of the viewfinder with a
7. Touch on the screen to stop recording.
Capture once to start recording.
timer showing the length of the video.
Gallery
Opening Gallery and Viewing Your Albums
Open the Gallery application to view albums of your pictures and
videos.
To open Gallery and view your albums
©
Touch the Gallery icon on the Home screen or on the
Launch screen.
OR
©
Open Gallery from the Camera application by touching the
Gallery icon .
75
Page 78

Entertainment
76
The Gallery application presents the pictures and videos on
your microSD card, including those you've taken with the
Camera application and those you downloaded from the
web or other locations.
If you have a Picasa
phone's GoogleTMAccounts, you'll also see your Picasa web
albums in Gallery.
To view and browse pictures
©
Open a Gallery album and touch a picture.
TM
account synced with one of your
Typical view of an album.
Scroll left or right to view more albums.
ouch to zoom in or
T
out; simply pinc
just double-tap the
pict
©
Turn the phone to view the picture in vertical (portrait) or
h; or
ure.
Touch the picture to see
the controls.
Drag left or right to see
the next or previous
picture in the album.
horizontal (landscape) orientation. The picture is displayed
(but not saved) in the new orientation.
Page 79

Entertainment
©
Touch the picture to view navigation, zoom, and other control
buttons.
©
Touch either Zoom icon to zoom in or out or just double-tap
the screen.
©
When the picture is zoomed in, drag the picture to view parts
that are not in view.
©
When the picture is zoomed to fit in the window, drag left or
right to view the next or previous picture in the album.
Working with Videos
Use the Gallery application to play videos that you've taken with the
Camera application and to share them with friends.
To play videos
©
Open a Gallery album then touch a video.
The video plays, with the orientation (landscape) you shot it
in.
Touch the video to view the playback controls
, resuming, and skipping
or pausing
f
backward and forward.
©
Touch the video to view the playback controls.
77
Page 80

Entertainment
78
Android Market
TM
Opening Android Market and Finding Applications
Open Android Market to browse and search for free and paid
applications.
To open Android Market application
©
Touch Market on the Home screen or in the Launch
screen.
When you open Android Market application for the first
time, you must read and accept the terms of service to
continue.
Touch to search Market for specific applications.
Touch a category to view its contents.
Touch a featured application to view more
information.
To get help with Android Market
Android Market Help webpages are available from all Android
Market screens.
©
Press the Menu Key and touch Help.
The Browser application opens to Android Market Help page,
with links to many help topics.
Page 81

Entertainment
Music
Opening Music and Working with Your Library
After you've copied some music onto your microSD card you can
open the Music application and see your library of music files.
To open Music and view your music library
©
Touch Music on the Home screen or in the Launch
screen.
ouch a tab to view your library according to
T
the theme.
w a summary of information of
h to sho
Touc
the current track.
You can return to the main Library screen from most other screens
in the
Music application by pressing the Menu Key , then
touching Library.
How to use
©
Open the main Library screen then press the Search Key
to search for music in the library.
©
Touch and hold a song in a Library list. In the menu that
opens, touch Delete.
OR
©
On the Playback screen, press the Menu Key and touch
Delete.
79
Page 82

Entertainment
80
To control playback
The Playback screen contains several icons that you can touch to
control the playback of songs, albums, and playlists:
Touch to pause playback.
Touch to resume playback.
Touch to skip to the next track in the album, playlist, or shuffle.
Touch to skip to the previous track in the album, playlist, or shuffle.
Touch to open the current playlist.
Touch to play the current playlist in shuffle mode (tracks are played in
random order).
Touch to set repeat mode: Don't repeat, Repeat the playlist, or Repeat
the current track.
To control playback volume
You can control the volume of music in the Music application by
pressing the phone's up/down Volume Keys.
To use a song as a ringtone
You can use a song as your phone ringtone, in place of one of the
ringtones that come with the phone.
©
Touch and hold a song in a Library list. In the menu that
opens, touch Use as phone ringtone.
OR
©
On the Playback screen, press the Menu Key and touch
Use as ringtone.
Page 83

Entertainment
Video Player
Learn to use the video player to play various kinds of videos. The
video player supports the following file formats: mpeg, mp4, 3gp,
3gpp, 3g2, 3gpp2, avi, divx, wmv, asf (Codec: MPEG4, H.263,
H.264, WMV, DivX/XviD).
• Some file formats are not supported depending on the software
of the phone.
• If the file size exceeds the available memory, an error can occur
when you open files.
1. From the Home screen, touch the Applications Launcher
Key
> Video Player.
2. Select a video to play.
3. Rotate the device counter clockwise to landscape view.
4. Control playback with the following icons:
Pause playback.
Play a video file.
Press to st
hold to re
Touch and hold to fast-forward playback.
art playing the video from the beginning. Touch and
wind playback.
81
Page 84

Entertainment
82
YouTube
TM
Opening YouTube and Watching Videos
You can browse, search for, view, upload, and rate YouTube videos
on your phone with the YouTube application.
To open the YouTube application
©
Touch YouTube on the Home screen or in the Launch
screen.
YouTube presents the videos grouped into categories, such
as Most viewed, Most discussed, and Top rated.
Touch to search for a video.
search by voice.
Touch to record and share a video.
Touch a video to play it.
Touch to learn more about a video.
You can also
To watch and interact with YouTube videos
©
On a YouTube screen, touch a video to play it.
©
Touch the video to view the Playback controls.
©
Press the Back Key to stop playback and return to the
videos list.
©
Press the Menu Key for Home, Brower, Search, My
Channel, Upload and Settings.
Page 85

Entertainment
Voice Recorder
Learn to operate your phone’s voice recorder. You can set voice
memos as call or alarm ringtones.
Record a voice memo
1. From the Home screen, touch the Applications Launcher
Key
> Voice Recorder.
2. Select to start recording.
3. Speak into the microphone.
4. When you are finished, touch .
5. To record more voice memos, select from the
bottom of the screen and touch
again.
Play a voice memo
1. From the Home screen, touch the Applications Launcher
Key
> Voice Recorder.
2. Touch
Go to list and touch a recording.
NOTE
You can send the voice memo to others by touching and holding a voice
memo and selecting
Share.
New record o simply touch
83
Page 86

Tool
84
Calendar
Agenda view
In Agenda, Day, or Week view, touch an
event to view its details.
Touch a day in Month view to open that day’s events.
To open Calendar
©
Touch Calendar on the Home screen or in the Launcher.
Events from each account you’ve added to your phone and
configured to synchronize calendars is displayed in Calendar.
Events from each calendar are displayed in a different color.
Working in Agenda view
Agenda view is a list of your events in chronological order. All-day
and multiday events are listed at the start of each day.
Day view
Week view
Month view
Page 87

Tool
Working in Day view
Day view displays a chart of the events of one day, in a table of onehour rows. A red line indicates the current time. All-day and
multiday events are displayed at the top. Part of the title of each
event is displayed in the rows that correspond to when it occurs.
Working in Week view
Week view displays a chart of the events of one week. All-day and
multiday events are displayed at the top.
Working in Month view
Month view displays a chart of the events of the month. Segments
of each day with scheduled events are blue in the day’s vertical bar.
Viewing event details
You can view more information about an event in a number of ways,
depending on the current view.
Synchronizing and displaying calendars
1. Press the Menu Key and touch More > Calendars.
2. Touch the icon next to a calendar to change whether it is
stored on the phone and visible in Calendar.
3. Touch
OK.
85
Page 88

Tool
86
Calculator
To open and use the Calculator
©
Touch Calculator on the Home screen or in the Launch
screen.
©
Enter numbers and arithmetic operators on the Basic panel.
©
Drag the Basic panel to the left to open the Advanced panel.
©
Touch and hold the Calculator’s display to open a menu
where you can copy what you’ve entered and access other
tools.
©
Touch Clear to delete the last number or operator you
entered. Touch and hold Clear to delete all of the entered
information.
Drag to switch
between the Basic
and Advanced panels.
Page 89

Clock
Viewing the Date, Time, and Other Information
You use the Clock application to monitor several kinds of
information at once, in addition to the current date and time.
To open the Clock application
©
Touch Clock on the Home screen or in the Launch screen.
Touch to dim the screen.
Tool
87
Displays the battery charge level when the
phone is plugged into a c
Touch go to the Home screen.
You can play music while the Clock is displayed.
You can play a slideshow of the pictures in your Gallery
albums from the Clock application.
Touch to set an alarm.
harger.
When the Clock application is running, it switches to screensaver mode after a few minutes. Simply press a phone key
to wake the phone up again.
To return to the Home screen, touch
Home at the
bottom of the Clock screen.
Page 90

Tool
88
ThinkFree Office
Create a new document
1. From the Home screen, touch the Applications Launcher
Key
> ThinkFree Office.
2. Touch Accept > Activate now > Close (This is necessary only
when you launch this application for the first time).
3. Press the
type of document you would like to start.
4. Enter a name for the document and touch
5. Enter contents in the document by using the tools at the
bottom of the screen.
6. When you are finished editing, press the
touch File > Save (or Save as and enter a new document
name), then press the Back Key to exit.
View and edit a document on your device
1. Touch the document you want to view and/or edit.
2. View and edit the document as desired.
• To open the toolbar to edit the document (word, text, or
3. When you are finished editing, save the document.
Menu Key , then touch New and choose the
excel file), press the
the tool bar to edit the document.
Menu Key and touch Edit. Use
Menu Key ,
OK.
Page 91

Tool
Using Car Home
The Car Home application opens with five large icons that you can
touch to access Navigate, Voice Search, Music, Phone, and
Contacts. You can also access Map and Settings by flicking the
screen to the left, as well as adjust the screen brightness.
Home Selector
Allows you to choose the color scheme used in the background of
the LCD screen.
89
Page 92

Specifications
90
The LG-CX670 phone and AndroidTM2.2 mobile platform feature the
following specifications.
Physical
dimensions
Storage
Display
Power and
battery
Cellular and
wireless
External keys
and controls
Height: 4.56 inches
Width: 2.22 inches
Depth: 0.62 inches
Weight: 5.57 oz.
Internal Memory: 102MB
microSD card: 2GB microSD card included
(expandable to 32GB)
3.2-inch (diagonal) widescreen
320x480
Removable 1500 mAh Li-Ion
Talk time: Up to 3.5 hours
Standby time: Up to 7 days
800 MHz CDMA Cellular
1.9 GHz CDMA PCS
EVDO Rev A
1xRTT
Wi-Fi (802.11 b/g)
Bluetooth 2.1 + EDR
HFP/HSP/A2DP/AVRCP/OPP/PBAP/FTP
Power/Lock Key
Function Keys (Menu, Home, Back and Search)
Voice Control key
Volume Keys
Camera Key
Page 93

Specifications
91
Connectors,
sensors,
indicators,
and audio
3.5mm, 4-conductor, stereo headset jack
microSD card slot
Micro USB port
Proximity sensor
Earpiece/ Speaker
Microphone
Assisted global positioning system (AGPS) receiver
Location
Cell tower and Wi-Fi positioning
Digital compass
Accelerometer
3.2 megapixels
Autofocus from 10cm to infinity
Camera
4X digital zoom
Embedded photo location marker capability (from phone's AGPS
receiver)
Video captured at 640x480 pixels
Platform
Android mobile technology platform 2.2 (Froyo)
DivX Mobile
ABOUT DIVX VIDEO: DivX®is a digital video format created by DivX,Inc. This is an official
DivX Certified®device that plays DivX video. Visit www.divx.com for more information and
software tools to convert your files into DivX video.
ABOUT DIVX VIDEO-ON-DEMAND: This DivX Certified
to play purchased DivX Video-on-Demand (VOD) movies. To obtain your registration code,
locate the DivX VOD section in your device setup menu. Go to vod.divx.com for more
information on how to complete your registration.
DivX Certified
DivX
under license.
®
®
to play DivX®video up to 320x240
, DivX Certified®and associated logos are trademarks of DivX, Inc. and are used
®
device must be registered in order
Page 94

Technical Details
92
Technical Details
CDMA
Standard
Basic Air
Interface
Network
Service
1x EV-DO
Related
Interface
Designator Description
TIA/EIA-95A
TSB-74
CDMA Dual-Mode Air Interface
14.4kbps Radio Link Protocol and Inter-band
Operations
ANSI J-STD-008
TIA/EIA-IS2000
TIA/EIA/IS-634
TIA/EIA/IS-651
TIA/EIA/IS-41-C
TIA/EIA/IS-124
TIA/EIA/IS-96-B
TIA/EIA/IS-637
TIA/EIA/IS-657
IS-801
TIA/EIA/IS-707-A
TIA/EIA/IS-856
TIA/EIA/IS-878
IS-95 Adapted for PCS Frequency Band
CDMA2000 1xRTT Air Interface
MAS-BS
PCSC-RS
Intersystem Operations
Non-Signaling Data Communications
Speech CODEC
Short Message Service
Packet Data
Position Determination Service (gpsOne)
High Speed Packet Data
CDMA2000 High Rate Packet Data Air Interface
1x EV-DO Inter-Operability Specification for HRPD
Access Network Interfaces
TIA/EIA/IS-866
Recommended Minimum Performance Standards
for HRPD High Rate Packet Data Access Terminal
TIA/EIA/IS-890
Test Application Specification (TAS) for High Rate
Packet Data Air Interface
Page 95

FAQ
FAQ
Please check to see if any problems you have encountered with
your phone are described in this section, before taking the phone in
for service or calling a service representative.
93
Category
Sub-Category
BT
Bluetooth
Devices
BT
Bluetooth
Headset
Data
Contacts
Backup
Data
Synchroniz ation
Data
Synchroniz ation
Question Answer
You can connect Bluetooth audio
device such as Stereo/Mono headset,
What are the functions
available via
Bluetooth?
Car Kit and share pictures, videos,
contacts, etc via Gallery/Contacts
menu. Also when FTP server is
connected to a compatible device,
you can share contents stored in the
SD card.
If my Bluetooth
headset is connected,
can I listen to my
music through my
3.5mm wired
headphones?
How can I back up
Contacts?
Is it possible to setup
one-way sync with
Google mail?
When a Bluetooth headset is
connected, all system sounds are
played over the headset. As a result,
you will not be able to listen to music
through your wired headphones.
The Contacts data can be
synchronized between your phone
and Google mail
Only two-way synchronization is
available.
The Inbox is automatically
Is it possible to
synchronize all the Email
synchronized. You can view other
folders by pressing the Menu Key
folders?
folder.
TM
.
and touch Folders to choose a
Page 96

FAQ
94
Category
Sub-Category
GoogleTMService
Google mail Log-In
Google Service
Google Account
Phone Function
YouTube
TM
Phone Function
Email
Phone Function
Ringtone
Phone F
unction
Message Time
Question Answer
Should I have to log
into Google mail
whenever I want to
access Google mail?
Is it possible to filter
emails?
Once you log into Google mail, you
don’t need to log in Google mail
again.
No, email filtering is not supported
via the phone.
Yes, YouTube videos are supported
Is it possible to play
YouTube videos?
but may have to be viewed through
the YouTube application (and not the
browser).
What happens when I
execute another
application while writing
Your email will automatically be
saved as a draft.
an email?
Is there a file size
limitation for when I want
to use a .MP3 file as a
There is no file size limitation.
ringtone?
My phone does not
display the time of receipt
for messages older than
24 hrs. How can I change
You will only be able to see the times
for messages received the same day.
this?
Phone Function
microSD Card
What is the maximum
supported size for a
memory card?
32 GB memory cards are compatible.
Page 97

FAQ
95
Category
Sub-Category
M
T
Google
Service
Navigation
Google Service
Synchroniz ation
Phone Function
Wait and Pause
Phone Function
y
Securit
Phone Function
Unlock Pattern
Question Answer
Is it possible to install
another navigation
application on my
phone?
Is it possible to
synchronize my
contacts from all my
email accounts?
Any application that is available on
Android Market
with the hardware can be installed
and used.
Only Google mail & MS Exchange
server(Company Email Server)
contacts can be synchronized.
If you transferred a contact with the
W & P functions saved into the
number, you will not be able to use
those features. You will need to resave each number.
Is it possible to save a
contact with Wait and
Pause in the numbers?
How to save with Wait and Pause:
1. From the Home screen, press the
Phone
2. Touch the Phone tab.
3. Dial the number, then press the
Menu Key
4. Touch
wait
You are able to set the phone to
What are the phone’s
security functions?
require the entry of an Unlock Pattern
before the phone can be accessed or
used.
After attempting the Unlock Pattern 5
What should I do if I forget
my the Unlock Pattern?
times, you can touch the
Pattern?
account information to unlock your
phone.
M
T
and is compatible
icon .
.
Add 2-sec pause or Add
.
option and use your Google
Forget
Page 98

FAQ
96
Category
Sub-Category
Phone Function
Unlock Pattern
Phone Function
Unlock Pattern
Question Answer
Without entering the Unlock Pattern,
you will not be able to access your
phone.
Caution: If you perform a factory
reset, all user applications and user
data will be deleted. Please
What should I do if I
forgot the Unlock
Pattern and I didn’t
create the Google
account on the phone?
remember to back up any
important data before performing
a factory reset.
1. Turn the power off.
2. Press and hold:
Power Key + Down Volume Key.
3. Turn the power on, while keeping
the three keys pressed.
4. When the LG logo is shown,
release the keys.
1. From the Home screen, press the
Menu Key .
2. Touch
security.
How do I create the
Unlock Pattern?
3. Touch Set unlock pattern (under
the Screen unlock pattern section
of the settings). The first time you
do this, a short tutorial about
creating an Unlock Pattern appears.
4. Set up by drawing your pattern
once, then again for confirmation.
Home Key +
Settings > Location &
Page 99

FAQ
97
Category
Sub-Category
Phone Function
Memory
Phone Function
Memory
Phone Function
Language Support
Phone Function
VPN
Phone Function
Screen time out
Question Answer
Is it possible to save a
picture to the internal
memory after taking a
picture?
Will I know when my
memory is full?
Pictures, along with Music and Video
files, can only be saved to external
memory.
Email and Applications can be saved
to the internal memory.
Yes, you will receive a notification.
The phone has multilingual
capabilities.
To change the language:
Is it possible to change
the language?
1. From the Home screen, press the
Menu Key and touch
Settings.
2. Touch Language & keyboard >
Select language.
3. Touch the desired language.
VPN access configuration is different
according to each company. To
How do I set up a VPN?
configure VPN access from your
phone, you must obtain the details
from your company’s network
administrator.
1. From the Home screen, press the
My screen turns off after
only 15 seconds. How
can I change the amount
of time for the backlight
to turn off?
Menu Key
2. Touch Settings > Display.
3. Under Display settings, touch
Screen timeout.
4. Touch the preferred screen
backlight timeout time.
.
Page 100

FAQ
98
Category
Sub-Category
Phone Function
Tactile feedback
Phone Function
Wi-Fi & 3G
Phone Function
Home screen
Phone Function
Application
Question Answer
I’ve turned off haptic
feedback on my phone.
However, when I dial a
number, the phone still
vibrates. How do I turn
this off?
1. From the Home screen, press the
Menu Key
2. Touch Settings > Sound.
3. Touch Haptic feedback to remove
the checkmark and disable the
function.
When using data, your phone may
default to the Wi-Fi connection (if Wi-
When Wi-Fi and 3G are
both available, which
service will my phone
use?
Fi connectivity on your phone is set
to On). However, there will be no
notification when your phone
switches from one to the other.
To know which data connection is
being used, use the 3G or Wi-Fi icon
at the top of your screen.
Yes. Just touch and hold the icon
Is it possible to remove
an application from the
Home screen?
until the trash can icon appears at
the bottom-center of the screen.
Then, without lifting your finger, drag
the icon to the trash can.
1. From the Home screen, press the
I downloaded an
application and it causes
a lot of errors. How do I
remove it?
Menu Key
2. Touch Settings > Applications >
Manage applications.
3. Touch the application, then touch
Uninstall.
.
.
 Loading...