

LG CRN-8240E Service Manual

Portable PCMCIA
CD-ROM DRIVE
MODEL : CRN-8240E
OWNER’S MANUAL
BEDIENUNGSHANDBUCH
MODE D’EMPLOI
GUIDA PER L’UTENTE
MANUAL DE USUARIO
To enjoy fully all the features and functions of your CD-ROM Drive,
Please read this Owner’s Manual carefully and completely.
English.......Page E-2 ~ E-22
Deutsch.....Seite D-1 ~ D-21
English
Français.....Page F-1 ~ F-21
Italiano..........Page I-1 ~ I-21
Spanish......Página S-1 ~ S-21
COMPACT
CAUTION: The laser used in the CD-ROM drive can damage your eyes.
Use of controls or performance of procedures other than those specified herein may result in hazardous radiation
exposure.
Do not attempt to open the cover.
To reduce the risk of electric shock, do not remove cover (or back).
No user-serviceable parts inside.
Refer servicing to qualified service personnel.
This unit uses CD-ROM discs
marked with this symbol:
PRODUCT COMPLIES WITH DHHS
RULES 21 C.F.R. SUB-CHAPTER J,
IN EFFECT AT THE DATE OF MANUFACTURE.
WARNING : To reduce the risk of fire or electric shock, do not expose this appliance to rain or moisture.
Industry Canada requirement
This class B digital apparatus meets all requirements of the Canadian Interference-Causing Equipment
Regulations.
Cet appareil numérique de la classe B respecte toutes les exigences du Règlement sur le matériel brouilleur
du Canada.
The power source voltage of the AC adaptor is listed on the nameplate.
Plug the AC adaptor only into an outlet with the proper voltage.
FCC COMPLIANCE STATEMENT
Note : This equipment has been tested and found to comply with the limits for a Class B digital device,
pursuant to Part 15 of the FCC Rules.
These limits are designed to provide reasonable protection against harmful interference in a
residential installation. This equipment generates, uses, and can radiate radio frequency energy and,
if not installed and used in accordance with the instructions, may cause harmful interference to radio
communications. However, there is no guarantee that interference will not occur in a particular
installation. If this equipment does cause harmful interference to radio or television reception, which
can be determined by turning the equipment off and on, the user is encouraged to try to correct the
interference by one or more of the following measures:
- Reorient or relocate the receiving antenna.
- Increase the separation between the equipment and receiver.
- Connect the equipment into an outlet on a circuit different from that to which the receiver is connected.
- Consult the dealer or an Authorized Service Center for help.
• FCC WARNING
Changes or modifications not expressly approved by the party responsible for compliance could void
the user’s authority to operate the equipment.
• This CD-ROM Drive is for use only with UL listed personal computers that have installation
instructions detailing user installation of card cage accessory.
E-2

FEATURES & CONTENTS
FEATURES
• Convenient compact
size, you can carry
anywhere
• Operates on the AC
adaptor or power from
your notebook
computer (via PCMCIA
Type interface
card/cable)
• Easy connection to a
notebook computer
which has a standard
PC Card(PCMCIA) slot
• Both CD-ROM and
audio CD can be
played back
• Tray loading system
with power eject
• Emergency eject
support
• Supports CD-ROM,
CD-ROM XA, CD-DA,
Photo-CD Multisession,
CD-I, Video CD,
CD-Extra, CD-RW.
• Supports various
Operating System
(MS-DOS, Windows
95/3.1, NT 4.0)
CONTENTS
LOCATION AND FUNCTION OF CONTROLS . . . .E-4
PRECAUTIONS . . . . . . . . . . . . . . . . . . . . . . . . . .E-6
HARDWARE INSTALLATION . . . . . . . . . . . . . . . .E-7
INSERTING AND REMOVING A CD . . . . . . . . . . .E-9
USING THE CD PLAYER . . . . . . . . . . . . . . . . . .E-10
INSERTING AND REMOVING
THE INTERFACE CARD . . . . . . . . . . . . . . . . . . .E-11
ELECTRIC POWER . . . . . . . . . . . . . . . . . . . . . .E-12
TROUBLESHOOTING . . . . . . . . . . . . . . . . . . . .E-13
SPECIFICATIONS . . . . . . . . . . . . . . . . . . . . . . .E-14
SOFTWARE INSTALLATION
FOR PCMCIA INTERFACE CARD . . . . . . . . . . .E-15
WINDOWS 95 INSTALLATION . . . . . . . . . . . .E-15
WINDOWS NT INSTALLATION . . . . . . . . . . . .E-19
DOS/WINDOWS 3.1 INSTALLATION . . . . . . . .E-20
■ SYSTEM REQUIREMENTS
An IBM Notebook PC or compatible with the following
system components:
• IBM or IBM compatible Notebook/Desktop PC with a
PC Card (PCMCIA) slot type ll or lll.
• Windows 95/3.1, NT 4.0
• MS-DOS Version 5.0 or greater
• Floppy disk drive (3.5 inch)
✻ The data transfer rate may be decreased compared to the capability of CD-ROM drive
itself, depending on the computer.
When using windows NT, the CD-ROM drive through PCMCIA interface may not be
recognized in some computers.
✻ Performance will vary based on computer specification. All specifications set forth in
this manual are subject to change without notice.
E-3

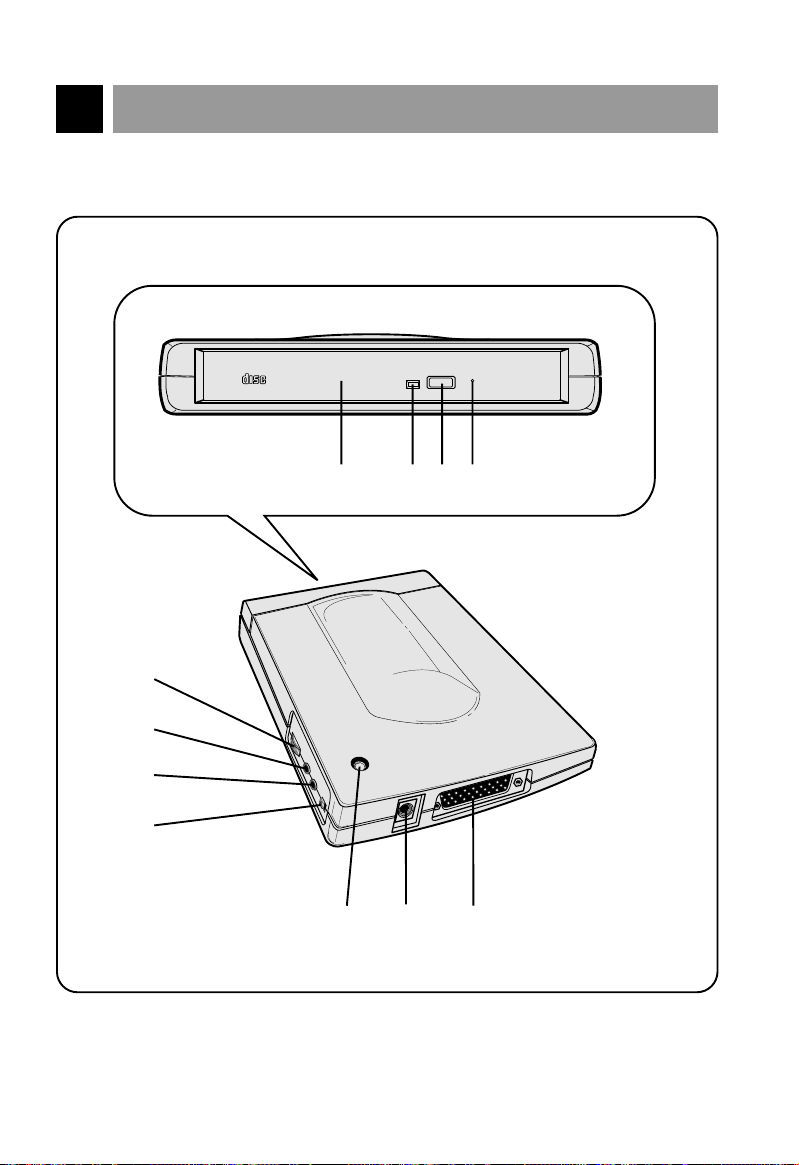
LOCATION AND FUNCTION OF CONTROLS
COMPACT
1
9
8
7
6
5
11
234
10
■ FRONT / REAR / RIGHT SIDE VIEW
E-4

1. DISC DRAWER
Accepts a CD-ROM disc on its tray.
2. BUSY INDICATOR
The busy indicator lights during
initialization and data-read operations.
3. OPEN BUTTON
This button is pressed to open the CD
tray. The button works only when
power is applied to the drive.
4. EMERGENCY EJECT HOLE
Insert a paper clip here to eject the
drawer manually or when there is no
power.
5. HEADPHONE VOLUME CONTROL
Adjusts the headphone sound level.
6. HEADPHONE JACK
3.5 mm jack for monitoring the audio
signal from audio CDs.
7. LINE OUT JACK
Connects external speaker system with
amplifier or your notebook PC using the
audio cable (not supplied).
8. DC/PC SWITCH
For selecting the DC or PC power
source. Set to PC to select the
PCMCIA power source.
Set to DC to select AC adaptor.
9. DC POWER INDICATOR
Lights when AC adaptor is used.
10. DC IN JACK
Connects CD-ROM drive to an AC
adaptor.
11. INTERFACE CONNECTOR
This interface connector is used to
connect to the PCMCIA interface card.
■ SUPPLIED ACCESSORIES
Item
Owner’s Manual
Setup Diskette
Interface Card/Cable (PCMCIA type)
AC Adaptor
Quantity
1
1
1
1
E-5

PRECAUTIONS
■ INSTALLATION
Avoid placing the drive in a location subject to:
- high humidity
- high temperature
- mechanical vibration
- direct sunlight
■ OPERATION
- During operation, excessive vibration, or a sudden jolt to the drive may cause a
malfunction.
- Avoid exposing the drive to sudden changes in temperature. This may cause
condensation to collect inside the drive.
■ TRANSPORTATION
- Always remove the disc before moving the drive.
■ AC ADAPTOR
- Do not plug in or remove the AC adaptor using wet hands.
- Do not damage the AC adaptor by scratching, modifying, or bending its prongs.
- Use only the supplied AC adaptor.
- Do not disassemble the AC adaptor.
■ CD
- Do not use solvents such as benzine, record cleaners, or anti-static spray for
records.
- Do not touch the data side (opposite side of label side).
- Wipe from the center to the edge with a dry, soft cloth.
E-6
HARDWARE INSTALLATION
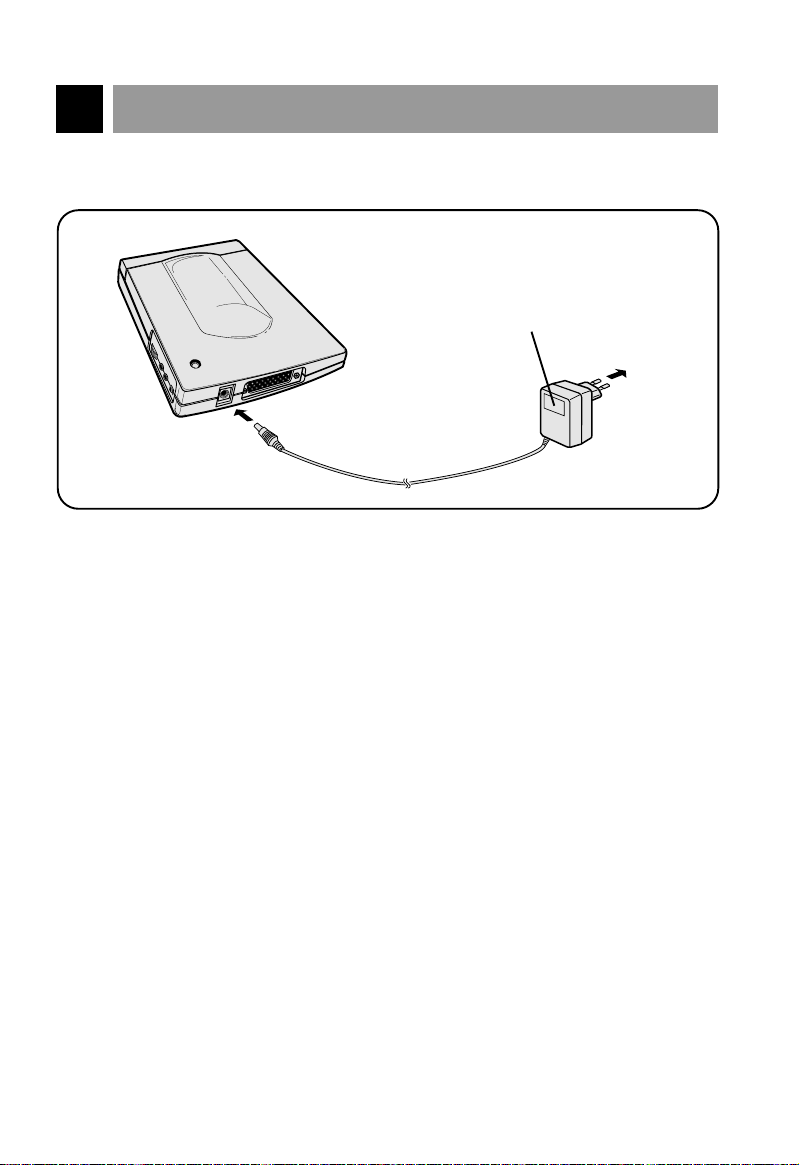
AC adaptor
DC IN jack
AC outlet
■ Connecting the AC adaptor
1. Connect the supplied AC adaptor plug to DC IN jack at the rear of the
CD-ROM drive.
2. Attach the AC adaptor to the AC outlet.
Notes :
• Use only the supplied AC adaptor, since other adaptors could damage the
CD-ROM drive.
• If the CD-ROM drive is not going to be used for an extended period, unplug the
AC adaptor from the AC outlet.
E-7
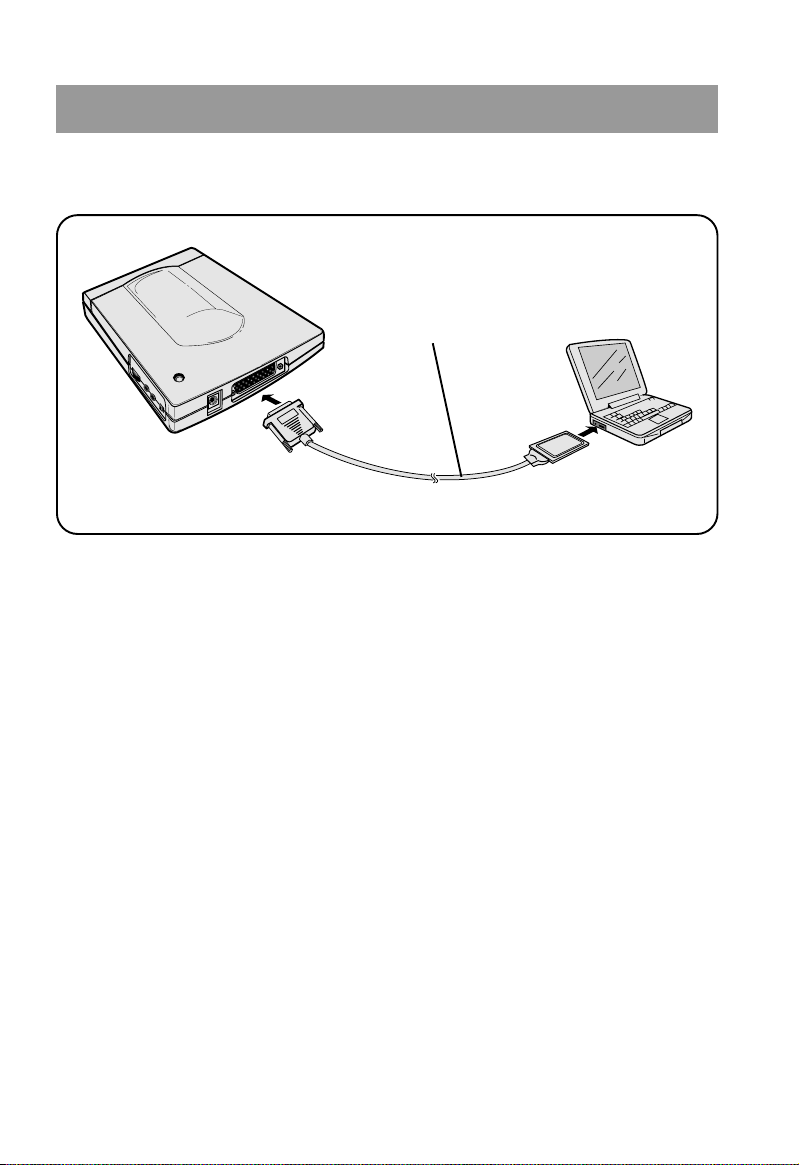
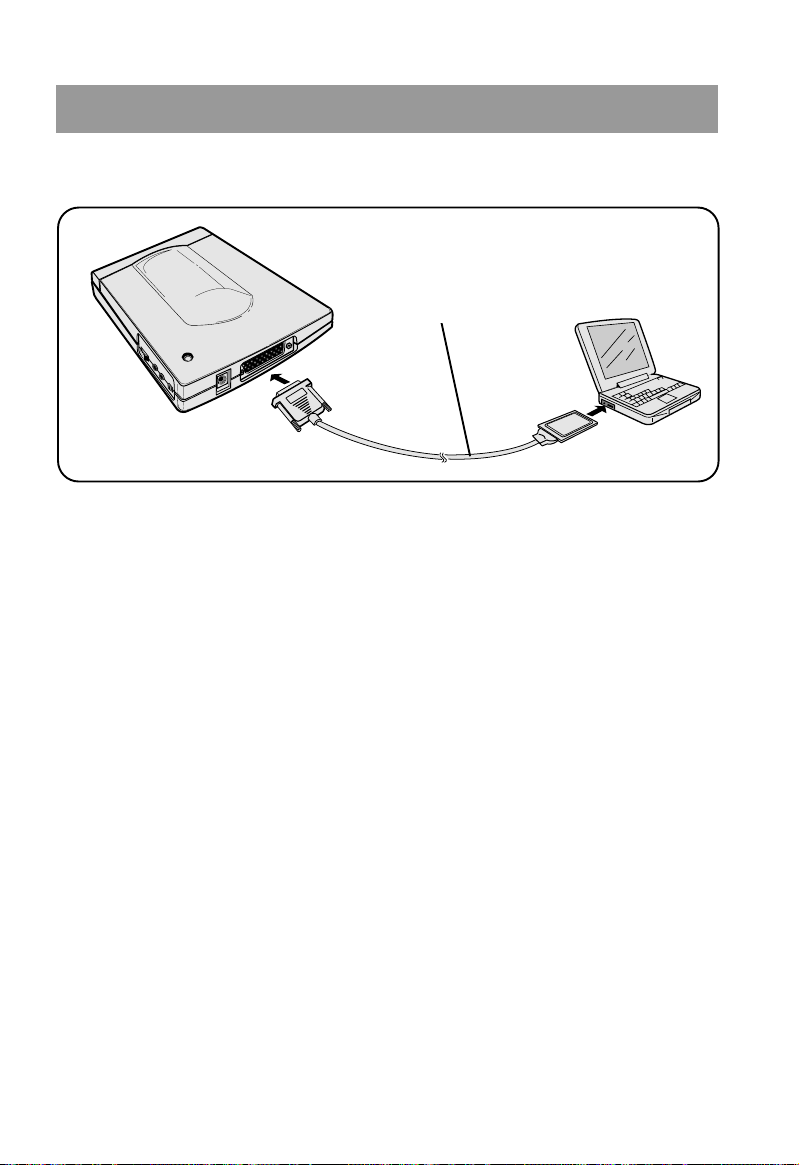
■ Connecting the notebook PC with PCMCIA card/cable
Interface cable/card
Interface connector
Card slot
✻
Power for all devices should be turned off before attaching cables.
1. Connect the PCMCIA interface card to the interface connector at the rear of
the CD-ROM drive.
Make sure that the cable of the PCMCIA interface card is firmly connected to
the interface connector at the rear of the CD-ROM drive.
2. Insert the interface cable/card into your notebook PC’s card slot firmly.
3. Turn the system on to install the PCMCIA CD-ROM device driver. Please
follow the software installation procedures.
Note :
• Do not force the interface cable/card since this could damage the interface
cable/card.
■ For desktop PC’s with a PC card reader (or PC card adaptor)
• A commercial PC card reader (or PC card adaptor) is required in order to connect
the CD-ROM drive to a desktop PC.
For the installation method and further information, refer to your PC card reader
(or PC card adaptor) manual.
E-8

INSERTING AND REMOVING A CD
■ Inserting a CD
1. Press the OPEN button to open the disc tray.
2. Place a CD onto the disc spindle with the playback side down(usually label
side up).
Press on the center of the CD until it locks onto the disc spindle.
3. Close the disc tray.
Note :
• Insert a CD firmly until it locks onto the spindle and then close the disc tray;
otherwise the CD may spin off the spindle and be damaged.
■ Removing a CD
1. Press the OPEN button to open the disc tray.
2. Carefully remove the CD by lifting it. Pressing on the disc spindle, lift the CD
by holding its edge.
3. Close the disc tray.
E-9

USING THE CD PLAYER
■ Playing an audio CD
You can listen to the music through headphones or through an amplified external
speaker system (not supplied), connected to the headphone jack/line out jack.
Be sure the headphone volume control is turned down before playing an audio CD.
1. Press the OPEN button to open the disc tray.
2. Insert an audio CD, printed (label) side facing up. Make sure the disc clicks
into place. Close the disc tray.
3. Plug your headphones or external amplified speaker system (not supplied)
into the headphone jack/line out jack.
4. Press and Hold the OPEN button for 2 seconds until the busy indicator
flickers continuously.
5. Rotate the headphone volume control to adjust the volume.
Notes :
• To go to the next track, press the OPEN button during playback for more than 2
seconds until the indicator flickers continuously. Play starts from the next selected
track.
• Some types of CD-ROM discs allow you listen to sound or music coming from the
CD-ROM through the headphones or amplified external speaker system (not
supplied) connected to the Headphone jack/Line Out jack of the CD-ROM drive. If
your notebook PC is equipped with a speaker system and a Line In jack, use the
audio cable (not supplied) to connect the Computer’s Line In jack and the CD-ROM
drive’s Line Out jack.
E-10
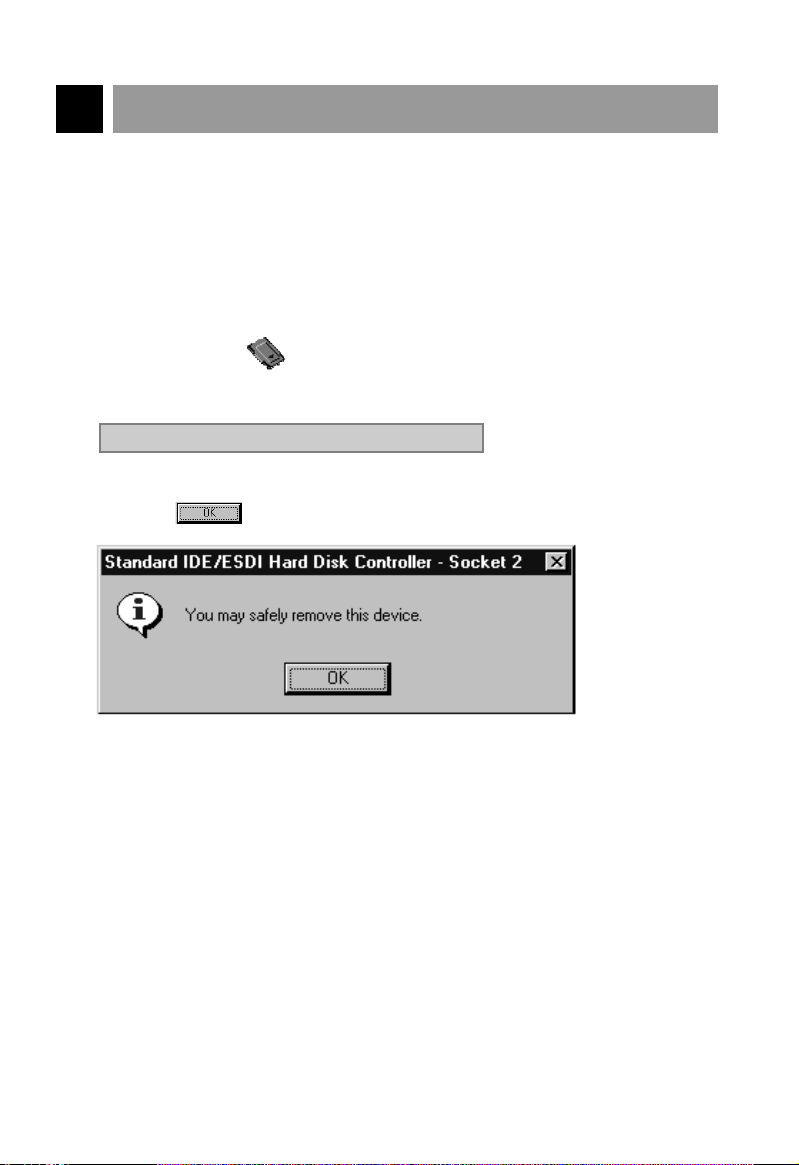
INSERTING AND REMOVING THE INTERFACE CARD
Stop Standard IDE/ESDI Hard Disk Controller
■ For Windows 95 users:
The supplied interface cable/card supports Win 95’s Plug & Play function. With your
notebook PC turned on, you can insert and remove the interface card without fear of
hardware damage (Hot Swap). Before removing the interface card, perform the
following steps:
1 Click PC card icon in task bar.
2 Click Stop Standard IDE/ESDI Hard DIsk Controller.
3 Make sure that the message You may safely remove this device is displayed,
then click .
4 Remove the interface card.
E-11

ELECTRIC POWER
■
Using the power from your notebook PC (through the interface card)
If the supplied interface cable/card is used between your notebook PC and CD-ROM
drive, you can operate the CD-ROM drive using the power from your notebook PC (you
do not need to connect the AC adaptor). The power for your CD-ROM drive will be
automatically supplied when the notebook PC is turned on. The DC/PC switch of the
CD-ROM drive must be set to the PC position.
Notes :
• Depending on the performance of computer’s power supply, the computer may not
be able to supply enough power to the CD-ROM drive. At that time, the CD-ROM
drive may not be able to operate with full performance. In this case, use the supplied
AC adaptor.
• When using the power from a PC, the data transfer rate has a maximum of 7x
speed.
• Do not change the DC/PC switch when the PCMCIA CD-ROM is powered on.
■ Using the power from supplied AC adaptor
To use the AC adaptor set the DC/PC switch to the DC position. The DC indicator will
light. In this case, the data transter rate has a maximum of 12x speed.
E-12

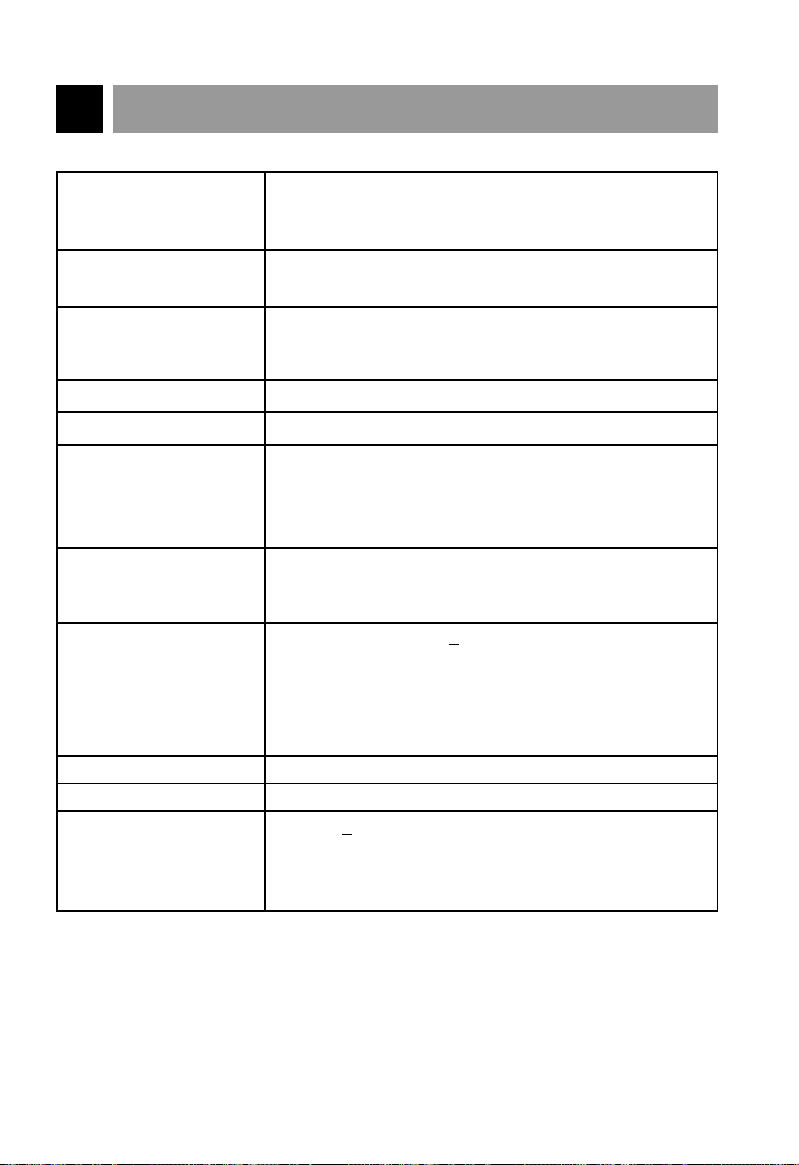
TROUBLESHOOTING
Please check to see if any problem which you may have with your CD-ROM drive is
described here before taking it for service or calling a service engineer.
Problem
Your notebook PC
does not recognize
the CD-ROM drive,
or does not function
properly.
You can not listen to
sound coming from
the headphone jack
of the CD-ROM
drive.
Possible Cause
The AC adaptor is not plugged
into the outlet or DC IN jack
correctly.
The computer has not been set
up yet.
The interface cable /card is not
connected to the CD-ROM
drive or to the computer
properly.
When the power from the
computer is used, the
CD-ROM drive’s PC/DC switch
is set to DC.
When the power from the
computer is used, power
supply capacity of the
computer is not sufficient.
Headphones are not connected.
The CD-ROM drive’s headphone
volume control is set to 0.
Solution
Plug in the AC adaptor
correctly.
Set up the computer.
Properly connect the
interface cable /card.
Set the PC/DC switch to
PC.
Use the AC adaptor.
Connect the headphones to
the headphone jack firmly.
Set the CD-ROM drive’s
headphone volume control
to a high level.
Sound skips, or data
can not be read.
CD is placed with the label
side facing down.
CD may have become dirty.
CD is damaged.
Dirt such as dust, grease or
hair may be on the disc or disc
spindle.
E-13
Place the CD with the label
side facing up.
Clean the CD.
Replace with another CD.
Clean the disc or disc
spindle.
SPECIFICATIONS
Applicable Disc Format:
Operating Environment:
Power Source:
Interface:
Buffer Size:
Data Transfer Rate
Access Time:
Audio Performance:
Dimensions (WxHxD):
Weight:
Power Consumption:
*:
CD-DA (Audio CD), CD-ROM (Mode 1 and Mode 2
Form 1), CD-ROM XA (Mode 2 Form 2), CD-I,
Video-CD, Photo CD (Multi-Session), CD-Extra, CD-RW.
Temperature: 5 °C to 45 °C
Humidity: 10% to 80%
• AC adaptor: Listed on the nameplate.
• Power from computer: Uses power from PCMCIA
card slot
PCMCIA 2.1 (interface card)
128KB
• When using the AC Adaptor:
1,500 Kbyte (inner: 10x) ~ 1,800 Kbyte/sec (outer: 12x)
• When using with internal power from computer:
450 Kbyte (inner: 3x) ~ 1,050 Kbyte/sec (outer: 7x)
When using the AC Adaptor: Random 130 ms typical.
When using with internal computer power, the access
time increases.
Frequency Response: +
S/N Ratio: 80 dB
Output Level (Line Out): 1.0 Vrms (47 kΩ)
(Headphone Out ): 0.6Vrms (33 Ω)
Distortion: 0.05%
150mmx 23.4mm x 181mm
Approx. 580g
+5V DC +
• When using the AC Adaptor: Max.1500mA
• When using with the power from computer:
Max. 750mA
5%, less than 100 mVp-p (ripple),
3dB at 90Hz to 20KHz
* When using the PCMCIA interface card to connect the CD-ROM drive to computer,
the data transfer rate of CD-ROM drive depends on the performance of the PCMCIA
controller in the computer. In the most computers, the performance of the PCMCIA
controller does not satisfy the data transfer rate of CD-ROM drive itself. Therefore,
there is the possibility that real data transfer rate can be decreased compared to the
capability of CD-ROM drive itself. Actually, the transfer rate in most computers is a
maximum of 12x speed.
Note : Specifications are subject to change without notice for improvement.
E-14
SOFTWARE INSTALLATION FOR PCMCIA INTERFACE CARD
■ Windows 95 Installation
Introduction
Windows 95 has embedded PC Card (PCMCIA) support in the operating system. Since
this PCMCIA card is truly Plug & Play compliant, all you have to do is to answer a few
questions, Windows 95 will take care of the rest for you.
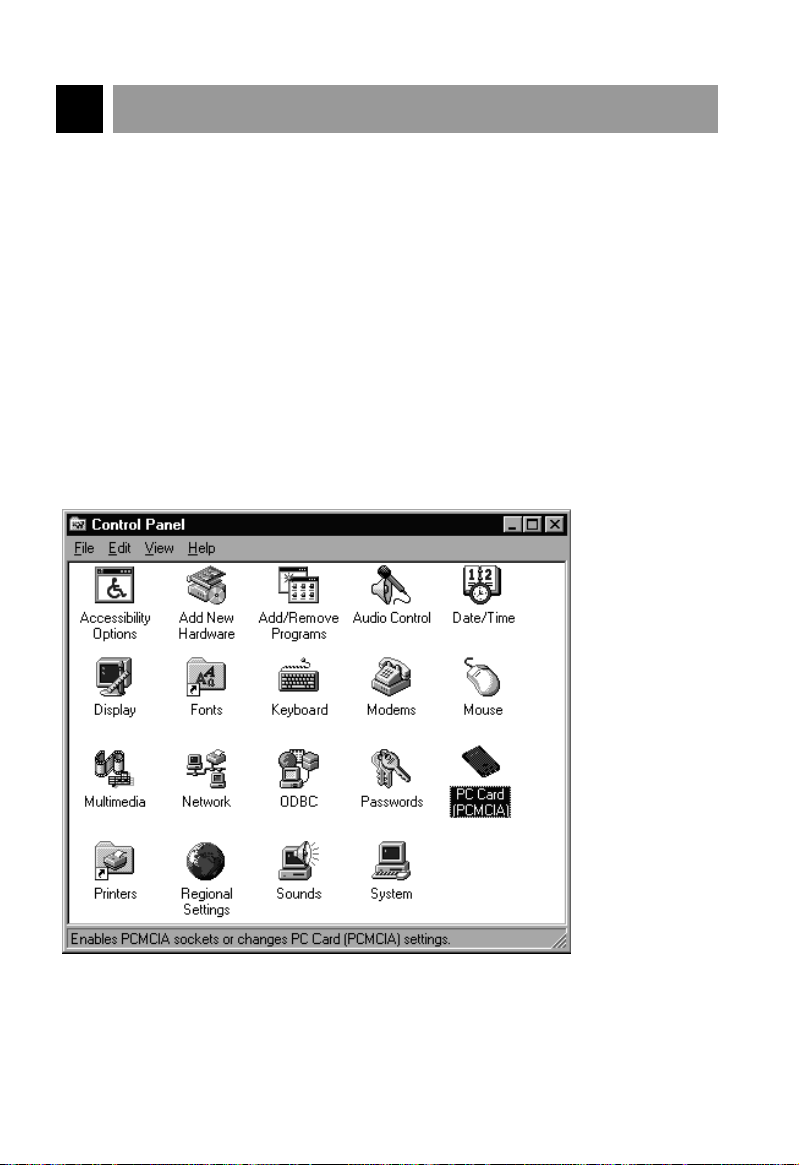
Step 1: Make sure PCMCIA socket is recognized by the system
Before you insert the PC card (PCMCIA) into the PCMCIA socket, please check the
Control Panel under My Computer icon. If you see a PC card [PCMCIA] icon present,
this means the operating system recognized the PCMCIA socket hardware during initial
Windows 95 installation.
If you do not see it, refer to the Windows 95 manual. Use Add New Hardware icon to
install the software driver.
E-15
Special Note: To check the Windows 95 version currently installed in your system, use
the right mouse button to click on My Computer icon, then click Properties. Check on
the General folder under system, if you read:
Microsoft Windows 95
4.00.950a
This indicates the version is original release. If you read:
Microsoft Windows 95
4.00.950 B
This indicates Windows 95 version OSR2 or release B
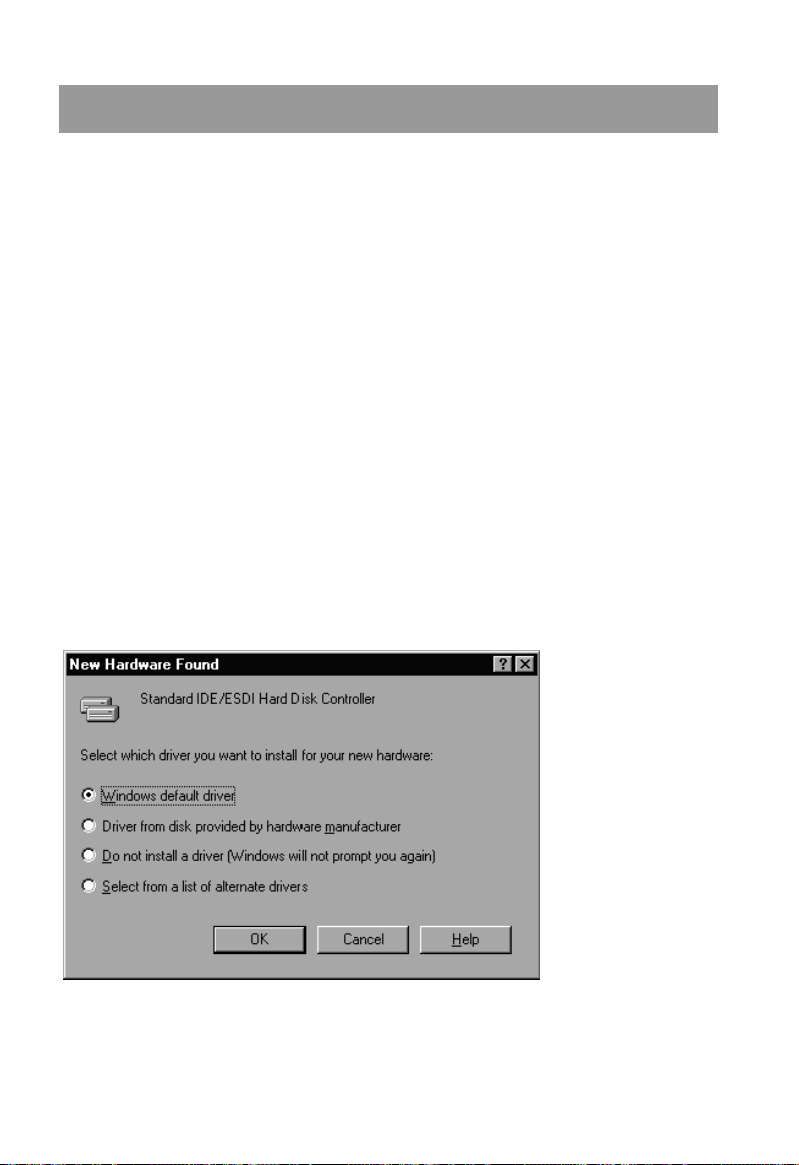
Step 2: Install the CD-ROM driver
First, make sure the cable connectors are securely connected between the drive and
card and drive power is on, then insert the PCMCIA card into the PC socket. Within 2 to
3 seconds, a window pops up, asking you the driver option for the card. Just select the
default driver, then click OK. Your Windows 95 installation is essentially done.
For users of original Windows 95 release version:
E-16
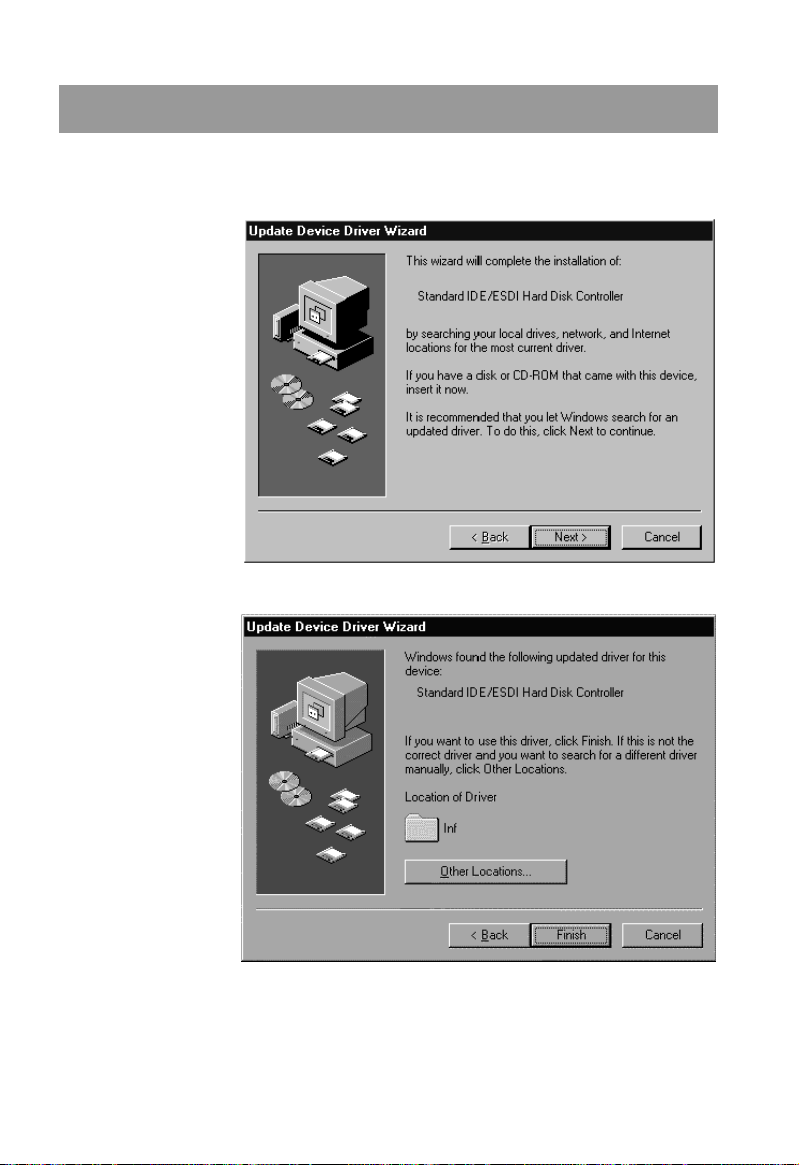
For users of Windows 95 Version OSR2:
Click Next or press
Enter to accept the
default.
Click Finish or press
Enter to accept the
default.
E-17
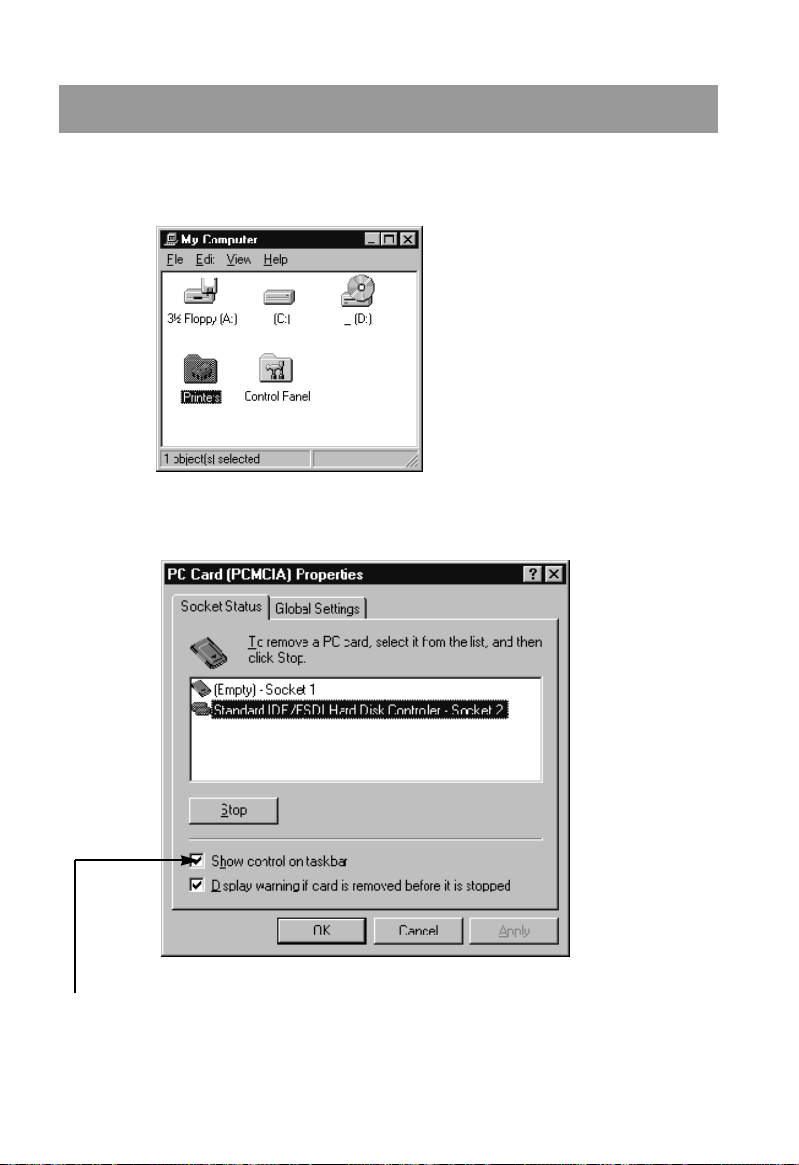
To verify the installation, open the My Computer icon. You should see extra drive(s)
appearing.
Click Control Panel, then click PCMCIA. You should be able to see the following:
Note : Make sure to check this point to display the PC card icon in the task bar.
E-18

■ Windows NT Installation
Use the selection path:
Control Panel->SCSI Adaptor->Drivers
Click on Add, put the supplied disk in drive A:, then click on Have Disk and OK. Click
on the LG Electronics PCMCIA ATA/ATAPI Adaptor. After installation, you will be
asked to reboot. After rebooting the system, the new drive icon will show up.
Notes:
• The Windows NT operating system does not support the Hot-Swap feature. The
card and the CD-ROM drive need to be setup correctly before booting up Windows
NT. Do not un-plug the card or CD-ROM drive while the system is still running. Turn
off the CD-ROM drive and the computer before removing the PCMCIA card.
• When using Windows NT, the CD-ROM drive through PCMCIA interface may not be
recognized in some computers.
E-19

■ DOS/Windows 3.1 Installation
For use in DOS/Windows 3.1, your computer must have the Card and Socket Service
software installed first.
The Card and Socket Service software package should come with your notebook
computer or desktop PC card reader, such as SystemSoft, CardSoft, Card Wizard,
Phoenix Technology, IBM ez-play, DataBook, or Award Software. They must be
PCMCIA specification 2.1 compliant or better. Talk to your computer supplier for the
software package.
Following is a two-step guide. It will help you through the installation process and solve
possible system conflicts. Please read it carefully and follow the guide step by step.
Step 1: Install PCMCIA System Software
Your PCMCIA software may come pre-installed in the factory. If it doesn’t, please find
the original diskettes and follow the installation procedure to setup the software.
Step 2: Install ATA/ATAPI drivers
Please find the installation diskette shipped with your card, put that disk in drive A and
type
A:\install
For CD-ROM unit installation:
CD-ROM drivers installation is very straightforward. Basically, it does three things.
1. Copy all necessary files to destination directory (default C:\COMMUTER)
2. Backup and modify CONFIG.SYS file, adding
DEVICEHIGH = C:\COMMUTER\PATAPICD.SYS lines to the file.
3. Backup and modify AUTOEXEC.BAT file, adding
C:\DOS\MSCDEX.EXE line to the file.
Special Note : The DOS/Windows installation is now complete. Reboot your system.
We will go to next step to test the system.
E-20

Verify Your Installation:
Reboot the system by pressing Ctrl-Alt-Del (three keys) at the same time. You should
see a message displaying:
ATAPI CD-ROM Driver Version 4.01
Copyright 1997 DataStor Technology
Initializing...
SLAVE ATAPI CD-ROM drive detected
Port Address: 180h, Interrupt: 15
Drive Info: LG CD-ROM
Driver Installed successfully!
followed by MSCDEX.EXE loading and drive letter assignment, this indicates a
successful installation. You can leave this manual and enjoy using the drive now.
Special Note: Otherwise, please read the following section carefully for important
debugging information.
E-21

Solving Resource Problems:
I/O addresses, memory addresses, interrupts, and DMAs are considered system
resources. PCMCIA system software has the ability to detect available system
resources and authority to assign resources. All PCMCIA aware software must go
through that manager to request/assign I/O ports and interrupts. Using this scheme can
avoid system conflict and minimize system compatibility issues.
All DOS drivers included in the retail disk are PCMCIA-aware software drivers. The
drivers will automatically interface with PCMCIA system software to request system
resources for the devices they are controlling.
Sometimes, the PCMCIA system software resource detection is not 100% accurate due
to operator error or peripheral compatibility problems. Resources assigned to us may
belong to someone else, thus it may not work properly. Next we will try to force the driver
to request certain I/O ports or interrupts.
➔ Move interrupt request to somewhere else
● Change the line in CONFIG.SYS to
DEVICE=C:\COMMUTER\PATAPICD.SYS /I:12 (or 11,10, 9)
➔ Move I/O port base address to 170h
● Change the line in CONFIG.SYS to
DEVICE=C:\COMMUTER\PATAPICD.SYS /P:170
Operation:
Disk caching software
If the disk caching program is loaded as a device driver, just make sure the Commuter
Disk device driver command line
DEVICE=\COMMUTER\CDISK.SYS
This line must appear in CONFIG.SYS before any other disk caching program
command. Nothing has to be changed for a TSR disk caching program (like
SMARTDRV.EXE).
Special Note: Starting with DOS 6.0, SMARTDRV.EXE is capable of caching CD-ROM
drives. Please make sure the MSCDEX.EXE appears before SMARTDRV.EXE in the
AUTOEXEC.BAT file in order to take advantage of this new feature.
C:\DOS\MSCDEX.EXE
SMARTDRV.EXE
E-22

CD-ROM LIMITED WARRANTY
WARRANTY PERIOD
THE ABOVE WARRANTY DOES NOT APPLY:
HOW SERVICE IS HANDLED
Therefore these costs are paid by the consumer.
CUSTOMER ASSISTANCE NUMBERS:
To Prove Warranty Coverage: Retain your Sales Receipt to prove date of purchase.
Copy of your Sales Receipt must be submitted at the time
warranty service is provided.
To Obtain Product, Customer, Call 1-800-243-0000 24 hrs/7 days
or Service Assistance:
Push appropriate menu code.
Push appropriate menu code.
Call 1-800-243-0000 (Mon~Fri 8am~5pm CST)
For Exchange Service:
LG Electronics U.S.A., Inc. will repair or at its option replace, without charge, your product which proves to
be defective in material or workmanship under normal use, during the warranty period listed below from
the data of original purchase. This warranty is good only to the original purchaser of the product
during the warranty period as long as it is in the U.S. including Alaska, Hawaii, and U.S. Territories.
Some states do not allow the exclusion or limitation of incidental or consequential damages or
limitations on how long an implied warranty lasts; so these limitations or exclusions may not apply to
you. This warranty gives you specific legal rights and you may also have other rights which vary
from state to state.
1 Year 1 Year
No other express warranty is applicable to this product. THE DURATION OF ANY IMPLIED
WARRANTIES, INCLUDING THE IMPLIED WARRANTY OF MERCHANTABILITY, IS LIMITED TO
THE DURATION OF THE EXPRESS WARRANTY HEREIN. LG ELECTRONICS U.S.A., INC.
SHALL NOT BE LIABLE FOR THE LOSS OF THE USE OF THE PRODUCT, INCONVENIENCE,
LOSS OR ANY OTHER DAMAGES, DIRECT OR CONSEQUENTIAL, ARISING OUT OF THE USE
OF, OR INABILITY TO USE, THIS PRODUCT OR FOR ANY BREACH OF ANY EXPRESS OR
IMPLIED WARRANTY, INCLUDING THE IMPLIED WARRANTY OF MERCHANTABILITY
APPLICABLE TO THIS PRODUCT.
Internet Address :
http :// www. LGEservice.com
If the unit is defective, a replacement* will be
sent by 2-day air for the first year.
After one year, repair or a 2-day swap at a
fixed labor charge. For service, please call
1-800-243-0000 (Mon.~Fri. 7AM~7PM CST)
MODEL #
LABOR
PARTS
1. To damages or problems which result from delivery or improper installation.
2. To damages or problems which result from misuse, abuse, accident, alteration, or incorrect
electrical current or voltage.
3. To service calls which do not involve defective workmanship or material and explaining the
operation of the unit.
* Replacement is a factory-reconditioned unit. Free replacement applies only within the initial
one-year period. Factory-reconditioned units are available at a low, fixed cost after the oneyear warranty expires.
COMPACT
Tragbares PCMCIA CD-ROM LAUFWERK
Um alle Möglichkeiten und Funktionen lhres CD-ROM Laufwerkes voll ausschöpfen zu können, lesen Sie
bitte dieses Bedienungshandbuch aufmerksam und völlständig.
Achtung: Um die Gefahr eines elektrischen Schlages zu vermeiden, entfernen Sie nicht das Gehäuse.
Deutsch
Keine durch den Anwender zu reparierende Teile im lnnern.
Überlassen Sie den Service qualifiziertem Service-Personal.
Da der im CD-ROM Laufwerk benutzte Laser gefährlich für die Augen ist, sollten Sie keineswegs
versuchen, das Gehäuse zu öffnen.
Lassen Sie den Service nur durch qualifizierte Servicestellen durchführen.
Dieses Laufwerk ist kompatibel zu CD-ROM Disk
mit diesem Warenzeichen.
Warnung: Um die Gefahr eines Feuers oder eines elektrischen Schlages zu
vermeiden, setzen sie dieses Gerät niemals Regen oder Feuchtigkeit aus.
Dieses Produkt entspricht der EMC Richtlinie 89/336/EEC und ist
demnach mit dem CE Label gekennzeichnet.
✻ Die Leistung wird aufgrund der Spezifikationen Ihres Computers verschieden sein. Jede
in diesem Handbuch beschriebene Spezifikation kann ohne besonderen Hinweis
Veränderungen unterliegen.
D-1

Merkmale und Inhalte
Merkmale
• Bequeme, Kompakte
Größe, überall
mitnehmbar.
• Wird durch einen ACAdapter oder mit
Strom aus Ihrem
Notebook bedient
(über PCMCIA
Schnittstellenkarte/kabel).
• Einfacher Anschluß an
jedes Notebook mit
Standard PC-Card
(PCMCIA)-Slot.
• Sowohl CD-ROM als
auch Audio-CD können
abgespielt werden.
• Plattenladesystem mit
Servo-Auswurf
• NotfallAuswurföffnung
• Unterstützt CD-ROM,
CD-ROM-XA, CD-DA,
Foto-CD, Multisession,
CD-I, Video-CD, CDExtra, CD-RW.
• Unterstützt
verschiedene
Betriebssysteme
(MS-DOS, Windows
95/3.1,NT 4.0)
Inhalte
Lage und Funktion der Steuerpults . . . . . . . . . . . .D-3
Vorsichtsmaßregeln . . . . . . . . . . . . . . . . . . . . . . .D-5
Anschlüsse . . . . . . . . . . . . . . . . . . . . . . . . . . . . . .D-6
Einfügen und Entfernen einer CD . . . . . . . . . . . . .D-8
Bedienung des CD-Players . . . . . . . . . . . . . . . . . .D-9
Einstecken und Entfernen
der Schnittstellenkarte . . . . . . . . . . . . . . . . . . . . .D-10
Stromversorgung . . . . . . . . . . . . . . . . . . . . . . . . .D-11
Problemlösung . . . . . . . . . . . . . . . . . . . . . . . . . .D-12
Spezifikationen . . . . . . . . . . . . . . . . . . . . . . . . . .D-13
Software-Installation
für die PCMCIA-Schnittstellenkarte . . . . . . . . . . .D-14
Windows 95-Installation . . . . . . . . . . . . . . . . . .D-14
Windows NT-Installation . . . . . . . . . . . . . . . . . .D-18
DOS/Windows 3.1-Installation . . . . . . . . . . . . .D-19
■ System-Anforderungen
Ein IBM-Notebook oder ein mit den folgenden SystemAnforderungen kompatibler PC:
• IBM- oder mit IBM kompatibler Notebook/DesktopPC mit einem PC-Card(PCMCIA)-Slot Typ II oder III
• Windows 95/3.1, NT 4.0
• MS-DOS Version 5.0 oder größer
• Floppy Disk-Laufwerk (3,5-Zoll)
✻ Wenn die PCMCIA-Schnittstelle fuer den Anschluß des CD-ROM Laufwerks an den
Computer verwendet wird, ist die Datenuebertragunsrate des CD-ROM-Laufwerks von
der Leistung des PCMCIA-Controllers im Computer abhaengig.
Beim Einsatz von Windows NT kann es vorkommen, dass das CD-ROM-Laufwerk ueber
die PCMCIA-Schnittstelle von einigen Computern nicht erkannt wird.
D-2
Lage und Funktion der Steuerpults
COMPACT
1
9
8
7
6
5
11
234
10
■ Vorderansicht/Rückenansicht/rechte Seitenansicht
D-3

1. Diskfach
Nimmt eine CD-ROM-Disk auf der
Plattenlade auf.
2. “Busy”-Anzeige
Die “Busy”-Anzeige leuchtet während
der Initialisierung und des DatenLesens.
3. “Open”-Taste
Drückt man diese Taste, dann wird
das Diskfach geöffnet. Die Taste
funktioniert nur, wenn das Laufwerk
eingeschaltet ist.
4. Notfall-Auswurföffnung
Stecken Sie hier eine Büroklammer
hinein, um das Fach manuell
auszuwerfen, oder bei Stromausfall.
5. Lautstärkeregler für den Kopfhörer
Stellt die Lautstärke des Kopfhörers
ein.
6. Kopfhöreranschlußbuchse
3,5 mm dicke Anschlußbuchse fürs
Mithören von Audio-CDs.
7. Line-Out-Buchse
Verbindet ein externes LautsprecherSystem mit einem Verstärker oder
über das Tonabnehmerkabel mit
Ihrem Notebook.
8. DC/PC-Schalter
Für die Wahl von DC oder PC als
Stromquelle. Stellen Sie auf “PC” ein,
um die PCMCIA-Stromquelle zu
wählen.
Stellen Sie auf “DC” ein, um den ACAdapter zu verwenden.
9. “DC Power”-Anzeige
Leuchtet, wenn der AC-Adapter
benutzt wird.
10. DC-IN-Buchse
Schließt das CD-ROM-Laufwerk an
den AC-Adapter an.
11. Schnittstellenkabelklemme
(Interface Anschluß)
Diese Schnittstellenkabelklemme wird
für den Anschluß der PCMCIASchnittstellenkarte eingesetzt.
■ Angebotenes Zubehör
Artikel
Bedienungshandbuch
Setup-Diskette
Schnittstellenkarte/-kabel(PCMCIA Typ)
AC-Adapter
Zahl
1
1
1
1
D-4

Vorsichtsmaßregeln
■ Installation
Vermeiden Sie, das Laufwerk an eine Stelle zu plazieren, wo es
- hoher Feuchtigkeit
- hohen Temperaturen
- mechanischer Schwingung
- direktem Sonnenlicht ausgesetzt ist.
■ Betrieb
- Während des Betriebs kann durch übermäßige Schwingung oder einen
plötzlichen Stoß ein Versagen des Laufwerks ausgelöst werden.
- Vermeiden Sie, daß das Laufwerk plötzlichen Temperaturänderungen
ausgesetzt wird. Das kann innerhalb des Laufwerks Kondensation
verursachen.
■ Transport
- Entfernen Sie auf jeden Fall die Disk, bevor Sie das Laufwerk transportieren.
■ AC-Adapter
- Schließen Sie den AC-Adapter nie mit nassen Händen an oder entfernen Sie
ihn nie mit nassen Händen.
- Beschädigen Sie den AC-Adapter nicht durch Kratzen, Modifizieren oder Biegen
seiner Zinken.
- Verwenden Sie ausschließlich den beigefügten AC-Adapter.
- Nehmen Sie den AC-Adapter nicht auseinander.
■ CD
- Benutzen Sie keine Lösungsmittel wie Benzin, Plattenreinigungsmittel oder
Antistatik-Spray für Schallplatten.
- Berühren Sie die Daten-Seite (Gegenseite der Kennsatz-Seite) nicht.
- Wischen Sie mit einem trockenen, weichen Tuch von der Mitte zum Rand.
D-5

Anschlüsse
AC adaptor
DC IN jack
AC outlet
■ Anschluß des AC-Adapters
AC-Adapter
Steckdose
DC-IN-Buchse
1. Führen Sie den Stecker des beigefügten AC-Adapters in die DC-IN-Buchse
an der Rückseite des CD-ROM-Laufwerks ein.
2. Stecken Sie den AC-Adapter in die Steckdose ein.
Hinweise:
• Benutzen Sie ausschließlich den beigefügten AC-Adapter, weil andere Adapter das
CD-ROM-Laufwerk beschädigen können.
• Wenn Sie das CD-ROM-Laufwerk längere Zeit nicht verwenden, dann ziehen Sie
den AC-Adapter aus der Steckdose heraus.
D-6
■ Verbindung des Notebooks mit PCMCIA-Karte/Kabel.
Interface cable/card
Interface connector
Card slot
Schnittstellenkarte/-kabel
Schnittstellenkabelklemme
✻ Um das CD-ROM Laufwerk und Ihren Computer, sowie
Card-Slot
Peripheriegeräte vor Beschädigungen zu schützen, ziehen Sie den
Netzstecker, bevor Sie das Laufwerk einbauen.
1. Der Netzschalter für alle Vorrichtungen sollte vor dem Anschluß der Kabel
abgeschaltet werden.
Schließen Sie die PCMCIA-Schnittstellenkarte an die Schnittstellenkabelklemme an der Rückseite des CD-ROM-Laufwerks an.
Prüfen Sie nach, ob das Kabel der PCMCIA-Schnittstellenkarte mit der
Schnittstellenkabelklemme an der Rückseite des CD-ROM-Laufwerks fest
verbunden ist.
2. Stecken Sie das Schnittstellenkabel/-karte fest in den Card-Slot Ihres
Notebooks.
3. Schalten Sie das System ein, um den PCMCIA CD-ROM-Gerätetreiber zu
installieren. Bitte folgen Sie dem Verfahren der Software-Installation.
Hinweis:
• Wenn man das Schnittstellenkabel/-karte mit Gewalt handhabt, kann es beschädigt
werden.
■
Für Desktop-PCs mit einem PC-Kartenleser (oder PC-Kartenadapter)
• Ein kommerzieller PC-Kartenleser (oder PC-Kartenadapter) ist erforderlich, um das
CD-ROM-Laufwerk an einen Desktop-PC anzuschließen.
Für die Installationsmethode und weitere Informationen schlagen Sie in Ihrem
Handbuch für den PC-Kartenleser (oder den PC-Kartenadapter) nach.
D-7
 Loading...